cms professional 4 - alnet systemsftp.alnetsystems.com/install/manuals/cms4_user_guide_en.pdf ·...
TRANSCRIPT

Build 0.9.9 - 1 - ALNET SYSTEMS
CMS Professional 4
User’s manual
User's manual version 1.0 (October 2016)
This manual applies to program version CMS PROFFESIONAL 4.0.

Build 0.9.9 - 2 - ALNET SYSTEMS
1. Contents
2. Introduction ......................................................................................................... 3 3. First run ................................................................................................................. 3 4. Configuration ....................................................................................................... 8 5. Main window...................................................................................................... 14 6. View mode .......................................................................................................... 15 7. ZOOM mode ....................................................................................................... 16 8. PTZ mode ............................................................................................................ 18

Build 0.9.9 - 3 - ALNET SYSTEMS
2. Introduction
We present to you next version of CMS PROFESSIONAL system with many new functions and
modules. Many of these changes is the effect of our cooperation with you and our partners.
Part of them are our ideas which extend capabilities of digital video recording system. Please
pay your attention to the possibilities that CMS PROFESSIONAL 4 (CMS 4 in short) brings to life
and check how much did we changed the system, which point whole new direction of our
evolution as NVR supplier.
3. First run
At the first run of the application it is necessary to set up it’s parameters using CMS Wizard,
which starts immediately after CMS 4 installation.
It is done only once. You may run the CMS Wizard manually from Menu Start -> Programs ->
ALNET SYSTEMS -> CMS -> Tools -> CMS 4 Wizard in order to change the configuration
parameters.
Welcome
Figure 1. Installation Wizard
Build 0.9.9 - 4 - ALNET SYSTEMS
Choose your language
In the first step, please select your language. Right now you can choose from 5 different
languages: English, Polish, Chinese, Italian and Russian.
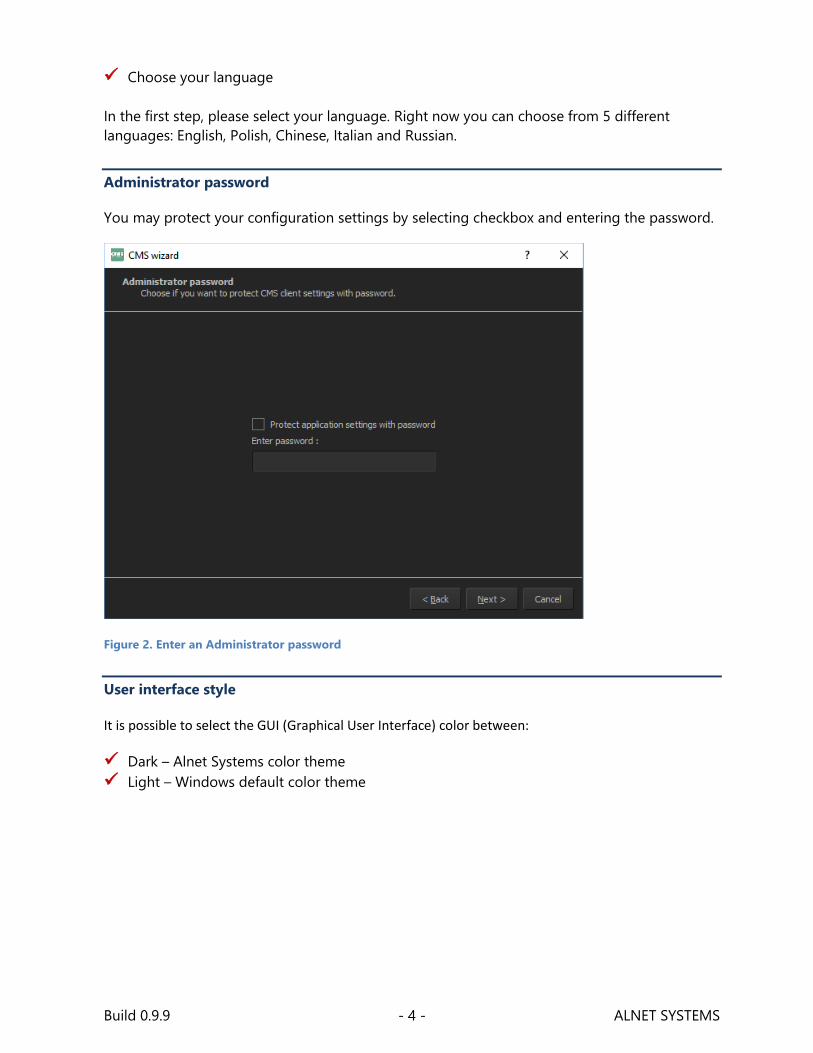
Administrator password
You may protect your configuration settings by selecting checkbox and entering the password.
Figure 2. Enter an Administrator password
User interface style
It is possible to select the GUI (Graphical User Interface) color between:
Dark – Alnet Systems color theme
Light – Windows default color theme

Build 0.9.9 - 5 - ALNET SYSTEMS
Figure 3. User interface style
Monitors
Figure 4. CMS application windows

Build 0.9.9 - 6 - ALNET SYSTEMS
CMS 4 Wizard automatically detects available monitors. You may select on which monitor(s) the
application will run by selecting the corresponding checkboxes next to detected monitors.
Below the window with monitors, there is an option that will allow you to start CMS 4 without
choosing profile name. It’s useful when you want to have connection to the server right after
double clicking CMS 4 icon or when using just single profile.
In CMS 4 there is no limit to number of monitors system could use. The only limit is your
hardware configuration.
When you right click on each monitor, there are two additional settings, first one allows you to
change the name of each monitor (to find them easier in multi-monitor configurations) and
lock the software in full screen mode. Second option allows to run few CMS 4 windows on the
same monitor.
Figure 5. Properties and number of available windows

Build 0.9.9 - 7 - ALNET SYSTEMS
Figure 6. Configuration is finished
At this point, basic software configuration is ready, and after clicking Finish button, the
program will start automatically.

Build 0.9.9 - 8 - ALNET SYSTEMS
4. Configuration
Figure 7. Main software window
After first run you have preconfigured Alnet Systems demo servers which allows you to check
your connection and test the system. If you want to add your own video server, then first you
need to create new Connection profile (profile which includes your servers, layouts, camera
settings, etc.) by clicking on icon.
New windows will appear, please enter the profile name, and optionally add background
image. After pressing Save changes button, the program automatically saves data and opens
it’s main window, which in next step will allow you to add your video servers.

Build 0.9.9 - 9 - ALNET SYSTEMS
Figure 8. Description and image path
Window with profile settings will appear after each run of the program (if you didn’t select the
option in Configuration wizard). You may add the new profile or edit existing profiles by right
clicking on it and selecting Edit properties option. In order to remove the profile, click the X
icon on the right-lower corner of profile’s tile.

Build 0.9.9 - 10 - ALNET SYSTEMS
Figure 9. CMS 4 - main window

Build 0.9.9 - 11 - ALNET SYSTEMS
After configuring the Connection profile, the main program window will appear. To add a
server (DVR) you need to right click on DVR folder on the left panel, and then choose Add DVR
option. A new window will appear where you can put a name of your DVR and short
description (optional).
Figure 10. Add DVR wizard
After that press Next> button, and you will be able to put connection details,
which are as below:
Address – IP address or domain of remote server
Port – TCP Port of remote server (default 9000)
Backup port – TCP port for making archive backup (default 4000)
Login – user name
Password – user password

Build 0.9.9 - 12 - ALNET SYSTEMS
Figure 11. Add DVR - connection details
After clicking Finish button, the connection to the remote server is established, and server
name with corresponding layout (depending on number of cameras) is displayed on Layouts
panel.

Build 0.9.9 - 13 - ALNET SYSTEMS
Figure 12. First view after connecting
Build 0.9.9 - 14 - ALNET SYSTEMS
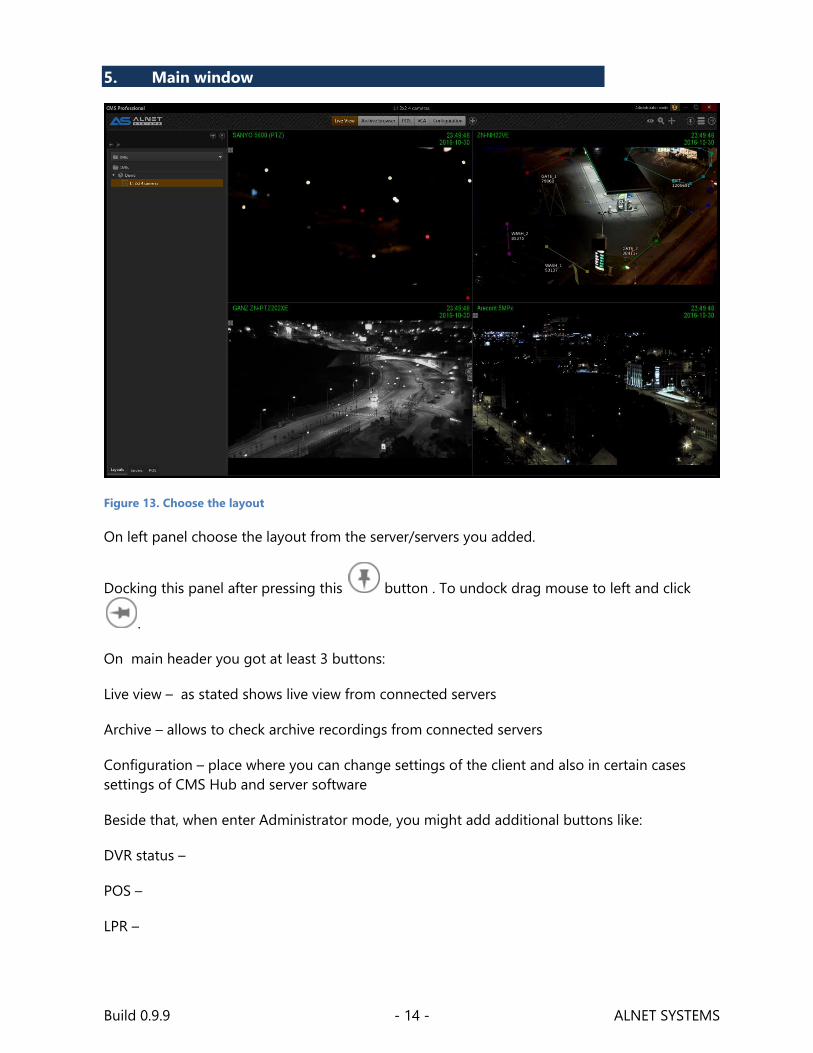
5. Main window
Figure 13. Choose the layout
On left panel choose the layout from the server/servers you added.
Docking this panel after pressing this button . To undock drag mouse to left and click
.
On main header you got at least 3 buttons:
Live view – as stated shows live view from connected servers
Archive – allows to check archive recordings from connected servers
Configuration – place where you can change settings of the client and also in certain cases
settings of CMS Hub and server software
Beside that, when enter Administrator mode, you might add additional buttons like:
DVR status –
POS –
LPR –

Build 0.9.9 - 15 - ALNET SYSTEMS
LPR archive –
VCA –
Access control –
Access control archive –
Web browser –
Logs –
Snapshots –
Backup –
Reports –
We will describe more thoroughly all of those windows in next chapters of this manual.
On the right you will also fine 3 buttons which allows to enter view mode, zoom mode and PTZ
mode.
In the right upper corner you will also find menu button, where you can for example enable
administrator mode. We will cover this menu in next chapters.
6. View mode
To enter VIEW mode go to upper left corner of active camera and press this . This is
standard mode to view cameras . In this mode you can for example double click to make
chosen camera on full screen or make a snapshot with right mouse click on the picture (when
you are in user mode).
When you enter to Administrator mode, you will get access to additional functions such as
stream quality, swtiching between live and archive view or choosing archive source (remote or
local). Also in administrator mode you can drag and drop cameras on the layout and also from
Servers menu on the left to arrange layouts.

Build 0.9.9 - 16 - ALNET SYSTEMS
Figure 14 Entering VIEW mode
7. ZOOM mode
To enter Zoom mode go to upper left corner of active camera and press this . This is
advanced mode to enlarge image using digital zoom. Simply press left mouse button and
enlarge the desired fragment of image.
If you set the same camera two times on the layout, then the one that is not enlarged will
display rectangle which allows you to easly move on the enlarged area. It is also shown in our
tutorial videos which are published on our Youtube channel.

Build 0.9.9 - 17 - ALNET SYSTEMS
Figure 15 Zoom mode
Figure 16 Drawing enlarged area

Build 0.9.9 - 18 - ALNET SYSTEMS
Figure 17 Enlarged part of the image is selected on the same camera in other place on the layout (blue
rectangle)
8. PTZ mode
To enter PTZ mode go to upper left corner of active image and press . Clicking the mouse
on picture from the dome camera will move the dome to desired direction/area. For optical
zoom you can use mouse scroll.

Build 0.9.9 - 19 - ALNET SYSTEMS
Figure 18 Entering the PTZ mode
Figure 19 Enlarged image in PTZ mode

Build 0.9.9 - 20 - ALNET SYSTEMS
Figure 20 Picture without left panels