clx.paypen ch s deut s ai Ç fran - crealogix.com · 6 deut s ch 7 deut s ch software installieren...
TRANSCRIPT

BenutzerhandBuch für den cLX.PayPen Seite 3E-Banking – Schnelles Erfassen von EinzahlungsscheinenText – Einfaches Scannen von TextBarcodes – Bequemes Einlesen von Codes
ManueL d’utiLiSation du cLX.PayPen Page 17e-banking – Saisie rapide de bulletins de versementTexte – Numérisation aisée de textesCodes à barres – Lecture confortable
ManuaLe utente di cLX.PayPen Pagina 31E-banking – Acquisizione rapida di polizze di versamentoTesti – Scansione semplice di testiCodici a barre – Comodità di acquisizione
uSer ManuaL for the cLX.PayPen Page 45E-banking – Record payment slips quicklyText – Scan texts with easeBarcodes – Scan barcodes instntly
deu
tSc
hfr
an
Ça
iSit
aLi
an
oen
gLi
Sh
CLX.PayPen

3
deu
tSc
h
BENuTzERhANdBuCh füR dEN CLX.PAyPEN
BENuTzERhANdBuCh füR dEN CLX.PAyPEN
Benutzerhandbuch für den cLX.PayPen Seite 4
Packungsinhalt Seite 4
cLX.PayPen Seite 5
Software installieren unter Windows Seite 5
Software installieren unter Mac Seite 7
cLX.PayPen-funktionen (nur für Windows gültig) Seite 8
• Allgemein Seite 8
So lesen Sie mit dem cLX.PayPen Seite 9
• Banking – Einzahlungsscheine Seite 9
• Text und Ziffern / Numerisch (nur für Windows gültig) Seite 10
• Barcodes (nur für Windows gültig) Seite 10
• Fehlerbehebung Seite 10
So belegen Sie die funktionstaste Seite 10
Weitere funktionen Seite 11
• Registerkarte Allgemein Seite 11
• Registerkarte Sprache Seite 11
• Registerkarte Banking Seite 11
• Test-Center Seite 12
• Registerkarte Barcode (nur für Windows gültig) Seite 12
Spezifische hilfe Seite 12
Weitere informationen Seite 12
• Technische Daten Seite 12
• Systemvoraussetzungen Seite 13
• Support Seite 13
• Unterstützte Sprachen (nur für Windows gültig) Seite 13
• Unterstützte Banking-Zeichen Seite 14
• Unterstützte Barcodes (nur für Windows gültig) Seite 14
• Garantie Seite 14
SuPPoRT
Wenden Sie sich bei Problemen oder Fragen jederzeit an unser Supportteam.
4
deu
tSc
h
5
deu
tSc
h
CLX.PAYPEN /// SoFTWARE iNSTALLiEREN UNTER WiNDoWSBENUTZERhANDBUCh FüR DEN CLX.PAYPEN /// PACkUNGSiNhALT
CLX.PAyPEN
SoFTWARE iNSTALLiEREN UNTER WiNDoWS
Microsoft .net framework:CLX.PayPen erfordert die neue Microsoft .NET Technologie!Das .NET Framework ist eine neue komponente des Windows-Betriebssystems. Es muss installiert sein, bevor Anwendungen zur Ausführung kommen, die speziell für die Plattform entwickelt wurden. Diese zusätzliche Microsoft .NET Framework installation, welche auf der CLX.PayPen CD-RoM enthalten ist und automatisch abläuft, kann zusätzlich zur übli-chen CLX.PayPen installation einige Minuten in Anspruch nehmen.
Bevor Sie den CLX.PayPen mit dem PC verbinden, muss die Software installiert werden, die sich auf der beiliegenden Cd-RoM befindet.
Wichtiger hinWeiS: Verbinden Sie den CLX.PayPen keinesfalls mit dem PC, bevor Sie die Software installiert haben.
1. Melden Sie sich mit dem Administrator-Benutzernamen an.2. Schliessen Sie alle geöffneten Anwendungen.3. Legen Sie die CD-RoM ins CD-RoM-Laufwerk des PCs ein. Das installationsprogramm startet automatisch. Befolgen Sie die Anweisungen am Bildschirm. 4. Nach abgeschlossener installation erscheint eine entsprechende Meldung. 5. Verbinden Sie den CLX.PayPen via USB-Anschluss mit ihrem PC.
BENuTzERhANdBuCh füR dEN CLX.PAyPEN
Ausgabe 2010Diese Anleitung wird von CREALoGiX E-Payment AG ohne jegliche Garantie veröffentlicht. CREALoGiX E-Payment AG behält sich vor, Aktualisierungen oder Änderungen dieses Do-kuments, die aufgrund von Schreibfehlern, unvollständigen Angaben oder Verbesserungen der Programme und/oder der Geräte notwendig sind, jederzeit und ohne vorherige An-kündigung durchzuführen. Diese Änderungen werden jedoch in neuen Ausgaben dieses Dokuments sowie auf unserer Website www.crealogix.com berücksichtigt. Alle Rechte vorbehalten.
Copyright © 2010 CREALoGiX E-Payment AG
ABBYY® FineReader® Engine 8.0 © 2005 ABBYY Software. ABByy fineReader – the keenest eye in oCR.ABBYY, FiNEREADER and ABBYY FineReader are registered trademarks of ABBYY Software Ltd.
CLX.PayPen has been developed by C Technologies AB.
CLX.PAyPEN
herzlichen Glückwunsch zum kauf des CLX.PayPen! Der CLX.PayPen wird ihnen die Arbeit erleichtern – Sie können damit jede Menge Zeit sparen.. Der Stift überträgt die Codierzeile von Einzahlungsscheinen direkt auf ihren PC bzw. auf ihren Mac. Wird der CLX.PayPen an einen PC mit einem Windows-Betriebssystem angeschlossen, so liest der CLX.PayPen nicht nur die Codierzeile von Einzahlungsscheinen ein, sondern auch zeichenketten aus Texten. CLX.PayPen erkennt 167 Sprachen mit lateinischen, kyrillischen oder griechischen Schrift-zeichen. Unter dem Windows-Betriebssystem liest das Gerät ebenfalls Barcodes und speziel-le oCR-B-Zeichen (Swiss-Banking-Font).
PACkUNGSiNhALT
diese Packung enthält:• CLX.PayPen mit USB-kabel• CD-RoM mit Software• Benutzerhandbuch• Tischhalter (optionales Zubehör)
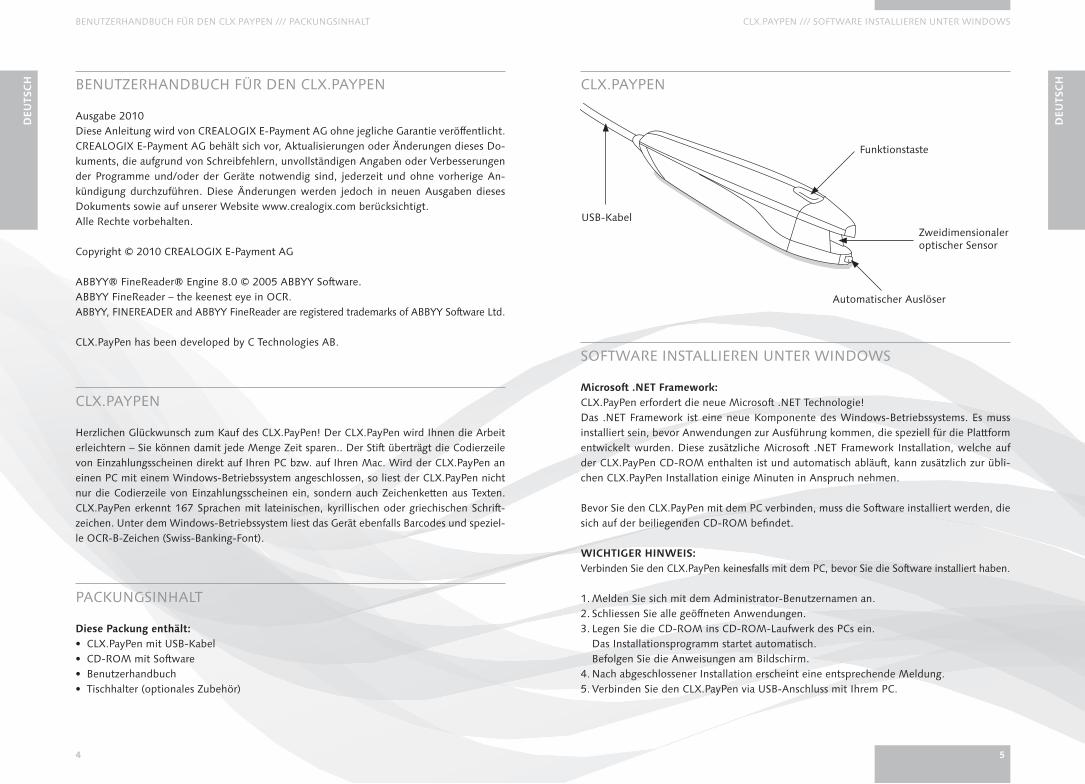
USB-kabel
funktionstaste
zweidimensionaleroptischer Sensor
Automatischer Auslöser

6
deu
tSc
h
7
deu
tSc
h
SoFTWARE iNSTALLiEREN UNTER WiNDoWS /// SoFTWARE iNSTALLiEREN UNTER MACSoFTWARE iNSTALLiEREN UNTER WiNDoWS
installation der cLX.PayPen treiber-Software (gilt für Windows 2000):Der input Pen und der CLX.PayPen werden automatisch installiert. Es ist keine Benutzer-aktion notwendig.
installation der cLX.PayPen treiber-Software (gilt für Windows 7, Vista, XP):• Der Assistent für das Suchen von neuer hardware wird 2× hintereinander ausgeführt.• Der erste Durchgang gilt für den «input Pen», der zweite Durchgang für den «CLX.PayPen».• Die Durchgänge bestehen aus den nachfolgenden Dialogen (Beispiel gilt für Windows XP
und «input Pen»-Erkennung).
Dialog 1 Dialog 2
Dialog 3 Dialog 4
dialog 5
fehlerbehebung (gilt für alle Betriebssysteme)• Wenn das installationsprogramm nicht automatisch startet, klicken Sie in der Windows-
Taskleiste auf «Start» und wählen Sie den Eintrag «Ausführen» aus. Tragen Sie nun im Eingabefeld «x:\setup» ein (wobei x für den Buchstaben des CD-RoM-Laufwerks steht).
• Wenn der Computer Treiber anfordert, haben Sie den CLX.PayPen möglicherweise vor der installation der Software auf der beiliegenden CD-RoM angeschlossen. Trennen Sie den CLX.PayPen vom Computer, installieren Sie die Software und verbinden Sie den CLX.PayPen erneut.
• USB-Verlängerungskabel können den einwandfreien Betrieb des CLX.PayPen stören oder gar verhindern (Licht vom CLX.PayPen wird nur kurz oder gar nicht eingeschaltet). Ver-wenden Sie nur uSB-Verlängerungskabel von hoher Qualität.
• Schliessen Sie den CLX.PayPen immer am gleichen USB-Anschluss an. Falls der CLX.PayPen an einem anderen uSB-Anschluss angeschlossen wird, kann es bei einigen Sys-temen vorkommen, dass der CLX.PayPen neu erkannt wird und die installation mit dem hardware-Assistenten nochmals durchgeführt werden muss.
Weiteren Support und mehr informationen zur fehlerbehebung finden Sie unter www.crealogix.com.
SoFTWARE iNSTALLiEREN UNTER MAC
Bevor Sie den CLX.PayPen mit dem Macintosh-Computer verbinden, muss die Software installiert werden, welche sich auf der beiliegenden Cd-RoM befindet.
1. Legen Sie die CD-RoM ins CD-RoM-Laufwerk des Mac ein.2. Starten Sie das installationsprogramm CLX.PayPen.mpkg
CLX.PayPen.mpkg und befolgen Sie die Anweisungen am Bildschirm. 3. Nach abgeschlossener installation erscheint eine entsprechende Meldung. 4. Verbinden Sie den CLX.PayPen mit einem USB-Anschluss am Mac. 5. Die CLX.PayPen-Applikation wird gestartet, indem Sie im ordner Programme/CLX.Pay-
Pen einen Doppelklick auf das Symbol CLX.PayPen ausführen.

8
deu
tSc
h
9
deu
tSc
h
So LESEN SiE MiT DEM CLX.PAYPENCLX.PAYPEN-FUNkTioNEN
CLX.PAYPEN-FUNkTioNEN (NUR FüR WiNDoWS GüLTiG)
Alle CLX.PayPen-Funktionen lassen sich über das Symbol in der Taskleiste aufrufen. klicken Sie mit der rechten Maustaste auf das CLX.PayPen-Symbol in der Taskleiste, um das kon-textmenü aufzurufen.
CLX.PayPen-Symbol CLX.PayPen-Menü in der Taskleiste in der Taskleiste
aLLgeMeinder cLX.PayPen kann zwischen folgenden funktionen umschalten:• Text und Ziffern – Text und Zahlen einlesen• Ziffern – nur Zahlen einlesen• Banking – Einzahlungsscheine einlesen• Barcodes – Barcodes (Strichcodes) einlesen
das Symbol in der Symbolleiste zeigt den aktiven Modus an:
Text und ziffern ziffern Banking Barcodes
umschalten zwischen den einzelnen Modi:klicken Sie mit der rechten Maustaste auf das Symbol von CLX.PayPen in der Symbolleiste.Das CLX.PayPen-Menü wird geöffnet. klicken Sie nun auf den gewünschten Modus. im CLX.PayPen-Menü signalisiert der Punkt, welcher der vier Modi aktiv ist.
damit Sie mit dem cLX.PayPen arbeiten können, müssen folgende Voraussetzungen erfüllt sein:• Der CLX.PayPen muss an ihrem PC bzw. Notebook angeschlossen sein. • Die Software von CLX.PayPen muss gestartet sein.
der CLX.PayPen muss im richtigen Modus sein. das Symbol CLX.PayPen unten rechts in der Symbolleiste zeigt an, welcher Modus gerade aktiv ist.
Beispiel: Banking-Modus
So LESEN SiE MiT DEM CLX.PAYPEN
BanKing – einzahLungSScheine1. halten Sie den CLX.PayPen wie einen Stift. Um eine Einzahlung zu erfassen, scannen Sie
bitte ausschliesslich die Codierzeile am unteren Rand des Einzahlungsscheins (siehe Bild). 2. Setzen Sie den CLX.PayPen vor der ersten Ziffer der Codierzeile an. Der CLX.PayPen
beginnt mit dem Lesevorgang, sobald der automatische Auslöser gegen die oberfläche gedrückt wird.
3. Bewegen Sie den Scanner zügig und mit leichtem Druck möglichst genau über die Codier-zeile. Für Linkshänder ist der Scanvorgang auch von rechts nach links möglich.
4. Wurden die Daten erfolgreich erfasst, erscheint in ihrer Zahlungs- oder kreditoren-Soft-ware (z. B. PayMaker) auf dem Bildschirm der fertig ausgefüllte Einzahlungsschein.
anmerkung: Die eingelesene Codierzeile wird sogleich auf korrektheit überprüft. Falls die eingelesene Codierzeile als komplett und fehlerfrei erkannt wird, wird sie im richtigen Format an die Cursor-Position ihrer Zahlungserfassungs- bzw. kreditoren-Software ge-schrieben. Dank dieser eingebauten automatischen Prüfziffer-kontrolle werden nur korrekt gelesene Daten an ihre Software übergeben.
Codierzeile
in der Codierzeile sind die relevanten Daten wie Betrag, Referenznummer und konto-nummer enthalten.

10
deu
tSc
h
11
deu
tSc
h
WEiTERE FUNkTioNENSo LESEN SiE MiT DEM CLX.PAYPEN /// So BELEGEN SiE DiE FUNkTioNSTASTE
teXt und ziffern / nuMeriSch (nur für WindoWS güLtig) 1. Bewegen Sie mit der Maus den Cursor zu der Position, an welcher der zu lesende Text
eingefügt werden soll. 2. halten Sie die Spitze des CLX.PayPen vor das erste zu lesende Zeichen. 3. Führen Sie den CLX.PayPen über die Textzeile. Für Linkshänder ist der Scanvorgang auch
von rechts nach links möglich.4. heben Sie den CLX.PayPen nach dem letzten zu lesenden Zeichen an. Der CLX.PayPen
unterbricht den Lesevorgang, wenn der automatische Auslöser nicht mehr betätigt wird. 5. Mit der funktionstaste schalten Sie zur nächsten zeile.
der CLX.PayPen kann immer nur eine zeile auf einmal erfassen. um einen ganzen Abschnitt einzulesen, muss jede Zeile einzeln eingescannt werden.
BarcodeS (nur für WindoWS güLtig)1. halten Sie den CLX.PayPen wie einen Stift. Setzen Sie den CLX.PayPen vor dem Barcode
(Strichcode) an. Der CLX.PayPen beginnt mit dem Lesevorgang, sobald der automatische Auslöser gegen die oberfläche gedrückt wird.
2. Bewegen Sie den Scanner zügig und mit leichtem Druck über den Barcode. Für Linkshän-der ist der Scanvorgang auch von rechts nach links möglich.
3. heben Sie den CLX.PayPen nach dem Scannen des Barcodes an. Der CLX.PayPen unter-bricht den Lesevorgang, wenn der automatische Auslöser nicht mehr betätigt wird.
fehLerBeheBungfalls Codierzeile, Text oder Barcode nicht korrekt erfasst werden, beachten Sie, dass die beiden Stützfüsse so zu positionieren sind, dass sich die Mitte der Textzeile in der Mitte der Öffnung befindet. Führen Sie den Scanner zügig (10 cm/s) über die zu erfassende Zeile.
So BELEGEN SiE DiE FUNkTioNSTASTE
1. klicken Sie mit der linken Maustaste auf das CLX.PayPen-Symbol in der Symbolleiste. Die CLX.PayPen-Einstellungen werden geöffnet. Mac-user gelangen über das Menü «CLX.PayPen > Einstellungen ...» zu den CLX.PayPen-Einstellungen.
2. Weisen Sie der Funktionstaste eine Funktion zu. Es sind folgende sechs Funktionen möglich: • Nichts (keine Funktion) • Tabulatortaste • Eingabetaste • Rücktaste • Escape • Text einfügen (Geben Sie den einzufügenden Text in das Textfeld ein.)
WEiTERE FUNkTioNEN
klicken Sie mit der linken Maustaste auf das CLX.PayPen-Symbol in der Symbolleiste. Die CLX.PayPen-Einstellungen werden geöffnet. Mac-user gelangen über das Menü «CLX.PayPen > Einstellungen ...» zu den CLX.PayPen-Einstellungen.
regiSterKarte aLLgeMeinSignalDer CLX.PayPen zeigt über zwei unterschiedliche Signale an, ob der Lesevorgang erfolgreich war oder nicht. Um das Signal auszuschalten, deaktivieren Sie das kontrollkästchen «Signal ein».
abschliessendes zeichen (existiert nur bei Windows)Wählen Sie im Listenfeld «Abschliessendes Zeichen» das Zeichen, das dem Text folgt. Vier Zeichen sind möglich:• Eingabetaste• Leerzeichen• Tabulatortaste• Nichts (keine Funktion)
regiSterKarte SPrache textsprache (existiert nur bei Windows)im Listenfeld «Textsprache» können Sie die Sprache des Textes auswählen, den Sie mit dem CLX.PayPen lesen.
Menüspracheim Listenfeld «Menüsprache» können Sie die Sprache für Menüs, Dialogfelder und Nach-richten auswählen.
regiSterKarte BanKingWählen Sie hier ihre Zahlungserfassungs- bzw. kreditoren-Software aus.Für detaillierte Erklärungen zum Einlesen von Einzahlungsscheinen siehe Seite 9.
funktionsweise des Banking-Modus 1. Starten Sie ihre Zahlungserfassungs- bzw. kreditoren-Software und arbeiten Sie normal
vorwärts bis zum Eingabefenster, wo Sie ihre Zahlungen erfassen müssen.2. Nun fahren Sie mit dem CLX.PayPen über die Codierzeile des einzulesenden Einzahlungs-
scheins.3. Die eingelesene Codierzeile wird sogleich auf korrektheit geprüft. Falls die eingelesene Co-
dierzeile als komplett und fehlerfrei erkannt wird, wird sie sofort im richtigen Format von ihrer Zahlungserfassungs- bzw. kreditoren-Software übernommen. Dank dieser eingebauten automatischen Prüfziffer-kontrolle werden nur korrekt gelesene Daten an ihre Software übergeben.

12
deu
tSc
h
13
deu
tSc
h
WEiTERE iNFoRMATioNENWEiTERE FUNkTioNEN /// SPEZiFiSChE hiLFE /// WEiTERE iNFoRMATioNEN
teSt-centerDas Test-Center eignet sich zum Ausprobieren und Testen ihres neuen Lesestifts. Weiter kann die Video-hilfe aufgerufen werden, welche ihnen instruktionen und Tipps für die Verwendung gibt.
regiSterKarte Barcode (nur für WindoWS güLtig)Barcode-typenWählen Sie im Listenfeld «Barcode-Typen» den Typ Barcode aus, der mit dem CLX.PayPen gelesen werden soll. Standardeinstellung: Automatische Erkennung.
abschliessendes zeichenWählen Sie das Zeichen, das dem Barcode folgt. Vier Zeichen sind möglich:• Eingabetaste• Leerzeichen• Tabulatortaste• Nichts (keine Funktion)
SPEZiFiSChE hiLFE
Spezifische hilfestellung zur Zahlungssoftware ihrer Bank, Videos über die korrekte Anwen-dung sowie informationen zum online-Support entnehmen Sie bitte dem hilfemenü. Um die hilfe aufzurufen, klicken Sie auf das CLX.PayPen-Symbol in der Taskleiste und wählen im kontextmenü den Eintrag «hilfe» aus. Mac-User rufen die hilfe über das Menü «hilfe» auf.
WEiTERE iNFoRMATioNEN
techniSche datenAbmessungen: 131 × 19 × 31 mmGewicht: 68 g, mit USB-kabel 106 gProzessor: Argus-Prozessor (Eigenentwicklung)Lesegeschwindigkeit: 15 cm/sZeichengrössen: 5–22 PunktUSB-kommunikationoCR-Software von ABByy Software house
SySteMVorauSSetzungen• PC mit Windows 7 (32bit/64bit) / Vista / XP / 2000 oder Mac mit oS X 10.3 oder höher• Pentium/PowerPC/intelMac mit 64 MB RAM und 300 MB freiem Festplattenspeicher• CD-RoM-Laufwerk• USB-Anschluss für kabelverbindung (USB 2.0 / USB 1.1)
SuPPortWenden Sie sich bei Problemen oder Fragen jederzeit an unser Supportteam. hotline tel.: 0900 900 015 (ab der 3. Min. ChF 2.13/Min.)hotline e-Mail: [email protected]
Auf unserer Website unter www.crealogix.com können Sie informationen, Neuigkeiten und Programmaktualisierungen abrufen.
unterStützte SPrachen (nur für WindoWS güLtig)34 hauptsprachen, für welche die ocr-engine von finereader Wörterbücher und rechtschreibprüfungen bereitstellt: Armenisch (ostarmenisch, Westarmenisch, Grabar), Bulgarisch, katalanisch, kroatisch, Tsche-chisch, Dänisch, Niederländisch (Niederlande und Belgien), Englisch, Estnisch, Finnisch, Fran-zösisch, Deutsch (neue und alte Rechtschreibung), Griechisch, Ungarisch, italienisch, Lettisch, Litauisch, Norwegisch (Nynorsk und Bokmål), Polnisch, Portugiesisch (Portugal und Brasilien), Rumänisch, Russisch, Slowakisch, Spanisch, Schwedisch, Tatarisch, Türkisch und Ukrainisch.
133 zusätzliche Sprachen mit lateinischen, kyrillischen oder griechischen Schriftzeichen: Abchasisch, Adyghe, Afrikaans, Aghulisch, Albanisch, Altaisch, Awarisch, Aymará, Aser-baidschanisch (kyrillisch), Aserbaidschanisch (lateinisch), Baschkirisch, Baskisch, Weiss-russisch, Bemba, Blackfoot, Bretonisch, Bugotu, Buriatisch, Cebuano, Chamorro, Tschet-schenisch, Tschuktschisch, Tschuwaschisch, kongo, korsisch, krimtatarisch, Crow, Dakota, Darginisch, Dunganisch, Eskimosprache (kyrillisch), Eskimosprache (lateinisch), Ewenisch, Ewenkisch, Färöisch, Fidschi, Friesisch, Friaulisch, Gagausisch, Galizisch, Ganda, Deutsch (Luxemburg), Guarani, hani, hausa, hawaiisch, isländisch, indonesisch, inguschetisch, irisch, Jingpo, kabardianisch, kalmükisch, karachay-Balkar, karakalpakisch, kaschubisch, kava, kasachisch, Chakassisch, Chantisch, kikuyu, kirgisisch, koryakisch, kpelle, kumy-kisch, kurdisch, Lakisch, Lateinisch, Lesgisch, Luba, Mazedonisch, Madagassisch, Malaisch, Malinke, Maltesisch, Mansisch, Maori, Mari, Maya, Miao, Minangkabau, Mohawk, Molda-wisch, Mongolisch, Mordwinisch, Nahuatl, Nenetsisch, Nivkh, Nogaisch, Nyanja, ojibway, ossetisch, Papiamento, Provenzalisch, Quechua, Rätoromanisch, Romany, Rundi, Russisch (alte Schreibweise), Ruandisch, Samisch (Lappisch), Samoisch, Schottisches Gälisch, Selkup, Serbisch (kyrillisch), Serbisch (lateinisch), Shona, Slowenisch, Somalisch, Sorbisch, Sotho, Sunda, Swahili, Swazi, Tabasaranisch, Tagalog, Tahitianisch, Tadschikisch, Tok Pisin, Ton-ganisch, Tswana, Tun, Turkmenisch, Tuwinisch, Udmurt, Usbekisch (kyrillisch), Usbekisch (lateinisch), Walisisch, Wolof, Xhosa, Jakutisch, Zapotekisch, Zulu.
14
deu
tSc
h
15
deu
tSc
h
WEiTERE iNFoRMATioNENWEiTERE iNFoRMATioNEN
unterStützte BanKing-zeichenoCR-B-Zeichen (Swiss-Banking-Font)Test-Codierzeile Einzahlungsschein
0100045622400>000000000000000000115530868+ 010353635>
unterStützte BarcodeS (nur für WindoWS güLtig)1D-Barcode-Typen: Check Code 39, Check interleaved 25, Code 128, Code 39, EAN 13, EAN 8, interleaved 25, CoDABAR (ohne Prüfsumme), UCC Code 128, Code 2 of 5 (indus-trial, iATA, Matrix), Code 93, UPC-A, UPC-E und Postnet.
Test-Barcodes: Code 39 EAN 13
garantieCREALoGiX E-Payment AG garantiert, dass dieses Produkt frei von Materialfehlern und Funktionsfehlern ist, und zwar für ein Jahr ab dem Zeitpunkt des Neuerwerbs. im Fol-genden bedeutet der Name CREALoGiX E-Payment AG, sofern nicht anders erwähnt, CREALoGiX E-Payment AG, die Tochtergesellschaften und händler.
Sollte während der Garantiezeit ein Defekt am Produkt auftreten, und zwar unabhängig davon, ob es sich um einen Material- oder Fertigungsfehler handelt, verpflichtet sich CREALoGiX E-Payment AG, das defekte Produkt zu reparieren oder gegen ein neues Pro-dukt desselben Modells oder eines vergleichbaren Modells auszutauschen. CREALoGiX E-Payment AG behält sich vor, darüber zu entscheiden, ob eine Reparatur des Gerätes oder der Austausch des Gerätes vorgenommen wird.
creaLogiX e-Payment ag übernimmt keine garantie für:1. Beschädigungen, die während des Transports, durch einen Unfall, durch vorsätzliche Be-
schädigung, durch Veränderungen am Gerät, durch unsachgemässen Gebrauch, durch höhere Gewalt entstanden sind oder durch ein Ereignis, das ausserhalb des Einflusses von CREALoGiX E-Payment AG liegt, verursacht wurden, einschliesslich aller Beschädi-gungen, die direkt oder indirekt durch Blitzschlag, überschwemmung, Feuer, öffentlichen Aufruhr, Unruhen, Streik, kriegszustand oder ähnliche Ereignisse auftreten.
2. Ersatz für Schäden (einschliesslich aller direkten oder indirekten Personenschäden, ent-gangenen Gewinns, sinkender Produktion, Verlust oder Veränderung von verarbeiteten informationen oder jeglicher anderen Art eines damit verbundenen Folgeschadens), die durch das Produkt oder seinen Gebrauch oder durch die Tatsache entstehen, dass das Produkt nicht gebraucht werden kann.
3. Mangelhafte Wartung oder Reparatur durch nicht autorisierte Personen.4. inkompatibilität aufgrund technischer Weiterentwicklungen.5. Fehler/Beschädigungen, die durch externe Geräte oder durch aussergewöhnliche Ab-
nutzung entstanden sind.6. Beschädigungen durch normale Abnutzung und normalen Verschleiss.7. Schäden in Verbindung mit oder als Folge von Aktualisierungen, bei denen das Pro-
dukt verändert oder Soft- oder hardware eingesetzt wurde, die nicht von CREALoGiX E-Payment AG hergestellt oder schriftlich genehmigt wurde.
Wenn Sie mit ihrem CLX.PayPen-Produkt den Garantieservice in Anspruch nehmen möchten, wenden Sie sich bitte an ihren Fachhändler, bei dem Sie das Produkt gekauft haben. das Produkt sollte in seiner originalverpackung eingeschickt werden, bzw. sollte so verpackt sein, dass Transportschäden vermieden werden. Der käufer des CLX.PayPen muss durch eine Rechnung oder einen kassenzettel bzw. eine Quittung, die/der vom Fachhändler ausgestellt wurde, bei dem das Produkt gekauft wurde, das kaufdatum nach-weisen können, um einen gültigen Garantieanspruch zu haben. Durch eine Reparatur oder einen Austausch wird die Garantiezeit nicht verlängert oder erneuert. Ausgetauschte Geräte oder Gerätebestandteile werden Eigentum von CREALoGiX E-Payment AG. Wenn die ursprüngliche Garantiezeit abgelaufen ist, endet automatisch auch die Garantiezeit für alle ausgetauschten/reparierten Bestandteile des Gerätes. Dieses Produkt gilt nicht als beschädigt mit Blick auf Material- oder funktionsfehler, wenn es umgebaut oder modifi-ziert werden muss, um nationalen Vorschriften oder örtlichen technischen Sicherheitsvor-schriften in einem Land zu entsprechen, für das das Produkt nicht vorgesehen ist.
CREALoGiX E-Payment AG behält sich alle Rechte am Produkt, seiner hard- und Soft-ware sowie seiner Marken vor. Niemand, der das Produkt kauft oder verwendet, erwirbt damit das Recht, die hard- oder Software zu verändern, das Produkt auseinanderzubauen oder in irgendeiner anderen form die hard- oder Software zu verwenden, die nicht dem gesetzlichen Bestimmungszweck und der Verwendungsweise entspricht. Diese Garantie berührt nicht die Rechte des käufers gegenüber dem händler auf der Grundlage des kaufvertrags oder die gesetzlichen Rechte des käufers. CREALoGiX E-Payment AG über-nimmt keine haftung für jegliche Art des Verstosses gegen die Garantieerklärung des Produkts, eine damit verbundene Schädigung sowie Folgeschäden. Dies gilt für explizit erwähnte und auch sinngemäss enthaltene Äusserungen.

17
fra
nÇ
aiS
MANUEL D’UTiLiSATioN DU CLX.PAYPEN
MANUEL D’UTiLiSATioN DU CLX.PAYPEN
Manuel d’utilisation du cLX.PayPen Page 18
contenu de l’emballage Page 18
cLX.PayPen Page 19
installation du logiciel avec Windows Page 19
installation du logiciel avec Mac Page 21
fonctions du cLX.PayPen (valable uniquement pour Windows) Page 22
• Généralités Page 22
comment effectuer une lecture avec votre cLX.PayPen Page 23
• Banking – bulletins de versement Page 23
• Texte et chiffres / numérique (uniquement pour Windows) Page 24
• Codes-barres (uniquement pour Windows) Page 24
• Dépannage en cas d’erreur Page 24
assignation du bouton de fonction Page 24
autres fonctions Page 25
• onglet Général Page 25
• onglet Langue Page 25
• onglet Banking Page 25
• Test Center Page 26
• onglet Codes-barres (uniquement pour Windows) Page 26
aide spécifique Page 26
informations complémentaires Page 26
• Spécifications techniques Page 26
• Configuration de système requise Page 27
• Support technique Page 27
• Langues reconnues (uniquement pour Windows) Page 27
• Caractères Banking reconnus Page 28
• Codes-barres reconnus (uniquement pour Windows) Page 28
• Garantie Page 28
SoUTiEN TEChNiQUE
Pour toute question ou en cas de problèmes, n’hésitez pas à contacter notre équipe de soutien technique. tél. hotline: 0900 900 015 (à partir de la 3ème min. ChF 2.13/min.)e-mail hotline: [email protected]

18
fra
nÇ
aiS
19
fra
nÇ
aiS
CLX.PAYPEN /// iNSTALLATioN DU LoGiCiEL AVEC WiNDoWSMANUEL D’UTiLiSATioN DU CLX.PAYPEN /// CoNTENU DE L’EMBALLAGE
MANUEL D’UTiLiSATioN DU CLX.PAYPEN
Parution (2010)Ce manuel est publié sans garantie par CREALoGiX E-Payment AG. Afin d’apporter des améliorations ou des modifications suite à des erreurs de frappe, des informations inexactes ou erronées ou des mises à jour informatiques et/ou matérielles, les informations conte-nues dans ce document pourront faire l’objet de modifications sans préavis. Toute modi-fication effectuée par CREALoGiX E-Payment AG ainsi que les modifications signalées sur notre site Web www.crealogix.com seront toutefois incorporées aux nouvelles éditions de ce manuel. Tous droits réservés
Copyright © 2010 CREALoGiX E-Payment AG
ABBYY® FineReader® Engine 8.0 © 2005 ABBYY Software. ABByy fineReader – the keenest eye in oCR.ABBYY, FiNEREADER and ABBYY FineReader are registered trademarks of ABBYY Software Ltd.
CLX.PayPen has been developed by C Technologies AB.
CLX.PAyPEN
Nous vous félicitons d’avoir porté votre choix sur le CLX.PayPen! Le CLX.PayPen vous faci-litera le travail et vous fera gagner un temps précieux. Le CLX.PayPen transmet directement la ligne de codage des bulletins de versement sur votre PC ou votre Mac. Si le CLX.PayPen est branché sur un ordinateur doté du système d’exploitation Windows, le CLX.PayPen reconnait non seulement les lignes de codage des bons de versement mais également les chaînes de caractères d’un texte. CLX.PayPen reconnaît 167 langues en caractères latins, cyrilliques ou grecs. Avec le système d’exploitation Windows, l’appareil lit également les codes-barres et les caractères oCR-B spéciaux (police Swiss-Banking).
CoNTENU DE L’EMBALLAGE
Cette boîte contient:• Un CLX.PayPen avec câble USB• Un CD-RoM contenant le logiciel d’installation• Un manuel d’utilisation• Un support de table (accessoire optionnel en option)
CLX.PAyPEN
iNSTALLATioN DU LoGiCiEL AVEC WiNDoWS
Microsoft .net framework:CLX.PayPen nécessite la nouvelle technologie de Microsoft.NET! Le Framework .NET est une nouvelle composante du système d’exploitation de Windows. il doit être installé avant le lancement des applications spécialement mises au point pour la plate-forme. Cette installation supplémentaire de Framework Microsoft .NET (également sur le CD-Rom du CLX.PayPen et dont le lancement est automatique) peut prolonger l’ins-tallation habituelle de CLX.PayPen de quelques minutes.
Avant de connecter le CLX.PayPen à votre ordinateur, veillez à avoir installé correctement le logiciel se trouvant sur le CD-RoM ci-joint.
reMarQue iMPortante: Ne raccordez en aucun cas le CLX.PayPen à l’ordinateur avant d’avoir installé le logiciel.
1. ouvrez une session en tant qu’administrateur.2. Fermez toutes les applications ouvertes.3. Placez le CD-RoM dans le lecteur de CD-RoM de votre ordinateur. Le programme d’installation démarre automatiquement. Suivez les instructions qui apparaissent à l’écran. 4. Un message s’affiche pour vous indiquer que l’installation est terminée. 5. Branchez le câble du CLX.PayPen au port USB de votre ordinateur.
Câble USB
Bouton de fonction
détecteur optique bidimensionnel
Gâchette automatique

20
fra
nÇ
aiS
21
fra
nÇ
aiS
iNSTALLATioN DU LoGiCiEL SoUS WiNDoWS /// iNSTALLATioN DU LoGiCiEL AVEC MACiNSTALLATioN DU LoGiCiEL AVEC WiNDoWS
après l’installation du pilote (logiciel) du cLX.PayPen (pour Windows 2000):L’ «input Pen» et le «CLX.PayPen» sont installés automatiquement. Aucune intervention de l’utilisateur n’est nécessaire.
après l’installation du pilote (logiciel) du cLX.PayPen (pour Windows 7, Vista, XP):• L’assistant «Ajout de nouveau matériel détecté» sera lancé à deux reprises.• Le premier lancement est pour «input Pen», le deuxième pour le «CLX.PayPen».• Les séquences de l’assistant comportent les fenêtres de dialogue suivantes: (exemple valable pour Windows XP et reconnaissance de «input Pen»).
Dialogue 1 Dialogue 2
Dialogue 3 Dialogue 4
dialogue 5
en cas de problème (valable pour tout système d’exploitation)• Si le programme d’installation ne démarre pas automatiquement, cliquez sur «Démarrer»
dans la barre des tâches, puis sur «exécuter». Entrez x:\setup dans le champ de saisie (x correspondant à la lettre attribuée au lecteur
CD-RoM).• Si l’ordinateur sollicite un Pilote, alors vous avez vraisemblablement branché le CLX.Pay-
Pen avant d’avoir installé le logiciel (sur le CD joint). Débranchez le CLX.PayPen, installez le logiciel et rebranchez le CLX.PayPen.
• Une rallonge du câble USB peut entraver, voire même bloquer le bon fonctionnement du CLX.PayPen (la lumière du CLX.PayPen n’apparaitra que brièvement voire même pas du tout). Utilisez uniquement une rallonge de haute qualité.
• Branchez toujours le CLX.PayPen sur la même prise USB. Si le CLX.PayPen est branché sur une autre prise USB, il est possible que certains systèmes le perçoivent comme un nouvel outil et que l’installation soit relancée par le biais de l’assistant «Ajout de nouveau matériel détecté».
Vous trouverez d’autres points d’aide technique (assistance en cas d’erreurs) sous www.crealogix.com.
iNSTALLATioN DU LoGiCiEL AVEC MAC
Avant de brancher le CLX.PayPen avec l’ordinateur Macintosh, veillez à bien installer le pilote dont le logiciel se trouve sur le CD-RoM ci-joint.
1. Placez le CD-RoM dans le lecteur CD-RoM de votre Mac.2. Lancez le programme d’installation CLX.PayPen.mpkg
Suivez les instructions apparaissant à l’écran.3. Un message s’affiche pour vous indiquer que l’installation est terminée. 4. Branchez le câble du CLX.PayPen à la prise USB de votre Mac. 5. L’application du CLX.PayPen sera lancée dès que vous aurez effectué un double-clic sur
le symbole du CLX.PayPen dans le fichier Programme/CLX.PayPen.

22
fra
nÇ
aiS
23
fra
nÇ
aiS
CoMMENT EffECTuER uNE LECTuRE AVEC VoTRE CLX.PAyPENFoNCTioNS DU CLX.PAYPEN (UNiQUEMENT PoUR WiNDoWS)
FoNCTioNS DU CLX.PAYPEN (UNiQUEMENT PoUR WiNDoWS)
Vous pouvez accéder à toutes les fonctions du CLX.PayPen à partir de l’icône dans la barre des tâches. Pour afficher le menu, cliquez avec le bouton droit de la souris sur l’icône du CLX.PayPen.
icône du CLX.PayPen Menu du CLX.PayPen dans la barre des tâches
inforMationS gÉnÉraLeSLe cLX.PayPen peut être utilisé avec les fonctions suivantes:• Texte et chiffres – lire un texte et des chiffres• Numérique – lire uniquement des chiffres• Banking – lire des bulletins de versement• Code à barres – lire des codes à barres
La barre d’icônes affiche le mode actif:
Texte et chiffres Numérique Banking Code à barres
Pour basculer entre les différents modes:Cliquez avec la touche droite de la souris sur l’icône CLX.PayPen dans la barre d’icônes. Le menu CLX.PayPen s’ouvre. Cliquez sur le mode désiré. dans le menu CLX.PayPen, le point signale quel mode est désormais actif.
afin de pouvoir travailler avec le cLX.PayPen, les conditions suivantes doivent être remplies:• Le CLX.PayPen doit être connecté à votre PC et/ou notebook. • Vous devez avoir démarré le logiciel de CLX.PayPen
Le CLX.PayPen doit être branché sur le mode adéquat. Le symbole CLX.PayPen en bas à droite dans la barre d’icônes indique quel mode est actuellement actif.
Exemple: Banking Mode
CoMMENT EffECTuER uNE LECTuRE AVEC VoTRE CLX.PAyPEN
BanKing – BuLLetinS de VerSeMent1. Tenez le CLX.PayPen comme un stylo. Pour saisir un versement, lisez uniquement la ligne
de codage se trouvant sur le bord inférieur du bulletin de versement (voir illustration). 2. Placez le CLX.PayPen devant le premier chiffre de la ligne de codage. il démarre la lecture
dès que vous pressez la gâchette automatique sur la surface à lire. 3. Déplacez le CLX.PayPen rapidement sur la ligne de codage en exerçant une légère pres-
sion. Les gauchers peuvent également effectuer la lecture de droite à gauche.4. Une fois les données correctement saisies, le bulletin de versement dûment complété
apparaît sur l’écran de votre logiciel créancier et de paiement (p. ex. PayMaker).
remarque: il vous suffit maintenant de passer le CLX.PayPen sur la ligne de codage du bulletin de versement. Le système vérifie parallèlement l’exactitude de la ligne de codage. Lorsque la ligne de codage lue est complète et correcte, elle s’affichera en format correct à l’endroit où se trouve le curseur dans votre logiciel créancier et de paiement. Grâce à ce système de contrôle intégré automatique, seules des données correctes sont transmises à votre logiciel.
ligne de codage
La ligne de codage contient des données importantes telles que le montant, le numéro de référence et le numéro de compte.

24
fra
nÇ
aiS
25
fra
nÇ
aiS
AUTRES FoNCTioNSCoMMENT EFFECTUER UNE LECTURE AVEC VoTRE CLX.PAYPEN /// ASSiGNATioN DU BoUToN DE FoNCTioN
teXte et chiffreS / nuMÉriQue (uniQueMent Pour WindoWS) 1. Placez le curseur à l’endroit où vous voulez insérer le texte à lire. 2. Placez l’extrémité du CLX.PayPen devant le premier caractère à lire. 3. Déplacez le CLX.PayPen sur la ligne de texte. Vous pouvez le déplacer de gauche à droite
ou de droite à gauche au-dessus du texte. 4. Soulevez le CLX.PayPen après le dernier caractère à saisir. La lecture est interrompue
lorsque vous relâchez la pression sur la gâchette automatique. 5. Pour passer à la ligne suivante, pressez le bouton de fonction.
Le CLX.PayPen ne peut saisir qu’une seule ligne à la fois. Pour lire un paragraphe, vous devez lire chaque ligne séparément.
codeS-BarreS (uniQueMent Pour WindoWS)1. Tenez le CLX.PayPen comme un stylo. Placez-le devant le code à barres. il démarre la
lecture dès que vous appliquez la gâchette automatique sur la surface à lire. 2. Passez rapidement le CLX.PayPen sur le code à barres en exerçant une légère pression.
Les gauchers peuvent également effectuer la lecture de droite à gauche.3. Soulevez le CLX.PayPen après la lecture du code à barres. La lecture est interrompue
lorsque vous relâchez la pression sur la gâchette automatique.
ÉLiMination deS erreurSSi le CLX.PayPen ne lit pas correctement la ligne de codage, le texte ou le code à barres, vérifiez si les deux pattes d’appui sont positionnées de sorte que le milieu de la ligne de texte se trouve au centre de l’ouverture. Passez le CLX.PayPen rapidement (10 cm/s) sur la ligne à lire.
ASSiGNATioN DU BoUToN DE FoNCTioN
1. Cliquez avec la touche gauche de la souris sur l’icône du CLX.PayPen (barre des tâches) pour afficher les réglages CLX.PayPen.
Les utilisateurs de Mac accèdent aux paramètres du CLX.PayPen en cliquant sur le menu CLX.PayPen > paramètres.
2. Vous pouvez assigner une fonction au bouton de fonction du CLX.PayPen. Sélectionnez une des six options suivantes:
• Aucune • Tabulation • Retour • Retour arrière • Echappement • insertion de texte (tapez le texte à insérer dans la case de texte)
AUTRES FoNCTioNS
Cliquez avec le bouton gauche de la souris sur l’icône du CLX.PayPen (dans la barre des tâches) pour afficher les réglages du CLX.PayPen.Les utilisateurs de Mac parviennent aux paramètres du CLX.PayPen en allant sur le menu CLX.PayPen > paramètres.
ongLet gÉnÉraLSonCLX.PayPen émet deux sons différents pour signaler la réussite ou l’échec de la saisie. Pour déconnecter le signal, désactivez la case «Signal activé». Séparateur de texte (uniquement pour Windows)Sélectionnez dans la boîte de dialogue «Séparateur de texte» la marque qui suit le texte. Quatre marques sont possibles:• Retour • Espace• Tabulation• Aucun
ongLet Langue Langue de lecture (existe uniquement pour Windows) dans la liste déroulante des langues, sélectionnez la langue du texte à lire.
Langue du menu dans la liste déroulante des langues, sélectionnez la langue qui sera utilisée pour les menus, dialogues et messages.
ongLet BanKingChoisissez ici votre logiciel créancier et de paiement.Pour des explications plus détaillées concernant la lecture des bulletins de versement, reportez-vous à la page 23.
fonctionnement du mode Banking 1. Démarrez votre logiciel créancier et de paiement puis continuez jusqu’à la fenêtre de
saisie dans laquelle vous entrez vos versements.2. Passez ensuite le CLX.PayPen sur la ligne de codage du bulletin de versement à lire. 3. Le système vérifie parallèlement l’exactitude de la ligne de codage. Si la ligne de codage
lue est complète et correcte, elle s’affichera en format correct dans votre logiciel créan-cier et de paiement. Grâce à cette vérification automatique des codes de contrôle, seules des données correctes sont transmises à votre logiciel.

26
fra
nÇ
aiS
27
fra
nÇ
aiS
iNFoRMATioNS CoMPLéMENTAiRESAUTRES FoNCTioNS /// AiDE SPéCiFiQUE /// iNFoRMATioNS CoMPLéMENTAiRES
teSt centerLe Test Center sert à tester votre nouveau CLX.PayPen. Vous pouvez aussi y consulter la vidéo d’aide qui vous fournit des instructions et des conseils d’utilisation.
ongLet code à BarreS (eXiSte uniQueMent Pour WindoWS) Séparateur de codes à barres Sélectionnez dans la boîte de dialogue «Types de codes à barres » le type de code à barres devant être lu avec le PayPen. Réglage par défaut: identification automatique.
Marque de finSélectionnez la marque qui suit le code à barres. Quatre marques sont possibles:• Retour• Espace• Tabulation• Aucun (pas de fonction)
AiDE SPéCiFiQUE
Vous trouverez dans le document d’Aide une aide spécifique concernant le logiciel de paie-ment de paiement de votre banque, des vidéos sur l’utilisation correcte du CLX.PayPen, ainsi que des informations sur l’aide en ligne. Pour ouvrir le document d’Aide, cliquez avec le bouton droit de la souris sur l’icône du CLX.PayPen dans la barre des tâches et sélection-nez l’option Aide dans le menu.Les utilisateurs de Mac appellent l’Aide par le biais du menu «Aide».
iNFoRMATioNS CoMPLéMENTAiRES
SPÉcificationS techniQueSTaille: 131 × 19 × 31 mmPoids: 68 g, avec le câble USB 106gProcesseur: Argus-Prozessor (conçu par C-Channel)Vitesse de numérisation: 15 cm/sTaille des caractères: 5 – 22 pointsCommunication uSB.Reconnaissance optique des caractères par ABBYY Software house.
configuration reQuiSe• ordinateur sous Windows 7 (32bit/64bit) / Vista / XP / 2000 ou Mac oS X 10.3 ou su-
périeur.• Pentium ou PowerPC/intel MAC avec 64 Mo RAM et 300 Mo d’espace disque disponible • Lecteur CD-RoM• Port USB pour connexion du câble (USB 2.0 / USB 1.1)
Soutien techniQuePour toute question ou en cas de problème, n’hésitez pas à contacter notre équipe de sou-tien technique. tél. hotline: 0900 900 015 (à partir de la 3ème min. ChF 2.13/min.)e-mail hotline: [email protected]
Vous pouvez également consulter notre site Web à www.crealogix.com. Vous y trouverez de plus amples informations ainsi que les actualités et mises à jour des programmes.
LangueS reconnueS (uniQueMent Pour WindoWS)34 langues principales pour lesquelles finereader engine propose un dictionnaire et un système de vérification orthographique: arménien (oriental, occidental, grabar), bulgare, catalan, croate, tchèque, danois, néer-landais (Pays-Bas et Belgique), anglais, estonien, finnois, français, allemand (nouvelle et ancienne orthographe), grec, hongrois, italien, letton, lituanien, norvégien (Nynorsk et Bo-kmål), polonais, portugais (Portugal et Brésil), roumain, russe, slovaque, espagnol, suédois, tatar, turc et ukrainien.
133 langues additionnelles en caractères latins, cyrilliques ou grecs: abkhaze, adyghéen, afrikaans, agoul, albanais, altaïen, avar, aymara, azéri (cyrillique), azéri (latin), bachkir, basque, biélorusse, bemba, blackfoot, breton, bougotou, bouriate, cé-buan, chamorro, tchétchène, tchouktche, chouvache, kongo, corse, tatar de Crimée, crow, dakota, dargwa, dungan, eskimo (cyrillique), eskimo (latin), even, evenki, féroïen, fidjien, frison, frioulan, gagaouze, galicien, ganda, allemand (Luxembourg), guarani, hani, haoussa, hawaiien, islandais, indonésien, ingouche, irlandais gaélique, jingpho, kabardien, kalmouk, karatchaï-balkar, karakalpak, cassoube, kawa, kazakh, khakasse, khanty, kikuyu, kirghiz, koryak, kpelle, koumyk, kurde, lak, latin, lezghi, luba, macédonien, malgache, malais, ma-linké, maltais, mansi, maori, mari, mayan, miao, minangkabau, mohawk, moldave, mon-gol, mordve, nahuatl, nenets, nivkh, nogaï, nyanja, ojibwa, ossète, papiamento, provençal, quechua, rhéto-roman, tsigane, rundi, russe (ancienne orthographe), kinyarwanda, same (lapon), samoan, gaélique écossais, selkoup, serbe (alphabet cyrillique), serbe (alphabet latin), shona, slovène, somali, sorabe, sotho, soundanais, swahili, swazi, tabasaran, tagalog, tahitien, tadjik, motu, tonguien, tswana, tun, turkmène, touvin, oudmourte, ouzbek (cyril-lique), ouzbek (latin), gallois, ouolof, xhosa, yakoute, zapotèque, zoulou.

28
fra
nÇ
aiS
29
fra
nÇ
aiS
iNFoRMATioNS CoMPLéMENTAiRES iNFoRMATioNS CoMPLéMENTAiRES
caractèreS BanKing reconnuSCaractères oCR-B (police Swiss Banking)Ligne de codage d’essai pour bulletin de versement
0100045622400>000000000000000000115530868+ 010353635>
codeS-BarreS reconnuS (uniQueMent Pour WindoWS)Types de codes à barres 1D : code de contrôle 39, code entrelacé 25, code 128, code 39, EAN 13, EAN 8, entrelacé 25, Codabar (sans total de contrôle), code UCC 128, code «2 parmi 5» (industriel, iATA, Matrice), code 93, UPC-A, UPC-E et Postnet.
Code à barres d’essai Code 39 EAN 13
garantieCREALoGiX E-Payment AG garantit ce produit contre tout défaut de matière et de fonc-tions au moment de son achat pendant une période subséquente d’un an. Lorsque le nom CREALoGiX E-Payment AG est mentionné dans le texte suivant, il désigne, sauf mention contraire explicite, CREALoGiX E-Payment AG, ses filiales et revendeurs. Si, au cours de la période de garantie, le produit s’avère être défectueux du fait de défauts de matière ou de fonction, CREALoGiX E-Payment AG pourra à son choix, soit procéder à la réparation, soit au remplacement du produit par un modèle identique ou équivalent.
creaLogiX e-Payment ag n’engage toutefois pas sa responsabilité pour ce qui suit:1. Dommages pendant le transport, accidents, dommages volontaires, modifications, usage
incorrect, cas de force majeure ou tout autre cause échappant au contrôle de CREALoGiX E-Payment AG, y compris, sans pour autant s’y limiter, la foudre, l’eau, le feu, les nuisan-ces publiques, les émeutes, les guerres ou tous conflits similaires.
2. Tout dommage (y compris, sans pour autant s’y limiter, dommage corporel direct ou indi-rect, pertes de profit, baisse de production, perte ou altération des informations traitées ou tout autre incident ou dommage subséquent) causé par le produit ou son usage, ou parce que le produit ne peut être utilisé.
3. Entretien incorrect ou réparations effectuées par des personnes non autorisées.4. incompatibilité en raison de développements technologiques.5. défauts ou usure anormale causés par des équipements externes.6. Défauts causés par l’usure normale.
7. Dommages se produisant en relation avec ou suite à la mise à niveau par des ajouts ou des altérations du produit, l’utilisation de logiciel ou de matériel qui ne soit pas fabriqué ou approuvé par écrit par CREALoGiX E-Payment AG.
Si votre CLX.PayPen exige l’application de la garantie, vous devez renvoyer ledit produit au distributeur/détaillant auprès duquel il a été acheté. Le produit doit se trouver dans son emballage d’origine ou être emballé avec un soin suffisant pour éviter de l’endommager pendant le transport. La garantie est appliquée uniquement sur présentation d’une facture/un reçu d’origine émis par le point de vente du produit. Toute réparation ou remplacement effectués aux termes de la présente garantie ne donne pas droit à une extension ou au renouvellement du délai de garantie. Les pièces défectueuses remplacées sont la propriété de CREALoGiX E-Payment AG. Lorsque le délai de garantie est expiré, la garantie cou-vrant les pièces échangées/remplacées s’éteint également. Ce produit ne sera pas considéré comme défectueux vis-à-vis des quant à la matière ou aux fonctions s’il est nécessaire de le reconstruire afin qu’il soit modifié en accord avec les normes techniques ou de sécurité, nationales ou locales, en vigueur dans tout pays autre que celui pour lequel il avait été conçu et fabriqué à l’origine.
CREALoGiX E-Payment AG se réserve tous les droits sur le produit, le matériel, le logiciel et la marque. Quiconque achète ou utilise le produit ne dispose d’aucun droit de le modi-fier, de le démonter, de lui appliquer un traitement d’ingénierie inversée ou d’utiliser de toute autre façon toute partie du matériel ou du logiciel du produit, excepté de la manière et dans le but autorisé par la loi. Cette garantie n’affecte pas les droits du consommateur envers le distributeur découlant du contrat de vente/achat, ni les droits du consommateur applicables au titre de la législation en vigueur. En l’absence d’une telle législation, les droits du consommateur sont limités à ceux qui sont mentionnés dans la présente garantie. CREALoGiX E-Payment AG ne sera pas responsable de tout dommage direct ou indirect quant à la violation de toute garantie exprimée ou implicite du présent produit.

31
ita
Lia
no
MANUALE UTENTE Di CLX.PAYPEN
Manuale utente di cLX.PayPen Pagina 32
contenuto della scatola Pagina 32
cLX.PayPen Pagina 33
installazione del software su Windows Pagina 33
installazione del software su Mac Pagina 35
funzioni di cLX.PayPen (solo per Windows) Pagina 36
• Generale Pagina 36
come leggere con cLX.PayPen Pagina 37
• Banking – Polizze di versamento Pagina 37
• Testo e cifre/Codici numerici (solo per Windows) Pagina 38
• Codici a barre (solo per Windows) Pagina 38
• Eliminazione guasti Pagina 38
come assegnare i tasti funzione Pagina 38
altre funzioni Pagina 39
• Scheda Generale Pagina 39
• Scheda Lingua Pagina 39
• Scheda Banking Pagina 39
• Test center Pagina 40
• Scheda Codici a barre (solo per Windows) Pagina 40
guida contestuale Pagina 40
informazioni aggiuntive Pagina 40
• Specifiche tecniche Pagina 40
• Requisiti di sistema Pagina 41
• Assistenza Pagina 41
• Riconoscimento lingue (solo per Windows) Pagina 41
• Caratteri banking supportati Pagina 42
• Codici a barre supportati (solo per Windows) Pagina 42
• Garanzia Pagina 42
ASSiSTENZA
Per qualsiasi problema o domanda è sempre a disposizione il nostro team di assistenza. hotline tel.: 0900 900 015 (dal terzo minuto ChF 2.13/min.) hotline e-mail: [email protected]
MANUALE UTENTE Di CLX.PAYPEN

32
ita
Lia
no
33
ita
Lia
no
MANUALE UTENTE Di CLX.PAYPEN /// CoNTENUTo DELLA SCAToLA CLX.PAYPEN /// iNSTALLAZioNE DEL SoFTWARE SoTTo WiNDoWS
MANUALE UTENTE Di CLX.PAYPEN
Edizione (Gennaio 2010) Questo manuale è pubblicato da CREALoGiX E-Payment AG senza alcuna garanzia. CREALoGiX E-Payment AG può apportare modifiche e migliorie a questo manuale, dovute a errori tipografici, inesattezza delle informazioni o migliorie di programmi e/o attrezzatu-re, in qualsiasi momento e senza preavviso. Tali modifiche, tuttavia, verranno incorporate in nuove edizioni di questo manuale, comprese quelle presentate sul nostro sito Web www.crealogix.com. Tutti i diritti riservati
Copyright © 2010 CREALoGiX E-Payment AG
ABBYY® FineReader® Engine 8.0 © 2005 ABBYY Software. ABByy fineReader – the keenest eye in oCR.ABBYY, FiNEREADER and ABBYY FineReader are registered trademarks of ABBYY Software Ltd.
CLX.PayPen has been developed by C Technologies AB.
CLX.PAyPEN
Complimenti per aver scelto CLX.PayPen! CLX.PayPen semplificherà il vostro lavoro e vi consentirà di risparmiare molto tempo. La penna trasmette la riga del codice dalle polizze di versamento direttamente sul vostro PC o sul vostro Mac.Collegata a un PC con sistema operativo Windows, CLX.PayPen legge non solo la riga del codice delle polizze di versamento ma anche le catene di caratteri dei testi. CLX.PayPen riconosce 167 lingue in caratteri latini, cirillici o greci. in ambiente Windows lo strumento legge anche i codici a barre e gli speciali caratteri oCR B (Swiss Banking Font).
CoNTENuTo dELLA SCAToLA
La scatola contiene:• CLX.PayPen con cavo USB• CD-RoM con il software• Manuale utente• Supporto da tavolo (accessorio opzionale)
CLX.PAyPEN
iNSTALLAZioNE DEL SoFTWARE SU WiNDoWS
Microsoft .net framework:CLX.PayPen richiede la nuova tecnologia Microsoft .NET.il .NET Framework è una nuova componente del sistema operativo Windows e deve es-sere installato prima di eseguire applicazioni sviluppate specificamente per la piattaforma. L‘installazione di Microsoft .NET framework dal Cd-Rom di CLX.PayPen viene eseguita au-tomaticamente e può richiedere qualche minuto in più rispetto alla consueta installazione del software CLX.PayPen.
Prima di collegare CLX.PayPen al proprio PC, occorre installare il software contenuto nel Cd-RoM allegato.
nota iMPortante: Non collegare mai CLX.PayPen al PC prima di avere installato il software.
1. Login come utente amministratore.2. Chiudere tutte le applicazioni aperte..3. inserire il CD-RoM nell’unità CD-RoM del PC e il programma di installazione si avvierà
automaticamente. Seguire le istruzioni visualizzate.4. Verrà visualizzato un messaggio quando l’installazione è completa.5. inserire CLX.PayPen nella porta USB del proprio PC.
Cavo uSB
Pulsante funzione
Sensore ottico adue dimensioni
Levetta di comando automatica

34
ita
Lia
no
35
ita
Lia
no
iNSTALLAZioNE DEL SoFTWARE SoTTo WiNDoWS /// iNSTALLAZioNE SoFTWARE SU MACiNSTALLAZioNE DEL SoFTWARE SU WiNDoWS
installazione del driver cLX.PayPen (per Windows 2000)input Pen e CLX.PayPen vengono installate automaticamente: non è richiesto alcun inter-vento da parte dell‘utente.
installazione del driver cLX.PayPen (per Windows 7, Vista, XP)• L‘assistente per la ricerca di nuovo hardware viene eseguito per 2 volte in successione.• il primo percorso vale per «input Pen», il secondo per «CLX.PayPen».• i percorsi si svolgono tramite le seguenti finestre (esempio riferito a Windows XP e
all‘identificazione di «input Pen»).
Finestra 1 Finestra 2
Finestra 3 Finestra 4
finestra 5
risoluzione dei problemi (per tutti i sistemi operativi)• Se il programma di installazione non parte, fare semplicemente clic su Start sulla Barra
delle applicazioni e selezionare Esegui. Nel campo Apri digitare D:\setup (ove l’unità D è la propria unità CD-RoM).
• Se il computer richiede i driver, CLX.PayPen è stato probabilmente collegato senza avere prima installato il software contenuto nel Cd-RoM allegato. Scollegare CLX.PayPen, in-stallare il software e ricollegare CLX.PayPen.
• i cavi di prolunga USB possono disturbare o addirittura pregiudicare il corretto funzio-namento di CLX.PayPen (la luce della penna si accende solo per brevi periodi o non si accende per nulla). Utilizzare soltanto cavi di prolunga USB di elevata qualità.
• Collegare CLX.PayPen sempre alla stessa porta USB. Se CLX.PayPen viene collegata a un‘altra porta USB, su alcuni sistemi può succedere che CLX.PayPen venga nuovamente identificata con l‘assistente hardware.
Per ulteriori informazioni di supporto per la risoluzione dei problemi visitare il sito www.crealogix.com.
iNSTALLAZioNE SoFTWARE SU MAC
Prima di collegare CLX.PayPen al computer Macintosh è necessario che sia installato il software presente sul Cd-Rom.
1. inserire il CD-Rom nella specifica unità del Mac.2. Lanciare il programma di installazione CLX.PayPen.mpkg
Seguire le istruzioni a schermo.3. Una volta conclusa l‘installazione, viene visualizzato il relativo messaggio. 4. Collegate CLX.PayPen a una porta USB sul Mac. 5. L‘applicazione CLX.PayPen viene lanciata facendo doppio clic sull‘icona CLX.PayPen nella
cartella Programmi/CLX.PayPen.

36
ita
Lia
no
37
ita
Lia
no
FUNZioNi Di CLX.PAYPEN CoME LEGGERE CoN CLX.PAYPEN
FUNZioNi Di CLX.PAYPEN (SoLo PER WiNDoWS)
È possibile accedere a tutte le funzioni di CLX.PayPen dall’icona della Barra delle applicazio-ni. fare clic con il tasto destro sull’icona di CLX.PayPen per visualizzare il menù.
icona della barra delle Menù di CLX.PayPen sulla applicazioni CLX.PayPen Barra delle applicazioni
generaLecLX.PayPen può essere convertita alle seguenti funzioni:• Testo e cifre - Lettura testi e numeri• Codici numerici – Lettura di soli numeri• Banking – Lettura polizze di versamento• Codici a barre – Lettura codici a barre
L’icona nella task-bar segnala il modo di funzionamento attualmente attivo:
Testo e cifre Codici numerici Banking Codici a barre
commutazione fra le singole modalità:Cliccare con il tasto destro del mouse sul simbolo di CLX.PayPen nella barra delle appli-cazioni. Si apre il menù CLX.PayPen. Cliccare quindi sul modo desiderato. Nel menù CLX.PayPen viene segnalato con un punto quale dei quattro modi è attualmente attivo.
Per potere lavorare con CLX.PayPen sono necessari i seguenti presupposti: • CLX.PayPen deve essere collegato al vostro PC o Notebook. • ii software di CLX.PayPen deve essere avviato.
CLX.PayPen deve essere nel modo giusto. il simbolo CLX.PayPen in basso a destra nella barra delle applicazioni indica quali dei modi è attivo attualmente.
Esempio: modo banking
CoME LEGGERE CoN CLX.PAYPEN
BanKing – PoLizze di VerSaMento1. impugnare CLX.PayPen come una penna. Per acquisire un versamento, scansire esclusi-
vamente la riga del codice al margine inferiore della polizza di versamento (vedi figura).2. Posizionare CLX.PayPen davanti al primo numero della riga del codice. CLX.PayPen co-
mincia la lettura non appena l’attivatore automatico viene premuto contro la superficie. 3. Spostare rapidamente lo scanner ed esercitare una leggera pressione, cercando di passare
con precisione sulla riga del codice. Per gli utenti mancini la scansione è possibile anche da destra a sinistra.
4. Una volta acquisiti correttamente i dati, lo schermo visualizza la polizza di versamento compilata nel software di pagamento ovvero nel software creditori (es. PayMaker).
nota bene: il programma della CLX.PayPen controlla subito se la riga di codice è corretta. Solo se la riga è stata riconosciuta come completa e senza errori, viene scritta nel formato giusto in corrispondenza del cursore del vostro programma per la registrazione dei paga-menti o la gestione dei creditori. Grazie alla cifra di controllo automatico incorporata, al vostro software vengono trasmessi soltanto dati che sono stati letti correttamente.
riga di codice
La riga del codice contiene i dati rilevanti come importo, numero di riferimento e numero di conto.

38
ita
Lia
no
39
ita
Lia
no
CoME LEGGERE CoN CLX.PAYPEN /// CoME ASSEGNARE i TASTi FUNZioNE ALTRE FUNZioNi
teSto e cifre/codici nuMerici (SoLo Per WindoWS) 1. Collocare il cursore nella posizione in cui il testo letto deve essere inserito.2. Collocare la punta di CLX.PayPen prima del primo carattere che si desidera leggere. 3. Muovere CLX.PayPen lungo la riga di testo. CLX.PayPen può essere spostato o da sinistra
a destra o da destra a sinistra attraverso il testo.4. Sollevare CLX.PayPen dopo l’ultimo carattere che si desidera leggere. CLX.PayPen termi-
na la lettura quando viene rilasciata la levetta di comando automatica.5. Con il tasto funzione si passa alla riga successiva.
CLX.PayPen può acquisire sempre e soltanto una riga per volta. Per la lettura di un paragra-fo è necessario scansire ogni singola riga.
codici a Barre (SoLo Per WindoWS)1. impugnare CLX.PayPen come una penna. Appoggiare CLX.PayPen prima del codice a
barre. CLX.PayPen comincia la lettura non appena l’attivatore automatico viene premuto contro la superficie.
2. Spostare rapidamente lo scanner ed esercitare una leggera pressione, cercando di passare con precisione sul codice a barre. Per gli utenti mancini la scansione è possibile anche da destra a sinistra.
3. Sollevare CLX.PayPen dopo avere scansito il codice a barre. Quando l’utente cessa di azionare l’attivatore automatico, CLX.PayPen interrompe la procedura di lettura.
eLiMinazione guaStiSe la riga del codice, un testo o un codice a barre non vengono acquisiti correttamente, verificare che i due piedi di appoggio siano posizionati in modo tale che il centro della riga del testo si trovi al centro dell’apertura. Condurre lo scanner velocemente (10 cm/s) sulla riga da acquisire.
CoME ASSEGNARE i TASTi FUNZioNE1. Cliccare con il tasto sinistro del mouse sull’icona CLX.PayPen presente sulla barra delle
applicazioni. Si aprono le impostazioni di CLX.PayPen. Gli utenti Mac possono accedere alle impostazioni di CLX.PayPen tramite il menu CLX.PayPen > impostazioni…
2. E’ possibile assegnare la funzione del pulsante funzione. Selezionare una delle sei se-guenti opzioni:
• Nessuno • Tab • invio • Backspace • Escape • inserisci testo (digitare il testo che si desidera inserire nella casella di testo).
ALTRE FUNZioNi
Cliccare con il tasto sinistro del mouse sull’icona CLX.PayPen presente sulla barra delle applicazioni. Si aprono le impostazioni di CLX.PayPen.Gli utenti Mac possono accedere alle impostazioni di CLX.PayPen tramite il menu CLX.PayPen > impostazioni…
Scheda generaLeSuonoCLX.PayPen indica con due suoni diversi se la lettura è andata a buon fine o meno. Per disattivare il segnale, togliere la spunta alla casella «Suono attivo».
Separatore del testo (solo con Windows)Scegliere dall’elenco «Separatore del testo» il carattere che segue il testo. Sono possibili quattro caratteri:• invio• Spazio vuoto• Tab• Nessuno (nessuna funzione)
Scheda Lingua Lingua di lettura (solo con Windows) Nella casella di riepilogo Lingua di lettura è possibile selezionare la lingua che si desidera utilizzare per la lettura.
Lingua menùNella casella di riepilogo Lingua menù, è possibile selezionare la lingua che si desidera utilizzare per i menù, le finestre di dialogo ed i messaggi.
Scheda BanKingSelezionare qui il software di acquisizione pagamenti ovvero il software creditori.Per informazioni dettagliate sulla lettura delle polizze di versamento vedere a pagina 37.
funzionamento della modalità Banking 1. Avviare il software di acquisizione pagamenti ovvero il software creditori e avanzare
normalmente fino alla finestra di acquisizione pagamenti.2. Passare ora con CLX.PayPen sopra la riga del codice della polizza di versamento da acquisire. 3. Viene immediatamente verificata la correttezza della riga del codice acquisita. Se com-
pleta e valida, la riga del codice acquisita viene registrata nel formato corretto dal softwa-re di acquisizione pagamenti ovvero dal software creditori. Grazie a questa procedura di verifica automatica incorporata tramite cifra di controllo è possibile inviare correttamente i dati al software.

40
ita
Lia
no
41
ita
Lia
no
ALTRE FUNZioNi /// GUiDA CoNTESTUALE /// iNFoRMAZioNi AGGiUNTiVE iNFoRMAZioNi AGGiUNTiVE
teSt center il Test center serve a collaudare e provare la penna ottica. inoltre è possibile attivare la guida video che fornisce istruzioni e consigli per l’utilizzo.
Scheda codici a Barre (SoLo con WindoWS)tipi di codice a barreDall’elenco «Tipi di codice a barre» selezionare il tipo di codice a barre che CLX.PayPen dovrà leggere. impostazione standard: Rilevamento automatico.Separatore codice a barre Selezionare il carattere che segue il codice a barre. Sono possibili quattro caratteri:• invio• Spazio• Tab• Nessuno (nessuna funzione)
GUiDA CoNTESTUALE
Per indicazioni specifiche sul software di pagamento della banca, visualizzare video sulla corretta applicazione e reperire informazioni sul supporto online vedere il menù della Gui-da. Per aprire la Guida, fare clic con il tasto destro sull’icona di CLX.PayPen sulla Barra delle applicazioni e selezionare Aiuto.Gli utenti Mac possono aprire la Guida tramite il menu «Aiuto».
iNFoRMAZioNi AGGiUNTiVE
SPecifiche tecnicheDimensioni: 131 × 19 × 31 mmPeso: 68 g, con cavo USB 106 gProcessore: Processore Argus sviluppato dalla casaVelocità di lettura: 15 cm/sDimensioni carattere: 5-22 puntiComunicazione uSBRiconoscimento caratteri della ABByy Software house.
reQuiSiti di SiSteMa• PC con Windows 7 (32bit/64bit) / Vista / XP / 2000 o Mac con oS X 10.3 o superiori• Pentium o PowerPC/intelMac con 64 MB RAM e 300 MB di spazio disponibile
sull’hard disk• unità CD-RoM• porta USB per collegamento con cavo (USB 2.0 / USB 1.1)
aSSiStenzaPer qualsiasi problema o domanda è sempre a disposizione il nostro team di assistenza. hotline tel.: 0900 900 015 (dal terzo minuto ChF 2.13/min.) hotline e-mail: [email protected]
È anche possibile visitare il nostro sito Web www.crealogix.com per ricercare informazioni, notizie e aggiornamenti dei programmi.
riconoSciMento Lingue (SoLo con WindoWS)34 lingue principali, per le quali finereader engine fornisce il supporto di un dizionario ed il sistema di controllo ortografico: armeno (orientale, occidentale, Grabar), bulgaro, catalano, croato, ceco, danese, olandese (Paesi Bassi e Belgio), inglese, estone, finlandese, francese, tedesco (nuova e precedente ortografia), greco, ungherese, italiano, lettone, lituano, norvegese (Nynorsk e Bokmal), po-lacco, portoghese (Portogallo e Brasile), rumeno, russo, slovacco, spagnolo, svedese, tataro, turco e ucraino.
133 lingue aggiuntive con caratteri latini, cirillici o greci:abkhaso, adigeano, afrikaans, agul, albanese, altaico, avaro, aymara, azerbaigiano (cirilli-co), azerbaigiano (latino), bashkir, basco, bielorusso, bemba, blackfoot, bretone, bugotu, buriato, cebuano, chamorro, ceceno, chukchee, chuvash, congolese, corso, tataro crimeo, crow, dakota, dargwa, dungan, eschimese (cirillico), eschimese (latino), even, evenki, fa-roese, figiano, frisone, friulano, gagauz, galiziano, ganda, tedesco (Lussemburgo), guaranì, hani, hausa, hawaiano, islandese, indonesiano, ingush, irlandese, jingpo, cabardino, kal-myk, karachay-balkar, karakalpak, kasub, kawa, kazako, khakass, khanty, kikuyu, kirghiso, koryak, kpelle, kumyk, curdo laco, latino, lesgo, luba, macedone, malgascio, malese, malin-ke, maltese, mansi, maori, mari, maya, miao, minangkabau, mohawk, moldavo, mongolo, mordvino, nahuatl, nenets, nivkh, nogay, nyanja, ojibway, ossetico, papiamento, provenza-le, quechua, retoromanzo, rom, rundi, russo (antica ortografia), ruandese, sami (lappone), samoano, gaelico scozzese, selkup, serbo (cirillico), serbo (latino), shona, sloveno, somalo, sorabo, sotho, sunda, swahili, swazi, tabasaran, tagalog, taitiano, tagico, tok pisin, tongano, tswana, tunguso, turcomanno, tuvinian, udmurt, usbeco (cirillico), usbeco (latino), gallese, wolof, xhosa, yakut, zapoteco, zulu.

42
ita
Lia
no
43
ita
Lia
no
iNFoRMAZioNi AGGiUNTiVE iNFoRMAZioNi AGGiUNTiVE
caratteri BanKing SuPPortati (SoLo con WindoWS)Caratteri oCR B (Swiss Banking Font)Riga di codice test polizza di versamento
0100045622400>000000000000000000115530868+ 010353635>
codici a Barre SuPPortati (SoLo con WindoWS)Tipi di codici a barre 1D: codice di controllo 39, controllo interleaved 25, codice 128, co-dice 39, EAN 13, EAN 8, interleaved 25, CoDABAR (senza totale di controllo), codice UCC 128, codice 2 of 5 (industrial, iATA, Matrix), codice 93, UPC-A, UPC-E e Postnet.
Codice a barre test: Code 39 EAN 13
garanziaCREALoGiX E-Payment AG garantisce che questo prodotto non include materiali difettosi. Garantisce anche il funzionamento del prodotto, dal momento dell’acquisto per un periodo di un anno da tale data. il nome CREALoGiX E-Payment AG, quando viene menzionato nel seguente testo, se non diversamente specificato, indica CREALoGiX E-Payment AG, le sue consociate e i rivenditori. Se, durante il periodo coperto da garanzia, si verificassero difetti nel prodotto dovuti a materiali scadenti o a malfunzionamenti, CREALoGiX E-Payment AG, a suo insindacabile giudizio, provvederà a riparare o a sostituire il prodotto con un altro prodotto identico o con un modello equivalente.
creaLogiX e-Payment ag, tuttavia, non si assume responsabilità per:1. Danni causati da spedizioni, incidenti, danni volontari, modifiche, uso scorretto, cause
di forza maggiore o in ogni caso indipendenti da CREALoGiX E-Payment AG, inclusi (ma non limitati a) fulmini, inondazioni, incendi, sommosse, sollevazioni popolari, scioperi, guerre o conflitti simili.
2. CREALoGiX E-Payment AG non è responsabile per danni, inclusi (ma non limitati a) feri-te personali dirette o indirette, perdita di profitti, cali di produzione, perdite o alterazioni delle informazioni trattate o altri danni incidentali o derivanti dal prodotto o dall’uso del prodotto o dal mancato uso del prodotto.
3. Manutenzione e riparazioni non adeguate eseguite da personale non autorizzato.4. incompatibilità dovuta a sviluppi tecnologici.5. difetti causati da apparecchiature esterne o usura anomala.
6. Difetti causati dal normale utilizzo e usura.7. Danni derivanti o causati da aggiornamenti, con aggiunte o alterazioni del prodotto,
con l’uso di software o hardware non prodotti o approvati per iscritto da CREALoGiX E-Payment AG.
Se CLX.PayPen richiede servizio di assistenza durante il periodo di garanzia è necessario restituire il prodotto al distributore/rivenditore presso cui è stato acquistato. il prodotto va presentato nell’imballaggio originale o comunque con una cura sufficiente a evitare danni durante il trasporto. L’acquirente originale deve essere in grado di esibire prova e data d’acquisto, con ricevuta/fattura emessa dal venditore, affinché la garanzia sia valida. La riparazione e il cambio del prodotto non estendono né rinnovano la validità della ga-ranzia. Eventuali parti sostituite diventano di proprietà di CREALoGiX E-Payment AG. Una volta scaduto il periodo di garanzia, scade anche la garanzia relativa alle parti cambiate/sostituite.Questo prodotto non deve essere considerato difettoso in termini di materiali o funzio-namento qualora debba essere ristrutturato per adattarsi alle norme nazionali o locali in termini di sicurezza tecnica in paesi diversi da quelli per cui il prodotto è stato realizzato.
Tutti i diritti su prodotto, hardware, software e marchio di fabbrica sono di proprietà di CREALoGiX E-Payment AG. Chiunque acquisti o utilizzi il prodotto non ha il diritto di alterarlo, disassemblarlo, ricrearlo o, in qualsiasi altro modo, utilizzare una qualsiasi com-ponente hardware o software del prodotto, ad eccezione dei modi e degli scopi previsti dalla legge. La presente garanzia non lede i diritti vantati dall’acquirente nei confronti del rivenditore in conformità al contratto d’acquisto, né i diritti giuridici vantati dall’acquirente sulla base di regolamenti esistenti vincolanti contenuti nelle leggi vigenti. in caso di as-senza di dette leggi vigenti o regolamenti vincolanti, i diritti dell’acquirente sono limitati a quelli indicati nella presente garanzia. CREALoGiX E-Payment AG non risponderà di alcun danno indiretto o consequenziale per violazione di qualsiasi garanzia espressa o implicita del presente prodotto.

45
eng
LiSh
uSER MANuAL foR ThE CLX.PAyPEN
uSER MANuAL foR ThE CLX.PAyPEN
user manual for the cLX.PayPen Page 46
contents of this box Page 46
cLX.PayPen Page 47
Software installation for Windows Page 47
Software installation for Mac Page 49
cLX.PayPen functions (valid for Windows only) Page 50
• General Page 50
how to read with your cLX.PayPen Page 51
• Banking – payslips Page 51
• Text and digits/numerics (valid for Windows only) Page 52
• Barcodes (valid for Windows only) Page 52
• Troubleshooting Page 52
assigning a function to the function futton Page 52
further functions Page 53
• General remarks tab Page 53
• Reading language tab Page 53
• Banking tab Page 53
• Test center Page 54
• Barcode tab (valid for Windows only) Page 54
Specific help Page 54
additional hnformation Page 54
• Technical specifications Page 54
• System requirements Page 55
• Support Page 55
• Recognition languages (valid for Windows only) Page 55
• Supported banking characters Page 56
• Supported barcodes (valid for Windows only) Page 56
• Warranty Page 56
SuPPoRT
if you have any problems or questions you are always welcome to contact our support team. hotline phone: 0900 900 015 (as of the 3rd min.: ChF 2.13 per min.) hotline e-mail: [email protected]

46
eng
LiSh
47
eng
LiSh
CLX.PAYPEN /// SoFTWARE iNSTALLATioN FoR WiNDoWS USER MANUAL FoR ThE CLX.PAYPEN /// CoNTENTS oF ThiS BoX
uSER MANuAL foR ThE CLX.PAyPEN
Edition (January 2010)This manual is published by CREALoGiX E-Payment AG, without any guarantee. im-provements and changes to this manual necessitated by typographical errors, inaccuracies of current information or improvements to programmes and/or equipment may be made by CREALoGiX E-Payment AG at any time and without notice. Such changes will, how-ever, be incorporated into new editions of this manual including those on our website www.crealogix.com. All rights reserved
Copyright © 2010 CREALoGiX E-Payment AG
ABBYY® FineReader® Engine 8.0 © 2005 ABByy Software. ABByy fineReader – the keenest eye in oCR.ABBYY, FiNEREADER and ABBYY FineReader are registered trademarks of ABBYY Software Ltd.
CLX.PayPen has been developed by C Technologies AB.
CLX.PAyPEN
Congratulations on choosing CLX.PayPen! The CLX.PayPen will make your work easier and save you a lot of time. The pen transfers the code line from payment slips directly to your PC or Mac.if the CLX.PayPen is hooked up to a PC with a Windows operating system, the CLX.PayPen reads not only the code line from payment slips but also chains of characters from texts. CLX.PayPen recognises 167 languages with Latin, Cyrillic and Greek characters. Under the Windows operating system, the device also reads barcodes and special oCR-B characters (Swiss banking font).
CoNTENTS oF ThiS BoX
the box contains:• CLX.PayPen with USB cable• CD-RoM with software• User manual• Desktop holder (optional accessory)
CLX.PAyPEN
SoFTWARE iNSTALLATioN FoR WiNDoWS
Microsoft .net frameworkCLX.PayPen requires the new Microsoft .NET technology!The .NET Framework is a new component of the Windows operating system. it has to be installed before the applications specially developed for the platform can be run. This additional Microsoft .NET framework installation, which is contained on the CLX.PayPen Cd-RoM and runs automatically, may take several minutes longer than the usual CLX.PayPen installation.
iMPortant note:do not connect your CLX.PayPen to your PC until you have installed the software.
1. Please log in as an Administrator User.2. Close all open applications.3. insert the CD-RoM in your PC’s CD-RoM drive. The installation programme will start
automatically. follow the on-screen instructions.4. A message will be displayed when the installation is complete. 5. Plug CLX.PayPen into the uSB port on your PC.
uSB cable
function button
Two-dimensionaloptical sensor
Automatic trigger

48
eng
LiSh
49
eng
LiSh
SoFTWARE iNSTALLATioN FoR WiNDoWS SoFTWARE iNSTALLATioN FoR WiNDoWS /// SoFTWARE iNSTALLATioN FoR MAC
installation of the cLX.PayPen driver software (for Windows 2000):The input Pen and CLX.PayPen are installed automatically. No user action is required.
installation of the cLX.PayPen driver software (for Windows 7, Vista, XP):• The wizard for finding new hardware is run twice in a row.• The first run applies to the input Pen; the second, to the CLX.PayPen.• The run-throughs consist of the following dialogs (example applies to Windows XP and
input Pen recognition).
Dialog 1 Dialog 2
Dialog 3 Dialog 4
dialog 5
troubleshooting (applies to all operating systems)• if the installation programme does not start, simply click on Start on the Taskbar and select
Run. in the open field type x:\setup (x stands for the location of your CD-RoM drive). • if your computer prompts you for drivers, you have probably connected CLX.PayPen
without first installing the software on the enclosed Cd-RoM. disconnect CLX.PayPen, install the software and reconnect CLX.PayPen.
• USB extension cables can disrupt the proper operation of the CLX.PayPen or even pre-vent operation altogether (light from the CLX.PayPen is switched on only briefly if at all). Make sure you only use uSB extension cables of the finest quality.
• Always connect the CLX.PayPen to the same USB port. if the CLX.PayPen is connected to another uSB port, some systems might recognise the CLX.PayPen again as new hardware and require the installation with the hardware wizard to be repeated.
Please visit www.crealogix.com for further support information concerning trouble-shooting.
SoFTWARE iNSTALLATioN FoR MAC
you have to install the software located on the enclosed Cd-RoM before connecting your CLX.PayPen to your Macintosh computer.
1. insert the CD-RoM in the CD-RoM drive of your Mac.2. Start the installation program CLX.PayPen.mpkg
follow the instructions appearing on the screen.3. When installation is completed, a message to this effect will appear on the screen. 4. Use a USB port to connect the CLX.PayPen to the Mac. 5. Start the CLX.PayPen application by double-clicking on the CLX.PayPen icon in the Pro-
grams/CLX.PayPen folder.

50
eng
LiSh
51
eng
LiSh
hoW To READ WiTh YoUR CLX.PAYPENCLX.PAYPEN FUNCTioNS
CLX.PAYPEN FUNCTioNS (VALiD FoR WiNDoWS oNLY)
you can access all the CLX.PayPen functions from the taskbar icon. Click on the CLX.PayPen taskbar icon with the right mouse button to display the menu.
CLX.PayPen CLX.PayPen Taskbar icon Taskbar menu
generaLcLX.PayPen can alternate between the following functions:• Text and digits – Scanning of text and digits• Numerics – Scanning numbers only• Banking – Scanning of payslips• Barcodes – Scanning of barcodes
the icon in the toolbar indicates the active mode:
Text and digits Numerics Banking Barcodes
Switching between the individual modes:Click on the CLX.PayPen icon in the toolbar with the left mouse button. The CLX.PayPen menu will be opened. Now click on the desired mode. in the CLX.PayPen menu, the dot signalises which of the four modi is activated.
the following conditions must be met in order to be able to use cLX.PayPen:• The CLX.PayPen must be connected to your PC or notebook. • The CLX.PayPen software must be started.
The CLX.PayPen must be in the correct mode. The CLX.PayPen symbol below in the right hand side of the task bar shows which mode is currently active.
Example: Banking mode
hoW To READ WiTh YoUR CLX.PAYPEN
BanKing – PaySLiPS1. hold the CLX.PayPen like a regular pen. To record a payment, scan only the code line on
the lower edge of the payment slip (see figure). 2. Place the tip of the CLX.PayPen in front of the first digit in the code line. The CLX.PayPen
starts the reading process as soon as you press the automatic trigger against the surface. 3. Move the scanner swiftly and as precisely as possible over the code line, applying light
pressure as you do so. if you are left-handed, you can also scan from right to left.4. once you have successfully recorded the data, the payslip appears in your payment or
accounting software (e.g. PayMaker) on the screen completely filled out.
note: The code line you scanned is checked to ensure that it is correct. if the code line is found to be complete and free of errors, it is written in the correct format to the cursor position of your payment transaction or accounting software. Thanks to the built-in digit check, only correctly scanned data is transferred to your software.
Codeline
The code line contains the relevant data such as amount, reference number and account number.

52
eng
LiSh
53
eng
LiSh
FURThER FUNCTioNShoW To READ WiTh YoUR CLX.PAYPEN /// ASSiGNiNG A FUNCTioN To ThE FUNCTioN BUTToN
teXt and digitS/nuMericS (VaLid for WindoWS onLy) 1. Place the cursor at the position where the read text is to be inserted. 2. Place the tip of CLX.PayPen before the first character you want to read. 3. Move CLX.PayPen over the line of text. You can move CLX.PayPen either left to right or
right to left over the text. 4. Lift CLX.PayPen after the last character you want to read. CLX.PayPen stops reading when
the automatic trigger is released. 5. use the function key to switch to the next line.
The CLX.PayPen can record only one line at a time. To scan a section, you must scan each line individually.
BarcodeS (VaLid for WindoWS onLy)1. hold the CLX.PayPen like a regular pen. Place the tip of the CLX.PayPen in front of the
barcode. The CLX.PayPen starts the reading process as soon as you press the automatic trigger against the surface.
2. Move the scanner swiftly over the barcode, applying light pressure as you do so. if you are left-handed, you can also scan from right to left.
3. Lift the CLX.PayPen off the surface after scanning the barcode. The CLX.PayPen interrupts the scanning process when the automatic trigger is no longer activated.
trouBLeShootingif the code line, text or barcode is not correctly recorded, make sure that the two support feet are positioned so that the middle of the text line is in the middle of the opening. Run the scanner swiftly (10 cm/s) over the line you are recording.
ASSiGNiNG A FUNCTioN To ThE FUNCTioN BUTToN
1. Click on the CLX.PayPen symbol with the left mouse button to open the CLX.PayPen set-tings window. Mac users proceed to the CLX.PayPen settings window via the menu CLX.PayPen > Settings…
2. You can assign the function of the function button. Select one of the six following options: • None • Tab • Return • Backspace • Escape • insert text (type the text you want to insert in the text box).
FURThER FUNCTioNS
Click on the CLX.PayPen icon in the icon bar with the left mouse button to open the CLX.PayPen settings window. Mac users proceed to the CLX.PayPen settings window via the menu CLX.PayPen > Settings…
generaL reMarKS taBSoundCLX.PayPen indicates with two different sounds whether the reading was successful or not. To switch off the signal, deactivate the “Signal oN” check box.
text Separator (exists in Windows only)Go to the “Text Separator” list box and select the character you wish to have follow the text.You have your choice of four characters:• Return• Space• Tab• None (no function)
reading Language taBtext language (exists in Windows only) from the Reading Language list box you can select the language you want to use for reading.
Menu languagefrom the Menu Language list box you can select the language you want to use for menus, dialog boxes and messages.
BanKing taBSelect your payment recording or accounting software here.Please refer to page 51 for detailed explanations on the scanning of payslips.
how the banking mode works 1. Start your payment recording or accounting software and proceed as you proceed as you
would normally until you come to the entry box for recording your payments.2. Now move the CLX.PayPen over the code line of the payslip you are scanning. 3. The correctness of the scanned code line is immediately checked. if the code line is de-
tected to be complete and free of errors, it is accepted immediately into your payment recording or accounting software in the correct format. This built-in automatic check digit procedure ensures that only correctly scanned data is transferred to your software.

54
eng
LiSh
55
eng
LiSh
ADDiTioNAL iNFoRMATioNFURThER FUNCTioNS /// FURThER FUNCTioNS /// ADDiTioNAL iNFoRMATioN
teSt centerThe Test Center is suitable for trying out and testing your new pen scanner. you can also open the video help, which provides you with instructions and tips on using the CLX.PayPen.
Barcode taB (eXiStS With WindoWS onLy)Barcode typesGo to the “Available Barcode Types” list box and select the type of barcode you wish to scan with your CLX.PayPen. Standard setting: Automatic Detection.
Barcode Separator (exists in Windows only)Select the character which is to follow the barcode. You have a choice of four characters:• Return• Space• Tab • None (no function)
SPECiFiC hELP
Please check the help menu for specific help on the payment software of your bank, videos on correct use and information regarding online support. To open the help document, click on the CLX.PayPen icon in the taskbar and select help in the menu.Mac users open help in the help menu.
ADDiTioNAL iNFoRMATioN
technical SpecificationsSize: 131 × 19 × 31 mm (5.1 × 0.74 × 1.2 inches)Weight: 68 g, with USB cable 106 gProcessor: in-house developed Argus processorReading speed: 15 cm/s (6 inches/s)Character sizes: 5–22 ptuSB communication.Character recognition from ABByy Software house.
SySteM reQuireMentS• PC with Windows 7 (32bit/64bit) / Vista / XP / 2000 or Mac with oS X 10.3 or higher • Pentium or PowerPC/intelMac with 64 MB RAM and 300 MB free hard disk space• CD-RoM drive• USB port for cable connection (USB 2.0 / USB 1.1)
SuPPortif you have any problems or questions you are always welcome to contact our support team.hotline phone: 0900 900 015 (as of the 3rd min.: ChF 2.13 per min.) hotline e-mail: [email protected]
you can also visit our website at www.crealogix.com for information, news and programme upgrades.
Language recognition (VaLid for WindoWS onLy)34 main languages, for which finereader engine provides dictionary support and spell checker: Armenian (Eastern, Western, Grabar), Bulgarian, Catalan, Croatian, Czech, Danish, Dutch (The Netherlands and Belgium), English, Estonian, Finnish, French, German (new and old spelling), Greek, hungarian, italian, Latvian, Lithuanian, Norwegian (Nynorsk and Bokmal), Polish, Portuguese (Portugal and Brazil), Romanian, Russian, Slovak, Spanish, Swedish, Tatar, Turkish and ukrainian.
133 additional languages with Latin, cyrillic or greek characters: Abkhaz, Adyghian, Afrikaans, Agul, Albanian, Altai, Avar, Aymara, Azerbaijani (Cyrillic), Azerbaijani (Latin), Bashkir, Basque, Byelorussian, Bemba, Blackfoot, Breton, Bugotu, Bur-yat, Cebuano, Chamorro, Chechen, Chukchee, Chuvash, Congo, Corsican, Crimean Tatar, Crow, Dakota, Dargwa, Dungan, Eskimo (Cyrillic), Eskimo (Latin), Even, Evenki, Faeroese, Fijian, Frisian, Friulian, Gagauz, Galician, Ganda, German (Luxemburg), Guarani, hani, hau-sa, hawaiian, icelandic, indonesian, ingush, irish, Jingpo, kabardian, kalmyk, karachay-balkar, karakalpak, kasub, kawa, kazakh, khakass, khanty, kikuyu, kirghiz, koryak, kpelle, kumyk, kurdish, Lak, Latin, Lezghian, Luba, Macedonian, Malagasy, Malay, Malinke, Mal-tese, Mansy, Maori, Mari, Maya, Miao, Minangkabau, Mohawk, Moldavian, Mongol, Mor-dvin, Nahuatl, Nenets, Nivkh, Nogay, Nyanja, ojibway, ossetian, Papiamento, Provencal, Quechua, Rhaeto-Romanic, Romany, Rundi, Russian (old spelling), Rwanda, Sami (Lap-pish), Samoan, Scottish Gaelic, Selkup, Serbian (Cyrillic), Serbian (Latin), Shona, Slovenian, Somali, Sorbian, Sotho, Sunda, Swahili, Swazi, Tabasaran, Tagalog, Tahitian, Tajik, Tok Pisin, Tongan, Tswana, Tun, Turkmen, Tuvinian, Udmurt, Uzbek (Cyrillic), Uzbek (Latin), Welsh, Wolof, Xhosa, Yakut, Zapotec, Zulu.

56
eng
LiSh
57
eng
LiSh
ADDiTioNAL iNFoRMATioNADDiTioNAL iNFoRMATioN
SuPPorted BanKing characterSoCR-B characters (Swiss banking font)
0100045622400>000000000000000000115530868+ 010353635>
SuPPorted BarcodeS (VaLid for WindoWS onLy)1D barcode types: Check Code 39, Check interleaved 25, Code 128, Code 39, EAN 13, EAN 8, interleaved 25, CoDABAR (without checksum), UCC Code 128, Code 2 of 5 (indus-trial, iATA, Matrix), Code 93, UPC-A, UPC-E and Postnet.
Test barcode: Code 39 EAN 13
WarrantyCREALoGiX E-Payment AG warrants that this product is free from defects in materials and function at the time of the original purchase and for a period of one year from that date. When the name CREALoGiX E-Payment AG is mentioned in the following text, it means, unless otherwise stated, CREALoGiX E-Payment AG, its subsidiaries and retailers. if, during the warranty period, any defect in the product arises due to a deficiency in materials or function, CREALoGiX E-Payment AG pledges to, at CREALoGiX E-Payment AG’s option, either repair or replace the defective product with the same or an equivalent model.
creaLogiX e-Payment ag, however, takes no responsibility for: 1. Damage caused during shipping, by accidents, malicious damage, modification, incorrect
usage, force majeure or any cause beyond the control of CREALoGiX E-Payment AG, including but not limited to lightning, water, fire, public disturbances, riots, strike, war or other similar conflicts.
2. Damage (including but not limited to direct or indirect personal injury, lost profits, fall in production, losses of or alterations to processed information or any other incidental or consequential damages) caused by the product or the usage of the product or because the product cannot be used.
3. Deficient maintenance or a repair performed by unauthorised persons.4. incompatibility due to technological developments.5. defects caused by external equipment or abnormal wear.6. Defects caused by normal wear and tear.7. Damage arising in connection with or as a consequence of upgrades altering the product,
or software or hardware used which was not produced by CREALoGiX E-Payment AG.
if your CLX.PayPen product requires warranty service you should return the product to the dealer/retailer from whom it was purchased. The product must be packed in its original packaging or with sufficient care so as to avoid shipping damage. The original purchaser must be able to show proof of purchase, including date of purchase, with receipt/invoice from point of purchase in order for this warranty to be valid. Repair or exchange does not extend or renew the warranty period. Exchanged defective parts become the property of CREALoGiX E-Payment AG. When the warranty period has expired, the warranty of ex-changed/replaced parts also ceases. This product is not to be regarded as having defects in materials or function if it must be rebuilt in order to be modified in accordance with na-tional or local technical safety regulations in a country other than one in which the product was meant to be used.
CREALoGiX E-Payment AG reserves all rights to the product, its hardware, software and trademark. Whoever buys or uses the product has no right to alter, disassemble, reverse engineering or in any other way use any part of the hardware or software in the product, except in the way and for the purposes permitted by law. This warranty does not affect the purchaser’s rights in relation to the retailer in accordance with the purchase agreement, nor the purchaser’s legal rights according to existing, mandatory rules in applicable laws. if there are no such applicable laws or mandatory rules, the purchaser’s rights are limited to those which are stated in this warranty. CREALoGiX E-Payment AG shall not be liable for any incidental or consequential damages for breach of any expressed or implied warranty of this product.

58
eng
LiSh
59
eng
LiSh
RohS DECLARATioN /// DECLARATioN oF CoNFoRMiTYUL STATEMENT /// FCC STATEMENT
uL STATEMENT
ETL LiSTED 3074926CoNFoRMS To ANSi/UL 60950-1-2002; Ed.:1CERTiFiED To CAN/CSA-C22.2 No. 60950-1
fCC STATEMENT
Radio and Television interference StatementThis device complies with Part 15 of the FCC Rules. operation is subject to the following two conditions: (1) this device may not cause harmful interference, and (2) this device must ac-cept any interference received, including interference that may cause undesired operation. NoTE: This equipment has been tested and found to comply with the limits for a Class B digital device, pursuant to Part 15 of the FCC Rules. These limits are designed to provide reasonable protection against harmful interference in a residential installation. This equip-ment generates, uses and can radiate radio frequency energy and, if not installed and used in accordance with the instructions, may cause harmful interference to radio communica-tions. however, there is no guarantee that interference will not occur in a particular instal-lation. if this equipment does cause harmful interference to radio or television reception, which can be determined by turning the equipment off and on, the user is encouraged to try to correct the interference by one or more of the following measures:• Reorient or relocate the receiving antenna.• increase the separation between the equipment and receiver.• Connect the equipment into an outlet on a circuit different from that to which the re-
ceiver is connected.• Consult the dealer or an experienced radio/TV technician for help.
The user may find the following booklet, prepared by the federal Communications Com-mission, helpful: how to identify and Resolve Radio and TV interference Problems. This booklet is available from the U.S. Government Printing office, Washington, DC 20402.
Warning!This equipment has been certified to comply with the limits for a Class B digital device under Part 15 of FCC Rules. This peripheral may only be attached to a computer certified to comply with the Class B limits. operation with a non-certified computer is likely to result in interference to radio and TV reception. Any changes or modifications to this equipment not expressly approved by the manufacturer could void the user’s authority to operate this equipment.
RohS DECLARATioN
Based on information provided by our suppliers C Technologies AB designated as RohS compliant.
The maximum concentration value of the prohibited six substances of “RohS directive” do not exceed the following:1 Cadmium and its compounds: 0.01% (100 ppm) by weight in homogeneous materials.2. Lead and its compounds, mercury and its compounds, hexavalent chromium and its
compounds, polybrominated biphenyls (PBB), polybrominated diphenyl ethers (PBDE): 0.1% (1000 ppm) by weight in homogeneous materials.
– homogeneous material means a unit that cannot be mechanically divided into single materials.– The term “homogeneous” is understood as “of uniform composition throughout”. Ex-
amples of “homogeneous materials” are individual types of plastics, glass, metals, alloys, paper, board, resins, and coatings.
DECLARATioN oF CoNFoRMiTY
CREALoGiX E-Payment AGBösch 83b6331 hünenbergSWiTZERLAND
hereby declares the productPayPen (product No. CT 151035 and CT 151036)
to comply with the EMC directive 89/336/EEC, fulfilling the requirements of the standardsEN 55022:1998 A1+A2EN 55024:1998 A1+A2EN 61000-3-2:95 A1-A2+A14EN 61000-3-3:1995 A1EC directive 2002/95/EC (the RohS Directive)
hünenberg 2010
Stefanie kälin-Lederer & Sabin Frank
Productmanagement & SalesCREALoGiX E-Payment AG

CREALoGiX E-Payment AGBösch 83bCh-6331 hünenbergTel. +41 41 784 55 55Fax +41 41 784 55 [email protected]
cLX.PayPen-SuPPort-hotLinehotline Tel.: 0900 900 015 (ab der 3. Min. ChF 2.13/Min.) hotline E-Mail: [email protected]
hotLine d’aSSiStance cLX.PayPenTél. hotline: 0900 900 015 (à partir de la 3e min. ChF 2.13/min.)e-mail hotline: [email protected]
hotLine SuPPorto cLX.PayPenhotline Tel.: 0900 900 015 (a partire dal terzo minuto ChF 2.13/min.) hotline e-mail: [email protected]
cLX.PayPen SuPPort hotLinehotline phone: 0900 900 015 (as of the 3rd min.: ChF 2.13 per min.) hotline e-mail: [email protected]