cloning gfp into mammalian cells - science and...
TRANSCRIPT

Cloning GFP Into Mammalian Cells
Studiepraktik 2016
Molecular Biology and Molecular Medicine
Aarhus University
Studiepraktik 2016, Aarhus University
1
PREFACE
This manual is developed to ”Studiepraktikken for Molekylærbiologi og Molekylær Medicin” at
Aarhus University. The manual contains four sections: background, laboratory protocol,
theoretical exercise and appendix.
The scientific level of this manual is to students at their 3rd year of high school with theory and
practical laboratory exercises inspired from university courses. The manual is written in
English to illustrate the literature at the university.
During your three days we will guide you through the material to give you a better and deeper
understanding of the theory behind the practical exercise.
A special thanks to the authors for contributing to this protocol: Maiken Østervemb Aagaard,
Rikke Mouridsen, Tobias Holm Bønnelykke, Steffan Noe Christensen, Emil Gregersen, Michael
Solgaard Jensen, Michael Nguyen and Charlotte Harmsen.
Kind regards
The Instructor Team of 2016
Lotte Stagsted, PhD student. Mol. Bio.
Louise Dalskov, Stud. Cand. Scient. Mol. Bio.
Diani Poulsen, Stud. BSc. Mol. Med.
Ida Møller, Stud. BSc. Mol. Med.
Matias Høgh, Stud. BSc. Mol. Med.
Line Hansen, Stud. BSc. Mol. Bio.
Studiepraktik 2016, Aarhus University
2
TABLE OF CONTENT
PREFACE ...........................................................................................................................................................................1
LABORATORY SAFETY INSTRUCTIONS ...............................................................................................................3
THEORY AND BACKGROUND ...................................................................................................................................4
INTRODUCTION ........................................................................................................................................................5
LABORATORY PROTOCOL .........................................................................................................................................8
Day 1 ..............................................................................................................................................................................9
Day 2 ........................................................................................................................................................................... 13
Day 3 ........................................................................................................................................................................... 16
THEORETICAL EXERCISE ....................................................................................................................................... 20
GENERAL QUESTIONS – THE CENTRAL DOGMA .......................................................................................... 25
APPENDIX ..................................................................................................................................................................... 28

Studiepraktik 2016, Aarhus University
3
LABORATORY SAFETY INSTRUCTIONS
GOOD LABORATORY BEHAVIOR
Bags and extra clothes are not allowed in the laboratory
Papers, pencils etc. are only allowed in the defined areas on the
table.
Do not touch your face, especially your eyes, nose and mouth with
your gloves
Eating, smoking etc. are prohibited in the laboratory
Only wear lab coats with a classification mark. The lab coat should always be worn and
buttoned up at all times in the laboratory and hallways. Not on the toilet!
Wash your hands often during the day and always before you leave the laboratory
Use gloves at all times. If anything is spilt on your gloves – change them
Remember to wash your tables with ethanol before and after using it
Walk in the laboratory. No running is allowed!
Behave yourselves responsibly. No shooting pipet tips, water and other things
SEPARATION OF WASTE
No chemicals or solutions can be poured back to the stock solution. Additional material
is waste
Hazard waste (H-waste) like pipet tips, one time pipets etc. is for the transparent
buckets
Biological waste (anything been in contact with live materials, like cells) is for the
yellow buckets.
POINTERS FOR MICROBIOLOGICAL WORK
Write name and group number on agar plates, eppendorf tubes etc.
Take one eppendorf tube at a time and never touch the opening. Flick the material
before using it.
Always use the lid in the centrifuge.

Studiepraktik 2016, Aarhus University
4
SECTION 1
THEORY AND BACKGROUND

Studiepraktik 2016, Aarhus University
5
INTRODUCTION
During your three days at Aarhus University you are going to conduct an experiment in order
to make human cells emit green fluorescent light. To do this we use the gene of Green
Fluorescent Protein (GFP) isolated from jellyfish. A schematic overview of the experiment is
seen on Figure 1. We have prepared the gene for you, consisting of a double stranded piece of
DNA. You will also receive a flask of living mammalian cells.
LIGATION
In order to transfer the gene into the cells, you have to convert the gene into a circularized
form of DNA, a so-called plasmid. Plasmids are more easily taken up by cells, than linear pieces
of DNA. Furthermore, the gene do not have to be inserted into the genome of the host, but will
function as an individual small genome. For preparing the plasmid, you will receive an open
plasmid, the expression plasmid. You have to ligate the GFP gene into the open plasmid to
recreate a complete circle. For ligation, an enzyme called T4 ligase, is used. The outcome is a
closed plasmid containing the GFP gene.
Figure 1: Schematic overview of your three days experiment in the laboratory.

Studiepraktik 2016, Aarhus University
6
TRANSFORMATION
In the next step we want to sort and amplify our newly prepared GFP plasmid. Our reaction
mixture from above contains different outcomes from the ligation; both unclosed and closed
circles of DNA, some with or without the insert. To find the plasmids with the GFP insert, you
will transform all plasmids from the sample into E. coli bacteria cells. The E. coli cells will be
treated in a way, so they might take up plasmids, and once taken up, the cells will treat the new
plasmid as it was their own genome, thus passing on copies of the plasmid to future daughter
cells. This means that one single E. coli cell, which has taken up the GFP plasmid, will give rise
to a whole colony of bacteria cells all expressing the plasmid harbouring our GFP gene. To get a
sufficient amount of plasmid, the E. coli cells will produce lots of the GFP containing plasmid.
SELECTION
To select the single E. coli cell which have absorbed the GFP plasmid, we seed the cells from
above on media plates, called agar plates. After one night of culturing, the cells will grow to
small colonies if the plasmid is absorbed. Our GFP plasmid contains, together with GFP, a gene
for resistance towards the antibiotic kanamycin. Hereby, E. coli cells, which have absorbed our
plasmid, are also resistant to kanamycin. Cells, which have not absorbed any plasmid, will die
in the presence of kanamycin. So to sort out the cells, we grow them on plates containing
kanamycin.
PLASMID CONTROL
E. coli colonies surviving on the plates have the resistance gene, but we have to test whether
they also contain the GFP gene. A plasmid closed without GFP insert still has resistance
towards kanamycin. You will use the Polymerase Chain Reaction(PCR) procedure, where DNA
can be amplified. We test the GFP-gene size with gel electrophoresis.
PLASMID PURIFICATION
The next step, we will perform for you, since we have no time for it together. The colonies
positive for GFP will be transferred to a flask with media to grow. When a sufficient number of
cells are reached, they are harvested and lysed (broken open) and the plasmids are purified.
TRANSFECTION
Now you have the plasmid containing the GFP gene and you are ready to transfer it into
mammalian cells. You will use calcium phosphate transfection, a transfection method based on

Studiepraktik 2016, Aarhus University
7
forming a calcium phosphate-DNA precipitate, which facilitates the binding of the DNA to the
cell surface. DNA then enters the cell by endocytosis. This means that the cell membrane, which
covers the cell, will fold around the DNA and drag it into the cell.
VISUALIZATION
After transfection, the cells are allowed to grow for two days. After one day you will change
their media in order for them to maintain healthy. On the second day the GFP protein have
been expressed in appropriate amounts to be visualized under UV light. You can therefore see
your cells glowing in a green light if you look in a fluorescence microscope.
The procedure above takes six days of work, and since you only have three, we will divide the
experiment in two parts. Therefore, on day one you will begin by ligating the GFP gene into an
open plasmid as explained. At the same day, you will receive an already made GFP plasmid,
which you will transfect into mammalian cells. On your last day, you will hopefully have an E.
coli colony expressing plasmid containing GFP, and mammalian cells green from GFP protein.

Studiepraktik 2016, Aarhus University
8
SECTION 2
LABORATORY PROTOCOL

Studiepraktik 2016, Aarhus University
9
Day 1
Plasmid production: Ligation of the GFP gene into an expression plasmid
You are going to ligate GFP into an already cut open expression plasmid. By ligation the GFP
becomes a covalent part of the plasmid, which at the same time is circularized. It is only the
circular form that can replicate inside cells.
The GFP and the plasmid have both been cut with the restriction enzymes SalI and NotI, which
recognize specific DNA sequences. This means that the gene and the plasmid have ends
matching each other. A map and sequence of the plasmid with GFP (called pEGFP-N1) is found
in the appendix.
Materials
The purified restricted GFP-gene
5 x T4 Ligase buffer
T4 DNA Ligase
Water
Restricted expression plasmid
Protocol
1. Prepare the following ligation mixtures for your restricted GFP (amounts in µL):
Sample A B
Water 20 7
5 x T4 Ligase buffer 0 4
Restricted GFP 0 6
Restricted plasmid 0 2
2. Add 1 μL T4 Ligase to B. The ligase is handed out by the instructors.

Studiepraktik 2016, Aarhus University
10
3. Incubate the ligation mixtures at room temperature for 1.5 hours. The instructors will
store the samples overnight in the freezer. Remember names on the eppendorf tubes.
Questions:
- What is a promoter?
_____________________________________________________________________________________________________
_____________________________________________________________________________________________________
- What is a vector?
_____________________________________________________________________________________________________
_____________________________________________________________________________________________________
- What is a ligase and how does it work?
_____________________________________________________________________________________________________
_____________________________________________________________________________________________________
- What is a restriction enzyme?
_____________________________________________________________________________________________________
_____________________________________________________________________________________________________
- Why are two different restriction enzyme used?
_____________________________________________________________________________________________________
_____________________________________________________________________________________________________
- What is special about the restriction sites?
_____________________________________________________________________________________________________
_____________________________________________________________________________________________________

Studiepraktik 2016, Aarhus University
11
Cell Transfection: The GFP plasmid is transfected into mammalian cells
To get the new GFP plasmid into the mammalian cells, the plasmid is mixed directly with a
concentrated solution of CaCl2. This mixture is then added drop wise to a phosphate buffer to
form a fine precipitate. Making air bubbles in the phosphate buffer, while adding the DNA-CaCl2
solution, helps to ensure that the precipitate that forms is as fine as possible. This is important
because clumped DNA will not adhere to or enter the cell as efficiently. This solution is then
added drop wise to the cells.
The cells used in this experiment are a line of immortalized human cells. They grow on an
active surface on the bottom of a plastic bottle. Be careful not to disturb the cells. They have to
stay attached to the bottom of the bottle in order to remain healthy.
Materials
Human embryonic kidney cells (HEK293)
2.5M CaCl2
GFP – Plasmid
HEPES buffer
Protocol
1. Add 17 µl 2.5M CaCl2 to your tube containing 150 µl DNA. Mix by gently taking the liquid
up and down with your pipet. Avoid air bubbles.
2. Add the 167 µl DNA-CaCl2-solution slowly one drop at a time to the tube containing 167
µl 2x HEPES buffer. While you do this, you continuously make bubbles in the solution
with a larger pipet.
3. Leave the mixture for 5 min at room temperature.
4. Add the mixture to your cells one drop at a time.
5. Leave the cells to grow in the incubator overnight.

Studiepraktik 2016, Aarhus University
12
Questions:
- Why do we use a stable cell line and not “primary” cells?
_____________________________________________________________________________________________________
_____________________________________________________________________________________________________
- What is the difference between transfection and transformation?
_____________________________________________________________________________________________________
_____________________________________________________________________________________________________
- Describe and draw the transfection method used:
_____________________________________________________________________________________________________
_____________________________________________________________________________________________________

Studiepraktik 2016, Aarhus University
13
Day 2
Plasmid production: Transformation of E. coli cells with ligation mixes
The plasmids carrying the insert (GFP) are to be transferred into E. coli in order to be sorted
and replicated. This process is called transformation. The E. coli cells have been treated in such
a manner that they are able to take up DNA. The cells are incubated with DNA plasmids and
will after heat shock at 42°C for 20 sec., take up the plasmids having accumulated on the cell
surface. The transformed cells are plated on agar plates containing a selective antibiotic (here
kanamycin). E. coli cells that have received intact plasmids will then be able to divide and grow
into colonies on the agar plates, because the plasmids carry the gene for antibiotic resistance.
Note that the antibiotic resistance does not give any information about whether the cells also
have received the GFP gene.
Materials
LB-medium
2 LB-agar plates containing kanamycin
2 Eppendorf tubes with E. coli cells.
The ligation mixtures from yesterday
Plastic Drigalsky spatulas for plating the bacteria
42°C heat block
Protocol
1. Mark the eppendorf tubes with the competent E. coli cells and the agar plates with name
and group number. Keep the cells on ice at all times.
2. Transfer 10 µL of each ligation mixture (A and B) into separate tubes with E. coli. Use a
pipet tip and gently stir around.
3. Incubate the transformation tubes on ice for 30 min.
4. Heat-shock the cells in a 42°C heat block for 20 sec. and immediately thereafter incubate
on ice for at least 2 min.
5. Add 950 µL LB-medium to each of the two transformation tubes.
6. Incubate at 37°C for 1 hour in a shaking incubator.
7. Mix the transformation mixture by gently pipetting up and down to ensure the cells are
equally distributed in the mix.

Studiepraktik 2016, Aarhus University
14
8. Plate 200 µL of each transformation mixture on each of two LB-agar plates marked A
and B.
9. The agar plates are incubated (bottom up!) in a 37°C incubator overnight.
Questions:
- What does the agar plate contain?
_____________________________________________________________________________________________________
_____________________________________________________________________________________________________
- What does it mean that the E. coli cells are competent?
_____________________________________________________________________________________________________
_____________________________________________________________________________________________________
- What is the purpose of the shaking incubator?
_____________________________________________________________________________________________________
_____________________________________________________________________________________________________
- Why isn’t there any antibiotic in the LB-media?
_____________________________________________________________________________________________________
_____________________________________________________________________________________________________
- Why are the cells placed at 37°C for one hour?
_____________________________________________________________________________________________________
_____________________________________________________________________________________________________
- How does the transformation works?
_____________________________________________________________________________________________________
_____________________________________________________________________________________________________
- Why are the agar plates placed with the bottom up?
_____________________________________________________________________________________________________
_____________________________________________________________________________________________________
- Why are the cells spread out on agar plates?
_____________________________________________________________________________________________________
_____________________________________________________________________________________________________
- What is the function of Kanamycin?
_____________________________________________________________________________________________________
_____________________________________________________________________________________________________

Studiepraktik 2016, Aarhus University
15
Cell transfection: Maintenance of cells
Today the cells have to have their old media taken away, get washed and receive new media.
The media contains among others the nutrients the cells need to grow.
Materials
Waste tube
PBS wash buffer
Media
Protocol
1. Remove the old media from the cells by transferring it to a waste tube.
2. Wash the cells with 2 mL wash buffer (PBS). Be careful not to disturb the cells. Add the
buffer, let it flow around and empty the flask again by transferring the buffer to the
waste tube.
3. Add 3.5 mL of new media to each culture flask.
Questions:
- Why do the cells need new media?
_____________________________________________________________________________________________________
_____________________________________________________________________________________________________
- Did the media change color from yesterday?
_____________________________________________________________________________________________________
_____________________________________________________________________________________________________
- If yes, why did the media change color?
_____________________________________________________________________________________________________
_____________________________________________________________________________________________________
- What is the purpose of PBS?
_____________________________________________________________________________________________________
_____________________________________________________________________________________________________

Studiepraktik 2016, Aarhus University
16
Day 3
Plasmid production: Check colonies for inserted GFP by colony PCR
Today you are going to find out whether any of your E. coli colonies contain the GFP insert. You
will be doing this by colony-PCR using a primer set, where one primer anneals upstream
(before) of the GFP gene and one anneals inside the gene itself. A PCR product of the right size
tells you that the insert is most probably GFP and that it is oriented correctly in the plasmid.
Materials
PCR master mix
10 x Taq buffer
50 mM MgCl2
Forward primer + reverse primer
10 mM dNTP
dH2O
PCR tubes
1 % agarose gel (incl. GelRed)
Gel apparatus
Power supply
5 x DNA loading buffer (Pulls the dye and DNA down in the wells)
100 bp DNA size marker (see appendix for the size of each band in the marker)
Taq DNA polymerase
Positive control (Pos)
Negative control (Neg)
Protocol
1. Number 5 PCR tubes (1-5).
2. Add 1 μL Taq DNA polymerase to the master mix. The polymerase is handed out by the
instructors. From now on, work on ice!
3. Add 10 µL master mix to each of the PCR tubes.
4. Mark the 3 colonies you want to test on the bottom of the plate with a pen.

Studiepraktik 2016, Aarhus University
17
5. Pick the colonies with a small pipette tip (those for Pipetman P20) by dipping the
pipette tip into a colony and then dipping it in one of the PCR tubes and stir a bit around,
so the cells get into the liquid. Close the lids on the PCR tubes.
6. Add 4 µl of the positive control to a PCR tube.
7. Add 2 µl of the negative control to a PCR tube.
8. The 5 PCR tubes are placed in the PCR machine (remember team numbers!) and the
PCR is started.
9. The PCR cycle program is:
1. Initial denaturation of template DNA: 2 min at 95°C
2. Amplification cycles (repeated 25 times):
30 sec. at 95°C (melting)
30 sec. at 60°C (annealing)
1 min. at 72°C (elongation)
10. After ended PCR, add 2 µL 5x DNA loading buffer to each PCR tube and to the size
marker. Pipette up and down very gently to mix the PCR product and the load buffer.
Avoid air bubbles!
11. Load the agarose gel with 10 µl of each sample. Write down where you load the
samples. (See appendix for how to load a gel).
12. Run electrophoresis at 150 V until the blue dye is around 2.5 cm from the bottom of the
gel.
Visualize the agarose gel on a UV box and photograph your gel. Write sample numbers
on your photography.
Questions:
- Do you have colonies on the agar plates?
_____________________________________________________________________________________________________
_____________________________________________________________________________________________________
- Do your samples contain the insert?
_____________________________________________________________________________________________________
_____________________________________________________________________________________________________

Studiepraktik 2016, Aarhus University
18
- What does dNTPs mean?
_____________________________________________________________________________________________________
_____________________________________________________________________________________________________
- Why do we have both a forward and a reverse primer?
_____________________________________________________________________________________________________
_____________________________________________________________________________________________________
- What does the positive control contain? What does the negative control contain?
_____________________________________________________________________________________________________
_____________________________________________________________________________________________________
- What is PCR?
_____________________________________________________________________________________________________
_____________________________________________________________________________________________________
- How does the polymerase work?
_____________________________________________________________________________________________________
_____________________________________________________________________________________________________
- How are the bands separated during gel electrophoresis?
_____________________________________________________________________________________________________
_____________________________________________________________________________________________________
- Normally, you add SDS, when you make gel electrophoresis of proteins. SDS denatures
proteins and gives them a negative charge. Why don’t we need SDS, when we run the
DNA on the agarose gel?
_____________________________________________________________________________________________________
_____________________________________________________________________________________________________
_____________________________________________________________________________________________________
- Why do we add the loading dye?
_____________________________________________________________________________________________________
_____________________________________________________________________________________________________
- How are the bands visualized?
_____________________________________________________________________________________________________
_____________________________________________________________________________________________________
- Why are there two different colored bands?
_____________________________________________________________________________________________________
_____________________________________________________________________________________________________

Studiepraktik 2016, Aarhus University
19
Cell transfection: GFP-glowing cells
Today you will see whether the transfection has worked.
Materials
Fluorescence microscope
Protocol
1. Look at your cells in a fluorescence microscope.
Questions:
- Do your cells contain the GFP plasmid?
_____________________________________________________________________________________________________
_____________________________________________________________________________________________________
- How efficient was your transfection?
_____________________________________________________________________________________________________
_____________________________________________________________________________________________________
- How can you optimize the transfection process?
_____________________________________________________________________________________________________
_____________________________________________________________________________________________________
- What is transfection used for other than making cells green?
_____________________________________________________________________________________________________
_____________________________________________________________________________________________________
- What do you think would happen if the cells where kept in the same culture flask?
_____________________________________________________________________________________________________
_____________________________________________________________________________________________________

Studiepraktik 2016, Aarhus University
20
SECTION 3
THEORETICAL EXERCISE

Studiepraktik 2016, Aarhus University
21
1. EcoRI has the cleavage site: 5' G*AATTC 3' (* indicates the cleavage). Where would
EcoRI cleave the following sequence: 3' GGTCTTAAGCGG 5'? What does the cleavage
product look like? Tip: Write the complement DNA string.
_____________________________________________________________________________________________________
_____________________________________________________________________________________________________
_____________________________________________________________________________________________________
_____________________________________________________________________________________________________
_____________________________________________________________________________________________________
_____________________________________________________________________________________________________
2. How often would there be a restriction site for a specific restriction enzyme that
recognizes a sequence of four bases? It is presumed that all nucleotides are distributed
evenly.
_____________________________________________________________________________________________________
_____________________________________________________________________________________________________
_____________________________________________________________________________________________________
_____________________________________________________________________________________________________
3. Make a forward and reverse primer that are able to amplify the following genomic
sequence by PCR. The primers must have a length of 10 base pairs.
5 ’CGCGATGGCTCACTAGCTGGCGCGGCTAGCATCGAGCGCGGACGAGG 3'
_____________________________________________________________________________________________________
_____________________________________________________________________________________________________
_____________________________________________________________________________________________________
_____________________________________________________________________________________________________
4. Calculate the size of your colony PCR product. Use the appendix.
_____________________________________________________________________________________________________
_____________________________________________________________________________________________________

Studiepraktik 2016, Aarhus University
22
5. Figure 2 shows an agarose gel with a proposed pattern of your product from your
colony PCR. It is shown with 3 different colonies loaded in the wells 1-3. What can be
concluded about the different colonies used when looking at the bands in the gel?
Explain the different pattern seen.
_____________________________________________________________________________________________________
_____________________________________________________________________________________________________
_____________________________________________________________________________________________________
_____________________________________________________________________________________________________
_____________________________________________________________________________________________________
_____________________________________________________________________________________________________
_____________________________________________________________________________________________________
_____________________________________________________________________________________________________
_____________________________________________________________________________________________________
_____________________________________________________________________________________________________
Figure 2: The DNA marker has the size from 1000 bp to 100 bp. There are 100 bp
between each band.

Studiepraktik 2016, Aarhus University
23
6. What restriction enzyme(s) would you choose to cut the GFP-gene out?
_____________________________________________________________________________________________________
_____________________________________________________________________________________________________
7. What band(s) would you see on the gel if you cut the vectors (see below) with the
following restriction enzymes: Xba, EcoRI, HindIII, NotI, Xba+NotI or BamHI+EcoRI?
What vector would you use to insert the GFP-gene from question 6? What enzyme(s)
would you choose to test if the GFP-gene is inserted correctly and how would the band
pattern look like?
_____________________________________________________________________________________________________
_____________________________________________________________________________________________________
_____________________________________________________________________________________________________
_____________________________________________________________________________________________________
_____________________________________________________________________________________________________
_____________________________________________________________________________________________________

Studiepraktik 2016, Aarhus University
24
Studiepraktik 2016, Aarhus University
25
SECTION 4
GENERAL QUESTIONS – THE CENTRAL DOGMA

Studiepraktik 2016, Aarhus University
26
1. The animal cell consists of different organelles. Fill out the empty boxes using the names
below. Write the function of these organelles.
- Cell membrane
- Vesicle
- Nucleus
- Endoplasmatic Reticulum
- DNA
- Cytoplasma
- Golgi apparatus
- Mitochondrion
2. Animal and plant cells are not alike. Describe the differences.
_____________________________________________________________________________________________________
_____________________________________________________________________________________________________
_____________________________________________________________________________________________________
_____________________________________________________________________________________________________
3. DNA consists of four different bases. What are their names and how are they paired?
_____________________________________________________________________________________________________
_____________________________________________________________________________________________________

Studiepraktik 2016, Aarhus University
27
_____________________________________________________________________________________________________
_____________________________________________________________________________________________________
4. The figure below shows “The Central Dogma”. Describe the different steps in this
process.
______________________________________
______________________________________
______________________________________
______________________________________
______________________________________
______________________________________
______________________________________
______________________________________
______________________________________
5. What are the difference(s) between RNA and DNA?
_____________________________________________________________________________________________________
_____________________________________________________________________________________________________
_____________________________________________________________________________________________________
_____________________________________________________________________________________________________
6. Where do the transcription and translation processes take place in eukaryotes and
prokaryotes?
_____________________________________________________________________________________________________
_____________________________________________________________________________________________________
_____________________________________________________________________________________________________
_____________________________________________________________________________________________________
_____________________________________________________________________________________________________
_____________________________________________________________________________________________________
7. What do proteins consist of and how are they built?
_____________________________________________________________________________________________________
_____________________________________________________________________________________________________
_____________________________________________________________________________________________________
_____________________________________________________________________________________________________

Studiepraktik 2016, Aarhus University
28
SECTION 5
APPENDIX

Studiepraktik 2016, Aarhus University
29
VECTOR OUTLINE OF pEGFP-N1
The expression plasmid with GFP insert.

Studiepraktik 2016, Aarhus University
30
THE SEQUENCE OF pEGFP-N1
1 tagttattaa tagtaatcaa ttacggggtc attagttcat agcccatata tggagttccg
61 cgttacataa cttacggtaa atggcccgcc tggctgaccg cccaacgacc cccgcccatt
121 gacgtcaata atgacgtatg ttcccatagt aacgccaata gggactttcc attgacgtca
181 atgggtggag tatttacggt aaactgccca cttggcagta catcaagtgt atcatatgcc
241 aagtacgccc cctattgacg tcaatgacgg taaatggccc gcctggcatt atgcccagta
301 catgacctta tgggactttc ctacttggca gtacatctac gtattagtca tcgctattac
361 catggtgatg cggttttggc agtacatcaa tgggcgtgga tagcggtttg actcacgggg
421 atttccaagt ctccacccca ttgacgtcaa tgggagtttg ttttggcacc aaaatcaacg
481 ggactttcca aaatgtcgta acaactccgc cccattgacg caaatgggcg gtaggcgtgt
541 acggtgggag gtctatataa gcagagctgg tttagtgaac cgtcagatcc gctagcgcta
601 ccggactcag atctcgagct caagcttcga attctgcagt cgacggtacc gcgggcccgg
661 gatccaccgg tcgccaccat ggtgagcaag ggcgaggagc tgttcaccgg ggtggtgccc
721 atcctggtcg agctggacgg cgacgtaaac ggccacaagt tcagcgtgtc cggcgagggc
781 gagggcgatg ccacctacgg caagctgacc ctgaagttca tctgcaccac cggcaagctg
841 cccgtgccct ggcccaccct cgtgaccacc ctgacctacg gcgtgcagtg cttcagccgc
901 taccccgacc acatgaagca gcacgacttc ttcaagtccg ccatgcccga aggctacgtc
961 caggagcgca ccatcttctt caaggacgac ggcaactaca agacccgcgc cgaggtgaag
1021 ttcgagggcg acaccctggt gaaccgcatc gagctgaagg gcatcgactt caaggaggac
1081 ggcaacatcc tggggcacaa gctggagtac aactacaaca gccacaacgt ctatatcatg
1141 gccgacaagc agaagaacgg catcaaggtg aacttcaaga tccgccacaa catcgaggac
1201 ggcagcgtgc agctcgccga ccactaccag cagaacaccc ccatcggcga cggccccgtg
1261 ctgctgcccg acaaccacta cctgagcacc cagtccgccc tgagcaaaga ccccaacgag
1321 aagcgcgatc acatggtcct gctggagttc gtgaccgccg ccgggatcac tctcggcatg
1381 gacgagctgt acaagtaaag cggccgcgac tctagatcat aatcagccat accacatttg
1441 tagaggtttt acttgcttta aaaaacctcc cacacctccc cctgaacctg aaacataaaa
1501 tgaatgcaat tgttgttgtt aacttgttta ttgcagctta taatggttac aaataaagca
1561 atagcatcac aaatttcaca aataaagcat ttttttcact gcattctagt tgtggtttgt
1621 ccaaactcat caatgtatct taaggcgtaa attgtaagcg ttaatatttt gttaaaattc
1681 gcgttaaatt tttgttaaat cagctcattt tttaaccaat aggccgaaat cggcaaaatc
1741 ccttataaat caaaagaata gaccgagata gggttgagtg ttgttccagt ttggaacaag
1801 agtccactat taaagaacgt ggactccaac gtcaaagggc gaaaaaccgt ctatcagggc
1861 gatggcccac tacgtgaacc atcaccctaa tcaagttttt tggggtcgag gtgccgtaaa
1921 gcactaaatc ggaaccctaa agggagcccc cgatttagag cttgacgggg aaagccggcg
1981 aacgtggcga gaaaggaagg gaagaaagcg aaaggagcgg gcgctagggc gctggcaagt
2041 gtagcggtca cgctgcgcgt aaccaccaca cccgccgcgc ttaatgcgcc gctacagggc
2101 gcgtcaggtg gcacttttcg gggaaatgtg cgcggaaccc ctatttgttt atttttctaa
2161 atacattcaa atatgtatcc gctcatgaga caataaccct gataaatgct tcaataatat
2221 tgaaaaagga agagtcctga ggcggaaaga accagctgtg gaatgtgtgt cagttagggt
2281 gtggaaagtc cccaggctcc ccagcaggca gaagtatgca aagcatgcat ctcaattagt

Studiepraktik 2016, Aarhus University
31
2341 cagcaaccag gtgtggaaag tccccaggct ccccagcagg cagaagtatg caaagcatgc
2401 atctcaatta gtcagcaacc atagtcccgc ccctaactcc gcccatcccg cccctaactc
2461 cgcccagttc cgcccattct ccgccccatg gctgactaat tttttttatt tatgcagagg
2521 ccgaggccgc ctcggcctct gagctattcc agaagtagtg aggaggcttt tttggaggcc
2581 taggcttttg caaagatcga tcaagagaca ggatgaggat cgtttcgcat gattgaacaa
2641 gatggattgc acgcaggttc tccggccgct tgggtggaga ggctattcgg ctatgactgg
2701 gcacaacaga caatcggctg ctctgatgcc gccgtgttcc ggctgtcagc gcaggggcgc
2761 ccggttcttt ttgtcaagac cgacctgtcc ggtgccctga atgaactgca agacgaggca
2821 gcgcggctat cgtggctggc cacgacgggc gttccttgcg cagctgtgct cgacgttgtc
2881 actgaagcgg gaagggactg gctgctattg ggcgaagtgc cggggcagga tctcctgtca
2941 tctcaccttg ctcctgccga gaaagtatcc atcatggctg atgcaatgcg gcggctgcat
3001 acgcttgatc cggctacctg cccattcgac caccaagcga aacatcgcat cgagcgagca
3061 cgtactcgga tggaagccgg tcttgtcgat caggatgatc tggacgaaga gcatcagggg
3121 ctcgcgccag ccgaactgtt cgccaggctc aaggcgagca tgcccgacgg cgaggatctc
3181 gtcgtgaccc atggcgatgc ctgcttgccg aatatcatgg tggaaaatgg ccgcttttct
3241 ggattcatcg actgtggccg gctgggtgtg gcggaccgct atcaggacat agcgttggct
3301 acccgtgata ttgctgaaga gcttggcggc gaatgggctg accgcttcct cgtgctttac
3361 ggtatcgccg ctcccgattc gcagcgcatc gccttctatc gccttcttga cgagttcttc
3421 tgagcgggac tctggggttc gaaatgaccg accaagcgac gcccaacctg ccatcacgag
3481 atttcgattc caccgccgcc ttctatgaaa ggttgggctt cggaatcgtt ttccgggacg
3541 ccggctggat gatcctccag cgcggggatc tcatgctgga gttcttcgcc caccctaggg
3601 ggaggctaac tgaaacacgg aaggagacaa taccggaagg aacccgcgct atgacggcaa
3661 taaaaagaca gaataaaacg cacggtgttg ggtcgtttgt tcataaacgc ggggttcggt
3721 cccagggctg gcactctgtc gataccccac cgagacccca ttggggccaa tacgcccgcg
3781 tttcttcctt ttccccaccc caccccccaa gttcgggtga aggcccaggg ctcgcagcca
3841 acgtcggggc ggcaggccct gccatagcct caggttactc atatatactt tagattgatt
3901 taaaacttca tttttaattt aaaaggatct aggtgaagat cctttttgat aatctcatga
3961 ccaaaatccc ttaacgtgag ttttcgttcc actgagcgtc agaccccgta gaaaagatca
4021 aaggatcttc ttgagatcct ttttttctgc gcgtaatctg ctgcttgcaa acaaaaaaac
4081 caccgctacc agcggtggtt tgtttgccgg atcaagagct accaactctt tttccgaagg
4141 taactggctt cagcagagcg cagataccaa atactgtcct tctagtgtag ccgtagttag
4201 gccaccactt caagaactct gtagcaccgc ctacatacct cgctctgcta atcctgttac
4261 cagtggctgc tgccagtggc gataagtcgt gtcttaccgg gttggactca agacgatagt
4321 taccggataa ggcgcagcgg tcgggctgaa cggggggttc gtgcacacag cccagcttgg
4381 agcgaacgac ctacaccgaa ctgagatacc tacagcgtga gctatgagaa agcgccacgc
4441 ttcccgaagg gagaaaggcg gacaggtatc cggtaagcgg cagggtcgga acaggagagc
4501 gcacgaggga gcttccaggg ggaaacgcct ggtatcttta tagtcctgtc gggtttcgcc
4561 acctctgact tgagcgtcga tttttgtgat gctcgtcagg ggggcggagc ctatggaaaa
4621 acgccagcaa cgcggccttt ttacggttcc tggccttttg ctggcctttt gctcacatgt
4681 tctttcctgc gttatcccct gattctgtgg ataaccgtat taccgccatg cat

Studiepraktik 2016, Aarhus University
32
Underlined sequences are the sequences where the primers bind
Bold sequence is the GFP insert
Italic and red sequences indicate where the restriction enzymes cleave

Studiepraktik 2016, Aarhus University
33
100 bp DNA SIZE MARKER
bp
Studiepraktik 2016, Aarhus University
34
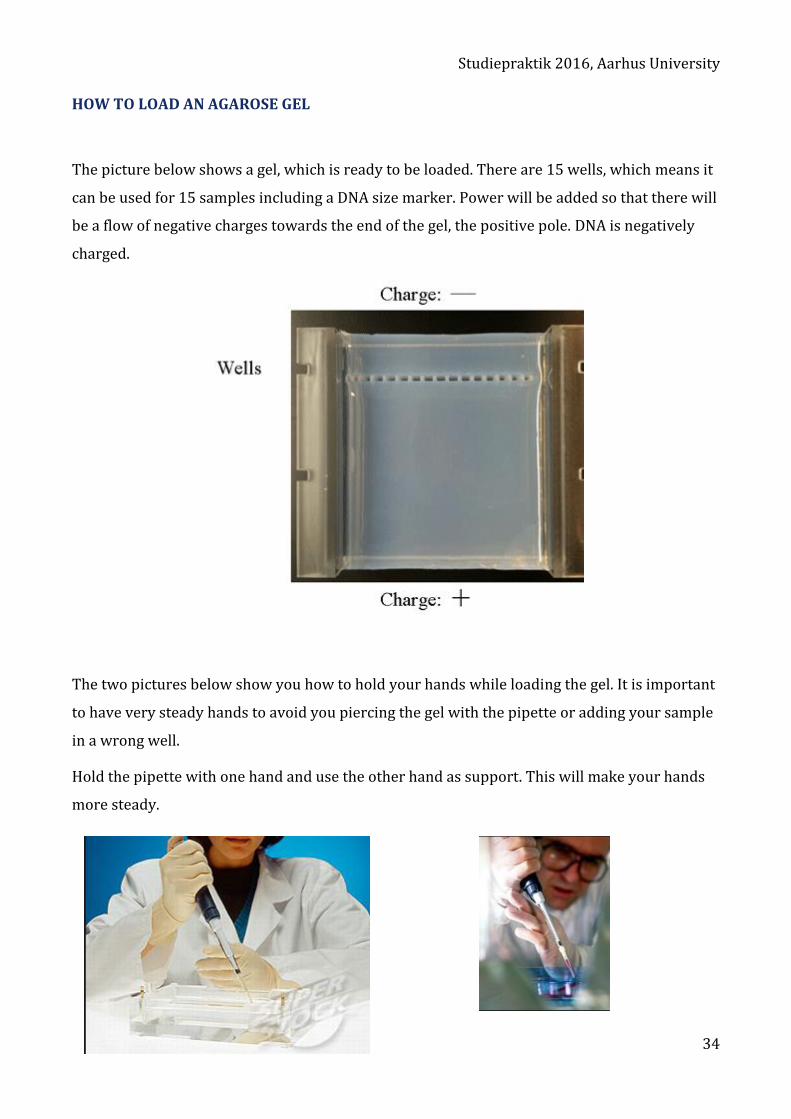
HOW TO LOAD AN AGAROSE GEL
The picture below shows a gel, which is ready to be loaded. There are 15 wells, which means it
can be used for 15 samples including a DNA size marker. Power will be added so that there will
be a flow of negative charges towards the end of the gel, the positive pole. DNA is negatively
charged.
The two pictures below show you how to hold your hands while loading the gel. It is important
to have very steady hands to avoid you piercing the gel with the pipette or adding your sample
in a wrong well.
Hold the pipette with one hand and use the other hand as support. This will make your hands
more steady.

Studiepraktik 2016, Aarhus University
35
The picture below shows how to add a sample to a well. It is important not to touch the bottom
of the well with the pipette tip. Add the sample very slowly by not pushing the pipette too hard.