citrix xenapp evaluation virtual appliance quick start guide · evaluation virtual appliance quick...
TRANSCRIPT
EVALUATION GUIDE | Citrix XenApp
www.citrix.com
Evaluation Virtual Appliance
Quick Start Guide for
Citrix XenApp
This document provides step-by-step instructions for extracting
and running the Citrix XenApp 6 Evaluation Virtual Appliance.
This virtual appliance is based on the Microsoft Windows
Server 2008 R2 partner VHD image.
Author: Rohan Vora, XenApp Engineering
Date Created: April 2010
2
Table of Contents
TABLE OF CONTENTS 2
INTRODUCTION 3
RUNNING AND CONFIGURING THE EVA 4
SYSTEM OVERVIEW ........................................................................................ 4
PREREQUISITES ............................................................................................. 4
OBTAINING THE EVA ..................................................................................... 5
RUNNING THE EVA ON CITRIX XENSERVER OR HYPER-V .................................... 5
ADDING THE EVA TO YOUR DOMAIN ................................................................. 6
LICENSING THE EVA ...................................................................................... 8
YOU’RE UP AND RUNNING. NOW WHAT? 11
PROFILING APPLICATIONS ............................................................................. 11
PUBLISHING APPLICATIONS ........................................................................... 15
ACCESSING AND RECEIVING APPLICATIONS ..................................................... 18
NEED HELP? HAVING A PROBLEM? ................................................................ 19

3
Introduction
Citrix XenApp is an on-demand application delivery solution that enables any Windows application to be virtualized, centralized and managed in the datacenter and instantly delivered as a service to users anywhere on any device. XenApp reduces the cost of application management by up to 50 percent, increases IT responsiveness when delivering an application to distributed users and improves application and data security.
The Citrix XenApp Evaluation Virtual Appliance (EVA) is a pre-configured, virtual machine system for evaluating on-demand application delivery. Citrix XenApp is unique in that it is a complete system for application delivery, offering both online and offline application access through a combination of application hosting and application streaming directly to user devices. The EVA system can also be expanded manually to include the following features of XenApp:
Service monitoring Monitor performance and pinpoint issues that affect the user experience.
Secure application access Control and secure remote access to applications from anywhere.
Load testing services Test XenApp server performance for accurate server sizing.
Provisioning services Provision XenApp farms from a single OS image.
SmartAuditor Record video of user activity while connected to Online applications.
Single sign-on Automated application login and policy-based control to ensure security.
Profile management Manage and ensure consistent user settings across devices and platforms.
Power and capacity management Optimize server capacity utilization and turn off servers when not in use.
Branch Repeater Accelerates application and data communications across the WAN. (NOTE: to evaluate, please contact Citrix Sales or a Citrix Solution Advisor.)
EasyCall VoIP-enable any application to reduce costs and increase productivity.
Workflow Studio orchestration Visual programming interface for automating XenApp workflows across the Citrix Delivery Center.
To evaluate these features, simply visit http://citrix.com/tryxenapp and select “Citrix Xenapp Platinum Edition 90-day Evaluation”. Access XenApp product documentation at the Citrix eDocs library.

4
Running and Configuring
the Citrix XenApp EVA
System Overview
The Evaluation Virtual Appliance for Citrix XenApp consists of a single Windows Server 2008 R2 Virtual Machine which is used for packaging, hosting and delivering applications to users. Minimum hardware requirements recommended to support the evaluation system are 2GB RAM running on a 64-bit system utilizing Citrix XenServer or Microsoft Hyper-V.
In addition to EVA virtual machine, you will need a client machine to access XenApp applications. This client can be a virtual machine or physical machine running any number of operating systems. For the broadest experience, Citrix recommends using a Windows Citrix receiver although a Linux or a Mac receiver provides an equally powerful demonstration of the value of XenApp.
NOTE: This system does not represent the best practice for deploying XenApp in a production environment. Furthermore, the EVA is not an acceptable platform for performance testing as it has been designed to be compact in order to simplify portability and to minimize resource usage during evaluation.
Prerequisites
Below is a list of pre-requisites and requirements for the XenApp EVA:
Physical Server (Recommendation): Dual Core Intel Processor with 4 GB RAM and minimum of 30GB free disk space. Minimum recommended memory for the EVA virtual machine is 2GB RAM.
Platform: Citrix XenServer 5.5 or Microsoft Windows Server 2008 R2 with Hyper-V role enabled.

5
Obtaining the EVA
To download the EVA visit http://citrix.com/tryxenapp. Scroll to the section labeled “Citrix XenApp Evaluation Virtual Appliance (EVA)”. The EVA download is approximately 3.0 GB.
The Citrix XenApp EVA is a self-extracting WinRAR archive. Prior to extraction, it is recommended that you create a backup copy of the EVA to simplify future re-use if desired. If you have received the EVA on physical media, insert the DVD and click the file to extract it. If you have downloaded the EVA from the Citrix website, place the file into a single folder on your hard drive and click the executable to extract it. After extraction, you will see Citrix and Microsoft EULA files, a README page and the CitrixXA6EVA.vhd file.
Running the EVA on Citrix XenServer or Hyper-V
The Evaluation Virtual Appliance for Citrix XenApp is a virtual machine system configured in Virtual Hard Disk (VHD) format. This means that it can easily be used with any hypervisor that supports this format including Citrix XenServer. Citrix XenServer is available at no charge from http://citrix.com/tryxenserver.
You will need a separate Windows XP, Windows Vista or Windows 7 machine with the XenCenter console installed in order to access and manage the virtual machines running on your XenServer. Download the Evaluation Virtual Appliance and use the XenCenter console to import it to your XenServer system.
Alternatively, Microsoft Hyper-V may be used to host the Citrix XenApp EVA. To use Microsoft Hyper-V, enable Hyper-V as a server role in any Windows 2008 R2 Server. Download the Evaluation Virtual Appliance and extract. Create a new virtual machine and attach the CitrixXA6EVA.vhd file to a new virtual machine.
In both cases, depending on whether you want to evaluate XenApp in isolation or allow access from your company network or the Internet, you will want to configure network access accordingly.

6
Adding the EVA to your domain
You may wish to join the EVA machine to your domain in order to allow specific users in your organization to access applications and evaluate XenApp. To do so, the steps below should be completed before configuring Remote Desktop Services Licensing (RDS Licensing).
1 Join the Citrix XenApp EVA virtual machine to your domain as you would any other server or machine in your environment (NOTE: Please do not change the machine name as it may cause XenApp to fail the farm discovery). Reboot the machine and logon again as CTXS-XA1\Administrator with a password of Evaluation1 (NOTE: This is the LOCAL MACHINE administrator account). Open the
Citrix Delivery Services Console from the Start Menu All
Programs Citrix Management Consoles Citrix Delivery Services Console.
2 From the tree navigation on the left, select Citrix Resources, XenApp, XENAPPDEMO. In the right side “Actions” panel, select “Add Administrator”.
3 Select the users you wish to provide administrative privileges to from the list and click NEXT. You can either choose to give them “Full Administrative privileges” or give them “custom privileges” as shown in the next step.
4 Give all permissions to the same domain administrators for all of the objects under XENAPPDEMO (e.g. Administrators, Applications, Load Evaluators, Load Balancing Policies, Policies, Printer Management, Servers and Worker Groups). Click „Close‟ then logoff of the server desktop and login using one of the domain administrator accounts you just configured to manage XenApp (e.g. DOMAIN\Administrator).
7
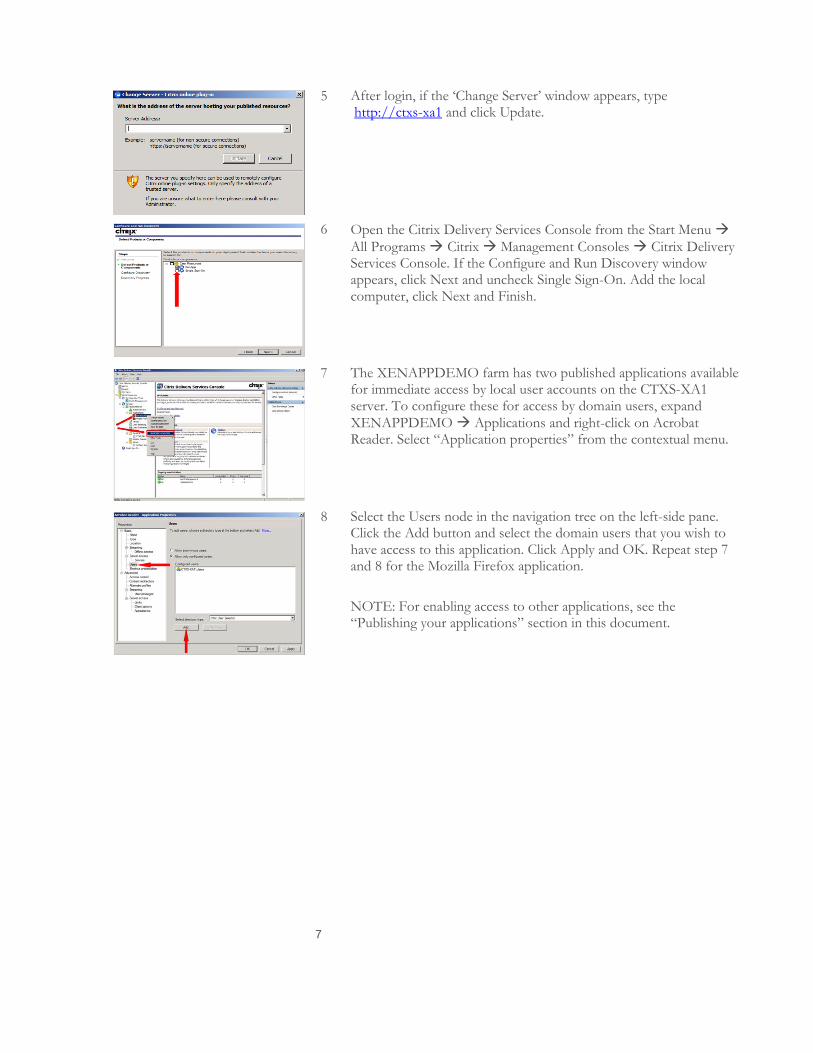
5 After login, if the „Change Server‟ window appears, type http://ctxs-xa1 and click Update.
6 Open the Citrix Delivery Services Console from the Start Menu
All Programs Citrix Management Consoles Citrix Delivery Services Console. If the Configure and Run Discovery window appears, click Next and uncheck Single Sign-On. Add the local computer, click Next and Finish.
7 The XENAPPDEMO farm has two published applications available for immediate access by local user accounts on the CTXS-XA1 server. To configure these for access by domain users, expand
XENAPPDEMO Applications and right-click on Acrobat Reader. Select “Application properties” from the contextual menu.
8 Select the Users node in the navigation tree on the left-side pane. Click the Add button and select the domain users that you wish to have access to this application. Click Apply and OK. Repeat step 7 and 8 for the Mozilla Firefox application.
NOTE: For enabling access to other applications, see the “Publishing your applications” section in this document.
8
Licensing the EVA
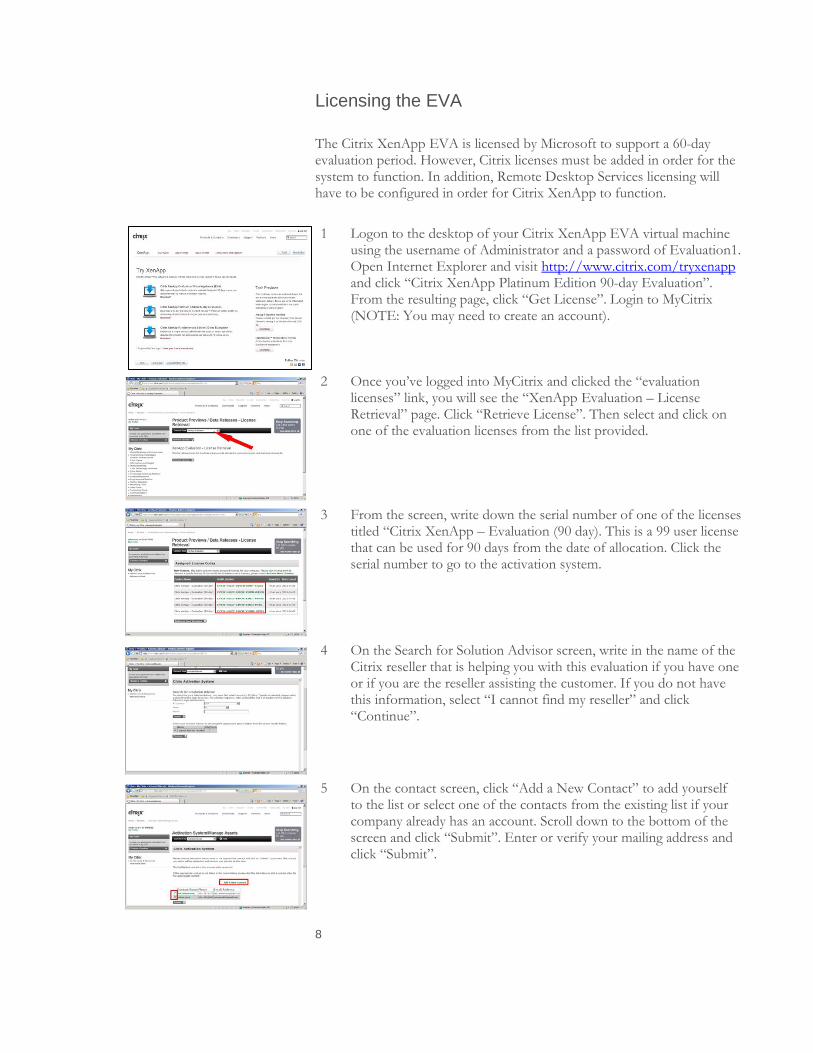
The Citrix XenApp EVA is licensed by Microsoft to support a 60-day evaluation period. However, Citrix licenses must be added in order for the system to function. In addition, Remote Desktop Services licensing will have to be configured in order for Citrix XenApp to function.
1 Logon to the desktop of your Citrix XenApp EVA virtual machine using the username of Administrator and a password of Evaluation1. Open Internet Explorer and visit http://www.citrix.com/tryxenapp and click “Citrix XenApp Platinum Edition 90-day Evaluation”. From the resulting page, click “Get License”. Login to MyCitrix (NOTE: You may need to create an account).
2 Once you‟ve logged into MyCitrix and clicked the “evaluation licenses” link, you will see the “XenApp Evaluation – License Retrieval” page. Click “Retrieve License”. Then select and click on one of the evaluation licenses from the list provided.
3 From the screen, write down the serial number of one of the licenses titled “Citrix XenApp – Evaluation (90 day). This is a 99 user license that can be used for 90 days from the date of allocation. Click the serial number to go to the activation system.
4 On the Search for Solution Advisor screen, write in the name of the Citrix reseller that is helping you with this evaluation if you have one or if you are the reseller assisting the customer. If you do not have this information, select “I cannot find my reseller” and click “Continue”.
5 On the contact screen, click “Add a New Contact” to add yourself to the list or select one of the contacts from the existing list if your company already has an account. Scroll down to the bottom of the screen and click “Submit”. Enter or verify your mailing address and click “Submit”.

9
6 Enter the required information and click “Submit”.
7 Click “Continue” to skip the warning about data CaSe SeNsItIvItY. On the license allocation screen, select “Citrix XenApp – Evaluation (90 day) and in the “Hostname of your Citrix license server” field, enter “ctxs-xa1” (NOTE: This field is case sensitive. Enter this server name EXACTLY as it appears. E.g. ctxs-xa1). Scroll down and click “Allocate” and confirm your selection.
8 Click the “Download License File” button and save the license file to C:\Program Files (x86)\Citrix\Licensing\MyFiles.
9 Click the Start button and select “All Programs Citrix
Management Consoles License Administration Console. Click on the “Administration” link and login with username = admin and password = Evaluation1. ”. Click Dashboard to see the list of your license files
NOTE: This same console could also have been used to install the license onto your server.
10 If you are unable to see you license files, Click “Administration” and
log in with username admin and password Evaluation1. Select “Vendor Daemon Configuration” and click “Administer”. Click the “Reread License Files” tab and then check the Dashboard again.

10
11 After configuring the License server, you need to make the XenApp server aware of the License server (which in this case is the same machine). Open the Citrix Delivery Services Console from the Start
Menu All Programs Citrix Management Consoles Citrix Delivery Services Console and Expand XENAPPDEMO. Click on
Policies Computer Settings Licensing Add
12 Enter the License server name (in this case ctxs-xa1) and click OK. Open a command prompt and run “gpupdate /force”. Wait for the command to complete.
Troubleshooting Tip: Once the gpupdate has completed, run “qfarm /load” in the command prompt after some time. It should return Server Load = 0.
13 Start the Server Manager. From the left side panel, expand Roles and select Remote Desktop Services. Then on the right side panel, select
Add Role Services Remote Desktop Licensing. Select whether you want to make this licensing server available to the workgroup (if the machine will not be on a domain) or to the domain (if you have added the Citrix XenApp EVA to your domain) then click Next and Install. When the installation completes, click Close.
NOTE: If you plan to add the EVA to your domain, complete this step first before enabling TS Licensing.
14 From the left-side pane of the Server Manager window, expand the Remote Desktop Services node and select RD Session Host Configuration. Double-click Remote Desktop license servers in the Edit Settings panel to open Licensing Properties. Select Per Device and add CTXS-XA1 as the specified license server. Click Apply and OK. Reboot your server to complete license configuration.
NOTE: If you are in a domain that already has a Remote Desktop License server, you can just point to that server rather than setup a new one.
11
You’re up and running.
Now What?
You should now have a fully functional Citrix XenApp 6 Evaluation Virtual Appliance running on Microsoft Windows Server 2008 R2. To logon to the system use the local machine Administrator account or user1 – user10 with a password of Evaluation1. If you have added your machine to a domain, you can also use domain accounts to login to applications delivered via XenApp.
In this section, you will learn how to make your evaluation more meaningful by delivering your own applications using Citrix XenApp. In the following pages, you will learn how to profile, publish and then enable users to receive applications.
Profiling applications
Citrix XenApp is an on-demand application delivery solution that comprises application virtualization and session virtualization technologies.
Citrix application virtualization technology isolates applications from the underlying operating system and from other applications to increase compatibility and manageability. XenApp virtualizes applications via integrated application streaming and isolation technology. This application virtualization technology enables applications to be streamed from a centralized location into an isolation environment on the target device where they will execute.
Session virtualization uses application streaming to deliver applications to hosting servers in the datacenter. XenApp then connects the user to the server to which the application has been delivered. The application then executes entirely on the server. The user interacts with the application remotely by sending mouse-clicks and keystrokes to the server.
In both application virtualization and session virtualization, user interaction with the application is seamless. Printers, drives, peripherals, and even the clipboard work in the exact same manner as if the application were installed.
To profile an application, follow the steps below.

12
1 To familiarize you with the profiling process, it is helpful to start with a simple application such as Microsoft PowerPoint Viewer 2007 which can be downloaded from the Microsoft web site. Save the exe on the C:\ drive.
NOTE: Make sure you only save the exe and DO NOT install the software.
2 Logon to the desktop of your Citrix XenApp EVA virtual machine using the username of Administrator and a password of Evaluation1. Open the Start menu All Programs Citrix Streaming Profiler Streaming Profiler and select New Profile.
3 Click Next on the initial screen and enter “Microsoft PowerPoint Viewer” as a name for your profile. Click Next. The User Update screen enables you to control whether users can write changes to the content of the package that has been streamed to their device. In most cases you will want to leave the “Enable User Updates” unchecked. For our purposes leave the default value and click Next.
4 On the Setup Inter-Isolation Communication (IIC) screen, select Browse and type \\CTXS-XA1\c$ and click OK. Inter-Isolation Communication allows you to control which virtual applications can communicate with one another. This assists with security and also improves application compatibility. Not enabling IIC prevents application conflicts while enabling it preserve communication between compatible applications. Here, we will select the applications and click Next.
5 Set the Operating System by selecting Windows Server 2008 R2 64-bit edition and Windows 7 64 Bit. To support other operating systems with this package, Citrix recommends running the profiling wizard on each operating system you wish to support. This is done by opening the profile from the new OS (e.g. Windows XP) using the Streaming Profiler and adding a new target operating system. This screen also allows you to configure minimum service pack levels and languages supported. Select All Languages.
Users accessing from un-configured operating systems will not be allowed to run the application locally. Fallback to online application delivery will then be used if the package is configured to run on server operating systems such as Windows Server 2008. Click Next.
13
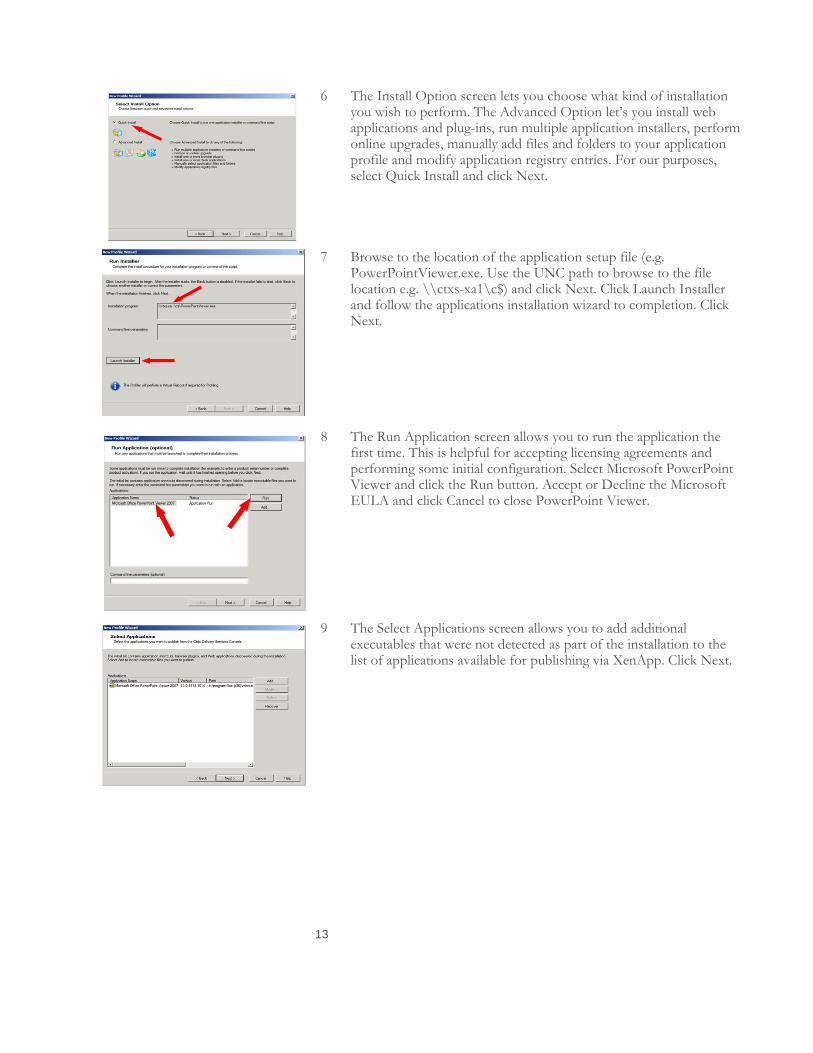
6 The Install Option screen lets you choose what kind of installation you wish to perform. The Advanced Option let‟s you install web applications and plug-ins, run multiple application installers, perform online upgrades, manually add files and folders to your application profile and modify application registry entries. For our purposes, select Quick Install and click Next.
7 Browse to the location of the application setup file (e.g. PowerPointViewer.exe. Use the UNC path to browse to the file location e.g. \\ctxs-xa1\c$) and click Next. Click Launch Installer and follow the applications installation wizard to completion. Click Next.
8 The Run Application screen allows you to run the application the first time. This is helpful for accepting licensing agreements and performing some initial configuration. Select Microsoft PowerPoint Viewer and click the Run button. Accept or Decline the Microsoft EULA and click Cancel to close PowerPoint Viewer.
9 The Select Applications screen allows you to add additional executables that were not detected as part of the installation to the list of applications available for publishing via XenApp. Click Next.

14
10 The Sign Profile screen lets you ensure the integrity and origin of this application profile to protect users from accessing corrupt or altered applications. Click Next Finish to complete the profile creation process. Select File, Save As… and save your profile to a UNC path that is readable by all users (EVERYONE). Citrix calls this the application hub.
NOTE: Although in this example, we have save the profile on the C:\ drive of the server, this is not a best practice recommendation. Ideally, you should store application profiles on a shared directory that can be accessed by all you intended users.
NOTE: You may have to modify the sharing and ownership permissions on the C:\share directory in order to allow domain administrators to save profiles there.

15
Publishing applications
Publishing applications allows you to make them available to specific users and groups under the conditions that you determine are best suited for the user and the application. XenApp allows you to control how applications are delivered (e.g. online or offline delivery), which users have access, which users can take applications offline, and specific features for online application delivery such as color depth and resolution, sound, and even placement of the application icon on the user‟s desktop and start menu.
To publish an application, follow the steps below.
1 Logon to the desktop of the Citrix XenApp EVA virtual machine as an administrator. Open the Citrix Delivery Services Console from
the Start Menu All Programs Citrix Management Consoles
Citrix Delivery Services Console. If the Configure and Run Discovery window appears, click Next and uncheck Single Sign-On. Add the local computer, click Next and Finish.
2 Expand the XENAPPDEMO farm. Right-click on applications and select Publish Application from the contextual menu. Click Next on the initial screen and type a name for your application. This name will appear to users. For our purposes we will use “Microsoft PowerPoint Viewer”. Click Next.
3 The Type screen allows you to select what kind of resource you are publishing. XenApp lets you publish a full server desktop to a user, a link (such as an Internet site or web application) and an application. If application is selected, XenApp allows a more detailed configuration of how you wish the application to be delivered to the user. Applications can be installed on the server (in this case you would publish the executable file), streamed to the server or streamed to the client machine with fallback to online delivery in the event of failure. Select “Streamed if Possible…” and for Server Application Type select “Streamed to Server”. This tells XenApp to stream the application profile to the server in the event the user needs to fall back to Online application delivery. Click Next.
16
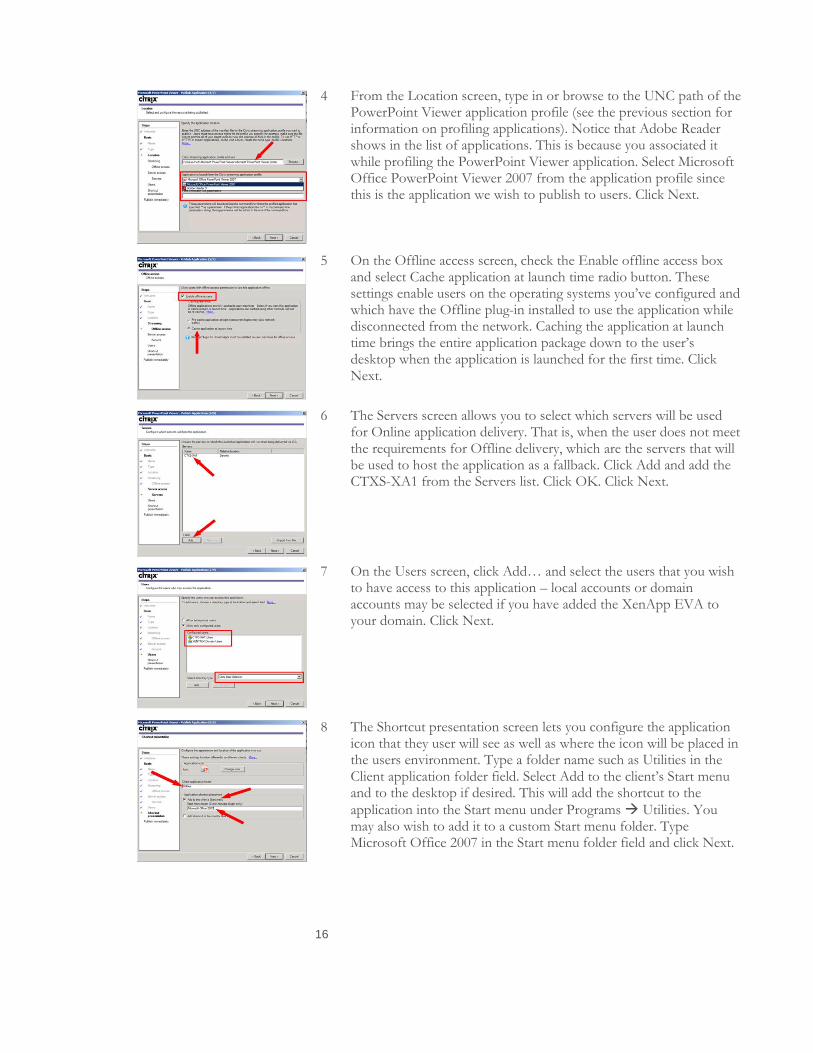
4 From the Location screen, type in or browse to the UNC path of the PowerPoint Viewer application profile (see the previous section for information on profiling applications). Notice that Adobe Reader shows in the list of applications. This is because you associated it while profiling the PowerPoint Viewer application. Select Microsoft Office PowerPoint Viewer 2007 from the application profile since this is the application we wish to publish to users. Click Next.
5 On the Offline access screen, check the Enable offline access box and select Cache application at launch time radio button. These settings enable users on the operating systems you‟ve configured and which have the Offline plug-in installed to use the application while disconnected from the network. Caching the application at launch time brings the entire application package down to the user‟s desktop when the application is launched for the first time. Click Next.
6 The Servers screen allows you to select which servers will be used for Online application delivery. That is, when the user does not meet the requirements for Offline delivery, which are the servers that will be used to host the application as a fallback. Click Add and add the CTXS-XA1 from the Servers list. Click OK. Click Next.
7 On the Users screen, click Add… and select the users that you wish to have access to this application – local accounts or domain accounts may be selected if you have added the XenApp EVA to your domain. Click Next.
8 The Shortcut presentation screen lets you configure the application icon that they user will see as well as where the icon will be placed in the users environment. Type a folder name such as Utilities in the Client application folder field. Select Add to the client‟s Start menu and to the desktop if desired. This will add the shortcut to the
application into the Start menu under Programs Utilities. You may also wish to add it to a custom Start menu folder. Type Microsoft Office 2007 in the Start menu folder field and click Next.
17
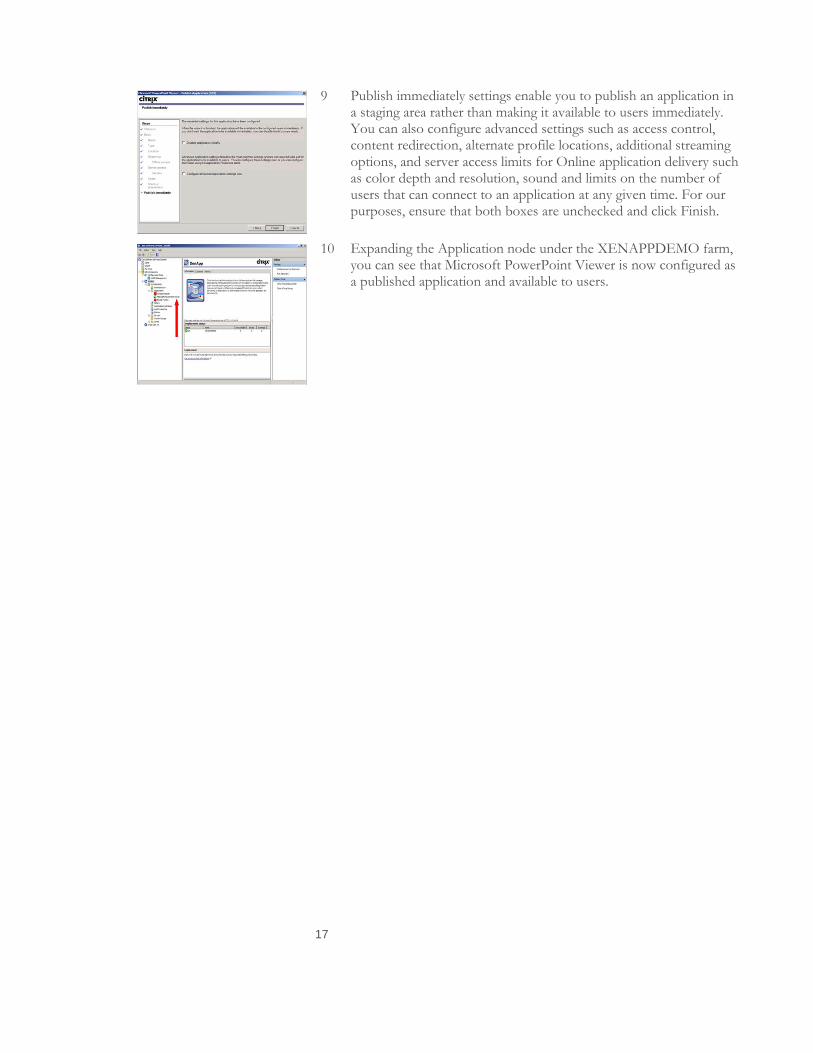
9 Publish immediately settings enable you to publish an application in a staging area rather than making it available to users immediately. You can also configure advanced settings such as access control, content redirection, alternate profile locations, additional streaming options, and server access limits for Online application delivery such as color depth and resolution, sound and limits on the number of users that can connect to an application at any given time. For our purposes, ensure that both boxes are unchecked and click Finish.
10 Expanding the Application node under the XENAPPDEMO farm, you can see that Microsoft PowerPoint Viewer is now configured as a published application and available to users.
18
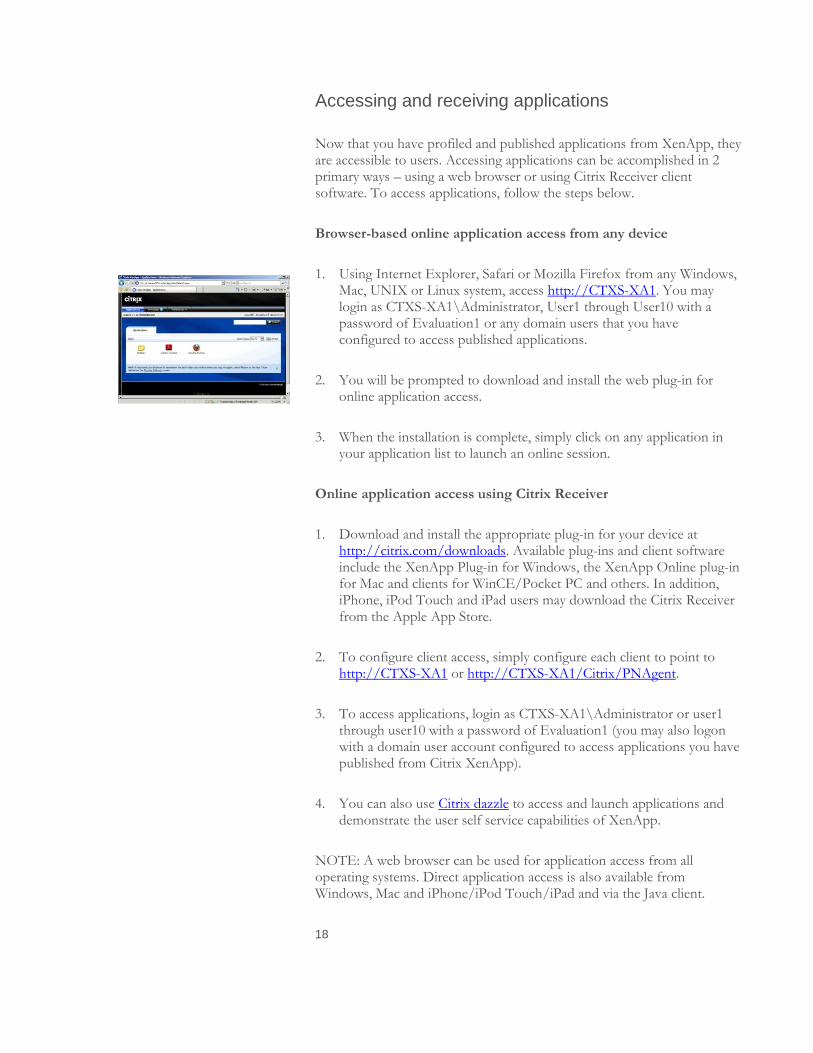
Accessing and receiving applications
Now that you have profiled and published applications from XenApp, they are accessible to users. Accessing applications can be accomplished in 2 primary ways – using a web browser or using Citrix Receiver client software. To access applications, follow the steps below.
Browser-based online application access from any device
1. Using Internet Explorer, Safari or Mozilla Firefox from any Windows, Mac, UNIX or Linux system, access http://CTXS-XA1. You may login as CTXS-XA1\Administrator, User1 through User10 with a password of Evaluation1 or any domain users that you have configured to access published applications.
2. You will be prompted to download and install the web plug-in for online application access.
3. When the installation is complete, simply click on any application in your application list to launch an online session.
Online application access using Citrix Receiver
1. Download and install the appropriate plug-in for your device at http://citrix.com/downloads. Available plug-ins and client software include the XenApp Plug-in for Windows, the XenApp Online plug-in for Mac and clients for WinCE/Pocket PC and others. In addition, iPhone, iPod Touch and iPad users may download the Citrix Receiver from the Apple App Store.
2. To configure client access, simply configure each client to point to http://CTXS-XA1 or http://CTXS-XA1/Citrix/PNAgent.
3. To access applications, login as CTXS-XA1\Administrator or user1 through user10 with a password of Evaluation1 (you may also logon with a domain user account configured to access applications you have published from Citrix XenApp).
4. You can also use Citrix dazzle to access and launch applications and demonstrate the user self service capabilities of XenApp.
NOTE: A web browser can be used for application access from all operating systems. Direct application access is also available from Windows, Mac and iPhone/iPod Touch/iPad and via the Java client.

19
Offline application access from Windows 7 or Windows Server 2008 R2
1. Using Internet Explorer, access http://ctxs-xa1 and login as CTXS-XA1\Administrator or user1 – user10 with a password of Evaluation1 (you may also logon with a domain user account configured to access applications you have published from Citrix XenApp).
2. You will be prompted to download and install client software including the web plug-in for Online application access and the Offline plug-in. The Online plug-in allows access to applications running on the server while the Offline plug-in enables applications to be streamed to the user device. Be sure to check for any messages in the Messages tab to ensure that you have all of the client software you need.
3. When the installation is complete, simply click on any application configured for Offline use to open it locally. Only applications configured for your operating system and for offline use will be delivered to your device for local execution. In addition, application availability while disconnected from the network is controlled via permissions set during the application publishing process. For more information on publishing applications see the section titled “Publishing applications”.
NOTE: While this particular evaluation scenario does not cover delivery to Windows Operating Systems other than Windows 7 64-bit and Windows Server 2008 R2, this can easily be configured by adding them as a target OS using the streaming profiler. For more information on application profiling, refer to the section of this document titled “Profiling an application”. To support other operating systems with this package, Citrix recommends running the profiling wizard on each operating system you wish to support. You may download the latest Streaming profiler and Offline plug-in client software from HERE
Need help? Having a problem?
Visit our support forum, the Citrix knowledge base at http://support.citrix.com or contact Citrix Sales or a Citrix Solution Advisor near you.
About Citrix
Citrix Systems, Inc. (Nasdaq:CTXS) is a leading provider of virtual computing solutions that help
companies deliver IT as an on-demand service. Founded in 1989, Citrix combines virtualization,
networking, and cloud computing technologies into a full portfolio of products that enable virtual
workstyles for users and virtual datacenters for IT. More than 230,000 organizations worldwide rely
on Citrix to help them build simpler and more cost-effective IT environments. Citrix partners with
over 10,000 companies in more than 100 countries. Annual revenue in 2009 was $1.61 billion.
©2010 Citrix Systems, Inc. All rights reserved. Citrix®, Citrix XenApp™, Citrix XenServer™ are trademarks of Citrix Systems, Inc. and/or one or more of its
subsidiaries, and may be registered in the United States Patent and Trademark Office and in other countries. Microsoft® and Windows® are registered trademarks
of Microsoft Corporation in the United States and/or other countries. UNIX® is a registered trademark of The Open Group in the United States and other countries.
All other trademarks and registered trademarks are property of their respective owners.
Citrix Worldwide
Worldwide headquarters
Citrix Systems, Inc.
851 West Cypress Creek Road
Fort Lauderdale, FL 33309
USA
T +1 800 393 1888
T +1 954 267 3000
Regional headquarters
Americas
Citrix Silicon Valley
4988 Great America Parkway
Santa Clara, CA 95054
USA
T +1 408 790 8000
Europe
Citrix Systems International GmbH
Rheinweg 9
8200 Schaffhausen
Switzerland
T +41 52 635 7700
Asia Pacific
Citrix Systems Hong Kong Ltd.
Suite 3201, 32nd Floor
One International Finance Centre
1 Harbour View Street
Central
Hong Kong
T +852 2100 5000
Citrix Online division
5385 Hollister Avenue
Santa Barbara, CA 93111
USA
T +1 805 690 6400
www.citrix.com