cisco asa upgrade · pdf filecisco asa upgrade guide 8 planning your upgrade asa and asa...
TRANSCRIPT

Cisco ASA Upgrade GuideLast Modified: 2018-05-10
Americas HeadquartersCisco Systems, Inc.170 West Tasman DriveSan Jose, CA 95134-1706USAhttp://www.cisco.comTel: 408 526-4000
800 553-NETS (6387)Fax: 408 527-0883

© 2018 Cisco Systems, Inc. All rights reserved.
C O N T E N T S
Planning Your Upgrade 1C H A P T E R 1
ASA Upgrade Checklist 1
Compatibility 3
ASA and ASDM Compatibility Per Model 3
ASA 9.9 to 9.5 3
ASA 9.4 to 9.3 4
ASA 9.2 to 9.1 5
ASA and ASA FirePOWER Module Compatibility 6
Firepower Management Center and Managed Device Version Compatibility 10
Upgrade Path 12
ASA Upgrade Path 12
ASA FirePOWER Upgrade Path—With ASDM 18
ASA FirePOWER Module Upgrade Path—With Firepower Management Center 19
Firepower Management Center Upgrade Path 19
Download the Software from Cisco.com 20
Download ASA Software 20
Download ASA FirePOWER Software 27
Download Firepower Management Center Software 29
Download Upgrade Packages from the Management Center GUI 29
Download Firepower Management Center Software 30
Download Guidelines for High Availability Firepower Management Centers 31
Upgrade Guidelines 31
ASA Upgrade Guidelines 31
Version-Specific Guidelines and Migrations 32
Clustering Guidelines 38
Failover Guidelines 40
Cisco ASA Upgrade Guideiii
Additional Guidelines 41
Firepower Management Center Upgrade Guidelines 41
Back Up Your Configurations 41
Upgrade the ASA Appliance or ASAv 43C H A P T E R 2
Upgrade the ASA 5500-X, ASAv, ASASM, or ISA 3000 43
Upgrade a Standalone Unit 43
Upgrade a Standalone Unit Using the CLI 43
Upgrade a Standalone Unit from Your Local Computer Using ASDM 45
Upgrade a Standalone Unit Using the ASDM Cisco.com Wizard 46
Upgrade an Active/Standby Failover Pair 48
Upgrade an Active/Standby Failover Pair Using the CLI 48
Upgrade an Active/Standby Failover Pair Using ASDM 50
Upgrade an Active/Active Failover Pair 52
Upgrade an Active/Active Failover Pair Using the CLI 52
Upgrade an Active/Active Failover Pair Using ASDM 55
Upgrade an ASA Cluster 56
Upgrade an ASA Cluster Using the CLI 56
Upgrade an ASA Cluster Using ASDM 62
Upgrade the ASA on the Firepower 2100 64
Upgrade a Standalone Unit 64
Upgrade a Standalone Unit Using the Firepower Chassis Manager 64
Upgrade a Standalone Unit Using the FXOS CLI 65
Upgrade an Active/Standby Failover Pair 67
Upgrade an Active/Standby Failover Pair Using the Firepower Chassis Manager 67
Upgrade an Active/Standby Failover Pair Using the FXOS CLI 69
Upgrade an Active/Active Failover Pair 74
Upgrade an Active/Active Failover Pair Using the Firepower Chassis Manager 74
Upgrade an Active/Active Failover Pair Using the FXOS CLI 75
Upgrade the ASA FirePOWERModule 81C H A P T E R 3
ASA FirePOWER Upgrade Behavior 81
Upgrade an ASA FirePOWER Module Managed by ASDM 82
Upgrade the Firepower Management Center 83
Cisco ASA Upgrade Guideiv
Contents

Upgrade a Standalone Firepower Management Center 84
Upgrade High Availability Firepower Management Centers 85
Upgrade ASA FirePOWER modules—With Firepower Management Center 87
Cisco ASA Upgrade Guidev
Contents

Cisco ASA Upgrade Guidevi
Contents
C H A P T E R 1Planning Your Upgrade
Before upgrading the ASA, you should perform the following preparation:
• Check compatibility between different versions of operating systems; for example, make sure that theASA version is compatible with the ASA FirePOWER module version.
• Check the upgrade path for the current version to the target version; ensure you plan for any intermediateversions required for each operating system.
• Check for guidelines and limitations that affect your intermediate and target versions, or that affectfailover and clustering zero downtime upgrading.
• Download all software packages required from Cisco.com.
• Back up your configurations, especially if there is a configuration migration.
The following topics explain how to upgrade your ASA.
• ASA Upgrade Checklist, on page 1• Compatibility, on page 3• Upgrade Path, on page 12• Download the Software from Cisco.com, on page 20• Upgrade Guidelines, on page 31• Back Up Your Configurations, on page 41
ASA Upgrade ChecklistTo plan your upgrade, use this checklist.
1. ASA model (ASA Upgrade Path, on page 12): _____________________
Current ASA version (ASA Upgrade Path, on page 12): _____________________
2. Check the ASA/ASDM compatibility per model (ASA and ASDM Compatibility Per Model, on page3).
Target ASA version: _____________________
Target ASDM version: _____________________
3. Check the upgrade path for ASA (ASA Upgrade Path, on page 12). Are there intermediate versionsrequired? Yes _____ No _____
Cisco ASA Upgrade Guide1
If yes, intermediate ASA version(s): ______________________________________________________
4. Download the target and intermediate ASA/ASDM versions (Download ASA Software, on page 20).
ASDM is included in the ASA for FXOS package.Note
5. Do you have an ASA FirePOWER module? Yes _____ No _____
If yes:
1. Current ASA FirePOWER version: _____________________
View your current version: ASDM (ASA FirePOWER Upgrade Path—With ASDM, on page 18) orFirepower Management Center (Firepower Management Center Upgrade Path, on page 19).
2. Check ASA/FirePOWER compatibility (ASA and ASA FirePOWERModule Compatibility, on page6).
Target ASA FirePOWER version: _____________________
3. Check the upgrade path for ASA FirePOWER (ASA FirePOWER Upgrade Path—With ASDM, onpage 18 or ASA FirePOWERModule Upgrade Path—With Firepower Management Center, on page19). Are there intermediate versions required? Yes _____ No _____
If yes, intermediate ASA FirePOWER version(s):______________________________________________________
4. Download the target and intermediate ASA FirePOWER versions (Download ASA FirePOWERSoftware, on page 27).
5. Do you manage the module using the Firepower Management Center? Yes _____ No _____
If yes:
1. Firepower Management Center model (Firepower Management Center Upgrade Path, on page19): _____________________
Current Firepower Management Center version (Firepower Management Center Upgrade Path,on page 19): _____________________
2. Check the upgrade path for the Firepower Management Center (Firepower Management CenterUpgrade Path, on page 19). Are there intermediate versions required? Yes _____ No _____
If yes, intermediate ASA FirePOWER version(s):______________________________________________________
3. Check the Firepower Management Center compatibility with managed devices (FirepowerManagement Center and Managed Device Version Compatibility, on page 10). Make sure youplan to upgrade the ASA FirePOWER module in step with the Firepower Management Centerupgrades.
4. Download the target and intermediate versions for the FirepowerManagement Center (DownloadFirepower Management Center Software, on page 30).
6. Check upgrade guidelines for each operating system.
• ASA Upgrade Guidelines, on page 31.
Cisco ASA Upgrade Guide2
Planning Your UpgradeASA Upgrade Checklist

• ASA FirePOWER guidelines: see the Firepower Release Notes for each intermediate and targetversion.
• Firepower Management Center guidelines: see the Firepower Release Notes for each intermediateand target version.
7. Back up your configurations. See the configuration guide for each operating system for backup methods.
CompatibilityThis section includes tables showing the compatibility between platforms, operating systems, and applications.
ASA and ASDM Compatibility Per ModelThe following tables list ASA and ASDM compatibility for current models. For older versions and models,see Cisco ASA Compatibility.
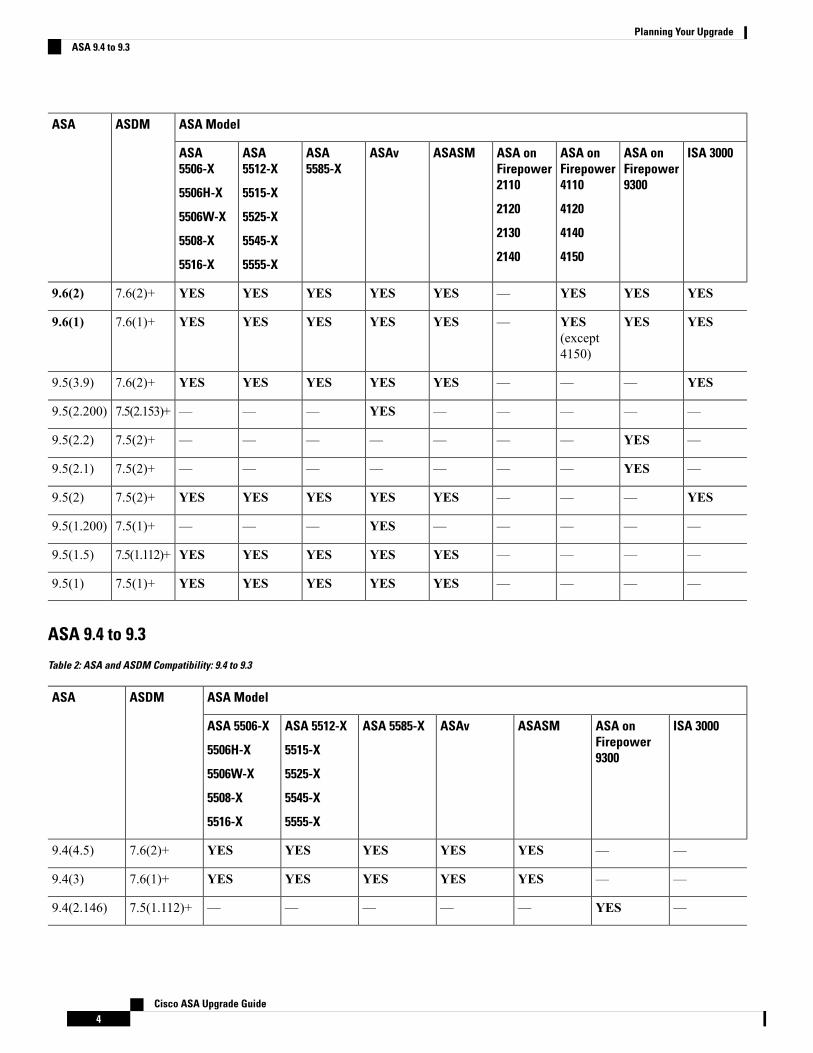
ASA 9.9 to 9.5Releases in bold are the recommended versions.
Table 1: ASA and ASDM Compatibility: 9.9 to 9.5
ASA ModelASDMASA
ISA 3000ASA onFirepower9300
ASA onFirepower4110
4120
4140
4150
ASA onFirepower2110
2120
2130
2140
ASASMASAvASA5585-X
ASA5512-X
5515-X
5525-X
5545-X
5555-X
ASA5506-X
5506H-X
5506W-X
5508-X
5516-X
YESYESYESYESYESYESYESYESYES7.9(2)+9.9(2)
YESYESYESYESYESYESYESYESYES7.9(1)+9.9(1)
YESYESYESYESYESYESYESYESYES7.8(2)+9.8(2)
—————YES———Nosupport
9.8(1.200)
YESYESYES—YESYES(+ASAv50)
YESYESYES7.8(1)+9.8(1)
YESYESYES—YESYESYESYESYES7.7(1)+9.7(1.4)
YESYESYES—YESYESYESYESYES7.9(1)+9.6(4)
YESYESYES—YESYESYESYESYES7.7(1)+9.6(3.1)
Cisco ASA Upgrade Guide3
Planning Your UpgradeCompatibility
ASA ModelASDMASA
ISA 3000ASA onFirepower9300
ASA onFirepower4110
4120
4140
4150
ASA onFirepower2110
2120
2130
2140
ASASMASAvASA5585-X
ASA5512-X
5515-X
5525-X
5545-X
5555-X
ASA5506-X
5506H-X
5506W-X
5508-X
5516-X
YESYESYES—YESYESYESYESYES7.6(2)+9.6(2)
YESYESYES(except4150)
—YESYESYESYESYES7.6(1)+9.6(1)
YES———YESYESYESYESYES7.6(2)+9.5(3.9)
—————YES———7.5(2.153)+9.5(2.200)
—YES———————7.5(2)+9.5(2.2)
—YES———————7.5(2)+9.5(2.1)
YES———YESYESYESYESYES7.5(2)+9.5(2)
—————YES———7.5(1)+9.5(1.200)
————YESYESYESYESYES7.5(1.112)+9.5(1.5)
————YESYESYESYESYES7.5(1)+9.5(1)
ASA 9.4 to 9.3
Table 2: ASA and ASDM Compatibility: 9.4 to 9.3
ASA ModelASDMASA
ISA 3000ASA onFirepower9300
ASASMASAvASA 5585-XASA 5512-X
5515-X
5525-X
5545-X
5555-X
ASA 5506-X
5506H-X
5506W-X
5508-X
5516-X
——YESYESYESYESYES7.6(2)+9.4(4.5)
——YESYESYESYESYES7.6(1)+9.4(3)
—YES—————7.5(1.112)+9.4(2.146)
Cisco ASA Upgrade Guide4
Planning Your UpgradeASA 9.4 to 9.3
ASA ModelASDMASA
ISA 3000ASA onFirepower9300
ASASMASAvASA 5585-XASA 5512-X
5515-X
5525-X
5545-X
5555-X
ASA 5506-X
5506H-X
5506W-X
5508-X
5516-X
—YES—————7.5(1.112)+9.4(2.145)
——YESYESYESYESYES7.5(1)+9.4(2)
YES——————7.5(1)+9.4(1.225)
———YES———7.4(2)+9.4(1.200)
—YES—————7.4(3)+9.4(1.152)
——YESYESYESYESYES7.4(1)+9.4(1)
——YESYESYESYESYES7.4(1)+9.3(3.8)
——YESYESYESYESYES7.4(1)+9.3(3)
———YES———7.3(2)+9.3(2.200)
——YESYESYESYESYES(5506-Xonly)
7.3(3)+9.3(2)
——YESYESYESYESYES(5506-Xonly)
7.3(2)+
——YESYESYESYES—7.3(1)+9.3(1)
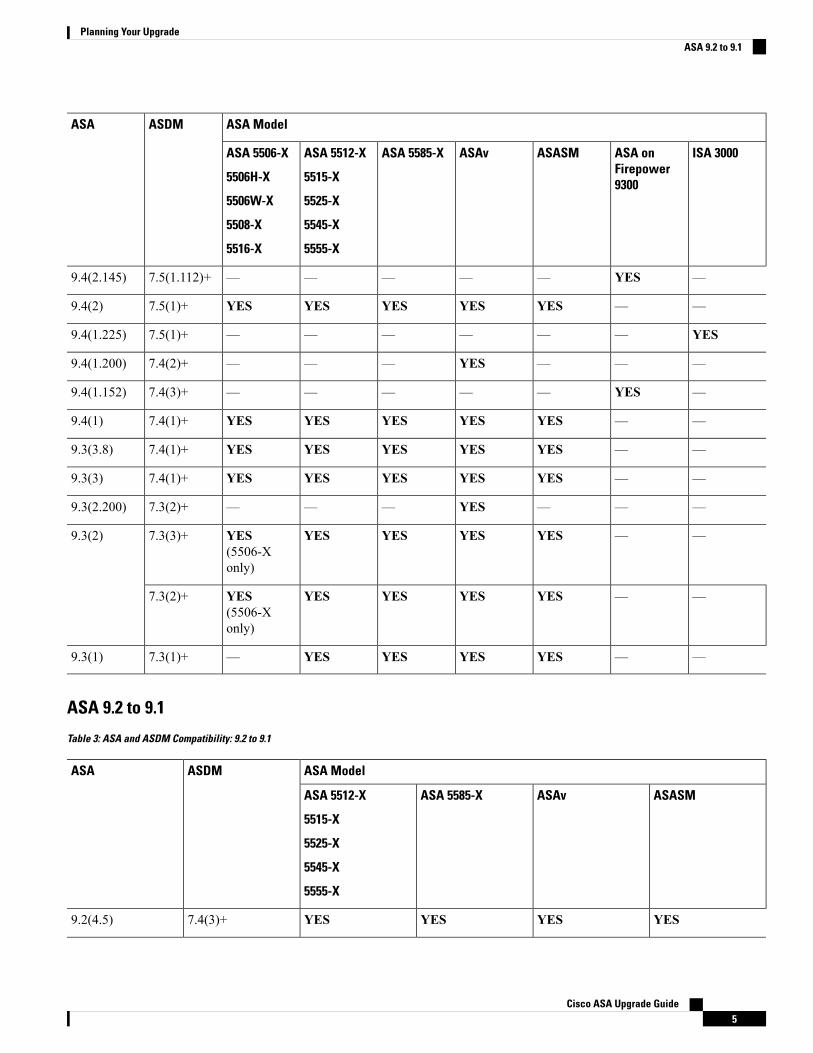
ASA 9.2 to 9.1
Table 3: ASA and ASDM Compatibility: 9.2 to 9.1
ASA ModelASDMASA
ASASMASAvASA 5585-XASA 5512-X
5515-X
5525-X
5545-X
5555-X
YESYESYESYES7.4(3)+9.2(4.5)
Cisco ASA Upgrade Guide5
Planning Your UpgradeASA 9.2 to 9.1
ASA ModelASDMASA
ASASMASAvASA 5585-XASA 5512-X
5515-X
5525-X
5545-X
5555-X
YESYESYESYES7.4(3)+9.2(4)
YESYESYESYES7.3(1.101)+9.2(3)
YESYESYESYES7.2(2)+9.2(2.4)
YESYESYESYES7.2(1)+9.2(1)
YES—YESYES7.5(2)+9.1(7.4)
YES—YESYES7.1(7)+9.1(6)
YES—YESYES7.1(6)+9.1(5)
YES—YESYES7.1(5)+9.1(4)
YES—YESYES7.1(4)+9.1(3)
YES—YESYES7.1(3)+9.1(2)
YES—YESYES7.1(1)+9.1(1)
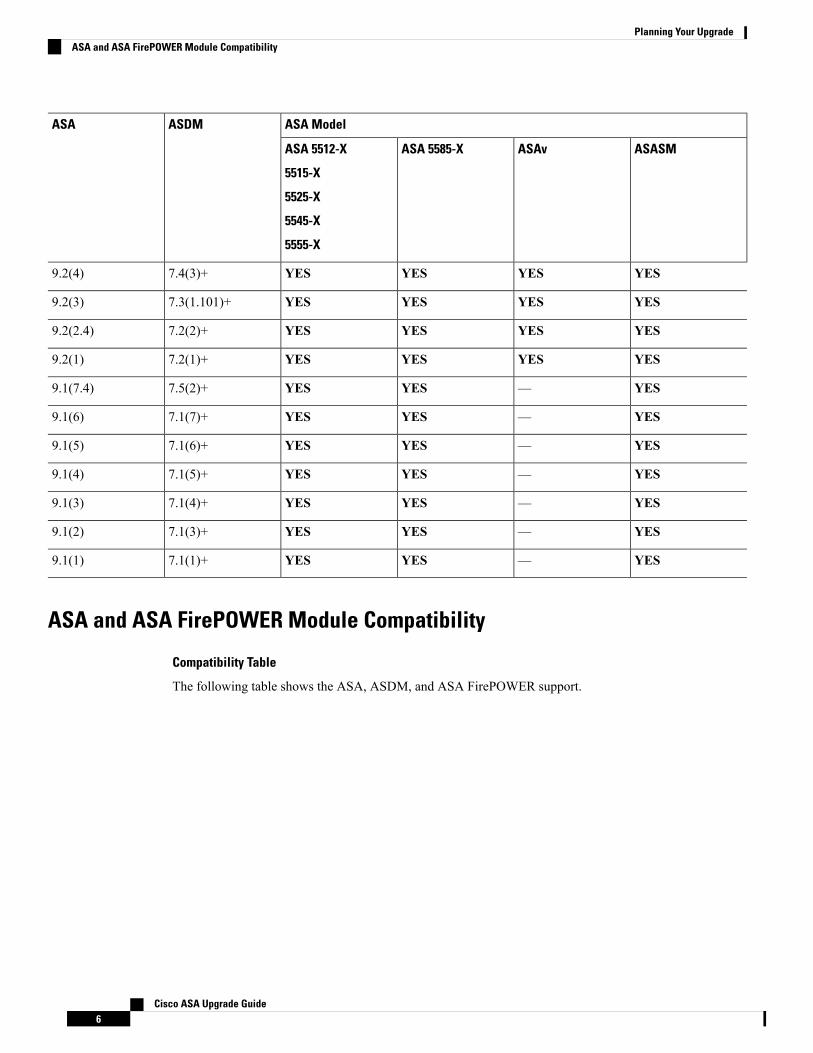
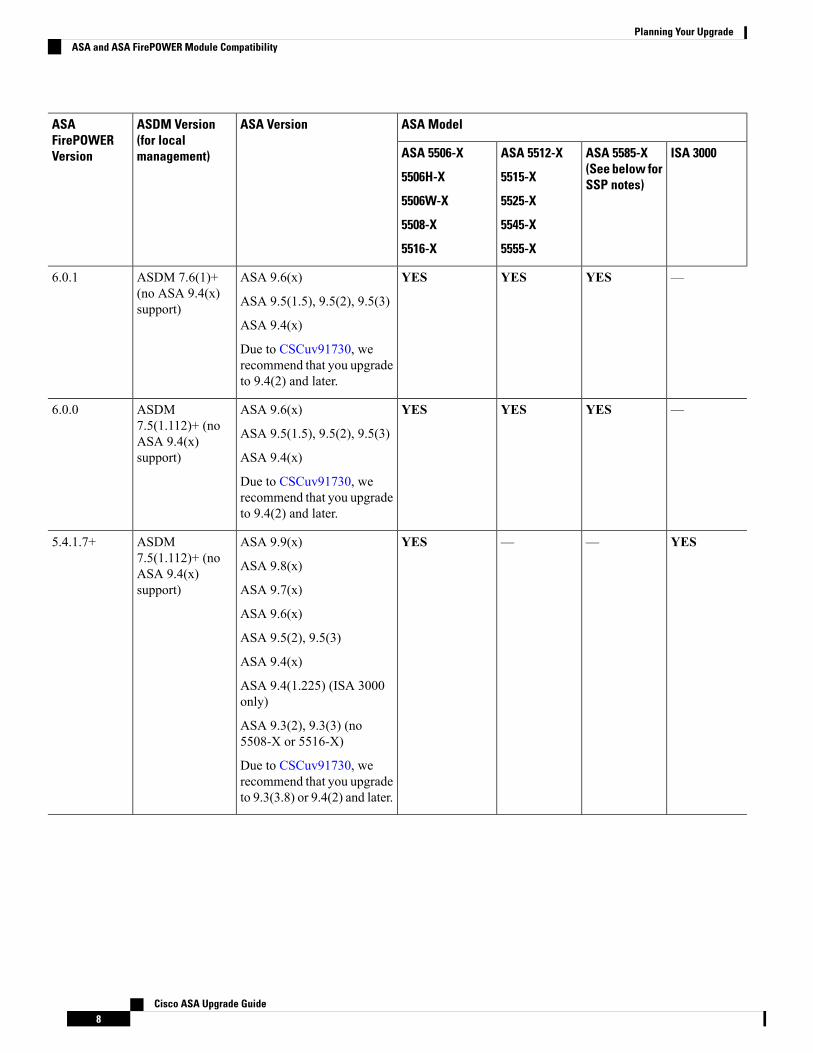
ASA and ASA FirePOWER Module Compatibility
Compatibility Table
The following table shows the ASA, ASDM, and ASA FirePOWER support.
Cisco ASA Upgrade Guide6
Planning Your UpgradeASA and ASA FirePOWER Module Compatibility
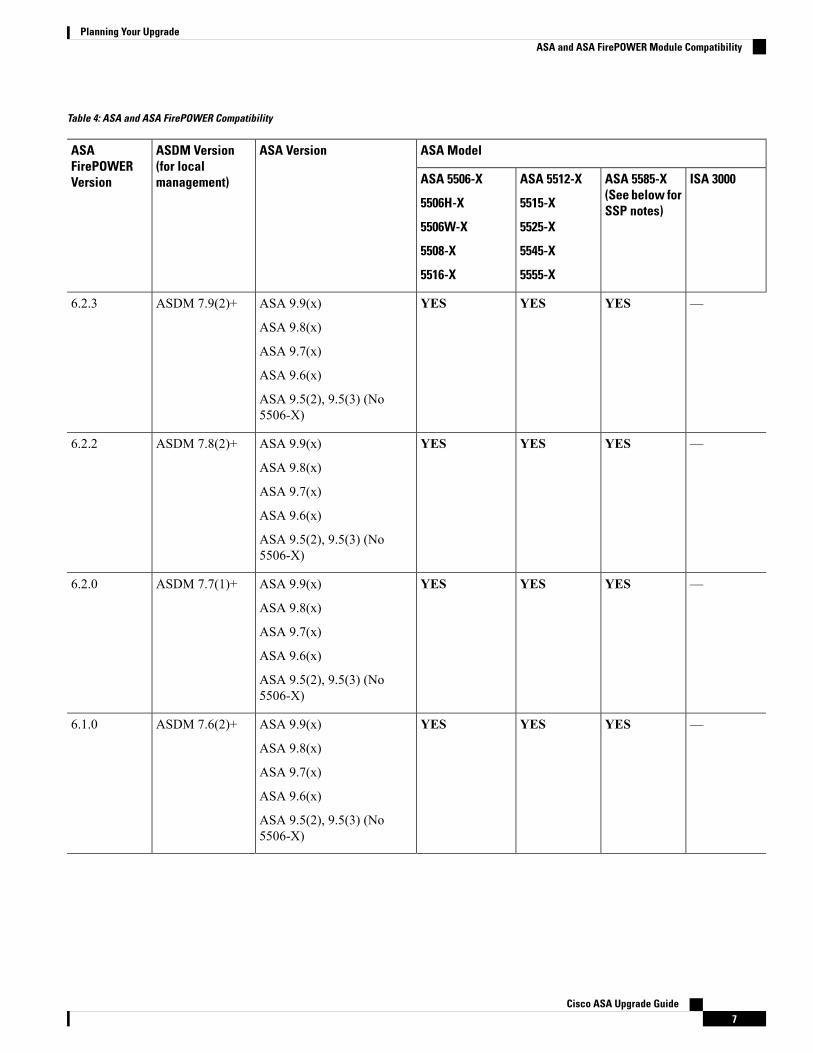
Table 4: ASA and ASA FirePOWER Compatibility
ASA ModelASA VersionASDM Version(for localmanagement)
ASAFirePOWERVersion ISA 3000ASA 5585-X
(See below forSSP notes)
ASA 5512-X
5515-X
5525-X
5545-X
5555-X
ASA 5506-X
5506H-X
5506W-X
5508-X
5516-X
—YESYESYESASA 9.9(x)
ASA 9.8(x)
ASA 9.7(x)
ASA 9.6(x)
ASA 9.5(2), 9.5(3) (No5506-X)
ASDM 7.9(2)+6.2.3
—YESYESYESASA 9.9(x)
ASA 9.8(x)
ASA 9.7(x)
ASA 9.6(x)
ASA 9.5(2), 9.5(3) (No5506-X)
ASDM 7.8(2)+6.2.2
—YESYESYESASA 9.9(x)
ASA 9.8(x)
ASA 9.7(x)
ASA 9.6(x)
ASA 9.5(2), 9.5(3) (No5506-X)
ASDM 7.7(1)+6.2.0
—YESYESYESASA 9.9(x)
ASA 9.8(x)
ASA 9.7(x)
ASA 9.6(x)
ASA 9.5(2), 9.5(3) (No5506-X)
ASDM 7.6(2)+6.1.0
Cisco ASA Upgrade Guide7
Planning Your UpgradeASA and ASA FirePOWER Module Compatibility
ASA ModelASA VersionASDM Version(for localmanagement)
ASAFirePOWERVersion ISA 3000ASA 5585-X
(See below forSSP notes)
ASA 5512-X
5515-X
5525-X
5545-X
5555-X
ASA 5506-X
5506H-X
5506W-X
5508-X
5516-X
—YESYESYESASA 9.6(x)
ASA 9.5(1.5), 9.5(2), 9.5(3)
ASA 9.4(x)
Due to CSCuv91730, werecommend that you upgradeto 9.4(2) and later.
ASDM 7.6(1)+(no ASA 9.4(x)support)
6.0.1
—YESYESYESASA 9.6(x)
ASA 9.5(1.5), 9.5(2), 9.5(3)
ASA 9.4(x)
Due to CSCuv91730, werecommend that you upgradeto 9.4(2) and later.
ASDM7.5(1.112)+ (noASA 9.4(x)support)
6.0.0
YES——YESASA 9.9(x)
ASA 9.8(x)
ASA 9.7(x)
ASA 9.6(x)
ASA 9.5(2), 9.5(3)
ASA 9.4(x)
ASA 9.4(1.225) (ISA 3000only)
ASA 9.3(2), 9.3(3) (no5508-X or 5516-X)
Due to CSCuv91730, werecommend that you upgradeto 9.3(3.8) or 9.4(2) and later.
ASDM7.5(1.112)+ (noASA 9.4(x)support)
5.4.1.7+
Cisco ASA Upgrade Guide8
Planning Your UpgradeASA and ASA FirePOWER Module Compatibility
ASA ModelASA VersionASDM Version(for localmanagement)
ASAFirePOWERVersion ISA 3000ASA 5585-X
(See below forSSP notes)
ASA 5512-X
5515-X
5525-X
5545-X
5555-X
ASA 5506-X
5506H-X
5506W-X
5508-X
5516-X
———YESASA 9.9(x)
ASA 9.8(x)
ASA 9.7(x)
ASA 9.6(x)
ASA 9.5(1.5), 9.5(2), 9.5(3)
ASA 9.4(x)
ASA 9.3(2), 9.3(3) (5506-Xonly)
Due to CSCuv91730, werecommend that you upgradeto 9.3(3.8) or 9.4(2) and later.
ASDM 7.3(3)+5.4.1
—YESYES—ASA 9.9(x)
ASA 9.8(x)
ASA 9.7(x)
ASA 9.6(x)
ASA 9.5(1.5), 9.5(2), 9.5(3)
ASA 9.4(x)
ASA 9.3(2), 9.3(3)
Due to CSCuv91730, werecommend that you upgradeto 9.3(3.8) or 9.4(2) and later.
—5.4.0.2+
—YESYES—ASA 9.2(2.4), 9.2(3), 9.2(4)
Due to CSCuv91730, werecommend that you upgradeto 9.2(4.5) and later.
—5.4.0.1
—YESYES—ASA 9.2(2.4), 9.2(3), 9.2(4)
Due to CSCuv91730, werecommend that you upgradeto 9.2(4.5) and later.
—5.3.1
Cisco ASA Upgrade Guide9
Planning Your UpgradeASA and ASA FirePOWER Module Compatibility
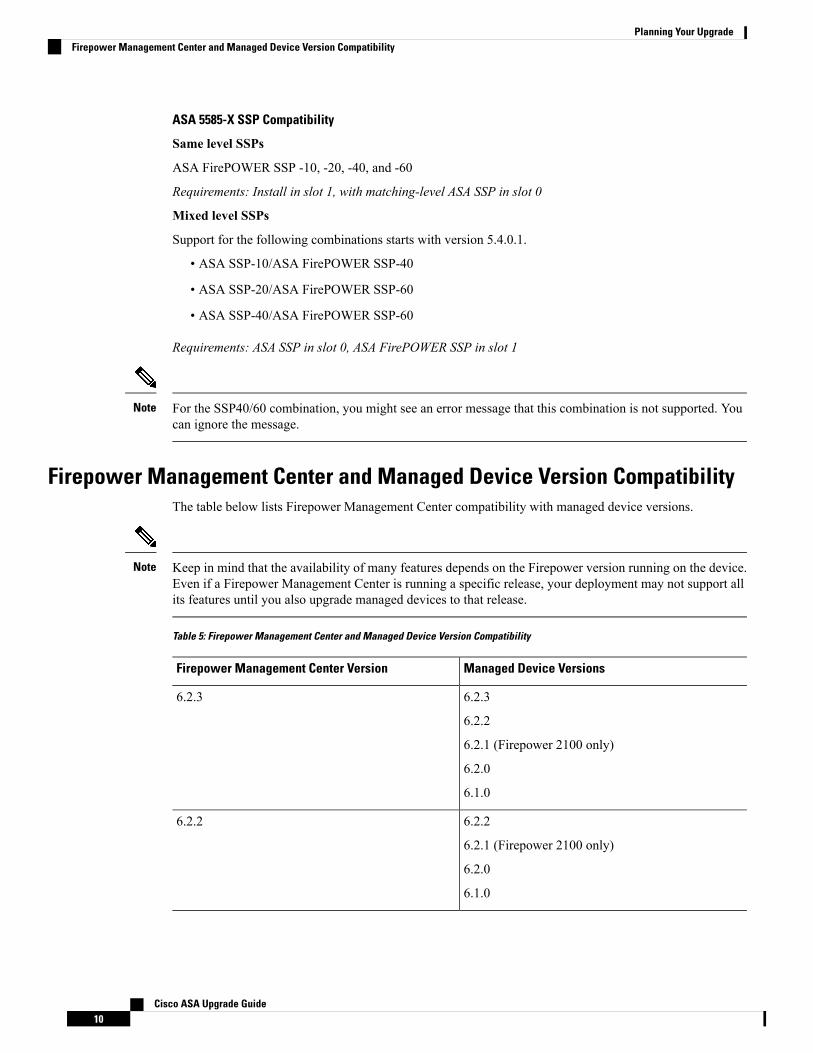
ASA 5585-X SSP Compatibility
Same level SSPs
ASA FirePOWER SSP -10, -20, -40, and -60
Requirements: Install in slot 1, with matching-level ASA SSP in slot 0
Mixed level SSPs
Support for the following combinations starts with version 5.4.0.1.
• ASA SSP-10/ASA FirePOWER SSP-40
• ASA SSP-20/ASA FirePOWER SSP-60
• ASA SSP-40/ASA FirePOWER SSP-60
Requirements: ASA SSP in slot 0, ASA FirePOWER SSP in slot 1
For the SSP40/60 combination, you might see an error message that this combination is not supported. Youcan ignore the message.
Note
Firepower Management Center and Managed Device Version CompatibilityThe table below lists Firepower Management Center compatibility with managed device versions.
Keep in mind that the availability of many features depends on the Firepower version running on the device.Even if a Firepower Management Center is running a specific release, your deployment may not support allits features until you also upgrade managed devices to that release.
Note
Table 5: Firepower Management Center and Managed Device Version Compatibility
Managed Device VersionsFirepower Management Center Version
6.2.3
6.2.2
6.2.1 (Firepower 2100 only)
6.2.0
6.1.0
6.2.3
6.2.2
6.2.1 (Firepower 2100 only)
6.2.0
6.1.0
6.2.2
Cisco ASA Upgrade Guide10
Planning Your UpgradeFirepower Management Center and Managed Device Version Compatibility
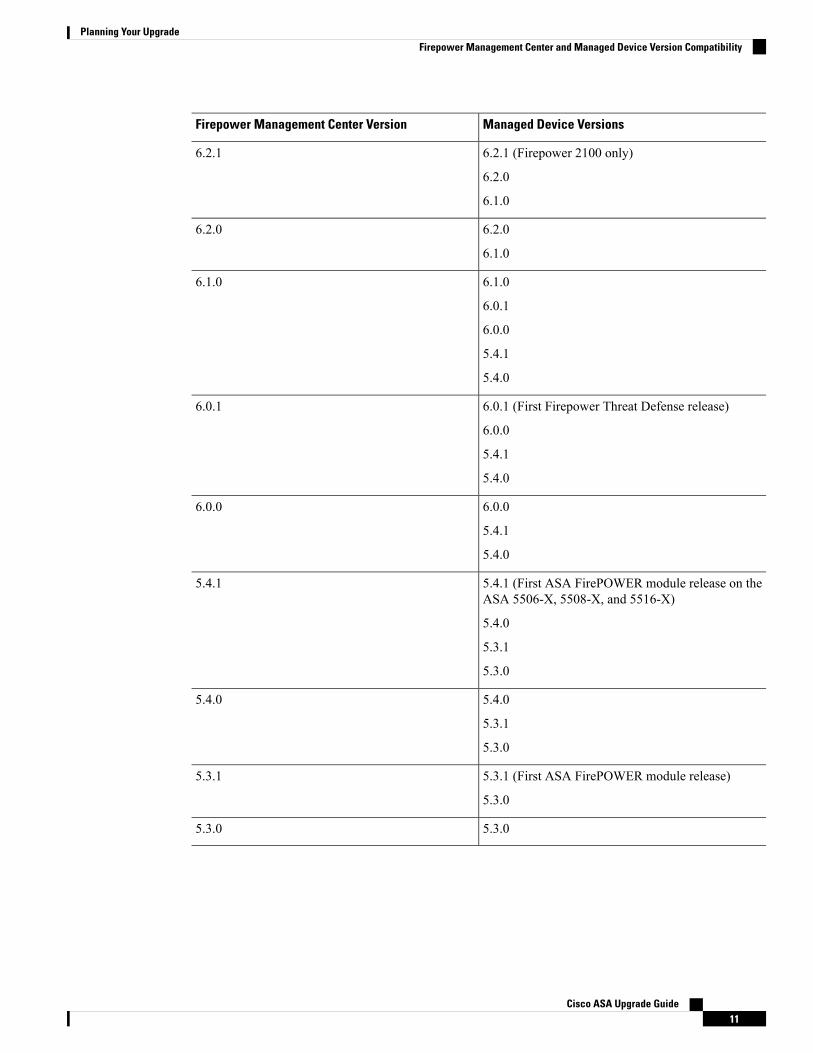
Managed Device VersionsFirepower Management Center Version
6.2.1 (Firepower 2100 only)
6.2.0
6.1.0
6.2.1
6.2.0
6.1.0
6.2.0
6.1.0
6.0.1
6.0.0
5.4.1
5.4.0
6.1.0
6.0.1 (First Firepower Threat Defense release)
6.0.0
5.4.1
5.4.0
6.0.1
6.0.0
5.4.1
5.4.0
6.0.0
5.4.1 (First ASA FirePOWER module release on theASA 5506-X, 5508-X, and 5516-X)
5.4.0
5.3.1
5.3.0
5.4.1
5.4.0
5.3.1
5.3.0
5.4.0
5.3.1 (First ASA FirePOWER module release)
5.3.0
5.3.1
5.3.05.3.0
Cisco ASA Upgrade Guide11
Planning Your UpgradeFirepower Management Center and Managed Device Version Compatibility
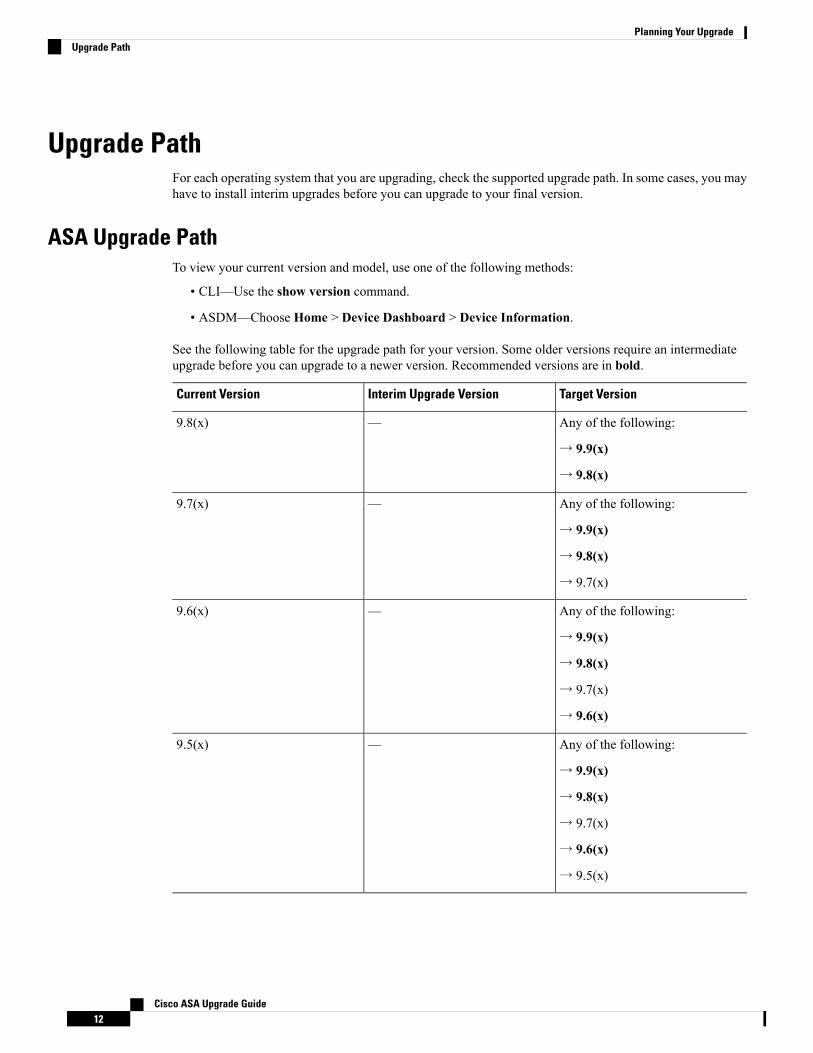
Upgrade PathFor each operating system that you are upgrading, check the supported upgrade path. In some cases, you mayhave to install interim upgrades before you can upgrade to your final version.
ASA Upgrade PathTo view your current version and model, use one of the following methods:
• CLI—Use the show version command.
• ASDM—Choose Home > Device Dashboard > Device Information.
See the following table for the upgrade path for your version. Some older versions require an intermediateupgrade before you can upgrade to a newer version. Recommended versions are in bold.
Target VersionInterim Upgrade VersionCurrent Version
Any of the following:
→ 9.9(x)
→ 9.8(x)
—9.8(x)
Any of the following:
→ 9.9(x)
→ 9.8(x)
→ 9.7(x)
—9.7(x)
Any of the following:
→ 9.9(x)
→ 9.8(x)
→ 9.7(x)
→ 9.6(x)
—9.6(x)
Any of the following:
→ 9.9(x)
→ 9.8(x)
→ 9.7(x)
→ 9.6(x)
→ 9.5(x)
—9.5(x)
Cisco ASA Upgrade Guide12
Planning Your UpgradeUpgrade Path
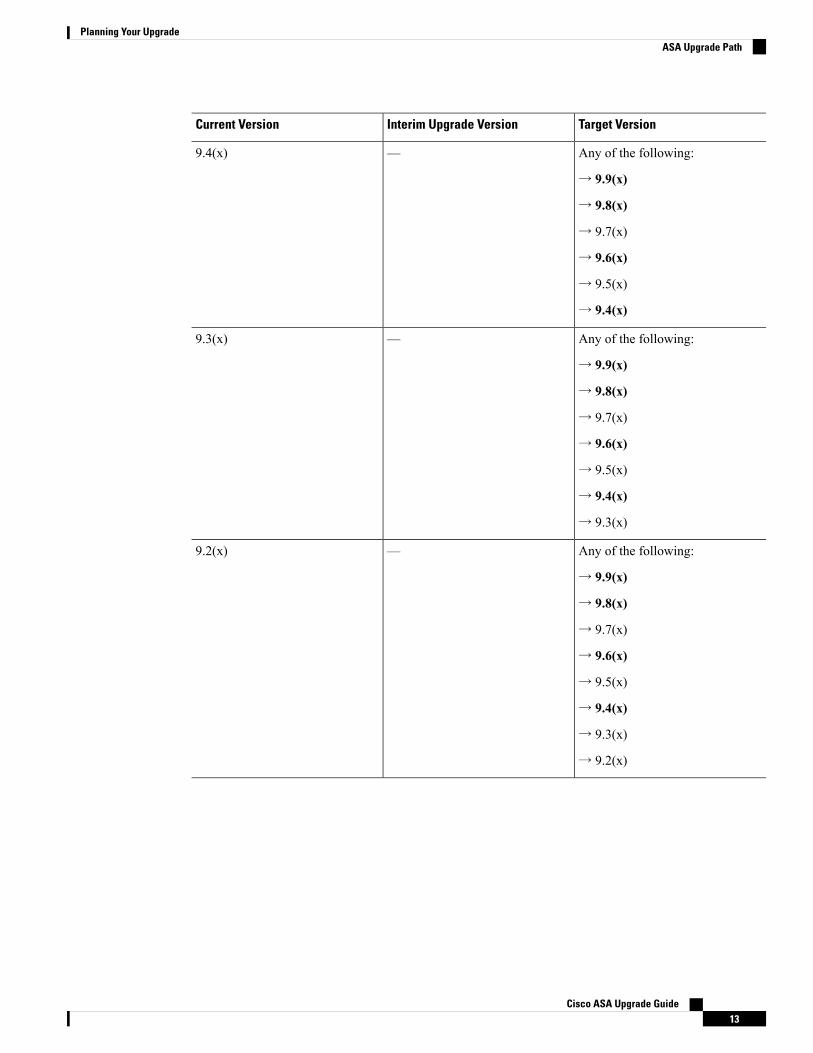
Target VersionInterim Upgrade VersionCurrent Version
Any of the following:
→ 9.9(x)
→ 9.8(x)
→ 9.7(x)
→ 9.6(x)
→ 9.5(x)
→ 9.4(x)
—9.4(x)
Any of the following:
→ 9.9(x)
→ 9.8(x)
→ 9.7(x)
→ 9.6(x)
→ 9.5(x)
→ 9.4(x)
→ 9.3(x)
—9.3(x)
Any of the following:
→ 9.9(x)
→ 9.8(x)
→ 9.7(x)
→ 9.6(x)
→ 9.5(x)
→ 9.4(x)
→ 9.3(x)
→ 9.2(x)
—9.2(x)
Cisco ASA Upgrade Guide13
Planning Your UpgradeASA Upgrade Path
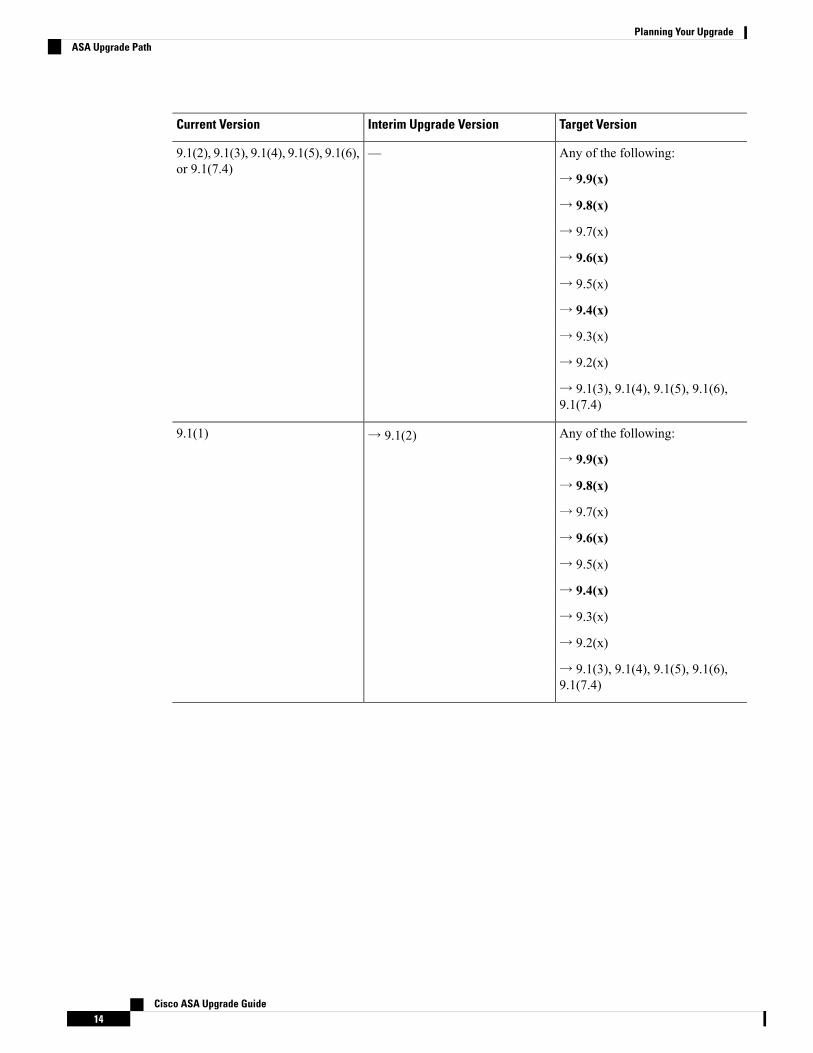
Target VersionInterim Upgrade VersionCurrent Version
Any of the following:
→ 9.9(x)
→ 9.8(x)
→ 9.7(x)
→ 9.6(x)
→ 9.5(x)
→ 9.4(x)
→ 9.3(x)
→ 9.2(x)
→ 9.1(3), 9.1(4), 9.1(5), 9.1(6),9.1(7.4)
—9.1(2), 9.1(3), 9.1(4), 9.1(5), 9.1(6),or 9.1(7.4)
Any of the following:
→ 9.9(x)
→ 9.8(x)
→ 9.7(x)
→ 9.6(x)
→ 9.5(x)
→ 9.4(x)
→ 9.3(x)
→ 9.2(x)
→ 9.1(3), 9.1(4), 9.1(5), 9.1(6),9.1(7.4)
→ 9.1(2)9.1(1)
Cisco ASA Upgrade Guide14
Planning Your UpgradeASA Upgrade Path
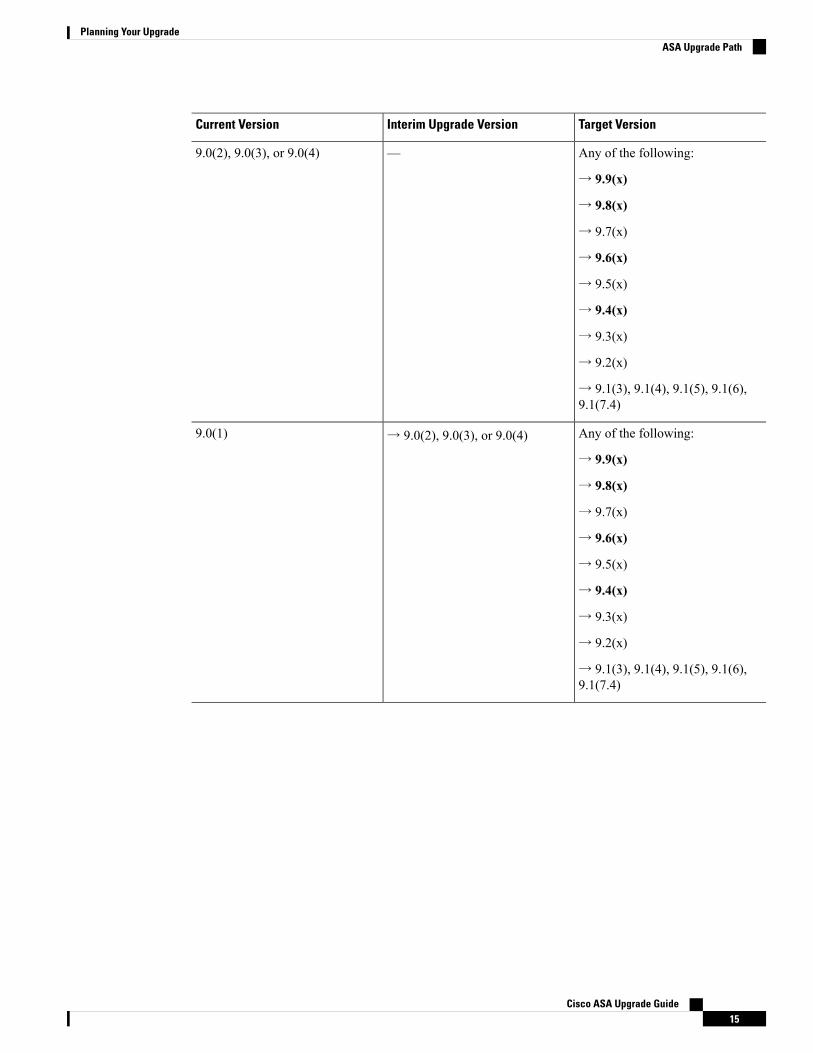
Target VersionInterim Upgrade VersionCurrent Version
Any of the following:
→ 9.9(x)
→ 9.8(x)
→ 9.7(x)
→ 9.6(x)
→ 9.5(x)
→ 9.4(x)
→ 9.3(x)
→ 9.2(x)
→ 9.1(3), 9.1(4), 9.1(5), 9.1(6),9.1(7.4)
—9.0(2), 9.0(3), or 9.0(4)
Any of the following:
→ 9.9(x)
→ 9.8(x)
→ 9.7(x)
→ 9.6(x)
→ 9.5(x)
→ 9.4(x)
→ 9.3(x)
→ 9.2(x)
→ 9.1(3), 9.1(4), 9.1(5), 9.1(6),9.1(7.4)
→ 9.0(2), 9.0(3), or 9.0(4)9.0(1)
Cisco ASA Upgrade Guide15
Planning Your UpgradeASA Upgrade Path

Target VersionInterim Upgrade VersionCurrent Version
Any of the following:
→ 9.9(x)
→ 9.8(x)
→ 9.7(x)
→ 9.6(x)
→ 9.5(x)
→ 9.4(x)
→ 9.3(x)
→ 9.2(x)
→ 9.1(3), 9.1(4), 9.1(5), 9.1(6),9.1(7.4)
→ 9.0(2), 9.0(3), or 9.0(4)8.6(1)
Any of the following:
→ 9.9(x)
→ 9.8(x)
→ 9.7(x)
→ 9.6(x)
→ 9.5(x)
→ 9.4(x)
→ 9.3(x)
→ 9.2(x)
→ 9.1(3), 9.1(4), 9.1(5), 9.1(6),9.1(7.4)
→ 9.0(2), 9.0(3), or 9.0(4)8.5(1)
Cisco ASA Upgrade Guide16
Planning Your UpgradeASA Upgrade Path
Target VersionInterim Upgrade VersionCurrent Version
Any of the following:
→ 9.9(x)
→ 9.8(x)
→ 9.7(x)
→ 9.6(x)
→ 9.5(x)
→ 9.4(x)
→ 9.3(x)
→ 9.2(x)
→ 9.1(3), 9.1(4), 9.1(5), 9.1(6),9.1(7.4)
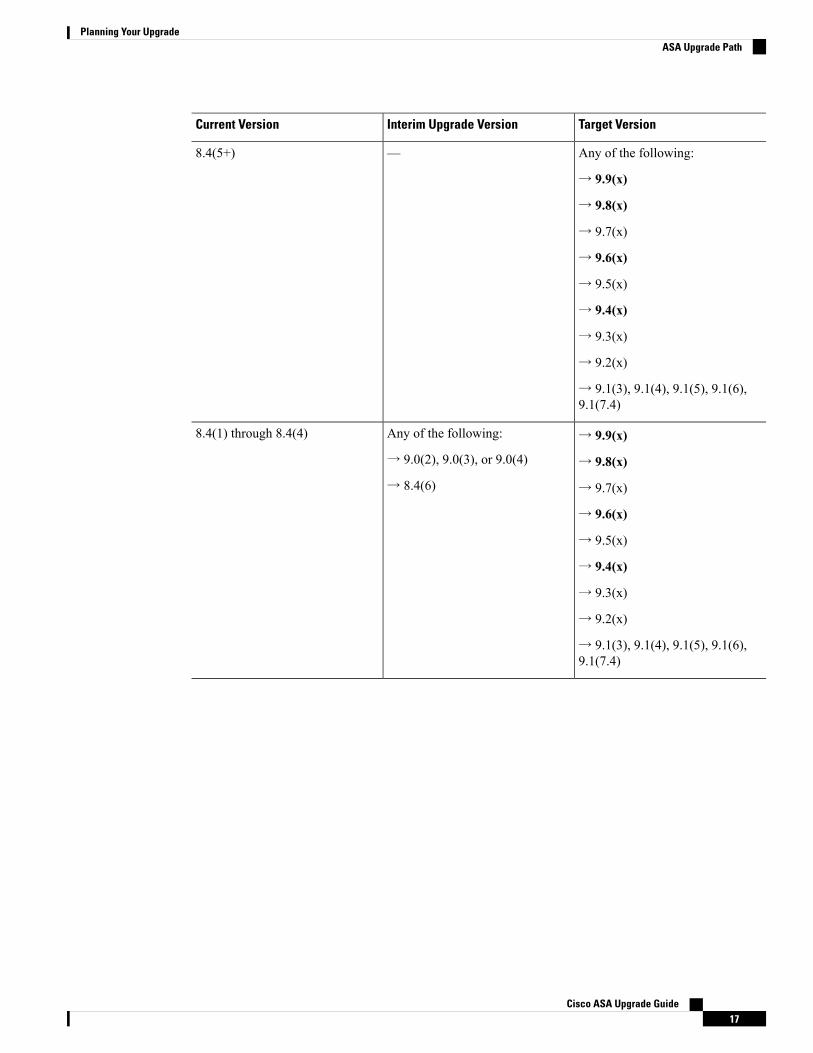
—8.4(5+)
→ 9.9(x)
→ 9.8(x)
→ 9.7(x)
→ 9.6(x)
→ 9.5(x)
→ 9.4(x)
→ 9.3(x)
→ 9.2(x)
→ 9.1(3), 9.1(4), 9.1(5), 9.1(6),9.1(7.4)
Any of the following:
→ 9.0(2), 9.0(3), or 9.0(4)
→ 8.4(6)
8.4(1) through 8.4(4)
Cisco ASA Upgrade Guide17
Planning Your UpgradeASA Upgrade Path
Target VersionInterim Upgrade VersionCurrent Version
Any of the following:
→ 9.9(x)
→ 9.8(x)
→ 9.7(x)
→ 9.6(x)
→ 9.5(x)
→ 9.4(x)
→ 9.3(x)
→ 9.2(x)
→ 9.1(3), 9.1(4), 9.1(5), 9.1(6),9.1(7.4)
→ 8.4(6)8.3(x)
Any of the following:
→ 9.9(x)
→ 9.8(x)
→ 9.7(x)
→ 9.6(x)
→ 9.5(x)
→ 9.4(x)
→ 9.3(x)
→ 9.2(x)
→ 9.1(3), 9.1(4), 9.1(5), 9.1(6),9.1(7.4)
→ 8.4(6)8.2(x) and earlier
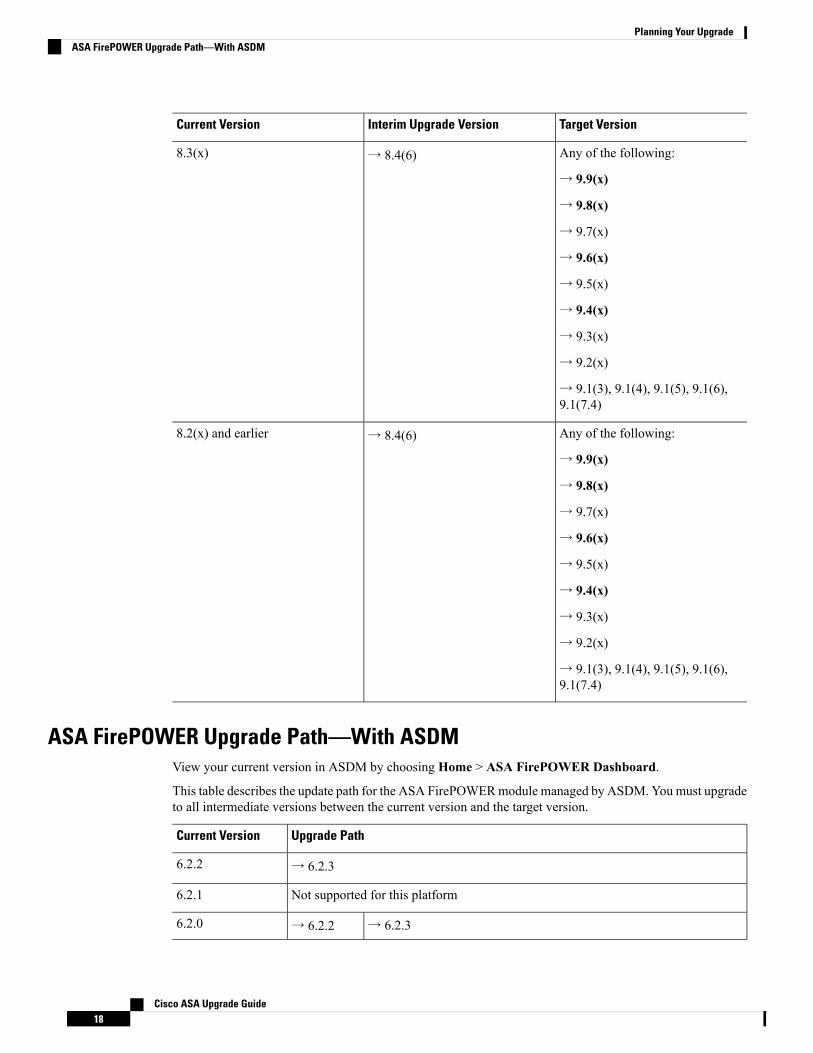
ASA FirePOWER Upgrade Path—With ASDMView your current version in ASDM by choosing Home > ASA FirePOWER Dashboard.
This table describes the update path for the ASA FirePOWERmodule managed by ASDM. You must upgradeto all intermediate versions between the current version and the target version.
Upgrade PathCurrent Version
→ 6.2.36.2.2
Not supported for this platform6.2.1
→ 6.2.3→ 6.2.26.2.0
Cisco ASA Upgrade Guide18
Planning Your UpgradeASA FirePOWER Upgrade Path—With ASDM
Upgrade PathCurrent Version
→ 6.2.3→ 6.2.2→ 6.2.06.1.0
→ 6.2.3→ 6.2.2→ 6.2.0→ 6.1.06.0.1
→ 6.2.3→ 6.2.2→ 6.2.0→ 6.1.0→ 6.0.16.0.0
→ 6.2.3→ 6.2.2→ 6.2.0→ 6.1.0→ 6.0.1→ 6.0.05.4.1
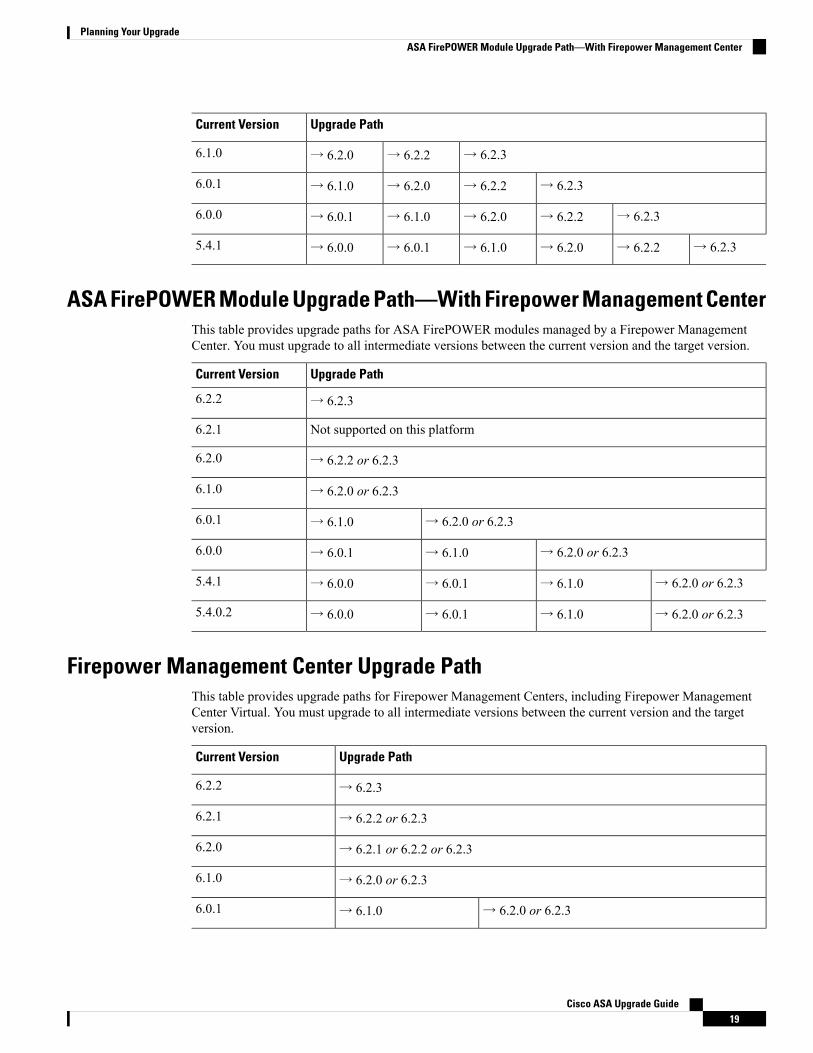
ASA FirePOWER Module Upgrade Path—With Firepower Management CenterThis table provides upgrade paths for ASA FirePOWER modules managed by a Firepower ManagementCenter. You must upgrade to all intermediate versions between the current version and the target version.
Upgrade PathCurrent Version
→ 6.2.36.2.2
Not supported on this platform6.2.1
→ 6.2.2 or 6.2.36.2.0
→ 6.2.0 or 6.2.36.1.0
→ 6.2.0 or 6.2.3→ 6.1.06.0.1
→ 6.2.0 or 6.2.3→ 6.1.0→ 6.0.16.0.0
→ 6.2.0 or 6.2.3→ 6.1.0→ 6.0.1→ 6.0.05.4.1
→ 6.2.0 or 6.2.3→ 6.1.0→ 6.0.1→ 6.0.05.4.0.2
Firepower Management Center Upgrade PathThis table provides upgrade paths for Firepower Management Centers, including Firepower ManagementCenter Virtual. You must upgrade to all intermediate versions between the current version and the targetversion.
Upgrade PathCurrent Version
→ 6.2.36.2.2
→ 6.2.2 or 6.2.36.2.1
→ 6.2.1 or 6.2.2 or 6.2.36.2.0
→ 6.2.0 or 6.2.36.1.0
→ 6.2.0 or 6.2.3→ 6.1.06.0.1
Cisco ASA Upgrade Guide19
Planning Your UpgradeASA FirePOWER Module Upgrade Path—With Firepower Management Center
Upgrade PathCurrent Version
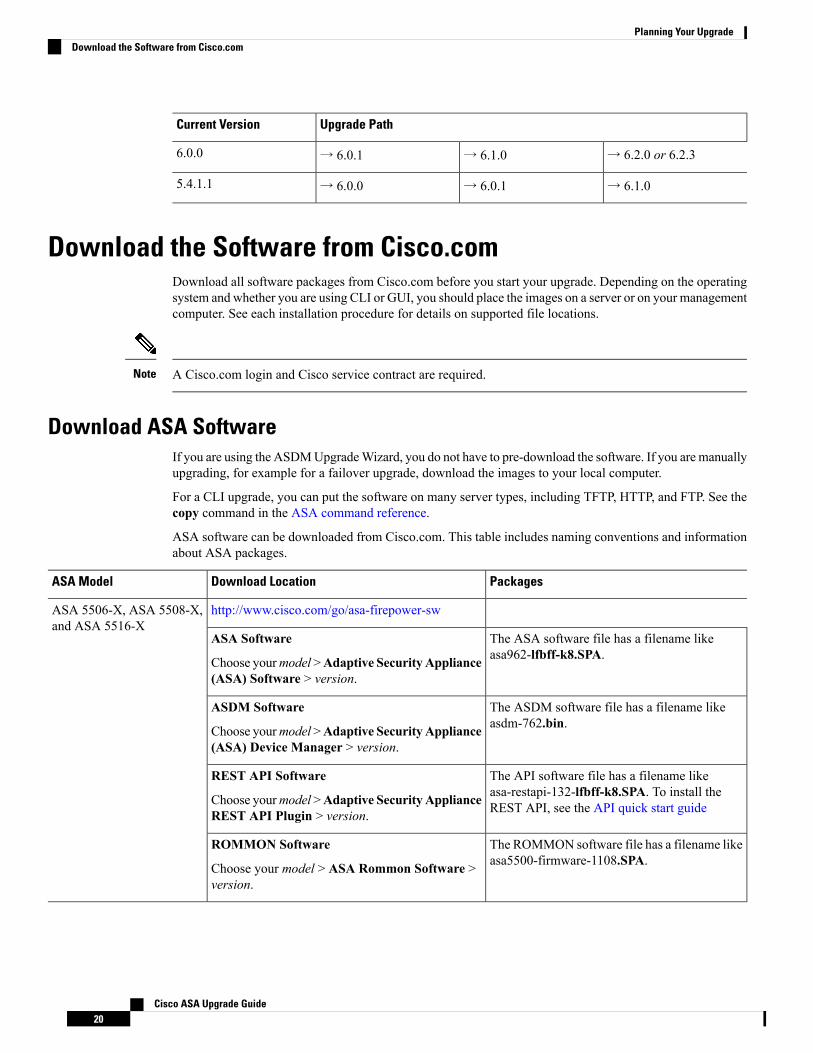
→ 6.2.0 or 6.2.3→ 6.1.0→ 6.0.16.0.0
→ 6.1.0→ 6.0.1→ 6.0.05.4.1.1
Download the Software from Cisco.comDownload all software packages from Cisco.com before you start your upgrade. Depending on the operatingsystem and whether you are using CLI or GUI, you should place the images on a server or on your managementcomputer. See each installation procedure for details on supported file locations.
A Cisco.com login and Cisco service contract are required.Note
Download ASA SoftwareIf you are using the ASDMUpgradeWizard, you do not have to pre-download the software. If you are manuallyupgrading, for example for a failover upgrade, download the images to your local computer.
For a CLI upgrade, you can put the software on many server types, including TFTP, HTTP, and FTP. See thecopy command in the ASA command reference.
ASA software can be downloaded from Cisco.com. This table includes naming conventions and informationabout ASA packages.
PackagesDownload LocationASA Model
http://www.cisco.com/go/asa-firepower-swASA 5506-X, ASA 5508-X,and ASA 5516-X
The ASA software file has a filename likeasa962-lfbff-k8.SPA.
ASA Software
Choose yourmodel >Adaptive Security Appliance(ASA) Software > version.
The ASDM software file has a filename likeasdm-762.bin.
ASDM Software
Choose yourmodel >Adaptive Security Appliance(ASA) Device Manager > version.
The API software file has a filename likeasa-restapi-132-lfbff-k8.SPA. To install theREST API, see the API quick start guide
REST API Software
Choose yourmodel >Adaptive Security ApplianceREST API Plugin > version.
The ROMMON software file has a filename likeasa5500-firmware-1108.SPA.
ROMMON Software
Choose your model > ASA Rommon Software >version.
Cisco ASA Upgrade Guide20
Planning Your UpgradeDownload the Software from Cisco.com
PackagesDownload LocationASA Model
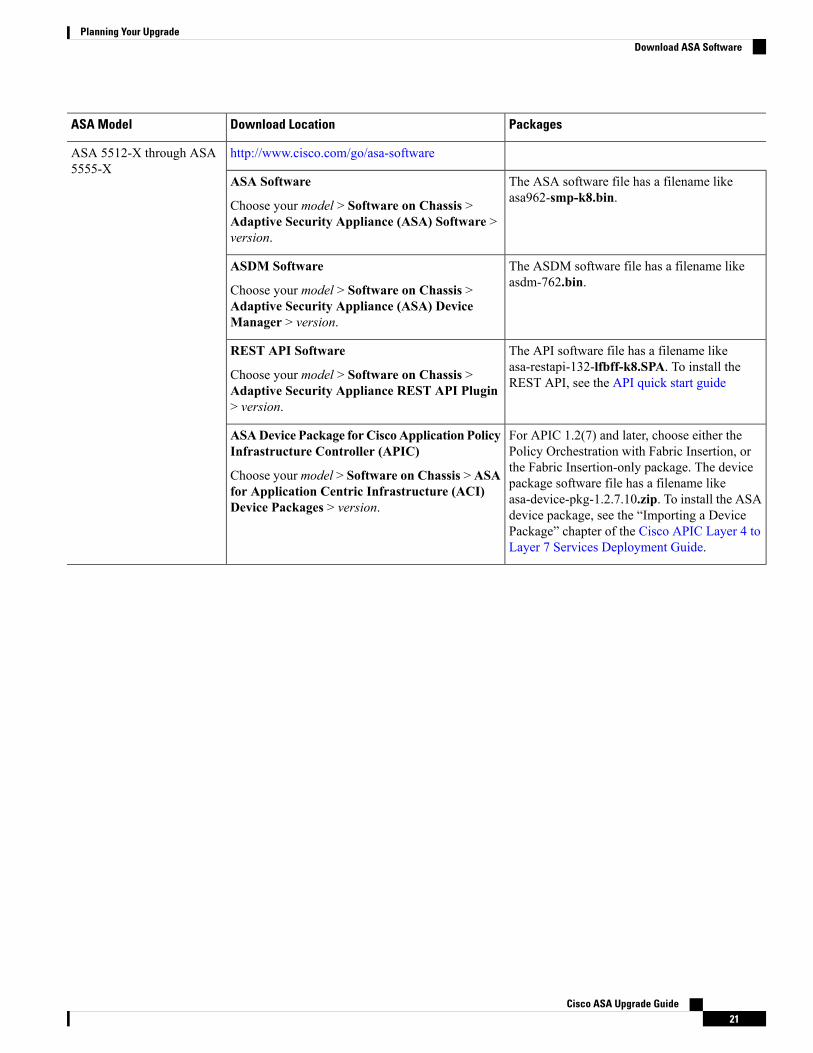
http://www.cisco.com/go/asa-softwareASA 5512-X through ASA5555-X
The ASA software file has a filename likeasa962-smp-k8.bin.
ASA Software
Choose your model > Software on Chassis >Adaptive Security Appliance (ASA) Software >version.
The ASDM software file has a filename likeasdm-762.bin.
ASDM Software
Choose your model > Software on Chassis >Adaptive Security Appliance (ASA) DeviceManager > version.
The API software file has a filename likeasa-restapi-132-lfbff-k8.SPA. To install theREST API, see the API quick start guide
REST API Software
Choose your model > Software on Chassis >Adaptive Security Appliance REST API Plugin> version.
For APIC 1.2(7) and later, choose either thePolicy Orchestration with Fabric Insertion, orthe Fabric Insertion-only package. The devicepackage software file has a filename likeasa-device-pkg-1.2.7.10.zip. To install the ASAdevice package, see the “Importing a DevicePackage” chapter of the Cisco APIC Layer 4 toLayer 7 Services Deployment Guide.
ASADevice Package for CiscoApplication PolicyInfrastructure Controller (APIC)
Choose your model > Software on Chassis > ASAfor Application Centric Infrastructure (ACI)Device Packages > version.
Cisco ASA Upgrade Guide21
Planning Your UpgradeDownload ASA Software
PackagesDownload LocationASA Model
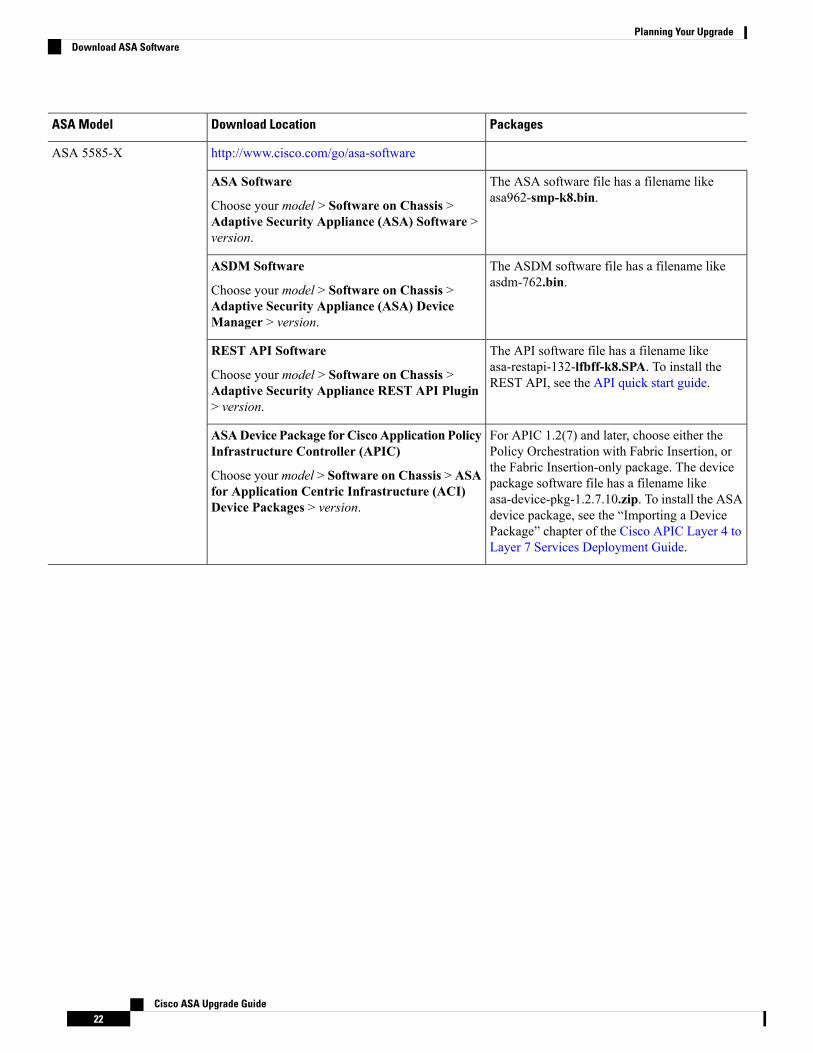
http://www.cisco.com/go/asa-softwareASA 5585-X
The ASA software file has a filename likeasa962-smp-k8.bin.
ASA Software
Choose your model > Software on Chassis >Adaptive Security Appliance (ASA) Software >version.
The ASDM software file has a filename likeasdm-762.bin.
ASDM Software
Choose your model > Software on Chassis >Adaptive Security Appliance (ASA) DeviceManager > version.
The API software file has a filename likeasa-restapi-132-lfbff-k8.SPA. To install theREST API, see the API quick start guide.
REST API Software
Choose your model > Software on Chassis >Adaptive Security Appliance REST API Plugin> version.
For APIC 1.2(7) and later, choose either thePolicy Orchestration with Fabric Insertion, orthe Fabric Insertion-only package. The devicepackage software file has a filename likeasa-device-pkg-1.2.7.10.zip. To install the ASAdevice package, see the “Importing a DevicePackage” chapter of the Cisco APIC Layer 4 toLayer 7 Services Deployment Guide.
ASADevice Package for CiscoApplication PolicyInfrastructure Controller (APIC)
Choose your model > Software on Chassis > ASAfor Application Centric Infrastructure (ACI)Device Packages > version.
Cisco ASA Upgrade Guide22
Planning Your UpgradeDownload ASA Software
PackagesDownload LocationASA Model
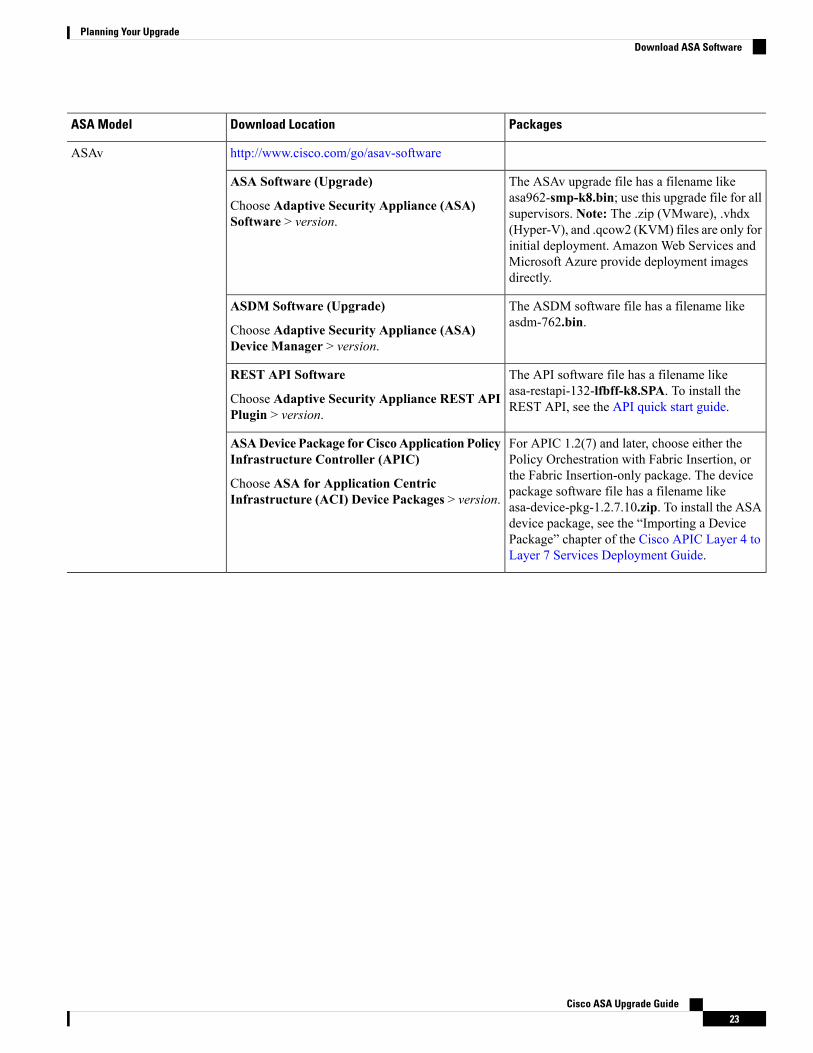
http://www.cisco.com/go/asav-softwareASAv
The ASAv upgrade file has a filename likeasa962-smp-k8.bin; use this upgrade file for allsupervisors. Note: The .zip (VMware), .vhdx(Hyper-V), and .qcow2 (KVM) files are only forinitial deployment. Amazon Web Services andMicrosoft Azure provide deployment imagesdirectly.
ASA Software (Upgrade)
Choose Adaptive Security Appliance (ASA)Software > version.
The ASDM software file has a filename likeasdm-762.bin.
ASDM Software (Upgrade)
Choose Adaptive Security Appliance (ASA)Device Manager > version.
The API software file has a filename likeasa-restapi-132-lfbff-k8.SPA. To install theREST API, see the API quick start guide.
REST API Software
Choose Adaptive Security Appliance REST APIPlugin > version.
For APIC 1.2(7) and later, choose either thePolicy Orchestration with Fabric Insertion, orthe Fabric Insertion-only package. The devicepackage software file has a filename likeasa-device-pkg-1.2.7.10.zip. To install the ASAdevice package, see the “Importing a DevicePackage” chapter of the Cisco APIC Layer 4 toLayer 7 Services Deployment Guide.
ASADevice Package for CiscoApplication PolicyInfrastructure Controller (APIC)
Choose ASA for Application CentricInfrastructure (ACI) Device Packages > version.
Cisco ASA Upgrade Guide23
Planning Your UpgradeDownload ASA Software
PackagesDownload LocationASA Model
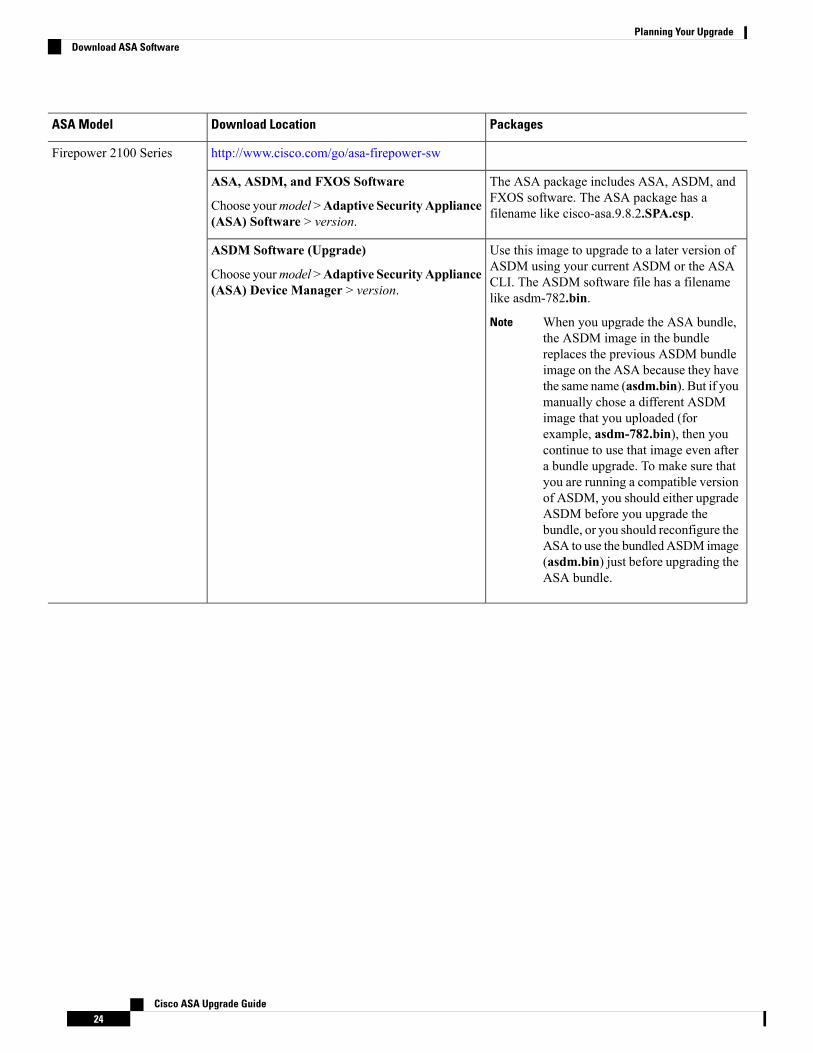
http://www.cisco.com/go/asa-firepower-swFirepower 2100 Series
The ASA package includes ASA, ASDM, andFXOS software. The ASA package has afilename like cisco-asa.9.8.2.SPA.csp.
ASA, ASDM, and FXOS Software
Choose yourmodel >Adaptive Security Appliance(ASA) Software > version.
Use this image to upgrade to a later version ofASDM using your current ASDM or the ASACLI. The ASDM software file has a filenamelike asdm-782.bin.
When you upgrade the ASA bundle,the ASDM image in the bundlereplaces the previous ASDM bundleimage on the ASA because they havethe same name (asdm.bin). But if youmanually chose a different ASDMimage that you uploaded (forexample, asdm-782.bin), then youcontinue to use that image even aftera bundle upgrade. To make sure thatyou are running a compatible versionof ASDM, you should either upgradeASDM before you upgrade thebundle, or you should reconfigure theASA to use the bundledASDM image(asdm.bin) just before upgrading theASA bundle.
Note
ASDM Software (Upgrade)
Choose yourmodel >Adaptive Security Appliance(ASA) Device Manager > version.
Cisco ASA Upgrade Guide24
Planning Your UpgradeDownload ASA Software
PackagesDownload LocationASA Model
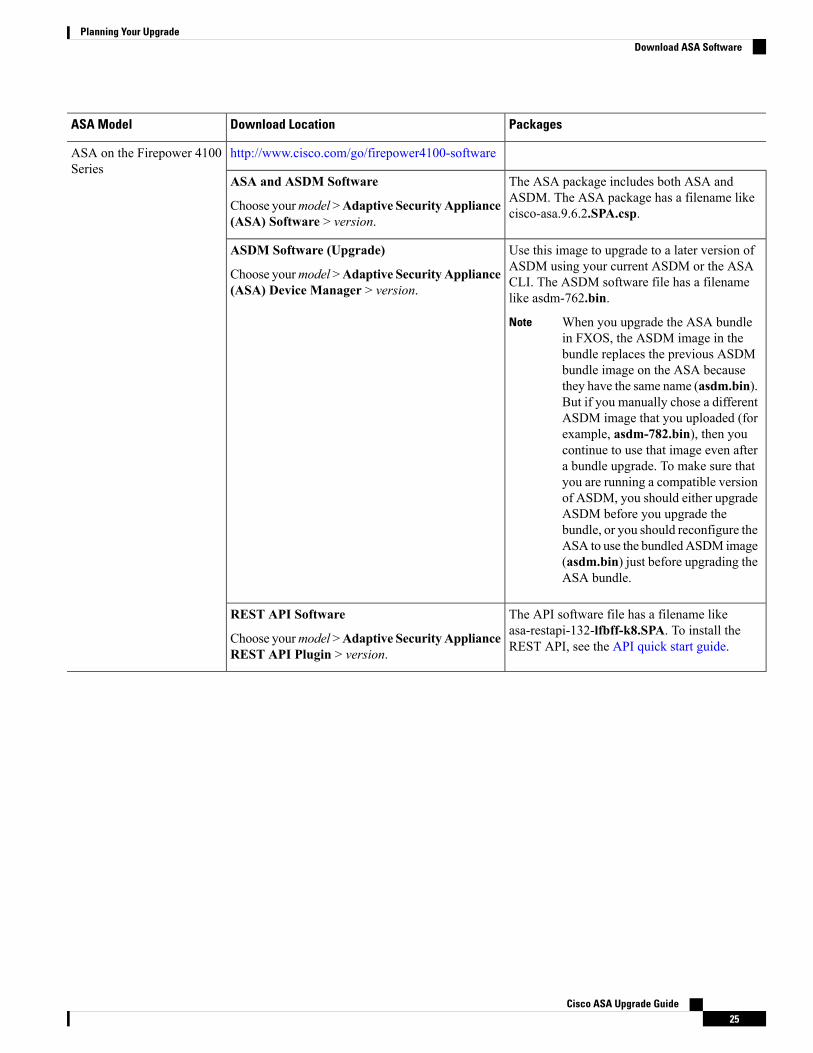
http://www.cisco.com/go/firepower4100-softwareASA on the Firepower 4100Series
The ASA package includes both ASA andASDM. The ASA package has a filename likecisco-asa.9.6.2.SPA.csp.
ASA and ASDM Software
Choose yourmodel >Adaptive Security Appliance(ASA) Software > version.
Use this image to upgrade to a later version ofASDM using your current ASDM or the ASACLI. The ASDM software file has a filenamelike asdm-762.bin.
When you upgrade the ASA bundlein FXOS, the ASDM image in thebundle replaces the previous ASDMbundle image on the ASA becausethey have the same name (asdm.bin).But if you manually chose a differentASDM image that you uploaded (forexample, asdm-782.bin), then youcontinue to use that image even aftera bundle upgrade. To make sure thatyou are running a compatible versionof ASDM, you should either upgradeASDM before you upgrade thebundle, or you should reconfigure theASA to use the bundledASDM image(asdm.bin) just before upgrading theASA bundle.
Note
ASDM Software (Upgrade)
Choose yourmodel >Adaptive Security Appliance(ASA) Device Manager > version.
The API software file has a filename likeasa-restapi-132-lfbff-k8.SPA. To install theREST API, see the API quick start guide.
REST API Software
Choose yourmodel >Adaptive Security ApplianceREST API Plugin > version.
Cisco ASA Upgrade Guide25
Planning Your UpgradeDownload ASA Software
PackagesDownload LocationASA Model
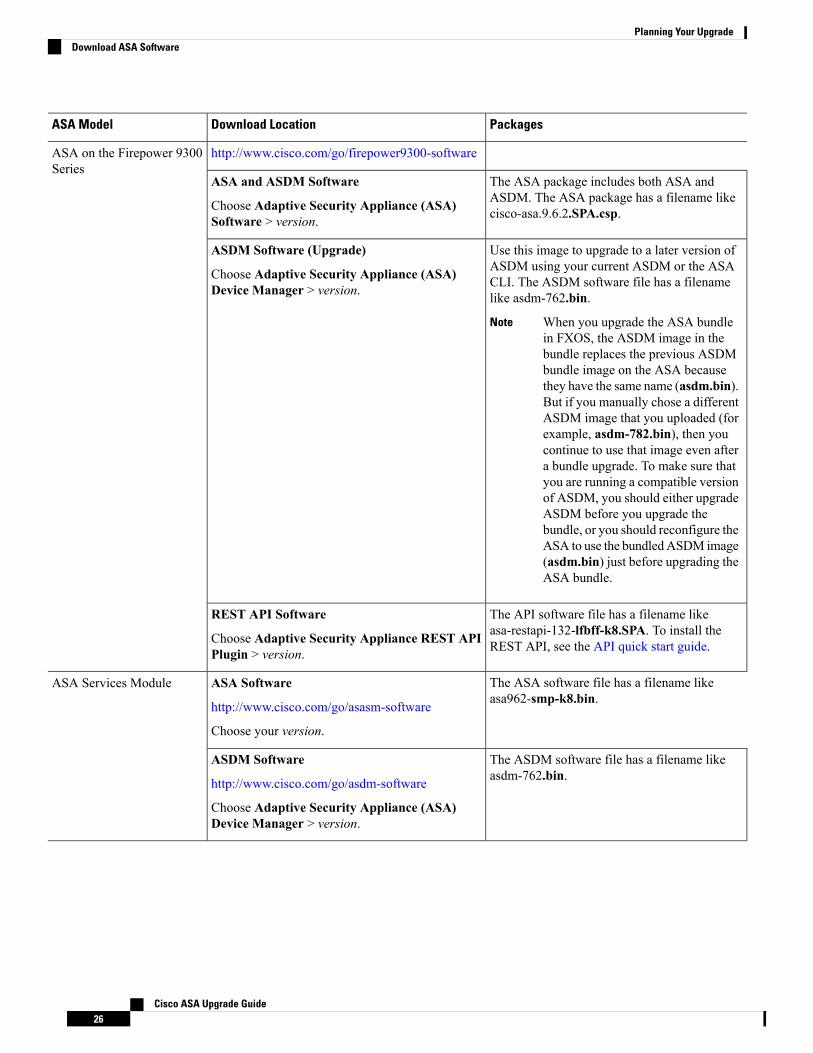
http://www.cisco.com/go/firepower9300-softwareASA on the Firepower 9300Series
The ASA package includes both ASA andASDM. The ASA package has a filename likecisco-asa.9.6.2.SPA.csp.
ASA and ASDM Software
Choose Adaptive Security Appliance (ASA)Software > version.
Use this image to upgrade to a later version ofASDM using your current ASDM or the ASACLI. The ASDM software file has a filenamelike asdm-762.bin.
When you upgrade the ASA bundlein FXOS, the ASDM image in thebundle replaces the previous ASDMbundle image on the ASA becausethey have the same name (asdm.bin).But if you manually chose a differentASDM image that you uploaded (forexample, asdm-782.bin), then youcontinue to use that image even aftera bundle upgrade. To make sure thatyou are running a compatible versionof ASDM, you should either upgradeASDM before you upgrade thebundle, or you should reconfigure theASA to use the bundledASDM image(asdm.bin) just before upgrading theASA bundle.
Note
ASDM Software (Upgrade)
Choose Adaptive Security Appliance (ASA)Device Manager > version.
The API software file has a filename likeasa-restapi-132-lfbff-k8.SPA. To install theREST API, see the API quick start guide.
REST API Software
Choose Adaptive Security Appliance REST APIPlugin > version.
The ASA software file has a filename likeasa962-smp-k8.bin.
ASA Software
http://www.cisco.com/go/asasm-software
Choose your version.
ASA Services Module
The ASDM software file has a filename likeasdm-762.bin.
ASDM Software
http://www.cisco.com/go/asdm-software
Choose Adaptive Security Appliance (ASA)Device Manager > version.
Cisco ASA Upgrade Guide26
Planning Your UpgradeDownload ASA Software
PackagesDownload LocationASA Model
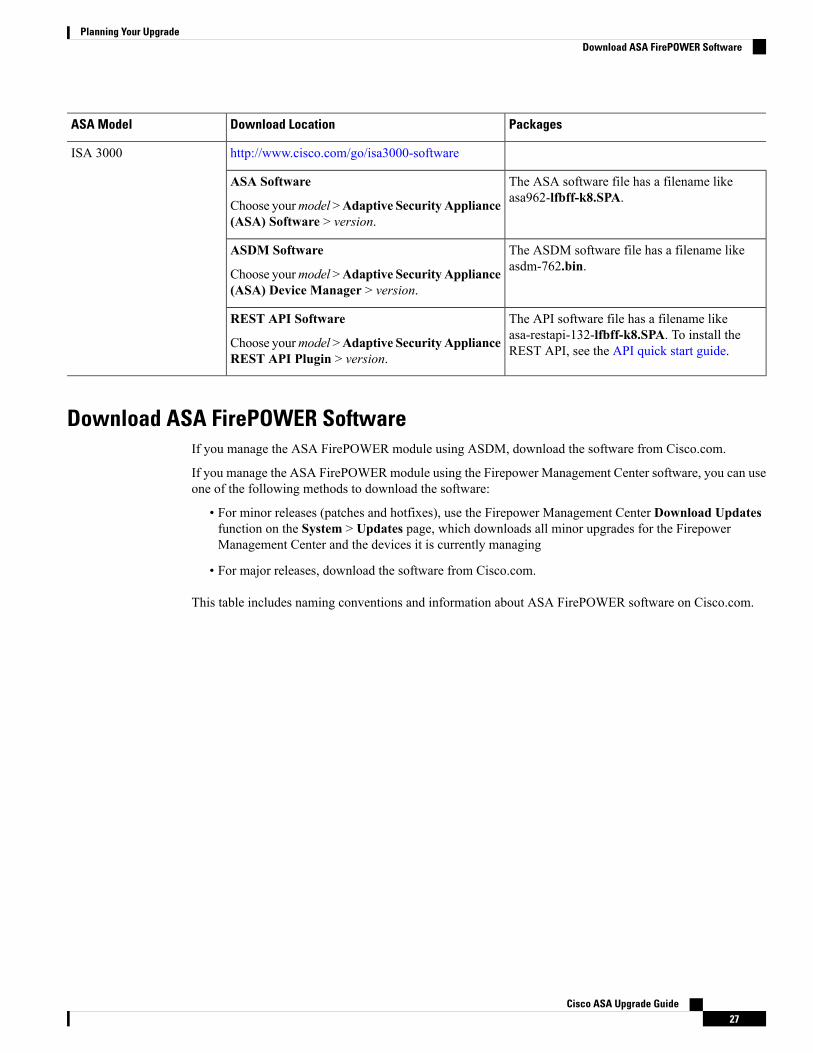
http://www.cisco.com/go/isa3000-softwareISA 3000
The ASA software file has a filename likeasa962-lfbff-k8.SPA.
ASA Software
Choose yourmodel >Adaptive Security Appliance(ASA) Software > version.
The ASDM software file has a filename likeasdm-762.bin.
ASDM Software
Choose yourmodel >Adaptive Security Appliance(ASA) Device Manager > version.
The API software file has a filename likeasa-restapi-132-lfbff-k8.SPA. To install theREST API, see the API quick start guide.
REST API Software
Choose yourmodel >Adaptive Security ApplianceREST API Plugin > version.
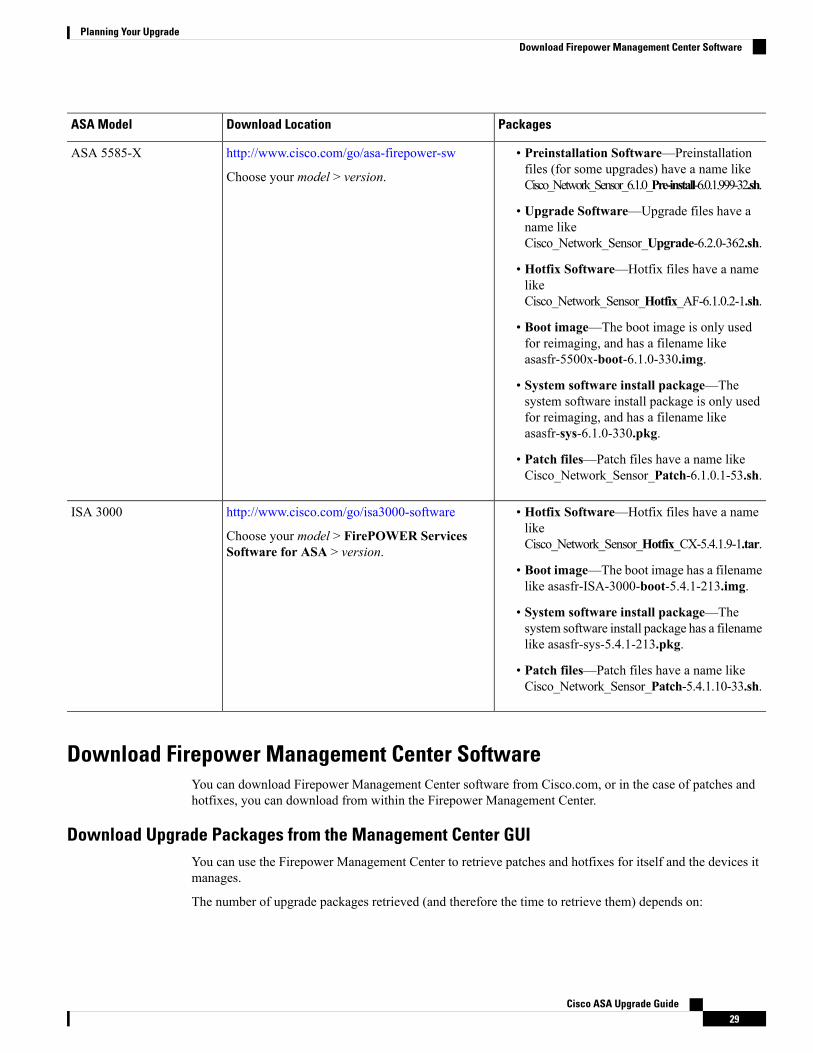
Download ASA FirePOWER SoftwareIf you manage the ASA FirePOWER module using ASDM, download the software from Cisco.com.
If you manage the ASA FirePOWERmodule using the Firepower Management Center software, you can useone of the following methods to download the software:
• For minor releases (patches and hotfixes), use the Firepower Management Center Download Updatesfunction on the System > Updates page, which downloads all minor upgrades for the FirepowerManagement Center and the devices it is currently managing
• For major releases, download the software from Cisco.com.
This table includes naming conventions and information about ASA FirePOWER software on Cisco.com.
Cisco ASA Upgrade Guide27
Planning Your UpgradeDownload ASA FirePOWER Software
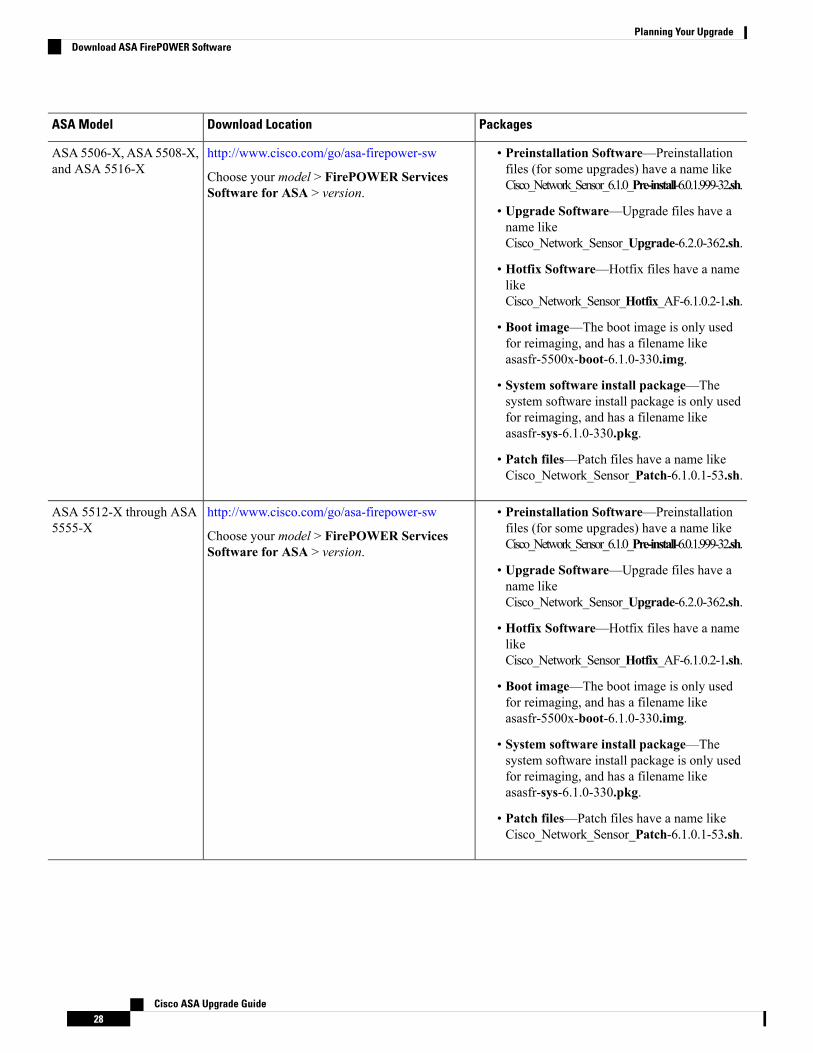
PackagesDownload LocationASA Model
• Preinstallation Software—Preinstallationfiles (for some upgrades) have a name likeCisco_Network_Sensor_6.1.0_Pre-install-6.0.1.999-32.sh.
• Upgrade Software—Upgrade files have aname likeCisco_Network_Sensor_Upgrade-6.2.0-362.sh.
• Hotfix Software—Hotfix files have a namelikeCisco_Network_Sensor_Hotfix_AF-6.1.0.2-1.sh.
• Boot image—The boot image is only usedfor reimaging, and has a filename likeasasfr-5500x-boot-6.1.0-330.img.
• System software install package—Thesystem software install package is only usedfor reimaging, and has a filename likeasasfr-sys-6.1.0-330.pkg.
• Patch files—Patch files have a name likeCisco_Network_Sensor_Patch-6.1.0.1-53.sh.
http://www.cisco.com/go/asa-firepower-sw
Choose your model > FirePOWER ServicesSoftware for ASA > version.
ASA 5506-X, ASA 5508-X,and ASA 5516-X
• Preinstallation Software—Preinstallationfiles (for some upgrades) have a name likeCisco_Network_Sensor_6.1.0_Pre-install-6.0.1.999-32.sh.
• Upgrade Software—Upgrade files have aname likeCisco_Network_Sensor_Upgrade-6.2.0-362.sh.
• Hotfix Software—Hotfix files have a namelikeCisco_Network_Sensor_Hotfix_AF-6.1.0.2-1.sh.
• Boot image—The boot image is only usedfor reimaging, and has a filename likeasasfr-5500x-boot-6.1.0-330.img.
• System software install package—Thesystem software install package is only usedfor reimaging, and has a filename likeasasfr-sys-6.1.0-330.pkg.
• Patch files—Patch files have a name likeCisco_Network_Sensor_Patch-6.1.0.1-53.sh.
http://www.cisco.com/go/asa-firepower-sw
Choose your model > FirePOWER ServicesSoftware for ASA > version.
ASA 5512-X through ASA5555-X
Cisco ASA Upgrade Guide28
Planning Your UpgradeDownload ASA FirePOWER Software
PackagesDownload LocationASA Model
• Preinstallation Software—Preinstallationfiles (for some upgrades) have a name likeCisco_Network_Sensor_6.1.0_Pre-install-6.0.1.999-32.sh.
• Upgrade Software—Upgrade files have aname likeCisco_Network_Sensor_Upgrade-6.2.0-362.sh.
• Hotfix Software—Hotfix files have a namelikeCisco_Network_Sensor_Hotfix_AF-6.1.0.2-1.sh.
• Boot image—The boot image is only usedfor reimaging, and has a filename likeasasfr-5500x-boot-6.1.0-330.img.
• System software install package—Thesystem software install package is only usedfor reimaging, and has a filename likeasasfr-sys-6.1.0-330.pkg.
• Patch files—Patch files have a name likeCisco_Network_Sensor_Patch-6.1.0.1-53.sh.
http://www.cisco.com/go/asa-firepower-sw
Choose your model > version.
ASA 5585-X
• Hotfix Software—Hotfix files have a namelikeCisco_Network_Sensor_Hotfix_CX-5.4.1.9-1.tar.
• Boot image—The boot image has a filenamelike asasfr-ISA-3000-boot-5.4.1-213.img.
• System software install package—Thesystem software install package has a filenamelike asasfr-sys-5.4.1-213.pkg.
• Patch files—Patch files have a name likeCisco_Network_Sensor_Patch-5.4.1.10-33.sh.
http://www.cisco.com/go/isa3000-software
Choose your model > FirePOWER ServicesSoftware for ASA > version.
ISA 3000
Download Firepower Management Center SoftwareYou can download Firepower Management Center software from Cisco.com, or in the case of patches andhotfixes, you can download from within the Firepower Management Center.
Download Upgrade Packages from the Management Center GUIYou can use the Firepower Management Center to retrieve patches and hotfixes for itself and the devices itmanages.
The number of upgrade packages retrieved (and therefore the time to retrieve them) depends on:
Cisco ASA Upgrade Guide29
Planning Your UpgradeDownload Firepower Management Center Software
• How up-to-date your current deployment is—The system downloads a package for each patch and hotfixassociated with the version your appliances are currently running.
• How many different device types you have—The system downloads a different package for each devicetype. If your deployment includes multiple devices of the same type (for example, ten Firepower ThreatDefense devices), the system downloads a single package to upgrade them all.
Before you begin
• Make sure the Firepower Management Center has internet access.
• If you are using the standby Firepower Management Center in a high availability pair, pausesynchronization. For more information, see Download Guidelines for High Availability FirepowerManagement Centers, on page 31.
Procedure
Step 1 On the Firepower Management Center web interface, choose System > UpdatesStep 2 Click Download Updates.
Download Firepower Management Center SoftwareThis section lists download locations and package names for Firepower Management Centers.
For high availability Firepower Management Centers, upload the package to both peers—to the secondarywith synchronization paused. For more information, see Download Guidelines for High Availability FirepowerManagement Centers, on page 31.
Download Location
Browse to https://www.cisco.com/web/go/firepower-software.
Choose your model > FireSIGHT System Software > version.
Package Names
Upgrade packages from Version 6.2.1+ are signed, and terminate in .sh.REL.tar instead of just .sh. Do notuntar signed upgrade packages. Install packages are for fresh installs (reimaging) only.
Package NamePackage TypeModel
Sourcefire_3D_Defense_Center_S3_Upgrade-version.sh
Sourcefire_3D_Defense_Center_S3_Upgrade-version.sh.REL.tar
UpgradeAll
Sourcefire_3D_Defense_Center_S3_Patch-version.sh
Sourcefire_3D_Defense_Center_S3_Patch-version.sh.REL.tar
Patch
Sourcefire_3D_Defense_Center_S3_Hotfix_letter-version.sh
Sourcefire_3D_Defense_Center_S3_Hotfix_letter-version.sh.REL.tar
Hotfix
Cisco ASA Upgrade Guide30
Planning Your UpgradeDownload Firepower Management Center Software
Package NamePackage TypeModel
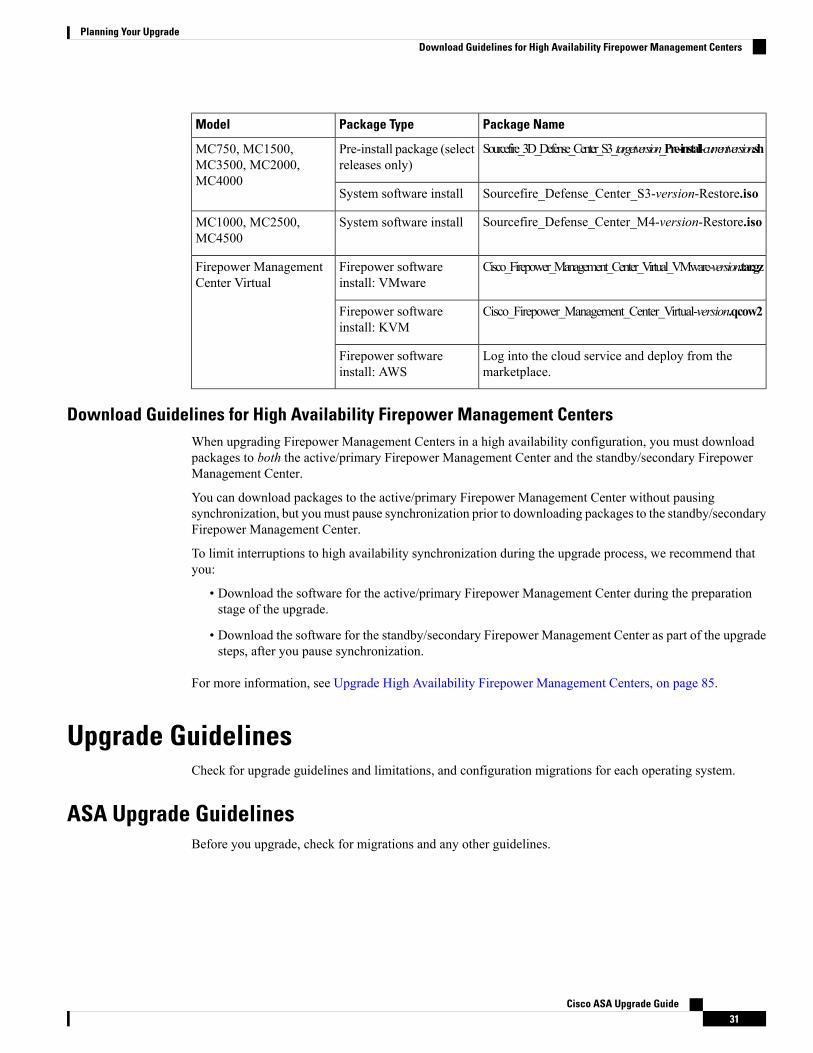
Sourcefire_3D_Defense_Center_S3_targetversion_Pre-install-currentversion.shPre-install package (selectreleases only)
MC750, MC1500,MC3500, MC2000,MC4000
Sourcefire_Defense_Center_S3-version-Restore.isoSystem software install
Sourcefire_Defense_Center_M4-version-Restore.isoSystem software installMC1000, MC2500,MC4500
Cisco_Firepower_Management_Center_Virtual_VMware-version.tar.gzFirepower softwareinstall: VMware
Firepower ManagementCenter Virtual
Cisco_Firepower_Management_Center_Virtual-version.qcow2Firepower softwareinstall: KVM
Log into the cloud service and deploy from themarketplace.
Firepower softwareinstall: AWS
Download Guidelines for High Availability Firepower Management CentersWhen upgrading Firepower Management Centers in a high availability configuration, you must downloadpackages to both the active/primary Firepower Management Center and the standby/secondary FirepowerManagement Center.
You can download packages to the active/primary Firepower Management Center without pausingsynchronization, but you must pause synchronization prior to downloading packages to the standby/secondaryFirepower Management Center.
To limit interruptions to high availability synchronization during the upgrade process, we recommend thatyou:
• Download the software for the active/primary Firepower Management Center during the preparationstage of the upgrade.
• Download the software for the standby/secondary Firepower Management Center as part of the upgradesteps, after you pause synchronization.
For more information, see Upgrade High Availability Firepower Management Centers, on page 85.
Upgrade GuidelinesCheck for upgrade guidelines and limitations, and configuration migrations for each operating system.
ASA Upgrade GuidelinesBefore you upgrade, check for migrations and any other guidelines.
Cisco ASA Upgrade Guide31
Planning Your UpgradeDownload Guidelines for High Availability Firepower Management Centers
Version-Specific Guidelines and MigrationsDepending on your current version, you might experience one or more configuration migrations, and have toconsider configuration guidelines for all versions between the starting version and the ending version whenyou upgrade.
9.9 Guidelines
• ASA 5506-X memory issues with large configurations on 9.9(2) and later—If you upgrade to 9.9(2) orlater, parts of a very large configuration might be rejected due to insufficient memory with the followingmessage: "ERROR: Insufficient memory to install the rules". One option is to enter theobject-group-search access-control command to improve memory usage for ACLs; your performancemight be impacted, however. Alternatively, you can downgrade to 9.9(1).
9.8 Guidelines
• Do not upgrade to 9.8(1) for ASAv on Amazon Web Services--Due to CSCve56153, you should notupgrade to 9.8(1). After upgrading, the ASAv becomes unreachable. Upgrade to 9.8(1.5) or later instead.
9.7 Guidelines
• Upgrade issue with 9.7(1) to 9.7(1.x) and later for VTI and VXLANVNI—If you configure both VirtualTunnel Interfaces (VTIs) and VXLAN Virtual Network Identifier (VNI) interfaces, then you cannotperform a zero downtime upgrade for failover; connections on these interface types will not replicate tothe standby unit until both units are on the same version. (CSCvc83062)
9.6 Guidelines
• (ASA 9.6(2) through 9.7(x)) Upgrade impact when using SSH public key authentication—Due to updatesto SSH authentication, additional configuration is required to enable SSH public key authentication; asa result, existing SSH configurations using public key authentication no longer work after upgrading.Public key authentication is the default for the ASAv on Amazon Web Services (AWS), so AWS userswill see this issue. To avoid loss of SSH connectivity, you can update your configuration before youupgrade. Or you can use ASDM after you upgrade (if you enabled ASDM access) to fix the configuration.
The original behavior was restored in 9.8(1).Note
Sample original configuration for a username "admin":
username admin nopassword privilege 15username admin attributesssh authentication publickey 55:06:47:eb:13:75:fc:5c:a8:c1:2c:bb:07:80:3a:fc:d9:08:a9:1f:34:76:31:ed:ab:bd:3a:9e:03:14:1e:1b hashed
To use the ssh authentication command, before you upgrade, enter the following commands:
aaa authentication ssh console LOCALusername admin password <password> privilege 15
Cisco ASA Upgrade Guide32
Planning Your UpgradeVersion-Specific Guidelines and Migrations
We recommend setting a password for the username as opposed to keeping the nopassword keyword,if present. The nopassword keyword means that any password can be entered, not that no password canbe entered. Prior to 9.6(2), the aaa command was not required for SSH public key authentication, so thenopassword keyword was not triggered. Now that the aaa command is required, it automatically alsoallows regular password authentication for a username if the password (or nopassword) keyword ispresent.
After you upgrade, the username command no longer requires the password or nopassword keyword;you can require that a user cannot enter a password. Therefore, to force public key authentication only,re-enter the username command:
username admin privilege 15
• Upgrade impact when upgrading the ASA on the Firepower 9300— Due to license entitlement namingchanges on the back-end, when you upgrade to ASA 9.6(1)/FXOS 1.1(4), the startup configuration maynot parse correctly upon the initial reload; configuration that corresponds to add-on entitlements isrejected.
For a standalone ASA, after the unit reloads with the new version, wait until all the entitlements areprocessed and are in an "Authorized" state (show license all orMonitoring > Properties > SmartLicense), and simply reload again (reload or Tools > System Reload) without saving the configuration.After the reload, the startup configuration will be parsed correctly.
For a failover pair if you have any add-on entitlements, follow the upgrade procedure in the FXOS releasenotes, but reset failover after you reload each unit (failover reset orMonitoring > Properties > Failover> Status,Monitoring > Failover > System, orMonitoring > Failover > Failover Group, and thenclick Reset Failover).
For a cluster, follow the upgrade procedure in the FXOS release notes; no additional action is required.
9.5 Guidelines and Migration
• 9.5(2) New Carrier License—The new Carrier license replaces the existing GTP/GPRS license, and alsoincludes support for SCTP and Diameter inspection. For the Firepower 9300 ASA security module, thefeature mobile-sp command will automatically migrate to the feature carrier command.
• 9.5(2) E-mail proxy commands deprecated—InASAVersion 9.5(2), the e-mail proxy commands (imap4s,pop3s, smtps) and subcommands are no longer supported.
• 9.5(2) CSD commands deprecated or migrated—InASAVersion 9.5(2), the CSD commands (csd image,show webvpn csd image, show webvpn csd, show webvpn csd hostscan, show webvpn csd hostscanimage) are no longer supported.
The following CSD commands will migrate: csd enable migrates to hostscan enable; csd hostscanimage migrates to hostscan image.
• 9.5(2) Select AAA commands deprecated—In ASA Version 9.5(2), these AAA commands andsubcommands (override-account-disable, authentication crack) are no longer supported.
• 9.5(1) We deprecated the following command: timeout gsn
• ASA 5508-X and 5516-X upgrade issue when upgrading to 9.5(x) or later—Before you upgrade to ASAVersion 9.5(x) or later, if you never enabled jumbo frame reservation then you must check the maximummemory footprint. Due to a manufacturing defect, an incorrect software memory limit might have been
Cisco ASA Upgrade Guide33
Planning Your Upgrade9.5 Guidelines and Migration
applied. If you upgrade to 9.5(x) or later before performing the below fix, then your device will crashon bootup; in this case, youmust downgrade to 9.4 using ROMMON (Load an Image for the ASA 5500-XSeries Using ROMMON), perform the below procedure, and then upgrade again.
1. Enter the following command to check for the failure condition:
ciscoasa# show memory detail | include Max memory footprintMax memory footprint = 456384512Max memory footprint = 0Max memory footprint = 456384512
If a value less than 456,384,512 is returned for “Max memory footprint,” then the failure conditionis present, and you must complete the remaining steps before you upgrade. If the memory shown is456,384,512 or greater, then you can skip the rest of this procedure and upgrade as normal.
2. Enter global configuration mode:
ciscoasa# configure terminalciscoasa(config)#
3. Temporarily enable jumbo frame reservation:
ciscoasa(config)# jumbo-frame reservationWARNING: This command will take effect after the running-configis saved and the system has been rebooted. Command accepted.INFO: Interface MTU should be increased to avoid fragmentingjumbo frames during transmit
Do not reload the ASA.Note
4. Save the configuration:
ciscoasa(config)# write memoryBuilding configuration...Cryptochecksum: b511ec95 6c90cadb aaf6b306 4157957214437 bytes copied in 1.320 secs (14437 bytes/sec)[OK]
5. Disable jumbo frame reservation:
ciscoasa(config)# no jumbo-frame reservationWARNING: This command will take effect after the running-config is saved andthe system has been rebooted. Command accepted.
Do not reload the ASA.Note
6. Save the configuration again:
ciscoasa(config)# write memory
Cisco ASA Upgrade Guide34
Planning Your Upgrade9.5 Guidelines and Migration
Building configuration...Cryptochecksum: b511ec95 6c90cadb aaf6b306 4157957214437 bytes copied in 1.320 secs (14437 bytes/sec)[OK]
7. You can now upgrade to Version 9.5(x) or later.
9.4 Guidelines and Migration
• 9.4(1) Unified Communications Phone Proxy and IntercompanyMedia Engine Proxy are deprecated—InASA Version 9.4, the Phone Proxy and IME Proxy are no longer supported.
9.3 Guidelines and Migration
• 9.3(2) Transport Layer Security (TLS) version 1.2 support—We now support TLS version 1.2 for securemessage transmission for ASDM, Clientless SSVPN, and AnyConnect VPN.We introduced or modifiedthe following commands: ssl client-version, ssl server-version, ssl cipher, ssl trust-point, ssl dh-group.We deprecated the following command: ssl encryption
• 9.3(1) Removal of AAAWindows NT domain authentication—We removed NTLM support for remoteaccess VPN users. We deprecated the following command: aaa-server protocol nt
9.2 Guidelines and Migration
Auto Update Server certificate verification
9.2(1) Auto Update Server certificate verification enabled by default. The Auto Update Server certificateverification is now enabled by default; for new configurations, you must explicitly disable certificateverification. If you are upgrading from an earlier release, and you did not enable certificate verification, thencertificate verification is not enabled, and you see the following warning:
WARNING: The certificate provided by the auto-update servers will not be verified. In order
to verify this certificate please use the verify-certificate option.
The configuration will be migrated to explicitly configure no verification:
auto-update server no-verification
Upgrade impact for ASDM login
Upgrade impact for ASDM login when upgrading from a pre-9.2(2.4) release to 9.2(2.4) or later. If youupgrade from a pre-9.2(2.4) release to ASA Version 9.2(2.4) or later and you use command authorization andASDM-defined user roles, users with Read Only access will not be able to log in to ASDM. You must changethemore command either before or after you upgrade to be at privilege level 5; only Admin level users canmake this change. Note that ASDM version 7.3(2) and later includes themore command at level 5 for defineduser roles, but preexisting configurations need to be fixed manually.
ASDM:
1. ChooseConfiguration >DeviceManagement >Users/AAA>AAAAccess > Authorization, and clickConfigure Command Privileges.
2. Selectmore, and click Edit.
Cisco ASA Upgrade Guide35
Planning Your Upgrade9.4 Guidelines and Migration
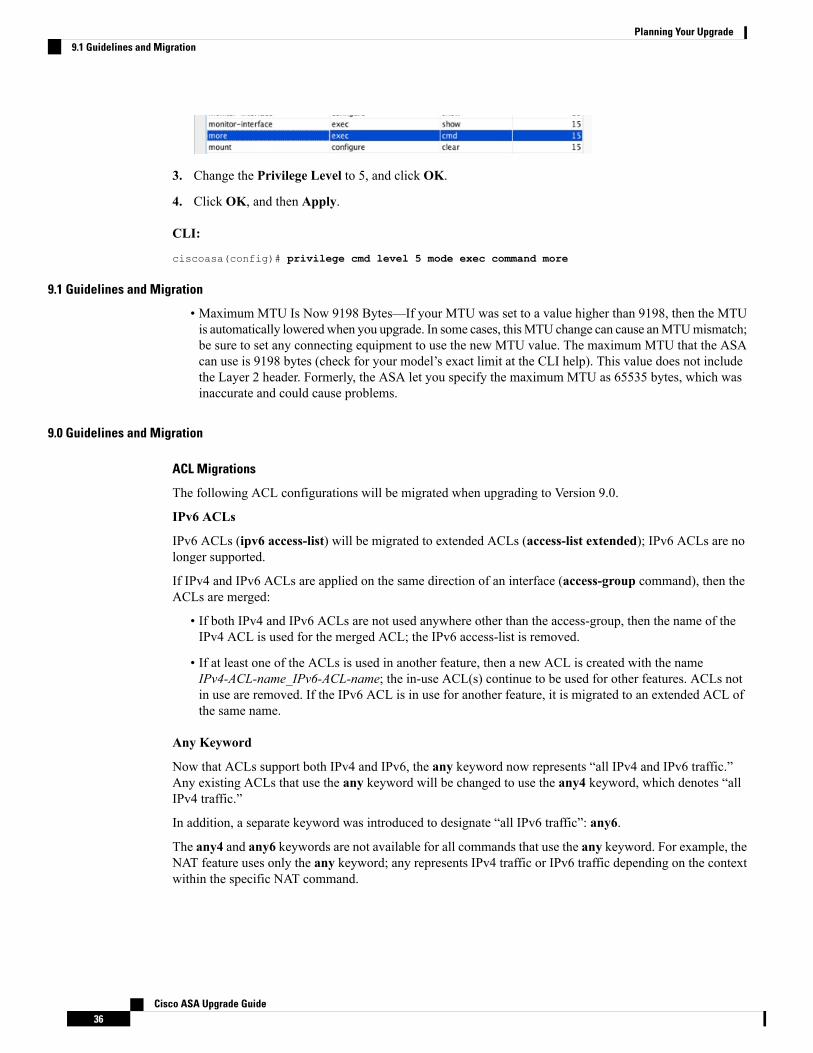
3. Change the Privilege Level to 5, and click OK.
4. Click OK, and then Apply.
CLI:
ciscoasa(config)# privilege cmd level 5 mode exec command more
9.1 Guidelines and Migration
• Maximum MTU Is Now 9198 Bytes—If your MTU was set to a value higher than 9198, then the MTUis automatically loweredwhen you upgrade. In some cases, thisMTU change can cause anMTUmismatch;be sure to set any connecting equipment to use the new MTU value. The maximum MTU that the ASAcan use is 9198 bytes (check for your model’s exact limit at the CLI help). This value does not includethe Layer 2 header. Formerly, the ASA let you specify the maximum MTU as 65535 bytes, which wasinaccurate and could cause problems.
9.0 Guidelines and Migration
ACL Migrations
The following ACL configurations will be migrated when upgrading to Version 9.0.
IPv6 ACLs
IPv6 ACLs (ipv6 access-list) will be migrated to extended ACLs (access-list extended); IPv6 ACLs are nolonger supported.
If IPv4 and IPv6 ACLs are applied on the same direction of an interface (access-group command), then theACLs are merged:
• If both IPv4 and IPv6 ACLs are not used anywhere other than the access-group, then the name of theIPv4 ACL is used for the merged ACL; the IPv6 access-list is removed.
• If at least one of the ACLs is used in another feature, then a new ACL is created with the nameIPv4-ACL-name_IPv6-ACL-name; the in-use ACL(s) continue to be used for other features. ACLs notin use are removed. If the IPv6 ACL is in use for another feature, it is migrated to an extended ACL ofthe same name.
Any Keyword
Now that ACLs support both IPv4 and IPv6, the any keyword now represents “all IPv4 and IPv6 traffic.”Any existing ACLs that use the any keyword will be changed to use the any4 keyword, which denotes “allIPv4 traffic.”
In addition, a separate keyword was introduced to designate “all IPv6 traffic”: any6.
The any4 and any6 keywords are not available for all commands that use the any keyword. For example, theNAT feature uses only the any keyword; any represents IPv4 traffic or IPv6 traffic depending on the contextwithin the specific NAT command.
Cisco ASA Upgrade Guide36
Planning Your Upgrade9.1 Guidelines and Migration
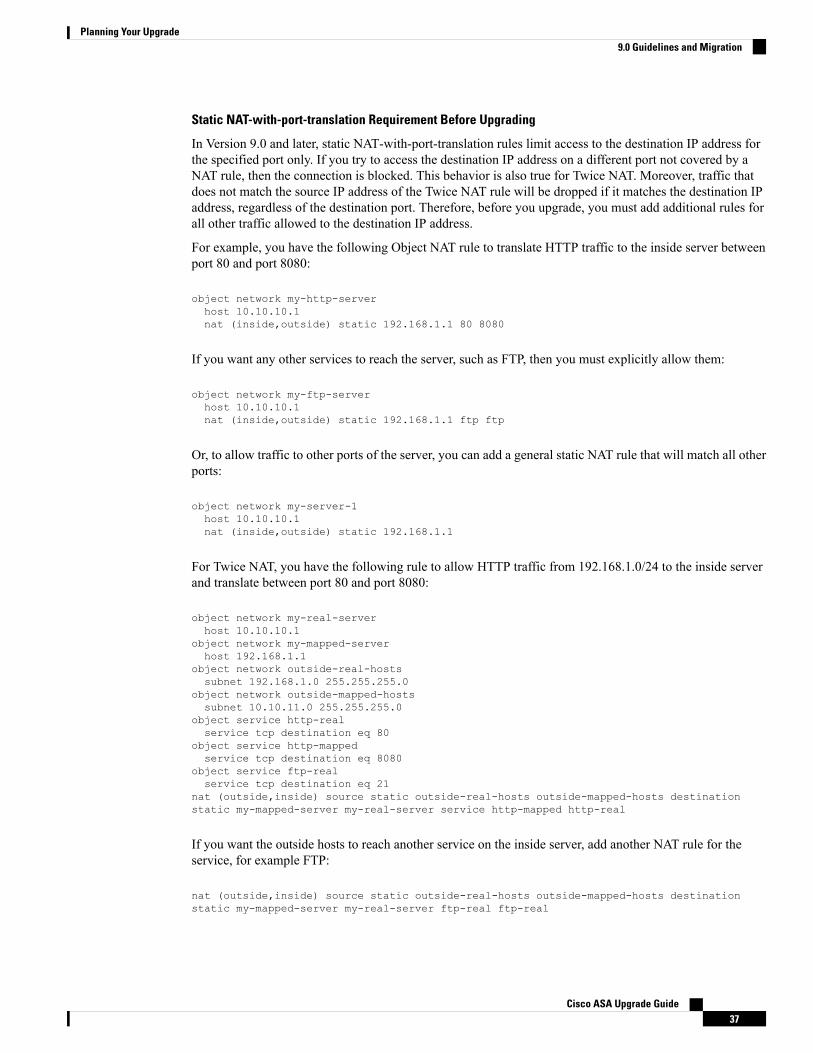
Static NAT-with-port-translation Requirement Before Upgrading
In Version 9.0 and later, static NAT-with-port-translation rules limit access to the destination IP address forthe specified port only. If you try to access the destination IP address on a different port not covered by aNAT rule, then the connection is blocked. This behavior is also true for Twice NAT. Moreover, traffic thatdoes not match the source IP address of the Twice NAT rule will be dropped if it matches the destination IPaddress, regardless of the destination port. Therefore, before you upgrade, you must add additional rules forall other traffic allowed to the destination IP address.
For example, you have the following Object NAT rule to translate HTTP traffic to the inside server betweenport 80 and port 8080:
object network my-http-serverhost 10.10.10.1nat (inside,outside) static 192.168.1.1 80 8080
If you want any other services to reach the server, such as FTP, then you must explicitly allow them:
object network my-ftp-serverhost 10.10.10.1nat (inside,outside) static 192.168.1.1 ftp ftp
Or, to allow traffic to other ports of the server, you can add a general static NAT rule that will match all otherports:
object network my-server-1host 10.10.10.1nat (inside,outside) static 192.168.1.1
For Twice NAT, you have the following rule to allow HTTP traffic from 192.168.1.0/24 to the inside serverand translate between port 80 and port 8080:
object network my-real-serverhost 10.10.10.1
object network my-mapped-serverhost 192.168.1.1
object network outside-real-hostssubnet 192.168.1.0 255.255.255.0
object network outside-mapped-hostssubnet 10.10.11.0 255.255.255.0
object service http-realservice tcp destination eq 80
object service http-mappedservice tcp destination eq 8080
object service ftp-realservice tcp destination eq 21
nat (outside,inside) source static outside-real-hosts outside-mapped-hosts destinationstatic my-mapped-server my-real-server service http-mapped http-real
If you want the outside hosts to reach another service on the inside server, add another NAT rule for theservice, for example FTP:
nat (outside,inside) source static outside-real-hosts outside-mapped-hosts destinationstatic my-mapped-server my-real-server ftp-real ftp-real
Cisco ASA Upgrade Guide37
Planning Your Upgrade9.0 Guidelines and Migration
If you want other source addresses to reach the inside server on any other ports, you can add another NATrule for that specific IP address or for any source IP address. Make sure the general rule is ordered after thespecific rule.
nat (outside,inside) source static any any destination static my-mapped-server my-real-server
8.4 Guidelines and Migration
• Configuration Migration for Transparent Mode—In 8.4, all transparent mode interfaces now belong toa bridge group. When you upgrade to 8.4, the existing two interfaces are placed in bridge group 1, andthe management IP address is assigned to the Bridge Group Virtual Interface (BVI). The functionalityremains the same when using one bridge group. You can now take advantage of the bridge group featureto configure up to four interfaces per bridge group and to create up to eight bridge groups in single modeor per context.
Note In 8.3 and earlier, as an unsupported configuration, you could configure amanagement interface without an IP address, and you could access the interfaceusing the device management address. In 8.4, the device management address isassigned to the BVI, and the management interface is no longer accessible usingthat IP address; the management interface requires its own IP address.
Note
• When upgrading to 8.4(2) from 8.3(1), 8.3(2), and 8.4(1), all identity NAT configurations will nowinclude the no-proxy-arp and route-lookup keywords, to maintain existing functionality. Theunidirectional keyword is removed.
8.3 Guidelines and Migration
See the following guide that describes the configuration migration process when you upgrade from a pre-8.3version of the Cisco ASA 5500 operating system (OS) to Version 8.3:
Cisco ASA 5500 Migration to Version 8.3
Clustering GuidelinesThere are no special requirements for Zero Downtime Upgrades for ASA clustering with the followingexceptions.
Zero Downtime Downgrades are not officially supported with clustering.Note
• Firepower 4100/9300 Cluster Upgrade to FXOS 2.3/ASA 9.9(2)—Slaves on ASA 9.8 and earlier cannotrejoin a cluster where the master unit is on FXOS 2.3/9.9(2) or later; they will join after you upgrade theASA version to 9.9(2)+ [CSCvi54844].
• Distributed Site-to-Site VPN—Distributed Site-to-Site VPN sessions on a failed unit require up to 30minutes to stabilize on other units. During this time, additional unit failures might result in lost sessions.Therefore, during a cluster upgrade, to avoid traffic loss, follow these steps. Refer to the FXOS/ASAcluster upgrade procedure so you can integrate these steps into your upgrade task.
Cisco ASA Upgrade Guide38
Planning Your Upgrade8.4 Guidelines and Migration
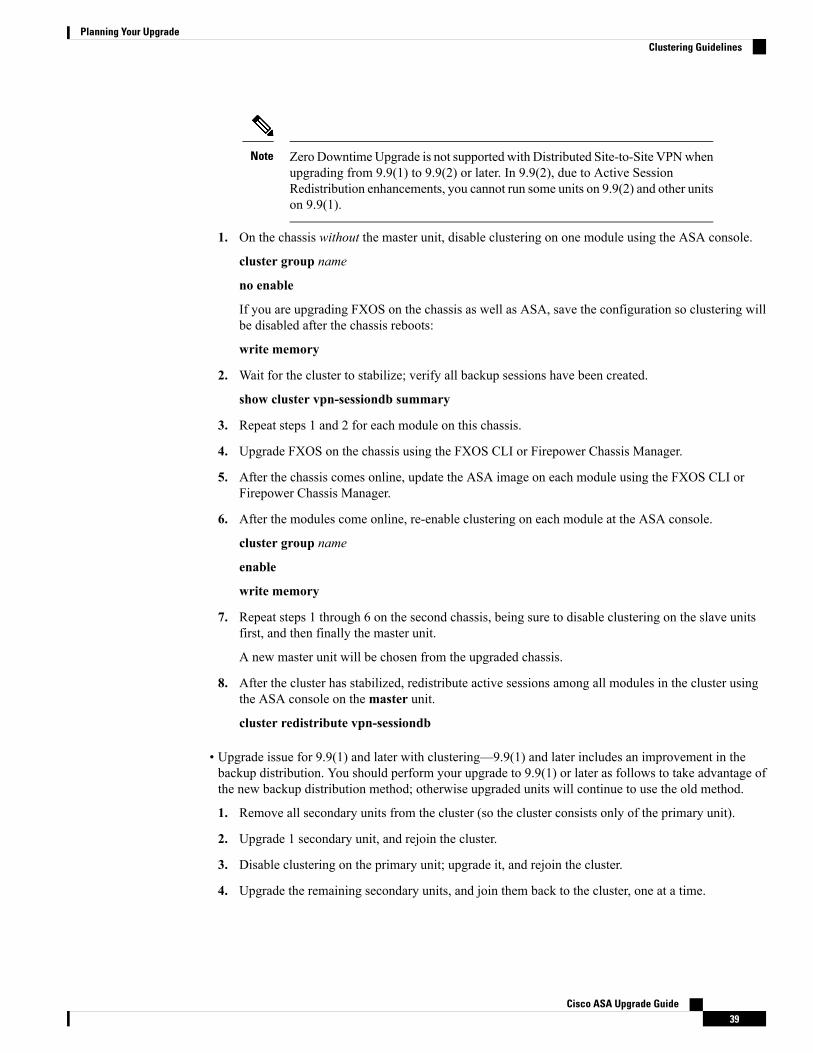
Zero DowntimeUpgrade is not supported with Distributed Site-to-Site VPNwhenupgrading from 9.9(1) to 9.9(2) or later. In 9.9(2), due to Active SessionRedistribution enhancements, you cannot run some units on 9.9(2) and other unitson 9.9(1).
Note
1. On the chassis without the master unit, disable clustering on one module using the ASA console.
cluster group name
no enable
If you are upgrading FXOS on the chassis as well as ASA, save the configuration so clustering willbe disabled after the chassis reboots:
write memory
2. Wait for the cluster to stabilize; verify all backup sessions have been created.
show cluster vpn-sessiondb summary
3. Repeat steps 1 and 2 for each module on this chassis.
4. Upgrade FXOS on the chassis using the FXOS CLI or Firepower Chassis Manager.
5. After the chassis comes online, update the ASA image on each module using the FXOS CLI orFirepower Chassis Manager.
6. After the modules come online, re-enable clustering on each module at the ASA console.
cluster group name
enable
write memory
7. Repeat steps 1 through 6 on the second chassis, being sure to disable clustering on the slave unitsfirst, and then finally the master unit.
A new master unit will be chosen from the upgraded chassis.
8. After the cluster has stabilized, redistribute active sessions among all modules in the cluster usingthe ASA console on themaster unit.
cluster redistribute vpn-sessiondb
• Upgrade issue for 9.9(1) and later with clustering—9.9(1) and later includes an improvement in thebackup distribution. You should perform your upgrade to 9.9(1) or later as follows to take advantage ofthe new backup distribution method; otherwise upgraded units will continue to use the old method.
1. Remove all secondary units from the cluster (so the cluster consists only of the primary unit).
2. Upgrade 1 secondary unit, and rejoin the cluster.
3. Disable clustering on the primary unit; upgrade it, and rejoin the cluster.
4. Upgrade the remaining secondary units, and join them back to the cluster, one at a time.
Cisco ASA Upgrade Guide39
Planning Your UpgradeClustering Guidelines
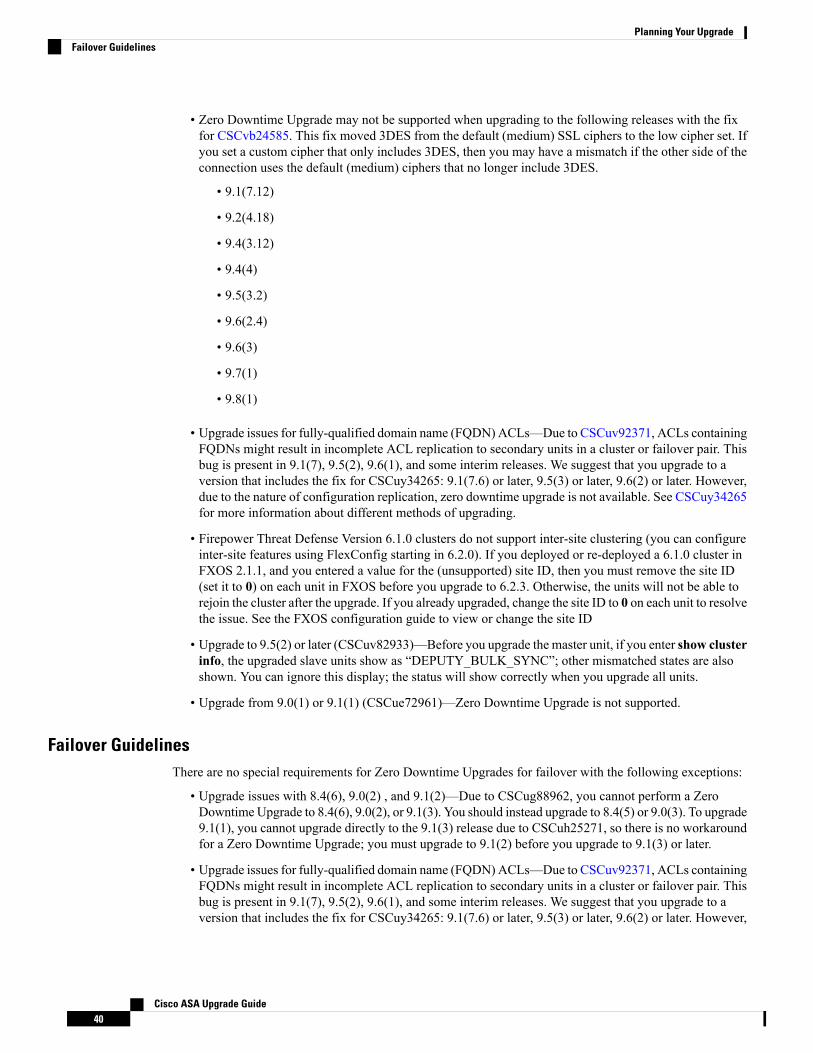
• Zero Downtime Upgrade may not be supported when upgrading to the following releases with the fixfor CSCvb24585. This fix moved 3DES from the default (medium) SSL ciphers to the low cipher set. Ifyou set a custom cipher that only includes 3DES, then you may have a mismatch if the other side of theconnection uses the default (medium) ciphers that no longer include 3DES.
• 9.1(7.12)
• 9.2(4.18)
• 9.4(3.12)
• 9.4(4)
• 9.5(3.2)
• 9.6(2.4)
• 9.6(3)
• 9.7(1)
• 9.8(1)
• Upgrade issues for fully-qualified domain name (FQDN) ACLs—Due to CSCuv92371, ACLs containingFQDNs might result in incomplete ACL replication to secondary units in a cluster or failover pair. Thisbug is present in 9.1(7), 9.5(2), 9.6(1), and some interim releases. We suggest that you upgrade to aversion that includes the fix for CSCuy34265: 9.1(7.6) or later, 9.5(3) or later, 9.6(2) or later. However,due to the nature of configuration replication, zero downtime upgrade is not available. See CSCuy34265for more information about different methods of upgrading.
• Firepower Threat Defense Version 6.1.0 clusters do not support inter-site clustering (you can configureinter-site features using FlexConfig starting in 6.2.0). If you deployed or re-deployed a 6.1.0 cluster inFXOS 2.1.1, and you entered a value for the (unsupported) site ID, then you must remove the site ID(set it to 0) on each unit in FXOS before you upgrade to 6.2.3. Otherwise, the units will not be able torejoin the cluster after the upgrade. If you already upgraded, change the site ID to 0 on each unit to resolvethe issue. See the FXOS configuration guide to view or change the site ID
• Upgrade to 9.5(2) or later (CSCuv82933)—Before you upgrade the master unit, if you enter show clusterinfo, the upgraded slave units show as “DEPUTY_BULK_SYNC”; other mismatched states are alsoshown. You can ignore this display; the status will show correctly when you upgrade all units.
• Upgrade from 9.0(1) or 9.1(1) (CSCue72961)—Zero Downtime Upgrade is not supported.
Failover GuidelinesThere are no special requirements for Zero Downtime Upgrades for failover with the following exceptions:
• Upgrade issues with 8.4(6), 9.0(2) , and 9.1(2)—Due to CSCug88962, you cannot perform a ZeroDowntime Upgrade to 8.4(6), 9.0(2), or 9.1(3). You should instead upgrade to 8.4(5) or 9.0(3). To upgrade9.1(1), you cannot upgrade directly to the 9.1(3) release due to CSCuh25271, so there is no workaroundfor a Zero Downtime Upgrade; you must upgrade to 9.1(2) before you upgrade to 9.1(3) or later.
• Upgrade issues for fully-qualified domain name (FQDN) ACLs—Due to CSCuv92371, ACLs containingFQDNs might result in incomplete ACL replication to secondary units in a cluster or failover pair. Thisbug is present in 9.1(7), 9.5(2), 9.6(1), and some interim releases. We suggest that you upgrade to aversion that includes the fix for CSCuy34265: 9.1(7.6) or later, 9.5(3) or later, 9.6(2) or later. However,
Cisco ASA Upgrade Guide40
Planning Your UpgradeFailover Guidelines
due to the nature of configuration replication, zero downtime upgrade is not available. See CSCuy34265for more information about different methods of upgrading.
• Upgrade issue with 9.7(1) to 9.7(1.x) and later for VTI and VXLANVNI—If you configure both VirtualTunnel Interfaces (VTIs) and VXLAN Virtual Network Identifier (VNI) interfaces, then you cannotperform a zero downtime upgrade for failover; connections on these interface types will not replicate tothe standby unit until both units are on the same version. (CSCvc83062)
Additional Guidelines• Cisco ASA Clientless SSL VPN Portal Customization Integrity Vulnerability—Multiple vulnerabilitieshave been fixed for clientless SSL VPN in ASA software, so you should upgrade your software to a fixedversion. See http://tools.cisco.com/security/center/content/CiscoSecurityAdvisory/cisco-sa-20141008-asafor details about the vulnerability and a list of fixed ASA versions. Also, if you ever ran an earlier ASAversion that had a vulnerable configuration, then regardless of the version you are currently running, youshould verify that the portal customization was not compromised. If an attacker compromised acustomization object in the past, then the compromised object stays persistent after you upgrade the ASAto a fixed version. Upgrading the ASA prevents this vulnerability from being exploited further, but itwill not modify any customization objects that were already compromised and are still present on thesystem.
Firepower Management Center Upgrade GuidelinesBefore you upgrade, check for Firepower Management Center guidelines in the release notes athttps://www.cisco.com/web/go/firepower-notes.
Back Up Your ConfigurationsWe recommend that you back up your configurations and other critical files before you upgrade, especiallyif there is a configuration migration. Each operating system has a different method to perform backups. Checkthe ASA, ASDM, ASA FirePOWER local management, Firepower Management Center, and FXOSconfiguration guides for more information.
Cisco ASA Upgrade Guide41
Planning Your UpgradeAdditional Guidelines

Cisco ASA Upgrade Guide42
Planning Your UpgradeBack Up Your Configurations
C H A P T E R 2Upgrade the ASA Appliance or ASAv
Upgrade the ASA 5500-X, ASA on Firepower 2100, ASAv, ASASM, and ISA 3000 according to the proceduresin this document.
• Upgrade the ASA 5500-X, ASAv, ASASM, or ISA 3000, on page 43• Upgrade the ASA on the Firepower 2100, on page 64
Upgrade the ASA 5500-X, ASAv, ASASM, or ISA 3000This document describes how to plan and implement an ASA andASDMupgrade for the ASA 5500-X, ASAv,ASASM, or ISA 3000 for standalone, failover, or clustering deployments.
Upgrade a Standalone UnitUse the CLI or ASDM to upgrade the standalone unit.
Upgrade a Standalone Unit Using the CLIThis section describes how to install the ASDM and ASA images, and also when to upgrade the ASAFirePOWER module.
Before you begin
This procedure uses FTP. For TFTP, HTTP, or other server types, see the copy command in the ASA commandreference.
Procedure
Step 1 In privileged EXEC mode, copy the ASA software to flash memory.
copy ftp://[[user[:password]@]server[/path]/asa_image_name diskn:/[path/]asa_image_name
Example:
ciscoasa# copy ftp://jcrichton:[email protected]/asa991-smp-k8.bin disk0:/asa991-smp-k8.bin
Step 2 Copy the ASDM image to flash memory.
Cisco ASA Upgrade Guide43
copy ftp://[[user[:password]@]server[/path]/asdm_image_name diskn:/[path/]asdm_image_name
Example:
ciscoasa# copy ftp://jcrichton:[email protected]/asdm-771791.bin disk0:/asdm-771791.bin
Step 3 Access global configuration mode.
configure terminal
Example:
ciscoasa# configure terminalciscoasa(config)#
Step 4 Show the current boot images configured (up to 4):
show running-config boot system
The ASA uses the images in the order listed; if the first image is unavailable, the next image is used, and soon. You cannot insert a new image URL at the top of the list; to specify the new image to be first, you mustremove any existing entries, and enter the image URLs in the order desired, according to the next steps.
Example:
ciscoasa(config)# show running-config boot systemboot system disk0:/cdisk.binboot system disk0:/asa931-smp-k8.bin
Step 5 Remove any existing boot image configurations so that you can enter the new boot image as your first choice:
no boot system diskn:/[path/]asa_image_name
Example:
ciscoasa(config)# no boot system disk0:/cdisk.binciscoasa(config)# no boot system disk0:/asa931-smp-k8.bin
Step 6 Set the ASA image to boot (the one you just uploaded):
boot system diskn:/[path/]asa_image_name
Repeat this command for any backup images that you want to use in case this image is unavailable. Forexample, you can re-enter the images that you previously removed.
Example:
ciscoasa(config)# boot system disk0:/asa991-smp-k8.bin
Step 7 Set the ASDM image to use (the one you just uploaded):
asdm image diskn:/[path/]asdm_image_name
You can only configure one ASDM image to use, so you do not need to first remove the existing configuration.
Example:
Cisco ASA Upgrade Guide44
Upgrade the ASA Appliance or ASAvUpgrade a Standalone Unit Using the CLI

ciscoasa(config)# asdm image disk0:/asdm-771791.bin
Step 8 Save the new settings to the startup configuration:
write memory
Step 9 Reload the ASA:
reload
Step 10 If you are upgrading the ASA FirePOWER module, disable the ASA REST API or else the upgrade will fail.
no rest-api agent
You can reenable it after the upgrade:
rest-api agent
The ASA 5506-X series does not support the ASA REST API if you are running the FirePOWERmodule Version 6.0 or later.
Note
Step 11 Upgrade the ASA FirePOWER module.
Upgrade a Standalone Unit from Your Local Computer Using ASDMThe Upgrade Software from Local Computer tool lets you upload an image file from your computer to theflash file system to upgrade the ASA.
Procedure
Step 1 In the main ASDM application window, choose Tools > Upgrade Software from Local Computer.
The Upgrade Software dialog box appears.
Step 2 From the Image to Upload drop-down list, choose ASDM.Step 3 In the Local File Path field, click Browse Local Files to find the file on your PC.Step 4 In the Flash File System Path field, click Browse Flash to find the directory or file in the flash file system.Step 5 Click Upload Image.
The uploading process might take a few minutes.
Step 6 You are prompted to set this image as the ASDM image. Click Yes.Step 7 You are reminded to exit ASDM and save the configuration. Click OK.
You exit the Upgrade tool. Note: You will save the configuration and exit and reconnect to ASDM after youupgrade the ASA software.
Step 8 Repeat these steps, choosingASA from the Image to Upload drop-down list. You can also use this procedureto upload other file types.
Step 9 Choose Tools > System Reload to reload the ASA.
A new window appears that asks you to verify the details of the reload.
Cisco ASA Upgrade Guide45
Upgrade the ASA Appliance or ASAvUpgrade a Standalone Unit from Your Local Computer Using ASDM
a) Click the Save the running configuration at the time of reload radio button (the default).b) Choose a time to reload (for example, Now, the default).c) Click Schedule Reload.
Once the reload is in progress, aReload Statuswindow appears that indicates that a reload is being performed.An option to exit ASDM is also provided.
Step 10 After the ASA reloads, restart ASDM.
You can check the reload status from a console port, or you can wait a few minutes and try to connect usingASDM until you are successful.
Step 11 If you are upgrading anASAFirePOWERmodule, disable the ASARESTAPI by choosingTools >CommandLine Interface, and entering no rest-api agent.
If you do not disable the REST API, the ASA FirePOWERmodule upgrade will fail. You can reenable it afterthe upgrade:
rest-api agent
The ASA 5506-X series does not support the ASA REST API if you are running the FirePOWERmodule Version 6.0 or later.
Note
Step 12 Upgrade the ASA FirePOWER module.
Upgrade a Standalone Unit Using the ASDM Cisco.com WizardThe Upgrade Software from Cisco.com Wizard lets you automatically upgrade the ASDM and ASA tomore current versions.
In this wizard, you can do the following:
• Choose an ASA image file and/or ASDM image file to upgrade.
ASDM downloads the latest image version, which includes the build number.For example, if you are downloading 9.4(1), the download might be 9.4(1.2).This behavior is expected, so you may proceed with the planned upgrade.
Note
• Review the upgrade changes that you have made.
• Download the image or images and install them.
• Review the status of the installation.
• If the installation completed successfully, restart the ASA to save the configuration and complete theupgrade.
Procedure
Step 1 Choose Tools > Check for ASA/ASDM Updates.
Cisco ASA Upgrade Guide46
Upgrade the ASA Appliance or ASAvUpgrade a Standalone Unit Using the ASDM Cisco.com Wizard
In multiple context mode, access this menu from the System.
The Cisco.com Authentication dialog box appears.
Step 2 Enter your Cisco.com username and password, and then click Login.
The Cisco.com Upgrade Wizard appears.
If there is no upgrade available, a dialog box appears. Click OK to exit the wizard.Note
Step 3 Click Next to display the Select Software screen.
The current ASA version and ASDM version appear.
Step 4 To upgrade the ASA version and ASDM version, perform the following steps:a) In the ASA area, check the Upgrade to check box, and then choose an ASA version to which you want
to upgrade from the drop-down list.b) In the ASDM area, check the Upgrade to check box, and then choose an ASDM version to which you
want to upgrade from the drop-down list.
Step 5 Click Next to display the Review Changes screen.Step 6 Verify the following items:
• The ASA image file and/or ASDM image file that you have downloaded are the correct ones.
• The ASA image file and/or ASDM image file that you want to upload are the correct ones.
• The correct ASA boot image has been selected.
Step 7 Click Next to start the upgrade installation.
You can then view the status of the upgrade installation as it progresses.
TheResults screen appears, which provides additional details, such as the upgrade installation status (successor failure).
Step 8 If the upgrade installation succeeded, for the upgrade versions to take effect, check the Save configurationand reload device now check box to restart the ASA, and restart ASDM.
Step 9 Click Finish to exit the wizard and save the configuration changes that you have made.
To upgrade to the next higher version, if any, you must restart the wizard.Note
Step 10 After the ASA reloads, restart ASDM.
You can check the reload status from a console port, or you can wait a few minutes and try to connect usingASDM until you are successful.
Step 11 If you are upgrading anASAFirePOWERmodule, disable the ASARESTAPI by choosingTools >CommandLine Interface, and entering no rest-api agent.
If you do not disable the REST API, the ASA FirePOWERmodule upgrade will fail. You can reenable it afterthe upgrade:
rest-api agent
The ASA 5506-X series does not support the ASA REST API if you are running the FirePOWERmodule Version 6.0 or later.
Note
Cisco ASA Upgrade Guide47
Upgrade the ASA Appliance or ASAvUpgrade a Standalone Unit Using the ASDM Cisco.com Wizard
Step 12 Upgrade the ASA FirePOWER module.
Upgrade an Active/Standby Failover PairUse the CLI or ASDM to upgrade the Active/Standby failover pair for a zero downtime upgrade.
Upgrade an Active/Standby Failover Pair Using the CLITo upgrade the Active/Standby failover pair, perform the following steps.
Before you begin
• Perform these steps on the active unit. For SSH access, connect to the active IP address; the active unitalways owns this IP address. When you connect to the CLI, determine the failover status by looking atthe ASA prompt; you can configure the ASA prompt to show the failover status and priority (primaryor secondary), which is useful to determine which unit you are connected to. See the prompt command.Alternatively, enter the show failover command to view this unit's status and priority (primary orsecondary).
• This procedure uses FTP. For TFTP, HTTP, or other server types, see the copy command in the ASAcommand reference.
Procedure
Step 1 On the active unit in privileged EXEC mode, copy the ASA software to the active unit flash memory:
copy ftp://[[user[:password]@]server[/path]/asa_image_name diskn:/[path/]asa_image_name
Example:
asa/act# copy ftp://jcrichton:[email protected]/asa991-smp-k8.bin disk0:/asa991-smp-k8.bin
Step 2 Copy the software to the standby unit; be sure to specify the same path as for the active unit:
failover exec mate copy /noconfirm ftp://[[user[:password]@]server[/path]/asa_image_namediskn:/[path/]asa_image_name
Example:
asa/act# failover exec mate copy /noconfirm ftp://jcrichton:[email protected]/asa991-smp-k8.bindisk0:/asa991-smp-k8.bin
Step 3 Copy the ASDM image to the active unit flash memory:
copy ftp://[[user[:password]@]server[/path]/asdm_image_name diskn:/[path/]asdm_image_name
Example:
asa/act# copy ftp://jcrichton:[email protected]/asdm-771791.bin disk0:/asdm-771791.bin
Cisco ASA Upgrade Guide48
Upgrade the ASA Appliance or ASAvUpgrade an Active/Standby Failover Pair
Step 4 Copy the ASDM image to the standby unit; be sure to specify the same path as for the active unit:
failover exec mate copy /noconfirm ftp://[[user[:password]@]server[/path]/asdm_image_namediskn:/[path/]asdm_image_name
Example:
asa/act# failover exec mate copy /noconfirm ftp://jcrichton:[email protected]/asdm-771791.bindisk0:/asdm-771791.bin
Step 5 If you are not already in global configuration mode, access global configuration mode:
configure terminal
Step 6 Show the current boot images configured (up to 4):
show running-config boot system
Example:
asa/act(config)# show running-config boot systemboot system disk0:/cdisk.binboot system disk0:/asa931-smp-k8.bin
The ASA uses the images in the order listed; if the first image is unavailable, the next image is used, and soon. You cannot insert a new image URL at the top of the list; to specify the new image to be first, you mustremove any existing entries, and enter the image URLs in the order desired, according to the next steps.
Step 7 Remove any existing boot image configurations so that you can enter the new boot image as your first choice:
no boot system diskn:/[path/]asa_image_name
Example:
asa/act(config)# no boot system disk0:/cdisk.binasa/act(config)# no boot system disk0:/asa931-smp-k8.bin
Step 8 Set the ASA image to boot (the one you just uploaded):
boot system diskn:/[path/]asa_image_name
Example:
asa/act(config)# boot system disk0://asa991-smp-k8.bin
Repeat this command for any backup images that you want to use in case this image is unavailable. Forexample, you can re-enter the images that you previously removed.
Step 9 Set the ASDM image to use (the one you just uploaded):
asdm image diskn:/[path/]asdm_image_name
Example:
asa/act(config)# asdm image disk0:/asdm-771791.bin
You can only configure one ASDM image to use, so you do not need to first remove the existing configuration.
Cisco ASA Upgrade Guide49
Upgrade the ASA Appliance or ASAvUpgrade an Active/Standby Failover Pair Using the CLI
Step 10 Save the new settings to the startup configuration:
write memory
These configuration changes are automatically saved on the standby unit.
Step 11 If you are upgrading ASA FirePOWER modules, disable the ASA REST API or else the upgrade will fail.
no rest-api agent
Step 12 Upgrade the ASA FirePOWER module on the standby unit.
For an ASAFirePOWERmodulemanaged byASDM, connect ASDM to the standbymanagement IP address.Wait for the upgrade to complete.
Step 13 Reload the standby unit to boot the new image:
failover reload-standby
Wait for the standby unit to finish loading. Use the show failover command to verify that the standby unit isin the Standby Ready state.
Step 14 Force the active unit to fail over to the standby unit.
no failover active
If you are disconnected from your SSH session, reconnect to the main IP address, now on the new active/formerstandby unit.
Step 15 Upgrade the ASA FirePOWER module on the former active unit.
For an ASAFirePOWERmodulemanaged byASDM, connect ASDM to the standbymanagement IP address.Wait for the upgrade to complete.
Step 16 From the new active unit, reload the former active unit (now the new standby unit).
failover reload-standby
Example:
asa/act# failover reload-standby
If you are connected to the former active unit console port, you should instead enter the reloadcommand to reload the former active unit.
Note
Upgrade an Active/Standby Failover Pair Using ASDMTo upgrade the Active/Standby failover pair, perform the following steps.
Before you begin
Place the ASA and ASDM images on your local management computer.
Cisco ASA Upgrade Guide50
Upgrade the ASA Appliance or ASAvUpgrade an Active/Standby Failover Pair Using ASDM
Procedure
Step 1 Launch ASDM on the standby unit by connecting to the standby IP address.Step 2 In the main ASDM application window, choose Tools > Upgrade Software from Local Computer.
The Upgrade Software dialog box appears.
Step 3 From the Image to Upload drop-down list, choose ASDM.Step 4 In the Local File Path field, enter the local path to the file on your computer or click Browse Local Files to
find the file on your PC.Step 5 In the Flash File System Path field, enter the path to the flash file system or click Browse Flash to find the
directory or file in the flash file system.Step 6 Click Upload Image. The uploading process might take a few minutes.
When you are prompted to set this image as the ASDM image, click No. You exit the Upgrade tool.
Step 7 Repeat these steps, choosing ASA from the Image to Upload drop-down list.
When you are prompted to set this image as the ASA image, click No. You exit the Upgrade tool.
Step 8 Connect ASDM to the active unit by connecting to the main IP address, and upload the ASDM software,using the same file location you used on the standby unit.
Step 9 When you are prompted to set the image as the ASDM image, click Yes.
You are reminded to exit ASDM and save the configuration. Click OK. You exit the Upgrade tool. Note:You will save the configuration and reload ASDM after you upgrade the ASA software.
Step 10 Upload the ASA software, using the same file location you used for the standby unit.Step 11 When you are prompted to set the image as the ASA image, click Yes.
You are reminded to reload the ASA to use the new image. Click OK. You exit the Upgrade tool.
Step 12 Click the Save icon on the toolbar to save your configuration changes.
These configuration changes are automatically saved on the standby unit.
Step 13 If you are upgrading ASA FirePOWERmodules, disable the ASARESTAPI by choosingTools >CommandLine Interface, and entering no rest-api enable.
If you do not disable the REST API, the ASA FirePOWER module upgrade will fail.
Step 14 Upgrade the ASA FirePOWER module on the standby unit.
For an ASAFirePOWERmodulemanaged byASDM, connect ASDM to the standbymanagement IP address.Wait for the upgrade to complete, and then connect ASDM back to the active unit.
Step 15 Reload the standby unit by choosingMonitoring > Properties > Failover > Status, and clicking ReloadStandby.
Stay on the System pane to monitor when the standby unit reloads.
Step 16 After the standby unit reloads, force the active unit to fail over to the standby unit by choosingMonitoring> Properties > Failover > Status, and clickingMake Standby.
ASDM will automatically reconnect to the new active unit.
Cisco ASA Upgrade Guide51
Upgrade the ASA Appliance or ASAvUpgrade an Active/Standby Failover Pair Using ASDM

Step 17 Upgrade the ASA FirePOWER module on the former active unit.
For an ASAFirePOWERmodulemanaged byASDM, connect ASDM to the standbymanagement IP address.Wait for the upgrade to complete, and then connect ASDM back to the active unit.
Step 18 Reload the (new) standby unit by choosingMonitoring > Properties > Failover > Status, and clickingReload Standby.
Upgrade an Active/Active Failover PairUse the CLI or ASDM to upgrade the Active/Active failover pair for a zero downtime upgrade.
Upgrade an Active/Active Failover Pair Using the CLITo upgrade two units in an Active/Active failover configuration, perform the following steps.
Before you begin
• Perform these steps on the primary unit.
• Perform these steps in the system execution space.
• This procedure uses FTP. For TFTP, HTTP, or other server types, see the copy command in the ASAcommand reference.
Procedure
Step 1 On the primary unit in privileged EXEC mode, copy the ASA software to flash memory:
copy ftp://[[user[:password]@]server[/path]/asa_image_name diskn:/[path/]asa_image_name
Example:
asa/act/pri# copy ftp://jcrichton:[email protected]/asa991-smp-k8.bin disk0:/asa991-smp-k8.bin
Step 2 Copy the software to the secondary unit; be sure to specify the same path as for the primary unit:
failover exec mate copy /noconfirm ftp://[[user[:password]@]server[/path]/asa_image_namediskn:/[path/]asa_image_name
Example:
asa/act/pri# failover exec mate copy /noconfirmftp://jcrichton:[email protected]/asa991-smp-k8.bin disk0:/asa991-smp-k8.bin
Step 3 Copy the ASDM image to the primary unit flash memory:
copy ftp://[[user[:password]@]server[/path]/asdm_image_name diskn:/[path/]asdm_image_name
Example:
Cisco ASA Upgrade Guide52
Upgrade the ASA Appliance or ASAvUpgrade an Active/Active Failover Pair
asa/act/pri# ciscoasa# copy ftp://jcrichton:[email protected]/asdm-771791.bindisk0:/asdm-771791.bin
Step 4 Copy the ASDM image to the secondary unit; be sure to specify the same path as for the primary unit:
failover exec mate copy /noconfirm ftp://[[user[:password]@]server[/path]/asdm_image_namediskn:/[path/]asdm_image_name
Example:
asa/act/pri# failover exec mate copy /noconfirm ftp://jcrichton:[email protected]/asdm-771791.bindisk0:/asdm-771791.bin
Step 5 If you are not already in global configuration mode, access global configuration mode:
configure terminal
Step 6 Show the current boot images configured (up to 4):
show running-config boot system
Example:
asa/act/pri(config)# show running-config boot systemboot system disk0:/cdisk.binboot system disk0:/asa931-smp-k8.bin
The ASA uses the images in the order listed; if the first image is unavailable, the next image is used, and soon. You cannot insert a new image URL at the top of the list; to specify the new image to be first, you mustremove any existing entries, and enter the image URLs in the order desired, according to the next steps.
Step 7 Remove any existing boot image configurations so that you can enter the new boot image as your first choice:
no boot system diskn:/[path/]asa_image_name
Example:
asa/act/pri(config)# no boot system disk0:/cdisk.binasa/act/pri(config)# no boot system disk0:/asa931-smp-k8.bin
Step 8 Set the ASA image to boot (the one you just uploaded):
boot system diskn:/[path/]asa_image_name
Example:
asa/act/pri(config)# boot system disk0://asa991-smp-k8.bin
Repeat this command for any backup images that you want to use in case this image is unavailable. Forexample, you can re-enter the images that you previously removed.
Step 9 Set the ASDM image to use (the one you just uploaded):
asdm image diskn:/[path/]asdm_image_name
Example:
Cisco ASA Upgrade Guide53
Upgrade the ASA Appliance or ASAvUpgrade an Active/Active Failover Pair Using the CLI
asa/act/pri(config)# asdm image disk0:/asdm-771791.bin
You can only configure one ASDM image to use, so you do not need to first remove the existing configuration.
Step 10 Save the new settings to the startup configuration:
write memory
These configuration changes are automatically saved on the secondary unit.
Step 11 If you are upgrading ASA FirePOWER modules, disable the ASA REST API or else the upgrade will fail.
no rest-api agent
Step 12 Make both failover groups active on the primary unit:
failover active group 1
failover active group 2
Example:
asa/act/pri(config)# failover active group 1asa/act/pri(config)# failover active group 2
Step 13 Upgrade the ASA FirePOWER module on the secondary unit.
For an ASA FirePOWER module managed by ASDM, connect ASDM to the failover group 1 or 2 standbymanagement IP address. Wait for the upgrade to complete.
Step 14 Reload the secondary unit to boot the new image:
failover reload-standby
Wait for the secondary unit to finish loading. Use the show failover command to verify that both failovergroups are in the Standby Ready state.
Step 15 Force both failover groups to become active on the secondary unit:
no failover active group 1
no failover active group 2
Example:
asa/act/pri(config)# no failover active group 1asa/act/pri(config)# no failover active group 2asa/stby/pri(config)#
If you are disconnected from your SSH session, reconnect to the failover group 1 IP address, now on thesecondary unit.
Step 16 Upgrade the ASA FirePOWER module on the primary unit.
For an ASA FirePOWER module managed by ASDM, connect ASDM to the failover group 1 or 2 standbymanagement IP address. Wait for the upgrade to complete.
Step 17 Reload the primary unit:
Cisco ASA Upgrade Guide54
Upgrade the ASA Appliance or ASAvUpgrade an Active/Active Failover Pair Using the CLI
failover reload-standby
Example:
asa/act/sec# failover reload-standby
If you are connected to the primary unit console port, you should instead enter the reload commandto reload the primary unit.
Note
You may be disconnected from your SSH session.
Step 18 If the failover groups are configured with the preempt command, they automatically become active on theirdesignated unit after the preempt delay has passed.
Upgrade an Active/Active Failover Pair Using ASDMTo upgrade two units in an Active/Active failover configuration, perform the following steps.
Before you begin
• Perform these steps in the system execution space.
• Place the ASA and ASDM images on your local management computer.
Procedure
Step 1 Launch ASDM on the secondary unit by connecting to the management address in failover group 2.Step 2 In the main ASDM application window, choose Tools > Upgrade Software from Local Computer.
The Upgrade Software dialog box appears.
Step 3 From the Image to Upload drop-down list, choose ASDM.Step 4 In the Local File Path field, enter the local path to the file on your computer or click Browse Local Files to
find the file on your PC.Step 5 In the Flash File System Path field, enter the path to the flash file system or click Browse Flash to find the
directory or file in the flash file system.Step 6 Click Upload Image. The uploading process might take a few minutes.
When you are prompted to set this image as the ASDM image, click No. You exit the Upgrade tool.
Step 7 Repeat these steps, choosing ASA from the Image to Upload drop-down list.
When you are prompted to set this image as the ASA image, click No. You exit the Upgrade tool.
Step 8 Connect ASDM to the primary unit by connecting to the management IP address in failover group 1, andupload the ASDM software, using the same file location you used on the secondary unit.
Step 9 When you are prompted to set the image as the ASDM image, click Yes.
You are reminded to exit ASDM and save the configuration. Click OK. You exit the Upgrade tool. Note:You will save the configuration and reload ASDM after you upgrade the ASA software.
Cisco ASA Upgrade Guide55
Upgrade the ASA Appliance or ASAvUpgrade an Active/Active Failover Pair Using ASDM

Step 10 Upload the ASA software, using the same file location you used for the secondary unit.Step 11 When you are prompted to set the image as the ASA image, click Yes.
You are reminded to reload the ASA to use the new image. Click OK. You exit the Upgrade tool.
Step 12 Click the Save icon on the toolbar to save your configuration changes.
These configuration changes are automatically saved on the secondary unit.
Step 13 If you are upgrading ASA FirePOWERmodules, disable the ASARESTAPI by choosingTools >CommandLine Interface, and entering no rest-api enable.
If you do not disable the REST API, the ASA FirePOWER module upgrade will fail.
Step 14 Make both failover groups active on the primary unit by choosingMonitoring > Failover > FailoverGroup #, where # is the number of the failover group you want to move to the primary unit, and clickingMake Active.
Step 15 Upgrade the ASA FirePOWER module on the secondary unit.
For an ASA FirePOWER module managed by ASDM, connect ASDM to the failover group 1 or 2 standbymanagement IP address. Wait for the upgrade to complete, and then connect ASDM back to the primary unit.
Step 16 Reload the secondary unit by choosingMonitoring > Failover > System, and clicking Reload Standby.
Stay on the System pane to monitor when the secondary unit reloads.
Step 17 After the secondary unit comes up, make both failover groups active on the secondary unit by choosingMonitoring > Failover > Failover Group #, where # is the number of the failover group you want to moveto the secondary unit, and clickingMake Standby.
ASDM will automatically reconnect to the failover group 1 IP address on the secondary unit.
Step 18 Upgrade the ASA FirePOWER module on the primary unit.
For an ASA FirePOWER module managed by ASDM, connect ASDM to the failover group 1 or 2 standbymanagement IP address. Wait for the upgrade to complete, and then connect ASDM back to the secondaryunit.
Step 19 Reload the primary unit by choosingMonitoring > Failover > System, and clicking Reload Standby.Step 20 If the failover groups are configured with Preempt Enabled, they automatically become active on their
designated unit after the preempt delay has passed. ASDM will automatically reconnect to the failover group1 IP address on the primary unit.
Upgrade an ASA ClusterUse the CLI or ASDM to upgrade the ASA Cluster for a zero downtime upgrade.
Upgrade an ASA Cluster Using the CLITo upgrade all units in an ASA cluster, perform the following steps. This procedure uses FTP. For TFTP,HTTP, or other server types, see the copy command in the ASA command reference.
Cisco ASA Upgrade Guide56
Upgrade the ASA Appliance or ASAvUpgrade an ASA Cluster
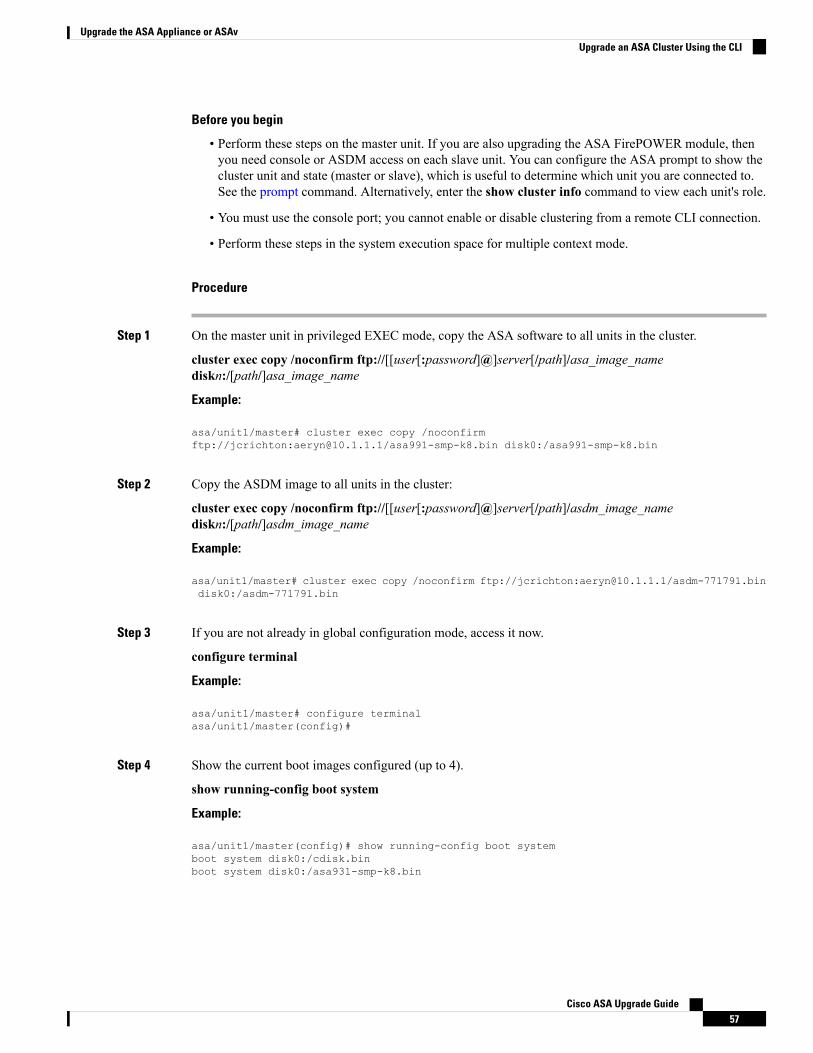
Before you begin
• Perform these steps on the master unit. If you are also upgrading the ASA FirePOWER module, thenyou need console or ASDM access on each slave unit. You can configure the ASA prompt to show thecluster unit and state (master or slave), which is useful to determine which unit you are connected to.See the prompt command. Alternatively, enter the show cluster info command to view each unit's role.
• You must use the console port; you cannot enable or disable clustering from a remote CLI connection.
• Perform these steps in the system execution space for multiple context mode.
Procedure
Step 1 On the master unit in privileged EXEC mode, copy the ASA software to all units in the cluster.
cluster exec copy /noconfirm ftp://[[user[:password]@]server[/path]/asa_image_namediskn:/[path/]asa_image_name
Example:
asa/unit1/master# cluster exec copy /noconfirmftp://jcrichton:[email protected]/asa991-smp-k8.bin disk0:/asa991-smp-k8.bin
Step 2 Copy the ASDM image to all units in the cluster:
cluster exec copy /noconfirm ftp://[[user[:password]@]server[/path]/asdm_image_namediskn:/[path/]asdm_image_name
Example:
asa/unit1/master# cluster exec copy /noconfirm ftp://jcrichton:[email protected]/asdm-771791.bindisk0:/asdm-771791.bin
Step 3 If you are not already in global configuration mode, access it now.
configure terminal
Example:
asa/unit1/master# configure terminalasa/unit1/master(config)#
Step 4 Show the current boot images configured (up to 4).
show running-config boot system
Example:
asa/unit1/master(config)# show running-config boot systemboot system disk0:/cdisk.binboot system disk0:/asa931-smp-k8.bin
Cisco ASA Upgrade Guide57
Upgrade the ASA Appliance or ASAvUpgrade an ASA Cluster Using the CLI
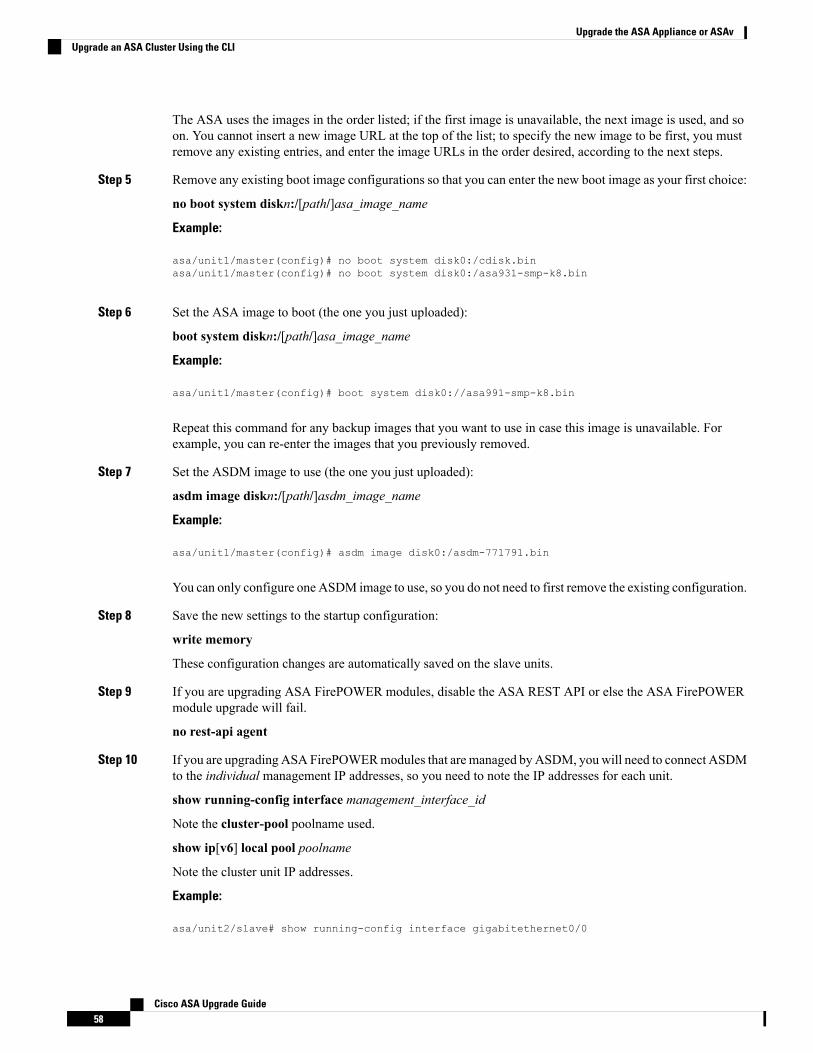
The ASA uses the images in the order listed; if the first image is unavailable, the next image is used, and soon. You cannot insert a new image URL at the top of the list; to specify the new image to be first, you mustremove any existing entries, and enter the image URLs in the order desired, according to the next steps.
Step 5 Remove any existing boot image configurations so that you can enter the new boot image as your first choice:
no boot system diskn:/[path/]asa_image_name
Example:
asa/unit1/master(config)# no boot system disk0:/cdisk.binasa/unit1/master(config)# no boot system disk0:/asa931-smp-k8.bin
Step 6 Set the ASA image to boot (the one you just uploaded):
boot system diskn:/[path/]asa_image_name
Example:
asa/unit1/master(config)# boot system disk0://asa991-smp-k8.bin
Repeat this command for any backup images that you want to use in case this image is unavailable. Forexample, you can re-enter the images that you previously removed.
Step 7 Set the ASDM image to use (the one you just uploaded):
asdm image diskn:/[path/]asdm_image_name
Example:
asa/unit1/master(config)# asdm image disk0:/asdm-771791.bin
You can only configure one ASDM image to use, so you do not need to first remove the existing configuration.
Step 8 Save the new settings to the startup configuration:
write memory
These configuration changes are automatically saved on the slave units.
Step 9 If you are upgrading ASA FirePOWER modules, disable the ASA REST API or else the ASA FirePOWERmodule upgrade will fail.
no rest-api agent
Step 10 If you are upgrading ASA FirePOWERmodules that are managed byASDM, youwill need to connect ASDMto the individual management IP addresses, so you need to note the IP addresses for each unit.
show running-config interface management_interface_id
Note the cluster-pool poolname used.
show ip[v6] local pool poolname
Note the cluster unit IP addresses.
Example:
asa/unit2/slave# show running-config interface gigabitethernet0/0
Cisco ASA Upgrade Guide58
Upgrade the ASA Appliance or ASAvUpgrade an ASA Cluster Using the CLI
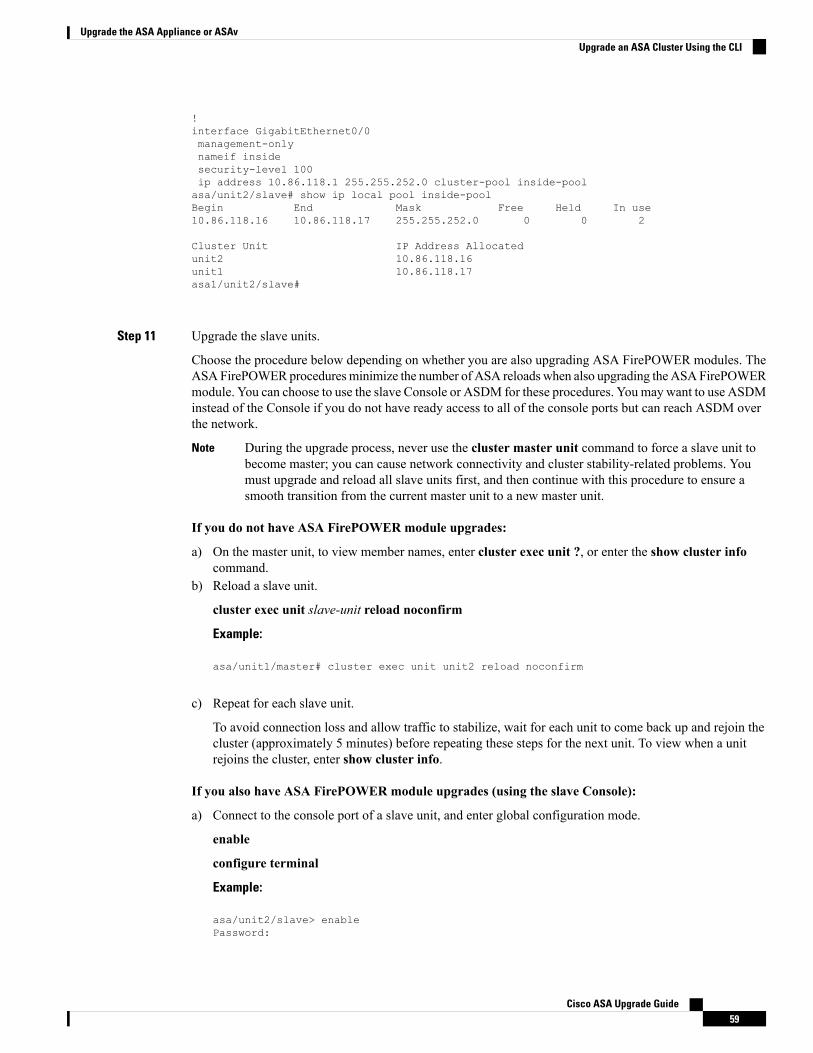
!interface GigabitEthernet0/0management-onlynameif insidesecurity-level 100ip address 10.86.118.1 255.255.252.0 cluster-pool inside-poolasa/unit2/slave# show ip local pool inside-poolBegin End Mask Free Held In use10.86.118.16 10.86.118.17 255.255.252.0 0 0 2
Cluster Unit IP Address Allocatedunit2 10.86.118.16unit1 10.86.118.17asa1/unit2/slave#
Step 11 Upgrade the slave units.
Choose the procedure below depending on whether you are also upgrading ASA FirePOWER modules. TheASAFirePOWERproceduresminimize the number of ASA reloadswhen also upgrading theASAFirePOWERmodule. You can choose to use the slave Console or ASDM for these procedures. Youmay want to use ASDMinstead of the Console if you do not have ready access to all of the console ports but can reach ASDM overthe network.
During the upgrade process, never use the cluster master unit command to force a slave unit tobecome master; you can cause network connectivity and cluster stability-related problems. Youmust upgrade and reload all slave units first, and then continue with this procedure to ensure asmooth transition from the current master unit to a new master unit.
Note
If you do not have ASA FirePOWER module upgrades:
a) On the master unit, to view member names, enter cluster exec unit ?, or enter the show cluster infocommand.
b) Reload a slave unit.
cluster exec unit slave-unit reload noconfirm
Example:
asa/unit1/master# cluster exec unit unit2 reload noconfirm
c) Repeat for each slave unit.
To avoid connection loss and allow traffic to stabilize, wait for each unit to come back up and rejoin thecluster (approximately 5 minutes) before repeating these steps for the next unit. To view when a unitrejoins the cluster, enter show cluster info.
If you also have ASA FirePOWER module upgrades (using the slave Console):
a) Connect to the console port of a slave unit, and enter global configuration mode.
enable
configure terminal
Example:
asa/unit2/slave> enablePassword:
Cisco ASA Upgrade Guide59
Upgrade the ASA Appliance or ASAvUpgrade an ASA Cluster Using the CLI
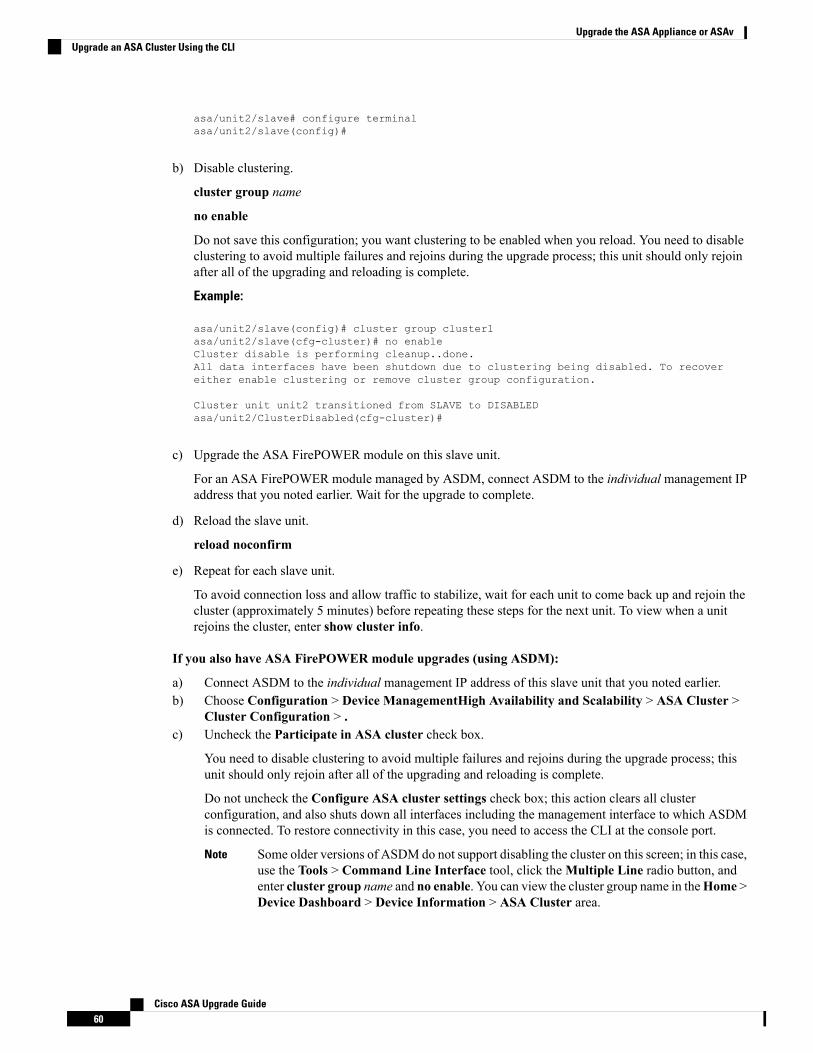
asa/unit2/slave# configure terminalasa/unit2/slave(config)#
b) Disable clustering.
cluster group name
no enable
Do not save this configuration; you want clustering to be enabled when you reload. You need to disableclustering to avoid multiple failures and rejoins during the upgrade process; this unit should only rejoinafter all of the upgrading and reloading is complete.
Example:
asa/unit2/slave(config)# cluster group cluster1asa/unit2/slave(cfg-cluster)# no enableCluster disable is performing cleanup..done.All data interfaces have been shutdown due to clustering being disabled. To recovereither enable clustering or remove cluster group configuration.
Cluster unit unit2 transitioned from SLAVE to DISABLEDasa/unit2/ClusterDisabled(cfg-cluster)#
c) Upgrade the ASA FirePOWER module on this slave unit.
For an ASA FirePOWER module managed by ASDM, connect ASDM to the individual management IPaddress that you noted earlier. Wait for the upgrade to complete.
d) Reload the slave unit.
reload noconfirm
e) Repeat for each slave unit.
To avoid connection loss and allow traffic to stabilize, wait for each unit to come back up and rejoin thecluster (approximately 5 minutes) before repeating these steps for the next unit. To view when a unitrejoins the cluster, enter show cluster info.
If you also have ASA FirePOWER module upgrades (using ASDM):
a) Connect ASDM to the individual management IP address of this slave unit that you noted earlier.b) Choose Configuration > Device ManagementHigh Availability and Scalability > ASA Cluster >
Cluster Configuration > .c) Uncheck the Participate in ASA cluster check box.
You need to disable clustering to avoid multiple failures and rejoins during the upgrade process; thisunit should only rejoin after all of the upgrading and reloading is complete.
Do not uncheck the Configure ASA cluster settings check box; this action clears all clusterconfiguration, and also shuts down all interfaces including the management interface to which ASDMis connected. To restore connectivity in this case, you need to access the CLI at the console port.
Some older versions of ASDM do not support disabling the cluster on this screen; in this case,use the Tools > Command Line Interface tool, click theMultiple Line radio button, andenter cluster group name and no enable. You can view the cluster group name in theHome >Device Dashboard > Device Information > ASA Cluster area.
Note
Cisco ASA Upgrade Guide60
Upgrade the ASA Appliance or ASAvUpgrade an ASA Cluster Using the CLI
d) Click Apply.e) You are prompted to exit ASDM. Reconnect ASDM to the same IP address.f) Upgrade the ASA FirePOWER module.
Wait for the upgrade to complete.
g) In ASDM, choose Tools > System Reload.h) Click the Reload without saving the running configuration radio button.
You do not want to save the configuration; when this unit reloads, you want clustering to be enabledon it.
i) Click Schedule Reload.j) Click Yes to continue the reload.k) Repeat for each slave unit.
To avoid connection loss and allow traffic to stabilize, wait for each unit to come back up and rejointhe cluster (approximately 5 minutes) before repeating these steps for the next unit. To view when aunit rejoins the cluster, see theMonitoring > ASA Cluster > Cluster Summary pane on the masterunit.
Step 12 Upgrade the master unit.a) Disable clustering.
cluster group name
no enable
Wait for 5 minutes for a new master unit to be selected and traffic to stabilize.
Do not save this configuration; you want clustering to be enabled when you reload.
We recommend manually disabling cluster on the master unit if possible so that a new master unit can beelected as quickly and cleanly as possible.
Example:
asa/unit1/master(config)# cluster group cluster1asa/unit1/master(cfg-cluster)# no enableCluster disable is performing cleanup..done.All data interfaces have been shutdown due to clustering being disabled. To recovereither enable clustering or remove cluster group configuration.
Cluster unit unit1 transitioned from MASTER to DISABLEDasa/unit1/ClusterDisabled(cfg-cluster)#
b) Upgrade the ASA FirePOWER module on this unit.
For an ASA FirePOWER module managed by ASDM, connect ASDM to the individual management IPaddress that you noted earlier. The main cluster IP address now belongs to the newmaster unit; this formermaster unit is still accessible on its individual management IP address.
Wait for the upgrade to complete.
c) Reload this unit.
reload noconfirm
Cisco ASA Upgrade Guide61
Upgrade the ASA Appliance or ASAvUpgrade an ASA Cluster Using the CLI
When the former master unit rejoins the cluster, it will be a slave unit.
Upgrade an ASA Cluster Using ASDMTo upgrade all units in an ASA cluster, perform the following steps.
Before you begin
• Perform these steps on the master unit. If you are also upgrading the ASA FirePOWER module, thenyou need ASDM access to each slave unit.
• Perform these steps in the system execution space for multiple context mode.
• Place the ASA and ASDM images on your local management computer.
Procedure
Step 1 Launch ASDM on the master unit by connecting to the main cluster IP address.
This IP address always stays with the master unit.
Step 2 In the main ASDM application window, choose Tools > Upgrade Software from Local Computer.
The Upgrade Software from Local Computer dialog box appears.
Step 3 Click the All devices in the cluster radio button.
The Upgrade Software dialog box appears.
Step 4 From the Image to Upload drop-down list, choose ASDM.Step 5 In the Local File Path field, click Browse Local Files to find the file on your computer.Step 6 (Optional) In the Flash File System Path field, enter the path to the flash file system or click Browse Flash
to find the directory or file in the flash file system.
By default, this field is prepopulated with the following path: disk0:/filename.
Step 7 Click Upload Image. The uploading process might take a few minutes.Step 8 You are prompted to set this image as the ASDM image. Click Yes.Step 9 You are reminded to exit ASDM and save the configuration. Click OK.
You exit the Upgrade tool. Note: You will save the configuration and reload ASDM after you upgrade theASA software.
Step 10 Repeat these steps, choosing ASA from the Image to Upload drop-down list.Step 11 Click the Save icon on the toolbar to save your configuration changes.
These configuration changes are automatically saved on the slave units.
Step 12 Take note of the individual management IP addresses for each unit onConfiguration > DeviceManagement> High Availability and Scalability > ASA Cluster > Cluster Members so that you can connect ASDMdirectly to slave units later.
Cisco ASA Upgrade Guide62
Upgrade the ASA Appliance or ASAvUpgrade an ASA Cluster Using ASDM
Step 13 If you are upgrading ASA FirePOWERmodules, disable the ASARESTAPI by choosingTools >CommandLine Interface, and entering no rest-api enable.
If you do not disable the REST API, the ASA FirePOWER module upgrade will fail.
Step 14 Upgrade the slave units.
Choose the procedure below depending on whether you are also upgrading ASA FirePOWER modules. TheASAFirePOWERprocedureminimizes the number of ASA reloadswhen also upgrading theASAFirePOWERmodule.
During the upgrade process, never use theMonitoring > ASA Cluster > Cluster Summary >Change Master To drop-down list to force a slave unit to become master; you can cause networkconnectivity and cluster stability-related problems. You must reload all slave units first, and thencontinue with this procedure to ensure a smooth transition from the current master unit to a newmaster unit.
Note
If you do not have ASA FirePOWER module upgrades:
a) On the master unit, choose Tools > System Reload.b) Choose a slave unit name from the Device drop-down list.c) Click Schedule Reload.d) Click Yes to continue the reload.e) Repeat for each slave unit.
To avoid connection loss and allow traffic to stabilize, wait for each unit to come back up and rejoin thecluster (approximately 5 minutes) before repeating these steps for the next unit. To view when a unitrejoins the cluster, see theMonitoring > ASA Cluster > Cluster Summary pane.
If you also have ASA FirePOWER module upgrades:
a) On themaster unit, chooseConfiguration > DeviceManagement > HighAvailability and Scalability> ASA Cluster > Cluster Members.
b) Select the slave unit that you want to upgrade, and click Delete.c) Click Apply.d) Exit ASDM, and connect ASDM to the slave unit by connecting to its individualmanagement IP address
that you noted earlier.e) Upgrade the ASA FirePOWER module.
Wait for the upgrade to complete.
f) In ASDM, choose Tools > System Reload.g) Click the Reload without saving the running configuration radio button.
You do not want to save the configuration; when this unit reloads, you want clustering to be enabledon it.
h) Click Schedule Reload.i) Click Yes to continue the reload.j) Repeat for each slave unit.
To avoid connection loss and allow traffic to stabilize, wait for each unit to come back up and rejointhe cluster (approximately 5 minutes) before repeating these steps for the next unit. To view when aunit rejoins the cluster, see theMonitoring > ASA Cluster > Cluster Summary pane.
Cisco ASA Upgrade Guide63
Upgrade the ASA Appliance or ASAvUpgrade an ASA Cluster Using ASDM
Step 15 Upgrade the master unit.a) In ASDM on the master unit, choose Configuration > Device Management > High Availability and
Scalability > ASA Cluster > Cluster Configuration pane.b) Uncheck the Participate in ASA cluster check box, and click Apply.
You are prompted to exit ASDM.
c) Wait for up to 5 minutes for a new master unit to be selected and traffic to stabilize.
When the former master unit rejoins the cluster, it will be a slave unit.
d) Re-connect ASDM to the former master unit by connecting to its individual management IP address thatyou noted earlier.
The main cluster IP address now belongs to the new master unit; this former master unit is still accessibleon its individual management IP address.
e) Upgrade the ASA FirePOWER module.
Wait for the upgrade to complete.
f) Choose Tools > System Reload.g) Click the Reload without saving the running configuration radio button.
You do not want to save the configuration; when this unit reloads, you want clustering to be enabled onit.
h) Click Schedule Reload.i) Click Yes to continue the reload.
You are prompted to exit ASDM. Restart ASDM on the main cluster IP address; you will reconnect tothe new master unit.
Upgrade the ASA on the Firepower 2100This document describes how to plan and implement an ASA, FXOS, and ASDM upgrade for standalone orfailover deployments.
Upgrade a Standalone UnitUse the FXOS CLI or Firepower Chassis Manager to upgrade the standalone unit.
Upgrade a Standalone Unit Using the Firepower Chassis ManagerThis section describes how to upgrade the ASA bundle for a standalone unit. You will upload the packagefrom your management computer.
Procedure
Step 1 Connect to the Firepower Chassis Manager.
Cisco ASA Upgrade Guide64
Upgrade the ASA Appliance or ASAvUpgrade the ASA on the Firepower 2100
Step 2 Choose System > Updates.The Available Updates area shows a list of the packages available on the chassis.
Step 3 Click Upload Image to upload the new package from your management computer.Step 4 Click Choose File to navigate to and select the package that you want to upload.Step 5 Click Upload.
The selected package is uploaded to the chassis. TheUpload Image dialog box shows the upload status. Waitfor the Success dialog box, and click OK. After completing the upload, the integrity of the image isautomatically verified.
Step 6 Click the Upgrade icon to the right of the new package.Step 7 Click Yes to confirm that you want to proceed with installation.
There is no indicator that the new package is being loaded. You will still see the Firepower Chassis Managerat the beginning of the upgrade process. When the system reboots, you will be logged out. You must wait forthe system to come back up before you can log in to the Firepower Chassis Manager. The reboot process takesapproximately 20 minutes. After the reboot, you will see the login screen.
Upgrade a Standalone Unit Using the FXOS CLIThis section describes how to upgrade the ASA bundle for a standalone unit. You can use FTP, SCP, SFTP,or TFTP to copy the package to the Firepower 2100 chassis.
Procedure
Step 1 Connect to the FXOS CLI, either the console port (preferred) or using SSH.Step 2 Download the package to the chassis.
a) Enter firmware mode.
scope firmware
Example:
firepower-2110# scope firmwarefirepower-2110 /firmware#
b) Download the package.
download image url
Specify the URL for the file being imported using one of the following:
• ftp://username@server/[path/]image_name
• scp://username@server/[path/]image_name
• sftp://username@server/[path/]image_name
• tftp://server[:port]/[path/]image_name
Example:
Cisco ASA Upgrade Guide65
Upgrade the ASA Appliance or ASAvUpgrade a Standalone Unit Using the FXOS CLI
firepower-2110 /firmware# download image tftp://10.88.29.181/cisco-asa-fp2k.9.8.2.2.SPAPlease use the command 'show download-task' or 'show download-task detail' to checkdownload progress.
c) Monitor the download process.
show download-task
Example:
firepower-2110 /firmware # show download
Download task:File Name Protocol Server Port Userid State--------- -------- --------------- ---------- --------------- -----cisco-asa-fp2k.9.8.2.SPA
Tftp 10.88.29.181 0 Downloadedcisco-asa-fp2k.9.8.2.2.SPA
Tftp 10.88.29.181 0 Downloadingfirepower-2110 /firmware #
Step 3 When the new package finishes downloading (Downloaded state), boot the package.a) View the version number of the new package.
show package
Example:
firepower-2110 /firmware # show packageName Package-Vers--------------------------------------------- ------------cisco-asa-fp2k.9.8.2.SPA 9.8.2cisco-asa-fp2k.9.8.2.2.SPA 9.8.2.2firepower-2110 /firmware #
b) Install the package.
scope auto-install
install security-pack version version
In the show package output, copy the Package-Vers value for the security-pack version number. Thechassis installs the ASA image and reboots.
Example:
firepower 2110 /firmware # scope auto-installfirepower-2110 /firmware/auto-install # install security-pack version 9.8.2.2
The system is currently installed with security software package 9.8.2, which has:- The platform version: 2.2.2.52- The CSP (asa) version: 9.8.2
If you proceed with the upgrade 9.8.2.2, it will do the following:- upgrade to the CSP asa version 9.8.2.2
Do you want to proceed ? (yes/no): yes
This operation upgrades firmware and software on Security Platform ComponentsHere is the checklist of things that are recommended before starting Auto-Install
Cisco ASA Upgrade Guide66
Upgrade the ASA Appliance or ASAvUpgrade a Standalone Unit Using the FXOS CLI
(1) Review current critical/major faults(2) Initiate a configuration backup
Attention:If you proceed the system will be re-imaged. All existing configuration will be lost,
and the default configuration applied.Do you want to proceed? (yes/no): yes
Triggered the install of software package version 9.8.2.2Install started. This will take several minutes.For monitoring the upgrade progress, please enter 'show' or 'show detail' command.firepower-2110 /firmware/auto-install #
Ignore the message, "All existing configuration will be lost, and the default configurationapplied." The configuration will not be erased, and the default configuration is not applied. Thedefault configuration is only applied during a reimage, not an upgrade.
Note
Step 4 Wait for the chassis to finish rebooting (5-10 minutes).
Although FXOS is up, you still need to wait for the ASA to come up (5 minutes). Wait until you see thefollowing messages:
firepower-2110#Cisco ASA: CMD=-install, CSP-ID=cisco-asa.9.8.2.2__asa_001_JAD20280BW90MEZR11, FLAG=''Verifying signature for cisco-asa.9.8.2.2 ...Verifying signature for cisco-asa.9.8.2.2 ... success
Cisco ASA: CMD=-start, CSP-ID=cisco-asa.9.8.2.2__asa_001_JAD20280BW90MEZR11, FLAG=''Cisco ASA starting ...Registering to process manager ...Cisco ASA started successfully.[…]
Upgrade an Active/Standby Failover PairUse the FXOS CLI or Firepower Chassis Manager to upgrade the Active/Standby failover pair for a zerodowntime upgrade.
Upgrade an Active/Standby Failover Pair Using the Firepower Chassis ManagerThis section describes how to upgrade the ASA bundle for an Active/Standby failover pair. You will uploadthe package from your management computer.
Before you begin
You need to determine which unit is active and which is standby: connect ASDM to the active ASA IP address.The active unit always owns the active IP address. Then chooseMonitoring > Properties > Failover > Statusto view this unit's priority (primary or secondary) so you know which unit you are connected to.
Cisco ASA Upgrade Guide67
Upgrade the ASA Appliance or ASAvUpgrade an Active/Standby Failover Pair
Procedure
Step 1 Upgrade the standby unit.a) Connect to the Firepower Chassis Manager on the standby unit.b) Choose System > Updates.
The Available Updates area shows a list of the packages available on the chassis.c) Click Upload Image to upload the new package from your management computer.d) Click Choose File to navigate to and select the package that you want to upload.e) Click Upload.
The selected package is uploaded to the chassis. The Upload Image dialog box shows the upload status.Wait for the Success dialog box, and click OK. After completing the upload, the integrity of the imageis automatically verified.
f) Click the Upgrade icon to the right of the new package.g) Click Yes to confirm that you want to proceed with installation.
There is no indicator that the new package is being loaded. You will still see the Firepower ChassisManager at the beginning of the upgrade process. When the system reboots, you will be logged out. Youmust wait for the system to come back up before you can log in to the Firepower Chassis Manager. Thereboot process takes approximately 20 minutes. After the reboot, you will see the login screen.
Step 2 Make the unit that you just upgraded the active unit so that traffic flows to the upgraded unit.a) Launch ASDM on the standby unit by connecting to the standby ASA IP address.b) Force the standby unit to become active by choosingMonitoring > Properties > Failover > Status,
and clickingMake Active.
Step 3 Upgrade the former active unit.a) Connect to the Firepower Chassis Manager on the former active unit.b) Choose System > Updates.
The Available Updates area shows a list of the packages available on the chassis.c) Click Upload Image to upload the new package from your management computer.d) Click Choose File to navigate to and select the package that you want to upload.e) Click Upload.
The selected package is uploaded to the chassis. The Upload Image dialog box shows the upload status.Wait for the Success dialog box, and click OK. After completing the upload, the integrity of the imageis automatically verified.
f) Click the Upgrade icon to the right of the new package.g) Click Yes to confirm that you want to proceed with installation.
There is no indicator that the new package is being loaded. You will still see the Firepower ChassisManager at the beginning of the upgrade process. When the system reboots, you will be logged out. Youmust wait for the system to come back up before you can log in to the Firepower Chassis Manager. Thereboot process takes approximately 20 minutes. After the reboot, you will see the login screen.
Cisco ASA Upgrade Guide68
Upgrade the ASA Appliance or ASAvUpgrade an Active/Standby Failover Pair Using the Firepower Chassis Manager
Upgrade an Active/Standby Failover Pair Using the FXOS CLIThis section describes how to upgrade the ASA bundle for an Active/Standby failover pair. You can use FTP,SCP, SFTP, or TFTP to copy the package to the Firepower 2100 chassis.
Before you begin
You need to determine which unit is active and which is standby. To determine the failover status, look at theASA prompt; you can configure the ASA prompt to show the failover status and priority (primary or secondary),which is useful to determine which unit you are connected to. See the prompt command. However, the FXOSprompt is not aware of ASA failover. Alternatively, enter the ASA show failover command to view this unit'sstatus and priority (primary or secondary).
Procedure
Step 1 Upgrade the standby unit.a) Connect to the FXOS CLI on the standby unit, either the console port (preferred) or using SSH.b) Enter firmware mode.
scope firmware
Example:
2110-sec# scope firmware2110-sec /firmware#
c) Download the package.
download image url
Specify the URL for the file being imported using one of the following:
• ftp://username@server/[path/]image_name
• scp://username@server/[path/]image_name
• sftp://username@server/[path/]image_name
• tftp://server[:port]/[path/]image_name
Example:
2110-sec /firmware# download image tftp://10.88.29.181/cisco-asa-fp2k.9.8.2.2.SPAPlease use the command 'show download-task' or 'show download-task detail' to checkdownload progress.
d) Monitor the download process.
show download-task
Example:
2110-sec /firmware # show download
Download task:
Cisco ASA Upgrade Guide69
Upgrade the ASA Appliance or ASAvUpgrade an Active/Standby Failover Pair Using the FXOS CLI
File Name Protocol Server Port Userid State--------- -------- --------------- ---------- --------------- -----cisco-asa-fp2k.9.8.2.SPA
Tftp 10.88.29.181 0 Downloadedcisco-asa-fp2k.9.8.2.2.SPA
Tftp 10.88.29.181 0 Downloading2110-sec /firmware #
e) When the new package finishes downloading (Downloaded state), boot the package. View the versionnumber of the new package.
show package
Example:
2110-sec /firmware # show packageName Package-Vers--------------------------------------------- ------------cisco-asa-fp2k.9.8.2.SPA 9.8.2cisco-asa-fp2k.9.8.2.2.SPA 9.8.2.22110-sec /firmware #
f) Install the package.
scope auto-install
install security-pack version version
In the show package output, copy the Package-Vers value for the security-pack version number. Thechassis installs the ASA image and reboots.
Example:
2110-sec /firmware # scope auto-install2110-sec /firmware/auto-install # install security-pack version 9.8.2.2
The system is currently installed with security software package 9.8.2, which has:- The platform version: 2.2.2.52- The CSP (asa) version: 9.8.2
If you proceed with the upgrade 9.8.2.2, it will do the following:- upgrade to the CSP asa version 9.8.2.2
Do you want to proceed ? (yes/no): yes
This operation upgrades firmware and software on Security Platform ComponentsHere is the checklist of things that are recommended before starting Auto-Install(1) Review current critical/major faults(2) Initiate a configuration backup
Attention:If you proceed the system will be re-imaged. All existing configuration will be lost,
and the default configuration applied.Do you want to proceed? (yes/no): yes
Triggered the install of software package version 9.8.2.2Install started. This will take several minutes.For monitoring the upgrade progress, please enter 'show' or 'show detail' command.2110-sec /firmware/auto-install #
Cisco ASA Upgrade Guide70
Upgrade the ASA Appliance or ASAvUpgrade an Active/Standby Failover Pair Using the FXOS CLI
Ignore the message, "All existing configuration will be lost, and the default configurationapplied." The configuration will not be erased, and the default configuration is not applied. Thedefault configuration is only applied during a reimage, not an upgrade.
Note
g) Wait for the chassis to finish rebooting (5-10 minutes).
Although FXOS is up, you still need to wait for the ASA to come up (5 minutes). Wait until you see thefollowing messages:
2110-sec#Cisco ASA: CMD=-install, CSP-ID=cisco-asa.9.8.2.2__asa_001_JAD20280BW90MEZR11, FLAG=''Verifying signature for cisco-asa.9.8.2.2 ...Verifying signature for cisco-asa.9.8.2.2 ... success
Cisco ASA: CMD=-start, CSP-ID=cisco-asa.9.8.2.2__asa_001_JAD20280BW90MEZR11, FLAG=''Cisco ASA starting ...Registering to process manager ...Cisco ASA started successfully.[…]
Step 2 Make the unit that you just upgraded the active unit so that traffic flows to the upgraded unit.a) Connect to the standby ASA CLI from FXOS.
connect asa
enable
The enable password is blank by default.
Example:
2110-sec# connect asaAttaching to Diagnostic CLI ... Press 'Ctrl+a then d' to detach.Type help or '?' for a list of available commands.asa/stby/sec> enablePassword: <blank>asa/stby/sec#
b) Force to the standby unit to become active.
failover active
Example:
asa/stby/sec> failover activeasa/act/sec#
c) To return to the FXOS console, enter Ctrl+a, d.
Step 3 Upgrade the former active unit.a) Connect to the FXOS CLI on the former active unit, either the console port (preferred) or using SSH.b) Enter firmware mode.
scope firmware
Example:
Cisco ASA Upgrade Guide71
Upgrade the ASA Appliance or ASAvUpgrade an Active/Standby Failover Pair Using the FXOS CLI
2110-pri# scope firmware2110-pri /firmware#
c) Download the package.
download image url
Specify the URL for the file being imported using one of the following:
• ftp://username@server/[path/]image_name
• scp://username@server/[path/]image_name
• sftp://username@server/[path/]image_name
• tftp://server[:port]/[path/]image_name
Example:
2110-pri /firmware# download image tftp://10.88.29.181/cisco-asa-fp2k.9.8.2.2.SPAPlease use the command 'show download-task' or 'show download-task detail' to checkdownload progress.
d) Monitor the download process.
show download-task
Example:
2110-pri /firmware # show download
Download task:File Name Protocol Server Port Userid State--------- -------- --------------- ---------- --------------- -----cisco-asa-fp2k.9.8.2.SPA
Tftp 10.88.29.181 0 Downloadedcisco-asa-fp2k.9.8.2.2.SPA
Tftp 10.88.29.181 0 Downloading2110-pri /firmware #
e) When the new package finishes downloading (Downloaded state), boot the package. View the versionnumber of the new package.
show package
Example:
2110-pri /firmware # show packageName Package-Vers--------------------------------------------- ------------cisco-asa-fp2k.9.8.2.SPA 9.8.2cisco-asa-fp2k.9.8.2.2.SPA 9.8.2.22110-pri /firmware #
f) Install the package.
scope auto-install
Cisco ASA Upgrade Guide72
Upgrade the ASA Appliance or ASAvUpgrade an Active/Standby Failover Pair Using the FXOS CLI

install security-pack version version
In the show package output, copy the Package-Vers value for the security-pack version number. Thechassis installs the ASA image and reboots.
Example:
2110-pri /firmware # scope auto-install2110-pri /firmware/auto-install # install security-pack version 9.8.2.2
The system is currently installed with security software package 9.8.2, which has:- The platform version: 2.2.2.52- The CSP (asa) version: 9.8.2
If you proceed with the upgrade 9.8.2.2, it will do the following:- upgrade to the CSP asa version 9.8.2.2
Do you want to proceed ? (yes/no): yes
This operation upgrades firmware and software on Security Platform ComponentsHere is the checklist of things that are recommended before starting Auto-Install(1) Review current critical/major faults(2) Initiate a configuration backup
Attention:If you proceed the system will be re-imaged. All existing configuration will be lost,
and the default configuration applied.Do you want to proceed? (yes/no): yes
Triggered the install of software package version 9.8.2.2Install started. This will take several minutes.For monitoring the upgrade progress, please enter 'show' or 'show detail' command.2110-pri /firmware/auto-install #
Ignore the message, "All existing configuration will be lost, and the default configurationapplied." The configuration will not be erased, and the default configuration is not applied. Thedefault configuration is only applied during a reimage, not an upgrade.
Note
g) Wait for the chassis to finish rebooting (5-10 minutes).
Although FXOS is up, you still need to wait for the ASA to come up (5 minutes). Wait until you see thefollowing messages:
2110-pri#Cisco ASA: CMD=-install, CSP-ID=cisco-asa.9.8.2.2__asa_001_JAD20280BW90MEZR11, FLAG=''Verifying signature for cisco-asa.9.8.2.2 ...Verifying signature for cisco-asa.9.8.2.2 ... success
Cisco ASA: CMD=-start, CSP-ID=cisco-asa.9.8.2.2__asa_001_JAD20280BW90MEZR11, FLAG=''Cisco ASA starting ...Registering to process manager ...Cisco ASA started successfully.[…]
Cisco ASA Upgrade Guide73
Upgrade the ASA Appliance or ASAvUpgrade an Active/Standby Failover Pair Using the FXOS CLI
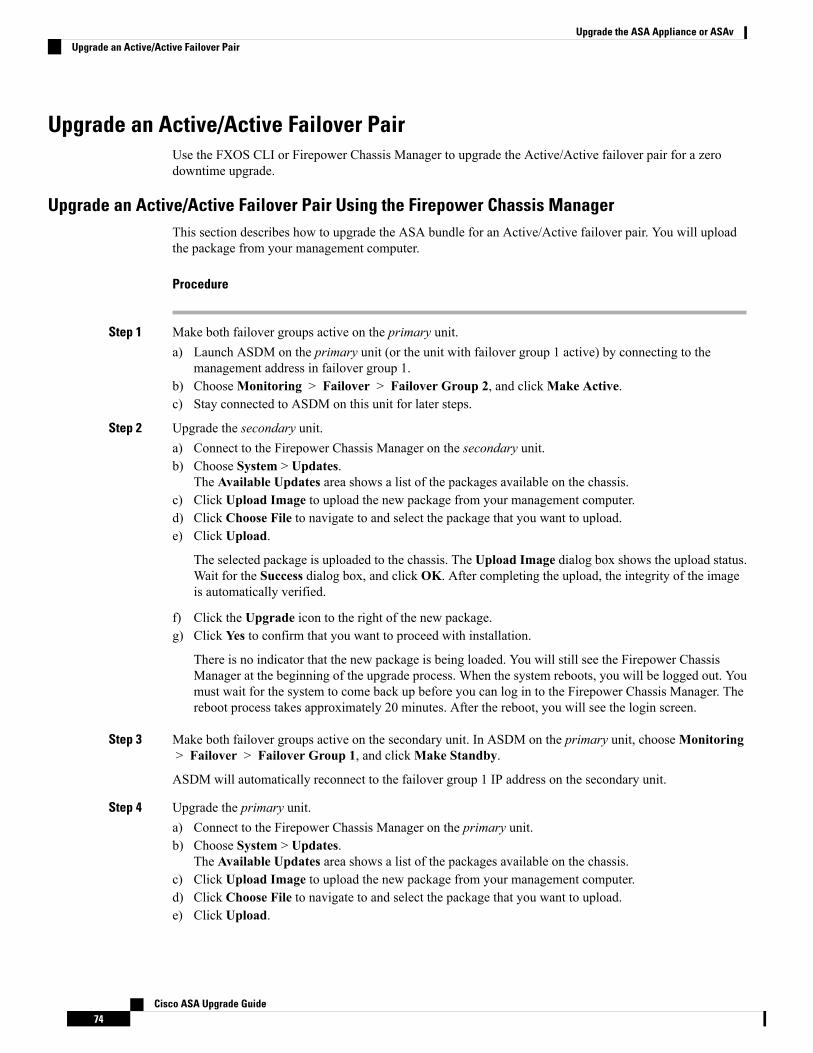
Upgrade an Active/Active Failover PairUse the FXOS CLI or Firepower Chassis Manager to upgrade the Active/Active failover pair for a zerodowntime upgrade.
Upgrade an Active/Active Failover Pair Using the Firepower Chassis ManagerThis section describes how to upgrade the ASA bundle for an Active/Active failover pair. You will uploadthe package from your management computer.
Procedure
Step 1 Make both failover groups active on the primary unit.a) Launch ASDM on the primary unit (or the unit with failover group 1 active) by connecting to the
management address in failover group 1.b) ChooseMonitoring > Failover > Failover Group 2, and clickMake Active.c) Stay connected to ASDM on this unit for later steps.
Step 2 Upgrade the secondary unit.a) Connect to the Firepower Chassis Manager on the secondary unit.b) Choose System > Updates.
The Available Updates area shows a list of the packages available on the chassis.c) Click Upload Image to upload the new package from your management computer.d) Click Choose File to navigate to and select the package that you want to upload.e) Click Upload.
The selected package is uploaded to the chassis. The Upload Image dialog box shows the upload status.Wait for the Success dialog box, and click OK. After completing the upload, the integrity of the imageis automatically verified.
f) Click the Upgrade icon to the right of the new package.g) Click Yes to confirm that you want to proceed with installation.
There is no indicator that the new package is being loaded. You will still see the Firepower ChassisManager at the beginning of the upgrade process. When the system reboots, you will be logged out. Youmust wait for the system to come back up before you can log in to the Firepower Chassis Manager. Thereboot process takes approximately 20 minutes. After the reboot, you will see the login screen.
Step 3 Make both failover groups active on the secondary unit. In ASDM on the primary unit, chooseMonitoring> Failover > Failover Group 1, and clickMake Standby.
ASDM will automatically reconnect to the failover group 1 IP address on the secondary unit.
Step 4 Upgrade the primary unit.a) Connect to the Firepower Chassis Manager on the primary unit.b) Choose System > Updates.
The Available Updates area shows a list of the packages available on the chassis.c) Click Upload Image to upload the new package from your management computer.d) Click Choose File to navigate to and select the package that you want to upload.e) Click Upload.
Cisco ASA Upgrade Guide74
Upgrade the ASA Appliance or ASAvUpgrade an Active/Active Failover Pair
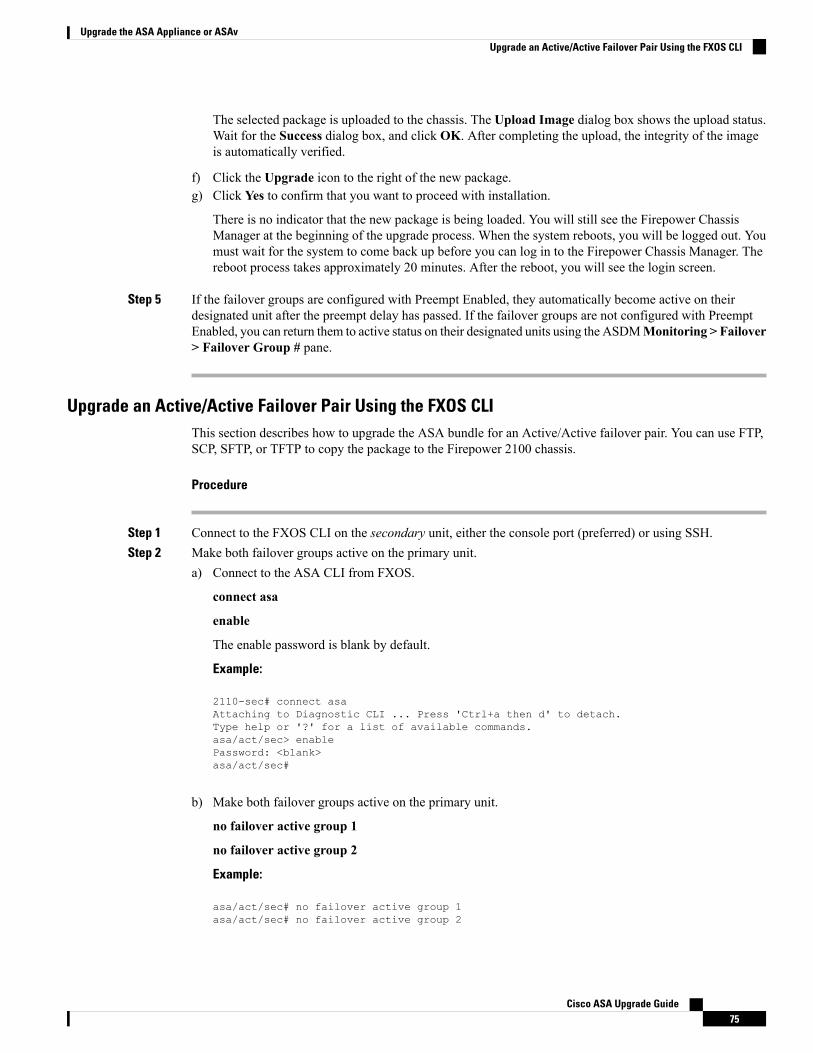
The selected package is uploaded to the chassis. The Upload Image dialog box shows the upload status.Wait for the Success dialog box, and click OK. After completing the upload, the integrity of the imageis automatically verified.
f) Click the Upgrade icon to the right of the new package.g) Click Yes to confirm that you want to proceed with installation.
There is no indicator that the new package is being loaded. You will still see the Firepower ChassisManager at the beginning of the upgrade process. When the system reboots, you will be logged out. Youmust wait for the system to come back up before you can log in to the Firepower Chassis Manager. Thereboot process takes approximately 20 minutes. After the reboot, you will see the login screen.
Step 5 If the failover groups are configured with Preempt Enabled, they automatically become active on theirdesignated unit after the preempt delay has passed. If the failover groups are not configured with PreemptEnabled, you can return them to active status on their designated units using the ASDMMonitoring > Failover> Failover Group # pane.
Upgrade an Active/Active Failover Pair Using the FXOS CLIThis section describes how to upgrade the ASA bundle for an Active/Active failover pair. You can use FTP,SCP, SFTP, or TFTP to copy the package to the Firepower 2100 chassis.
Procedure
Step 1 Connect to the FXOS CLI on the secondary unit, either the console port (preferred) or using SSH.Step 2 Make both failover groups active on the primary unit.
a) Connect to the ASA CLI from FXOS.
connect asa
enable
The enable password is blank by default.
Example:
2110-sec# connect asaAttaching to Diagnostic CLI ... Press 'Ctrl+a then d' to detach.Type help or '?' for a list of available commands.asa/act/sec> enablePassword: <blank>asa/act/sec#
b) Make both failover groups active on the primary unit.
no failover active group 1
no failover active group 2
Example:
asa/act/sec# no failover active group 1asa/act/sec# no failover active group 2
Cisco ASA Upgrade Guide75
Upgrade the ASA Appliance or ASAvUpgrade an Active/Active Failover Pair Using the FXOS CLI
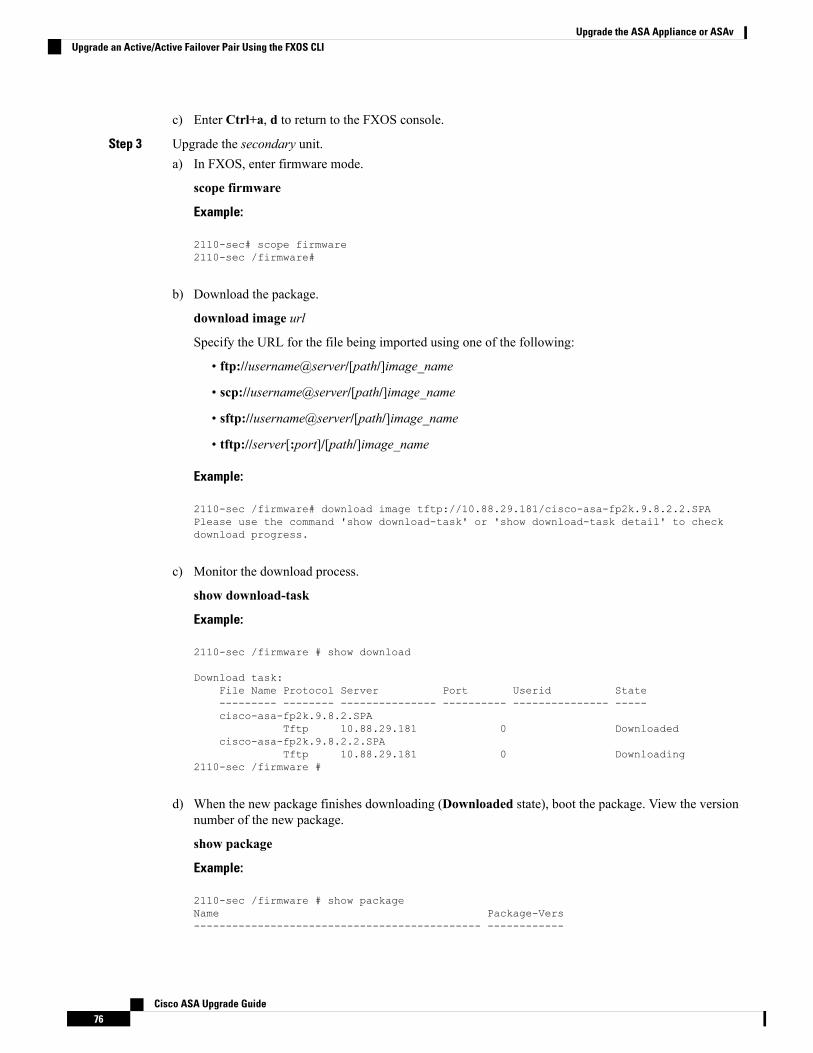
c) Enter Ctrl+a, d to return to the FXOS console.
Step 3 Upgrade the secondary unit.a) In FXOS, enter firmware mode.
scope firmware
Example:
2110-sec# scope firmware2110-sec /firmware#
b) Download the package.
download image url
Specify the URL for the file being imported using one of the following:
• ftp://username@server/[path/]image_name
• scp://username@server/[path/]image_name
• sftp://username@server/[path/]image_name
• tftp://server[:port]/[path/]image_name
Example:
2110-sec /firmware# download image tftp://10.88.29.181/cisco-asa-fp2k.9.8.2.2.SPAPlease use the command 'show download-task' or 'show download-task detail' to checkdownload progress.
c) Monitor the download process.
show download-task
Example:
2110-sec /firmware # show download
Download task:File Name Protocol Server Port Userid State--------- -------- --------------- ---------- --------------- -----cisco-asa-fp2k.9.8.2.SPA
Tftp 10.88.29.181 0 Downloadedcisco-asa-fp2k.9.8.2.2.SPA
Tftp 10.88.29.181 0 Downloading2110-sec /firmware #
d) When the new package finishes downloading (Downloaded state), boot the package. View the versionnumber of the new package.
show package
Example:
2110-sec /firmware # show packageName Package-Vers--------------------------------------------- ------------
Cisco ASA Upgrade Guide76
Upgrade the ASA Appliance or ASAvUpgrade an Active/Active Failover Pair Using the FXOS CLI
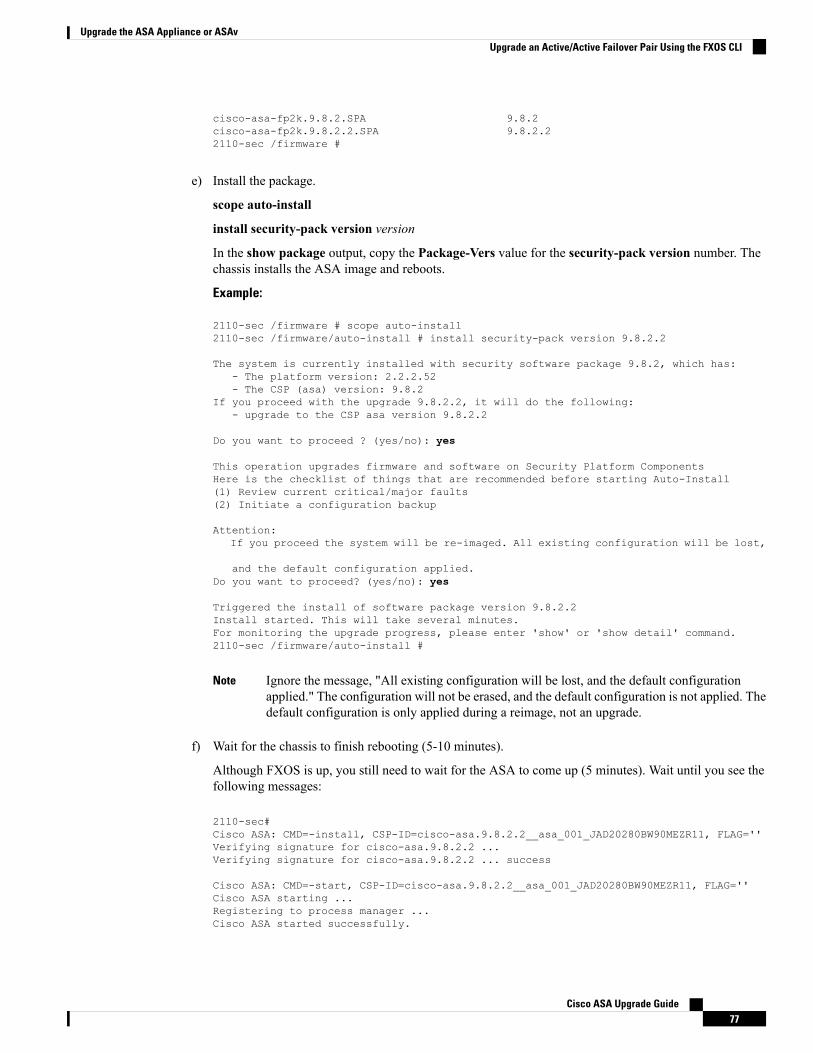
cisco-asa-fp2k.9.8.2.SPA 9.8.2cisco-asa-fp2k.9.8.2.2.SPA 9.8.2.22110-sec /firmware #
e) Install the package.
scope auto-install
install security-pack version version
In the show package output, copy the Package-Vers value for the security-pack version number. Thechassis installs the ASA image and reboots.
Example:
2110-sec /firmware # scope auto-install2110-sec /firmware/auto-install # install security-pack version 9.8.2.2
The system is currently installed with security software package 9.8.2, which has:- The platform version: 2.2.2.52- The CSP (asa) version: 9.8.2
If you proceed with the upgrade 9.8.2.2, it will do the following:- upgrade to the CSP asa version 9.8.2.2
Do you want to proceed ? (yes/no): yes
This operation upgrades firmware and software on Security Platform ComponentsHere is the checklist of things that are recommended before starting Auto-Install(1) Review current critical/major faults(2) Initiate a configuration backup
Attention:If you proceed the system will be re-imaged. All existing configuration will be lost,
and the default configuration applied.Do you want to proceed? (yes/no): yes
Triggered the install of software package version 9.8.2.2Install started. This will take several minutes.For monitoring the upgrade progress, please enter 'show' or 'show detail' command.2110-sec /firmware/auto-install #
Ignore the message, "All existing configuration will be lost, and the default configurationapplied." The configuration will not be erased, and the default configuration is not applied. Thedefault configuration is only applied during a reimage, not an upgrade.
Note
f) Wait for the chassis to finish rebooting (5-10 minutes).
Although FXOS is up, you still need to wait for the ASA to come up (5 minutes). Wait until you see thefollowing messages:
2110-sec#Cisco ASA: CMD=-install, CSP-ID=cisco-asa.9.8.2.2__asa_001_JAD20280BW90MEZR11, FLAG=''Verifying signature for cisco-asa.9.8.2.2 ...Verifying signature for cisco-asa.9.8.2.2 ... success
Cisco ASA: CMD=-start, CSP-ID=cisco-asa.9.8.2.2__asa_001_JAD20280BW90MEZR11, FLAG=''Cisco ASA starting ...Registering to process manager ...Cisco ASA started successfully.
Cisco ASA Upgrade Guide77
Upgrade the ASA Appliance or ASAvUpgrade an Active/Active Failover Pair Using the FXOS CLI
[…]
Step 4 Make both failover groups active on the secondary unit.a) Connect to the ASA CLI from FXOS.
connect asa
enable
The enable password is blank by default.
Example:
2110-sec# connect asaAttaching to Diagnostic CLI ... Press 'Ctrl+a then d' to detach.Type help or '?' for a list of available commands.asa/stby/sec> enablePassword: <blank>asa/stby/sec#
b) Make both failover groups active on the secondary unit.
failover active group 1
failover active group 2
Example:
asa/stby/sec# failover active group 1asa/act/sec# failover active group 2
c) Enter Ctrl+a, d to return to the FXOS console.
Step 5 Upgrade the primary unit.a) Connect to the FXOS CLI on the primary unit, either the console port (preferred) or using SSH.b) Enter firmware mode.
scope firmware
Example:
2110-pri# scope firmware2110-pri /firmware#
c) Download the package.
download image url
Specify the URL for the file being imported using one of the following:
• ftp://username@server/[path/]image_name
• scp://username@server/[path/]image_name
• sftp://username@server/[path/]image_name
• tftp://server[:port]/[path/]image_name
Cisco ASA Upgrade Guide78
Upgrade the ASA Appliance or ASAvUpgrade an Active/Active Failover Pair Using the FXOS CLI
Example:
2110-pri /firmware# download image tftp://10.88.29.181/cisco-asa-fp2k.9.8.2.2.SPAPlease use the command 'show download-task' or 'show download-task detail' to checkdownload progress.
d) Monitor the download process.
show download-task
Example:
2110-pri /firmware # show download
Download task:File Name Protocol Server Port Userid State--------- -------- --------------- ---------- --------------- -----cisco-asa-fp2k.9.8.2.SPA
Tftp 10.88.29.181 0 Downloadedcisco-asa-fp2k.9.8.2.2.SPA
Tftp 10.88.29.181 0 Downloading2110-pri /firmware #
e) When the new package finishes downloading (Downloaded state), boot the package. View the versionnumber of the new package.
show package
Example:
2110-pri /firmware # show packageName Package-Vers--------------------------------------------- ------------cisco-asa-fp2k.9.8.2.SPA 9.8.2cisco-asa-fp2k.9.8.2.2.SPA 9.8.2.22110-pri /firmware #
f) Install the package.
scope auto-install
install security-pack version version
In the show package output, copy the Package-Vers value for the security-pack version number. Thechassis installs the ASA image and reboots.
Example:
2110-pri /firmware # scope auto-install2110-pri /firmware/auto-install # install security-pack version 9.8.2.2
The system is currently installed with security software package 9.8.2, which has:- The platform version: 2.2.2.52- The CSP (asa) version: 9.8.2
If you proceed with the upgrade 9.8.2.2, it will do the following:- upgrade to the CSP asa version 9.8.2.2
Do you want to proceed ? (yes/no): yes
This operation upgrades firmware and software on Security Platform Components
Cisco ASA Upgrade Guide79
Upgrade the ASA Appliance or ASAvUpgrade an Active/Active Failover Pair Using the FXOS CLI
Here is the checklist of things that are recommended before starting Auto-Install(1) Review current critical/major faults(2) Initiate a configuration backup
Attention:If you proceed the system will be re-imaged. All existing configuration will be lost,
and the default configuration applied.Do you want to proceed? (yes/no): yes
Triggered the install of software package version 9.8.2.2Install started. This will take several minutes.For monitoring the upgrade progress, please enter 'show' or 'show detail' command.2110-pri /firmware/auto-install #
Ignore the message, "All existing configuration will be lost, and the default configurationapplied." The configuration will not be erased, and the default configuration is not applied. Thedefault configuration is only applied during a reimage, not an upgrade.
Note
g) Wait for the chassis to finish rebooting (5-10 minutes).
Although FXOS is up, you still need to wait for the ASA to come up (5 minutes). Wait until you see thefollowing messages:
2110-pri#Cisco ASA: CMD=-install, CSP-ID=cisco-asa.9.8.2.2__asa_001_JAD20280BW90MEZR11, FLAG=''Verifying signature for cisco-asa.9.8.2.2 ...Verifying signature for cisco-asa.9.8.2.2 ... success
Cisco ASA: CMD=-start, CSP-ID=cisco-asa.9.8.2.2__asa_001_JAD20280BW90MEZR11, FLAG=''Cisco ASA starting ...Registering to process manager ...Cisco ASA started successfully.[…]
Step 6 If the failover groups are configured with the ASA preempt command, they automatically become active ontheir designated unit after the preempt delay has passed. If the failover groups are not configured with thepreempt command, you can return them to active status on their designated units by connecting to the ASACLI and using the failover active group command.
Cisco ASA Upgrade Guide80
Upgrade the ASA Appliance or ASAvUpgrade an Active/Active Failover Pair Using the FXOS CLI
C H A P T E R 3Upgrade the ASA FirePOWER Module
This document describes how to upgrade the ASA FirePOWER module using ASDM or the FirepowerManagement Center, depending on your management choice. Refer to Upgrade the ASA Appliance or ASAv,on page 43 to determine when you should perform the FirePOWER upgrade in a standalone, failover, orclustering scenario.
• ASA FirePOWER Upgrade Behavior, on page 81• Upgrade an ASA FirePOWER Module Managed by ASDM, on page 82• Upgrade the Firepower Management Center, on page 83• Upgrade ASA FirePOWER modules—With Firepower Management Center, on page 87
ASA FirePOWER Upgrade BehaviorYour ASA service policies for redirecting traffic to the ASA FirePOWER module determine how the modulehandles traffic during the Firepower software upgrade, including when you deploy certain configurations thatrestart the Snort process.
Traffic BehaviorTraffic Redirection Policy
Passed without inspectionFail open (sfr fail-open)
DroppedFail closed (sfr fail-close)
Egress packet immediately, copynot inspected
Monitor only (sfr {fail-close}|{fail-open} monitor-only)
Traffic Behavior During Deployment
Traffic behavior while the Snort process restarts is the same as when you upgrade the ASA FirePOWERmodule. You deploy configurations multiple times during the upgrade process. The Snort process typicallyrestarts during the first deployment immediately after the upgrade. It does not restart during other deploymentsunless, before deploying, you modify specific policy or device configurations.
When you deploy, resources demands may result in a small number of packets dropping without inspection.Additionally, restarting the Snort process interrupts traffic inspection . Your service policies determine whethertraffic drops or passes without inspection during the interruption.
Cisco ASA Upgrade Guide81
Upgrade an ASA FirePOWER Module Managed by ASDMUse the following procedure to upgrade ASA FirePOWER modules managed by ASDM.
Do not make configuration changes, manually reboot, or shut down an upgrading module. Do not restart anupgrade in progress. The upgrade process may appear inactive during prechecks; this is expected. If youencounter issues with the upgrade, including a failed upgrade or unresponsive appliance, contact Cisco TAC.
Caution
Procedure
Step 1 Make sure you are running a supported version of ASA.
There is wide compatibility between ASA and ASA FirePOWER versions. However, even if an ASA upgradeis not strictly required, resolving issues may require an upgrade to the latest supported version.
See the ASA upgrade procedures for standalone, failover, and clustering scenarios for when to upgrade theASA FirePOWER module in the sequence. Even if you are not upgrading the ASA software, you should stillrefer to the ASA failover and clustering upgrade procedures so you can perform a failover or disable clusteringon a unit before the module upgrade to avoid traffic loss. For example, in a cluster, you should upgrade eachsecondary unit serially (which involves disabling clustering, upgrading the module, then reenabling clustering),and then upgrade the primary unit.
Step 2 Download the upgrade package from Cisco.com.
For major versions:
• Upgrading to Version 6.0 through 6.2.2 — Cisco_Network_Sensor_Upgrade-[version]-[build].sh
• Upgrading to Version 6.2.3+ — Cisco_Network_Sensor_Upgrade-[version]-[build].sh.REL.tar
For patches:
• Upgrading to 5.4.1.x through 6.2.1.x — Cisco_Network_Sensor_Patch-[version]-[build].sh
• Upgrading to Version 6.2.2.1+ — Cisco_Network_Sensor_Patch-[version]-[build].sh.REL.tar
Download directly from Cisco.com. If you transfer a package by email, it may become corrupted. Note thatupgrade packages from Version 6.2.2+ are signed, and terminate in .sh.REL.tar instead of just .sh. Do notuntar signed upgrade packages.
Step 3 Connect to the ASA with ASDM and upload the upgrade package.a) Choose Configuration > ASA FirePOWER Configuration > Updates.b) Click Upload Update.c) Click Choose File to navigate to and choose the update.d) Click Upload.
Step 4 Deploy pending configuration changes. Otherwise, the upgrade may fail.
When you deploy, resource demands may result in a small number of packets dropping without inspection.Additionally, deploying some configurations restarts Snort, which interrupts traffic inspection and, depending
Cisco ASA Upgrade Guide82
Upgrade the ASA FirePOWER ModuleUpgrade an ASA FirePOWER Module Managed by ASDM
on how your device handles traffic, may interrupt traffic until the restart completes. For more information,see ASA FirePOWER Upgrade Behavior, on page 81.
Step 5 (Upgrading to Version 6.1+) Disable the ASA REST API.
If you do not disable the RESTAPI, the upgrade will fail. Note that ASA 5506-X series devices do not supportthe ASA REST API if you are also running Version 6.0+ of the ASA FirePOWER module.
Use the CLI on the ASA to disable the REST API:
no rest-api agent
You can reenable it after the upgrade:
rest-api agent
Step 6 ChooseMonitoring >ASAFirePOWERMonitoring >Task Status tomake sure essential tasks are complete.
Tasks running when the upgrade begins are stopped, become failed tasks, and cannot be resumed. You canmanually delete failed status messages later.
Step 7 Choose Configuration > ASA FirePOWER Configuration > Updates.Step 8 Click the Install icon next to the upgrade package you uploaded, then confirm that you want to upgrade and
reboot the module.
Traffic either drops throughout the upgrade or traverses the network without inspection, depending on howthe module is configured. For more information, see ASA FirePOWER Upgrade Behavior, on page 81.
Step 9 Monitor upgrade progress on the Task Status page.
Do not make configuration changes to the module while it is upgrading. Even if the upgrade status shows noprogress for several minutes or indicates that the upgrade has failed, do not restart the upgrade or reboot themodule. Instead, contact Cisco TAC.
Step 10 After the upgrade finishes, reconnect ASDM to the ASA.Step 11 ChooseConfiguration >ASAFirePOWERConfiguration and clickRefresh. Otherwise, the interface may
exhibit unexpected behavior.Step 12 Choose Configuration > ASA FirePOWER Configuration > System Information and confirm that the
module has the correct software version.Step 13 If the intrusion rule update or the vulnerability database (VDB) available on the Support site is newer than
the version currently running, install the newer version.Step 14 Complete any post-upgrade configuration changes described in the release notes.Step 15 Redeploy configurations.
Upgrade the Firepower Management CenterIf you manage the ASA FirePOWER module using the Firepower Management Center, then you need toupgrade the Management Center before you upgrade the module.
Cisco ASA Upgrade Guide83
Upgrade the ASA FirePOWER ModuleUpgrade the Firepower Management Center

Upgrade a Standalone Firepower Management CenterUse this procedure to upgrade a standalone FirepowerManagement Center, including FirepowerManagementCenter Virtual.
Do not deploy changes to or from, manually reboot, or shut down an upgrading appliance. Do not restart anupgrade in progress. The upgrade process may appear inactive during prechecks; this is expected. If youencounter issues with the upgrade, including a failed upgrade or unresponsive appliance, contact Cisco TAC.
Caution
Before you begin
Check your place in the upgrade path, including hosting environment and managed device upgrades. Makesure you have fully planned and prepared for this step.
Procedure
Step 1 Deploy to managed devices whose configurations are out of date.
On the Firepower Management Center menu bar, click Deploy. Choose devices, then click Deploy again. Ifyou do not deploy to an out-of-date device now, its eventual upgrade may fail and you may have to reimageit.
When you deploy, resource demands may result in a small number of packets dropping without inspection.Additionally, deploying some configurations restarts Snort, which interrupts traffic inspection and, dependingon how your device handles traffic, may interrupt traffic until the restart completes. .
Step 2 Perform final preupgrade checks.
• Check health—Use the Message Center (click the System Status icon on the menu bar). Make sure theappliances in your deployment are successfully communicating and that there are no issues reported bythe health monitor.
• Running tasks—Also in theMessage Center, make sure essential tasks are complete. Tasks running whenthe upgrade begins are stopped, become failed tasks, and cannot be resumed. You can manually deletefailed status messages later.
• Check disk space—Perform a final disk space check. Without enough free disk space, the upgrade fails.
Step 3 Choose System > Updates.Step 4 Click the Install icon next to the upgrade package you want to use, then choose the Firepower Management
Center.Step 5 Click Install to begin the upgrade.
Confirm that you want to upgrade and reboot the Firepower Management Center.
Step 6 Monitor precheck progress in the Message Center until you are logged out.
Do not make configuration changes or deploy to any device while the Firepower Management Center isupgrading. Even if the Message Center shows no progress for several minutes or indicates that the upgradehas failed, do not restart the upgrade or reboot the Firepower Management Center. Instead, contact CiscoTAC.
Cisco ASA Upgrade Guide84
Upgrade the ASA FirePOWER ModuleUpgrade a Standalone Firepower Management Center
Step 7 Log back into the Firepower Management Center when you can.
• Minor upgrades (patches and hotfixes)—You can log in after the upgrade completes and the FirepowerManagement Center reboots.
• Major upgrades—You can log in before the upgrade completes. The Firepower Management Centerdisplays a page you can use to monitor the upgrade's progress and view the upgrade log and any errormessages. You are logged out again when the upgrade completes and the Firepower Management Centerreboots.
Step 8 (Major upgrades only) Log back into the Firepower Management Center.
If prompted, review and accept the End User License Agreement (EULA). Otherwise, you are logged out.
Step 9 Verify upgrade success.
If the Firepower Management Center does not notify you of the upgrade's success when you log in, chooseHelp > About to display current software version information.
Step 10 Use the Message Center to recheck deployment health.Step 11 Update intrusion rules and the vulnerability database (VDB).
If the intrusion rule update or the VDB available on the Support site is newer than the version currentlyrunning, install the newer version. For more information, see the FirepowerManagement Center ConfigurationGuide. Note that when you update intrusion rules, you do not need to automatically reapply policies. You willdo that later.
Step 12 Complete any post-upgrade configuration changes described in the release notes.Step 13 Redeploy configurations.
Redeploy to allmanaged devices. If you do not deploy to a device, its eventual upgrade may fail and you mayhave to reimage it.
Upgrade High Availability Firepower Management CentersUse this procedure to upgrade the Firepower software on FirepowerManagement Centers in a high availabilitypair.
You upgrade peers one at a time. With synchronization paused, first upgrade the standby, then the active.When the standby Firepower Management Center starts prechecks, its status switches from standby to active,so that both peers are active. This temporary state is called split-brain and is not supported except duringupgrade. Do notmake or deploy configuration changes while the pair is split-brain. Your changes will be lostafter you upgrade the Firepower Management Centers and restart synchronization.
Do not deploy changes to or from, manually reboot, or shut down an upgrading appliance. Do not restart anupgrade in progress. The upgrade process may appear inactive during prechecks; this is expected. If youencounter issues with the upgrade, including a failed upgrade or unresponsive appliance, contact Cisco TAC.
Caution
Cisco ASA Upgrade Guide85
Upgrade the ASA FirePOWER ModuleUpgrade High Availability Firepower Management Centers
Before you begin
Check your place in the upgrade path, including managed device upgrades. Make sure you have fully plannedand prepared for this step.
Procedure
Step 1 On the active Firepower Management Center, deploy to managed devices whose configurations are out ofdate.
On the Firepower Management Center menu bar, click Deploy. Choose devices, then click Deploy again. Ifyou do not deploy to an out-of-date device now, its eventual upgrade may fail and you may have to reimageit.
When you deploy, resource demands may result in a small number of packets dropping without inspection.Additionally, deploying some configurations restarts Snort, which interrupts traffic inspection and, dependingon how your device handles traffic, may interrupt traffic until the restart completes. .
Step 2 Use the Message Center to check deployment health before you pause synchronization.
Click the System Status icon on the Firepower Management Center menu bar to display the Message Center.Make sure the appliances in your deployment are successfully communicating and that there are no issuesreported by the health monitor.
Step 3 Pause synchronization.a) Choose System > Integration.b) On the High Availability tab, click Pause Synchronization.
Step 4 Upgrade the Firepower Management Centers one at a time.a) Upgrade the standby.b) Upgrade the active.
To upgrade, follow the instructions in Upgrade a Standalone Firepower Management Center, on page 84, butomit the initial deploy, and stop after you verify update success on each Firepower Management Center. Donot make or deploy configuration changes while the pair is split-brain.
Step 5 On the Firepower Management Center you want to make the active peer, restart synchronization.a) Choose System > Integration.b) On the High Availability tab, clickMake-Me-Active.c) Wait until high availability synchronization restarts and the other FirepowerManagement Center switches
to standby mode.
Step 6 Use the Message Center to recheck deployment health.Step 7 Update intrusion rules and the vulnerability database (VDB).
If the intrusion rule update or the VDB available on the Support site is newer than the version currentlyrunning, install the newer version. For more information, see the FirepowerManagement Center ConfigurationGuide. Note that when you update intrusion rules, you do not need to automatically reapply policies. You willdo that later.
Step 8 Complete any post-upgrade configuration changes described in the release notes.Step 9 Redeploy configurations.
Cisco ASA Upgrade Guide86
Upgrade the ASA FirePOWER ModuleUpgrade High Availability Firepower Management Centers
Redeploy to allmanaged devices. If you do not deploy to a device, its eventual upgrade may fail and you mayhave to reimage it.
Upgrade ASA FirePOWER modules—With FirepowerManagement Center
Use this procedure to upgrade ASA FirePOWER modules managed by a Firepower Management Center.
If you are upgrading ASA along with the ASA FirePOWER module on a standalone ASA device, upgradethe module after you upgrade ASA and reload. If you are upgrading ASA and the ASA FirePOWER moduleon clustered or failover ASA devices, upgrade each module before you reload each unit. For more information,see ASA FirePOWERModule Upgrade Path—With FirepowerManagement Center, on page 19 and the ASAupgrade procedures.
If you are not upgrading ASA, you can upgrade all ASA FirePOWER modules together, regardless of ASAfailover or clustering configuration. However, you should still refer to the ASA failover and clustering upgradeprocedures so you can perform a failover or disable clustering on a unit before the module upgrade to avoidtraffic loss.
Do not deploy changes to or from, manually reboot, or shut down an upgrading appliance. Do not restart anupgrade in progress. The upgrade process may appear inactive during prechecks; this is expected. If youencounter issues with the upgrade, including a failed upgrade or unresponsive appliance, contact Cisco TAC.
Caution
Before you begin
Check your place in the upgrade path, including ASA and Firepower Management Center upgrades. Makesure you have fully planned and prepared for this step.
There is wide compatibility between ASA and ASA FirePOWER versions. However, even if an ASA upgradeis not strictly required, resolving issues may require an upgrade to the latest supported version.
Procedure
Step 1 Deploy configurations to the devices you are about to upgrade.
On the Firepower Management Center menu bar, click Deploy. Choose devices, then click Deploy again. Ifyou do not deploy to an out-of-date device now, its eventual upgrade may fail and you may have to reimageit.
When you deploy, resource demands may result in a small number of packets dropping without inspection.Additionally, deploying some configurations restarts Snort, which interrupts traffic inspection and, dependingon how your device handles traffic, may interrupt traffic until the restart completes. For more information,see ASA FirePOWER Upgrade Behavior, on page 81.
Step 2 (Upgrading to Version 6.1+) Disable the ASA REST API.
Cisco ASA Upgrade Guide87
Upgrade the ASA FirePOWER ModuleUpgrade ASA FirePOWER modules—With Firepower Management Center
If you do not disable the RESTAPI, the upgrade will fail. Note that ASA 5506-X series devices do not supportthe ASA REST API if you are also running Version 6.0+ of the ASA FirePOWER module.
Use the CLI on the ASA to disable the REST API:
no rest-api agent
You can reenable it after the upgrade:
rest-api agent
Step 3 Perform final preupgrade checks.
• Check health—Use the Message Center (click the System Status icon on the menu bar). Make sure theappliances in your deployment are successfully communicating and that there are no issues reported bythe health monitor.
• Running tasks—Also in theMessage Center, make sure essential tasks are complete. Tasks running whenthe upgrade begins are stopped, become failed tasks, and cannot be resumed. You can manually deletefailed status messages later.
• Check disk space—Perform a final disk space check. Without enough free disk space, the upgrade fails.
Step 4 Choose System > Updates.Step 5 Click the Install icon next to the upgrade package you want to use and choose the devices to upgrade.
If the devices you want to upgrade are not listed, you chose the wrong upgrade package.
We strongly recommend upgrading no more than five devices simultaneously. The FirepowerManagement Center does not allow you stop a device upgrade until all selected devices completethe process. If there is an issue with any one device upgrade, all devices must finish upgradingbefore you can resolve the issue.
Note
Step 6 Click Install, then confirm that you want to upgrade and reboot the devices.
Traffic either drops throughout the upgrade or traverses the network without inspection depending on howyour devices are configured and deployed. For more information, see ASA FirePOWER Upgrade Behavior,on page 81.
Step 7 Monitor upgrade progress in the Message Center.
Do not deploy configurations to the device while it is upgrading. Even if theMessage Center shows no progressfor several minutes or indicates that the upgrade has failed, do not restart the upgrade or reboot the device.Instead, contact Cisco TAC.
Step 8 Verify update success.
After the upgrade completes, choose Devices > Device Management and confirm that the devices youupgraded have the correct software version.
Step 9 Use the Message Center to recheck deployment health.Step 10 Update intrusion rules and the vulnerability database (VDB).
If the intrusion rule update or the VDB available on the Support site is newer than the version currentlyrunning, install the newer version. For more information, see the FirepowerManagement Center ConfigurationGuide. Note that when you update intrusion rules, you do not need to automatically reapply policies. You willdo that later.
Cisco ASA Upgrade Guide88
Upgrade the ASA FirePOWER ModuleUpgrade ASA FirePOWER modules—With Firepower Management Center

Step 11 Complete any post-upgrade configuration changes described in the release notes.Step 12 Redeploy configurations to the devices you just upgraded.
Cisco ASA Upgrade Guide89
Upgrade the ASA FirePOWER ModuleUpgrade ASA FirePOWER modules—With Firepower Management Center

Cisco ASA Upgrade Guide90
Upgrade the ASA FirePOWER ModuleUpgrade ASA FirePOWER modules—With Firepower Management Center