circuits basic
DESCRIPTION
circuits basicsTRANSCRIPT

Electronic Circuits and Design- a potpourri of basic electronic circuits, circuit ideas, and formulae for anyone undertaking electronic circuit designhttp://www.radio-electronics.com/info/circuits/index.php
The exact configuration of an electronic circuit is not always easy to remember, and even then there are associated electronic circuit design formulae to calculate the various circuit values. This section of the Radio-Electronics.Com website contains information about basic electronic circuits, building blocks, along with the relevant formulae to provide a unique reference on the web for anyone undertaking electronic circuit design.
This section is organized by the chief component in the circuit. Thus a filter using an operation amplifier would come under the operational amplifier section, and a transistor radio frequency amplifier would come under the transistors section and a pin diode attenuator would be found in the diodes section.
Resistor circuitsResistors are the most widely used components in electronic circuits. Although very simple in concept they are keys to the operation of many circuits. They can be used in a variety of ways to produce the required results.- Resistors in parallel- Resistor attenuator circuits
Resistor capacitor (RC) circuitsRC or resistor capacitor circuits are used in a number of applications and may be used to provide simple frequency dependent circuits.- Twin T notch filter
LC filter circuitsUsing inductors and capacitors a whole variety of filters can be designed and made. These include low pass, high pass and band pass filters- A basic filter overview- Low pass LC filter- High pass LC filter- Band pass LC filter
Diode circuitsThe diode is one of the most elementary semiconductor devices. It essentially allows current though the device in one direction. Using this facet of the diode there are many uses, but there are also other facets of its nature that enable to be used in other applications as well.- Simple PIN diode attenuator and switch- Constant impedance pin diode attenuator- Power supply current limiter- Diode voltage multiplier- Single balanced diode mixer- Double balanced diode mixer

Transistor circuits- Two transistor amplifier circuit with feedback- Transistor active high pass filter- Transistor current limiter for power supplies
SCR, Diac and Triac CircuitsSCR over-voltage crowbar circuit
Operational amplifier circuitsOperational amplifiers are one of the main building blocks these days used in analogue electronics. They are not only easy to use, but they are plentiful, cheap and offer a very high level of performance.- Operational amplifier basics- Inverting amplifier- High input impedance inverting amplifier- Non-inverting amplifier- High pass filter- Low pass filter- Band pass filter- Variable gain amplifier- Fixed frequency notch filter- Twin T notch filter with variable Q- Multi-vibrator oscillator- Bi-stable multi-vibrator- Comparator- Schmitt trigger
Digital logic circuitsLogic circuits consisting of building blocks including AND and OR and NAND and NOR gates for the basis of today's digital circuitry that is used in widely in electronics. Trigger, bi-stables, flip flops, etc. are also widely sued and can be made up from the basic building blocks.- Logic truth table- Hints and tips on designing and laying out digital or logic circuits- Using inverters to create other functions- A divide by two frequency divider using a D-type flip-flop- An R S flip flop using two logic gates- An edge triggered R S flip flop using two D types- An electronically controlled inverter using an exclusive OR gate
Electrostatic Discharge ESDElectro Static Discharge (ESD) is important for anyone involved with electronics. Even small discharges that would go unnoticed in everyday life can cause large amounts of damage to electronic circuits. Find out all about it and how to ensure electronic circuits are not affected in our three page tutorial.- Electrostatic Discharge ESD (3 pages)

Resistor attenuator circuits- for use in radio frequency circuits including receivers and transmitters, etc
Attenuator circuits are used in a variety of radio frequency circuit design applications. The attenuators reduce the level of the signal and this can be used to ensure that the correct radio signal level enters another circuit block such as mixer or amplifier so that it is not overloaded. As such attenuators are widely used by radio frequency circuit designers. While it is possible to buy ready made attenuators, it is also easy to make attenuators for many applications. Here a simple resistor network can be used to make attenuators that provide levels of attenuation up to figures of 60 dB and at frequency of 1 GHz and more, provided that care is taken with the construction and the choice of components.
One important feature that is required for radio frequency applications is that the characteristic impedance should be maintained. In other words the impedance looking into and out of the attenuator should be matched to the characteristic impedance of the system.
T and Pi networksThere are two basic formats that can be used for resistive attenuators. They are the T and pi networks. Often there is little to choose between them and the choice is often down to the preference of the designer.
As the name suggests the "T"section attenuator is in the shape of the letter T with two resistors in the signal line and one in the centre to ground.
T section attenuator
The two resistor values can be calculated very easily knowing the ratio of the input and output voltages, Vin and Vout respectively and the characteristic impedance Ro.

The pi section attenuator is in the form of the Greek letter pi and has one in line resistor and a resistor to ground at the input and the output.
Pi section attenuator
Similarly the values for the pi section attenuator can be calculated
Practical aspectsIt is generally good practice not to attempt to achieve any more than a maximum of 20 dB attenuation in any one attenuator section. Even this is possibly a little high. It is therefore

common practice to cascade several sections. When this is done the adjoining resistors can be combined. In the case of the T section attenuator this simply means the two series resistors can be added together. For the pi section attenuators there are parallel resistors.
When making large value attenuators, great care must be taken to prevent the signal leaking past the attenuator and reaching the output. This can result from capacitive or inductive coupling and poor earth arrangements. To overcome these problems good earth connection and careful layout, keeping the output and input away from one another are required. It may also be necessary to place a screen between the different sections.
Using these attenuators a surprisingly good frequency response can be obtained. Non-inductive resistors are required to ensure the best performance, and using good printed circuit board techniques and surface mount resistors, a good performance at frequencies in excess of 1 GHz are easy to achieve.
Table of resistor values for 50 ohm attenuatorsResistor designations refer to diagrams above
Loss in dB R1 R2 R3 R4
1 2.9 433 870 5.8
2 5.7 215 436 11.6
3 8.5 142 292 17.6
4 11.3 105 221 23.8
5 14.0 82.2 179 30.4
6 16.6 66.9 151 37.3
7 19.1 55.8 131 44.8
8 21.5 47.3 116 52.8
9 23.8 40.6 105 61.6
10 26.0 35.1 96.2 71.2
11 28.0 30.6 89.2 81.7
12 29.9 26.8 83.5 93.2
13 31.7 23.6 78.8 106
14 33.4 20.8 74.9 120

15 34.9 18.4 71.6 136
16 36.3 16.3 68.8 154
17 37.6 14.4 66.5 173
18 38.8 12.8 64.4 195
19 39.9 11.4 62.6 220
20 40.9 10.1 61.1 248
Twin T notch filter- design and circuit considerations for a resistor capacitor (RC) twin T notch filter
The twin T circuit is very useful as a notch filter. Here the twin T provides a large degree of rejection at a particular frequency. This notch filter can be useful in rejecting unwanted signals that are on a particular frequency. One example may be to filter out unwanted mains hum at 50 or 60 Hz that may be entering a circuit.
The response provided by the filter consists of a low level of attenuation away from the notch frequency. As signals move closer to the notch frequency, the level of attenuation rises, giving the typical notch filter response. In theory, at the notch frequency the level of attenuation provided by the twin T notch filter is infinite.
RC - Resistor Capacitor Twin T Notch Filter
The circuit for the twin T notch filter is shown above and can be seen to consist of three resistors and three capacitors. It operates by phase shifting the signals in the different legs and adding them at the output. At the notch frequency, the signals passing through each leg are 180 degrees out of phase and cancel out. In theory this provides a complete null of the signal. However in practice close tolerance components are required to achieve a good null.
In common with other RC circuits, the RC twin T notch filter circuit has what may be termed as a soft cut-off. The response of the notch circuit falls away slowly and affects a wide band of

frequencies either side of the cut-off frequency. However very close to the cut-off frequency the response falls away very quickly, assuming that close tolerance components have been used.
Calculation of the value for the circuit is very straightforward.
fc = 1 / (2 pi R C)
Where:fc = cut off frequency in Hertzpi = 3.142R and C are the values of the resistors and capacitors as in the circuit
Filters overview- an overview of the types of filter and the various design considerations and parameters
Filters of all types are required in a variety of applications from audio to RF and across the whole spectrum of frequencies. As such filters form an important element within a variety of scenarios, enabling the required frequencies to be passed through the circuit, while rejecting those that are not needed.
The ideal filter, whether it is a low pass, high pass, or band pass filter will exhibit no loss within the pass band, i.e. the frequencies below the cut off frequency. Then above this frequency in what is termed the stop band the filter will reject all signals.
In reality it is not possible to achieve the perfect pass filter and there is always some loss within the pass band, and it is not possible to achieve infinite rejection in the stop band. Also there is a transition between the pass band and the stop band, where the response curve falls away, with the level of rejection rises as the frequency moves from the pass band to the stop band.
Filter typesThere are four types of filter that can be defined. These are low pass, high pass, band pass and band reject filters. As the names indicate, a low pass filter only allows frequencies below what is termed the cut off frequency through. This can also be thought of as a high reject filter as it rejects high frequencies. Similarly a high pass filter only allows signals through above the cut off frequency and rejects those below the cut off frequency. A band pass filter allows frequencies through within a given pass band. Finally the band reject filter rejects signals within a certain band. It can be particularly useful for rejecting a particular unwanted signal or set of signals falling within a given bandwidth.

Types of filter

Filter frequenciesA filter allows signals through in what is termed the pass band. This is the band of frequencies below the cut off frequency for the filter.
The cut off frequency of the filter is defined as the point at which the output level from the filter falls to 50% (-3 dB) of the in band level, assuming a constant input level. The cut off frequency is sometimes referred to as the half power or -3 dB frequency.
The stop band of the filter is essentially the band of frequencies that is rejected by the filter. It is taken as starting at the point where the filter reaches its required level of rejection.
Filter classificationsFilters can be designed to meet a variety of requirements. Although using the same basic circuit configurations, the circuit values differ when the circuit is designed to meet different criteria. In band ripple, fastest transition to the ultimate roll off, highest out of band rejection are some of the criteria that result in different circuit values. These different filters are given names, each one being optimized for a different element of performance.
Butterworth: This type of filter provides the maximum in band flatness.
Bessel: This filter provides the optimum in-band phase response and therefore also provides the best step response.
Chebychev: This filter provides fast roll off after the cut off frequency is reached. However this is at the expense of in band ripple. The more in band ripple that can be tolerated, the faster the roll off.
Elliptical: This has significant levels of in band and out of band ripple, and as expected the higher the degree of ripple that can be tolerated, the steeper it reaches its ultimate roll off.
LC low pass filter- the design considerations and formulae (formulas) for an LC (inductor capacitor) low pass filter
Low pass filters are used in a wide number of applications. Particularly in radio frequency applications, low pass filters are made in their LC form using inductors and capacitors. Typically they may be used to filter out unwanted signals that may be present in a band above the wanted pass band. In this way, this form of filter only accepts signals below the cut-off frequency.
Low pass filters using LC components, i.e. inductors and capacitors are arranged in ether a pi or T network. For the pi section filter, each section has one series component and either side a component to ground. The T network low pass filter has one component to ground and either side there is a series in line component. In the case of a low pass filter the series component or components are inductors whereas the components to ground are capacitors.

LC Pi and T section low pass filters
There is a variety of different filter variants that can be used dependent upon the requirements in terms of in band ripple, rate at which final roll off is achieved, etc. The type used here is the constant-k and this produces some manageable equations:
L = Zo / (pi x Fc) Henries
C = 1 / (Zo x pi x Fc) Farads
Fc = 1 / (pi x square root (L x C) Hz
WhereZo = characteristic impedance in ohmsC = Capacitance in FaradsL = Inductance in HenriesFc = Cutoff frequency in Hertz
Further detailsIn order to provide a greater slope or roll off, it is possible to cascade several low pass filter sections. When this is done the filter elements from adjacent sections may be combined. For example if two T section filters are cascaded and each T section has a 1 uH inductor in each leg of the T, these may be combined in the adjoining sections and a 2 uH inductor used.
The choice of components for any filter, and in this case for a low pass filter is important. Close tolerance components should be used to ensure that the required performance is obtained. It is

also necessary to check on the temperature stability to ensure that the filter components do not vary significantly with temperature, thereby altering the performance.
Care must be taken with the layout of the filter. This should be undertaken not just for the pass band frequencies, but more importantly for the frequencies in the stop band that may be well in excess of the cut off frequency of the low pass filter. Capacitive and inductive coupling are the main elements that cause the filter performance to be degraded. Accordingly the input and output of the filter should be kept apart. Short leads and tracks should be used, components from adjacent filter sections should be spaced apart. Screens used where required, and good quality connectors and coaxial cable used at the input and output if applicable. LC high pass filter- the design considerations and formulae (formulas) for an LC (inductor capacitor) high pass filter
High pass filters are used in a wide number of applications and particularly in radio frequency applications. For the radio frequency filter applications, the high pass filters are made from inductors and capacitors rather than using other techniques such as active filters using operational amplifiers where applications are normally in the audio range.
High pass filters using LC components, i.e. inductors and capacitors are arranged in ether a pi or T network. As suggested by its name, the pi network has one series component, and either side of it there is a component to ground. Similarly the T network high pass filter has one component to ground and either side there is a series in line component. In the case of a high pass filter the series component or components are capacitors whereas the components to ground are inductors. In this way these filters pass the high frequency signals, and reject the low frequency signals. These filters may be used in applications where there are unwanted signals in a band of frequencies below the cut-off frequency and it is necessary to pass the wanted signals in a band above the cut-off frequency of the filter.

LC Pi and T section low pass filters
There is a variety of different filter variants that can be used dependent upon the requirements in terms of in band ripple, rate at which final roll off is achieved, etc. The type used here is the constant-k and this produces some manageable equations:
L = Zo / (4 x pi x Fc) Henries
C = 1 / (4 x Zo x pi x Fc) Farads
Fc = 1 / (4 x pi x square root (L x C) Hz
WhereZo = characteristic impedance in ohmsC = Capacitance in FaradsL = Inductance in HenriesFc = Cut off frequency in Hertz
Further detailsIn order to provide a greater slope or roll off in the high pass filter, it is possible to cascade several filter sections. When this is done the filter elements from adjacent sections may be combined. For example if two T section filters are cascaded and each T section has a 1 uH

inductor in each leg of the T, these may be combined in the adjoining sections and a 2 uH inductor used.
The choice of components for any filter, and in this case for a high pass filter is important. Close tolerance components should be used to ensure that the required performance is obtained. It is also necessary to check on the temperature stability to ensure that the filter components do not vary significantly with temperature, thereby altering the performance.
Care must be taken with the layout of the filter, especially when the filter is used for high frequencies. Capacitive and inductive coupling are the main elements that cause the filter performance to be degraded. Accordingly the input and output of the filter should be kept apart. Short leads and tracks should be used, Components from adjacent filter sections should be spaced apart. Screens used where required, and good quality connectors and coaxial cable used at the input and output if applicable.
LC band pass filter- the design considerations and formulae (formulas) for an LC (inductor capacitor) band pass filter
Band pass filters using LC components, i.e. inductors and capacitors are used in a number of radio frequency applications. These filters enable a band of frequencies to be passed through the filter, while those in the stop band of the band pass filter are rejected.
These filters are typically used where a small band of frequencies need to be passed through the filter and all others rejected by the filter.
Like the high pass filters and the low pass filters, there are two topologies that are used for these filters, namely the Pi and the T configurations. Rather than having a single element in each leg of the filter as in the case of the low pass and high pass filters, the band pass filter has a resonant circuit in each leg. These resonant circuits are either series or parallel tuned LC circuits.

LC Pi and T section band pass filters
The equations below provide the values for the capacitors and resistors for a constant-k filter. As the filter is a band pass filter there are two cut off frequencies. One at the low edge of the pass band and the toher at the top edge of the pass band.
L1 = Zo / (pi (f2 - f1)) Henries
L2 = Zo (f2 - f1) / (4 pi f2 f1)) Henries
C1 = (f2 - f1) / (4 pi f2 f1 Zo) Farads
C2 = 1 / (pi Zo (f2 - f1)) Farads
Zo = characteristic impedance in ohmsC1 and C2 = Capacitance in FaradsL1 and L2 = Inductance in Henriesf1 and f2 = Cut off frequencies in Hertz
Further detailsThe choice of components for any filter such as a low pass filter or a high pass filter can be crucial to its performance. In the case of a band pass filter it is even more important as the circuit comprises six components rather than just three. As a result of this, close tolerance components should be used to ensure that the required performance is obtained. It is also necessary to check on the temperature stability to ensure that the filter components do not vary significantly with temperature, thereby altering the performance.
Care must be taken with the layout of the filter, especially when the filter is used for high frequencies. Capacitive and inductive coupling are the main elements that cause the filter performance to be degraded. Accordingly the input and output of the filter should be kept apart. Short leads and tracks should be used, Components from adjacent filter sections should be spaced apart. Screens used where required, and good quality connectors and coaxial cable used at the input and output if applicable.
Simple PIN diode switch- PIN diode attenuator and switch circuit using a single PIN diode
For applications where the ultimate performance is not required a single PIN diode can be used. The circuit shown only requires a few components and is very simple to implement. Nevertheless it is able to act as a switch for radio frequency or RF applications and is adequate for many applications.
When a positive potential is applied to the control point current, this forward biases the diode and as a result the radio frequency signal is able to pass through the circuit. When a negative bias is

applied to the circuit, the diode become reverse biased and is effectively switched off. Under these conditions the depletion layer in the diode becomes wide and does not allow signal to pass.
Simple PIN diode attenuator and switch
Although in theory any diode could be used in this position, PIN diodes have a number of advantages as switches. In the first place they are more linear than ordinary PN junction diodes. This means that in their action as a radio frequency switch they do not create as many spurious products. Secondly when reverse biased and switched off, the depletion layer is wider than with an ordinary diode and this provides for greater isolation when switching.
PIN diode attenuator- a constant impedance attenuator design for radio frequency or RF circuit design applications
Electronically controllable PIN diode attenuators are often used in radio frequency or RF circuit designs. It is often necessary to be able to control the level of a radio frequency signal using a control voltage. It is possible to achieve this using a PIN diode attenuator circuit. Some circuits do not offer a constant impedance, whereas this PIN diode attenuator gives a satisfactory match.
The PIN diode variable attenuator is used to give attenuation over a range of about 20 dB and can be used in 50 ohm systems. The inductor L1 along with the capacitors C4 and C5 are included to prevent signal leakage from D1 to D2 that would impair the performance of the circuit.
The maximum attenuation is achieved when Vin is at a minimum. At this point current from the supply V+ turns the diodes D1 and D2 on effectively shorting the signal to ground. D3 is then reverse biased. When Vin is increased the diodes D1 and D2 become reverse biased, and D3 becomes forward biased, allowing the signal to pass through the circuit.

PIN diode variable attenuator
Typical values for the circuit might be: +V : 5 volts; Vin : 0 - 6 volts; D1 to D3 HP5082-3080 PIN diodes; R1 2k2; R2 : 1k; R3 2k7; L1 is self resonant above the operating frequency, but sufficient to give isolation between the diodes D1 and D2.
These values are only a starting point for an experimental design, and are only provided as such. The circuit may not be suitable in all instances.
Choice of diodeAlthough in theory any diode could be used in this position, PIN diodes have a number of advantages as switches. In the first place they are more linear than ordinary PN junction diodes. This means that in their action as a radio frequency switch they do not create as many spurious products and additionally as an attenuator they have a more useful curve. Secondly when reverse biased and switched off, the depletion layer is wider than with an ordinary diode and this provides for greater isolation when switching.
Power supply current limiter- a simple circuit for a power supply current limiter using two diodes and a resistor
In any power supply there is always the risk that the output will experience a short circuit. Accordingly it is necessary to protect the power supply from damage under these circumstances. There are a number of circuits that can be used for power supply protection, but one of the simplest circuits uses just two diodes and an additional resistor.
The circuit for the power supply current limiter uses a sense resistor placed in series with the emitter of the output pass transistor. Two diodes placed between the output of the circuit and the base of the pass transistor provide the current limiting action. When the circuit is operating within its normal operating range a small voltage exists across the series resistor. This voltage plus the base emitter voltage of the transistor is less than the two diode junction drops needed to turn on the two diodes to allow them to conduct current. However as the current increases so does the voltage across the resistor. When it equals the turn on voltage for a diode the voltage across the

resistor plus the base emitter junction drop for the transistor equals two diode drops, and as a result this voltage appears across the two diodes, which start to conduct. This starts to pull the voltage on the base of the transistor down, thereby limiting the current that can be drawn.
Basic power supply current limiting circuit
The circuit of this diode current limiter for a power supply is particularly simple. The value of the series resistor can be calculated so that the voltage across it rises to 0.6 volts (the turn on voltage for a silicon diode) when the maximum current is reached. However it is always best to ensure that there is some margin in hand by limiting the current from the simple power supply regulator before the absolute maximum level is reached.
Using in other circuitsThe same simple diode form of current limiting may be incorporated into power supply circuits that use feedback to sense the actual output voltage and provide a more accurately regulated output. If the output voltage sense point is taken after the series current sensing resistor, then the voltage drop across this can be corrected at the output.
Power supply with feedback and current limiting
This circuit gives far better regulation than the straight emitter follower regulator. Also voltage drops in the series current limit sense resistor can be accounted for provided that there is sufficient voltage drop across the series pass transistor in the power supply circuit. Finally the output voltage can be adjusted to give the required value using the variable resistor.
SummaryThe diode form of current limiting can be incorporated into a power supply circuit very easily. Additionally it is cheap and convenient. However if superior performance is needed then a

transistorized form of current limit may be used. This gives a sharper limiting that is more suitable for more exacting power supply requirements.
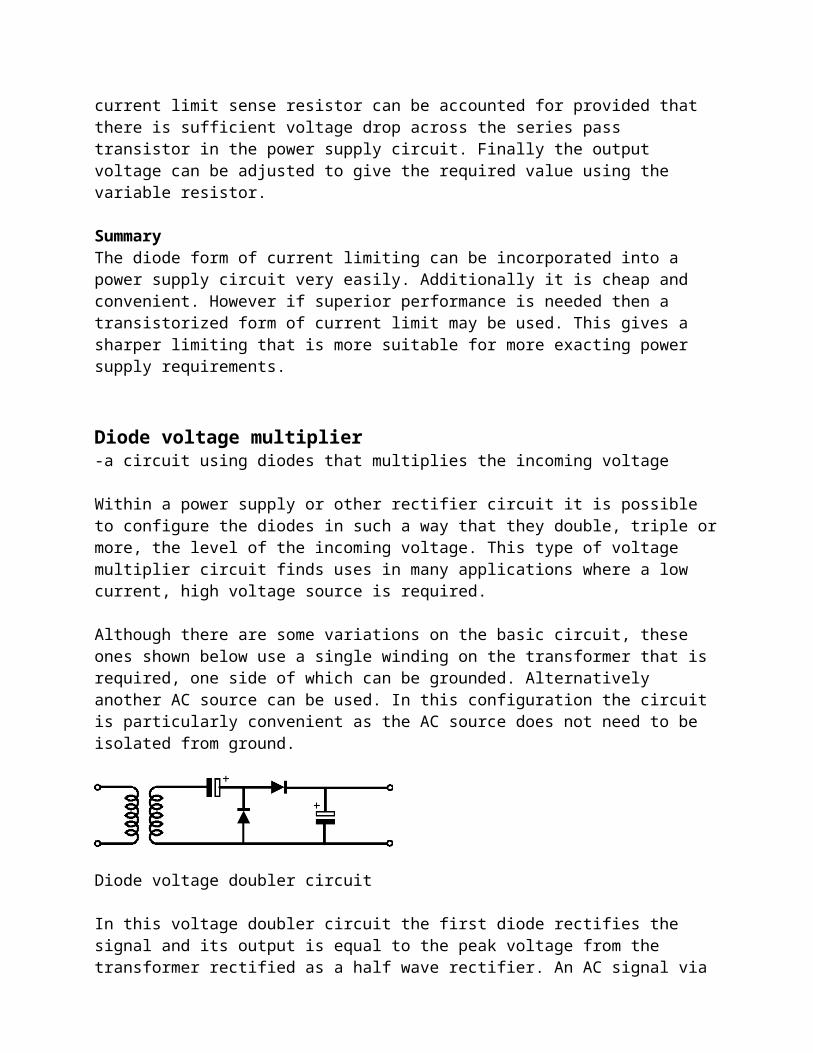
Diode voltage multiplier-a circuit using diodes that multiplies the incoming voltage
Within a power supply or other rectifier circuit it is possible to configure the diodes in such a way that they double, triple or more, the level of the incoming voltage. This type of voltage multiplier circuit finds uses in many applications where a low current, high voltage source is required.
Although there are some variations on the basic circuit, these ones shown below use a single winding on the transformer that is required, one side of which can be grounded. Alternatively another AC source can be used. In this configuration the circuit is particularly convenient as the AC source does not need to be isolated from ground.
Diode voltage doubler circuit
In this voltage doubler circuit the first diode rectifies the signal and its output is equal to the peak voltage from the transformer rectified as a half wave rectifier. An AC signal via the capacitor also reaches the second diode, and in view of the DC block provided by the capacitor this causes the output from the second diode to sit on top of the first one. In this way the output from the circuit is twice the peak voltage of the transformer, less the diode drops.
Variations of the basic circuit and concept are available to provide a voltage multiplier function of almost any factor. Applying the same principle of sitting one rectifier on top of another and using capacitive coupling enables a form of ladder network to built up.
The voltage multiplier circuits are very useful. However they are normally suitable only for low current applications. As the voltage multiplication increases the losses increase. The source resistance tends to rise, and loading becomes an issue. For each diode in the chain there is the usual diode drop (normally 0.6 volts for a silicon diode), but the reactance of the capacitors can become significant, especially when mains frequencies of 50 or 60 Hz are used. High voltage high value capacitors can be expensive and large. This may provide physical constraints for making them too large.
Diode single balanced mixer-a circuit of a diode single balanced mixer and its typical applications for radio frequency, RF circuits

Mixers are widely used for radio frequency of RF applications. The mixers used in this arena multiply the two signals entering the circuit together. (note - audio mixers add signals together). The multiplier type mixers used in radio frequency applications are formed using non-linear devices. As a result the two signals entering the circuit are multiplied together - the output at any given time is proportional to the product of the levels of the two signals entering the circuit at that instant. This gives rise to signals at frequencies equal to the sum and the difference of the frequencies of the two signals entering the circuit.
One of the simpler mixer circuits is based around two diodes. This type of diode known as a single balanced diode mixer circuit provides rejection of the input signals at the output as a result of the fact that the two inputs are balanced.
The circuit is only singly balanced and as a result it does not give isolation between the two input ports. This means that the signal from the local oscillator may leak onto the signal input line and this may give rise to inter-modulation distortion. However for many applications this circuit operates quite satisfactorily. Where this may be a problem then a double balanced mixer should be used.
The circuit of a diode single balanced mixer
The circuit has a typical conversion loss, i.e. the difference between the signal input and the output of around 8dB, although this depends upon the components used and the construction. The diodes should be as nearly matched as possible, and the transformer should be closely balanced for optimum rejection of the input signals at the output.
Where the input signals are widely spaced in frequency, it is possible to utilize a variation of the basic single balanced diode mixer to good effect. The circuit which is shown below may be used in a variety of applications, for example where an audio signal needs to be modulated onto a radio frequency, RF, carrier. In the circuit the two signals are combined using C1 as a high pass filter, and the combination of RFC and C2 as a low pass filter. In this way the leakage between the two input ports is minimized. A further refinement is that a balance control is incorporated into the balanced mixer circuit. This is used to ensure optimum balance. For example when used for modulating an RF carrier, it can be used to minimize the level of the carrier at the output, thereby ensuring only the two sidebands are produced.

The circuit of a diode single balanced mixer with a balance control
Although this form of the single balanced diode mixer circuit does require a few more components, the performance is improved as the variable resistor enables much better balance to be achieved, and additionally there is some form of isolation between the two inputs.
Double balanced diode mixer-a circuit of a double balanced diode mixer and its typical applications for radio frequency, RF circuits
Radio frequency mixers such as the double balanced diode mixer are used, not for adding signals together as in an audio mixer, but rather multiplying them together. When this occurs the output is a multiplication of the two input signals, and signals at new frequencies equal to the sum and difference frequencies are produced.
Being a double balanced mixer, this type of mixer suppresses the two input signals at the output. In this way only the sum and difference frequencies are seen. Additionally the balancing also isolates the two inputs from one another. This prevents the signals from one input entering the output circuitry of the other and the resultant possibility of inter-modulation.
The circuit of a double balanced diode mixer
Typical performance figures for the circuit are that isolation between ports is around 25 dB, and the conversion loss, i.e. the difference between the signal input and output levels is around 8 dB.

Using typical diodes, the input level to the mixer on the local oscillator port is around 1 volt RMS or 13 dBm into 50 ohms.
The isolation between the various ports is maximized if the coils are accurately matched so that a good balance is achieved. Additionally the diodes must also be matched. Often they need to be specially selected to ensure that their properties closely match each other.
In order to obtain the optimum performance the source impedances for the two input signals and the load impedance for the output should be matched to the required impedance. It is for this reason that small attenuators are often placed in the lines of the mixer. These are typically 3 dB, and although they do reduce the signal level they improve the overall performance of the mixer.
These mixers may be constructed, but for many commercial pieces of equipment they are purchased in a manufactured form. These devices can have the required level of development and as a result their performance can be optimized. Although they are often not cheap to buy, their performance is often worth the additional expense.
Simple two transistor amplifier- a simple design for a two transistor amplifier with feedback
This electronic circuit design shows a simple two transistor amplifier with feedback. It offers a reasonable high impedance while providing a low output impedance. It is an ideal transistor amplifier circuit for applications where a higher level of gain is required than that which would be provided by a single transistor stage.
Two transistor amplifier circuit with feedback
Av = (R4 + R5) / R4
The resistors R1 and R2 are chosen to set the base of TR1 to around the mid point. If some current limiting is required then it is possible to place a resistor between the emitter of TR2 and the supply.

Transistor high pass filter- a simple one transistor circuit to provide an active high pass filter
It is sometimes convenient to design a simple active high pass filter using one transistor. The transistor filter circuit given below provides a two pole filter with unity gain. Using just a single transistor, this filter is convenient to place in a larger circuit because it contains few components and does not occupy too much space.
The active high pass transistor circuit is quite straightforward, using just a total of four resistors, two capacitors and a single transistor. The operating conditions for the transistor are set up in the normal way. R2 and R3 are used to set up the bias point for the base of the transistor. The resistor Re is the emitter resistor and sets the current for the transistor.
The filter components are included in negative feedback from the output of the circuit to the input. The components that form the active filter network consist of C1, C2, R1 and the combination of R2 and R3 in parallel, assuming that he input resistance to the emitter follower circuit are very high and can be ignored.
Transistor active high pass filter circuit
C1 = 2 C2
R1 = R2 x R3 / (R2 + R3)
This is for values where the effect of the emitter follower transistor itself within the high pass filter circuit can be ignored, i.e.:
Re (B+1) >> R2 x R3 / (R2 + R3)
fo = 1.414 / (4 pi R1 C2)
Where:

B = the forward current gain of the transistorfo = the cut-off frequency of the high pass filterpi = the Greek letter pi and is equal to 3.14285
The equations for determining the component values provide a Butterworth response, i.e. maximum flatness within the pass-band at the expense of achieving the ultimate roll off as quickly as possible. This has been chosen because this form of filter suits most applications and the mathematics works out easily
Over-voltage crowbar circuit- an over voltage crowbar protection circuit using a silicon controlled rectifier or SCR
Power supplies are normally reliable, but if they fail then they can cause significant damage to the circuitry they supply on some occasions. The SCR over-voltage crowbar protection circuit described provides a very simple but effective method of protecting against the certain types of power supply failure.
In most analogue power supply arrangements a control voltage is fed into a series regulating device such as a transistor. This controls the current and hence the output voltage. Typically the input voltage to this may be well in excess of the output voltage. If the series regulator transistor in the power supply fails and goes short circuit, then the full input voltage will appear on the circuitry that is being supplied and significant damage may result. To overcome this SCR over voltage crowbar circuits are widely used. These over-voltage protection circuits are easy to design, simple to construct and may prevent significant levels of damage in the unlikely event of a power supply failure.
By looking at the voltages involved it is very easy to see why the inclusion of over-voltage protection is so important. A typical supply may provide 5 volts stabilized to logic circuitry. To provide sufficient input voltage to give adequate stabilization, ripple rejection and the like, the input to the power supply regulator may be in the region of 10 to 15 volts. Even 10 volts would be sufficient to destroy many chips used today, particularly the more expensive and complicated ones. Accordingly preventing this is of great importance.
CircuitMost good bench power supplies include a form of over-voltage protection, but for those power supplies or for other applications where over voltage protection is required, a simple over voltage crowbar circuit can be built. It uses just four components: a silicon controlled rectifier or SCR, a zener diode, a resistor and a capacitor.
SCR over-voltage crowbar circuit
The SCR over voltage crowbar or protection circuit is connected between the output of the power supply and ground. The zener diode voltage is chosen to be slightly above that of the output rail. Typically a 5 volt rail may run with a 6.2 volt zener diode. When the zener diode voltage is reached, current will flow through the zener and trigger the silicon controlled rectifier or thyristor. This will then provide a short circuit to ground, thereby protecting the circuitry that is being supplied form any damage.
As a silicon controlled rectifier, SCR, or thyristor is able to carry a relatively high current - even quite average devices can conduct five amps and short current peaks of may be 50 and more amps, cheap devices can provide a very good level of protection for small cost. Also voltage across the SCR will be low, typically only a volt when it has fired and as a result the heat sinking is not a problem.
However it is necessary to ensure that the power supply has some form of current limiting. Often a fuse is ideal because the SCR will be able to clamp the voltage for long enough for it to blow.
The small resistor, often around 100 ohms from the gate of the thyristor or SCR to ground is required so that the zener can supply a reasonable current when it turns on. It also clamps the gate voltage at ground potential until the zener turns on. The capacitor is present to ensure that short spikes to not trigger the circuit. Some optimization may be required in choosing the correct value although 0.1 microfarads is a good starting point.
LimitationsAlthough this power supply over-voltage protection circuit is widely used, it does have some limitations. Most of these are associated with the zener diode. The zener diode is not adjustable, and these diodes come with at best a 5% tolerance. In addition to this the firing voltage must be sufficiently far above the nominal power supply output voltage to ensure that any spikes that may appear on the line do not fire the circuit. When taking into account all the tolerances and margins the guaranteed voltage at which the circuit may fire can be 20 - 40% above the nominal dependent upon the voltage of the power supply. The lower the voltage the greater the margins needed. Often on a 5 volt supply there can be difficulty designing it so that the over-voltage crowbar fires below 7 volts where damage may be caused to circuits being protected.

It is also necessary to ensure that there is some means of limiting the current should the over-voltage crowbar circuit fire. If not then further damage may be caused to the power supply itself. Often a fuse may be employed in the circuit. In some circuits a fuse is introduced prior to the series regulator transistor, and the SCR anode connected to the junction node where the output of the fuse is connected to the input of the series regulator. This ensures that the fuse will blow swiftly.
Despite its drawbacks this is still a very useful circuit which can be used in a variety of areas.
Operational amplifier basics- Overview of the operational amplifier or op-amp as a circuit building block
Operational amplifiers are one of the workhorses of the analogue electronics scene. They are virtually the ideal amplifier, providing a combination of a very high gain, a very high input impedance and a very low output impedance. The input to the operational amplifier has differential inputs, and these enable the operational amplifier circuit to be used in an enormous variety of circuits.
The circuit symbol for an operational amplifier consists simply of a triangle as shown below. The two inputs are designated by "+" and "-" symbols, and the output of the operational amplifier is at the opposite end of the triangle. Inputs from the "+" input appear at the output in the same phase, whereas signals present at the "-" input appear at the output inverted or 180 degrees out of phase. This gives rise to the names for the inputs. The "+" input is known as the non-inverting input, while the "-" input is the inverting input of the operational amplifier.
Operational amplifier circuit symbol
Often the power supply rails for the operational amplifier are not shown in circuit diagrams and there is no connection for a ground line. The power rails for the operational amplifier are assumed to be connected. The power for the operational amplifier is generally supplied as a positive rail and also a negative rail. Often voltages of +15V and -15 V are used, although this will vary according to the application and the actual chip used.
The gain of the operational amplifier is very high. Figures for the levels of gain provided by an operational amplifier on its own are very high. Typically they may be upwards of 10 000.
While levels of gain may be too high for use on their own, the application of feedback around the operational amplifier enables the circuit to be used in a wide variety of applications, from very flat amplifiers, to filters, oscillators, switches, and much more.
Open loop gain

The gain of an operational amplifier is exceedingly high. Normally feedback is applied around the op-amp so that the gain of the overall circuit is defined and kept to a figure which is more usable. However the very high level of gain of the op-amp enables considerable levels of feedback to be applied to enable the required performance to be achieved.
When measured the open loop gain of an operational amplifier falls very rapidly with increasing frequency. Typically an op-amp may have an open loop gain of around 10^5, but this usually starts to fall very quickly. For the famous 741 operational amplifier, it starts to fall at a frequency of only 10 Hz.
Slew rateWith very high gains the operational amplifiers have what is termed compensation capacitance to prevent oscillation. This capacitance combined with the limited drive currents mean that the output of the amplifier is only able to change at a limited rate, even when a large or rapid change occurs at the input. This maximum speed is known as the slew rate. A typical general purpose device may have a slew rate of 10 V / microsecond. This means that when a large step change is placed on the input, the device would be able to provide an output 10 volt change in one microsecond.
The figures for slew rate change are dependent upon the type of operational amplifier being used. Low power op-amps may only have a slew rate of a volt per microsecond, whereas there are fast operational amplifiers capable to providing slew rates of 1000 V / microsecond.
The slew rate can introduce distortion onto a signal by limiting the frequency of a large signal that can be accommodated. It is possible to find the maximum frequency or voltage that can be accommodated. A sine wave with a frequency of f Hertz and amplitude V volts requires an operational amplifier with a slew rate of 2 x pi x V x V volts per second.
Offset nullOne of the minor problems with an operational amplifier is that they have a small offset. Normally this is small, but it is quoted in the datasheets for the particular operational amplifier in question. It is possible to null this using an external potentiometer connected to the three offset null pins.
Inverting operational amplifier circuit- the use of an operational amplifier or op-amp in an inverting amplifier or virtual earth circuit
Operational amplifiers can be used in a wide variety of circuit configurations. One of the most widely used is the inverting amplifier configuration. It offers many advantages from being very simple to use, requiring just the operational amplifier integrated circuit and a few other components.
Basic circuitThe basic circuit for the inverting operational amplifier circuit is shown below. It consists of a resistor from the input terminal to the inverting input of the circuit, and another resistor

connected from the output to the inverting input of the op-amp. The non inverting input is connected to ground.
Basic inverting operational amplifier circuit
In this circuit the non inverting input of the operational amplifier is connected to ground. As the gain of the operational amplifier itself is very high and the output from the amplifier is a matter of a few volts, this means that the difference between the two input terminals is exceedingly small and can be ignored. As the non-inverting input of the operational amplifier is held at ground potential this means that the inverting input must be virtually at earth potential (i.e. a virtual earth).
As the input to the op-amp draws no current this means that the current flowing in the resistors R1 and R2 is the same. Using ohms law Vout /R2 = -Vin/R1. Hence the voltage gain of the circuit Av can be taken as:
Av = - R2 / R1
As an example, an amplifier requiring a gain of ten could be built by making R2 47 k ohms and R1 4.7 k ohms.
Input impedanceIt is often necessary to know the input impedance of a circuit. A circuit with a low input impedance may load the output of the previous circuit and may give rise to effects such as changing the frequency response if the coupling capacitors are not large.
It is very simple to determine the input impedance of an inverting operational amplifier circuit. It is simply the value of the input resistor R1. This is because the inverting input is at earth potential (i.e. a virtual earth) and this means that the resistor is connected between the input and earth.
High impedance inverting op amp circuit- a high input impedance version of the inverting operational amplifier or op-amp circuit
The standard inverting amplifier configuration is widely used with operational amplifier integrated circuits. It has many advantages: being simple to construct; it offers the possibility of summation or mixing (in the audio sense) of several signals; and of course it inverts the signal which can be important in some instances.

However the circuit does have some drawbacks which can be important on some occasions. The main drawback is its input impedance. To show how this can be important it is necessary to look at the circuit and take some examples. The basic circuit for the inverting operational amplifier circuit is shown below. It consists of a resistor from the input terminal to the inverting input of the circuit, and another resistor connected from the output to the inverting input of the op-amp. The non inverting input is connected to ground.
Basic inverting operational amplifier circuit
The gain for the amplifier can be calculated from the formula:
Av = - R2 / R1
If a high gain of, for example 100, is required this means that the ratio of R2 : R1 is 100. It is good practice to keep the resistors in op amp circuits within reasonable bounds. In view of this the maximum value for R2 should be 1 M Ohm. This means that the input resistor and hence the input resistance to the amplifier circuit as a whole is 10 k Ohm. In some instances this may not be sufficiently high.
To overcome this problem it is possible to modify the circuit, and add a couple of extra resistors. The feedback resistor R2 serves to limit the amount of feedback. The higher it is the less feedback, and hence the higher the gain. By adding a couple of additional resistors across the output to act as a potential divider and taking the resistor R2 from the centre point, the level of feedback can be reduced. The circuit for this configuration is shown below:
High input impedance inverting operational amplifier circuit

The gain for this amplifier can be calculated from the formula:
Av = - R2 (R3 + R4) / (R1 x R4)
Again the input resistance is equal to R1, but this can be made higher for the same gain.
ReminderIt is worth mentioning at this point that for high levels of gain, the gain bandwidth product of the basic op amp itself may become a problem. With levels of gain of 100, the bandwidth of some operational amplifier ICs may only be around 3 kHz. Check the data sheet for the given chip being used before settling on the level of gain.
Non-inverting operational amplifier circuit- the use of an operational amplifier or op-amp in a non-inverting amplifier circuit
Operational amplifiers can be used in two basic configurations to create amplifier circuits. One is the inverting amplifier where the output is the inverse or 180 degrees out of phase with the input, and the other is the non-inverting amplifier where the output is in the same sense or in phase with the input.
Both operational amplifier circuits are widely used and they find applications in different areas. When an operational amplifier or op-amp is used as a non-inverting amplifier it only requires a few additional components to create a working amplifier circuit.
Basic circuitThe basic non-inverting operational amplifier circuit is shown below. In this circuit the signal is applied to the non-inverting input of the op-amp. However the feedback is taken from the output of the op-amp via a resistor to the inverting input of the operational amplifier where another resistor is taken to ground. It is the value of these two resistors that govern the gain of the operational amplifier circuit.
Basic non-inverting operational amplifier circuit

The gain of the non-inverting circuit for the operational amplifier is easy to determine. The calculation hinges around the fact that the voltage at both inputs is the same. This arises from the fact that the gain of the amplifier is exceedingly high. If the output of the circuit remains within the supply rails of the amplifier, then the output voltage divided by the gain means that there is virtually no difference between the two inputs.
As the input to the op-amp draws no current this means that the current flowing in the resistors R1 and R2 is the same. The voltage at the inverting input is formed from a potential divider consisting of R1 and R2, and as the voltage at both inputs is the same, the voltage at the inverting input must be the same as that at the non-inverting input. This means that Vin = Vout x R1 / (R1 + R2) Hence the voltage gain of the circuit Av can be taken as:
Av = 1 + R2 / R1
As an example, an amplifier requiring a gain of eleven could be built by making R2 47 k ohms and R1 4.7 k ohms.
Input impedanceIt is often necessary to know the input impedance of a circuit. The input impedance of this operational amplifier circuit is very high, and may typically be well in excess of 10^7 ohms. For most circuit applications this can be completely ignored. This is a significant difference to the inverting configuration of an operational amplifier circuit which provided only a relatively low impedance dependent upon the value of the input resistor.
AC couplingIn most cases it is possible to DC couple the circuit. However in this case it is necessary to ensure that the non-inverting has a DC path to earth for the very small input current that is needed. This can be achieved by inserting a high value resistor, R3 in the diagram, to ground as shown below. The value of this may typically be 100 k ohms or more. If this resistor is not inserted the output of the operational amplifier will be driven into one of the voltage rails.
Basic non-inverting operational amplifier circuit with capacitor coupled input
When inserting a resistor in this manner it should be remembered that the capacitor-resistor combination forms a high pass filter with a cut-off frequency. The cut off point occurs at a frequency where the capacitive reactance is equal to the resistance.

Operational amplifier high pass filter-a summary of operational amplifier or op-amp active high pass filter circuitry
Operational amplifiers lend themselves to being used for active filter circuits, including a high pass filter circuit. Using a few components they are able to provide high levels of performance.
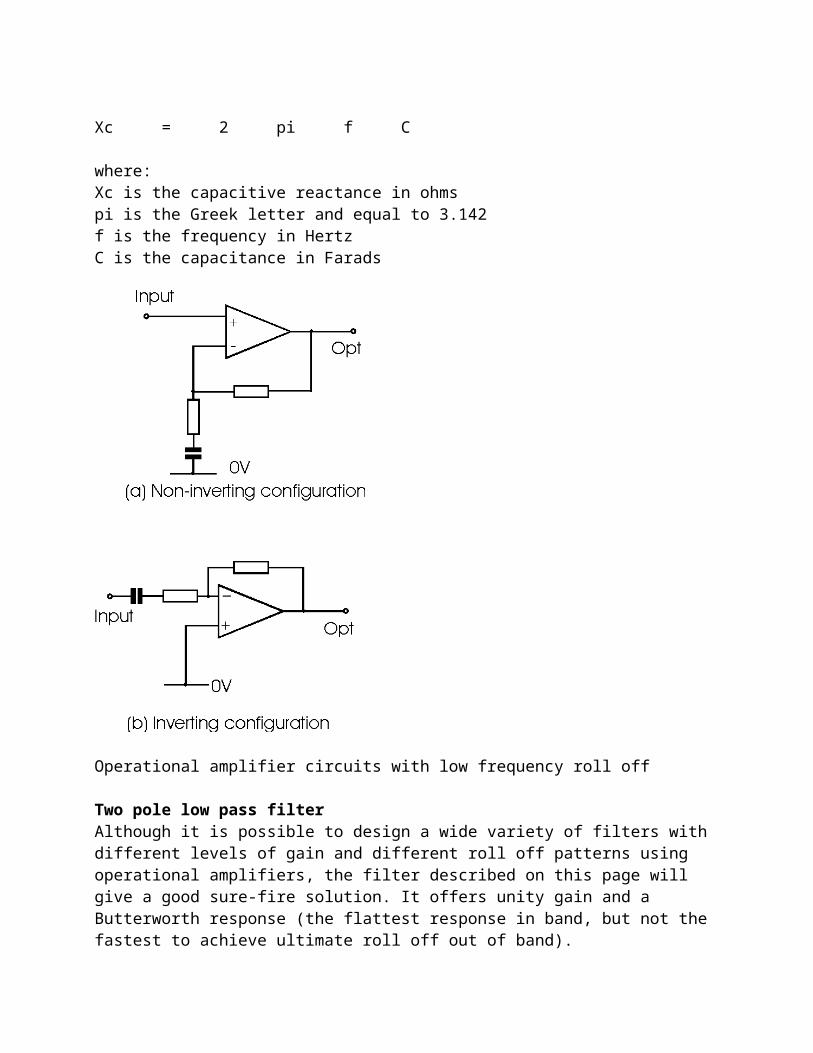
The simplest circuit high pass filter circuit using an operational amplifier can be achieved by placing a capacitor in series with one of the resistors in the amplifier circuit as shown. The capacitor reactance increases as the frequency falls, and as a result this forms a CR low pass filter providing a roll off of 6 dB per octave. The cut off frequency or break point of the filter can be calculated very easily by working out the frequency at which the reactance of the capacitor equals the resistance of the resistor. This can be achieved using the formula:
Xc = 2 pi f C
where:Xc is the capacitive reactance in ohmspi is the Greek letter and equal to 3.142f is the frequency in HertzC is the capacitance in Farads

Operational amplifier circuits with low frequency roll off
Two pole low pass filterAlthough it is possible to design a wide variety of filters with different levels of gain and different roll off patterns using operational amplifiers, the filter described on this page will give a good sure-fire solution. It offers unity gain and a Butterworth response (the flattest response in band, but not the fastest to achieve ultimate roll off out of band).
Operational amplifier two pole high pass filterSimple sure fire design with Butterworth response and unity gain
The calculations for the circuit values are very straightforward for the Butterworth response and unity gain scenario. Critical damping is required for the circuit and the ratio of the resistor vales determines this.
When choosing the values, ensure that the resistor values fall in the region between 10 k ohms and 100 k ohms. This is advisable because the output impedance of the circuit rises with increasing frequency and values outside this region may affect he performance.
Operational amplifier band pass filter-a sure fire operational amplifier or op-amp active band pass filter circuit

The design of band pass filters can become very involved even when using operational amplifiers. However it is possible to simplify the design equations while still being able to retain an acceptable level of performance of the operational amplifier filter for many applications.
Circuit of the operational amplifier active band pass filter
As only one operational amplifier is used in the filter circuit, the gain should be limited to five or less, and the Q to less than ten. In order to improve the shape factor of the operational amplifier filter one or more stages can be cascaded. A final point to note is that high stability and tolerance components should be used for both the resistors and the capacitors. In this way the performance of the operational amplifier filter will be obtained.
Op-amp variable gain amplifier- a variable gain circuit using an operational amplifier
A useful variable gain and sign amplifier can be constructed using a single variable gain amplifier. The circuit uses a single operational amplifier, two resistors and a variable resistor.

Variable gain operational amplifier circuit
Using this circuit the gain can be calculated from the formula below. In this the variable "a" represents the percentage of travel of the potentiometer, and it varies between "0" and "1". It is also worth noting that the input impedance is practically independent of the position of the potentiometer, and hence the gain
Op amp notch filter- the circuit and design considerations for a notch filter using an operational amplifier, four resistors and two capacitors
This operational amplifier notch filter circuit is simple yet effective, providing a notch on a specific fixed frequency. It can be used to notch out or remove a particular frequency that may need to be removed.
Having a fixed frequency, this operational amplifier, op amp, notch filter circuit may find applications such as removing fixed frequency interference like mains hum, from audio circuits.
Active operational amplifier notch filter circuit
The circuit is quite straightforward to build. It employs both negative and positive feedback around the operational amplifier chip and in this way it is able to provide a high degree of performance.
Calculation of the value for the circuit is very straightforward. The formula to calculate the resistor and capacitor values for the notch filter circuit is:

fnotch = 1 / (2 pi R C)
R = R3 = R4
C = C1 = C2
Where:fnotch = centre frequency of the notch in Hertzpi = 3.142R and C are the values of the resistors and capacitors in Ohms and Farads
When building the circuit, high tolerance components must be used to obtain the best performance. Typically they should be 1% or better. A notch depth of 45 dB can be obtained using 1% components, although in theory it is possible for the notch to be of the order of 60 dB using ideal components. R1 and R2 should be matched to within 0.5% or they may be trimmed using parallel resistors.
A further item to ensure the optimum operation of the circuit is to ensure that the source impedance is less than about 100 ohms. Additionally the load impedance should be greater than about 2 M Ohms.
The circuit is often used to remove unwanted hum from circuits. Values for a 50 Hz notch would be: C1, C2 = 47 nF, R1, R2 = 10 k, R3, R4 = 68 k.
Op amp twin T notch filter- the circuit and design considerations for a twin T notch filter with variable Q using an operational amplifier
The twin T notch filter is a simple circuit that can provide a good level of rejection at the "notch" frequency. The simple RC notch filter can be placed within an operational amplifier circuit to provide an active filter. In the circuit shown below, the level of Q of the notch filter can be varied.
Active twin T notch filter circuit with variable Q

Calculation of the value for the circuit is very straightforward. The formula is the same as that used for the passive version of the twin T notch filter.
fc = 1 / (2 pi R C)
Where:fc = cut off frequency in Hertzpi = 3.142R and C are the values of the resistors and capacitors as in the circuit
The notch filter circuit can be very useful, and the adjustment facility for the Q can also be very handy. The main drawback of the notch filter circuit is that as the level of Q is increased, the depth of the null reduces. Despite this the notch filter circuit can be successfully incorporated into many circuit applications.
Operational amplifier multi-vibrator- a simple multi-vibrator oscillator circuit using a single op amp
It is possible to construct a very simple multi-vibrator oscillator circuit using an operational amplifier. The circuit can be used in a variety of applications where a simple square wave oscillator circuit is required.
The circuit comprises two sections. The feedback to the capacitor is provided by the resistor R1, whereas hysterises is provided by the two resistors R2 and R3.
Operational amplifier multi-vibrator oscillator
The time period for the oscillation is provided by the formula:

T = 2 C R1 loge (1 + 2 R2 / R3)
Although many multi-vibrator circuits may be provided using simple logic gates, this circuit ahs the advantage that it can be used to provide an oscillator that will generate a much higher output than that which could come from a logic circuit running from a 5 volt supply. In addition to this the multi-vibrator oscillator circuit is very simple, requiring just one operational amplifier ( op amp ), three resistors, and a single capacitor.
Operational amplifier bi-stable multi-vibrator- a circuit for a bi-stable multi-vibrator using an operational amplifier, op amp
It is easy to use an operational amplifier as a bi-stable multi-vibrator. An incoming waveform is converted into short pulses and these are used to trigger the operational amplifier to change between its two saturation states. To prevent small levels of noise triggering the circuit, hysteresis is introduced into the circuit, the level being dependent upon the application required. The operational amplifier bi-stable multi-vibrator uses just five components, the operational amplifier, a capacitor and three resistors.
Bi-stable multi-vibrator operational amplifier circuit
The bi-stable circuit has two stable states. These are the positive and negative saturation voltages of the operational amplifier operating with the given supply voltages. The circuit can then be switched between them by applying pulses. A negative going pulse will switch the circuit into the positive saturation voltage, and a positive going pulse will switch it into the negative state.
Waveforms for the bi-stable multi-vibrator operational amplifier circuit

It is very easy to calculate the points at which the circuit will trigger. The positive going pulses need to be greater than Vo-Sat through the potential divider, i.e. Vo-Sat x R3 / (R2 + R3), and similarly the negative going pulses will need to be greater than Vo+Sat through the potential divider, i.e. Vo+Sat x R3 / (R2 + R3). If they are not sufficiently large then the bi-stable will not change state.
Operational amplifier comparator- a simple comparator circuit using a single op amp
Comparator circuits find a number of applications in electronics. As the name implies they are used to compare two voltages. When one is higher than the other the comparator circuit output is in one state, and when the input conditions are reversed, then the comparator output switches.
These circuits find many uses as detectors. They are often used to sense voltages. For example they could have a reference voltage on one input, and a voltage that is being detected on another. While the detected voltage is above the reference, the output of the comparator will be in one state. If the detected voltage falls below the reference then it will change the state of the comparator, and this could be used to flag the condition. This is but one example of many for which comparators can be used.
In operation the op amp goes into positive or negative saturation dependent upon the input voltages. As the gain of the operational amplifier will generally exceed 100 000 the output will run into saturation when the inputs are only fractions of a milli-volt apart.
Although op amps are widely used as comparator, special comparator chips are often used. These integrated circuits offer very fast switching times, well above those offered by most op-amps that are intended for more linear applications. Typical slew rates are in the region of several thousand volts per microsecond, although more often figures of propagation delay are quoted.
A typical comparator circuit will have one of the inputs held at a given voltage. This may often be a potential divider from a supply or reference source. The other input is taken to the point to be sensed.
Circuit for a basic operational amplifier comparator

There are a number of points to remember when using comparator circuits. As there is no feedback the two inputs to the circuit will be at different voltages. Accordingly it is necessary to ensure that the maximum differential input is not exceeded. Again as a result of the lack of feedback the load will change. Particularly as the circuit changes there will be a small increase in the input current. For most circuits this will not be a problem, but if the source impedance is high it may lead to a few unusual responses.
The main problem with this circuit is that new the changeover point, even small amounts of noise will cause the output to switch back and forth. Thus near the changeover point there may be several transitions at the output and this may give rise to problems elsewhere in the overall circuit. The solution to this is to use a Schmitt Trigger as described on another page.
Operational amplifier Schmitt trigger- a simple circuit using an op amp to produce a Schmitt trigger to remove multiple transitions on slow input signals
Although the simple comparator circuit using either an ordinary operational amplifier (op-amp) or a special comparator chip is often adequate, if the input waveform is slow or has noise on it, then there is the possibility that the output will switch back and forth several times during the switch over phase as only small levels of noise on the input will cause the output to change. This may not be a problem in some circumstances, but if the output from the operational amplifier comparator is being fed into fast logic circuitry, then it can often give rise to problems.
The problem can be solved very easily by adding some positive feedback to the operational amplifier or comparator circuit. This is provided by the addition of R3 in the circuit below and the circuit is known as a Schmitt trigger.
Operational amplifier (Schmitt trigger circuit)
The effect of the new resistor (R3) is to give the circuit different switching thresholds dependent upon the output state of the comparator or operational amplifier. When the output of the comparator is high, this voltage is fed back to the non-inverting input of the operational amplifier

of comparator. As a result the switching threshold becomes higher. When the output is switched in the opposite sense, the switching threshold is lowered. This gives the circuit what is termed hysteresis.
The fact that the positive feedback applied within the circuit ensures that there is effectively a higher gain and hence the switching is faster. This is particularly useful when the input waveform may be slow. However a speed up capacitor can be applied within the Schmitt trigger circuit to increase the switching speed still further. By placing a capacitor across the positive feedback resistor R3, the gain can be increased during the changeover, making the switching even faster. This capacitor, known as a speed up capacitor may be anywhere between 10 and 100 pF dependent upon the circuit.
It is quite easy to calculate the resistors needed in the Schmitt trigger circuit. The centre voltage about which the circuit should switch is determined by the potential divider chain consisting of R1 and R2. This should be chosen first. Then the feedback resistor R3 can be calculated. This will provide a level of hysteresis that is equal to the output swing of the circuit reduced by the potential divide formed as a result of R3 and the parallel combination of R1 and R2.
Logic gate truth table- used for AND, NAND, OR, NOR and exclusive OR functions in electronic logic gate circuits
Logic circuits form the very basis of digital electronics. Circuits including the AND, NAND, OR, NOR and exclusive OR gates or circuits form the building blocks on which much of digital electronics is based.
The various types of electronic logic gates that can be used have outputs that depend upon the states of the two (or more) inputs to the logic gate. The two main types are AND and OR gates, although there are logic gates such as exclusive OR gates and simple inverters.
For the explanations below, the logic gates have been assumed to have two inputs. While two input gates are the most common, many gates that possess more than two inputs are used. The logic in the explanations below can be expanded to cover these multiple input gates, although for simplicity the explanations have been simplified to cover two input cases.
AND and NAND gatesAn AND gate has an output that is a logical "1" or high when a "1" is present at both inputs. In other words if a logic gate has inputs A and B, then the output to the circuit will be a logical "1" when A AND B are at level "1". For all other combinations of input the output will be at "0".
A NAND gate is simply an AND gate with its output inverted. In other words the output is at level "0" when A AND B are at "1". For all other states the output is at level "1".
OR and NOR gatesFor an electronic OR gates the output is at "1" when the input at either A or B is at logical "1". In other words only one of the inputs has to be at "1" for the output to be set to "1". The output remains at "1" even if both inputs are at "1". The output only goes to "0" if no inputs are at "1".

In just the same way that a NAND gate is an AND gate with the output inverted, so too the NOR gate is an OR gate with its output inverted. Its output goes to "0" when either A OR B is at logical "1". For all other input states the output of the NOR gate goes to "1".
Exclusive OROne other form of OR gate that is often used is known as an exclusive OR gate. As the name suggests it is a form of OR gate, but rather than providing a "1" at the output for a variety of input conditions as in the case of a normal OR gate, the exclusive OR gate only provides a "1" when one of its inputs is at "1", and not both (or more than one in the case of a gate with more than two inputs).
InverterThe final form of gate, if indeed it could be categorized as a gate is the inverter. As the name suggests this circuit simply inverts the state of the input signal. For an input of "0" it provides an output of "1" and for an input of "1", it provides an output of "0". Although very simple in its operation, these circuits are often of great use, and accordingly they are quite widely used.
Logic gate truth table
A B AND NAND OR NOR Ex OR
0 0 0 1 0 1 0
1 0 0 1 1 0 1
0 1 0 1 1 0 1
1 1 1 0 1 0 0
Digital circuit tips- guidance and hints and tips on using digital logic circuits
Digital logic circuits are widely used in today's' electronics. These circuits are used for a very wide variety of applications. From simple logic circuits consisting of a few logic gates, through to complicated microprocessor based systems.
Whatever the form of digital logic circuit, there are a number of precautions that should be observed when designing, and also when undertaking the circuit board layout. If the circuit is correctly designed and constructed then problems in the performance can be avoided.
DecouplingOne of the main points to ensure is that the power rails are adequately decoupled. As the logic circuits switch very fast, switching spikes appear on the rails and these can in turn appear on the

outputs of other circuits. In turn this can cause other circuits to "fire" when they would not normally be intended to do so.
To prevent this happening all chips should be decoupled. In the first instance there should be a large capacitor at the input to the board, and then each chip should be individually decoupled using a smaller capacitor. The value of the capacitor will depend upon the type of logic being used. The speed and current consumption will govern the size of capacitor required, but typically a 22nF may be used. For chips running with very low values of current a smaller capacitor may be acceptable, but be aware that even low current logic families tend to switch very fast these days and this can place large voltage spikes onto the rails.
Some manufacturing companies suggest in their codes of practice that a proportion of the chips should be decoupled. While this may be perfectly acceptable, the safest route is to decouple each chip.
EarthingThe ground lines in a logic circuit of great importance. By providing an effective ground line, problems such as ringing, spikes and noise can be reduced. In many printed circuit boards a ground plane is used. This may be the second side of a double sided board, or in some cases an internal layer in a multilayer board. By having a complete, or nearly complete layer in the board, it is possible to take any decoupling or earth points to the plane using the shortest possible leads. This reduces the inductance and makes the connection more effective. With the sharp edges, and the inherent high frequencies that are present, these techniques are important and can improve the performance. For the more simple circuits that may be made using pin and wire techniques, good practice is still as important, if not more so. Earth loops should be avoided, and earth wires should be as thick as reasonably possible. A little planning prior to constructing the circuit can enable the leads to be kept as short as possible.
General layoutThe layout of a digital logic board can have a significant affect on its performance. With edges of waveforms being very fast, the frequencies that are contained within the waveforms are particularly high. Accordingly leads must be kept as short as reasonably possible if the circuit is to be able to perform correctly. Indeed many high end printed circuit board layout packages contain software that simulates the effects of the leads in the layout. These software packages can be particularly helpful when board or system complexity dictates that lead lengths greater than those that would normally be needed are required to enable the overall system to be realized. However for many instances this level of simulation is not required, and lead lengths can be kept short.
Unused inputsIn many circuits using logic ICs, inputs may be left open. This can cause problems. Even though they normally float high, i.e. go to the "1" state, it is wise not to leave them open. Ideally inputs to gates should be taken to ground, or if they need a logical "1" at the input they should be taken to the rail, preferably though a resistor.
In many designs, spare gates may be available on the board. The input gates to these circuits should not be left floating as they have been known to switch and cause additional spikes on the
rails, etc. It is best practice to take the inputs of these gates to ground. In this way any possibility of them switching in a spurious manner will be removed.
SummaryAt first sight digital logic circuits may not appear to need all the care and attention given to a radio frequency (RF) circuit, but the speed of some of the edges on the waveform transitions mean that very high frequencies are contained within them. To ensure that the optimum performance is obtained, good layout is essential. Obeying a few simple rules can often ensure that the circuit operates correctly
Logic NAND / NOR Conversions- using inverters to enable logic NAND / AND gates and NOR / OR gates to provide alternative functions
It often happens on a logic circuit board that an NAND gate and a few inverters may be available, whereas in reality an NOR function is required. If this occurs then all is not lost. It is still possible to create an OR function from an AND / NAND gate and inverters, or an AND gate from a NOR / OR function.
The diagram below gives some of the conversions. As an example it can be seen that a NOR gate is the same as an AND gate with two inverters on the input. It is then possible to add inverters to create the function that is required.
AND Gate and OR Gate Equivalents
These simple conversions can be used to save adding additional logic circuits into circuits. By using chips with spare gates, it is often possible to save adding additional chips, and thereby save cost and board space.
D-type frequency divider- using a logic D-type flip flop electronic circuit to provide a frequency division of two

The D-type logic flip flop is a very versatile circuit. It can be used in many areas where an edge triggered circuit is needed. In one application this logic or digital circuit provides a very easy method of dividing an incoming pulse train by a factor of two.
The divide by two circuit employs one logic d-type element. Simply by entering the pulse train into the clock circuit, and connecting the Qbar output to the D input, the output can then be taken from the Q connection on the D-type.
D-type frequency divided by two circuits
The circuit operates in a simple way. The incoming pulse train acts as a clock for the device, and the data that is on the D input is then clocked through to the output. To see exactly how the circuit works it is worth examining what happens at each stage of the waveforms shown below. Take the situation when the Q output is a level '1'. This means that the Qbar output will be at '0'. This data is clocked through to the output Q on the next positive going edge from the incoming pulse train on the clock input. At this point the output changes from a '1' to a '0'. At the next positive going clock pulse, the data on the Q-bar output is again clocked through. As it is now a '1' (opposite to the Q output), this is transferred to the output, and the output again changes state.
D-type frequency divided by two circuits
It can be seen that the output of the circuit only changes state on the positive going edges of the incoming pulse clock stream. Each positive edge occurs once every cycle, but as the output of the D type requires two changes to complete a cycle, it means that the output from the D-type circuit changes at half the rate of the incoming pulse train. In other words it ahs been divided by two.
There are some precautions when using this type of circuit. The first is that the pulse train should have sharp edges. If the rising edges are insufficiently sharp then there may be problems with the circuit operating as it should. If this is the case, then the problem can be easily overcome by simply placing an inverter before the clock input. This has the effect of sharpening the edges on the incoming signal.
R S-Flip Flop Circuit

- two logic or digital circuits for an R S flip flop, one using NAND gates and the other using NOR gates
R-S flip flops find uses in many applications in logic or digital electronic circuitry. They provide a simple switching function whereby a pulse on one input line of the flip flop sets the circuit in one state. Further pulses on this line have no effect until the R-S flip flop is reset. This is accomplished by a pulse on the other input line. In this way the R S flip flop is toggled between two states by pulses on different lines.
Although chips are available with R-S functions in them, it is often easier to create an R-S flip flop from spare gates that may already be available on the board, or on a breadboard circuit using a chip that may be to hand. To make an R S flip flop, it simply requires either two NAND gates or two NOR gates.
Using two NAND gates and active low R S flip flop is produced. In other words low going pulses active the flip flop. As it can be seen from the circuit below, the two incoming lines are applied, one to each gate. The other inputs to each of the NAND gates are taken from the output of the other NAND gate.
It can be seen from the waveform diagram that a low going pulse on input A of the flip flop forces the outputs to change, C, going high and D going low. A low going pulse on input B then changes the state, with C going low and D going high.
An R S flip flop using two NAND gates
The waveforms for an R S flip flop
The circuit for the NOR version of the circuit is exceedingly similar and performs the same basic function. However using the NOR logic gate version of the R S flip flop, the circuit is an active high variant. In other words the input signals need to go high to produce a change on the output.

This may determine the choice of integrated circuit that is used. Although the NAND gate version is probably more widely used, there are many instances where the NOR gate circuit is of value.
An R S flip-flop using two NOR gates
The waveforms for the NOR gate R S flip flop
These circuits are widely used in many electronic logic circuit applications. There are also contained within many integrated circuits where they are a basic building block. As such the R S flip flop is an exceedingly popular circuit.
One useful application for a simple R S flip flop is as a switch de-bounced circuit. When any mechanical switch makes or breaks contact, the connection will make and break several times before the full connection is made or broken. While for many applications this may not be a problem, it is when the switch interfaces to logic circuitry. Here a series of pulses will pass into the circuit, each one being captured and forming a pulse. Dependent upon the circuit this may appear as a series of pulses, and falsely triggering circuits ahead of time.

An R S flip flop used as a de-bounce circuit
It is possible to overcome this problem using a simple R S flip flop. By connecting the switch as shown below, the flip flop will change on the first sign of contact being made. Further pulses will not alter the output of the circuit. Only when the switch is turned over to the other position will the circuit revert to the other state. In this way a simple two gate circuit can save the problems of de-bouncing the switch in other ways.
Edge triggered flip flop- the circuit for an edge triggered R S flip flop using two D types
While the simpler R S flip flop using two electronic logic gates is quite adequate for most purposes, there are instances where an edge triggered one may be needed. For these instances, this circuit provides a simple and effective manner of implementing this electronic circuit function.
Edge Triggered R-S Flip Flop
When there is a low to high transition on the set input to the circuit on CK1 this sets the Q1 output to high. A low to high on CK2 then sets Q1 to low.
This type of circuit may have a number of applications. One could be as a phase detector in a phase locked loop. The two signals will be seeking to either set or reset the circuit, and the length of time that Q is high will be dependent upon the phase difference between the two signals.
Electronically programmable inverter- a simple circuit enabling an invert / non-invert function to be switched using an exclusive OR gate
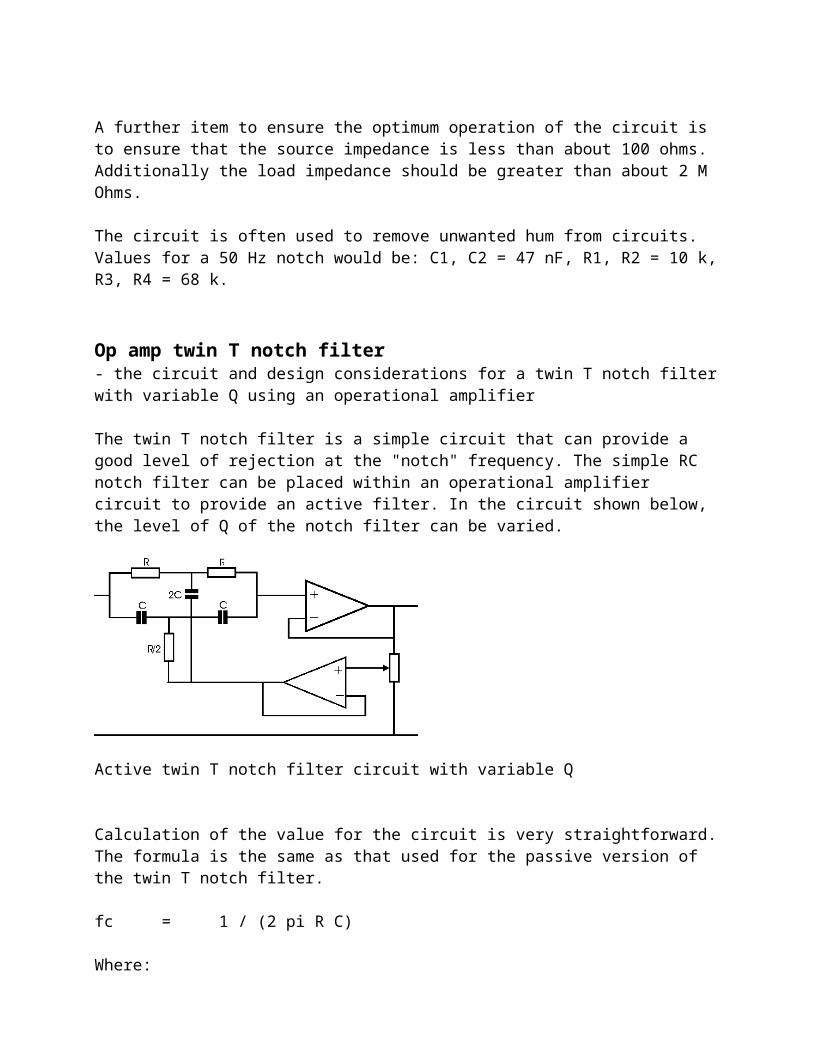
This electronic circuit is a particularly elegant for its simplicity. Using a single NOR gate it provides the ability to either invert or not invert a logic signal.
Simply using the truth table for the exclusive OR function it can be seen that when there is a low on one input to the exclusive OR gate, the signal on the other input is passed through the circuit and not inverted. When the signal on one input is a high, then the signal on the other is inverted at the output.
Exclusive OR truth table
A B Output
0 0 0
0 1 1
1 0 1
1 1 0
As seen from the electronic circuit below, it consists of an exclusive OR gate, a pull up resistor and a switch. The control line could come from an external source such as another gate. In this case there would be no need for the pull up resistor, and the circuit would simply consist of the single gate held within the integrated circuit.
Programmable Inverter using Exclusive OR gate
Electro Static Discharge (ESD) tutorial [1]- a tutorial or summary about the basics of Electro Static Discharge, ESD
This tutorial is in three pages dealing which address the different topics:ESD and how it arises [1] The sensitivity of electronics to ESD [2]Overcoming ESD [3]

Electro Static Discharge or E.S.D. awareness is particularly important for anyone associated with electronics. As integrated circuits become more compact, and feature sizes shrink, active devices as well as some passive devices are becoming more prone to damage by the levels of static that exist. To combat its effects, industry is spending many millions of pounds to prevent damage to electronic components from the effects of static. Anti-static areas using protective antistatic workbenches, as well as measures for ensuring people are not carrying static are all used. Using what are termed ESD PA or Electrostatic Discharge Protected Areas, the destructive effects of static on electronics equipment during manufacture can be virtually removed.
Although awareness has grown considerably in recent years, the problem has existed for a long time. It came to light in a major way with the introduction of the first MOSFET devices. In view of the very high gate impedances that existed it was found that they were easily damaged. Originally it was thought that only devices such as MOSFETs were at risk, but studies soon revealed that far more damage was being done that had been originally imagined. The problem also became more acute as feature sizes on ICs dropped and they became more prone to damage.
What is static?Static electricity is a natural phenomenon which occurs as part of everyday life. Its effects can often be felt when touching a metal door handle having walked across a nylon carpet. Another effect can be seen when hair stands up after it has been combed. The most dramatic effect is lightning. Here the scale is many orders of magnitude greater than those seen in and around the home. Colossal powers are dissipated in every strike, and its effects can be heard for many miles around.
Static is created when there is movement. When objects rub together there is friction and this causes the surfaces to interact. An excess of electrons appears on one surface while there will be a deficiency on the other. The surface with the excess of electrons becomes negatively charged, whereas the surface with the deficit becomes positively charged.
These charges will try to flow and neutralize the charge difference. However as many substances exhibit a very high resistance these charges can remain in place for a very long time.
Tribo-electric series:The size of the charge which is generated is determined by a variety of different factors. One is obviously the conductivity of the two materials and also whether the charge between them can leak away. However one of the major influences is the materials themselves and their position of the two materials in what is called the tribo-electric series. The position of the two materials which are in rubbing against one another in this series governs the size of the charge and the relative polarities. The further apart they are in the series, then the greater the charge. The material that is higher up the series will receive the positive charge, whereas the one lower in the series will receive the negative charge. Materials such as human hair, skin, and other natural fibers are higher up the series and tend to receive positive charges, whereas man made fibers together with materials like polythene, PVC and even silicon are towards the negative end. This means that when combing hair with a man made plastic comb, the hair will receive a positive charge and the comb will become negative.
positive charge

skin hair wool silk paper cotton wood rubber rayon polyester polythene pvc teflon
negative chargePractical examplesOne of the most commonly visible examples of generating charge is when walking across a room. Even this everyday occurrence can generate some surprisingly high voltages. Walking on an ordinary vinyl floor might generate a voltage in the region of 10kV. Walking on a nylon carpet is much worse with voltages in the region of 30kV to be expected. Other actions can also generate very high voltages. For example moving a polythene bag can generate voltages of around 10kV.
These voltages seem to be very high, but they usually pass unnoticed. The smallest discharge that can be felt is around 5kV, and even then this magnitude of discharge may only be felt on occasions. The reason is that even though the resulting peak currents may be very high, they only last for a very short time and the body does not detect them.
Effects on electronicsWith most electronics ICs and components being designed to operate at voltage so 5 V or less, it is hardly surprising that these discharges can cause some damage. The next page in this tutorial looks more closely at the discharges and they way in which they cause damage to electronics. The final page looks at ways of protecting against static discharges of this nature.
Electro Static Discharge (ESD) tutorial [2]- a tutorial or summary about the basics of Electro Static Discharge, ESD and the affects it has on electronic components and electronic circuits
This tutorial is in three pages which address the different aspects of ESD:ESD and how it arises [1] The sensitivity of electronics to ESD [2]Overcoming ESD [3]
ESD can have disastrous effects on electronic components. With ICs operating of supply voltages of 5 V and less these days, and with the feature sizes measured in fractions of a micron the static charges that go unnoticed in everyday life can easily destroy a chip. Worse still these effects may

not destroy the chip instantly, but leave a defect waiting to cause a problem later in the life of the equipment.
In view of their sensitivity to static, most semiconductor devices today are treated as static sensitive devices (SSD). To prevent damage they must be handled in anti-static areas, often called ESDPAs (Electrostatic Protected Areas). Within these areas a variety of precautions are taken to ensure that static is dissipated and that the SSD, static sensitive devices do not experience any static discharges. Benches with dissipative surfaces, anti-static flooring, wrist straps for operators and many more items all form part of these anti-static areas.
SensitivitySome electronic devices are more sensitive to ESD than others. However to put the problem in perspective it is worth relating the levels of static to those to supply voltages. One would not consider applying a voltage of even fifty volts to a logic device. Yet static voltages of several kilovolts are often applied to them by careless handling.
The most sensitive devices are generally those which include FETs. These devices have very high impedances which do not allow the charge to dissipate in a more controlled fashion. However this does not mean that bipolar devices are immune from damage.
Standard CMOS chips can be damaged by static voltages of as little as 250V. These include the 74HC and 74HCT logic families are widely used in many designs using "glue logic" because of their lower current consumption. However many of the new microprocessors and LSI chips use very much smaller feature sizes, and cannot withstand anything like these voltages, making them very sensitive to ESD. Many new devices would be destroyed by operating them with a supply voltage of 5 V, and they are corresponding more susceptible to damage from ESD.
Logic devices are not the only devices requiring anti static precautions to be taken. GaAs FETs which are used for RF applications are very susceptible to damage, and can be destroyed by static voltages as low as 100V. Other forms of discrete FETs are also affected by ESD. MOSFETs which are again often used for many RF applications are very sensitive.
Even ordinary bipolar transistors can be damaged by potentials of around 500V. This is particularly true of the newer transistors which are likely to have much smaller internal geometries to give higher operating frequencies. This is only a broad indication of a very few of the ESD susceptibility levels. However it indicates that all semiconductor devices should be treated as static sensitive devices (SSD).
It is not only semiconductor devices that are being treated as SSDs these days. In some areas even passive components are starting to be treated as static sensitive. With the ever quickening trend to miniaturization individual components are becoming much smaller. This makes them more sensitive to the effects of damage from ESD. A large discharge through a very small component may cause overheating, or breakdown in the component.
Discharge mechanismsThe way in which the electrostatic discharge takes place is dependent on a large number of variables. Most of these are difficult to quantify. The level of static which is built up varies according to the materials involved, the humidity of the day, and even the size of the person has

an effect. Each person represents a capacitor on which charge is held. The average person represents a capacitor of about 300 pF but this will vary greatly from one person to the next.
The way in which the discharge takes place also varies. Often the charge will be dissipated very quickly: typically in less than a hundred nanoseconds. During this time the peak current can rise to as much as twenty or thirty amps. The peak current and the time for the discharge are dependent upon a wide variety of factors. However if a metal object is used, like a pair of tweezers or thin nosed pliers the current peak is higher and reached in a shorter time than if the discharge takes place through a finger. This is because the metal provides a much lower resistance path for the discharge. However whatever the means of the discharge, the same amount of charge will be dissipated.
Failure mechanismsThe way in which ICs fail as a result of ESD also varies, and it is also dependent upon a number of factors including the way in which the charge is dissipated to the topology within the IC.
One of the most obvious way in which an IC can fail as a result of ESD occurs when the static charge represented as a very high voltage gives rise to a high peak current causing burn out. Even though the current passes for a very short time, the minute sizes within ICs can mean that the small interconnecting links wires or the devices in the chip itself can be fused by the amount of heat dissipated. In some instances the connection or component may not be completely destroyed. Instead it may only be partly destroyed. When this happens the device will continue to operate and may have no detectable reduction in its performance. At other times there may be a slight degradation in operation. This is particularly true of analogue devices where small fragments of material from the area of damage can spread over the surface of the chip. These may bridge or particularly bridge other components in the chip causing the performance to be altered or degraded.
When damage has been caused to the device, but it still remains operational, the defect leaves it with what is termed a 'latent defect' which may lead to a failure later in its life. Subsequent current surges resulting from turning the equipment on, or even as a result of normal operation may stress the defect and cause it to fail. This may also be brought about by vibration in some cases.
Latent damage cause inside an IC by ESD

These latent defects are particularly damaging because they are likely to lead to failures later in the life of the equipment, thereby reducing its reliability. In fact manufacturing plants with poor anti-static protection are likely to produce low reliability equipment as a result of this. In fact it is estimated that for every device which suffers instant damage at least ten are affected by latent damage and will fail at a later date.
Another way in which static can cause failure is when the voltage itself causes breakdown within the IC. It is quite possible for the voltage to breakdown an insulating oxide layer leaving the IC permanently damaged. Again this can destroy the chip immediately, or leave a partly damaged area with a latent failure.
Charge can also be transferred to electronic components in other ways and cause damage. It may result in damage either from voltage breakdown or by generating current to flow in the device. This may occur because a highly charged item will tend to induce an opposite charge in any article near it. Plastic drinks cups are very susceptible to carrying high static voltages and if they are placed on a work surface next to a sensitive piece of electronics they can induce a charge which may lead to damage.
InvestigationsAlthough it is not easy to determine the cause of destruction of a device, some specialist laboratories have the means of making these investigations. They accomplish this by removing the top of the IC to reveal the silicon chip beneath. This is inspected using a microscope to reveal the area of damage.
These investigations are relatively costly. They are not normally undertaken for routine failures. Instead they are only undertaken when it is necessary to determine the exact cause of the failure.
ProtectionWith ICs being prone to damage so easily, it is necessary to consider all semiconductor devices, and often many passive devices as static sensitive devices SSD. They should only be handled in the special anti static ESDPAs. The next page in this tutorial (Page [3]) summarizes some of the methods and techniques that can be used.
Electro-Static Discharge (ESD) tutorial [3]- a tutorial or summary about the basics of Electrostatic Discharge, ESD and the ways in which electronic components and circuits can be protected from it affects.
This tutorial is in three pages which address the different aspects of ESD:ESD and how it arises [1] The sensitivity of electronics to ESD [2]Overcoming ESD [3]
There are many ways in which the effects of ESD can be overcome. A variety of methods are employed including products including anti-static, or static dissipative workbenches, anti-static or static dissipative containers, static dissipative protection for operators and the like.

To provide the best protection the problem must be addressed from several angles:
An area which is static free (anti-static) must be created. These areas are often known as electro-static discharge protected areas (ESDPA) and they must be used whenever SSDs or boards containing SSDs are to be handled.
Any static sensitive devices, or boards containing them must be stored in conditions where they are not subjected to the effects of static.
Any boards using SSDs should be designed so that the effects of a discharge into the board are reduced to acceptable levels.
Finally any people who come into contact with electronic components or assemblies should be made aware of the effects of static discharges.
The decision about the number of measures to employ can be difficult because it is not always easy to determine the cause of any failures. Additionally it may take many years for some of the failures to occur. However if sufficient measures are taken then the risks of damages from ESD can be reduced to sufficiently low levels
Work AreasTo avoid static build up in the area where electronic components and boards are being handled the bench surfaces should be able to remove any static build up which occurs. If there is an existing work bench then it is possible to buy a carbon impregnated rubber mat to place on the bench. These anti-static mats are relatively cheap and are very cost effective. If a new bench is being installed then special static dissipative surfaces can be used.
The level of conductivity of the surfaces is important. If it is too low then it may not only affect the operation of any board or assembly placed upon it, but when a board is placed onto it, and charge that is dissipated should not be removed too quickly otherwise damage may occur. Accordingly the volume conductivity of the material used should fall into the static dissipative category.
Another essential element in combating static build up on people is to use wrist straps. These ensure that any charge built up on a person working on the equipment is safely dissipated. The strap consists of two sections. The band itself which is worn around the wrist. This is connected to earth via the lead which incorporates a large value resistor, normally in excess of 1 M Ohm. This is included for two reasons. The first is safety, and the second is again to ensure that any static is removed in a controlled fashion.
The straps should be regularly tested to ensure they have not become open circuit. Without a test of this nature a faulty strap could go undetected for many months. Many companies insist that every strap that is in use is tested every day. In this way any defects can be discovered before they cause too much damage.
Wrist straps, connections to workbench tops and any other points are normally connected together using a special junction box. These junction boxes usually have resistors of 1 M Ohm for each of the contacts. These are joined and then taken to earth. Often a special mains plug with a

connection to only the earth pin can be used. These special plugs are usually yellow and have two plastic pins for the live and neutral, and a metal pin for the earth. In this way it is only possible to connect to earth.
Flooring in an electrostatic protected area, or anti-static area also needs to be considered. Flooring made out of acrylic materials is likely to generate very high levels of static. For example, acrylic carpets in the home are particularly bad whereas natural fibers like wool are much better. Even nylon is not as bad as an acrylic floor. For an electronic production area there is a wide variety of static dissipative coverings which can be installed if required to overcome any problems that might be caused.
If static dissipative flooring is to be used then conductive footwear must be worn. There is no point in having static dissipative flooring if peoples' shoes act as excellent insulators. Most people will want to wear their normal shoes and not have to wear 'regulation' footwear as this is not likely to be as comfortable. The solution is to use a heel strap which fits over part of the shoe. This provides an acceptable path to earth past the shoe.
Clothing is another element that must be considered. Clothes of wool, cotton or even polyester cotton are normally not a problem. However some synthetic clothes can develop very high levels of static of their own even if the person wearing them is grounded by the use of a wrist strap. Acrylic ties are particularly notable. They can collect high levels of static charge, and this can be passed to nearby components and electronic boards causing damage. To overcome this type of problem special static dissipative overalls can be worn. These normally have a relatively high conductivity to contain any static fields which might be generated.
Finally chair coverings should also be investigated. They should not be of the type that generate high levels of static. In some instances they may need to be dissipative and connected to ground. It is possible to obtain special seat coverings for existing chairs, or completely new chairs. Choices can be made dependent upon the state of the chairs and the budget available.
Another approach that can be taken to help control static and ESD is to control the humidity. In dry periods of the year, especially winder when the level of water vapor held in the air drops, the possibility if ESD rises. By introducing some humidity the levels of static can be reduced. Although not one of the most commonly used methods of ESD control, there are several types of humidifiers which can be installed. Some fit into heating systems whereas others are separate units. Ideally a minimum humidity figure of 50% can be used as an aiming point. Above this the high humidity levels can lead to other problems.
StorageNot only do work environments need to have ESD control measures introduced, but so too do the storage media. Whenever an electronic component or assembly is transported or stored it should be placed in suitable packing to ensure that it is not damaged. The dissipative bags for boards and tubes and special dissipative containers for components are now common place in the electronics industry. Often the storage bags have a pink or grey tint to them. The older black conductive bags are used less as they may dissipate the charge too quickly. Another problem was that they tended to discharge any on-board batteries more quickly than intended!
Soldering Irons
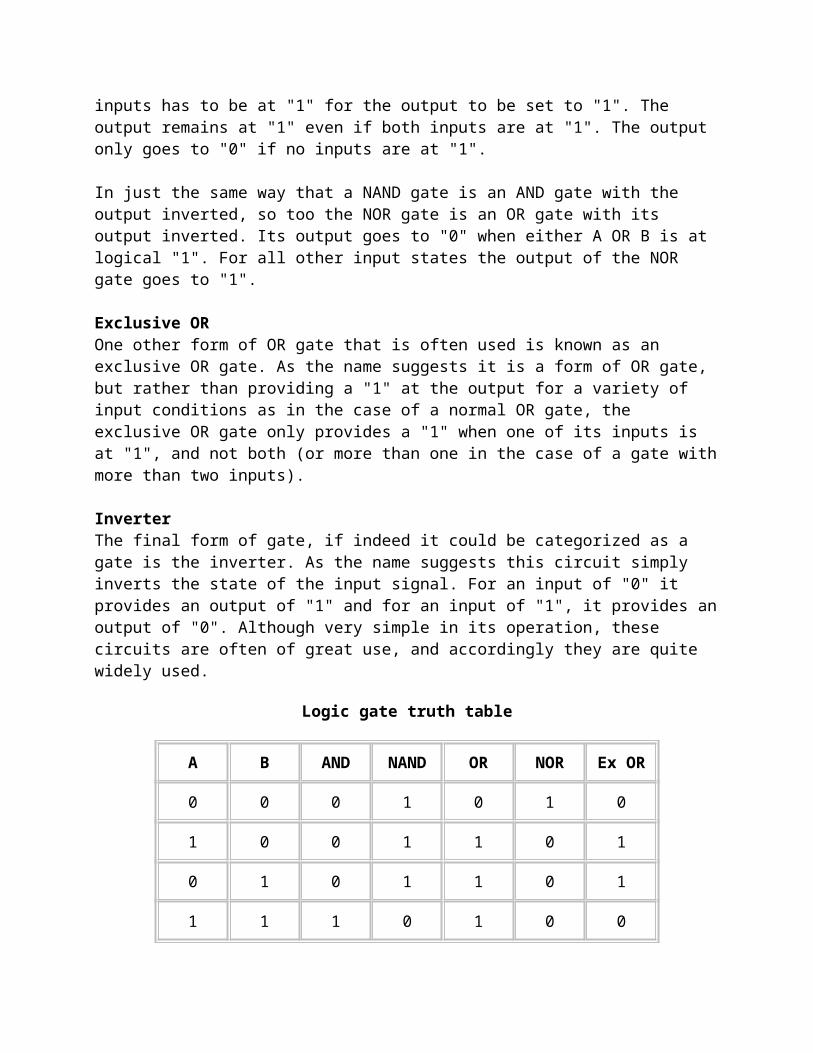
There is a wide variety of soldering irons available on the market today. Many are quite suitable for work with static sensitive devices. The main requirement is that the bit used for soldering should be earthed. In general it is recommended that the resistance to earth should be less than five [ohm]. Any irons which are thermostatically controlled should ideally use a zero voltage switching system. This prevents large spikes caused by the switching of the thermostat from appearing at the tip of the iron and causing damage to the equipment.