check out this way to recover files from formatted hard drive
TRANSCRIPT

Check Out This Way To Recover Files From Formatted
Hard Drive
Content:
Classification of Hard Drive Formatting
How to Format a Drive
Recover Files from Formatted Hard Drive
Common Reasons You May Need to Format a Drive
Related Articles
User Comments
Formatting refers to an initialization operation performed to disk to make it available for
data storage. The implication is that if a disk has not been formatted yet, it can’t be used to
save data.
However, users can also choose to format the disk drive anytime they want after data had
been saved to that drive. They only need to be aware of the fact that all files in the target
disk drive will be cleared after formatting was actually performed to hard drive.
Reading here, some users may want to ask what if a drive has been formatted
unintentionally. It’s reasonable that seeking ways to recover files from formatted hard
drive becomes users’ top priority. But unfortunately, file recovery from damaged drive is
not always practical.
For instance, if the formatted hard drive is logically damaged or has been sent to
manufactures for low-level formatting, files in it will be gone forever. Therefore, we feel it’s
very necessary to talk about the hard drive formatting types before we get done to

recovering formatted hard drive.
Classification of Hard Drive Formatting
In general, formatting is divided into two types: low-level formatting and high-level
formatting. If there is no special instruction, the hard drive formatting usually refers to
high-level formatting process while the floppy disk formatting often includes both
formatting types. Read the following paragraphs to know clearly about low-level formatting
and high-level formatting.
Low-level formatting: low-level formatting is also known as physical formatting and
it is considered as initialization to some hard drive manufacturers. At early times,
encoding schemes like CHS addressing, frequency modulation (FM) and modified
frequency modulation (MFM) are used in disk. And low-level formatting was used to
refer to the operation of dividing cylinders, tracks and sectors. But currently, this kind of
formatting generally refers to the zero-fill operation of hard drive.
Strictly speaking, low-level formatting includes those steps – dive a disk into several
cylinders and tracks; divide each track into several sectors; divide each sector into
several parts, such as identification section, GAP area and DATA area. As a preliminary
job for high-level formatting, low-level formatting can only be done in DOS environment
and its object is a whole disk.
In fact, the low-level formatting work has been performed to each hard drive by
manufacturers when it leaves the factory, so users are no longer required to do such
thing. It should be noted that the low-level formatting is a loss operation, which has a
negative impact on the service life of hard drive. As a result, lots of manufacturers
recommend that this low-level formatting should be users’ last resort.
When the magnetic recording on hard drive platter is partially lost due to the impact of

strong external magnet, the effect of strong magnetic field or the long-term use, a large
number of “bad sectors” will appear. And users have no choice but to carry out low-level
formatting to hard drive provided that no physical damage like scratches can be found
on the surface of platter.
Besides, if certain hard drive parameters related to low-level formatting have been
attacked and destroyed by virus unfortunately, users have to re-establish these
parameters by resorting to low-level formatting.
The CMOS of many motherboards provides the low-level formatting function and it is
usually embedded in HDD Low Level Format option. If users have this option on their
motherboard, they can directly choose Hard Disk Low Level Format Utility for low-level
formatting.
Of course, there’re many motherboards which have no such feature. In this case, users
had better make use of the hard drive management/low-level formatting program
provided by their hard drive manufacturers, instead.
What’s more, if users’ hard drive is a standard one, they can also turn to third-party
tools when low-level formatting is needed.
High-level formatting: high-level formatting is also known as logical formatting. It
writes specific data into specific area of the disk according to the file system users have
selected, in order to achieve the effect of disk/disk partition initialization and file
deletion.

High-level formatting includes the following operations: rewriting the corresponding
region of partition table in Master Boot Record (MBR) and dividing certain disk partition
space to store information that is used for file management, like file allocation table and
file directory table, according to users’ selection on file system.
In other words, high-level formatting refers to removing data on hard drive, generating
boot sector information, initializing FAT and marking logical bad sectors. This kind of
formatting is generally involved in the OS reinstallation process; since MBR is not going
to be rewritten, there is great possibility that virus exists. But don’t worry, the MBR virus
can be completely cleared by using antivirus software or executing fdisk/mbr in DOS.
In the MS-DOS environment, we can make use of the FORMAT command to format
hard drive. However, the formatting operation is executed by Explorer in Windows OS.
To put it in a very simple way, low-level formatting is operating system-related while
high-level formatting is not. After reading above content, we guess most users have
known clearly about what high-level formatting is and the difference between a high-level
and low-level formatting. So now, we’re going to talk about how to format a drive
successfully and how to recover files from formatted hard drive

How to Format a Drive
Since only high-level formatting is involved in the case where data lost and need to be
recovered from hard drive, we’ll focus on how to complete high-level formatting in this
part.
Here we’ll introduce 3 common ways users usually adopt to format a drive in Windows.
1.Format in Windows Explorer
First of all, click on the “Computer” icon on desktop to enter.
Then, users should select the drive they plan to format. Afterwards, right click on it
and choose “Format…” from the pop-up menu to enter corresponding formatting
window.

Here, users can set a file system for the drive waiting to be formatted. What’s
more, they are able to change the allocation unit size (but we recommend users should
keep the default value if there’s no special need). Also, they can choose to create a
label for this drive or just skip this part. At last, users can click “Start” button to get
formatting process begun.
A prompt window will appear at this time, warning users that the formatting
operation will erase all data. If users are sure they want to format the drive, please click

“OK” to continue. Then, at the end of formatting, users can close the window to put it to
an end.
However, this method is only helpful when users want to reformat a drive which has
already been formatted for data storage. If users need to create a new drive by using
certain unallocated space and format it or initialize a new disk, they’d better using the
following two ways.
2.Format in Windows Disk Management
Choose one way to open the Disk Management: click on the “Computer” icon on
desktop and choose “Manage” option from pop-up menu; click on “Start” button in the
lower left corner of desktop, find “Computer” option, right click on it and choose
“Manage”. Now, choose “Disk Management” under “Storage”.
Then, right click on the unallocated space and choose “New Simple Volume…” to
start. A “New Simple Volume Wizard” window will appear and users just need to click
“Next” in each interface to continue. In this process, they can set volume size, drive
letter, file system, allocation unit size and volume label. At last, click “Finish” and users
will see the following interface which indicates the formatting has been completed.

Now, this drive created by using unallocated space can be used to store data. In
fact, this method can also be applied to initialize the new disk for data storage. Besides,
Disk Management tool can also help users format the drive which has already been put
into use.
3.Format with Third-party Tool
Many disk management tools can be found on current software and almost all of them
provide the formatting function. Here, we’ll show users how to format drive with a powerful
free program named MiniTool Partition Wizard.

First of all, launch MiniTool Partition Wizard, select the drive which needs to be
reformatted and choose “Format Partition” function in left action panel. Then, above
“Format Partition” window will appear and users can input a partition label and choose a
file system and cluster size for drive. After that, click “OK” to go back to main interface.
And then, click “Apply” button in the upper left corner and press “Yes” in the pop-up
warning window to confirm changes.

If users need to create a new drive and format it by using unallocated space, they
should select the space and then choose “Create Partition” function from left action
panel. Then, users can choose to set partition label, partition type, drive letter, file
system, cluster size, and partition size & location according to their needs. After that,
click on “OK” to return to main interface. At last, click “Apply” button in the upper left
corner and press “Yes” in the pop-up warning window to confirm changes.
Well, some users would ask what if they have formatted a drive by mistake. Can the files
lost from formatted drive be recovered? Our answer is positive. Users can recover
formatted hard drive files as long as they’re not overwritten by new data. As for how to get
file recovery from damaged drive done easily, please refer to the following content.
Recover Files from Formatted Hard Drive
Imagine this, one of your drive saves very important files, but when you try to open it and
access files, you failed. The system prompts that this drive needs to be formatted for
further use. At this critical moment, you can’t just agree to “Format disk” in order to use the
drive as usual. It will do harm to files in that disk. Unfortunately, if you do format the drive
and lose some important files, what should you do to recover formatted drive?
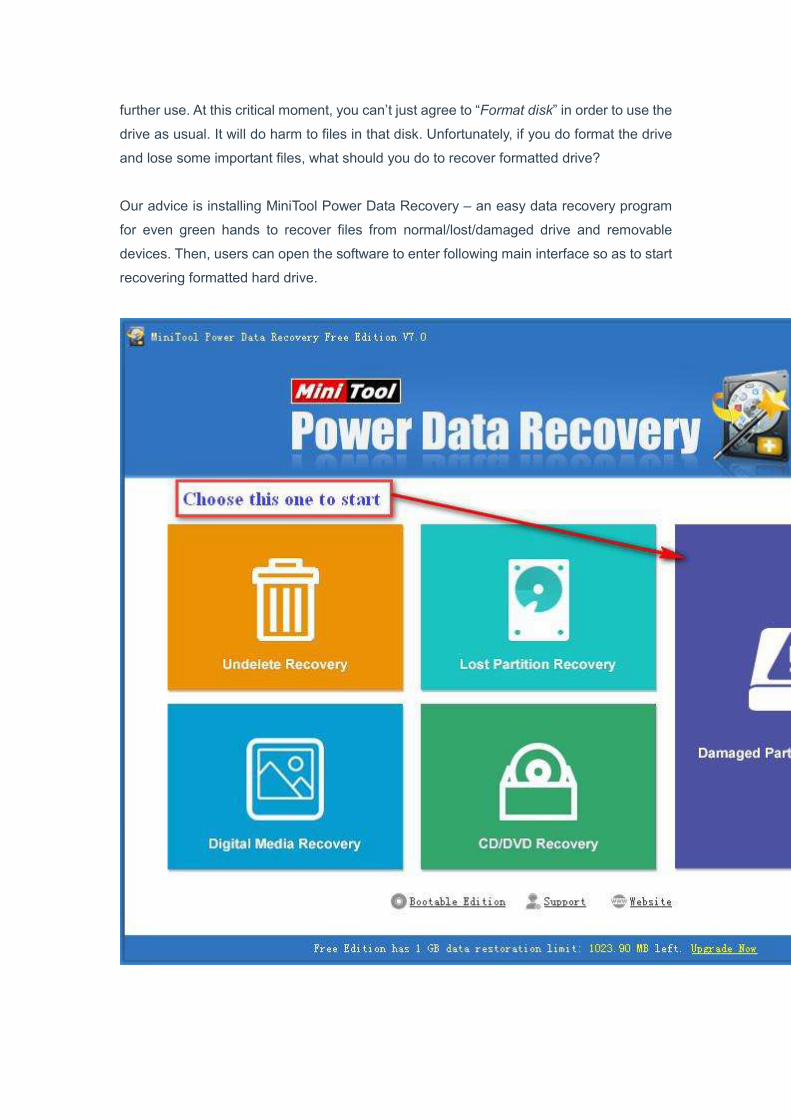
Our advice is installing MiniTool Power Data Recovery – an easy data recovery program
for even green hands to recover files from normal/lost/damaged drive and removable
devices. Then, users can open the software to enter following main interface so as to start
recovering formatted hard drive.

Now, please click on the “Damaged Partition Recovery” function to enter.
By the way, users can download the free edition of MiniTool Power Data Recovery and
use it to recover no more than 1GB data. If they need to recover more, they should buy a
license and click on “Register” button to activate. If users want to recover files from
removable formatted drive, they should connect it to computer before opening the
software.
Now, please select the formatted drive and click on “Full Scan” to continue. Of course,
users can set specific file system and file type to scan by clicking on “Settings” button. At
the end of the full scan, a lot of found files will be listed in order. Users need to find and
check the files they needed to recover by pressing “Save”, setting storage path and
clicking on “OK”.
After all files were recovered successfully to the appointed place, users can go to see
them there. And if users have got all they need, they can quit the software.

Common Reasons You May Need to Format a Drive
Initialize drive: a new disk drive can’t be put into use before formatting. So if users
want to use a new drive to store and manage data, they need to format it.
Kill virus: since computer virus spread widely through the internet, users can get
easily attacked by it. If users want to kill virus in certain drive and make it clean, they’d
better format the drive rather than just using antivirus software.
Change file system/drive size: once a drive is set, its file system and size are
determined. When users need to change any of them, they have to format the drive
again. However, we’d like to share the good news with them – they can achieve those
easy purposes by using MiniTool Partition Wizard we mentioned before without
reformatting.
Format inaccessible drive: the commonest case is that users open a drive, only to
find it can’t be accessed. To further use it, users have no choice but to format this drive.
All in all, please think twice before you finally decide to format your drive which saves
business/personal files. Once the formatting is done, all files can be lost forever. And no
matter how regretful you’re, they just disappear. Remember, though you may be able to
recover files from formatted hard drive, it’s not a 100% sure thing. Protection is always
more important than recovery.