charter instruction manual - idaho transportation...
TRANSCRIPT

Project Charter Instructional Manual
January 2014

PROJECT CHARTER INSTRUCTION MANUAL
Understanding the Charter Process
Last Updated December 4, 2013

TABLE OF CONTENTS
(The items in this table of contents are all clickable links, for your convenience.) Basics of Project Management ........................................................................................................... 6
Overview of Project Management ............................................................................................................ 6
Definitions ............................................................................................................................................. 6
Roles and Responsibilities ..................................................................................................................... 7
Project Organization Chart .................................................................................................................... 8
Candidates for Roles .............................................................................................................................. 9
Project Life Cycle ..................................................................................................................................... 11
PM Life Cycle Stages ................................................................................................................................ 12
Evaluation Phase - PM Life Cycle Stages ............................................................................................. 13
Development Phase - PM Life Cycle Stages ........................................................................................ 13
Implementation Phase - PM Life Cycle Stages .................................................................................... 14
Operations Phase PM - Life Cycle Stages ............................................................................................ 14
Understanding the Software ............................................................................................................ 15
Differences between MSP and PWA ....................................................................................................... 15
PWA Home-Page Layout ......................................................................................................................... 16
PWA Project Center Layout ..................................................................................................................... 17
Microsoft Project Professional 2010 Layout ........................................................................................... 18
Project Charter Process .................................................................................................................... 19
Purpose of using a Project Charter.......................................................................................................... 19
Overview of Project Charter Phases ........................................................................................................ 20
Evaluation Phase ................................................................................................................................. 20
Development Phase ............................................................................................................................ 20
Implementation Phase ........................................................................................................................ 20
Contents of the Project Charter .............................................................................................................. 21
Project Charter Flowchart ....................................................................................................................... 22
Project Charter Steps .............................................................................................................................. 23
Evaluation Phase ................................................................................................................................. 23
Development Phase (NOTE: only for Infrastructure Projects) ........................................................ 24

Implementation Phase ........................................................................................................................ 25
Closeout Phase .................................................................................................................................... 26
Creating and Updating Projects ........................................................................................................ 27
Main Functions ........................................................................................................................................ 28
Starting a New Project FROM PWA ..................................................................................................... 28
Starting a New Project FROM PROJECT PROFESSIONAL ..................................................................... 31
Creating a Stakeholder List .................................................................................................................. 35
Updating Work Breakdown Structure ................................................................................................. 37
Assigning Resources ............................................................................................................................ 40
Setting the Project Baseline ................................................................................................................ 44
Updating Progress ............................................................................................................................... 46
Viewing Reports .................................................................................................................................. 49
Archiving a Project............................................................................................................................... 51
Running QuantumPM Schedule Auditor (QSA) ................................................................................... 54
Submitting a Charter ........................................................................................................................... 56
Approving a Charter ............................................................................................................................ 57
Accessing Project Web App ................................................................................................................. 57
Project Detail Page Functions.................................................................................................................. 58
Updating Project Information ............................................................................................................. 59
Writing Scope and Objectives ............................................................................................................. 61
Documenting Environmental Considerations ..................................................................................... 63
(NOTE: Infrastructure Projects Only) .................................................................................................. 63
Anticipated Major Environmental Deliverables .................................................................................. 64
(NOTE: INFRASTRUCTURE PROJECTS ONLY) ....................................................................................... 64
Documenting Evaluation Design Standards ........................................................................................ 67
(note: INFRASTRUCTURE PROJECTS ONLY) ........................................................................................ 67
Documenting Resource Plan and Constraints ..................................................................................... 72
ITD Project Schedule ........................................................................................................................... 74
Documenting Exit Criteria ................................................................................................................... 75
Project Site Lists ...................................................................................................................................... 78
Stakeholders ........................................................................................................................................ 78
Deliverables ......................................................................................................................................... 78

Alternatives Analysis ........................................................................................................................... 81
Design Exceptions ................................................................................................................................ 82
Change Request ................................................................................................................................... 84
Issues ................................................................................................................................................... 86
Risks ..................................................................................................................................................... 91
Calendar .............................................................................................................................................. 96
Lessons Learned .................................................................................................................................. 98
Appendices ........................................................................................................................................ i
Appendix A: Project Charter Samples ....................................................................................................... ii
Pavement Restoration Project ............................................................................................................. iii
Bridge Restoration Project .................................................................................................................. vii
Appendix B: Glossary of Acronyms ......................................................................................................... xii
Charter Instruction Manual Basics of Project Management
6
BASICS OF PROJECT MANAGEMENT
OVERVIEW OF PROJECT MANAGEMENT
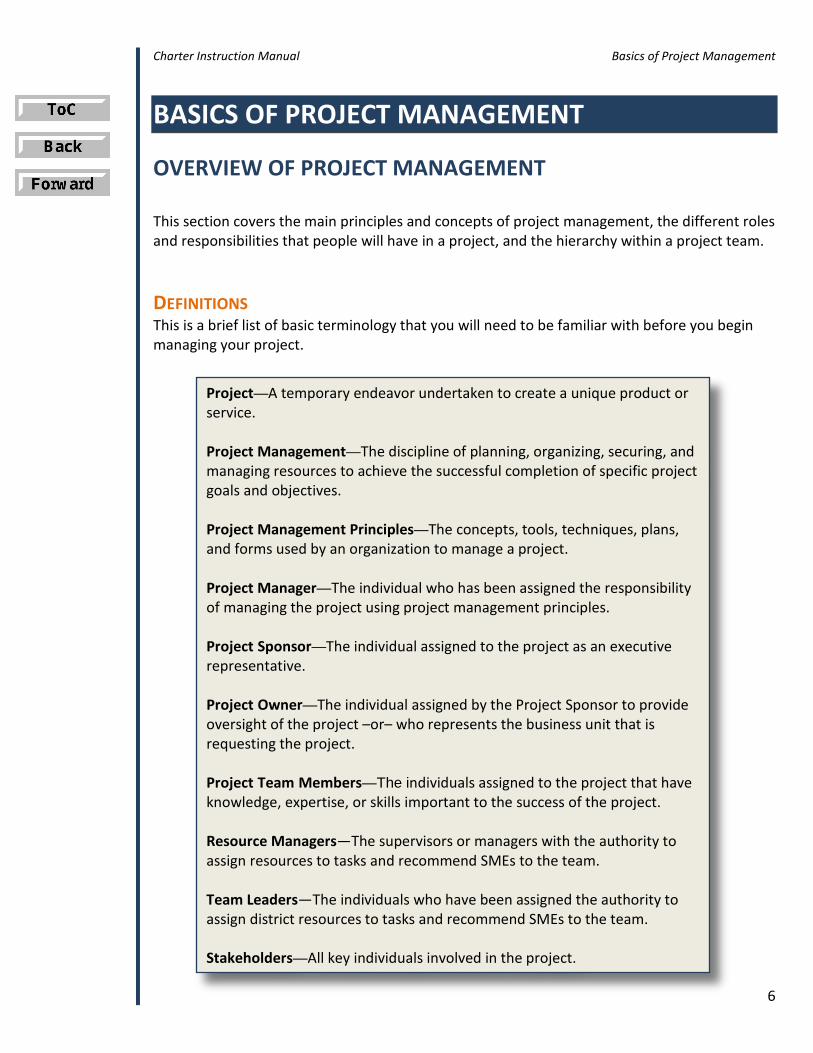
This section covers the main principles and concepts of project management, the different roles and responsibilities that people will have in a project, and the hierarchy within a project team. DEFINITIONS This is a brief list of basic terminology that you will need to be familiar with before you begin managing your project. Project—A temporary endeavor undertaken to create a unique product or
service. Project Management—The discipline of planning, organizing, securing, and managing resources to achieve the successful completion of specific project goals and objectives. Project Management Principles—The concepts, tools, techniques, plans, and forms used by an organization to manage a project. Project Manager—The individual who has been assigned the responsibility of managing the project using project management principles. Project Sponsor—The individual assigned to the project as an executive representative. Project Owner—The individual assigned by the Project Sponsor to provide oversight of the project –or– who represents the business unit that is requesting the project. Project Team Members—The individuals assigned to the project that have knowledge, expertise, or skills important to the success of the project. Resource Managers—The supervisors or managers with the authority to assign resources to tasks and recommend SMEs to the team. Team Leaders—The individuals who have been assigned the authority to assign district resources to tasks and recommend SMEs to the team. Stakeholders—All key individuals involved in the project.

Charter Instruction Manual Basics of Project Management
7
ROLES AND RESPONSIBILITIES It is important that the team establish roles early in the project to avoid any confusion down the road. The following are the key responsibilities for the different roles within the project. Review them, and make sure everybody in the project understands their roles. To better understand the organizational hierarchy of these roles, please refer to the “Project Organization Chart” section.
Project Sponsor Project Owner • Approves project charter, scope, and
deliverables, and authorizes any necessary changes.
• Authorizes money and resources. • Champions the project.
• Accountable to Project Sponsor for success of the project.
• Communicates between Project Sponsor and Project Manager.
• Recommends a Project Manager to the Sponsor and may assist in team selection.
• Removes barriers and provides project support; is a resource for resolving issues.
• Champions the project.
Project Manager Project Team Members • Assumes ownership and responsibility for
the project schedule, budget, and scope. • Identifies resources and assigns team
member roles. • Defines project requirements and
monitors progress against the work plan. • Identifies and manages project risks. • Notifies Project Sponsor/Owner of
progress, support needed, or barriers. • Maintains ongoing communication with
the stakeholders. • Provides status reports to Project
Sponsor/Owner and stakeholders.
• Assume ownership and accountability for assigned project activities and tasks.
• Participate in the project initiation, planning, execution, and closure stages.
• Identify and communicate problems, challenges, and issues to Project Manager.
• Participate in problem solving. • Submit timely and accurate activity
progress to Project Manager.
Resource Managers Team Leaders • Assign appropriate staff to a project and
project tasks. • Authorize assigned work from a Project
Manager to their section. • Recommend SMEs for a project.
• Assign appropriate District staff to a project team.
• Recommend District SMEs for a project.

Charter Instruction Manual Basics of Project Management
8
Project Sponsor
Project Owner
Project Manager
Resource Managers
Team Leaders
Team Members
Other Stakeholders
PROJECT ORGANIZATION CHART The graphic below is the organizational hierarchy of a project. For a detailed overview of the responsibilities of these roles, please refer to the “Roles and Responsibilities“ section. For suggestions about who should assume these roles for any given project type, please refer to the “Candidates for Roles” section.

Charter Instruction Manual Basics of Project Management
9
CANDIDATES FOR ROLES Depending on what program your project falls under, the Project Manager, Owner, and Sponsor may be different than those for other projects. Please refer to the tables below (and continuing onto the next page) for suggestions on who should assume each role for your project. Each letter or group of letters corresponds to a specific Title, office, program, committee, etc. One individual who either holds that title or belongs to that office, program, committee, etc. would need to be assigned.
BR -HQ Bridge MPO -MPO CE -Chief Engineer OHS -Office of Highway Safety D -District
DE -District Engineer RCE -Resource Center Engineer DA -Division Administrator APM -Aeronautics Project Manager GO -GARVEE Office TMAC -Transportation Management Area Committee HQ -Various HQ Sections TP -Transportation Performance
LHTAC -LHTAC UC -Urban Committee (MPOs) LA -Local Agency
Program Project Sponsor Project Owner Project Manager Pavement Preservation DE D D Pavement Restoration DE D D Bridge Preservation BR DE D Bridge Restoration BR DE D State Expansion DE D D Early Development DE D D Board Unallocated Board D D GARVEE Board D GO or D Systems Support HQ HQ HQ ADA Curb Ramp TP or HQ HQ or TP or LA TP or LA Safety - Statewide OHS DE or LHTAC D or LHTAC Safety – SAFETEA-LU Rail RCE DE or LA D Safety - State-Rail RCE DE or LA D Systems Planning DE D D CMAQ TP or RCE D or LA D or LA Highway Planning – Other Formula
UC or HQ MPO or HQ MPO or HQ
Safe Routes to School TP TP or D TP or D STP—Local Urban UC LA D or MPO or LHTAC STP—Transportation Management Area (TMA)
TMAC D or LA D or MPO or LHTAC

Charter Instruction Manual Basics of Project Management
10
TPA – Transportation Management Area (TMA)
TMAC or TP or LHTAC
TP or LA or MPO or LHTAC
TP or LA or MPO or LHTAC
STP—Local Rural LHTAC LA LHTAC or D Bridge—Local LHTAC LA LHTAC Bridge—Off System LHTAC LA LHTAC Emergency Relief (ER) CE D or LA D Capital TP TP TP Operations TP TP TP New Airport Facility DA APM APM Airport Facility Maintenance DA APM APM Airport Planning DA APM APM Aviation Systems Planning DA APM APM

Charter Instruction Manual Basics of Project Management
11
PROJECT LIFE CYCLE
Any project within the Idaho Transportation Investment Program (ITIP) will go through the ITD Project Life Cycle. This is a structured way to manage a project to avoid falling behind schedule and over budget. When projects follow this life cycle, they are easier to manage, easier to regulate, and easier to correct when there are errors or aspects that need to be changed or updated. To see detailed information about what happens in each of these phases, and for further detail about the PM Life Cycle Stages, please go to the “PM Life Cycle Stages” section of this instruction manual.
To get a better understanding of how the project charter is used during the three main phases of the project life cycle (evaluation, development, and implementation) please refer to the “Overview of Project Charter Phases” section of this document.

Charter Instruction Manual Basics of Project Management
12
PM LIFE CYCLE STAGES
During each phase, the project goes through the project management (PM) life cycle stages. This part of project management involves four stages:
1. Initiation 2. Planning 3. Execution, monitor, and control 4. Closure
For further detail on what happens during each of these stages in any particular phase, please refer to the diagrams in the following pages. Phase PM Life Cycle Stages: Evaluation Phase Development Phase Implementation Phase Operations Phase

Charter Instruction Manual Basics of Project Management
13
EVALUATION PHASE - PM LIFE CYCLE STAGES
DEVELOPMENT PHASE - PM LIFE CYCLE STAGES
• Define Evaluation roles & responsibilities
• Approve ITIP • Proceed with project
• Data gathering • Determine selection criteria
• Project prioritization / ranking • Develop project charter • ITIP documentation
• Review / update project charter • Define Development roles & responsibilities • Development kick-off meeting
• Development WBS • Project management plans
• Development activities • Change management / QC-QA • Contract documents / awards
• Lessons learned • Development archive

Charter Instruction Manual Basics of Project Management
14
IMPLEMENTATION PHASE - PM LIFE CYCLE STAGES
OPERATIONS PHASE PM - LIFE CYCLE STAGES
• Review / update project charter • Define Implementation roles & responsibilities • Implementation kick-off meeting
• Implementation WBS • Project management plans
• Implementation activities • Change management / QC-QA • Substantial completion
• Lessons learned • Implementation archive
• Define Operations roles & responsibilities
• Project Management Plans
• Operations activities • Change management / QC-QA
• Lessons learned

Charter Instruction Manual Understanding the Software
15
UNDERSTANDING THE SOFTWARE This section goes over the software that is used when creating and editing a project charter. There are two main software applications that are used, Microsoft Project Professional 2010 (MSP) and Project Web App (PWA), and they share a lot of functionality. Certain steps in creating a project charter will require you to use one program or the other, so it is important that you understand the differences.
DIFFERENCES BETWEEN MSP AND PWA
Microsoft Project Professional Project Web App • For Project Managers only • Full desktop program • View/Edit project schedules • Enter/Edit project information (i.e.
custom fields) • Review/Update project progress • Use templates to create project schedules • Assign resources to project tasks • Baseline project • Use various viewing/reporting tools
• Accessible to all team members • Online tool • View/edit timeline and deliverables • Project reporting • Access shared workspaces for issues,
risks, and documents • View task assignments • Manage issues and risks • Edit project development pages (PDPs) &
submit workflow items
Note that when you set up MSP, you will need to link it to the PSS. This is done by utilizing the Login window when you first open MSP (below). Click the drop-down menu, select PSS, and then click OK.

Charter Instruction Manual Understanding the Software
16
PWA HOME-PAGE LAYOUT
The PWA is available online at http://pwahway/PWA/default.aspx
1. Site Actions – from here, you have the ability to access different tools for
customizing the PWA and uploading documentation. 2. Browse Menu – this tab allows you to access any part of the PWA. 3. Personal Menu – allows you to change settings, switch users, log out, or
customize a page you are on. 4. Quick Launch – this gives you access to various tools, reports, and pages. 5. Reminders – you will see any task, approval, status report, risk, or issue
reminders in this section.
1 3
2
4 5

Charter Instruction Manual Understanding the Software
17
PWA PROJECT CENTER LAYOUT
1. Ribbon interface – allows you to perform various actions 2. Quick launch - this gives you access to various tools, reports, and pages. 3. Icon hyperlinks to workspace content – allows you to see all documents
associated with a specific project. 4. Graphic icon display and custom fields – you can see quickly if a project is
on schedule or not. 5. Gantt chart – a Gantt chart display for all projects.
1
2
3
4 5
Charter Instruction Manual Understanding the Software
18
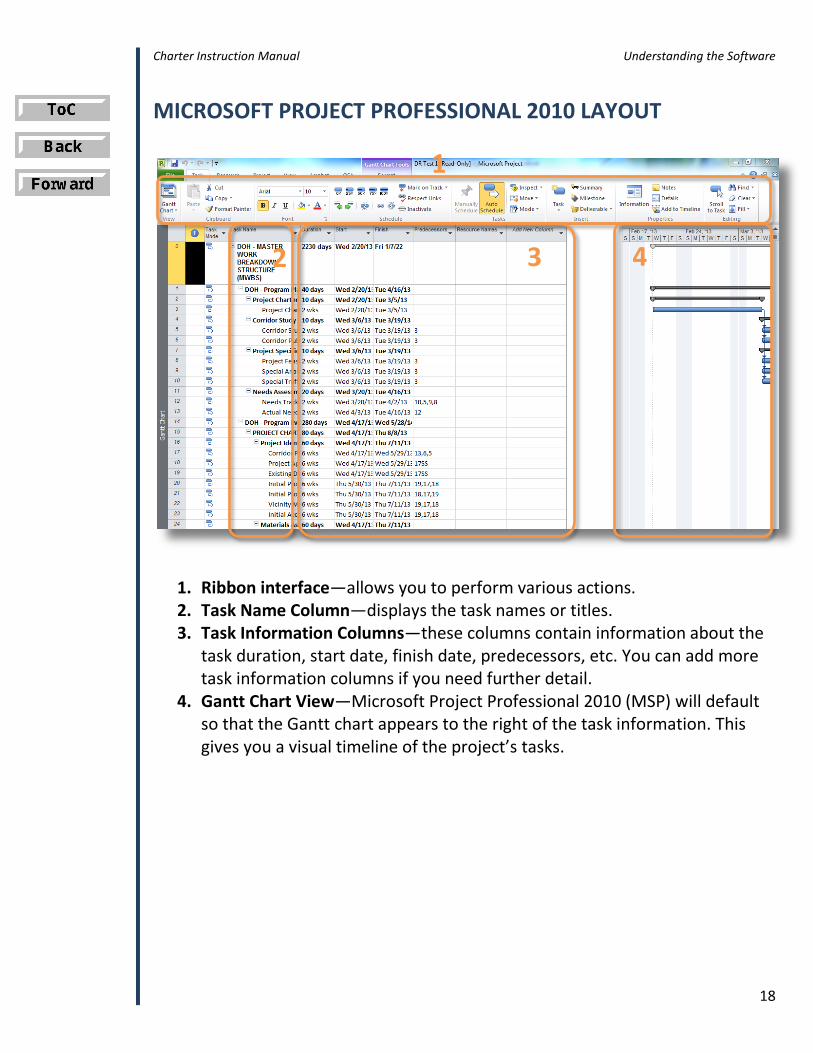
MICROSOFT PROJECT PROFESSIONAL 2010 LAYOUT
1. Ribbon interface—allows you to perform various actions. 2. Task Name Column—displays the task names or titles. 3. Task Information Columns—these columns contain information about the
task duration, start date, finish date, predecessors, etc. You can add more task information columns if you need further detail.
4. Gantt Chart View—Microsoft Project Professional 2010 (MSP) will default so that the Gantt chart appears to the right of the task information. This gives you a visual timeline of the project’s tasks.
1
2 3 4
Charter Instruction Manual Project Charter Process
19
PROJECT CHARTER PROCESS
PURPOSE OF USING A PROJECT CHARTER
Using a project charter helps improve delivery, increase accountability, and establish a baseline for the project. The project charter is a living document which:
Provides high-level project description When you need to know something about the project in its current state, the project charter serves as a collection of easy-to-reference facts about the project. Rather than having to sift through all of the accompanying forms, reports, and documents to find what you need, you simply go to the section you need. Furthermore, if you need to compare the project in its current state to a previous state, you can pull that information up easily. Defines project parameters By having the scope, schedule, budget, and all other necessary information compiled in one document, it is much easier to understand what limitations you may face when working on a project. When you are defining project parameters, you are essentially setting a “fence” around the project’s scope, schedule, and budget. Of course, these aspects of the project can be changed, but the project charter increases accountability. States what will be delivered It is important that expectations for the project be managed. The project charter serves as a universal document that can help the project team better understand what the goals and objectives of the project are. The project charter will help track goals and objectives based on budget, time constraints, risks, issues, and standards. Documents changes The key point of using a project charter is that it is a living document that evolves with the project. When there are major changes to the scope, schedule, and budget, those changes are recorded in the project charter; and, since the project charter is a live document, there will be a track record of all changes made. At any point, you can reference a previous state of the project charter to compare how it has changed.

Charter Instruction Manual Project Charter Process
20
OVERVIEW OF PROJECT CHARTER PHASES
This is an overview of each of the three main phases of the project charter process. To better understand how these phases interact with one another, please refer to the “Project Life Cycle“ section of this document. EVALUATION PHASE The evaluation phase is the initial programming of the project. The team enters this phase after the planning phase has concluded, and they propose the project to be included in the ITIP. In this phase, the team determines the high-level needs and resources of the project and develops the initial scope, schedule, and budget. At this phase of the project, the team needs to clearly define and assign the various roles of different members and make sure that each member understands their responsibilities within the team. DEVELOPMENT PHASE The development phase is when the team develops or designs the project. During the development phase, the team will make any necessary changes to the initial scope, schedule, and budget while creating detailed delivery and resource schedule. Upon completion of a detailed schedule, the Sponsor and Owner will need to approve the new plan, allowing the PM to baseline the schedule. Changes to the scope, schedule and budget can be managed through the Charter Change Request process. These changes will be documented in the project charter and PSS. IMPLEMENTATION PHASE The implementation phase is when construction begins and/or funds are expended. For DOH Infrastructure projects, the PM updates the project schedule based on the contractor’s schedule. The PM will then update the schedule monthly based on planned contractor activities. Necessary changes to the scope, schedule, and budget can also be made during this phase using the Construction change order process. These changes will need to be documented in the project charter.

Charter Instruction Manual Project Charter Process
21
CONTENTS OF THE PROJECT CHARTER
A project charter has nine main sections. Each section may have individual subsections that make up the whole section. The Project Manager fills out these sections using Project Detail Pages in the PWA.
1. Project Information This section consists of the Key Number, Project Name, District, Route, Beginning Mile Post, Funding Year, Ending Mile Post, Program, Temporary Key Number, and Type of Project.
2. Workflow Summary Information
This section shows what phase and stage the project charter is in. It also shows when the stage was submitted and the date it was approved.
3. Exit Criteria This section shows whether or not Exit Criteria has been met for a specific phase.
4. Scope & Strategic Objectives This section consists of the Project Objective Statement, Strategic Goals, and Scope of Work.
5. Environmental Considerations This section consists of the primary and secondary needs of the project, the Anticipated Major Deliverables, and the Environmental Narrative.
6. Design Standards This section consists of Crash History, Design Data, Project Standards, Additional Design Data, and Design Standards.
7. Funding and Cost Summary Shows the fiscal year and budget amount for each phase.
8. Resource Plan & Constraints This section consists of the Project Constraints and Resource Plan.
9. True Minimum Milestones This section shows the True Minimum Milestones (TMM) for the current phase of the project charter. It also includes start and finish dates, actual duration, and baseline start and finish dates for each TMM.

Charter Instruction Manual Project Charter Process
22
PROJECT CHARTER FLOWCHART
Different people within the project team play different roles in the process of creating, approving, and updating a project charter. For more details on this process and the workflow, please refer to the graphic below and the following section, “Project Charter Steps.”
Project Manager 2PM Project Owner Sponsor
approval
APPROVAL FOR
TRANSITION
Project Manager Project Owner Project Sponsor
Owner and Sponsor approval
Project Manager Project Owner Sponsor
approval
APPROVAL FOR
TRANSITION
Project Manager Project Owner Project Sponsor
Owner and Sponsor approval
Project Manager Project Owner Sponsor
approval
APPROVAL FOR
TRANSITION
Project Manager preps
for archival COMPLETION
Evaluation Phase
Development
Phase Im
plementation
Phase

Charter Instruction Manual Project Charter Process
23
PROJECT CHARTER STEPS
This section covers the three main phases of the project charter process (the Evaluation Phase, the Development Phase, and the Implementation Phase), as well as the last phase of the process, the Closeout Phase. This section also chronologically lays out the steps that each member needs to take in the three phases. EVALUATION PHASE Project Manager:
1. Creates Charter from PWA using appropriate template or from a project schedule in Microsoft Project Professional based on DOH master template.
2. If starting from a schedule in Project Pro, update Enterprise Project Type (EPT). 3. Fills out Evaluation Phase information, including stakeholder list in PWA workspace. 4. Completes or defines high-level schedule & runs Quantum Schedule Auditor (QSA) in
Microsoft Project Professional. 5. Enters Temporary Key # and date obtained in charter PDP. 6. Submits charter to 2PM for approval.
2PM: 7. Validates Temporary Key #. 8. Runs compliance checks using QSA. 9. Approves charter. 10. Submits charter to Project Owner for approval.
Project Owner: 11. Reviews Evaluation Phase charter. 12. Following ITIP approval by the Idaho Transportation Board, approves charter. 13. Submits charter to Project Sponsor for approval.
Project Sponsor: 14. Reviews Evaluation Phase charter. 15. Approves charter.
Upon approval: • System takes a snapshot of all current charter information. • System baselines obligated funding amount from Project Tracking. • Office of Transportation Investment (OTI) issues Key # based on Temporary Key #,
following Board approval. • System pulls funding information onto the Funding & Cost Summary PDP. • System captures TMM level data (baselines and actual). • Phase transitions to “Development.”

Charter Instruction Manual Project Charter Process
24
DEVELOPMENT PHASE (NOTE: ONLY FOR INFRASTRUCTURE PROJECTS) Project Manager:
1. Reviews and updates charter for Development Phase. 2. Refines schedule and runs QSA. 3. (Optional) Runs multiple custom resource reports reflected in Project Detail Pages
(PDPs) to use during negotiations with Resource Manager to determine resources. 4. Publishes updated schedule. 5. When schedule is completed, submits charter to Project Owner for baseline approval.
Project Owner: 6. Reviews Development Phase charter and schedule. 7. Reviews Schedule Approval Report. 8. Approves charter. 9. Submits charter to Project Sponsor for approval.
Project Sponsor: 10. Reviews Development Phase charter and schedule. 11. Reviews Schedule Approval Report. 12. Approves or suggests changes. 13. If approved, notifies Project Manager to baseline schedule.
Project Manager: 14. Baselines the schedule once owner and sponsor approve schedule ( January 1). 15. Manages project. 16. Enters PS&E package Delivered Date and Contract Award Date. 17. Submits charter to Project Owner for approval.
Project Owner: 18. Reviews Development Phase charter. 19. Approves charter. 20. Submits charter to Project Sponsor for approval.
Project Sponsor: 21. Reviews Development Phase charter. 22. Approves charter.
Upon approval:
• System takes a snapshot of all current charter information. • System pulls funding information onto the Funding & Cost Summary PDP. • System captures TMM level data (baselines and actual). • Phase transitions to “Implementation.”

Charter Instruction Manual Project Charter Process
25
IMPLEMENTATION PHASE Project Manager:
1. Reviews and updates charter for Implementation Phase. 2. Refines schedule based on contractor’s schedule and runs QSA. 3. (Optional) Runs multiple custom reports reflected in PDPs. 4. When schedule is completed, submits charter to Project Owner for approval.
Project Owner: 5. Reviews Implementation Phase charter and schedule. 6. Reviews Schedule Approval Report. 7. Approves charter. 8. Submits charter to Project Sponsor for approval.
Project Sponsor: 9. Reviews Implementation Phase charter and schedule. 10. Reviews Schedule Approval Report. 11. Approves or suggests changes. 12. If approved, notifies the Project Manager to baseline schedule.
Project Manager: 13. Baselines schedule. 14. Manages project. 15. Enters Final Voucher Issues. 16. Submits charter to Project Owner for approval.
Project Owner: 17. Reviews Implementation Phase charter. 18. Approves charter. 19. Submits charter to Project Sponsor for approval.
Project Sponsor: 20. Reviews Implementation Phase charter. 21. Approves charter.
Upon approval:
• System takes a snapshot of all current charter information. • System pulls funding information onto the Funding & Cost Summary PDP. • System captures TMM level data (baselines and actual). • Phase transitions to “Closeout.”

Charter Instruction Manual Project Charter Process
26
CLOSEOUT PHASE Project Manager:
1. Sets Remaining Duration to 0 (zero). Note: Simply marking tasks as 100% complete will just add Remaining Duration to Actual Duration.
2. Updates necessary Enterprise Custom Fields a. Project Status = Archive
3. Sets the Publish flag to NO for all tasks, and then publishes the schedule. 4. Closes Tasks to update the Project Summary Task (Task 0). 5. Publishes the schedule. 6. Updates the Project Site with all the artifacts. 7. Saves all documents off to Project Wise.

Charter Instruction Manual Creating and Updating Projects
27
CREATING AND UPDATING PROJECTS This section outlines how to perform specific tasks that are required when working with the Project Scheduling System (PSS). For information on when to perform these functions, please refer to the “Project Charter Steps” section. Main Functions Starting a New Project Creating a Stakeholder List Updating Work Breakdown Structure Assigning Resources Setting the Project Baseline Updating Progress Viewing Reports Archiving a Project Running QuantumPM Schedule Auditor (QSA) Submitting a Charter Approving a Charter Accessing Project Web App Project Detail Page Functions Updating Project Information Writing Scope and Objectives Documenting Environmental Considerations Documenting Evaluation Design Standards Documenting Resource Plan and Constraints ITD Project Schedule Documenting Exit Criteria Project Site Lists Stakeholders Deliverables Alternatives Analysis Design Exceptions Change Request Issues Risks Calendar Lessons Learned

Charter Instruction Manual Creating and Updating Projects
28
MAIN FUNCTIONS
STARTING A NEW PROJECT FROM PWA This is accomplished in the Evaluation Phase. You can start in Project Web Application (PWA) at the Project Center and select the appropriate template.
1. From the New button in the Ribbon. Click Arrow under New. Select the Project Type you want from the list.
2. Fill in basic project information in the following screen. Note red astrisks * for required
fields (4). Press Save button to create the project.
CAUTION: You cannot use a project name containing any of the following special characters: .(period) \ " / : ; | ? ' < > * # ~ % & { } +

Charter Instruction Manual Creating and Updating Projects
29
3. Open the Project in Project Professional. Click on the icon to open the project in Project Professional. This matches the WBS codes for the project tasks to the project template. After the schedule is open and the WBS codes have been updated, Publish and Check In the project and close Project Professional.

Charter Instruction Manual Creating and Updating Projects
30
4. Update project information. From the Project Center view in PWA, Click Project Name to open the project. Press Edit to edit the remaining Project Detail Pages. You must Save between each page of information. When you have completed editing, press the Close button and accept the prompt to save and check in the project.
5. Modify Schedule using PWA. Although you can edit the project through PWA, you will find the tools to be basic and do not lend them to easily edit the schedule if you have much detail to add.
Charter Instruction Manual Creating and Updating Projects
31
STARTING A NEW PROJECT FROM PROJECT PROFESSIONAL This is done in the Evaluation Phase. You can start in PWA at the Project Center and select the appropriate template; however, when you need to modify the Enterprise Project Type (EPT) of an existing project to take advantage of workflow, use the Project Web App (PWA).
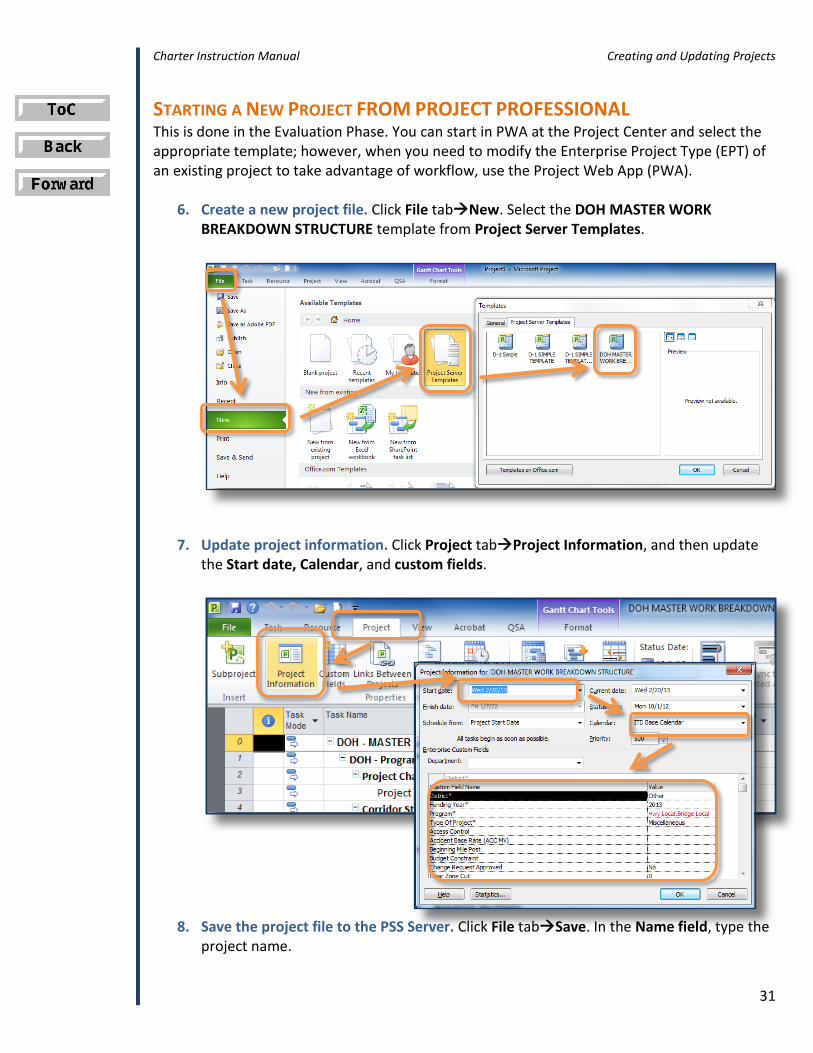
6. Create a new project file. Click File tabNew. Select the DOH MASTER WORK BREAKDOWN STRUCTURE template from Project Server Templates.
7. Update project information. Click Project tabProject Information, and then update the Start date, Calendar, and custom fields.
8. Save the project file to the PSS Server. Click File tabSave. In the Name field, type the project name.

Charter Instruction Manual Creating and Updating Projects
32
9. Publish the project file to the PSS Server. Click File tabPublish.
10. Review the QSA report. This report will show up in your browser after the QSA runs automatically. Any check that is marked with a red will need to be corrected
CAUTION: You cannot use a project name containing any of the following special characters: .(period) \ " / : ; | ? ' < > * # ~ % & { } +
NOTE: A Project Site will be created and opened in your browser automatically. QuantumPM Schedule Auditor (QSA) will run automatically.

Charter Instruction Manual Creating and Updating Projects
33
eventually. If you would like to read further into any of the checks, simply click the titles of those specific checks.
11. Update Enterprise Project Type (EPT). From the Project Web App, go to the Project Center. Select the project you are working on by clicking next to it (on the left). Next,
NOTE: It is normal for the QSA to come up with errors that need to be corrected the first time it runs on a new project. Although these will need to be resolved eventually, you don’t need to worry about fixing them right away. For instance, at this point in the Evaluation Phase, you haven’t assigned resources yet, and you may have not documented any planned costs for the project. These issues will be covered later in this manual.

Charter Instruction Manual Creating and Updating Projects
34
click the Change Project Type button in the ribbon and change the EPT to the correct project type (i.e. Infrastructure).

Charter Instruction Manual Creating and Updating Projects
35
CREATING A STAKEHOLDER LIST After you have created a project, you need to create a stakeholder list using the Project Web App (PWA) to access the Project Site. The roles and responsibilities for various stakeholders can be found in the “Roles and Responsibilities” section. Refer to the “Project Organization Chart” section to see an example organization chart for how these roles should interact.
1. Go to the Project Site. With your project open in the PWA, click Project Site.
2. Pull up the Stakeholders dialogue box. Under Stakeholders, click Add new item.

Charter Instruction Manual Creating and Updating Projects
36
3. Create your stakeholder list. In the Title field, enter a short, simple title for your stakeholder list. Then, using the fields provided below, add your individual stakeholders. Be sure to include contact information for each stakeholder so they can be reached by other stakeholders and team members. When all the stakeholders are updated, click Save.

Charter Instruction Manual Creating and Updating Projects
37
UPDATING WORK BREAKDOWN STRUCTURE You need to modify your work breakdown structure (WBS) to meet the requirements of your project as well as develop and refine the schedule according to the phase you are in. Follow best practices when modifying a schedule built off an enterprise template. Pay close attention to task relationships and stay away from task constraints as much as possible. You should allow the task relationships and durations of tasks to set the start and finish dates rather than manually entering them. All of the following steps will be performed using Microsoft Project Professional 2010 (MSP).
1. Modify view. Click View to find a view suitable for updating your WBS. The Gantt Chart is a good starting point.
NOTE: When removing/deleting tasks from project schedules created from templates, ensure any pre-defined dependencies contributing to the project’s finish date are not compromised by moving the necessary link(s) (predecessor tasks) to the appropriate remaining task(s) (successor tasks). Instead of deleting tasks, you can simply inactivate them by right-clicking and then clicking “inactivate tasks.”
CAUTION: Do not delete predefined milestones in templates, such as “Concept Approval.” These are identified with a “Z” in the WBS code of the milestones and are extremely important for reporting purposes.

Charter Instruction Manual Creating and Updating Projects
38
2. Make sure tasks are set up to be automatically scheduled. Using the DOH MASTER
WORK BREAKDOWN STRUCTURE template should make tasks default to automatic scheduling. However, in case the tasks in your project aren’t automatically scheduled default, follow these steps to make them automatically scheduled: Click the Task tab. In the Tasks group, click the Mode drop-down menu, and then click Auto Schedule.
3. Enter durations. From the Gantt Chart view, click the Duration field for the task you
would like to change, and then enter duration. Enter the duration as a number. For example, type 4d to indicate 4 days. To specify a milestone without duration, type 0d. To indicate that a duration is an estimate, add a question mark. For example, type 6d?

Charter Instruction Manual Creating and Updating Projects
39
12. Link tasks to show relationships. From the Gantt Chart view, select the tasks that you
want to link, and then click the Link Tasks button in the Tasks group, which is under the Tasks tab. To change the default finish-to-start dependency type, double-click the line between the tasks that you want to change, and then select a task link from the Type list.
a. Finish-to-Start: “Task B” can start when “Task A” finishes (**Most Commonly Used**)
b. Finish-to-Finish: “Task B” can finish when “Task A” finishes c. Start-to-Start: “Task B” can start when “Task A” starts d. Start-to-Finish: “Task B” can finish when “Task A” starts (**Rarely Used**)
NOTE: Durations can be entered in days, weeks, or months. Don’t enter start and finish dates for tasks. Instead, enter duration and let MSP automatically set these dates. This allows the schedule to live dynamically and adjust remaining start/finish dates as tasks are being completed.

Charter Instruction Manual Creating and Updating Projects
40
ASSIGNING RESOURCES Assignments are the associations between specific tasks and the resources needed to complete them. Make these assignments using Microsoft Project Professional 2010 (MSP). You can only assign one resource to a task. Be sure to communicate with Resource Managers to ensure the right resources are assigned to correct tasks.
1. Add resources to your project. You must add resources from the enterprise resource pool. Click the Resource tab, and then click Add Resources. Then select Build Team from Enterprise… From the Build Team window, select the Enterprise Resources you want to add to the project, then click Add >.
NOTE: Use the Group By and Filter mechanisms within the Build Team window to find the resources you need. You can also filter for resources based on availability and view resource capacity versus demand plotted on a bar chart.
Charter Instruction Manual Creating and Updating Projects
41
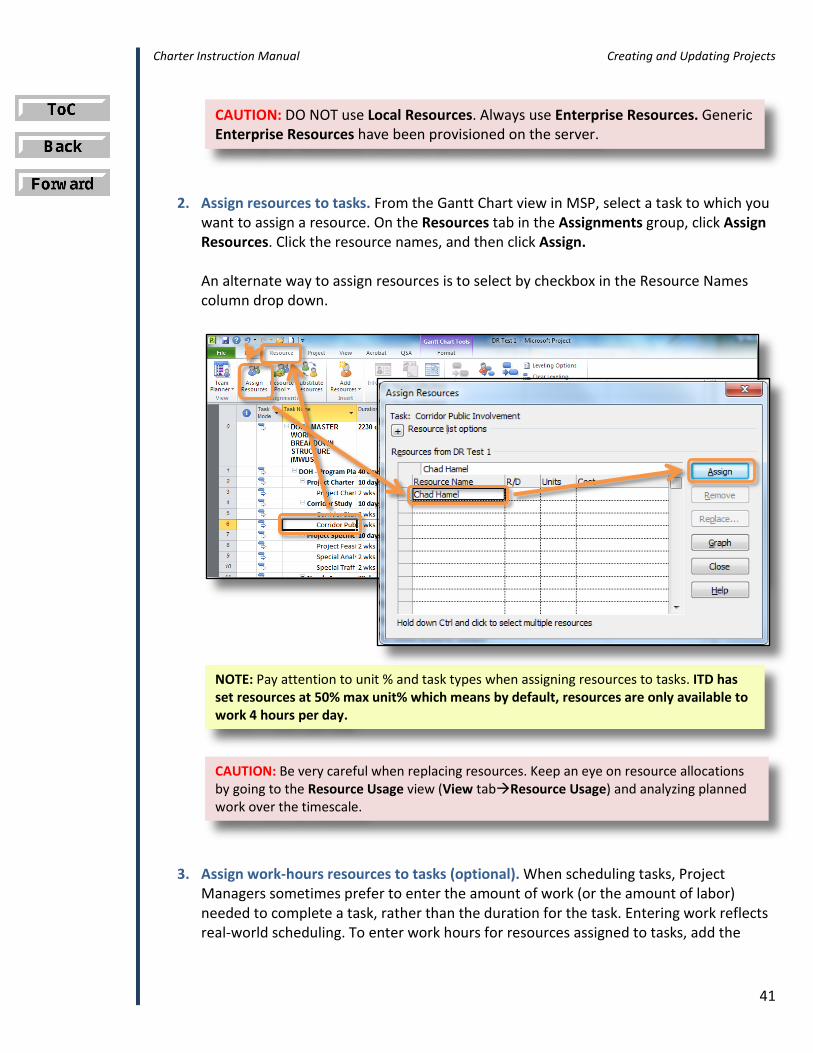
2. Assign resources to tasks. From the Gantt Chart view in MSP, select a task to which you want to assign a resource. On the Resources tab in the Assignments group, click Assign Resources. Click the resource names, and then click Assign. An alternate way to assign resources is to select by checkbox in the Resource Names column drop down.
3. Assign work-hours resources to tasks (optional). When scheduling tasks, Project Managers sometimes prefer to enter the amount of work (or the amount of labor) needed to complete a task, rather than the duration for the task. Entering work reflects real-world scheduling. To enter work hours for resources assigned to tasks, add the
CAUTION: DO NOT use Local Resources. Always use Enterprise Resources. Generic Enterprise Resources have been provisioned on the server.
NOTE: Pay attention to unit % and task types when assigning resources to tasks. ITD has set resources at 50% max unit% which means by default, resources are only available to work 4 hours per day.
CAUTION: Be very careful when replacing resources. Keep an eye on resource allocations by going to the Resource Usage view (View tabResource Usage) and analyzing planned work over the timescale.

Charter Instruction Manual Creating and Updating Projects
42
Work column to the Gantt Chart view. To do this, click the Add New Column column. Type "Work" and select the Work column. (Graphic on following page.)
4. Know your task type. As soon as you assign resources to automatically scheduled tasks, MSP determines how to schedule the task based on the task type. Durations might change as you assign resources to tasks.
HOW TASK TYPES WORK: Work, duration, and units (% allocation) are determined by the formula: Work = Duration * Units
PROJECT TYPE If you revise work If you revise duration If you revise units
Fixed units task Duration changes Work changes Duration changes
Fixed work task Duration changes Units change Duration changes
Fixed duration task Units change Work changes Work changes
a. To set a default task type for the entire project, click the File tab, and then click
Options and then click on Schedule. In the Default task type box, select Fixed Units (the default), Fixed Duration, or Fixed Work.
NOTE: Manually scheduled tasks don't use task types.

Charter Instruction Manual Creating and Updating Projects
43
b. To change the task type for an individual task, click the Task tab, and then in the Properties group, click the Task Information button. Click the Advanced tab, and then in the Task type box, click the task type that you want to create.
5. Identify factors affecting task schedules. You can use MSP to help you understand how changes to one task can affect the rest of the project. Click the Task tab, and then in the Tasks group, click Inspect. A pane opens on the left showing the factors that affect the scheduling of the selected task.
NOTE: You can also see task scheduling information (such as scheduling mode, duration, and start and finish dates) quickly by hovering the mouse over the task's Gantt bar.

Charter Instruction Manual Creating and Updating Projects
44
SETTING THE PROJECT BASELINE A baseline is critical for enterprise reporting and tracking schedule progress. It is the tool for schedule change control. You should only baseline once the Project Sponsor approves the schedule. When you save a baseline, Microsoft Project Professional 2010 (MSP) saves the baseline data as part of the project file. A project schedule that is not baselined will result in planned work and actual work being the same. The baseline dates are what the project will be measured against and reported on to management throughout the various PSS reports.
1. Save the baseline plan. After your project plan is solidly in place for the finish date, budget, and scope, you can submit the plan for approval using the PDPs associated with the charter. Once it has been approved, save the baseline plan. Click the Project tab, then open the Set Baseline drop-down menu and select Set Baseline.... Then, in the Set Baseline dialogue box, make sure Entire Project is selected, and then click OK.
NOTE: Each MSP file can have eleven baselines: the original baseline, plus ten other snapshots of the project’s progress. The original baseline, “Baseline,” is the only one used for enterprise reporting. Make sure that this baseline is reflected accurately.

Charter Instruction Manual Creating and Updating Projects
45
2. View baseline data in a Gantt Chart view. From the Gantt Chart view, click the Format tab under Gantt Chart Tools. Then, in the Bar Styles group, click Baseline. The baseline information is shown as the lower of the two Gantt bars for each task.
3. View baseline data in a table. From the Gantt Chart view, click Tables, and then select
Variance. This table includes fields for baseline and variance start and finish.

Charter Instruction Manual Creating and Updating Projects
46
UPDATING PROGRESS Updating the progress of your project is the only way to make sure it stays on track as work is performed. The focus at this point is on managing changes, updating the schedule, tracking progress, and communicating project information. Microsoft Project Professional 2010 (MSP) tracks four sets of dates: current status, baseline, actual, and projected. When you first set the baseline, projected = baseline. Current Status Date is the date that the task updates have been posted in MS Project. It is represented by the black vertical bar within the Tracking Gantt Chart. When a task is 100% complete, the date becomes the actual date. Tasks not yet completed ar projected. Baseline, actual, and projected values exist for the start date, finish date, duration, cost, and work.
1. Accept & publish updates. As a Project Manager you need to accept updates submitted by the resources on your project(s). To do this, you must go to the Project Web App (PWA), click Approval Center and accept/reject updates. You must also publish the updates by going to the Approval Center, clicking History and selecting Status Updates. You can then publish the pending updates.
2. Manage changes. Managing changes involves modifying durations, dates, dependencies, resource assignments, or tasks based on requested changes or new information. Keep the current fields up to date and compare them to the baseline. You should open the project in MSP and go to the Tracking Gantt view to update the status of each task. Be sure to set the Status Date to indicate when you last updated the project schedule. (Graphic on following page.)
NOTE: Updates from resources should be submitted at least once every two weeks opposite payday Friday. The Project Manager should accept and publish those updates by the following Monday. Next, the Project Manager should make updates to the project schedule and finally, publish the updates.

Charter Instruction Manual Creating and Updating Projects
47
3. Manually update tasks. The PM may need to manually update some tasks.
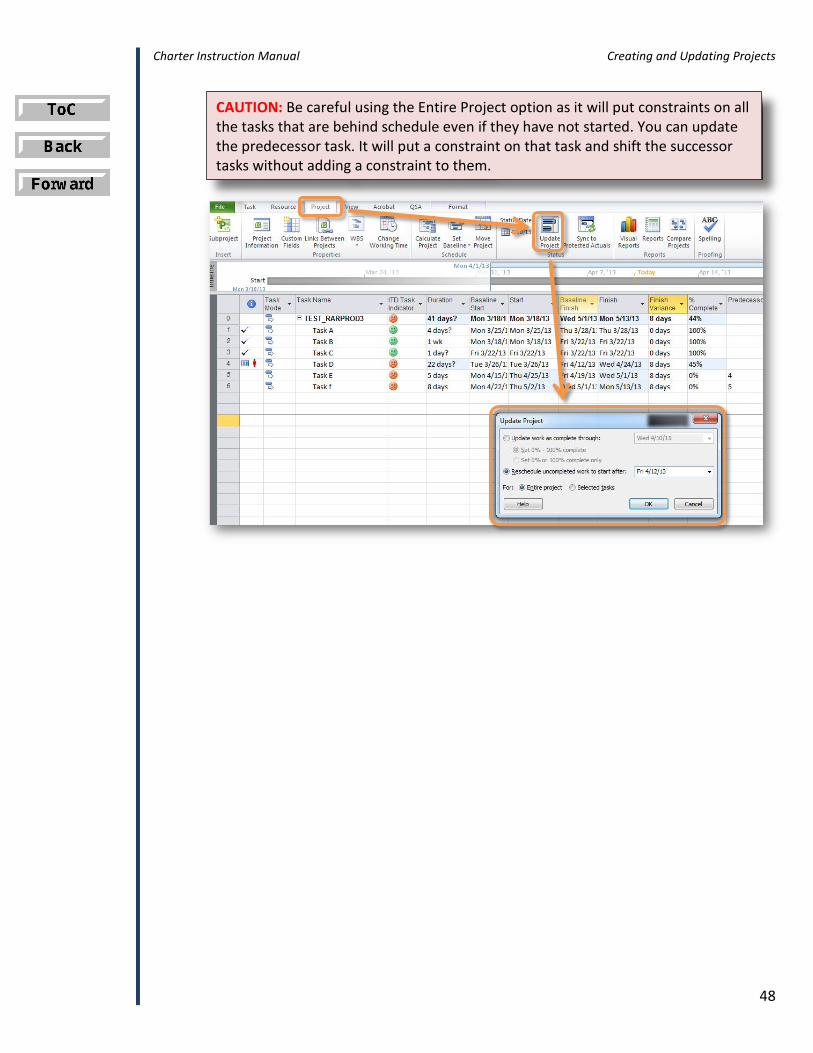
4. Reschedule remaining work. Go to Project, Update Project to reschedule remaining work. From here, you can reschedule uncompleted work to start after a certain date for the entire project or selected tasks. (Graphic on following page.)
NOTE: The Status Date is used to evaluate and project the project’s performance, based on the project’s trends so far, where you can expect costs, work, and other aspects of the project to be on the status date set.
CAUTION: Be careful when updating %Complete on the task, as doing so will update actual work and remaining work.
NOTE: If you want to enter actual and remaining work hours or costs, use the tracking table. Click the View tab. In the Data group, point Table, and then click Tracking. Enter progress data in the Act. Work or Act. Cost fields for the task. You can also use the tracking table to enter percent complete, actual start and finish dates, and actual and remaining duration.
Charter Instruction Manual Creating and Updating Projects
48
CAUTION: Be careful using the Entire Project option as it will put constraints on all the tasks that are behind schedule even if they have not started. You can update the predecessor task. It will put a constraint on that task and shift the successor tasks without adding a constraint to them.

Charter Instruction Manual Creating and Updating Projects
49
VIEWING REPORTS Keep stakeholders and team members up-to-date on project progress by providing them with access to online or printed views and reports. The Project Scheduling System (PSS) provides many ways to print and distribute both detailed and overview information project information quickly and efficiently. You can also get custom reports directly from the Business Intelligence Center in the Project Web App (PWA). Viewing Reports in Microsoft Project Professional (MSP)
1. Select a view. MSP has views to help you see project information and report it to others on your team or organization. Click the View tab. In either the Task Views group or the Resource Views group, select the view you want to use. The most useful views include:
a. Any ITD specific views b. Gantt Chart c. Tracking Gantt d. Resource Usage
Generating Reports with the PWA
1. Generate a report. You can use the Business Intelligence Center on the PWA to access
custom reports created for the ITD environment. To access these reports, open your project in PWA, and then click ITD Custom Reports under Business Intelligence in the Quick Launch (you may have to scroll down to get there). Then, select the report type you wish to generate. (Graphic on following page.)

Charter Instruction Manual Creating and Updating Projects
50
2. View reports in PWA. The Project Web App offers several ways to view reports. The Project Center provides basic views which will list all projects you have visibility to. Generally you should be using the views with “ITD” in front of the names. To change your view in the Project Center, simply select a different view from the view drop-down menu.

Charter Instruction Manual Creating and Updating Projects
51
ARCHIVING A PROJECT Just because your project is almost finished doesn’t mean that your work is done. You still need to resolve any final project details and obtain sponsor acceptance of final deliverables. You should update the lists on the Project site and conduct a “lessons learned” session, recording information about areas for improvement and best practices. You need to make final updates to the project plan including properly closing out tasks and releasing resources. Finally, archive the project plan according to ITD’s guidelines. Once the project is complete the schedule should be closed out appropriately by following these steps:
1. Set Remaining Duration to Zero. Open the project you wish to update in Microsoft Project Professional 2010 (MSP). Insert Remaining Duration column and change all values to 0 (zero).
2. Update necessary Enterprise Custom Fields. From the Project tab, go to Project Information. Update Project Status to “Archive” and then click OK if you no longer need to report on it. This will indicate to Project Server Administrator that the Project should be archived. (Graphic on following page.)
CAUTION: Simply marking tasks as 100% complete will just add Remaining Duration to Actual Duration.

Charter Instruction Manual Creating and Updating Projects
52
3. Set the Publish flag to No. Do this for all tasks. From MSP, insert the Publish Flag. Change all values in Publish Field to No.
NOTE : Publish (task field) - The publish field indicates whether the current task should be published to Project Server 2010 with the rest of the project. By default, the field is set to Yes.

Charter Instruction Manual Creating and Updating Projects
53
4. Publish the schedule. Go to Project Web App (PWA) Server Settings Close Tasks
to Updates, select the Project Summary Task (Task 0) and Publish.
5. Update the Project Site appropriately and archive documentation. Make sure all Project Site documentation is current, and then save all documents from Project Site to ProjectWise.

Charter Instruction Manual Creating and Updating Projects
54
RUNNING QUANTUMPM SCHEDULE AUDITOR (QSA) QSA runs compliance checks against the project for both ITD specific business requirements and other options. You can run QSA at any time from Microsoft Project Professional 2010 (MSP); additionally, QSA will automatically run when you publish a schedule.
1. Open QSA by clicking the QSA tab.
2. Specify checks to run by clicking the checkbox next to each check. After selecting the
checks you wish to run, click Run Checks.
NOTE: To find out more about any specific check from the check list(s), select the check you wish to find out about, and then click the Info tab.

Charter Instruction Manual Creating and Updating Projects
55
3. Take corrective action for anything marked with a red on the schedule.
4. Rerun QSA to ensure schedule is in compliance. (See steps 1 & 2).
NOTE: ITD checks will always run. A report will be generated in a new window. By default, the report will save to your Documents folder. To change this, go to SettingsOptions.

Charter Instruction Manual Creating and Updating Projects
56
SUBMITTING A CHARTER After you are done reviewing your charter and you are ready to send it to either the Project Owner or Project Sponsor for approval, you will need to electronic submit the charter to them so that there is a record saying it has been approved.
1. Submit the charter. Open your project in the Project Web App (PWA). Then, from the Project tab, click Submit.

Charter Instruction Manual Creating and Updating Projects
57
APPROVING A CHARTER There are three approval methods the Project Owner and Project Sponsor can use. The first approval method can be done from the approval email that is sent out automatically. The other two approval methods are done directly through Project Web App (PWA).
1. From the approval email, click the Approve link.
2. From PWA, go to Workflow Approvals in the Project Server Workflow Tasks.
3. From PWA, go to the Workflow Status page, and then click Additional Workflow Data. ACCESSING PROJECT WEB APP Since many of the steps require you to be working through PWA, it is important that you understand how to access it. For further information on what you can do through PWA and how it varies from Microsoft Project Professional 2010 (MSP), please see the “Understanding the Software” section.
1. Open Internet Explorer.
2. Navigate to the URL: http://pwahway/pwa
NOTE: You may want to add this URL to your Favorites in Internet Explorer, as it is a site you will come back to regularly throughout the process of creating and updating your project charter.

Charter Instruction Manual Creating and Updating Projects
58
PROJECT DETAIL PAGE FUNCTIONS
The Project Manager fills out these sections using the project detail pages (PDPs) on the Project Web App (PWA). The information entered into these PDPs will be the information that makes up the project charter.
To access these PDPs, Open your project in Project Web App. Then, click Edit Rules for PDP Fields
• Fields that include an ellipses button contain drop-down menus.
• Fields that include a browse button contain pop-up windows to choose items from.
• Fields that include a calendar button contain a pop-up calendar to choose a date from.
• Fields that include a Yes/No drop-down allow you to choose Yes or No.
• Fields that don’t contain any buttons are text or narrative fields. You can write information into these fields by simply clicking inside them and then using your keyboard to type.

Charter Instruction Manual Creating and Updating Projects
59
UPDATING PROJECT INFORMATION Under the Project tab, click Project Information. Then, input all of the information into the appropriate fields. Some of this information will likely already be filled out with information from Microsoft Project Professional 2010 (MSP).
Name Pulls automatically from MSP. Update if necessary. Beginning Mile Post Enter the beginning milepost for construction, if applicable. Ending Mile Post Enter the ending milepost for construction, if applicable. Route Enter the highway route that the project is on, if applicable.

Charter Instruction Manual Creating and Updating Projects
60
Start Date Enter project start date by using the calendar button . Owner Click the browse button to select an Owner for the project’s schedule. This will typically be the Project Manager, and not the Project Owner. District District or work organization responsible for the project. Pulls automatically from MSP. Update if necessary by clicking the ellipses button . Funding Year Fiscal Year the project is placed in STIP. Pulls automatically from MSP. Update if necessary by clicking the ellipses button . Program Anticipated program funding category (Typically follows the STIP definition). Pulls automatically from MSP. Update if necessary by clicking the ellipses button . Type of Project Pulls automatically from MSP. Update if necessary by clicking the ellipses button . Note that an Alternatives Analysis is required in the Evaluation Phase for the Preservation Pavement 1R, Rehabilitation, Preservation Bridge, Pavement Maintenance, and 3R Less than or equal to Minor Widening project types.

Charter Instruction Manual Creating and Updating Projects
61
WRITING SCOPE AND OBJECTIVES Under the Project tab, click Scope and Strategic Goals. Then, fill out the two narrative fields and select strategic objectives from the drop-down menu.
Project Objective Scope and Strategic Goals
Project Objective Statement The project objective statement describes what a project is to accomplish in order to be successful. It is used to focus the team members, the Project Sponsor, and the other key stakeholders on the primary objective of the project. This should include the project's business case. The Project Objective Statement will cover the Triple Constraint: scope, schedule, and budget. If you are unsure of how to word your Project Objective Statement, you can use the following template as a basic guide for writing it:
“The objective of (insert the project name) is to (insert major outcome or deliverables). This will be accomplished by implementing (insert those items that define the project scope), to be completed by (insert the project due date), and not to exceed a budget of (insert budget amount).”

Charter Instruction Manual Creating and Updating Projects
62
Remember that this template is just a basic guide for writing a Project Objective Statement. If you feel a need to add any additional information, feel free to do so. However, keep in mind that you will be able to expand upon any details in the scope. Scope of Work The scope of work should be an expanded summary of the work that will be accomplished with each phase. It sets the boundaries of the project and provides the project team with a clear understanding of what needs to be done to successfully complete the project. It is also a good idea to list any constraints in the scope, and also make note of what the project will not include. This is a good way of managing the expectations of the project team and key stakeholders. Strategic Objectives This is a set of universal ITD objectives for projects. Select all of the strategic objectives that apply to your project by clicking the ellipses button .

Charter Instruction Manual Creating and Updating Projects
63
DOCUMENTING ENVIRONMENTAL CONSIDERATIONS (NOTE: INFRASTRUCTURE PROJECTS ONLY)
For more details on the specific environmental requirements for your project type, please refer to the Environmental Process Manual. Under the Project tab, click Environmental considerations. Then, use the drop-down menus and narrative/text fields to fill out all of the information that your project requires. Project Need
Primary Need This is the primary reason for the project’s existence. This field can be edited by clicking the ellipses button . Secondary Need This is the secondary reason for the project’s existence. This field can be edited by clicking the ellipses button . Note that you can select one or more secondary need(s).

Charter Instruction Manual Creating and Updating Projects
64
ANTICIPATED MAJOR ENVIRONMENTAL DELIVERABLES (NOTE: INFRASTRUCTURE PROJECTS ONLY)
Cultural Select any of the provided Cultural deliverables that apply to your project by clicking the ellipses button . Section 4F Select from Section 4F Deminimus and Section 4F Evaluation including Alternatives Analysis by clicking the ellipses button . Add whichever is necessary for your project. Note that you can add both, if applicable. Noise Air Quality and Hazmat

Charter Instruction Manual Creating and Updating Projects
65
Select any of the provided Noise Air Quality and Hazmat deliverables that apply to your project by clicking the ellipses button . Miscellaneous Select any of the provided Miscellaneous deliverables that apply to your project by clicking the ellipses button . Wetlands Stream Alteration Select any of the provided Wetlands Stream Alteration deliverables that apply to your project by clicking the ellipses button . Navigable Waters Select Yes or No by using the Yes/No drop-down to show whether or not your project affects Navigable Waters. Floodway Floodplain Select any of the provided Floodway Floodplain deliverables that apply to your project by clicking the ellipses button . Species and Habitat Select any of the provided Species and Habitat deliverables that apply to your project by clicking the ellipses button . Stormwater Select Yes or No by using the Yes/No drop-down to show whether or not your project includes a Stormwater Pollution Prevention Plan. EA FONSI Select Yes or No by using the Yes/No drop-down to show whether or not your project includes an Environmental Assessment, Finding of No Significant Impact. EE Cat Ex Select from No, Yes-Cat Ex ITD Approval, or Yes-Cat Ex FHWA Approval by clicking the ellipses button . EIS ROD Select Yes or No by using the Yes/No drop-down to show whether or not your project includes an Environmental Impact Statement, Record of Decision. Environmental Narrative

Charter Instruction Manual Creating and Updating Projects
66
Use this field to sum up your environmental deliverables, and also include any information that you think is necessary to supplement the list of deliverables.
Charter Instruction Manual Creating and Updating Projects
67
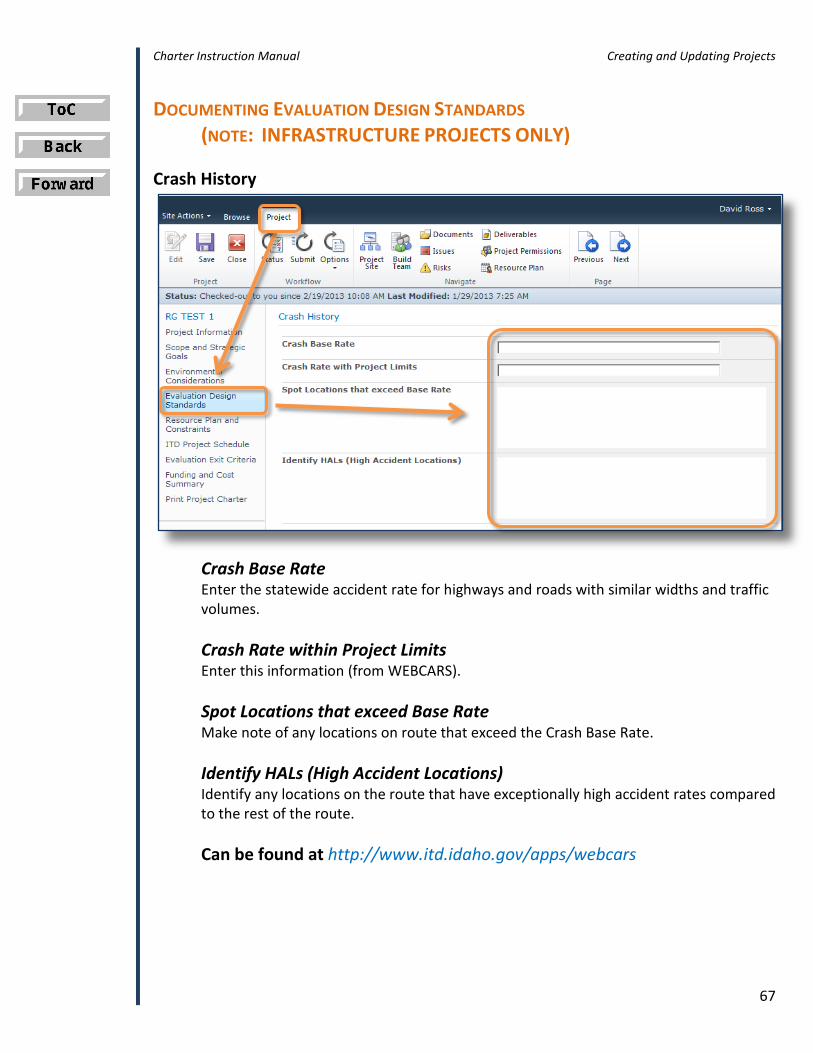
DOCUMENTING EVALUATION DESIGN STANDARDS (NOTE: INFRASTRUCTURE PROJECTS ONLY)
Crash History
Crash Base Rate Enter the statewide accident rate for highways and roads with similar widths and traffic volumes. Crash Rate within Project Limits Enter this information (from WEBCARS). Spot Locations that exceed Base Rate Make note of any locations on route that exceed the Crash Base Rate. Identify HALs (High Accident Locations) Identify any locations on the route that have exceptionally high accident rates compared to the rest of the route.
Can be found at http://www.itd.idaho.gov/apps/webcars

Charter Instruction Manual Creating and Updating Projects
68
Design Data
Design Exception Anticipated Select Yes or No by using the Yes/No drop-down to indicate whether you anticipate design exceptions. If you are unsure what qualifies as a design exception, please refer to the Design Manual, section 330.00 and Appendix A.10.16.

Charter Instruction Manual Creating and Updating Projects
69
Pavement Width Enter the pavement width (in feet). This includes the total pavement width, including the lanes and shoulders. Proposed Design Vehicle Enter the project’s proposed design vehicle. This is the vehicle used in the design of the main alignment and the major intersections. Guidance for the proper vehicle to use for each project is given in the Design Manual Section 555.00. Design Year Enter the project’s design year. The design year for Federal-Aid projects and for complex ST projects is the year the project is shown in the ITD Project Development Schedule plus 20 years, plus 2 years (for construction). See Design Manual Subsection 335.2, Traffic Volume. Posted Speed Enter the project’s posted speed. Posted Speed should be the actual posted speed throughout the project. Design Speed Enter the project’s design speed. Minimum Design Speeds are found in the AASHTO Green Book and in the State Standards. Freeways 2004 Green Book Page 503, NHS (Principal Arterial) 2004 Green Book Page 444 (Rural) & 470 (Urban). Non-NHS State Design Standards ITD uses the general rule of 75 mph for Interstate, 60 mph for ramps and state highways, or at least equal to the posted speed. If more than one speed zone exist on a project, list them with limits. 3R Projects should have the Posted Speed listed and both the Average Running Speed and the 85th Percentile Speed listed instead of the Design speed. This should be obtained from the District Traffic Section. (See Design Manual, Appendix A.) Traffic ADT Present Enter the current average daily traffic (ADT) for the route of the project. Traffic ADT Future Enter the future average daily traffic (ADT) for the route of the project. Traffic DHV Present Enter the current design hourly volume (DHV) for the route of the project. Traffic DHV Future Enter the future design hourly volume (DHV) for the route of the project.

Charter Instruction Manual Creating and Updating Projects
70
Proposed Structures and Standards Refer to the Design Manual, sections 345.00 and 1000. Traffic Signals Select Yes or No by using the Yes/No drop-down to indicate if the project route contains any traffic signals. Railroad Crossing Protection Make note of any railroad crossing protection that currently exists on the project route or any additional railroad crossing protection that will need to be implemented. Proposed Design Exceptions Document any proposed design exceptions. You will have the ability to upload any necessary files in the Project Site Lists. Please refer to the “Design Exceptions” section for details on how to upload files to the Project Site Lists. If you are unsure what qualifies as a design exception, please refer to the Design Manual, section 330.00 and Appendix A.10.16.
Charter Instruction Manual Creating and Updating Projects
71
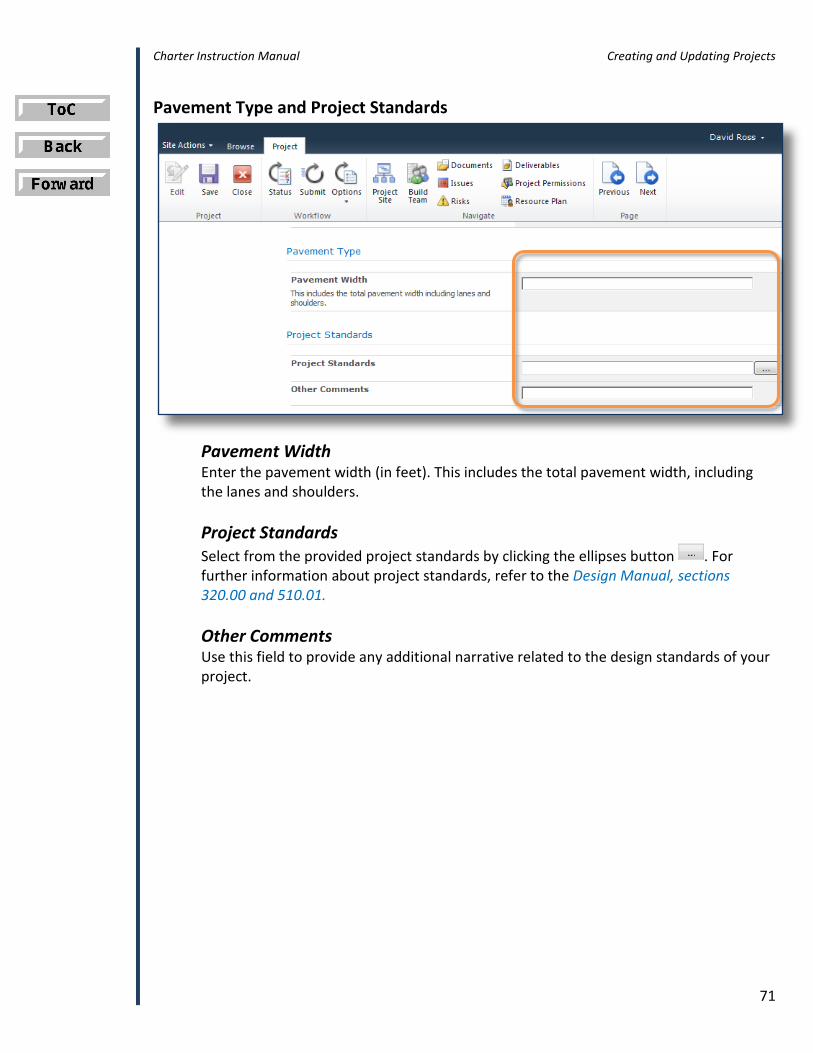
Pavement Type and Project Standards
Pavement Width Enter the pavement width (in feet). This includes the total pavement width, including the lanes and shoulders. Project Standards Select from the provided project standards by clicking the ellipses button . For further information about project standards, refer to the Design Manual, sections 320.00 and 510.01. Other Comments Use this field to provide any additional narrative related to the design standards of your project.

Charter Instruction Manual Creating and Updating Projects
72
DOCUMENTING RESOURCE PLAN AND CONSTRAINTS Project Constraints
Scope Constraint Select the priority for your scope, from High, Medium, or Low, by clicking the ellipses button . Schedule Constraint Select the priority for your schedule, from High, Medium, or Low, by clicking the ellipses button . Budget Constraint Select the priority for your budget, from High, Medium, or Low, by clicking the ellipses button . Project Constraints Narrative Add any additional narrative to accompany your project constraints.

Charter Instruction Manual Creating and Updating Projects
73
Resource Plan
Project Design Services Indicate whether the design services for the project will be accomplished in-house, by consultants, or using a combination of both by clicking the ellipses button . Narrative Add any additional narrative to accompany the resource plan of your project.

Charter Instruction Manual Creating and Updating Projects
74
ITD PROJECT SCHEDULE
This page allows you to view your schedule as it was created or updated in Microsoft Project Professional 2010 (MSP). However, if you need to update your project’s schedule, you should do so using MSP.
CAUTION: Only Project Managers should make changes to the schedule.

Charter Instruction Manual Creating and Updating Projects
75
DOCUMENTING EXIT CRITERIA Evaluation Exit Criteria From the Project tab, click Evaluation Exit Criteria, and then fill out the Evaluation Exit Criteria fields to the right.
Temporary Key Number Enter the temporary key number that OTI issued for the project. Temporary Key Number Date Enter the date OTI issued the temporary key number using the calendar button . Owner Approved Date This field should fill out automatically, but if it does not, enter the date the Owner approved the Evaluation Phase charter using the calendar button . Sponsor Approved Date This field should fill out automatically, but if it does not, enter the date the Sponsor approved the Evaluation Phase charter using the calendar button .
KEY
This field should fill out automatically after the project is issued a key number.
Charter Instruction Manual Creating and Updating Projects
76
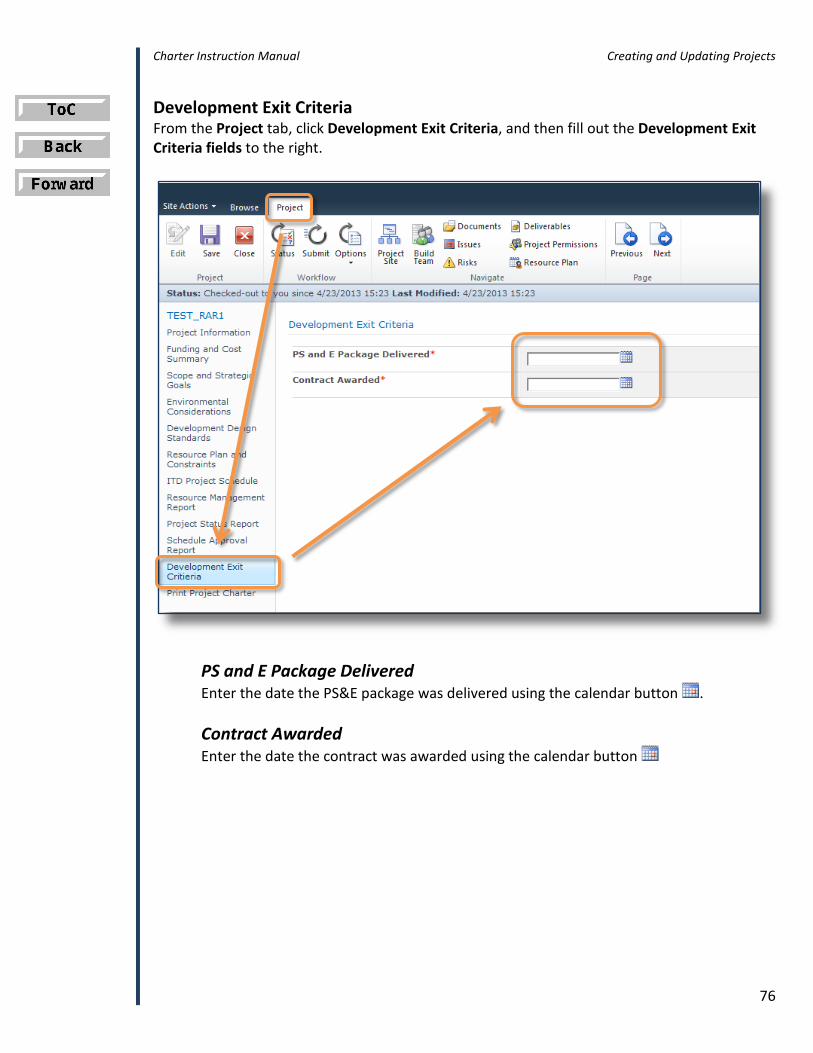
Development Exit Criteria From the Project tab, click Development Exit Criteria, and then fill out the Development Exit Criteria fields to the right.
PS and E Package Delivered Enter the date the PS&E package was delivered using the calendar button .
Contract Awarded Enter the date the contract was awarded using the calendar button

Charter Instruction Manual Creating and Updating Projects
77
Implementation Exit Criteria From the Project tab, click Implementation Exit Criteria, and then fill out the Implementation Exit Criteria field to the right.
Final Voucher Issued Use the ellipses button to indicate whether the final voucher has been issued.

Charter Instruction Manual Creating and Updating Projects
78
PROJECT SITE LISTS
All of these functions are performed from the project’s Project Site, which can be accessed by opening the project in PWA and then clicking Project Site. With the Project Site Lists, you will be able to archive all documentation and information associated with the project that isn’t included in the charter. STAKEHOLDERS Please refer to Creating a Stakeholder List under Main Functions. DELIVERABLES Use the Deliverables list to communicate key deliverables and dates. These can be linked with Microsoft Project Professional 2010 (MSP). Creating Deliverables in PWA
1. Create a new deliverable item. Click Deliverables, and then click the green plus sign. Then, click New Item to add a new deliverable.

Charter Instruction Manual Creating and Updating Projects
79
2. Enter deliverable information. The deliverable must have a Title and may also have a Description. Be sure to enter deliverable start and finish dates using the calendar buttons provided, if necessary. Then, use the Attach File button to attach the deliverable file (report, analysis, study, etc.). Once the file is attached and the information has been updated into the fields provided, click Save.
Creating Deliverables in MSP
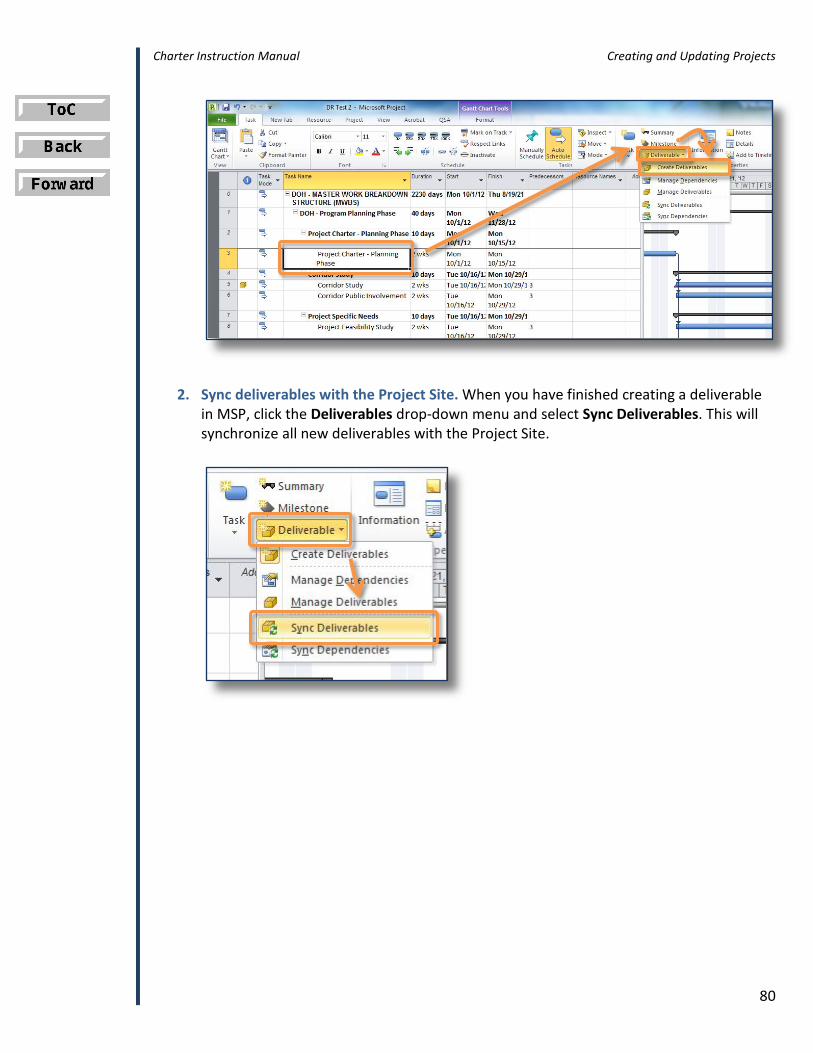
1. Create a deliverable in a specific task. Select the task you wish to add a deliverable to. Then, click the Deliverables drop-down menu and select Create Deliverables. This will create a deliverable linked with that specific task. (Graphic on following page.)
Charter Instruction Manual Creating and Updating Projects
80
2. Sync deliverables with the Project Site. When you have finished creating a deliverable in MSP, click the Deliverables drop-down menu and select Sync Deliverables. This will synchronize all new deliverables with the Project Site.

Charter Instruction Manual Creating and Updating Projects
81
ALTERNATIVES ANALYSIS Use this section to document your alternatives analysis. For further clarification on what an alternatives analysis should include, please see the Design Manual, section 335.00.
1. Create a new alternatives analysis item. Click Alternatives Analysis, and then click Add new Item.
2. Enter alternatives analysis information. Enter a Title for the alternatives analysis. Then, enter the location and a description in the fields provided. Attach any additional or supplementary files using the Attach File button. Once the information has been updated into the fields provided, click Save.

Charter Instruction Manual Creating and Updating Projects
82
DESIGN EXCEPTIONS Use this section to document any design exceptions associated with your project. For further information about design exceptions, please refer to the Design Manual, section 330.00 and Appendix A.10.16.
1. Create a new design exceptions item. Click Design Exceptions, and then click Add new Item.
2. Enter design exceptions information. Enter a Title for the design exceptions. Then, include all relevant information for the design exceptions using the fields provided. Attach any additional or supplementary files using the Attach File button. Once the file is attached and the information has been updated into the fields provided, click Save. (Graphic on following page.)

Charter Instruction Manual Creating and Updating Projects
83

Charter Instruction Manual Creating and Updating Projects
84
CHANGE REQUEST Changes to the scope, schedule and budget can be managed through the Charter Change Request process. These changes will also need to be separately documented in the project charter.
1. Create a new change request item. Click Change Request, and then click Add new Item.
2. Enter change request information. Enter a Title for the change request. Then, use the following fields provided to enter the change request information. Leave the “Request Status” field as “Submitted.” Attach any additional background or supplementary files using the Attach File button. When all information is updated, click Save. (Graphic on following page.)

Charter Instruction Manual Creating and Updating Projects
85
NOTE: After you have submitted a change request, an email will be sent to the Project Owner and Sponsor with a link to the change request on the Project Site. The Project Sponsor will then need to change the “Request Status” field to either “Approved” or “Denied.”

Charter Instruction Manual Creating and Updating Projects
86
ISSUES An issue is a point or matter in question or in dispute. There is usually a current discussion with opposing viewpoints based around an issue. Use the Issues list to manage a set of issues related to this project. You can assign, prioritize, and follow the progress of issues from start to finish. The Issues list is a great tool because it helps you keep track of issues that come up during your project and lets you keep a record of your resolutions to those issues.
1. Create a new issues item. Click Issues, and then click Add new Item.
2. Enter issue information. Enter a Title for the issue. Then, use the fields provided to fill out the information about the issue and the resolution. Attach any additional or supplementary files using the Attach File button. When all information is updated, click Save. (Graphic on following page.)

Charter Instruction Manual Creating and Updating Projects
87
NOTE: You can also link an issue to a specific task(s) using the Custom Commands button. (Graphics on following pages.)

Charter Instruction Manual Creating and Updating Projects
88
Linking an issue to a task
1. Follow steps 1 and 2 for create an issues list item. Do not click Save.
2. Link the items. Click Custom Commands and then click Link Items.
3. Select a task(s) to link to. Use the page navigation buttons and then use the
check box(es) to link to a specific task(s). Then, click OK.

Charter Instruction Manual Creating and Updating Projects
89
4. Verify and save. Verify that all of the information in the fields is correct, then
click Save to save the issues list item.

Charter Instruction Manual Creating and Updating Projects
90
RISKS A risk is an event that could have a negative impact on a project. Use the Risks list to manage a set of risks related to this project. You can assign, prioritize, and follow the progress of risks from start to finish.
1. Create a new risks item. Click Risks, and then click Add new Item.
2. Enter risk information. Enter a Title for the risk. Then, you can use the fields provided to fill out the information about the risk and the mitigation plan. Attach any additional or supplementary files using the Attach File button. When all information is updated, click Save. (Graphic on following page.)

Charter Instruction Manual Creating and Updating Projects
91
NOTE: You can also link a risk to a specific task(s) using the Custom Commands button. (Graphics on following pages.)
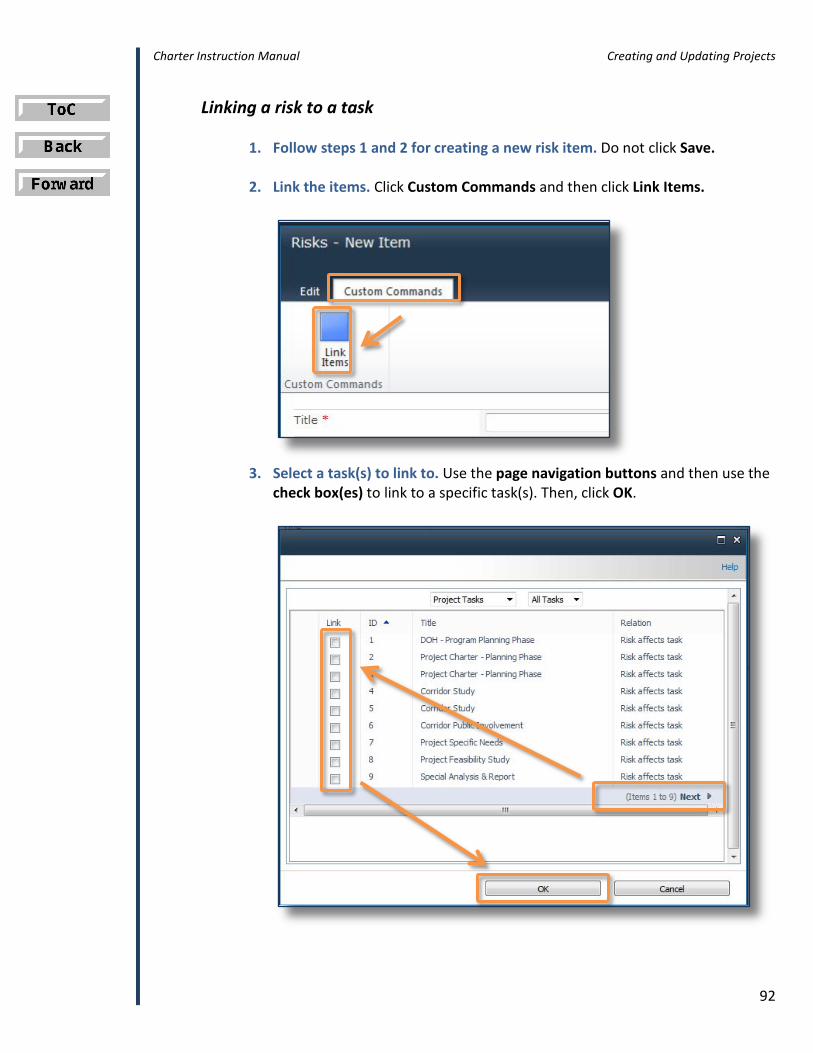
Charter Instruction Manual Creating and Updating Projects
92
Linking a risk to a task
1. Follow steps 1 and 2 for creating a new risk item. Do not click Save.
2. Link the items. Click Custom Commands and then click Link Items.
3. Select a task(s) to link to. Use the page navigation buttons and then use the
check box(es) to link to a specific task(s). Then, click OK.

Charter Instruction Manual Creating and Updating Projects
93
4. Verify and save. Verify that all of the information in the fields is correct, then click Save to save the risk item.

Charter Instruction Manual Creating and Updating Projects
94
CALENDAR Use the Calendar list to keep informed of upcoming meetings, deadlines, and other important events. This calendar is available for all team members and stakeholders on the project.
1. Open the calendar to the month and year desired. Click Calendar, and then navigate to the month and year you wish to schedule a calendar event using the calendar tool in the upper-left corner.
2. Add a calendar event to a specific day. Hover your mouse over the specific day you want to add a calendar event to, and then click Add. (Graphic on following page.)

Charter Instruction Manual Creating and Updating Projects
95
3. Enter calendar event information. Enter a Title for the calendar event. Then, add all the information for the event in the fields provided, including the Start Time and End Time. Attach any additional or supplementary files using the Attach File button. Once all information is updated, click Save.

Charter Instruction Manual Creating and Updating Projects
96
LESSONS LEARNED Use the Lessons Learned page to document what went well and what could have gone better. You should be entering a lessons learned item at the end of each phase, but you may enter them at any time throughout the life of the project.
1. Create a new lessons learned item. Click Lessons Learned, and then click Add new Item.
3. Enter lessons learned information. Enter a Title for the lessons learned item. Then, you can use the fields provided to fill out the information about the lessons learned. Attach any additional or supplementary files using the Attach File button. When all information is updated, click Save. (Graphic on following page.)

Charter Instruction Manual Creating and Updating Projects
97

Charter Instruction Manual Appendices
i
APPENDICES Appendix A: Project Charter Samples Appendix B: Glossary of Acronyms

Charter Instruction Manual Appendices
ii
APPENDIX A: PROJECT CHARTER SAMPLES
This section shows examples of current project charters and test charters for various project types. These are examples of what the project detail pages (PDPs) will look like with information filled in. Since different Project Managers have varying writing styles and varying approaches to project management, the detail of the content will vary between samples. These are only examples. The content and data will be different for every project, and the narrative is going to depend entirely on your writing style, how much detail you want to include, and how much detail your Project Sponsor likes to see for any given project.

Charter Instruction Manual Appendices
iii
PAVEMENT RESTORATION PROJECT This is an example of a pavement restoration project submitted by District 4 for FY18. These are only the project detail pages (PDPs), which contain the fields that the Project Manager filled out using Project Web App (PWA). This project is currently in the Evaluation Phase. Project Information
Scope and Strategic Goals

Charter Instruction Manual Appendices
iv
Environmental Considerations

Charter Instruction Manual Appendices
v
Evaluation Design Standards

Charter Instruction Manual Appendices
vi
Resource Plan and Constraints
Evaluation Exit Criteria

Charter Instruction Manual Appendices
vii
BRIDGE RESTORATION PROJECT This is an example of a bridge restoration project submitted by District 6 for FY17. These are only the project detail pages (PDPs), which contain the fields that the Project Manager filled out using Project Web App (PWA). This project is currently in the Evaluation Phase. Project Information
Scope and Strategic Goals

Charter Instruction Manual Appendices
viii
Environmental Considerations

Charter Instruction Manual Appendices
ix
Environmental Design Standards

Charter Instruction Manual Appendices
x
Resource Plan and Constraints

Charter Instruction Manual Appendices
xi
Evaluation Exit Criteria

Charter Instruction Manual Appendices
xii
APPENDIX B: GLOSSARY OF ACRONYMS
2PM Planning/Program Management BIC Business Intelligence Center CIP Capital Investment Program
COMPASS Community Planning Association of Southwest Idaho DOH Division of Highways DPC Development Phase Charter
EIS Environmental Impact Study EPT Enterprise Project Type
FHWA Federal Highway Administration ITD Idaho Transportation Department ITIP Idaho Transportation Improvement Program
LHTAC Local Highway Technical Assistance Council MPO Metropolitan Planning Organization MSP Microsoft Project Professional 2010 PDP Project Detail Page PM Project Manager
PMBOK Project Management Body of Knowledge PMI Project Management Institute
PS&E Plans, Specifications & Estimates PSS Project Scheduling System
PWA Project Web App QPM QuantumPM, Inc. QSA QuantumPM Schedule Auditor STIP Statewide Transportation Improvement Program
TMM True Minimum Milestone WBS Work Breakdown Structure