certification guide - cci learning – enable...
TRANSCRIPT

3252-1 v1.00 © CCI Learning Solutions Inc. 95
Microsoft® Office Specialist 2013 Series
Microsoft®
Outlook 2013 Certification Guide
Lesson 4: Using the Calendar
Lesson ObjectivesIn this lesson, you will explore the features of the Calendar module and learn how to customize its views. Upon completion of this lesson, you should be able to:
change the calendar view
create and edit appointments
set reminders
create recurring appointments
schedule single and multi-day events
schedule meetings
customize the calendar options
invite attendees and track responses
determine available meeting times
make changes to or cancel meetings
create a calendar group
show or hide calendars
print calendars
Scheduling Items You can schedule appointments, meetings and events in the Calendar.
An appointment is an activity that usually only involves you – such as a lunch date, a dental appointment, or a personal engagement. An appointment blocks the time in your calendar.
A meeting is an appointment to which others are invited and may involve reserving resources such as rooms or audio-visual equipment.
An event is an activity that may last an entire day or longer, such as attending an out of town conference. Annual events are occasions that occur once a year, such as birthdays, anniversaries, or social events. Events do not block out time in your calendar.
For E
valua
tion O
nly

Lesson 4 Using the Calendar
96 3252-1 v1.00 © CCI Learning Solutions Inc.
When you schedule appointments, meetings or events, the time in your calendar can be marked as free, tentative, busy or out of office. This is a very useful feature, especially for others who want to check your availability. A colored bar indicating your availability will be displayed in your calendar.
Appointments, meetings and events can be color categorized for quick identification in the same manner as email messages.
Changing Views Objective 1.1, 3.1
When you start the Calendar, the default calendar view appears similar to:
Regardless of which view is active, there is a thicker dark line on the current date, and it also appears highlighted within the Date Navigator. You can always click Today, on the Home tab, to return to the current date.
You can use the options in the Go To or Arrange group of the Home tab to change to a different view:
Date Navigator
For E
valua
tion O
nly

Using the Calendar Lesson 4
3252-1 v1.00 © CCI Learning Solutions Inc. 97
Day Displays the hours in 30-minute increments with your working hours in a white background while non-working hours appear in a shaded background. The time increments can be changed by right-clicking the Time Bar and then choosing the preferred time increment.
Work Week Displays only those days you work; this can be set in the Calendar options.
For E
valua
tion O
nly

Lesson 4 Using the Calendar
98 3252-1 v1.00 © CCI Learning Solutions Inc.
Week Displays the seven days of the week starting from Sunday through to Saturday.
Month Displays a month at a time; you can also choose the level of detail to appear with the appointments, meetings, or events (the following is an example of low level detail). You can switch quickly to a weekly view by double-clicking the tab at the far left of a week.
For E
valua
tion O
nly

Using the Calendar Lesson 4
3252-1 v1.00 © CCI Learning Solutions Inc. 99
Schedule View
Displays the time horizontally so you can see your schedule at a glance, thereby enabling you to schedule new appointments, or manage existing ones. If you share calendars with a colleague, you will also be able to see their schedule.
Using the Date Navigator The Date Navigator appears at the top left of the Navigation Pane. By default, one month appears, but you can adjust this to show two or more by changing the width of the Navigation Pane.
The arrows on either side of the current month allow you to move quickly to the previous or next month.
To change to a month within six months of the current month, click the current month to display a pop-up similar to the image at the right, and then click the month you want to view.
To move to a date in the current month, click that date.
If in the Month view of the Date Navigator, click a date in the current month to switch to the Day view to show appointments for that day.
Any date in the Date Navigator that appears in bold indicates there is an appointment for that date. You can then click the date to view the appointments.
Drag the horizontal split bar below the Date Navigator to show more than or only one month at a time.
For E
valua
tion O
nly

Lesson 4 Using the Calendar
100 3252-1 v1.00 © CCI Learning Solutions Inc.
To show more than one day at a time, drag to select the days.
You can also press as you click non-consecutive, individual days to show the calendar for those
days only.
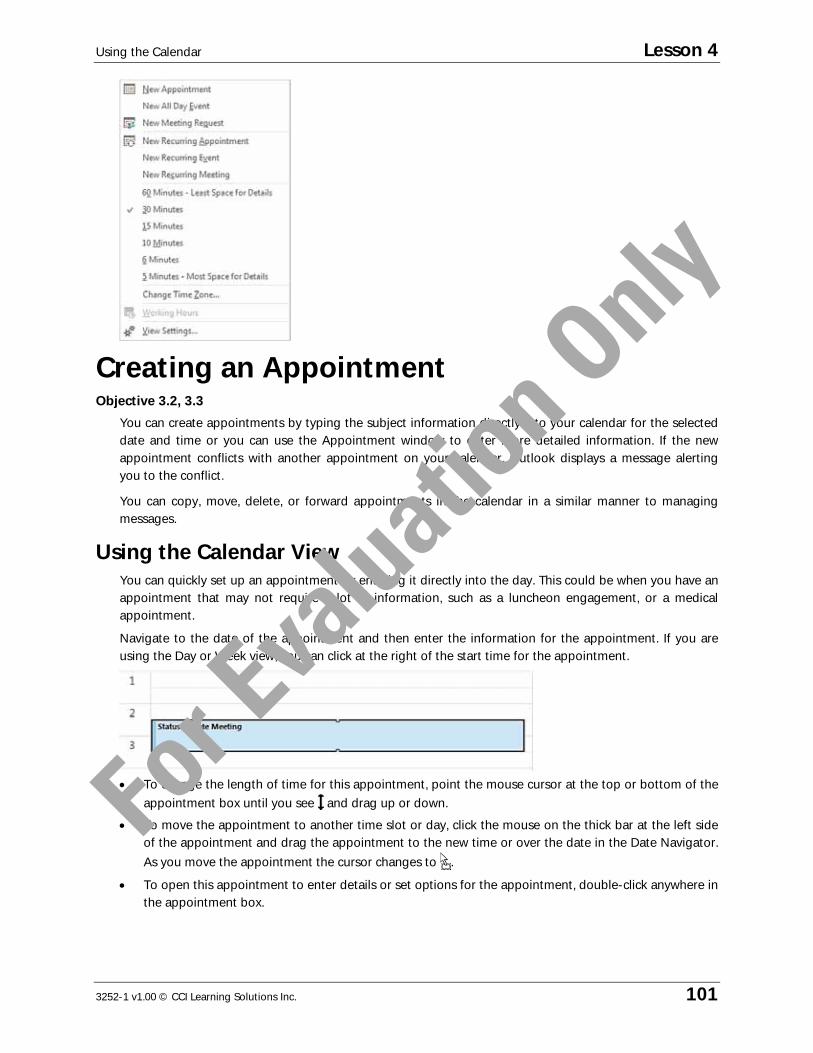
To change the time interval used in the calendar, right-click the Time Bar and then click the interval amount you want to use. Fo
r Eva
luatio
n Only
Using the Calendar Lesson 4
3252-1 v1.00 © CCI Learning Solutions Inc. 101
Creating an Appointment Objective 3.2, 3.3
You can create appointments by typing the subject information directly into your calendar for the selected date and time or you can use the Appointment window to enter more detailed information. If the new appointment conflicts with another appointment on your calendar, Outlook displays a message alerting you to the conflict.
You can copy, move, delete, or forward appointments in the calendar in a similar manner to managing messages.
Using the Calendar View You can quickly set up an appointment by entering it directly into the day. This could be when you have an appointment that may not require a lot of information, such as a luncheon engagement, or a medical appointment.
Navigate to the date of the appointment and then enter the information for the appointment. If you are using the Day or Week view, you can click at the right of the start time for the appointment.
To change the length of time for this appointment, point the mouse cursor at the top or bottom of the
appointment box until you see and drag up or down.
To move the appointment to another time slot or day, click the mouse on the thick bar at the left side of the appointment and drag the appointment to the new time or over the date in the Date Navigator. As you move the appointment the cursor changes to .
To open this appointment to enter details or set options for the appointment, double-click anywhere in the appointment box.
For E
valua
tion O
nly
Lesson 4 Using the Calendar
102 3252-1 v1.00 © CCI Learning Solutions Inc.
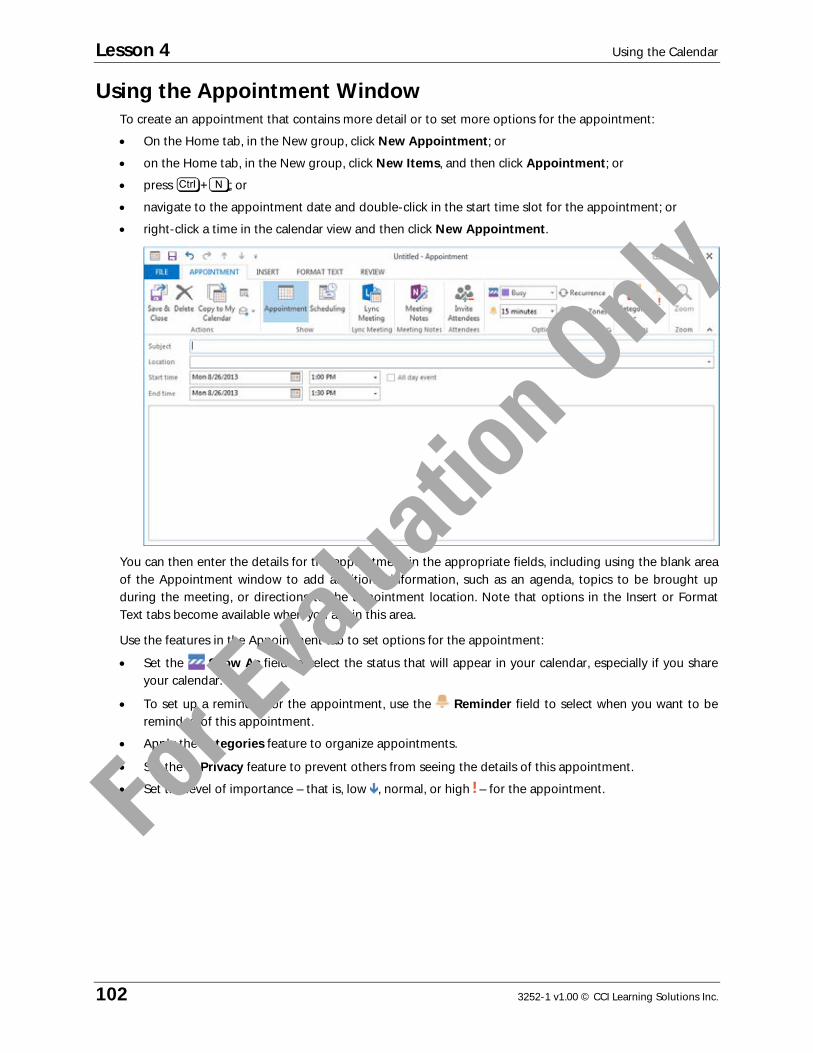
Using the Appointment Window To create an appointment that contains more detail or to set more options for the appointment:
On the Home tab, in the New group, click New Appointment; or
on the Home tab, in the New group, click New Items, and then click Appointment; or
press + ; or
navigate to the appointment date and double-click in the start time slot for the appointment; or
right-click a time in the calendar view and then click New Appointment.
You can then enter the details for the appointment in the appropriate fields, including using the blank area of the Appointment window to add additional information, such as an agenda, topics to be brought up during the meeting, or directions to the appointment location. Note that options in the Insert or Format Text tabs become available when you are in this area.
Use the features in the Appointment tab to set options for the appointment:
Set the Show As field to select the status that will appear in your calendar, especially if you share your calendar.
To set up a reminder for the appointment, use the Reminder field to select when you want to be reminded of this appointment.
Apply the Categories feature to organize appointments.
Set the Privacy feature to prevent others from seeing the details of this appointment.
Set the level of importance – that is, low , normal, or high – for the appointment.
For E
valua
tion O
nly

Using the Calendar Lesson 4
3252-1 v1.00 © CCI Learning Solutions Inc. 103
Creating an Appointment from an Email Objective 3.2
If you receive a message requesting a meeting or, that contains information you would like to add to the calendar for other purposes, Outlook makes it easy to create an appointment while in Mail:
If the message is open, on the Message tab, in the Move group, click Move, and click Calendar; or
on the Message tab, in the Move group, click Move to Other Folder, and click Calendar, or
if the message is in the Inbox, drag it to Calendar on the Peeks Bar.
Both methods open an appointment with the subject of the message copied to the appointment’s Subject box. The contents of the message also appear in the text box area for reference and you need only to set the details to schedule the appointment.
If you want to respond to a message and schedule an appointment with the sender, select the message. Then on the Home tab, in the Respond group, click Meeting.
For E
valua
tion O
nly

Lesson 4 Using the Calendar
104 3252-1 v1.00 © CCI Learning Solutions Inc.
A new meeting invitation is created with the sender’s name in the address field and a copy of the message for all recipients. This message invitation will contain the buttons to accept, decline or propose a different time for the meeting. Meeting requests/invitations are discussed later in this lesson.
Creating a Recurring Appointment Objective 3.2
A recurring appointment is one that occurs regularly. The recurrence can be set with no end date, to end after a certain number of occurrences, or on a specific end date. To make an appointment recurring, select the appointment and then, on the Appointment tab, in the Options group, click Recurrence.
Alternatively, if you are creating a new appointment that you want to be recurring, right-click a time in the calendar view and then click New Recurring Appointment.
Appointment time
Sets the start and end time for the appointment. The duration time adjusts automatically when you set the time, or you can select the duration to have the end time determined.
Recurrence pattern
Sets the pattern for the appointment, which is the frequency of the meeting.
Range of recurrence
Has Outlook set up the recurrence dates for you. For instance, use No end date if this is a standard meeting for status updates, use End after x occurrences with a project that has an end date, or use End by when you want Outlook to schedule the meeting automatically from one date to the end date set here.
Once details are set, Outlook automatically inserts or schedules the recurring appointment in your calendar. If you open a recurring appointment, Outlook gives you the choice of opening one occurrence or the complete recurring appointment. Any changes you make will then be saved to the one occurrence or all occurrences of the appointment. For instance, if you want to add an extra note to the next meeting for discussion, you will open just the occurrence of that meeting, whereas if the agenda or time needs to change for the meeting you can choose all occurrences to change every upcoming date of that meeting.
For E
valua
tion O
nly

Using the Calendar Lesson 4
3252-1 v1.00 © CCI Learning Solutions Inc. 105
Scheduling Events Scheduling events is similar to creating appointments, except for the duration. Events generally occur on an entire day or longer, such as a birthday, anniversary or a conference. When you schedule an event, you can still schedule appointments or meetings during the time of the event.
By default, Outlook marks events as free time with no color indication. If you show the time as Busy, Tentative or Out of Office, the duration of the event will be shaded in the appropriate color on your calendar.
You can create recurring events in the same way as you would create a recurring appointment.
To create an event:
On the Home tab, in the New group, click New Items and then click All Day Event, or
right-click in the calendar and then click New All Day Event, or
while in Day or Week view, double-click the highlighted area below the day of the week, or
while in Month view, double-click in the date.
Learn the Skill In this exercise, you will learn to create appointments using various methods.
1 In the Peeks Bar, click Calendar.
2 On the Home tab, in the Arrange group, click Week to change the view.
3 On the Home tab, in the Arrange group, click Work Week to change the view.
Notice the slight difference between the full week and the work week. Using the latter view allows work days to display larger so you can focus on appointments for these five days only.
4 On the Home tab, in the Arrange group, click Day to change the view.
5 In the Data Navigator, click the day one week from today’s date.
For E
valua
tion O
nly

Lesson 4 Using the Calendar
106 3252-1 v1.00 © CCI Learning Solutions Inc.
You should notice how the date navigator still shows today in a darker box than the new date you selected. If you see a tab on either side of the calendar view, this indicates there are appointments previously set up in the calendar. You can use these tabs to move to the previous or next appointment in the calendar.
6 Click in the 2:00pm slot, type: Seattle Office Updates and press .
Notice the meeting is set for the default 30 minutes.
7 Point at the bottom border of the appointment and drag down to change the end time of this meeting to be 3:00pm.
Now try moving it to another day in the month.
8 Point at the colored bar at the left of the appointment and drag to the following Tuesday from this date in the Date Navigator.
The appointment now displays with the new day and in the same time slot as previously.
Now create a new appointment using the Appointment window.
9 On the Home tab, in the New group, click New Appointment.
10 Using tomorrow’s date, type in the information as shown in the following:
11 On the Appointment tab, in the Tags group, click Categorize and click Network. Also in this group, set
the priority to High Importance.
12 Click Save & Close.
13 Return to the date you used for the first appointment regarding Seattle Office Updates and then
double-click the meeting to view it in a separate window.
14 Add Room 3 to the Location field. Then on the Appointment tab, in the Options group, click Recurrence.
15 Set the frequency to be every two weeks, starting from this date and with no end date. Click OK and then click Save & Close.
Note the Calendar Tools, Appointment Series tab appears with Recurrence selected.
16 On the Date Navigator move to the next month and drag to select the 15th to the 17th.
17 Then in the calendar view, click in the 15th date and drag to select the next two days. Type: Worldwide Travel Trade Show, San Francisco and press .
For E
valua
tion O
nly

Using the Calendar Lesson 4
3252-1 v1.00 © CCI Learning Solutions Inc. 107
You have now created an event for these days. You can edit the event by double-clicking the
appointment box.
Now try creating an appointment from a message.
18 Click Mail from the Peeks Bar and then click the Sent Items folder.
19 Select the latest message you sent to Nick Klassen regarding the budget for the new proposal and drag over the Calendar icon in the Element Bar.
20 Type: Lync online in the Location field, change the start time to approximately an hour from the
current time, and then click Save & Close.
21 Click Calendar to return to this element and then look at the calendar to see whether it contains a new appointment for the Budget message.
Hint: You can also point at the Calendar in the Peeks Bar for a quick glance of appointments scheduled for the current date.
Change the time increments to increase or decrease the number of slots for appointments.
22 Right-click the time bar and click 15 Minutes.
For E
valua
tion O
nly

Lesson 4 Using the Calendar
108 3252-1 v1.00 © CCI Learning Solutions Inc.
Even though the view is now larger, you can enter more details for appointments, such as a hair salon entering client names and the services to be provided or a medical office receptionist who enters details on why the appointment may need more than 15 minutes.
23 Right-click the time bar and click 60 Minutes – Least Space for Details.
If you don’t need to see the details and want to allocate an hour for each appointment, this view can
be useful to manage your appointments.
24 Right-click the time bar and click 30 Minutes to return to the default time frequency.
Sending Meeting Requests Objectives 3.2, 3.3
Meetings are similar to appointments, except that they involve other participants and affect their calendars. You can schedule a meeting to occur on-site or off-site via an invitation sent automatically to all meeting invitees.
Invitees can respond to the message by choosing Accept, Tentative or Decline. If the invitee chooses Accept or Tentative, the meeting is scheduled in his or her calendar. Responses from the invitees are tallied in your meeting request on the Tracking Page.
You may need to reserve certain resources for your meeting, such as a conference room or audio-visual equipment. These resources can be set up and made available by your organization’s network administrator or someone with administrative rights for managing Outlook on the network. This allows you to reserve the resources directly in Outlook when you schedule your meeting.
Scheduling a Meeting Use the Meeting option to plan meetings, invite attendees and reserve resources using one of the following methods:
On the Appointment tab, in the New group, click New Meeting; or
press + + ; or
right-click the calendar and click New Meeting Request; or
create a new appointment and then, on the Appointment tab, in the Attendees group, click Invite Attendees.
Note: If you share calendars with others, click New Meeting with All from the New Meeting command to schedule a meeting automatically with these people.
For E
valua
tion O
nly

Using the Calendar Lesson 4
3252-1 v1.00 © CCI Learning Solutions Inc. 109
You can use the Address Book to invite attendees instead of typing the names. With this option, you can specify which invitees are required to attend, have the option to attend or not, as well as what resources are required for the meeting, such as a projector, boardroom, executive assistant, or consultant.
Use the Scheduling button in the Show group of the Appointment tab to display a grid showing invitee availability.
For E
valua
tion O
nly

Lesson 4 Using the Calendar
110 3252-1 v1.00 © CCI Learning Solutions Inc.
To add people as invitees, use one of the following methods:
Click To, and in the Address Book, click the names and then click the appropriate attendee button; or
in the Scheduling window, click Add Others and then click Add from Address Book to select the names there; or
type the names directly into the blank fields in the All Attendees list.
If you are connected via an Exchange server, each name on the list will display bars to show their availability to attend this meeting; use the color legend near the bottom of the meeting invitation to determine their availability. For instance, a blue bar indicates the person is busy and would not be able to accept a meeting request for this time, whereas a bar with a pattern would indicate free time or a possible conflict where the invitee may choose to accept your meeting request instead of attending the other meeting as an optional attendee.
To switch to the appointment invitation, click Appointment in the Show group. Alternatively, you can click Send to send the invitations for this meeting to the listed attendees.
You can then use the features shown in the Meeting tab to specify details for this meeting, such as scheduling the location of the meeting to be an on-line meeting, or adding a category for the meeting.
Once an appointment appears in the calendar, you can point at it to view details, as shown:
For E
valua
tion O
nly

Using the Calendar Lesson 4
3252-1 v1.00 © CCI Learning Solutions Inc. 111
Using the Scheduling Assistant Objective 3.2
The Scheduling Assistant appears only if you are connected to an Exchange server. This feature is similar to using the Scheduling command except that suggestions for other times and resources instantly display for you as the Exchange server seeks and matches this meeting request with the invitees’ schedules.
A feature called Room Finder also becomes available where you can determine which location or resource to assign with the meeting. This command is also available in the Options group of the Meeting tab once you activate the Scheduling Assistant; use it to turn the feature on or off.
These rooms need to have been set up previously by the network or Global Administrator for your site. As with the scheduling calendar, you can identify when invitees may have another appointment that conflicts with your meeting request. Make adjustments to the appointment start or end time by dragging the appropriate line of the appointment.
Tracking Responses to Meeting Requests Objective 3.2, 3.3
When you open an invitation to a meeting, you will see the following buttons on the Meeting tab with which to respond to the meeting invitation:
For E
valua
tion O
nly

Lesson 4 Using the Calendar
112 3252-1 v1.00 © CCI Learning Solutions Inc.
As noted previously, if you choose Accept or Tentative for the meeting, Outlook schedules it in your calendar. If you choose Propose New Time with the proposed date and time, Outlook also schedules this in the calendar until the meeting is accepted by the meeting coordinator, or changed or confirmed by other attendees.
When you click the arrow for one of these buttons, you see the following options as shown in the first image below; these buttons also appear in the Reading Pane above the message (second image) with the same menu options available when clicked.
If you open the meeting request, you can also use the Respond feature in the Respond group to choose to send a response without first making a choice for the meeting. This is useful if you want more information on the meeting before deciding to attend or perhaps want to invite someone else.
As you receive replies to an invitation, Outlook tabulates the results and tracks responses. To view the tracking results, select the meeting and then use one of the following methods:
On the Meeting tab, in the Attendees group, click Tracking; or
open the meeting and on the Meeting tab, in the Show group, click Tracking; or
open the meeting and view the information bar above the meeting invitation information.
You also have the option to forward a meeting request to someone else if you want another person to attend the meeting. When that person responds to the meeting, the response is sent to the meeting organizer and not you. You will need to add a short message to the invitation if you would like that person to respond to you and not the meeting organizer.
Making Changes to Meetings Objective 3.2, 3.3
Occasionally, you may have to make changes to a meeting date, time, location or list of attendees after it is scheduled. The originator of the meeting may make these changes or an invited attendee may propose date and time changes. When a change is made to the details of a meeting, Outlook can send a notification of these changes to the proposed attendees.
You can easily update the attendee list by adding or deleting people or resources. If you have forgotten to invite someone to a meeting, you can update the attendee list. If someone is unable to attend the meeting, you may want to invite an alternate to the meeting. You can send an update notification to all attendees or just to those you have added or deleted.
As the originator of a meeting request, you may sometimes need to reschedule it. You can change the date and/or time of a meeting by editing it on the Meeting tab, or by using the drag and drop method directly on the calendar.
For E
valua
tion O
nly

Using the Calendar Lesson 4
3252-1 v1.00 © CCI Learning Solutions Inc. 113
When you reschedule a meeting, you should notify all the invitees so everyone is aware of the change. Outlook will handle this for you automatically unless you select otherwise.
Cancelling or Deleting a Meeting Objective 3.2
If you schedule a meeting where responses have been received, but the meeting is no longer needed, you can send a cancellation notice and have Outlook remove it from the calendar. You can simply delete an appointment in your calendar to which no one else has been invited.
To cancel a meeting with requested attendees, use one of the following methods:
On the Meeting tab, in the Actions group, click Cancel Meeting; or
right-click the meeting and then click Cancel Meeting.
Hint: If you are the meeting organizer and choose to delete the meeting from your calendar, the cancellation notice also appears.
A message opens with the attendees listed in the To field and you can now send an appropriate message.
If you do not send a cancellation notice, the meeting is deleted from your calendar only and you will need to contact the invitees to advise them of the cancellation.
You can delete a recurring appointment in addition to single occurrences; once you activate the Delete feature, you can then select how to notify the attendees:
Notice that you can choose to delete this one occurrence or the entire series.
Appointments entered for your own calendar do not impact anyone else’s calendar and therefore can be deleted directly to the Deleted Items folder.
Fo
r Eva
luatio
n Only

Lesson 4 Using the Calendar
114 3252-1 v1.00 © CCI Learning Solutions Inc.
Using Meeting Notes Objective 3.3
During your meeting, you can start the Meeting Notes command to take notes. When this command is active, it opens OneNote with a blank notebook for you to begin entering information from the meeting.
These notes can be shared with others in a shared notebook on your network or, if preferred, you can enter notes for your own use in OneNote.
Learn the Skill In this exercise, you will make changes to an existing meeting. In these exercises we will use people from Tolano as part of the demonstration. Please select someone from within your class, as directed by your instructor, to send and receive meeting requests.
1 On the Home tab, in the New group, click New Meeting. On the Meeting tab, in the Attendees group, click Invite Attendees.
2 Click To and in the Address Book, select Ji Mai Kim and Lawrence Jang. Both attendees are required to attend. Then click OK.
3 Type: Seattle Projects as the Subject and type: Boardroom for the Location.
4 Set the Start date to next Tuesday, starting at 8:30am and ending at 9:30am.
5 In the meeting notes box, type the following:
6 Send the meeting request.
Edit the meeting as you now realize it should be a recurring meeting every Tuesday.
7 Click next Tuesday’s date on the Date Navigator and when you see the meeting, double-click to open it.
8 On the Meeting tab, in the Options group, click Recurrence.
9 Set up the meeting so it occurs every Tuesday at the same time and with no end date. Click OK when done.
10 Click Send Update.
11 Open the meeting for the Update to Office 365 (should be set for tomorrow’s date based on an earlier exercise in this lesson).
For E
valua
tion O
nly

Using the Calendar Lesson 4
3252-1 v1.00 © CCI Learning Solutions Inc. 115
12 On the Appointment tab, in the Show group, click Scheduling.
13 Click Add Others, click Add from Address Book, and then add Nick Klassen and David Singh as Required attendees (in the classroom select the person to the left and right of you) and click OK.
14 On the Meeting tab, in the Show group, click Appointment and then click Send.
You have just changed an appointment set up for yourself to now include two other people required to attend.
15 Create a new meeting inviting everyone in your class to meet in about 30 minutes from now to discuss when you might take the Outlook 2013 certification exam. Set a reminder for 15 minutes before the time and apply the Admin category. Click Send,
Outlook has detected that this is a meeting where others have been invited but no location was selected. This serves as a reminder in case you forgot to select a location for the meeting; in this case, we want to discuss which location we will use to take the certification exam so you will ignore this prompt.
16 Click Send Anyway.
17 Switch to the Mail element. When you receive the meeting invitations, accept at least one request and decline the other. If you have a third meeting invitation, propose a different time for the meeting.
Note: It doesn’t matter which meeting you accept or decline. The purpose here is to identify the different icons that appear when an action is activated for meeting requests.
18 Review the icons in the Inbox list to identify which meetings have been accepted and which have been declined. Depending on the number of meeting requests you have, you may not see any action yet for a meeting request.
Now try deleting a meeting in the calendar.
19 Click to select the Seattle Projects meeting and then on the Home tab, in the Actions group, click Cancel Meeting (or press ).
If you selected the Cancel Meeting command, you would see the drop-down list for Cancel meeting,
whereas if you pressed the message box appears.
20 Click Cancel Series or, Delete the series and click OK. Then in the Seattle Projects window invitation, click Send Cancellation.
As people accept the cancellation notice the meeting will be removed from the calendar.
For E
valua
tion O
nly

Lesson 4 Using the Calendar
116 3252-1 v1.00 © CCI Learning Solutions Inc.
21 Double-click the meeting regarding the Outlook 2013 certification.
You should see responses at the top of the meeting invitation, directly below the Ribbon.
22 Close the meeting.
Customizing the Calendar Options Objective 3.1
The Calendar Options can be modified to change the default reminder time for appointments, work days or work start and end times. For example, if you work Monday to Thursday, you may wish to set those days as your work week.
You can choose a background color for your Calendar to help identify your working hours and free time as the working hours are displayed in a lighter shade such as white. If you have the option to display multiple calendars; setting different colors for the calendars helps identify which calendar you are viewing.
You can change all the above settings in the Outlook Options dialog box for the Calendar. Click File, click Options, and in the panel at the left, click Calendar.
Work time Selects the days or times you want to show for the Week or Work Week views, as well as sets days other than the default ones shown here, such as your week starts with Monday instead of Sunday, or you work Tuesday to Saturday.
Calendar options
Sets default options for items in the calendar such as the reminder time, adds holidays for your country or another country or shows an alternate calendar.
Display options Chooses the default calendar color or chooses to display week numbers in the calendar, or options to display when in Schedule View.
Time zones Sets your time zone or adds a second time zone to the calendar. This can also be activated by right-clicking the time bar.
For E
valua
tion O
nly

Using the Calendar Lesson 4
3252-1 v1.00 © CCI Learning Solutions Inc. 117
Scheduling assistant
Sets how details appear when you schedule a meeting invitation using Schedule View.
Automatic accept or decline
Selects options to automatically accept or decline meeting requests, such as accept all meeting requests and remove canceled meetings, decline meeting requests where a conflict may occur with an existing meeting, or decline recurring meeting requests.
Weather Sets whether to display the weather on your calendar for your location, and if the temperature should appear in Celsius or Fahrenheit.
All these options can also be activated from the calendar view by right-clicking in the calendar view or on the Calendar folder in the Peeks Bar. For instance, to change the default color of the calendar, right-click anywhere in the calendar view and choose Color from the shortcut menu, or right-click the Calendar folder in the Peeks Bar to click Color.
You can change the default amount of time for reminders in the Outlook options and this setting will be reflected in each of the Outlook elements. Click File, click Options, click Calendar and then, in the Calendar options area, click the arrow to display the list for Default reminders.
Learn the Skill In this exercise, you will make changes to the Calendar display.
1 Click the File tab, click Options and then, in the panel at the left, click Calendar.
2 In the Work time area, change the start time to be 9:00am.
3 In the Display options area, click the Default calendar color button and then click a color.
4 Set up the time zones and temperature appropriately for your location.
5 Click OK to accept these changes.
Your calendar should now have these changes applied.
6 Return the options to the original settings.
Working with Other Calendars Objective 3.1, 3.2
One benefit of using Outlook to manage your appointments and meetings is that you can share this information with others, either individuals or work groups. In order to see current information, the calendar needs to be active – in other words, the person whose calendar you are sharing needs to be logged in to their account so you can see any changes he/she might make in his/her calendar.
To view a calendar with someone else, on the Home tab, in the Manage Calendars group, click Open Calendar and then select the option needed for the new calendar.
For E
valua
tion O
nly

Lesson 4 Using the Calendar
118 3252-1 v1.00 © CCI Learning Solutions Inc.
From Address Book
Selects the contact from one of the address books available to you.
From Room List
Selects the resource from the list of rooms that may have been set up for your facility. This is usually set by the network administrator when setting up the Global Address Book, to allow sharing of a room and its resources to be viewed by anyone in the organization. For instance, this list is very helpful when the main Boardroom is scheduled for three different meetings during the day. You can then check the calendar for this Boardroom to see when the room may be free to schedule a training session.
From Internet Enter the web site address where the calendar was published online. This is useful when you want everyone to see appointments on the calendar from a central location; however, no changes can be made to the published calendar unless you are the owner of that calendar. For instance, a coach may post a monthly calendar letting all team members and their parents see when the next game is and at which location.
Create New Blank Calendar
Creates another calendar for your use such as one for a specific project or event that is separate from your main or daily calendar.
Open Shared Calendar
Opens a calendar that someone has shared with you. Before you can share someone’s calendar, he/she needs to give you permission to view the calendar. Depending on the relationship, you may also be given permission to edit that calendar.
To share a calendar with someone, use one of the following methods:
On the Home tab, in the Manage Calendars group, click Open Calendar and then click Open Shared Calendar; or
right-click My Calendars in the Navigation Pane, click Add Calendar, and then click Open Shared Calendar.
Type the name of the person’s calendar you want to share, or click Name to choose it from the Search Name: Contacts window. Fo
r Eva
luatio
n Only

Using the Calendar Lesson 4
3252-1 v1.00 © CCI Learning Solutions Inc. 119
You can change the Address Book to find a contact name such as using the Global Address Book instead of your list of contacts:
Notice in this instance the network administrator has set up different resources as part of the Global Address Book so anyone who needs to book a room or equipment can select it for their meeting request.
Sharing Your Calendar by Email You can share your calendar with others even if you are not connected to an Exchange server. To share a calendar, you can choose to email a copy of your calendar or publish it to a specific server where others can sign in to view the calendar.
To email your calendar to someone else, use one of the following methods:
On the Home tab, in the Share group, click E-mail Calendar; or
right-click the Calendar folder in the Navigation Pane, click Share and then click E-mail Calendar.
For E
valua
tion O
nly

Lesson 4 Using the Calendar
120 3252-1 v1.00 © CCI Learning Solutions Inc.
Choose which options you want in the shared calendar prior to sending this by email. Once you click
OK, the following screen appears with the calendar as shown here:
If the time span for the calendar has no scheduled appointments, Outlook displays a message, giving
you the opportunity to reset the appropriate dates for the shared calendar.
For E
valua
tion O
nly

Using the Calendar Lesson 4
3252-1 v1.00 © CCI Learning Solutions Inc. 121
Publishing Your Calendar You can choose to share your calendar by publishing it to a web site that others may access by signing in and viewing your calendar.
To publish your calendar use one of the following methods:
On the Home tab, in the Share group, click Publish Online, and then click Publish to WebDAV Server; or
right-click the Calendar folder in the Navigation Pane, click Share and then click Publish to WebDAV Server.
You can now enter the web site where the calendar will be published and determine how much of the
calendar is to be shared.
Understanding Calendar Groups You can display or hide other calendars in the Navigation Pane, as well as create a calendar group for those calendars you view frequently. If you have set up Outlook to view multiple calendars such as for colleagues involved in a special project or for personal contacts, a calendar group enables you to organize these calendars. A calendar group can include Internet calendars, SharePoint calendars, or resources set up for everyone on this network.
You can create a calendar group using one of the following methods:
Select the names from an address book or list of contacts; or
save the calendars currently in view with a new group name.
To create a new calendar group:
Click the Home tab, in the Manage Calendars group, click Calendar Groups, and then click Create New Calendar Group; or
right-click My Calendars in the Navigation Pane and click New Calendar Group.
For E
valua
tion O
nly

Lesson 4 Using the Calendar
122 3252-1 v1.00 © CCI Learning Solutions Inc.
Adding a Calendar to your Calendar You can then select the names from the Address Book in the same manner as if you were addressing an email. Once the individuals are chosen as Group members, Outlook displays a calendar for each individual on the screen.
To add a calendar, use one of the following methods:
On the Home tab, in the Manage Calendars group, click Open Calendar and click where you will be adding the calendar from; or
right-click the My Calendars folder (or a custom calendar group), click Add Calendar and then click where you will be adding the calendar from.
– Use the to view the calendars side by side or in an overlay layout; you will need to do this for
each calendar you want to overlap. As each calendar is in a different color, you can quickly see the appointments for each person in that corresponding color.
– Use the to show a portion of the calendars individually.
For E
valua
tion O
nly

Using the Calendar Lesson 4
3252-1 v1.00 © CCI Learning Solutions Inc. 123
– To show or hide individual calendars in the calendar group, click the checkbox for the individual in
the Navigation Pane. Alternatively, click the for that calendar
– To hide the entire calendar group, click the checkbox to the left of the calendar group name.
To change the color of an individual calendar, right-click that calendar, click Color and then choose a color. Notice how using colors can be helpful in identifying the calendar you want to view.
To add a calendar on an Exchange server, use the same process as noted previously. The difference is that you can click Share Calendar from the Share group of the Home tab. The Share Calendar and Calendar Permissions command will be greyed out if you are not connected to an Exchange server.
For E
valua
tion O
nly

Lesson 4 Using the Calendar
124 3252-1 v1.00 © CCI Learning Solutions Inc.
You can then choose how much of your calendar you want to share with the recipient using the Details field:
Note: The Calendar permissions feature is covered in Lesson 6 where you will explore how to delegate access to other people to edit your calendar.
Creating a Blank Calendar You can create a blank calendar for various purposes such as to print a blank month to enter all your social activities, or for people to enter their name to book a location or resource. To create a new blank calendar, use one of the following methods:
On the Home tab, in the Manage Calendars group, click Open Calendar and then Create New Blank Calendar; or
right-click the default calendar in the Navigation Pane and click New Calendar.
Enter the name for the new calendar and then click which items you want included in this calendar.
Learn the Skill In this exercise, you will open and share calendars with other people in your class. If you are not on a network or do not have access to an Exchange server, review the steps in the exercise so you are aware of how you might add or share a calendar.
1 Right-click the My Calendars folder in the Navigation Pane. Click Add Calendar and then click From Address Book.
2 Select Nick Klassen (or the person to your right in the classroom) and then click Calendar. Click OK.
3 On the Home tab, in the Manage Calendars group, click Calendar Groups and then click Create New
Calendar Group.
4 Type: Seattle Office as the name of the new calendar group to view calendars for the colleagues in this office, and click OK.
For E
valua
tion O
nly

Using the Calendar Lesson 4
3252-1 v1.00 © CCI Learning Solutions Inc. 125
5 Double-click Lawrence Jang (or the person to your left in the classroom) to specify his calendar to add. Click OK.
6 In the Navigation Pane right-click Seattle Office and click Add Calendar, click From Address Book and add Ji Mai Kim’s calendar.
7 Click the for Nick Klassen to place his calendar over the first calendar.
8 Repeat for the other two calendars.
Notice how you can still identify whose calendar to view using the different colors for each calendar.
Note: If you see a message similar to , this is an indicator that you are not sharing a live version of the calendar as if you were on an Exchange server.
9 Click Nick Klassen under My Calendars to turn off the display of this calendar.
10 Right-click Ji Mai Kim’s calendar and click Delete Calendar.
Remember that you are only deleting the display and sharing of this calendar on your screen; you are not deleting her actual calendar.
11 Repeat step 10 for the remaining two shared calendars.
12 Right-click the Seattle Office calendar group and click Delete Group. Click Yes to confirm the deletion.
Only your calendar and the Date Navigator appear in the Navigation Pane. If you used the Andrew McSweeney data file, his calendar may also appear.
Printing the Calendar Objective 1.3
As with messages, you can print items from the calendar. Outlook provides a number of layouts that match printed organizers so you can insert the printouts from Outlook.
To print an appointment or event, select it in the calendar, click the File tab, and then click Print.
For E
valua
tion O
nly

Lesson 4 Using the Calendar
126 3252-1 v1.00 © CCI Learning Solutions Inc.
Outlook displays a preview of the appointment using the default style. You can click a style in the list to preview if you use a different type of organizer.
Use the middle panel to set up what is to be printed and from which printer. Click Print Options to set
the printer options and choose which attachments to print with this appointment. Notice how you can hide the details of the appointment, if you don’t want these to be printed.
For E
valua
tion O
nly

Using the Calendar Lesson 4
3252-1 v1.00 © CCI Learning Solutions Inc. 127
Use the panel at the right to preview how the message will print and use the three buttons at the lower right to change the view.
Use Settings to select the print style for the appointment. You can also set the range of dates to print
as well as whether you want to print several appointments or events from the calendar.
Learn the Skill In this exercise you will print from the Calendar.
1 Select one of the meetings in your calendar.
2 Click the File tab and click Print.
Notice how the daily view lists the meetings for that day and also includes an area to list any tasks you may have outstanding to this date.
3 Click Weekly Agenda Style to preview whether this style is appropriate.
4 Continue clicking each of the styles to preview which style you may prefer for the printed copy of the calendar.
5 Try using the zoom feature to zoom in and out of the calendar styles.
6 Print the meeting using the calendar style you prefer.
Lesson SummaryIn this lesson, you learned to compose, send, receive and view email messages. You should now be able to:
change the calendar view
create and edit appointments
set reminders
create recurring appointments
schedule single- and multi-day events
schedule meetings
customize the calendar options
invite attendees and track the responses
determine available meeting times
make changes to or cancel meetings
create a calendar group
show or hide calendars
print calendars
One Page
Actual Size Multiple Pages
For E
valua
tion O
nly

Lesson 4 Using the Calendar
128 3252-1 v1.00 © CCI Learning Solutions Inc.
Review Questions 1. Describe how you can view three months on either side of the current month.
2. Explain the difference between a meeting and an appointment.
3. How can you change the time interval for appointments?
4. How can you view a summary of who has accepted a meeting request that you sent to a number of co-workers?
5. How do you update the list of invitees to include another person?
6. If you receive a meeting invitation and tentatively accept it, but propose a different time to the organizer, will the meeting appear on your calendar?
7. Describe two methods of deleting a meeting.
8. Why would you want to change the default display of the days of a week?
9. What is the purpose of creating a calendar group?
10. How can you hide an individual calendar?
MMMGo online for Additional Review and Activities
For E
valua
tion O
nly