center for design at rmit case study - packt · center for design at rmit case study so far in the...
TRANSCRIPT
8 Center for Design at RMIT
Case Study
So far in the book we have covered almost every aspect of eZ publish. We started with installation and configuration, moved on to adding content and understanding content types, working with templates, and understanding the core framework.The later chapters discussed how to extend the functionality of eZ publish, develop our own modules, and finally how to deploy and optimize our installation.
In this chapter, we will take an in-depth look at the implementation of an eZ publish site. This case study will take you through an entire project, from conception to deployment, explaining all the stages of the project, along with the various problems encountered at each stage and their resolution. We begin with a discussion of the client.
The Client The Centre for Design promotes environmental sustainability through a directed program of research, consulting, professional development, and knowledge sharing. It is recognized internationally as a leader in the development of design methods and tools that support sustainable product design. Its programs focus on sustainability and eco-efficiency as a source of innovation and responsible development.
The organization is supported by the Royal Melbourne Institute of Technology (RMIT) but must make its full budget through commercial commissioned consulting work. It is based in the Faculty of the Constructed Environment at RMIT's city campus in Melbourne. RMIT is one of Australia's largest and most respected technical and design universities. The integrity of their consulting service comes from their university-based research and yet they have to be commercially realistic to survive and grow. Their revenue is from research and consulting services, training, and publishing reference material in three areas of design: sustainable products and product systems, sustainable buildings, and life cycle assessment.
Center for Design at RMIT Case Study
254
By way of example, here is some of the work they have done and are doing:
• A pilot stewardship project—Beyond the Dead TV: Managing end-of-life consumer electronics in Victoria. The aim of the project was to develop sustainable solutions that helped reduce and ultimately eliminate hazardous materials from end-of-life electronics (e-waste) entering landfill and presenting ecological or human health problems. More than 3,500 TVs, computer monitors, and VCRs were diverted from landfill during the project. Every year, a large number of discarded electrical and electronic products enter the waste stream. There are significant opportunities to recover and reuse much of the metal, plastics, glass, and other materials. Barriers to collection, as well as expected costs for collection and disassembly operations, were studied.
• The EcoHome: A new model project home (the EcoHome) was built in Deer Park, in outer western Melbourne. This research project investigated the sustainability outcomes possible in outer suburban project homes using current building and design technologies, and the barriers to the uptake of these technologies more broadly in outer suburban project homes. The outcomes included a critically needed decision support tool to help the industry meet regulatory requirements for more sustainable housing.
• Centre for Education and Research in Environmental Strategies: RMIT is working with CERES (Centre for Education and Research in Environmental Strategies) through the Centre for Design to assist in developing an urban water conservation demonstration and research facility.
Being a cross between a commercial organization and a University's research division, the Centre for Design is treading a fine path of commercial promotion and a reference authority. This project was essentially a challenge to deliver a site that met both objectives with integrity.
Being the centre for design and the national leading authority on design issues for environmental sustainability, the site needed to reflect this positioning in its information structure, navigation, and visual design.
This organization's value lies in its information—the value of the information is in its depth of non-commercial research. Sharing information increases the reputation and value of the organization. A website is the perfect place to transfer knowledge globally.
As environmental design is the way of the future, the Centre and its public presentation materials had to project the intention, depth, value, and professionalism of the organization.
Chapter 8
255
The Existing Site The first website was built in 1996. At that time, most websites were built with HTML and simple graphics. This site was no exception. The navigation was implemented using a series of icons that allowed the user to click through to each section of the site. While clever, the icons had little intrinsic meaning and no text to explain where you would end up if you clicked them. However, most pages had regular hyperlinks that gave the user a better idea of what the site contained.
What was interesting about the existing site was how it had grown over time. The site was updated fairly regularly over a seven-year period by many people with varying levels of technical skill. The result was an extremely difficult-to-navigate website with a remarkable amount of content. Updating sections of the site became the responsibility of the managers that ran those areas within the business. One of the larger sections of the site, Life Cycle Assessment (LCA), was maintained by the Manager of LCA for the Centre for Design. This section of the site had internal consistency as one person was in charge of its content and maintenance. However, the structure of the content in the LCA section differed from other parts of the website. The colors, navigation, and structure were all unique to this section.
Over seven years, the existing site had become so fragmented and disjointed that even staff within the CFD had trouble finding content. A copy of the existing site was archived before deploying the new site using the eZ publish CMS to ensure that content would not be lost.
The Project Initially, the requirements were to provide a consistent look and feel to the existing information as well as the ability to update certain sections. The focus was purely on the content and its presentation. As the need for content management was limited to only some of the sections, we initially proposed a custom-built CMS. However, we also stated that the needs of content management could go beyond expectations, so a full content management system would be a better long-term option. This proposal was presented in November 2002.
When we discussed the proposal with the client, it became clear that the needs of the new website could not be fulfilled with a simple custom-built CMS. The depth and scope of content was far too wide. A custom-built CMS might have provided an acceptable short-term solution, but considering the life span of the previous site (seven years) we knew that this site had a minimum two year life span and an expected life span of five years. Based on this, we went back to the client in December 2002 to establish the detailed requirements of the site.
Center for Design at RMIT Case Study
256
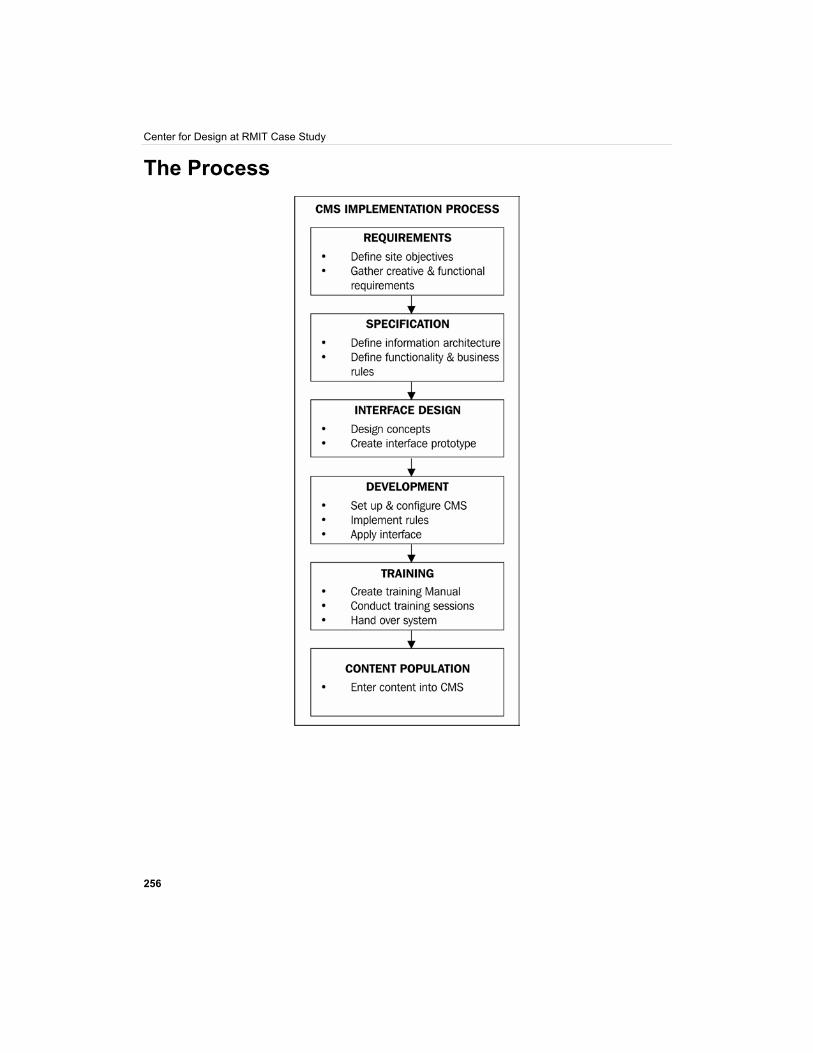
The Process
Chapter 8
257
Requirements Requirements gathering was conducted over several meetings and finalized in January 2003. The requirements covered the following areas:
Key Objectives • Promote the organization and its services • Clearly define what CFD are about • Create a knowledge base • Publish information in order to change current practices
Creative • Present CFD as they wished to be seen • Show an understanding of the target market • Recognize local & international considerations
Functionality • All content to be managed in-house without needing technical skills • Intuitive and easy-to-use browser-based administration interface • Multiple users with different permission levels (namely author, editor, and
publisher) • Consistent presentation for all content • Site search facility (including searching Word documents & PDFs) • Complex publication rules (for example, content added to one section can
automatically appear in other sections) • Accommodate different types of content • Workflow for creation, review, and publication of content • Version tracking • Ability to update look and feel without rebuilding the entire site
Center for Design at RMIT Case Study
258
Content • Review existing content • Establish patterns • Establish ideal structure
Hosting Environment Sorting out the hardware was straightforward. We already had a server configured that hosted other eZ publish sites. The client agreed that we would host the new site.
Hardware • Hewlett Packard LC 2000R • Dual PIII 1GHz processors • 1Gb Ram • 3 x 9Gb SCSI Hot Swappable Hard Drives • RAID 5 Array • DAT tape back up facility with daily tape rotation • Dual Redundant Power Supply
Software • Red Hat Linux • Apache web server • Tomcat 4 servlet container • PHP 4 • MySQL 3
Selecting a CMS What made this project unique was the combination of the number of authors, the number of content types, and the rules for how content was to be displayed. Individually, these requirements weren't difficult, but combined, they became far more complex.
We had previously evaluated CMS solutions and found that eZ publish could immediately satisfy the majority of the requirements at face value. The only requirement not covered was searching Word and PDF documents, but this was on the roadmap for
Chapter 8
259
implementation within the next 12 months. Our experience with eZ publish gave us confidence that it was the right solution for this project.
Once the requirements had been established and eZ publish had been selected as the CMS solution, we had to work out the requirements to be implemented as a part of Stage 1. The aim was to have the site live by the end of May 2002. Given this timeframe and the budget, we knew that it would not be possible to deliver all the requirements. We discussed priorities with the client to establish what had to be in Stage 1 and what could wait until later stages.
The priority was to get the site up, as the Centre was not keeping up with best practices in their field; this was having an impact on their reputation both nationally and internationally. Another priority was making sure the content was properly structured and presented. It was agreed that the implementation of workflow with multiple levels of permissions could wait until Stage 2.
Specifications Now that we were clear what to achieve, and by when, we needed to specify exactly how we planned to make it happen. We did this by creating an information architect document that contained the following sections:
• User View • Admin View • Content Model • Display Templates • Content Types
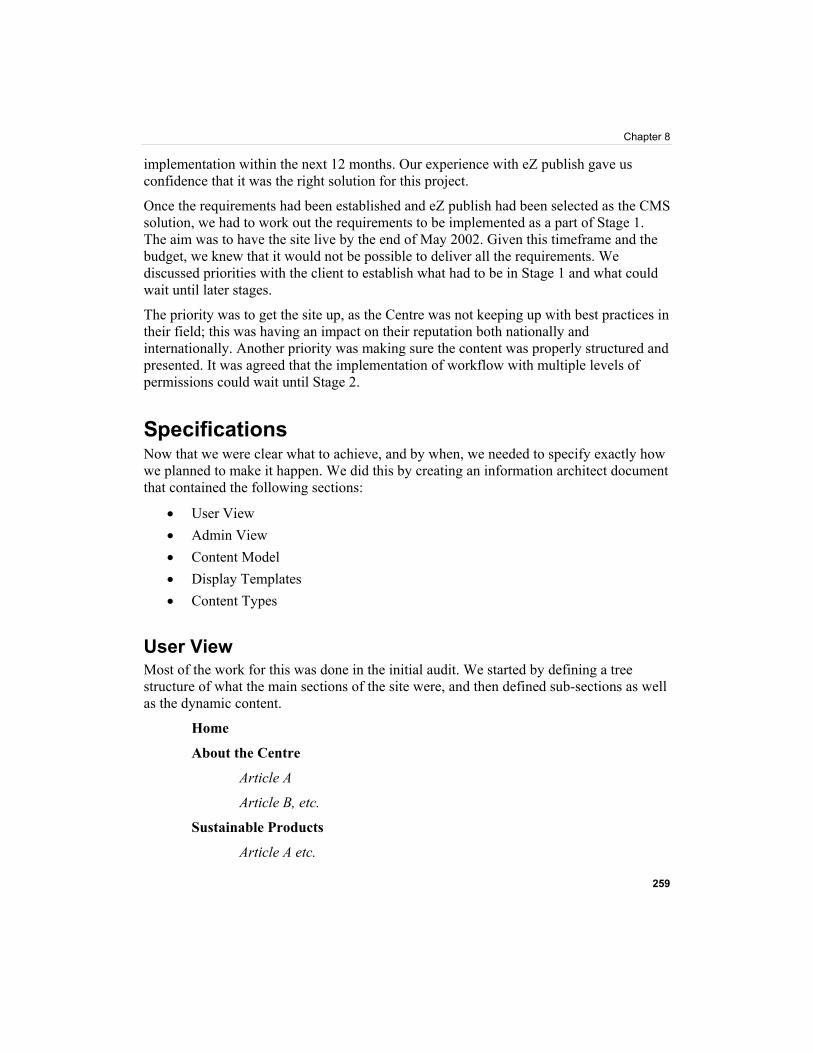
User View Most of the work for this was done in the initial audit. We started by defining a tree structure of what the main sections of the site were, and then defined sub-sections as well as the dynamic content.
Home
About the Centre
Article A
Article B, etc.
Sustainable Products
Article A etc.
Center for Design at RMIT Case Study
260
Client A
Client B etc.
Publication A
Publication B etc.
Link A
Link B, etc.
Project A
Project B, etc.
Training A
Research & Consulting
Article A
Article B
Publications
Publication A
Publication B
Sustainable Products
Publication A, B, etc.
Sustainable Buildings
Publication A, B, etc.
Life Cycle Assessment
Publication A, B, etc.
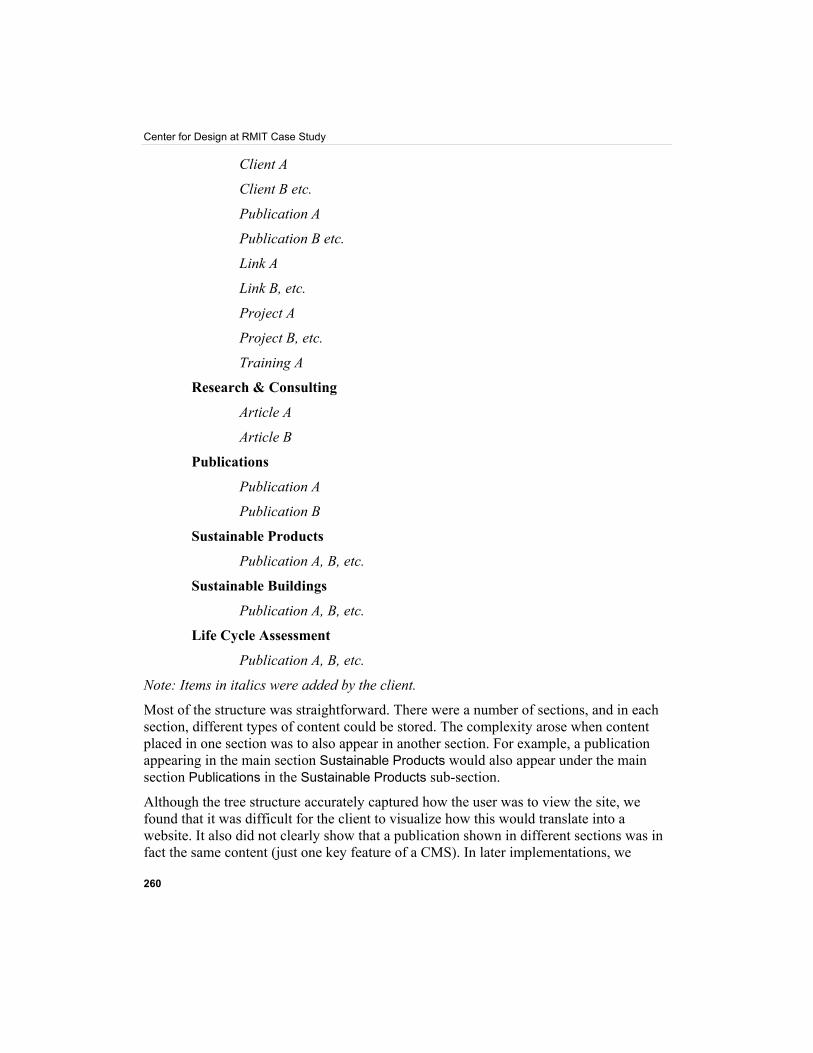
Note: Items in italics were added by the client.
Most of the structure was straightforward. There were a number of sections, and in each section, different types of content could be stored. The complexity arose when content placed in one section was to also appear in another section. For example, a publication appearing in the main section Sustainable Products would also appear under the main section Publications in the Sustainable Products sub-section.
Although the tree structure accurately captured how the user was to view the site, we found that it was difficult for the client to visualize how this would translate into a website. It also did not clearly show that a publication shown in different sections was in fact the same content (just one key feature of a CMS). In later implementations, we
Chapter 8
261
replaced the tree view with a simple sitemap, which has proved to be far more effective. To show the rules of where content was to appear, we used a content model.
Admin View The Admin view is how people managing the content see the site. However, this is not necessarily how the user sees the site—from a display perspective as well as the structuring of information. As mentioned earlier, a user view is best represented by a sitemap; for the Admin view we found the tree structure to work well. The Admin view is about where to add, edit, and delete content. It's like a file server where the content is organized in a logical manner for easy access. How that content is viewed by the user is a different thing altogether. The purpose of the Admin view is to make things easier for the people creating and managing the content. The Admin view became a working area, a repository of information that needed to be structured appropriately.
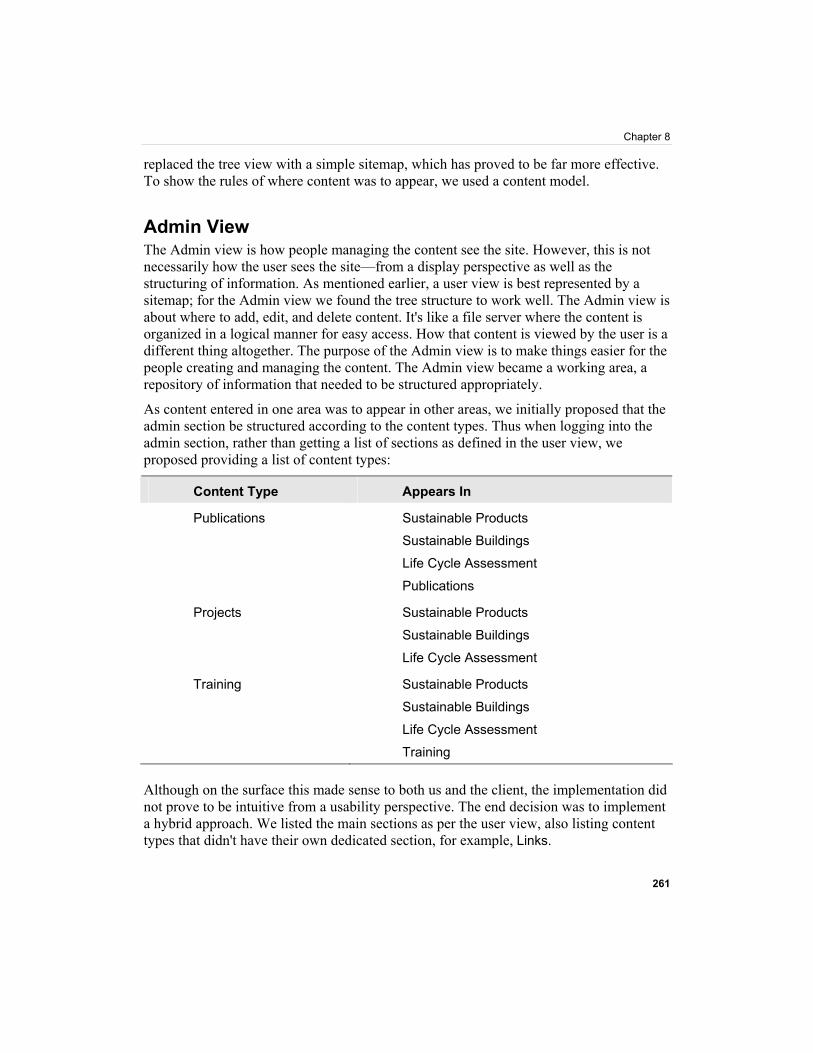
As content entered in one area was to appear in other areas, we initially proposed that the admin section be structured according to the content types. Thus when logging into the admin section, rather than getting a list of sections as defined in the user view, we proposed providing a list of content types:
Content Type Appears In
Publications Sustainable Products
Sustainable Buildings
Life Cycle Assessment
Publications
Projects Sustainable Products
Sustainable Buildings
Life Cycle Assessment
Training Sustainable Products
Sustainable Buildings
Life Cycle Assessment
Training Although on the surface this made sense to both us and the client, the implementation did not prove to be intuitive from a usability perspective. The end decision was to implement a hybrid approach. We listed the main sections as per the user view, also listing content types that didn't have their own dedicated section, for example, Links.
Center for Design at RMIT Case Study
262
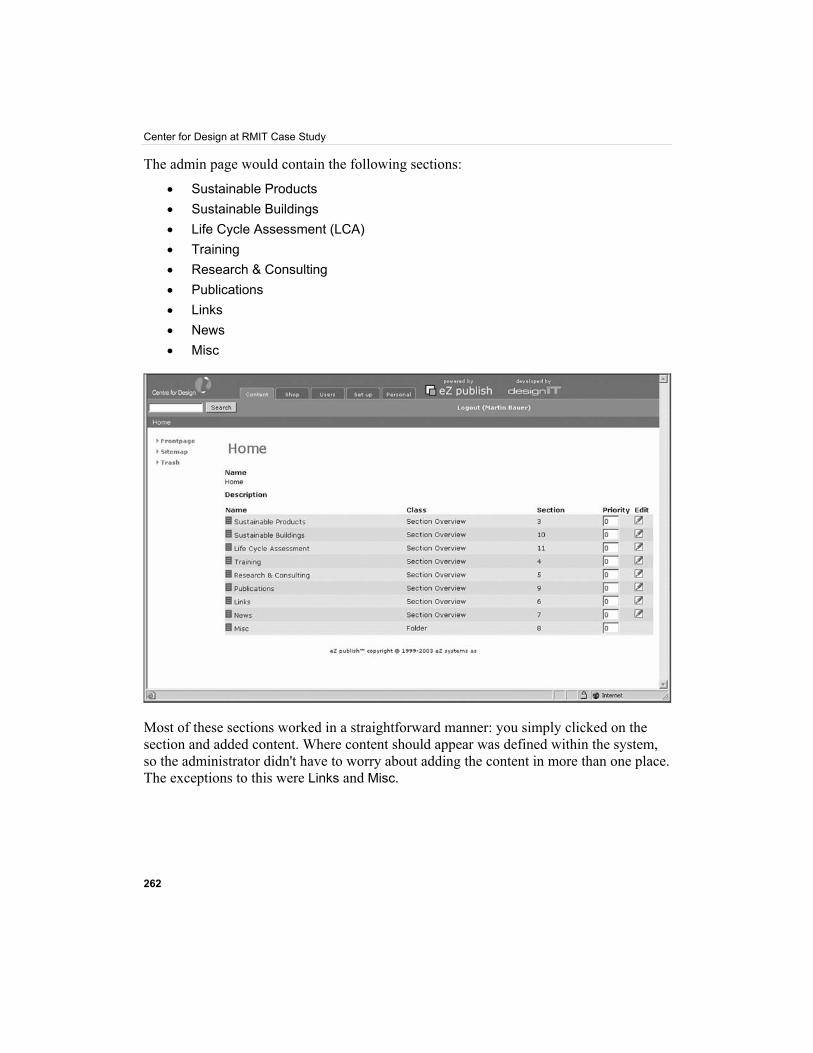
The admin page would contain the following sections:
• Sustainable Products • Sustainable Buildings • Life Cycle Assessment (LCA) • Training • Research & Consulting • Publications • Links • News • Misc
Most of these sections worked in a straightforward manner: you simply clicked on the section and added content. Where content should appear was defined within the system, so the administrator didn't have to worry about adding the content in more than one place. The exceptions to this were Links and Misc.
Chapter 8
263
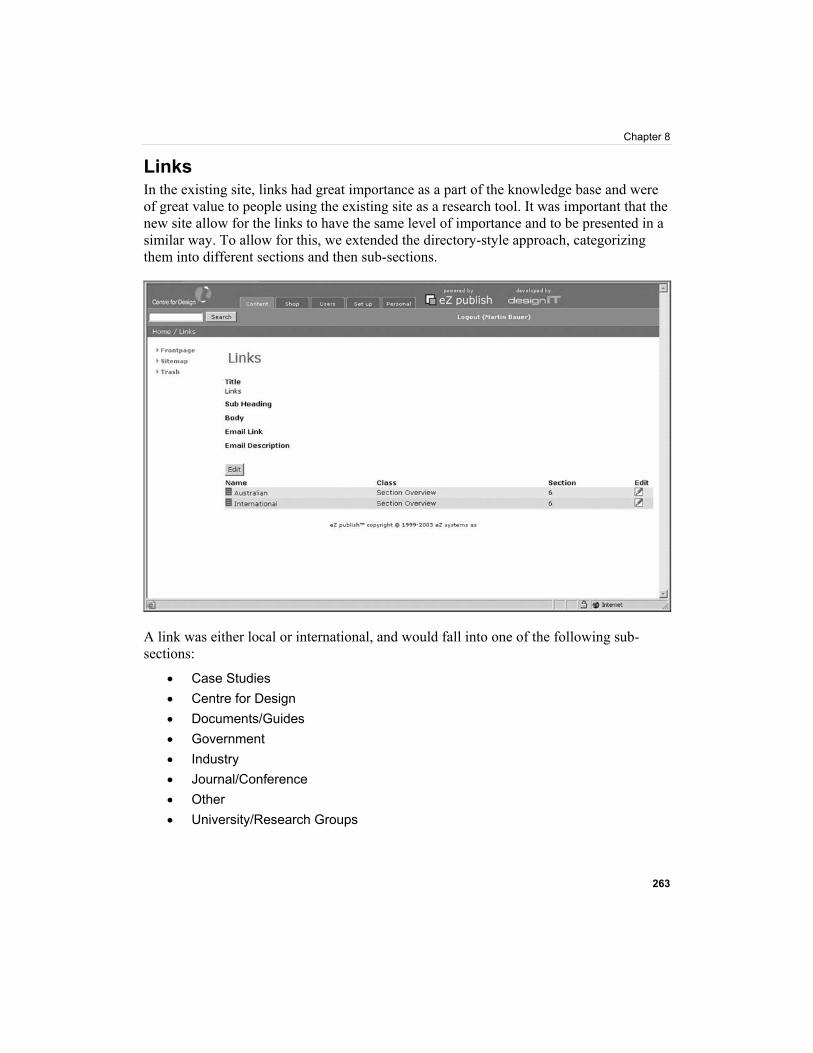
Links In the existing site, links had great importance as a part of the knowledge base and were of great value to people using the existing site as a research tool. It was important that the new site allow for the links to have the same level of importance and to be presented in a similar way. To allow for this, we extended the directory-style approach, categorizing them into different sections and then sub-sections.
A link was either local or international, and would fall into one of the following sub-sections:
• Case Studies • Centre for Design • Documents/Guides • Government • Industry • Journal/Conference • Other • University/Research Groups
Center for Design at RMIT Case Study
264
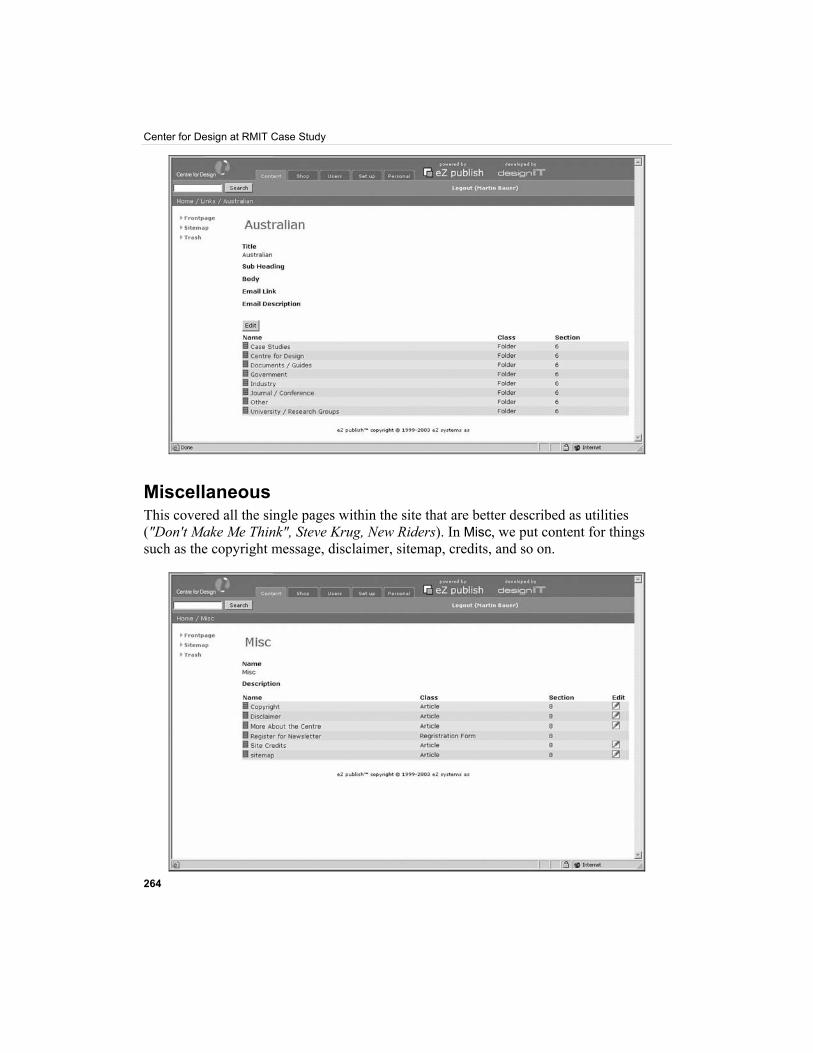
Miscellaneous This covered all the single pages within the site that are better described as utilities ("Don't Make Me Think", Steve Krug, New Riders). In Misc, we put content for things such as the copyright message, disclaimer, sitemap, credits, and so on.
Chapter 8
265
It was a repository for anything that was information about the site or the centre, rather than the information that CFD provided. Links to these items appeared in the footer on each page of the site.
In recent implementations, we have found it useful to add another section, Library. In it, we store files (such as Word documents or PDFs) or images that are used in more than one place on the site. It is especially handy for reusing graphics. We've found that some clients use the library a bit like a file server and create sub-directories to help structure the content. The inclusion of a Media view in the admin templates of the version 3.2 of eZ publish makes the management of a library of images much more user-friendly.
Content Model Having defined the way users would see the site and how administrators would work with the content, we had to define the business rules that would control not only what the user saw in each section, but also what the administrators would be able to add in each section. In the user view we used a sitemap and in the Admin view we used a tree structure, but neither of these approaches was effective in capturing the business rules of what content could go where. It was important to capture the rules in a manner that had enough detail for the developer to work with but was also easy enough for the client and designer to understand.
Traditionally, sites with a database are displayed using a sitemap and a line to a database. The details of the database are defined separately in a schema, which in itself has different views: for example, table definition and relationship diagram. We needed to combine the sitemap with the content types and show the relationship between them and other parts of the site.
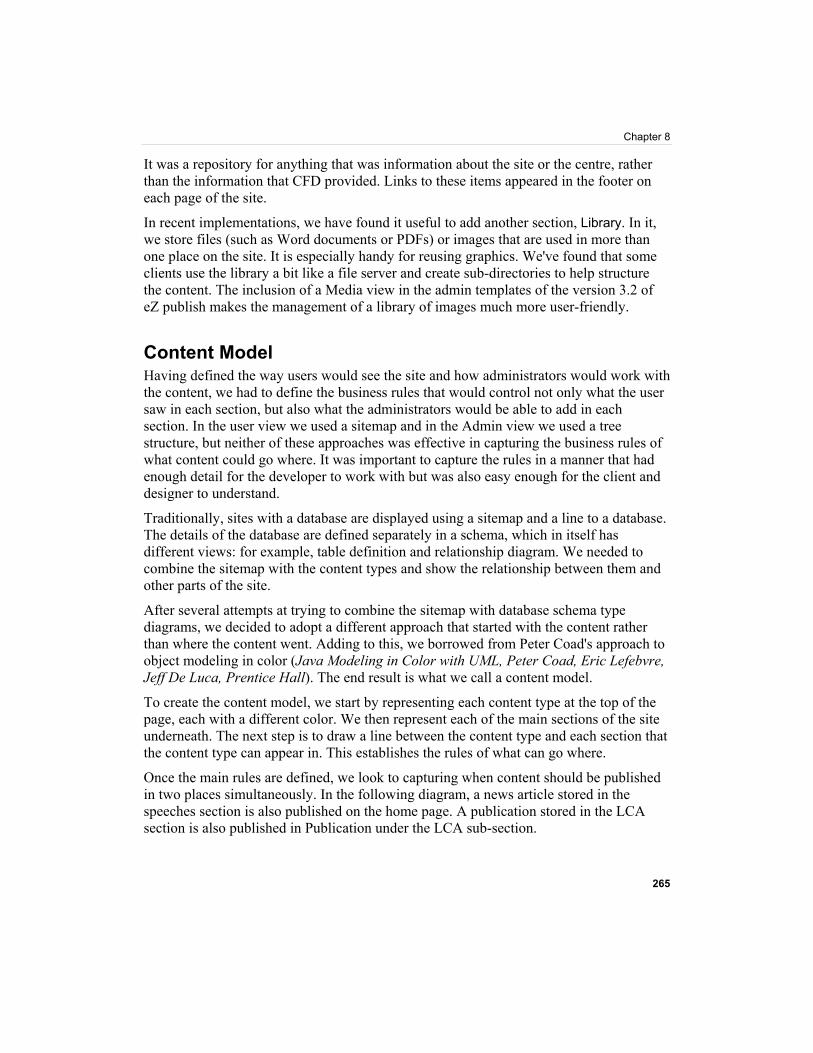
After several attempts at trying to combine the sitemap with database schema type diagrams, we decided to adopt a different approach that started with the content rather than where the content went. Adding to this, we borrowed from Peter Coad's approach to object modeling in color (Java Modeling in Color with UML, Peter Coad, Eric Lefebvre, Jeff De Luca, Prentice Hall). The end result is what we call a content model.
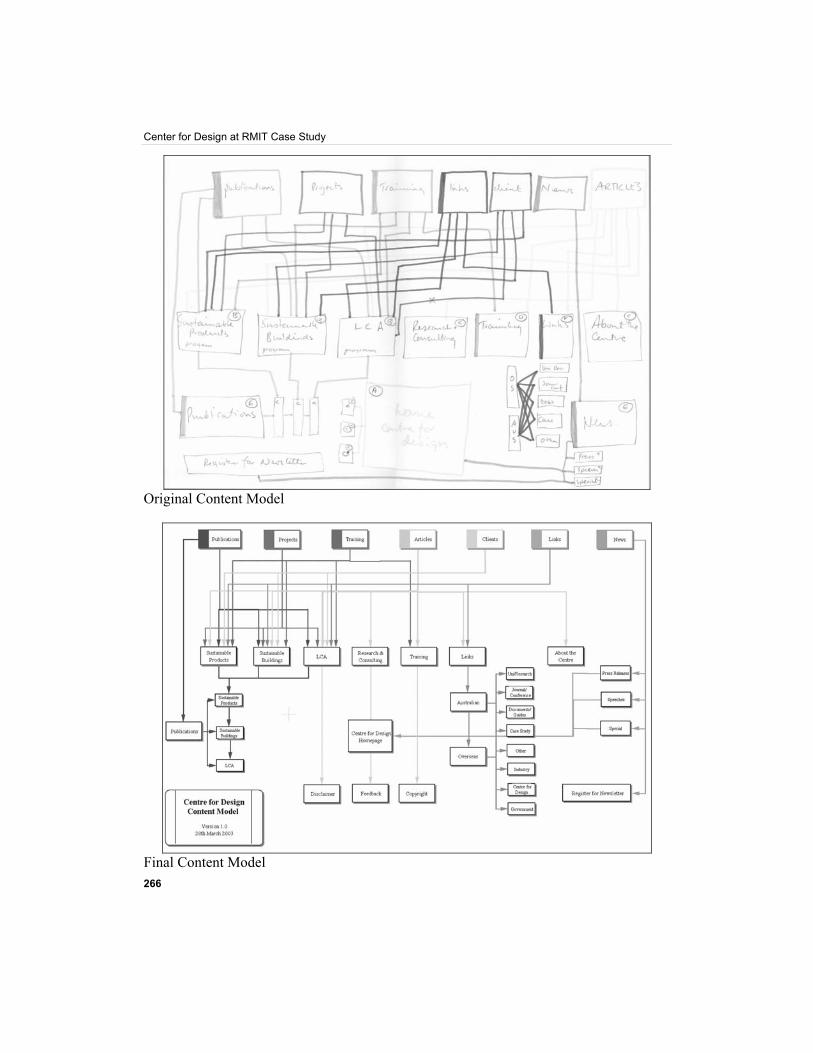
To create the content model, we start by representing each content type at the top of the page, each with a different color. We then represent each of the main sections of the site underneath. The next step is to draw a line between the content type and each section that the content type can appear in. This establishes the rules of what can go where.
Once the main rules are defined, we look to capturing when content should be published in two places simultaneously. In the following diagram, a news article stored in the speeches section is also published on the home page. A publication stored in the LCA section is also published in Publication under the LCA sub-section.
Center for Design at RMIT Case Study
266
Original Content Model
Final Content Model
Chapter 8
267
This approach proved to be quite powerful. It was easy for the client to understand the relationship between the content and the site. At the same time, the developer was provided with a high-level view of the relationships that would be implemented within the CMS.
In the same way that an object model captures the objects within a business domain and how they work together, the content model brought together the content, the site, and the business rules in a single effective representation. Because the content model brings so many elements together, it is the most important part of the specification to get right.
Get the content model right and everything else will fall into place.
Display Templates Having captured the high-level user view and the content model, the next step was to work out the details of how the navigation was to work and how content was to be displayed. We created a series of display templates (or wireframes) and documented all the elements that would be displayed on that page; in other words, the presentation logic.
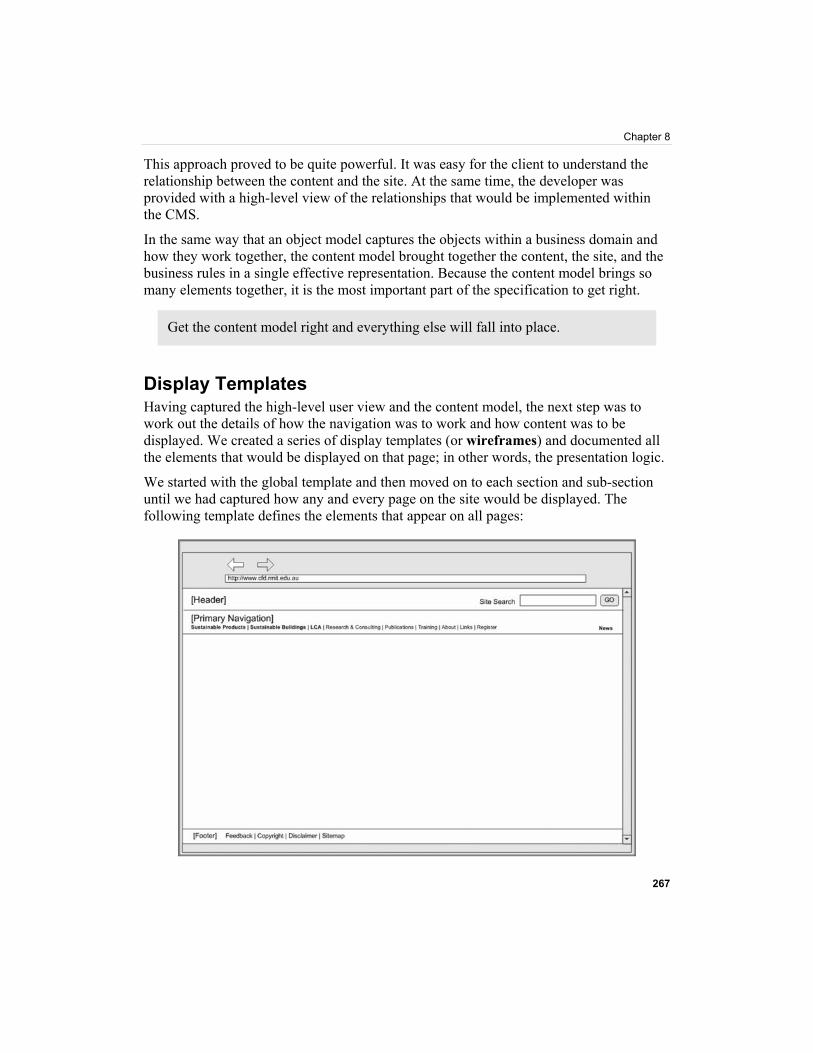
We started with the global template and then moved on to each section and sub-section until we had captured how any and every page on the site would be displayed. The following template defines the elements that appear on all pages:
Center for Design at RMIT Case Study
268
The various sections of this template were:
• Header: Displays logo & search window • Primary Navigation: Displays all primary navigation items • Footer: Displays feedback, copyright link, disclaimer, and sitemap
Once we had defined the global elements, we looked at each section to define what content was to appear in it, the sub-navigation, and the specific rules that defined how and where the content would be displayed on the page.
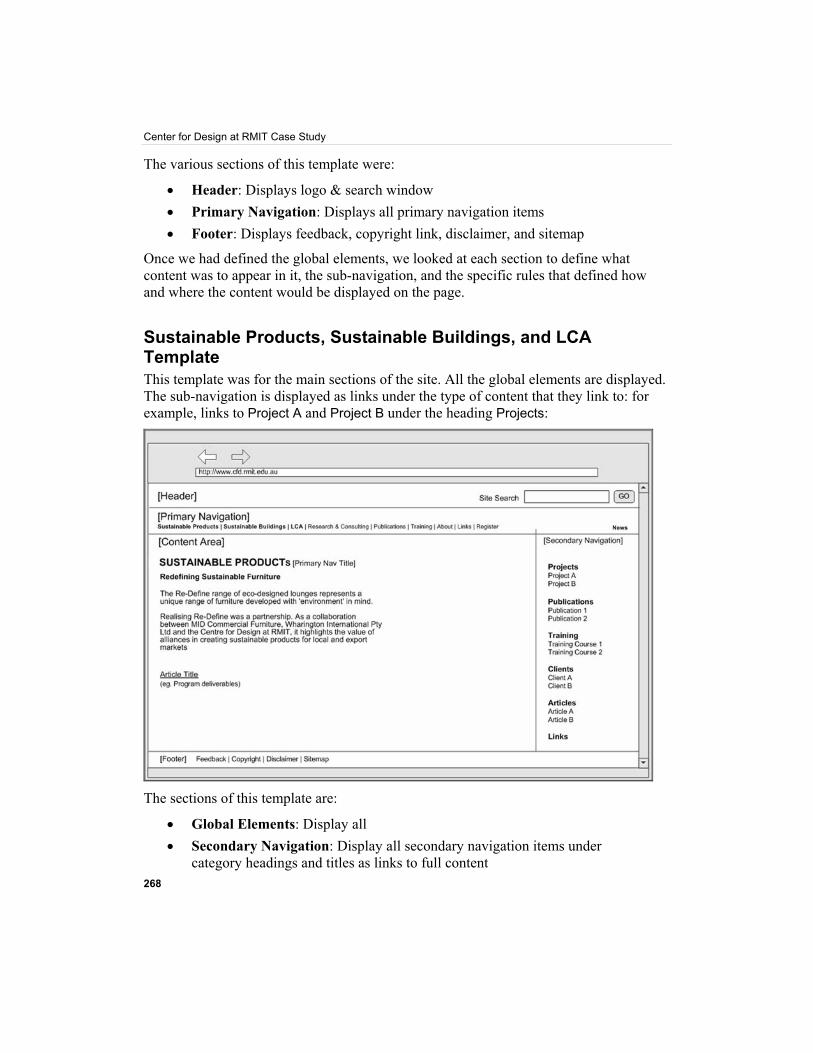
Sustainable Products, Sustainable Buildings, and LCA Template This template was for the main sections of the site. All the global elements are displayed. The sub-navigation is displayed as links under the type of content that they link to: for example, links to Project A and Project B under the heading Projects:
The sections of this template are:
• Global Elements: Display all • Secondary Navigation: Display all secondary navigation items under
category headings and titles as links to full content
Chapter 8
269
• Content Area (Sustainable Products / Sustainable Buildings / LCA): Display selected primary navigation title, selected primary navigation overview article, and article title as link to full article
Content Types Defining all the content types proved to be one of the bigger challenges. It was difficult to identify patterns in the existing site to use as a basis to accommodate all of the content. For example, not all training courses had the same information; some had a breakdown of the content, others didn't. It took a number of revisions to be able to consolidate all of the content into eight content types that would allow CFD to port everything on the existing site to the new site.
The content types were as follows:
• Overview Article • Article • Project • Training Course • Publication • Link • Client • News
The next step was to define each content type in more depth. Borrowing from database definition and OO terminology, we defined each content type in terms of attributes and datatypes.
An attribute represented each element of a content type: for example, heading and description. The datatype represented how the information was to be stored, for example, rich text, plain text, or numeric.
We also provided an example of each attribute as a part of the definition to ensure that the name of the attribute was meaningful and the datatype was appropriate. This was a very important step.
In a previous implementation, we found that although the content type definition made sense during the specification stage, the definition no longer worked when it came to adding the actual content, and changes had to be made.
Adding an example at this definition stage is a simple but effective way of checking that you are on the right track.
Center for Design at RMIT Case Study
270
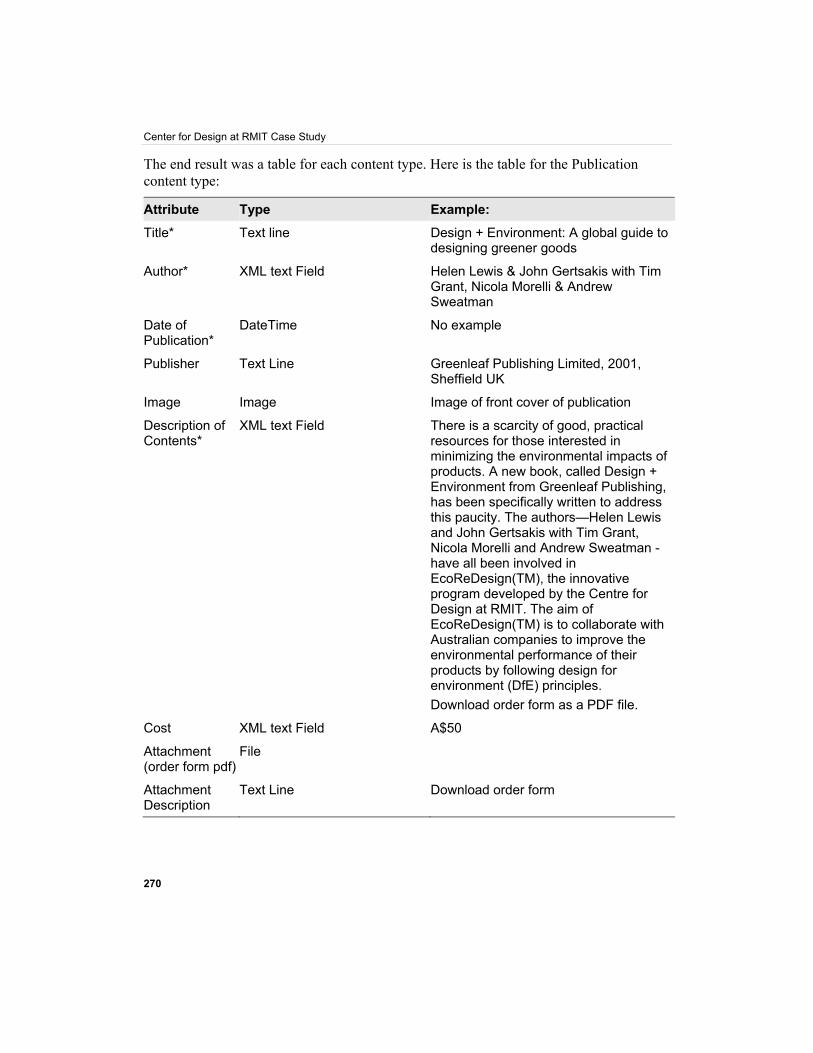
The end result was a table for each content type. Here is the table for the Publication content type:
Attribute Type Example:
Title* Text line Design + Environment: A global guide to designing greener goods
Author* XML text Field Helen Lewis & John Gertsakis with Tim Grant, Nicola Morelli & Andrew Sweatman
Date of Publication*
DateTime No example
Publisher Text Line Greenleaf Publishing Limited, 2001, Sheffield UK
Image Image Image of front cover of publication
Description of Contents*
XML text Field There is a scarcity of good, practical resources for those interested in minimizing the environmental impacts of products. A new book, called Design + Environment from Greenleaf Publishing, has been specifically written to address this paucity. The authors—Helen Lewis and John Gertsakis with Tim Grant, Nicola Morelli and Andrew Sweatman - have all been involved in EcoReDesign(TM), the innovative program developed by the Centre for Design at RMIT. The aim of EcoReDesign(TM) is to collaborate with Australian companies to improve the environmental performance of their products by following design for environment (DfE) principles. Download order form as a PDF file.
Cost XML text Field A$50
Attachment (order form pdf)
File
Attachment Description
Text Line Download order form
Chapter 8
271
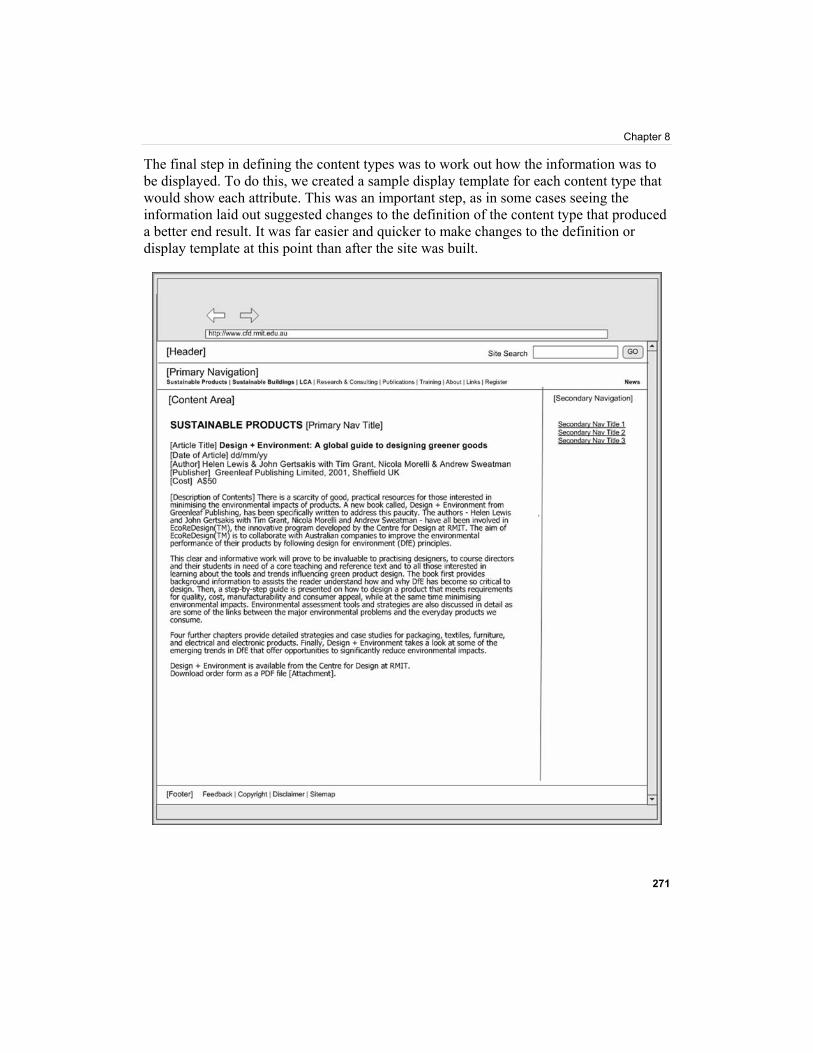
The final step in defining the content types was to work out how the information was to be displayed. To do this, we created a sample display template for each content type that would show each attribute. This was an important step, as in some cases seeing the information laid out suggested changes to the definition of the content type that produced a better end result. It was far easier and quicker to make changes to the definition or display template at this point than after the site was built.
Center for Design at RMIT Case Study
272
The process of creating the information architecture document was long and difficult. The document went through several revisions and reviews with the client. During these reviews, we went through every element of the specification until we were sure that we had captured everything correctly. After each revision, we made sure both the designer and developer also had a chance to give their input from an implementation perspective.
Overall, this process took approximately two months from start to finish; it took time to organize the reviews and coordinate getting all the right people together at the same time.
Although it was a very difficult and complex process, it proved to be a wise investment; the end result required very few changes from what was contained in the information architecture document.
Interface Design As the client had such an outstanding reputation with world thinkers in the environment design sector, it was imperative that the site looked and felt like it was a unique individual with best-practice design sensibilities and an inspirational interface.
Visual Design Earlier, the Centre for Design had a terrible logo – very 90's, hard, and academic. The first job was to talk the Centre into getting a good visual device, i.e. a logo, to associate their name with. We recommended a logo designer and with the brief he came up with a logo the Centre is very happy with. We then moved on to navigation.
Once we sorted the exact number, type, and informational priority of navigation items, it became easy to display them in an innovative, yet clear and logical manner.
The home page design needed to have a real personality and the secondary pages needed to draw on that personality to surround the internal content without intrusion:
• The site had to say: we are modern, eco-sensitive, unique, dramatic, and 'we are where design is at'
• It had to be: non-threatening, classic, timeless, and easy to navigate • It had to have: the Centre's purpose clearly displayed, and the navigation near
that area
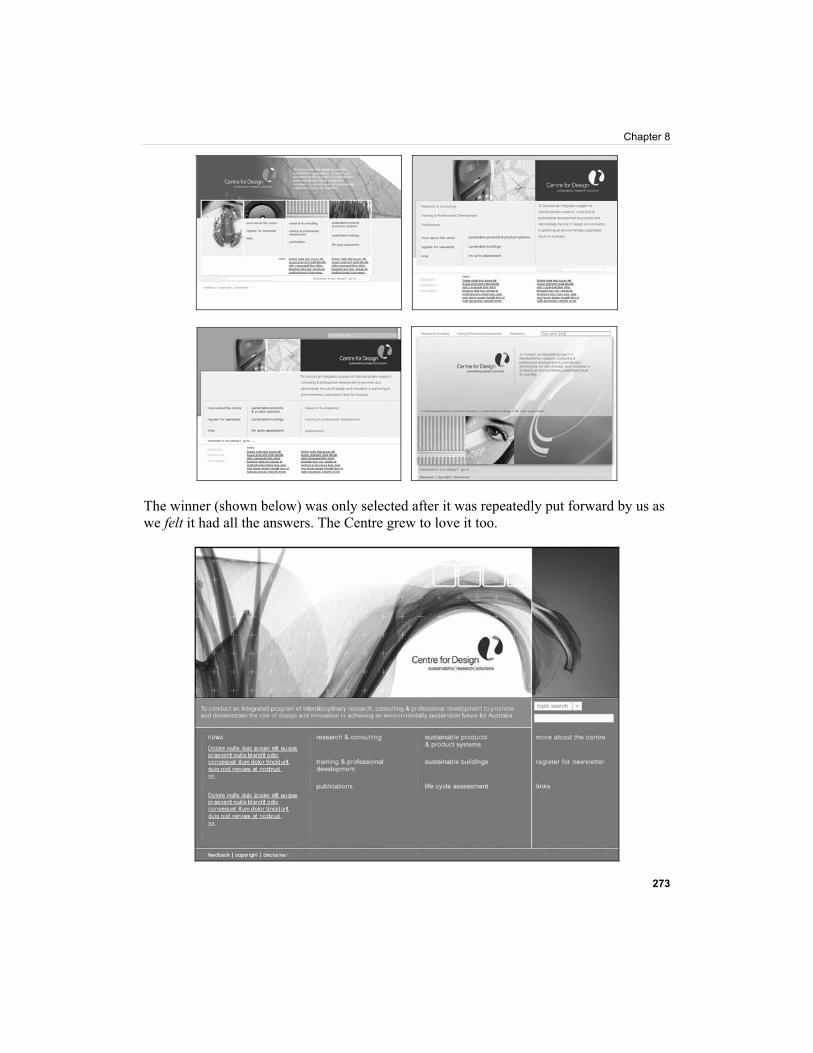
Our initial concepts are shown in the following screenshots:
Chapter 8
273
The winner (shown below) was only selected after it was repeatedly put forward by us as we felt it had all the answers. The Centre grew to love it too.
Center for Design at RMIT Case Study
274
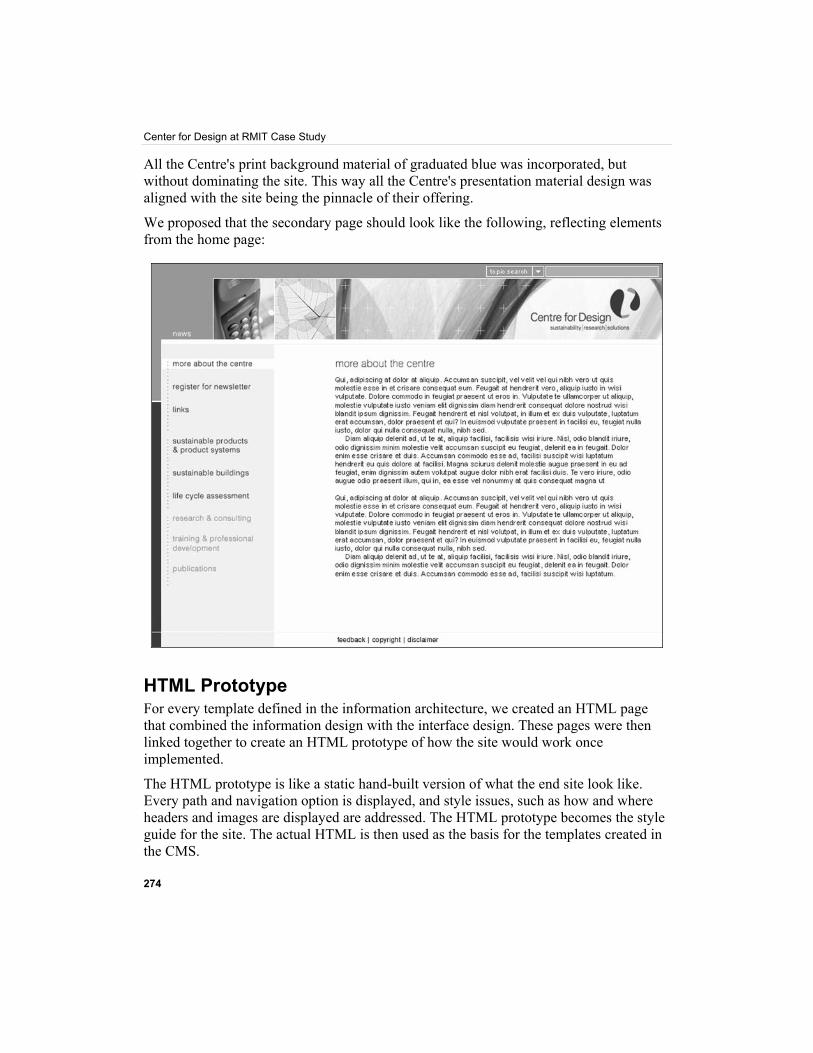
All the Centre's print background material of graduated blue was incorporated, but without dominating the site. This way all the Centre's presentation material design was aligned with the site being the pinnacle of their offering.
We proposed that the secondary page should look like the following, reflecting elements from the home page:
HTML Prototype For every template defined in the information architecture, we created an HTML page that combined the information design with the interface design. These pages were then linked together to create an HTML prototype of how the site would work once implemented.
The HTML prototype is like a static hand-built version of what the end site look like. Every path and navigation option is displayed, and style issues, such as how and where headers and images are displayed are addressed. The HTML prototype becomes the style guide for the site. The actual HTML is then used as the basis for the templates created in the CMS.
Chapter 8
275
This step is important for two reasons:
• Client review: After many months of meetings to gather requirements and work out specifications, the HTML prototype is the first tangible result that the client gets that is not a document. They can look and interact with the HTML prototype. They can comment on how it works, how it looks, whether it meets their expectations, and so on. It's much easier to comment on something that you can interact with, rather than a document you just read.
• Testing: The HTML prototype also provides an excellent opportunity to test the information and interface design as well as the actual HTML in various browser/OS combinations. Once applied to the CMS, it takes a lot more work to make changes, which may also flow on effects. As the implementation has only started, this gives us the chance to fine tune and update without having to rewrite code, which is easier and far more cost effective.
In the case of the CFD site, the HTML prototype raised a number of issues.
The Home Page The home page looked fine as a design presented in .jpg format, but when constructed, we encountered problems with browser compatibility and scalability. The design was optimized for 800 x 600 resolution, so for screens with greater resolution we needed to ensure the background extended gracefully. This was easy to fix in the more popular browsers but was a bit trickier in older browsers such as Netscape 4.
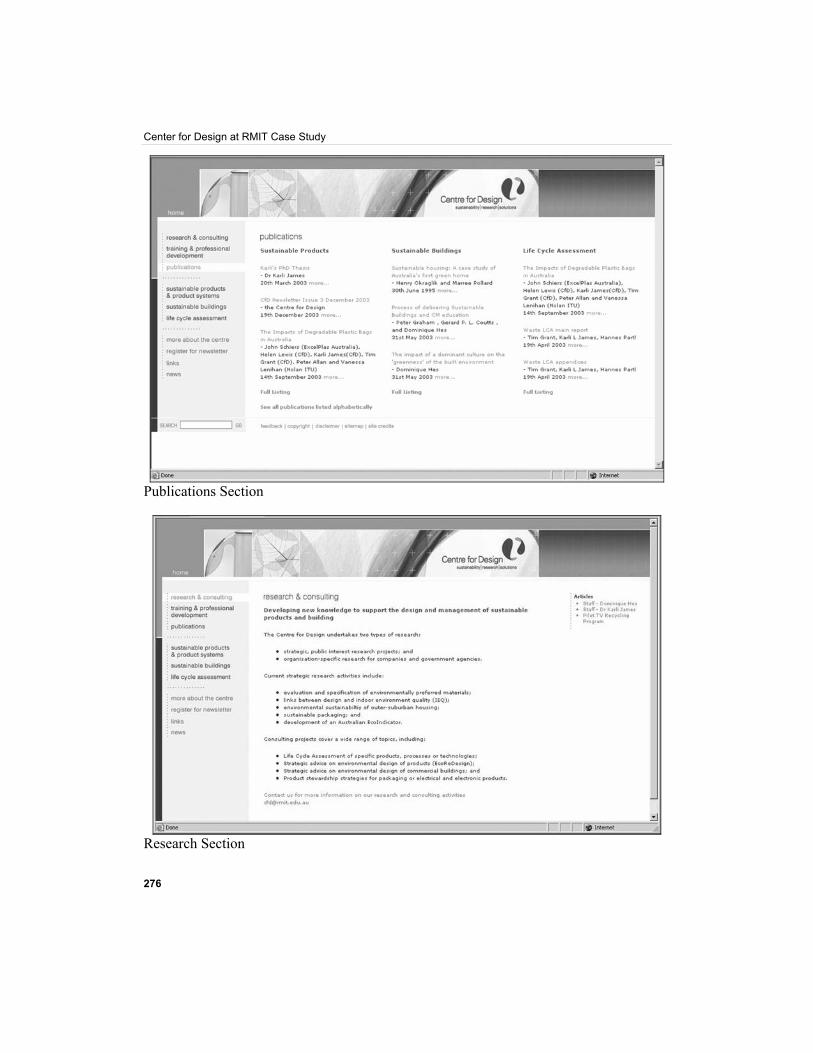
Section Pages Most of the section pages were straightforward, with the main navigation on the left of the screen, sub-navigation down the right, and content in the center column, i.e. the classic three-column layout. This was easy to scale for different resolutions on the common browsers. The only issue we found on most section pages was making sure the sub-navigation allowed for long link names, for example, "Process of delivering Sustainable Buildings and CM education". Our previous experience taught us that clients have a habit of having very long titles, which the CMS uses as the link to that content.
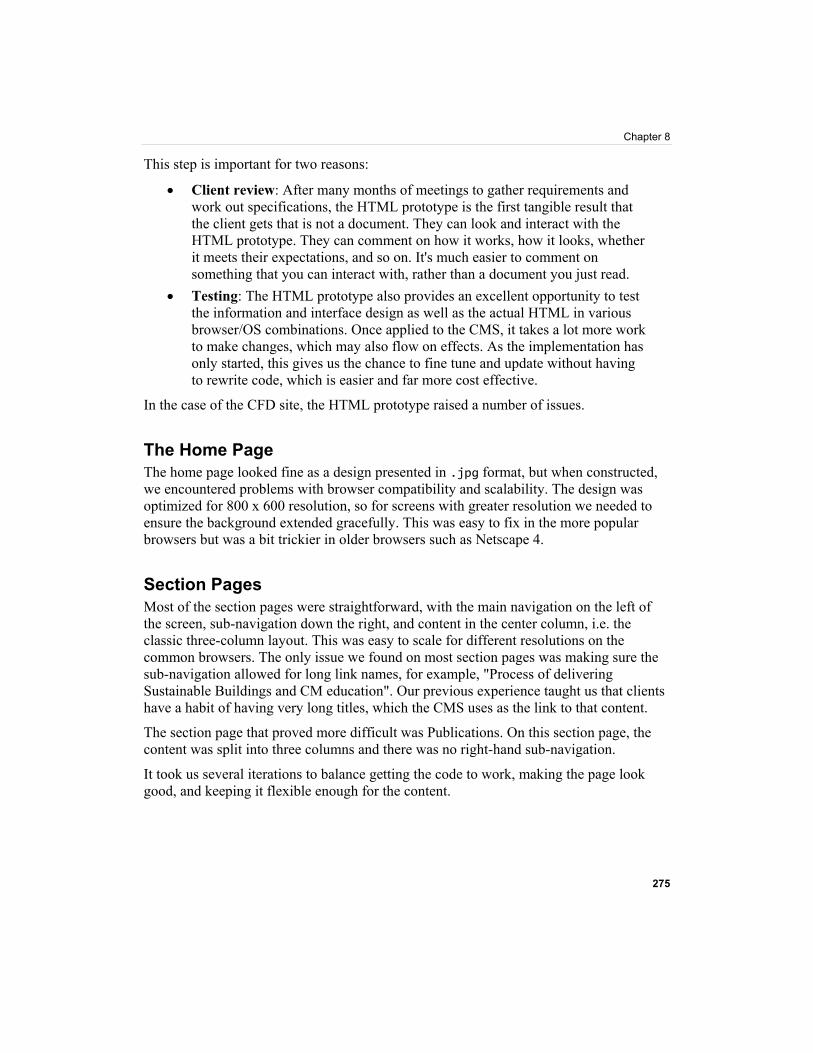
The section page that proved more difficult was Publications. On this section page, the content was split into three columns and there was no right-hand sub-navigation.
It took us several iterations to balance getting the code to work, making the page look good, and keeping it flexible enough for the content.
Center for Design at RMIT Case Study
276
Publications Section
Research Section
Chapter 8
277
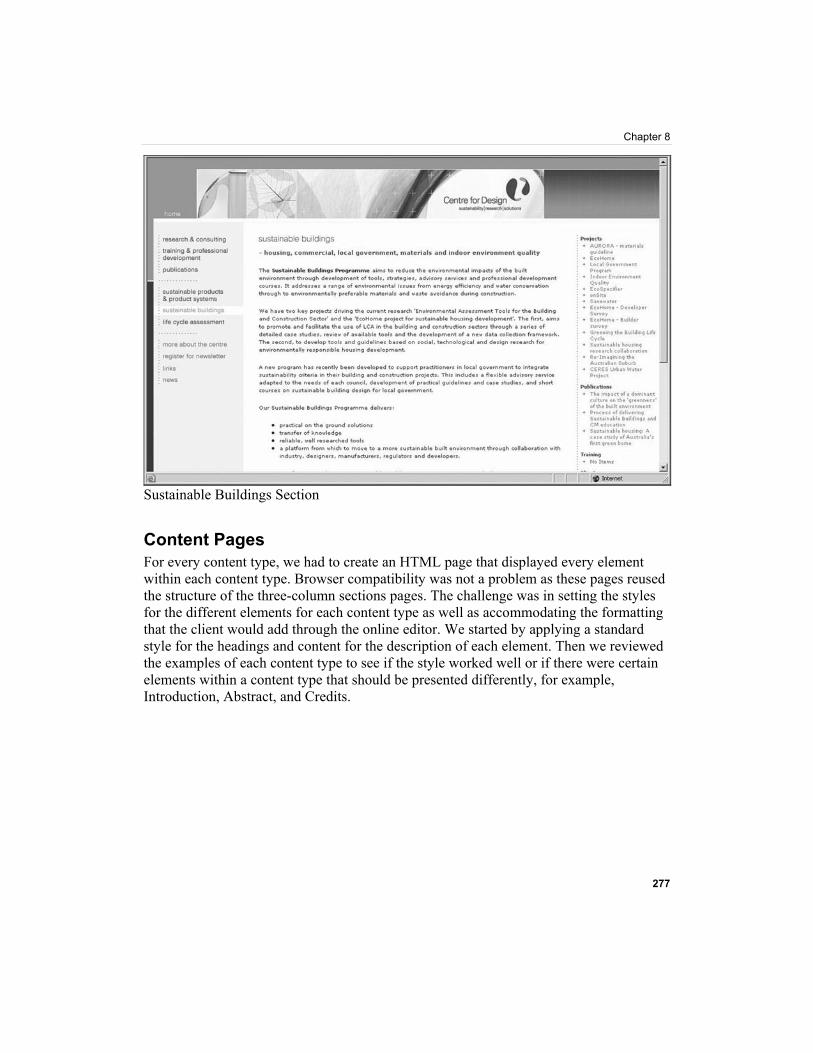
Sustainable Buildings Section
Content Pages For every content type, we had to create an HTML page that displayed every element within each content type. Browser compatibility was not a problem as these pages reused the structure of the three-column sections pages. The challenge was in setting the styles for the different elements for each content type as well as accommodating the formatting that the client would add through the online editor. We started by applying a standard style for the headings and content for the description of each element. Then we reviewed the examples of each content type to see if the style worked well or if there were certain elements within a content type that should be presented differently, for example, Introduction, Abstract, and Credits.
Center for Design at RMIT Case Study
278
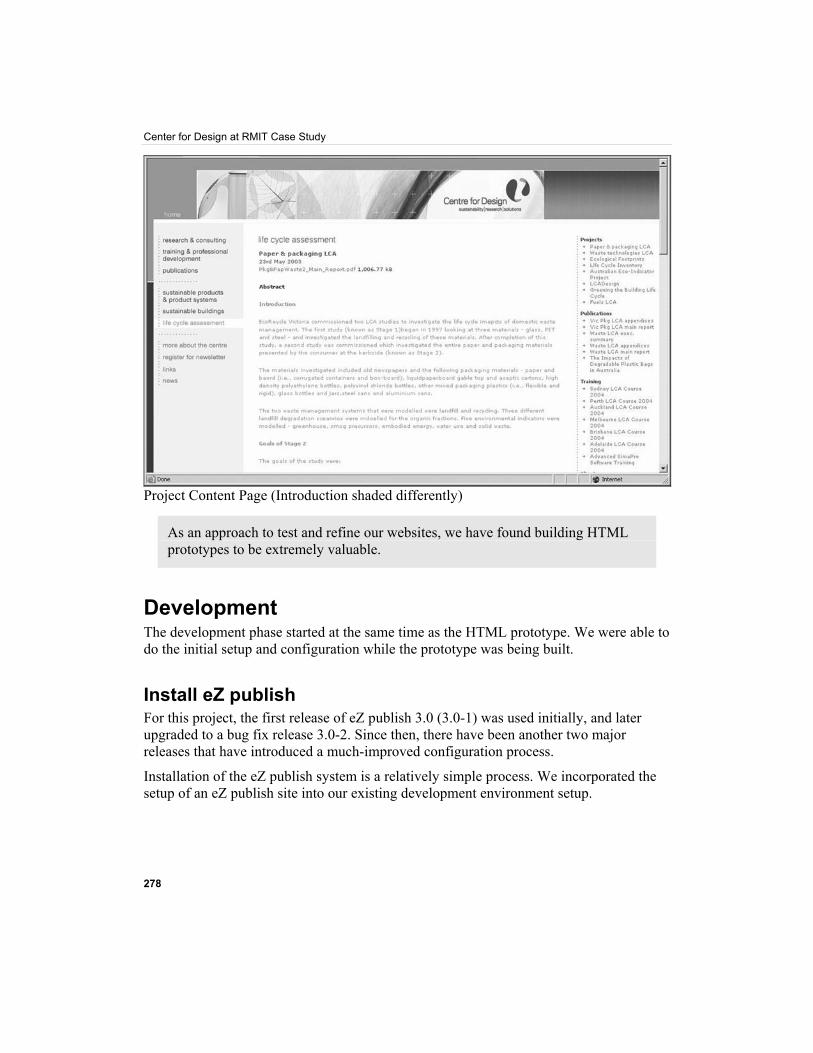
Project Content Page (Introduction shaded differently)
As an approach to test and refine our websites, we have found building HTML prototypes to be extremely valuable.
Development The development phase started at the same time as the HTML prototype. We were able to do the initial setup and configuration while the prototype was being built.
Install eZ publish For this project, the first release of eZ publish 3.0 (3.0-1) was used initially, and later upgraded to a bug fix release 3.0-2. Since then, there have been another two major releases that have introduced a much-improved configuration process.
Installation of the eZ publish system is a relatively simple process. We incorporated the setup of an eZ publish site into our existing development environment setup.
Chapter 8
279
While the eZ publish initial configuration process has improved remarkably in subsequent releases, the installation process remains largely similar to the first version.
As a matter of policy, we use a regular site for the web server and a secure site for the admin section. For example:
http://projectname.devserver/ Regular site
https://admin.projectname.devserver/ Admin site
The main steps in the installation of eZ publish are:
1. Set up virtual servers (regular and secure) as normal. 2. Create a MySQL database and database user. 3. Uncompress the eZ publish distribution in the site DOCROOT. 4. Change permissions and ownership on the var and settings directories to
allow the web server to write to these. 5. Visit the site URL and process through the eZ publish configuration screens. 6. Manually modify the eZ publish configuration files to match our setup. (This
involves changing the default way the regular site is distinguished from the admin site. By default, eZ publish uses the "URL" method, but we used port numbers. This part of the process is now included in the setup process via web pages).
7. Setup and configure design directories for the admin and regular sites.
The CMS is now ready for configuration.
Define Content Classes and Sections Because of the time spent in getting the information architecture correct, the setup of the content type was a simple process. We used the existing content types Folder and Article, with the Article type requiring the addition of a number of attributes. The other content types were added using the Admin pages.
Configure Roles and Permissions Due to the workflow requirements being left for a future production stage, the roles required for this project were limited to three—the default Administrator and Anonymous roles, and the additional Editor role for data entry.
Center for Design at RMIT Case Study
280
The Administrator role has access to all functionality, including the creation, modification, and removal of content, and the ability to modify configuration of the CMS itself. We did not need to modify this role in any way.
The Editor role has access to create content where it is appropriate (this is based on the Content model outlined earlier), and to modify and delete this content. Items in the misc folder may only be edited, as these are statically linked in the templates and would break links if removed. Similarly, adding content to this folder would be of no advantage. Access to the configuration aspects of the CMS is not permitted by this role.
The Anonymous role, like that of the Administrator, is an existing role. The only modification required to this role is to grant read access to the newly created content objects.
It is a common mistake not to give the Anonymous role read access to newly created content types. If you cannot view data in the site, check to see if the Anonymous role has read permission for that particular content type.
Each role was assigned to a corresponding user group, and a number of Editor users were created for the client for the content population staff.
Apply Display Logic and Templates All page types (home, primary, secondary, tertiary), content types (article, folder, etc.), and sectional summary pages are defined in the Information Architecture document and created in a HTML prototype. This allows for the associated templates to be created directly from the HTML prototype. Also, this process becomes a simple copying of the core HTML and replacement of the sample data with the appropriate eZ publish template code.
Templates in the eZ publish system are divided into two main types: page layout and content templates. We will now see how these templates were created, along with the templates for navigation and summaries of content.
Specifically, we will look at how the templates were created for:
• Page layout • Navigation • Summarized content • Content

Chapter 8
281
Create Page Layout Templates The first step in applying the templates is to create the page layout template. This template determines the layout of the page. This site has different page layouts for the home page and all secondary pages and this process is performed for both.
All external files (images, stylesheets, and JavaScript) are copied to the design directory on the eZ publish server. The HTML prototype is copied to pagelayout.tpl and all references to external files (images, stylesheets, and JavaScript) are converted to use the ezdesign and ezimage functions.
For example, the following HTML to include a JavaScript file: <script language="JavaScript" src="script/common.js" type="text/JavaScript"> </script>
becomes: <script language="JavaScript" src={"script/common.js" |ezdesign} type="text/JavaScript"> </script>
The following HTML to include a stylesheet: <link rel="stylesheet" href="stylesheets/style.css"
type="text/css">
becomes: <link rel="stylesheet" href={"stylesheets/style.css"|ezdesign}
type="text/css">
The following HTML to include an image: <img src="images/nv_0202_montage.jpg" width="675" height="96"
alt="Welcome to the Centre for Design">
becomes: <img src={"nv_0202_montage.jpg"|ezimage} width="675" height="96" alt="Welcome to the Centre for Design">
This tells the template system where to find the external files.
The main content area is then replaced with {module-result.content}. This is substituted by the template system with the content for a specific page.
Center for Design at RMIT Case Study
282
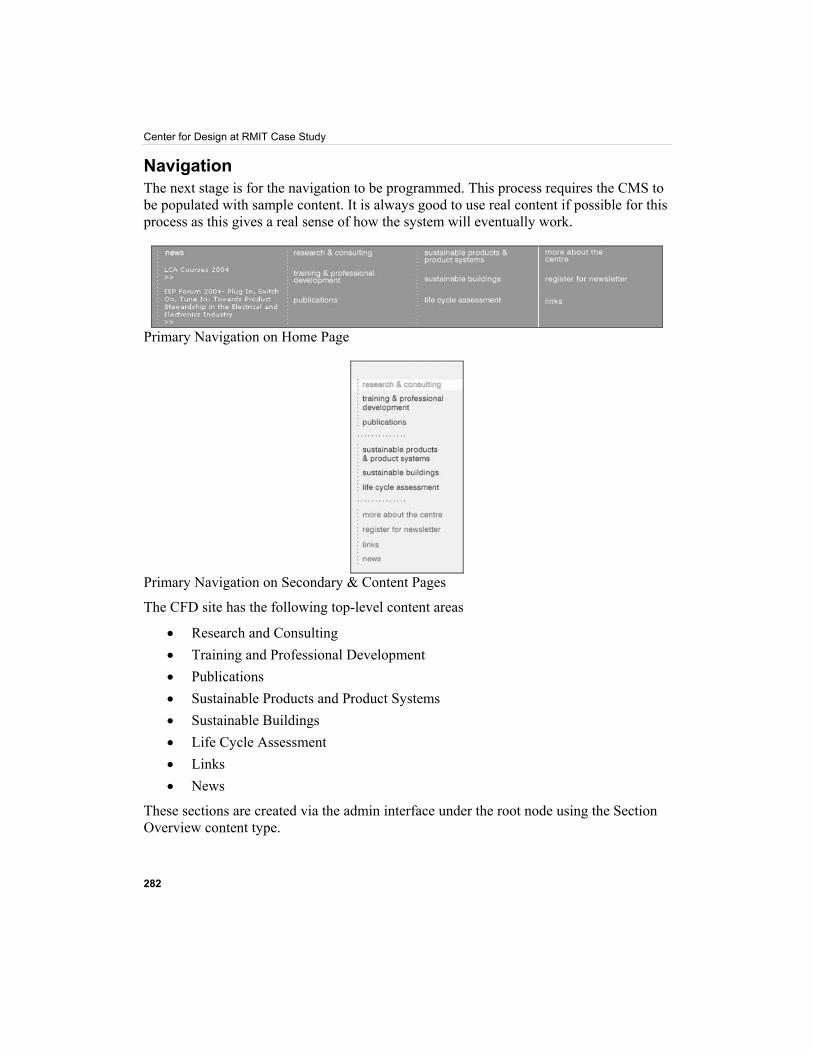
Navigation The next stage is for the navigation to be programmed. This process requires the CMS to be populated with sample content. It is always good to use real content if possible for this process as this gives a real sense of how the system will eventually work.
Primary Navigation on Home Page
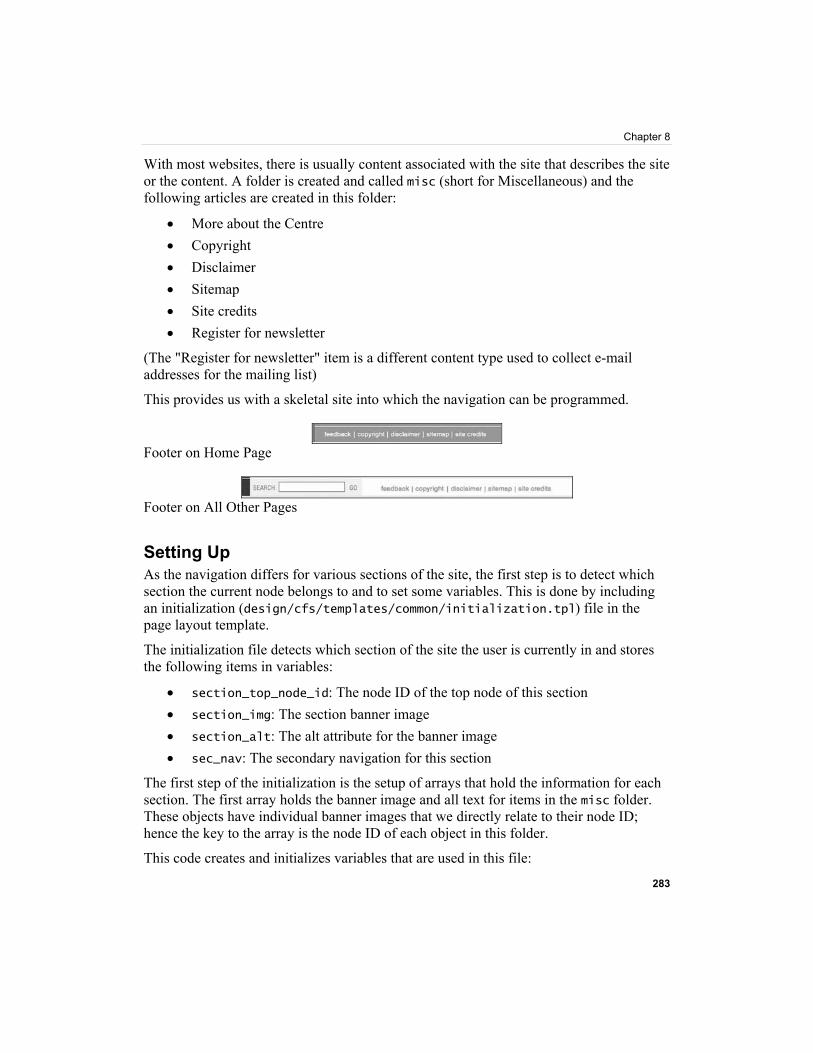
Primary Navigation on Secondary & Content Pages
The CFD site has the following top-level content areas
• Research and Consulting • Training and Professional Development • Publications • Sustainable Products and Product Systems • Sustainable Buildings • Life Cycle Assessment • Links • News
These sections are created via the admin interface under the root node using the Section Overview content type.
Chapter 8
283
With most websites, there is usually content associated with the site that describes the site or the content. A folder is created and called misc (short for Miscellaneous) and the following articles are created in this folder:
• More about the Centre • Copyright • Disclaimer • Sitemap • Site credits • Register for newsletter
(The "Register for newsletter" item is a different content type used to collect e-mail addresses for the mailing list)
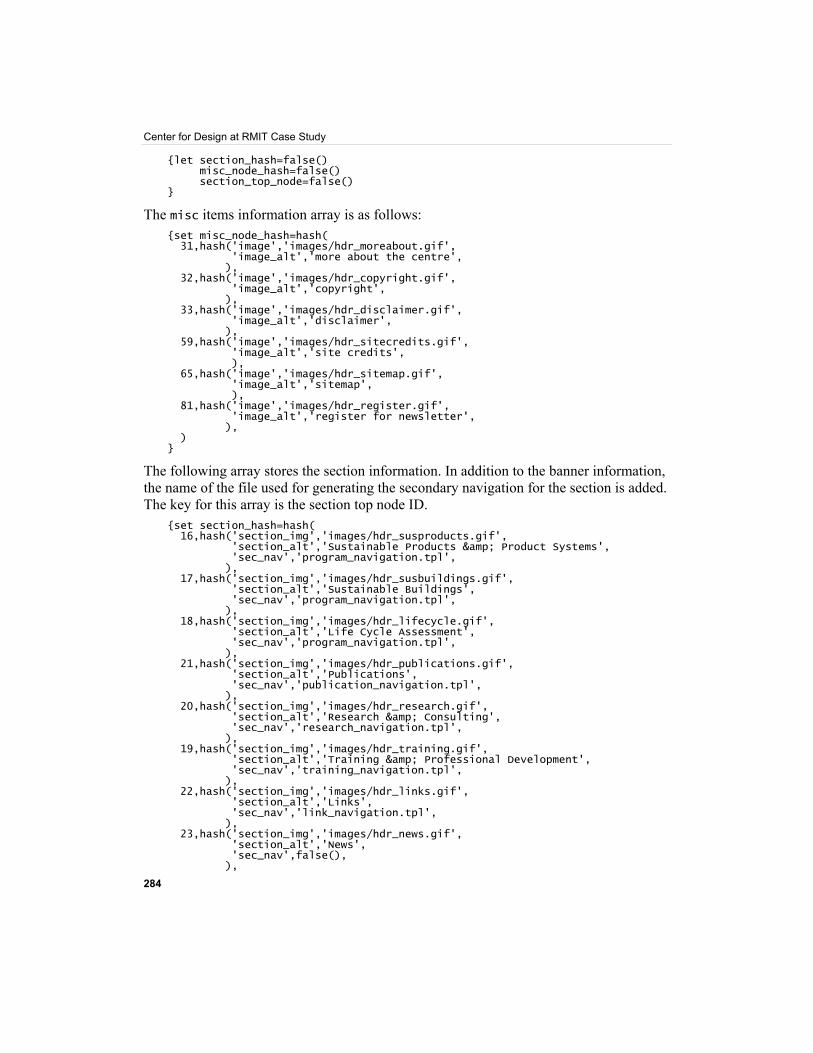
This provides us with a skeletal site into which the navigation can be programmed.
Footer on Home Page
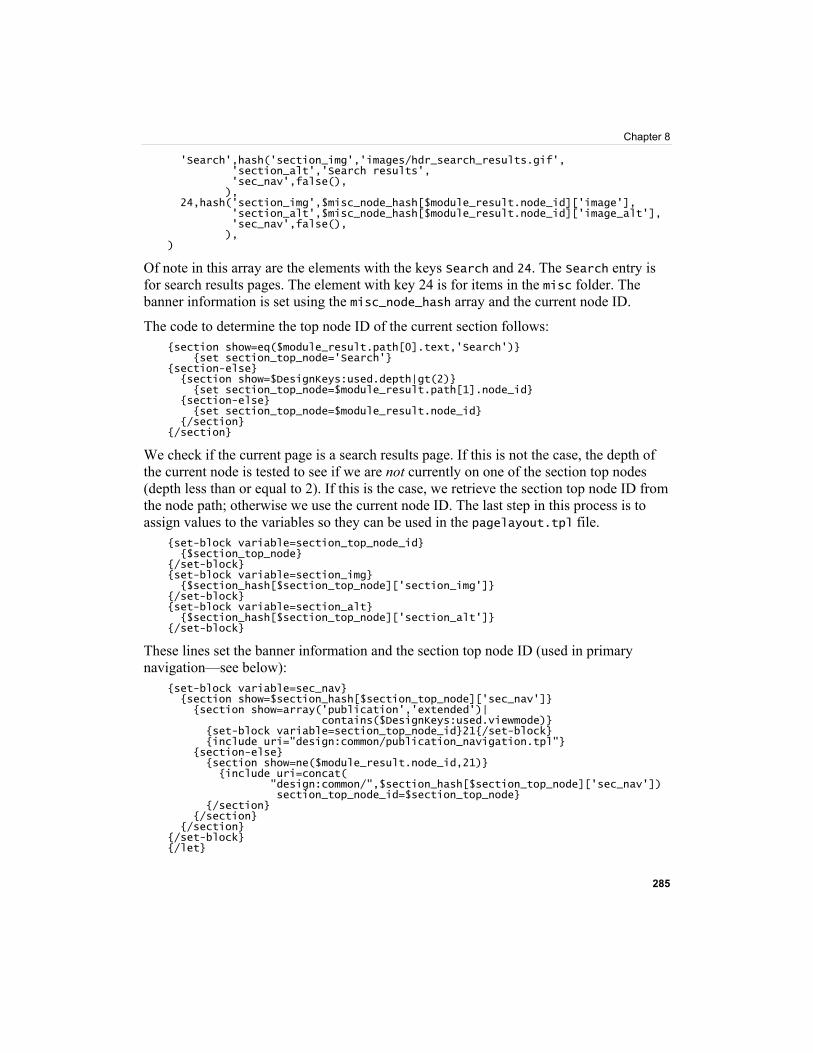
Footer on All Other Pages
Setting Up As the navigation differs for various sections of the site, the first step is to detect which section the current node belongs to and to set some variables. This is done by including an initialization (design/cfs/templates/common/initialization.tpl) file in the page layout template.
The initialization file detects which section of the site the user is currently in and stores the following items in variables:
• section_top_node_id: The node ID of the top node of this section • section_img: The section banner image • section_alt: The alt attribute for the banner image • sec_nav: The secondary navigation for this section
The first step of the initialization is the setup of arrays that hold the information for each section. The first array holds the banner image and all text for items in the misc folder. These objects have individual banner images that we directly relate to their node ID; hence the key to the array is the node ID of each object in this folder.
This code creates and initializes variables that are used in this file:
Center for Design at RMIT Case Study
284
{let section_hash=false() misc_node_hash=false() section_top_node=false() }
The misc items information array is as follows: {set misc_node_hash=hash( 31,hash('image','images/hdr_moreabout.gif', 'image_alt','more about the centre', ), 32,hash('image','images/hdr_copyright.gif', 'image_alt','copyright', ), 33,hash('image','images/hdr_disclaimer.gif', 'image_alt','disclaimer', ), 59,hash('image','images/hdr_sitecredits.gif', 'image_alt','site credits', ), 65,hash('image','images/hdr_sitemap.gif', 'image_alt','sitemap', ), 81,hash('image','images/hdr_register.gif', 'image_alt','register for newsletter', ), ) }
The following array stores the section information. In addition to the banner information, the name of the file used for generating the secondary navigation for the section is added. The key for this array is the section top node ID.
{set section_hash=hash( 16,hash('section_img','images/hdr_susproducts.gif', 'section_alt','Sustainable Products & Product Systems', 'sec_nav','program_navigation.tpl', ), 17,hash('section_img','images/hdr_susbuildings.gif', 'section_alt','Sustainable Buildings', 'sec_nav','program_navigation.tpl', ), 18,hash('section_img','images/hdr_lifecycle.gif', 'section_alt','Life Cycle Assessment', 'sec_nav','program_navigation.tpl', ), 21,hash('section_img','images/hdr_publications.gif', 'section_alt','Publications', 'sec_nav','publication_navigation.tpl', ), 20,hash('section_img','images/hdr_research.gif', 'section_alt','Research & Consulting', 'sec_nav','research_navigation.tpl', ), 19,hash('section_img','images/hdr_training.gif', 'section_alt','Training & Professional Development', 'sec_nav','training_navigation.tpl', ), 22,hash('section_img','images/hdr_links.gif', 'section_alt','Links', 'sec_nav','link_navigation.tpl', ), 23,hash('section_img','images/hdr_news.gif', 'section_alt','News', 'sec_nav',false(), ),
Chapter 8
285
'Search',hash('section_img','images/hdr_search_results.gif', 'section_alt','Search results', 'sec_nav',false(), ), 24,hash('section_img',$misc_node_hash[$module_result.node_id]['image'], 'section_alt',$misc_node_hash[$module_result.node_id]['image_alt'], 'sec_nav',false(), ), )
Of note in this array are the elements with the keys Search and 24. The Search entry is for search results pages. The element with key 24 is for items in the misc folder. The banner information is set using the misc_node_hash array and the current node ID.
The code to determine the top node ID of the current section follows: {section show=eq($module_result.path[0].text,'Search')} {set section_top_node='Search'} {section-else} {section show=$DesignKeys:used.depth|gt(2)} {set section_top_node=$module_result.path[1].node_id} {section-else} {set section_top_node=$module_result.node_id} {/section} {/section}
We check if the current page is a search results page. If this is not the case, the depth of the current node is tested to see if we are not currently on one of the section top nodes (depth less than or equal to 2). If this is the case, we retrieve the section top node ID from the node path; otherwise we use the current node ID. The last step in this process is to assign values to the variables so they can be used in the pagelayout.tpl file.
{set-block variable=section_top_node_id} {$section_top_node} {/set-block} {set-block variable=section_img} {$section_hash[$section_top_node]['section_img']} {/set-block} {set-block variable=section_alt} {$section_hash[$section_top_node]['section_alt']} {/set-block}
These lines set the banner information and the section top node ID (used in primary navigation—see below):
{set-block variable=sec_nav} {section show=$section_hash[$section_top_node]['sec_nav']} {section show=array('publication','extended')| contains($DesignKeys:used.viewmode)} {set-block variable=section_top_node_id}21{/set-block} {include uri="design:common/publication_navigation.tpl"} {section-else} {section show=ne($module_result.node_id,21)} {include uri=concat( "design:common/",$section_hash[$section_top_node]['sec_nav']) section_top_node_id=$section_top_node} {/section} {/section} {/section} {/set-block} {/let}

Center for Design at RMIT Case Study
286
This code block sets the sec_nav variable. For some sections there is no secondary navigation and this variable is empty. Apart from the publication section, this process is simply a matter of including the correct file to generate the navigation.
The following code from the pagepayout.tpl file displays the section banner: <img src={$section_img|ezdesign} alt="{$section_alt}"
width="370" height="26" border="0"><br>
The secondary navigation is simply added in the correct place in the template. The use of the section_top_node_id variable is detailed in the next section.
Primary Navigation: Navigation Highlighted by Border
All of the primary navigation items are hard-coded in to the page layout template using their unique node IDs. We initially used the URL alias feature but found that when a content editor changed the title of an object the URL alias also changed, breaking the hard-coded link.
The new URL Translator feature allows you to bypass this issue and will be implemented in Stage 2.
Chapter 8
287
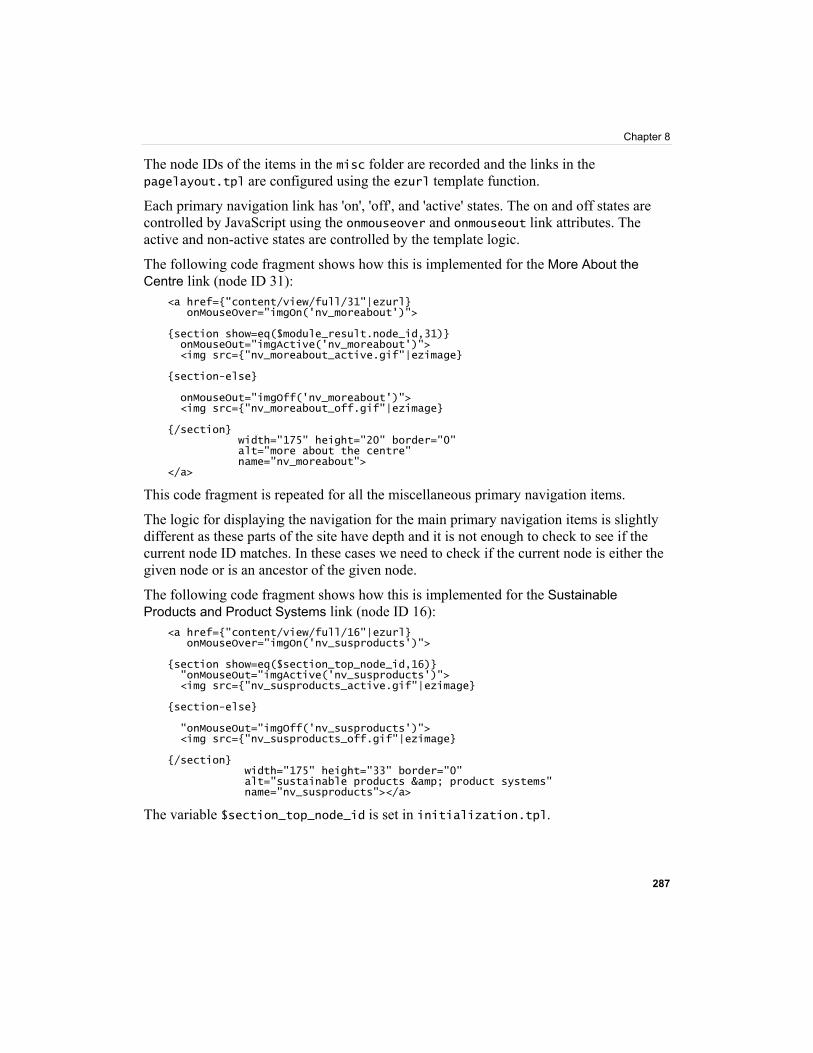
The node IDs of the items in the misc folder are recorded and the links in the pagelayout.tpl are configured using the ezurl template function.
Each primary navigation link has 'on', 'off', and 'active' states. The on and off states are controlled by JavaScript using the onmouseover and onmouseout link attributes. The active and non-active states are controlled by the template logic.
The following code fragment shows how this is implemented for the More About the Centre link (node ID 31):
<a href={"content/view/full/31"|ezurl} onMouseOver="imgOn('nv_moreabout')"> {section show=eq($module_result.node_id,31)} onMouseOut="imgActive('nv_moreabout')"> <img src={"nv_moreabout_active.gif"|ezimage} {section-else} onMouseOut="imgOff('nv_moreabout')"> <img src={"nv_moreabout_off.gif"|ezimage} {/section} width="175" height="20" border="0" alt="more about the centre" name="nv_moreabout"> </a>
This code fragment is repeated for all the miscellaneous primary navigation items.
The logic for displaying the navigation for the main primary navigation items is slightly different as these parts of the site have depth and it is not enough to check to see if the current node ID matches. In these cases we need to check if the current node is either the given node or is an ancestor of the given node.
The following code fragment shows how this is implemented for the Sustainable Products and Product Systems link (node ID 16):
<a href={"content/view/full/16"|ezurl} onMouseOver="imgOn('nv_susproducts')"> {section show=eq($section_top_node_id,16)} "onMouseOut="imgActive('nv_susproducts')"> <img src={"nv_susproducts_active.gif"|ezimage} {section-else} "onMouseOut="imgOff('nv_susproducts')"> <img src={"nv_susproducts_off.gif"|ezimage} {/section} width="175" height="33" border="0" alt="sustainable products & product systems" name="nv_susproducts"></a>
The variable $section_top_node_id is set in initialization.tpl.
Center for Design at RMIT Case Study
288
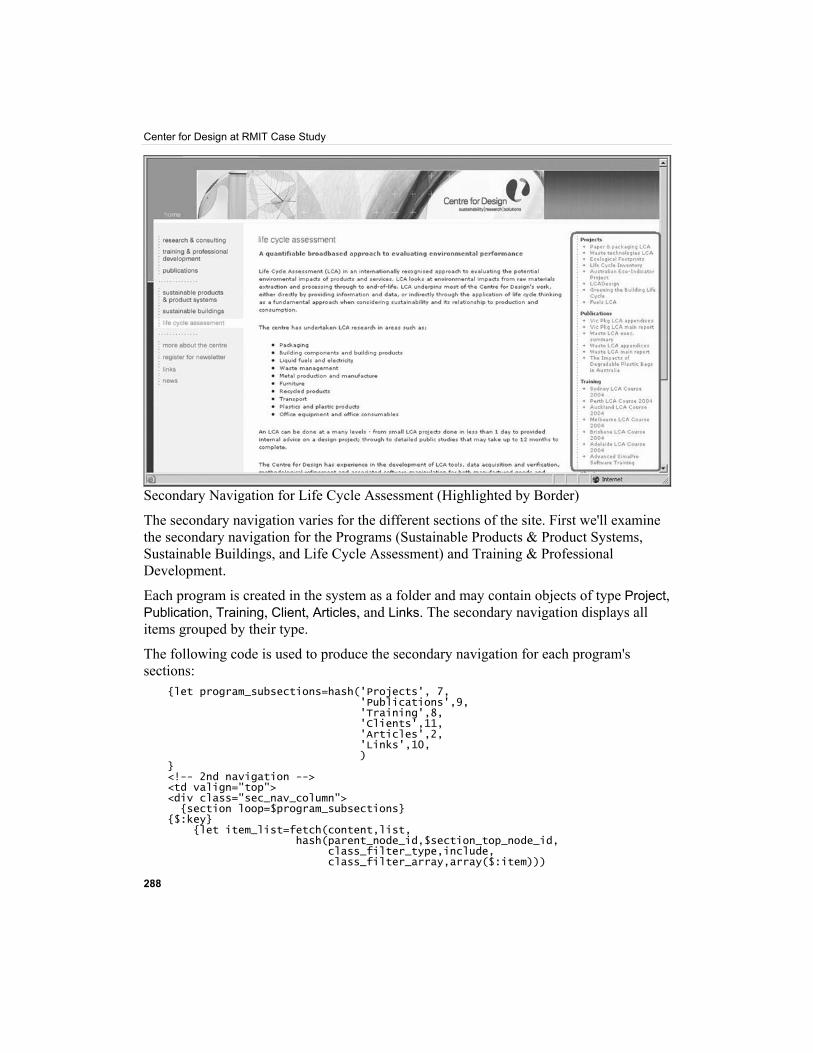
Secondary Navigation for Life Cycle Assessment (Highlighted by Border)
The secondary navigation varies for the different sections of the site. First we'll examine the secondary navigation for the Programs (Sustainable Products & Product Systems, Sustainable Buildings, and Life Cycle Assessment) and Training & Professional Development.
Each program is created in the system as a folder and may contain objects of type Project, Publication, Training, Client, Articles, and Links. The secondary navigation displays all items grouped by their type.
The following code is used to produce the secondary navigation for each program's sections:
{let program_subsections=hash('Projects', 7, 'Publications',9, 'Training',8, 'Clients',11, 'Articles',2, 'Links',10, ) } <!-- 2nd navigation --> <td valign="top"> <div class="sec_nav_column"> {section loop=$program_subsections} {$:key} {let item_list=fetch(content,list, hash(parent_node_id,$section_top_node_id, class_filter_type,include, class_filter_array,array($:item)))
Chapter 8
289
} <ul> {section show=$item_list} {section loop=$item_list} <li><a href={$:item.object.main_node.url_alias|ezurl}> {$:item.name}</a></li> {/section} {section-else} <li>No Items</li> {/section} </ul> {/let} {/section} </div></td> <!-- end 2nd navigation --> {/let}
First we define an array of headings and their corresponding class IDs. This array is then looped and for each class type:
• The heading is outputted. • All objects of that type that belong to the current program area
($section_top_node_id) are retrieved. • Links to the objects are outputted.
If no objects of a particular type exist, the text No Items is outputted.
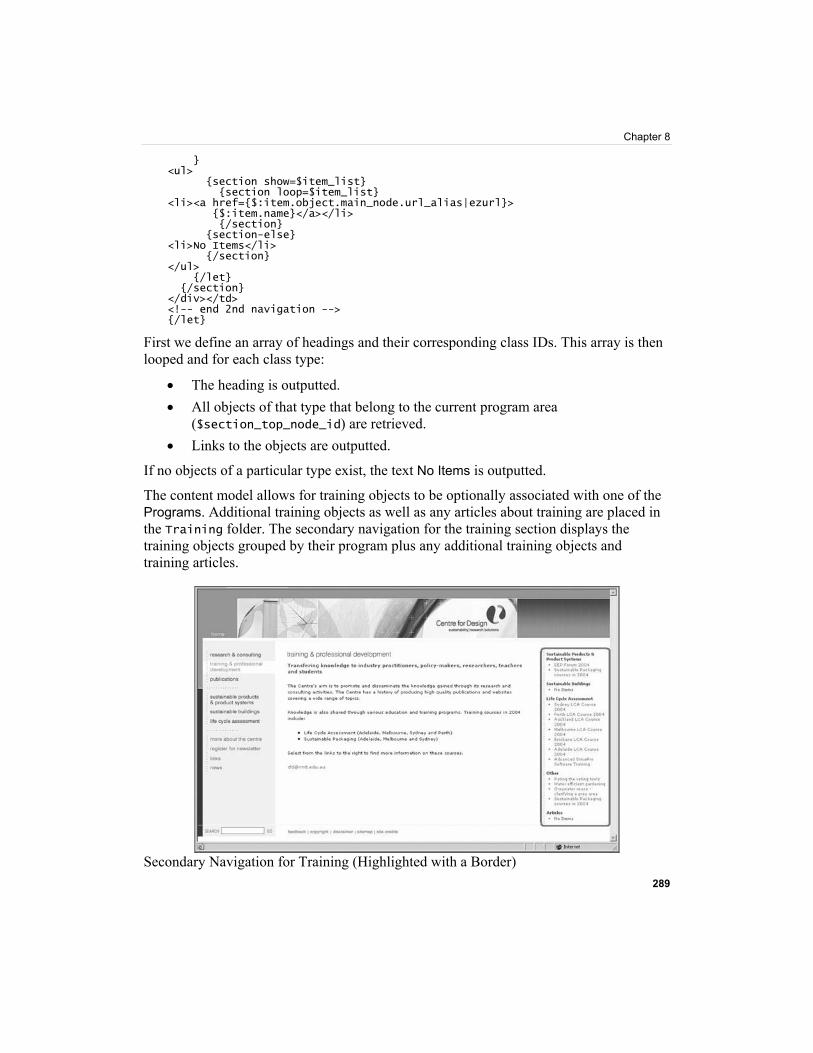
The content model allows for training objects to be optionally associated with one of the Programs. Additional training objects as well as any articles about training are placed in the Training folder. The secondary navigation for the training section displays the training objects grouped by their program plus any additional training objects and training articles.
Secondary Navigation for Training (Highlighted with a Border)
Center for Design at RMIT Case Study
290
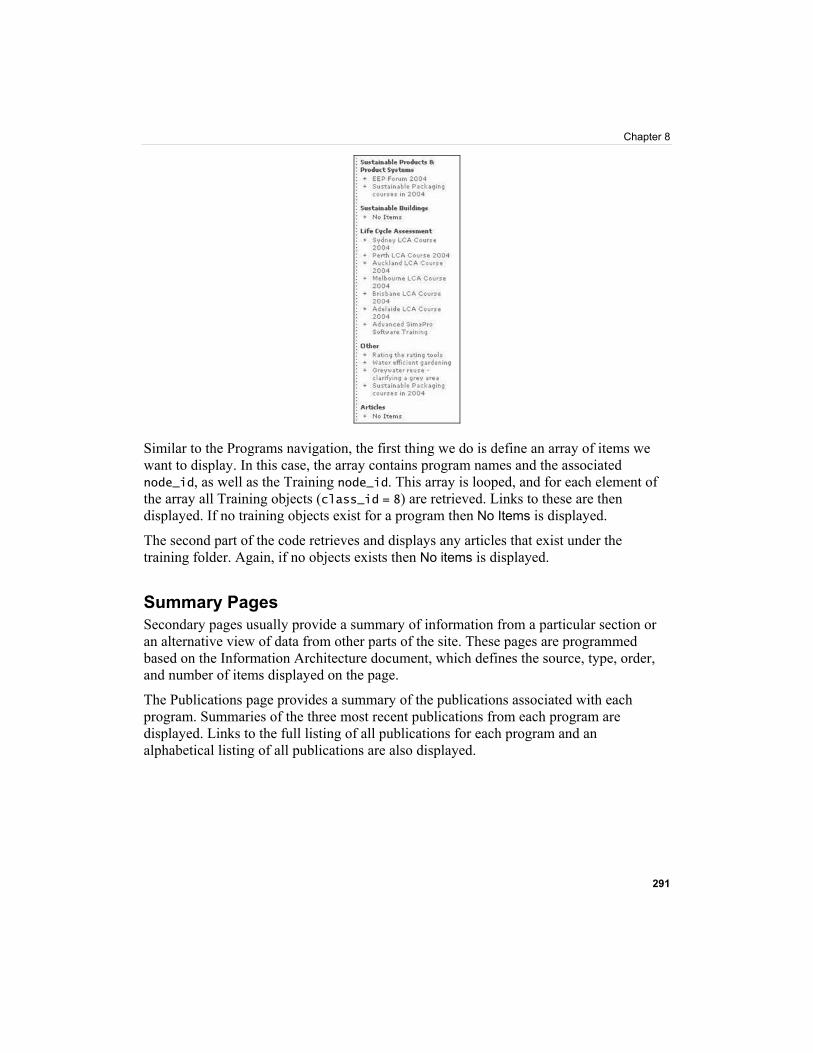
The following code is used to produce the secondary navigation for the Training section: { let programs=hash( 'Sustainable Products & Product Systems', 16, 'Sustainable Buildings',17, 'Life Cycle Assessment',18, 'Other',19 ) } <!-- 2nd navigation --> <td valign="top"> <div class="sec_nav_column"> {* list training *} {section loop=$programs} {$:key} { let item_list=fetch(content,list, hash(parent_node_id,$:item, class_filter_type,include, class_filter_array,array(8))) } <ul> {section loop=$item_list show=$item_list} <li><a href={$:item.object.main_node.url_alias|ezurl}> {$:item.name}</a> </li> {section-else} {* no matching content *} <li>No Items</li> {/section} </ul> {/let} {/section} {* list articles *} { let articles=fetch(content,list, hash(parent_node_id,$section_top_node_id, class_filter_type,include, class_filter_array,array(2))) } Articles <ul> {section show=$articles} {section loop=$articles} <li><a href={$:item.object.main_node.url_alias|ezurl}>{$:item.name}</a></li> {/section} {section-else} <li>No Items</li> {/section} </ul> {/let} </div></td> <!-- end 2nd navigation --> {/let}
Chapter 8
291
Similar to the Programs navigation, the first thing we do is define an array of items we want to display. In this case, the array contains program names and the associated node_id, as well as the Training node_id. This array is looped, and for each element of the array all Training objects (class_id = 8) are retrieved. Links to these are then displayed. If no training objects exist for a program then No Items is displayed.
The second part of the code retrieves and displays any articles that exist under the training folder. Again, if no objects exists then No items is displayed.
Summary Pages Secondary pages usually provide a summary of information from a particular section or an alternative view of data from other parts of the site. These pages are programmed based on the Information Architecture document, which defines the source, type, order, and number of items displayed on the page.
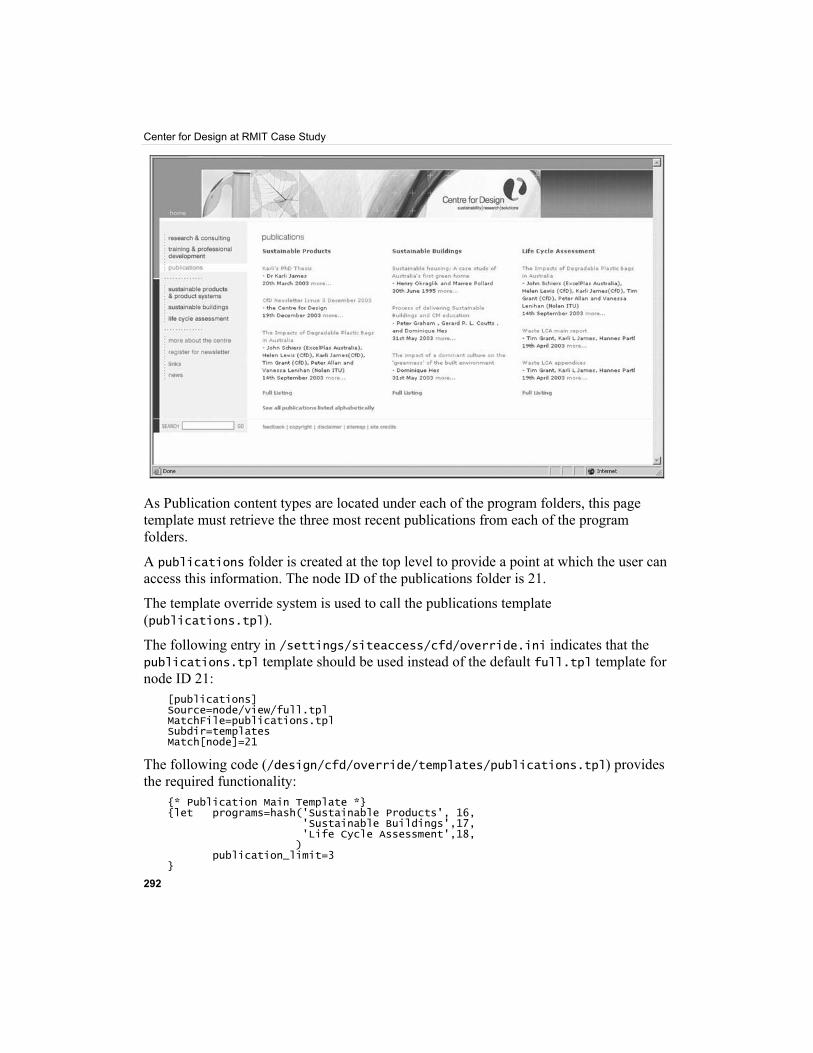
The Publications page provides a summary of the publications associated with each program. Summaries of the three most recent publications from each program are displayed. Links to the full listing of all publications for each program and an alphabetical listing of all publications are also displayed.
Center for Design at RMIT Case Study
292
As Publication content types are located under each of the program folders, this page template must retrieve the three most recent publications from each of the program folders.
A publications folder is created at the top level to provide a point at which the user can access this information. The node ID of the publications folder is 21.
The template override system is used to call the publications template (publications.tpl).
The following entry in /settings/siteaccess/cfd/override.ini indicates that the publications.tpl template should be used instead of the default full.tpl template for node ID 21:
[publications] Source=node/view/full.tpl MatchFile=publications.tpl Subdir=templates Match[node]=21
The following code (/design/cfd/override/templates/publications.tpl) provides the required functionality:
{* Publication Main Template *} {let programs=hash('Sustainable Products', 16, 'Sustainable Buildings',17, 'Life Cycle Assessment',18, ) publication_limit=3 }
Chapter 8
293
We begin by creating an array of the program types and their node IDs along with a publication_limit variable. The publication_limit variable allows us to easily change the number of publications displayed.
Next, the programs array is looped through. For each program, we retrieve the three most recent (sort_by,array(published,false())) publication objects (class_filter_type, include, class_filter_array,array(9)) that are children of the current program (parent_node_id,$:item).
<div style="width: 100%;"> <table border="0" cellpadding="0" cellspacing="0" align="left" width="100%"> <tr> {section loop=$programs} <td valign="top" width="33%"> <div class="heading_2">{$:key}</div> {* Display 3 most recent items *} {let publications=fetch(content,list, hash(parent_node_id,$:item, class_filter_type,include, class_filter_array,array(9), sort_by,array(published,false()), limit,$publication_limit ) ) }
A summary of each of the retrieved publications is displayed using the node_view_gui function with the line view mode. (The use of alternative view modes will be examined in detail in the next section.)
{section name=Publication loop=$publications} {node_view_gui view=line content_node=$Publication:item} {/section} {/let} {delimiter} </td> <td><img src={"images/spacer.gif"|ezdesign} alt="" width="30" height="1" border="0"></td> {/delimiter} {/section} {* programs *} </tr> <tr> <td colspan="5"> </td> </tr> <tr>
This process is repeated for all programs defined in the programs array. The {delimiter} option of the section loop is used to close table data tags and place a spacer cell between the program columns.
The programs array is then looped again to produce the links to the full listing of publications for each program:
{section loop=$programs} <td colspan="2"> <a href={concat('content/view/publication/',$:item)|ezurl}> <b>Full Listing</b></a></td> {/section} </tr> <tr>
Center for Design at RMIT Case Study
294
<td colspan="5"> </td> </tr> <tr> <td colspan="5"><a href={concat("content/view/allpublications /",$node.node_id)|ezurl}><b>See all publications listed alphabetically</b></a></td> </tr> </table> {/let} </div>
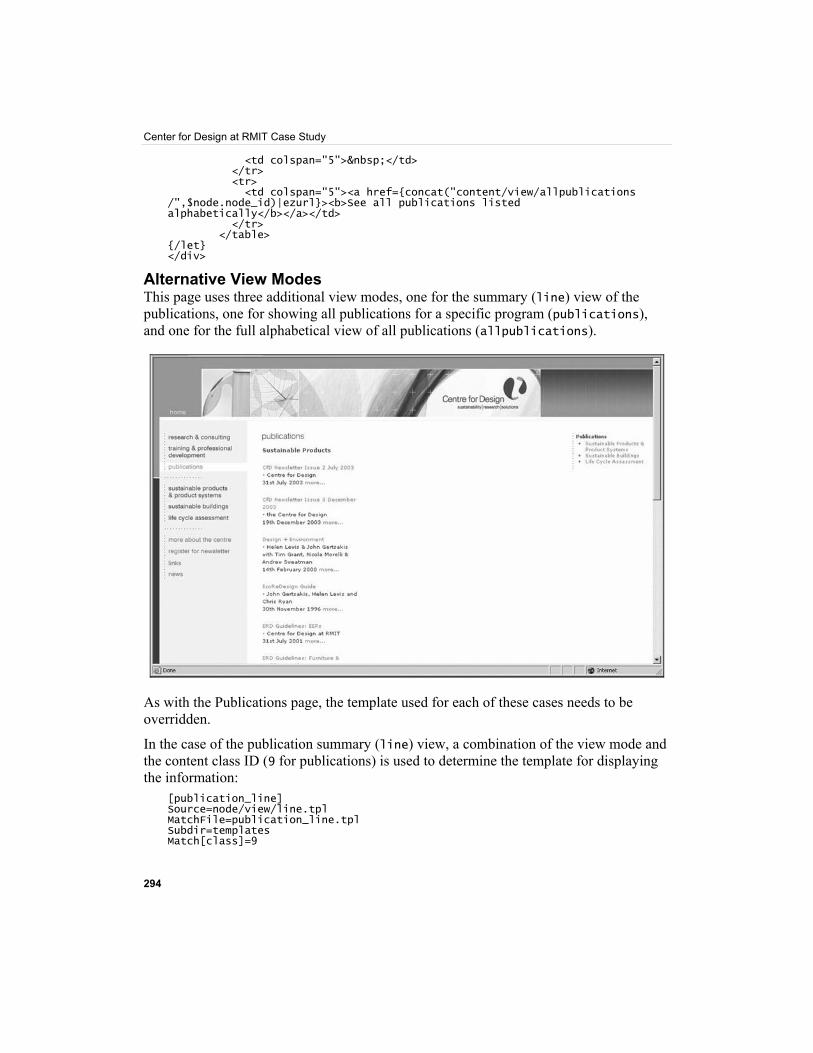
Alternative View Modes This page uses three additional view modes, one for the summary (line) view of the publications, one for showing all publications for a specific program (publications), and one for the full alphabetical view of all publications (allpublications).
As with the Publications page, the template used for each of these cases needs to be overridden.
In the case of the publication summary (line) view, a combination of the view mode and the content class ID (9 for publications) is used to determine the template for displaying the information:
[publication_line] Source=node/view/line.tpl MatchFile=publication_line.tpl Subdir=templates Match[class]=9
Chapter 8
295
This results in the file design/cfd/override/templates/publication_line.tpl being used when publications are displayed with the line view mode.
The link that displays a full listing of publications for a specific program will look like /content/view/publication/16. The system interprets this to display node ID 16 using the publication view mode.
There is no need to create an override.ini setting for this view mode. It is simply a matter of creating the design/cfd/templates/node/view/publications.tpl file. The same applies to the template to display all publications (design/cfd/templates/node/view/allpublications.tpl).
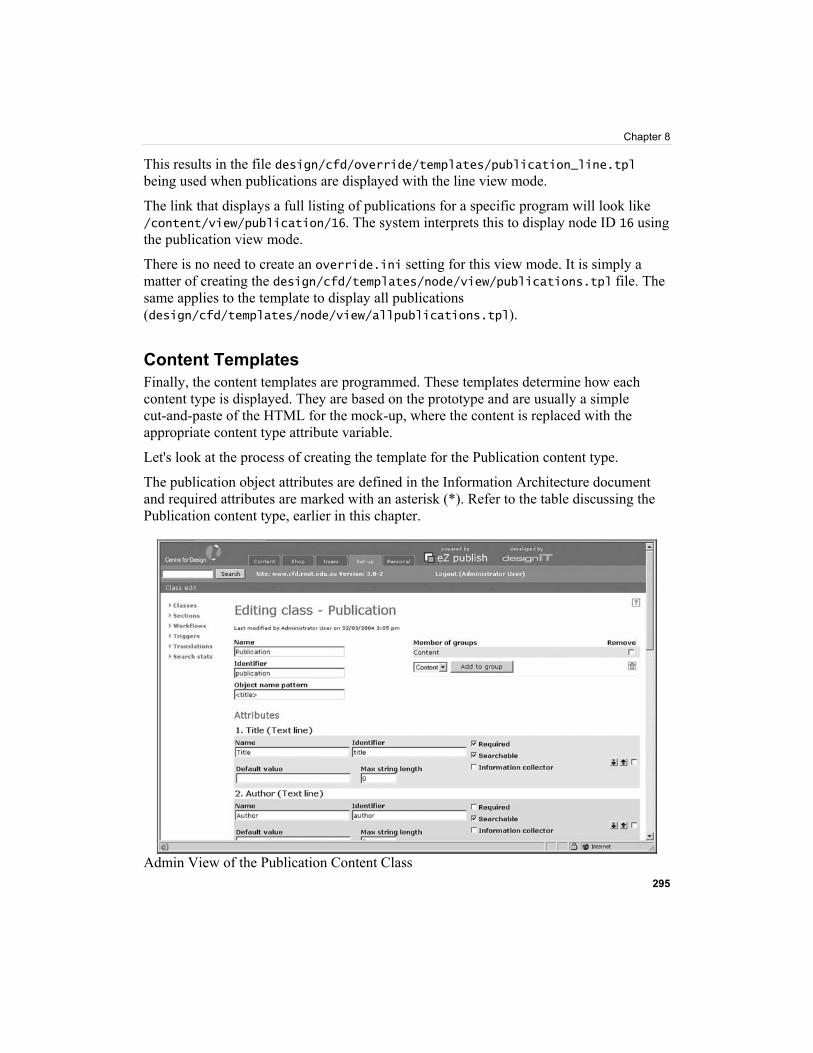
Content Templates Finally, the content templates are programmed. These templates determine how each content type is displayed. They are based on the prototype and are usually a simple cut-and-paste of the HTML for the mock-up, where the content is replaced with the appropriate content type attribute variable.
Let's look at the process of creating the template for the Publication content type.
The publication object attributes are defined in the Information Architecture document and required attributes are marked with an asterisk (*). Refer to the table discussing the Publication content type, earlier in this chapter.
Admin View of the Publication Content Class
Center for Design at RMIT Case Study
296
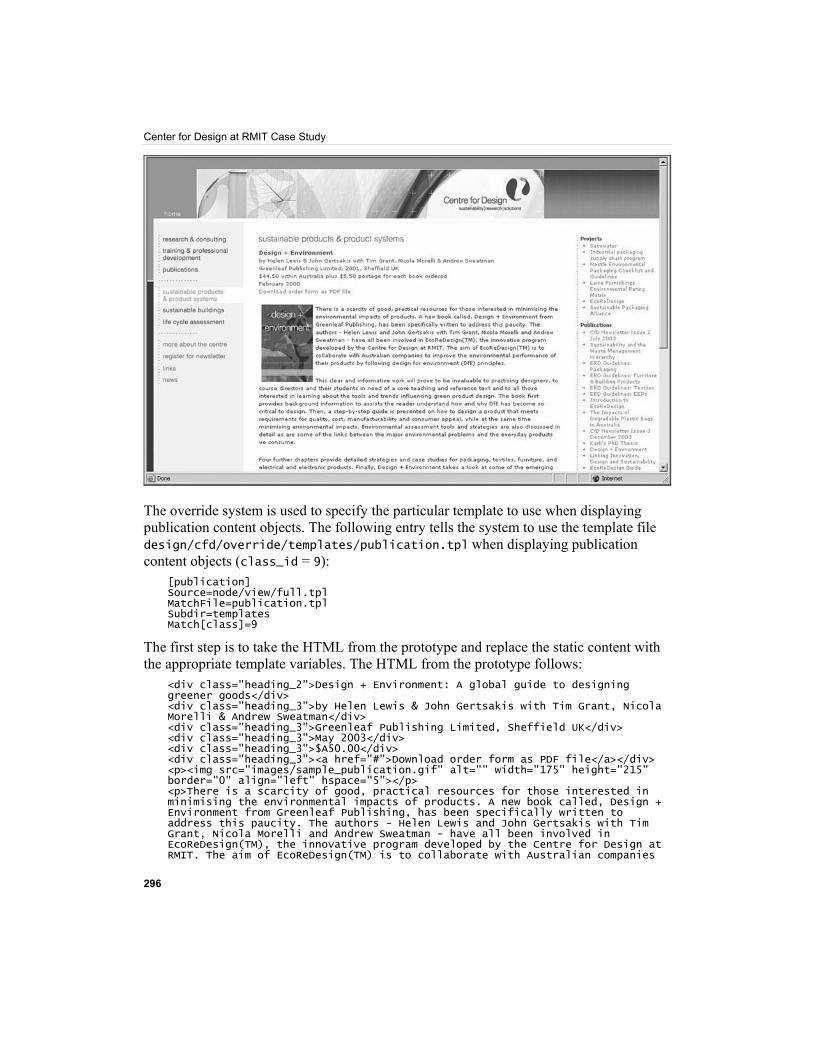
The override system is used to specify the particular template to use when displaying publication content objects. The following entry tells the system to use the template file design/cfd/override/templates/publication.tpl when displaying publication content objects (class_id = 9):
[publication] Source=node/view/full.tpl MatchFile=publication.tpl Subdir=templates Match[class]=9
The first step is to take the HTML from the prototype and replace the static content with the appropriate template variables. The HTML from the prototype follows:
<div class="heading_2">Design + Environment: A global guide to designing greener goods</div> <div class="heading_3">by Helen Lewis & John Gertsakis with Tim Grant, Nicola Morelli & Andrew Sweatman</div> <div class="heading_3">Greenleaf Publishing Limited, Sheffield UK</div> <div class="heading_3">May 2003</div> <div class="heading_3">$A50.00</div> <div class="heading_3"><a href="#">Download order form as PDF file</a></div> <p><img src="images/sample_publication.gif" alt="" width="175" height="215" border="0" align="left" hspace="5"></p> <p>There is a scarcity of good, practical resources for those interested in minimising the environmental impacts of products. A new book called, Design + Environment from Greenleaf Publishing, has been specifically written to address this paucity. The authors - Helen Lewis and John Gertsakis with Tim Grant, Nicola Morelli and Andrew Sweatman - have all been involved in EcoReDesign(TM), the innovative program developed by the Centre for Design at RMIT. The aim of EcoReDesign(TM) is to collaborate with Australian companies

Chapter 8
297
to improve the environmental performance of their products by following design for environment (DfE) principles. </p> <p>This clear and informative work will prove to be invaluable to practising designers, to course directors and their students in need of a core teaching and reference text and to all those interested in learning about the tools and trends influencing green product design. The book first provides background information to assists the reader understand how and why DfE has become so critical to design. Then, a step-by-step guide is presented on how to design a product that meets requirements for quality, cost, manufacturability and consumer appeal, while at the same time minimising environmental impacts. Environmental assessment tools and strategies are also discussed in detail as are some of the links between the major environmental problems and the everyday products we consume. </p> <p>Four further chapters provide detailed strategies and case studies for packaging, textiles, furniture, and electrical and electronic products. Finally, Design + Environment takes a look at some of the emerging trends in DfE that offer opportunities to significantly reduce environmental impacts. </p> <p>Design + Environment is available from the Centre for Design at RMIT.</p>
After replacing the sample content with the appropriate template variables, we end up with the following code in /design/cfd/override/templates/publication.tpl:
{default content_object=$node.object content_version=$node.contentobject_version_object} <div class="heading_2"> {attribute_view_gui attribute=$content_version.data_map.title} </div> <div class="heading_3">by {attribute_view_gui attribute=$content_version.data_map.author} </div> <div class="heading_3"> {attribute_view_gui attribute=$content_version.data_map.publisher} </div> <div class="heading_3"> {attribute_view_gui attribute=$content_version.data_map.cost} </div> <div class="heading_3">{$content_version.data_map.date.data_int|datetime(custom,"F %Y")}</div> <div class="heading_3"> <a href={concat("content/download/", $content_version.data_map.order_form.contentobject_id, "/", $content_version.data_map.order_form.id, "/file/", $content_version.data_map.order_form.content.original_filename)|ezurl}> Download order form as PDF file</a></div> <p>{attribute_view_gui attribute=$content_object.data_map.image alignment=left hspace=5 vspace=0 image_class=medium}</p> {attribute_view_gui attribute=$content_version.data_map.description} {/default}
The next step is to add some code so that any non-mandatory attributes (and associated static information such as a label) are not displayed. Mandatory attributes are indicated with an * in the content type table (refer back to the Content Types section). In this case only the title, author, and description of content attributes are mandatory. The final code follows:
{default content_object=$node.object content_version=$node.contentobject_version_object} <div class="heading_2">{attribute_view_gui attribute=$content_version.data_map.title}</div>

Center for Design at RMIT Case Study
298
<div class="heading_3">by {attribute_view_gui attribute=$content_version.data_map.author}</div> {section show=$content_version.data_map.publisher.content} <div class="heading_3">{attribute_view_gui attribute=$content_version.data_map.publisher}</div>{/section} {section show=$content_version.data_map.cost.content} <div class="heading_3">{attribute_view_gui attribute=$content_version.data_map.cost}</div>{/section} <div class="heading_3">{$content_version.data_map.date.data_int|datetime(custom,"F %Y")}</div> {section show=$content_version.data_map.order_form.content} <div class="heading_3"><a href={concat("content/download/",$content_version.data_map.order_form.contentobject_id,"/",$content_version.data_map.order_form.id,"/file/",$content_version.data_map.order_form.content.original_filename)|ezurl}> {section show=$content_version.data_map.order_form_description.content}{attribute_view_gui attribute=$content_version.data_map.order_form_description} {section-else} Download order form as PDF file {/section} </a></div> {/section} {section show=$content_object.data_map.image.content}<p>{attribute_view_gui attribute=$content_object.data_map.image alignment=left hspace=5 vspace=0 image_class=medium}</p>{/section} {attribute_view_gui attribute=$content_version.data_map.description} {/default}
The order form is a binary file datatype. This code checks whether an order form has been uploaded as part of the object by checking if there is data in $content_version.data_map.order_form_description.content. If yes, the appropriate link is generated. If a description of the binary file is present then the link is displayed, otherwise the text Download order form as PDF file is displayed:
{section show=$content_version.data_map.order_form_description.content}{attribute_view_gui attribute=$content_version.data_map.order_form_description} {section-else} Download order form as PDF file {/section}
Testing whether an attribute is empty is relatively straightforward (and is much easier now with the introduction of the is_empty function in the current version of eZ publish). For most attributes, if there is no associated content, the value content (such as $content_object.data_map.publication.content) is set to false.
Testing Leaving testing until the end of the project is usually a bad idea, because making changes at that stage is far more time consuming and expensive. We perform testing as a part of each stage of the project to minimize the chance of things going wrong later.
Chapter 8
299
Requirements We tested the requirements by reviewing them with the client and then with other staff within the organization that published content on the existing site. Different people may have different issues that their manager might not be aware of. Talking to more than one person gave us a more rounded and complete view.
We then thoroughly analyzed the existing site to ensure that the functionality set out in the requirements would cover all of the content the client currently published.
Specifications Normally a specification document is quite technical and difficult for clients to review. We ensured that the specification document had the visual representations such as wireframes as well as technical details, so that the client was able to understand and provide meaningful feedback. We also got examples of real content and used them as a part of the specification. Using dummy data or made-up examples increases risk. With real examples we were able to pick up issues such as long titles for content and made sure that the datatypes we applied were correct.
Implementation The majority of the testing was done with the HTML prototype to ensure that it not only accommodated the information design, but also worked in the required browsers and operating systems for the specified screen resolutions (discussed in the HTML Prototype section).
Functional Testing Once the site was finished, it was simply a matter of going through every element of the site entering several examples of each content type into the system and cross checking against the HTML prototype to make sure that the CMS produced exactly what the client expected. As the HTML used to create the prototype was the same HTML used to create the templates in the CMS and that had already been tested, we minimized the risk of errors.
Content Population This is the final test of correctness and functionality. After the training sessions, we provided the client with access to the site for content population. During this phase, we used a web-based issue tracking system (Mantis) so that the client could record any issues that arose during content population. Before putting the site live, we ensured that all the issues were resolved.
Center for Design at RMIT Case Study
300
Deployment Deployment involves the configuration of the live web server to mirror the configuration of the development server and the copying of the entire eZ publish directory to the live server.
With the CFD project, we were able to run the new site in parallel with the existing site and simply reconfigure the DNS to point to the new site once the client gave approval.
Our experience with CMS-based sites is that the client must start content population before the entire site is finished. Before the site is opened to the client to start content population it is important to ensure that the underlying structures are sound; once content population starts changes in the underlying content types may result in data having to be input again.
Maintenance and Support During the development of this site, a maintenance release of the eZ publish CMS system was released. The upgrade proved to be a painless process and fixed a number of issues that were not affecting this project.
The site has been live for 5 months and has required minimal maintenance. There is a formal support package being drafted to cover helpdesk-type issues and to manage upgrades to new versions of eZ publish. When notified by eZ systems of any security patches that need to be applied, they are applied immediately to all installations.
Training Even though the eZ publish admin interface is simple and easy to use, we knew from previous implementations that training was very important on two levels. Firstly, we found it was useful for people using the CMS to understand how it worked, how a CMS wasn't just a normal website, and to think of content as separate from how it was presented on the website. Secondly, it was important to familiarize people with the main functions provided by the admin screens.
We conducted two training sessions based on a training manual we had written for a previous project, which we then customized for this project. The training manual was broken down into five main areas:
• What is a CMS: The key message for this section was to explain that a CMS is made up of different layers that combine to produce the site. These layers, the content, the display templates, and the rules for how the content and templates combine, together create the website.
Chapter 8
301
• General functions: The purpose of this section was to help familiarize people with the main areas of the eZ publish admin interface and how to navigate.
• Folders: This part of the manual talked about how the content was structured in the same way that files are stored in folders on computer. It also explained that there were rules that meant only certain content types could be put in certain folders.
• Managing content: This was the largest part of the manual and covered all of the functions that people would need to enter, preview, and manage content, including reverting to a previous version of an article.
• Formatting: Most of the formatting was covered by the templates but formatting could be applied to some areas. This part of the manual explained how to use the online editor or to use the standard formatting tags allowed by the CMS.
Project Assessment The entire project took just under eight months. However, when you look at the breakdown of the project, you can see that the actual development was less than a quarter of the time of the entire project. In fact, the bulk of the time taken was in the gathering of requirements and specification phases of the project.
• Requirements – 2 months (elapsed) • Specification – 2 months (elapsed) • Development – 1.5 months (full time) • Testing – 1 week • Content Population & Review – 1.5 months (elapsed time)
Requirements and Specification Phases The requirements and specification phases did not have a set timeframe. Both of these phases included discovery, which took longer than expected. Given the nature of gathering requirements, the need to review and analyze, it is hard and potentially dangerous to put a set timeframe on this phase.
With the specification phase, the difficulty of getting everyone together and facilitating feedback impacted the completion time. Had there been a set deadline, these phases could have been shortened.
Center for Design at RMIT Case Study
302
Development Phase Development was planned out in detail and was to cover four weeks.
Week One • Commence build of interface templates • Install eZ publish • Configure content classes and sections
Week Two • Complete build of interface templates • Configure roles and permissions • Apply logic display and template framework
Week Three • Apply interface templates to eZ publish • Implement site search • Implement sitemap
Week Four • Test and review functionality
In reality, the development took six weeks to complete. The main cause for delay was the review and update of the interface templates. The actual development time was close to what we had planned but we did not allow enough time for client reviews, which pushed the timeframe out.
This was the third site we completed with the eZ publish CMS, and while it was quite straightforward, we found that the lack of documentation meant that a significant amount of time was spent in research, trial and error, and code review of the CMS system itself.
With each new eZ publish site we complete, our knowledge of the system increases, and accordingly the quality of the implementation. It must be noted that the amount and quality of documentation has increased dramatically since the completion of this project.
Chapter 8
303
Content Population and Review Phase Given the amount of content and time pressure on the client, we allowed three weeks for content population. From previous experience, we knew that although we had fully tested all functionality, certain potential issues wouldn't arise until the site was populated with content.
After three weeks, the site was still not fully populated. We had underestimated the amount of work required to take content from the existing site and shape it to fit the structure of the content types in the CMS. There were also some policy issues that arose during this phase. The client decided to push back the deadline by two weeks to allow for these issues to be resolved.
On this, as well as other implementations, we found that unless the content is well prepared ahead of time, content population will always extend to the full time allowed and often take longer. A bit like a gas, it extends to fill the space allowed. This is big risk if there is a set deadline and it's important to ensure that the client understands how much work is involved in populating a site. Implementing the CMS is like setting the structure for a book; someone still has to write the content, and this is a significant task that should be planned for. In every implementation we have done, content population has taken longer than development.
Extending the Site Before development commenced, we knew that we would have to address workflow as a part of Stage 2. During the testing and content population phases, other improvements were identified that would also form a part of Stage 2. We advised the client that we should note down all these requests to review after the site had gone live. In previous implementations, we found that what we thought should be added as a priority in Stage 2 hasn't always turned out to be the case. What we think we need and what proves to be valuable aren't always the same.
Three months after the site went live, we met with the client to review how things were going with the management of the site and how the public were reacting. What we found was the design and structure of the site was received well and didn't need any revision. We also found that the functionality was more than adequate.
Workflow Although it was seen as important early on in the project, the need for workflow wasn't that important. The creation and review of content was being handled well as a manual system. The cost and effort for implementing workflow outweighed the benefits that it would bring.
Center for Design at RMIT Case Study
304
Archiving Before the site went live, we had identified that the way the sub-navigation was displayed would become unwieldy if there was a lot of content. We discussed possible solutions, the main one being the ability to put content into an archive so only the most recent or most important content would be displayed as a part of the sub-navigation in the section pages. It was agreed that an archive facility would be added as part of Stage 2.
Integration with CRM What wasn't important earlier but became a priority was the ability to automate the registration for newsletters from the site into the CRM software used by the client. This project is to be scoped out in more depth soon.
Summary This was our third implementation using eZ publish and was done at a time when the product was rapidly evolving and there was lack of important documentation. Very few details existed on how to best implement the system and we had to work out things along the way both in terms of process and implementation. We learned some valuable lessons that made future implementations much easier.
The most important lesson we learned was the value of receiving all of the content upfront. The requirements contained some complex rules for publishing content in different areas. This meant the specification became more complex, in particular the content model and display templates, which also made development harder. Having more of the content upfront, we could have better tested the validity of the requirements and simplified some of the rules, which would have made the specification and development phases easier without affecting the quality of the end result.
Another lesson learned was with our approach to building the HTML prototype. We used traditional layout techniques, i.e. heavy use of tables. We have since found that using an XHTML/CSS approach (i.e. all layout and styling defined in the CSS) we can dramatically reduce the amount of time it takes to convert the HTML prototype to eZ publish templates. It also reduces the page size, and increases accessibility and performance. This method fits in well with the modular approach to content that eZ publish dictates and has been very successful in subsequent projects. We are now converting the CFD site to XHTML/CSS to make any further changes easier to manage.
On the whole, we've found that the more time spent upfront, analyzing requirements, understanding the client, their needs, and their content leads to a much smoother implementation and a better end result. The better we understand the client's domain and their content, the better the solution we can come up with. In subsequent projects,
Chapter 8
305
although the time spent in the requirements and specification phases has slightly increased, the time taken in the development phases has decreased significantly.
Finally, the task of creating, entering, and shaping content should not be underestimated. No matter how well structured the information architecture, how efficient the implementation, how elegant the design, or impressive the use of XHTML/CSS, it all becomes meaningless without quality content. The result of all this hard work is merely a system for managing content—and the system is only as good as the content itself.
