celtic knot squares - babajezas wundertüte · pdf filernd. 3. decide how big you want to...
TRANSCRIPT

Celtic Knot Squares Carola Wijma August 2010
Copyright © Carola Wijma 2010
My patterns are for personal use only and should not be used to crochet or knit items for sale.
1 2

Nederlands UK USA
Losse Chain (ch) Chain (ch )
Halve vaste Slip Stitch (sl st) Slip Stitch (sl st )
Vaste (v) Double Crochet (dc) Single Crochet (sc)
Half stokje (h.stk) Half Treble Crochet (htr) Half Double Crochet (hdc)
Stokje (st) Treble Crochet (tr) Double Crochet (dc)
Copyright © Carola Wijma
2010
Read the written pattern
before you start!!
OVAL
Make 2
CENTRE SQUARE Make 1

Copyright © Carola Wijma
2010
1
2

Written chard
The Celtic Knot consists of three parts, 1 centre square and 2 ovals.
CORNER SQUARE AND OVALS: 4 Tr(dc) in 1 chain stitch. To prevent a hole pick up 2 loops of the chain
stitch instead of one. (1 loop corner) (2 loops corner)
Centre Square:
Chain 28, close ring with a slipstitch.
Chain 3, 1 tr(dc) in next stitch –corner (see above)- 6 tr(dc)- corner- 6 tr(dc)- corner - 6 tr(dc)- corner -
4 tr(dc), sl.st. in 3th chain.
Oval (make 2):
Chain 36, Tr(dc) in 4th chain stitch from hook, 1 tr(dc) in next stitch – corner (see above)- 16 tr(dc) –
corner- 14 tr(dc). Check if the sides have the right length. Sometimes different colors, even from the
same brand, give different results. It may be necessary to shorten the sides of the ovals. See the photo’s.
Copyright © Carola Wijma
2010
The pink oval has sides off 14 and 16 tr(dc).
The lilac oval has sides off 15 and 13 tr(dc).
Same yarn, same brand, different color.
Too long, do 2
tr(dc) less.
1 tr (dc) less, on both sides

EDGES SQUARE 2. Rnd 1.
Weave the three parts together.
Fasten and weave in the ends of the parts as
shown in the photo’s.
2
Start on a corner of the centre
square. * 4 dc(sc), Chain 3,
[2 dc(sc), chain 3, 2 dc(sc)] on the
4 corner stitches of an oval:
Chain 3*. Repeat 3 times *-*.
End with a slipstitch in the first
dc(sc).
Fasten and weave
in ends
Rnd. 2.
Chain 3, 3 tr(dc),* 3 tr(dc) in the chain 3 loop, 2 tr(dc) . In corner loop:
[2 tr(dc)-chain 2- 2 tr(dc)], 2 tr(dc), 3 tr(dc) in the chain 3 loop, 4 tr(dc)
on the 4 sc(dc) of rnd. 1* repeat *-* 3 times.
End with a sl.st. in the 3th chain stitch.
Copyright © Carola Wijma
2010
Fasten and weave
in ends
Rnd. 3.
Decide how big you want to make the square.
I needed a round of htr(hdc) to get a 6 inch square.
Add as many rounds as you need to make what
you want to make.
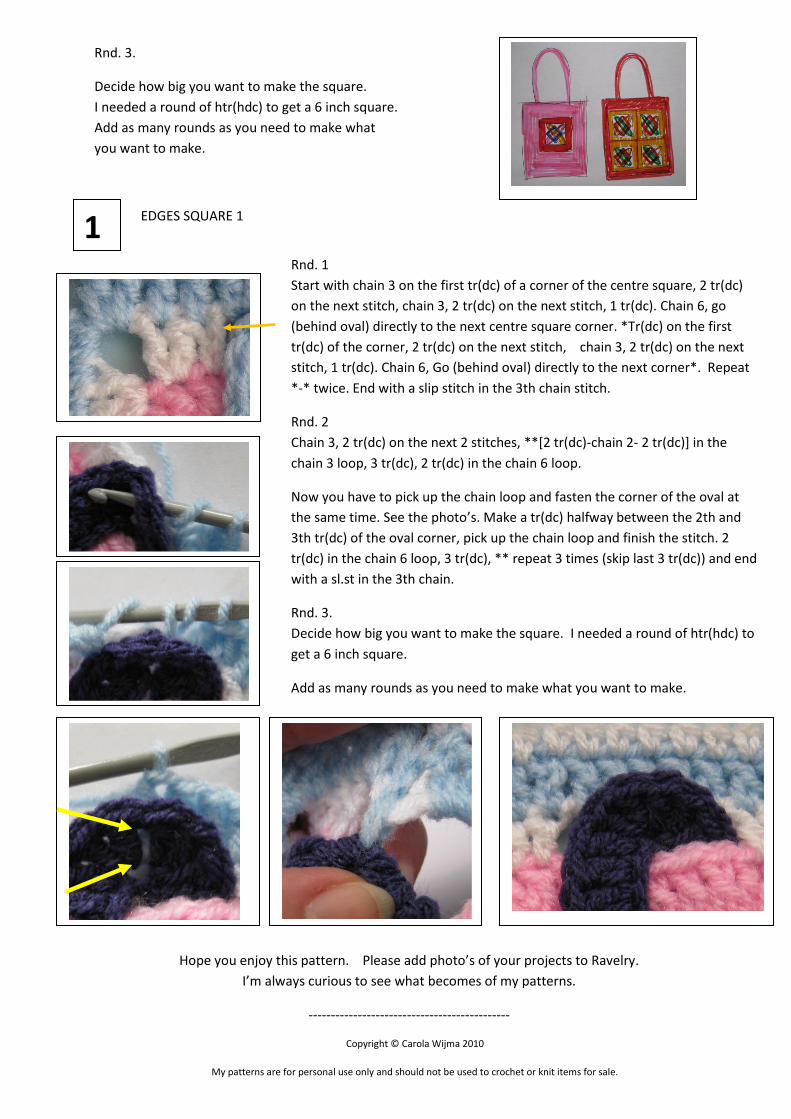
EDGES SQUARE 1
Hope you enjoy this pattern. Please add photo’s of your projects to Ravelry.
I’m always curious to see what becomes of my patterns.
---------------------------------------------
Copyright © Carola Wijma 2010
My patterns are for personal use only and should not be used to crochet or knit items for sale.
1
Rnd. 1
Start with chain 3 on the first tr(dc) of a corner of the centre square, 2 tr(dc)
on the next stitch, chain 3, 2 tr(dc) on the next stitch, 1 tr(dc). Chain 6, go
(behind oval) directly to the next centre square corner. *Tr(dc) on the first
tr(dc) of the corner, 2 tr(dc) on the next stitch, chain 3, 2 tr(dc) on the next
stitch, 1 tr(dc). Chain 6, Go (behind oval) directly to the next corner*. Repeat
*-* twice. End with a slip stitch in the 3th chain stitch.
Rnd. 2
Chain 3, 2 tr(dc) on the next 2 stitches, **[2 tr(dc)-chain 2- 2 tr(dc)] in the
chain 3 loop, 3 tr(dc), 2 tr(dc) in the chain 6 loop.
Now you have to pick up the chain loop and fasten the corner of the oval at
the same time. See the photo’s. Make a tr(dc) halfway between the 2th and
3th tr(dc) of the oval corner, pick up the chain loop and finish the stitch. 2
tr(dc) in the chain 6 loop, 3 tr(dc), ** repeat 3 times (skip last 3 tr(dc)) and end
with a sl.st in the 3th chain.
Rnd. 3.
Decide how big you want to make the square. I needed a round of htr(hdc) to
get a 6 inch square.
Add as many rounds as you need to make what you want to make.