burgoyne surrounded 2012 x - lyn brown's quilting blog€¦ · burgoyne surrounded week two...
TRANSCRIPT
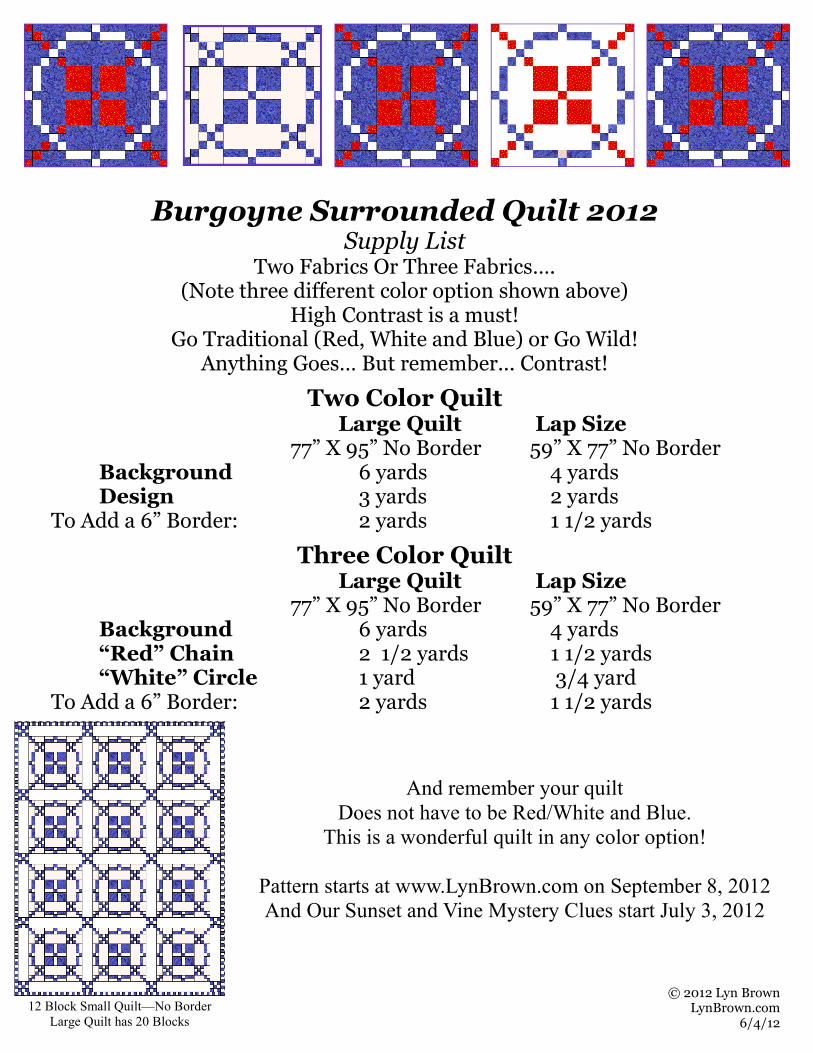
Burgoyne Surrounded Quilt 2012 Supply List
Two Fabrics Or Three Fabrics…. (Note three different color option shown above)
High Contrast is a must! Go Traditional (Red, White and Blue) or Go Wild!
Anything Goes… But remember... Contrast!
Two Color Quilt Large Quilt Lap Size 77” X 95” No Border 59” X 77” No Border Background 6 yards 4 yards Design 3 yards 2 yards To Add a 6” Border: 2 yards 1 1/2 yards
Three Color Quilt Large Quilt Lap Size 77” X 95” No Border 59” X 77” No Border Background 6 yards 4 yards “Red” Chain 2 1/2 yards 1 1/2 yards “White” Circle 1 yard 3/4 yard To Add a 6” Border: 2 yards 1 1/2 yards
© 2012 Lyn Brown LynBrown.com
6/4/12
And remember your quilt
Does not have to be Red/White and Blue.
This is a wonderful quilt in any color option!
Pattern starts at www.LynBrown.com on September 8, 2012
And Our Sunset and Vine Mystery Clues start July 3, 2012
12 Block Small Quilt—No Border
Large Quilt has 20 Blocks
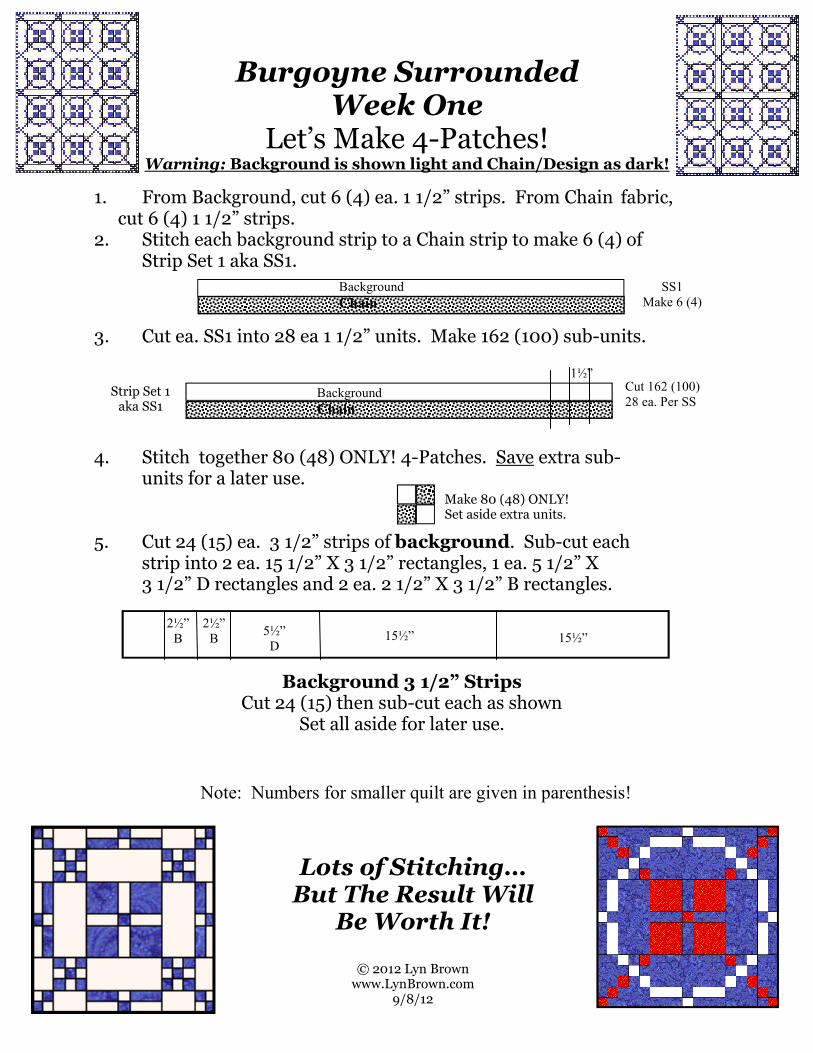
Burgoyne Surrounded Week One
Let’s Make 4-Patches! Warning: Background is shown light and Chain/Design as dark!
1. From Background, cut 6 (4) ea. 1 1/2” strips. From Chain fabric, cut 6 (4) 1 1/2” strips.
2. Stitch each background strip to a Chain strip to make 6 (4) of Strip Set 1 aka SS1.
3. Cut ea. SS1 into 28 ea 1 1/2” units. Make 162 (100) sub-units.
4. Stitch together 80 (48) ONLY! 4-Patches. Save extra sub- units for a later use. 5. Cut 24 (15) ea. 3 1/2” strips of background. Sub-cut each
strip into 2 ea. 15 1/2” X 3 1/2” rectangles, 1 ea. 5 1/2” X 3 1/2” D rectangles and 2 ea. 2 1/2” X 3 1/2” B rectangles.
1½”
SS1
Make 6 (4)
Cut 162 (100)
28 ea. Per SS
Make 80 (48) ONLY! Set aside extra units.
Background 3 1/2” Strips Cut 24 (15) then sub-cut each as shown
Set all aside for later use.
2½”
B
2½”
B 5½”
D 15½” 15½”
Lots of Stitching… But The Result Will
Be Worth It!
© 2012 Lyn Brown www.LynBrown.com
9/8/12
Strip Set 1 aka SS1
Background
Chain
Background
Chain
Note: Numbers for smaller quilt are given in parenthesis!
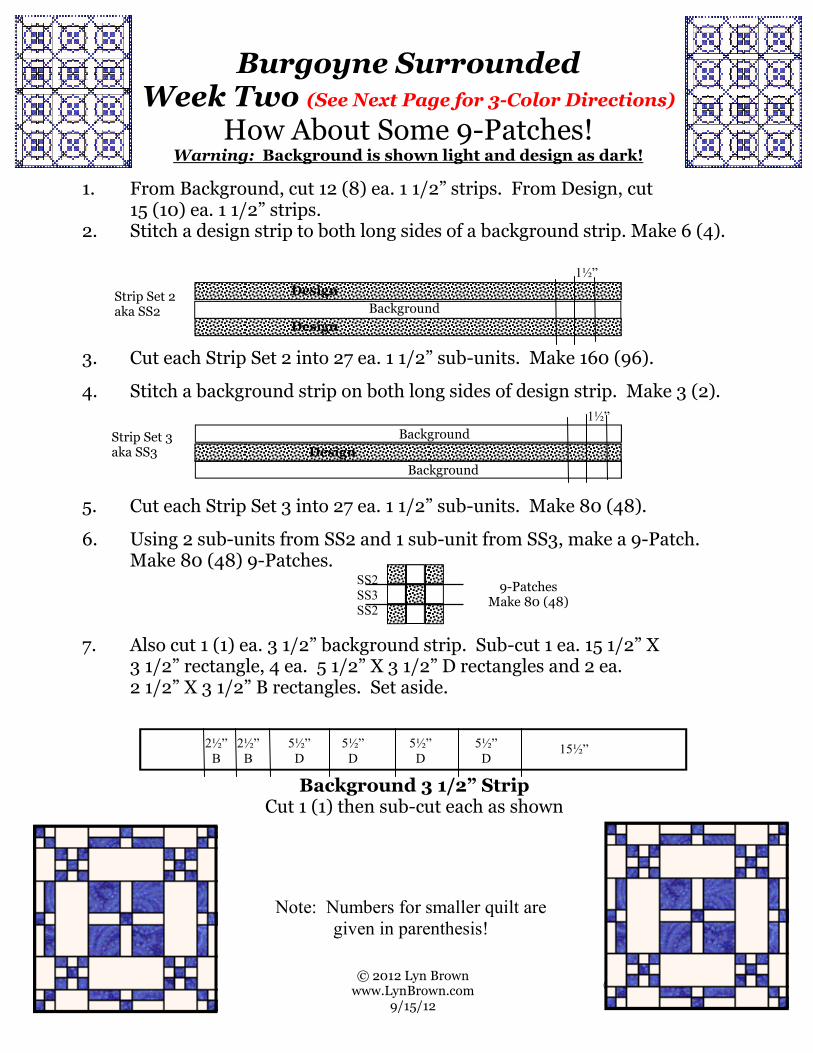
Burgoyne Surrounded Week Two (See Next Page for 3-Color Directions)
How About Some 9-Patches! Warning: Background is shown light and design as dark!
1. From Background, cut 12 (8) ea. 1 1/2” strips. From Design, cut 15 (10) ea. 1 1/2” strips. 2. Stitch a design strip to both long sides of a background strip. Make 6 (4). 3. Cut each Strip Set 2 into 27 ea. 1 1/2” sub-units. Make 160 (96).
4. Stitch a background strip on both long sides of design strip. Make 3 (2).
5. Cut each Strip Set 3 into 27 ea. 1 1/2” sub-units. Make 80 (48).
6. Using 2 sub-units from SS2 and 1 sub-unit from SS3, make a 9-Patch. Make 80 (48) 9-Patches. 7. Also cut 1 (1) ea. 3 1/2” background strip. Sub-cut 1 ea. 15 1/2” X 3 1/2” rectangle, 4 ea. 5 1/2” X 3 1/2” D rectangles and 2 ea. 2 1/2” X 3 1/2” B rectangles. Set aside.
© 2005 Lyn Brown
Strip Set 2 aka SS2
1½”
Design
Design
Background
1½”
Background
Background
Design Strip Set 3 aka SS3
9-Patches Make 80 (48)
2½”
B
5½”
D 15½” 5½”
D
5½”
D
5½”
D
2½”
B
Background 3 1/2” Strip Cut 1 (1) then sub-cut each as shown
Note: Numbers for smaller quilt are
given in parenthesis!
© 2012 Lyn Brown www.LynBrown.com
9/15/12
SS2
SS3
SS2
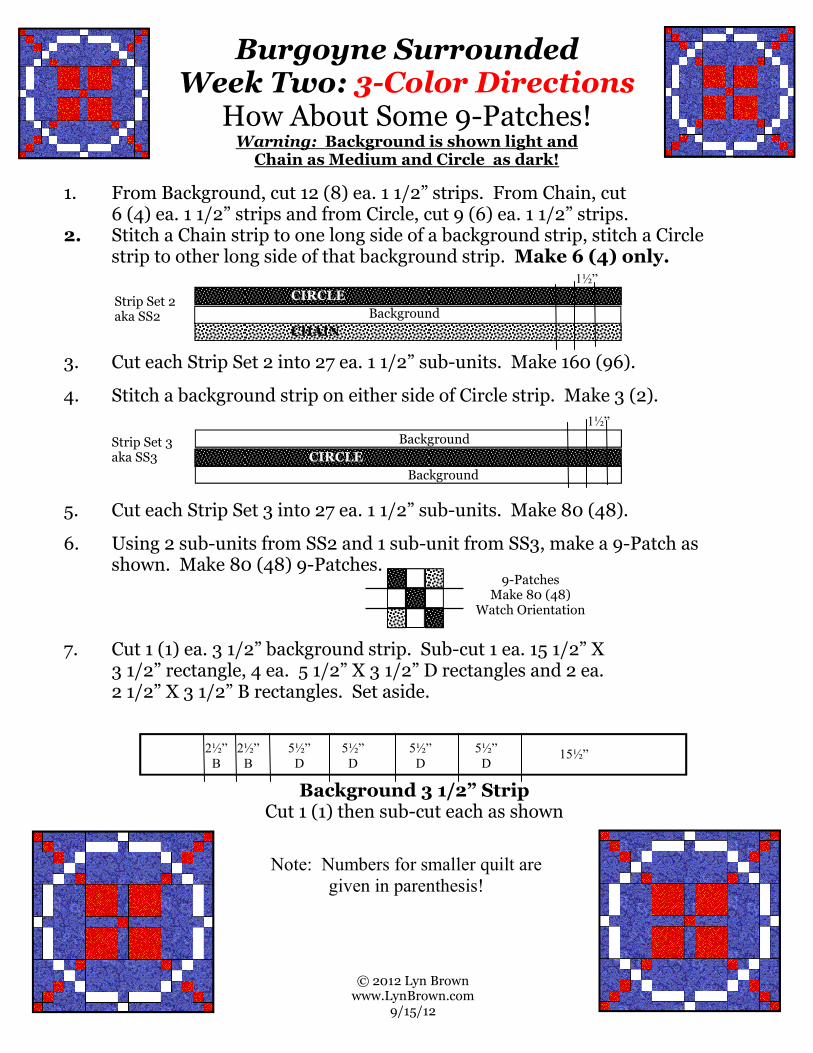
Burgoyne Surrounded Week Two: 3-Color Directions
How About Some 9-Patches! Warning: Background is shown light and
Chain as Medium and Circle as dark!
1. From Background, cut 12 (8) ea. 1 1/2” strips. From Chain, cut 6 (4) ea. 1 1/2” strips and from Circle, cut 9 (6) ea. 1 1/2” strips. 2. Stitch a Chain strip to one long side of a background strip, stitch a Circle
strip to other long side of that background strip. Make 6 (4) only. 3. Cut each Strip Set 2 into 27 ea. 1 1/2” sub-units. Make 160 (96).
4. Stitch a background strip on either side of Circle strip. Make 3 (2).
5. Cut each Strip Set 3 into 27 ea. 1 1/2” sub-units. Make 80 (48).
6. Using 2 sub-units from SS2 and 1 sub-unit from SS3, make a 9-Patch as shown. Make 80 (48) 9-Patches. 7. Cut 1 (1) ea. 3 1/2” background strip. Sub-cut 1 ea. 15 1/2” X 3 1/2” rectangle, 4 ea. 5 1/2” X 3 1/2” D rectangles and 2 ea. 2 1/2” X 3 1/2” B rectangles. Set aside.
© 2005 Lyn Brown
Strip Set 2 aka SS2
1½”
CIRCLE
CHAIN
Background
1½”
Background
Background
CIRCLE Strip Set 3 aka SS3
9-Patches Make 80 (48)
Watch Orientation
2½”
B
5½”
D 15½”
5½”
D
5½”
D
5½”
D
2½”
B
Background 3 1/2” Strip Cut 1 (1) then sub-cut each as shown
Note: Numbers for smaller quilt are
given in parenthesis!
© 2012 Lyn Brown www.LynBrown.com
9/15/12
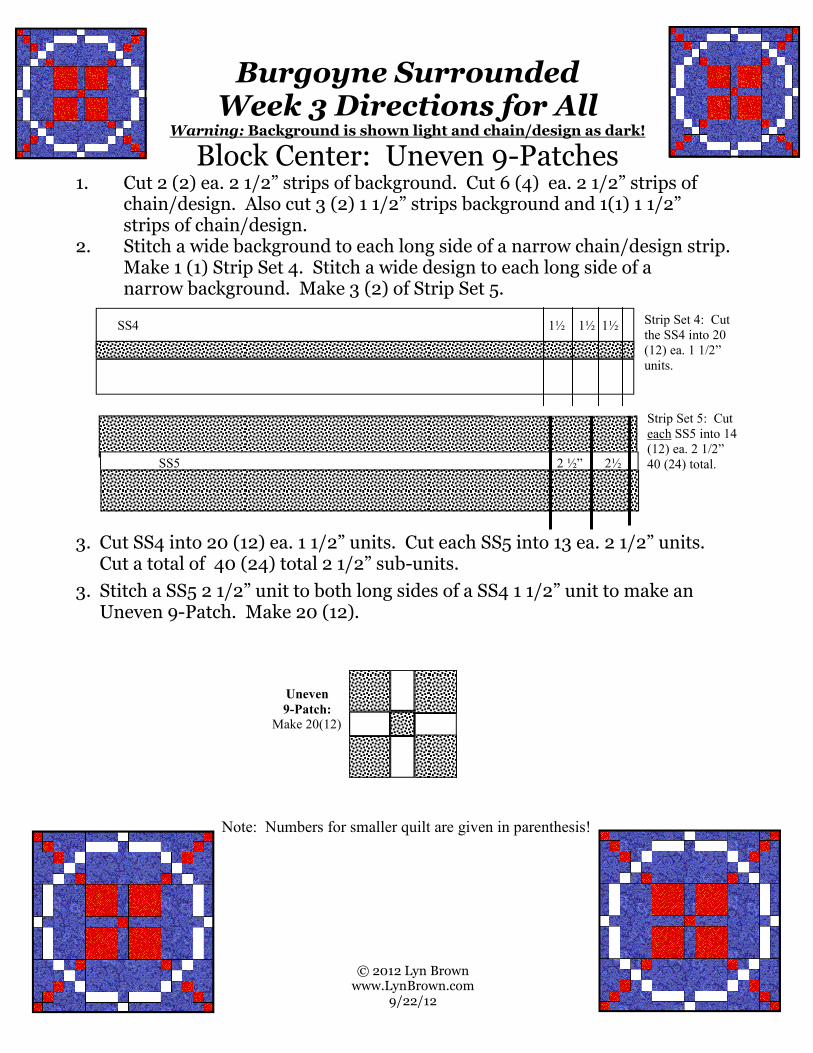
Burgoyne Surrounded Week 3 Directions for All
Warning: Background is shown light and chain/design as dark!
Block Center: Uneven 9-Patches 1. Cut 2 (2) ea. 2 1/2” strips of background. Cut 6 (4) ea. 2 1/2” strips of
chain/design. Also cut 3 (2) 1 1/2” strips background and 1(1) 1 1/2” strips of chain/design.
2. Stitch a wide background to each long side of a narrow chain/design strip. Make 1 (1) Strip Set 4. Stitch a wide design to each long side of a narrow background. Make 3 (2) of Strip Set 5.
3. Cut SS4 into 20 (12) ea. 1 1/2” units. Cut each SS5 into 13 ea. 2 1/2” units. Cut a total of 40 (24) total 2 1/2” sub-units.
3. Stitch a SS5 2 1/2” unit to both long sides of a SS4 1 1/2” unit to make an Uneven 9-Patch. Make 20 (12).
Note: Numbers for smaller quilt are given in parenthesis!
Strip Set 4: Cut
the SS4 into 20
(12) ea. 1 1/2”
units.
1½ 1½ 1½
2 ½” 2½
Strip Set 5: Cut
each SS5 into 14
(12) ea. 2 1/2”
40 (24) total.
SS4
SS5
Uneven
9-Patch:
Make 20(12)
© 2012 Lyn Brown www.LynBrown.com
9/22/12
Burgoyne Surrounded Week 4
Warning: Background is shown light and design as dark
If Making Three Fabric Quilt,
Use Background and CIRCLE Fabric.
Side Units
1. Cut 6 (4) ea. 2 1/2” strips of background. Cut 6 (4) ea. 2 1/2” strips of design/circle. Also cut 3 (2) ea. 1 1/2” strips background and 3 (2) ea. 1 1/2” strips of design/circle.
2. Stitch a wide background to each long side of a narrow design / circle strip. Make 3(2) Strip Set 4.
3. Stitch a wide design/ circle to each long side of a narrow background. Make 3(2) of Strip Set 5.
4. Cut each SS4 into 27 ea. 1 1/2” units. Make a total of 80 (48) sub-units. Cut each SS5 into 27 ea. 1 1/2”. Make 80(48) total 1 1/2” sub-units.
5. Stitch a SS4 1 1/2” unit to a SS5 1 1/2” unit along a long side to make a Side Unit. Make 80(48) Side-Units (2 1/2” X 5 1/2”).
Note: Numbers for smaller quilt are given in parenthesis!
Strip Set 4: Cut
each SS4 into 27
ea. 1 1/2” units.
Make a total of
80 (48) sub-units
1½ 1½ 1½
1 ½ 1 ½ 1 ½
Strip Set 5: Cut
each SS5 into 27
ea. 1 1/2” units.
Make a total of
80 (48) sub-units
SS4
SS5
Side Unit:
Make 80(48)
© 2012 Lyn Brown www.LynBrown.com
10/6/12
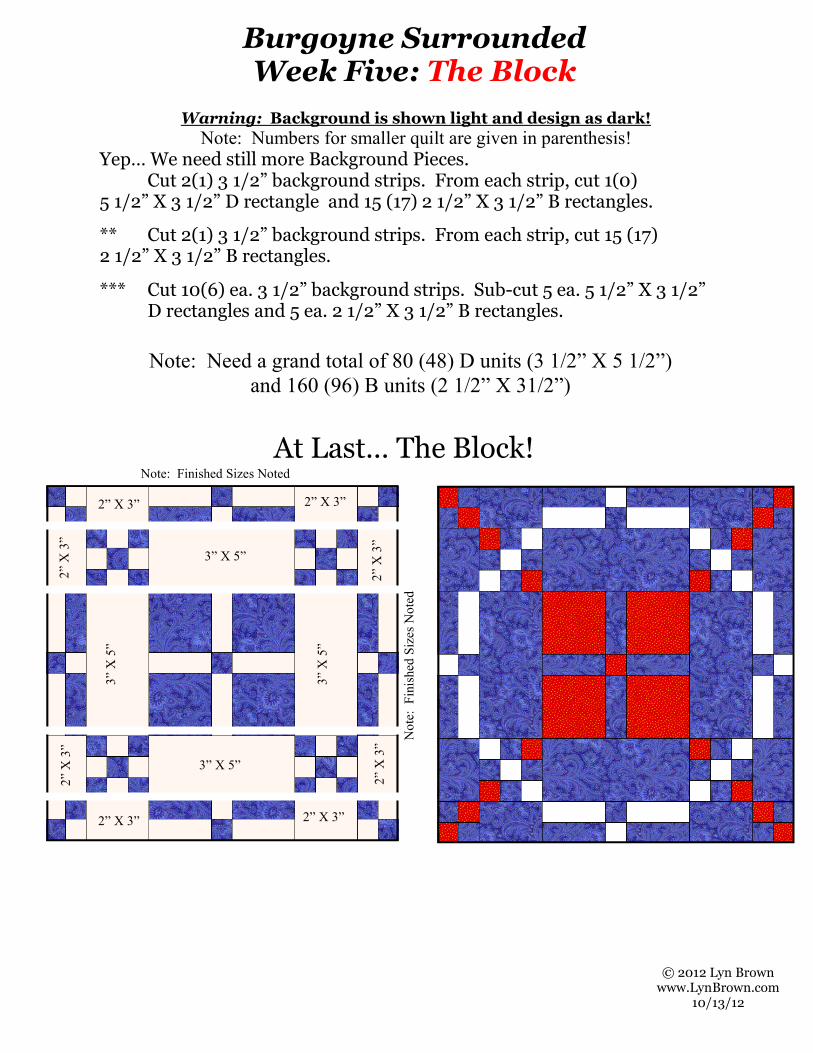
Note: Finished Sizes Noted
At Last… The Block!
2” X 3”
2” X 3” 2” X 3”
2” X 3”
2” X 3”
2” X 3”
2” X 3”
2” X 3”
3” X 5”
3” X 5”
3” X 5”
3” X 5”
Warning: Background is shown light and design as dark!
Note: Numbers for smaller quilt are given in parenthesis!
Yep… We need still more Background Pieces. Cut 2(1) 3 1/2” background strips. From each strip, cut 1(0) 5 1/2” X 3 1/2” D rectangle and 15 (17) 2 1/2” X 3 1/2” B rectangles.
** Cut 2(1) 3 1/2” background strips. From each strip, cut 15 (17) 2 1/2” X 3 1/2” B rectangles.
Note: Need a grand total of 80 (48) D units (3 1/2” X 5 1/2”)
and 160 (96) B units (2 1/2” X 31/2”)
*** Cut 10(6) ea. 3 1/2” background strips. Sub-cut 5 ea. 5 1/2” X 3 1/2” D rectangles and 5 ea. 2 1/2” X 3 1/2” B rectangles.
Burgoyne Surrounded Week Five: The Block
© 2012 Lyn Brown www.LynBrown.com
10/13/12
Note: Finished Sizes Noted
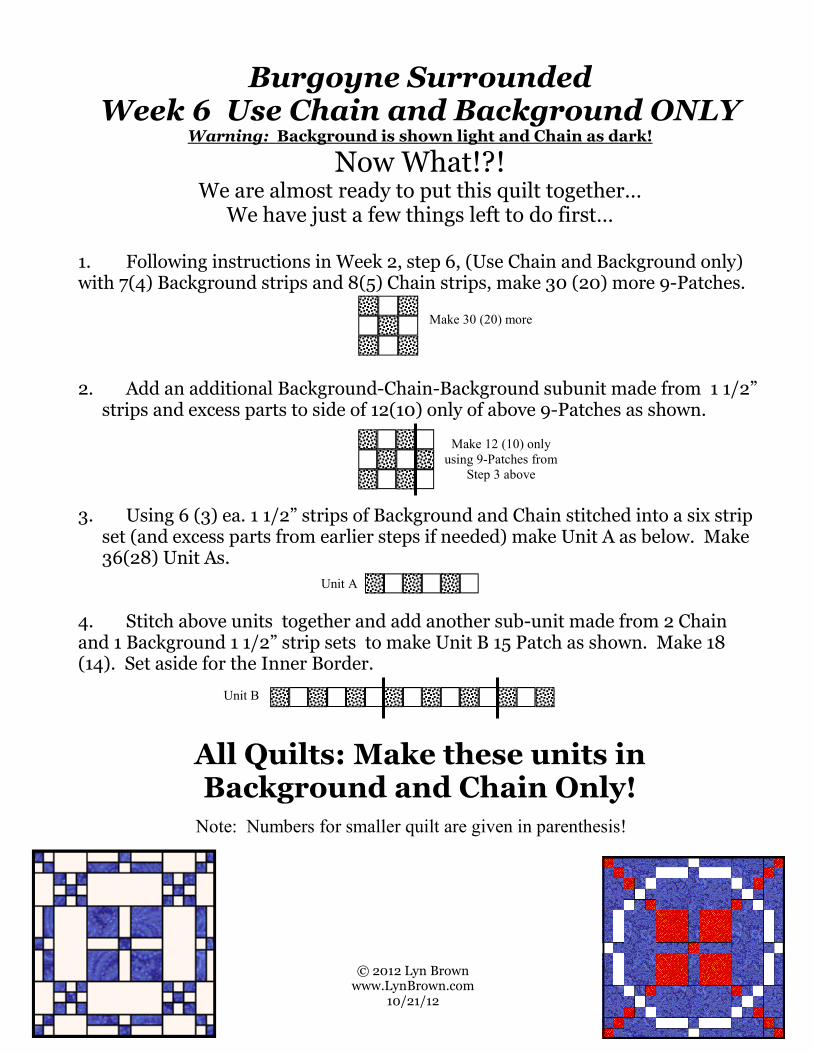
Burgoyne Surrounded Week 6 Use Chain and Background ONLY
Warning: Background is shown light and Chain as dark!
Now What!?! We are almost ready to put this quilt together…
We have just a few things left to do first…
1. Following instructions in Week 2, step 6, (Use Chain and Background only) with 7(4) Background strips and 8(5) Chain strips, make 30 (20) more 9-Patches. 2. Add an additional Background-Chain-Background subunit made from 1 1/2”
strips and excess parts to side of 12(10) only of above 9-Patches as shown. 3. Using 6 (3) ea. 1 1/2” strips of Background and Chain stitched into a six strip
set (and excess parts from earlier steps if needed) make Unit A as below. Make 36(28) Unit As.
4. Stitch above units together and add another sub-unit made from 2 Chain and 1 Background 1 1/2” strip sets to make Unit B 15 Patch as shown. Make 18 (14). Set aside for the Inner Border.
All Quilts: Make these units in Background and Chain Only! Note: Numbers for smaller quilt are given in parenthesis!
Unit A
Unit B
Make 30 (20) more
Make 12 (10) only
using 9-Patches from
Step 3 above
© 2012 Lyn Brown www.LynBrown.com
10/21/12
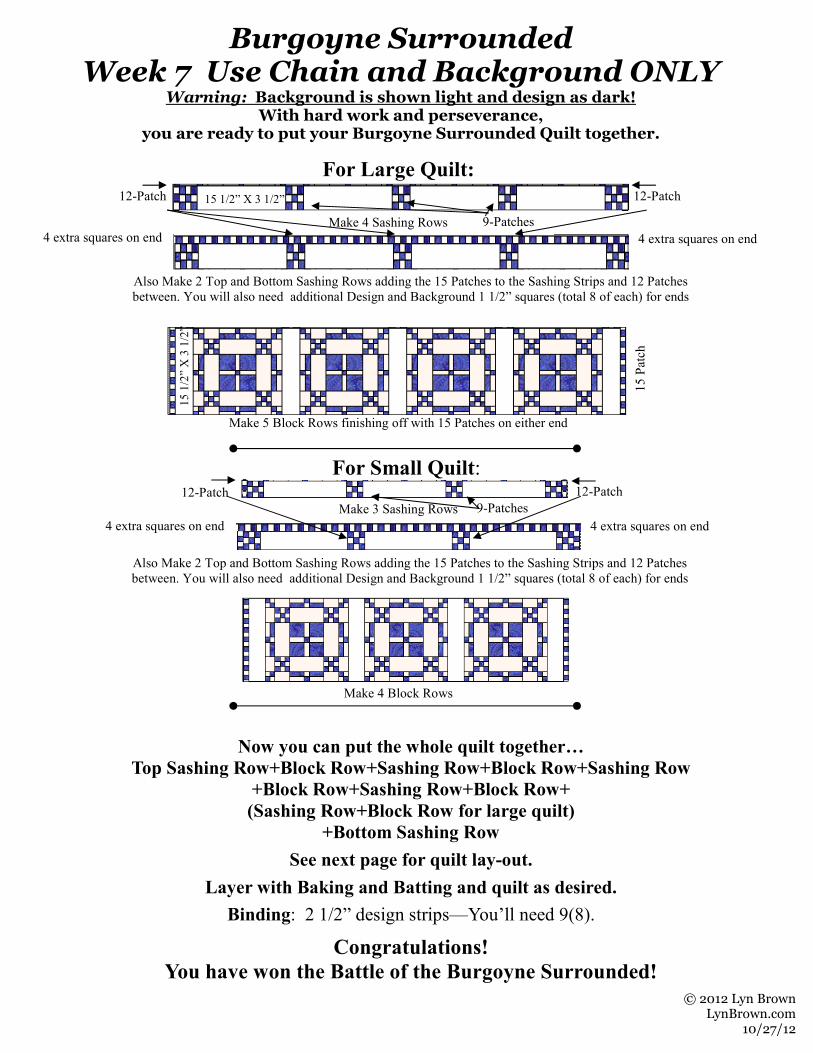
Burgoyne Surrounded Week 7 Use Chain and Background ONLY
Warning: Background is shown light and design as dark! With hard work and perseverance,
you are ready to put your Burgoyne Surrounded Quilt together.
Make 4 Sashing Rows
Make 5 Block Rows finishing off with 15 Patches on either end
Make 3 Sashing Rows
Make 4 Block Rows
For Large Quilt:
For Small Quilt: 12-Patch 12-Patch
12-Patch 12-Patch
Now you can put the whole quilt together…
Top Sashing Row+Block Row+Sashing Row+Block Row+Sashing Row
+Block Row+Sashing Row+Block Row+
(Sashing Row+Block Row for large quilt)
+Bottom Sashing Row
See next page for quilt lay-out.
Layer with Baking and Batting and quilt as desired.
Binding: 2 1/2” design strips—You’ll need 9(8).
Congratulations!
You have won the Battle of the Burgoyne Surrounded!
15 1/2” X 3 1/2”
9-Patches
15 1/2” X 3 1/2”
Also Make 2 Top and Bottom Sashing Rows adding the 15 Patches to the Sashing Strips and 12 Patches
between. You will also need additional Design and Background 1 1/2” squares (total 8 of each) for ends
Also Make 2 Top and Bottom Sashing Rows adding the 15 Patches to the Sashing Strips and 12 Patches
between. You will also need additional Design and Background 1 1/2” squares (total 8 of each) for ends
15 Patch
9-Patches
© 2012 Lyn Brown LynBrown.com
10/27/12
4 extra squares on end 4 extra squares on end
4 extra squares on end 4 extra squares on end

Week 7—Solution! Winning the Battle of Saratoga “Burgoyne Surrounded” Quilt
Large Quilt
Small Quilt
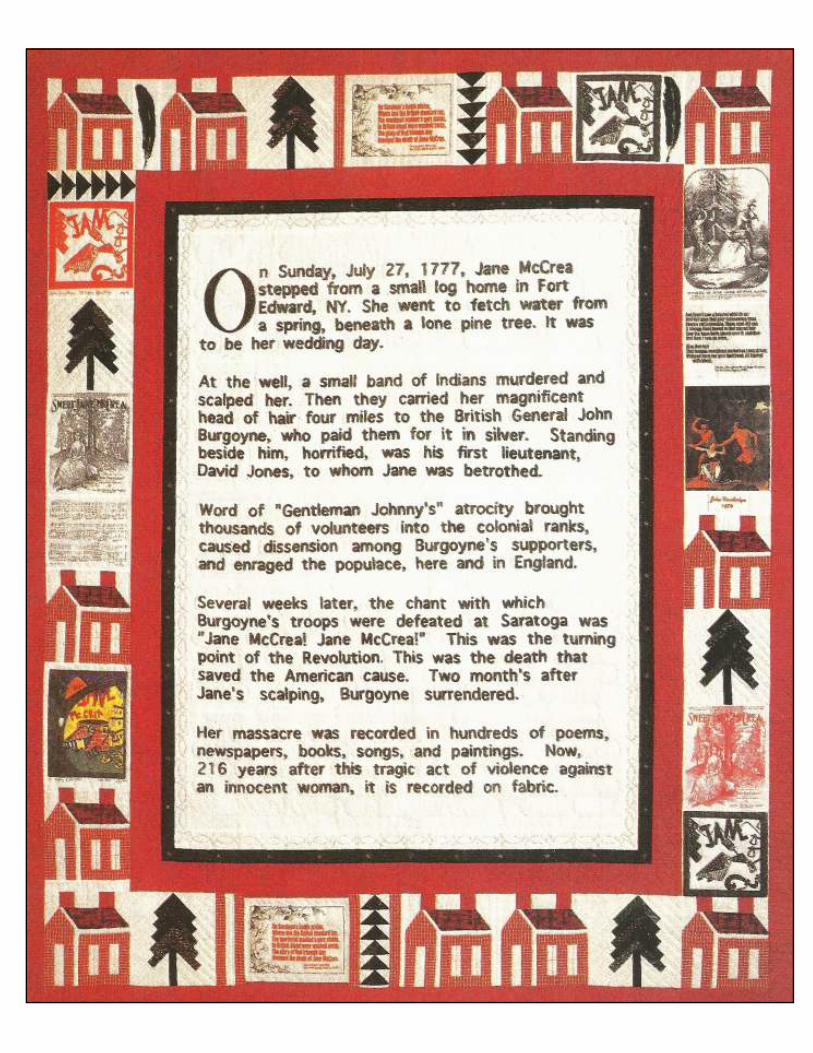
Burgoyne Surrounded History
During the American Revolution, the Colonial forces met the
British in battle at Saratoga. The British general was “Gentleman
Johnny” Burgoyne and his 7000 men far outnumbered the Ameri-
cans. However, the colonists prevailed, and this pattern illustrates
that battle, with Burgoyne’s large force in the center of the block
and the smaller groups of Americans surrounding them. The bat-
tle was a turning point in the War for Independence. In the spirit
of all those soldiers so long ago, you have met the challenge of
the unknown and won the battle of the Marathon Mystery!
© 2012 Lyn Brown LynBrown.com
10/27/12
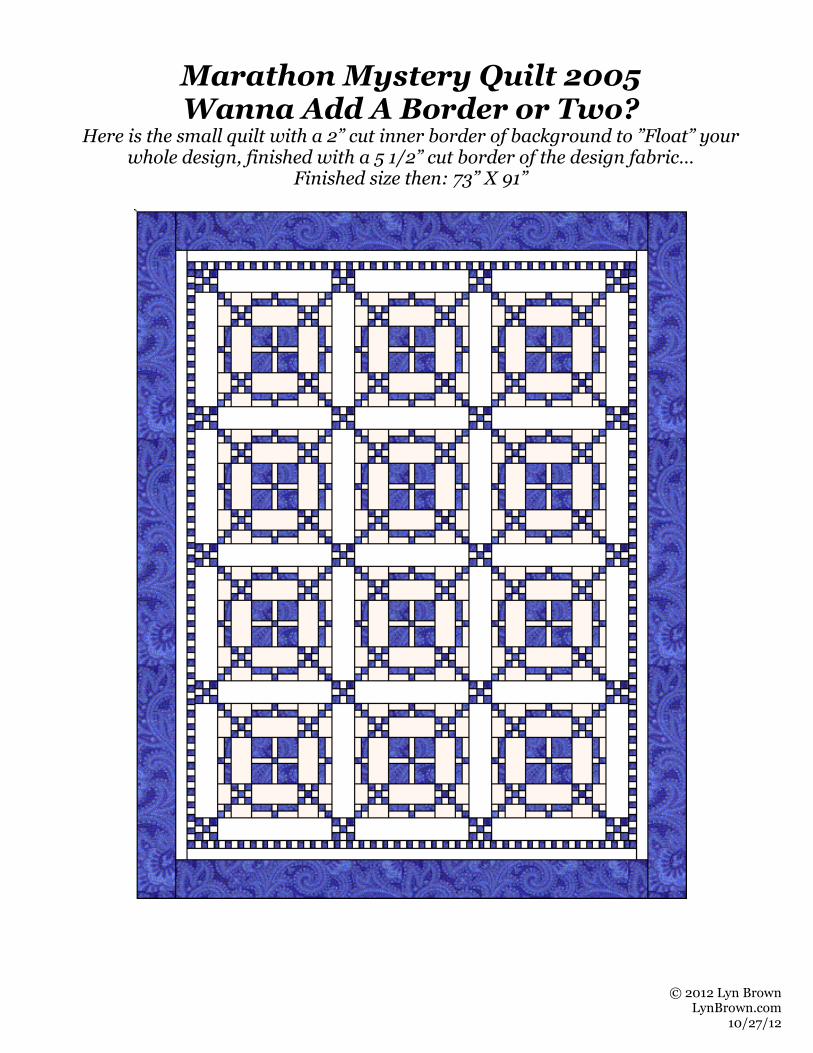
Marathon Mystery Quilt 2005 Wanna Add A Border or Two?
Here is the small quilt with a 2” cut inner border of background to ”Float” your whole design, finished with a 5 1/2” cut border of the design fabric…
Finished size then: 73” X 91”
© 2012 Lyn Brown LynBrown.com
10/27/12