bunn ultra 2 slush machine technical training
TRANSCRIPT

© 2001 Bunn-O-Matic Corporation. All rights reserved. Confidential material.

2© 2001 Bunn-O-Matic Corporation. All rights reserved. Confidential material.
• 120 volt / 15 amp dedicated outlet
• (no extension cord)
• At least 6” clearance for airflow (back and sides).
• Recommended for indoor use. If it must be used outdoors, it will take longer to freeze. (Keep out of direct sunlight)
Site Requirements

3© 2001 Bunn-O-Matic Corporation. All rights reserved. Confidential material.
Installation
•Save black plastic drum supports (They will be used as servicing jigs later) Do not lift by the drums!
•Machine should be level or slightly lower in front
•Remove shipping eye-bolts from compressor
•Install rear gaskets on drums (no grease on ULTRA)
•Install augers (no grease on ULTRA)
•Install hoppers (no grease on ULTRA)
•Fill with product & install hopper lids
•Unit can now be powered up

4© 2001 Bunn-O-Matic Corporation. All rights reserved. Confidential material.
Cooling Drum Alignment
The "A" shaped Cooling Drum Shipping Supports, removed during Initial Setup, should be kept and used as a tool to reset the alignment of the cooling drums should it ever be required.
Symptoms:
Squeaky Operation, hopper lifts or won't seat properly,
hopper is pushed to one side or the other.
To check alignment
1. Place the "A" shaped support on the auger shaft
with the ledge under the cooling drum.
2. Lift the cooling drum while rotating the support
into a vertical position. The boss on the very
bottom will drop into the hopper drip tray's drain hole. When in its proper position, the cooling drum will cause a slight pressure on the hopper drip tray drain hole and the two legs will be equidistant from the hopper drip tray.
If adjustment is needed, remove the support and gently force the free end of the evaporator in the direction the adjustment is needed.
Reinstall the support, check the alignment, and readjust the cooling drums as required.

5© 2001 Bunn-O-Matic Corporation. All rights reserved. Confidential material.
Plastic grates molded into top cover of drip tray (interchangeable w/CDS-2)
Touch pad replaces drawer, switches & dials!
Foam seal acts as a moisture barrier for the Control Board
Clamp for ribbon cable
Bottom unchanged
Front
Tray has a molded hose connection for using an optional 3/8” drain hose

6© 2001 Bunn-O-Matic Corporation. All rights reserved. Confidential material.
1 Turn on main power switch2 Turn on Auger Switch, Auger will
rotate clockwise. (No display indication)
3 Turn the Ice/OFF/CHILL switch to the Ice position
· UPPER CASE indicates refrigerant solenoid open.
· Lower case indicates refrigerant solenoid closed.
* After 10 seconds the machine will open the solenoid valves to allow equalization of the refrigerant, there will be one audible click.
Left Right
2 3
1
Home screen toggles time, date, serial, & asset
numbers continuously
Touch pad
ICE chillJAN.1, 2002

7© 2001 Bunn-O-Matic Corporation. All rights reserved. Confidential material.
Home screen
Off OffJAN.1, 2002
Off Off10:00:00 AM
Off OffULT00001234
Off OffAN000001234

8© 2001 Bunn-O-Matic Corporation. All rights reserved. Confidential material.
Hold these 2 hidden switches for 5 seconds. Then you will see the above display. After releasing buttons, it will alternately display drum & hot gas line temps & auger torque
Press both switches again to return to home screen
DISPLAY TEMP
& TORQUE
Home screen

9© 2001 Bunn-O-Matic Corporation. All rights reserved. Confidential material.
0 36
Left Right
0 36°h
0 67
Left Right
0 67°b
Top row - indicates auger operating torque (% of revolution) Bottom row - (b) barrel temp (h) high temp same for both since there’s only one thermistor on hot gas line.
Note: If powered down, display remains, but back light will turn off
Home screen

10© 2001 Bunn-O-Matic Corporation. All rights reserved. Confidential material.
Menu Function index
Off Off10:45:30 AM
Hold this hidden switch for 5 seconds to enter the menu function index. You
can also use it as a “NEXT” button.

11© 2001 Bunn-O-Matic Corporation. All rights reserved. Confidential material.
TEST AUGERS ?
Pressing “YES” will allow you to operate either auger in forward and/or reverse directions
NO YES
Test augers
12© 2001 Bunn-O-Matic Corporation. All rights reserved. Confidential material.
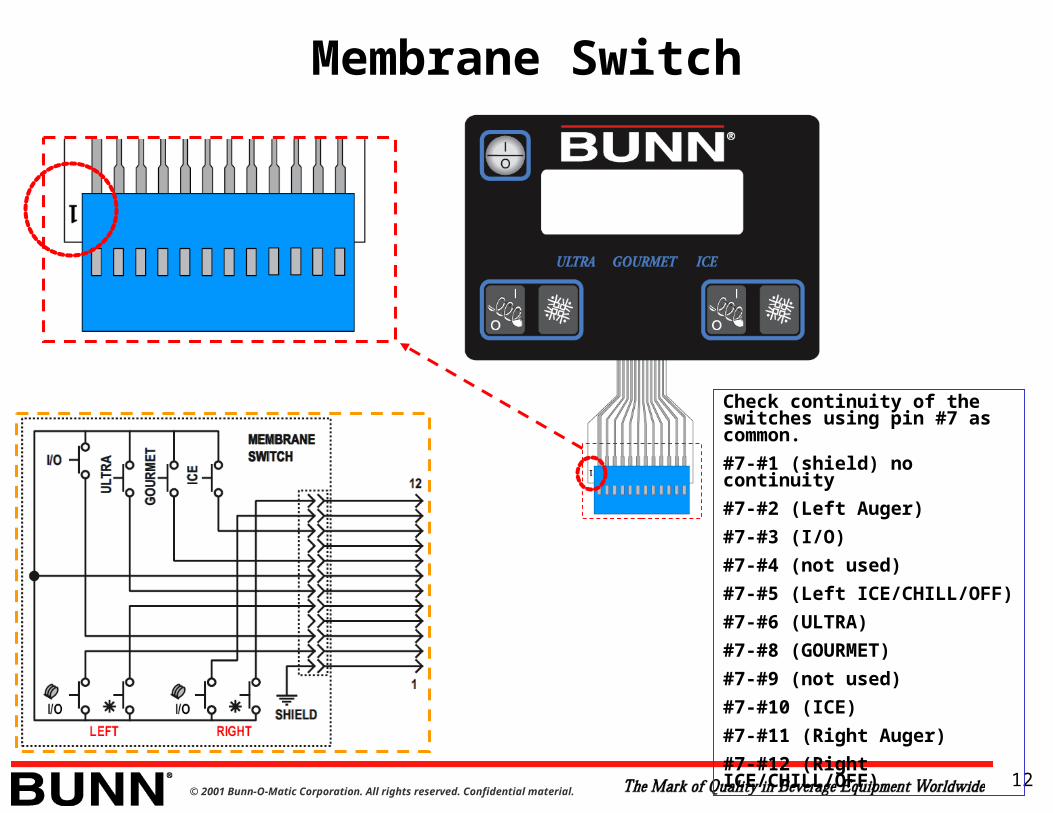
Membrane Switch
Check continuity of the switches using pin #7 as common.#7-#1 (shield) no continuity#7-#2 (Left Auger)#7-#3 (I/O)#7-#4 (not used)#7-#5 (Left ICE/CHILL/OFF)#7-#6 (ULTRA)#7-#8 (GOURMET)#7-#9 (not used)#7-#10 (ICE)#7-#11 (Right Auger)#7-#12 (Right ICE/CHILL/OFF)
13© 2001 Bunn-O-Matic Corporation. All rights reserved. Confidential material.
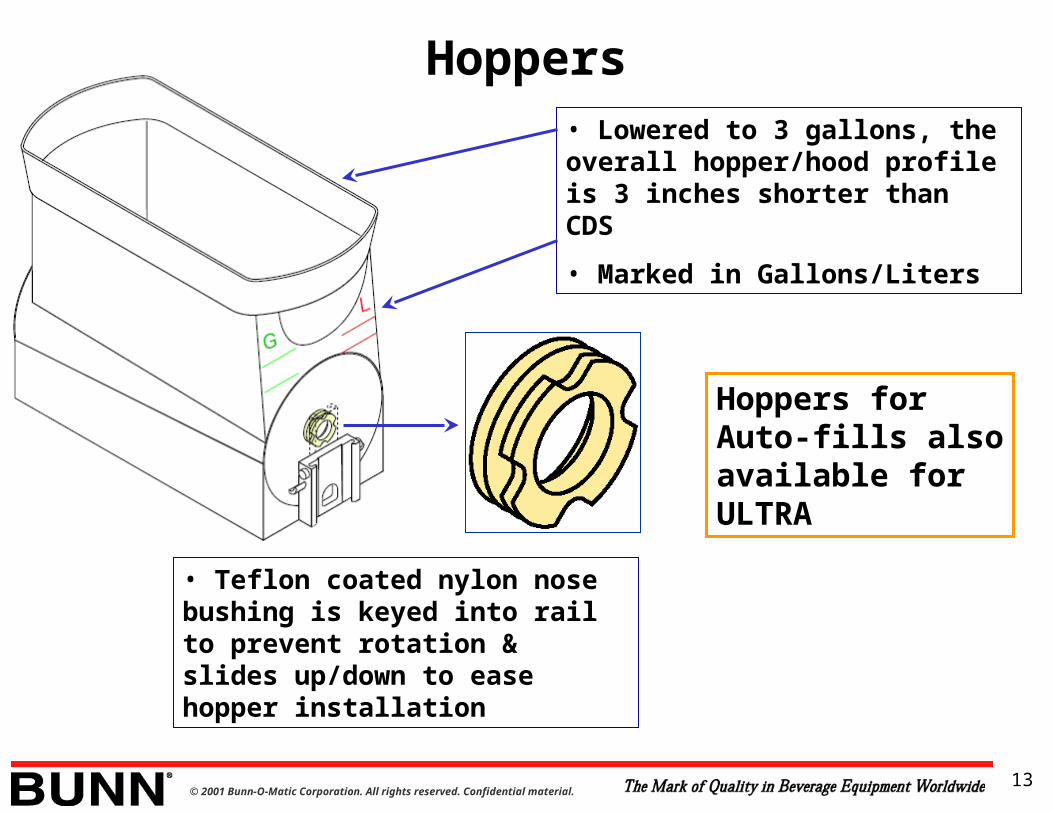
Hoppers• Lowered to 3 gallons, the overall hopper/hood profile is 3 inches shorter than CDS
• Marked in Gallons/Liters
• Teflon coated nylon nose bushing is keyed into rail to prevent rotation & slides up/down to ease hopper installation
Hoppers for Auto-fills also available for ULTRA
14© 2001 Bunn-O-Matic Corporation. All rights reserved. Confidential material.
Faucet
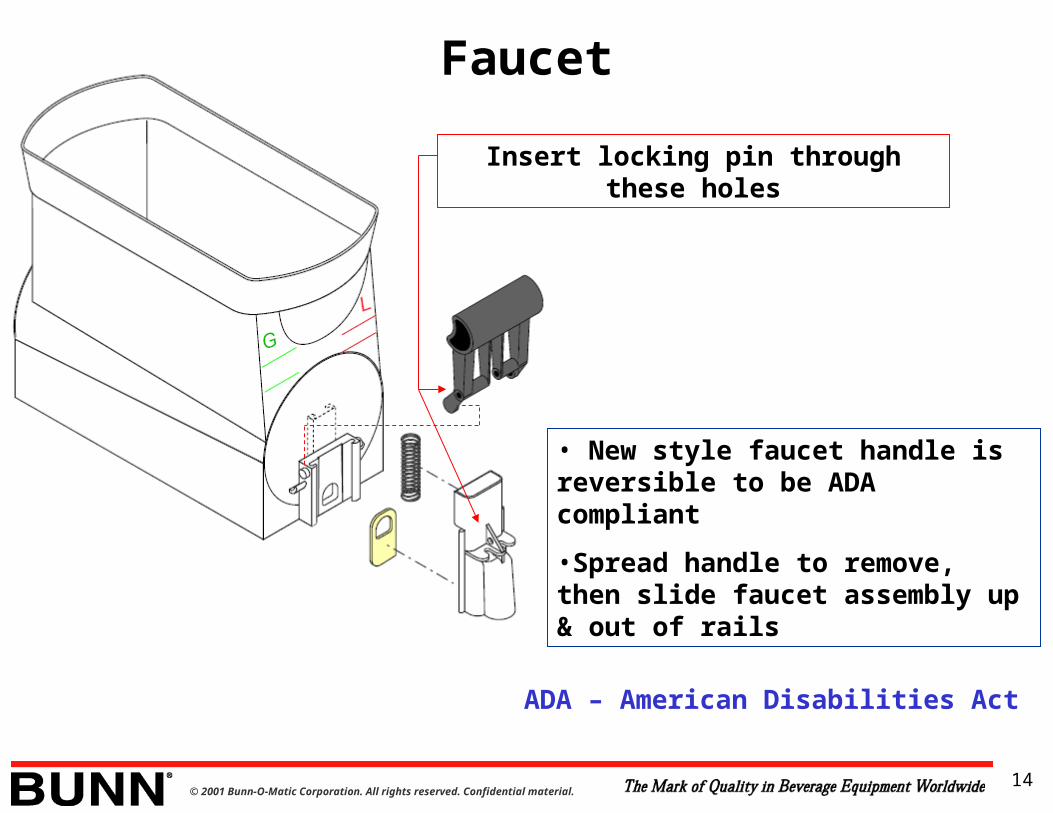
• New style faucet handle is reversible to be ADA compliant
•Spread handle to remove, then slide faucet assembly up & out of rails
Insert locking pin through these holes
ADA – American Disabilities Act

15© 2001 Bunn-O-Matic Corporation. All rights reserved. Confidential material.
Faucet
New faucet seal is keyed at bottom for one way installation (coated side toward hopper) keyed

16© 2001 Bunn-O-Matic Corporation. All rights reserved. Confidential material.
Hoods
• Lower hood profile • Use a small screwdriver to pry out
the new vents • 912 industry standard bulbs, T-5
wedge base• 1 amp at 12vac• Rated at 1100 hours• Do not replace with 921 bulbs,
these draw 1.4 amps and will overload the 5 amp circuit breaker
• On during “day” mode only
Use small screwdriver to pry out vents &
replace lamps

17© 2001 Bunn-O-Matic Corporation. All rights reserved. Confidential material.
Cooling Drum/Auger
Brix level should be at least 9-12, if it’s less, the ice could be too solid to shave off, and possibly break the auger. Too high, and it may not freeze!
Auger shaves ice off as it forms on drum

18© 2001 Bunn-O-Matic Corporation. All rights reserved. Confidential material.
New coated rear drum seal (32079.0000)
New auger (32106.0000) to compensate for
discontinued front seal
Drum, mounting, motors & shafts unchanged
Cooling Drums/Auger

19© 2001 Bunn-O-Matic Corporation. All rights reserved. Confidential material.
Cooling Drums/Auger Drive
Bushing
Seal

20© 2001 Bunn-O-Matic Corporation. All rights reserved. Confidential material.
Auger Drive Motor
*120vac*39.6RPM @ 60Hz *Rotation: clockwise (front view) *56.8*.48 amp (no load) *Locked rotor .9 amp *Thermal overload Protection *Torque 20-50 in-lbs.

21© 2001 Bunn-O-Matic Corporation. All rights reserved. Confidential material.
Relays on control board will energize once every hour to reverse auger motors for 2 minutes. This breaks up chunks of ice that may be floating on top. Torque sensing is ignored during reverse mode. (ULTRA software will start a reverse sequence if the solenoids stay open for an extended time .
Auger Drive Control

22© 2001 Bunn-O-Matic Corporation. All rights reserved. Confidential material.
Auger Drive/PM
Ceramic coating
Keep grease & dirt off pins, or it could prevent freezing!
PM every 6 months

23© 2001 Bunn-O-Matic Corporation. All rights reserved. Confidential material.
Auger Drive/PM
Front of drum
Failure to PM this area could lead to loss of freezing, due to product (sugar) build up on the bushings & seals over-loading the torque sensing systems
Seal
Bushing

24© 2001 Bunn-O-Matic Corporation. All rights reserved. Confidential material.
Auger Drive/PM
Keeps product out of spring
Install brown seal with spring facing away from product
and towards the auger motor.

25© 2001 Bunn-O-Matic Corporation. All rights reserved. Confidential material.
Auger Drive/Torque Sensing
As the ice thickens, the torsion springs allow a slight twisting motion, allowing the two pins to move farther apart. If user has to keep setting thickness to a higher level, it may be an indication of worn or broken springs
Torsion springs transmit driving force from motor drive coupler to shaft drive coupler
26© 2001 Bunn-O-Matic Corporation. All rights reserved. Confidential material.
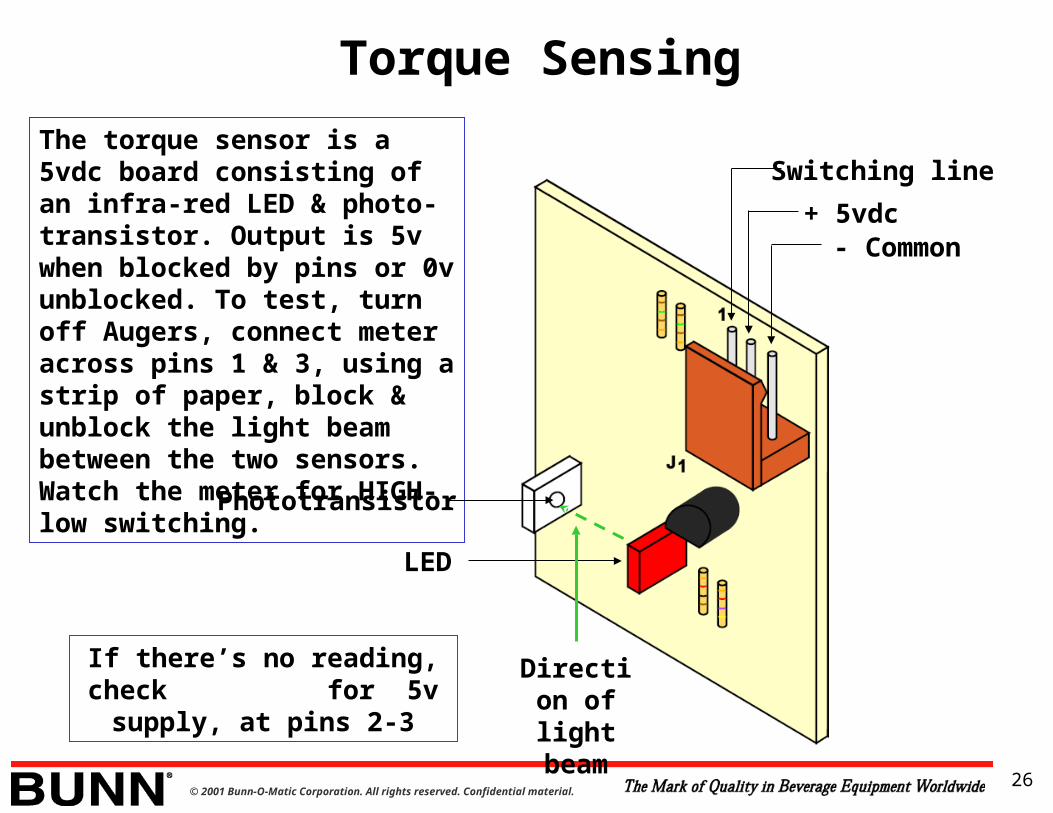
The torque sensor is a 5vdc board consisting of an infra-red LED & photo-transistor. Output is 5v when blocked by pins or 0v unblocked. To test, turn off Augers, connect meter across pins 1 & 3, using a strip of paper, block & unblock the light beam between the two sensors. Watch the meter for HIGH-low switching.
Switching line+ 5vdc
- Common
Phototransistor
LED
If there’s no reading, check for 5v supply, at pins 2-3
Torque Sensing
Direction of light beam

27© 2001 Bunn-O-Matic Corporation. All rights reserved. Confidential material.
Invisible Infra red beam is momentarily blocked by the Motor pin, then the Shaft pin.
Torque Sensing
As the Auger drive shaft rotates, the two pins block the beam of light. The micro- processor calculates the distance between the pins and determines the refrigerant solenoid shut off point, based on where the thickness adjustment is set.

28© 2001 Bunn-O-Matic Corporation. All rights reserved. Confidential material.
Fault codes- Torque Sensor Unplugged
LEFT TORQUE RIGHT TORQUE
SENSOR OPENSENSOR OPEN
FAULT ICE ICE FAULT
FAULT ICE ICE FAULT

29© 2001 Bunn-O-Matic Corporation. All rights reserved. Confidential material.
SHAFT
Viewed from rear side of machine
1/4” gap (minimum)
Starts freezing
Torque sensor“reads” the gap between pins during shaft rotation.
Torque Sensing
30© 2001 Bunn-O-Matic Corporation. All rights reserved. Confidential material.
SHAFT
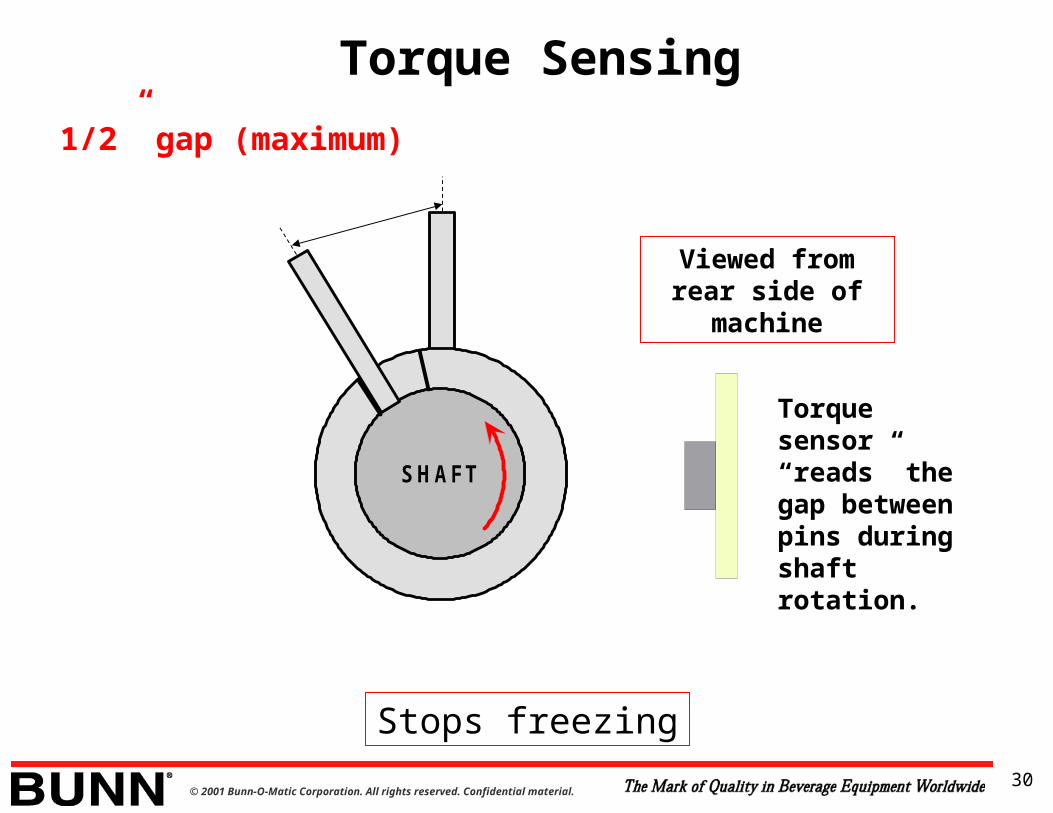
1/2” gap (maximum)
Stops freezing
Viewed from rear side of machine
Torque sensor“reads” the gap between pins during shaft rotation.
Torque Sensing

31© 2001 Bunn-O-Matic Corporation. All rights reserved. Confidential material.
Satisfied point will vary withthickness settings
SHAFT
Stops freezing
Viewed from rear side of machine
Torque sensor“reads” the gap between pins during shaft rotation.
Torque Sensing

32© 2001 Bunn-O-Matic Corporation. All rights reserved. Confidential material.
Fault: no rotation detected No freezing
Both pins missing, or no motor rotation
SHAFT
Viewed from rear side of machine
Torque sensor“reads” the gap between pins during shaft rotation.
Torque Sensing

33© 2001 Bunn-O-Matic Corporation. All rights reserved. Confidential material.
Fault: torque lower than possible No freezing
Bent pin, debris, grease, or anything that would optically close gap to less than 1/4”
SHAFT
Viewed from rear side of machine
Torque sensor“reads” the gap between pins during shaft rotation.
Torque Sensing

34© 2001 Bunn-O-Matic Corporation. All rights reserved. Confidential material.
Fault: torque higher than possible No freezing
Bent, broken,ormissing pin.gap wider than 1/2”
SHAFT
Torque Sensing
Viewed from rear side of machine
Torque sensor“reads” the gap between pins during shaft rotation.

35© 2001 Bunn-O-Matic Corporation. All rights reserved. Confidential material.
Fault codes- Sensor Good, Check Pins
LEFT TORQUE RIGHT TORQUE
SENSOR ERRORSENSOR ERROR
FAULT ICE ICE FAULT
FAULT ICE ICE FAULT

36© 2001 Bunn-O-Matic Corporation. All rights reserved. Confidential material.
TEMPERATURE SENSING
Thermistor monitors the actual temperature of each cooling drum. “Night” and “Chill” modes maintain 35° F, instead of Torque sensing (Thickness)

37© 2001 Bunn-O-Matic Corporation. All rights reserved. Confidential material.
TEMPERATURE SENSING
Resistance values:
2k @ 77°F
5650 @ 32°F
Voltage readings:
0vdc = short circuit
1.5vdc @ room temp
2.7vdc @ 35°F
5vdc = open circuit

38© 2001 Bunn-O-Matic Corporation. All rights reserved. Confidential material.
Fault codes- Temperature Sensor Unplugged
LEFT TEMPERATURE RIGHT TEMPERATURE
SENSOR OPENSENSOR OPEN
FAULT ICE ICE FAULT
FAULT ICE ICE FAULT

39© 2001 Bunn-O-Matic Corporation. All rights reserved. Confidential material.
Refrigeration Schematic

40© 2001 Bunn-O-Matic Corporation. All rights reserved. Confidential material.
Filter/Condenser/Fan
Filter
Condenser
Optional cover
air
flow
Thermistor added to discharge line, detects overheating due to clogged filter, will shut down cooling system
3 screws to remove 120vac fan/motor
assy.
One piece shroud on CDS units

41© 2001 Bunn-O-Matic Corporation. All rights reserved. Confidential material.
Filter Clean Reminder
MONTHLY FILTER
CLEAN REQUIRED
XX DAYS
HOLD ULTRA SWTCH
3 SECS TO CLEAR
A monthly counter will automatically show this message, to remind users to clean the condenser filter. Once it starts displaying this screen, the third line shows how many days it’s overdue! (Thermistor will sense overheating & shut down refrigeration if left untouched)
ACTUAL DISPLAY MESSAGE!

42© 2001 Bunn-O-Matic Corporation. All rights reserved. Confidential material.
Filter Clean - Urgent
FILTER NEEDS
CLEANINGHot Gas Sensor detects 220° F
FILTER NEEDS
!!!CLEANING!!!
Hot Gas Sensor detects 250° F (refrigeration shuts down)

43© 2001 Bunn-O-Matic Corporation. All rights reserved. Confidential material.
Refrigeration System
Thermistor (Hot Gas Sensor)
New filter/dryer/splitter Fewer braze joints!
Larger accumulator
Some units now have a
high side port (R404A)

44© 2001 Bunn-O-Matic Corporation. All rights reserved. Confidential material.
Unplugged Overheated
HOT GAS HOT GAS
SENSOR SHORTEDSENSOR OPEN
OFF OFF OFF OFF
OFF OFF OFF OFF

45© 2001 Bunn-O-Matic Corporation. All rights reserved. Confidential material.
Solenoids
120vac, controlled individually by main board (Parker valves)
Mounted on front left corner post
Must be certified in refrigeration to remove stem and plunger assemblies
Replace each valve as an assembly
No repair kit

46© 2001 Bunn-O-Matic Corporation. All rights reserved. Confidential material.
Fan Assembly Pulls in air to cool condenser 120vac controlled by main board.
.8 amp (same as CDS-2) Turns on aprox. Same time as compressor, but may continue running for a while after compressor turns off
CAUTION: It will also turn on every ½ hr. to cool auger motors3 screws
for removal

47© 2001 Bunn-O-Matic Corporation. All rights reserved. Confidential material.
Compressor Relay
L1 from Control Board
Neutral
coil
contacts (N.O.)
L1 from main harness
To compressor circuit
alternate set of contacts (N.O.)

48© 2001 Bunn-O-Matic Corporation. All rights reserved. Confidential material.
Americold Compressor
Overload
PTC
120vac 7.3 amps 1/4hp 3955 BTU (locked rotor condition aprox. 41 amps)
Used in early units

49© 2001 Bunn-O-Matic Corporation. All rights reserved. Confidential material.
Embraco Compressor
OverloadPTC
120vac 7.3 amps 1/4hp 3955 BTU (locked rotor condition aprox. 41 amps)
Start capacitor 145-175µfd
250vac
Used in later units

50© 2001 Bunn-O-Matic Corporation. All rights reserved. Confidential material.
Refrigeration system
Thermistor, discharge line
New Parker valves mounted on frame
(no repair kit)
New filter/dryer/splitter
Fewer braze joints!
Larger accumulator
New 404A Refrigerant

51© 2001 Bunn-O-Matic Corporation. All rights reserved. Confidential material.
Start Circuit
Contactor
Start Relay
Line
PTC resistance starts low, allowing the start winding to operate. The PTC gets hotter as current flows through it. The resistance increases to the point where the start winding is disabled.

52© 2001 Bunn-O-Matic Corporation. All rights reserved. Confidential material.
Compressor relay
Lamp relay (12vdc coil)
Lamp circuit breaker
Main
control
board
Memory/battery backup board (TIC)
(10 yr. Life)
Transformer (new)
Electrical Components

53© 2001 Bunn-O-Matic Corporation. All rights reserved. Confidential material.
Electrical Components
Step down transformer
Compressor relay
Lamp relay
5 amp breaker
Main harness routed along top of frame, instead of being tied to condenser

54© 2001 Bunn-O-Matic Corporation. All rights reserved. Confidential material.
Lamp CircuitNot used (N/C)
White/Yellow (N/O)
Blue/Black (+)
Violet (-)
White/Violet (Common)
12vdc coil
Transformer supplies 12vac to hood lamps & PC board at J5-8
(white/blue) and J5-20 (white/black)

55© 2001 Bunn-O-Matic Corporation. All rights reserved. Confidential material.
Home Screen
Off OffJAN.1, 2002
Off Off10:00:00 AM
Off OffULTR0001234
Off OffAN000001234

56© 2001 Bunn-O-Matic Corporation. All rights reserved. Confidential material.
Hold these 2 hidden switches for 5 seconds. Then you will see the above display. After releasing buttons, it will alternately display drum & hot gas line temps & auger torque
Press both switches again to return to home screen
DISPLAY TEMP & TORQUE
Display Temp & Torque

57© 2001 Bunn-O-Matic Corporation. All rights reserved. Confidential material.
0 36
Left Right
0 36°h
0 67
Left Right
0 67°b
Top row - indicates auger operating torque (% of revolution) (initial setting x 3. Plus 1 will shut off solenoid) Bottom row - (b) barrel temp (h) high temp same for both since there’s only one thermistor on hot gas line.
Note: If powered down, display remains, but back light will turn off
Temp & Torque Screens
SOLENOID ON solenoid off

58© 2001 Bunn-O-Matic Corporation. All rights reserved. Confidential material.
Entering Program Modes
Off Off10:45:30 AM
Hold this hidden switch for 5 seconds to enter the menu function index. You
can also use it as a “NEXT” button.

59© 2001 Bunn-O-Matic Corporation. All rights reserved. Confidential material.
CLEANING GUIDE ?
Pressing “YES” will walk you through hopper removal and cleaning, step by step. This is used to
reset the “1-14” day cleaning reminder. Cooling drums must also warm up to 50° F to reset counter.
NO YES
Cleaning Guide

60© 2001 Bunn-O-Matic Corporation. All rights reserved. Confidential material.
SET THICKNESS ?
Pressing “YES” lets you adjust thickness of product from 1 (thin) to 16 (thick) with 10 as default
NO YES
Adjusting Product Thickness
Use the ON/OFF switch to back up one
screen

61© 2001 Bunn-O-Matic Corporation. All rights reserved. Confidential material.
TEST AUGERS ?
Pressing “YES” will allow you to operate either auger in forward and/or reverse directions, starting with left side.
NO YES
Auger Test Modes

62© 2001 Bunn-O-Matic Corporation. All rights reserved. Confidential material.
SET DATE TIME ?
Pressing “YES” allows you to set year; month; day; hour; minutes & seconds
NO YES
Set Date & Time

63© 2001 Bunn-O-Matic Corporation. All rights reserved. Confidential material.
PASSWORD 0NEXT(-) (+)
If a password had previously been set, you must enter it here in order to proceed to next screen. Must be 4 digits from 0001
to 9999. (6601) is built in back door password from factory. Use “+” to scroll up, or “-” to scroll down
Entering a Password

64© 2001 Bunn-O-Matic Corporation. All rights reserved. Confidential material.
SET NIGHT TIME(-) (+)DISABLED
“+” will start at 12:01 AM; “-” will start at 11:59 PM; once enabled, it will now give
you access to a second screen to set “DAY” mode in a similar manner.
Night/Day mode

65© 2001 Bunn-O-Matic Corporation. All rights reserved. Confidential material.
DEFROST MINUTES(-) (+)OFF
Acts similar to night mode, but does not turn off hood lights. Range is 10-60
minutes. Once enabled, a second screen will prompt for “FREEZE MINUTES” This is
the time increment between “DEFROST” cycles. The range for this screen is 20-180
minutes.
Night/Day mode

66© 2001 Bunn-O-Matic Corporation. All rights reserved. Confidential material.
PM COMPLETE ?
Use this screen to reset 6 month PM reminder message by pressing “YES”
NO YES
Reset PM Counter

67© 2001 Bunn-O-Matic Corporation. All rights reserved. Confidential material.
6 MONTH PMENABLED(-) (+)
Toggles 6 month PM counter on/off. Press either “+” or “-” to toggle changes. (No lockout)
Enable PM Counter
SHAFT SEAL
MAINTENANCE DUE
6 month reminder display

68© 2001 Bunn-O-Matic Corporation. All rights reserved. Confidential material.
DAY TO CLEAN OFFNEXT(-) (+)
“DAYS TO CLEAN” (1-14) sets counter for routine daily or weekly cleaning. When enabled, you will then have to choose
“message only” or “lockout” If lockout is chosen, it will stay in “CHILL” mode until reset. You will need to step through the cleaning guide (1 minute
minimum) & drums also have to warm up to 50°F to reset counter.
Set Days to Clean
CLEAN DUE TODAY
ACTUAL DISPLAY MESSAGE!

69© 2001 Bunn-O-Matic Corporation. All rights reserved. Confidential material.
YES THICK ADJUSTNEXT(-) (+)
Toggling this to “NO” with either (-) or (+) disables adjustments in screen 2
Enable Thickness Adjustment

70© 2001 Bunn-O-Matic Corporation. All rights reserved. Confidential material.
SWITCHESON(-) (+)
“LOCKOUT” will prevent touchpad switches from working after 2 minutes of inactivity. To
access touchpad, hold any button for 5 seconds
Touchpad Sleep Mode

71© 2001 Bunn-O-Matic Corporation. All rights reserved. Confidential material.
ENTER ASSET #AN00000000
An asset # is for any company that wishes to assign their own inventory number to each
machine. Press “ULTRA” for “-” or “ICE” for “+”
Enter Asset Number

72© 2001 Bunn-O-Matic Corporation. All rights reserved. Confidential material.
SET PASS WR 0NEXT(-) (+)
This is where you program in password from 0001-9999. Press “+” to go up or “-” to go down.
Set Password

73© 2001 Bunn-O-Matic Corporation. All rights reserved. Confidential material.
RESTORE DEFAULT?
If you press “YES”, it will prompt “ARE YOU SURE?” After pressing “YES” again, you will see
scrolling numbers, setting everything back to factory defaults, except for S/N; A/N & install date
NO YES
Restore Factory Defaults

74© 2001 Bunn-O-Matic Corporation. All rights reserved. Confidential material.
INSTALL DATEJAN.1, 2002
This date will be burned in automatically when unit has been PLUGGED IN for 100 hours consecutively. NOTE: without install date
burned in, the PM & Cleaning counters will not start. This screen will not be used for warranty.
View Install Date

75© 2001 Bunn-O-Matic Corporation. All rights reserved. Confidential material.
ULTRAVERSION # 00.44
Displays currently installed software version
View Software Version

76© 2001 Bunn-O-Matic Corporation. All rights reserved. Confidential material.
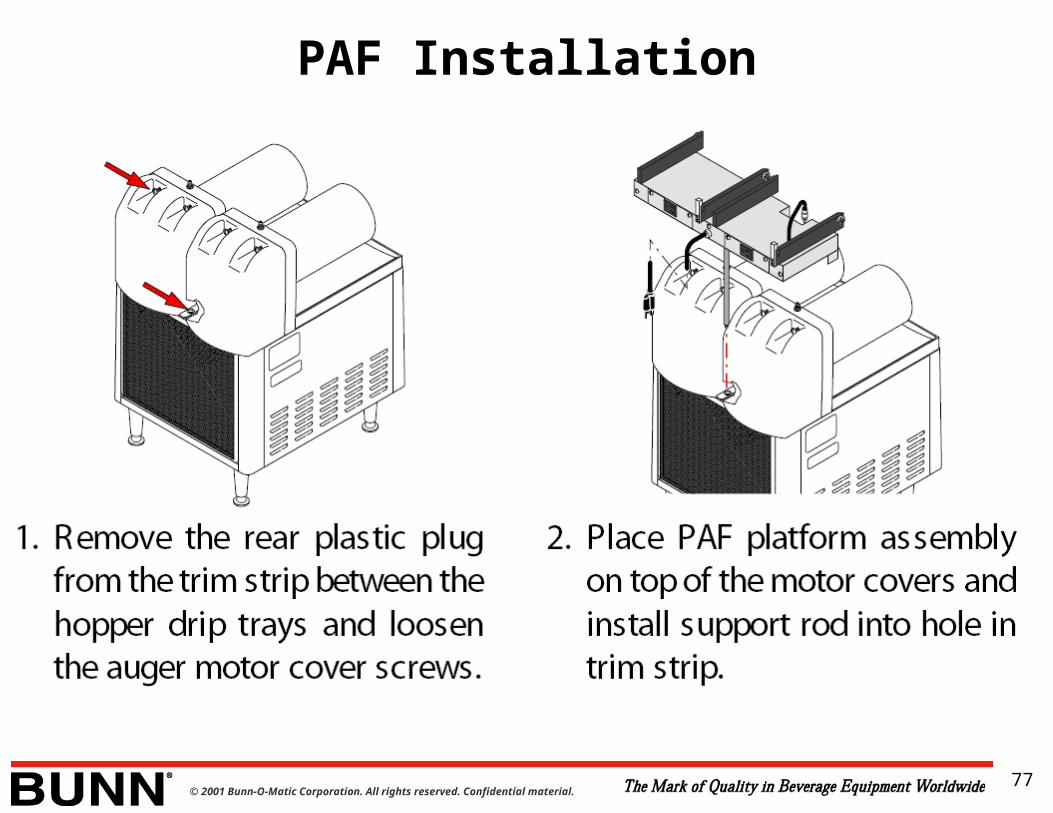
PAF Installation
Rail stops
receptacles
Relay
Rectifier
Kit plugs into light socket
Support rod
77© 2001 Bunn-O-Matic Corporation. All rights reserved. Confidential material.
PAF Installation

78© 2001 Bunn-O-Matic Corporation. All rights reserved. Confidential material.
PAF Installation

79© 2001 Bunn-O-Matic Corporation. All rights reserved. Confidential material.
PAF Wiring
Rail kit
Light circuit turns on PAF during day mode, off during night mode

80© 2001 Bunn-O-Matic Corporation. All rights reserved. Confidential material.
Powder Auto Fill
TECHNICAL
TRAINING
PRESENTATION

81© 2001 Bunn-O-Matic Corporation. All rights reserved. Confidential material.
Installation
Use 1/4” f/m flare fitting and 1/4” flex tubing 20-90 psi
Power cord plugs into back of CDS or ULTRA platform

82© 2001 Bunn-O-Matic Corporation. All rights reserved. Confidential material.
Control Board
Controls all functions of P.A.F.

83© 2001 Bunn-O-Matic Corporation. All rights reserved. Confidential material.
Transformer
Supplies 24vac to operate control board.
Amber colored disk soldered to transformer
is a P.T.C. style fuse.

84© 2001 Bunn-O-Matic Corporation. All rights reserved. Confidential material.
Power SwitchSPST
Supplies L1 to transformer and Control board

85© 2001 Bunn-O-Matic Corporation. All rights reserved. Confidential material.
Test SwitchTEST position will initiate 10 second hopper throw test
Service position will allow dispensing with door open
SPDT center off

86© 2001 Bunn-O-Matic Corporation. All rights reserved. Confidential material.
Door
Arms prop door in upright position & ride in side rails
Same 12v lamp as CDS, illuminates display & flashes 4 possible fault codes

87© 2001 Bunn-O-Matic Corporation. All rights reserved. Confidential material.
Fault Code List

88© 2001 Bunn-O-Matic Corporation. All rights reserved. Confidential material.
Door Switch
Actuated by right door arm assemblyDisables door lamp & dispensing

89© 2001 Bunn-O-Matic Corporation. All rights reserved. Confidential material.
Regulator
Preset to 15 psi (103 kPa) (kilopascal) no adjustment necessary

90© 2001 Bunn-O-Matic Corporation. All rights reserved. Confidential material.
Needle Valve
Preset to 1oz. (29.5ml) /second
No adjustment necessary
91© 2001 Bunn-O-Matic Corporation. All rights reserved. Confidential material.
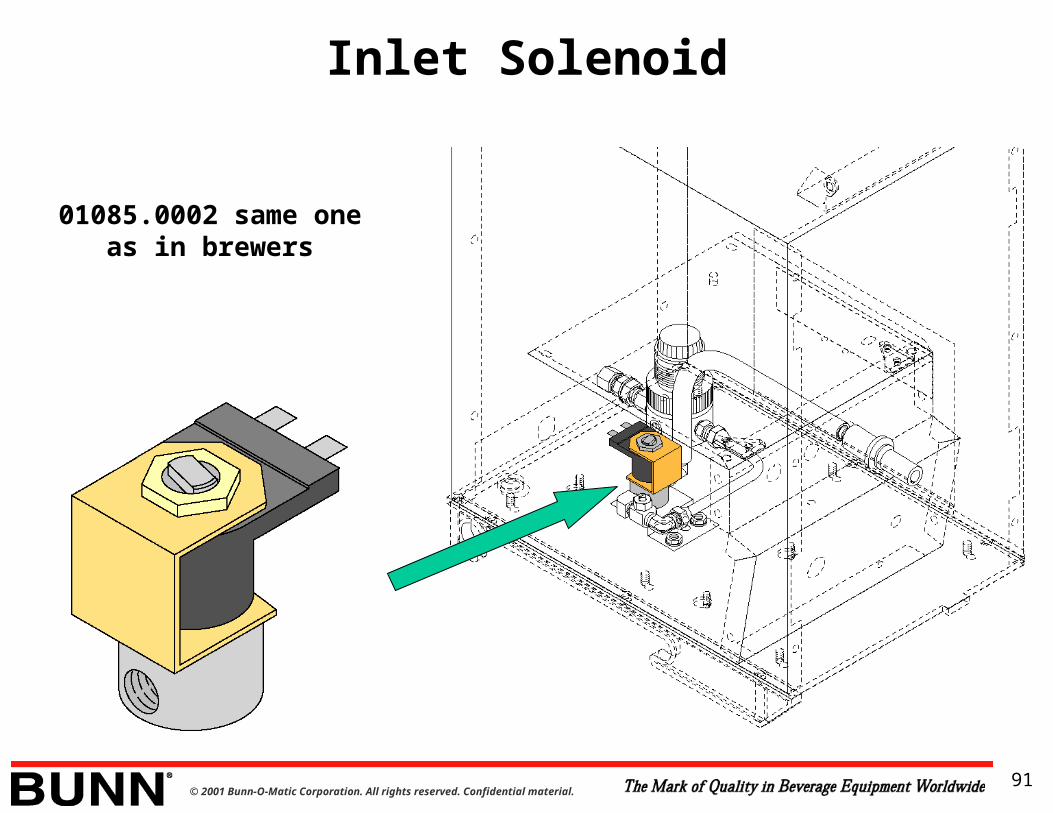
Inlet Solenoid
01085.0002 same one as in brewers

92© 2001 Bunn-O-Matic Corporation. All rights reserved. Confidential material.
Water Outlet
Water outlet goes to the mixing chamber

93© 2001 Bunn-O-Matic Corporation. All rights reserved. Confidential material.
Hopper
Auger drive bracket
Slide gate
Elbow
Auger drive shaft
Wiper blade drive gearWiper blade
Auger
To fill hopper, close slide gate, lift front of hopper above guides, & pull hopper out

94© 2001 Bunn-O-Matic Corporation. All rights reserved. Confidential material.
Hopper Switch
green to J1-8 COM.
Red/blk to J1-10 N.O.
Fault code # 3 if not actuated by hopper

95© 2001 Bunn-O-Matic Corporation. All rights reserved. Confidential material.
Level Sensor
Photo transistor (receiver) J6-1(+) J6-3(-) 5v=hopper full 0v=hopper empty
L.E.D. (sender) J2-1(+) J2-2(-) 1.5v (infrared)
Fault code # 1 “product level low”

96© 2001 Bunn-O-Matic Corporation. All rights reserved. Confidential material.
Auger Drive
* R.P.M 15 to 90* 24 vdc variable speed* 4.5 vdc-24 vdc (when on)* 0.35 vdc (when off).

97© 2001 Bunn-O-Matic Corporation. All rights reserved. Confidential material.
Motor Speed
Clockwise=faster
Counterclockwise=slower

98© 2001 Bunn-O-Matic Corporation. All rights reserved. Confidential material.
Brixing
Set brix ratio according to product recommendations To adjust, use hopper throw test & determine ratio If adjustment is necessary, use a small flat blade screwdriver to pry off cap, then use it to turn the adjusting potentiometer Clockwise for more powder, Counterclockwise for less

99© 2001 Bunn-O-Matic Corporation. All rights reserved. Confidential material.
Mixing
Water inlet creates a powerful vortex Mixing
chamber

100© 2001 Bunn-O-Matic Corporation. All rights reserved. Confidential material.
Whipper
dispensetip
whipper chamber
O-ringfrother
receptacle
nylon slingerrubber seal
Whipper motor 120vac 18,000 rpm (no load)

101© 2001 Bunn-O-Matic Corporation. All rights reserved. Confidential material.
Probe Circuit
To J1-12
motor coverCDS hopper
PAF unit
resistor301k 1% tol.
When this connection is broken, Fault code # 2 is displayed
probe
Should the PAF fail to fill the CDS hopper in 5 minutes, Fault # 4 displays
Resistor prevents Fault # 2 when CDS hopper is low

102© 2001 Bunn-O-Matic Corporation. All rights reserved. Confidential material.