bunk bed assembly instructions - log in · pdf file1 bunk bed assembly instructions thank you...
TRANSCRIPT

1
Bunk Bed Assembly Instructions Thank you for your purchase of a smartstuff bunk bed. smartstuff
bunk beds are designed, engineered and certified to meet the safety
guidelines of the Consumer Product Safety Commission as well as
ASTM International standards. Keep these instructions for future
reference.

2
READ THESE INSTRUCTIONS CAREFULLY BEFORE
ASSEMBLING THIS PRODUCT AND UNDERSTAND
THESE SAFETY WARNINGS:
1. Follow the information on the WARNING LABEL appearing on the upper bunk end structure and on
the carton. DO NOT REMOVE WARNING LABEL FROM BED
2. Always use the specified mattress size and mattress support to help prevent the likelihood of entrap-
ment or falls. The slat roll provided must be used with this bed.
3. Surface of the mattress must be at least 5 inches below the upper edge of the guard rails.
4. Do not allow children under 6 years of age to use the upper bunk.
5. Only one person at a time is permitted on the upper bunk.
6. Periodically check to ensure that the guardrails, ladder, and other components are in their proper
position, free from damage. Also, make sure the connectors are tight and secure.
7. Do not allow horseplay on or under the bed and prohibit jumping on the bed.
8. Always use the ladder for entering and leaving the upper bunk.
9. Do not use substitute parts. Contact your smartstuff dealer or Universal Furniture for replacement
parts.
10. Use of a night light may provide an added safety precaution for a child using the upper bunk.
11. Use guardrails on both sides of the upper bunk.
12. If the bunk bed is placed next to a wall, the guard rail that extends the full length of the bed should
be placed against the wall to prevent entrapment between the bed and the wall.
13. The use of a water mattress or sleep flotation mattress is prohibited.
14. STRANGULATION HAZARD—Never attach or hang items to any part of the bunk bed that is not
designed for use with the bed; for example, but not limited to: hooks, belts, and jump ropes.
15. Keep these instructions for future use.
3
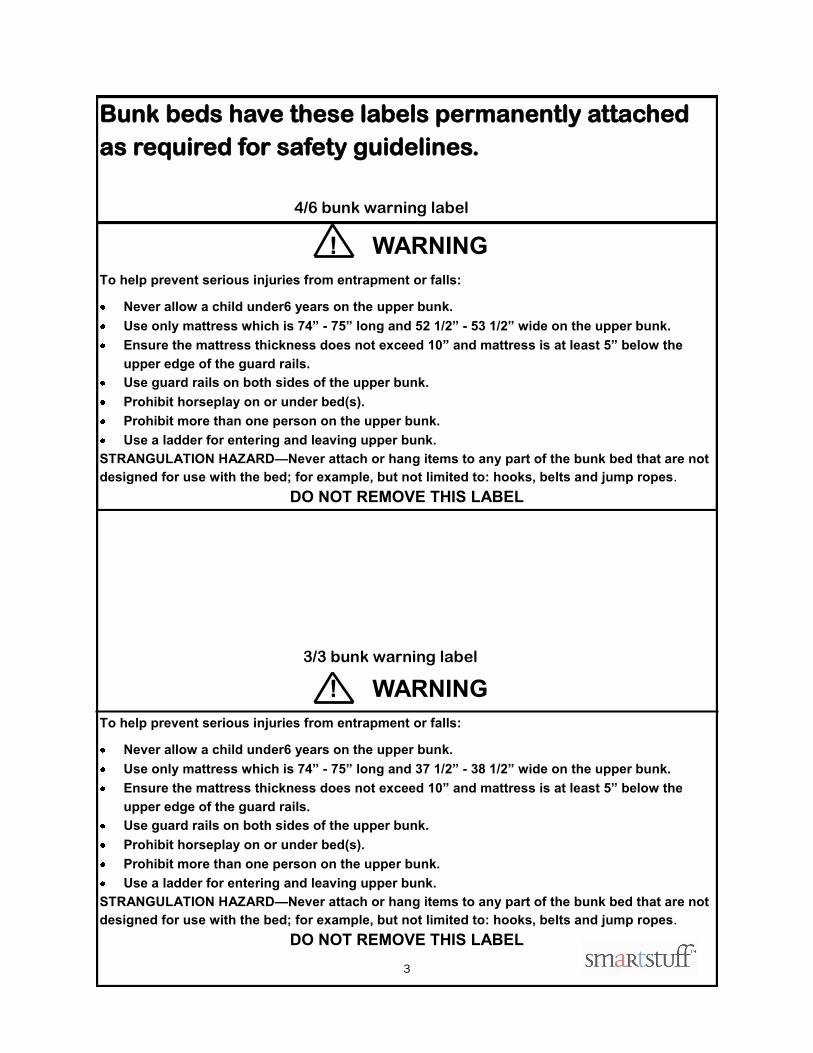
Bunk beds have these labels permanently attached
as required for safety guidelines.
! WARNING
To help prevent serious injuries from entrapment or falls:
Never allow a child under6 years on the upper bunk.
Use only mattress which is 74” - 75” long and 37 1/2” - 38 1/2” wide on the upper bunk.
Ensure the mattress thickness does not exceed 10” and mattress is at least 5” below the
upper edge of the guard rails.
Use guard rails on both sides of the upper bunk.
Prohibit horseplay on or under bed(s).
Prohibit more than one person on the upper bunk.
Use a ladder for entering and leaving upper bunk.
STRANGULATION HAZARD—Never attach or hang items to any part of the bunk bed that are not
designed for use with the bed; for example, but not limited to: hooks, belts and jump ropes.
DO NOT REMOVE THIS LABEL
! WARNING
To help prevent serious injuries from entrapment or falls:
Never allow a child under6 years on the upper bunk.
Use only mattress which is 74” - 75” long and 52 1/2” - 53 1/2” wide on the upper bunk.
Ensure the mattress thickness does not exceed 10” and mattress is at least 5” below the
upper edge of the guard rails.
Use guard rails on both sides of the upper bunk.
Prohibit horseplay on or under bed(s).
Prohibit more than one person on the upper bunk.
Use a ladder for entering and leaving upper bunk.
STRANGULATION HAZARD—Never attach or hang items to any part of the bunk bed that are not
designed for use with the bed; for example, but not limited to: hooks, belts and jump ropes.
DO NOT REMOVE THIS LABEL
4/6 bunk warning label
3/3 bunk warning label

4
Identify the individual parts of the bunk bed for reference in
assembling your bed. While the illustrations in this manual are
generic, the assembly method is the same for all smartstuff
bunks.
Take inventory of each part. Make sure that the proper quantity of each
component is available. If any part is missing, please contact the retailer for
service parts. If you find any part is defective, please contact your
smartstuff retailer immediately. Do not use parts not supplied with this item
for assembly. Give yourself ample room for assembly in the place where the
bunk will reside. Replacement parts, including additional guardrails, may
be obtained from any of our Universal/smartstuff dealers. Two people are
required for safe assembly.
Tools:
1—Flat Head Screw Driver
1—Phillips Head Screw Driver
1 guard
rail shelf 1 short guard rail 1 long guard rail
2 slat rolls 4 bunk ends — 2 upper and 2 lower
1 ladder
4 side rails

5
Identifying the hardware to be used for
assembly of the bunk bed
(2) allen wrenches (16) allen head assembly bolts—A
(3) guard rail L brackets allen head cover bolts—B
(16 bolts and (16) female connectors
(2) allen head shelf bolts—C
(15) female connectors
(4) metal alignment pins
(4) mushroom caps
(25) allen guard rail bolts—D
(16) # 8 X 1 1/4
wood screws
(16) side rail barrel nuts
(6) guard rail
brackets
(4) # 8 X 1 wood
screws for ladder
(2) ladder
brackets

6
STEP 1.
Assembly of the lower bunk (2) person assembly
1. Using a flat head screwdriver, insert the barrel nuts into
the inside of the side rails. Note how the slot in the barrel
nut is in a horizontal position to align the threads to accept
the connector bolts.
2. The lower bunk rails can be put in the upper position
using the upper holes or lower position using the lower holes
depending on customer preference or under bed storage
options. Illustration is for setting up the bed in the upper
position. Note that the bed ends have the holes in the crown
to accept the upper bunk pins. These are the taller of the
four ends. Using the allen wrench provided tighten all bolts.
3. Bolt A is the longest bolt and is used to attach
the side rails. Bolt B and the B connector are only
used to fill in the empty holes not used for the side
rail attachment. Make sure when threading the
bolt into the barrel nut that the barrel nut is posi-
tioned as shown in figure 1. above and the
threads tighten easily.
Barrel nut
Bolt A
Bolt B
Bolt B
Inside of
side rail
NOTE: Counter
sink holes to face
the outside of bed
Slot in end
positioned
horizontally

7
STEP 2.
Assembly of the upper bunk (2) person assembly
1. Install the metal alignment pins in each of the four cor-
ners of the tall bed ends. Make sure that the pin seats
completely in the end structure.
2. Carefully set the upper
bunk ends onto the align-
ment pins. The bed posts
should seat completely
over the pin and the pin
should not be exposed.
Take note that the counter
sink holes in the posts face
the outside of the bunk
bed. See figure 1. below.
Figure 1. countersink
holes face the outside of
assembled bed.

8
STEP 3.
Assembly of the upper bunk (2) person assembly
Bolt A
Bolt B
Bolt B
1. The upper bunk rails must attach in the high position up-
per holes. This is critical as the guard rails and ladder will
not function properly if assembled in the lower set of holes.
The lower holes are only for use if the bed is not used as a
bunk bed.
2. Using the same
steps used on page 5
STEP 1., attach the
upper side rails. Two
person assembly
required. Tighten all
connections.
Barrel nut in
horizontal
position
Inside of
side rail

9
STEP 4.
Assembly of the ladder brackets
1. At the top of the ladder there will be two pre drilled
locator holes.
2. Position the two ladder brackets as shown in the
illustration aligning the holes of the bracket with
the pre drilled locator holes in the ladder..
3. Using a Phillips head screwdriver, attach the two
brackets with the (4) #8 X 1 wood screws provided.

10
STEP 5.
Assembly of the slat roll (2) person assembly
1. Attach the slat roll with
the nylon strip facing down.
Extend the slats all the way
to the ends. Screw the slats
in place with the flat head
wood screws provided. The
ladder may be used to assist
in slat roll assembly.
Rotate the ladder
up as shown in
the picture on the
upper left. Drop
the ladder down
over the side rail.
The ladder is
ready for use.
11
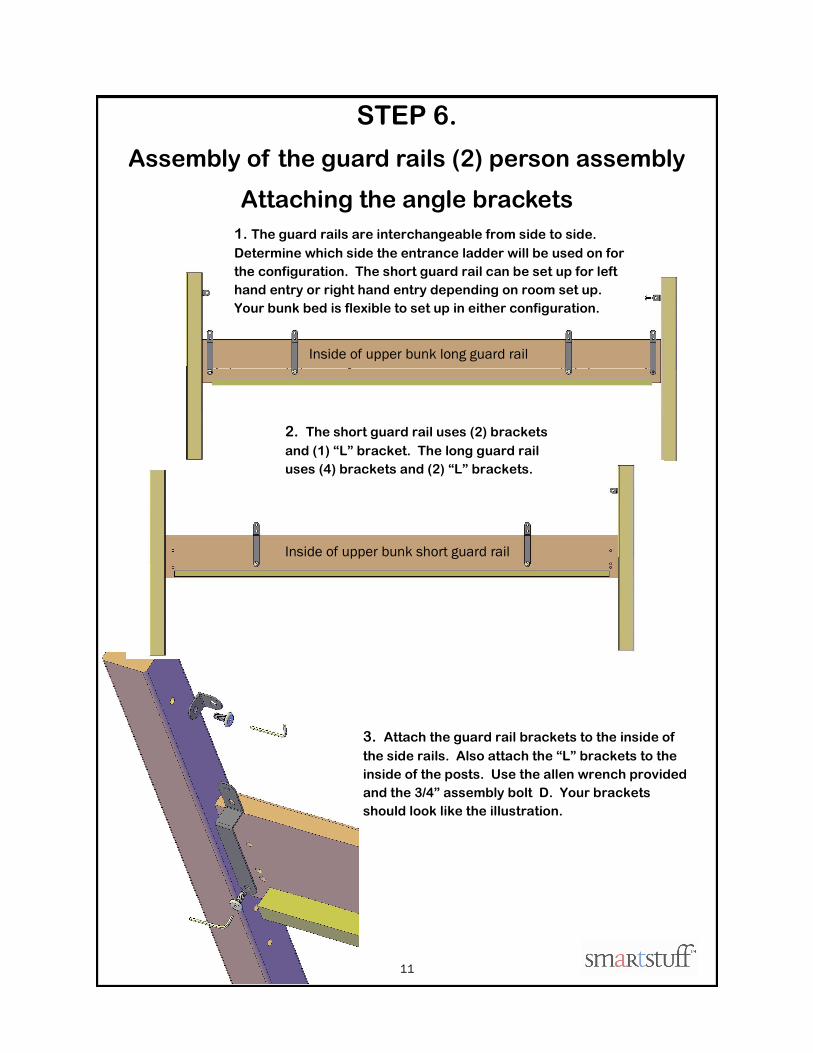
STEP 6.
Assembly of the guard rails (2) person assembly
Attaching the angle brackets
3. Attach the guard rail brackets to the inside of
the side rails. Also attach the “L” brackets to the
inside of the posts. Use the allen wrench provided
and the 3/4” assembly bolt D. Your brackets
should look like the illustration.
2. The short guard rail uses (2) brackets
and (1) “L” bracket. The long guard rail
uses (4) brackets and (2) “L” brackets.
1. The guard rails are interchangeable from side to side.
Determine which side the entrance ladder will be used on for
the configuration. The short guard rail can be set up for left
hand entry or right hand entry depending on room set up.
Your bunk bed is flexible to set up in either configuration.
Inside of upper bunk long guard rail
Inside of upper bunk short guard rail

12
STEP 7.
Assembly of the guard rails (2) person assembly
Attaching the guard rails
Determine the position of the short guard rail and
where the ladder will be positioned now. Proceed to
next page after making the determination of left or
right entry, note the short guard rail rotates to make
the left or right entry.
The short guard rail
will have to rotate to
determine left or
right entry. This will
assure the shelf is
always away from
the ladder.

13
STEP 8.
Assembly of the guard rails (2) person assembly
Attaching the guard rails
1. Using the connector bolt D attach the guard rails to
the upper bunk brackets. Attach the upper post
bracket first for support then the longer angle
brackets on the side rail.
2. The guard rails are interchangeable from side to
side. Determine which side the entrance ladder will
be used on for the configuration. The short guard
rail can be set up for left hand entry or right hand
entry depending on room set up. Your bunk bed is
flexible to set up in either way.
3. If bed will be placed next to the wall, the guard rail
that runs the length of the bed must be placed
against the wall to prevent entrapment between the
bed and wall.
Short guard rail can
set up left or right

14
STEP 9.
Assembly of the guard rail shelf accessory
2. Place the shelf away from the Lad-
der opening to prevent knocking off
any item on the shelf while entering
or exiting the upper bunk.
3. NOTE: it is not necessary to use the
shelf feature. The shelf is offered
as an accessory item and should be
used in a responsible manner.
Omitting the shelf will not in any
way affect the performance of the
bunk bed.
1. Using 2- “C” bolts, attach the shelf
to the short guard rail. Attach the shelf
to the outside of the bunk bed. Do not
use the shelf for heavy objects or for
any object than can fall and cause in-
jury to the lower bunk occupant.

15
STEP 10.
Assembly of the ladder attachment
1. Rotate the ladder up as
shown in the picture on the
upper left. Drop the ladder
down over the side rail. The
ladder is ready for use.
2. Use the ladder for only
entering and exiting the
upper bunk.
3. Use caution when using the
ladder and only one person
at a time is permitted on the
ladder.
4. The picture at left is the final
assembled bunk ready for
the mattress foundation
Plug the open hole in
the post at ladder open-
ing with bolt D

16
Bedding specification for a full 4/6:
The following mattress size must be used with this bunk bed:
MATTRESS: 74” - 75” LENGTH X 52 1/2” - 53 1/2” WIDTH X 10” THICKNESS (Max. Thickness)
1. The slat roll provided must be used with this bed. Do not substitute any other foundation for
the slat roll as the bed is designed for stability and safety using the provided slat roll
foundation.
2. It is not necessary to use a “bunky” board foundation with this item as the slat roll is
designed to support the specified mattress above.
3. Be sure to maintain at least 5” of space from the top of the mattress to the top of the guard
rail for maximum safety of the occupant of the upper bunk.
STEP 11.
Installing a mattress foundation
Bedding specification for a twin 3/3:
The following mattress size must be used with this bunk bed:
MATTRESS: 74” - 75” LENGTH X 37 1/2” - 38 1/2” WIDTH X 10” THICKNESS (Max. Thickness)
1. The slat roll provided must be used with this bed. Do not substitute any other foundation for
the slat roll as the bed is designed for stability and safety using the provided slat roll
foundation.
2. It is not necessary to use a “bunky” board foundation with this item as the slat roll is
designed to support the specified mattress above.
3. Be sure to maintain at least 5” of space from the top of the mattress to the top of the guard
rail for maximum safety of the occupant of the upper bunk.

17
4/6 Extension Kit Option
Hardware and Parts Listing
(8) Connector
bolts and caps
(1) allen wrench
(8) spring washers (8) flat washers
(1) 4/6 slat roll
(2) extension ends (one left
and one right)

18
Extension Kit Option Assembly Instructions
2 person assembly required
1. Prepare the connector bolts with the
spring washer first then slide on the flat
washer as shown.
2. Attach the extension with the brackets
attached to the lower bed end to be ex-
tended as shown with the connector bolts
and caps.
3. Follow steps on page 5 for assembly of the
side rail. Use the bunk bed assembly bolts
provided with the bunk bed hardware.

19
Extension Kit Option Assembly Instructions
2 person assembly required
The bunk bed will assemble with
the extensions in left hand and
right hand ends. The bed rail can
be set up in the upper or lower
configuration depending on under
bed options or desired mattress
height.
The bottom bunk will use a full size
mattress and must use the 4/6 full
size slat roll mattress support.
Attach the mattress support with
the screws provided following the
instructions on page 8.

20
Extension Kit Option Assembly Instructions
Bunk Bed assembled with the extension kit

21
Smartstuff bunks will make two twin beds
1. The bottom bunk is a higher panel and is the head board. Rotate the head board so
that the countersink holes are on the front side of the bed facing the mattress open-
ing.
2. Use the upper bunk as the foot board and set up with the counter sink holes to the out-
side of the bed.
3. Use the steps previously show on page 5 and page 8 for assembly of the side rails and
the slat roll mattress foundation.
4. Use the mushroom caps provided to fill the holes in the headboard where the align-
ment pins were used on the bunk bed assembly.
Footboard has
countersink
facing forward.
Headboard has
countersink
facing forward
Mushroom caps on headboard to
cover the alignment pin holes.

22
smartstuff is a registered product
manufactured and marketed by
UNIVERSAL FURNITURE INTERNATIONAL, INC
2575 Penny Road
High Point, NC 27265