building iot with arduino day one
TRANSCRIPT

BUILDING INTERNET OF THINGSNWITH THE ARDUINO AND ATMEL AVR MICROCONTROLLER
Anthony Faustine Sambaiga (AL, UDOM)Bsc. ECS (UDSM), Msc. TE (UDOM)
Research Interest: WSAN, M2M, Smart grid Communications and ICT4D. 1

Training Introduction
The evolution of communication technologies bring Internet connection to devices at lower cost, less power consumption and smaller sizes.
• As the results devices are able to be parts of the so called Internet of Things (IoT).
Arduino: flexible micro-controller and development environment.
• Used to control devices, and to read data from all kinds of sensors.Arduino is the best way to be introduced to the IoT
Anthony Faustine 2

Aim
• Introduction to IoT and Cloud Computing.• Introduction to the world of Arduino.• See how to develop IoT application using Atmel AVR
microcontroller with Arduino boot loader.• See how to connect Arduino to the Cloud.
Anthony Faustine 3

Coverage
• Introduction to the Internet of Things (IoT)• Arduino Microcontroller Platform• Arduino Development Environment• Digital & Analog Inputs / Output• Reading Data From Sensors• Introduction to Atmel Atmega328• Connecting Arduino to the Internet• Cloud Computing and IoT• Where to buy equipment• Taking your prototype to commercial Product• Project works
Anthony Faustine 4

Internet of Things
Imagine having small device connected that can sense temperature, smoke, humidity, and light condition of your room and report them to a web services:
Anthony Faustine 5

Internet of Things
The Internet of Things, also called The Internet of Objects:
• A global network of smart devices that can sense and interact with their environment using internet for their communication and interaction.
• A network of Physical Objects that can interact with each other to share information and take Action.
Anthony Faustine 6

Internet of Things Concept
Anthony Faustine 7

IoT Device Requirements common to all of IoT Device include
• Sensing and data collection capability (sensing nodes)• Layers of local embedded processing capability (local
embedded processing nodes)• Wired and/or wireless communication capability
(connectivity nodes)• Software to automate tasks and enable new classes of
services• Remote network/cloud-based embedded processing
capability (remote embedded processing nodes)• Full security across the signal path
Anthony Faustine 8

Functional View of IoT Technologies
Anthony Faustine 9

Feature of IoT device
Anthony Faustine 10

Interaction with The Internet The ability to communicate directly or indirectly with the
internet make IoT device different from other devices.
• Why need to communicate with internet??Sensors generate lot of data that need to be
managed.Embedded memory is limitedInternet provide web application for data storage
which can be accessed anywhere or anytime.Provide data exchanges between other applications.
• The IoT is an interaction between the internet, things… and data
Anthony Faustine 11

Interaction with The Internet
Anthony Faustine 12

Building Blocks of the IoT
• Control Units• Sensors• Communication Modules• Power sources
Anthony Faustine 13

Control Units IoT device utilize microcontroller as the main control unit
• A microcontroller: Is a small computer in a single integrated circuit.It contain a processor core, a memory, and
programmable I/O peripheral.• MCU
The ‘brain’ controls everythingReads input from sensorsDrives outputsLED, Switch, Motor,…Communicates!
Anthony Faustine 14

Sensors Device that can sense the physical quantities and convert
into signal which can be interpreted by the MCU.
• Fall into two types Analog and Digital Sensor
Anthony Faustine 15

Communication Modules Provide connectivity to the IoT devices and the Internet Communication between IoT and the Internet can be
performed in two ways.
• There is an interned enabled intermediate node called gateway
• The IoT device has direct connection to the Internet
Anthony Faustine 16

Communication Modules
Anthony Faustine 17

Power Sources This can power
• Battery• Energy harvesting
Anthony Faustine 18

IoT Examples
Anthony Faustine 19
http://postscapes.com/internet-of-things-examples/

Arduino Microcontroller Platform
Microcontroller:
• A small computer in a single integrated circuit• Consist of processor core, memory and programmable
I/O peripherals.• Very common component in modern electronics systems
Anthony Faustine 20

Arduino Microcontroller Platform
The main components of MCU
• CPUMain processing unit
• MemoryInclude the program that is being executed and is
also available for storing.• I/O peripheral
Pins that collect and generate digital signals to other circuit
• Serial line (TX/RX)Allow serial data to be transmitted to or from the MCU
Anthony Faustine 21

Arduino Microcontroller Platform
Most MCU also includes
• A/D convertersTo allow MCU receive analog data for processing
• TimersTo allow MCU to perform task for certain time period.
Anthony Faustine 22

Arduino Microcontroller Platform
PIC
• This is the classic micro from Microchip. • Very simple, very proven, • It lacks many of the features that other mfg’s are building
into their chips. AVR
• This is basically a direct competitor of PICs. • They do everything a PIC does, • It is better, faster, cheaper, and simpler.
Anthony Faustine 23

Arduino Microcontroller Platform
MSP
• These are very good micros by Texas Instruments (TI), • Excel at low-power applications.
ARM
• Very powerful, very low-cost• It is complex
8051
• Developed by Intel in the 1980s, • seems to be the instruction set they love to teach you in
college. • Very old tech
Anthony Faustine 24

Programming MCU The main function of the MCU is to control things through
I/O interfaces.
• To instruct MCU what and how to control you need to program it.
• MCU was ordinary programmed only in assembly languages.
• But nowadays MCU can be programmed in high-level programming language like C.
Anthony Faustine 25

Programming MCU To programme MCU you need a particular hardware
knows MCU programmer.
• Challenge of using programmerThe need for special hardware that is somehow
costlyIt is difficult to program
• These challenges can be addressed by a Bootloader Bootloader: A small program that has been loaded onto
the MCU.
• This program is programmed just once in the program memory of the MCU using programmer.
• After this the MCU can be programmed without a programmer
Anthony Faustine 26

Arduino Platform What is Arduino?
• An open-source physical computing platform based on A simple microcontroller board and A development environment for writing software for
the board.• Used to develop stand-alone interactive objects • It can be connected to a computer to retrieve or send
data to the Arduino.The board can be assembled by hand or purchased
preassembled.
Anthony Faustine 27

Arduino Platform
Arduino platform offer main three things which made programming of the MCU easy.
• An open source Bootloader• Open Schematic boards• A development environment
Anthony Faustine 28

Arduino Platform
Why Arduino used mostly
• It is inexpensive • cross-platform (the Arduino software runs on Windows,
Mac OS X, and Linux), and • easy to program. • Both Arduino hardware and software are open source
and extensible.
Anthony Faustine 29

Arduino Hardware Uses Atmel Microcontroller (AVR Atmega8 and
Atmega168 microcontroller chip)
• designed to be used with C language
Anthony Faustine 30

Arduino Board Arduino exist in several different board variants.
Anthony Faustine 31

Arduino Hardware
Anthony Faustine 32

Arduino Hardware

Prototyping Circuits Solderless Breadboard: The most useful tools in an
engineer or
Anthony Faustine 34
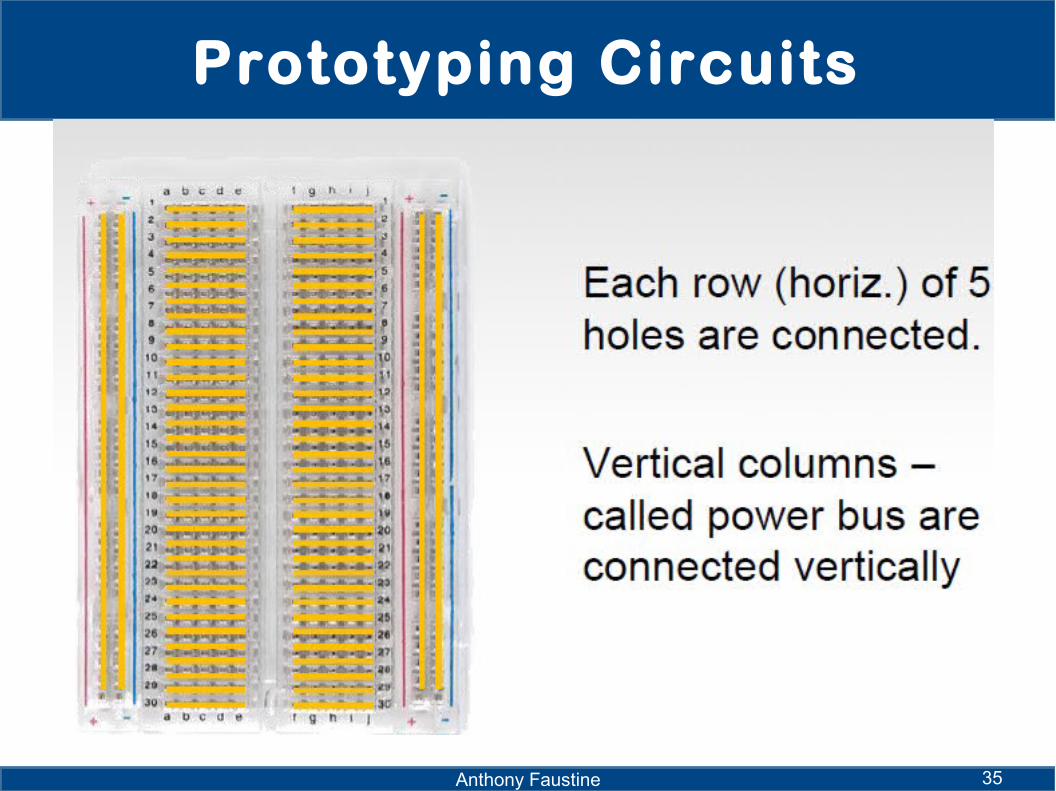
Prototyping Circuits
Anthony Faustine 35

Anatomy of a Breadboard
oDip supportoTerminal stripsoPower rails

Anatomy of a BreadboardTerminal strips
• Conductive metal rows that allow current to flow from any point in that strip.
• Each side of a given row is disconnected from the other

Anatomy of a BreadboardPower Rails
• Metal strips that are identical to the ones that run horizontally, except they are, typically*, all connected
• labeled with a ‘+’ and a ‘-• Power rails on either side are not connected

Anatomy of a BreadboardDIP Support
• This is the ravine that isolates the two sides of a breadboard
• Useful for connecting integrated circuits (ICs)
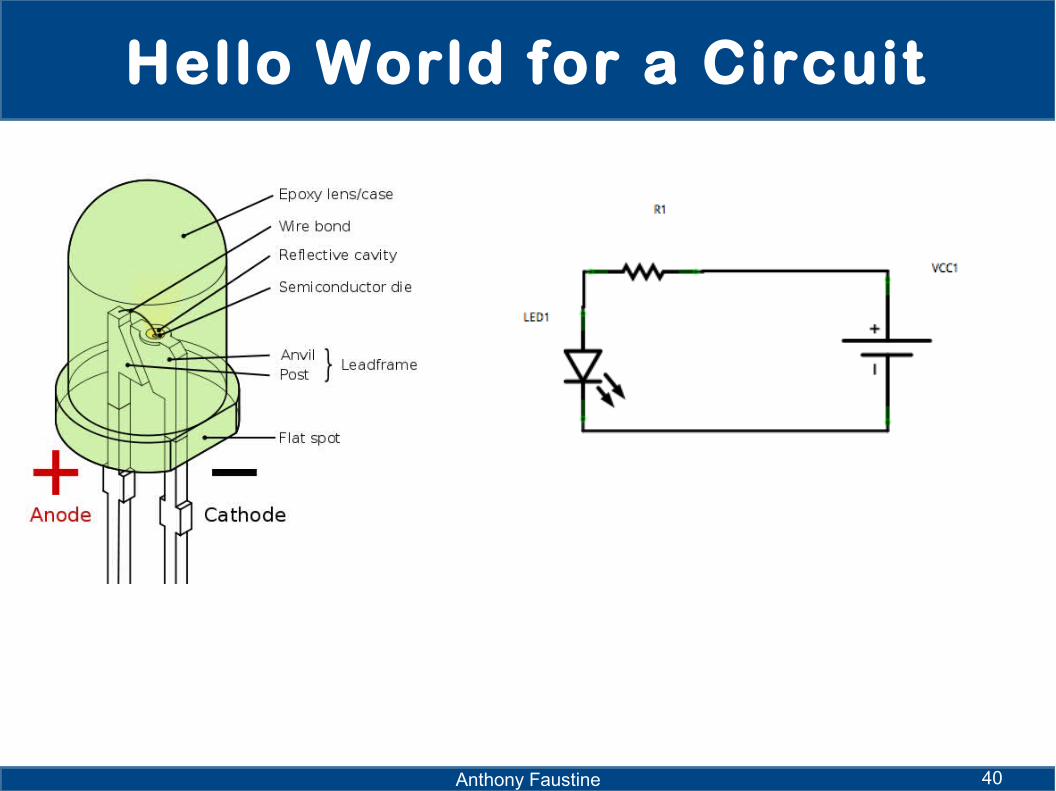
Hello World for a Circuit
Anthony Faustine 40

Arduino IDE A graphical cross platform application written in Java.
• Derived from the IDE for the processing programming language and the wiring project.
• Very simple to use• Run in Windows, Mac and Linux
It connects to the Arduino hardware to upload programs and communicate with them.

Arduino IDE Installation

Arduino IDE

Arduino IDE To use Arduino IDE
• Write your sketch• Press Verify button (to check for errors)• Press Upload button to program Arduino board with
your sketch

Writing Arduino program Software written using Arduino are called sketches.
• Language is standard C (but made easy) with lots of useful functions.
• These sketches are written in the text editor (IDE) and saved with the file extension .ino
A typical sketch consists of two parts or routines:
The initialization function called setup and The loop function
setup() – run once at beginning, set pinsloop() – run repeatedly, after setup()

Sketch structureo The setup function:
• Identified in the sketch as
• It is the main initiation function• It run once
Example

Sketch structure The loop function:
• Identified in the sketch as
• It is automatically executed.• Anything contained in this function will executed
repeatedly.Example

Writing Arduino program

“hello world” of Arduino
Activity 2: Setup the Circuit as Shown Below, Open Arduino IDE and Write the sketch below. Observe what happens

“hello world” of Arduino Open Arduino IDE and write the following code
Connect the Arduino board to the IDE

“hello world” of Arduino
Connect the Arduino board to the IDE by selecting the appropriate serial port.

“hello world” of Arduino
Next, double-check that the proper board is selected under the Tools => Board menu.

“hello world” of Arduino
Upload your code and observe what will happen
• Now open your code and Add digitalWrite(ledPin, LOW); delay(1000);
• Upload your code and observe what happen

“hello world” of Arduino
Upload your code and observe what will happen
• Now open your code and Add digitalWrite(ledPin, LOW); delay(1000);
• Upload your code and observe what happen
Lab Session Try adding other LEDs
• Can you brink two, three or four LED (Each LED will need its own Resistor)
• Generate your own LED flashing • You may try
Police lightDisco lightTraffic lightetcc
