bt 0085 server side programming practical contents · 2018-09-07 · bt 0085 server side...
TRANSCRIPT
BT 0085 Server Side Programming – Practical
Contents
Guidelines for conducting Practical Exercises i-iv
Exercise1
Installation, Configuration and Execution of a Servlet 1
Exercise 2
Execution of a JSP page 32
Exercise 3
Hello World Using Servlets 38
Exercise 4
Search for Prime Numbers Using Servlets 39
Exercise 5
A Simple Cookie using Servlets 40
Exercise 6
Reading HTML Form Parameters using Servlets 41
Exercise 7
Servlet Session Tracking 43
Exercise 8
Simple Query Execution using Servlets 45
Exercise 9
Generating a HTML Table Based on Query Results
using Servlets 47
Edition: Spring 2009
BKID – B1089 30th
Sept. 2009
Exercise 10
Servlet Life Cycle Demo 48
Exercise 11
Hello World Using JSP 49
Exercise 12
Date Display Using JSP 50
Exercise 13
Include Directive Demo Using JSP 51
Exercise 14
Scriptlets Demo Using JSP 52
Acknowledgements, References & Suggested Readings 53
Director & Dean Directorate of Distance Education Sikkim Manipal University of Health, Medical & Technological Sciences (SMU DDE)
Board of Studies
Dr. U. B. Pavanaja (Chairman) Nirmal Kumar Nigam General Manager – Academics HoP – IT Manipal Universal Learning Pvt. Ltd. Sikkim Manipal University – DDE Bangalore. Manipal.
Prof. Bhushan Patwardhan Dr. A. Kumaran Chief Academics Research Manager (Multilingual) Manipal Education Microsoft Research Labs India Bangalore. Bangalore.
Dr. Harishchandra Hebbar Ravindranath P. S. Director Director (Quality) Manipal Centre for Info. Sciences, Bangalore. Yahoo India, Bangalore.
Dr. N. V. Subba Reddy Dr. Ashok Kallarakkal HOD – CSE Vice President Manipal Institute of Technology, Manipal. IBM India, Bangalore.
Dr. Ashok Hegde H. Hiriyannaiah Vice President Group Manager MindTree Consulting Ltd., Bangalore. EDS Mphasis, Bangalore.
Dr. Ramprasad Varadachar Director, Computer Studies Dayanand Sagar College of Engg., Bangalore.
Content Preparation Team
Content Writing Content Editing Mr. Nirmal Kumar Nigam Mr. Purushotham U Asst. Professor & HoP – IT Asst. Professor – IT SMU DDE, Manipal SMU DDE, Manipal.
Instructional Design Mr. Kulwinder Pal Asst. Professor – Education SMU DDE, Manipal.
Edition: Spring 2009
This book is a distance education module comprising a collection of learning material for our students. All rights reserved. No part of this work may be reproduced in any form by any means without permission in writing from Sikkim Manipal University of Health, Medical and Technological Sciences, Gangtok, Sikkim. Printed and published on behalf of Sikkim Manipal University of Health, Medical and Technological Sciences, Gangtok, Sikkim by Mr. Rajkumar Mascreen, GM, Manipal Universal Learning Pvt. Ltd., Manipal – 576 104. Printed at Manipal Press Limited, Manipal.

The subject titled “Server Side Programming – Practical” bearing the
subject code BT 0085 is a two credit subject of fourth semester in BSc IT
program, and it is a complimentary subject to the “Server Side
Programming – Theory” bearing the subject code BT 0083
This lab manual intends the student to gain experience in Server Side
Programming with Servlets and developing Web applications with Java
Server Pages, both of which are the products of Sun Micro Systems.
The applications developed are run at the Server and the corresponding
output in the form of HTML pages is displayed in the Client browser.
The user should be familiar with the concepts of client side programming
using HTML to create the Web pages and he / she should also be familiar
with server side programming using Servlets or JSP.
For server side programming the user is supposed to know the installation
and configuration steps of the Web Server like Apache Tomcat (5.0 0r
higher version).
The Software’s required are free and can be downloaded from the URLs
indicated in the following pages.
The exercises given here cover the concepts of basic Servlet programming,
handling Form data, Exception Handling, Session tracking, and Database
Connectivity.
This lab manual is prepared with an intention of increasing the comfort level
of students in Server Side programming using Servlets and/or Java Server
Pages.
The successful completion of these exercises would enable the students to
be comfortable with the skills needed for implementation of client and server
side programming.
The following subjects deal with the theoretical aspects and sample
exercises for reference.
1. BT0083 – Server Side Programming – Theory – IV Semester
2. BT0072 – Computer Networks – I Semester
3. BT0074 – OOPs with Java – II Semester
SUBJECT INTRODUCTION
4. BT0075 – RDBMS With MySQL – II Semester
5. BT0078 – Website Design – II Semester
Objectives
The objective of this manual is to make the student to get hands on
experience regarding the application of theoretical concepts learnt in this or
the previous semesters. It covers the installation and configuration of related
software i.e., the Apache Tomcat Web Server Software.
The set of exercises included as part of this lab manual intend to make the
students more practical oriented and also to pave the way for using Java,
Servlets, and Java Server programming for complex and real time
applications.
The manual provides the user with the following details regarding the
experiments to be completed:
1. Software installation and configuration
2. Problem Statement
3. Algorithm
The manual also provides the list of commands to be used for editing,
typing, and compilation of the given programs.
The time requirement for individual exercises is also specified. The format
for preparation and submission of these exercises at Learning Centers
would be as follows and it should be placed as the “Table of Contents”
page in the Practical Record.
After completing various practical exercises of this subject, you should be
able to:
illustrate the usage, configuration and deployment of Servlets and JSP
programs on Web Servers.
implement various applications of Servlets and JSP in real time
applications.
apply database connectivity using Servlets and / or JSP and perform
database related operations.
explain the usage of Cookies in Server side programming.
read input from HTML forms and sending it to web servers for
processing and retrieving the processed information into the HTML
forms.
use sessions to keep track of transactions between clients and servers.
illustrate the usage of scriptlets and directives in JSP pages.
Software and Hardware Requirements
The following are the software and hardware requirements for performing
the given exercises.
Software Requirements
1. JSDK 1.5 or Higher Version
2. Web Servers:
Apache Tomcat (5.5 or Higher versions)
Sun Java Web Server
Java Servlet Development Kit
3. Java IDE’s [Optional]:
Eclipse
JCreator Pro Version 4 or higher
4. Internet Explorer 6.0 or Mozilla Firefox or any other Java Compatible
browser
Hardware Requirements
1. P-IV or higher system
2. 80 GB Hard Disk
3. 512 MB RAM (Recommended 1GB for optimal performance)

Server Side Programming – Practical
Sikkim Manipal University Page No. 1
Exercise 1 Installation, Configuration and
Execution of a Servlet
Objective: After undertaking this exercise, you should be able to install,
configure and deploy the Servlet Software on your local machine and
execute a simple application like printing the message “Hello World” on the
Web browser.
Procedure: The steps below are a walkthrough of the deployment of
required software, which would in turn be useful for completing the rest of
the exercises of this practical subject.
Step 1: Download the Java Software from:
http://java.sun.com/javase/downloads/index.jsp
and install in a preferred drive of your hard disk.
Example: D:\jdk1.6 and D:\jre1.6
Step 2: Download the apache tomcat web server software from:
http://tomcat.apache.org/download-60.cgi
OR
Download the Sun Microsystems Servlet Software from:
http://java.sun.com/products/archive/servlet/
Step 3: Configure the following environmental variables as shown below:
PATH =.;d:\jdk1.6\bin;%PATH%;
CLASSPATH = D:\Tomcat 5.5\common\lib\servlet-api.jar;
JAVA_HOME = D:\jdk1.6;
Server Side Programming – Practical
Sikkim Manipal University Page No. 2
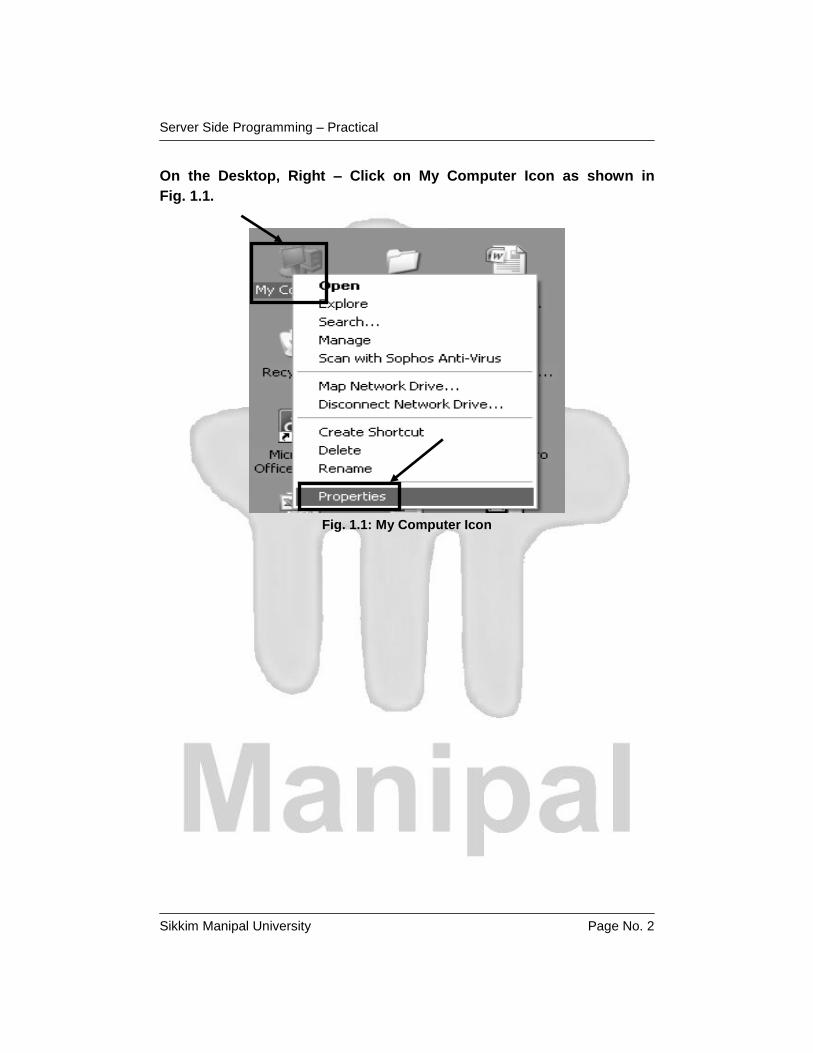
On the Desktop, Right – Click on My Computer Icon as shown in
Fig. 1.1.
Fig. 1.1: My Computer Icon
Server Side Programming – Practical
Sikkim Manipal University Page No. 3
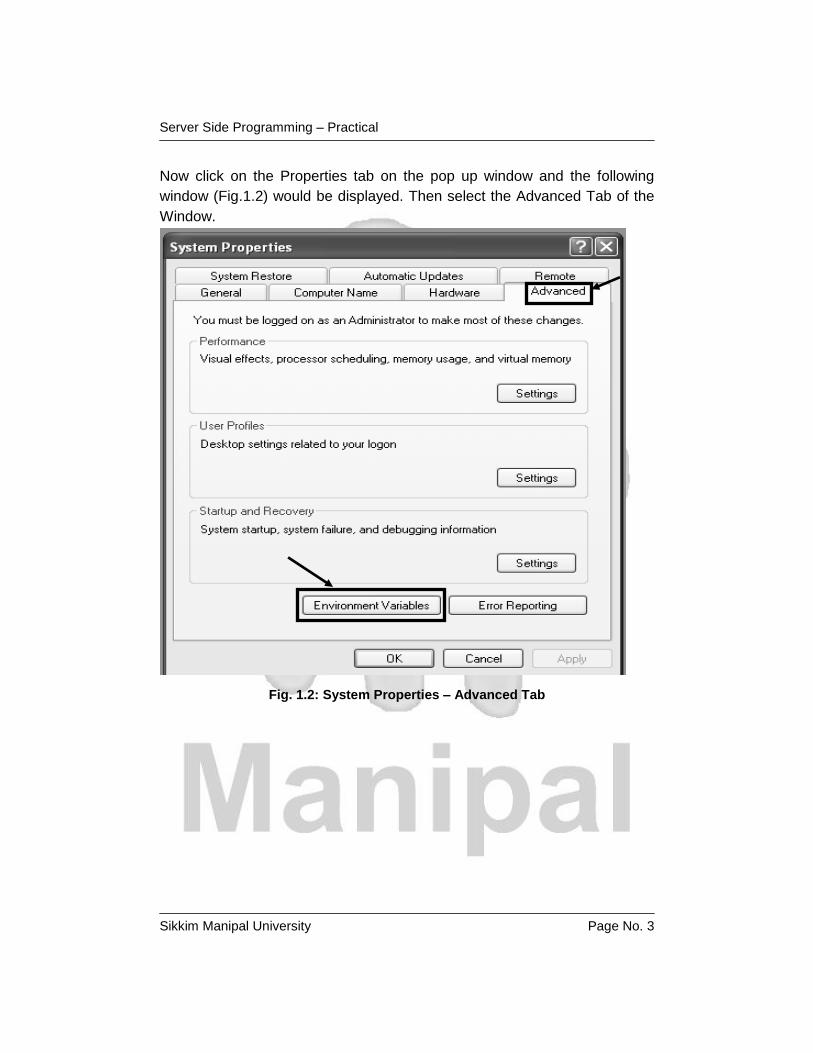
Now click on the Properties tab on the pop up window and the following
window (Fig.1.2) would be displayed. Then select the Advanced Tab of the
Window.
Fig. 1.2: System Properties – Advanced Tab
Server Side Programming – Practical
Sikkim Manipal University Page No. 4
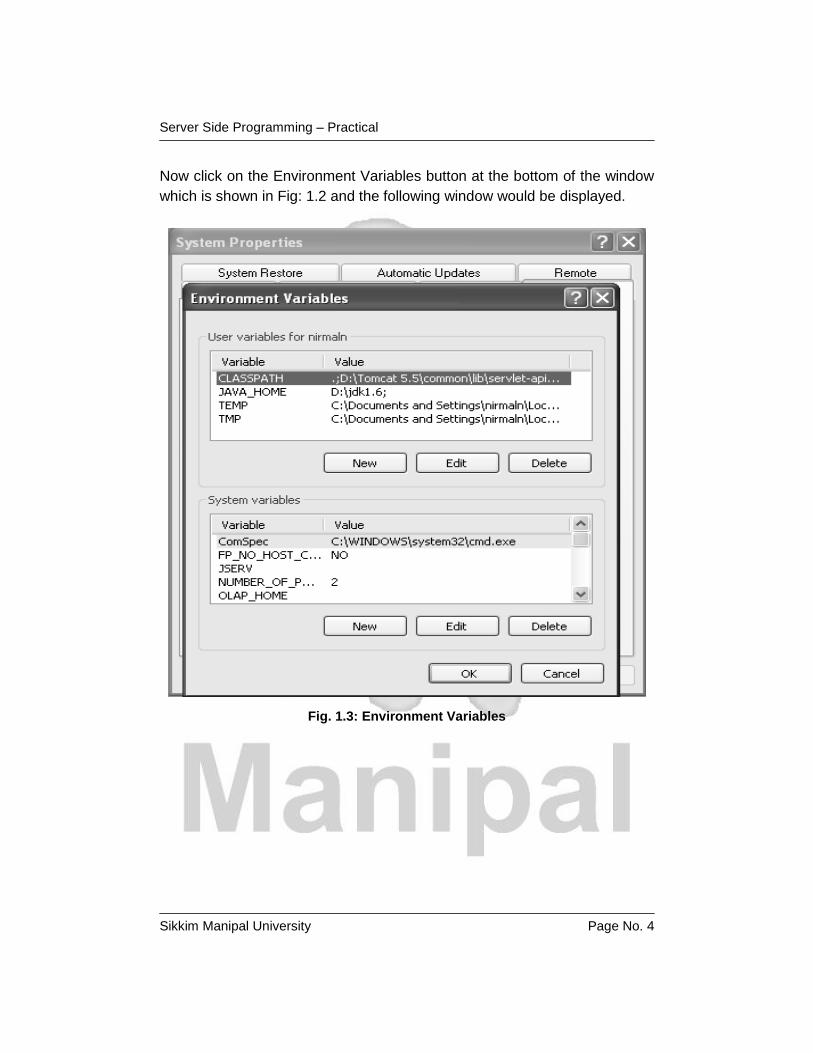
Now click on the Environment Variables button at the bottom of the window
which is shown in Fig: 1.2 and the following window would be displayed.
Fig. 1.3: Environment Variables
Server Side Programming – Practical
Sikkim Manipal University Page No. 5
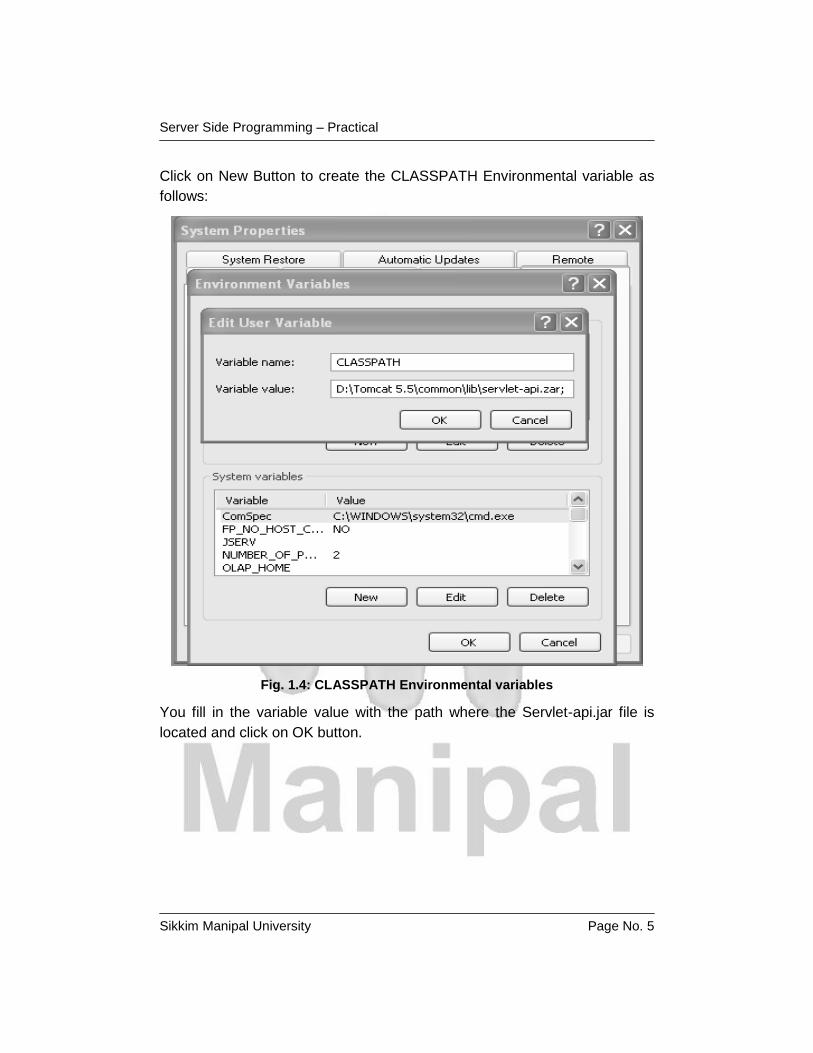
Click on New Button to create the CLASSPATH Environmental variable as
follows:
Fig. 1.4: CLASSPATH Environmental variables
You fill in the variable value with the path where the Servlet-api.jar file is
located and click on OK button.
Server Side Programming – Practical
Sikkim Manipal University Page No. 6
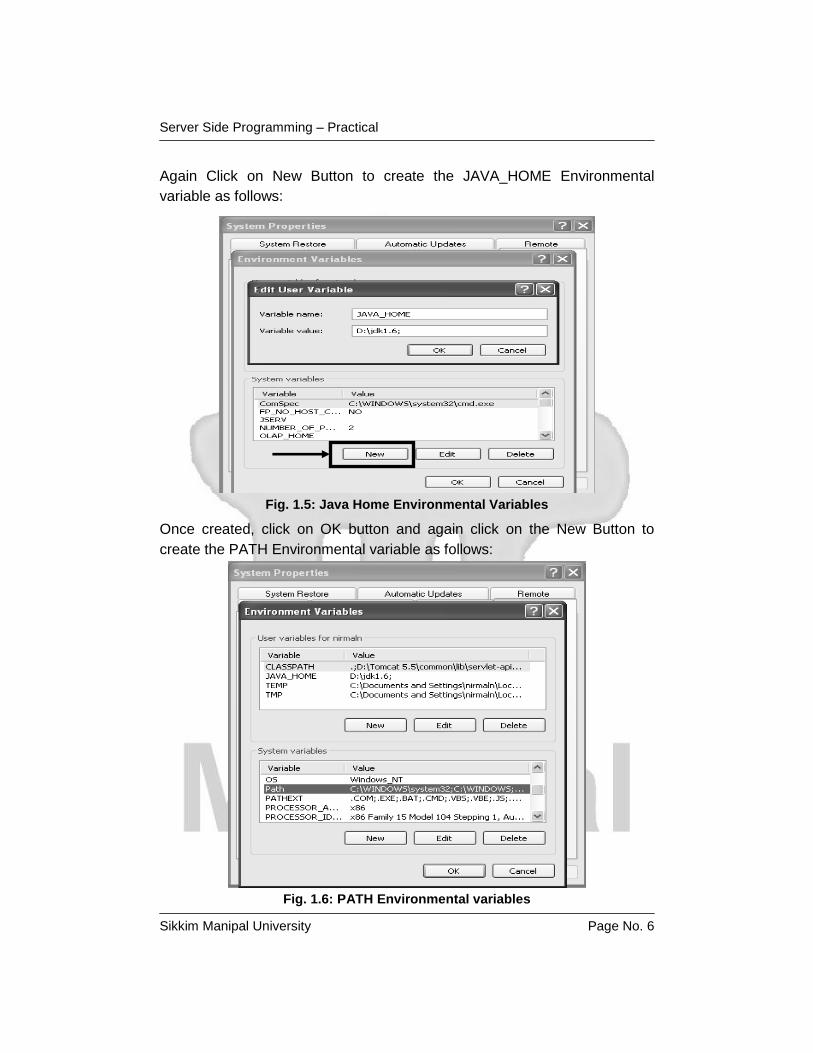
Again Click on New Button to create the JAVA_HOME Environmental
variable as follows:
Fig. 1.5: Java Home Environmental Variables
Once created, click on OK button and again click on the New Button to
create the PATH Environmental variable as follows:
Fig. 1.6: PATH Environmental variables
Server Side Programming – Practical
Sikkim Manipal University Page No. 7
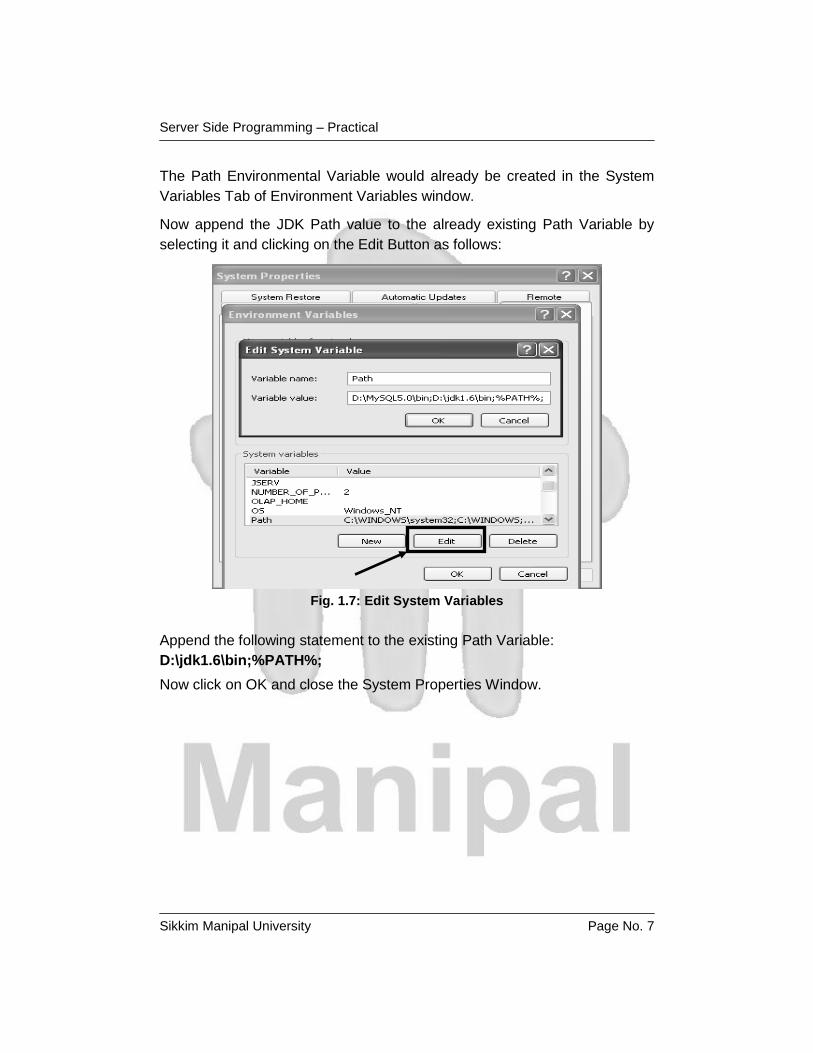
The Path Environmental Variable would already be created in the System
Variables Tab of Environment Variables window.
Now append the JDK Path value to the already existing Path Variable by
selecting it and clicking on the Edit Button as follows:
Fig. 1.7: Edit System Variables
Append the following statement to the existing Path Variable:
D:\jdk1.6\bin;%PATH%;
Now click on OK and close the System Properties Window.
Server Side Programming – Practical
Sikkim Manipal University Page No. 8
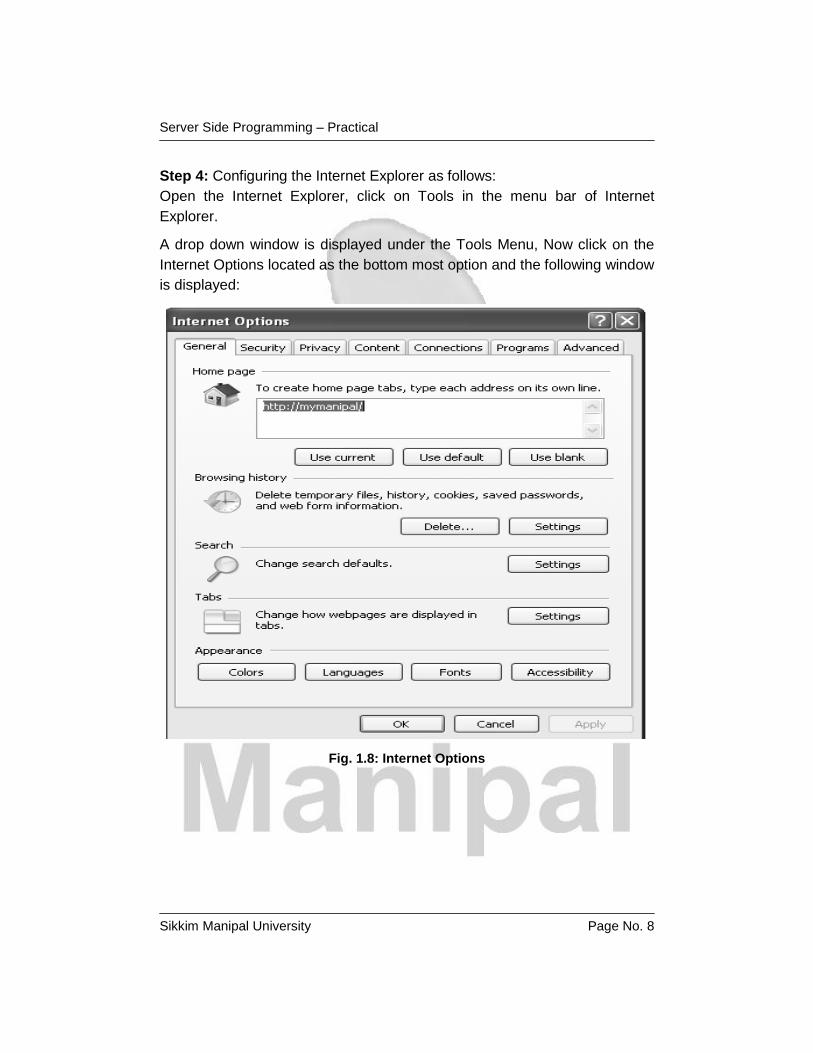
Step 4: Configuring the Internet Explorer as follows:
Open the Internet Explorer, click on Tools in the menu bar of Internet
Explorer.
A drop down window is displayed under the Tools Menu, Now click on the
Internet Options located as the bottom most option and the following window
is displayed:
Fig. 1.8: Internet Options
Server Side Programming – Practical
Sikkim Manipal University Page No. 9
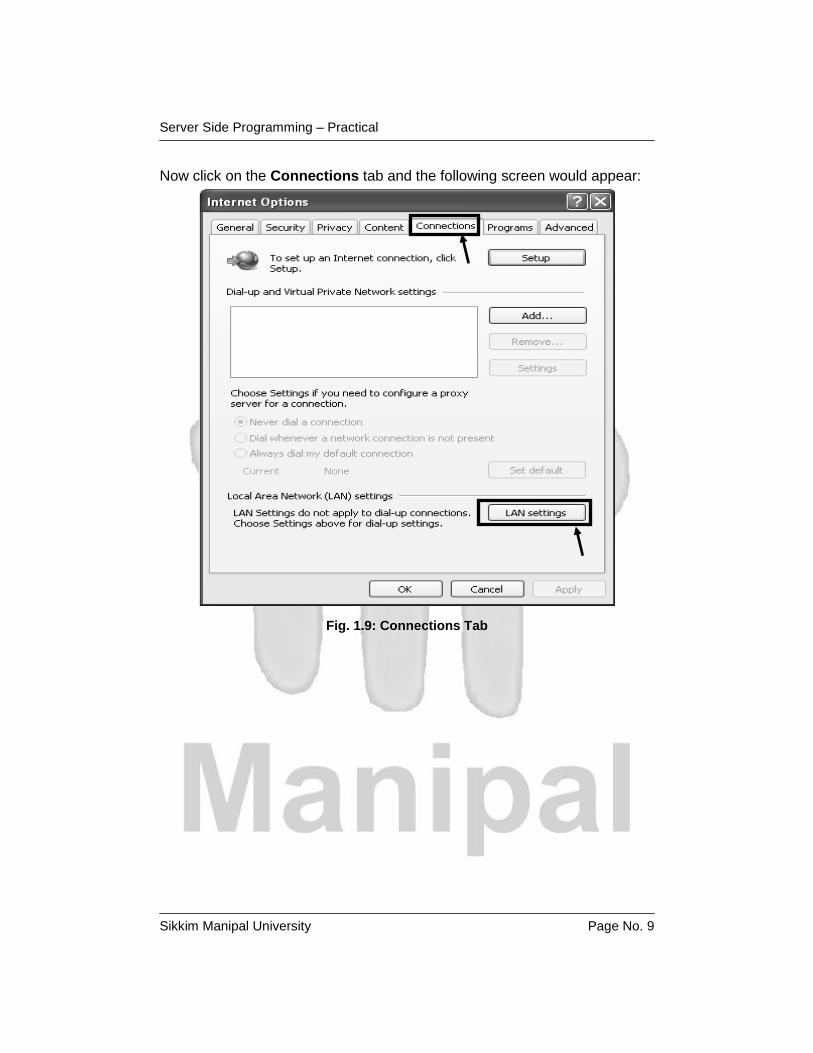
Now click on the Connections tab and the following screen would appear:
Fig. 1.9: Connections Tab
Server Side Programming – Practical
Sikkim Manipal University Page No. 10
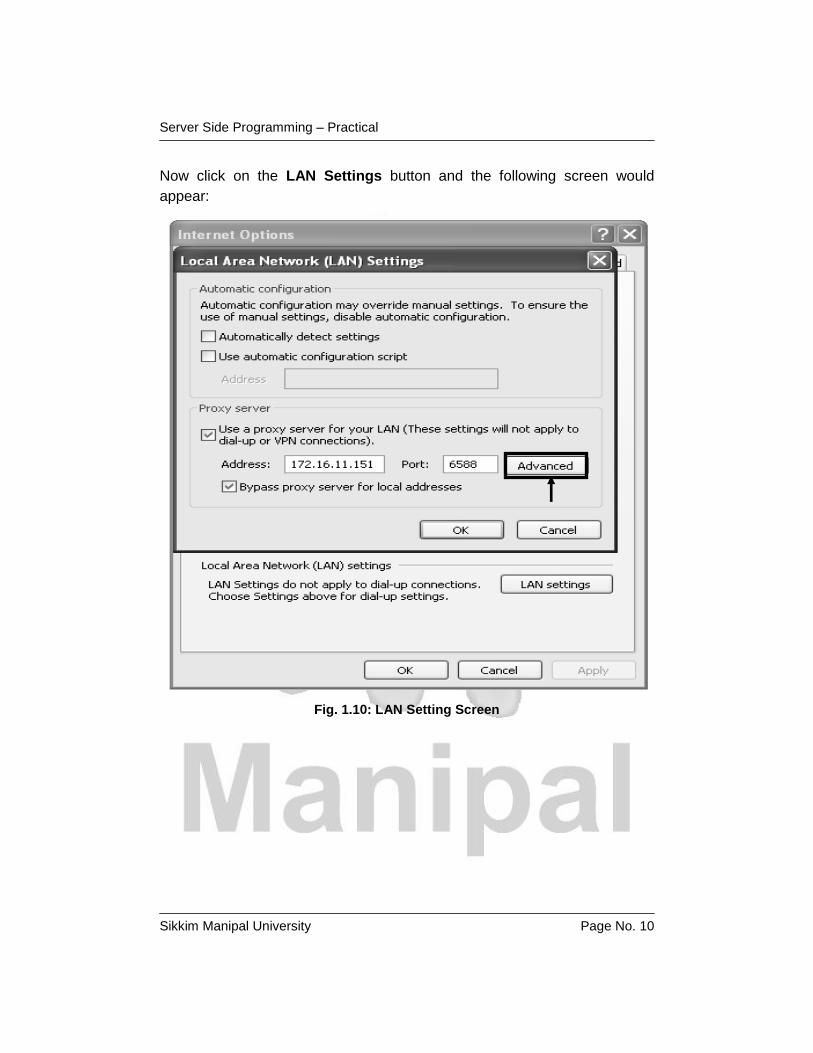
Now click on the LAN Settings button and the following screen would
appear:
Fig. 1.10: LAN Setting Screen
Server Side Programming – Practical
Sikkim Manipal University Page No. 11
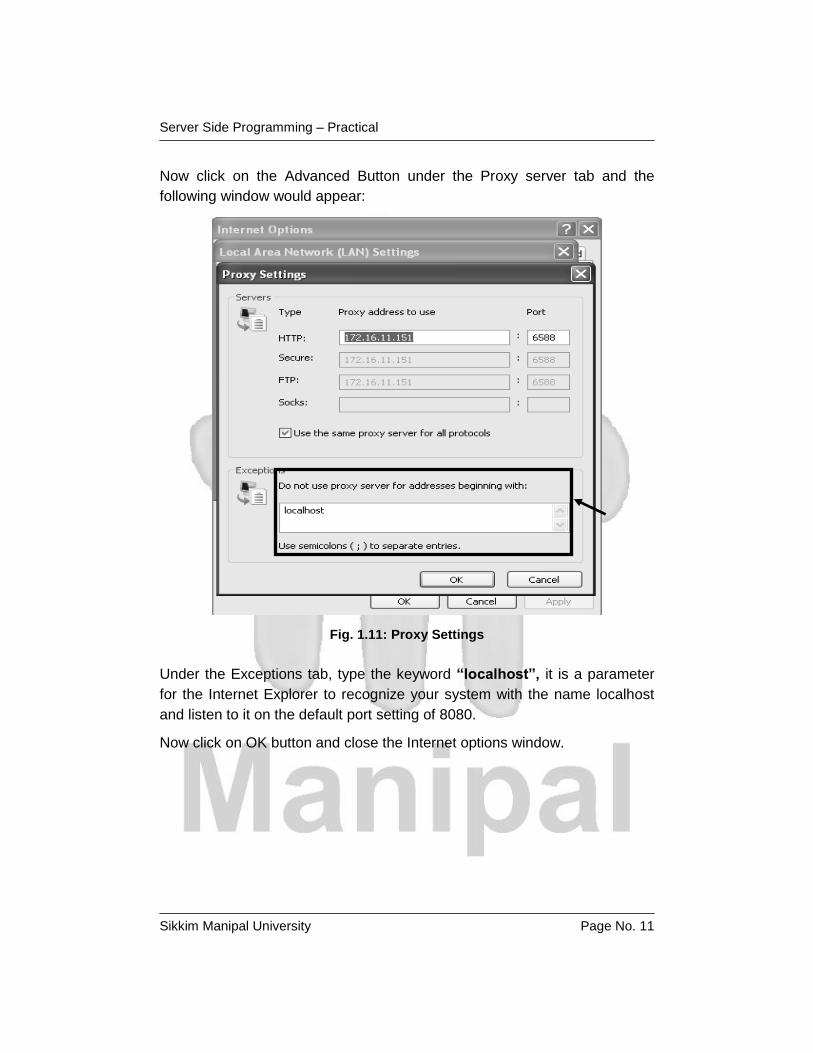
Now click on the Advanced Button under the Proxy server tab and the
following window would appear:
Fig. 1.11: Proxy Settings
Under the Exceptions tab, type the keyword “localhost”, it is a parameter
for the Internet Explorer to recognize your system with the name localhost
and listen to it on the default port setting of 8080.
Now click on OK button and close the Internet options window.
Server Side Programming – Practical
Sikkim Manipal University Page No. 12
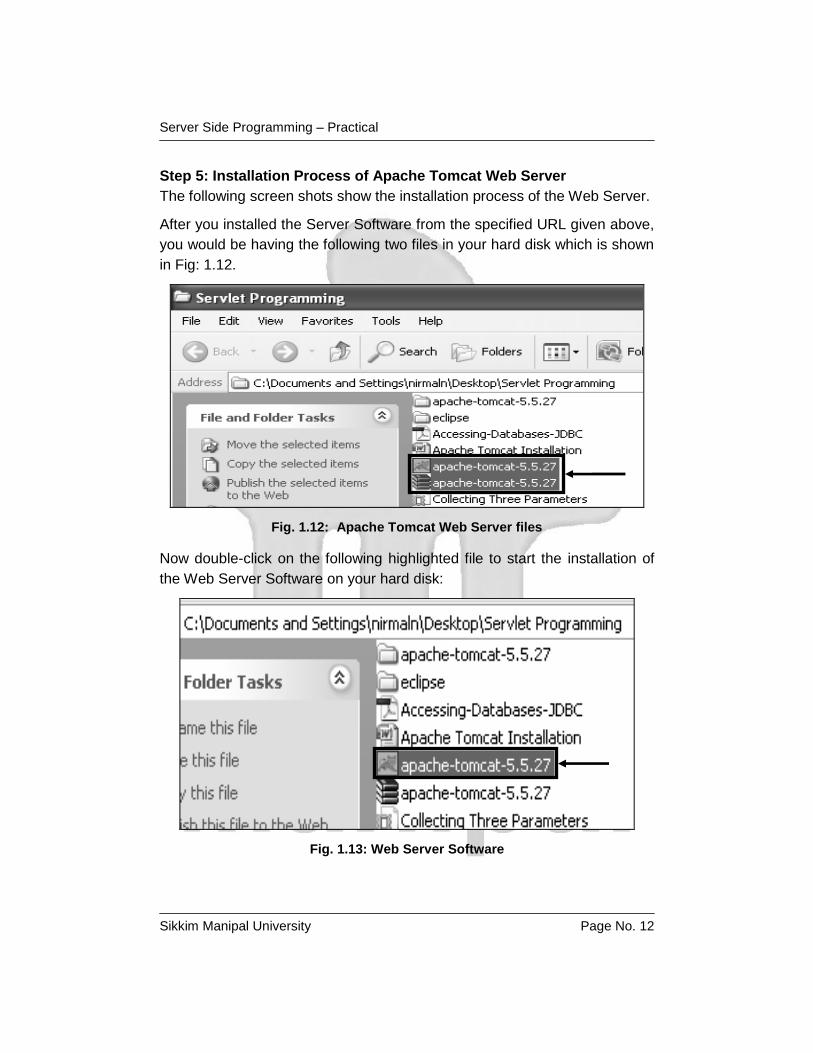
Step 5: Installation Process of Apache Tomcat Web Server
The following screen shots show the installation process of the Web Server.
After you installed the Server Software from the specified URL given above,
you would be having the following two files in your hard disk which is shown
in Fig: 1.12.
Fig. 1.12: Apache Tomcat Web Server files
Now double-click on the following highlighted file to start the installation of
the Web Server Software on your hard disk:
Fig. 1.13: Web Server Software
Server Side Programming – Practical
Sikkim Manipal University Page No. 13
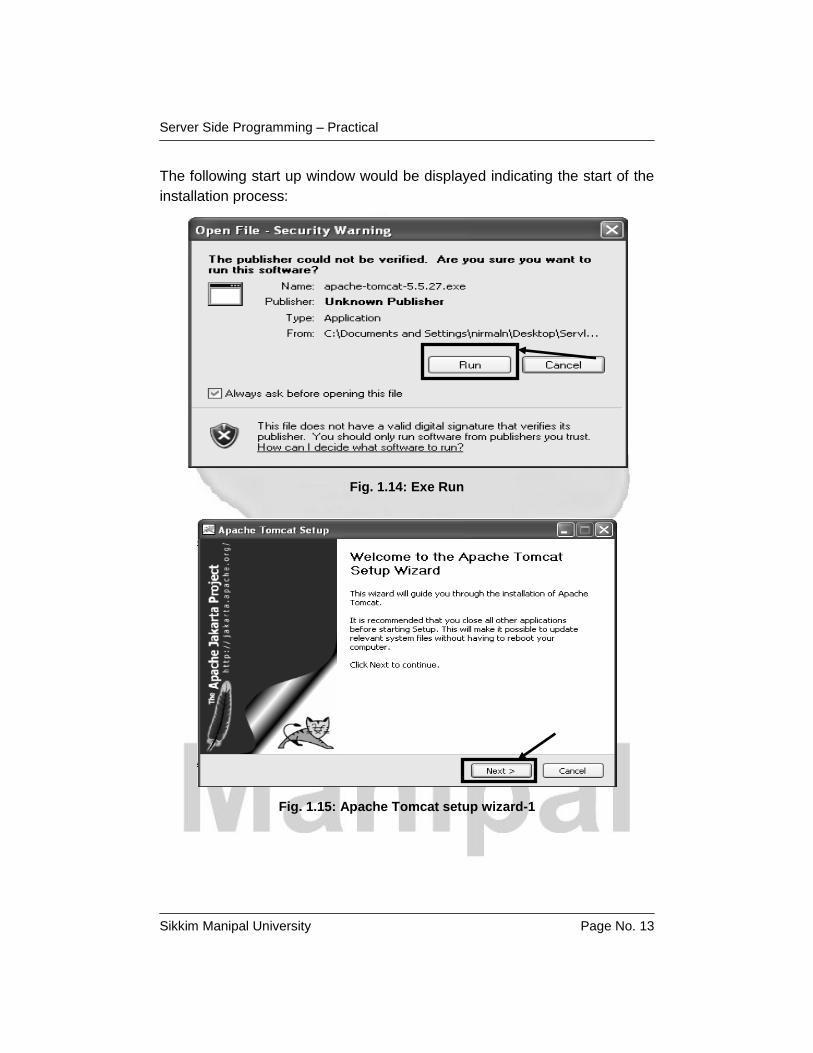
The following start up window would be displayed indicating the start of the
installation process:
Fig. 1.14: Exe Run
Fig. 1.15: Apache Tomcat setup wizard-1
Server Side Programming – Practical
Sikkim Manipal University Page No. 14
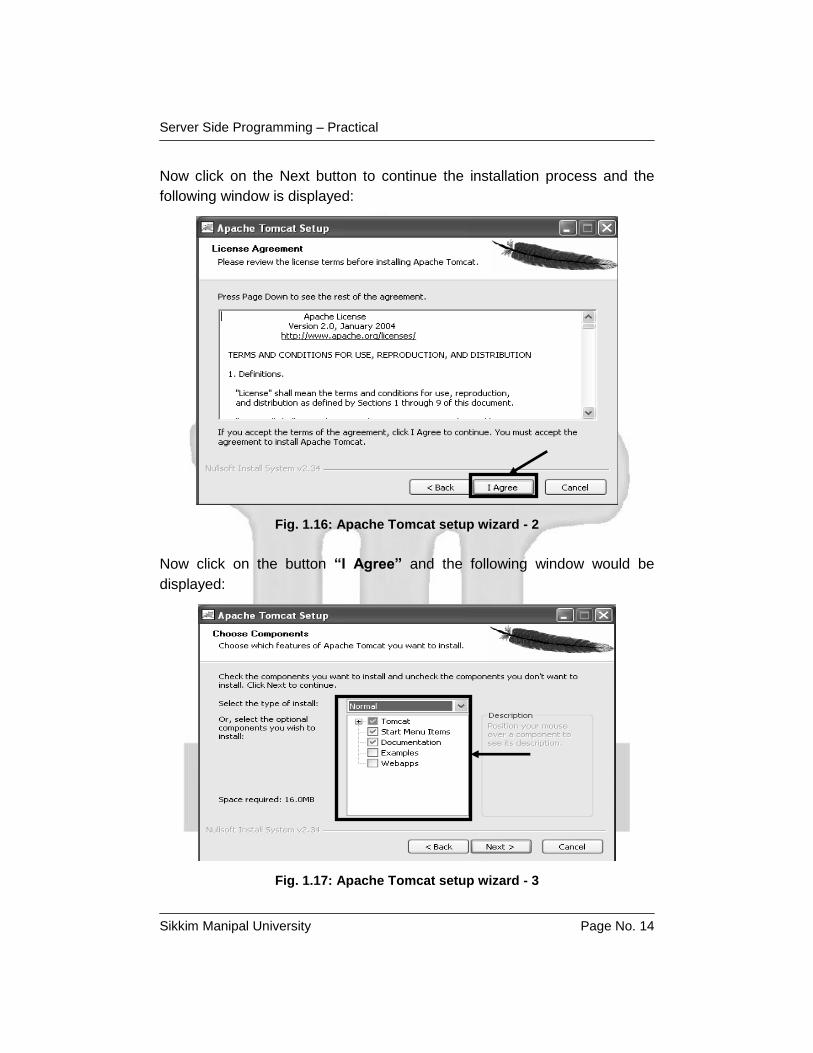
Now click on the Next button to continue the installation process and the
following window is displayed:
Fig. 1.16: Apache Tomcat setup wizard - 2
Now click on the button “I Agree” and the following window would be
displayed:
Fig. 1.17: Apache Tomcat setup wizard - 3
Server Side Programming – Practical
Sikkim Manipal University Page No. 15
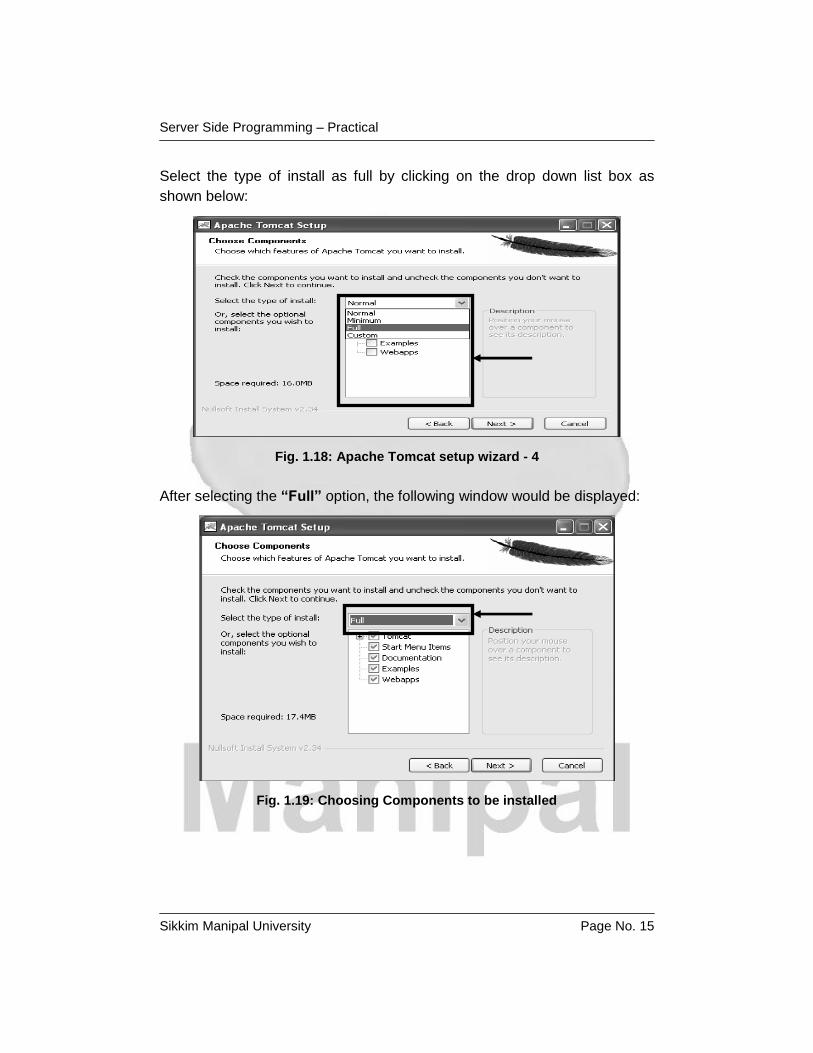
Select the type of install as full by clicking on the drop down list box as
shown below:
Fig. 1.18: Apache Tomcat setup wizard - 4
After selecting the “Full” option, the following window would be displayed:
Fig. 1.19: Choosing Components to be installed
Server Side Programming – Practical
Sikkim Manipal University Page No. 16
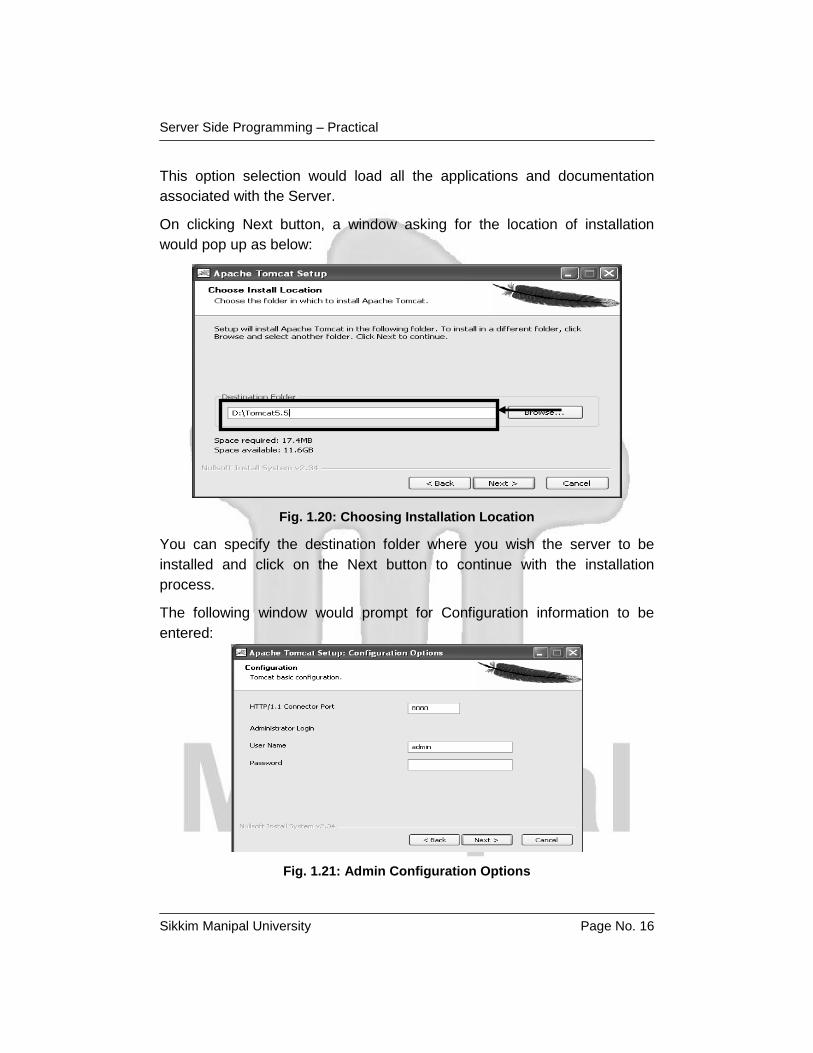
This option selection would load all the applications and documentation
associated with the Server.
On clicking Next button, a window asking for the location of installation
would pop up as below:
Fig. 1.20: Choosing Installation Location
You can specify the destination folder where you wish the server to be
installed and click on the Next button to continue with the installation
process.
The following window would prompt for Configuration information to be
entered:
Fig. 1.21: Admin Configuration Options
Server Side Programming – Practical
Sikkim Manipal University Page No. 17
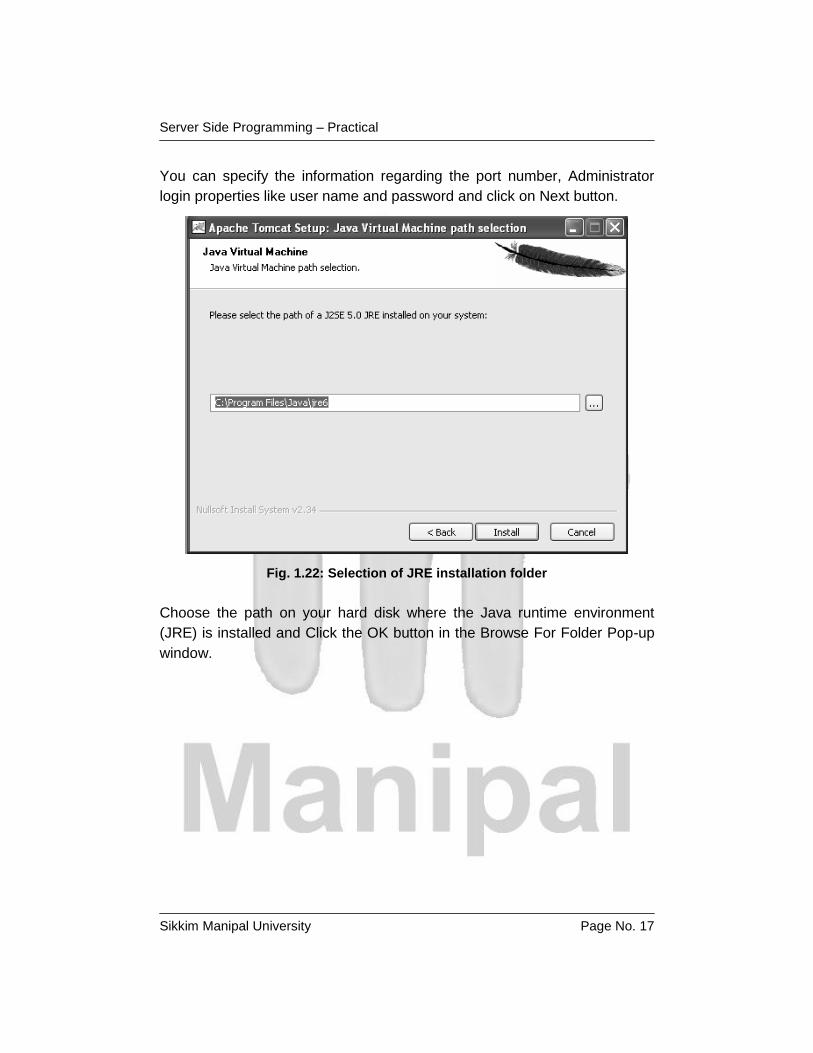
You can specify the information regarding the port number, Administrator
login properties like user name and password and click on Next button.
Fig. 1.22: Selection of JRE installation folder
Choose the path on your hard disk where the Java runtime environment
(JRE) is installed and Click the OK button in the Browse For Folder Pop-up
window.
Server Side Programming – Practical
Sikkim Manipal University Page No. 18
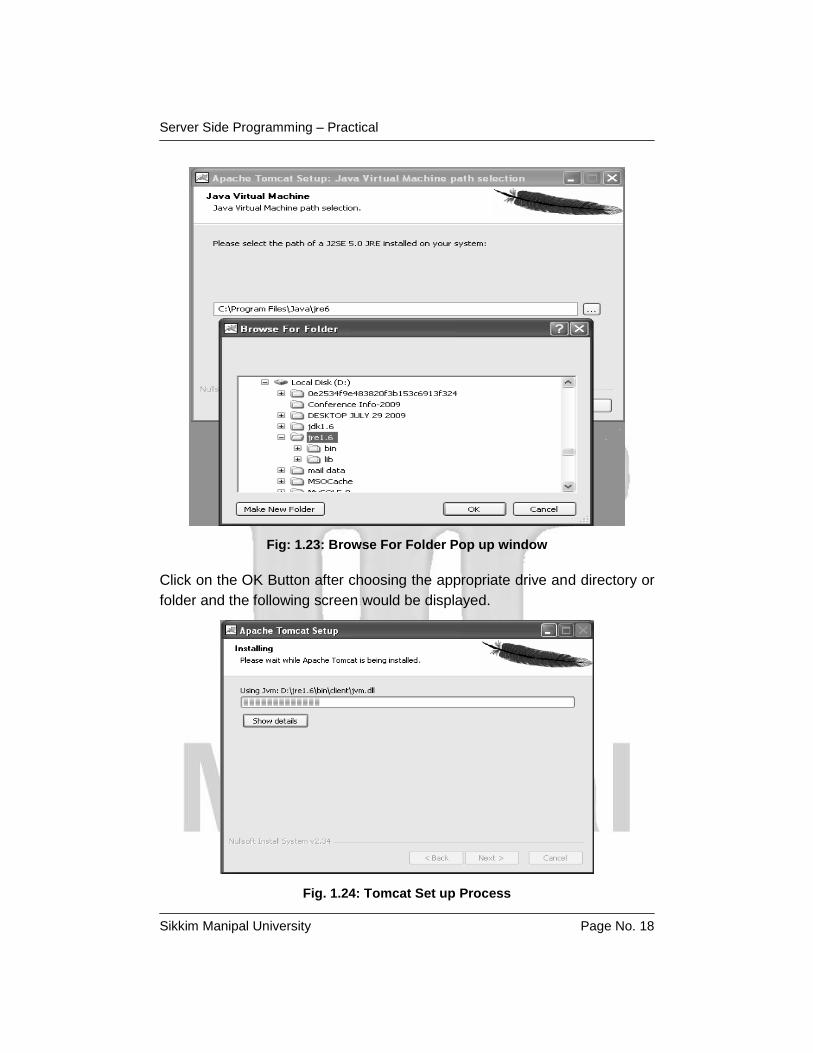
Fig: 1.23: Browse For Folder Pop up window
Click on the OK Button after choosing the appropriate drive and directory or
folder and the following screen would be displayed.
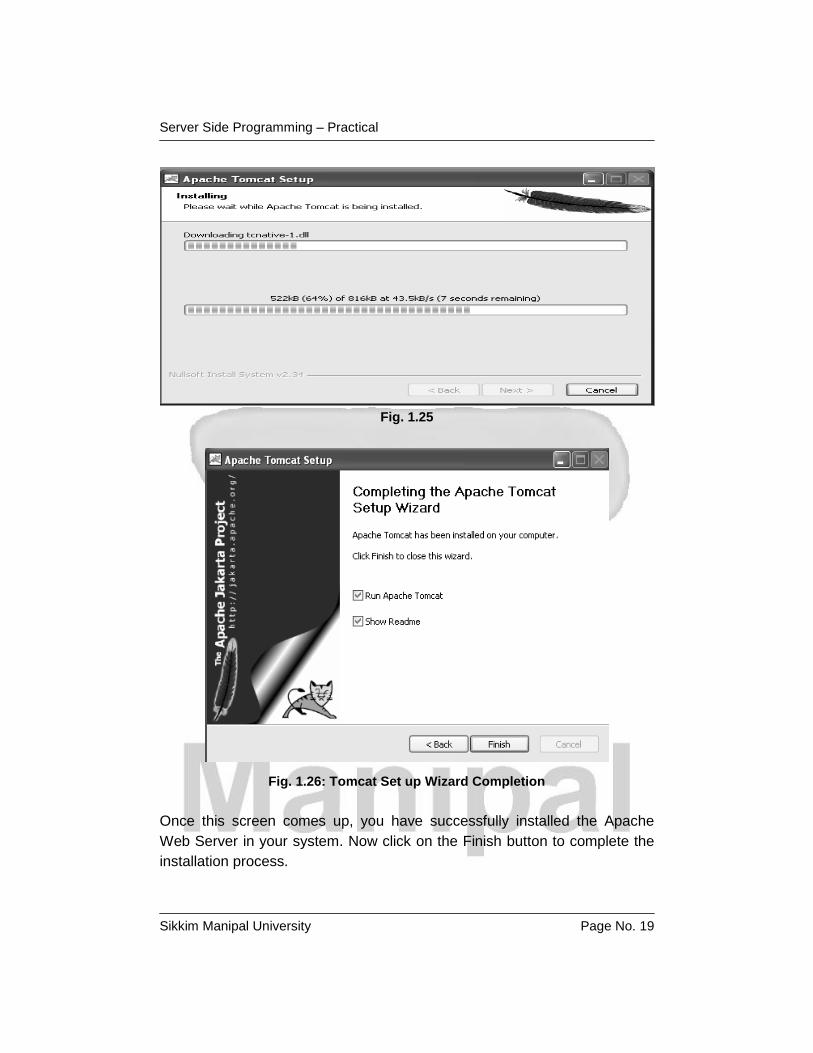
Fig. 1.24: Tomcat Set up Process
Server Side Programming – Practical
Sikkim Manipal University Page No. 19
Fig. 1.25
Fig. 1.26: Tomcat Set up Wizard Completion
Once this screen comes up, you have successfully installed the Apache
Web Server in your system. Now click on the Finish button to complete the
installation process.
Server Side Programming – Practical
Sikkim Manipal University Page No. 20
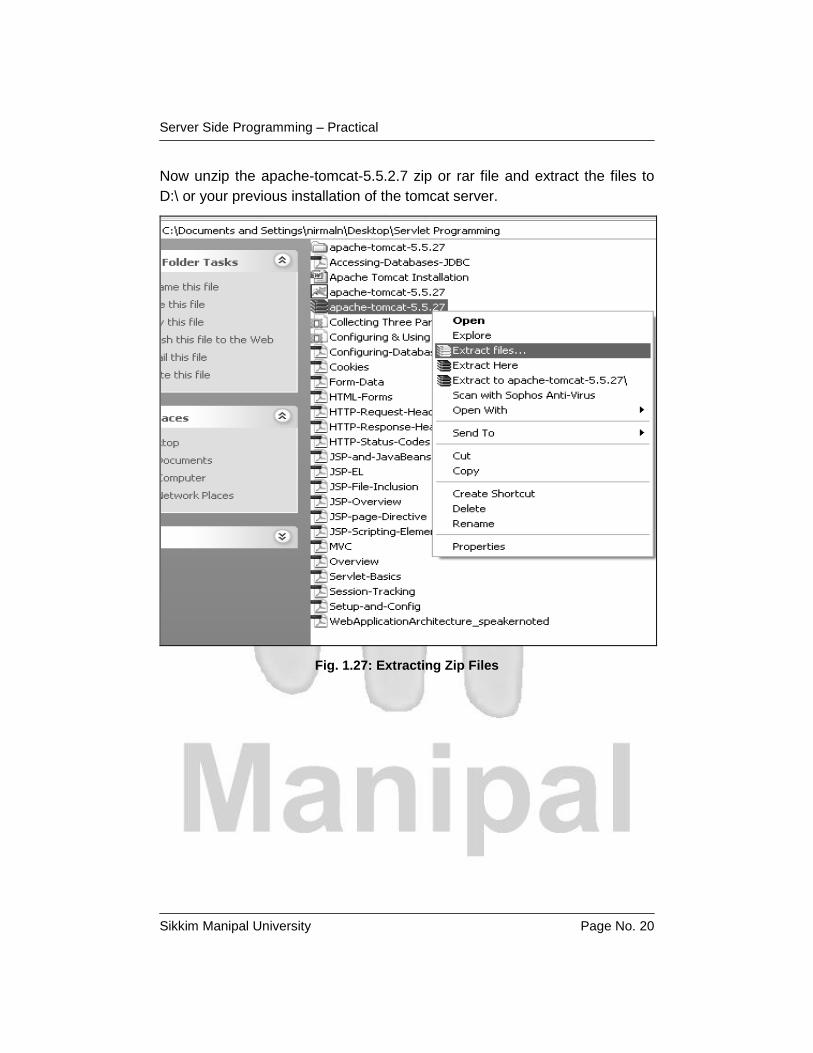
Now unzip the apache-tomcat-5.5.2.7 zip or rar file and extract the files to
D:\ or your previous installation of the tomcat server.
Fig. 1.27: Extracting Zip Files
Server Side Programming – Practical
Sikkim Manipal University Page No. 21
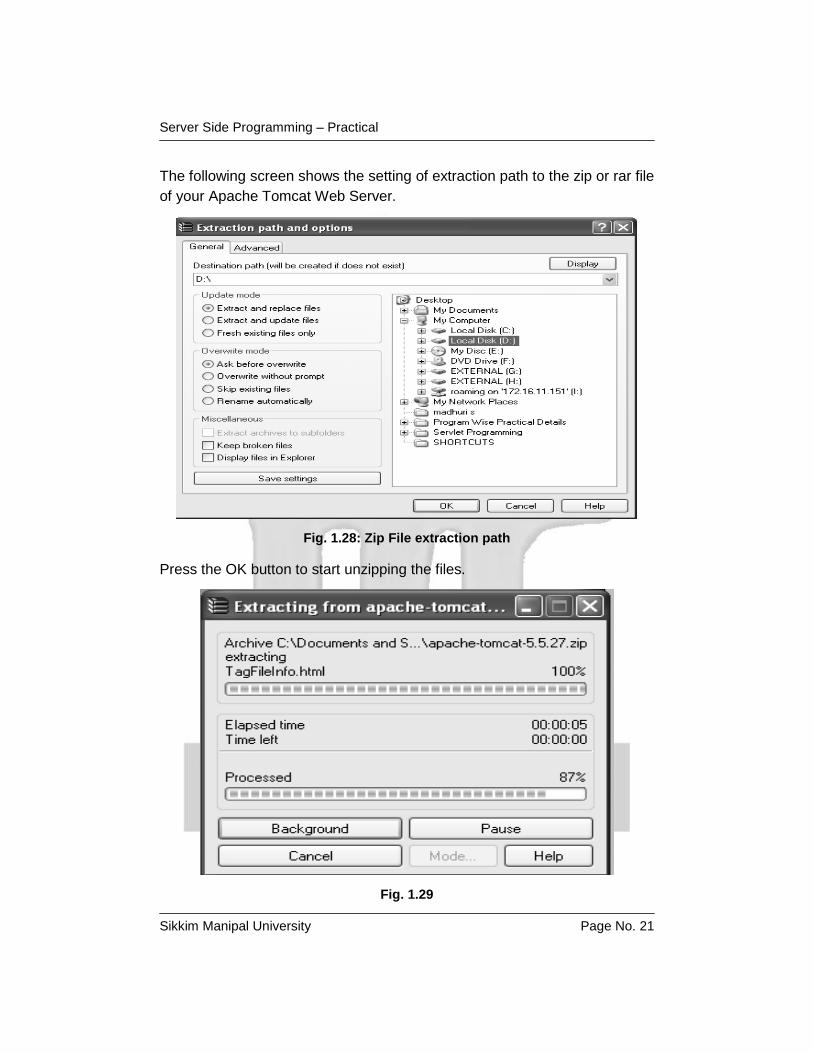
The following screen shows the setting of extraction path to the zip or rar file
of your Apache Tomcat Web Server.
Fig. 1.28: Zip File extraction path
Press the OK button to start unzipping the files.
Fig. 1.29

Server Side Programming – Practical
Sikkim Manipal University Page No. 22
The unzipped files would be appearing in the D:\ (or your installation
directory) as shown below:
Fig. 1.30
Now click on the folder “apache-tomcat-5.5.27\bin” and the following
contents would be popped up:
Fig. 1.31: apache-tomcat-5.5.27\bin folder content
This folder contains all the necessary files for running and configuring the
Web Server.
Server Side Programming – Practical
Sikkim Manipal University Page No. 23
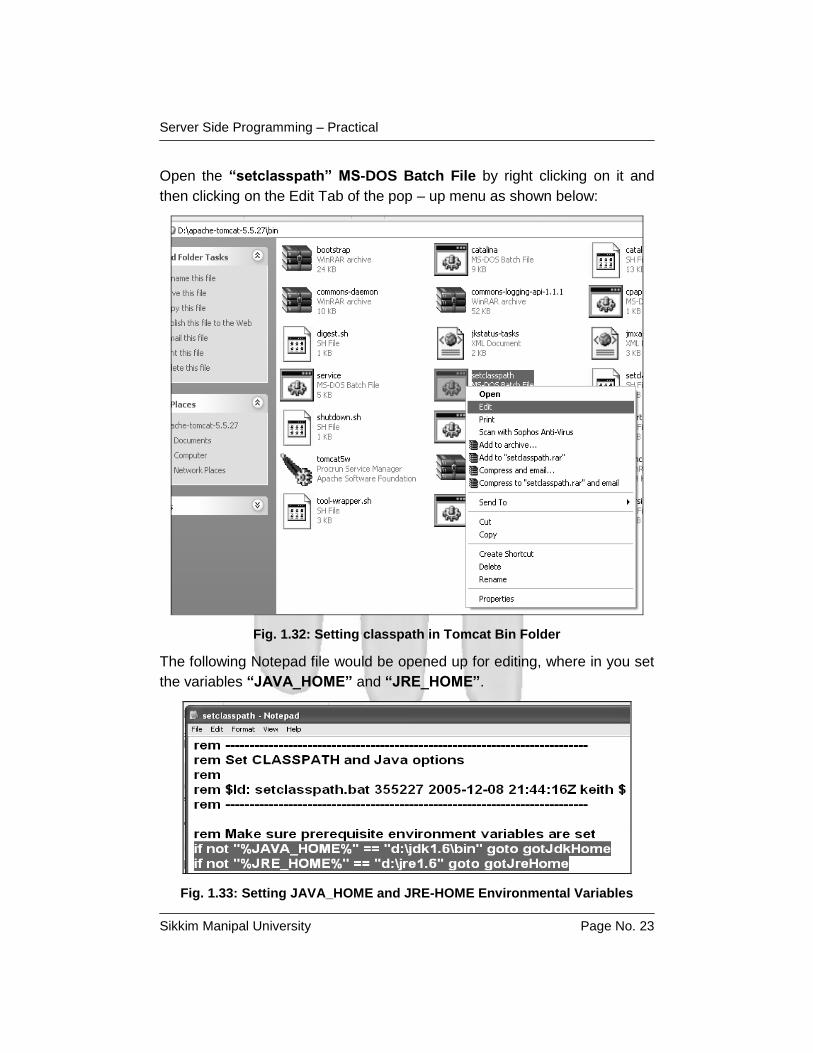
Open the “setclasspath” MS-DOS Batch File by right clicking on it and
then clicking on the Edit Tab of the pop – up menu as shown below:
Fig. 1.32: Setting classpath in Tomcat Bin Folder
The following Notepad file would be opened up for editing, where in you set
the variables “JAVA_HOME” and “JRE_HOME”.
Fig. 1.33: Setting JAVA_HOME and JRE-HOME Environmental Variables
Server Side Programming – Practical
Sikkim Manipal University Page No. 24
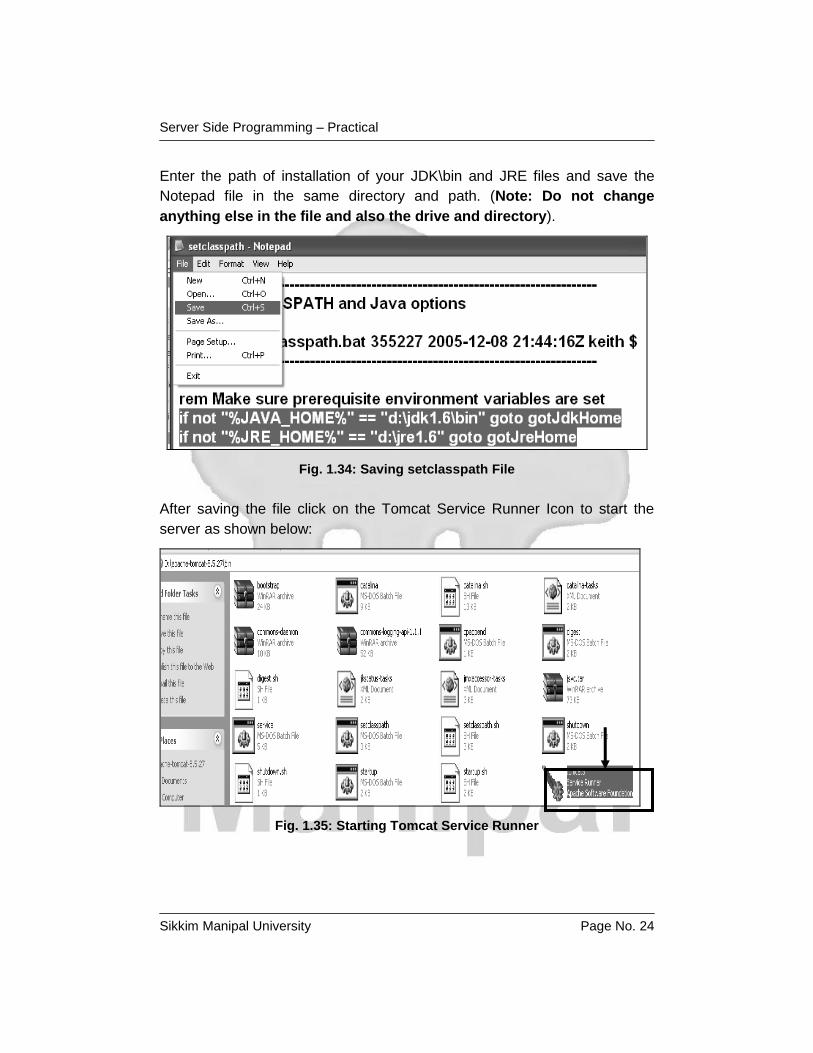
Enter the path of installation of your JDK\bin and JRE files and save the
Notepad file in the same directory and path. (Note: Do not change
anything else in the file and also the drive and directory).
Fig. 1.34: Saving setclasspath File
After saving the file click on the Tomcat Service Runner Icon to start the
server as shown below:
Fig. 1.35: Starting Tomcat Service Runner
Server Side Programming – Practical
Sikkim Manipal University Page No. 25
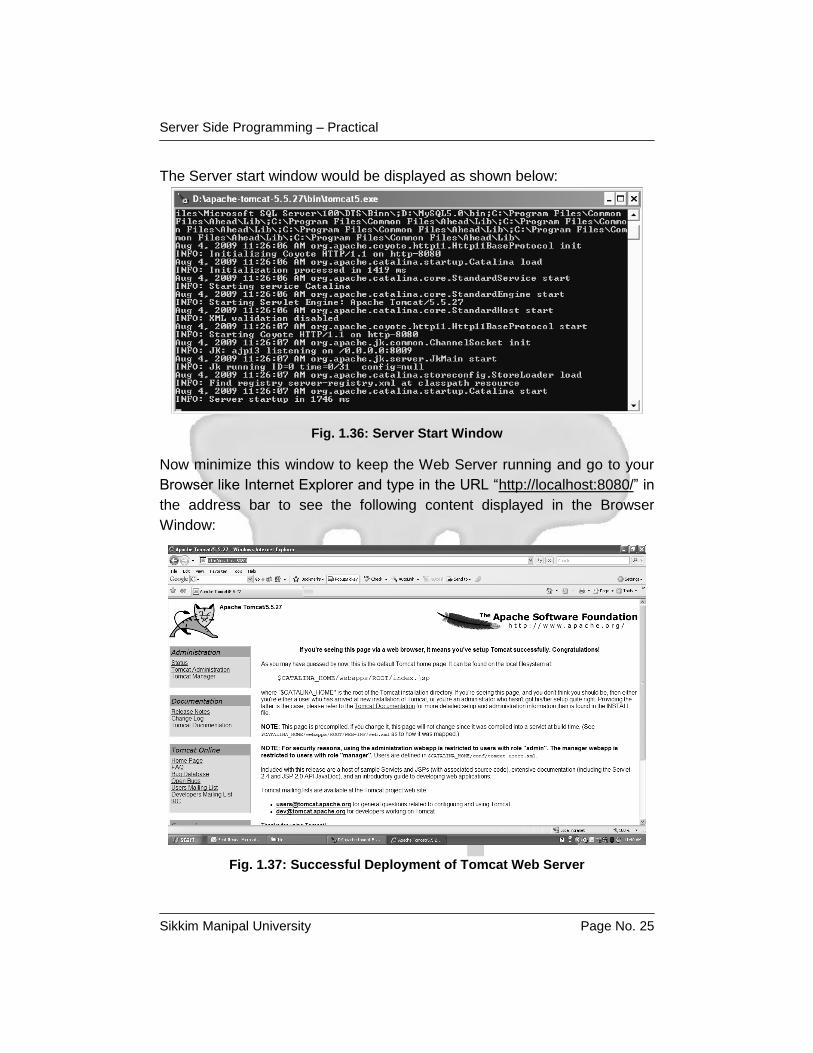
The Server start window would be displayed as shown below:
Fig. 1.36: Server Start Window
Now minimize this window to keep the Web Server running and go to your
Browser like Internet Explorer and type in the URL “http://localhost:8080/” in
the address bar to see the following content displayed in the Browser
Window:
Fig. 1.37: Successful Deployment of Tomcat Web Server
Server Side Programming – Practical
Sikkim Manipal University Page No. 26
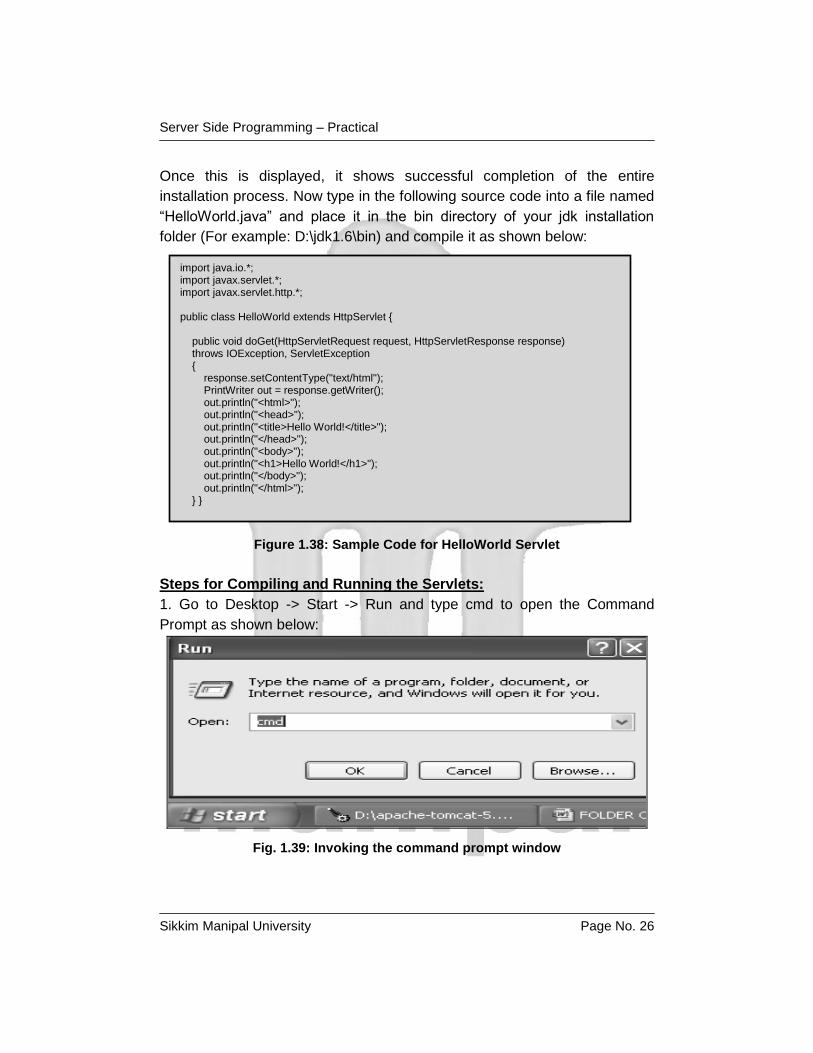
Once this is displayed, it shows successful completion of the entire
installation process. Now type in the following source code into a file named
“HelloWorld.java” and place it in the bin directory of your jdk installation
folder (For example: D:\jdk1.6\bin) and compile it as shown below:
Figure 1.38: Sample Code for HelloWorld Servlet
Steps for Compiling and Running the Servlets:
1. Go to Desktop -> Start -> Run and type cmd to open the Command
Prompt as shown below:
Fig. 1.39: Invoking the command prompt window
import java.io.*; import javax.servlet.*; import javax.servlet.http.*; public class HelloWorld extends HttpServlet { public void doGet(HttpServletRequest request, HttpServletResponse response) throws IOException, ServletException { response.setContentType("text/html"); PrintWriter out = response.getWriter(); out.println("<html>"); out.println("<head>"); out.println("<title>Hello World!</title>"); out.println("</head>"); out.println("<body>"); out.println("<h1>Hello World!</h1>"); out.println("</body>"); out.println("</html>"); } }

Server Side Programming – Practical
Sikkim Manipal University Page No. 27
A command window would be displayed; Go to the drive and directory
where your java software is installed and go to the bin directory.
Fig. 1.40: Command Window Displayed
Now type in the text “edit HelloWorld.java” at the command prompt as
shown below and press enter:
Fig. 1.41: Invoking the editor for Java File
Server Side Programming – Practical
Sikkim Manipal University Page No. 28
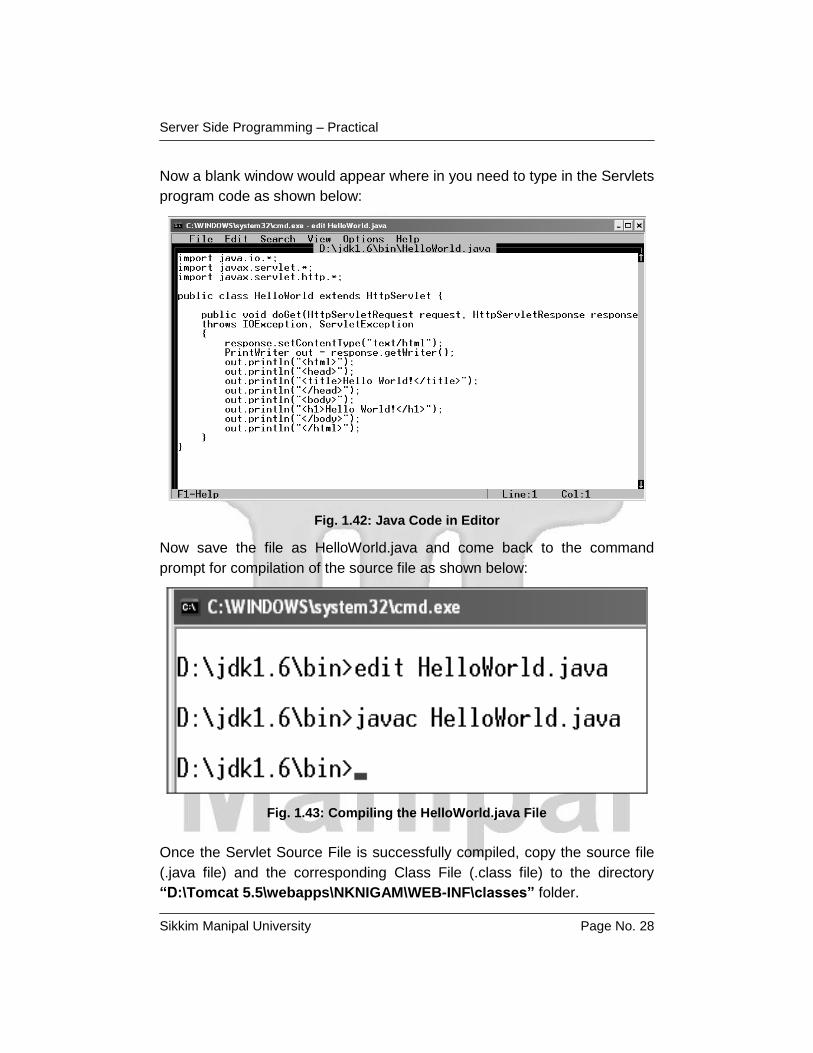
Now a blank window would appear where in you need to type in the Servlets
program code as shown below:
Fig. 1.42: Java Code in Editor
Now save the file as HelloWorld.java and come back to the command
prompt for compilation of the source file as shown below:
Fig. 1.43: Compiling the HelloWorld.java File
Once the Servlet Source File is successfully compiled, copy the source file
(.java file) and the corresponding Class File (.class file) to the directory
“D:\Tomcat 5.5\webapps\NKNIGAM\WEB-INF\classes” folder.
Server Side Programming – Practical
Sikkim Manipal University Page No. 29
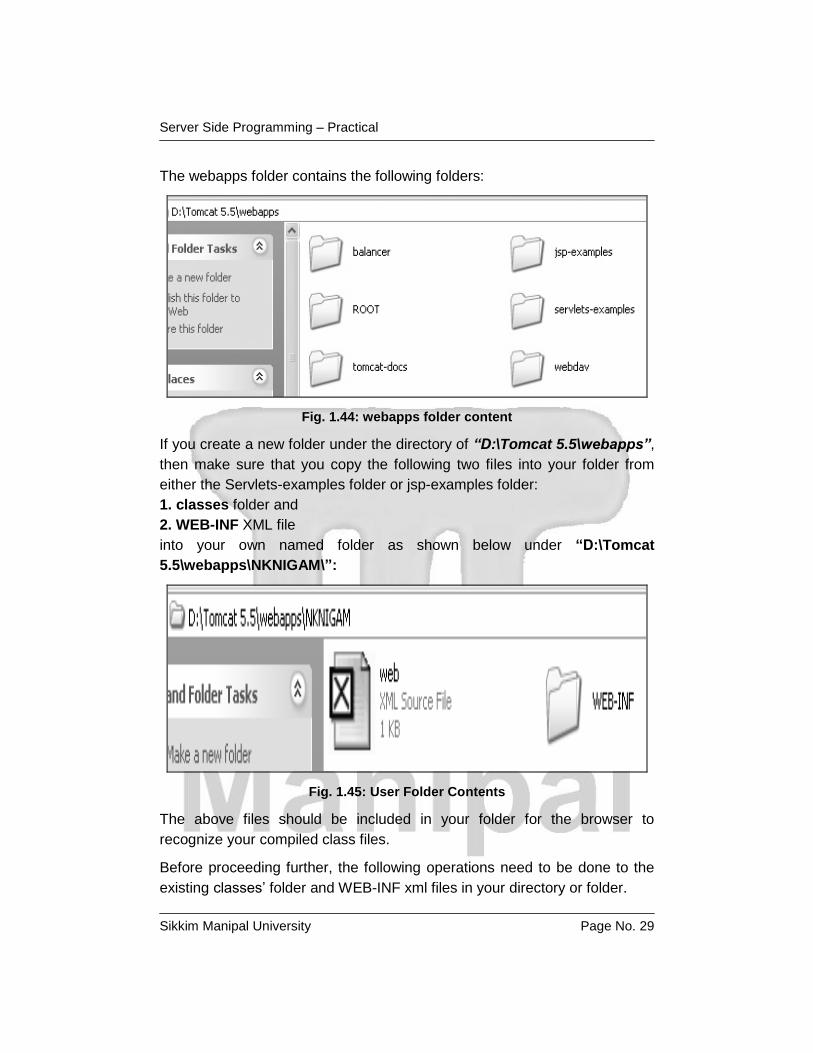
The webapps folder contains the following folders:
Fig. 1.44: webapps folder content
If you create a new folder under the directory of “D:\Tomcat 5.5\webapps”,
then make sure that you copy the following two files into your folder from
either the Servlets-examples folder or jsp-examples folder:
1. classes folder and
2. WEB-INF XML file
into your own named folder as shown below under “D:\Tomcat
5.5\webapps\NKNIGAM\”:
Fig. 1.45: User Folder Contents
The above files should be included in your folder for the browser to
recognize your compiled class files.
Before proceeding further, the following operations need to be done to the
existing classes’ folder and WEB-INF xml files in your directory or folder.

Server Side Programming – Practical
Sikkim Manipal University Page No. 30
1. For web.xml source file:
Right – click on the web.XML source file in your folder and click on the Edit
option, it would be opened in a notepad.Only the following content should
appear in the web.xml file:
Figure 1.46: web.xml file Content
Note: All other content can be safely deleted.
Now save the web.xml file.
2. For classes folder: Open the classes folder and make it empty.
After copying the source file (.java file) and the corresponding Class File
(.class file) to the directory “D:\Tomcat 5.5\webapps\NKNIGAM\WEB-
INF\classes” folder the classes’ folder under your named directory or folder
would appear as shown below:
<?xml version="1.0" encoding="ISO-8859-1"?>
<web-app xmlns="http://java.sun.com/xml/ns/j2ee"
xmlns:xsi="http://www.w3.org/2001/XMLSchema-instance"
xsi:schemaLocation="http://java.sun.com/xml/ns/j2ee
http://java.sun.com/xml/ns/j2ee/web-app_2_4.xsd"
version="2.4">
<display-name>Servlet 2.4 Examples</display-name>
<description>
Servlet 2.4 Examples.
</description>
<!-- Define servlets that are included in the application -->
<servlet>
<servlet-name>HelloWorld</servlet-name>
<servlet-class>HelloWorld</servlet-class>
</servlet>
<servlet-mapping>
<servlet-name>HelloWorld</servlet-name>
<url-pattern>/servlet/HelloWorld</url-pattern>
</servlet-mapping>
</web-app>
Server Side Programming – Practical
Sikkim Manipal University Page No. 31
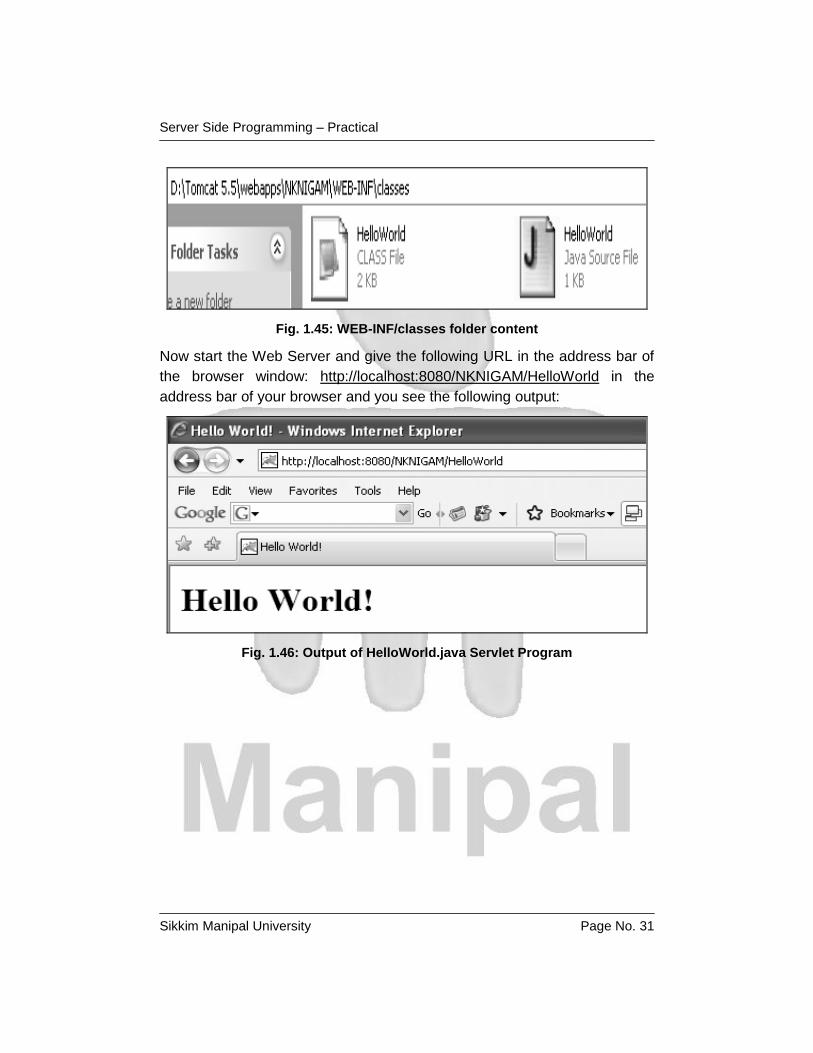
Fig. 1.45: WEB-INF/classes folder content
Now start the Web Server and give the following URL in the address bar of
the browser window: http://localhost:8080/NKNIGAM/HelloWorld in the
address bar of your browser and you see the following output:
Fig. 1.46: Output of HelloWorld.java Servlet Program
Server Side Programming – Practical
Sikkim Manipal University Page No. 32
Exercise 2 Execution of a JSP page
Objective: After undertaking this exercise, you should be able to install,
configure and deploy the Servlet Software on your local machine and
execute a simple application like printing the message “Hello World” on the
Web browser.
Procedure: The steps below are a walkthrough of the deployment and
configuration settings of the required software, which would in turn be useful
for completing the rest of the exercises related to Java Server Pages (JSP)
of this practical subject.
Since the Web Server configuration has already been explained in
Exercise – 1, the steps discussed below are the continuation for
deployment, configuration and execution of JSP.
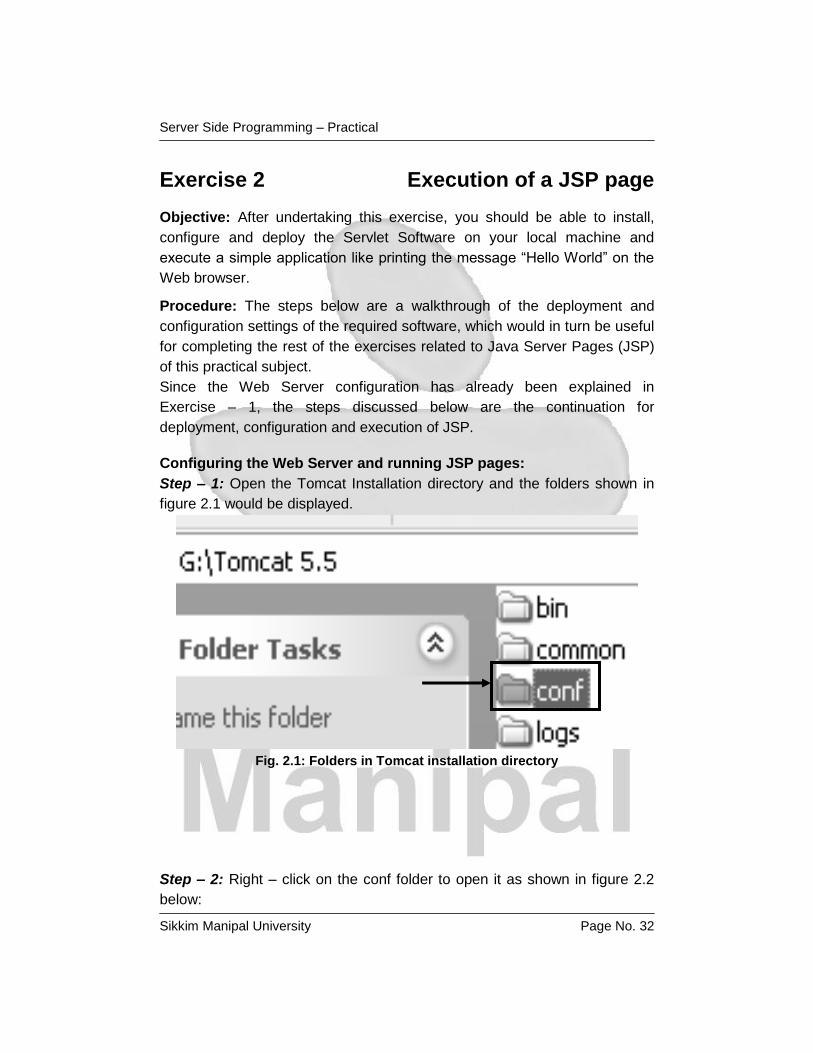
Configuring the Web Server and running JSP pages:
Step – 1: Open the Tomcat Installation directory and the folders shown in
figure 2.1 would be displayed.
Fig. 2.1: Folders in Tomcat installation directory
Step – 2: Right – click on the conf folder to open it as shown in figure 2.2
below:
Server Side Programming – Practical
Sikkim Manipal University Page No. 33
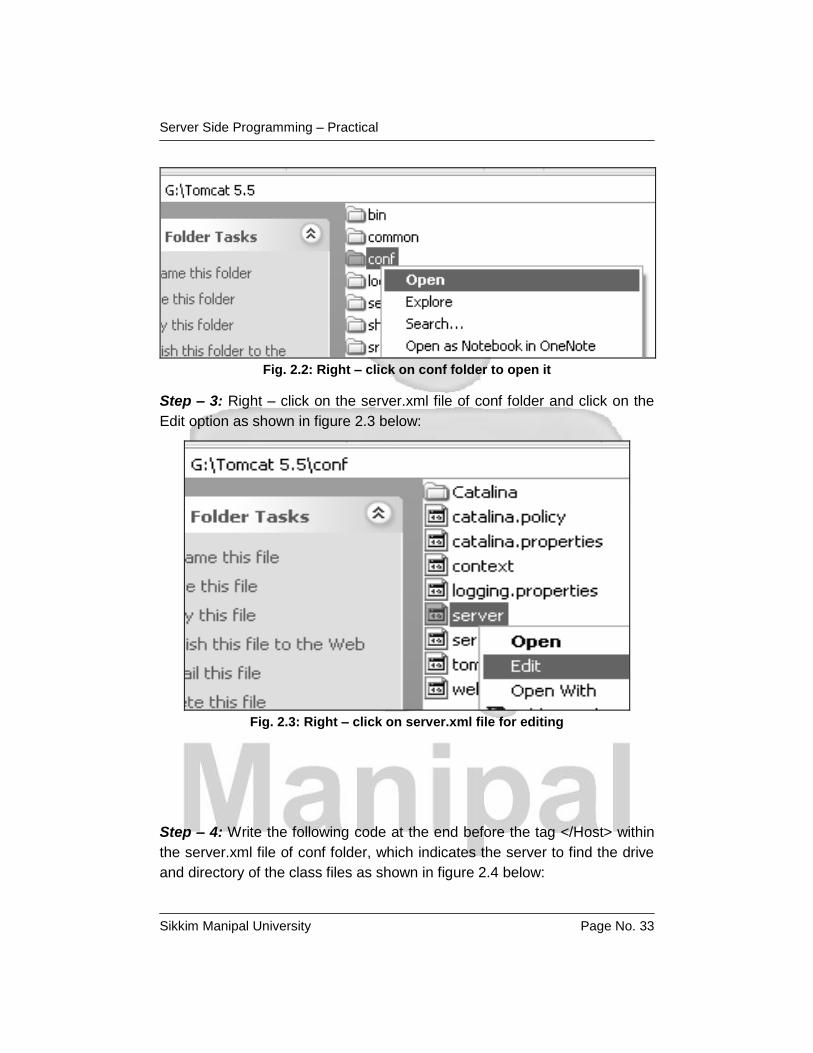
Fig. 2.2: Right – click on conf folder to open it
Step – 3: Right – click on the server.xml file of conf folder and click on the
Edit option as shown in figure 2.3 below:
Fig. 2.3: Right – click on server.xml file for editing
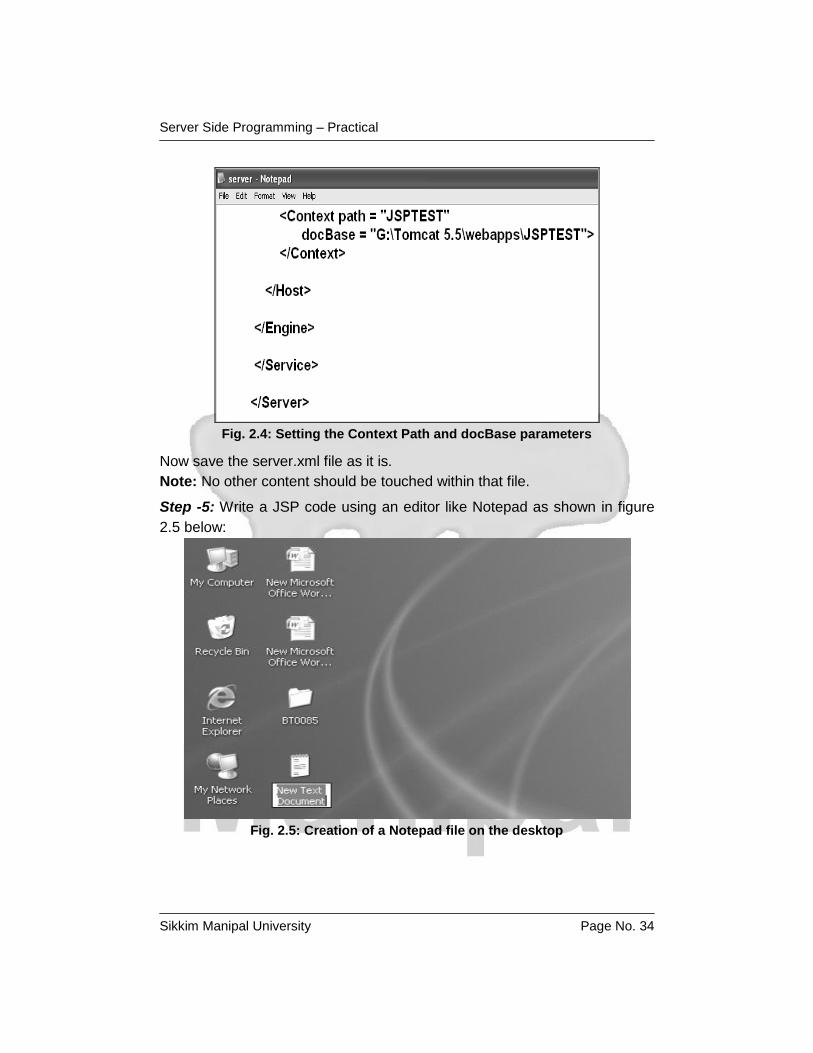
Step – 4: Write the following code at the end before the tag </Host> within
the server.xml file of conf folder, which indicates the server to find the drive
and directory of the class files as shown in figure 2.4 below:
Server Side Programming – Practical
Sikkim Manipal University Page No. 34
Fig. 2.4: Setting the Context Path and docBase parameters
Now save the server.xml file as it is.
Note: No other content should be touched within that file.
Step -5: Write a JSP code using an editor like Notepad as shown in figure
2.5 below:
Fig. 2.5: Creation of a Notepad file on the desktop
Server Side Programming – Practical
Sikkim Manipal University Page No. 35
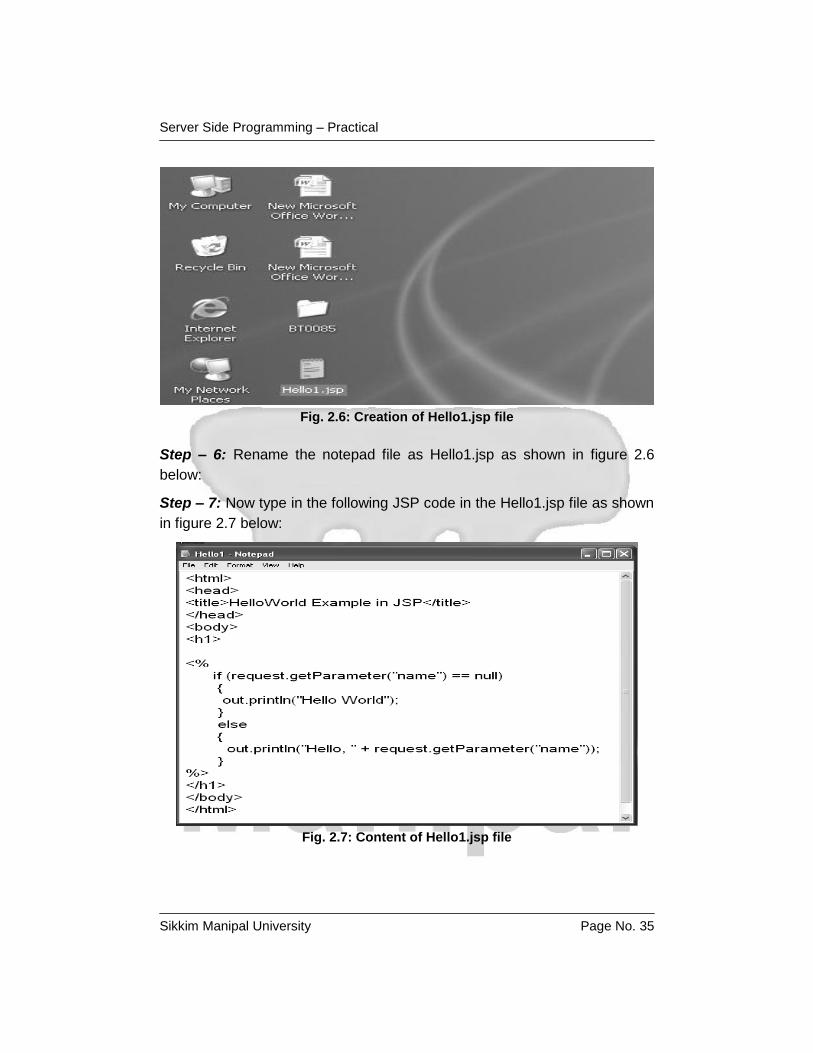
Fig. 2.6: Creation of Hello1.jsp file
Step – 6: Rename the notepad file as Hello1.jsp as shown in figure 2.6
below:
Step – 7: Now type in the following JSP code in the Hello1.jsp file as shown
in figure 2.7 below:
Fig. 2.7: Content of Hello1.jsp file
Server Side Programming – Practical
Sikkim Manipal University Page No. 36
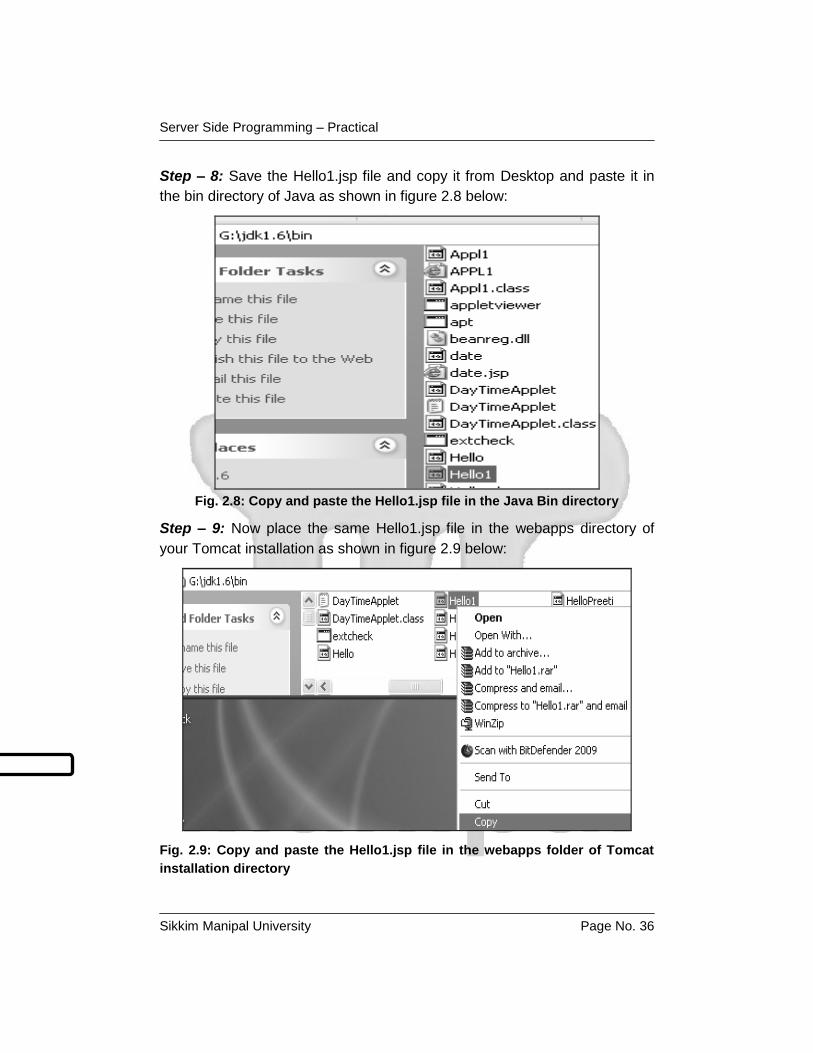
Step – 8: Save the Hello1.jsp file and copy it from Desktop and paste it in
the bin directory of Java as shown in figure 2.8 below:
Fig. 2.8: Copy and paste the Hello1.jsp file in the Java Bin directory
Step – 9: Now place the same Hello1.jsp file in the webapps directory of
your Tomcat installation as shown in figure 2.9 below:
Fig. 2.9: Copy and paste the Hello1.jsp file in the webapps folder of Tomcat
installation directory
Server Side Programming – Practical
Sikkim Manipal University Page No. 37
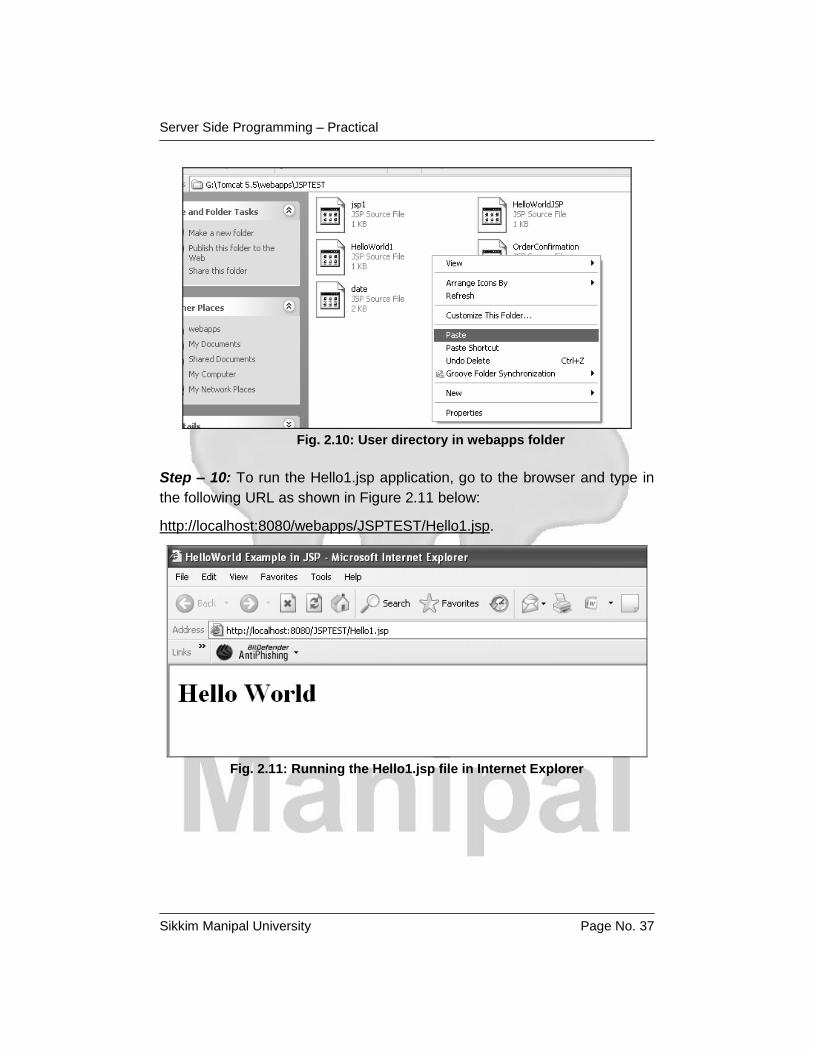
Fig. 2.10: User directory in webapps folder
Step – 10: To run the Hello1.jsp application, go to the browser and type in
the following URL as shown in Figure 2.11 below:
http://localhost:8080/webapps/JSPTEST/Hello1.jsp.
Fig. 2.11: Running the Hello1.jsp file in Internet Explorer
Server Side Programming – Practical
Sikkim Manipal University Page No. 38
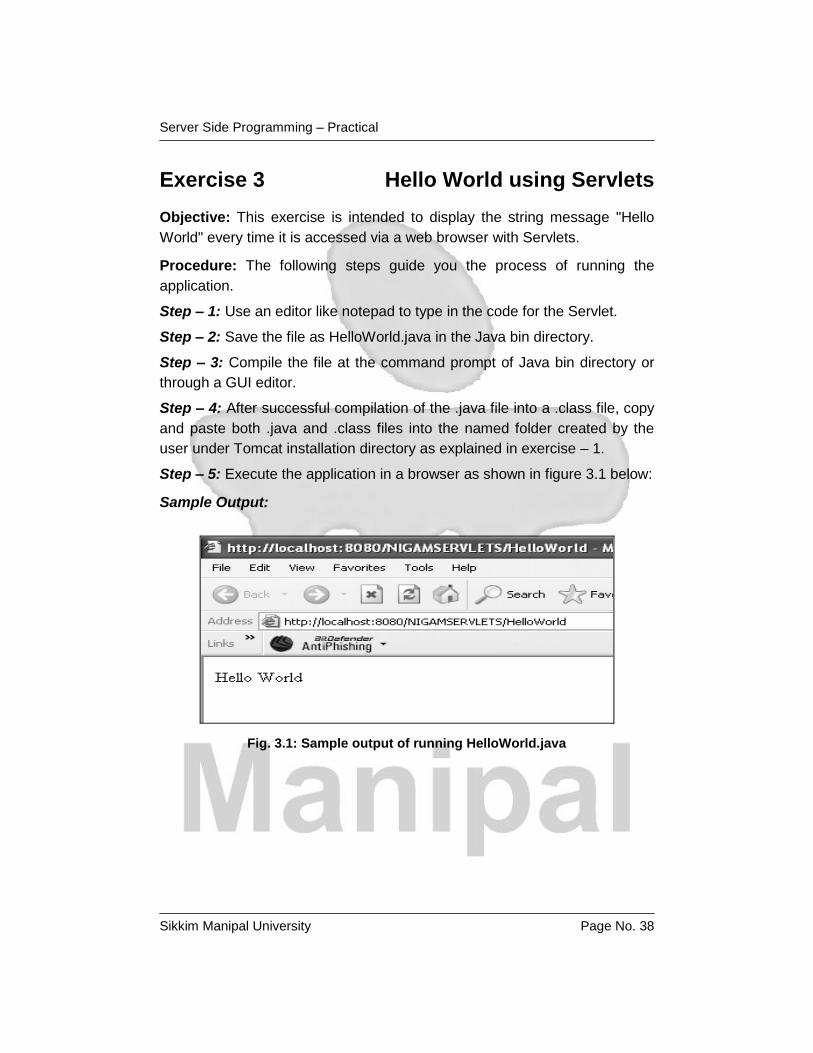
Exercise 3 Hello World using Servlets
Objective: This exercise is intended to display the string message "Hello
World" every time it is accessed via a web browser with Servlets.
Procedure: The following steps guide you the process of running the
application.
Step – 1: Use an editor like notepad to type in the code for the Servlet.
Step – 2: Save the file as HelloWorld.java in the Java bin directory.
Step – 3: Compile the file at the command prompt of Java bin directory or
through a GUI editor.
Step – 4: After successful compilation of the .java file into a .class file, copy
and paste both .java and .class files into the named folder created by the
user under Tomcat installation directory as explained in exercise – 1.
Step – 5: Execute the application in a browser as shown in figure 3.1 below:
Sample Output:
Fig. 3.1: Sample output of running HelloWorld.java
Server Side Programming – Practical
Sikkim Manipal University Page No. 39
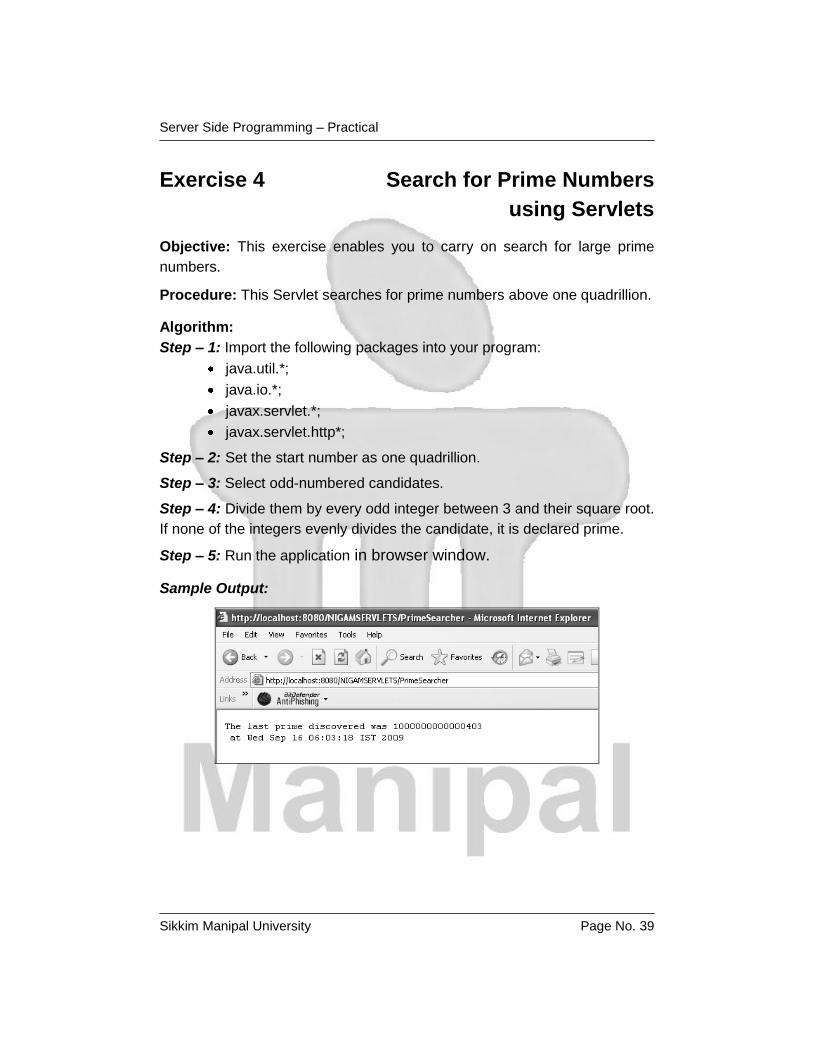
Exercise 4 Search for Prime Numbers
using Servlets
Objective: This exercise enables you to carry on search for large prime
numbers.
Procedure: This Servlet searches for prime numbers above one quadrillion.
Algorithm:
Step – 1: Import the following packages into your program:
java.util.*;
java.io.*;
javax.servlet.*;
javax.servlet.http*;
Step – 2: Set the start number as one quadrillion.
Step – 3: Select odd-numbered candidates.
Step – 4: Divide them by every odd integer between 3 and their square root.
If none of the integers evenly divides the candidate, it is declared prime.
Step – 5: Run the application in browser window.
Sample Output:
Server Side Programming – Practical
Sikkim Manipal University Page No. 40
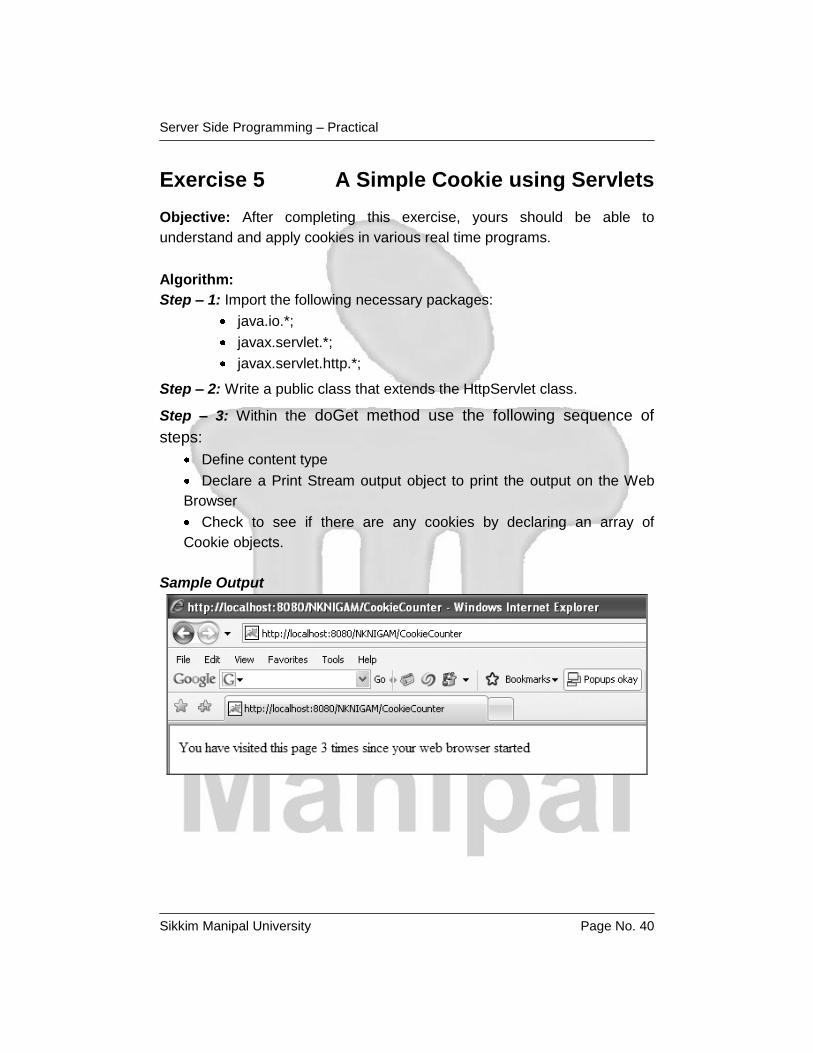
Exercise 5 A Simple Cookie using Servlets
Objective: After completing this exercise, yours should be able to
understand and apply cookies in various real time programs.
Algorithm:
Step – 1: Import the following necessary packages:
java.io.*;
javax.servlet.*;
javax.servlet.http.*;
Step – 2: Write a public class that extends the HttpServlet class.
Step – 3: Within the doGet method use the following sequence of
steps:
Define content type
Declare a Print Stream output object to print the output on the Web
Browser
Check to see if there are any cookies by declaring an array of
Cookie objects.
Sample Output
Server Side Programming – Practical
Sikkim Manipal University Page No. 41
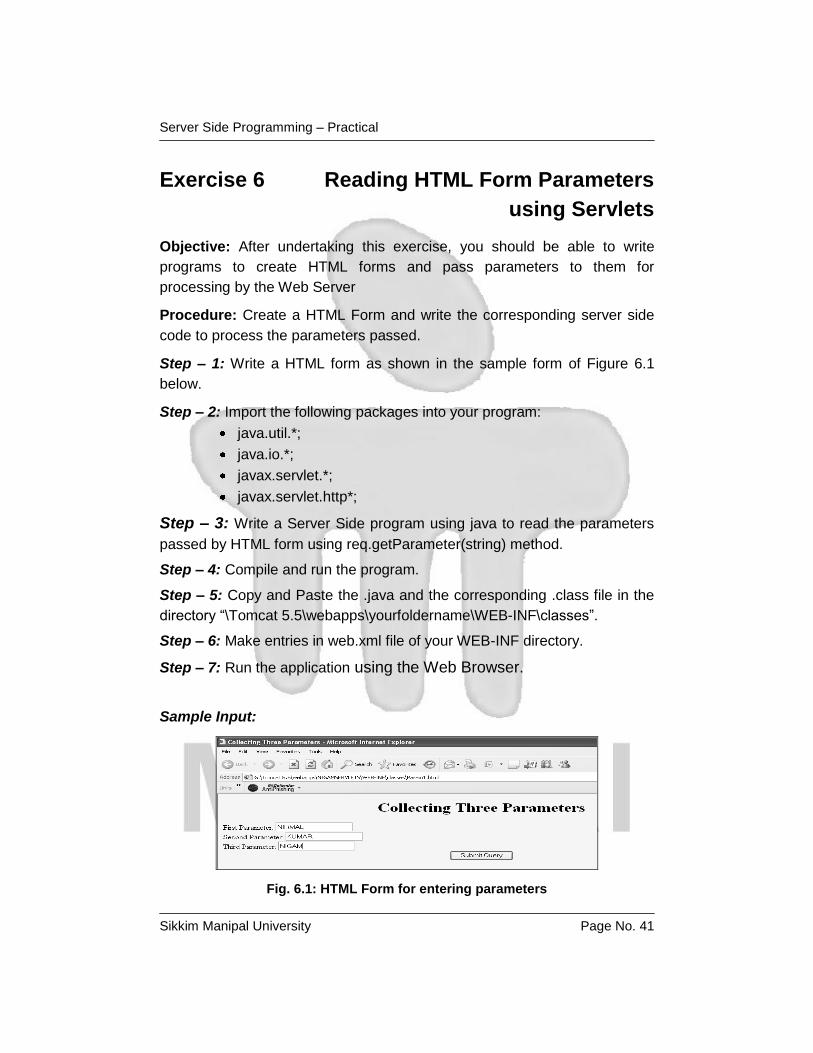
Exercise 6 Reading HTML Form Parameters
using Servlets
Objective: After undertaking this exercise, you should be able to write
programs to create HTML forms and pass parameters to them for
processing by the Web Server
Procedure: Create a HTML Form and write the corresponding server side
code to process the parameters passed.
Step – 1: Write a HTML form as shown in the sample form of Figure 6.1
below.
Step – 2: Import the following packages into your program:
java.util.*;
java.io.*;
javax.servlet.*;
javax.servlet.http*;
Step – 3: Write a Server Side program using java to read the parameters
passed by HTML form using req.getParameter(string) method.
Step – 4: Compile and run the program.
Step – 5: Copy and Paste the .java and the corresponding .class file in the
directory “\Tomcat 5.5\webapps\yourfoldername\WEB-INF\classes”.
Step – 6: Make entries in web.xml file of your WEB-INF directory.
Step – 7: Run the application using the Web Browser.
Sample Input:
Fig. 6.1: HTML Form for entering parameters
Server Side Programming – Practical
Sikkim Manipal University Page No. 42
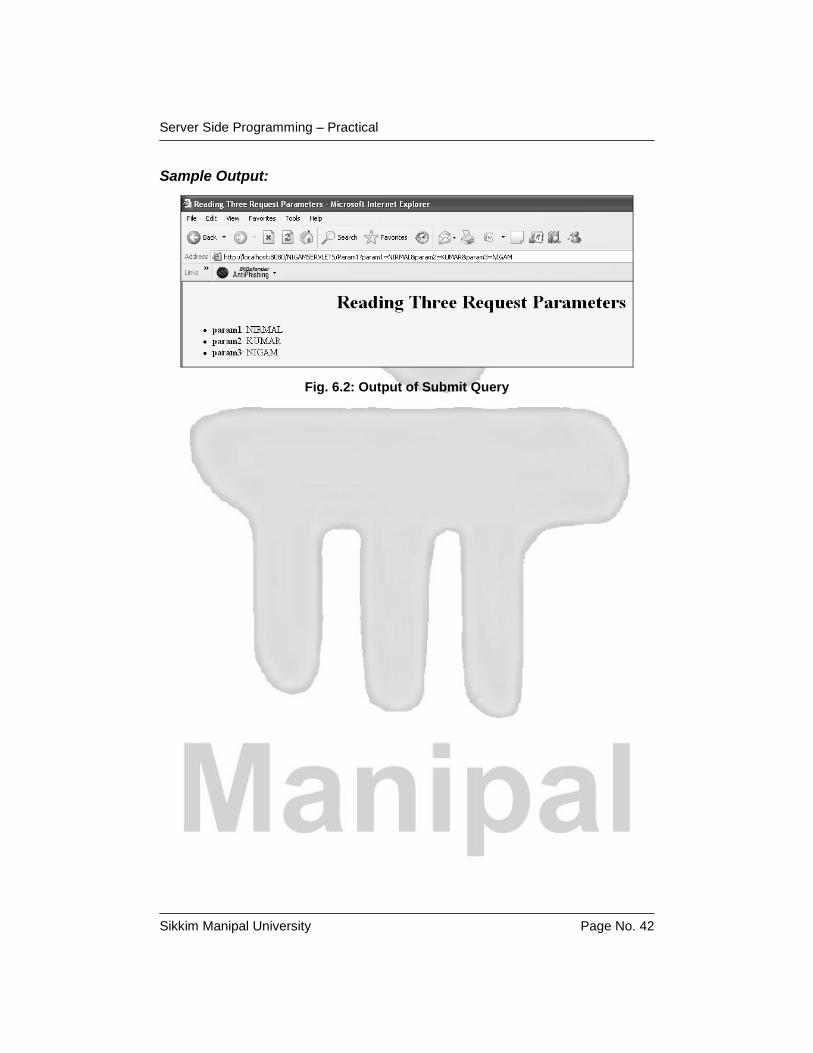
Sample Output:
Fig. 6.2: Output of Submit Query
Server Side Programming – Practical
Sikkim Manipal University Page No. 43
Exercise 7 Servlet Session Tracking
Objective: After the completion of this exercise, you should be able to
understand the implementation of sessions and their usage in real time
applications.
Procedure:
Step – 1: Write the code using Session objects and integer variables in a
.java file and compile it.
Step-2: Copy the corresponding .class file into \Tomcat\webapps\your
folder.
Step – 3: Update the web.xml deployment descriptor with the entries for the
created .class file.
Step – 4: Run the application in a Web browser to see the output.
Algorithm:
Step – 1: Import the following java packages:
java.io.*;
javax.servlet.*;
javax.servlet.http.*;
Step – 2: Create a SessionTracker class that extends HttpServlet.
Step – 3: Override the doGet method as stated below:
3.1: Set the response content type (text / html).
3.2: Create a output object of the PrintWriter class.
3.3: Get the current session object, create one if necessary
3.4: Increment the hit count for this page. This value is saved in
this client’s session under a name, for example, “tracker.count”.
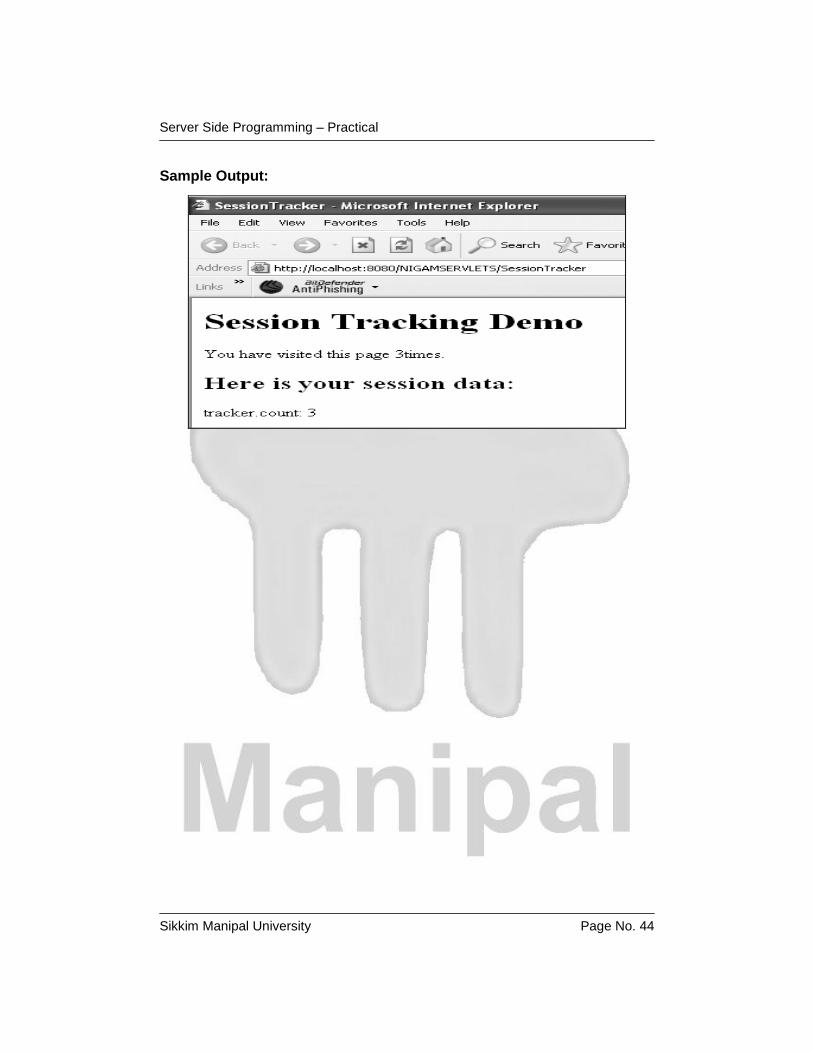
3.5: Display the hit count for this page.
Server Side Programming – Practical
Sikkim Manipal University Page No. 44
Sample Output:
Server Side Programming – Practical
Sikkim Manipal University Page No. 45
Exercise 8 Simple Query Execution
using Servlets
Objective: After completing this exercise, you should be able to use a
simple query to connect to a database such as Oracle and execute a select
query to display the result set.
Procedure:
Step – 1: Select a database that you wish to connect to.
Step – 2: Create a user Data Source Name (DSN) for Open Database
Connectivity (ODBC) in the control panel with necessary parameters.
Step – 3: Write the Servlet code indicating the connection string like Data
Source name, User Name, and Password.
Step – 4: Write code to execute the query within the Servlet or JSP
program.
Step – 5: Write code in the Servlet or JSP program to display the result in
the browser window.
Step – 6: Close the application.
Algorithm:
Step - 1: Import the following packages:
java.io.*;
java.sql.*;
javax.servlet.*;
javax.servlet.http.*;
Step - 2: Create a class that extends HttpServlet
Step - 3: Override the doGet method as follows:
3.1 Declare and initialize Connection, Statement, and ResultSet
object variables.
3.2 Define the output content type (MIME)
3.3 Declare an output object variable of PrintWriter Stream.
3.4 Load and Register the Driver (Example: Oracle) using
Class.forName() method.
Server Side Programming – Practical
Sikkim Manipal University Page No. 46
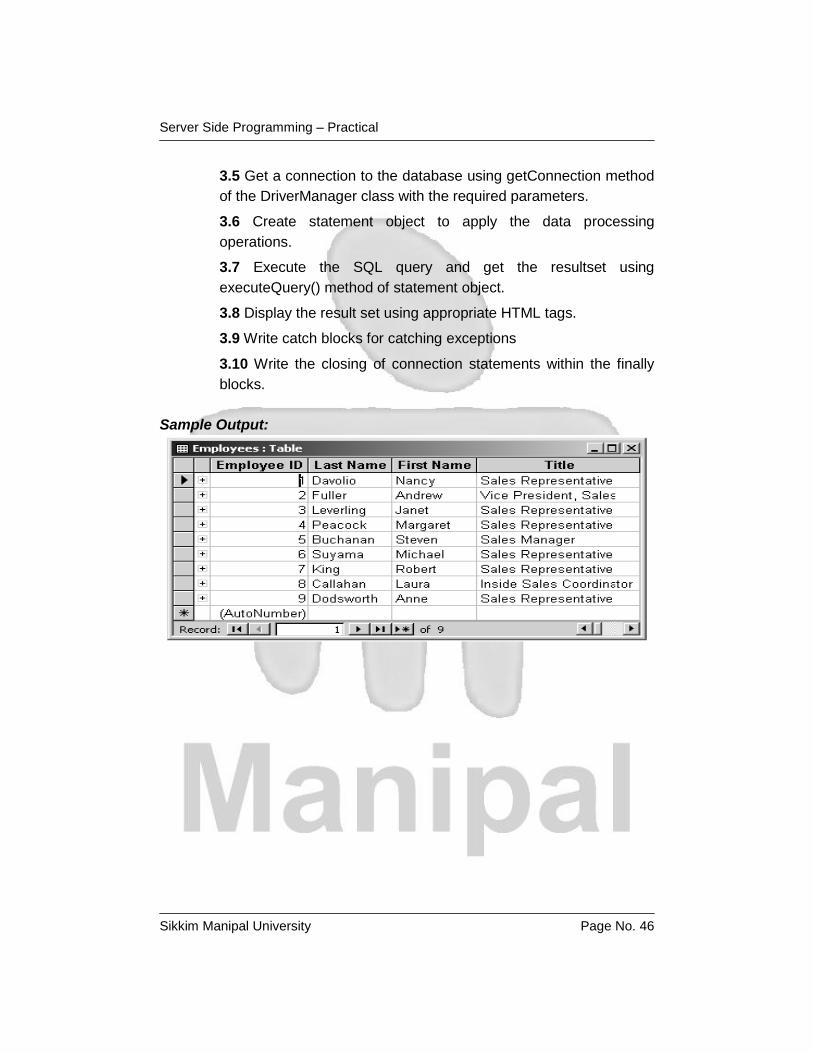
3.5 Get a connection to the database using getConnection method
of the DriverManager class with the required parameters.
3.6 Create statement object to apply the data processing
operations.
3.7 Execute the SQL query and get the resultset using
executeQuery() method of statement object.
3.8 Display the result set using appropriate HTML tags.
3.9 Write catch blocks for catching exceptions
3.10 Write the closing of connection statements within the finally
blocks.
Sample Output:
Server Side Programming – Practical
Sikkim Manipal University Page No. 47
Exercise 9 Generating a HTML table based on
Query Results using Servlets
Objective: After completing this exercise, you should be able to generate a
HTML page based on the results of a query.
Procedure: If we desire to display the results of a query in an HTML table, it
would be nice to have some Java code that builds the table automatically
from the ResultSet rather than having to write the same loop-and-display
code over and over. The ResultSetMetaData interface provides a way for a
program to learn about the underlying structure of a query result on the fly.
We can use it to build an object that dynamically generates an HTML table
from a ResultSet.
Algorithm:
Step – 1: Import the following java packages:
java.io.*;
java.sql.*;
Step – 2: Create a class and declare a ResultSet object variable.
Step – 3: In the constructor of the class, use the this variable to initialize the
current instance of the resultset.
Step – 4: Create a public method toString() that returns a String object.
4.1: Declare an output variable of StringBuffer class.
4.2: Start a table to display the result.
4.3: Declare a ResultSetMetaData object and use its
getMetaData() method to retrieve the meta data of the table.
4.4: Declare an integer variable and initialize it with the column
count of the table.
4.5: Title the table with the result set’s column label.
4.6: End the table
4.7: Write a code block to handle exceptions.
Server Side Programming – Practical
Sikkim Manipal University Page No. 48
Exercise 10 Servlet Life Cycle Demo
Objective: After completing this exercise, you should be able to use various
Servlet life cycle stages in various applications.
Procedure: To complete this exercise, you need to perform the following
steps:
Step – 1: Create a .java file
Step – 2: Compile the .java file and place it in appropriate folders
Step – 3: Create a .HTML File and place it in webapps\userfolder\classes
Step – 4: Make entries in the web.xml file
Step – 5: Run the application
Algorithm:
The lifecycle consists of the following methods:
1. init() method: Once the Servlet has been instantiated, the Web
container calls the init() method. This method allows Servlet perform any
required initialization before being invoked against HTTP requests.
2 service() method: This is the entry point for executing application logic
in a Servlet. The container calls this method in response to incoming
requests. Only after the Servlet has been successfully initialized will the
service() method be called.
3. destroy() method: The container calls this method before removing a
Servlet instance out of service. This might occur if it needs to free some
memory or the Web server is being shut down. Before the container
calls this method, it will give the remaining service() threads time to
finish executing.
Step – 1: Import the Servlet packages.
Step – 2: Write code for doPost() method.
Step –3: Use the request.getParameter() method to get the
parameters.
Step – 4: Create a response stream print object to print the content.
Step – 5: Set the content type (MIME) to be printed.
Step – 6: Obtain a print write object.
Step – 7: Write the code to print the response using PrintWriter object.
Step – 8: Write code for Service method for request processing
Step – 9: Write code for destroy method
Step – 10: Create a web.xml file and with definitions for <Servlet> and
<error page definitions>
Server Side Programming – Practical
Sikkim Manipal University Page No. 49
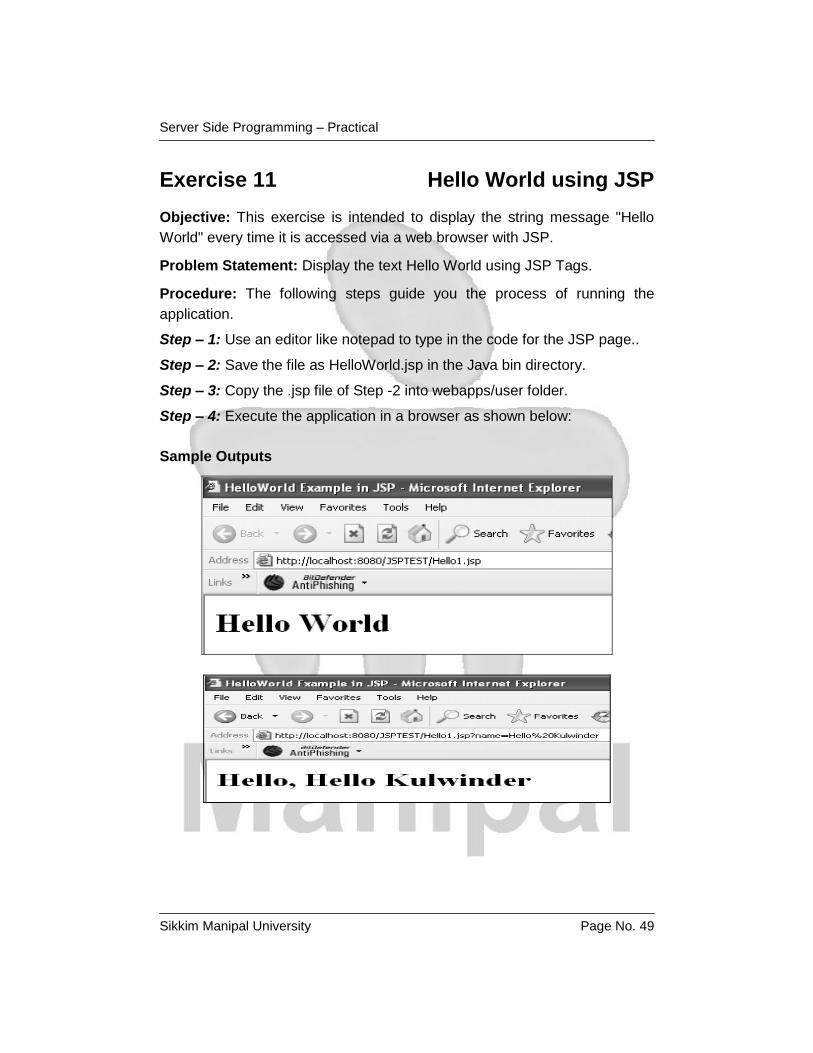
Exercise 11 Hello World using JSP
Objective: This exercise is intended to display the string message "Hello
World" every time it is accessed via a web browser with JSP.
Problem Statement: Display the text Hello World using JSP Tags.
Procedure: The following steps guide you the process of running the
application.
Step – 1: Use an editor like notepad to type in the code for the JSP page..
Step – 2: Save the file as HelloWorld.jsp in the Java bin directory.
Step – 3: Copy the .jsp file of Step -2 into webapps/user folder.
Step – 4: Execute the application in a browser as shown below:
Sample Outputs
Server Side Programming – Practical
Sikkim Manipal University Page No. 50
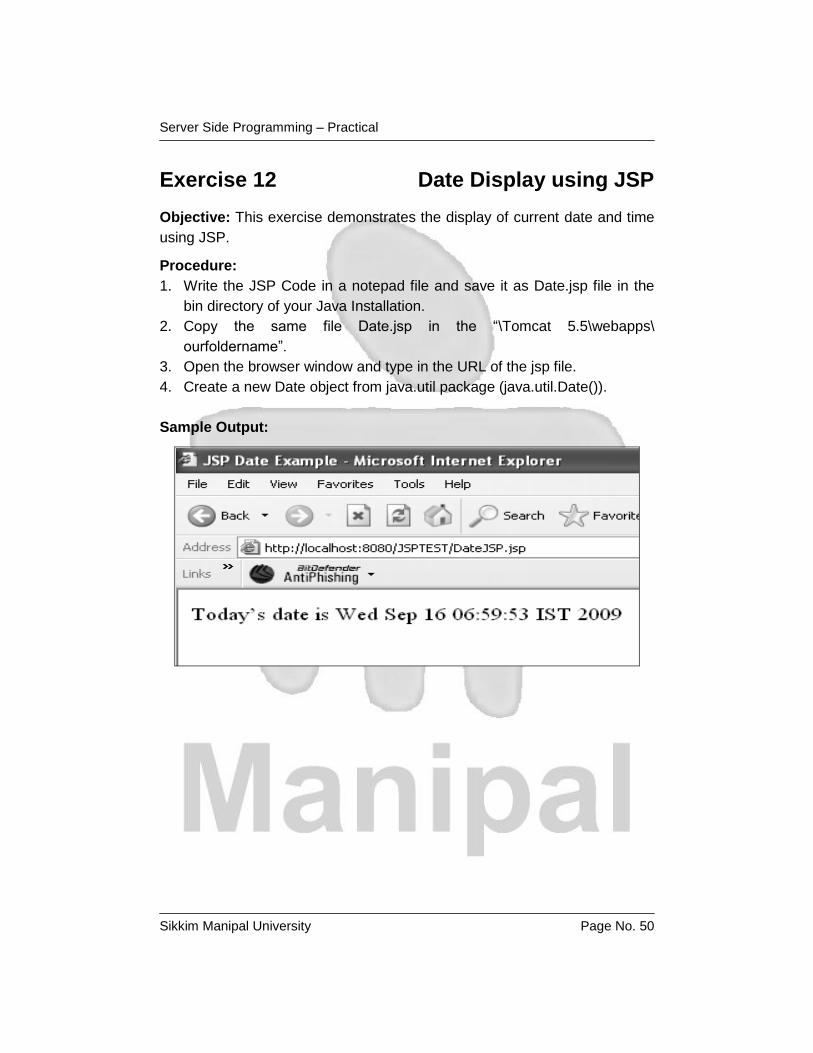
Exercise 12 Date Display using JSP
Objective: This exercise demonstrates the display of current date and time
using JSP.
Procedure:
1. Write the JSP Code in a notepad file and save it as Date.jsp file in the
bin directory of your Java Installation.
2. Copy the same file Date.jsp in the “\Tomcat 5.5\webapps\
ourfoldername”.
3. Open the browser window and type in the URL of the jsp file.
4. Create a new Date object from java.util package (java.util.Date()).
Sample Output:
Server Side Programming – Practical
Sikkim Manipal University Page No. 51
Exercise 13 Include Directive Demo using JSP
Objective: After the completion of this exercise, you should be able to
demonstrate and apply the concepts of file inclusions in a server program.
Problem Statement: Write a .jsp file requests the inclusion, during
compilation, of a copy right file containing HTML disclaimers.
Procedure: The include directive instructs the container to include the
content of the resource in the current JSP, by inserting it, in the JSP in place
of the directive. The file specified should be accessible and available to the
JSP container.
Syntax:
Step – 1: Write a JSP file for inclusion of the sample HTML file.
Step – 2: Place this JSP file in the appropriate directories.
Step – 3: Write the .HTML file and place it in the appropriate directories.
Step – 4: Run the JSP file in the Web Browser.
<%@ include file=”Filename” %>
Server Side Programming – Practical
Sikkim Manipal University Page No. 52
Exercise 14 Scriptlets Demo using JSP
Objective: After the completion of this exercise, you should be able to
demonstrate and apply the concepts of scriptlets in a server program.
Problem Statement: Write a scriptlet that executes a loop 10 times, printing
out a message each time to the browser window (using the implicit object
out) and to the System.out stream (i.e. to the console window within which
Tomcat is running).
Procedure: A Scriptlet is a block of Java code that is executed during the
request – processing time, and is enclosed between <% and %> tags. What
the Srciptlet actually does depends on the code itself and can include
producing output for the client. Multiple scriptlets are combined in the
generated Servlet class in the order they appear in the JSP. Scriptlets, like
any other Java code block or method, can modify objects inside them as a
result of method invocations.
In Tomcat, all the code appearing between the <% ad %> tags in the JSP
gets put into the service() method of the Servlet, as is, in the order in which
it appeared. It is therefore processed for every request that the Servlet
receives.
Syntax:
Step – 1: Write the JSP file containing the sriptlet code.
Step – 2: Place this JSP file in the appropriate directories.
Step – 3: Run the JSP file in the Web Browser.
<%Valid Java Code Statements %>
Server Side Programming – Practical
Sikkim Manipal University Page No. 53
Acknowledgements, References and Suggested Readings:
1) Armstrong, E., Ball, J. et al. The J2EE™ 1.4 Tutorial.
2) Bergsten, H. (2000). Java Server Pages, First Edition. O'Reilly.
3) Farley, J. Java Distributed Computing. O'Reilly.
4) Harold, E. and Means, W.S. XML in a Nutshell. O'Reilly.
5) Hunter, J. and Crawford, W. (1998). Java Servlet Programming, First
edition. O'Reilly.
6) McLaughlin, B. Java and XML. O'Reilly.
7) Neimeyer, P. and Knudsen, J. Learning Java (formerly Exploring Java).
O'Reilly.
Web Sites:
1) Go through Sun Java™ System Application Server Platform Edition 8
Developer’s Guide at http://docs.sun.com/db/doc/817-6087 for
information about developer features of the Application Server.
2) Go through Sun Java™ System Application Server Platform Edition 8
Administration Guide at http://docs.sun.com/db/doc/817-6088 for
information about administering the Application Server.
3) Oracle, JDeveloper http://www.oracle.com/java/
A development environment for Java-based database applications with
support for JSP-based user interfaces.
4) VisualAge for Java (IBM), http://www-4.ibm.com/software/ad/vajava/
An IDE with support for servlet and JSP debugging as well as a wizard
for generation of template code. Available for Windows and Linux.
5) Tomcat (Apache Software Foundation), http://jakarta.apache.org
Tomcat is the official reference implementation for the Servlet and JSP
specifications, developed as an open source product in the Apache
Jakarta project.
_____________________
Server Side Programming – Practical Guidelines
Sikkim Manipal University Page No. i
Guidelines for the Conduct of Practical Exercises
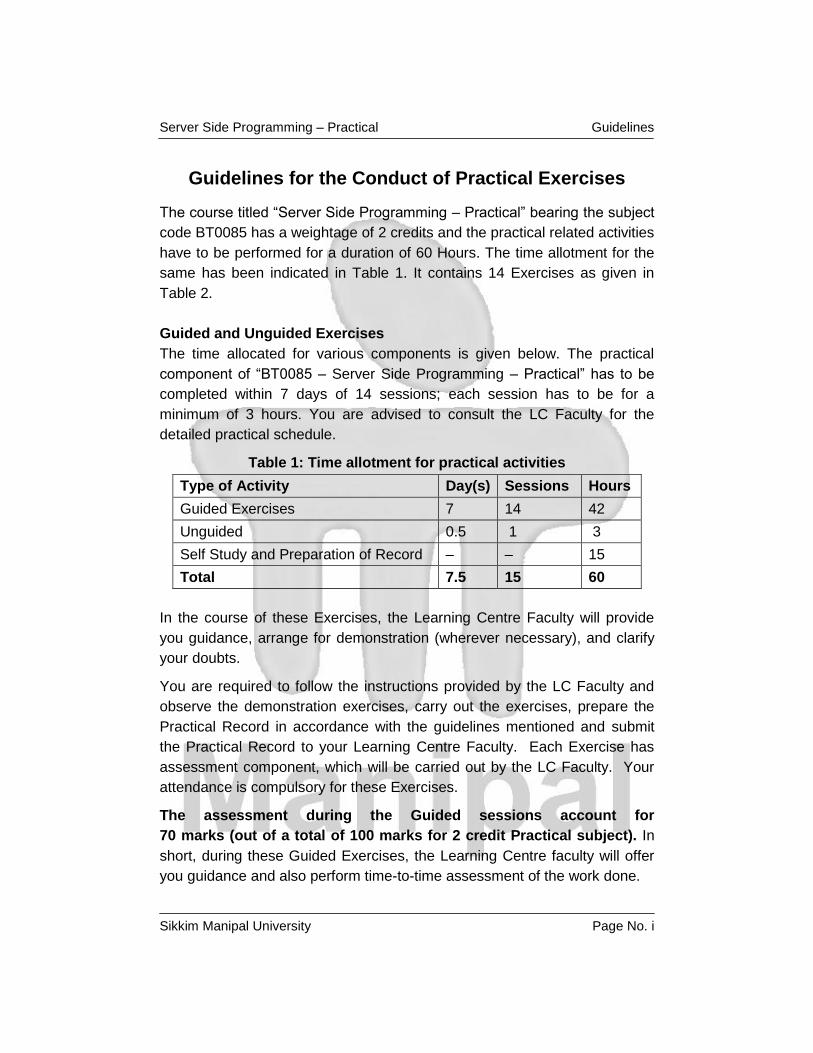
The course titled “Server Side Programming – Practical” bearing the subject
code BT0085 has a weightage of 2 credits and the practical related activities
have to be performed for a duration of 60 Hours. The time allotment for the
same has been indicated in Table 1. It contains 14 Exercises as given in
Table 2.
Guided and Unguided Exercises
The time allocated for various components is given below. The practical
component of “BT0085 – Server Side Programming – Practical” has to be
completed within 7 days of 14 sessions; each session has to be for a
minimum of 3 hours. You are advised to consult the LC Faculty for the
detailed practical schedule.
Table 1: Time allotment for practical activities
Type of Activity Day(s) Sessions Hours
Guided Exercises 7 14 42
Unguided 0.5 1 3
Self Study and Preparation of Record – – 15
Total 7.5 15 60
In the course of these Exercises, the Learning Centre Faculty will provide
you guidance, arrange for demonstration (wherever necessary), and clarify
your doubts.
You are required to follow the instructions provided by the LC Faculty and
observe the demonstration exercises, carry out the exercises, prepare the
Practical Record in accordance with the guidelines mentioned and submit
the Practical Record to your Learning Centre Faculty. Each Exercise has
assessment component, which will be carried out by the LC Faculty. Your
attendance is compulsory for these Exercises.
The assessment during the Guided sessions account for
70 marks (out of a total of 100 marks for 2 credit Practical subject). In
short, during these Guided Exercises, the Learning Centre faculty will offer
you guidance and also perform time-to-time assessment of the work done.
Server Side Programming – Practical Guidelines
Sikkim Manipal University Page No. ii
The end semester examination will be conducted by the CoE for three
hours for 30 marks, which forms the Unguided Exercise(s) (UGE),
where one or more problem(s) will be assigned to you. The exercise
prescribed as unguided could be based on the concepts underlying guided
exercises, but need not be exactly the same.
To complete the lab course successfully, you have to score a
combined average of 40% (i.e., 40 marks) in both Guided and Unguided
parts together and a minimum of 35% in each part (i.e., 25 in marks in
Guided part and 11 marks in Unguided part). In case of failure in either or
both the parts, you have to redo the concerned part(s).
Instructions
Each exercise should be performed based on the algorithm outlined.
The faculty or the instructor at the LC should demonstrate the execution
process of the software involved.
The student should be motivated to produce the desired output from
each exercise and these outputs should be recorded in the individual
student report.
All the student records should contain the following details with respect to
each and every exercise.
Objective: It should contain a one or two line description of the problem
being solved and the methods or procedures followed.
Procedure: Contains the steps followed to achieve the desired
objective.
Algorithm: A pseudo-code should be written presenting the steps
involved in solving the problem, wherever applicable.
The detailed executable version of the program should be written by
hand and a print out of these executable versions along with sample
outputs should be taken; which should be signed by the concerned LC
Faculty on the date of completion of the exercise and other details
should be recorded as per the table mentioned below.
A record of the work done should be submitted at the end semester
examination.

Server Side Programming – Practical Guidelines
Sikkim Manipal University Page No. iii
Exercises
The following is the list of experiments to be completed by the students
within the timeline specified by the Learning Center. The detailed algorithm
is outlined in the exercises given in Table 2.
Table 2: List of Exercises
S.No. Title of the Exercise Date Duration (in Hrs)
Remarks
1. Installation, Configuration and Execution of a Servlet
2. Execution of a JSP page
3. Hello World using Servlets
4. Search for prime numbers using Servlets
5. A Simple Cookie using Servlets
6. Reading HTML Form Parameters using Servlets
7. Servlet Session Tracking
8. Simple Query Execution using Servlets
9. Generating a HTML table based on Query Results using Servlets
10. Servlet Life Cycle Demo
11. Hello World using JSP
12. Date Display using JSP
13. Include Directive Demo using JSP
14 Scriptlets Demo using JSP
Faculty Name: Faculty Signature:
Lab Administrator Name: Lab Administrator Signature:
*External Examiner Name: *External Examiner Signature:
(* To be done at the time of final external examination)
Note: Each exercise carries a uniform weightage of 5 Marks.
Server Side Programming – Practical Guidelines
Sikkim Manipal University Page No. iv
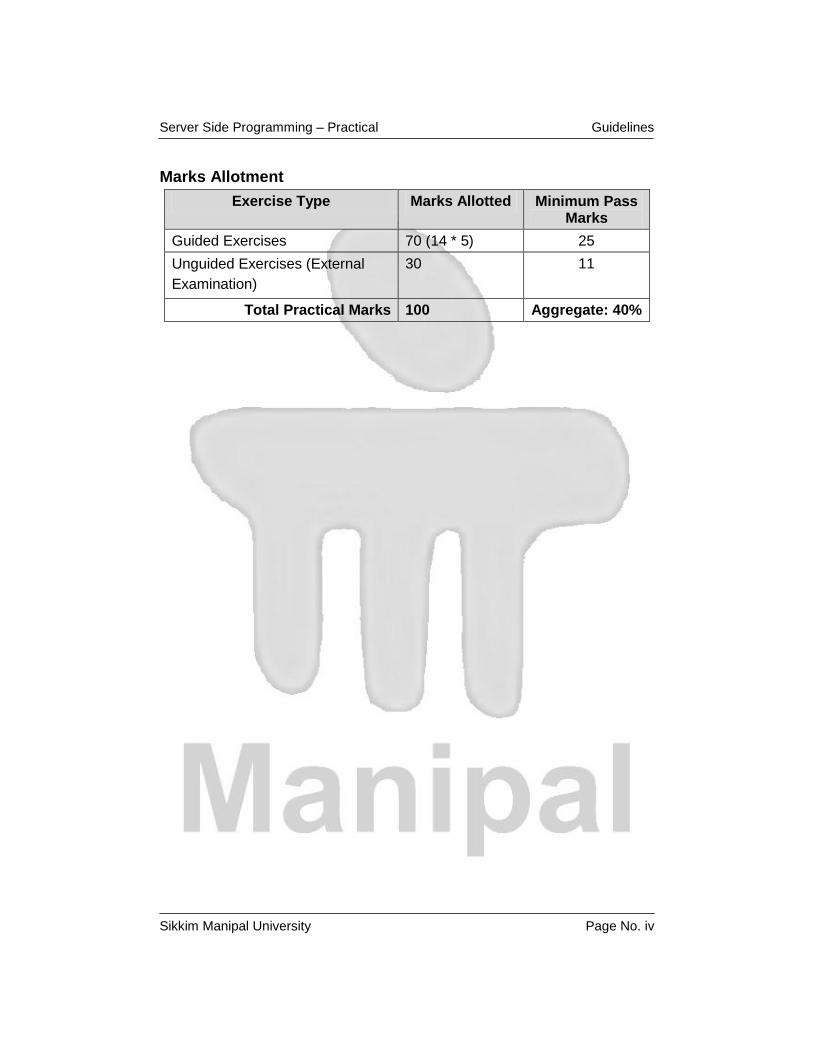
Marks Allotment
Exercise Type Marks Allotted Minimum Pass Marks
Guided Exercises 70 (14 * 5) 25
Unguided Exercises (External
Examination)
30 11
Total Practical Marks 100 Aggregate: 40%