bride and groom - zhaya.de · bride and groom feel free to sell your finished items. mass...
TRANSCRIPT
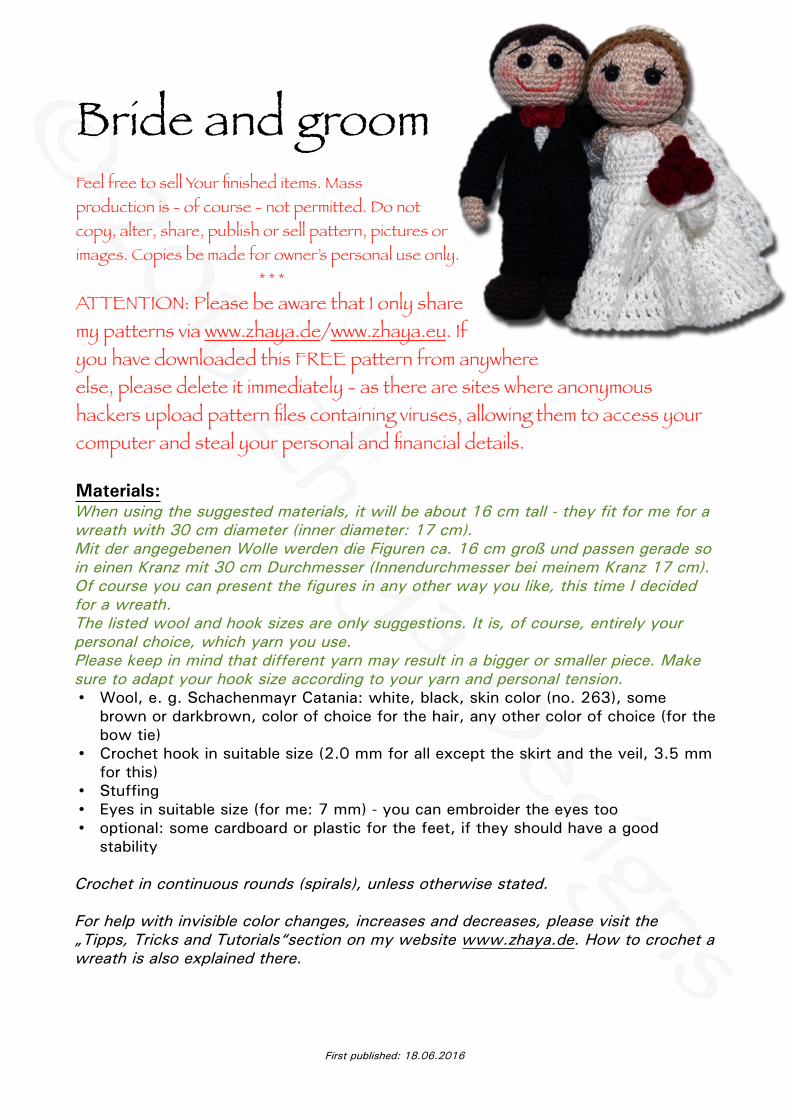
Bride and groom
Feel free to sell Your finished items. Mass production is - of course - not permitted. Do not copy, alter, share, publish or sell pattern, pictures or images. Copies be made for owner’s personal use only.
* * * ATTENTION: Please be aware that I only share my patterns via www.zhaya.de/www.zhaya.eu. If you have downloaded this FREE pattern from anywhere else, please delete it immediately - as there are sites where anonymous hackers upload pattern files containing viruses, allowing them to access your computer and steal your personal and financial details.
Materials: When using the suggested materials, it will be about 16 cm tall - they fit for me for a wreath with 30 cm diameter (inner diameter: 17 cm). Mit der angegebenen Wolle werden die Figuren ca. 16 cm groß und passen gerade so in einen Kranz mit 30 cm Durchmesser (Innendurchmesser bei meinem Kranz 17 cm). Of course you can present the figures in any other way you like, this time I decided for a wreath. The listed wool and hook sizes are only suggestions. It is, of course, entirely your personal choice, which yarn you use. Please keep in mind that different yarn may result in a bigger or smaller piece. Make sure to adapt your hook size according to your yarn and personal tension.• Wool, e. g. Schachenmayr Catania: white, black, skin color (no. 263), some
brown or darkbrown, color of choice for the hair, any other color of choice (for the bow tie)
• Crochet hook in suitable size (2.0 mm for all except the skirt and the veil, 3.5 mm for this)
• Stuffing • Eyes in suitable size (for me: 7 mm) - you can embroider the eyes too • optional: some cardboard or plastic for the feet, if they should have a good
stability
Crochet in continuous rounds (spirals), unless otherwise stated.
For help with invisible color changes, increases and decreases, please visit the „Tipps, Tricks and Tutorials“section on my website www.zhaya.de. How to crochet a wreath is also explained there.
First published: 18.06.2016
* for a half treble crochet: yarn over twice, insert hook into the stitch, yarn over and pull the yarn through the stitch (4 loops on hook), yarn over and pull through the first two loops on the hook (3 loops remain on hook), yarn over und pull through the last 3 loops on the hook. The difference in height from the double chrochet to the half treble crochet is smoother than to a treble crochet.
Bride:
Head: Skin color 1. sc 6 in MR (6) 2. inc x6 (12) 3. (sc 1, inc) x6 (18) 4. (sc 2, inc) x6 (24) 5. (sc 3, inc) x6 (30) 6. (sc 4, inc) x6 (36) 7.-13. (7 Rounds) sc in each st around (36) 14. (sc 4, dec) x6 (30) 15. (sc 3, dec) x6 (24) 16. (sc 2, dec) x6 (18) 17. (sc 1, dec) x6 (12) Stuff and shape the head. 18.dec x6 (6) Fasten off, leave a long tail for sculpting.
(The following step can be made later) To sculpt the face mark the spots for eyes and nose with pins. I’ve placed the pins for the eyes between round 8 and 9 with a distance of 5 stitches, for the nose a round lower in the middle between the eyes. The sculpting is not necessary but there is a nicer head shape.
Thread the ending thread (or a new one) through a tapestry needle and insert it at the bottom, come out at the mark of one eye, insert again 1 stitch offset and go back to the starting point, tighten to form the eye socket, knot twice, repeat it for the second eye, knot well. Attach or embroider the eyes.
Abbreviations (US Terms):
MR = magic ring inc = increase
sc = single crochet dec = decrease
hdc = half double crochet ch = chain
dc = double crochet BLO = back loop only
htr = half treble crochet* FLO = front loop only
tr = treble crochet slst = slip stitch
st = stitch
(-) x = repeat inside of () for x nr of times
First published: 18.06.2016

When you have enough thread left (otherwise take a new one), insert again in the same spot and go to left or right of the nose pin, run the thread over the outside of the face and insert with a distance of 1 or 2 stitches, repeat it until a little nose is formed, go back to the starting point, fix the yarn and hide the ends inside the head.
Now embroider mouth and lashes and if desired color the cheeks with chalk pastels or something like that.
Hair: Color of choice 1. sc 6 in MR (6) 2. inc x6 (12) 3. (sc 1, inc) x6 (18) 4. (sc 2, inc) x6 (24) 5. (sc 3, inc) x6 (30) 6. (sc 4, inc) x6 (36) 7.-13. (7 Rounds) sc in each st around (36) For the bangs/fringe simply continue crocheting as follows: slst 1, sc 1, hdc 2, dc 2, htr 1, tr 5, htr 2, dc 1, hdc 1, sc 1, slst 1, sc 1, hdc 1, dc 3, hdc 1, sc 1, slst 1, sc 8, slst 1 Fasten off, don’t close of course, leave a long tail for sewing.
Bun: Same color as before. 1. sc 6 in MR (6) 2. inc x6 (12) 3. (sc 1, inc) x6 (18) 4. (sc 2, inc) x6 (24) 5.-6. (2 Rounds) sc in each st around (24) - you can add more rounds if you want Change color to white: 7. slst 1, ch 1 alternately until the end of the round (BLO the last 5 stitches)
First published: 18.06.2016
Veil: White, with a bigger hook size (as indicated at the label) to make the fabric more loosely. Crochet in rows. At the end of each row, chain 1 and turn. Join with a slip stitch and ch 1 at a free loop of the bun (round 7) 1. FLO: sc 2 in each free loop, ch 3, turn (10) 2. dc in each st, ch 3, turn (10) 3. (dc 1, inc) x5, ch 3, turn (15) 4. dc in each st, ch 3, turn (15) 5. (dc 2, inc) x5 (20) 6. dc in each st, ch 3, turn (20) 7. (dc 3, inc) x5 (25) 8. dc in each st, ch 3, turn (25) 9. (dc 4, inc) x5, ch 3, turn (30) 10. (dc 5, inc) x5 (36) 11. ch 1, slst 1 alternately until the end of the row You can make the veil longer if necessary or desired. Just continue crocheting in the same way. Fasten off invisibly. Now put the hair to the head (align the bangs), sew it on. Pin the bun to the hair (keep an eye to the veil, it has to point downwards), sew it on. Stuff a little before closing.
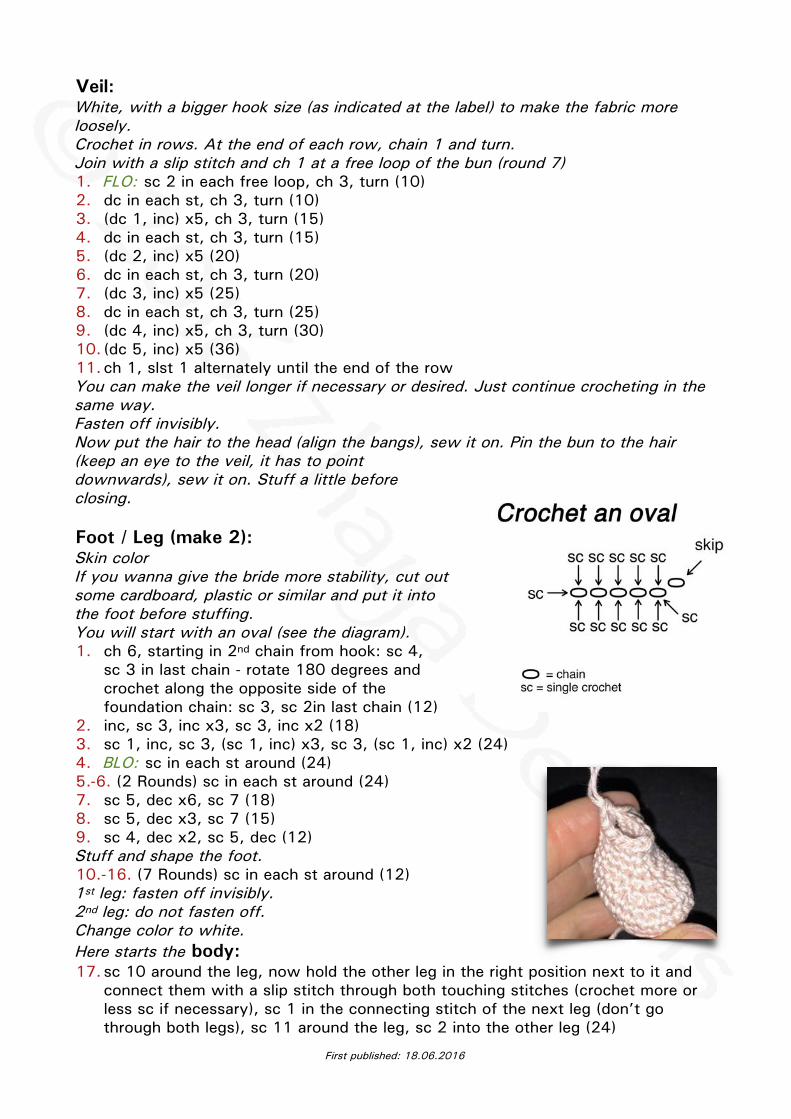
Foot / Leg (make 2): Skin color If you wanna give the bride more stability, cut out some cardboard, plastic or similar and put it into the foot before stuffing. You will start with an oval (see the diagram). 1. ch 6, starting in 2nd chain from hook: sc 4,
sc 3 in last chain - rotate 180 degrees and crochet along the opposite side of the foundation chain: sc 3, sc 2in last chain (12)
2. inc, sc 3, inc x3, sc 3, inc x2 (18) 3. sc 1, inc, sc 3, (sc 1, inc) x3, sc 3, (sc 1, inc) x2 (24) 4. BLO: sc in each st around (24) 5.-6. (2 Rounds) sc in each st around (24) 7. sc 5, dec x6, sc 7 (18) 8. sc 5, dec x3, sc 7 (15) 9. sc 4, dec x2, sc 5, dec (12) Stuff and shape the foot. 10.-16. (7 Rounds) sc in each st around (12) 1st leg: fasten off invisibly. 2nd leg: do not fasten off. Change color to white. Here starts the body: 17. sc 10 around the leg, now hold the other leg in the right position next to it and
connect them with a slip stitch through both touching stitches (crochet more or less sc if necessary), sc 1 in the connecting stitch of the next leg (don’t go through both legs), sc 11 around the leg, sc 2 into the other leg (24)
First published: 18.06.2016
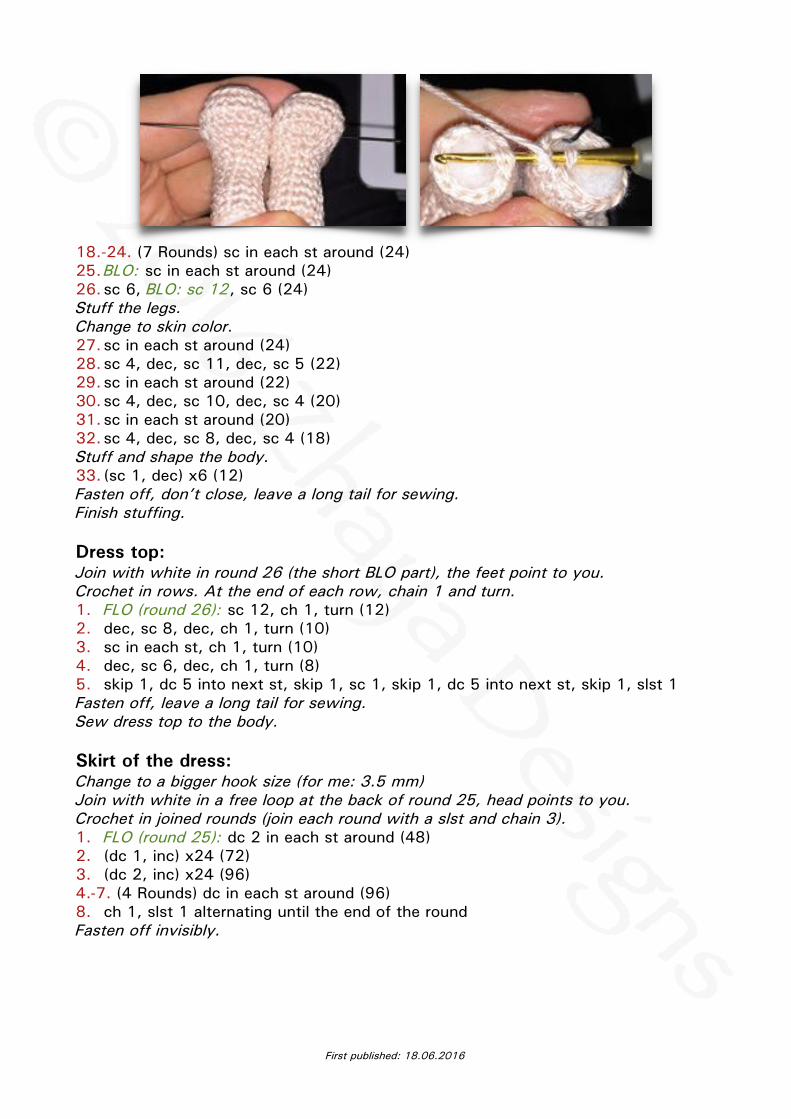
18.-24. (7 Rounds) sc in each st around (24) 25.BLO: sc in each st around (24) 26. sc 6, BLO: sc 12, sc 6 (24) Stuff the legs. Change to skin color. 27. sc in each st around (24) 28. sc 4, dec, sc 11, dec, sc 5 (22) 29. sc in each st around (22) 30. sc 4, dec, sc 10, dec, sc 4 (20) 31. sc in each st around (20) 32. sc 4, dec, sc 8, dec, sc 4 (18) Stuff and shape the body. 33. (sc 1, dec) x6 (12) Fasten off, don’t close, leave a long tail for sewing. Finish stuffing.
Dress top: Join with white in round 26 (the short BLO part), the feet point to you. Crochet in rows. At the end of each row, chain 1 and turn. 1. FLO (round 26): sc 12, ch 1, turn (12) 2. dec, sc 8, dec, ch 1, turn (10) 3. sc in each st, ch 1, turn (10) 4. dec, sc 6, dec, ch 1, turn (8) 5. skip 1, dc 5 into next st, skip 1, sc 1, skip 1, dc 5 into next st, skip 1, slst 1 Fasten off, leave a long tail for sewing. Sew dress top to the body.
Skirt of the dress: Change to a bigger hook size (for me: 3.5 mm) Join with white in a free loop at the back of round 25, head points to you. Crochet in joined rounds (join each round with a slst and chain 3). 1. FLO (round 25): dc 2 in each st around (48) 2. (dc 1, inc) x24 (72) 3. (dc 2, inc) x24 (96) 4.-7. (4 Rounds) dc in each st around (96) 8. ch 1, slst 1 alternating until the end of the round Fasten off invisibly.
First published: 18.06.2016
Shoe (make 2): White (you can also start for the sole in another color and change to white later) You will start with an oval (see the diagram). Crochet in joined rounds (join each round with a slst and chain 1). 1. ch 6, starting in 2nd chain from hook: sc 4, sc 3 into last chain, rotate 180
degrees and crochet along the opposite side of the foundation chain: sc 3, sc 2 into last st, slst, ch 1 (12)
2. inc, sc 3, inc x3, sc 3, inc x2, slst, ch 1 (18) 3. sc 1, inc, sc 3, (sc 1, inc) x3, sc 3, (sc 1, inc) x2, slst, ch1 (24) 4. BLO: sc in each st around, slst, ch 1 (24) 5.-7. (3 Rounds) sc in each st around, slst, ch 1 (24) 8. sc 8, dec x3, sc 10, slst (21) Fasten off, leave a long tail for sewing. Put her on the shoes and sew it to the foot.
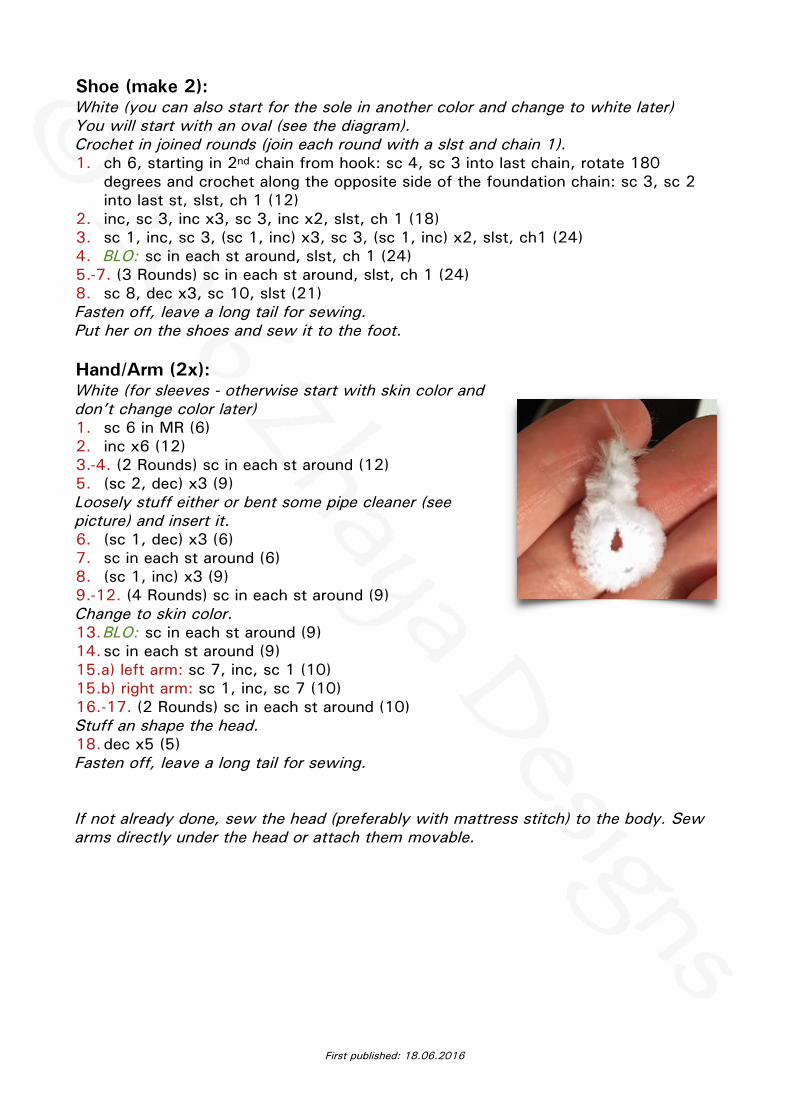
Hand/Arm (2x): White (for sleeves - otherwise start with skin color and don’t change color later) 1. sc 6 in MR (6) 2. inc x6 (12) 3.-4. (2 Rounds) sc in each st around (12) 5. (sc 2, dec) x3 (9) Loosely stuff either or bent some pipe cleaner (see picture) and insert it. 6. (sc 1, dec) x3 (6) 7. sc in each st around (6) 8. (sc 1, inc) x3 (9) 9.-12. (4 Rounds) sc in each st around (9) Change to skin color. 13.BLO: sc in each st around (9) 14. sc in each st around (9) 15.a) left arm: sc 7, inc, sc 1 (10) 15.b) right arm: sc 1, inc, sc 7 (10) 16.-17. (2 Rounds) sc in each st around (10) Stuff an shape the head. 18.dec x5 (5) Fasten off, leave a long tail for sewing.
If not already done, sew the head (preferably with mattress stitch) to the body. Sew arms directly under the head or attach them movable.
First published: 18.06.2016
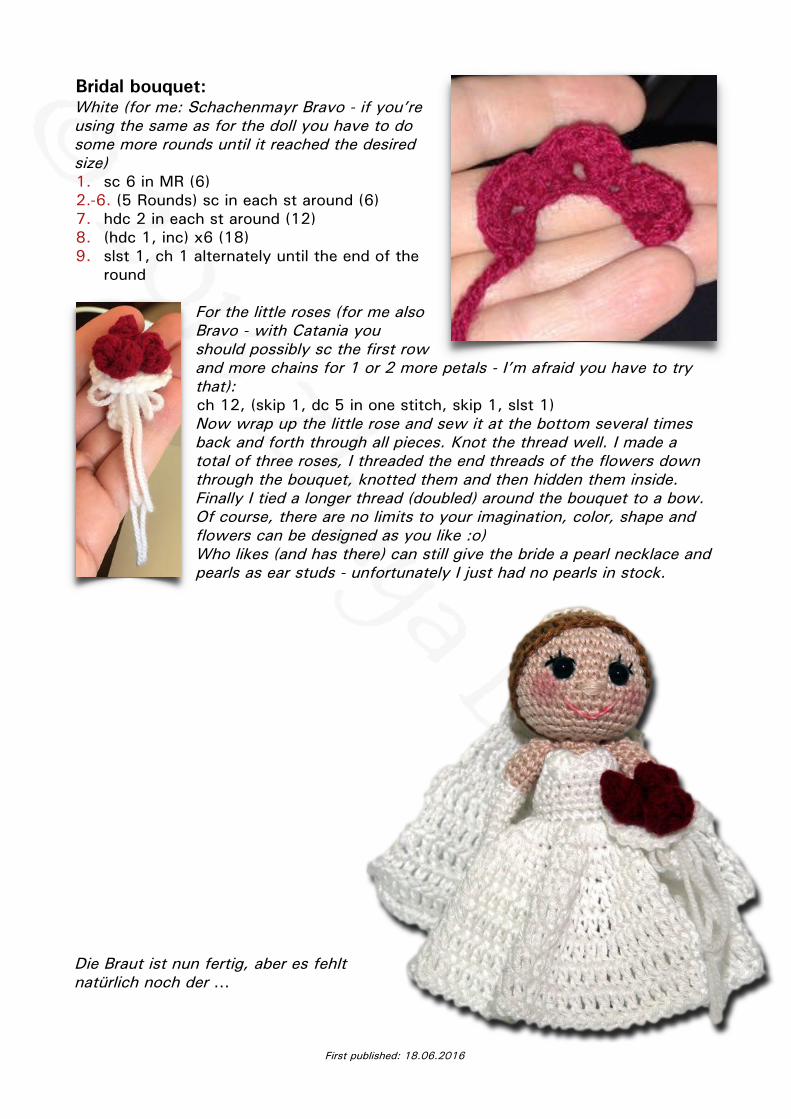
Bridal bouquet: White (for me: Schachenmayr Bravo - if you’re using the same as for the doll you have to do some more rounds until it reached the desired size) 1. sc 6 in MR (6) 2.-6. (5 Rounds) sc in each st around (6) 7. hdc 2 in each st around (12) 8. (hdc 1, inc) x6 (18) 9. slst 1, ch 1 alternately until the end of the
round
For the little roses (for me also Bravo - with Catania you should possibly sc the first row and more chains for 1 or 2 more petals - I’m afraid you have to try that): ch 12, (skip 1, dc 5 in one stitch, skip 1, slst 1) Now wrap up the little rose and sew it at the bottom several times back and forth through all pieces. Knot the thread well. I made a total of three roses, I threaded the end threads of the flowers down through the bouquet, knotted them and then hidden them inside. Finally I tied a longer thread (doubled) around the bouquet to a bow. Of course, there are no limits to your imagination, color, shape and flowers can be designed as you like :o) Who likes (and has there) can still give the bride a pearl necklace and pearls as ear studs - unfortunately I just had no pearls in stock.
Die Braut ist nun fertig, aber es fehlt natürlich noch der …
First published: 18.06.2016
Groom:
Head: Skin color 1. sc 6 in MR (6) 2. inc x6 (12) 3. (sc 1, inc) x6 (18) 4. (sc 2, inc) x6 (24) 5. (sc 3, inc) x6 (30) 6. (sc 4, inc) x6 (36) 7.-13. (7 Rounds) sc in each st around (36) 14. (sc 4, dec) x6 (30) 15. (sc 3, dec) x6 (24) 16. (sc 2, dec) x6 (18) 17. (sc 1, dec) x6 (12) Stuff and shape the head. 18.dec x6 (6) Fasten off, leave a long tail for sculpting. Sculpt the head the same way as the brides head.
Hair: Color of choice 1. sc 6 in MR (6) 2. inc x6 (12) 3. (sc 1, inc) x6 (18) 4. (sc 2, inc) x6 (24) 5. (sc 3, inc) x6 (30) 6. (sc 4, inc) x6 (36) 7.-13. (7 Rounds) sc in each st around (36) For the bangs/fringe simply continue crocheting as follows: slst 1, ch 4, starting in 2nd chain from hook: sc 1, hdc 1, dc 3, skip 1 stitch at the head, slst 1, sc 1, hdc 1, dc 1, hdc 1, sc 1, slst 1 Fasten off, leave a long tail for sewing. Sew the hair to the head.
Foot / Leg (make 2): Brown or dark brown Here also: if you wanna give the groom more stability, cut out some cardboard, plastic or similar and put it into the foot before stuffing. You will start with an oval. 1. ch 6, starting in 2nd chain from hook: sc 4, sc 3 in last chain - rotate 180 degrees
and crochet along the opposite side of the foundation chain: sc 3, sc 2in last chain (12)
2. inc, sc 3, inc x3, sc 3, inc x2 (18) 3. sc 1, inc, sc 3, (sc 1, inc) x3, sc 3, (sc 1, inc) x2 (24) 4. BLO: sc in each st around (24) 5.-7. (3 Rounds) sc in each st around (24) 8. sc 5, dec x6, sc 7 (18) 9. sc 5, dec x3, sc 7 (15) 10. sc 4, dec x2, sc 5, dec (12)
First published: 18.06.2016
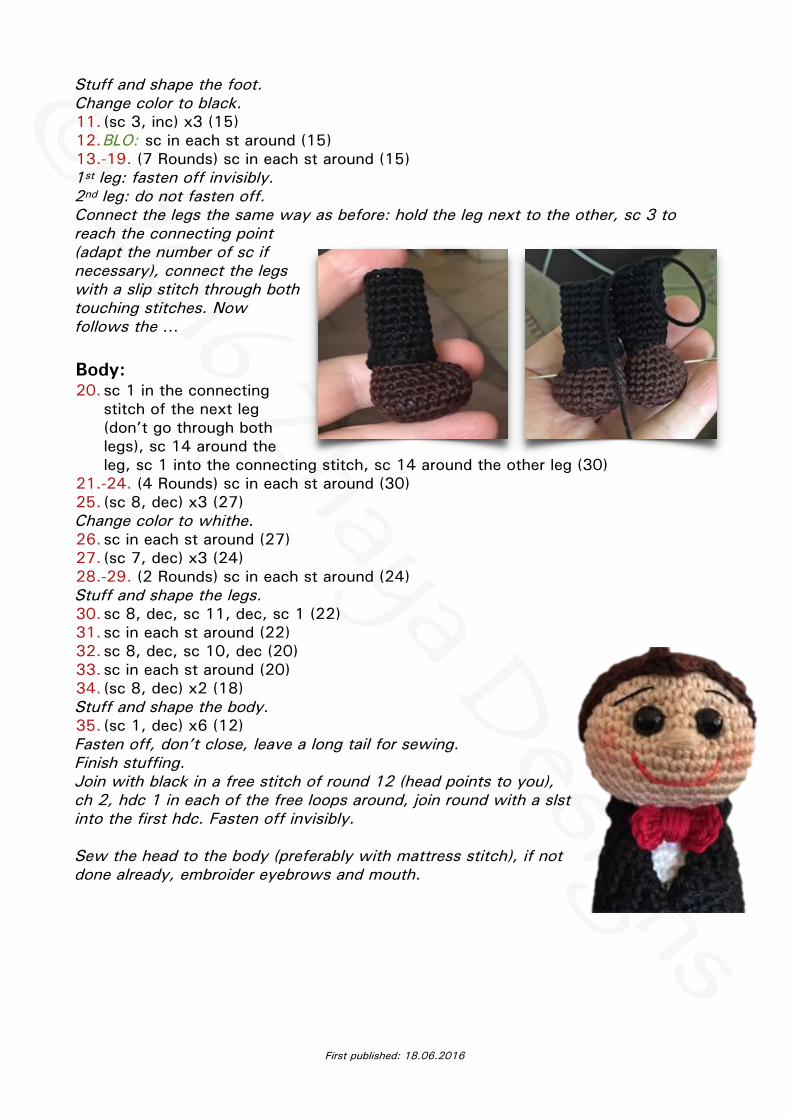
Stuff and shape the foot. Change color to black. 11. (sc 3, inc) x3 (15) 12.BLO: sc in each st around (15) 13.-19. (7 Rounds) sc in each st around (15) 1st leg: fasten off invisibly. 2nd leg: do not fasten off. Connect the legs the same way as before: hold the leg next to the other, sc 3 to reach the connecting point (adapt the number of sc if necessary), connect the legs with a slip stitch through both touching stitches. Now follows the …
Body: 20. sc 1 in the connecting
stitch of the next leg (don’t go through both legs), sc 14 around the leg, sc 1 into the connecting stitch, sc 14 around the other leg (30)
21.-24. (4 Rounds) sc in each st around (30) 25. (sc 8, dec) x3 (27) Change color to whithe. 26. sc in each st around (27) 27. (sc 7, dec) x3 (24) 28.-29. (2 Rounds) sc in each st around (24) Stuff and shape the legs. 30. sc 8, dec, sc 11, dec, sc 1 (22) 31. sc in each st around (22) 32. sc 8, dec, sc 10, dec (20) 33. sc in each st around (20) 34. (sc 8, dec) x2 (18) Stuff and shape the body. 35. (sc 1, dec) x6 (12) Fasten off, don’t close, leave a long tail for sewing. Finish stuffing. Join with black in a free stitch of round 12 (head points to you), ch 2, hdc 1 in each of the free loops around, join round with a slst into the first hdc. Fasten off invisibly.
Sew the head to the body (preferably with mattress stitch), if not done already, embroider eyebrows and mouth.
First published: 18.06.2016
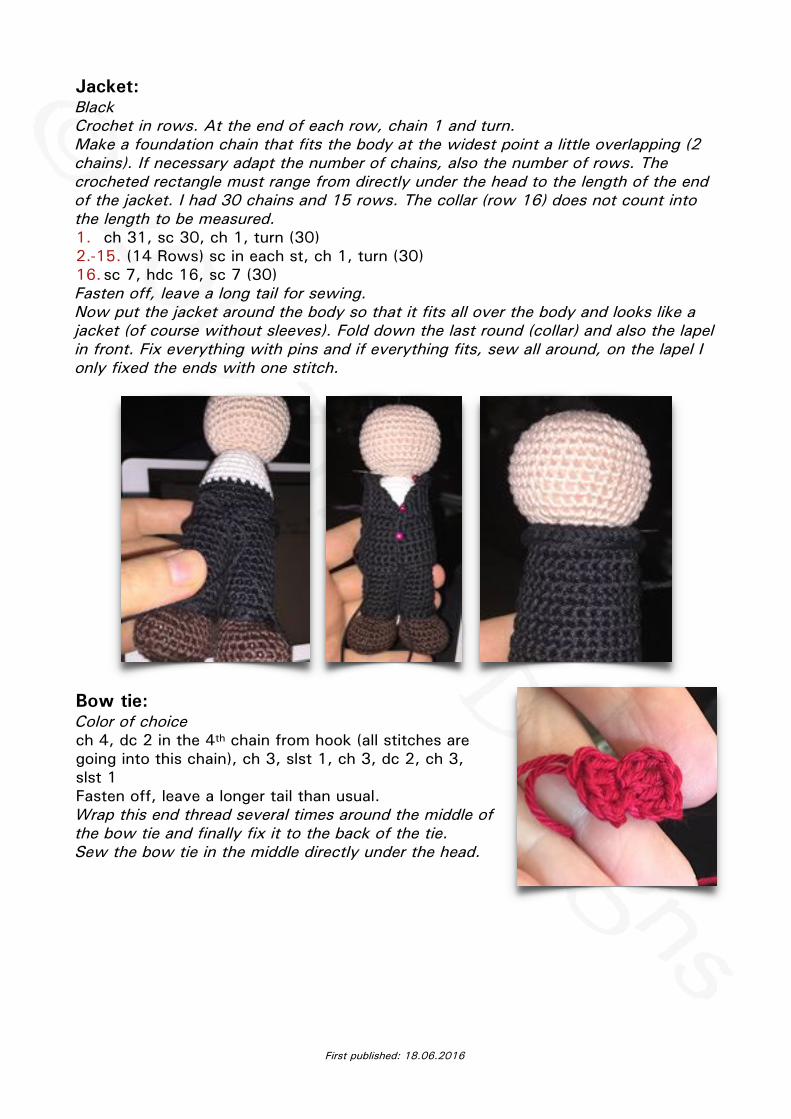
Jacket: Black Crochet in rows. At the end of each row, chain 1 and turn. Make a foundation chain that fits the body at the widest point a little overlapping (2 chains). If necessary adapt the number of chains, also the number of rows. The crocheted rectangle must range from directly under the head to the length of the end of the jacket. I had 30 chains and 15 rows. The collar (row 16) does not count into the length to be measured. 1. ch 31, sc 30, ch 1, turn (30) 2.-15. (14 Rows) sc in each st, ch 1, turn (30) 16. sc 7, hdc 16, sc 7 (30) Fasten off, leave a long tail for sewing. Now put the jacket around the body so that it fits all over the body and looks like a jacket (of course without sleeves). Fold down the last round (collar) and also the lapel in front. Fix everything with pins and if everything fits, sew all around, on the lapel I only fixed the ends with one stitch.
Bow tie: Color of choice ch 4, dc 2 in the 4th chain from hook (all stitches are going into this chain), ch 3, slst 1, ch 3, dc 2, ch 3, slst 1 Fasten off, leave a longer tail than usual. Wrap this end thread several times around the middle of the bow tie and finally fix it to the back of the tie. Sew the bow tie in the middle directly under the head.
First published: 18.06.2016
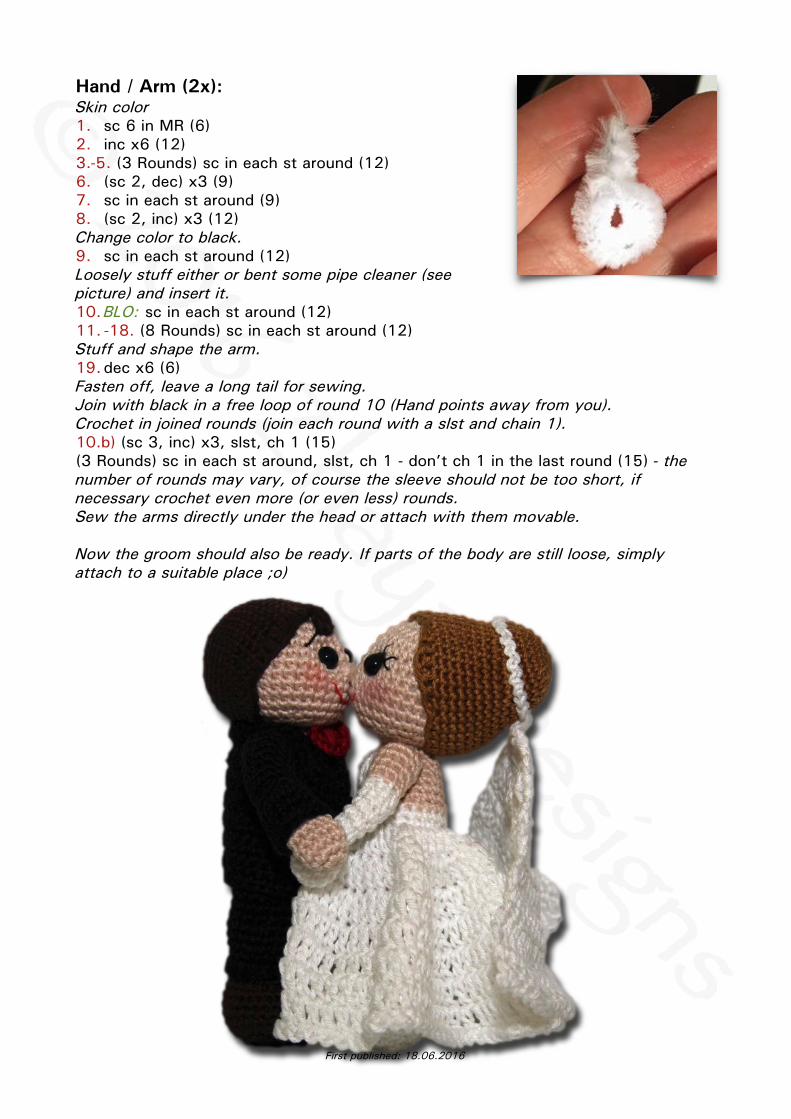
Hand / Arm (2x): Skin color 1. sc 6 in MR (6) 2. inc x6 (12) 3.-5. (3 Rounds) sc in each st around (12) 6. (sc 2, dec) x3 (9) 7. sc in each st around (9) 8. (sc 2, inc) x3 (12) Change color to black. 9. sc in each st around (12) Loosely stuff either or bent some pipe cleaner (see picture) and insert it. 10.BLO: sc in each st around (12) 11. -18. (8 Rounds) sc in each st around (12) Stuff and shape the arm. 19.dec x6 (6) Fasten off, leave a long tail for sewing. Join with black in a free loop of round 10 (Hand points away from you). Crochet in joined rounds (join each round with a slst and chain 1). 10.b) (sc 3, inc) x3, slst, ch 1 (15) (3 Rounds) sc in each st around, slst, ch 1 - don’t ch 1 in the last round (15) - the number of rounds may vary, of course the sleeve should not be too short, if necessary crochet even more (or even less) rounds. Sew the arms directly under the head or attach with them movable.
Now the groom should also be ready. If parts of the body are still loose, simply attach to a suitable place ;o)
First published: 18.06.2016
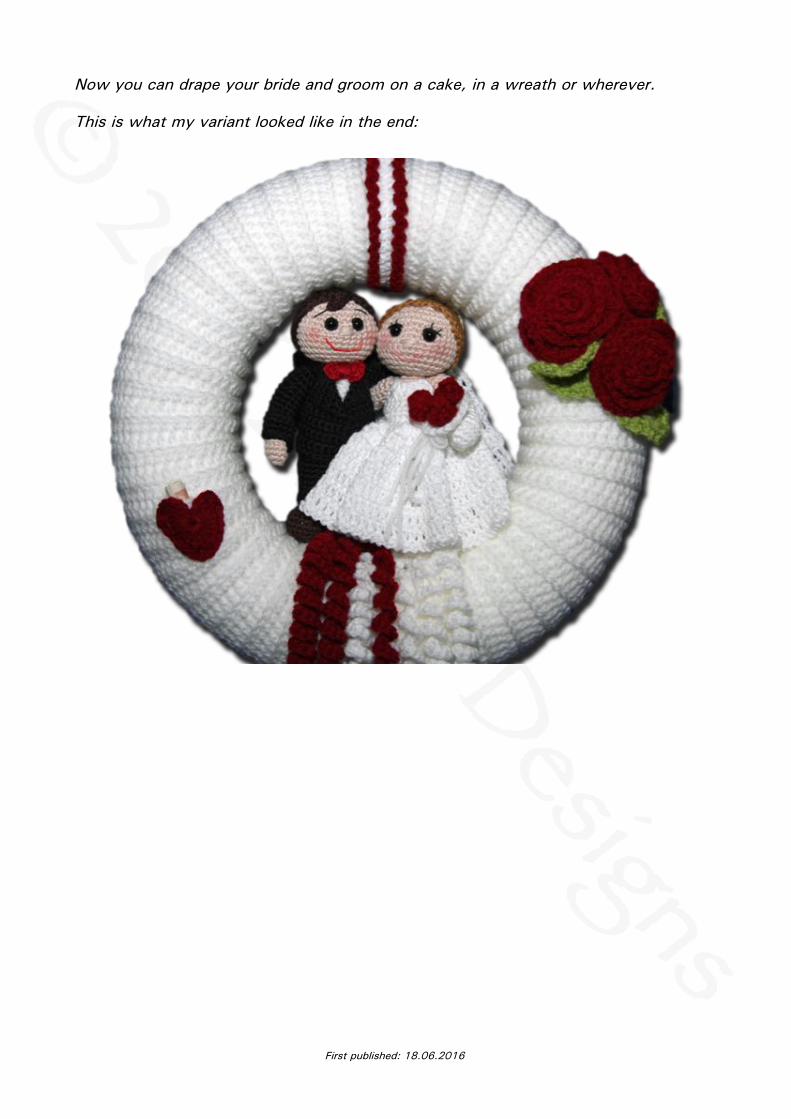
Now you can drape your bride and groom on a cake, in a wreath or wherever.
This is what my variant looked like in the end:
First published: 18.06.2016