bria 3 administrator guide - counterpath · the bluetooth word mark, ... setting up chat rooms ......
TRANSCRIPT

Bria 3 Administrator Guide

CounterPath Corporation
CounterPath CorporationSuite 300, One Bentall Centre505 Burrard Street, Box 95Vancouver, BC V7X 1M3Tel: [email protected] www.counterpath.com
© July 2013 CounterPath Corporation. All rights reserved.Windows, Windows Vista, Active Directory, and Outlook are registered trademarks of Microsoft Corporation in the United States and other countries. This document contains information proprietary to CounterPath Corporation, and shall not be used for engineering, design, procurement, or manufacture, in whole or in part, without the consent of CounterPath Corporation. The content of this publication is intended to demonstrate typical uses and capabilities of the CounterPath Bria 3 softphone application from CounterPath Corporation. Users of this material must determine for themselves whether the information contained herein applies to a particular IP-based networking system. CounterPath makes no warranty regarding the content of this document, including—but not limited to—implied warranties of fitness for any particular purpose. In no case will CounterPath or persons involved in the production of this documented material be liable for any incidental, indirect or otherwise consequential damage or loss that may result after the use of this publication.
CounterPath and the logo are trademarks of CounterPath Corporation.
The Bluetooth word mark, figure mark, and combination mark are all trademarks owned by the Bluetooth SIG. Windows, Windows Vista, Active Directory, Excel and Outlook are registered trademarks of Microsoft Corporation in the United States and other countries.
This manual corresponds to version 3.5 of Bria 3 for Windows and Bria 3 for Mac.
Rev 8

ContentsOverview.......................................................................................................................................1
System Requirements .............................................................................................................2Multimedia Device Requirements ..........................................................................................3Deploying through Manual Configuration: Recommended Procedure ..................................4Deploying through Remote Provisioning: Recommended Procedure ....................................6
Configuring Bria ...........................................................................................................................9Summary of Features ..............................................................................................................9Configuring Accounts.............................................................................................................11Setting up Contacts .................................................................................................................15Verifying your Presence Setup ...............................................................................................17Setting up Workgroups ...........................................................................................................18Setting up Chat Rooms ...........................................................................................................18Managing Licenses .................................................................................................................18
Account Configuration Reference ................................................................................................19Accounts Settings Window.....................................................................................................19XMPP Account .......................................................................................................................20Outlook or MAB Account ......................................................................................................22SIP Account Properties – Account .........................................................................................24SIP Account Properties – Voicemail ......................................................................................26SIP Account Properties – Topology .......................................................................................28SIP Account Properties – Presence.........................................................................................29SIP Account Properties – Storage...........................................................................................35SIP Account Properties – Transport .......................................................................................36SIP Account Properties – Advanced.......................................................................................38
Preferences Reference...................................................................................................................41Preferences – Devices .............................................................................................................41Preferences – Audio Codecs ...................................................................................................42Preferences – Video Codecs ...................................................................................................44Preferences – Quality of Service ............................................................................................45Preferences – Directory ..........................................................................................................46Preferences – Calls..................................................................................................................49Preferences – Files & Web Tabs.............................................................................................50
A Configuration Form ..................................................................................................................51B Contact List Headings ...............................................................................................................55C Glossary.....................................................................................................................................57
i

CounterPath Corporation
ii

1 Overview
This manual is intended for:
• System administrators who have purchased Bria from the CounterPath website and are deploying Bria for use by the staff in an enterprise. The administrator should be familiar with PBX solutions, telephony and VoIP telephony.
• Service providers who have purchased Bria from CounterPath Sales, without further customization or engineering changes.
You can deploy Bria either by manually configuring via the softphone GUI or by using a provisioning server. If you are planning to implement provisioning, you must also read:
• “Bria 3 Configuration Guide – Retail Deployments”• “Bria 3 Provisioning Guide – Retail Deployments”
For more information on the documents you should read, go to http://www.counterpath.com/bria.html, click Resources and read the “Bria 3 Administrator Orientation”.
Bria for Windows versus Bria for MacThis guide describes administrator tasks for deploying both Bria for Windows and Bria for Mac.
It is assumed that you, the administrator, will be exploring deployment strategies using Bria for Window. Therefore, all illustrations and instructions intended only for administrators are for Bria for Windows.
If information applies to your end users, details are provided for both Windows and Mac.
1

CounterPath Corporation
1.1 System RequirementsRequirements for Bria for Windows
Requirements for Bria Add-inThe Bria Add-in requires a 32-bit version of Microsoft Outlook®. If a user has a 64-bit version of Outlook, they can run Bria but they will not be able to use Bria Add-in.
You cannot use Bria Add-in with Outlook if you are running Outlook in “click to run” mode. Outlook must be installed in the usual way.
Requirements for Bria for Mac
Processor Minimum: Pentium 4® 2.4 GHz or equivalentOptimal: Intel Core 2 Duo or equivalent; Video Card with DirectX 9.0c supportRecommended to support HD video: Intel Core 2 Duo or equivalent with minimum 3.0 GHz, or a triple- or quad-core processor; Video Card with DirectX 9.0c support.
Memory Optimal: 2 GB RAM. Minimum: 1 GB RAM
Hard Disk Space 125 MB
Operating System Microsoft Windows XP Service Pack 3Microsoft Windows® Vista® Service Pack 1Microsoft Windows 7 Service Pack 1Microsoft Windows 8.Bria can run in either 32-bit or 64-bit architecture in all these operating systems.
Additional Microsoft Windows Installer 3.1Microsoft .NET 4.0Microsoft VC 9.0 Runtime Service Pack 1(Note that the installer will take care of installing those if you do not have them).
Connection Minimum: IP network connection (broadband, LAN, wireless)Recommended to support HD video: A 2.0 Mbps connectionNote that Bria requires a continual internet connection.
Sound Card Full-duplex, 16-bit or use USB headset
Operating System Mac OS™ 10.7 or 10.8. (Mac OS 10.6 is supported on a “best efforts” basis.)
Connection IP network connection (broadband, LAN, wireless). Note that Bria requires a continual internet connection. Recommended to support HD video: A 2.0 Mbps connection.Note that Bria requires a continual internet connection.
Memory 2GB RAM minimum
2

Bria 3 Administrator Guide
1.2 Multimedia Device RequirementsRequirements for Bria for WindowsBria requires both speakers and a microphone to make calls. Any of the following are acceptable:
• External speakers and microphone• Built-in speakers and microphone• Dual-jack multimedia headset• Bluetooth® multimedia headset• USB multimedia headset• USB phone.
HID-compliant devices can be configured to work with Bria.
Video Cameras
Calls made with Bria will work without a video camera, but one is necessary to allow users to see each others’ images. Bria will work with most USB video cameras.
Requirements for Bria for MacBria is optimized to work with Apple iSight™
3

CounterPath Corporation
1.3 Deploying through Manual Configuration: Recommended ProcedureIf you have chosen to manually configure Bria and will not implement remote provisioning, read this entire manual.
If you are a service provider, you should be aware that if you deploy through manual configuration then users do not log in, which exposes your service to abuse and may compromise the user’s privacy.
It is assumed that you, the administrator, will be exploring deployment strategies using Bria for Window. Therefore, instructions in this section are for Bria for Windows only.
Configuring Bria: Administrator StepsThe general procedure is:
1. Install and start Bria. The Bria Login dialog appears with the Profile set to “Manually enter login server”. Set the profile to “No login required” and click Continue. The softphone GUI appears.
2. Configure Bria to work on your network and with your services. Use the Account Settings window (Softphone > Accounts) and the Preferences window (Softphone > Preferences).
The Troubleshooting Assistant (Help > Troubleshooting) may help you identify problems with your configuration.
The rest of this manual describes this configuration.
3. When you are satisfied with the configuration, deploy to your employees or users.
4. Then either configure the application for each employee, or provide them with a list of settings so that they can configure it themselves (see page 51 for a sample form).
4

Bria 3 Administrator Guide
Instructions for your UsersBecause you are not provisioning Bria, your users do not need to log on. Instruct your users to start Bria as follows:
• The first time the user starts Bria, the Login dialog appears. The Login dialog for Bria for Windows and Bria for Mac Login dialogs are shown below.
• The user should set the profile to “No login required” and click Continue.
Bria will start and the user can configure the softphone. The next time the user starts Bria, the Login dialog will not appear: Bria will start immediately.
5

CounterPath Corporation
1.4 Deploying through Remote Provisioning: Recommended ProcedureConfiguring Bria: Administrator StepsIf you are deploying through remote provisioning you will need to start Bria without provisioning in order to explore configuration options.
1. Install and start Bria. The Bria Login dialog appears with the Profile set to “Manually enter login server”. Set the profile to “No login required” and click Continue. The softphone GUI appears. From now on, when Bria starts, the Login dialog will not appear.
2. Manually configure Bria to work on your network and with your services. Use the Account Settings window (Softphone > Accounts) and the Preferences window (Softphone > Preferences.
The Troubleshooting Assistant (Help > Troubleshooting) may help you identify problems with your configuration.
The rest of this manual describes this configuration.
3. When you are satisfied with the configuration, see:
• The “Bria 3 Configuration Guide – Retail Deployments” for information on more features that can be configured only by remotely configuring Bria settings (they cannot be configured on the Bria screens).
• The “Bria 3 Provisioning Guide - Retail Edition” for information on setting up for remote login and remote provisioning.
4. In addition, just before you deploy across your enterprise, change the setup for your own Bria to follow the correct login procedure:
• Start Bria, go to the Preferences > Application page and check Enable login screen.• Shut down Bria and restart. The Login dialog will appear.• Choose t“Manually enter login server” and complete the other fields. Click Login.
6

Bria 3 Administrator Guide
Using the “No Login” ProfileIf you, the system administrator, ever need to start Bria without logging in:
1. Go to the Preferences > Application page and check Enable Login screen.
2. Restart Bria. The Login dialog will appear. Choose “No login required”.
Bria will start, using the local version of the configuration data that is saved on your computer (from the first time you used Bria without logging in).
Keep in mind that when you are supporting remote provisioning, starting Bria without logging in is intended to allow you, the system administrator, to experiment with login options. It is not intended to allow users to skip login, for example, by displaying the Login dialog and choosing the “No login required” option.
If a user first logs on and then later changes to “No login required”, Bria will start but none of the user’s account credentials or account settings will be available, so Bria will not be usable.
Instructions for your Users1. When the user starts Bria, the Login dialog appears. The Login dialog for Bria for Windows and Bria for
Mac Login dialogs are shown below
2. The user should set the profile to “Manually enter login server”.
3. The user should complete the remaining fields (with information you have provided to each user, perhaps through an e-mail) and click Login. Bria will start. From now on, the Login dialog will appear at each startup.
7

CounterPath Corporation
8

2 Configuring Bria
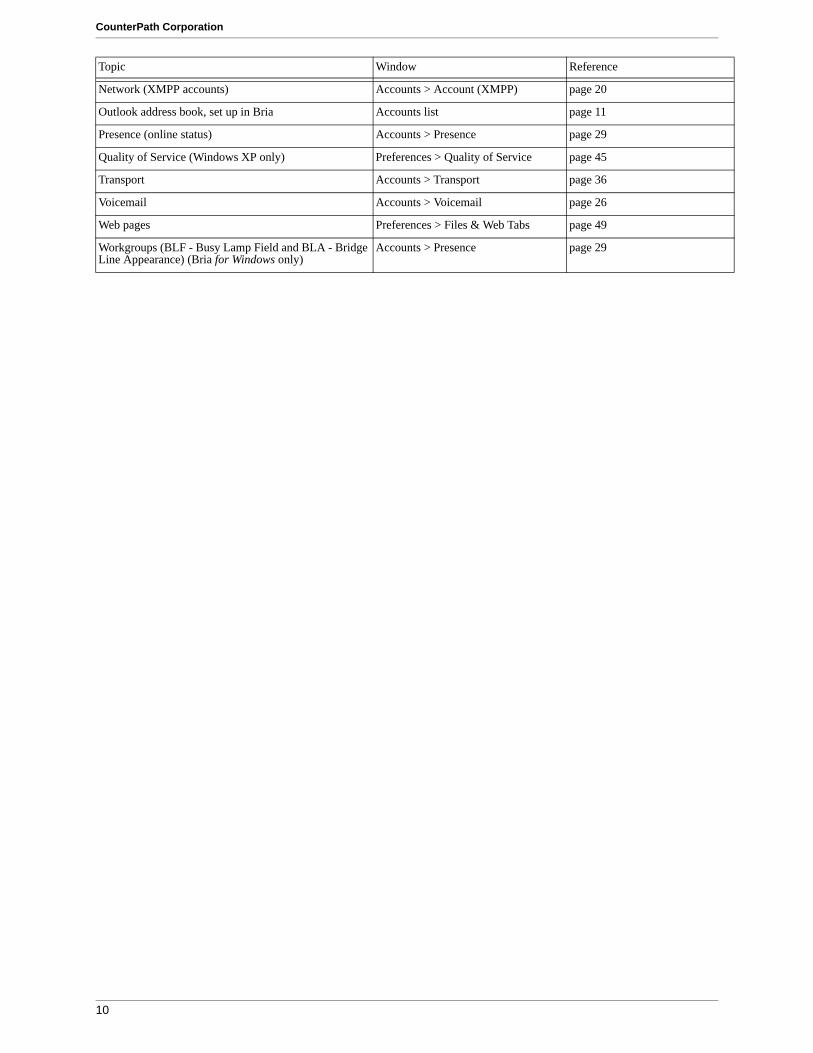
2.1 Summary of FeaturesYou configure Bria by completing the fields on the Account Settings window and the Preferences window. The following table specifies the window where each feature is configured.
Topic Window Reference
Account credentials (SIP accounts) Accounts > Account (SIP) page 24
Account credentials (Outlook account) Accounts list page 11
Account credentials (XMPP accounts) Accounts > Account (XMPP) page 20
Account, multiple SIP account setup Accounts list page 13
Calls, set the preferred account for phone calls Accounts list page 13
Active Directory (Windows only) Preferences > Directory page 46
BLA - Bridge Line Appearance (Windows only) Accounts > Presence page 29
BLF - Busy Lamp Field (Windows only) Accounts > Presence page 29
Call forwarding Accounts > Voicemail page 26
Chat room - page 18
Codecs Preferences > Audio Codecs and Video Codecs
page 42
Contact list, setting up a corporate contact list page 15
Corporate Directory Preferences > Directory page 46
Deskphone Preferences > Devices page 41
Dial plan Accounts > Account (SIP) page 24
Directory Preferences > Directory page 46
DTMF; method for handling DTMF Preferences > Calls page 38
Encryption (call security) Accounts > Transport page 36
File transfer (XMPP account) Preferences > Files & Web Tabs page 49
Hold; method for handling hold Accounts > Calls page 38
LDAP Directory Preferences > Directory page 46
Login Preferences > Application page 4
Media - RTP inactivity timer Preferences > Calls page 49
Media Encryption Accounts > Transport page 36
MWI - Message Waiting Indicator Accounts > Voicemail page 26
Network (SIP accounts) Accounts > Account (SIP) page 24
Accounts > Topology page 28
Accounts > Calls page 38
9
CounterPath Corporation
Network (XMPP accounts) Accounts > Account (XMPP) page 20
Outlook address book, set up in Bria Accounts list page 11
Presence (online status) Accounts > Presence page 29
Quality of Service (Windows XP only) Preferences > Quality of Service page 45
Transport Accounts > Transport page 36
Voicemail Accounts > Voicemail page 26
Web pages Preferences > Files & Web Tabs page 49
Workgroups (BLF - Busy Lamp Field and BLA - Bridge Line Appearance) (Bria for Windows only)
Accounts > Presence page 29
Topic Window Reference
10

Bria 3 Administrator Guide
2.2 Configuring AccountsSIP Accounts
Each user will need at least one SIP account, in order to make phone calls. The SIP account may also be used for presence (online status sharing) and instant messaging.
Each user requires the following information in order to register with the SIP registrar:
• User name• Password• Authorization Name (if applicable; see page 24 for information)• Domain
XMPP Accounts
Setup of an XMPP account is optional; if it is set up, it will automatically be used for presence subscriptions and instant messaging.
Several XMPP accounts can be created and enabled concurrently. For example, you could set up the corporate XMPP account for your users, and then an individual user could optionally add their own Gmail account, in order to monitor this account through Bria.
Each user requires the following information:
• User ID• Domain• Password.
Outlook Account
Bria is automatically set up with an Outlook or Mac Address Book account but the account is disabled by default. Enabling of the account is optional. If the account becomes enabled, the contacts from that address book will be pulled into Bria. Enabling this account is therefore a mechanism for populating the contact list. See page 16.
11

CounterPath Corporation
Procedure
Create SIP Account
1. When the softphone appears, click the Go to Account Settings link. The SIP Account window appears.
2. Enter the User Details and then change or complete all other fields. See “Account Configuration Reference” on page 19 for details.
3. When done with the SIP account, click OK; the account is created and registered.
Create XMPP Account
4. If you are setting up an XMPP account, choose Softphone > Account Settings again. This time the Account Settings window appears, showing the SIP account you have already set up.
5. Click Add > New XMPP Account. The XMPP Account window appears. Complete the window (page 20) and click OK.
6. On the Account Settings window, click Apply to register the newly added account. Click OK when the Status column is “Ready”.
See page 16 for information on this account
12

Bria 3 Administrator Guide
Setting up Multiple SIP AccountsYou can set up Bria so that phone calls can be made from more than one account.
1. Decide how you want Bria to choose the account to use for any given phone call. There are two options:
• Dial plan decides: The dial plans must be designed so that they select the appropriate account, based on the phone number being dialed. You can still designate one account as the “preferred” account; this account will only be used if none of the dial plan rules apply to a given phone number.
• User selects: With this option, you do not need to revise the default dial plans. Instead, the user can select the account to use for any given call, as described in the user guide. You must advise users on which account to use for which kind of phone call. For example, “use Account 1 for internal calls”.
2. When each SIP account is created, make sure that the Use for Call field (on the Account > Accounts tab) is checked if you want to use the account for phone calls.
3. Back on the Accounts list, enable the accounts you want to use for phone calls.
4. Click Apply. The icons in the Call column are updated:
5. If you are implementing “Dial plan decides”: Modify the dial plans as required. See the Bria 3 Dial Plan Guide, available on the CounterPath website. Advise users whether they should use the account selection feature – probably they should not, but this is your decision.
The account is the “preferred account”. Each user will typically set the preferred account to the account they use most often.
The account can be used for phone calls by selecting it on the dashboard (page 13)
The account cannot be used for phone calls.
See page 29 for information on workgroups
See page 16 for information on this account
13

CounterPath Corporation
Configuring Global Settings (Preferences)Use the Preferences window (Softphone > Preferences) to configure features that apply globally, rather than on a per-account basis. The panels that you, as the system administrator, should set are:
• Devices.If you want Bria to support SIP deskphones, set up the deskphone from this panel.• Audio Codecs and Video Codecs. You should enable the codecs that are suitable to your environment.• Quality of Service. This panel appears only if the user is running Bria for Windows on Windows XP. If your
VoIP service provider supports QoS, you can configure Bria for it.• Directory. You can set up a company directory on a server and connect Bria to it via the LDAP or ADSI
protocol. The directory will appear in the Directory tab. Information in this tab will update automatically whenever the information on the LDAP or ADSI directory changes.
• Calls.• Files & Web Tabs
See “Preferences Reference” on page 41. For information on the panels that are not discussed in this guide, see “Bria 3 for Windows User Guide – Enterprise Deployments”.
One of the differences between Bria for Windows and Bria for Mac is in the organization of configuration information:
• In Bria for Windows, account information is in the Accounts window, which is accessed by choosing Softphone > Accounts. Preferences are in the Preferences window, which is accessed by choosing Softphone > Preferences.
• In Bria for Mac, all information is in the Preferences window, which is accessed by choosing Bria > Preferences.
14
Bria 3 Administrator Guide
2.3 Setting up ContactsTypically, users will want to create contacts in order to easily make phone calls. In addition, in order to send IMs, shared online information and transfer files, contacts are required.
Populating the Contact List from an XMPP RosterIf you support XMPP accounts, the XMPP roster is automatically pulled into Bria when the XMPP account is enabled.
You could pre-populate each user’s roster with the corporate contact list.
Populating the Contact List by Importing a FileYou can provide a file that users can import. Users can import a contact list from:• CSV. A comma-separated file. Use this method to import from a Microsoft® Excel® file. You will first
have to set up the file; see below. • vCard. A vCard file (*.vcf file). A vCard is an electronic business card that is often attached to an e-mail.• PST. A Microsoft Outlook or Microsoft® Exchange contact list (a *.pst file).
Setting up an Excel File for Import
1. Remove any introductory text or headings from the top of the file. (You can keep text at the end of the file; it will be ignored during the import.)
2. Insert a blank row as the first row, then insert the headings that Bria will use to interpret the meaning of each column. The columns can be in any order. Key headings are:
• sip-address. Bria recognizes a value in this column as a softphone address and considers the address as one that can be phoned and as an address that can be used for IM/presence (if SIP is being used for IM/presence).
• xmpp-address: Bria recognizes a value in this field as a Jabber (XMPP) address and will map this field to the Jabber contact method for the contact. Bria considers a Jabber address as one that can be used for IM/presence (if XMPP is being used for IM/presence).
• display-name, given_name, surname• business number• presence_subscription. Complete this column in one of these ways:
• If you only want to share presence information with some of your contacts, fill in this column in the file. Enter “true” for contacts whose online presence you want to see, leave blank or enter “false” for others. During the import, you will be able to choose to share presence with only these contacts. Bria will subscribe to the presence of these “true” contacts, assuming that the user has a SIP (if using SIP for presence).
• If you want to share presence with all your contacts (or with none), ignore this heading. During the import you will be able to choose to share with all (or none) of your contacts.
For a complete list of headings, see page 84.
3. Save the file as *.csv.
15

CounterPath Corporation
Importing the File
1. From the main menu choose Contacts > Import Contacts. The Import Contacts wizard starts.
2. As soon as you click Finish on the wizard, the Contacts tab in Bria is updated to show the imported entries.
Populating Contact List from Outlook or Mac Address BookBria for Windows is automatically set up with an Outlook account. Bria for Mac is automatically set up with a Mac Address Book account. Both these accounts are disabled by default.
If the user enables the account, the contacts from that address book are pulled into Bria. Typically let the individual user decide whether to enable the Outlook or MAB account.
Populating from an LDAP Directory or Active DirectoryIf your company has a corporate directory, users can connect to it. Users of Bria for Mac can only connect to an LDAP directory. See page 46 for configuration information.
The user will be able to view the directory and directory contents appear in the Directory tab (alongside the Contacts and History tabs)
The user can promote any entry in the directory to their contact list. Contacts created from the directory are automatically synchronized periodically. Changes to the directory entry are pushed to the contact. If the directory entry is deleted, the contact is not deleted.
Storing Contacts on a WebDAV or XCAP ServerIf desired, you can set up Bria so that contacts are stored on a WebDAV or XCAP server. See page 35.
16

Bria 3 Administrator Guide
2.4 Verifying your Presence SetupOnce you have created a contact list, you can test your presence setup to make sure that contacts are being subscribed to.
View the contact list: some or all your contacts should have a presence icon besides their name. In order for a contact to include a presence icon, it must be “presence-ready” and you must be subscribing to the contact. (“Presence-ready” means that the contact has an address that allows for presence data to be shared.)
If none of your contacts show an icon and you expect at least one of them to show it. :
Source of Contact A contact is “presence ready” if If the contact is “presence ready” and
the presence icon still does not show
Manually entered or from File Import
The contact has an address in the Softphone field. Verify this on the Contact Profile. If SIP addresses are not appearing in the Softphone field and you initially populated the contact list by importing a file, the easiest solution is to fix the file and redo the import.
• Make sure the SIP account is enabled.
XMPP The contact has a Jabber address in the Instant Message field. Verify this on the Contact Profile.
• Make sure the XMPP account is enabled• Make sure you clicked the Enable XMPP
Presence button on the Contact Profile. When you click this button, the Instant Message address appears in the Presence field. See below.
Outlook **The Outlook contact has an address in the “softphone mapping” field. The “softphone mapping” field is identified in the Outlook Account window in “Field to use for Softphone address”.Bria recognizes the “softphone mapping” field as containing a SIP address: an address that can be used for a phone call and for IM and presence via a SIP account.
• Make sure the SIP account is enabled.• If you specified the wrong “softphone
mapping” field on the Preferences > Contact Storage panel, you can change it.
17

CounterPath Corporation
2.5 Setting up WorkgroupsA workgroup is a group of people who work together. Via the Bria Workgroup window, members of a workgroup can monitor each other’s calls and pick up on behalf of another member and join an established call.
To set up workgroups for your users, see page 31.
2.6 Setting up Chat RoomsIf you support XMPP accounts, you can set up persistent chat rooms on your XMPP server. Users with accounts on that XMPP server can then join any chat room (View > Chat Rooms).
Chat rooms are set up to allow the same group of people to have a group IM session, usually on a regular basis. The chat room feature involves persistent groups, while the group chat feature creates ad-hoc groups.
Bria supports the following features:
• Open chat rooms: users can join without being already set up as a member of the group.• Members-only chat rooms: users can join only if already set up as a member.• Password-protected (confidential) chat rooms: users must enter the password to join.
On your XMPP server, create the chat room. Add members if desired and if supported by your XMPP server. Assign passwords if desired and if supported by your XMPP server.
2.7 Managing LicensesWhen you obtain Bria, you purchase a license with a specified number of seats. Each time a user enters the license key, the license count is drawn down on the CounterPath license database. When the count is drawn down to 0, then the next time the key is entered, an error message appears for that user.
You can either increase your license count or revoke unused seats. To revoke seats, go to ww.counterpath.com, click the Store link, click the Your Account link, and log in.
Currently, a license count can be shared by users on the same computer if the users are using the Windows administrator or regular user accounts. However, a user who uses this computer with the Windows guest account and starts Bria will automatically draw down the license count (assuming that a license key has already been entered).
Therefore, if you seem to have drawn down more license counts than expected, the problem may be that one or more guests have used seats. You can request that CounterPath revoke these licenses in order to reinstate the number of seats actually in use.
Setting up for the Licensing ServerPeriodically, Bria connects to CounterPath’s license server in order to verify that a valid license is being used. Therefore, at all times, Bria will need to have an internet connection.
Bria connects to https://secure.counterpath.com via port 443; make sure your firewall allows this HTTPS traffic to this URL. In addition, if you have explicitly set a web proxy (Start > Control Panel > Internet Options > Connections) then Bria will use this proxy; make sure the proxy allows this traffic.
18

3 Account Configuration Reference
The Account Settings window lets you configure features that apply on a per-account basis. (The preferences window lets you configure features that apply across all accounts.)
3.1 Accounts Settings Window Choose Softphone > Account Settings from the menu.
The first time you (or the user) choose Softphone > Account Settings, the SIP Account window appears to allow setup of a SIP account. Once that first account has been set up, choosing Softphone > Account Settings displays the Account Settings window.
For information on setting up accounts, see page 11.
The account is the “preferred account”. Each user will typically set the preferred account to the account they use most often.
The account can be used for phone calls by selecting it on the dashboard (page 13)
The account cannot be used for phone calls.
How this account is used for phone calls
19

CounterPath Corporation
3.2 XMPP Account
Table 1: XMPP Account Properties – Account
Field DescriptionAccount name If desired, change the account name to something that is meaningful to you. Protocol Read-only. Always specifies XMPP.
User DetailsUser ID Typically the account number for the softphone account. For example, kperera. Domain For example, domainXMPP.com.PasswordDisplay name This name is displayed in the Bria display.
Other parties will see this name when they are connected to you.
AdvancedPort selection Configures the port to use.
If you choose “User selected”, complete the Connect port field. Connect port Complete only if Port selection is set to “User selected”Outbound proxy The values in User ID and Domain and in this setting may be used by Bria to compose a valid jid:
User ID/Domain Outbound proxy [email protected] empty [email protected]@ABC.com/home empty [email protected]@ABC.com XYZ.com [email protected]. Ignore the
Outbound [email protected] IP address or host address [email protected]. IP address is
used as the outbound proxy).bob ABC.com [email protected].
Fields with a red asterisk are required
20

Bria 3 Administrator Guide
Resource Optional resource, as specified in RFC 3920. For example "/home". If this setting is blank and the User ID includes a resource, the value from that ID is used. If both are specified, the value from this Resource field is used.If no resource is specified, the XMPP server will assign a temporary resource.
Priority The priority, as per RFC 3921. The default is 0.
Table 1: XMPP Account Properties – Account
Field Description
21

CounterPath Corporation
3.3 Outlook or MAB AccountBria automatically creates an Outlook account if it detects Outlook on the user’s computer. On a Mac computer, Bria always creates a Mac Address Book (MAB) account.
The user can enable the Outlook or MAB account to provide Bria with access to the contacts in that address address book. Furthermore, the usre can map contact addresses to Bria contact fields in order to make the addresses “phone-able” or “IM-able”:
• With an Outlook account, the user can display the Outlook Account details in order to create contact mappings. See below.
• With a MAB account this mapping is done in the Mac Address Book, not in Bria. For details, see “Populating from the Mac Address Book” in “Bria 3 for Mac User Guide – Enterprise Deployments”.
Table 2: Outlook Account Properties – Account
Field DescriptionOutlook profile Typically, you only have one profile, which Bria detects.
However, if your Outlook is set up on this computer with more than one profile, select the profile whose contacts you want to access.
Profile password The password for the selected Outlook profile. Field to use for Softphone address
Bria can be set up to treat one of the contact fields as a SIP address that can be subscribed to, assuming that you are using your SIP account for presence.For example, if you select “Business Telephone Number” in this field, then when contacts are pulled into Bria, any Business Telephone Number fields that have a value will be copied to the Softphone field in the Bria contact and Bria will subscribe to the online status of that contact via your SIP account.For example, if an Outlook contact has “2766” in its Business Telephone Number field and your SIP account is domainA.com, then Bria will subscribe to [email protected].
22

Bria 3 Administrator Guide
Field to use for IM address Bria can be set up to treat one of the contact fields as an XMPP address that can be subscribed to, assuming that you are have an XMPP account set up in Bria.For example, if you select “IM address” in this field, then when contacts are pulled into Bria, any IM Address fields that have a value will be copied to the Instant Message field in the Bria contact. Bria will subscribe to the online status of that contact via your XMPP account. For example, if an Outlook contact has “[email protected]” in its Instant Message field and you have a Gmail account set up in Bria, then Bria will subscribe to [email protected]
Table 2: Outlook Account Properties – Account
Field Description
23

CounterPath Corporation
3.4 SIP Account Properties – Account
Table 3: SIP Account Properties – Account
Field DescriptionAccount name If desired, change the account name to something that is meaningful to you. Protocol Read-only. Always specifies SIP.Use for Call If checked, this account is eligible to be used for phone calls. If unchecked, this account will
never be used for placing phone calls.Use for IM/Presence If checked, this account is eligible to be used for IM and online status (presence). If
unchecked, this account will never be used for IM and online status.
User DetailsUser ID Typically the account number for the softphone account plus the domain. For example,
6045551212 or 1331.PasswordDisplay name This name is displayed in the Bria display.
Other people will see you as this name.Authorization name Typically not used in an enterprise environment. This name is useful if, for example, you
allow user IDs that are short and therefore easy to guess. The authorization name is used in place of the user name to register the account with the SIP registrar.
Fields with a red asterisk are required
24

Bria 3 Administrator Guide
Domain ProxyRegister with domain and receive calls
Typically, this field is checked. A situation in which this field is unchecked is, for example, if your level of service does not include the ability to receive incoming calls. In this case, turning this field on may cause registration to fail (when you close the Account Properties window), meaning that your Bria cannot register.
Send outbound via • Domain: If your VoIP service provider requires that traffic be directed to proxies that are discovered via the domain.
• Proxy Address: If your VoIP service provider has an outbound proxy address and requires that you provide the address to Bria. For the address enter a domain name (for example, domain.com) or an IP address (for example, 123.456.789.012).
If you are using Bria in a test lab, it is possible that neither of these settings is suitable; see page 39 for a third way to direct traffic.
Dial Plan The default plan is:#1\a\a.T;match=1;prestrip=2;See the guide **.
Table 3: SIP Account Properties – Account
Field Description
25

CounterPath Corporation
3.5 SIP Account Properties – Voicemail
These settings let you configure client-side voicemail features.Your IP PBX may also provide the ability to configure voicemail (server-side handling). An incoming phone call first goes through server-side handlers and then through the client-side handlers. Keep in mind that the fields on this Voicemail tab are not written to the server; they are configuring a second, separate handler.You must decide how you want phone calls to be handled: by the server only, by the Bria client only, or by both. Instruct your users accordingly.If you decide to allow both, you must make sure that your users understand how the server-side and client-side voicemail configuration must be synchronized to work together. You must also check what the server-side settings are and make sure you enter compatible information in Bria.
Table 4: SIP Account Properties – Voicemail
Field DescriptionCheck for voicemail Set the checkbox in one of these ways:
• Check the box if Bria must subscribe to be notified when there is a voicemail for you. In other words, to configure for “subscribe for message waiting”.
• Clear the checkbox if your voicemail server sends notifications without Bria subscribing. In other words, to configure for “implicit subscription”.
• Clear the checkbox if you do not support voicemail.
Voicemail is controlled by your IP PBX, not by Bria. Number to dial for checking voicemail This is the number that will be called when a user
clicks the Check for voicemail icon on the softphone, in order to connect to voicemail and listen to messages. • Completing this field activates the vicarial icon on
the softphone. • If you leave this field empty, then this icon will not
work; users will have to manually dial this number in order to connect to voicemail.
Number for sending calls to voicemail This is the number that incoming calls will be forwarded to if they are unanswered after the specified interval (below).
Send calls to voicemail if unanswered To send to voicemail after the specified number of seconds.Your IP PBX may also provide a similar feature that is set up outside of Bria. If so, make sure you do not enter competing information in Bria and in the IP PBX’s user interface. For example, if you turn off this field, make sure the same feature at your service provider is also turned off. Otherwise, all your calls will continue to be forwarded.
26

Bria 3 Administrator Guide
Always forward to this address Typically, each user sets this field up individually, to suit their needs. This feature works even if the VoIP service does not include voicemail.To always forward phone calls received on this account.Enter the address to forward to, but leave the checkbox cleared (the individual user will click it when desired). Phone calls received on other accounts (if you have them) are not affected by enabling this field for this particular account.
When on the phone, forward to Typically, each user sets this field up individually, to suit their needs. This feature works even if the VoIP service does not include voicemail.To forward only when you are on another phone call. Enter the address to forward to, but leave the checkbox cleared (the individual user will click it when desired). Phone calls received on other accounts (if you have them) are not affected by enabling this field for this particular account.Your service provider may provide a similar feature that is set up outside of Bria. If so, your users must make sure they do not enter competing information in Bria and in the service provider’s user interface. For example, if they turn off this field, make sure the same feature at your service provider is also turned off.
Table 4: SIP Account Properties – Voicemail
Field Description
27

CounterPath Corporation
3.6 SIP Account Properties – Topology
Table 5: SIP Account Properties – Topology
Field DescriptionFirewall traversal mode • Auto detect using ICE: Automatically determine the contact address for signaling traffic.
Advertise the local IP, public IP (discovered via STUN, if available), and media relay IP (discovered via TURN, if available), and use these to automatically determine the best route for media traffic during calls.
• Discover public IP address: Advertise the public IP address (discovered via STUN) for the contact address for signaling traffic, and for the connection address for media traffic.
• Use media relay (TURN): Advertise the public IP address (discovered via STUN) for the contact address for signaling traffic.
Advertise the address of a media relay server (discovered via TURN) for the connection address for media traffic.
• None: Advertise the local IP address only for both signaling and media traffic.Server address • Empty: Discover the address of the firewall traversal server (the STUN or TURN server), if
available, using DNS SRV. • Specified: Use the firewall traversal server specified as either an IP address or a fully qualified
hostname.
If you use the “Auto detect using ICE” option, then you can only enter a STUN server here. Don’t enter a TURN server because when ICE is used, TURN is not supported.
Range of ports used on local computer
The appropriate setting depends on your computer setup:• Checked: If your computer is behind a restrictive firewall that only allows specific port ranges to
be used. Enter the range of ports to use for your SIP account. (You must also open those ports on your firewall; refer to applicable firewall documentation for information.)
• Unchecked: If your computer is not behind a restrictive firewall.
28

Bria 3 Administrator Guide
3.7 SIP Account Properties – PresenceThis tab lets you set up presence (for both Bria for Windows and Bria for Mac) and workgroups (Bria for Windows only).
Setting up PresenceIf you are using SIP SIMPLE for online status sharing (presence), you can configure the SIP account to handle subscriptions through peer-to-peer subscriptions (the default) or through a presence agent.
Note that you do not have to set up to share presence information on an XMPP account.
Table 6: SIP Account Properties – Presence
Field Description
PresenceMode • Disabled: Presence is not supported.
• Presence Agent. • Peer-to-Peer.
Poll time The factory setting is 300.Refresh interval The factory setting is 3600.
29

CounterPath Corporation
How Presence Subscriptions WorkThe following chart illustrates how the sharing of online status occurs. This chart illustrates a peer-to-peer subscription, but the same principle applies when a presence agent is used.
Joseph Kokila
Joseph adds Kokila to his contact list with “Show this contact’s Availability” checked
Joseph’s Bria sends a “let me see you” notification request to Kokila
Kokila receives a notification request and responds by clicking “Allow and add”
Now that Joseph is in Kokila’s contact list, Kokila’s Bria sends “Let me see you” notification request to Joseph
Joseph receives a notification request and responds “Allow” Response sent
Availability icon is added for Kokila, colored gray
“Allow” response sent
Joseph’s availability icon turns green
Privacy rule is created for Joseph with “allow” and “show”
Joseph is added to Kokila’s contact list
Availability icon is added for Joseph, colored gray
Kokila’s availability icon turns green
30
Bria 3 Administrator Guide
Configuring Workgroups A workgroup is a group of people who work together. Workgroups are also known as BLF (Busy lamp field) and BLA (Bridged line appearance).
Via the Bria Workgroup window, members of a workgroup can monitor each others’ calls, pick up on behalf of another member, and join an established call.
Workgroups can be set up as a server-side feature (below), or they can be set up in the Bria client, in peer-to-peer mode (page 32). In both cases, each member of the workgroup can be set up as:
• A regular member: every watches and is watched by everyone else.• Or as a supervisor: the supervisor watches but is not watched by other members.
Configuring in Server ModeIn server mode, workgroups are implemented through support of dialog events (RFC 4235) and through subscription to a “resource list server” (RLS) in accordance with RFC 4662. The workgroup feature uses full updates (not partial updates) for dialog events.
The server application (your PBX that includes workgroups or the workgroup application) must support RFC 4235 and RFC 4662. Bria does not support resource list subscriptions for the “presence” event package.
How Workgroup Works
Here is a typical implementation. The RLS application is set up with one or more resource lists. Each list con-tains the URIs (extensions) of people who are considered to be in a workgroup and can therefore monitor each other.
Now the user setup: The user displays the Accounts > Presence panel for that account and enters the URI to one resource list. The user also checks the “Allow others to monitor” field.
When the Workgroup window is opened, Bria automatically contacts the RLS with the URI of the specified list. The RLS sends out subscription requests to all the URIs in the list. Each online user automatically responds to the request. When responses are received, the RLS sends status information to the requesting user.
When all the “online” (SIP account is registered) users in the workgroup do this, the result is that each user is able to monitor the activity of every other online member of the list.
One variation on this setup is for supervisors. The setup is identical except that the supervisor unchecks the “Allow others to monitor” field. When the supervisor goes online, their requests to monitor other people in the list will be accepted, but requests from other people to monitor that supervisor will be blocked. The result is that the supervisor is able to monitor the activity of everyone in the list but no-one can see the supervisor.
Setup on the Server Application
1. Create the resource list and add the appropriate people.
2. Make a note of the list name. For example, sip:[email protected] or sip:salesgroup@mydomain.
Setup on Bria
1. Each user must be set up as follows:
• The Workgroup address must specify the name of the list.• If the user is non-supervisory, check the “Allow others to monitor” field.• If the user is a supervisor, uncheck this field.
31

CounterPath Corporation
When the user chooses View >Workgroup, Bria immediately registers attempts to subscribe to the workgroup. If the subscription succeeds, the Workgroup window appears in Bria.
The Workgroup window will show the following:
Configuring in Peer-to-Peer ModeIn this mode, you have two options:
• If you are deploying through provisioning, you can create workgroups and set up members in members through your provisioning response, as described in the “Bria 3 Configuration Guide – Retail Deployments”. However, you may still want to configure a workgroup manually yourself before setting up through provisioning.
• If you are deploying manually, users must perform their own setup, as described in the user guide. However, you may want to set up a workgroup yourself, as a dry run.
Setting up as a Regular User
Typically, everyone in a group will informally agree to add each other to their group so that everyone’s setup contains the same workgroup members.
1. Set the Mode to Peer-to-peer.
2. Select the monitoring method:
• Allow anyone to monitor my call activity: if you want everyone in the workgroup to monitor you. Normally, you choose this mode.
• I will choose who can monitor me: if you do not want to let everyone in the workgroup to monitor you. (for example, if you are a supervisor; see below for details). Or if you only want one person to monitor you.
3. Click Edit Members. On the Workgroup Members window click Add. In the Add Workgroup member window, enter a person’s SIP address as shown. Repeat for all the members of the workgroup.
32

Bria 3 Administrator Guide
When you display the Workgroup (View > Workgroup from the main menu), the members will appear.
This person is shaded out. Either she has not yet added you to her workgroup list or she has added you but with “Allow this person to monitor my activity” turned off
This person is in your group and you are in her group. You are watching each other
33

CounterPath Corporation
Setting up as a Supervisor
1. Set the Mode to Peer-to-peer and select “I will choose who can monitor me”.
2. Click Edit Members. On the Workgroup Members window click Add. In the Add Workgroup member window, enter a person’s SIP address as shown. Repeat for all the members of the workgroup.
The Workgroup Members window will look like this:
3. When done, close the Workgroup Members window. When you display the Workgroup (View > Workgroup from the main menu), the members will appear.
34

Bria 3 Administrator Guide
3.8 SIP Account Properties – Storage
Change this tab if you want to let users store their contact list on a WebDAV or XCap server that you have already set up.
Table 7: SIP Account Properties – Storage
Field DescriptionStorage method Choose the appropriate storage.
Server Settings (not used for “Local”)Use SIP credentials Check this box to use the username and password from your SIP account in order to log into
the storage server.Otherwise, uncheck this box and complete the Username and Password fields.
Use alternative server credentials Check this box to use specific credentials. Enter data for connecting to the server.
35

CounterPath Corporation
3.9 SIP Account Properties – Transport
You can set up Bria for the type of security (encryption) you want for incoming and outgoing calls.Bria supports:• Signaling encryption using TLS• Media encryption using SRTP.
Setting up for Security outside of BriaWhen using TLS, you must have the root certificate that signs the proxy's chain of certificates. In most cases, the root certification will already be installed. Procedures for the exchange of certificates are outside the scope of this documentation. The certificates must be stored on the Bria computer, in the root certificate store.Setting up the root certificate on your computer ensures that the connection to the proxy is TLS secure (the first hop). Any proxy in the chain (between you and the caller) that does not support TLS may cause an insecure link in the chain. Therefore, if the other party is outside your domain, you cannot be completely sure that the call is secured at the signaling level, which means that you cannot be sure that it is secured at the media level.
Table 8: SIP Account Properties – Security
Field DescriptionSignaling Transport • Automatic: Bria sets up the transport based on the capabilities of the network and the
Bria computer. Choose this option if you do not care which transport is used.• TCP: This transport provides no signaling security. • UDP: This transport provides no signaling security. • TLS: Choose this option to request signaling encryption or both signaling and media
encryption.Media Encryption over TLS See Table 9 on page 37.
The factory setting is Do not allow encrypted call.Enable IPv6 Generally, leave this field enabled to allow Bria to use IPv6 for phone calls and IMs. You
may want to disable this field if you are currently upgrading your network to support IPv6, and you do not want your users to interfere with your test plans.
36

Bria 3 Administrator Guide
Setting up for Security within BriaThe options for media encryption are described in the following table.
Table 9: Media Encryption Options
Option How Outgoing Calls are Handled How Incoming Calls Are HandledMake and accept only encrypted calls
Bria will place all calls with TLS. The call INVITE will specify SRTP media encryption.If the correct certificates are not in place or if the other party does not accept encrypted calls, the call will fail.
Bria will only accept INVITEs that are for encrypted calls.If Bria receives a call INVITE that is not encrypted, the call will be rejected
Do not allow encrypted calls
Bria will place only unencrypted calls.If the other party does not accept unencrypted calls, the call will fail.
Bria will only accept INVITEs that are for unencrypted calls.
If Bria receives a call INVITE that is encrypted, the call will be rejected.
37
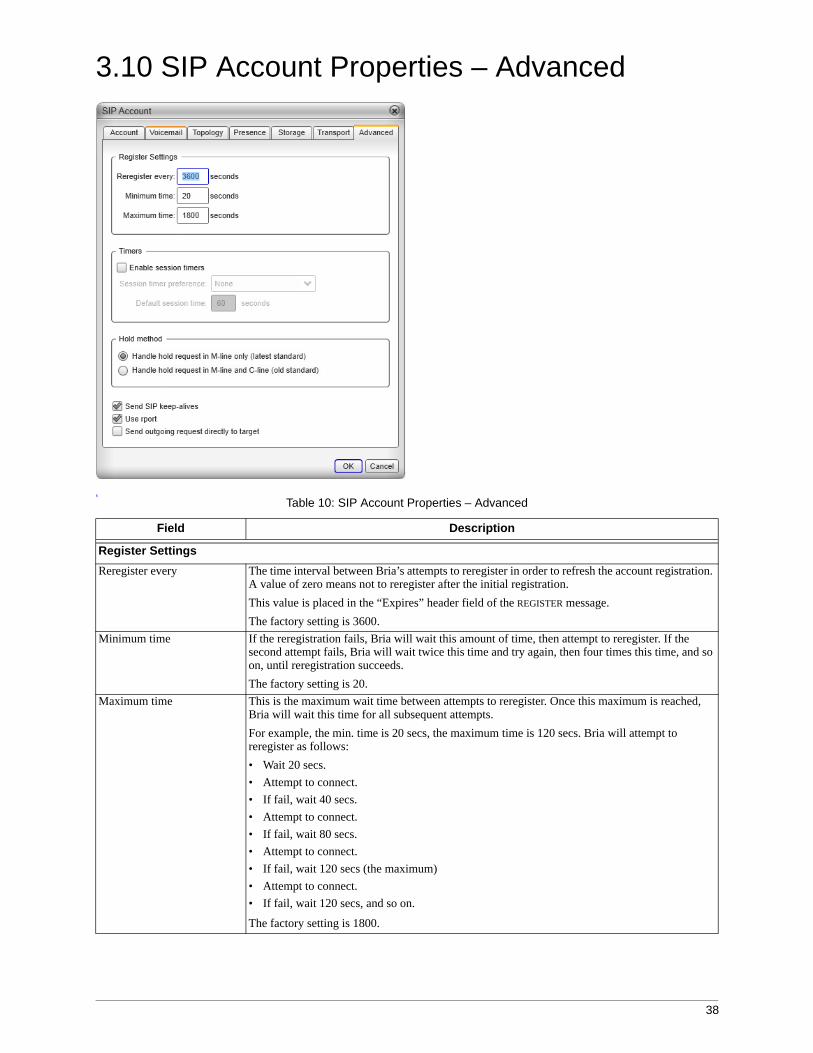
3.10 SIP Account Properties – Advanced
s
Table 10: SIP Account Properties – Advanced
Field Description
Register SettingsReregister every The time interval between Bria’s attempts to reregister in order to refresh the account registration.
A value of zero means not to reregister after the initial registration.This value is placed in the “Expires” header field of the REGISTER message.The factory setting is 3600.
Minimum time If the reregistration fails, Bria will wait this amount of time, then attempt to reregister. If the second attempt fails, Bria will wait twice this time and try again, then four times this time, and so on, until reregistration succeeds.The factory setting is 20.
Maximum time This is the maximum wait time between attempts to reregister. Once this maximum is reached, Bria will wait this time for all subsequent attempts.For example, the min. time is 20 secs, the maximum time is 120 secs. Bria will attempt to reregister as follows:• Wait 20 secs.• Attempt to connect. • If fail, wait 40 secs.• Attempt to connect.• If fail, wait 80 secs.• Attempt to connect.• If fail, wait 120 secs (the maximum)• Attempt to connect.• If fail, wait 120 secs, and so on.
The factory setting is 1800.
38

Bria 3 Administrator Guide
TimersEnable session timersDefault session time
A session timer is a mechanism to detect whether a call session is still active from the signaling point of view. When the timer expires, a refresh is sent from one party to the other. The timer is then reset.• Turn on to enable session timer. Enter a value in Default session time. The factory setting is 60.• Turn off to disable session timer; refreshes will never be sent.
Session timer preference This field specifies your preference for which party should send the refresh. The preference is not a guarantee that the refresh will be performed by the specified party. The choices are:• None: No preference.• Local refreshes: Your computer sends.• Remote refreshes: The other party sends.• UAC refreshes: The user agent client (the party that initiated establishment of the
communications) sends.• UAS refreshes: The user agent server (the other party) sends.
Hold method Choose the appropriate value. If necessary, speak to your service provider.Send SIP keep-alives Typically on, to instruct Bria to send SIP keep-alive messages in order to maintain a “pinhole”
through your firewall for SIP messaging.Use rport Typically on.Send outgoing request directly to target
When checked, requests with a complete URI ([email protected]) go to ABC.com and the “Send outbound via” field on the Account tab (page 24) is ignored.If you check this field, make sure you also set “Send outbound via” (on Accounts > Account) to “Domain”.Typically off. This field is intended for test labs and may cause problems in a NAT environment.
Table 10: SIP Account Properties – Advanced
Field Description
39

CounterPath Corporation
40

4 Preferences Reference
Choose Softphone > Preferences. The Preferences window appears. The Preferences panels let users control the way that they work with Bria. It also contains fields to configure features that apply globally, rather than on a per-account basis.
The following sections discuss only the tabs and fields that you, the administrator, should complete. Other fields, which control user preferences, are not discussed.
4.1 Preferences – Devices
On this panel, you should complete only the Deskphone information on the Other Devices tab, and only if you support deskphone use. Leave the other tabs for each user to complete to match their individual hardware.
Setting up a DeskphoneIf your enterprise uses SIP deskphones, you can configure Bria to use them. Users will be able to initiate calls from Bria then switch over to the deskphone for the rest of the call.
The deskphone must be a SIP phone that supports dialog events and out-of-dialog REFERs, it must be registered on the PBX with its own extension (not the same extension as the user’s Bria account) and it must be on the local network (reachable without NAT traversal).
To set up for deskphones:
• Make sure the deskphone has already been set up in your network and on your PBX, and that it can make phone calls.
• Click Deskphone in the Other Devices tab and enter the URI of the deskphone. For example, [email protected].
• To test the deskphone setup, on the Bria dashboard menu, choose Call Using Deskphone. Then place a phone call.
41

CounterPath Corporation
4.2 Preferences – Audio Codecs
This panel shows all the codecs that are included in the retail version of Bria. You can enable or disable codecs as desired.
With only one codec enabled, all calls made will use that codec. With more than one codec enabled, Bria automatically chooses the best codec based on the other party’s capability, the available bandwidth, and network conditions.
You cannot change the properties of any codecs.
About CodecsAudio codecs describe the format by which audio streams are compressed for transmission over networks. Codecs can be categorized as either narrowband or wideband:
• Narrowband codecs work with low bandwidth such as a dialup internet connection. These codecs have a sampling rate of 8 kHz.
• Wideband codecs work with high bandwidths and result in better audio quality. However, they do not work with PSTN. These codecs have a sampling rate of 16 kHz.
42

Bria 3 Administrator Guide
Supported CodecsCodec Narrowband Wideband Royalty-bearing
Broadvoice-32
Broadvoice-32 FEC
G.711aLaw *
G.711uLaw *
G.722
G.729 *
iLBC
OPUS
SILK Narrowband
SILK Wideband
SILK Super-wideband
Speex
Speex FEC
Speex Wideband
Speex Wideband FEC
* Generally, at least one of these codecs must be enabled in order to place a PSTN (land line) call.
43

CounterPath Corporation
4.3 Preferences – Video Codecs
Video codecs describe the format by which video streams are compressed for transmission over networks. Some codecs require less bandwidth than others, but may result in lower video quality.
You can enable or disable codecs as desired.
With only one codec enabled, all calls made will use that particular compression format. With more than one codec enabled, Bria automatically chooses the best codec based on the other party’s capability, the available bandwidth, and network conditions.
You cannot change the properties of any codecs.
Supported Codecs
Codec Royalty-bearing Included in Retail Bria for Windows
Included in Retail Bria for Mac
H.263
H.263+ 1998
H.264 (unified)
VP8
44

4.4 Preferences – Quality of ServiceQuality of Service is supported only in Bria for Windows and only if the user is using a computer running Windows XP. QoS is not supported on later versions of Windows. This panel appears only if the computer is running Windows XP.
The Quality of Service panel lets you request a specific transport service for audio, video and signaling traffic.This service is through DSCP (also known as ToS). In a network that has the default configuration, the recommended value for audio is 46, because “46” is the standard marking for audio.
The Quality of Service panel lets you request a specific transport service for audio, video and signaling traffic.
There are two types of services. The service to use depends on what your VoIP service provider supports:
• GQoS, which is available for audio and video.• DSCP (also known as ToS), which is available for audio, video and signaling.
In a network that has the default configuration, the recommended value for audio is 46, because “46” is the standard marking for audio.
Bria supports 802.1p QoS packet tagging. If you set up for QoS, Bria will include the specified information in the packets that it sends to the network provider. Whether the packet is delivered with the specified service depends on whether your broadband router and the network provider between you and the other party supports multiple transport services. In other words, whether each network provider reads the QoS information and prioritizes packet delivery based on the requested service.
45

CounterPath Corporation
4.5 Preferences – DirectoryIf your organization has an LDAP or Active Directory server, you can configure Bria to connect to that server. The entries from the directory will appear in the Directory tab (alongside the Contacts and History tabs).
If your users use both Bria for Windows and Bria for Mac, you can deploy a directory using LDAP. If your users use only Bria for Windows, you can deploy a directory using LDAP or Active Directory.
In Directory Type, select the desired option. Other fields appears; see below.
LDAP
LDAP Settings
Field Description
Server Settings
Server The hostname or IP address of the directory server. For example, ldap.example.com.
Authentication method Anonymous or Simple.Choose Simple if your LDAP server requires a valid login in order to allow binding and searching the directory.
Username The full DN of the username that will be used for authenticating to the directory. For example:CN=ldapauthuser,OU=users,OU=company,DC=example,DC=comLeave blank if Authentication is set to Anonymous.
Credential The password for the username. Leave blank if Authentication is Anonymous.
Root DN The “base” DN of the server where searches will begin. The entire subtree under the Root DN will be used for searching. For example:OU=users, OU=company, DC=example,DC=com
Search expression The query used to filter valid users in the directory. This query can be used to retrieve only members of a group, for example. For example:(memberOf=CN=Corporate Users, Ou=Groups, OU=company, DC=example,DC=com)
46

Bria 3 Administrator Guide
Search Options
Type • Search on demand: The Directory tab on the softphone will have a Search button. The Directory tab is empty until the user performs a search. Each time the user clicks Search, a new retrieve is performed. This option is recommended for directories with more than 500 entries.
• Type to filter list: The Directory tab on the softphone will not have a Search button. The Directory tab is populated as soon as Bria starts, with the records from the database (restricted by the Max records field. When the user types in the filter field in the Directory tab, the local contents are filtered (a new retrieve is not performed).
Search timeout A search of the database will stop if it has not succeeded by this timeout.
Max results Optional, to restrict the number of records returned. • When “Search on demand” is chosen, this field can be used to prevent the user retrieving too
many records (and slowing down the system).• When “Type to filter” is chosen, make sure this number is at least equal to the number of
records in your database, otherwise records at the end of the database will never be retrieved.
0 means no maximum number of records.
Update interval When “Type to filter” is chosen, the database is retrieved with this frequency. If the user has filtered the Directory contents, then when this timer expires, the filter is lost and the entire database is displayed again.
Attribute Mapping
All fields In this section, map the names of the attributes that are in your directory to the corresponding fields in Bria. The field label is the Bria field. The field box specifies the attribute name.Be careful with this mapping because when users create a contact from a directory entry, the phone number is mapped into the different contact methods in the contact. Specifically:• Softphone: Bria recognizes a value in this field as a softphone address and will map this field to
the Softphone contact method for the contact. Bria considers a Softphone address as one that can be phoned and (if SIP is being used for IM/presence) as one that can be used for IM/presence.
• Jabber: Bria recognizes a value in this field as a Jabber (XMPP) address and will map this field to the Jabber contact method for the contact. Bria considers a Jabber address as one that can be used for IM/presence (if XMPP is being used for IM/presence).
LDAP Settings
Field Description
47

CounterPath Corporation
Active Directory
ADSI (Active Directory) Settings
Field Description
Server Settings
Subtree DN The Active Directory subdirectory to restrict the search to.
Search Options
Type • Search on demand: The Directory tab on the softphone will have a Search button. The Directory tab is empty until the user performs a search. Each time the user clicks Search, a new retrieve is performed. This option is recommended for directories with more than 500 entries.
• Type to filter list: The Directory tab on the softphone will not have a Search button. The Directory tab is populated as soon as Bria starts, with the records from the database (restricted by the Max records field. When the user types in the filter field in the Directory tab, the local contents are filtered (a new retrieve is not performed).
Search timeout A search of the database will stop if it has not succeeded by this timeout.
Max results Optional, to restrict the number of records returned. • When “Search on demand” is chosen, this field can be used to prevent the user retrieving too
many records (and slowing down the system).• When “Type to filter” is chosen, make sure this number is at least equal to the number of
records in your database, otherwise records at the end of the database will never be retrieved.
0 means no maximum number of records.
Update interval When “Type to filter” is chosen, the database is retrieved with this frequency. If the user has filtered the Directory contents, then when this timer expires, the filter is lost and the entire database is displayed again.
Attribute Mapping
All fields In this section, map the names of the attributes that are in your directory to the corresponding fields in Bria. The field label is the Bria field. The field box specifies the attribute name.Be careful with this mapping because when users create a contact from a directory entry, the phone number is mapped into the different contact methods in the contact. Specifically:• Softphone: Bria recognizes a value in this field as a softphone address and will map this field to
the Softphone contact method for the contact. Bria considers a Softphone address as one that can be phoned and (if SIP is being used for IM/presence) as one that can be used for IM/presence.
• Jabber: Bria recognizes a value in this field as a Jabber (XMPP) address and will map this field to the Jabber contact method for the contact. Bria considers a Jabber address as one that can be used for IM/presence (if XMPP is being used for IM/presence).
48

Bria 3 Administrator Guide
4.6 Preferences – Calls
Field Description
Auto Answer Let your users set these fields to suit.
DTMF Choose the method for sending DTMF that is supported by your VoIP service provider.In-band means that Bria will encode the DTMF signals in the audio stream as regular sound. Typically, DTMF is not sent in-band; in-band is only used in specific situations. One scenario in which it might be advisable to send in-band is if you own your gateways and:• One or more of these gateways does not support 2833 or does not handle it well, and• Your gateway is using codes that reproduce DTMF tones well.
In this case, sending in-band will ensure that DTMF tones get through (because the DTMF tones will bypass the gateway) and that they reproduce accurately at the receiving end.
RTP The RTP inactivity timers control how phone calls are disconnected when RTP and/or RTCP are not detected. You can choose to enable or disable the timers. The timers are enabled by default.If you leave the timers enabled, you can set the value of the RTCP timer. The RTP timer is fixed at 30 seconds. • Bria ends a call if it has never detected RTCP in the call and no RTP is received for the length
of the RTP timer (30 seconds).• Bria ends a call if it has detected RTCP on this call but then it does not receive an RTCP for
the length of the RTCP timer (default value: 300 seconds). You can change the length of this timer.
Preserve Bandwidth When this feature is on, Bria stops sending audio when you are not talking.When this feature is off, Bria always sends audio, which uses more bandwidth but may result in better call quality.Typically off. However, if you are using a slow (dial-up or ISDN) connection, you may want to turn it on.
Web Page Tabs You can set up a web page as a new tab in the Resources panel; it will appear alongside Contacts, History and so on.Enter the web address and a name (this name will be appear in the tab). Enter a checkbox to create the tab. At any time, the user can clear the checkbox to remove the tab from the Resources panel.
49

4.7 Preferences – Files & Web Tabs
Field Description
Recording folder The folder where files for recording of phone calls will be saved.
File transfer folder The folder where received files will be saved.
Web Page Tabs You can set up a web page as a new tab in the Resources panel; it will appear alongside Contacts, History and so on.Enter the web address and a name (this name will be appear in the tab). Enter a checkbox to create the tab. At any time, you can clear the checkbox to remove the tab from the Resources panel.You can also simply show or hide the tab from the View menu in the Bria menu.
50

A Configuration FormThis form provides space for configuration information for one SIP account. Fields that are typically completed by the user to suit their preference are not included.
SIP Accountsi
Dialog Field Account 1 Account 2
Accounts List Preferred account for phone calls
Preferred account for workgroup (if applicable)
Account > Account Tab
Use for Calls (yes/no)
Use for IM and presence (yes/no)
Account Name
User ID
Domain
Password
Display name
Authorization name
Register with domain
Send outbound via
Dial plan
Account > Voicemail Tab
Check for Voicemail
Number to dial for checking voicemail
Number for sending calls to voicemail
Send calls to voicemail if unanswered
seconds
Always forward to
When on the phone, forward to
Account > Topology Tab
Firewall traversal method
Server address
User name
Password
Range of ports (checkbox)
Range of ports (from, to)
51

CounterPath Corporation
Account > Presence Tab
Presence Mode
Poll time
Update interval
Enable workgroup
Workgroup mode
If RLS mode: Workgroup address (Bria for Windows only)
If RLS mode: Allow others to monitor
If peer-to-peer mode: Edit members list (list of people in workgroup)
Account > Storage Storage Method
Account > Security Tab
Signaling Transport
Media Encryption over TLS
Enable IPv6
Account > Advanced Tab
Reregister every
Minimum time
Maximum time
Enable session timers
Session timer preference
Default session time
Hold method (old or new standard)
Send SIP keep-alives
Use rport
Send outgoing request directly to target
Preferences > Devices > Other Devices
Deskphone URI (if supported)
Preferences > Audio Codecs
Enabled codecs
Preferences > Video Codecs
Enabled codecs
Preferences > Quality of Service (Bria for Windows on Windows XP only)
Signaling Qos
Audio Qos
Video Qos
Dialog Field Account 1 Account 2
52

Bria 3 Administrator Guide
Preferences > Directory
Directory type
LDAP
Server
Authentication method
Username
Credential
Root DN
ADSI
Subtree DN
Search Options (Both Types)
Type of search
Search timeout
Max results
Update interval
Attribute Mapping (Both Types)
Display name
First name
Last name
Job title
Department
Location
Work number
Mobile number
Softphone
Office phone
Jabber
Preferences > Calls
DTMF method
RTP - enable inactivity timer
RTP - time
Preferences > Files & Web Tabs
Recording folder
File transfer folder
Web page tabs – web address
Dialog Field Account 1 Account 2
53

CounterPath Corporation
XMPP AccountField Value
Account Name
User ID
Domain
Password
Display name
Port selection
Connect port
Outbound proxy
Resource
Priority
54

B Contact List HeadingsFollowing is a list of all the headings that are used in the Bria contact list. This list can be useful when formatting a contact list in order to import it into Bria. For details, see “Setting up Contacts” on page 15.The same headings are used for both Bria for Mac and Bria for Windows.
Heading Description
business_number
business_numbern, where n is 2 to 6
categories Maps to Bria groups
default_address Maps to the Presence field
default_address_comm Always specifies IM, if default_address is specified. This heading does not map to a Contact Profile field
default_address_type Specifies SIP or XMPP
display-name
email_address
email_addressn, where n is 2 to 6
fax_number
fax_numbern, where n is 2 to 6
given_name
home_number
home_numbern, where n is 2 to 6
mobile_number
mobile_numbern, where n is 2 to 6
other_address
other_addressn, where n is 2 to 6
postal_address
presence_subscription TRUE or FALSE
sip_address Maps to the Softphone field.
sip_addressn, where n is 2 to 6
surname
web_page
web_pagen, where n is 2 to 6
xmpp_address Maps to the Instant Message field. This field must always specify an XMPP address
xmpp_addressn, where n is 2 to 6
55

CounterPath Corporation
56

Bria 3 Administrator Guide
C GlossaryBroadband Broad or wide bandwidth. In data transmission, the wider the band, the more data it is
possible to transmit in a given time span. A cable, DSL and ADSL connection to the network provide broadband for data transmission. A dialup or ISDN connection typically provide a narrow bandwidth for data transmission.
Codec Codecs are programs in Bria involved in transmitting audio; each codec has different characteristics and therefore each works better in some situations than in others
Dial plan The rules that Bria follows in order to interpret the softphone address or phone number that the user has entered and to modify the number or address, as required, to ensure that the call will be placed successfully.
DTMF Dual-tone multi frequency. DTMF is the system that is used in interactive voice-response menu systems such as the menu system for accessing voicemail messages. The DTMF system allows the user to interact with the menu by pressing keys on a dialpad or keyboard.
Firewall A technology that prevents unauthorized people connecting to your computer and to the applications running on the computer.
HID Human interface device. In Bria, if the headset is HID-compliant, the user can configure the buttons on the device to invoke functions on Bria such as answering an incoming call.
IM Instant Messaging. A technology that lets users send text message and files for near instantaneous delivery and display on each others’ computers.
MWI Message Waiting Indicator. An indicator that there is a voicemail message for the owner of an account.
Narrowband In data transmission, the wider the band, the more data it is possible to transmit in a given time span. A cable, DSL and ADSL connection to the network provide broadband for data transmission. A dialup or ISDN connection typically provide a narrow bandwidth for data transmission.
Presence An instant messaging feature that allows users to share information about their online status.
PSTN Public Switch Telephone Network. The traditional land-line phone network.SIP account An account that provides the user the ability to make VoIP phone calls. The account
encapsulates the rules and functions the user can access.softphone address The address used to connect to a SIP endpoint. In other words, the “phone number”
used in a VoIP phone call. For example, sip:[email protected] device Universal Serial Bus device. A device that follows a specific communications
standard. A headset may be a “USB type” of headset. vCard An electronic business card that is often attached to an e-mail. It often appears as a
“signature” block that identifies the person, their title, and their business.VoIP Voice over Internet Protocol. A variation of IP used for sending voice data over the
internet, in other words, used for making phone calls over the internet.XMPP account An account that provides the user with the ability to send IMs and view other people’s
presence.
57

CounterPath Corporation
58