brew programming primer: creating a mobile...
TRANSCRIPT
BREW ® Programming Primer 3.1
BREW Programming Primer: Creating a Mobile Application
This primer is the first in a series to get you started as a Binary Runtime Environment for Wireless® (BREW®
) developer. The purpose of this tutorial is to provide you with instructions for creating your first BREWapplication and a brief introduction to the BREW environment and development tools. You will learn the basicsteps in developing a sample application from beginning to testing on the Simulator using BREW tools. Youwill be presented with an overview of the BREW application development process. This will help youunderstand how each step relates to the entire development process, and most importantly, help you developyour own BREW application from scratch.
Copyright© 2006 QUALCOMM IncorporatedProprietary Statement
Updated: December 7, 2006
Page 1

BREW ® Programming Primer 3.1
The BREW Development Process From Idea to Simulator
Follow the steps below to create a BREW application. The numbers in the diagram correspond to the steps.
1. Use the BREW Application Wizard, an add-in to Microsoft Visual Studio, to create the workspace fileand the project file. The project file contains a skeletal source file and two additional files(AEEAppGen.c and AEEModGen.c) that are essential to all BREW applications.
2. Create a Module Information File (MIF) with the BREW MIF Editor, which includes all module-specificand application-specific information required to load the applet.
3. Use the BREW Resource Editor to create resources, such as strings, images, dialogs, and controlsto be used by the application.
4. Edit, compile and build the source files generated by the BREW Application Wizard and the resourceheader files to create the application DLL file.
5. Launch the BREW Simulator, specifying the MIF and applet directories and test your application.
Page 2

Copyright© 2006 QUALCOMM IncorporatedProprietary Statement
Updated: December 7, 2006
Page 3

BREW ® Programming Primer 3.1
Sample Problem
To introduce you to BREW and some of its main concepts such as APIs and BREW event handling, thistutorial helps you create a simple application called myfirstapp. The process of creating a BREW applicationwill familiarize you with some of the BREW tools used to support writing BREW applications.
If you have some experience with the BREW development environment, you might want to skip to the BREWApplication Wizard section.
Copyright© 2006 QUALCOMM IncorporatedProprietary Statement
Updated: December 7, 2006
Page 4
BREW ® Programming Primer 3.1
For More Information
These additional documents that provide further information on developing BREW applications:
BREW Programming Concepts
The API Reference Guide
BREW SDK User Docs
These documents are included with the BREW SDK and/or available at the BREW 3.1 Developer's Technical web site
Copyright© 2006 QUALCOMM Incorporated
Proprietary Statement Updated: December 7, 2006
Page 5

BREW ® Programming Primer 3.1
Tools and Environment
BREW Setup and Fundamental Concepts describe the various tools that are required for getting started withBREW and BREW's basic concepts. Microsoft Visual Studio .NET 2003 is used in this tutorial; however anydevelopment environment which can generate Window's compliant dynamic link libraries is suitable fordeveloping BREW applications which will execute on the Simulator. Microsoft Visual Studio .NET 2003 isreferred to as Visual Studio in this tutorial. It is assumed that you already have a working knowledge of VisualStudio (or the development environment of your choice) and the programming language C.
Copyright© 2006 QUALCOMM IncorporatedProprietary Statement
Updated: December 7, 2006
Page 6
BREW ® Programming Primer 3.1
BREW Setup
Other than your C compiler and third party tools, the components you need to install are
BREW SDK®
BREW SDK Tools
NOTE: Be sure that you install Visual Studio before installing the BREW SDK. If you reinstall Visual Studio,you need to reinstall the BREW SDK and the BREW SDK Tools. If you do not have Visual Studio, installingthe BREW SDK Tools will not install the BREW Add-ins for Visual Studio.
When the BREW SDK installer completes, a dialog box may prompt you to set the BREWDIR Environmentvariable. The BREW directory is needed for referencing included files or libraries. You should select the Set/Update the BREWDIR environment variable to point to the current installation and make it the defaultSDK installation.
Throughout this primer BREWDIR is used to represent the SDK installation directory references to directorypaths. <BREWDIR\examples\myfirstapp> refers to the current BREW installation, for example, <C:\ProgramFiles\BREW 3.1.5\sdk>.
When naming your BREW files, avoid spaces and uppercase letters in all of your BREW filenames.
Copyright© 2006 QUALCOMM IncorporatedProprietary Statement
Updated: December 7, 2006
Page 7
BREW ® Programming Primer 3.1
Fundamental Concepts
This section explains BREW fundamental concepts. If you are familiar with the BREW environment, or wouldlike to get started on myfirstapp right away, skip to Creating myfirstapp.
The basic elements of a BREW application are BREW classes and the BREW shell, module, applet, eventhandler, ClassIDs, resources, and Module Information Files (MIF).
NOTE: The term applet and application are used interchangeably.
BREW APIs
The BREW API is included with the BREW SDK, and represents a group of interface classes with their ownset of functions to use in your applications. BREW interfaces are initialized and memory is allocated onlywhen the interface is needed. Each interface has a unique ClassID, and the name of each interface in theBREW API begins with the letter I. The BREW API Reference lists the available interfaces and their functionsfor the specific BREW versions in alphabetical order. The API Reference is included with the documents inthe BREW SDK User Docs.
Application Execution Environment (AEE) and the BREW Shell (IShell)
BREW devices support an Application Execution Environment (AEE) to load and execute BREWapplications. The AEE is the foundation of BREW; its applications use the IShell interface pointer to accessshell services. The BREW shell is an interface, which is loaded when your application first runs. IShellpermits access to a wide variety of lower-level services provided by the device. The BREW shell handlessystem services such as application management, resource management functions, device and applicationconfiguration and management, and access to all external services.
BREW Module
A BREW module is a binary file containing the code for applications or extensions. Each module can containone or more applets (instance of the IApplet interface) or non-applet classes, and must have a correspondingMIF associated with it. The module is loaded by the BREW shell. Fundamentally this module exports asingle defined entry point so that the BREW shell can call into your application's CreateInstance function (theentry point for your application). The CreateInstance function creates an event handler and allocatesapplication memory, and creates an instance of the IDisplay interface and other miscellaneous items.
Each module can be initially developed in the BREW SDK, starting as a stand-alone Windows DLL that plugsinto the BREW Simulator for debugging and testing. Each application has a ClassID and a set of privilegesassociated with it. These are defined in a MIF.
Event Handler
The BREW application model is based on an event-driven programming model. All BREW applications mustcontain an event handling function. After an application is loaded, the BREW layer passes all input to thisfunction as events. An event may be a key press, a dialog change, or a control change.
Your application is expected to quickly determine how to handle events. All processing must be completedbefore the next event can be received. With BREW, substantial delays in processing events may result in theapplication being shut down to safeguard the device.
ClassIDs
Page 8

ClassIDs are a unique 32-bit ID identifying BREW applications, BREW extensions, privilege levels, or BREWinterfaces. The ClassID associated with an interface is used to request the interface from the system shell.The ClassID is stored in a BREW ClassID (BID) file, which is required for compilation. The BID file is createdby the MIF Editor when generating a ClassID locally. There are some distinctions between ClassIDs; thoseassociated with an application, those associated with BREW classes, and those associated with BREWExtensions. Uniquely identifying ClassIDs becomes important when your application is ready to be madepublic or commercial. A unique ClassID for an application or extension can be generated from the BREWClassID Generator via the BREW web site. However, for the purposes of this primer, you will generate theClassID for myfirstapp locally.
Resources
Many modules include resources, strings, icons and dialog boxes. Rather than hard-coding them into themodule, resources can be created in a separate resource file. This file is created by the BREW ResourceEditor, which allows you to assign IDs to these resources and create a header file containing the IDs. Seethe BREW SDK Tools User Docs, included in the documents installed with the BREW SDK Tools.
Module Information Files (MIFs)
Created using the MIF Editor, the MIF contains information about the contents of the module, such assupported classes, supported applications, application privileges, application details (like the title and icon)and the author of the application. The MIF also specifies which classes are exported for use by othermodules. All modules must contain a MIF. As the device starts up, the MIF describes the module to thedevice.
Copyright© 2006 QUALCOMM IncorporatedProprietary Statement
Updated: December 7, 2006
Page 9

BREW ® Programming Primer 3.1
Creating myfirstapp
You will use the BREW Application Wizard to create the myfirstapp project files and then add the code toaccomplish these tasks:
Draw a string in the center of the device screen that will familiarize you with writing to the display.
Draw a thin, horizontal rectangle that appears on the screen as a line, dividing the screen into twohalves to familiarize you with creating graphics.
Define and load two text strings from a resource file to familiarize you with using resources.
Load a bitmap image (representing a cursor) from the resource file and draw the cursor centered inthe bottom half of the screen. This will familiarize you with using graphics in your applications.
Enable the user to move the cursor bitmap using the up, down, left, and right arrow keys on thedevice, which will teach you how to handle user input events.
The MIF Editor will generate a MIF file, which is required to compile your application and explain theapplication to your device. The Resource Editor will create resource files that contain character strings,objects, and dialogs that are loaded at runtime, and the Simulator will allow you to test your application,using the default device skin.
Copyright© 2006 QUALCOMM Incorporated
Proprietary Statement Updated: December 7, 2006
Page 10
BREW ® Programming Primer 3.1
BREW Application Wizard
The BREW Application Wizard provides the option of creating source code based on a template, whichgenerates code for the most common BREW application functionality. The Application Wizard initiates thecreation of the project file, Visual Studio solution file, and the application source file.
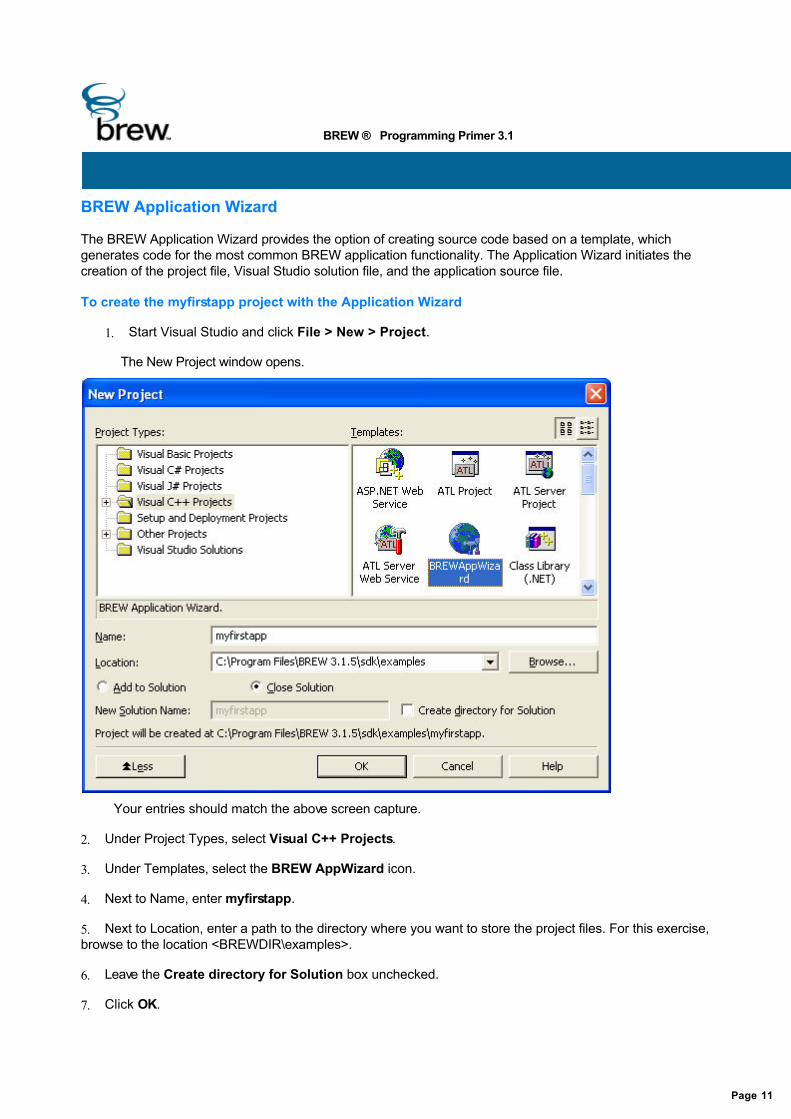
To create the myfirstapp project with the Application Wizard
1. Start Visual Studio and click File > New > Project.
The New Project window opens.
Your entries should match the above screen capture.
2. Under Project Types, select Visual C++ Projects.
3. Under Templates, select the BREW AppWizard icon.
4. Next to Name, enter myfirstapp.
5. Next to Location, enter a path to the directory where you want to store the project files. For this exercise,browse to the location <BREWDIR\examples>.
6. Leave the Create directory for Solution box unchecked.
7. Click OK.
Page 11
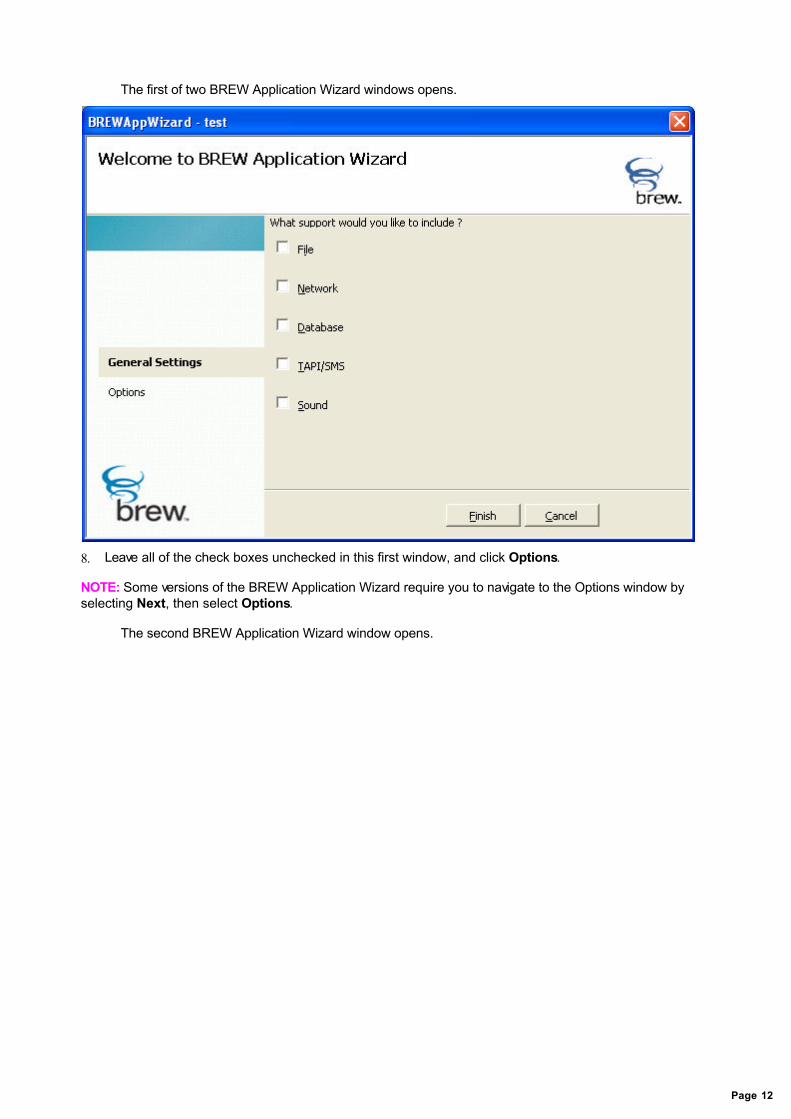
The first of two BREW Application Wizard windows opens.
8. Leave all of the check boxes unchecked in this first window, and click Options.
NOTE: Some versions of the BREW Application Wizard require you to navigate to the Options window byselecting Next, then select Options.
The second BREW Application Wizard window opens.
Page 12
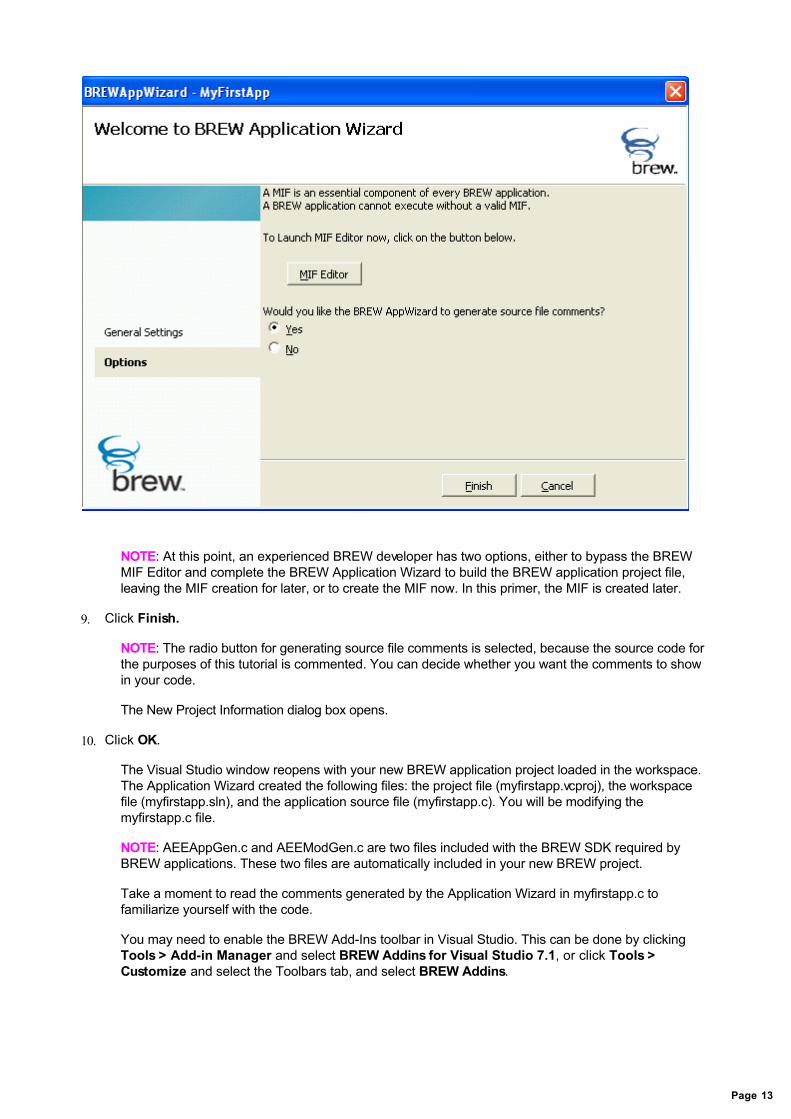
NOTE: At this point, an experienced BREW developer has two options, either to bypass the BREWMIF Editor and complete the BREW Application Wizard to build the BREW application project file,leaving the MIF creation for later, or to create the MIF now. In this primer, the MIF is created later.
9. Click Finish.
NOTE: The radio button for generating source file comments is selected, because the source code forthe purposes of this tutorial is commented. You can decide whether you want the comments to showin your code.
The New Project Information dialog box opens.
10. Click OK.
The Visual Studio window reopens with your new BREW application project loaded in the workspace.The Application Wizard created the following files: the project file (myfirstapp.vcproj), the workspacefile (myfirstapp.sln), and the application source file (myfirstapp.c). You will be modifying themyfirstapp.c file.
NOTE: AEEAppGen.c and AEEModGen.c are two files included with the BREW SDK required byBREW applications. These two files are automatically included in your new BREW project.
Take a moment to read the comments generated by the Application Wizard in myfirstapp.c tofamiliarize yourself with the code.
You may need to enable the BREW Add-Ins toolbar in Visual Studio. This can be done by clicking Tools > Add-in Manager and select BREW Addins for Visual Studio 7.1, or click Tools >Customize and select the Toolbars tab, and select BREW Addins.
Page 13

Copyright© 2006 QUALCOMM IncorporatedProprietary Statement
Updated: December 7, 2006
Page 14
BREW ® Programming Primer 3.1
BREW MIFs
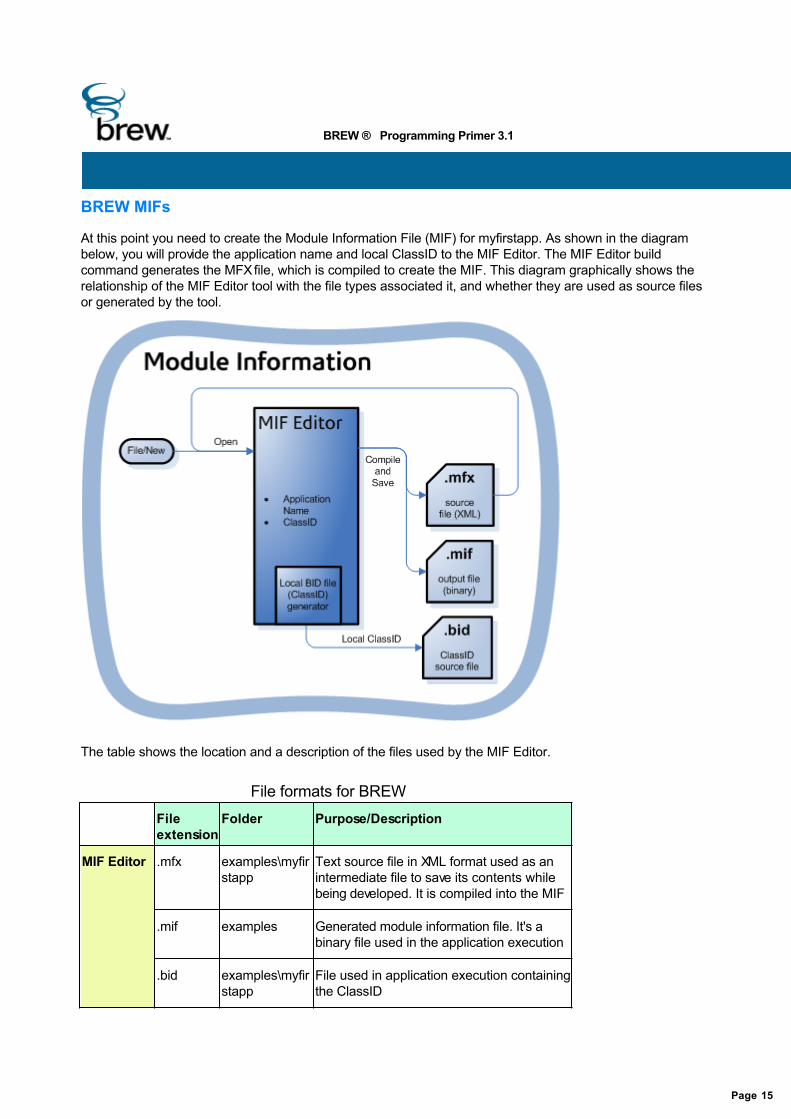
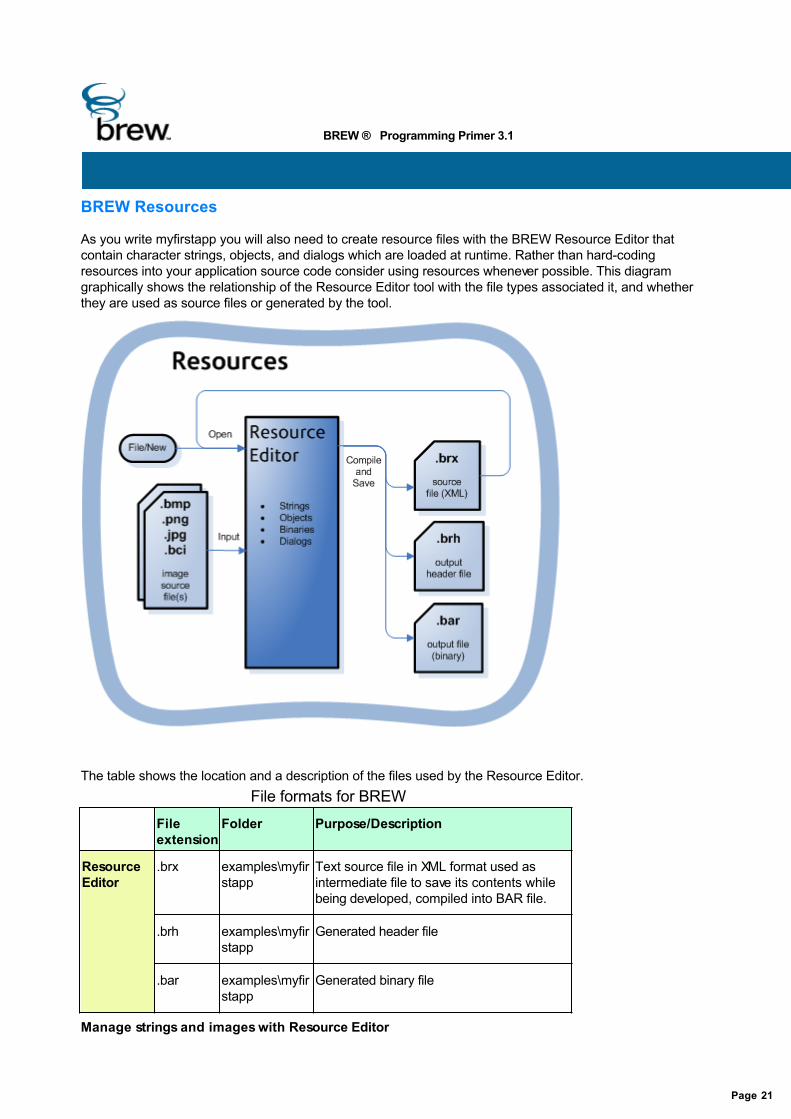
At this point you need to create the Module Information File (MIF) for myfirstapp. As shown in the diagrambelow, you will provide the application name and local ClassID to the MIF Editor. The MIF Editor buildcommand generates the MFX file, which is compiled to create the MIF. This diagram graphically shows therelationship of the MIF Editor tool with the file types associated it, and whether they are used as source filesor generated by the tool.
The table shows the location and a description of the files used by the MIF Editor.
File formats for BREW File
extensionFolder Purpose/Description
MIF Editor .mfx examples\myfirstapp
Text source file in XML format used as anintermediate file to save its contents whilebeing developed. It is compiled into the MIF
.mif examples Generated module information file. It's abinary file used in the application execution
.bid examples\myfirstapp
File used in application execution containingthe ClassID
Page 15

The BID file is listed under the #include statements in myfirstapp:
#include "myfirstapp.bid"
Create the MIF file with the MIF editor
1. Launch the MIF Editor. In Visual Studio you can launch the MIF Editor from the toolbar as seenbelow.
The MIF Editor opens.
2. Click the New Applet button on the Applets tab.
The Specify BREW ClassID dialog box opens.
3. Click Locally.
Enter the number 10101010 for the ClassID and myfirstapp for the Class Name. If you are followingthis process for multiple applications you will need to use a different number for the ClassID for eachapplication
Your entries should match those in the preceding screen capture.
4. Click OK.
5. A dialog box opens asking whether you want to generate the BREW ClassID locally, click Yes.
Page 16
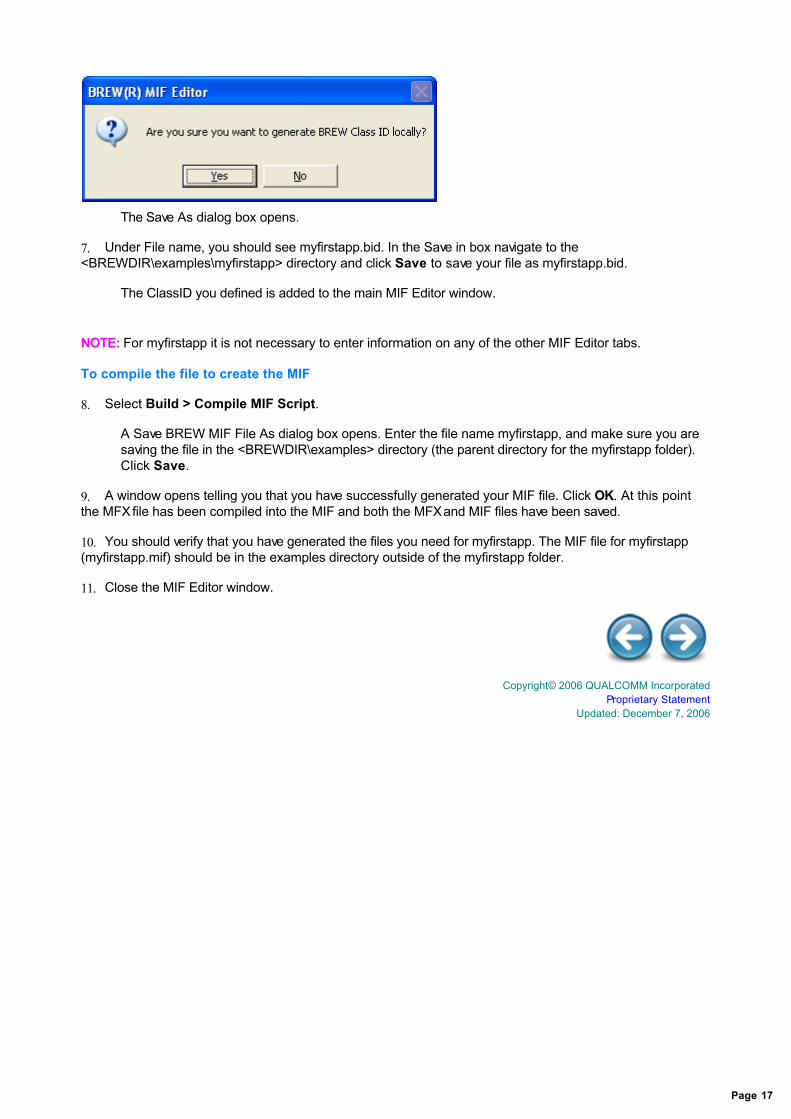
The Save As dialog box opens.
7. Under File name, you should see myfirstapp.bid. In the Save in box navigate to the<BREWDIR\examples\myfirstapp> directory and click Save to save your file as myfirstapp.bid.
The ClassID you defined is added to the main MIF Editor window.
NOTE: For myfirstapp it is not necessary to enter information on any of the other MIF Editor tabs.
To compile the file to create the MIF
8. Select Build > Compile MIF Script.
A Save BREW MIF File As dialog box opens. Enter the file name myfirstapp, and make sure you aresaving the file in the <BREWDIR\examples> directory (the parent directory for the myfirstapp folder).Click Save.
9. A window opens telling you that you have successfully generated your MIF file. Click OK. At this pointthe MFX file has been compiled into the MIF and both the MFX and MIF files have been saved.
10. You should verify that you have generated the files you need for myfirstapp. The MIF file for myfirstapp(myfirstapp.mif) should be in the examples directory outside of the myfirstapp folder.
11. Close the MIF Editor window.
Copyright© 2006 QUALCOMM IncorporatedProprietary Statement
Updated: December 7, 2006
Page 17
BREW ® Programming Primer 3.1
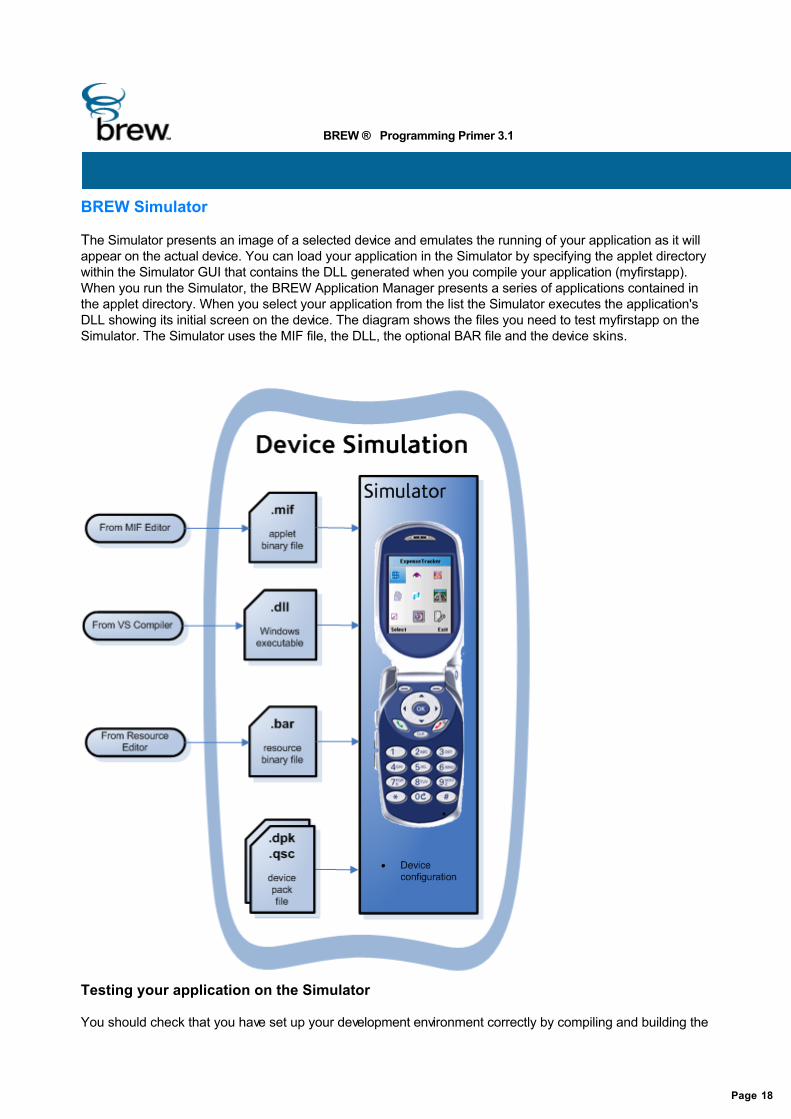
BREW Simulator
The Simulator presents an image of a selected device and emulates the running of your application as it willappear on the actual device. You can load your application in the Simulator by specifying the applet directorywithin the Simulator GUI that contains the DLL generated when you compile your application (myfirstapp).When you run the Simulator, the BREW Application Manager presents a series of applications contained inthe applet directory. When you select your application from the list the Simulator executes the application'sDLL showing its initial screen on the device. The diagram shows the files you need to test myfirstapp on theSimulator. The Simulator uses the MIF file, the DLL, the optional BAR file and the device skins.
Testing your application on the Simulator
You should check that you have set up your development environment correctly by compiling and building the
Page 18
skeleton code generated by the Application Wizard and running it on the Simulator before adding any code.The skeleton code does not do anything until you modify myfirstapp. After completing each step in writing thesource code for myfirstapp, check your progress by compiling and building your application in Visual Studioand running it on the Simulator.
To test myfirstapp on the Simulator
NOTE: Before you run myfirstapp on the Simulator you should be sure all the myfirstapp files are saved in thecorrect directory. The myfirstapp.mif and myfirstapp.mfx should be saved in the <BREWDIR\examples>directory and all other myfirstapp files should be saved in <BREWDIR\examples\myfirstapp> outside theDebug folder.
1. Click Debug > Start Without Debugging.
NOTE: The first time you open the Simulator using this method you will need to specify theBREW_Simulator.exe as your executable. You can browse to the Simulator executable at <BREWDIR\bin>.
2. You can also initiate the Simulator from the Windows start menu by selecting start > Programs >BREW SDK 3.1.5 > BREW Simulator.
3. This can also be done from the Simulator icon in the Visual Studio toolbar.
4. Within the Properties tab make sure that the applet directory is set to <BREWDIR\examples>. Click File> Change Applet Dir to change the applet directory.
5. Under the Properties tab be sure that the MIF directory is the same as the applet directory.
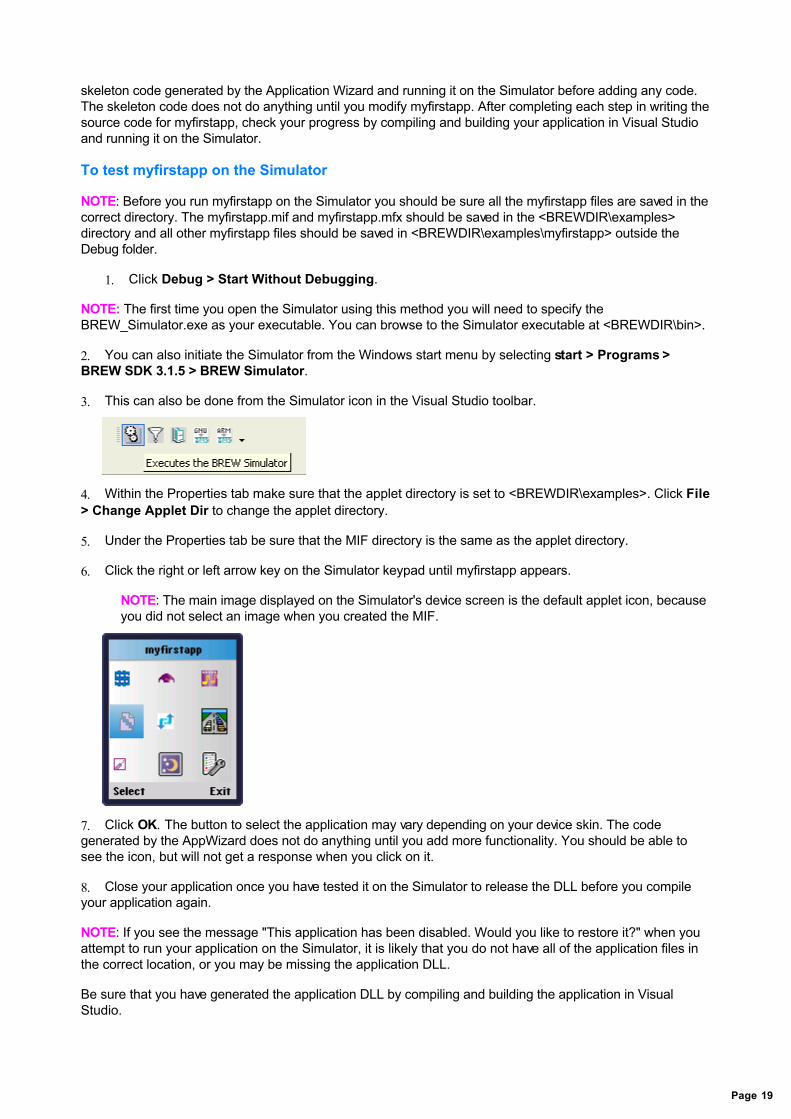
6. Click the right or left arrow key on the Simulator keypad until myfirstapp appears.
NOTE: The main image displayed on the Simulator's device screen is the default applet icon, becauseyou did not select an image when you created the MIF.
7. Click OK. The button to select the application may vary depending on your device skin. The codegenerated by the AppWizard does not do anything until you add more functionality. You should be able tosee the icon, but will not get a response when you click on it.
8. Close your application once you have tested it on the Simulator to release the DLL before you compileyour application again.
NOTE: If you see the message "This application has been disabled. Would you like to restore it?" when youattempt to run your application on the Simulator, it is likely that you do not have all of the application files inthe correct location, or you may be missing the application DLL.
Be sure that you have generated the application DLL by compiling and building the application in VisualStudio.
Page 19

The myfirstapp.mif should be saved in the <BREWDIR\examples> directory. All other myfirstapp files,including myfirstapp.dll, should be saved in <BREWDIR\examples\myfirstapp>, outside the Debug folder.
Copyright© 2006 QUALCOMM IncorporatedProprietary Statement
Updated: December 7, 2006
Page 20
BREW ® Programming Primer 3.1
BREW Resources
As you write myfirstapp you will also need to create resource files with the BREW Resource Editor thatcontain character strings, objects, and dialogs which are loaded at runtime. Rather than hard-codingresources into your application source code consider using resources whenever possible. This diagramgraphically shows the relationship of the Resource Editor tool with the file types associated it, and whetherthey are used as source files or generated by the tool.
The table shows the location and a description of the files used by the Resource Editor.
File formats for BREW File
extensionFolder Purpose/Description
ResourceEditor
.brx examples\myfirstapp
Text source file in XML format used asintermediate file to save its contents whilebeing developed, compiled into BAR file.
.brh examples\myfirstapp
Generated header file
.bar examples\myfirstapp
Generated binary file
Manage strings and images with Resource Editor
Page 21
One of the objectives for the creation of myfirstapp is to create a resource file that contains two characterstrings and a cursor image.
To define the string resources for myfirstapp
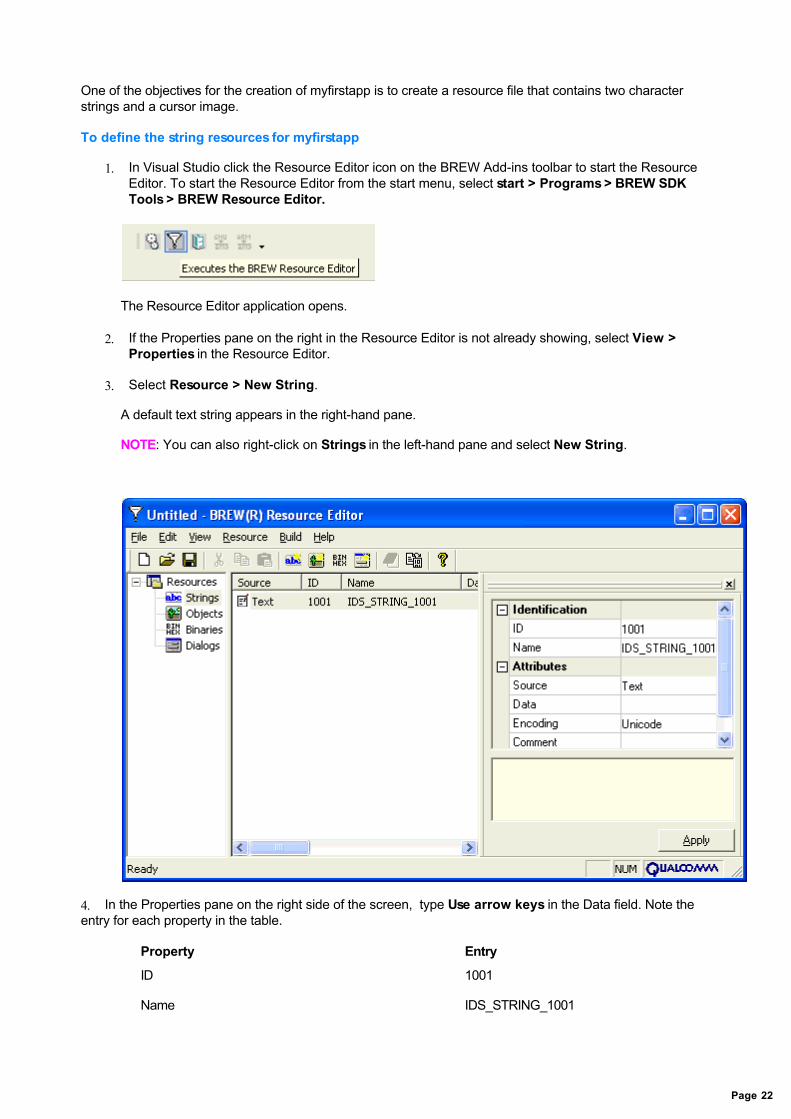
1. In Visual Studio click the Resource Editor icon on the BREW Add-ins toolbar to start the ResourceEditor. To start the Resource Editor from the start menu, select start > Programs > BREW SDKTools > BREW Resource Editor.
The Resource Editor application opens.
2. If the Properties pane on the right in the Resource Editor is not already showing, select View >Properties in the Resource Editor.
3. Select Resource > New String.
A default text string appears in the right-hand pane.
NOTE: You can also right-click on Strings in the left-hand pane and select New String.
4. In the Properties pane on the right side of the screen, type Use arrow keys in the Data field. Note theentry for each property in the table.
Property Entry
ID 1001
Name IDS_STRING_1001
Page 22

Source Text
Data This field contains the actual string content for the resource. Type Use arrow keys
Encoding Unicode
Comment Leave blank
5. When you have completed your entries for this resource, click Apply.
The string resources you have created appear in the main pane of the Resource Editor window.
6. To add your second string repeat the previous steps and type to move cursor in the data field. Note theentry for each property in the table.
Property Entry
ID 1002
Name IDS_STRING_1002
Source Text
Data Type to move cursor
Encoding Unicode
Comment Leave blank
7. When you have completed your entries for this resource click Apply.
The string resources you have created appear in the main pane of the Resource Editor window.
You are now ready to create your image resource.
To define the image resource for myfirstapp
1. With the Resource Editor window open select Resource > New Object.
NOTE: You can also right-click on Objects and select New Object.
A default object line appears in the middle pane and the Properties pane to the right shows propertyinformation for the object.
Page 23

2. In the Properties pane on the right click in the Data field, then click the Locate button (...) and navigateto <BREWDIR\bitmaps> and load cursor-1.bmp. The object is issued a default name IDI_OBJECT_5001which you will change to IDI_IMG_CURSOR. Note the entry for each property in the table.
Property Entry
ID 5001
Name IDI_IMG_CURSOR
Source File
Data cursor-1.bmp
Comment Leave blank
After selecting the bitmap in the Data field notice that the fields under Preview in the Properties paneon the right have been pre-filled with values for the bitmap you selected and the Object Preview showsthe cursor image.
Page 24

3. When you have completed your entries for the object click Apply, and save your file as myfirstapp in the<BREWDIR\examples\myfirstapp> directory.
NOTE: Be sure to use only lowercase letters with no spaces when naming your resource files. Do not add anextension to the name of the file at this step because the Resource Editor automatically saves myfirstapp asmyfirstapp.brx. This is the file you will compile to create you resource file and header file.
To compile the BREW resource file
1. In the Resource Editor window select Build > Compile Resource Script.
A message box opens informing you that the BREW Applet Resource file (BAR) and BREW ResourceHeader file (BRH) have been created. They are stored in the same directory.
NOTE: Be sure that you have included the resource file you have just created (myfirstapp.brh) in yourVisual Studio solution, or your application will not compile.
Copyright© 2006 QUALCOMM IncorporatedProprietary Statement
Updated: December 7, 2006
Page 25

BREW ® Programming Primer 3.1
BREW Coding: Writing the Source Code for myfirstapp
This section explains how to add the source code to get myfirstapp up and running on the Simulator.
Adding the source code
Now that you have created your base project you are ready to start writing the actual source code formyfirstapp. The coding portion of the primer is divided into the following sections or steps. When you havefinished a step, compile and build your application, then run it on the Simulator. If you are interested in simplydisplaying text on the Simulator screen, step 1 is essentially a "Hello World" program that requires noresources.
Step 1: Draw a string in the center of the device screen that will familiarize you with writing to thedisplay.
Step 2: Draw a thin, horizontal rectangle, dividing the screen into two halves to familiarize you withcreating graphics.
Step 3: Define and load two text strings from a resource file to familiarize you with using resources.
Step 4: Load a bitmap image (representing a cursor) from the resource file and draw the cursorcentered in the bottom half of the screen. This will familiarize you with using graphics in yourapplications.
Step 5: Enable the user to move the cursor bitmap using the up, down, left, and right arrow keys onthe device, which will teach you how to handle user input events.
In Visual Studio open the myfirstapp.c file.
If you previously installed an older version than BREW 3.1.5 on your computer the Application Wizard maygenerate code slightly different than the code used in this example. In the applet structure, your codegenerated by the Application Wizard should look like the following:
typedef struct _myfirstapp { AEEApplet a ; // First element of this structure must beAEEApplet AEEDeviceInfo DeviceInfo; // Always have access to the hardwaredevice information IDisplay *pIDisplay; // Give a standard way to access theDisplay interface IShell *pIShell; // Give a standard way to access the Shellinterface}myfirstapp;
If you are missing the following two lines, be sure to add them in so your code matches the sample shownabove.
IDisplay *pIDisplay; // give a standard way to access the DisplayinterfaceIShell *pIShell; // give a standard way to access the Shellinterface
Your code generated by the Application Wizard for myfirstapp_InitAppData should look like the following:
boolean myfirstapp_InitAppData(myfirstapp* pMe){ pMe->DeviceInfo.wStructSize = sizeof(pMe->DeviceInfo); ISHELL_GetDeviceInfo(pMe->a.m_pIShell,&pMe->DeviceInfo); pMe->pIDisplay = pMe->a.m_pIDisplay;
P a g e 2 6

pMe->pIShell = pMe->a.m_pIShell; return TRUE;}
If you are missing the following lines of code, be sure to paste them in so your code matches that shownabove.
pMe->pIDisplay = pMe->a.m_pIDisplay;pMe->pIShell = pMe->a.m_pIShell;
NOTE: Some comments generated by the Application Wizard are not duplicated in this section.
Copyright© 2006 QUALCOMM IncorporatedProprietary Statement
Updated: December 7, 2006
Page 27
BREW ® Programming Primer 3.1
Step 1: Display a String
The first objective is to add the code to myfirstapp to draw a string in the center of the device screen, whichwill familiarize you with writing to the display. To meet this objective you will be modifying themyfirstapp_HandleEvent function and creating the myfirstapp_DrawScreen function.
Modifying the myfirstapp_HandleEvent function
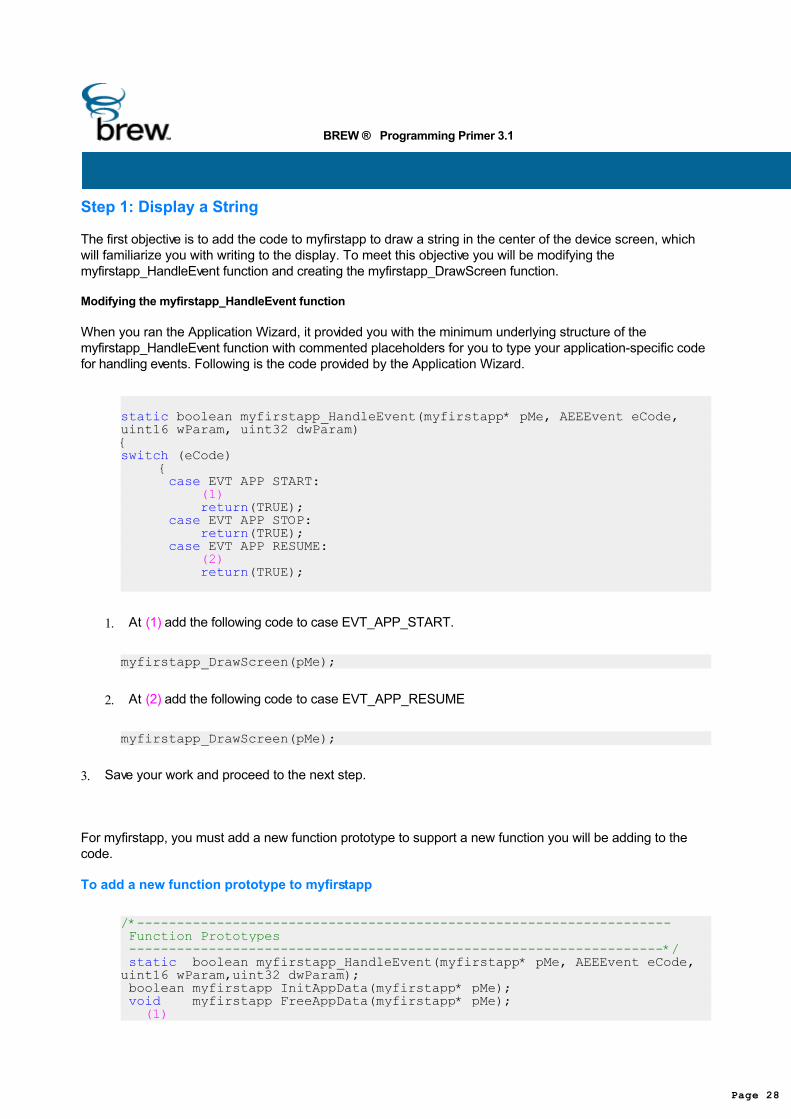
When you ran the Application Wizard, it provided you with the minimum underlying structure of themyfirstapp_HandleEvent function with commented placeholders for you to type your application-specific codefor handling events. Following is the code provided by the Application Wizard.
static boolean myfirstapp_HandleEvent(myfirstapp* pMe, AEEEvent eCode,uint16 wParam, uint32 dwParam){ switch (eCode) {
case EVT_APP_START: (1) return(TRUE); case EVT_APP_STOP: return(TRUE); case EVT_APP_RESUME: (2) return(TRUE);
1. At (1) add the following code to case EVT_APP_START.
myfirstapp_DrawScreen(pMe);
2. At (2) add the following code to case EVT_APP_RESUME
myfirstapp_DrawScreen(pMe);
3. Save your work and proceed to the next step.
For myfirstapp, you must add a new function prototype to support a new function you will be adding to thecode.
To add a new function prototype to myfirstapp
/*------------------------------------------------------------------- Function Prototypes -------------------------------------------------------------------*/ static boolean myfirstapp_HandleEvent(myfirstapp* pMe, AEEEvent eCode,uint16 wParam,uint32 dwParam); boolean myfirstapp_InitAppData(myfirstapp* pMe); void myfirstapp_FreeAppData(myfirstapp* pMe); (1)
Page 28
1. Scroll down in your source code and type the following after the FreeAppData function prototype (1):
static void myfirstapp_DrawScreen(myfirstapp * pMe);
2. Save your work and proceed to the next step.
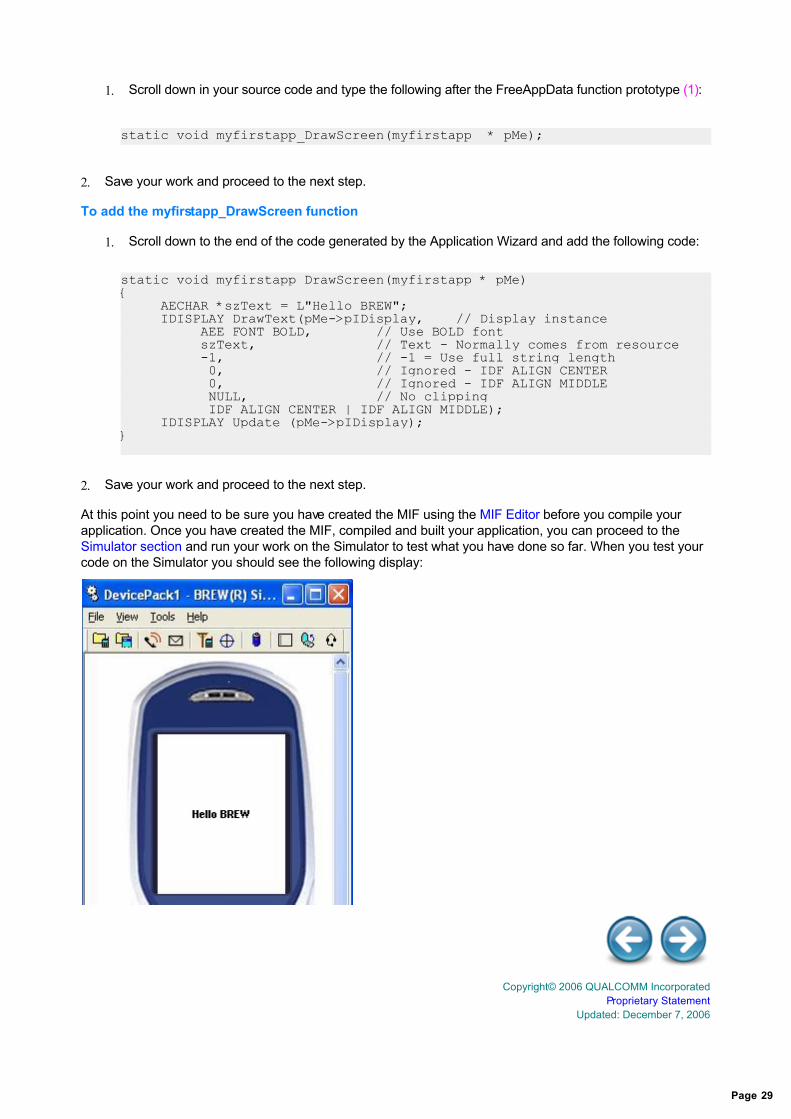
To add the myfirstapp_DrawScreen function
1. Scroll down to the end of the code generated by the Application Wizard and add the following code:
static void myfirstapp_DrawScreen(myfirstapp * pMe){ AECHAR *szText = L"Hello BREW"; IDISPLAY_DrawText(pMe->pIDisplay, // Display instance AEE_FONT_BOLD, // Use BOLD font szText, // Text - Normally comes from resource -1, // -1 = Use full string length 0, // Ignored - IDF_ALIGN_CENTER 0, // Ignored - IDF_ALIGN_MIDDLE NULL, // No clipping IDF_ALIGN_CENTER | IDF_ALIGN_MIDDLE); IDISPLAY_Update (pMe->pIDisplay);}
2. Save your work and proceed to the next step.
At this point you need to be sure you have created the MIF using the MIF Editor before you compile yourapplication. Once you have created the MIF, compiled and built your application, you can proceed to the Simulator section and run your work on the Simulator to test what you have done so far. When you test yourcode on the Simulator you should see the following display:
Copyright© 2006 QUALCOMM IncorporatedProprietary Statement
Updated: December 7, 2006
Page 29

BREW ® Programming Primer 3.1
Step 2: Display a Rectangular Line
The second objective is to draw a thin, horizontal, color-filled rectangle that appears on the screen as a line tofamiliarize yourself with creating graphics. To meet this objective you will add to the applet structure andmodify the myfirstapp_DrawScreen and the myfirstapp_InitAppData functions.
Adding the application-specific data structure
The applet structure information, located below the Includes and Variable Definitions section of the sourcecode, is shown below.
typedef struct _myfirstapp { AEEApplet a ; // First element of this structure must beAEEApplet AEEDeviceInfo DeviceInfo; // Always have access to the hardware deviceinformation IDisplay *pIDisplay; // Give a standard way to access the DisplayinterfaceIShell *pIShell; // Give a standard way to access the Shellinterface
(1) // Add your own variables here... } myfirstapp;
To add to the application-specific data structure information at (1)
1. Replace the comment placeholder with the following lines:
int m_cxWidth; // Stores the device screen widthint m_cyHeight; // Stores the device screen heightint m_nCursorX; // Stores the cursor bitmap x coordinateint m_nCursorY; // Stores the cursor bitmap y coordinateIImage * pIImage; // IImage interface pointer
To modify the myfirstapp_DrawScreen function
The code you will be modifying for the myfirstapp_DrawScreen() function is shown below.
static void myfirstapp_DrawScreen(myfirstapp * pMe){ (1) AECHAR *szText = L"Hello BREW"; IDISPLAY_DrawText(pMe->pIDisplay, // Display instance AEE_FONT_BOLD, // Use BOLD font szText, // Text - Normally comes from resource -1, // -1 = Use full string length 0, // Ignored - IDF_ALIGN_CENTER 0, // Ignored - IDF_ALIGN_MIDDLE NULL, // No clipping IDF_ALIGN_CENTER | IDF_ALIGN_MIDDLE); (2) IDISPLAY_Update (pMe->pIDisplay);}
1. Add the following lines to the beginning of the myfirstapp_DrawScreen() function (1):
AEERect rc;
P a g e 3 0
AECHAR szBuf[30] = {0};
2. Add the following lines above the line IDISPLAY_Update (pMe->pIDisplay) (2):
IDISPLAY_ClearScreen (pMe->pIDisplay); //erases whole screen SETAEERECT( &rc, 0, pMe->m_cyHeight/2-2, pMe->m_cxWidth, 2);IDISPLAY_DrawRect(pMe->pIDisplay, &rc, 0, 1, IDF_RECT_FILL);
Modifying the myfirstapp_InitAppData function
Next you need to modify the myfirstapp_InitAppData function, which is used to initialize applet-specificdata. Below is the initial source code generated by the Application Wizard.
boolean myfirstapp_InitAppData(myfirstapp* pMe){ pMe->DeviceInfo.wStructSize = sizeof(pMe->DeviceInfo); ISHELL_GetDeviceInfo(pMe->a.m_pIShell,&pMe->DeviceInfo); pMe->pIDisplay = pMe->a.m_pIDisplay; pMe->pIShell = pMe->a.m_pIShell; (1) return TRUE; }
To modify the myfirstapp_InitAppData function
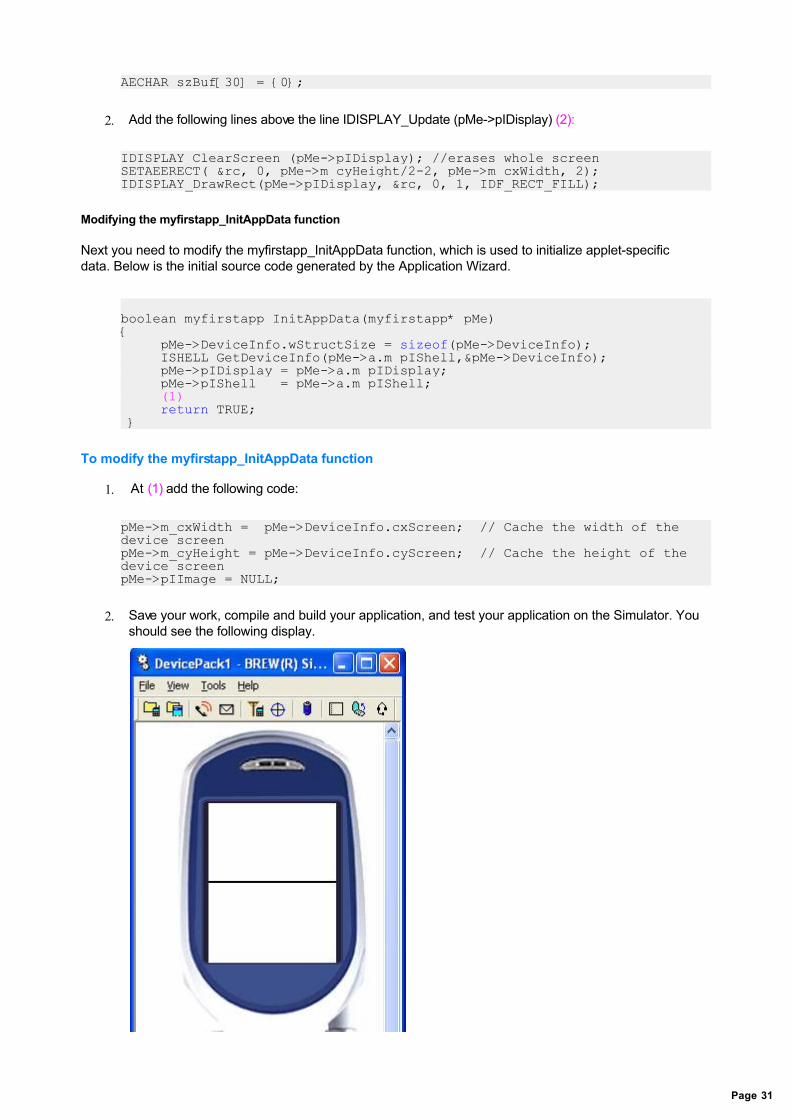
1. At (1) add the following code:
pMe->m_cxWidth = pMe->DeviceInfo.cxScreen; // Cache the width of thedevice screenpMe->m_cyHeight = pMe->DeviceInfo.cyScreen; // Cache the height of thedevice screenpMe->pIImage = NULL;
2. Save your work, compile and build your application, and test your application on the Simulator. Youshould see the following display.
Page 31

Copyright© 2006 QUALCOMM IncorporatedProprietary Statement
Updated: December 7, 2006
Page 32
BREW ® Programming Primer 3.1
Step 3: Define and Display String Resources
The next objective for myfirstapp is to define and load two text strings from a resource file to familiarize youwith using resources.
For the following code additions to compile you'll need to create your resource file using the Resource Editorand return to this section and proceed. To load two strings from the resource file you'll need to add an#include line and modify the myfirstapp_HandleEvent function.
Adding #include statements
When you ran the Application Wizard it automatically generated the following #include statements in yoursource code:
/*=========================================================================INCLUDES AND VARIABLE DEFINITIONS========================================================================*/#include "AEEModGen.h" // Module interface definitions for IModuleinterface#include "AEEAppGen.h" // Applet interface definitions for IAppletinterface#include "AEEShell.h" // Shell interface definitions for IShell BREWinterface#include "myfirstapp.bid" // Identifies the BID file, which contains thelocally generated ClassID created with the MIF Editor
As you create a BREW application you need to add another #include statement to handle the other BREWinterfaces required by the application and definitions for any global constants needed by the application.
To add an #include line
1. Scroll down to the INCLUDES AND VARIABLE DEFINITIONS section shown above and add thefollowing #include line after the AEEShell.h line.#include "myfirstapp.brh" // Resource ID definitions
NOTE: The header file you generate using the Resource Editor, myfirstapp.brh, will be added to getthe resource IDs for the applet. The myfirstapp.bid file you create using the MIF Editor contains thedefinitions of the unique ClassIDs for the applet.
2. Save your work and proceed to the next step.
Modifying the myfirstapp_HandleEvent function
The code with your modifications is shown below.
static void myfirstapp_DrawScreen(myfirstapp * pMe){ AEERect rc; AECHAR szBuf[30] = {0}; AECHAR *szText = L"Hello BREW"; IDISPLAY_DrawText(pMe->pIDisplay, // Display instance AEE_FONT_BOLD, // Use BOLD font szText, // Text - Normally comes fromresource -1, // -1 = Use full string length 0, // Ignored - IDF_ALIGN_CENTER 0, // Ignored - IDF_ALIGN_MIDDLE
P a g e 3 3
NULL, // No clipping IDF_ALIGN_CENTER | IDF_ALIGN_MIDDLE); IDISPLAY_ClearScreen(pMe->pIDisplay); // Erases whole screen SETAEERECT( &rc, 0, pMe->m_cyHeight/2-2, pMe->m_cxWidth, 2); IDISPLAY_DrawRect(pMe->pIDisplay, &rc, 0, 1, IDF_RECT_FILL); (1) IDISPLAY_Update(pMe->pIDisplay);}
To modify the myfirstapp_HandleEvent function
1. At(1)insert the following lines:
ISHELL_LoadResString(pMe->pIShell, MYFIRSTAPP_RES_FILE,IDS_STRING_1001,szBuf, sizeof(szBuf));IDISPLAY_DrawText(pMe->pIDisplay, AEE_FONT_NORMAL, szBuf, -1,pMe->m_cxWidth/5, pMe->m_cyHeight/8, 0, IDF_ALIGN_CENTER);ISHELL_LoadResString(pMe->pIShell, MYFIRSTAPP_RES_FILE,IDS_STRING_1002,szBuf, sizeof(szBuf));IDISPLAY_DrawText(pMe->pIDisplay, AEE_FONT_NORMAL, szBuf, -1,pMe->m_cxWidth/5, pMe->m_cyHeight/5, 0, IDF_ALIGN_CENTER);
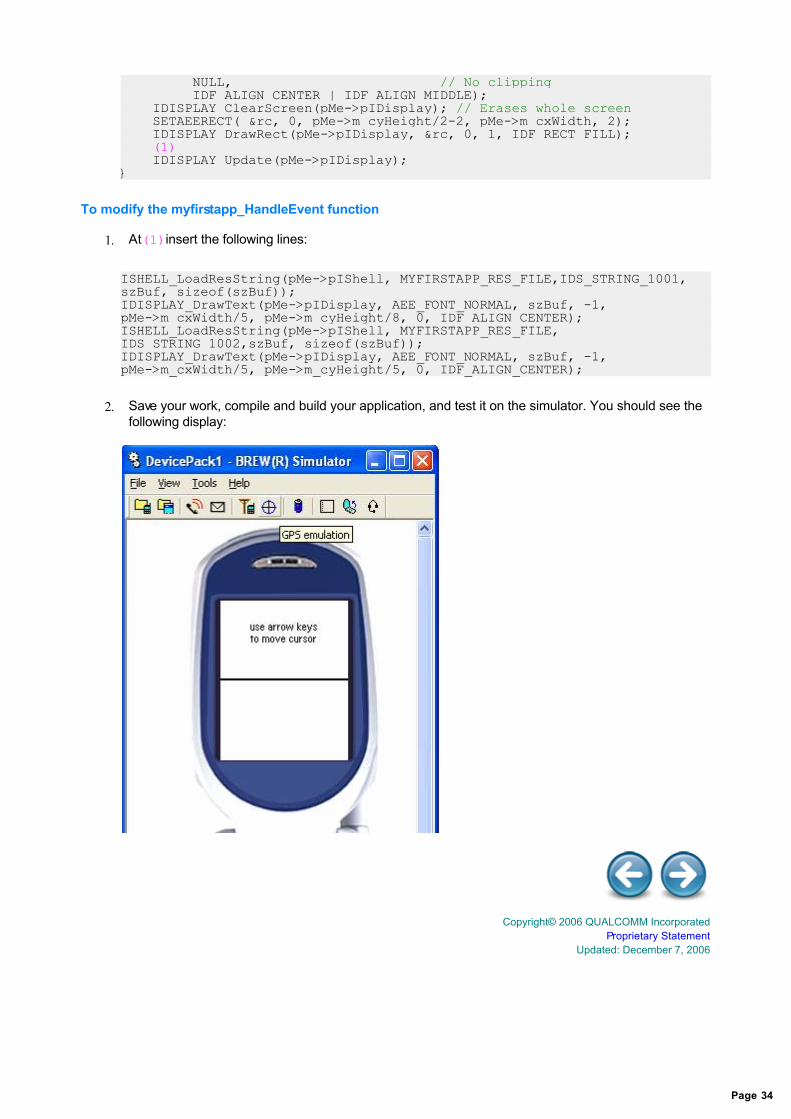
2. Save your work, compile and build your application, and test it on the simulator. You should see thefollowing display:
Copyright© 2006 QUALCOMM IncorporatedProprietary Statement
Updated: December 7, 2006
Page 34
BREW ® Programming Primer 3.1
Step 4: Define and Display a Bitmap Resource
The fourth objective is to load a bitmap image (representing a cursor) from the resource file and draw thecursor centered in the bottom half of the screen. This will familiarize you with using graphics in yourapplications. To meet this objective you'll need to modify myfirstapp_DrawScreen, myfirstapp_InitAppDataand the myfirstapp_FreeAppData function.
Modifying the myfirstapp_DrawScreen function
The code in the myfirstapp_DrawScreen function, which you will be modifying appears below.
IDISPLAY_DrawText(pMe->pIDisplay, AEE_FONT_NORMAL, szBuf, -1,pMe->m_cxWidth/5, pMe->m_cyHeight/5, 0,IDF_ALIGN_CENTER); SETAEERECT (&rc, 0, pMe->m_cyHeight/2-2, pMe->m_cxWidth, 2);IDISPLAY_DrawRect (pMe->pIDisplay, &rc, 0, 1, IDF_RECT_FILL);
ISHELL_LoadResString(pMe->pIShell, MYFIRSTAPP2_RES_FILE, IDS_STRING_1001,szBuf, sizeof(szBuf));IDISPLAY_DrawText(pMe->pIDisplay, AEE_FONT_NORMAL, szBuf, -1,pMe->m_cxWidth/5, pMe->m_cyHeight/8, 0, IDF_ALIGN_CENTER);
ISHELL_LoadResString(pMe->pIShell, MYFIRSTAPP2_RES_FILE, IDS_STRING_1002,szBuf, sizeof(szBuf));IDISPLAY_DrawText(pMe->pIDisplay, AEE_FONT_NORMAL, szBuf, -1,pMe->m_cxWidth/5, pMe->m_cyHeight/5, 0, IDF_ALIGN_CENTER);(1) IDISPLAY_Update (pMe->pIDisplay);
To modify the myfirstapp_DrawScreen function
1. At (1) add the following code before the IDISPLAY_Update line.
pMe->pIImage =ISHELL_LoadResImage(pMe->pIShell,MYFIRSTAPP_RES_FILE,IDI_IMG_CURSOR);IIMAGE_Draw (pMe->pIImage, pMe->m_nCursorX, pMe->m_nCursorY);
The added statement loads the image from the resource file and stores a pointer to the image in the pIImageapplet structure data.
Modifying the myfirstapp_InitAppData function
Below is the code in myfirstapp for the myfirstapp_InitAppData function, including the additions made in thepreceding steps.
boolean myfirstapp_InitAppData(myfirstapp* pMe){pMe->DeviceInfo.wStructSize = sizeof(pMe->DeviceInfo); ISHELL_GetDeviceInfo(pMe->a.m_pIShell, &pMe->DeviceInfo); pMe->pIDisplay = pMe->a.m_pIDisplay;pMe->pIShell = pMe->a.m_pIShell; pMe->m_cxWidth = pMe->DeviceInfo.cxScreen; // Cache the width of thedevice screen pMe->m_cyHeight = pMe->DeviceInfo.cyScreen; // Cache the height of thedevice screenpMe->pIImage = NULL; (1) // If there have been no failures up to this point then returnsuccess return TRUE;return TRUE;}
P a g e 3 5
To modify the myfirstapp_InitAppData function
1. At (1)insert the following code:
pMe->m_nCursorX = pMe->m_cxWidth/2; pMe->m_nCursorY = pMe->m_cyHeight*2/3;
Modifying the myfirstapp_FreeAppData function
The myfirstapp_FreeAppData function frees application data stored in the applet data structure. The sourcecode you will be modifying for the myfirstapp_FreeAppdata function appears below.
NOTE: Do not call the myfirstapp_FreeAppData function directly in your application, since the BREW layerwill automatically call this.
// this function is called when your application is exiting void myfirstapp_FreeAppData(myfirstapp* pMe){ // insert your code here for freeing any resources you haveallocated... // example to use for releasing each interface: // if ( pMe->pIMenuCtl != NULL ) // Check for NULL first // { // IMENUCTL_Release(pMe->pIMenuCtl) // Release the interface // pMe->pIMenuCtl = NULL; // Set to NULL so noproblems trying to free later // } }
To modify myfirstapp_FreeAppdata function
1. Replace the comment lines with the following lines of code:
if (pMe->pIImage != NULL) { IIMAGE_Release (pMe->pIImage); pMe->pIImage = NULL; }
Save your work, compile and build your application, and test your application on the Simulator. You shouldsee the following display;
Page 36
Copyright© 2006 QUALCOMM IncorporatedProprietary Statement
Updated: December 7, 2006
Page 37
BREW ® Programming Primer 3.1
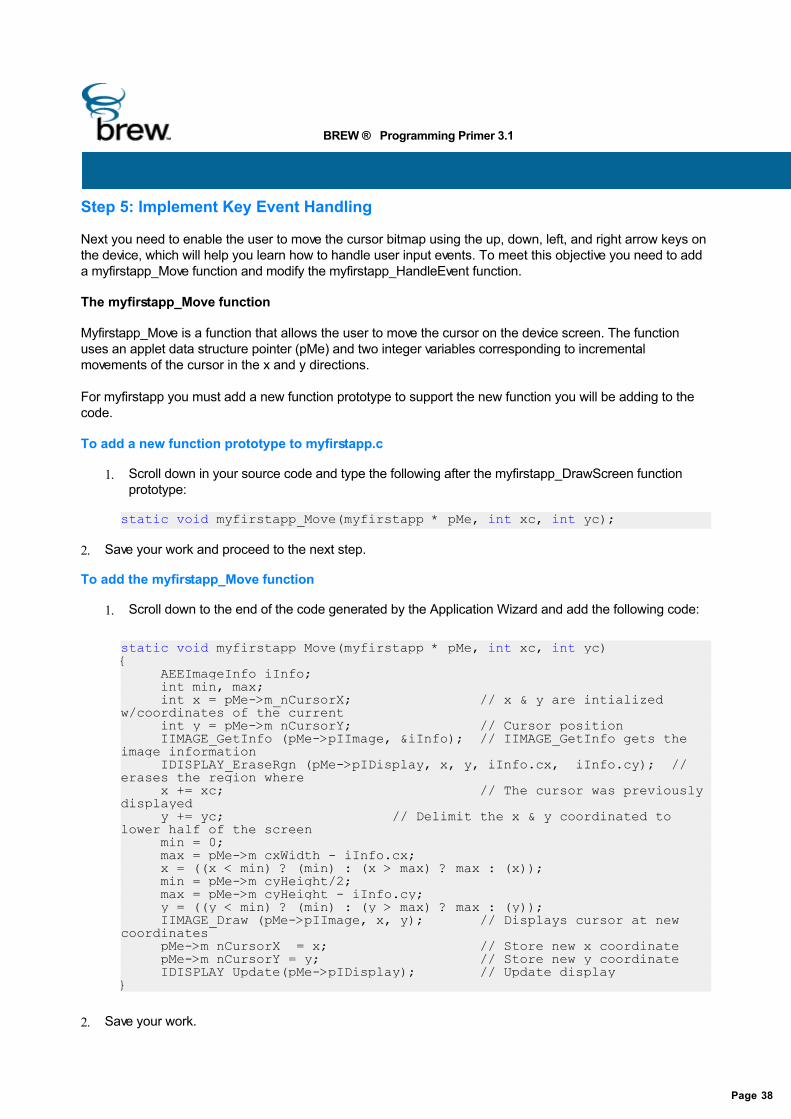
Step 5: Implement Key Event Handling
Next you need to enable the user to move the cursor bitmap using the up, down, left, and right arrow keys onthe device, which will help you learn how to handle user input events. To meet this objective you need to adda myfirstapp_Move function and modify the myfirstapp_HandleEvent function.
The myfirstapp_Move function
Myfirstapp_Move is a function that allows the user to move the cursor on the device screen. The functionuses an applet data structure pointer (pMe) and two integer variables corresponding to incrementalmovements of the cursor in the x and y directions.
For myfirstapp you must add a new function prototype to support the new function you will be adding to thecode.
To add a new function prototype to myfirstapp.c
1. Scroll down in your source code and type the following after the myfirstapp_DrawScreen functionprototype:
static void myfirstapp_Move(myfirstapp * pMe, int xc, int yc);
2. Save your work and proceed to the next step.
To add the myfirstapp_Move function
1. Scroll down to the end of the code generated by the Application Wizard and add the following code:
static void myfirstapp_Move(myfirstapp * pMe, int xc, int yc){ AEEImageInfo iInfo; int min, max; int x = pMe->m_nCursorX; // x & y are intializedw/coordinates of the current int y = pMe->m_nCursorY; // Cursor position IIMAGE_GetInfo (pMe->pIImage, &iInfo); // IIMAGE_GetInfo gets theimage information IDISPLAY_EraseRgn (pMe->pIDisplay, x, y, iInfo.cx, iInfo.cy); //erases the region where x += xc; // The cursor was previouslydisplayed y += yc; // Delimit the x & y coordinated tolower half of the screen min = 0; max = pMe->m_cxWidth - iInfo.cx; x = ((x < min) ? (min) : (x > max) ? max : (x)); min = pMe->m_cyHeight/2; max = pMe->m_cyHeight - iInfo.cy; y = ((y < min) ? (min) : (y > max) ? max : (y)); IIMAGE_Draw (pMe->pIImage, x, y); // Displays cursor at newcoordinates pMe->m_nCursorX = x; // Store new x coordinate pMe->m_nCursorY = y; // Store new y coordinate IDISPLAY_Update(pMe->pIDisplay); // Update display}
2. Save your work.
Page 38
To modify the myfirstapp_HandleEvent function
1. Within case EVT_KEY insert the following lines: switch (wParam){ case AVK_LEFT: case AVK_RIGHT: myfirstapp_Move(pMe,(wParam == AVK_RIGHT ? 1 : -1),0) return(TRUE); case AVK_UP: case AVK_DOWN: myfirstapp_Move(pMe,0,(wParam == AVK_UP ? -1 : 1)); return(TRUE); default: return(FALSE);}
The new code switches on the AVK_LEFT, AVK_RIGHT, AVK_UP, and AVK_DOWN keypresscodes, and the myfirstapp_Move function is called to move the cursor in the direction corresponding tothe keypress.
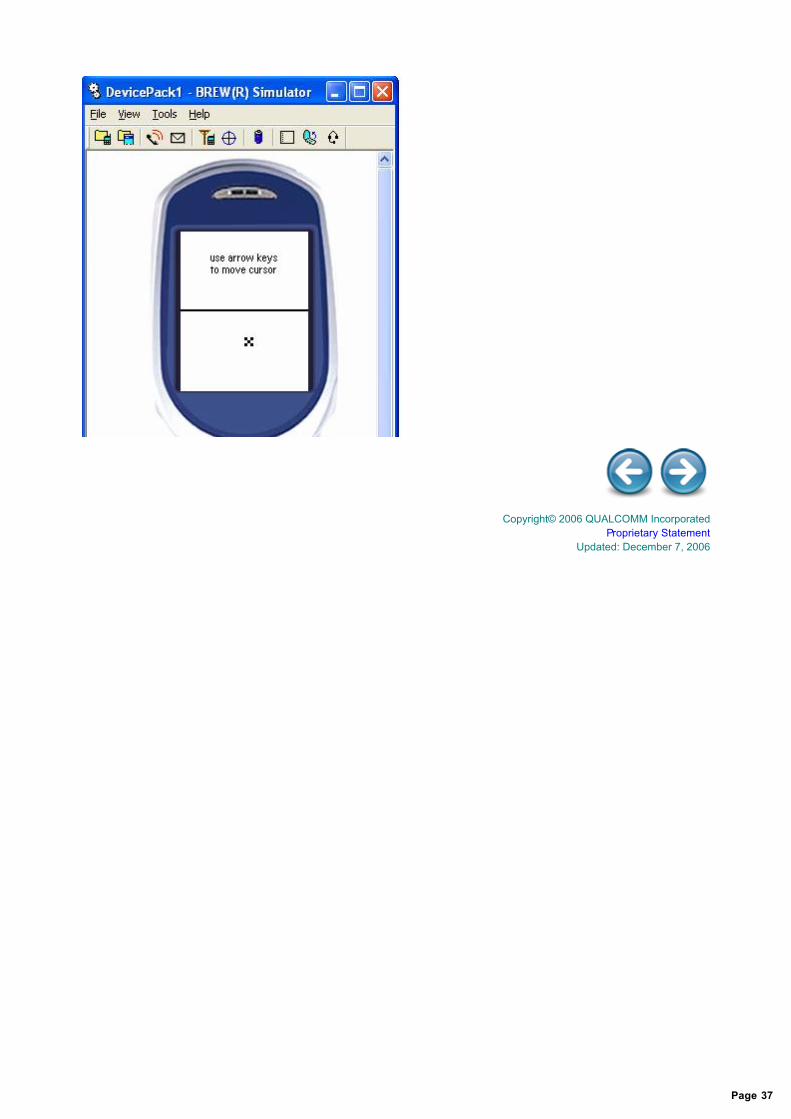
2. Save your work, compile and build your application, and test it in the Simulator.
The Simulator displays a myfirstapp application screen similar to the following.
3. Click the up, down, left, or right arrow keys to move the cursor around the bottom half of the screen.
Congratulations, you have successfully created a BREW application!
Copyright© 2006 QUALCOMM IncorporatedProprietary Statement
Updated: December 7, 2006
Page 39
BREW ® Programming Primer 3.1
Simulation Debugging
There are two primary strategies available for debugging program behavior in BREW. The first is to use theHelper function DBGPRINTF() for simple error-checking print statements; the other is to debug the applicationwith Visual Studio while it is running in the Simulator.
Break points: Debugging in Visual Studio
NOTE: Be sure to check that debug information is turned on in Visual Studio. Click Project > myfirstappProperties > Linker > Debugging > Generate Debug Info.
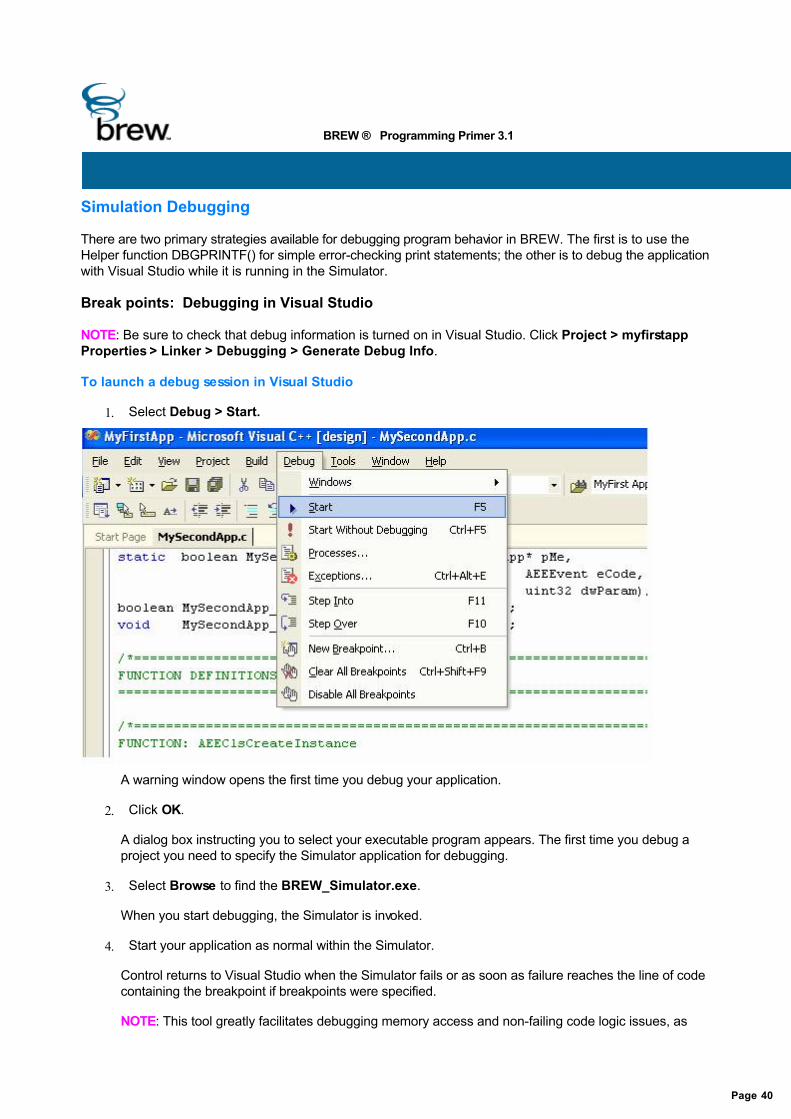
To launch a debug session in Visual Studio
1. Select Debug > Start.
A warning window opens the first time you debug your application.
2. Click OK.
A dialog box instructing you to select your executable program appears. The first time you debug aproject you need to specify the Simulator application for debugging.
3. Select Browse to find the BREW_Simulator.exe.
When you start debugging, the Simulator is invoked.
4. Start your application as normal within the Simulator.
Control returns to Visual Studio when the Simulator fails or as soon as failure reaches the line of codecontaining the breakpoint if breakpoints were specified.
NOTE: This tool greatly facilitates debugging memory access and non-failing code logic issues, as
Page 40

Visual Studio indicates exactly which line of code is responsible for the failure. To specify a breakpointright-click on the desired line of code and select Insert Breakpoint from the resulting pop-up menu.
5. If a breakpoint was specified and after the breakpoint is reached use Visual Studio's debugging toolsto inspect relevant variables and function call parameters. Review your code to diagnose the causesof your program's undesired behavior.
At this point it is assumed that you have successfully written myfirstapp and tested it on the Simulator.
Copyright© 2006 QUALCOMM IncorporatedProprietary Statement
Updated: December 7, 2006
Page 41
BREW ® Programming Primer 3.1
Learning BREW by Example
You can learn a lot by examining the applications of other BREW developers and observing how, within theboundaries of the BREW AEE, they successfully created BREW applications.
<BREWDIR\examples> directory
In the BREW SDK the <BREWDIR\examples> directory contains several sample applications written byin-house QUALCOMM developers. The sample applications demonstrate the use of many interfaces andcontrols commonly used in BREW application development. Each sample application includes the sourcecode as well as the files you will need to run the application on the Simulator.
BREW Sample Applications Guide
A quick way to access the Examples directory within Windows is to click Start > Programs > BREW SDK> BREW Examples.
The BREW Sample Applications Guide, accessed by clicking Start > Programs > BREW SDK >Documents > BREW Sample Applications Guide, examines five sample BREW applications.
In the Sample Applications Guide, read the descriptions of what these applications allow the device user todo, try them out on the Simulator to see how they really work, and look at the source code for each. Thesource code is heavily commented to aid in your exploration.
Copyright© 2006 QUALCOMM IncorporatedProprietary Statement
Updated: December 7, 2006
Page 42

BREW ® Programming Primer 3.1
BREW Forums
BREW Forums provides BREW developers a web site to discuss using BREW technical andbusiness-related solutions with other BREW application developers. Go to http://brewforums.qualcomm.com/
Copyright© 2006 QUALCOMM IncorporatedProprietary Statement
Updated: December 7, 2006
Page 43

BREW ® Programming Primer 3.1
BREW Training
QUALCOMM offers a variety of training packages designed to benefit developers, managers, and trainers. Formore information see the BREW web site.
Copyright© 2006 QUALCOMM IncorporatedProprietary Statement
Updated: December 7, 2006
Page 44
BREW ® Programming Primer 3.1
Handling SUSPEND and RESUME Events
It is important to include the EVT_APP_SUSPEND and EVT_APP_RESUME event handlers within yourapplication's HandleEvent function so that your application knows how to handle events that might interruptits operation. For example, when an SMS message or an incoming phone call is received, your applicationneeds to know whether it should resume where it left off at the end of the call or if it should start over.
When BREW suspends an applet it sends the EVT_APP_SUSPEND event. You can have BREW handle theevent in a couple of ways depending on the type of application you are developing.
1. You can set the applet to return TRUE to the event, indicating that the applet has processed theSuspend and has not been unloaded from memory. This is how myfirstapp works.
2. You can also have the applet return FALSE to the event, indicating that you do not want the applet toprocess the Suspend. When this occurs BREW sends an EVT_APP_STOP event and the applet isremoved from memory.
To test EVT_APP_SUSPEND and EVT_APP_RESUME with myfirstapp on the Simulator
1. Click Tools > Settings to open the Settings dialog.
When the dialog opens myfirstapp returns TRUE to Suspend operation.
2. Click Cancel to dismiss the dialog box.
Myfirstapp issues the EVT_APP_RESUME event and the cursor in the application remains in thesame position where you left it.
Copyright© 2006 QUALCOMM IncorporatedProprietary Statement
Updated: December 7, 2006
Page 45

BREW ® Programming Primer 3.1
Requesting New BREW Features
Do you have ideas for features that would make the BREW SDK more valuable and useful? Please send usemail at [email protected]. Each request is evaluated and a member of the New FeaturesResponse Team will respond to your email.
Copyright© 2006 QUALCOMM IncorporatedProprietary Statement
Updated: December 7, 2006
Page 46

BREW ® Programming Primer 3.1
Appendix
Additional information on device packs, BREW APIs, and BREW Extensions are included in the appendix.
Device Packs
BREW APIs
Extensions
Copyright© 2006 QUALCOMM Incorporated
Proprietary Statement Updated: December 7, 2006
Page 47
BREW ® Programming Primer 3.1
Device Packs
The Simulator is installed with a default set of device packs, QUALCOMM Skin Configurator (QSC) files,located in the Devices folder of your BREW installation. Additional device packs are available for download byauthenticated developers from the QUALCOMM BREW Devices page.
To change the device pack used by the Simulator
1. In the Simulator select File > Load Device.
2. Select a new device pack and click Open.
The Simulator's appearance is modified to reflect the specified device pack.
NOTE: Device packs allow you to test your application using the appearance and limitations of the intendeddevice, but they do not completely replicate the specific device environment. The Simulator and its devicepacks should not replace testing your application directly on the device. Many phones have known issuesthat are not reproduced in the Simulator.
Copyright© 2006 QUALCOMM Incorporated
Proprietary Statement Updated: December 7, 2006
Page 48
BREW ® Programming Primer 3.1
BREW APIs
BREW is a library of functions, Application Programming Interfaces (APIs), used to write applications formobile devices. To use the methods in a particular BREW API the corresponding header file must beincluded in your application.
To prevent the introduction of static and global data do not link standard C libraries to your BREWapplication. Standard C library routines such as strcat(), malloc(), and sprintf() cannot be used within BREW.
Helper functions are provided for the most commonly used C functions. See the BREW API Reference OnlineHelp for more details.
For any specific usage details on the various BREW APIs, consult the BREW API Reference.
Copyright© 2006 QUALCOMM IncorporatedProprietary Statement
Updated: December 7, 2006
Page 49

BREW ® Programming Primer 3.1
Extensions
Extensions are reusable components, which extend the BREW API. They can be thought of as softwarelibraries encapsulated as classes for use in applications that you and others develop. They are self-developedextended interfaces—classes defined by developers in modules, and are then shared with otherdevelopers. These modules are obtained when the classes are required. They are not used as a stand-aloneapplication; rather extensions are handled within the context of the application using the extension.
Copyright© 2006 QUALCOMM IncorporatedProprietary Statement
Updated: December 7, 2006
Page 50