bonny doon fused glass tools · pdf filebonny doon fused glass tools ... piece due to the high...
TRANSCRIPT

Bonny Doon Fused Glass Toolshttp://bonnydoonfusedglasstools.comPattern Bar Flow Technique(using our stainless forms!)
Start by making strips of glass and tac fusing them together. In this example I have cut strips 1” wide by 20” long. Tac fuse them together using this schedule. You can line them up close as they will not melt or move. If you have a small kiln....no worries. Just make them the lengths you can as you are going to slice them up anyway! Use 90 or 96.
Tac Fuse:300 degrees to 1300 degrees hold 10 min9999 (as fast as kiln will go) to anneal 900 (Coe 90) 950 (coe 96) 3 hour hold50 degrees an hour to 800 no hold100 degrees to 700 and off. Do not open....cool to room temp. This is alot of glass!!Slice them up on your wet saw and clean on sliced edges with a diamond pad or
scrubbie. Do not let them dry between slicing and cleaning. Drop in a bucket of water as you go! Only use fusable glass on these....any glass that will devitrify easily should not be used!!
Prepare your shelf with fresh kiln wash. Place your stainless steel ring on the shelf and line the inside edge with 1/8” fiber paper as shown in this picture. There are so many ways to
place your bars..... experiment! Take a before and after picture as I have done here! The more negative space that you have between your bar segments the more flow you will have.
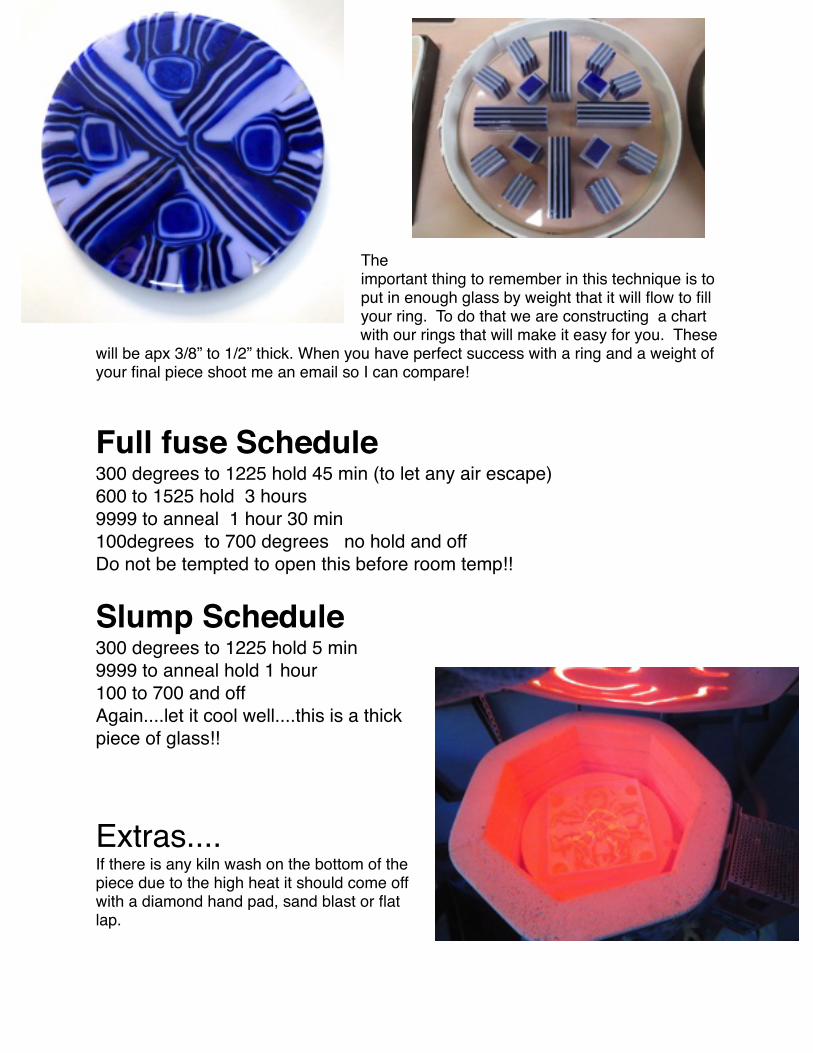
The important thing to remember in this technique is to put in enough glass by weight that it will flow to fill your ring. To do that we are constructing a chart with our rings that will make it easy for you. These
will be apx 3/8” to 1/2” thick. When you have perfect success with a ring and a weight of your final piece shoot me an email so I can compare!
Full fuse Schedule300 degrees to 1225 hold 45 min (to let any air escape)600 to 1525 hold 3 hours9999 to anneal 1 hour 30 min100degrees to 700 degrees no hold and offDo not be tempted to open this before room temp!!
Slump Schedule300 degrees to 1225 hold 5 min9999 to anneal hold 1 hour100 to 700 and offAgain....let it cool well....this is a thick piece of glass!!
Extras....If there is any kiln wash on the bottom of the piece due to the high heat it should come off with a diamond hand pad, sand blast or flat lap.

I have found if I place the pattern bars on the exterior at least 1/2” away from the fiber paper....when it flows out it does not have such a rough edge to deal with. Here is one that ended up with a slightly scalloped but beautiful smooth edge!
Pattern bars made in our formers can also be used in this technique! I am going to try a pot melt pattern bar in the next few days.
You can place a blank of color or clear glass onto your shelf and put your pattern bar pieces onto that. This eliminates the sticking kiln wash! Yeah!It also works well on shelf paper when using a full sheet of glass as the bottom layer. Do not use shelf paper if putting the pattern bars directly on the shelf as the movement will gather the paper into the glass.
When slicing patterns bars for this technique I like to make them at least 3/4 inch so they will have movement as you can see in the next picture. These were made in our 8” pattern bar former. Woweeeee!!! Thanks to Bullseye for this idea......one of the folks that work at Bullseye Emeryville that uses my rings turned me onto it.
Kiln getting prepared for loading. Fresh Bullseye kiln wash

3 layers liberally applied.....next picture 1/8” fiber paper on the insides of all the forms. Make sure it overlaps and is pressed against the shelf. I could add more forms and pack it tighter but it is alot of glass and I like to give it a little room!
On the load below I added a couple of stilts with a small shelf and a couple of pattern bars in our formers. Worked out great. Next load I will probably add 2 more!
This white orange pattern bar turned into the pattern bars above.


Here is a list of stainless steel formers that we make and use in our studio!!
Stainless Steel Rings, Squares and Pattern Bar FormersROUNDS!! All 1" deep6 ½” Round $24.008 1/2” Round $26.00 10 1/2” Round $28.0012 1/2” Round $32.0014 1/2” Round $38.00 SQUARES!! All 1" deep51/2" BY 51/2" Square $26.00 8 1/2" BY 8 1/2" Square $30.0010 1/2" BY 10 1/2" Square $34.00 12 ½” x 12 ½” Square $38.0014 1/2" BY 14 1/2" Square $40.00PATTERN BAR FORMERS!! All 2" deep 8” x 3 1/2” x 2” deep $34.10 x 31/2" x 2" deep $36.0012” x 3 1/2” x 2” deep $38.00 14” x 5” x 2” deep $44.00

How fun is this?????? Please let us know if you have enjoyed the information in this tutorial!!! Hope you will order some stainless steel formers soon!!!! send emails and orders to [email protected] or call 831-454-0103
Here is one that came out a few days ago......I will continue to add pics as these evolve!

Updating Aug 9th!
Here is a new group of bars. Each one is around 24” ling by 1” wide stacked in 6, 8, 10 high stacks.....tack fused according to the schedule above.I have just loaded the kiln. A full kiln load only took around 1/3 of the bars that I made.....This load I decided to use Bullseye shelf paper with a full sheet of glass on the bottom of each piece after putting 1/8” fiber in the stainless steel formers.
Here is a shot of the loaded kiln. There are also 2 of our pattern bar formers loaded up with scrap......We like to use all the space in every load. Now a prayer to the Kiln Gods!Please shoot me an email if you are following this so that I can judge the interest!! [email protected]
I will post pics tomorrow am when I open the kiln!


Update 8/10/2013
Finally....still to warm to remove but here they are....I will post more pics late todayI learn something in every load...... This load I held for 2 hrs at top temp...all nice and smooth except for a couple of popped air bubbles which are always frustrating....The next step is to clean them up and decide if I want to add more glass, fire polish, slump or what.
When I take these out of the kiln.....I carefully hold the steel and the 1/8” fiber paper together lifting them leaving the glass on the shelf. I then place them on a flat side table......Then I can reuse the fiber paper 3-4 times if I am very gentle. I liked firing these on shelf paper so far.....backs are clean. You can only do that if you use a solid pice of glass under the pattern bars.please email me if you are following this just so I will know I am not talking to myself....as that can be sort of scary!!! :)
this was one of my favorites today....
8/10Sooooo...the saga continues. Being someone who wants perfection I decided to refire a few of the pieces. Here is
todays load with some from yesterday with new elements and some new.Filled the pattern bars up again and again have surrendered myself to the kiln Gods!

I was able to use all of the 1/8 fiber paper again except on the pattern bars which made loading so easy. I did clean them up well before reloading, new shelf paper......and still have plenty of bars left for at least 2 more loads. I am starting this load slow 150 degrees an hour to 800 (cracking stage) and then I will resume the schedule above.Here are individual pics...so many experiments to do!


Update 8/12Great result from second firing
These have not been cleaned up yet but I thought I would post for those of you who are anxious!!


For those of you watching my Pattern Bar Flow tutorial .....I just added these....Since this piece is a special order for a tray....I decided to take 4 of the 1" blocks of the pattern bar that were left over.....cold worked them....and they will go in one of the next loads as a fire polish. Perfect feet!!
New Load 8/25/2013First let me tell all of you that have asked.......Here is the saw I am using although I did find the stand too low so I have it on a work table. It is the Qep 61024 24 inch Brutus Tile saw.The only issue I am having with it at this point is I need to add grease to the table slide to make it slide easier. It does need to be outdoors too. Quite a bit of splash.

Here are the new pictures for the load that I made yesterday. This time I used the tilt on the saw and cut alot of the bars on a 45 degree angle. We shall see how they turn out! It will take all day for this kiln to cool so the finished pics will be up Mon 8/26.
The 4 stilts are in there for a second shelf that I added that is full of pattern bars.

As you can see, I like to use all the space I can. When you use stainless steel in a firing such as this not only is it much quicker to load but you never have to worry about a dam collapsing.On this load I held at the top temp for 3 hours. we will see what difference it makes.

I am particularly interested in these....I know they will not be clean diamonds.....they will soften a lot....but I can’t wait to see.on this next on I added white triangles 2 high and 3 circles in the center to help retain some of the design. Now the WAIT!! Let me know by email
if you are watching! [email protected]

Here are the shots of the kiln 8/26 - Pattern bars will be sliced and for sale later today. Send me an email for first [email protected]
Favorite of the day. Can’t wait to do it in other color combos


below....Boring.....these colors just do not sing to me.....

this one will be going back in for more umph!
SO!!!!! I am trying to decide whether I should continue the pic/results thing. Please let me know via email if you want me to so I can see how many are reading this! It is quite a bit of work in my busy day! never enough hours.

Here are a couple of the pattern bars from this load.....