blood hemolysis detector - ultimaker: 3d printers user manaual.pdf · blood hemolysis detector user...
TRANSCRIPT

Blood Hemolysis Detector
User Manual
Written by: Kayla Marquis, Jordan Seekins,
Hanna Anderson, Marie-Louise Doe
April 2017

2
Table of Contents
OVERVIEW ................................................................................................................................................................ 3
GETTING STARTED ................................................................................................................................................ 4
CONTENTS IN BOX ....................................................................................................................................................... 4
ADDITIONAL SUPPLIES OR EQUIPMENT NECESSARY FOR OPERATION ..................................................................... 5
SETUP ......................................................................................................................................................................... 6
MICROFLUIDICS SETUP ............................................................................................................................................... 6
OPTICAL UNIT SETUP ................................................................................................................................................. 6
LABVIEW CALIBRATION ............................................................................................................................................ 7
PHONE APPLICATION SET-UP .................................................................................................................................... 7
OPERATION .............................................................................................................................................................. 9
SAMPLE SEPARATION ................................................................................................................................................. 9
OPTICAL ANALYSIS-LABVIEW UNIT ..................................................................................................................... 11
OPTICAL ANALYSIS-PHONE CAMERA ASSEMBLY................................................................................................... 13
MAINTENANCE ..................................................................................................................................................... 15
CLEANING .................................................................................................................................................................................... 15
PART REPLACEMENT.................................................................................................................................................................. 16
TROUBLESHOOTING .......................................................................................................................................... 16
MICROFLUIDICS .......................................................................................................................................................................... 16
OPTICS .......................................................................................................................................................................................... 16
SPECIFICATIONS .................................................................................................................................................. 16
MICROFLUIDICS .......................................................................................................................................................................... 16
OPTICS .......................................................................................................................................................................................... 16
SCHEMATICS ......................................................................................................................................................... 17
OVERALL SYSTEM ....................................................................................................................................................................... 17
MICROFLUIDIC CHANNEL .......................................................................................................................................................... 18
CIRCUIT SCHEMATIC .................................................................................................................................................................. 18
LABVIEW BLOCK DIAGRAM .................................................................................................................................................... 19
BREADBOARD CIRCUIT .............................................................................................................................................................. 19
OPTICAL ANALYSIS CHAMBER ................................................................................................................................................. 19
PHONE FILTER ATTACHMENT .................................................................................................................................................. 20
SAMPLE CARTRIDGE HOUSING ................................................................................................................................................. 21
GLOSSARY OF TECHNICAL TERMS ................................................................................................................ 23

3
Overview

4
When red blood cells rupture, free hemoglobin is released. If not immediately detected,
severe health complications such as acute kidney or heart failure could result. Traditional free
hemoglobin detection methods require blood to be mixed with chemicals as well as the use of
expensive detection equipment. For a fraction of the time, money, and sample size of
conventional methods, this point-of-care hemolysis detector will indicate the concentration of
free hemoglobin while maintaining the integrity of the blood sample.
This hemolysis detector consists of a blood plasma separator and an optical detector. The
plasma separator uses a microfluidic system to isolate the plasma from the red blood cells. Free
hemoglobin is contained in the plasma, permitting efficient detection using a photoresistor and
LED to determine the concentration of free hemoglobin in the sample. A second option for
optical analysis for a mobile phone is also provided, where a phone analysis unit and instructions
for the ImageJ analysis software are included.
Getting Started
Contents in box
● Microfluidic chamber with connected tubing and luer lock fittings
● 3mL luer lock syringe
● Glass slide capillary tube
● Optical analysis chamber with cover and circuitry in breadboard

5
● Hemolysis Analyser LabView VI disc
● Phone analysis unit:
○ Phone filter attachment
○ Sample cartridge housing
Additional supplies or equipment necessary for operation
● Syringe pump
● Amazing Goop, or other waterproof sealant
● 70% ethanol cleaning solution
● Computer
● NI myDAQ console, terminal connector and USB cable
● Set of calibration slides
● Galaxy S7 Edge cellphone
● LabVIEW
● ImageJ
● Microsoft Excel or other spreadsheet program

6
Setup
Microfluidics Setup
1. No setup is required.
Optical Unit Setup
1. Attach the breadboard wires into the black NI myDAQ terminal connector by securing
them into the indicated channels.
Green: +15V Yellow: AGND (AO) Orange: 0+(AI +/-10V) Red: 0 (DIO 0-5V) Brown: DGND
2. Connect the NI myDAQ console to computer.
3. Open the LabView VI titled Hemolysis Analyzer from the disc provided.

7
LabVIEW Calibration
1. Run LabView VI by clicking the arrow in the toolbar.
2. Turn LED on by pressing “LED On/Off” button.
For this part, disregard instrument hemolysis indications
3. Insert 0 mg/mL calibration slide into analyser.
4. Record the voltage shown in the “Calibration Control Panel.”
5. Do this for remaining 5 calibration slides.
6. Using Excel, plot the voltage vs. the concentration.
7. Fit a linear trendline to the data.
8. Input the slope and y-intercept of this line into the controls in the calibration panel.
9. VI will now display concentration data based on the calibration line determined.
Phone Application Set-up
1. Slide the phone filter attachment over the top half of the phone.

8
2. Make sure the slots for the camera and flash are aligned properly.
3. Attach the sample box to the device.

9
Operation
Sample Separation
1. Acquire blood sample, minimum of 100𝜇𝐿
2. Put blood sample in 3 mL luer lock syringe
3. Attach syringe luer lock to tubing
4. Insert the red blood cell outlet tubing into a small collection container.

10
5. Put plasma outlet tubing into contact with glass slide capillary tube to fill with plasma.
6. Set syringe pump flow rate to 25 mL/hr to initiate whole blood separation.
7. Once slide reservoir is full stop syringe pump.
8. Seal the slide assembly with waterproof sealant to prevent leakage of sample.
9. Choose LabVIEW unit or phone camera optical analysis.

11
Optical Analysis-LabVIEW Unit
1. Once the Hemolysis Analyzer VI is open and calibration is complete, use the ‘Threshold
Concentration’ control on the VI front panel to input a desired threshold value for hemolysis
concentration (omit units when entering; program reads as mg/dL).
2. Insert sealed capillary slide containing the plasma sample in the slot of the optical analysis
chamber.

12
3. Place the chamber cover over the sample to block out external light.
4. Press the white arrow in the top lefthand corner of the VI front panel, indicated here by the red
circle, to run the analysis.
5. Press the ‘LED On/Off’ button to turn on the LED in the chamber.
6. Allow analysis to run until result is displayed in the ‘Sample Concentration’ box, indicating
the concentration of hemoglobin in the sample (mg/dL).

13
7. If sample concentration is equal to or higher than the threshold value input in (1), the green
‘Normal Sample’ indicator will turn off, and the red ‘Hemolyzed Sample’ indicator will turn on.
8. Press the red ‘STOP’ icon to halt the VI when sample has been analyzed.
Optical Analysis-Phone Camera Assembly
1. Insert sample slide into slot on the right side of the sample cartridge housing.
2. Photograph sample slide with phone’s integrated camera application.
3. Transfer image to computer and open file in ImageJ.
4. Go to Image > Open and select appropriate picture.

14
5. Go to Analyze > Set Measurements > select Mean gray scale.
6. Make sure “Mean Gray Value” is selected. Click “OK” to close menu.
7. Using a selection tool, select sample area in image.

15
8. Go to Analyze > Measure. Mean Gray Value will be displayed in pop-up box.
9. Use calibration curve to determine sample concentration.
Maintenance
Cleaning
1. Clean microfluidic portion of device by rinsing with 70% ethanol, run rinse to remove color
and then continue rinsing for 1 minute after to ensure complete cleaning.

16
2. Following cleaning with 70% ethanol, rinse system with 1x phosphate buffered saline.
3. When the microfluidic chamber becomes discolored it will need to be discarded and an
additional unit ordered.
Part replacement
● Refer to Specifications-Optics for part details if replacement becomes necessary.
● Contact manufacturers if new 3D-printed parts are needed.
Troubleshooting
Microfluidics
● If microfluidic separation is blocked or leaking, replace with new component.
Optics
● If LabVIEW VI doesn’t run upon initiation of the Hemolysis Analyzer program, check
that both the terminal connector on the NI myDAQ console and the USB cable are
secured properly.
● If a higher than reasonable concentration occurs, ensure that the LED control has been
clicked to the ‘ON’ position, indicated by a green icon on the dashboard.
● If the above problem occurs but the LED is visibly on, check the connection of the
photoresistor. Photoresistor may need to be replaced (see specifications below).
Specifications
Microfluidics
● Minimum blood sample size: 100𝜇𝐿
● Maximum blood flow rate: 25 mL/hr
● Tubing size: 0.020” Inner Diameter x 0.060” Outer Diameter x 0.020 Width
● Materials:
○ Tubing: polytetrafluoroethylene (PTFE)
○ Microfluidic channel: polydimethylsiloxane (PDMS)
○ Adhesive for tubing microfluidic channel connection: Gorilla Clear Epoxy
Adhesive
Optics
● Optical Analysis Chamber:
○ 3D-printed polylactic acid (PLA) chamber
■ Dimensions:
○ Photoresistor: 10k-200k @ Illuminance

17
■ P/N: PDV-P9008-ND
■ Luna Optoelectronics
○ Light-emitting diode: LEDWE-15 Ultra-Bright White LED
■ Thor Labs
■ Center Wavelength Tolerance (CWL): 440-660nm
■ Total Optical Power: 13.0 mW at 20mA
○ Breadboard:
○ 500k Ohm Resistors
○ 50k Ohm Resistors
● Hardware and Software:
○ Labview NI 2013 or newer required, National Instruments
○ NI myDAQ compatibility and software
● Phone Specifications:
○ Samsung Galaxy S7 Edge
Schematics
Overall System

18
Microfluidic Channel
Circuit Schematic
19
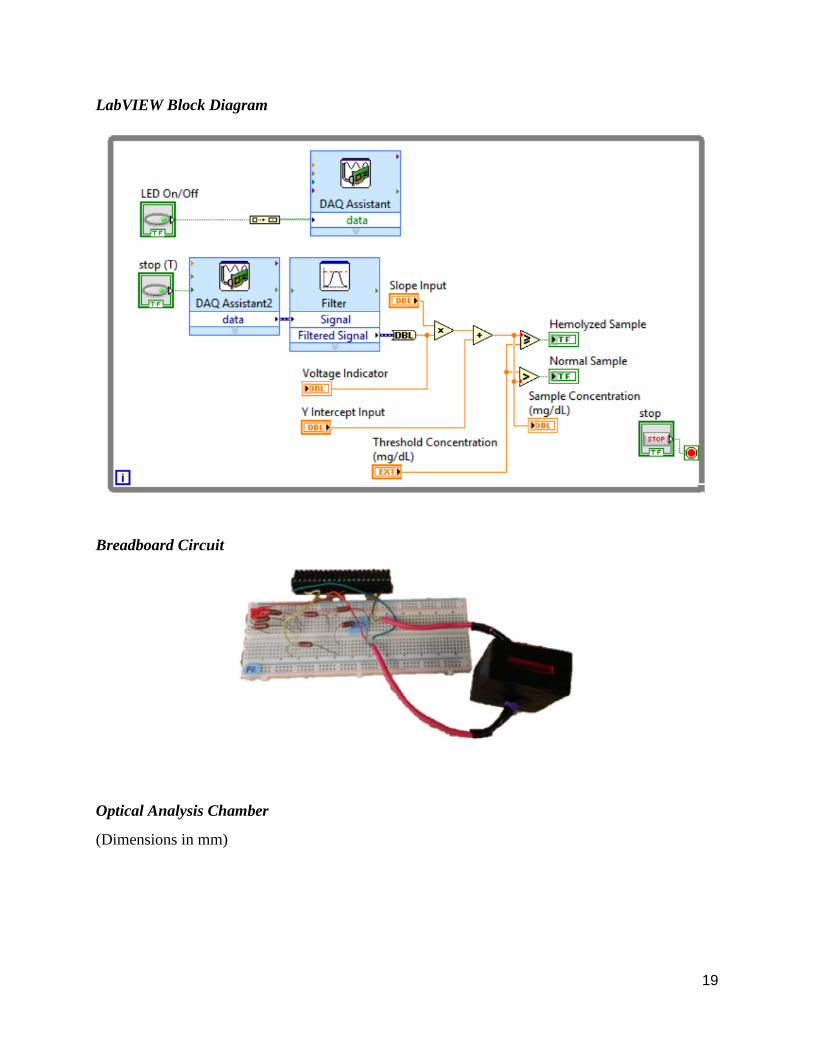
LabVIEW Block Diagram
Breadboard Circuit
Optical Analysis Chamber
(Dimensions in mm)

20
Phone Filter Attachment
(Dimensions given in mm)

21
Sample Cartridge Housing
(Dimensions given in mm)

22

23
Glossary of Technical Terms
● Absorbance - Ability of a material or substance to absorb light.
● Bandpass - A type of filter that permits the transmission of one wavelength with a
narrow surrounding range indicated by the center wavelength tolerance.
● Blood plasma - Yellowish colored liquid component of blood that aids in the suspension
of the red blood cells in whole blood. Makes up about 55% of the total blood volume.
● Breadboard - A board for making an experimental circuit.
● Calibration curve - Method for determining the concentration of an unknown sample
based on known values.
● Free hemoglobin - When red blood cells rupture, hemoglobin is released, or ‘freed’. Free
hemoglobin is very reactive outside the red blood cells, potentially resulting in harmful
bodily reactions and processes.
● Hemoglobin - Contained within red blood cells.
● Hemolysis - The rupturing of red blood cells that releases the cellular contents into the
plasma.
● Luer lock - Type of tubing connection, useful for fast connections and disconnections.
● LED - Light-Emitting Diode.
● Microfluidics - The movement of fluids through a microscopic system.
● Microfluidic separation chamber - Aids in separation of red blood cells and plasma by
varying channel dimensions and angles.
● Photoresistor - A resistor where the resistance changes depending on the intensity of the
surrounding light.