blaze ez quick start guide - amazon s3€¦ · music button ocr button book button radio button...
TRANSCRIPT
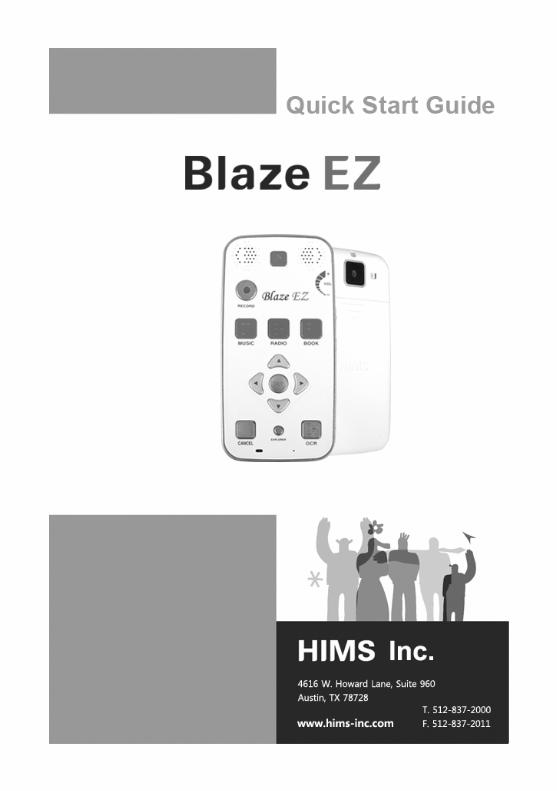
Quick Start Guide – Blaze EZ
II
- Table of Contents -
1. What’s in the box? ................................................................ 1 2. Physical description .............................................................. 1
2.1. The Top Face ................................................................. 1 2.2. The Right Edge .............................................................. 3 2.3. The Left Edge ................................................................. 4 2.4. The Bottom Edge ........................................................... 4 2.5. The Back Face ............................................................... 4
3. Inserting and Removing the Battery ..................................... 5 4. Inserting and Removing the SD Card. .................................. 5 5. Connecting to a PC ............................................................... 6 6. Powering On/Off ................................................................... 7 7. The Home Menu ................................................................... 8 8. Basic Interface and Programming ........................................ 9
8.1. Recording ....................................................................... 9 8.2. Music .............................................................................. 9 8.3. FM Radio ...................................................................... 10 8.4. Books ........................................................................... 11 8.5. OCR ............................................................................. 12
9. Web-based Programming ................................................... 12 9.1. Online DAISY ............................................................... 12 9.2. Podcasts ...................................................................... 13 9.3. Web Radio ................................................................... 14
10. Checking Date and Time .................................................. 15
Quick Start Guide – Blaze EZ
III
Introduction
This Quick Start guide gives you a basic orientation to your Blaze EZ, shows you how to connect and charge the battery, how to turn the unit on and off, how to access programs on the unit and how to prevent the accidental pressing of buttons.
This is a basic guide to help you get oriented to the unit and get you started using the basic programming. Please refer to the full user manual for more detailed information on the functions of the Blaze EZ.
Quick Start Guide – Blaze EZ
1
1. What’s in the box? Your Blaze EZ packing box should contain all of the following items:
1) Blaze EZ 2) Rechargeable battery pack 3) AC adapter 4) USB cable for connecting Blaze EZ to a PC 5) USB Gender adapter for connecting USB drives to Blaze
EZ 6) Headphones 7) Carrying pouch 8) Lanyard 9) Quick Start Guide in print and Braille. 10) Documentation CD
2. Physical description Place the Blaze EZ in your hand or on a desk or table top in front of you so that the keypad is facing up and the long rectangular slot on the side of the unit is facing left.
2.1. The Top Face The top face of the unit contains the main keypad. At the top center is a slightly recessed square button. This is the Power On-Off button. To the left and right of the Power button are the stereo speakers. Below the Power button, toward the left is a round button. This is the Record button. Below the Record button is a row of 3 square buttons with Braille labels. From left to right these buttons are the Media button, the Radio button, and the Books button. These buttons open the Media Player, the FM Radio, and the Book Reader respectively.

Quick Start Guide – Blaze EZ
2
Below the program buttons is a circular navigation pad containing 5 keys: the Left, Right, Up and Down arrows, and a small round button in the center which is the Select button. Below the navigation pad is a row of 3 buttons: 2 square buttons with a dot-like button between them. The square button on the left is the Cancel button. The Square button on the right is the OCR button. The dot-like button between them is the Explorer button. The Explorer button brings up a list of files associated with the currently open program. For example, if you have the BOOK reader opened, pressing the explorer button will bring up a list of DAISY books and documents readable by the Book Reader. The Cancel button is used to exit a program, menu or dialog.
<The Top Face>
Music Button
OCR Button
Book Button
Radio Button
Record Button
Power On/Off Button
Navigation Pad
Cancel Button
Explorer Button

Quick Start Guide – Blaze EZ
3
2.2. The Right Edge The right side of the unit contains 3 controls. Nearest the top of the unit is the volume dial. Turn the dial away from you to increase the volume, and turn it toward you to decrease it. As you adjust the volume, you will feel the dial click past each setting, and the unit announces the volume level as a number. Below the Volume dial is the Voice Control button. The Voice Control button allows you to quickly access Speed, volume, and pitch settings for the TTS. Cycle through the settings with repeated presses of the Voice Control button, and use the Volume dial to adjust the chosen setting. Below the Voice Control button is the Keylock switch. Place the Keylock switch in the down position to lock the keyboard and in the up position for normal operation.
Volume Dial
Reset Button
Key lock Switch
Voice control Button
<The Left and Right EDGE>
SD card slot
Quick Start Guide – Blaze EZ
4
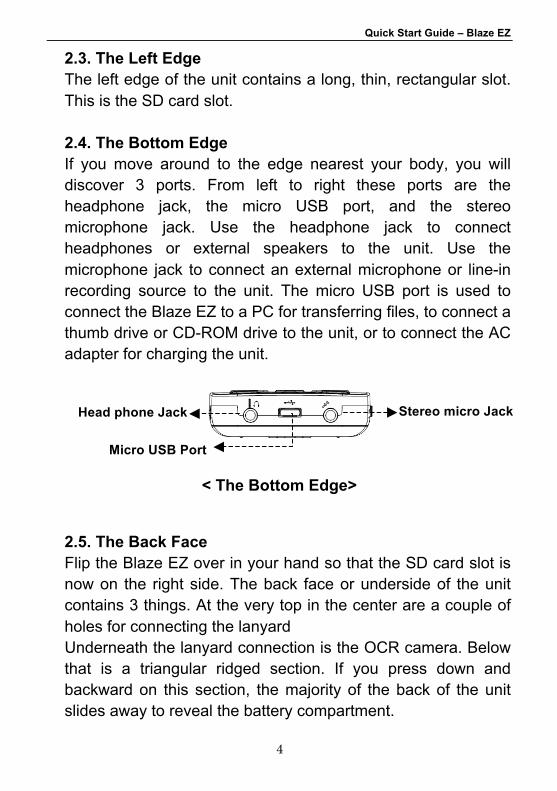
2.3. The Left Edge The left edge of the unit contains a long, thin, rectangular slot. This is the SD card slot. 2.4. The Bottom Edge If you move around to the edge nearest your body, you will discover 3 ports. From left to right these ports are the headphone jack, the micro USB port, and the stereo microphone jack. Use the headphone jack to connect headphones or external speakers to the unit. Use the microphone jack to connect an external microphone or line-in recording source to the unit. The micro USB port is used to connect the Blaze EZ to a PC for transferring files, to connect a thumb drive or CD-ROM drive to the unit, or to connect the AC adapter for charging the unit.
2.5. The Back Face Flip the Blaze EZ over in your hand so that the SD card slot is now on the right side. The back face or underside of the unit contains 3 things. At the very top in the center are a couple of holes for connecting the lanyard Underneath the lanyard connection is the OCR camera. Below that is a triangular ridged section. If you press down and backward on this section, the majority of the back of the unit slides away to reveal the battery compartment.
< The Bottom Edge>
Head phone Jack
Micro USB Port
Stereo micro Jack

Quick Start Guide – Blaze EZ
5
3. Inserting and Removing the Battery As described above, you can access the battery compartment by sliding the back off of the unit. With the keypad facing down and the SD card slot facing to the right, locate the triangular ridged section under the camera on the back of the unit. Press down and backward on the triangular ridge to release and slide the back away from the unit.
To insert the battery pack into the unit, hold it so that the edge with the small ridge is facing toward you with the ridge on the left. You should also notice a small dot near the bottom left corner of the top surface of the battery. Place the ridged end into the bottom of the battery compartment first, then gently press down on the top of the battery to secure it in place. Slide the back casing on to the unit and click it into place.
To remove the battery pack, slide the back casing off of the unit. Place your fingernail between the top of the battery pack and the edge of the compartment and lift the battery up and out.
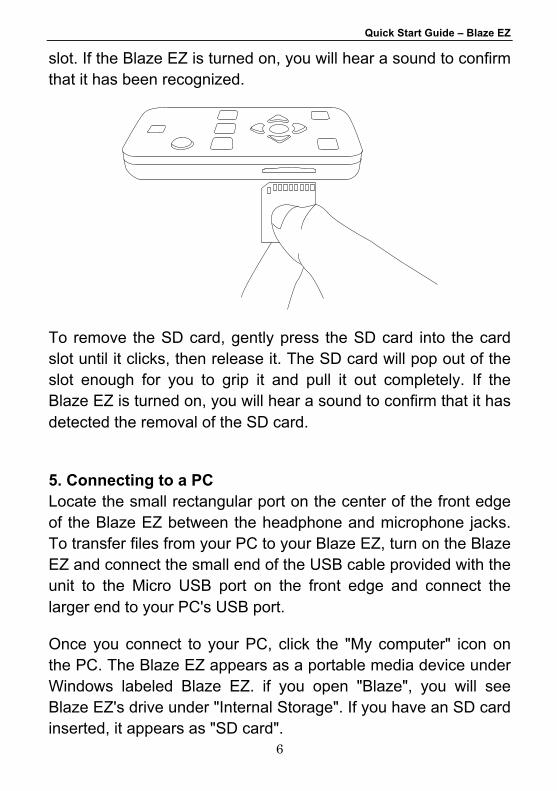
4. Inserting and Removing the SD Card. With the keypad facing you, locate the long rectangular slot near the bottom of the left edge.
To insert the SD card, locate the corner of the SD card that is cut at a 45 degree angle. Place the SD card so that this cut corner is at the top right when you insert the card into the SD slot. The surface of the label should be face down. Gently press the SD card into the slot until it clicks into place. Do not use excessive force. Only slight pressure is required to insert the SD card in the
Quick Start Guide – Blaze EZ
6
slot. If the Blaze EZ is turned on, you will hear a sound to confirm that it has been recognized.
To remove the SD card, gently press the SD card into the card slot until it clicks, then release it. The SD card will pop out of the slot enough for you to grip it and pull it out completely. If the Blaze EZ is turned on, you will hear a sound to confirm that it has detected the removal of the SD card.
5. Connecting to a PC Locate the small rectangular port on the center of the front edge of the Blaze EZ between the headphone and microphone jacks. To transfer files from your PC to your Blaze EZ, turn on the Blaze EZ and connect the small end of the USB cable provided with the unit to the Micro USB port on the front edge and connect the larger end to your PC's USB port.
Once you connect to your PC, click the "My computer" icon on the PC. The Blaze EZ appears as a portable media device under Windows labeled Blaze EZ. if you open "Blaze", you will see Blaze EZ's drive under "Internal Storage". If you have an SD card inserted, it appears as "SD card".

Quick Start Guide – Blaze EZ
7
You may copy and organize documents, media, DAISY books and scanned images in whatever way makes the most sense to you. The Blaze EZ will locate playable content no matter where it resides on the disk and index it and make it available for the associated programs.
6. Powering On/Off To power on the Blaze EZ, press and hold the Power button for 2 seconds. The first time you insert the battery or connect AC power to the Blaze EZ, the unit automatically boots with a short beep followed by a musical flourish with "HIMS" spoken. After this, progress beeps are heard, followed by the power on sound.
Next, the unit announces, "Scanning disk" and the unit scans the internal flashdisk as well as any storage device currently connected for content playable by Blaze EZ. As stated in the previous section, it is not necessary to place content in any set folder structure as this process will scan and index all playable content on all storage devices and make it available for its associated program. After a few seconds, the unit announces "Scanning complete".
You are placed at the Home Menu, described in the next section. To power off Blaze EZ, press and hold the Power button again for 2 seconds. The power down sound is heard, and the unit is powered off.
After the initial boot sequence described above, you can power the unit on and off quickly by pressing and holding the “Power” button and the unit will power on at the Home menu. However, if the battery is depleted, or the unit is reset, the Blaze EZ will go through the more lengthy boot process described above.

Quick Start Guide – Blaze EZ
8
7. The Home Menu When you power on the unit, you are placed in the Home Menu. You can also get to the Home Menu by pressing Cancel when in a program. The Home Menu contains a combination of things including status information, settings, and executable programs not accessible via the program buttons. You can navigate among the items in the Home Menu using the Left and Right arrows. Press the Select button to activate the focused item in the menu.
The Home Menu contains the following items: Date and Time, Battery Status, software version and Free Space, Guide Voice Settings, Record Settings, Bluetooth status, Wi-Fi status, Online DAISY, Web Radio, Podcasts and Utilities.
Pressing "Select" on the Software version/Free Space item will bring up more detailed information about the unit, including serial number and Mac Address.
In areas where it is necessary to input data, such as entering a Wi-Fi network key, enter the data using the following method:
1) Use the Up and Down arrows to choose the keyboard type: upper case letters, lower case letters, numbers, or symbols.
2) Use the Left and Right arrows to choose the character to enter.
3) Press "Select" to input the character.
4) Press the “Record” button to delete a character, and press the “Explorer” button to read the content of the edit box.
5) Press and hold "Select" when you are finished entering text.
Quick Start Guide – Blaze EZ
9
8. Basic Interface and Programming Much of the programming on the Blaze EZ is easily executable via dedicated buttons.
8.1. Recording Press the round button below and to the left of the Power button to record and access saved recordings. A quick press of the Record button brings up a list of recordings saved on the unit. To make a new recording, press and hold the Record button for 2 seconds. You will hear a chime indicating recording has started. While recording, you can press the Record button to pause and resume recording. When you are finished recording, press the Select button. The recording is saved, and you are placed at the location from which you initiated recording. To delete a recording, from the recordings list, press and hold the "Cancel" key. 8.2. Music Below the record button are 3 square buttons as described in section 1. The button on the left, labeled with an m in Braille opens the Media Player. If you have played media files previously, the last file you played begins playing. If you have not played media files, the first media file in your collection begins playing. While playing media files, the same Media button that opened the Media Player serves as the Play/Pause key. During Playback you can change speed and pitch by pressing the Voice Control button to change which setting is being adjusted, then use the Volume dial to adjust the setting. Note: after a few seconds, the Volume dial will return to its normal

Quick Start Guide – Blaze EZ
10
operation of adjusting the volume. You will know this has occurred when you hear a short beep. During playback, you can also move by various navigation elements including various time frames as well as numbers of tracks and marks if they exist. Use the Up and Down arrows to choose the element to move by, then use the Left and Right arrows to move back and forward by the chosen element. While a file is playing or paused, press the "Select" button to bring up the Mark Manager. in the mark Manager, you can insert Bookmarks, Voice marks, and highlight marks. You can also move and delete marks. To choose a specific file or folder to play, press the dot-like button in the center of the bottom row. This is the Explorer button and brings up a list of all the files and folders on all storage devices connected to the Blaze EZ containing media content. Use the Right and Left arrows to enter and exit folders respectively, and use the Up and Down arrows to move through a folder or file list. Press the Select button to start playing a file or folder. Press the "Cancel" button to exit the Explorer and return to the Media Player. Press and hold "Cancel" to delete a file or folder. From media playback, to return to the Home Menu, press the Cancel key. Or, you may switch to another program using the button associated with that program. 8.3. FM Radio On the row of square buttons above the navigation pad, press the center button with the label r in Braille to open the FM Radio. Use the Left and Right arrows to scan back and forward by 0.1 MHz for radio stations. Note: You must have headphones connected to use the FM radio as the cord serves as the antenna.
Quick Start Guide – Blaze EZ
11
To auto scan back and forward for radio chanells, press and hold the Right or Left arrow. To adjust scanning sensitivity, press and hold the Up or Down arrow. To set the current station as a preset, press "Select". Use the Up and Down arrows to move among your presets. To mute and unmute the sound of the radio, press the "Radio" (R) button while the radio application is open. To switch between the headphones and internal speakers of Blaze EZ, press and hold the "Radio" (R) button. 8.4. Books The button on the right of the row of square buttons is labeled with a b in Braille and opens the book reader. The book reader reads DAISY books and document files. If a book or document has been opened, when you press the Books button, reading resumes at the position you last left the Book Reader. If you have not opened any books or documents since your last reset, you are placed in the list of available books and documents. You can also access the list of books and documents available on the unit by opening the Book Reader and pressing the Explorer button. As with the Media Player, once playback of a book or document is started, the Books button serves as the Play/Pause button. You can also use the Voice Control button and the Volume dial to adjust speed and pitch of the reading voice. Use the Up and Down arrows to cycle through the various navigation elements for the book or document, and use the Left and Right arrows to move by the chosen element. Use the “Explorer” button to open a list of the documents and DAISY books on the Blaze EZ.
Quick Start Guide – Blaze EZ
12
8.5. OCR To open the OCR program, press the square button on the bottom right corner of the keypad labeled with an o in Braille. You are presented with a list of options: "Take a picture", "Flash on/off", "Result", "Open captured file", "Open an external file" and "Options". You are automatically placed on "Take a picture". Thus, you may quickly take a picture from anywhere on the unit by pressing the OCR button followed by the Select button, or by pressing the OCR button twice. For best results, use your elbow or some other method to ensure the camera remains stable and still. Raise the camera about a foot above the text you intend to scan and get as close to the center of the page as you can. Note: when scanning small items such as business cards or half sheets of paper, you will need to lower the camera closer to the text. When you select the "Take a picture" option, the camera obtains focus, and the picture is taken. The OCR program automatically recognizes text and begins reading it aloud. A TXT copy of the recognized text as well as a JPG of the image are automatically saved in the unit. You can access the JPG images using the "Open captured file" option. The text copies of the recognition results are available under the "result" option. You may also access them in the Book Reader as all text files on the unit are available there. You can also open image files from other locations on the unit and have them recognized by the OCR program using the "Open an External file" option. Use the "Options" dialog to set options for how OCR scans are processed and saved.
9. Web-based Programming
9.1. Online DAISY From the Home menu, navigate to "Online DAISY" using the

Quick Start Guide – Blaze EZ
13
Left or Right arrow and press the "select" button to open it. You are placed in the ID and Password dialog. Type the ID and password using the method described in section 7. When you are logged in, you are placed in a combo box with the options "Expired", "New", and "Issued". You can navigate among the items using the Left and Right arrows. Press the Down arrow to view the items in your chosen book list. Press select on an item to get information for the book or to download it. Use the left and Right arrows to move between “File information” and “Download File”, and press “Select” to choose your option. Once the item is downloaded, you may play it in the Blaze EZ's Book Reader.
9.2. Podcasts From the Home menu, use the Left or Right arrow to navigate to Podcasts, and press the "Select" button. The Blaze EZ announces, "Updating Feeds" and places you in the list of feeds you have saved on the unit. Blaze EZ comes preloaded with 24 default podcasts covering several genres. You can import feeds to the unit by copying OPML files in to the "Podcasts" folder of the Blaze EZ when it is connected to a computer. When in the feed list, press the Left and Right arrows to navigate among the feeds. Press the "Select" button on a feed to update it. To get a list of podcasts available for the feed, press the Down arrow. When in the podcasts list, use the Left and Right arrows to navigate among the podcasts. As you move between podcasts, the name of the podcast is announced followed by "Not downloaded", "Not played", “Partially played” or "played" to indicate its status. If you press "Select" on a podcast that is "Not downloaded", the podcast will be downloaded to your

Quick Start Guide – Blaze EZ
14
Blaze EZ. If you press "Select" on a podcast that is listed as 'Not played" or "Played", the Blaze EZ opens the Media Player and begins playing. You can interact with and navigate podcast files as you can any other media file on the unit. Podcasts are also available when viewing the Explorer from the Media Player. To delete a feed or podcast, when it is in focus, press and hold the “Cancel” button.
9.3. Web Radio To save internet radio stations to Blaze EZ, connect Blaze EZ to your computer, and copy Web radio playlist URL's to the Web radio folder. To open the Web Radio application, go to the Home menu and press the Left or right arrow to navigate to "Web Radio" and press "Select". When the Web radio application is launched, it scans for internet radio station playlist URL's in the Web Radio folder. Blaze EZ announces, "Creating channel list' followed in a few seconds by "Channel list creation complete", and you are placed in the list of available Web radio channels. Blaze EZ comes preloaded with several default Web Radio stations from ACB, Serotek, 181.FM and Sky.FM. Use the Left and Right arrows to navigate the channel list. Press "Select" on the station you wish to play. Use the left and Right arrows to move between stations during playback. press the Up and Down arrows to choose among other movement units such as "First or last channel" or "5 channels'. If you wish to navigate to a station in the list without connecting to each station as you go, press the "Cancel" button and you are returned to the station list. To delete a station from the list, press and hold the “Cancel” button when it is in focus.

Quick Start Guide – Blaze EZ
15
10. Checking Date and Time You can check the date and time on the Blaze EZ in two ways:
1) Press the Power button quickly. If you press the Power button quickly from anywhere on the unit, the date and time are announced.
2) Bring up the Home Menu. The Date and time is the first item in the Home Menu. Any time you exit a program and return to the Home Menu, the date and time are announced as the first status item. Press “Select” on the “Date and Time” to set it
