bicycle owner’s guide & assembly instructions … · bicycle owner’s guide & assembly...
TRANSCRIPT
BICYCLE OWNER’S GUIDE & ASSEMBLY INSTRUCTIONS
WWW.RALEIGH.CO.UK
PLEASE READ CAREFULLY BEFORE RIDING
2 for further information consult our website www.raleigh.co.uk • for video support & download
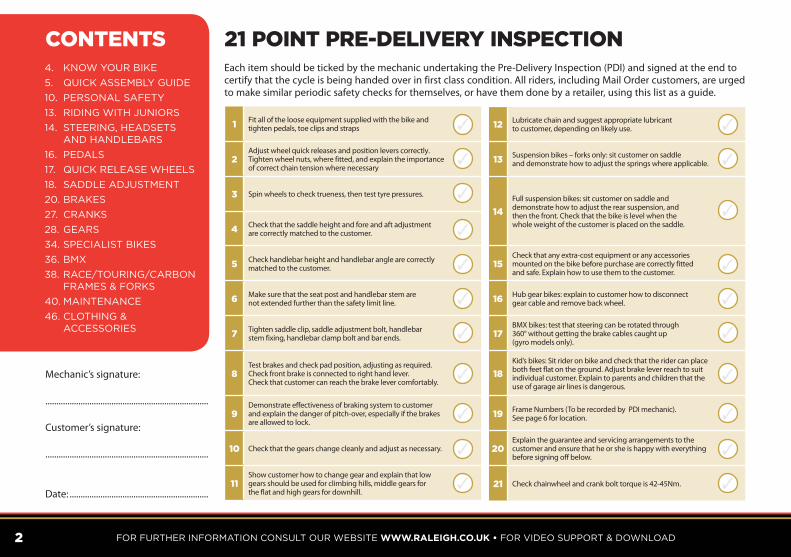
4. KNOW YOUR BIKE5. QUICK ASSEMBLY GUIDE10. PERSONAL SAFETY13. RIDING WITH JUNIORS14. STEERING, HEADSETS
AND HANDLEBARS16. PEDALS17. QUICK RELEASE WHEELS18. SADDLE ADJUSTMENT20. BRAKES27. CRANKS28. GEARS34. SPECIALIST BIKES36. BMX38. RACE/TOURING/CARBON
FRAMES & FORKS40. MAINTENANCE46. CLOTHING & ACCESSORIES
ContEnts 21 Point PRE-DELivERY insPECtion
Mechanic’s signature:
.......................................................................... Customer’s signature: ..........................................................................
Date: ...............................................................
Each item should be ticked by the mechanic undertaking the Pre-Delivery Inspection (PDI) and signed at the end to certify that the cycle is being handed over in first class condition. All riders, including Mail Order customers, are urged to make similar periodic safety checks for themselves, or have them done by a retailer, using this list as a guide.
1 Fit all of the loose equipment supplied with the bike and tighten pedals, toe clips and straps 12 Lubricate chain and suggest appropriate lubricant
to customer, depending on likely use.
2Adjust wheel quick releases and position levers correctly. Tighten wheel nuts, where fitted, and explain the importance of correct chain tension where necessary
13 Suspension bikes – forks only: sit customer on saddle and demonstrate how to adjust the springs where applicable.
3 Spin wheels to check trueness, then test tyre pressures.
14Full suspension bikes: sit customer on saddle and demonstrate how to adjust the rear suspension, and then the front. Check that the bike is level when the whole weight of the customer is placed on the saddle.4 Check that the saddle height and fore and aft adjustment
are correctly matched to the customer.
5 Check handlebar height and handlebar angle are correctly matched to the customer. 15
Check that any extra-cost equipment or any accessories mounted on the bike before purchase are correctly fitted and safe. Explain how to use them to the customer.
6 Make sure that the seat post and handlebar stem are not extended further than the safety limit line. 16 Hub gear bikes: explain to customer how to disconnect
gear cable and remove back wheel.
7 Tighten saddle clip, saddle adjustment bolt, handlebar stem fixing, handlebar clamp bolt and bar ends. 17
BMX bikes: test that steering can be rotated through 360° without getting the brake cables caught up (gyro models only).
8Test brakes and check pad position, adjusting as required. Check front brake is connected to right hand lever. Check that customer can reach the brake lever comfortably.
18Kid’s bikes: Sit rider on bike and check that the rider can place both feet flat on the ground. Adjust brake lever reach to suit individual customer. Explain to parents and children that the use of garage air lines is dangerous.
9Demonstrate effectiveness of braking system to customer and explain the danger of pitch-over, especially if the brakes are allowed to lock.
19 Frame Numbers (To be recorded by PDI mechanic). See page 6 for location.
10 Check that the gears change cleanly and adjust as necessary. 20Explain the guarantee and servicing arrangements to the customer and ensure that he or she is happy with everything before signing off below.
11Show customer how to change gear and explain that low gears should be used for climbing hills, middle gears for the flat and high gears for downhill.
21 Check chainwheel and crank bolt torque is 42-45Nm.
✓
✓
✓
✓
✓
✓
✓
✓
✓
✓
✓
✓
✓
✓
✓
✓
✓
✓
✓
✓
✓

3for further information consult our website www.raleigh.co.uk • for video support & download
WELComE to thE FAmiLYWhen Sir Frank W. Bowden started Raleigh Bicycles in Nottingham UK, in 1887 we are certain that he would have pictured you stood here today with your new bicycle, which comes steeped with the innovation and expertise that you get from designing bikes for over 125 years.
You see, Sir Frank was a visionary who took a small bicycle company from Raleigh Street, Nottingham, into every corner of the globe. It was Sir Frank’s ability to picture the impossible that drove us to create the world’s most recognisable bike brand.
Without his inspirational foresight and huge leaps of imagination we wouldn’t have had classic Raleighs like the All Steel Roadster, the Superbe and Clubman. Nor for that matter would we have had iconic bikes like the Chopper, Burner and Grifter. And certainly wouldn’t have inspired the careers of professional cyclists like A.A. Zimmerman, Tommy Godwin, Reg Harris, Joop Zoetemelk, Sir Chris Hoy and ‘today’s Team Raleigh superstars’.
Sir Frank’s vision has been evident in Raleigh for over 125 years, helping us drive Raleigh forward to create today’s cutting edge race-winning performance bikes, as well as our beautiful classic bikes, around-town everyday bikes and beginner bikes for tomorrow’s riders. From your first bike to your fastest, Raleigh has been there every step of the way for generations and generations.
Raleigh Bikes
4 for further information consult our website www.raleigh.co.uk • for video support & download
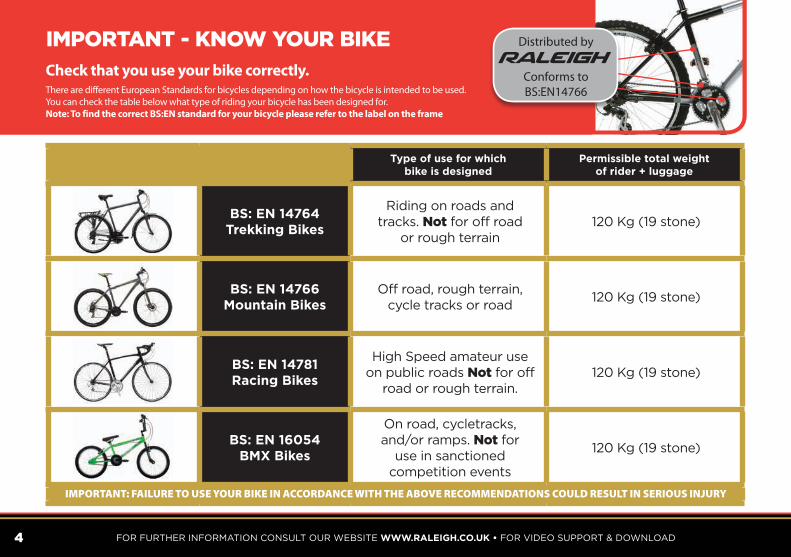
imPoRtAnt - knoW YoUR bikECheck that you use your bike correctly.There are different European Standards for bicycles depending on how the bicycle is intended to be used. You can check the table below what type of riding your bicycle has been designed for. Note: To find the correct BS:EN standard for your bicycle please refer to the label on the frame
Type of use for which bike is designed
Permissible total weight of rider + luggage
BS: EN 14764Trekking Bikes
Riding on roads and tracks. not for off road
or rough terrain120 Kg (19 stone)
BS: EN 14766Mountain Bikes
Off road, rough terrain, cycle tracks or road 120 Kg (19 stone)
BS: EN 14781Racing Bikes
High Speed amateur use on public roads not for off
road or rough terrain.120 Kg (19 stone)
BS: EN 16054BMX Bikes
On road, cycletracks, and/or ramps. not for
use in sanctioned competition events
120 Kg (19 stone)
Distributed by
Conforms to BS:EN14766
Important: FaIlure to use your bIke In accordance wIth the above recommendatIons could result In serIous Injury

5for further information consult our website www.raleigh.co.uk • for video support & download
imPoRtAntPlease read these instructions carefully.
For more detailed information and tips, including a comprehensive guide to care and maintenance we recommend you read the owners guide in detail.This bike is fully adjusted and checked over at the factory. The handlebars may be removed or assembled in the bike and turned through 90 degrees. the pedals removed and in some cases the front wheel will have been removed too. It is a relatively simple operation to re-assemble these parts, however if you do not feel competent to do this you should ask someone who is, as it is important that these simple tasks are done correctly for the integral safety of the bike. If in doubt consult a qualified mechanic or cycle dealer.
UnPACkingPlease remove all packaging very carefully, especially if using a knife or sharp blade. Take care not to scratch any of the parts of the bike or slash the tyres.
We suggest that you keep hold of the carton in case you need to return the bike.
sUPPLiED With YoUR bikE*• Allen key (s) • Multi-spanner• Pedals • Reflectors*Where applicable
FOR DETAILED ADJUSTMENT AND OTHER INFORMATION PLEASE REFER TO THE SPECIFIC SECTIONS IN THIS GUIDE
QUiCk AssEmbLY gUiDE
6 for further information consult our website www.raleigh.co.uk • for video support & download
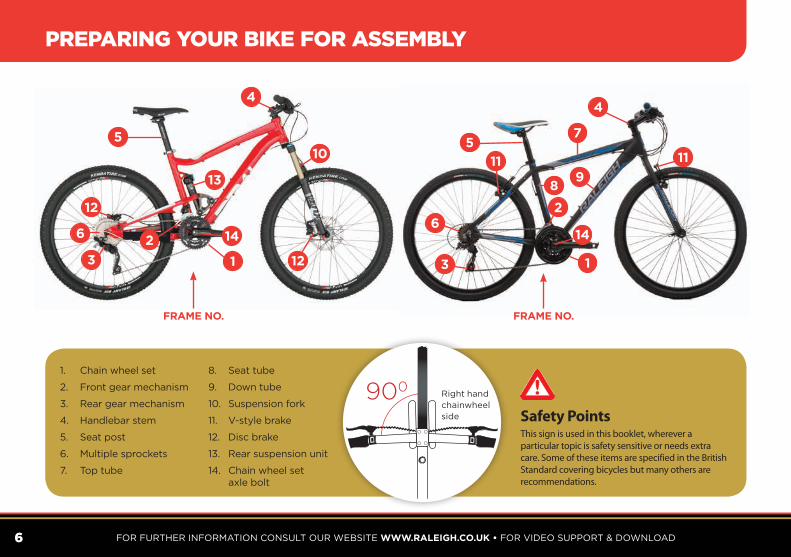
Safety PointsThis sign is used in this booklet, wherever a particular topic is safety sensitive or needs extra care. Some of these items are specified in the British Standard covering bicycles but many others are recommendations.
1. Chain wheel set
2. Front gear mechanism
3. Rear gear mechanism
4. Handlebar stem
5. Seat post
6. Multiple sprockets
7. Top tube
8. Seat tube
9. Down tube
10. Suspension fork
11. V-style brake
12. Disc brake
13. Rear suspension unit
14. Chain wheel set axle bolt
900
12
14
3
6
12
5
4
12
7
4
11
14
3
6
511
8 9
2
FRAME No.FRAME No.
Right handchainwheel side
13
10
1
PREPARing YoUR bikE FoR AssEmbLY
7for further information consult our website www.raleigh.co.uk • for video support & download
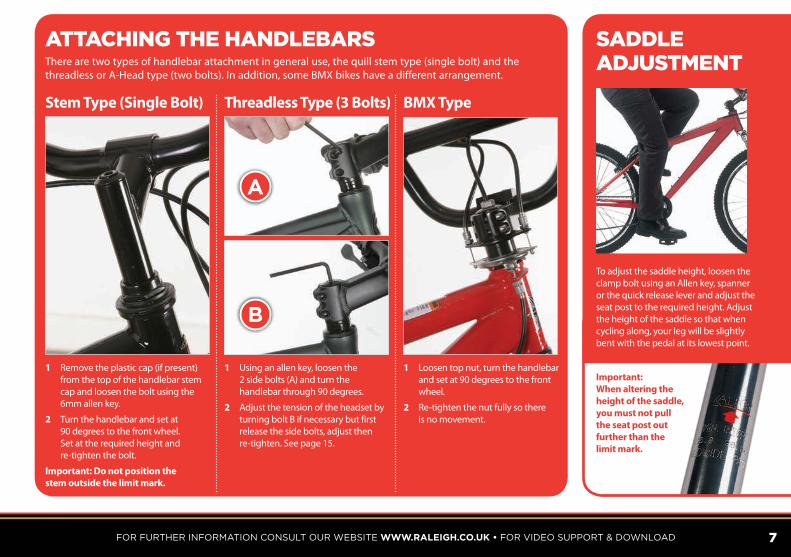
1 Remove the plastic cap (if present) from the top of the handlebar stem cap and loosen the bolt using the 6mm allen key.
2 Turn the handlebar and set at 90 degrees to the front wheel. Set at the required height and re-tighten the bolt.
Important: Do not position the stem outside the limit mark.
AttAChing thE hAnDLEbARs
1 Using an allen key, loosen the 2 side bolts (A) and turn the handlebar through 90 degrees.
2 Adjust the tension of the headset by turning bolt B if necessary but first release the side bolts, adjust then re-tighten. See page 15.
1 Loosen top nut, turn the handlebar and set at 90 degrees to the front wheel.
2 Re-tighten the nut fully so there is no movement.
There are two types of handlebar attachment in general use, the quill stem type (single bolt) and the threadless or A-Head type (two bolts). In addition, some BMX bikes have a different arrangement.
Stem Type (Single Bolt) Threadless Type (3 Bolts) BMX Type
To adjust the saddle height, loosen the clamp bolt using an Allen key, spanner or the quick release lever and adjust the seat post to the required height. Adjust the height of the saddle so that when cycling along, your leg will be slightly bent with the pedal at its lowest point.
Important: When altering the height of the saddle, you must not pull the seat post out further than the limit mark.
sADDLE ADjUstmEnt
A
B
8 for further information consult our website www.raleigh.co.uk • for video support & download
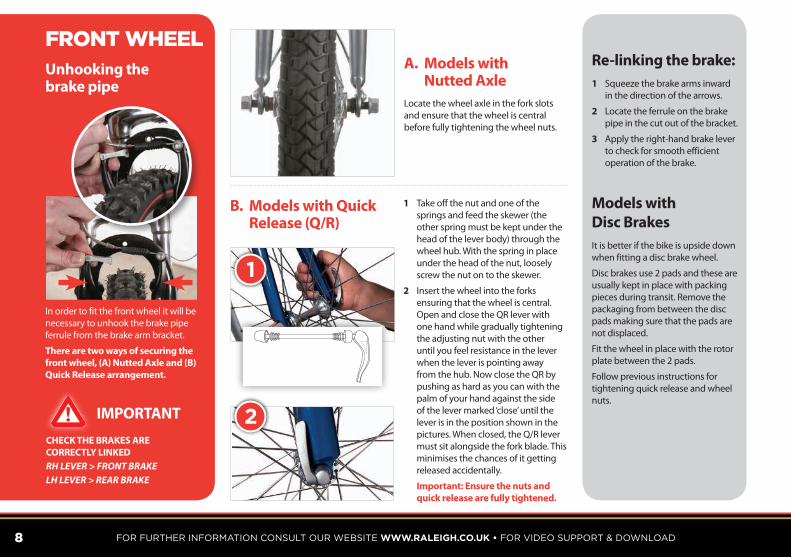
FRont WhEEL
In order to fit the front wheel it will be necessary to unhook the brake pipe ferrule from the brake arm bracket.
There are two ways of securing the front wheel, (A) Nutted Axle and (B) Quick Release arrangement.
Unhooking the brake pipe
A. Models with Nutted Axle
Locate the wheel axle in the fork slots and ensure that the wheel is central before fully tightening the wheel nuts.
B. Models with Quick Release (Q/R)
Re-linking the brake:1 Squeeze the brake arms inward
in the direction of the arrows.
2 Locate the ferrule on the brake pipe in the cut out of the bracket.
3 Apply the right-hand brake lever to check for smooth efficient operation of the brake.
Models with Disc BrakesIt is better if the bike is upside down when fitting a disc brake wheel.
Disc brakes use 2 pads and these are usually kept in place with packing pieces during transit. Remove the packaging from between the disc pads making sure that the pads are not displaced.
Fit the wheel in place with the rotor plate between the 2 pads.
Follow previous instructions for tightening quick release and wheel nuts.
1 Take off the nut and one of the springs and feed the skewer (the other spring must be kept under the head of the lever body) through the wheel hub. With the spring in place under the head of the nut, loosely screw the nut on to the skewer.
2 Insert the wheel into the forks ensuring that the wheel is central. Open and close the QR lever with one hand while gradually tightening the adjusting nut with the other until you feel resistance in the lever when the lever is pointing away from the hub. Now close the QR by pushing as hard as you can with the palm of your hand against the side of the lever marked ‘close’ until the lever is in the position shown in the pictures. When closed, the Q/R lever must sit alongside the fork blade. This minimises the chances of it getting released accidentally.
Important: Ensure the nuts and quick release are fully tightened.
1
2CHECK THE BRAKES ARE CORRECTLY LINKEDRH LEVER > FRONT BRAKELH LEVER > REAR BRAKE
IMPORTANT
9for further information consult our website www.raleigh.co.uk • for video support & download
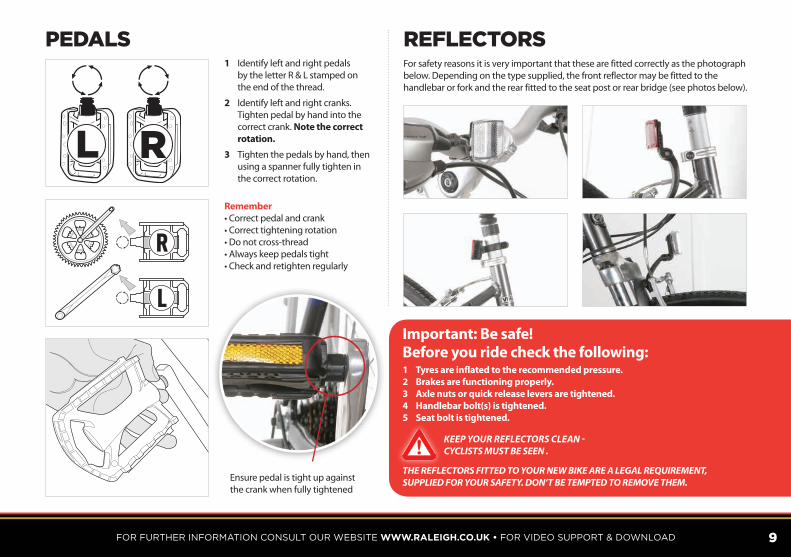
1 Identify left and right pedals by the letter R & L stamped on the end of the thread.
2 Identify left and right cranks. Tighten pedal by hand into the correct crank. Note the correct rotation.
3 Tighten the pedals by hand, then using a spanner fully tighten in the correct rotation.
Remember• Correct pedal and crank• Correct tightening rotation• Do not cross-thread• Always keep pedals tight• Check and retighten regularly
PEDALs REFLECtoRsFor safety reasons it is very important that these are fitted correctly as the photograph below. Depending on the type supplied, the front reflector may be fitted to the handlebar or fork and the rear fitted to the seat post or rear bridge (see photos below).
Before you ride check the following:1 Tyres are inflated to the recommended pressure.2 Brakes are functioning properly.3 Axle nuts or quick release levers are tightened.4 Handlebar bolt(s) is tightened.5 Seat bolt is tightened.
KEEp yOuR REFLEcTORs cLEAN - cycLIsTs MusT BE sEEN .
THE REFLEcTORs FITTED TO yOuR NEW BIKE ARE A LEGAL REQuIREMENT, suppLIED FOR yOuR sAFETy. DON’T BE TEMpTED TO REMOVE THEM.
Important: Be safe!
Ensure pedal is tight up against the crank when fully tightened
10 for further information consult our website www.raleigh.co.uk • for video support & download
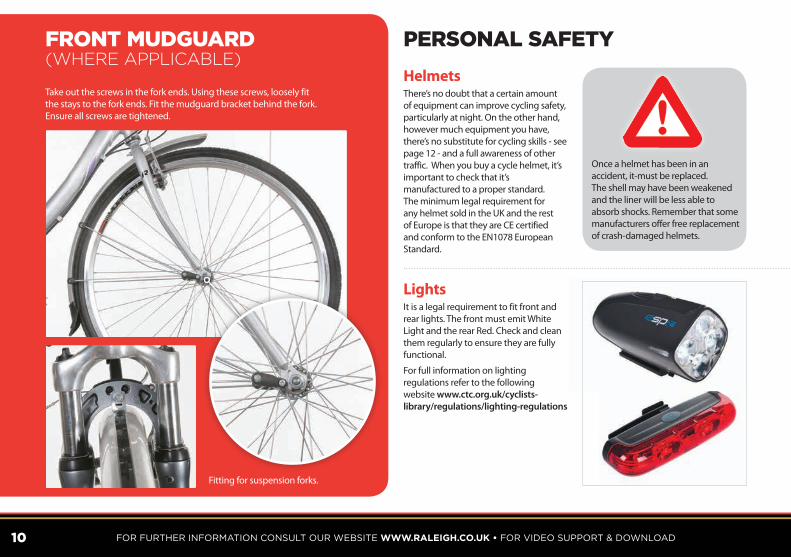
FRont mUDgUARD (where applicable)
Take out the screws in the fork ends. Using these screws, loosely fit the stays to the fork ends. Fit the mudguard bracket behind the fork. Ensure all screws are tightened.
Fitting for suspension forks.
PERsonAL sAFEtYHelmetsThere’s no doubt that a certain amount of equipment can improve cycling safety, particularly at night. On the other hand, however much equipment you have, there’s no substitute for cycling skills - see page 12 - and a full awareness of other traffic. When you buy a cycle helmet, it’s important to check that it’s manufactured to a proper standard. The minimum legal requirement for any helmet sold in the UK and the rest of Europe is that they are CE certified and conform to the EN1078 European Standard.
LightsIt is a legal requirement to fit front and rear lights. The front must emit White Light and the rear Red. Check and clean them regularly to ensure they are fully functional.
For full information on lighting regulations refer to the following website www.ctc.org.uk/cyclists-library/regulations/lighting-regulations
Once a helmet has been in an accident, it-must be replaced. The shell may have been weakened and the liner will be less able to absorb shocks. Remember that some manufacturers offer free replacement of crash-damaged helmets.
11for further information consult our website www.raleigh.co.uk • for video support & download
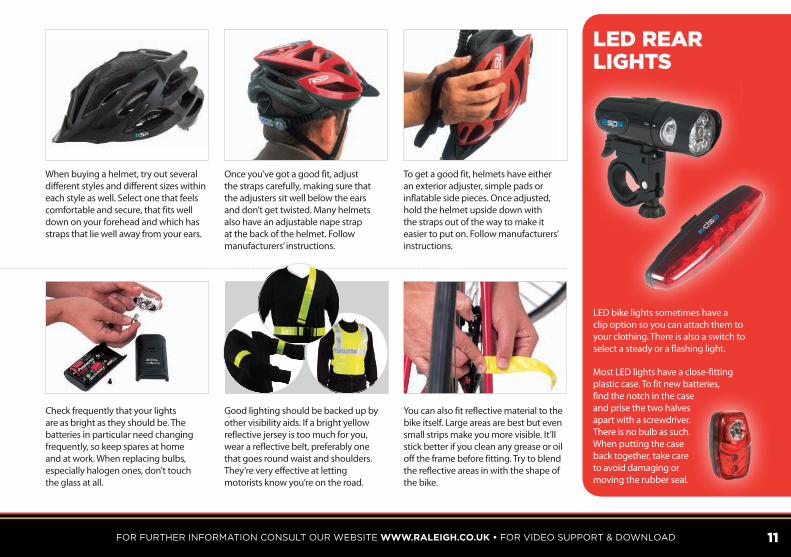
LED REAR Lights
When buying a helmet, try out several different styles and different sizes within each style as well. Select one that feels comfortable and secure, that fits well down on your forehead and which has straps that lie well away from your ears.
Once you’ve got a good fit, adjust the straps carefully, making sure that the adjusters sit well below the ears and don’t get twisted. Many helmets also have an adjustable nape strap at the back of the helmet. Follow manufacturers’ instructions.
To get a good fit, helmets have either an exterior adjuster, simple pads or inflatable side pieces. Once adjusted, hold the helmet upside down with the straps out of the way to make it easier to put on. Follow manufacturers’ instructions.
Check frequently that your lights are as bright as they should be. The batteries in particular need changing frequently, so keep spares at home and at work. When replacing bulbs, especially halogen ones, don’t touch the glass at all.
You can also fit reflective material to the bike itself. Large areas are best but even small strips make you more visible. It’ll stick better if you clean any grease or oil off the frame before fitting. Try to blend the reflective areas in with the shape of the bike.
Good lighting should be backed up by other visibility aids. If a bright yellow reflective jersey is too much for you, wear a reflective belt, preferably one that goes round waist and shoulders. They’re very effective at letting motorists know you’re on the road.
LED bike lights sometimes have a clip option so you can attach them to your clothing. There is also a switch to select a steady or a flashing light.
Most LED lights have a close-fitting plastic case. To fit new batteries, find the notch in the case and prise the two halves apart with a screwdriver. There is no bulb as such. When putting the case back together, take care to avoid damaging or moving the rubber seal.
12 for further information consult our website www.raleigh.co.uk • for video support & download
RiDing ADviCEWARNING: There is a risk of injury to the rider and to others if all necessary repairs and adjustments are not made. Take every precaution to ensure safe riding.
Before Riding Carry out the checks listed on page 2 and also refer to ‘Know your bike’ section on page 4 so that you understand the type of use your bike is designed for. If you have any problems refer them to your Raleigh Retailer at once.
Make sure you are able to use your gears and brakes effectively and that you can handle your bicycle safely in traffic. To-familiarise yourself with the many rules of the road, we recommend you obtain a current copy of the Highway Code, available from Post Offices and most good bookshops.
Parents are urged not to let their children onto busy roads until they are experienced cyclists. We recommend a training course such as Royal Society for the Prevention of Accidents (ROSPA) National Cycling Proficiency Scheme (for-children of nine and above) or the in-school version ‘Cycleway’ for young children.
Indeed, all new or inexperienced cyclists are strongly recommended to take a training course in cycling. Details may be obtained from schools, council offices or Police stations.
AnticipationThe most important general riding skills you need to develop are keeping track of what other road users are doing and working out what they are going to do next. That way you can position yourself safely on the road and let them know, by your road position, what you are going to do next. Do not follow too closely behind other road vehicles or other cyclists and avoid riding up the inside of traffic queues. Make use of “cycle lanes” where they are provided. Always concentrate and keep a good grip on the handlebars at all time in case you suddenly need to steer out of harms way.
Riding In Bad WeatherAlways take extra care when the weather is wet, foggy, windy or icy. Wear warm waterproof clothing - in bright, reflective colours if possible. Ride slowly and brake early, as stopping distances can be doubled or trebled. Sudden braking could lead to skidding on hazards such as mud, gravel, snow, etc. When it’s like that don’t just rely on hearing other traffic because snow, wind and fog can carry away the sound of approaching vehicles. When conditions are really bad or an area is particularly congested be prepared to walk your bike around roundabouts and difficult right turns.
Riding In The DarkAgain, take extra care in the dark. Make sure your signals are in good time, so motorists are aware of your intentions.
Make sure you can see and be seen - front and rear lights, a rear reflector, pedal and wheel reflectors are legal requirements. They should conform to British Standard BS 6102.
Carry spare bulbs and batteries if needed. Light coloured and reflective clothing will help you to be seen - ask to see the range stocked by your Raleigh Retailer.
Personal Music Players/HeadphonesWe recommend that YOU DO NOT LISTEN to such devices while riding. They distract your attention from the traffic around you and prevent you from hearing approaching danger.
After Your First Few RidesAll the nuts and bolts on your bicycle bed-down in the first few weeks of use, we recommend you regularly check your bike as per the maintenance section on page 40.
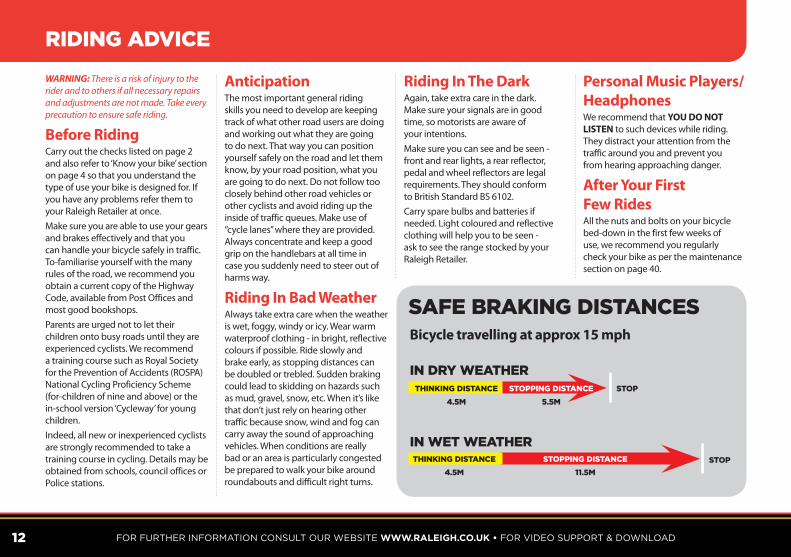
Bicycle travelling at approx 15 mph
stoP
in DRY WEAthERthinking DistAnCE
4.5mstoPPing DistAnCE
5.5m
sAFE bRAking DistAnCEs
stoPstoPPing DistAnCE11.5m
in WEt WEAthERthinking DistAnCE
4.5m
13for further information consult our website www.raleigh.co.uk • for video support & download
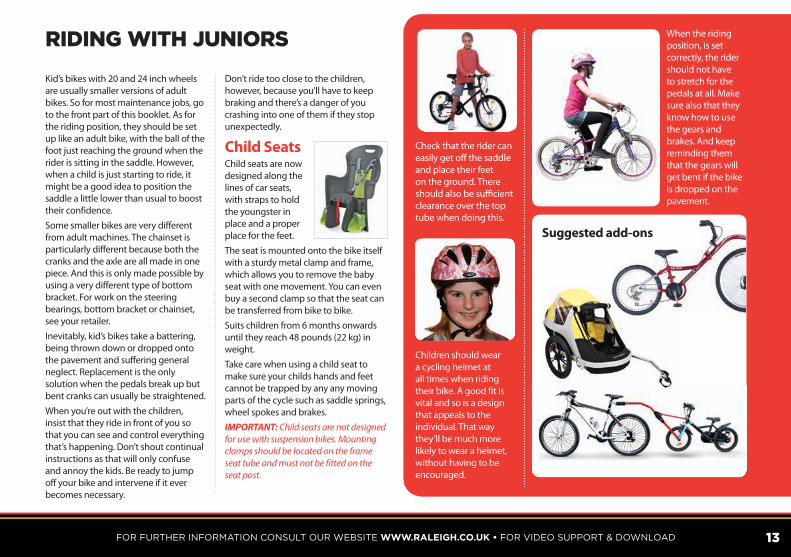
When the riding position, is set correctly, the rider should not have to stretch for the pedals at all. Make sure also that they know how to use the gears and brakes. And keep reminding them that the gears will get bent if the bike is dropped on the pavement.
RiDing With jUnioRsKid’s bikes with 20 and 24 inch wheels are usually smaller versions of adult bikes. So for most maintenance jobs, go to the front part of this booklet. As for the riding position, they should be set up like an adult bike, with the ball of the foot just reaching the ground when the rider is sitting in the saddle. However, when a child is just starting to ride, it might be a good idea to position the saddle a little lower than usual to boost their confidence.
Some smaller bikes are very different from adult machines. The chainset is particularly different because both the cranks and the axle are all made in one piece. And this is only made possible by using a very different type of bottom bracket. For work on the steering bearings, bottom bracket or chainset, see your retailer.
Inevitably, kid’s bikes take a battering, being thrown down or dropped onto the pavement and suffering general neglect. Replacement is the only solution when the pedals break up but bent cranks can usually be straightened.
When you’re out with the children, insist that they ride in front of you so that you can see and control everything that’s happening. Don’t shout continual instructions as that will only confuse and annoy the kids. Be ready to jump off your bike and intervene if it ever becomes necessary.
Don’t ride too close to the children, however, because you’ll have to keep braking and there’s a danger of you crashing into one of them if they stop unexpectedly.
Child SeatsChild seats are now designed along the lines of car seats, with straps to hold the youngster in place and a proper place for the feet.
The seat is mounted onto the bike itself with a sturdy metal clamp and frame, which allows you to remove the baby seat with one movement. You can even buy a second clamp so that the seat can be transferred from bike to bike.
Suits children from 6 months onwards until they reach 48 pounds (22 kg) in weight.
Take care when using a child seat to make sure your childs hands and feet cannot be trapped by any any moving parts of the cycle such as saddle springs, wheel spokes and brakes.
IMpORTANT: Child seats are not designed for use with suspension bikes. Mounting clamps should be located on the frame seat tube and must not be fitted on the seat post.
Check that the rider can easily get off the saddle and place their feet on the ground. There should also be sufficient clearance over the top tube when doing this.
Children should wear a cycling helmet at all times when riding their bike. A good fit is vital and so is a design that appeals to the individual. That way they’ll be much more likely to wear a helmet, without having to be encouraged.
Suggested add-ons
14 for further information consult our website www.raleigh.co.uk • for video support & download
stEERing, hEADsEts AnD hAnDLEbARs
When you’ve got the saddle height and position right, you can fine tune your riding position by altering the angle of the handlebars. On some bikes, you can also adjust the height of the handlebars. Don’t forget that altering the angle of an adjustable stem also alters the height of the handlebars.
Your back should be roughly 45° to the ground but this is not a hard and fast rule. It’s also a good thing to have a slight bend at the elbow to help absorb road shocks. In fact, most mountain bikes are designed to provide the correct back angle and arm reach for the majority of riders. If you have a problem getting comfortable, consult your retailer about altering the handlebar stem length, the height of the handlebars or even fitting different ones. Always check the alignment of the handlebar stem with the front wheel, if you move anything else.
If there’s any free play in the steering bearings, you’ll get brake judder, judder over bumps and steering wobble as well. Tight steering may also be a problem. These are potentially dangerous so if you don’t feel confident about making the adjustment, take the bike to your retailer.
As part of the 21 point safety check, make sure the stem clamp bolts and the handlebar clamp bolts are all tight enough to prevent the handlebars moving.
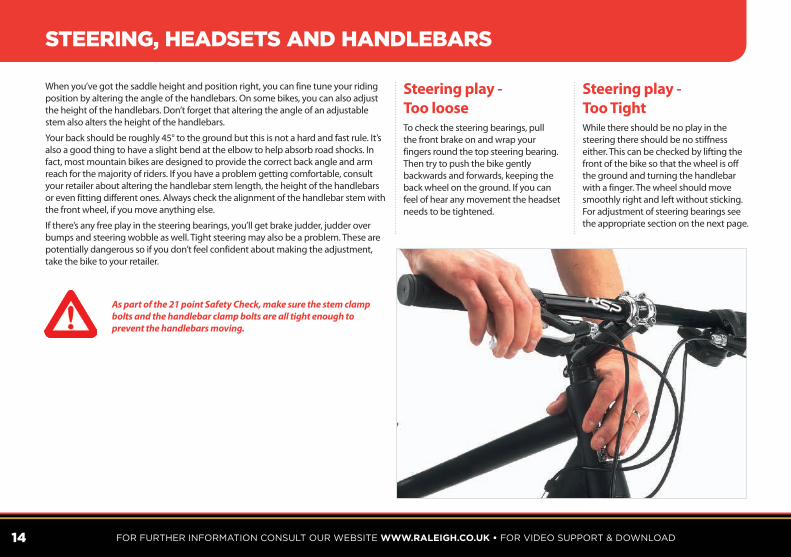
To check the steering bearings, pull the front brake on and wrap your fingers round the top steering bearing. Then try to push the bike gently backwards and forwards, keeping the back wheel on the ground. If you can feel of hear any movement the headset needs to be tightened.
While there should be no play in the steering there should be no stiffness either. This can be checked by lifting the front of the bike so that the wheel is off the ground and turning the handlebar with a finger. The wheel should move smoothly right and left without sticking. For adjustment of steering bearings see the appropriate section on the next page.
Steering play - Too loose
Steering play - Too Tight
15for further information consult our website www.raleigh.co.uk • for video support & download
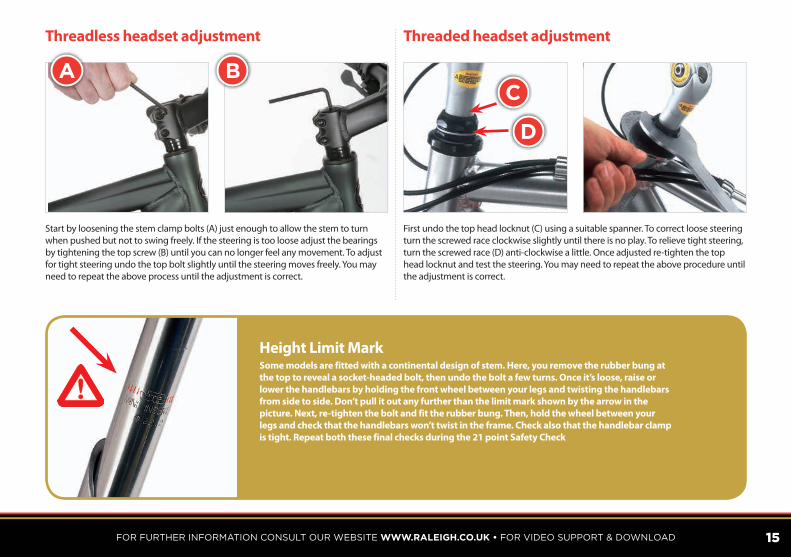
Threadless headset adjustment
Start by loosening the stem clamp bolts (A) just enough to allow the stem to turn when pushed but not to swing freely. If the steering is too loose adjust the bearings by tightening the top screw (B) until you can no longer feel any movement. To adjust for tight steering undo the top bolt slightly until the steering moves freely. You may need to repeat the above process until the adjustment is correct.
Threaded headset adjustment
First undo the top head locknut (C) using a suitable spanner. To correct loose steering turn the screwed race clockwise slightly until there is no play. To relieve tight steering, turn the screwed race (D) anti-clockwise a little. Once adjusted re-tighten the top head locknut and test the steering. You may need to repeat the above procedure until the adjustment is correct.
Height Limit MarkSome models are fitted with a continental design of stem. Here, you remove the rubber bung at the top to reveal a socket-headed bolt, then undo the bolt a few turns. Once it’s loose, raise or lower the handlebars by holding the front wheel between your legs and twisting the handlebars from side to side. Don’t pull it out any further than the limit mark shown by the arrow in the picture. Next, re-tighten the bolt and fit the rubber bung. Then, hold the wheel between your legs and check that the handlebars won’t twist in the frame. Check also that the handlebar clamp is tight. Repeat both these final checks during the 21 point Safety Check
A BC
D
16 for further information consult our website www.raleigh.co.uk • for video support & download
ChECking PEDALs
Don’t underestimate the importance of the pedals. If they’re not tight enough, if the toe clips are loose, if the toe straps are missing or if the pedals don’t turn smoothly, it’s only too easy to lose control.
ANY PROBLEMS ALONG THE WAY? CONSULT YOUR RETAILER.
1 32
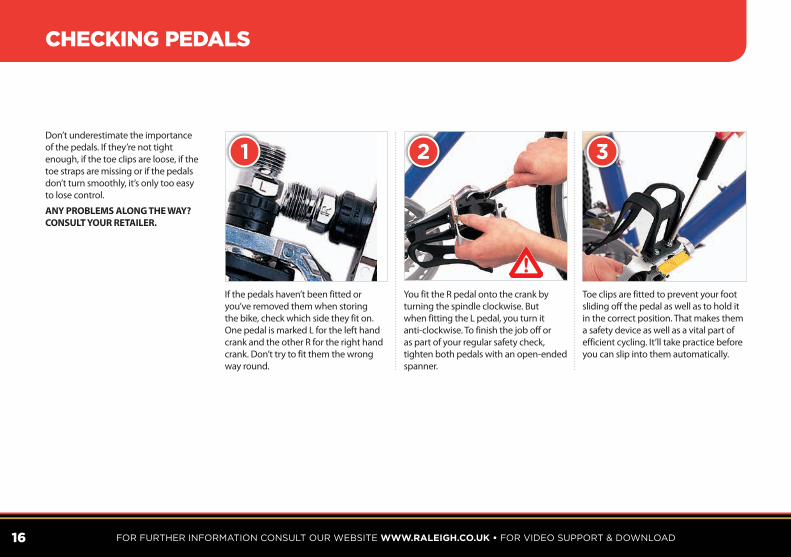
If the pedals haven’t been fitted or you’ve removed them when storing the bike, check which side they fit on. One pedal is marked L for the left hand crank and the other R for the right hand crank. Don’t try to fit them the wrong way round.
Toe clips are fitted to prevent your foot sliding off the pedal as well as to hold it in the correct position. That makes them a safety device as well as a vital part of efficient cycling. It’ll take practice before you can slip into them automatically.
You fit the R pedal onto the crank by turning the spindle clockwise. But when fitting the L pedal, you turn it anti-clockwise. To finish the job off or as part of your regular safety check, tighten both pedals with an open-ended spanner.
17for further information consult our website www.raleigh.co.uk • for video support & download
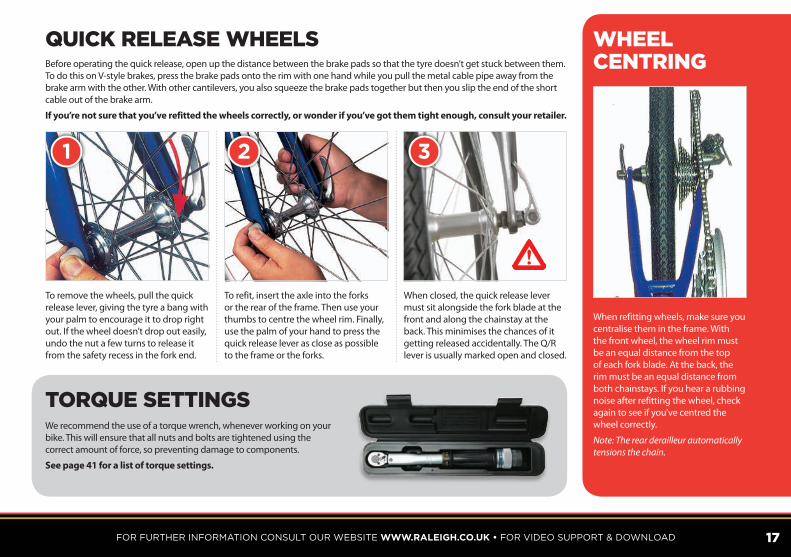
To remove the wheels, pull the quick release lever, giving the tyre a bang with your palm to encourage it to drop right out. If the wheel doesn’t drop out easily, undo the nut a few turns to release it from the safety recess in the fork end.
To refit, insert the axle into the forks or the rear of the frame. Then use your thumbs to centre the wheel rim. Finally, use the palm of your hand to press the quick release lever as close as possible to the frame or the forks.
When closed, the quick release lever must sit alongside the fork blade at the front and along the chainstay at the back. This minimises the chances of it getting released accidentally. The Q/R lever is usually marked open and closed.
QUiCk RELEAsE WhEELsBefore operating the quick release, open up the distance between the brake pads so that the tyre doesn’t get stuck between them. To do this on V-style brakes, press the brake pads onto the rim with one hand while you pull the metal cable pipe away from the brake arm with the other. With other cantilevers, you also squeeze the brake pads together but then you slip the end of the short cable out of the brake arm.
If you’re not sure that you’ve refitted the wheels correctly, or wonder if you’ve got them tight enough, consult your retailer.
WhEEL CEntRing
When refitting wheels, make sure you centralise them in the frame. With the front wheel, the wheel rim must be an equal distance from the top of each fork blade. At the back, the rim must be an equal distance from both chainstays. If you hear a rubbing noise after refitting the wheel, check again to see if you’ve centred the wheel correctly.
Note: The rear derailleur automatically tensions the chain.
toRQUE sEttingsWe recommend the use of a torque wrench, whenever working on your bike. This will ensure that all nuts and bolts are tightened using the correct amount of force, so preventing damage to components.
See page 41 for a list of torque settings.
1 32
18 for further information consult our website www.raleigh.co.uk • for video support & download
sADDLE ADjUstmEntThere’s no hard and fast rule for setting up the riding position on a bike. The best starting point is to set the saddle height so that you can get the ball of your foot on the ground while you’re sitting on the saddle.
When you have to raise the saddle, don’t lift it any higher than the limit mark. There’s a danger that the seat post will break or fall out of the frame if you do. Fit a longer seat post or buy a bigger bike if you need the saddle higher than allowed by the limit mark.
There is also a fore-and-aft adjustment but you must only move the saddle to another position along the parallel section of the saddle wire, marked by the arrows below. Don’t try to force the saddle any further in either direction or you’ll break the saddle clip. Be careful also when tightening the bolt under the saddle or you’ll damage the alloy threads.
Start with the saddle right in the middle of the range of adjustment and try a short ride. The main thing is to find an easy and comfortable reach to the handlebar grips. But this also controls the angle of your body, so experiment by moving the saddle a centimetre at a time until you find the best combination. Check also that you’ve got a good view of the road ahead, without cranking your head back at an uncomfortable angle. As for saddle angle, keep it more-or-less parallel to the ground.
If your bike is fitted with a shockpost that moves up and down to absorb bumps, adjust the saddle a little higher than normal to allow for your own weight. If you find that the shock post hits the bottom of its travel quite often, even after adjusting it, your retailer will supply you with a stronger spring, which should stop that happening. Different springs are easy to fit - just undo the adjustment screw all the way.
When altering the height of the saddle, you must not pull the seat post out any further than the limit mark. If-you do, there’s a danger that the seat post will either break or fall out of the frame when riding over rough terrain.
A quick release seat post clamp must be tight enough to hold the seat post in place on the roughest terrain. With the quick release lever fully open, tighten the knurled nut as far as you can with your fingers, then undo it one full turn. Next, start to move the Q/R lever.
It should be easy to move at first, then harder as the lever gets nearer to the frame, then easier just before it hits the frame. Turn the knurled nut anti-clockwise if the lever is too tight to reach the frame and the other way if it’s too loose.
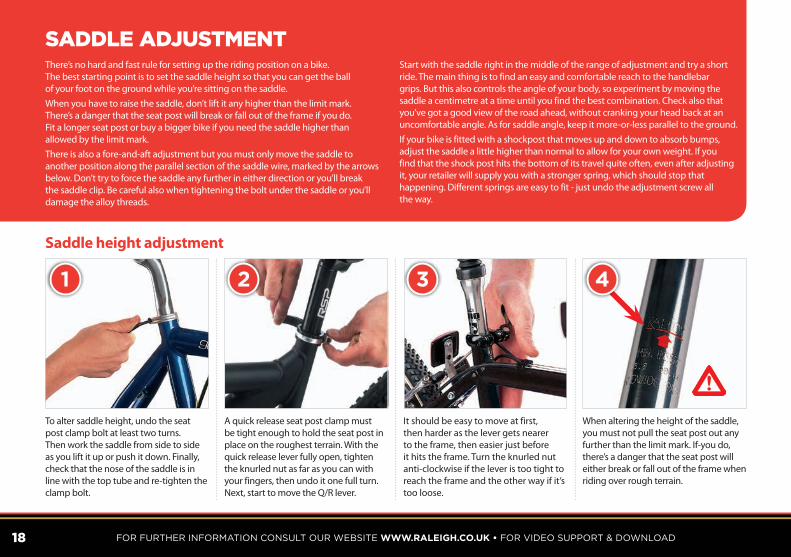
To alter saddle height, undo the seat post clamp bolt at least two turns. Then work the saddle from side to side as you lift it up or push it down. Finally, check that the nose of the saddle is in line with the top tube and re-tighten the clamp bolt.
Saddle height adjustment
1 3 42
19for further information consult our website www.raleigh.co.uk • for video support & download
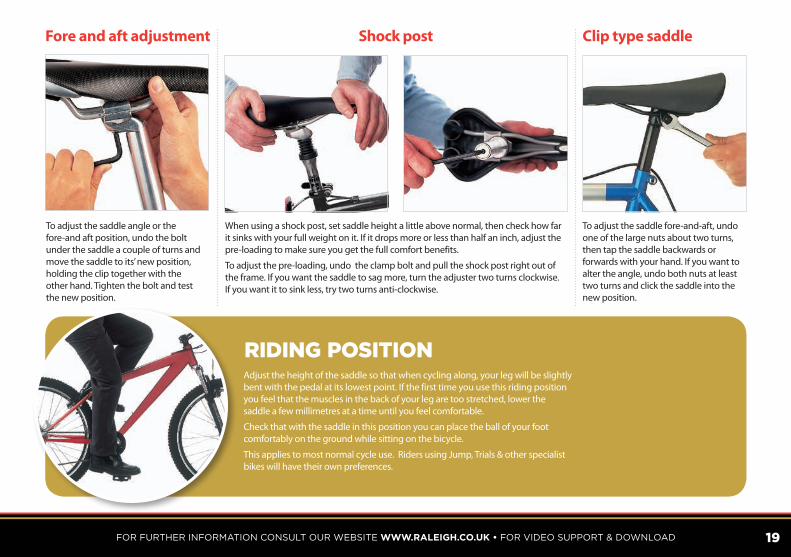
To adjust the saddle angle or the fore-and aft position, undo the bolt under the saddle a couple of turns and move the saddle to its’ new position, holding the clip together with the other hand. Tighten the bolt and test the new position.
To adjust the saddle fore-and-aft, undo one of the large nuts about two turns, then tap the saddle backwards or forwards with your hand. If you want to alter the angle, undo both nuts at least two turns and click the saddle into the new position.
Shock post Clip type saddleFore and aft adjustment
RiDing PositionAdjust the height of the saddle so that when cycling along, your leg will be slightly bent with the pedal at its lowest point. If the first time you use this riding position you feel that the muscles in the back of your leg are too stretched, lower the saddle a few millimetres at a time until you feel comfortable.
Check that with the saddle in this position you can place the ball of your foot comfortably on the ground while sitting on the bicycle.
This applies to most normal cycle use. Riders using Jump, Trials & other specialist bikes will have their own preferences.
When using a shock post, set saddle height a little above normal, then check how far it sinks with your full weight on it. If it drops more or less than half an inch, adjust the pre-loading to make sure you get the full comfort benefits.
To adjust the pre-loading, undo the clamp bolt and pull the shock post right out of the frame. If you want the saddle to sag more, turn the adjuster two turns clockwise. If you want it to sink less, try two turns anti-clockwise.
20 for further information consult our website www.raleigh.co.uk • for video support & download
ChECking bRAkEsThe first thing to check on either cantilever or caliper brakes is the amount of effort needed for an emergency stop. If you have to pull the lever more than halfway to the handlebars, the cable should be tightened .Next, check that the brake pads are aligned with the wheel rim and are not worn. If they’re not aligned correctly or need changing, see page 21.
If one of the wheels starts to rub against the brake pads after making any of these adjustments, check that it’s correctly centred in the frame and that the brake pads are centred on the wheel rim. If the wheels and brakes are correctly centred, the wheels may be slightly buckled and you should ask your retailer to check this point.
Most models are fitted with powerful long arm cantilever brakes, called V-brakes. If they don’t seem to be stopping the bike as quickly as they should, check the alignment and condition of the brake pads and the position of the brake arms - see page 22. It’s more difficult to set up standard cantilever correctly. If you have problems, consult your retailer.
Finally, see page 26 for caliper brakes, often fitted to sports and children’s bikes.
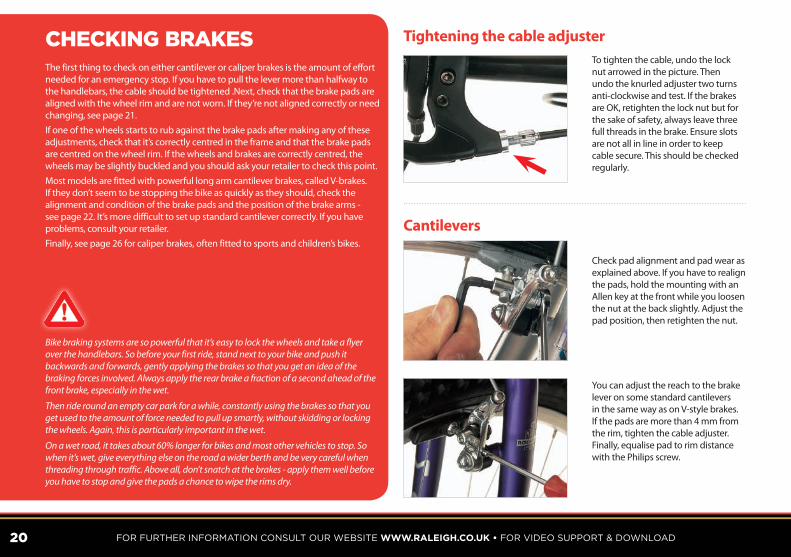
To tighten the cable, undo the lock nut arrowed in the picture. Then undo the knurled adjuster two turns anti-clockwise and test. If the brakes are OK, retighten the lock nut but for the sake of safety, always leave three full threads in the brake. Ensure slots are not all in line in order to keep cable secure. This should be checked regularly.
Check pad alignment and pad wear as explained above. If you have to realign the pads, hold the mounting with an Allen key at the front while you loosen the nut at the back slightly. Adjust the pad position, then retighten the nut.
You can adjust the reach to the brake lever on some standard cantilevers in the same way as on V-style brakes. If the pads are more than 4 mm from the rim, tighten the cable adjuster. Finally, equalise pad to rim distance with the Philips screw.
Tightening the cable adjuster
Cantilevers
Bike braking systems are so powerful that it’s easy to lock the wheels and take a flyer over the handlebars. So before your first ride, stand next to your bike and push it backwards and forwards, gently applying the brakes so that you get an idea of the braking forces involved. Always apply the rear brake a fraction of a second ahead of the front brake, especially in the wet.
Then ride round an empty car park for a while, constantly using the brakes so that you get used to the amount of force needed to pull up smartly, without skidding or locking the wheels. Again, this is particularly important in the wet.
On a wet road, it takes about 60% longer for bikes and most other vehicles to stop. So when it’s wet, give everything else on the road a wider berth and be very careful when threading through traffic. Above all, don’t snatch at the brakes - apply them well before you have to stop and give the pads a chance to wipe the rims dry.
21for further information consult our website www.raleigh.co.uk • for video support & download
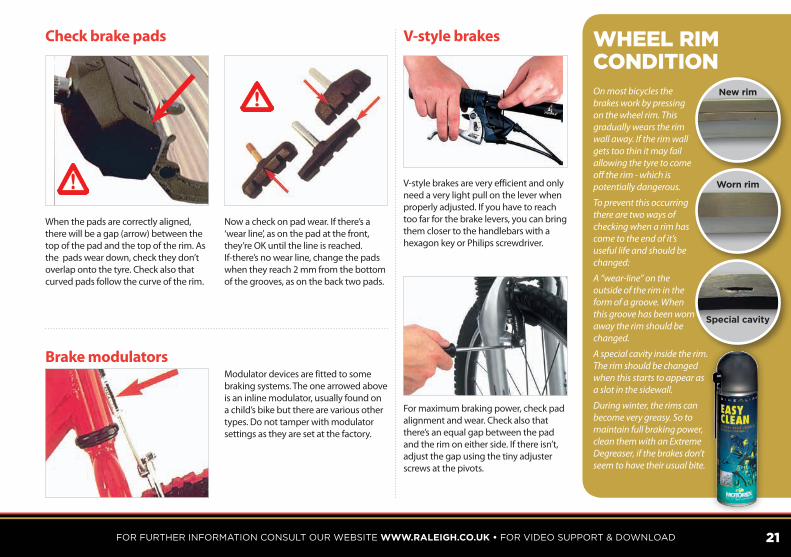
When the pads are correctly aligned, there will be a gap (arrow) between the top of the pad and the top of the rim. As the pads wear down, check they don’t overlap onto the tyre. Check also that curved pads follow the curve of the rim.
Now a check on pad wear. If there’s a ‘wear line’, as on the pad at the front, they’re OK until the line is reached. If-there’s no wear line, change the pads when they reach 2 mm from the bottom of the grooves, as on the back two pads.
Modulator devices are fitted to some braking systems. The one arrowed above is an inline modulator, usually found on a child’s bike but there are various other types. Do not tamper with modulator settings as they are set at the factory.
Check brake pads V-style brakes
Brake modulators
WhEEL Rim ConDition
For maximum braking power, check pad alignment and wear. Check also that there’s an equal gap between the pad and the rim on either side. If there isn’t, adjust the gap using the tiny adjuster screws at the pivots.
V-style brakes are very efficient and only need a very light pull on the lever when properly adjusted. If you have to reach too far for the brake levers, you can bring them closer to the handlebars with a hexagon key or Philips screwdriver.
New rim
Worn rim
Special cavity
On most bicycles the brakes work by pressing on the wheel rim. This gradually wears the rim wall away. If the rim wall gets too thin it may fail allowing the tyre to come off the rim - which is potentially dangerous.
To prevent this occurring there are two ways of checking when a rim has come to the end of it’s useful life and should be changed:
A “wear-line” on the outside of the rim in the form of a groove. When this groove has been worn away the rim should be changed.
A special cavity inside the rim. The rim should be changed when this starts to appear as a slot in the sidewall.
During winter, the rims can become very greasy. So to maintain full braking power, clean them with an Extreme Degreaser, if the brakes don’t seem to have their usual bite.
22 for further information consult our website www.raleigh.co.uk • for video support & download
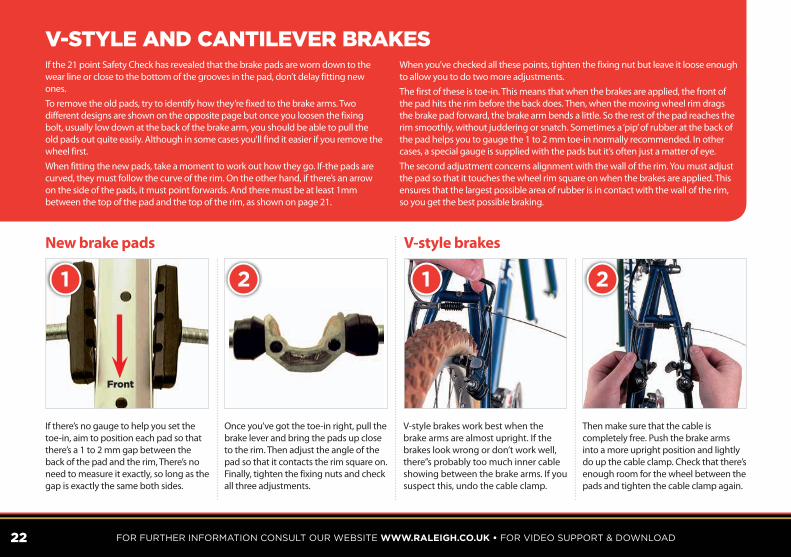
v-stYLE AnD CAntiLEvER bRAkEsIf the 21 point Safety Check has revealed that the brake pads are worn down to the wear line or close to the bottom of the grooves in the pad, don’t delay fitting new ones.
To remove the old pads, try to identify how they’re fixed to the brake arms. Two different designs are shown on the opposite page but once you loosen the fixing bolt, usually low down at the back of the brake arm, you should be able to pull the old pads out quite easily. Although in some cases you’ll find it easier if you remove the wheel first.
When fitting the new pads, take a moment to work out how they go. If-the pads are curved, they must follow the curve of the rim. On the other hand, if there’s an arrow on the side of the pads, it must point forwards. And there must be at least 1mm between the top of the pad and the top of the rim, as shown on page 21.
When you’ve checked all these points, tighten the fixing nut but leave it loose enough to allow you to do two more adjustments.
The first of these is toe-in. This means that when the brakes are applied, the front of the pad hits the rim before the back does. Then, when the moving wheel rim drags the brake pad forward, the brake arm bends a little. So the rest of the pad reaches the rim smoothly, without juddering or snatch. Sometimes a ‘pip’ of rubber at the back of the pad helps you to gauge the 1 to 2 mm toe-in normally recommended. In other cases, a special gauge is supplied with the pads but it’s often just a matter of eye.
The second adjustment concerns alignment with the wall of the rim. You must adjust the pad so that it touches the wheel rim square on when the brakes are applied. This ensures that the largest possible area of rubber is in contact with the wall of the rim, so you get the best possible braking.
Then make sure that the cable is completely free. Push the brake arms into a more upright position and lightly do up the cable clamp. Check that there’s enough room for the wheel between the pads and tighten the cable clamp again.
Once you’ve got the toe-in right, pull the brake lever and bring the pads up close to the rim. Then adjust the angle of the pad so that it contacts the rim square on. Finally, tighten the fixing nuts and check all three adjustments.
V-style brakes work best when the brake arms are almost upright. If the brakes look wrong or don’t work well, there’’s probably too much inner cable showing between the brake arms. If you suspect this, undo the cable clamp.
If there’s no gauge to help you set the toe-in, aim to position each pad so that there’s a 1 to 2 mm gap between the back of the pad and the rim, There’s no need to measure it exactly, so long as the gap is exactly the same both sides.
New brake pads V-style brakes
1 1 22
Front
23for further information consult our website www.raleigh.co.uk • for video support & download
Check also that the angle of the brake pad brings it square on to the wheel rim. When you’ve checked all these points, tighten up the pad clamp nut. Make sure the pad doesn’t move by holding the front of the pad clamp with a hexagon key.
If a standard cantilever is not working well, check that the straddle wire lines up with the diagonal mark running across the cable carrier (arrow). If-it doesn’t, undo the straddle wire clamp and adjust the length of the straddle wire.
To fit new brake pads to standard cantilevers, slacken off the cable adjuster on the brake lever and then unhook the wire from the brake arm. Loosen the nut at the back of the pad holder, using a hexagon key to stop it turning round and round.
Turn the pad clamp so that the brake pad faces away from the rim. Pull the worn pad out of the clamp and fit the new one. Align it with the rim leaving a gap at the top and set toe-in at 1mm. Check again when the pads have worn down.
Standard cantilever
1
2
3
4
How pads are fitted to V-style brakes
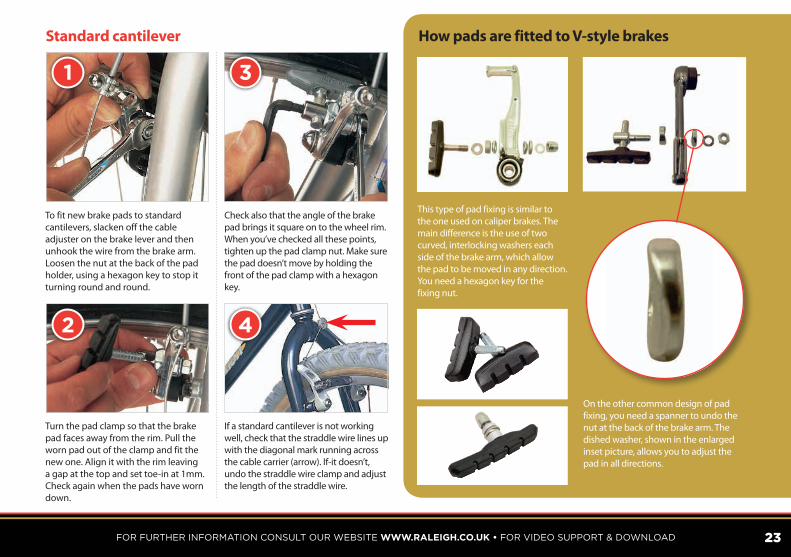
This type of pad fixing is similar to the one used on caliper brakes. The main difference is the use of two curved, interlocking washers each side of the brake arm, which allow the pad to be moved in any direction. You need a hexagon key for the fixing nut.
On the other common design of pad fixing, you need a spanner to undo the nut at the back of the brake arm. The dished washer, shown in the enlarged inset picture, allows you to adjust the pad in all directions.

24 for further information consult our website www.raleigh.co.uk • for video support & download
DisC bRAkEsIt is better if the bike is upside down when fitting a disc brake wheel.
Disc brakes use 2 pads and these are usually kept in place with packing pieces during transit. Remove the packaging from between the disc pads making sure that the pads are not displaced.
High performance models are fitted with disc brakes to ensure powerful and consistent braking under all conditions. Brakes which work on the wheel rim only work properly when the rim is clean and dry. In rain or mud, the brake pad tends to slide over the braking surface rather than gripping it. So not only does braking performance fall off badly, you can never be sure just how much it is affected.
Disc brakes, on the other hand, have larger pads that can easily wipe any water or mud off the disc. This gives you consistent levels of braking, whatever the weather or the surface conditions. In addition, the mechanism presses the pad much more firmly against the disc.
Remember that the gap between the pad and the disc is very small. So-when correctly adjusted, the brake pads rub very lightly against the disc. In fact you should be able to hear a light scraping noise when you spin the wheel. This means that you get the full braking effect with only a short pull on the brake lever. But the small gap also means that when fitting wheels with disc brakes
to a bike, you must slide the disc into position between the pads, before you fit the wheel to the frame. If you don’t, there’s a slight possibility of either jamming the pad against the disc or preventing the caliper moving.
The small gap between the pad and the disc also makes it vital to keep the disc absolutely straight and true. So don’t ever kick it, let it bind on a rock or get damaged in any other way. If the disc does go out of true, it’ll rub much more heavily on the pad and must be replaced without delay.
As for maintenance, disc brake pads should be replaced every 2 to 3,000 km or when they have worn down to 6.3 mm in thickness, whichever comes first. If you don’t, the steel backing will eventually score the disc. But when you do fit new pads, and whenever you find that you need to pull the brake lever a lot further to stop quickly, you must adjust the gap between the pad and the disc. The only other maintenance job is to apply a little copper-based anti-seize compound to the caliper mounting pins every so often.
Refer immediately to your retailer if the disc gets scored or distorted or you hear any unusual noises, especially screeching or grinding sounds.
Please note disc brake type may vary from model to model, but in principal their operation is the same.
To fit new brake pads, you next have to free the inner pad holder from the caliper body. So locate all three fixing bolts and go round undoing each one half a turn at a time. This method of working will prevent any distortion of the parts.
When you have removed all three bolts, gently prise the pad holder away from the caliper body. The pad is held in place with a tiny spring, so prise this away as well. Be very careful, as the spring can fly in any direction.
To remove a front wheel with a disc brake, turn the quick release lever to the open position and let it drop out. If it seems stuck, undo the adjuster nut a bit. When refitting the wheel, lift it carefully into place and re-adjust the quick release.
To fit a new cable, hold the back of the cable clamp with a spanner while you loosen the cable clamp with an Allen key. This is also the first step when you have to strip down the caliper to free it off or when you want to fit new brake pads.
1
2
3
4
25for further information consult our website www.raleigh.co.uk • for video support & download
When properly located, the pad holder is a snug fit on the face of the caliper body and there should be an even gap all the way round. Re-fit all three Allen screws next, going round tightening them a quarter or a half turn at a time.
The caliper body is held onto the fork leg by two pins but it must be easily moveable. If it seems to be fixed, strip the caliper down again and take care to fit it all back together again evenly. Finally, adjust the brake pads.
You can now shake the pad out of the holder. Check the thickness of the pad to see if it needs replacing and clean any dust out of the pad holder and caliper body. You must not inhale the dust, so use multilube for this part of the job.
Fit the new pads into the pad holder and caliper body, holding them there with the springs. However, they don’t hold the pads in place very firmly and the pins on the pad holder are a tight fit in the holes in the caliper body, so be careful.
5
6
7
8
Adjusting brake pads
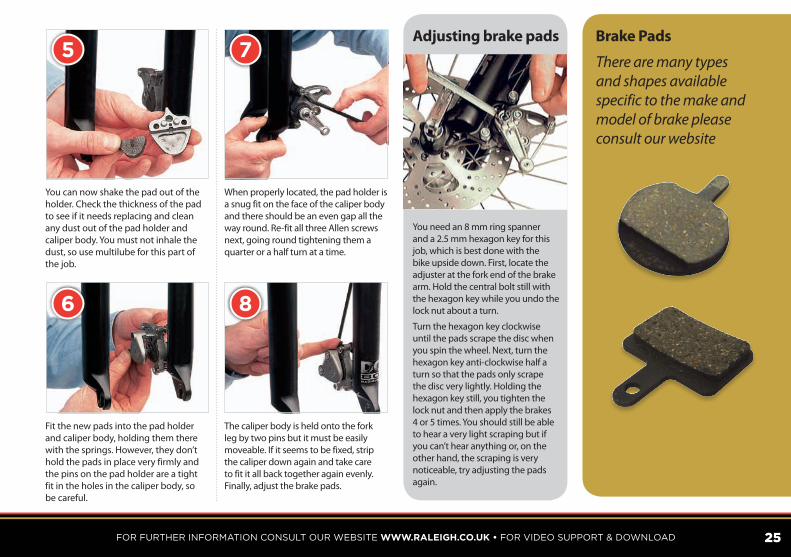
You need an 8 mm ring spanner and a 2.5 mm hexagon key for this job, which is best done with the bike upside down. First, locate the adjuster at the fork end of the brake arm. Hold the central bolt still with the hexagon key while you undo the lock nut about a turn.
Turn the hexagon key clockwise until the pads scrape the disc when you spin the wheel. Next, turn the hexagon key anti-clockwise half a turn so that the pads only scrape the disc very lightly. Holding the hexagon key still, you tighten the lock nut and then apply the brakes 4 or 5 times. You should still be able to hear a very light scraping but if you can’t hear anything or, on the other hand, the scraping is very noticeable, try adjusting the pads again.
Brake Pads
There are many types and shapes available specific to the make and model of brake please consult our website
26 for further information consult our website www.raleigh.co.uk • for video support & download
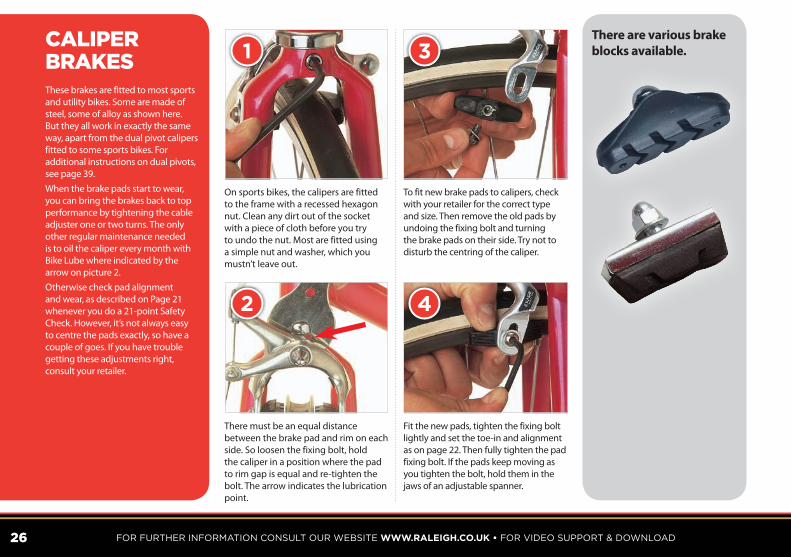
CALiPER bRAkEsThese brakes are fitted to most sports and utility bikes. Some are made of steel, some of alloy as shown here. But they all work in exactly the same way, apart from the dual pivot calipers fitted to some sports bikes. For additional instructions on dual pivots, see page 39.
When the brake pads start to wear, you can bring the brakes back to top performance by tightening the cable adjuster one or two turns. The only other regular maintenance needed is to oil the caliper every month with Bike Lube where indicated by the arrow on picture 2.
Otherwise check pad alignment and wear, as described on Page 21 whenever you do a 21-point Safety Check. However, it’s not always easy to centre the pads exactly, so have a couple of goes. If you have trouble getting these adjustments right, consult your retailer.
To fit new brake pads to calipers, check with your retailer for the correct type and size. Then remove the old pads by undoing the fixing bolt and turning the brake pads on their side. Try not to disturb the centring of the caliper.
Fit the new pads, tighten the fixing bolt lightly and set the toe-in and alignment as on page 22. Then fully tighten the pad fixing bolt. If the pads keep moving as you tighten the bolt, hold them in the jaws of an adjustable spanner.
On sports bikes, the calipers are fitted to the frame with a recessed hexagon nut. Clean any dirt out of the socket with a piece of cloth before you try to undo the nut. Most are fitted using a simple nut and washer, which you mustn’t leave out.
There must be an equal distance between the brake pad and rim on each side. So loosen the fixing bolt, hold the caliper in a position where the pad to rim gap is equal and re-tighten the bolt. The arrow indicates the lubrication point.
1
2
3
4
There are various brake blocks available.
27for further information consult our website www.raleigh.co.uk • for video support & download
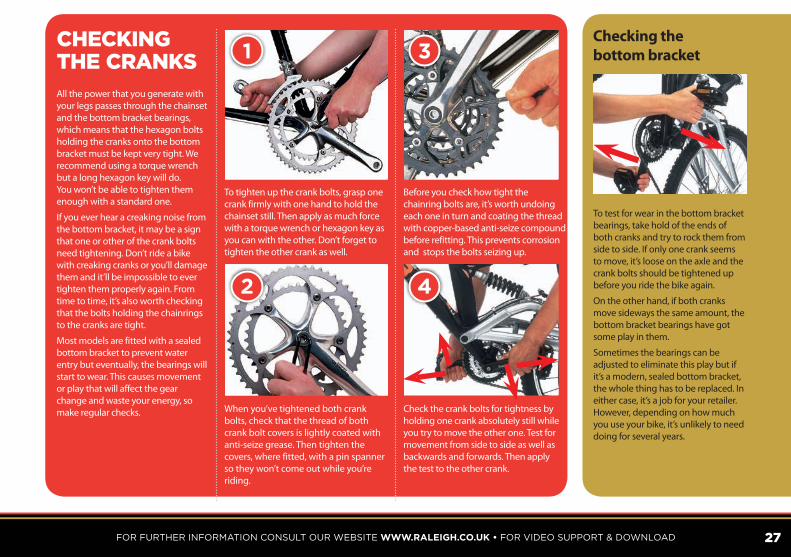
Before you check how tight the chainring bolts are, it’s worth undoing each one in turn and coating the thread with copper-based anti-seize compound before refitting. This prevents corrosion and stops the bolts seizing up.
Check the crank bolts for tightness by holding one crank absolutely still while you try to move the other one. Test for movement from side to side as well as backwards and forwards. Then apply the test to the other crank.
To tighten up the crank bolts, grasp one crank firmly with one hand to hold the chainset still. Then apply as much force with a torque wrench or hexagon key as you can with the other. Don’t forget to tighten the other crank as well.
When you’ve tightened both crank bolts, check that the thread of both crank bolt covers is lightly coated with anti-seize grease. Then tighten the covers, where fitted, with a pin spanner so they won’t come out while you’re riding.
1
2
3
4
ChECking thE CRAnksAll the power that you generate with your legs passes through the chainset and the bottom bracket bearings, which means that the hexagon bolts holding the cranks onto the bottom bracket must be kept very tight. We recommend using a torque wrench but a long hexagon key will do. You won’t be able to tighten them enough with a standard one.
If you ever hear a creaking noise from the bottom bracket, it may be a sign that one or other of the crank bolts need tightening. Don’t ride a bike with creaking cranks or you’ll damage them and it’ll be impossible to ever tighten them properly again. From time to time, it’s also worth checking that the bolts holding the chainrings to the cranks are tight.
Most models are fitted with a sealed bottom bracket to prevent water entry but eventually, the bearings will start to wear. This causes movement or play that will affect the gear change and waste your energy, so make regular checks.
Checking the bottom bracket
To test for wear in the bottom bracket bearings, take hold of the ends of both cranks and try to rock them from side to side. If only one crank seems to move, it’s loose on the axle and the crank bolts should be tightened up before you ride the bike again.
On the other hand, if both cranks move sideways the same amount, the bottom bracket bearings have got some play in them.
Sometimes the bearings can be adjusted to eliminate this play but if it’s a modern, sealed bottom bracket, the whole thing has to be replaced. In either case, it’s a job for your retailer. However, depending on how much you use your bike, it’s unlikely to need doing for several years.

28 for further information consult our website www.raleigh.co.uk • for video support & download
gEAR ChAngingThere are two different types of gear changer. Those fitted to the right hand side of the handlebar control the rear gear. This moves the chain across the six, seven, eight or nine sprockets on the back wheel. To help you keep track of which gear you are in, they are usually fitted with an indicator. When the rear changer is working correctly, gear changes are almost silent and go through very quickly. However, it’s always best to change gear well before you start struggling to keep the speed up. It also helps to take a little pressure off the pedals and change a maximum of three gears at a time.
If a changer is fitted to the left hand side of the handle bar, this controls the front chainwheel gears.
Don’t try to changer gear when the bike is standing still or coasting downhill. In addition, don’t try to take a gear changer apart, just give them a quick squirt of multi purpose lube over the exterior of the moving parts and then wipe off the surplus. As for rotational changers, leave both lubrication and fault finding entirely to your retailer.
Indexing adjustment
If gears are slow to change up to top gear or tend to jump off when you select bottom gear, try tightening the cable adjuster half a turn. If that doesn’t work, try another half turn. If there’s still a problem, check the basic adjustment, as shown on page 30.
On some bikes, the lever for changing gear upwards has a large thumb grip. To change up, reduce the pressure on the pedals but keep them turning. Then push the lever once or more, depending on how many gears you want to shift.
To change downwards, hook your forefinger round the bottom lever, pull it upwards until it clicks and then release it. If you want to change more than one gear, pull the lever two or three times but again, keep pedalling. while you do so.
If you find it awkward to use this type of changer, or cannot see the gear indicator, try adjusting its position on the handlebars. Just loosen the bolt on the handlebar clamp two turns and twist the whole changer assembly.
Easy-Fire shifters
1 32
29for further information consult our website www.raleigh.co.uk • for video support & download
Don’t ride a bike with badly adjusted gears. If you can’t rely on finding the right gear every time, if the chain keeps jumping off or you’re stuck in a high gear, it’s only too easy to lose control.
AND REMEMBER: Bottom and the rest of the low gears are for climbing hills. Top and the other high gears are for descents.
At the rear wheel, the small sprocket is top gear, the large sprocket is bottom.
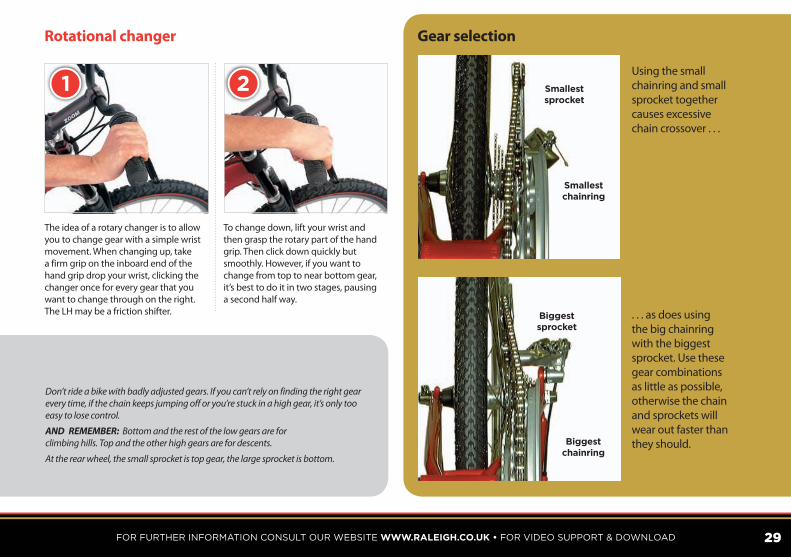
The idea of a rotary changer is to allow you to change gear with a simple wrist movement. When changing up, take a firm grip on the inboard end of the hand grip drop your wrist, clicking the changer once for every gear that you want to change through on the right. The LH may be a friction shifter.
To change down, lift your wrist and then grasp the rotary part of the hand grip. Then click down quickly but smoothly. However, if you want to change from top to near bottom gear, it’s best to do it in two stages, pausing a second half way.
Rotational changer
1 2
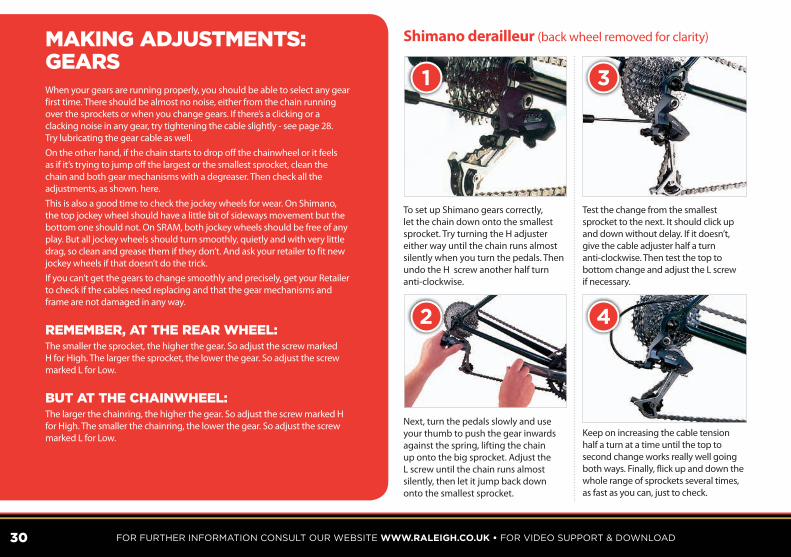
Gear selection
Using the small chainring and small sprocket together causes excessive chain crossover . . .
. . . as does using the big chainring with the biggest sprocket. Use these gear combinations as little as possible, otherwise the chain and sprockets will wear out faster than they should.
Smallest sprocket
Smallest chainring
Biggest sprocket
Biggest chainring
30 for further information consult our website www.raleigh.co.uk • for video support & download
mAking ADjUstmEnts:gEARs
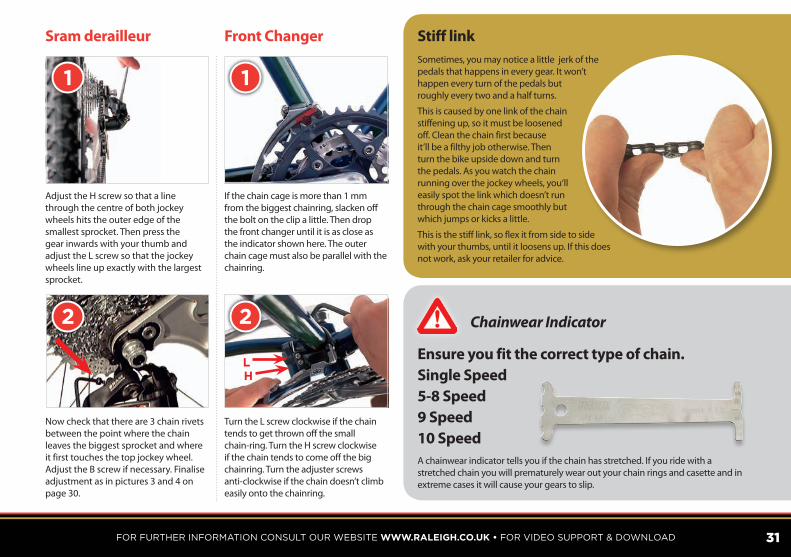
Shimano derailleur (back wheel removed for clarity)
When your gears are running properly, you should be able to select any gear first time. There should be almost no noise, either from the chain running over the sprockets or when you change gears. If there’s a clicking or a clacking noise in any gear, try tightening the cable slightly - see page 28. Try lubricating the gear cable as well.
On the other hand, if the chain starts to drop off the chainwheel or it feels as if it’s trying to jump off the largest or the smallest sprocket, clean the chain and both gear mechanisms with a degreaser. Then check all the adjustments, as shown. here.
This is also a good time to check the jockey wheels for wear. On Shimano, the top jockey wheel should have a little bit of sideways movement but the bottom one should not. On SRAM, both jockey wheels should be free of any play. But all jockey wheels should turn smoothly, quietly and with very little drag, so clean and grease them if they don’t. And ask your retailer to fit new jockey wheels if that doesn’t do the trick.
If you can’t get the gears to change smoothly and precisely, get your Retailer to check if the cables need replacing and that the gear mechanisms and frame are not damaged in any way.
REmEmbER, At thE REAR WhEEL:The smaller the sprocket, the higher the gear. So adjust the screw marked H for High. The larger the sprocket, the lower the gear. So adjust the screw marked L for Low.
bUt At thE ChAinWhEEL:The larger the chainring, the higher the gear. So adjust the screw marked H for High. The smaller the chainring, the lower the gear. So adjust the screw marked L for Low.
Test the change from the smallest sprocket to the next. It should click up and down without delay. If it doesn’t, give the cable adjuster half a turn anti-clockwise. Then test the top to bottom change and adjust the L screw if necessary.
Keep on increasing the cable tension half a turn at a time until the top to second change works really well going both ways. Finally, flick up and down the whole range of sprockets several times, as fast as you can, just to check.
To set up Shimano gears correctly, let the chain down onto the smallest sprocket. Try turning the H adjuster either way until the chain runs almost silently when you turn the pedals. Then undo the H screw another half turn anti-clockwise.
Next, turn the pedals slowly and use your thumb to push the gear inwards against the spring, lifting the chain up onto the big sprocket. Adjust the L screw until the chain runs almost silently, then let it jump back down onto the smallest sprocket.
1
2
3
4
31for further information consult our website www.raleigh.co.uk • for video support & download
Sram derailleur Front Changer
If the chain cage is more than 1 mm from the biggest chainring, slacken off the bolt on the clip a little. Then drop the front changer until it is as close as the indicator shown here. The outer chain cage must also be parallel with the chainring.
Turn the L screw clockwise if the chain tends to get thrown off the small chain-ring. Turn the H screw clockwise if the chain tends to come off the big chainring. Turn the adjuster screws anti-clockwise if the chain doesn’t climb easily onto the chainring.
Adjust the H screw so that a line through the centre of both jockey wheels hits the outer edge of the smallest sprocket. Then press the gear inwards with your thumb and adjust the L screw so that the jockey wheels line up exactly with the largest sprocket.
Now check that there are 3 chain rivets between the point where the chain leaves the biggest sprocket and where it first touches the top jockey wheel. Adjust the B screw if necessary. Finalise adjustment as in pictures 3 and 4 on page 30.
1
2
1
2
LH
Stiff linkSometimes, you may notice a little jerk of the pedals that happens in every gear. It won’t happen every turn of the pedals but roughly every two and a half turns.
This is caused by one link of the chain stiffening up, so it must be loosened off. Clean the chain first because it’ll be a filthy job otherwise. Then turn the bike upside down and turn the pedals. As you watch the chain running over the jockey wheels, you‘ll easily spot the link which doesn’t run through the chain cage smoothly but which jumps or kicks a little.
This is the stiff link, so flex it from side to side with your thumbs, until it loosens up. If this does not work, ask your retailer for advice.
Ensure you fit the correct type of chain.Single Speed 5-8 Speed9 Speed10 Speed
chainwear Indicator
A chainwear indicator tells you if the chain has stretched. If you ride with a stretched chain you will prematurely wear out your chain rings and casette and in extreme cases it will cause your gears to slip.
32 for further information consult our website www.raleigh.co.uk • for video support & download
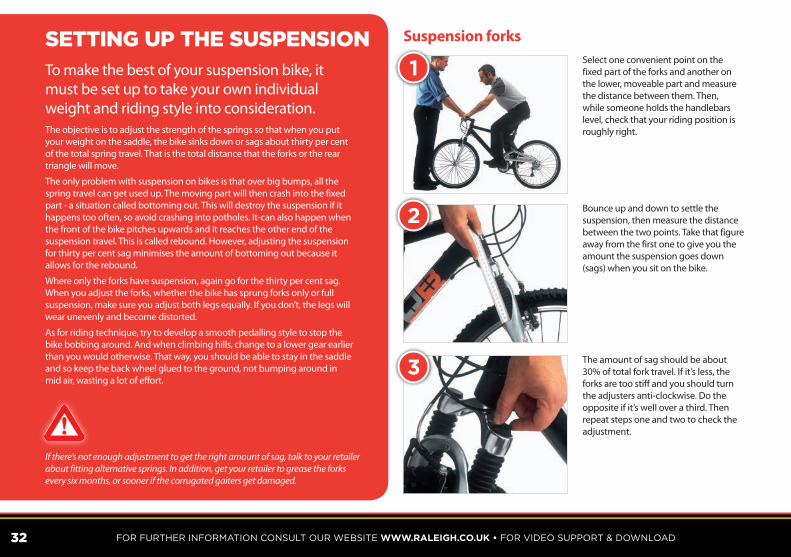
sEtting UP thE sUsPEnsionTo make the best of your suspension bike, it must be set up to take your own individual weight and riding style into consideration.The objective is to adjust the strength of the springs so that when you put your weight on the saddle, the bike sinks down or sags about thirty per cent of the total spring travel. That is the total distance that the forks or the rear triangle will move.
The only problem with suspension on bikes is that over big bumps, all the spring travel can get used up. The moving part will then crash into the fixed part - a situation called bottoming out. This will destroy the suspension if it happens too often, so avoid crashing into potholes. It-can also happen when the front of the bike pitches upwards and it reaches the other end of the suspension travel. This is called rebound. However, adjusting the suspension for thirty per cent sag minimises the amount of bottoming out because it allows for the rebound.
Where only the forks have suspension, again go for the thirty per cent sag. When you adjust the forks, whether the bike has sprung forks only or full suspension, make sure you adjust both legs equally. If you don’t, the legs will wear unevenly and become distorted.
As for riding technique, try to develop a smooth pedalling style to stop the bike bobbing around. And when climbing hills, change to a lower gear earlier than you would otherwise. That way, you should be able to stay in the saddle and so keep the back wheel glued to the ground, not bumping around in mid air, wasting a lot of effort.
Select one convenient point on the fixed part of the forks and another on the lower, moveable part and measure the distance between them. Then, while someone holds the handlebars level, check that your riding position is roughly right.
Bounce up and down to settle the suspension, then measure the distance between the two points. Take that figure away from the first one to give you the amount the suspension goes down (sags) when you sit on the bike.
The amount of sag should be about 30% of total fork travel. If it’s less, the forks are too stiff and you should turn the adjusters anti-clockwise. Do the opposite if it’s well over a third. Then repeat steps one and two to check the adjustment.
Suspension forks
If there’s not enough adjustment to get the right amount of sag, talk to your retailer about fitting alternative springs. In addition, get your retailer to grease the forks every six months, or sooner if the corrugated gaiters get damaged.
1
2
3
33for further information consult our website www.raleigh.co.uk • for video support & download
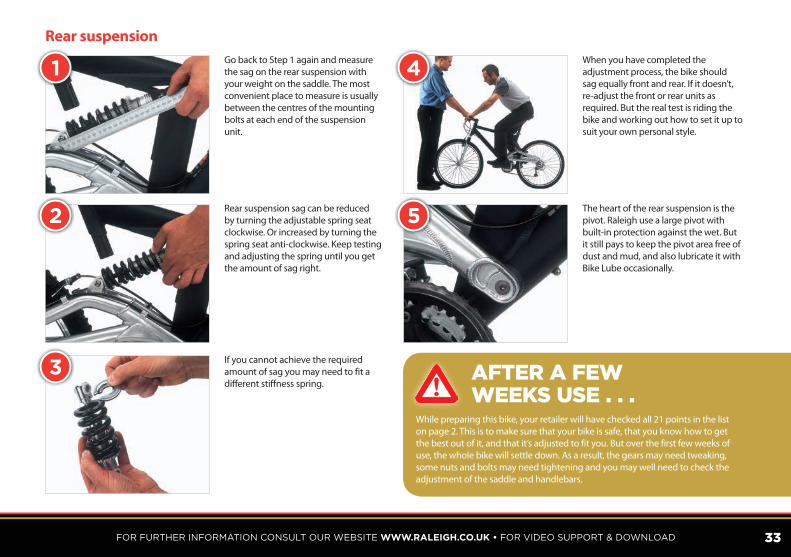
Go back to Step 1 again and measure the sag on the rear suspension with your weight on the saddle. The most convenient place to measure is usually between the centres of the mounting bolts at each end of the suspension unit.
When you have completed the adjustment process, the bike should sag equally front and rear. If it doesn’t, re-adjust the front or rear units as required. But the real test is riding the bike and working out how to set it up to suit your own personal style.
Rear suspension sag can be reduced by turning the adjustable spring seat clockwise. Or increased by turning the spring seat anti-clockwise. Keep testing and adjusting the spring until you get the amount of sag right.
The heart of the rear suspension is the pivot. Raleigh use a large pivot with built-in protection against the wet. But it still pays to keep the pivot area free of dust and mud, and also lubricate it with Bike Lube occasionally.
If you cannot achieve the required amount of sag you may need to fit a different stiffness spring.
Rear suspension
1 4
2 5
3 AFtER A FEW WEEks UsE . . .
While preparing this bike, your retailer will have checked all 21 points in the list on page 2. This is to make sure that your bike is safe, that you know how to get the best out of it, and that it’s adjusted to fit you. But over the first few weeks of use, the whole bike will settle down. As a result, the gears may need tweaking, some nuts and bolts may need tightening and you may well need to check the adjustment of the saddle and handlebars.
34 for further information consult our website www.raleigh.co.uk • for video support & download
sPECiAList bikEsHub gear or utility bikes are mainly used for short distance work in town. They’re nearly always designed to have an upright riding position, though the actual frame is usually quite laid back. This means that nearly all your weight is on the saddle, so this has to be pretty soft. By carefully adjusting the handlebars, you can get some of your weight forward but not a lot. As for saddle height, it’s best to position the saddle so that you can get the ball of your feet on the ground while sitting on the saddle, without stretching at all. That way you’ll be comfortable when held up by the traffic and be able to hop on and off easily.
Toe clips are not usually used on this type of bike but you should still try to pedal with the ball of your foot. If you pedal with your instep, it’ll be much harder work, especially on hills.
Hub gear bikes have a different back wheel safety system, so take careful note of how the wheel nuts and washers are fitted BEFORE removing the wheel and stick rigidly to this arrangement when you replace it.
Adjusting a Sturmey ArcherTo adjust a Sturmey Archer gear, if it slips or jumps when you’re pedalling or when refitting the back wheel, turn the whole control chain clockwise. It must be screwed into the gear as far as it will go.
Next, if you’re refitting the back wheel, screw the cable connector onto the end of the control chain until it almost reaches the knurled nut set in second gear. Then look through the hole in the sleeve nut and locate the main part of the control chain (in red). Turn the connector until the shoulder of the control chain (arrowed, where the blue meets the red) lines up with the end of the axle. Finally, lock the connector with the knurled nut.
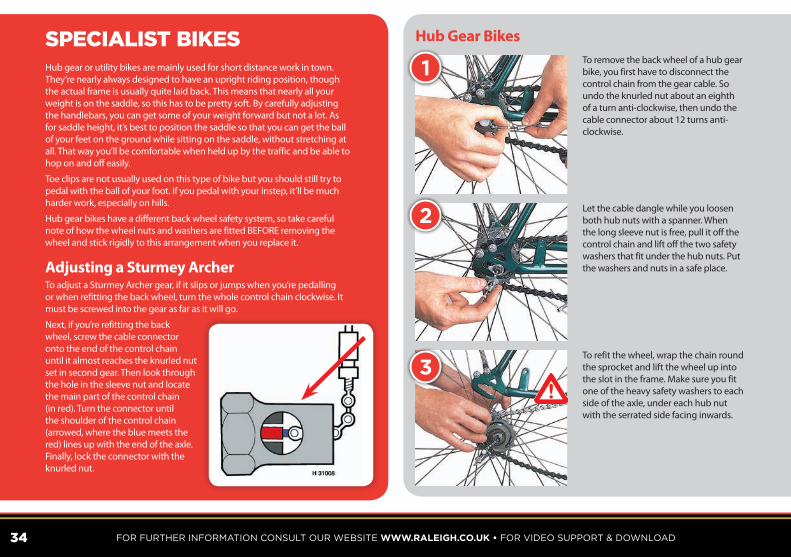
To remove the back wheel of a hub gear bike, you first have to disconnect the control chain from the gear cable. So undo the knurled nut about an eighth of a turn anti-clockwise, then undo the cable connector about 12 turns anti-clockwise.
Let the cable dangle while you loosen both hub nuts with a spanner. When the long sleeve nut is free, pull it off the control chain and lift off the two safety washers that fit under the hub nuts. Put the washers and nuts in a safe place.
To refit the wheel, wrap the chain round the sprocket and lift the wheel up into the slot in the frame. Make sure you fit one of the heavy safety washers to each side of the axle, under each hub nut with the serrated side facing inwards.
Hub Gear Bikes
1
2
3
35for further information consult our website www.raleigh.co.uk • for video support & download
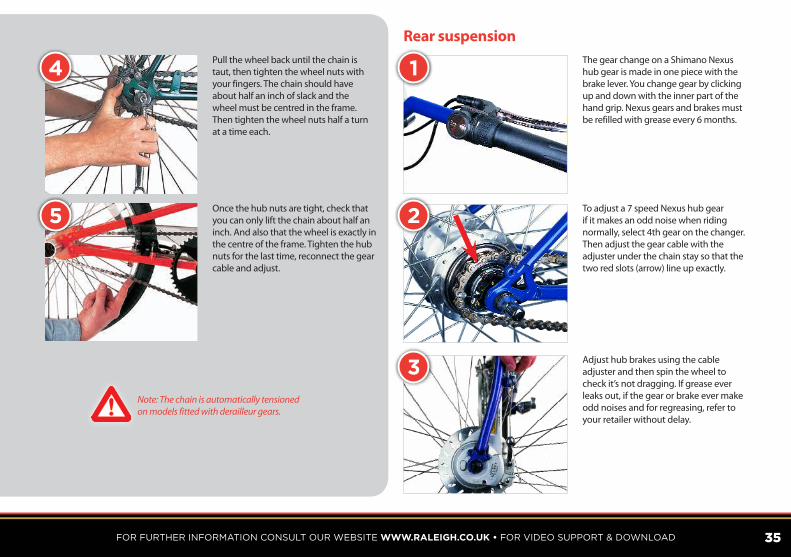
Pull the wheel back until the chain is taut, then tighten the wheel nuts with your fingers. The chain should have about half an inch of slack and the wheel must be centred in the frame. Then tighten the wheel nuts half a turn at a time each.
Once the hub nuts are tight, check that you can only lift the chain about half an inch. And also that the wheel is exactly in the centre of the frame. Tighten the hub nuts for the last time, reconnect the gear cable and adjust.
4
5
Note: The chain is automatically tensioned on models fitted with derailleur gears.
The gear change on a Shimano Nexus hub gear is made in one piece with the brake lever. You change gear by clicking up and down with the inner part of the hand grip. Nexus gears and brakes must be refilled with grease every 6 months.
To adjust a 7 speed Nexus hub gear if it makes an odd noise when riding normally, select 4th gear on the changer. Then adjust the gear cable with the adjuster under the chain stay so that the two red slots (arrow) line up exactly.
Adjust hub brakes using the cable adjuster and then spin the wheel to check it’s not dragging. If grease ever leaks out, if the gear or brake ever make odd noises and for regreasing, refer to your retailer without delay.
Rear suspension
1
2
3
36 for further information consult our website www.raleigh.co.uk • for video support & download
bmX bikEsBMXs are designed for maximum bike control at slow speeds. The frames are built for strength rather than speed and the basic design does not vary a lot, although there are various styles of riding. Only one size of frame is normally available, though the saddle adjusts up and down to cater for riders of varying height.
Some BMX riding styles and practices place an extraordinary load on the frame and mechanical parts. Riders should therefore read the guarantee on page 51, which covers normal off road riding only.
There is only one gear on these bikes, so the best way to change the gearing is to fit a larger or smaller sprocket. However, basic BMXs use a one piece chainset, so you can’t change the gearing anyway. Higher up the range, they’re similar to a normal cotterless chainset and it is possible to alter the gearing.
Maybe the hardest part of a BMX to understand is the braking system. Most BMXs are fitted with compact U brakes front and back. However, many tricks involve spinning the handlebars, which would be impossible without a special device called a Gyro or an Oryg. This features a back brake cable that splits into two near the brake lever. The cable adjusters screw into a loose plate at the top of the headset with the nipples located in the middle plate. A second pair of cables connects to the middle and lower plates but join into one again before reaching the back brake. When you spin the handlebars, the stem and headset revolve but the cable mounting plates stay still.
It nearly always requires a fair bit of trial and error to get the brake cable adjustment right. So if you have trouble, consult your retailer. He will also be able to supply a replacement for the special rear cable.
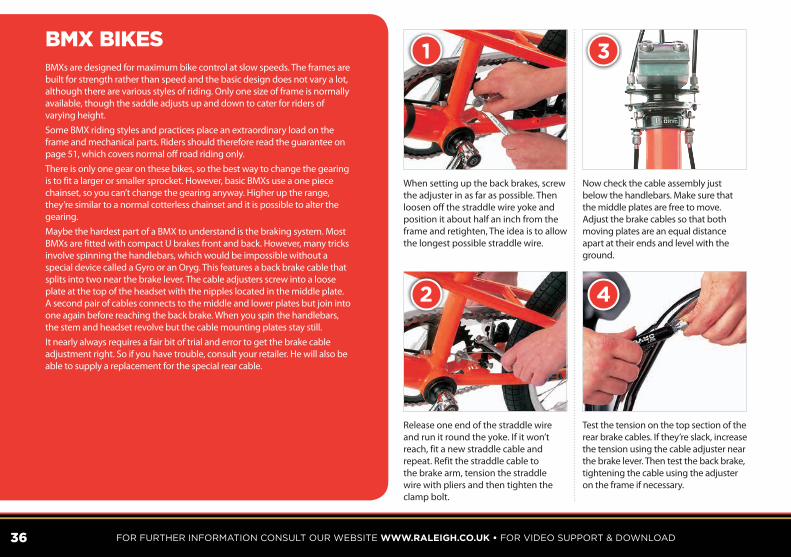
Now check the cable assembly just below the handlebars. Make sure that the middle plates are free to move. Adjust the brake cables so that both moving plates are an equal distance apart at their ends and level with the ground.
Test the tension on the top section of the rear brake cables. If they’re slack, increase the tension using the cable adjuster near the brake lever. Then test the back brake, tightening the cable using the adjuster on the frame if necessary.
When setting up the back brakes, screw the adjuster in as far as possible. Then loosen off the straddle wire yoke and position it about half an inch from the frame and retighten, The idea is to allow the longest possible straddle wire.
Release one end of the straddle wire and run it round the yoke. If it won’t reach, fit a new straddle cable and repeat. Refit the straddle cable to the brake arm, tension the straddle wire with pliers and then tighten the clamp bolt.
1
2
3
4
37for further information consult our website www.raleigh.co.uk • for video support & download
Lift the chain at the mid-point of it’s bottom run. Chain tension is correct when you can lift it 12mm. To adjust, undo the wheel nuts, move the wheel to it’s new position, check it’s central and finally, tighten the wheel nuts a little at a time.
To prevent distortion of the handlebar clamp, undo one nut half a turn, then the diagonally opposite one the same amount. Undo the other two nuts in a similar way and continue half a turn at a time. Tighten up using the same method.
Some ‘U’ brakes may be fitted with a cable pipe that fits into a socket on one of the brake arms. Occasionally, check that the cable pipe moves freely and that the straddle wire is as short as possible. Alternatively a simple cable adjuster may be fitted at the end.
When front or rear pegs are fitted, you’ll have to use a socket set with a 250mm or 300mm extension to tighten up or undo the wheels nuts. This is not the easiest task but if you get somebody else to steady the handlebars, that’ll help.
5
6
7
8
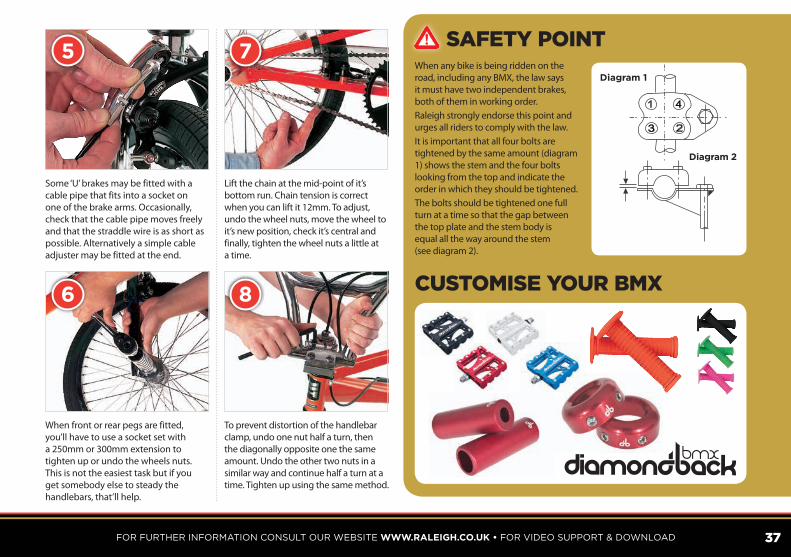
sAFEtY Point
CUstomisE YoUR bmX
When any bike is being ridden on the road, including any BMX, the law says it must have two independent brakes, both of them in working order.Raleigh strongly endorse this point and urges all riders to comply with the law.It is important that all four bolts are tightened by the same amount (diagram 1) shows the stem and the four bolts looking from the top and indicate the order in which they should be tightened.The bolts should be tightened one full turn at a time so that the gap between the top plate and the stem body is equal all the way around the stem (see diagram 2).
Diagram 1
Diagram 2
38 for further information consult our website www.raleigh.co.uk • for video support & download
RACE & toURing bikEsThe riding position on a race bike looks uncomfortable but isn’t, if you adjust the riding position correctly. The ball of the foot should just reach the ground when you’re sat on the saddle and your feet, hands and bottom should each support about a third of your weight.
Minimum weight is very important, so the tyres are very thin and light. In fact the whole bike looks fragile besides a mountain bike. However, with careful adjustment of the riding position, these bikes are very comfortable. They also have more precise and agile handling than any other adult bike. Provided you use this built-in agility to avoid all potholes and keep the tyres pumped up hard, the wheels fitted to your sports bike will last as long as the ones fitted to any mountain bike.
Lower-priced sports bikes have indexed gears controlled by levers on the down tube. Top-of-the-range bikes have dual control levers with the gears operated from the brake levers, which is much more convenient. However, the gears themselves, though, are very similar, to mountain bike gears, except in detail, and they’re adjusted in the same way, as shown on pages 30 and 31. The only real difference is that most sports bikes only have two chainrings, not three as mountain bikes do.
Clipless pedals are fitted to all top sports and racing bikes and to top mountain bikes. They’re more efficient for racing and fast riding generally because the cleat on the sole of the shoe gives you a positive connection to the pedal. But there are several different designs of pedals and cleats, so you have to buy cleats that match your pedals.
Long distance touring machines are similar to sports bikes but have mudguards, luggage carriers and lower gears, perhaps with a triple chainset to cope with their different role.
Some sports bikes do not have such a wide range of gears as on a mountain bike so the gear mechanisms may be are more compact, with a shorter chain cage on the rear mech and a lighter front mech. But they’re still adjusted as shown on page 28.
On top road bikes, the brake and gear levers are combined. To change up, you move the brake lever sideways. To change down, you operate the smaller lever. Keep the cable well lubricated with multi-purpose lube but don’t lube the shifter.
Basic sports bikes are fitted with a gear lever on the frame. But the gears are still indexed, so you change gear by just clicking the lever up and down. There’s a similar lever on the other side of the frame that operates the front gear change.
Top sports bikes and mountain bikes are fitted with clipless pedals, only usable with the correct shoes and cleats. Both the pedal and cleat must be kept clean to ensure that the device that binds the shoe to the pedal works reliably every time.
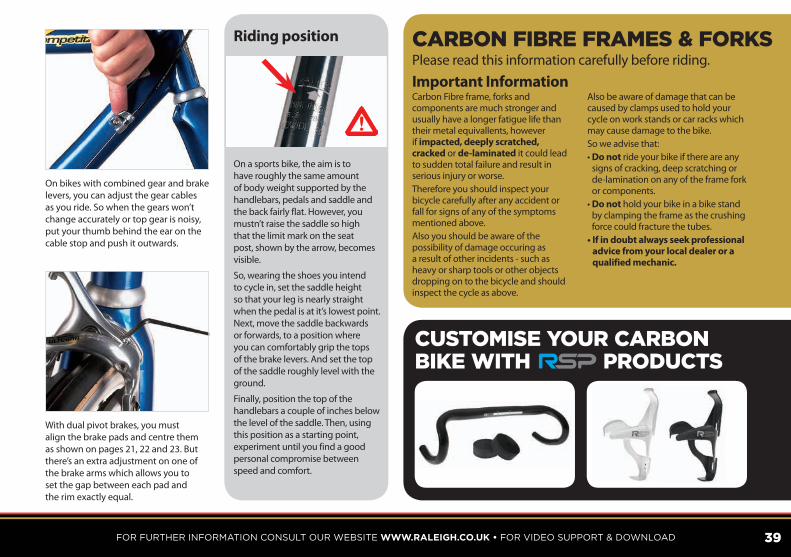
39for further information consult our website www.raleigh.co.uk • for video support & download
On bikes with combined gear and brake levers, you can adjust the gear cables as you ride. So when the gears won’t change accurately or top gear is noisy, put your thumb behind the ear on the cable stop and push it outwards.
With dual pivot brakes, you must align the brake pads and centre them as shown on pages 21, 22 and 23. But there’s an extra adjustment on one of the brake arms which allows you to set the gap between each pad and the rim exactly equal.
Riding position
On a sports bike, the aim is to have roughly the same amount of body weight supported by the handlebars, pedals and saddle and the back fairly flat. However, you mustn’t raise the saddle so high that the limit mark on the seat post, shown by the arrow, becomes visible.
So, wearing the shoes you intend to cycle in, set the saddle height so that your leg is nearly straight when the pedal is at it’s lowest point. Next, move the saddle backwards or forwards, to a position where you can comfortably grip the tops of the brake levers. And set the top of the saddle roughly level with the ground.
Finally, position the top of the handlebars a couple of inches below the level of the saddle. Then, using this position as a starting point, experiment until you find a good personal compromise between speed and comfort.
CARbon FibRE FRAmEs & FoRksPlease read this information carefully before riding.
CUstomisE YoUR CARbon bikE With PRoDUCts
Important InformationCarbon Fibre frame, forks and components are much stronger and usually have a longer fatigue life than their metal equivallents, however if impacted, deeply scratched, cracked or de-laminated it could lead to sudden total failure and result in serious injury or worse.Therefore you should inspect your bicycle carefully after any accident or fall for signs of any of the symptoms mentioned above.Also you should be aware of the possibility of damage occuring as a result of other incidents - such as heavy or sharp tools or other objects dropping on to the bicycle and should inspect the cycle as above.
Also be aware of damage that can be caused by clamps used to hold your cycle on work stands or car racks which may cause damage to the bike.So we advise that:• Do not ride your bike if there are any
signs of cracking, deep scratching or de-lamination on any of the frame fork or components.
• Do not hold your bike in a bike stand by clamping the frame as the crushing force could fracture the tubes.
• If in doubt always seek professional advice from your local dealer or a qualified mechanic.
40 for further information consult our website www.raleigh.co.uk • for video support & download
mAintEnAnCEIt is extremely important that your bike is checked and serviced at regular intervals to ensure its reliability and especially that it is safe to ride.
Cleaning and lubrication also forms an important tool in the proper maintenance of your bike and this is covered in more detail immediately after this section.
Some servicing and repair tasks require specialised knowledge and tools. Improper adjustment may result in damage to the bike or may lead to a serious accident, If you have any doubts consult your cycle dealer.
The following checks are suggested: -
Before you ride - Check:-
• Wheels are tightly secured.
• Tyres are inflated to correct pressure (indicated on side-wall of tyre). Also check condition of tyres for cuts etc. (Note: It is a good idea to carry a puncture repair kit or spare inner tube, tyre levers and pump with you).
• Handlebar, stem and headset locknut are tight and that the steering turns smoothly.
• Brakes – Squeeze levers to ensure sufficient pressure can be applied without the lever touching the handlebars. Also ensure brake blocks are aligned correctly with rim and the blocks are not badly worn.
• Brake cables are not frayed at the end.
• Gears operate correctly.
• Wheels are running true by spinning them. You can also check that mudguards, if fitted, are correctly adjusted at this time.
• Saddle is adjusted to the correct riding position and the seat pin is tightened.
After long or hard rides or at least every month of regular use – Check same points as above + the following: -
• Clean, degrease and lubricate your bike.
• Cranks, bottom bracket fittings and pedals are tight.
• Tyre wear and general condition for cuts, glass, thorns etc.
• Spokes are not loose or broken. These need to be attended to before the bike can be ridden again and you are advised to get these done at your dealer.
• Hubs are running smoothly.
Every 12 monthsBefore you start make sure your bike is thoroughly clean and degreased.
Unless you have a good knowledge of bikes, we suggest that you take your bike to your local dealer for a full service. If this is not feasible we suggest you use the following checks: -• Frame and forks for any damage or cracks.
• Wheels are true. Replace or repair if necessary.
• Brake tracks on rims are not badly worn. Also clean and degrease - see page 19.
• Brake levers, brake adjusters + cable and nipple attached to lever is in good order. Any sign of wear on cable to nipple joint replace inner wire.
• Brakes - Brake blocks – Replace if excessive wear is evident. Re-set brakes.
• Chainwheel teeth – These wear, especially if it is an alloy chainwheel and the same chainwheel ring is used most of the time. Worn chainwheels can significantly affect gear changing.
• Chain for wear and stiff links, clean and re-grease chain or replace if necessary. Chains stretch with use and should be changed before causing excessive wear of the chainwheel or sprockets (approximately every 1500 – 2000 miles or every 2 years if riding approximately 25 miles per week)
• Cranks are attached securely.
• Front shifter and rear derailleur for wear and especially check the rear derailleur in respect of straightness and the Jockey wheel.
• Bottom bracket fittings for wear and disassemble and re-grease or replace if required.
• Headset moves smoothly by turning wheel. Also check side movement by applying the front brake and try rocking the bike. If any movement is found, the headset may need cleaning, adjusting and re-greasing or the bearing may need replacing or even a complete new headset may need fitting.
If in doubt always consult a bike dealer or qualified mechanic.
Please note that these schedules are suggestions, frequent and heavy use of your bike such as off road riding will require more frequent maintenance.
Remember good maintenance will prolong the life of your bike and components and ensure yours and other peoples safety. Always use genuine replacement parts for safety critical items such as brakes.
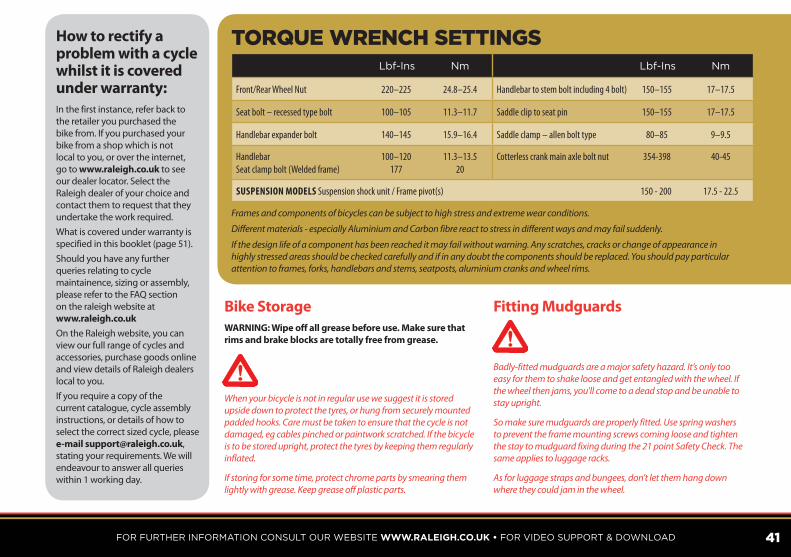
41for further information consult our website www.raleigh.co.uk • for video support & download
How to rectify a problem with a cycle whilst it is covered under warranty:In the first instance, refer back to the retailer you purchased the bike from. If you purchased your bike from a shop which is not local to you, or over the internet, go to www.raleigh.co.uk to see our dealer locator. Select the Raleigh dealer of your choice and contact them to request that they undertake the work required.
What is covered under warranty is specified in this booklet (page 51).
Should you have any further queries relating to cycle maintainence, sizing or assembly, please refer to the FAQ section on the raleigh website at www.raleigh.co.uk
On the Raleigh website, you can view our full range of cycles and accessories, purchase goods online and view details of Raleigh dealers local to you.
If you require a copy of the current catalogue, cycle assembly instructions, or details of how to select the correct sized cycle, please e-mail [email protected], stating your requirements. We will endeavour to answer all queries within 1 working day.
Bike StorageWARNING: Wipe off all grease before use. Make sure that rims and brake blocks are totally free from grease.
When your bicycle is not in regular use we suggest it is stored upside down to protect the tyres, or hung from securely mounted padded hooks. Care must be taken to ensure that the cycle is not damaged, eg cables pinched or paintwork scratched. If the bicycle is to be stored upright, protect the tyres by keeping them regularly inflated.
If storing for some time, protect chrome parts by smearing them lightly with grease. Keep grease off plastic parts.
Fitting Mudguards
Badly-fitted mudguards are a major safety hazard. It’s only too easy for them to shake loose and get entangled with the wheel. If the wheel then jams, you’ll come to a dead stop and be unable to stay upright.
So make sure mudguards are properly fitted. Use spring washers to prevent the frame mounting screws coming loose and tighten the stay to mudguard fixing during the 21 point Safety Check. The same applies to luggage racks.
As for luggage straps and bungees, don’t let them hang down where they could jam in the wheel.
toRQUE WREnCh sEttings
Frames and components of bicycles can be subject to high stress and extreme wear conditions.
Different materials - especially Aluminium and Carbon fibre react to stress in different ways and may fail suddenly.
If the design life of a component has been reached it may fail without warning. Any scratches, cracks or change of appearance in highly stressed areas should be checked carefully and if in any doubt the components should be replaced. You should pay particular attention to frames, forks, handlebars and stems, seatposts, aluminium cranks and wheel rims.
Lbf-Ins Nm Lbf-Ins Nm
Front/Rear Wheel Nut 220–225 24.8–25.4 Handlebar to stem bolt including 4 bolt) 150–155 17–17.5
Seat bolt – recessed type bolt 100–105 11.3–11.7 Saddle clip to seat pin 150–155 17–17.5
Handlebar expander bolt 140–145 15.9–16.4 Saddle clamp – allen bolt type 80–85 9–9.5
Handlebar 100–120 11.3–13.5 Seat clamp bolt (Welded frame) 177 20
Cotterless crank main axle bolt nut 354-398 40-45
SuSpenSion modelS Suspension shock unit / Frame pivot(s) 150 - 200 17.5 - 22.5
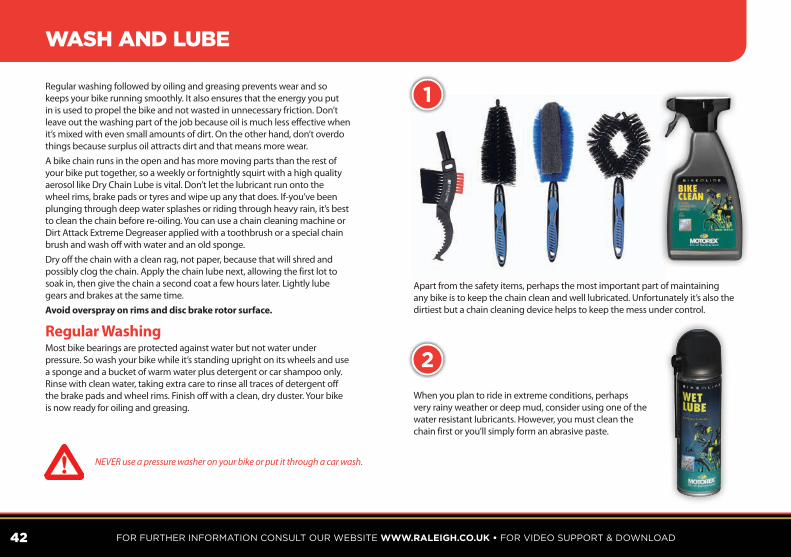
42 for further information consult our website www.raleigh.co.uk • for video support & download
Apart from the safety items, perhaps the most important part of maintaining any bike is to keep the chain clean and well lubricated. Unfortunately it’s also the dirtiest but a chain cleaning device helps to keep the mess under control.
When you plan to ride in extreme conditions, perhaps very rainy weather or deep mud, consider using one of the water resistant lubricants. However, you must clean the chain first or you’ll simply form an abrasive paste.
Regular washing followed by oiling and greasing prevents wear and so keeps your bike running smoothly. It also ensures that the energy you put in is used to propel the bike and not wasted in unnecessary friction. Don’t leave out the washing part of the job because oil is much less effective when it’s mixed with even small amounts of dirt. On the other hand, don’t overdo things because surplus oil attracts dirt and that means more wear.
A bike chain runs in the open and has more moving parts than the rest of your bike put together, so a weekly or fortnightly squirt with a high quality aerosol like Dry Chain Lube is vital. Don’t let the lubricant run onto the wheel rims, brake pads or tyres and wipe up any that does. If-you’ve been plunging through deep water splashes or riding through heavy rain, it’s best to clean the chain before re-oiling. You can use a chain cleaning machine or Dirt Attack Extreme Degreaser applied with a toothbrush or a special chain brush and wash off with water and an old sponge.
Dry off the chain with a clean rag, not paper, because that will shred and possibly clog the chain. Apply the chain lube next, allowing the first lot to soak in, then give the chain a second coat a few hours later. Lightly lube gears and brakes at the same time.
Avoid overspray on rims and disc brake rotor surface.
Regular WashingMost bike bearings are protected against water but not water under pressure. So wash your bike while it’s standing upright on its wheels and use a sponge and a bucket of warm water plus detergent or car shampoo only. Rinse with clean water, taking extra care to rinse all traces of detergent off the brake pads and wheel rims. Finish off with a clean, dry duster. Your bike is now ready for oiling and greasing.
1
2
NEVER use a pressure washer on your bike or put it through a car wash.
WAsh AnD LUbE
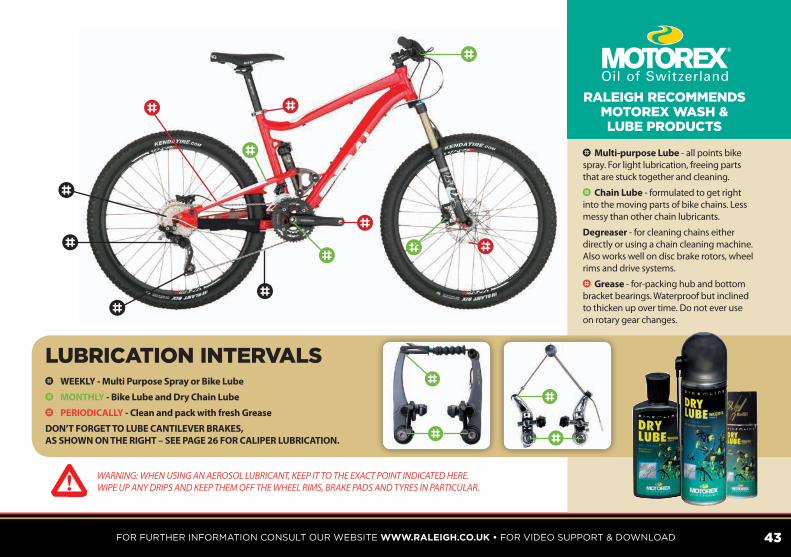
43for further information consult our website www.raleigh.co.uk • for video support & download
Multi-purpose Lube - all points bike spray. For light lubrication, freeing parts that are stuck together and cleaning.
Chain Lube - formulated to get right into the moving parts of bike chains. Less messy than other chain lubricants.
Degreaser - for cleaning chains either directly or using a chain cleaning machine. Also works well on disc brake rotors, wheel rims and drive systems.
Grease - for-packing hub and bottom bracket bearings. Waterproof but inclined to thicken up over time. Do not ever use on rotary gear changes.
WEEKLY - Multi Purpose Spray or Bike Lube
MONTHLY - Bike Lube and Dry Chain Lube
PERIODICALLY - Clean and pack with fresh Grease
DON’T FORGET TO LUBE CANTILEVER BRAKES, AS SHOWN ON THE RIGHT – SEE PAGE 26 FOR CALIPER LUBRICATION.
LUbRiCAtion intERvALs
WARNING: WHEN USING AN AEROSOL LUBRICANT, KEEP IT TO THE EXACT POINT INDICATED HERE. WIPE UP ANY DRIPS AND KEEP THEM OFF THE WHEEL RIMS, BRAKE PADS AND TYRES IN PARTICULAR.
RALEigh RECommEnDsmotoREX WAsh & LUbE PRoDUCts
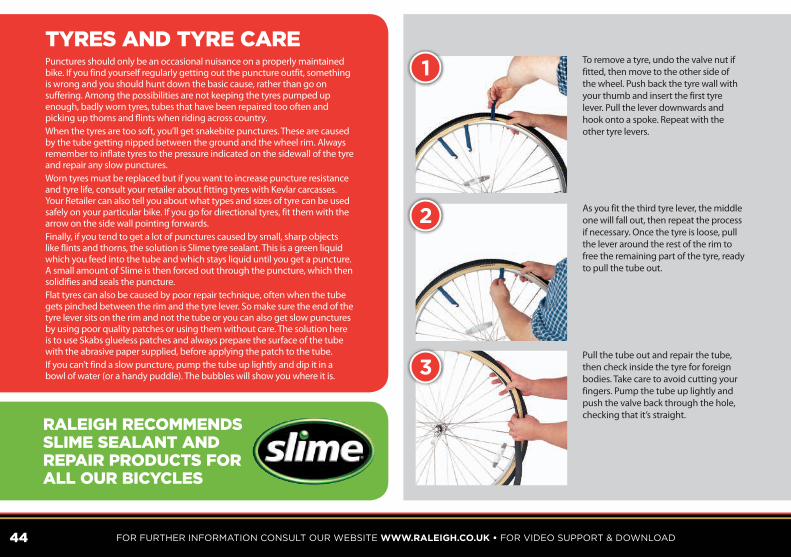
44 for further information consult our website www.raleigh.co.uk • for video support & download
tYREs AnD tYRE CAREPunctures should only be an occasional nuisance on a properly maintained bike. If you find yourself regularly getting out the puncture outfit, something is wrong and you should hunt down the basic cause, rather than go on suffering. Among the possibilities are not keeping the tyres pumped up enough, badly worn tyres, tubes that have been repaired too often and picking up thorns and flints when riding across country. When the tyres are too soft, you’ll get snakebite punctures. These are caused by the tube getting nipped between the ground and the wheel rim. Always remember to inflate tyres to the pressure indicated on the sidewall of the tyre and repair any slow punctures.Worn tyres must be replaced but if you want to increase puncture resistance and tyre life, consult your retailer about fitting tyres with Kevlar carcasses. Your Retailer can also tell you about what types and sizes of tyre can be used safely on your particular bike. If you go for directional tyres, fit them with the arrow on the side wall pointing forwards.Finally, if you tend to get a lot of punctures caused by small, sharp objects like flints and thorns, the solution is Slime tyre sealant. This is a green liquid which you feed into the tube and which stays liquid until you get a puncture. A small amount of Slime is then forced out through the puncture, which then solidifies and seals the puncture.Flat tyres can also be caused by poor repair technique, often when the tube gets pinched between the rim and the tyre lever. So make sure the end of the tyre lever sits on the rim and not the tube or you can also get slow punctures by using poor quality patches or using them without care. The solution here is to use Skabs glueless patches and always prepare the surface of the tube with the abrasive paper supplied, before applying the patch to the tube.If you can’t find a slow puncture, pump the tube up lightly and dip it in a bowl of water (or a handy puddle). The bubbles will show you where it is.
To remove a tyre, undo the valve nut if fitted, then move to the other side of the wheel. Push back the tyre wall with your thumb and insert the first tyre lever. Pull the lever downwards and hook onto a spoke. Repeat with the other tyre levers.
As you fit the third tyre lever, the middle one will fall out, then repeat the process if necessary. Once the tyre is loose, pull the lever around the rest of the rim to free the remaining part of the tyre, ready to pull the tube out.
Pull the tube out and repair the tube, then check inside the tyre for foreign bodies. Take care to avoid cutting your fingers. Pump the tube up lightly and push the valve back through the hole, checking that it’s straight.
1
2
3
RALEigh RECommEnDssLimE sEALAnt AnD REPAiR PRoDUCts FoR ALL oUR biCYCLEs
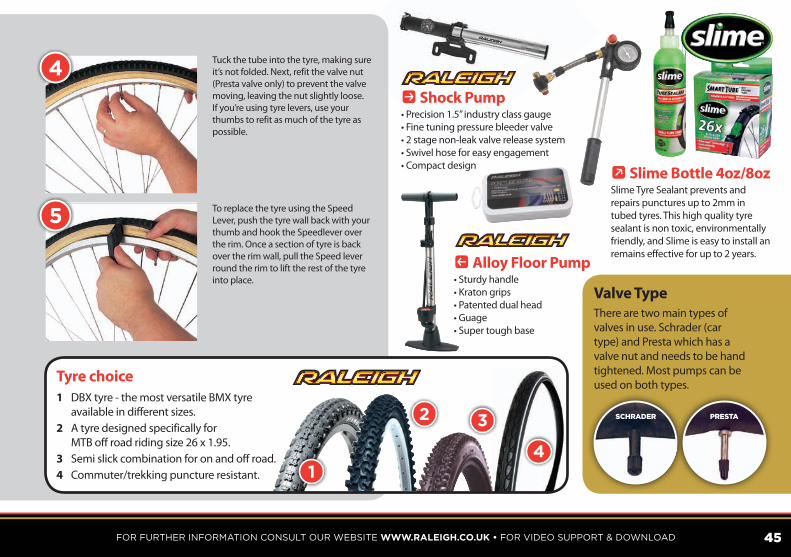
45for further information consult our website www.raleigh.co.uk • for video support & download
1
2
4
3
Tuck the tube into the tyre, making sure it’s not folded. Next, refit the valve nut (Presta valve only) to prevent the valve moving, leaving the nut slightly loose. If you’re using tyre levers, use your thumbs to refit as much of the tyre as possible.
To replace the tyre using the Speed Lever, push the tyre wall back with your thumb and hook the Speedlever over the rim. Once a section of tyre is back over the rim wall, pull the Speed lever round the rim to lift the rest of the tyre into place.
4
5
Valve TypeThere are two main types of valves in use. Schrader (car type) and Presta which has a valve nut and needs to be hand tightened. Most pumps can be used on both types.
sChRADER PREstA
Tyre choice1 DBX tyre - the most versatile BMX tyre available in different sizes.2 A tyre designed specifically for MTB off road riding size 26 x 1.95.3 Semi slick combination for on and off road.4 Commuter/trekking puncture resistant.
P Shock Pump
W Slime Bottle 4oz/8oz
Q Alloy Floor Pump
• Precision 1.5” industry class gauge• Fine tuning pressure bleeder valve• 2 stage non-leak valve release system• Swivel hose for easy engagement• Compact design
Slime Tyre Sealant prevents and repairs punctures up to 2mm in tubed tyres. This high quality tyre sealant is non toxic, environmentally friendly, and Slime is easy to install an remains effective for up to 2 years.
• Sturdy handle• Kraton grips• Patented dual head• Guage• Super tough base
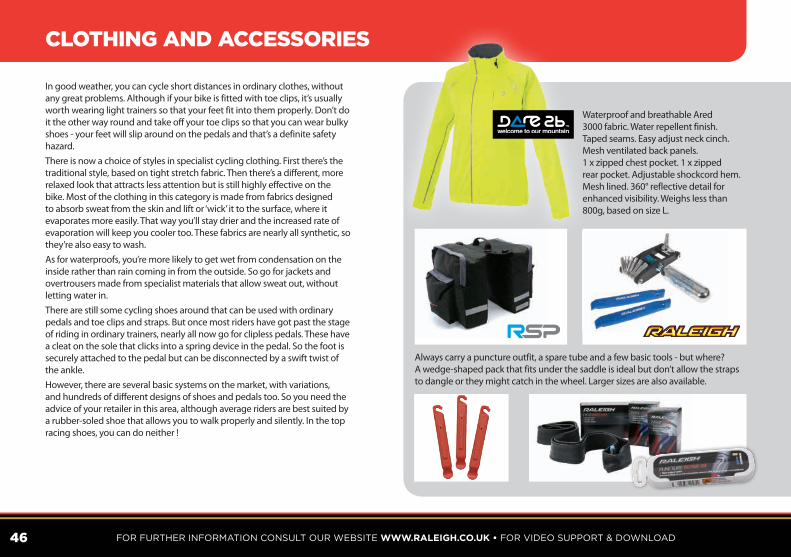
46 for further information consult our website www.raleigh.co.uk • for video support & download
In good weather, you can cycle short distances in ordinary clothes, without any great problems. Although if your bike is fitted with toe clips, it’s usually worth wearing light trainers so that your feet fit into them properly. Don’t do it the other way round and take off your toe clips so that you can wear bulky shoes - your feet will slip around on the pedals and that’s a definite safety hazard.
There is now a choice of styles in specialist cycling clothing. First there’s the traditional style, based on tight stretch fabric. Then there’s a different, more relaxed look that attracts less attention but is still highly effective on the bike. Most of the clothing in this category is made from fabrics designed to absorb sweat from the skin and lift or ‘wick’ it to the surface, where it evaporates more easily. That way you’ll stay drier and the increased rate of evaporation will keep you cooler too. These fabrics are nearly all synthetic, so they’re also easy to wash.
As for waterproofs, you’re more likely to get wet from condensation on the inside rather than rain coming in from the outside. So go for jackets and overtrousers made from specialist materials that allow sweat out, without letting water in.
There are still some cycling shoes around that can be used with ordinary pedals and toe clips and straps. But once most riders have got past the stage of riding in ordinary trainers, nearly all now go for clipless pedals. These have a cleat on the sole that clicks into a spring device in the pedal. So the foot is securely attached to the pedal but can be disconnected by a swift twist of the ankle.
However, there are several basic systems on the market, with variations, and hundreds of different designs of shoes and pedals too. So you need the advice of your retailer in this area, although average riders are best suited by a rubber-soled shoe that allows you to walk properly and silently. In the top racing shoes, you can do neither !
CLothing AnD ACCEssoRiEs
Always carry a puncture outfit, a spare tube and a few basic tools - but where? A wedge-shaped pack that fits under the saddle is ideal but don’t allow the straps to dangle or they might catch in the wheel. Larger sizes are also available.
Waterproof and breathable Ared 3000 fabric. Water repellent finish. Taped seams. Easy adjust neck cinch. Mesh ventilated back panels. 1 x zipped chest pocket. 1 x zipped rear pocket. Adjustable shockcord hem. Mesh lined. 360° reflective detail for enhanced visibility. Weighs less than 800g, based on size L.
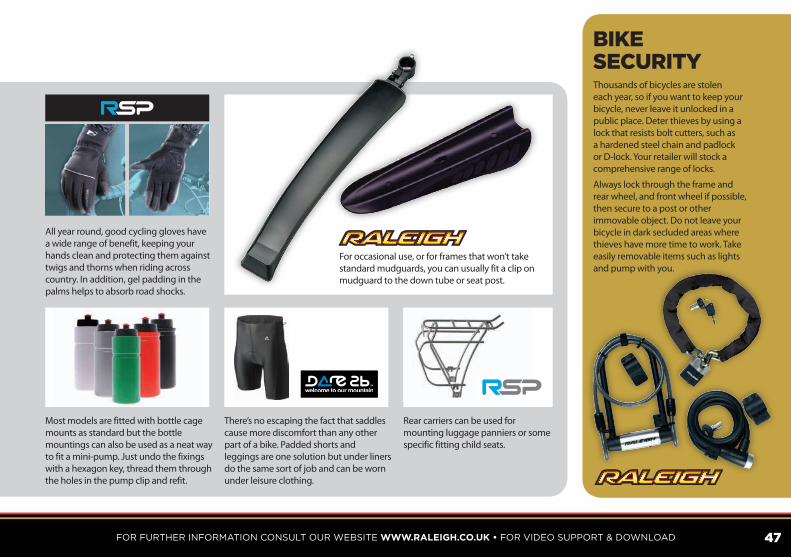
47for further information consult our website www.raleigh.co.uk • for video support & download
All year round, good cycling gloves have a wide range of benefit, keeping your hands clean and protecting them against twigs and thorns when riding across country. In addition, gel padding in the palms helps to absorb road shocks.
Most models are fitted with bottle cage mounts as standard but the bottle mountings can also be used as a neat way to fit a mini-pump. Just undo the fixings with a hexagon key, thread them through the holes in the pump clip and refit.
There’s no escaping the fact that saddles cause more discomfort than any other part of a bike. Padded shorts and leggings are one solution but under liners do the same sort of job and can be worn under leisure clothing.
Rear carriers can be used for mounting luggage panniers or some specific fitting child seats.
bikE sECURitYThousands of bicycles are stolen each year, so if you want to keep your bicycle, never leave it unlocked in a public place. Deter thieves by using a lock that resists bolt cutters, such as a hardened steel chain and padlock or D-lock. Your retailer will stock a comprehensive range of locks.
Always lock through the frame and rear wheel, and front wheel if possible, then secure to a post or other immovable object. Do not leave your bicycle in dark secluded areas where thieves have more time to work. Take easily removable items such as lights and pump with you.
For occasional use, or for frames that won’t take standard mudguards, you can usually fit a clip on mudguard to the down tube or seat post.
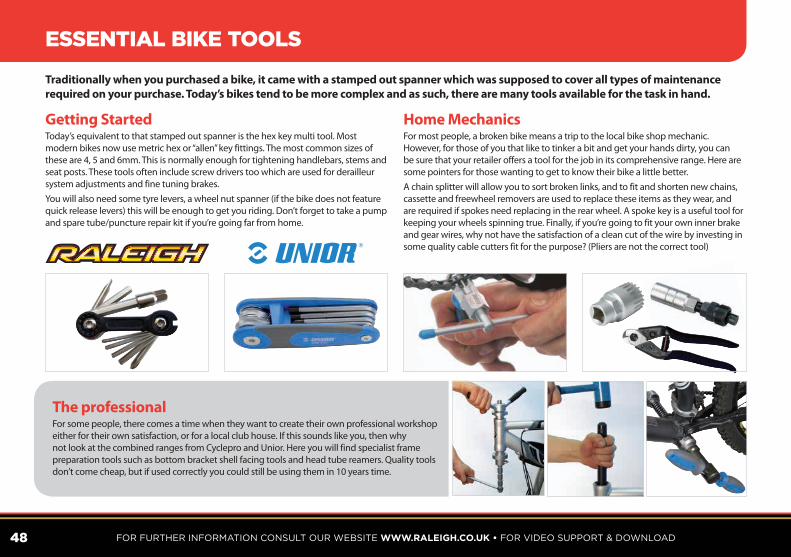
48 for further information consult our website www.raleigh.co.uk • for video support & download
Getting StartedToday’s equivalent to that stamped out spanner is the hex key multi tool. Most modern bikes now use metric hex or “allen” key fittings. The most common sizes of these are 4, 5 and 6mm. This is normally enough for tightening handlebars, stems and seat posts. These tools often include screw drivers too which are used for derailleur system adjustments and fine tuning brakes.
You will also need some tyre levers, a wheel nut spanner (if the bike does not feature quick release levers) this will be enough to get you riding. Don’t forget to take a pump and spare tube/puncture repair kit if you’re going far from home.
Home MechanicsFor most people, a broken bike means a trip to the local bike shop mechanic. However, for those of you that like to tinker a bit and get your hands dirty, you can be sure that your retailer offers a tool for the job in its comprehensive range. Here are some pointers for those wanting to get to know their bike a little better.
A chain splitter will allow you to sort broken links, and to fit and shorten new chains, cassette and freewheel removers are used to replace these items as they wear, and are required if spokes need replacing in the rear wheel. A spoke key is a useful tool for keeping your wheels spinning true. Finally, if you’re going to fit your own inner brake and gear wires, why not have the satisfaction of a clean cut of the wire by investing in some quality cable cutters fit for the purpose? (Pliers are not the correct tool)
The professionalFor some people, there comes a time when they want to create their own professional workshop either for their own satisfaction, or for a local club house. If this sounds like you, then why not look at the combined ranges from Cyclepro and Unior. Here you will find specialist frame preparation tools such as bottom bracket shell facing tools and head tube reamers. Quality tools don’t come cheap, but if used correctly you could still be using them in 10 years time.
EssEntiAL bikE tooLs
Traditionally when you purchased a bike, it came with a stamped out spanner which was supposed to cover all types of maintenance required on your purchase. Today’s bikes tend to be more complex and as such, there are many tools available for the task in hand.
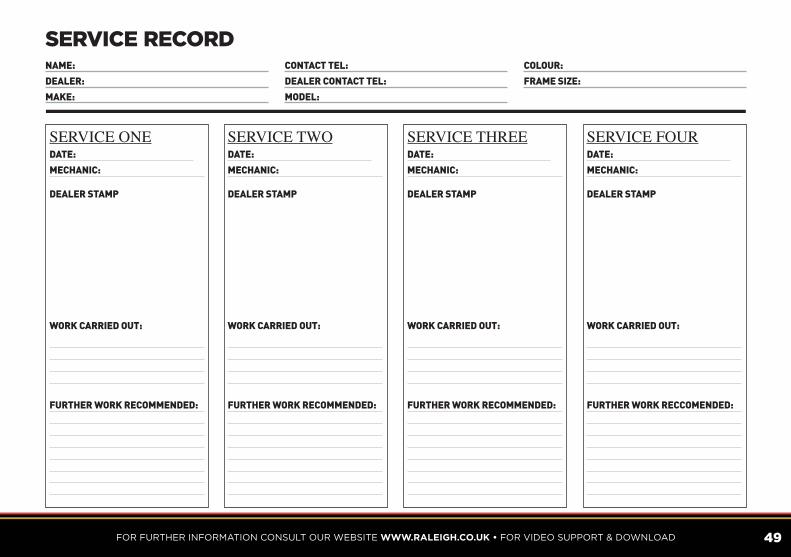
49for further information consult our website www.raleigh.co.uk • for video support & download
sERviCE RECoRDNAME:
DEALER:
MAKE:
CONTACTTEL:
DEALERCONTACTTEL:
MODEL:
COLOUR:
FRAMESIZE:
SERVICE ONEDATE:
MECHANIC:
DEALERSTAMP
WORKCARRIEDOUT:
FURTHERWORKRECOMMENDED:
SERVICE TWODATE:
MECHANIC:
DEALERSTAMP
WORKCARRIEDOUT:
FURTHERWORKRECOMMENDED:
SERVICE THREEDATE:
MECHANIC:
DEALERSTAMP
WORKCARRIEDOUT:
FURTHERWORKRECOMMENDED:
SERVICE FOURDATE:
MECHANIC:
DEALERSTAMP
WORKCARRIEDOUT:
FURTHERWORKRECCOMENDED:

50 for further information consult our website www.raleigh.co.uk • for video support & download
notEs:UsEFUL REFEREnCE DAtA
Frame Number:
Distinguishing marks:
Accessories fitted:
Tyre size (Found on tyre side wall):
Tyre pressure maximum:
Tyre pressure minimum:
COMPUTER RECORDS
1. DATE & MILEAGE:
2. DATE & MILEAGE:
3. DATE & MILEAGE:
4. DATE & MILEAGE:
5. DATE & MILEAGE:
6. DATE & MILEAGE:
7. DATE & MILEAGE:
8. DATE & MILEAGE
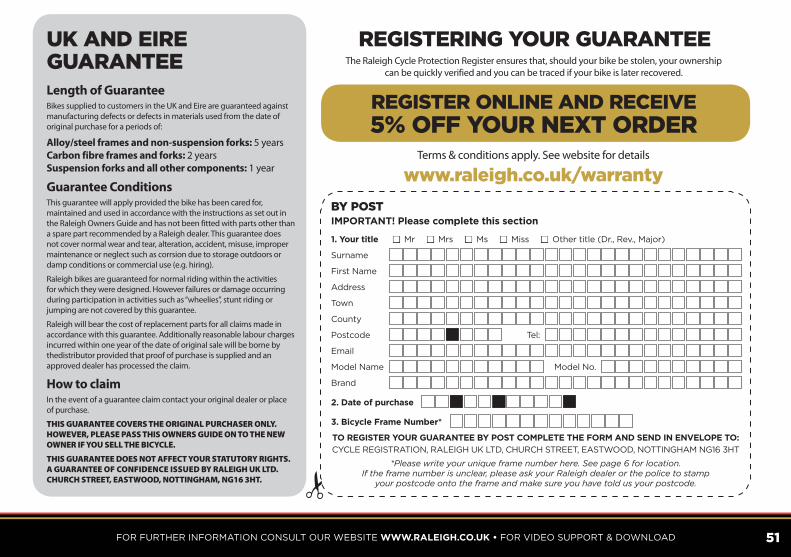
51for further information consult our website www.raleigh.co.uk • for video support & download
Uk AnD EiRE gUARAntEE
REgistERing YoUR gUARAntEE
Length of GuaranteeBikes supplied to customers in the UK and Eire are guaranteed against manufacturing defects or defects in materials used from the date of original purchase for a periods of:
Alloy/steel frames and non-suspension forks: 5 years Carbon fibre frames and forks: 2 yearsSuspension forks and all other components: 1 year
Guarantee ConditionsThis guarantee will apply provided the bike has been cared for, maintained and used in accordance with the instructions as set out in the Raleigh Owners Guide and has not been fitted with parts other than a spare part recommended by a Raleigh dealer. This guarantee does not cover normal wear and tear, alteration, accident, misuse, improper maintenance or neglect such as corrsion due to storage outdoors or damp conditions or commercial use (e.g. hiring).
Raleigh bikes are guaranteed for normal riding within the activities for which they were designed. However failures or damage occurring during participation in activities such as “wheelies”, stunt riding or jumping are not covered by this guarantee.
Raleigh will bear the cost of replacement parts for all claims made in accordance with this guarantee. Additionally reasonable labour charges incurred within one year of the date of original sale will be borne by thedistributor provided that proof of purchase is supplied and an approved dealer has processed the claim.
How to claimIn the event of a guarantee claim contact your original dealer or place of purchase.
thIs Guarantee covers the orIGInal purchaser only.however, please pass thIs owners GuIde on to the new owner IF you sell the bIcycle.
thIs Guarantee does not aFFect your statutory rIGhts. a Guarantee oF conFIdence Issued by raleIGh uk ltd. church street, eastwood, nottInGham, nG16 3ht.
The Raleigh Cycle Protection Register ensures that, should your bike be stolen, your ownership can be quickly verified and you can be traced if your bike is later recovered.
Terms & conditions apply. See website for details
www.raleigh.co.uk/warrantybY PostIMPoRTANT! Please complete this section
1. Your title n Mr n Mrs n Ms n Miss n Other title (Dr., Rev., Major)
Surname
First Name
Address
Town
County
Postcode Tel:
Model Name Model No.
Brand
2. Date of purchase
3. Bicycle Frame Number*
To REgISTER YouR guARANTEE BY PoST CoMPLETE THE FoRM AND SEND IN ENvELoPE To:CYCLE REGISTRATION, RALEIGH UK LTD, CHURCH STREET, EASTWOOD, NOTTINGHAM NG16 3HT
*Please write your unique frame number here. See page 6 for location. If the frame number is unclear, please ask your Raleigh dealer or the police to stamp
your postcode onto the frame and make sure you have told us your postcode.
REgistER onLinE AnD RECEivE5% oFF YoUR nEXt oRDER
✁

Photos in part from the Haynes Bike Book.
J.H. Haynes & Co. Ltd and Raleigh UK Ltd, 1999
www.raleigh.co.uk
Buy on-LinE or CLiCk AnD CoLLECt in store
@RaleighBikes_UK
RaleighBikesUK
WWW.RALEigh.Co.Uk
RALEigh Uk LtDChurch Street, Eastwood, Nottingham, NG16 3HT
telephone: 01773 532600
Did you know? We’re much more than just a bike brand.We also stock thousands of parts and accessories from leading brands,
distributing them to hundreds of the UK’s cycle stores.