benutzerhandbuch user manual manuel d'utilisation · 3 deutsch wlanmaus kurzübersicht /...
TRANSCRIPT
WLAN-MULTIMAUS®
▶ Benutzerhandbuch ▶ User Manual ▶ Manuel d'utilisation
8010813920.indd 1 13.07.2017 10:27:31
22
Kurzübersicht / Overview / en un clin d'oeil
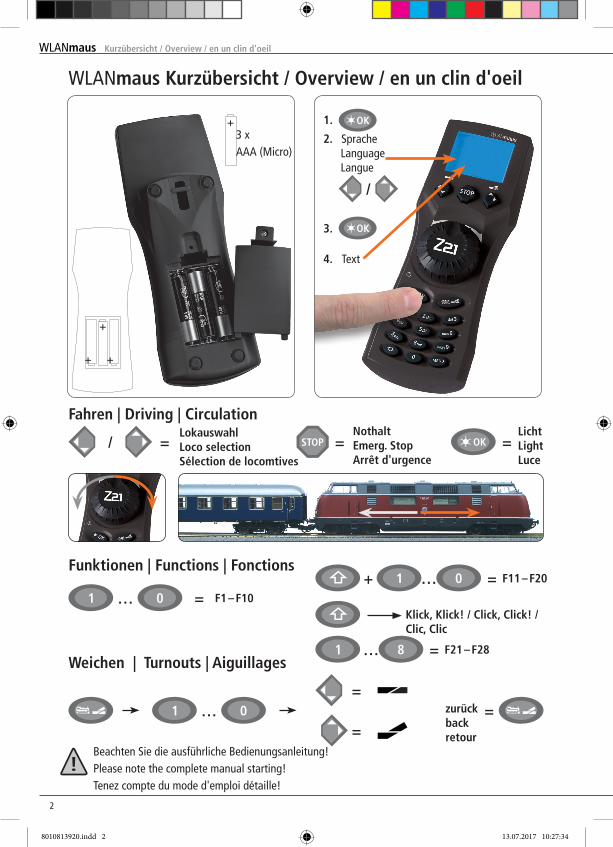
WLANmaus Kurzübersicht / Overview / en un clin d'oeil
Fahren | Driving | CirculationLokauswahlLoco selectionSélection de locomtives
=LichtLightLuce
=
Weichen | Turnouts | Aiguillages
=
Beachten Sie die ausführliche Bedienungsanleitung!Please note the complete manual starting!Tenez compte du mode d'emploi détaille!
F1 – F10=F11 – F20= +
NothaltEmerg. StopArrêt d'urgence
=/
……
… zurückbackretour
==
+3 xAAA (Micro)
+ +
+
Funktionen | Functions | Fonctions
1.
2. Sprache Language Langue
3.
/
4. Text
F21 – F28= … 8
Klick, Klick! / Click, Click! / Clic, Clic
8010813920.indd 2 13.07.2017 10:27:34
3
Deu
tsch
WLANmaus Kurzübersicht / Overview / en un clin d'oeil
Kurzübersicht / Overview / en un clin d'oeil
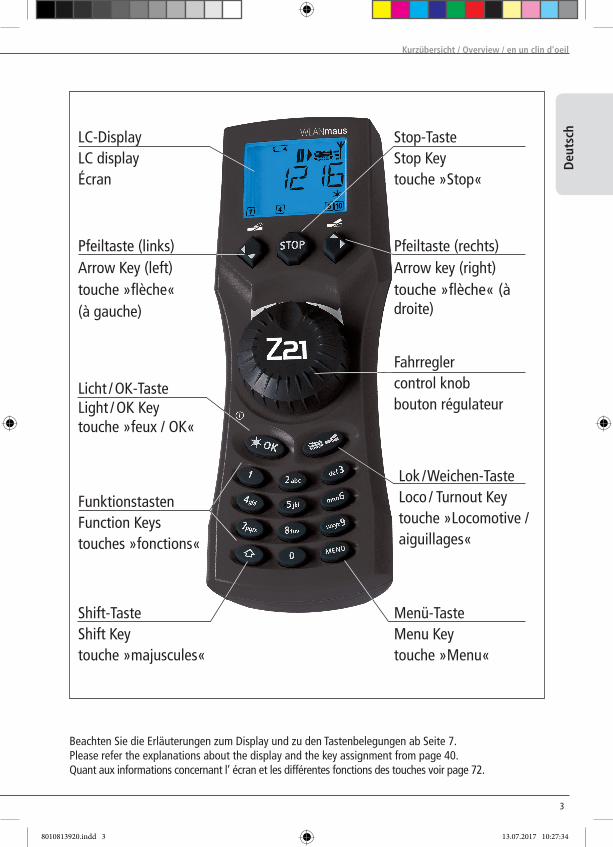
Beachten Sie die Erläuterungen zum Display und zu den Tastenbelegungen ab Seite 7.Please refer the explanations about the display and the key assignment from page 40.Quant aux informations concernant l’ écran et les différentes fonctions des touches voir page 72.
Fahrreglercontrol knobbouton régulateur
FunktionstastenFunction Keystouches »fonctions«
Stop-TasteStop Keytouche »Stop«
LC-DisplayLC displayÉcran
Pfeiltaste (links)Arrow Key (left)touche »flèche«(à gauche)
Lok / Weichen-TasteLoco / Turnout Keytouche »Locomotive / aiguillages«
Menü-TasteMenu Keytouche »Menu«
Shift-TasteShift Keytouche »majuscules«
Pfeiltaste (rechts)Arrow key (right)touche »flèche« (à droite)
Licht / OK-TasteLight / OK Keytouche »feux / OK«
8010813920.indd 3 13.07.2017 10:27:34

44
Hinweise zur AnleitungEin „“ vor einem Wort verweist auf eine Erläuterung im „Glossar“ im fünften Teil des Handbuches.„+“ in den Skizzen bedeutet, die beiden erwähnten Tasten gleichzeitig zu drücken.„/“ in den Skizzen steht für die Auswahl, eine der beiden erwähnten Tasten zu drücken.Das rote Dreieck „▶“ in den Skizzen symbolisiert eine elektrische Trennung der Schiene.
InhaltsverzeichnisWLANmaus Kurzübersicht .................................................................................................................... 2Die Evolution der ROCO Lokmaus — die WLANmaus ......................................................................... 5Die WLANmaus im Überblick .................................................................................................................. 5
Teil 1 ▪ Grundlagen – Lernen Sie die WLANmaus kennen1.1 Verbinden der WLANmaus ............................................................................................................... 61.2 Erklärungen zur Zeicheneingabe bei der SSID- und Passworteingabe ............................................. 71.3 WLANmaus: Das Display .................................................................................................................. 81.4 WLANmaus: Die Tasten .................................................................................................................... 9
Teil 2 ▪ Betrieb –Fahren und Schalten2.1 Start 2.1.1 Erstmalige Nutzung ................................................................................................................ 11 2.1.2 Bereits genutzte WLANmaus .................................................................................................. 112.2 Lok-Auswahl 2.2.1 Der Bibliotheks-Modus ........................................................................................................... 11 2.2.2 Neueintragung einer Lok ....................................................................................................... 12 2.2.3 Der Lokadress-Modus ............................................................................................................ 142.3 Fahren und Funktionen ................................................................................................................... 142.4 Die Nothalt-Funktionen 2.4.1 Nothalt ................................................................................................................................... 15 2.4.2 Selektiver Nothalt .................................................................................................................. 162.5 Weichensteuerung ........................................................................................................................... 162.6 Schnellprogrammierung von Loks und Decodern ............................................................................ 192.7 Kurzschluss und Überlastung .......................................................................................................... 20
Teil 3 ▪ Die Menüs – Programmieren für Profis und die, die es werden wollenDie Menü-Funktionen der WLANmaus .................................................................................................. 21Die Menüstruktur in der Übersicht ........................................................................................................ 231. Das „LOK“ Menü .............................................................................................................................. 252. Das „PROGRAMMIEREN“ Menü ...................................................................................................... 273. Das „EINSTELLuNGEN“ Menü .......................................................................................................... 29
Teil 4 ▪ Anhang 4.1 update von der WLANmaus ..........................................................................................................................334.2 Glossar ............................................................................................................................................ 334.3 Tipps, Hinweise und Kurzhilfe .......................................................................................................... 34 4.3.1 Programmierhilfe Lokmaus 2 / R3 – WLANmaus ..............................................................................36
Inhaltsverzeichnis
8010813920.indd 4 13.07.2017 10:27:35
5
Deu
tsch
Die Evolution der ROCO Lokmaus — die WLANmausDie WLANmaus ist die optimale Ergänzung zu Ihrer Z21. Sie vereinigt die Funktionalität der legendären Lokmaus mit dem Komfort einer ausgewachsenen Digital-Zentrale. Ob Sie die WLANmaus nur als kom-fortablen Fahrregler nutzen, oder Ihre Lokdecoder und Weichen umfassend programmieren wollen, das übersichtliche Design in Verbindung mit der einfachen Bedienung macht die WLANmaus zu einem Maßstab für digitale Modellbahnsteuerungen.unser Ziel war es, auch diese Lokmaus so zu gestalten, dass ein intuitives Bedienen ermöglicht wird. Selbst die vielen neuen Funktionen, die diese Lokmaus der neuesten Generation erhalten hat, können einfach gesteuert werden. Was die WLANmaus alles kann, möchten wir Ihnen in diesem Handbuch vorstellen.um dieses Handbuch nicht unübersichtlich werden zu lassen, ist es in mehrere Teile untergliedert. So muss ein Anwender, der die WLANmaus nur zum Spielen einsetzen möchte, nicht das gesamte Handbuch durch-lesen, er kann sich auf das Lesen des ersten Teils beschränken.Dieser erste Teil des Handbuches befasst sich mit den wichtigsten Grundlagen zum Anschluss und zur Bedie-nung der WLANmaus. Anwender, die die vielfältigen Möglichkeiten der WLANmaus zum Programmieren nutzen möchten, finden im zweiten Teil alles, was sie dazu wissen müssen. Ein Glossar erläutert einige wichtige Digital-Modellbahnen immer wieder begegnen können.Wir wünschen Ihnen viel Spaß bei der Lektüre dieses Handbuches und natürlich mit der WLANmaus.
Ihre Modelleisenbahn GmbH
Info: "Z21" in der Bedienungsanleitung meint sowohl die Z21 (schwarz) als auch z21 (weiß) und z21start (weiß) mit WLAN-Package.
Die WLANmaus im ÜberblickDas Konzept▪ ergonomische Form für Ein-Hand-Bedienung▪ großes, hintergrundbeleuchtetes LC-Display mit mehrspachiger Menüführung▪ einfache Einstellung von Geschwindigkeit und Fahrtrichtung der Lokomotive über den Drehregler▪ Rastung der 0-Stellung des Drehreglers▪ perfekte Ergänzung zu Ihrer Z21▪ das ROCO Digital-System ist ausbaubar auf bis zu 31 Eingabe-Geräte wie weitere Lokmäuse /
multiMÄUSE / WLANmäuse, RouteControl usw.▪ Zukunftssicher durch updatemöglichkeiten
Die Möglichkeiten▪ Verwaltung von 9.999 Lokadressen, wahlweise über Lokbibliothek oder Lokadresse▪ alphanumerische Loknamen-Anzeige mit Lokdatenbank für 100 Loks und Einträge (je 10 Zeichen)▪ Steuerung der Loks mit 14, 28 oder 128 Fahrstufen, individuell für jede Lok einstellbar▪ Steuerung von Licht und 28 Zusatzfunktionen bei Lokomotiven▪ Steuerung von bis zu 2.048 Magnetartikel- (Weichen-) Adressen▪ Konfigurationsvariablen (DCC-CVs 1 –1024, Wertebereiche 0 –255) auslesen und schreiben
Sicherheit▪ Stabile Funkverbindung durch digitalen Funkstandard „WLAN“ IEEE 802.11 mit 2,4 GHz▪ Nothalt mit Abschalten der gesamten Anlage, selektiver Nothalt für die ausgewählte Lok▪ Kindersicherung für Funktionen, die Kindern Probleme bereiten könnten (z. B. Programmieren)
Die Evolution der ROCO Lokmaus — die WLANmaus
8010813920.indd 5 13.07.2017 10:27:35
66
Grundlagen
Teil 1 ▪ Grundlagen
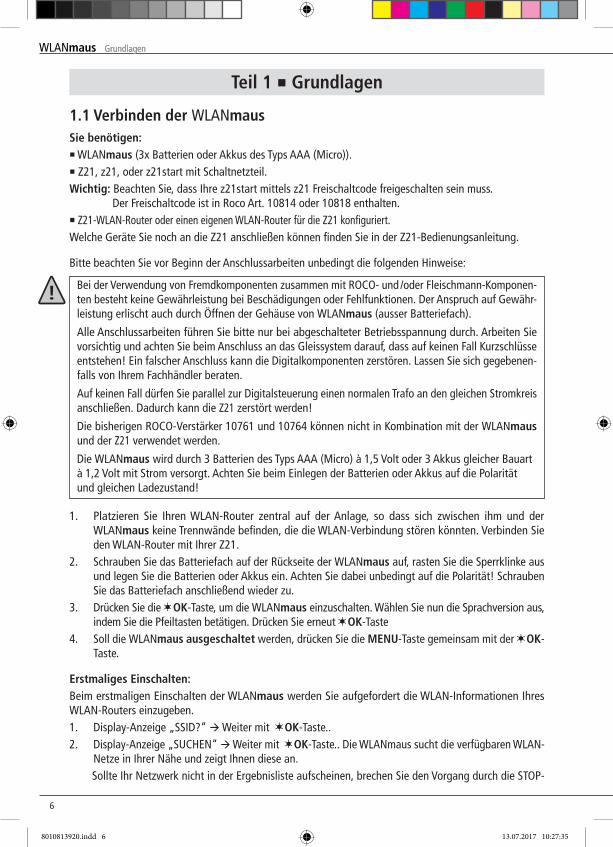
1.1 Verbinden der WLANmausSie benötigen:▪ WLANmaus (3x Batterien oder Akkus des Typs AAA (Micro)).▪ Z21, z21, oder z21start mit Schaltnetzteil.Wichtig: Beachten Sie, dass Ihre z21start mittels z21 Freischaltcode freigeschalten sein muss. Der Freischaltcode ist in Roco Art. 10814 oder 10818 enthalten.▪ Z21-WLAN-Router oder einen eigenen WLAN-Router für die Z21 konfiguriert.Welche Geräte Sie noch an die Z21 anschließen können finden Sie in der Z21-Bedienungsanleitung.
Bitte beachten Sie vor Beginn der Anschlussarbeiten unbedingt die folgenden Hinweise:
Bei der Verwendung von Fremdkomponenten zusammen mit ROCO- und /oder Fleischmann-Komponen-ten besteht keine Gewährleistung bei Beschädigungen oder Fehlfunktionen. Der Anspruch auf Gewähr-leistung erlischt auch durch Öffnen der Gehäuse von WLANmaus (ausser Batteriefach).
Alle Anschlussarbeiten führen Sie bitte nur bei abgeschalteter Betriebsspannung durch. Arbeiten Sie vorsichtig und achten Sie beim Anschluss an das Gleissystem darauf, dass auf keinen Fall Kurzschlüsse entstehen! Ein falscher Anschluss kann die Digitalkomponenten zerstören. Lassen Sie sich gegebenen-falls von Ihrem Fachhändler beraten.
Auf keinen Fall dürfen Sie parallel zur Digitalsteuerung einen normalen Trafo an den gleichen Stromkreis anschließen. Dadurch kann die Z21 zerstört werden!
Die bisherigen ROCO-Verstärker 10761 und 10764 können nicht in Kombination mit der WLANmaus und der Z21 verwendet werden.
Die WLANmaus wird durch 3 Batterien des Typs AAA (Micro) à 1,5 Volt oder 3 Akkus gleicher Bauart à 1,2 Volt mit Strom versorgt. Achten Sie beim Einlegen der Batterien oder Akkus auf die Polarität und gleichen Ladezustand!
1. Platzieren Sie Ihren WLAN-Router zentral auf der Anlage, so dass sich zwischen ihm und der WLANmaus keine Trennwände befinden, die die WLAN-Verbindung stören könnten. Verbinden Sie den WLAN-Router mit Ihrer Z21.
2. Schrauben Sie das Batteriefach auf der Rückseite der WLANmaus auf, rasten Sie die Sperrklinke aus und legen Sie die Batterien oder Akkus ein. Achten Sie dabei unbedingt auf die Polarität! Schrauben Sie das Batteriefach anschließend wieder zu.
3. Drücken Sie die OK-Taste, um die WLANmaus einzuschalten. Wählen Sie nun die Sprachversion aus, indem Sie die Pfeiltasten betätigen. Drücken Sie erneut OK-Taste
4. Soll die WLANmaus ausgeschaltet werden, drücken Sie die MENU-Taste gemeinsam mit der OK-Taste.
Erstmaliges Einschalten:Beim erstmaligen Einschalten der WLANmaus werden Sie aufgefordert die WLAN-Informationen Ihres WLAN-Routers einzugeben.1. Display-Anzeige „SSID?“ Weiter mit OK-Taste..2. Display-Anzeige „SuCHEN“ Weiter mit OK-Taste.. Die WLANmaus sucht die verfügbaren WLAN-
Netze in Ihrer Nähe und zeigt Ihnen diese an.Sollte Ihr Netzwerk nicht in der Ergebnisliste aufscheinen, brechen Sie den Vorgang durch die STOP-
Grundlagen
8010813920.indd 6 13.07.2017 10:27:35
7
Deu
tsch
Grundlagen
Taste ab. Die manuelle Netzwerkeingabe finden Sie im Kapitel 3.6.1, Seite 313. Wählen Sie mit den Pfeiltasten Ihr gewünschtes WLAN-Netz aus und bestätigen Sie mit der OK-
Taste.4. Display-Anzeige „PWD?“ Weiter mit OK-Taste.5. Geben Sie das WLAN-Passwort ein Weiter mit OK-Taste.6. Die WLANmaus startet neu und verbindet sich mit Ihrem WLAN-Router.Info: Ein Ändern der WLAN-Informationen ist jederzeit möglich (siehe Kapitel 3.6, Seite 31)
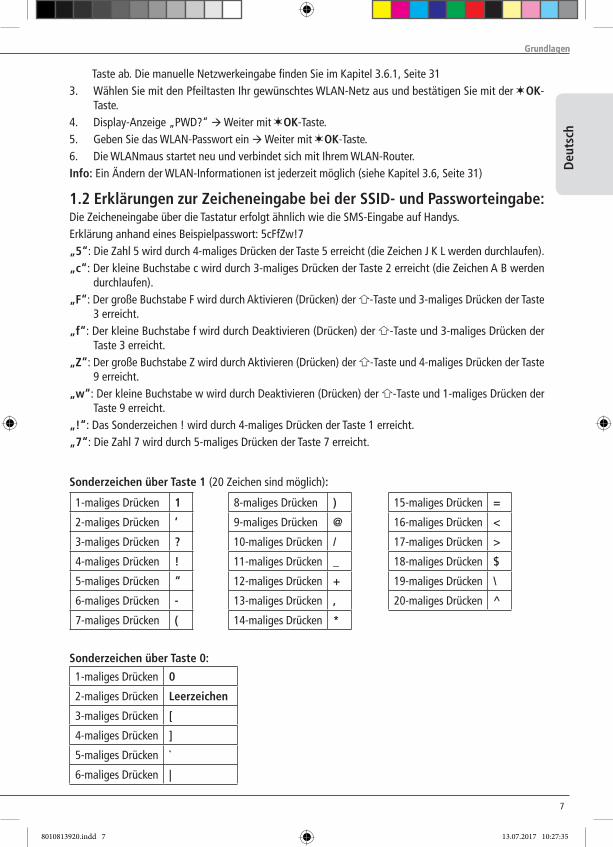
1.2 Erklärungen zur Zeicheneingabe bei der SSID- und Passworteingabe:Die Zeicheneingabe über die Tastatur erfolgt ähnlich wie die SMS-Eingabe auf Handys.Erklärung anhand eines Beispielpasswort: 5cFfZw!7„5“: Die Zahl 5 wird durch 4-maliges Drücken der Taste 5 erreicht (die Zeichen J K L werden durchlaufen).„c“: Der kleine Buchstabe c wird durch 3-maliges Drücken der Taste 2 erreicht (die Zeichen A B werden
durchlaufen).„F“: Der große Buchstabe F wird durch Aktivieren (Drücken) der -Taste und 3-maliges Drücken der Taste
3 erreicht.„f“: Der kleine Buchstabe f wird durch Deaktivieren (Drücken) der -Taste und 3-maliges Drücken der
Taste 3 erreicht.„Z“: Der große Buchstabe Z wird durch Aktivieren (Drücken) der -Taste und 4-maliges Drücken der Taste
9 erreicht.„w“: Der kleine Buchstabe w wird durch Deaktivieren (Drücken) der -Taste und 1-maliges Drücken der
Taste 9 erreicht.„!“: Das Sonderzeichen ! wird durch 4-maliges Drücken der Taste 1 erreicht.„7“: Die Zahl 7 wird durch 5-maliges Drücken der Taste 7 erreicht.
1-maliges Drücken 1
2-maliges Drücken ‘
3-maliges Drücken ?
4-maliges Drücken !
5-maliges Drücken “
6-maliges Drücken -
7-maliges Drücken (
Sonderzeichen über Taste 0:
8-maliges Drücken )
9-maliges Drücken @
10-maliges Drücken /
11-maliges Drücken _
12-maliges Drücken +
13-maliges Drücken ,
14-maliges Drücken *
Sonderzeichen über Taste 1 (20 Zeichen sind möglich):
1-maliges Drücken 0
2-maliges Drücken Leerzeichen
3-maliges Drücken [
4-maliges Drücken ]
5-maliges Drücken `
6-maliges Drücken |
15-maliges Drücken =
16-maliges Drücken <
17-maliges Drücken >
18-maliges Drücken $
19-maliges Drücken \
20-maliges Drücken ^
Grundlagen
8010813920.indd 7 13.07.2017 10:27:35
88
Grundlagen
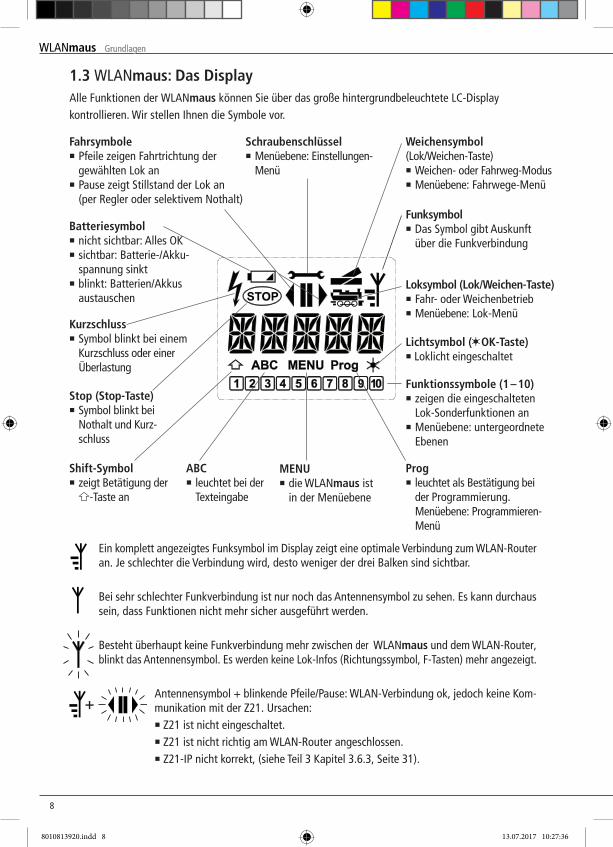
1.3 WLANmaus: Das DisplayAlle Funktionen der WLANmaus können Sie über das große hintergrundbeleuchtete LC-Display kontrollieren. Wir stellen Ihnen die Symbole vor.
Grundlagen
Lichtsymbol ( OK-Taste)▪ Loklicht eingeschaltet
Weichensymbol(Lok/Weichen-Taste)▪ Weichen- oder Fahrweg-Modus▪ Menüebene: Fahrwege-Menü
Loksymbol (Lok/Weichen-Taste)▪ Fahr- oder Weichenbetrieb▪ Menüebene: Lok-Menü
Kurzschluss▪ Symbol blinkt bei einem
Kurzschluss oder einer Überlastung
Stop (Stop-Taste)▪ Symbol blinkt bei
Nothalt und Kurz-schluss
MENU▪ die WLANmaus ist
in der Menüebene
Prog▪ leuchtet als Bestätigung bei
der Programmierung. Menüebene: Programmieren-
Menü
ABC▪ leuchtet bei der
Texteingabe
Schraubenschlüssel▪ Menüebene: Einstellungen-
Menü
Funktionssymbole (1 – 10)▪ zeigen die eingeschalteten
Lok-Sonderfunktionen an▪ Menüebene: untergeordnete
Ebenen
Fahrsymbole▪ Pfeile zeigen Fahrtrichtung der
gewählten Lok an▪ Pause zeigt Stillstand der Lok an (per Regler oder selektivem Nothalt)
Shift-Symbol▪ zeigt Betätigung der
-Taste an
Batteriesymbol▪ nicht sichtbar: Alles OK▪ sichtbar: Batterie-/Akku-
spannung sinkt▪ blinkt: Batterien/Akkus
austauschen
Funksymbol▪ Das Symbol gibt Auskunft
über die Funkverbindung
Ein komplett angezeigtes Funksymbol im Display zeigt eine optimale Verbindung zum WLAN-Router an. Je schlechter die Verbindung wird, desto weniger der drei Balken sind sichtbar.
Bei sehr schlechter Funkverbindung ist nur noch das Antennensymbol zu sehen. Es kann durchaus sein, dass Funktionen nicht mehr sicher ausgeführt werden.
Besteht überhaupt keine Funkverbindung mehr zwischen der WLANmaus und dem WLAN-Router, blinkt das Antennensymbol. Es werden keine Lok-Infos (Richtungssymbol, F-Tasten) mehr angezeigt.
Antennensymbol + blinkende Pfeile/Pause: WLAN-Verbindung ok, jedoch keine Kom-munikation mit der Z21. ursachen: ▪ Z21 ist nicht eingeschaltet.▪ Z21 ist nicht richtig am WLAN-Router angeschlossen.▪ Z21-IP nicht korrekt, (siehe Teil 3 Kapitel 3.6.3, Seite 31).
+
8010813920.indd 8 13.07.2017 10:27:36
9
Deu
tsch
Grundlagen
in Kombination mit
in Kombination mit
in Kombination mit
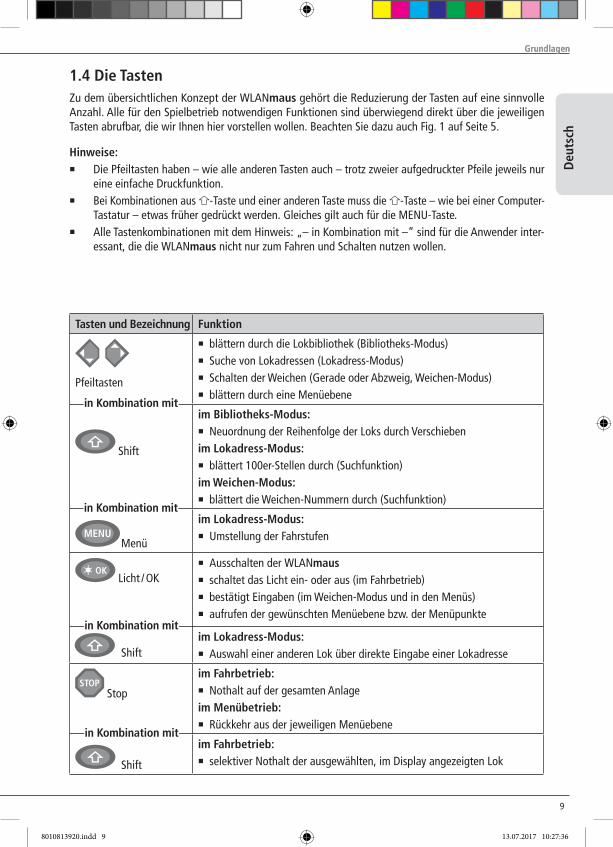
1.4 Die TastenZu dem übersichtlichen Konzept der WLANmaus gehört die Reduzierung der Tasten auf eine sinnvolle Anzahl. Alle für den Spielbetrieb notwendigen Funktionen sind überwiegend direkt über die jeweiligen Tasten abrufbar, die wir Ihnen hier vorstellen wollen. Beachten Sie dazu auch Fig. 1 auf Seite 5.
Hinweise:▪ Die Pfeiltasten haben – wie alle anderen Tasten auch – trotz zweier aufgedruckter Pfeile jeweils nur
eine einfache Druckfunktion.▪ Bei Kombinationen aus -Taste und einer anderen Taste muss die -Taste – wie bei einer Computer-
Tastatur – etwas früher gedrückt werden. Gleiches gilt auch für die MENu-Taste.▪ Alle Tastenkombinationen mit dem Hinweis: „– in Kombination mit –“ sind für die Anwender inter-
essant, die die WLANmaus nicht nur zum Fahren und Schalten nutzen wollen.
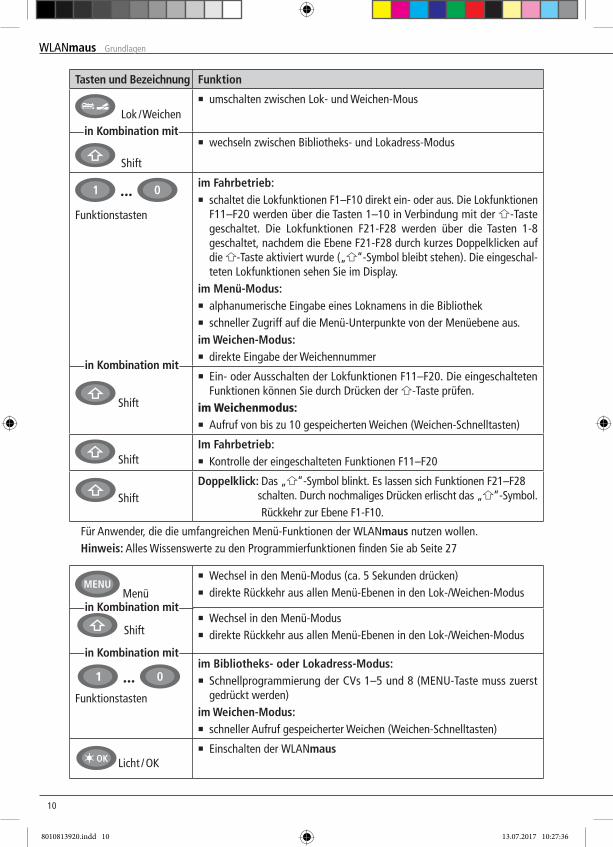
Tasten und Bezeichnung Funktion
Pfeiltasten
Shift
Menü
▪ blättern durch die Lokbibliothek (Bibliotheks-Modus)▪ Suche von Lokadressen (Lokadress-Modus)▪ Schalten der Weichen (Gerade oder Abzweig, Weichen-Modus)▪ blättern durch eine Menüebene
im Bibliotheks-Modus:▪ Neuordnung der Reihenfolge der Loks durch Verschiebenim Lokadress-Modus:▪ blättert 100er-Stellen durch (Suchfunktion)im Weichen-Modus:▪ blättert die Weichen-Nummern durch (Suchfunktion)
im Lokadress-Modus:▪ umstellung der Fahrstufen
Licht / OK
Shift
▪ Ausschalten der WLANmaus▪ schaltet das Licht ein- oder aus (im Fahrbetrieb)▪ bestätigt Eingaben (im Weichen-Modus und in den Menüs)▪ aufrufen der gewünschten Menüebene bzw. der Menüpunkte
im Lokadress-Modus:▪ Auswahl einer anderen Lok über direkte Eingabe einer Lokadresse
Stop
Shift
im Fahrbetrieb:▪ Nothalt auf der gesamten Anlageim Menübetrieb:▪ Rückkehr aus der jeweiligen Menüebene
im Fahrbetrieb:▪ selektiver Nothalt der ausgewählten, im Display angezeigten Lok
in Kombination mit
Grundlagen
8010813920.indd 9 13.07.2017 10:27:36
1010
Grundlagen
in Kombination mit
Tasten und Bezeichnung Funktion
Lok / Weichen
Shift
▪ umschalten zwischen Lok- und Weichen-Mous
▪ wechseln zwischen Bibliotheks- und Lokadress-Modus
…Funktionstasten
Shift
im Fahrbetrieb:▪ schaltet die Lokfunktionen F1–F10 direkt ein- oder aus. Die Lokfunktionen
F11–F20 werden über die Tasten 1–10 in Verbindung mit der -Taste geschaltet. Die Lokfunktionen F21-F28 werden über die Tasten 1-8 geschaltet, nachdem die Ebene F21-F28 durch kurzes Doppelklicken auf die -Taste aktiviert wurde („ “-Symbol bleibt stehen). Die eingeschal-teten Lokfunktionen sehen Sie im Display.
im Menü-Modus:▪ alphanumerische Eingabe eines Loknamens in die Bibliothek▪ schneller Zugriff auf die Menü-unterpunkte von der Menüebene aus.im Weichen-Modus:▪ direkte Eingabe der Weichennummer▪ Ein- oder Ausschalten der Lokfunktionen F11–F20. Die eingeschalteten
Funktionen können Sie durch Drücken der -Taste prüfen.im Weichenmodus:▪ Aufruf von bis zu 10 gespeicherten Weichen (Weichen-Schnelltasten)
ShiftIm Fahrbetrieb:▪ Kontrolle der eingeschalteten Funktionen F11–F20
ShiftDoppelklick: Das „ “-Symbol blinkt. Es lassen sich Funktionen F21–F28 schalten. Durch nochmaliges Drücken erlischt das „ “-Symbol. Rückkehr zur Ebene F1-F10.
Menü
Shift
Funktionstasten
▪ Wechsel in den Menü-Modus (ca. 5 Sekunden drücken)▪ direkte Rückkehr aus allen Menü-Ebenen in den Lok-/Weichen-Modus
▪ Wechsel in den Menü-Modus▪ direkte Rückkehr aus allen Menü-Ebenen in den Lok-/Weichen-Modus
im Bibliotheks- oder Lokadress-Modus:▪ Schnellprogrammierung der CVs 1–5 und 8 (MENu-Taste muss zuerst
gedrückt werden)im Weichen-Modus:▪ schneller Aufruf gespeicherter Weichen (Weichen-Schnelltasten)
Licht / OK
▪ Einschalten der WLANmaus
…
in Kombination mit
in Kombination mit
in Kombination mit
Für Anwender, die die umfangreichen Menü-Funktionen der WLANmaus nutzen wollen.Hinweis: Alles Wissenswerte zu den Programmierfunktionen finden Sie ab Seite 27
8010813920.indd 10 13.07.2017 10:27:36
11
Deu
tsch
Betrieb — Fahren und Schalten
Teil 2 ▪ Betrieb – Fahren und Schalten
Trotz ihrer vielen Möglichkeiten ist die WLANmaus leicht und intuitiv bedienbar. Ein Konzept, das von ROCO schon mit den Lokmäusen der ersten, zweiten und dritten Generation erfolgreich eingeführt und mit der WLANmaus fortgesetzt wurde. Im Folgenden zeigen wir Ihnen an Hand praktischer Beispiele die Bedienung der WLANmaus. Sollten bei der Bedienung Probleme auftreten, finden Sie ab Seite 34 „Tipps, Hinweise und Kurzhilfe“.
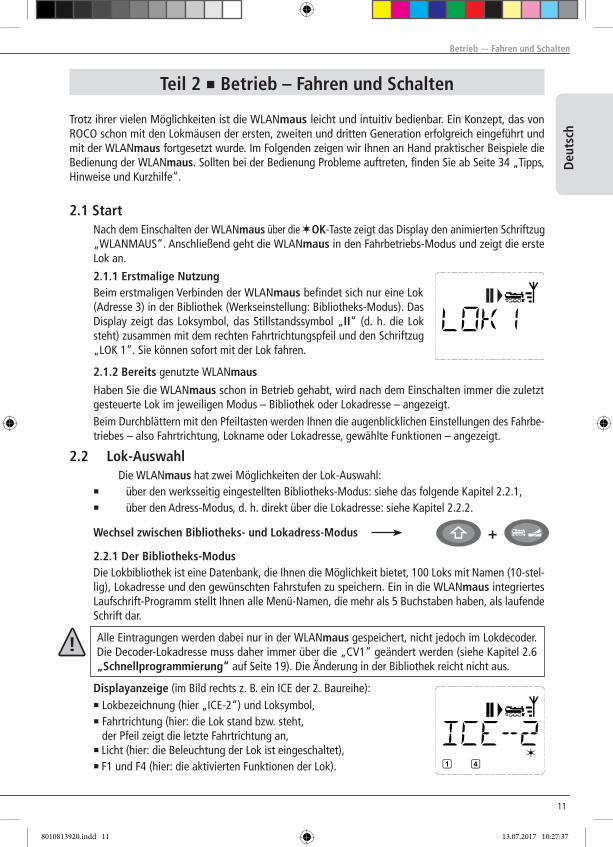
2.1 Start Nach dem Einschalten der WLANmaus über die OK-Taste zeigt das Display den animierten Schriftzug
„WLANMAuS“. Anschließend geht die WLANmaus in den Fahrbetriebs-Modus und zeigt die erste Lok an.
2.1.1 Erstmalige Nutzung Beim erstmaligen Verbinden der WLANmaus befindet sich nur eine Lok
(Adresse 3) in der Bibliothek (Werkseinstellung: Bibliotheks-Modus). Das Display zeigt das Loksymbol, das Stillstandssymbol „II“ (d. h. die Lok steht) zusammen mit dem rechten Fahrtrichtungspfeil und den Schriftzug „LOK 1“. Sie können sofort mit der Lok fahren.
2.1.2 Bereits genutzte WLANmaus
Haben Sie die WLANmaus schon in Betrieb gehabt, wird nach dem Einschalten immer die zuletzt gesteuerte Lok im jeweiligen Modus – Bibliothek oder Lokadresse – angezeigt.
Beim Durchblättern mit den Pfeiltasten werden Ihnen die augenblicklichen Einstellungen des Fahrbe-triebes – also Fahrtrichtung, Lokname oder Lokadresse, gewählte Funktionen – angezeigt.
2.2 Lok-Auswahl Die WLANmaus hat zwei Möglichkeiten der Lok-Auswahl: ▪ über den werksseitig eingestellten Bibliotheks-Modus: siehe das folgende Kapitel 2.2.1, ▪ über den Adress-Modus, d. h. direkt über die Lokadresse: siehe Kapitel 2.2.2.
Wechsel zwischen Bibliotheks- und Lokadress-Modus + 2.2.1 Der Bibliotheks-Modus Die Lokbibliothek ist eine Datenbank, die Ihnen die Möglichkeit bietet, 100 Loks mit Namen (10-stel-
lig), Lokadresse und den gewünschten Fahrstufen zu speichern. Ein in die WLANmaus integriertes Laufschrift-Programm stellt Ihnen alle Menü-Namen, die mehr als 5 Buchstaben haben, als laufende Schrift dar.
Alle Eintragungen werden dabei nur in der WLANmaus gespeichert, nicht jedoch im Lokdecoder. Die Decoder-Lokadresse muss daher immer über die „CV1“ geändert werden (siehe Kapitel 2.6 „Schnellprogrammierung“ auf Seite 19). Die Änderung in der Bibliothek reicht nicht aus.
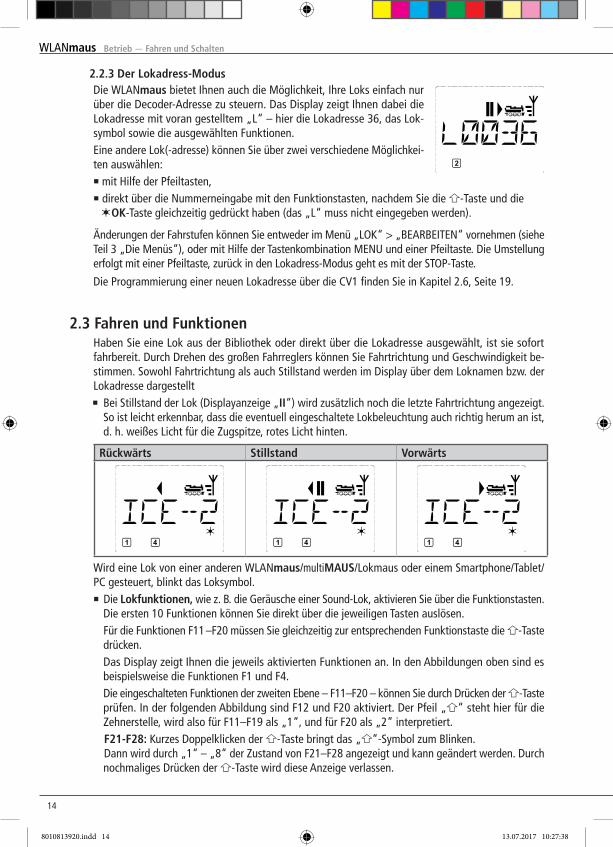
Displayanzeige (im Bild rechts z. B. ein ICE der 2. Baureihe): ▪ Lokbezeichnung (hier „ICE-2“) und Loksymbol, ▪ Fahrtrichtung (hier: die Lok stand bzw. steht, der Pfeil zeigt die letzte Fahrtrichtung an, ▪ Licht (hier: die Beleuchtung der Lok ist eingeschaltet), ▪ F1 und F4 (hier: die aktivierten Funktionen der Lok).
8010813920.indd 11 13.07.2017 10:27:37
1212
Betrieb — Fahren und Schalten
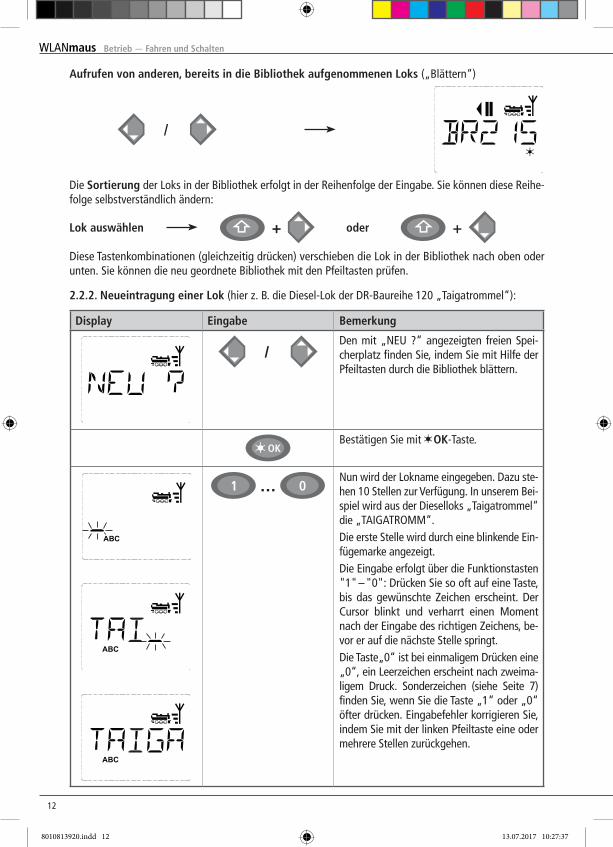
2.2.2. Neueintragung einer Lok (hier z. B. die Diesel-Lok der DR-Baureihe 120 „Taigatrommel“):
Aufrufen von anderen, bereits in die Bibliothek aufgenommenen Loks („Blättern“)
Die Sortierung der Loks in der Bibliothek erfolgt in der Reihenfolge der Eingabe. Sie können diese Reihe-folge selbstverständlich ändern:
oder ++Lok auswählen
Diese Tastenkombinationen (gleichzeitig drücken) verschieben die Lok in der Bibliothek nach oben oder unten. Sie können die neu geordnete Bibliothek mit den Pfeiltasten prüfen.
/
Display Eingabe Bemerkung
/Den mit „NEu ?“ angezeigten freien Spei-cherplatz finden Sie, indem Sie mit Hilfe der Pfeiltasten durch die Bibliothek blättern.
Bestätigen Sie mit OK-Taste.
…Nun wird der Lokname eingegeben. Dazu ste-hen 10 Stellen zur Verfügung. In unserem Bei-spiel wird aus der Dieselloks „Taigatrommel“ die „TAIGATROMM“.Die erste Stelle wird durch eine blinkende Ein-fügemarke angezeigt.Die Eingabe erfolgt über die Funktionstasten "1" – "0": Drücken Sie so oft auf eine Taste, bis das gewünschte Zeichen erscheint. Der Cursor blinkt und verharrt einen Moment nach der Eingabe des richtigen Zeichens, be-vor er auf die nächste Stelle springt.Die Taste„0“ ist bei einmaligem Drücken eine „0“, ein Leerzeichen erscheint nach zweima-ligem Druck. Sonderzeichen (siehe Seite 7) finden Sie, wenn Sie die Taste „1“ oder „0“ öfter drücken. Eingabefehler korrigieren Sie, indem Sie mit der linken Pfeiltaste eine oder mehrere Stellen zurückgehen.
8010813920.indd 12 13.07.2017 10:27:37
13
Deu
tsch
Betrieb — Fahren und Schalten
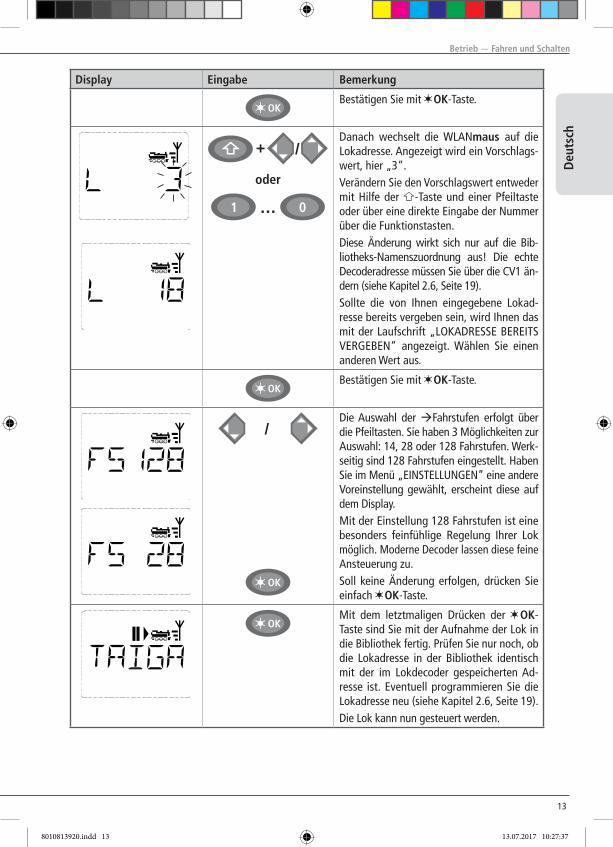
Display Eingabe Bemerkung
Bestätigen Sie mit OK-Taste.
/+
oder
…
Danach wechselt die WLANmaus auf die Lok adresse. Angezeigt wird ein Vorschlags-wert, hier „3“.Verändern Sie den Vorschlagswert entweder mit Hilfe der -Taste und einer Pfeiltaste oder über eine direkte Eingabe der Nummer über die Funktionstasten.Diese Änderung wirkt sich nur auf die Bib-liotheks-Namenszuordnung aus! Die echte Decoder adresse müssen Sie über die CV1 än-dern (siehe Kapitel 2.6, Seite 19).Sollte die von Ihnen eingegebene Lokad-resse bereits vergeben sein, wird Ihnen das mit der Laufschrift „LOKADRESSE BEREITS VERGEBEN“ angezeigt. Wählen Sie einen anderen Wert aus.
Bestätigen Sie mit OK-Taste.
/Die Auswahl der Fahrstufen erfolgt über die Pfeiltasten. Sie haben 3 Möglichkeiten zur Auswahl: 14, 28 oder 128 Fahrstufen. Werk-seitig sind 128 Fahrstufen eingestellt. Haben Sie im Menü „EINSTELLuNGEN“ eine andere Voreinstellung gewählt, erscheint diese auf dem Display.Mit der Einstellung 128 Fahrstufen ist eine besonders feinfühlige Regelung Ihrer Lok möglich. Moderne Decoder lassen diese feine Ansteuerung zu.Soll keine Änderung erfolgen, drücken Sie einfach OK-Taste.
Mit dem letztmaligen Drücken der OK-Taste sind Sie mit der Aufnahme der Lok in die Bibliothek fertig. Prüfen Sie nur noch, ob die Lokadresse in der Bibliothek identisch mit der im Lokdecoder gespeicherten Ad-resse ist. Eventuell programmieren Sie die Lokadresse neu (siehe Kapitel 2.6, Seite 19).Die Lok kann nun gesteuert werden.
8010813920.indd 13 13.07.2017 10:27:37
1414
Betrieb — Fahren und Schalten
2.2.3 Der Lokadress-Modus Die WLANmaus bietet Ihnen auch die Möglichkeit, Ihre Loks einfach nur
über die Decoder-Adresse zu steuern. Das Display zeigt Ihnen dabei die Lokadresse mit voran gestelltem „L“ – hier die Lokadresse 36, das Lok-symbol sowie die ausgewählten Funktionen.
Eine andere Lok(-adresse) können Sie über zwei verschiedene Möglichkei-ten auswählen:
▪ mit Hilfe der Pfeiltasten, ▪ direkt über die Nummerneingabe mit den Funktionstasten, nachdem Sie die -Taste und die OK-Taste gleichzeitig gedrückt haben (das „L“ muss nicht eingegeben werden).
Änderungen der Fahrstufen können Sie entweder im Menü „LOK“ > „BEARBEITEN“ vornehmen (siehe Teil 3 „Die Menüs“), oder mit Hilfe der Tastenkombination MENu und einer Pfeiltaste. Die umstellung erfolgt mit einer Pfeiltaste, zurück in den Lokadress-Modus geht es mit der STOP-Taste.
Die Programmierung einer neuen Lokadresse über die CV1 finden Sie in Kapitel 2.6, Seite 19.
2.3 Fahren und Funktionen Haben Sie eine Lok aus der Bibliothek oder direkt über die Lokadresse ausgewählt, ist sie sofort
fahrbereit. Durch Drehen des großen Fahrreglers können Sie Fahrtrichtung und Geschwindigkeit be-stimmen. Sowohl Fahrtrichtung als auch Stillstand werden im Display über dem Loknamen bzw. der Lokadresse dargestellt
▪ Bei Stillstand der Lok (Displayanzeige „II“) wird zusätzlich noch die letzte Fahrtrichtung angezeigt. So ist leicht erkennbar, dass die eventuell eingeschaltete Lokbeleuchtung auch richtig herum an ist, d. h. weißes Licht für die Zugspitze, rotes Licht hinten.
Rückwärts Stillstand Vorwärts
Wird eine Lok von einer anderen WLANmaus/multiMAUS/Lokmaus oder einem Smartphone/Tablet/PC gesteuert, blinkt das Loksymbol. ▪ Die Lokfunktionen, wie z. B. die Geräusche einer Sound-Lok, aktivieren Sie über die Funktionstasten.
Die ersten 10 Funktionen können Sie direkt über die jeweiligen Tasten auslösen. Für die Funktionen F11 –F20 müssen Sie gleichzeitig zur entsprechenden Funktionstaste die -Taste
drücken. Das Display zeigt Ihnen die jeweils aktivierten Funktionen an. In den Abbildungen oben sind es
beispielsweise die Funktionen F1 und F4. Die eingeschalteten Funktionen der zweiten Ebene – F11–F20 – können Sie durch Drücken der -Taste
prüfen. In der folgenden Abbildung sind F12 und F20 aktiviert. Der Pfeil „ “ steht hier für die Zehnerstelle, wird also für F11–F19 als „1“, und für F20 als „2“ interpretiert.F21-F28: Kurzes Doppelklicken der -Taste bringt das „ “-Symbol zum Blinken. Dann wird durch „1“ – „8“ der Zustand von F21–F28 angezeigt und kann geändert werden. Durch nochmaliges Drücken der -Taste wird diese Anzeige verlassen.
8010813920.indd 14 13.07.2017 10:27:38
15
Deu
tsch
Betrieb — Fahren und Schalten
Welche Funktionen für Ihre Lok verfügbar sind, entnehmen Sie bitte deren Betriebsanleitung.
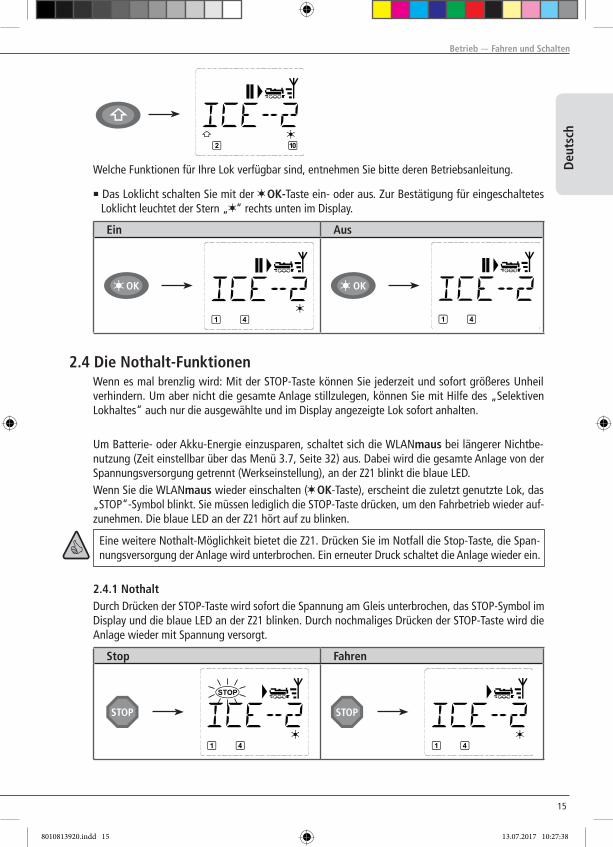
▪ Das Loklicht schalten Sie mit der OK-Taste ein- oder aus. Zur Bestätigung für eingeschaltetes Loklicht leuchtet der Stern „ “ rechts unten im Display.
Ein Aus
2.4 Die Nothalt-Funktionen Wenn es mal brenzlig wird: Mit der STOP-Taste können Sie jederzeit und sofort größeres unheil
verhindern. um aber nicht die gesamte Anlage stillzulegen, können Sie mit Hilfe des „Selektiven Lokhaltes“ auch nur die ausgewählte und im Display angezeigte Lok sofort anhalten.
um Batterie- oder Akku-Energie einzusparen, schaltet sich die WLANmaus bei längerer Nichtbe-nutzung (Zeit einstellbar über das Menü 3.7, Seite 32) aus. Dabei wird die gesamte Anlage von der Spannungsversorgung getrennt (Werkseinstellung), an der Z21 blinkt die blaue LED.
Wenn Sie die WLANmaus wieder einschalten ( OK-Taste), erscheint die zuletzt genutzte Lok, das „STOP“-Symbol blinkt. Sie müssen lediglich die STOP-Taste drücken, um den Fahrbetrieb wieder auf-zunehmen. Die blaue LED an der Z21 hört auf zu blinken.
Eine weitere Nothalt-Möglichkeit bietet die Z21. Drücken Sie im Notfall die Stop-Taste, die Span-nungsversorgung der Anlage wird unterbrochen. Ein erneuter Druck schaltet die Anlage wieder ein.
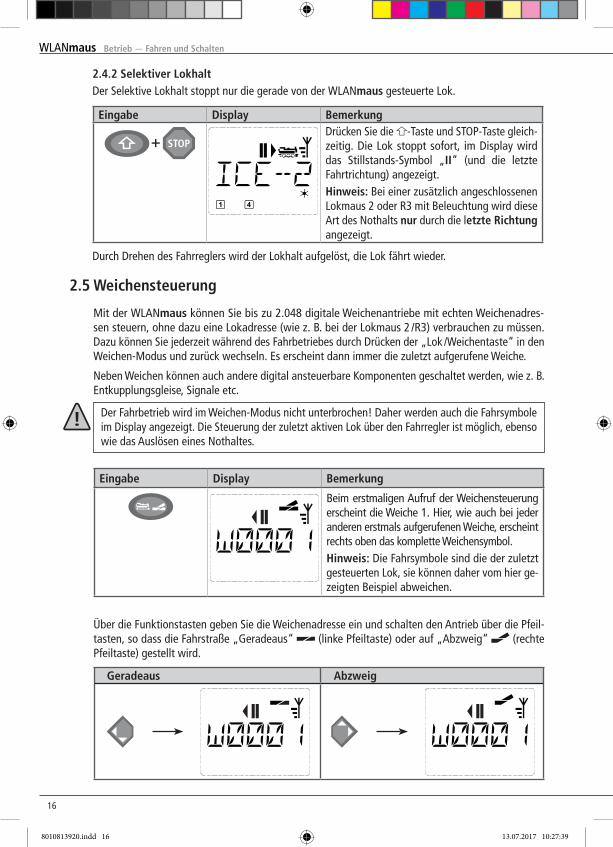
2.4.1 Nothalt Durch Drücken der STOP-Taste wird sofort die Spannung am Gleis unterbrochen, das STOP-Symbol im
Display und die blaue LED an der Z21 blinken. Durch nochmaliges Drücken der STOP-Taste wird die Anlage wieder mit Spannung versorgt.
Stop Fahren
8010813920.indd 15 13.07.2017 10:27:38
1616
Betrieb — Fahren und Schalten
2.4.2 Selektiver Lokhalt Der Selektive Lokhalt stoppt nur die gerade von der WLANmaus gesteuerte Lok.
Eingabe Display BemerkungDrücken Sie die -Taste und STOP-Taste gleich-zeitig. Die Lok stoppt sofort, im Display wird das Stillstands-Symbol „II“ (und die letzte Fahrtrichtung) angezeigt.Hinweis: Bei einer zusätzlich angeschlossenen Lokmaus 2 oder R3 mit Beleuchtung wird diese Art des Nothalts nur durch die letzte Richtung angezeigt.
Durch Drehen des Fahrreglers wird der Lokhalt aufgelöst, die Lok fährt wieder.
2.5 Weichensteuerung
Mit der WLANmaus können Sie bis zu 2.048 digitale Weichenantriebe mit echten Weichenadres-sen steuern, ohne dazu eine Lokadresse (wie z. B. bei der Lokmaus 2 /R3) verbrauchen zu müssen. Dazu können Sie jederzeit während des Fahrbetriebes durch Drücken der „Lok /Weichentaste“ in den Weichen-Modus und zurück wechseln. Es erscheint dann immer die zuletzt aufgerufene Weiche.
Neben Weichen können auch andere digital ansteuerbare Komponenten geschaltet werden, wie z. B. Entkupplungsgleise, Signale etc.
Der Fahrbetrieb wird im Weichen-Modus nicht unterbrochen! Daher werden auch die Fahrsymbole im Display angezeigt. Die Steuerung der zuletzt aktiven Lok über den Fahrregler ist möglich, ebenso wie das Auslösen eines Nothaltes.
Eingabe Display Bemerkung
Beim erstmaligen Aufruf der Weichensteuerung erscheint die Weiche 1. Hier, wie auch bei jeder anderen erstmals aufgerufenen Weiche, erscheint rechts oben das komplette Weichensymbol.Hinweis: Die Fahrsymbole sind die der zuletzt gesteuerten Lok, sie können daher vom hier ge-zeigten Beispiel abweichen.
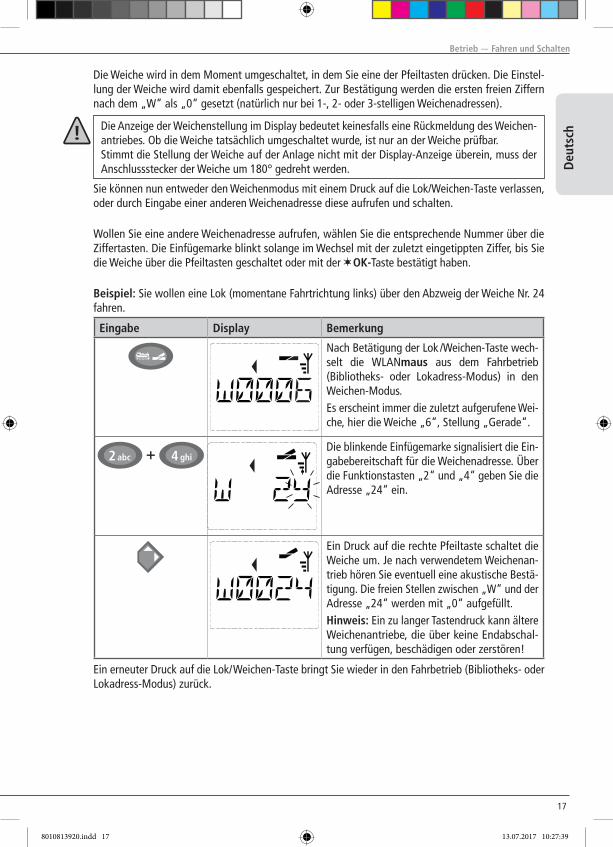
Über die Funktionstasten geben Sie die Weichenadresse ein und schalten den Antrieb über die Pfeil-
tasten, so dass die Fahrstraße „Geradeaus“ (linke Pfeiltaste) oder auf „Abzweig“ (rechte Pfeiltaste) gestellt wird.
Geradeaus Abzweig
8010813920.indd 16 13.07.2017 10:27:39
17
Deu
tsch
Betrieb — Fahren und Schalten
Die Weiche wird in dem Moment umgeschaltet, in dem Sie eine der Pfeiltasten drücken. Die Einstel-lung der Weiche wird damit ebenfalls gespeichert. Zur Bestätigung werden die ersten freien Ziffern nach dem „W“ als „0“ gesetzt (natürlich nur bei 1-, 2- oder 3-stelligen Weichenadressen).
Die Anzeige der Weichenstellung im Display bedeutet keinesfalls eine Rückmeldung des Weichen-antriebes. Ob die Weiche tatsächlich umgeschaltet wurde, ist nur an der Weiche prüfbar.Stimmt die Stellung der Weiche auf der Anlage nicht mit der Display-Anzeige überein, muss der Anschlussstecker der Weiche um 180° gedreht werden.
Sie können nun entweder den Weichenmodus mit einem Druck auf die Lok/Weichen-Taste verlassen, oder durch Eingabe einer anderen Weichenadresse diese aufrufen und schalten.
Wollen Sie eine andere Weichenadresse aufrufen, wählen Sie die entsprechende Nummer über die Ziffertasten. Die Einfügemarke blinkt solange im Wechsel mit der zuletzt eingetippten Ziffer, bis Sie die Weiche über die Pfeiltasten geschaltet oder mit der OK-Taste bestätigt haben.
Beispiel: Sie wollen eine Lok (momentane Fahrtrichtung links) über den Abzweig der Weiche Nr. 24 fahren.
Eingabe Display Bemerkung
Nach Betätigung der Lok /Weichen-Taste wech-selt die WLANmaus aus dem Fahrbetrieb (Bibliotheks- oder Lokadress-Modus) in den Weichen-Modus.Es erscheint immer die zuletzt aufgerufene Wei-che, hier die Weiche „6“, Stellung „Gerade“.
Die blinkende Einfügemarke signalisiert die Ein-gabebereitschaft für die Weichenadresse. Über die Funktionstasten „2“ und „4“ geben Sie die Adresse „24“ ein.
Ein Druck auf die rechte Pfeiltaste schaltet die Weiche um. Je nach verwendetem Weichenan-trieb hören Sie eventuell eine akustische Bestä-tigung. Die freien Stellen zwischen „W“ und der Adresse „24“ werden mit „0“ aufgefüllt.Hinweis: Ein zu langer Tastendruck kann ältere Weichenantriebe, die über keine Endabschal-tung verfügen, beschädigen oder zerstören!
Ein erneuter Druck auf die Lok/ Weichen-Taste bringt Sie wieder in den Fahrbetrieb (Bibliotheks- oder Lok adress-Modus) zurück.
8010813920.indd 17 13.07.2017 10:27:39
1818
Betrieb — Fahren und Schalten
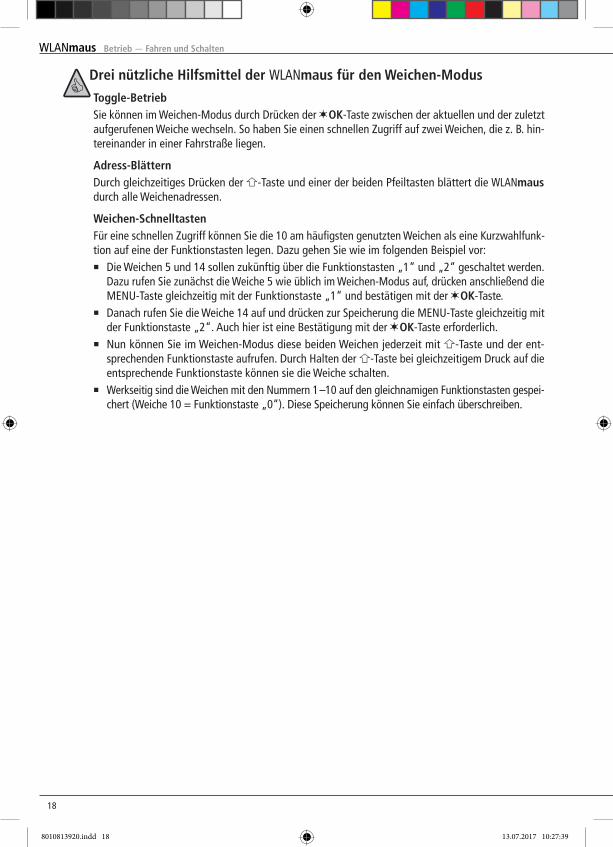
Drei nützliche Hilfsmittel der WLANmaus für den Weichen-Modus
Toggle-Betrieb Sie können im Weichen-Modus durch Drücken der OK-Taste zwischen der aktuellen und der zuletzt
aufgerufenen Weiche wechseln. So haben Sie einen schnellen Zugriff auf zwei Weichen, die z. B. hin-tereinander in einer Fahrstraße liegen.
Adress-Blättern Durch gleichzeitiges Drücken der -Taste und einer der beiden Pfeiltasten blättert die WLANmaus
durch alle Weichenadressen.
Weichen-Schnelltasten Für eine schnellen Zugriff können Sie die 10 am häufigsten genutzten Weichen als eine Kurzwahlfunk-
tion auf eine der Funktionstasten legen. Dazu gehen Sie wie im folgenden Beispiel vor:▪ Die Weichen 5 und 14 sollen zukünftig über die Funktionstasten „1“ und „2“ geschaltet werden.
Dazu rufen Sie zunächst die Weiche 5 wie üblich im Weichen-Modus auf, drücken anschließend die MENu-Taste gleichzeitig mit der Funktionstaste „1“ und bestätigen mit der OK-Taste.
▪ Danach rufen Sie die Weiche 14 auf und drücken zur Speicherung die MENu-Taste gleichzeitig mit der Funktionstaste „2“. Auch hier ist eine Bestätigung mit der OK-Taste erforderlich.
▪ Nun können Sie im Weichen-Modus diese beiden Weichen jederzeit mit -Taste und der ent-sprechenden Funktionstaste aufrufen. Durch Halten der -Taste bei gleichzeitigem Druck auf die entsprechende Funktionstaste können sie die Weiche schalten.
▪ Werkseitig sind die Weichen mit den Nummern 1 –10 auf den gleichnamigen Funktionstasten gespei-chert (Weiche 10 = Funktionstaste „0“). Diese Speicherung können Sie einfach überschreiben.
8010813920.indd 18 13.07.2017 10:27:39
19
Deu
tsch
Betrieb — Fahren und Schalten
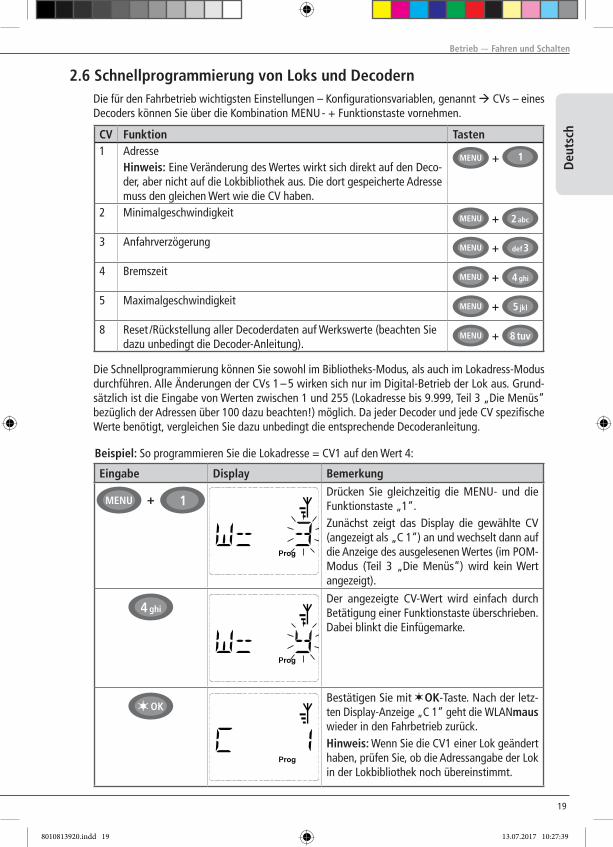
2.6 Schnellprogrammierung von Loks und Decodern Die für den Fahrbetrieb wichtigsten Einstellungen – Konfigurationsvariablen, genannt CVs – eines
Decoders können Sie über die Kombination MENu - + Funktionstaste vornehmen.
CV Funktion Tasten1 Adresse
Hinweis: Eine Veränderung des Wertes wirkt sich direkt auf den Deco-der, aber nicht auf die Lokbibliothek aus. Die dort gespeicherte Adresse muss den gleichen Wert wie die CV haben.
+
2 Minimalgeschwindigkeit +
3 Anfahrverzögerung +
4 Bremszeit +
5 Maximalgeschwindigkeit +
8 Reset /Rückstellung aller Decoderdaten auf Werkswerte (beachten Sie dazu unbedingt die Decoder-Anleitung). + 8 tuv
Die Schnellprogrammierung können Sie sowohl im Bibliotheks-Modus, als auch im Lokadress-Modus durchführen. Alle Änderungen der CVs 1 – 5 wirken sich nur im Digital-Betrieb der Lok aus. Grund-sätzlich ist die Eingabe von Werten zwischen 1 und 255 (Lokadresse bis 9.999, Teil 3 „Die Menüs“ bezüglich der Adressen über 100 dazu beachten!) möglich. Da jeder Decoder und jede CV spezifische Werte benötigt, vergleichen Sie dazu unbedingt die entsprechende Decoderanleitung.
Beispiel: So programmieren Sie die Lokadresse = CV1 auf den Wert 4:
Eingabe Display Bemerkung
Drücken Sie gleichzeitig die MENu- und die Funktionstaste „1“.Zunächst zeigt das Display die gewählte CV (angezeigt als „C 1“) an und wechselt dann auf die Anzeige des ausgelesenen Wertes (im POM-Modus (Teil 3 „Die Menüs“) wird kein Wert angezeigt).
Der angezeigte CV-Wert wird einfach durch Betätigung einer Funktionstaste überschrieben. Dabei blinkt die Einfügemarke.
Bestätigen Sie mit OK-Taste. Nach der letz-ten Display-Anzeige „C 1“ geht die WLANmaus wieder in den Fahrbetrieb zurück.Hinweis: Wenn Sie die CV1 einer Lok geändert haben, prüfen Sie, ob die Adressangabe der Lok in der Lokbibliothek noch übereinstimmt.
8010813920.indd 19 13.07.2017 10:27:39
2020
Betrieb — Fahren und Schalten
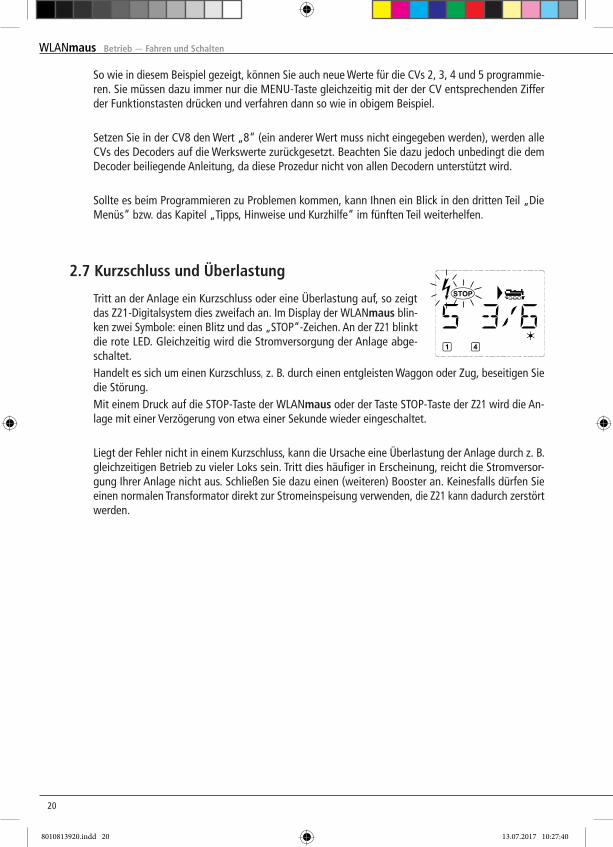
2.7 Kurzschluss und Überlastung
Tritt an der Anlage ein Kurzschluss oder eine Überlastung auf, so zeigt das Z21-Digitalsystem dies zweifach an. Im Display der WLANmaus blin-ken zwei Symbole: einen Blitz und das „STOP“-Zeichen. An der Z21 blinkt die rote LED. Gleichzeitig wird die Stromversorgung der Anlage abge-schaltet.
Handelt es sich um einen Kurzschluss, z. B. durch einen entgleisten Waggon oder Zug, beseitigen Sie die Störung.
Mit einem Druck auf die STOP-Taste der WLANmaus oder der Taste STOP-Taste der Z21 wird die An-lage mit einer Verzögerung von etwa einer Sekunde wieder eingeschaltet.
Liegt der Fehler nicht in einem Kurzschluss, kann die ursache eine Überlastung der Anlage durch z. B. gleichzeitigen Betrieb zu vieler Loks sein. Tritt dies häufiger in Erscheinung, reicht die Stromversor-gung Ihrer Anlage nicht aus. Schließen Sie dazu einen (weiteren) Booster an. Keinesfalls dürfen Sie einen normalen Transformator direkt zur Stromeinspeisung verwenden, die Z21 kann dadurch zerstört werden.
So wie in diesem Beispiel gezeigt, können Sie auch neue Werte für die CVs 2, 3, 4 und 5 programmie-ren. Sie müssen dazu immer nur die MENu-Taste gleichzeitig mit der der CV entsprechenden Ziffer der Funktionstasten drücken und verfahren dann so wie in obigem Beispiel.
Setzen Sie in der CV8 den Wert „8“ (ein anderer Wert muss nicht eingegeben werden), werden alle CVs des Decoders auf die Werkswerte zurückgesetzt. Beachten Sie dazu jedoch unbedingt die dem Decoder beiliegende Anleitung, da diese Prozedur nicht von allen Decodern unterstützt wird.
Sollte es beim Programmieren zu Problemen kommen, kann Ihnen ein Blick in den dritten Teil „Die Menüs“ bzw. das Kapitel „Tipps, Hinweise und Kurzhilfe“ im fünften Teil weiterhelfen.
8010813920.indd 20 13.07.2017 10:27:40
21
Deu
tsch
Die Menüs
Teil 3 ▪ Die Menüs
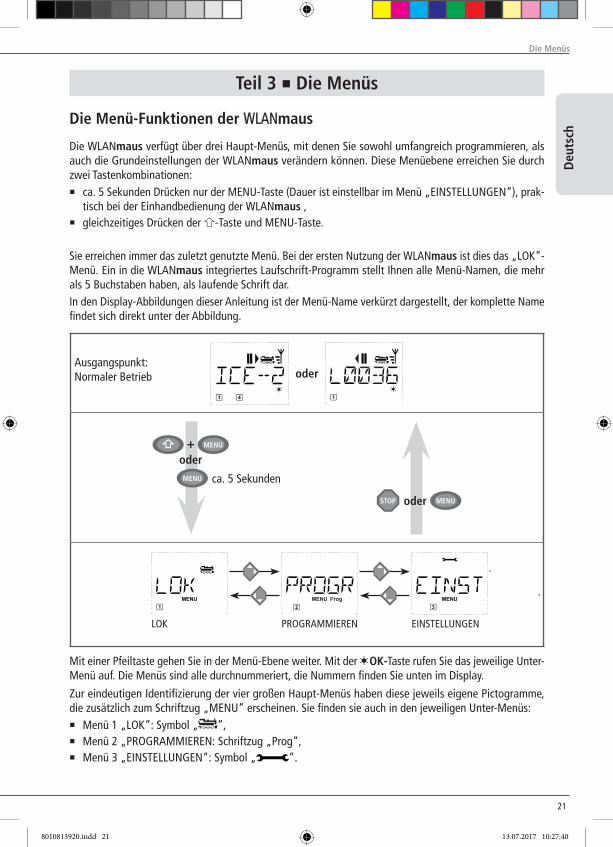
Die Menü-Funktionen der WLANmaus
Die WLANmaus verfügt über drei Haupt-Menüs, mit denen Sie sowohl umfangreich programmieren, als auch die Grundeinstellungen der WLANmaus verändern können. Diese Menüebene erreichen Sie durch zwei Tastenkombinationen:▪ ca. 5 Sekunden Drücken nur der MENu-Taste (Dauer ist einstellbar im Menü „EINSTELLuNGEN“), prak-
tisch bei der Einhandbedienung der WLANmaus ,▪ gleichzeitiges Drücken der -Taste und MENu-Taste.
Sie erreichen immer das zuletzt genutzte Menü. Bei der ersten Nutzung der WLANmaus ist dies das „LOK“-Menü. Ein in die WLANmaus integriertes Laufschrift-Programm stellt Ihnen alle Menü-Namen, die mehr als 5 Buchstaben haben, als laufende Schrift dar.In den Display-Abbildungen dieser Anleitung ist der Menü-Name verkürzt dargestellt, der komplette Name findet sich direkt unter der Abbildung.
oder
oder
ca. 5 Sekunden
oder
EINSTELLuNGENPROGRAMMIERENLOK
Ausgangspunkt: Normaler Betrieb
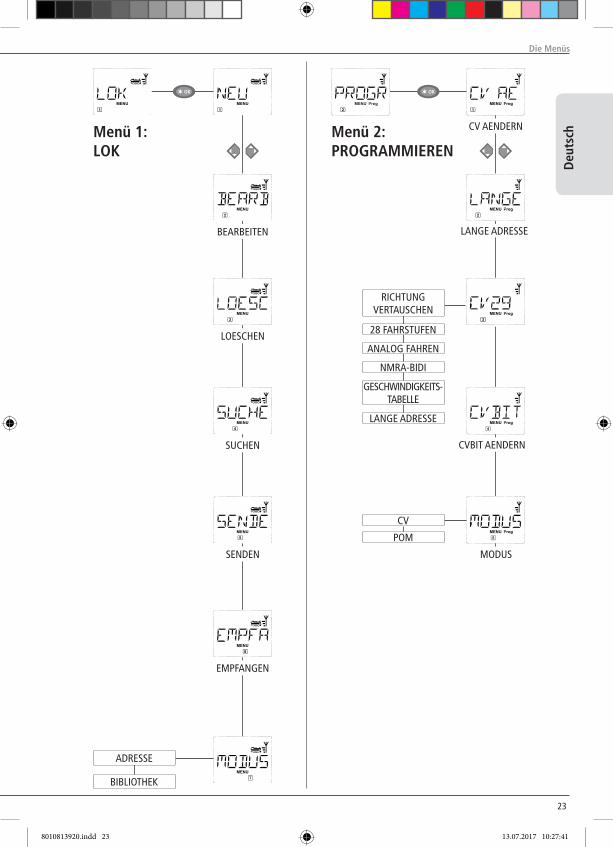
Mit einer Pfeiltaste gehen Sie in der Menü-Ebene weiter. Mit der OK-Taste rufen Sie das jeweilige unter-Menü auf. Die Menüs sind alle durchnummeriert, die Nummern finden Sie unten im Display.
Zur eindeutigen Identifizierung der vier großen Haupt-Menüs haben diese jeweils eigene Pictogramme, die zusätzlich zum Schriftzug „MENU“ erscheinen. Sie finden sie auch in den jeweiligen Unter-Menüs:▪ Menü 1 „LOK“: Symbol „ “,▪ Menü 2 „PROGRAMMIEREN: Schriftzug „Prog“,▪ Menü 3 „EINSTELLuNGEN“: Symbol „ “.
8010813920.indd 21 13.07.2017 10:27:40
2222
Die Menüs
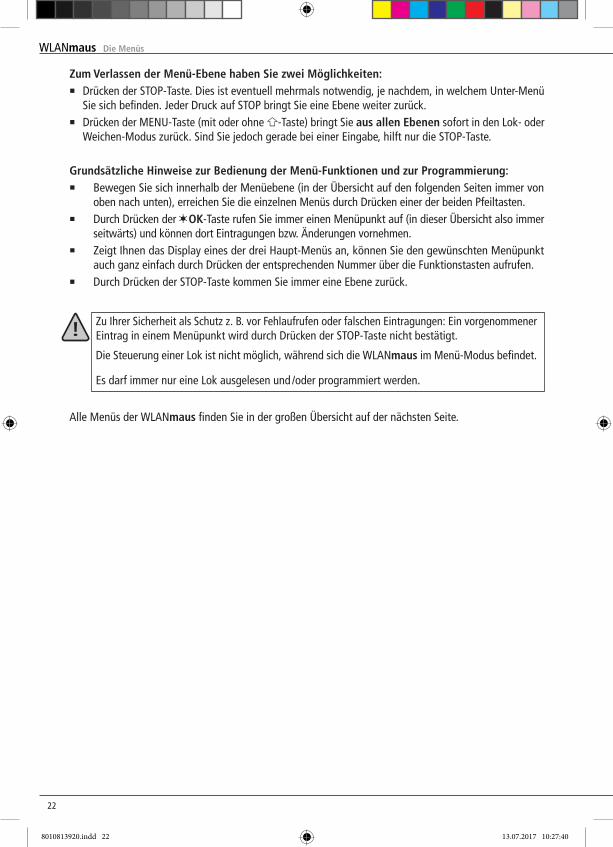
Zum Verlassen der Menü-Ebene haben Sie zwei Möglichkeiten:▪ Drücken der STOP-Taste. Dies ist eventuell mehrmals notwendig, je nachdem, in welchem unter-Menü
Sie sich befinden. Jeder Druck auf STOP bringt Sie eine Ebene weiter zurück.▪ Drücken der MENu-Taste (mit oder ohne -Taste) bringt Sie aus allen Ebenen sofort in den Lok- oder
Weichen-Modus zurück. Sind Sie jedoch gerade bei einer Eingabe, hilft nur die STOP-Taste.
Grundsätzliche Hinweise zur Bedienung der Menü-Funktionen und zur Programmierung:▪ Bewegen Sie sich innerhalb der Menüebene (in der Übersicht auf den folgenden Seiten immer von
oben nach unten), erreichen Sie die einzelnen Menüs durch Drücken einer der beiden Pfeiltasten.▪ Durch Drücken der OK-Taste rufen Sie immer einen Menüpunkt auf (in dieser Übersicht also immer
seitwärts) und können dort Eintragungen bzw. Änderungen vornehmen.▪ Zeigt Ihnen das Display eines der drei Haupt-Menüs an, können Sie den gewünschten Menüpunkt
auch ganz einfach durch Drücken der entsprechenden Nummer über die Funktionstasten aufrufen.▪ Durch Drücken der STOP-Taste kommen Sie immer eine Ebene zurück.
Zu Ihrer Sicherheit als Schutz z. B. vor Fehlaufrufen oder falschen Eintragungen: Ein vorgenommener Eintrag in einem Menüpunkt wird durch Drücken der STOP-Taste nicht bestätigt.
Die Steuerung einer Lok ist nicht möglich, während sich die WLANmaus im Menü-Modus befindet.
Es darf immer nur eine Lok ausgelesen und /oder programmiert werden.
Alle Menüs der WLANmaus finden Sie in der großen Übersicht auf der nächsten Seite.
8010813920.indd 22 13.07.2017 10:27:40
23
Deu
tsch
Die Menüs
RICHTuNG VERTAuSCHEN
28 FAHRSTuFEN
ANALOG FAHREN
NMRA-BIDI
GESCHWINDIGKEITS-TABELLE
LANGE ADRESSE
BEARBEITEN
LOESCHEN
CV AENDERN
LANGE ADRESSE
SENDEN
EMPFANGEN
SuCHEN
Menü 2:PROGRAMMIEREN
ADRESSE
BIBLIOTHEK
Menü 1:LOK
CV
POM
MODuS
CVBIT AENDERN
8010813920.indd 23 13.07.2017 10:27:41
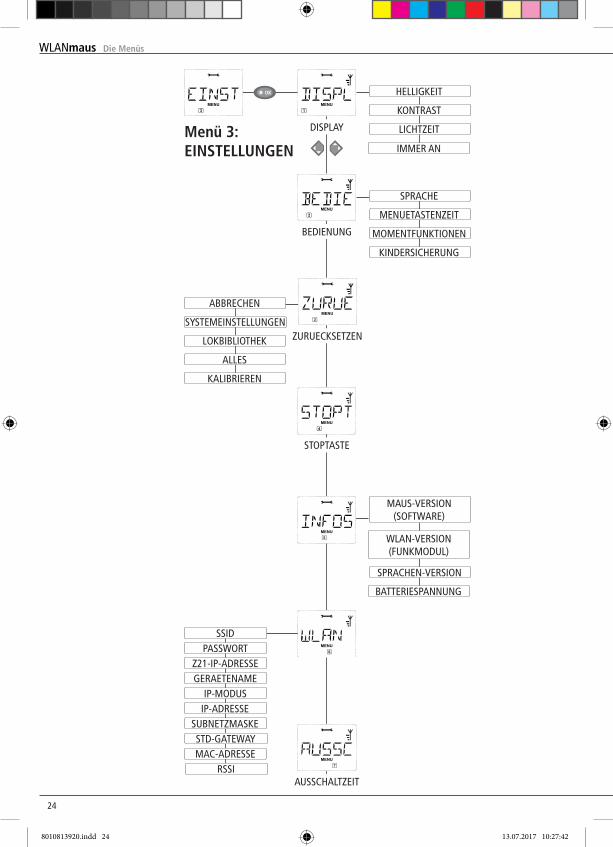
2424
ABBRECHEN
SySTEMEINSTELLuNGEN
LOKBIBLIOTHEK
ALLES
KALIBRIEREN
PASSWORTSSID
Z21-IP-ADRESSEGERAETENAME
IP-MODuS
MAuS-VERSION (SOFTWARE)
WLAN-VERSION (FuNKMODuL)
BATTERIESPANNuNG
Menü 3:EINSTELLUNGEN
HELLIGKEIT
KONTRAST
SPRACHE
MENuETASTENZEIT
MOMENTFuNKTIONEN
KINDERSICHERuNG
DISPLAy
BEDIENuNG
STOPTASTE
AuSSCHALTZEIT
LICHTZEIT
ZuRuECKSETZEN
IP-ADRESSESuBNETZMASKESTD-GATEWAyMAC-ADRESSE
RSSI
SPRACHEN-VERSION
Die Menüs
IMMER AN
8010813920.indd 24 13.07.2017 10:27:42
25
Deu
tsch
Im „Lok“-Menü werden alle Daten verwaltet, die für die Lok-Bibliothek und die Identifizierung einer Lok erforderlich sind. Auch können Sie hier die WLANmaus grundsätzlich auf Bibliotheks- oder Adress-Bedienung einstellen.
1.1 „NEU“ In diesem Menüpunkt können Sie eine neue Lok in die Bibliothek aufnehmen. Der Ablauf ist ausführ-
lich ab Seite 12 beschrieben und dargestellt.
1.2 „BEARBEITEN“ Die Daten einer in der Bibliothek befindlichen Lok ändern Sie über diesen Menüpunkt. Soll z. B. nur die Lokadresse geändert werden, Bezeichung und Fahrstufen hingegen unverändert
bleiben, können Sie durch Drücken der OK-Taste diese Punkte unbearbeitet überspringen. Das erste Bild zeigt immer die zuletzt im Bibliotheks-Modus genutzte Lok. Über die Pfeiltasten wählen
Sie die Lok aus, an der Sie etwas ändern wollen. ▪ Bestätigen Sie mit der OK-Taste.
Sie haben nun die Möglichkeit, die Bezeichnung der Lok zu ändern. Die Einfügemarke blinkt an der letzten Stelle. Über die linke „Pfeiltaste“ löschen Sie die Buchstaben /Ziffern und können diese neu über die „Funktionstasten“ eingeben. Mit der rechten Pfeiltaste können Sie an der aktuellen Stelle Text eingeben bzw. vorhandenen Text ersetzen.
▪ Bestätigen Sie mit der OK-Taste. Die Korrektur der Lokadresse erfolgt wie zuvor beschrieben.
▪ Bestätigen Sie mit der OK-Taste. Die Korrektur der Fahrstufen erfolgt wieder über die Pfeiltasten.
▪ Bestätigen Sie mit der OK-Taste. Sie kommen auf die Ausgangsebene „BEARBEITEN“ zurück.
Die Änderung einer Lokadresse in der Bibliothek hat keine Auswirkung auf die im Lokdecoder ge-speicherte Adresse. Diese kann nur über die „CV1“ geändert werden. Beachten Sie dazu die Kapitel „Schnellprogrammierung“ auf Seite 19 bzw. im Menü „PROGRAMMIEREN“ den Menüpunkt 2.1 „CV AENDERN“ auf Seite 27.
1.3 „LOESCHEN“ Mit diesem Menüpunkt können Sie eine Lok aus der Bibliothek entfernen. Das erste Bild zeigt die zuletzt im Bibliotheks-Modus genutzte Lok. Über die „Pfeiltasten“ wählen Sie
die zu entfernende Lok aus. ▪ Bestätigen Sie mit der OK-Taste. Im nächsten Bild erscheint die Laufschrift „LOESCHEN?“
▪ Bestätigen Sie den Löschvorgang erneut mit der OK-Taste. Sie kommen auf die Ausgangs ebene „LOESCHEN“ zurück, erkennbar an der unten im Display.
Die Lok ist aus der Bibliothek entfernt und wird, sofern sie noch fährt, automatisch gestoppt (selek-tiver Nothalt). Bis die gelöschte Lok erneut in die Bibliothek aufgenommen wird, ist eine Steuerung nur noch über den Lokadress-Modus möglich.
1. Das „LOK“-Menü
Die Menüs
8010813920.indd 25 13.07.2017 10:27:42
2626
Die Menüs
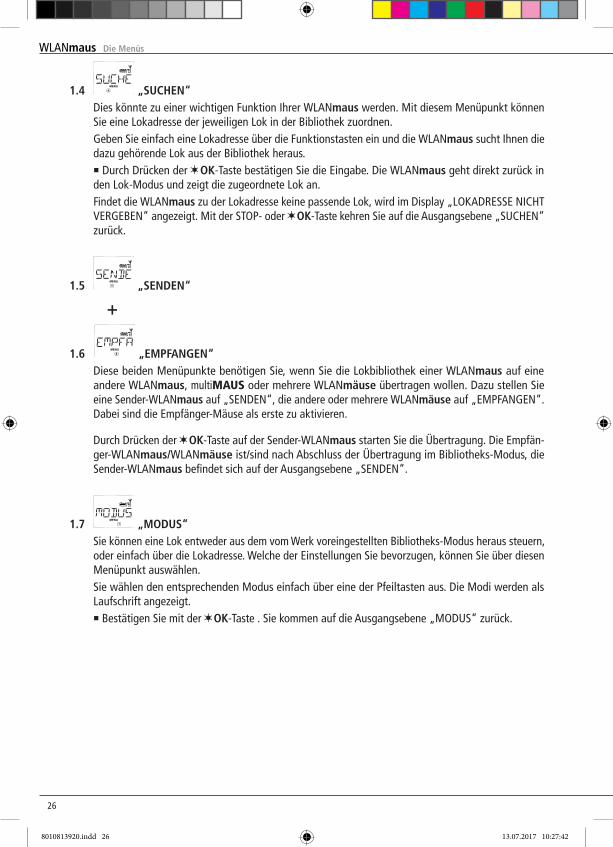
1.4 „SUCHEN“ Dies könnte zu einer wichtigen Funktion Ihrer WLANmaus werden. Mit diesem Menüpunkt können
Sie eine Lokadresse der jeweiligen Lok in der Bibliothek zuordnen. Geben Sie einfach eine Lokadresse über die Funktionstasten ein und die WLANmaus sucht Ihnen die
dazu gehörende Lok aus der Bibliothek heraus. ▪ Durch Drücken der OK-Taste bestätigen Sie die Eingabe. Die WLANmaus geht direkt zurück in
den Lok-Modus und zeigt die zugeordnete Lok an. Findet die WLANmaus zu der Lokadresse keine passende Lok, wird im Display „LOKADRESSE NICHT
VERGEBEN“ angezeigt. Mit der STOP- oder OK-Taste kehren Sie auf die Ausgangsebene „SuCHEN“ zurück.
1.5 „SENDEN“
+
1.6 „EMPFANGEN“ Diese beiden Menüpunkte benötigen Sie, wenn Sie die Lokbibliothek einer WLANmaus auf eine
andere WLANmaus, multiMAUS oder mehrere WLANmäuse übertragen wollen. Dazu stellen Sie eine Sender -WLANmaus auf „SENDEN“, die andere oder mehrere WLANmäuse auf „EMPFANGEN“. Dabei sind die Empfänger-Mäuse als erste zu aktivieren.
Durch Drücken der OK-Taste auf der Sender-WLANmaus starten Sie die Übertragung. Die Empfän-ger-WLANmaus/WLANmäuse ist/sind nach Abschluss der Übertragung im Bibliotheks-Modus, die Sender-WLANmaus befindet sich auf der Ausgangsebene „SENDEN“.
1.7 „MODUS“ Sie können eine Lok entweder aus dem vom Werk voreingestellten Bibliotheks-Modus heraus steuern,
oder einfach über die Lokadresse. Welche der Einstellungen Sie bevorzugen, können Sie über diesen Menüpunkt auswählen.
Sie wählen den entsprechenden Modus einfach über eine der Pfeiltasten aus. Die Modi werden als Laufschrift angezeigt.
▪ Bestätigen Sie mit der OK-Taste . Sie kommen auf die Ausgangsebene „MODuS“ zurück.
8010813920.indd 26 13.07.2017 10:27:42
27
Deu
tsch
Die Menüs
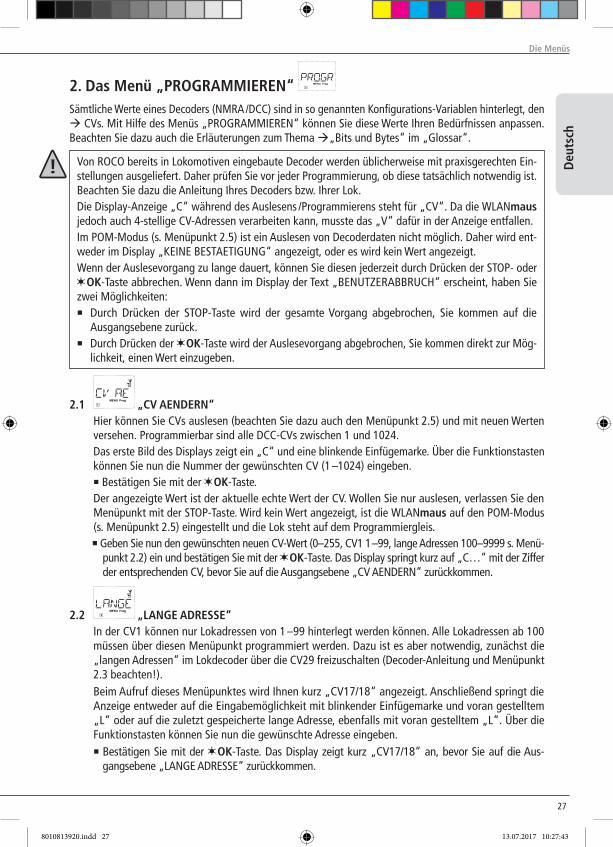
2. Das Menü „PROGRAMMIEREN“ Sämtliche Werte eines Decoders (NMRA /DCC) sind in so genannten Konfigurations-Variablen hinterlegt, den CVs. Mit Hilfe des Menüs „PROGRAMMIEREN“ können Sie diese Werte Ihren Bedürfnissen anpassen. Beachten Sie dazu auch die Erläuterungen zum Thema „Bits und Bytes“ im „Glossar“.
Von ROCO bereits in Lokomotiven eingebaute Decoder werden üblicherweise mit praxisgerechten Ein-stellungen ausgeliefert. Daher prüfen Sie vor jeder Programmierung, ob diese tatsächlich notwendig ist. Beachten Sie dazu die Anleitung Ihres Decoders bzw. Ihrer Lok.Die Display-Anzeige „C“ während des Auslesens /Programmierens steht für „CV“. Da die WLANmaus jedoch auch 4-stellige CV-Adressen verarbeiten kann, musste das „V“ dafür in der Anzeige entfallen.Im POM-Modus (s. Menüpunkt 2.5) ist ein Auslesen von Decoderdaten nicht möglich. Daher wird ent-weder im Display „KEINE BESTAETIGuNG“ angezeigt, oder es wird kein Wert angezeigt.Wenn der Auslesevorgang zu lange dauert, können Sie diesen jederzeit durch Drücken der STOP- oder
OK-Taste abbrechen. Wenn dann im Display der Text „BENuTZERABBRuCH“ erscheint, haben Sie zwei Möglichkeiten:▪ Durch Drücken der STOP-Taste wird der gesamte Vorgang abgebrochen, Sie kommen auf die
Ausgangs ebene zurück.▪ Durch Drücken der OK-Taste wird der Auslesevorgang abgebrochen, Sie kommen direkt zur Mög-
lichkeit, einen Wert einzugeben.
2.1 „CV AENDERN“ Hier können Sie CVs auslesen (beachten Sie dazu auch den Menüpunkt 2.5) und mit neuen Werten
versehen. Programmierbar sind alle DCC-CVs zwischen 1 und 1024. Das erste Bild des Displays zeigt ein „C“ und eine blinkende Einfügemarke. Über die Funktionstasten
können Sie nun die Nummer der gewünschten CV (1 –1024) eingeben. ▪ Bestätigen Sie mit der OK-Taste. Der angezeigte Wert ist der aktuelle echte Wert der CV. Wollen Sie nur auslesen, verlassen Sie den
Menüpunkt mit der STOP-Taste. Wird kein Wert angezeigt, ist die WLANmaus auf den POM-Modus (s. Menüpunkt 2.5) eingestellt und die Lok steht auf dem Programmiergleis.▪ Geben Sie nun den gewünschten neuen CV-Wert (0–255, CV1 1 –99, lange Adressen 100–9999 s. Menü-
punkt 2.2) ein und bestätigen Sie mit der OK-Taste. Das Display springt kurz auf „C…“ mit der Ziffer der entsprechenden CV, bevor Sie auf die Ausgangsebene „CV AENDERN“ zurückkommen.
2.2 „LANGE ADRESSE“ In der CV1 können nur Lokadressen von 1 –99 hinterlegt werden können. Alle Lokadressen ab 100
müssen über diesen Menüpunkt programmiert werden. Dazu ist es aber notwendig, zunächst die „langen Adressen“ im Lokdecoder über die CV29 freizuschalten (Decoder-Anleitung und Menüpunkt 2.3 beachten!).
Beim Aufruf dieses Menüpunktes wird Ihnen kurz „CV17/18“ angezeigt. Anschließend springt die Anzeige entweder auf die Eingabemöglichkeit mit blinkender Einfügemarke und voran gestelltem „L“ oder auf die zuletzt gespeicherte lange Adresse, ebenfalls mit voran gestelltem „L“. Über die Funktionstasten können Sie nun die gewünschte Adresse eingeben.▪ Bestätigen Sie mit der OK-Taste. Das Display zeigt kurz „CV17/18“ an, bevor Sie auf die Aus-
gangsebene „LANGE ADRESSE“ zurückkommen.
8010813920.indd 27 13.07.2017 10:27:43
2828
Die Menüs
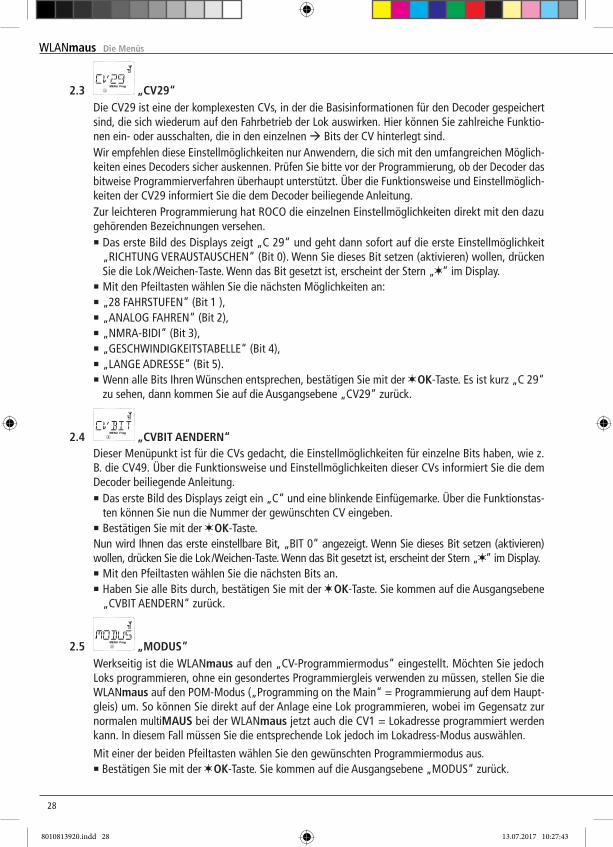
2.3 „CV29“ Die CV29 ist eine der komplexesten CVs, in der die Basisinformationen für den Decoder gespeichert
sind, die sich wiederum auf den Fahrbetrieb der Lok auswirken. Hier können Sie zahlreiche Funktio-nen ein- oder ausschalten, die in den einzelnen Bits der CV hinterlegt sind.
Wir empfehlen diese Einstellmöglichkeiten nur Anwendern, die sich mit den umfangreichen Möglich-keiten eines Decoders sicher auskennen. Prüfen Sie bitte vor der Programmierung, ob der Decoder das bitweise Programmierverfahren überhaupt unterstützt. Über die Funktionsweise und Einstellmöglich-keiten der CV29 informiert Sie die dem Decoder beiliegende Anleitung.
Zur leichteren Programmierung hat ROCO die einzelnen Einstellmöglichkeiten direkt mit den dazu gehörenden Bezeichnungen versehen.▪ Das erste Bild des Displays zeigt „C 29“ und geht dann sofort auf die erste Einstellmöglichkeit
„RICHTuNG VERAuSTAuSCHEN“ (Bit 0). Wenn Sie dieses Bit setzen (aktivieren) wollen, drücken Sie die Lok /Weichen-Taste. Wenn das Bit gesetzt ist, erscheint der Stern „ “ im Display.
▪ Mit den Pfeiltasten wählen Sie die nächsten Möglichkeiten an:▪ „28 FAHRSTuFEN“ (Bit 1 ),▪ „ANALOG FAHREN“ (Bit 2),▪ „NMRA-BIDI“ (Bit 3),▪ „GESCHWINDIGKEITSTABELLE“ (Bit 4),▪ „LANGE ADRESSE“ (Bit 5).▪ Wenn alle Bits Ihren Wünschen entsprechen, bestätigen Sie mit der OK-Taste. Es ist kurz „C 29“
zu sehen, dann kommen Sie auf die Ausgangsebene „CV29“ zurück.
2.4 „CVBIT AENDERN“ Dieser Menüpunkt ist für die CVs gedacht, die Einstellmöglichkeiten für einzelne Bits haben, wie z.
B. die CV49. Über die Funktionsweise und Einstellmöglichkeiten dieser CVs informiert Sie die dem Decoder beiliegende Anleitung.▪ Das erste Bild des Displays zeigt ein „C“ und eine blinkende Einfügemarke. Über die Funktionstas-
ten können Sie nun die Nummer der gewünschten CV eingeben.▪ Bestätigen Sie mit der OK-Taste.Nun wird Ihnen das erste einstellbare Bit, „BIT 0“ angezeigt. Wenn Sie dieses Bit setzen (aktivieren) wollen, drücken Sie die Lok /Weichen-Taste. Wenn das Bit gesetzt ist, erscheint der Stern „ “ im Display.▪ Mit den Pfeiltasten wählen Sie die nächsten Bits an.▪ Haben Sie alle Bits durch, bestätigen Sie mit der OK-Taste. Sie kommen auf die Ausgangsebene
„CVBIT AENDERN“ zurück.
2.5 „MODUS“ Werkseitig ist die WLANmaus auf den „CV-Programmiermodus“ eingestellt. Möchten Sie jedoch
Loks programmieren, ohne ein gesondertes Programmiergleis verwenden zu müssen, stellen Sie die WLANmaus auf den POM-Modus („Programming on the Main“ = Programmierung auf dem Haupt-gleis) um. So können Sie direkt auf der Anlage eine Lok programmieren, wobei im Gegensatz zur normalen multiMAUS bei der WLANmaus jetzt auch die CV1 = Lokadresse programmiert werden kann. In diesem Fall müssen Sie die entsprechende Lok jedoch im Lokadress-Modus auswählen.
Mit einer der beiden Pfeiltasten wählen Sie den gewünschten Programmiermodus aus. ▪ Bestätigen Sie mit der OK-Taste. Sie kommen auf die Ausgangsebene „MODuS“ zurück.
8010813920.indd 28 13.07.2017 10:27:43
29
Deu
tsch
Die Menüs
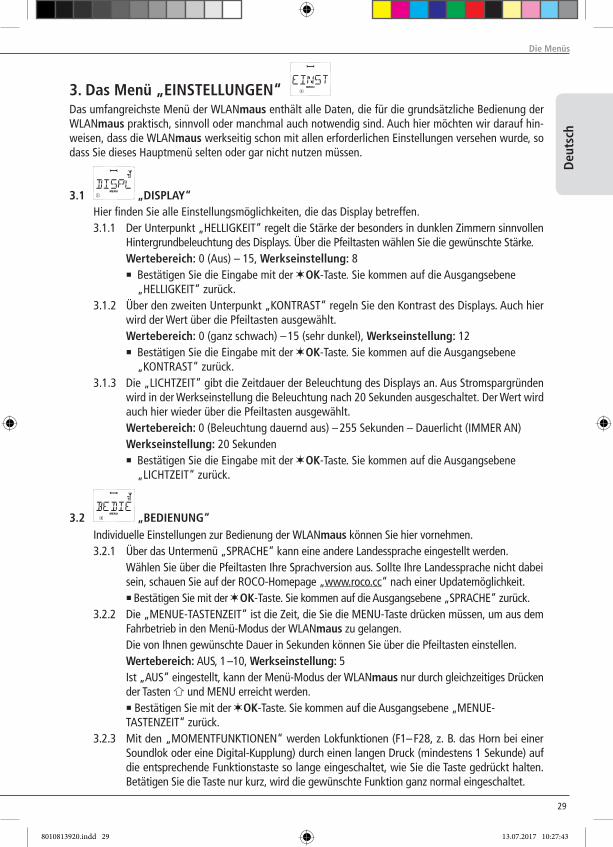
Das umfangreichste Menü der WLANmaus enthält alle Daten, die für die grundsätzliche Bedienung der WLANmaus praktisch, sinnvoll oder manchmal auch notwendig sind. Auch hier möchten wir darauf hin-weisen, dass die WLANmaus werkseitig schon mit allen erforderlichen Einstellungen versehen wurde, so dass Sie dieses Hauptmenü selten oder gar nicht nutzen müssen.
3.1 „DISPLAY“ Hier finden Sie alle Einstellungsmöglichkeiten, die das Display betreffen. 3.1.1 Der unterpunkt „HELLIGKEIT“ regelt die Stärke der besonders in dunklen Zimmern sinnvollen
Hintergrundbeleuchtung des Displays. Über die Pfeiltasten wählen Sie die gewünschte Stärke. Wertebereich: 0 (Aus) – 15, Werkseinstellung: 8 ▪ Bestätigen Sie die Eingabe mit der OK-Taste. Sie kommen auf die Ausgangsebene
„HELLIGKEIT“ zurück. 3.1.2 Über den zweiten unterpunkt „KONTRAST“ regeln Sie den Kontrast des Displays. Auch hier
wird der Wert über die Pfeiltasten ausgewählt. Wertebereich: 0 (ganz schwach) – 15 (sehr dunkel), Werkseinstellung: 12 ▪ Bestätigen Sie die Eingabe mit der OK-Taste. Sie kommen auf die Ausgangsebene
„KONTRAST“ zurück. 3.1.3 Die „LICHTZEIT“ gibt die Zeitdauer der Beleuchtung des Displays an. Aus Stromspargründen
wird in der Werkseinstellung die Beleuchtung nach 20 Sekunden ausgeschaltet. Der Wert wird auch hier wieder über die Pfeiltasten ausgewählt.
Wertebereich: 0 (Beleuchtung dauernd aus) – 255 Sekunden – Dauerlicht (IMMER AN) Werkseinstellung: 20 Sekunden ▪ Bestätigen Sie die Eingabe mit der OK-Taste. Sie kommen auf die Ausgangsebene
„LICHTZEIT“ zurück.
3.2 „BEDIENUNG“ Individuelle Einstellungen zur Bedienung der WLANmaus können Sie hier vornehmen. 3.2.1 Über das untermenü „SPRACHE“ kann eine andere Landessprache eingestellt werden. Wählen Sie über die Pfeiltasten Ihre Sprachversion aus. Sollte Ihre Landessprache nicht dabei
sein, schauen Sie auf der ROCO-Homepage „www.roco.cc“ nach einer updatemöglichkeit. ▪ Bestätigen Sie mit der OK-Taste. Sie kommen auf die Ausgangsebene „SPRACHE“ zurück. 3.2.2 Die „MENuE-TASTENZEIT“ ist die Zeit, die Sie die MENu-Taste drücken müssen, um aus dem
Fahrbetrieb in den Menü-Modus der WLANmaus zu gelangen. Die von Ihnen gewünschte Dauer in Sekunden können Sie über die Pfeiltasten einstellen. Wertebereich: AuS, 1 –10, Werkseinstellung: 5 Ist „AuS“ eingestellt, kann der Menü-Modus der WLANmaus nur durch gleichzeitiges Drücken
der Tasten und MENu erreicht werden. ▪ Bestätigen Sie mit der OK-Taste. Sie kommen auf die Ausgangsebene „MENuE-
TASTENZEIT“ zurück. 3.2.3 Mit den „MOMENTFuNKTIONEN“ werden Lokfunktionen (F1– F28, z. B. das Horn bei einer
Soundlok oder eine Digital-Kupplung) durch einen langen Druck (mindestens 1 Sekunde) auf die entsprechende Funktionstaste so lange eingeschaltet, wie Sie die Taste gedrückt halten. Betätigen Sie die Taste nur kurz, wird die gewünschte Funktion ganz normal eingeschaltet.
3. Das Menü „EINSTELLUNGEN“
8010813920.indd 29 13.07.2017 10:27:43
3030
Die Menüs
Den gewünschten Zustand „EIN“ oder „AuS“ wählen Sie über die Pfeiltasten aus. Werkseinstellung: AuS ▪ Bestätigen Sie mit der OK-Taste. Sie kommen auf die Ausgangsebene „MOMENTFuNKTI-
ONEN“ zurück. 3.2.4 Die WLANmaus verfügt über eine mehrstufig einstellbare „KINDERSICHERUNG“, die Sie nach
Aufrufen des Menüpunktes über die Pfeiltasten aktivieren können. Zur Sperrung eines Bereiches ist die Eingabe eines Codes (4 Ziffern – keine Buchstaben) erforderlich.
Der Code wird abgefragt, wenn Sie einen gesperrten Bereich der WLANmaus aufrufen wollen. Werkseinstellung: AuS ▪ „MENuE SPERREN“: Die vier Hauptmenüs können nicht aufgerufen werden; ▪ „PROG/MENuE SPERREN“: Zusätzlich wird noch der Schnellprogrammier-Modus gesperrt; ▪ „BIB/PROG/MENuE SPERREN“: Zusätzlich zu den beiden oben genannten Punkten
werden auch jegliche Änderungen an der Lokbibliothek verhindert. ▪ Jede Eingabe muss mit der OK-Taste bestätigt werden.
3.3 „ZURUECKSETZEN“ Als besonders anwenderfreundliche Digital-Steuerung können Sie die WLANmaus nicht nur komplett,
sondern auch in Teilen in den Werkszustand zurückbringen. 3.3.1 „NICHTS“ ist sozusagen der Notausstieg aus diesem Menüpunkt. 3.3.2 Ein Reset der „SySTEMEINSTELLuNGEN“ bringt alle Eintragungen im Menü „Einstellungen“
auf den Werkszustand zurück. Die Lokbibliothek bleibt erhalten. Falls eine Kalibrierung vor-genommen wurde (siehe 3.3.7), muss diese nach dem Reset erneut durchgeführt werden.
3.3.3 Wollen Sie die „LOKBIBLIOTHEK“ löschen, wählen Sie diesen unterpunkt aus. 3.3.4 Mit „ALLES“ setzen Sie Ihre WLANmaus komplett in den ursprungszustand zurück. Alle jemals
vorgenommenen Eintragungen werden dabei gelöscht.Bei den vorgenannten Punkten müssen Sie nur die OK-Taste drücken. Sie kommen danach automa-tisch auf den Menüpunkt „ZuRuECKSETZEN“ zurück.
3.3.5 „KALIBRIEREN“ müssen Sie die WLANmaus im Normalfall nicht, das wird bei der Auslieferung vorgenommen. Durch extreme Temperaturschwankungen könnte es aber dazu kommen, dass der Fahrregler neu justiert werden muss, wenn also beispielsweise in der Nullstellung eine Lok fährt. Gehen Sie dazu wie folgt vor:
▪ Als erstes Bild dieses unterpunktes sehen Sie „START?“. Bestätigen Sie mit der OK-Taste. Es erscheint „LINKS“ im Display. ▪ Drehen Sie den Fahrregler bis zum Anschlag nach links. Bestätigen Sie mit der OK-Taste.
Es erscheint „MITTE“ im Display. ▪ Drehen Sie den Fahrregler in die Mitte (Nullstellung) und bestätigen Sie mit der OK-Taste.
Es erscheint „RECHTS“ im Display. ▪ Drehen Sie den Fahrregler bis zum Anschlag nach rechts. Nach Bestätigen mit der OK-Taste kommen Sie wieder in die Ausgangsebene „ZuRuECKSETZEN“ zurück. Reagiert die WLANmaus gar nicht mehr auf Tastaturbefehle, können Sie die mit folgender Tastenkom-
bination auf den Werkszustand zurücksetzen: Drücken Sie gleichzeitig die -Taste und MENu-Taste und kurz die OK-Taste. Es erscheint der Text
„RESET ALL?“. Bestätigen Sie mit der OK-Taste, die WLANmaus wird zurückgesetzt und startet neu. Wir weisen darauf hin, dass dadurch die Lokbibliothek komplett gelöscht wird.
8010813920.indd 30 13.07.2017 10:27:43
31
Deu
tsch
Die Menüs
3.4 „STOPTASTE“ Im Falle eines Falles wird durch einen Druck auf die STOP-Taste während des Fahrbetriebes ein sofor-
tiger Nothalt ausgelöst. Hier stellen Sie ein, ob bei Betätigung der STOP-Taste die gesamte Anlage von der Spannungsversor-
gung getrennt wird („SPANNuNG AuS“), oder ob lediglich die Lokomotiven sofort angehalten werden („NOT-STOP“). Die Auswahl treffen Sie über die Pfeiltasten, bestätigt wird mit OK-Taste.
Werkseinstellung: SPANNuNG AuS unabhängig von diesen beiden Einstellmöglichkeiten können Sie immer noch einen „Selekti-
ven Nothalt“ auslösen, der nur die ausgewählte Lok betrifft. Beachten Sie dazu Seite 16.
Beachten Sie bitte: Im Fall einer Funkunterbrechung können Sie über die STOP-Taste der WLANmaus keinen STOP mehr auslösen. Dies ist nur mehr über die STOP-Taste Ihrer Z21 möglich.
3.5 „INFOS“ Ein Menüpunkt, der Sie umfassend über die Software und die Batteriespannung Ihrer WLANmaus
informiert. „MAuS-VERSION“: Softwareversion Ihrer WLANmaus „WLAN-VERSION“: Softwareversion des Funkmoduls „SPRACHEN-VERSION“: Version der Sprachen „BATTERIESPANNuNG“: Zeigt die aktuell gemessene Batteriespannung in Volt (V) an. Anzeigebeispiel: „4,12V“
3.6 „WLAN“ 3.6.1 „SSID“ Auswahl oder Eingabe der SSID des Routers, mit dem sich die WLANmaus verbinden soll. „SuCHEN“: Zeigt bis zu 8 der stärksten Netzwerke in der umgebung der WLANmaus an. Die
Auswahl des gewünschten Netzwerkes erfolgt durch die OK-Taste. „EINGEBEN“: Sollte das gewünschte Netzwerk bei „SuCHEN“ nicht angezeigt werden, so
können Sie es hier manuell eingeben. Außerdem wird die aktuell verwendete SSID angezeigt (siehe Erklärungen zur Zeicheneingabe Seite 7).
3.6.2 „PASSWORT“ Hier ist die Passwort-Eingabe möglich. Achten Sie hierbei genau auf Groß/Kleinschreibung,
Sonder- und Leerzeichen! Nach Bestätigung mit der OK-Taste wird das eingegebene Pass-wort in der WLANmaus gespeichert. Das Passwort wird nicht mehr im Menü angezeigt (siehe Erklärungen zur Zeicheneingabe Seite 7).
3.6.3 „Z21-IP-ADRESSE“ Hier ist die Eingabe der IP-Adresse der Z21 möglich, das heißt „Wohin schickt die Maus ihre
Befehle?“. Die Voreinstellung der WLANmaus stimmt mit der Voreinstellung Ihrer Z21 überein: „192.168.0.111“. Nur im Fall, dass Sie die IP Ihrer Z21 manuell geändert haben, müssen Sie auch die Z21-IP in der WLANmaus anpassen. Durchklicken der vier IP-Stellen mit OK-Taste, verändern der Werte mit den Pfeiltasten oder über die Nummerntasten, Abbruch mit STOP-Taste möglich.
8010813920.indd 31 13.07.2017 10:27:43
3232
Die Menüs
3.6.4 „GERAETENAME“ Hier können Sie Ihrer WLANmaus einen Netzwerknamen zuordnen. um Namensgleichheit
im Netzwerk zu verhindern wird dieser automatisch um die letzten sechs Stellen der MAC-Adresse der WLANmaus ergänzt. Beispiel: „WLANmaus_A1B2C3“ (Hexadezimal).
3.6.5 „IP-MODuS“ Auswahlmöglichkeiten: „DyNAMISCH (voreingestellt) oder „STATISCH“.
Auswahl: Über die Pfeiltasten, Bestätigung durch OK-Taste Abbruch durch STOP-Taste.„DyNAMISCH“: Die Netzwerkinformationen (IP-ADRESSE, SuBNETZMASKE und STD-GATE- WAy) werden automatisch vom WLAN-Router bezogen. Anzeige der bezogenen Informationen ist in den Menüs 3.6.6-3.6.8 möglich.„STATISCH“: Die Netzwerkinformationen (IP-ADRESSE, SuBNETZMASKE und STD-GATE WAy) müssen manuell eingegeben werden. ACHTuNG: Erweiterte Netzwerk kenntnisse notwendig! Die Eingabe erfolgt in den Menüs 3.6.6-3.6.8.
3.6.6 „IP-ADRESSE“ Anzeige (wenn IP-MODuS = DyNAMISCH) bzw. Eingabe (wenn IP-MODuS = STATISCH) der
IP-Adresse. Durchklicken der vier IP-Stellen mit OK-Taste, verändern der Werte mit den Pfeil-tasten oder über die Nummerntasten, Abbruch mit STOP-Taste möglich.
3.6.7 „SuBNETZMASKE“ Anzeige (wenn IP-MODuS = DyNAMISCH) bzw. Eingabe (wenn IP-MODuS = STATISCH) der
Subnetzmaske. Durchklicken der vier Stellen mit OK-Taste, verändern der Werte mit den Pfeiltastenoder über die Nummerntasten, Abbruch mit STOP-Taste möglich.
3.6.8 „STD-GATEWAy“ Anzeige (wenn IP-MODuS = DyNAMISCH) bzw. Eingabe (wenn IP-MODuS = STATISCH) des
Standardgateways. Durchklicken der vier IP-Stellen mit OK-Taste, verändern der Werte mit den Pfeiltasten oder über die Nummerntasten, Abbruch mit STOP-Taste möglich.
3.6.9 „MAC-ADRESSE“ Infoanzeige: Zeigt Ihnen die MAC-Adresse Ihrer WLANmaus an. Durchklicken der Anzeige mit
OK-Taste.
3.6.10 „RSSI“ Infoanzeige: Zeigt Ihnen die WLAN-Signalstärke in dBm (Dezibel Milliwatt) an.
3.7 „AUSSCHALTZEIT“
um Batterie-Energie der WLANmaus zu sparen, schaltet sich diese bei Nichtbenutzung nach einer festgelegten Zeit ab.
Wertebereich: 1–255 Minuten, Werkseinstellung: 10 (Minuten) ▪ Wählen Sie über die Pfeiltasten aus und bestätigen Sie die Eingabe mit der OK-Taste. Sie
kommen zurück auf „AuSSCHALTZEIT“.
8010813920.indd 32 13.07.2017 10:27:43
33
Deu
tsch
Anhang
4.1 Updaten der WLANmausÜber das PC-Tool "Z21-Maintenance" und Ihren Router können Sie Ihre WLANmaus updaten.Sie können das PC-Tool auf unserer Hompage unter www.z21.eu downloaden.
4.2 Glossar Bits und BytesDie auch bei Digital-Modellbahnen auftauchenden Begriffe „Bits“ und „Bytes“ stammen aus der Frühzeit der Computertechnik. In dieser Welt haben die uns bekannten Zahlen, die Dezimalzahlen, keinen Platz. So hat man ein neues Zahlensystem entwickelt, das Binärsystem. Hier gibt es nur zwei Zahlen, die „0“ und die „1“. Praktischerweise bezeichnen diese beiden Zahlen auch noch Schaltzustände. Dabei bedeutet die „1“ „geschaltet“ oder „aktiviert“, die „0“ „nicht geschaltet“ bzw. „nicht aktiviert“.„0“ und „1“ bilden ein „Bit“, 8 Bits wiederum werden zu einem „Byte“ zusammengefasst. Die im Byte zusammen gefassten Bits werden von 0 (Bit0) bis 7 (Bit7) durchgezählt. Jeder Bit-Position ist eine bestimmte Wertigkeit zugeordnet:
Bit 7 6 5 4 3 2 1 0Wertigkeit 128 64 32 16 8 4 2 1
Rechnet man nun die Wertigkeiten zusammen, kommt man auf ein maximalen Wert von 255 pro Byte (jedes Bit aktiviert, d.h. „1“), wobei wir wieder im Dezimalsystem angelangt sind. Der minimale Wert ist „0“, alle Bits sind auf „0“ gesetzt.ROCO hat in der WLANmaus die Programmierung der einzelnen Bits deutlich vereinfacht. Wenn es der Decoder unterstützt, müssen Sie dazu nicht mehr bestimmte Werte ausrechnen, sondern entscheiden im Menü „PROGRAMMIEREN“ einfach per Tastendruck, ob ein Bit gesetzt wird oder nicht.Wenn Sie sich umfassend über dieses Thema informieren wollen, empfehlen wir die zahlreich dazu veröf-fentlichte Literatur.
CVsAlle Werte, die das Verhalten des Lokdecoders – und somit letztendlich das Verhalten der Lok – beeinflus-sen, werden in sogenannten CVs hinterlegt. CV ist die Abkürzung für Configuration Variables, was man mit „Konfigurations-Werte“ übersetzen kann. Da die WLANmaus und die Z21 kompatibel zum NMRA /DCC-Standard ist, können CVs von 1 – 1023 ausgelesen und geschrieben werden.CVs können einen Wertebereich von „0“ bis zu „255“ haben. Dies verdeutlicht, dass eine umprogrammie-rung Erfahrung voraussetzt, da falsch eingestellte CVs das Verhalten des Decoders beeinträchtigen können.
Decoderum die digitalen Steuersignale von der WLANmaus und der Z21 der „konventionellen“ Technik einer Lok verständlich zu machen, braucht es einen „Übersetzer“ – den Decoder. Er ersetzt keines der in analogen Gleichstrom-Loks befindlichen Bauteile, sondern ist eine notwendige Ergänzung und muss im Lokgehäuse ebenfalls noch Platz finden. Bei Wechselstrom-Lokomotiven hingegen wird das Umschaltmodul oder -relais durch den Decoder ersetzt, dort natürlich nicht im DCC-, sondern im Motorola-Format.
FahrstufenBei einer konventionellen Modellbahn wird zur Loksteuerung ein Regeltrafo verwendet. Der Transforma-tor gibt über den Fahrregler Spannungswerte zwischen 0 Volt und der Maximalspannung (üblicherweise zwischen 12 und 16 Volt) ab, mit denen der Lokmotor gesteuert wird.Im Gegensatz dazu liegt in einem Digitalsystem von vornherein ein feste Spannung am Gleis an. Hier erfolgt die Steuerung des Motors über Steuersignale, die der Decoder in Spannungswerte umsetzt. Da diese Signale
Teil 4 ▪ Anhang
8010813920.indd 33 13.07.2017 10:27:44
3434
Anhang
aus „Nullen“ und „Einsen“ bestehen, sind sie abgestuft. Je kleiner die Stufen – Fahrstufen – sind, umso feiner lässt sich die Lok regeln. Die NMRA /DCC-Norm, nach der WLANmaus und der Z21 arbeiten, kennt 14, 27, 28 oder 128 Fahrstufen.Decoder etwa seit dem Jahr 2000 sind mindestens über 28 Fahrstufen steuerbar. Dabei stellen sie sich automatisch auf die in der Loksteuerung – also WLANmaus und Z21 – eingestellten Fahrstufenzahl ein, so dass Sie sich um eine Einstellung im Decoder nicht kümmern müssen. Ob Ihre Decoder die automatische Fahrstufeneinstellung unterstützen, bzw. welche Fahrstufen Ihre Decoder akzeptieren, können Sie der jeweiligen Anleitung entnehmen.
MAC-AdresseMit MAC-Adresse (Media-Access-Control-Adresse) bezeichnet man die Hardware-Adresse eines in einem Netzwerkverbund befindlichen Gerätes. Über diese Adresse kann jedes Gerät eindeutig identifiziert werden.
Z21 und BoosterSie versorgen die Modellbahnanlage mit der notwendigen Spannung und leiten die digitalen Steuersignale der WLANmaus an Lokomotiven, Weichen und anderes digitales Zubehör weiter.
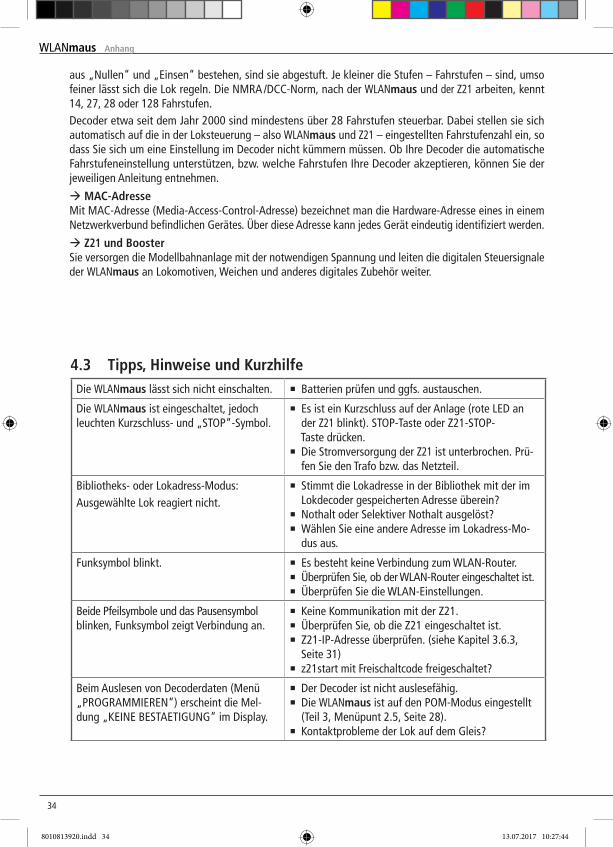
Die WLANmaus lässt sich nicht einschalten. ▪ Batterien prüfen und ggfs. austauschen.
Die WLANmaus ist eingeschaltet, jedoch leuchten Kurzschluss- und „STOP“-Symbol.
▪ Es ist ein Kurzschluss auf der Anlage (rote LED an der Z21 blinkt). STOP-Taste oder Z21-STOP-
Taste drücken.▪ Die Stromversorgung der Z21 ist unterbrochen. Prü-
fen Sie den Trafo bzw. das Netzteil.
Bibliotheks- oder Lokadress-Modus:Ausgewählte Lok reagiert nicht.
▪ Stimmt die Lokadresse in der Bibliothek mit der im Lokdecoder gespeicherten Adresse überein?
▪ Nothalt oder Selektiver Nothalt ausgelöst?▪ Wählen Sie eine andere Adresse im Lokadress-Mo-
dus aus.
Funksymbol blinkt. ▪ Es besteht keine Verbindung zum WLAN-Router.▪ Überprüfen Sie, ob der WLAN-Router eingeschaltet ist.▪ Überprüfen Sie die WLAN-Einstellungen.
Beide Pfeilsymbole und das Pausensymbol blinken, Funksymbol zeigt Verbindung an.
▪ Keine Kommunikation mit der Z21.▪ Überprüfen Sie, ob die Z21 eingeschaltet ist.▪ Z21-IP-Adresse überprüfen. (siehe Kapitel 3.6.3,
Seite 31)▪ z21start mit Freischaltcode freigeschaltet?
Beim Auslesen von Decoderdaten (Menü „PROGRAMMIEREN“) erscheint die Mel-dung „KEINE BESTAETIGuNG“ im Display.
▪ Der Decoder ist nicht auslesefähig.▪ Die WLANmaus ist auf den POM-Modus eingestellt
(Teil 3, Menüpunt 2.5, Seite 28).▪ Kontaktprobleme der Lok auf dem Gleis?
4.3 Tipps, Hinweise und Kurzhilfe
8010813920.indd 34 13.07.2017 10:27:44
35
Deu
tsch
Anhang
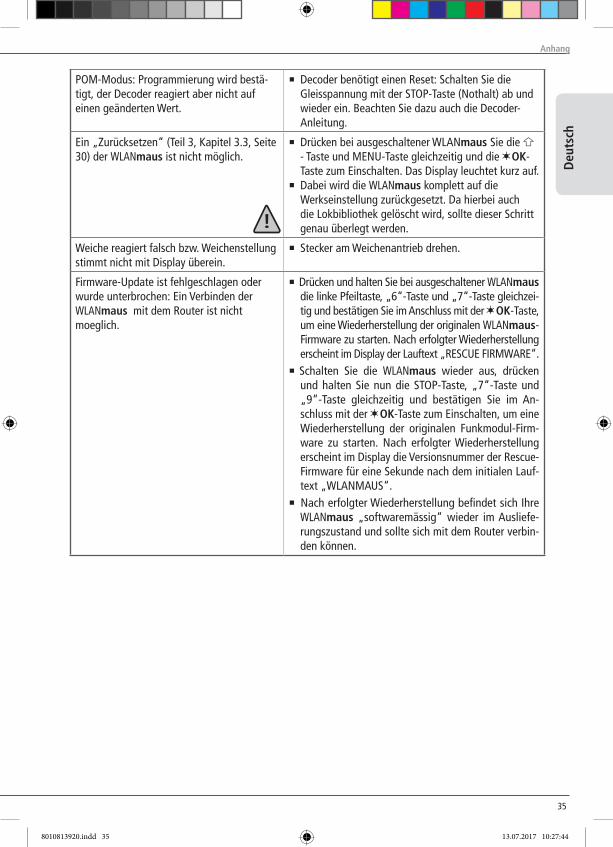
POM-Modus: Programmierung wird bestä-tigt, der Decoder reagiert aber nicht auf einen geänderten Wert.
▪ Decoder benötigt einen Reset: Schalten Sie die Gleisspannung mit der STOP-Taste (Nothalt) ab und wieder ein. Beachten Sie dazu auch die Decoder-Anleitung.
Ein „Zurücksetzen“ (Teil 3, Kapitel 3.3, Seite 30) der WLANmaus ist nicht möglich.
▪ Drücken bei ausgeschaltener WLANmaus Sie die - Taste und MENu-Taste gleichzeitig und die OK-Taste zum Einschalten. Das Display leuchtet kurz auf.
▪ Dabei wird die WLANmaus komplett auf die Werkseinstellung zurückgesetzt. Da hierbei auch die Lokbibliothek gelöscht wird, sollte dieser Schritt genau überlegt werden.
Weiche reagiert falsch bzw. Weichenstellung stimmt nicht mit Display überein.
▪ Stecker am Weichenantrieb drehen.
Firmware-update ist fehlgeschlagen oder wurde unterbrochen: Ein Verbinden der WLANmaus mit dem Router ist nicht moeglich.
▪ Drücken und halten Sie bei ausgeschaltener WLANmaus die linke Pfeiltaste, „6“-Taste und „7“-Taste gleichzei-tig und bestätigen Sie im Anschluss mit der OK-Taste, um eine Wiederherstellung der originalen WLANmaus-Firmware zu starten. Nach erfolgter Wiederherstellung erscheint im Display der Lauftext „RESCuE FIRMWARE“.
▪ Schalten Sie die WLANmaus wieder aus, drücken und halten Sie nun die STOP-Taste, „7“-Taste und „9“-Taste gleichzeitig und bestätigen Sie im An-schluss mit der OK-Taste zum Einschalten, um eine Wiederherstellung der originalen Funkmodul-Firm-ware zu starten. Nach erfolgter Wiederherstellung erscheint im Display die Versionsnummer der Rescue-Firmware für eine Sekunde nach dem initialen Lauf-text „WLANMAuS“.
▪ Nach erfolgter Wiederherstellung befindet sich Ihre WLANmaus „softwaremässig“ wieder im Ausliefe-rungszustand und sollte sich mit dem Router verbin-den können.
8010813920.indd 35 13.07.2017 10:27:44
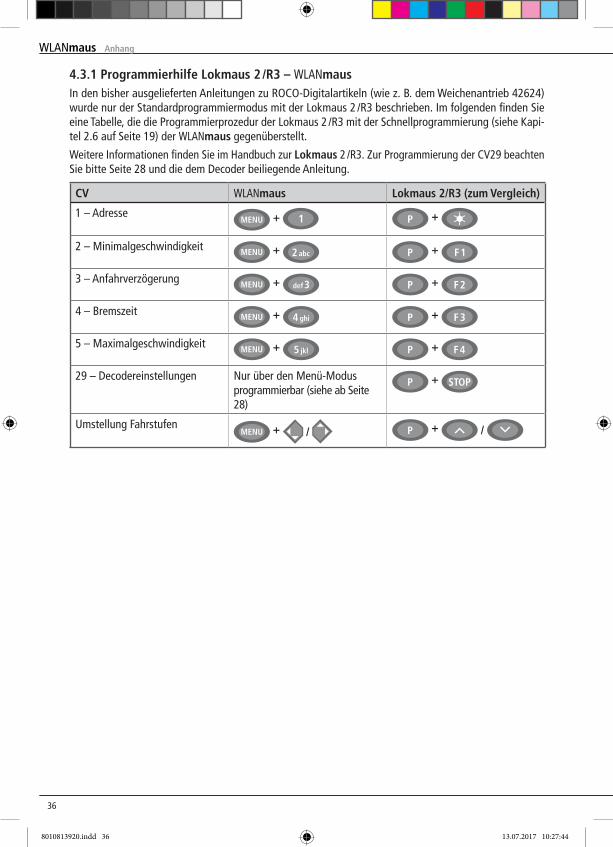
3636
4.3.1 Programmierhilfe Lokmaus 2 /R3 – WLANmausIn den bisher ausgelieferten Anleitungen zu ROCO-Digitalartikeln (wie z. B. dem Weichenantrieb 42624) wurde nur der Standardprogrammiermodus mit der Lokmaus 2 /R3 beschrieben. Im folgenden finden Sie eine Tabelle, die die Programmierprozedur der Lokmaus 2 /R3 mit der Schnellprogrammierung (siehe Kapi-tel 2.6 auf Seite 19) der WLANmaus gegenüberstellt.
Weitere Informationen finden Sie im Handbuch zur Lokmaus 2 /R3. Zur Programmierung der CV29 beachten Sie bitte Seite 28 und die dem Decoder beiliegende Anleitung.
CV WLANmaus Lokmaus 2/R3 (zum Vergleich)
1 – Adresse +
+
2 – Minimalgeschwindigkeit +
+
3 – Anfahrverzögerung +
+
4 – Bremszeit +
+
5 – Maximalgeschwindigkeit +
+
29 – Decodereinstellungen Nur über den Menü-Modus programmierbar (siehe ab Seite 28)
+
umstellung Fahrstufen +
/ +
/
Anhang
8010813920.indd 36 13.07.2017 10:27:44
37
Engl
ish
Note on the instructions
Text that contains an “” before a word refers to a definition in the “Glossary” in section three.“+” in the diagrams means that both the keys mentioned must be pressed together.“/” in the diagrams stands for a selection of one of the two keys mentioned.The red triangle „▶“ in the diagrams symbolizes an electrical disconnect of the track.unless otherwise mentioned, the term "Z21" refers to all different Z21 variants (Z21, z21, z21start).
Table of ContentWLANmaus Overview ............................................................................................................................ 2The evolution of the ROCO Lokmaus — the WLANmaus ..................................................................... 38An overview of the WLANmaus ............................................................................................................. 38
Section 1 ▪ Basics – Get to know the WLANmaus1.1 Connecting the WLANmaus ............................................................................................................ 391.2 How to enter the characters when entering the SSID and the password ........................................ 401.3 WLANmaus: The Display Screen ....................................................................................................... 411.4 WLANmaus: The Keys ....................................................................................................................... 42
Section 2 ▪ Operation – Driving and Switching2.1 Start 2.1.1 First–Time use ........................................................................................................................ 44 2.1.2 Already used WLANmaus ....................................................................................................... 442.2 Selecting a Locomotive 2.2.1 Library Mode .......................................................................................................................... 44 2.2.2 Entering a New Locomotive ................................................................................................... 45 2.2.3 Locomotive Address Mode ..................................................................................................... 472.3 Driving and Functions ..................................................................................................................... 472.4 The Emergency Stop Functions 2.4.1 Emergency Stop ..................................................................................................................... 48 2.4.2 Selective Locomotive Stop ..................................................................................................... 492.5 Turnout control ................................................................................................................................ 492.6 Quick Programming of Locomotives and Decoders ......................................................................... 522.7 Short Circuit and Overload .............................................................................................................. 53
Section 3 ▪ Menus – Programming for advanced usersThe Menu Functions of the WLANmaus ................................................................................................ 54Overview of the Menu Structure ........................................................................................................... 561. The “LOCO” Menu ............................................................................................................................ 582. The “PROGRAMMING” Menu ........................................................................................................... 603. The “SETTINGS” Menu ...................................................................................................................... 62
Section ▪ Appendix 4.1 updating the WLANmaus ..............................................................................................................................664.2 Glossary .......................................................................................................................................... 664.3 Tips, Information, and Shortcuts ...................................................................................................... 67 4.3.1 Programming help for WLANmaus ....................................................................................................68
Table of Content
8010813920.indd 37 13.07.2017 10:27:44
3838
The evolution of the ROCO Lokmaus — the WLANmausThe WLANmaus is the optimal addition to your Z21. The WLANmaus brings together the functionality of the legendary Lokmaus with the comfort of a fully digital central control unit. Whether you use the WLANmaus just a comfortable controller or wish to use it for comprehensive programming of your locomotive decoder and turnouts, the clear layout of the design and simple operation make the WLANmaus the leading digital model railroading controller.Our aim when developing this Lokmaus was to make operation as intuitive as possible. The addition of the various new functions can be easily controlled. This manual is designed to introduce you to all the capabilities of the WLANmaus.In order to make this manual clear and easy to understand, it is broken down into several sections. Beginning users that wish to use the WLANmaus only for playing are not required to read the entire manual. The first section is sufficient for simple, everyday use.This first section of the manual deals with the basics for connecting and operating the WLANmaus. users who wish to use the many diverse programming options of the WLANmaus will find instructions in the second section of this manual. The third section serves as a guide for special cases involving digital model railroading. The glossary contains the definitions of basic terms that you may encounter while spending time with your digital system.Have fun reading this manual and, of course, using the WLANmaus.
Modelleisenbahn GmbH
Information: "Z21" in the instruction manual refers both to the Z21 (black) and the z21 (white) and z21start (white) with the WLAN package.
An overview of the WLANmausThe concept
▪ Ergonomic form of the WLANmaus for single hand operation▪ Large, backlit LCD with multi–language menu navigation▪ Simple methods for setting speed and direction of travel of the locomotives using the rotary knob▪ Rotary knob with zero locking position▪ perfect addition to your Z21▪ The ROCO digital system is expandable to include up to 31 input devices such as extra Lokmaus/
multiMAUS units orWLANmaus, route controller units, etc.▪ Future–proof update optionsThe features▪ Managing 9,999 locomotive addresses & Deciding between locomotive library or locomotive address▪ Alphanumerical locomotive name display with locomotive database for 64 entries, i.e. locomotives▪ Locomotive control with 14, 28 or 128 speed steps which can be set for each locomotive individually▪ Control of light and 28 additional functions for locomotives▪ Controlling up to 2048 magnetic articles – (turnout –) addresses▪ Reading and writing configuration variables (DCC–CVs 1–1024, value range 0–255)Safety▪ Stable wireless connection with digital wireless standard "WLAN" IEEE 802.11 with 2.4 GHz▪ Emergency stop with shut–down of the entire system, individual emergency stop for selected locomotive▪ Child lock for functions which may could be problematic for children (e.g. programming)
The evoltution of the Roco Lokmaus — the WLANmaus
8010813920.indd 38 13.07.2017 10:27:44
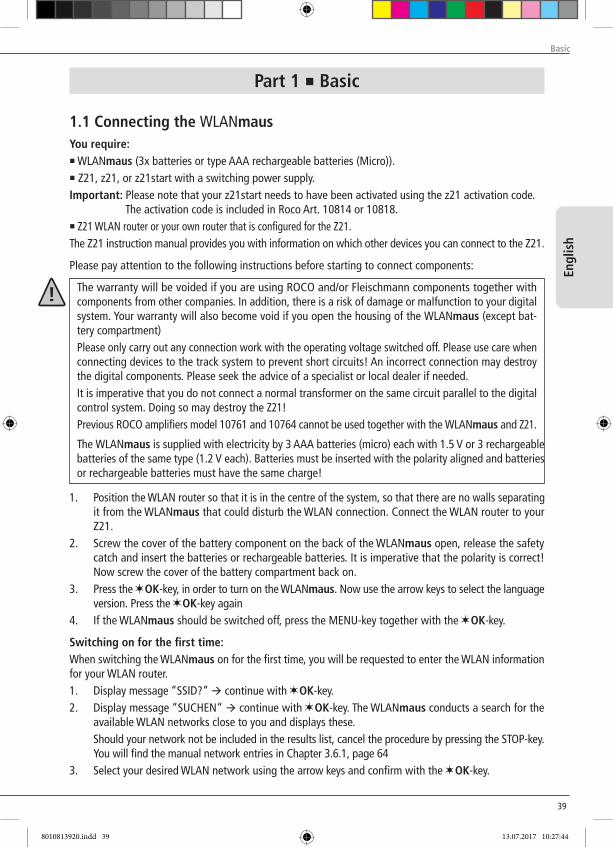
39
Engl
ish
Part 1 ▪ Basic
1.1 Connecting the WLANmausYou require:▪ WLANmaus (3x batteries or type AAA rechargeable batteries (Micro)).▪ Z21, z21, or z21start with a switching power supply.Important: Please note that your z21start needs to have been activated using the z21 activation code. The activation code is included in Roco Art. 10814 or 10818.▪ Z21 WLAN router or your own router that is configured for the Z21.The Z21 instruction manual provides you with information on which other devices you can connect to the Z21.
Please pay attention to the following instructions before starting to connect components:
The warranty will be voided if you are using ROCO and/or Fleischmann components together with components from other companies. In addition, there is a risk of damage or malfunction to your digital system. your warranty will also become void if you open the housing of the WLANmaus (except bat-tery compartment)Please only carry out any connection work with the operating voltage switched off. Please use care when connecting devices to the track system to prevent short circuits! An incorrect connection may destroy the digital components. Please seek the advice of a specialist or local dealer if needed.It is imperative that you do not connect a normal transformer on the same circuit parallel to the digital control system. Doing so may destroy the Z21!Previous ROCO amplifiers model 10761 and 10764 cannot be used together with the WLANmaus and Z21.
The WLANmaus is supplied with electricity by 3 AAA batteries (micro) each with 1.5 V or 3 rechargeable batteries of the same type (1.2 V each). Batteries must be inserted with the polarity aligned and batteries or rechargeable batteries must have the same charge!
1. Position the WLAN router so that it is in the centre of the system, so that there are no walls separating it from the WLANmaus that could disturb the WLAN connection. Connect the WLAN router to your Z21.
2. Screw the cover of the battery component on the back of the WLANmaus open, release the safety catch and insert the batteries or rechargeable batteries. It is imperative that the polarity is correct! Now screw the cover of the battery compartment back on.
3. Press the OK-key, in order to turn on the WLANmaus. Now use the arrow keys to select the language version. Press the OK-key again
4. If the WLANmaus should be switched off, press the MENu-key together with the OK-key.
Switching on for the first time:When switching the WLANmaus on for the first time, you will be requested to enter the WLAN information for your WLAN router.1. Display message “SSID?“ continue with OK-key.2. Display message “SuCHEN“ continue with OK-key. The WLANmaus conducts a search for the
available WLAN networks close to you and displays these. Should your network not be included in the results list, cancel the procedure by pressing the STOP-key.
You will find the manual network entries in Chapter 3.6.1, page 643. Select your desired WLAN network using the arrow keys and confirm with the OK-key.
Basic
8010813920.indd 39 13.07.2017 10:27:44
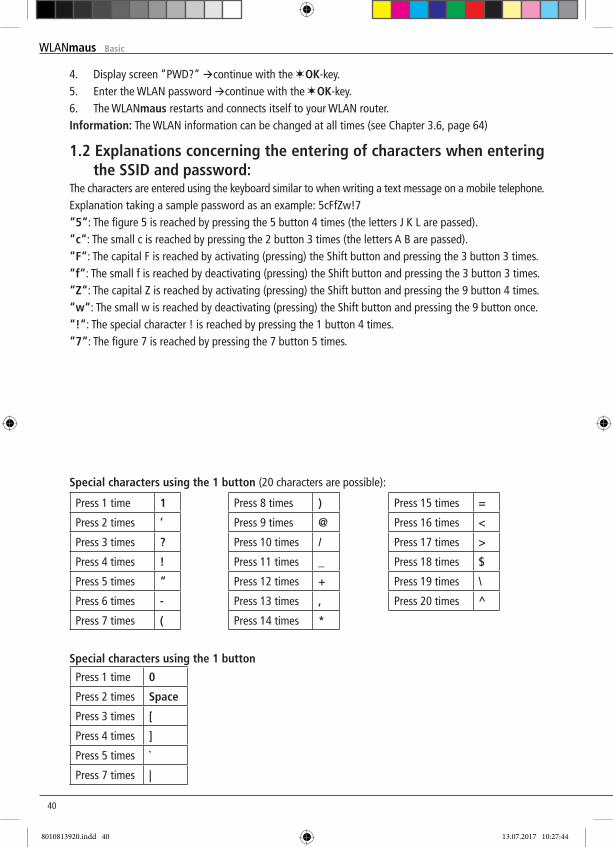
4040
4. Display screen “PWD?“ continue with the OK-key.5. Enter the WLAN password continue with the OK-key.6. The WLANmaus restarts and connects itself to your WLAN router.Information: The WLAN information can be changed at all times (see Chapter 3.6, page 64)
1.2 Explanations concerning the entering of characters when entering the SSID and password:
The characters are entered using the keyboard similar to when writing a text message on a mobile telephone.Explanation taking a sample password as an example: 5cFfZw!7“5“: The figure 5 is reached by pressing the 5 button 4 times (the letters J K L are passed).“c“: The small c is reached by pressing the 2 button 3 times (the letters A B are passed).“F“: The capital F is reached by activating (pressing) the Shift button and pressing the 3 button 3 times.“f“: The small f is reached by deactivating (pressing) the Shift button and pressing the 3 button 3 times.“Z“: The capital Z is reached by activating (pressing) the Shift button and pressing the 9 button 4 times.“w“: The small w is reached by deactivating (pressing) the Shift button and pressing the 9 button once.“!“: The special character ! is reached by pressing the 1 button 4 times.“7“: The figure 7 is reached by pressing the 7 button 5 times.
Press 1 time 1
Press 2 times ‘
Press 3 times ?
Press 4 times !
Press 5 times “
Press 6 times -
Press 7 times (
Special characters using the 1 button
Press 8 times )
Press 9 times @
Press 10 times /
Press 11 times _
Press 12 times +
Press 13 times ,
Press 14 times *
Special characters using the 1 button (20 characters are possible):
Press 1 time 0
Press 2 times Space
Press 3 times [
Press 4 times ]
Press 5 times `
Press 7 times |
Press 15 times =
Press 16 times <
Press 17 times >
Press 18 times $
Press 19 times \
Press 20 times ^
Basic
8010813920.indd 40 13.07.2017 10:27:44
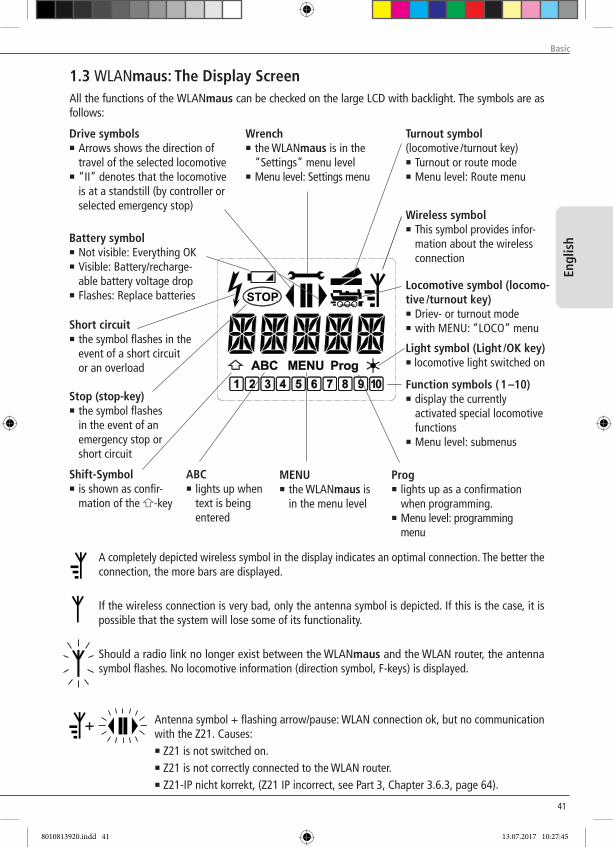
41
Engl
ish
1.3 WLANmaus: The Display ScreenAll the functions of the WLANmaus can be checked on the large LCD with backlight. The symbols are as follows:
Light symbol (Light /OK key)▪ locomotive light switched on
Turnout symbol(locomotive /turnout key)▪ Turnout or route mode▪ Menu level: Route menu
Locomotive symbol (locomo-tive /turnout key)▪ Driev- or turnout mode▪ with MENu: “LOCO” menuShort circuit
▪ the symbol flashes in the event of a short circuit or an overload
Stop (stop-key)▪ the symbol flashes
in the event of an emergency stop or short circuit
MENU▪ the WLANmaus is
in the menu level
Prog▪ lights up as a confirmation
when programming. ▪ Menu level: programming
menu
ABC▪ lights up when
text is being entered
Wrench▪ the WLANmaus is in the
“Settings” menu level▪ Menu level: Settings menu
Function symbols ( 1 –10)▪ display the currently
activated special locomotive functions
▪ Menu level: submenus
Drive symbols▪ Arrows shows the direction of
travel of the selected locomotive▪ “II” denotes that the locomotive
is at a standstill (by controller or selected emergency stop)
Shift-Symbol▪ is shown as confir-
mation of the -key
Battery symbol▪ Not visible: Everything OK▪ Visible: Battery/recharge-
able battery voltage drop▪ Flashes: Replace batteries
Wireless symbol▪ This symbol provides infor-
mation about the wireless connection
A completely depicted wireless symbol in the display indicates an optimal connection. The better the connection, the more bars are displayed.
If the wireless connection is very bad, only the antenna symbol is depicted. If this is the case, it is possible that the system will lose some of its functionality.
Should a radio link no longer exist between the WLANmaus and the WLAN router, the antenna symbol flashes. No locomotive information (direction symbol, F-keys) is displayed.
Antenna symbol + flashing arrow/pause: WLAN connection ok, but no communication with the Z21. Causes:▪ Z21 is not switched on.▪ Z21 is not correctly connected to the WLAN router.▪ Z21-IP nicht korrekt, (Z21 IP incorrect, see Part 3, Chapter 3.6.3, page 64).
+
Basic
8010813920.indd 41 13.07.2017 10:27:45
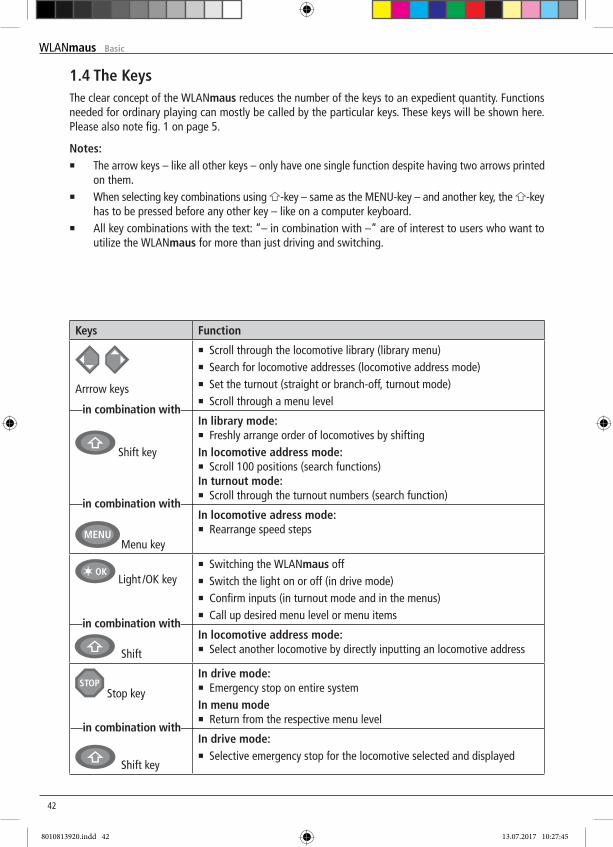
4242
1.4 The KeysThe clear concept of the WLANmaus reduces the number of the keys to an expedient quantity. Functions needed for ordinary playing can mostly be called by the particular keys. These keys will be shown here. Please also note fig. 1 on page 5.
Notes:▪ The arrow keys – like all other keys – only have one single function despite having two arrows printed
on them.▪ When selecting key combinations using -key – same as the MENu-key – and another key, the -key
has to be pressed before any other key – like on a computer keyboard.▪ All key combinations with the text: “– in combination with –” are of interest to users who want to
utilize the WLANmaus for more than just driving and switching.
Keys Function
Arrrow keys
Shift key
Menu key
▪ Scroll through the locomotive library (library menu)▪ Search for locomotive addresses (locomotive address mode)▪ Set the turnout (straight or branch-off, turnout mode)▪ Scroll through a menu level
In library mode:▪ Freshly arrange order of locomotives by shiftingIn locomotive address mode:▪ Scroll 100 positions (search functions)In turnout mode:▪ Scroll through the turnout numbers (search function)
In locomotive adress mode:▪ Rearrange speed steps
Light /OK key
Shift
▪ Switching the WLANmaus off▪ Switch the light on or off (in drive mode)▪ Confirm inputs (in turnout mode and in the menus)▪ Call up desired menu level or menu items
In locomotive address mode:▪ Select another locomotive by directly inputting an locomotive address
Stop key
Shift key
In drive mode:▪ Emergency stop on entire systemIn menu mode▪ Return from the respective menu level
In drive mode:▪ Selective emergency stop for the locomotive selected and displayed
in combination with
in combination with
in combination with
in combination with
Basic
8010813920.indd 42 13.07.2017 10:27:45
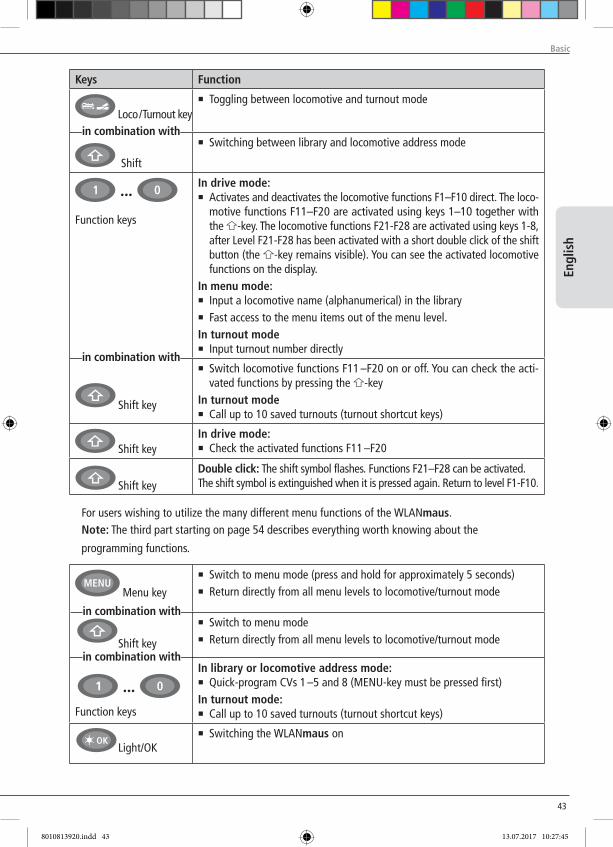
43
Engl
ish
Keys Function
Loco / Turnout key
Shift
▪ Toggling between locomotive and turnout mode
▪ Switching between library and locomotive address mode
…
Function keys
Shift key
In drive mode:▪ Activates and deactivates the locomotive functions F1–F10 direct. The loco-
motive functions F11–F20 are activated using keys 1–10 together with the -key. The locomotive functions F21-F28 are activated using keys 1-8, after Level F21-F28 has been activated with a short double click of the shift button (the -key remains visible). you can see the activated locomotive functions on the display.
In menu mode:▪ Input a locomotive name (alphanumerical) in the library▪ Fast access to the menu items out of the menu level.In turnout mode▪ Input turnout number directly▪ Switch locomotive functions F11 –F20 on or off. you can check the acti-
vated functions by pressing the -keyIn turnout mode▪ Call up to 10 saved turnouts (turnout shortcut keys)
Shift keyIn drive mode:▪ Check the activated functions F11 –F20
Shift keyDouble click: The shift symbol flashes. Functions F21–F28 can be activated. The shift symbol is extinguished when it is pressed again. Return to level F1-F10.
Menu key
Shift key
Function keys
▪ Switch to menu mode (press and hold for approximately 5 seconds)▪ Return directly from all menu levels to locomotive/turnout mode
▪ Switch to menu mode▪ Return directly from all menu levels to locomotive/turnout mode
In library or locomotive address mode:▪ Quick-program CVs 1 –5 and 8 (MENU-key must be pressed first)In turnout mode:▪ Call up to 10 saved turnouts (turnout shortcut keys)
Light/OK
▪ Switching the WLANmaus on
…
For users wishing to utilize the many different menu functions of the WLANmaus.Note: The third part starting on page 54 describes everything worth knowing about the
programming functions.
in combination with
in combination with
in combination with
in combination with
Basic
8010813920.indd 43 13.07.2017 10:27:45
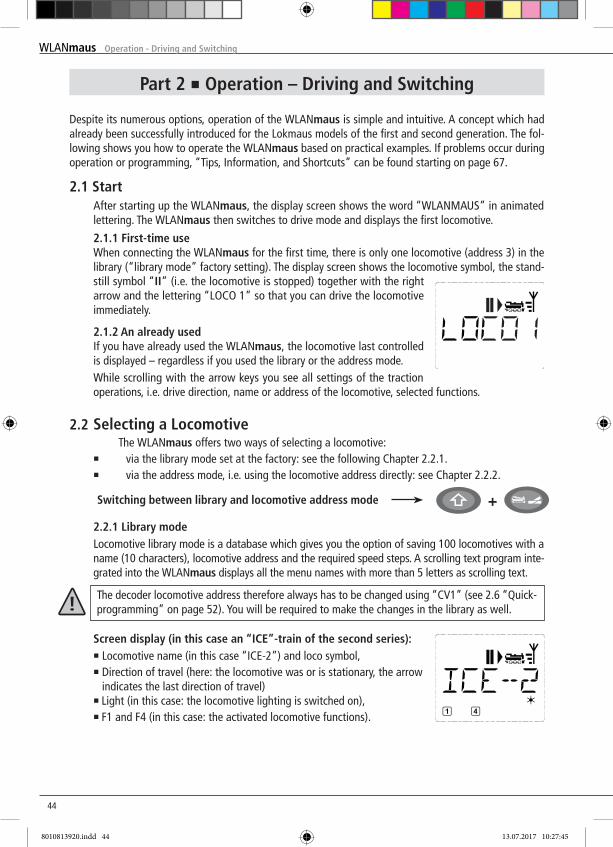
4444
Part 2 ▪ Operation – Driving and Switching
Despite its numerous options, operation of the WLANmaus is simple and intuitive. A concept which had already been successfully introduced for the Lokmaus models of the first and second generation. The fol-lowing shows you how to operate the WLANmaus based on practical examples. If problems occur during operation or programming, “Tips, Information, and Shortcuts” can be found starting on page 67.
2.1 Start After starting up the WLANmaus, the display screen shows the word “WLANMAuS” in animated
lettering. The WLANmaus then switches to drive mode and displays the first locomotive.
2.1.1 First-time use When connecting the WLANmaus for the first time, there is only one locomotive (address 3) in the
library (“library mode” factory setting). The display screen shows the locomotive symbol, the stand-still symbol “II” (i.e. the locomotive is stopped) together with the right arrow and the lettering “LOCO 1” so that you can drive the locomotive immediately.
2.1.2 An already used If you have already used the WLANmaus, the locomotive last controlled
is displayed – regardless if you used the library or the address mode. While scrolling with the arrow keys you see all settings of the traction
operations, i.e. drive direction, name or address of the locomotive, selected functions.
2.2 Selecting a Locomotive The WLANmaus offers two ways of selecting a locomotive: ▪ via the library mode set at the factory: see the following Chapter 2.2.1. ▪ via the address mode, i.e. using the locomotive address directly: see Chapter 2.2.2.
Switching between library and locomotive address mode +
2.2.1 Library mode Locomotive library mode is a database which gives you the option of saving 100 locomotives with a
name (10 characters), locomotive address and the required speed steps. A scrolling text program inte-grated into the WLANmaus displays all the menu names with more than 5 letters as scrolling text.
The decoder locomotive address therefore always has to be changed using “CV1” (see 2.6 “Quick-programming” on page 52). you will be required to make the changes in the library as well.
Screen display (in this case an “ICE”-train of the second series): ▪ Locomotive name (in this case “ICE-2”) and loco symbol, ▪ Direction of travel (here: the locomotive was or is stationary, the arrow indicates the last direction of travel) ▪ Light (in this case: the locomotive lighting is switched on), ▪ F1 and F4 (in this case: the activated locomotive functions).
Operation - Driving and Switching
8010813920.indd 44 13.07.2017 10:27:45
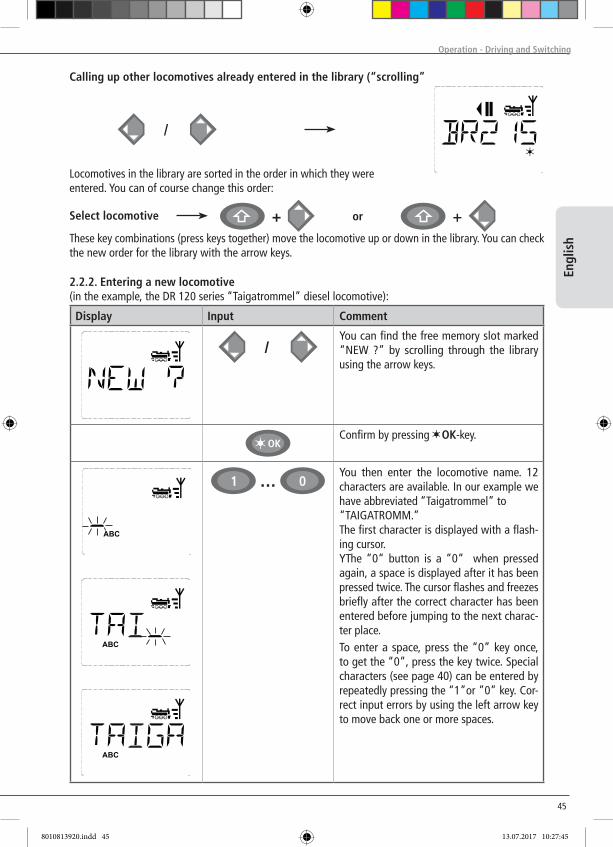
45
Engl
ish
2.2.2. Entering a new locomotive (in the example, the DR 120 series “Taigatrommel” diesel locomotive):
Calling up other locomotives already entered in the library (“scrolling”
Locomotives in the library are sorted in the order in which they were entered. you can of course change this order:
or ++Select locomotive
These key combinations (press keys together) move the locomotive up or down in the library. you can checkthe new order for the library with the arrow keys.
/
Display Input Comment
/You can find the free memory slot marked “NEW ?” by scrolling through the library using the arrow keys.
Confirm by pressing OK-key.
…you then enter the locomotive name. 12 characters are available. In our example we have abbreviated “Taigatrommel” to “TAIGATROMM.”The first character is displayed with a flash-ing cursor.yThe “0“ button is a “0“ when pressed again, a space is displayed after it has been pressed twice. The cursor flashes and freezes briefly after the correct character has been entered before jumping to the next charac-ter place.To enter a space, press the “0” key once, to get the “0”, press the key twice. Special characters (see page 40) can be entered by repeatedly pressing the “1”or ”0” key. Cor-rect input errors by using the left arrow key to move back one or more spaces.
Operation - Driving and Switching
8010813920.indd 45 13.07.2017 10:27:45
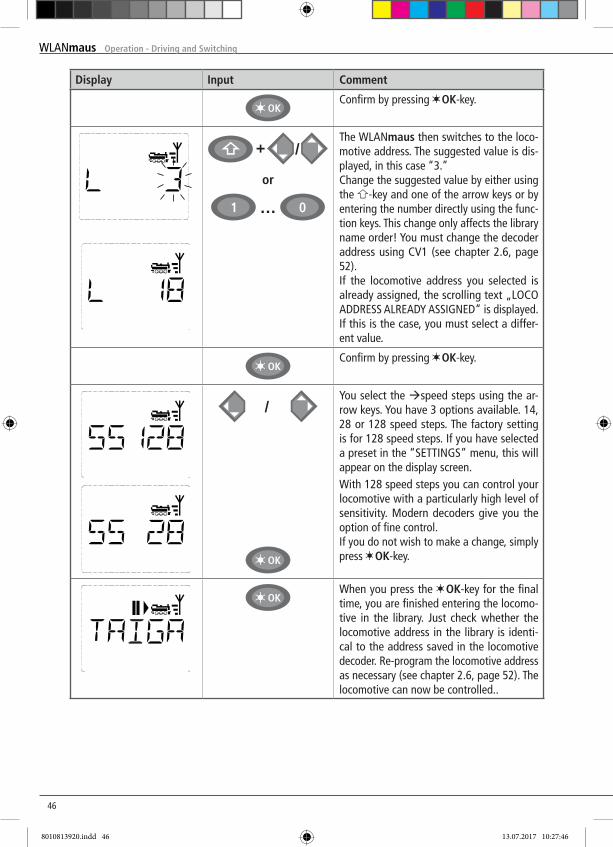
4646
Display Input Comment
Confirm by pressing OK-key.
/+
or
…
The WLANmaus then switches to the loco-motive address. The suggested value is dis-played, in this case “3.”Change the suggested value by either using the -key and one of the arrow keys or by entering the number directly using the func-tion keys. This change only affects the library name order! you must change the decoder address using CV1 (see chapter 2.6, page 52).If the locomotive address you selected is already assigned, the scrolling text „LOCO ADDRESS ALREADy ASSIGNED“ is displayed. If this is the case, you must select a differ-ent value.
Confirm by pressing OK-key.
/you select the speed steps using the ar-row keys. you have 3 options available. 14, 28 or 128 speed steps. The factory setting is for 128 speed steps. If you have selected a preset in the “SETTINGS” menu, this will appear on the display screen.With 128 speed steps you can control your locomotive with a particularly high level of sensitivity. Modern decoders give you the option of fine control.If you do not wish to make a change, simply press OK-key.
When you press the OK-key for the final time, you are finished entering the locomo-tive in the library. Just check whether the locomotive address in the library is identi-cal to the address saved in the locomotive decoder. Re-program the locomotive address as necessary (see chapter 2.6, page 52). The locomotive can now be controlled..
Operation - Driving and Switching
8010813920.indd 46 13.07.2017 10:27:46
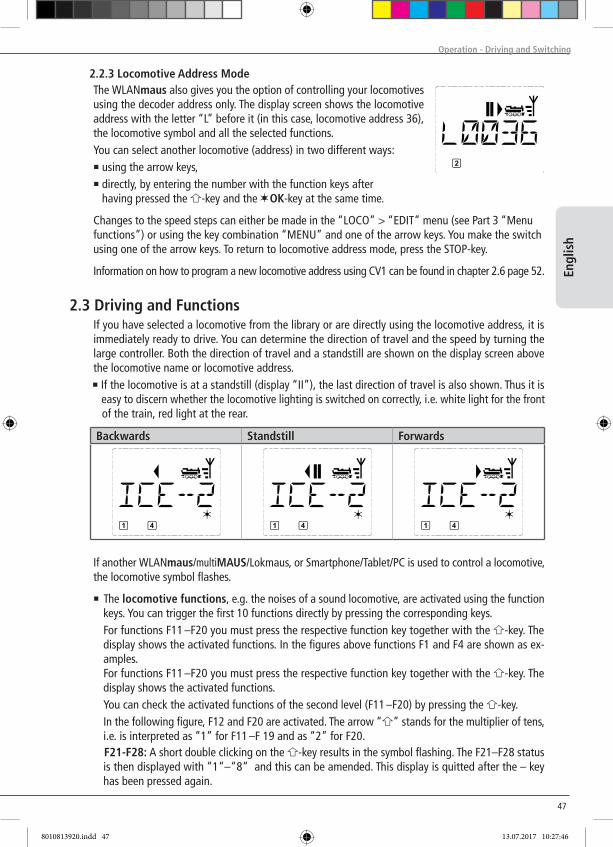
47
Engl
ish
2.2.3 Locomotive Address Mode The WLANmaus also gives you the option of controlling your locomotives
using the decoder address only. The display screen shows the locomotive address with the letter “L” before it (in this case, locomotive address 36), the locomotive symbol and all the selected functions.
you can select another locomotive (address) in two different ways: ▪ using the arrow keys, ▪ directly, by entering the number with the function keys after having pressed the -key and the OK-key at the same time.
Changes to the speed steps can either be made in the “LOCO” > “EDIT” menu (see Part 3 “Menu functions”) or using the key combination “MENu” and one of the arrow keys. you make the switch
using one of the arrow keys. To return to locomotive address mode, press the STOP-key.
Information on how to program a new locomotive address using CV1 can be found in chapter 2.6 page 52.
2.3 Driving and Functions If you have selected a locomotive from the library or are directly using the locomotive address, it is
immediately ready to drive. you can determine the direction of travel and the speed by turning the large controller. Both the direction of travel and a standstill are shown on the display screen above the locomotive name or locomotive address.
▪ If the locomotive is at a standstill (display “II”), the last direction of travel is also shown. Thus it is easy to discern whether the locomotive lighting is switched on correctly, i.e. white light for the front of the train, red light at the rear.
Backwards Standstill Forwards
If another WLANmaus/multiMAUS/Lokmaus, or Smartphone/Tablet/PC is used to control a locomotive,
the locomotive symbol flashes.
▪ The locomotive functions, e.g. the noises of a sound locomotive, are activated using the function keys. You can trigger the first 10 functions directly by pressing the corresponding keys.
For functions F11 –F20 you must press the respective function key together with the -key. The display shows the activated functions. In the figures above functions F1 and F4 are shown as ex-amples.
For functions F11 –F20 you must press the respective function key together with the -key. The display shows the activated functions.
you can check the activated functions of the second level (F11 –F20) by pressing the -key. In the following figure, F12 and F20 are activated. The arrow “ ” stands for the multiplier of tens,
i.e. is interpreted as “1” for F11 –F 19 and as “2” for F20.F21-F28: A short double clicking on the -key results in the symbol flashing. The F21–F28 status is then displayed with “1“–“8“ and this can be amended. This display is quitted after the – key has been pressed again.
Operation - Driving and Switching
8010813920.indd 47 13.07.2017 10:27:46

4848
See the operating manual for the functions which are available for your locomotive▪ you switch the locomotive light on or off using the OK-key The star “ ” at the bottom right of
the display lights up to confirm that the locomotive lighting is switched on.
On Off
2.4 The Emergency Stop Functions When a situation becomes dangerous: you can use the STOP-key. at any time to prevent a more seri-
ous calamity immediately. In order to avoid shutting down the entire system however, you can use the “selective locomotive stop” function to stop only the locomotive selected and displayed.
To save battery life, the WLANmaus switches itself off if not used for a certain amount of time (value can be set in menu 3.7, page 65). This action disconnects the entire system from the mains power supply (factory setting) and causes the blue LED on the Z21 to flash.
If you are switching the WLANmaus back on ( OK-key), the last used locomotive is displayed and the “STOP” symbol flashes. Simply press the STOP-key to restart train operation. The blue LED stops flashing on the Z21 and the green LED once again depicts a steady light.
The Z21 offers another option for an emergency stop. In case of an emergency, press the STOP-key to disconnect the power supply to the system. Pressing the same key again switches the system back on.
.
2.4.1 Emergency stop Press the STOP-key to sever the voltage at the track at once. The "STOP" symbol then appears in the
display and the blue LED flashes at the Z21. Press the STOP-key again to supply the system with volt-age again.
Stop Driving
Operation - Driving and Switching
8010813920.indd 48 13.07.2017 10:27:46
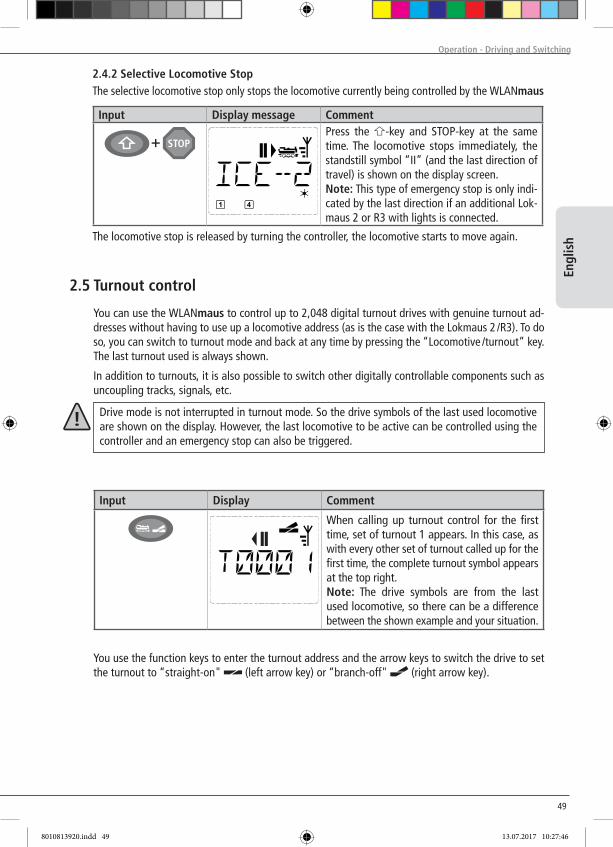
49
Engl
ish
2.4.2 Selective Locomotive Stop The selective locomotive stop only stops the locomotive currently being controlled by the WLANmaus
Input Display message CommentPress the -key and STOP-key at the same time. The locomotive stops immediately, the standstill symbol “II” (and the last direction of travel) is shown on the display screen.Note: This type of emergency stop is only indi-cated by the last direction if an additional Lok-maus 2 or R3 with lights is connected.
The locomotive stop is released by turning the controller, the locomotive starts to move again.
2.5 Turnout control
you can use the WLANmaus to control up to 2,048 digital turnout drives with genuine turnout ad-dresses without having to use up a locomotive address (as is the case with the Lokmaus 2 /R3). To do so, you can switch to turnout mode and back at any time by pressing the “Locomotive /turnout” key. The last turnout used is always shown.
In addition to turnouts, it is also possible to switch other digitally controllable components such as uncoupling tracks, signals, etc.
Drive mode is not interrupted in turnout mode. So the drive symbols of the last used locomotive are shown on the display. However, the last locomotive to be active can be controlled using the controller and an emergency stop can also be triggered.
Input Display Comment
When calling up turnout control for the first time, set of turnout 1 appears. In this case, as with every other set of turnout called up for the first time, the complete turnout symbol appears at the top right. Note: The drive symbols are from the last used locomotive, so there can be a difference between the shown example and your situation.
you use the function keys to enter the turnout address and the arrow keys to switch the drive to set
the turnout to “straight-on" (left arrow key) or “branch-off" (right arrow key).
Operation - Driving and Switching
8010813920.indd 49 13.07.2017 10:27:46
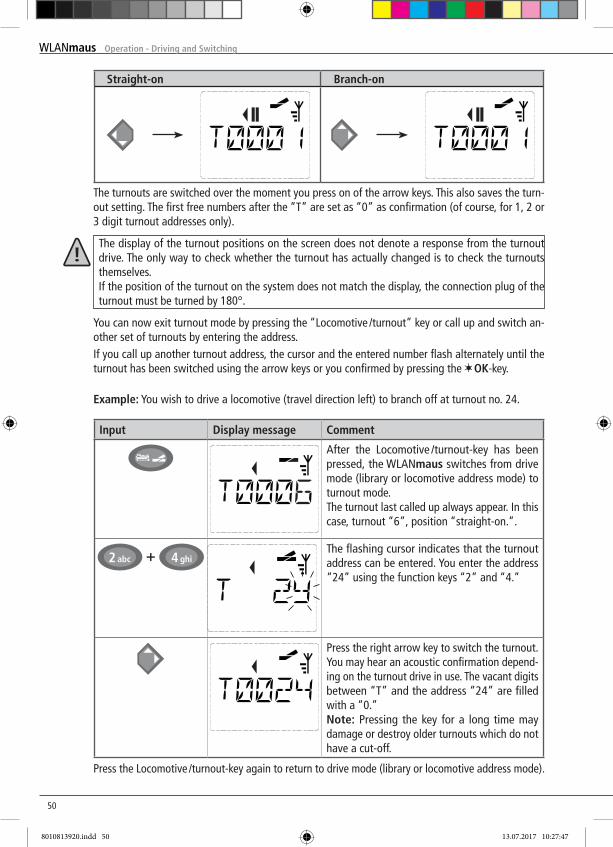
5050
Straight-on Branch-on
The turnouts are switched over the moment you press on of the arrow keys. This also saves the turn-out setting. The first free numbers after the “T” are set as “0” as confirmation (of course, for 1, 2 or 3 digit turnout addresses only).
The display of the turnout positions on the screen does not denote a response from the turnout drive. The only way to check whether the turnout has actually changed is to check the turnouts themselves.If the position of the turnout on the system does not match the display, the connection plug of the turnout must be turned by 180°.
you can now exit turnout mode by pressing the “Locomotive /turnout” key or call up and switch an-other set of turnouts by entering the address.
If you call up another turnout address, the cursor and the entered number flash alternately until the turnout has been switched using the arrow keys or you confirmed by pressing the OK-key.
Example: you wish to drive a locomotive (travel direction left) to branch off at turnout no. 24.
Input Display message Comment
After the Locomotive /turnout-key has been pressed, the WLANmaus switches from drive mode (library or locomotive address mode) to turnout mode.The turnout last called up always appear. In this case, turnout “6”, position “straight-on.”.
The flashing cursor indicates that the turnout address can be entered. you enter the address “24” using the function keys “2” and “4.”
Press the right arrow key to switch the turnout. You may hear an acoustic confirmation depend-ing on the turnout drive in use. The vacant digits between “T” and the address “24” are filled with a “0.”Note: Pressing the key for a long time may damage or destroy older turnouts which do not have a cut-off.
Press the Locomotive /turnout-key again to return to drive mode (library or locomotive address mode).
Operation - Driving and Switching
8010813920.indd 50 13.07.2017 10:27:47
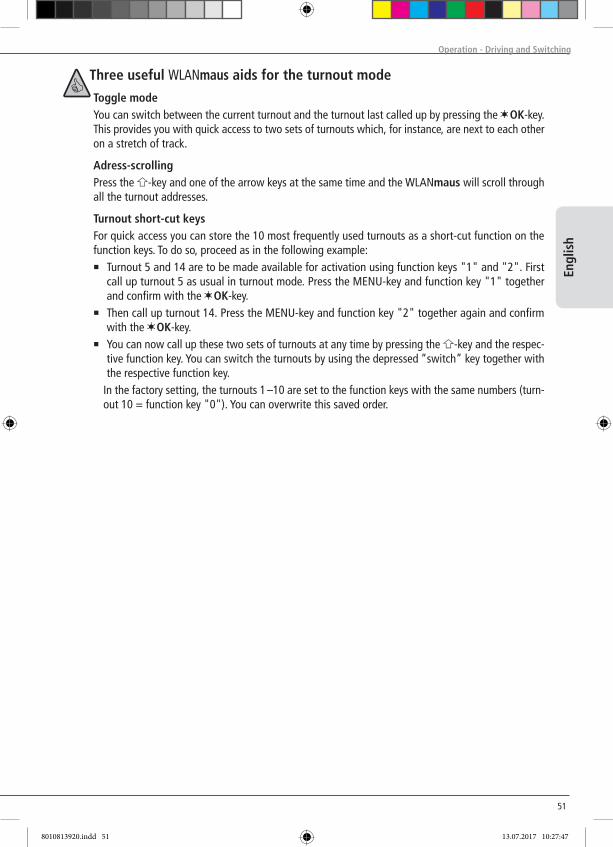
51
Engl
ish
Three useful WLANmaus aids for the turnout mode
Toggle mode you can switch between the current turnout and the turnout last called up by pressing the OK-key.
This provides you with quick access to two sets of turnouts which, for instance, are next to each other on a stretch of track.
Adress-scrolling Press the -key and one of the arrow keys at the same time and the WLANmaus will scroll through
all the turnout addresses.
Turnout short-cut keys For quick access you can store the 10 most frequently used turnouts as a short-cut function on the
function keys. To do so, proceed as in the following example:▪ Turnout 5 and 14 are to be made available for activation using function keys "1" and "2". First
call up turnout 5 as usual in turnout mode. Press the MENu-key and function key "1" together and confirm with the OK-key.
▪ Then call up turnout 14. Press the MENU-key and function key "2" together again and confirm with the OK-key.
▪ you can now call up these two sets of turnouts at any time by pressing the -key and the respec-tive function key. you can switch the turnouts by using the depressed “switch” key together with the respective function key.
In the factory setting, the turnouts 1 –10 are set to the function keys with the same numbers (turn-out 10 = function key "0"). you can overwrite this saved order.
Operation - Driving and Switching
8010813920.indd 51 13.07.2017 10:27:47
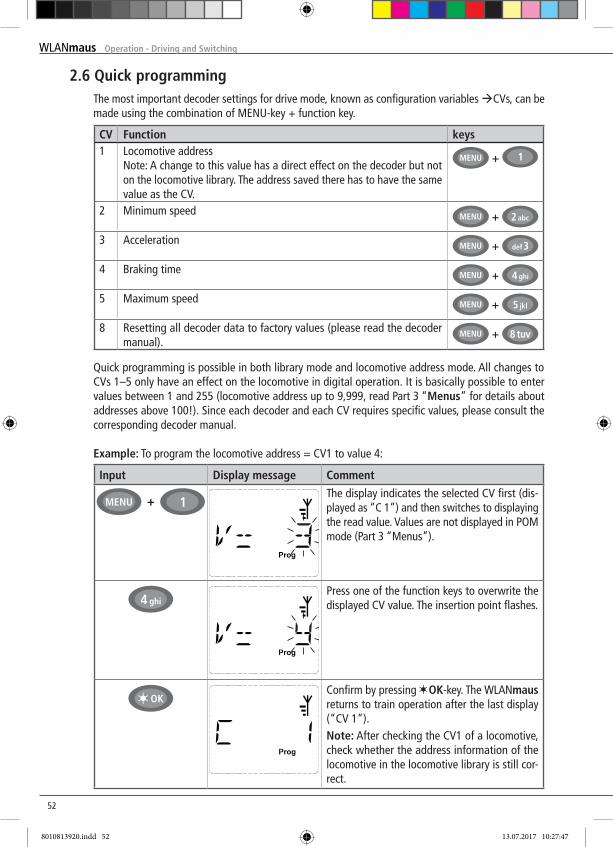
5252
2.6 Quick programming The most important decoder settings for drive mode, known as configuration variables CVs, can be
made using the combination of MENu-key + function key.
CV Function keys1 Locomotive address
Note: A change to this value has a direct effect on the decoder but not on the locomotive library. The address saved there has to have the same value as the CV.
+
2 Minimum speed +
3 Acceleration +
4 Braking time +
5 Maximum speed +
8 Resetting all decoder data to factory values (please read the decoder manual). + 8 tuv
Quick programming is possible in both library mode and locomotive address mode. All changes to CVs 1–5 only have an effect on the locomotive in digital operation. It is basically possible to enter values between 1 and 255 (locomotive address up to 9,999, read Part 3 “Menus” for details about addresses above 100!). Since each decoder and each CV requires specific values, please consult the corresponding decoder manual.
Example: To program the locomotive address = CV1 to value 4:
Input Display message Comment
The display indicates the selected CV first (dis-played as “C 1”) and then switches to displaying the read value. Values are not displayed in POM mode (Part 3 “Menus”).
Press one of the function keys to overwrite the displayed CV value. The insertion point flashes.
Confirm by pressing OK-key. The WLANmaus returns to train operation after the last display (“CV 1”).Note: After checking the CV1 of a locomotive, check whether the address information of the locomotive in the locomotive library is still cor-rect.
Operation - Driving and Switching
8010813920.indd 52 13.07.2017 10:27:47
53
Engl
ish
2.7 Short Circuit and Overload
If a system short circuit or overload occurs, the Z21-digital system indicates this in two different ways. Two symbols flash in the display of the WLANmaus, namely a lightning or thunderbolt symbol and the STOP sign. The red LED flashes on the Z21. The power supply to the system is disconnected at the same time.
If there is a short circuit, e.g. because of a derailed coach or train, eliminate the fault. Press the STOP-key of the WLANmaus or the white key of the Z21 to switch the system back on with
a delay of approx. one second.
If the fault is not a short circuit, the cause may be an overload of the system due to the simultaneous operation of too many locomotives. If this occurs frequently, the power supply to your system is insuf-ficient. This is fixed by connecting an additional booster). Never use a normal transformer connected directly to the power supply input since this may destroy the Z21.
you can also program new values for CV 2, 3, 4 and 5 as shown in this example. To do so, you simply press the MENu-key together with the function key with the number corresponding to the CV and then proceed as in the above example.
If you set value “8” in CV8 (no other value is necessary), all CVs of the decoder are reset to fac-tory values. Since this procedure is not supported by all decoders, you should consult the decoder‘s manual for additional information.
If you experience programming problems, please read Part 3 “Menus” or the Chapter “Tips, Informa-tion, and Shortcuts” in Part 5 for additional help
Operation - Driving and Switching
8010813920.indd 53 13.07.2017 10:27:47
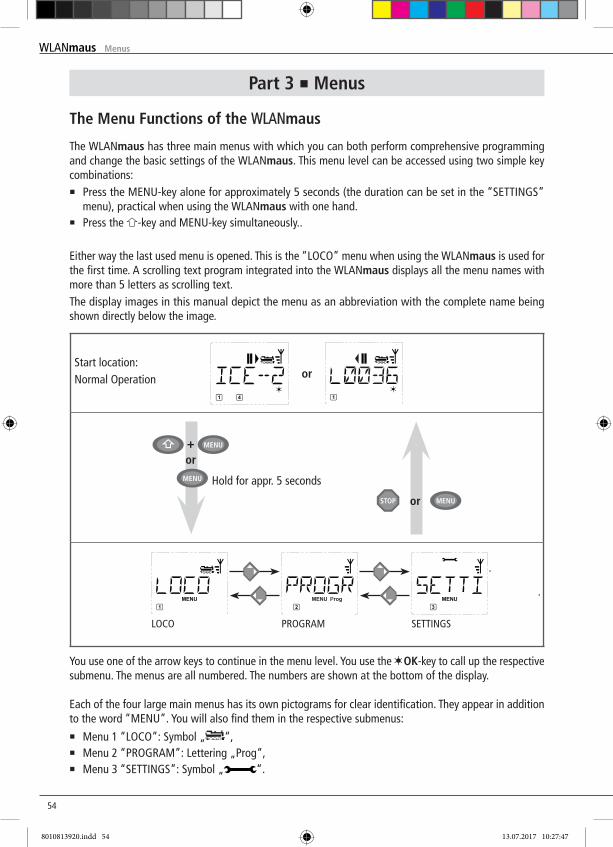
5454
Part 3 ▪ Menus
The Menu Functions of the WLANmaus
The WLANmaus has three main menus with which you can both perform comprehensive programming and change the basic settings of the WLANmaus. This menu level can be accessed using two simple key combinations:▪ Press the MENu-key alone for approximately 5 seconds (the duration can be set in the “SETTINGS”
menu), practical when using the WLANmaus with one hand.▪ Press the -key and MENu-key simultaneously..
Either way the last used menu is opened. This is the “LOCO” menu when using the WLANmaus is used for the first time. A scrolling text program integrated into the WLANmaus displays all the menu names with more than 5 letters as scrolling text.The display images in this manual depict the menu as an abbreviation with the complete name being shown directly below the image.
or
or
Hold for appr. 5 seconds
or
SETTINGSPROGRAMLOCO
Start location:Normal Operation
you use one of the arrow keys to continue in the menu level. you use the OK-key to call up the respective submenu. The menus are all numbered. The numbers are shown at the bottom of the display.
Each of the four large main menus has its own pictograms for clear identification. They appear in addition to the word “MENU”. You will also find them in the respective submenus:▪ Menu 1 “LOCO”: Symbol „ “,▪ Menu 2 “PROGRAM”: Lettering „Prog“,▪ Menu 3 “SETTINGS”: Symbol „ “.
Menus
8010813920.indd 54 13.07.2017 10:27:47
55
Engl
ish
There are two ways to exit the menu level:▪ Press the STOP-key. you may need to do this several times depending on the submenu which you are
currently in. Each time you press STOP-key you go back one level.▪ Press the MENu-key (alone or together with the -key) to exit all levels immediately and return to
locomotive and turnout mode.
Basic information about using the menu functions and programming:▪ When navigating within the menu level (always from top to bottom in the overview on the following
pages), use one of the two arrow keys to access the individual menus.▪ Press the OK-key to open a menu item (always sideways in this overview) to make entries or changes.▪ If the display depicts one of the four main menus, you can also simply open the desired menu item by
pressing the corresponding number with the function keys.▪ Pressing the STOP-key always returns you to the previous level..
To safeguard against erroneously opening menus or incorrect entries, etc.: Pressing the STOP-key does not confirm an entry made into a menu item.
A locomotive cannot be controlled while the WLANmaus is in menu mode.
Only one locomotive at a time may be read out and/or programmed.
All of the menus of the WLANmaus can be found in the large overview on the next two pages.
Menus
8010813920.indd 55 13.07.2017 10:27:47

5656
REVERSE DIRECTION
28 SPEED STEPS
ANALOG DRIVING
NMRA-BIDI
SPEED TABLE
LONG ADDRESS
EDIT
DELETE
CV MODIFICATION
LONG ADDRESS
SEND
RECEIVE
SAERCH
Menu 2:PROGRAM
ADDRESS
LIBRARy
Menu 1:LOCO
CV
POM
MODuS
CVBIT AENDERN
Menus
8010813920.indd 56 13.07.2017 10:27:48
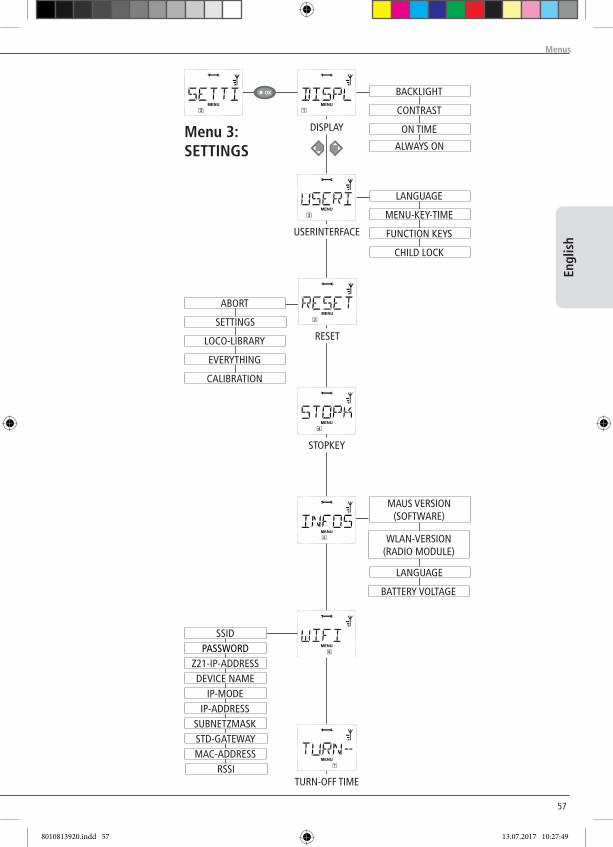
57
Engl
ish
ABORT
SETTINGS
LOCO-LIBRARy
EVERyTHING
CALIBRATION
PASSWORDSSID
Z21-IP-ADDRESSDEVICE NAME
IP-MODE
MAuS VERSION (SOFTWARE)
WLAN-VERSION (RADIO MODuLE)
BATTERy VOLTAGE
Menu 3:SETTINGS
BACKLIGHT
CONTRAST
LANGuAGE
MENu-KEy-TIME
FuNCTION KEyS
CHILD LOCK
DISPLAy
uSERINTERFACE
STOPKEy
TuRN-OFF TIME
ON TIME
RESET
IP-ADDRESSSuBNETZMASKSTD-GATEWAyMAC-ADDRESS
RSSI
LANGuAGE
Menus
ALWAyS ON
8010813920.indd 57 13.07.2017 10:27:49
5858
The WLANmaus uses the “LOCO” menu to manage all data which is required for the locomotive library and for identification of a locomotive. You can also use this menu to set the WLANmaus to library or address mode.
1.1 “NEW“ use this menu item to add a new locomotive to the library. The sequence of steps is described and
depicted in detail starting on page 45.
1.2 “EDIT“ you change the data for a locomotive in the library using this menu item. If, for example, only the locomotive address is changed but the name and speed steps remain un-
changed, you can skip these items without editing them by pressing the OK-key. The first screen shows the locomotive last used in locomotive mode. you select the locomotive for which you wish to make changes, using the arrow keys
▪ To confirm, press the OK-key. You now have the option of changing the locomotive name. The cursor flashes in the first place. You
use the left arrow key to delete letters / numbers and can re-enter them using the function keys. Text can be entered or amended at the current position by using the right arrow key. Another country language can be set in the “LANGuAGE“ submenu.
▪ To confirm, press the OK-key. you can correct the locomotive address as previously described.
▪ To confirm, press the OK-key you correct the speed steps using the arrow keys.
▪ To confirm, press the OK-key. you return to the start level “EDIT”.
A change to the locomotive address in the library has no effect on the address stored in the loco-motive decoder. It can be changed using “CV1”. See the Chapter 2.6 “Quick Programming” on page 52 or the menu item 2.1 “CV MODIFICATION” on page 60 in the “PROGRAMMING” menu.
1.3 “DELETE“ you use this menu item to remove a locomotive from the library. The first screen shows the locomotive last used in locomotive mode. Use the arrow keys to select the
locomotive you wish to remove. ▪ To confirm, press the OK-key . The scrolling text “DELETE LOCO?” appears in the next screen.
▪ Press OK-key to confirm the deletion action again. This returns you to the “DELETE” start level, as indicated by the at the bottom of the display.
The locomotive is removed from the library and, if it is still travelling, is stopped automatically (selec-tive emergency stop). The locomotive can only be controlled using locomotive address mode until it is entered in the library again.
1. The “LOCO” Menu
Menus
8010813920.indd 58 13.07.2017 10:27:49
59
Engl
ish
1.4 “SEARCH“ This could be one of the most important functions of your WLANmaus you can use this menu item
to assign a locomotive address to the corresponding locomotive in the library. Simply enter a locomotive address using the function keys and the WLANmaus will find the corre-
sponding locomotive in the library. – Press the OK-key to confirm the entry. The WLANmaus returns directly to locomotive mode and
display the assigned locomotive. If the WLANmaus does not find the corresponding locomotive for the address, “LOCO NOT FOUND”
appears in the display. you can use the STOP-key or OK-key to return to the start level “SEARCH.”
1.5 “SEND“
+
1.6 “RECEIVE“ you require both of these menu items when you wish to transfer the locomotive library from one
WLANmaus to another WLANmaus (or several WLANmaus devices). To do so, you set the transmit-ting WLANmaus to “SEND” and the other WLANmaus or WLANmaus devices to “RECEIVE.” The receiver units must be activated first.
you start the transmission by pressing the OK-key on the transmitting WLANmaus. When the trans-fer is complete, the receiver WLANmaus/ WLANmaus devises is/are in library mode, the transmitting WLANmaus is at the start level “SEND.”
1.7 “MODE“ you can either control a locomotive from library mode as set in the factory or simply using the loco-
motive address. you can select which of the settings you prefer using this menu item. you select the respective mode using one of the arrow keys. The modes are displayed in scrolling text. ▪ To confirm, press the OK-key. you return to the start level “MODE.”
Menus
8010813920.indd 59 13.07.2017 10:27:49
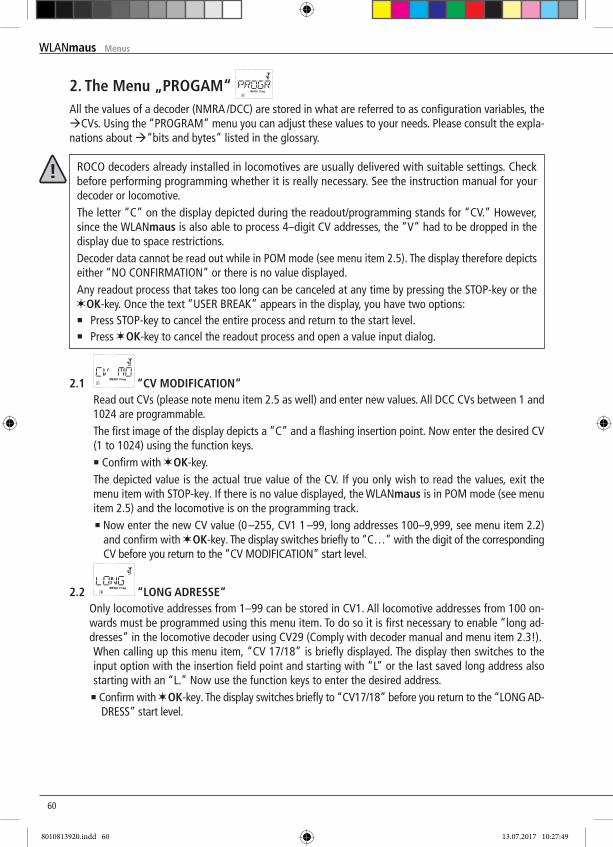
6060
2. The Menu „PROGAM“ All the values of a decoder (NMRA /DCC) are stored in what are referred to as configuration variables, the CVs. using the “PROGRAM” menu you can adjust these values to your needs. Please consult the expla-nations about “bits and bytes” listed in the glossary.
ROCO decoders already installed in locomotives are usually delivered with suitable settings. Check before performing programming whether it is really necessary. See the instruction manual for your decoder or locomotive.The letter “C” on the display depicted during the readout/programming stands for “CV.” However, since the WLANmaus is also able to process 4–digit CV addresses, the “V” had to be dropped in the display due to space restrictions.Decoder data cannot be read out while in POM mode (see menu item 2.5). The display therefore depicts either “NO CONFIRMATION” or there is no value displayed.Any readout process that takes too long can be canceled at any time by pressing the STOP-key or the
OK-key. Once the text “uSER BREAK” appears in the display, you have two options:▪ Press STOP-key to cancel the entire process and return to the start level.▪ Press OK-key to cancel the readout process and open a value input dialog.
2.1 “CV MODIFICATION“ Read out CVs (please note menu item 2.5 as well) and enter new values. All DCC CVs between 1 and
1024 are programmable. The first image of the display depicts a “C” and a flashing insertion point. Now enter the desired CV
(1 to 1024) using the function keys. ▪ Confirm with OK-key. The depicted value is the actual true value of the CV. If you only wish to read the values, exit the
menu item with STOP-key. If there is no value displayed, the WLANmaus is in POM mode (see menu item 2.5) and the locomotive is on the programming track.▪ Now enter the new CV value (0 –255, CV1 1 –99, long addresses 100–9,999, see menu item 2.2)
and confirm with OK-key. The display switches briefly to “C…” with the digit of the corresponding CV before you return to the “CV MODIFICATION” start level.
2.2 “LONG ADRESSE“ Only locomotive addresses from 1–99 can be stored in CV1. All locomotive addresses from 100 on-
wards must be programmed using this menu item. To do so it is first necessary to enable “long ad-dresses” in the locomotive decoder using CV29 (Comply with decoder manual and menu item 2.3!).
When calling up this menu item, “CV 17/18” is briefly displayed. The display then switches to the input option with the insertion field point and starting with “L” or the last saved long address also starting with an “L.” Now use the function keys to enter the desired address.
▪ Confirm with OK-key. The display switches briefly to “CV17/18” before you return to the “LONG AD-DRESS” start level.
Menus
8010813920.indd 60 13.07.2017 10:27:49
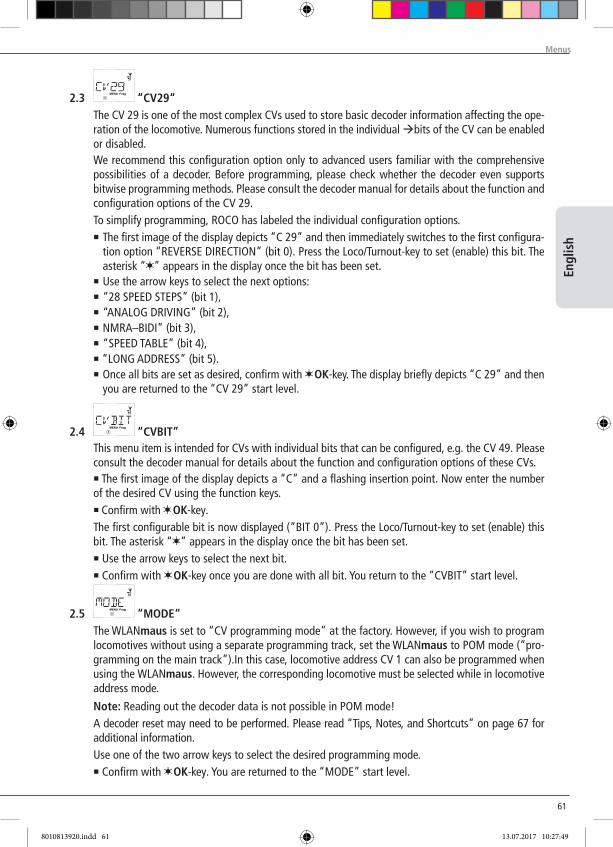
61
Engl
ish
2.3 “CV29“ The CV 29 is one of the most complex CVs used to store basic decoder information affecting the ope-
ration of the locomotive. Numerous functions stored in the individual bits of the CV can be enabled or disabled.
We recommend this configuration option only to advanced users familiar with the comprehensive possibilities of a decoder. Before programming, please check whether the decoder even supports bitwise programming methods. Please consult the decoder manual for details about the function and configuration options of the CV 29.
To simplify programming, ROCO has labeled the individual configuration options.▪ The first image of the display depicts “C 29” and then immediately switches to the first configura-
tion option “REVERSE DIRECTION” (bit 0). Press the Loco/Turnout-key to set (enable) this bit. The asterisk “ ” appears in the display once the bit has been set.
▪ use the arrow keys to select the next options:▪ “28 SPEED STEPS” (bit 1),▪ “ANALOG DRIVING” (bit 2),▪ NMRA–BIDI” (bit 3),▪ “SPEED TABLE” (bit 4),▪ “LONG ADDRESS” (bit 5).▪ Once all bits are set as desired, confirm with OK-key. The display briefly depicts “C 29” and then
you are returned to the “CV 29” start level.
2.4 “CVBIT” This menu item is intended for CVs with individual bits that can be configured, e.g. the CV 49. Please
consult the decoder manual for details about the function and configuration options of these CVs. ▪ The first image of the display depicts a “C” and a flashing insertion point. Now enter the number
of the desired CV using the function keys. ▪ Confirm with OK-key. The first configurable bit is now displayed (“BIT 0”). Press the Loco/Turnout-key to set (enable) this
bit. The asterisk “ ” appears in the display once the bit has been set. ▪ use the arrow keys to select the next bit. ▪ Confirm with OK-key once you are done with all bit. you return to the “CVBIT” start level.
2.5 “MODE“ The WLANmaus is set to “CV programming mode” at the factory. However, if you wish to program
locomotives without using a separate programming track, set the WLANmaus to POM mode (“pro-gramming on the main track”).In this case, locomotive address CV 1 can also be programmed when using the WLANmaus. However, the corresponding locomotive must be selected while in locomotive address mode.
Note: Reading out the decoder data is not possible in POM mode! A decoder reset may need to be performed. Please read “Tips, Notes, and Shortcuts” on page 67 for
additional information. use one of the two arrow keys to select the desired programming mode. ▪ Confirm with OK-key. you are returned to the “MODE” start level.
Menus
8010813920.indd 61 13.07.2017 10:27:49
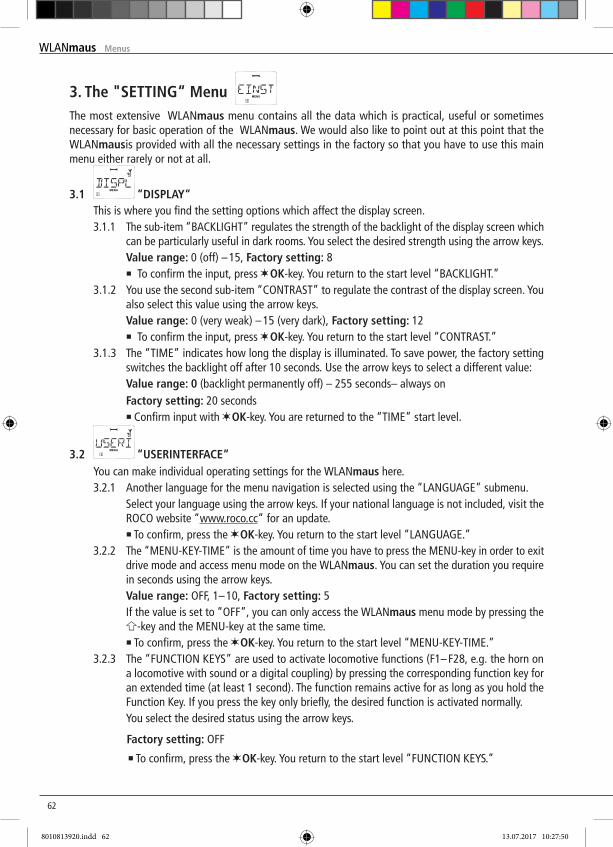
6262
The most extensive WLANmaus menu contains all the data which is practical, useful or sometimes necessary for basic operation of the WLANmaus. We would also like to point out at this point that the WLANmausis provided with all the necessary settings in the factory so that you have to use this main menu either rarely or not at all.
3.1 “DISPLAY“ This is where you find the setting options which affect the display screen. 3.1.1 The sub-item “BACKLIGHT” regulates the strength of the backlight of the display screen which
can be particularly useful in dark rooms. you select the desired strength using the arrow keys. Value range: 0 (off) – 15, Factory setting: 8 ▪ To confirm the input, press OK-key. you return to the start level “BACKLIGHT.” 3.1.2 you use the second sub-item “CONTRAST” to regulate the contrast of the display screen. you
also select this value using the arrow keys. Value range: 0 (very weak) – 15 (very dark), Factory setting: 12 ▪ To confirm the input, press OK-key. you return to the start level “CONTRAST.” 3.1.3 The “TIME” indicates how long the display is illuminated. To save power, the factory setting
switches the backlight off after 10 seconds. use the arrow keys to select a different value: Value range: 0 (backlight permanently off) – 255 seconds– always on Factory setting: 20 seconds ▪ Confirm input with OK-key. you are returned to the “TIME” start level.
3.2 “USERINTERFACE“ you can make individual operating settings for the WLANmaus here. 3.2.1 Another language for the menu navigation is selected using the “LANGuAGE” submenu. Select your language using the arrow keys. If your national language is not included, visit the
ROCO website “www.roco.cc” for an update. ▪ To confirm, press the OK-key. you return to the start level “LANGuAGE.” 3.2.2 The “MENu-KEy-TIME” is the amount of time you have to press the MENu-key in order to exit
drive mode and access menu mode on the WLANmaus. you can set the duration you require in seconds using the arrow keys.
Value range: OFF, 1– 10, Factory setting: 5 If the value is set to “OFF”, you can only access the WLANmaus menu mode by pressing the
-key and the MENu-key at the same time. ▪ To confirm, press the OK-key. you return to the start level “MENu-KEy-TIME.” 3.2.3 The “FuNCTION KEyS” are used to activate locomotive functions (F1– F28, e.g. the horn on
a locomotive with sound or a digital coupling) by pressing the corresponding function key for an extended time (at least 1 second). The function remains active for as long as you hold the Function Key. If you press the key only briefly, the desired function is activated normally.
you select the desired status using the arrow keys.
Factory setting: OFF
▪ To confirm, press the OK-key. you return to the start level “FuNCTION KEyS.”
3. The "SETTING“ Menu
Menus
8010813920.indd 62 13.07.2017 10:27:50
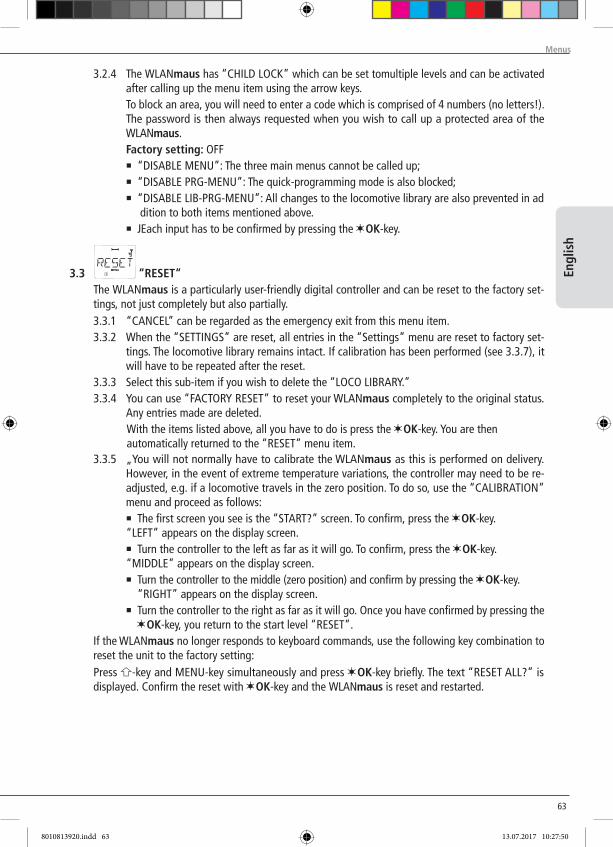
63
Engl
ish
3.2.4 The WLANmaus has “CHILD LOCK” which can be set tomultiple levels and can be activated after calling up the menu item using the arrow keys.
To block an area, you will need to enter a code which is comprised of 4 numbers (no letters!). The password is then always requested when you wish to call up a protected area of the WLANmaus.
Factory setting: OFF ▪ “DISABLE MENu”: The three main menus cannot be called up; ▪ “DISABLE PRG-MENu”: The quick-programming mode is also blocked; ▪ “DISABLE LIB-PRG-MENu”: All changes to the locomotive library are also prevented in ad dition to both items mentioned above. ▪ JEach input has to be confirmed by pressing the OK-key.
3.3 “RESET“ The WLANmaus is a particularly user-friendly digital controller and can be reset to the factory set-
tings, not just completely but also partially. 3.3.1 “CANCEL” can be regarded as the emergency exit from this menu item. 3.3.2 When the “SETTINGS” are reset, all entries in the “Settings” menu are reset to factory set-
tings. The locomotive library remains intact. If calibration has been performed (see 3.3.7), it will have to be repeated after the reset.
3.3.3 Select this sub-item if you wish to delete the “LOCO LIBRARy.” 3.3.4 you can use “FACTORy RESET” to reset your WLANmaus completely to the original status.
Any entries made are deleted. With the items listed above, all you have to do is press the OK-key. you are then automatically returned to the “RESET” menu item. 3.3.5 „you will not normally have to calibrate the WLANmaus as this is performed on delivery.
However, in the event of extreme temperature variations, the controller may need to be re-adjusted, e.g. if a locomotive travels in the zero position. To do so, use the “CALIBRATION” menu and proceed as follows:
▪ The first screen you see is the “START?” screen. To confirm, press the OK-key. “LEFT” appears on the display screen.
▪ Turn the controller to the left as far as it will go. To confirm, press the OK-key. “MIDDLE” appears on the display screen.
▪ Turn the controller to the middle (zero position) and confirm by pressing the OK-key. “RIGHT” appears on the display screen.
▪ Turn the controller to the right as far as it will go. Once you have confirmed by pressing the OK-key, you return to the start level “RESET”. If the WLANmaus no longer responds to keyboard commands, use the following key combination to
reset the unit to the factory setting: Press -key and MENu-key simultaneously and press OK-key briefly. The text “RESET ALL?” is
displayed. Confirm the reset with OK-key and the WLANmaus is reset and restarted.
Menus
8010813920.indd 63 13.07.2017 10:27:50
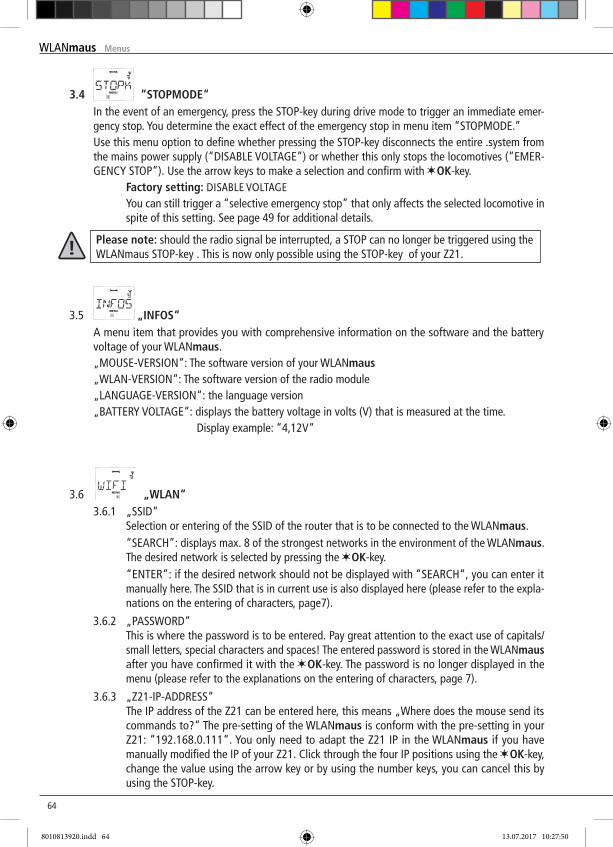
6464
3.4 “STOPMODE“ In the event of an emergency, press the STOP-key during drive mode to trigger an immediate emer-
gency stop. you determine the exact effect of the emergency stop in menu item “STOPMODE.” Use this menu option to define whether pressing the STOP-key disconnects the entire .system from
the mains power supply (“DISABLE VOLTAGE”) or whether this only stops the locomotives (“EMER-GENCY STOP”). Use the arrow keys to make a selection and confirm with OK-key.
Factory setting: DISABLE VOLTAGE you can still trigger a “selective emergency stop” that only affects the selected locomotive in
spite of this setting. See page 49 for additional details.
Please note: should the radio signal be interrupted, a STOP can no longer be triggered using the WLANmaus STOP-key . This is now only possible using the STOP-key of your Z21.
3.5 „INFOS“ A menu item that provides you with comprehensive information on the software and the battery
voltage of your WLANmaus. „MOuSE-VERSION“: The software version of your WLANmaus „WLAN-VERSION“: The software version of the radio module „LANGuAGE-VERSION“: the language version „BATTERy VOLTAGE“: displays the battery voltage in volts (V) that is measured at the time. Display example: “4,12V“
3.6 „WLAN“ 3.6.1 „SSID“ Selection or entering of the SSID of the router that is to be connected to the WLANmaus. “SEARCH”: displays max. 8 of the strongest networks in the environment of the WLANmaus.
The desired network is selected by pressing the OK-key. “ENTER”: if the desired network should not be displayed with “SEARCH“, you can enter it
manually here. The SSID that is in current use is also displayed here (please refer to the expla-nations on the entering of characters, page7).
3.6.2 „PASSWORD“ This is where the password is to be entered. Pay great attention to the exact use of capitals/
small letters, special characters and spaces! The entered password is stored in the WLANmaus after you have confirmed it with the OK-key. The password is no longer displayed in the menu (please refer to the explanations on the entering of characters, page 7).
3.6.3 „Z21-IP-ADDRESS“ The IP address of the Z21 can be entered here, this means „Where does the mouse send its
commands to?“ The pre-setting of the WLANmaus is conform with the pre-setting in your Z21: “192.168.0.111“. you only need to adapt the Z21 IP in the WLANmaus if you have manually modified the IP of your Z21. Click through the four IP positions using the OK-key, change the value using the arrow key or by using the number keys, you can cancel this by using the STOP-key.
Menus
8010813920.indd 64 13.07.2017 10:27:50
65
Engl
ish
3.6.4 „DEVICE NAME“ you can allocate a network name to your WLANmaus here. In order to prevent the same na-
mes in the network, this is automatically supplemented with the last six figures or the MAC address of the WLANmaus. For example: “WLANmaus_A1B2C3“ (Hexadecimal).
3.6.5 „IP-MODE“ Selection possibilities: “DyNAMIC" (pre-set) or “STATIC“. Selection: using the arrow key, confirmation with the OK-key, cancel with the OK-key. “DyNAMIC“: The network information (IP-ADRESSE, SuBNETZMASKE and STD-GATE-WAy) is
automatically obtained from the WLAN router. The obtained information can be displayed in menus 3.6.6-3.6.8.
“STATIC“: The network information (IP-ADRESSE, SuBNETZMASKE and STD-GATE-WAy) are to be entered manually. CAuTION: an extended network knowledge is neces sary! The entry is made in menus 3.6.6-3.6.8.
3.6.6 „IP-ADDRESS“ Display (if IP-MODE = DyNAMIC) or entry (if IP-MODE = STATIC) of the IP address. Clicking
through the four IP positions using the OK-key, changing of the values using the arrow keys or by using the number keys, you can cancel this by using the STOP-key
3.6.7 „SuBNETMASK“ Display (if IP-MODE = DyNAMIC) or entry (if IP-MODE = STATIC) of the subnetwork mask.
Change the value using the arrow keys or by using the number keys, you can cancel this by using the STOP-key.
3.6.8 „STD-GATEWAy“ Display (if IP-MODE = DyNAMIC) or entry (if IP-MODE = STATIC) of the standard gateway.
change the value using the arrow key or by using the number keys, you can cancel this by using the STOP-key.
3.6.9 „MAC-ADRESSE“ Information display: displays the MAC address for your WLANmaus. The display can be clicked
through using the OK-key.
3.6.10 „RSSI“
Information display: displays the WLAN signal strength in dBm (decibel milliwatt).
3.7 „TURN-OFF TIME”“
To save battery power of the WLANmaus, the unut switches off automatically after a defined period of time when not being used. Value range: 1–255, factory setting: 10 minutes ▪ Select with the arrow keys and confirm input with the OK-key. you are returned to “TuRN-OFF TIME.”
Menus
8010813920.indd 65 13.07.2017 10:27:50
6666
4.1 Updating the WLANmausyou can update your WLANmaus using the "Z21-Maintenance" PC tool and your router.you can download the PC tool from our homepage: www.z21.eu.
4.2 Glossary Bits and BytesThe terms bits and bytes were used during the early days of computing and is still encountered with digital model railways. Decimal numbers are not part of the computer world. A new number system was developed, the binary system. This system has only two numbers, 0 and 1. These two numbers also represent switch-ing states. The 1 means switched, enabled, or activated; 0 means not switched, disabled, or deactivated.One bit consists of 0 and 1; eight bits are combined to one byte. The bits combined into one byte are num-bered from 0 (bit 0) to 7 (bit 7). A certain value is assigned to each bit position.
Bit 7 6 5 4 3 2 1 0Value 128 64 32 16 8 4 2 1
If these values are added up, a max. value of 255 per byte (with each bit activated, i.e. set to 1) is derived, which returns us to the decimal system. The min. value is 0, all bits are set to 0.ROCO has significantly simplified programming individual bits in the WLANmaus. If supported by the decoder, you no longer need to calculate certain values but simply select whether to set or not to set a bit in the “PROGRAMMING” menu.Numerous published articles provide additional or in–depth knowledge about this topic.
CVsAll values which affect the behaviour of the locomotive decoder – and ultimately the behaviour of the locomotive – are stored in what are referred to as CVs. CV is the abbreviation for configuration variables. Since the WLANmaus and the Z21 are compatible with the NMRA/DCC standard, CVs between 1 – 1023 can be read and written.CVs range from “0” to “255”. This shows that reprogramming requires experience, as incorrectly set CVs may have an adverse effect on the performance of the decoder.
DecoderIn order to make the digital control signals of the WLANmaus and Z21 accessible to „conventional“ technol-ogy, you require a “translator” – the decoder. It does not replace any of the components in the analogue direct current locomotive but is a necessary addition and must also be given a place in the locomotive housing. For alternating current locomotives on the other hand, the change-over module or relay is replaced by the decoder, not in DCC format but of course Motorola format.
Speed stepsOn a conventional model railway a regulating transformer is used to control locomotives. The transformer emits voltage values to control the locomotive motor between 0 volts and the maximum voltage (typically between 12 and 16 volts) via the controller.In a digital system on the other hand, the track always carries a fixed constant voltage. The motor is con-trolled by the control signals which the decoder converts into voltage values. These signals are made up of “zeros” and “ones” and are therefore modified. The smaller the steps – speed steps – are, the more accurately the locomotive can be controlled. The DCC /NMRA standard, according to which WLANmaus and Z21 works, recognises 14, 27, 28 or 128 speed steps.Decoders (from about 2000 onwards) can be controlled using at least 28 speed steps. They automatically
Part 4 ▪ Appendix
Appendix
8010813920.indd 66 13.07.2017 10:27:50
67
Engl
ish
switch to the number of speed steps set in the locomotive controller (i.e. the WLANmaus and Z21) so that you do not need to make the setting in the decoder yourself. See the respective operating manual to determine whether your decoder is compatible with automatic speed step setting and which speed steps your decoder accepts.
MAC-AddressMAC addresses (Media Access Control Address) is the term used to describe the hardware address of device that is part of the network. Each device can be uniquely identified via its address.
Z21 and BoosterThey supply the model railway system with the necessary voltage and conduct the digital control signals from the WLANmaus to the locomotives, turnouts and other digital accessories.
The WLANmaus cannot be switched on. ▪ Check batteries and replace if necessary.
The WLANmaus is switched on but the short circuit and "STOP" symbol are illuminated.
▪ A system short circuit has occurred (red LED at Z21 flashes).Press the STOP-key or the Z21-STOP-key
▪ The power supply of the Z21 has been interrupted. Check the transformer or the power supply unit.
Library or locomotive address mode:Selected locomotive does not react
▪ Does the locomotive address in the library match the address in the locomotive decoder?
▪ Has an emergency stop or selective emergency stop been triggered?
▪ Select an address in locomotive address mode.
The radio symbol flashes. ▪ There is no connection with the WLAN router.▪ Ensure that the WLAN router is switched on.▪ Check the WLAN settings.
Both of the “arrow” symbols and the pause symbol are flashing, the radio symbol indicates a connection
▪ No communication with the Z21.▪ Check whether the Z21 is switched on.▪ Check the Z21 IP address (see Chapter 3.6.3, page 64)▪ z21start activated with the activation code?
The readout of the decoder data (“PROGRAMMING” menu) triggers the mes-sage “NO CONFIRMATION” in the display.
▪ The decoder cannot be read out.▪ The WLANmaus is set to “POM” mode (Part 3, menu
item 2.5, page 61).▪ Contact problems of the locomotive on the track?
POM mode: Programming is confirmed,but the decoder does not react to an altered value
▪ Decoder needs to be reset: Switch the track voltage off and back on again using the STOP-key (emer-gency stop). See the operating manual for the de-coder.
Resetting (Part 3, Chapter 3.3, page 63) of the WLANmaus is not possible.
▪ Press -key and MENu-key simultaneously and press OK-key briefly
▪ This resets the WLANmaus completely to the factory settings. A reset also deletes the locomotive library and should therefore only be carried out if abso-lutely necessary.
4.3 Tips, Information, and Shortcuts
Appendix
8010813920.indd 67 13.07.2017 10:27:50
6868
The firmware update was unsuccessful or was stopped: it is not possible to connect the WLANmaus to the router.
▪ While the WLANmaus is switched off, press the left ar-row key, the “6“ key and the “7“ key at the same time and keep them pressed down and then confirm this with the OK-key, in order to restart the original WLAN-maus firmware. After the restart has taken place, the ticker text “RESCuE FIRMWARE“ appears in the display..
▪ Switch the WLANmaus off again, press and hold the STOP-key, the “7“ key and the “9“ key at the same time and then confirm this with the OK-key, you thereby switching it back on again so that the origi-nal radio module firmware can be restarted. After the restart has taken place, the ver-sion number of the rescue firmare appears in the display for one second after the initial ticker text “WLANMAuS“
▪ After the restart has been carried out, your WLAN-maus should again be in the delivery condition as far as the software is concerned and it should then be able to connect it with the router.
4.3.1 Programming Help for Lokmaus 2 / R3 – WLANmausPrevious operating manuals for digital ROCO articles (e.g. 42624 turnout drive) only describe the standard programming mode for Lokmaus 2 /R3. The following includes a table which compares the programming procedure for the Lokmaus 2 /R3 and quick programming (see chapter 2.6 on page 52) on the WLANmaus.
For more information see the operating manual for the Lokmaus 2 /R3. To program CV29 see the operating instructions included with the decoder.
CV WLANmaus Lokmaus 2/R3 (for comparison)
1 – Adress +
+
2 – Minimum speed +
+
3 – Start-up delay +
+
4 – Braking delay +
+
5 – Maximum speed +
+
29 – Decoder settings Can only be programmed in menu mode (see page 61)
+
Change speed steps +
/ +
/
Appendix
8010813920.indd 68 13.07.2017 10:27:50
69
Fran
çais
Table des matières
Table des matièresL’évolution de la loco-souris de ROCO — WLANmaus .......................................................................... 70La WLANmaus en un clin d’oeil .............................................................................................................. 70
Chapitre 1 ▪ Les bases – Faites connaissance avec la WLANmaus 1.1 Raccordement de la WLANmaus ...................................................................................................... 711.2 Explications pour la saisie de caractères en entrant de mot de passe et SSID ................................. 721.3 WLANmaus: L’écran d’affichage ...................................................................................................... 731.4 WLANmaus: Les touches ................................................................................................................. 74
Chapitre 2 ▪ Exploitation – Marche et connexion2.1 On démarre 2.1.1 Première exploitation ............................................................................................................. 76 2.1.2 Mise en service d‘une WLANmaus déjà utilisée ...................................................................... 762.2 Sélection de locomotives 2.2.1 Le mode bibliothèque ............................................................................................................. 76 2.2.2 Nouvel enregistrement d‘une locomotive ............................................................................... 77 2.2.3 Le mode adresse locomotive ................................................................................................... 792.3 Marche et fonctions ........................................................................................................................ 792.4 Les fonctions d‘arrêt d‘urgence 2.4.1 Arrêt d‘urgence ...................................................................................................................... 80 2.4.2 Arrêt d‘urgence sélectif ........................................................................................................... 812.5 Commande d‘aiguillages ................................................................................................................. 812.6 Programmation rapide de locomotives et décodeurs ....................................................................... 832.7 Court-circuit et surcharge ................................................................................................................ 84
Chapitre 3 ▪ Les menus –Programmer pour les spécialistes et les futurs «pro»
Les menus de la WLANmaus et leurs fonctions ...................................................................................... 85La structure des menus de la WLANmaus en un coup D’oeil .................................................................. 871 Le menu «LOCO» ............................................................................................................................... 892 Le menu «PROGRAMMER» ................................................................................................................. 913 Le menu «REGLAGES» ........................................................................................................................ 93
Chapitre 4 ▪ Annexe 4.1 Mises à jour de la WLANmaus ......................................................................................................................974.2 Glossaire ......................................................................................................................................... 974.3 Astuces, renseignements et petits dépannages rapides ................................................................... 99 4.3.1 Programmation de la WLANmaus ......................................................................................................100
Remarques concernant le manuelune «» placée devant un mot du texte renvoie à une explication complémentaire du «Glossaire» situé dans le cinquième chapitre du manuel.Un «+» dans les croquis signifie qu‘il faut presser simultanément les deux touches mentionnées.un «/» dans les croquis vous indique qu‘il ne faut presser que l‘une ou l‘autre des deux touches mentionnées.Le triangle rouge «▶» dans les croquis symbolise une déconnexion électrique des rails.
Info : "Z21" dans le mode d’emploi signifie aussi bien les centrales Z21 (noir) que z21 (blanc) et z21start (blanc) avec WLAN-Package.
8010813920.indd 69 13.07.2017 10:27:50
7070
L’évolution de la loco-souris de ROCO — la WLANmausLa WLANmaus est le complément optimal de votre centrale Z21. Elle associe la fonctionnalité de la célèbre Lokmaus au confort d’une centrale numérique élaborée. Que vous utilisez la WLANmaus comme confortable régulateur de la marche de vos machines ou comme programmateur de vos décodeurs »traction« et »moteurs d’aiguilles« ; le dessin clair ainsi que le maniement simple et ergonomique de la WLANmaus la rend exemp-laire pour toute commande numérique d’un réseau miniature.Notre objectif : Concevoir cette nouvelle loco-souris de telle façon qu’elle puisse être utilisée intuitivement. Même les nombreuses nouvelles fonctions qui caractérisent cette loco-souris de dernière génération sont fa-cilement accessibles. La vocation de ce manuel ? Vous montrer tout ce qui est possible avec la WLANmaus.Pour plus de clarté, le manuel a été regroupé en plusieurs chapitres. Ceux qui n’utilisent la WLANmaus que pour faire circuler leurs trains n’ont pas besoin de lire le manuel de »A« à »Z«. La lecture du premier chapitre suffit. Ce premier chapitre comprend les informations essentielles concernant le raccordement et le manie-ment de la WLANmaus Pour utiliser les multiples possibilités de programmation de la WLANmaus, veuillez vous référer au deuxième chapitre qui vous fournit toutes les informations nécessaires.Finalement, le troisième chapitre est consacré aux sujets spécifiques du train miniature à commande numé-rique et comprend un glossaire englobant les termes techniques élémentaires que vous allez toujours ren-contrer en vous occupant de train miniature à commande numérique.Nous vous souhaitons une lecture enrichissante et divertissante ainsi que beaucoup de plaisir avec votre nouvelle WLANmausCordialement vôtre, Modelleisenbahn GmbH.
La WLANmaus en un clin d’oeilLa conception▪ dessein ergonomique permettant une commande à une seule main▪ grand écran à cristaux liquides avec éclairage translucide▪ réglage simple de la vitesse et de la direction de la locomotive par bouton régulateur▪ position »0« précise du bouton régulateur par encoche▪ le parfait complément pour votre Z21▪ permet l’intégration au système ROCO de commande numérique de 31 autres appareils de com-
mande tels que d’autres locomäuse et multiMÄUSE / WLANmäuse, claviers numériques »appareils de voie« ou »Route Control«, etc.
▪ produit d'avenir grâce à des possibilités de mise à jour
Les possibilités▪ gestion de 9.999 adresses »traction«, par bibliothèque »traction« ou directement par adresses »traction«▪ affichage alphanumérique des noms des machines par base de données »traction« à 100 noms individuels▪ commande du matériel moteur à 14, 28 ou 128 crans, à programmer individuellement pour chaque
adresse »traction«▪ commande des feux des machines et d’autres 28 fonctions supplémentaires par adresse »traction«▪ commande jusqu'à 2 048 adresses (d‘aiguillage) d‘articles magnétiques▪ lire et écrire les variables de configuration (DCC-CVs 1 – 1024, plage des valeurs : 0 à 255)
Fonctions de sécurité▪ liaison radio stable grâce à un standard radio numérique „WLAN“ IEEE 802.11 mit 2,4 GHz▪ arrêt d‘urgence avec déconnexion de toute l‘installation, arrêt d‘urgence sélectif pour la locomotive
sélectionnée▪ Protection «enfants» de fonctions pouvant poser problème aux enfants (blocage des fonctions «pro-
grammation», par exemple)
L'evolution de la loco-souris de ROCO — la WLANmaus
8010813920.indd 70 13.07.2017 10:27:51
71
Fran
çais
Chapitre 1 ▪ Les bases
1.1 Raccordement de la WLANmausVous avez besoin :▪ WLANmaus (3 piles ou accus de type AAA (micro).▪ Centrales Z21, z21, ou z21start avec alimentation à découpage.Important : veuillez noter que votre centrale z21start doit être débloquée à l’aide du code de déverrouillage z21. Le code de déverrouillage est contenu dans Roco réf. 10814 ou 10818.▪ Routeur WLAN Z21 ou un propre routeur WLAN configuré pour la Z21.Vous trouverez dans le mode d’emploi de la Z21 la liste des appareils qui peuvent être encore raccordés à la Z21.
Avant de commencer le raccordement, il faut absolument observer les indications suivantes :
un emploi hybride de composants numériques ROCO et/ou Fleischmann avec des composants d‘autres fabricants provoquera une perte de garantie en cas de dommages ou de dysfonctionnements. Toute ouverture du boîtier de la WLANmaus (sauf le compartiment des batteries) causera également une perte de garantie.Tous travaux de câblage sont à faire l‘alimentation déconnectée. Travaillez avec précaution et veillez à ce tout risque éventuel de court-circuits soit exclu à coup sûr lors du raccordement au système de voie ! un câblage erroné peut détruire des composantes électroniques de votre commande numérique. En cas de doute, consultez votre détaillant spécialisé.En aucun cas, ne pas raccorder en parallèle un transformateur classique et une commande numérique au même réseau. Les composants numériques de la Z21 risquent alors d‘être détruits !Les actuels amplificateurs ROCO 10761 et 10764 ne peuvent pas être utilisés avec la WLANmaus et la Z21.La WLANmaus est alimentée par 3 batteries de modèle AAA (micro) de 1,5 volts ou 3 accus de même type de 1,2 volts En insérant les piles ou accus, respectez la polarité et faites attention à ce qu‘ils aient le même état de charge ! Vous trouverez les remarques concernant l‘utilisation des piles et accus au dos du manuel.
1. Placez votre routeur WLAN de façon centrale à l’installation, de sorte qu’entre votre routeur et la WLANmaus il n’y ait aucune cloison de séparation pouvant perturber la connexion WLAN. Raccordez le routeur WLAN à votre Z21.
2. Vissez le compartiment à piles à l’arrière de la WLANmaus, tirez le cliquet et insérez les piles ou les accus. Il faut absolument respecter la polarité ! Ensuite fermez le compartiment à piles en le vissant.
3. Appuyez sur la touche « OK» pour mettre en marche la WLANmaus. Sélectionnez la langue souhaitée en actionnant les touches flèches. Appuyez à nouveau sur la touche « OK».
4. WLANmaus doit être débranchée, appuyez simultanément sur la touche MENu et la touche « OK».
Première mise en service :Lors de la première mise en service de la WLANmaus, vous êtes invité à en entrer les informations WLAN de votre routeur WLAN.1. L’écran affiche „SSID?“ Continuez en cliquant sur « OK».2. L’écran affiche „SUCHEN“ (CHERCHER) Continuez en cliquant sur « OK». La WLANmaus cherche
les réseaux WLAN disponibles à proximité de chez vous et vous les indique.Si votre réseau ne s’affiche pas dans la liste des résultats, interrompez le procédé en appuyant sur la touche STOP. Le chapitre 3.6.1, page 94 vous indique la saisie manuelle du réseau.
3. Sélectionnez à l’aide des touches flèches votre réseau WLAN souhaité et confirmez en appuyant sur la touche « OK».
Les bases
8010813920.indd 71 13.07.2017 10:27:51
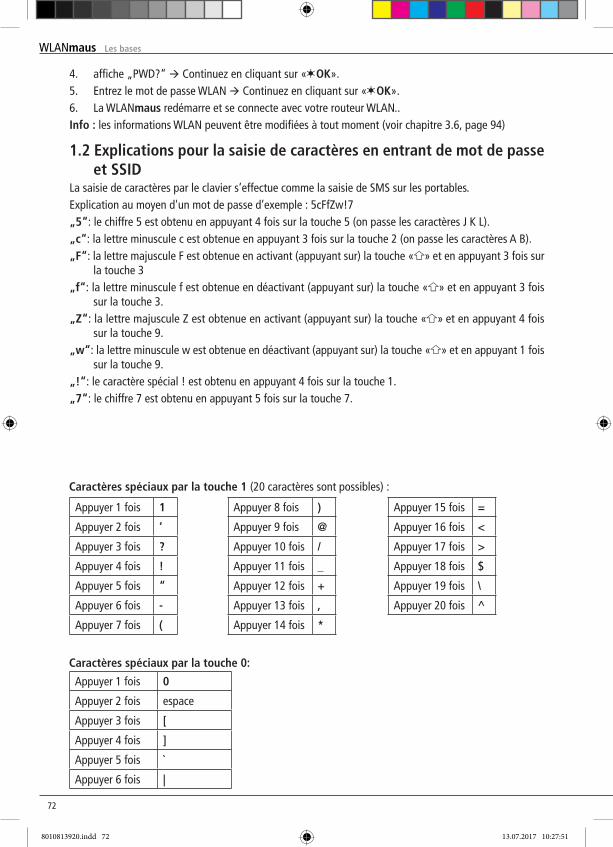
7272
4. affiche „PWD?“ Continuez en cliquant sur « OK».5. Entrez le mot de passe WLAN Continuez en cliquant sur « OK».6. La WLANmaus redémarre et se connecte avec votre routeur WLAN..Info : les informations WLAN peuvent être modifiées à tout moment (voir chapitre 3.6, page 94)
1.2 Explications pour la saisie de caractères en entrant de mot de passe et SSID
La saisie de caractères par le clavier s’effectue comme la saisie de SMS sur les portables.Explication au moyen d'un mot de passe d’exemple : 5cFfZw!7„5“: le chiffre 5 est obtenu en appuyant 4 fois sur la touche 5 (on passe les caractères J K L).„c“: la lettre minuscule c est obtenue en appuyant 3 fois sur la touche 2 (on passe les caractères A B).„F“: la lettre majuscule F est obtenue en activant (appuyant sur) la touche « » et en appuyant 3 fois sur
la touche 3„f“: la lettre minuscule f est obtenue en déactivant (appuyant sur) la touche « » et en appuyant 3 fois
sur la touche 3.„Z“: la lettre majuscule Z est obtenue en activant (appuyant sur) la touche « » et en appuyant 4 fois
sur la touche 9.„w“: la lettre minuscule w est obtenue en déactivant (appuyant sur) la touche « » et en appuyant 1 fois
sur la touche 9.„!“: le caractère spécial ! est obtenu en appuyant 4 fois sur la touche 1.„7“: le chiffre 7 est obtenu en appuyant 5 fois sur la touche 7.
Appuyer 1 fois 1
Appuyer 2 fois ‘
Appuyer 3 fois ?
Appuyer 4 fois !
Appuyer 5 fois “
Appuyer 6 fois -
Appuyer 7 fois (
Caractères spéciaux par la touche 0:
Appuyer 8 fois )
Appuyer 9 fois @
Appuyer 10 fois /
Appuyer 11 fois _
Appuyer 12 fois +
Appuyer 13 fois ,
Appuyer 14 fois *
Caractères spéciaux par la touche 1 (20 caractères sont possibles) :
Appuyer 1 fois 0
Appuyer 2 fois espace
Appuyer 3 fois [
Appuyer 4 fois ]
Appuyer 5 fois `
Appuyer 6 fois |
Appuyer 15 fois =
Appuyer 16 fois <
Appuyer 17 fois >
Appuyer 18 fois $
Appuyer 19 fois \
Appuyer 20 fois ^
Les bases
8010813920.indd 72 13.07.2017 10:27:51
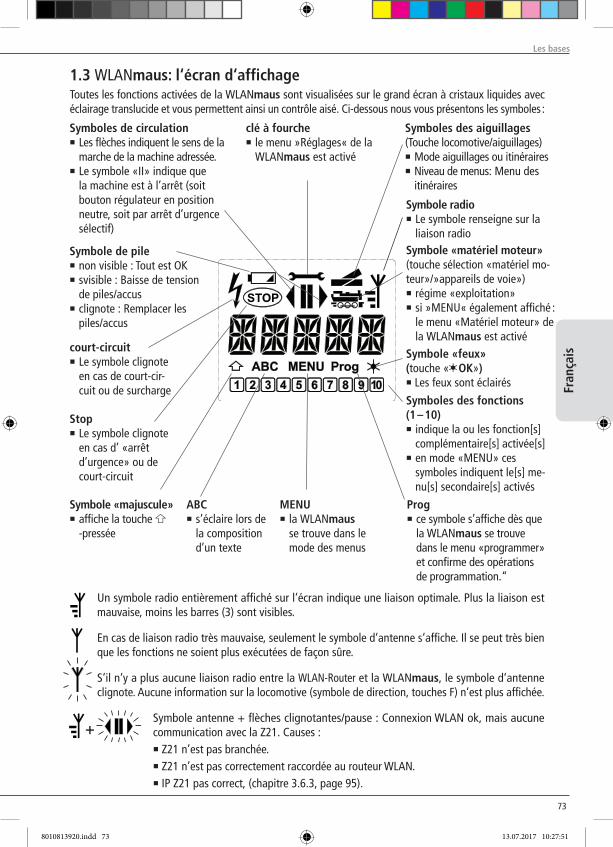
73
Fran
çais
1.3 WLANmaus: l‘écran d‘affichageToutes les fonctions activées de la WLANmaus sont visualisées sur le grand écran à cristaux liquides avec éclairage translucide et vous permettent ainsi un contrôle aisé. Ci-dessous nous vous présentons les symboles :
Symbole «feux» (touche « OK»)▪ Les feux sont éclairés
Symboles des aiguillages(Touche locomotive/aiguillages)▪ Mode aiguillages ou itinéraires▪ Niveau de menus: Menu des
itinéraires
Symbole «matériel moteur»(touche sélection «matériel mo-teur»/»appareils de voie»)▪ régime «exploitation»▪ si »MENU« également affiché :
le menu «Matériel moteur» de la WLANmaus est activé
court-circuit▪ Le symbole clignote
en cas de court-cir-cuit ou de surcharge
Stop▪ Le symbole clignote
en cas d’ «arrêt d’urgence» ou de court-circuit
MENU▪ la WLANmaus
se trouve dans le mode des menus
Prog▪ ce symbole s’affiche dès que
la WLANmaus se trouve dans le menu «programmer» et confirme des opérations de programmation.“
ABC▪ s’éclaire lors de
la composition d’un texte
clé à fourche▪ le menu »Réglages« de la
WLANmaus est activé
Symboles des fonctions (1 – 10)▪ indique la ou les fonction[s]
complémentaire[s] activée[s]▪ en mode «MENu» ces
symboles indiquent le[s] me-nu[s] secondaire[s] activés
Symboles de circulation▪ Les flèches indiquent le sens de la
marche de la machine adressée.▪ Le symbole «II» indique que
la machine est à l’arrêt (soit bouton régulateur en position neutre, soit par arrêt d’urgence sélectif)
Symbole «majuscule»▪ affiche la touche
-pressée
Symbole de pile▪ non visible : Tout est OK▪ svisible : Baisse de tension
de piles/accus▪ clignote : Remplacer les
piles/accus
Symbole radio▪ Le symbole renseigne sur la
liaison radio
Un symbole radio entièrement affiché sur l‘écran indique une liaison optimale. Plus la liaison est mauvaise, moins les barres (3) sont visibles.
En cas de liaison radio très mauvaise, seulement le symbole d‘antenne s‘affiche. Il se peut très bien que les fonctions ne soient plus exécutées de façon sûre.
S‘il n‘y a plus aucune liaison radio entre la WLAN-Router et la WLANmaus, le symbole d‘antenne clignote. Aucune information sur la locomotive (symbole de direction, touches F) n‘est plus affichée.
Symbole antenne + flèches clignotantes/pause : Connexion WLAN ok, mais aucune communication avec la Z21. Causes : ▪ Z21 n’est pas branchée.▪ Z21 n’est pas correctement raccordée au routeur WLAN.▪ IP Z21 pas correct, (chapitre 3.6.3, page 95).
+
Les bases
8010813920.indd 73 13.07.2017 10:27:51
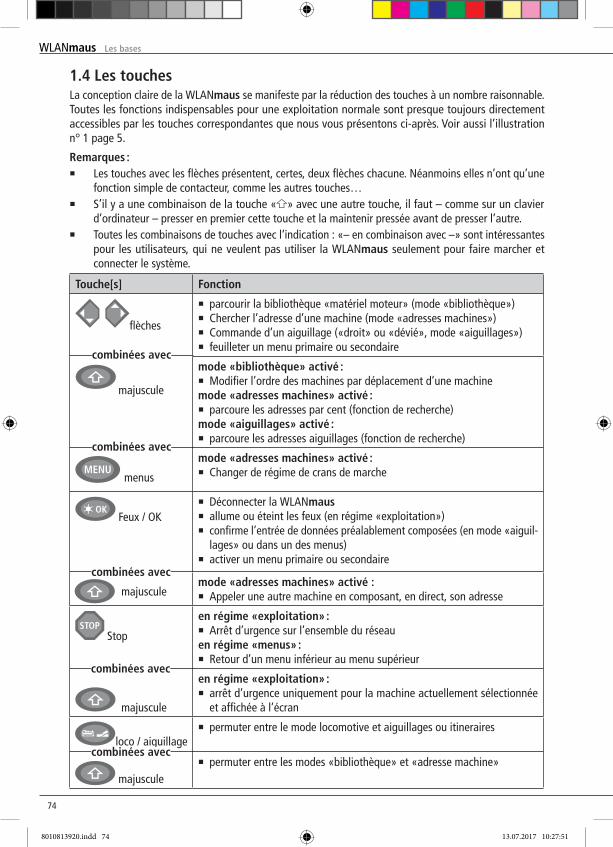
7474
1.4 Les touchesLa conception claire de la WLANmaus se manifeste par la réduction des touches à un nombre raisonnable. Toutes les fonctions indispensables pour une exploitation normale sont presque toujours directement accessibles par les touches correspondantes que nous vous présentons ci-après. Voir aussi l’illustration n° 1 page 5.
Remarques :▪ Les touches avec les flèches présentent, certes, deux flèches chacune. Néanmoins elles n’ont qu’une
fonction simple de contacteur, comme les autres touches…▪ S’il y a une combinaison de la touche « » avec une autre touche, il faut – comme sur un clavier
d’ordinateur – presser en premier cette touche et la maintenir pressée avant de presser l’autre.▪ Toutes les combinaisons de touches avec l‘indication : «– en combinaison avec –» sont intéressantes
pour les utilisateurs, qui ne veulent pas utiliser la WLANmaus seulement pour faire marcher et connecter le système.
Touche[s] Fonction
flèches
majuscule
menus
▪ parcourir la bibliothèque «matériel moteur» (mode «bibliothèque»)▪ Chercher l’adresse d’une machine (mode «adresses machines»)▪ Commande d’un aiguillage («droit» ou «dévié», mode «aiguillages»)▪ feuilleter un menu primaire ou secondaire
mode «bibliothèque» activé :▪ Modifier l’ordre des machines par déplacement d’une machinemode «adresses machines» activé :▪ parcoure les adresses par cent (fonction de recherche)mode «aiguillages» activé :▪ parcoure les adresses aiguillages (fonction de recherche)
mode «adresses machines» activé :▪ Changer de régime de crans de marche
Feux / OK
majuscule
▪ Déconnecter la WLANmaus▪ allume ou éteint les feux (en régime «exploitation»)▪ confirme l’entrée de données préalablement composées (en mode «aiguil-
lages» ou dans un des menus)▪ activer un menu primaire ou secondaire
mode «adresses machines» activé :▪ Appeler une autre machine en composant, en direct, son adresse
Stop
majuscule
en régime «exploitation» :▪ Arrêt d’urgence sur l’ensemble du réseauen régime «menus» :▪ Retour d’un menu inférieur au menu supérieur
en régime «exploitation» :▪ arrêt d’urgence uniquement pour la machine actuellement sélectionnée
et affichée à l’écran
loco / aiguillage
▪ permuter entre le mode locomotive et aiguillages ou itineraires
majuscule
▪ permuter entre les modes «bibliothèque» et «adresse machine»
combinées avec
combinées avec
combinées avec
combinées avec
combinées avec
Les bases
8010813920.indd 74 13.07.2017 10:27:51
75
Fran
çais
Touche[s] Fonction
…fonctions
majuscule
en régime «exploitation» :▪ Connecte ou déconnecte directement les fonctions locomotive F1–F10.
Les fonctions locomotive F11–F20 sont activées sont activées par les touches 1–10 en association
avec la touche « ». Les fonctions locomotive F21-F28 sont activées par les touches 1-8, une fois que le niveau F21-F28 a été activé par double clic bref sur la touche « » (le symbole « » s’arrête). Vous voyez les fonctions locomotive activées sur l’écran.
en mode «menu» :▪ enregister un nom alphanumérique d’une machine dans la bibliothèque▪ accès rapide aux options du menu activéen mode »appareils de voie«▪ composition directe du numéro de l’aiguillage▪ Activer ou désactiver les fonctions F11 à F20 de la machine. Pour vérifier les
fonctions de ce groupe actuellement activées presser la touche .en mode «appareils de voie»▪ Commande directe d’un sur dix aiguillages préalablement enregistrés
(Touches rapides «aiguillages»). Pas de commande d’itinéraires !
majusculeen régime «exploitation» :▪ Affichage des fonctions activées du groupe F11 à F20.
majusculeDouble clic : le symbole « » clignote. Les fonctions F21–F28 peuvent être
activées. En appuyant encore une fois, le symbole « » dispa-raît. Retour au niveau F1-F10.
menus
majuscule
fonctions
▪ passer au mode «menu» (presser la touche pressée pendant 5 secondes environ)
▪ retour direct de n’importe quel menu primaire ou secondaire au mode «machine /aiguillages /itineraires»
▪ passer au mode «menus»▪ retour direct de tous les niveaux de menus dans le mode locomotive/
aiguillages /itineraires
en modes «bibliothèque» ou «adresses machines»▪ Programmation rapide des variables CV 1 à CV 5 et CV 8 (presser d’abord
la touche «MENu» et la maintenir pressée)en mode «appareils de voie» :▪ accès rapide aux aiguillages mémorisées par ces touches
Feux / OK
▪ Connecter la WLANmaus
…
Pour les utilisateurs, qui veulent se servir des nombreuses fonctions de menu de la WLANmaus.A noter : Vous trouverez des renseignements complémentaires concernant les fonctions de programmation au chapitre 3, à partir de la page 117.
combinées avec
combinées avec
combinées avec
Les bases
8010813920.indd 75 13.07.2017 10:27:51
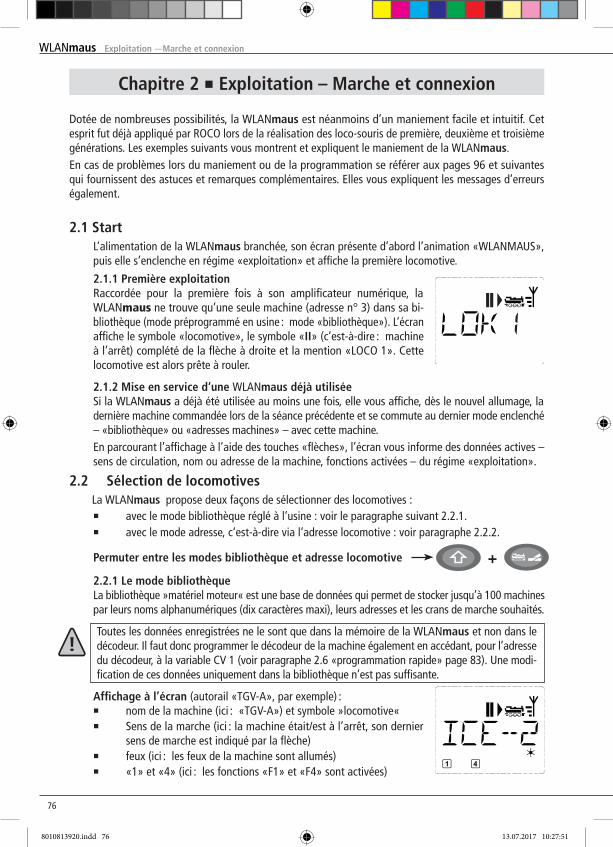
7676
Chapitre 2 ▪ Exploitation – Marche et connexion
Dotée de nombreuses possibilités, la WLANmaus est néanmoins d’un maniement facile et intuitif. Cet esprit fut déjà appliqué par ROCO lors de la réalisation des loco-souris de première, deuxième et troisième générations. Les exemples suivants vous montrent et expliquent le maniement de la WLANmaus.En cas de problèmes lors du maniement ou de la programmation se référer aux pages 96 et suivantes qui fournissent des astuces et remarques complémentaires. Elles vous expliquent les messages d’erreurs également.
2.1 Start L’alimentation de la WLANmaus branchée, son écran présente d’abord l’animation «WLANMAuS»,
puis elle s’enclenche en régime «exploitation» et affiche la première locomotive.
2.1.1 Première exploitation Raccordée pour la première fois à son amplificateur numérique, la
WLANmaus ne trouve qu’une seule machine (adresse n° 3) dans sa bi-bliothèque (mode préprogrammé en usine : mode «bibliothèque»). L’écran affiche le symbole «locomotive», le symbole «II» (c’est-à-dire : machine à l’arrêt) complété de la flèche à droite et la mention «LOCO 1». Cette locomotive est alors prête à rouler.
2.1.2 Mise en service d‘une WLANmaus déjà utilisée Si la WLANmaus a déjà été utilisée au moins une fois, elle vous affiche, dès le nouvel allumage, la
dernière machine commandée lors de la séance précédente et se commute au dernier mode enclenché – «bibliothèque» ou «adresses machines» – avec cette machine.
En parcourant l’affichage à l’aide des touches «flèches», l’écran vous informe des données actives – sens de circulation, nom ou adresse de la machine, fonctions activées – du régime «exploitation».
2.2 Sélection de locomotivesLa WLANmaus propose deux façons de sélectionner des locomotives :
▪ avec le mode bibliothèque réglé à l‘usine : voir le paragraphe suivant 2.2.1. ▪ avec le mode adresse, c‘est-à-dire via l‘adresse locomotive : voir paragraphe 2.2.2.
Permuter entre les modes bibliothèque et adresse locomotive + 2.2.1 Le mode bibliothèque La bibliothèque »matériel moteur« est une base de données qui permet de stocker jusqu’à 100 machines
par leurs noms alphanumériques (dix caractères maxi), leurs adresses et les crans de marche souhaités.
Toutes les données enregistrées ne le sont que dans la mémoire de la WLANmaus et non dans le décodeur. Il faut donc programmer le décodeur de la machine également en accédant, pour l’adresse du décodeur, à la variable CV 1 (voir paragraphe 2.6 «programmation rapide» page 83). une modi-fication de ces données uniquement dans la bibliothèque n’est pas suffisante.
Affichage à l’écran (autorail «TGV-A», par exemple) : ▪ nom de la machine (ici : «TGV-A») et symbole »locomotive« ▪ Sens de la marche (ici : la machine était/est à l’arrêt, son dernier
sens de marche est indiqué par la flèche) ▪ feux (ici : les feux de la machine sont allumés) ▪ «1» et «4» (ici : les fonctions «F1» et «F4» sont activées)
Exploitation —Marche et connexion
8010813920.indd 76 13.07.2017 10:27:51
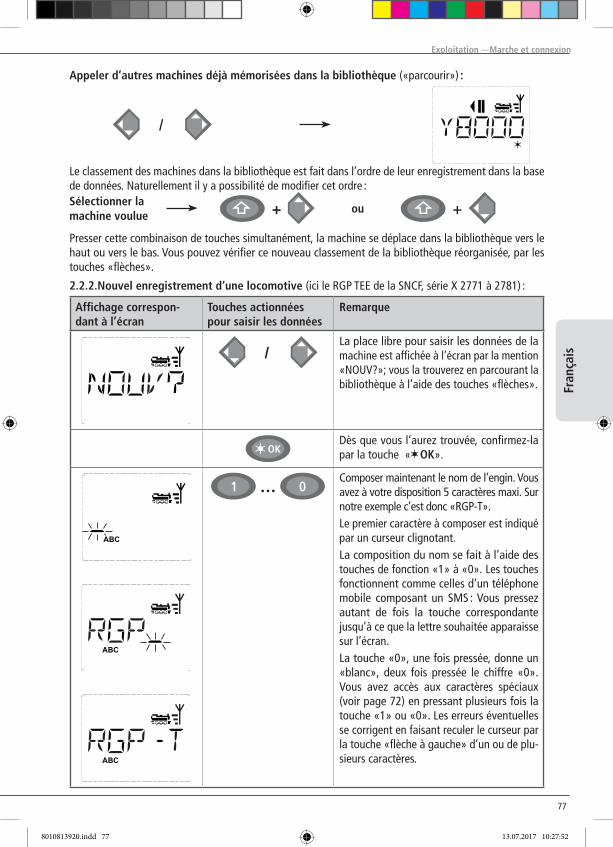
77
Fran
çais
2.2.2.Nouvel enregistrement d‘une locomotive (ici le RGP TEE de la SNCF, série X 2771 à 2781) :
Appeler d’autres machines déjà mémorisées dans la bibliothèque («parcourir») :
Le classement des machines dans la bibliothèque est fait dans l’ordre de leur enregistrement dans la base de données. Naturellement il y a possibilité de modifier cet ordre :
ou ++Sélectionner lamachine voulue
Presser cette combinaison de touches simultanément, la machine se déplace dans la bibliothèque vers le haut ou vers le bas. Vous pouvez vérifier ce nouveau classement de la bibliothèque réorganisée, par les touches «flèches».
/
Affichage correspon-dant à l’écran
Touches actionnées pour saisir les données
Remarque
/La place libre pour saisir les données de la machine est affichée à l’écran par la mention «NOuV?»; vous la trouverez en parcourant la bibliothèque à l’aide des touches «flèches».
Dès que vous l’aurez trouvée, confirmez-la par la touche « OK».
…Composer maintenant le nom de l’engin. Vous avez à votre disposition 5 caractères maxi. Sur notre exemple c’est donc «RGP-T».Le premier caractère à composer est indiqué par un curseur clignotant.La composition du nom se fait à l’aide des touches de fonction «1» à «0». Les touches fonctionnent comme celles d’un téléphone mobile composant un SMS : Vous pressez autant de fois la touche correspondante jusqu’à ce que la lettre souhaitée apparaisse sur l’écran.La touche «0», une fois pressée, donne un «blanc», deux fois pressée le chiffre «0». Vous avez accès aux caractères spéciaux (voir page 72) en pressant plusieurs fois la touche «1» ou «0». Les erreurs éventuelles se corrigent en faisant reculer le curseur par la touche «flèche à gauche» d’un ou de plu-sieurs caractères.
Exploitation —Marche et connexion
8010813920.indd 77 13.07.2017 10:27:52
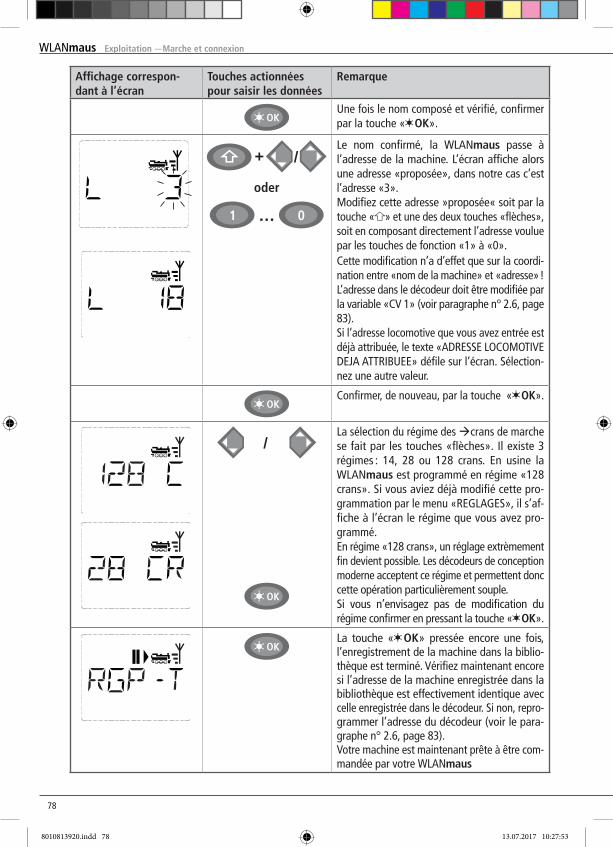
7878
Affichage correspon-dant à l’écran
Touches actionnées pour saisir les données
Remarque
Une fois le nom composé et vérifié, confirmer par la touche « OK».
/+
oder
…
Le nom confirmé, la WLANmaus passe à l’adresse de la machine. L’écran affiche alors une adresse «proposée», dans notre cas c’est l’adresse «3».Modifiez cette adresse »proposée« soit par la touche « » et une des deux touches «flèches», soit en composant directement l’adresse voulue par les touches de fonction «1» à «0».Cette modification n’a d’effet que sur la coordi-nation entre «nom de la machine» et «adresse» ! L’adresse dans le décodeur doit être modifiée par la variable «CV 1» (voir paragraphe n° 2.6, page 83).Si l‘adresse locomotive que vous avez entrée est déjà attribuée, le texte «ADRESSE LOCOMOTIVE DEJA ATTRIBUEE» défile sur l‘écran. Sélection-nez une autre valeur.
Confirmer, de nouveau, par la touche « OK».
/La sélection du régime des crans de marche se fait par les touches «flèches». Il existe 3 régimes : 14, 28 ou 128 crans. En usine la WLANmaus est programmé en régime «128 crans». Si vous aviez déjà modifié cette pro-grammation par le menu «REGLAGES», il s’af-fiche à l’écran le régime que vous avez pro-grammé.En régime «128 crans», un réglage extrèmement fin devient possible. Les décodeurs de conception moderne acceptent ce régime et permettent donc cette opération particulièrement souple.Si vous n’envisagez pas de modification du régime confirmer en pressant la touche « OK».
La touche « OK» pressée encore une fois, l’enregistrement de la machine dans la biblio-thèque est terminé. Vérifiez maintenant encore si l’adresse de la machine enregistrée dans la bibliothèque est effectivement identique avec celle enregistrée dans le décodeur. Si non, repro-grammer l’adresse du décodeur (voir le para-graphe n° 2.6, page 83).Votre machine est maintenant prête à être com-mandée par votre WLANmaus
Exploitation —Marche et connexion
8010813920.indd 78 13.07.2017 10:27:53
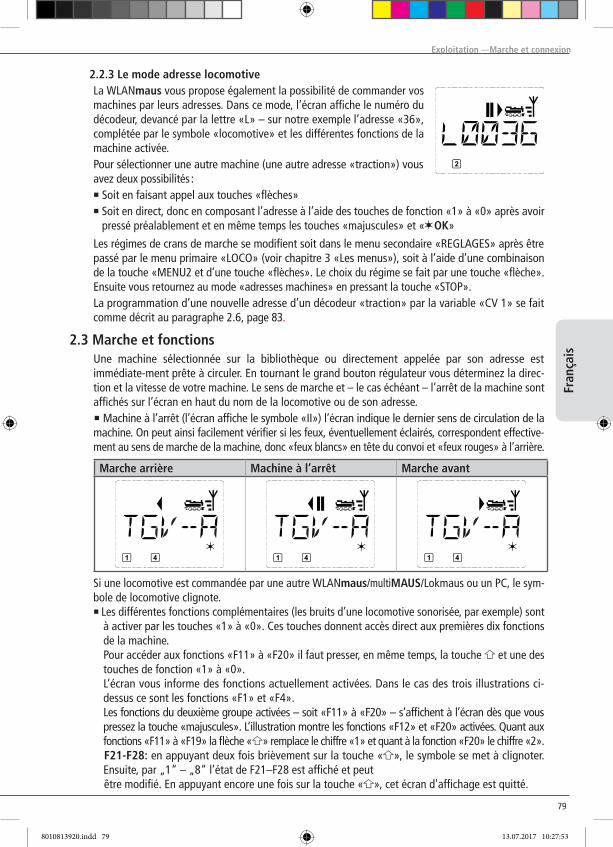
79
Fran
çais
2.2.3 Le mode adresse locomotive La WLANmaus vous propose également la possibilité de commander vos
machines par leurs adresses. Dans ce mode, l’écran affiche le numéro du décodeur, devancé par la lettre «L» – sur notre exemple l’adresse «36», complétée par le symbole «locomotive» et les différentes fonctions de la machine activée.
Pour sélectionner une autre machine (une autre adresse «traction») vous avez deux possibilités :
▪ Soit en faisant appel aux touches «flèches» ▪ Soit en direct, donc en composant l’adresse à l’aide des touches de fonction «1» à «0» après avoir pressé préalablement et en même temps les touches «majuscules» et « OK»
Les régimes de crans de marche se modifient soit dans le menu secondaire «REGLAGES» après être passé par le menu primaire «LOCO» (voir chapitre 3 «Les menus»), soit à l’aide d’une combinaison de la touche «MENU2 et d’une touche «flèches». Le choix du régime se fait par une touche «flèche». Ensuite vous retournez au mode «adresses machines» en pressant la touche «STOP».
La programmation d’une nouvelle adresse d’un décodeur «traction» par la variable «CV 1» se fait comme décrit au paragraphe 2.6, page 83.
2.3 Marche et fonctions une machine sélectionnée sur la bibliothèque ou directement appelée par son adresse est
immédiate-ment prête à circuler. En tournant le grand bouton régulateur vous déterminez la direc-tion et la vitesse de votre machine. Le sens de marche et – le cas échéant – l’arrêt de la machine sont affichés sur l’écran en haut du nom de la locomotive ou de son adresse.
▪ Machine à l’arrêt (l’écran affiche le symbole «II») l’écran indique le dernier sens de circulation de la machine. On peut ainsi facilement vérifier si les feux, éventuellement éclairés, correspondent effective-ment au sens de marche de la machine, donc «feux blancs» en tête du convoi et «feux rouges» à l’arrière.
Marche arrière Machine à l’arrêt Marche avant
Si une locomotive est commandée par une autre WLANmaus/multiMAUS/Lokmaus ou un PC, le sym-bole de locomotive clignote. ▪ Les différentes fonctions complémentaires (les bruits d’une locomotive sonorisée, par exemple) sont
à activer par les touches «1» à «0». Ces touches donnent accès direct aux premières dix fonctions de la machine.
Pour accéder aux fonctions «F11» à «F20» il faut presser, en même temps, la touche et une des touches de fonction «1» à «0».
L’écran vous informe des fonctions actuellement activées. Dans le cas des trois illustrations ci-dessus ce sont les fonctions «F1» et «F4».
Les fonctions du deuxième groupe activées – soit «F11» à «F20» – s’affichent à l’écran dès que vous pressez la touche «majuscules». L’illustration montre les fonctions «F12» et «F20» activées. Quant aux fonctions «F11» à «F19» la flèche « » remplace le chiffre «1» et quant à la fonction «F20» le chiffre «2».F21-F28: en appuyant deux fois brièvement sur la touche « », le symbole se met à clignoter. Ensuite, par „1“ – „8“ l’état de F21–F28 est affiché et peutêtre modifié. En appuyant encore une fois sur la touche « », cet écran d'affichage est quitté.
Exploitation —Marche et connexion
8010813920.indd 79 13.07.2017 10:27:53
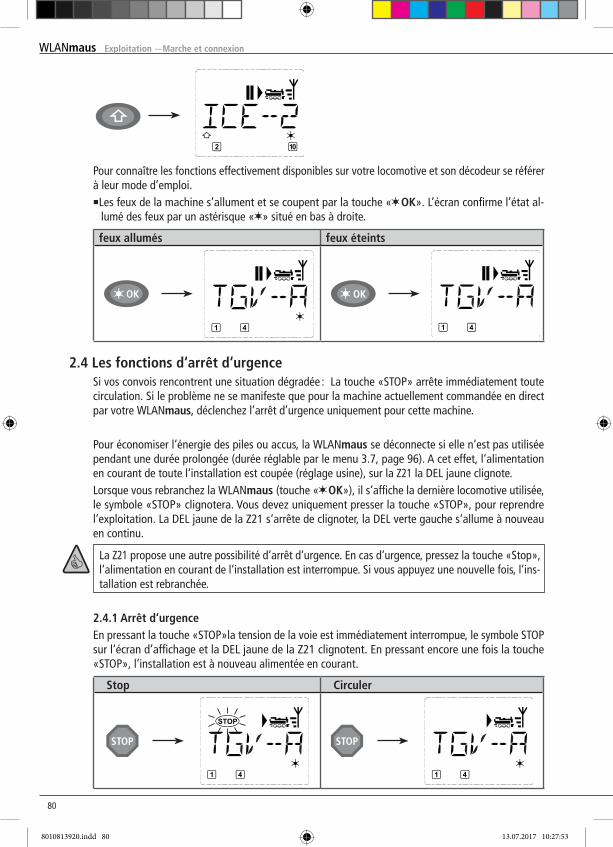
8080
Pour connaître les fonctions effectivement disponibles sur votre locomotive et son décodeur se référer à leur mode d’emploi.▪Les feux de la machine s’allument et se coupent par la touche « OK». L’écran confirme l’état al-
lumé des feux par un astérisque « » situé en bas à droite.
feux allumés feux éteints
2.4 Les fonctions d‘arrêt d‘urgence Si vos convois rencontrent une situation dégradée : La touche «STOP» arrête immédiatement toute
circulation. Si le problème ne se manifeste que pour la machine actuellement commandée en direct par votre WLANmaus, déclenchez l’arrêt d’urgence uniquement pour cette machine.
Pour économiser l‘énergie des piles ou accus, la WLANmaus se déconnecte si elle n‘est pas utilisée pendant une durée prolongée (durée réglable par le menu 3.7, page 96). A cet effet, l‘alimentation en courant de toute l‘installation est coupée (réglage usine), sur la Z21 la DEL jaune clignote.
Lorsque vous rebranchez la WLANmaus (touche « OK»), il s‘affiche la dernière locomotive utilisée, le symbole «STOP» clignotera. Vous devez uniquement presser la touche «STOP», pour reprendre l‘exploitation. La DEL jaune de la Z21 s‘arrête de clignoter, la DEL verte gauche s‘allume à nouveau en continu.
La Z21 propose une autre possibilité d‘arrêt d‘urgence. En cas d‘urgence, pressez la touche «Stop», l‘alimentation en courant de l‘installation est interrompue. Si vous appuyez une nouvelle fois, l‘ins-tallation est rebranchée.
2.4.1 Arrêt d‘urgence En pressant la touche «STOP»la tension de la voie est immédiatement interrompue, le symbole STOP
sur l‘écran d‘affichage et la DEL jaune de la Z21 clignotent. En pressant encore une fois la touche «STOP», l‘installation est à nouveau alimentée en courant.
Stop Circuler
Exploitation —Marche et connexion
8010813920.indd 80 13.07.2017 10:27:53
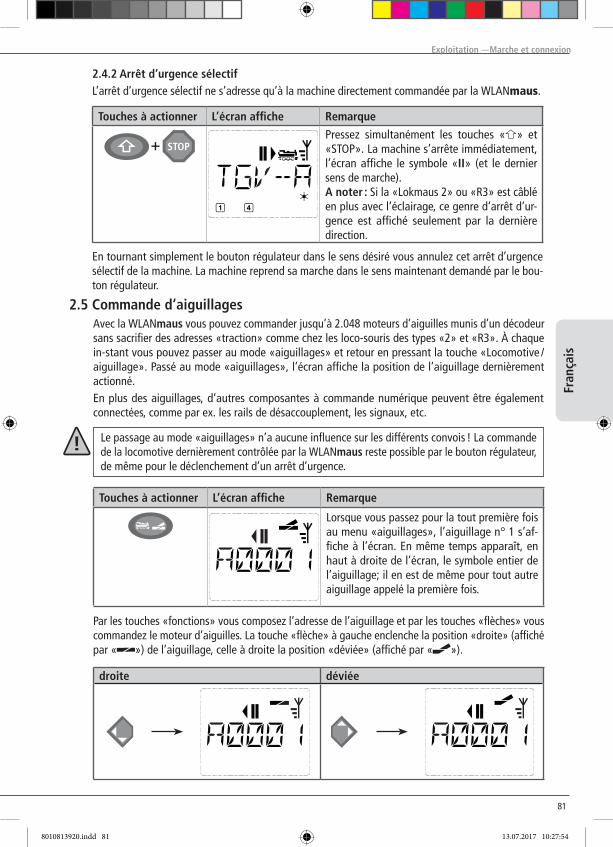
81
Fran
çais
2.4.2 Arrêt d‘urgence sélectif L’arrêt d’urgence sélectif ne s’adresse qu’à la machine directement commandée par la WLANmaus.
Touches à actionner L’écran affiche Remarque
Pressez simultanément les touches « » et «STOP». La machine s’arrête immédiatement, l’écran affiche le symbole «II» (et le dernier sens de marche).A noter : Si la «Lokmaus 2» ou «R3» est câblé en plus avec l‘éclairage, ce genre d‘arrêt d‘ur-gence est affiché seulement par la dernière direction.
En tournant simplement le bouton régulateur dans le sens désiré vous annulez cet arrêt d’urgence sélectif de la machine. La machine reprend sa marche dans le sens maintenant demandé par le bou-ton régulateur.
2.5 Commande d‘aiguillages Avec la WLANmaus vous pouvez commander jusqu’à 2.048 moteurs d’aiguilles munis d’un décodeur
sans sacrifier des adresses «traction» comme chez les loco-souris des types «2» et «R3». À chaque in-stant vous pouvez passer au mode «aiguillages» et retour en pressant la touche «Locomotive /aiguillage». Passé au mode «aiguillages», l’écran affiche la position de l’aiguillage dernièrement actionné.
En plus des aiguillages, d‘autres composantes à commande numérique peuvent être également connectées, comme par ex. les rails de désaccouplement, les signaux, etc.
Le passage au mode «aiguillages» n’a aucune influence sur les différents convois ! La commande de la locomotive dernièrement contrôlée par la WLANmaus reste possible par le bouton régulateur, de même pour le déclenchement d’un arrêt d’urgence.
Touches à actionner L’écran affiche Remarque
Lorsque vous passez pour la tout première fois au menu «aiguillages», l’aiguillage n° 1 s’af-fiche à l’écran. En même temps apparaît, en haut à droite de l’écran, le symbole entier de l’aiguillage; il en est de même pour tout autre aiguillage appelé la première fois.
Par les touches «fonctions» vous composez l’adresse de l’aiguillage et par les touches «flèches» vous commandez le moteur d’aiguilles. La touche «flèche» à gauche enclenche la position «droite» (affiché par « ») de l’aiguillage, celle à droite la position «déviée» (affiché par « »).
droite déviée
Exploitation —Marche et connexion
8010813920.indd 81 13.07.2017 10:27:54

8282
Les aiguilles changent de position au moment ou vous pressez une des deux touches «flèches». En même temps, la nouvelle position des aiguilles est mémorisée par la WLANmaus et confirmée par la mise à «0» des premiers chiffres libres suivant la lettre «A», si l’adresse du moteur n’a que trois chiffres maxi.
L’affichage de la position des aiguilles à l’écran n’indique pas la position physique mais unique-ment virtuelle. Le changement effectif de la position des aiguilles est à vérifier de visu.Si la position d‘aiguille sur l‘installation ne correspond pas à l‘affichage de l‘écran, il faut tourner à 180° la fiche de raccordement de l‘aiguillage.
Ces opérations effectués vous quittez le mode «aiguillages» par la touche «Locomotive/aiguillage» ou passez à la commande d’un autre aiguillage en composant son adresse et actionnant ensuite une des touches «flèches».
Si vous appelez un autre aiguillage en composant son adresse, le curseur clignote en alternance avec le dernier chiffre que vous avez pressé jusqu’à ce que vous ayez effectivement déclenché une action du moteur d’aiguilles en pressant une des touches «flèches».
Exemple : Vous voulez faire passer une machine par l’aiguillage n° 24 à mettre en position «dévié».
Touches à actionner L’écran affiche Remarque
La touche «Locomotive/aiguillage»« actionnée, la WLANmaus passe du régime «exploitation» (mode «bibliothèque» ou «adresse machine») au mode «aiguillages».S’affiche toujours l’adresse de l’aiguillage com-mandé en dernier, ici le n° 6, position «droite».
Le curseur clignotant indique que la WLANmaus accepte l’adresse du moteur d’aiguilles. En pres-sant successivement les touches «2» et «4» vous composez l’adresse «24».
Pressez la touche «flèche droite» et les aiguilles s’enclenchent en position 2déviée». En fonction du type de moteur utilisé vous avez éventuelle-ment une confirmation acoustique de l’opéra-tion. Les chiffres libres entre le «A» et l’adresse «24» se remplissent maintenant de «0».À noter : Si vous pressez trop longtemps une touche «flèches» il y a risque d’endommager des moteurs d’aiguilles par surcharge des solé-noïdes si ces derniers ne sont pas munis d’inter-rupteurs de fin de course !
En pressant la touche «Locomotive/aiguillage» de nouveau, vous retournez au régime «exploitation» (mode «bibliothèque» ou «adresse machine»).
Exploitation —Marche et connexion
8010813920.indd 82 13.07.2017 10:27:54
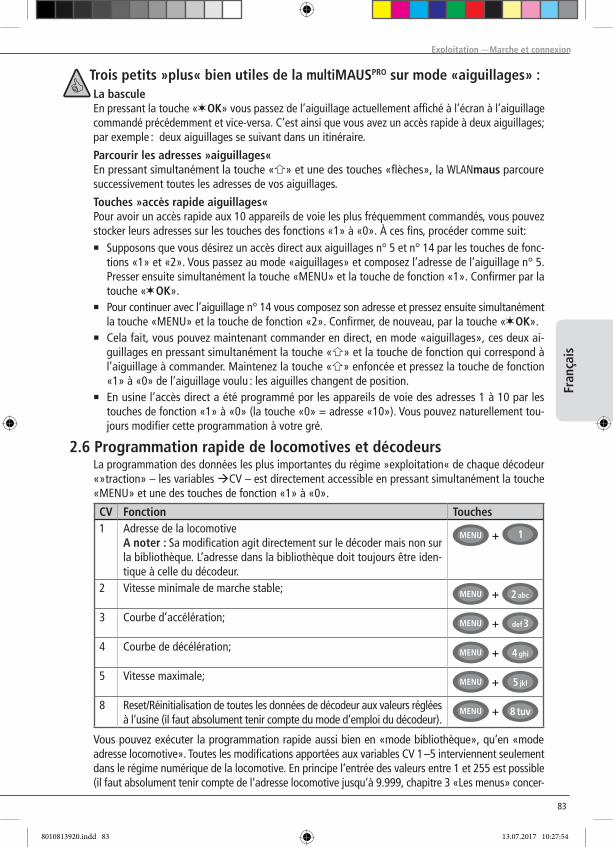
83
Fran
çais
Trois petits »plus« bien utiles de la multiMAUSPRO sur mode «aiguillages» : La bascule En pressant la touche « OK» vous passez de l’aiguillage actuellement affiché à l’écran à l’aiguillage
commandé précédemment et vice-versa. C’est ainsi que vous avez un accès rapide à deux aiguillages; par exemple : deux aiguillages se suivant dans un itinéraire.
Parcourir les adresses »aiguillages« En pressant simultanément la touche « » et une des touches «flèches», la WLANmaus parcoure
successivement toutes les adresses de vos aiguillages.
Touches »accès rapide aiguillages« Pour avoir un accès rapide aux 10 appareils de voie les plus fréquemment commandés, vous pouvez
stocker leurs adresses sur les touches des fonctions «1» à «0». À ces fins, procéder comme suit:▪ Supposons que vous désirez un accès direct aux aiguillages n° 5 et n° 14 par les touches de fonc-
tions «1» et «2». Vous passez au mode «aiguillages» et composez l’adresse de l’aiguillage n° 5. Presser ensuite simultanément la touche «MENU» et la touche de fonction «1». Confirmer par la touche « OK».
▪ Pour continuer avec l’aiguillage n° 14 vous composez son adresse et pressez ensuite simultanément la touche «MENU» et la touche de fonction «2». Confirmer, de nouveau, par la touche « OK».
▪ Cela fait, vous pouvez maintenant commander en direct, en mode «aiguillages», ces deux ai-guillages en pressant simultanément la touche « » et la touche de fonction qui correspond à l’aiguillage à commander. Maintenez la touche « » enfoncée et pressez la touche de fonction «1» à «0» de l’aiguillage voulu : les aiguilles changent de position.
▪ En usine l’accès direct a été programmé por les appareils de voie des adresses 1 à 10 par les touches de fonction «1» à «0» (la touche «0» = adresse «10»). Vous pouvez naturellement tou-jours modifier cette programmation à votre gré.
2.6 Programmation rapide de locomotives et décodeurs La programmation des données les plus importantes du régime »exploitation« de chaque décodeur
«»traction» – les variables CV – est directement accessible en pressant simultanément la touche «MENu» et une des touches de fonction «1» à «0».
CV Fonction Touches1 Adresse de la locomotive
A noter : Sa modification agit directement sur le décoder mais non sur la bibliothèque. L’adresse dans la bibliothèque doit toujours être iden-tique à celle du décodeur.
+
2 Vitesse minimale de marche stable; +
3 Courbe d’accélération; +
4 Courbe de décélération; +
5 Vitesse maximale; +
8 Reset/Réinitialisation de toutes les données de décodeur aux valeurs réglées à l‘usine (il faut absolument tenir compte du mode d‘emploi du décodeur). + 8 tuv
Vous pouvez exécuter la programmation rapide aussi bien en «mode bibliothèque», qu‘en «mode adresse locomotive». Toutes les modifications apportées aux variables CV 1 –5 interviennent seulement dans le régime numérique de la locomotive. En principe l‘entrée des valeurs entre 1 et 255 est possible (il faut absolument tenir compte de l‘adresse locomotive jusqu‘à 9.999, chapitre 3 «Les menus» concer-
Exploitation —Marche et connexion
8010813920.indd 83 13.07.2017 10:27:54
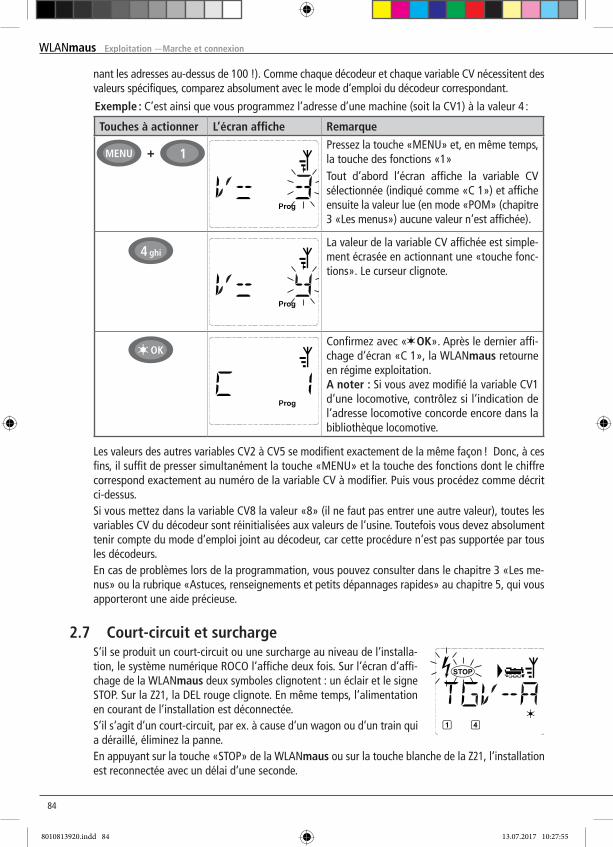
8484
nant les adresses au-dessus de 100 !). Comme chaque décodeur et chaque variable CV nécessitent des valeurs spécifiques, comparez absolument avec le mode d‘emploi du décodeur correspondant.
Exemple : C’est ainsi que vous programmez l’adresse d’une machine (soit la CV1) à la valeur 4 :
Touches à actionner L’écran affiche Remarque
Pressez la touche «MENu» et, en même temps, la touche des fonctions «1»Tout d‘abord l‘écran affiche la variable CV sélectionnée (indiqué comme «C 1») et affiche ensuite la valeur lue (en mode «POM» (chapitre 3 «Les menus») aucune valeur n‘est affichée).
La valeur de la variable CV affichée est simple-ment écrasée en actionnant une «touche fonc-tions». Le curseur clignote.
Confirmez avec « OK». Après le dernier affi-chage d‘écran «C 1», la WLANmaus retourne en régime exploitation.A noter : Si vous avez modifié la variable CV1 d‘une locomotive, contrôlez si l‘indication de l‘adresse locomotive concorde encore dans la bibliothèque locomotive.
2.7 Court-circuit et surcharge S‘il se produit un court-circuit ou une surcharge au niveau de l‘installa-
tion, le système numérique ROCO l‘affiche deux fois. Sur l‘écran d‘affi-chage de la WLANmaus deux symboles clignotent : un éclair et le signe STOP. Sur la Z21, la DEL rouge clignote. En même temps, l‘alimentation en courant de l‘installation est déconnectée.
S‘il s‘agit d‘un court-circuit, par ex. à cause d‘un wagon ou d‘un train qui a déraillé, éliminez la panne.
En appuyant sur la touche «STOP» de la WLANmaus ou sur la touche blanche de la Z21, l‘installation est reconnectée avec un délai d‘une seconde.
Les valeurs des autres variables CV2 à CV5 se modifient exactement de la même façon ! Donc, à ces fins, il suffit de presser simultanément la touche «MENU» et la touche des fonctions dont le chiffre correspond exactement au numéro de la variable CV à modifier. Puis vous procédez comme décrit ci-dessus.
Si vous mettez dans la variable CV8 la valeur «8» (il ne faut pas entrer une autre valeur), toutes les variables CV du décodeur sont réinitialisées aux valeurs de l‘usine. Toutefois vous devez absolument tenir compte du mode d‘emploi joint au décodeur, car cette procédure n‘est pas supportée par tous les décodeurs.
En cas de problèmes lors de la programmation, vous pouvez consulter dans le chapitre 3 «Les me-nus» ou la rubrique «Astuces, renseignements et petits dépannages rapides» au chapitre 5, qui vous apporteront une aide précieuse.
Exploitation —Marche et connexion
8010813920.indd 84 13.07.2017 10:27:55
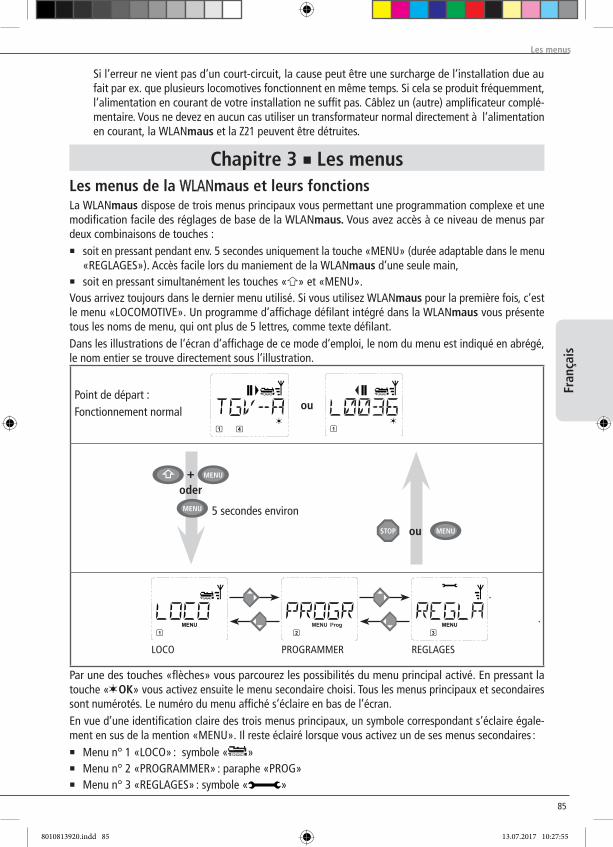
85
Fran
çais
Si l‘erreur ne vient pas d‘un court-circuit, la cause peut être une surcharge de l‘installation due au fait par ex. que plusieurs locomotives fonctionnent en même temps. Si cela se produit fréquemment, l‘alimentation en courant de votre installation ne suffit pas. Câblez un (autre) amplificateur complé-mentaire. Vous ne devez en aucun cas utiliser un transformateur normal directement à l‘alimentation en courant, la WLANmaus et la Z21 peuvent être détruites.
Chapitre 3 ▪ Les menusLes menus de la WLANmaus et leurs fonctionsLa WLANmaus dispose de trois menus principaux vous permettant une programmation complexe et une modification facile des réglages de base de la WLANmaus. Vous avez accès à ce niveau de menus par deux combinaisons de touches :▪ soit en pressant pendant env. 5 secondes uniquement la touche «MENu» (durée adaptable dans le menu
«REGLAGES»). Accès facile lors du maniement de la WLANmaus d‘une seule main,▪ soit en pressant simultanément les touches « » et «MENu».Vous arrivez toujours dans le dernier menu utilisé. Si vous utilisez WLANmaus pour la première fois, c‘est le menu «LOCOMOTIVE». Un programme d‘affichage défilant intégré dans la WLANmaus vous présente tous les noms de menu, qui ont plus de 5 lettres, comme texte défilant.Dans les illustrations de l‘écran d‘affichage de ce mode d‘emploi, le nom du menu est indiqué en abrégé, le nom entier se trouve directement sous l‘illustration.
ou
ou
5 secondes environ
oder
REGLAGESPROGRAMMERLOCO
Point de départ :Fonctionnement normal
Par une des touches «flèches» vous parcourez les possibilités du menu principal activé. En pressant la touche « OK» vous activez ensuite le menu secondaire choisi. Tous les menus principaux et secondaires sont numérotés. Le numéro du menu affiché s’éclaire en bas de l’écran.En vue d’une identification claire des trois menus principaux, un symbole correspondant s’éclaire égale-ment en sus de la mention «MENu». Il reste éclairé lorsque vous activez un de ses menus secondaires :▪ Menu n° 1 «LOCO» : symbole « »▪ Menu n° 2 «PROGRAMMER» : paraphe «PROG»▪ Menu n° 3 «REGLAGES» : symbole « »
Les menus
8010813920.indd 85 13.07.2017 10:27:55
8686
Pour quitter le mode «MENU» vous avez également deux possibilités :▪ Soit vous pressez la touche «STOP». Il sera peut-être nécessaire de la presser plusieurs fois, cela dépend
du niveau actuel hiérarchique sur lequel vous vous trouvez à ce moment. Chaque action sur la touche «STOP» vous ramène d’un niveau actuel au niveau supérieur.
▪ Soit vous pressez la touche «MENu» (peu importe si avec ou sans la touche « »), vous retournez direc-tement aux modes «adresses machines» ou «aiguillages» quelque soit le niveau hiérarchique actuel.
Grundsätzliche Hinweise zur Bedienung der Menü-Funktionen und zur Programmierung:▪ Si vous restez sur le même niveau de menus (dans l‘illustration dans les pages suivantes les niveaux
sont toujours présentés en verticale), vous sélectionnez les menus souhaités par l‘une des deux «touches flèche».
▪ En pressant la touche « OK», vous activez toujours une option de menu (dans cette illustration les menus sont toujours présentés sur le côté) et vous pouvez passer aux enregistrements ou modifications de données introduire des données.
▪ Si l‘écran vous affiche un des trois menus principaux, vous pouvez activez également l‘option souhai-tée tout simplement en pressant le numéro correspondant par les «touches fonctions».
▪ En pressant la touche «STOP», vous retournez toujours au menu supérieur dans la hiérarchie.
Pour vous rassurer : une protection contre l‘activation involontaire d‘une fonction ou contre l‘enregistrement involontaire d‘une donnée fait qu‘une telle activation ou enregistrement n‘a pas lieu, lorsque vous pressez la touche «STOP».
Il est impossible de commander une locomotive, pendant que la WLANmaus se trouve en mode menu.
Il faut toujours lire et/ou programmer une seule locomotive.
une vue d’ensemble de tous les menus se trouve aux deux pages suivantes.
Les menus
8010813920.indd 86 13.07.2017 10:27:55
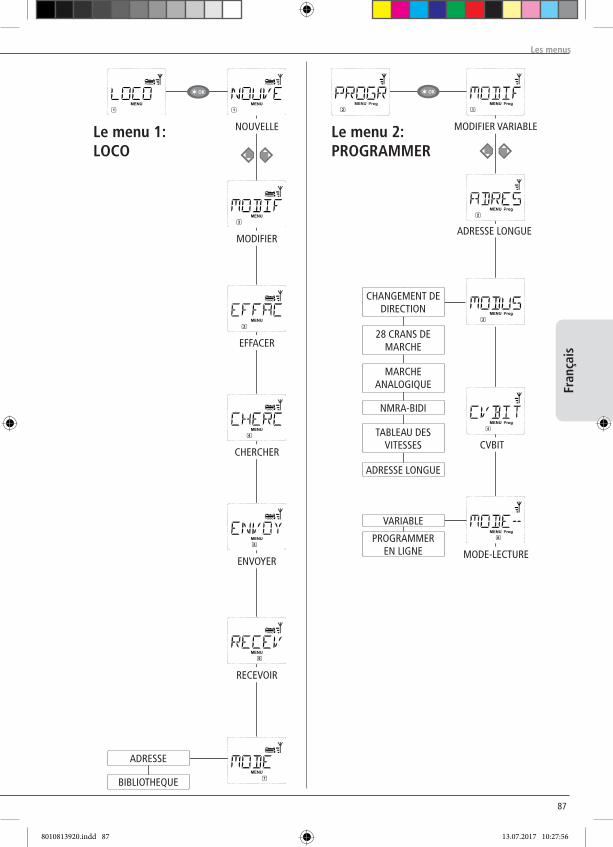
87
Fran
çais
CHANGEMENT DE DIRECTION
28 CRANS DE MARCHE
MARCHE ANALOGIQuE
NMRA-BIDI
TABLEAu DES VITESSES
ADRESSE LONGuE
MODIFIER VARIABLE
ADRESSE LONGuE
Le menu 2:PROGRAMMER
Le menu 1:LOCO
VARIABLE
PROGRAMMER EN LIGNE MODE-LECTuRE
CVBIT
MODIFIER
EFFACER
ENVOyER
RECEVOIR
CHERCHER
ADRESSE
BIBLIOTHEQuE
NOuVELLE
Les menus
8010813920.indd 87 13.07.2017 10:27:56
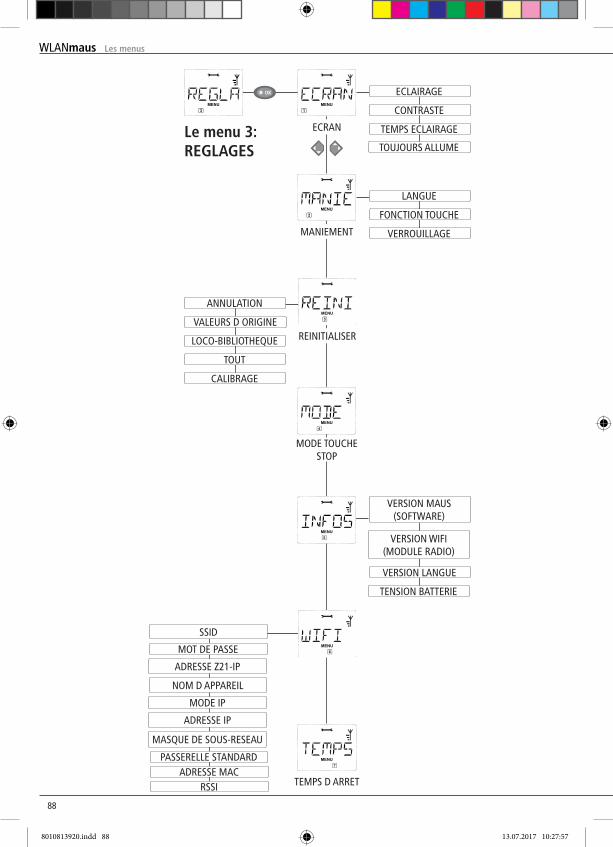
8888
ANNuLATION
VALEuRS D ORIGINE
LOCO-BIBLIOTHEQuE
TOuT
CALIBRAGE
MOT DE PASSE
SSID
ADRESSE Z21-IP
NOM D APPAREIL
MODE IP
VERSION MAuS(SOFTWARE)
VERSION WIFI(MODuLE RADIO)
TENSION BATTERIE
Le menu 3:REGLAGES
ECLAIRAGE
CONTRASTE
LANGuE
FONCTION TOuCHE
VERROuILLAGE
ECRAN
MANIEMENT
MODE TOuCHE STOP
TEMPS D ARRET
TEMPS ECLAIRAGE
REINITIALISER
ADRESSE IP
MASQuE DE SOuS-RESEAu
PASSERELLE STANDARDADRESSE MAC
RSSI
VERSION LANGuE
TOuJOuRS ALLuME
Les menus
8010813920.indd 88 13.07.2017 10:27:57
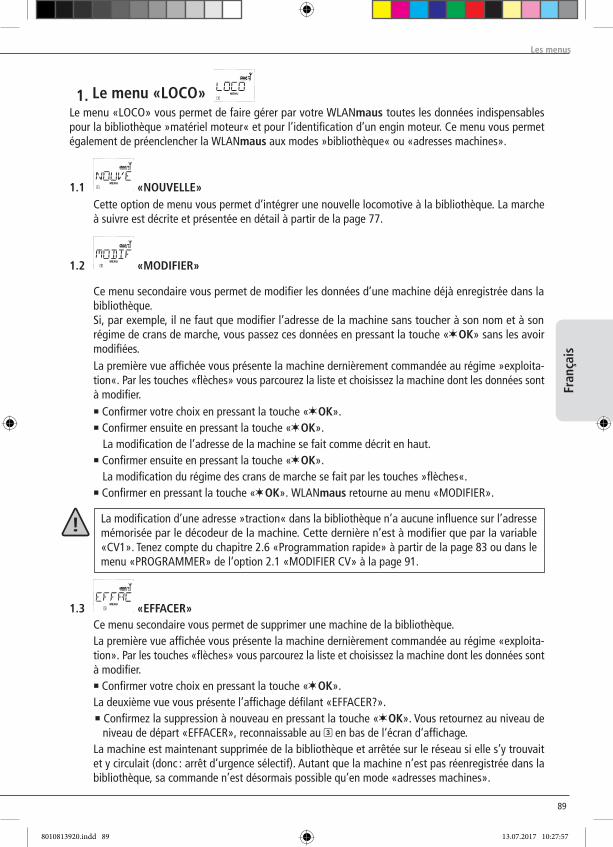
89
Fran
çais
Le menu «LOCO» vous permet de faire gérer par votre WLANmaus toutes les données indispensables pour la bibliothèque »matériel moteur« et pour l’identification d’un engin moteur. Ce menu vous permet également de préenclencher la WLANmaus aux modes »bibliothèque« ou «adresses machines».
1.1 «NOUVELLE» Cette option de menu vous permet d‘intégrer une nouvelle locomotive à la bibliothèque. La marche
à suivre est décrite et présentée en détail à partir de la page 77.
1.2 «MODIFIER»
Ce menu secondaire vous permet de modifier les données d’une machine déjà enregistrée dans la bibliothèque.
Si, par exemple, il ne faut que modifier l’adresse de la machine sans toucher à son nom et à son régime de crans de marche, vous passez ces données en pressant la touche « OK» sans les avoir modifiées.
La première vue affichée vous présente la machine dernièrement commandée au régime »exploita-tion«. Par les touches «flèches» vous parcourez la liste et choisissez la machine dont les données sont à modifier.
▪ Confirmer votre choix en pressant la touche « OK».▪ Confirmer ensuite en pressant la touche « OK».
La modification de l’adresse de la machine se fait comme décrit en haut. ▪ Confirmer ensuite en pressant la touche « OK».
La modification du régime des crans de marche se fait par les touches »flèches«. ▪ Confirmer en pressant la touche « OK». WLANmaus retourne au menu «MODIFIER».
La modification d’une adresse »traction« dans la bibliothèque n’a aucune influence sur l’adresse mémorisée par le décodeur de la machine. Cette dernière n’est à modifier que par la variable «CV1». Tenez compte du chapitre 2.6 «Programmation rapide» à partir de la page 83 ou dans le menu «PROGRAMMER» de l‘option 2.1 «MODIFIER CV» à la page 91.
1.3 «EFFACER» Ce menu secondaire vous permet de supprimer une machine de la bibliothèque. La première vue affichée vous présente la machine dernièrement commandée au régime «exploita-
tion». Par les touches «flèches» vous parcourez la liste et choisissez la machine dont les données sont à modifier.
▪ Confirmer votre choix en pressant la touche « OK». La deuxième vue vous présente l’affichage défilant «EFFACER?».
▪ Confirmez la suppression à nouveau en pressant la touche « OK». Vous retournez au niveau de niveau de départ «EFFACER», reconnaissable au en bas de l‘écran d‘affichage.
La machine est maintenant supprimée de la bibliothèque et arrêtée sur le réseau si elle s’y trouvait et y circulait (donc : arrêt d’urgence sélectif). Autant que la machine n’est pas réenregistrée dans la bibliothèque, sa commande n’est désormais possible qu’en mode «adresses machines».
1. Le menu «LOCO»
Les menus
8010813920.indd 89 13.07.2017 10:27:57
9090
1.4 «CHERCHER» Il est possible que ce menu secondaire devienne pour vous, à la longue, une des fonctions les plus
importantes de la WLANmaus. Ce menu secondaire vous permet de retrouver une machine dans la bibliothèque en ne connaissant que l’adresse.
Composez tout simplement l’adresse de la machine par les touches des fonctions «1» à «0» et votre WLANmaus vous trouve immédiatement la machine correspondante dans la bibliothèque.
▪ En pressant la touche « OK» vous confirmez les résultats de la recherche. La WLANmaus vous affiche la machine attribuée à cette adresse et retourne au régime «exploitation».
Si la WLANmaus ne trouve pas de machine attribuée à cette adresse, son écran affiche la mention «ADRESSE LOCO NON ATTRIBuEE». Par les touches «STOP» ou « OK» vous retournez alors au menu «CHERCHER».
1.5 «ENVOYER»
+
1.6 «RECEVOIR» Ces deux menus secondaires sont nécessaires pour transférer la bibliothèque «matériel moteur»
d’une WLANmaus à une ou plusieurs autres. A ces fins, vous choisissez le menu secondaire «EN-VOyER» sur la WLANmaus émettrice et «RECEVOIR» sur la ou les WLANmaus réceptrice[s]. Les souris destinataire doivent être activées en premier.
En pressant ensuite la touche « OK» de la WLANmaus émettrice vous démarrez le transfert d’une copie de la bibliothèque. une fois le transfert terminé, la ou les WLANmaus réceptrice[s] se trouve[nt] en mode «bibliothèque» alors que la WLANmaus émettrice retourne au départ du menu secondaire «ENVOyER».
1.7 «MODE» Vous pouvez commander une machine soit en mode «bibliothèque» (mode préprogrammé en usine),
soit en mode «adresses machines». Le menu «MODE» vous permet de choisir le mode que votre WLANmaus doit utiliser de préférence.
Vous choisissez le mode désiré par les touches «flèches». Les modes apparaissent à l’écran par affi-chage défilant.
▪ Confirmer par la touche « OK». La WLANmaus retourne au départ du menu secondaire «MODE».
Les menus
8010813920.indd 90 13.07.2017 10:27:58
91
Fran
çais
2. Le menu «PROGRAMMER» Toutes les valeurs modifiables d’un décodeur au format DCC /NMRA sont stockées dans des mémoires dites «Variables de configuration» (les CV). Le menu «PROGRAMMER» vous permet d’adapter ces valeurs à vos besoins. Tenez également compte des explications sur le thème »Bits et Bytes (octets)» dans le «Glossaire» de ce manuel.
Les décodeurs déjà installés dans des locomotives ROCO par l‘usine sont habituellement livrés avec des réglages adaptés aux caractéristiques individuelles des machines. Par conséquent, contrôlez avant toute programmation, si elle est vraiment nécessaire. Tenez compte du mode d‘emploi de votre décodeur ou de votre locomotive.L‘affichage de l‘écran «C» pendant la sélection /programmation signifie variable «CV». Comme la WLANmaus peut traiter également une adresse CV à 4 chiffres, le «V» devrait être annulé dans l‘affichage.En mode «POM» (voir option 2.5), il est impossible de lire les données du décodeur. Par conséquent, il s‘affiche sur l‘écran «PAS DE CONFIRMATION», ou bien aucune valeur n‘est affichée.Si le procédé de lecture dure trop longtemps, vous pouvez l‘interrompre à tout moment en pressant la touche «STOP» ou « OK». Si le texte «ANNULATION PAR UTILISATEUR» s‘affiche à l‘écran, vous avez deux possibilités :▪ en pressant la touche «STOP», l‘ensemble du procédé est interrompu, vous revenez au niveau de départ.▪ En pressant la touche « OK», le procédé de lecture est interrompu, vous pouvez directement entrer
une valeur.
2.1 «MODIFIER VARIABLE» Ici vous pouvez lire les variables CV (tenez également compte de l‘option 2.5) et les modifier. Toutes
les variables CV-DCC entre 1 et 1024 peuvent être programmées. La première image de l‘écran affiche un «C» et un curseur clignotant. A l‘aide des «touches fonc-
tions» vous pouvez entrer le numéro des variables CV souhaitées (1 –1024). ▪ Confirmez avec la touche « OK». La valeur affichée est la véritable valeur actuelle de la variable CV. Si vous voulez seulement lire une
variable, quittez l‘option en appuyant sur «STOP». Si aucune valeur n‘est affichée, la WLANmaus est réglée en mode «POM» (voir option 2.5) et la locomotive est sur la voie de programmation.▪ Entrez la nouvelle valeur CV souhaitée (0 –255, CV1 1 –99, adresses longues 100 –9999 voir option
2.2) et confirmezavec la touche « OK». L‘écran d‘affichage passe brièvement à «C…» avec le chiffre du CV correspondant, avant que vous ne retourniez au niveau de départ «MODIFIER VARIABLE».
2.2 «ADRESSE LONGUE» La variable CV1 n’accepte que les adresses 1 à 99. Toutes les adresses «traction» à partir de 100 sont
à programmer par ce menu secondaire. Mais pour ce faire il faut préalablement activer la fonction «adresses longues» par la variable «CV 29» du décodeur (Tenez compte du mode d‘emploi du déco-deur et de l‘option 2.3 !).
BEn activant cette option, il s‘affiche brièvement «CV17/18». Ensuite, l‘écran affiche pour quelques instants soit la possibilité d‘entrer des données avec un curseur clignotant et la lettre «L» placée avant soit l‘adresse longue enregistrée en dernier, également précédée de la lettre «L». A l‘aide des «touches fonctions» vous pouvez entrer l‘adresse souhaitée.▪ Confirmez avec la touche « OK». L‘écran affiche brièvement «CV17/18», avant que vous ne retourniez
au niveau de départ «ADRESSE LONGuE».
Les menus
8010813920.indd 91 13.07.2017 10:27:58
9292
2.3 «CV29» La variable CV29 est une des plus complexes variables CV, dans laquelle sont enregistrées les infor-
mations de base pour le décodeur, qui ont à nouveau un effet sur le régime exploitation de la loco-motive. Ici vous pouvez connecter ou déconnecter de nombreuses fonctions, qui sont mémorisées dans les bits de la variable CV.
Nous recommandons ces possibilités de réglage seulement aux utilisateurs, qui connaissent bien les nombreuses possibilités d‘un décodeur. Avant la programmation, vérifiez que le décodeur accepte le principe de programmation bit à bit. Le mode d‘emploi joint au décodeur vous informe de la manière de fonctionner et des possibilités de réglage de CV29.
Pour faciliter la programmation, ROCO a attribué directement des désignations associées à chaque possibilité de réglage.▪ la première vue de l‘écran affiche «C 29» et passe ensuite immédiatement à la première possibilité
de réglage «CHANGEMENT DE DIRECTION» (Bit 0). Si vous voulez activer ce bit, pressez la touche «Locomotive /aiguillages». Si le bit est activé, il s‘affiche l‘étoile « » sur l‘écran.
▪ à l‘aide des «touches flèche» sélectionnez les possibilités suivantes : ▪ «28 CRANS DE MARCHE» (Bit 1), ▪ «MARCHE ANALOG» (Bit 2), ▪ «NMRA-BIDI» (Bit 3), ▪ «TABLEAu DE VITESSES» (Bit 4), ▪ «ADRESSE LONGuE» (Bit 5).
▪ Lorsque tous les bits correspondent à vos souhaits, confirmez avec la touche « OK». «C 29» s‘af-fiche brièvement, puis vous retournez au niveau de départ «CV29».
2.4 «CVBIT» Cette option de menu est conçue pour les variables CV, qui ont des possibilités de réglage pour
chaque bits, comme par ex. CV49. Le mode d‘emploi joint au décodeur vous informe du fonctionne-ment et des possibilités de réglage de cette variable CV.▪ La première vue de l‘écran affiche un «C» et un curseur clignotant. A l‘aide des «touches fonctions»
vous pouvez entrer le numéro des variables CV souhaitées. ▪ Confirmez avec la touche « OK». Maintenant le premier bit réglable „BIT 0“ est affiché. Si vous voulez activer ce bit, pressez la touche
«Locomotive /aiguillages». Si le bit est activé, il s‘affiche l‘étoile « » sur l‘écran. ▪ à l‘aide des «touches flèche» sélectionnez les prochains bits.
▪ Lorsque vous avez terminé tous les bits, confirmez avec la touche « OK». Vous revenez au niveau de départ «CVBIT».
2.5 «MODE» La WLANmaus est réglée sur le „mode de programmation CV“ par l‘usine. Si vous souhaitez pro-
grammer les locomotives, sans devoir utiliser une voie de programmation séparée, permutez la WLANmaus sur le mode «POM» («Programming on the Main» = Programmation sur la voie princi-pale). Ainsi vous pouvez programmer directement sur l‘installation une locomotive, et contrairement à une multiMAUS normale on peut maintenant également programmer sur la WLANmaus la variable CV1 = adresse de locomotive. Dans ce cas, vous devez sélectionner la locomotive correspondante dans le mode adresse locomotive.
A l‘aide d‘une des deux «touches flèche» sélectionnez le mode de programmation souhaité. ▪ Confirmez avec la touche « OK». Vous revenez au niveau de départ «MODE».
Les menus
8010813920.indd 92 13.07.2017 10:27:58
93
Fran
çais
Ce menu principal de la WLANmaus englobe plus de menus secondaires que les deux autres menus principaux et gère toutes les données pratiques, avantageuses et parfois même indispensables pour un maniement aisé de la WLANmaus. Comme dans les cas précédents, permettez-nous de rappeler que les valeurs de la WLANmaus ont été programmées en usine en vue d’une exploitation optimale. C’est pourquoi vous n’avez besoin de ce menu principal que rarement ou même jamais.3.1
«ECRAN» Vous trouvez dans ce menu secondaire toutes les possibilités de réglage concernant l’écran-même. 3.1.1 Le menu secondaire de deuxième niveau («ECLAIRAGE») règle l’intensité de l’éclairage
translucide de l’écran – option particulièrement avantageuse dans des pièces faiblement éclairées. Par les touches «flèches» sélectionner la valeur souhaitée de l’intensité.
Plage des valeurs : 0 (= éteint) à 15, Valeur d’usine : 8 ▪ Confirmer la valeur choisie par la touche « OK». La WLANmaus retourne au départ du
menu secondaire «ECRAN». 3.1.2 Par l’autre menu secondaire de deuxième niveau (»CONTRASTE«) vous pouvez régler à votre
gré le contraste de l’écran. Comme pour l’intensité de l’éclairage, sélectionner la valeur de contraste souhaitée par les touches «flèches»
Plage des valeurs : 0 (= très, très faible) à 15 (très sombre), Valeur d’usine : 12 ▪ Confirmer la valeur choisie par la touche «Feux /OK». La WLANmaus retourne au départ du
menu secondaire «CONTRASTE». 3.1.3 Le «TEMPS ECLAIRAGE» indique la durée d‘éclairage de l‘écran d‘affichage. Pour des raisons
d‘économie de courant, l‘éclairage est déconnecté après 20 secondes dans le réglage usine. La valeur est sélectionnée ici aussi par les touches «flèche».
Plage des valeurs : 0 (éclairage constamment arrêté) à 255 secondes – lumière permanente (TOuJOuRS ALLuME)
Valeur d’usine : 20 secondes ▪ Confirmez l‘entrée avec la touche « OK». Vous revenez au niveau de départ «TEMPS
ECLAIRAGE».
3.2 «MANIEMENT» Ce menu vous permet un réglage individuel du maniement de votre WLANmaus à votre gré. 3.2.1 Par le menu secondaire «LANGuE» on peut activer une autre langue. Sélectionner la langue souhaitée par les touches »flèches«. Si votre langue préférée n’est
pas mémorisée, consulter le site «www.roco.cc» (actuellement ce site n’existe qu’en langues allemande et anglaise) pour y trouver une possibilité éventuelle de mise à jour.
▪ Confirmer par la touche « OK». La WLANmaus retourne au départ du menu secondaire «LANGuE».
3.2.2 Le menu «DELAI TOuCHE MENu» permet de régler la durée pendant laquelle il faut presser la touche «MENu» pour passer du régime »exploitation« au mode «MENu» de la WLANmaus.
Vous pouvez régler cette durée (en secondes) par les touches «flèches». Plage des valeurs : OFF, 1 à 10, Valeur d’usine : 5 Si vous choisissez la valeur »OFF«, l’accès au mode »MENu« de la WLANmaus n’est possible
qu’en pressant simultanément les touches « » et «MENu».
3. Le menu «REGLAGES»
Les menus
8010813920.indd 93 13.07.2017 10:27:58
9494
▪ Confirmer la valeur choisie par la touche « OK». La WLANmaus retourne au départ du menu secondaire «DELAI TOuCHE MENu».
3.2.3 Le menu «FONCTION TOuCHE» détermine le caractère des fonctions «F1» à «F28» des ma-chines (le sifflet d’une locomotive sonorisée, par exemple, ou la commande d’un attelage à télécommande). Si vous pressez les touches de fonction correspondantes pendant moins d’une seconde, la fonction est activée et reste activée. Pour la désactiver il faut actionner la même touche encore une fois. Si vous pressez les touches de fonction pendant plus d’une seconde, la fonction est activée tant que vous maintenez la touche pressée.
Le mode effectivement souhaité est à sélectionner par les touches «flèches». État programmé en usine : INTERRuPTEuR ▪ Après avoir fait votre choix confirmer par la touche « OK». La WLANmaus retourne au
départ du menu secondaire «FONCTION TOuCHE». 3.2.4 La WLANmaus dispose d’un système «protection parentale» à plusieurs niveaux permettant
de protéger certains menus et programmations. Par les touches «flèches» vous pouvez choisir le niveau désiré.
Pour verrouiller un niveau, il faut composer un mot de passe (uniquement à 4 chiffres, pas de caractères). Pour chaque niveau vous pouvez définir un mot de passe individuel, mais vous avez également la possibilité d’utiliser un seul mot de passe pour les trois niveaux. Ensuite, dès que vous voulez activer un menu, un mode ou une fonction faisant partie du niveau pro-tégé, la WLANmaus vous demande le mot de passe correspondant.
Mot de passe programmé en usine : INACTIF ▪ «TOuCHE MENu» : Les trois menus principaux sont inaccessible sans mot de passe. ▪ «PROGRAMMATION» : De plus, aussi le mode de »Programmation rapide« est inaccessible
sans mot de passe. ▪ «BIBLIOTHÈQuE PROGRAMMATION» : En sus des deux niveaux précédents, l’accès à la
programmation de la bibliothèque «matériel moteur» est également inaccessible sans mot de passe.
▪ Chaque composition de code est à confirmer par la touche « OK».
3.3 «REINITIALISER» La WLANmaus ayant été étudiée comme base d’une commande numérique particulièrement convi-
viale, vous pouvez la réinitialiser totalement avec les données programmées en usine mais aussi section par section.
3.3.1 La fonction «NON» représente, en quelque sorte, la sortie de secours du menu «REINITIALISER». 3.3.2 La fonction «VALEuRS D ORIGINE» remet en état d’origine toutes les valeurs accessibles par
le menu «REGLAGES». Toutes les données programmées par vos soins dans la bibliothèque «matériel moteur» sont conservées. S’il y a eu un calibrage de la WLANmaus (voir 3.3.7. en bas) un nouveau calibrage devient éventuellement nécessaire après la réinitialisation de la WLANmaus par cette fonction.
3.3.3 La fonction «LOCO-BIBLIOTHÈQuE» : Si vous voulez uniquement effacer la bibliothèque»»ma-tériel moteur» en totalité, choisissez cette fonction.
3.3.4 Par la fonction «TOuT» vous remettez votre WLANmaus entièrement dans son état d’origine.Pour les points mentionnés ci-dessus, vous devez seulement presser la touche « OK». Vous revenez ensuite automatiquement à l‘option de menu «REINITIALISER».
3.3.5 «CALIBRAGE“. Normalement vous n’avez pas besoin de ce menu secondaire assez complexe car le calibrage nécessaire de la WLANmaus est fait en usine une fois pour toutes. Cependant,
Les menus
8010813920.indd 94 13.07.2017 10:27:58
95
Fran
çais
si la WLANmaus a subie des variations extrêmes de température il peut arriver qu’il faille recalibrer le bouton régulateur de vitesse, surtout lorsque le bouton est en position neutre et que la machine roule encore. Dans ce cas procédez comme suit :
▪ La première vue affichée à l’écran comprend la mention «DEMARRAGE?». Confirmer par la touche « OK». Apparaît alors la mention «A GAuCHE» à l’écran. ▪ Tourner le bouton régulateur à gauche jusqu’à sa buttée. Confirmer ensuite la position du bouton par la touche « OK». Apparaît alors la mention «POSITION NEuTRE» à l’écran. ▪ Tourner le bouton régulateur à sa position centrale (position neutre »0«), puis confirmer la position par la touche « OK». Apparaît alors la mention «A DROITE» à l’écran. ▪ Tourner le bouton régulateur à droite jusqu’à sa buttée. Confirmer ensuite la position du bouton par la touche « OK». La WLANmaus retourne au départ du menu «CALIBRAGE».
Pressez simultanément les touches « » et «MENu» et brièvement la touche « OK». Il s‘affiche le texte «TOUT REINITIALISER ?». Confirmez avec la touche « OK», la WLANmaus est réinitialisée et redémarre. Veuillez noter que cette opération entraîne la suppression totale de la bibliothèque locomotive.
3.4 «MODE TOUCH STOP» En cas d’urgence, l’action sur la touche «STOP» en régime »exploitation« déclenche un arrêt immé-
diat de toute circulation sur le réseau. Ici vous réglez, si lors de l‘actionnement de la touche stop toute l‘installation est coupée de l‘alimen-
tation en courant («RESEAu HORS TENSION»), ou si uniquement les locomotives sont immédiatement arrêtées («ARRET D‘URGENCE»). Vous effectuez la sélection par les «touches flèche», et cela est confirmé par « OK».
Valeurs d’usine : TENSION ARRETIndépendamment des deux possibilités de réglage, vous pouvez toujours déclencher un „arrêt d‘ur-gence sélectif“, qui concerne seulement la locomotive sélectionnée. Tenez compte de la page 81.
Veuillez noter que : dans le cas d’une interruption radio, vous ne pouvez plus déclencher de STOP par la touche STOP de la WLANmaus. Cela est seulement plus possible par la touche STOP de votre Z21.
3.5 „INFOS“ une rubrique de menu, qui vous informe complètement sur le logiciel et la tension de pile de votre
WLANmaus. „VERSION MAuS“: version du logiciel de votre WLANmaus „VERSION WIFI“:version du logiciel du module de radio „VERSION LANGuE“: version des langues „TENSION BATTERIE“: affiche la tension de pile actuellement mesurée en Volt (V). Exemple d'affichage : „4,12V“
3.6 „WIFI“ 3.6.1 „SSID“ Sélection ou entrée du SSID du routeur, avec lequel la WLANmaus doit se raccorder.
Les menus
8010813920.indd 95 13.07.2017 10:27:59
9696
„CHERCHER“ : affiche jusqu’à 8 des plus puissants réseaux dans l’environnement de la WLAN-maus. La sélection du réseau souhaité s’effectue par la touche « OK».
„ENTRER“ : Si le réseau souhaité n’est pas affiché pour „CHERCHER“, vous pouvez entrer ici le réseau manuellement. En outre, le SSID actuellement utilisé s’affiche (voir les explications concernant la saisie de caractères page 72).
3.6.2 „MOT DE PASSE“ Ici le mot de passe peut être entré. Respecter bien l’écriture en majuscule/minuscule, les carac-
tères spéciaux et les espaces ! Après avoir confirmé avec la touche « OK», le mot de passe entré est enregistré dans la WLANmaus. Le mot de passe n’est plus affiché dans le menu (voir les explications concernant la saisie de caractères page 72).
3.6.3 „ADRESSE Z21-IP“ Ici l'adresse IP de la Z21 peut être entrée, ce qui veut dire „Où la souris envoie-t-elle ses
ordres ?“. Le pré-réglage de la WLANmaus correspond au pré-réglage de votre Z21 : „192.168.0.111“. Seulement dans le cas où vous avez modifié manuellement l’IP de votre Z21, vous devez également adapter l’IP Z21 dans la WLANmaus. En cliquant sur les quatre chiffres IP avec la touche « OK», modification des valeurs avec les touches flèches ou par les touches numériques, interruption avec la touche STOP possible.
3.6.4 „NOM D APPAREIL“ Ici vous pouvez attribuer un nom de réseau à votre WLANmaus. Pour éviter toute équivalence
de nom dans le réseau, celui-ci est automatiquement complété des six derniers chiffres de l’adresse MAC de la WLANmaus. Exemple : „WLANmaus_A1B2C3“ (hexadécimal).
3.6.5 „MODE IP“ Possibilités de sélection : „DyNAMIQuE (pré-réglé) ou „STATIQuE.
Sélection : par les touches flèches, confirmation par la touche « OK», interruption par la touche STOP.„DyNAMIQuE“ : les informations de réseau (ADRESSE IP, MASQuE DE SOuS-RESEAu et PAS-
SERELLE STD) sont automatiquement extraites du routeur WLAN. L’affichage des informations extraites est possible dans les menus 3.6.6-3.6.8.
„STATIQuE“ : les informations de réseau (ADRESSE IP, MASQuE DE SOuS-RESEAu et PAS-SERELLE STD) doivent être entrées manuellement. ATTENTION : connaissan-ces approfondies de réseau nécessaires ! La saisie s’effectue dans les menus 3.6.6-3.6.8.
3.6.6 „ADRESSE IP“ Affichage (si MODE IP = DYNAMIQUE) resp. saisie (si MODE IP = STATIQUE) de l’adresse IP.
En cliquant sur les quatre chiffres IP avec la touche « OK», modification des valeurs avec les touches flèches ou par les touches numériques, interruption avec la touche STOP possible.
3.6.7 „MASQuE DE SOuS-RESEAu“ Affichage (si MODE IP = DYNAMIQUE) resp. saisie (si MODE IP = STATIQUE) du masque de
sous-réseau. En cliquant sur les quatre chiffres avec la touche « OK», modification des va-leurs avec les touches flèches ou par les touches numériques, interruption avec la touche STOP possible.
3.6.8 „PASSERELLE STANDARD“ Affichage (si MODE IP = DYNAMIQUE) resp. saisie (si MODE IP = STATIQUE) de la passerelle
standard. En cliquant sur les quatre chiffres IP avec la touche « OK», modification des va-leurs avec les touches flèches ou par les touches numériques, interruption avec la touche STOP possible.
Les menus
8010813920.indd 96 13.07.2017 10:27:59
97
Fran
çais
3.6.9 „ADRESSE MAC“ Affichage d'info : vous indique l’adresse MAC de votre WLANmaus. Double-clic sur l’affichage
avec la touche « OK».
3.6.10 „RSSI“ Affichage d'info : vous indique la puissance du signal WLAN en dBm (décibel milliwatt).
3.7 „TEMPS D ARRET“
Pour économiser l‘énergie des batteries de la WLANmaus, elle se déconnecte lorsqu‘elle n‘est pas utilisée après une période déterminée.
Plage des valeurs : 1–255 minutes, Plage des valeurs : 10 (minutes) ▪ Sélectionnez à l‘aide des «touches flèche» et confirmez l‘entrée avec la touche « OK». Vous revenez à «TEMPS D ARRET».
4.1 Mise à jour de la WLANmausPar l’outil PC "Maintenance Z21" et votre routeur, vous pouvez mettre à jour votre WLANmaus.Vous pouvez télécharger l’outil PC sur notre page d’accueil du site www.z21.eu
4.2 Glossaire «Bits» et «Bytes (Octets)»Les concepts apparaissant également pour les trains miniatures à commande numérique, «bits» et «bytes» remontent aux début de l‘informatique. Aujourd‘hui, les chiffres que nous connaissons, les nombres déci-maux, n‘ont plus leur place. un nouveau système de numération, le système binaire, a donc vu le jour. Ce système n‘a que deux chiffres : le «0» et le «1». En pratique, ces deux chiffres désignent également des états de connexion. Le «1» signifie «connecté» ou «activé», le «0» «déconnecté» ou p»pas activé».«0» et «1» forment un «bit2, 8 bits forme à nouveau un «octet». Les bits contenus dans un oct et sont comptés de 0 (Bit0) à 7 (Bit7). Chaque position de bit est attribuée à une valeur significative déterminée :
Bit 7 6 5 4 3 2 1 0Valeur significative 128 64 32 16 8 4 2 1
Si on additionne les valeurs significatives, on obtient une valeur maximum de 255 par «byte» (chaque bit activé, c‘est-à-dire «1»), à cet effet nous sommes à nouveau dans le système décimal. La valeur minimum est «0», tous les bits sont mis sur «0».ROCO a nettement simplifié la programmation des bits dans la WLANmaus. Si le décodeur l‘accepte, vous ne devez plus calculé des valeurs déterminées, mais décider dans le menu «PROGRAMMER» en pressant simplement une touche, si un bit est mis ou pas.Si vous voulez de plus amples renseignements, nous vous recommandons de consulter les nombreux ouv-rages publiés à ce sujet.
CVsToutes les données modifiables impactant les fonctions du décodeur – et finalement les caractéristiques de la machine – sont stockées dans des variables «CV». C’est une abréviation du terme informatique «Confi-
Chapitre 4 ▪ Annexe
Annexe
8010813920.indd 97 13.07.2017 10:27:59
9898
guration Variable» = variable de configuration. Comme la WLANmaus et la Z21 sont compatibles avec le standard NMRA /DCC, des variables CV de 1 à – 1023 peuvent être lues et écrites.Les valeurs des «CV» varient fortement et ont une plage de «0» à «255». Il est donc compréhensible qu’il faille de l’expérience pour modifier ces valeurs car des variables «CV» mal programmées peuvent sensi-blement gêner les fonctions du décodeur et de la machine.
DécodeurPour rendre compréhensible les informations numériques de la WLANmaus et de la Z21 par la technique «conventionnelle» d‘une locomotive, il faut un «traducteur» - le décodeur. Il ne remplace aucun compo-sant d’une locomotive à commande analogique «deux rails, courant continu» mais fonctionne comme complément indispensable et doit avoir sa place dans la carrosserie de la machine. Sur des machines analogiques «trois rails, courant alternatif» l’inverseur du sens de marche, de conception électroméca-nique ou entièrement électronique, est à remplacer par le décodeur – cette fois au format «Motorola» et non au format «DCC /NMRA».
Crans de marcheEn commande analogique, le sens de marche et la vitesse d’une machine sont déterminés par un transfor-mateur régulateur qui fournit à la voie une tension variant de 0 Volt à la tension maximale (normalement entre 12 et 16 Volt) et règle ainsi la marche de la machine. La commande numérique, par contre, est caractérisée par une tension quasi-constante dans la voie et par des informations codées transmises également par la voie. Le décodeur transforme ces informations en tensions variables qu’il fournit au moteur. Ces informations se composent d’une suite de valeurs «0» et «1», la variation de la tension fournie au moteur n’est pas continue mais se fait par degrés. Plus ces degrés sont fins – les crans de marche – plus modulable est le réglage de la machine. Le protocole DCC/NMRA, fonctionnant d‘après la WLANmaus et la Z21, connaît en tout 14, 27, 28 ou 128 crans de marche.Les décodeurs modernes (fabriqués depuis l’an 2000 environ) ont au moins 28 crans de marche. A cet effet, réglez-vous automatiquement sur le nombre de crans de marche réglé dans la commande de train – WLANmaus et Z21 –, de sorte à ne pas avoir besoin de régler le décodeur. Pour savoir si vos décodeurs sont équipés ou non de cette adaptation automatique et quels sont les regimes de crans de marche qu’ils connaissent, veuillez consulter les modes d’emploi des décodeurs.
MAC-AdresseAvec l‘adresse MAC («Media-Access-Control-Adresse») on désigne une adresse Hardware d‘un appareil se trouvant dans un système en réseau. Cette adresse permet d‘identifier chaque appareil.
Z21 et BoosterIls assurent l’alimentation du réseau en énergie électrique et transmettent les informations numériques de la WLANmaus aux décodeurs de votre matériel moteur, à vos appareils de voie et à tout autre accessoire à commande numérique.
Annexe
8010813920.indd 98 13.07.2017 10:27:59
99
Fran
çais
La WLANmaus ne peut pas être connectée. ▪ vérifier les batteries et év. les remplacer.
La WLANmaus est connectée, mais les sym-boles court-circuit et STOP s‘allument.
▪ un court-circuit s‘est produit dans l‘installation (la DEL rouge de la Z21 clignote). Pressez la touche «STOP».
▪ L‘alimentation en courant de la Z21 est interrompue. Contrôlez le transformateur ou le bloc d‘alimenta-tion.
En modes «bibliothèque» ou «adresses machines» :La machine sélectionnée ne réagit pas
▪ L’adresse «traction» mémorisée dans la bibliothèque est identique à celle mémorisée dans le décodeur ?
▪ L’arrêt d’urgence général ou l’arrêt d’urgence sélec-tif déclenchés ?
Le symbole de radio clignote. ▪ Aucune connexion au routeur WLAN disponible.▪ Vérifiez si le routeur WLAN est connecté.▪ Vérifiez les réglages WLAN.
Les deux symboles de flèche et le symbole de pause clignotent, le symbole de radio affiche la connexion
▪ Aucune connexion avec la Z21.▪ Vérifiez si la Z21 est connectée.▪ Vérifiez l’adresse IP de Z21. (Voir chapitre 3.6.3)▪ z21start débloquée avec le code de déverrouillage ?
Lors de la lecture des données de décodeur (menu «PROGRAMMER») le message «PAS DE CONFIRMATION» s‘affiche sur l‘écran.
▪ le décodeur ne peut pas lire.▪ la WLANmaus est réglée sur le mode «POM» (cha-
pitre 3, menu 2.5, page 92).▪ Problèmes de contact de la locomotive sur la voie?
La programmation a été confirmée, mais le décodeur ne réagit pas par rapport à une valeur modifiée.
▪ Le décodeur a besoin d’un «reset» : Coupez et réenclenchez l’alimentation du réseau par la touche «STOP» (arrêt d’urgence). Consultez également le mode d’emploi du décodeur.
une réinitialisation de la WLANmaus (voir chapitre 3, menu 3.3, page 94) s’avère impos-sible.
▪ presser simultanément les touches « » et «MENu» et presser brièvement la touche « OK» pour connecter. L‘écran d‘affichage s‘allume brièvement.
▪ Par cette opération vous réinitialisez complètement la WLANmaus aux valeurs programmées en usine. Bien réfléchir avant de lancer cette procédure qui efface aussi la bibliothèque «matériel moteur».
Les aiguilles réagissent à l’inverse de l’affichage «aiguillage» à l‘écran.
▪ tourner de 180° la fiche du moteur d’aiguilles
4.3 Astuces, renseignements et petits dépannages rapides
Annexe
8010813920.indd 99 13.07.2017 10:27:59

100100
La mise à jour du firmware a échoué ou a été interrompue : impossible d’établir la connexion entre la souris sans fil et le rou-teur.
▪ Appuyez et maintenez appuyer, lorsque la WLAN-maus est déconnectée, simultanément sur la touche flèche gauche „6“ et la touche „7“ et confirmez en-suite avec la touche OK, pour démarrer la restau-ration du firmware d’origine de la WLANmaus. Après la restauration effectuée avec succès, il s’affiche sur l’écran le texte déroulant „RESCuE FIRMWARE“.
▪ Déconnectez à nouveau la WLANmaus, appuyez et maintenez appuyer simultanément sur la touche STOP, la touche „7“ et la touche „9“ et confirmez ensuite avec la touche OK pour connecter, pour démarrer la restauration du firmware d’origine de la WLANmaus. Après la restauration effectuée avec succès, il s’affiche à nouveau sur l’écran le numéro de version de la firme de secours apparaît à l'écran pen-dant une seconde après le texte initial "WLANMAuS"
▪ Après la restauration effectuée avec succès, votre WLANmaus fonctionne à nouveau „sous logiciel“ dans l’état de livraison et doit pouvoir se connecter avec le routeur.
4.3.1 Programmation de la WLANmaus par rapport aux «Lokmaus 2» et «R3»Les modes d’emploi des composants de la commande numérique ROCO commercialisés avant la WLAN-maus (le moteur d’aiguilles réf. 42624 avec décodeur intégré, par exemple) ne décrivent que le mode standard de programmation par les «Lokmaus 2» et «R3». Ci-après un tableau comparatif des procédures de programmation par les «Lokmaus 2» et «R3» par rapport au mode «programmation rapide» de la WLANmaus (voir page 92).D’autres informations complémentaires concernant la programmation par les «Lokmaus 2» et «R3» se trouvent dans leurs manuels respectifs. Quant à la programmation de la variable «CV 29» voir le mode d’emploi fourni avec le décodeur.
variable «CV» WLANmaus «Lokmaus 2 et R3»
1 – adresse +
+
2 – vitesse minimale +
+
3 – courbe d’accélération +
+
4 – courbe de décélération +
+
5 – Maximalgeschwindigkeit +
+
29 – vitesse maximale à programmer uniquement au mode «MENu» (voir page 92)
+
changement des régimes «crans de marche»
+ /
+ /
Annexe
8010813920.indd 100 13.07.2017 10:27:59
101
Notizen / Notes
8010813920.indd 101 13.07.2017 10:27:59
102102
Notizen / Notes
8010813920.indd 102 13.07.2017 10:27:59

103
Notizen / Notes
8010813920.indd 103 13.07.2017 10:27:59

Änderungen von Konstruktion und Ausführung vorbehalten! We reserve the right to change the construction and design! Bitte diese Beschreibung zum späteren Gebrauch aufbewahren!Please retain these instructions for further reference!
VII / 20178010813920
Modelleisenbahn GmbH • 5101 Bergheim • Austria
www.roco.cc
14+Alter/Age
8010813920.indd 104 13.07.2017 10:28:00