bathroom faucet - lowe'spdf.lowes.com/installationguides/019934463942_install.pdf · bathroom...
TRANSCRIPT
1
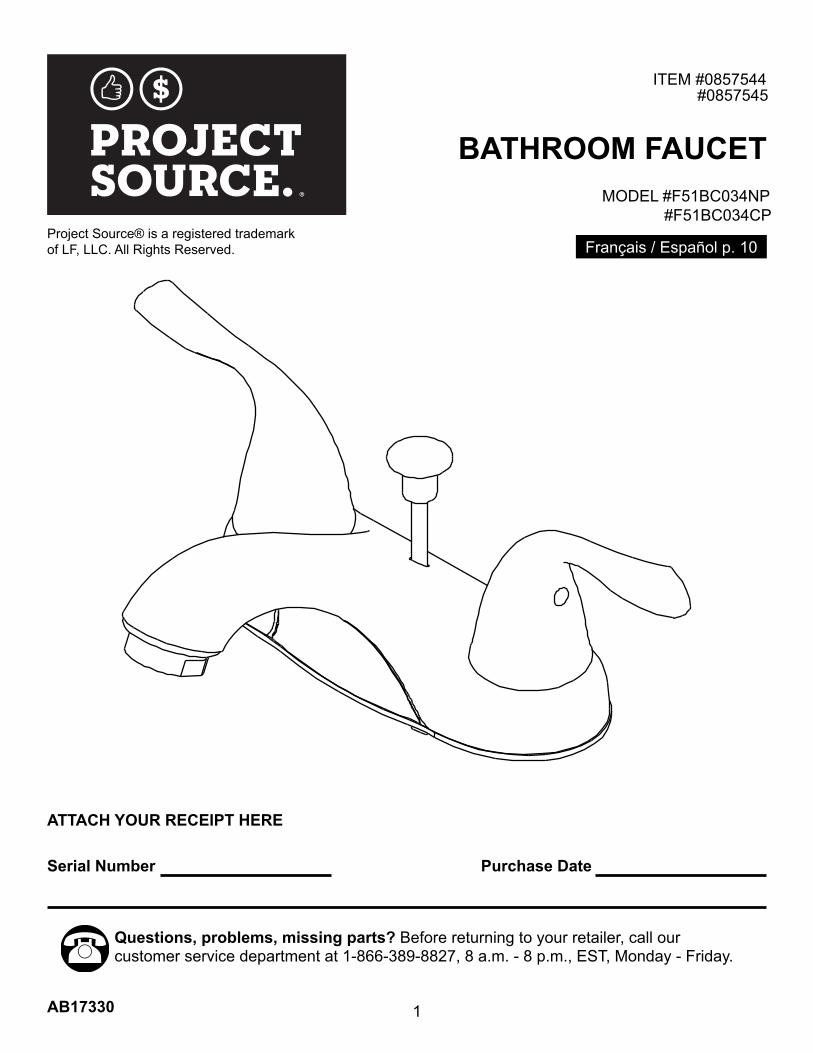
MODEL #F51BC034NP #F51BC034CP
ITEM #0857544 #0857545
BATHROOM FAUCET
Français / Español p. 10
Serial Number
AB17330
Purchase Date
ATTACH YOUR RECEIPT HERE
Project Source® is a registered trademarkof LF, LLC. All Rights Reserved.
Questions, problems, missing parts? Before returning to your retailer, call our customer service department at 1-866-389-8827, 8 a.m. - 8 p.m., EST, Monday - Friday.
2
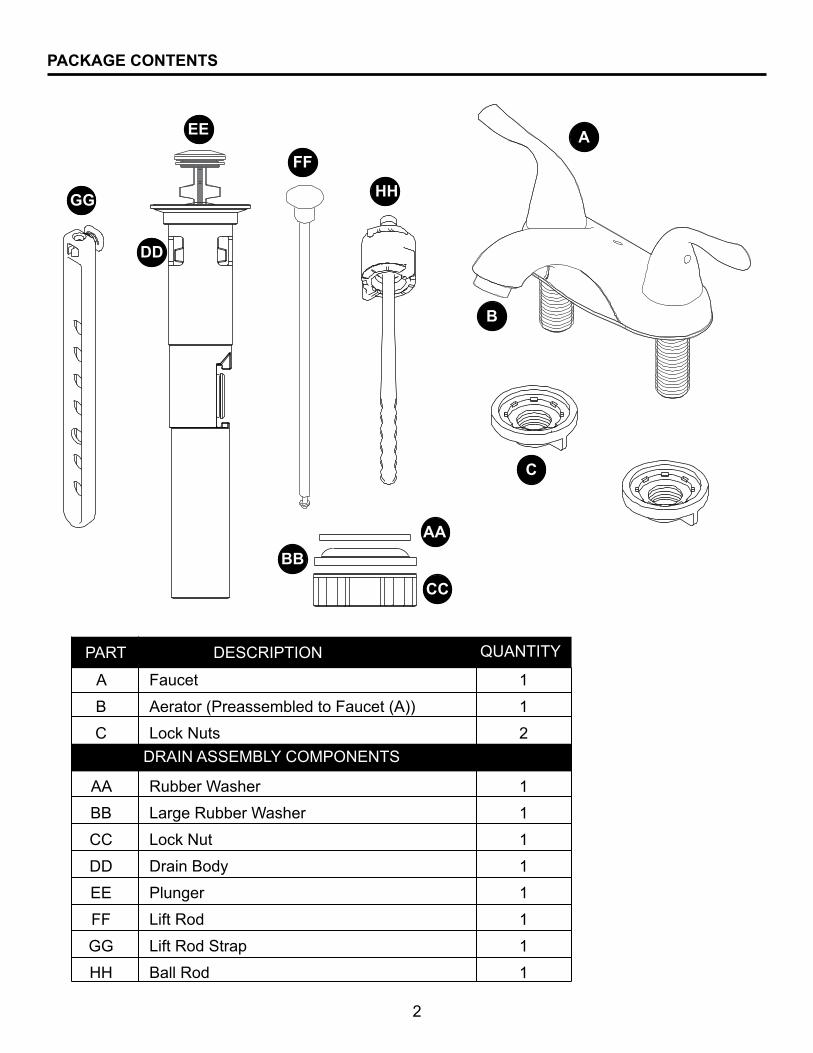
PACKAGE CONTENTS
A
BBAA
CC
DD
EE
FF
HHGG
B
C
PART DESCRIPTION QUANTITY
Faucet
Aerator (Preassembled to Faucet (A))
Lock Nuts
Rubber Washer
Large Rubber Washer
Lock Nut
Drain Body
Plunger
Lift Rod
Lift Rod Strap
Ball Rod
A
B
C
AA
BB
CC
DD
EE
FF
GG
HH
1
1
2
1
1
1
1
1
1
1
1
DRAIN ASSEMBLY COMPONENTS
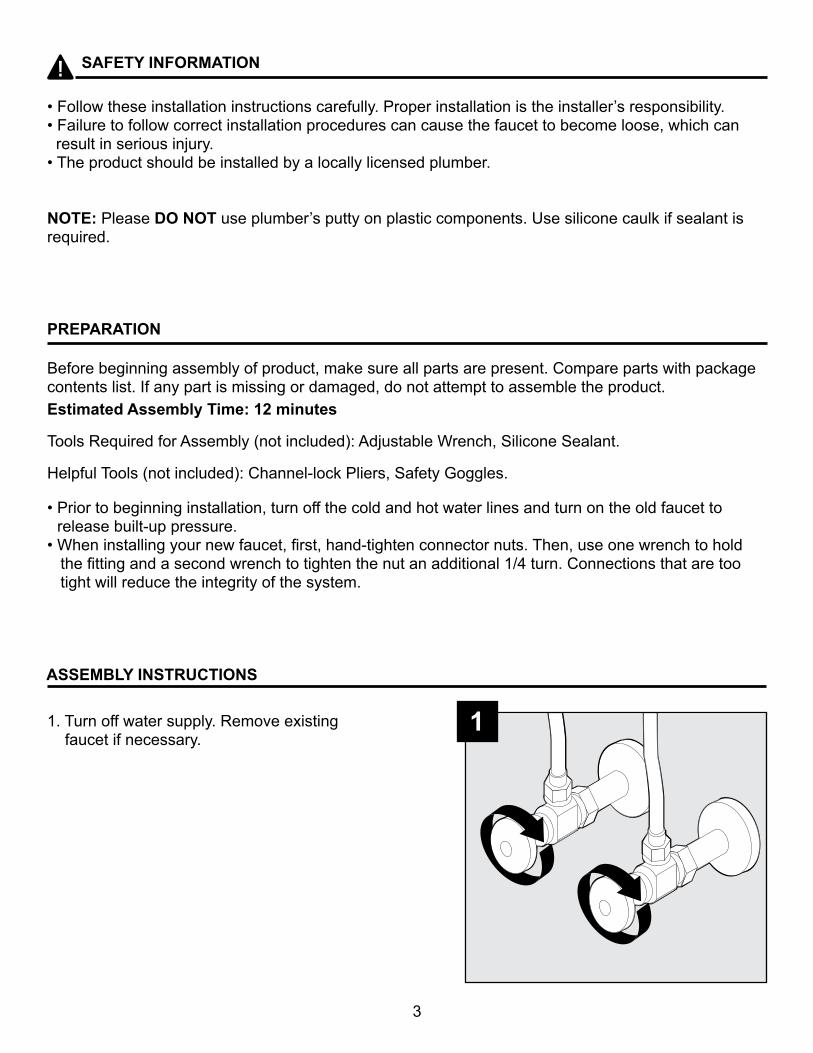
SAFETY INFORMATION
PREPARATION
Before beginning assembly of product, make sure all parts are present. Compare parts with package contents list. If any part is missing or damaged, do not attempt to assemble the product. Estimated Assembly Time: 12 minutes
Tools Required for Assembly (not included): Adjustable Wrench, Silicone Sealant.
Helpful Tools (not included): Channel-lock Pliers, Safety Goggles.
• Prior to beginning installation, turn off the cold and hot water lines and turn on the old faucet to release built-up pressure.
• When installing your new faucet, first, hand-tighten connector nuts. Then, use one wrench to hold the fitting and a second wrench to tighten the nut an additional 1/4 turn. Connections that are too tight will reduce the integrity of the system.
1
3
• Follow these installation instructions carefully. Proper installation is the installer’s responsibility. • Failure to follow correct installation procedures can cause the faucet to become loose, which can result in serious injury. • The product should be installed by a locally licensed plumber.
NOTE: Please DO NOT use plumber’s putty on plastic components. Use silicone caulk if sealant is required.
1. Turn off water supply. Remove existing faucet if necessary.
ASSEMBLY INSTRUCTIONS

1
1
C
1
1
2
3
4
2
2
4
ASSEMBLY INSTRUCTIONS
A
2. Place a bead of clear silicone sealant (not included) around the base of the faucet (A). Install faucet (A) through top of sink (not included).
3. Tighten lock nuts (C) onto the faucet (A).
A
4. Install coupling nuts (not included) to supply lines (not included). Screw coupling nuts and supply lines onto faucet (A). A

1
DD
HH
AA
BB
CC
DD
1
2
6. Insert plunger (EE). Note: Plastic loop on plunger (EE) facing rear of sink is in locked mode and plunger cannot be removed. Plastic loop on plunger (EE) facing the front of sink is in unlocked mode and can be removed for easy cleaning.
5. Install drain body (DD) and rubber washer (AA) through top of sink (not included). Secure with large rubber washer (BB) and lock nut (CC). Note: Opening for ball rod (HH) must face to-wards rear of sink.
7. Insert ball rod (HH) into drain assembly (DD). Tighten sleeve.
5
7
EE
6 EE
EE
3
2
5
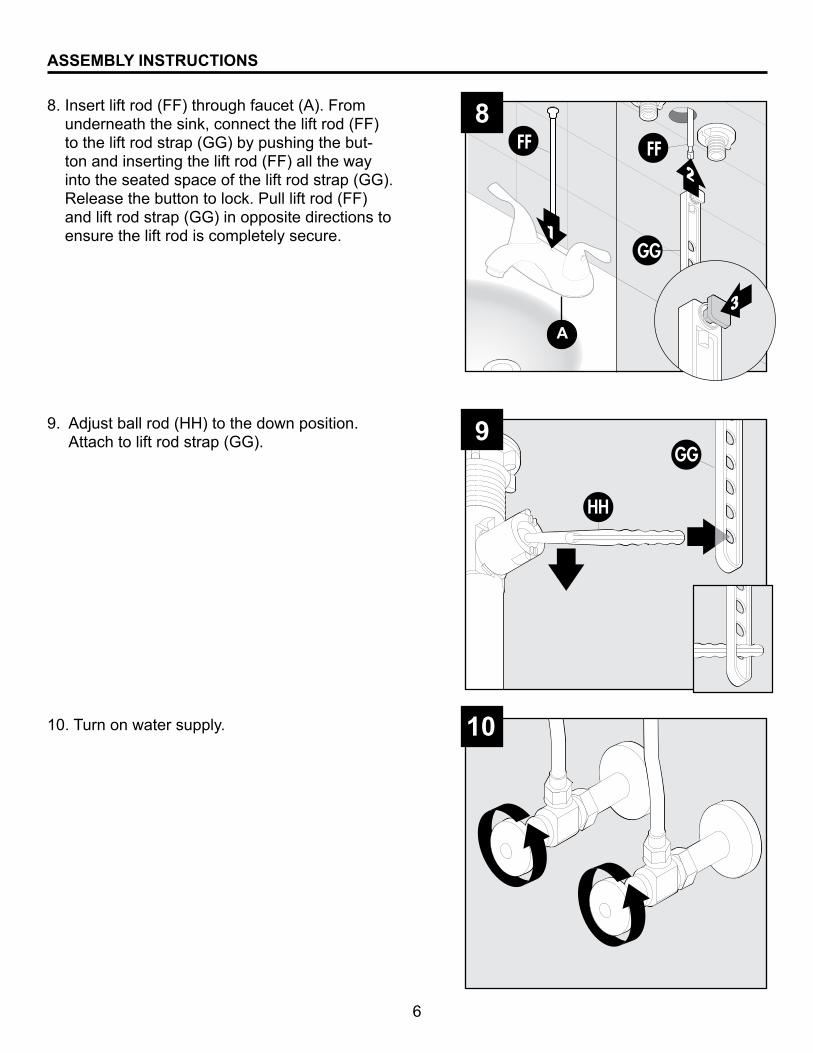
ASSEMBLY INSTRUCTIONS
No Yes
GG
HH
9. Adjust ball rod (HH) to the down position. Attach to lift rod strap (GG). 9
10
6
ASSEMBLY INSTRUCTIONS
10. Turn on water supply.
2
GG1
FF FF
8
3
A
8. Insert lift rod (FF) through faucet (A). From underneath the sink, connect the lift rod (FF) to the lift rod strap (GG) by pushing the but-ton and inserting the lift rod (FF) all the way into the seated space of the lift rod strap (GG). Release the button to lock. Pull lift rod (FF) and lift rod strap (GG) in opposite directions to ensure the lift rod is completely secure.

B
1
B
2
12
13
11
1
2
7
ASSEMBLY INSTRUCTIONS
12. Turn on both hot and cold water to flush out any debris and check for leaks around drain.
13. Replace aerator (B).
11. Remove aerator (B) from faucet (A).
• Clean periodically with a soft cloth. Avoid abrasive cleaners, steel wool and harsh chemicals as these will dull the finish and void your warranty.
8
CARE AND MAINTENANCE
WARRANTY
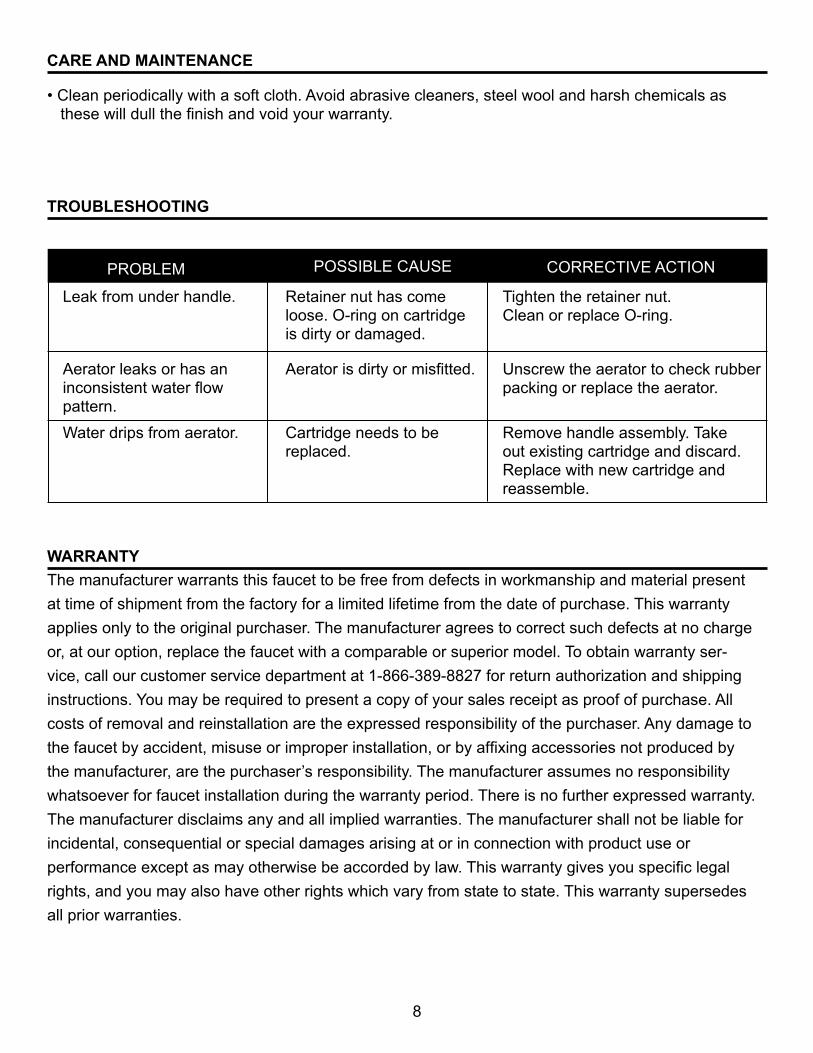
TROUBLESHOOTING
POSSIBLE CAUSE CORRECTIVE ACTION
Leak from under handle.
PROBLEM
Aerator leaks or has aninconsistent water flow pattern. Water drips from aerator.
Retainer nut has come loose. O-ring on cartridge is dirty or damaged.
Aerator is dirty or misfitted.
Cartridge needs to be replaced.
Tighten the retainer nut. Clean or replace O-ring.
Unscrew the aerator to check rubberpacking or replace the aerator.
Remove handle assembly. Take out existing cartridge and discard. Replace with new cartridge and reassemble.
The manufacturer warrants this faucet to be free from defects in workmanship and material present at time of shipment from the factory for a limited lifetime from the date of purchase. This warranty applies only to the original purchaser. The manufacturer agrees to correct such defects at no charge or, at our option, replace the faucet with a comparable or superior model. To obtain warranty ser-vice, call our customer service department at 1-866-389-8827 for return authorization and shipping instructions. You may be required to present a copy of your sales receipt as proof of purchase. All costs of removal and reinstallation are the expressed responsibility of the purchaser. Any damage to the faucet by accident, misuse or improper installation, or by affixing accessories not produced by the manufacturer, are the purchaser’s responsibility. The manufacturer assumes no responsibility whatsoever for faucet installation during the warranty period. There is no further expressed warranty. The manufacturer disclaims any and all implied warranties. The manufacturer shall not be liable for incidental, consequential or special damages arising at or in connection with product use or performance except as may otherwise be accorded by law. This warranty gives you specific legal rights, and you may also have other rights which vary from state to state. This warranty supersedes all prior warranties.
3.
2.
1.
4.
6.
7.
8.
9.
10.
5.15.2
9
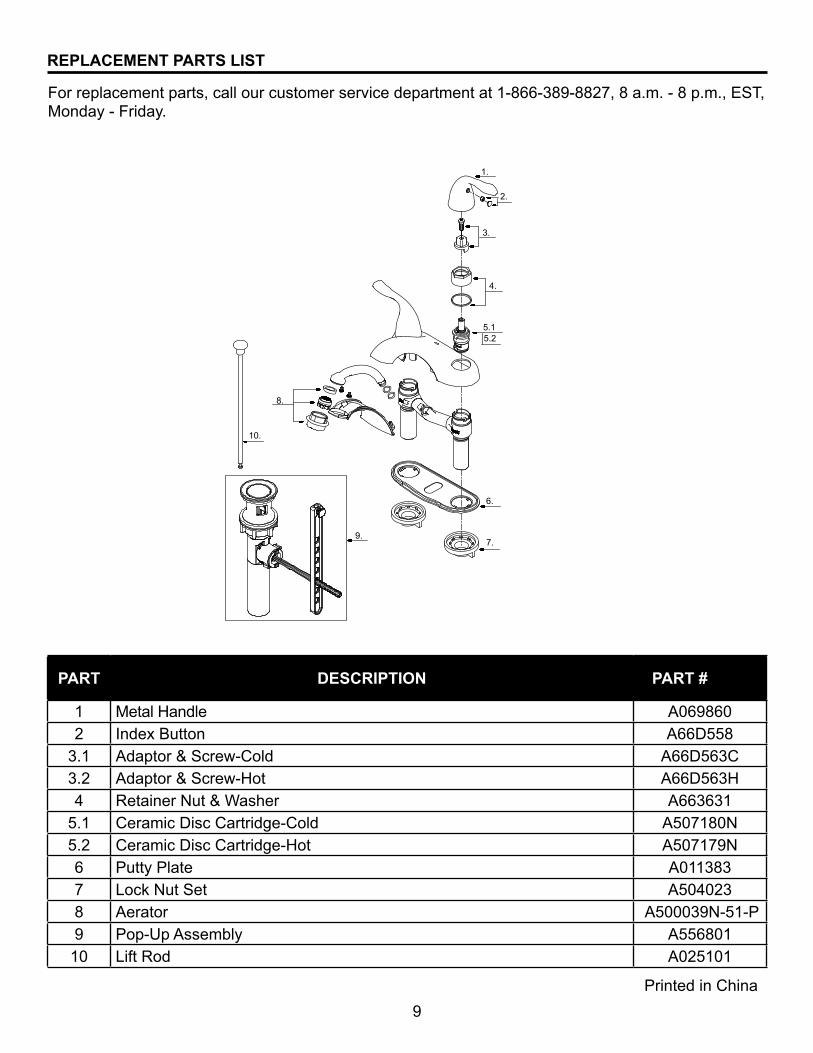
REPLACEMENT PARTS LIST
Printed in China
PART DESCRIPTION PART #
1 Metal Handle A0698602 Index Button A66D558
3.1 Adaptor & Screw-Cold A66D563C3.2 Adaptor & Screw-Hot A66D563H4 Retainer Nut & Washer A663631
5.1 Ceramic Disc Cartridge-Cold A507180N5.2 Ceramic Disc Cartridge-Hot A507179N6 Putty Plate A0113837 Lock Nut Set A5040238 Aerator A500039N-51-P9 Pop-Up Assembly A55680110 Lift Rod A025101
For replacement parts, call our customer service department at 1-866-389-8827, 8 a.m. - 8 p.m., EST, Monday - Friday.

10
ARTICLE #0857544#0857545
ROBINET DE SALLE DE BAINS
MODÈLE #F51BC034NP #F51BC034CP
MODELO #F51BC034NP #F51BC034CP
ARTÍCULO #0857544#0857545
GRIFO PARA BAÑO
JOIGNEZ VOTRE REÇU ICI / ADJUNTE SU RECIBO AQUÍNuméro de série / Número de serie __________________________________________________ Date d’achat / Fecha de compra _____________________________________________________
COMPOSANTS DE L’ENSEMBLE D’ÉVACUATION / COMPONENTES DEL ENSAMBLE DEL DESAGÜE
Project Source® est une marque de commerce déposée de LF, LLC. Tous droits réservés.
Project Source® es una marca registrada de LF, LLC. Todos los derechos reservados.
Des questions, des problèmes, des pièces manquantes? Avant de retourner l’article au détaillant, appelez notre service à la clientèle au 1 866 389-8827, entre 8 h et 20 h (HNE), du lundi au vendredi.
¿Preguntas, problemas, piezas faltantes? Antes de volver a la tienda, llame a nuestro Departamento de Servicio al Cliente al 1-866-389-8827, de lunes a viernes de 8 a.m. a 8 p.m., hora estándar del Este.

11
CONTENU DE L’EMBALLAGE / CONTENIDO DEL PAQUETE
PIÈCE PIEZA
DESCRIPTIONDESCRIPCIÓN
QUANTITÉCANTIDAD
A Robinet / Grifo 1
B Aérateur (Préassemblé au corps du robinet (A)) /Aireador (Preensamblada al cuerpo del grifo (A)) 1
C Écrous de blocage / Contratuercas 2
AA Rondelle en caoutchouc / Arandela de goma 1BB Grosse rondelle en caoutchouc / Arandela de caucho grande 1CC Écrou de blocage / Contratuerca 1DD Tuyau de vidange / Cuerpo del desagüe 1EE Fermeture mobile / Tapón del desagüe 1FF Tige de levage / Varilla de levantamiento 1GG Sangle de tige de levage / Barra de la varilla de elevación 1HH Tige à rotule / Varilla de bola 1
COMPOSANTS DE L’ENSEMBLE D’ÉVACUATION / COMPONENTES DEL ENSAMBLE DEL DESAGÜE
A
BBAA
CC
DD
EE
FFHHGG
B
C

12
CONSIGNES DE SÉCURITÉ / INFORMACIÓN DE SEGURIDAD
• Suivez attentivement ces instructions pour l’installation. Il incombe à l’installateur d’effectuer une installation adéquate.• Si vous ne respectez pas les instructions, le robinet peut se desserrer et causer des blessures graves.• L’installation de ce produit doit être effectuée par un plombier qualifié.
REMARQUE : N’appliquez pas de mastic de plomberie sur les pièces en plastique. En cas de besoin, utilisez du calfeutrant à base de silicone.
• Siga con atención las siguientes instrucciones de instalación. El instalador tiene la responsabilidad de realizar una instalación adecuada.• Si no sigue los procedimientos correctos de instalación, el grifo puede soltarse y causar lesiones graves.• Un plomero certificado debe instalar este producto.
NOTA: No utilice masilla de plomero en componentes plásticos. Si es necesario aplicar sellador, utilice masilla de calafateo de silicona.
1
13
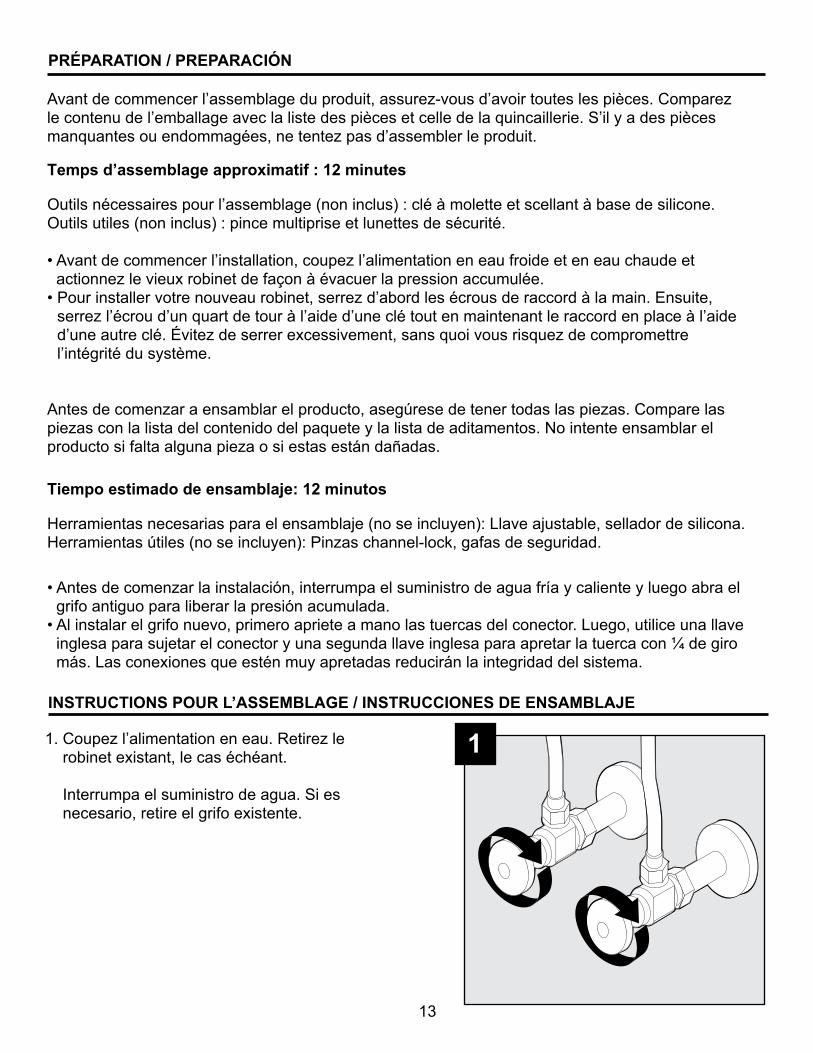
PRÉPARATION / PREPARACIÓN
Avant de commencer l’assemblage du produit, assurez-vous d’avoir toutes les pièces. Comparez le contenu de l’emballage avec la liste des pièces et celle de la quincaillerie. S’il y a des pièces manquantes ou endommagées, ne tentez pas d’assembler le produit.
Temps d’assemblage approximatif : 12 minutes
Outils nécessaires pour l’assemblage (non inclus) : clé à molette et scellant à base de silicone.Outils utiles (non inclus) : pince multiprise et lunettes de sécurité.
• Avant de commencer l’installation, coupez l’alimentation en eau froide et en eau chaude et actionnez le vieux robinet de façon à évacuer la pression accumulée.
• Pour installer votre nouveau robinet, serrez d’abord les écrous de raccord à la main. Ensuite, serrez l’écrou d’un quart de tour à l’aide d’une clé tout en maintenant le raccord en place à l’aide d’une autre clé. Évitez de serrer excessivement, sans quoi vous risquez de compromettre l’intégrité du système.
Antes de comenzar a ensamblar el producto, asegúrese de tener todas las piezas. Compare las piezas con la lista del contenido del paquete y la lista de aditamentos. No intente ensamblar el producto si falta alguna pieza o si estas están dañadas.
Tiempo estimado de ensamblaje: 12 minutos
Herramientas necesarias para el ensamblaje (no se incluyen): Llave ajustable, sellador de silicona.Herramientas útiles (no se incluyen): Pinzas channel-lock, gafas de seguridad.
• Antes de comenzar la instalación, interrumpa el suministro de agua fría y caliente y luego abra el grifo antiguo para liberar la presión acumulada.
• Al instalar el grifo nuevo, primero apriete a mano las tuercas del conector. Luego, utilice una llave inglesa para sujetar el conector y una segunda llave inglesa para apretar la tuerca con ¼ de giro más. Las conexiones que estén muy apretadas reducirán la integridad del sistema.
INSTRUCTIONS POUR L’ASSEMBLAGE / INSTRUCCIONES DE ENSAMBLAJE
1. Coupez l’alimentation en eau. Retirez le robinet existant, le cas échéant.
Interrumpa el suministro de agua. Si es necesario, retire el grifo existente.
1
1
C
1
1
2
3
4
2
2
14
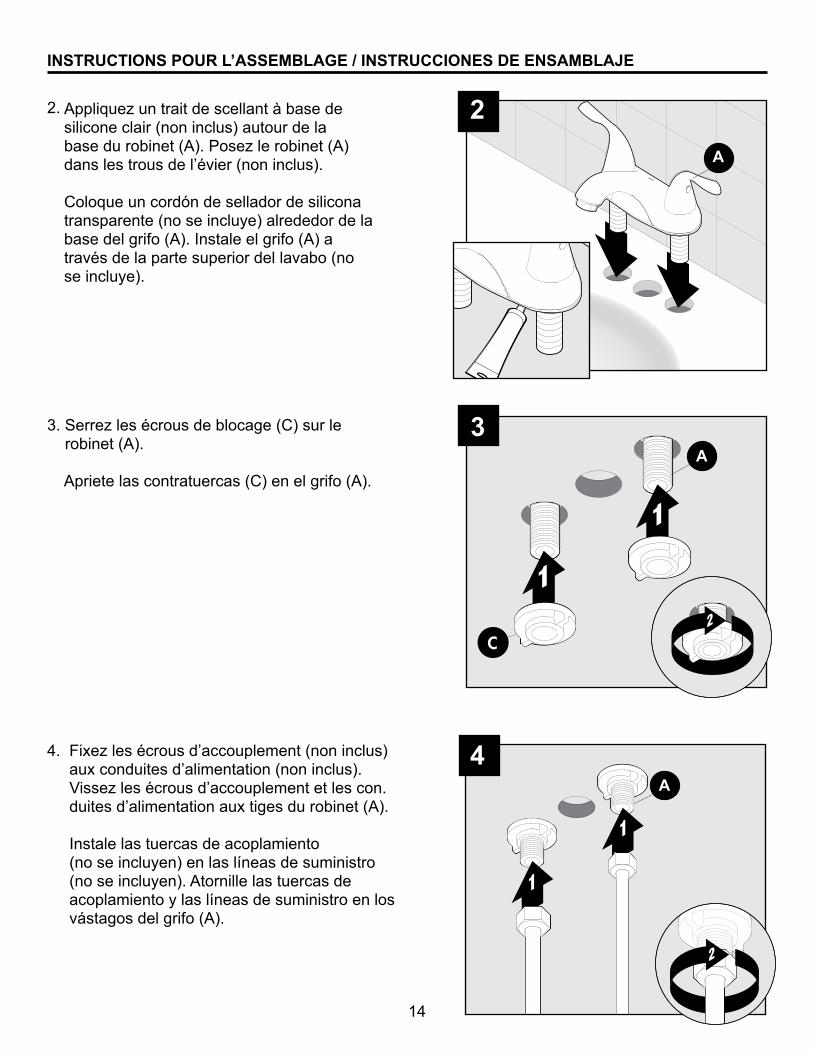
4. Fixez les écrous d’accouplement (non inclus) aux conduites d’alimentation (non inclus). Vissez les écrous d’accouplement et les con. duites d’alimentation aux tiges du robinet (A).
Instale las tuercas de acoplamiento (no se incluyen) en las líneas de suministro (no se incluyen). Atornille las tuercas de acoplamiento y las líneas de suministro en los vástagos del grifo (A).
INSTRUCTIONS POUR L’ASSEMBLAGE / INSTRUCCIONES DE ENSAMBLAJE
Appliquez un trait de scellant à base desilicone clair (non inclus) autour de labase du robinet (A). Posez le robinet (A)dans les trous de l’évier (non inclus).
Coloque un cordón de sellador de siliconatransparente (no se incluye) alrededor de labase del grifo (A). Instale el grifo (A) através de la parte superior del lavabo (nose incluye).
3. Serrez les écrous de blocage (C) sur le robinet (A).
Apriete las contratuercas (C) en el grifo (A).
A
A
A
2.
1
DD
HH
AA
BB
CC
DD
1
2
5
EE
6 EE
EE
Insérez le plongeur (EE).Remarque : L’anneau en plastique situé sur leplongeur (EE) est orienté vers l’arrière du lavabo en mode verrouillé et le plongeur ne peut pas être retiré. L’anneau en plastique situé sur le plongeur (EE) est orienté vers l’avant du lavabo en mode déverrouillé et peut être retiré pour faciliter le nettoyage.
Inserte el émbolo (EE).Note: El anillo de plástico en el émbolo (EE) que da hacia la parte posterior del lavabo está en modo bloqueado y el émbolo no se puede retirar. El anillo de plástico en el émbolo (EE) que da hacia la parte frontal del lavabo está en modo desbloqueado y se puede retirar para facilitar la limpieza.
7
3
15
INSTRUCTIONS POUR L’ASSEMBLAGE / INSTRUCCIONES DE ENSAMBLAJE
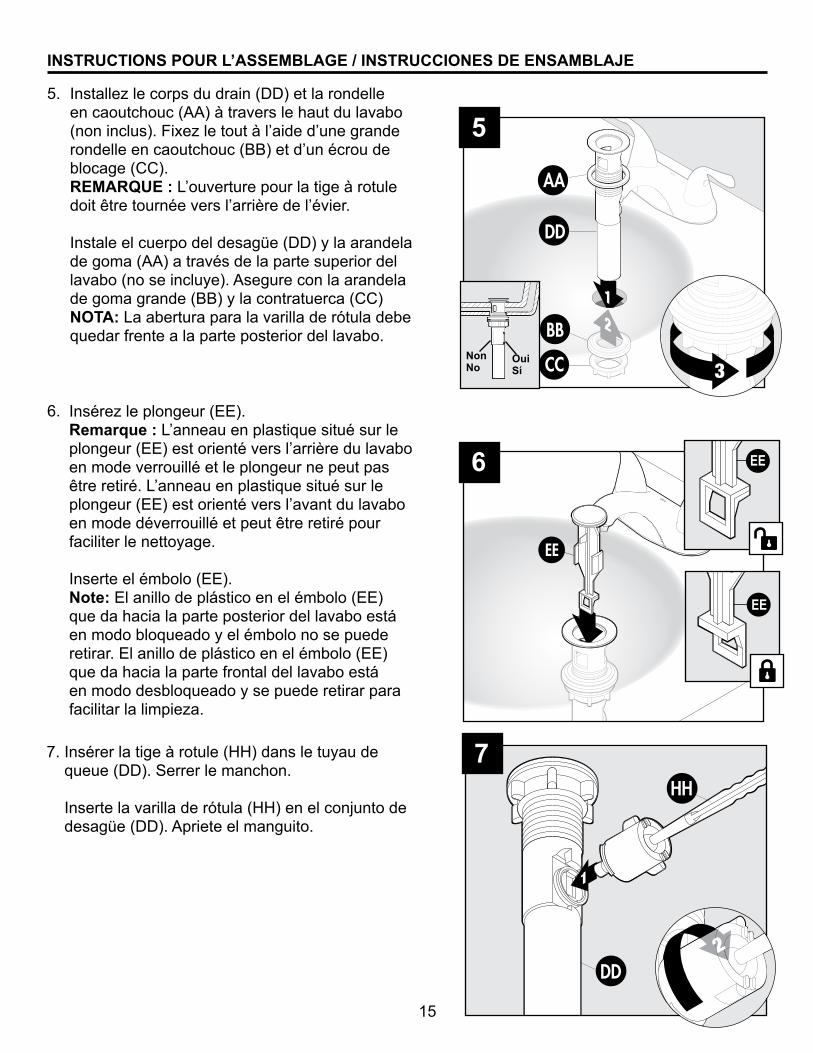
Installez le corps du drain (DD) et la rondelle en caoutchouc (AA) à travers le haut du lavabo (non inclus). Fixez le tout à l’aide d’une grande rondelle en caoutchouc (BB) et d’un écrou de blocage (CC). REMARQUE : L’ouverture pour la tige à rotule doit être tournée vers l’arrière de l’évier.
Instale el cuerpo del desagüe (DD) y la arandela
de goma (AA) a través de la parte superior del lavabo (no se incluye). Asegure con la arandela de goma grande (BB) y la contratuerca (CC)NOTA: La abertura para la varilla de rótula debe quedar frente a la parte posterior del lavabo.
NonNo
OuiSí
5.
6.
7. Insérer la tige à rotule (HH) dans le tuyau de queue (DD). Serrer le manchon. Inserte la varilla de rótula (HH) en el conjunto de desagüe (DD). Apriete el manguito.
2
GG
HH
2
GG1
FF FF
8
9
10
16
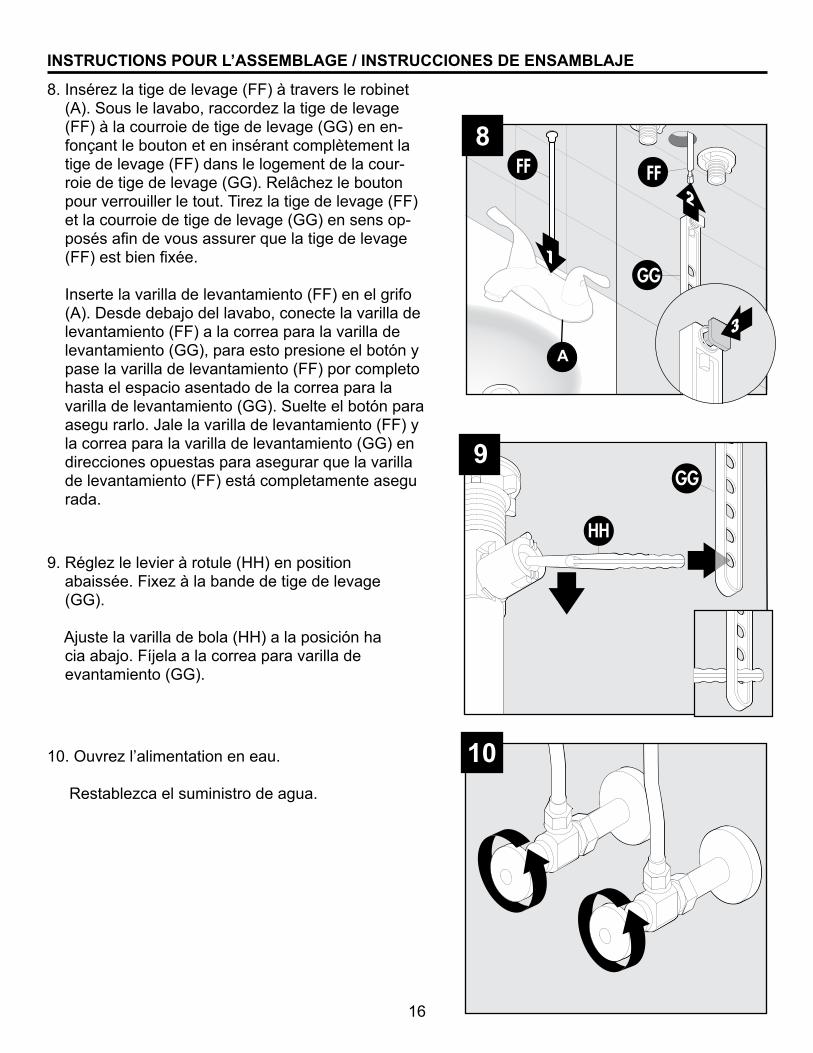
9. Réglez le levier à rotule (HH) en position abaissée. Fixez à la bande de tige de levage (GG). Ajuste la varilla de bola (HH) a la posición ha cia abajo. Fíjela a la correa para varilla de evantamiento (GG).
10. Ouvrez l’alimentation en eau.
Restablezca el suministro de agua.
INSTRUCTIONS POUR L’ASSEMBLAGE / INSTRUCCIONES DE ENSAMBLAJE
8. Insérez la tige de levage (FF) à travers le robinet (A). Sous le lavabo, raccordez la tige de levage (FF) à la courroie de tige de levage (GG) en en-fonçant le bouton et en insérant complètement la tige de levage (FF) dans le logement de la cour-roie de tige de levage (GG). Relâchez le bouton pour verrouiller le tout. Tirez la tige de levage (FF) et la courroie de tige de levage (GG) en sens op-posés afin de vous assurer que la tige de levage (FF) est bien fixée. Inserte la varilla de levantamiento (FF) en el grifo
(A). Desde debajo del lavabo, conecte la varilla de levantamiento (FF) a la correa para la varilla de levantamiento (GG), para esto presione el botón y pase la varilla de levantamiento (FF) por completo hasta el espacio asentado de la correa para la varilla de levantamiento (GG). Suelte el botón para asegu rarlo. Jale la varilla de levantamiento (FF) y la correa para la varilla de levantamiento (GG) en direcciones opuestas para asegurar que la varilla de levantamiento (FF) está completamente asegu rada.
A3
B
1
B
2
11
12
13
17
INSTRUCTIONS POUR L’ASSEMBLAGE / INSTRUCCIONES DE ENSAMBLAJE
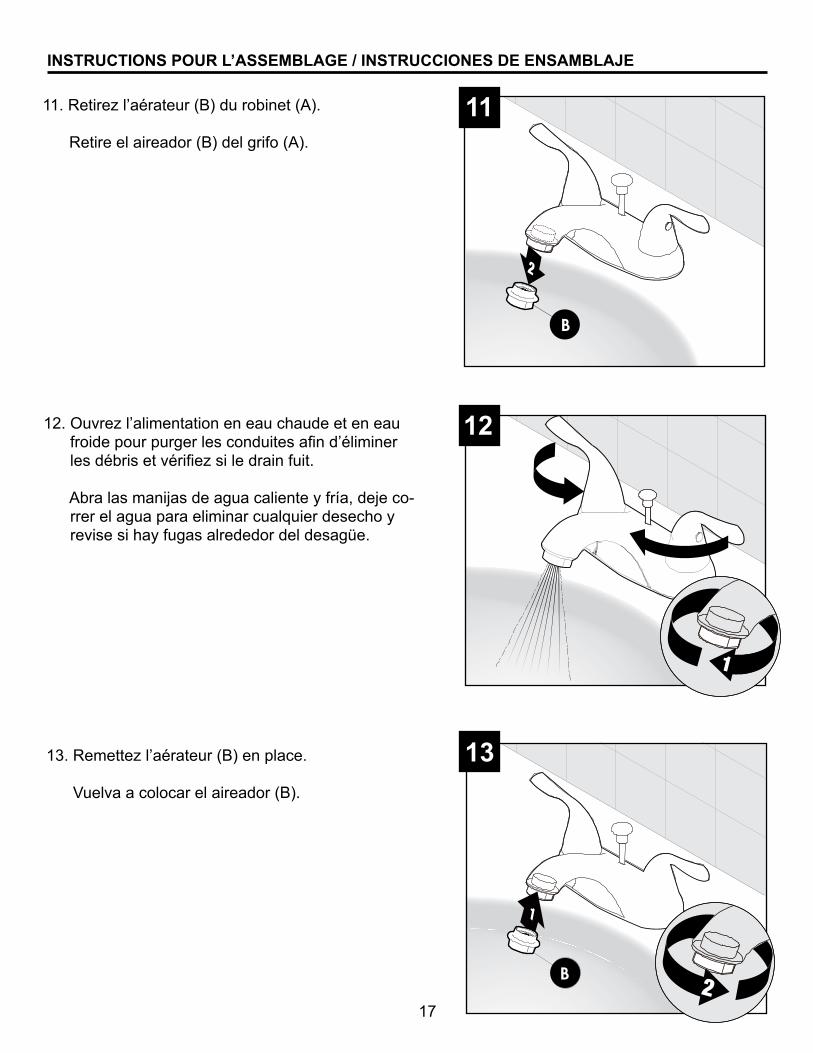
11. Retirez l’aérateur (B) du robinet (A).
Retire el aireador (B) del grifo (A).
12. Ouvrez l’alimentation en eau chaude et en eau froide pour purger les conduites afin d’éliminer les débris et vérifiez si le drain fuit.
Abra las manijas de agua caliente y fría, deje co- rrer el agua para eliminar cualquier desecho y revise si hay fugas alrededor del desagüe.
13. Remettez l’aérateur (B) en place.
Vuelva a colocar el aireador (B).
1
2
18
ENTRETIEN / CUIDADO Y MANTENIMIENTO
DÉPANAGE / SOLUCIÓN DE PROBLEMAS
• Nettoyez l’article périodiquement à l’aide d’un linge doux. N’utilisez pas de nettoyant abrasif, de laine d’acier ni de produit chimique puissant; ceux-ci risquent de ternir le fini et leur utilisation annulera votre garantie.
• Limpie periódicamente con un paño suave. Evite utilizar limpiadores abrasivos, lana de acero y químicos agresivos, ya que pueden dañar el acabado y anular la garantía.
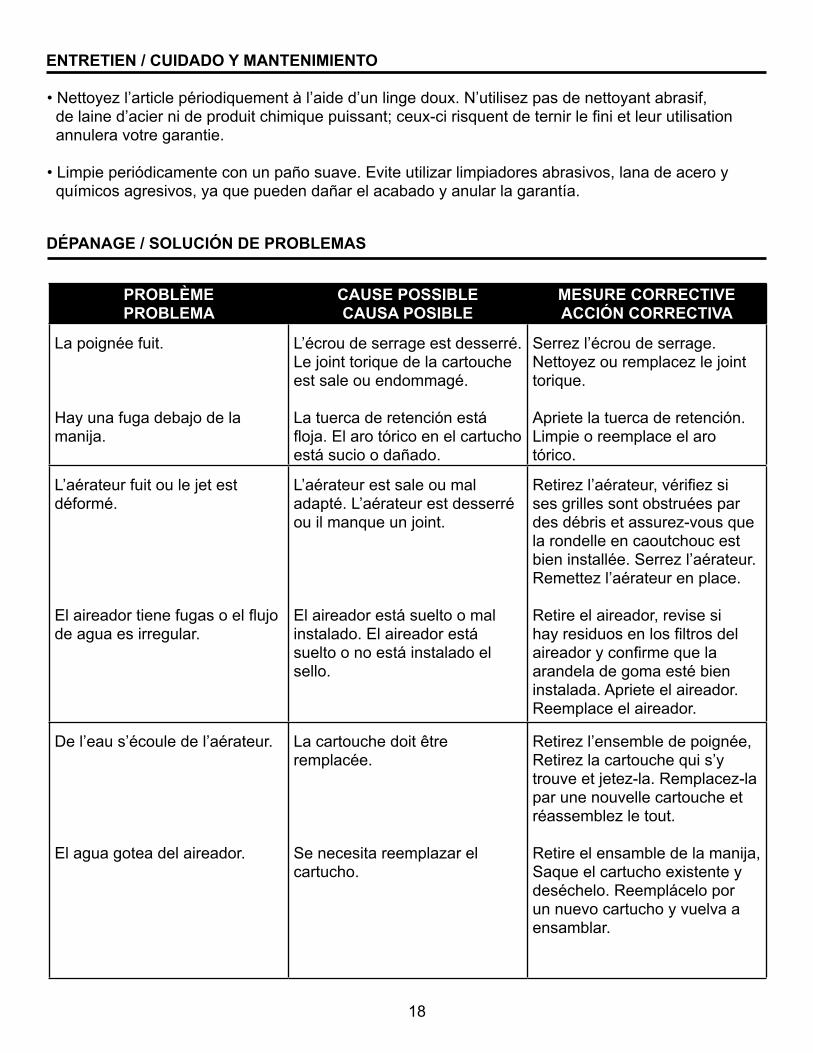
PROBLÈMEPROBLEMA
CAUSE POSSIBLECAUSA POSIBLE
MESURE CORRECTIVEACCIÓN CORRECTIVA
La poignée fuit.
Hay una fuga debajo de la manija.
L’écrou de serrage est desserré. Le joint torique de la cartouche est sale ou endommagé.
La tuerca de retención está floja. El aro tórico en el cartucho está sucio o dañado.
Serrez l’écrou de serrage. Nettoyez ou remplacez le joint torique.
Apriete la tuerca de retención. Limpie o reemplace el aro tórico.
L’aérateur fuit ou le jet est déformé.
El aireador tiene fugas o el flujo de agua es irregular.
L’aérateur est sale ou mal adapté. L’aérateur est desserré ou il manque un joint.
El aireador está suelto o mal instalado. El aireador está suelto o no está instalado el sello.
Retirez l’aérateur, vérifiez si ses grilles sont obstruées par des débris et assurez-vous que la rondelle en caoutchouc est bien installée. Serrez l’aérateur. Remettez l’aérateur en place.
Retire el aireador, revise si hay residuos en los filtros del aireador y confirme que la arandela de goma esté bien instalada. Apriete el aireador. Reemplace el aireador.
De l’eau s’écoule de l’aérateur.
El agua gotea del aireador.
La cartouche doit être remplacée.
Se necesita reemplazar el cartucho.
Retirez l’ensemble de poignée, Retirez la cartouche qui s’y trouve et jetez-la. Remplacez-la par une nouvelle cartouche et réassemblez le tout.
Retire el ensamble de la manija, Saque el cartucho existente y deséchelo. Reemplácelo por un nuevo cartucho y vuelva a ensamblar.

19
GARANTIE / GARANTÍA
Le fabricant garantit le robinet contre les défauts de matériaux ou de fabrication présents au moment de l’expédition de l’usine pendant une période limitée à compter de la date d’achat. Cette garantie ne s’applique qu’à l’acheteur initial. Le fabricant convient de corriger un tel défaut sans frais ou, à sa discrétion, de remplacer le robinet par un modèle comparable ou de qualité supérieure. Pour effectuer une réclamation au titre de la garantie, communiquez avec notre service à la clientèle au 1 866 389-8827 afin d’obtenir une autorisation de retour et des instructions d’expédition. Vous devrez peut-être présenter une copie de votre reçu comme preuve d’achat. Tous les frais de désin-stallation et de réinstallation incombent à l’acheteur. L’acheteur est responsable de tout dommage causé au robinet à la suite d’un accident, d’un usage inapproprié ou d’une installation inadéquate, ou par l’ajout d’accessoires qui ne sont pas produits par le fabricant. Le fabricant n’est aucunement responsable de l’installation du robinet durant la période de garantie. Aucune autre garantie explic-ite n’est consentie. Le fabricant décline toute garantie implicite. Le fabricant n’est pas responsable des dommages accessoires, consécutifs ou spéciaux découlant de l’utilisation ou du rendement du produit, à l’exception de ce qui pourrait être prévu autrement par la loi. Cette garantie vous confère des droits précis. Il est possible que vous disposiez également d’autres droits, qui varient d’un État ou d’une province à l’autre. Cette garantie remplace toute garantie antérieure.
El fabricante garantiza que este grifo no presenta defectos en la mano de obra ni en los materiales presentes en el momento del transporte desde la fábrica durante un período limitado de por vida a partir de la fecha de compra. Esta garantía es válida solo para el comprador original. El fabricante acepta reparar dichos defectos sin cargo o, según nuestro criterio, reemplazar el grifo por un modelo comparable o superior. Para obtener los servicios cubiertos por la garantía, llame a nuestro Depar-tamento de Servicio al Cliente al 1-866-389-8827 para enviarle una autorización de devolución y las instrucciones de envío. Es posible que se le exija presentar una copia del recibo de venta como comprobante de compra. Todos los costos de extracción y reinstalación son de responsabilidad explícita del comprador. Cualquier daño al grifo producido por accidente, uso indebido o instalación incorrecta, o a causa del uso de elementos accesorios que no son del fabricante, será responsa-bilidad del comprador. El fabricante no asume ningún tipo de responsabilidad por la instalación del grifo durante el período de garantía. No existe otro tipo de garantía explícita. El fabricante rechaza cualquiera y todas las garantías implícitas. El fabricante no se hará responsable por daños acciden-tales, resultantes o especiales que surjan en relación con el uso o el funcionamiento del producto, excepto que la ley indique lo contrario. Esta garantía le otorga derechos legales específicos, pero podría tener también otros derechos que varían según el estado. Esta garantía sustituye cualquier garantía previa.
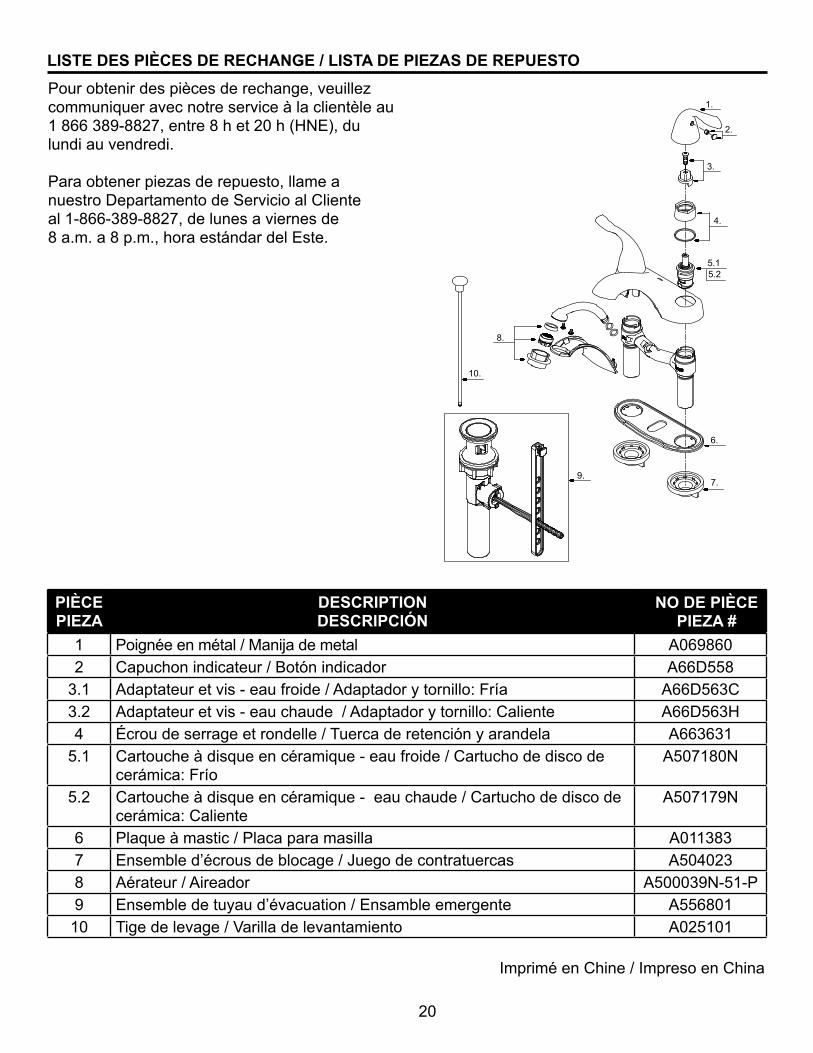
3.
2.
1.
4.
6.
7.
8.
9.
10.
5.15.2
20
LISTE DES PIÈCES DE RECHANGE / LISTA DE PIEZAS DE REPUESTO
Imprimé en Chine / Impreso en China
PIÈCEPIEZA
DESCRIPTIONDESCRIPCIÓN
1 Poignée en métal / Manija de metal A0698602 Capuchon indicateur / Botón indicador A66D558
3.1 Adaptateur et vis - eau froide / Adaptador y tornillo: Fría A66D563C3.2 Adaptateur et vis - eau chaude / Adaptador y tornillo: Caliente A66D563H4 Écrou de serrage et rondelle / Tuerca de retención y arandela A663631
5.1 Cartouche à disque en céramique - eau froide / Cartucho de disco de cerámica: Frío
A507180N
5.2 Cartouche à disque en céramique - eau chaude / Cartucho de disco de cerámica: Caliente
A507179N
6 Plaque à mastic / Placa para masilla A0113837 Ensemble d’écrous de blocage / Juego de contratuercas A5040238 Aérateur / Aireador A500039N-51-P9 Ensemble de tuyau d’évacuation / Ensamble emergente A55680110 Tige de levage / Varilla de levantamiento A025101
NO DE PIÈCE PIEZA #
Pour obtenir des pièces de rechange, veuillezcommuniquer avec notre service à la clientèle au1 866 389-8827, entre 8 h et 20 h (HNE), dulundi au vendredi.
Para obtener piezas de repuesto, llame anuestro Departamento de Servicio al Clienteal 1-866-389-8827, de lunes a viernes de8 a.m. a 8 p.m., hora estándar del Este.