basics guide guía básica - hp.com · 2 print basics this section describes the basics of printing...
TRANSCRIPT

HP Photosmart A620 series
Guía básicaBasics Guide
Hewlett-Packard Company noticesThe information contained in this document is subject to change without notice.All rights reserved. Reproduction, adaptation, or translation of this material is prohibited without prior written permission of Hewlett-Packard, except as allowed under copyright laws. The only warranties for HP products and services are set forth in the express warranty statements accompanying such products and services. Nothing herein should be construed as constituting an additional warranty. HP shall not be liable for technical or editorial errors or omissions contained herein.© 2007 Hewlett-Packard Development Company, L.P.Windows, Windows 2000, and Windows XP are U.S. registered trademarks of Microsoft Corporation. Windows Vista is either a registered trademark or trademark of Microsoft Corporation in the United States and/or other countries. Intel and Pentium are trademarks or registered trademarks of Intel Corporation or its subsidiaries in the United States and other countries.The Bluetooth trademarks are owned by its proprietor and used by Hewlett-Packard Company under license.
Avisos de Hewlett-Packard CompanyLa información contenida en el presente documento está sujeta a cambios sin previo aviso.Reservados todos los derechos. Quedan prohibidas la reproducción, adaptación o traducción del presente material sin previa autorización por escrito de Hewlett-Packard, excepto en los casos permitidos por las leyes de propiedad intelectual. Las únicas garantías para los productos y servicios HP son las descritas en las declaraciones expresas de garantía que acompañan a dichos productos y servicios. Nada de lo aquí indicado deberá interpretarse como una garantía adicional. HP no se responsabiliza de los posibles errores técnicos o editoriales ni de las omisiones que puedan existir en el presente documento.© 2007 Hewlett-Packard Development Company, L.P.Windows, Windows 2000 y Windows XP son marcas comerciales registradas en EE.UU. de Microsoft Corporation.Windows Vista es una marca comercial o marca comercial registrada de Microsoft Corporation en los EE.UU. o en otros países.Intel y Pentium son marcas comerciales o marcas comerciales registradas de Intel Corporation o de sus filiales en EE.UU. y en otros países.Las marcas comerciales registradas Bluetooth son propiedad de su titular y son utilizadas bajo licencia por Hewlett-Packard Company.
HP Photosmart A620 series BasicsGuideHP Photosmart A620 series Basics Guide
Engl
ish
Contents
1 Get startedThe HP Photosmart at a glance.................................................................................................5Control panel buttons and indicator lights..................................................................................6Use the touch screen..................................................................................................................6
The quick touch frame..........................................................................................................6The photo viewing area........................................................................................................7The printer status bar............................................................................................................7Photo icons...........................................................................................................................8
Use the stylus.............................................................................................................................9Printer menus.............................................................................................................................9
How to use the printer menus ............................................................................................10
2 Print basicsLoad your paper.......................................................................................................................11Insert a memory card................................................................................................................12Print from a memory card.........................................................................................................12Enhance or edit your photos.....................................................................................................13
Use Photo Fix.....................................................................................................................13Remove red-eye from your photos.....................................................................................13
Print from a computer ..............................................................................................................14Install the software and connect the USB cable.................................................................14Transfer photos from a memory card to the computer.......................................................14
3 Creative projectsCustomize your photos.............................................................................................................15Specialty printing projects.........................................................................................................17
4 Troubleshooting and supportPrinting and hardware issues ..................................................................................................18Insert or replace the print cartridge...........................................................................................20Find more information...............................................................................................................21HP support................................................................................................................................21Regulatory model identification number SDGOA-0702............................................................22HP Warranty ............................................................................................................................23Printer specifications................................................................................................................24
4 HP Photosmart A620 series Basics Guide
English
1 Get startedThis section provides introductory information about the HP Photosmart A620 seriesprinter.
The HP Photosmart at a glance
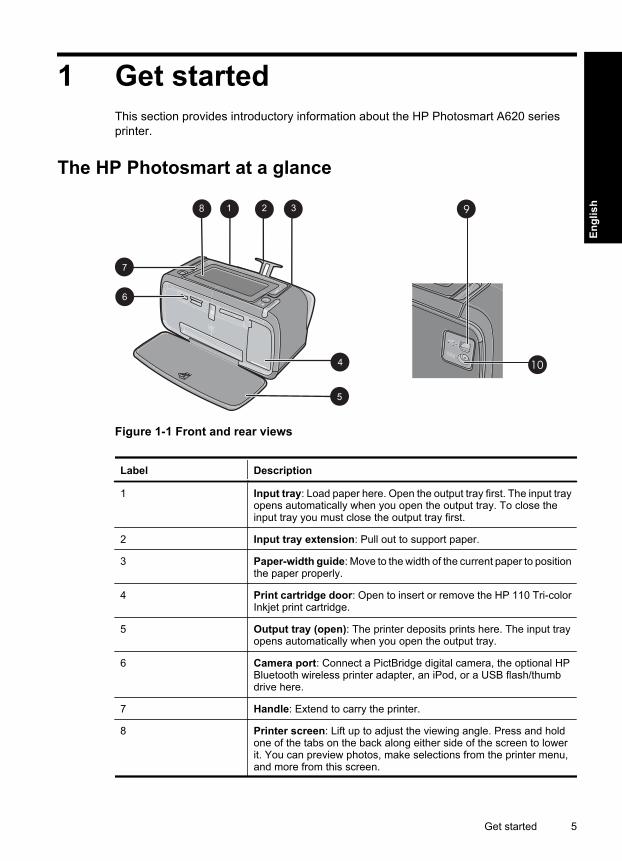
Figure 1-1 Front and rear views
Label Description
1 Input tray: Load paper here. Open the output tray first. The input trayopens automatically when you open the output tray. To close theinput tray you must close the output tray first.
2 Input tray extension: Pull out to support paper.
3 Paper-width guide: Move to the width of the current paper to positionthe paper properly.
4 Print cartridge door: Open to insert or remove the HP 110 Tri-colorInkjet print cartridge.
5 Output tray (open): The printer deposits prints here. The input trayopens automatically when you open the output tray.
6 Camera port: Connect a PictBridge digital camera, the optional HPBluetooth wireless printer adapter, an iPod, or a USB flash/thumbdrive here.
7 Handle: Extend to carry the printer.
8 Printer screen: Lift up to adjust the viewing angle. Press and holdone of the tabs on the back along either side of the screen to lowerit. You can preview photos, make selections from the printer menu,and more from this screen.
Get started 5
Engl
ish
Label Description
9 USB port: Connect the printer to a computer using the supplied USBcable here.
10 Power cord connection: Connect the power cord here.
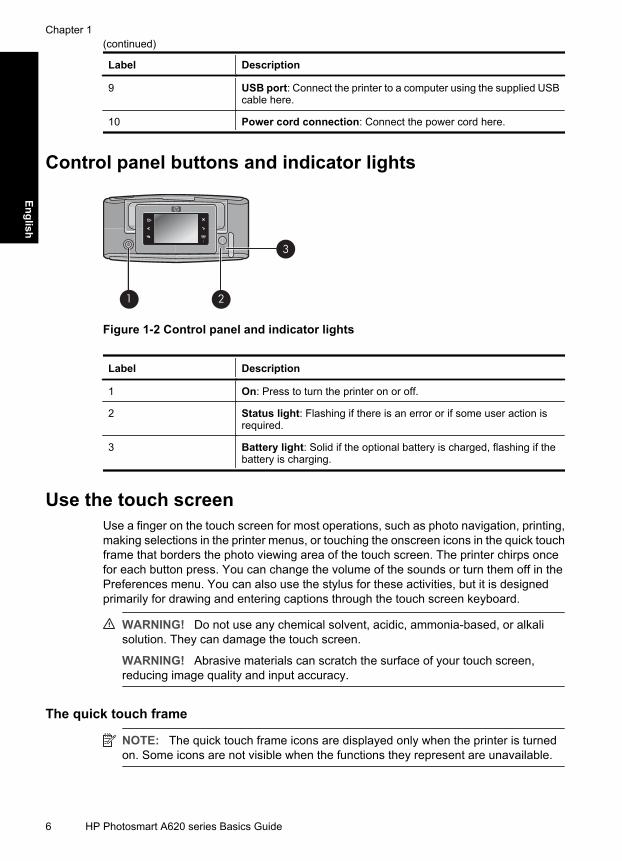
Control panel buttons and indicator lights
Figure 1-2 Control panel and indicator lights
Label Description
1 On: Press to turn the printer on or off.
2 Status light: Flashing if there is an error or if some user action isrequired.
3 Battery light: Solid if the optional battery is charged, flashing if thebattery is charging.
Use the touch screenUse a finger on the touch screen for most operations, such as photo navigation, printing,making selections in the printer menus, or touching the onscreen icons in the quick touchframe that borders the photo viewing area of the touch screen. The printer chirps oncefor each button press. You can change the volume of the sounds or turn them off in thePreferences menu. You can also use the stylus for these activities, but it is designedprimarily for drawing and entering captions through the touch screen keyboard.
WARNING! Do not use any chemical solvent, acidic, ammonia-based, or alkalisolution. They can damage the touch screen.
WARNING! Abrasive materials can scratch the surface of your touch screen,reducing image quality and input accuracy.
The quick touch frame
NOTE: The quick touch frame icons are displayed only when the printer is turnedon. Some icons are not visible when the functions they represent are unavailable.
Chapter 1(continued)
6 HP Photosmart A620 series Basics Guide
English
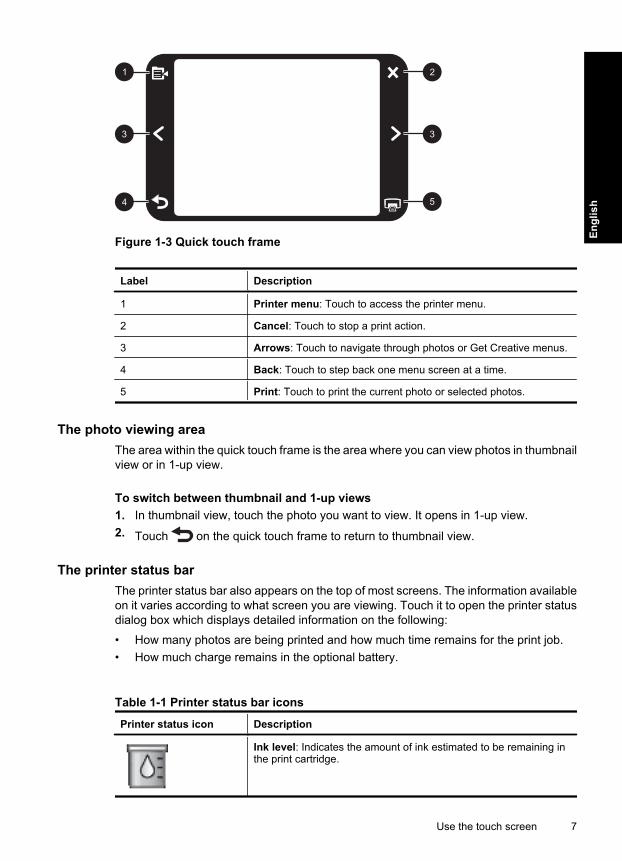
Figure 1-3 Quick touch frame
Label Description
1 Printer menu: Touch to access the printer menu.
2 Cancel: Touch to stop a print action.
3 Arrows: Touch to navigate through photos or Get Creative menus.
4 Back: Touch to step back one menu screen at a time.
5 Print: Touch to print the current photo or selected photos.
The photo viewing areaThe area within the quick touch frame is the area where you can view photos in thumbnailview or in 1-up view.
To switch between thumbnail and 1-up views1. In thumbnail view, touch the photo you want to view. It opens in 1-up view.2. Touch on the quick touch frame to return to thumbnail view.
The printer status barThe printer status bar also appears on the top of most screens. The information availableon it varies according to what screen you are viewing. Touch it to open the printer statusdialog box which displays detailed information on the following:
• How many photos are being printed and how much time remains for the print job.• How much charge remains in the optional battery.
Table 1-1 Printer status bar icons
Printer status icon Description
Ink level: Indicates the amount of ink estimated to be remaining inthe print cartridge.
Use the touch screen 7
Engl
ish
Printer status icon Description
Estimated time remaining: Indicates estimated print time remainingin the print queue.
Battery status: Indicates how much charge remains on the optionalprinter battery, if installed.
Number of copies selected: Displays the number of photos selectedfor printing.
Photo iconsPhoto icons appear on photos and video clips in thumbnail and 1-up views. Some iconsshow the status of a photo or video clip. Others can affect the photo or video clip whentouched.
Table 1-2 Photo icons
Photo icon Description
Print status: Indicates the photo is printing.
Copies: Touch in 1-up view to change the number of copies to beprinted.
Selection box: Touch to select or deselect a photo or frame of avideo.
Rotate: Touch in 1-up view to rotate the photo 90 degrees clockwisefor each press of the icon.
Red-eye: Indicates a photo in 1-up view that has red-eye removed.The icon flashes on a photo undergoing red-eye removal.
Video: Indicates a video clip. Touch to play the video clip.
Chapter 1Printer status bar icons (continued)
8 HP Photosmart A620 series Basics Guide
English
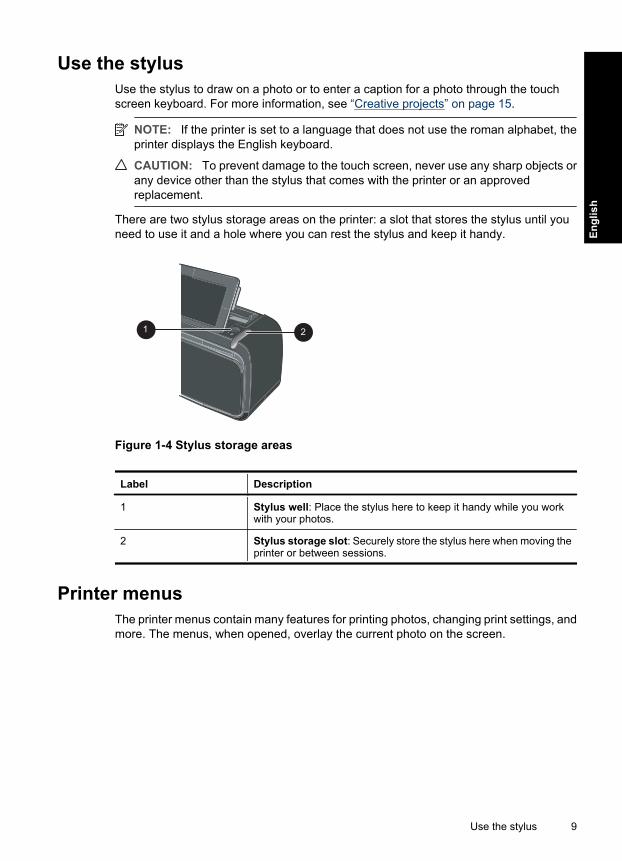
Use the stylusUse the stylus to draw on a photo or to enter a caption for a photo through the touchscreen keyboard. For more information, see “Creative projects” on page 15.
NOTE: If the printer is set to a language that does not use the roman alphabet, theprinter displays the English keyboard.
CAUTION: To prevent damage to the touch screen, never use any sharp objects orany device other than the stylus that comes with the printer or an approvedreplacement.
There are two stylus storage areas on the printer: a slot that stores the stylus until youneed to use it and a hole where you can rest the stylus and keep it handy.
Figure 1-4 Stylus storage areas
Label Description
1 Stylus well: Place the stylus here to keep it handy while you workwith your photos.
2 Stylus storage slot: Securely store the stylus here when moving theprinter or between sessions.
Printer menusThe printer menus contain many features for printing photos, changing print settings, andmore. The menus, when opened, overlay the current photo on the screen.
Use the stylus 9
Engl
ish

How to use the printer menus
Label Description
1 Menu name: The name of the current menu appears here.
2 Menu option: The options available in the current menu appear onthese buttons.
3 Menu scroll arrows: Touch to scroll through menus or menu options.
To use the printer menus1. Touch the Menu icon on the quick touch frame to open the printer menus, and then
press the scroll arrows to navigate through the menus.2. Touch a menu name to open the options under the menu. Menu options that are not
accessible are dimmed. The current menu option is indicated by a check mark.3. Touch an option to open it or to perform the operation it indicates.4. To exit a menu, touch the icon on the quick touch frame.
For detailed information on all the options in the printer menus, see the electronic Help.
Chapter 1
10 HP Photosmart A620 series Basics Guide
English
2 Print basicsThis section describes the basics of printing photos. For information on inserting orreplacing the print cartridge before you print, see the setup instructions that came in thebox with the printer or “Insert or replace the print cartridge” on page 20.
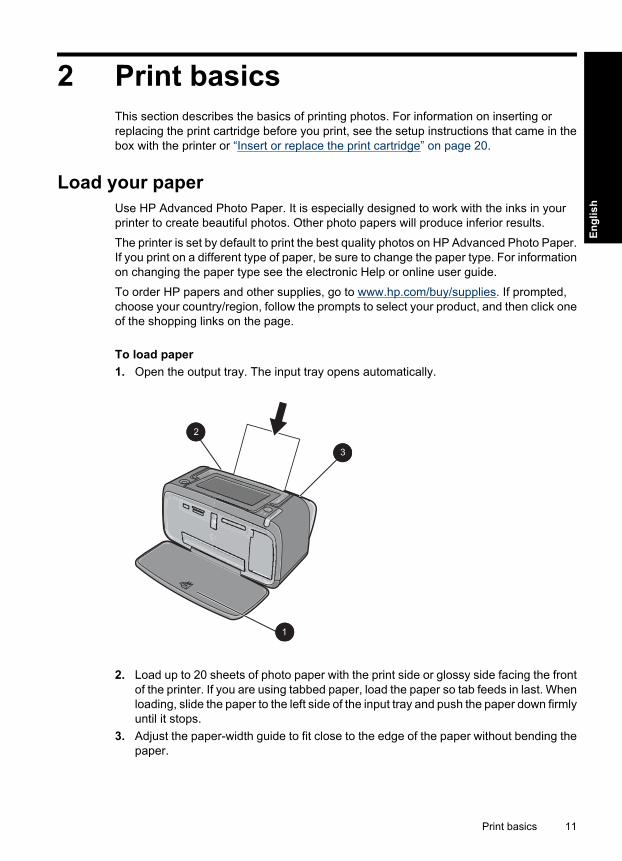
Load your paperUse HP Advanced Photo Paper. It is especially designed to work with the inks in yourprinter to create beautiful photos. Other photo papers will produce inferior results.
The printer is set by default to print the best quality photos on HP Advanced Photo Paper.If you print on a different type of paper, be sure to change the paper type. For informationon changing the paper type see the electronic Help or online user guide.
To order HP papers and other supplies, go to www.hp.com/buy/supplies. If prompted,choose your country/region, follow the prompts to select your product, and then click oneof the shopping links on the page.
To load paper1. Open the output tray. The input tray opens automatically.
2. Load up to 20 sheets of photo paper with the print side or glossy side facing the frontof the printer. If you are using tabbed paper, load the paper so tab feeds in last. Whenloading, slide the paper to the left side of the input tray and push the paper down firmlyuntil it stops.
3. Adjust the paper-width guide to fit close to the edge of the paper without bending thepaper.
Print basics 11
Engl
ish
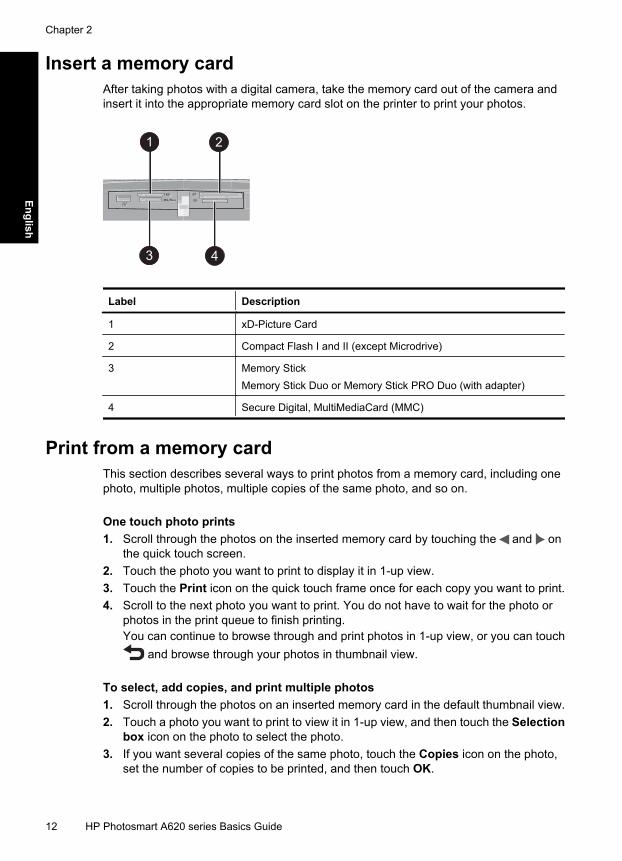
Insert a memory cardAfter taking photos with a digital camera, take the memory card out of the camera andinsert it into the appropriate memory card slot on the printer to print your photos.
Label Description
1 xD-Picture Card
2 Compact Flash I and II (except Microdrive)
3 Memory StickMemory Stick Duo or Memory Stick PRO Duo (with adapter)
4 Secure Digital, MultiMediaCard (MMC)
Print from a memory cardThis section describes several ways to print photos from a memory card, including onephoto, multiple photos, multiple copies of the same photo, and so on.
One touch photo prints1. Scroll through the photos on the inserted memory card by touching the and on
the quick touch screen.2. Touch the photo you want to print to display it in 1-up view.3. Touch the Print icon on the quick touch frame once for each copy you want to print.4. Scroll to the next photo you want to print. You do not have to wait for the photo or
photos in the print queue to finish printing.You can continue to browse through and print photos in 1-up view, or you can touch
and browse through your photos in thumbnail view.
To select, add copies, and print multiple photos1. Scroll through the photos on an inserted memory card in the default thumbnail view.2. Touch a photo you want to print to view it in 1-up view, and then touch the Selection
box icon on the photo to select the photo.3. If you want several copies of the same photo, touch the Copies icon on the photo,
set the number of copies to be printed, and then touch OK.
Chapter 2
12 HP Photosmart A620 series Basics Guide
English
4. Touch the arrow keys to browse through photos and select other photos you want toprint. To return to the thumbnail view, touch .
5. When you finish selecting photos, press the Print icon on the quick touch frame toprint all selected photos.
To print all photos
NOTE: Make sure no photo is selected. If you are in 1-up view, touch to returnto thumbnail view first.
1. Touch the Print icon on the quick touch frame while viewing photos in the defaultthumbnail view.
2. Touch Yes to print all photos on the inserted memory card.
Enhance or edit your photosYou can enhance or edit your photos in various ways, as explained in the followingsections.
Use Photo FixPhoto Fix automatically enhances your photos using HP Real Life Technologies that:
• Sharpen blurred photos.• Improve the dark areas of a photo without affecting the light areas of a photo.• Improve the overall brightness, color, and contrast of photos.
Photo Fix is on by default when you turn on the printer. If you want to print a photo withoutusing the Photo Fix improvements, turn off Photo Fix.
To turn off Photo Fix1. Touch the Menu icon on the quick touch frame.2. Touch Preferences, and then touch Photo Fix.3. Touch Off.Photo Fix remains off until you turn it on again. Photo Fix is always on for Bluetooth orPictBridge printing.
Remove red-eye from your photosThe printer provides a way to reduce red-eye that can occur in photos taken with a flash.
To remove red-eye1. Touch Edit Photo when viewing a photo with red-eye in 1-up view.2. Touch Remove Red-Eye.
The Red-eye icon flashes and then displays continuously after red-eye removal.A message is displayed If the printer does not detect red-eye in the photo.
3. To undo red-eye removal, touch Edit Photo when viewing the photo with red-eyeremoved and then touch Undo Red-Eye.
Enhance or edit your photos 13
Engl
ish
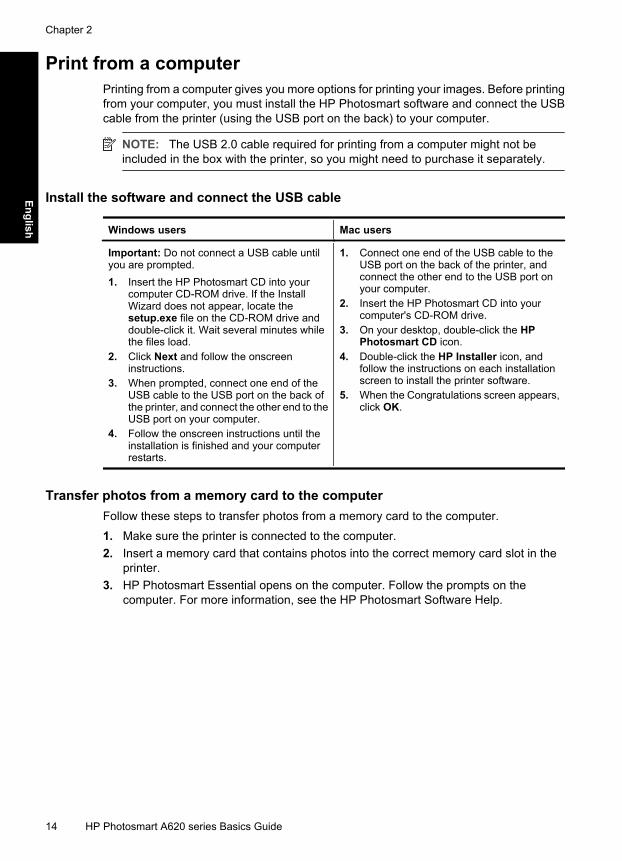
Print from a computerPrinting from a computer gives you more options for printing your images. Before printingfrom your computer, you must install the HP Photosmart software and connect the USBcable from the printer (using the USB port on the back) to your computer.
NOTE: The USB 2.0 cable required for printing from a computer might not beincluded in the box with the printer, so you might need to purchase it separately.
Install the software and connect the USB cable
Windows users Mac users
Important: Do not connect a USB cable untilyou are prompted.1. Insert the HP Photosmart CD into your
computer CD-ROM drive. If the InstallWizard does not appear, locate thesetup.exe file on the CD-ROM drive anddouble-click it. Wait several minutes whilethe files load.
2. Click Next and follow the onscreeninstructions.
3. When prompted, connect one end of theUSB cable to the USB port on the back ofthe printer, and connect the other end to theUSB port on your computer.
4. Follow the onscreen instructions until theinstallation is finished and your computerrestarts.
1. Connect one end of the USB cable to theUSB port on the back of the printer, andconnect the other end to the USB port onyour computer.
2. Insert the HP Photosmart CD into yourcomputer's CD-ROM drive.
3. On your desktop, double-click the HPPhotosmart CD icon.
4. Double-click the HP Installer icon, andfollow the instructions on each installationscreen to install the printer software.
5. When the Congratulations screen appears,click OK.
Transfer photos from a memory card to the computerFollow these steps to transfer photos from a memory card to the computer.
1. Make sure the printer is connected to the computer.2. Insert a memory card that contains photos into the correct memory card slot in the
printer.3. HP Photosmart Essential opens on the computer. Follow the prompts on the
computer. For more information, see the HP Photosmart Software Help.
Chapter 2
14 HP Photosmart A620 series Basics Guide
English
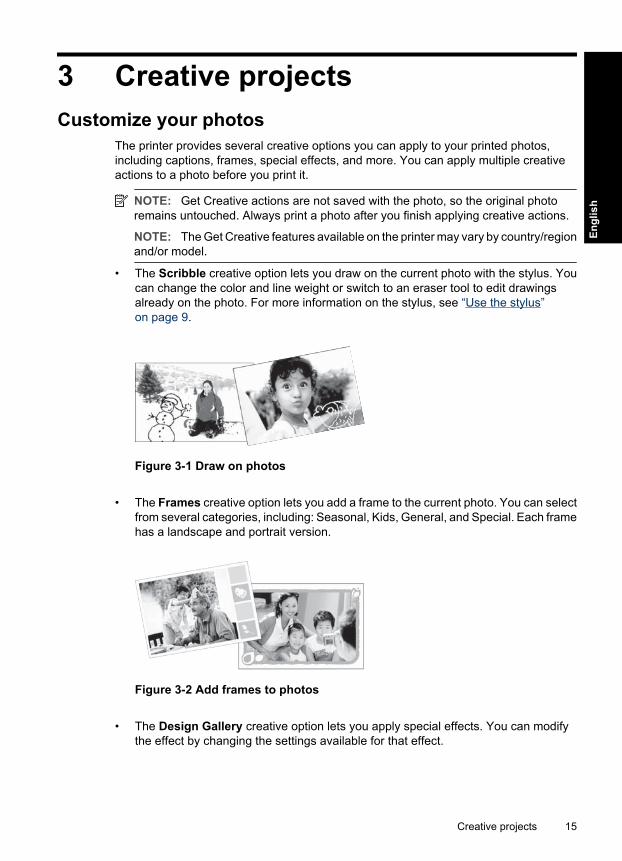
3 Creative projectsCustomize your photos
The printer provides several creative options you can apply to your printed photos,including captions, frames, special effects, and more. You can apply multiple creativeactions to a photo before you print it.
NOTE: Get Creative actions are not saved with the photo, so the original photoremains untouched. Always print a photo after you finish applying creative actions.
NOTE: The Get Creative features available on the printer may vary by country/regionand/or model.
• The Scribble creative option lets you draw on the current photo with the stylus. Youcan change the color and line weight or switch to an eraser tool to edit drawingsalready on the photo. For more information on the stylus, see “Use the stylus”on page 9.
Figure 3-1 Draw on photos
• The Frames creative option lets you add a frame to the current photo. You can selectfrom several categories, including: Seasonal, Kids, General, and Special. Each framehas a landscape and portrait version.
Figure 3-2 Add frames to photos
• The Design Gallery creative option lets you apply special effects. You can modifythe effect by changing the settings available for that effect.
Creative projects 15
Engl
ish
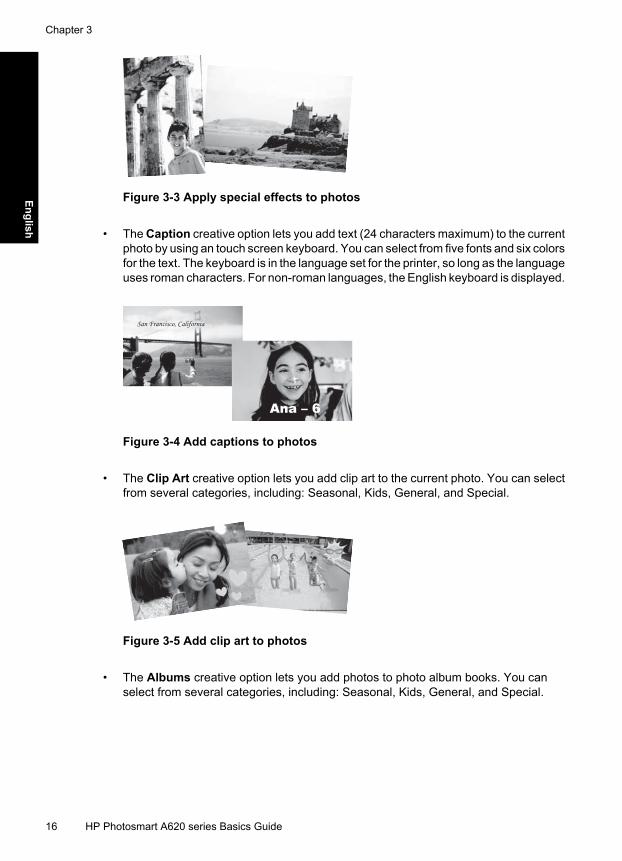
Figure 3-3 Apply special effects to photos
• The Caption creative option lets you add text (24 characters maximum) to the currentphoto by using an touch screen keyboard. You can select from five fonts and six colorsfor the text. The keyboard is in the language set for the printer, so long as the languageuses roman characters. For non-roman languages, the English keyboard is displayed.
Figure 3-4 Add captions to photos
• The Clip Art creative option lets you add clip art to the current photo. You can selectfrom several categories, including: Seasonal, Kids, General, and Special.
Figure 3-5 Add clip art to photos
• The Albums creative option lets you add photos to photo album books. You canselect from several categories, including: Seasonal, Kids, General, and Special.
Chapter 3
16 HP Photosmart A620 series Basics Guide
English
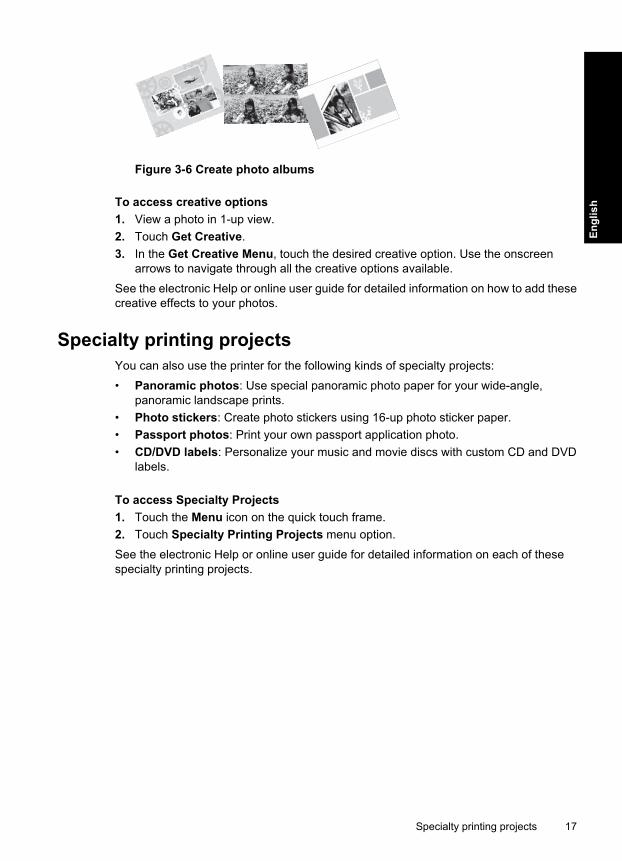
Figure 3-6 Create photo albums
To access creative options1. View a photo in 1-up view.2. Touch Get Creative.3. In the Get Creative Menu, touch the desired creative option. Use the onscreen
arrows to navigate through all the creative options available.
See the electronic Help or online user guide for detailed information on how to add thesecreative effects to your photos.
Specialty printing projectsYou can also use the printer for the following kinds of specialty projects:
• Panoramic photos: Use special panoramic photo paper for your wide-angle,panoramic landscape prints.
• Photo stickers: Create photo stickers using 16-up photo sticker paper.• Passport photos: Print your own passport application photo.• CD/DVD labels: Personalize your music and movie discs with custom CD and DVD
labels.
To access Specialty Projects1. Touch the Menu icon on the quick touch frame.2. Touch Specialty Printing Projects menu option.
See the electronic Help or online user guide for detailed information on each of thesespecialty printing projects.
Specialty printing projects 17
Engl
ish
4 Troubleshooting and supportBefore contacting HP support, read this section for troubleshooting tips or go to the onlinesupport services at www.hp.com/support.
Before you begin, make sure:
• All the cable connections between the printer and computer are secure.• You are using the most recent version of the printer software.
TIP: HP recommends using a USB cable 3 meters (10 feet) or less in length. Usinga longer USB cable may cause errors.
This section contains troubleshooting information for the HP Photosmart A620 seriesprinter.
• Printing and hardware issues• Insert or replace the print cartridge• Find more information• HP support• Regulatory model identification number SDGOA-0702• HP Warranty• Printer specifications
Printing and hardware issues• The printout did not appear• Printing is very slow• The printer is plugged in, but it will not turn on.• I lost the stylus
The printout did not appearCause: The paper jammed while printing.
Solution: Try the following steps to clear the paper jam:• If the paper came part way through the front of the printer, gently pull the paper
towards you to remove it.• If the paper did not come part way through the front of the printer, try removing it
from the back of the printer:• Remove the paper from the input tray, then gently pull down on the input tray
until pops open more fully. Do not attempt to extend it to a full horizontalposition. Doing so could damage the printer.
• Gently pull the jammed paper to remove it from the back of the printer.• Lift the input tray up until it snaps back into paper-loading position.
18 HP Photosmart A620 series Basics Guide
English
• If you cannot grasp the edge of the jammed paper to remove it, try the following:• Turn off the printer.• Turn on the printer. The printer checks for paper in the paper path and will
automatically eject the jammed paper.• Press OK to continue.
Printing is very slow
Cause:• You may be printing a high-resolution image. These take longer to print.• You may have chosen Maximum dpi.• The system resources may be too low. You may have chat, music download, or
virus software running in the background.• You may be using outdated printer software.
Solution:• In the Features tab of the Printer Properties dialog box, set the Print Quality to
Best or Normal instead of Maximum dpi, and try printing again.• See the electronic Help or online user guide for information on checking the level
of ink in the print cartridge. Replace the cartridge if necessary.• See the electronic Help or online user guide for information on updating the printer
software. To check the version of the software, select About from the HP DigitalImaging Monitor icon in the taskbar.
To improve the system resources, close all open programs except Windows Explorerand Systray, then try printing again:
To improve system resources1. Press Ctrl+Alt+Delete.2. Select all programs except Windows Explorer and Systray. Hold Ctrl or Shift to
select multiple programs.3. Click End Task. If a second message appears, click End Task again.4. Repeat steps 1–3 until all programs except Windows Explorer and Systray are
closed.5. Try printing again.
Printing and hardware issues 19
Engl
ish
The printer is plugged in, but it will not turn on.
Solution:• The printer may be plugged into a power strip that is turned off. Turn on the power
strip, and then turn on the printer.• The printer may be plugged into an incompatible power source. If you are traveling
abroad, make certain the power source in the country/region you are visitingcomplies with the power requirements and power cord of the printer.
• Check that the power adapter is functioning properly. To check the power adapter:• Make sure the power adapter is connected to your printer and a compatible
power source.• Press and hold down the On button on the printer. If the On button lights up,
then the power cord is working properly. If it fails to light, go to www.hp.com/support or contact HP support.
I lost the stylusSolution: If the printer is still under warranty, call HP support for a replacementstylus, or purchase any stylus approved for use on a touch screen. To preventdamage to the touch screen, never use any sharp object as a stylus.
Insert or replace the print cartridgeNOTE: Ink from the cartridges is used in the printing process in a number of differentways, including in the initialization process, which prepares the device and cartridgesfor printing, and in printhead servicing, which keeps print nozzles clear and ink flowingsmoothly. In addition, some residual ink is left in the cartridge after it is used. For moreinformation see www.hp.com/go/inkusage.
Use the HP 110 Tri-color Inkjet print cartridge to print black-and-white and color photos.
HP Vivera Inks deliver true-to-life photo quality and exceptional fade resistance, resultingin vivid colors that last. HP Vivera Inks are specially formulated and scientifically testedfor quality, purity, and fade resistance.
CAUTION: Check that you are using the correct print cartridges. Also, note that HPdoes not recommend modifying or refilling HP cartridges. Damage that results frommodifying or refilling HP cartridges is not covered by the HP warranty.
For best print quality, HP recommends that you install all retail print cartridges before thedate stamped on the box.
To insert or replace a print cartridge1. Make sure the power is on and you have removed the cardboard from inside the
printer.2. Open the print cartridge door of the printer.
Chapter 4
20 HP Photosmart A620 series Basics Guide
English
3. Remove the bright pink tape from the cartridge.
NOTE: Do not touch the copper-colored contacts on the print cartridge.
4. If you are replacing a cartridge, push down and pull outward on the cartridge in thecradle to remove it.
5. Hold the replacement cartridge with the label on top. Slide the cartridge at a slightupward angle into the cradle so the copper-colored contacts go in first. Push thecartridge until it snaps into place.
6. Close the print cartridge door.The printer starts print cartridge alignment. See the electronic Help or online userguide for more information.Recycle the old cartridge. The HP Inkjet Supplies Recycling Program is available inmany countries/regions and lets you recycle used print cartridges free of charge. Formore information, go to www.hp.com/hpinfo/globalcitizenship/environment/recycle/inkjet.html.
Find more informationYour new HP Photosmart A620 series printer comes with the following documentation:
• Setup Guide: The setup instructions explain how to set up the printer, install the HPPhotosmart software, and print a photo. Read this document first.
• Basics Guide: This is the document you are reading. It describes the features of theprinter, explains how to use the printer without connecting it to a computer, andcontains troubleshooting tips and support information.
• Online Help: The online Help describes how to use the printer with a computer andcontains software troubleshooting information.
After you have installed the HP Photosmart software on your computer, you can view theonline Help on your computer:
• Windows PC: From the Start menu, select Programs (in Windows XP, select AllPrograms) > HP > HP Photosmart A620 series > Photosmart Help.
• Mac: Select Help > Mac Help in the Finder, then select Library > HP ProductHelp.
HP support
If you still have a problem, follow these steps:1. Check the documentation that came with the HP Photosmart.2. Visit the HP online support Web site at www.hp.com/support. HP online support is
available to all HP customers. It is the fastest source for up-to-date device informationand expert assistance and includes the following features:• Fast access to qualified online support specialists• Software and driver updates for the HP Photosmart• Valuable HP Photosmart and troubleshooting information for common problems• Proactive device updates, support alerts, and HP newsgrams that are available
when you register the HP Photosmart
Find more information 21
Engl
ish
3. For Europe only: Contact your local point of purchase. If the printer has a hardwarefailure, you will be asked to bring the printer to where you purchased it. Service is freeduring the printer limited warranty period. After the warranty period, you will be quoteda service charge.
4. Call HP support. Support options and availability vary by device, country/region, andlanguage.
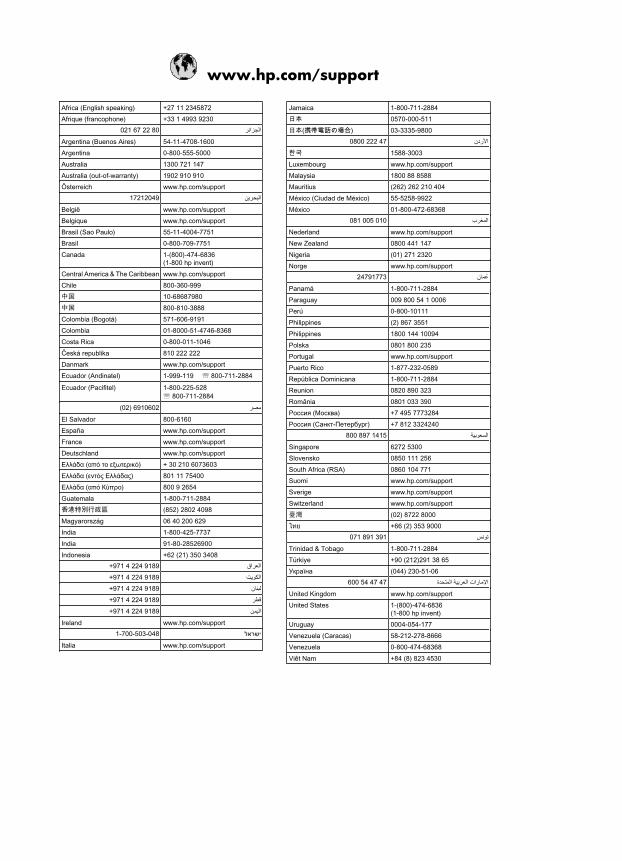
NOTE: For a list of support phone numbers, see the phone number list on theinside of the back cover.
Regulatory model identification number SDGOA-0702For regulatory identification purposes, the product is assigned a Regulatory ModelNumber. The Regulatory Model Number for the product is SDGOA-0702. This regulatorynumber should not be confused with the marketing name (HP Photosmart A620 series)or product number (Q8536A).
Chapter 4
22 HP Photosmart A620 series Basics Guide
English
HP Warranty
HP Warranty 23
Engl
ish
Printer specificationsFor a complete list of specifications, see the electronic Help. For help on accessing theelectronic Help, see “Find more information” on page 21.
Operating SystemMicrosoft® Windows XP Home, XP Professional, x64 Edition, or VistaMac® OS X 10.3x, 10.4x
Environmental SpecificationsMaximum during operation: 5–40° C (41–104° F), 5–90% RHRecommended during operation: 15–35 ° C (59–95° F), 20–80% RH
Power requirements and power consumptionNorth AmericaPower requirements: HP Part # 0957-2121 power adapter; input voltage: 120 VAC; inputfrequency: 60 Hz.Power consumption: 13 W typical while printing (22 W peak); 4.1 W typical when idle; 3.3 W typicalwhen off.Rest of worldPower requirements: HP Part #0957-2120 power adapter; input voltage: 100-240 VAC; inputfrequency: 50/60 Hz.Power consumption: 14 W typical while printing (22.5 W peak); 4.9 W typical when idle; 3.8 Wtypical when off.
Media sizesPhoto paper 13 x 18 cm (5 x 7 inches)Photo paper 10 x 15 cm (4 x 6 inches)Photo paper with tab 10 x 15 cm with 1.25 cm tab (4 x 6 inches with 0.5 inch tab)HP Premium Photo Cards 10 x 20 cm (4 x 8 inches)Photo sticker paper 10 x 15 cm (4 x 6 inches), 16 rectangular or oval stickers per pagePanorama photo paper 10 x 30 cm (4 x 12 inches)Index cards 10 x 15 cm (4 x 6 inches) and 9 x 13 cm (3.5 x 5 inches)Hagaki cards 100 x 148 mm (3.9 x 5.8 inches)A6 cards 105 x 148 mm (4.1 x 5.8 inches)L-size cards 90 x 127 mm (3.5 x 5 inches)L-size cards with tab 90 x 127 mm with 12.5 mm tab (3.5 x 5 inches with 0.5 inch tab)2L-size cards 127 x 178 mm (5 x 7 inches)
Paper TrayOne 10 x 15 cm (4 x 6 inches) photo paper trayPaper Tray Capacity20 sheets of photo paper, maximum thickness 292 µm (11.5 mil) per sheet10 sheets of 10 x 30 cm (4 x 12 inches) photo paper for panoramic printing
Chapter 4
24 HP Photosmart A620 series Basics Guide
English
Guía básica de HP Photosmart A620seriesGuía básica de HP Photosmart A620 series
Espa
ñol
Contenido
1 IntroducciónEl HP Photosmart de un vistazo...............................................................................................27Botones e indicadores luminosos del panel de control............................................................28Usar la pantalla táctil................................................................................................................28
Marco de retoque rápido....................................................................................................29El área de visión de la fotografía........................................................................................29La barra de estado de la impresora....................................................................................29Iconos de fotografía............................................................................................................30
Usar el lápiz..............................................................................................................................31Menús de la impresora.............................................................................................................32
Cómo usar los menús de impresora ..................................................................................32
2 Introducción a la impresiónCargue el papel........................................................................................................................33Insertar una tarjeta de memoria...............................................................................................34Imprimir desde una tarjeta de memoria....................................................................................34Realzar o editar sus fotografías................................................................................................35
Usar Corrección de fotografías...........................................................................................35Eliminar el efecto de ojos rojos de sus fotografías.............................................................36
Imprimir desde un equipo ........................................................................................................36Instale el software y conecte el cable USB........................................................................36Transferir fotografías desde una tarjeta de memoria al equipo..........................................37
3 Proyectos creativosPersonalizar las fotos...............................................................................................................38Proyectos de impresión especializados...................................................................................40
4 Solución de problemas y asistencia técnicaProblemas de impresión y hardware .......................................................................................41Insertar o sustituir el cartucho de tinta......................................................................................44Cómo buscar más información.................................................................................................44asistencia técnica de HP..........................................................................................................45Número normativo de identificación de modelo SDGOA-0702................................................45Garantía de HP ........................................................................................................................46Especificaciones de la impresora.............................................................................................47
26 Guía básica de HP Photosmart A620 series
Español
1 IntroducciónEsta sección ofrece información básica acerca de la impresora HP Photosmart A620series.
El HP Photosmart de un vistazo
Figura 1-1 Vistas frontal y posterior
Etiqueta Descripción del producto
1 Bandeja de entrada: cargue el papel aquí. Primero abra la bandejade salida. La bandeja de entrada se abre automáticamente al abrirla bandeja de salida. Para cerrar la bandeja de entrada deberá cerrarprimero la bandeja de salida.
2 Alargador de la bandeja de entrada: extráigalo para colocar elpapel.
3 Guía de anchura de papel: ajústela a la anchura del papel actualpara la correcta colocación del mismo.
4 Puerta del cartucho de impresión: ábrala para insertar o extraer elcartucho de impresión HP 110 Tri-color Inkjet.
5 Bandeja de salida (abierta): la impresora deposita las copiasimpresas aquí. La bandeja de entrada se abre automáticamente alabrir la bandeja de salida.
6 Puerto de la cámara: conecte aquí una cámara digital PictBridge, eladaptador de impresora inalámbrico HP Bluetooth opcional, un iPodo una unidad flash o de almacenamiento USB.
7 Asa: despliéguela para transportar la impresora.
8 Pantalla de la impresora: si desea ajustar el ángulo de visión,levante la pantalla. Pulse y mantenga pulsada una de las fichas de
Introducción 27
Espa
ñol
Etiqueta Descripción del producto
ambos lados de la pantalla para bajarla. Entre otras cosas, puedeobtener vistas previas de fotografías, hacer selecciones desde elmenú de la impresora.
9 Puerto USB: conecte aquí la impresora a un equipo mediante elcable USB suministrado.
10 Conexión del cable de alimentación: conecte el cable dealimentación aquí.
Botones e indicadores luminosos del panel de control
Figura 1-2 Panel de control e indicadores luminosos
Etiqueta Descripción del producto
1 Encender: presione este botón para encender o apagar laimpresora.
2 Indicador luminoso de estado: parpadea si hay algún error o si elusuario debe llevar a cabo alguna acción.
3 Luz de la pila: aparece fijo si la batería de la cámara está cargaday parpadea si la batería se está cargando.
Usar la pantalla táctilToque la pantalla táctil con los dedos para realizar la mayoría de operaciones, comodesplazarse por las fotografías, imprimir, realizar selecciones en los menús de impresióno tocar los iconos de la pantalla en el marco de retoque rápido que rodea el área devisualización de fotografías de la pantalla táctil. La impresora emitirá un sonido cada vezque toque un botón. Puede cambiar el volumen del sonido o desactivarlo en el menú depreferencias. También puede usar el lápiz para realizar estas tareas, pero su cometidoprincipal es dibujar o introducir títulos mediante el teclado de la pantalla táctil.
Advertencia No utilice disolventes químicos, ni soluciones ácidas, basadas enamoníaco ni alcalinas. Pueden dañar la pantalla táctil.
Advertencia Los materiales abrasivos pueden rayar la superficie de su pantallatáctil, lo que hará que disminuya la calidad de imagen y la precisión de entrada.
Capítulo 1(continúa)
28 Guía básica de HP Photosmart A620 series
Español
Marco de retoque rápido
Nota Los iconos del marco de retoque rápido sólo aparecen cuando la impresoraestá activada. Algunos iconos no se encuentran visibles cuando sus funciones noestán disponibles.
Figura 1-3 Marco de retoque rápido
Etiqueta Descripción del producto
1 Menú de la impresora: Toque este botón para acceder al menú dela impresora.
2 Cancelar: Toque este botón para detener una acción de impresión.
3 Flechas: Toque estos botones para desplazarse entre las fotografíaso los menús de creatividad.
4 Atrás: Utilice este botón para retroceder a la pantalla anterior.
5 Imprimir: Toque este botón para imprimir las fotografíasseleccionadas.
El área de visión de la fotografíaEl área dentro del marco de retoque rápido es el área donde puede ver las fotos en vistasen miniatura o en vista 1 en 1.
Para alternar entre vistas en miniatura y 1 en 11. En la vista en miniatura toque la fotografía que quiere ver. Se abre en vista 1 en 1.2. Toque en el marco de retoque rápido para volver a la vista en miniatura.
La barra de estado de la impresoraLa barra de estado de la impresora también aparece en la parte superior de la mayoríade las pantallas. La información disponible varía en función de la pantalla que vea.Tóquela para abrir el cuadro de diálogo de estado de la impresora que muestrainformación detallada sobre lo siguiente:
Usar la pantalla táctil 29
Espa
ñol
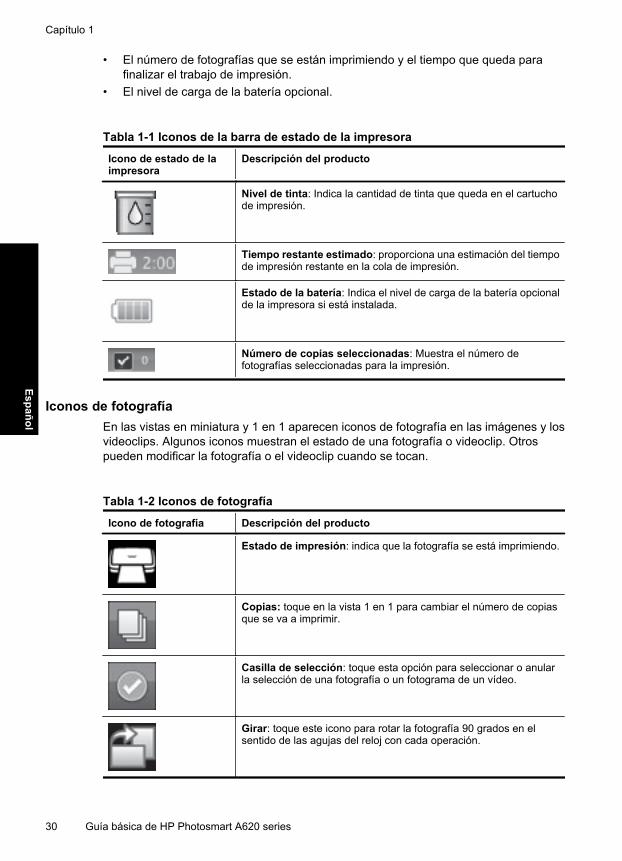
• El número de fotografías que se están imprimiendo y el tiempo que queda parafinalizar el trabajo de impresión.
• El nivel de carga de la batería opcional.
Tabla 1-1 Iconos de la barra de estado de la impresora
Icono de estado de laimpresora
Descripción del producto
Nivel de tinta: Indica la cantidad de tinta que queda en el cartuchode impresión.
Tiempo restante estimado: proporciona una estimación del tiempode impresión restante en la cola de impresión.
Estado de la batería: Indica el nivel de carga de la batería opcionalde la impresora si está instalada.
Número de copias seleccionadas: Muestra el número defotografías seleccionadas para la impresión.
Iconos de fotografíaEn las vistas en miniatura y 1 en 1 aparecen iconos de fotografía en las imágenes y losvideoclips. Algunos iconos muestran el estado de una fotografía o videoclip. Otrospueden modificar la fotografía o el videoclip cuando se tocan.
Tabla 1-2 Iconos de fotografía
Icono de fotografía Descripción del producto
Estado de impresión: indica que la fotografía se está imprimiendo.
Copias: toque en la vista 1 en 1 para cambiar el número de copiasque se va a imprimir.
Casilla de selección: toque esta opción para seleccionar o anularla selección de una fotografía o un fotograma de un vídeo.
Girar: toque este icono para rotar la fotografía 90 grados en elsentido de las agujas del reloj con cada operación.
Capítulo 1
30 Guía básica de HP Photosmart A620 series
Español
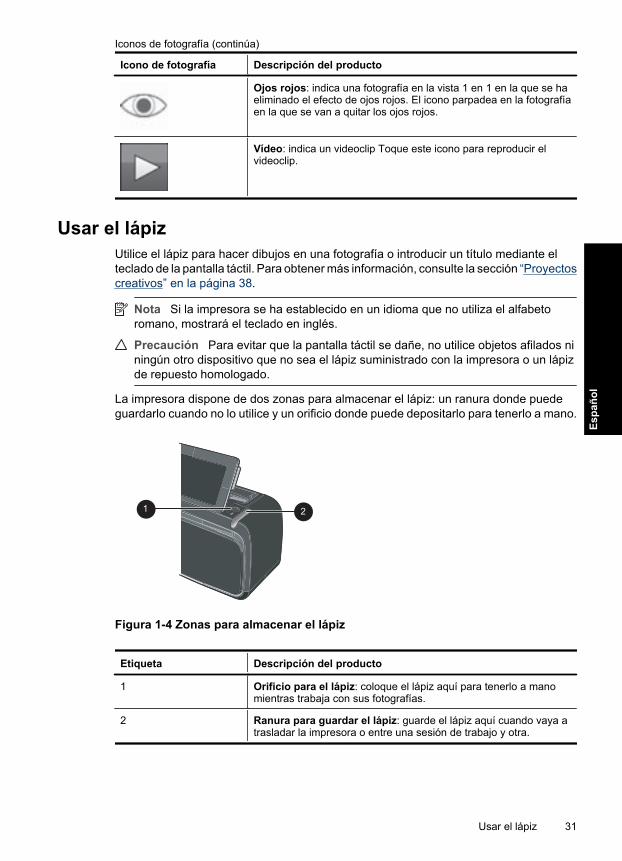
Icono de fotografía Descripción del producto
Ojos rojos: indica una fotografía en la vista 1 en 1 en la que se haeliminado el efecto de ojos rojos. El icono parpadea en la fotografíaen la que se van a quitar los ojos rojos.
Vídeo: indica un videoclip Toque este icono para reproducir elvideoclip.
Usar el lápizUtilice el lápiz para hacer dibujos en una fotografía o introducir un título mediante elteclado de la pantalla táctil. Para obtener más información, consulte la sección “Proyectoscreativos” en la página 38.
Nota Si la impresora se ha establecido en un idioma que no utiliza el alfabetoromano, mostrará el teclado en inglés.
Precaución Para evitar que la pantalla táctil se dañe, no utilice objetos afilados niningún otro dispositivo que no sea el lápiz suministrado con la impresora o un lápizde repuesto homologado.
La impresora dispone de dos zonas para almacenar el lápiz: un ranura donde puedeguardarlo cuando no lo utilice y un orificio donde puede depositarlo para tenerlo a mano.
Figura 1-4 Zonas para almacenar el lápiz
Etiqueta Descripción del producto
1 Orificio para el lápiz: coloque el lápiz aquí para tenerlo a manomientras trabaja con sus fotografías.
2 Ranura para guardar el lápiz: guarde el lápiz aquí cuando vaya atrasladar la impresora o entre una sesión de trabajo y otra.
Iconos de fotografía (continúa)
Usar el lápiz 31
Espa
ñol
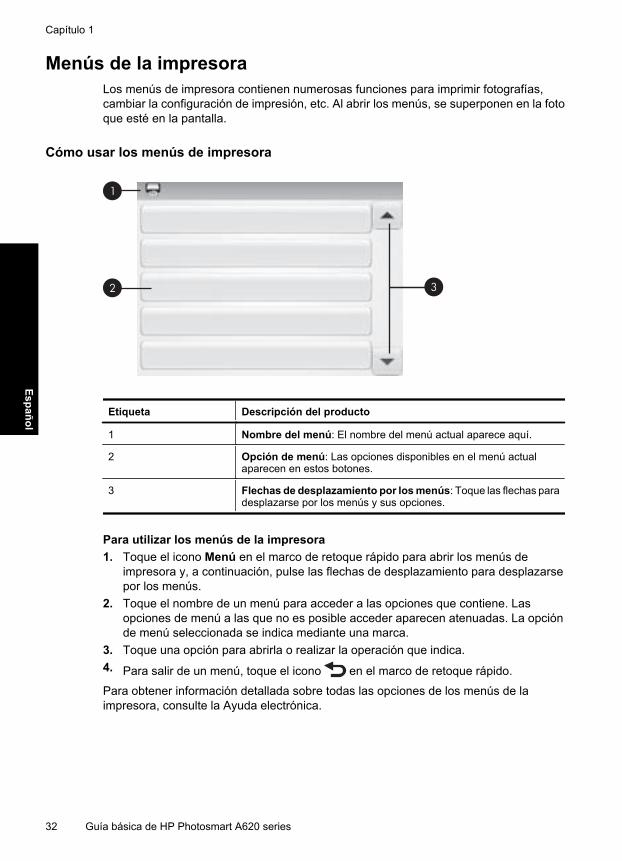
Menús de la impresoraLos menús de impresora contienen numerosas funciones para imprimir fotografías,cambiar la configuración de impresión, etc. Al abrir los menús, se superponen en la fotoque esté en la pantalla.
Cómo usar los menús de impresora
Etiqueta Descripción del producto
1 Nombre del menú: El nombre del menú actual aparece aquí.
2 Opción de menú: Las opciones disponibles en el menú actualaparecen en estos botones.
3 Flechas de desplazamiento por los menús: Toque las flechas paradesplazarse por los menús y sus opciones.
Para utilizar los menús de la impresora1. Toque el icono Menú en el marco de retoque rápido para abrir los menús de
impresora y, a continuación, pulse las flechas de desplazamiento para desplazarsepor los menús.
2. Toque el nombre de un menú para acceder a las opciones que contiene. Lasopciones de menú a las que no es posible acceder aparecen atenuadas. La opciónde menú seleccionada se indica mediante una marca.
3. Toque una opción para abrirla o realizar la operación que indica.4. Para salir de un menú, toque el icono en el marco de retoque rápido.
Para obtener información detallada sobre todas las opciones de los menús de laimpresora, consulte la Ayuda electrónica.
Capítulo 1
32 Guía básica de HP Photosmart A620 series
Español
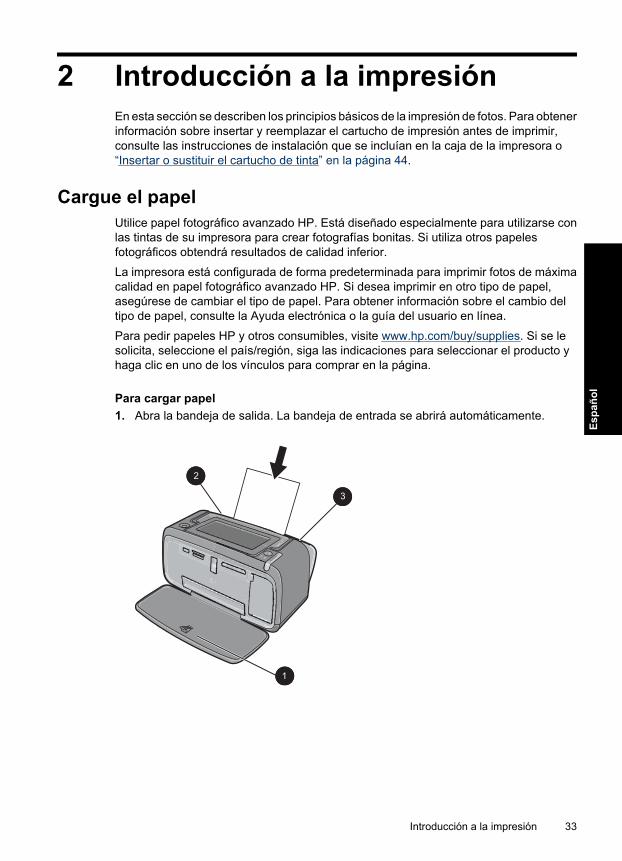
2 Introducción a la impresiónEn esta sección se describen los principios básicos de la impresión de fotos. Para obtenerinformación sobre insertar y reemplazar el cartucho de impresión antes de imprimir,consulte las instrucciones de instalación que se incluían en la caja de la impresora o“Insertar o sustituir el cartucho de tinta” en la página 44.
Cargue el papelUtilice papel fotográfico avanzado HP. Está diseñado especialmente para utilizarse conlas tintas de su impresora para crear fotografías bonitas. Si utiliza otros papelesfotográficos obtendrá resultados de calidad inferior.
La impresora está configurada de forma predeterminada para imprimir fotos de máximacalidad en papel fotográfico avanzado HP. Si desea imprimir en otro tipo de papel,asegúrese de cambiar el tipo de papel. Para obtener información sobre el cambio deltipo de papel, consulte la Ayuda electrónica o la guía del usuario en línea.
Para pedir papeles HP y otros consumibles, visite www.hp.com/buy/supplies. Si se lesolicita, seleccione el país/región, siga las indicaciones para seleccionar el producto yhaga clic en uno de los vínculos para comprar en la página.
Para cargar papel1. Abra la bandeja de salida. La bandeja de entrada se abrirá automáticamente.
Introducción a la impresión 33
Espa
ñol
2. Cargue hasta 20 hojas de papel fotográfico con la cara impresa o satinada orientadahacia la parte delantera de la impresora. Si está utilizando papel con pestañas,cárguelo de modo que la pestaña se introduzca al final. Cuando lo cargue, ajuste elpapel hacia la parte izquierda de la bandeja de entrada y empújelo hacia abajo confirmeza hasta que se detenga.
3. Mueva la guía de anchura de papel para que se ajuste perfectamente al borde delpapel, sin doblarlo.
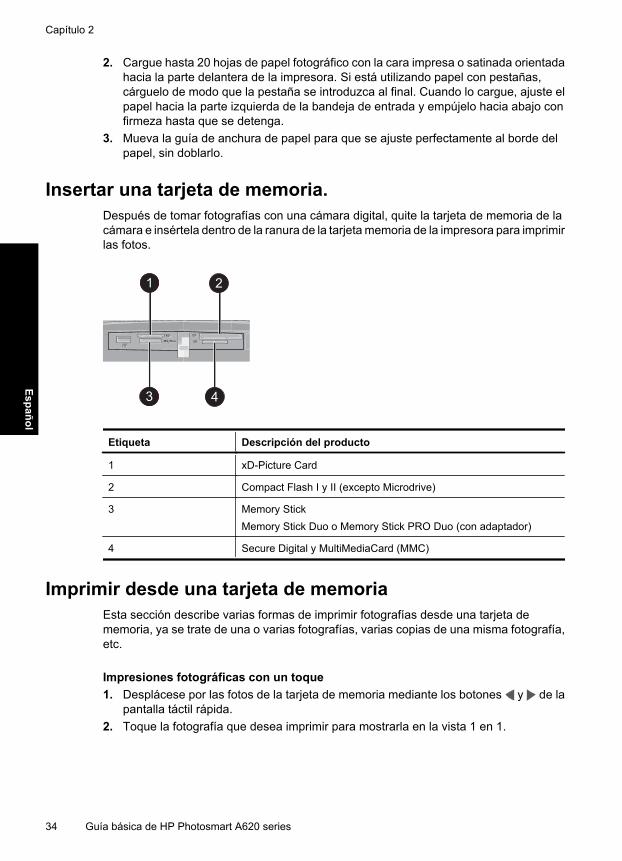
Insertar una tarjeta de memoria.Después de tomar fotografías con una cámara digital, quite la tarjeta de memoria de lacámara e insértela dentro de la ranura de la tarjeta memoria de la impresora para imprimirlas fotos.
Etiqueta Descripción del producto
1 xD-Picture Card
2 Compact Flash I y II (excepto Microdrive)
3 Memory StickMemory Stick Duo o Memory Stick PRO Duo (con adaptador)
4 Secure Digital y MultiMediaCard (MMC)
Imprimir desde una tarjeta de memoriaEsta sección describe varias formas de imprimir fotografías desde una tarjeta dememoria, ya se trate de una o varias fotografías, varias copias de una misma fotografía,etc.
Impresiones fotográficas con un toque1. Desplácese por las fotos de la tarjeta de memoria mediante los botones y de la
pantalla táctil rápida.2. Toque la fotografía que desea imprimir para mostrarla en la vista 1 en 1.
Capítulo 2
34 Guía básica de HP Photosmart A620 series
Español
3. Toque una vez el icono Imprimir situado en el marco de retoque rápido para cadafotografía que desee imprimir.
4. Desplácese hasta la siguiente fotografía que desee imprimir. No tiene que esperarlas fotografías de la cola de impresión para completar la impresión.Puede continuar examinando e imprimiendo fotografías en la vista 1 en 1 o tocar
y examinar las fotografías en la vista en miniatura.
Para seleccionar, agregar copia e imprimir varias fotografías1. Desplácese hasta las fotografías de una tarjeta de memoria insertada en la vista en
miniatura predeterminada.2. Toque la fotografía que desee imprimir para verla en la vista 1 en 1 y, a continuación,
toque el icono Casilla de selección de la fotografía para seleccionarla.3. Si desea realizar varias copias de la misma fotografía, toque el icono Copias en la
fotografía, especifique el número de copias que desea imprimir y, a continuación,toque OK.
4. Toque las teclas de flecha para examinar las fotografías y seleccionar las que deseeimprimir. Para volver a la vista en miniatura, toque .
5. Cuando termine de imprimir las fotografías, pulse el icono Imprimir en el marco deretoque rápido e imprima todas las fotografías seleccionadas.
Para imprimir todas las fotografías
Nota Asegúrese de que no se ha seleccionado ninguna fotografía. Si está en la vista1 en 1, toque para volver a la vista en miniatura primero.
1. Toque el icono Imprimir en el marco de retoque rápido mientras ve las fotografíasen la vista en miniatura predeterminada.
2. Toque Sí para imprimir todas las fotografías de la tarjeta de memoria insertada.
Realzar o editar sus fotografíasPuede realizar o editar sus fotografías de varias formas, tal como se explica en lassecciones siguientes.
Usar Corrección de fotografíasCorrección de fotografías mejora automáticamente las fotografías mediante lastecnologías Real Life de HP que permiten:
• Aumentar la nitidez de las fotografías borrosas.• Mejorar las zonas oscuras de las fotografías sin afectar a las zonas claras de las
mismas.• Mejorar el brillo, color y contraste general de las fotografías.
Corrección de fotografías se activa de manera predeterminada al encender la impresora.Si desea imprimir una fotografía sin utilizar las mejoras realizadas con Corrección defotografías, desactive Corrección de fotografías.
Realzar o editar sus fotografías 35
Espa
ñol

Para desactivar Corrección de fotografías1. Toque el icono Menú en el marco de retoque rápido.2. Toque Preferencias y, a continuación, Corrección de fotografías.3. Toque Desactivado.
La característica Corrección de fotografías permanecerá desactivada hasta que vuelvaa activarla. La corrección de fotografías siempre está activada para la impresiónBluetooth o PictBridge.
Eliminar el efecto de ojos rojos de sus fotografíasLa impresora permite atenuar el efecto de ojos rojos que se produce en las fotografíasrealizadas con flash.
Para eliminar el efecto de ojos rojos1. Toque Editar foto al ver una fotografía con el efecto de ojos rojos en la vista 1 en 1.2. Toque Eliminación de ojos rojos.
El icono Ojos rojos parpadeará y se quedará fijo después de eliminar el efecto deojos rojos.Si la impresora no detecta los ojos rojos en la fotografía, aparecerá un mensaje.
3. Para deshacer la eliminación del efecto de ojos rojos, toque Editar foto cuando veala fotografía con los ojos rojos eliminados y, a continuación toque Deshacer ojosrojos.
Imprimir desde un equipoImprimir desde un ordenador permite utilizar más opciones de impresión de imágenes.Antes de imprimir desde el equipo, debe instalar el programa HP Photosmart y conectarel cable USB desde la impresora (mediante el puerto USB de la parte posterior) al equipo.
Nota El cable USB 2.0 que se necesita para imprimir desde un equipo puede queno esté incluido en la caja de la impresora, de modo que quizá deba comprarlo porseparado.
Instale el software y conecte el cable USB
Usuarios de Windows Usuarios de Mac
Importante: no conecte el cable USB hastaque lo indique la impresora.1. Inserte el CD de HP Photosmart en la
unidad de CD-ROM del equipo. Si no seabre el asistente de instalación, busque elarchivo setup.exe en la unidad de CD-ROM y haga doble clic en el mismo. Espereunos minutos mientras se cargan losarchivos.
2. Haga clic en Siguiente y siga lasinstrucciones que aparecen en la pantalla.
1. Conecte un extremo del cable USB alpuerto USB situado en la parte posterior dela impresora y conecte el otro extremo alpuerto USB del equipo.
2. Inserte el CD de HP Photosmart en launidad de CD-ROM del equipo.
3. En el escritorio, haga doble clic en el iconoHP Photosmart CD.
Capítulo 2
36 Guía básica de HP Photosmart A620 series
Español
Usuarios de Windows Usuarios de Mac
3. Cuando se le indique, conecte un extremodel cable USB al puerto USB situado en laparte posterior de la impresora y conecte elotro extremo al puerto USB del equipo.
4. Siga las instrucciones mostradas en lapantalla hasta que finalice la instalación yse reinicie el ordenador.
4. Haga doble clic en el icono del InstaladorHP, y siga las instrucciones en cadapantalla de instalación para instalar elsoftware de la impresora.
5. En la pantalla de enhorabuena, haga clicen OK.
Transferir fotografías desde una tarjeta de memoria al equipoSiga los pasos que se indican para transferir fotografías de una tarjeta de memoria alequipo.
1. Asegúrese de que la impresora está conectada al equipo.2. Inserte una tarjeta de memoria que contenga fotografías en la ranura de tarjeta de
memoria correcta de la impresora.3. HP Photosmart Essential abre el equipo. Siga las instrucciones que aparecen en
pantalla. Para obtener más información, consulte la Ayuda del software deHP Photosmart.
(continúa)
Imprimir desde un equipo 37
Espa
ñol
3 Proyectos creativosPersonalizar las fotos
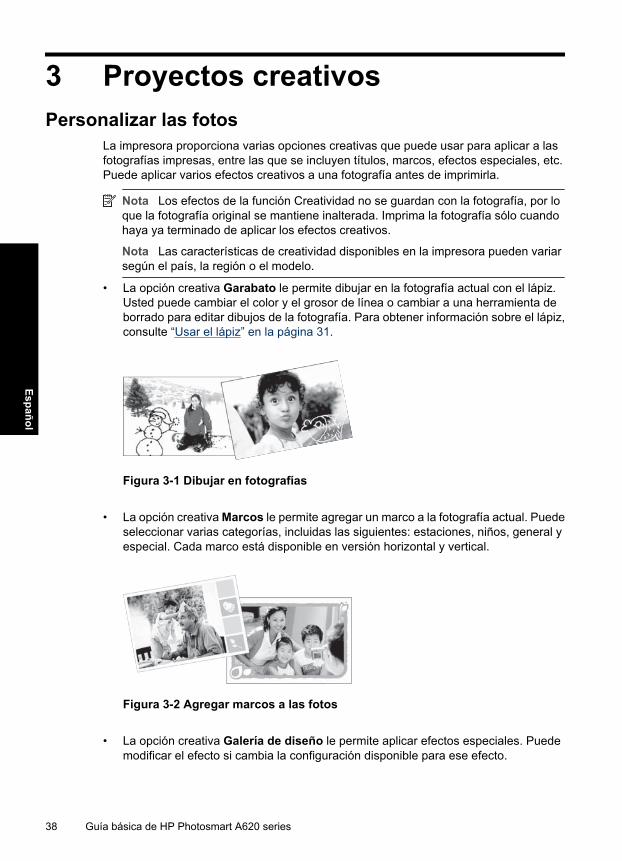
La impresora proporciona varias opciones creativas que puede usar para aplicar a lasfotografías impresas, entre las que se incluyen títulos, marcos, efectos especiales, etc.Puede aplicar varios efectos creativos a una fotografía antes de imprimirla.
Nota Los efectos de la función Creatividad no se guardan con la fotografía, por loque la fotografía original se mantiene inalterada. Imprima la fotografía sólo cuandohaya ya terminado de aplicar los efectos creativos.
Nota Las características de creatividad disponibles en la impresora pueden variarsegún el país, la región o el modelo.
• La opción creativa Garabato le permite dibujar en la fotografía actual con el lápiz.Usted puede cambiar el color y el grosor de línea o cambiar a una herramienta deborrado para editar dibujos de la fotografía. Para obtener información sobre el lápiz,consulte “Usar el lápiz” en la página 31.
Figura 3-1 Dibujar en fotografías
• La opción creativa Marcos le permite agregar un marco a la fotografía actual. Puedeseleccionar varias categorías, incluidas las siguientes: estaciones, niños, general yespecial. Cada marco está disponible en versión horizontal y vertical.
Figura 3-2 Agregar marcos a las fotos
• La opción creativa Galería de diseño le permite aplicar efectos especiales. Puedemodificar el efecto si cambia la configuración disponible para ese efecto.
38 Guía básica de HP Photosmart A620 series
Español
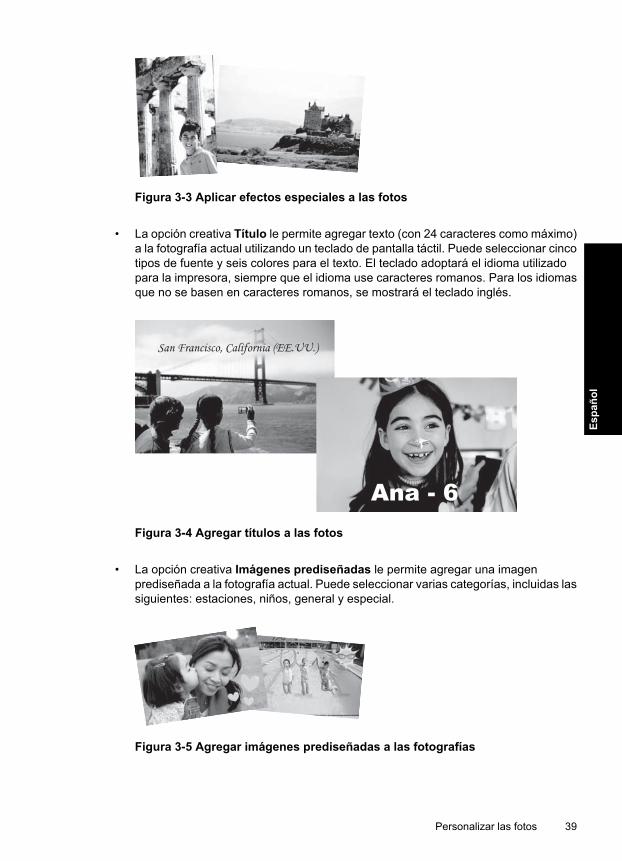
Figura 3-3 Aplicar efectos especiales a las fotos
• La opción creativa Título le permite agregar texto (con 24 caracteres como máximo)a la fotografía actual utilizando un teclado de pantalla táctil. Puede seleccionar cincotipos de fuente y seis colores para el texto. El teclado adoptará el idioma utilizadopara la impresora, siempre que el idioma use caracteres romanos. Para los idiomasque no se basen en caracteres romanos, se mostrará el teclado inglés.
San Francisco, California (EE.UU.)
Ana - 6Figura 3-4 Agregar títulos a las fotos
• La opción creativa Imágenes prediseñadas le permite agregar una imagenprediseñada a la fotografía actual. Puede seleccionar varias categorías, incluidas lassiguientes: estaciones, niños, general y especial.
Figura 3-5 Agregar imágenes prediseñadas a las fotografías
Personalizar las fotos 39
Espa
ñol
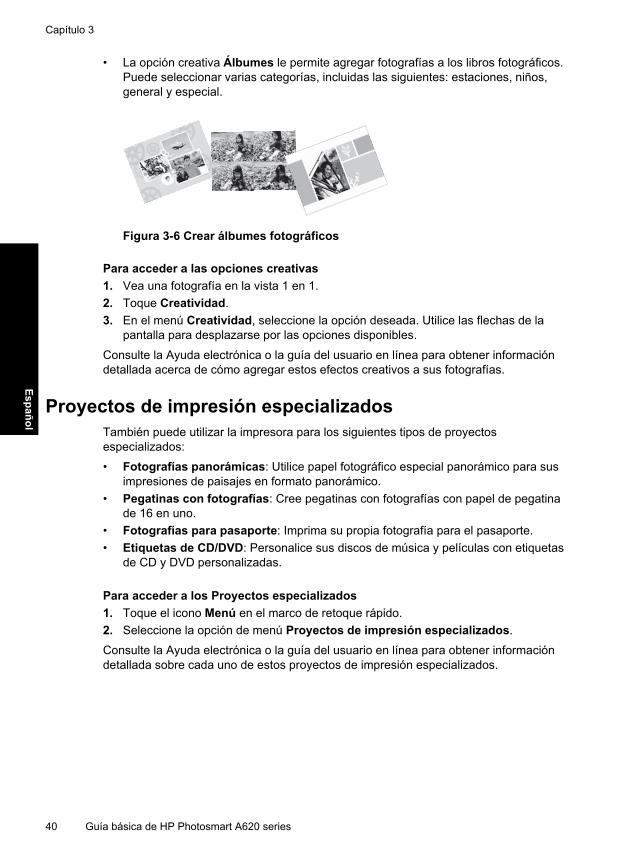
• La opción creativa Álbumes le permite agregar fotografías a los libros fotográficos.Puede seleccionar varias categorías, incluidas las siguientes: estaciones, niños,general y especial.
Figura 3-6 Crear álbumes fotográficos
Para acceder a las opciones creativas1. Vea una fotografía en la vista 1 en 1.2. Toque Creatividad.3. En el menú Creatividad, seleccione la opción deseada. Utilice las flechas de la
pantalla para desplazarse por las opciones disponibles.
Consulte la Ayuda electrónica o la guía del usuario en línea para obtener informacióndetallada acerca de cómo agregar estos efectos creativos a sus fotografías.
Proyectos de impresión especializadosTambién puede utilizar la impresora para los siguientes tipos de proyectosespecializados:
• Fotografías panorámicas: Utilice papel fotográfico especial panorámico para susimpresiones de paisajes en formato panorámico.
• Pegatinas con fotografías: Cree pegatinas con fotografías con papel de pegatinade 16 en uno.
• Fotografías para pasaporte: Imprima su propia fotografía para el pasaporte.• Etiquetas de CD/DVD: Personalice sus discos de música y películas con etiquetas
de CD y DVD personalizadas.
Para acceder a los Proyectos especializados1. Toque el icono Menú en el marco de retoque rápido.2. Seleccione la opción de menú Proyectos de impresión especializados.
Consulte la Ayuda electrónica o la guía del usuario en línea para obtener informacióndetallada sobre cada uno de estos proyectos de impresión especializados.
Capítulo 3
40 Guía básica de HP Photosmart A620 series
Español
4 Solución de problemas yasistencia técnicaAntes de ponerse en contacto con el servicio de asistencia técnica de HP, lea estasección de consejos para la resolución de problemas o visite los servicios de asistenciaen línea en el sitio Web www.hp.com/support.
Antes de empezar, asegúrese de que:
• Todas las conexiones de cables entre la impresora y el equipo se han realizadocorrectamente.
• Está utilizando la versión más reciente del software de la impresora.
Sugerencia HP recomienda utilizar un cable USB con una longitud máxima de 3metros (10 pies). El uso de un cable USB más largo puede causar errores.
Esta sección contiene información sobre la solución de problemas de la impresoraHP Photosmart A620 series.
• Problemas de impresión y hardware• Insertar o sustituir el cartucho de tinta• Cómo buscar más información• asistencia técnica de HP• Número normativo de identificación de modelo SDGOA-0702• Garantía de HP• Especificaciones de la impresora
Problemas de impresión y hardware• No se imprimió la copia• La impresión es muy lenta• La impresora está conectada, pero no se enciende.• He perdido el lápiz
No se imprimió la copiaCausa: El papel se atasca al imprimir.
Solución de problemas y asistencia técnica 41
Espa
ñol

Solución: Pruebe a llevar a cabo los siguientes pasos para resolver un atasco depapel:• Si sale parte del papel por la parte delantera de la impresora, tire de él con
cuidado hacia usted.• Si el papel no ha salido por la parte delantera de la impresora, intente extraerlo
por la parte posterior:• Saque el papel de la bandeja de entrada, tire suavemente hacia abajo de esta
bandeja hasta que las lengüetas se abran más. No trate de extenderla en suposición horizontal completa. Si lo hace, puede causar daños a la impresora.
• Tire con cuidado del papel atascado para extraerlo por la parte posterior dela impresora.
• Levante la bandeja de entrada hasta que vuelva a encajar en la posición decarga de papel.
• Si no puede sujetar el borde del papel atascado para extraerlo, pruebe a realizarlo siguiente:• Apague la impresora.• Encienda la impresora. La impresora comprobará si se ha quedado alguna
hoja en la ruta del papel y expulsará automáticamente el papel atascado.• Presione OK para continuar.
La impresión es muy lenta
Causa:• Es posible que esté imprimiendo una imagen de alta resolución. Este tipo de
imágenes tarda más en imprimirse.• Puede que haya elegido Máximo de ppp.• Los recursos del sistema pueden ser bajos. Puede que esté manteniendo una
charla, descargando música o ejecutando software antivirus en segundo plano.• Puede que el software de la impresora que está utilizando no esté actualizado.
Solución:• En la ficha Funciones del cuadro de diálogo Propiedades de la impresora, ajuste
la calidad de impresión a Óptima o Normal, en lugar de Máximo de ppp, eintente imprimir de nuevo.
• Consulte la Ayuda electrónica o la guía del usuario en línea para obtenerinformación sobre la comprobación del nivel de tinta del cartucho de impresión.Cambie el cartucho si es necesario.
• Consulte la Ayuda electrónica o la guía del usuario en línea para obtenerinformación sobre la actualización del software de la impresora. Para comprobarla versión del software, seleccione Acerca de en el icono del Monitor deimágenes digitales de HP de la barra de tareas.
Capítulo 4
42 Guía básica de HP Photosmart A620 series
Español
Para mejorar los recursos del sistema, cierre todos los programas excepto elExplorador de Windows y Systray, e intente imprimir de nuevo:
Para mejorar los recursos del sistema1. Presione Ctrl+Alt+Supr.2. Seleccione todos los programas excepto el Explorador de Windows y Systray.
Mantenga presionadas las teclas Ctrl o Mayús para seleccionar variosprogramas.
3. Haga clic en Finalizar tarea. Si aparece un segundo mensaje, vuelva a hacerclic en Finalizar tarea.
4. Repita los pasos de 1 a 3 hasta que se hayan cerrado todos los programasexcepto el Explorador de Windows y Systray.
5. Pruebe a imprimir de nuevo.
La impresora está conectada, pero no se enciende.
Solución:• La impresora puede estar conectada a una regleta de conexiones que esté
apagada. Conecte la regleta de conexiones y encienda la impresora.• Es posible que la impresora esté conectada a una fuente de alimentación
incompatible. Si viaja al extranjero, asegúrese de que la alimentación eléctricadel país/región que visite cumple con los requisitos y el cable de alimentación dela impresora.
• Compruebe que el adaptador esté funcionando correctamente. Para comprobarel adaptador:• Asegúrese de que el adaptador esté conectado a la impresora y a una fuente
de alimentación compatible.• Mantenga pulsado el botón de encendido. Si el botón de encendido se
ilumina, el cable de alimentación estará funcionando correctamente. Si no seilumina, visite el sitio web www.hp.com/support o póngase en contacto conel servicio de asistencia técnica de HP.
He perdido el lápizSolución: Si la impresora está aún bajo garantía, llame a la asistencia de HP paraobtener un lápiz de reemplazo o compre cualquier lápiz apto para usar en unapantalla táctil. Para evitar daños a la pantalla táctil, nunca utilice un objeto afilado opuntiagudo como lápiz.
Problemas de impresión y hardware 43
Espa
ñol
Insertar o sustituir el cartucho de tintaNota La tinta de los cartuchos se emplea durante el proceso de impresión de variasmaneras, incluido el proceso de inicialización, que prepara el dispositivo y loscartuchos para la impresión, y el servicio de los cabezales de impresión, quemantiene las boquillas de impresión limpias y facilita el paso correcto de la tinta.También se deja parte de la tinta en el cartucho después de su utilización. Para másinformación, visite www.hp.com/go/inkusage.
Utilice el cartucho de impresión HP 110 Tri-color Inkjet para imprimir fotografías en blancoy negro, y de color.
Las tintas HP Vivera ofrecen una calidad fotográfica que parece real y una resistencia aldesgaste que proporciona colores intensos y duraderos. Las tintas HP Vivera se hanformulado y probado científicamente para conseguir la mejor calidad, pureza yresistencia al desvanecimiento.
Precaución Compruebe que utiliza los cartuchos de impresión adecuados.Asimismo, observe que HP no recomienda modificar ni rellenar los cartuchos HP. Lagarantía de la impresora HP no cubre los daños producidos como consecuencia dela modificación o el rellenado de los cartuchos HP.
Para obtener una mayor calidad de impresión, HP le recomienda instalar todos loscartuchos de impresión antes de la fecha que figure en la caja.
Para insertar o sustituir un cartucho de impresión1. Asegúrese de que la impresora está encendida y de que se ha retirado el cartón de
su interior.2. Abra la cubierta de los cartuchos de impresión de la impresora.3. Retire la cinta rosa brillante del cartucho de impresión.
Nota No toque los contactos color cobre del cartucho de impresión.
4. Si va a sustituir un cartucho, presiónelo y tire de él hacia fuera para extraerlo delsoporte.
5. Sostenga el cartucho de sustitución con la etiqueta en la parte superior.Deslice elcartucho ligeramente inclinado hacia arriba en el soporte de modo que los contactosde color cobre se introduzcan primero.Presione el cartucho hasta que encaje en susitio.
6. Cierre la cubierta del cartucho de impresión.La impresora inicia la alineación del cartucho de impresión. Consulte la Ayudaelectrónica o la guía del usuario en línea para obtener más información.Recicle el cartucho viejo. El programa de reciclaje de suministros de HP parainyección de tinta está disponible en muchos países/regiones y permite reciclar loscartuchos de impresión usados de forma gratuita. Para obtener más información,visite www.hp.com/hpinfo/globalcitizenship/environment/recycle/inkjet.html
Cómo buscar más informaciónSu nueva impresora HP Photosmart A620 seriesincluye la siguiente documentación:
Capítulo 4
44 Guía básica de HP Photosmart A620 series
Español
• Guía de instalación: Las instrucciones de instalación explican cómo configurar laimpresora, instalar el software de HP Photosmart e imprimir una fotografía. Leadetenidamente este documento.
• Guía básica: Este es el documento que está leyendo. Describe las característicasde la impresora, explica cómo utilizarla sin conectarla un equipo e incluye informaciónsobre la solución de problemas de hardware.
• Ayuda en línea: La Ayuda en línea explica cómo utilizar la impresora con un equipoy se incluye información sobre la solución de problemas de software.
Una vez que haya instalado el software HP Photosmart en el equipo, podrá ver la Ayudaen línea en su equipo:
• Equipo con Windows: En el menú Inicio, seleccione Programas (en Windows XP,seleccione Todos los programas) > HP > HP Photosmart A620 Series > Ayudade Photosmart.
• Mac: En el Finder, seleccione Ayuda > Ayuda Mac y, a continuación, seleccioneBiblioteca > Ayuda para productos HP.
asistencia técnica de HP
Si el problema persiste, siga estos pasos:1. Consulte la documentación suministrada con HP Photosmart.2. Visite el sitio Web de asistencia en línea de HP que se encuentra en www.hp.com/
support. La asistencia en línea de HP se encuentra disponible para todos los clientesde HP. Es la manera más rápida de obtener información actualizada sobre eldispositivo, así como la asistencia de los expertos, y presenta las siguientescaracterísticas:• Acceso rápido a especialistas cualificados de asistencia en línea• Actualizaciones de software y de controladores para HP Photosmart.• Información valiosa de HP Photosmart y soluciones para problemas habituales.• Actualizaciones activas del dispositivo, avisos de asistencia y comunicados de
prensa HP que están disponibles al registrar HP Photosmart.3. Sólo para Europa: póngase en contacto con el punto de distribución más cercano.
Si la impresora presenta un fallo de hardware, se le solicitará que lleve la impresoraal establecimiento donde la compró. La reparación es gratuita durante el período degarantía limitada de la impresora. Una vez transcurrido el período de garantía, se lecobrará el servicio.
4. Llame al servicio de asistencia de HP Las opciones de asistencia técnica ydisponibilidad varían en función del dispositivo, el país/región y el idioma.
Nota Encontrará una lista de números de teléfono de asistencia técnica en laparte interior de la cubierta posterior.
Número normativo de identificación de modeloSDGOA-0702
A efectos de identificación normativa, al producto se le asigna un número normativo demodelo. El número normativo de modelo para este producto es SDGOA-0702. No debe
asistencia técnica de HP 45
Espa
ñol
confundirse este número normativo con el nombre comercial (HP Photosmart A620series) o el número de producto (Q8536A).
Garantía de HP
Capítulo 4
46 Guía básica de HP Photosmart A620 series
Español
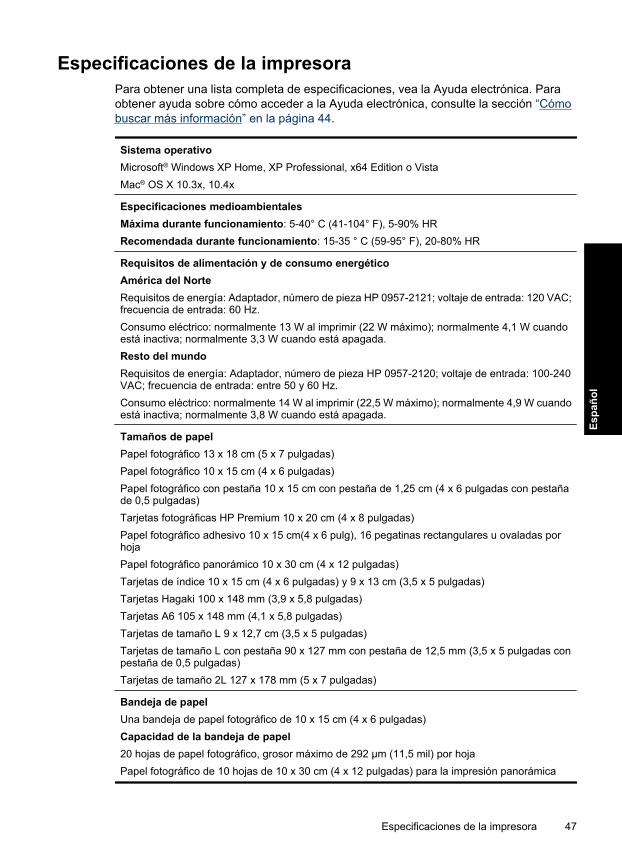
Especificaciones de la impresoraPara obtener una lista completa de especificaciones, vea la Ayuda electrónica. Paraobtener ayuda sobre cómo acceder a la Ayuda electrónica, consulte la sección “Cómobuscar más información” en la página 44.
Sistema operativoMicrosoft® Windows XP Home, XP Professional, x64 Edition o VistaMac® OS X 10.3x, 10.4x
Especificaciones medioambientalesMáxima durante funcionamiento: 5-40° C (41-104° F), 5-90% HRRecomendada durante funcionamiento: 15-35 ° C (59-95° F), 20-80% HR
Requisitos de alimentación y de consumo energéticoAmérica del NorteRequisitos de energía: Adaptador, número de pieza HP 0957-2121; voltaje de entrada: 120 VAC;frecuencia de entrada: 60 Hz.Consumo eléctrico: normalmente 13 W al imprimir (22 W máximo); normalmente 4,1 W cuandoestá inactiva; normalmente 3,3 W cuando está apagada.Resto del mundoRequisitos de energía: Adaptador, número de pieza HP 0957-2120; voltaje de entrada: 100-240VAC; frecuencia de entrada: entre 50 y 60 Hz.Consumo eléctrico: normalmente 14 W al imprimir (22,5 W máximo); normalmente 4,9 W cuandoestá inactiva; normalmente 3,8 W cuando está apagada.
Tamaños de papelPapel fotográfico 13 x 18 cm (5 x 7 pulgadas)Papel fotográfico 10 x 15 cm (4 x 6 pulgadas)Papel fotográfico con pestaña 10 x 15 cm con pestaña de 1,25 cm (4 x 6 pulgadas con pestañade 0,5 pulgadas)Tarjetas fotográficas HP Premium 10 x 20 cm (4 x 8 pulgadas)Papel fotográfico adhesivo 10 x 15 cm(4 x 6 pulg), 16 pegatinas rectangulares u ovaladas porhojaPapel fotográfico panorámico 10 x 30 cm (4 x 12 pulgadas)Tarjetas de índice 10 x 15 cm (4 x 6 pulgadas) y 9 x 13 cm (3,5 x 5 pulgadas)Tarjetas Hagaki 100 x 148 mm (3,9 x 5,8 pulgadas)Tarjetas A6 105 x 148 mm (4,1 x 5,8 pulgadas)Tarjetas de tamaño L 9 x 12,7 cm (3,5 x 5 pulgadas)Tarjetas de tamaño L con pestaña 90 x 127 mm con pestaña de 12,5 mm (3,5 x 5 pulgadas conpestaña de 0,5 pulgadas)Tarjetas de tamaño 2L 127 x 178 mm (5 x 7 pulgadas)
Bandeja de papelUna bandeja de papel fotográfico de 10 x 15 cm (4 x 6 pulgadas)Capacidad de la bandeja de papel20 hojas de papel fotográfico, grosor máximo de 292 µm (11,5 mil) por hojaPapel fotográfico de 10 hojas de 10 x 30 cm (4 x 12 pulgadas) para la impresión panorámica
Especificaciones de la impresora 47
Espa
ñol

Capítulo 4
48 Guía básica de HP Photosmart A620 series
Español