bank reconciliation
TRANSCRIPT

document.doc Page 1

Table of Contents
2.1.1.1 Bank Reconciliation............................................................................................................32.1.1.1.1 Introduction..................................................................................................................32.1.1.1.2 NOC Bank Account Reconciliation............................................................................32.1.1.1.3 Bank Statement Entry/ Upload..................................................................................32.1.1.1.4 Reviewing JDE Bank Statement.................................................................................42.1.1.1.5 Bank Statement Header..............................................................................................52.1.1.1.6 Bank Statement Detail.................................................................................................62.1.1.1.7 Auto Reconcile Void Receipts:...................................................................................72.1.1.1.8 Refresh Reconciliation File.........................................................................................72.1.1.1.9 Reconcile self-balancing items (Bank Statement side):............................................92.1.1.1.10 Reconcile self-balancing items (General Ledger side):........................................102.1.1.1.11 Reconciliation of Operating / Main Bank Accounts:............................................102.1.1.1.12 Bank Statement Entry/ Upload..............................................................................102.1.1.1.13 Bank Statement Header..........................................................................................112.1.1.1.14 Bank Statement Detail.............................................................................................112.1.1.1.15 Auto Reconcile Void Payments/ Receipts:.............................................................132.1.1.1.16 Refresh Reconciliation File.....................................................................................132.1.1.1.17 Reconcile self-balancing items (Bank Statement side):........................................162.1.1.1.18 Reconcile self-balancing items (General Ledger side):........................................16
document.doc Page 2

2.1.1.1 Bank Reconciliation
2.1.1.1.1 Introduction
Types of Banking Accounts at HPCL:
Non-Operative Collection Bank Account (NOC) Operating Bank Accounts and Main Bank Accounts
2.1.1.1.2 NOC Bank Account Reconciliation
Following steps are involved in reconciliation for a NOC Bank Accounts for the location:
Bank Statement Entry/Upload Review Bank Statement Auto Reconcile Void Receipts Refresh Reconciliation Bank Reconciliation Reconcile self-balancing items (Bank Statement side) Reconcile self-balancing items (General Ledger side)
2.1.1.1.3 Bank Statement Entry/ Upload
The user depending on the requirements will use any one of the following methods of creating a bank statement:
In cases where the user receives a printed Bank Statement only, he/ she will enter each transaction from the statement in the system using an interactive program “Review Bank Statement”. In cases where a location receives Bank Statement in electronic format such as a DBF file, the file needs to be formatted in specific format .Locations can create the requisite format in an MS Excel worksheet and upload the electronic bank statement received from the bank in it.
For copying the Bank Statement records from the Excel File to the Bank Statement Detail just select the cells in the Excel file and click copy. On the Bank Statement Detail click on the first cell on the grid and press “Ctrl’ + ‘v’. The records will get created in the detail section. Wait for all the records to get read by the system. Finally the cursor will come to rest on the last row with data in it. Bring the cursor down to the last blank row. Click ‘OK’. While uploading the records in this manner care should be taken to see that the dates (Value date and GL date) are in DD/MM/YYYY format with only “/” as the separator. Using “-“ or “.” as the separator will result in the Default GL date from the Header to be entered in the records.
+ Getting There
From your Location specific Bank Reconciliation menu, select Review JDE Bank Statement (P09160). The following screen appears:
Caption 2.41
document.doc Page 3
2.1.1.1.4 Reviewing JDE Bank Statement
The Bank Statement so obtained above would be an exact replica of the Statement received from your Bank for that period. If required, even at this stage this can be revised to make it an exact replica of the Bank Statement.The appearance of this JDE Bank Statement is the same as the Dummy Bank Statement.
+ Getting There
From your Location specific Bank Reconciliation menu, select Review JDE Bank Statement (P09160). The following screen appears:
document.doc Page 4

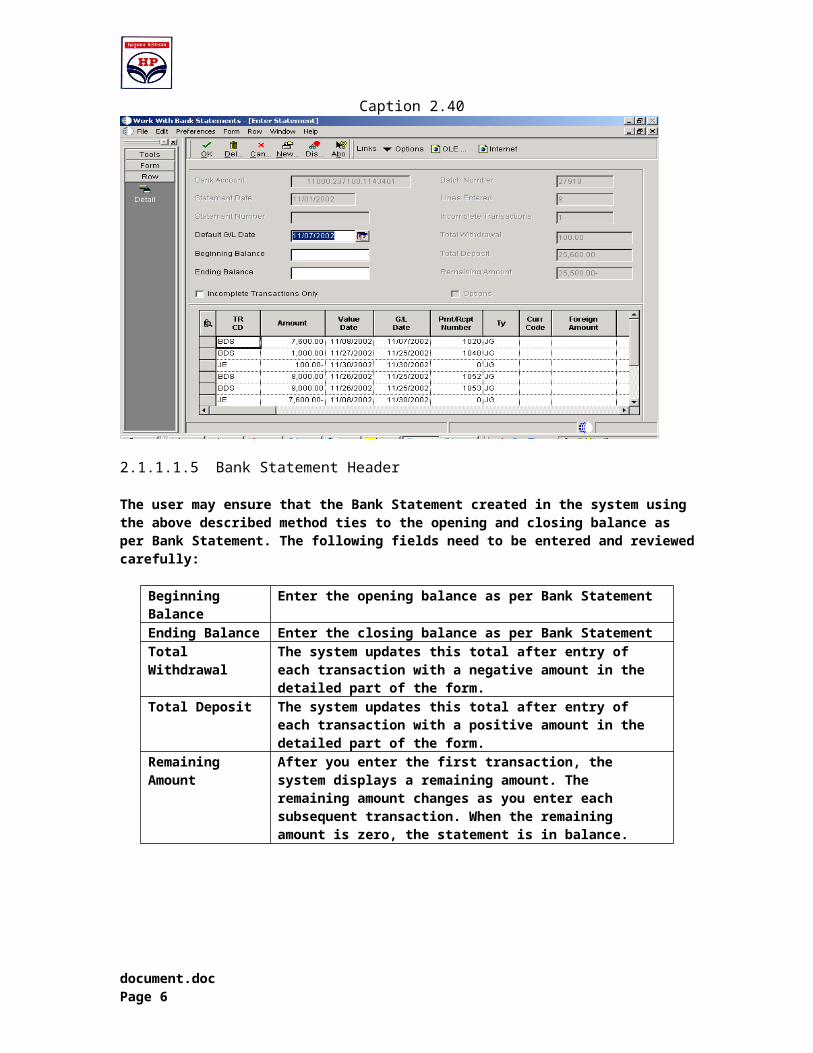
Caption 2.40
2.1.1.1.5 Bank Statement Header
The user may ensure that the Bank Statement created in the system using the above described method ties to the opening and closing balance as per Bank Statement. The following fields need to be entered and reviewed carefully:
Beginning Balance
Enter the opening balance as per Bank Statement
Ending Balance Enter the closing balance as per Bank StatementTotal Withdrawal The system updates this total after entry of each transaction
with a negative amount in the detailed part of the form.Total Deposit The system updates this total after entry of each transaction
with a positive amount in the detailed part of the form.Remaining Amount
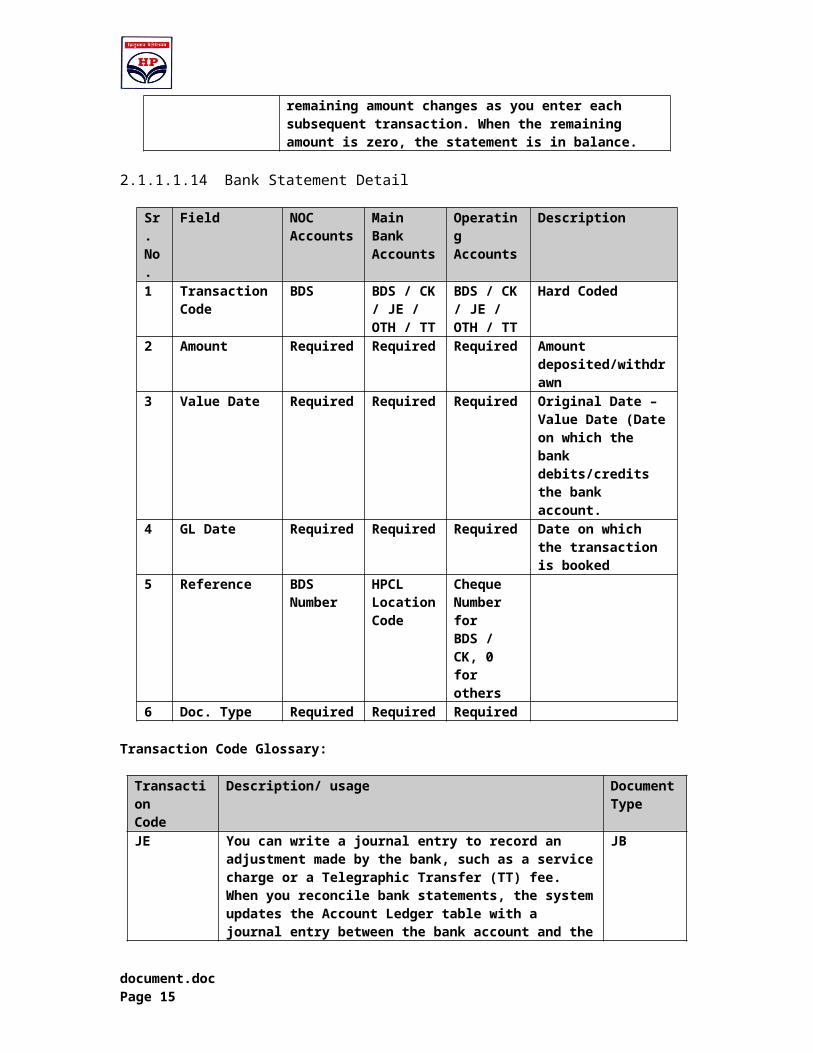
After you enter the first transaction, the system displays a remaining amount. The remaining amount changes as you enter each subsequent transaction. When the remaining amount is zero, the statement is in balance.
document.doc Page 5
2.1.1.1.6 Bank Statement Detail
Sr. No.
Field NOC Accounts
Main BankAccounts
Operating Accounts
Description
1 Transaction Code
BDS BDS / CK / JE / OTH / TT
BDS / CK / JE / OTH / TT
Hard Coded
2 Amount Required Required Required Amount deposited/withdrawn
3 Value Date Required Required Required Original Date – Value Date (Date on which the bank debits/credits the bank account.
4 GL Date Required Required Required Date on which the transaction is booked
5 Reference BDS Number
HPCL Location Code
Cheque Number for BDS / CK, 0 for others
6 Doc. Type Required Required Required
Transaction Code Glossary:
TransactionCode
Description/ usage Document Type
JE You can write a journal entry to record an adjustment made by the bank, such as a service charge or a Telegraphic Transfer (TT) fee. When you reconcile bank statements, the system updates the Account Ledger table with a journal entry between the bank account and the G/L account that you specify in the Account Number field in the Details option of the exit bar. During Reconciliation, the system marks transactions with this code as reconciled.
JB
BK A self-reconciling item does not require reconciliation and does not access a detail form.
BDS This transaction code is used in case of BDS credits and TT entries, which have to be reconciled for Value Date, Amount and document reference. Please note that this code indicates to the system that for reference, the matching has to be done from Bank Statement Reference (Payment/ Rcpt No field) to Reference 2 field of the General Ledger Reconciliation Work Table file.
JG
OTH This transaction code is used for all other transactions including Payment and Journal Entries and the matching is done based on Document Reference Number (Payment/ Rcpt No field) to Reference 1 of the General Ledger Reconciliation Work Table file.
JB
TT This transaction code is used to create Transfer entries (in/out) to other bank accounts. There is no need to give the other account number in the Detail exit bar, as this account number is hard coded in the Bank Account information set-up. During Reconciliation, the system marks transactions with this code as reconciled.
JB
document.doc Page 6

2.1.1.1.7 Auto Reconcile Void Receipts:
+ Getting ThereFrom your Location specific Bank Reconciliation menu, select Auto Reconcile Void Receipts.This program is to be run before the Refresh Reconciliation File program is run so that zero-amount and voided receipts are not included in the worktable.Auto Reconcile Void Receipts: From the Account Reconciliation menu, choose Auto Reconcile Void Receipt. The system selects receipts that were voided manually. The Auto Reconcile Void Receipt program marks voided receipts as reconciled in the Account Ledger table.
2.1.1.1.8 Refresh Reconciliation File
The “Refresh” application extracts all the transactions from GL Bank Account that are not previously reconciled to a temporary work file.This application needs to be run before running the bank reconciliation application viz. “Bank Statement Journal Processing”. The “Bank Statement Journal Processing” application, which completes the matching process, uses this work file and the Bank Statement created above. This application uses a date range provided in the Processing Option. It is very important to remember to leave the from date as <Blank> which would ensure to pick up all the open transactions of the GL Bank Account that is being refreshed.
+ Getting There
From your Location specific Bank Reconciliation menu, select Refresh Reconciliation (R09130). At the Data Selection dialog box, enter the short account ID of your GL Bank Account. Then click ‘OK’ to submit the data selection.Upon submitting the data selection, the system will prompt at Processing Options dialog box. Review and/or update the Processing Options. Give the appropriate through date for which the worktable is to be refreshed.
2.1.1.1.8.1 Bank Reconciliation
The last step is to complete the matching of records between the General Ledger Bank Account records with the corresponding Bank Statement records. The application should be run in “Proof” mode first. At this time, the system will not generate any entries. The application has several matching iterations that could run to drop items depending upon the user requirement. The following Matrix shows each iteration to be used, and the case in which it should be used. Using of iterations in a wrong sequence would result in erroneous results.
When Processing Bank Statements across multiple periods:While reconciling Bank Statements for multiple periods, run the reconciliation report for respective Bank Statement separately. This can be achieved by giving the respective Statement Date as an additional Data Selection criteria.
+ Getting There
From your location specific menu, select GL Bank Statement Reconciliation – Proof/Final (R55B170).
document.doc Page 7
At the Data Selection dialog box, verify that it contains the short account ID of your GL Bank Account and reconciliation code of not equal to ‘R’. Then click ‘Ok’ to submit the data selection.Upon submitting the data selection, the system will prompt at Processing Options dialog box. Review and/or update the Processing Options. Of these, the Variance tab contains the iterations, which will be the basis on which the records are reconciled. Use the information below for entering the iterations as required for running the Bank Reconciliation.
IterationTransaction Code Main/Local Bank Consolidation 0 1 2 3 4 5BDS Main Off NA Y Y Y Y NBDS Local (NOC) On NA N N N N YBDS Local (NOC) Off NA Y Y Y Y YOTH / CK Local (Optg) On Y N N N N NOTH / CK Local (Optg) Off Y N N N N N
The values in the above table determine the basis for the iteration:
0 = Check No + Amount This iteration compares the Check No and Amount fields on the GL and Bank Statement side for an exact match.
1 = Value Date + Amount This iteration compares the Value date of the Bank statement with the value date in the GL (Check Date field) and the amount fields on both sides for an exact match.
2 = Doc No + Date + Amount This iteration compares the Value date of the Bank statement with the value date in the GL (Check Date field), the Amount fields on both sides and the Reference 2 field with the Pymnt/Rect Number field on the Bank Statement side. It also checks for BDS or Reference 1 field in the GL with the Pymnt/Rect Number field on the Bank Statement side for other transactions for an exact match.
3 = Doc No + Date (+/- 5 days) + AmountThis iteration uses the same fields as that in Iteration 2 but with a number of days tolerance set to 5 days
4 = Doc No + Date + Amount (+/- Tolerance)This iteration uses the same fields as that in Iteration 2 but with a user defined tolerance of amount depending upon the value set in another processing option for this purpose. While using this iteration it is important to populate the Processing Option no 2 on the Variance tab with ‘1’ to automatically create a Journal entry for the write off amount. Also the Account Number to be used for the write off is to be provided in Processing Option no.5 of the same tab.
5 = Doc No + AmountThis iteration compares the Amount fields on both sides and the Reference 2 field with the Pymnt/Rect Number field on the Bank Statement side for BDS or Reference 1 field in the GL with the Pymnt/Rect Number field on the Bank Statement side for other transactions for an exact match.
Consolidation ON/OFF:
The consolidation flag determines whether the Bank Journal process groups the records on either side while comparing to a single record on the other side.
document.doc Page 8

This is meant to address situations where a particular amount issued/ received by us has been the bank side has been debit/credited on the bank side in part amounts and vice versa. On the Bank Statement side, the application groups the items on the basis of the Doc Number (Pymnt/ Rect Number field) and Value DateOn the GL side, the application groups items on the basis of Referece2 for BDS and Reference 1 for Non-BDS items and Value Date.
This would be the last in the series of iterations run for the Bank Reconciliation process.
Detailed description of reports generated by this application and how to interpret the messages in them is given below:
2.1.1.1.8.2 Bank Reconciliation Report:
This report shows detail information about each transaction on the bank statement. It includes the status of each transaction after the reconciliation process. This report contains the following messages:
Cleared - Represents information in the Bank Statement. Issued - Represents information in the Account Ledger.
Cleared Not Issued Report:
This report shows transactions that are in the Bank Statement Detail table with a clear date that is earlier than the G/L date in the Account Ledger table.
Amounts Not Equal Report:
This report shows transactions that have different amounts in the Bank Statement Detail and Account Ledger tables.
Un-reconciled Items Report:
This report shows all un-reconciled items in the Bank Statement Detail table. The report contains the following abbreviated column headings:Cleared - Represents information in the Bank StatementIssued - Represents information in the Account Ledger
When run in final mode, the system creates a batch for the entries in the General Ledger for the records with Transaction type of TT and JE.
After running the report in final mode, the user may run the report again so as to get a concise report listing the open items only.
2.1.1.1.9 Reconcile self-balancing items (Bank Statement side):
After the Bank Reconciliation is run in final mode for the various iterations required, run the self-balancing programs to eliminate self-balancing items. For example, wrong entries reversed by bank in the bank statement, rectification entries passed in the General Ledger. The report will list amounts with records with the same amounts but opposite signs having the same Reference number.
For Main Bank Account: This will result in a report listing the transactions eligible to be marked as self-reconciling. If user wishes to drop any transaction from the list as self-
document.doc Page 9

reconciling, he will mark the change by changing the transaction code to OTH. In Final mode, the application will update the transaction type as BK for unchanged listed transactions.For Operating Bank Account: After Bank Statement upload, the application is to be run in proof mode. This will result in a report listing the transactions eligible to be marked as self-reconciling. The user will review the same and in final mode, the application will update the transaction type as BK.After running this application in final mode, run the Bank Reconciliation program again in proof and final modes. As a result of this, the Bank Reconciliation program will mark these transactions as reconciled.
2.1.1.1.10 Reconcile self-balancing items (General Ledger side):
The application devised for this purpose is to be run separately.
This report is to be used for transactions with Batch Type G i.e. Journal Entries which are entered for reversal transactions. In proof mode, this program lists the transactions in the General Ledger with similar amounts of opposite signs. Run this with a data selection of the account ID of your Bank Account for a particular date range to be provided in the processing options.Using this report mark / update the reversal transactions with the same Reference number as that of the original transaction. The Reference number needs to be populated in Reference 1. The Reference 1 field can be populated using the “Features” form exit of the Journal Entry Screen. The application is then to be run in final mode. On finding records with matching Reference 1 values and similar amounts with opposite signs, the application will mark these as reconciled in the Account Ledger (F0911) file. It is necessary to run the Refresh Reconciliation program after this to update the Reconciliation Work file. Run the Bank Reconciliation application again in final mode to get the final list of unreconciled transactions.
2.1.1.1.11 Reconciliation of Operating / Main Bank Accounts:
Upload / Review Bank Statement Auto Reconcile Void Payments/ Receipts Refresh Reconciliation Bank Reconciliation Reconcile self-balancing items (Bank Statement side) Reconcile self-balancing items (General Ledger side)
2.1.1.1.12 Bank Statement Entry/ Upload
The user depending on the requirements will use any one of the following methods of creating a bank statement:
In cases where the user receives a printed Bank Statement only, he/ she will enter each transaction from the statement in the system using an interactive program “Review Bank Statement”. In cases where a location receives Bank Statement in electronic format such as a DBF file, the file needs to be formatted in specific format provided for data conversion. Detailed mapping and requirement for each type of account is given below. Once the data is ready in the prescribed format, a batch application (also known as a Table Conversion program)
document.doc Page 10

will be run to upload the statement in the system. This table conversion process would require certain technical resources such as a fat client.
Locations that are not equipped with technical resources required for electronic upload of bank statement described above can create the requisite format in an MS Excel worksheet and download the electronic bank statement received from the bank in it.
For copying the Bank Statement records from the Excel File to the Bank Statement Detail just select the cells in the Excel file and click copy. On the Bank Statement Detail click on the first cell on the grid and press “Ctrl’ + ‘v’. The records will get created in the detail section. Wait for all the records to get read by the system. Finally the cursor will come to rest on the last row with data in it. Bring the cursor down to the last blank row. Click ‘OK’. While uploading the records in this manner care should be taken to see that the dates (Value date and GL date) are in DD/MM/YYYY format with only “/” as the separator. Using “-“ or “.” as the separator will result in the Default GL date from the Header to be entered in the records.
+ Getting There
From your Location specific Bank Reconciliation menu, select Review JDE Bank Statement (P09160). The following screen appears:
Caption 2.41
2.1.1.1.13 Bank Statement Header
The user must ensure that the Bank Statement created in the system using the above described method ties to the opening and closing balance as per Bank Statement. The following fields need to be entered and reviewed carefully.
Beginning Balance Enter the opening balance as per Bank StatementEnding Balance Enter the closing balance as per Bank StatementTotal Withdrawal The system updates this total after entry of each
transaction with a negative amount in the detailed part of
document.doc Page 11
the form.Total Deposit The system updates this total after entry of each
transaction with a positive amount in the detailed part of the form.
Remaining Amount
After you enter the first transaction, the system displays a remaining amount. The remaining amount changes as you enter each subsequent transaction. When the remaining amount is zero, the statement is in balance.
2.1.1.1.14 Bank Statement Detail
Sr. No.
Field NOC Accounts
Main BankAccounts
Operating Accounts
Description
1 Transaction Code
BDS BDS / CK / JE / OTH / TT
BDS / CK / JE / OTH / TT
Hard Coded
2 Amount Required Required Required Amount deposited/withdrawn
3 Value Date Required Required Required Original Date – Value Date (Date on which the bank debits/credits the bank account.
4 GL Date Required Required Required Date on which the transaction is booked
5 Reference BDS Number
HPCL Location Code
Cheque Number for BDS / CK, 0 for others
6 Doc. Type Required Required Required
Transaction Code Glossary:
TransactionCode
Description/ usage Document Type
JE You can write a journal entry to record an adjustment made by the bank, such as a service charge or a Telegraphic Transfer (TT) fee. When you reconcile bank statements, the system updates the Account Ledger table with a journal entry between the bank account and the G/L account that you specify in the Account Number field in the Details option of the exit bar. During Reconciliation, the system marks transactions with this code as reconciled.
JB
BK A self-reconciling item does not require reconciliation and does not access a detail form.
JB
BDS This transaction code is used in case of BDS credits and TT entries, which have to be reconciled for Value Date, Amount and document reference. Please note that this code indicates to the system that for reference, the matching has to be done from Bank Statement Reference (Payment/ Rcpt No field) to Reference 2 field of the General Ledger Reconciliation Work Table file.
JG
document.doc Page 12

OTH This transaction code is used for all other transactions including Payment and Journal Entries and the matching is done based on Document Reference Number (Payment/ Rcpt No field) to Reference 1 of the General Ledger Reconciliation Work Table file.
JB
CK This transaction code is used for all Payment transactions including Payment and Journal Entries and the matching is done based on Document Reference Number (Payment/ Rcpt No field) to Reference 1 of the General Ledger Reconciliation Work Table file.
PK – Auto ChecksPN – Manual Checks
TT This transaction code is used to create Transfer entries (in/out) to other bank accounts. There is no need to give the other account number in the Detail exit bar as this account number is hard coded in the Bank Account information set-up. During Reconciliation, the system marks transactions with this code as reconciled.
JB
2.1.1.1.15 Auto Reconcile Void Payments/ Receipts:
+ Getting There
From your Location specific Bank Reconciliation menu, select Auto Reconcile Void Receipts / Auto Reconcile Void Payments.
These programs should be run before the Refresh Reconciliation File program to create the reconciliation worktable so that zero-amount and voided receipts/ payments are not included in the worktable.
Auto Reconcile Void Payments: From the Account Reconciliation menu, choose Auto Reconcile Void Payment. The system selects payments that were voided manually or during automatic payment processing. The Auto Reconcile Void Payment program marks voided payments as reconciled and update the Account Ledger.
Auto Reconcile Void Receipts: From the Account Reconciliation menu, choose Auto Reconcile Void Receipt. The system selects receipts that were voided manually. The Auto Reconcile Void Receipt program marks voided receipts as reconciled in the Account Ledger table.
2.1.1.1.16 Refresh Reconciliation File
The “Refresh” application extracts all the transactions from GL Bank Account that are not previously reconciled to a temporary work file.
This application needs to be run before running the bank reconciliation application viz. “Bank Statement Journal Processing”. The “Bank Statement Journal Processing” application, which completes the matching process, uses this work file and the Bank Statement created above. This application uses a date range provided in the Processing Option. It is very important to remember to leave the from date as <Blank> which would ensure to pick up all the open transactions of the GL Bank Account that is being refreshed.
+ Getting There
From your Location specific Bank Reconciliation menu, select Refresh Reconciliation (R09130).
document.doc Page 13

At the Data Selection dialog box enter the short account ID of your GL Bank Account. Then click ‘Ok’ to submit the data selection.Upon submitting the data selection, the system will prompt at Processing Options dialog box. Review and/or update the Processing Options. Give the appropriate through date for which the worktable is to be refreshed.
2.1.1.1.16.1 Bank Reconciliation
The last step is to complete the matching of records between the General Ledger Bank Account records with the corresponding Bank Statement records. The application should be run in “Proof” mode first. At this time, the system will not generate any entries. The application has several matching iterations that could run to drop items depending upon the user requirement. The following Matrix shows each iteration to be used, and the case in which it should be used. Using of iterations in a wrong sequence would result in erroneous results.
+ Getting There
From your location specific menu, select GL Bank Statement Reconciliation – Proof/Final (R55B170).
At the Data Selection dialog box, verify that it contains the short account ID of your GL Bank Account and reconciliation code of not equal to ‘R’. Then click ‘Ok’ to submit the data selection.Upon submitting the data selection, the system will prompt at Processing Options dialog box. Review and/or update the Processing Options. Of these, the Variance tab contains the iterations, which will be the basis on which the records are reconciled. Use the information below for entering the iterations as required for running the Bank Reconciliation.
IterationTransaction Code Main/Local Bank
Consolidation 0 1 2 3 4 5
BDS Main Off NA Y Y Y Y NBDS Local (NOC) On NA N N N N YBDS Local (NOC) Off NA Y Y Y Y YOTH / CK Local (Optg) On Y N N N N NOTH / CK Local (Optg) Off Y N N N N N
The values in the above table determine the basis for the iteration:
0 = Check No + Amount This iteration compares the Check No and Amount fields on the GL and Bank Statement side for an exact match.
1 = Value Date + Amount This iteration compares the Value date of the Bank statement with the value date in the GL (Check Date field) and the amount fields on both sides for an exact match.
2 = Doc No + Date + Amount This iteration compares the Value date of the Bank statement with the value date in the GL (Check Date field), the Amount fields on both sides and the Reference 2 field with the Pymnt/Rect Number field on the Bank Statement side for BDS or Reference 1 field in the GL with the Pymnt/Rect Number field on the Bank Statement side for other transactions for an exact match.
document.doc Page 14
3 = Doc No + Date (+/- 5 days) + AmountThis iteration uses the same fields as that in Iteration 2 but with a number of days tolerance set to 5 days
4 = Doc No + Date + Amount (+/- Tolerance)This iteration uses the same fields as that in Iteration 2 but with a user defined tolerance of amount depending upon the value set in another processing option for this purpose.
5 = Doc No + AmountThis iteration compares the Amount fields on both sides and the Reference 2 field with the Pymnt/Rect Number field on the Bank Statement side for BDS or Reference 1 field in the GL with the Pymnt/Rect Number field on the Bank Statement side for other transactions for an exact match.
Consolidation ON/OFF:
The consolidation flag determines whether the Bank Journal process groups the records on either side while comparing to a single record on the other side. This is meant to address situations where a particular amount issued/ received by us has been the bank side has been debit/credited on the bank side in part amounts and vice versa. On the Bank Statement side the application groups the items on the basis of the Doc Number (Pymnt/Rect Number field) and Value DateOn the GL side the application groups items on the basis of Referece2 for BDS and Reference 1 for Non-BDS items and Value Date.
This would be the last in the series of iterations run for the Bank Reconciliation process.
Detailed description of reports generated by this application and how to interpret the messages in them is given below:
2.1.1.1.16.2 Bank Reconciliation Report:
This report shows detail information about each transaction on the bank statement. It includes the status of each transaction after the reconciliation process. This report contains the following messages:
Cleared - Represents information in the Bank Statement.Issued - Represents information in the Account Ledger.
Cleared Not Issued Report:
This report shows transactions that are in the Bank Statement Detail table with a clear date that is earlier than the G/L date in the Account Ledger table.
Amounts Not Equal Report:
This report shows transactions that have different amounts in the Bank Statement Detail and Account Ledger tables.
Un-reconciled Items Report:
This report shows all un-reconciled items in the Bank Statement Detail table.
The report contains the following abbreviated column headings:
document.doc Page 15

Cleared - Represents information in the Bank Statement Issued - Represents information in the Account Ledger
When run in final mode, the system creates a batch for the entries in the General Ledger for the records with Transaction type of TT and JE.
After running the report in final mode, the user may run the report again so as to get a concise report listing the open items only.
2.1.1.1.17 Reconcile self-balancing items (Bank Statement side):
After the Bank Reconciliation is run in final mode for the various iterations required, run the self-balancing programs to eliminate self-balancing items. For example, wrong entries reversed by bank in the bank statement, rectification entries passed in the General Ledger. The report will list amounts with records with the same amounts but opposite signs having the same Reference number.
For Main Bank Account: This will result in a report listing the transactions eligible to be marked as self-reconciling. If user wishes to drop any transaction from the list as self-reconciling he will mark the change by changing the transaction code to OTH. In Final mode the application will update the transaction type as BK for unchanged listed transactions.For Operating Bank Account: After Bank Statement upload the application is to be run in proof mode. This will result in a report listing the transactions eligible to be marked as self-reconciling. The user will review the same and in final mode the application will update the transaction type as BK.After running this application in final mode run the Bank Reconciliation program again in proof and final modes. As a result of this, the Bank Reconciliation program will mark these transactions as reconciled.
2.1.1.1.18 Reconcile self-balancing items (General Ledger side):
The application devised for this purpose is to be run separately.
This report is to be used for transactions with Batch Type G i.e. Journal Entries which are entered for reversal transactions. In proof mode, this program lists the transactions in the General Ledger with similar amounts of opposite signs. Run this with a data selection of the account ID of your Bank Account for a particular date range to be provided in the processing options.Using this report mark / update the reversal transactions with the same Reference number as that of the original transaction. The Reference number needs to be populated in Reference 1. The Reference 1 field can be populated using the “Features” form exit of the Journal Entry Screen. The application is then to be run in final mode. On finding records with matching Reference 1 values and similar amounts with opposite signs, the application will mark these as reconciled in the Account Ledger (F0911) file. It is necessary to run the Refresh Reconciliation program after this to update the Reconciliation Work file. Run the Bank Reconciliation application again in final mode to get the final list of unreconciled transactions.
document.doc Page 16

document.doc Page 17

document.doc Page 18