bank import reconciliation - iqretail.co.za bank... · a bank reconciliation is the process of...
TRANSCRIPT
iQ Retail Pty (Ltd) Registered Office: First Floor, 25 Quantum Road, Technopark, Stellenbosch 7600, Company Reg No. 2000/020305/07. VAT Number: 4760205510
BANK IMPORT
& RECONCILIATION
BANK RECONCILIATION 2019
Page 2 of 33
P R E F A C E
This is the Bank Reconciliation reference guide for IQ Business and IQ Enterprise software systems.
The document will aid in the configuration of the Bank Reconciliation for it to function correctly.
Although every effort has been made to keep this Bank Reconciliation document up to date, some of the screen examples may not be 100% the same as the ones reflected in previous versions of IQ Enterprise. This is due to the continuous development and improvement of IQ Enterprise.
Unfortunately, there will be a discrepancy from time to time. We do apologize for the inconvenience that it may cause.
Should you feel that the Bank Reconciliation document is inadequate or requires further explanation or more and better examples, please feel free to email us.
We would love to have some feedback to improve the Bank Reconciliation document in some way or another.
Regards,
IQ Retail (PTY) LTD

BANK RECONCILIATION 2019
Page 3 of 33
CONTENTS INTRODUCTION ................................................................................................................................................................................... 4
SETUP .............................................................................................................................................................................................. 4 DEFAULT SETTINGS (1) ................................................................................................................................................................ 4
BANK IMPORT ..................................................................................................................................................................................... 5 DEFINE BANK IMPORT ................................................................................................................................................................. 7
CASHBOOK POSTINGS ....................................................................................................................................................................... 13 HOW TO RECONCILE THE CASHBOOK ACCOUNT? .................................................................................................................... 22 HOW TO CORRECT AN INCORRECT CASHBOOK ENTRY? ........................................................................................................... 22
BANK RECONCILIATION ..................................................................................................................................................................... 23 ELECTRONIC RECON .................................................................................................................................................................. 27
ACCOUNT RECONCILIATION .............................................................................................................................................................. 29 SETUP ........................................................................................................................................................................................ 29 HOW TO RECONCILE ANY OTHER LEDGER ACCOUNT? ............................................................................................................. 33
BANK RECONCILIATION 2019
Page 4 of 33
INTRODUCTION A bank reconciliation is the process of matching the balances in the user’s accounting records for an account to the corresponding information on a bank statement. The information on the bank statement is the bank’s record of all transactions impacting the user’s bank account during a past month.
The goal of the bank reconciliation process is to ascertain the differences between the bank statement and the ledger account on the system and to book any changes to the accounting records as appropriate.
A bank reconciliation should be done on regular intervals for all the company’s bank accounts, to ensure that the company’s banking records are correct. A bank reconciliation will detect some types of fraud and this information can be used to design better controls over the receipt and payment of cash.
A bank reconciliation should be done at least once a month, as soon as the company received the bank statement. In some companies, the bank reconciliation can be done daily by checking and capturing the month-to-day transactions as recorded on the information on the company’s bank account.
SETUP
DEFAULT SETTINGS (1)
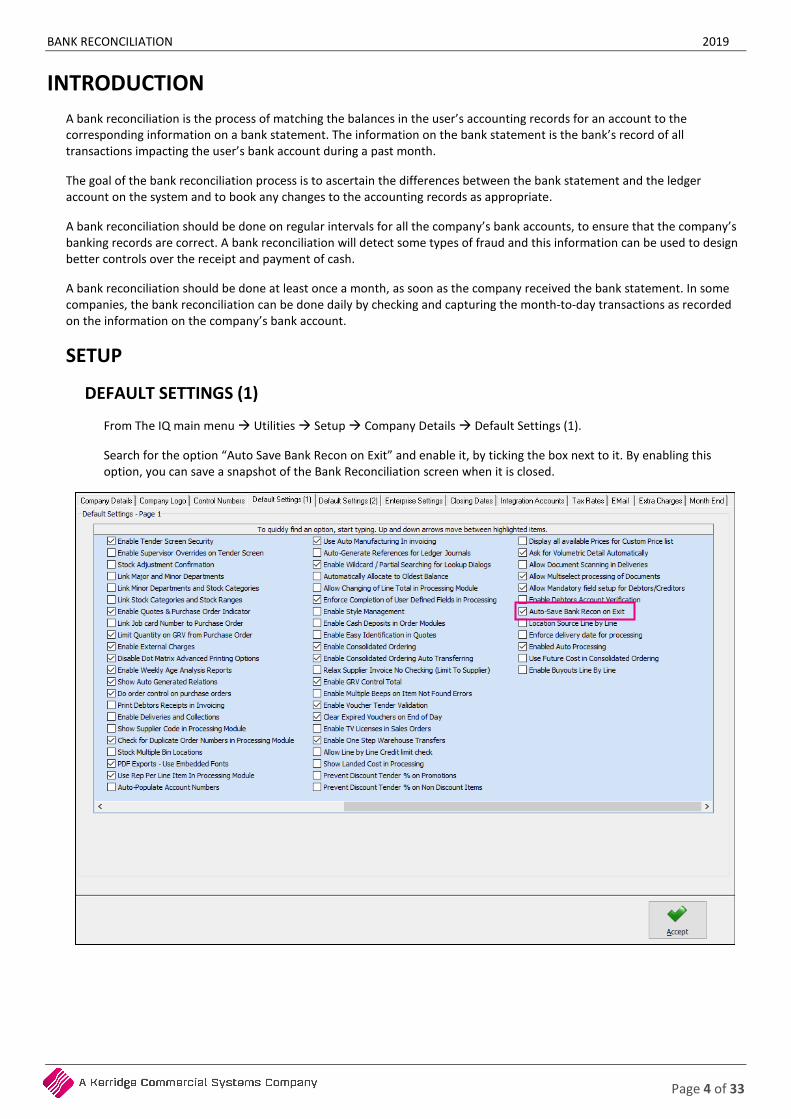
From The IQ main menu Utilities Setup Company Details Default Settings (1).
Search for the option “Auto Save Bank Recon on Exit” and enable it, by ticking the box next to it. By enabling this option, you can save a snapshot of the Bank Reconciliation screen when it is closed.

BANK RECONCILIATION 2019
Page 5 of 33
BANK IMPORT The IQ system allows you to import the bank statements directly out of the bank account, without recapturing any information. You can edit the import and allocate transactions to specific debtors, creditors and ledger accounts.
The system must be setup to enable you to import the bank statement.
From the IQ main menu Utilities Setup Module Parameters Ledger Tab Select Bank Import Definitions and click on the Setup button at the bottom of the screen.
There are a few steps to follow to define the bank import file.
All the Bank Imports that have already been defined will be listed in the Bank Imports Maintenance grid.

BANK RECONCILIATION 2019
Page 6 of 33
BANK IMPORTS MAINTENANCE
NAME The Name field displays the name that was given to the bank import. This name is utilized for identifying the bank import. The name allows for 20 characters and can be entered as alpha and / or numeric characters.
DESCRIPTION The description displays the description or name given to the specific bank import. The bank import description can be 30 characters in length.
EDIT DATA
IMPORT NAME The import name field is where the bank import name or number is entered, that will identify the relevant bank import. The import name can consist of either alpha and / or numeric characters.
IMPORT DESCRIPTION The Import description field is where the description or the name of the bank import is entered. Remember to make the import description meaningful, so that you know which bank import it refers to.
FORMAT The format option allows you to specify in what format the bank import files must be, for them to be imported into the system. The available formats are TXT (text or CSV), XLS (Excel Format) or XML (XML Format).
BUTTON FUNCTIONALITY
ADD The Add option allows you to add any new or additional bank import definitions.
NOTE: Remember that after a new or additional bank import was added, you must define the Bank Import.
DELETE The delete option allows you to delete any of the existing or newly created bank import definitions.
SEARCH The search option allows you to search for any information on the bank import definitions screen.
DEFINE BANK IMPORT The Define Bank Import option allows you to define the bank statement import. (See below how to Define the Bank Import).
DESIGN The design option allows you to design a Bank Import Definitions report.
PREVIEW The Preview option allows you to Preview and/or print the Ledger Bank Import Definitions Report as at the date.
ACCEPT The Accept option allows you to save the Bank Import Definitions and to exit the maintenance screen.
BANK RECONCILIATION 2019
Page 7 of 33
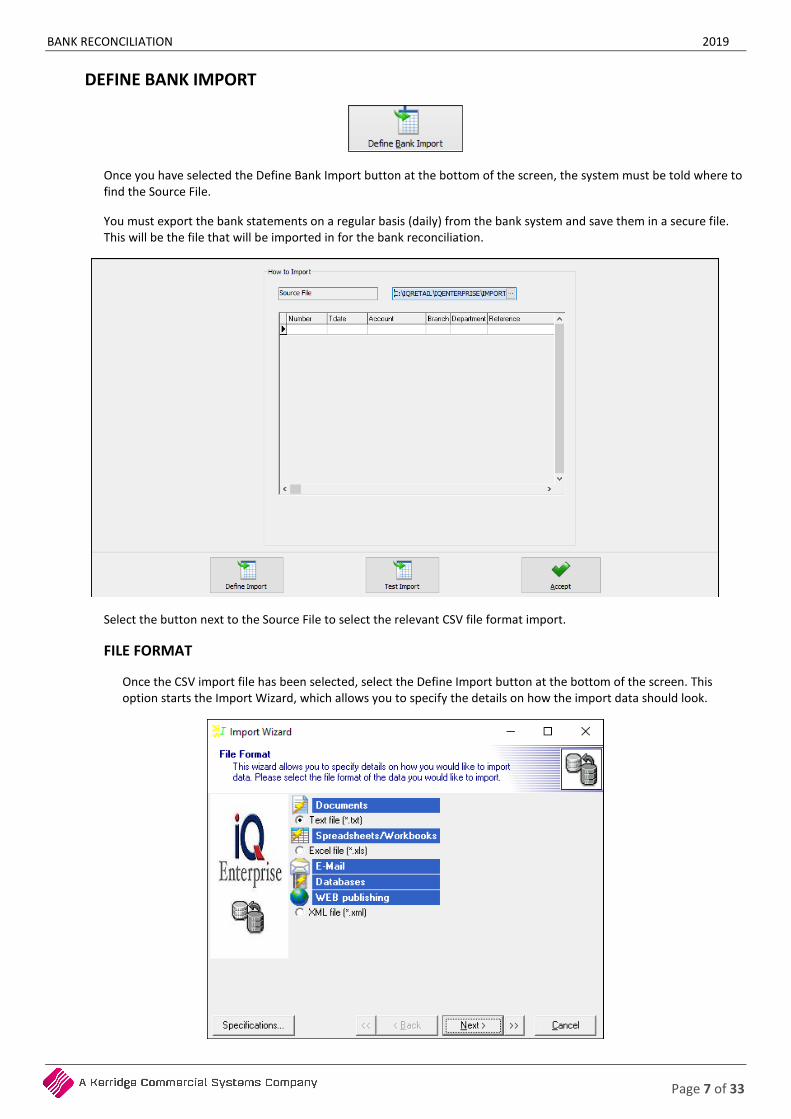
DEFINE BANK IMPORT
Once you have selected the Define Bank Import button at the bottom of the screen, the system must be told where to find the Source File.
You must export the bank statements on a regular basis (daily) from the bank system and save them in a secure file. This will be the file that will be imported in for the bank reconciliation.
Select the button next to the Source File to select the relevant CSV file format import.
FILE FORMAT
Once the CSV import file has been selected, select the Define Import button at the bottom of the screen. This option starts the Import Wizard, which allows you to specify the details on how the import data should look.
BANK RECONCILIATION 2019
Page 8 of 33
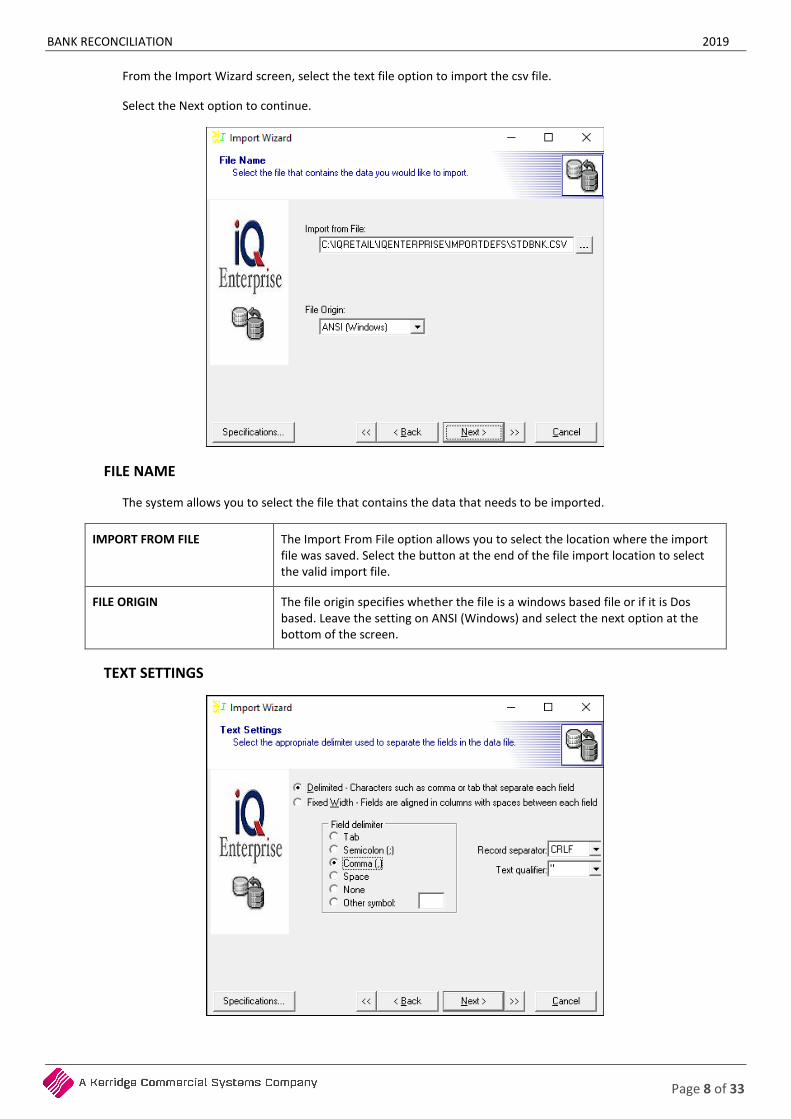
From the Import Wizard screen, select the text file option to import the csv file.
Select the Next option to continue.
FILE NAME
The system allows you to select the file that contains the data that needs to be imported.
IMPORT FROM FILE The Import From File option allows you to select the location where the import file was saved. Select the button at the end of the file import location to select the valid import file.
FILE ORIGIN The file origin specifies whether the file is a windows based file or if it is Dos based. Leave the setting on ANSI (Windows) and select the next option at the bottom of the screen.
TEXT SETTINGS

BANK RECONCILIATION 2019
Page 9 of 33
DELIMITED The delimited option is applicable if commas separate the import files’ fields.
FIXED WIDTH The fixed width option is only applicable if the fields in the import file are aligned in columns with spaces between each field.
FIELD DELIMITER The field delimiter option allows you to specify the type of character that separates the different fields within the import file. In this case, where the file was saved as a .CSV file, the comma option must be selected.
RECORD SEPARATOR The record separator option allows you to choose how the records for imports are inserted. The following options are available on the drop-down menu next to the field:
• CRLF = Character Line Feed
• CR = Character Feed
• LF = Line Feed
NOTE: IF the import file is a text or .CSV file, the option must be changed to LF.
Click on the Next button at the bottom of the screen to continue with the Import Wizard.
DATA FORMATS
You can now define the additional options for the data import. Ensure that these settings are set correctly; otherwise the import will not work.
FIRST ROW The first row which is part of the import. In other words, if the import file has headings in, the first row to read might only be row number 2 or 3. You will not count the headings as part of the import.
DATES, TIMES AND NUMBERS These settings are done to tell the system how the information on the bank statement is displayed and how to read it. The system must be told exactly how to read the date, time and amounts and those settings can be set here.
Click on the Next button at the bottom of the screen to continue with the Import Wizard.
BANK RECONCILIATION 2019
Page 10 of 33
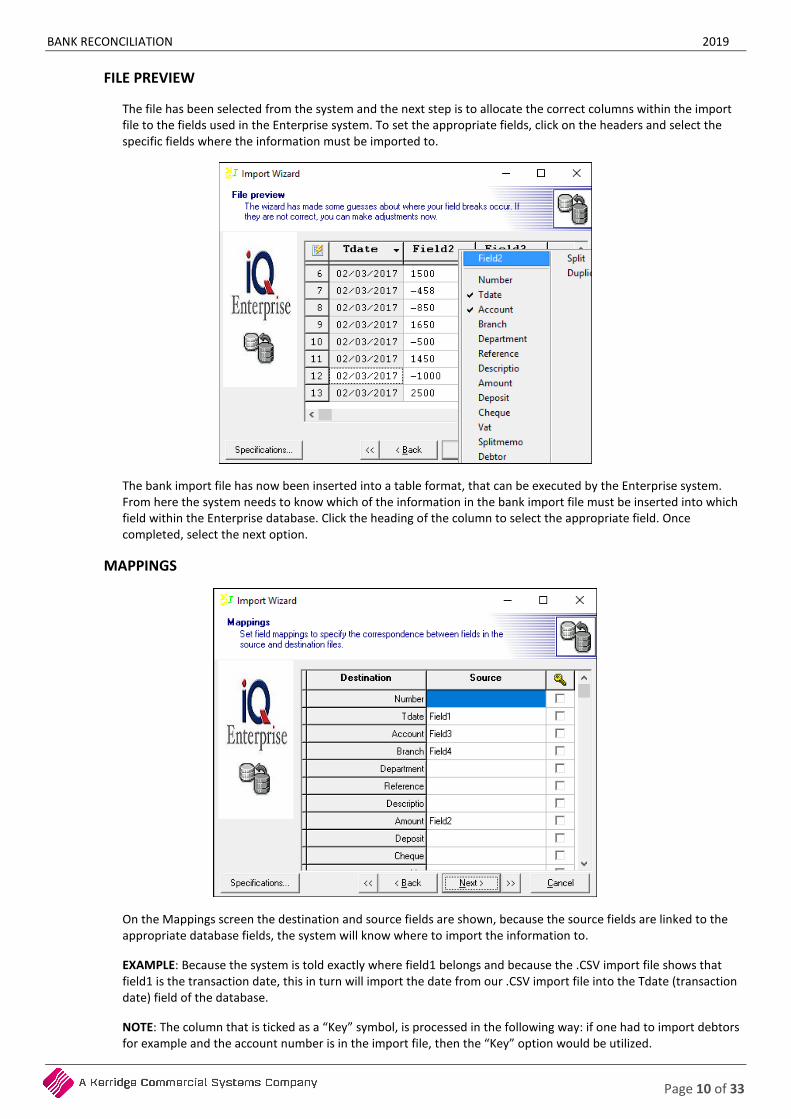
FILE PREVIEW
The file has been selected from the system and the next step is to allocate the correct columns within the import file to the fields used in the Enterprise system. To set the appropriate fields, click on the headers and select the specific fields where the information must be imported to.
The bank import file has now been inserted into a table format, that can be executed by the Enterprise system. From here the system needs to know which of the information in the bank import file must be inserted into which field within the Enterprise database. Click the heading of the column to select the appropriate field. Once completed, select the next option.
MAPPINGS
On the Mappings screen the destination and source fields are shown, because the source fields are linked to the appropriate database fields, the system will know where to import the information to.
EXAMPLE: Because the system is told exactly where field1 belongs and because the .CSV import file shows that field1 is the transaction date, this in turn will import the date from our .CSV import file into the Tdate (transaction date) field of the database.
NOTE: The column that is ticked as a “Key” symbol, is processed in the following way: if one had to import debtors for example and the account number is in the import file, then the “Key” option would be utilized.
BANK RECONCILIATION 2019
Page 11 of 33
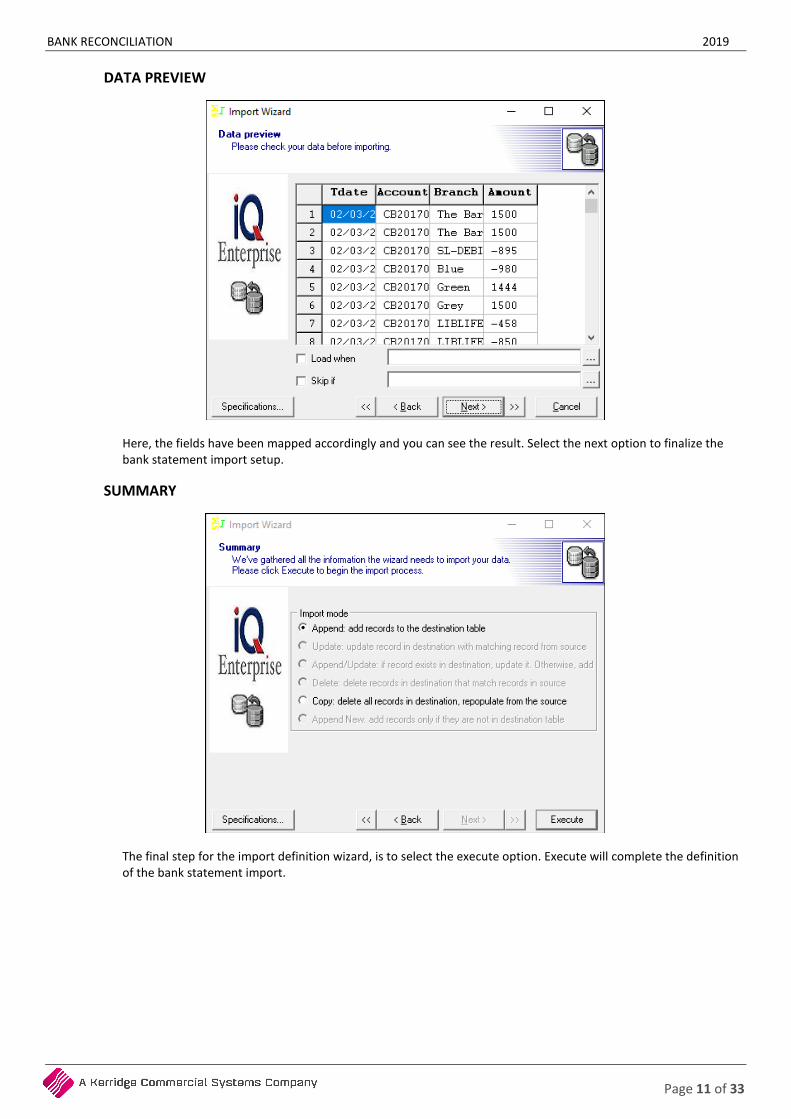
DATA PREVIEW
Here, the fields have been mapped accordingly and you can see the result. Select the next option to finalize the bank statement import setup.
SUMMARY
The final step for the import definition wizard, is to select the execute option. Execute will complete the definition of the bank statement import.
BANK RECONCILIATION 2019
Page 12 of 33
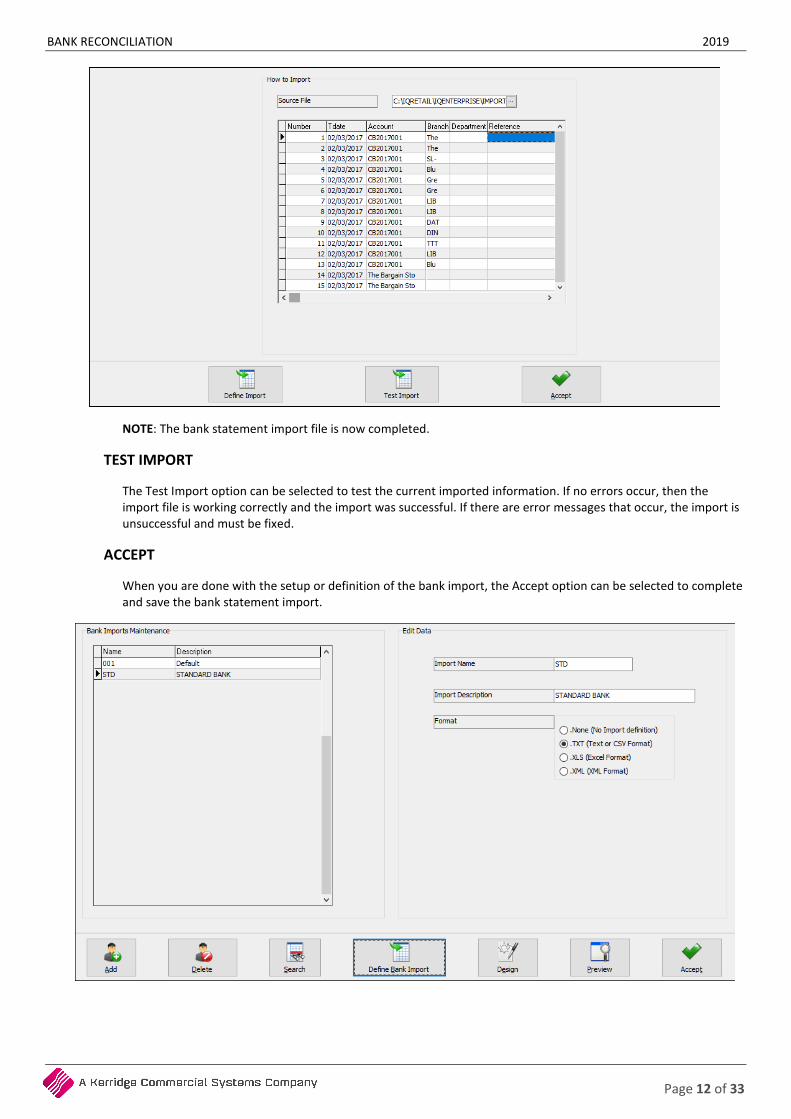
NOTE: The bank statement import file is now completed.
TEST IMPORT
The Test Import option can be selected to test the current imported information. If no errors occur, then the import file is working correctly and the import was successful. If there are error messages that occur, the import is unsuccessful and must be fixed.
ACCEPT
When you are done with the setup or definition of the bank import, the Accept option can be selected to complete and save the bank statement import.

BANK RECONCILIATION 2019
Page 13 of 33
CASHBOOK POSTINGS A cashbook is a financial journal that contains all receipts and payments, including bank deposits and withdrawals. A cashbook is regularly reconciled with the bank statements, as an internal auditing measure.
Each month, the bank sends a bank statement, which lists the beginning and ending account balance and transactions that took place throughout the month.
When the cashbook is reconciled, the transactions are compared between the cashbook and the bank statement. Proper adjustments are made to ensure that both accounts report the same amount of cash. Reconciling the bank statement and cashbook allows you to know how much cash the business has available.
IQ added the option to reconcile the entries as they are added to a cashbook batch. A new field was added to the grid for this purpose.
When the bank statement is imported, you must ensure that no transactions are duplicated. No payments or receipts must be done for the transactions that already appear in the bank statement.
From the IQ main menu Ledger Cashbook Postings.
NOTE: The Cashbook Postings are processed in batch format, which allows you to capture the complete cashbook for a period and then process the whole batch at once.
BANK RECONCILIATION 2019
Page 14 of 33
CASHBOOK OPTIONS
BANK ACCOUNT Select the appropriate bank account from the drop-down menu at the end of the field. Each bank account has its own ledger account and therefore every bank account can be reconciled on its own. This enables you to ensure that each cashbook balances to the appropriate bank statement.
BATCH NAME The saved batches appear under the Batch selection screen. Once a batch is selected, the name under which the batch was saved, will appear in this field.
ENABLE ACCOUNT ALLOCATIONS
If this option is enabled, you can allocate debtors receipts and creditors payments directly to selected transactions, once the batch is processed. IQ uses the
Open Item posting method.
If this option is not enabled (ticked), you will have to do separate debtors and creditors allocations.
ENABLE INCREMENT REFERENCE
If this option is enabled, you can enter a reference to the transaction and the system will automatically
increment the reference number for the next line.
BATCH SELECTION
SELECT BATCH On the top right hand corner of the screen are 12 different cashbook batches listed. Select the batch to be used. If a previous batch has already been used and saved, this batch can be recalled, details amended and / or to process. In other words, this option allows you to work in different batches at any given time.
DYNAMIC RECONCILIATION
After the inclusion of the reconciliation feature in the Cashbook postings, it was necessary to add a view of what the effect of the reconciled records will be, once it is processed. The summary of the Bank Recon module was included into the Cashbook, with a few amendments to assist you in using the new Reconcile feature. It shows the current state of the Bank account, with its closing balance. The new feature of providing a control amount is implemented here. When adding entries to the batch, they will increase the total of cheques and deposits for the current batch. If reconciled, they are used in the calculation to determine the new bank balance after processing the batch.
The refresh button is only available on the Dynamic Reconciliation screen. This option will recalculate all the transactions in the cashbook since the start of the account, to refresh the totals that appear in the Dynamic Recon.
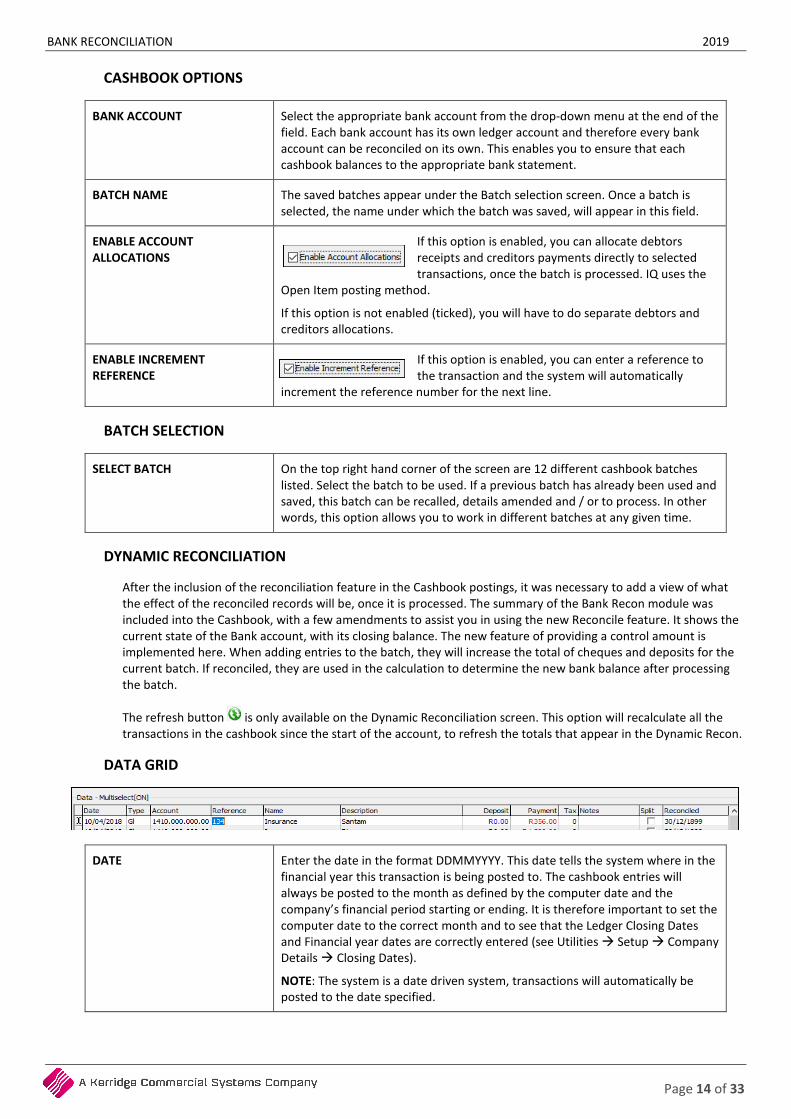
DATA GRID
DATE
Enter the date in the format DDMMYYYY. This date tells the system where in the financial year this transaction is being posted to. The cashbook entries will always be posted to the month as defined by the computer date and the company’s financial period starting or ending. It is therefore important to set the computer date to the correct month and to see that the Ledger Closing Dates and Financial year dates are correctly entered (see Utilities Setup Company Details Closing Dates).
NOTE: The system is a date driven system, transactions will automatically be posted to the date specified.
BANK RECONCILIATION 2019
Page 15 of 33
TYPE The Type field specifies what type of cashbook posting is going to be posted. There are three (3) different types that you may choose from (GL, DRS or CRS).
The GL option allows you to post either a deposit or payment to any of the general ledger accounts. The DRS option allows you to post a debtor receipt, once the DRS option has been selected, to a selected debtors account. The CRS option allows you to post a creditor payment, once the CRS option has been selected, to a selected creditors account.
ACCOUNT Enter the account number that the payment (cheque) or the deposit must be allocated to, or use the available search facility (ALT and the down arrow or click on the drop-down button at the end of the field.)
REFERENCE Enter the cheque or deposit number in this field. This is a 30-character alphanumeric field.
NOTE: If a numeric value (e.g. 1234) is entered and increment reference is enabled, the number will automatically increment and insert into the reference field of the next line (e.g. 1235).
NOTE: You can press the F8 function key at the beginning of a line, which will duplicate the information of the previous line. You only must enter the amounts for the deposit or payment.
NAME This field will default to either the ‘allocated’ account description or the name of the debtor or creditor, whose account was selected in the account field. The name can’t be edited.
DESCRIPTION This field will default to either the ‘allocated’ account description or the name of the debtor or creditor, whose account was selected in the account field. Edit this field if required and enter a more descriptive and meaningful description.
DEPOSIT Enter the full amount inclusive of VAT under the deposit column.
Deposits represent the entries that show the money coming into the bank account, in other words if will increase the cashbook or bank account.
Cashbook / Bank
Debit + Credit -
1,000
Debtor’s Account
Debit + Credit -
1,000

BANK RECONCILIATION 2019
Page 16 of 33
PAYMENT Enter the full amount inclusive of VAT under the payment column.
Payments represent the entries that show the money going out of the bank account, in other words payments will decrease the cashbook or bank account.
Cashbook / Bank
Debit + Credit -
1,000
500
Creditor’s Account
Debit - Credit +
1,000
Advertising
Debit + Credit -
500
TAX Enter the VAT rate applicable to the transaction into this field. The applicable rate can be selected from the drop-down menu next to the field. The appropriate VAT rate for the ledger account should automatically appear, as each account is setup to link to a VAT rate.
NOTES The Notes field allows you to enter any additional information regarding the transaction. These notes can be printed at a later stage.
SPLIT The Split option is only available on the General Ledger accounts. It allows you to split a transaction to more than one ledger account.
The Cash Book Split Entry screen will appear, when you have ticked the box to split the entry, or when you select the transaction from the cashbook grid and click on the Split Entry button at the bottom right of the screen.
You are then allowed to split the amount to more than one ledger account, until the remaining amount is zero.
BANK RECONCILIATION 2019
Page 17 of 33
NOTE: You can’t exit or close the Split Entry screen unless the whole amount is split and allocated.
NOTE: Split is not available on the Debtors or Creditors transactions, only the Ledger accounts.
RECONCILED The Reconciled option allows you to reconcile a transaction as soon as the line is entered. Use the F9 function key on the keyboard to toggle the transaction to be reconciled, or to un-reconcile the transaction.
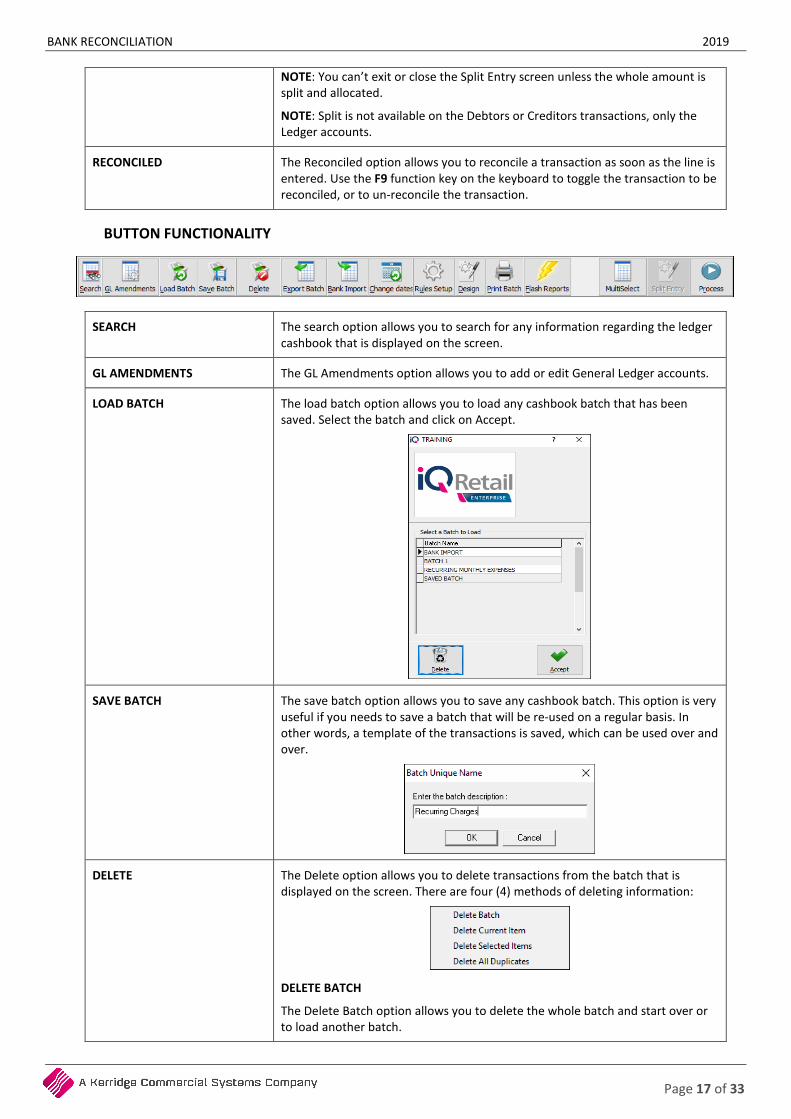
BUTTON FUNCTIONALITY
SEARCH The search option allows you to search for any information regarding the ledger cashbook that is displayed on the screen.
GL AMENDMENTS The GL Amendments option allows you to add or edit General Ledger accounts.
LOAD BATCH The load batch option allows you to load any cashbook batch that has been saved. Select the batch and click on Accept.
SAVE BATCH The save batch option allows you to save any cashbook batch. This option is very useful if you needs to save a batch that will be re-used on a regular basis. In other words, a template of the transactions is saved, which can be used over and over.
DELETE The Delete option allows you to delete transactions from the batch that is displayed on the screen. There are four (4) methods of deleting information:
DELETE BATCH
The Delete Batch option allows you to delete the whole batch and start over or to load another batch.

BANK RECONCILIATION 2019
Page 18 of 33
DELETE CURRENT ITEM
The Delete Current Item option allows you to delete only the current highlighted item from the batch. Select the item by highlighting it and then selecting this option from the Delete button at the bottom of the screen.
DELETE SELECTED ITEMS
The Delete Selected Items option allows you to select a few transactions and to delete only the selected items from the batch.
DELETE ALL DUPLICATES
The Delete All Duplicates option allows you to delete all the duplicated transactions.
EXPORT BATCH Select the Export Batch option to export the current information displayed on the screen, into any of the following formats (.CSV, TXT, HTML, XML and XLS (Excel)).
BANK IMPORT The Bank Import option allows you to import the bank statement once it has been setup correctly.
CHANGE DATES The change dates option allows you to change all the dates within the cashbook posting screen, to a selected date. In other words, if the change dates option is selected, the system will change all the dates on the current cashbook postings displayed on the screen to the last date or the date that is currently highlighted.
NOTE: This option is to be used with the reloading of a saved batch. The saved batch can be loaded and then you must change the dates to the current month.
NOTE: You need to change the date on the first line of the imported batch to the appropriate date. If you then select the Change Dates option, the system will prompt you to change all the dates in the batch to the selected date.
RULES SETUP You can Setup rules on the cashbook postings. If the bank statement is imported and the Reference, Description or Notes contain specific words or information, the system can be set to automatically write these entries to specific accounts.
SETUP F6 (CASHBOOK RULES)
RUN F7
The Run Rules function key (F7) on the keyboard, allows you to automatically allocate the setup accounts to the entries in the cashbook.

BANK RECONCILIATION 2019
Page 19 of 33
DESIGN The Design option allows you to modify the Cashbook Postings report layout.
PRINT BATCH The print batch option allows you to print the existing (current) batch as it is entered on the grid, before the batch is processed. Printing the batch before it’s processed helps to see what is going to happen when the batch is processed.
FLASH REPORTS
The Flash Reports option allows you to draw a quick flash report that has been setup specific to Cashbook Postings. This makes it easy if you need to see previous processed information quickly.
MULTISELECT The Multiselect feature is available to reconcile and delete transactions from the Cashbook Postings screen.
The Multiselect feature is enabled by clicking the Multiselect button at the bottom of the screen. You then selects multiple records by holding the Ctrl button on the keyboard and clicking on the records that need to be reconciled or deleted. The feature is turned off by again clicking the button or by reconciling or deleting the transactions.
BANK RECONCILIATION 2019
Page 20 of 33
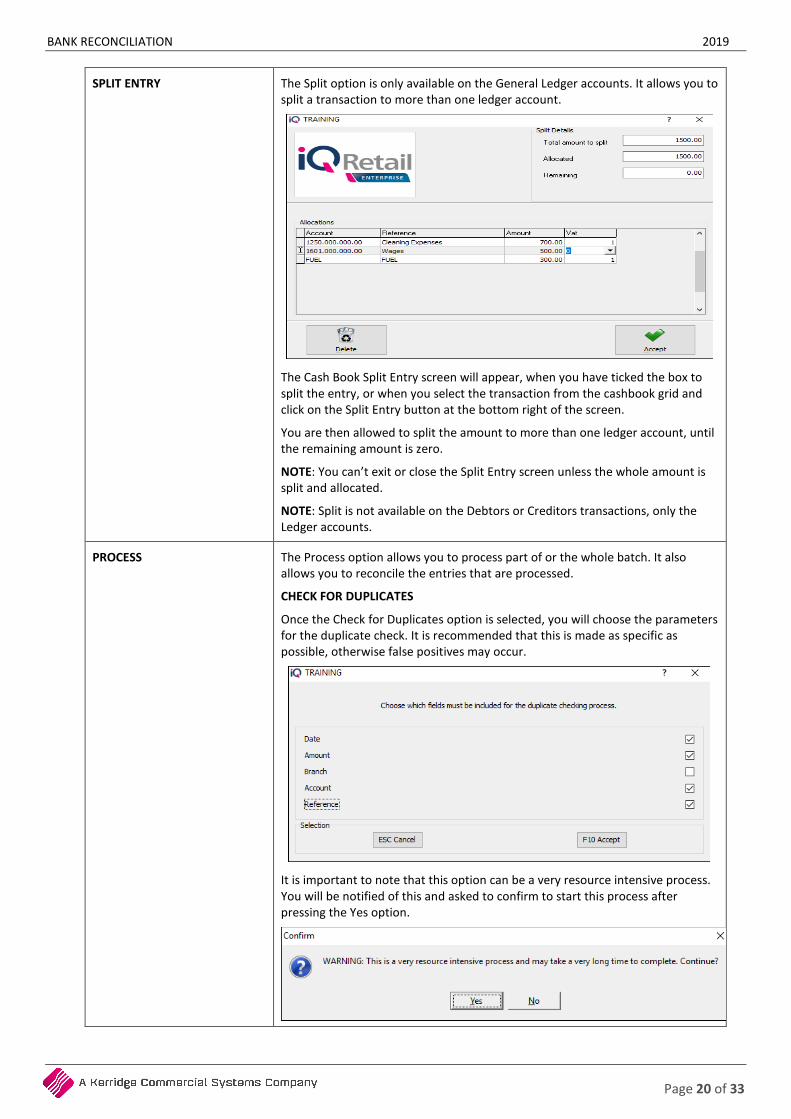
SPLIT ENTRY
The Split option is only available on the General Ledger accounts. It allows you to split a transaction to more than one ledger account.
The Cash Book Split Entry screen will appear, when you have ticked the box to split the entry, or when you select the transaction from the cashbook grid and click on the Split Entry button at the bottom right of the screen.
You are then allowed to split the amount to more than one ledger account, until the remaining amount is zero.
NOTE: You can’t exit or close the Split Entry screen unless the whole amount is split and allocated.
NOTE: Split is not available on the Debtors or Creditors transactions, only the Ledger accounts.
PROCESS The Process option allows you to process part of or the whole batch. It also allows you to reconcile the entries that are processed.
CHECK FOR DUPLICATES
Once the Check for Duplicates option is selected, you will choose the parameters for the duplicate check. It is recommended that this is made as specific as possible, otherwise false positives may occur.
It is important to note that this option can be a very resource intensive process. You will be notified of this and asked to confirm to start this process after pressing the Yes option.

BANK RECONCILIATION 2019
Page 21 of 33
The IQ system will check if there are any duplicates within the current batch (based on the selected parameters). If there are duplicates, BOTH records will be highlighted in blue.
IQ will also check the Ledger for all the dates found in the current batch. If there are duplicates found between postings already done on any of those days and the current batch, the entry in the batch will be highlighted in a lighter blue.
Duplicates already processed can’t be picked up by this process. Only the current batch can be changed.
After all the duplicates have been identified, you can choose to delete them manually, or use the feature “Delete all Duplicates” under the Delete menu. The Delete All Duplicates option deletes only ONE of the two duplicates, if they are found in the current batch.
RECONCILIATION
You now have the option to reconcile entries as they are added to a cashbook batch. There are a few ways to mark the entries as reconciled: Reconcile a selected item, reconcile all the entries in the batch or reconcile only the selected items.
As the reconciliation is a toggle function, all the reconcile options can be reversed (un-reconciled).
• RECONCILE THIS ITEM (F9)
The Reconcile This Item option allows you to mark only the selected item as reconciled.
• RECONCILE ALL
The Reconcile All option allows you to mark all the entries on the current cashbook as reconciled.
• RECONCILE SELECTED ITEMS
The Reconcile Selected Items option allows you to select a few entries (by clicking on the Multiselect button and then holding the CTRL key on the keyboard and clicking on entries) and reconcile them.
• UN-RECONCILE THIS ITEM (F9)
The Un-reconcile This Item option allows you to mark only the selected item as un-reconciled.
• UN-RECONCILE ALL
The Un-reconcile All option allows you to mark all the entries as un-reconciled.
• UN-RECONCILE SELECTED ITEMS
The Un-reconcile Selected Items option allows you to mark all the selected items as reconciled.
PROCESS BATCH AND RECONCILE ALL
The Process Batch and Reconcile All option allows you to process all the cashbook entries on the batch and to reconcile them all.
BANK RECONCILIATION 2019
Page 22 of 33
PROCESS BATCH
The Process Batch option allows you to Process the batch and to reconcile it at a later stage. Once the batch is processed, it will be removed from the available batches and influence the correct ledger accounts.
HOW TO RECONCILE THE CASHBOOK ACCOUNT?
• Get the bank statement from the bank and / or import it into the IQ system.
• Check off in the Cashbook transactions for the period, all the payments that are listed on the bank statement as having cleared the bank.
• Check off in the Cashbook transactions for the period, all the deposits that are listed on the bank statement as having cleared the bank.
• Enter all the transactions appearing on the bank statement and which have not been recorded in the company’s cashbook records.
• Enter the closing balance on the bank statement into the Dynamic Reconciliation field “Bank Statement Bal Actual”. If the cashbook and bank statement balances match, then process and reconcile the changes recorded.
• If there is a difference on the balances (this might be due to an incorrect or duplicated entry) – don’t process or reconcile the entries on the cashbook. The incorrect entry or duplicated entry must first be corrected, before the cashbook can be reconciled.
HOW TO CORRECT AN INCORRECT CASHBOOK ENTRY?
To correct an incorrect entry on the cashbook, reverse the transaction and redo the correct transaction.
The reversed entry and the incorrect entry can then be reconciled and the correct entry can be reconciled to the bank statement entry.
BANK RECONCILIATION 2019
Page 23 of 33
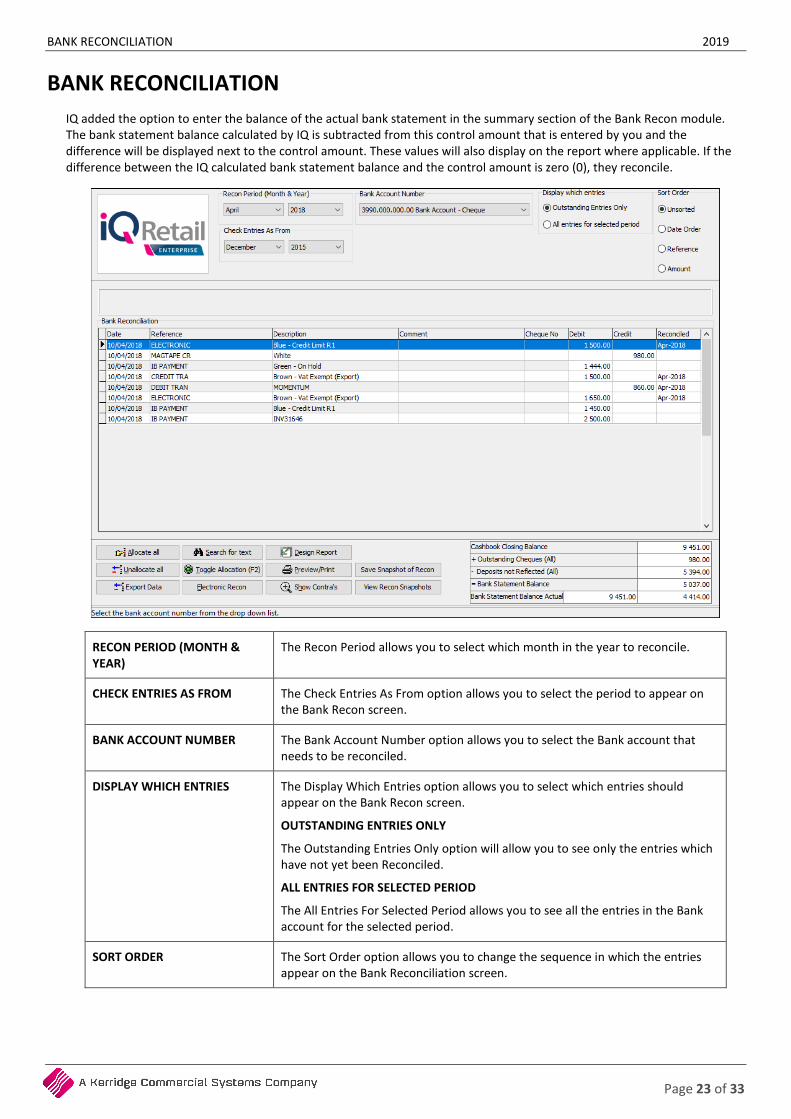
BANK RECONCILIATION IQ added the option to enter the balance of the actual bank statement in the summary section of the Bank Recon module. The bank statement balance calculated by IQ is subtracted from this control amount that is entered by you and the difference will be displayed next to the control amount. These values will also display on the report where applicable. If the difference between the IQ calculated bank statement balance and the control amount is zero (0), they reconcile.
RECON PERIOD (MONTH & YEAR)
The Recon Period allows you to select which month in the year to reconcile.
CHECK ENTRIES AS FROM The Check Entries As From option allows you to select the period to appear on the Bank Recon screen.
BANK ACCOUNT NUMBER The Bank Account Number option allows you to select the Bank account that needs to be reconciled.
DISPLAY WHICH ENTRIES The Display Which Entries option allows you to select which entries should appear on the Bank Recon screen.
OUTSTANDING ENTRIES ONLY
The Outstanding Entries Only option will allow you to see only the entries which have not yet been Reconciled.
ALL ENTRIES FOR SELECTED PERIOD
The All Entries For Selected Period allows you to see all the entries in the Bank account for the selected period.
SORT ORDER The Sort Order option allows you to change the sequence in which the entries appear on the Bank Reconciliation screen.
BANK RECONCILIATION 2019
Page 24 of 33
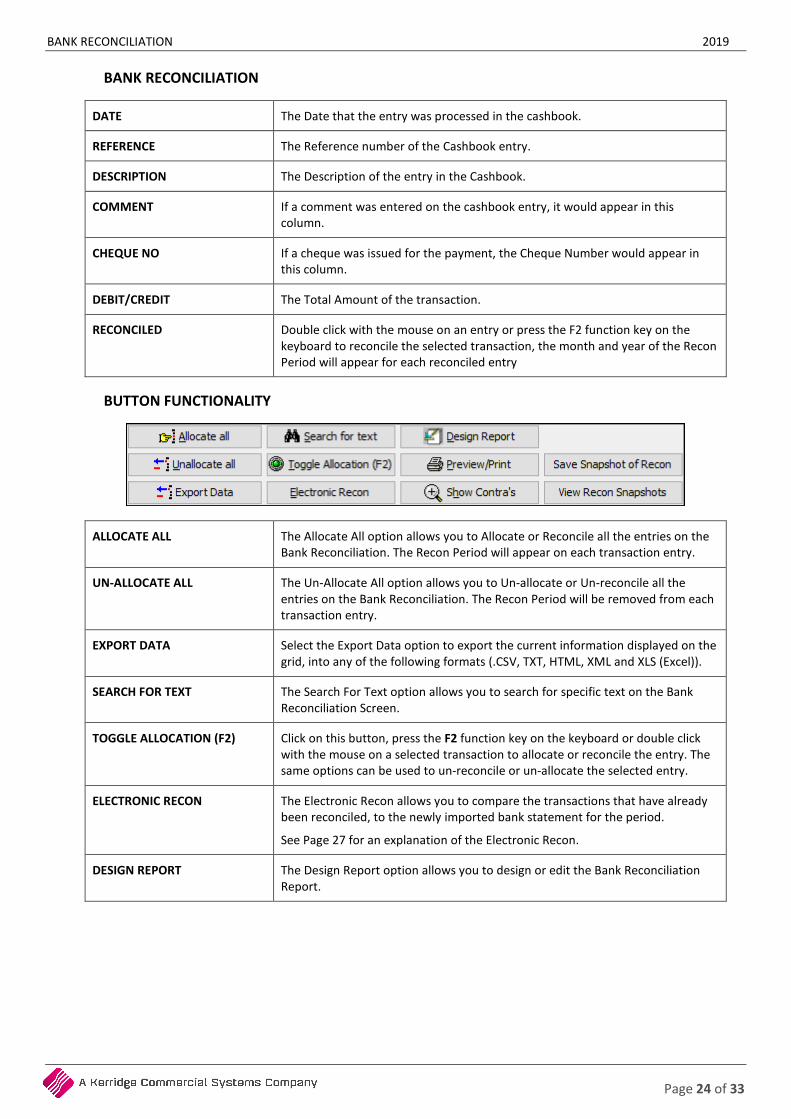
BANK RECONCILIATION
DATE The Date that the entry was processed in the cashbook.
REFERENCE The Reference number of the Cashbook entry.
DESCRIPTION The Description of the entry in the Cashbook.
COMMENT If a comment was entered on the cashbook entry, it would appear in this column.
CHEQUE NO If a cheque was issued for the payment, the Cheque Number would appear in this column.
DEBIT/CREDIT The Total Amount of the transaction.
RECONCILED Double click with the mouse on an entry or press the F2 function key on the keyboard to reconcile the selected transaction, the month and year of the Recon Period will appear for each reconciled entry
BUTTON FUNCTIONALITY
ALLOCATE ALL The Allocate All option allows you to Allocate or Reconcile all the entries on the Bank Reconciliation. The Recon Period will appear on each transaction entry.
UN-ALLOCATE ALL The Un-Allocate All option allows you to Un-allocate or Un-reconcile all the entries on the Bank Reconciliation. The Recon Period will be removed from each transaction entry.
EXPORT DATA Select the Export Data option to export the current information displayed on the grid, into any of the following formats (.CSV, TXT, HTML, XML and XLS (Excel)).
SEARCH FOR TEXT The Search For Text option allows you to search for specific text on the Bank Reconciliation Screen.
TOGGLE ALLOCATION (F2) Click on this button, press the F2 function key on the keyboard or double click with the mouse on a selected transaction to allocate or reconcile the entry. The same options can be used to un-reconcile or un-allocate the selected entry.
ELECTRONIC RECON The Electronic Recon allows you to compare the transactions that have already been reconciled, to the newly imported bank statement for the period.
See Page 27 for an explanation of the Electronic Recon.
DESIGN REPORT The Design Report option allows you to design or edit the Bank Reconciliation Report.

BANK RECONCILIATION 2019
Page 25 of 33
PREVIEW/PRINT The Preview/Print option allows you to preview or print the Bank Reconciliation.
SUGGESTION: If the bank reconciliation is completed at the end of the month, it is suggested to print the bank reconciliation report and file it. This gives auditors ready access to the information if they want to examine the reconciliations later.
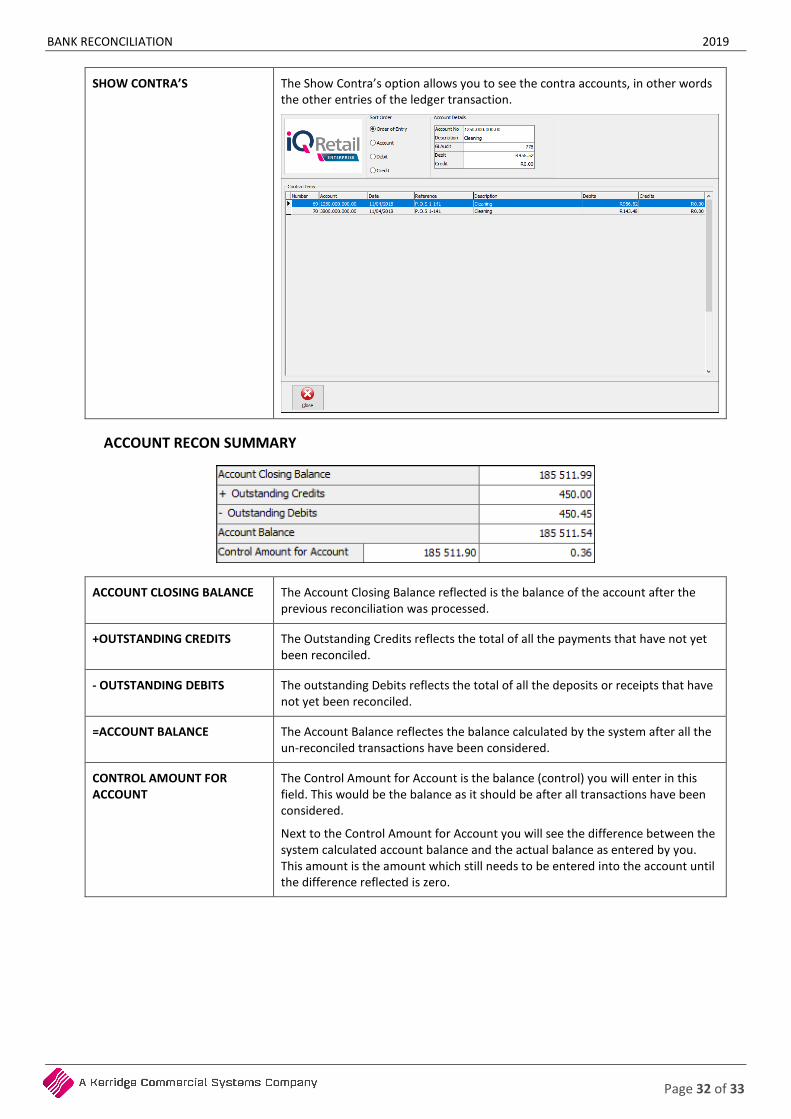
SHOW CONTRA’S
The Show Contra’s option allows you to see the contra accounts, in other words the other leg of the cashbook entry.
SAVE SNAPSHOT OF RECON The Save Snapshot of Recon option allows you to save a snapshot of the bank recon as it is now.
A new feature which was added to the Bank Recon screen, is that you can save a snapshot of the current state of the Bank Recon screen.
The following values are saved to the table when pressing the “Save Snapshot of Recon” button:
• Date/Time
• Cashbook Balance
• Outstanding cheques
• Outstanding Deposits
• Bank Statement Balance (Calculated by IQ)
• Captured Bank Statement balance
• Difference (Between two values above)
• Generated Report (in a BLOB field)

BANK RECONCILIATION 2019
Page 26 of 33
VIEW RECON SNAPSHOTS
When pressing the View Recon Snapshots button, a new screen will appear with a grid listing all previous saved snapshots. You can highlight a record and press the Save Report button, which will generate PDF of the report as it was saved.
Example of Snapshot Preview of Bank Reconciliation through Cashbook postings:
The report as seen above will be the report that would appear if you pressed the Preview/Print button at the time of Pressing the Save Snapshot button.
BANK RECON SUMMARY
CASHBOOK CLOSING BALANCE The Cashbook closing Balance reflects the balance of the Cashbook after the previous reconciliation was done.
+OUTSTANDING CHEQUES (ALL)
The Outstanding Cheques reflects the total of all the cheques or payments that have not yet been reconciled.
-DEPOSITS NOT REFLECTED (ALL)
The Deposits Not Reflected shows the total of all the deposits or receipts that have not yet been reconciled.
=BANK STATEMENT BALANCE The Bank Statement Balance reflected is the balance calculated by the system after all the un-reconciled transactions have been considered.
BANK STATEMENT BALANCE ACTUAL
The Bank Statement Balance Actual is the balance (control) you will enter in this field. This would be the balance as it appears on the bank statement.
Next to the Bank Statement Balance Actual you will see the difference between the system calculated cashbook balance and the bank statement balance as entered by you. This amount will then be the amount which still needs to be entered the cashbook until the difference reflected is zero.
BANK RECONCILIATION 2019
Page 27 of 33
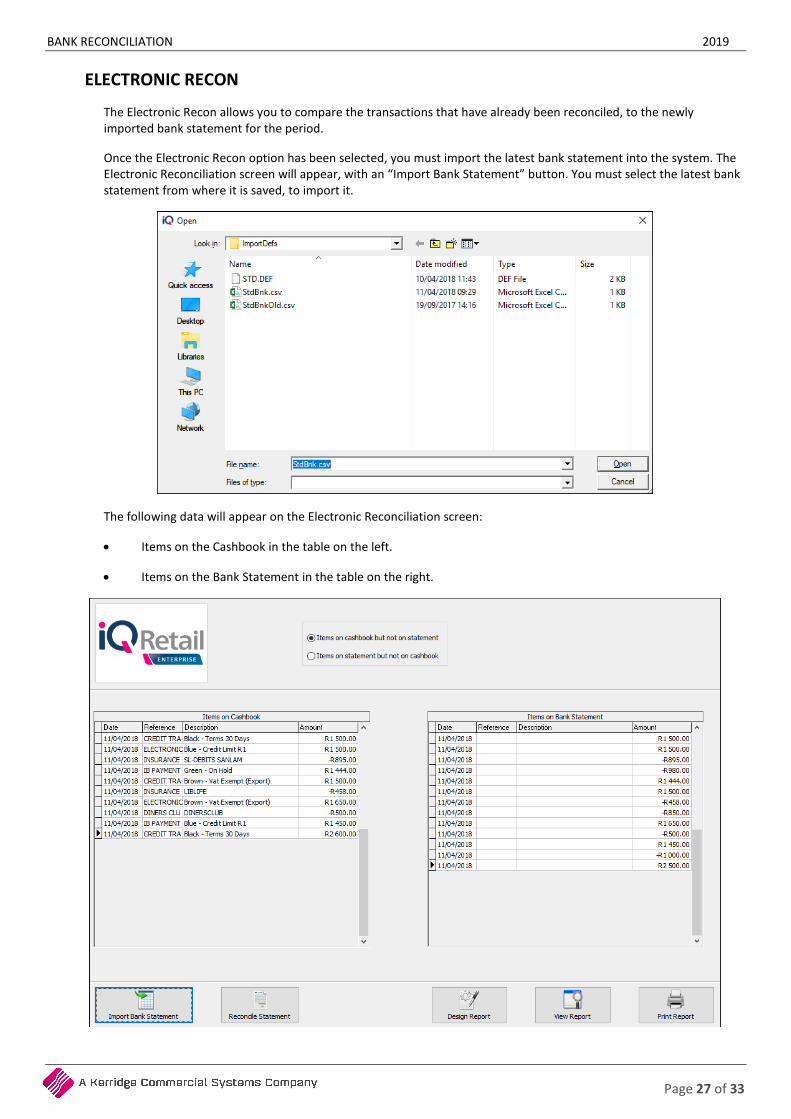
ELECTRONIC RECON
The Electronic Recon allows you to compare the transactions that have already been reconciled, to the newly imported bank statement for the period.
Once the Electronic Recon option has been selected, you must import the latest bank statement into the system. The Electronic Reconciliation screen will appear, with an “Import Bank Statement” button. You must select the latest bank statement from where it is saved, to import it.
The following data will appear on the Electronic Reconciliation screen:
• Items on the Cashbook in the table on the left.
• Items on the Bank Statement in the table on the right.

BANK RECONCILIATION 2019
Page 28 of 33
There are two (2) options you can select from, to identify what information you want to preview or print:
• Items on cashbook but not on statement
• Items on Statement but not on cashbook
BUTTON FUNCTIONALITY
IMPORT BANK STATEMENT The Import Bank Statement option allows you to import the latest bank statement.
RECONCILE STATEMENT The Reconcile Statement option allows you to link the reconciled items from the cashbook to the items on the bank statement. All reconciled transactions will be highlighted in yellow. The transactions that are not highlighted, will be the transactions that are not on the bank statement (if they appear in the cashbook) or the transactions that are not in the cashbook (if they appear in the Bank Statement).
PROCESS RECONCILIATION Once you are happy that everything is correct, the Process Reconciliation button will update the Bank Reconciliation data.
DESIGN REPORT The Design Report option allows you to design or edit the existing Electronic Reconciliation report.
BANK RECONCILIATION 2019
Page 29 of 33
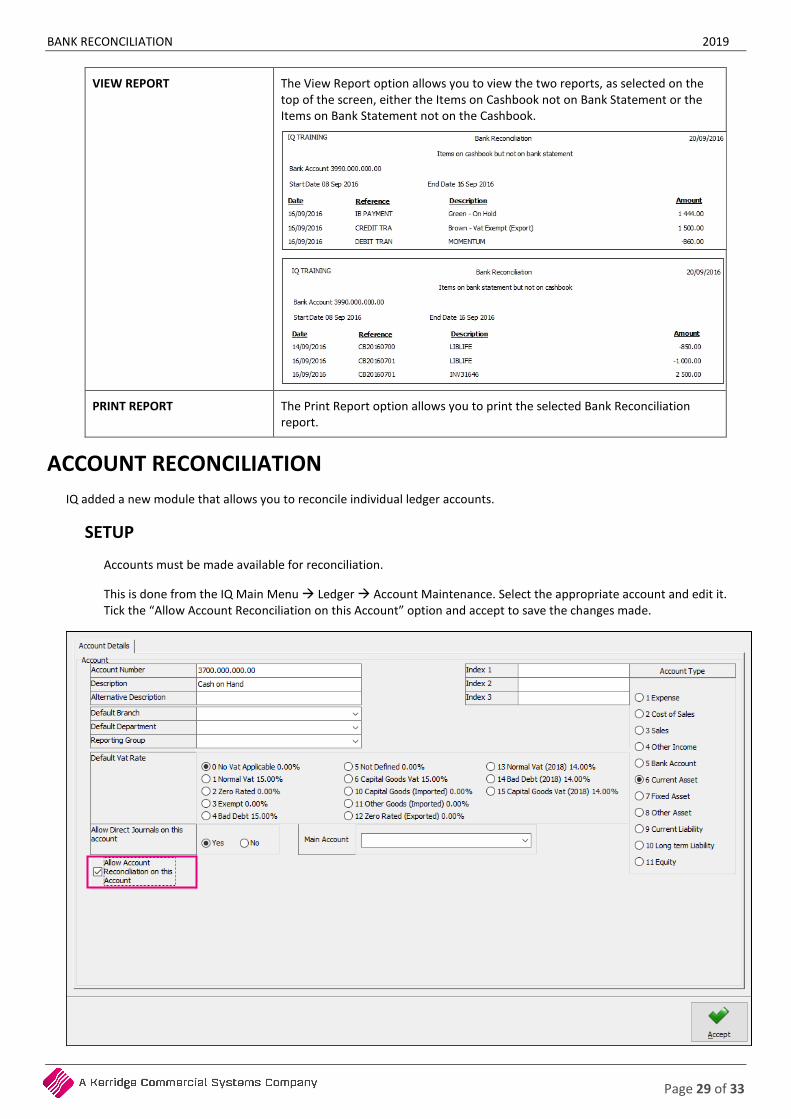
VIEW REPORT The View Report option allows you to view the two reports, as selected on the top of the screen, either the Items on Cashbook not on Bank Statement or the Items on Bank Statement not on the Cashbook.
PRINT REPORT The Print Report option allows you to print the selected Bank Reconciliation report.
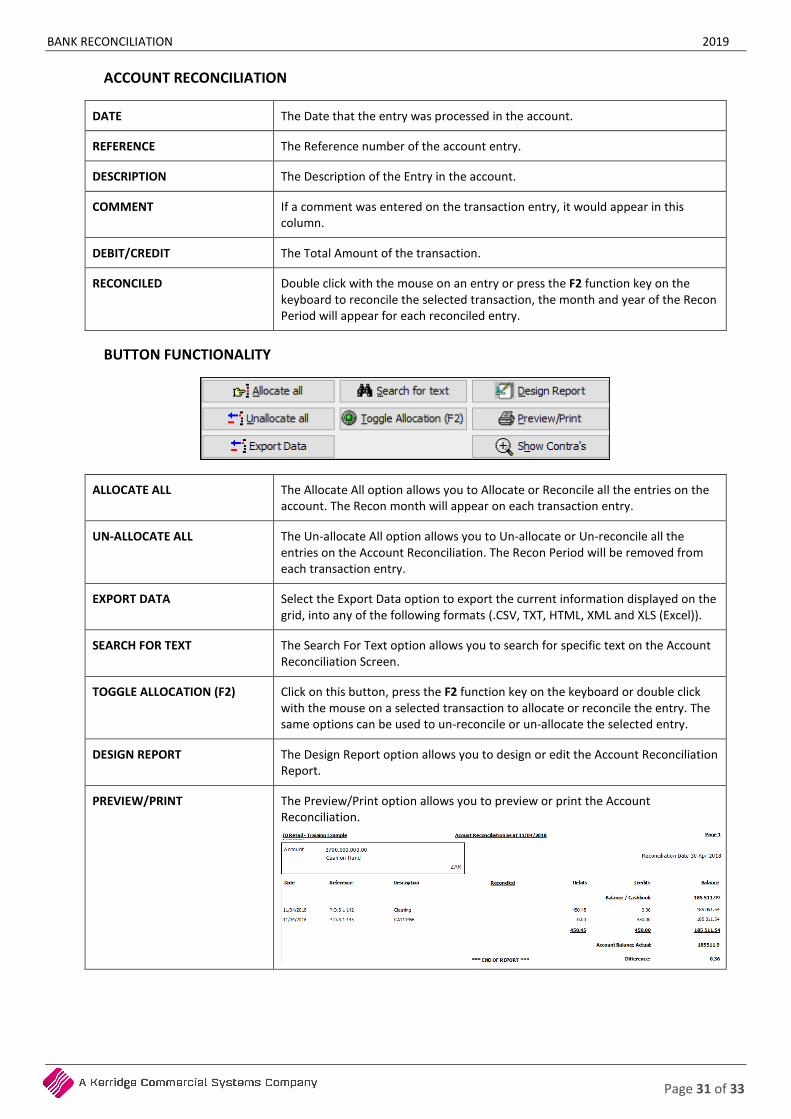
ACCOUNT RECONCILIATION IQ added a new module that allows you to reconcile individual ledger accounts.
SETUP
Accounts must be made available for reconciliation.
This is done from the IQ Main Menu Ledger Account Maintenance. Select the appropriate account and edit it. Tick the “Allow Account Reconciliation on this Account” option and accept to save the changes made.

BANK RECONCILIATION 2019
Page 30 of 33
Once the first account is allowed, the new Account Reconciliation module becomes available.
Example of Account Reconciliation:
RECON PERIOD (MONTH & YEAR)
The Recon Period allows you to select which month in the year to reconcile.
CHECK ENTRIES AS FROM The Check Entries As From option allows you to select the period to appear on the Account Recon screen.
ACCOUNT NUMBER The Account Number option allows you to select the account that needs to be reconciled. Only accounts that have been enabled to be reconciled will appear on the drop-down menu for selection.
DISPLAY WHICH ENTRIES The Display Which Entries option allows you to select which entries should appear on the Bank Recon screen.
• OUTSTANDING ENTRIES ONLY
The Outstanding Entries Only option will allow you to see only the entries which have not yet been Reconciled.
• ALL ENTRIES FOR SELECTED PERIOD
The All Entries For Selected Period allows you to see all the entries in the account for the selected period.
SORT ORDER The Sort Order option allows you to change the sequence in which the entries appear on the Account Reconciliation screen.
BANK RECONCILIATION 2019
Page 31 of 33
ACCOUNT RECONCILIATION
DATE The Date that the entry was processed in the account.
REFERENCE The Reference number of the account entry.
DESCRIPTION The Description of the Entry in the account.
COMMENT If a comment was entered on the transaction entry, it would appear in this column.
DEBIT/CREDIT The Total Amount of the transaction.
RECONCILED Double click with the mouse on an entry or press the F2 function key on the keyboard to reconcile the selected transaction, the month and year of the Recon Period will appear for each reconciled entry.
BUTTON FUNCTIONALITY
ALLOCATE ALL The Allocate All option allows you to Allocate or Reconcile all the entries on the account. The Recon month will appear on each transaction entry.
UN-ALLOCATE ALL The Un-allocate All option allows you to Un-allocate or Un-reconcile all the entries on the Account Reconciliation. The Recon Period will be removed from each transaction entry.
EXPORT DATA Select the Export Data option to export the current information displayed on the grid, into any of the following formats (.CSV, TXT, HTML, XML and XLS (Excel)).
SEARCH FOR TEXT The Search For Text option allows you to search for specific text on the Account Reconciliation Screen.
TOGGLE ALLOCATION (F2) Click on this button, press the F2 function key on the keyboard or double click with the mouse on a selected transaction to allocate or reconcile the entry. The same options can be used to un-reconcile or un-allocate the selected entry.
DESIGN REPORT The Design Report option allows you to design or edit the Account Reconciliation Report.
PREVIEW/PRINT The Preview/Print option allows you to preview or print the Account Reconciliation.
BANK RECONCILIATION 2019
Page 32 of 33
SHOW CONTRA’S The Show Contra’s option allows you to see the contra accounts, in other words the other entries of the ledger transaction.
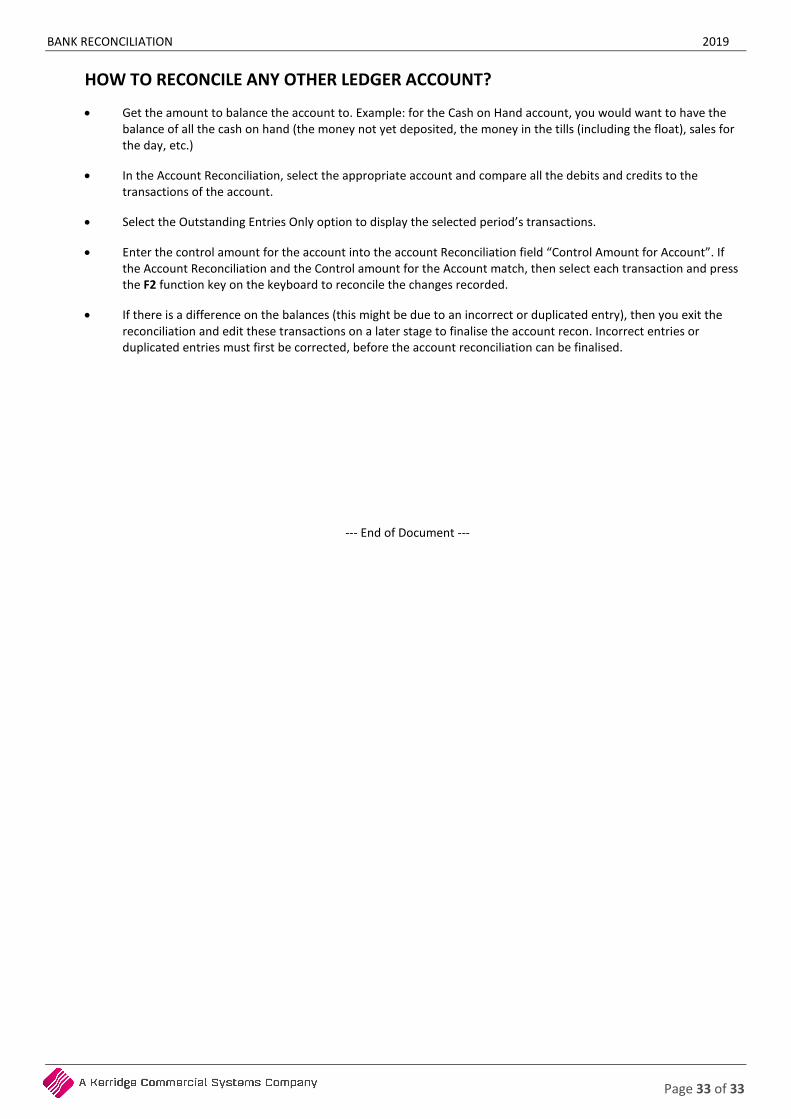
ACCOUNT RECON SUMMARY
ACCOUNT CLOSING BALANCE The Account Closing Balance reflected is the balance of the account after the previous reconciliation was processed.
+OUTSTANDING CREDITS The Outstanding Credits reflects the total of all the payments that have not yet been reconciled.
- OUTSTANDING DEBITS The outstanding Debits reflects the total of all the deposits or receipts that have not yet been reconciled.
=ACCOUNT BALANCE The Account Balance reflectes the balance calculated by the system after all the un-reconciled transactions have been considered.
CONTROL AMOUNT FOR ACCOUNT
The Control Amount for Account is the balance (control) you will enter in this field. This would be the balance as it should be after all transactions have been considered.
Next to the Control Amount for Account you will see the difference between the system calculated account balance and the actual balance as entered by you. This amount is the amount which still needs to be entered into the account until the difference reflected is zero.
BANK RECONCILIATION 2019
Page 33 of 33
HOW TO RECONCILE ANY OTHER LEDGER ACCOUNT?
• Get the amount to balance the account to. Example: for the Cash on Hand account, you would want to have the balance of all the cash on hand (the money not yet deposited, the money in the tills (including the float), sales for the day, etc.)
• In the Account Reconciliation, select the appropriate account and compare all the debits and credits to the transactions of the account.
• Select the Outstanding Entries Only option to display the selected period’s transactions.
• Enter the control amount for the account into the account Reconciliation field “Control Amount for Account”. If the Account Reconciliation and the Control amount for the Account match, then select each transaction and press the F2 function key on the keyboard to reconcile the changes recorded.
• If there is a difference on the balances (this might be due to an incorrect or duplicated entry), then you exit the reconciliation and edit these transactions on a later stage to finalise the account recon. Incorrect entries or duplicated entries must first be corrected, before the account reconciliation can be finalised.
--- End of Document ---