backgrounder # 88 navy at the memorial section 13 hall … · backgrounder # 88 navy at the...
TRANSCRIPT

ISSUE # 2 (July 2007)
BACKGROUNDER # 88
NAVY
at the
Memorial
Section 13
HALL OF VALOUR
Contents
Chief Petty Officer Jonathan(Buck) Rogers, GC, DSM
Lieutenant Commander William Henry Vaughan Edgar DSC
Able Seaman Noel Jack Johnston DSM

ISSUE #2(July 2007)

ISSUE # 2 (July 2007)
Chief Petty Officer Jonathan(Buck) Rogers, GC, DSM
Jonathan 'Buck' Rogers was born in Llangollen, Wales, on 16 September 1920. He joined the Royal
Navy in 1938 and served, with the service number D/SSX 28071, in British waters, the North Sea,
Atlantic and Mediterranean during the Second World War. He was awarded the Distinguished
Service Medal in 1944 as a Petty Officer coxswain on the Motor Torpedo Boat 698, while it was
operating in the Dover Strait. Rogers left the Royal Navy in 1946 and subsequently emigrated to
Australia, where he joined the Royal Australian Navy in 1950, serving with the number R/40859.
He served in the Korean War and was promoted to Chief Petty Officer in 1956. On 10 February
1964 Rogers was serving in the destroyer HMAS Voyager. During night time excercises with the
aircraft carrier HMAS Melbourne both ships collided and Voyager was cut in half by the larger
carrier. Rogers was in the forward cafeteria of the Voyager with between fifty and sixty sailors,
many of them young Ordinary Seamen on their first posting to a sea-going vessel. He realised that
the forward section of the Voyager would sink rapidly and began organising escape through the
single escape hatch. He himself was too large to be able to pass through the hatch. As the forward
section began to sink Rogers was heard to lead the trapped sailors in a prayer and a hymn. For his
actions he was awarded a posthumous George Cross. The citation reads, 'In recognition of his
outstanding gallantry and devotion to duty in saving life at sea when HMAS Voyager was sunk
after a collision on 10th February 1964, for maintaining the morale of junior ratings in great
adversity, for organising the escape of as many as possible, and for supporting the spirits of those
who could not escape and for encouraging them to meet death alongside himself with dignity and
honour. He upheld the highest traditions of service at sea and his rating of Chief Petty Officer
(Coxswain).
Chief Petty Officer Jonathan Rogers

ISSUE # 2 (July 2007)
Lieutenant Commander William Henry Vaughan Edgar DSC
Won by Lieutenant Commander William Henry Vaughan Edgar. As a Warrant Officer Artificer
Engineer on HMAS Australia when he volunteered for duty aboard HMS Iris, a converted Mersey
ferryboat for the British raid on Zeebrugge in April 1918. The citation for the award reads, 'In
recognition of distinguished services during the operations against Zeebrugge and Ostend on the
night of the 22nd and 23rd April, 1918. It was due to the officer that HMS IRIS was kept going
during the action under very heavy fire and, though holed several times, succeeded in returning to
base under her own steam. He did valuable work in the engine room and boiler room throughout the
operation for a period of seventeen hours without rest. He showed great bravery when the ship was
under very heavy fire, by coming onto the upper deck and with the help of an engineroom artificer
turned on the smoke apparatus'. This last action allowed the Iris to make a successful escape. Edgar
was immediately commissioned as a lieutenant as a consequence of his bravery. He was the only
member of the Royal Australian Navy to receive the Distinguished Service Cross during the First
World War. He was promoted to Lieutenant Commander on 23 April 1926.
England, 1918. Lieutenant William Henry Vaughan Edgar DSC, RAN, with a party of civilians on
HMAS Australia.

ISSUE # 2 (July 2007)
Able Seaman Noel Jack Johnston DSM
PM3322 Able Seaman Noel Jack Johnston was born in 1916 and enlisted in the Royal Australian
Naval Reserve on 31 January 1941, from Orbost, Victoria, where he was a farmer. He volunteered
for special anti-submarine work and was sent to England for training. He was posted to the cruiser
HMS Cleopatra and sent to the Mediterranean. The ship was damaged by bomb attacks en route and
Johnston was transferred to serve on a Royal Navy motor lauch, assigned to protecting Tobruk
Harbour. Johnston was awarded the Distinguished Service Medal during the German occupation of
Tobruk and consequent Allied withdrawal in July 1942. The recommendation for his award reads,
'For courage, resolution and devotion to duty during the evacuation of Tobruk under heavy fire in
1942. Though seriously wounded he steered ML1069 back to the jetty after that vessel had been hit
and set on fire. By this act, rescue of the wounded and there embarkation by ML355 was rendered
possible.' An Australian witness to the incident stated that Johnston's motor launch had been hit by
German tank fire from the shore while attempting to clear the harbour. Despite wounds to his body
and legs, and the death of most of the launch's crew, Johnston returned fire with the launch's
machine gun and took control of the launch. He was hospitalised for several months recovering
from his wounds before being sent home to Australia. He was discharged on 25 March 1946 and
returned to farming. He was accidentally killed in 1957.
ABLE SEAMAN NOEL JACK JOHNSTON, ROYAL AUSTRALIAN NAVAL RESERVE (RANR) WHO WAS AWARDED THE
DISTINGUISHED SERVICE MEDAL FOR HIS SERVICE ON HM MOTOR LAUNCH 1069 DURING THE EVACUATION OF TOBRUK IN
1942. JOHNSTON'S MEDALS AND UNIFORMS WERE DONATED TO THE AUSTRALIAN WAR MEMORIAL IN 1980.

ISSUE #1 (December 2006)

ISSUE #1 (December 2006)
BACKGROUNDER # 88
NAVY
at the
Memorial
Section 14
AIRCRAFT HALL
Contents
• Kamikaze Attack on HMAS Australia and RAN Ships. Captions in Aircraft Hall
• Battle of the Coral Sea. Sea Power Centre website. November 2006
• Battle of the Coral Sea : A tragic comedy. Barrie Virtue Voluntary Guide • Hawker Sea Fury F.B. 11 VW232 (VX730).Benjamin Evans. Rocket Tour Notes
• HMAS SYDNEY and Sea Fury Operations in the Korean War.
Benjamin Evans. WARTIME #11

ISSUE #1 (December 2006)
HMAS AUSTRALIA.This model was built by an RAAF engineer for the wife of a Chief Petty
Officer who served on Australia.
Kamikaze Attack on HMAS Australia and RAN Ships
HMAS Australia and the “divine wind”
! Battle for the Philippines
In October 1944 the Allies sent 600 ships and 150,000 men to invade the Philippines. Several
Australian ships joined the force, including the cruisers HMAS Australia and HMAS
Shropshire. The Japanese resisted fiercely, losing many men and four aircraft carriers.
Facing defeat, the Japanese launched their final offensive – mass kamikaze attacks.
! HMAS Australia
This ship was the victim of the first kamikaze attack of the war, on 21 October 1944. The
explosion and flames engulfed the bridge, killing the captain as well as 29 other sailors. After
repairs, HMAS Australia returned in January 1945 to support the Allied landings on Luzon, in
the Philippines. Australia was struck four more times by kamikazes.
! Armoured amphibious vehicles carry American troops ashore, with covering fire from a
warship. In a series of attacks during 1944 and 1945, the Allies moved steadily closer to Japan.
! Anti-aircraft gun crews on HMAS Australia, December 1944
! Crew members of HMAS Australia with the propeller and parts of one of the kamikaze aircraft,
July 1945
See Section 12 Year of Victory for further background material on the kamikaze attacks on
HMAS AUSTRALIA

ISSUE #1 (December 2006)
11/26/2006 05:42 AMBATTLE OF THE CORAL SEA - General RAN History (Sea Power Centre - Australia)
Page 1 of 8file:///Users/peterhugonnet/Desktop/%2388-NAVY@AWM%2024.11.06/%…%20History%20(Sea%20Power%20Centre%20-%20Australia).webarchive
SEA POWER CENTRE - AUSTRALIA
GENERAL RAN HISTORY
BATTLE OF THE CORAL SEA
In early 1942 as the list of military defeats and reversals for the Australian,
British, American and Dutch military and naval forces began to mount the
feeling in the general populace of Australia was one of depression and a
general expectation that the Japanese would invade at any moment. Almost as
if aware of these fears the Japanese were, by April 1942, examining the
possibility of capturing Port Moresby, Tulagi, New Caledonia, Fiji and Samoa.
The object of this plan was to extend and strengthen the Japanese defensive
perimeter as well as cutting the lines of communication between Australia and
the United States. The occupation of Port Moresby, designated Operation MO,
would not only cut off the eastern sea approaches to Darwin but provide the
Imperial Japanese Navy with a secure operating base on Australia's northern
doorstep.
At the same time that the Naval Staff were examining options for further
operations the planning staff of the Combined Fleet were doing the same.
Though their objectives were different. In early April 1942 the staff of the
Combined Fleet had presented the Naval Staff with a proposal for the invasion
and capture of Midway Island. By this action it was hoped that the American
Fleet would be enticed "into an ambush where they [the American Fleet] could
be annihilated by overwhelming numbers" . In essence Admiral Yamamoto was
hoping to repeat Admiral Togo Heihachiro's victory over the Russians at the
Straits of Tsushima in 1905. After much haggling the two staffs agreed to go
ahead with the Midway operation after the capture of Port Moresby. However,
planning progressed slowly until the 18 April when American B25 bombers led
by Lieutenant Colonel James H. Doolittle attacked targets in the Japanese
Home Islands.
The military value of this raid was minimal, "but its psychological effect on the
Japanese was all that might have been desired. The army and navy had failed
in their duty to safeguard the homeland and the Emperor from attack. Admiral
Yamamoto regarded the raid as a mortifying personal defeat." As a result of this
first air raid on Japan the Midway operation took on greater importance and
Admiral Inouye, at Rabaul, was instructed that the Port Moresby operation was
to take place in early May with the Midway operation planned for the following
month. "The generals and admirals had suffered a tremendous loss of face, and
their angry over-reaction eventually brought a succession of strategic disasters".
Had the Doolittle raid not occurred there is the real possibility that the majority
of the Japanese aircraft carriers may have been involved in Operation MO, the
aircraft carrier KAGA (72 combat planes) was originally allocated to take part in
the operation but with the advancement of the timetable she had to be omitted
as she was in dockyard hands till late April 1942. As it was Admiral Inouye still
had the aircraft carriers SHOHO, SHOKAKU and ZUIKAKU. After completion of
Operation MO the carriers were to rejoin the rest of the fleet and take part in the
planned operations against Midway Island.
The Japanese Plan
The Japanese plan was to initially seize the islands of Tulagi, in the Solomons,
and Deboyne off the east coast of New Guinea. The intent was to use both
islands as bases for flying boats which would then conduct patrols into the
Coral Sea in order to protect the flank of the Moresby invasion force. The
Japanese also believed that they would be denying the Americans the use of
these islands for the same purpose. The Moresby occupation force would sail

11/26/2006 05:42 AMBATTLE OF THE CORAL SEA - General RAN History (Sea Power Centre - Australia)
Page 2 of 8file:///Users/peterhugonnet/Desktop/%2388-NAVY@AWM%2024.11.06/%…%20History%20(Sea%20Power%20Centre%20-%20Australia).webarchive
these islands for the same purpose. The Moresby occupation force would sail
after the capture of Tulagi on 3 May. As the Moresby occupation force entered
the Coral Sea from the north it would be covered by the Carrier Striking Force
which had entered the Coral Sea from the direction of the Solomon Islands.
Prior to implementation, the operation was expanded to include the seizure of
Ocean Island and Nauru after the capture of Port Moresby.
Admiral Inouye, Commander of the Fourth Fleet, based at Rabaul had overall
command of Operation MO. His forces were divided into several major groups:
Tulagi Invasion Group. Commanded by Rear Admiral Kiyohide Shima,
consisting of minelayers OKINOSHIMA and KOIE MARU, two destroyers
KIKUZUKI and YUZUKI, the transport AZUMASAN MARU, submarine chasers
TOSHI MARU No3 and TAMA MARU No8 and the mine-sweepers No1, No2,
HAGOROMO MARU, NOSHIRO MARU No2 and TAMA MARU. This force was
to capture the island of Tulagi.
Support Group. Commanded by Rear Admiral Kuninori Marumo, consisting of
the light cruisers TENRYU and TATSUTA, a seaplane transport KAMIKAWA
MARU and the gunboats KEIJO MATU, SEIKAI MARU and NIKKAI MARU. This
group was to establish a seaplane base in the Louisiade Archipelago.
Carrier Striking Force. Commanded by Vice Admiral Takeo Takagi, consisting of
the aircraft carriers ZUIKAKU and SHOKAKU, heavy cruisers MYOKO and
HAGURO, the destroyers ARIAKE, YUGURE, SHIRATSUYU, SHIGURE,
USHIO and AKEBONO, and the oiler TOHO MARU. This group was intended to
provide long range cover for the operation by intercepting and destroying Allied
warships.
Attack Force. Commanded by Rear Admiral Sadamichi Kajioka, consisting of
the light cruiser YUBARI and the destroyers OITE, ASANAGI, UZUKI, MUSUKI,
MOCHIZUKI and YAYOI. This group was to support the Transport Group and
command the assault phase of the operation at Port Moresby.
Transport Group. Commanded by Rear Admiral Katsuo Abe, consisting of 5
Navy and 6 Army transports, the repair ship OSHIMA, the oilers GOYO MARU,
HOYO MARU and IRO (at anchor at Shortland Is). These ships were escorted
by the minelayer TSUGARU, Fleet Mine-sweeper No 20 and mine-sweepers
HAGOROMO MARU, NOSHIRO MARU No2 and FUMI MARU No2. The
Moresby invasion troops were in this group.
Main Body Support Force. Commanded by Rear Admiral Aritomo Goto,
consisting of the light carrier SHOHO, heavy cruisers AOBA, KAKO, KINUGASA
and FURUTAKA, and the destroyer SAZANAMI. This force was to provide
protection for the Attack Force and Transport Group.
Submarine Force. Commanded by Captain Noboru Ishizaki and consisting of
the submarines I 21, I 22, I 24, I 28, I 29, RO 33 and RO 34. This group was to
provide warning of the movement of Allied warships in the southern Coral Sea.
Land based aircraft, under the command of Rear Admiral Sadayoshi Yamada
commander 25th Air Flotilla, operating out of Japanese airfields and the newly
established seaplane bases were also allocated to support the operation.
American Intelligence On Japanese Intentions
Prior to the fall of the Philippines the USN's signals intelligence unit at
Corregidor Island, known as CAST and commanded by LEUT Rudolph J Fabian
USN, had been transferred to Melbourne and became a joint USN/RAN unit
known as Fleet Radio Unit Melbourne (FRUMEL). This organisation was to play
"an important part in the Battle of Coral Sea and in the Battle of Midway"
On 28 March U.S. Naval Intelligence decoded a message that stated "THE
OBJECTIVE OF MO WILL BE FIRST TO RESTRICT THE ENEMY FLEET
MOVEMENTS AND WILL BE ACCOMPLISHED BY MEANS OF ATTACKS ON

11/26/2006 05:42 AMBATTLE OF THE CORAL SEA - General RAN History (Sea Power Centre - Australia)
Page 3 of 8file:///Users/peterhugonnet/Desktop/%2388-NAVY@AWM%2024.11.06/%…%20History%20(Sea%20Power%20Centre%20-%20Australia).webarchive
MOVEMENTS AND WILL BE ACCOMPLISHED BY MEANS OF ATTACKS ON
THE NORTH COAST OF AUSTRALIA" .. As a consequence of the ability to
read Japanese naval communications traffic the Americans were almost as well
informed on what was planned as the Japanese commanders. The problem was
in the correct interpretation of that information.
The extent of the advance knowledge of Japanese operations is shown by the
following extracts from FRUMEL records:
" 9th April 1942 3. C-in-C Combined Fleet today asked for a report on progress
of repairs to KAGA. He requires her services as soon as possible since she is
due to take part in the "RZP" campaign. (Comments 1. "RZP" is the place
designator for Moresby.)"
" 4th May 1942 7. Message to 5th Cruiser Division and 5th Carrier Squadron
gives the following programme for the "MO" Striking Force: On X-minus 2 or 3
day they are to - to the SE of Moresby and attack bases in the Moresby area. If
the of "RX" (Solomons) and then proceed south. At 0600 on 6th May after
arrival at - further orders will be issued, but if no further orders are received they
are to proceed to "RBX" (Tulagi). If air search is required in the southern
sectors, the 5th Carrier Division is to send aircraft to "RBX" (Tulagi) at dawn."
Armed with this information the Allies were able to concentrate much of their
available striking forces in the Coral Sea area.
American Response
As the picture of the intended Japanese plans began to develop Admiral
Chester Nimitz, Commander-in-Chief of the Pacific Fleet, deployed his two
available carrier groups. Rear Admiral Aubrey Fitch commander of TF11 centred
on the USS LEXINGTON was ordered to sail and join Rear Admiral Frank Jack
Fletcher's TF17, centred on the USS YORKTOWN, in the Coral Sea. The
YORKTOWN group was returning to the Coral Sea after replenishing and
conducting a short maintenance period at Tongatabu in the Tonga Islands. From
the south was deployed the cruiser force, TF44, commanded by Rear Admiral
John Crace RN.
This combined force, under the command of Rear Admiral Fletcher, was
designated Task Force 17 and organised as follows:
Attack Group. Commanded by Rear Admiral T.C. Kinkaid consisting of the
cruisers USS MINNEAPOLIS (flagship), NEW ORLEANS, ASTORIA, CHESTER
and PORTLAND. Supported by the destroyers PHELPS, DEWEY, FARRAGUT,
AYLWIN and MONAGHAN.
Support Group. Commanded by Rear Admiral J.G Crace RN and consisting of
the cruisers HMA Ships AUSTRALIA (flagship), HOBART and USS CHICAGO
supported by the destroyers USS PERKINS and WALKE.
Air Group. Commanded by Rear Admiral A.W. Fitch and consisting of by the
destroyers USS MORRIS, ANDERSON, HAMMANN and RUSSELL.
Fuelling Group. Commanded by Commander J.S. Phillips and consisting of the
oilers USS NEOSHO and TIPPECANOE supported by the destroyers USS
SIMS and WORDEN.
Search Group. Commanded by Commander G.H. de Baun and consisting of the
seaplane tender USS TANGIER, based at Noumea, and 12 patrol aircraft.
Eastern Australian Submarine Group. Commanded by Rear Admiral Francis W.
Rockwell and consisting of the submarines S 42, S 43, S 44, S 45, S 46, S 47,
S 37, S 38, S 39, S 40 and S 41.
Allied Air Forces. Commanded by Lieutenant General George H. Brett and
consisting of Allied aircraft based in Australia and New Guinea.

11/26/2006 05:42 AMBATTLE OF THE CORAL SEA - General RAN History (Sea Power Centre - Australia)
Page 4 of 8file:///Users/peterhugonnet/Desktop/%2388-NAVY@AWM%2024.11.06/%…%20History%20(Sea%20Power%20Centre%20-%20Australia).webarchive
In the Pacific Fleet headquarters at Pearl Harbor a large chart of the Coral Sea
area was laid out and staff commenced plotting the movements of the two
opposing forces. An orange line traced the expected movements of the
Japanese fleet whilst blue lines showed the converging Allied forces. After their
return from the Tokyo raid Rear Admiral William F. Halsey's two carriers were
quickly refuelled and replenished and sailed on the 30 April.
The deployment and operation of the American naval forces into the Coral Sea
was further complicated by the fact that the Coral Sea lay in the newly created
South West Pacific Area, under the control of General Douglas MacArthur. This
prevented Commander De Baun from sending his patrol aircraft into the area
where Brett's aircraft were to be searching, even though "it was physically
impossible for them to do it". The submarines were to patrol the coastal waters
of New Guinea, the Louisiades and the Bismark Sea. Again they did not cross
the demarcation line and patrol the approaches to the Solomons. Had they
done so then the movements of Tagaki's carriers into the Coral Sea may have
been detected. Fletcher was also reliant on MacArthur's command for the
provision of timely intelligence information on the movements of the Japanese.
Information from these aircraft was first evaluated by local command staff and
then what they considered relevant was passed onto Fletcher. The fact that the
Coral Sea battleground straddled two different operational commands did
complicate matters.
Opening Moves
On 1 May, the two American carrier groups rendezvoused and began to refuel
from their attendant oilers. The YORKTOWN group completed fuelling first and,
when Rear Admiral Fitch advised Rear Admiral Fletcher that he did not expect
to complete fuelling till noon on the 4 May, Fletcher decided to move the
YORKTOWN group further to the north-west. He advised Rear Admiral Fitch of
his intention and of a new rendezvous. The second rendezvous, set for the
morning of the 4 May would see the Australian cruisers AUSTRALIA and
HOBART join the force for the first time.
As the Americans were refuelling and attempting to position themselves so that
they could intercept any Japanese naval forces, the SHOKAKU and ZUIKAKU
were sailing from Truk and by the 3 May, as the Tulagi Invasion Group was
landing, were north east of Rabaul. The movement south of the Tulagi Invasion
Group had been reported by D. G. Kennedy a coast watcher on Santa Isabel
Island. With the successful occupation of Tulagi Operation MO was well and
truly underway.
On receiving advice of the landings at Tulagi Fletcher turned the YORKTOWN
group to the north east and increased speed to 27 knots with a view to
launching strikes against Tulagi on the morning of 4 May. As YORKTOWN
headed for Tulagi the Fletcher detached the tanker, NEOSHO and her escorting
destroyer RUSSELL to rendezvous with Fitch and Crace and advise them of his
intentions and of a new rendezvous planned for the morning of the 5 May some
300 miles south of Guadalcanal.
By 0630 on the morning of the 4th YORKTOWN was in a position to be able to
launch carrier strikes against Tulagi. The first strike arrived at Tulagi about 0815
and commenced to attack Japanese shipping in the harbour. A total of three
strikes were launched by YORKTOWN against Tulagi. By the end of the day the
Americans had sunk the destroyer KIKAZUKI, four landing barges and
destroyed five floatplanes whilst damaging the minelayer OKINOSHIMA and a
destroyer. All this was achieved at a cost of three aircraft, 22 torpedoes, 76
1000lb bombs and thousand of rounds of machine gun ammunition.
Whilst these strikes would have confirmed any suspicions the Japanese had as
to the presence of American carriers in the Coral Sea, they also destroyed the
Japanese reconnaissance capability out of Tulagi and so reduced the number of

11/26/2006 05:42 AMBATTLE OF THE CORAL SEA - General RAN History (Sea Power Centre - Australia)
Page 5 of 8file:///Users/peterhugonnet/Desktop/%2388-NAVY@AWM%2024.11.06/%…%20History%20(Sea%20Power%20Centre%20-%20Australia).webarchive
Japanese reconnaissance capability out of Tulagi and so reduced the number of
long range aircraft available to the Japanese, particularly in the north east Coral
Sea.
On completion of the strikes against Tulagi, Fletcher retired to the south to
rendezvous with Fitch and Crace. After making the rendezvous on the morning
of the 5 May Fletcher commenced to refuel his ships. On completion of
refuelling Fletcher headed for the Louisiade Achipelago to intercept the
Japanese forces he expected to pass through there en-route to Port Moresby.
Meanwhile the carriers of Admiral Tagaki's Carrier Striking Force were rounding
the southern tip of the Solomons and about to enter the Coral Sea behind the
American carriers.
On the 6th a Japanese land based reconnaissance aircraft spotted the
American carrier group refuelling but this information did not reach Tagaki until
the next day. Fletcher was advised that B17s made an unsuccessful attack on
the SHOHO and other Japanese naval units and transports which were sighted
heading south from Rabaul. Aircraft launched that afternoon by the Americans
flew over the Japanese carriers without spotting them due to the heavy cloud
cover. Tagaki, meanwhile having found nothing, headed north and commenced
to refuel, only 70 miles away from Fletcher's carriers. At the end of the day
Fletcher, having refuelled his ships, detached the almost empty NEOSHO to the
south with the destroyer SIMS.
Crace's Cruisers
Early on the morning of the 7th Fletcher split his force by detaching Crace and
the Support Group to cover the Jomard Passage and intercept the invasion
force as it exited. This was an extremely risky decision and perhaps the most
important in the entire battle. For not only did Fletcher weaken his own air
defences but he also exposed Crace's ships to the possibility of air attack
without hope of fighter protection, as occurred with HM Ships PRINCE OF
WALES and REPULSE.
Crace's cruisers arrived off the Jomard Passage at about 2 pm on 7 May. Due
to the major air threat that faced the cruisers Crace ordered the ships to take up
an anti-aircraft formation. Half an hour later a group of unidentified aircraft
approached the ships. Not taking any chances the ships opened fire on the
aircraft, no hits were registered. A short time later an American Dauntless dive-
bomber approached seeking information as to the location of the American
carriers. As this was not known the pilot was given the range and bearing to
Port Moresby.
More aircraft were sighted at about 3 pm and it soon became clear that these
were Japanese. Crace altered course so that the ships were heading directly
towards the oncoming aircraft. In an attempt to make as difficult a target as
possible each of the ships commenced evasive manoeuvring. As the ships
opened fire on the Japanese one was hit and the remainder released their
torpedoes at too great a range and with the ships still bow on to the attackers.
This presented the narrowest possible target for the torpedoes, all of which not
surprisingly missed. After releasing their torpedoes the aircraft strafed the ships.
This resulted in a small number of casualties. During this brief attack the
Japanese lost five aircraft, whilst others may have ditched on the return flight.
After the departure of the low level attackers another wave of aircraft attacked
Crace's squadron. These were high level bombers which seemed to single out
the AUSTRALIA for the ships was completely obscured from view by the rising
water columns made by a large number of near misses. These aircraft were
followed by yet another high level raid. This last group of attackers were later
identified as American B17 bombers. Fortunately their bombing, as was most
high level bombing against moving ships, proved to be ineffectual. The skilful
shiphandling of the Crace and his commanding officers also contributed to the
safety of the ships. Following these attacks Crace continued to patrol the area

11/26/2006 05:42 AMBATTLE OF THE CORAL SEA - General RAN History (Sea Power Centre - Australia)
Page 6 of 8file:///Users/peterhugonnet/Desktop/%2388-NAVY@AWM%2024.11.06/%…%20History%20(Sea%20Power%20Centre%20-%20Australia).webarchive
safety of the ships. Following these attacks Crace continued to patrol the area
of the Jomard Passage.
On their return to Rabaul the Japanese airmen reported that they had sunk a
battleship and damaged a second and a cruiser. As a result of the inaccurate
battle reports no further strikes were launched, against Crace, from Rabaul.
Crace was now free to intercept the invasion force, when as expected, it
emerged from the Jomard Passage. However, Admiral Inouye had ordered the
Moresby invasion force to reverse course whilst the situation with regard to the
"battleship" sightings was clarified. Had Crace's ships been with Fletcher's
carriers the invasion force would have been able to proceed onto Port Moresby.
Coral Sea Battle
At the same time as Crace had been spotted the Japanese had commenced to
launch, from the aircraft carriers SHOKAKU and ZUIKAKU, a 78 plane strike
against a reported American carrier and cruiser sighted to the south. About an
hour later a second report arrived advising the Japanese that an American
carrier and about ten other ships were sighted 280 miles to his north west. As it
was too late to recall the strike all that Rear Admiral Tadaichi Hara, commander
of the 5th Carrier Division, could do was wait for the return of his aircraft. The
two American ships were located at 0954 and the Japanese immediately
realised their error. They were about to attack the oiler NEOSHO and the
destroyer SIMS. During the course of the attacks that followed the SIMS was
reduced to a wreck, and sunk, whilst the NEOSHO was severely damaged. She
was later sank by torpedoes and gunfire from the USS HENLEY.
Whilst the Japanese were shadowing Crace and preparing to attack the
NEOSHO and SIMS the Americans were attempting to locate the Japanese
carriers. At 0815 a sighting report was received indicating that a force of two
carriers and four cruisers were 235 miles northwest of the Americans. This
report was, unfortunately, inaccurate as what had been sighted were two
cruisers and some minor craft. However, acting on this report Fletcher
immediately commenced to launch a strike of some 90 aircraft from both
carriers. It was after the last of the aircraft were launched that the error was
realised. However, Fletcher decided to let the strike continue. At 1022 a
message was received that land based aircraft had spotted a carrier, SHOHO,
and other ships a few miles north of Misima Island. The outbound strike was
then re-directed to the location of the SHOHO.
When sighted by the American aircraft, at around 1100, SHOHO and her
consorts were in an area of clear weather with excellent visibility. SHOHO could
not launch any aircraft at this stage because she was in the process of refuelling
her fighters which had been flying reconnaissance missions. As SHOHO was
turning into the wind to launch her aircraft the main American attack, which was
delayed whilst the slower torpedo bombers arrived, started. LEXINGTON's dive
bombers and torpedo bombers made a co-ordinated attack followed almost
immediately by YORKTOWN's dive bombers. By the time YORKTOWN's
torpedo aircraft arrived SHOHO was already doomed. Unfortunately, instead of
attacking the other Japanese ships they continued the attack on SHOHO, which
eventually received approximately 13 bomb and seven torpedo hits. Not one
other Japanese ship in the group was damaged.
By 1335 the Americans had recovered their aircraft and Fletcher was debating
whether to launch another strike against the remaining Japanese ships.
However, he decided against this on the grounds that the other Japanese
carriers still had not been located. Later in the afternoon Fletcher learnt of the
attack on the NEOSHO. But again an incorrect position had been given.
Meanwhile Admiral Tagaki on learning of the attack on the SHOHO was
powerless to act because of his earlier decision in attacking the incorrectly
reported aircraft carrier and cruiser, NEOSHO and SIMS. However, once his
aircraft returned Tagaki decided to launch a late afternoon strike against the

11/26/2006 05:42 AMBATTLE OF THE CORAL SEA - General RAN History (Sea Power Centre - Australia)
Page 7 of 8file:///Users/peterhugonnet/Desktop/%2388-NAVY@AWM%2024.11.06/%…%20History%20(Sea%20Power%20Centre%20-%20Australia).webarchive
aircraft returned Tagaki decided to launch a late afternoon strike against the
American carriers, though he had no firm idea as to their position.
For this attempted strike Tagaki selected his most experienced aircrew, mainly
as the aircraft would be returning in the dark. The 12 dive bombers and 15
torpedo bombers launched in three groups at 1630 hoping to locate and attack
the Americans at dusk. As it was they could not locate the Americans and
jettisoned their ordnance for the return flight. On the return flight one group of
Japanese almost flew over the top of the Americans, and failed to see them.
Unfortunately, the American carriers were using their radar to good effect and
intercepted the returning Japanese. In the ensuing melee eight Japanese were
shot down for the loss of three Americans. But more importantly from the
Japanese side Tagaki had lost eight (almost 10%) of his most experienced
aircrew. Two other groups arrived at where they thought their carriers were and
commenced a search. When three aircraft saw a carrier and attempted to land
after giving the correct recognition signals YORKTOWN's gunners opened fire
and the aircraft retired. All in all only 18 aircraft returned to the Japanese
carriers.
Later that night both commanders contemplated sending their surface ships out
to attack the opposing carrier force, and both rejected the idea because they
expected attacks the next morning and needed the ships to provide additional
anti-aircraft firepower.
On the morning of the 8th both sides were to locate their opponents almost
simultaneously. At 0900 the Americans commenced to launch their aircraft
whilst the Japanese commenced at 0915. Both the Japanese and Americans
passed each other as they headed for their respective targets. The heavy cloud,
which had dogged the entire operation prevented any sightings.
The first American aircraft, dive bombers from YORKTOWN, arrived over the
two Japanese carriers, which were operating as separate groups, at 1030. They
had to wait another ten minutes for the arrival of the slower torpedo bombers
before commencing an attack. At 1057 YORKTOWN's aircraft attacked the
SHOKAKU, the ZUIKAKU had managed in the meantime to hide in a rain
squall. Again the inexperience of the American aircrew showed, with bombs and
torpedoes generally being released too far away. SHOKAKU managed to avoid
all the torpedoes that were fired at her but she was hit by a number of bombs.
The damage done and fires started prevented her from launching aircraft. Only
part of LEXINGTON's strike arrived due to difficulties in locating the targets in
the squally weather. After they arrived they commenced to attack the Japanese
carrier.
Whilst the American aircraft were commencing their attack on SHOKAKU the
Japanese were detected by LEXINGTON's radar at 70 miles and closing. At this
stage there were only eight fighters in the air, all short on fuel, with a further
nine aircraft having just landed on LEXINGTON and in the process of being
refuelled. Perhaps because of the fuel problem, or inexperience, the fighter
direction officer on LEXINGTON placed the his combat air patrol too close to the
ships and at such an altitude that they were below the dive bombers and above
the torpedo bombers. In either case, they could do little to break up the
Japanese attack which commenced at 1118. Two minutes latter LEXINGTON
was hit on the port side forward by a torpedo and then a second hit opposite the
bridge. After the torpedo bombers came the dive bombers which scored at least
two hits and several near misses.
As a result of these attacks fuel tanks were ruptured and the ship was on fire in
at least four places and developed a 6 degrees list to port.
YORKTOWN was also attacked by the Japanese but managed to avoid the
torpedoes, which were launched from only one side, but was hit by one bomb.
This bomb hit reduced YORKTOWN's speed to 24 knots. At about 1230 the
American strike group began to return and as LEXINGTON's aircraft lifts were

11/26/2006 05:42 AMBATTLE OF THE CORAL SEA - General RAN History (Sea Power Centre - Australia)
Page 8 of 8file:///Users/peterhugonnet/Desktop/%2388-NAVY@AWM%2024.11.06/%…%20History%20(Sea%20Power%20Centre%20-%20Australia).webarchive
American strike group began to return and as LEXINGTON's aircraft lifts were
jammed in the upright position she could retrieve her aircraft. Shortly after this
the ship was rocked by a large internal explosion caused by the build up of
petrol fumes. This explosion started new fires which were fed by oil and other
flammables. This fire gradually spread and at 1707 the order was given to
abandon ship. LEXINGTON was finally sunk by torpedo from the destroyer
PHELPS. With the last of LEXINGTON's aircraft onboard YORKTOWN the
remainder of the force withdrew to the south and thence to Pearl Harbor.
Fortunately for the Americans the Japanese were not in a position to take
advantage of the loss of the LEXINGTON. SHOKAKU was so badly damaged
that she had to return to Truk for repairs before going onto Japan. An entry in
the FRUMEL records for the 10th gives her intended itinerary for the return
voyage with the comment "Looks like a reasonable submarine target" . A
warning of what was to come for the Japanese merchant fleet. The second
carrier, ZUIKAKU, was low on fuel and had less than forty serviceable aircraft
left. As a consequence of this Admiral Inouye ordered the Moresby invasion
postponed and the ships to retire.
Admiral Yamamoto however, ordered Tagaki and Goto to pursue the
Americans. The Japanese broke off the search on the 11 May, due to the
allocation of insufficient forces Yamamoto had missed his chance to destroy a
large proportion of the US Pacific Fleet.
Admiral Fletcher returned with YORKTOWN to Pearl Harbor where battle
damage was made good and the carrier prepared for the forthcoming battle of
Midway. Admiral Crace, who had spent the last few days blocking the
approaches to Port Moresby, was apparently not advised of the end of the
battle nor of Fletcher's departure from the area. Crace departed the area on the
10 May and sailed for Cid Harbour to refuel from the Australian oiler
KURUMBA. Shortly after arriving at Cid Harbour he received a signal from
Fletcher acknowledging his services in the battle.
Finally on the 18 May staff at FRUMEL intercepted and decrypted a Japanese
message which indicated that the Japanese had given up attempting to capture
Port Moresby by seaborne assault and intended to mount an assault overland.
The Aftermath
Both the Japanese and the Allies have portrayed the Battle of the Coral Sea as
a victory. In a sense they are both right. On the Japanese part they managed to
sink more American ships than they lost. Whilst the Allies not only prevented
the Japanese from achieving their objective, the occupation of Port Moresby,
but also reduced the forces available to the Japanese for the forthcoming
Midway operations.
Against this, on the part of the Americans, must be weighed the fact that the
Japanese assault forces remained intact and all that had actually stood in the
way of the Japanese and the capture Port Moresby were Crace's cruisers.
Fletcher's carriers, which were engaged in trying to locate and destroy the
Japanese carriers, were too far away and too busy to provide any opposition or
support if required. The decision by Fletcher to weaken his forces by detaching
Crace had proved to be the correct one, eventhough this may have contributed
to the loss of the LEXINGTON.
The Royal Australian Navy's overall contribution to the battle of the Coral Sea
may not have been as spectacular as that of the American carriers, but the
work done by the coast watchers, intelligence staff, the cruisers and other
support ships and personnel all contributed to the final result, not just at Coral
Sea but throughout the Pacific War. Whilst Australian's today may scoff at the
fears of a Japanese invasion during 1942 the fact is that for many Australians
during the 1940s that fear was real.

ISSUE #1 (December 2006)
BATTLE OF THE CORAL SEA: A “TRAGIC-COMEDY”
By Barry Virtue Voluntary Guide
The Battle of the Coral Sea was a battle amongst the warships of four navies, fought over five
days in May 1942 in a normally peaceful area of ocean bounded by a great semi-circle of
tropical, palm-fringed islands - the New Hebrides in the east, the Solomons in the north-east and
north, and New Britain and Papua in the north-west. Australia, and more specifically
Queensland, formed the western boundary of the battle zone.
The south-east trade winds blow across it for most of the year, sending long rollers eventually
crashing onto the Great Barrier Reef along the Queensland coast.
We celebrate the Battle of the Coral Sea every year in May, when representatives of Australia,
New Zealand and the United States meet in ceremonies designed to recall those five days from 4
May to 8 May 57 years ago when their ships and aircraft joined in conflict with the ships and
aircraft of Japan.
Some people still believe that we celebrate “the battle that saved Australia”. But that’s a false
belief because although some parts of the Japanese war machine had given some thought to
invading Australia, the decision had already been made, before the battle, that there would be no
invasion of this country.
The Japanese warships and troop transports that were engaged in the Coral Sea were not heading
for Australia; they were heading for Port Moresby, with a smaller part of the convoy destined
for Tulagi in the Solomons, where they were to establish a seaplane base.
The Japanese wanted to consolidate their southward drive, in which they had overwhelmed the
whole of South-East Asia in 100 days. So they planned to capture Port Moresby and clear
Papua-New Guinea of Allied forces. They also wanted to strike at American positions in the
Solomons. The Japanese believed that if they could do these things, they could then disable the
American Pacific fleet by drawing it into a great battle at Midway - a battle for which plans were
already being made.
Japan had controlled the Coral Sea and the air above it since January 1942, when it had captured
Rabaul in New Britain, and turned it into a huge sea and air base. By May, the Japanese
commanders believed the time had come for them to establish a foothold on the south coast of
Papua.
What the battle did do was prevent a Japanese invasion of Papua at Port Moresby, where one
battalion of the Australian militia - the conscripted citizen force - was stationed. That battalion
had been described by General Vernon Sturdee, by the way, as “quite the worst battalion in
Australia”. And as a veteran of Gallipoli and the Western Front in France in the First World
War, and later as Chief of the General Staff, Sturdee should have been in a position to know.
Because the Americans had broken the Japanese codes and were able to intercept Japanese cable
traffic, they knew what was coming. That’s why, when Rear Admiral Kajioka’s dozen
transports, heavy cruisers and a light carrier entered the Coral Sea from Rabaul, the American
carriers Lexington and Yorktown were waiting for them.

ISSUE #1(December 2006)
The battle itself was a bit of a shambles. Rear Admiral Samuel Morrison of the US Navy said
later that it was “full of mistakes, both humorous and tragic, wrong estimates and assumptions,
bombing the wrong ships, missing great opportunities and cashing-in accidentally on minor
ones”.
For example, at dawn on 7 May, after a couple of fairly quiet days, planes from the Japanese
carriers Shokaku and Zuikaku sighted an American fuel-supply ship and a destroyer, but
reported that they had seen a cruiser and an aircraft carrier. The Japanese made a massive attack
on these two hapless vessels and sank them, losing six aircraft in the attack and failing to do
what they should have been doing - attacking the American carriers.
But the Americans made their own mistakes. At 8.15 on the morning of the same day, search
planes from the Yorktown reported seeing two cruisers and four heavy carriers about 175 miles
away from the American force. The Americans immediately despatched aircraft to attack, but
while they were on the way it was discovered that the report of the pilot who had seen the enemy
ships had become garbled when he was encoding his report, and what he had really seen were
two cruisers and two destroyers - a smaller and much less potent force.
However, simply by good luck the American planes came across the carrier Shoho and sank her
in ten minutes - the quickest sinking in the war. They had sunk the wrong ship (or at least not
the ship they had set out to attack), but nevertheless the sinking of the Shoho so discouraged the
commander of the Port Moresby invasion force that he abandoned the plan to invade Papua.
There was another mix-up on 7 May which now seems humorous (if anything is humorous in
war), but which could have had tragic consequences. Part of the Allied force, consisting of two
Australian cruisers, Australia and Hobart, with the USS Chicago and a few destroyers, was
ordered to break away and attack the invasion force. They beat off 31 land-based bombers from
Rabaul without receiving a scratch, although the Japanese pilots reported that they had sunk two
battleships and a heavy cruiser. Then the Allied ships had to fight off three American B-17
bombers which had arrived from Townsville, and mistook the Allied ships for Japanese.
Later that night six Japanese pilots tried to land their planes on the deck of the Yorktown,
thinking she was one of their own carriers.
Finally, on 8 May, the opposing forces really came to grips. The Lexington was badly damaged
but perhaps could have been saved, until two massive internal explosions occurred, and she had
to be abandoned. She was then sunk by American torpedoes. The Shokaku was damaged and
took several months to repair.
But while the Allies came off worst in terms of shipping losses, the invasion of Papua at Port
Moresby had been foiled - foiled when Allied planes attacked the Shoho, the wrong ship - and
thus intimidated the Japanese into abandoning their invasion plan.
Interesting facts about the Battle of the Coral Sea are that it was the first occasion on which ships
of the American, Australian and New Zealand Navies worked together, and it was the first naval
engagement in history in which the opposing ships never once came within sight of each other.
All of the attacks were launched by the aircraft of each side.
The foiling of the invasion plan was a great psychological boost to the people of Australia who,
over the previous four months, had lived in increasing fear that their land would be invaded and
conquered by the Japanese.

ISSUE #1(December 2006)
Hawker Sea Fury F.B. 11 VW232 (VX730)
C. 1951. A Hawker Sea Fury F.B. 11 aircraft of the 20th Carrier Air Group landing on the flight deck of HMAS
Sydney. This aircraft, number 130, belonged to either No. 805 or No. 808 Squadron. The aircraft has "D Day"
type stripes painted on the wings and fuselage which was a feature on all British and Australian naval aircraft
operating in Korea to assist US forces identify friendly aircraft.
(Naval Historical Collection)
Manufacturer: Hawker
Theatre of war: Korea
Wingspan: 11.69m
Length: 10.57m
Powerplant: Bristol Centaurus XVIII 18 cylinder two-row, sleeve-valve aircooled radial with
a single stage, two-speed supercharger, generating 2,480hp
Performance: Maximum speed 740km/h, range (with external fuel) 1,674km
Armament: 4 x 20mm Hispano Mk V cannons, bombs, rockets
The Hawker Sea Fury is a typical late piston-engine development that had to compete with
the new jet powered aircraft of the late 1940s. The type was a further development of the
highly successful Hawker Tempest, and was intended as its replacement for the RAF and to
provide a new fighter for the RN. The lack of such a large, fast and heavily armed fighter had
meant that the RN completed the Second World War equipped with US-built types.
By May 1945 it became apparent that the jet was in the ascendant, and the entire RAF order
and half the RN order was cancelled. The RN, along with other navies operating aircraft
carriers, was extremely reluctant to be dragged into the jet age. Early jet engines were
unreliable and very slow to come to full power, which naturally enough did not recommend

ISSUE #1(December 2006)
them to carrier pilots. Development of the Sea Fury therefore continued, and the first F.B.10
was given RN service clearance in the middle of 1947.
The RAN Fleet Air Arm operated 101 Sea Fury F.B. 11 aircraft, the first arriving in Australia
with HMAS Sydney on 12 May 1949. HMAS Sydney began operations in Korean waters
from 5 October 1951. Between that date and 25 January 1952, Sydney’s aircraft flew 2,366
sorties for the loss of eight Sea Furies and three Fairy Fireflies. Three aircrew were killed.
The RAN Sea Furies were immensely successful, flying predominantly ground attack
missions, but also combat air patrols, armed reconnaissance and naval gunfire spotting
missions. Disposal of RAN Sea Furies commenced in 1957, with the last flight made by an
operational training unit in 1962.
VW232 was originally built as a F.B.10 under serial TF925. The aircraft was subsequently
converted to a F.B.11 and acquired by the RAN, probably in 1949, under serial number
VW232. Only the first 51 Sea Furies were built as F.B.10 aircraft. Thereafter all were
produced as the F.B.11, which differed in its ability to carry external stores and 50 minor
internal changes. Some records state that VW232 was reduced to parts under the serial
VX730, but obviously such was not the case.
Although an excellent fighter by 1940s standards, the Sea Fury sat uneasily in the nascent jet
age. In Korea the type achieved a disproportionate amount of fame as a result of Lieutenant
P. Carmichael, flying a Sea Fury off HMS Ocean, shooting down a MiG-15 on 2 August
1952. As had been demonstrated during the Second World War, jet fighters cannot defeat
piston-engined fighters in a turning engagement.
Korea was the swansong for the heavy piston-engine fighter. Although Douglas A-1
Skyraiders served in Vietnam in the ground attack role (and shot down at least two MiG-17
jet fighters), the piston-engine fighter was no longer useful in the air superiority role.
Observers at Malta in March 1953 were confronted by the sight of Sea Furies sharing HMS
Centaur’s flight deck with the new jet powered Hawker Seahawk.


ISSUE #1(December 2006)

ISSUE #2 (July 2007)
BACKGROUNDER # 88
NAVY
at the
Memorial
Section 15
ANZAC HALL
Contents
• Decorations and Campaign Medals Awarded to RAN Personnel on Display in the
ANZAC Spirit Exhibition in the ANZAC Hall
• Royal Australian Navy Ship’s Bells
• Royal Australian Navy Distinguishing Badges

ISSUE #2 (July 2007)

ISSUE #2 (July 2007)
Orders, Decorations and Campaign Medals Awarded to RAN
Personnel on Display in the ANZAC Spirit- Courage Exhibition
in the ANZAC Hall
GEORGE MANLEY DIXON LIEUTENANT COMMANDER RAN VOLUNTEER RESRERVE
DISTINGUISHED SERVICE CROSS:FOR GALLANTRY OIN THE FACE OF TRHE ENEMY, OPERATION
HUSKY,SICILY,JULY 1943
George Manley Dixon was born at Woodford, Essex, in the UK, in December 1899, and was
working as a farmer at Brighton, in the south east of Tasmania, when the First World War
commenced. Lying about his age (he claimed to have been born in 1895, making him 19, when he
was in fact only 15) he enlisted in the AIF in September 1914, and became an original member of C
Company, 12 Battalion, with the service number 529. Dixon was one of those who landed at
Gallipoli before dawn on 25 April 1915, but only a week later, on 2 May, he was severely wounded
in the left forearm, wrist and foot, and was evacuated. He was also suffering from tuberculosis, and
considered 'dangerously ill', was quickly transported to Malta, and then to England, where he made
a slow recovery. As it was not considered that he would ever be fit for further service, he was
returned to Australia and discharged at Sydney in July 1916. Dixon subsequently married and
settled in Sydney. In September 1940, he enlisted in the Royal Australian Naval Volunteer Reserve,
and was granted a commission as probationary sub-lieutenant. He embarked for England later the
same month, and after completing his training, held command of a number of small vessels. In July
1943, he was appointed to command the British Landing Ship Tank (LST) 409 with the rank of
acting lieutenant commander. He was awarded the Distinguished Service Cross for his handling of
this vessel during 'Operation Husky', the Allied invasion of Sicily, although the award was not
announced until 1945. Dixon continued to command LSTs for the remainder of the war, and was
present at the Normandy landings in 1944. He remained in the navy until 1957, taking HMALST
3501 (later renamed 'Labuan') to the Antarctic in 1947-48 and 1948-49, as a result of which Mount
Dixon on Heard Island was named after him. George Dixon eventually retired with the rank of
lieutenant commander RANVR in 1957, and died in August 1978. The citation for the DSC, which
ISSUE #2 (July 2007)
was gazetted on 1 January 1945, reads as follows: 'For gallantry in the face of the enemy. This
officer of HMLST409, 2nd LST Flotilla, is an outstanding officer in the Flotilla whose boundless
energy has been an example to the remainder. His excellent work after his ship was near missed by
a mine on the eve of Operation HUSKY resulted in her taking part in that operation. His coolness
under shell fire and air attack has been an example to all. He is thoroughly deserving of a
decoration.'
THE INVASION OF SICILY - OPERATION HUSKY
By J.H. Straczek
Throughout the dark days of 1940 and 1941 ships of the RAN were present in the Mediterranean
operating alongside the Royal Navy and supporting Army operations. From the brilliant successes
of HMAS SYDNEY, off Crete, to the tragic loss of HMAS WATERHEN whilst running supplies
into the besieged garrison of Tobruk - the Navy was there.
In late 1941 and early 1942 the ships of the RAN were recalled to help in the defence of their island
home. Many of the ships which had won fame in the Mediterranean were to be lost much closer to
home. By 1943 however, the situation had changed. The Allies were on the offensive and the RAN
was once again in the frontline. Following on from the defeat of the Afrika Corps in northern Africa
the Allies commenced planning for the liberation of Sicily. an amphibious invasion to be code
named Operation HUSKY.
Present in the estimated 3,000 ship invasion force were HMA Ships GAWLER, LISMORE,
MARYBOROUGH, IPSWICH, CESSNOCK, GERALDTON, CAIRNS and WOLLONGONG.
Whilst these ships may have appeared insignificant in an order of battle that boasted six battleships,
two aircraft carriers, 18 cruisers and over 100 destroyers their roles were vital ones. The corvettes
had arrived in the Mediterranean in May and on 26 May GAWLER, IPSWICH, LISMORE and
MARYBOROUGH were formed into the 21st Minesweeping Flotilla at Alexandria. The remaining
four corvettes were formed into the 22nd Minesweeping Flotilla.
During the built up to HUSKY the Australian corvettes were busily engaged in escort work. On 5
July IPSWICH sailed from Tobruk as part of a tanker escort. She was detached off Benghazi were
she was to join her sister ships GAWLER, LISMORE, and MARYBOROUGH. At dawn on the 6
July these ships joined MWS36, one of the many invasion convoys. These ships arrived at the
assembly point off Malta and immediately took their position as escorts for the stores ships. .
The weather at this time, always critical for an amphibious assault, was proving to be marginal. The
decision was taken to continue with the assault as planned. Fortunately conditions eased as the ships
approached the island and the assault was able to be progressed without too much delay. Ships of
the bombardment group commenced firing shortly after dawn and by 8.00 am most of the German
and Italian shore batteries had been silenced. The initial assault waves met with light resistance.
At 6.00 am on 10 July the Australian ships, with the exception of GAWLER, arrived at the release
point "Baker East". GAWLER in the meantime was assisting one of the transports which found
itself in difficulties. After the problems had been overcome GAWLER signalled to the straggler
"Follow father". Daybreak was to reveal that the straggler who had followed father was the Convoy
Commodore !
After arriving at their release position the Australian ships commenced carrying out anti-submarine
patrols and mine sweeping operations. Throughout the day there were continual air raid warnings.
The four Australian ships sailed for Malta, and hence Alexandria, on 11 July escorting empty
troopships. During the return voyage GAWLER carried out an attack on a sonar contact. A search
after the attack failed to reveal any results.

ISSUE #2 (July 2007)
As these ships were leaving Sicily HMA Ships GERALDTON, CAIRNS, WOLLONGONG and
CESSNOCK were arriving off Sicily as part of a 36 ship convoy from Alexandria. The second
group of corvettes spent the 13 July carrying out endless patrols off the beaches. During one of the
air raids an American Liberty ship was hit and blew up.
The original corvettes, IPSWICH, LISMORE GERALDTON and GAWLER returned to Sicily on
the 24/25 July with another convoy. After seeing their charges into the newly liberated port of
Syracuse the Australian ships carried out continuous anti-submarine patrols off the port. At about
4.00 am on the 25 July an air raid alert was sounded. The Luftwaffe launched an all out raid on the
port and surrounding areas lasting for about one hour. During this time a bomb was seen to burst
close to MARYBOROUGH, momentarily obscuring MARYBOROUGH's silhouette. At first light
the Commanding Officer of GAWLER enquired if any damage had been sustained. The response
from MARYBOROUGH read "No damage except to my underpants".
Once their part in the invasion of Sicily was completed the Australian ships returned to their vital
and still dangerous task of escorting convoys through the Mediterranean.
Thirty eight days after the initial landings the island of Sicily had been liberated.

ISSUE #2 (July 2007)
JOHN THOMAS HUMPHRIES PETTY OFFICER. HMAS KANIMBLA
GEORGE MEDAL: FOR SKILL AND COURAGE OF THE HIGHEST DEGREE.BANDAR SHAPUR,PERSIAN
GULF ,AUGUST 1941
6699 Petty Officer John Thomas Humphries was born at Sebastopol, Victoria, in 1903 and enlisted
in the RAN in July 1918 as a boy seaman. After initial training in HMAS Tingira he served in
HMA ships Australia Geranium, Melbourne, Anzac and Sydney before joining the Royal Australian
Fleet Reserve in July 1938. He was recalled to full time service on the outbreak of the Second
World War in 1939 and was posted to the requisitioned armed merchant cruiser HMS (later HMAS)
Kanimbla, which was staffed largely by Australian reserve seaman. Although not trained as a diver,
Humphries, by now a Petty Officer, volunteered for service in this capacity while the Kanimbla was
serving in the Persian Gulf in 1941and received the George Medal for his work. The citation reads:
'For skill and undaunted devotion to duty in hazardous diving operations whilst serving in HMAS
Kanimbla. During salvage operations on the prize ship Hohenfels at Bandar Shapur, Persian
Gulf,[in August 1941] Petty Officer Humphries was employed as a diver. On twelve occasions he
descended into the flooded engine room to shut bilge suction valves. The descent was down three
long ladders to the level of the starting platform, thence forward the length of the engine room and
then down two short ladders to the tunnels under the bunker. The length of air pipe and short rope
required was at least 120 feet. Diving under such conditions there was a very grave risk indeed of
the air pipe being fouled. There was no telephone to the diver and as soon as he had descended the
first long ladder he was out of communication with his attendants. If anything should go wrong
there was no hope of survival. Petty Officer Humphries succeeded in his task which called for skill
and courage of the highest degree.' As a result of this incident he was immediately granted the non-
substantive rating of Diver 1st Class. In December 1942 Humphries returned to Australian and
spent the rest of the war serving in the Brisbane shore establishment HMAS Moreton. He was
discharged in May 1946.

ISSUE #2 (July 2007)
PERCY JOHN KEMPSTER PETTY OFFICER HM SUBMARINE G8
DISTINGUISHED SERVICE MEDAL: FOR SERVICES IN ACTION WITH ENEMY SUBMARINES.ATLANTIC
OCEAN, JULY 1917
Percy John Kempster was one of a number of Australians in the RAN who served in Royal Navy
Submarines in WW1.
Kempster served in HM Submarine G8 and was awarded the Distinguished Service Medal for
services in action with enemy submarines in the Atlantic in July 1917.
In January 1918 G8 left for a patrol in the North Sea. She failed to return and it is believed she fell
victim to a mine on or around 14th January.
Percy Kempster's service is commemorated on the Royal Navy Memorial on the Plymouth Hoe
and on the AWM Roll of Honour WWI Panel #1.
In Memory of
Petty Officer PERCY JOHN KEMPSTER DSM
H.M.S/M G8, Royal Australian Navy
who died aged 34 on Monday, 14th January 1918.
Petty Officer KEMPSTER was the husband of Beatrice Kempster, of 180, Fratton Rd., Portsmouth.
Remembered with honour
PLYMOUTH NAVAL MEMORIAL, Devon, United Kingdom.
In the perpetual care of
the Commonwealth War Graves Commission
ISSUE #2 (July 2007)
ROYAL AUSTRALIAN NAVY SHIP'S BELLS
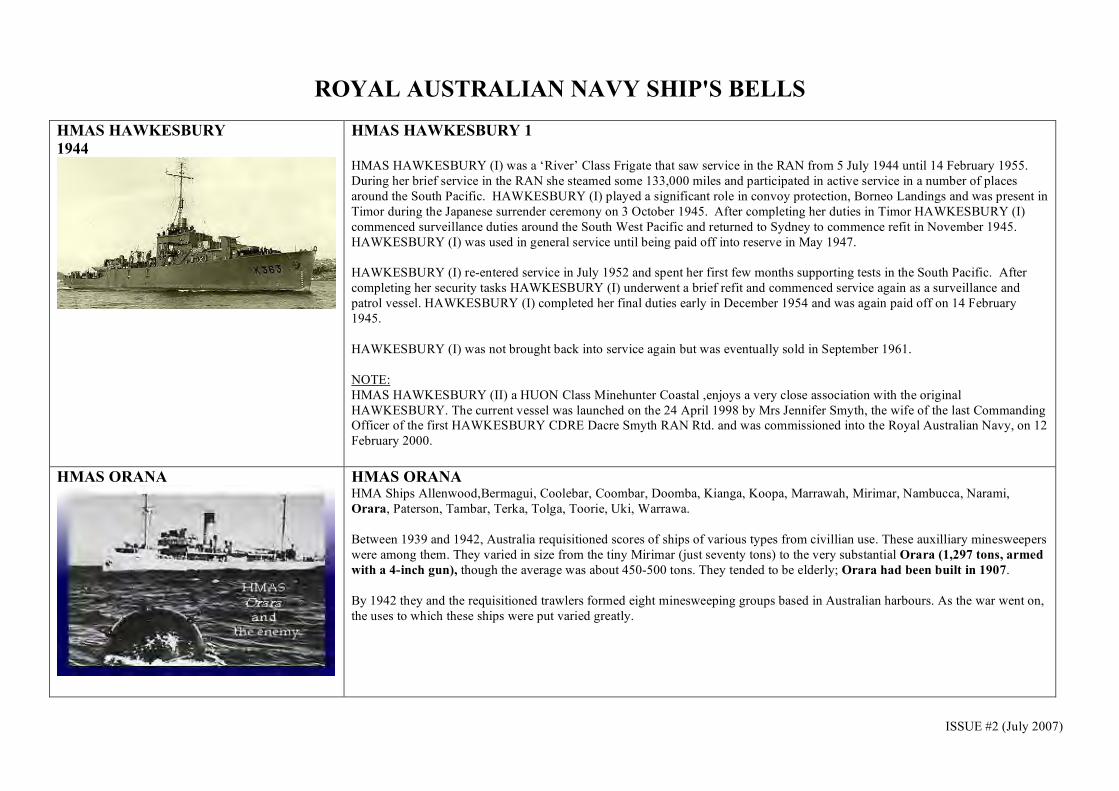
HMAS HAWKESBURY
1944
HMAS HAWKESBURY 1
HMAS HAWKESBURY (I) was a ‘River’ Class Frigate that saw service in the RAN from 5 July 1944 until 14 February 1955.
During her brief service in the RAN she steamed some 133,000 miles and participated in active service in a number of places
around the South Pacific. HAWKESBURY (I) played a significant role in convoy protection, Borneo Landings and was present in
Timor during the Japanese surrender ceremony on 3 October 1945. After completing her duties in Timor HAWKESBURY (I)
commenced surveillance duties around the South West Pacific and returned to Sydney to commence refit in November 1945.
HAWKESBURY (I) was used in general service until being paid off into reserve in May 1947.
HAWKESBURY (I) re-entered service in July 1952 and spent her first few months supporting tests in the South Pacific. After
completing her security tasks HAWKESBURY (I) underwent a brief refit and commenced service again as a surveillance and
patrol vessel. HAWKESBURY (I) completed her final duties early in December 1954 and was again paid off on 14 February
1945.
HAWKESBURY (I) was not brought back into service again but was eventually sold in September 1961.
NOTE:
HMAS HAWKESBURY (II) a HUON Class Minehunter Coastal ,enjoys a very close association with the original
HAWKESBURY. The current vessel was launched on the 24 April 1998 by Mrs Jennifer Smyth, the wife of the last Commanding Officer of the first HAWKESBURY CDRE Dacre Smyth RAN Rtd. and was commissioned into the Royal Australian Navy, on 12
February 2000.
HMAS ORANA
HMAS ORANA HMA Ships Allenwood,Bermagui, Coolebar, Coombar, Doomba, Kianga, Koopa, Marrawah, Mirimar, Nambucca, Narami,
Orara, Paterson, Tambar, Terka, Tolga, Toorie, Uki, Warrawa.
Between 1939 and 1942, Australia requisitioned scores of ships of various types from civillian use. These auxilliary minesweepers
were among them. They varied in size from the tiny Mirimar (just seventy tons) to the very substantial Orara (1,297 tons, armed
with a 4-inch gun), though the average was about 450-500 tons. They tended to be elderly; Orara had been built in 1907.
By 1942 they and the requisitioned trawlers formed eight minesweeping groups based in Australian harbours. As the war went on,
the uses to which these ships were put varied greatly.

ISSUE #2 (July 2007)
HMAS WARREGO
HMAS WARREGO II.
Warrego was the second ship of that name in the RAN. Designed as an escort sloop of the British Grimsby Class . She was laid down at Cockatoo Island Dockyard on 15 May 1939, launched on 10 February 1940 by Mrs. P. Menzies,
wife of the Prime Minister and commissioned on the 22nd August, 1940.
Warrego replaced Yarra as Senior Ship 20th Mine-sweeping Flotilla and served on escort, patrol and mine- sweeping duties until 16 July 1944, when Lieutenant Commander G.D. Tancred assumed command for surveying operations. These included wartime
surveys in the Philippines, New Guinea and Borneo and peacetime surveys around Australia. Battle honours credited to her name
are Sunda Straits, Darwin, New Guinea, Halmaheras, Philippines & Borneo.
Warrego was immobilised in January 1947, mobilised in January 1948, immobilised in August 1949 and again mobilised in June
1951. Paid off in Sydney on 15 August 1963 after sailing a total of 440,977.9 miles. She was sold on 2 June 1965 to Australian
Metal Traders Limited, for $30,000.00 and broken up at Rozelle Bay in 1966. HMAS AUSTRALIA
1928
HMAS AUSTRALIA II ‘County’ Class Heavy CruiserComplement:848 (war)679 (peace)
Laid Down:26th August 1925Builders:John Brown & Co Ltd, ClydebankLaunched:17th March 1927 Completed:April 1928
Commissioned:24th April 1928 Arrived Australia Station: October 1928 Paid Off:24th April 1938 Re- Commissioned: 28th
August 1939 Paid Off:31st August 1954.
WORLD WAR II
• On 28 August 1939 AUSTRALIA re-commissioned in Sydney and spent the first nine months of the War on the Australian
coast.
• The Battle of the Coral Sea (7 May 1942) saw AUSTRALIA as Flagship of the Support Group (TG 17.3) patrolling the Jomard Passage. The Support Group was attacked by eight torpedo bombers and nineteen high level bombers on this date. On
7 August 1942 AUSTRALIA led the escort of nine transports and six store ships containing the forces for the landing at
Guadalcanal, and remained in the area until the end of August 1942, during which period she was subject with the remainder
of the forces, to frequent heavy air attacks.
• . On 21 October 1944 after bombardments in Leyte Gulf (Philippines) AUSTRALIA was hit by a Japanese suicide plane. Six
officers and 23 ratings were killed and her Commanding Officer (CAPT E. F. V. Dechaineaux, DSC) later died of wounds.
Nine officers, 52 ratings and one AIF soldier were wounded. Whether this was the first deliberate Kamikaze attack on allied
ships is uncertain. After this action, AUSTRALIA, escorted by WARRAMUNGA proceeded to Manus Island and thence to
Espiritu Santo (New Hebrides) for repairs and by 5 January 1945 she was back in action in the Lingayen Gulf covering the
allied invasion of Luzon Island. Here she was subjected to repeated suicide attacks this time there being no doubt of the
Kamikaze nature of the Japanese planes. AUSTRALIA was hit on 5th, 6th, 8th and 9th January, losing 3 officers, 41 ratings killed and 1 officer 68 ratings wounded. This was the ship's last action in World War II. After repairs in Sydney,
AUSTRALIA sailed for the UK via America on 24 May 1945 for a major refit arriving at Plymouth on 1 July. She was still in
UK at war's end and returned to Australia on 16 Feb 1946 and paid-off into Reserve.

ISSUE #2 (July 2007)
POST-WAR SERVICE
• Apart from a three month deployment in Ear Eastern waters in September November 1947, AUSTRALIA spent the next three
and half years in home waters. She then spent the last five years of her active commission as a training cruiser. visiting New
Zealand on 3 occasions with the Australian Squadron from 24 February 31 March 1950, mid September to 6 October 1952,
and for a brief visit in October 1953.
• .AUSTRALIA paid off for disposal on 31 August 1954 and was sold as scrap to British Iron and Steel Corporation (Salvage) Ltd on 25 January 1955. Under tow of the Dutch tug RODE ZEE, the ship departed Sydney on 26 March 1955 and was
broken up at Thomas Ward Shipbreaking Yard, Barrow-in-Furness in 1956.
NOTE:
HMAS AUSTRALIA 1
AUSTRALIA I a Battle Cruiser commissioned at Portsmouth, England, on 21st June, 1913 and reached Sydney on the 4th
October, 1913 and on that day as Flagship, led the newly formed Australian Fleet Unit (Australia, Melbourne, Encounter, Sydney,
Parramatta and Yarra) into Port Jackson for the first time. On the outbreak of World War 1 AUSTRALIA I was assigned the role
(with other ships of the Australian Fleet) of operating as counter to the German Pacific Squadron under Admiral Von Spee. Up to
December 1914 when the Battle of the German Naval threat in Pacific Ocean waters she was employed solely in the pacific.
To comply with the terms of the Washington Naval Treaty of 1922 which provided for a reduction in naval strengths,
AUSTRALIA was scrapped less than 21/2 years later. She was towed to sea by tugs and sunk with her main armament in position
95° 24 miles from Inner South Head, Sydney, on 12th April,1924.
ML 819
Motor Gunboats
35 Fairmile B-type Motor Launches - MLs 424 - 431; 801 - 827.
All these plywood launches were of the British Fairmile "B" type; though some were pre-fabricated in England all were built in
Australia. The first, ML 807, was commissioned into service on 8th April 1943. They served as boom defence patrols in harbours
at home and abroad, they escorted convoys across the Torres Strait to Milne Bay and Port Moresby, acted as couriers to ships and
submarines at sea, took part in the endless survey work and raided up MLs 816 - 819, 801, 426, 428 and 430 formed a flotilla
under the command of the US CTG 70.1 at Mois Woendi. ML 430 fell victim to the dark and confusion. On the night of
6th/7th August 1944 she was mistaken for a Japanese submarine by ML 819. In the gunfire which followed she was set on
fire and burned to the waterline.
ISSUE #2 (July 2007)
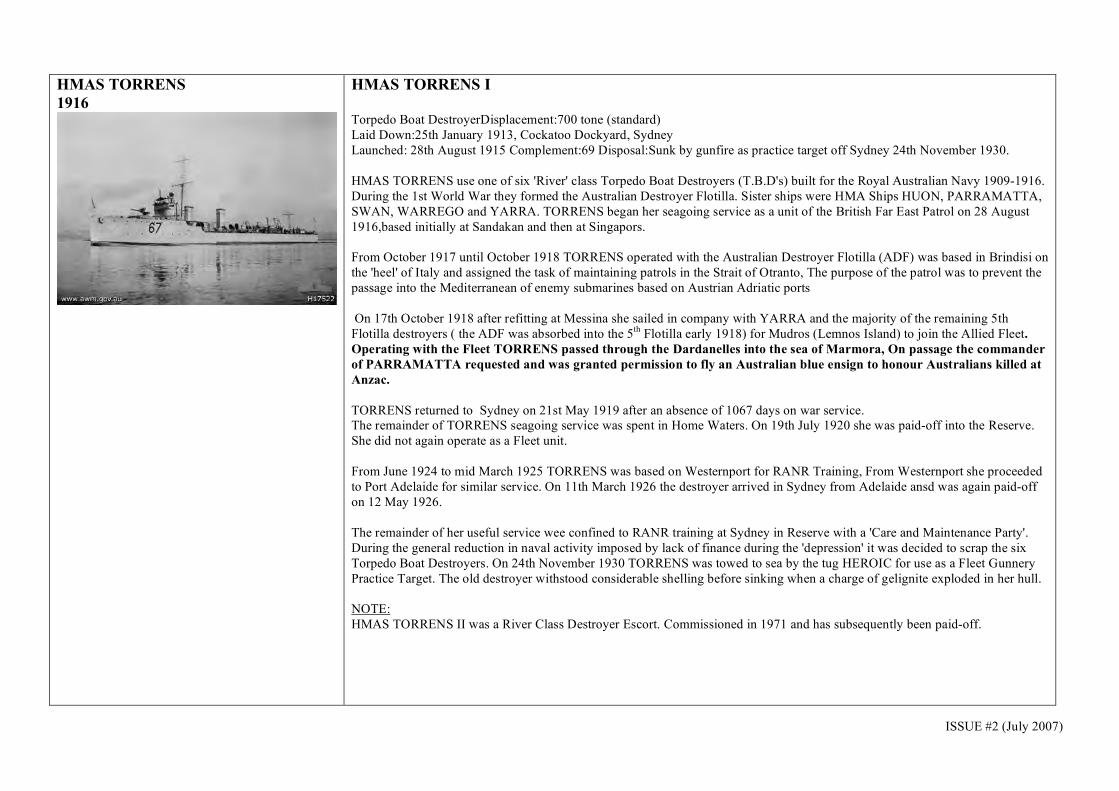
HMAS TORRENS
1916
HMAS TORRENS I
Torpedo Boat DestroyerDisplacement:700 tone (standard)
Laid Down:25th January 1913, Cockatoo Dockyard, Sydney
Launched: 28th August 1915 Complement:69 Disposal:Sunk by gunfire as practice target off Sydney 24th November 1930.
HMAS TORRENS use one of six 'River' class Torpedo Boat Destroyers (T.B.D's) built for the Royal Australian Navy 1909-1916.
During the 1st World War they formed the Australian Destroyer Flotilla. Sister ships were HMA Ships HUON, PARRAMATTA,
SWAN, WARREGO and YARRA. TORRENS began her seagoing service as a unit of the British Far East Patrol on 28 August
1916,based initially at Sandakan and then at Singapors.
From October 1917 until October 1918 TORRENS operated with the Australian Destroyer Flotilla (ADF) was based in Brindisi on
the 'heel' of Italy and assigned the task of maintaining patrols in the Strait of Otranto, The purpose of the patrol was to prevent the
passage into the Mediterranean of enemy submarines based on Austrian Adriatic ports
On 17th October 1918 after refitting at Messina she sailed in company with YARRA and the majority of the remaining 5th
Flotilla destroyers ( the ADF was absorbed into the 5th Flotilla early 1918) for Mudros (Lemnos Island) to join the Allied Fleet.
Operating with the Fleet TORRENS passed through the Dardanelles into the sea of Marmora, On passage the commander
of PARRAMATTA requested and was granted permission to fly an Australian blue ensign to honour Australians killed at
Anzac.
TORRENS returned to Sydney on 21st May 1919 after an absence of 1067 days on war service. The remainder of TORRENS seagoing service was spent in Home Waters. On 19th July 1920 she was paid-off into the Reserve.
She did not again operate as a Fleet unit.
From June 1924 to mid March 1925 TORRENS was based on Westernport for RANR Training, From Westernport she proceeded
to Port Adelaide for similar service. On 11th March 1926 the destroyer arrived in Sydney from Adelaide ansd was again paid-off
on 12 May 1926.
The remainder of her useful service wee confined to RANR training at Sydney in Reserve with a 'Care and Maintenance Party'.
During the general reduction in naval activity imposed by lack of finance during the 'depression' it was decided to scrap the six
Torpedo Boat Destroyers. On 24th November 1930 TORRENS was towed to sea by the tug HEROIC for use as a Fleet Gunnery
Practice Target. The old destroyer withstood considerable shelling before sinking when a charge of gelignite exploded in her hull.
NOTE:
HMAS TORRENS II was a River Class Destroyer Escort. Commissioned in 1971 and has subsequently been paid-off.

ISSUE #2 (July 2007)
HMAS MORESBY
1925
HMAS MORESBY I
(EX HMS SILVIO) Survey Vessel (ex Minesweeper) Laid Down:27 November 1917 Launched: 12 April 1918
HMS SILVIO was one of the twenty-four ships known officially as the '24' Class and popularly as the 'Racehorse'' Class, their
names being those of English Derby winners. They were classified as 'Fleet Sweeping Vessels (Sloops)'. SILVIO commissioned in
the Royal Navy on 25 May 1918.
On 25 July 1918 the destroyer HMS MORESBY was escorting a convoy off the Ulster coast when a U-boat was sighted and
attacked, unsuccessfully, by all five vessels of the escort. One of the escorts was SILVIO, later to become HMAS MORESBY.
SILVO was converted to a Survey ship in 1925. In the same year SILVIO was lent to the Commonwealth Government to assist in
the survey of the Cumberland Channel inside the Great Barrier Reef. Before leaving England for Australia on 28 June 1925 she
was renamed MORESBY in honour of Admiral John Moresby. The first ship to bear the name, the destroyer mentioned above,
was named after Admiral John Moresby in 1914. The derivation of the name is unique in Royal Navy, since the ship was named
after a living commoner. Admiral (then Captain) Moresby (1830-1922), commanding HMS BASILISK, discovered Port Moresby
and Fairfax Harbour on 21 February 1873 and named them after his father, Admiral of the Fleet Sir Fairfax Moresby, GCB. The
ship commissioned as HMAS MORESBY on 20 June 1925.
MORESBY reached Australia in September 1925 and was engaged on the Barrier Reef survey until she paid off at Sydney on 21
December 1929 for reasons of economy.
On 27 April 1933 MORESBY recommissioned for urgent strategic survey work in Australian northern waters. The ship paid off
into reserve at Sydney on 14 December 1934 and recommissioned on 11 April 1935. During her period in reserve MORESBY was
converted to oil-burning.
MORESBY's survey work up to the outbreak of war in September 1939 was almost entirely in northern waters.
For the first year of the war MORESBY served as an anti-submarine training, vessel. In January 1941 she resumed her former
duty as a survey vessel and until the outbreak of war with Japan in December 1941 was engaged surveying in Australian and New
Guinea waters.
In January 1942 MORESBY was assigned to duty as an escort and anti-submarine vessel in Australian waters and until the end of
1943 she was almost constantly at sea escorting convoys on the Australian east coast. This was the period when Japanese
submarines were active in Australian coastal waters and three attacks were made on ships under escort by MORESBY. In all
during the period MORESBY was serving as an escort vessel nineteen ships were sunk off the Australian coast by Japanese
submarines with the loss of 568 lives.
In November l943 MORESBY ceased operating as an escort vessel and at Sydney prepared to resume duty as s survey vessel.
From December 1943 until the end of the war she was engaged on surveys mainly in the Darwin and Bathurst Island areas.
Brigadier Lewis Dyke took the surrender in Dutch Timor on HMAS Moresby in Koepang Harbour on September 11 1945. He

ISSUE #2 (July 2007)
then sailed to Dili in Portuguese Timor on HMAS Warmambool for the surrender of the small Japanese garrison. On October 1, he
returned to Koepang on HMAS Moresby for the surrender of Lieutenant General Kunitaro Yamada, commander of the 48th
Japanese Division.
She paid off on 14 March 1946 and on 3 February 1947 she was sold for breaking up to Broken Hill Pty Co Ltd.
HMAS MORESBY II: The second MORSEBY was also a survey ship that was paid-off in the early 80's.
HMAS MELBOURNE
HMAS MELBOURNE I Town Class Light Cruiser 1912
HMAS Melbourne was built by Cammell Laird & Co Ltd. It was laid down on April 14 1911 and launched 30 May 1912. She was completed in January 1913 and first arrived in Australian waters in March 1913. On 4 October 1913 Melbourne first entered
Sydney Harbour with the First Australian Fleet Unit.
When the First World War broke out Melbourne was sent into the Pacific to capture German possessions. With HMAS Australia
she was present at the capture of Samoa on 30 August 1914. In November 1914 she was a unit of the escort for the First ANZAC
convoy, and it was during this transit that Melbourne ordered HMAS Sydney to detach to investigate reports of enemy shipping
close by. On 9 November 1914 HMAS Sydney encountered the German cruiser Emden and eventually destroyed her.
During WW1 Melbourne was a part of the Second Light Cruiser Squadron, and took part in patrols, anti-submarine sweeps, fleet
exercises, minesweeping and laying, and convoy duties. She was the only Australian cruiser to wear a full pattern of camouflage
during the Firs World War.
In November 1917 she was fitted with a revolving aeroplane platform, and launched its first plane on 10 May 1918. This is the
first recorded Australian aircraft launched at sea for offensive action.
HMAS Melbourne returned to Australia in 1919 after being present at the surrender of the German High Seas Fleet in November
1918. The majority of her remaining service was spent as the Flagship of the Australian Fleet. In 1928 she was disarmed and
returned to England for decommissioning, and was eventually sold in 1929.
NOTE:
HMAS MELBOURNE II (EX - HMS MAJESTIC) Type: Light Fleet Aircraft Carrier
HMAS MELBOURNE Iiwas laid down for the Royal Navy as HMS MAJESTIC. She is one of six 'Majestic' class aircraft carriers which were laid down in 1943. In 1947 when it was decided to acquire two aircraft carriers for the RAN none of the 'Majestic'
class had been completed, construction having been suspended in May 1946.
Following an agreement between the British and Australian governments to transfer two of the class, HMS MAJESTIC and HMS
TERRIBLE (later HMAS SYDNEY), to the RAN. Work resumed on MAJESTIC in 1949. On 28 October 1955 she was renamed
MELBOURNE and commissioned in the RAN.

ISSUE #2 (July 2007)
MELBOURNE sailed from Glasgow for Australia on 11 March 1956 and arrived at Sydney on 9 May with 808 Squadron (De
Havilland Sea Venoms), 816 and 817 Squadrons (Fairey Gannets) embarked. .
On 10 February 1964 Melbourne was involved in a collision with HMAS VOYAGER off Nowra, NSW. VOYAGER sank with
the loss of 82 lives out of a complement of 317.
Each year, 1959 to 1967 inclusive, MELBOURNE served in Far Eastern waters on exercises and/or as part of the Far East
Strategic Reserve. She took part in SEATO exercises and escorted HMS SYDNEY (carrying troops) to Vietnam on several
occasions.
Further misfortune occurred during the course of a SEATO exercise when in the early hours of 3 June 1969, MELBOURNE and
USS FRANK E. EVANS collided in the South China Sea with the loss of 74 crew of the latter vessel..
The ship was initially sold in June 1984 to an Australian company for $1.7 million, however the sale fell through. In February
1985, MELBOURNE was sold to China United Shipbuilding Co Ltd for $1.4 million to be broken up in the port of Dalian, China.
HMAS MELBOURNE III :The third MELBOURNE is a Guided Missile Frigate still in service.

ISSUE # 2 (July 2007)
ROYAL AUSTRALIAN NAVY
SAILORS DISTINGUISHING BADGES
"Petty Officers and men , whether dressed as seaman or not , wear the badges denoting rating and conduct on the left arm, and
badges denoting their non-substantive rating or special qualification on their right arm. Petty Officers have a Crown above right
arm rate badge.
Petty Officers (confirmed) wear jackets with gilt buttons instead of jumpers: these jackets are single breasted for working dress
and double breasted for No.1 dress.
Chief Petty Officers wear similar jackets , with the addition of three large gilt buttons across each sleeve . Chief Petty Officers do
not wear any Good Conduct Badges, but wear badges denoting their non -substantive rate or special qualification on the collar of
their jackets. Artificer Chief Petty Officers wear no collar badges…."
Manual Of Seamanship Volume 1 1937
NOTES:
1.The majority of the badges on display are Post WW2 and only a few of these are in use today.
2 "Stars" on rate badges generally indicate the Grade of the qualification.
MECHANICIAN
AIRCRAFT HANDLER
GUNNERY RATE
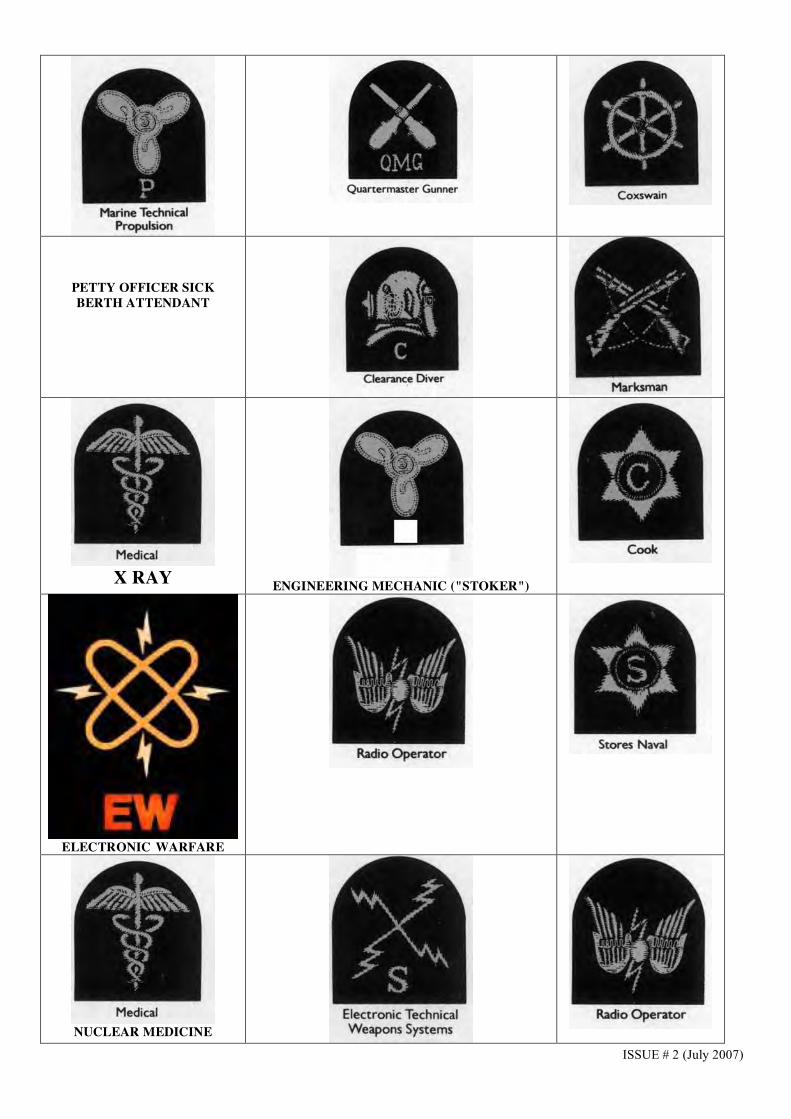
ISSUE # 2 (July 2007)
PETTY OFFICER SICK
BERTH ATTENDANT
X RAY
ENGINEERING MECHANIC ("STOKER")
ELECTRONIC WARFARE
NUCLEAR MEDICINE

ISSUE # 2 (July 2007)
WEAPONS ELECTRONIC
OFFICERS STEWARD
BOSUN'S MATE

ISSUE #2(July 2007)

ISSUE #1 (December 2006)
BACKGROUNDER # 88
NAVY
at the
Memorial
Section 16
KOREA
HMAS 'Murchison' bombarding enemy positions on the Han River Estuary, Korea 1951.McFadyen, Ken.1970
Contents
• “Operation Han” – July September 1951.Extract from Out in the Cold Exhibition
• RAN in the Korean War. J.H.Straczek. SEA Power Centre Australia November 2006
See also BACKGROUNDER # 4 Issue # 2 June 2003.
KOREA- Out in the Cold
This Section will be reviewed and updated as necessary to reflect the redeveloped
Korea Gallery in late 2007

ISSUE #1 (December 2006)
“Operation Han" - July-September 1951
HMAS Murchison, under the command of Lieutenant Commander A. N. Dollard, saw its first
action in July 1951, while patrolling the Yellow Sea. Many enemy forces were stationed along the
sea's shores. On the 24 July, the vessel fired successfully on an enemy tank on shore, on the west
coast of the Haeju peninsula. Murchison, along with other frigates and launches, then moved into
the Han River, which proved slow and difficult to navigate.
The aim of "Operation Han" was to destroy enemy forces and installations along the Han River in
the Kaesong area. A naval blockade would also prevent the Chinese from crossing the river and
occupying the group of islands to the south along the coast. A group of 14 UN ships launched a
full-scale bombardment campaign of firing shells into a large area near Kaesong, on the north bank
of the Han. While the blockade of the Han and the bombardment campaign went on for months,
survey boats mapped and charted the many channels of the river, often becoming targets for enemy
soldiers on land.
By September, the Chinese prepared for organised retaliation. On 28 September, Murchison
exchanged fierce fire with Chinese troops along the coast. Two days later, it was fired upon again,
this time with greater force and accuracy. There was a direct hit in her engine room from a 75 mm
shell, shrapnel damage, and seven shell holes in her side, but she sustained no serious damage.
Several men on board were wounded, one seriously. Murchison's involvement in Operation Han
was considered a significant success.
Admiral A. K. Scott-Moncrieff, Commander, West Coast Blockade Force, sent this message to the
crew of the Murchison:
“You have been a tower of strength and your good name will always be associated with the
infamous Han. No ship could have done better. For fine seamanship and steadiness under fire you
have proved yourselves beyond reproach.” (Out in the Cold Exhibition)

ISSUE #1 (December 2006)
RAN IN THE KOREAN WAR
By: J.H. Straczek
Since 1910 Korea had been an integral part of the Japanese Empire. The people of Korea, however,
sought independence and many influential Koreans agitated for such overseas. Dreams of Korean
independence appeared to have become a reality when the Cairo Declaration of 1 December 1943
made Korean independence an Allied war aim. This declaration was followed by a decision,
between the United States and America, to divide Korea at the 38th parallel in order that the
occupying Japanese could be disarmed.
The decision to divide Korea had one unforseen consequence. The northern half was ultimately
closed and a communist regime established under Kim Il-sung, whilst in the south United Nations
sponsored elections were held. The situation along the 38th parallel remained tense and finally on
25 June 1950 North Korea invade the South. United Nations reaction to this invasion was swift and
on 27 June the United Nations requested assistance for South Korea.
On the 29 June the Australian Prime Minister Sir Robert Menzies decided to place HMA Ships
SHOALHAVEN and BATAAN at the disposal of United Nations authorities in support of the
Republic of Korea. From this time onwards until the cessation of maritime operations on 27 July
1953, RAN units played a major role in support of United Nations operations.
Predominantly RAN destroyers and frigates were involved in conducting blockade, escort and
bombardment duties on both sides of the Korean Peninsular.
Escort and blockade duties were generally tedious but none the less essential. The frigate
SHOALHAVEN served as on escort duties until relieved by HMAS WARRAMUNGA. On
occasion, with ships carrying out coastal blockade duties close to shore, enemy shore batteries
would open fire. The first such exchange involving an RAN ship occurred on 1 August 1950 when
BATAAN was attacked by shore batteries whilst patrolling the northern approaches to the Seoul R.
BATAAN returned fire and silenced four of the enemy guns. The cruiser HMS BELFAST soon
joined BATAAN and both ships engaged the enemy. BATAAN was straddled by enemy fire on a
number of occasions during the duel.
On 29 August WARRAMUNGA provided escort support for the first non-American troops to
arrive in Korea. These British troops were landed at Pusan. WARRAMUNGA was also to act as
part of the screen for the Royal Navy aircraft carrier HMS TRIUMPH when she operated off the
east coast near Pusan.
Both WARRAMUNGA and BATAAN were assigned to screening duties for the Allied landings at
Inchon on 15 September. At about this time it was also decided to extend the period of RAN ships
to a year. This was because the RAN was unable to provide relief ships. Five years after World War
Two the RAN had difficulty in sustaining two ships on war service. Both ships were to spend most
of their service conducting patrols and bombardments of enemy positions and facilities. They were
operating near the Yalu River when China intervened on the side of North Korea.
BATAAN was relieved by HMAS MURCHISON in June 1951. During her deployment
MURCHISON was to gain fame, and good fortune, during engagements with enemy shore batteries
off the Han River. In September/October 1951 whilst patrolling near the Han River MURCHISON
was engaged by a mixed group of enemy guns ranging from 75 mm to 50 mm and smaller. In the
ensuing gun duel MURCHISON returned fire with her main armament and 40 mm Bofors guns.
Her intense and accurate fire quickly silenced the enemy guns. The next day, while patrolling the
same area MURCHISON was again engaged by enemy shore batteries. In this instant
MURCHISON received a number of hits, fortunately there were no fatalities. With the arrival of
other ships the Communist batteries were quickly silenced.
By this stage WARRAMUNGA had been relieved by HMAS ANZAC. During her tour of duty
ANZAC was engaged in conducting the patrols as well as landing intelligence teams and some train

ISSUE #1 (December 2006)
hunting. ANZAC's short deployment came to an end on 30 September 1951 when she escorted
HMS GLORY to Australia for a refit. ANZAC was replaced by HMAS TOBRUK.
In addition to the operations of the destroyers and frigates the aircraft carrier HMAS SYDNEY and
embarked squadrons were also deployed to the Korean theatre. Her first operations were on 4
October 1951 on the west coast. After transferring to the east coast she commenced operations
against enemy troop concentrations and suspected supply dumps. On 21 October SYDNEY's
aircraft attack a large concentration of junks preparing to launch an assault on Taehwa Do Island.
Other operations included support for the Commonwealth Division and search and rescue patrols.
SYDNEY's aircraft were generally engaged in operations against lines of communication, troop
concentrations and industrial infrastructure. Weather conditions were a major influence on
operations at this stage. During the middle of her deployment SYDNEY was operating off Korea in
the northern winter at time sub-zero temperatures were experienced. Such conditions limited flying
operations.
SYDNEY's deployment to the Korean theatre resulted in the general introduction of fluorescent
panels to aid rescue aircraft. The system devised by CAPT Harries to aid rescue aircraft in locating
downed crews were so successful that it was recommended for general introduction.
After a stay of six months SYDNEY departed for Australia accompanied by TOBRUK.
MURCHISON also left the war zone, she had spent a total of 60 days in the Han River region. By
this stage WARRAMUNGA and BATAAN had returned to Korea. On 14 February BATAAN was
hit by enemy coastal batteries but no major was sustained. In March WARRAMUNGA was also the
target of enemy shore based fire but was not hit. Both ships continued to be engaged in patrol and
bombardment work throughout this second deployment.
In the second half of 1952 the ANZAC and HMAS CONDAMINE were deployed to the war zone.
In September and October CONDAMINE defeated an attempt by Communist forces to capture the
Island of Tok Som. Whilst ANZAC, like the hips she relieved, received the unwelcome attention of
North Korean shore batteries. By this stage the war on the peninsular had reached a stalemate and
serious attempts were being made to resolve the situation. However, it would not be until July 1953
that naval operations would be halted and by that stage two more RAN ships had deployed to
Korea. These were HMAS CULGOA and TOBRUK. During her deployment CULGOA aided in
the evacuation of Allied troops from Yong Mae do Island. The naval war off Korea ended on the 27
July 1953. However, RAN units continued to serve in the area for some time to come in support of
the United Nations.
As well as conducting military operations in the Korean theatre of operations members of the RAN
provided assistance to the general populace. Throughout 1950/51 RAN ships regularly mercy runs
to off shore islands carrying rice and other food stuffs. HMAS CONDAMINE, in 1952, discovered
about 100 orphaned Korean children living with the locals on an island off the west coast. The
ship's company provided these children with warm clothing, fruit chocolate and meat. On a
subsequent trip the ship delivered a large number of toys purchased with money collected by the
sailors.
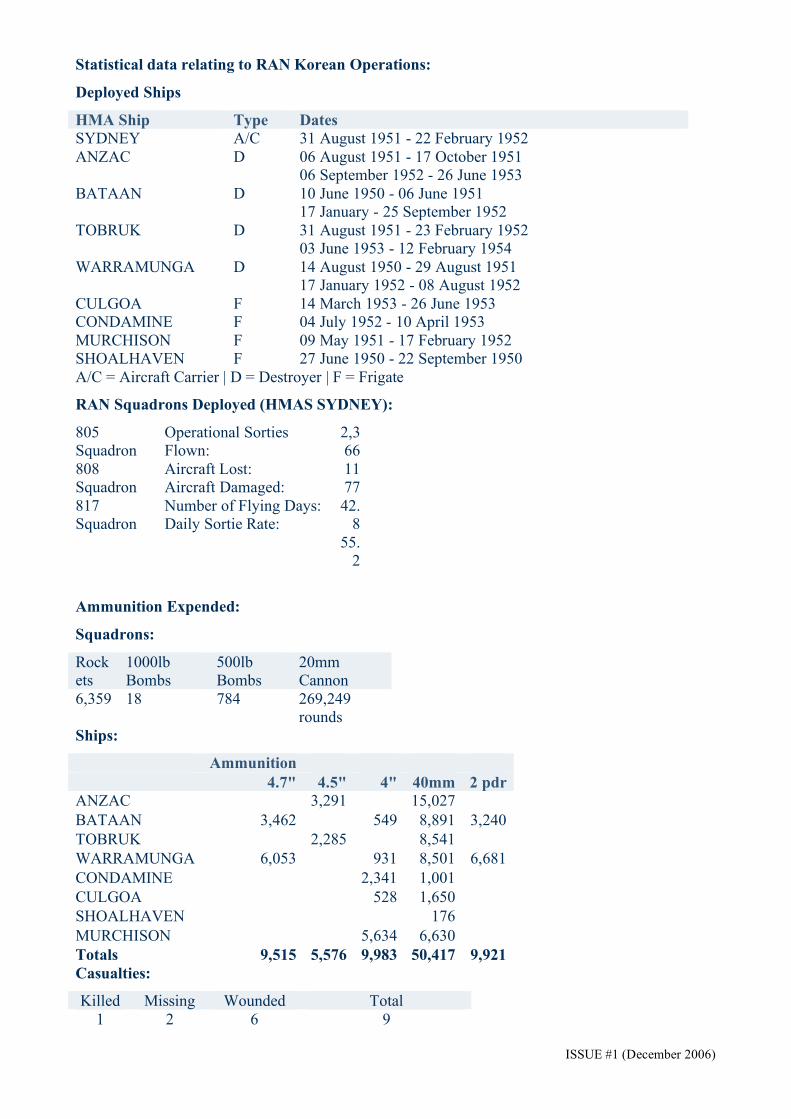
ISSUE #1 (December 2006)
Statistical data relating to RAN Korean Operations:
Deployed Ships
HMA Ship Type Dates
SYDNEY A/C 31 August 1951 - 22 February 1952
ANZAC D 06 August 1951 - 17 October 1951
06 September 1952 - 26 June 1953
BATAAN D 10 June 1950 - 06 June 1951
17 January - 25 September 1952
TOBRUK D 31 August 1951 - 23 February 1952
03 June 1953 - 12 February 1954
WARRAMUNGA D 14 August 1950 - 29 August 1951
17 January 1952 - 08 August 1952
CULGOA F 14 March 1953 - 26 June 1953
CONDAMINE F 04 July 1952 - 10 April 1953
MURCHISON F 09 May 1951 - 17 February 1952
SHOALHAVEN F 27 June 1950 - 22 September 1950
A/C = Aircraft Carrier | D = Destroyer | F = Frigate
RAN Squadrons Deployed (HMAS SYDNEY):
805
Squadron
808
Squadron
817
Squadron
Operational Sorties
Flown:
Aircraft Lost:
Aircraft Damaged:
Number of Flying Days:
Daily Sortie Rate:
2,3
66
11
77
42.
8
55.
2
Ammunition Expended:
Squadrons:
Rock
ets
1000lb
Bombs
500lb
Bombs
20mm
Cannon
6,359 18 784 269,249
rounds
Ships:
Ammunition
4.7" 4.5" 4" 40mm 2 pdr
ANZAC 3,291 15,027
BATAAN 3,462 549 8,891 3,240
TOBRUK 2,285 8,541
WARRAMUNGA 6,053 931 8,501 6,681
CONDAMINE 2,341 1,001
CULGOA 528 1,650
SHOALHAVEN 176
MURCHISON 5,634 6,630
Totals 9,515 5,576 9,983 50,417 9,921
Casualties:
Killed Missing Wounded Total
1 2 6 9

ISSUE #1 (December 2006)

ISSUE #1 (December 2006)
BACKGROUNDER # 88
NAVY
at the
Memorial
Section 17
VIETNAM
An artist’s view of how the HMAS BRISBANE bridge and gun mount will look at the AWM late
2007
Contents
! HMAS BRISBANE (II). AWM website November 2006
! Naval Operations in Vietnam. SEAPOWER Centre Australia November 2006 ! Royal Australian Navy Detachment, 9 Squadron RAAF – Vietnam. SEAPOWER Centre
Australia November 2006 ! Royal Australian Navy Helicopter Flight Vietnam. SEAPOWER Centre Australia November
2006
See also BACKGROUNDERS: # 5 Issue # 1 July 1998 Vietnam War 1962-1972 # 33 Issue # 1 may 2000 RAN in the Vietnam War # 53 Issue #1 October 2001 Vietnam –Presentation to VGAWM –Libby Stewart # 62 Issue #1 July 2002 1st
Australian Task Force and the Vietnam War # 70 Issue #1 October 2003 Dilemas of a Long War – The Australian Army in Vietnam
This Section will be reviewed and updated as necessary to reflect the redeveloped
Vietnam Gallery in late 2007

ISSUE #1 (December 2006)

ISSUE #1 (December 2006)
HMAS Brisbane {AWM website November 2006}
HMAS Brisbane [II] (1966) was the second vessel of that name to serve in the Royal Australian Navy. She was the third of the RAN's American-built "Charles F. Adams" class guided-missiles destroyers. (The other two were HMAS Hobart and HMAS Perth.) These ships cost $40 million each (or $50 million with missiles) and were the first major Australian warships designed and built in America. They carried a complement of 20 officers and 312 sailors. Apart from the 5-inch/54 calibre guns, they were armed with Ikara missile systems and anti-submarine torpedoes.
Starboard bow view of the guided missile destroyer HMAS Brisbane (II) AWM 300460
Service Brisbane undertook two tours of duty with the United States Seventh Fleet off Vietnam, in 1969 and again in 1971, and was the last ship of the RAN to serve there. On each occasion, she fired approximately 8,000 rounds of ammunition while on the gunline. As successive destroyers went on the gunline, they were passed "the weight". "The weight", comprising the bases of two 5-inch powder cases, symbolised the responsibility imposed on RAN destroyers that served with the Seventh Fleet. It is inscribed on the lower section with the names, dates and call signs of the destroyers that served with the fleet. (This object is currently on display in the Vietnam Gallery at the Memorial. While on a firing mission on 22 July 1969, her forward 5-in gun (Mount 51) suffered an inbore explosion. One sailor was slightly injured. She spent the next 15 days with only one operational gun before retiring to Subic Bay in the Philippines for repairs.
!Starboard bow view of the guided missile destroyer
HMAS Brisbane (II)!AWM 300463

ISSUE #1 (December 2006)
During the Gulf War (1990-91), Brisbane was one of four Australian warships to serve a tour in Gulf waters. These formed part of the anti-aircraft screen for the US Navy carrier battle groups. Brisbane arrived in the Gulf in December 1990 and served there until March 1991, performing a number of roles. Apart from contributing to the anti-air defences in the carrier screen, she also kept watch for mines and ensured that small civilian craft kept well away from the carrier group. Later, during Desert Storm, Brisbane controlled fighter combat air patrols and tanker aircraft. Her final role was as an escort for US replenishment ships.
HMAS Brisbane berthed in Dubai, Persian Gulf, January 1991. AWM
P01572.001
Mount 52 This gun mount was the aft mount (Mount 52) on the ship. The ammunition feed system for the single 5-inch gun was almost entirely automated and this meant that it could achieve a continuous firing rate equal to what an expert crew could manage over short bursts using two gun mounts. The starboard "bubble"dome, or "frog-eye", has been removed.
This dome was normally used for anti-aircraft fire control within the mount (the retained port dome being used for local surface control), but this was not needed here because of the use of the Tartar anti-aircraft missile system on these Australian ships.
View of the mount.
This is the original mount, although the gun would have been re-barrelled a number of times. Normal barrel life was approximately 1500 rounds.
Gun Mount 52
Calibre: 127 mm (5-inch) Barrel length: 54 calibres Rate of fire: 45 rounds/min Maximum range: Approx. 24 km Weight of projectile:
Approx. 32 kg
Weight of mount: 60 tons (complete) Barrel life: Approx. 1500 rounds HMAS Brisbane
Type: "Charles F. Adams" class guided-missile destroyer (DDG) Launched: 5 May 1966 Built by: Defoe Shipbuilding Co, Bay City, Michigan, USA Displacement 3,370 tons (standard); 4,500 tons (full load) Length: 133.19 m Speed: 35 knots

11/24/2006 06:06 AMGeneral RAN History (Sea Power Centre - Australia)
Page 1 of 8file:///Users/peterhugonnet/Desktop/%2388-NAVY@AWM%2022.11.0…(0700260606)/%2388-11-VIETNAM/NAVY%20IN%20VIETNAM.webarchive
SEA POWER CENTRE - AUSTRALIA
GENERAL RAN HISTORY
Naval Operations in Vietnam
Between 1965 and 1972 elements of the RAN undertook continuous operational
service in Vietnam. During this period the Navy performed a variety of
operational tasks at sea, ashore and in the air. The RAN's primary contribution
consisted of destroyers, Fleet Air Arm personnel attached to a United States
(US) Army assault helicopter company and the Royal Australian Air Force's
(RAAF) No. 9 Squadron, a Clearance Diving Team, and a logistic support force
consisting of transport and escort ships. Other RAN personnel served ashore in
medical teams or performed staff duties at the Australian Embassy in Saigon or
the Australian Task Force Headquarters in Nui Dat. The RAN Fleet Band also
completed a short tour of Vietnam entertaining troops during periods of rest and
recreation (R & R).
The Vietnam War was not a markedly naval conflict but for the 13 500 members
of the RAN who saw active service it was undoubtedly a high tempo
environment. The RAN's contribution, although small in comparison to that of
the United States Navy (USN), was diverse and played a significant part in the
Australian Forces overall commitment .
Early Goodwill Visits
Though the RAN did not become operationally involved in the Vietnam conflict
until 1965, HMA Ships VAMPIRE and QUICKMATCH were the first ships in the
area when they made a goodwill visit to Saigon in 1962. They were followed the
next year by the Q Class destroyers HMA Ships QUIBERON and
QUEENBOROUGH . These were not operational visits: but designed to show
Australian government support for the government in Saigon, and members of
the ships company visited the Vietnamese Special Forces training centre and
carried out other `flag showing' activities. During the 1963 visit the small
Vietnamese naval vessel KY-HOA accidently rammed and holed QUIBERON
whilst coming alongside her.
Clearance Diving Team 3 - United and Undaunted
Without doubt one of the smallest, and unrivalled, Australian units to serve in
Vietnam was Clearance Diving Team 3 (CDT3). They were an elite group of 49
officers and men; divers trained in the dangerous business of explosive
ordnance disposal, who established an enviable reputation for courage and
innovation in time of war in the spirit of the diver's motto, United and Undaunted.
The RAN formally established a Clearance Diving branch in 1951, and a Mobile
Clearance Diving Team in 1956. In March 1966 two distinct teams were
commissioned in Sydney; CDT1 and CDT2. Shortly thereafter CDT1 deployed
for exercises in South East Asia, including one week in Vietnam conducting
operations with their American counterparts. The Commanding Officer of CDT1
was of the view that a RAN diving team would make a worthwhile contribution
to the Australian effort in Vietnam and recommended that CDT1 be deployed for
a three to six month period. The RAN approved the formation of CDT3 in late
1966 as one element of a larger naval contribution to the war in Vietnam.
The first contingent of six personnel arrived in Vietnam on 6 February 1967 and
were initially attached to a United States Navy Explosive Ordnance Disposal
Team based in Saigon. They then moved to Vung Tau and assumed
responsibility for the defence of shipping against enemy attack, known as

11/24/2006 06:06 AMGeneral RAN History (Sea Power Centre - Australia)
Page 2 of 8file:///Users/peterhugonnet/Desktop/%2388-NAVY@AWM%2022.11.0…(0700260606)/%2388-11-VIETNAM/NAVY%20IN%20VIETNAM.webarchive
responsibility for the defence of shipping against enemy attack, known as
Operation Stable Door. The team was responsible for searching the hulls and
anchor cables of shipping in the Vung Tau anchorages or alongside, for
improvised explosive devices. In one particular incident, Viet Cong sappers
penetrated the Vung Tau port area and placed home-made and Russian limpet
mines on the hull of the MV Heredia and a nearby wharf. The home-made
device partially exploded during search operations, and team members
removed the Russian mine. Additional tasks included the salvage of downed
military helicopters, searching villages for ammunition caches and demolishing
Viet Cong cave and tunnel complexes.
CDT3 had originally been directed not to participate in SEAL type operations
(United States Navy Special Forces) or in operations along the Cambodian
border, however, the prohibition was lifted in January 1969 allowing team
members to make full use of their unique skills. Consequently, the operational
focus from 1969 shifted towards the provision of explosive ordnance disposal
support for offensive operations, with team members frequently being attached
to American and South Vietnamese special forces. These operations intensified
in 1970 and team members were often under enemy fire while they were
engaged in the destruction of bunker complexes, tunnels, trenches, observation
posts and log barricades erected by the Viet Cong in the rivers and waterways
of South Vietnam.
In August 1970 CDT3 was relieved at Vung Tau by South Vietnamese Navy
personnel and airlifted to Da Nang. In three and a half years on Operation
Stable Door, CDT3 searched 7,441 ships.
The eighth and final contingent returned to Australia in May 1971, bringing to a
close four years of war service in trying and hazardous circumstances. The
contingents had rotated through Vietnam at approximately six to seven month
intervals. The one fatal casualty was a young sailor killed in a motor vehicle
accident while on exchange with an American unit in Cam Ranh Bay. Seven
personnel were decorated whilst others received recognition from the United
States and South Vietnamese governments, including a United States Navy
Meritorious Unit Commendation awarded to the first contingent.
CDT3 was disbanded in 1971 and did not reform again until 1991. The
traditions established by CDT3 personnel in Vietnam have been carried forth by
their successors who served meritoriously in the 1991 Gulf War and the 2003

11/24/2006 06:06 AMGeneral RAN History (Sea Power Centre - Australia)
Page 3 of 8file:///Users/peterhugonnet/Desktop/%2388-NAVY@AWM%2022.11.0…(0700260606)/%2388-11-VIETNAM/NAVY%20IN%20VIETNAM.webarchive
their successors who served meritoriously in the 1991 Gulf War and the 2003
campaign in Iraq.
On the Gun Line - HMA Ships Hobart, Perth, Brisbane &Vendetta
The largest single commitment by the Royal Australian Navy to Vietnam was
the provision of a destroyer on a rotational basis to the United States Navy's
Seventh Fleet for service on what became known as the 'gunline'. RAN
warships provided naval gunfire support from March 1967 to September 1971.
They also participated in Operation Sea Dragon, the bombardment of North
Vietnamese military targets and the interdiction of supply routes and logistic
craft along the coast of North Vietnam from the Demilitarized Zone to the Red
River Delta, from April 1967 until it was suspended in November 1968.
The first RAN destroyers to deploy to Vietnam were the Charles F. Adams class
guided missile destroyers (DDG) Hobart, Perth and Brisbane. The Australian
DDG's were well suited for the task of providing Naval Gunfire Support (NGS).
Armed with two 5 inch 54 calibre gun mounts that fired a standard 76 lb High
Explosive (HE) shell, they were capable of bringing down accurate 5 inch
gunfire at a rate of 40 rounds per minute on targets at ranges beyond 14
nautical miles in most conditions.
The Daring class destroyer HMAS Vendetta was also deployed for service on
the gunline. Her main armament consisted of six 4.5 inch guns that were
capable of providing accurate and rapid fire to a range of nine nautical miles at
a rate of 16 rounds per gun per minute. In good conditions Vendetta's guns
were capable of expending up to 100 rounds per minute.
HMAS Hobart was the first DDG to join the US Seventh Fleet on 15 March
1967 beginning the six monthly rotation of RAN destroyers for service on the
gunline. Hobart and Perth deployed three times to Vietnam, Brisbane twice and
Vendetta once. The destroyers carried out NGS missions in all of South
Vietnam's four military regions and Hobart and Perth were actively involved in
Sea Dragon. Hobartand Perth came under fire on a number of occasions. Perthwas hit once during her first deployment and Hobart suffered two killed and
seven wounded when she was mistakenly hit by missiles fired from a United
States Air Force jet aircraft.

11/24/2006 06:06 AMGeneral RAN History (Sea Power Centre - Australia)
Page 4 of 8file:///Users/peterhugonnet/Desktop/%2388-NAVY@AWM%2022.11.0…(0700260606)/%2388-11-VIETNAM/NAVY%20IN%20VIETNAM.webarchive
Hobart was awarded a US Navy Unit Commendation in recognition of her
service in Vietnam while Perth received both the US Navy Unit Commendation
and the US Meritorious Unit Commendation. This honour allowed both ships to
fly distinguishing pennants known as 'burgees' from their masthead when
alongside for the duration of their commissions.
In their five years service in Vietnam, the four gunline destroyers steamed over
397,000 miles and fired 102,546 rounds.
Logistic Support - and the 'Vung Tau Ferry'
Mention 'The Vung Tau Ferry' to any Vietnam veteran and they will immediately
recall HMAS Sydney, the former aircraft carrier that was later converted as a
fast troop transport and destined to become the mainstay of naval logistic
support operations for Australian forces in Vietnam.
Commissioned in 1948, HMAS Sydney was a keystone in the development of
Australia's post war naval aviation capability and served with distinction in the
Korean War. HMAS Sydney was converted for troopship duties in the early
1960s and began her first voyage to Vietnam in May 1965, transporting the First
Battalion, Royal Australian Regiment, from Sydney to Vung Tau in southern
Vietnam.
Between 1965 and 1972, HMAS Sydney undertook 25 voyages to Vietnam and
transported 16,094 troops, 5,753 deadweight tons of cargo and 2,375 vehicles.
On her first voyage four days were taken to unload cargo in Vung Tau. On
subsequent voyages this turn around time was reduced to a matter of hours.

11/24/2006 06:06 AMGeneral RAN History (Sea Power Centre - Australia)
Page 5 of 8file:///Users/peterhugonnet/Desktop/%2388-NAVY@AWM%2022.11.0…(0700260606)/%2388-11-VIETNAM/NAVY%20IN%20VIETNAM.webarchive
On every voyage HMAS Sydney was ably supported by at least one escort that
provided a measure of protection against potential hostile forces. She had up to
four escorts in 1965 and 1966, including at times the flagship HMAS
Melbourne. Other escorts included HMA Ships Anzac, Derwent, Duchess,
Parramatta, Stuart, Swan, Torrens, Vampire, Vendetta and Yarra.
In 1966 the Vietnam supply line was supplemented by two Australian National
Line (ANL) cargo ships, Jeparit and Boonaroo. These ships were chartered by
the Department of Shipping and Transport on behalf of the Australian Army to
transport military vehicles, ammunition, aid and canteen supplies.
In March 1967 members of the Seamen's Union refused to man Jeparit and
Boonaroo. To overcome this difficulty, Boonaroo was immediately commissioned
by the Royal Australian Navy with a full naval crew for one return voyage to
Cam Ranh Bay and Singapore.
In the case of Jeparit, existing crew who were prepared to continue to serve in
the ship were supplemented by a Royal Australian Navy detachment. She made
21 voyages under the Red Ensign with a combined Merchant Navy / Royal
Australian Navy crew. Further industrial action in December 1969 prompted the
Federal Government to commission Jeparit as one of Her Majesty's Australian
Ships. HMAS Jeparit made a further 17 incident free voyages under the
Australian White Ensign. In all she carried 175,000 deadweight tons of cargo to
Vietnam before returning to ANL control in March 1972.
The RAN Fleet Air Arm in Vietnam - 'Get The Bloody JobDone'
The ubiquitous Bell UH-1 Iroquois helicopter is still arguably the most instantly
recognisable symbol of the Vietnam War. Images of the 'helicopter war' feature
prominently in books, films and documentaries; indeed, a granite etched image
of an Iroquois extracting troops forms the centrepiece of Australia's National
Vietnam Memorial located on Anzac Parade in Canberra.

11/24/2006 06:06 AMGeneral RAN History (Sea Power Centre - Australia)
Page 6 of 8file:///Users/peterhugonnet/Desktop/%2388-NAVY@AWM%2022.11.0…(0700260606)/%2388-11-VIETNAM/NAVY%20IN%20VIETNAM.webarchive
Not so widely known though is the role that was played by personnel of the
RAN's Fleet Air Arm (FAA), in a war that depended heavily on tactical air
movement of combat troops, supplies and equipment in what were eventually
called air-mobile operations.
Between 1967 and 1971 the Royal Australian Navy Helicopter Flight Vietnam
(RANHFV), was fully integrated with the US Army 135th Assault Helicopter
Company (AHC) flying Iroquois helicopters in both the utility and gun-ship
configurations. As a result of this unique relationship between the RAN and the
US Army, the unit was officially designated 'EMU', for Experimental Military Unit.
This was fitting, given that the EMU is a native Australian bird, yet amusing at
the same time because of the Emu's inability to fly. The unit later designed its
own unique badge and adopted the unofficial motto 'get the bloody job done',
which was to personify their attitude to air-mobile operations. In keeping with
Australian Naval tradition many of the aviators also grew beards to distinguish
themselves as sailors in a predominantly army environment.
The 135th AHC was initially based at Vung Tau and comprised two troop lift
platoons, each with eleven UH-1Ds, a gun-ship platoon with eight UH-1Cs, a
maintenance platoon with a single UH-1D and a headquarters platoon. Six of
the gun-ships were equipped with mini guns, rockets and machine guns. The
remaining two were fitted with the XM-5 40mm grenade-launcher system,
rockets and machine guns.
The role of 135th AHC was to provide tactical air movement of combat troops,
supplies and equipment in air-mobile operations. This included augmentation of
army medical services, search and rescue and the provision of a command and
control aircraft capability.
It was not long before the Australians became fully operational, flying their first
mission on 3 November 1967. By the end of November the company had flown
3182 hours in support of the US Army 9th Infantry Division and the 1st
Australian Task Force based at Nui Dat, in Phuoc Tuy province.
In December 1967, the 135th AHC was relocated to Camp Blackhorse five
miles south of Xuan Loc, in Long Khanh province. In February 1968, the North
Vietnamese launched the Tet offensive and Camp Blackhorse came under
enemy attack by mortar. Skirmishes on the boundaries became frequent and
the enemy mining of the road from Long Binh to Baria, via Xuan Loc disrupted
supply convoys causing shortages of aircraft spare parts.
In response to the Tet offensive, operations intensified with EMU aircraft
frequently coming under enemy fire and being forced down. The RANHFV
suffered its first casualty during a mission to lift out troops of the 18th Army of
the Republic of Vietnam near Xuan Loc when Lieutenant Commander P.J.
Vickers, RAN, was fatally wounded while piloting the lead aircraft. He was to be
the first of five RAN aviators killed in action during the flight's four-year
deployment to Vietnam.

11/24/2006 06:06 AMGeneral RAN History (Sea Power Centre - Australia)
Page 7 of 8file:///Users/peterhugonnet/Desktop/%2388-NAVY@AWM%2022.11.0…(0700260606)/%2388-11-VIETNAM/NAVY%20IN%20VIETNAM.webarchive
Throughout the RANHFV's deployment there were many individual acts of
bravery performed in the face of the enemy. One such incident occurred on 4
December 1971 when Lieutenant Jim Buchanan, RAN, was piloting a helicopter
operating in the U-Minh Forest. He was engaged in the medical evacuation of a
wounded crew member from a Government patrol boat when the group came
under heavy attack from enemy forces. Another patrol boat, fifty metres away
exploded due to a direct hit by a B40 rocket. Realising that the boat on which he
was operating was disabled and drifting towards the enemy held shore,
Lieutenant Buchanan deliberately hooked the skids of his aircraft onto the boats
superstructure and towed it to a safe area although he was still receiving heavy
automatic weapons and 82mm mortar fire. He was subsequently awarded the
Distinguished Flying Cross.
The gallantry and distinguished service of RANHFV members was recognised
by the award of three Member of the British Empire Medals, eight Distinguished
Service Crosses, five Distinguished Flying Crosses (DFC), one British Empire
Medal, twenty-four Mentions-in-Dispatches and numerous Vietnamese and US
decorations. 723 Squadron, RANHFV's parent unit, was awarded the battle
honour 'Vietnam 1967-71' on 22 December 1972.
The RANHFV ceased operations on 8 June 1971. During its four-year
deployment to Vietnam, over 200 RAN FAA personnel had rotated though the
RANHFV in four contingents. Over this period they were continuously engaged
in offensive operations, earning not only the pilots but also the maintenance and
support staff of the flight, a reputation second to none.
RAN FAA crews also supplemented the Royal Australian Air Force's (RAAF's) 9
Squadron based at Vung Tau. Eight RAN pilots were attached to 9 Squadron
which was also providing troop-lift capacity for the 1st Australian Task Force,
and re-supplying troops in the field with food, ammunition, clean clothing and
stores. An equally important role was aerial fire support using specially modified
UH-1H helicopters dubbed 'Bushrangers' that were introduced early in 1969.The
RAN detachment to 9 Squadron played a significant part in enabling it to meet
its army support role in Phuoc Tuy Province during 1968 and into 1969, until the
last of its pilots returned home in May that year. The eight-man detachment to 9
Squadron RAAF was also recognised with the award of a DFC and three
Mentions-in-Dispatches.
Medical and Support Personnel
Members of the RAN also served at the Headquarters Australian Forces
Vietnam and as detached medical officers. This second group were RAN
doctors who served with 1st Australian Field Hospital and US Army and Navy
hospitals. While serving in this capacity the Navy doctors were also involved in
11/24/2006 06:06 AMGeneral RAN History (Sea Power Centre - Australia)
Page 8 of 8file:///Users/peterhugonnet/Desktop/%2388-NAVY@AWM%2022.11.0…(0700260606)/%2388-11-VIETNAM/NAVY%20IN%20VIETNAM.webarchive
hospitals. While serving in this capacity the Navy doctors were also involved in
the Medical Civil Action Program which provided medical support to the local
civilian population.
Withdrawl
In April 1971 the (then) Prime Minister Mr John Gorton announced that
Australian forces in Vietnam would be reduced. This led to the withdrawal of the
clearance divers in May and the RANHFV in June. The final RAN destroyer on
the gunline, BRISBANE, returned to Sydney on October 15 , 1971.
The Whitlam Labor government withdrew all Australian forces from and stopped
military aid to South Vietnam. JEPARIT returned to Sydney from her final
voyage on March 11, 1972 and was followed the next day by SYDNEY.
During the 10 years that the RAN was involved in the war, eight officers and
sailors were killed and another 46 were either wounded or suffered other
injuries. The dedication and professionalism shown by members of the RAN
earned the Service the respect of our Allies and continued the traditions
established by Australian sailors in other wars.
RAN ships in support of the Vietnam War
Gunline Destroyers Logistic Support Escorts
HOBARTBRISBANE PERTH VENDETTA
SYDNEY BOONAROO JEPARIT
ANZAC DERWENT DUCHESS MELBOURNE PARRAMATTA STUART SWAN TORRENS VAMPIRE VENDETTA YARRA

11/24/2006 06:11 AMGeneral RAN History (Sea Power Centre - Australia)
Page 1 of 4file:///Users/peterhugonnet/Desktop/%2388-NAVY@AWM%2022.11.0…(0700260606)/%2388-11-VIETNAM/9%20SQUAD%20VIETNAM.webarchive
SEA POWER CENTRE - AUSTRALIA
GENERAL RAN HISTORY
Royal Australian Navy Detachment, 9 Squadron RAAF - Vietnam
Those Who Served
RAN Detachment 9 Squadron Awards
Early in 1966 the Australian Government decided to increase the Royal
Australian Air Force's (RAAF) active commitment in Vietnam . Later that year on
12 June, No. 9 Squadron RAAF arrived in Vung Tau equipped with eight
Iroquois UH-1B helicopters.
The squadron was posted to Vietnam with the specific task of operating in direct
support of the 1st Australian Task Force which was based at Nui Dat, a rubber
plantation situated in the centre of Phuoc Tuy Province, about eighteen miles
due north of the Vung Tau air base.
In the later part of 1967, the RAAF began to replace 9 Squadron's UH-1B
aircraft with the larger and more powerful UH-1H variant. At the same time the
squadron's strength was to be doubled from eight to sixteen helicopters. Due to
the RAAF's other commitments in Vietnam , Malaysia and within Australia , this
decision resulted in a severe shortage of airforce pilots and the Royal Australian
Navy (RAN) was asked to fill the gap temporarily. Consequently eight RAN
Fleet Air Arm pilots were assigned for duties with 9 Squadron in 1968.
Lieutenant A.A. Hill, the first of the RAN pilots, joined 9 Squadron in February.
He was followed a month later by Sub-Lieutenants G.E.S Vidal and M.J. Ward.
The remaining pilots joined in May, with Lieutenant Commander R.A. Waddell-
Wood being appointed officer-in-charge of the detachment. In addition to the
RAN detachment thirteen pilots from the Royal New Zealand Air Force also flew
with 9 Squadron.

11/24/2006 06:11 AMGeneral RAN History (Sea Power Centre - Australia)
Page 2 of 4file:///Users/peterhugonnet/Desktop/%2388-NAVY@AWM%2022.11.0…(0700260606)/%2388-11-VIETNAM/9%20SQUAD%20VIETNAM.webarchive
It was particularly appropriate that 9 Squadron should have acquired an RAN
detachment, as the Squadron itself began as No. 101 (Fleet Cooperation) Flight
in July 1925 which was formed to provide aircraft for naval reconnaissance and
survey. Throughout it's history 9 Squadron enjoyed a close relationship with the
RAN particularly during World War II when it operated a number of amphibian
aircraft from RAN ships until it was disbanded in December 1944.
9 Squadron Operations
With nearly all of the 1st Australian Task Force operations being air-mobile in
concept, the first major role of 9 Squadron was to provide troop-lift capacity for
the Army. The Squadron's second major task was re-supplying troops in the
field with food, ammunition, clean clothing and stores.
An equally important role was aerial fire support, and to give 9 Squadron a
greater capacity for direct support of Army ground operations, a specially
modified UH-1H was introduced early in 1969. The 'Bushranger' helicopter was
a UH-1H equipped with a modified XM-21 armament sub-system of two rocket
pods each holding seven 2.75 rockets; two miniguns, each capable of firing
4,800 rounds per minute; and two M60 machine guns, handled by door-
gunners. This armament sub-system could be removed in three hours to
convert the Bushranger gunship to a troop carrying utility (slick) if additional
troop lift capacity was required for operation.
The Bushrangers, operating as a light fire team of two helicopters, escorted
slicks in combat assaults, provided suppressive fire on enemy bunkers and
protected MEDEVAC aircraft. They also supported slicks that inserted and
extracted Army Special Air Service (SAS) patrols in enemy occupied jungle
areas. The extraction of SAS patrols, especially 'hot extractions' when the
patrols were in contact with the enemy, was a particularly dangerous operation.
9 Squadron aircraft were regularly required to land and take off in small
clearings, or hover over jungle within range of hostile fire while taking on board
the SAS troopers.
On 28 July 1968 Lieutenant Commander Waddell-Wood and his RAAF crew
were tasked with one such mission that called for a 'hot' extraction of an SAS
patrol in a jungle-clad area of Phuoc Tuy Province . Due to the presence of

11/24/2006 06:11 AMGeneral RAN History (Sea Power Centre - Australia)
Page 3 of 4file:///Users/peterhugonnet/Desktop/%2388-NAVY@AWM%2022.11.0…(0700260606)/%2388-11-VIETNAM/9%20SQUAD%20VIETNAM.webarchive
patrol in a jungle-clad area of Phuoc Tuy Province . Due to the presence of
thick vegetation, the crew had no choice but to adopt a winch extraction even
though the Viet Cong were firing automatic weapons at the Iroquois from a
range of just thirty metres. Ignoring this fire, the Navy pilot held his helicopter in
the hover until all the troops had been winched aboard and then returned them
to Nui Dat without further incident.
A high degree of flying skill was also called for in missions flown in support of
troops operating in the Long Hai hills, five miles north west of Vung Tau, where
the Viet Cong were entrenched in a complex of caves and bunkers. Here
changeable air currents, few and small landing pads in the narrow valleys, and
the ever present danger of hostile small arms fire combined to place the pilots in
constant jeopardy.
Sub-Lieutenant Geoff Vidal experienced many of these hazards during an
operation in mid 1968. He was tasked to evacuate two wounded Australian
soldiers from the middle of an enemy bunker complex. When he reached the
scene of the contact the naval aviator found that he had to make a hazardous
descent down to the landing zone as the trees in the area were 40 metres high.
He gradually worked his way down to the ground-all the while being subject to
heavy ground fire-and picked up one of the wounded troops (there was only
room in the helicopter for one stretcher case). He then made the equally
hazardous ascent under the cover of gunship attacks, which suppressed some
of the enemy's fire, and delivered the soldier to a safe clearing where he was
transferred to another helicopter and taken to hospital. Sub-Lieutenant Vidal
then returned to the contact site and repeated the whole hazardous process to
extract the second wounded soldier.
The RAN Detachment played a significant part in enabling 9 Squadron to meet
its army support role in Phuoc Tuy Province during 1968 and into 1969 when
the detachment returned to Australia . Most of the RAN pilots also flew missions
with the RAN Helicopter Flight Vietnam attached to the 135 th Assault
Helicopter Company. The deployment had given the RAAF the chance it
needed to increase its pilot training program to cater for an expanded helicopter
squadron in Vietnam .
9 Squadron remained in Phuoc Tuy Province where it continued to support the
1st Australian Task Force up until the time of its withdrawal from Vietnam . The
unit's last operation was flown on 19 November 1971 and its personnel and
helicopters returned to Australia the following months.

11/24/2006 06:11 AMGeneral RAN History (Sea Power Centre - Australia)
Page 4 of 4file:///Users/peterhugonnet/Desktop/%2388-NAVY@AWM%2022.11.0…(0700260606)/%2388-11-VIETNAM/9%20SQUAD%20VIETNAM.webarchive
Sources:
Fairfax D, Royal Australian Navy in Vietnam, Department of Defence, Canberra
Australian Government Publishing Service, 1980
Eather, S, Get The Bloody Job Done, Allen & Unwin, St Leonards, NSW 1980
Images:
All colour photographic images used on this site appear with the express
permission of the owner, Lieutenant Commander J.R. Brown, RANR (Rtd)
Those Who Served
RAN Detachment 9 Squadron Awards

11/24/2006 06:09 AMRoyal Australian Navy Helicopter Flight Vietnam - General RAN History (Sea Power Centre - Australia)
Page 1 of 6file:///Users/peterhugonnet/Desktop/%2388-NAVY@AWM%2022.11.06/%…%20History%20(Sea%20Power%20Centre%20-%20Australia).webarchive
SEA POWER CENTRE - AUSTRALIA
GENERAL RAN HISTORY
Royal Australian Navy Helicopter Flight Vietnam
As the name suggests the Royal Australian Navy Helicopter Flight Vietnam
(RANHFV) was specially formed for service in support of allied forces during the
Vietnam War.
Mr Allen Fairhall, Minister for Defence, announced the formation of this unit on
July 14, 1967. The new flight was to be integrated with the United States Army
135th Assault Helicopter Company (AHC) flying the ubiquitous Iroquois
helicopters in both the utility and gun-ship configurations.
The first contingent of pilots, observers, naval airmen and support staff was
assigned to 723 Squadron Naval Air Station (NAS) Nowra in July 1967 under
the command of Lieutenant Commander Neil Ralph, RAN. The flight consisted
of eight pilots, four observers, four aircrewmen, twenty-four technical sailors
and six support staff comprising of cooks, stewards, writers (clerks), medics and
storemen.
Following an eight-week period of training the first contingent arrived in Vietnam
on 16 October 1967 and was quickly integrated with the 330 personnel of the
135th AHC. As a result of this unique relationship between the R.A.N and the
US Army, the unit was officially designated 'EMU', for Experimental Military Unit.
This was fitting, given that the Emu is a native Australian bird, and in some
ways comical as the Emu cannot fly.
135th Assault Helicopter Company
The 135th AHC was based at Vung Tau and organised to operate two troop lift
('slick') platoons, each with eleven UH-1Ds, a gunship platoon with eight UH-
1Cs, a maintenance platoon with a single UH-1D and a headquarters platoon.
Six of the gunships were equipped with mini guns, rockets and machine guns.
The remaining two were fitted with the XM-5 40mm grenade launcher system
(mounted in a ball turret under the nose of the helicopter) rockets and machine
guns.

11/24/2006 06:09 AMRoyal Australian Navy Helicopter Flight Vietnam - General RAN History (Sea Power Centre - Australia)
Page 2 of 6file:///Users/peterhugonnet/Desktop/%2388-NAVY@AWM%2022.11.06/%…%20History%20(Sea%20Power%20Centre%20-%20Australia).webarchive
The role of the 135th AHC was to provide tactical air movement of combat
troops, supplies and equipment in air-mobile operations. This included
augmentation of army medical services, search and rescue and the provision of
a command and control aircraft capability to supported units.
First Operations
Having established their camp, and with a full complement, the 135th AHC
become fully operational and flew its first mission on 3 November 1967. By the
end of November the company had flown 3182 hours in support of the US Army
9th Infantry and the 1st Australian Task Force based at Nui Dat, Phuoc Tuy
province. The usual daily commitment was one UH1H command and control
helicopter, four UH1C gunships and ten slicks.
The company's first major operation, Operation Santa Fe , was a lift of 9th
Infantry Division troops into northeast Phuoc Tuy in early November 1967. This
operation involved more than 80 helicopters from a number of helicopter
companies flying in support of a combined allied sweep against the 5th Viet
Cong Division. It was also one of the largest operations any RANHFV
contingent participated in. Operation Tiger Coronado followed and it was during
this operation that helicopters of the AHC were first hit by enemy fire.
First Helicopter Shot Down
The first EMU aircraft to be shot down (and the first with an Australian pilot to
be hit) was a gunship piloted by Sub Lieutenant Anthony Casadio, RAN. This
occurred on 19 November 1967, during an attack on Viet Cong positions in the
Rung Sat Special Zone near Saigon . After his gunship was hit by ground fire
several times Lieutenant Casadio force-landed near the enemy. Once on the
ground the Viet Cong immediately attacked the helicopter crew. Despite their
relative inexperience, the young American soldiers and their Australian Navy
captain maintained control of the situation and set up a defensive perimeter
using the helicopter's door-mounted M60 machine guns. The M60s combined
with the small arms they all carried afforded the crew a degree of self-
protection. Meanwhile Lieutenant John Leek, RAN in an accompanying gunship

11/24/2006 06:09 AMRoyal Australian Navy Helicopter Flight Vietnam - General RAN History (Sea Power Centre - Australia)
Page 3 of 6file:///Users/peterhugonnet/Desktop/%2388-NAVY@AWM%2022.11.06/%…%20History%20(Sea%20Power%20Centre%20-%20Australia).webarchive
circled overhead until his fuel ran dangerously low and he was forced to leave
the scene.
Before Sub-Lieutenant Casadio and his men were rescued by another EMU
helicopter, they successfully drove off an unknown number of Viet Cong, killing
two of the enemy in the process. A Chinook helicopter later lifted the downed
helicopter from the crash site and recovered it back to Vung Tau.
Camp Blackhorse
In December 1967 the company experienced its first night combat operations
and Lieutenant Commander Ralph experienced his first assignment as air
mission commander. In late December the company moved from the secure
base at Vung Tau to Camp Blackhorse , thirty five miles away and on a main
road five miles south of Xuan Loc, Long Khanh province. Blackhorse, in the
middle of rubber plantations and jungle was dependent on convoys from Long
Binh to bring food, ammunition and fuel to it. It was also dangerously vulnerable
to rocket and mortar attack. Its unsealed runways caused it to be extremely
dusty in the 'dry' and, conversely, a sea of mud in the 'wet' so that take-offs and
landings required more than the usual exercise of caution.
The shift to Blackhorse committed the 135th to the support of more units over a
greater area. On January 8, 1968, eight EMU helicopters were hit by enemy
ground fire while supporting elements of the 9th Infantry Division's 3/39th
Infantry Battalion outside Saigon . On this occasion the insertion and extraction
of troops that went on well into the night was led by Lieutenant B.C. Crawford,
RAN.
First RAN Sailors Injured
On January 12 1968 the RANHFV suffered its first casualties when Leading
Seaman Kevin French and Naval Airman Keith Wardle of the maintenance
platoon were injured when the gunship in which they were travelling was forced
down in jungle some miles north of Baria, Phuoc Tuy province. The men
scrambled clear as the wreck caught fire, detonating ammunition and rockets. A
RAAF helicopter from 9 Squadron was soon on the scene and the downed
aviators were winched from the jungle and evacuated to hospital. Leading
Seaman French soon recovered from this ordeal but Able Seaman Wardle
suffered very severe injuries necessitating his evacuation to Australia .
The 135th's relationship with 9 Squadron, RAAF, was first established when
both units shared the tarmac at Vung Tau, this relationship was further
strengthened early in 1968 when 9 Squadron began to replace its UH-1Bs with
larger and more powerful UH-1Hs. To help the RAAF Squadron achieve an
easy transition it was arranged that a number of its pilots would be attached to

11/24/2006 06:09 AMRoyal Australian Navy Helicopter Flight Vietnam - General RAN History (Sea Power Centre - Australia)
Page 4 of 6file:///Users/peterhugonnet/Desktop/%2388-NAVY@AWM%2022.11.06/%…%20History%20(Sea%20Power%20Centre%20-%20Australia).webarchive
easy transition it was arranged that a number of its pilots would be attached to
the 135th's slick platoons for conversion training. Subsequently, RAAF and
RNZAF pilots saw action with the EMUs for several months. It should be noted
that RAN pilots also augmented 9 Squadron during its service in Vietnam .
Operations continued throughout January 1968 during which Lieutenant
Commander Ralph and the crew of the command and control helicopter
survived three mortar attacks on the ground during a vigorous fire fight between
a Viet Cong force and elements of the US 25th Infantry Division at Duc Hoa
west of Saigon . Two company gunships were hit by enemy fire and during the
widespread Tet offensive of February 1968, the increasing Viet Cong activity in
III Corps emphasised the vulnerability of Blackhorse. Skirmishes on the
boundaries became frequent and the enemy mining of the road from Long Binh
to Baria, via Xuan Loc disrupted supply convoys causing shortages of spare
parts.
First EMU Personnel Killed in Acton
On February 8, members of an enemy group later assessed as five companies
strong attacked EMU aircraft flying in support of the 9th Infantry Division near
My Tho. In this action, sniper fire was directed at the ten lift aircraft led by
Lieutenant Commander Pat Vickers. On the third lift in, automatic fire and
Rocket Propelled Grenades (RPG) brought down one helicopter that crashed
into the jungle. All the US Army crew were killed. Sub Lieutenant Jeff Dalgleish
had a lucky escape in this action when rounds pierced the tail boom of his
aircraft and almost severed the tail rotor control cables. He landed the helicopter
just as the cables gave way and until he could be lifted out he was protected
from further attacks by covering gunships. Forced down nearby was a helicopter
piloted by Lieutenant Crawford that had been hit in the fuel tank. Most of the
crew from the two downed aircraft spent the night with 9th Infantry Division
troops before being airlifted back to Blackhorse. During the action eight
helicopters were hit by ground fire and two were irreparably damaged.
On February 20, EMU helicopters assisted the 1st Australian Task Force in
Operation Clayton , a cordon and search of the village of long Dien near Dat Do
on Highway 23 in Phuoc Tut province. Two days later Lieutenant Commander
Vickers was fatally wounded while piloting the lead aircraft in a mission to lift out
troops of the 18th Army of the Republic of Vietnam (ARVN) Division near Xuan
Loc. Descending to the pick up zone, his aircraft was hit by enemy fire and
Lieutenant Commander Vickers was wounded. The co-pilot immediately flew the
helicopter to Blackhorse, landing on the hospital pad within five minutes.
Notwithstanding this prompt action Lieutenant Commander Vickers died without
regaining consciousness.
Enemy Activity at Blackhorse
With the Tet offensive declining, enemy activity decreased around Blackhorse.
This however, did not stop the base from being the target of forty-two enemy
mortar rounds in the early hours of March 9. Not all of the missiles exploded,
however eight personnel were injured and several buildings sustained minor
damage. Enemy mining of Blackhorse-Xuan Loc road continued and Petty
Officer O.C. Phillips, the company's construction NCO, escaped injury when a
vehicle he was travelling in detonated a mine tearing off one the vehicles tracks.
An American civilian engineer was killed in this incident.
Operation Ashgrove Tram
On 25 March 1968, EMU slicks with helicopters of 9 Squadron RAAF lifted
troops of ANZAC Battalion (2nd Battalion RAR/1st Battalion RNZIR) from Nui
Dat to Xa Long Hai, a fishing village at the foot of the Long Hai Hills. A total of
2085 Vietnamese were screened in this operation, code-named Ashgrove Tram. The infantry were lifted back to Nui Dat the next day.

11/24/2006 06:09 AMRoyal Australian Navy Helicopter Flight Vietnam - General RAN History (Sea Power Centre - Australia)
Page 5 of 6file:///Users/peterhugonnet/Desktop/%2388-NAVY@AWM%2022.11.06/%…%20History%20(Sea%20Power%20Centre%20-%20Australia).webarchive
By the end of March 1968, the EMUs were flying in support of the 5th, 18th and
25th ARVN Divisions. The commitment to combat assaults and troop lifts was
varied by general support missions carried out every fourth day. The company
also supplied eleven utility helicopters which were employed singly as command
and control aircraft for ground operations, and for essential administrative and
re-supply sorties.
Ambushes
Early in May, an 18th ARVN Division convoy was ambushed on highway 1 at
Dinh Quanh north of Xuan Loc. The rapid counter-action of the 'Taipans' (the
EMU gunships) and tactical air support helped to kill 200 of the attacking Viet
Cong.
On May 18th a flight of ten Hueys put down in a landing zone near Tan An
without the usual 'softening up' by artillery and gunships in an attempt to take
the Viet Cong by surprise. The experiment proved disastrous. The helicopters
settled into the paddy field without opposition but, as their troops began to
disembark, they came under intense fire from the Viet Cong who had been
waiting, concealed in small 'spider' holes, complete with lids which had rice
growing on them. All the aircraft were hit and some of the ARVN troops
panicked and refused to get out. After unloading their troops all of the
helicopters took off but few made it back to base as most crashed or force-
landed on the way. Two helicopters were 'written off' and the remaining eight
were badly damaged. Though aircraft were seriously damaged, crew injuries
generally were light. One crew remained unscathed in spite of 22 rounds
passing through the aircraft while a bullet passed through the windscreen of
Lieutenant Crawford's helicopter, three inches from his head. As this ambush
had successfully immobilised most aircraft of this EMU flight, a relief flight was
called in to complete the operation.
Jungle Crash
On June 13 Lieutenant John Leak, Lieutenant Andy Craig (of RAN detachment,
9 Squadron RAAF), and Leading Air Mechanic A. Green were injured when a
lateral cyclic control rod broke (possibly due to gunfire), sending their helicopter
into an uncontrolled spiral dive. It came out of the dive just above the jungle
canopy, but still out of control it crashed through the trees coming to rest in a
more or less level position. The injured crew extracted themselves from the
wreck with the engine of the aircraft screaming and unable to be shut down.
After spending some time alone in enemy occupied territory they were later
winched to safety by a RAAF MEDEVAC (medical evacuation) helicopter and
taken to the 1st Australian Field Hospital at Vung Tau, later being evacuated to
Australia .
Aircraft Hit
Six company aircraft were hit on July 25 while bringing troops of the 25th ARVN
Division into a landing zone near Ben Luc, southwest of Saigon . Light enemy
fire received on the first landing was suppressed by the accompanying
gunships. The six aircraft were hit on the second landing by rifle fire from Viet
Cong who were well entrenched in 'spider' holes with concrete lids. Six
disembarking ARVN soldiers were killed during this insertion. On this occasion
the helicopter piloted by Lieutenant Godfrey received several rounds, but no
RAN personnel were injured.

11/24/2006 06:09 AMRoyal Australian Navy Helicopter Flight Vietnam - General RAN History (Sea Power Centre - Australia)
Page 6 of 6file:///Users/peterhugonnet/Desktop/%2388-NAVY@AWM%2022.11.06/%…%20History%20(Sea%20Power%20Centre%20-%20Australia).webarchive
August 1968 brought large-scale enemy movements through III Corps, in
contrast to June and July, when contact with Viet Cong was infrequent.
Blackhorse again attracted attention in the form of mortar attacks in the early
hours of August 15, and it became apparent that this was a Viet Cong tactic to
keep helicopter gunships grounded while they attacked ARVN outposts at Gia
Ray ten miles from the camp. Heavy fighting followed nearer Blackhorse on the
23rd as units of the 18th ARVN Division battled with a large Viet Cong force.
The EMUs kept the ARVN units supplied with reinforcements and lifted an
ARVN battalion into a blocking position to the rear of the enemy.
Further Casualties
The gunship platoon suffered further casualties on 21 August 1968 when a light
fire team was engaged by enemy troops equipped with Rocket Propelled
Grenades (RPGs) near Blackhorse. The lead gunship, captained by Lieutenant
Casadio, RAN, flying at tree top level was hit by one of these deadly projectiles
and exploded in flames before crashing through trees and exploding. Lieutenant
Dalgleish, RAN, landed his helicopter quickly in an attempt to rescue the crew,
but all had been killed, and the exploding ammunition stopped attempts to
extinguish the fire. Petty Officer O.C. 'Darky' Phillips of the RANHFV also lost
his life in this incident as did Warrant Officer Hershel Bullock (USA) and
Specialist 4 William Fennell (USA). The loss of these aviators was deeply felt
within the 135th AHC.

ISSUE # 2 (July 2007)
BACKGROUNDER # 88
NAVY
at the
Memorial
Section 18
POST 45 CONFLICTS
Contents
Malayan Emergency {6.06.48-31.07.60*}
• The RAN, the Strategic Reserve and the Malayan Emergency. SEAPOWER Centre website
December 2006
Indonesian Confrontation {24.12.62-11.08.66*}
• RAN and Indonesian Confrontation. SEAPOWER Centre website
Malay Peninsular {19.02.64 -11.08.66*}
First Gulf War
• Gulf War 1990 - 1991.AWM Encyclopedia April 2004
East Timor {16.09.99-18.08.03*}
• Operation Astute- The RAN in East Timor. SEMAPHORE #12 June 2006
Thailand {25.06.65-31.08.94*}
Somalia {20.10.92-30.11.94}
Afghanistan {11.10 01-18.08.03*}
Iraq {16.07.03-Continuing*}
• Iraq Lessons: The More Things Change….SEMAPHORE #6 August 2003
• The RAN in the Gulf -Two Years On. SEMAPHORE Issue #3 March 2005
• Operation Catalyst. ADF website May 2007
* AWM Roll of Honour Specified Dates
See also BACKGROUNDERS:
# 1 Issue #1 June 1998 The Malayan Emergency
# 3 Issue #1 July 1998 Confrontation with Indonesia
# 6 Issue # 1 August 1998 Gulf War (Middle East) 1990-91
# 11 Issue #1 The Malayan Emergency – a guides perspective
#74 Issue #1 April 2004 Australians in Iraq
This Section will be reviewed and updated as necessary to reflect the redeveloped
Post 45 Gallery in late 2007

ISSUE #2(July 2007)
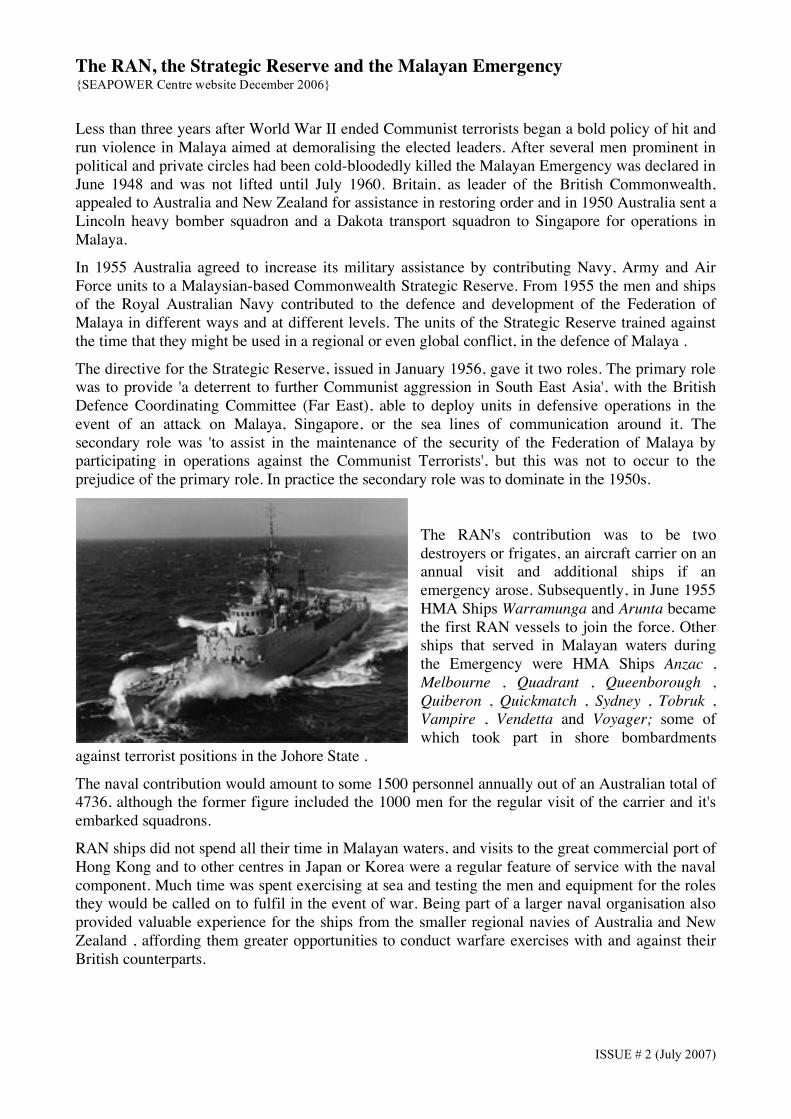
ISSUE # 2 (July 2007)
The RAN, the Strategic Reserve and the Malayan Emergency {SEAPOWER Centre website December 2006}
Less than three years after World War II ended Communist terrorists began a bold policy of hit and
run violence in Malaya aimed at demoralising the elected leaders. After several men prominent in
political and private circles had been cold-bloodedly killed the Malayan Emergency was declared in
June 1948 and was not lifted until July 1960. Britain, as leader of the British Commonwealth,
appealed to Australia and New Zealand for assistance in restoring order and in 1950 Australia sent a
Lincoln heavy bomber squadron and a Dakota transport squadron to Singapore for operations in
Malaya.
In 1955 Australia agreed to increase its military assistance by contributing Navy, Army and Air
Force units to a Malaysian-based Commonwealth Strategic Reserve. From 1955 the men and ships
of the Royal Australian Navy contributed to the defence and development of the Federation of
Malaya in different ways and at different levels. The units of the Strategic Reserve trained against
the time that they might be used in a regional or even global conflict, in the defence of Malaya .
The directive for the Strategic Reserve, issued in January 1956, gave it two roles. The primary role
was to provide 'a deterrent to further Communist aggression in South East Asia', with the British
Defence Coordinating Committee (Far East), able to deploy units in defensive operations in the
event of an attack on Malaya, Singapore, or the sea lines of communication around it. The
secondary role was 'to assist in the maintenance of the security of the Federation of Malaya by
participating in operations against the Communist Terrorists', but this was not to occur to the
prejudice of the primary role. In practice the secondary role was to dominate in the 1950s.
The RAN's contribution was to be two
destroyers or frigates, an aircraft carrier on an
annual visit and additional ships if an
emergency arose. Subsequently, in June 1955
HMA Ships Warramunga and Arunta became
the first RAN vessels to join the force. Other
ships that served in Malayan waters during
the Emergency were HMA Ships Anzac ,
Melbourne , Quadrant , Queenborough ,
Quiberon , Quickmatch , Sydney , Tobruk ,
Vampire , Vendetta and Voyager; some of
which took part in shore bombardments
against terrorist positions in the Johore State .
The naval contribution would amount to some 1500 personnel annually out of an Australian total of
4736, although the former figure included the 1000 men for the regular visit of the carrier and it's
embarked squadrons.
RAN ships did not spend all their time in Malayan waters, and visits to the great commercial port of
Hong Kong and to other centres in Japan or Korea were a regular feature of service with the naval
component. Much time was spent exercising at sea and testing the men and equipment for the roles
they would be called on to fulfil in the event of war. Being part of a larger naval organisation also
provided valuable experience for the ships from the smaller regional navies of Australia and New
Zealand , affording them greater opportunities to conduct warfare exercises with and against their
British counterparts.

ISSUE # 2 (July 2007)
Service with the Strategic Reserve could at times be arduous. Life at sea in the tropics was
occasionally dangerous and seldom pleasant in mess decks that had no air conditioning (seven
members of RAN ships were killed accidentally or died of other causes while serving with the
Strategic Reserve).
The naval component's secondary role in combating the communist terrorists (CTs) during the
Emergency was largely symbolic. However, it should be noted that the effective naval blockade
against the supply of arms and ammunition to the CTs from sources outside the country denied
them any effective use of the sea throughout the Emergency.
Between 1955 and 1960 a total of 13 RAN ships served with the Strategic Reserve. Some of these
attachments were for short periods involving, for example, participation in exercises conducted
under the auspices of the South East Asia Treaty Organisation (SEATO). More generally however,
an attachment lasted between six and nine months.

ISSUE # 2 (July 2007)
RAN and Indonesian Confrontation {SEAPOWER Centre website December 2006}
At the end of the Malayan Emergency Australia agreed to keep forces in Malaya-Singapore as part
of the British Commonwealth Strategic Reserve, and the RAN had two frigates, Yarra and
Parramatta there on duty when the Indonesian policy of 'confrontation' began with the new nation
of Malaysia . Malaysia had been formed in 1963, embracing the British colonies of Malaya ,
Singapore (later to withdraw) Sarawak (North Borneo) and Sabah . Fearing that the new Federation
posed a threat, Indonesia 's President Sukarno decided to demonstrate Indonesia 's opposition.
Indonesian forces made shore landings in Borneo and Malaya, paratroopers were dropped into
Malaya early in the confrontation and naval skirmishes occurred in the straits of Malacca. Grave
fears were therefore held for the stability of the region. As tension mounted, Australia increased its
presence by sending HMAS Sydney , the destroyers Vampire , Vendetta and Duchess and the
frigate, Derwent to the area. Sydney had by now been converted to a fast troop transport and carried
troops and equipment to Jesselton in North Borneo .
The 16th Minesweeping Squadron comprising six Ton Class coastal minesweepers was also
assigned for duties during Confrontation arriving in Malaysian waters in May 1964. Initially their
patrol duties were centred in Borneo . They had a standard displacement of 360 tons, a maximum
speed of 15 knots, a crew of three officers and 30 ratings and were armed with two 40/60mm
Bofors guns, together with light automatic weapons.

ISSUE # 2 (July 2007)
On 10 November 1964 Prime Minister Menzies told Parliament that there had been a 'deterioration
in Australia 's strategic situation' and announced big manpower and equipment increases in the
navy, army and airforce. 'Indonesian attacks,' the Prime Minister told parliament, may create a real
risk of war. it is tremendously important to us that Indonesia should not become Communist.
On 13 December 1964, as if to echo the Prime Minister's concerns, the minesweeper HMAS Teal,
Lieutenant K. Murray, RAN, whilst operating as part of the Singaporean Straits patrol, was fired
upon with automatic weapons by an unlit vessel. The attacking vessel (one of two) then shaped
course for Indonesian waters but was overpowered and arrested by Teal following a further small
arms engagement that resulted in the deaths of three Indonesian crew members. For his coolness
and judgment during this, and a previous, interception Lieutenant Murray was awarded the
Distinguished Service Cross, the only award for gallant or distinguished service made to the RAN
during Confrontation.
Teal was involved in another interception on 23 February 1965 when she detected an unlit vessel
nine miles off Cape Rachado . The suspicious vessel was closed and illuminated, and revealed nine
fully armed infiltrators in uniform who surrendered immediately upon challenge. The contacts
between December 1964 and February 1965 were symptomatic of a period of considerably
heightened activity by the Indonesians, and although few of their infiltration parties actually made it
ashore in Malaysia , the level of effort required to stop them stretched the security forces
considerably.
Teal was not the only ship of the 16th Squadron to see action. On 13 March 1966 while patrolling
off Raffles Light HMAS Hawk , under the command of Lieutenant J.D. Foster, RAN, came under
fire from an Indonesian shore battery, even though the minesweeper was inside Singapore territorial
waters. Two salvoes totalling 11 high explosive rounds were fired at the ship, landing within 200
yards of the vessel. Hawk retired at speed, and without retaliating, since fire ceased immediately the
minesweeper got under way. The following morning Hawk 'evened the score' when it intercepted a
sampan with five Indonesians on board who were promptly arrested.
This trend of interrogating suspicious vessels
and making arrests continued throughout
Confrontation. It was hard, long, tedious and
exacting work with little to show as a result.
During a five-month period on patrol activities
in 1964-65, HMAS Ibis spent 87 of 100 days at
sea. Throughout Confrontation the small Ton
Class Minesweepers proved to be a worthy
gunboat with a useful all round capability.
However it came as no comfort to those onboard
to know that they were out-gunned by nearly
every Indonesian warship in the region.

ISSUE # 2 (July 2007)
As Indonesia continued its 'confrontation' the British organised substantial naval forces to defend
Malaysia . RAN destroyers, frigates and minesweepers maintained their patrols in the Malacca,
Singapore and Johore Straits and in the Tawau area of North Borneo as well as joining in exercises
with fleet units of the Malaysian Navy. When Indonesian forces crossed the border into eastern
Sebatik Island near Tawau, Sabah on 28 June 1965, HMAS Yarra was called on to carry out
bombardments designed to harass the withdrawal of the infiltrators. During three runs Yarra fired a
total of 70 rounds. Bombardments of the border area of Sebatik were again carried out on 5 and 10
July, the targets on all occasions being within Sabah .
On the night of 30 September/1 October 1965, a communist inspired coup attempt occurred in
Indonesia . Six senior generals were slain, but the coup failed and was followed by widespread
violence and bloodshed. It proved a turning point for 'confrontation', which thereafter declined. On
13 August 1966 a formal agreement concluded between Indonesia and Malaysia brought the
conflict to an end.
The Far East Strategic Reserve maintained an on-going presence in Southeast Asia until 1971 at
which time the Five Power Defence Arrangements came into effect replacing the arrangements of
earlier years associated with the Anglo-Malaysian Defence Agreement.
Sources and Further Reading :
. Stevens, D. The Royal Australian Navy - The Australian Centenary History of Defence Vol III,
Oxford University Press, Melbourne ,2001
0. Odgers, G. Navy Australia , National Book Distributors, Brookvale, NSW, 1993 George Odgers
0. Royal Australian Navy - A Brief History, Department of Defence, Canberra , 1985
0. Grey, J. Up Top The Royal Australian Navy and Southeast Asian Conflicts 1955-1972
0. Allen & Unwin, St Leonards, NSW, 1998
0. Foster, J. Hands to Boarding Stations - The Story of the Minesweeper HMAS Hawk
0. Australian Military History Publications, Loftus, NSW, 2003
Defence Report 1972 , Department of Defence, Canberra , 1972

ISSUE #2(July 2007)

ISSUE # 2 (July 2007)
Gulf War 1990 - 1991 {AWM Encyclopedia April 2004}
Iraq invaded its rival oil-exporting neighbour, Kuwait, on 2 August 1990. The invasion was widely
condemned, and four days later the United Nations Security Council unanimously approved a trade
embargo against Iraq. A blockade of Iraq's access to the sea followed within weeks, as the United
States assembled a large multinational task force in the Persian Gulf, while another was formed in
Saudi Arabia. By the end of 1990 this force numbered some 40,000 troops from thirty countries,
though the US retained its high profile as the dominant partner in the coalition.
In November 1990 the UN Security Council set 15 January 1991 as the deadline for an Iraqi
withdrawal from Kuwait. On 17 January coalition forces began an aerial bombardment of Iraq that
continued without respite until the war ended 43 days later.
On 24 February 1991, after more than a month of aerial attacks, the coalition's ground forces moved
against Iraqi positions in Kuwait and in Iraq itself. The magnitude and decisiveness of these strikes
destroyed what was left of Iraq's capacity to resist. After two days of strikes Baghdad radio
announced that Iraq's armed forces had been ordered to withdraw from Kuwait to the positions they
had occupied before August 1990. Two days after this order, the coalition ceased hostilities and
declared victory. Coalition losses amounted to 166, many by "friendly fire"; at least 100,000 Iraqis
had been killed.
GULF OF OMAN? 1990-09. INTERCEPTION OF THE IRAQI MOTOR VESSEL TADMUR, SUSPECTED OF FLOUTING TRADE
SANCTIONS AGAINST IRAQ. THIS WAS A MULTI NATIONAL OPERATION IN CONJUNCTION WITH THE ROYAL NAVY AND THE
UNITED STATES NAVY. THE VESSEL WAS SUBSEQUENTLY BOARDED AND DIVERTED FOLLOWING THE DISCOVERY OF
PROHIBITED GOODS. ON THE HMAS DARWIN BRIDGE WING IS CAPTAIN RUSSELL E. SHALDERS AND WARRANT OFFICER
SIGNALS YEOMAN B. W. KANE. NOTE THE FLAK JACKETS AND STEEL HELMETS IN THE EVENT OF IRAQI RETALIATION.
(DONOR R. SHALDERS)
Australian forces were deployed in the Gulf War under the auspices of the UN. The Royal
Australian Navy (RAN) provided vessels for the multi-national naval force, which formed an
interception force in the Persian Gulf to enforce the UN sanctions. The RAN presence included two
frigates and the replenishment ship HMAS Success, which, having no air defences of its own, relied
on the army's 16th Air Defence Regiment. In January 1991 the replenishment tanker HMAS
Westralia left Fremantle to relieve Success. Four warships, HMAS Sydney (IV), HMAS Adelaide,
HMAS Brisbane and HMAS Darwin also served tours of duty in the Persian Gulf. During the
operational phase of their deployment they formed part of the anti-aircraft screen for the carrier

ISSUE # 2 (July 2007)
battle groups of the US Navy. A RAN clearance diving team was also dispatched for explosive
ordnance and demolition tasks.
In addition to naval units, Australian personnel took part on attachment to various British and
American ground formations. A small group of RAAF photo-interpreters was based in Saudi
Arabia, together with a detachment from the Defence Intelligence Organisation. Four medical teams
were also dispatched at the request of the US. Although the ships and their crews were in danger
from mines and possible air attack, Australia's war was relatively uneventful, and there were no
casualties. At the war's end 75 Australian personnel were sent to northern Iraq to assist the delivery
of humanitarian aid to Kurds living in the UN-declared exclusion zone, while ships of the RAN
remained on station, at US request, to maintain trade sanctions.
GULF OF OMAN? C.1990-10. HMAS DARWIN (04) DURING REPLENISHMENT AT SEA FROM HMAS SUCCESS (304).
NOTE THE AUSTRALIAN FLAG PAINTED ON THE MID SHIP SUPERSTRUCTURE OF HMAS SUCCESS.
Sources and further reading:
Peter Dennis et al., The Oxford companion to Australian military history, Oxford University Press,
Melbourne, 1995.
J. Bickerton, 43 days: the Gulf War, Text Publishing and the Australian Broadcasting Corporation,
Melbourne, 1991.

Sea Power Centre - AustraliaDepartment of DefenceCANBERRA ACT 2600
[email protected]://www.navy.gov.au/spc/
SEMAPHOREOPERATION ASTUTE – THE RAN IN EAST TIMOR
Operation ASTUTE, the ADF’s recent deployment of‘troops to bring security, peace and confidence to thepeople of Timor-Leste’,1 has been accompanied by theexpected flood of media analysis. With some 1300soldiers once more facing a challenging mission onforeign soil, the tendency has been to focus on the land-force contribution because, as one columnist put it,‘Whatever we do and wherever we do it the army isalmost certain to be playing the central role’.2 The dangerassociated with such themes is the often explicit dismissalof the force-enabling role played by other ADFcapabilities. ‘Our high-tech weaponry is useless in these[asymmetric warfare] situations’, another writer opined,‘when the key to victory is boots on the ground’.3
Oversimplifications and misrepresentations such as thesedo nothing to enhance our understanding of currentoperational experience and little to address future securityconcerns. Regrettably, too few analysts comprehend thata credible ADF must necessarily be a flexible, balancedjoint force. That is, one in which the integrated capabilitiesof the three Services work together to provide operationalsynergy. Moreover, rather than structuring to meet aparticular set of circumstances, the ADF must besufficiently versatile to respond effectively across a widespectrum of operations, at times preparing for threatlevels which may ultimately never eventuate. Deterrence,after all, is far preferable to victory on an Australianbattlefield.
This is not to suggest that the ADF can have it all: alimited budget must always be prioritised. But it is herethat cost-effectiveness comes into play, and given thelong lead times and service lives of modern defencehardware, it would be wise to procure inherently flexibleassets. The propensity of some defence commentators toadvance a few narrowly focused capabilities at the totalexpense of others carries the risk of strategic irrelevance,as the security climate inevitably changes. Suchproposals would also upset the ADF’s ability to applycredible power across a range of contingencies. Anyincrease to the size of a modern Army, for example,brings with it the need to add joint force enablingcapabilities in order to provide support and protectionwhen deployed. Operation ASTUTE offers a salutarylesson in this context because, despite the ongoing mediacommentary, it began and continued as a joint operationand while publicised as a ‘troop deployment’, was in fact atext book example of littoral maritime power projection.4
It is food for thought that the land forces were not simplyassisted by naval elements during ASTUTE, but at afundamental level relied upon the many and variedcapabilities brought by one of the largest RAN task groupsoperationally deployed since World War II. Involving fivemajor and three minor fleet units, ASTUTE’s initial forceallocation was only slightly less than the number ofwarships assigned to the 1999 INTERFET (International
Force East Timor) deployment, Operation STABILISE. Inview of the planned acquisition of two large amphibiousships of the Canberra class from 2012, it is especiallynoteworthy that ASTUTE witnessed the first operationaldeployment of the ADF’s Amphibious Ready Group(ARG), comprising the amphibious transports HMA ShipsKanimbla and Manoora, and heavy landing ship HMASTobruk. Acting together these units established an ArmyBattalion group ashore within three days. Using either ofthe designs currently proposed for the Canberra class, asimilar sized expedition could be transported in a single liftand landed in a matter of hours.
The Amphibious Ready Group off Dili, May 2006 (RAN)The call for help from the government of Timor-Lestecame on 24 May and crucial to Australia’s rapid reactionwas the readiness of the ADF’s maritime assets and theeffectiveness of individual and collective training regimes.Sailing from Darwin early on 25 May, Kanimbla was firstdiverted to the south coast of Timor, where she providedfacilities to four Army helicopters unable to reach Dili dueto poor weather. She entered Dili Harbour late on 26 Maywith an operational Primary Casualty Reception Facility,staff essential to initial operations, and priority military andhumanitarian aid stores. Soon following Kanimbla into Diliwere Manoora and Tobruk, which had sailed fromTownsville on 24 May. Each carried several hundredtroops and their equipment together with armouredpersonnel carriers and associated support vehicles.
The chaotic environment ashore required the land forcesto be disembarked in a high state of tactical readiness,and with Dili port facilities unsecured this relied entirely onthe over-the-beach capabilities provided by the ARG andits embarked helicopters. Manoora, for example, carriedfour Black Hawks in addition to a Sea King, and theseconducted an air assault on 28 May. She also had onboard a Deployable Geo-spatial Support Team whichsurveyed the landing sites prior to the amphibious assaultconducted by hard-worked RAN heavy landing craft (HMAShips Balikpapan, Tarakan, Labuan and later Wewak)and Army LCM8s. Some of these smaller units will likelyremain until the ADF’s final withdrawal for, as has beendemonstrated time and again within our region’s
NEWSLETTER OF THE SEA POWER CENTRE - AUSTRALIA ISSUE 12, JUNE 2006

Sea Power Centre - AustraliaDepartment of DefenceCANBERRA ACT 2600
[email protected]://www.navy.gov.au/spc/
underdeveloped operational environments, scope formanoeuvre ashore can be highly constrained. Thecorollary is that an amphibious capability to provide inter-and intra-theatre lift is a vital enabler of land operations.
Furthermore, no military operation can be sustainedwithout the necessary accompanying infrastructure. TheArmy Company group first deployed to East Timor by C-130 late on 25 May did not have the luxury of a prolongedbuild-up to create a base from which to operate, achieveoperational mass and establish appropriate supportmechanisms. The ARG not only brought these essentialheavier and second level forces into theatre, but alsooffered an immediately functioning offshore base, therebyallowing the force ashore to maximise its effectivenesswhile minimising its footprint. Support roles are intrinsic tothe design of amphibious ships and in addition tofunctioning as a large heliport, fuel dump and hospital, theARG acted or could potentially have served as acommunications centre, hotel, food service centre, portsecurity force, and supply depot for items as diverse astoilet paper, clothing and ammunition.
However, the amphibious and logistic enabling activitiesof the ARG only touch on the totality of the naval roleduring ASTUTE’s early phases. One of the critical navaltasks during Operation STABILISE in 1999 was to providepresence, and the RAN deployed several major surfacecombatants to ensure the area was safe duringINTERFET’s initial insertion. That the threat was of adifferent scale and nature in May 2006 did not lessen theimportance of advance force operations,5 particularlysince naval units operated in a dimension that potentialantagonists were unable to oppose. As the Vice Chief ofthe Defence Force flew into Dili airport with the firsttroops, the FFG HMAS Adelaide appeared over thehorizon.6 While tasked for border protection underOperation RELEX II, the frigate had been simultaneouslypoised ready to assist off East Timor, offering a range ofcombat, surveillance, command and control and aviationcapabilities. The ADF had ‘to go in there with plenty ofcombat power’, noted the Chief of the Defence Force,[and] ‘demonstrate that we have very good capability’.Adelaide, he continued, was ‘a very handy asset tohave…and of course as we all know, when a naval shipsteams into port, it does have an effect that is good tocreating a stable environment’.7
Allowing sustainment of the naval presence and addingher own not inconsiderable bulk was the replenishmentship, HMAS Success. Joining Adelaide on a patrol lineclose off Dili Harbour at dawn on 26 May, the highlyvisible and professional appearance of the two warshipshad a significant impact on perceptions ashore. Indeed,during the critical early hours, before sufficient troopswere available to deploy throughout Dili, high-endmaritime combat capabilities combined with the inherentmobility of warships went far towards making theAustralian presence seem ubiquitous. The overt navalpresence also brought a measure of reassurance to thefew Australian forces then in Dili; should the situationhave become untenable, then an emergency extractionwould not have been possible without the presence of themaritime component.
With the ARG’s arrival Adelaide’s mission shifted toproviding cover,8 but by 28 May the security situation hadclarified to the extent that it no longer warranted her
presence. Testament to the ability of warships tosuccessfully conduct wide-ranging activities over vastdistances with little or no notice, Adelaide returned to herprevious RELEX tasking, while Success was soon in theSouth China Sea replenishing a US Navy task groupproceeding to provide humanitarian aid to the victims ofan earthquake in Java. As her commanding officerrelated, in a matter of six days Success, ‘had transitedfrom one side of Borneo to the other. In between the shipconducted ‘gun boat diplomacy’ off one country in supportof law and order and was then able to support anothernation’s aid efforts to yet a third nation’.9
Forecasting future global trends in an unpredictable worldis an inherently uncertain process, but experiencesuggests that strategic choices should never be absolute.Recent operations in East Timor, the Solomons,Indonesia and Iraq have routinely illustrated themultifaceted tasks which navies perform in the littoralenvironment. In all these commitments amphibious unitshave played a vital part, yet only 16 years ago officialpolicy dismissed these assets as ‘inappropriate forAustralia’s force structure’.10
As Professor Andrew Lambert argued at a recent SPC-Aconference, our greatest danger is to allow the impulsesof today to become an excuse not to think: ‘Narrowprescriptionist approaches to national strategy do notwork. Wise nations know their interests, and are preparedto defend them.’11 Australia is a maritime nation, and as‘the littoral accommodates over three quarters of theworld’s population, hosts over 80% of the world’s capitalcities and nearly all of the marketplaces for internationaltrade’,12 only rarely will securing our national interests notinvolve a maritime dimension. Operating in anincreasingly complex and at times more dangerousenvironment, the ADF must maintain its ability to crediblyfunction and flexibly use its equipment at short notice. Toargue that any one or other ADF capability ‘is the singlemost important’ or more ‘central’ than others, is tomisunderstand the interdependency of joint operations,and to put the effectiveness of those operations at risk.
1 Department of Defence, Operation ASTUTE web page, Internet<defence.gov.au/opastute/> (viewed 31 May 2006).
2 G. Sheridan, ‘We need soldiers and more firepower’, The Australian,25 May 2006.
3 N. Stuart, ‘Stretching our forces too tightly is not the way to win thepeace’, The Canberra Times, 6 June 2006.
4 Royal Australian Navy, Australian Maritime Doctrine (AMD), DPS,
Canberra, 2000, p. 156. Maritime power projection is defined as: ‘Theability to project, sustain and apply effective military force from the seain order to influence events on land.’
5 AMD, p. 60: ‘Advance force operations are conducted in advance of a
main force, notably an amphibious force, in order to make acceptablysafe the area in which the latter will operate’.
6 VCDF Doorstop Interview, 27 May 2006, Internet
<defence.gov.au/opastute/> (viewed 31 May 2006).7
CDF Media Briefing: ‘Update on Op ASTUTE’, 26 May 2006, Internet<defence.gov.au/opastute/> (viewed 31 May 2006).
8 AMD, p. 56. Cover is ‘the provision of support for less capable forces
to ensure their protection and the completion of their tasking withoutinterference from an adversary.’
9 HMAS Success, Report of Proceedings, May 2006.
10 D. Stevens (ed.), The Royal Australian Navy, OUP, Melbourne, 2001,p. 261.
11 Professor A. Lambert, ‘Sea power ashore and in the air’, presentationto the King-Hall Naval History Conference, Canberra, 21 July 2005.
12 A. Tewes, et al., A Foundation Paper on Australia’s Maritime Strategy,Parliamentary Library, Canberra, 2002, p. 16.

!"#$%&#'(%&)#*+,+&$#*,('#-./0#/12/3
!"#$%&'(")($*+,"!!'-!.+/&"+#'("+/&)-0!+1&$-0"2
!"#$%&'()*+,%)+(-*+./( 0#)( .1"")..21,( "$&",1.%$&($2( "$34*0$5)+*0%$&.(%&(6+*7(#*.(4+$1'#0(-%0#( %0( 0#)()85)"0)9(2,$$9($2*&*,:.%.(2+$3(9)2)&")("$33)&0*0$+.;(<%0#%&(=1.0+*,%*(0#)+)#*>)( *,+)*9:( 4))&( "*,,.( 0$( "*&"),( $+( +)91")( 0#)( ."*,)( $2.$3)( 5,*&&)9( "*5*4%,%0%).( -#%,)( *""),)+*0%&'( 0#)( *9$50%$&$2( $0#)+.( 3$+)( ?*55+$5+%*0)@( 0$( *( .)*3,)..( 0+*&.%0%$&)92$+");( =,0#$1'#( 0#)( 0)+3( ?+)>$,10%$&( %&( 3%,%0*+:( *22*%+.@/( $+AB=/(*55)*+.(0$(#*>)(2*,,)&(2+$3(5+$3%&)&")/(0#)(C)"$&9D1,2(<*+( #*.( )>%9)&0,:( -%0&)..)9( .1"#( *( +)>$,10%$&/( $&)-#%"#(#*.(9),%>)+)9(.1"#(?*(9)>*.0*0%&'(.#$"E(0$(0+*9%0%$&*,&$0%$&.( $2( =1.0+*,%*@.(3%,%0*+:@( 0#*0( %0( %.( &$-( ?.)0( 0$( .-))5*.%9)( :)*+.( $2( 3%,%0*+:( "1,01+)@;
F( !>)&( 0#)( &$0%$&( 0#*0
=1.0+*,%*@.( .)"1+%0:( %&0)+).0.( *+)(9)0)+3%&)9(4:(')$'+*5#:#*.(&$-(4))&(?2%+3,:@(+)519%*0)9;
G
H#)(3)9%*(3*:( +*5%9,:( 5%"E( 15( $&( .1"#( 0#)3)./( 410( 0#):0)&9(0$(,*"E(4$0#(1&9)+.0*&9%&'(*&9(9)50#($2(*&*,:.%.;(H#)",*..%"()8*35,)(2+$3(FIIF(-*.(0#)()35#*0%"/(?D1,2(J)..$&K&)( %.( 0#)( >*,1)( $2( *%+( 5$-)+@/( *00+%410)9( 0$( 0#)( LCM+).%9)&0/( 410( 0#)+)*20)+( *9$50)9( 4:( 0#$.)( .))E%&'( 0$*99+)..( =1.0+*,%*&( .)"1+%0:( "$&")+&.( -%0#( *( .%,>)+( 41,,)0;H#)(GNNO(>)+.%$&(3*:(-),,(4)( ?P)0-$+EQR)&0+%"(<*+2*+)( %.0#)( -*+2*+)( $2( 0#)( 2101+)@( 4)"*1.)/( -)( *+)( %&2$+3)9/( ?0#)'*3)( %.( 9%22)+)&0( %&( 0#)( &)0-$+E)9( )&>%+$&3)&0@;
O( H#)( )Q
4*00,).5*")(%.($4>%$1.,:(>%0*,/(*&9(0#)+)(%.(*(.0+$&'("*.)(2$+0#)( 4)00)+( ,%&E%&'( $2( +)3$0)( .)&.$+.( *&9( 5,*02$+3./( 410.$3)("$33)&0*0$+.(.))3()%0#)+( 0$$( +)*9:( 0$("$&21.)( 0#)3)*&.(-%0#(0#)(9).%+)9()&9($+(*+)(1&*-*+)($2(0#)(&))9(2$+
!!!!!!!!!!!!!!!!!!!!!!!!!!!!!!!!!!!!!!!!!!!!!!!!F( B;(S$+4).(?H#)(,)..$&.($2(6+*7(*+)(.)0(0$(0+*&.2$+3=1.0+*,%*@.(3%,%0*+:(.0+1"01+)@/(/$4/(O(B*:(GNNO;G( =;(T15$&0/(?C0+*%'#0U*"E)0($22(*.(9)2)&")(')0.(+)*,@//%5),67+6&/(GV(S)4+1*+:(GNNO;O( C))(S$+4).(*4$>);
*( 3$+)( "$&.%9)+)9( *55+$*"#( 0$( 0#)( .5)"0+13( $2( =TS$5)+*0%$&.;
H#)( =TS( %.( &$0( .%35,:( *( "10Q9$-&( >)+.%$&( $2( 0#)( LC3%,%0*+:/( *&9( "$&")50.( $2( 0+*&.%0%$&( *55,%"*4,)( 0$( *( ',$4*,5$-)+( .#$1,9( &$0( 4)( *9$50)9( %&( %.$,*0%$&/( &$+( 1.)9( 0$$4."1+)( 0#)( 1&%71)( &*01+)( $2( $1+( "%+"13.0*&").;( S$+)8*35,)/( 0#)(A=P@.( ,%3%0)9( &134)+( $2( -*+.#%5.( *+)( $20)&+)71%+)9( 0$( 1&9)+0*E)( *( 2*+( -%9)+( *&9( 3$+)( &1*&")93%..%$&( 0#*&( 0#)%+( LCP( "$1&0)+5*+0.;( H#)( %&2,1)&")( $2')$'+*5#:( $&( =1.0+*,%*&( .)"1+%0:( "*&( ,%E)-%.)( &)>)+( 4)%'&$+)9/( .%35,:(4)"*1.)(=1.0+*,%*( )&91+).(*.(*( 5#:.%"*,,:,*+')(*&9(-%9),:( 9%.5)+.)9(3*+%0%3)(&*0%$&/( $&)( 2$+(-#%"#*&:( 5$..%4,)( 3%,%0*+:( 3$>)3)&0/( )%0#)+( *.( 0#+)*0( $+"$&0+%410%$&/( 31.0( 0+*>),( $&/( $>)+( $+( 1&9)+( 0#)( .)*;6&2$+3*0%$&/( >%0*,( 0#$1'#( %0( %.( 0$( 0#)( *,,$"*0%$&( $2( *..)0./"*&&$0(9%+)"0,:(.14.0%010)(2$+(5#:.%"*,(5+).)&");(<#*0(1.)(*2101+)( =TS( 0#*0( #*.( 3%.U19')9( 0#)( 4*,*&")( 4)0-))&.:.0)3.( *&9( )71%53)&0( 0$( 0#)( )80)&0( 0#*0( %0( "*&&$0( *22$+9.122%"%)&0(5,*02$+3.W
C%3%,*+,:( 9*&')+$1.( %.( 0#)( 4),%)2( 0#*0( 0)"#&%"*,( .$,10%$&.3*:( .$3)#$-( +)5,*")( *( +$41.0( $5)+*0%$&*,( 9$"0+%&)2$1&9)9($&(3*&:(:)*+.($2()85)+%)&");(=,0#$1'#(0#)(P*>:(%.*(0)"#&$,$':Q4*.)9($+'*&%.*0%$&/($1+(*55+)"%*0%$&($2(0#).)0)"#&$,$'%).( %.( 2%+3,:( +$$0)9( %&( 0#)( #%.0$+%"*,( 5)+.5)"0%>);K1+(0$$,.(31.0(&)>)+(4)(*,,$-)9(0$(9+%>)(0#)(-*:(-)(&))90$(2%'#0;(=.(T+(=&9+)-(D$+9$&(#*.(*+'1)9(%&($&)($2(0#)(C)*M$-)+(R)&0+)@.(3$.0(+)")&0(514,%"*0%$&./
X(0#)(51+>):$+.($2
*(&)-( 0)"#&$,$':(*,3$.0(*,-*:.($>)+.),,( 0#)( +)>$,10%$&*+:&*01+)($2(0#)%+(9),%>)+%).Y($22)+%&'(1&0).0)9(")+0*%&0%).(-#%,)#$,9%&'( 4*"E( $&( >1,&)+*4%,%0%).;( P$( 3*00)+( #$-( '$$9( 0#)5+)5*+*0%$&./(0#)(5+*"0%")($2(-*+2*+)(-%,,(&)>)+(4)(5)+2)"0,:+*0%$&*,/( *&9( #)&")( 0#)+)( %.( &$( .14.0%010)( 2$+( 0#)( %&#)+)&02,)8%4%,%0:( $2( *( -),,Q0+*%&)9/( 9%."%5,%&)9( 2$+")( -#%"#( #*.3*&*')9(0$(')0( %0.("1,01+)/(9$"0+%&)(*&9(5+*"0%").(,%&)9(15-%0#( %0.( $5)+*0%$&*,( 0*.E.;( 6&( 2*"0/( -#%,)( 0#)( "#*+*"0)+( $2"$&2,%"0.( 3*:( "#*&')/( 0#)( 9))5)+( $&)( ,$$E.( 0#)( 3$+)")+0*%&( %0( %.( 0#*0( 0#)( )&91+%&'( 5+%&"%5,).( $2( -*+( #*>)"#*&')9(#*+9,:(*0(*,,;
H#%.(-$1,9(*,,("$3)(*.(&$(.1+5+%.)(0$(*&:(.019)&0($2(&*>*,#%.0$+:(*&9(.0+*0)':;(B$+)(0#*&(*(")&01+:(*'$/(A)*+(=93%+*,=,2+)9( H#*:)+( B*#*&/( LCP/( *00)350)9( 0$( 9)2%&)( 0#)5+%&"%5,).($2(.)*(5$-)+(%&(*&(*')($2(0)"#&$,$'%"*,(0+*&.%0%$&;Z)(+)"$'&%.)9(0#)(%&2,1)&")(0#*0("$&0+$,($2(0#)(.)*()8)+0)9$&( "*35*%'&.(*&9(1&9)+.0$$9( 0#*0( 0#)( 5+%&"%5*,( %35*"0( $20)"#&$,$':( -*.( $&( 0*"0%".( *&9( 0#*0/( -#%,)( .0+*0)'%"( *&9
!!!!!!!!!!!!!!!!!!!!!!!!!!!!!!!!!!!!!!!!!!!!!!!!X(894#:6;4#(*#16<67#=6))74/(=,,)&([(L&-%&/(GNNO
!"#$%"&&"'()*(&+"($",(-)#"'(."!&'"(,/$&',%0, 0$$/"(1(,/2/$&(3445

" # $"
%&
'()*+,-!./
01!2,3
.4,-
53647
8(-6
9617
396,)#59(>+&$#1?0#@(5+)+(&5#6)#/7#:6>#@4&+&5%76
9$"0+%&*,(%9)*,.(3*:(4)(3$9%2%)9(4:(."%)&0%2%"(9)>),$53)&0./0#):( -%,,( &$0( 4)( 21&9*3)&0*,,:( *,0)+)9;
\( 6&( "$&.)71)&")/
.1"")..( %&( 0#)( ?-*+2*+)($2( 0#)( 2101+)@( %.( ,%E),:( 0$(4)( U1.0(*.2%+3,:( 4*.)9( $&( *( -%,,%&'&)..( 0$( *"")50( +%.E./( *5+)5*+)9&)..( 0$( 1.)( $&)@.( %&%0%*0%>)/( *&9( 0#)( *4%,%0:( 0$+)"$'&%.)( -#)&( *( 9)"%.%>)( 3$3)&0( #*.( *++%>)9;( H#%.+)71%+).( *( -*+2%'#0%&'( *&9( "1,01+*,( )0#$.( 0#*0( '$).( 2*+4):$&9(.:.0)3.(3*&*')3)&0;
H$(4)00)+(%,,1.0+*0)(0#).)()&91+%&'(2)*01+)./($&)(3%'#0(5$%&00$( 0#)(1.)($2(&*>*,('1&2%+)(.155$+0( ]PDC^($&(GFQGG(B*+"#GNNO/(91+%&'(0#)(A$:*,(B*+%&)(]AB^(*..*1,0($&(0#)(=,(S*-M)&%&.1,*;( H#)( LCP( #*9( )35,$:)9( 4*00,).#%5( PDC( -%0#"$&.%9)+*4,)()22)"0(%&(FIIF/(410(4:(GNNO(0#)(4*00,).#%5.(#*9,$&'( '$&)( *&9( 0#)( LCP( #*9( 41%,0( 15( *( 3)*.1+)( $2%&.0%010%$&*,(+).%.0*&")(0$(0#)(0*.E/(5+)2)++%&'(%&.0)*9(0$(+),:$&( *%+( 9),%>)+)9(-)*5$&.;(A)%&2$+"%&'( 0#%.( 5)+")50%$&/( 0#)LCP@.("+1%.)+.(*&9(9).0+$:)+./(*,0#$1'#(.0%,,(3$1&0%&'(*(\Q%&"#('1&/(-)+)(5#:.%"*,,:(*&9($5)+*0%$&*,,:(1&.1%0)9(0$(0#)&*>%'*0%$&*,( "$&.0+*%&0.( $2( 6+*7%( "$*.0*,( -*0)+.;( H#)( A=P*&9( A$:*,( P*>:/( 4:( "$&0+*.0/( '*>)( *&( PDC( "*5*4%,%0:( 2*+3$+)( 5+$3%&)&")( *&9( 5$..)..)9( .#%5.( %&( 0#)(D1,2( %9)*,,:.1%0)9( 0$( 0#)(3%..%$&;( 6&9))9/(ZB=C(/&A6;( -*.( *+'1*4,:0#)(3$.0()22)"0%>)(.#%5(*>*%,*4,)/(4$0#(%&(0)+3.($2(3$1&0%&'0#)(3$.0(5$-)+21,('1&(*&9(%&("*++:%&'(0#)(3$.0(*331&%0%$&;!71*,,:( %35$+0*&0/( 0#)( A=P@.( ,$&'Q0)+3( 5+).)&")( %&( 0#)*+)*(3)*&0(0#*0(%0.(1&9)+.0*&9%&'($2(0#)(,%00$+*,()&>%+$&3)&0-*.( 1&.1+5*..)9;( 6&( "$&.)71)&")/( 0#)( LCP( R$33*&9)+-*.( 5)+.1*9)9( 0$( 5+).)+>)( 0#)( PDC( $50%$&/( *( 9)"%.%$&>%&9%"*0)9(4:(0#)(3*&&)+(%&(-#%"#()>)&0.(1&2$,9)9;
P$0($&,:(9%9(5$$+(-)*0#)+(*&9("$35)0%&'(0*.E.(+).0+%"0( 0#)1.)($2( 0*"0%"*,(*%+( .155$+0(91+%&'( 0#)(AB(*..*1,0/( 410( 6+*7%4)*"#( 3%&%&'( *,.$( #*35)+)9( 0#)( ,*&9%&'( $2( *+0%,,)+:( *&9,%'#0( *+3$1+;( =.( .1"#/( 0#)( 2$1+( -*+.#%5.( 5$%.)9( $22.#$+)1&9)+0$$E(*(3$+)(>%0*,(0#*&()85)"0)9(+$,)/(5+$>%9%&'(#%'#,:*""1+*0)( *&9( +).5$&.%>)( %&9%+)"0( 2%+)( 2$+( X_( #$1+.( +*0#)+0#*&( 0#)( $+%'%&*,,:( 5,*&&)9( GX;( K2( 5*+0%"1,*+( &$0)( -*.( 0#)
!!!!!!!!!!!!!!!!!!!!!!!!!!!!!!!!!!!!!!!!!!!!!!!!\( =;H;(B*#*&/(894#B&*7%4&;4#(*#046#C(>4,#D@(&#-+5)(,E#FGGHIFJKL/(]`$.0$&a(J%00,)(`+$-&(*&9(R$35*&:(F_IN^;
*''+)..%>)( :)0( +).0+*%&)9( -*:( %&( -#%"#( 0#%.( .155$+0( -*.1.)9;( <%0#( ?9134@( +$1&9.( +),*0%>),:( %&)85)&.%>)b%&"$35*+%.$&(0$(5+)"%.%$&('1%9)9(31&%0%$&.b*&9(*(.)&.$+(0$.#$$0)+( +).5$&.)( 0%3)( 3)*.1+)9( %&( .)"$&9.( +*0#)+( 0#*&3%&10)./( %0( -*.( 5$..%4,)( 0$( 5+$>%9)( *( 2%&),:( 01&)95.:"#$,$'%"*,(*.(-),,(*.(*(5#:.%"*,()22)"0;(H*+')0.("$1,9(4)+*5%9,:(.#%20)9(*.(0#)(0*"0%"*,(.%01*0%$&()>$,>)9(*&9(*0(0%3).0#%.( 3)*&0( 0#*0/( )>)&( %&( -),,Q5+$0)"0)9( 5$.%0%$&./( )&)3:0+$$5.( "$1,9( 4)( )&"$1+*')9( 0$( .1++)&9)+( $+( 3$>)9( %&( *5*+0%"1,*+( 9%+)"0%$&;( H#)( .#%5.( -)+)( ,*0)+( *9>%.)9( 4:( OR$33*&9$( `+%'*9)( 0#*0( 0#)%+( '1&2%+)( #*9( #*9( *( ?#1')%35*"0($&(0#)('+$1&9(*&9(.#*00)+)9(0#)()&)3:(-%,,(0$(2%'#0@;
PDC(%.(#*+9,:(*(&)-(0)"#&%71)/(410(%0( %.(9%22%"1,0(0$(%3*'%&)*( 4)00)+( 3)*&.( $2( $22)+%&'( .1"#( *( .-%20/( 5)+.%.0)&0/)"$&$3%"( *&9( 3$.0( %35$+0*&0,:/( 3)*.1+)9( 3)*&.( $2+).5$&.);(H#)(,)..$&/(#$-)>)+/(%.(&$0(0#*0($&)("*5*4%,%0:(%.3$+)( )22)"0%>)( 0#*&( *&$0#)+/( 410( 0#*0( *( "$33*&9)+( 31.05$..)..( *( +*&')( $2( "*5*4%,%0%).( 0#*0( "*&( 4)( *9*50)9( 0$5+$>%9)(0#)(9).%+)9()22)"0(%&(0#)("%+"13.0*&").(0#*0()8%.0(*00#)( 0%3);( Z*>%&'( ).0*4,%.#)9( .)*( "$&0+$,/( =1.0+*,%*@.9)5,$:)9(3*+%0%3)(*..)0.(-)+)(*4,)(0$($5)+*0)(.1"")..21,,:%&( *( 31,0%Q0#+)*0( )&>%+$&3)&0/( *&9( -)+)( .%31,0*&)$1.,:)35,$:)9( $&( 31,0%5,)( 0*.E.( +*&'%&'( 2+$3( *%+( *&9( .1+2*")9)2)&")( 0$(.1+>)%,,*&")(*&9(4$*+9%&'($5)+*0%$&.;(K1+(3)&*&9(-$3)&("$&.%.0)&0,:(9)3$&.0+*0)9(0#)%+(5+$2)..%$&*,%.3*&9( %&%0%*0%>)/( -#%,)( $1+( .#%5.( )8#%4%0)9( 0#)( %&#)+)&0"#*+*"0)+%.0%".( $2( 3$4%,%0:/( *"")../( +)*9%&)../( 5)+.%.0)&")*&9( 2,)8%4%,%0:( 0#*0( "$&0%&1)( 0$( 3*E)( 3*+%0%3)( 5$-)+( 0#)'+)*0( )&*4,%&'( %&.0+13)&0;( =.( T)2)&")( +).5$&9.( 0$9)3*&9.( 2$+( *( +*9%"*,( "1,01+*,( *&9( )71%53)&0( .#%20/
c( -)
-$1,9(9$(-),,(0$(+)3)34)+(0#)(&))9(2$+(4*,*&")/(2$+(.$3)0#%&'.(9$(&$0("#*&')(*&9/(&$(3*00)+(#$-(-),,(&)0-$+E)9/(%0%.($&,:(0#)(-),,Q5+*"0%.)9("$34%&*0%$&($2(5)$5,)/(#*+9-*+)/*&9(9$"0+%&)(-#%"#("*&(*55,:(0#)()22)"0;
!!!!!!!!!!!!!!!!!!!!!!!!!!!!!!!!!!!!!!!!!!!!!!!!c( B;(<*,.#(*&9(S;(`)&"#,):/(?H#)(T)2)&")(B*0+%8@/(=%774)+&/(Od1&)(GNNO;
!"#$%&'"($)"*+("$,-.+(#/0#
T)2)&")(!.0*4,%.#3)&0(S*%+4*%+&/(R=P`!AA=(=RH(GcNN
T%+)"0$+ R=MH(A%"#*+9(B)&#%&%"E(( ]NG^(cG_V(cG\OT)510:(T%+)"0$+ JRTA(d$#&(A$4%&.$& ]NG^(cG_V(cOcVT%+)"0$+(B*+%0%3)(C019%). RBTA(`*++:(C&1.#*,, ]NG^(XGGF(OGG\e%.%0%&'(P*>*,(S),,$- RTA!(d*"E(B"R*22+%) ]NG^(cG_V(cGcX!9%0$+%*,(K22%")+ B+.(f%3(J) ]NG^(cG_V(cOcF=93%&%.0+*0%>)(=..%.0*&0 B+(B*+0%&(D%44 ]NG^(cG_V(cO\VS*".%3%,) ]NG^(cG_V(cXGc
!"#"$%&'()*+,%-./)'*0
T%+)"0$+($2(P*>*,(Z%.0$+: T+(T*>%9(C0)>)&. ]NG^(cGcc(GXGOC)&%$+(P*>*,(Z%.0$+%"*,(K22%")+ B+(d$)(C0+*"g)E ]NG^(cGcc(GcXFP*>*,(Z%.0$+%"*,(K22%")+(F B+(T*>%9(D+%22%& ]NG^(cGcc(Gc\XP*>*,(Z%.0$+%"*,(K22%")+(G B+(`+)00(B%0"#),, ]NG^(cGcc(ONXXC0*22(K22%")+(]P*>*,(Z%.0$+:^ B.(e*&)..*(`)&9,) ]NG^(cGcc(XVIVS*".%3%,) ]NG^(cGcc(GV_G
1.(."+/2%-./)'*0
A).)*+"#(K22%")+( JRTA(D,)&&(f)++ ]NG^(cG_V(cXFFC0*22(K22%")+(]A).)*+"#^ B+.(A*"#*),(Z)*0# ]NG^(cG_V(cccVS*".%3%,) ]NG^ cG_V cXGc

!"#$%&'"($)"*+("$,$-./+(#01#2"3#(+4"*+$&5$2"5"*6")-789::-$-);$<=>>
/"#3&'"(?6"*+("@A"5"*6"?B&C?#.
!"#$%&'(")&"*($+*,+*)&"*-./0*1*)2'*3"$(!*'+
D*$ EF$G#(6H$ <>>I$ /&4"$ J>$ 6#(B&$ AH&'/$ /#10"A$ 5(&4+H"$KH#'($-LA$ -00#H$ MK--N$'#+"('#O$ #*A$ "*+"("A$ +H"7&(+H"(*$ -(#L1#*$ P.05$ M7-PN?$ Q"("$ #'#1+"A$ +H"$ 3(",3&/1+1&*"A$ /H13/$ &5$ +H"$ G#(1+14"$ R*+"(6"3+1&*$ S&(6"MGRSNT$#$4.0+1,*#+1&*#0$50&+100#$+#/U"A$'1+H$3("C"*+1*B$L&+H+H"$"*+(O$&5$3(&H1L1+"A$B&&A/$ 1*+&$ R(#V$#*A$ +H"$6&*A.6+&5$#*O$100"B#0$"W3&(+$+(#A"?$;H"$GRS$H#A$A"#0+$'1+H$4#*O/1410#($1*61A"*+/$&C"($3("C1&./$4&*+H/?$X3'#(A/$&5$I>>C"//"0/$&5$#00$+O3"/$'"("$L&++0"A$.3$1*$+H"$K--Y$4&/+$&5'H16H$6#((1"A$H1BH,C#0."$L.+$100161+$6#(B&"/?$R*$#*$#++"43++&$ &C"('H"04$ +H"$ '#1+1*B$ 3#+(&0/Y$ +H"$ 0#+"/+$ /4.BB0"(+#6+16$ '#/$ +&$ &(6H"/+(#+"$ #$ 4#//$ L("#U&.+$ A.(1*BA#(U*"//?$ D*$ +H1/$ &66#/1&*Y$ +H&.BHY$ +H"$ AH&'/$ '"("0"#C1*B$ 1*$ +H"$ "#(0O$ #5+"(*&&*?$ G#*O$ '"("$ A1/30#O1*B'H1+"$ 50#B/$#*A$ +H"1($ 6("'/$ "C"*$ &55"("A$ +&$ A.43$ +H"1(6#(B&"/$ /H&.0A$ +H1/$ L"$ &(A"("A?$ :"#6+1*B$ +&$ 4"A1#("3&(+/$ &*$ +H"$ 1441*"*+$ /+#(+$ &5$ H&/+101+1"/Y$ +H"O$ H#AA"61A"A$ +H#+$ +H"$ 3&//1L0"$ 3(&51+$ *&$ 0&*B"($ Z./+151"A$ +H"(1/U?$;&$+H"$/.(3(1/"$&5$+H"$/4.BB0"(/Y$H&'"C"(Y$+H"$GRS/""4"A$ *&$ 0&*B"($ 6&*6"(*"A$ '1+H$ 6&44"(61#06&*+(#L#*A?$-5+"($#$ +H&(&.BH$ 1*/3"6+1&*$ +&$ "*/.("$ +H"O3&/"A$ *&$ +H("#+$ +&$ )+1&*$ 5&(6"/Y$ "#6H$ AH&'$ '#/&(A"("A$+&$60"#($+H"$#("#?
;H"$"W&A./$4#(U"A$#$'#+"(/H"A$1*$*"#(0O$+H1(+""*$O"#(/&5$4#(1+14"$1*+"(6"3+1&*$&3"(#+1&*/?$!1*6"$-.B./+$E[[>Y'H"*$ +H"$ X*1+"A$ 7#+1&*/$ 51(/+$ 143&/"A$ "6&*&416/#*6+1&*/$5&00&'1*B$+H"$R(#V1$1*C#/1&*$&5$K.'#1+Y$#$4.0+1,*#+1&*#0$ *#C#0$ 5&(6"$ H#A$ 6&*A.6+"A$ &*"$ &5$ +H"$ 0&*B"/+4#(1+14"$"*5&(6"4"*+$&3"(#+1&*/$1*$H1/+&(O?$8O$1+/"05$+H""4L#(B&$ 6&.0A$ *&+$ 5&(6"$ R(#V$ +&$ 6&430O$ '1+H$ +H"A1("6+1&*/$&5$+H"$X7$!"6.(1+O$)&.*610$L.+Y$ 1*$#AA1+1&*$ +&H#43"(1*B$ R(#V\/$"55&(+/$ +&$ ("#6V.1("$ #$ 6("A1L0"$4101+#(O6#3#L101+OY$ 1+$#0/&$/"(C"A$#/$#$6&*+1*.1*B$A"4&*/+(#+1&*&5$ 1*+"(*#+1&*#0$ ("/&0C"$#*A$#$H1BH0O$C1/1L0"$A"+"(("*+$ +&#*O$R(#V1$("/3&*/"?$G&("&C"(Y$LO$./1*B$/.(5#6"$'#(/H13/+H"$&3"(#+1&*$#00&'"A$1*A1C1A.#0$*#+1&*/$+&$4#U"$#$51*"0O+.*"A$6&*+(1L.+1&*T$&*"$'H16H$6&.0A$L"$4#+6H"A$"W#6+0O+&$ +H"1($ 6H#*B1*B$ &LZ"6+1C"/$ #*A$ 1*+"("/+/?$ ]1+H$ +H"4&C"$ +&'#(A/$ 6&*5016+$ 1*$ G#(6H$ <>>I$ +H"$ 41//1&*$ '#/#L&.+$+&$6H#*B"$O"+$#B#1*?
;H"$X*1+"A$!+#+"/$7#CO$MX!7N$(#*$ +H"$&C"(#00$4#(1+14"6#43#1B*Y$ L.+$ +H(&.BH&.+$ +H"$ "4L#(B&\/$ "C&0.+1&*$ +H":&O#0$ -./+(#01#*$ 7#CO$ M:-7N$ 30#O"A$ 5#($ 4&("$ +H#*$ #+&U"*$ (&0"?$ X*A"($ +H"$ 6&A"*#4"$ D3"(#+1&*$ 2-G-!K+H"$:-7$3(&C1A"A$#$+H("",/H13$+#/U$B(&.3$1*$!"3+"4L"(E[[>$ #*AY$ L.10A1*B$ &*$ #$ 6&44&*$ A&6+(1*"$ #*A$ 4#*OO"#(/$&5$6&4L1*"A$"W"(61/"/Y$5&.*A$ 1+$ ("0#+1C"0O$"#/O$ +&&3"(#+"$ '1+H1*$ #*$ !"# $%&$ 6+1&*?$ :-7$ .*1+/$ 0#+"(3(&C1A"A$ "/6&(+$ #*A$ 0&B1/+16$ /.33&(+$ A.(1*B$ +H"$ 6&4L#+&3"(#+1&*/$ +&$ 01L"(#+"$ K.'#1+$ #*A$ +H"*$ 4#1*+#1*"A$ #("B.0#($ /1*B0",/H13$ 3("/"*6"$'1+H$ +H"$GRS$ 1*$ "1+H"($ +H"-(#L1#*$P.05$&($+H"$:"A$!"#?$DC"($+H"$O"#(/$+H"$4#**"(1*$'H16H$+H"$GRS$6&*A.6+"A$1*+"(6"3+1&*/$#*A$L&#(A1*B/6H#*B"A$4#(U"A0OY$ L.+$-./+(#01#*$ /#10&(/$ 3(&C"A$H1BH0O
#A#3+#L0"$#*A$"C"($("#AO$+&$1**&C#+"?$QG-!$'()!&Y$5&("W#430"Y$L"B#*$+H"$+"*+H$#*A$0#/+$2-G-!K$A"30&O4"*+1*$ 41A,<>>E$ #*A$ '#/$ 1*/+(.4"*+#0$ 1*$ L(1*B1*B$ #L&.+$ #4&("$ #BB("//1C"$ #33(H$ +&$ 1*+"(6"3+1&*$ &3"(#+1&*/?Q"($ /U100"A$ L&#(A1*B$ 3#(+1"/$ A"4&*/+(#+"A$ +H"#AC#*+#B"/$&5$#$60&/"$#*A$.*("41++1*B$3("/"*6"$1*$R(#V16&#/+#0$'#+"(/?$DC"($ +H"$6&.(/"$&5$'()!&\/$A"30&O4"*++H"$GRS\/$/.66"//$(#+"$#B#1*/+$ 100"B#0$ +(#A"(/$ 1*6("#/"A5(&4$Z./+$<>^$+&$4&("$+H#*$_>^?E
*!("%+,-#.(#/$,#01234#56,-!/.%(#7'8'9:;84#<==>?@'AB
)H#*B"/$ 1*$ +H"$ 1*+"(*#+1&*#0$/"6.(1+O$ /1+.#+1&*$ 5&00&'1*B+H"$ A(#4#+16$ "C"*+/$ &5$ EE$ !"3+"4L"($ <>>E$ ("/.0+"A$ 1*-./+(#01#$ 1*6("#/1*B$ 1+/$ 6&*+(1L.+1&*$ 1*$ +H"$G1AA0"$ 9#/+?-/$ 3#(+$ &5$D3"(#+1&*$!`R%%9:$ #*&+H"($ +H("",/H13$ +#/UB(&.3$#((1C"A$ 1*$ +H"$P.05$ 1*$2"6"4L"($ <>>E$#*A$*"C"(0"//$+H#*$+'&$/H13/$'"("$4#1*+#1*"A$LO$("B.0#($(&+#+1&*.*+10$ 41A,<>>I?$ ]1+H$ X!7$ 5&(6"/$ #0/&$ *""A1*B$ +B&44&A#+"$ *"'$ +#/U/$ 1*$ -5BH#*1/+#*Y$ 6&44#*A$ &5+H"$ GRS$ 3#//"A$ (&.+1*"0O$ +&$ +H"$ -./+(#01#*$ +#/U$ B(&.36&44#*A"(?$ R+$ '#/$ #$ .*1V."$ 6&4L1*"A$ &3"(#+1&*#0("/3&*/1L101+O$ #*A$ +H"$ /.66"//5.0$ ("/.0+/$ A1A$ 4.6H$ +&"*H#*6"$ -./+(#01#\/$ 1*+"(*#+1&*#0$ /+#*A1*B?$ 2"/31+"1**&C#+1C"$+#6+16/$LO$+H"$/4.BB0"(/Y$1*60.A1*B$+H"$./"$&5"C"($ 4&("$ "0#L&(#+"$4"#*/$ +&$ &L/+(.6+$ L&#(A1*B/Y$ +H"GRS$ 4#1*+#1*"A$ +H"$ 1*1+1#+1C"$ #*A$ U"3+$ +H"$ 100"B#0$ +(#A".*3(&51+#L0"?$;#U1*B$30#6"$#+$#$A1/+#*6"$#*A$&.+$&5$/1BH+Y+H"/"$ #6+1C1+1"/$ /"0A&4$ 4#A"$ +H"$ *"'/Y$ L.+$ '"("*&*"+H"0"//$ "//"*+1#0$ +&$ +H"$ 4101+#(O$ 6#43#1B*$ 'H16H5&00&'"A?$ 8O$ 3("/"(C1*B$ #$ /./+#1*"A$ 3("/"*6"$ '1+H1*R(#V1$ +"((1+&(1#0$ '#+"(/Y$ /.66"//1C"$ :-7$ 6&44#*A"(/L.10+$.3$*&+$&*0O$C#0.#L0"$/U100/$'1+H1*$+H"$5&(6"Y$L.+$#0/&#$ A"+#10"A$ 316+.("$ &5$ 0&6#0$ 4101+#(O$ #*A$ 61C10$ #6+1C1+1"/?955"6+1C"$"W30&1+#+1&*$&5$ +H1/$ U*&'0"AB"$ #AC#*+#B"$'#/+H"$ /1B*1516#*+$ 5"#+.("$ &5$ +H"$ :-7\/$ 6&*+(1L.+1&*+H(&.BH&.+$+H"/"$O"#(/?
D*$E_$G#(6H$<>>I$ +H"$:-7$ +#/U$B(&.3$ +(#*/1+1&*"A$ +&D3"(#+1&*$ S-`)D79:Y$ #*A$ +H"$ 6&*A.6+$ &5$ 6&4L#+&3"(#+1&*/$#B#1*/+$+H"$("B14"$&5$!#AA#4$Q.//"1*?$-0/&.*A"($-./+(#01#*$ +#6+16#0$6&44#*A$'"("$/H13/$ 5(&4$ +H"
!"#$%"&&"'()*(&+"($",(-)#"'(."!&'"(/(,0$&',%1, 1$$0"(23(4,'.+(5667

!"#$%&'"($)"*+("$,$-./+(#01#2"3#(+4"*+$&5$2"5"*6")-789::-$-);$<=>>
/"#3&'"(?6"*+("@A"5"*6"?B&C?#.
X!7Y$ X!$ )&#/+$ P.#(AY$ :&O#0$ 7#CO$ #*A$ %&0#*A?$ ;H"3(14#(O$*#C#0$ +#/U$ 1*$ +H"$7-P$'#/$ +&$ ("&3"*$ +H"$ R(#V13&(+$&5$X44$a#/($+&$#00&'$+H"$"*+(O$&5$H.4#*1+#(1#*$#1A#/$V.16U0O$#/$3&//1L0"?$;H1/$+#/U$#0/&$4"#*+$/.33&(+1*B+H"$ 8(1+1/H$ :&O#0$ G#(1*"/$ 1*$ +H"1($ 0#*A$ #//#.0+$ #*A"*/.(1*B$ +H#+$ +H"$ K--$ ("4#1*"A$ 60"#($ &5$ R(#V1$ 5&(6"/?9#6H$-./+(#01#*$/H13$ 1*$ +H"$ 5&(6"$H#A$#*$"//"*+1#0$ #*A4.0+1,5#6"+"A$ 3#(+$ +&$ 30#Ob$ +H"$ #43H1L1&./$ +(#*/3&(+C!(.DE2!$#6+"A$#/$#$6&44#*A$30#+5&(4$#*A$4&+H"($/H135&($ 6+1&*$ 3#+(&0$ 6(#5+$ #*A$ L&#(A1*B$ 3#(+1"/T$ '()!&3(&C1A"A$H1BH0O$ ("/3&*/1C"$*#C#0$B.*51("$/.33&(+T$'H10"F!-G.($51(/+$#6+"A$#/$/6"*"$&5$#6+1&*$6&44#*A"($A.(1*B+H"$ AH&'$ "W&A./$ 5(&4$ +H"$ K--Y$ +H"*$ &55"("A$ /.(5#6"#*A$#*+1,#1($3(&+"6+1&*$+&$H1BH$C#0."$)+1&*$.*1+/?$;H"6#3+.("$ &5$ +H(""$ R(#V1$ 41*"0#O1*B$ +.B/Y$ #$ /.161A"$ L&#+#*A$#$C#(1"+O$&5$H1AA"*$'"#3&*/$6#6H"/$ 100./+(#+"A$ +H"3&+"*+1#0$ +H("#+Y$ L.+$ +H"1($ (#31A$ A1/6&C"(O$ #*A*".+(#01/#+1&*$ #0/&$ A"4&*/+(#+"A$ H&'$ 6&430"+"0O$ +H")+1&*$H#A$"/+#L01/H"A$/"#$6&*+(&0?$c./+$+"*$A#O/$1*+&+H"$ 6#43#1B*Y$ +H"$ 51(/+$ H.4#*1+#(1#*$ #//1/+#*6"$ 6#(B&#((1C"A$#+$X44$a#/(Y$#$ +"/+#4"*+$ +&$ +H"$V.#01+O$&5$ +H"3(",6&4L#+$ 30#**1*B$ #*A$ +H"$ 3(&5"//1&*#01/4$ &5$ +H"5&(6"/$1*C&0C"A?
2"/31+"$+H"1($(#31A$#*A$.*V."/+1&*"A$/.66"//Y$)+1&**#C#0$ &3"(#+1&*/$ 1*$ +H"$ P.05$ '"("$ 5#($ 5(&4$ &C"(?D3"(#+1&*$)-;-`d!;$,$-./+(#01#\/$6&441+4"*+$+&$4.0+1,*#+1&*#0$ "55&(+/$ +&$ A"C"0&3$ #$ /"6.("$ #*A$ /+#L0""*C1(&*4"*+$ 1*$ 3&/+,!#AA#4$ R(#V$ ,$ L"B#*$ &*$ E=$ c.0O<>>I?$!1*6"$+H"*$+H"$:-7$H#/$/"3#(#+"0O$A"30&O"A$+H"5(1B#+"/$ A,G&!H/2,Y# I,2E%1-(,4# ;/1!-/Y$ '",2!.",$ #*AF!-G.($+&$+H"$("B1&*$5&($3"(1&A/$&5$.3$+&$/1W$4&*+H/?$!+100H"#C10O$1*C&0C"A$1*$ 1*+"(6"3+1&*$&3"(#+1&*/Y$+H"$6("'/$&5+H"/"$ /H13/$ H#C"$ 6&*A.6+"A$ H.*A("A/$ &5$ L&#(A1*B/Y("/.0+1*B$1*$/"C"(#0$A1/6&C"(1"/$&5$6#/HY$H1AA"*$+#*U/$&5&10$#*A$&+H"($/4.BB0"A$B&&A/?
R*$#AA1+1&*$+&$+H"$L&#(A1*B$&5$/"0"6+"A$C"//"0/$+&$"*/.("+H#+$ 6&*+(#L#*A$ #*A$ '"#3&*/$ #("$ *&+$ /4.BB0"A$ 1*+&R(#VY$+H"("$1/$#$4&("$B"*"(#0$("V.1("4"*+$+&$U""3$'#+6H&*$#00$4#(1+14"$ +(#5516$"*+"(1*B$#*A$ 0"#C1*B$ +H"$ 6&.*+(OY#*A$ #0/&$ +&$ 3(&C1A"$ 3(&+"6+1&*$ 5&($ R(#V\/$ 3(14#(O$ &10+"(41*#0/$ #*A$ /H1331*B$ 0#*"/?$ ;H"/"$ +#/U/$ ("V.1("$ #/H13\/$ 6&43#*O$ +&$ ("4#1*$ #+$ #$ H1BH$ /+#+"$ &5$ #0"(+Y4#1*+#1*1*B$ 6&*/+#*+$ C1/.#0$ #*A$ "0"6+(&*16$ /.(C"100#*6"1*$6&*A1+1&*/$'H16H$(#*B"$5(&4$"W+("4"$H"#+$1*$/.44"(+H(&.BH$+&$"W+("4"$'1*+"($6&0A?
D*$+H"$"C"$&5$-*e#6$2#O$<>>J$ +H"$&*B&1*B$ +H("#+$'#/(","43H#/1/"A$ 'H"*$ 1*/.(B"*+/$ 6#((1"A$ &.+$ #$ '"00&(B#*1/"A$#++#6U$#B#1*/+$+H"$R(#V1$&10$+"(41*#0/$&5$-0$8#U(#*A$ KH#'($ -0$ -4#O#?$ Q.*A("A/$ &5$ 51/H"(4"*$ ./"$ +H"/.((&.*A1*B$#("#$#*A$)+1&*$5&(6"/$(&.+1*"0O$'#(*$&55AH&'/$#+$(1/U$&5$"*+"(1*B$ +H"$"/+#L01/H"A$/"6.(1+O$e&*"?R*$ 60&/1*B$ +&$ 1*+"(6"3+$ #*A$ 1*+"((&B#+"$ +H"$ 0#+"/+1*6.(/1&*Y$+H(""$4"4L"(/$&5$#$X!$3#+(&0$L&#+\/#L&#(A1*B3#(+O$'"("$U100"A$'H"*$+H"$AH&'\/$&66.3#*+/$A"+&*#+"A#*$ "W30&/1C"$ 6H#(B"?$ ;H"$ &*,/6"*"$ 4#(1+14"$ /"6.(1+O&3"(#+1&*/$ 6&44#*A"(Y$ QG-!$ ;/1!-/Y$ 144"A1#+"0O60&/"A$+&$("*A"($#//1/+#*6"$#*A$L"B#*$+&$6&&(A1*#+"$+H"("/6."$"55&(+?$]1+H1*$41*.+"/Y$+'&$5.(+H"($#++#6U/$#B#1*/++H"$ +"(41*#0/$ '"("$ +H'#(+"A$ LO$ R(#V1$ /"6.(1+OA"+#6H4"*+/$ #*A$ 1+$ L"6#4"$ 60"#($ +H#+$ +H"$ 1*1+1#01*6.(/1&*$ '#/$ 3#(+$ &5$ #$ 6&&(A1*#+"A$ #6+1&*?$ X*A"(;/1!-/J/$ A1("6+1&*$ )+1&*$ 5&(6"/$ (#31A0O$ /"6.("A$ +H"#("#Y$#*A$)+1&*$30#*/$'"("$#AZ./+"A$ +&$6&.*+"($#*O5.(+H"($+H("#+?
R*$#AA1+1&*$ +&$ +H"$A"30&O4"*+$&5$4#Z&($ 50""+$.*1+/Y$:-73"(/&**"0$H#C"$6&*+(1L.+"A$+&$+H"$("A"C"0&34"*+$&5$R(#V1*$ 4#*O$ &+H"($ '#O/?$ )0"#(#*6"$ 21C1*B$ ;"#4$ I$ '#/1*/+(.4"*+#0$ 1*$ /"6.(1*B$ R(#V1$ 3&(+$ 5#6101+1"/$ A.(1*B$ +H"H&/+101+1"/$ 1*$G#(6H$<>>IY$#*A$ +H"*$3"(5&(4"A$#$ C#(1"+O&5$&(A*#*6"$A1/3&/#0$+#/U/$1*$+H"$/.((&.*A1*B$("B1&*?$R*0#+"$ <>>J$ +H"$ :-7$ 4"4L"(/$ &5$ +H"$ R(#V1$ )&#/+#02"5"*6"$;(#1*1*B$;"#4$("+.(*"A$+&$-./+(#01#$5&00&'1*B$#0"*B+HO$A"30&O4"*+$A.(1*B$'H16H$+H"O$H"03"A$/"+$.3$+H"*"'$ R(#V1$ 7#CO?$ D+H"($ 3"(/&**"0$ H#C"$ 5.05100"A#A41*1/+(#+1C"$#*A$6&44#*A$(&0"/$'1+H1*$+H"$'1A"($-2S3("/"*6"?$ G&/+$ ("6"*+0OY$ )&44&A&("$ !+"C"$ P104&("Y)!)Y$ :-7Y$ H#/$ L""*$ #33&1*+"A$ +&$ 6&44#*A$ #006+1&*$4#(1+14"$&3"(#+1&*/$ 1*$ +H"$*&(+H"(*$3#(+$&5$ +H"P.05Y$#/$'"00$ #/$3(&C1A1*B$4#(1+14"$/"6.(1+O$ 5&($ R(#V1$ &1030#+5&(4/$#*A$/H1331*B$6&**"6+1&*/$1*$#*A$&.+$&5$K.'#1+Y5(&4$0#+"$-3(10$<>>f?
;H"$ &3"(#+1&*#0$ "*C1(&*4"*+$ 1*$ +H"$ -(#L1#*$ P.05$ 1/6&*/+#*+0O$ 6H#*B1*BY$ #*A$ 4#*O$ &5$ +H"$ &3"(#+1&*#0#6+1C1+1"/$ +H#+$ '"("$ 5&("1B*$ +&$ +H"$ :-7$ #$ 01++0"$ &C"($ #A"6#A"$ #B&$ #("$ *&'$ 6&44&*$ 3(#6+16"?$ 7"C"(+H"0"//Y+H"$P.05$ ("4#1*/$ #$ A#*B"(&./$ #*A$ .*3("A16+#L0"$ #("#?R*+"(*#+1&*#0$L&.*A#(1"/$#("$&5+"*$A1/3.+"A$#*A$+H"("$1/#*$ "C"(,3("/"*+$ ("V.1("4"*+$ 5&($ A130&4#6O$ #*A$ B&&AZ.AB"4"*+?$ )(1+16#0$ +&$ +H"$ :-7\/$ /.66"//$ #*A6&*51A"*6"$ H#/$ L""*$ +H"$ 3&//"//1&*$ &5$ "55"6+1C"$ /"05,3(&+"6+1C"$4"#/.("/Y$L&+H$#+$/"#$#*A$A.(1*B$L(1"5$C1/1+/+&$/"0"6+$5&("1B*$3&(+/?
;H"$ 0"//&*/$ #(1/1*B$ 5(&4$ 515+""*$ O"#(/$ &5$ -(#L1#*$ P.05&3"(#+1&*/$#("$4#*O$#*A$C#(1"A?$8.+$3"(H#3/$ +H"$4&/+143&(+#*+$ 5&($ -./+(#01#*$ 30#**"(/$ 1/$ +H"$ .+101+OY$ 50"W1L101+O#*A$ ("/3&*/1C"*"//$ &5$ 4#(1+14"$ 5&(6"/Y$ "/3"61#00O$ +H"/.(5#6"$ 6&4L#+#*+$ 5&(6"?$ -0+H&.BH$ #6V.1("A$ "//"*+1#00O5&($ +H"$ A"5"*6"$ &5$ -./+(#01#$ +H"/"$ /H13/$ H#C"6&*/1/+"*+0O$ A"4&*/+(#+"A$ +H"1($ #L101+O$ +&$ (#31A0O$ /"05,A"30&O$ #*A$ +H"*$ 3(&Z"6+$ *#+1&*#0$ 3&'"($ #*A$ 1*50."*6"4#*O$ +H&./#*A/$ &5$ 410"/$ 5(&4$ H&4"?$ -*A$ +H"O$ H#C"A&*"$ /&$ '1+H&.+$ ("V.1(1*B$ #$ /1B*1516#*+$ 3"(/&**"03("/"*6"$ &*$ 5&("1B*$ /&10?$ -$ '#(/H13$ 1/$ #$ 4&L10"6&44.*1+O$&5$H1BH0O$+(#1*"A$/3"61#01/+/Y$&*"$'H16H$&55"(/"W6"3+1&*#0$ C"(/#+101+O$ #6(&//$ #$ L(&#A$ /3"6+(.4$ &5&3"(#+1&*/?$ R*$ +H"$ -(#L1#*$ P.05Y$ :-7$ .*1+/$ H#C"3"(5&(4"A$ +#/U/$ (#*B1*B$ 5(&4$ 3"#6"+14"$ /.(C"100#*6"Y3#+(&0$#*A$L&#(A1*B$&3"(#+1&*/$+H(&.BH$+&$H1BH$1*+"*/1+O6&4L#+$ 1*C&0C1*B$ #1(Y$ /.(5#6"Y$ 41*"$ #*A$ #/O44"+(16+H("#+/?
R*$#//"//1*B$+H"$*""A$5&($+(#*/5&(4#+1&*$1*$+H"$6&*A.6+&5$ -./+(#01#*$ /"6.(1+OY$ +H"$ ("V.1("4"*+$ +&$ 4#1*+#1*$ #L#0#*6"$ 1*$ &.($ 5&(6"$ /+(.6+.("$ 4./+$ ("6"1C"$ #+$ 0"#/+"V.#0$#++"*+1&*?$]"$ 01C"Y$#/$'"$H#C"$#0'#O/$A&*"Y$'1+H#*$.*6"(+#1*$5.+.("?$R*$-.B./+$E[[>Y$*&$&*"$1*$-./+(#01#"W3"6+"A$ #*$ &3"(#+1&*#0$ A"30&O4"*+$ +&$ 5(""$ K.'#1+?!1410#(0OY$1*$!"3+"4L"($<>>EY$5"'$'&.0A$H#C"$3("A16+"A+H"$3#+H$'H16H$0"A$ +&$6&4L#+$&3"(#+1&*/$ 1*$-5BH#*1/+#*#*A$R(#V?$;H"$&.+/+#*A1*B$3"(5&(4#*6"$&5$:-7$'#(/H13/1*$("6"*+$O"#(/$H#/$6&4"$*&+$+H(&.BH$#66.(#+"$5&("6#/+/&5$ -./+(#01#\/$ /+(#+"B16$ 5.+.("Y$ L.+$ L"6#./"$ +H"O3&//"//"A$ +H"$ 4#+"(1"0$ #*A$ H.4#*$ 50"W1L101+O$ +&6&*/+#*+0O$ #A#3+$ +H"1($ (&0"/$ #*A$ +#6+16/$ +&$ ("50"6+6H#*B1*B$#*A$.*"W3"6+"A$61(6.4/+#*6"/$#*A$41//1&*/?
$$$$$$$$$$$$$$$$$$$$$$$$$$$$$$$$$$$$$$$$$$$$$$$$$$$$$$$
E)#3+#1*$ 7?!?$ )&#+"/Y$ :-7Y$ 1*$ 8$,# @'A# .(# /$,# 0123# KLL=M<==>Y!%),-Y$5&(+H6&41*B?

ISSUE # 2 (July 2007)
Operation Catalyst 16 July 2003- {ADF website May 2007}
Operation Catalyst is the Australian Defence Force (ADF) contribution to the rehabilitation and
reconstruction of Iraq. Operation Catalyst commenced on 16 July 2003 following on from
Operation Falconer and Bastille. Working with the Iraqi Government, the ADF continues to
contribute to Multi-National Force efforts to develop a secure and stable environment in Iraq, assist
national recovery programs and facilitate the transition to Iraq self-government. Operation
Catalyst currently comprises up to 1575 Australian Defence Force personnel. Brigadier Gerard
Fogarty commands all ADF units deployed in the Middle East Area of Operations. Though
deployed on Catalyst, some units, personnel and assets are dual assigned and are also responsible to
supporting Operation Slipper (the ADF's contribution to fighting global terrorism) in such cases,
information appears in Italics. Operation Catalyst fact sheet Australia's commitment to Operation
Catalyst presently includes:
• An Australian Joint Task Force Headquarters of about 70 personnel that commands all ADF
maritime, land and air elements deployed on either Operations Catalyst or Slipper. The headquarters
is currently commanded by Brigadier Gerard Fogarty;
• A security detachment (SECDET) of about 110 personnel including infantry personnel and
Australian Light Armoured Vehicles (ASLAVs) to provide protection and escort for Australian
Government personnel working in our Embassy in Baghdad;
• The Overwatch Battle Group-West (OBG-W) based in the southern Iraqi province of Dhi Qar
comprising approximately 515 personnel and consisting of a headquarters, a cavalry squadron, an
infantry company, ASLAVs and Bushmaster vehicles. The Task Group is based at Tallil Air Base
and from where it undertakes a security overwatch role for Al Muthanna and Dhi Qar Provinces as
part of a larger Coalition Force;
• The Australian Army Training Team - Iraq contributes to training the Iraqi Army with a team of
up to 100 trainers working at various locations throughout Iraq (for more, please see link: Training
in Iraq);
• A RAAF C-130 Hercules detachment of about 155 personnel providing intra-theatre airlift and
sustainment support in the Middle East, with three transport aircraft, ground crew and other support
elements;
• About 95 personnel serving in the multi-national force headquarters and units;
• A RAAF AP-3C Orion detachment of about 170 personnel conducting maritime patrol
operations, with two aircraft and associated command and support elements supporting both the
rehabilitation operation in Iraq and the coalition operation against terrorism;
• HMAS Toowoomba, under the command of CMDR Jaimie Hatcher, RAN, is deployed to
the Persian Gulf where she assists in the detection, deterring and intercepting of vessels within
Iraqi waters suspected of undertaking illegal activity. Importantly, HMAS Toowoomba assists
in protecting Iraq's offshore assets such as oil platforms, thus ensuring Iraq's key economic
resources are able to generate much needed funds to support reconstruction and
rehabilitation efforts. There are approximately 190 personnel aboard HMAS Toowoomba;
• A small number of personnel employed in the Combined Explosives Exploitation Cell who are
tasked with disarming explosive devices and conducting post-explosion assessments to determine
the type of explosive devices used;
• A tri-service Force Level Logistic Asset, communications element and movement control group of
110 personnel are responsible for a range of logistic, training and communications activities.
Information current at 10 May 2007