autodesk® inventor® to autodesk® revit®: building...
TRANSCRIPT

Autodesk® Inventor® to Autodesk® Revit®: Building Product Manufacturing Workflow
Adam Smith – Product Manager for Inventor, Autodesk, Inc.
MA2467
In this class, you will learn how to use Autodesk® Product Design Suite to transform Autodesk Inventor models into intelligent models in Autodesk Revit for Building Information Modeling (BIM). We will focus on simplifying the Inventor model, removing intellectual property, adding necessary connectors and metadata, and finally, importing the model into Revit. We’ll also describe how to add value to your simplified BIM models by creating compelling visualization materials with Autodesk® Showcase® visualization software.
Learning Objectives At the end of this class, you will be able to:
Simplify Inventor models to protect intellectual property and prepare for BIM exchange
Recognize Inventor model features in order to export as native Revit models
Transform non-Inventor CAD models into Revit models using Autodesk Inventor
Add value to BIM models through Autodesk Showcase visualization tools
About the Speaker
Adam Smith is a Product Manager for Autodesk Inventor and lives in Portland, Oregon. He has
an MBA in Innovation Management and has served as a fellow for the National Collegiate
Inventors and Innovators Alliance. An inventor himself, Adam is constantly in awe of the
amazing designs created by Autodesk customers.
Autodesk® Inventor® to Autodesk® Revit®: Building Product Manufacturing Workflow
2
Inventor to Revit: Creating BIM Ready Content
The following exercises will teach you how to convert an existing Inventor assembly or part to
become a native Revit Family file.
In this class, we will do the following:
Create an RFA file from an existing Inventor assembly
Create an RFA file from an imported non-native part (Solidworks model)
Create an ADSK file from an imported non-native part with BIM information and some
further operations on ADSK file in Revit
Sample datasets which correspond to the exercise instructions can be downloaded from the
course files website for:
MA2467 Autodesk® Inventor® to Autodesk® Revit®: Building Product Manufacturing Workflow
Exercise 1 – Create a RFA file from an existing Inventor assembly
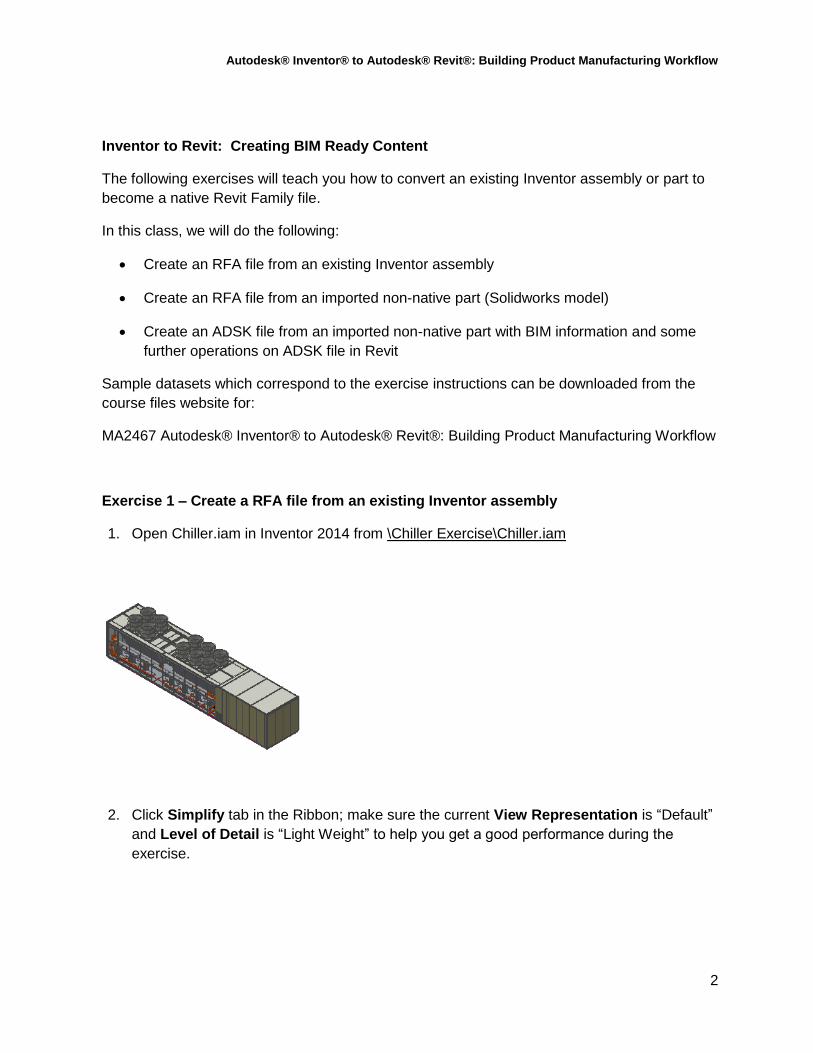
1. Open Chiller.iam in Inventor 2014 from \Chiller Exercise\Chiller.iam
2. Click Simplify tab in the Ribbon; make sure the current View Representation is “Default”
and Level of Detail is “Light Weight” to help you get a good performance during the
exercise.

Autodesk® Inventor® to Autodesk® Revit®: Building Product Manufacturing Workflow
3
3. Use Include Components command to create a simple View Representation.
a. Activate Include Components command in the Simplify tab.
b. Pick the key components (including fan tubes, housing and pipes) from the graphic
window by referring to the picture below.
c. Check on “Select all occurrences” option when selecting the fan tubes and pipes to
reduce clicking times.
d. Click OK, a new View Representation is created and called Simple View 1.

Autodesk® Inventor® to Autodesk® Revit®: Building Product Manufacturing Workflow
4
4. (Optional) Activate Edit Include Components command to add or remove components
from the current View Representation, from the Right click context menu of the Simple
View 1 browser node.
5. Activate Define Envelopes command. Replace the tubes with Bounding Cylinder, and
replace the housing with a Bounding Box. Resizing is not needed in this model.
6. Activate Create Simplified Part command. Choose “Maintain each solid as a separate
body” option, and click OK. Then a new simplified part will be created and opened.
7. When the new simplified part is created, you will be guided to BIM tab. Activate Check
Revit Features command, all features in the Model browser tree will be checked to find
the feature that are not available for Revit feature translation. You will find a feature of
“Derive” that doesn’t pass the checking from the report. You are suggested to go to BIM

Autodesk® Inventor® to Autodesk® Revit®: Building Product Manufacturing Workflow
5
Feature Recognize (Recognize Revit Feature) environment to convert this feature to be
available for Revit.
8. Activate Recognize Revit Features environment from the BIM tab, and choose the first
option of “Keep features recognized by Revit” in the message dialog. So only these two
elbow pipes will be involved in the feature recognition, and others will be kept outside of
the Recognize Revit Feature environment.
9. Activate Recognize Sweep command in Recognize Revit Features panel. Select the
selection option of “Select Face” in the Mini-toolbar, and pick the Start and End face from
the pipe. Click OK to recognize the sweep feature. After two sweep features are
recognized, you can click Finish Recognize Revit Features command to exit the
environment.

Autodesk® Inventor® to Autodesk® Revit®: Building Product Manufacturing Workflow
6
10. Add “Orange” color appearance for these two sweep features.
11. For this model, an extra feature is needed to be created. Switch to 3D Model tab, and
create a cut Extrusion to make these two pipes to be visible in the housing box.

Autodesk® Inventor® to Autodesk® Revit®: Building Product Manufacturing Workflow
7
12. Switch back to BIM tab and activate Check Revit Features command again to make sure
all features are available for Revit feature translation.
13. Activate BIM Exchange environment in the BIM tab.
14. Activate Pipe Connector command,
a. Select the upper pipe face, and set
i. System Type: Hydroid Return
ii. Loss Method: Specific Loss
iii. Flow Configuration: Calculated
iv. Flow Direction: In
v. Click Apply to Create.
b. Select the lower pipe face, and set
i. System Type: Hydroid Supply
ii. Loss Method: Specific Loss
iii. Pressure Drop: 4.51psi
iv. Flow Configuration: Calculated
v. Flow Direction: Out
vi. Click OK to Create.
c. Link these two connectors from the right click context menu.

Autodesk® Inventor® to Autodesk® Revit®: Building Product Manufacturing Workflow
8
15. Set the face in which the pipes are visible to be oriented to Front by changing the
ViewCube.
16. Activate Export Building Components command,
a. Select the File Type of Revit Family Files (*.rfa)
b. Set the Component Type of “23.75.10.24.21 Cooling and Freeze Components” by
searching “Chiller”

Autodesk® Inventor® to Autodesk® Revit®: Building Product Manufacturing Workflow
9
c. Input the Manufacturer name of “Mammoth” in the Component Properties list in
Identity Data group.
d. Select the Orientation method of “ViewCube” and locate the insertion point in a
corner by clicking and moving the trial sphere of the manipulator.
e. Click “Check Design” button to go through the list to make sure the connectors are
health and the model complexity is low.
f. Click OK to export Revit Family file. Open the report to review translation details.
(Optional, if you have Revit 2014 installed)
17. Open the Revit Family file in Revit 2014, activate the 3D view and change the appearance
style to be Realistic. During checking, you will find that
a. The color is consistent with Inventor model
b. The category and identity data is kept
c. The connectors and its properties are kept
d. The Orientation and insertion point is consistent with Inventor
e. Each feature is translated successfully. However, not all features can be driven
directly by changing parameters so far. Some manual work is needed.

Autodesk® Inventor® to Autodesk® Revit®: Building Product Manufacturing Workflow
10
Exercise 2 – Create a RFA file from an imported non-native part (Solidworks model)
1. Open Solidworks part file “DAY chiller_YMC2 YM252514M1.SLDPRT” in Inventor 2014.
All features will be converted to Base solids.
2. Click BIM tab in the Ribbon, and use Check Revit Features to check how successfully
the features will be translated when export to Revit Family file.

Autodesk® Inventor® to Autodesk® Revit®: Building Product Manufacturing Workflow
11
Tips are provided for Failures in the report
3. Under BIM tab, click Recognize Revit Features to enter Recognize Revit Features
environment. Activate Fill Voids command in Simplify panel or Marking Menu (via right-
click).
4. Click Auto Select in the “Fill Voids” mini-toolbar to select all voids, and click Apply or OK
to fill selected voids.
5. Activate Recognize Revolve command in Recognize Revit Features panel or Marking
Menu. Pick Revolved Face from the model and then click Apply to recognize revolve
feature.
Recognize four revolve features at the ends of Chiller.

Autodesk® Inventor® to Autodesk® Revit®: Building Product Manufacturing Workflow
12
Recognize five revolve features in the middle of Chiller (it is recommended to
recognize dependent features from small to large)
Recognized features will be shown Transparent in the graphic window, and new nodes are
added in the browser tree.
6. Activate Recognize Sweep command in Recognize Revit Features panel or Marking
Menu. Select the selection option of “Select Loop” in the Mini-toolbar, and pick the Start
and End loops from the pipe. Click OK to recognize the sweep feature.

Autodesk® Inventor® to Autodesk® Revit®: Building Product Manufacturing Workflow
13
7. Activate Auto Recognize command in Recognize Revit Features panel or Marking
Menu. Check off the option of “Remove Details” from Mini-tools and make sure
“Recognize Extrude” and “Recognize Revolve” checked on. Click OK to recognize all of
left features. After all features are recognized, you can click Finish Recognize Revit
Features command to exit the environment.
A progress bar is shown when executing auto recognize and user can click Stop to
cancel.
Autodesk® Inventor® to Autodesk® Revit®: Building Product Manufacturing Workflow
14
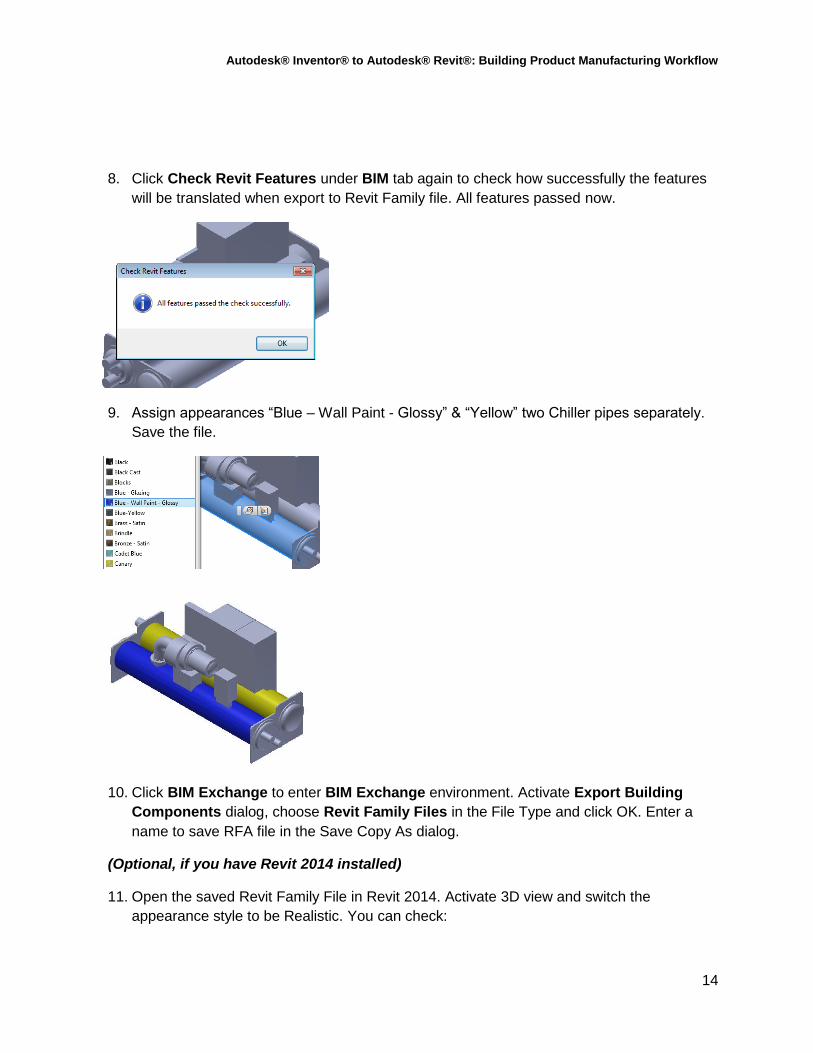
8. Click Check Revit Features under BIM tab again to check how successfully the features
will be translated when export to Revit Family file. All features passed now.
9. Assign appearances “Blue – Wall Paint - Glossy” & “Yellow” two Chiller pipes separately.
Save the file.
10. Click BIM Exchange to enter BIM Exchange environment. Activate Export Building
Components dialog, choose Revit Family Files in the File Type and click OK. Enter a
name to save RFA file in the Save Copy As dialog.
(Optional, if you have Revit 2014 installed)
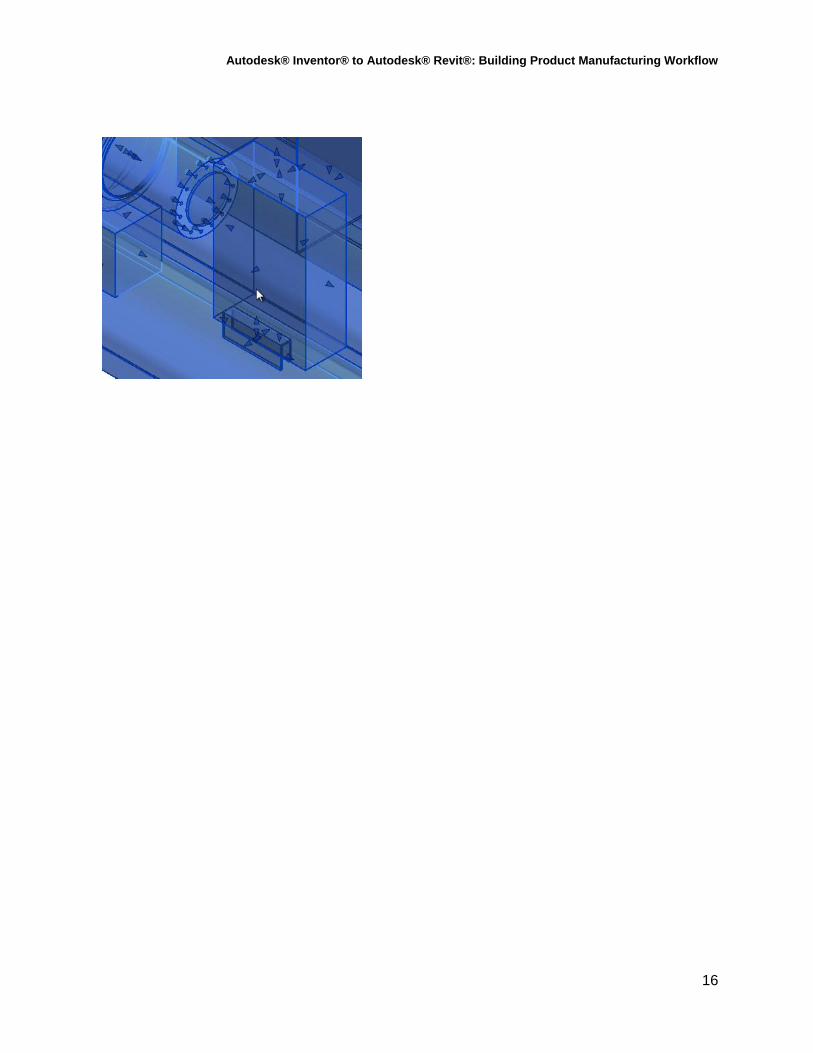
11. Open the saved Revit Family File in Revit 2014. Activate 3D view and switch the
appearance style to be Realistic. You can check:

Autodesk® Inventor® to Autodesk® Revit®: Building Product Manufacturing Workflow
15
The appearance is consistent with Inventor model
The Orientation and insertion point is consistent with Inventor
Each feature is translated successfully.
12. Try to edit the features in Revit. E.g. changing the size.
Autodesk® Inventor® to Autodesk® Revit®: Building Product Manufacturing Workflow
16