armrest rev8 5-2014 - eagle ieagle-i.us/ins_armrests/ins_armrests.pdf · page 3 eagle innovations...
TRANSCRIPT
Page 1
Eagle Innovations Armrest Installation
Eagle Innovations Armrest Installation Manual Designed and Produced By: Don Muddiman
Disclaimer: These armrests are to be used solely for the purpose of supporting and resting the passenger’s forearms and are not to be used as a restraint system, protection device, assistance for passenger embarking or disembarking the vehicle, or for any function other than the intended purpose of providing a place for the passenger’s arms to rest upon.
Tools Required: ● Allen wrenches – 3MM, 4MM, 5MM ● T20 TORX socket or right angle driver ● Cordless hand drill ● Drill bits: 5/32”(4mm), 3/16”(4.5mm), 15/64”(6mm), 1/4”(6.5mm) ● TAP 6MMx 1.00 and T-handle ● 1” Masking tape ● Tongue depressors (Used for shims)
● Pliers ● Flat blade screwdriver ● Xacto knife ● Awl ● Side cutters Install time is approximately two hours. Armrests are warranted one year from date of purchase.
Don Muddiman
305 Oregon Ave.
St. Cloud, FL 34769 USA
Phone: 407-301-6080
www.eagle-i.us Ea
gle I
nnov
ation
s Motorcycle Innovations
Keeping the fun in Riding ……
Thank you for purchasing the Eagle Innovations Armrests. For questions or comments contact:
Don Muddiman [email protected] or call 407-301-6080
www.eagle-i.us
Revised: June 17, 2007

Page 2
Eagle Innovations Armrest Installation
Step 1: Open the trunk lid and remove the ten screws on each side holding the rear speakers onto the trunk lid using a T20 TORX driver. Carefully remove the speaker wires and set the speakers aside for later reinstall. Remove the left side wire harness retainer clip from the hinge stiffener.

Page 3
Eagle Innovations Armrest Installation
Step 2: Remove the nylon strap at the looped end on the lower trunk connection by removing the thumb screw. The trunk will now fully open and rest on the passenger seat. Place a cloth or tape news-paper in place below the hinge areas to catch the drill shavings.
Step 3: Starting on the right hinge as viewed from the rear, use a sharp 5/32” drill bit and drill out the six upper Aluminum rivets retaining the trunk lid. Use light pressure when drilling out the rivets. Stop drilling when the rivet head starts spinning on the drill bit. Repeat for all six rivets.

Page 4
Eagle Innovations Armrest Installation
Step 4: Remove the factory hinge stiffener using a flat blade screw driver. Replace the factory hinge stiffener with the new hinge stiffener and secure using six M4x16mm stainless socket screws and washers from the hinge side.
Step 5: Repeat steps 3-4 for the left stiffener with the following exception: Place the longer M4x18mm screw into the left front inside hole.

Page 5
Eagle Innovations Armrest Installation
Step 6: Place a small piece of wood, metal or use the blade of putty knife as a drill bit stop under the hinge and tape in place. Close the trunk lid. Using the hinge stiffener as a drill guide, use a sharp 3/16 drill bit and drill through the M6 threaded hole. You will be drilling through the plastic trunk material and the steel trunk hinge.
Step 7: This step has two options: You can remove the stiffener and re-drill the 3/16” hole to a 15/64” for the M6 screw to pass through, or you can use a M6x1.00 tap, starting from the stiffener side, and tap through trunk lid material and hinge to save some time.

Page 6
Eagle Innovations Armrest Installation
Step 8: With the hinge stiffener in place and using it as a drill guide, drill out the two remaining holes through the trunk material using a sharp 15/64” drill bit. Tape down the speaker wires and har-ness to keep from getting entangled into the drill. Repeat for the other side.
Modifying the trunk light switch and location.
Step 9: Remove the right panel. The right panel is attached by two T20 TORX screws and hinges from the top. Push back the passenger seat to remove the side screw. The bottom screw can be removed by opening the side case door. Use a right angle TORX wrench or use a pair of pliers to hold a T20 TORX socket and remove the bottom screw.
Page 7
Eagle Innovations Armrest Installation
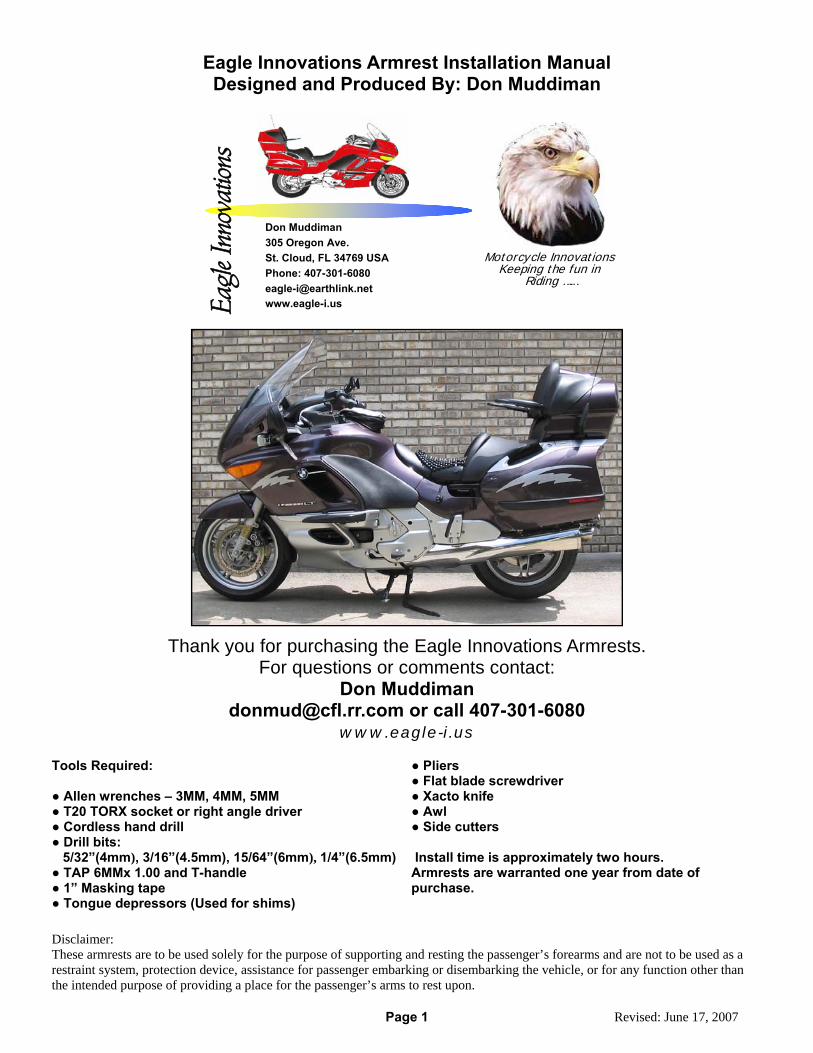
Step 10: On the right side use a flat thin blade screw driver under the metal keeper to remove the plastic light switch spacer.
Step 11: Using an Xacto knife and a 3/16” drill bit, trim and drill out the indicated areas to mount the light switch in its new position.

Page 8
Eagle Innovations Armrest Installation
Step 12: The inside hinge tab of the panel must be removed to relocate the trunk light switch. The side screw will be sufficient to retain the panel in place.
Step 13: Remove the light switch retainer from the original hinge support rivet and drill a 1/4” hole though the original rivet hole.
TRIM OFF TAB
Page 9
Eagle Innovations Armrest Installation
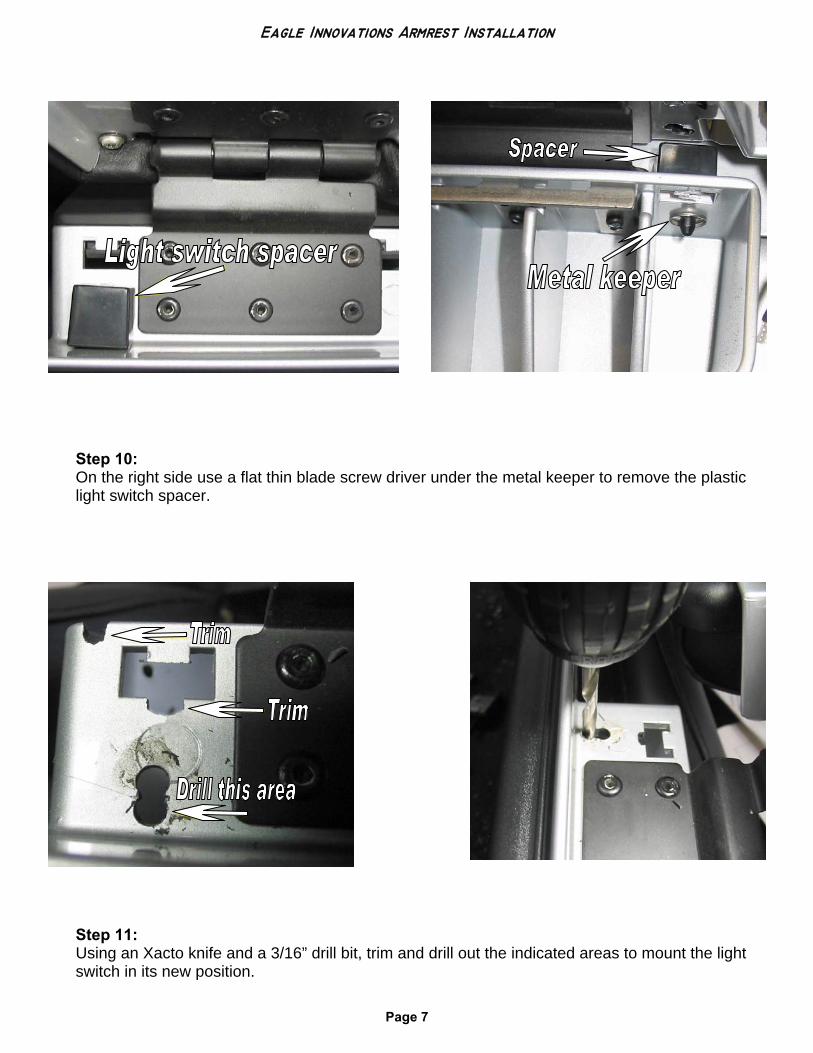
Step 14: Reassemble the switch into the retainer and slide metal U-Clip over the switch bracket.
Step 15: Place the light switch in its new location and secure in place with a #10 stainless steel sheet metal screw. Place the wire harness into the notched area. Check the fit and reinstall the panel.
Light Switch

Page 10
Eagle Innovations Armrest Installation
Step 17: Bolt both main brackets in place using two M6x16mm stainless steel socket head screws and lock washers. On the left side install the wire harness cable retainer on the long M4 screw and secure with a M4x.75mm nylon locknut. Attach the wire harness clip to the retainer.
Step 16: Apply masking tape on the covers below where the main supports will mount to prevent the main support from marring the plastic.
Main bracket mounting bolts
Cable Retainer
M4 Nylon locknut
Page 11
Eagle Innovations Armrest Installation
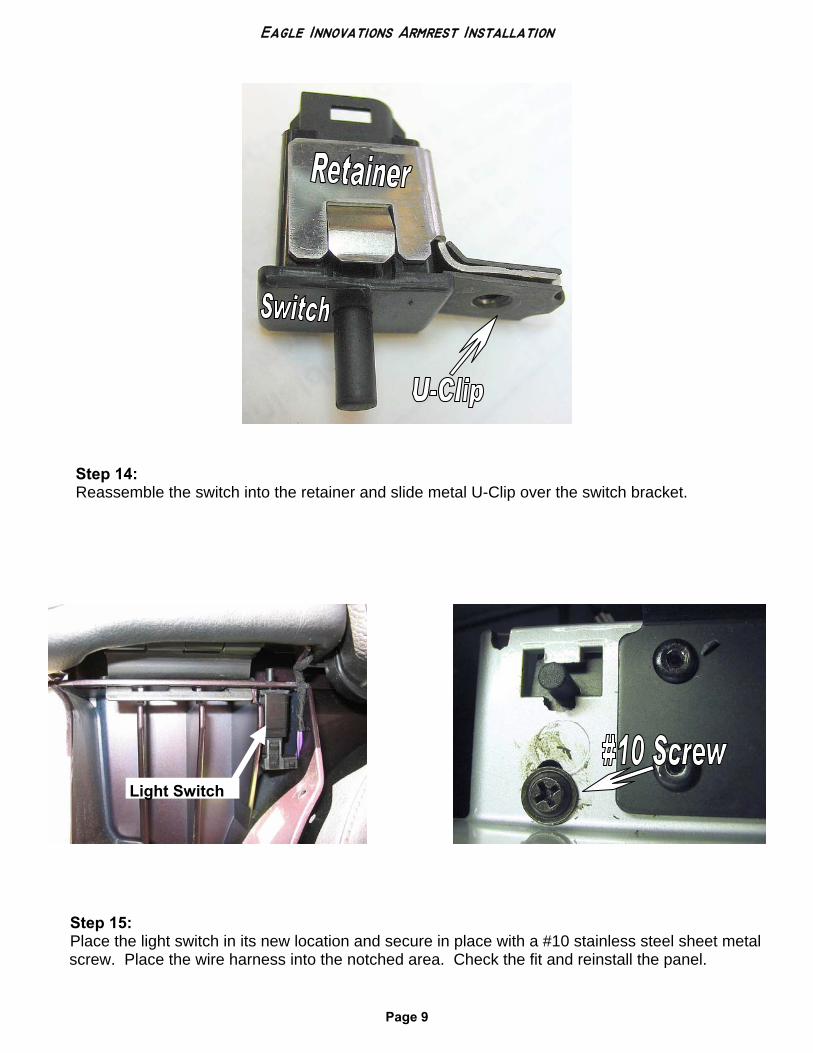
Step 18: Attach both sides main support bracket stiffeners using one M6x16mm and two M6x8mm stain-less steel button head socket screws.
Step 19: Cut a tongue depressor in half and tape both pieces in place on the right side below the main bracket to set the trunk lid clearance when the trunk lid is opened.
M6x16mm
M6x8mm

Page 12
Eagle Innovations Armrest Installation
Step 20: Using an Awl, push a hole through the nylon strap and secure it with a 6-32 machine screw, washers and a nut. Make sure the nylon strap is tight to eliminate the main support bracket from marring/hitting the panels. Tuck the excess strap into the cavity. Remove the tongue depressors and check for Main Bracket clearance. Readjust the strap if required.
Step 21: Reinstall all speakers. Note one lower speaker screw on each side cannot be reinstalled because of the main bracket. Reinstall the lower outer screw using a T20 socket and a small breaker bar or right angle TORX driver.
These screws cannot be reinstalled

Page 13
Eagle Innovations Armrest Installation
Step 22: Install the armrest with the widest side from the mount to the outer side of the bike. Mount using two 1/4-20x1” stainless steel socket head screws for each pad.
Parts List:
Qty. Description
2 Assembled armrest pads with horizontal and vertical hinge mounts.
1 Zinc-Plated Pan Head Phillips Machine Screw 6-32 Thread, 5/16" Length
1 Zinc Plated Machine Screw Nut 6-32 Screw Size
2 Zinc-Plated Flat Washer #6 Size
4 Stainless Steel Socket Head Socket Cap Screw, 1/4"-20 Thread 1" Length
1 Standard U-Nut #10 Size, .025"-.04" Panel, .359" Hole Center To Edge
1 18-8 Stainless Steel Pan Head Phillips Sheet Metal Screw No 10 Size, 5/8" Length
11 Metric 18-8 Stainless Steel Socket Head Cap Screw M4 Thread, 14mm Length 7mm Pitch
1 Metric 18-8 Stainless Steel Socket Head Cap Screw M4 Thread, 18mm Length 7mm Pitch
1 Metric Zinc-Plated Steel Nylon-Insert Locknut M4 Screw Size, .7 mm Pitch, 7mm Width, 5mm Height
4 Metric 18-8 Stainless Steel Socket Head Cap Screw M6 Thread, 16mm Length
4 Metric 18-8 Stainless Steel Spring Washer For Socket-HD Cap Screw M6 Screw Size
4 Metric 18-8 Stainless Steel Button Head Socket Cap Screw M6 Size, 8 mm Length, 1 mm Pitch
2 Metric 18-8 Stainless Steel Button Head Socket Cap Screw M6 Size, 16 mm Length, 1 mm Pitch
12 Metric 18-8 Stainless Steel Spring Lock Washer M4 Screw Size, 4.4mm ID, 7.6mm OD, 0.9mm Min Thick
2 Main Brackets
2 Hinge stiffeners
2 Main Bracket support stiffeners
To outer side
To outer side