arise, awake and stop not till the goal is . · pdf filearise, awake and stop not till the...
TRANSCRIPT

Arise, Awake and
Stop not
till the GOAL is Reached.
Swami Vivekananda
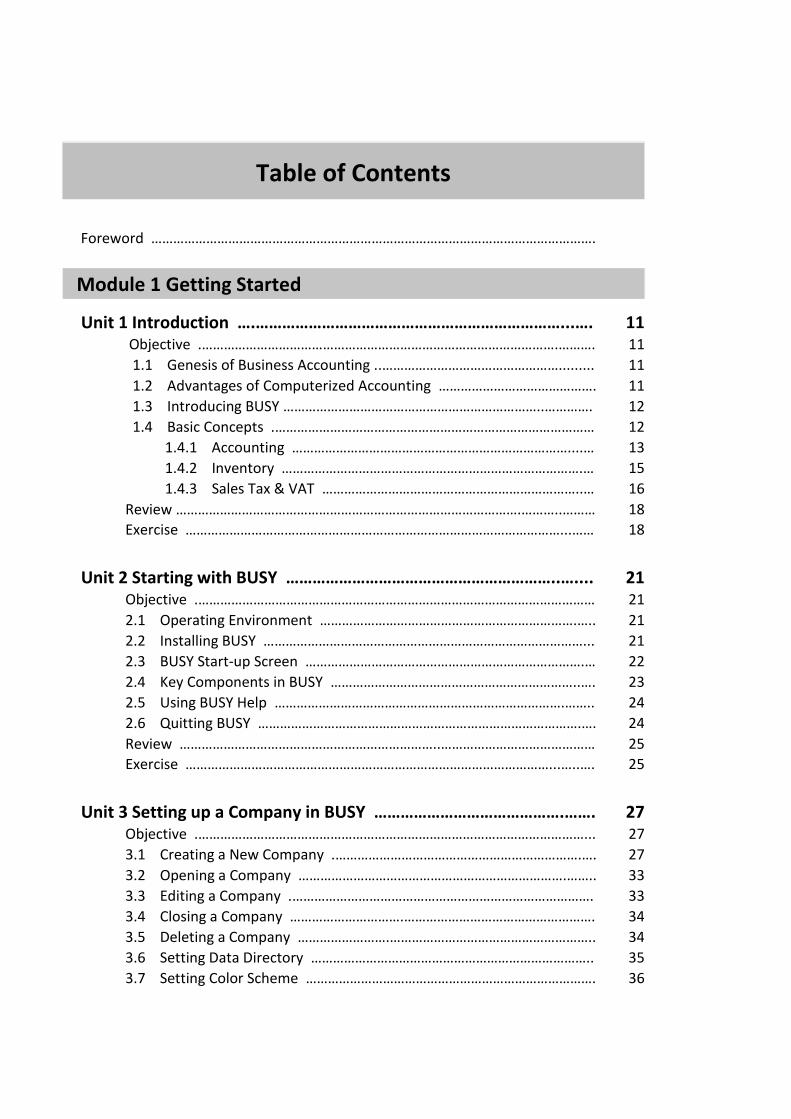
Table of Contents
Foreword ………………………………………………………………………………………………………….
Module 1 Getting Started
Unit 1 Introduction ….……………………………………………………………...…. 11 Objective .…………………………………………………………………………………….………. 11
1.1 Genesis of Business Accounting ..…………………………………………......... 11
1.2 Advantages of Computerized Accounting ……………………………………. 11
1.3 Introducing BUSY ……………………………………………………………..…………. 12
1.4 Basic Concepts .…………………………………………………………………………… 12
1.4.1 Accounting …………………………………………………………………....… 13
1.4.2 Inventory ……………………………………………………………………….… 15
1.4.3 Sales Tax & VAT ……………………………………………………………..… 16
Review ………………………………………………………………………………….………..……… 18
Exercise …………………………………………………………………………………………...……
18
Unit 2 Starting with BUSY ……………………………………………………..….... 21 Objective .……………………………………………………………………………………………… 21
2.1 Operating Environment …………………………………………………………….….. 21
2.2 Installing BUSY ……………………………………………………………………………... 21
2.3 BUSY Start-up Screen ………………………………………………………………….… 22
2.4 Key Components in BUSY …………………………………………………………..…. 23
2.5 Using BUSY Help …………………………………………………………………….…….. 24
2.6 Quitting BUSY …………………………………………………………………………….…. 24
Review ……………………………………………………………..…………………………………… 25
Exercise ………………………………………………………………………………………...…..….
25
Unit 3 Setting up a Company in BUSY …………………………………….……. 27 Objective .……………………………………………………………………………………………... 27
3.1 Creating a New Company .………………………………………………………….…. 27
3.2 Opening a Company ……………………………………………………………….…….. 33
3.3 Editing a Company .………………………………………………………………………. 33
3.4 Closing a Company ………………………….……………………………………………. 34
3.5 Deleting a Company …………………….……………………………………………….. 34
3.6 Setting Data Directory ………………………………………………………………….. 35
3.7 Setting Color Scheme ……………………………………………………………………. 36
Review ………………………………………..………………………………………………………… 40
Exercise ………………………………………………………………………………………..…….…
40
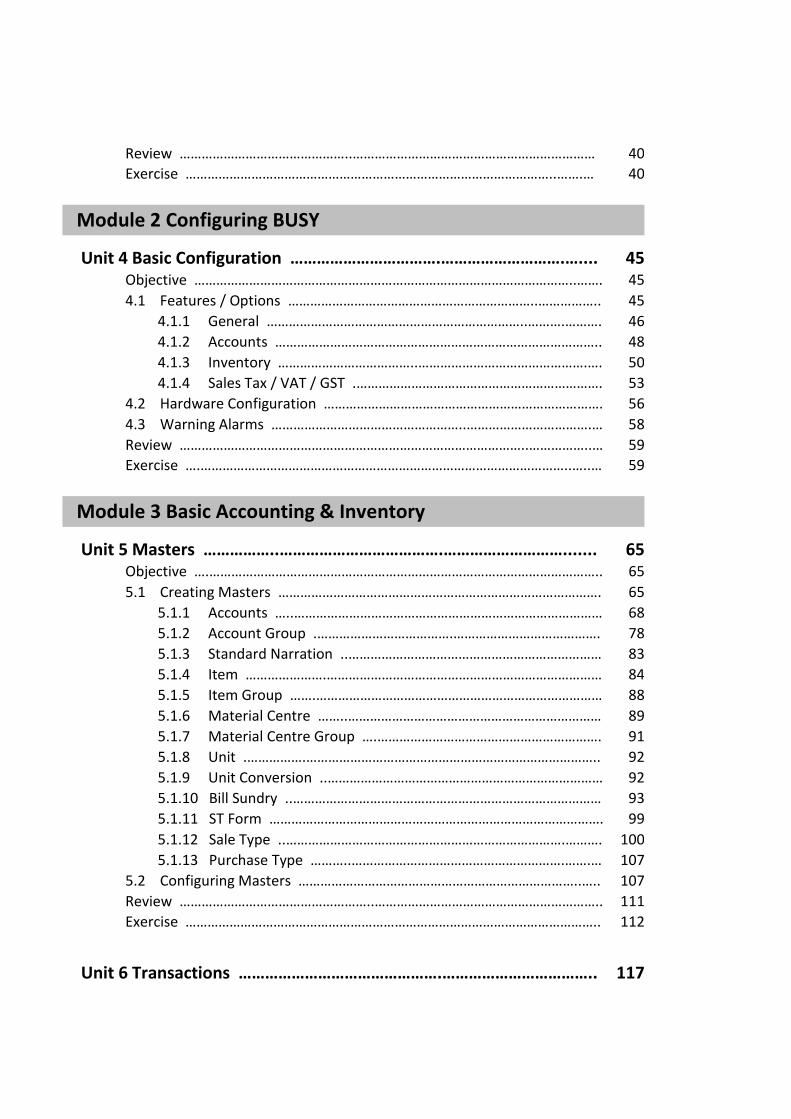
Module 2 Configuring BUSY
Unit 4 Basic Configuration …………………………….……………………….….... 45 Objective …………………………………………………………………………………………..……. 45
4.1 Features / Options …………………………………………………………..…………….. 45
4.1.1 General ……………………………………………………………..……….………. 46
4.1.2 Accounts …………………………………………………………………………….. 48
4.1.3 Inventory ………………………………..……………………………………….…. 50
4.1.4 Sales Tax / VAT / GST .…………………………………………………………. 53
4.2 Hardware Configuration …………………………………………………………………. 56
4.3 Warning Alarms ……………………………………………..…………………………….… 58
Review …………………………………………………………………………………..……………..… 59
Exercise ….………………………………………………………………………………………..…..…
59
Module 3 Basic Accounting & Inventory
Unit 5 Masters ……………..……………………………….………………………....... 65 Objective ….…………………………………………………………………………………………….. 65
5.1 Creating Masters ……………………………………………………………………………. 65
5.1.1 Accounts …..………………………………………………………………………… 68
5.1.2 Account Group .……………………………….…………………………………. 78
5.1.3 Standard Narration ..…………………………………………………………… 83
5.1.4 Item ………………….………………………………………………………………… 84
5.1.5 Item Group …….…………………………………………………………………… 88
5.1.6 Material Centre ……..…………………………………………………………… 89
5.1.7 Material Centre Group ….……………………………………………………. 91
5.1.8 Unit .…………….…………………………………………………………………….. 92
5.1.9 Unit Conversion ..………………………………………………………………… 92
5.1.10 Bill Sundry ..………………………………………………………………………… 93
5.1.11 ST Form ………………………………………………………………………………. 99
5.1.12 Sale Type ..………………………………………………………………….………. 100
5.1.13 Purchase Type ………..………………………………………………….…….… 107
5.2 Configuring Masters …………………………………………………………………..….. 107
Review ……………………………………………..…………………………………………………….. 111
Exercise …………………………………………………………………………………………………..
112
Unit 6 Transactions ……………………………………….…………………………….. 117
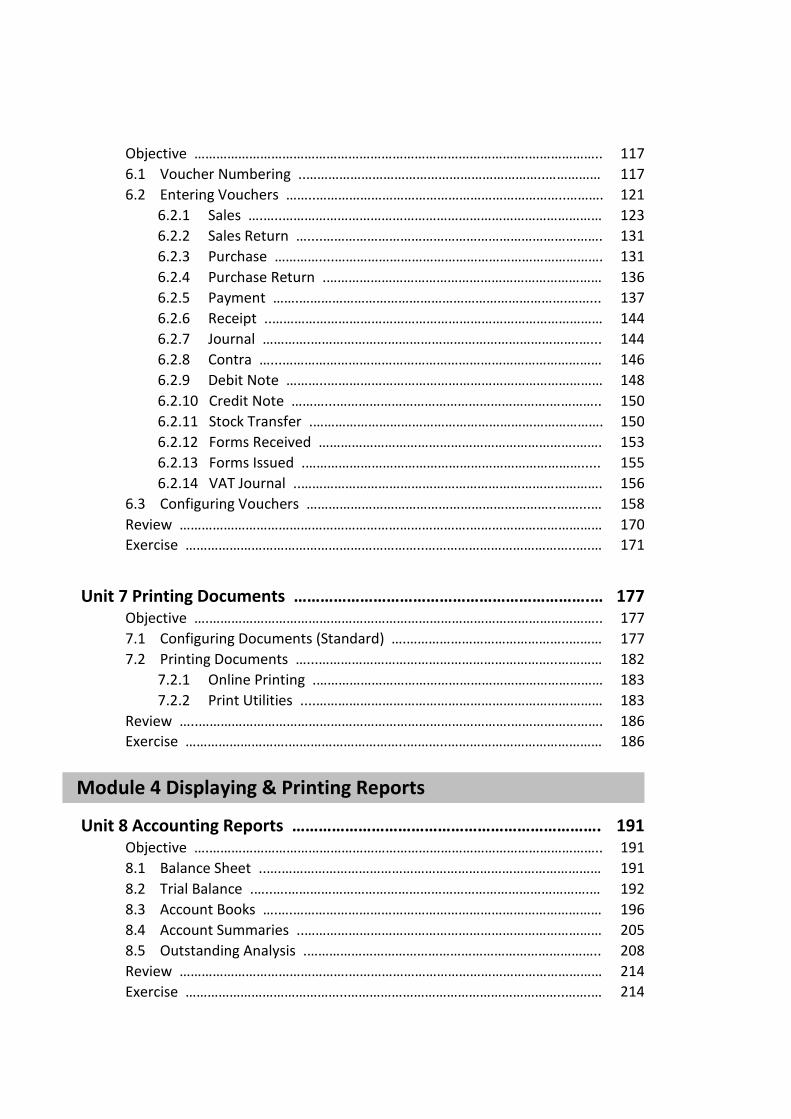
Objective ……………………………………………………………………………….……………….. 117
6.1 Voucher Numbering ..………………………………………………………..…………… 117
6.2 Entering Vouchers ……..…………………………………………………………..………. 121
6.2.1 Sales ….…..…………………………………………………………………………… 123
6.2.2 Sales Return …....…………………………………………………………………. 131
6.2.3 Purchase …………....………………………………………………………………. 131
6.2.4 Purchase Return .………………………………………………………………… 136
6.2.5 Payment …….……………………………………………………………….……... 137
6.2.6 Receipt ..……………………………………………………………………………… 144
6.2.7 Journal ………….……………………………………………………………….…... 144
6.2.8 Contra …...…………………………………………………………………………… 146
6.2.9 Debit Note ………..………………………………………………………………… 148
6.2.10 Credit Note ………...………………………………………………….………….. 150
6.2.11 Stock Transfer .……………………………………………………………………. 150
6.2.12 Forms Received …………………………………………………………….……. 153
6.2.13 Forms Issued .…………………………………………………………………..... 155
6.2.14 VAT Journal ..………………………………………………………………………. 156
6.3 Configuring Vouchers …………………………………………………………..……...… 158
Review …………………………………………………………………….……………………………… 170
Exercise ………………………………………………………..…………………………………..….…
171
Unit 7 Printing Documents ………………………………………………………….… 177 Objective ….…………………………………………………………………………………………….. 177
7.1 Configuring Documents (Standard) ….……………………………………..……… 177
7.2 Printing Documents …...………………………………………………………..………… 182
7.2.1 Online Printing .…………………………………………………………………… 183
7.2.2 Print Utilities ....…………………………………………………………………… 183
Review …..………………………………………………………………………….……………………. 186
Exercise ……………………….…………………………..………..……………………………………
186
Module 4 Displaying & Printing Reports
Unit 8 Accounting Reports ……………………………………………………………. 191 Objective ….…………………………………………………………………………………………….. 191
8.1 Balance Sheet ..….…………………………………………………………………………… 191
8.2 Trial Balance .…..….……………………………………………………………………….… 192
8.3 Account Books ….….………………………………………………………………………… 196
8.4 Account Summaries ..……………………………………………………………………… 205
8.5 Outstanding Analysis .…………………………………………………………………….. 208
Review ……………………………………….…………………………………………………………… 214
Exercise ……………………………………..…………………………………………………..…….… 214
Unit 9 Inventory Reports …………………………………………………………….… 217 Objective ….…………………………………………………………………………………………….. 217
9.1 Stock Status ..….………………………………………………………………………….….. 217
9.2 Inventory Books ….…………………………………………………………………………. 221
9.3 Inventory Summaries …………………………………………………………………..... 226
Review ………………………………………………………………………………..…………..……… 233
Exercise ………………………………………………………………………………………….…….…
234
Unit 10 Sales Tax & VAT Reports …..……………………………………………... 237 Objective ….…………………………………………………………………………………………….. 237
10.1 ST Forms Reports ..……………………………………………………………………….. 237
10.2 Sales Tax / VAT Summaries …………………………………………………………… 240
10.3 Sales Tax / VAT Registers (General) .……………………………………………… 247
10.4 Sales Tax / VAT Reports (State Specific) ..………………………………..……. 250
10.5 VAT Adjustment Details .……………………………………………………..…….…. 250
10.6 Reconcile Accounts & Sales / Purchase Tax ………………………………….. 251
Review ……………………………………………………………….…………………………………… 252
Exercise ……………………………………………………………………..…………………..…….…
253
Module 5 Managing Data
Unit 11 Managing Backup …………………………………….…………..………..… 257 Objective ….…………………………………………………………………………………………….. 257
11.1 Backup Configuration …….………………………………………………..…………… 257
11.2 Taking Backup ……………..………………………………………………………..…….. 259
11.3 Restore Data ………………………………………………………………………………… 261
Review ….………………………………………………………………………………………………… 263
Exercise ..…………………………………………………………………………………………..….…
263
Unit 12 Utilities ………………………………………….………………………………... 267 Objective ….…………………………………………………………………………………………….. 267
12.1 Data Freezing ...…………………………………………………………………………….. 267
12.2 Data Export (MS Excel / PDF / HTML) …..………………………………..…….. 268
Review ….………………………………………………………………………………………………… 270
Exercise ..………………………………………………………………………………………......……
270
Unit 13 Housekeeping …….……………………………………………………………. 273 Objective ….…………………………………………………………………………………………….. 273
13.1 Rebuild Databases ...…….…………………………………………………………….… 273
13.2 Rewrite Books …………….………………………………………………………………… 274
Review ….………………………………………………………………………………………………… 275
Exercise ..…………………………………………………………………………………………..….…
275
Unit 14 Year-end Process …..…………………….……………………………..…... 277 Objective ….…………………………………………………………………………………………….. 277
14.1 Year-end Entries .………………………………………………………………………….. 277
14.2 Changing Financial Year ………………..…..……………………………….……..…. 280
Review ….………………………………………………………………………………………………… 283
Exercise ..………………………………………………………………………………………...………
283
Shortcut Key Combinations …………………………………………………………………………..…... 286
Glossary ..……………………….……………………………………………………………………………….…. 288

Module 1
Getting Started
Unit 1 – Introduction
Unit 2 – Starting with BUSY
Unit 3 – Setting up a Company in BUSY

Teachers open the Door,
but you must Enter
By Yourself.
Chinese Proverb
Unit 1 Introduction
The main objective of this unit is to familiarize the User with the basic concepts of accounting & inventory management. As accounting & inventory management is an integral part of a business, we will learn how the need for efficient and correct accounting & inventory management has given birth to the business accounting. The unit also describes that with the passage of time, how business accounting from being managed manually is now largely dependent on the computerized accounting.
Topics covered under this unit:
Genesis of Business Accounting
Advantages of Computerized Accounting
Introducing BUSY
Basic Concepts
1.1 Genesis of Business Accounting Accounting is the art of classifying, summarizing and recording the transactions of the business in a prescribed format so as to use this information to take managerial decisions and to ensure the smooth running of the business. In a business, there is a need to keep a record of multiple things such as expenses, amount receivable and payable, tax submission, stock maintenance and so on. The recording of all these entries or managing all such issues is jointly termed as business accounting.
One of the major purpose of accounting is to provide data needed for decision-making and efficient operation of business. For example, the owners, who provide capital for the business, are interested in interest yielded on the capital and the financial stability of the business. This can be done only by maintaining accounts of the company. Similarly, accounting also serves creditors purpose by displaying a fair view of assets and liabilities of the company. In addition, government relies on accounting for assessing the taxable capacity of the business. Thus, accounting is an inevitable part of a business.
1.2 Advantages of Computerized Accounting Computerized Accounting has lots of benefits with it. With the availability of User-friendly accounting software at a relatively low cost, it is a wise decision to maintain accounting records through accounting software instead of manual maintenance of records. Given here is a list of the advantages of computerized accounting:

12
Availability of records with just a click of button
Data accuracy
Reliability of data
Automatic generation of accounting documents like Invoices, Statement of Account and so on
Generation of VAT and other statutory reports
Ability to handle high volumes of transactions without compromising on speed or efficiency
Increase revenue while lowering operating costs
1.3 Introducing BUSY BUSY is an integrated business accounting software for small & medium businesses. It was launched in 1994 at IT-ASIA'94, Pragati Maidan, New Delhi and has received an overwhelming response since then. With over 90,000 installations in over 20 countries, it is one of the leading accounting software in India.
The salient features of BUSY are:
Financial Accounting (Multi-Currency)
Multi-Location Inventory Management
Production / Bill of Material
Sales / Purchase Order Processing
Fully User-Configurable Invoicing
User-Configurable Documents / Letters
Sales Tax Reports / Registers
VAT Reports / Registers (State-Wise)
Mfg / Trading Excise Registers
Service Tax / TDS / FBT
Direct E-Mail / SMS Facility
MIS Reports & Analysis
BUSY is known for its simplicity & reliability. It is available in Single-User (Desktop), Multi-User (LAN) and Client-Server (MS-SQL based) editions.
1.4 Basic Concepts In this topic, we will learn about the basic concepts of accounts & inventory management along with some basic knowledge of Sales Tax & VAT.

Unit 1 - Introduction 13
1.4.1 Accounting The prime motive for doing a business is to earn profit. To know the profit earned or loss incurred in a particular period, it is necessary to record the financial transactions for the same period. Financial accounting is an effective tool to record, classify, and summarize financial transactions. Accounting is the art of recording, classifying and summarizing financial transactions and analyzing & interpreting the results thereof. To maintain uniformity in accounting, certain accounting principles are followed. The accounting principles consist of accounting concepts and accounting conventions.
Accounting is a business language used to communicate the financial information of the business to the people concerned. This makes it important for accounting to be based on certain concepts. These concepts imply the necessary assumptions or conditions upon which accounting is based. These can be listed as:
Business Entity Concept
Dual Aspect Concept
Accounting Period Concept
Business Entity Concept
This concept holds prime importance in Financial Accounting. According to this concept, a business is a separate entity from its owner. Business transactions are recorded from the point of view of the business entity and not the owner. The business entity can be a company, firm or proprietorship.
Dual Aspect Concept
This concept indicates that each transaction has two aspects and is recorded in two different accounts. For example, if a business house purchases a machine on cash basis, the Machine account and the Cash account will be affected. The double-entry system of accounting is based on this concept. The basic presumption of this system is that every business transaction has two aspects. Under this system, both the aspects of a transaction are recognized and recorded.
Accounting Period Concept
The time period during which the transactions of a business are recorded is called the accounting period. It states that the indefinitely long period of the business life should be divided into shorter periods for summarizing accounting information. Accounts for a business are prepared for a specific period, generally a 12-month period. In India, the accounting period is generally, taken from April 1 to March 31.
After discussing the concepts of Accounting, let us discuss the various Accounting conventions. Conventions are the customs and traditions that act as a guide to the preparation of the final accounts. Following these conventions, results in the presentation of clear and meaningful final accounts. The conventions followed to prepare accounting statements are:
Convention of Consistency
14
Convention of Conservatism
Convention of Consistency
According to the convention of consistency the accounting practices and methods should not be changed from one accounting period to another. For example, there are 2 methods to charge depreciation, Written Down Value method and Straight Line method. The method once chosen should be used consistently year after year. Consistency in accounting practices and methods makes the records of the company for different years comparable.
Convention of Conservatism
According to this convention the accounting records should present a realistic picture of the state of affairs of the business. All the prospective losses should be accounted for and all prospective gains should be ignored. For example, to present a realistic picture the closing stock is valued at market or cost price whichever is less. If the market price is Rs. 15 and the cost price is Rs. 10, then the closing stock will be valued at Rs. 10. On the other hand if the market price is Rs. 12 and cost price is Rs. 14, then the closing stock will be valued at Rs. 12.
Now that we have discussed the Accounting principles, let us move on to the accounting terms that are used frequently.
Account
An Account is a summarized record of various transactions pertaining to a particular account head. It is commonly referred to as a Ledger Account.
Debit & Credit
The terms debit and credit refer to the additions to or subtractions from an account. Debit is an accounting term that means 'to owe'. It is used to describe a payment, debt, or an entry in recording a transaction, the effect of which is to decrease a liability, income, or capital account or increase an asset or expense account. Credit is the opposite of debit. It is an accounting term used to describe an entry that increases an income, liability or capital account, and decreases an expense or asset account.
Assets
Assets are resources owned by a business. It can be anything that enables a business to get benefit. For example, land, building, stock of goods, and cash.
Liabilities
A liability can be defined as something that a business owes to a third party in the form of an obligation to pay. For example, when a loan is taken from a bank or a financial institution it raises a liability for the business.
Unit 1 - Introduction 15
Capital
Capital is the money that the owner invests to start the business and can claim from the business. Thus, for the business it is a liability towards the owner since the owner is a separate entity from the business. It can also be defined as the positive difference of assets over liabilities.
Income
Income is money received by a person or organization because of effort or work done by the person. In other words, it is return on work done or returns on investments.
Expense
Expense is the amount spent in order to produce and sell the goods and services, which produce the revenue.
Debtor
A debtor is a person or business concern that owes money to another business concern.
Creditor
A creditor is a person or business concern to which a business concern owes money.
Stock
Stock refers to the goods lying unsold on a particular date. The stock can be either opening stock or closing stock. Opening stock is the stock lying unsold at the beginning of the accounting period while closing stock refers to the stock lying unsold at the end of the accounting period.
Golden Rules of Accounting
For making accounting entries, you must remember the three Golden Rules of accounting. The rules are:
Rule 1: Debit the receiver and credit the giver
Rule 2: Debit what comes in and credit what goes out
Rule 3: Debit all expenses and losses and credit all income and gains
1.4.2 Inventory In a general business scenario, inventory management is an integral part that helps in smooth running of the business and in determining the deficiency / excess of stock at any given time. Inventory includes the stock of raw material; semi finished goods and finished goods. Inventory management implies maintaining an accurate record of incoming and outgoing stock.
Companies can be of two types, Trading and Manufacturing. Trading companies just sell the goods as they are purchased with no modification in it whereas Manufacturing companies manufacture some
16
other goods (Finished Product) from the goods that are purchased (Raw Material). Let us understand this with the help of an example. A garment manufacturing company has its own production house. It purchases cloth from the market and makes shirts out of that cloth. The company then sells the Shirts in the market. In this case, Cloth is the raw material and Shirt is the finished product.
Manufacturing companies require a high level of inventory management, as they have to keep a record of both raw material and finished goods. These companies also have to look after the composition of the finished product. Continuing with the above example, company need to make a composition that for each Shirt manufactured, one metre of cloth, ten buttons and a reel of thread is required. Hence, the company needs to keep a record about all the items that are used in manufacturing of a finished product.
The task of maintaining inventory, with knowing in advance the material required for manufacturing a product, the deficiency or excess of stock, cost involved in the process of production and stock in hand is called Inventory Management. Inventory Management forms a major part of any business.
1.4.3 Sales Tax & VAT
The primary difference between Sales Tax and VAT is in the way tax is levied. In case of Sales Tax, the tax is generally levied at either the first point or the last point in the production and distribution chain. It is therefore a single-point tax system. In case of VAT, the tax is levied at each point in the production and distribution chain. Thus, VAT is a multi-point tax system.
VAT is the abbreviated form for Value Added Tax. Value Added Tax as the name suggests, is an indirect tax calculated on the 'value added' to the goods and services at each point in the production and distribution chain. It is charged as a percentage of prices, which means that the actual tax burden is visible at each stage in the production and distribution chain.
In India, the Tax Credit method is followed to calculate VAT. VAT is calculated on both the purchase and sale transactions in the chain of production and distribution of goods and services with the provision for a set-off for the tax paid at earlier stages in the chain.
There are few typical terms used in VAT that we need to know. Let us discuss these terms. The terms used in VAT are:
Tax Payers Identification Number (TIN)
Input Tax
Output Tax
Input Tax Credit
Net Tax Payable / Receivable
Invoice
Unit 1 - Introduction 17
Tax Payers Identification Number
Tax Payers Identification Number, popularly known, as TIN is the registration number allotted to a dealer registered under the Value Added Tax (VAT) Act. The Sales Tax Department issues TIN to the registered VAT dealer.
Input Tax
Input Tax is the tax that you have paid on your purchases of business inputs, which include the goods that you bought for resale, raw material, capital goods, as well as other inputs for use directly or indirectly in your business.
Output Tax
Output Tax is the tax that you charge on your sales that are subject to tax. This tax is payable to the government.
Input Tax Credit
Input Tax Credit is the amount of input tax for which you are allowed to claim a credit.
Net Tax Payable / Receivable
Net Tax is the difference between your Output Tax and Tax Credits you are allowed to claim in a given tax period. It could be a positive or a negative amount. The negative amount represents tax credits in excess of output tax for a given period.
Net tax payable / receivable is calculated as:
Net tax payable / receivable = Output Tax – Input Tax Credit
Invoice
Invoice, popularly known as a bill, is a claim raised by the seller of the goods on the buyer of the goods in respect of the goods sold. It provides complete detail of the goods sold by the seller.
There are primarily two types of invoices:
Tax Invoice - This invoice is issued when a registered dealer sells goods to another registered dealer for Resale or Manufacture or processing of goods for sale.
Retail Invoice - This invoice is issued when a dealer, registered or unregistered sells goods to an unregistered dealer or a consumer.
The significance of Tax Invoice in VAT is that the entire design of VAT and input tax credit is based on documentation of tax invoice, cash memo, or bill. The dealer can claim input tax credit only when the goods are purchased on a tax invoice.
18
Review
In this unit, we have covered the need for business accounting and the benefits of computerized accounting along with a brief introduction of BUSY accounting software, its launching & the purpose it serves.
The unit has also covered the basic accounting, inventory concepts and a small introduction to the VAT concepts & calculation.
Exercise 1. A Debtor is:
a) Who owes money to company c) Any Party with whom you deal b) To which company owes money d) Both a & b
2. Double Entry Accounting affects:
a) One Account c) Only Two Accounts b) Two or More Accounts d) All of the above
3. Full form of TIN:
a) Tax Invoice No. c) Tax Identifier No. b) Tax Payers Identification No. d) Total Invoice No.
4. Input Tax Credit can be claimed on:
a) Tax Invoice c) Goods sold without bill b) Retail Invoice d) Goods sold to unregistered dealer
5. Accuracy & Reliability of data is more in:
a) Computerized Accounting c) Manual Accounting b) Spreadsheets d) Both a & c
6. Tax charged on goods sold is:
a) Input Tax Credit c) Tax Deposit b) Output Tax d) None of the above
7. Write any three advantages of using computerized accounting.
8. Describe three golden rules of accounting.
9. What is the formula for calculating Net Tax Payable / Receivable?
Unit 1 - Introduction 19
10. What is the difference between Tax Invoice and Retail Invoice?
The Journey of a Thousand
Miles must Begin with a
Single Step.
Lao Tzu
Unit 2 Starting with BUSY
The objective of this unit is to help User to install BUSY accounting software on his computer and to run its application. The unit describes about the minimum hardware and software configuration required for installing BUSY and the steps to install BUSY. The unit also introduces User to the start-up screen of BUSY and the key components of BUSY software along with using the exhaustive online help provided in case User is not able to use any feature of BUSY software.
Topics covered under this unit:
Operating Environment
Installing BUSY
BUSY Start-Up Screen
Key Components in BUSY
Using BUSY Help
Quitting BUSY
2.1 Operating Environment Operating Environment required for running BUSY application is:
PC with P-IV (or equivalent) Processor
Operating system - Windows XP / 2000 / 2003 onwards
RAM 512 MB
Hard Disk Drive with 100 MB free space and above
Screen resolution - 1024 X 768 pixels
Display Colour Palette - High Colour (32 bit)
CD Drive
Printer - 80 column
2.2 Installing BUSY To install BUSY software on your computer, first you have to check for the above-mentioned hardware and software requirements. Once all the requirements are fulfilled on a computer only then you can
22
install BUSY on it. You can install BUSY on your computer from the CD provided in the pack when you buy BUSY software. To install BUSY from the CD provided, you need to perform the following steps:
Insert CD into CD-ROM Drive
Double click My Computer folder to open the CD folder
Double click the Setup file in the CD folder to start the Setup Wizard
Setup Wizard will guide you through the rest of the Installation process. This may take a few minutes and BUSY will be successfully installed on your computer.
2.3 BUSY Start-Up Screen After installation of BUSY, an icon of BUSY starts appearing on the desktop. Double click the BUSY icon to run the application. On running the BUSY application, a Security Check message box appears displaying message that security device has been found and program will run in the following edition of BUSY. Here security check refers to detecting Dongle (a security device attached to LPT or USB port and used for authentication of software) and marking of data directory (see Unit 3) on computer. If you are using an Educational Copy of BUSY then this message box will not appear.
Click Ok button in the Security Check message box. On clicking the Ok button, Start-Up Screen of BUSY appears. Given here is a screenshot of Start-Up Screen of BUSY.
Image on next Page
Unit 2 – Starting with BUSY 23
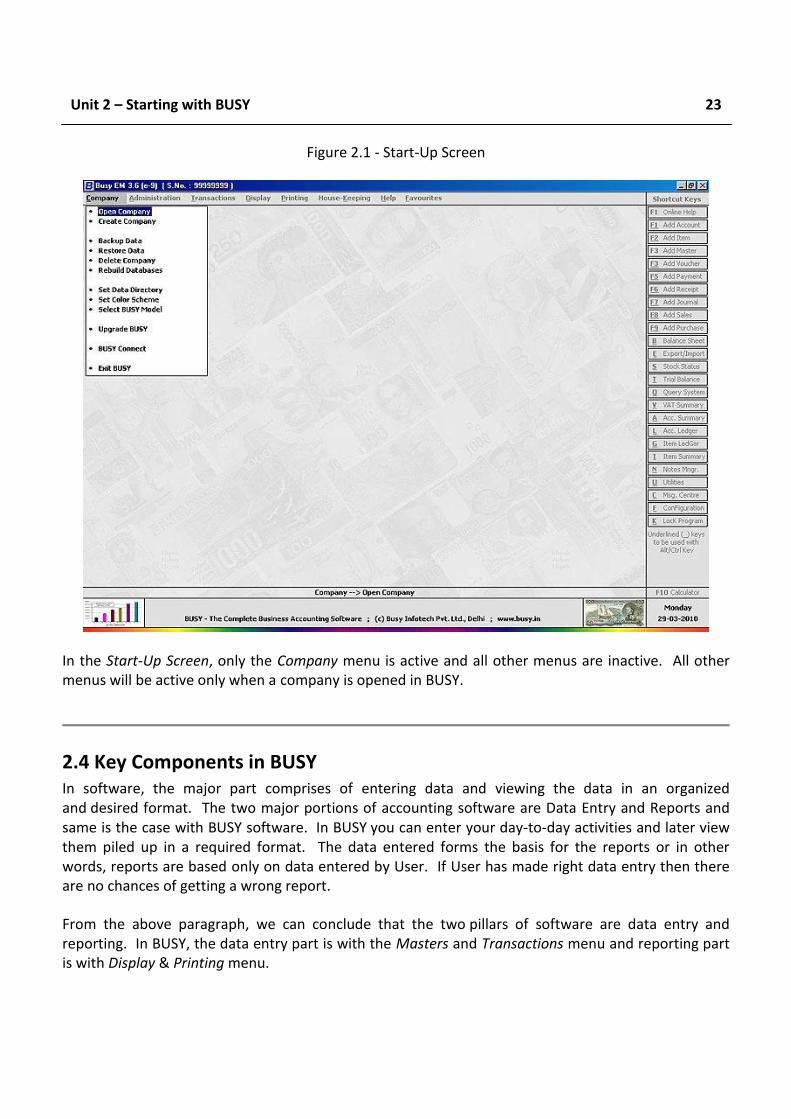
Figure 2.1 - Start-Up Screen
In the Start-Up Screen, only the Company menu is active and all other menus are inactive. All other menus will be active only when a company is opened in BUSY.
2.4 Key Components in BUSY In software, the major part comprises of entering data and viewing the data in an organized and desired format. The two major portions of accounting software are Data Entry and Reports and same is the case with BUSY software. In BUSY you can enter your day-to-day activities and later view them piled up in a required format. The data entered forms the basis for the reports or in other words, reports are based only on data entered by User. If User has made right data entry then there are no chances of getting a wrong report.
From the above paragraph, we can conclude that the two pillars of software are data entry and reporting. In BUSY, the data entry part is with the Masters and Transactions menu and reporting part is with Display & Printing menu.
24
Masters stores information, which requires to be entered once. Masters stores the static information that rarely gets changed. For example, the name of the company is a static information as in very rare case it will happen that company will change its name. To enter Masters information, BUSY provides the Masters menu. When you start BUSY application, only the Company menu is active. Once you open a Company using the Company menu then only the Masters menu get active.
Information stored in Masters is further used in the Transactions. Entering data in the Masters is a one-time work but entering data in transactions is a day-to-day activity. Transactions store information about dealings of the business such as sale, purchase, payment, receipt and so on. You can enter data in Transactions menu only if you have opened a company in BUSY. Transactions menu provides a classified menu of voucher types providing voucher type according to various transactions. For example, if you have made a sale then you can enter a Sales voucher, similarly if you have made a purchase then you can enter a Purchase voucher.
After entering transactions, the next thing User requires is to view the data in a required format. For example, after entering transactions, User may want to know the total sale made in the day or total outflow or inflow of cash. To view / print reports, BUSY provides the Display & Printing menu. With Display menu, you can view the reports on screen, and with the Printing menu, you can print the reports.
Apart from Data Entry and Reporting, which are without a doubt one of the major part of software; there are various small components also that complete the software package. These small components can be the Utilities provided by software or different features and options that User can enable / disable as per his requirement. BUSY also provides various utilities and numerous features to cater needs of as many Users as possible. The utilities and features are all part of the Utilities and Configuration menu respectively. With the help of Utilities menu you can manage your data more efficiently and with the help of the Configuration menu you can customize BUSY as per your requirement.
2.5 Using BUSY Help BUSY provides an exhaustive online help, which can be invoked either by pressing <F1> key or by clicking User's Manual option in Help menu. On pressing the <F1> key, the help for the topic in which you are working will be displayed.
2.6 Quitting BUSY To quit BUSY, Company menu provides the Exit option. You cannot exit from BUSY if a company is opened in BUSY. You have to close the company in which you are working and then only you can exit from BUSY. On clicking the Exit option, BUSY will be closed. To maintain integrity of data, you should exit from BUSY by clicking the Exit option only.
Unit 2 – Starting with BUSY 25
Review Minimum Hardware requirement to run BUSY are, CD Drive, Hard Disk with at least 100 MB
free space.
Minimum Software requirement to run BUSY are, P-IV or equivalent Processor, Windows XP / 2000 / 2003 Operating System, 512 MB RAM.
In BUSY Data Entry is with Masters and Transactions menu and Reporting is with Display and Printing menu.
Online Help can be invoked by pressing <F1> key or User’s Manual option from the Help menu.
You cannot exit from BUSY if a company is still opened.
To maintain integrity of data, always exit from BUSY by using the Exit option provided in Company menu.
Exercise 1 . BUSY cannot be installed on:
a) Windows 98 c) Windows XP b) Linux d) Windows Server 2003
2 . Minimum Processor requirement to install BUSY is:
a) P-III c) P-IV b) P-II d) Dual Core
3 . In BUSY, help can be invoked by using:
a) F1 Key c) Help Menu b) F2 Key d) Both a & c
4 . Recommended screen resolution for running BUSY is:
a) 800 x 600 c) 1024 x 768 b) 1152 x 864 d) Any Resolution
5 . Which menu is active in the start-up screen of BUSY:
a) Company c) Transactions b) Administration d) Configuration
6 . What is Dongle? 7 . What are the key components of BUSY?
8 . Why is it necessary to close the company before quitting from BUSY?

There is a Brilliant Child
locked inside
every Student.
Marva Collins
Unit 3 Setting up a Company in BUSY
The main objective of this unit is that the User should be able to create a company in BUSY and should start maintaining records in it. Managing a company is an important task while using a business accounting software and this unit focuses on the different options that will ease User in managing the company created in BUSY and performing different actions on it.
Topics covered under this unit:
Creating a New Company
Opening a Company
Editing a Company
Closing a Company
Deleting a Company
Setting Data Directory
Setting Color Scheme
3.1 Creating a New Company In accounting software, the first step is to create a company in which you can record all the transactions of your company. You can create a company in BUSY with the name of your company, firm, factory or outlets. You can create a single company or can create multiple companies. If you have different branches of your company in different cities then you can create multiple companies with the name of the city appended with the company name or if you are a Chartered Accountant then you can create various companies for the different clients with whom you deal.
Creating a company in BUSY is first and foremost step. To create a company in BUSY, you need to perform the following steps:
Double click the BUSY icon on the desktop. It will run the BUSY application.
On running the BUSY application, Startup screen of BUSY appears (see figure 3.1). In the Startup screen of BUSY, only the Company menu is active. In the Company menu, click the Create Company option.
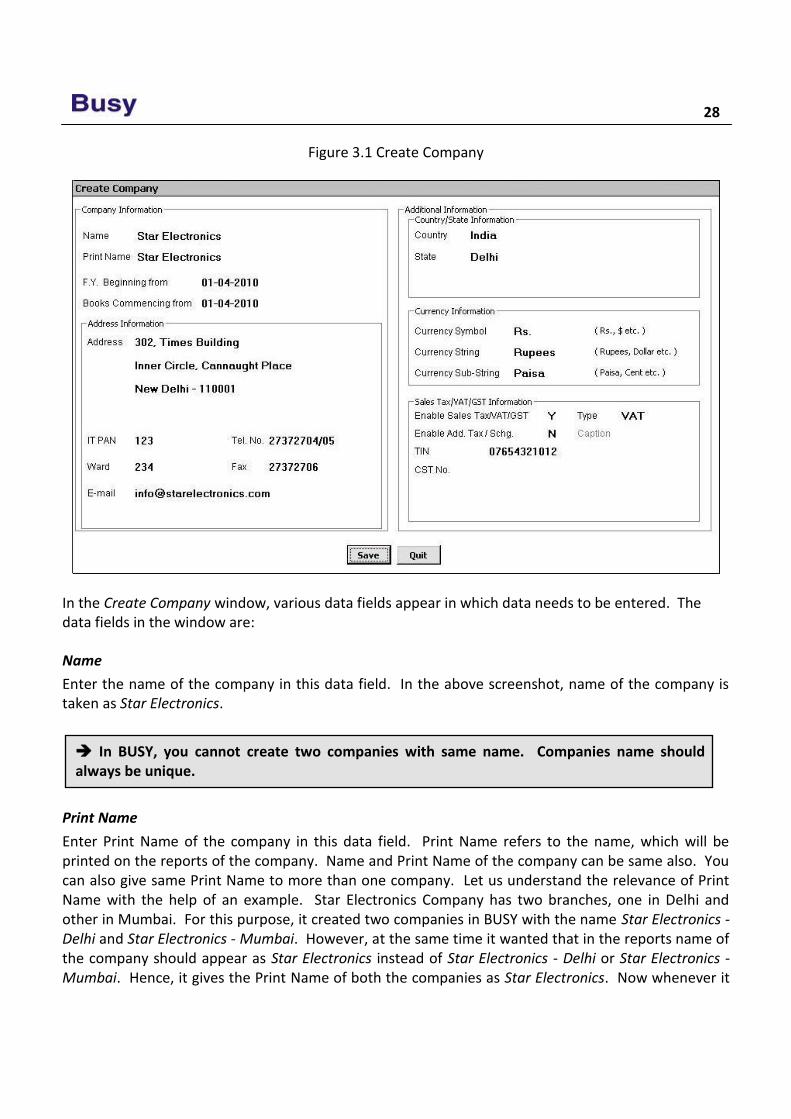
On clicking the Create Company option, a Create Company window appears in which you can specify the name of company to be created and other information about the company such as Address, Currency applicable, VAT applicable for the company or not and so on. Given here is a screenshot of Create Company window.
28
Figure 3.1 Create Company
In the Create Company window, various data fields appear in which data needs to be entered. The data fields in the window are:
Name
Enter the name of the company in this data field. In the above screenshot, name of the company is taken as Star Electronics.
Print Name
Enter Print Name of the company in this data field. Print Name refers to the name, which will be printed on the reports of the company. Name and Print Name of the company can be same also. You can also give same Print Name to more than one company. Let us understand the relevance of Print Name with the help of an example. Star Electronics Company has two branches, one in Delhi and other in Mumbai. For this purpose, it created two companies in BUSY with the name Star Electronics - Delhi and Star Electronics - Mumbai. However, at the same time it wanted that in the reports name of the company should appear as Star Electronics instead of Star Electronics - Delhi or Star Electronics - Mumbai. Hence, it gives the Print Name of both the companies as Star Electronics. Now whenever it
In BUSY, you cannot create two companies with same name. Companies name should always be unique.
Unit 3 – Setting up a Company in BUSY 29
will print reports for any of these companies the name of the company in the report will appear as Star Electronics.
F. Y. Beginning From
F. Y. is the abbreviated form for financial year. Financial year here refers to the accounting period under which your company is incorporated. Generally, an accounting period is from 1st April to 31st March. For example, if your company is incorporated on 1st June 2010 then enter 1st April 2010 in this data field as your company is incorporated in the financial year starting from 1st April 2010.
Books Commencing From
Enter the date on which you have started the books of your company. Continuing with the above example, Books Commencing From date will be 1st June 2010.
Address Information
In the Address Information sub-group, various data fields appear in which address, telephone number and other details about the company are to be entered. Various data fields under this sub-group are:
Address 1-4
Four lines for entering address of the company appear. You can enter address of the company in these four lines.
IT PAN
Enter the IT PAN of the company in this data field.
Tel. No.
Enter telephone number of the company in this data field.
Ward
Enter the Ward under which the company falls in this data field.
Fax
Enter fax number of the company in this data field.
Enter E-mail address of the company in this data field.
You cannot change the original beginning F. Y. once it is saved. You can go to the successive financial years but cannot go to the F. Y. prior to the original beginning financial year.
30
Country / State Information
Under this group, you have to specify the country and the state under which your company exist. For this, two data fields, Country and State are provided. Select the required Country and State in these data fields.
Currency Information
Under this sub-group, you have to specify the currency of the country in which your company exists. Three data fields are provided under this sub-group. The data fields are:
Currency Symbol
Enter the currency symbol in this data field. For example, symbol of Rupees is Rs., Dollar is $, Pound is £ and so on.
Currency String
Enter the currency string in this data field. For example, currency string is Rupees, Dollar, Pound and so on.
Currency Sub-String
Enter currency sub-string in this data field. For example, sub-string of Rupees is Paisa, Dollar is Cent, Pound is Pence and so on.
Sales Tax / VAT / GST Information
Under this sub group, you can enable the Sales Tax / VAT / GST for the company and specify the type of tax applicable for your company. For example, if you pay and charge VAT on the goods in which you deal then you can specify the type of tax as VAT. Various data fields that appear under this sub group are:
Enable Sales Tax / VAT / GST
Specify ‘Y’ in this data field if you want to enable Sales Tax / VAT / GST for the company.
Type
Select the type of tax i.e. LST, VAT or GST.
Enable Add. Tax / Schg.
Specify ‘Y’ in this data field if you want to enable Additional Tax / Surcharge for the company.
Caption
This data field is active only if you have specified ‘Y’ in the Enable Add. Tax / Schg. data field. Specify the caption to be used for Additional Tax / Surcharge in this data field. For example, for Additional Tax, you can use term as Add. Tax, for Surcharge, you can use term as Schg.
Unit 3 – Setting up a Company in BUSY 31
TIN
This data field is active only if you have selected type of tax as VAT. Specify TIN of the company in this data field.
LST No.
This data field is active only if you have selected type of tax as LST. Specify Local Sales Tax number of the company in this data field.
GST No.
This data field is active only if you have selected type of tax as GST. Specify GST number of the company in this data field.
CST No.
This data field is active only if you have selected type of tax as LST or VAT. Specify Central Sales Tax number of the company in this data field.
After entering required details, click the Save button to save the company details. On clicking the Save button, a Save message box appears.
Click the Yes button in the Save message box to save the information. On clicking the Yes button, a Copy Masters & Configuration message box appears. If you are a first time User, and creating first company in BUSY then this message box will not appear. It appears only when a company already exists at the path specified in the Set Data Directory option (See topic 3.6) or at the Server specified in the Set Server Information option. In the message box, there are two buttons. The buttons are:
Yes - Click this button if you want to copy masters and configurations from some other company. On clicking this button, it will ask you to select an existing company from where the Masters and Configuration settings will be copied.
No - Click this button if you do not want to copy Masters and Configuration settings from any other company.
Once the company is created, a Congratulations message box appears confirming the creation of the company. On clicking the Ok button, in the Congratulations message box, a SuperUser Creation window appears. Given here is a screenshot of SuperUser Creation window.
If you have selected a Country other than India in the Country / State Information sub group then two additional data fields Default Tax Rate 1 and Default Tax Rate 2 appear under the Sales Tax / VAT / GST Information sub group. Specify the default tax rates applicable for the company in these data fields.
32
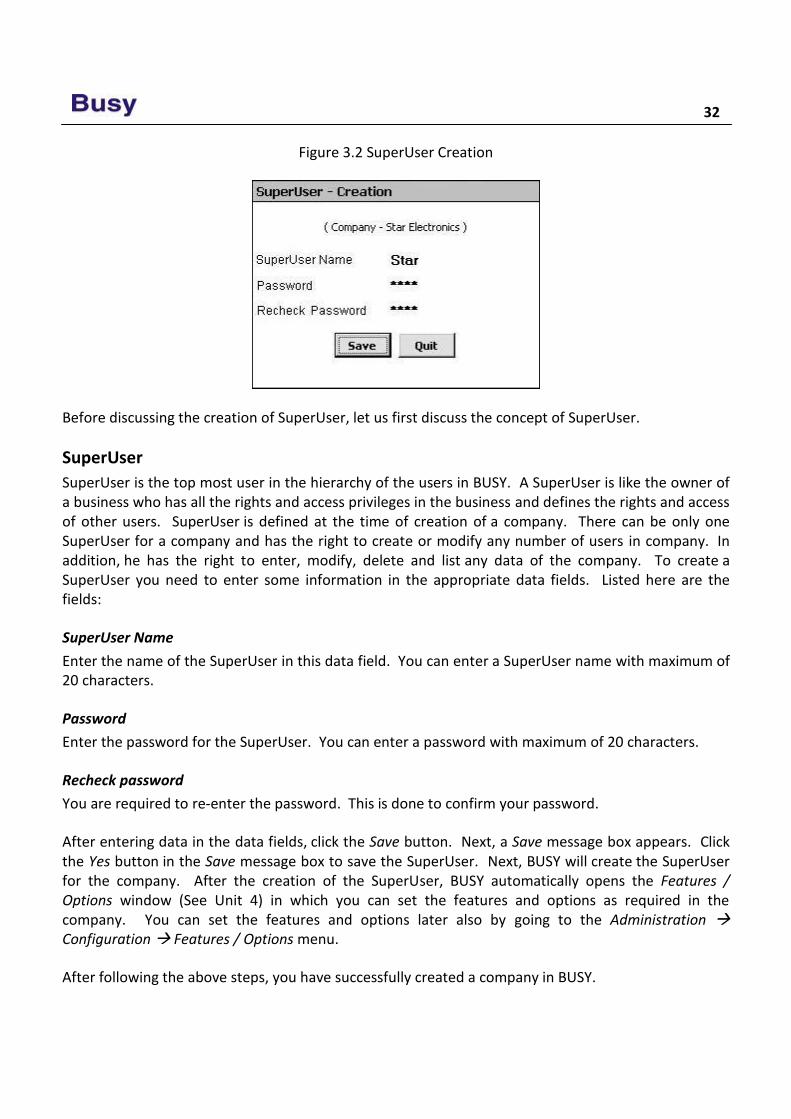
Figure 3.2 SuperUser Creation
Before discussing the creation of SuperUser, let us first discuss the concept of SuperUser.
SuperUser
SuperUser is the top most user in the hierarchy of the users in BUSY. A SuperUser is like the owner of a business who has all the rights and access privileges in the business and defines the rights and access of other users. SuperUser is defined at the time of creation of a company. There can be only one SuperUser for a company and has the right to create or modify any number of users in company. In addition, he has the right to enter, modify, delete and list any data of the company. To create a SuperUser you need to enter some information in the appropriate data fields. Listed here are the fields:
SuperUser Name
Enter the name of the SuperUser in this data field. You can enter a SuperUser name with maximum of 20 characters.
Password
Enter the password for the SuperUser. You can enter a password with maximum of 20 characters.
Recheck password
You are required to re-enter the password. This is done to confirm your password.
After entering data in the data fields, click the Save button. Next, a Save message box appears. Click the Yes button in the Save message box to save the SuperUser. Next, BUSY will create the SuperUser for the company. After the creation of the SuperUser, BUSY automatically opens the Features / Options window (See Unit 4) in which you can set the features and options as required in the company. You can set the features and options later also by going to the Administration Configuration Features / Options menu.
After following the above steps, you have successfully created a company in BUSY.
Unit 3 – Setting up a Company in BUSY 33
3.2 Opening a Company Once a company has been created, the next step you would like to do is to start working in that company. To work in a company, you have to first open the company. To open a company in BUSY, you need to perform the following steps:
Open Company menu and click Open Company option. On clicking the Open Company option, a Select Company for Operation window appears. The window displays the list of companies you have created. Select the company that you want to open.
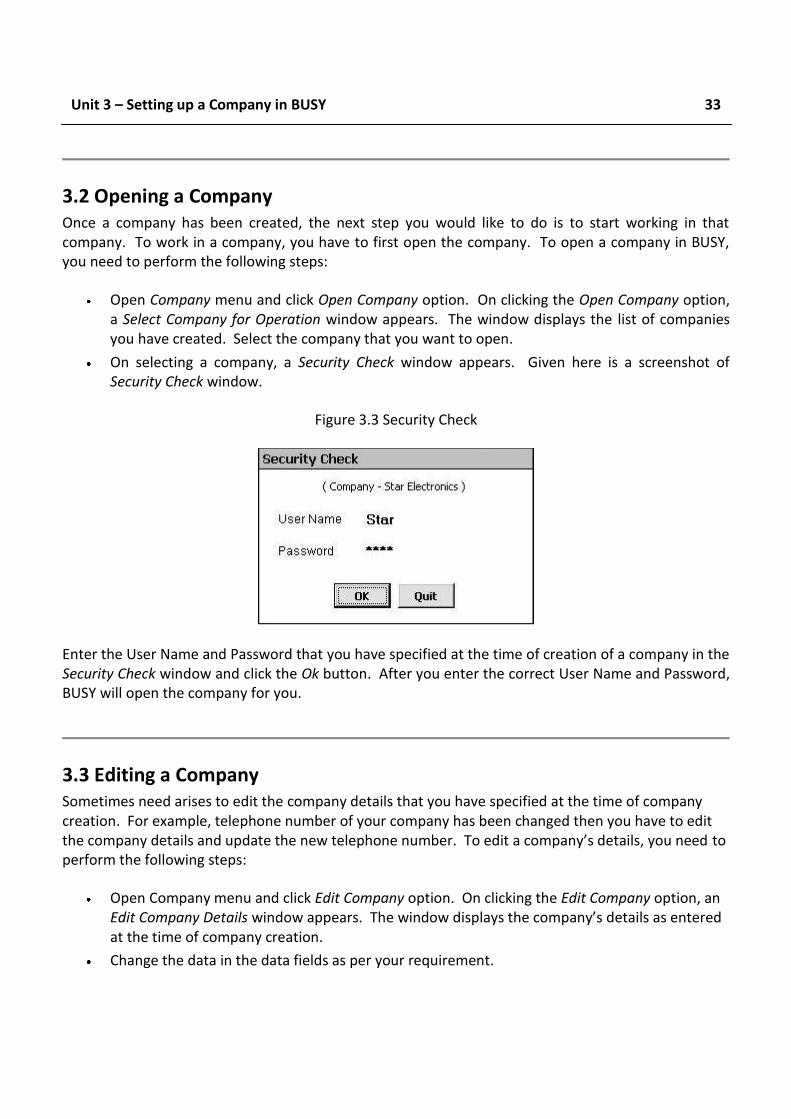
On selecting a company, a Security Check window appears. Given here is a screenshot of Security Check window.
Figure 3.3 Security Check
Enter the User Name and Password that you have specified at the time of creation of a company in the Security Check window and click the Ok button. After you enter the correct User Name and Password, BUSY will open the company for you.
3.3 Editing a Company Sometimes need arises to edit the company details that you have specified at the time of company creation. For example, telephone number of your company has been changed then you have to edit the company details and update the new telephone number. To edit a company’s details, you need to perform the following steps:
Open Company menu and click Edit Company option. On clicking the Edit Company option, an Edit Company Details window appears. The window displays the company’s details as entered at the time of company creation.
Change the data in the data fields as per your requirement.
34
After making the required changes, click the Save button.
3.4 Closing a Company It is necessary to close a company before exiting from BUSY. To close an active company, open Company menu and click the Close Company option. On clicking the Close Company option, the company will be closed.
Close Company option is active only when a company is active or open. On clicking, the Close Company option, BUSY closes the active company, and returns to the Main window of BUSY.
3.5 Deleting a Company Deleting a company is an irreversible process in BUSY. If in rare case, a need arises to delete a company then you should do so with utmost care because once a company is deleted then its data cannot be recovered in any case. To delete a company in BUSY, you need to perform the following steps:
Open Company menu and click the Delete Company option. On clicking the Delete Company option, a Select Company for Deletion window appears. Select the company that you want to delete and click the Select button.
On clicking the Select button, an Authority Check window appears. Enter SuperUser name and password of the company. This is done to check the authenticity of the person who is deleting the company as only the SuperUser has the authority to delete a company.
Once you have entered the correct SuperUser name and password then a Delete Company window appears. In the window, there are following two options:
o Complete Company - Select this option if you want to delete data of all the financial years of the company.
o Single F. Y. - Select this option if you want to delete data for a single financial year of the company. If more than one financial year exists for the company then a Select F.Y. message box appears in which you can select the financial year for which you want to delete the data. You can delete data either for first or for last financial year. You cannot delete data for a middle financial year. This is done to maintain integrity of data. If only one financial year exists for the company then a Can’t Delete message box appears informing you that since you have only one financial year, you have to select the Complete Company option.
You cannot change the F. Y. Beginning Date. This data field is non-editable.
Unit 3 – Setting up a Company in BUSY 35
After selecting any of the above option, a Data Deletion message box appears. Click the Yes button in the message box to delete the company.
3.6 Setting Data Directory Data Directory refers to the directory where you want the company data to be stored. By default, BUSY stores company data in the COMP000x directory under the parent directory DATA stored under the path, Hard Drive\BusyWin. For example, you want to store all your work of BUSY in BusyData folder in D drive. For this purpose, you can use the Set Data Directory option and specify the path for storing BUSY data as D:\BusyData.
An important point to note here is that data directory is different from the directory or folder where BUSY application is stored.
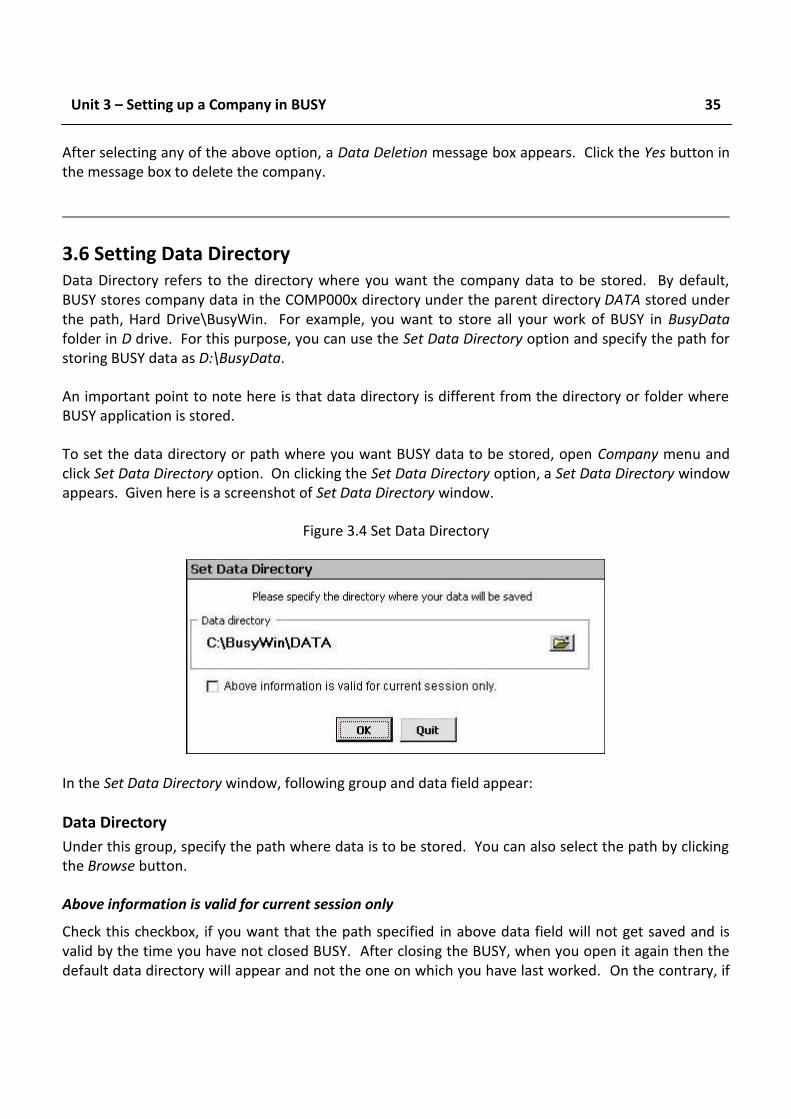
To set the data directory or path where you want BUSY data to be stored, open Company menu and click Set Data Directory option. On clicking the Set Data Directory option, a Set Data Directory window appears. Given here is a screenshot of Set Data Directory window.
Figure 3.4 Set Data Directory
In the Set Data Directory window, following group and data field appear:
Data Directory
Under this group, specify the path where data is to be stored. You can also select the path by clicking the Browse button.
Above information is valid for current session only
Check this checkbox, if you want that the path specified in above data field will not get saved and is valid by the time you have not closed BUSY. After closing the BUSY, when you open it again then the default data directory will appear and not the one on which you have last worked. On the contrary, if
36
you do not check this checkbox then the path specified in above data field will get saved and next time when you open BUSY, the same path will be displayed in the Data Directory data field.
After entering appropriate data in the data fields, click the Ok button to save the data directory information.
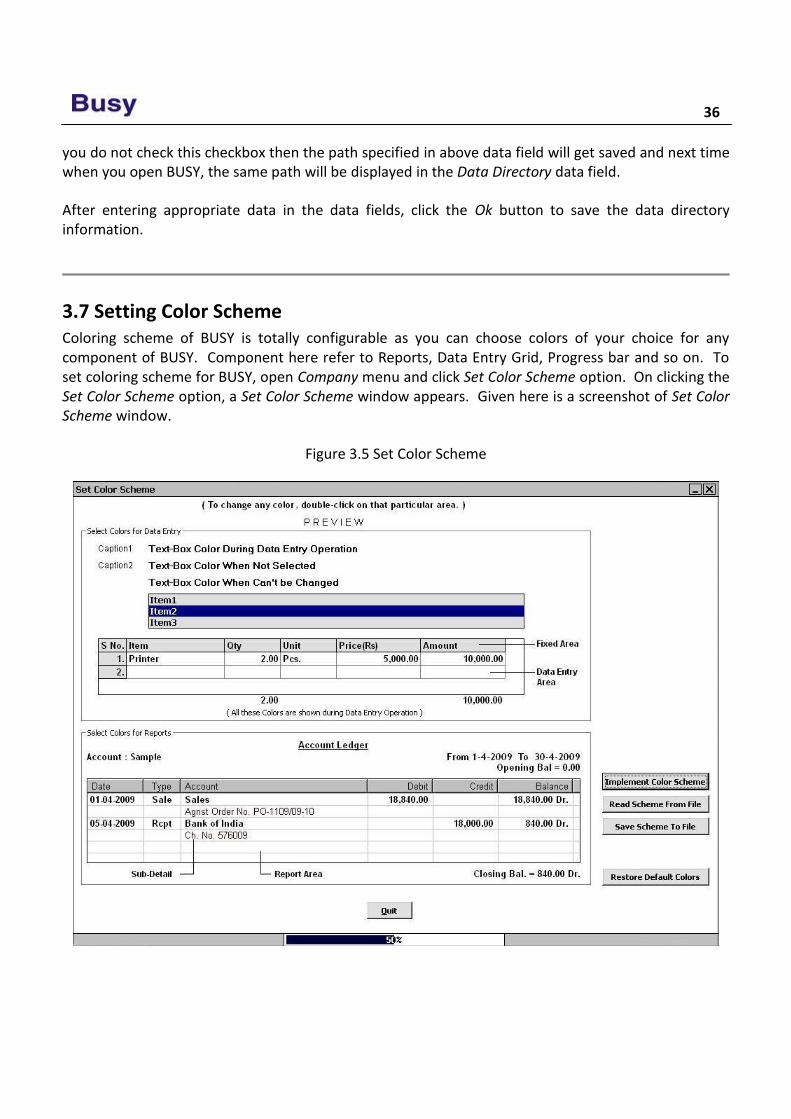
3.7 Setting Color Scheme Coloring scheme of BUSY is totally configurable as you can choose colors of your choice for any component of BUSY. Component here refer to Reports, Data Entry Grid, Progress bar and so on. To set coloring scheme for BUSY, open Company menu and click Set Color Scheme option. On clicking the Set Color Scheme option, a Set Color Scheme window appears. Given here is a screenshot of Set Color Scheme window.
Figure 3.5 Set Color Scheme
Unit 3 – Setting up a Company in BUSY 37
In the Set Color Scheme window, you can set colors for various components of BUSY. Setting color for a component is very simple, as you have to double click the component whose colors you want to change and select the required color from the Color palette. To change the background color of forms just double click any plain area of the Set Color Scheme window and select the color of your choice.
Various groups and buttons that appear in the Set Color Scheme window are:
Title Bar
Select Color for Data Entry
Select Color for Reports
Restore Default Colors
Implement Color Scheme
Read Scheme from File
Save Scheme to File
Progress Bar
Title Bar
By double clicking the Title bar, you can define font color and back color of the Title bar of the forms.
Select Color for Data entry
Under this group, you can configure colors for various data entry components such as back color / fore color of textbox, color for selection list, colors for various labels and so on. Within the Set Colors for Data Entry group various options appear. The options are:
Textbox Color during Data Entry Operation
Double click this option to select the color for textbox when some data is entered in it. On clicking this option, a Select Option message box appears. In the message box, there are two options. The options are:
Fore-Color - Select this option if you want to select fore color for textbox i.e. the color in which text will appear in the textbox.
Back-Color - Select this option if you want to select back color for textbox i.e. the color that will appear behind the text.
Textbox Color when not selected
Double click this option to select the color for textbox when it is not being selected. For example, when you open a Master in Modify mode then the data fields in which no data is entered will appear inactive. Hence, with this option you can select the color for textbox when it is not being active. On double clicking this option, a Color window will appear in which you can select the required color.
38
Textbox Color When Can’t Changed
Double click this option to select color for the textbox whose value cannot be changed. This option is applicable for all such textboxes whose value cannot be changed. On clicking this option, a Select Option message box appears. In the message box, there are two options. The options are:
Fore-Color - Select this option if you want to select fore color for textbox i.e. the color in which text will appear in the textbox.
Back-Color - Select this option if you want to select back color for the textbox i.e. the color that will appear behind the text.
On selecting any of the above option, a Color window will appear in which you can select the color of your choice.
Selection List
Double click this option to select colors for the list that appear in BUSY. List here implies the list that appears for selecting Account, Item and so on. For example, while entering a transaction, various lists appear for selecting Series, Sale Type, Party, Material Centre, Item and so on. On clicking this option, a Select Option message box appears. In the message box, there are two options. The options are:
Fore-Color - Select this option if you want to select fore color for textbox i.e. the color in which text will appear in the textbox.
Back-Color - Select this option if you want to select back color for the textbox i.e. the color that will appear behind the text.
On selecting any of the above option, a Color window will appear in which you can select the color of your choice.
Data Grid
Double click this option to select colors for the data grid. On selecting this option, a Select Option message box appears. In the message box, there are four options. The options are:
Fore-Color (Data Entry Area) - Select this option if you want to select fore color of the data entry area i.e. the color in which text will appear in the data grid.
Fore-Color (Fixed Area) - Select this option if you want to select fore color of the fixed area i.e. the color in which the static text or the headings or serial number will appear.
Back-Color (Data Entry Area) - Select this option if you want to select back color of the data entry area i.e. the color in which the portion behind the text will appear in the data grid.
Back-Color (Fixed Area) - Select this option if you want to select back color of the fixed area i.e. the color in which the portion behind the static text will appear.
Unit 3 – Setting up a Company in BUSY 39
Captions & Notes
Double click various captions or notes to select color for them. Caption here implies the headings for various textboxes and notes implies various notes that appear at the bottom of the form. On double clicking a caption or a note, a Color window appears in which you can select required color.
Select Color for Reports
Under this group you can select colors in which the report will be displayed. On double clicking the report area, a Select Option message box appears. In the message box, there are four options. The options are:
Fore-Color (Report Area) - Select this option if you want to select fore color i.e. the color in which the text in the report will appear. On selecting this option, a Color window will appear in which you can select the required color.
Back-Color (Report Area) - Select this option if you want to select back color i.e. the color in which the portion behind the text will appear.
Special Effect - Select this option if you want to select colors for the sub headings or data that shows details of the main master.
Report Heading & Labels - Double click various headings or labels to select color for them. Label here implies the values that are shown at the bottom of the reports such as labels displaying totals of various columns and so on.
Progress Bar
Double click the progress bar to select back colors and fore color of Progress bar. On double clicking this option, a Select Options message box appears. In the message box, there are two options. The options are:
Fore-Color - Select this option if you want to select fore color for the progress bar.
Back-Color - Select this option if you want to select back color for the progress bar.
On selecting any of the above option, a Color window appears in which you can select the required color.
Implement Color Scheme
Click this button to implement the configured color scheme in BUSY.
Restore Default Colors
Click this button to apply the default coloring scheme provided by BUSY.
Save Scheme to File
Click this button to save the configured color scheme to a file. On clicking this button, a Save As window appears in which you can specify the name and path of file.
40
Read Scheme from File
Click this button to read color scheme configuration from a file. On clicking this button, an Open window appears.
Specify the file name in the window from where the configuration data is to be read.
Click the Ok button to read data from the specified file.
Review You cannot create two companies with same Name but can create two companies with same
Print Name.
Financial Year Beginning From and Books Commencing From Date can either be same or different.
You cannot modify the financial year beginning date in BUSY.
There can be only one SuperUser in a company. SuperUser is like owner of the company with all the rights and privileges in the company.
You cannot exit from BUSY unless the active company is closed.
Data once deleted can never be recovered.
Only SuperUser has the authority to delete a company.
Data can be deleted only for first or last financial year. You cannot delete a middle financial year of the company.
You can set the path where BUSY data is to be stored by using the Set Data Directory option.
Coloring Scheme in BUSY is fully configurable.
Exercise 1 . You cannot create two companies with:
a) Same Financial year c) Same Name b) Same Print Name d) Same Address
2 . Number of SuperUser in a Company can be:
a) Only One c) Only Two b) Infinite d) None
3 . Financial Year Beginning Date can be:
a) 1st of any month c) Any date - any month b) 1st of F. Y. beginning month d) 30th of any month
Unit 3 – Setting up a Company in BUSY 41
4 . Books commencing from date can start from: a) 01-any month c) Any date - any month b) 01-January d) 01-April
5 . A company can be deleted by:
a) Any user c) Both a & b b) SuperUser d) None of the above
6 . You cannot modify:
a) Name of the Company c) Books Commencing from Date b) Address of the Company d) Financial Year Beginning Date
7 . Default Data Directory path is: a) Any path c) C drive b) Where BUSY is installed d) D drive
8 . What is the difference between Name and Print Name?
9 . What are the two options asked while deleting a company?
1 0 . Can in any case company deleted be recovered?
1 1 . What is the difference between Financial Year Beginning Date and Books Commencing From
Date?
1 2 . Explain the option “Above information is valid for this session only” in set data directory.
1 3 . Create a color scheme of your choice and save it with the name ‘My Color Scheme’ in ‘D’ drive.
1 4 . Create a company named ‘Star Electronics’ with following details: a ) Financial Year - 01.04.2010 b ) Books Commencing from – 01.04.2010 c ) Address Line 01 - 302, Times Building d ) Address Line 02 - Inner Circle, Cannaught Place e ) Address Line 03 - New Delhi-110 001 f ) Telephone - +91-11-27372704, 05 g ) Enable VAT h ) TIN - 07654321012 i ) SuperUser - Star j ) Password - Star
1 5 . Edit the following company details of the Star Electronics:
a ) Print Name - Star Electronics Co. b ) Address Line 02 - Inner Circle, C.P.

Module 2
Configuring BUSY
Unit 4 – Basic Configuration

Discipline is the Bridge
Between
Goals and Accomplishments.
Jim Rohn
Unit 4 Basic Configuration
The objective of this unit is to communicate about various options or choices that BUSY software offers. Each User has its own set of requirement therefore a feature, which is of high need for one User can be needless for other User. To cope up with such situations, BUSY comes up with the Configuration menu wherein User can enable / disable features as per his requirements. Configuration menu forms the backbone of the BUSY software. Based on the settings in the Configuration menu, User can customize BUSY according to his requirement.
Topics covered under this unit:
Features / Options
Hardware Configuration
Warning Alarms
4.1 Features / Options With Features / Options option, you can enable / disable various features and options in BUSY as per your requirement. Features / Options menu provides various features and options classified into eight sections or tabs. All the features and options are classified into the category to which they belong. For example, all the features related to accounting are kept under Accounts tab; all the features related to inventory are kept under Inventory tab and so on. To set various features and options, you need to perform the following steps:
Click Administration Configuration Features / Options option.
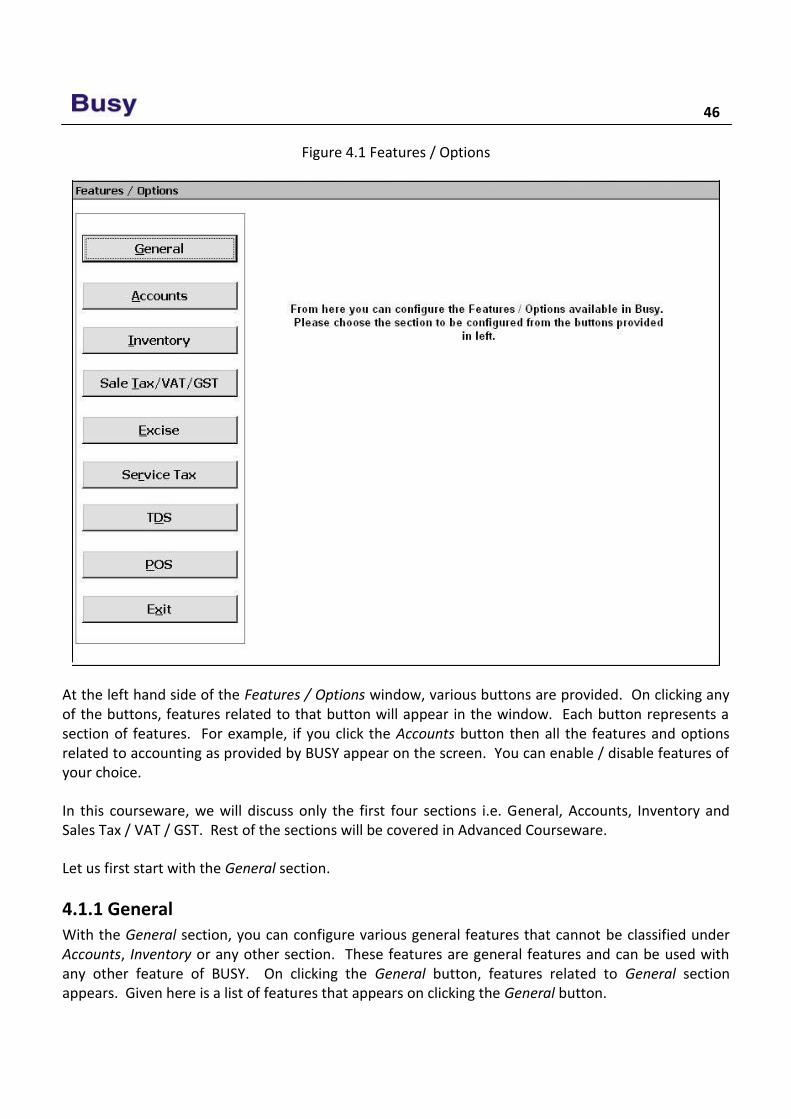
On clicking the Features / Options option, a Features / Options window appears. Given here is a screenshot of Features / Options window.
46
Figure 4.1 Features / Options
At the left hand side of the Features / Options window, various buttons are provided. On clicking any of the buttons, features related to that button will appear in the window. Each button represents a section of features. For example, if you click the Accounts button then all the features and options related to accounting as provided by BUSY appear on the screen. You can enable / disable features of your choice.
In this courseware, we will discuss only the first four sections i.e. General, Accounts, Inventory and Sales Tax / VAT / GST. Rest of the sections will be covered in Advanced Courseware.
Let us first start with the General section.
4.1.1 General With the General section, you can configure various general features that cannot be classified under Accounts, Inventory or any other section. These features are general features and can be used with any other feature of BUSY. On clicking the General button, features related to General section appears. Given here is a list of features that appears on clicking the General button.
Unit 4 – Basic Configuration 47
Currency Symbol
Enter currency symbol of the country where your company exists. By default, currency symbol as specified at the time of company creation appears here.
Currency String
Enter currency string of the country where your company exists. By default, currency string as specified at the time of company creation appears here.
Currency Sub-String
Enter currency sub-string of the country where your company exists. By default, currency sub-string as specified at the time of company creation appears here.
Format for Displaying Numbers
In this data field, you can select format for displaying numbers in BUSY. One option is the Indian Decimal System (9,99,99,999.99) and other is the International Decimal System (999,999,999.99).
Skip Currency Separator in Numbers
Specify ‘Y’ in this data field if you do not want the currency separator i.e. comma to appear in numbers.
Date Format
Select the format according to which date will be displayed in BUSY.
Date Separator
Specify the symbol to be used as date separator. For example, you can use a hyphen (-), slash (/), colon (:) as date separator.
Currency Decimal Place
Specify the number of digits to appear after decimal in the currency amount. For example, if you specify ‘2’ in this data field then a number 538.246 will be displayed as 538.24.
Country / State Information
Under this sub group, two data fields, Country and State appear. Specify the country and state where your company exists. By default the country and state as specified at the time of company creation appears here.
If the country selected is India and state selected is Assam / Chandigarh / Himachal Pradesh / Jammu & Kashmir / Kerala / Meghalaya / Mizoram / Punjab / Tripura then a Load Default Invoice Formats button appears next to the State data field. Click this button if you want to load the default invoice formats for the state. The default invoice formats are the formats that are specified by the respective state governments.
48
Delete Exported Files on Closing the Company
Exported files refer to the files that are exported from BUSY in html, txt, xls or pdf format. By default, these files are exported to the folder where data of the company is stored. With this option, you can delete all such files that are exported to data folder of the company. In the list, there are three options. The options are:
Never - Select this option if you do not want to delete exported files from the company’s data folder.
Ask before Deletion - Select this option if you want to delete exported files from data folder but only with your permission. On selecting this option, if any file with html, txt, xls or pdf format exists in company’s data folder then a message box will appear at the time of closing the company. In the message box, you can choose either to delete the exported files or to retain the exported files.
Delete Automatically - Select this option if you want to delete exported files from the company’s data folder whenever you close the company.
Display Thought of the Day
Specify 'Y' in this option if you want to view thought of the day at the time of company startup.
After you have entered the appropriate information, click the Save button to save the information.
Let us now move on to the Accounts section.
4.1.2 Accounts Under Accounts section, you can set various accounting features. On clicking the Accounts button, various accounting features appear. We will cover only the basic accounting features in this section. Rest of the features will be covered in Advanced Courseware. Basic accounting features are:
Bill-by-bill Details
Bill-by-bill Details feature is useful in keeping track of bills payable / receivable. With this option, you can maintain various bills or references for a single transaction. Along with maintaining bill references, you can keep track of due dates when payment is due and view various reports displaying pending bills, cleared bills and so on. For example, you have sold goods worth Rs. 10,000 on credit basis to a party and the party ensures to pay the payment after fifteen days of delivery of goods. Hence, in this case it is necessary for you to raise a bill for the party stating the due amount and the due date of bill.
To use Bill-by-bill Details feature, you need to perform the following steps:
Click Administration Configuration Features / Options Accounts tab.
Enable Bill-by-bill Details feature. On enabling this feature, a Configure button appears next to it. On clicking the Configure button, a Bill Reference Group window appears. In the Bill Reference Group window, you can enable the Enable Grouping of Reference option if you want
Unit 4 – Basic Configuration 49
to enable Bill Reference grouping. With Bill Reference Grouping, you can classify bills according to their group. For example, a company Star Electronics deals in electronic goods, hence it can create group with name such as LG, Sony, Philips and so on.
Company’s Act Depreciation
In case your company follows the Company's Act then you can enable this feature to charge depreciation on fixed assets according to the Company's Act. By default, depreciation is charged according to the IT Act. Companies that need to maintain the books of accounts according to the Company's Act as well as Income Tax Act need to enable the Company's Act Depreciation feature. The need for this feature arises on two counts. Firstly, there is a requirement that depreciation should be charged in the books of accounts according to the Company's Act. Secondly, depreciation according to the Income Tax Act should be reflected in the books of account for tax calculation purpose.
To enable the Company’s Act Depreciation feature, click the Administration Configuration Features / Options Accounts button. Enable the Company’s Act Depreciation feature in it.
Posting in Accounts Through Sales Return and Purchase Return
You can enable this option if you want to post the sale return / purchase return directly to Sale / Purchase account. Let us understand with the help of an example. In the month of April 2010, for Star Electronics Company, there was a Sale and a Sale Return voucher for Rs. 10,000 and Rs. 5,000 respectively. Now if this feature is enabled then in the Sales account both the transactions are posted and the net balance is Rs. 5,000 credit. In this way, both the inventory and accounting aspect of goods returned are taken care of.
On the other hand, if this feature is disabled then it means that Star Electronics Company does not want Sales Return voucher to be posted to the Sales account directly. Instead, it issues a credit note to reflect the debt on part of the organisation / individual returning the goods. Thus, if the feature is disabled then only the Sales voucher will be posted to the Sales account and the balance will be Rs. 10,000. Now for the goods returned, a Sales Return voucher is entered that takes care of the inventory aspect of the transaction but the accounting aspect is left out. For this purpose, Star Electronics enters a credit note against the organisation / individual returning the goods thus taking care of the accounting aspect of the transaction.
Double Entry System for Payment & Receipt Voucher
Enable this option if you want to follow Double Entry system for entering Payment / Receipt vouchers otherwise disable this option if you want to follow Single Entry system for entering Payment / Receipt vouchers. In the Double Entry system, you need to specify two accounts and the debit / credit aspect of the accounts. Thus, you need to remember the debit / credit aspect of the transaction. In the Single Entry system, you only need to select the payment / receipt mode and specify the affected account. You do not need to remember and specify the debit / credit aspect for the affected accounts.
If this option is enabled and any Payment / Receipt voucher exists then you cannot disable this option.
50
Show Accounts Current Balance during Voucher Entry
Enable this option if you want to view current balance of the account at the time of entering voucher. On enabling this option, when you select an account in the voucher, current balance of the account will be displayed in the voucher. Thus, you are aware of the account’s balance right at the time of voucher entry and can check whether you are exceeding the credit limit fixed for the account.
Bank Reconciliation
Enable this option if you want to maintain bank reconciliation statement and want to enter cheque issued / deposited details.
After you have enabled / disabled features as per your requirement, click the Save button, to save the changes made by you.
Let us now move to the Inventory section.
4.1.3 Inventory Under Inventory section, you can configure various inventory features. On clicking the Inventory button, various inventory related features appear. We will cover only the basic inventory features in this section. Rest of the features will be covered in Advanced Courseware. Basic inventory features are:
Qty. Decimal Places
Specify the number of digits that will appear after the decimal in item quantity. In other words, whenever you enter a quantity, the number of digits that appear after the decimal places is determined by the value in this data field. For example, if you enter ‘3’ in this data field then 3 digits after the decimal will be displayed. Thus, if the quantity is 100.5541 then 100.554 will be displayed.
Stock Val. Method
Under this option, you need to select the stock valuation method that will be used for valuing the closing stock. In the list, eight different stock valuation methods are provided. You can choose the method, which is best suited for your company.
Let us now have a brief look upon the eight stock valuation methods provided by BUSY.
Stock Valuation method specified here is used for valuation of closing stock only. It is important to note that the closing stock of one month is the opening stock of another month. Thus stock valuation method affects the closing stock / opening stock that appears in the Inventory reports such as Stock Status. An exception to the above rule is the opening stock of the first beginning financial year as the opening stock on first date is valued at the amount specified in the Item master.

Unit 4 – Basic Configuration 51
FIFO
FIFO refers to the First In First Out. Under this method, quantity of item purchased first is assumed to be sold first.
LIFO
LIFO refers to Last In First Out. Under this method, quantity of item purchased last is assumed to be sold first.
Last Purchase
Under this method, closing stock is valued at the price at which the last purchase was made for the item. It takes into account only the Purchase voucher.
Last Qty. In
Under this method, closing stock is valued at the price at which the last quantity was purchased or received. It takes into account Purchase voucher and Material Rcvd. From Party voucher whichever was lastly entered.
Last Sale
Under this method, closing stock is valued at the price at which last sale was made for the item.
Self Evaluation
Under this method, closing stock is valued at the price as specified by you in the Self Evaluation Price data field in Item master (see Unit 5).
Weighted Average
Under this method, closing stock is valued at the weighted average price based on the prices of all the quantities purchased or received.
Average Price
Under this method, stock is valued by dividing total amount in by total quantity in.
Enable Multi-Godown Inventory
Enable this option if you want to maintain details of Material Centre from where the goods are dispatched or where the goods are received. A Material Centre is a place where stock of raw material, semi-finished, finished products and so on can be stored. If you enable this option then Material Centre and Material Centre Group masters (see Unit 5) appears in the Masters menu and Stock Transfer voucher (see Unit 6) appears in the Transactions menu. For example, Star Electronics has a retail outlet or showroom and a godown where it keeps its stock. Hence, both the Showroom and Godown are Material Centres for the company.

52
Enable Bill Sundry Narration
Enable this option to enter narration for Bill Sundry at the time of voucher entry. On enabling this option, a Narration field will appear in the Bill Sundry Details grid in the voucher in which you can enter narration for each Bill Sundry used in voucher.
Show Items Current Balance during Voucher Entry
Enable this option if you want to view current balance or stock of the item in the voucher entry. After enabling this option, when you enter a voucher and select an item then current stock of the item will be displayed in the voucher. Thus, you are aware of the item’s current stock right at the time of voucher entry and can check whether stock of item is sufficient or not.
Separate Stock Updation Date in Dual Voucher
Enable this option if you want to maintain separate stock updation date and voucher date. Stock updation date here refers to the date on which stock is moved out or moved in and voucher date is the date on which bill / voucher is entered. For example, Star Electronics Company sells a Refrigerator and an Air Conditioner to a customer on 10th April and enters a Sales voucher on 10th of April. However, the delivery of goods took place on 11th April as refrigerator was not available in the godown for delivery and the customer does not want to take the refrigerator kept for display. Hence, in this case, voucher date is 10th April and stock updation date is 11th April as although the bill is raised on 10th April but goods are delivered or stock is updated on 11th April.
Separate Sales / Purchase Accounts with Item
Enable this option if you want to post various items to different Sales / Purchase account when the items are being sold or purchased. This is helpful in ascertaining the sale / purchase turnover of the items. For example, Star Electronics Company wants that whenever it sells Air Conditioners of LG Company then the entry should be posted in LG AC Sales account and whenever it sells Air Conditioners of Voltas Company then entry should be posted in Voltas AC Sales account. For this purpose, company enables this option and specifies the Sales / Purchase account with each item in Item master (see Unit 5). Now company can easily view the sales of LG Air Conditioners and Voltas Air Conditioners.
Separate Stock Valuation Method for Items
Enable this option if you want to value closing stock of various items by applying different stock valuation method. For example, Star Electronics want to valuate closing stock of item Television with FIFO method and stock of item Mobile Phones with Average Price method. For this purpose, it can enable this feature and specify separate stock valuation method with both items in Item master (See Unit 5).
Items Pricing Mode in Vouchers
Click this button if you want to set a default pricing mode for the vouchers. Pricing Mode here refers to the mode according to which default price of items will be displayed at the time of voucher entry. For example, you want that whenever you select an item in Sales voucher then the price at which item was last sold to a party should automatically appear in the voucher so that you do not have to
Unit 4 – Basic Configuration 53
remember the price at which the item was last sold. On clicking this button, a Pricing Mode Options window appears. The window is divided into two parts, one is for Sales price and other is for Purchase price. Both the parts contain same options with only difference is that under Pricing Mode for Sales, you can select mode according to which Sale price will be displayed and under Pricing Mode for Purchase, you can select mode according to which Purchase price will be displayed.
Various options in Pricing Mode Options window are:
Show Party’s Last Prices in Sales / Purchase voucher – Select this option if you want to view sale / purchase price at which the item was sold to the party. Here sale / purchase price will be picked only for the party for which you are entering the voucher.
Show Last Item Price – Select this option if you want to view sale / purchase price at which the item was last sold. Here price will be picked as the last sale / purchase price irrespective of the party.
Default (Pick from Item Master) – Select this option if you want to pick sale / purchase price from Item Master (see Unit 5).
Treat MRP as Sales Price – Enable this option if you want to make item MRP as its Sale price.
After enabling / disabling various features / options, click Save button to save the changes made by you.
Let us now move on to the Sales Tax / VAT / GST section.
4.1.4 Sales Tax / VAT / GST Under Sales Tax / VAT / GST section, you can enable / disable Sales Tax / VAT / GST for a company and specify details regarding the same. On clicking the Sales Tax / VAT / GST button, various options appear. The options are:
Enable Sales Tax / VAT / GST Reporting
Enable this option if you want to enable Sales Tax / VAT / GST for the company. If you have enabled Sales Tax / VAT / GST at the time of company creation then by default this option will be enabled.
Type
Select the type of tax applicable for the company. By default, the tax selected at the time of company creation is selected in this option.
Default Tax Rate-1
This data field appears if you have selected a country other than India at the time of company creation. By default, the default tax rate-1 specified at the time of company creation appears here. You can change it as per your requirement.
54
Default Tax Rate-2
This data field appears if you have selected a country other than India at the time of company creation. By default, the default tax rate-2 specified at the time of company creation appears here. You can change it as per your requirement.
LST Reg. No.
Enter the LST (Local Sales Tax) registration number of your company in the data field.
CST Reg. No.
Enter the CST (Central Sales Tax) registration number of your company in the data field.
ST Ward No.
Enter the Sales Tax Ward number of your company in the data field.
ST-37 Reg. No.
This data field appears if you have selected the type of tax as LST. Enter the ST-37 registration number of your company in the data field.
TIN
This data field appears if you have selected the type of tax as VAT. Enter TIN for your company in this data field. If you have specified TIN at the time of company creation then that value will appear by default in this data field.
Signatory Details
This button appears if you have selected the type of tax as VAT. Click the Signatory's Details button to enter name, father / husband name and designation of the person on behalf of whom VAT related reports are submitted to the concerned authorities. On clicking the button, an Authorized Signatory Details window appears in which you can enter name, designation and other details of the concerned person.
Adjust Output CST in Input VAT
This data field appears if you have selected the type of tax as VAT. Specify 'Y' in this data field if you want to adjust Output CST in Input VAT. The central government allows you to adjust Output CST (payable) amount against Input VAT (claimable).
Pick VAT Op. Bal. from VAT Ledger A/C(s)
This data field appears if you have selected the type of tax as VAT. Specify 'Y' in this data field if you want to consider VAT accounts balances as opening balances. If there is a debit balance in VAT account then only it will be considered as opening balance.
Unit 4 – Basic Configuration 55
GST No.
This data field appears if you have selected the type of tax as GST. If you have specified GST number at the time of company creation then that number will appear by default in this data field.
Specify Original Sales Details in Sales Return Voucher
Specify 'Y' in this data field if you want to enter details of Sales voucher against which the sale is returned in the Sales Return voucher. If you specify 'Y' in this data field then whenever you enter a Sales Return voucher, an Original Sales Invoice Details window appears in which you can specify details of Sales voucher against which the stock is returned.
Transport Details in Local Sales / Purchase
Specify 'Y' in this data field if you want to enter transport details in local sales / purchase transactions. If you specify 'Y' in this data field then while entering Sales / Purchase voucher for local (within state) transactions, a Transport Details window appears. In the window, you can enter transport related details such as Transport, GR / RR No., Vehicle No., and Station. By default, Transport Details window appears for central (inter-state) transactions only. In local transactions, it will appear only on specifying ‘Y’ in this data field.
Enable Add. Tax / Schg.
Specify ‘Y’ in this data if you want to levy Additional Tax / Surcharge on Sales Tax / VAT / GST.
Caption
Enter name for the Additional Tax / Surcharge. The name you mention here will appear as heading for Additional Tax / Surcharge column in all the VAT / CST reports and Invoices.
Enable Add. Tax / Schg. In Central transactions
This data fields gets active if you have specified 'Y' in the Enable Add. Tax / Schg. data field. Specify 'Y' in this data field if you want to enable Additional Tax / Surcharge in central transactions.
Item-wise Add. Tax / Schg. to be calculated on
Under this group, two options appear. The options are:
Item Amt. - Select this option if you want to calculate Additional Tax / Surcharge on item amount.
Tax Amt. - Select this option if you want to calculate Additional Tax / Surcharge on tax amount.
After entering the appropriate details, click the Save button to save the Sales Tax / VAT / GST details.
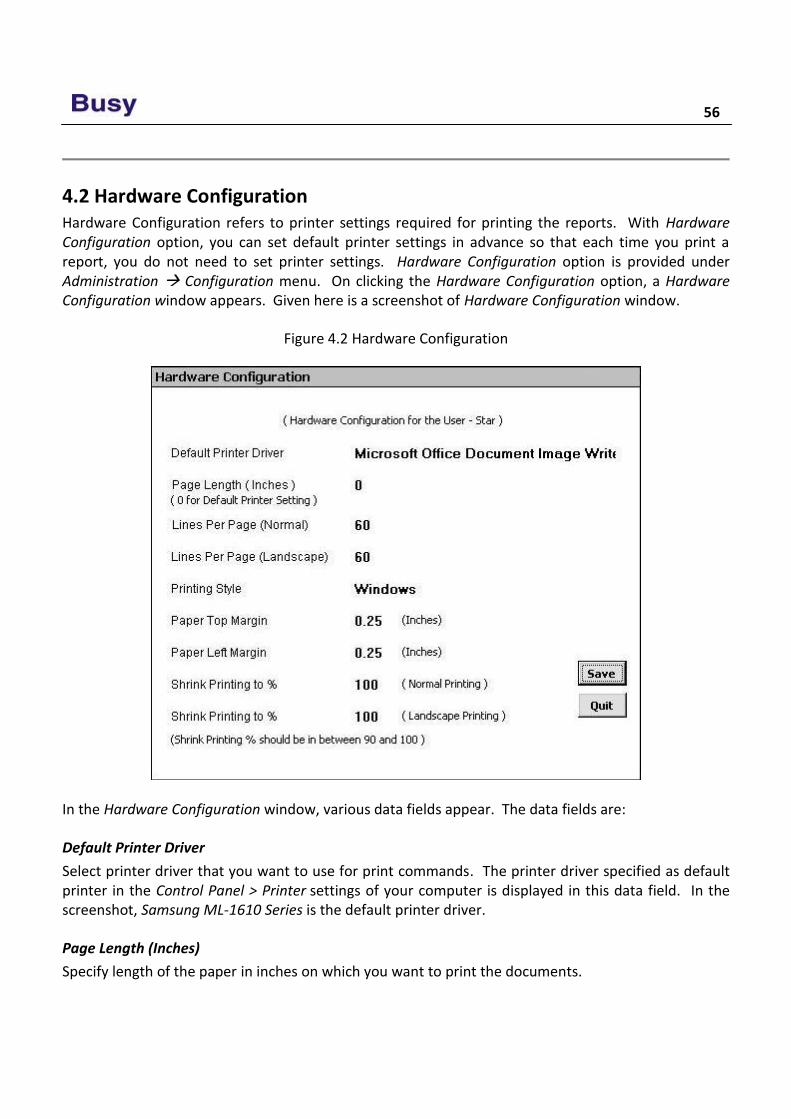
56
4.2 Hardware Configuration Hardware Configuration refers to printer settings required for printing the reports. With Hardware Configuration option, you can set default printer settings in advance so that each time you print a report, you do not need to set printer settings. Hardware Configuration option is provided under Administration Configuration menu. On clicking the Hardware Configuration option, a Hardware Configuration window appears. Given here is a screenshot of Hardware Configuration window.
Figure 4.2 Hardware Configuration
In the Hardware Configuration window, various data fields appear. The data fields are:
Default Printer Driver
Select printer driver that you want to use for print commands. The printer driver specified as default printer in the Control Panel > Printer settings of your computer is displayed in this data field. In the screenshot, Samsung ML-1610 Series is the default printer driver.
Page Length (Inches)
Specify length of the paper in inches on which you want to print the documents.
Unit 4 – Basic Configuration 57
Lines Per Page (Normal)
Specify number of lines that will be printed on a single page. The default value is 60.
Lines Per Page (Landscape)
Specify the number of lines that will be printed on a single page, if you select the orientation as Landscape. The default value is 60.
Printing Style
You can select the Printing Style from either of the following two options, Windows and DOS.
Windows
If you select the Printing Style as Windows then printing will be done in Graphics mode. In case of Windows Printing Style, the default printer driver will generally be the same as the printer you are using. For example, if you are using Samsung ML-1610 Series printer, the default driver will be Samsung ML-1610 Series. On selecting this option, following four data fields become active:
Paper Top Margin - Specify the margin, in inches, for the top of the page. By default, the top margin is 0.25.
Paper Left Margin - Specify the margin, in inches, for the left side of the page. By default, the left margin is 0.25.
Shrink Printing to % (Normal) - Specify the percentage to which the document is to be reduced for printing in Normal mode. This feature allows you to scale the document for printing and thus helping you to avoid adjusting margins.
Shrink Printing to % (Landscape) - Specify the percentage to which the document is to be reduced for printing in Landscape mode. This feature allows you to scale the document for printing and thus helping you to avoid adjusting margins.
DOS
If you select this option then printing will be done in Draft mode. On selecting this option, a data field and a button gets active. The data field and button are:
DOS Emulation - Select the DOS printer driver to be used from the list of options displayed in the data field. If the printer driver you are using is not listed, choose the one that is nearest to it in print characteristics. For example, if you are using a dot matrix printer of Wipro, you can choose the printer driver as Epson. By default, Epson is selected as the DOS Printer Driver.
Configure Printer Command - Click this button to configure various commands for DOS Printer. On clicking this button, a Printer Configuration window appears. In the Printer Configuration window, you can configure various Printer commands. Apart from the Printer commands given, you can also configure any other three commands in the Command 1, 2 & 3 data fields. If you want to load the default settings, then click the Load Default button.
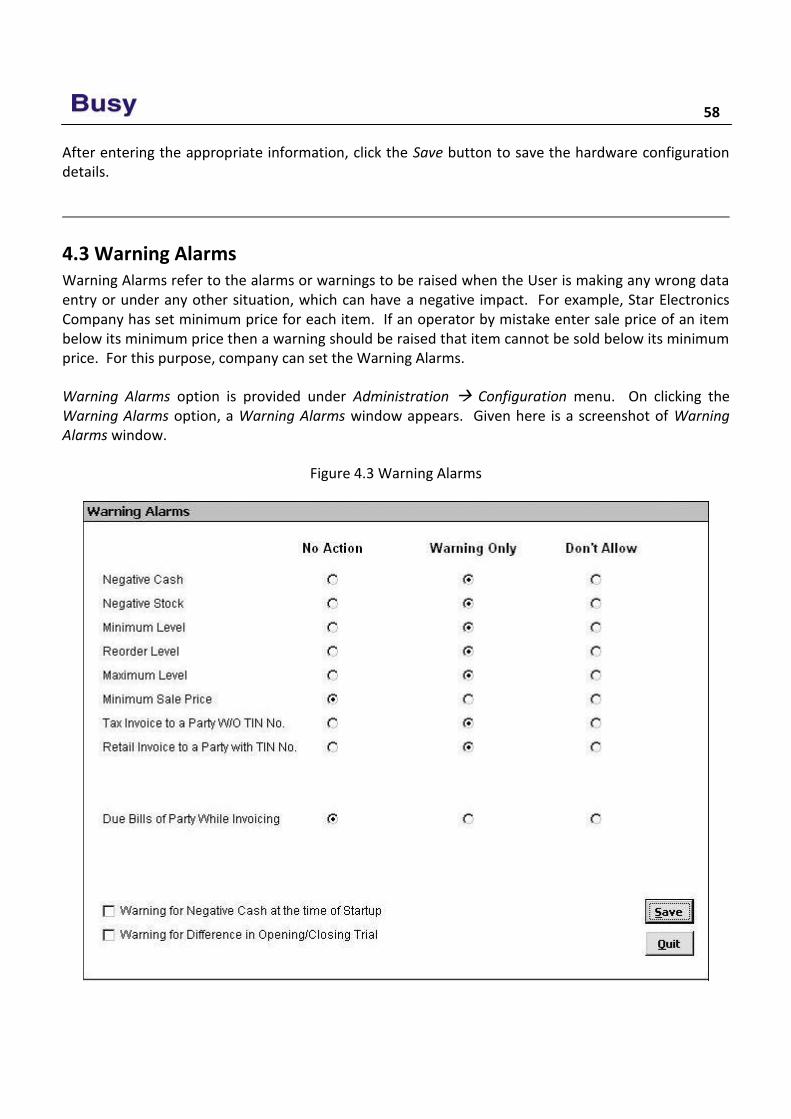
58
After entering the appropriate information, click the Save button to save the hardware configuration details.
4.3 Warning Alarms Warning Alarms refer to the alarms or warnings to be raised when the User is making any wrong data entry or under any other situation, which can have a negative impact. For example, Star Electronics Company has set minimum price for each item. If an operator by mistake enter sale price of an item below its minimum price then a warning should be raised that item cannot be sold below its minimum price. For this purpose, company can set the Warning Alarms.
Warning Alarms option is provided under Administration Configuration menu. On clicking the Warning Alarms option, a Warning Alarms window appears. Given here is a screenshot of Warning Alarms window.
Figure 4.3 Warning Alarms
Unit 4 – Basic Configuration 59
Using the Warning Alarms option, you can select different types of alerts for different conditions. There are three types of alerts that can be configured for Warning Alarms. These are:
No Action - No action will be taken if the condition occurs.
Warning Only - Only a warning message will be displayed if the condition occurs.
Don't Allow - You cannot complete the action or move forward if the condition occurs. To move forward you need to make appropriate changes as per the condition.
To configure the alerts, select the appropriate alert against the condition.
Review All the Features / Options in BUSY are classified under various tabs or sections such as
Accounting, Inventory and so on.
BUSY has the provision to enter Payment / Receipt voucher in either Double Entry mode or Single Entry mode. Only one mode can be used at a time.
In BUSY, you can charge depreciation according to both Income Tax Act and Company’s Act.
Current account balance and current stock of item can be seen at the time of making voucher entry itself.
BUSY provides eight different types of stock valuation methods for valuing the closing stock of items.
You can create multiple Material Centres from where the goods are dispatched or where goods are received.
In BUSY, there is a provision to enter separate voucher date and stock updation date.
Various pricing modes are provided to set default sales / purchase price for the vouchers.
In Sales Return vouchers, you can specify the details of Sale voucher against which the actual sale has taken place.
You can print documents / reports in both Windows and DOS printing style.
You can also shrink documents to be printed to a certain percentage.
In Warning Alarms, you can choose either to take no action or to give warning only or don’t allow further data entry for certain conditions or situations.
Exercise 1 . Default currency string is:
a) Rs. c) INR b) Rupees d) None of the above
60
2 . Default Date format is: a) dd/mm/yyyy c) mm/dd/yyyy b) mm/dd/yy d) None of the above
3 . Stock Valuation method not provided by BUSY:
a) Last in First out c) First in First out b) First in Last out d) Average method
4 . BUSY provides Warning Alarms for:
a) Negative cash c) Minimum Sales Price b) Negative stock d) All of the above
5 . Printing can be shrink to:
a) 60-100% c) 80-90% b) 70-100% d) 90-100%
6 . Reports of BUSY can be printed on:
a) Ink Jet printer c) Laser Printer b) Dot Matrix Printer d) All of the above
7 . What is the use of Hardware Configuration? 8 . Can you enable / disable, 'Double Entry System for Payment / Receipt' voucher feature after
entering any payment / receipt transaction?
9 . What is Multi Godown Inventory?
1 0 . Open Company ‘Star Electronics’ and enable the following features: a) Bill-by-bill Details under Accounts tab b) Last Item Price in Item Pricing Modes c) Separate Stock Updation Date in Dual vouchers under Inventory tab
Disable the following features: a) Multi Godown Inventory under Inventory tab b) Double Entry system for Payment & Receipt Vouchers under Accounts tab
Change the following information: a) Qty. decimal places from 2 to 0
b) Change warning alarm ‘Minimum Sale Price’ from ‘No Action’ to ‘Don’t Allow’.


Module 3
Basic Accounting & Inventory
Unit 5 – Masters
Unit 6 – Transactions
Unit 7 – Printing Documents

What we Learn with Pleasure
we never Forget.
Alfred Mercier

Unit 5 Masters
The main objective of this unit is to focus on creating Masters in BUSY. The term Masters signifies the information that is generally entered once, usually after creating a company. Masters stores information that is either static or that seldom gets change. Information stored in Masters is further used in entering day-to-day transactions. From User's point of view, Masters can be the parties with whom he deals, the items in which he trades or manufactures and the taxes he use.
Topics covered under this unit:
Creating Masters
Configuring Masters
5.1 Creating Masters In BUSY the term 'Master' signifies information that is generally entered once but further used in day-to-day activities and transactions. Masters contain a set of information which is either static or which does not require high volume of changes. Before entering transactions of a business, one needs to create certain masters, which will be used, in daily course of business. BUSY provides various masters under Masters menu such as Account master, Item master, Bill Sundry master and so on which are to be created before starting the operations of business. Basic masters that are generic and are required by any type of company get created at the time of company creation itself. For example, almost every type of company needs, Cash account, Stock account, and Miscellaneous Expense account. Similarly, every company needs to charge or pay basic taxes such as Sales Tax or VAT. Hence, to ease the workload of Users, BUSY creates generic masters itself. Apart from these basic masters, other masters that vary from company to company needs to be created by User itself. For example, each company has its own set of parties with whom it deals, each company has different items to sell or purchase and so on. Thus, these company specific masters are to be created by User as per his requirement. In this section, we will discuss creation of various Masters in BUSY.
Masters are provided under Administration menu of BUSY. On clicking the Administration menu, various options appear. Click the Masters option to view the list of Master types provided by BUSY. On clicking the Masters option, a list of Masters is displayed. Given here is a screenshot of Masters menu displaying list of Masters.
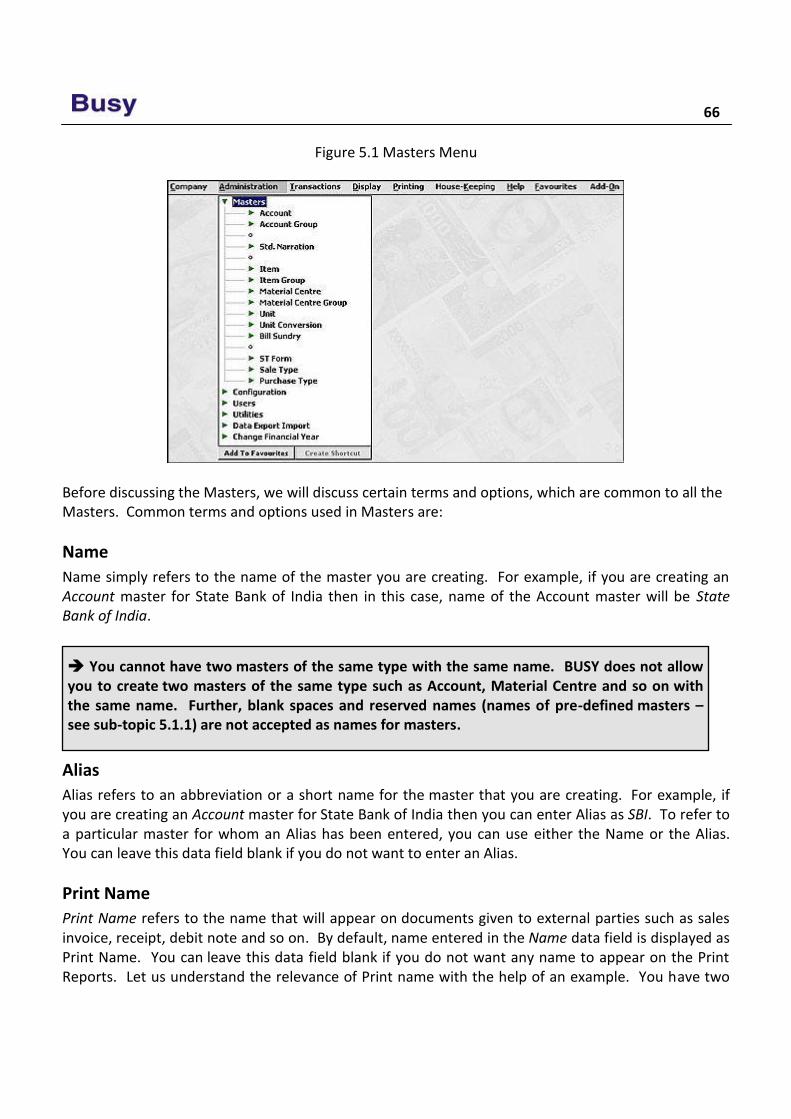
66
Figure 5.1 Masters Menu
Before discussing the Masters, we will discuss certain terms and options, which are common to all the Masters. Common terms and options used in Masters are:
Name
Name simply refers to the name of the master you are creating. For example, if you are creating an Account master for State Bank of India then in this case, name of the Account master will be State Bank of India.
Alias
Alias refers to an abbreviation or a short name for the master that you are creating. For example, if you are creating an Account master for State Bank of India then you can enter Alias as SBI. To refer to a particular master for whom an Alias has been entered, you can use either the Name or the Alias. You can leave this data field blank if you do not want to enter an Alias.
Print Name
Print Name refers to the name that will appear on documents given to external parties such as sales invoice, receipt, debit note and so on. By default, name entered in the Name data field is displayed as Print Name. You can leave this data field blank if you do not want any name to appear on the Print Reports. Let us understand the relevance of Print name with the help of an example. You have two
You cannot have two masters of the same type with the same name. BUSY does not allow you to create two masters of the same type such as Account, Material Centre and so on with the same name. Further, blank spaces and reserved names (names of pre-defined masters – see sub-topic 5.1.1) are not accepted as names for masters.
Unit 5 - Masters 67
dealers with same name Rohan Kapoor, one is in Delhi and other is in Mumbai. To differentiate between the two Account masters, you append the name of the city with their names. Thus, the account names will be Rohan Kapoor - Delhi and Rohan Kapoor - Mumbai. Now all the documents concerning these two accounts will have the name of the cities appended with the customer's names. This is not acceptable to the company since it wants only the name of the customers to appear on the reports. For this purpose, the company specifies the Print Name as Rohan Kapoor for both the accounts. Now the reports will display only Rohan Kapoor in the header while the account names will remain different.
Parent Group
Parent Group refers to the Group under which various masters can be classified. It helps to establish a hierarchy for the Masters. You can specify Parent Group for Account, Item, Material Centre and Cost Centre masters. For example, Star Electronics Company has many models of Televisions such as LCD, Flat Screen and so on, hence it can categorise all these models of Television under group Television. Let us take another example, Star Electronics has various debtors and creditors, hence it can specify the group as Sundry Debtors for all the parties, which are debtors of the company and can specify the group as Sundry Creditors for all the parties, which are creditors of the company.
Apart from the common terms, there are certain options that are common to all the Masters. The options are Add, Modify and List. On clicking any Master Type in Masters menu, these options appear. Let us discuss these options in detail.
Add
By using Add option of Masters, you can add a new master in BUSY. On clicking the Add option, a Master – Add window appears in which you can create a new Master. For example, if you want to create a new Account master then click Administration Masters Accounts Add Option. On clicking the Add option, an Account Master – Add window appears in which you can create a new Account master.
Modify
By using Modify option of Masters, you can edit details of the already entered Masters. On clicking the Modify option, a Select Master to Modify window appears in which you can select the master to be modified. On selecting the master, click the Select button. On clicking, the Select button, a Master – Modify window appears with already entered details of the Master. Edit the master information and click the Save button.
You can also delete a Master by using the Modify option. At the top of Master – Modify window, a Delete button appears on clicking which you can delete a Master. Masters can be deleted based on certain conditions. The conditions are:
Master should not be used in any other Master
Master should not be used in any transaction
68
Master is not a predefined Master
List
By using List option of Masters, you can view / print list of Masters created for a Master Type. For example, you want to view list of all the Item masters created by you then you can do so by clicking Administration Masters Item List option.
After discussing common terms and options, let us start discussing the Masters provided in BUSY. We will first start with the Account master.
5.1.1 Accounts An Account is a summarized record of various transactions pertaining to a particular account head. It is commonly referred to as a Ledger Account. In BUSY, it is called Account master. All the transactions pertaining to a particular account head are recorded under one Account master. For example, all the transactions of cash payments and cash receipts are recorded under the Cash Account master. When you create a new company, 56 Account masters are created by default for your convenience. The default Account masters are:
Additional Tax / Surcharge on VAT
Advertisement & Publicity
Bad Debts Written Off
Bank Charges
Books and Periodicals
Busy Infotech Pvt. Ltd.
Capital Equipments
Cash
Central Sales Tax
Charity and Donations
Commission on Sales
Computers
Conveyance Expenses
Customer Entertainment Expenses
Depreciation Account
Development Tax
Earnest Money
Edu. Cess on Excise
Edu. Cess on Service Tax
Edu. Cess on TDS
Excise Duty
Unit 5 - Masters 69
Freight and Forwarding Charges
Furniture and Fixture
Legal Expenses
Local Sales Tax / VAT
Miscellaneous Expenses
Office Equipments
Office Maintenance Expenses
Office Rent
Plant & Machinery
Postal Expenses
Printing and Stationery
Profit & Loss
Purchase
Rounded Off
Salary
Salary & Bonus Payable
Sales
Sales Promotion Expenses
Service Charges Paid
Service Charges Receipt
Service Tax
SHE Cess on Excise
SHE Cess on Service Tax
SHE Cess on TDS
Staff Welfare Expenses
Stock
TDS (Advertisement)
TDS (Commission)
TDS (Contractor)
TDS (Interest)
TDS (Rent)
TDS (Salary)
Telephone Expenses
Traveling Expenses
Water & Electricity Expenses
Out of the 56 default Account masters, following five are pre-defined Account masters:
70
Cash
Profit & Loss
Purchase
Sales
Stock
Let us now start creating an Account master. To create an Account master, you need to click the Administration Masters Accounts Add option. On clicking the Add option, an Account Master - Add window appears. In the window, you can enter name of the account to be created and can specify other related details. Given here is a screenshot of Account Master – Add window.
Image on next Page
Predefined Account masters are those accounts, which are necessary for maintaining books of accounts. Without these accounts, you cannot maintain accounting aspect of business. In BUSY, names of Pre-defined Account masters are reserved names i.e. these names cannot be used to create a new Account master or to rename an existing master. For example, Cash is a pre-defined Account master. You can rename the account to Cash-in-Hand but you cannot create a new Account master with the name Cash or rename any existing Account master to Cash. Thus, you can only rename the pre-defined Account masters. You cannot delete predefined Account masters. For other default Account masters, you can modify or delete them as per your convenience.
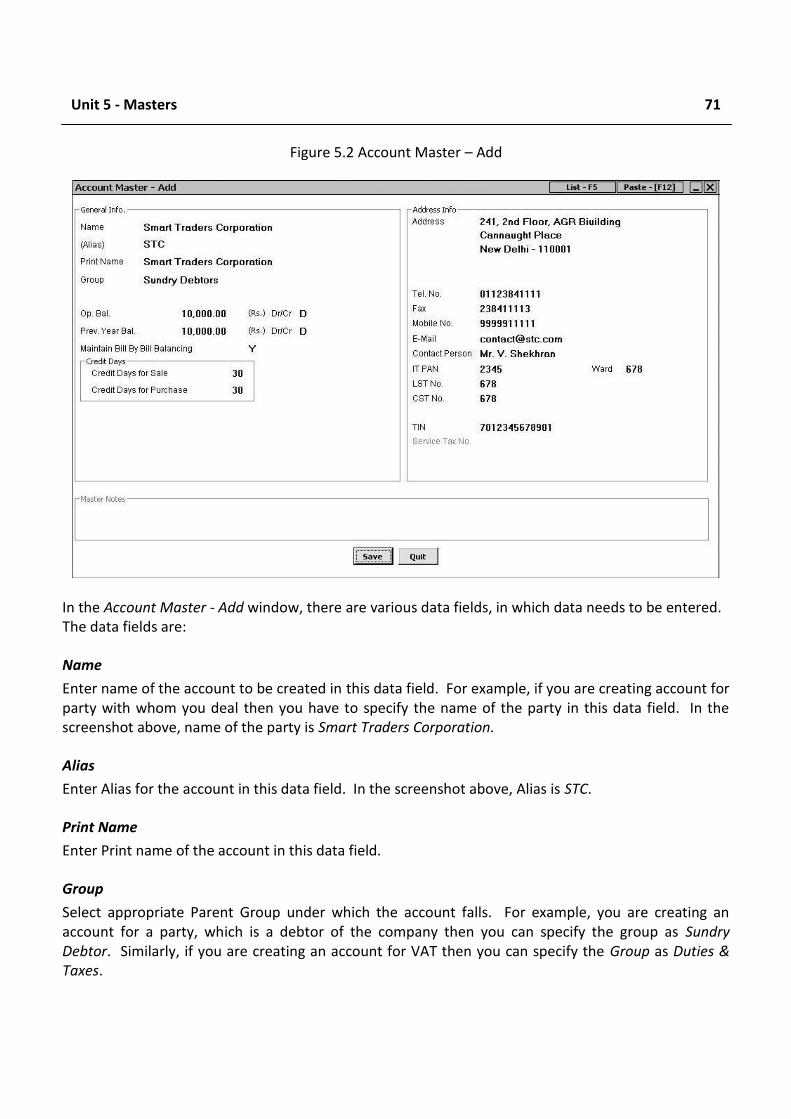
Unit 5 - Masters 71
Figure 5.2 Account Master – Add
In the Account Master - Add window, there are various data fields, in which data needs to be entered. The data fields are:
Name
Enter name of the account to be created in this data field. For example, if you are creating account for party with whom you deal then you have to specify the name of the party in this data field. In the screenshot above, name of the party is Smart Traders Corporation.
Alias
Enter Alias for the account in this data field. In the screenshot above, Alias is STC.
Print Name
Enter Print name of the account in this data field.
Group
Select appropriate Parent Group under which the account falls. For example, you are creating an account for a party, which is a debtor of the company then you can specify the group as Sundry Debtor. Similarly, if you are creating an account for VAT then you can specify the Group as Duties & Taxes.
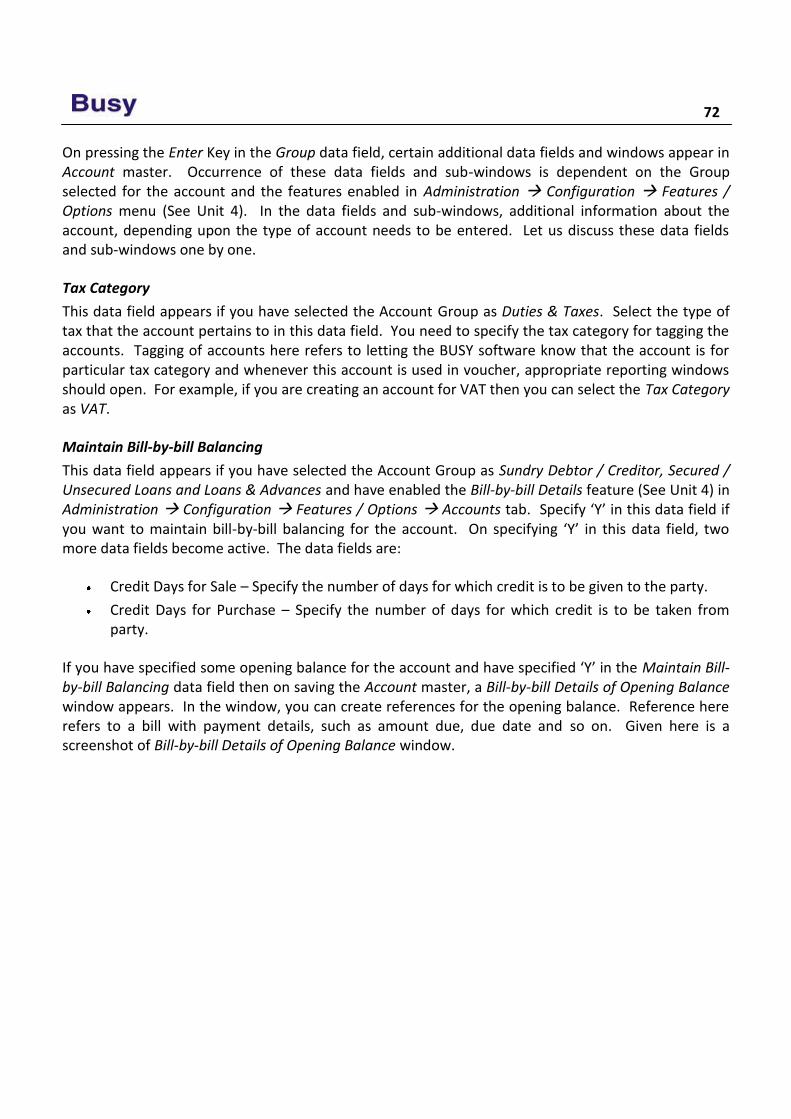
72
On pressing the Enter Key in the Group data field, certain additional data fields and windows appear in Account master. Occurrence of these data fields and sub-windows is dependent on the Group selected for the account and the features enabled in Administration Configuration Features / Options menu (See Unit 4). In the data fields and sub-windows, additional information about the account, depending upon the type of account needs to be entered. Let us discuss these data fields and sub-windows one by one.
Tax Category
This data field appears if you have selected the Account Group as Duties & Taxes. Select the type of tax that the account pertains to in this data field. You need to specify the tax category for tagging the accounts. Tagging of accounts here refers to letting the BUSY software know that the account is for particular tax category and whenever this account is used in voucher, appropriate reporting windows should open. For example, if you are creating an account for VAT then you can select the Tax Category as VAT.
Maintain Bill-by-bill Balancing
This data field appears if you have selected the Account Group as Sundry Debtor / Creditor, Secured / Unsecured Loans and Loans & Advances and have enabled the Bill-by-bill Details feature (See Unit 4) in Administration Configuration Features / Options Accounts tab. Specify ‘Y’ in this data field if you want to maintain bill-by-bill balancing for the account. On specifying ‘Y’ in this data field, two more data fields become active. The data fields are:
Credit Days for Sale – Specify the number of days for which credit is to be given to the party.
Credit Days for Purchase – Specify the number of days for which credit is to be taken from party.
If you have specified some opening balance for the account and have specified ‘Y’ in the Maintain Bill-by-bill Balancing data field then on saving the Account master, a Bill-by-bill Details of Opening Balance window appears. In the window, you can create references for the opening balance. Reference here refers to a bill with payment details, such as amount due, due date and so on. Given here is a screenshot of Bill-by-bill Details of Opening Balance window.
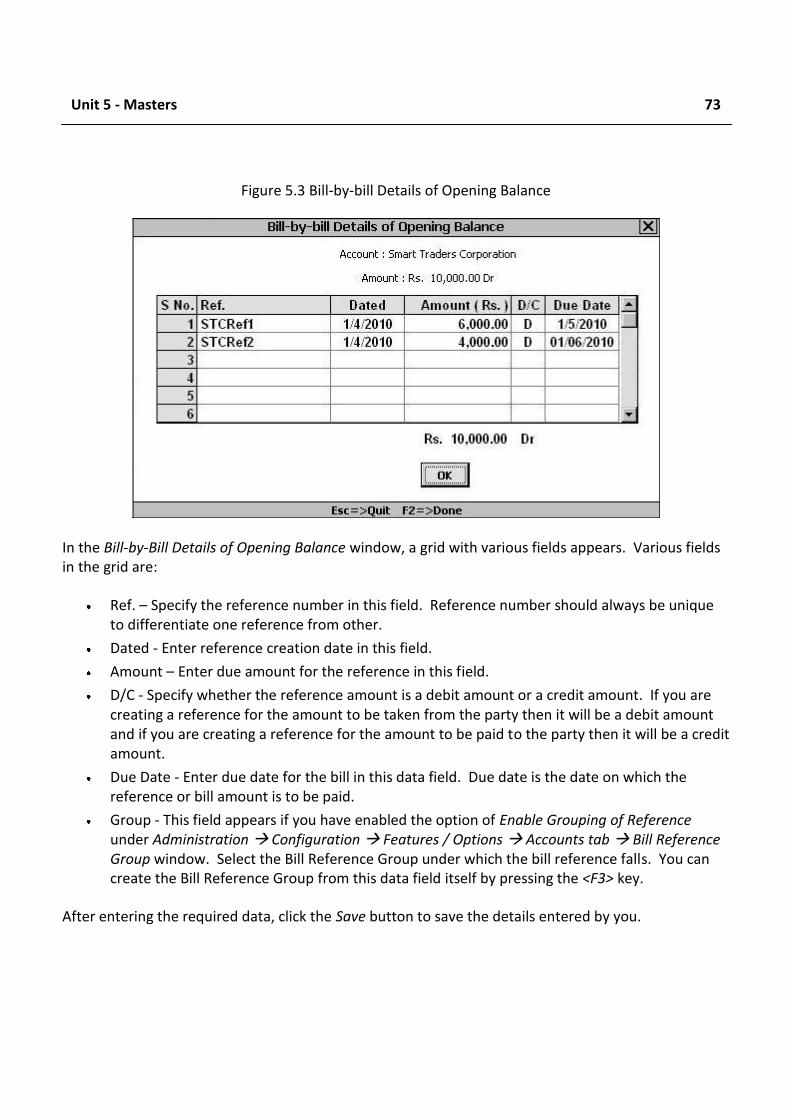
Unit 5 - Masters 73
Figure 5.3 Bill-by-bill Details of Opening Balance
In the Bill-by-Bill Details of Opening Balance window, a grid with various fields appears. Various fields in the grid are:
Ref. – Specify the reference number in this field. Reference number should always be unique to differentiate one reference from other.
Dated - Enter reference creation date in this field.
Amount – Enter due amount for the reference in this field.
D/C - Specify whether the reference amount is a debit amount or a credit amount. If you are creating a reference for the amount to be taken from the party then it will be a debit amount and if you are creating a reference for the amount to be paid to the party then it will be a credit amount.
Due Date - Enter due date for the bill in this data field. Due date is the date on which the reference or bill amount is to be paid.
Group - This field appears if you have enabled the option of Enable Grouping of Reference under Administration Configuration Features / Options Accounts tab Bill Reference Group window. Select the Bill Reference Group under which the bill reference falls. You can create the Bill Reference Group from this data field itself by pressing the <F3> key.
After entering the required data, click the Save button to save the details entered by you.
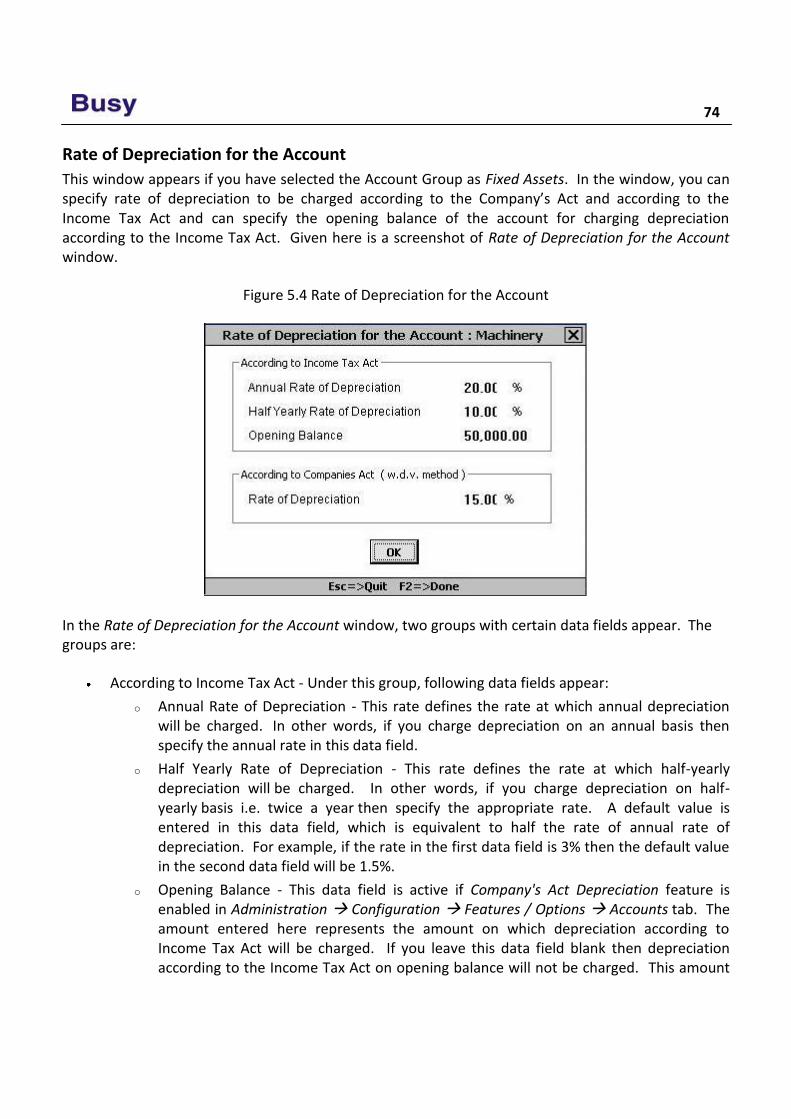
74
Rate of Depreciation for the Account
This window appears if you have selected the Account Group as Fixed Assets. In the window, you can specify rate of depreciation to be charged according to the Company’s Act and according to the Income Tax Act and can specify the opening balance of the account for charging depreciation according to the Income Tax Act. Given here is a screenshot of Rate of Depreciation for the Account window.
Figure 5.4 Rate of Depreciation for the Account
In the Rate of Depreciation for the Account window, two groups with certain data fields appear. The groups are:
According to Income Tax Act - Under this group, following data fields appear:
o Annual Rate of Depreciation - This rate defines the rate at which annual depreciation will be charged. In other words, if you charge depreciation on an annual basis then specify the annual rate in this data field.
o Half Yearly Rate of Depreciation - This rate defines the rate at which half-yearly depreciation will be charged. In other words, if you charge depreciation on half-yearly basis i.e. twice a year then specify the appropriate rate. A default value is entered in this data field, which is equivalent to half the rate of annual rate of depreciation. For example, if the rate in the first data field is 3% then the default value in the second data field will be 1.5%.
o Opening Balance - This data field is active if Company's Act Depreciation feature is enabled in Administration Configuration Features / Options Accounts tab. The amount entered here represents the amount on which depreciation according to Income Tax Act will be charged. If you leave this data field blank then depreciation according to the Income Tax Act on opening balance will not be charged. This amount
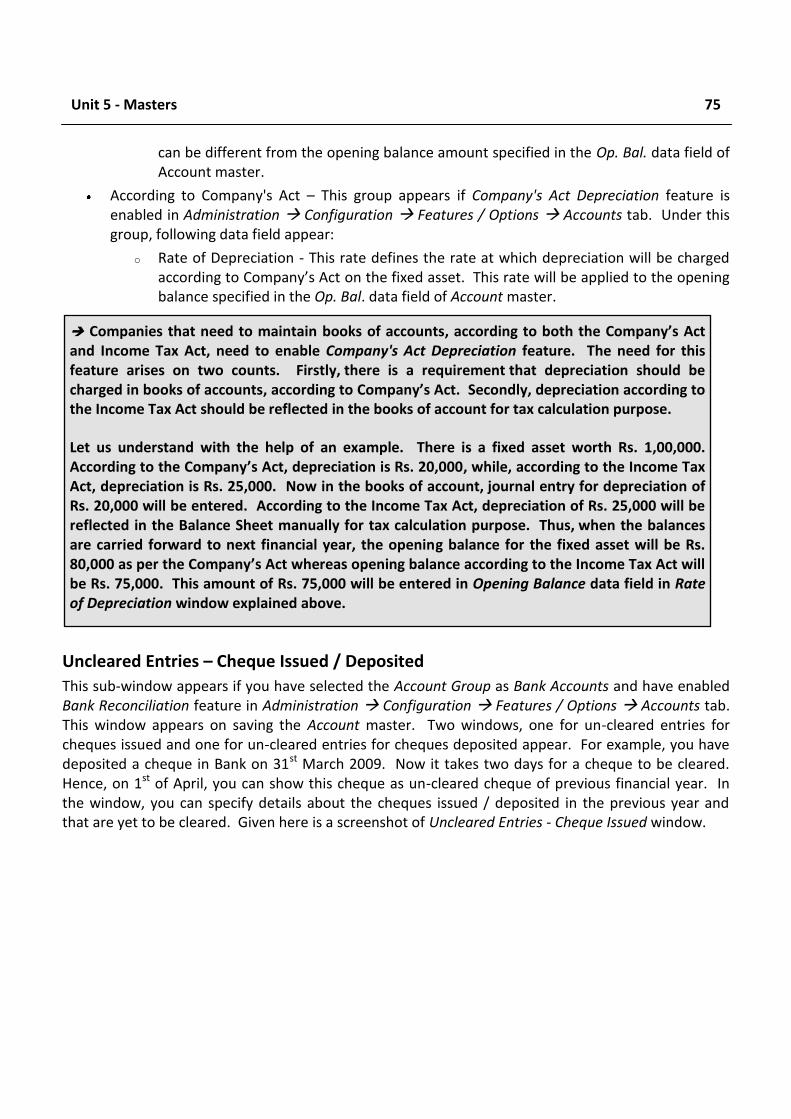
Unit 5 - Masters 75
can be different from the opening balance amount specified in the Op. Bal. data field of Account master.
According to Company's Act – This group appears if Company's Act Depreciation feature is enabled in Administration Configuration Features / Options Accounts tab. Under this group, following data field appear:
o Rate of Depreciation - This rate defines the rate at which depreciation will be charged according to Company’s Act on the fixed asset. This rate will be applied to the opening balance specified in the Op. Bal. data field of Account master.
Uncleared Entries – Cheque Issued / Deposited
This sub-window appears if you have selected the Account Group as Bank Accounts and have enabled Bank Reconciliation feature in Administration Configuration Features / Options Accounts tab. This window appears on saving the Account master. Two windows, one for un-cleared entries for cheques issued and one for un-cleared entries for cheques deposited appear. For example, you have deposited a cheque in Bank on 31st March 2009. Now it takes two days for a cheque to be cleared. Hence, on 1st of April, you can show this cheque as un-cleared cheque of previous financial year. In the window, you can specify details about the cheques issued / deposited in the previous year and that are yet to be cleared. Given here is a screenshot of Uncleared Entries - Cheque Issued window.
Companies that need to maintain books of accounts, according to both the Company’s Act and Income Tax Act, need to enable Company's Act Depreciation feature. The need for this feature arises on two counts. Firstly, there is a requirement that depreciation should be charged in books of accounts, according to Company’s Act. Secondly, depreciation according to the Income Tax Act should be reflected in the books of account for tax calculation purpose.
Let us understand with the help of an example. There is a fixed asset worth Rs. 1,00,000. According to the Company’s Act, depreciation is Rs. 20,000, while, according to the Income Tax Act, depreciation is Rs. 25,000. Now in the books of account, journal entry for depreciation of Rs. 20,000 will be entered. According to the Income Tax Act, depreciation of Rs. 25,000 will be reflected in the Balance Sheet manually for tax calculation purpose. Thus, when the balances are carried forward to next financial year, the opening balance for the fixed asset will be Rs. 80,000 as per the Company’s Act whereas opening balance according to the Income Tax Act will be Rs. 75,000. This amount of Rs. 75,000 will be entered in Opening Balance data field in Rate of Depreciation window explained above.
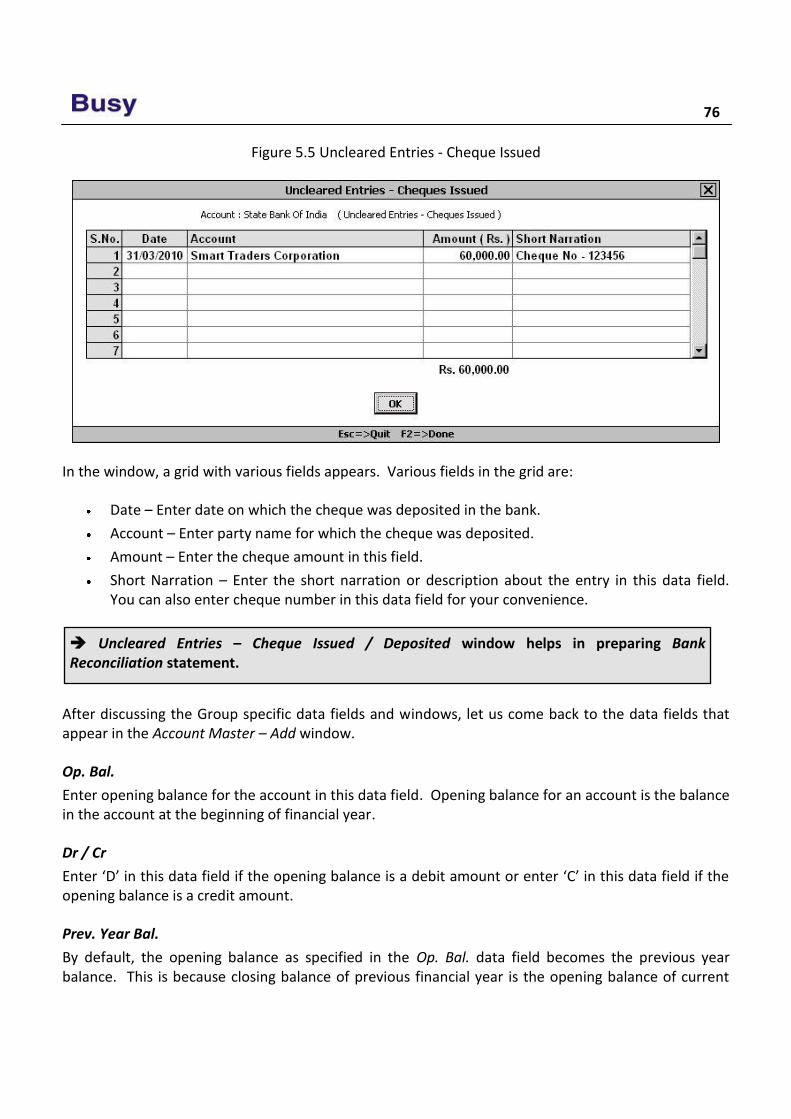
76
Figure 5.5 Uncleared Entries - Cheque Issued
In the window, a grid with various fields appears. Various fields in the grid are:
Date – Enter date on which the cheque was deposited in the bank.
Account – Enter party name for which the cheque was deposited.
Amount – Enter the cheque amount in this field.
Short Narration – Enter the short narration or description about the entry in this data field. You can also enter cheque number in this data field for your convenience.
After discussing the Group specific data fields and windows, let us come back to the data fields that appear in the Account Master – Add window.
Op. Bal.
Enter opening balance for the account in this data field. Opening balance for an account is the balance in the account at the beginning of financial year.
Dr / Cr
Enter ‘D’ in this data field if the opening balance is a debit amount or enter ‘C’ in this data field if the opening balance is a credit amount.
Prev. Year Bal.
By default, the opening balance as specified in the Op. Bal. data field becomes the previous year balance. This is because closing balance of previous financial year is the opening balance of current
Uncleared Entries – Cheque Issued / Deposited window helps in preparing Bank Reconciliation statement.
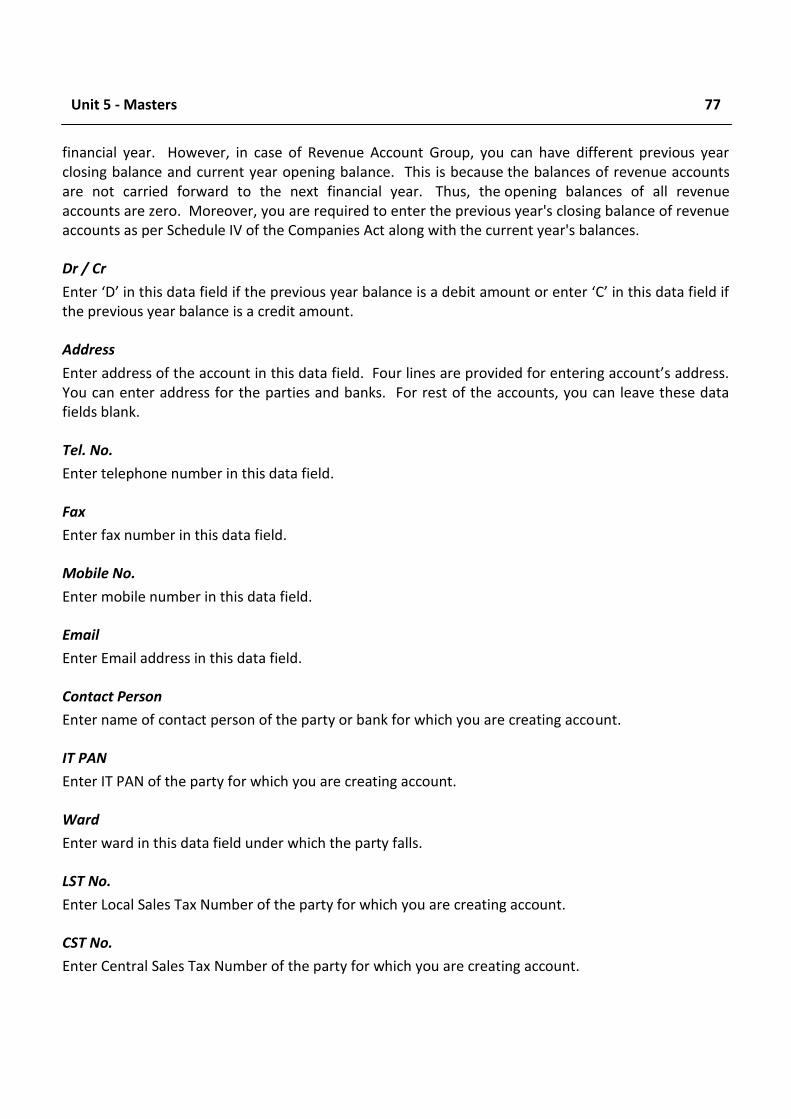
Unit 5 - Masters 77
financial year. However, in case of Revenue Account Group, you can have different previous year closing balance and current year opening balance. This is because the balances of revenue accounts are not carried forward to the next financial year. Thus, the opening balances of all revenue accounts are zero. Moreover, you are required to enter the previous year's closing balance of revenue accounts as per Schedule IV of the Companies Act along with the current year's balances.
Dr / Cr
Enter ‘D’ in this data field if the previous year balance is a debit amount or enter ‘C’ in this data field if the previous year balance is a credit amount.
Address
Enter address of the account in this data field. Four lines are provided for entering account’s address. You can enter address for the parties and banks. For rest of the accounts, you can leave these data fields blank.
Tel. No.
Enter telephone number in this data field.
Fax
Enter fax number in this data field.
Mobile No.
Enter mobile number in this data field.
Enter Email address in this data field.
Contact Person
Enter name of contact person of the party or bank for which you are creating account.
IT PAN
Enter IT PAN of the party for which you are creating account.
Ward
Enter ward in this data field under which the party falls.
LST No.
Enter Local Sales Tax Number of the party for which you are creating account.
CST No.
Enter Central Sales Tax Number of the party for which you are creating account.
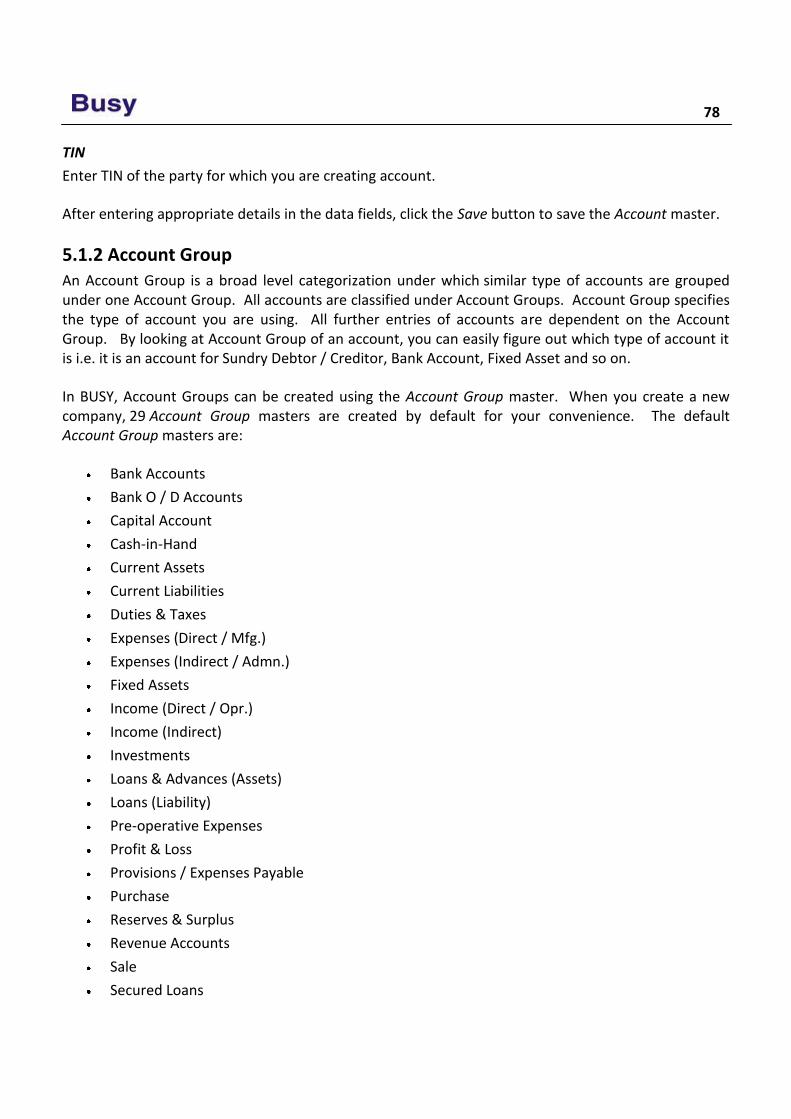
78
TIN
Enter TIN of the party for which you are creating account.
After entering appropriate details in the data fields, click the Save button to save the Account master.
5.1.2 Account Group An Account Group is a broad level categorization under which similar type of accounts are grouped under one Account Group. All accounts are classified under Account Groups. Account Group specifies the type of account you are using. All further entries of accounts are dependent on the Account Group. By looking at Account Group of an account, you can easily figure out which type of account it is i.e. it is an account for Sundry Debtor / Creditor, Bank Account, Fixed Asset and so on.
In BUSY, Account Groups can be created using the Account Group master. When you create a new company, 29 Account Group masters are created by default for your convenience. The default Account Group masters are:
Bank Accounts
Bank O / D Accounts
Capital Account
Cash-in-Hand
Current Assets
Current Liabilities
Duties & Taxes
Expenses (Direct / Mfg.)
Expenses (Indirect / Admn.)
Fixed Assets
Income (Direct / Opr.)
Income (Indirect)
Investments
Loans & Advances (Assets)
Loans (Liability)
Pre-operative Expenses
Profit & Loss
Provisions / Expenses Payable
Purchase
Reserves & Surplus
Revenue Accounts
Sale
Secured Loans

Unit 5 - Masters 79
Securities & Deposits (Assets)
Stock-in-Hand
Sundry Creditors
Sundry Debtors
Suspense Account
Unsecured Loans
All the 29 default Account Group masters are pre-defined (See topic 5.1.1) Account Group masters. Pre-defined Account Groups in BUSY, are based on the common requirements of the Indian Accounting System.
Classification of Account Groups
Pre-defined Account Groups are classified in primarily two categories:
Primary - These Account Groups represent the top-most level in the hierarchy of Account Groups.
Secondary - These Accounts Groups are grouped under the Primary Groups. For example, Cash-in-Hand is a secondary group under the Current Assets Primary Group.
Importance of Classifying Account Groups
The flexibility of creating sub-groups under the groups according to your requirements helps in organizing large number of accounts in a systematic manner. This in turn enhances the information system in the organisation. For example, you can divide your sundry debtors according to the region where their office is located. Thus, you can create various Account Groups as North Delhi Debtors, East Delhi Debtors, South Delhi Debtors and West Delhi Debtors under the Account Group Sundry Debtors. This will help you in viewing report for a single debtor, for all the debtors of East, West, North or South Delhi and for all the debtors of Delhi region.
Key Points while classifying Account Groups
Given here are the key points to be kept in mind when you are creating Account Groups.
Create accounts for income or expenditure under the Revenue Accounts Account Group only. The reason is that only the Revenue Accounts Account Group and Stock-in-Hand Account Group affect the Profit & Loss account of the company.
Create tax related accounts under the Duties & Taxes Account Group. The basic functionality of Duties & Taxes Account Group is to maintain accounts for Sales Tax, VAT and other such liabilities of the company towards the government.
Classification of Account Groups should be governed by the needs of your organization. Use this facility of grouping various Account Groups judiciously. Do not create unnecessary hierarchy in account groups since it can lead to confusion.
80
Create a Sundry Debtor or Sundry Creditor account based on the type and the frequency of transactions that you carry out with the party.
Given here is a diagram of the hierarchical representation of the Account Groups.
Image on next Page
BUSY does not distinguish between Sundry Debtors and Sundry Creditors while entering the Sales or Purchase vouchers. Thus, you can enter both Sales and Purchase voucher for Sundry Debtors and Sundry Creditors.
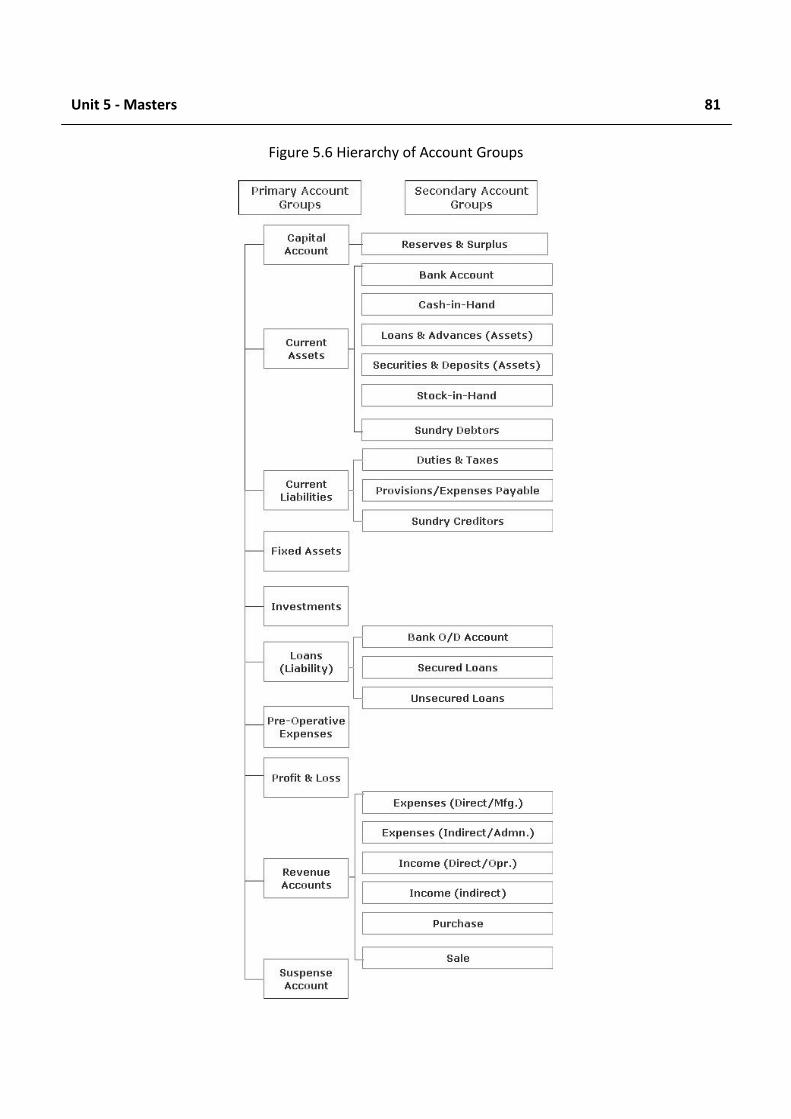
Unit 5 - Masters 81
Figure 5.6 Hierarchy of Account Groups
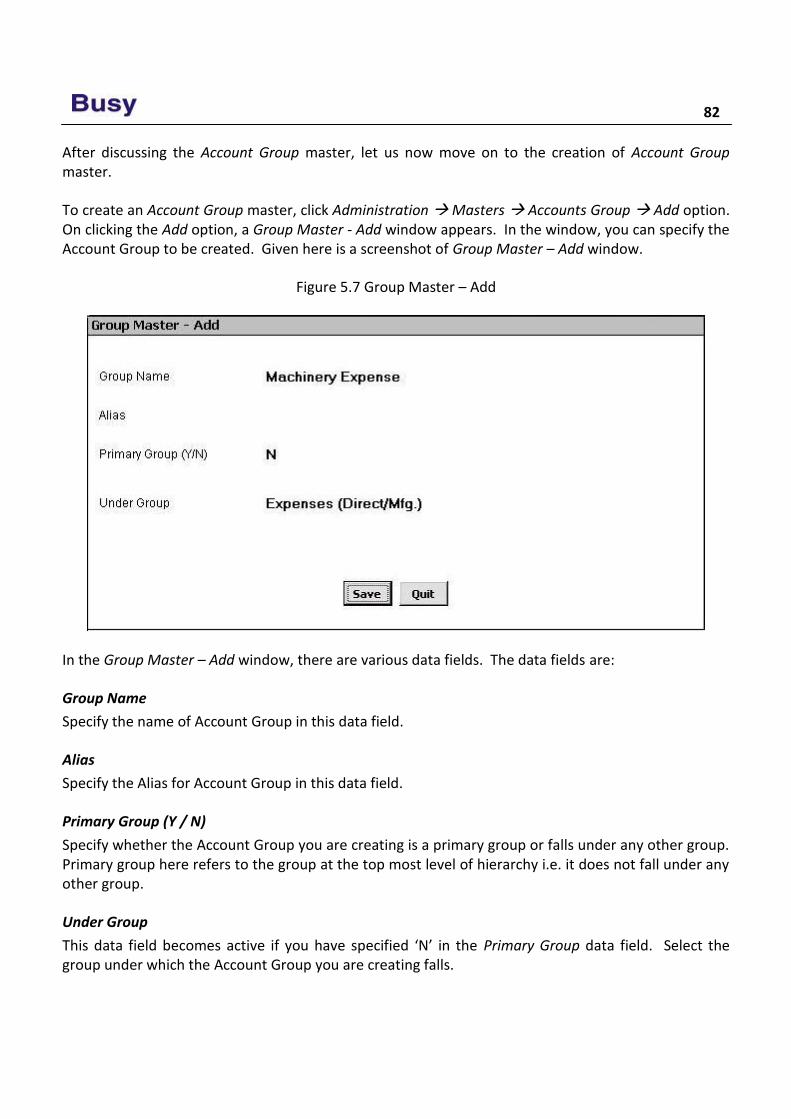
82
After discussing the Account Group master, let us now move on to the creation of Account Group master.
To create an Account Group master, click Administration Masters Accounts Group Add option. On clicking the Add option, a Group Master - Add window appears. In the window, you can specify the Account Group to be created. Given here is a screenshot of Group Master – Add window.
Figure 5.7 Group Master – Add
In the Group Master – Add window, there are various data fields. The data fields are:
Group Name
Specify the name of Account Group in this data field.
Alias
Specify the Alias for Account Group in this data field.
Primary Group (Y / N)
Specify whether the Account Group you are creating is a primary group or falls under any other group. Primary group here refers to the group at the top most level of hierarchy i.e. it does not fall under any other group.
Under Group
This data field becomes active if you have specified ‘N’ in the Primary Group data field. Select the group under which the Account Group you are creating falls.
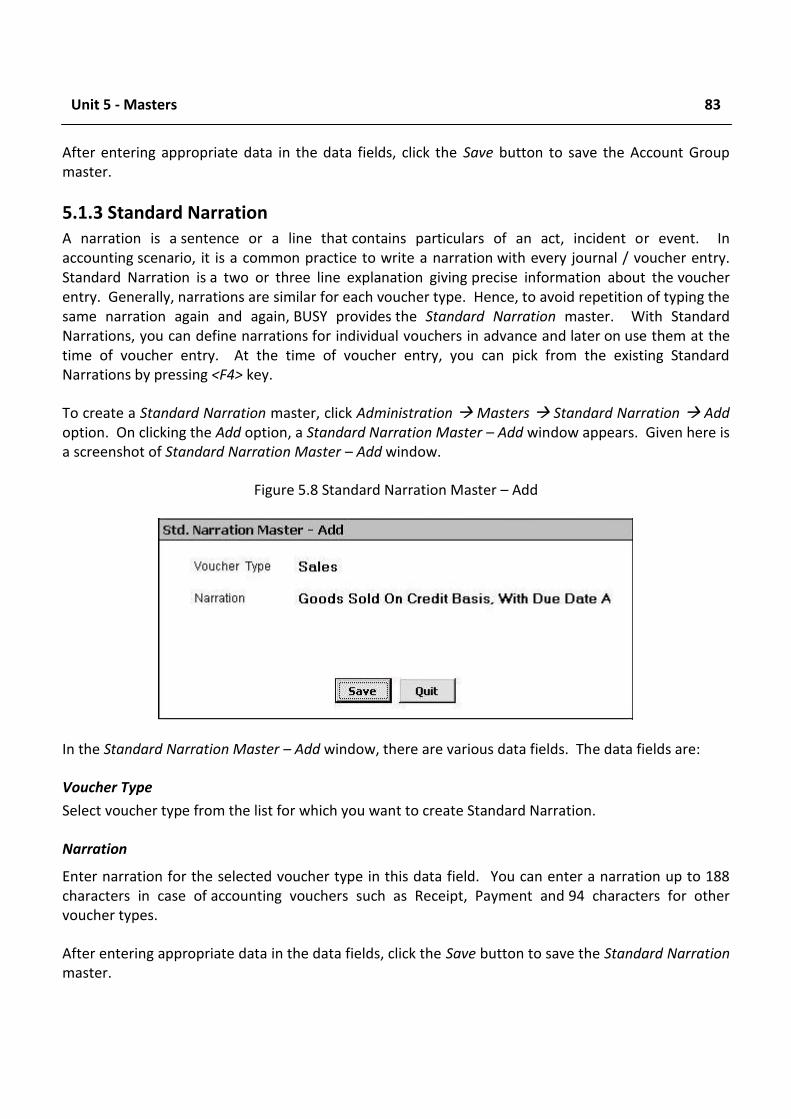
Unit 5 - Masters 83
After entering appropriate data in the data fields, click the Save button to save the Account Group master.
5.1.3 Standard Narration A narration is a sentence or a line that contains particulars of an act, incident or event. In accounting scenario, it is a common practice to write a narration with every journal / voucher entry. Standard Narration is a two or three line explanation giving precise information about the voucher entry. Generally, narrations are similar for each voucher type. Hence, to avoid repetition of typing the same narration again and again, BUSY provides the Standard Narration master. With Standard Narrations, you can define narrations for individual vouchers in advance and later on use them at the time of voucher entry. At the time of voucher entry, you can pick from the existing Standard Narrations by pressing <F4> key.
To create a Standard Narration master, click Administration Masters Standard Narration Add option. On clicking the Add option, a Standard Narration Master – Add window appears. Given here is a screenshot of Standard Narration Master – Add window.
Figure 5.8 Standard Narration Master – Add
In the Standard Narration Master – Add window, there are various data fields. The data fields are:
Voucher Type
Select voucher type from the list for which you want to create Standard Narration.
Narration
Enter narration for the selected voucher type in this data field. You can enter a narration up to 188 characters in case of accounting vouchers such as Receipt, Payment and 94 characters for other voucher types.
After entering appropriate data in the data fields, click the Save button to save the Standard Narration master.
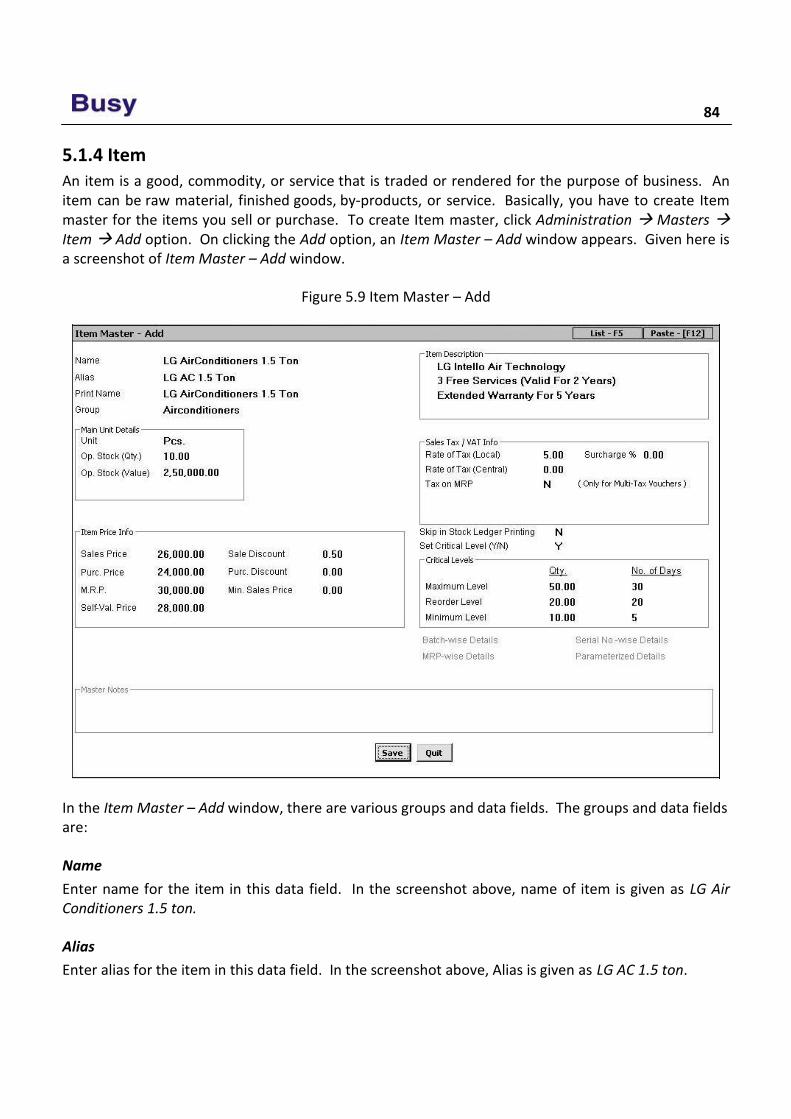
84
5.1.4 Item An item is a good, commodity, or service that is traded or rendered for the purpose of business. An item can be raw material, finished goods, by-products, or service. Basically, you have to create Item master for the items you sell or purchase. To create Item master, click Administration Masters Item Add option. On clicking the Add option, an Item Master – Add window appears. Given here is a screenshot of Item Master – Add window.
Figure 5.9 Item Master – Add
In the Item Master – Add window, there are various groups and data fields. The groups and data fields are:
Name
Enter name for the item in this data field. In the screenshot above, name of item is given as LG Air Conditioners 1.5 ton.
Alias
Enter alias for the item in this data field. In the screenshot above, Alias is given as LG AC 1.5 ton.
Unit 5 - Masters 85
Print Name
Enter print name for the item in this data field.
Group
Select the Item group under which the item falls. For example, for item LG AC 1.5 ton, you can specify Group as Air Conditioners. If you want to use an Item Group, which is not yet created then you can create Item Group from Group data field itself by pressing <F3> key.
Main Unit Details
Under this group, you can specify details about the Main unit of the item. Various data fields under this group are:
Unit
Select the unit in which the item will be measured. For example, unit for item LG AC 1.5 ton can be Pieces, for item Speakers unit can be Pair or Set and so on.
Op. Stock (Qty)
Specify the opening stock of the item in this data field. If you have some pending stock of item in the previous financial year then you can specify that stock quantity in this data field.
Op. Stock (Value)
This data field gets active if you enter a value greater than zero in Op. Stock (Qty.) data field. Specify value of opening stock in this data field. For example, cost of one AC is Rs. 25,000 and you have opening stock of 10 pieces then you can specify value as Rs. 2,50,000.
Item Price Info
Under this group, you can specify various item prices such as Sales Price, Purchase Price and so on. Various data fields under this group are:
Sales Price
Enter sale price of the item in this data field. By default, this price will be displayed as sales price in the Sales voucher.
Sales Discount
Enter rate of discount to be given on sale of the item.
Purchase Price
Enter purchase price of the item in this data field. By default, this price will be displayed as purchase price in the Purchase voucher.
Purchase Discount
Enter rate of discount to be received on purchase of the item.
86
M.R.P.
Enter maximum retail price of the item in this data field.
Minimum Sale Price
Enter minimum sale price of item in this data field. The relevance of this data field is with the Warning Alarm option (See Unit 4) of the Configuration menu. If you have set Warning Alarm for Minimum Sale Price then in Sales voucher, on entering a sale price less than the value specified in this data field, a message box asking you to enter a higher price will be displayed.
Self Val. Price
Enter price to be used for valuation of closing stock of this item. This option is useful only when you have specified the stock valuation method as Self-Evaluation in Administration Configuration Features / Options Inventory tab.
Item Description
Under this group, four lines appear for entering a description about the item. You can enter item description regarding the manufacturing, warranty, size, color or any other description in the data fields.
Sales Tax / VAT Info.
This group is active only if Sales Tax / VAT is enabled for the company. Under this group, you can provide various Sales Tax / VAT related details. Various data fields under this group are:
Rate of Tax (Local)
Specify rate of tax to be charged / paid when the item is sold / purchased locally.
Taxation Type
This data field gets active if you have specified tax rate as zero in Rate of Tax (Local) data field. Select the type of taxation from the list. Basically, you have to select the reason for zero percent tax rate. In the list, three options are provided i.e. Tax Free, Exempted and Tax Paid.
Surcharge %
This data field appears if you have enabled Additional Tax / Surcharge for the company and have specified a tax rate other than ‘0’ in the Rate of Tax (Local) data field. Specify local rate of Additional Tax / Surcharge applicable for the item.
Rate of Tax (Central)
Specify rate of tax to be charged / paid when the item is sold / purchased centrally i.e. from some other state.
Unit 5 - Masters 87
Surcharge %
This data field appears if you have enabled Additional Tax / Surcharge for the company and have specified a tax rate other than ‘0’ in the Rate of Tax (Central) data field. Specify the central rate of Additional Tax / Surcharge applicable for the item.
Tax on MRP
Specify 'Y' in this data field if you want to calculate tax on item MRP.
Skip in Stock Ledger Printing
Specify ‘Y’ in this data field, if you do not want the item to be printed in Stock Ledger.
Set Critical Levels
Specify ‘Y’ in this data field, if you want to enter critical levels for the item. Critical levels imply setting the minimum / maximum / re-order stock level for an item. Setting critical levels for different items will help in generating Critical Level reports and Warning Alarms whenever the quantity of the item reaches its critical level. On specifying ‘Y’ in this data field, a Critical Levels group gets active. Let us discuss this group in detail.
Critical Level
Under Critical Level group, you can specify the maximum, minimum and re-order stock of the item. In the Critical Level group, you can specify the quantity and number of days for maximum, minimum and re-order level of item.
After entering appropriate data in the data fields, click the Save button to save Item master. On clicking the Save button, a Material Centre wise Opening Stock window appears. This window appears if you have specified some opening stock for the item and have created more than one Material Centre master (See sub topic 5.1.9). In the Material Centre wise Opening Stock Details window, you can specify details of item opening stock kept at various Material Centres. Given here is a screenshot of Material Centre wise Opening Stock Details window.
If the state selected is Uttar Pradesh then two additional data fields Type of Item and Entry Tax Rate appear. Entry Tax Rate data field appears only if you have specified 'Y' in the Enable Entry Tax Rate option in Administration Configuration Features / Options Sales Tax / VAT / GST tab. Specify the type of item i.e. VAT, Non VAT and Entry Tax rate applicable for the item in the data fields respectively.
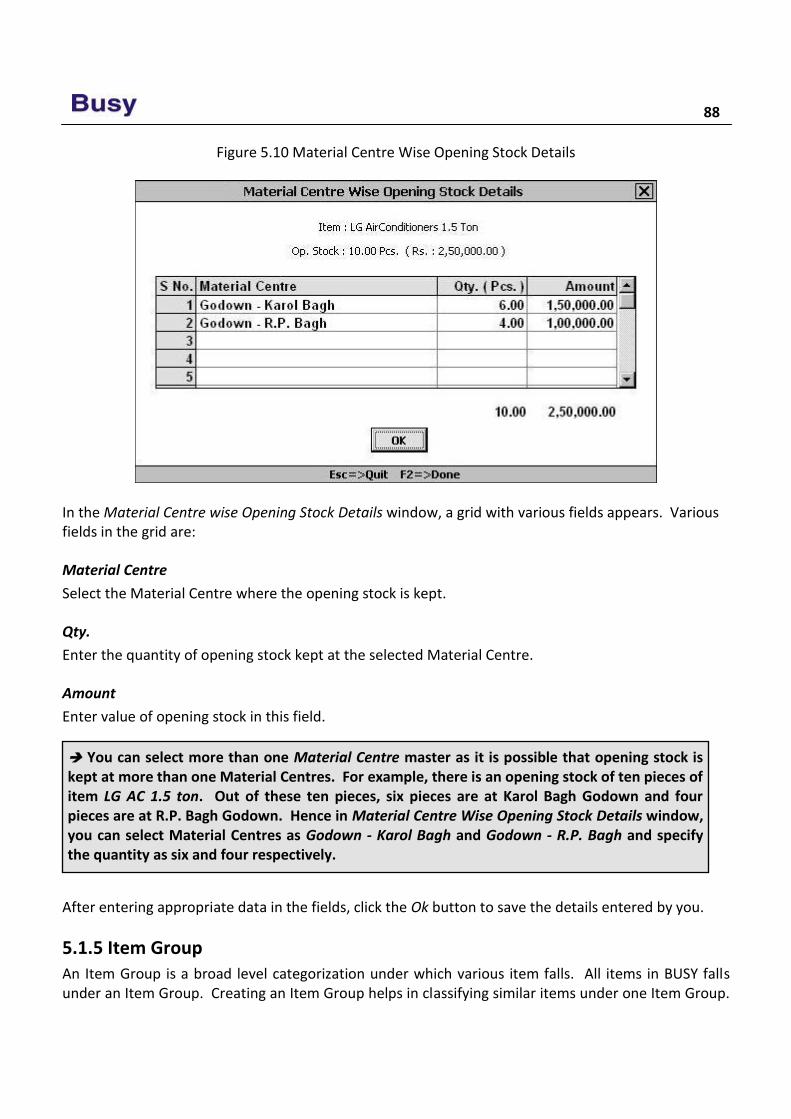
88
Figure 5.10 Material Centre Wise Opening Stock Details
In the Material Centre wise Opening Stock Details window, a grid with various fields appears. Various fields in the grid are:
Material Centre
Select the Material Centre where the opening stock is kept.
Qty.
Enter the quantity of opening stock kept at the selected Material Centre.
Amount
Enter value of opening stock in this field.
After entering appropriate data in the fields, click the Ok button to save the details entered by you.
5.1.5 Item Group An Item Group is a broad level categorization under which various item falls. All items in BUSY falls under an Item Group. Creating an Item Group helps in classifying similar items under one Item Group.
You can select more than one Material Centre master as it is possible that opening stock is kept at more than one Material Centres. For example, there is an opening stock of ten pieces of item LG AC 1.5 ton. Out of these ten pieces, six pieces are at Karol Bagh Godown and four pieces are at R.P. Bagh Godown. Hence in Material Centre Wise Opening Stock Details window, you can select Material Centres as Godown - Karol Bagh and Godown - R.P. Bagh and specify the quantity as six and four respectively.
Unit 5 - Masters 89
For example, Star Electronics Company sells Air Conditioners of different brands such as LG, Voltas, Hitachi and so on. It creates item with the name LG AC 1.5 ton, LG AC 2 ton, Voltas Intello Cool 1 ton and so on. Hence, it can create all these items under the Item Group Air Conditioner. This will help the company to view reports for single AC sold or to view overall sales of the ACs.
When you create a new company then by default BUSY create a General group for your convenience. To create an Item Group master, click Administration Masters Item Group Add option. On clicking the Add option, a Group Master – Add window appears. This window is similar to the Group Master – Add window that appears for creating Account Group.
For detailed help on Group Master – Add window, please refer to sub topic 5.1.2.
5.1.6 Material Centre A Material Centre is a place where stock is kept. A Material Centre can be a godown, showroom, almirah, locker or any other such place where you keep your stock. Material Centre master appears in the list of Masters menu only if you have enabled the option of Enable Multi Godown Inventory in Administration Configuration Features / Options Inventory tab (See Unit 4). Further if you have created more than one Material Centre master then at the time of voucher entry it is necessary to specify the Material Centre from where the goods are dispatched or where the goods are received. To create a Material Centre master, click Administration Masters Material Centre Add option. On clicking the Add option, a Material Centre Master – Add window appears. Given here is a screenshot of Material Centre Master – Add window.
Image on next Page
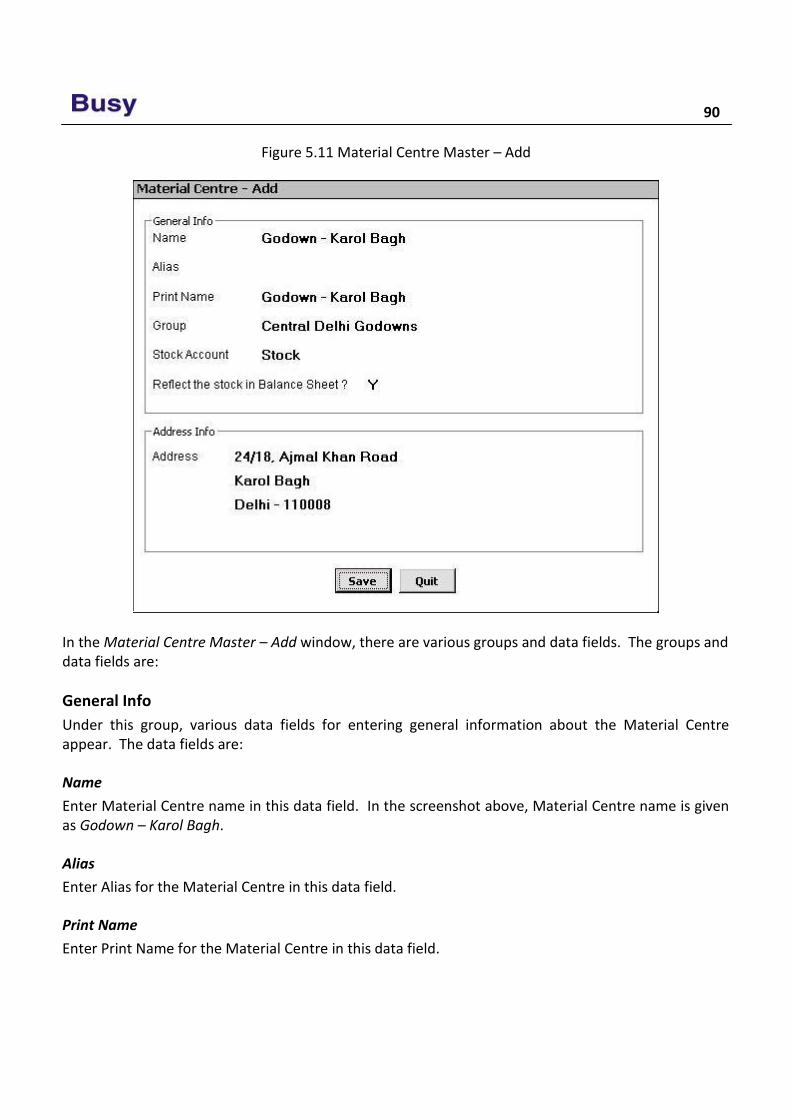
90
Figure 5.11 Material Centre Master – Add
In the Material Centre Master – Add window, there are various groups and data fields. The groups and data fields are:
General Info
Under this group, various data fields for entering general information about the Material Centre appear. The data fields are:
Name
Enter Material Centre name in this data field. In the screenshot above, Material Centre name is given as Godown – Karol Bagh.
Alias
Enter Alias for the Material Centre in this data field.
Print Name
Enter Print Name for the Material Centre in this data field.
Unit 5 - Masters 91
Group
Select Material Centre Group under which, the Material Centre falls. In the screenshot given above Group is taken as Central Delhi Godowns.
Stock Account
Select account under which stock value of Material Centre will be recorded. Generally, companies use Stock Account to record stock of Material Centre, however, you can use some other account also such as Stock in Hand and so on.
Reflect the Stock in Balance Sheet
Specify ‘Y’ in this data field if you want to reflect stock of Material Center in the Balance Sheet. Otherwise, specify ‘N’ in this data field if you do not want to reflect stock of Material Centre in the Balance Sheet. For example, at a particular Material Centre, you keep only scrap, hence you would not like the stock of that Material Centre to be displayed in Balance sheet.
Address Info.
Under this group, various lines for entering Material Centre address appear. Enter Material Centre address in the address lines.
After entering appropriate data in the data fields, click the Save button to save the Material Centre master.
5.1.7 Material Centre Group A Material Centre Group is a broad level categorization under which similar types of Material Centres are grouped. All Material Centres are classified under Material Centre Groups. For example, Star Electronics Company has various godowns in Delhi. It treats all the godowns as Material Centres for the company and wants to classify Material Centres falling under same region of Delhi into one group. For this purpose it create Material Centre group with the name East Delhi Godown, Central Delhi Godown, North Delhi Godown and West Delhi Godown. Star Electronics further classifies all these Material Centre Groups under the Group Delhi Godowns. By making, this hierarchy, Star Electronics can anytime check the availability of stock in all the godowns of Delhi, all the godowns of particular region of Delhi such as North Delhi, Central Delhi, West Delhi, and East Delhi or for a particular Material Centre.
To create a Material Centre Group master, click Administration Master Material Centre Group Add option. On clicking the Add option, a Group Master – Add window appears. This window is similar to the Group Master – Add window that appears for creating Account Group.
For detailed help on Group Master – Add window, please refer to the sub topic 5.1.2.
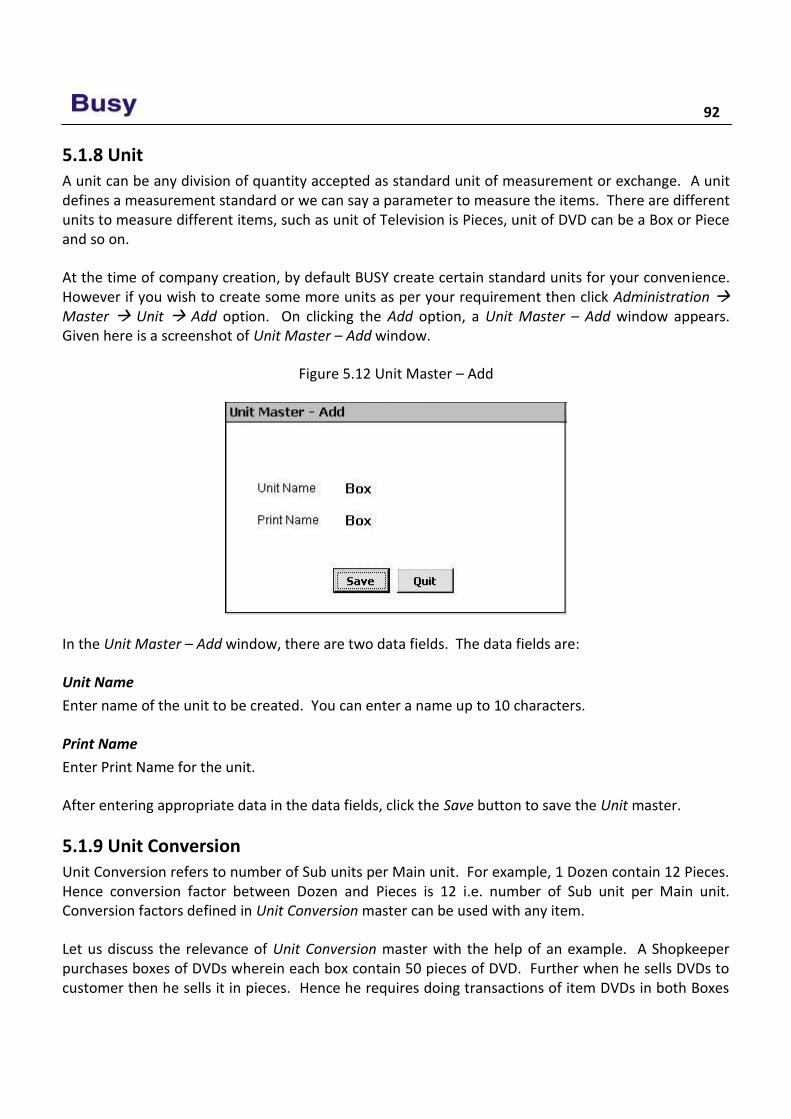
92
5.1.8 Unit A unit can be any division of quantity accepted as standard unit of measurement or exchange. A unit defines a measurement standard or we can say a parameter to measure the items. There are different units to measure different items, such as unit of Television is Pieces, unit of DVD can be a Box or Piece and so on.
At the time of company creation, by default BUSY create certain standard units for your convenience. However if you wish to create some more units as per your requirement then click Administration Master Unit Add option. On clicking the Add option, a Unit Master – Add window appears. Given here is a screenshot of Unit Master – Add window.
Figure 5.12 Unit Master – Add
In the Unit Master – Add window, there are two data fields. The data fields are:
Unit Name
Enter name of the unit to be created. You can enter a name up to 10 characters.
Print Name
Enter Print Name for the unit.
After entering appropriate data in the data fields, click the Save button to save the Unit master.
5.1.9 Unit Conversion Unit Conversion refers to number of Sub units per Main unit. For example, 1 Dozen contain 12 Pieces. Hence conversion factor between Dozen and Pieces is 12 i.e. number of Sub unit per Main unit. Conversion factors defined in Unit Conversion master can be used with any item.
Let us discuss the relevance of Unit Conversion master with the help of an example. A Shopkeeper purchases boxes of DVDs wherein each box contain 50 pieces of DVD. Further when he sells DVDs to customer then he sells it in pieces. Hence he requires doing transactions of item DVDs in both Boxes
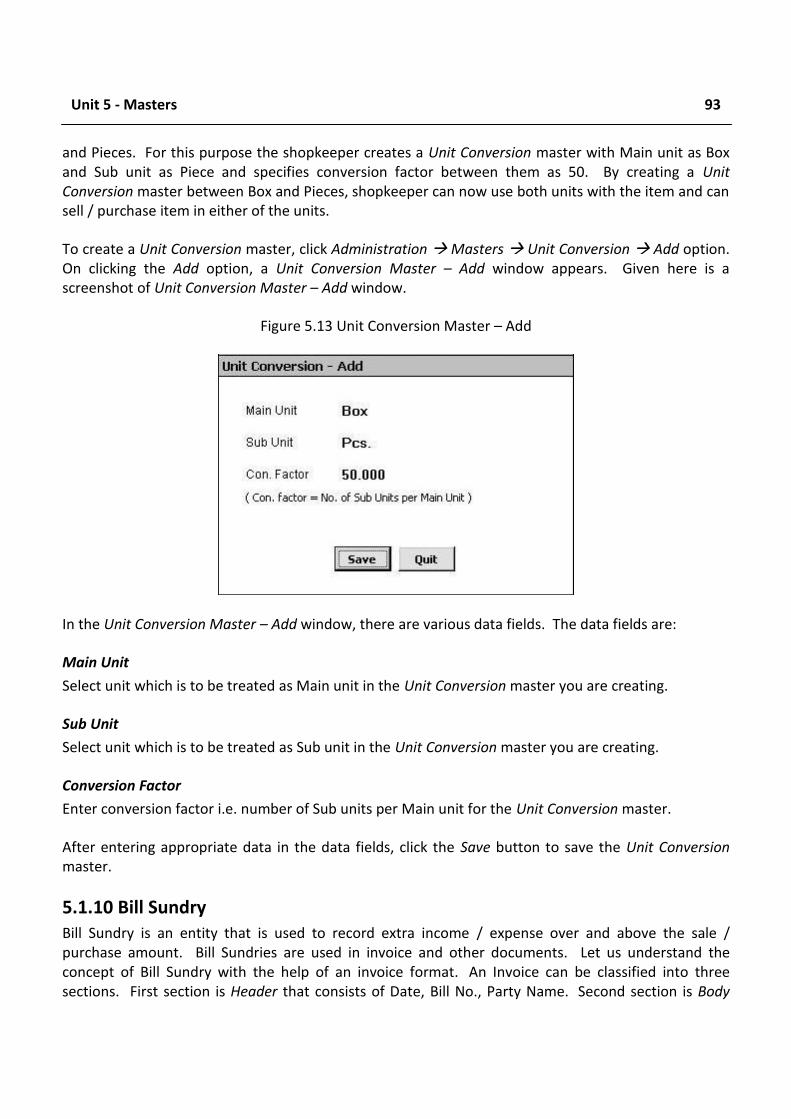
Unit 5 - Masters 93
and Pieces. For this purpose the shopkeeper creates a Unit Conversion master with Main unit as Box and Sub unit as Piece and specifies conversion factor between them as 50. By creating a Unit Conversion master between Box and Pieces, shopkeeper can now use both units with the item and can sell / purchase item in either of the units.
To create a Unit Conversion master, click Administration Masters Unit Conversion Add option. On clicking the Add option, a Unit Conversion Master – Add window appears. Given here is a screenshot of Unit Conversion Master – Add window.
Figure 5.13 Unit Conversion Master – Add
In the Unit Conversion Master – Add window, there are various data fields. The data fields are:
Main Unit
Select unit which is to be treated as Main unit in the Unit Conversion master you are creating.
Sub Unit
Select unit which is to be treated as Sub unit in the Unit Conversion master you are creating.
Conversion Factor
Enter conversion factor i.e. number of Sub units per Main unit for the Unit Conversion master.
After entering appropriate data in the data fields, click the Save button to save the Unit Conversion master.
5.1.10 Bill Sundry Bill Sundry is an entity that is used to record extra income / expense over and above the sale / purchase amount. Bill Sundries are used in invoice and other documents. Let us understand the concept of Bill Sundry with the help of an invoice format. An Invoice can be classified into three sections. First section is Header that consists of Date, Bill No., Party Name. Second section is Body
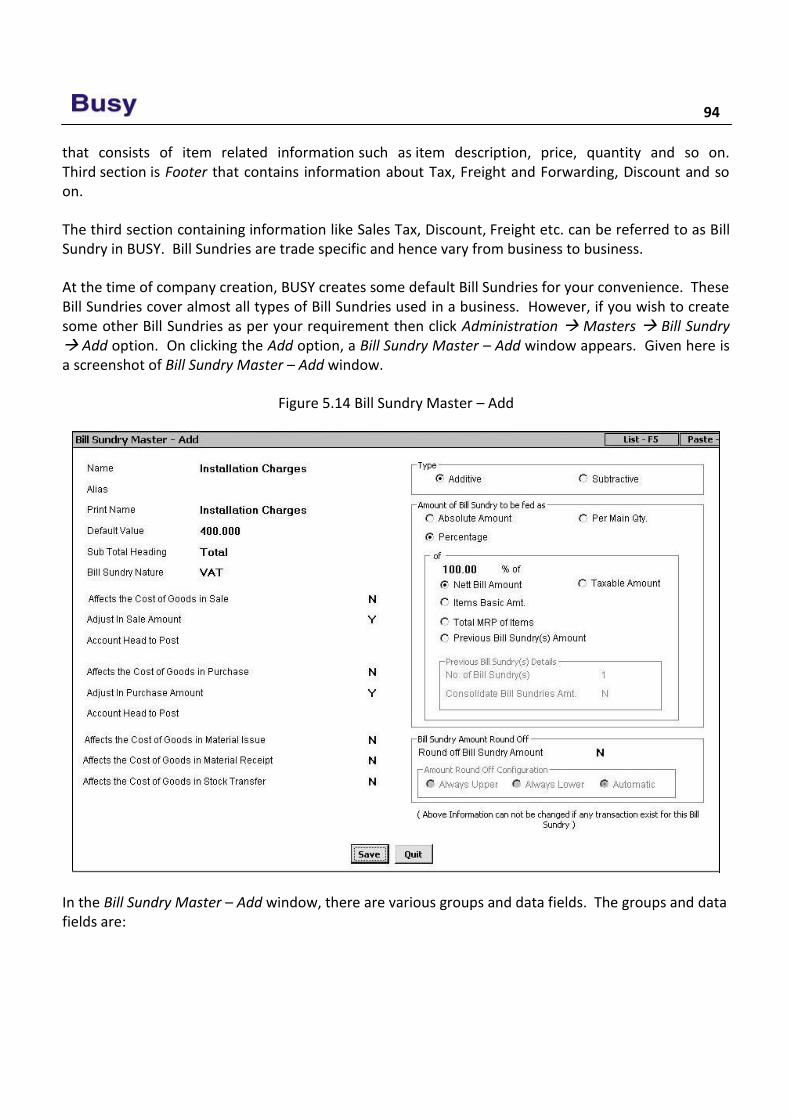
94
that consists of item related information such as item description, price, quantity and so on. Third section is Footer that contains information about Tax, Freight and Forwarding, Discount and so on.
The third section containing information like Sales Tax, Discount, Freight etc. can be referred to as Bill Sundry in BUSY. Bill Sundries are trade specific and hence vary from business to business.
At the time of company creation, BUSY creates some default Bill Sundries for your convenience. These Bill Sundries cover almost all types of Bill Sundries used in a business. However, if you wish to create some other Bill Sundries as per your requirement then click Administration Masters Bill Sundry Add option. On clicking the Add option, a Bill Sundry Master – Add window appears. Given here is a screenshot of Bill Sundry Master – Add window.
Figure 5.14 Bill Sundry Master – Add
In the Bill Sundry Master – Add window, there are various groups and data fields. The groups and data fields are:
Unit 5 - Masters 95
Name
Enter name of the Bill Sundry in this data field. In the screenshot given above, name is given as Installation Charges.
Alias
Enter Alias for the Bill Sundry in this data field.
Print Name
Enter Print Name of the Bill Sundry in this data field.
Default Value
Enter default value for the Bill Sundry you are creating. The value specified here is used as a default amount or percentage to be charged as Bill Sundry in voucher.
Sub Total Heading
The default value in this data field is Total. The value specified in this data field act as heading for the sub total to be printed on the invoice. Here sub total refers to the amount of bill before charging the Bill Sundry you are creating. For example, you are creating Bill Sundry for Installation Charges then sub total means amount of bill before charging Installation Charges Bill Sundry.
Bill Sundry Nature
Select nature or type of Bill Sundry you are creating. For example, if you are creating Bill Sundry for Surcharge then you can select the Add. Tax / Surcharge on VAT option or if you are creating a Bill Sundry for Installation Charges then you can select the Others option.
Affects the Cost of Goods in Sale
Specify ‘Y’ in this data field if you want to add or deduct amount of Bill Sundry you are creating in the cost of goods sold. This option only affects the inventory reports and has nothing to do with the accounting reports. For example, you have entered a Sales voucher for four pieces of item LG AC 1.5 Ton costing Rs 20,000 each on which Installation Charges Bill Sundry of Rs. 1600 is levied. Now if you specify ‘Y’ in this data field then the cost of item LG AC 1.5 Ton will be displayed inclusive of installation charges i.e. Rs. 81,600 otherwise it will be displayed exclusive of installation charges i.e. Rs. 80,000.
Adjust in Sale Amount
If you specify 'Y' in this data field then the amount corresponding to this Bill Sundry in invoice will be posted in Sales account. If you specify 'N' in this data field then Account Head to Post data field gets activated in which you can select some other ledger account to which the amount will be posted.
Account Head to Post
This data field gets activated only when you have specified 'N' in the Adjust in Sale Amount data field. Select the ledger account from the list in which the amount of Bill Sundry is to be posted. For example
96
if you want to post amount of Bill Sundry in Miscellaneous Income account then you can select the Miscellaneous Income account from the list.
Similar three data fields appear for Purchase vouchers. The data fields are, Affect the Cost of Goods in Purchase, Adjust in Purchase Amount and Account Head to Post. These data fields are similar to the before-mentioned three data fields with only difference is that the value you specify in these data fields will be applicable for Purchase vouchers.
Affects the Cost of Goods in Stock Transfer
Specify ‘Y’ in this data field if you want to add or deduct amount of Bill Sundry to the cost of goods transferred.
Type
Under this group, you have to specify the type of Bill Sundry i.e. whether Bill Sundry is to be added / subtracted in / from the bill. Under this group, following two options appear:
Additive – Select this option if value of Bill Sundry is to be added in bill value.
Subtractive – Select this option if value of Bill Sundry is to be subtracted from bill value.
Amount of Bill Sundry to be Fed As
Under this group, you have to select the option according to which Bill Sundry value will be entered in the voucher. There are five options provided under this group. The options are:
Absolute Amount
Select this option if you want to enter Bill Sundry as an absolute amount. It means that if you select this option then you can directly enter the Bill Sundry amount without any calculation. For example, Star Electronics Company takes fix delivery charges i.e. Rs. 200 to deliver goods to any part of Delhi. Hence, it can create a Bill Sundry named Goods Delivery Amount, specify its Default Value as 200 and select the Absolute Amount option. Now whenever the company will use Goods Delivery Amount Bill Sundry in the voucher then Rs. 200 will be displayed automatically as Bill Sundry amount.
Per Main Qty.
Select this option if you want to calculate Bill Sundry amount as per the number of item units sold / purchased. For example, Star Electronics Company charges Rs. 400 as installation charges on every unit of AC sold. In this case, company can create a Bill Sundry named Installation Charges, specify its Default Value as Rs. 400 and select the Per Main Qty. option. Now, whenever it will use this Bill Sundry in the voucher then installation charges of Rs. 400 per piece will appear as Bill Sundry value. For example, Star Electronics Company enter a Sales voucher for four pieces of AC and specify the Bill Sundry as Installation Charges then Bill Sundry amount would be Rs. 1600 (400*4).
Unit 5 - Masters 97
Percentage
Select this option if you want to calculate Bill Sundry amount as a certain percentage of items sold / purchased. For example, Star Electronics Company charges 5% as VAT on all the items it sells. It can then create a Bill Sundry named VAT 5%, specify its Default Value as ‘5’ and select the Percentage option. Now whenever the company will use this Bill Sundry, 5% of item’s amount will be taken as Bill Sundry amount.
On selecting the Percentage option, a sub group with the name ‘of’ gets activated. Under this group, you have to specify an amount on which Bill Sundry value is to be calculated. This amount can be net bill amount, Item MRP and so on. Various options under this group are:
Percentage of
Specify the percentage of item value on which Bill Sundry amount is to be calculated. For example, if you want to charge Bill Sundry on 80% value of item then you can specify 80 in this data field. Otherwise, if you want to calculate Bill Sundry amount on full item value then you can specify 100 in this data field.
Nett Bill Amount
Select this option if you want to calculate the amount of Bill Sundry on Nett bill amount. Nett bill amount implies the bill amount inclusive of Bill Sundries charged. For example, an item of Rs. 10,000 is taxable at the rate of 5 % then nett bill amount will be Rs. 10,500 (10,000 + 5% of 10,000).
Taxable Amount
Select this option if you want to calculate Bill Sundry on taxable amount. Taxable amount refers to the item amount on which tax is to be charged. Continuing with above example, taxable amount will be Rs. 10,000.
Item Basic Amount
Select this option if you want to calculate amount of Bill Sundry on the actual cost of goods excluding any Bill Sundry charged. For example, you are selling an item of Rs. 10,000 on which you have applied a Discount Bill Sundry @1% amounting to Rs. 100. In this case, item basic amount will be Rs. 10,000 only and not Rs. 9,900, as item basic amount does not include any Bill Sundry value.
Total MRP of Items
Select this option if you want to calculate Bill Sundry amount on MRP of item entered in the Item master.
Previous Bill Sundry Amount
Select this option if you want to calculate Bill Sundry amount according to a previous Bill Sundry in the voucher. If you select this option then a Previous Bill Sundry Detail group gets activated. In the group following two data fields appear:
98
No. of Bill Sundry(s) - Enter the number of previous Bill Sundries to be taken into account when the Bill Sundry amount is to be calculated. You can take into account maximum of nine Bill Sundries.
Consolidate Bill Sundries Amount - This data field gets active only if you have specified a number other than 1 and 0 in the above data field. If you specify 'Y' in this data field then consolidated amount of previous Bill Sundries will be taken into account. Number of previous Bill Sundries to be taken into account for calculation purpose will be equivalent to the number specified in the No. of Bill Sundry data field.
For example, you have entered a Sales voucher and charged three Bill Sundries amounting Rs. 10, Rs. 20 and Rs. 30 respectively. At the fourth position you charge a Bill Sundry in which you have specified 'Y' in the Consolidate Bill Sundry Amount data field and '2' in the No. of Bill Sundry(s) data field. In this case, value of the two Bill Sundries counting back from the current Bill Sundry (two Bill Sundry from the current Bill Sundry) will be consolidated i.e. 30+20 = 50. Value of Bill Sundry at the fourth position will be calculated on Rs. 50. Bill Sundries are picked by doing back counting from the current position. In other words, since the current Bill Sundry is at fourth position thus Bill Sundries lying at third and second position will be consolidated to calculate the amount of fourth Bill Sundry.
In the same scenario, if you have specified 'N' in the Consolidate Bill Sundry Amount data field then it will take into account the amount of Bill Sundry lying at the position mentioned in the No. of Bill Sundry(s) data field counting back from the current Bill Sundry. Bill Sundry lying at second position counting back from the current Bill Sundry is of Rs. 20. Hence, value of Bill Sundry lying at fourth position will be calculated on Rs. 20.
Round Off Bill Sundry Amount
Specify 'Y' in this data field if you want to round off the Bill Sundry amount in the voucher entry.
Bill Sundry Amount Round Off
In the Amount Round Off Configuration sub group, you can specify the method according to which Bill Sundry amount will be round off. In the sub group, there are three options. The options are:
Always Upper - Select this option if you want to round off the value in a voucher to the upper limit.
Always Lower - Select this option if you want to round off the value in a voucher to the lower limit.
Automatic - Select this option if you want to round off the value to upper / lower limit in a voucher automatically.
Values in Amount to be Fed As group cannot be changed if the Bill Sundry is used in any voucher.
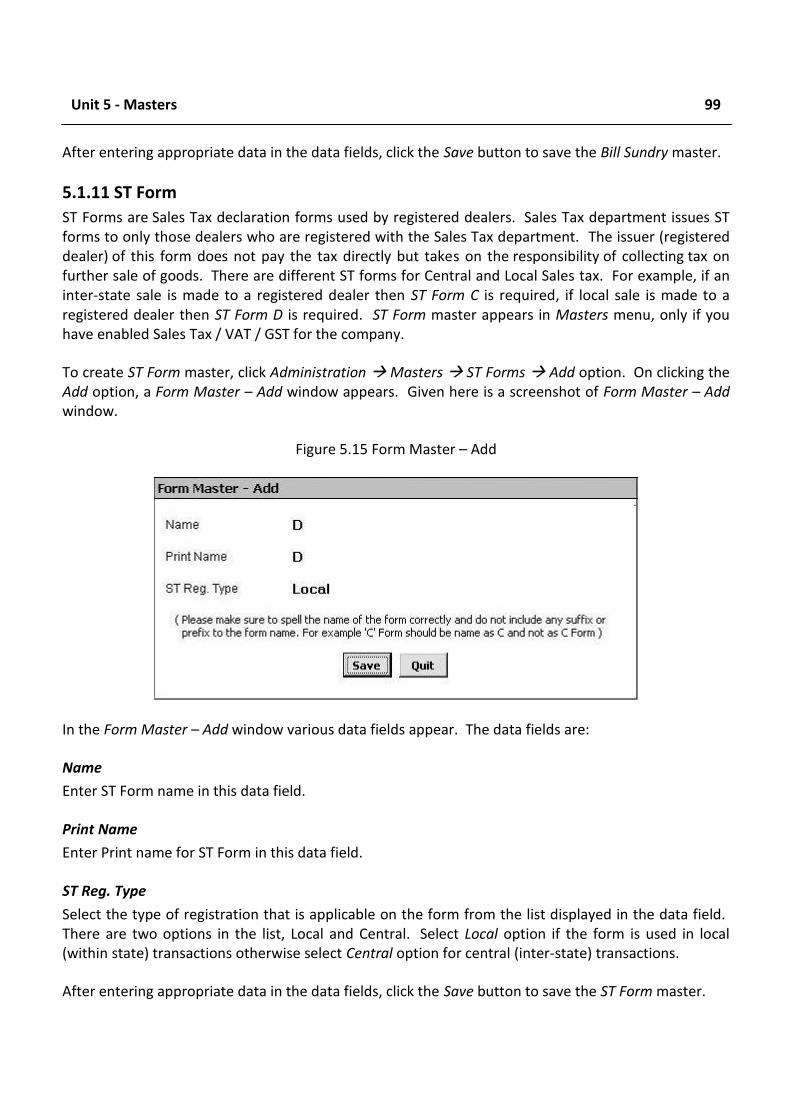
Unit 5 - Masters 99
After entering appropriate data in the data fields, click the Save button to save the Bill Sundry master.
5.1.11 ST Form
ST Forms are Sales Tax declaration forms used by registered dealers. Sales Tax department issues ST forms to only those dealers who are registered with the Sales Tax department. The issuer (registered dealer) of this form does not pay the tax directly but takes on the responsibility of collecting tax on further sale of goods. There are different ST forms for Central and Local Sales tax. For example, if an inter-state sale is made to a registered dealer then ST Form C is required, if local sale is made to a registered dealer then ST Form D is required. ST Form master appears in Masters menu, only if you have enabled Sales Tax / VAT / GST for the company.
To create ST Form master, click Administration Masters ST Forms Add option. On clicking the Add option, a Form Master – Add window appears. Given here is a screenshot of Form Master – Add window.
Figure 5.15 Form Master – Add
In the Form Master – Add window various data fields appear. The data fields are:
Name
Enter ST Form name in this data field.
Print Name
Enter Print name for ST Form in this data field.
ST Reg. Type
Select the type of registration that is applicable on the form from the list displayed in the data field. There are two options in the list, Local and Central. Select Local option if the form is used in local (within state) transactions otherwise select Central option for central (inter-state) transactions.
After entering appropriate data in the data fields, click the Save button to save the ST Form master.
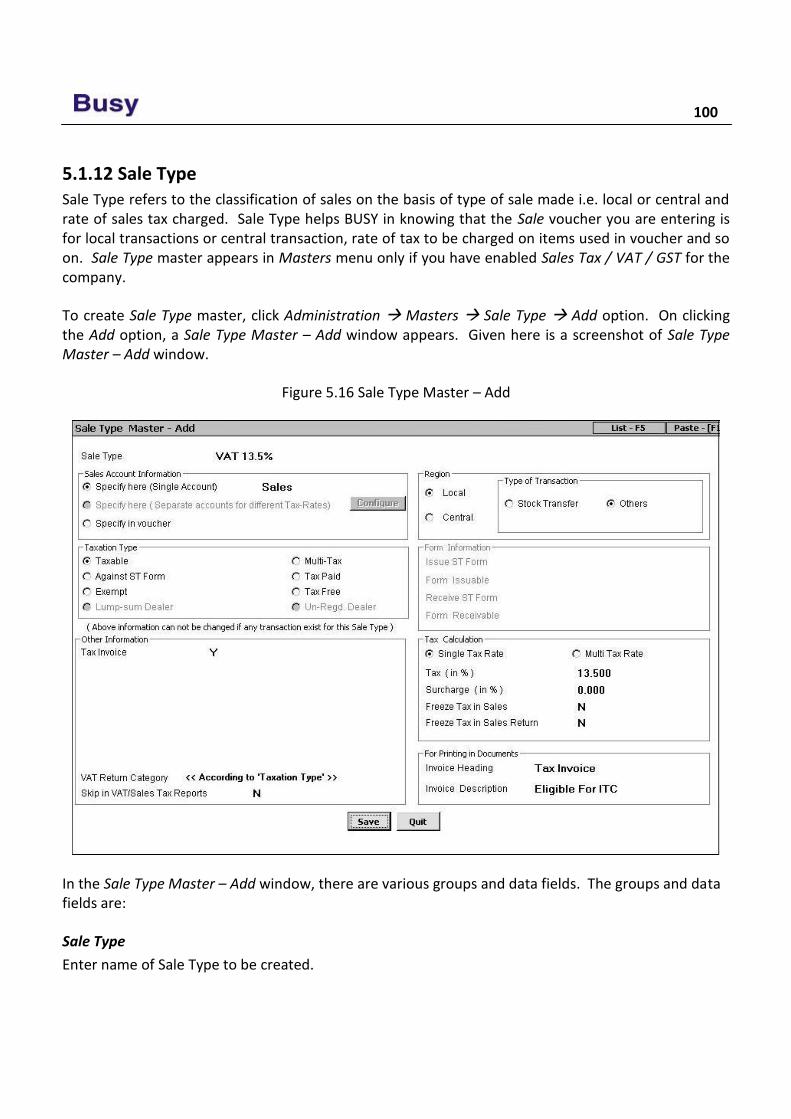
100
5.1.12 Sale Type Sale Type refers to the classification of sales on the basis of type of sale made i.e. local or central and rate of sales tax charged. Sale Type helps BUSY in knowing that the Sale voucher you are entering is for local transactions or central transaction, rate of tax to be charged on items used in voucher and so on. Sale Type master appears in Masters menu only if you have enabled Sales Tax / VAT / GST for the company.
To create Sale Type master, click Administration Masters Sale Type Add option. On clicking the Add option, a Sale Type Master – Add window appears. Given here is a screenshot of Sale Type Master – Add window.
Figure 5.16 Sale Type Master – Add
In the Sale Type Master – Add window, there are various groups and data fields. The groups and data fields are:
Sale Type
Enter name of Sale Type to be created.
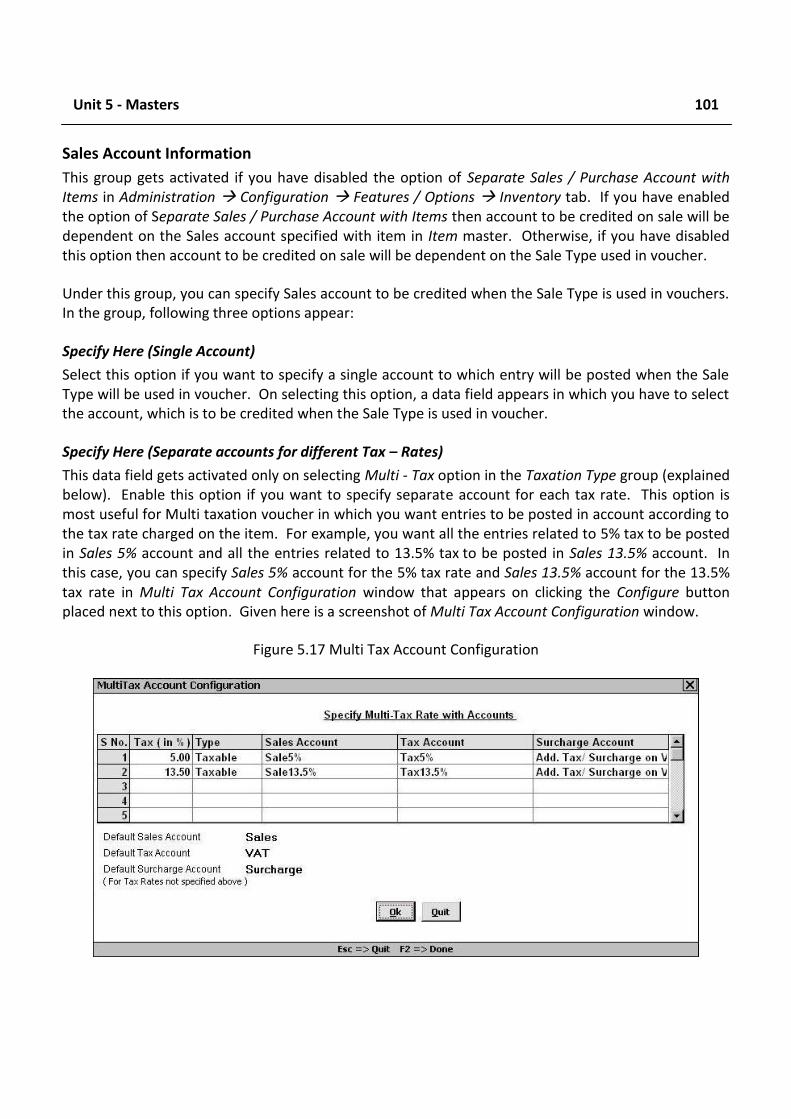
Unit 5 - Masters 101
Sales Account Information
This group gets activated if you have disabled the option of Separate Sales / Purchase Account with Items in Administration Configuration Features / Options Inventory tab. If you have enabled the option of Separate Sales / Purchase Account with Items then account to be credited on sale will be dependent on the Sales account specified with item in Item master. Otherwise, if you have disabled this option then account to be credited on sale will be dependent on the Sale Type used in voucher.
Under this group, you can specify Sales account to be credited when the Sale Type is used in vouchers. In the group, following three options appear:
Specify Here (Single Account)
Select this option if you want to specify a single account to which entry will be posted when the Sale Type will be used in voucher. On selecting this option, a data field appears in which you have to select the account, which is to be credited when the Sale Type is used in voucher.
Specify Here (Separate accounts for different Tax – Rates)
This data field gets activated only on selecting Multi - Tax option in the Taxation Type group (explained below). Enable this option if you want to specify separate account for each tax rate. This option is most useful for Multi taxation voucher in which you want entries to be posted in account according to the tax rate charged on the item. For example, you want all the entries related to 5% tax to be posted in Sales 5% account and all the entries related to 13.5% tax to be posted in Sales 13.5% account. In this case, you can specify Sales 5% account for the 5% tax rate and Sales 13.5% account for the 13.5% tax rate in Multi Tax Account Configuration window that appears on clicking the Configure button placed next to this option. Given here is a screenshot of Multi Tax Account Configuration window.
Figure 5.17 Multi Tax Account Configuration

102
In the Multi Tax Account Configuration window, a grid and various data fields appear. The grid and data fields are:
Tax Details grid - Various fields in the grid are:
o Tax (in %) - Specify the rate of tax in this field.
o Type - Focus comes to this field only if you specify ‘0’ in the Tax (in %) field. Select from the list the type of taxation.
o Sales Accounts - Select the sale account to which entry will be posted when the specified tax rate will be charged.
o Tax Account - Select the tax account to which entry will be posted when the specified tax rate will be charged.
o Surcharge Account - This field appears if you have enabled surcharge for the company. Select the surcharge account to which entry will be posted when the specified tax rate will be charged.
Default Sales Account - Select the default sale account to which entry will be posted for tax rate not specified in the Tax Details grid.
Default Tax Account - Select the default tax account to which entry will be posted for tax rate not specified in the Tax Details grid.
Default Surcharge Account - Select the default surcharge account to which the entry will be posted for tax rate not specified in the Tax Details grid.
Specify in Voucher
Select this option if you want to specify Sale account to which entry will be posted in the voucher itself. In Sales voucher, a Sales Account data field appears in which you can select the account to be credited on selecting a Sales Type in which this option is enabled.
Taxation Type
Under this group, you can specify the type of tax to be used with the items of voucher in which the Sale Type you are creating will be used. Various options under this group are:
Taxable
Select this option if the item is taxable i.e. tax is to be paid on sale of the item.
Multi Tax
Select this option if different tax rates are to be levied on different items in a single Sales Invoice. If there are different items of different tax rates in a Sale invoice then this option provides the facility of charging different tax rates to individual items. In a Sales voucher with Sale Type having this option enabled, an Item wise VAT window appears with each item in which you can specify the tax rate applicable for the item.
Unit 5 - Masters 103
Against ST Form
Select this option if you make sales against ST Form. In Sales voucher in which you select a Sale Type with this option enabled, a Form Issuable / Receivable window appears in which you can specify the amount issued / received against ST Form.
Tax Paid
Select this option if you deal in items for which tax is already paid and you issue tax paid bills to your customers.
Exempt
Select this option if the Sale Type is to be used for exempted items. Exempted items are those items that are exempted from tax under certain conditions. For example, glass industry is exempted from tax in Himachal Pradesh while it may not be exempted from tax in other states.
Tax Free
Select this option if Sale Type is to be used for tax free items. For example, salt is a tax free item all over India irrespective of any state in which your company exists.
Lump-sum Dealer
This option does not get activated in the Sale Type because you do not need to create a separate Sale Type for lump-sum dealers since sale to lump-sum dealers is treated as sale to a customer. Thus, for such sales you will use the Sale Type as defined for sale to a customer.
Un-registered Dealer
This option is not active for Sale Type because you do not need to create a separate Sale Type for un-registered dealers since sale to un-registered dealers is treated as sale to a customer. Thus, for such sales you will use the Sale Type as defined for sale to a customer.
Other Information
Under this group, various data fields appear. Many of the data fields in the group are dependent on the option selected in the Taxation Type group. Let us discuss the data fields that appear under this group.
Tax Invoice
This data field appears if you have selected Taxable or Multi-Tax option in the Taxation Type group. Specify ‘Y’ in this data field if you want to make an invoice as Tax Invoice in which the Sale Type you are creating will be used. Benefit of making an invoice, as Tax invoice is that Tax Invoice will be printed on the invoice, which in turn will allow the buyer to claim Input Tax Credit on it.
Calculate Tax on Item MRP
This data field appears if you have selected Multi-Tax option in the Taxation Type group. Specify ‘Y’ in this data field if you want to calculate tax on item MRP.
104
Tax Inclusive Item Price
This data field appears if you have selected Multi-Tax option in the Taxation Type group. Specify ‘Y’ in this data field if you want to enter item price inclusive of tax. BUSY will perform a reverse calculation for calculating the amount of tax levied and the actual price of item without tax. This option is useful when the User is making a sale to a person who is not concerned about the tax rate applied or price of item without tax and simply wants to know the final price of the item. In addition, some items are sold with tax included in their price but the shopkeeper needs to maintain the tax amount separately as he has to deposit the tax to the government. Hence, for this purpose, one can specify ‘Y’ in this option.
Hide Item Tax Rate window
This option appears if you have specified ‘Y’ in the Tax Inclusive Item Price data field. This data field is useful at the time of voucher entry. With this data field set to 'N' an Item Tax Rate window appears at the time of voucher entry in which you can enter the tax rates for individual items. However, if you have specified tax rates with each item separately in the Item master then you can set this data field to 'Y'. By setting, this data field to 'Y', Item Tax Rate window will not appear at the time of voucher entry and the tax rate specified with the item in Item master will be considered for calculating the tax in item amount.
Calculated Tax on 100% of Amount
This data field appears on specifying 'N' in the Tax Inclusive Item Price data field. You can specify the percentage of item amount on which tax is to be calculated. This option is useful if the tax rate is fixed at a certain percentage of the item amount. For example, if you specify 80 in this data field then tax will be calculated on 80% of item value.
Adjust Tax / Schg. in Sales Account
This data field appears if you have selected Multi-Tax option in the Taxation Type sub-group. Specify 'Y' in this data field if you want to adjust tax / surcharge amount in the Sales account itself.
Tax Account
This data field appears if you have specified ‘N’ in the Adjust Tax / Schg. in Sales Account data field. Select the account in which tax amount is to be adjusted.
Surcharge Account
This data field appears if you have specified ‘N’ in the Adjust Tax / Schg. in Sales Account data field. Select the account in which surcharge amount is to be adjusted.
VAT Return Category
Select the type of VAT Return Category from the list. Values in the list are state specific. For example, if you have selected the state as Delhi then Work Contract Act option appears in the list.
Unit 5 - Masters 105
Skip in VAT / Sales Tax Reports
Specify 'Y' in this data field if you want that transactions in which this Sale Type will be used should not be considered for generating VAT / Sales Tax reports. In other words, if you specify 'Y' in this data field then Sales vouchers having Sale Type with this option enabled will not be reflected in tax reports.
Region
Under this group, you can select whether the Sale type you are making, is for central transactions or for local transaction. Various options under this group are:
o Local - Select this option if the Sale Type is used for local transactions.
o Central - Select this option if the Sale Type is used for central transactions.
On selecting any of the above option, a Type of Transaction sub-window appears. Various data fields that appear in this sub-window are:
o Stock Transfer - Select this option if the Sale Type is meant for transfer of stock.
o Others - Select this option if the Sale Type is meant for inter-state or intra-state sale of goods.
o Export (Normal) - This option appears if you have selected the Central option. Select this option if the Sale Type is meant for normal export of goods.
o Export (High Sea) - This option appears if you have selected the Central option. Select this option if the Sale Type is meant for High Sea export of goods.
o Sale in Transit - This option appears if you have selected the Central option. Select this option if you make purchase from one party and sell it to another party without goods being delivered at your Material Centre. In other words, stock will be directly sent to the party to whom the sale has been made; from the party from whom the goods have been purchased.
Form Information
This group gets activated on selecting the Against ST Form option under Taxation Type group. Under this group, you can specify details about the form to be issued / received when the Sale Type will be used in voucher. Various options under this group are:
Issue ST Form
Specify ‘Y’ in this data field if ST form is issuable against the sale in the Sale Type being created.
Form Issuable
This data field gets active on specifying ‘Y’ in the Issue ST Form data field. Select from the list, the type of form to be issued under the Sale Type being created.
Tax Invoice data field that appears under Other Information group gets deactivated on selecting the Central option in the Region group. This is because you cannot issue a Tax Invoice for Central transactions.
106
Receive ST Form
Specify ‘Y’ in this data field if ST Form is receivable against the sale in the Sale Type being created.
Form Receivable
This data field gets active on specifying ‘Y’ in the Receive ST Form data field. Select from the list, the type of form to be received under the Sale Type.
Tax Calculation
This group gets active on selecting the Taxable or Against ST Form option under Taxation Type group. Under this group, you can specify the tax rates to be charged on items, whether tax rates are to be freeze and so on. Various options under this group are:
Single Tax Rate
Select this option if single tax rate is to be charged on all the items of voucher in which the Sale Type will be used.
Multi Tax Rate
Select this option if different tax rates are to be charged on different items in a Sales voucher in which the Sale Type will be used. Difference between Multi Tax Rate option and Multi-Tax option that appears in Taxation Type group is that with Multi-Tax option, an Item wise VAT window appears in voucher with each item in which you can specify tax rate for individual item and there is no need to charge a Tax Bill Sundry in the voucher. However, with Multi Tax Rate option, no such window appears with an item in the voucher. Instead, you have to specify various Tax Bill Sundries and BUSY will automatically apply the tax rate on the item as per the tax rate specified in the Item master. For example, in a Sales voucher there are ten items with certain items having 5% tax rate and certain items with 13.5% VAT rate. Now you have to specify the VAT 5% and VAT 13.5% Bill Sundry in the voucher. BUSY will then charge 5% tax on the items in which tax rate is specified as 5% in Item master and will charge 13.5% tax on the items in which 13.5% tax rate is specified in Item master.
Tax (in %)
This option gets active only if you have selected the Single Tax Rate option. Enter the percentage to be charged as tax under the Sale Type.
Surcharge (in %)
This data field is active only if you have specified, 'Y', in the Enable Add. Tax / Schg. option in Administration Configuration Features / Options Sales Tax / VAT / GST tab. Enter rate of surcharge to be charged under the Sale Type.
Freeze Tax in Sales
Specify ‘Y’ in this data field if you want to freeze tax rate for the Sales voucher in which the Sale Type you are creating will be used. In other words, in Sales voucher when you use a Sale Type in which this option is enabled, you necessarily have to apply tax rate as specified in the Tax (in %) data field of the
Unit 5 - Masters 107
Sale Type. For example, you have created a Sale Type in which this option is enabled and have specified ‘5’ in the Tax (in %) data field. Now whenever you use this Sale Type in voucher then it is necessary to specify a Bill Sundry of 5% tax in the voucher.
Freeze Tax in Sales Return
Specify ‘Y’ in this data field if you want to freeze tax rate for the Sales Return voucher in which the Sale Type you are creating will be used. In other words, if you have specified ‘Y’ in this data field then in the Sales Return voucher with this Sale Type, you cannot select a tax rate, other than the one specified in Tax (in %) data field.
For Printing in Documents
Under this group, you can specify the heading and description to be printed on the bill in which the Sale Type you are creating will be used. Under this group, following two data fields appear:
Invoice Heading
Enter text to be displayed as heading of the bill.
Invoice Description
Enter description to be printed in the bill. For example, if you are making a Sale Type as Retail Invoice then you can enter invoice description as No Input Tax Credit.
After entering appropriate data in the data fields, click the Save button to save the Sale Type master.
5.1.13 Purchase Type Purchase Type refers to the classification of purchase on the basis of type of purchase made i.e. local, central and rate of sales tax paid. Purchase Type helps BUSY in knowing that the Purchase voucher you are entering is for local transactions or central transactions, rate of tax to be paid on items used in voucher and so on. Purchase Type master appears in Masters menu only if you have enabled Sales Tax / VAT / GST for the company. To create Purchase Type master, click Administration Masters Purchase Type Add option. On clicking the Add option, a Purchase Type Master – Add window appears. This window is totally similar to Sale Type Master – Add window.
For detailed help on Purchase Type Master – Add window, please refer to Sale Type Master – Add window (sub topic 5.1.12) as both the windows are totally similar.
5.2 Configuring Masters Masters can be configured with respect to Optional Fields, Print Name and the components to be displayed with them while showing Masters in a dropdown list. Let us first discuss the concept of Optional Fields, Print Name and Additional components in Dropdown list.

108
Optional Fields
Optional Fields are User-Defined fields that vary from User to User. Each User can create customized Optional Fields as per his requirement. Every company has its own set of requirement and it is very difficult to cater to the needs of each & every company. For example, an electronic goods company may need to specify the warranty, installation charges, security measure and other such features with item whereas a garment manufacturing company may need to specify the designer name, fabric, washing & ironing details with the item. Therefore BUSY introduced the concept of Optional Fields in its software. Data fields that are generic and are relevant for all types of business are given in Masters itself whereas data fields that are company or business specific are left with the User. User can create ten Optional Fields of his choice for a Master type.
Print Name
Print Name refers to the name that will be printed in the reports. BUSY provides the facility to generate Print Name automatically for the Masters. For example, a company follows a particular method for entering Print Name. According to the method, in an Item Print Name, first three characters are for Item name and next three characters are for Item Group. Hence, User can specify this configuration in advance and then generate Print Name automatically at the time of creating masters.
Additional Components in Dropdown List
Additional components in dropdown list refer to the components to be shown in the list displaying Master Name / Alias. For example, while entering a Sales voucher, a list of items appears wherein you can select the required item. You want that along with item name, its MRP and current stock should also appear in the list. Thus with Master Configuration, you can specify the components to be displayed in the dropdown list.
After discussing these concepts, let us move on to configure Masters. To configure Masters, click Administration Configuration Masters Configuration option. On clicking the Masters Configuration option, a Masters Configuration window appears. Given here is a screenshot of Masters Configuration window.
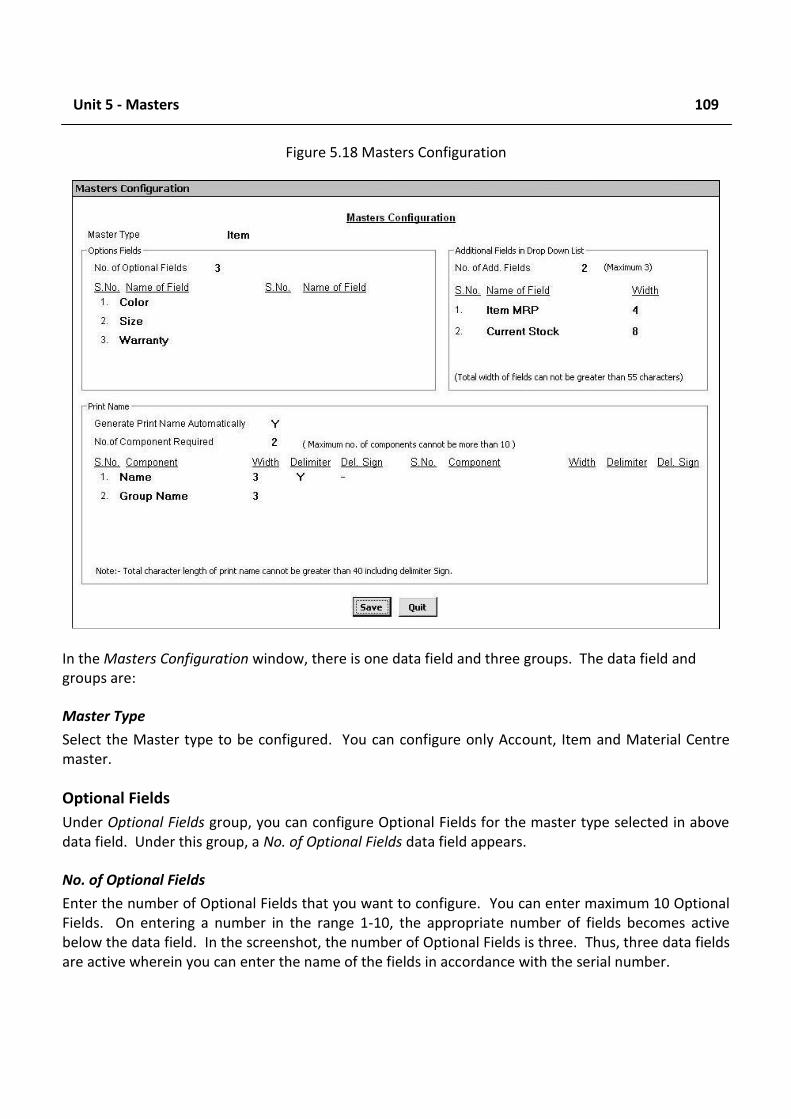
Unit 5 - Masters 109
Figure 5.18 Masters Configuration
In the Masters Configuration window, there is one data field and three groups. The data field and groups are:
Master Type
Select the Master type to be configured. You can configure only Account, Item and Material Centre master.
Optional Fields
Under Optional Fields group, you can configure Optional Fields for the master type selected in above data field. Under this group, a No. of Optional Fields data field appears.
No. of Optional Fields
Enter the number of Optional Fields that you want to configure. You can enter maximum 10 Optional Fields. On entering a number in the range 1-10, the appropriate number of fields becomes active below the data field. In the screenshot, the number of Optional Fields is three. Thus, three data fields are active wherein you can enter the name of the fields in accordance with the serial number.

110
You can enter additional information for specific master in the Optional Fields that appear at the time of creating / modifying the respective master. For example, if you have configured Optional Fields for Item master then while creating / modifying Item master an Optional Fields window will appear in which you can enter the value for Optional Field. Further elaborating the example, you have created three Optional Fields with name Color, Size and Warranty. Now when you create an Item master and press Enter key in the Group data field then an Optional Fields window will appear with these three data fields. You can then enter the relevant information in these data fields about the item you are creating.
Additional Fields in Dropdown List
Under this group, you can select additional fields or components to be displayed in the dropdown list of Masters. You can specify additional fields only for Account and Item master. Under this group a No. of Additional Fields data fields appear. Specify the number of additional fields to be displayed in the list. You can specify maximum three additional fields for the list. On specifying a number from 1 to 3 in this data field, equivalent number of following data fields get activated in the group:
Name of Field - Select name of the field to be displayed in the Item / Account list.
Width - Specify the number of characters to be used for the selected field.
After selecting the fields and specifying width for them, these fields will start appearing in the Masters list.
Print Name
Under Print Name group, you can specify that whether you want to generate Print Name automatically for the selected Master. In addition, you can specify the configuration for generating Print Name automatically. Under this group, various data fields appear. The data fields are:
Generate Print Name Automatically
Specify 'Y' in this data field if you want to generate Print Name automatically for the selected Master.
No. of Components Required
Specify the number of components required for generating the Print Name. You can specify a number between 1 and 10.
On specifying a value in the No. of Components Required data field, equivalent number of following data fields get activated in the group:
Component - Select the required component, which is to be used while generating the Print Name.
It is necessary to run Regenerate Help File command provided in Housekeeping menu of BUSY after making any changes in configuration of Dropdown list.
Unit 5 - Masters 111
Width - Specify the number of characters to be used for the selected component.
Delimiter - Specify 'Y' in this data field if you want a delimiter sign after the component. Delimiter sign refers to a symbol to be used as a separator between two components. For example, while generating Print Name, you want that first three characters should be for Item Name and next three characters for Item Group. However, at the same time you want that after first three characters a hyphen (-) sign should be placed to differentiate between Item Name and Item Group. Hence, for this purpose, you can specify ‘Y’ in this data field. This data field does not appear for the last component, as there is no need to give a delimiter sign at the end of the Print Name.
Del Sign - This data field gets activated if you have if you have specified 'Y' in the Delimiter data field. Specify the delimiter sign to be used after the component.
After entering appropriate data in the data fields, click the Save button to save the Masters Configuration.
Review You cannot create two Master with same Name but can create two Masters with same Print
Name.
On creating a company, by default BUSY creates 56 Account masters and 29 Account Group masters for your convenience.
All the 29 Account Group masters and five Account masters created at the time of company creation are Predefined Masters.
Current year opening balance and previous year closing balance can be different only in case of Revenue Account Groups.
Primary Groups are at the top most level of hierarchy and does not fall under any other Group.
You can create infinite number of Standard Narrations for a voucher type. In the voucher, Standard Narrations can be picked by pressing <F4> key.
Unit Conversion refers to number of Sub units per Main unit.
Bill Sundry is an entity used to record extra income / expense over and above the items sale / purchase price.
It is up to you to include the Bill Sundry amount in the cost of goods. You can also specify the account in which the amount of Bill Sundry is to be posted.
Bill Sundries can be additive or subtractive in nature.
In a voucher, Taxable amount refers to the amount on which tax is to be charged, Items Basic amount refers to the value of item excluding any Bill Sundry charged and Nett Bill Amount refers to the value of item including the amount of Bill Sundry charged.
A Material Centre is a place where stock of item is kept.
112
ST Forms are sales tax declaration forms used by registered dealer. The issuer (registered dealer) of this form does not pay tax directly but takes on the responsibility of collecting tax on further sale of goods.
Sale Type refers to the classification of sales on the basis of type of sale made.
You can specify different sales account to be credited for different tax rates.
With Multi-Tax option in Sale Type master, you can specify tax rate with each item of voucher.
With Tax Inclusive Item Price option, BUSY does a reverse calculation to separate the item amount and tax amount.
On selecting Tax Invoice option in Sale Type master, Tax invoice will be printed on the bill and the buyer will be entitled for Input Tax Credit.
You can freeze the tax rates to be used in voucher for different Sale Types.
Optional Fields are User-Defined fields. You can create ten Optional Fields for a master type.
You can generate Print Name of Account and Item master automatically by specifying the components to be used for generating Print name.
Exercise 1 . Two masters can have:
a) Same Alias c) Same Name b) Same Print Name d) None of the above
2 . New Account Master cannot be created under Group:
a) Sundry Debtors c) Duties and Taxes b) Sundry Creditors d) Revenue Account
3 . Balance of Account Master can be entered in:
a) Debit c) Either Debit or Credit b) Credit d) By & To
4 . Different Current Year Opening balance and Previous Year Closing balance in Account Master
can be entered for: a) Current Assets Group c) Fixed Assets Group b) Revenue Account Group d) Current Liabilities
5 . List of masters cannot be exported to:
a) MS-Excel c) MS-Word b) Text File d) PDF file
6 . Standard Narration master can be created for:
a) Sale Voucher c) Journal Voucher b) Purchase Voucher d) All of the above
Unit 5 - Masters 113
7 . Maximum character length for Master Name is:
a) 40 Characters c) 50 Characters b) 25 Characters d) 35 Characters
8 . Which of these taxes can be defined in Item Master:
a) Local Sales Tax c) Surcharge b) Central Sales Tax d) All of the above
9 . While creating Item Master, mandatory fields are:
a) Name c) Unit b) Group d) All of the above
1 0 . Critical levels can be defined for:
a) Minimum Level c) Reorder Level b) Maximum Level d) All of the above
1 1 . Conversion Factor cannot be:
a) Zero c) In Decimals b) Negative d) Both a & b
1 2 . Bill Sundry can be:
a) Only Additive in nature c) Either Additive or Subtractive b) Only Subtractive in Nature d) None of the Above
1 3 . Bill Sundry cannot be configured on:
a) Item Basic Amount c) Previous Item Basic Amount b) Item MRP d) Previous Bill Sundry Amount
1 4 . A Bill Sundry cannot be deleted if it is :
a) Used in a Voucher c) Subtractive in Nature b) Created for Taxation purpose d) None of the above
1 5 . Material Centre and Material Centre Group Master can be created with:
a) Same Name c) Same Parent Group b) Same Alias d) All of the Above
1 6 . ST Form can be created for:
a) Local Sale / Purchase c) Either Local or Central Sale / Purchase b) Central Sale / Purchase d) Neither Local nor Central Sale / Purchase
1 7 . Purchase Type master cannot be created for Taxation Type:
a) Taxable c) Export b) Lump-Sum Dealer d) Tax Free
114
1 8 . We can freeze tax in Sale Type for:
a) Sales Voucher c) Journal Voucher b) Sales Return Voucher d) Both a & b
1 9 . Optional Fields can be defined for:
a) Account master c) Material Centre master b) Item master d) All of the above
2 0 . Maximum Optional Fields defined with a Master are:
a) Ten c) Hundred b) One d) Three
2 1 . What are Predefined Accounts?
2 2 . What are Bill Sundries?
2 3 . What is the difference between Multi - Tax and Tax Inclusive Item Price option provided in Sale
/ Purchase Type master?
2 4 . What is the difference between Multi – Tax and Multi Tax Rate option under Sale / Purchase Type master?
2 5 . Open Company Star Electronics (created in Unit 3) and create following masters:
Account masters
Account Name Parent Group Debit Bal. Credit Bal.
Amit Capital Account 5,00,000.00
Ankit Capital Account 5,00,000.00
Car-DL4C AA 1308 Fixed Assets 1,66,000.00
Cash Cash-in-hand 2,72,000.00
Galaxy International Sundry Debtors 2,35,000.00
HDFC-015401507152 Bank Accounts 3,12,000.00
Jindal Appliances Sundry Debtors 1,37,000.00
LG Electronics Sundry Creditors 1,00,000.00
Lotus Industries Sundry Debtors 2,60,000.00
Nokia Sundry Creditors 1,20,000.00
Philips India Sundry Creditors 75,000.00
Rajesh Capital Account 10,00,000.00
Sony India Pvt. Ltd Sundry Creditors 80,000.00
State Bank Of India Bank Accounts 2,85,000.00
Stock Stock-in-hand 5,63,000.00
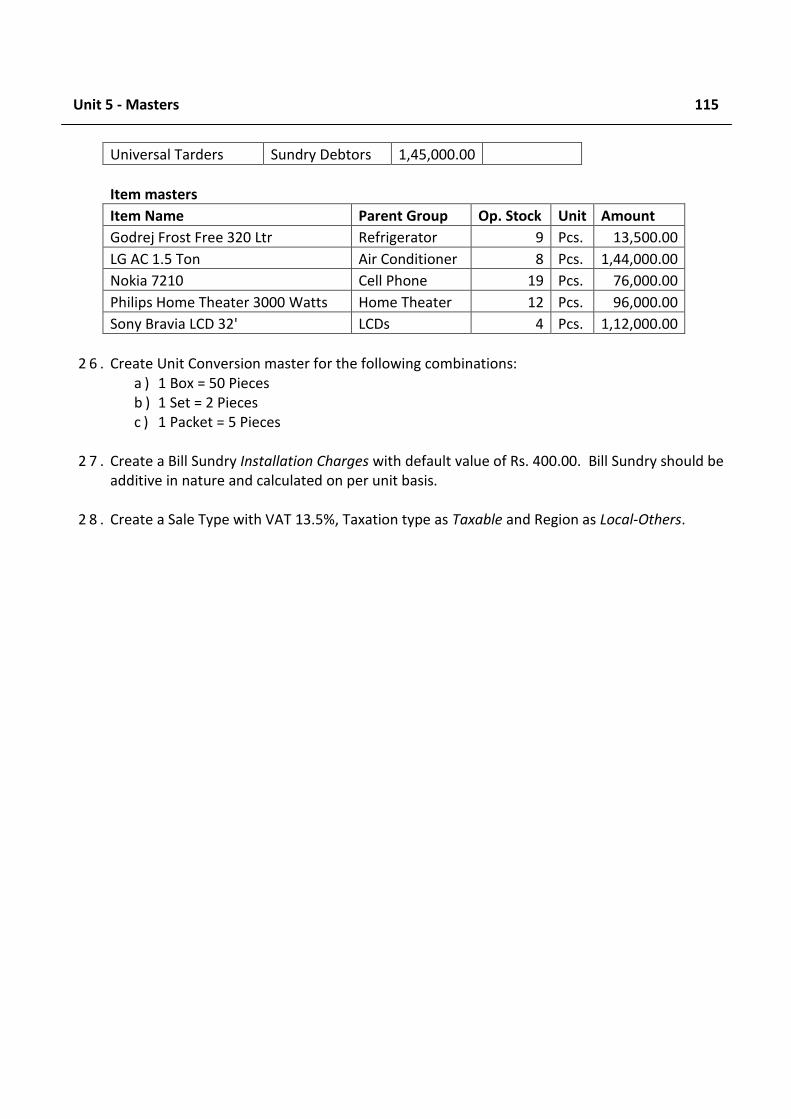
Unit 5 - Masters 115
Universal Tarders Sundry Debtors 1,45,000.00
Item masters
Item Name Parent Group Op. Stock Unit Amount
Godrej Frost Free 320 Ltr Refrigerator 9 Pcs. 13,500.00
LG AC 1.5 Ton Air Conditioner 8 Pcs. 1,44,000.00
Nokia 7210 Cell Phone 19 Pcs. 76,000.00
Philips Home Theater 3000 Watts Home Theater 12 Pcs. 96,000.00
Sony Bravia LCD 32' LCDs 4 Pcs. 1,12,000.00
2 6 . Create Unit Conversion master for the following combinations:
a ) 1 Box = 50 Pieces b ) 1 Set = 2 Pieces c ) 1 Packet = 5 Pieces
2 7 . Create a Bill Sundry Installation Charges with default value of Rs. 400.00. Bill Sundry should be
additive in nature and calculated on per unit basis.
2 8 . Create a Sale Type with VAT 13.5%, Taxation type as Taxable and Region as Local-Others.

The Beautiful thing about
Learning is that no one can
take it away from You.
B.B. King

Unit 6 Transactions
The main objective of this unit is to help User in entering day-to-day entries of his business in BUSY. Once the Masters have been created and configured the next step in an accounting software is to record the transactions. Transactions are day-to-day entries and have a great deal of activity in them. Transaction entries require frequent posting of records and need regular insertion and updation. Entering transactions means recording of transactions in vouchers such as Sales / Purchase, Payment / Receipt and so on. BUSY classifies various transactions according to their type and provides various vouchers to make your work easier. For example, if you have made a sale of goods then you can record this transaction in Sales voucher, similarly if you have received a payment from the party then you can record this transaction in a Receipt voucher and so on.
Topics covered under this unit:
Voucher Numbering
Entering Vouchers
Configuring Vouchers
6.1 Voucher Numbering Voucher numbering is one of the essential components of voucher entry. Voucher numbering provides a unique way of differentiating various vouchers and helps in knowing the sequence in which they were entered. Each company follows a different pattern for entering voucher numbers. For example, some companies append date with voucher numbers while some companies append register or page number with voucher numbers and so on. To cater to the needs of all the companies, BUSY provides configurable voucher numbering. With configurable voucher numbering, different voucher numbering pattern can be set for different voucher types and even for a single voucher type.
To configure voucher numbering for various voucher types, click Administration Configuration Vouchers Configuration option. On clicking the Voucher Configuration option, a Voucher Configuration window appears. On the left hand side of the Voucher Configuration window, a list of voucher types is provided. You can select the voucher type for which you want to configure the voucher numbering. On clicking the plus (+) sign next to a voucher type, a Main option appears. This is actually a default voucher series created by BUSY. You can create different voucher series for a voucher type (see topic 6.3) and can set different voucher numberings for various series created by you.
On selecting a series, various buttons get activated on the right hand side. Click Voucher Numbering button to set voucher numbering for a voucher type. On clicking the Voucher Numbering button, a

118
Voucher Numbering window appears in which you can configure voucher numbering. Given here is a screenshot of Voucher Numbering window.
Figure 6.1 Voucher Numbering
In the Voucher Numbering window, there are various data fields and groups. The data fields and groups are:
Numbering Type
Select the type of numbering required for the selected series of voucher type. Under this data field, three options are provided. The options are:
Automatic – Select this option if you want to generate voucher numbers automatically. On selecting this option, you have to specify in advance the pattern according to which voucher numbers will be generated. The pattern for automatic voucher numbers can be defined in Voucher Numbering window itself (described later in this topic).
Unit 6 - Transactions 119
Manual – Select this option if you want to enter voucher number manually at the time of voucher entry.
Not Required – Select this option if you do not want to maintain voucher numbering for the selected series of voucher type. If you select this option then no data field for entering voucher number will appear in the voucher. For example, if you select this option for Main series of Sales voucher then while entering Sales voucher for Main series, you will not be able to enter the voucher date.
Manual Numbering Validation
This group gets activated only if you have selected Manual option in the Numbering Type data field. In this group, you can set validations for entering voucher numbers, since you are entering voucher numbers manually there is more scope of entering wrong voucher number or duplicate voucher number. Under this group, two data fields appear. The data fields are:
Duplicate Voucher Number
Select the action to be taken on entering a duplicate voucher number. You can choose to display a warning message only or can totally disallow entering of duplicate voucher number. You can also choose to not to take an action on entering a duplicate voucher number.
Blank Voucher Number
Select the action to be taken on entering a blank voucher number i.e. not entering a voucher number at all. You can choose to display a warning message only or can totally disallow blank voucher number. You can also choose to not to take an action on leaving voucher number blank.
Auto Numbering Info
Under this group, you can specify the configuration for generating automatic voucher numbers. This group gets active only if you have selected Automatic option in the Numbering Type data field. Various data fields and sub group that appear under this group for configuring voucher number are:
Prefix
Specify prefix for the voucher number in this data field. Prefix refers to the string that will be added in front of voucher number or you can say the string with which voucher number will begin.
Suffix
Specify suffix for the voucher number in this data field. Suffix refers to the string that will be added at the end of the voucher number or you can say the string with which voucher number will end.
Starting No.
Specify the number for the first voucher number. For example, you want to start first voucher number with ‘1’ then you can specify ‘1’ in this data field.
120
Specify Ending No.
Specify ‘Y’ in this data field if you want to have limited number of vouchers for the selected series of voucher type.
Ending Details
This group gets active only if you have specified ‘Y’ in the Specify Ending No. data field. Various data fields that appear under this group are:
Ending No.
Specify the maximum number of vouchers that can be entered for the voucher type. For example, you want to enter only 1000 vouchers for the Main series of Sales voucher type then you can specify 1000 in this data field. BUSY will not allow you to enter more than 1000 voucher for the Main series of Sales voucher type.
Warning before number of vouchers left
Specify the number of vouchers left before which a warning message is to be generated at the time of voucher entry. For example, you have entered 1000 in above data field and 10 in this data field then after entering 990th voucher, a warning will start appearing on saving the voucher that you can enter only 10 more vouchers.
Warning Message
Specify warning message to be displayed when the specified number of vouchers are left for the voucher type. The message you specify here will be appended with default warning message provided by BUSY.
Renumbering Frequency
Specify the time duration after which the voucher numbers are to be regenerated or to be started again. For example, if you select Monthly option from the list then after every month, voucher numbering will start from the beginning (i.e. from the voucher number specified in the Starting No. data field). If you select Yearly option then after every year voucher numbering will start from the beginning.
Maintain Book No.
Specify ‘Y’ in this data field if you want to maintain book number for the voucher.
Book Size
This data field appears on specifying ‘Y’ in the Maintain Book No. data field. Specify the size of the book in this data field. For example, each book in which voucher details are maintained, has 50 pages or can have entry of 50 vouchers only then you can specify the book size as 50.
Unit 6 - Transactions 121
Fix Length of Numeric Part
Specify ‘Y’ in this data field if you want to fix length of the numeric part of the voucher. For example, you want that size of voucher numbers for all the vouchers should always be same, whether it is the first voucher or the hundredth voucher. For this purpose, you can fix the numeric part of the voucher and can specify the character to be added to the numeric part to make it equal in size to other voucher numbers.
Padding Details
This group gets active only on specifying ‘Y’ in the Fix Length of Numeric Part data field. Under this group, you can specify the details about fixing the length of numeric part of the voucher number. Various data fields under this group are:
Total Length of Numeric Part
Specify total length of the numeric part of voucher number in this data field. For example, you want numeric part of voucher number to be of four digits always then you can specify ‘4’ in this data field.
Padding Character
Specify the character to be added to the numeric part of the voucher number to make it equivalent to the value specified in the Total Length of Numeric Part data field. For example, if you specify ‘0’ in this data field and ‘4’ in previous data field then first voucher number will appear as 0001, tenth voucher number will appear as 0010, hundredth voucher number will appear as 0100 and thousandth voucher number will appear as 1000.
After entering appropriate details in the data fields, click the Save button to save the Voucher Numbering configuration.
6.2 Entering Vouchers Entering Voucher means recording of day-to-day activities or transactions of business in a specified format according to the type of transaction made. All the reports in BUSY are based on the data entered in the vouchers. To record various transactions, BUSY provides a classified menu of different voucher types. To view list of various vouchers provided by BUSY, click Transactions menu. On clicking the Transactions menu, a list displaying all the voucher types appears. Given here is a screenshot of Transactions menu displaying all the voucher types provided in BUSY.
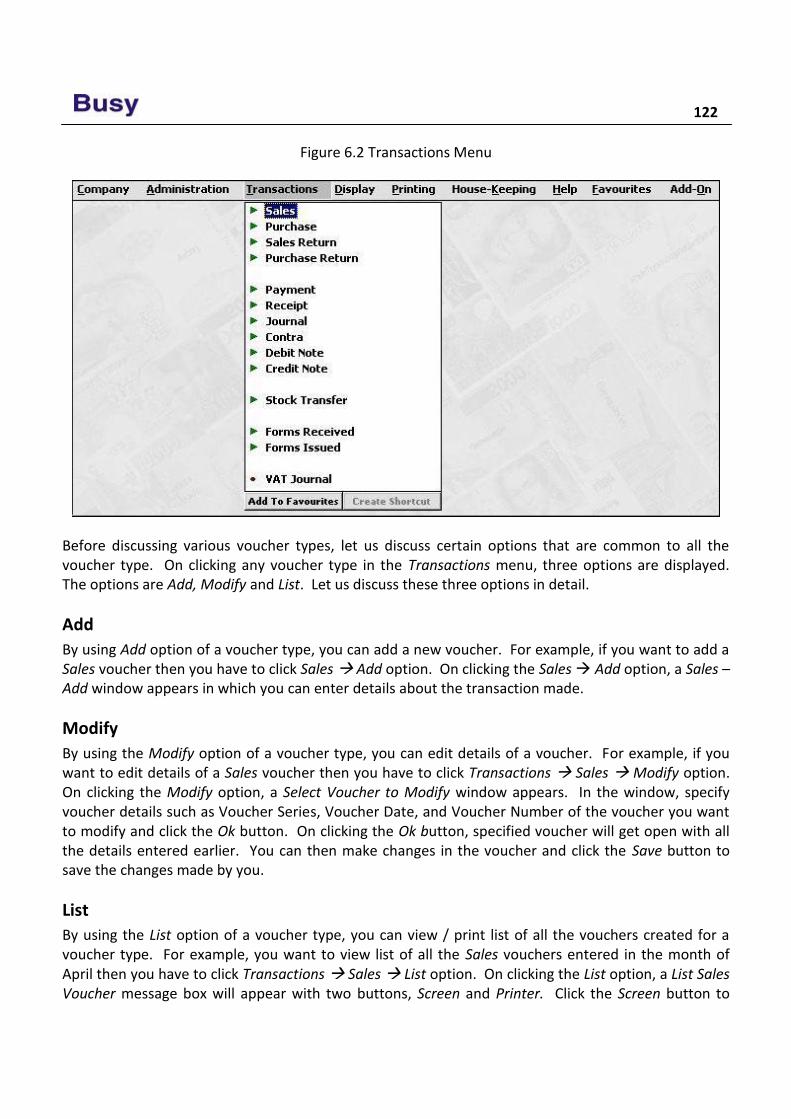
122
Figure 6.2 Transactions Menu
Before discussing various voucher types, let us discuss certain options that are common to all the voucher type. On clicking any voucher type in the Transactions menu, three options are displayed. The options are Add, Modify and List. Let us discuss these three options in detail.
Add
By using Add option of a voucher type, you can add a new voucher. For example, if you want to add a Sales voucher then you have to click Sales Add option. On clicking the Sales Add option, a Sales – Add window appears in which you can enter details about the transaction made.
Modify
By using the Modify option of a voucher type, you can edit details of a voucher. For example, if you want to edit details of a Sales voucher then you have to click Transactions Sales Modify option. On clicking the Modify option, a Select Voucher to Modify window appears. In the window, specify voucher details such as Voucher Series, Voucher Date, and Voucher Number of the voucher you want to modify and click the Ok button. On clicking the Ok button, specified voucher will get open with all the details entered earlier. You can then make changes in the voucher and click the Save button to save the changes made by you.
List
By using the List option of a voucher type, you can view / print list of all the vouchers created for a voucher type. For example, you want to view list of all the Sales vouchers entered in the month of April then you have to click Transactions Sales List option. On clicking the List option, a List Sales Voucher message box will appear with two buttons, Screen and Printer. Click the Screen button to
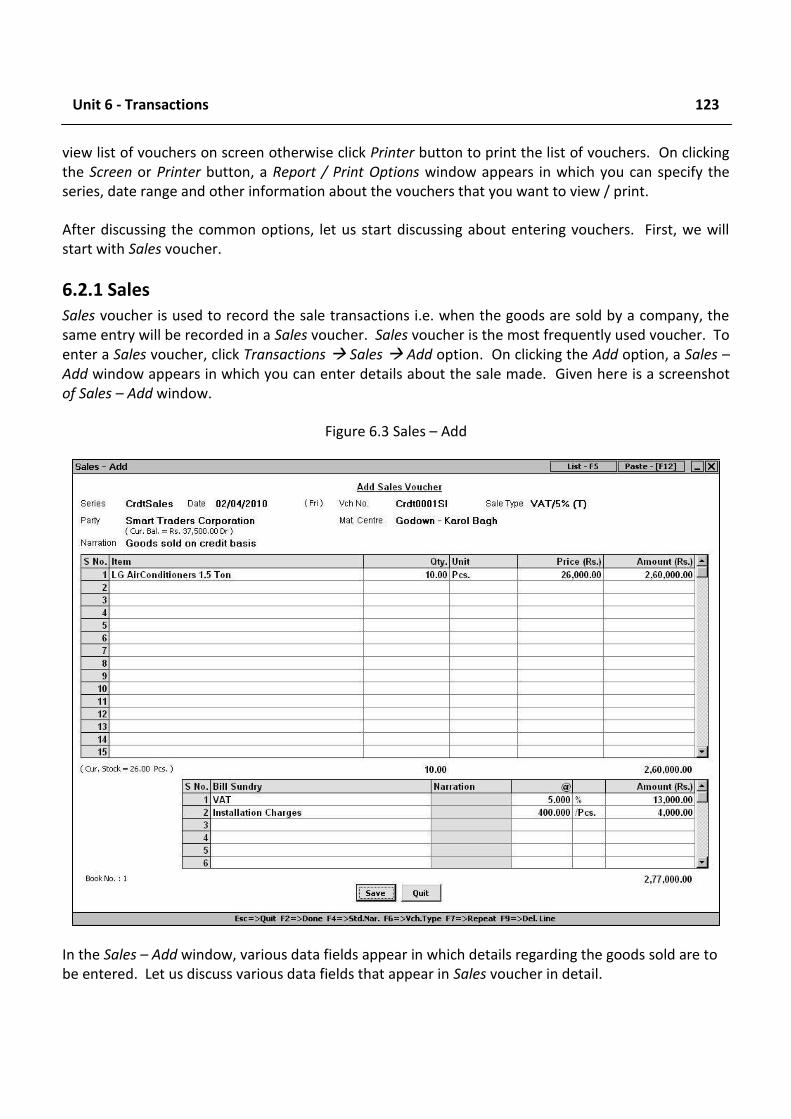
Unit 6 - Transactions 123
view list of vouchers on screen otherwise click Printer button to print the list of vouchers. On clicking the Screen or Printer button, a Report / Print Options window appears in which you can specify the series, date range and other information about the vouchers that you want to view / print.
After discussing the common options, let us start discussing about entering vouchers. First, we will start with Sales voucher.
6.2.1 Sales Sales voucher is used to record the sale transactions i.e. when the goods are sold by a company, the same entry will be recorded in a Sales voucher. Sales voucher is the most frequently used voucher. To enter a Sales voucher, click Transactions Sales Add option. On clicking the Add option, a Sales – Add window appears in which you can enter details about the sale made. Given here is a screenshot of Sales – Add window.
Figure 6.3 Sales – Add
In the Sales – Add window, various data fields appear in which details regarding the goods sold are to be entered. Let us discuss various data fields that appear in Sales voucher in detail.
124
Series
Select the voucher series in which you want to record the sale entry.
Date
Enter date for which you are entering the voucher. On pressing the Enter key in this data field, a Stock Updation Date window appears. This window appears if you have enabled the option of Separate Stock Updation Date in Dual Vouchers in Administration Configuration Features / Option Inventory tab (see Unit 4, topic 4.1 – Features / Options, sub topic - 4.1.3 Inventory). Enter date on which stock is updated or goods are moved out.
Vch No.
Enter the voucher number in this data field. If you have set the voucher numbering as Automatic in Voucher Configuration then voucher number will be generated automatically and you cannot change value in it. If you have set the voucher numbering as Not Required then this field will be disabled and you are not allowed to enter voucher number. By default, voucher numbering is set to Automatic for Sales voucher.
Sale Type
This data field appears if you have enabled Sales Tax / VAT / GST for the company. Select required Sale Type from the list. For example, if you are entering a voucher in which VAT @ 5% will be levied on all the items then you can select VAT / 5% (T / R) Sale Type. Similarly, if you are entering a voucher in which different tax rate will be levied on various items of the bill then you can select VAT / Multi Tax (T / R) option.
Party
Select the party to which you are selling the goods. The list will display all the Account masters whose Parent Group is Sundry Debtor / Creditor, Cash or Bank. If you are selling goods on cash basis then you can select the Cash account. If you are selling goods on credit basis then you can select the name of the party to whom you are selling the goods.
Material Centre
This data field appears if you have created more than one Material Centre masters. Select the Material Centre from where the goods have been dispatched or moved out.
Sales Acc.
This data field appears if you have selected Specify in Voucher option in the Sale Type master selected in the Sale Type data field of the voucher. Select the account to which the sale entry will be posted or the account which is to be credited on saving the Sales voucher.
Narration
Enter narration for the voucher in this data field. You can also pick from the existing Standard Narrations by pressing <F4> key.
Unit 6 - Transactions 125
Item Details Grid
Although no name is given to this grid in voucher, we have given it a name in the Courseware for your convenience. In the Item Details grid, you can specify details about the items sold. Various fields in the Item Details grid are:
Item
Select required item from the list. The list will display name / alias of all the Item masters.
Qty.
Enter quantity of item sold.
Unit
By default, the unit as specified in the selected item will appear in this field. You can change it to any other unit if the conversion factor exists between the main unit as specified in the Item master and the unit you are selecting in this field.
Price
Enter the price in this field at which you are selling the item.
Amount
By default, the amount calculated by multiplying the quantity and price is displayed in this field. You can change the amount as per your requirement. If you change the amount then the price will be adjusted automatically. On pressing the Enter key, after entering the amount in the Amount field, an Item-Wise Sales Tax window or Item–Wise Tax Information window appears.
Let us discuss both these windows one by one.
Item-Wise Sales Tax window appears if the option of Multi-Tax is enabled in the Sale Type master selected in the Sale Type data field. The window will appear with each item in the Item Details grid. Given here is a screenshot of Item-Wise Sales Tax window.
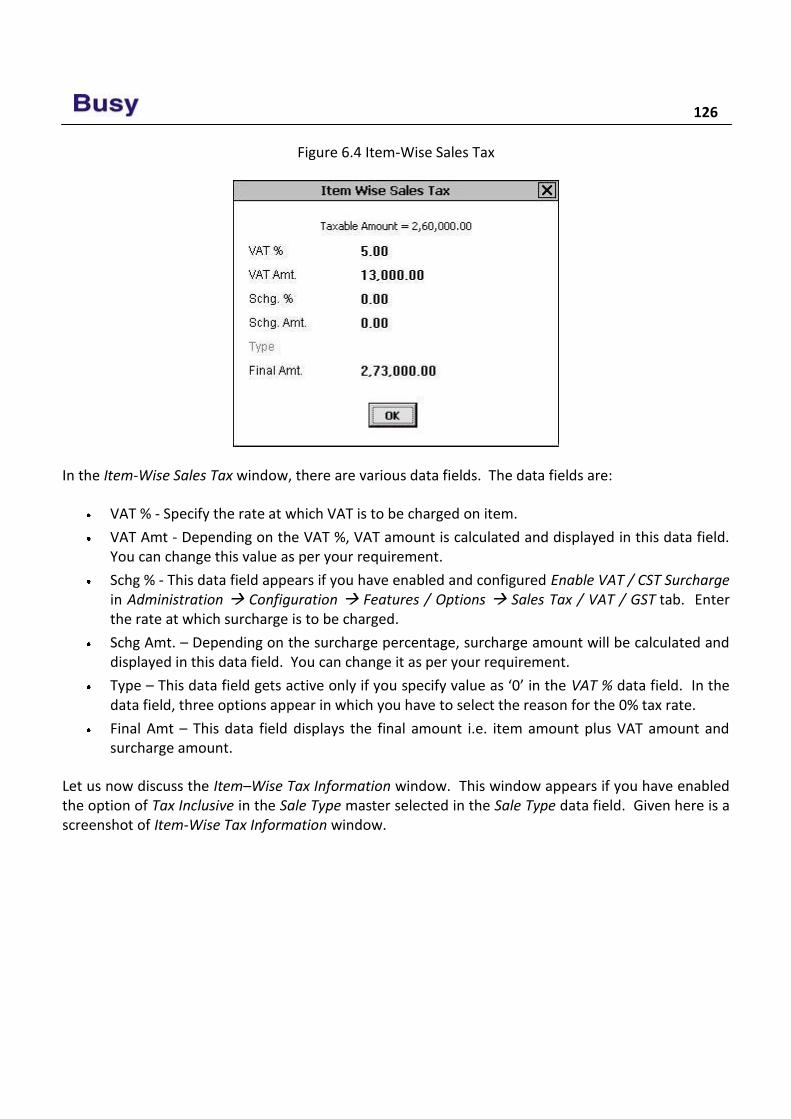
126
Figure 6.4 Item-Wise Sales Tax
In the Item-Wise Sales Tax window, there are various data fields. The data fields are:
VAT % - Specify the rate at which VAT is to be charged on item.
VAT Amt - Depending on the VAT %, VAT amount is calculated and displayed in this data field. You can change this value as per your requirement.
Schg % - This data field appears if you have enabled and configured Enable VAT / CST Surcharge in Administration Configuration Features / Options Sales Tax / VAT / GST tab. Enter the rate at which surcharge is to be charged.
Schg Amt. – Depending on the surcharge percentage, surcharge amount will be calculated and displayed in this data field. You can change it as per your requirement.
Type – This data field gets active only if you specify value as ‘0’ in the VAT % data field. In the data field, three options appear in which you have to select the reason for the 0% tax rate.
Final Amt – This data field displays the final amount i.e. item amount plus VAT amount and surcharge amount.
Let us now discuss the Item–Wise Tax Information window. This window appears if you have enabled the option of Tax Inclusive in the Sale Type master selected in the Sale Type data field. Given here is a screenshot of Item-Wise Tax Information window.
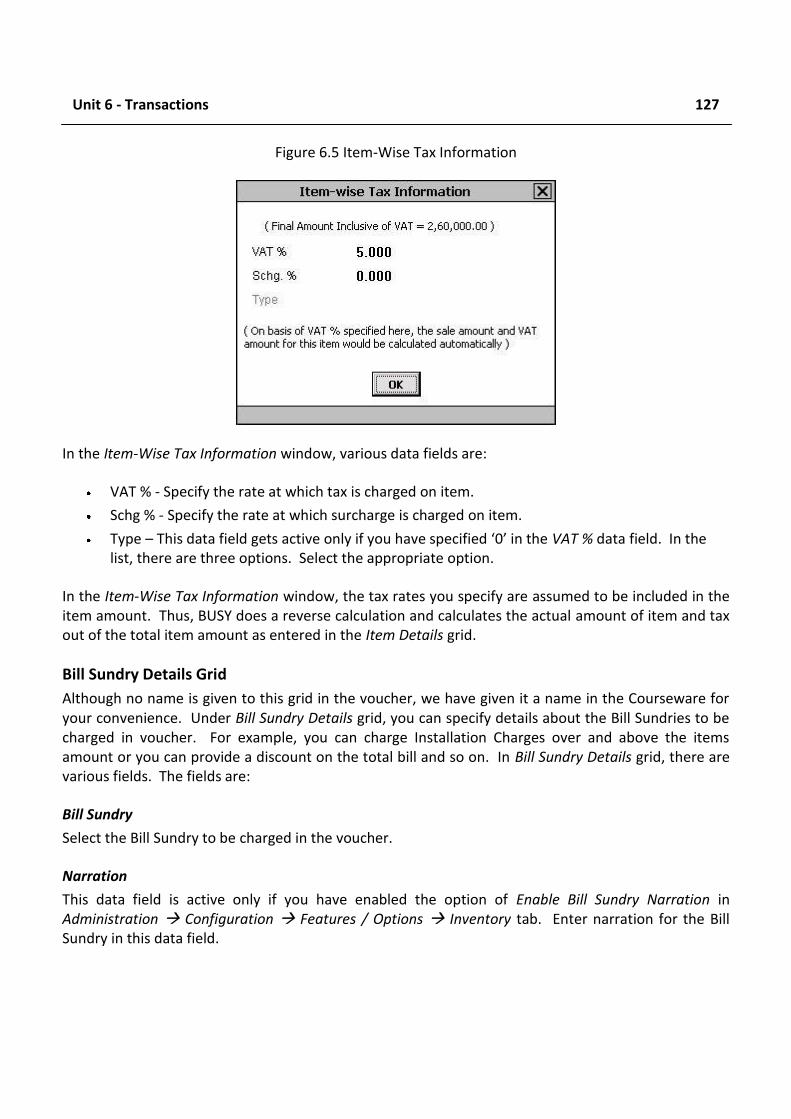
Unit 6 - Transactions 127
Figure 6.5 Item-Wise Tax Information
In the Item-Wise Tax Information window, various data fields are:
VAT % - Specify the rate at which tax is charged on item.
Schg % - Specify the rate at which surcharge is charged on item.
Type – This data field gets active only if you have specified ‘0’ in the VAT % data field. In the list, there are three options. Select the appropriate option.
In the Item-Wise Tax Information window, the tax rates you specify are assumed to be included in the item amount. Thus, BUSY does a reverse calculation and calculates the actual amount of item and tax out of the total item amount as entered in the Item Details grid.
Bill Sundry Details Grid
Although no name is given to this grid in the voucher, we have given it a name in the Courseware for your convenience. Under Bill Sundry Details grid, you can specify details about the Bill Sundries to be charged in voucher. For example, you can charge Installation Charges over and above the items amount or you can provide a discount on the total bill and so on. In Bill Sundry Details grid, there are various fields. The fields are:
Bill Sundry
Select the Bill Sundry to be charged in the voucher.
Narration
This data field is active only if you have enabled the option of Enable Bill Sundry Narration in Administration Configuration Features / Options Inventory tab. Enter narration for the Bill Sundry in this data field.
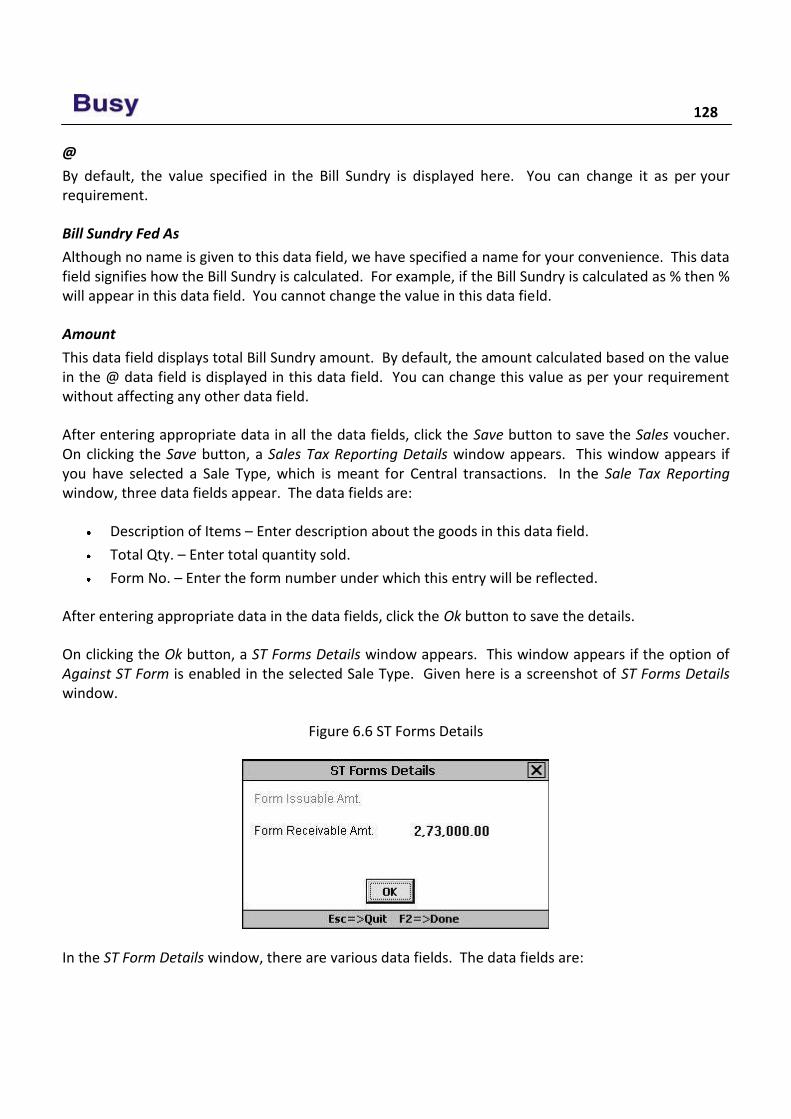
128
@
By default, the value specified in the Bill Sundry is displayed here. You can change it as per your requirement.
Bill Sundry Fed As
Although no name is given to this data field, we have specified a name for your convenience. This data field signifies how the Bill Sundry is calculated. For example, if the Bill Sundry is calculated as % then % will appear in this data field. You cannot change the value in this data field.
Amount
This data field displays total Bill Sundry amount. By default, the amount calculated based on the value in the @ data field is displayed in this data field. You can change this value as per your requirement without affecting any other data field.
After entering appropriate data in all the data fields, click the Save button to save the Sales voucher. On clicking the Save button, a Sales Tax Reporting Details window appears. This window appears if you have selected a Sale Type, which is meant for Central transactions. In the Sale Tax Reporting window, three data fields appear. The data fields are:
Description of Items – Enter description about the goods in this data field.
Total Qty. – Enter total quantity sold.
Form No. – Enter the form number under which this entry will be reflected.
After entering appropriate data in the data fields, click the Ok button to save the details.
On clicking the Ok button, a ST Forms Details window appears. This window appears if the option of Against ST Form is enabled in the selected Sale Type. Given here is a screenshot of ST Forms Details window.
Figure 6.6 ST Forms Details
In the ST Form Details window, there are various data fields. The data fields are:
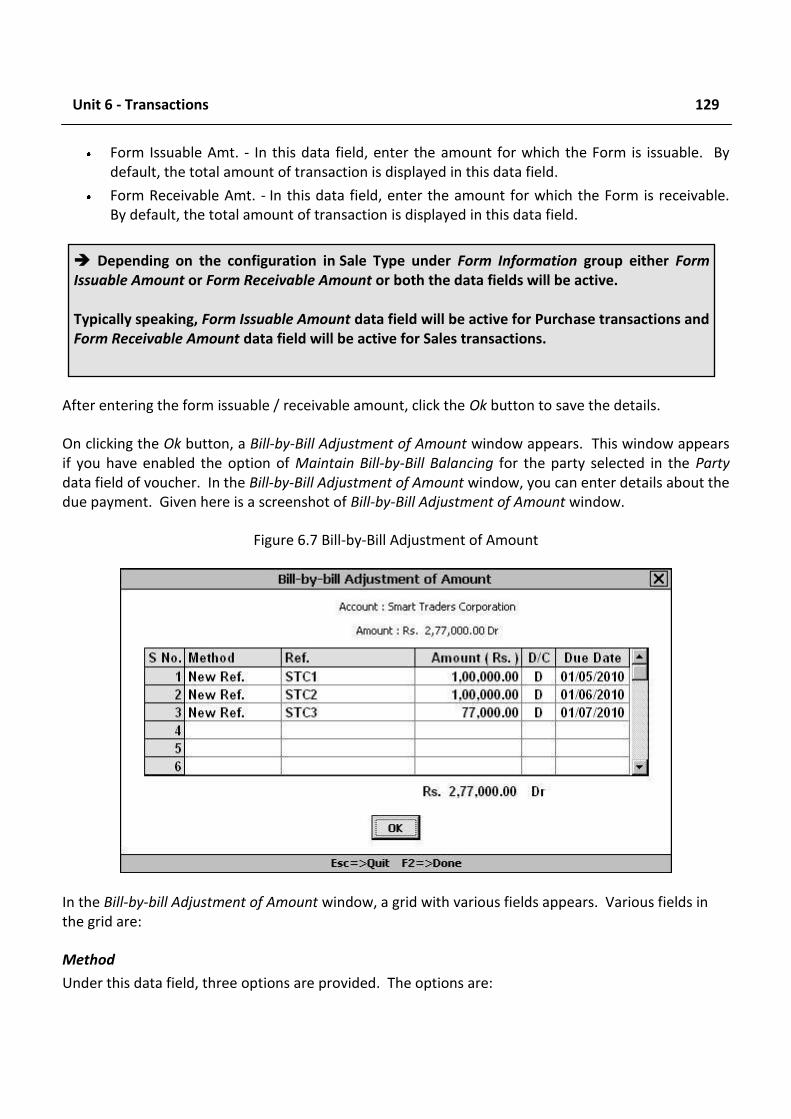
Unit 6 - Transactions 129
Form Issuable Amt. - In this data field, enter the amount for which the Form is issuable. By default, the total amount of transaction is displayed in this data field.
Form Receivable Amt. - In this data field, enter the amount for which the Form is receivable. By default, the total amount of transaction is displayed in this data field.
After entering the form issuable / receivable amount, click the Ok button to save the details.
On clicking the Ok button, a Bill-by-Bill Adjustment of Amount window appears. This window appears if you have enabled the option of Maintain Bill-by-Bill Balancing for the party selected in the Party data field of voucher. In the Bill-by-Bill Adjustment of Amount window, you can enter details about the due payment. Given here is a screenshot of Bill-by-Bill Adjustment of Amount window.
Figure 6.7 Bill-by-Bill Adjustment of Amount
In the Bill-by-bill Adjustment of Amount window, a grid with various fields appears. Various fields in the grid are:
Method
Under this data field, three options are provided. The options are:
Depending on the configuration in Sale Type under Form Information group either Form Issuable Amount or Form Receivable Amount or both the data fields will be active. Typically speaking, Form Issuable Amount data field will be active for Purchase transactions and Form Receivable Amount data field will be active for Sales transactions.
130
New Ref. – Select this option if you want to create a new bill reference for the party.
Adjust – Select this option if you want to adjust the current bill amount with any other reference already created for the party. This option will appear only if there is a pending bill of the party with which the current bill amount can be adjusted. For example, Star Electronics Company has sold 10 pieces of item LG AC 1.5 ton worth Rs. 2,60,000 to Smart Traders Corporation on credit basis. Smart Traders Corporation had earlier made some advance payment of Rs. 60,000 for which a bill reference has already been created. Now Star Electronics Company can adjust Rs. 60,000 with the existing bill reference and for the rest Rs. 2, 00,000 it can create new bill reference.
Append – Select this option if you want to append or add the current bill amount to any existing bill reference. This option appears only if there is a pending bill to which the reference can be appended. For example, Star Electronics Company has sold 10 pieces of item LG AC 1.5 ton worth Rs. 2,00,000 to Smart Traders Corporation on credit basis. Smart Traders Corporation decided to make payment in four installments of Rs. 50,000 each due on 1st April, 1st May, 1st June and 1st July. However, there is already a pending bill of Rs. 20,000 due on 1st April which the Smart Traders Corporation has to pay to the Star Electronics Company. Now instead of making a new bill of Rs. 50,000 for 1st April, Star Electronics Company can append this amount to existing bill reference which is due on 1st April. Hence, total amount in a single bill reference to be paid by Smart Traders Corporation on 1st April will be Rs. 70,000.
Ref
Enter bill reference number if you are creating new reference or select the existing reference to which the amount is to be adjusted / appended.
Amount
Enter the amount for bill reference.
D / C
Enter ‘D’ if it is a debit amount or ‘C’ if is a credit amount.
Due Date
Enter due date for the reference in this field. You can enter due date only for new references. If you have selected the New Ref. method then by default, the date of the voucher appears in the field. If you have specified credit days in the Account master for party / account then depending on the number of credit days specified in Account master, the due date is displayed in the field. If you have selected the Adjustment / Append method then depending on the reference selected in the Ref. data field the due date is displayed in the field.
Group
This field appears if you have enabled the option of Enable Grouping of Reference under Administration Configuration Features / Options Accounts tab Bill Reference Group window. If you have selected the New Ref. method then you have to select the Reference Group
Unit 6 - Transactions 131
under which the reference falls. You can create Reference Group also by pressing <F3> key in the Group field. If you have selected Adjustment or Append method then by default, the group as specified in the reference will appear in this field. You cannot change the group of the selected reference.
After entering appropriate data in the fields, click the Ok button to save the bill-by-bill adjustment details. However, if you do not want to create or adjust bill reference then press the Esc key.
6.2.2 Sales Return Sales Return refers to the goods returned to your company by the customers. You can record sale return transaction in Sales Return voucher. For example, Star Electronics Company has sold 10 pieces of item LG AC 1.5 ton to Smart Traders Corporation but Smart Traders Corporation return 5 pieces to Star Electronics Company since it wants 5 pieces of LG AC 1.5 ton and 5 pieces of LG AC 2 ton. To record this transaction Star Electronics Company has to enter Sales Return voucher. To enter Sales Return voucher, click Transactions Sales Return Add option. On clicking the Add option, a Sales Return – Add window appears. Sales Return – Add window is totally similar to Sales – Add window with only difference is that quantity entered in Sales Return voucher will be treated as quantity returned by customer and item stock will be increased.
For detailed help on Sales Return – Add window, please refer to Sales – Add window (sub topic 6.2.1 – Sales) as both the windows are totally similar.
6.2.3 Purchase Purchase voucher is used to record the purchase transactions of the company i.e. when the goods are purchased by the company then it can record this transaction in Purchase voucher. To enter a Purchase voucher, click Transactions Purchase Add option. On clicking the Add option, a Purchase – Add window appears. In the window, you can enter details about the goods purchased. Given here is a screenshot of Purchase – Add window.
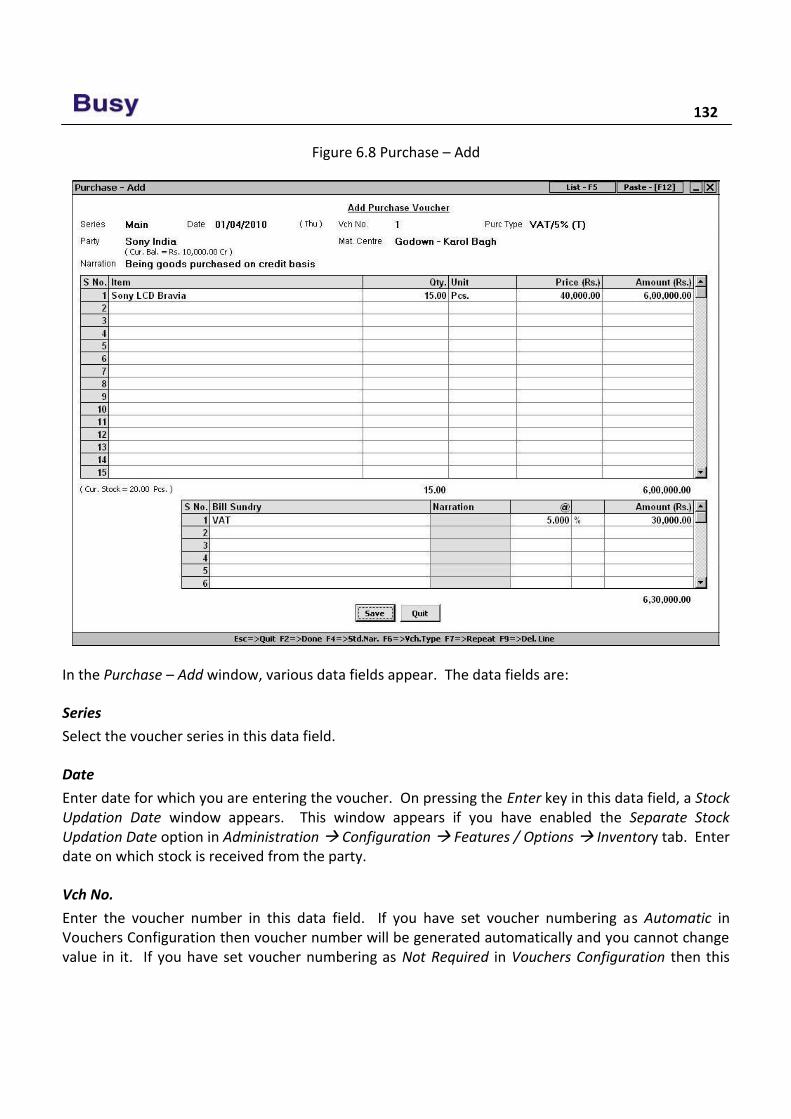
132
Figure 6.8 Purchase – Add
In the Purchase – Add window, various data fields appear. The data fields are:
Series
Select the voucher series in this data field.
Date
Enter date for which you are entering the voucher. On pressing the Enter key in this data field, a Stock Updation Date window appears. This window appears if you have enabled the Separate Stock Updation Date option in Administration Configuration Features / Options Inventory tab. Enter date on which stock is received from the party.
Vch No.
Enter the voucher number in this data field. If you have set voucher numbering as Automatic in Vouchers Configuration then voucher number will be generated automatically and you cannot change value in it. If you have set voucher numbering as Not Required in Vouchers Configuration then this
Unit 6 - Transactions 133
field will be disabled and you are not allowed to enter voucher number. By default, voucher numbering is set to Manual for Purchase vouchers.
Purchase Type
This data field appears if you have enabled Sales Tax / VAT / GST for the company. Select required Purchase Type from the list.
Party
Select party from whom you are purchasing the goods. You can also select the Cash or Bank account if you have purchased goods in cash or through cheque.
Material Centre
This data field appears if you have created more than one Material Centre master. Select the Material Centre in this data field where the goods have been received or where the purchased goods are kept.
Purc Acc.
This data field appears if you have enabled the Specify in Voucher option in the selected Purchase Type. Select the account in which purchase entry will be posted or select the account that is to be debited for the purchase transaction you are entering.
Narration
Enter narration for the purchase transaction in this data field. You can pick from already created Standard Narrations also by pressing <F4> key.
Item Details Grid
Although no name is given to this grid in the voucher, we have given a name to it in the Courseware for your convenience. Under Item Details grid, you can enter details about the items you have purchased. In the Item Details grid, there are various fields. The fields are:
Item
Select required item from the list. The list will display name / alias of all the Item masters.
Qty.
Enter quantity of item purchased.
Unit
By default, the unit as specified in the selected Item master will appear in this field. You can change it to any other unit if the conversion factor exists between the main unit as specified in the Item master and the unit selected in this field.
Price
Enter the price in this field at which the item is purchased.
134
Amount
By default, the amount calculated by multiplying the quantity and price is displayed in this field. You can change the amount as per your requirement. If you change the amount then the price will be adjusted automatically. On pressing the Enter key after entering the amount in the Amount field, an Item-Wise Sales Tax window or Item–Wise Tax Information window appears. For detailed help on these windows, please refer to sub topic 6.2.1 - Sales.
Bill Sundry Details grid
Although no name is given to this grid in the voucher, we have given it a name in the Courseware for your convenience. Under Bill Sundry Details grid, you can specify details about the Bill Sundries to be used in voucher. For example, you can enter Bill Sundry for freight & forwarding charges paid on receipt of goods. In Bill Sundry Details grid, there are various fields. The fields are:
Bill Sundry
Select required Bill Sundry from the list.
Narration
This data field is active only if you have enabled the option of Enable Bill Sundry Narration in Administration Configuration Features / Options Inventory tab. Enter narration for the Bill Sundry in this data field.
@
By default, the value specified in the Bill Sundry is displayed here. You can change it as per your requirement.
Bill Sundry Fed As
Although no name is given to this data field, we have given it a name for your convenience. This field signifies how the Bill Sundry is calculated. For example, if the Bill Sundry is calculated on percentage basis then ‘%’ sign will appear in this field. You cannot change the value in this field.
Amount
This data field displays total Bill Sundry amount. By default, the amount calculated based on the value in the @ data field is displayed in this data field. You can change this value as per your requirement without affecting any other data field.
After entering appropriate data in the data fields, click the Save button to save the Purchase voucher. On clicking the Save button, a Sales Tax Reporting Details window appears. In the window, you can specify original purchase bill number and date. This is useful when you maintain your own purchase voucher number other than the one that is printed on the bill issued by the party from whom you have purchased the goods. You can maintain your own purchase bill number to follow a particular sequence for voucher numbers. However, for sales tax and reporting purposes, you require the original purchase number that is printed on the bill. Hence, you can enter the original purchase bill

Unit 6 - Transactions 135
number in the Sales Tax Reporting Details window. This purchase bill number will be printed as original purchase bill number in the Sales tax reports. Given here is a screenshot of Sales Tax Reporting Details window.
Figure 6.9 Sales Tax Reporting Details
In the Sales Tax Reporting Details window, there are various data fields. The data fields are:
Purchase Bill No.
Specify the bill number printed on the purchase bill you have received.
Purchase Bill Date
Specify the bill date as printed on the purchase bill you have received.
Description of Items
Enter description of item if any.
Total Qty.
Enter total quantity of all the items as entered in the purchase bill. For example, you have entered Purchase voucher in which three different items are purchased. Thus, in Total Qty. field you have to specify total combined quantity of all the three items purchased.
Form No.
Enter the form number in which this entry is to be reflected.
After entering appropriate data in the data fields, click the Ok button to save the details entered by you.
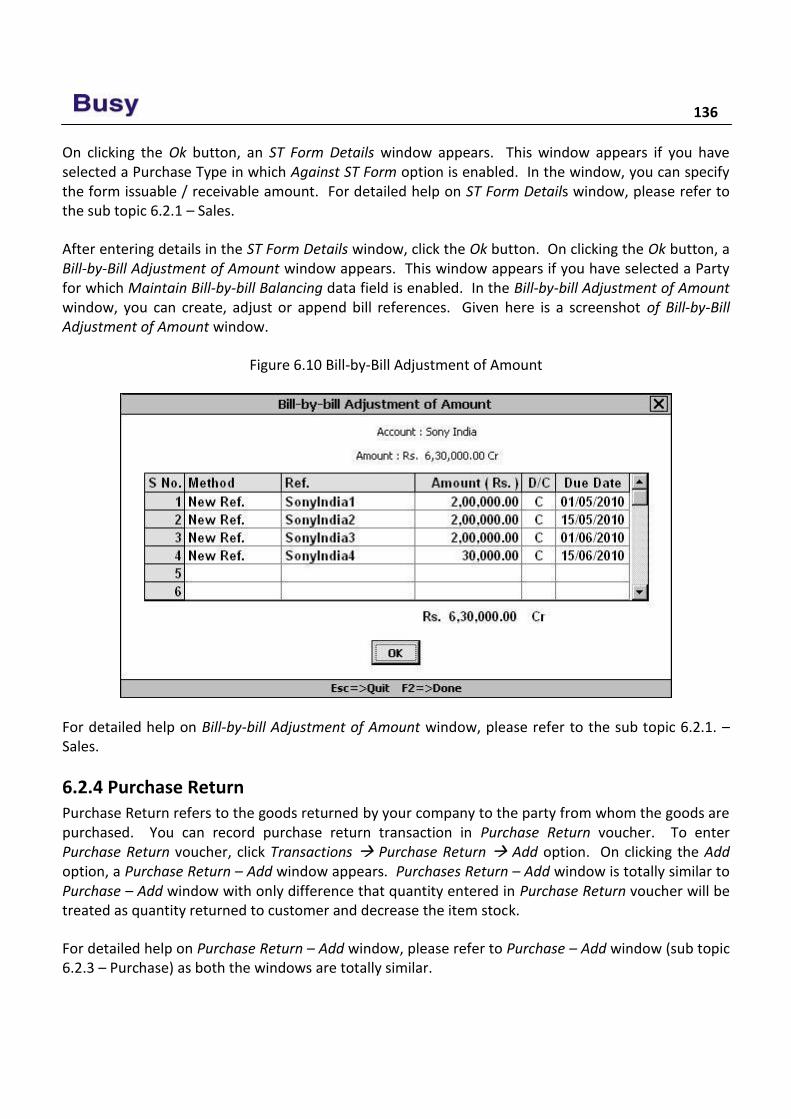
136
On clicking the Ok button, an ST Form Details window appears. This window appears if you have selected a Purchase Type in which Against ST Form option is enabled. In the window, you can specify the form issuable / receivable amount. For detailed help on ST Form Details window, please refer to the sub topic 6.2.1 – Sales.
After entering details in the ST Form Details window, click the Ok button. On clicking the Ok button, a Bill-by-Bill Adjustment of Amount window appears. This window appears if you have selected a Party for which Maintain Bill-by-bill Balancing data field is enabled. In the Bill-by-bill Adjustment of Amount window, you can create, adjust or append bill references. Given here is a screenshot of Bill-by-Bill Adjustment of Amount window.
Figure 6.10 Bill-by-Bill Adjustment of Amount
For detailed help on Bill-by-bill Adjustment of Amount window, please refer to the sub topic 6.2.1. – Sales.
6.2.4 Purchase Return Purchase Return refers to the goods returned by your company to the party from whom the goods are purchased. You can record purchase return transaction in Purchase Return voucher. To enter Purchase Return voucher, click Transactions Purchase Return Add option. On clicking the Add option, a Purchase Return – Add window appears. Purchases Return – Add window is totally similar to Purchase – Add window with only difference that quantity entered in Purchase Return voucher will be treated as quantity returned to customer and decrease the item stock.
For detailed help on Purchase Return – Add window, please refer to Purchase – Add window (sub topic 6.2.3 – Purchase) as both the windows are totally similar.
Unit 6 - Transactions 137
6.2.5 Payment Payment voucher is used to enter the payment transactions i.e. when the payment is made to a party or any other person or company then you can record this transaction in a Payment voucher. To enter a Payment voucher, click Transactions Payment Add option. On clicking the Add option, a Payment – Add window appears. If you have enabled the option of Double Entry System for Payment & Receipt voucher in Administration Configuration Features / Options Accounts tab then you can enter Payment voucher in double entry system otherwise if you have disabled this option then you can enter Payment voucher in single entry system. Hence, different Payment – Add window appears for making entry in double entry system and single entry system.
We will discuss both the systems of entering Payment voucher one by one starting with Double Entry System.
In the Double Entry System, you need to enter Payment voucher in the traditional way. In other words, you need to specify at least two accounts and the debit / credit aspect of the accounts. Thus, you need to remember the debit / credit aspect of the transaction. For example, Star Electronics Company made payment to all its suppliers in cash in one go. In such a case, the supplier accounts will be debited while the cash account will be credited. We can represent this transaction in the form of a journal entry given here:
Dr. Philips India (Supplier)
Dr. Sony India (Supplier)
Cr. Cash Account
To enter a Payment voucher, click Transactions Payment Add option. On clicking the Add option, a Payment Voucher – Add window appears. Given here is a screenshot of Payment Voucher – Add window.
Image on next Page
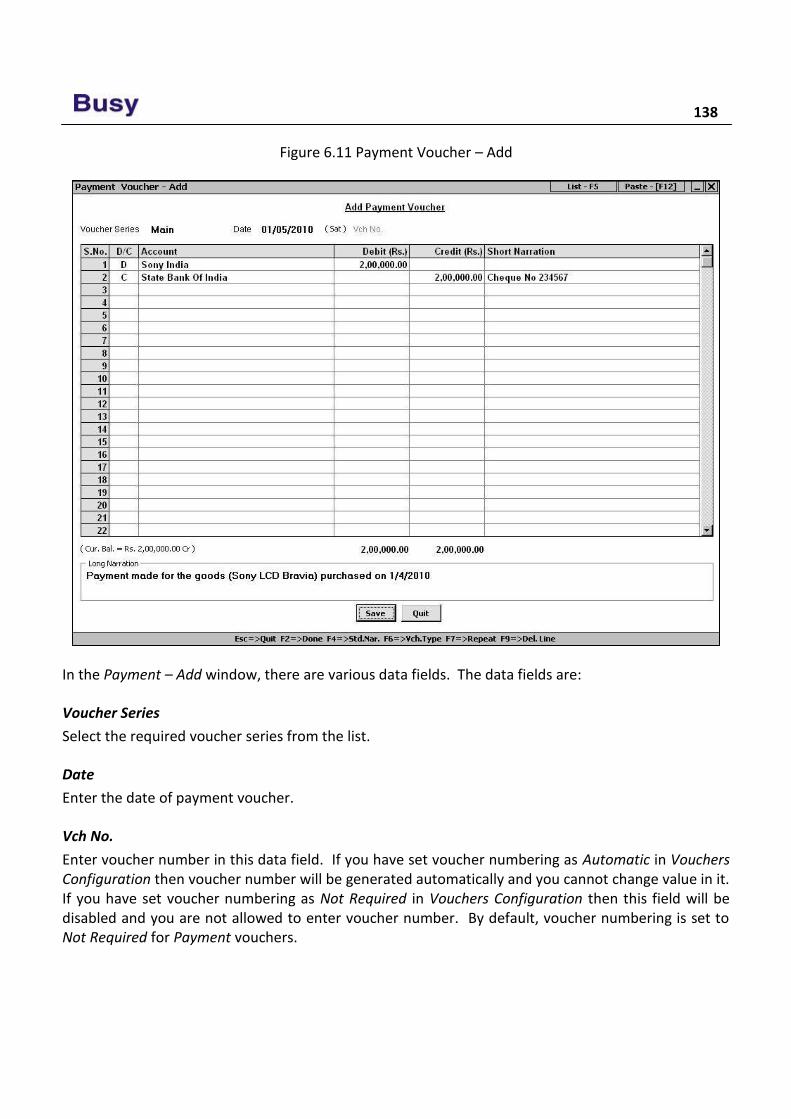
138
Figure 6.11 Payment Voucher – Add
In the Payment – Add window, there are various data fields. The data fields are:
Voucher Series
Select the required voucher series from the list.
Date
Enter the date of payment voucher.
Vch No.
Enter voucher number in this data field. If you have set voucher numbering as Automatic in Vouchers Configuration then voucher number will be generated automatically and you cannot change value in it. If you have set voucher numbering as Not Required in Vouchers Configuration then this field will be disabled and you are not allowed to enter voucher number. By default, voucher numbering is set to Not Required for Payment vouchers.
Unit 6 - Transactions 139
Accounts Detail grid
Under Account Details grid, you can select the accounts to be debited and credited and the debit / credit amount. Basically, you have to specify the parties to whom payment has been made and the payment mode i.e. cash or bank. Various fields under the Accounts Detail grid are:
D / C
Select ‘D’ if the account you will select next is to be debited otherwise select ‘C’ if the account you will select next is to be credited.
Account
Select Account to be debited / credited.
Debit
Focus comes to this field, if you have selected ‘D’ in the D / C data field. Enter the amount to be debited.
Credit
Focus comes to this field, if you have selected ‘C’ in the D / C data field. Enter the amount to be credited.
Short Narration
Enter short narration for the entry in this data field. For example, if you are making payment through cheque then you can enter cheque number in this data field.
Long Narration
Enter long narration for the voucher in this data field.
After entering appropriate details in the data fields, click the Save button to save the Payment voucher. On clicking the Save button certain windows appear. The appearance of these windows is dependent on the account selected in the Account Details grid. Let us discuss such windows one by one.
Bill-by-Bill Adjustment of Account
This window appears if you have selected an account for which Maintain Bill-by-bill Balancing option is enabled in the Account master. In the Bill-by-Bill Adjustment of Amount window, you can adjust the amount paid to any existing reference or can create a new bill reference. For example, Star Electronic Company has purchased goods worth Rs. 6,30,000 from Sony India company for which it has created various bill reference with different due dates. Now when the Star Electronics Company will make the payment then it will enter a Payment voucher and adjust the amount paid with the bill reference due on that date. Given here is a screenshot of Bill-by-bill Adjustment of Amount window displaying adjustment of the payment amount.
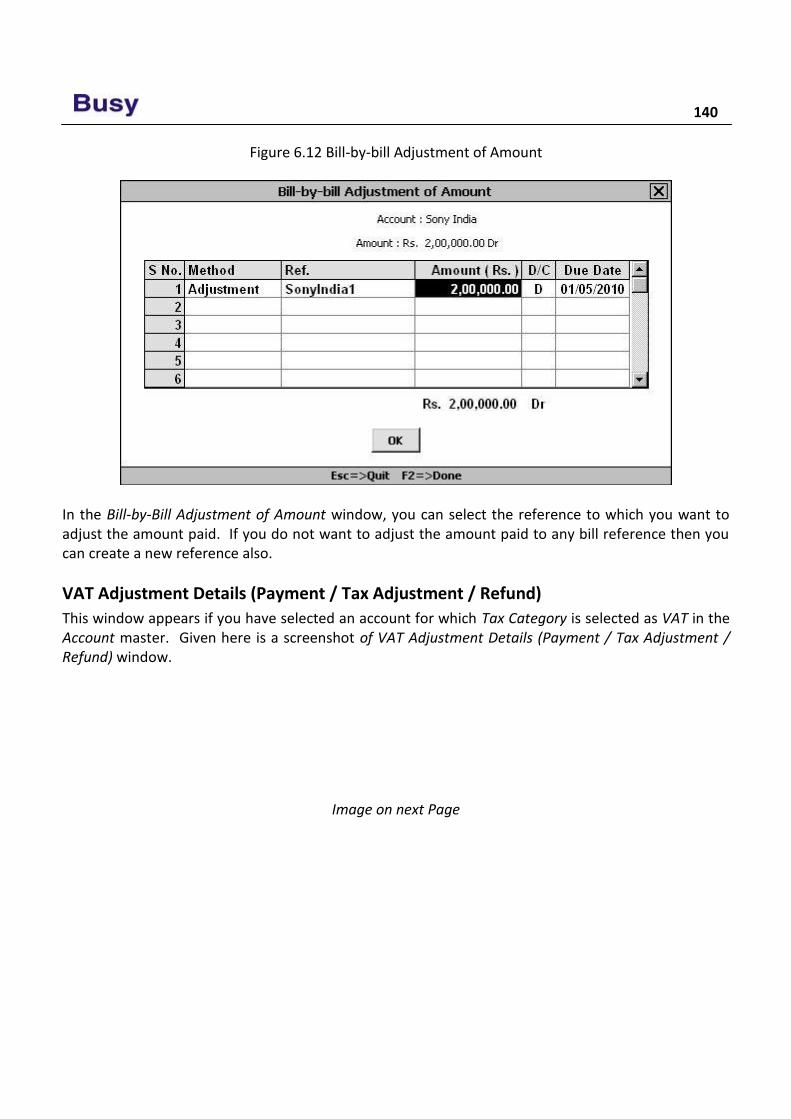
140
Figure 6.12 Bill-by-bill Adjustment of Amount
In the Bill-by-Bill Adjustment of Amount window, you can select the reference to which you want to adjust the amount paid. If you do not want to adjust the amount paid to any bill reference then you can create a new reference also.
VAT Adjustment Details (Payment / Tax Adjustment / Refund)
This window appears if you have selected an account for which Tax Category is selected as VAT in the Account master. Given here is a screenshot of VAT Adjustment Details (Payment / Tax Adjustment / Refund) window.
Image on next Page
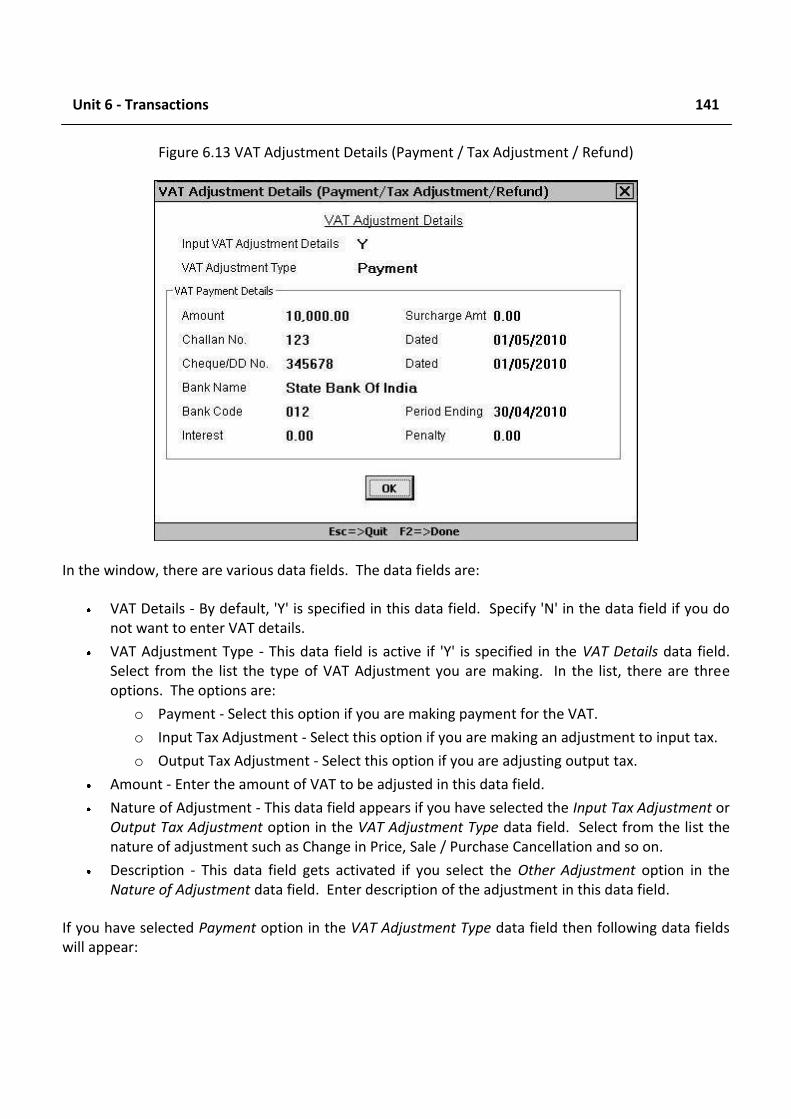
Unit 6 - Transactions 141
Figure 6.13 VAT Adjustment Details (Payment / Tax Adjustment / Refund)
In the window, there are various data fields. The data fields are:
VAT Details - By default, 'Y' is specified in this data field. Specify 'N' in the data field if you do not want to enter VAT details.
VAT Adjustment Type - This data field is active if 'Y' is specified in the VAT Details data field. Select from the list the type of VAT Adjustment you are making. In the list, there are three options. The options are:
o Payment - Select this option if you are making payment for the VAT.
o Input Tax Adjustment - Select this option if you are making an adjustment to input tax.
o Output Tax Adjustment - Select this option if you are adjusting output tax.
Amount - Enter the amount of VAT to be adjusted in this data field.
Nature of Adjustment - This data field appears if you have selected the Input Tax Adjustment or Output Tax Adjustment option in the VAT Adjustment Type data field. Select from the list the nature of adjustment such as Change in Price, Sale / Purchase Cancellation and so on.
Description - This data field gets activated if you select the Other Adjustment option in the Nature of Adjustment data field. Enter description of the adjustment in this data field.
If you have selected Payment option in the VAT Adjustment Type data field then following data fields will appear:
142
Challan No - Enter the number of challan, which is deposited in the Bank such as DVAT20 in case of Delhi and so on.
Dated - Enter the date when the challan is deposited.
Cheque / DD No. - Enter the cheque or Demand Draft number through which VAT is paid.
Dated - Enter the cheque date in this data field.
Bank Name - Enter the name of the bank where VAT is to be deposited.
Bank Code - Enter the Bank code in this data field.
Period Ending - Specify the period ending for which you are paying the VAT.
Interest - Enter the amount of interest paid if any.
Penalty - Enter the amount of penalty paid if any.
After entering appropriate data in the data fields, click the Ok button to save the details entered by you.
CST Adjustment Details (Payment)
This window appears if you have selected an account in which Tax Category is specified as CST in the Account master. In the window, there are various data fields. The data fields are:
Input CST Adjustment Details - Specify 'Y' in this data field if you want to adjust input CST details.
CST Adjustment Type - Select the type of CST adjustment. Only CST Payment option appears in this data field.
Amount - Specify the amount of CST to be adjusted in this data field.
Challan No. - Enter the challan number, which is deposited in the bank.
Dated - Enter the date on which challan is deposited.
Cheque / DD No. - Enter the Cheque / Demand Draft number through which the CST is paid.
Dated - Enter the cheque date in this data field.
Bank Name - Enter the name of the bank where CST is to be deposited.
Bank Code - Enter the Bank code in this data field.
Period Ending - Specify the period ending for which you are paying the CST.
Interest - Enter the amount of interest paid if any.
Penalty - Enter the amount of penalty paid if any.
After entering appropriate data in the data fields, click the Ok button to save the details entered by you.
Let us now discuss the Single Entry System for entering Payment voucher.
In Single Entry system, while entering a Payment voucher you only need to select the payment mode and specify the affected accounts. You do not need to remember and specify the debit / credit aspect
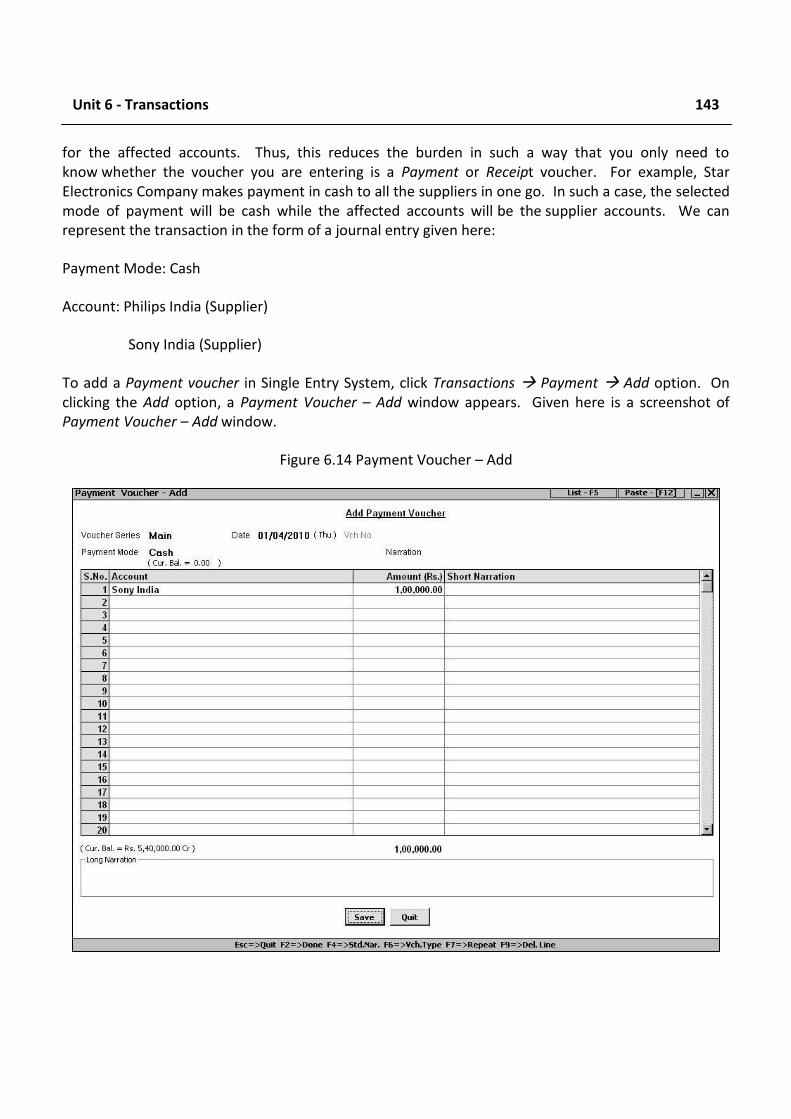
Unit 6 - Transactions 143
for the affected accounts. Thus, this reduces the burden in such a way that you only need to know whether the voucher you are entering is a Payment or Receipt voucher. For example, Star Electronics Company makes payment in cash to all the suppliers in one go. In such a case, the selected mode of payment will be cash while the affected accounts will be the supplier accounts. We can represent the transaction in the form of a journal entry given here:
Payment Mode: Cash
Account: Philips India (Supplier)
Sony India (Supplier)
To add a Payment voucher in Single Entry System, click Transactions Payment Add option. On clicking the Add option, a Payment Voucher – Add window appears. Given here is a screenshot of Payment Voucher – Add window.
Figure 6.14 Payment Voucher – Add
144
With the exception of certain data fields, most of the data fields and windows are same as the ones that appear when Double Entry System is followed. The common data fields and windows are explained in Double Entry System while the data fields specific to Single Entry System are explained here.
Payment Mode
Select the mode from the list displayed in the data field. Mode refers to the method by which payment is made i.e. cash or bank.
Narration
Specify the narration for the payment transaction.
Account Details
Under Account Details grid, you need to specify the accounts to be debited and the amount to be debited. In the Account Details grid, following fields appear:
Account
Select the account to be debited.
Amount
Specify the amount to be debited to the selected account.
Short Narration
Specify a short narration for the entry.
After entering appropriate data in the data fields, click the Save button to save the Payment voucher.
6.2.6 Receipt Receipt voucher is used to record receipt transactions i.e. payment received by you from your customers or parties. To enter a receipt transaction, click Transactions Receipt Add option. On clicking the Add option, a Receipt – Add window appears. For detailed help on entering Receipt transaction, please refer to the sub topic 6.2.5 – Payment, as Payment – Add window and Receipt – Add window are totally similar.
6.2.7 Journal Journal voucher is used to record entries that cannot be classified as Sale / Purchase, Sales Return / Purchase Return or Payment / Receipt. For example, to record entry of depreciation charged on fixed assets you can enter a Journal voucher. To enter a Journal voucher, click Transactions Journal
Single Entry Mode is available for Payment & Receipt vouchers only.
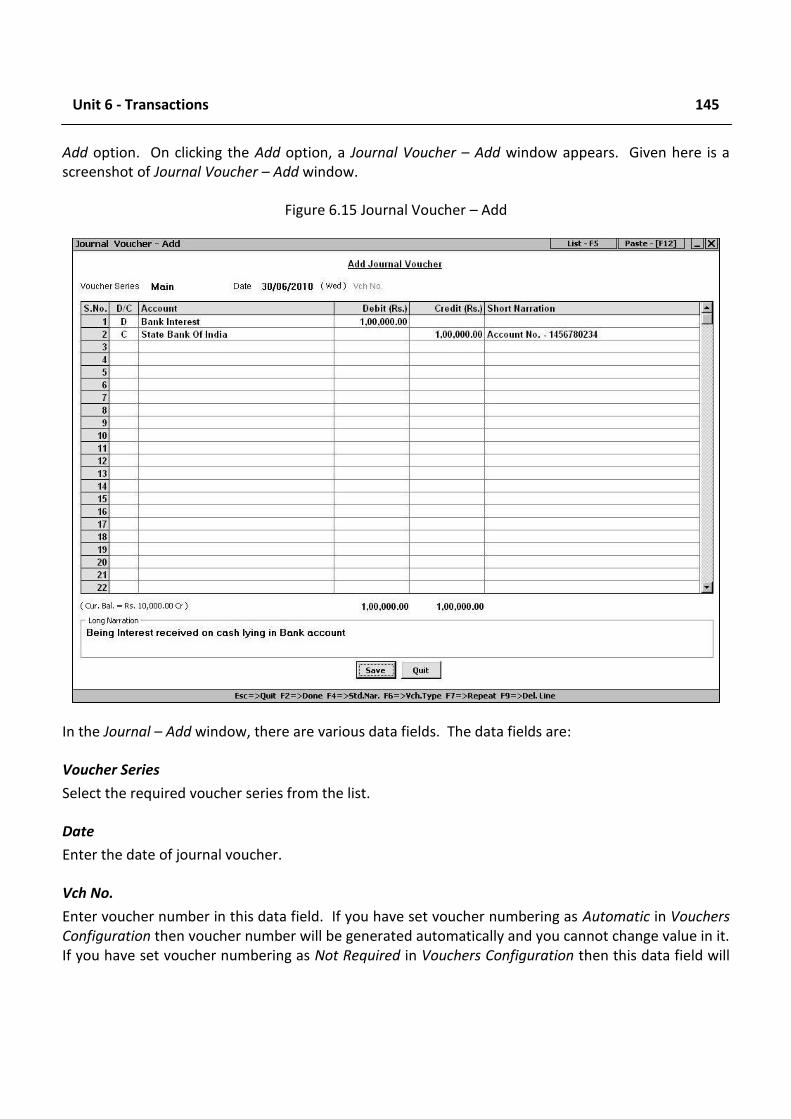
Unit 6 - Transactions 145
Add option. On clicking the Add option, a Journal Voucher – Add window appears. Given here is a screenshot of Journal Voucher – Add window.
Figure 6.15 Journal Voucher – Add
In the Journal – Add window, there are various data fields. The data fields are:
Voucher Series
Select the required voucher series from the list.
Date
Enter the date of journal voucher.
Vch No.
Enter voucher number in this data field. If you have set voucher numbering as Automatic in Vouchers Configuration then voucher number will be generated automatically and you cannot change value in it. If you have set voucher numbering as Not Required in Vouchers Configuration then this data field will
146
be disabled and you are not allowed to enter voucher number. By default, voucher numbering is set to Not Required for Journal vouchers.
Accounts Detail Grid
Under Account Details grid, you can select the accounts to be debited and credited and the debit / credit amount. Various fields under the Accounts Detail grid are:
D / C
Select ‘D’ if the account you will select next is to be debited otherwise select ‘C’ if the account you will select next is to be credited.
Account
Select account to be debited / credited.
Debit
Focus comes to this field, if you have selected ‘D’ in the D / C data field. Select the amount to be debited.
Credit
Focus comes to this field, if you have selected ‘C’ in the D / C data field. Select the amount to be credited.
Short Narration
Enter short narration for the entry in this data field.
Long Narration
Enter long narration for the voucher in this data field.
After entering appropriate data in the data fields, click the Save button to save the Journal voucher. On clicking the Save button certain windows appear. The windows are Bill-bill Adjustment of Amount, VAT Adjustment (Payment / Tax Adjustment / Refund) and CST Adjustment Details (Payment). For detailed help on these windows, please refer to the subtopic 6.2.5 – Payment.
6.2.8 Contra Contra entries are those entries that involve only Bank and Cash accounts. For example, cash deposited in bank, cash withdrawn from bank, bank to bank deposit and so on. To enter a Contra voucher, click Transactions Contra Add option. On clicking the Add option, a Contra Voucher – Add window appears. Given here is a screenshot of Contra Voucher – Add window.
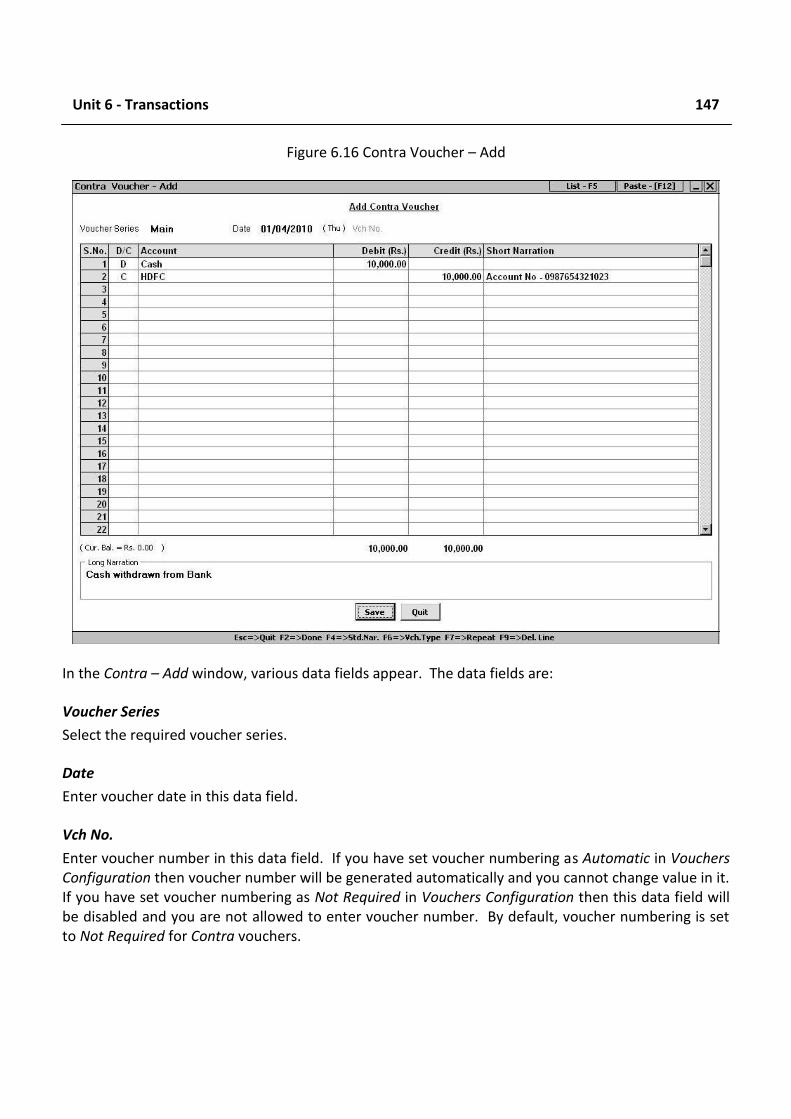
Unit 6 - Transactions 147
Figure 6.16 Contra Voucher – Add
In the Contra – Add window, various data fields appear. The data fields are:
Voucher Series
Select the required voucher series.
Date
Enter voucher date in this data field.
Vch No.
Enter voucher number in this data field. If you have set voucher numbering as Automatic in Vouchers Configuration then voucher number will be generated automatically and you cannot change value in it. If you have set voucher numbering as Not Required in Vouchers Configuration then this data field will be disabled and you are not allowed to enter voucher number. By default, voucher numbering is set to Not Required for Contra vouchers.
148
Account Details grid
In the Account Details grid, you can select the accounts to be debited / credited. Various fields in the grid are:
D / C
Select ‘D’ if the account you will select next is to be debited otherwise select ‘C’ if the account you will select next is to be credited.
Account
Select account to be debited / credited. The list will display only those accounts whose Parent Group is Cash or Bank.
Debit
Focus comes to this field, if you have selected ‘D’ in the D / C data field. Select the amount to be debited.
Credit
Focus comes to this field, if you have selected ‘C’ in the D / C data field. Select the amount to be credited.
Short Narration
Enter short narration for the entry in this data field.
Long Narration
Enter long narration for the voucher in this data field.
After entering appropriate data in the data fields, click the Save button to save the Contra voucher.
6.2.9 Debit Note Debit Note is a document for a debit to be raised against a party for reasons other than the invoice sent to the party. For example, Star Electronics Company has sold goods worth Rs. 1,00,000 to Smart Traders Corporation. Later on, it discovers that the goods were actually worth Rs. 1,10,000. Hence, the company will raise a Debit Note for the Smart Traders Corporation for the amount that is receivable from them. In BUSY you can enter Debit Note related details by using the Debit Note voucher.
To enter a Debit Note voucher, click Transactions Debit Note Add option. On clicking the Add option, a Debit Note – Add window appears. In the Debit Note – Add window, there are various data fields. The data fields are:
Series
Select the required voucher series from the list.
Unit 6 - Transactions 149
Date
Enter voucher date in this data field.
Vch No.
Enter voucher number in this data field. If you have set voucher numbering as Automatic in Vouchers Configuration then voucher number will be generated automatically and you cannot change value in it. If you have set voucher numbering as Not Required in Vouchers Configuration then this data field will be disabled and you are not allowed to enter voucher number. By default, voucher numbering is set to Automatic for Debit Note vouchers.
Account Details grid
In the Account Details grid, you can select the accounts to be debited / credited. Various fields in the grid are:
D / C
Select ‘D’ if the account you will select next is to be debited otherwise select ‘C’ if the account you will select next is to be credited.
Account
Select Account to be debited / credited. The list will display only those accounts whose Parent Group is Cash or Bank.
Debit
Focus comes to this field, if you have selected ‘D’ in the D / C data field. Select the amount to be debited.
Credit
Focus comes to this field, if you have selected ‘C’ in the D / C data field. Select the amount to be credited.
Short Narration
Enter short narration for the entry in this data field. For example, you can enter the original sale bill number in this data field against which you are entering a debit note.
Long Narration
Enter long narration for the voucher in this data field.
After entering appropriate data in the data fields, click the Save button to save the Debit Note voucher.
150
6.2.10 Credit Note Credit Note is a document for credit to be raised for a party for reasons other than the bill already received from that party. For example, Star Electronics Company decided to give additional trade discount of Rs. 10,000 to its customer Universal Traders. For this purpose, it will raise a credit note for Universal Traders for the discount amount. In BUSY you can enter Credit Note related details by using the Credit Note voucher.
To enter a Credit Note voucher, click Transactions Credit Note Add option. On clicking the Add option, a Credit Note – Add window appears. You can enter credit note related details in the Credit Note – Add window. For detailed help on Credit Note – Add window please refer to the sub topic 6.2.9 – Debit Note as Credit Note – Add window and Debit Note – Add window are totally similar.
6.2.11 Stock Transfer Stock transfer refers to movement of goods from one Material Centre to other. For example, Star Electronics Company sends stock of item LG AC 1.5 ton from its Karol Bagh Godown to R.P. Bagh Godown. Now to record this transaction, it will enter a Stock Transfer voucher. Stock Transfer voucher appears in Transactions menu only if you have enabled the Enable Multi-Godown Inventory feature under Administration Configuration Features / Options Inventory tab.
To enter a Stock Transfer voucher, click Transactions Stock Transfer Add option. On clicking the Add option, a Stock Transfer – Add window appears. Given here is a screenshot of Stock Transfer – Add window.
Image on next Page
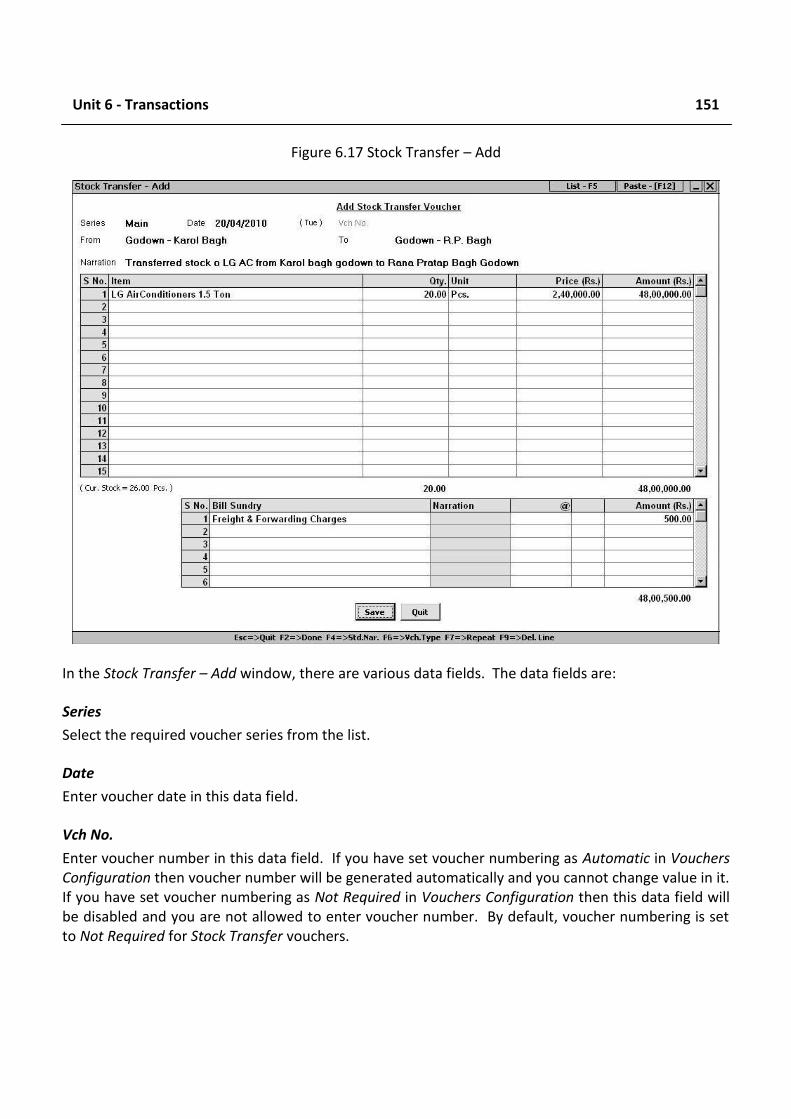
Unit 6 - Transactions 151
Figure 6.17 Stock Transfer – Add
In the Stock Transfer – Add window, there are various data fields. The data fields are:
Series
Select the required voucher series from the list.
Date
Enter voucher date in this data field.
Vch No.
Enter voucher number in this data field. If you have set voucher numbering as Automatic in Vouchers Configuration then voucher number will be generated automatically and you cannot change value in it. If you have set voucher numbering as Not Required in Vouchers Configuration then this data field will be disabled and you are not allowed to enter voucher number. By default, voucher numbering is set to Not Required for Stock Transfer vouchers.
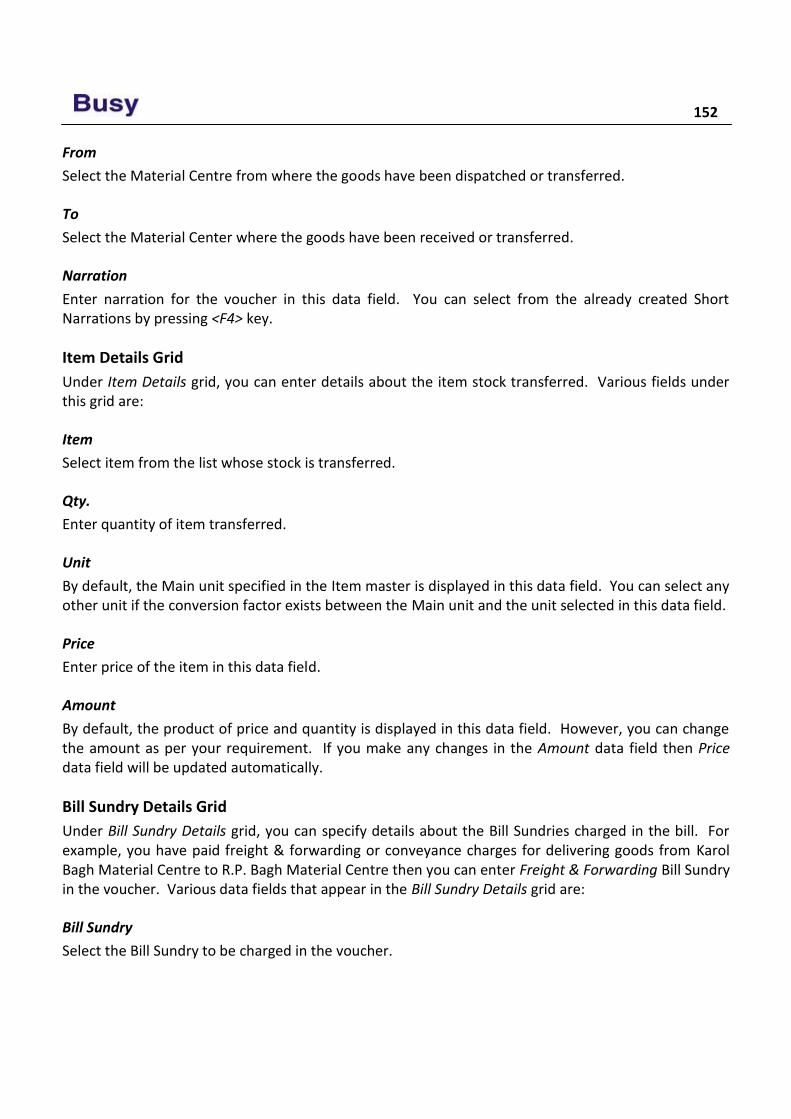
152
From
Select the Material Centre from where the goods have been dispatched or transferred.
To
Select the Material Center where the goods have been received or transferred.
Narration
Enter narration for the voucher in this data field. You can select from the already created Short Narrations by pressing <F4> key.
Item Details Grid
Under Item Details grid, you can enter details about the item stock transferred. Various fields under this grid are:
Item
Select item from the list whose stock is transferred.
Qty.
Enter quantity of item transferred.
Unit
By default, the Main unit specified in the Item master is displayed in this data field. You can select any other unit if the conversion factor exists between the Main unit and the unit selected in this data field.
Price
Enter price of the item in this data field.
Amount
By default, the product of price and quantity is displayed in this data field. However, you can change the amount as per your requirement. If you make any changes in the Amount data field then Price data field will be updated automatically.
Bill Sundry Details Grid
Under Bill Sundry Details grid, you can specify details about the Bill Sundries charged in the bill. For example, you have paid freight & forwarding or conveyance charges for delivering goods from Karol Bagh Material Centre to R.P. Bagh Material Centre then you can enter Freight & Forwarding Bill Sundry in the voucher. Various data fields that appear in the Bill Sundry Details grid are:
Bill Sundry
Select the Bill Sundry to be charged in the voucher.
Unit 6 - Transactions 153
Narration
This data field is active only if you have enabled the option of Enable Bill Sundry Narration in Administration Configuration Features / Options Inventory tab. Enter narration for the Bill Sundry in this data field.
@
By default, the value specified in the Bill Sundry is displayed here. You can change it as per your requirement.
Bill Sundry Fed As
Although no name is given to this data field, we have specified a name for your convenience. This data field signifies how the Bill Sundry is calculated. For example, if the Bill Sundry is calculated as % then % will appears in this data field. You cannot change the value in this data field.
Amount
This data field displays total Bill Sundry amount. By default, the amount calculated based on the value in the @ data field is displayed in this data field. You can change this value as per your requirement without affecting any other data field.
After entering appropriate data in the data fields, click the Save button to save the Stock Transfer voucher.
6.2.12 Forms Received Form Received voucher appears in Transactions menu only if you have enabled Sales Tax / VAT / GST for the company. This voucher is used to enter records of sales tax declaration forms received from parties at the time of sale or purchase. Generally, Sales Tax Declaration forms are received at the time of making sales. To enter details about the form received from the party you can enter the Form Received voucher. To enter a Form Received voucher, click Transactions Form Received Add option. On clicking the Add option, a Form Received – Add window appears. Given here is a screenshot of Form Received – Add window.
154
Figure 6.18 Form Received – Add
In the Form Received – Add window, there are various data fields. The data fields are:
Date
Enter date on which the form is received.
Form
Select form that has been received. The list displays all the ST Form masters.
Form No.
Enter the form number that is printed on the form. This is the unique number, which is printed on the form you have received.
State of Issue
Select the state from where the form has been issued.
Party
Select party who has issued the form.
Narration
Enter narration for the voucher in this data field.
Unit 6 - Transactions 155
Bill Details Grid
Although no name is given to this grid in the voucher, we have given it a name in the Courseware for your convenience. Under this grid, you have to specify the bill or voucher against which you have received the form. Various fields under this grid are:
Bill No.
Select the bill / voucher number against which you have received the form. The bill number is actually the voucher number. If no number was given to the voucher then this data field will remain blank. The bill numbers are displayed for those vouchers for which Form Receivable amount is entered in the ST Forms Details window in the relevant vouchers. For example, you have entered a Sales voucher with the Sale Type as C / C-Form. Further, you entered the Form Receivable amount in the ST Forms Details window that appears at the time of saving the voucher. Thus, only those vouchers will appear in the list in which you have entered a Form Receivable amount
Date
The voucher creation date of the selected Bill No. will be displayed in this data field. You cannot modify value in this data field.
Amount
The form receivable amount of the selected Bill No. will be displayed in this data field. Form Receivable amount is the amount that is entered in the ST Forms Details window that appears when you enter the relevant voucher. However, you can make modifications in the amount as per your requirement.
After entering appropriate data in the data fields, click the Save button to save the Form Received voucher.
6.2.13 Forms Issued Forms Issued voucher appears in Transactions menu only if you have enabled Sales Tax / VAT / GST for the company. This voucher is used to enter records of sales tax declaration issued to parties at the time of sale or purchase. Generally, Sales Tax Declaration forms are issued at the time of purchase. To enter details about the form issued to party you can enter the Form Issued voucher. To enter a Form Issued voucher, click Transactions Form Issued Add option. On clicking the Add option, a Form Issued – Add window appears. With the exception of few data fields, all the data fields that appear in Form Issued – Add window are totally similar to Form Received – Add window. The data field that is not common in both the windows is:
Rcvd from Authority on
Enter date on which you have received the Sales Tax Declaration Form from the Sales Tax authority.
Enter appropriate data in the data fields and click the Save button to save the Form Issued voucher.
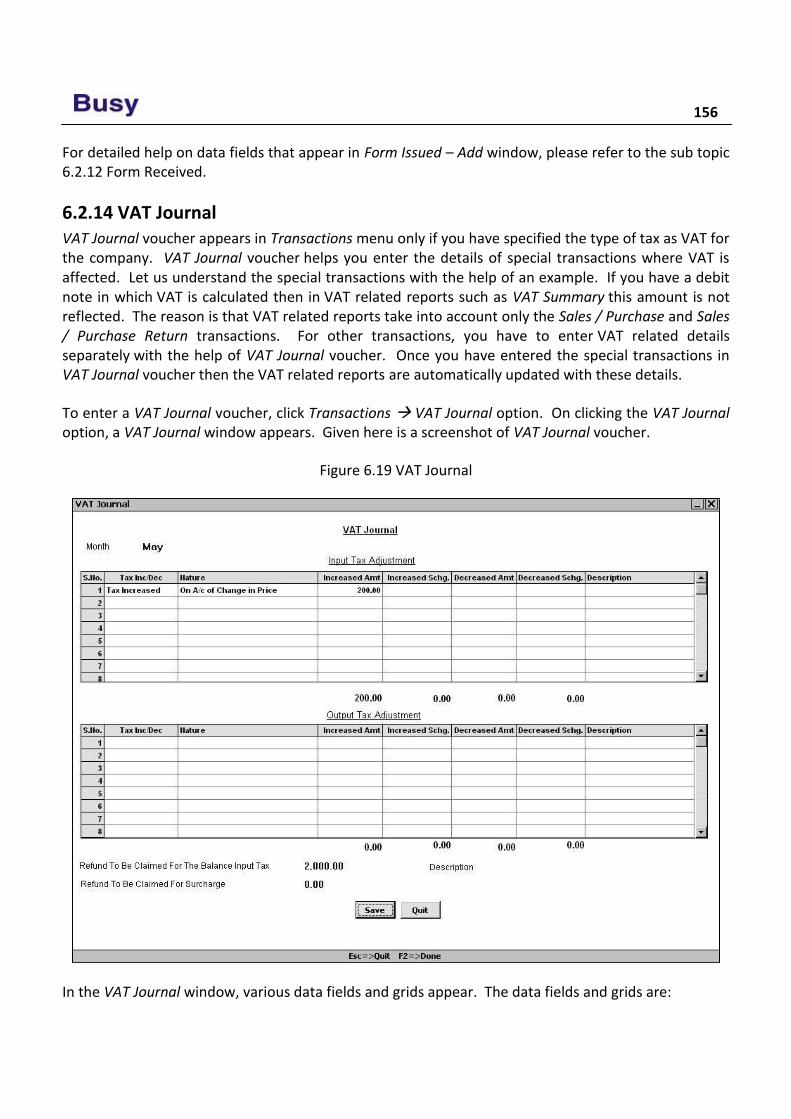
156
For detailed help on data fields that appear in Form Issued – Add window, please refer to the sub topic 6.2.12 Form Received.
6.2.14 VAT Journal VAT Journal voucher appears in Transactions menu only if you have specified the type of tax as VAT for the company. VAT Journal voucher helps you enter the details of special transactions where VAT is affected. Let us understand the special transactions with the help of an example. If you have a debit note in which VAT is calculated then in VAT related reports such as VAT Summary this amount is not reflected. The reason is that VAT related reports take into account only the Sales / Purchase and Sales / Purchase Return transactions. For other transactions, you have to enter VAT related details separately with the help of VAT Journal voucher. Once you have entered the special transactions in VAT Journal voucher then the VAT related reports are automatically updated with these details.
To enter a VAT Journal voucher, click Transactions VAT Journal option. On clicking the VAT Journal option, a VAT Journal window appears. Given here is a screenshot of VAT Journal voucher.
Figure 6.19 VAT Journal
In the VAT Journal window, various data fields and grids appear. The data fields and grids are:
Unit 6 - Transactions 157
Month
Select the month from the list for which you are entering a VAT Journal voucher.
Input Tax Adjustment
Input Tax is the tax paid on the purchase of goods. In this grid, you can enter transactions regarding adjustment of Input Tax. Various fields under this grid are:
Tax Increase / Decrease
Select Tax Increased option if the transaction you are entering is for increased Input Tax. Otherwise, select the Tax Decreased option, if the transaction you are entering is for decreased Input Tax.
Nature
Select the nature of transaction due to which Input Tax is increased / decreased. For example, you have sold an item to a company for Rs. 21,000 on which you charged VAT @ 5% i.e. Rs. 1,050. Later on, you discover that the actual price of the item is Rs. 27,000 and by mistake, it was entered as Rs. 21,000. Now you will take that extra amount from the party and due to this, Input Tax will also be increased to Rs. 1,350. Now for adjusting Rs. 300 (i.e. Rs. 1,350 – Rs. 1,050) you have to enter a VAT Journal voucher and select the Nature as On A/c of Price Change.
Increased Amount
Focus comes to this data field only if you have selected Tax Increased option. Specify the amount of Input Tax for which you are entering the transaction. Continuing with above example, you have to enter Rs. 200 in this field.
Increased Surcharge
This data field gets activated if Tax Increased option is selected from the Tax Increase / Decrease data field and Surcharge is enabled in the company. Enter the amount of increased surcharge in this data field.
Decreased Amount
This data field gets activated if Tax Decreased option is selected from the Tax Increase / Decrease data field. Enter the amount of decreased Input Tax in this data field.
Decreased Surcharge
This data field gets activated if Tax Increased option is selected from the Tax Increase / Decrease data field and Surcharge is enabled in the company. Enter the amount of decreased surcharge in this data field.
Description
This data field is active only if you have selected Other option in the Nature data field. Enter a description about the nature of transaction.
158
Output Tax Adjustment
Output Tax is the tax charged on sale of goods. In this grid, you can enter transactions regarding adjustment of Output Tax. All the fields in this grid are similar to the one that appear for Input Tax with only difference that data entered in these fields will be for adjusting output tax.
Refund to be Claimed for the Balance Input Tax
Enter the amount of Input Tax that is to be claimed from the government. For example, Star Electronics Company purchases ten computers with Bar Codes for its billing counters on which it paid Rs. 5,000 as VAT to the government. Since the goods i.e. computers are purchased for use in business, the Company can claim Rs. 5,000 from the government. Further Star Electronics makes a sale transaction and charges Rs. 3,000 as VAT, which is to be deposited to the government. In this case company can adjust Rs. 3,000 with the amount to be claimed from the government i.e. Rs. 5,000. After adjustment, Rs. 2,000 balance remains with the government, which the company can claim later on. This balance of Rs. 2,000 is the refund amount to be claimed from the government.
Refund to be Claimed for Surcharge
This data field appears if you have enabled Surcharge for the company. Specify the surcharge amount to be claimed from the government.
After entering appropriate data in the data fields, click the Save button to save the Journal voucher.
6.3 Configuring Vouchers Configuring Vouchers refer to setting various features and options to be displayed and used in voucher as per User’s requirement. To configure various vouchers, BUSY provides Vouchers Configuration option under Administration Configuration menu. In Vouchers Configuration, a lot of options are provided which you can enable as per your requirement. For example, you can enable Optional Fields for voucher, enable automatic rounding off of bill amount and many more such features. To use Vouchers Configuration option, click Administration Configuration Vouchers Configuration option. On clicking the Vouchers Configuration option, a Voucher Configuration window appears. Given here is a screenshot of Voucher Configuration window.
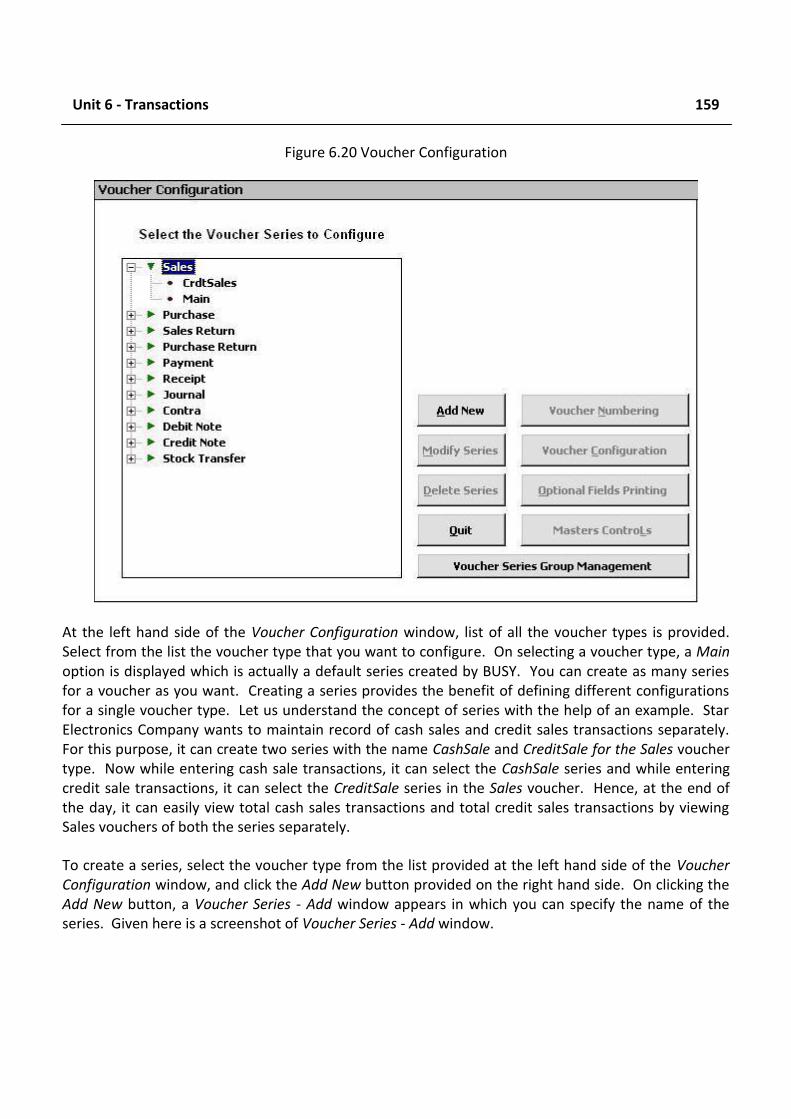
Unit 6 - Transactions 159
Figure 6.20 Voucher Configuration
At the left hand side of the Voucher Configuration window, list of all the voucher types is provided. Select from the list the voucher type that you want to configure. On selecting a voucher type, a Main option is displayed which is actually a default series created by BUSY. You can create as many series for a voucher as you want. Creating a series provides the benefit of defining different configurations for a single voucher type. Let us understand the concept of series with the help of an example. Star Electronics Company wants to maintain record of cash sales and credit sales transactions separately. For this purpose, it can create two series with the name CashSale and CreditSale for the Sales voucher type. Now while entering cash sale transactions, it can select the CashSale series and while entering credit sale transactions, it can select the CreditSale series in the Sales voucher. Hence, at the end of the day, it can easily view total cash sales transactions and total credit sales transactions by viewing Sales vouchers of both the series separately.
To create a series, select the voucher type from the list provided at the left hand side of the Voucher Configuration window, and click the Add New button provided on the right hand side. On clicking the Add New button, a Voucher Series - Add window appears in which you can specify the name of the series. Given here is a screenshot of Voucher Series - Add window.
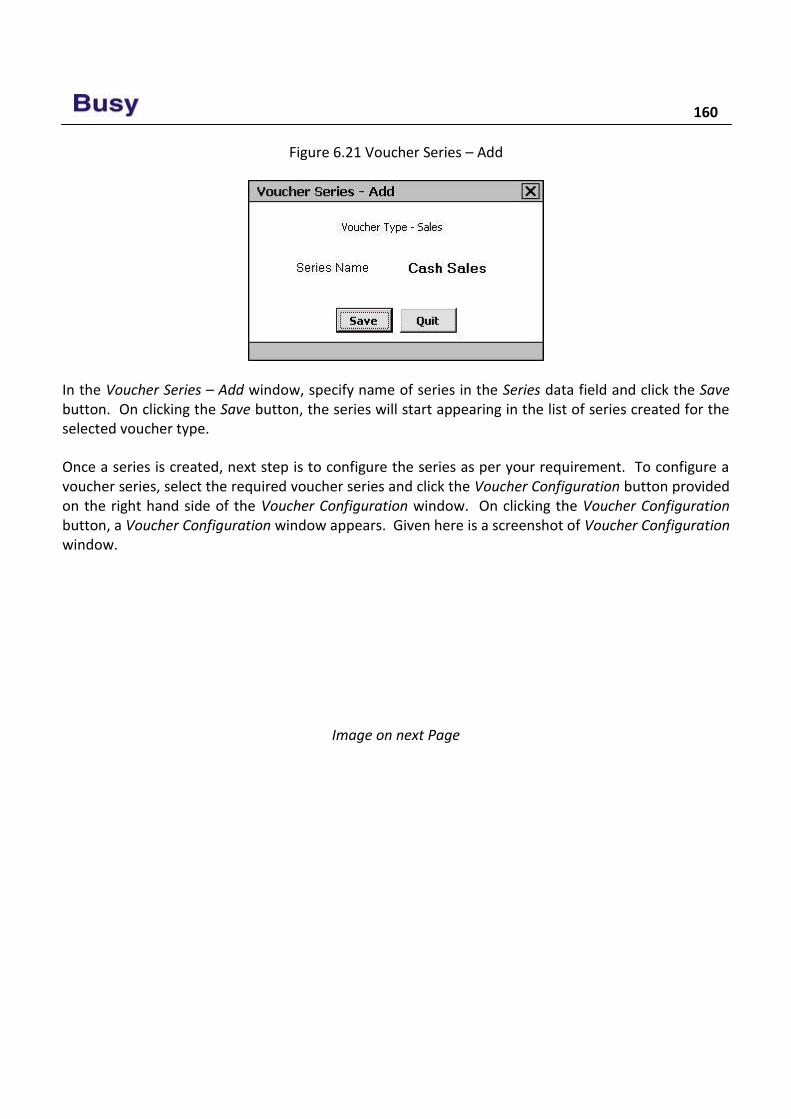
160
Figure 6.21 Voucher Series – Add
In the Voucher Series – Add window, specify name of series in the Series data field and click the Save button. On clicking the Save button, the series will start appearing in the list of series created for the selected voucher type.
Once a series is created, next step is to configure the series as per your requirement. To configure a voucher series, select the required voucher series and click the Voucher Configuration button provided on the right hand side of the Voucher Configuration window. On clicking the Voucher Configuration button, a Voucher Configuration window appears. Given here is a screenshot of Voucher Configuration window.
Image on next Page
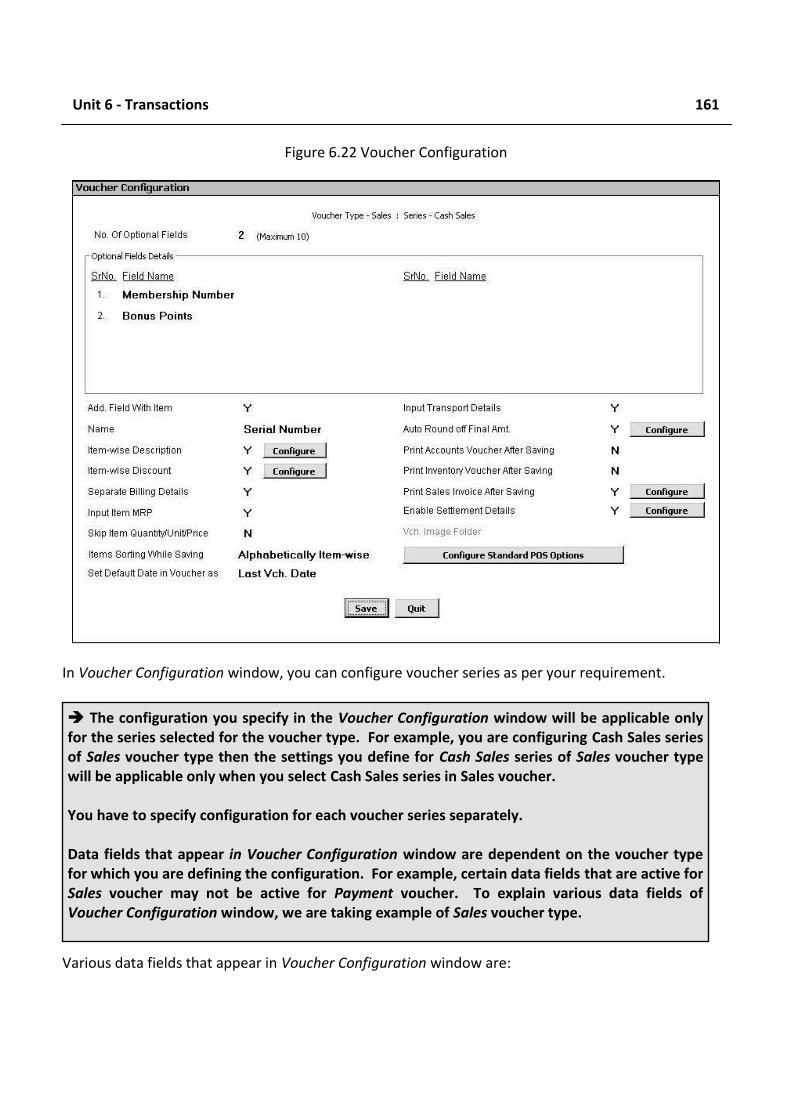
Unit 6 - Transactions 161
Figure 6.22 Voucher Configuration
In Voucher Configuration window, you can configure voucher series as per your requirement.
Various data fields that appear in Voucher Configuration window are:
The configuration you specify in the Voucher Configuration window will be applicable only for the series selected for the voucher type. For example, you are configuring Cash Sales series of Sales voucher type then the settings you define for Cash Sales series of Sales voucher type will be applicable only when you select Cash Sales series in Sales voucher. You have to specify configuration for each voucher series separately. Data fields that appear in Voucher Configuration window are dependent on the voucher type for which you are defining the configuration. For example, certain data fields that are active for Sales voucher may not be active for Payment voucher. To explain various data fields of Voucher Configuration window, we are taking example of Sales voucher type.
162
No of Optional Fields
Optional Fields are the User-Defined fields that vary from User to User. Each User can create Optional Fields as per his requirement. Maximum ten Optional Fields can be defined for a series. We have also discussed Master Optional Fields in Unit 5, which can be configured for various Masters. Master Optional Fields are used to describe additional characteristics or details about a Master whereas Voucher Optional Fields are used to describe any additional information or detail about the voucher.
Enter the number of Optional Fields for which you want to enter the data at the time of entering a voucher. You cannot enter a number more than 10 in this data field.
On entering a number in the range 1-10, the appropriate number of fields becomes active below the data field. In the screenshot (Figure 6.22, Voucher Configuration), the number of Optional Fields is two. Thus, two data fields are active wherein you can enter name of the fields in accordance with the serial number.
Add. Field with Item
Specify ‘Y’ in this data field if you want to create an additional field with item in which you can specify any extra information about the item at the time of voucher entry.
Name
This data field gets active only if you have specified ‘Y’ in the Add. Field with Item data field. Enter name for the additional field in this data field. Let us understand the relevance of Additional Field with the help of an example. Star Electronics Company wants to print Serial number of each item in the bill. For this purpose, it creates an additional field with the name Serial No. Now, whenever, it will select an item in the voucher and press <Enter> key, an Additional Field window will appear with Serial No. data field in which User can enter serial number of the item he is selling / buying.
Item-Wise Description
Specify ‘Y’ in this data field if you want to enter description about an item at the time of voucher entry. On specifying ‘Y’ in this data field, a Configure button appears. Click the Configure button to specify the number of description lines required with item at the time of voucher entry and the title for the description lines. On clicking the Configure button, an Item-Wise Description Configuration window appears. Given here is a screenshot of Item-Wise Description Configuration window.
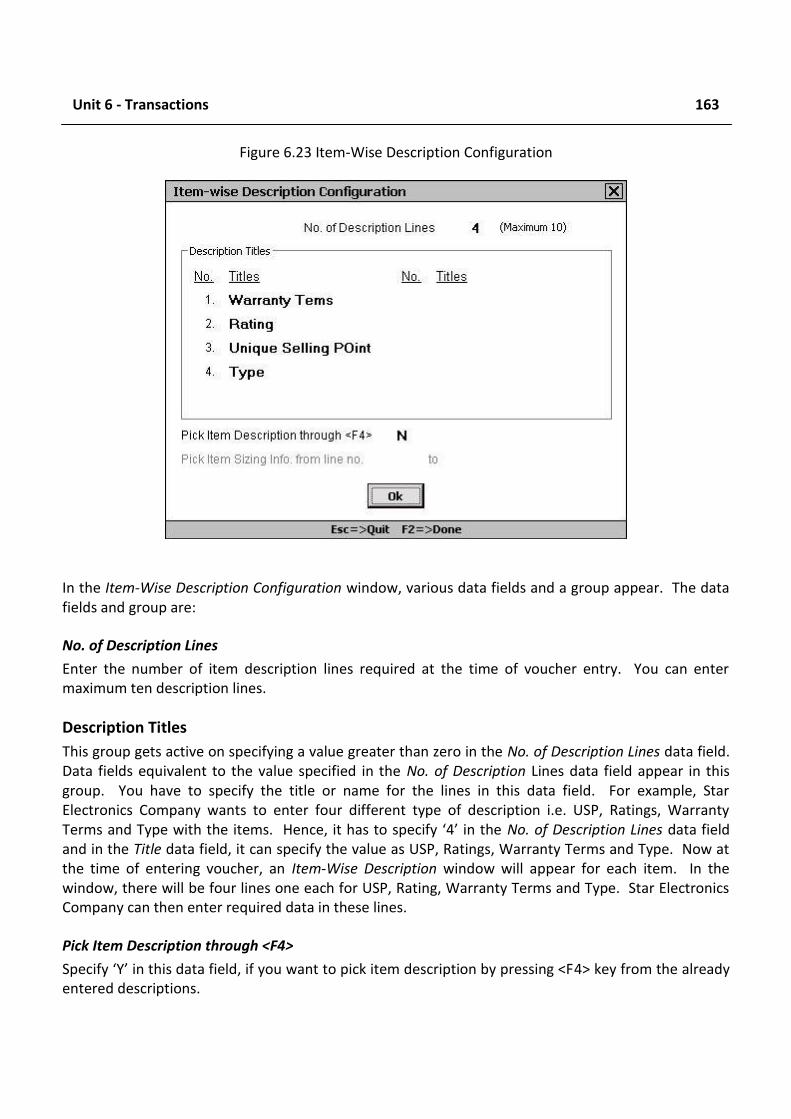
Unit 6 - Transactions 163
Figure 6.23 Item-Wise Description Configuration
In the Item-Wise Description Configuration window, various data fields and a group appear. The data fields and group are:
No. of Description Lines
Enter the number of item description lines required at the time of voucher entry. You can enter maximum ten description lines.
Description Titles
This group gets active on specifying a value greater than zero in the No. of Description Lines data field. Data fields equivalent to the value specified in the No. of Description Lines data field appear in this group. You have to specify the title or name for the lines in this data field. For example, Star Electronics Company wants to enter four different type of description i.e. USP, Ratings, Warranty Terms and Type with the items. Hence, it has to specify ‘4’ in the No. of Description Lines data field and in the Title data field, it can specify the value as USP, Ratings, Warranty Terms and Type. Now at the time of entering voucher, an Item-Wise Description window will appear for each item. In the window, there will be four lines one each for USP, Rating, Warranty Terms and Type. Star Electronics Company can then enter required data in these lines.
Pick Item Description through <F4>
Specify ‘Y’ in this data field, if you want to pick item description by pressing <F4> key from the already entered descriptions.
164
Item-Wise Discount
Specify ‘Y’ in this data field if you want to enter discount with each item at the time of voucher entry. On specifying ‘Y’ in this data field, an Item-Wise Discount window will appear with each item at the time of voucher entry in which you can enter the discount to be given / taken on item. On specifying ‘Y’ in this data field, a Configure button appears. On clicking the Configure button, a Calculation of Item-Wise Discount window appears. In the Calculation of Item-Wise Discount window, following two groups appear:
Discount Type
In this group, there is only one option. The option is:
Simple Discount - Select this option if you want to enter simple discount.
Amount of Discount to be Fed As
In this group, you can configure item-wise discount based on four options. The options are:
Absolute Amount - Select this option if you want to enter an absolute amount of discount for an item. For example, Star Electronics Company wants to give Rs. 1,000 discount on a bill of Rs. 10,000 and above. For this purpose, it can select this option.
Percentage - Select this option if you want to give discount at a specified rate on the item price / amount / MRP. On selecting this option, you have to specify the item value i.e. price, amount or MRP on which you want to calculate the discount percentage. On selecting this option, following options appear:
o Item Price – Select this option if you want to calculate the discount on item price. For example, Star Electronics Company wants to give 5% discount on the price of item LG AC 1.5 ton. Hence, it will select this option and enter the discount percentage as ‘5’ in the Item Price & Discount window that appears at the time of voucher entry. Now if the cost of LG AC 1.5 ton is Rs. 25,000 then discount will be Rs. 1,250 and the price of the item after discount will be Rs. 23,750.
o Item MRP – Select this option if you want to calculate discount percentage on Item MRP.
o Item Amount – Select this option if you want to calculate discount percentage on total item amount.
Per Main Qty. - Select this option if you want to give discount as per main quantity. For example, Star Electronics Company wants to give flat Rs. 2,000 as discount on each unit of item LG AC 1.5 ton. For this purpose, it can select this option and specify the rate of discount for each unit of item at the time of voucher entry.
Separate Billing Details
Specify ‘Y’ in this data field if you want to maintain party’s billing address separately. On specifying ‘Y’ in this data field, a Separate Billing Details window will appear on selecting a party at in the voucher. In the Separate Billing Details window, you can enter the Name, TIN and address of the party. This
Unit 6 - Transactions 165
field is useful if you want to print some other address of the party as it is entered in the Account master. For example, Star Electronics Company has sold goods to Smart Traders Corporation but Smart Traders Corporation wants the goods to be delivered at one of their branch office instead of head office and wants the branch office address to be printed on the bill. In the Account master of Smart Traders Corporation, address of the head office exists. Now for this purpose Star Electronics Company can enter the branch office address of Smart Traders in the Separate Billing Details window.
Input Item MRP
Specify ‘Y’ in this data field if you want to enter MRP of the item at the time of voucher entry. On specifying ‘Y’ in this data field, an Input Item MRP window will appear with each item at the time of voucher entry.
Skip Item Qty / Unit / Price
Specify 'Y' in this data field if you want to skip Quantity, Unit and Price fields in the Item Details grid at the time of voucher entry. On specifying 'Y' in this data field, Quantity, Unit and Price fields of Item Details grid will be de-activated at the time of voucher entry. This feature is useful for companies falling under Service Tax Category in which the services rendered cannot be measured in terms of quantity, unit or price per unit.
Items Sorting While Saving
Select from the list the type of sorting to be applied on the items at the time of voucher saving. In the list, there are three options. The options are:
None - Select this option if you do not want to sort voucher items at the time of voucher saving. On selecting this option, order of the items as specified in the voucher will not be changed at the time of voucher saving.
Alphabetically Item-Wise - Select this option if you want to sort items alphabetically at the time of voucher saving. On selecting this option all the items used in the voucher will be sorted alphabetically.
Alphabetically Item Group-Wise - Select this option if you want to sort items, group-wise at the time of voucher saving. On selecting this option, all the items will be sorted according to their Parent Group. For example, there are three items in a voucher, LG AC 1.5 ton, Sony LCD Bravia and Voltas AC 1.5 ton. Out of these three items, LG AC 1.5 ton and Voltas AC 1.5 ton belongs to Air Conditioner Parent Group and Sony LCD Bravia item belongs to Television Parent Group. In this case, with this option selected, first, items of Air Conditioner Parent Group will be sorted and then items of Television Parent Group will be sorted on saving the voucher. Hence, at the
The address and other details specified in the Separate Billing Details window will be printed in the bill. If you do not enter any details in the Separate Billing Details window then party name, address and TIN will be picked from Account master and the same will be printed in the bill.
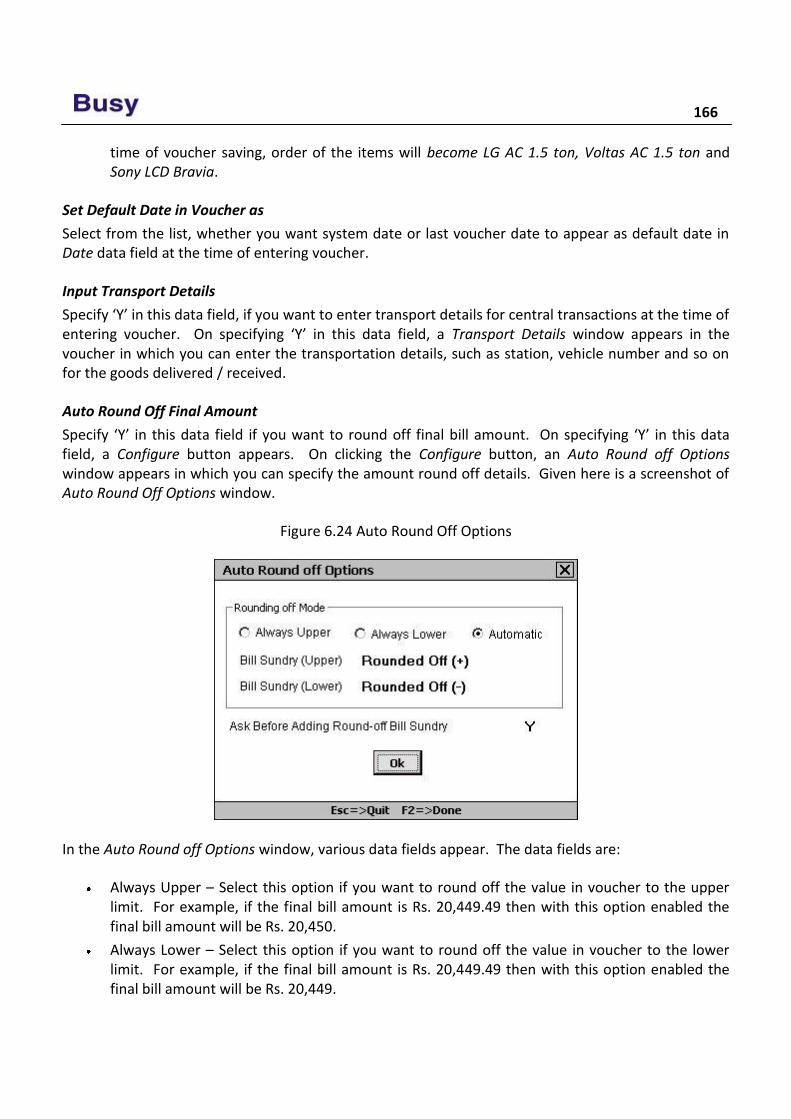
166
time of voucher saving, order of the items will become LG AC 1.5 ton, Voltas AC 1.5 ton and Sony LCD Bravia.
Set Default Date in Voucher as
Select from the list, whether you want system date or last voucher date to appear as default date in Date data field at the time of entering voucher.
Input Transport Details
Specify ‘Y’ in this data field, if you want to enter transport details for central transactions at the time of entering voucher. On specifying ‘Y’ in this data field, a Transport Details window appears in the voucher in which you can enter the transportation details, such as station, vehicle number and so on for the goods delivered / received.
Auto Round Off Final Amount
Specify ‘Y’ in this data field if you want to round off final bill amount. On specifying ‘Y’ in this data field, a Configure button appears. On clicking the Configure button, an Auto Round off Options window appears in which you can specify the amount round off details. Given here is a screenshot of Auto Round Off Options window.
Figure 6.24 Auto Round Off Options
In the Auto Round off Options window, various data fields appear. The data fields are:
Always Upper – Select this option if you want to round off the value in voucher to the upper limit. For example, if the final bill amount is Rs. 20,449.49 then with this option enabled the final bill amount will be Rs. 20,450.
Always Lower – Select this option if you want to round off the value in voucher to the lower limit. For example, if the final bill amount is Rs. 20,449.49 then with this option enabled the final bill amount will be Rs. 20,449.
Unit 6 - Transactions 167
Automatic - Select this option if you want to round off the value in voucher automatically. If the amount is less than .50 then it will be rounded off to the lower limit and if the amount is equal to or greater than .50 then it will be rounded off to the upper limit.
Bill Sundry (Upper) – Specify the Bill Sundry to be added in voucher to adjust the round off amount. You can select only those Bill Sundries that are additive in nature.
Bill Sundry (Lower) – Specify the Bill Sundry to be added in voucher to adjust the round off amount. You can select only those Bill Sundries that are subtractive in nature.
Ask before Rounding off Bill Sundry – Specify ‘Y’ in this data field if you want to ask before rounding off the bill amount at the time of voucher saving. On specifying ‘Y’ in this data field, a message box will appear on saving the voucher asking you whether you want to add round off Bill Sundry. If you click Yes button in the message box then only the bill amount will be round off.
Print Account Voucher After Saving
Specify ‘Y’ in this data field if you want to print accounting aspect of the voucher after saving the voucher. On specifying ‘Y’ in this data field, a Print Account Voucher message box appears on saving the voucher. Click the Yes button in the message box to print the accounting aspect of the transaction. If you print only accounting aspect of a voucher then in the bill only the debit and credit aspect of the transaction will be printed. For example, Star Electronics Company has sold 10 pieces of item LG AC 1.5 ton to Smart Traders Corporation amounting to Rs. 2,60,000. If the Star Electronics Company prints the account bill for this transaction then the following details will be printed:
Debit: Smart Traders Corporation 2,60,000
Credit: Sales Account 2,60,000
No details of item sold will be printed in the bill, if you are printing only accounting voucher.
On specifying ‘Y’ in this data field, a Configure button appears. On clicking the Configure button, a Printing Details window appears in which you can define the settings for printing accounting part of a voucher. Various data fields in the Printing Details window are:
Prompt for Printing After Saving – On specifying 'Y' in this data field, a message box asking to print accounts voucher will appear at the time of saving the voucher.
Show Print Options - Specify 'Y' in this data field if you want Printing Options form to appear at the time of accounts voucher printing. In Printing Option forms, you can specify the printing details plus various criteria for printing the bill.
Specify Default No. of Copies - Specify 'Y' in this data field if you want to specify the default number of copies to be printed for the accounts voucher.
No. of Copies - This data field is activated if you have specified 'Y' in the Specify Default No. of Copies data field. Specify the number of copies that you want to print for the accounts voucher.
168
Can Change No. of Copies - This data field gets activated if you have specified 'Y' in the Specify Default No. of Copies data field. Specify 'Y' in this data field if you want to change the number of copies to print for the accounts voucher at the time of printing the accounts voucher.
Print Inventory Voucher After Saving
Specify ‘Y’ in this data field if you want to print inventory part of the transaction in the bill. On specifying ‘Y’ in this data field, a Print Inventory Voucher message box appears on saving the voucher. Click the Yes button in the message box to print the inventory aspect of the transaction. If you print only the inventory aspect then the inventory details will be printed in the bill. For example, Star Electronics Company has sold 10 pieces of item LG AC 1.5 ton to Smart Traders Corporation amounting to Rs. 2,60,000. If the Star Electronics Company prints the inventory bill for this transaction then the following details will be printed:
Party: Smart Traders Corporation
S. No. Item Description Qty. Unit Price Discount Amount
1. LG AC 1.5 ton 10 Pcs 26,000 0% 2,60,000
On specifying ‘Y’ in this data field, a Configure button appears. On clicking the Configure button, a Printing Details window appear in which you can set the printing details for printing inventory part of transaction. This window is similar to the Printing Details window explained for accounting part above.
Print Invoice After Saving
Specify ‘Y’ in this data field, if you want to print full invoice i.e. both the accounting and the inventory aspect of the voucher. On specifying ‘Y’ in this data field, a Configure button appears. On clicking the Configure button, a Printing Details window appears. This window is similar to the Printing Details window that appears for printing accounting aspect of voucher. However, in the Printing Details window that appears for full invoice printing, you can create four different formats and specify the settings for each format. Hence, you can print the full invoice in four different formats.
If you specify ‘Y’ in this data field then a Print Invoice message box appears on saving the voucher. Click the Yes button in the message box to print the full transaction.
Enable Settlement Details
Specify ‘Y’ in this data field if you want to enter settlement details in the voucher. Settlement details refer to the details about the adjustment of bill amount given by / to the customer. On specifying ‘Y’ in this data field, a Configure button appears. On clicking the Configure button, a Voucher Settlement Configuration window appears. Given here is a screenshot of Voucher Settlement Configuration window.

Unit 6 - Transactions 169
Figure 6.25 Voucher Settlement Configuration
In the Voucher Settlement Configuration window, there are various data fields. The data fields are:
Allow – Under this data field, you have to select the payment modes that are to be allowed for making / receiving payments. Various options under this data field are:
o Cash - Select this option if you accept or make cash payments.
o CC (M/C-1) - Select this option if you accept or make credit card payments also.
o CC (M/C-2) - Select this option if you accept or make payments through more than one credit card.
o CC (M/C-3) - Select this option if you accept or make payments through more than two credit cards.
o Cheque - Select this option if you accept or make cheque payments.
Acc Name - Specify the name of the account to which the amount will be adjusted for the corresponding payment option. For example, if you specify Cash A/c in this data field in front of Cash option then all the payments made in cash will be posted to Cash account.
Caption - Specify the caption for the corresponding payment mode in the voucher. For example, if you specify Cash Payment value in this data field in front of Cash option then in voucher, instead of Cash, Cash Payment data field will appear for entering cash payment / receipts in the Amount Settlement Details group.
Enforce Narr. - Specify 'Y' in this data field if you do not want a voucher to be saved unless a narration is entered in the corresponding field.
170
Enforce Full Adjustment of Amount - Specify 'Y' in this data field if you want that at the time of voucher entry full amount of voucher should be adjusted in the Amount Settlement Details group. If you specify 'Y' in this data field, then at the time of voucher entry, you have to adjust full bill amount manually in the various payment modes available in the voucher. BUSY will not allow you to save the voucher unless you adjust the full bill amount. On the other hand, if you specify 'N' in this data field and do not adjust full bill amount in the various payment modes available in the voucher then the balance bill amount will be debited / credited to the party (as selected in the voucher) account. A label will appear in the voucher displaying the balance amount debited / credited to the party.
Post Settlement Data along with Party Data – Specify ‘Y’ in this data field if you want to post party details also along with the settlement details. For example, Star Electronics Company made a sale to Smart Traders Corporation for Rs. 25,000 and Smart Traders Corporation paid Rs. 5,000 by Cash and Rs. 20,000 by Credit Card. Now if this option is enabled then following entries for this transaction will be posted:
Debit: Smart Traders Corporation 25,000 Credit: Sales A/c 25,000
Debit: Cash A/c 5,000 Debit: Credit Card A/c 20,000 Credit: Smart Traders Corporation 25,000
If this option is disabled then following entry will be posted:
Debit: Cash A/c 5,000 Debit: Credit Card A/c 20,000 Credit: Sales A/c 25,000
This option is useful only if you want to maintain details of the party with whom the transaction has been made.
After entering appropriate data in the data fields, click the Save button to save the Voucher Configuration details.
Review In BUSY, voucher numbers can be generated automatically by defining the configuration
(prefix, suffix, numeric number) in advance.
You can fix length of numeric part of the voucher number and specify the character to be added to numeric part to make it equal in length with the higher numbers.
You can set maximum number or limit for vouchers that can be entered in a voucher series.
Unit 6 - Transactions 171
Sale / Purchase Account data field appears in Sale / Purchase voucher only if the Sale / Purchase Type selected in voucher has Specify in Voucher option enabled in it.
With Item-Wise Sales Tax and Item-Wise Tax Information window, you can specify the tax rate individually with each item used in voucher.
You can specify the Form Issued / Received Amount in the ST Form Details window that appears in various vouchers.
Journal voucher is basically entered for the entries that cannot be classified as sale / purchase, payment / receipt and so on. For example, entry for Depreciation charged on fixed assets, entry for salary paid to the employees and so on.
Contra voucher is entered for entries that involve only cash or bank accounts.
Debit / Credit Note vouchers are raised for a party for reasons other than invoice sent to the party or received from the party. It denotes the amount to be taken / given from / to the party for various reasons.
Stock Transfer voucher records the movement of goods from one Material Centre to another.
Form Issued / Received vouchers are entered when the ST Form is issued / received to / from the party.
By creating different voucher series for a voucher type, you can set different voucher settings for a single voucher type.
Using Vouchers Configuration option, you can define the settings for automatic round off of the bill amount in advance.
Exercise 1 . Voucher Numbering for a series can be:
a) Automatic c) Not Required b) Manual d) All of the above
2 . We can add prefix or suffix to a voucher number if numbering type is:
a) Automatic c) Not Required b) Manual d) All of the above
3 . Sale Type used for entering separate tax rate with each item is:
a) VAT Multi Tax c) VAT 1% (R) b) VAT 5% (T) d) VAT Exempt
4 . In a voucher, existing Short Narrations can be picked by pressing:
a) F4 key c) F3 key b) F12 key d) Enter Key
5 . Occurrence of Form Receivable / Issuable window in a voucher is dependent on:
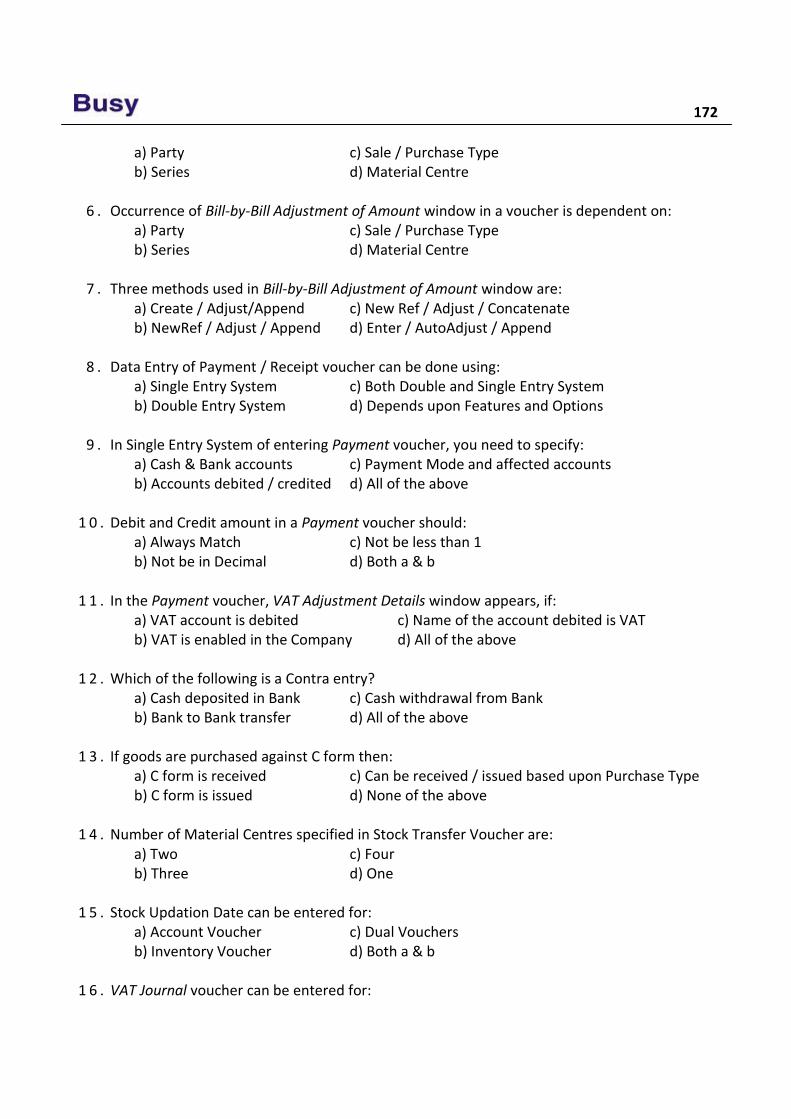
172
a) Party c) Sale / Purchase Type b) Series d) Material Centre
6 . Occurrence of Bill-by-Bill Adjustment of Amount window in a voucher is dependent on:
a) Party c) Sale / Purchase Type b) Series d) Material Centre
7 . Three methods used in Bill-by-Bill Adjustment of Amount window are: a) Create / Adjust/Append c) New Ref / Adjust / Concatenate b) NewRef / Adjust / Append d) Enter / AutoAdjust / Append
8 . Data Entry of Payment / Receipt voucher can be done using: a) Single Entry System c) Both Double and Single Entry System b) Double Entry System d) Depends upon Features and Options
9 . In Single Entry System of entering Payment voucher, you need to specify: a) Cash & Bank accounts c) Payment Mode and affected accounts b) Accounts debited / credited d) All of the above
1 0 . Debit and Credit amount in a Payment voucher should: a) Always Match c) Not be less than 1 b) Not be in Decimal d) Both a & b
1 1 . In the Payment voucher, VAT Adjustment Details window appears, if: a) VAT account is debited c) Name of the account debited is VAT b) VAT is enabled in the Company d) All of the above
1 2 . Which of the following is a Contra entry?
a) Cash deposited in Bank c) Cash withdrawal from Bank b) Bank to Bank transfer d) All of the above
1 3 . If goods are purchased against C form then:
a) C form is received c) Can be received / issued based upon Purchase Type b) C form is issued d) None of the above
1 4 . Number of Material Centres specified in Stock Transfer Voucher are: a) Two c) Four b) Three d) One
1 5 . Stock Updation Date can be entered for: a) Account Voucher c) Dual Vouchers b) Inventory Voucher d) Both a & b
1 6 . VAT Journal voucher can be entered for:

Unit 6 - Transactions 173
a) Increase Input Tax c) Increased Output Tax b) Decreased Input Tax d) All of the above
1 7 . Maximum number of lines used for item Description can be: a) 10 c) 4 b) 15 d) 5
1 8 . Account Settlement details can be defined for:
a) Sales Return voucher c) Journal voucher b) Debit Note voucher d) All of the above
1 9 . We can configure Voucher Optional Fields for:
a) Sales Voucher c) Debit Note Voucher b) Stock Transfer Voucher d) All of the above
2 0 . A Sales voucher can be printed as: a) Account Voucher c) Full Invoice b) Inventory Voucher d) All of the above
2 1 . Explain with a suitable example, the use of Debit Note / Credit Note vouchers.
2 2 . Can we sort items while saving a voucher? If yes, then explain the steps.
2 3 . Open company Star Electronics Pvt. Ltd. and perform the following steps in it:
a) Create a series named Retail for Sales voucher and change name of the series Main to Tax b) Set the following configuration for Retail series:
Set Voucher Numbering as Automatic. Enable Item Additional field and specify its name as Item Specification. Enable Item wise Discount feature and set the discount type as percentage. Enable Auto Round off feature and set rounding off mode as Always Upper.
c) Set the following configuration for Tax series:
Set Voucher Numbering as Automatic with Prefix as T, Suffix as / 2010-11, length of numeric part – 4 and padding character as 0.
Enable Item wise Discount and specify discount type as Absolute amount. Enable Auto Round off with Rounding off mode as Automatic. Enable Account Settlement Details feature with payment mode as Cash and Credit card only.
d) In the Main series of Purchase voucher, set the Voucher Numbering as Automatic with
prefix as ‘Purc’ and starting number as 1.
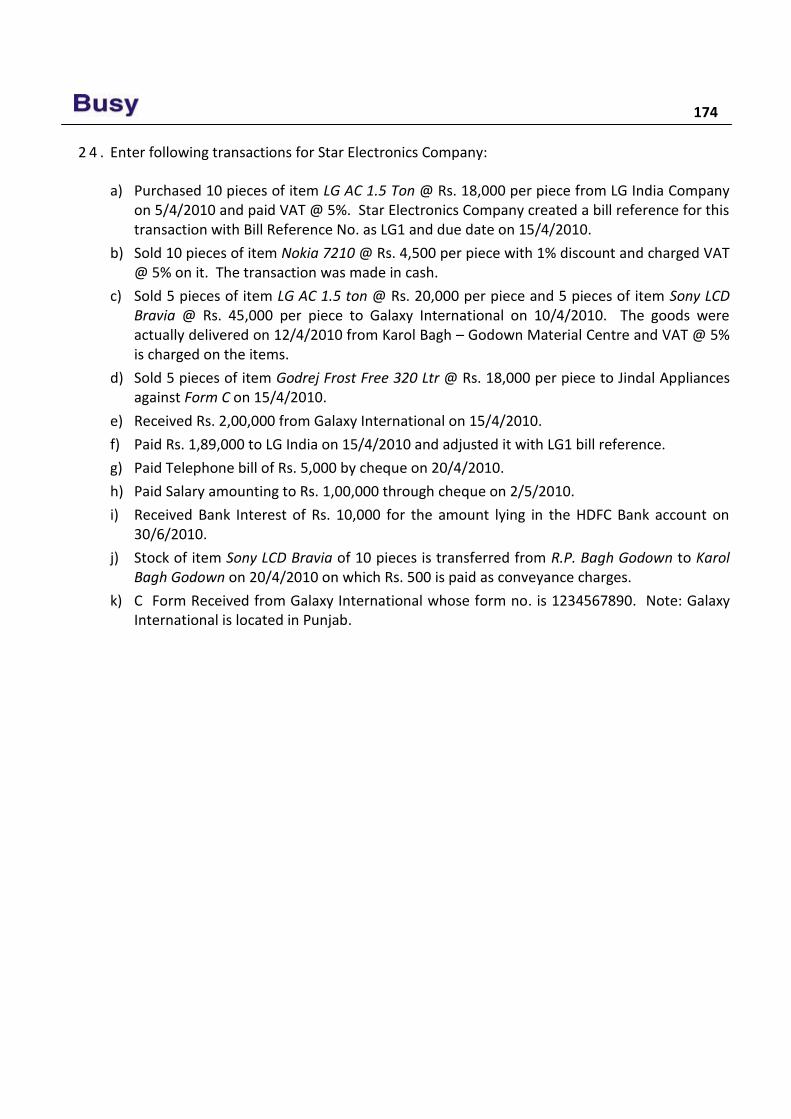
174
2 4 . Enter following transactions for Star Electronics Company:
a) Purchased 10 pieces of item LG AC 1.5 Ton @ Rs. 18,000 per piece from LG India Company on 5/4/2010 and paid VAT @ 5%. Star Electronics Company created a bill reference for this transaction with Bill Reference No. as LG1 and due date on 15/4/2010.
b) Sold 10 pieces of item Nokia 7210 @ Rs. 4,500 per piece with 1% discount and charged VAT @ 5% on it. The transaction was made in cash.
c) Sold 5 pieces of item LG AC 1.5 ton @ Rs. 20,000 per piece and 5 pieces of item Sony LCD Bravia @ Rs. 45,000 per piece to Galaxy International on 10/4/2010. The goods were actually delivered on 12/4/2010 from Karol Bagh – Godown Material Centre and VAT @ 5% is charged on the items.
d) Sold 5 pieces of item Godrej Frost Free 320 Ltr @ Rs. 18,000 per piece to Jindal Appliances against Form C on 15/4/2010.
e) Received Rs. 2,00,000 from Galaxy International on 15/4/2010.
f) Paid Rs. 1,89,000 to LG India on 15/4/2010 and adjusted it with LG1 bill reference.
g) Paid Telephone bill of Rs. 5,000 by cheque on 20/4/2010.
h) Paid Salary amounting to Rs. 1,00,000 through cheque on 2/5/2010.
i) Received Bank Interest of Rs. 10,000 for the amount lying in the HDFC Bank account on 30/6/2010.
j) Stock of item Sony LCD Bravia of 10 pieces is transferred from R.P. Bagh Godown to Karol Bagh Godown on 20/4/2010 on which Rs. 500 is paid as conveyance charges.
k) C Form Received from Galaxy International whose form no. is 1234567890. Note: Galaxy International is located in Punjab.


You Learn something
Every Day
if you pay Attention.
Ray Leblond
Unit 7 Printing Documents
This unit focuses on the printing of bill or invoice. Printing of bill or invoice is a must thing for any business. Printing of bills is a User-Specific activity as each User may require something different to be printed on the document apart from basic transaction. Also some Users need print of a bill as soon as they enter a transaction while some may require to print all bills for a day or week altogether. This unit will discuss all such issues that can arise at the time of printing bill and the steps to configure a bill before printing.
Topics covered under this unit:
Configuring Documents (Standard)
Printing Documents
7.1 Configuring Documents (Standard) Configuring Document refers to the configuration settings of various bills to be printed. You can define separate configuration setting for each voucher type. For example, you may want to print terms & condition of your business in the footer of the sale bill whereas you do not want to print any terms & conditions in Purchase bill. Hence, for this purpose, you can configure various documents i.e. bills / invoice as per your requirement.
Standard configuration of documents means configuring document for basics design such as company name, address, logo, terms & conditions, item details to be printed and so on. BUSY has set a format for printing various vouchers or bills, which is called the Standard format of printing the bill. However if you wish to make some changes in the Standard format as created by BUSY, you can do so by using the Document Printing Standard option provided under Administration Configuration menu.
On clicking the Standard option, a Select Standard Document Configuration window appears with list of vouchers that can be configured for standard printing. Select the required voucher and click the Select button.
On clicking the Select button, a Configure Invoice (Standard) window appears. To explain various data fields of the window, we will take example of Sales voucher. On selecting the Sales Invoice option in the Select Standard Document Configuration window, a Configure Sales Invoice (Standard) window appears. Given here is a screenshot of Configure Sales Invoice (Standard) window.
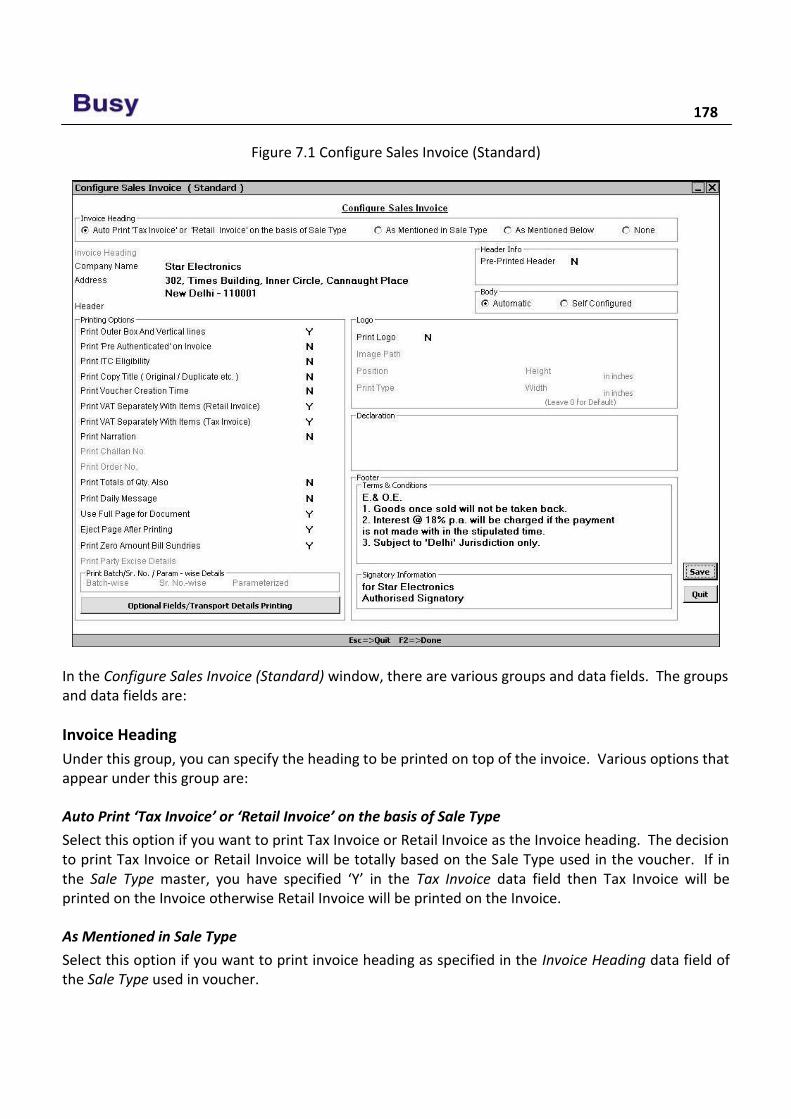
178
Figure 7.1 Configure Sales Invoice (Standard)
In the Configure Sales Invoice (Standard) window, there are various groups and data fields. The groups and data fields are:
Invoice Heading
Under this group, you can specify the heading to be printed on top of the invoice. Various options that appear under this group are:
Auto Print ‘Tax Invoice’ or ‘Retail Invoice’ on the basis of Sale Type
Select this option if you want to print Tax Invoice or Retail Invoice as the Invoice heading. The decision to print Tax Invoice or Retail Invoice will be totally based on the Sale Type used in the voucher. If in the Sale Type master, you have specified ‘Y’ in the Tax Invoice data field then Tax Invoice will be printed on the Invoice otherwise Retail Invoice will be printed on the Invoice.
As Mentioned in Sale Type
Select this option if you want to print invoice heading as specified in the Invoice Heading data field of the Sale Type used in voucher.
Unit 7 – Print Utilities 179
As Mentioned Below
Select this option if you want to print Invoice heading as per your choice. On selecting this option, an Invoice heading data field will get active below this group. The heading you enter in that field will be printed on the Invoice.
None
Select this option if you do not want a heading to be printed on the invoice. This option is useful if you print invoice on a paper having pre printed header. For example, if you are printing a bill on a paper that already has Tax Invoice or Retail Invoice printed on it then you will not need to give a heading for it.
Invoice Heading
This data field gets active only if you have selected As Mentioned Below option in the Invoice Heading group. Specify the heading to be printed on the invoice.
Company Name
By default, the Company’s Print name as specified at the time of company creation appears here. You can make any changes in it to print the required name. This data field will be deactivated on specifying ‘Y’ in the Pre Printed Header data field under Header Info group.
Address
By default, the company address as specified at the time of company creation appears here. You can change it as per your requirement. The address you specify here will be printed on invoice. This data field will be deactivated on specifying ‘Y’ in the Pre Printed Header data field under Header Info group.
Header
Enter Header to be printed on the invoice. The value you specify in this data field will be printed after the Company Name & Address in the invoice. You can specify punch line of your business in this data field or any other such information that you want to print on the bill. For example, Star Electronics Company has its punch line as ‘Range of High Quality Home products’, hence it can specify this line in the Header data field.
Header Info.
Under this group, you can specify configuration for header details of the invoice. In this group, there are two data fields. The data fields are:
Pre Printed Header – Specify ‘Y’ in this data field, if you print invoice on a paper on which header is already printed. For example, you are printing document on letterhead of the company; in this case, you need to leave some space at the top of the page so that printing will start after a specified region. For this purpose, you have to specify 'Y' in this data field. On specifying 'Y' in this data field, Company Name, Address, Header and Logo sub group will be
180
deactivated as it will be assumed that these details will already be printed on paper and are not required to be printed again.
No. of Lines to skip – This data field gets active only if you have specified ‘Y’ in the Pre Printed Header data field. Specify the number of lines to be skipped from the top of paper before printing the invoice. Approximately 1 inch is equal to 6 lines, hence, you can measure printed part of the page and accordingly specify the number of lines to be skipped.
Body
Under this group, you can specify details to be printed in the invoice body. Under this group, two data fields appear. The data fields are:
Automatic
Select this option if you want to print invoice body in the format as created by BUSY.
Self Configured
Select this option if you want to print invoice body in the format as specified by you. On selecting this option, a Configurable Body Items window appears in which you can specify the total character length to be used for each item component and the caption or heading to be used for it in the report. If you do not want to print any item component then specify the character length as zero for it.
Printing Options
Under this group, you can select various options or components to be printed in the invoice. Various options that appear under this group are:
Print Outer Box and Vertical Lines – Specify ‘Y’ in this data field if you want to print outer box and vertical lines in the document. On specifying ‘Y’ in this data field, a box and various lines will be printed in the invoice otherwise, dotted lines will be printed.
Print 'Pre Authenticated on Invoice' - Specify 'Y' in this data field to print 'Pre Authenticated' word on the Invoice.
Print ITC Eligibility - Specify 'Y' in this data field if you want to display the status of ITC (Input Tax Credit) Eligibility in the document.
Print Copy Title (Original / Duplicate etc.) - Specify 'Y' if you want to print copy title. The copy title information is picked from the Copy Title Configuration under Administration Configuration Document Printing Copy Title Configuration option.
Print Voucher Creation Time - Specify 'Y' in this data field, if you want to display the time at which voucher is entered in the document.
Print VAT Separately with Items (Retail Invoice) - Specify 'Y' if you want to print the VAT amount separately with items in Retail Invoice bills. This is useful in case of Multi Tax or Tax Inclusive Sale Types. For example, in case of Multi Tax if you want the tax amount to be printed separately with all the items then specify 'Y' in this data field. Similarly, in case of Tax Inclusive if you want the tax amount to be reflected along with the items (by reverse
Unit 7 – Print Utilities 181
calculation) then specify 'Y' in this data field. On specifying ‘Y’ in this data field, in front of each Item, its price, tax amount and total amount including tax will be displayed.
Print VAT Separately with Items (Tax Invoice) - Specify 'Y' if you want to print VAT amount separately with items in the Tax Invoice bills. This is useful in case of Multi Tax or Tax Inclusive Sale Types.
Print Narration - Specify 'Y' in this data field if you want to print narration in the document.
Print Totals of Qty. Also - Specify 'Y' in this data field if you want to display the totals of the quantity of multiple items. For example, if you have made a single invoice for five items and you specify 'Y' in this data field then the sum of the quantity sold for all the items will be displayed as total quantity.
Print Daily Message – Specify ‘Y’ in this data field if you want to print daily message as specified for the voucher in the Input Daily Message option that appears under Administration Utilities Miscellaneous Data Entry menu.
Use Full Page for Document - Specify 'Y' in this data field, if you want to use the full page for the document. For example, you are printing two invoices simultaneously and when the first invoice is printed on a paper, almost half of the paper is left blank. Now if you have specified ‘Y’ in this data field then the printing of second invoice will start from the same page otherwise it will start from the second page.
Eject Page After Printing - Specify 'Y' in this data field if you want to eject the page after printing.
Print Zero Amount Bill Sundries – Specify ‘Y’ in this data field if you want to print those Bill Sundries also that have a zero amount in voucher.
Optional Fields / Transport Details Printing - Click this button to configure printing of Optional Fields and Transport details. On clicking this button, an Optional Fields / Transport Details window appears. In the Optional Fields / Transport Details window, select As Specified in Voucher Series Configuration, if you want to pick printing configuration of Optional Fields & Transport Details from the Vouchers Configuration. On selecting this option, printing of Optional Fields & Transport details will be dependent on the configuration settings in Vouchers Configuration. If you want to configure Optional Fields & Transport details printing then select the As Mentioned Below option. On selecting this option, all the further data fields gets activated and you can specify which of the Optional Fields and Transport fields should be printed in the documents. To specify the same, you need to select the checkbox against the Optional / Transport Detail field under Print in Documents column.
Logo
Under this group, you can specify whether you want logo to be printed in the document and can further specify different characteristics of the logo. Various data fields under this group are:
Print Logo - Specify 'Y' in this data field if you want to print a logo in the document. Image Path - Specify the path of the logo to be printed in the document. Position - Select the position at which the logo is to be printed in the document.
182
Print Type - Select the print type from the list. In the list, there are two options. The options are:
o Superimpose - Select this option if you want to superimpose the logo. If you select this option then logo will be printed at the specified position and can overlap any text or image placed at that position.
o Create Space - Select this option to create space for the logo. If you select this option then first some space will be created for the logo at the specified position and then the logo will be printed. In this case logo will not overlap any existing text or image.
Height - Specify the height of the image. Specify 0 in this data field if you want to print default height of the logo.
Width - Specify the width of the image. Specify 0 in this data field if you want to print default width of the logo.
Declaration
Specify declaration if any to be printed on the document.
Footer
Under this group, you can specify details or text to be printed in the footer or at the bottom of the invoice. Under this group, various data fields appear. The data fields are:
Terms & Conditions
Specify the terms and conditions to be printed at the bottom of the invoice. By default, terms and conditions commonly stated are displayed in the data field. You can change them as per your requirement.
Signatory Information
There are two data fields under Signatory Information group. You can specify any information that you would like to display as signatory information in these data fields. By default, in the first data field, the name of the company is displayed while in the second data field 'Authorized Signatory' is displayed.
After entering appropriate data in the data fields, click the Save button to save the document configuration.
7.2 Printing Documents There are two ways of printing a document, first is the online printing and second is the offline printing. Online printing refers to the printing of the document / bill at the time of saving the voucher and offline printing refers to printing of document / bill later on whenever required. For online printing, you can print the vouchers by clicking Yes button in the message box that appear for printing
Unit 7 – Print Utilities 183
the document at the time of voucher saving and for offline printing, you can use the Print Utilities option provided in the Printing menu. Let us discuss both these concepts in detail.
7.2.1 Online Printing Online printing refers to the printing of the bill as soon as the voucher is saved. When you save a voucher, a message box, asking you to print the bill appears. On clicking the Yes button in the message box, you can print the bill for the voucher entered. Depending on the voucher type and its configuration, the number of message boxes appears for printing of bill. For example, after saving a Sales voucher, you can either want to print details of the stock moved out or the details of the party to whom the sale is made or both. Details to be printed in the bills are configurable and can be configured using the Vouchers Configuration option.
In the Vouchers Configuration, different printing configuration for each voucher type appears. For example in dual voucher i.e. the vouchers in which both the inventory and accounting aspects are affected, you can specify whether you want to print inventory aspect, accounting aspect or both. In this section, we will discuss the concept of online printing by taking example of Sales voucher.
In Administration Configuration Vouchers Configuration option, select the Voucher type as Sales and select the required series. On selecting the required series, click the Vouchers Configuration option. On clicking the Vouchers Configuration option, a Voucher Configuration window appears. In the window, there are three options provided by BUSY. The options are, Print Accounts Voucher After Saving, Print Inventory Voucher After Saving and Print Sales Invoice After Saving. Configure these options as per your requirement. For detailed explanation, please refer to Vouchers Configuration topic in Unit 6.
Once you have configured the Vouchers Configuration for printing, the appropriate number of message box will appear for printing the bill on saving the Sales voucher. Click the Yes button in the required message box. On clicking the Yes button, a Printing Options window appears in which you can specify the printer details, number of copies to be printed and so on. Click the Print button to print the bill.
7.2.2 Print Utilities Print Utilities option is used for bulk printing of vouchers. This option is useful for the companies that do not print the bill at the time of voucher saving but take print of all the vouchers of a day or week together. Print Utilities option is provided under the Printing menu. On clicking the Print Utilities option, various options are displayed. In the Courseware, we will discuss only the Documents, Inventory Vouchers and Accounts Vouchers option. Rest of the options will be covered in the Advanced Courseware.
Document
Document option is used to print full invoice details as per your requirement. You can create different formats for printing documents using Administration Configuration Document Printing Advanced option (covered in Advanced Courseware) or can make changes in the Standard format
184
created by BUSY for printing various documents (explained in topic 7.1 Configuring Document (Standard)). For dual vouchers such as Sales / Purchase, Sale Return / Purchase Return, you can use Document option to print both accounting and inventory aspect of the voucher. On selecting the Document option under Printing Print Utilities menu, a Select Document for Printing window appears. The window displays the list of various documents that can be printed using this option. On selecting any of the document or voucher, a Print Basis message box appears. In the message box, there are two options. The options are:
Date-Wise - Select this option if you want to print documents for a specified date range.
Voucher No.-Wise - Select this option if you want to print documents for a specified range of vouchers.
On selecting any of the option, a Document Printing message box appears. In the message box, there are three options. The options are:
All Parties - Select this option if you want to print report for all the parties.
Group of Parties - Select this option if you want to print report for a particular Party Group.
One Party - Select this option if you want to print report for a particular party.
On selecting any of the option, a Printing Options window appears. Given here are the data fields that appear in the Printing Options window.
Party Name - This data field appears if you have selected the One Party option in the Document Printing message box. Select the required party from the list.
Group Name - This data field appears if you have selected the Group of Parties option in the Document Printing message box. Select the required Party Group from the list.
Voucher Series - Select the voucher series for which you want to print the document. In other words, vouchers entered using the specified series will be considered for printing.
Starting Vch No. - This data field appears only if you have selected Voucher No.-Wise option in Print Basis message box. Specify the starting voucher numbers, vouchers entered after which will be considered for printing.
Ending Vch No. - This data field appears only if you have selected Voucher No.-Wise option in Print Basis message box. Specify the ending voucher number, vouchers entered up to which will be considered for printing.
Starting Date - This data field appears only if you have selected Date-Wise option in Print Basis message box. Specify the date, vouchers entered on or after which will be considered for printing.
Ending Date - This data field appears only if you have selected Date-Wise option in Print Basis message box. Specify the date, vouchers entered on or before which will be considered for printing.
No. of Copies - Specify the number of copies to be printed for the report.
Unit 7 – Print Utilities 185
Default Printing Options – Under this group, you can specify the printer related details. By default, the details specified using the Hardware Configuration option appears here.
After entering appropriate data in the data fields, click the Ok button to print the documents.
Inventory Vouchers
Inventory vouchers option provides the facility to print inventory / stock related details of the vouchers. For example, if you print the report for Sales voucher using the Inventory Voucher option then all the details regarding the items sold will be printed in the report. On clicking the Inventory Voucher option under Printing Print Utilities option, a Select Voucher Type for Printing window appears. The window displays list of various vouchers that can be printed using this option. You can print Inventory vouchers only in the format as defined by BUSY. You cannot create separate format for printing inventory aspect of voucher.
On selecting any of the vouchers, a Print Basis message box appears. In the message box, there are two options. The options are:
Date-Wise - Select this option if you want to print the vouchers date wise.
Voucher No.-Wise - Select this option if you want to print the vouchers according to voucher number.
On selecting any of the option, a Printing Options window appears. Given here are the data fields that appear in the Printing Options window.
Printing Options
Voucher Series – Select the voucher series for which you want to print the inventory voucher. In other words, vouchers entered using the specified series will only be printed.
Starting Vch No. - This data field appears only if you have selected Voucher No.-Wise option in Print Basis message box. Specify the starting voucher numbers, vouchers entered after which will be considered for printing.
Ending Vch No. - This data field appears only if you have selected Voucher No.-Wise option in Print Basis message box. Specify the ending voucher number, vouchers entered up to which will be considered for printing.
Starting Date - This data field appears only if you have selected Date-Wise option in Print Basis message box. Specify the date, vouchers entered on or after which will be considered for printing.
Ending Date - This data field appears only if you have selected Date-Wise option in Print Basis message box. Specify the date, vouchers entered on or before which will be considered for printing.
No. of Copies - Specify the number of copies to be printed for the report.
Default Printing Options – Under this group, you can specify the printer related details. By default, the details specified using the Hardware Configuration option appears here.
186
After entering data in the data fields, click the Ok button to print the documents.
Accounts Vouchers
Accounts vouchers option provides the facility to print accounts related details of the vouchers. For example, if you print the report for a Sales voucher using the Accounts Vouchers option then the accounts debited and credited along with the amount will be printed in the report. On clicking the Accounts Voucher option under Printing Print Utilities menu, a Select Voucher Type for Printing window appears. The window displays list of various vouchers that can be printed under this option. For detailed explanation, please refer to the Inventory Vouchers option above.
Review In BUSY, printing can be of two type, online printing and offline printing.
Online printing refers to printing a bill as soon as it is saved. While offline printing refers to taking pint of all the bills of a day / week / month together.
Standard configuration of documents refers to configuring a bill for basic design such as Company name, terms & conditions, signatory details and so on.
You can print Logo of your company on the bill by specifying its path and other characteristics in Standard document configuration.
Print button is provided in the vouchers while opening them in Modify mode to print the bill details.
Bulk Printing in BUSY can be done by using Print Utilities option under Printing menu.
You can create different formats for printing various documents. You can also make changes in the Standard format created by BUSY, by using the Document Printing Standard option under Administration Configuration option.
Exercise 1 . Which of the following options appear under Print Utilities menu:
a) Documents c) Inventory Vouchers b) Accounts Vouchers d) All of the Above
2 . Under Logo option, you can specify:
a) Image Path c) Print Type b) Height & Width of Image d) All of the above
3 . A Bill can be printed:
a) At the time of saving voucher c) By using Print Utilities option b) By opening it in modify mode d) All of the above
Unit 7 – Print Utilities 187
4 . Information specified in the Header data field in Document Configuration is displayed after: a) Company’s Name & Address c) Invoice Heading b) Company’s Terms & Conditions d) Signatory’s Information
5 . Maximum width specified for Item details can be: a) 80 / 96 / 136 characters c) 80 / 94 / 132 characters b) 80 / 90 / 132 characters d) 80 / 94 / 136 characters
6 . In a Sales invoice, Invoice Heading can be: a) As specified in the Sale Type c) Automatically as Tax or Retail Invoice b) As mentioned in Document Configuration d) All of the above
7 . To print Logo with its default height and width, you should specify its height / width as: a) 1 c) None b) 0 d) 6
8 . What is the difference between super impose and create space option while printing Logo?
9 . What is the use of Pre Printed Header option?
1 0 . Open company Star Electronics and perform the following steps in it:
a) Configure a Sales document and make the following provisions in it: Paste a logo with its default height and width. VAT Rates should not be printed separately with the items in Retail Invoice Specify Declaration as “Goods once sold will not be taken back after fifteen days of delivery”.
b) Specify Terms & Conditions for the Payment voucher as “Cheque subject to Realization”.

Module 4
Displaying & Printing Reports
Unit 8 – Accounting Reports
Unit 9 – Inventory Reports
Unit 10 – Sales Tax & VAT Reports

Education’s Purpose is to
replace an Empty Mind
with an Open one.
Malcolm Forbes
Unit 8 Accounting Reports
The objective of this Unit is to make User familiar with the accounting reports provided in BUSY. Accounting reports provides details of all the accounting entries and transactions of the company. With the Accounting reports, User can depict the financial position of the company, the amount receivable / payable from / to various parties and so on. Based on the details shown in the Accounting reports, User can take decision regarding the growth and future prospects of the company. Accounting reports play a pivotal role in shaping the decision of the User.
Topics covered under this unit:
Balance Sheet
Trial Balance
Account Books
Account Summaries
Outstanding Analysis
8.1 Balance Sheet Balance Sheet is a financial statement depicting the financial position of the business by listing the assets and liabilities as on a certain date. It depicts what the business owes and what it owns on a certain date. It is prepared from the accounts listed in the Trial Balance. The balances of the accounts are grouped as assets and liabilities and are arranged in a proper manner in the Balance Sheet. Further, the net profit or net loss calculated in the Profit & Loss account is posted in the Balance Sheet.
To view the Balance Sheet report, click Display Balance Sheet option. On clicking the Balance Sheet option, two options appear. The options are:
Horizontal - Select this option if you want to view balance sheet horizontally i.e. all the liabilities are listed on the left hand side and assets are listed on the right hand side.
Vertical - Select this option if you want to view balance sheet vertically i.e. first all the liabilities are listed and below them, all the assets are listed.
On selecting any of the above option, a Balance Sheet message box appears with following two options:
Month End – Select this option to view Balance Sheet at the end of a month.
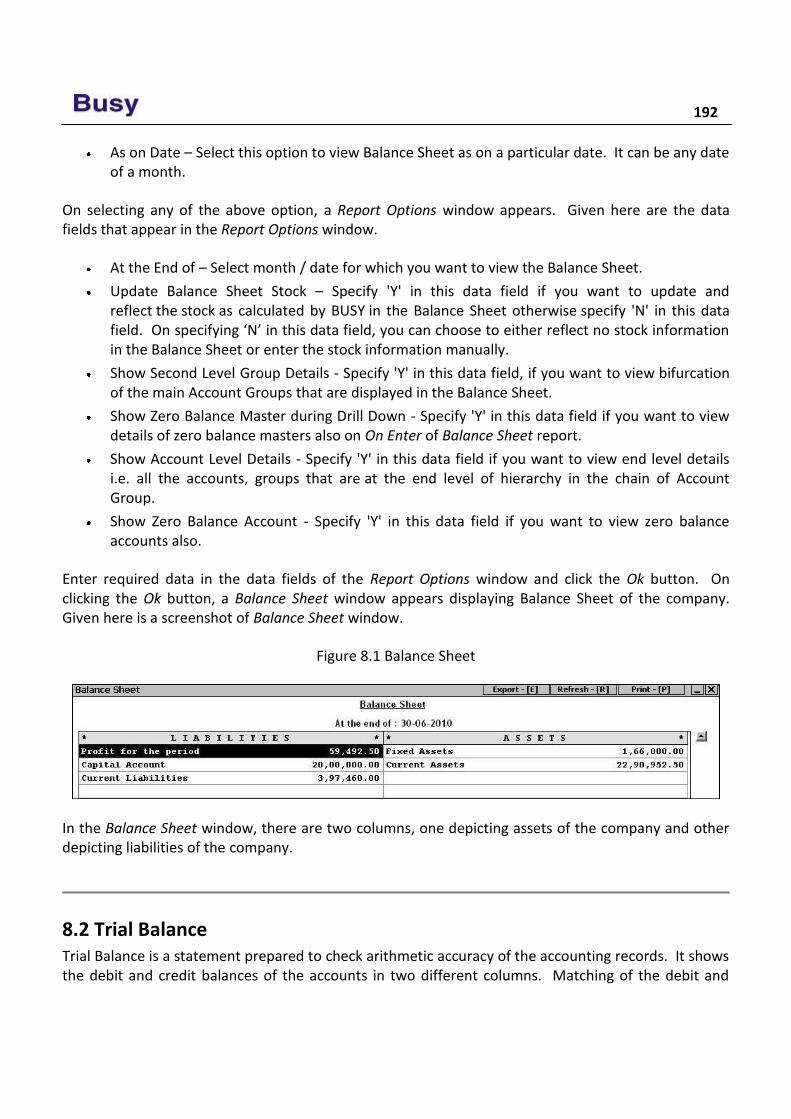
192
As on Date – Select this option to view Balance Sheet as on a particular date. It can be any date of a month.
On selecting any of the above option, a Report Options window appears. Given here are the data fields that appear in the Report Options window.
At the End of – Select month / date for which you want to view the Balance Sheet.
Update Balance Sheet Stock – Specify 'Y' in this data field if you want to update and reflect the stock as calculated by BUSY in the Balance Sheet otherwise specify 'N' in this data field. On specifying ‘N’ in this data field, you can choose to either reflect no stock information in the Balance Sheet or enter the stock information manually.
Show Second Level Group Details - Specify 'Y' in this data field, if you want to view bifurcation of the main Account Groups that are displayed in the Balance Sheet.
Show Zero Balance Master during Drill Down - Specify 'Y' in this data field if you want to view details of zero balance masters also on On Enter of Balance Sheet report.
Show Account Level Details - Specify 'Y' in this data field if you want to view end level details i.e. all the accounts, groups that are at the end level of hierarchy in the chain of Account Group.
Show Zero Balance Account - Specify 'Y' in this data field if you want to view zero balance accounts also.
Enter required data in the data fields of the Report Options window and click the Ok button. On clicking the Ok button, a Balance Sheet window appears displaying Balance Sheet of the company. Given here is a screenshot of Balance Sheet window.
Figure 8.1 Balance Sheet
In the Balance Sheet window, there are two columns, one depicting assets of the company and other depicting liabilities of the company.
8.2 Trial Balance Trial Balance is a statement prepared to check arithmetic accuracy of the accounting records. It shows the debit and credit balances of the accounts in two different columns. Matching of the debit and
Unit 8 – Accounting Reports 193
credit balances indicates arithmetic accuracy of the records. It summarizes the account information in a tabular format. To prepare the Trial Balance, the debit and the credit balances are written in two separate columns, which are placed right next to each other, while the account name is written in the Name of Account column.
On selecting the Trial Balance option, a list of reports is displayed. The list displays various formats in which you can view the Trial Balance report. Various options in the list are:
Closing Trial - Grouped
Closing Trial - Alphabetical
Closing Trial - Hierarchical
Opening Trial - Grouped
Opening Trial - Alphabetical
Opening Trial - Hierarchical
In the Closing Trial reports, you can view the closing Trial Balance of a month or of a particular date and in the Opening Trial reports, you can view the opening Trial Balance of a month or of a particular date. Let us start discussing various formats of Trial Balance reports starting with Closing Trial – Grouped option.
Closing Trial - Grouped
Closing Trial – Grouped report displays the closing Trial Balance of all the Accounts / Account Groups. The report displays Group-Wise bifurcation of amounts. On selecting this option, a Trial Balance message box appears with the following two options:
Month End – Select this option to view closing Trial Balance for a particular month.
As on Date – Select this option to view closing Trial Balance as on a particular date.
On selecting any of the above option, a Trial Balance message box with following two options appear:
Primary Groups – Select this option to view closing Trial Balance for all the Primary groups i.e. the groups that are at the top most level and do not fall under any other group.
All Groups – Select this option to view closing Trial Balance for all the Account Groups. It will display only those Account Groups under which directly an account is created.
On selecting any of the above option, a Report Options window appears. Given here are the data fields that appear in the Report Options window.
At End of – Select the month or specify the date for which you want to view the closing Trial Balance.
Show Zero Balance Groups – Specify ‘Y’ in this data field if you want to view those groups also that have a zero balance in them.

194
Show Sub Group Balances – Specify ‘Y’ in this data field if you want to view bifurcation of amount of a group. By specifying ‘Y’ in this data field, separate balances of sub groups falling under a Group will also be displayed.
Enter the required data in the data fields of the Report Options window and click the Ok button. On clicking the Ok button, a Trial Balance report appears displaying Account / Accounts Group and the debit / credit amount. Given here is a screenshot of Closing Trial - Grouped report.
Figure 8.2 Trial Balance
Closing Trial - Alphabetical
Closing Trial – Alphabetical report displays the closing Trial Balance of the accounts with all the accounts arranged in an alphabetical order. On selecting the Closing Trial – Alphabetical option, two options are displayed. The options are:
Balances Only – Balances Only report displays only the debit / credit amount of the accounts.
Detailed – Detailed report displays the opening balance and closing balance of the account along with the debit / credit amount.
Let us discuss both the options one by one.
Balances Only
On selecting the Balances Only option, a Trial Balance message box appears with the following options:
All Accounts – Select this option if you want to view report for all the accounts.
Group of Accounts – Select this option if you want to view report for a particular Account Group. The report will display only those accounts that fall under the selected Account Group.
Unit 8 – Accounting Reports 195
On selecting any of the above option, a Report Options window appears. Given here are the data fields that appear in the Report Options window.
Specify the Group Name – Select the Account Group for which you want to view the report.
Report Date – Specify the date on which you want to view the closing Trial Balance report.
Account to be shown by – Select from the list, whether Accounts Name, Alias or Print Name is to be displayed in the report.
Show Zero Balance Accounts – Specify ‘Y’ in this data field if you want to view those accounts also that have a zero balance in them.
Show Parent Group – Specify ‘Y’ in this data field if you want to view Parent Group of the account in the report. By specifying ‘Y’ in this data field, a Parent Group column will appear in the report. The column will display the name of the Parent Group of the corresponding account.
Enter the required data in the data fields and click the Ok button. On clicking the Ok button, a Trial Balance window appears displaying the Accounts and their debit / credit amount.
Detailed
On selecting the Detailed option, a Trial Balance message box with following three options appears:
All Accounts – Select this option if you want to view closing Trial Balance of all the accounts.
Group of Accounts – Select this option if you want to view closing Trial Balance of a particular Account Group. On selecting this option, report will display only those accounts that fall under the selected Account Group.
Selected Account – Select this option if you want to view closing Trial Balance for selected accounts. On selecting this option, a List of Accounts window appears in which you can select the accounts for which you want to view the report.
On selecting any of the above option, a Report Options window appears. Given here are the data fields that appear in the Report Options window.
Specify Parent Group – Select the Account Group for which you want to view the closing Trial Balance.
Starting Date – Enter the starting date from which the account balances are to be picked for generating the report.
Ending Date – Enter the ending date up to which the account balances are to be picked for generating the report.
Account to be shown by – Select from the list whether the Account Name, Alias or Print Name is to be displayed in the report.
Masters to be Picked – In the list there are three options. The options are:
o All - Select this option if you want to pick all the masters for the report.
196
o Moved - Select this option if you want to pick only those masters for the report that are used in any transaction.
o Moved / Closing Bal - Select this option if you want to pick those masters for the report that are either used in any transaction or have some closing balance.
Split Dr / Cr of Opening / Closing Balances – Specify ‘Y’ in this data field if you want to view debit and credit aspect of opening and closing balances in separate columns.
Show Parent Group – Specify ‘Y’ in this data field if you want to view Parent Group of the account.
Enter required data in all the data fields of the Report Options window and click the Ok button. On clicking the Ok button, a Trial Balance window appears displaying Opening Balance (debit / credit), Debit amount, Credit amount and Closing Balance (debit / credit).
Closing Trial - Hierarchical
Closing Trial – Hierarchical report displays the closing Trial Balance of the accounts with all the accounts arranged as per their hierarchy. First, all the Primary Account Groups are sorted alphabetically and then all the Groups and parties that falls under the Primary group will be sorted alphabetically. On selecting the Closing Trial – Hierarchical option, a Trial Balance message box appears with following two options:
Balances Only – Balances Only report displays only the debit / credit amount of the accounts.
Detailed – Detailed report displays the opening balance and closing balance of the account along with the debit / credit amount.
For detailed help on the above two options, please refer to the Closing Trial – Alphabetical option above.
Till now, we have discussed all the Closing Trial reports. After this, all the Opening Trial reports appear in the list. Opening Trial reports display the opening Trial Balance of the accounts. All the Opening Trial Balance reports are similar to their respective closing Trial Balance reports. Hence, for detailed explanation on Opening Trial - Grouped, Opening Trial – Alphabetical and Opening Trial – Hierarchical reports, please refer to the corresponding Closing Trial reports.
8.3 Account Books In a general business scenario, numerous transactions take place such as sales / purchase of goods or receipt / payment of cash. Generally, these transactions are recorded in a single register, Journal Register. The maintenance of these transactions becomes a tedious process when the business expands and the number of transactions increases multiple times. In such a case, there is a need to categorise the transactions and record them in different registers depending on the type of transaction. This will help in knowing the exact position of the business based on the transactions.
Unit 8 – Accounting Reports 197
For example, a company wants to know the status of the cash / bank balance for a particular period. For this purpose, it can view the Cash / Bank Book in which all the transactions that affect the cash and bank accounts are listed. These accounts books or registers are the Books of Original Entry / Subsidiary Books. On the basis of these books, the Principal Books of Accounts, i.e. Ledger Accounts are prepared.
On clicking the Accounts Books option, a list of following reports is displayed:
Day Book
Ledger
Cash / Bank Books
Accounts Registers (Standard)
Account Activity Report
Let us discuss these reports in detail.
Day Book
Day Book report displays all the accounting transactions of the business sequentially within a specified date range. The report displays the voucher type and its debit / credit affect. On selecting the Day Book option, a Day Book message box appears asking you to show Cash Balances also. Click the Yes / No button as per your requirement. If you click the Yes button in the message box then in the Report, two columns, one displaying transactions for amount debited and other displaying transactions for amount credited will appear. If you click the No button then all the transactions will be displayed in the sequence in which they were entered irrespective of their debit / credit effect.
On clicking either of the option, a Report Options window appears. Given here are the data fields that appear in the Report Options window.
Starting Date – Enter the starting date from which the vouchers are to be picked for the report.
Ending Date – Enter the ending date up to which the vouchers are to be picked for the report.
Accounts to be Shown By – Select from the list, whether Account Name, Alias or Print Name is to be displayed in the report.
Show Long Narration – Specify ‘Y’ in this data field to view long narration as entered in the voucher.
Show Opt. Fields / Transport Details – Specify ‘Y’ in this data field to view data as entered in the Optional Fields and Transport Details window.
Show Item Details – Specify ‘Y’ in this data field to view details of the items used in voucher. On specifying ‘Y’ in this data field, a button appears next to it. Click the button to configure the item details that are to be displayed in the report.
Show Bill References – Specify ‘Y’ in this data field if you want to view bill reference details also in the report.
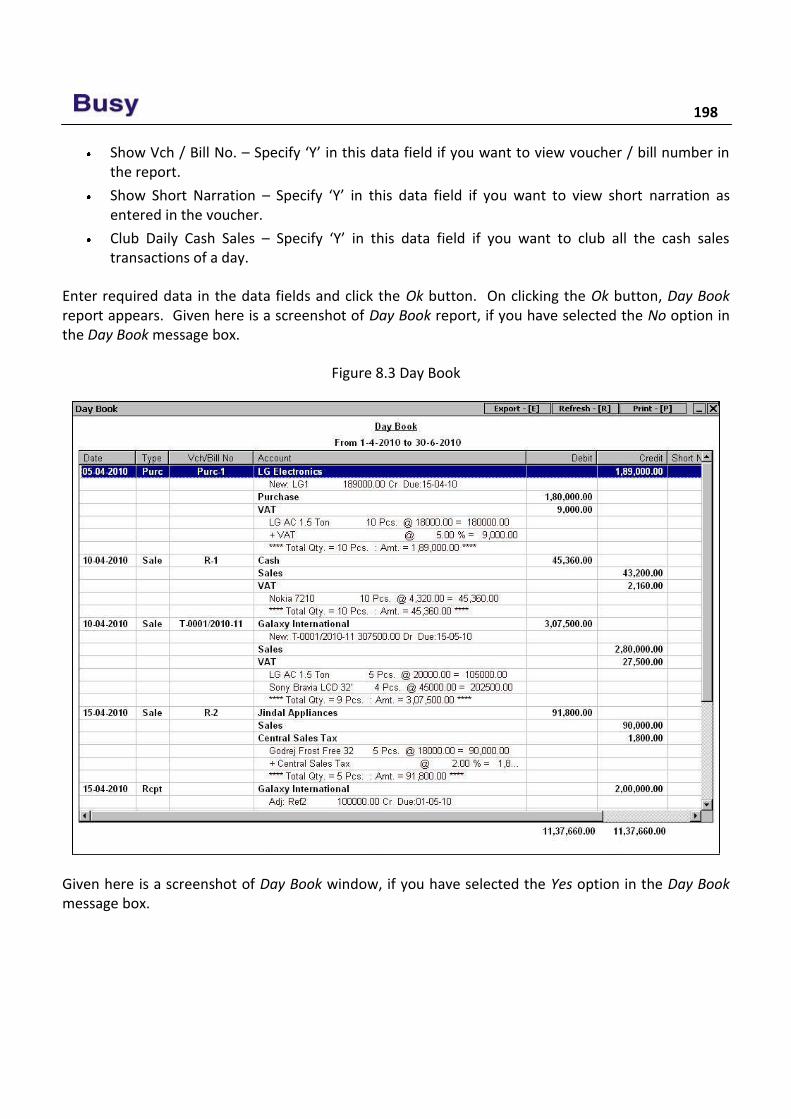
198
Show Vch / Bill No. – Specify ‘Y’ in this data field if you want to view voucher / bill number in the report.
Show Short Narration – Specify ‘Y’ in this data field if you want to view short narration as entered in the voucher.
Club Daily Cash Sales – Specify ‘Y’ in this data field if you want to club all the cash sales transactions of a day.
Enter required data in the data fields and click the Ok button. On clicking the Ok button, Day Book report appears. Given here is a screenshot of Day Book report, if you have selected the No option in the Day Book message box.
Figure 8.3 Day Book
Given here is a screenshot of Day Book window, if you have selected the Yes option in the Day Book message box.
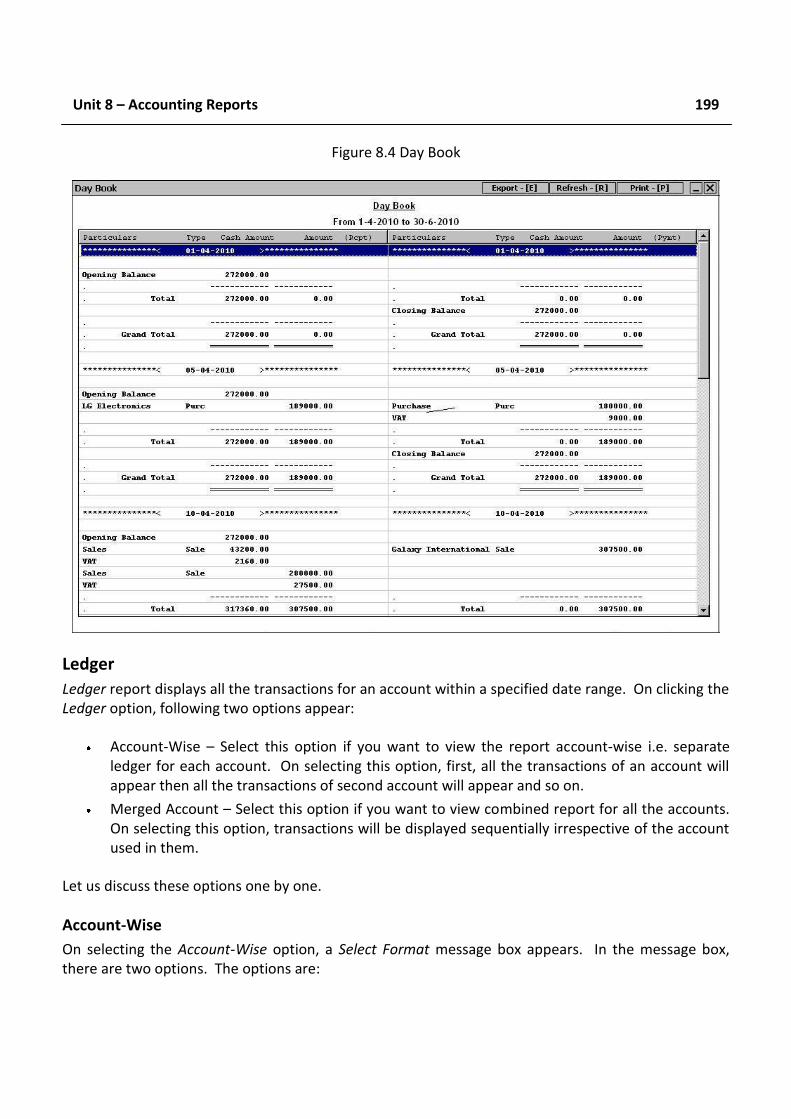
Unit 8 – Accounting Reports 199
Figure 8.4 Day Book
Ledger
Ledger report displays all the transactions for an account within a specified date range. On clicking the Ledger option, following two options appear:
Account-Wise – Select this option if you want to view the report account-wise i.e. separate ledger for each account. On selecting this option, first, all the transactions of an account will appear then all the transactions of second account will appear and so on.
Merged Account – Select this option if you want to view combined report for all the accounts. On selecting this option, transactions will be displayed sequentially irrespective of the account used in them.
Let us discuss these options one by one.
Account-Wise
On selecting the Account-Wise option, a Select Format message box appears. In the message box, there are two options. The options are:
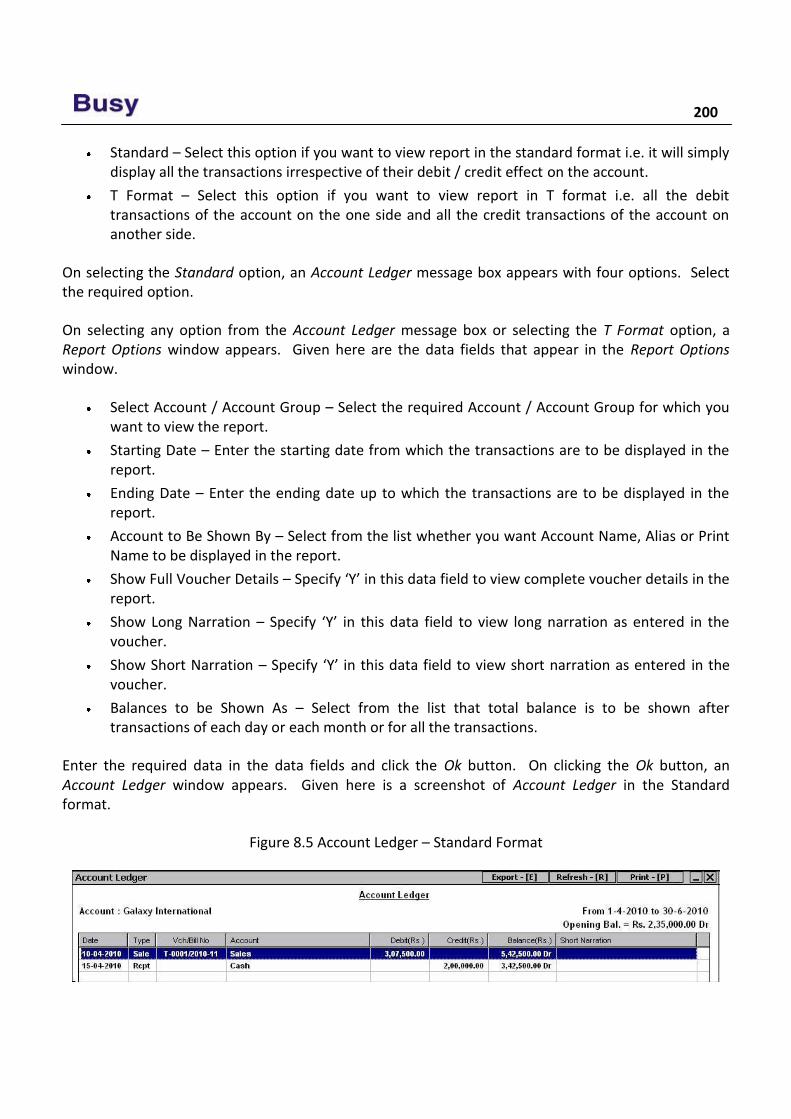
200
Standard – Select this option if you want to view report in the standard format i.e. it will simply display all the transactions irrespective of their debit / credit effect on the account.
T Format – Select this option if you want to view report in T format i.e. all the debit transactions of the account on the one side and all the credit transactions of the account on another side.
On selecting the Standard option, an Account Ledger message box appears with four options. Select the required option.
On selecting any option from the Account Ledger message box or selecting the T Format option, a Report Options window appears. Given here are the data fields that appear in the Report Options window.
Select Account / Account Group – Select the required Account / Account Group for which you want to view the report.
Starting Date – Enter the starting date from which the transactions are to be displayed in the report.
Ending Date – Enter the ending date up to which the transactions are to be displayed in the report.
Account to Be Shown By – Select from the list whether you want Account Name, Alias or Print Name to be displayed in the report.
Show Full Voucher Details – Specify ‘Y’ in this data field to view complete voucher details in the report.
Show Long Narration – Specify ‘Y’ in this data field to view long narration as entered in the voucher.
Show Short Narration – Specify ‘Y’ in this data field to view short narration as entered in the voucher.
Balances to be Shown As – Select from the list that total balance is to be shown after transactions of each day or each month or for all the transactions.
Enter the required data in the data fields and click the Ok button. On clicking the Ok button, an Account Ledger window appears. Given here is a screenshot of Account Ledger in the Standard format.
Figure 8.5 Account Ledger – Standard Format
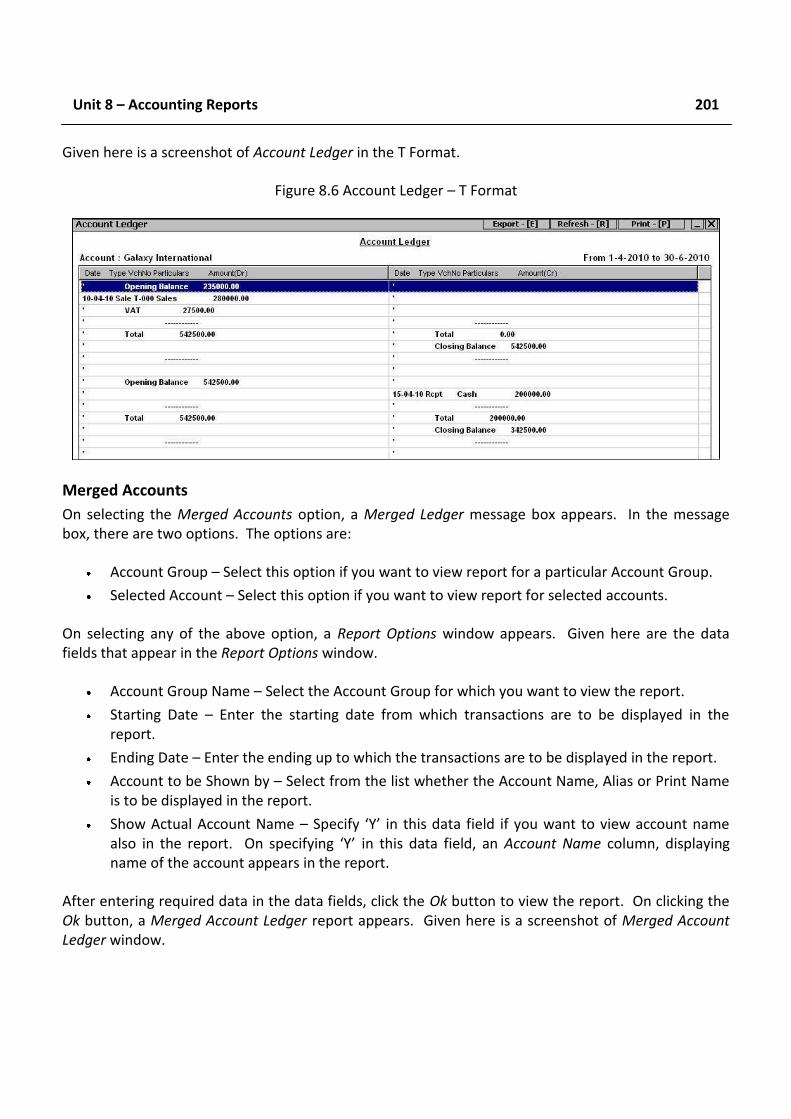
Unit 8 – Accounting Reports 201
Given here is a screenshot of Account Ledger in the T Format.
Figure 8.6 Account Ledger – T Format
Merged Accounts
On selecting the Merged Accounts option, a Merged Ledger message box appears. In the message box, there are two options. The options are:
Account Group – Select this option if you want to view report for a particular Account Group.
Selected Account – Select this option if you want to view report for selected accounts.
On selecting any of the above option, a Report Options window appears. Given here are the data fields that appear in the Report Options window.
Account Group Name – Select the Account Group for which you want to view the report.
Starting Date – Enter the starting date from which transactions are to be displayed in the report.
Ending Date – Enter the ending up to which the transactions are to be displayed in the report.
Account to be Shown by – Select from the list whether the Account Name, Alias or Print Name is to be displayed in the report.
Show Actual Account Name – Specify ‘Y’ in this data field if you want to view account name also in the report. On specifying ‘Y’ in this data field, an Account Name column, displaying name of the account appears in the report.
After entering required data in the data fields, click the Ok button to view the report. On clicking the Ok button, a Merged Account Ledger report appears. Given here is a screenshot of Merged Account Ledger window.
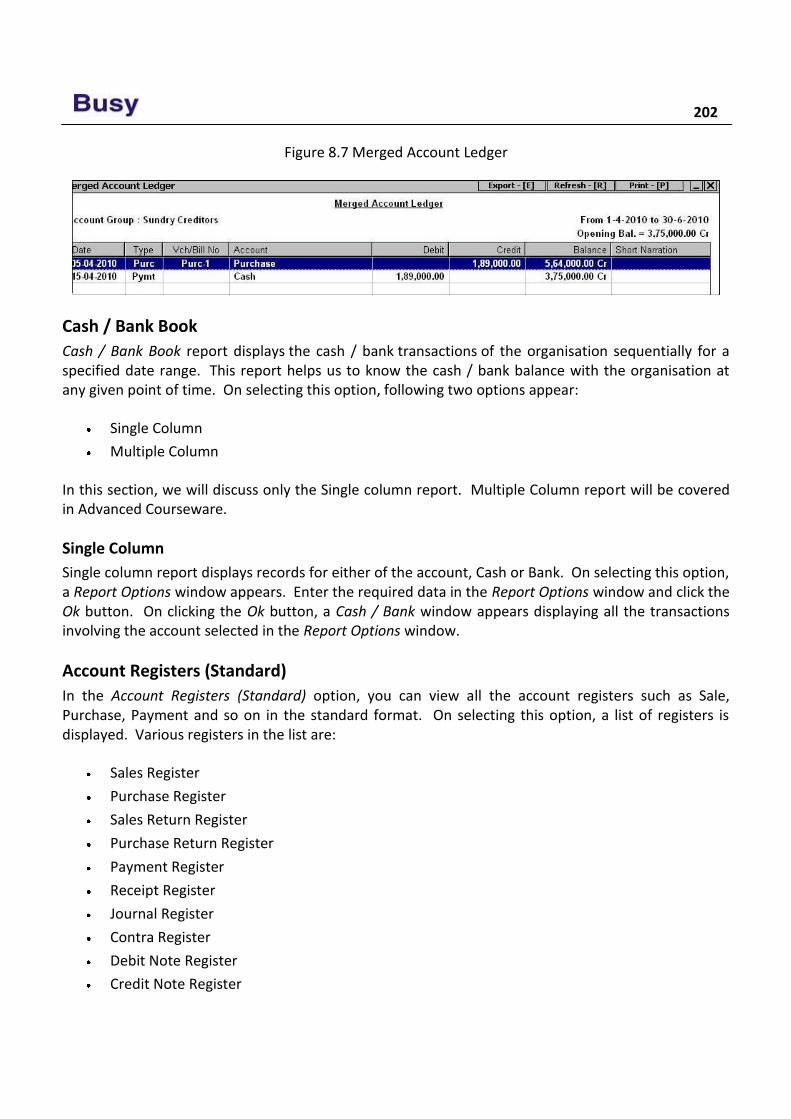
202
Figure 8.7 Merged Account Ledger
Cash / Bank Book
Cash / Bank Book report displays the cash / bank transactions of the organisation sequentially for a specified date range. This report helps us to know the cash / bank balance with the organisation at any given point of time. On selecting this option, following two options appear:
Single Column
Multiple Column
In this section, we will discuss only the Single column report. Multiple Column report will be covered in Advanced Courseware.
Single Column
Single column report displays records for either of the account, Cash or Bank. On selecting this option, a Report Options window appears. Enter the required data in the Report Options window and click the Ok button. On clicking the Ok button, a Cash / Bank window appears displaying all the transactions involving the account selected in the Report Options window.
Account Registers (Standard)
In the Account Registers (Standard) option, you can view all the account registers such as Sale, Purchase, Payment and so on in the standard format. On selecting this option, a list of registers is displayed. Various registers in the list are:
Sales Register
Purchase Register
Sales Return Register
Purchase Return Register
Payment Register
Receipt Register
Journal Register
Contra Register
Debit Note Register
Credit Note Register
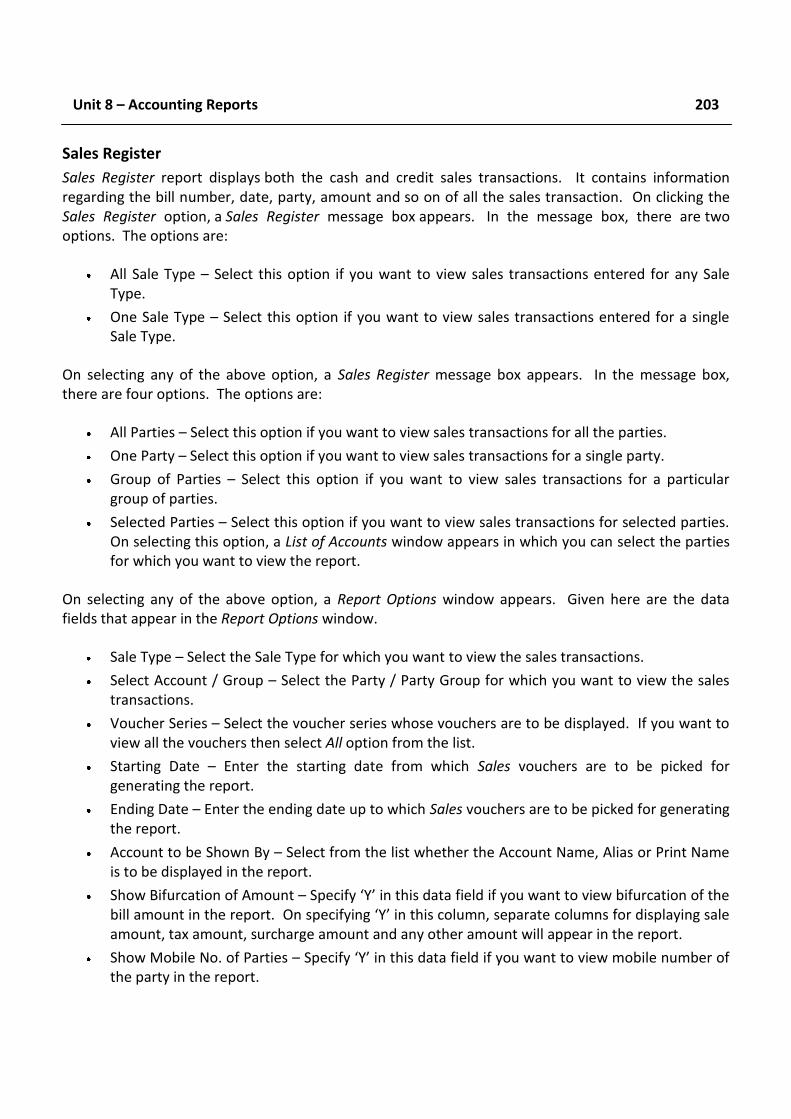
Unit 8 – Accounting Reports 203
Sales Register
Sales Register report displays both the cash and credit sales transactions. It contains information regarding the bill number, date, party, amount and so on of all the sales transaction. On clicking the Sales Register option, a Sales Register message box appears. In the message box, there are two options. The options are:
All Sale Type – Select this option if you want to view sales transactions entered for any Sale Type.
One Sale Type – Select this option if you want to view sales transactions entered for a single Sale Type.
On selecting any of the above option, a Sales Register message box appears. In the message box, there are four options. The options are:
All Parties – Select this option if you want to view sales transactions for all the parties.
One Party – Select this option if you want to view sales transactions for a single party.
Group of Parties – Select this option if you want to view sales transactions for a particular group of parties.
Selected Parties – Select this option if you want to view sales transactions for selected parties. On selecting this option, a List of Accounts window appears in which you can select the parties for which you want to view the report.
On selecting any of the above option, a Report Options window appears. Given here are the data fields that appear in the Report Options window.
Sale Type – Select the Sale Type for which you want to view the sales transactions.
Select Account / Group – Select the Party / Party Group for which you want to view the sales transactions.
Voucher Series – Select the voucher series whose vouchers are to be displayed. If you want to view all the vouchers then select All option from the list.
Starting Date – Enter the starting date from which Sales vouchers are to be picked for generating the report.
Ending Date – Enter the ending date up to which Sales vouchers are to be picked for generating the report.
Account to be Shown By – Select from the list whether the Account Name, Alias or Print Name is to be displayed in the report.
Show Bifurcation of Amount – Specify ‘Y’ in this data field if you want to view bifurcation of the bill amount in the report. On specifying ‘Y’ in this column, separate columns for displaying sale amount, tax amount, surcharge amount and any other amount will appear in the report.
Show Mobile No. of Parties – Specify ‘Y’ in this data field if you want to view mobile number of the party in the report.
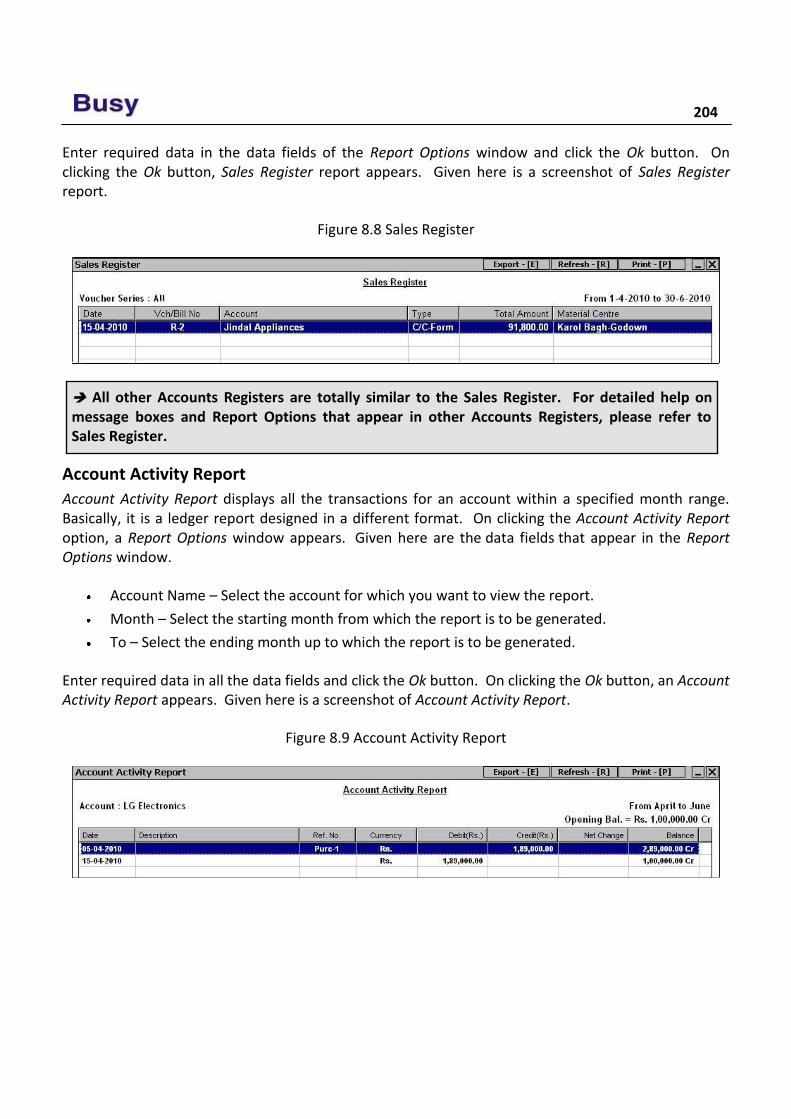
204
Enter required data in the data fields of the Report Options window and click the Ok button. On clicking the Ok button, Sales Register report appears. Given here is a screenshot of Sales Register report.
Figure 8.8 Sales Register
Account Activity Report
Account Activity Report displays all the transactions for an account within a specified month range. Basically, it is a ledger report designed in a different format. On clicking the Account Activity Report option, a Report Options window appears. Given here are the data fields that appear in the Report Options window.
Account Name – Select the account for which you want to view the report.
Month – Select the starting month from which the report is to be generated.
To – Select the ending month up to which the report is to be generated.
Enter required data in all the data fields and click the Ok button. On clicking the Ok button, an Account Activity Report appears. Given here is a screenshot of Account Activity Report.
Figure 8.9 Account Activity Report
All other Accounts Registers are totally similar to the Sales Register. For detailed help on message boxes and Report Options that appear in other Accounts Registers, please refer to Sales Register.

Unit 8 – Accounting Reports 205
8.4 Account Summaries Account Summaries reports display various summarised reports for all the accounting transactions of the company. Account Summaries reports include various reports such as Daily Balances, Transactions Summary and so on. On clicking the Account Summaries option, a list of reports is displayed. Various reports in the list are:
Daily Balances
Daily Summary
Monthly Summary
Consolidated Summary
Transaction Summary
Profit & Loss A/c
Profit & Loss Summary
Min / Max Cash Balances
Account Ledger Comparison
Let us discuss these reports in detail.
Daily Balances
Daily Balances report displays date-wise closing balance for an account for the specified date range. Closing balance will be calculated based on the opening balance of the account and the vouchers that affect the account on a particular date. On selecting the Daily Balances option, a Report Options window appears. Enter the required data in the data fields of the Report Options window and click the Ok button. On clicking the Ok button, a Daily Balances report appears. The report displays the debit / credit closing balance of the account for the dates on which the account has been used in any transaction.
Daily Summary
Daily Summary report displays date-wise opening balance, totals of debit entries and credit entries and the closing balance of an account for the specified date range. On selecting the Daily Summary option, a Report Options window appears. Given here are the data fields that appear in the Report Options window.
Account Name – Select the account for which you want to view the report.
Starting Date – Enter the starting date from which the report is to be generated.
Ending Date – Enter the ending date up to which the report is to be generated.
Show Unmoved Dates Also – Specify ‘Y’ in this data field if you want to view opening / closing balance of the dates on which no transaction has taken place.
206
Enter required data in the data fields of Report Options window and click the Ok button. On clicking the Ok button, a Daily Summary report appears. The report displays the opening balance, debit / credit amount and the closing balance on various dates.
Monthly Summary
Monthly Summary report displays month-wise opening balance, totals of debit entries and credit entries and the closing balance of an Account / All Accounts / Account Group. On clicking the Monthly Summary option, two options appear. The options are:
Vertical - Click this option if you want to view the Monthly Summary report with the months arranged vertically. In other words, the months are listed in one column and the related information for each month is displayed in a separate row. On selecting this option, a Monthly Summary message box appears. In the message box there are following two options:
o One Account – Select this option if you want to view report for a single account.
o Account Group – Select this option if you want to view report for a single Account Group.
Horizontal - Click this option if you want to view the Monthly Summary report with the months arranged horizontally. In other words, the accounts are listed in one row and the related information for each account is displayed month-wise in separate columns. On selecting this option, a Monthly Summary message box appears with following two options:
o Group of Accounts – Select this option if you want to view report for a particular Group of Accounts.
o All Accounts – Select this option if you want to view report for all the accounts.
On selecting the required options, a Report Options window appears. Given here are the data fields that appear in the Report Options window.
Select Account – Select the account for which the report is to be generated.
Select Group – Select the Account Group for which the report is to be generated.
Accounts to be Shown By – Select from the list whether the Account Name, Alias or Print Name is to be displayed in the report.
Enter required data in the data fields of Report Options window and click the Ok button. On clicking the Ok button, a Monthly Summary window appears displaying month-wise debit / credit and closing balance of Account / Account Group.
Consolidated Summary
Consolidated Summary report displays consolidated opening balance, totals of debit entries and credit entries and the closing balance of Accounts / Account Group for a specified date range. On clicking the Consolidated Summary option, two options appear. The options are:
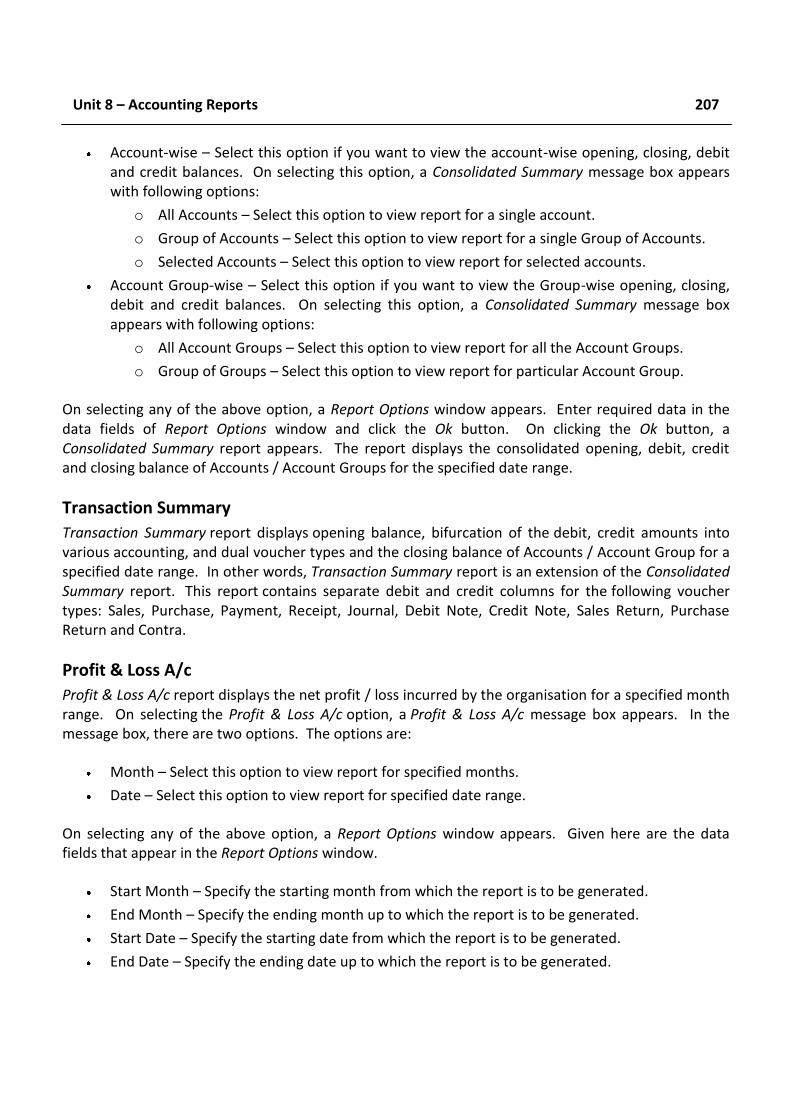
Unit 8 – Accounting Reports 207
Account-wise – Select this option if you want to view the account-wise opening, closing, debit and credit balances. On selecting this option, a Consolidated Summary message box appears with following options:
o All Accounts – Select this option to view report for a single account.
o Group of Accounts – Select this option to view report for a single Group of Accounts.
o Selected Accounts – Select this option to view report for selected accounts.
Account Group-wise – Select this option if you want to view the Group-wise opening, closing, debit and credit balances. On selecting this option, a Consolidated Summary message box appears with following options:
o All Account Groups – Select this option to view report for all the Account Groups.
o Group of Groups – Select this option to view report for particular Account Group.
On selecting any of the above option, a Report Options window appears. Enter required data in the data fields of Report Options window and click the Ok button. On clicking the Ok button, a Consolidated Summary report appears. The report displays the consolidated opening, debit, credit and closing balance of Accounts / Account Groups for the specified date range.
Transaction Summary
Transaction Summary report displays opening balance, bifurcation of the debit, credit amounts into various accounting, and dual voucher types and the closing balance of Accounts / Account Group for a specified date range. In other words, Transaction Summary report is an extension of the Consolidated Summary report. This report contains separate debit and credit columns for the following voucher types: Sales, Purchase, Payment, Receipt, Journal, Debit Note, Credit Note, Sales Return, Purchase Return and Contra.
Profit & Loss A/c
Profit & Loss A/c report displays the net profit / loss incurred by the organisation for a specified month range. On selecting the Profit & Loss A/c option, a Profit & Loss A/c message box appears. In the message box, there are two options. The options are:
Month – Select this option to view report for specified months.
Date – Select this option to view report for specified date range.
On selecting any of the above option, a Report Options window appears. Given here are the data fields that appear in the Report Options window.
Start Month – Specify the starting month from which the report is to be generated.
End Month – Specify the ending month up to which the report is to be generated.
Start Date – Specify the starting date from which the report is to be generated.
End Date – Specify the ending date up to which the report is to be generated.
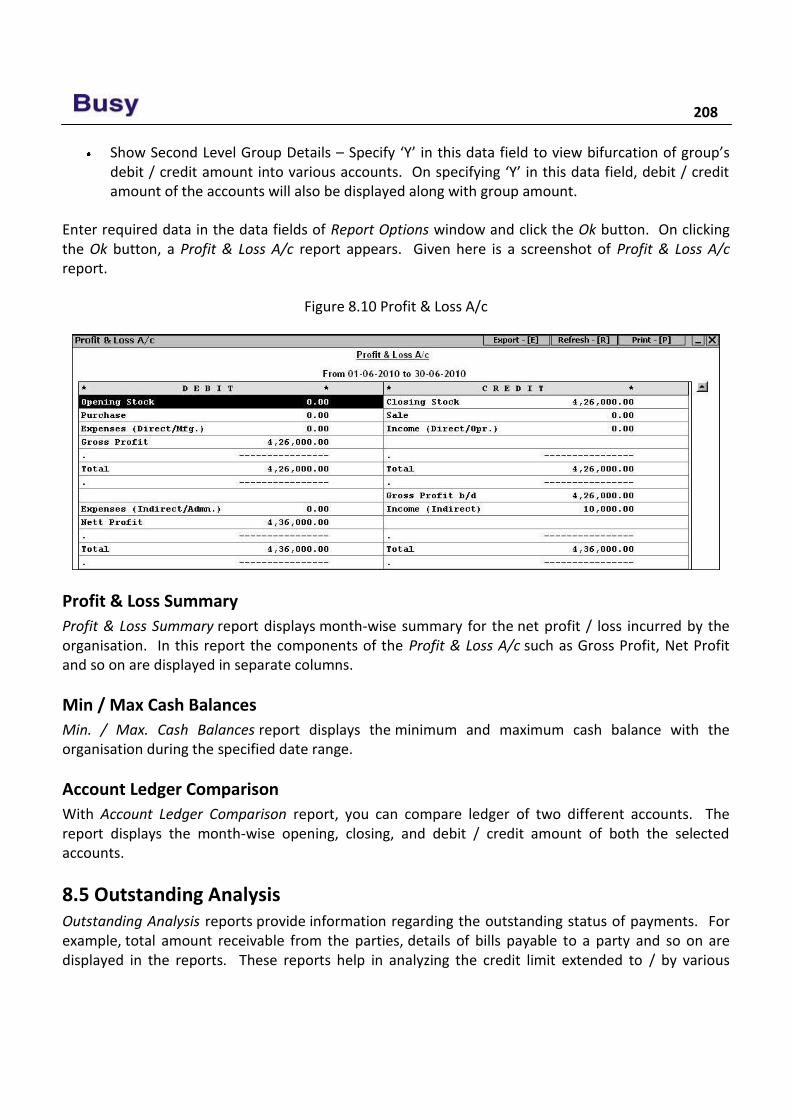
208
Show Second Level Group Details – Specify ‘Y’ in this data field to view bifurcation of group’s debit / credit amount into various accounts. On specifying ‘Y’ in this data field, debit / credit amount of the accounts will also be displayed along with group amount.
Enter required data in the data fields of Report Options window and click the Ok button. On clicking the Ok button, a Profit & Loss A/c report appears. Given here is a screenshot of Profit & Loss A/c report.
Figure 8.10 Profit & Loss A/c
Profit & Loss Summary
Profit & Loss Summary report displays month-wise summary for the net profit / loss incurred by the organisation. In this report the components of the Profit & Loss A/c such as Gross Profit, Net Profit and so on are displayed in separate columns.
Min / Max Cash Balances
Min. / Max. Cash Balances report displays the minimum and maximum cash balance with the organisation during the specified date range.
Account Ledger Comparison
With Account Ledger Comparison report, you can compare ledger of two different accounts. The report displays the month-wise opening, closing, and debit / credit amount of both the selected accounts.
8.5 Outstanding Analysis Outstanding Analysis reports provide information regarding the outstanding status of payments. For example, total amount receivable from the parties, details of bills payable to a party and so on are displayed in the reports. These reports help in analyzing the credit limit extended to / by various
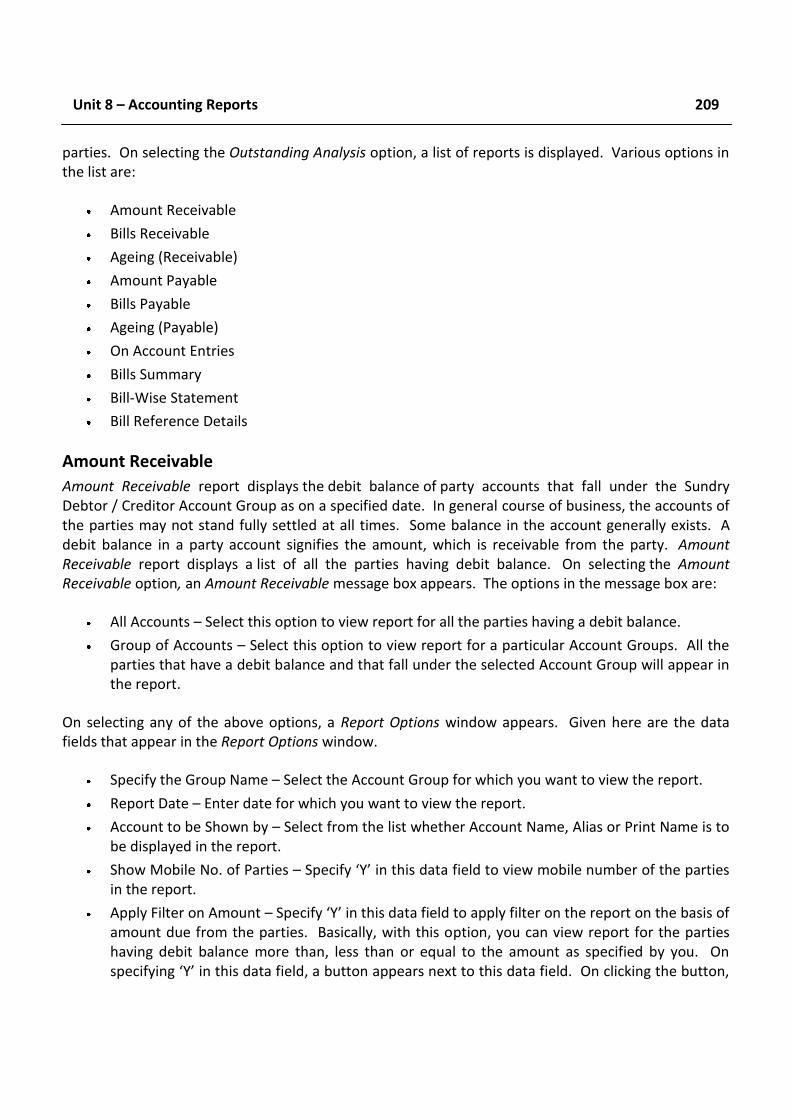
Unit 8 – Accounting Reports 209
parties. On selecting the Outstanding Analysis option, a list of reports is displayed. Various options in the list are:
Amount Receivable
Bills Receivable
Ageing (Receivable)
Amount Payable
Bills Payable
Ageing (Payable)
On Account Entries
Bills Summary
Bill-Wise Statement
Bill Reference Details
Amount Receivable
Amount Receivable report displays the debit balance of party accounts that fall under the Sundry Debtor / Creditor Account Group as on a specified date. In general course of business, the accounts of the parties may not stand fully settled at all times. Some balance in the account generally exists. A debit balance in a party account signifies the amount, which is receivable from the party. Amount Receivable report displays a list of all the parties having debit balance. On selecting the Amount Receivable option, an Amount Receivable message box appears. The options in the message box are:
All Accounts – Select this option to view report for all the parties having a debit balance.
Group of Accounts – Select this option to view report for a particular Account Groups. All the parties that have a debit balance and that fall under the selected Account Group will appear in the report.
On selecting any of the above options, a Report Options window appears. Given here are the data fields that appear in the Report Options window.
Specify the Group Name – Select the Account Group for which you want to view the report.
Report Date – Enter date for which you want to view the report.
Account to be Shown by – Select from the list whether Account Name, Alias or Print Name is to be displayed in the report.
Show Mobile No. of Parties – Specify ‘Y’ in this data field to view mobile number of the parties in the report.
Apply Filter on Amount – Specify ‘Y’ in this data field to apply filter on the report on the basis of amount due from the parties. Basically, with this option, you can view report for the parties having debit balance more than, less than or equal to the amount as specified by you. On specifying ‘Y’ in this data field, a button appears next to this data field. On clicking the button,

210
a Filter Options window appears. Specify the required filtration criteria in the Filter Options window.
Enter required data in the data fields of the Report Options window and click the Ok button. On clicking the Ok button, an Amount Receivable report appears. Given here is a screenshot of Amount Receivable report.
Figure 8.11 Amount Receivable
Bills Receivable
Bills Receivable report appears only if you have enabled the Bill-by-Bill Details feature in Administration Configuration Features / Options Accounts tab. The report displays the bills receivable details of an Account / Account Group / All Accounts. On clicking the Bills Receivable option, a Bills Receivable message box appears. In the message box, there are three options. The options are:
One Account – Select this option to view report for single party.
Group of Accounts – Select this option to view report for a group of parties.
All Accounts – Select this option to view report for all the parties.
On selecting any of the above option, a Report Options window appears. Given here are the data fields that appear in the Report Options window.
Select Account / Group – Select Party / Group of Parties for which you want to view the report.
Type of Entries to be Considered – Select from the list, the type of entries to be displayed in the report. A bill is said to be pending from the day the bill is raised to the day it is adjusted / paid / received. If you want to view all the Bills Receivable details then select the All Including (Cleared) option. If you want to view, details for those bills that are due i.e. the due date has passed and are yet to be adjusted / received then select the Due option. If you want to view the pending bills, i.e. bills whose due date has not been passed then select the Pending option.
Select Reference Group - This data field appears if you have enabled the option of Enable Grouping of Reference under Administration Configuration Features / Options Accounts tab Bill Reference Group window. Select the required Reference group. If you want to view the report for all reference groups then select either All (Sorted) or All (Unsorted) option. The difference between All (Sorted) and All (Unsorted) option is that on selecting the All (Sorted) option, the report will appear Bill Reference Group-Wise i.e. first a Reference Group

Unit 8 – Accounting Reports 211
will appear then all the references falling under the group will appear then another Reference group will appear and all the reference falling under the group will appear and so on. If you select the All (Unsorted) option then no sorting will be done on Bill Reference group and all the references will appear according to the due date.
Starting Date – Enter the starting date from which the bills receivable details are to be displayed in the report.
Ending Date – Enter the ending date up to which the bills receivable details are to be displayed in the report.
Bills Status As On - Specify the date on which the status of the bills is to be considered. For example, you are viewing Bills Receivable report for date range 1-4-2010 to 30-6-2010 and you want the know the status of the bills on 1-7-2010 then you can specify the Bill Status As On as 1-7-2010.
Accounts to be shown as – Select from the list whether Account Name, Alias or Print Name is to be displayed in the report.
Consider Bills Older Than (Days) – Specify the days, bills older than which will be displayed in the report. In other words, specify the number of days the bill should have been due for displaying in the report. If you have selected the Pending option in the Type of Entries to be Considered data field then voucher date will be taken into account otherwise if you have selected Due option then due date of the bill reference will be taken into account for generating the report.
Show On Acc. Amount & Ledger Bal. - Specify 'Y' in this data field, if you want that the On Account amount and Ledger Balance for the account should be displayed in the report. On Account are those entries of the account for which no bill reference has been created.
Show Last Receipt Details – Specify ‘Y’ in this data field to view details of last receipt from the party.
Show Bills Adjustment Details – Specify ‘Y’ in this data field to view details of bill adjustment in the report. On specifying ‘Y’ in this data field, three columns Adjusted By, Date, Adjusted Amount appear in the report. These columns display details of any adjustment made for the bill reference.
Apply Filter on Amount – Specify ‘Y’ in this data field to filter report on the basis of amount. On specifying ‘Y’ in this data field, a button appears next to it. Click the button to specify the filtration criteria.
Show Mobile No. of Parties – Specify ‘Y’ in this data field to view mobile number of the party in the report.
Enter required data in the data fields of Report Options window and click the Ok button. On clicking the Ok button, a Bills Receivable report appears. Given here is a screenshot of Bills Receivable report.
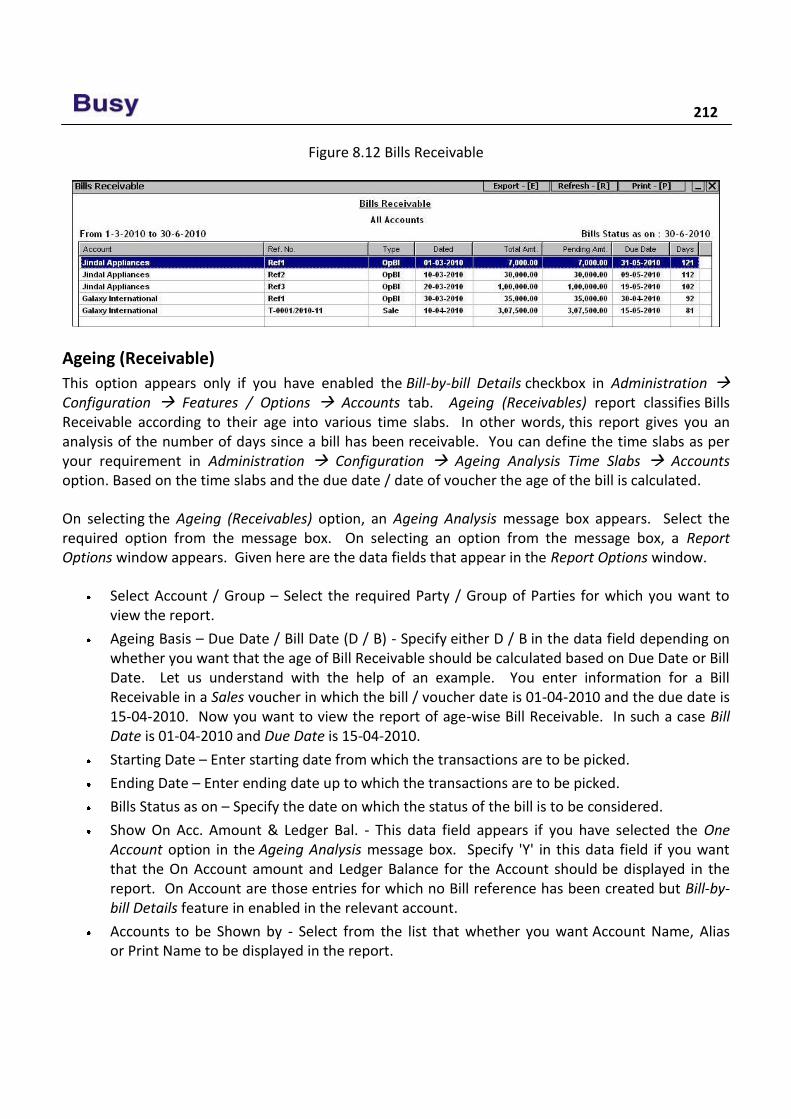
212
Figure 8.12 Bills Receivable
Ageing (Receivable)
This option appears only if you have enabled the Bill-by-bill Details checkbox in Administration Configuration Features / Options Accounts tab. Ageing (Receivables) report classifies Bills Receivable according to their age into various time slabs. In other words, this report gives you an analysis of the number of days since a bill has been receivable. You can define the time slabs as per your requirement in Administration Configuration Ageing Analysis Time Slabs Accounts option. Based on the time slabs and the due date / date of voucher the age of the bill is calculated.
On selecting the Ageing (Receivables) option, an Ageing Analysis message box appears. Select the required option from the message box. On selecting an option from the message box, a Report Options window appears. Given here are the data fields that appear in the Report Options window.
Select Account / Group – Select the required Party / Group of Parties for which you want to view the report.
Ageing Basis – Due Date / Bill Date (D / B) - Specify either D / B in the data field depending on whether you want that the age of Bill Receivable should be calculated based on Due Date or Bill Date. Let us understand with the help of an example. You enter information for a Bill Receivable in a Sales voucher in which the bill / voucher date is 01-04-2010 and the due date is 15-04-2010. Now you want to view the report of age-wise Bill Receivable. In such a case Bill Date is 01-04-2010 and Due Date is 15-04-2010.
Starting Date – Enter starting date from which the transactions are to be picked.
Ending Date – Enter ending date up to which the transactions are to be picked.
Bills Status as on – Specify the date on which the status of the bill is to be considered.
Show On Acc. Amount & Ledger Bal. - This data field appears if you have selected the One Account option in the Ageing Analysis message box. Specify 'Y' in this data field if you want that the On Account amount and Ledger Balance for the Account should be displayed in the report. On Account are those entries for which no Bill reference has been created but Bill-by-bill Details feature in enabled in the relevant account.
Accounts to be Shown by - Select from the list that whether you want Account Name, Alias or Print Name to be displayed in the report.
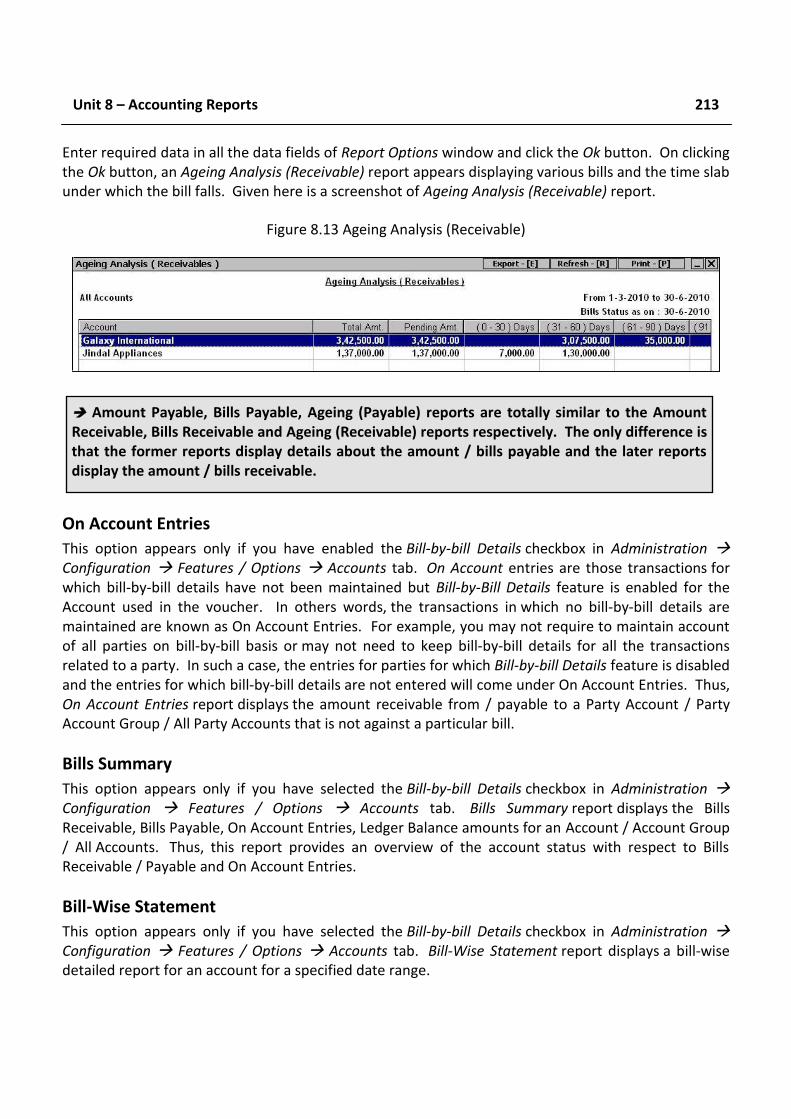
Unit 8 – Accounting Reports 213
Enter required data in all the data fields of Report Options window and click the Ok button. On clicking the Ok button, an Ageing Analysis (Receivable) report appears displaying various bills and the time slab under which the bill falls. Given here is a screenshot of Ageing Analysis (Receivable) report.
Figure 8.13 Ageing Analysis (Receivable)
On Account Entries
This option appears only if you have enabled the Bill-by-bill Details checkbox in Administration Configuration Features / Options Accounts tab. On Account entries are those transactions for which bill-by-bill details have not been maintained but Bill-by-Bill Details feature is enabled for the Account used in the voucher. In others words, the transactions in which no bill-by-bill details are maintained are known as On Account Entries. For example, you may not require to maintain account of all parties on bill-by-bill basis or may not need to keep bill-by-bill details for all the transactions related to a party. In such a case, the entries for parties for which Bill-by-bill Details feature is disabled and the entries for which bill-by-bill details are not entered will come under On Account Entries. Thus, On Account Entries report displays the amount receivable from / payable to a Party Account / Party Account Group / All Party Accounts that is not against a particular bill.
Bills Summary
This option appears only if you have selected the Bill-by-bill Details checkbox in Administration Configuration Features / Options Accounts tab. Bills Summary report displays the Bills Receivable, Bills Payable, On Account Entries, Ledger Balance amounts for an Account / Account Group / All Accounts. Thus, this report provides an overview of the account status with respect to Bills Receivable / Payable and On Account Entries.
Bill-Wise Statement
This option appears only if you have selected the Bill-by-bill Details checkbox in Administration Configuration Features / Options Accounts tab. Bill-Wise Statement report displays a bill-wise detailed report for an account for a specified date range.
Amount Payable, Bills Payable, Ageing (Payable) reports are totally similar to the Amount Receivable, Bills Receivable and Ageing (Receivable) reports respectively. The only difference is that the former reports display details about the amount / bills payable and the later reports display the amount / bills receivable.
214
Bill Reference Details
This option appears only if you have selected the Bill-by-bill Details checkbox in Administration Configuration Features / Options Accounts tab. Bill Reference Details report displays a detailed report for a particular bill reference of an account. On clicking the Bill Reference Details option, a Report Options window appears. Given here are the data fields that appear in the Report Options window.
Select Account – Select the account whose bill reference is to be considered.
Bill-Ref. No. – Enter the bill reference number whose details you want to view.
Enter the required data in the data fields of Report Options window and click the Ok button. On clicking the Ok button, a Reference Details window appears displaying details of the bill reference.
Review Outstanding Analysis reports provide information regarding outstanding status of payments.
Bills Receivable / Payable reports appear only if Bill-by-Bill Details feature is enabled in Features / Options. The reports display details of various bills receivable / payable from / to the party.
You can filter various reports on the basis of amount receivable / payable. For example, you want to view report for those parties from whom more than Rs. 10,000 is due. In this case, you can use the Specify Filter on Amount data field provided in the Report Options window.
On Account entries are those transactions for which bill-by-bill details have not been maintained but Bill-by-Bill Details feature is enabled in the relevant account.
Bills Summary report displays the Bills Receivable, Bills Payable, On Account Entries, Ledger Balance amounts for an Account / Account Group / All Accounts.
Bill-Wise Statement report displays a bill-wise detailed report for an account for a specified date range.
Exercise 1 . Balance Sheet lists the:
a) Assets of the company c) Liabilities of the company b) Net Profit / Loss d) All of the above
2 . Trial Balance is prepared to check:
a) Debit Balances c) Arithmetic Accuracy of Record b) Credit Balances d) All of the above
3 . Cash / Bank Book displays:
Unit 8 – Accounting Reports 215
a) Only Bank transactions c) Single transaction involving both Cash & Bank b) Only Cash transactions d) Both Cash & Bank transactions
4 . Profit and Loss Account displays:
a) Net Increase in Cash c) Net Decrease in Outstanding b) Net Profit / Loss d) All of the above
5 . What are On Account Entries? 6 . What is the difference between Pending Bills and Due Bills?
7 . What is Ledger and what information it displays?
8 . What are the benefits of viewing Merged Account Ledger?
9 . If in Busy, Closing Trial balance is not matched then what could be the possible reason?
1 0 . Is there any report, which displays the amount to be paid to the parties on a specific date?
1 1 . Is there any report from which we can get balance of particular account on a particular date?
1 2 . Which report shows bill-wise outstanding?
1 3 . Which report shows profit or loss for a specified period?
1 4 . Which report shows movement of a particular Group of Account during a period?
1 5 . In which report we can view details of all Sales voucher entered in a specified period?

The objective of Education is to
prepare Young to Educate
themselves throughout their Lives.
Robert Maynard Hutchins
Unit 9 Inventory Reports
The main objective of this Unit is to let User know about the inventory reports provided in BUSY. Inventory reports display stock of a particular item, movement of goods, and overall sale / purchase of an item in a year / month / day and so on. These reports help User to ascertain the stock of the company based on which the company can order goods that are comparatively less in stock. With these reports, User can also judge the items that have high volume of sales and items that have comparatively low volume of sales.
Topics covered under this unit:
Stock Status
Inventory Books
Inventory Summaries
9.1 Stock Status Stock Status reports display the stock status of items in terms of quantity and value. To determine the quantity of the stock, transactions recorded using the Dual and Inventory vouchers are taken into account and to determine the value of stock, the Stock Val. Method specified in Administration Configuration Features / Options Inventory tab or Self-Val. Price specified in the Item master is taken into account.
On selecting the Stock Status option, a list of reports is displayed. Various reports in the list are:
Closing Stock - Grouped
Closing Stock - Alphabetical
Closing Stock - Hierarchical
Opening Stock - Grouped
Opening Stock - Alphabetical
Opening Stock - Hierarchical
Let us discuss these reports in detail.
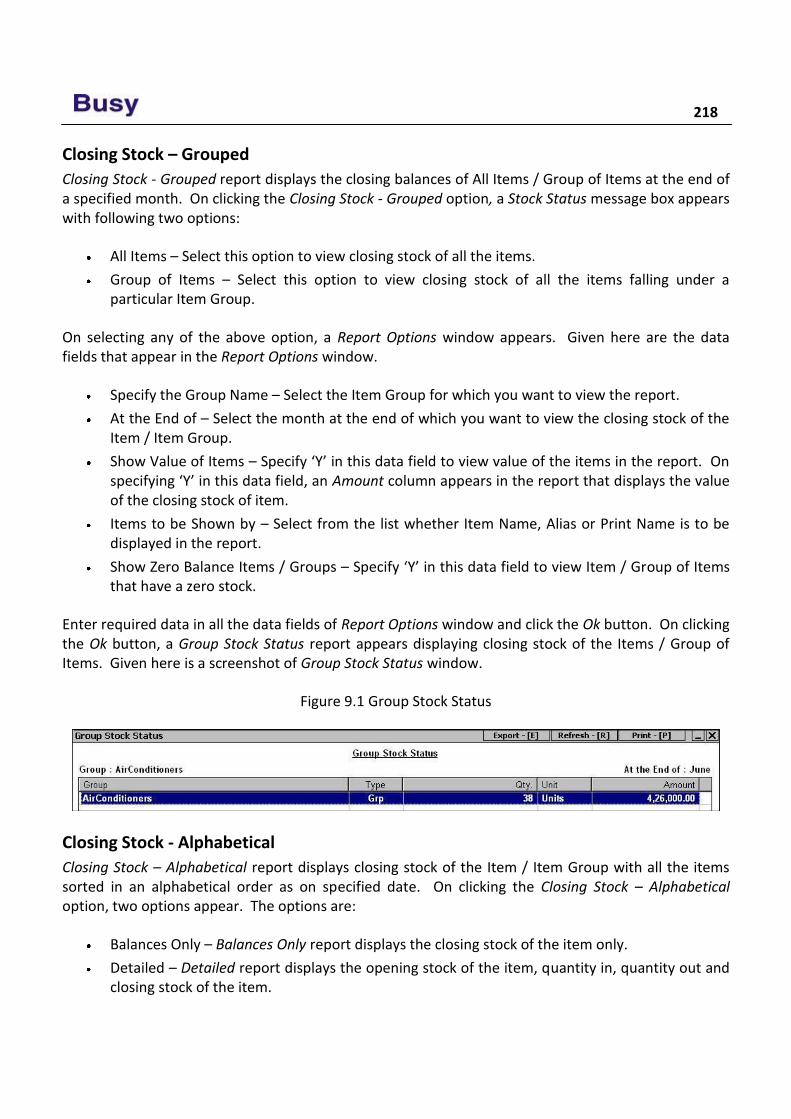
218
Closing Stock – Grouped
Closing Stock - Grouped report displays the closing balances of All Items / Group of Items at the end of a specified month. On clicking the Closing Stock - Grouped option, a Stock Status message box appears with following two options:
All Items – Select this option to view closing stock of all the items.
Group of Items – Select this option to view closing stock of all the items falling under a particular Item Group.
On selecting any of the above option, a Report Options window appears. Given here are the data fields that appear in the Report Options window.
Specify the Group Name – Select the Item Group for which you want to view the report.
At the End of – Select the month at the end of which you want to view the closing stock of the Item / Item Group.
Show Value of Items – Specify ‘Y’ in this data field to view value of the items in the report. On specifying ‘Y’ in this data field, an Amount column appears in the report that displays the value of the closing stock of item.
Items to be Shown by – Select from the list whether Item Name, Alias or Print Name is to be displayed in the report.
Show Zero Balance Items / Groups – Specify ‘Y’ in this data field to view Item / Group of Items that have a zero stock.
Enter required data in all the data fields of Report Options window and click the Ok button. On clicking the Ok button, a Group Stock Status report appears displaying closing stock of the Items / Group of Items. Given here is a screenshot of Group Stock Status window.
Figure 9.1 Group Stock Status
Closing Stock - Alphabetical
Closing Stock – Alphabetical report displays closing stock of the Item / Item Group with all the items sorted in an alphabetical order as on specified date. On clicking the Closing Stock – Alphabetical option, two options appear. The options are:
Balances Only – Balances Only report displays the closing stock of the item only.
Detailed – Detailed report displays the opening stock of the item, quantity in, quantity out and closing stock of the item.
Unit 9 – Inventory Reports 219
Let us discuss both these options one by one.
Balances Only
On clicking the Balances Only option, a Stock Status message box appears. This message box appears if you have created more than one Material Centre master. In the message box, there are three options. The options are:
One MC – Select this option to view closing stock of the item at a single Material Centre.
Group of MC – Select this option to view closing stock of the item at a single Material Centre Group. The stock of item at all the Material Centres falling under the selected Group will be taken into account for generating the report.
All MC – Select this option to view closing stock of item at all the Material Centres.
On selecting any of the above option, a Stock Status message box appears. In the message box, following options appear:
One Item – Select this option to view closing stock of a single item.
Group of Items – Select this option to view closing stock of a single Item Group. All the items falling under the selected Item Group will be displayed in the report.
All Items – Select this option to view closing stock of all the items.
On selecting any of the above option, a Report Options window appears. Given here are the data fields that appear in the Report Options window.
Specify Item / Item Group – Select the Item / Item Group whose closing stock you want to view.
Specify MC / MC Group – Select the Material Centre / Material Centre Group for which the closing stock is to be displayed.
Report Date – Enter the date on which you want to view the closing stock of the item.
Show Total Stock / Book Stock Only (T / B) – Specify ‘T’ in this data field if you want to view total stock of the item otherwise specify ‘B’ in this data field if you want to view book stock of the item. Difference between total stock and book stock is that while calculating book stock, the stock lying at Material Centres in which Reflect stock in Balance Sheet option is set to No will not be taken into account whereas while calculating total stock of the item, stock lying at such Material Centres will also be taken into account.
Show Zero Stock Item – Specify ‘Y’ in this data field to view items having zero stock.
Show Parent Group – Specify ‘Y’ in this data field to view Parent Group of the items in the report.
Item to be Shown by – Select from the list whether Item Name, Alias or Print Name is to be displayed in the report.
220
Show Value of Items – Specify ‘Y’ in this data field to view value of the closing stock in the report.
Enter required data in the data fields of Report Options window and click the Ok button. On clicking the Ok button, Stock Status report appears displaying closing stock of the Item / Item Group.
Detailed
On clicking the Detailed option, a Stock Status message box appears. In the message box, there are three options. The options are:
All Items – Select this option to view closing stock of all the items.
Group of Items – Select this option to view closing stock of a single Item Group.
One Item – Select this option to view closing stock of a single item.
On selecting any of the above option, a Stock Status message box appears. In the message box, there are two options. The options are:
One MC – Select this option to view closing stock of item at a single Material Centre.
All MC – Select this option to view closing stock of item at all the Material Centres.
On selecting any of the above option, a Stock Status message box appears with following three options:
All Items – Select this option to view closing stock of all the items.
Group of Item – Select this option to view closing stock of a single Item Group.
One Item – Select this option to view closing stock of a single item.
On selecting any of the option, a Report Options window appears. Given here are the data fields that appear in the Report Options window.
Material Centre Name – Select the Material Centre for which the closing stock is to be displayed in the report.
Select Item / Item Group – Select the Item / Item Group for which the closing stock is to be displayed.
Starting Date – Enter the starting date from which the item details are to be considered for generating the report.
Ending Date – Enter the ending date up to which the item details are to be considered for generating the report.
Item to be Shown by – Select from the list whether Item Name, Alias or Print Name is to be displayed in the report.
Masters to be Picked - In the list there are three options. The options are:
o All - Select this option if you want to pick all the masters for the report.
Unit 9 – Inventory Reports 221
o Moved - Select this option if you want to pick only those masters for the report that are used in any transaction.
o Moved / Closing Bal - Select this option if you want to pick those masters for the report that are either used in any transaction or have some closing balance.
Show Sales / Purchase separately – Specify ‘Y’ in this data field to view separate columns displaying sale and purchase of item.
Show Value of Items – Specify ‘Y’ in this data field to view value of closing stock in the report.
Show Parent Group – Specify ‘Y’ in this data field to view Parent Group of the item in the report.
Consider Stock Transfer Entries – Specify ‘Y’ in this data field to include stock transfer entries also while calculating the closing stock.
After entering the required data in the data fields of Report Options window, click the Ok button. On clicking the Ok button, a Stock Status window appears displaying, opening stock, quantity in, quantity out and closing stock of item.
Closing Stock - Hierarchical
Closing Stock Hierarchical report displays closing stock of the item with all the items arranged as per their hierarchy. First, all the Primary groups are sorted in alphabetical order and then all the sub groups and items falling under Primary group will appear. On clicking this option, two options appear. The options are:
Balances Only – Balances Only report displays only the closing stock of the item.
Detailed – Detailed report displays the opening stock, quantity in, quantity out and closing stock of the item.
For Detailed help on the above two options, please refer to the Closing Stock – Alphabetical option above.
Till now, we have discussed all the Closing Stock reports. After this, all the Opening Stock reports appear in the list. Opening Stock reports display the opening stock of the items. All the Opening Stock reports are similar to their respective Closing Stock reports. Hence, for detailed explanation on Opening Stock - Grouped, Opening Stock – Alphabetical and Opening Stock – Hierarchical reports, please refer to the corresponding Closing Stock reports.
9.2 Inventory Books In a general business scenario, numerous transactions take place such as sales / purchase of goods. In BUSY these transactions are recorded using various vouchers such as Sales, Purchase, Stock Transfer and so on. From these vouchers, inventory related information is posted to Inventory Books.
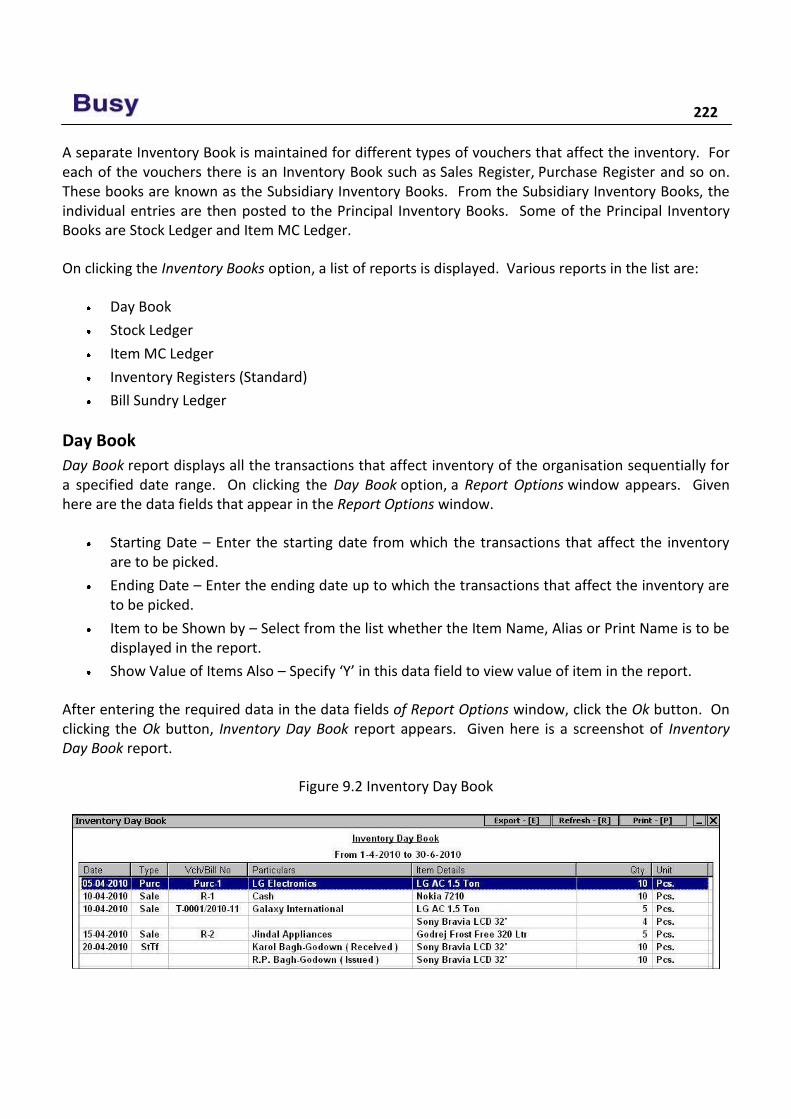
222
A separate Inventory Book is maintained for different types of vouchers that affect the inventory. For each of the vouchers there is an Inventory Book such as Sales Register, Purchase Register and so on. These books are known as the Subsidiary Inventory Books. From the Subsidiary Inventory Books, the individual entries are then posted to the Principal Inventory Books. Some of the Principal Inventory Books are Stock Ledger and Item MC Ledger.
On clicking the Inventory Books option, a list of reports is displayed. Various reports in the list are:
Day Book
Stock Ledger
Item MC Ledger
Inventory Registers (Standard)
Bill Sundry Ledger
Day Book
Day Book report displays all the transactions that affect inventory of the organisation sequentially for a specified date range. On clicking the Day Book option, a Report Options window appears. Given here are the data fields that appear in the Report Options window.
Starting Date – Enter the starting date from which the transactions that affect the inventory are to be picked.
Ending Date – Enter the ending date up to which the transactions that affect the inventory are to be picked.
Item to be Shown by – Select from the list whether the Item Name, Alias or Print Name is to be displayed in the report.
Show Value of Items Also – Specify ‘Y’ in this data field to view value of item in the report.
After entering the required data in the data fields of Report Options window, click the Ok button. On clicking the Ok button, Inventory Day Book report appears. Given here is a screenshot of Inventory Day Book report.
Figure 9.2 Inventory Day Book
Unit 9 – Inventory Reports 223
Stock Ledger
Stock Ledger displays all the transactions of an item sequentially within the specified date range. On clicking the Stock Ledger option, two options appear. The options are:
Item-Wise - Select this option if you want to view the report item-wise i.e. all the transactions involving the selected item will be displayed sequentially.
Merged Account – Select this option if you want to view combined report for all the items. On selecting this option, transactions will be displayed sequentially irrespective of the item used in them.
Let us discuss both these options one by one.
Item-Wise
On clicking the Item-Wise option, a Stock Ledger message box appears. This message box appears if you have created more than one Material Centre master. In the message box, there are two options. The options are:
One MC – Select this option to view transactions involving a particular Material Centre.
All MC – Select this option to view transactions for any Material Centre.
On selecting any of the above option, a Report Options window appears. Given here are the data fields that appear in the Report Options window.
Item Name – Select the item for which you want to view the report.
Select MC – Select the Material Centre at which the stock will be considered for generating the report.
Starting Date – Enter the starting date from which transactions are to be picked.
Ending Date – Enter the ending date up to which the transactions are to be picked.
Account to be Shown by – Select from the list whether Name, Alias or Print Name of the party used in voucher is displayed in the report.
Show Value of Items – Specify ‘Y’ in this data field to view value of the items in the report.
Show Stock Transfer Entries – Specify ‘Y’ in this data field to pick stock transfer entries also in the report.
Enter required data in the data fields of Report Options window and click the OK button. On clicking the Ok button, Stock Ledger report appears displaying all the transactions sequentially for the selected item.
Merged Items
On clicking the Merged Items option, a Merged Ledger message box appears. In the message box, there are two options. The options are:
224
Item Group – Select this option to view stock ledger for a single Item Group. All the items falling under the selected Item Group will be considered for generating the report.
Selected Item – Select this option to view stock ledger of selected items. On selecting this option, a List of Items window appears in which you can select the required items.
On selecting any of the above option, a Report Options window appears. Given here are the data fields that appear in the Report Options window.
Item Group Name – Select the Item Group for which you want to view the report.
Generate Report for Single MC Only – Specify ‘Y’ in this data field, if you want to generate stock ledger for a single Material Centre only.
Select MC – This data field gets active only if you have specified ‘Y’ in the Generate Report for Single MC Only data field. Select the Material Centre for which the stock ledger is to be generated.
Starting Date – Enter the starting date from which the transactions are to be picked for generating the report.
Ending Date – Enter the ending date up to which the transactions are to be picked for generating the report.
Account to be Shown by – Select from the list whether Name, Alias or Print Name of the party used in the voucher is to be displayed in the report.
Show Actual Item Name – Specify ‘Y’ in this data field to view item name also in the report. On specifying ‘Y’ in this data field, an Item Name column, displaying name of the item used in transaction appear in the report.
Show Value of Items – Specify ‘Y’ in this data field to view value of the item in the report.
Enter required data in the data fields of Report Options window and click the Ok button. On clicking the Ok button, a Merged Stock Ledger report appears.
Item MC Ledger
Item MC Ledger report displays all the transactions involving the selected Item and Material Centre. It is a filtered form of Stock Ledger report since it displays item-wise information of quantity in and quantity out at a particular Material Centre. In other words, we can say that Item MC Ledger report is the Stock Ledger report of a particular Material Centre. This report appears only if you have created more than one Material Centre masters.
Material Centre Register
Material Centre Register report displays information of all the inventory related transactions at a Material Centre of the organisation sequentially for a specified date range. It displays information of quantity in and quantity out of all the items at a particular Material Centre. This report appears only if you have created more than one Material Centre master.
Unit 9 – Inventory Reports 225
Inventory Registers (Standard)
With Inventory Registers (Standard) option, you can view all the Inventory Registers in Standard format. On clicking the Inventory Registers (Standard) option, a list of registers is displayed. Various Registers in the list are:
Sales Register
Purchase Register
Sales Return Register
Purchase Return Register
Stock Transfer Register
Sales Register
Sales Register displays all the sales transactions sequentially with in a specified date range. On clicking the Sales Register option, a Sales Register message box appears. In the message box, there are four options. The options are:
All Parties – Select this option if you want to view sales transactions for all the parties.
One Party – Select this option if you want to view sales transactions for a single party.
Group of Parties – Select this option if you want to view sales transactions for a particular group of parties.
Selected Parties – Select this option if you want to view sales transactions for selected parties. On selecting this option, a List of Accounts window appears in which you can select the parties for which you want to view the report.
On selecting any of the above option, a Report Options window appears. Given here are the data fields that appear in the Report Options window.
Select Account / Group – Select the Party / Party Group for which you want to view the report.
Voucher Series – Select the voucher series whose vouchers are to be displayed. If you want to view all the vouchers then select All option from the list.
Starting Date – Enter the starting date from which Sales vouchers are to be picked for generating the report.
Ending Date – Enter the ending date up to which Sales vouchers are to be picked for generating the report.
Account to be Shown by – Select from the list whether the Party Name, Alias or Print Name is to be displayed in the report.
Item to be Shown By – Select from the list whether Item Name, Alias or Print Name is to be displayed in the report.
Show Value of Items – Specify ‘Y’ in this data field to view value of item in the report.
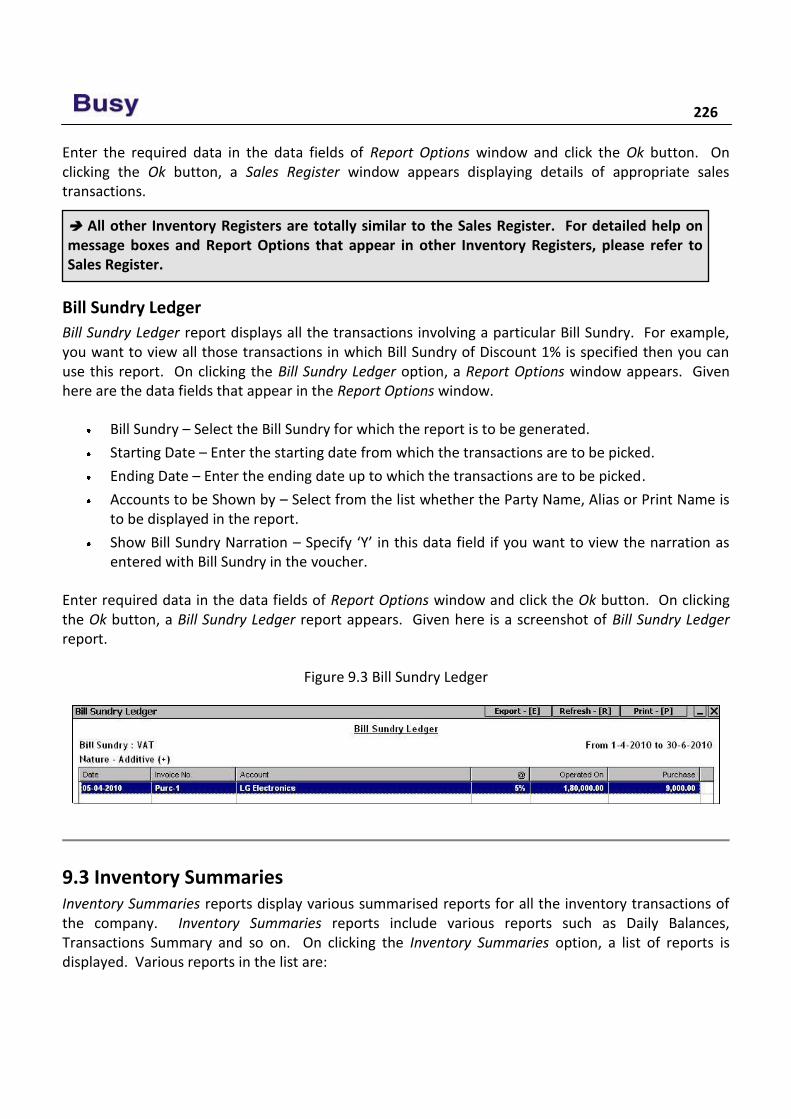
226
Enter the required data in the data fields of Report Options window and click the Ok button. On clicking the Ok button, a Sales Register window appears displaying details of appropriate sales transactions.
Bill Sundry Ledger
Bill Sundry Ledger report displays all the transactions involving a particular Bill Sundry. For example, you want to view all those transactions in which Bill Sundry of Discount 1% is specified then you can use this report. On clicking the Bill Sundry Ledger option, a Report Options window appears. Given here are the data fields that appear in the Report Options window.
Bill Sundry – Select the Bill Sundry for which the report is to be generated.
Starting Date – Enter the starting date from which the transactions are to be picked.
Ending Date – Enter the ending date up to which the transactions are to be picked.
Accounts to be Shown by – Select from the list whether the Party Name, Alias or Print Name is to be displayed in the report.
Show Bill Sundry Narration – Specify ‘Y’ in this data field if you want to view the narration as entered with Bill Sundry in the voucher.
Enter required data in the data fields of Report Options window and click the Ok button. On clicking the Ok button, a Bill Sundry Ledger report appears. Given here is a screenshot of Bill Sundry Ledger report.
Figure 9.3 Bill Sundry Ledger
9.3 Inventory Summaries Inventory Summaries reports display various summarised reports for all the inventory transactions of the company. Inventory Summaries reports include various reports such as Daily Balances, Transactions Summary and so on. On clicking the Inventory Summaries option, a list of reports is displayed. Various reports in the list are:
All other Inventory Registers are totally similar to the Sales Register. For detailed help on message boxes and Report Options that appear in other Inventory Registers, please refer to Sales Register.
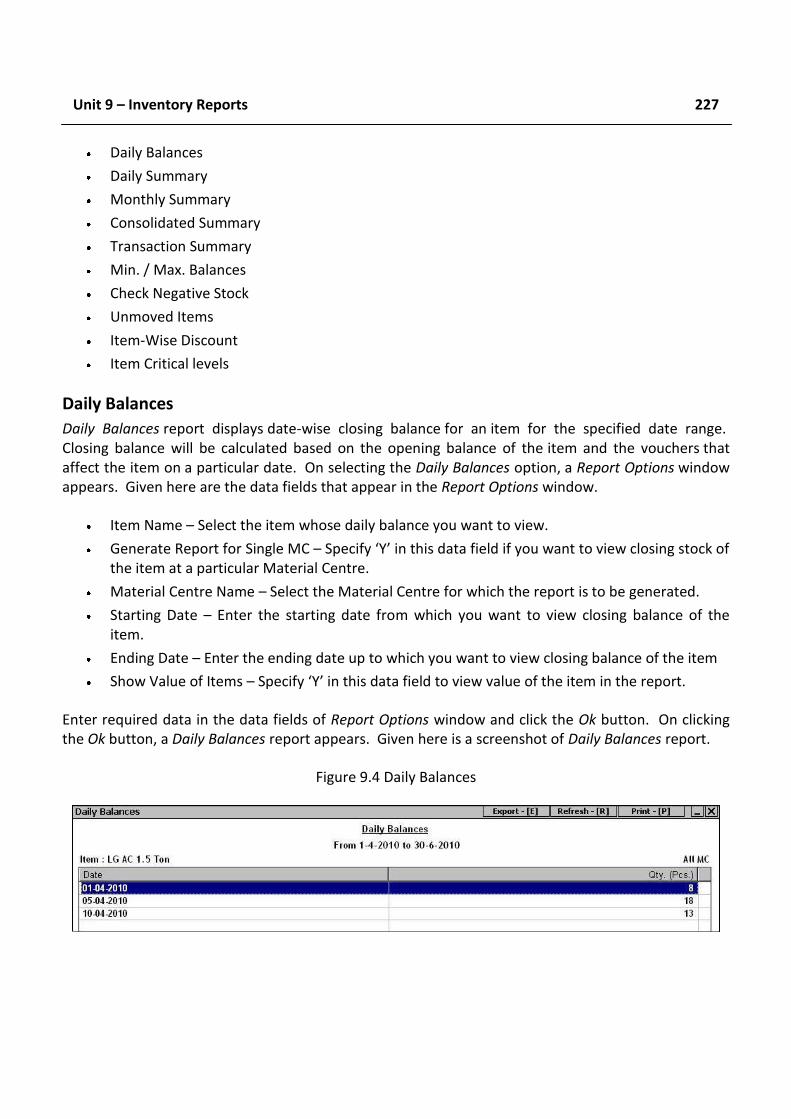
Unit 9 – Inventory Reports 227
Daily Balances
Daily Summary
Monthly Summary
Consolidated Summary
Transaction Summary
Min. / Max. Balances
Check Negative Stock
Unmoved Items
Item-Wise Discount
Item Critical levels
Daily Balances
Daily Balances report displays date-wise closing balance for an item for the specified date range. Closing balance will be calculated based on the opening balance of the item and the vouchers that affect the item on a particular date. On selecting the Daily Balances option, a Report Options window appears. Given here are the data fields that appear in the Report Options window.
Item Name – Select the item whose daily balance you want to view.
Generate Report for Single MC – Specify ‘Y’ in this data field if you want to view closing stock of the item at a particular Material Centre.
Material Centre Name – Select the Material Centre for which the report is to be generated.
Starting Date – Enter the starting date from which you want to view closing balance of the item.
Ending Date – Enter the ending date up to which you want to view closing balance of the item
Show Value of Items – Specify ‘Y’ in this data field to view value of the item in the report.
Enter required data in the data fields of Report Options window and click the Ok button. On clicking the Ok button, a Daily Balances report appears. Given here is a screenshot of Daily Balances report.
Figure 9.4 Daily Balances
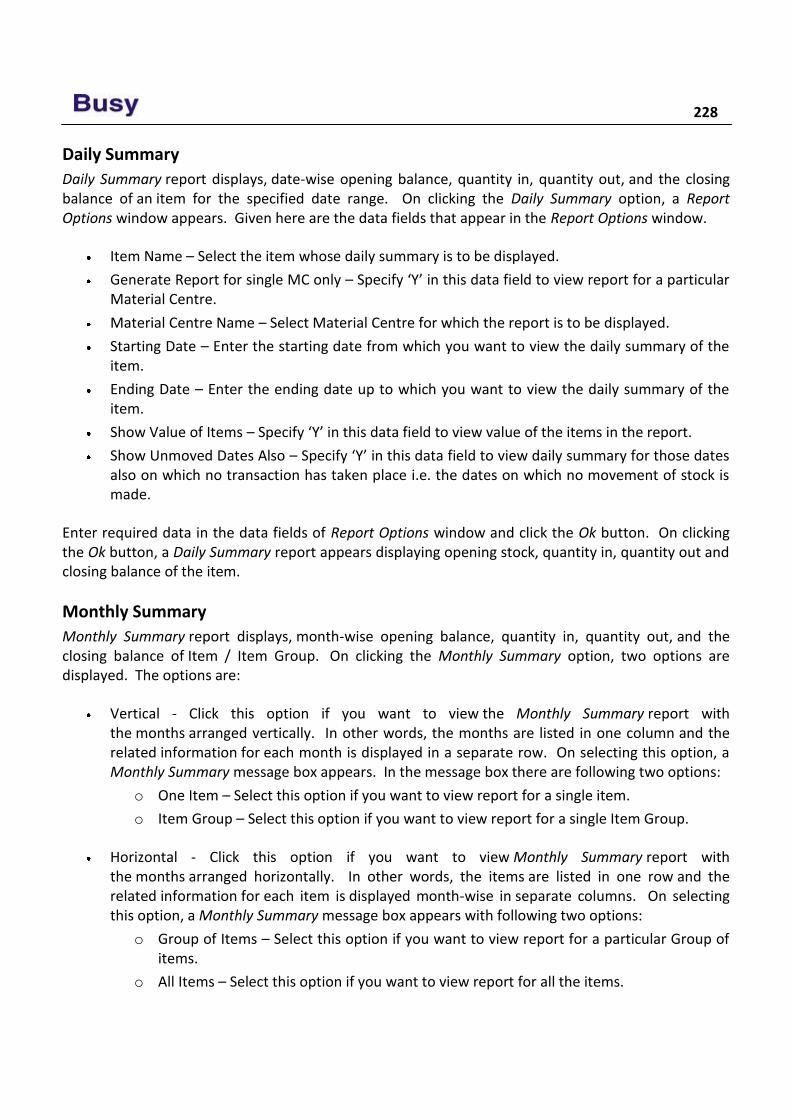
228
Daily Summary
Daily Summary report displays, date-wise opening balance, quantity in, quantity out, and the closing balance of an item for the specified date range. On clicking the Daily Summary option, a Report Options window appears. Given here are the data fields that appear in the Report Options window.
Item Name – Select the item whose daily summary is to be displayed.
Generate Report for single MC only – Specify ‘Y’ in this data field to view report for a particular Material Centre.
Material Centre Name – Select Material Centre for which the report is to be displayed.
Starting Date – Enter the starting date from which you want to view the daily summary of the item.
Ending Date – Enter the ending date up to which you want to view the daily summary of the item.
Show Value of Items – Specify ‘Y’ in this data field to view value of the items in the report.
Show Unmoved Dates Also – Specify ‘Y’ in this data field to view daily summary for those dates also on which no transaction has taken place i.e. the dates on which no movement of stock is made.
Enter required data in the data fields of Report Options window and click the Ok button. On clicking the Ok button, a Daily Summary report appears displaying opening stock, quantity in, quantity out and closing balance of the item.
Monthly Summary
Monthly Summary report displays, month-wise opening balance, quantity in, quantity out, and the closing balance of Item / Item Group. On clicking the Monthly Summary option, two options are displayed. The options are:
Vertical - Click this option if you want to view the Monthly Summary report with the months arranged vertically. In other words, the months are listed in one column and the related information for each month is displayed in a separate row. On selecting this option, a Monthly Summary message box appears. In the message box there are following two options:
o One Item – Select this option if you want to view report for a single item.
o Item Group – Select this option if you want to view report for a single Item Group.
Horizontal - Click this option if you want to view Monthly Summary report with the months arranged horizontally. In other words, the items are listed in one row and the related information for each item is displayed month-wise in separate columns. On selecting this option, a Monthly Summary message box appears with following two options:
o Group of Items – Select this option if you want to view report for a particular Group of items.
o All Items – Select this option if you want to view report for all the items.
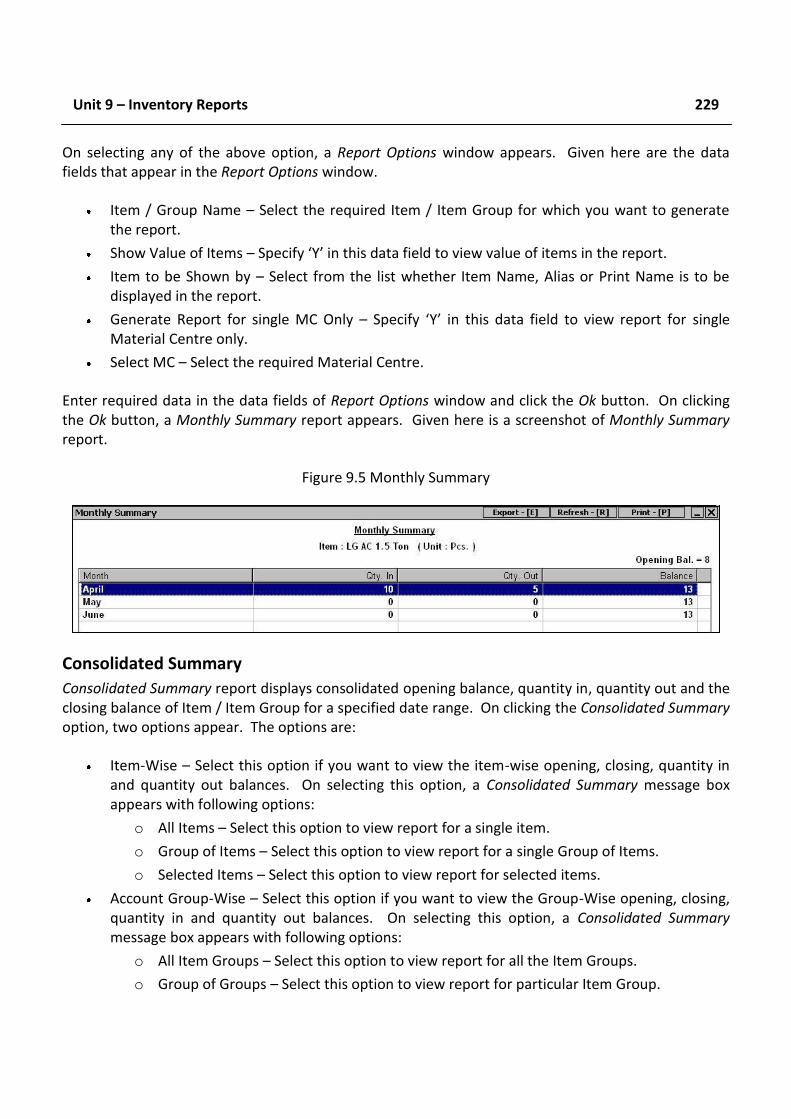
Unit 9 – Inventory Reports 229
On selecting any of the above option, a Report Options window appears. Given here are the data fields that appear in the Report Options window.
Item / Group Name – Select the required Item / Item Group for which you want to generate the report.
Show Value of Items – Specify ‘Y’ in this data field to view value of items in the report.
Item to be Shown by – Select from the list whether Item Name, Alias or Print Name is to be displayed in the report.
Generate Report for single MC Only – Specify ‘Y’ in this data field to view report for single Material Centre only.
Select MC – Select the required Material Centre.
Enter required data in the data fields of Report Options window and click the Ok button. On clicking the Ok button, a Monthly Summary report appears. Given here is a screenshot of Monthly Summary report.
Figure 9.5 Monthly Summary
Consolidated Summary
Consolidated Summary report displays consolidated opening balance, quantity in, quantity out and the closing balance of Item / Item Group for a specified date range. On clicking the Consolidated Summary option, two options appear. The options are:
Item-Wise – Select this option if you want to view the item-wise opening, closing, quantity in and quantity out balances. On selecting this option, a Consolidated Summary message box appears with following options:
o All Items – Select this option to view report for a single item.
o Group of Items – Select this option to view report for a single Group of Items.
o Selected Items – Select this option to view report for selected items.
Account Group-Wise – Select this option if you want to view the Group-Wise opening, closing, quantity in and quantity out balances. On selecting this option, a Consolidated Summary message box appears with following options:
o All Item Groups – Select this option to view report for all the Item Groups.
o Group of Groups – Select this option to view report for particular Item Group.
230
On selecting any of the above option, a Report Options window appears. Enter the required data in the data fields of Report Options window and click the Ok button. On clicking the Ok button, a Consolidated Summary report appears. The report displays the consolidated opening, quantity in, quantity out and closing balance of Items / Item Groups for the specified date range.
Transaction Summary
Transaction Summary report displays opening balance, details of quantity in and quantity out into various inventory and dual voucher types and the closing balance of Item / Item Group for a specified date range. In other words, Transaction Summary report is an extension of the Consolidated Summary report. This report contains separate quantity in and quantity out columns for the following voucher types: Sales, Purchase, Sales Return, Purchase Return and Stock Transfer.
Min. / Max. Balance
Min. / Max. Balances report displays minimum and maximum stock level of the items with the organisation during the specified date range. Using this report, you can find out the minimum and maximum stock level of All Items / Item Group / One Item at a Material Centre / All Material Centres / Material Centre Group during a specified date range. On clicking the Min. / Max. Balances option, an Item Min. / Max. Balances message box appears. The options in the message box are:
All Items – Select this option to view minimum and maximum balance of all the items within a specified date range.
Group of Items - Select this option to view minimum and maximum balance of a Group of Items within a specified date range.
One Item - Select this option to view minimum and maximum balance of a single item within a specified date range.
On selecting any of the above option, an Item Min. / Max. Balances message box appears. This message box appears if you have created more than one Material Centre master. The options in the message box are:
One MC – Select this option to consider stock level of the item at a single Material Centre.
Group of MC – Select this option to consider stock level of the item at a single Material Centre Group.
All MC – Select this option to consider stock level of the item at all the Material Centres.
On selecting any of the above option, a Report Options window appears. Enter required data in the data fields of Report Options window and click the Ok button. On clicking the Ok button, an Item Min. / Max. Balance report appears. The report displays the dates on which the stock of the items is minimum and maximum.
Unit 9 – Inventory Reports 231
Check Negative Stock
Check Negative Stock report displays items with negative stock during the specified date range. Using this report, you can find out the negative stock of All Items / Item Group / One Item at a Material Centre / All Material Centres / Material Centre Group during a specified date range.
Unmoved Items
Unmoved Items report displays those items that have not been affected by transactions / vouchers during the specified date range. Using this report, you can find out the items for which no transactions were recorded during the specified date range.
Item-Wise Discount
Item-Wise Discount report provides details of discount provided / received on each item during every sale / purchase transaction. With this report, you can find out the various rates at which discount is provided / received to / from various parties. On clicking the Item-Wise Discount option, an Item-Wise Discount message box appears. In the message box, there are three options. The options are:
One Item – Select this option to view details of discount provided / received on single item.
Group of Items – Select this option to view details of discount provided / received on a single Group of Items.
All Items – Select this option to view details of discount provided / received on all the items.
On selecting any of the above option, a Report Options window appears. Given here are the data fields that appear in the Report Options window.
Select Party / Group – Select the Party / Party Group for which the report is to be generated.
Select Item / Item Group – Select the Item / Item Group for which the report is to be generated.
Vch Type (Sale / Purchase) – Specify ‘S’ in this data field to view all the sales transactions in which the discount on the selected item is provided. Otherwise, specify ‘P’ in this data field to view all the purchase transactions in which discount on the specified item is received.
Starting Date – Enter the starting date from which the transactions are to be picked.
Ending Date – Enter the ending date up to which the transactions are to be picked.
Enter required data in the data fields of Report Options window and click the Ok button. On clicking the Ok button, an Item-Wise Discount report appears. Given here is a screenshot of Item-Wise Discount report.
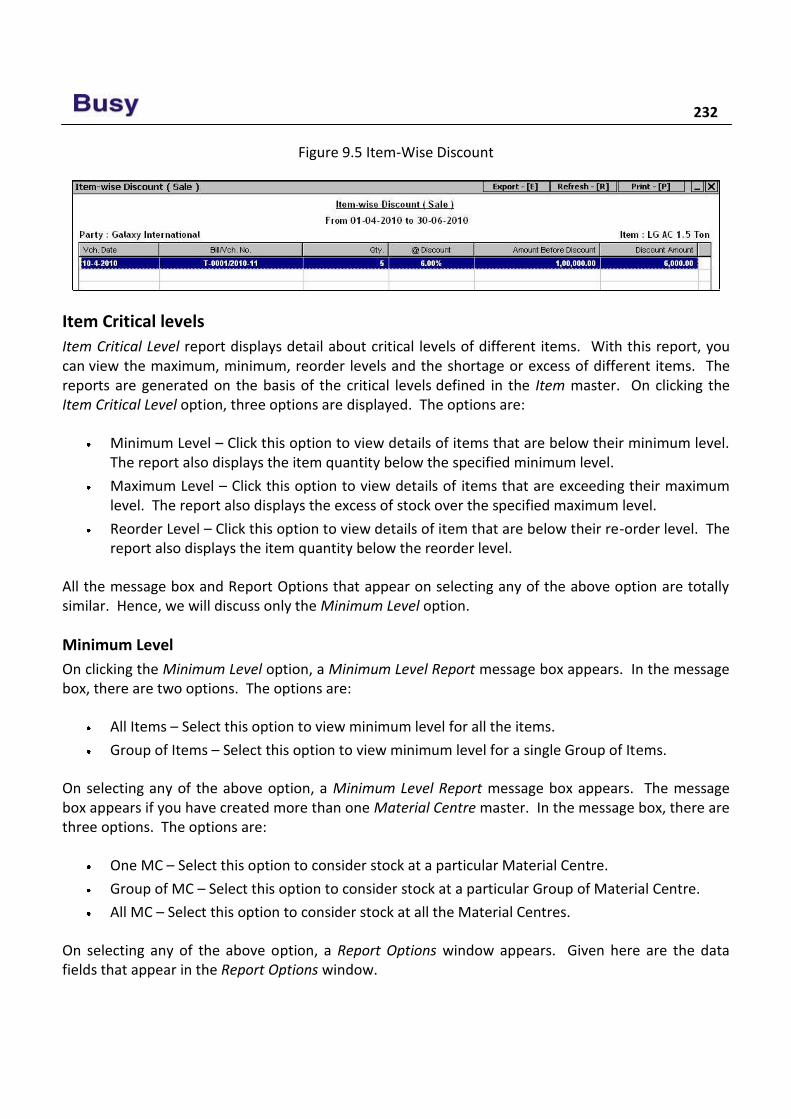
232
Figure 9.5 Item-Wise Discount
Item Critical levels
Item Critical Level report displays detail about critical levels of different items. With this report, you can view the maximum, minimum, reorder levels and the shortage or excess of different items. The reports are generated on the basis of the critical levels defined in the Item master. On clicking the Item Critical Level option, three options are displayed. The options are:
Minimum Level – Click this option to view details of items that are below their minimum level. The report also displays the item quantity below the specified minimum level.
Maximum Level – Click this option to view details of items that are exceeding their maximum level. The report also displays the excess of stock over the specified maximum level.
Reorder Level – Click this option to view details of item that are below their re-order level. The report also displays the item quantity below the reorder level.
All the message box and Report Options that appear on selecting any of the above option are totally similar. Hence, we will discuss only the Minimum Level option.
Minimum Level
On clicking the Minimum Level option, a Minimum Level Report message box appears. In the message box, there are two options. The options are:
All Items – Select this option to view minimum level for all the items.
Group of Items – Select this option to view minimum level for a single Group of Items.
On selecting any of the above option, a Minimum Level Report message box appears. The message box appears if you have created more than one Material Centre master. In the message box, there are three options. The options are:
One MC – Select this option to consider stock at a particular Material Centre.
Group of MC – Select this option to consider stock at a particular Group of Material Centre.
All MC – Select this option to consider stock at all the Material Centres.
On selecting any of the above option, a Report Options window appears. Given here are the data fields that appear in the Report Options window.

Unit 9 – Inventory Reports 233
Specify Item Group – Select Item Group for which you want to view the report.
Specify Material Centre / Group – Select Material Centre Group for which you want to view the report.
Report Date – Enter the date on which stock is to be considered.
Item to be Shown by – Select from the list whether Item Name, Alias or Print Name is to be displayed in the report.
Consider Items having zero as Minimum Level – Specify ‘Y’ in this data field to view those items also in the report in which minimum level is set to zero.
Enter required data in the data fields of Report Options window and click the Ok button. On clicking the Ok button, a Minimum Level Report appears displaying minimum level, current stock and shortage of item. Given here is a screenshot of Minimum Level report.
Figure 9.6 Minimum Level Report
Review Stock Status reports display stock of items in terms of quantity and value.
Day Book report displays all the transactions that affect inventory of the organisation sequentially for a specified date range.
Stock Ledger report displays all the transactions of an item sequentially within the specified date range.
Item MC Ledger report is the Stock Ledger report of a particular Material Centre.
Daily Balances report displays date-wise closing balance for an item for the specified date range.
Daily Summary report displays date-wise opening balance, quantity in, quantity out, and the closing balance of an item for the specified date range.
Monthly Summary report displays month-wise opening balance, quantity in, quantity out, and the closing balance of Single Item / Item Group or All Items .
Item-Wise Discount Reports report provides details of discount provided / received on each item during every sale / purchase.

234
Item Critical Level report displays detail about the critical levels of the different items. With this report, you can view the maximum, minimum, re-order levels and the shortage or excess of different items.
Exercise 1 . Stock Status report display stock in terms of:
a) Quantity c) Value b) Quantity & Value d) Priority
2 . Item MC Ledger report appears on enabling:
a) Multi Godown Feature c) Separate Stock updation date in Dual Vouchers b) Allocate Expense / Purc. to Items d) None of the above
3 . Daily Balances report display:
a) Date-Wise Closing Balance c) Date-Wise Opening Balance b) Date-Wise Cash Transactions d) Date-Wise Credit Transactions
4 . Min / Max Balances Report displays:
a) Minimum Cash Balance c) Min & Max Cash Balance b) Minimum Stock Level d) Min & Max Stock Level
5 . Unmoved Item report displays:
a) Items with Negative Stock c) Item with Zero Stock b) Items not used in any transaction d) Items lying unsold
6 . What is the difference between Total Stock & Book Stock?
7 . What is the difference between Transaction Summary and Consolidated Summary report?
8 . What is the difference between Closing Stock Alphabetical and Closing Stock Hierarchical
report?
9 . What is the use of Inventory Day Book?
1 0 . Which report can be used to view all sales transactions on specified date?
1 1 . What is the benefit of Item-Wise Discount report?


An Ounce of Practice,
Is Worth More Than
Tons of Preaching.
Mahatma Gandhi
Unit 10 Sales Tax & VAT Reports
The objective of this unit is to cover all the Sales Tax & VAT related reports. These are statutory reports and are designed in the format as described by the government. Sales Tax / VAT reports are provided according to each state. There are some reports that are general and are used in each state but some reports are state specific and vary from state to state. In this Unit we will cover the reports that are common to all the states and for the state specific reports, you can view the User’s Manual provided in the Help menu of BUSY.
Topics covered under this unit:
Sales Tax Forms Reports
Sales Tax / VAT Summaries
Sales Tax / VAT Registers (General)
Sales Tax / VAT Reports (State specific)
VAT Adjustment Details
Reconcile Account & Sale / Purchase Tax
10.1 Sales Tax Forms Reports Sales Tax Forms Reports display reports related to Forms Receivable / Issuable and Forms Received / Issued register. These reports appear if you have selected the country as India at the time of company creation. On clicking the ST Form Reports option, various options are displayed. The options are:
Forms Receivable
Forms Issuable
Forms Received Register
Forms Issued Register
Forms Receivable
Forms Receivable report displays details of all the forms receivable from customers or parties. On clicking the Forms Receivable option, a list of options is displayed. The options in the list are:
One Party – One Form – Select this option to view report of a particular form receivable from a particular party.
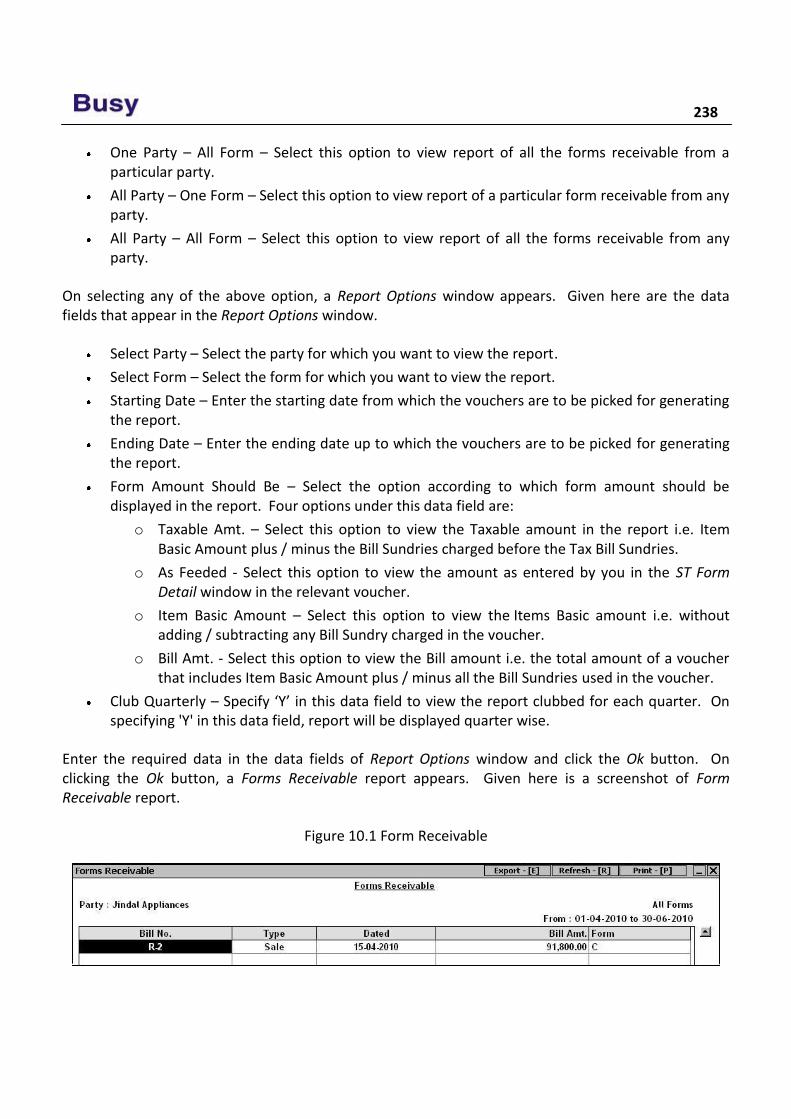
238
One Party – All Form – Select this option to view report of all the forms receivable from a particular party.
All Party – One Form – Select this option to view report of a particular form receivable from any party.
All Party – All Form – Select this option to view report of all the forms receivable from any party.
On selecting any of the above option, a Report Options window appears. Given here are the data fields that appear in the Report Options window.
Select Party – Select the party for which you want to view the report.
Select Form – Select the form for which you want to view the report.
Starting Date – Enter the starting date from which the vouchers are to be picked for generating the report.
Ending Date – Enter the ending date up to which the vouchers are to be picked for generating the report.
Form Amount Should Be – Select the option according to which form amount should be displayed in the report. Four options under this data field are:
o Taxable Amt. – Select this option to view the Taxable amount in the report i.e. Item Basic Amount plus / minus the Bill Sundries charged before the Tax Bill Sundries.
o As Feeded - Select this option to view the amount as entered by you in the ST Form Detail window in the relevant voucher.
o Item Basic Amount – Select this option to view the Items Basic amount i.e. without adding / subtracting any Bill Sundry charged in the voucher.
o Bill Amt. - Select this option to view the Bill amount i.e. the total amount of a voucher that includes Item Basic Amount plus / minus all the Bill Sundries used in the voucher.
Club Quarterly – Specify ‘Y’ in this data field to view the report clubbed for each quarter. On specifying 'Y' in this data field, report will be displayed quarter wise.
Enter the required data in the data fields of Report Options window and click the Ok button. On clicking the Ok button, a Forms Receivable report appears. Given here is a screenshot of Form Receivable report.
Figure 10.1 Form Receivable
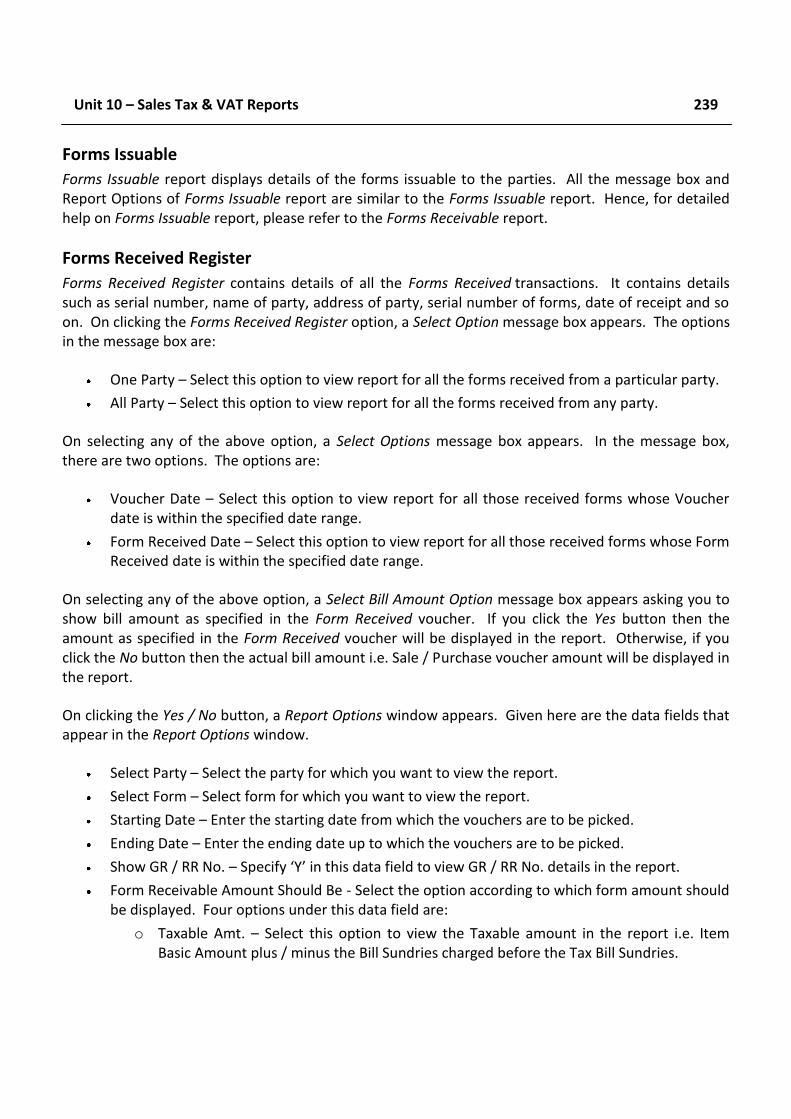
Unit 10 – Sales Tax & VAT Reports 239
Forms Issuable
Forms Issuable report displays details of the forms issuable to the parties. All the message box and Report Options of Forms Issuable report are similar to the Forms Issuable report. Hence, for detailed help on Forms Issuable report, please refer to the Forms Receivable report.
Forms Received Register
Forms Received Register contains details of all the Forms Received transactions. It contains details such as serial number, name of party, address of party, serial number of forms, date of receipt and so on. On clicking the Forms Received Register option, a Select Option message box appears. The options in the message box are:
One Party – Select this option to view report for all the forms received from a particular party.
All Party – Select this option to view report for all the forms received from any party.
On selecting any of the above option, a Select Options message box appears. In the message box, there are two options. The options are:
Voucher Date – Select this option to view report for all those received forms whose Voucher date is within the specified date range.
Form Received Date – Select this option to view report for all those received forms whose Form Received date is within the specified date range.
On selecting any of the above option, a Select Bill Amount Option message box appears asking you to show bill amount as specified in the Form Received voucher. If you click the Yes button then the amount as specified in the Form Received voucher will be displayed in the report. Otherwise, if you click the No button then the actual bill amount i.e. Sale / Purchase voucher amount will be displayed in the report.
On clicking the Yes / No button, a Report Options window appears. Given here are the data fields that appear in the Report Options window.
Select Party – Select the party for which you want to view the report.
Select Form – Select form for which you want to view the report.
Starting Date – Enter the starting date from which the vouchers are to be picked.
Ending Date – Enter the ending date up to which the vouchers are to be picked.
Show GR / RR No. – Specify ‘Y’ in this data field to view GR / RR No. details in the report.
Form Receivable Amount Should Be - Select the option according to which form amount should be displayed. Four options under this data field are:
o Taxable Amt. – Select this option to view the Taxable amount in the report i.e. Item Basic Amount plus / minus the Bill Sundries charged before the Tax Bill Sundries.
240
o As Feeded - Select this option to view the amount as entered by you in the ST Form Detail window in the relevant voucher.
o Item Basic Amount – Select this option to view the Items Basic amount i.e. without adding / subtracting any Bill Sundry charged in the voucher.
o Bill Amt. - Select this option to view the Bill amount i.e. the total amount of a voucher that includes Item Basic Amount plus / minus all the Bill Sundries used in the voucher.
Enter required data in the data fields of Report Options window and click the Ok button. On clicking the Ok button, a Form Received Register appears. Given here is a screenshot of Form Received Register.
Figure 10.2 Form Received Register
Form Issued Register
Form Issued Register displays details of form issued to the parties. All the message box and Report Options of Form Issued Register are similar to Form Received Register. Hence, for detailed help on Form Issued Register, please refer to Form Received Register.
10. 2 Sales Tax / VAT Summaries Sales Tax / VAT Summaries report displays various summarized reports for CST and VAT. On clicking the VAT Summaries option, a list of reports is displayed. Various reports in the list are:
VAT Summary
VAT Computation
Sale Type Summary
Purchase Type Summary
Sale VAT Summary
Purchase VAT Summary
Annual VAT Summary
Item Tax Rate–Wise Summary
Party–Wise Sale VAT Summary
Party–Wise Purchase VAT Summary
Unit 10 – Sales Tax & VAT Reports 241
Item–Wise Sale VAT Summary
Item–Wise Purchase VAT Summary
Party-Wise Sale CST Summary
Party-Wise Purchase CST Summary
Item-Wise Sale CST Summary
Item-Wise Purchase CST Summary
Let us discuss these reports in detail.
VAT Summary
VAT Summary report forms the base for all other VAT reports. It is a detailed summary of all the transactions related to VAT and CST. It takes into account Tax Free and Exempted Sale / Purchase and Purchase CST that are not included in the VAT Computation report. The report calculates Nett Input VAT, Total Output VAT, Nett VAT payable / refundable and CST Payable. On clicking the VAT Summary option, a Report Options window appears. Enter required data in the data fields of Report Options window and click the Ok button. On clicking the Ok button, a VAT Summary report appears. Given here is a screenshot of VAT Summary report.
Image on next Page
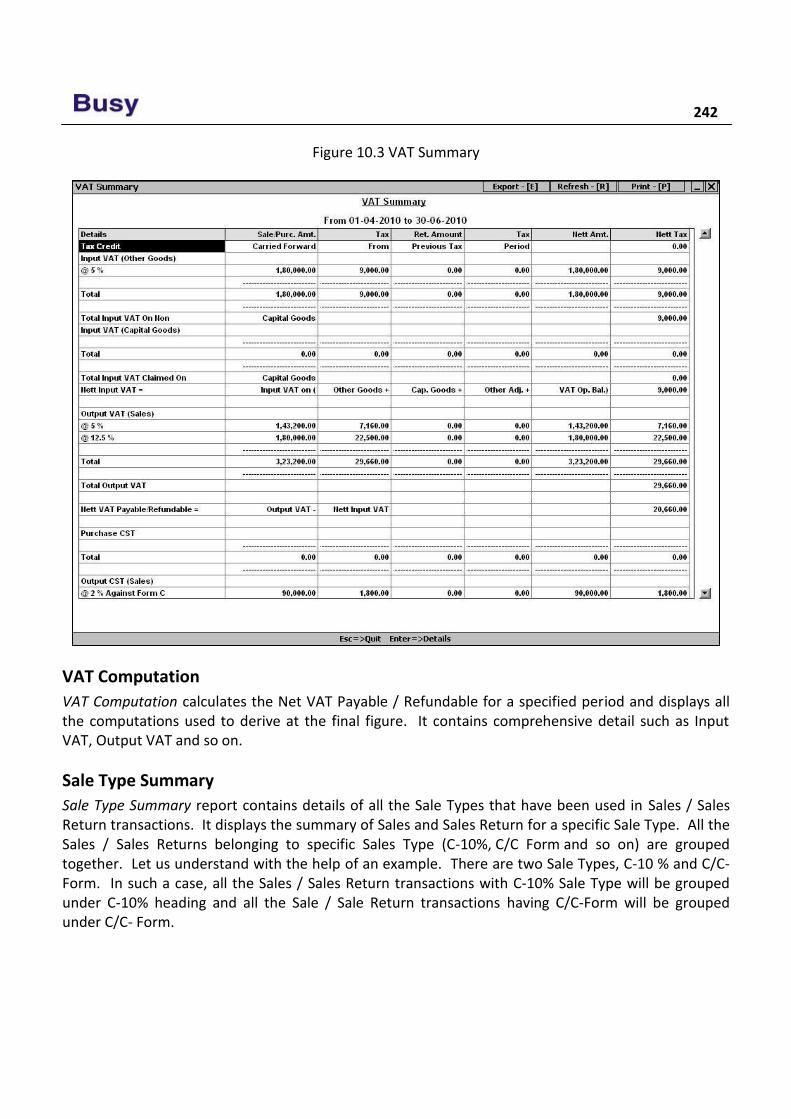
242
Figure 10.3 VAT Summary
VAT Computation
VAT Computation calculates the Net VAT Payable / Refundable for a specified period and displays all the computations used to derive at the final figure. It contains comprehensive detail such as Input VAT, Output VAT and so on.
Sale Type Summary
Sale Type Summary report contains details of all the Sale Types that have been used in Sales / Sales Return transactions. It displays the summary of Sales and Sales Return for a specific Sale Type. All the Sales / Sales Returns belonging to specific Sales Type (C-10%, C/C Form and so on) are grouped together. Let us understand with the help of an example. There are two Sale Types, C-10 % and C/C- Form. In such a case, all the Sales / Sales Return transactions with C-10% Sale Type will be grouped under C-10% heading and all the Sale / Sale Return transactions having C/C-Form will be grouped under C/C- Form.
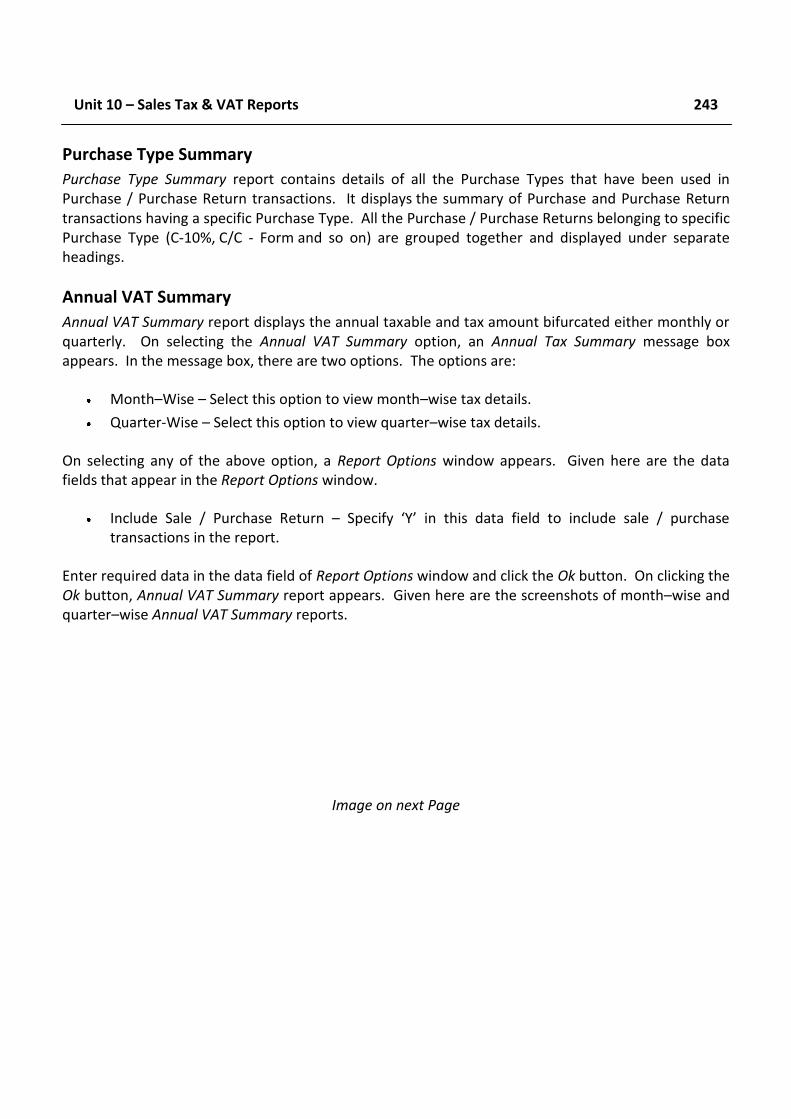
Unit 10 – Sales Tax & VAT Reports 243
Purchase Type Summary
Purchase Type Summary report contains details of all the Purchase Types that have been used in Purchase / Purchase Return transactions. It displays the summary of Purchase and Purchase Return transactions having a specific Purchase Type. All the Purchase / Purchase Returns belonging to specific Purchase Type (C-10%, C/C - Form and so on) are grouped together and displayed under separate headings.
Annual VAT Summary
Annual VAT Summary report displays the annual taxable and tax amount bifurcated either monthly or quarterly. On selecting the Annual VAT Summary option, an Annual Tax Summary message box appears. In the message box, there are two options. The options are:
Month–Wise – Select this option to view month–wise tax details.
Quarter-Wise – Select this option to view quarter–wise tax details.
On selecting any of the above option, a Report Options window appears. Given here are the data fields that appear in the Report Options window.
Include Sale / Purchase Return – Specify ‘Y’ in this data field to include sale / purchase transactions in the report.
Enter required data in the data field of Report Options window and click the Ok button. On clicking the Ok button, Annual VAT Summary report appears. Given here are the screenshots of month–wise and quarter–wise Annual VAT Summary reports.
Image on next Page
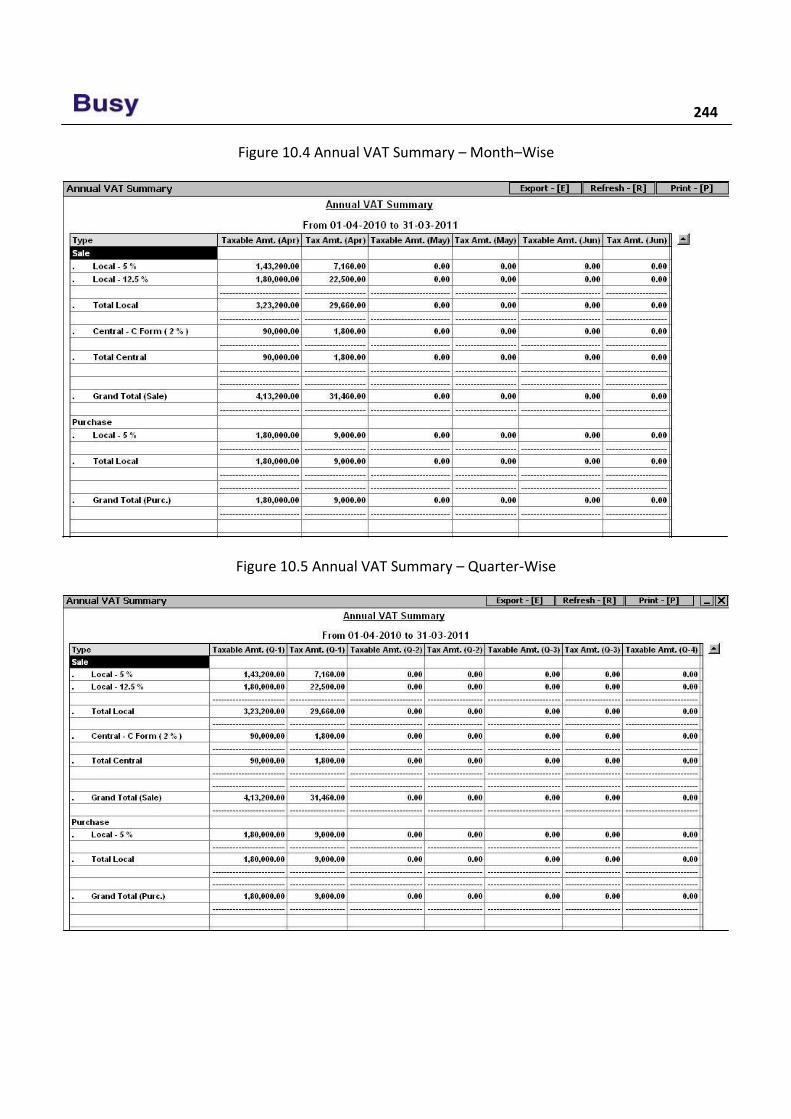
244
Figure 10.4 Annual VAT Summary – Month–Wise
Figure 10.5 Annual VAT Summary – Quarter-Wise
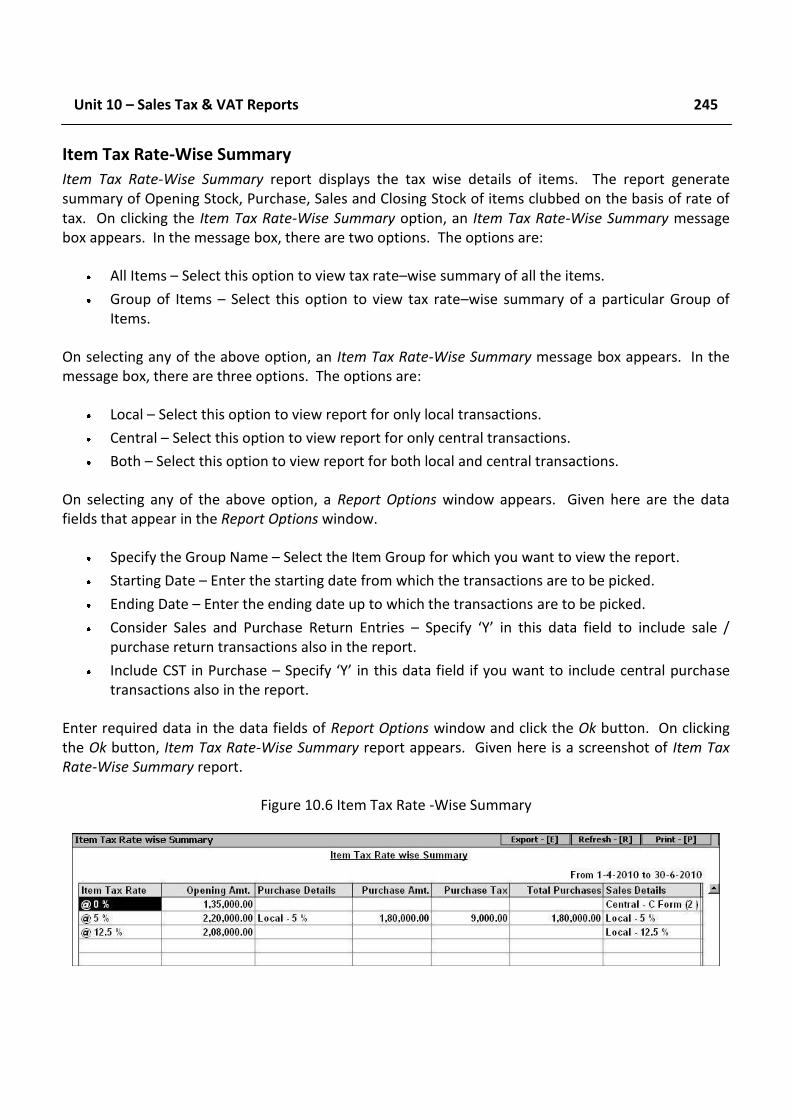
Unit 10 – Sales Tax & VAT Reports 245
Item Tax Rate-Wise Summary
Item Tax Rate-Wise Summary report displays the tax wise details of items. The report generate summary of Opening Stock, Purchase, Sales and Closing Stock of items clubbed on the basis of rate of tax. On clicking the Item Tax Rate-Wise Summary option, an Item Tax Rate-Wise Summary message box appears. In the message box, there are two options. The options are:
All Items – Select this option to view tax rate–wise summary of all the items.
Group of Items – Select this option to view tax rate–wise summary of a particular Group of Items.
On selecting any of the above option, an Item Tax Rate-Wise Summary message box appears. In the message box, there are three options. The options are:
Local – Select this option to view report for only local transactions.
Central – Select this option to view report for only central transactions.
Both – Select this option to view report for both local and central transactions.
On selecting any of the above option, a Report Options window appears. Given here are the data fields that appear in the Report Options window.
Specify the Group Name – Select the Item Group for which you want to view the report.
Starting Date – Enter the starting date from which the transactions are to be picked.
Ending Date – Enter the ending date up to which the transactions are to be picked.
Consider Sales and Purchase Return Entries – Specify ‘Y’ in this data field to include sale / purchase return transactions also in the report.
Include CST in Purchase – Specify ‘Y’ in this data field if you want to include central purchase transactions also in the report.
Enter required data in the data fields of Report Options window and click the Ok button. On clicking the Ok button, Item Tax Rate-Wise Summary report appears. Given here is a screenshot of Item Tax Rate-Wise Summary report.
Figure 10.6 Item Tax Rate -Wise Summary
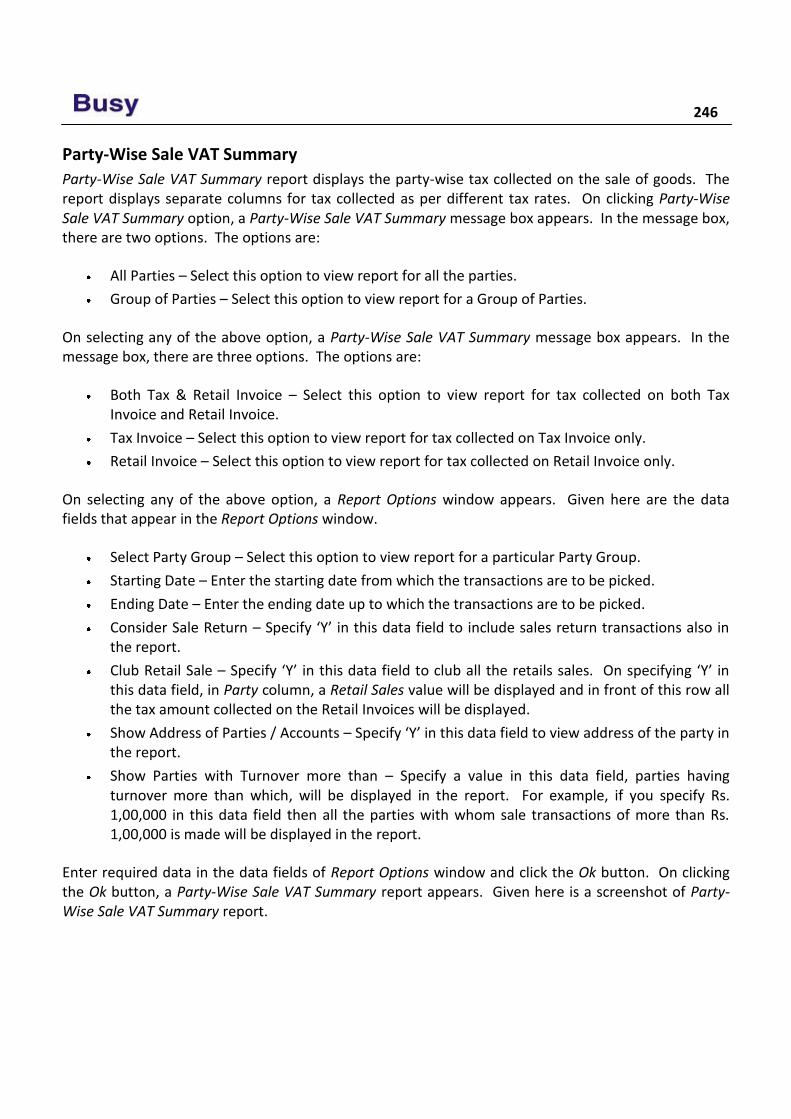
246
Party-Wise Sale VAT Summary
Party-Wise Sale VAT Summary report displays the party-wise tax collected on the sale of goods. The report displays separate columns for tax collected as per different tax rates. On clicking Party-Wise Sale VAT Summary option, a Party-Wise Sale VAT Summary message box appears. In the message box, there are two options. The options are:
All Parties – Select this option to view report for all the parties.
Group of Parties – Select this option to view report for a Group of Parties.
On selecting any of the above option, a Party-Wise Sale VAT Summary message box appears. In the message box, there are three options. The options are:
Both Tax & Retail Invoice – Select this option to view report for tax collected on both Tax Invoice and Retail Invoice.
Tax Invoice – Select this option to view report for tax collected on Tax Invoice only.
Retail Invoice – Select this option to view report for tax collected on Retail Invoice only.
On selecting any of the above option, a Report Options window appears. Given here are the data fields that appear in the Report Options window.
Select Party Group – Select this option to view report for a particular Party Group.
Starting Date – Enter the starting date from which the transactions are to be picked.
Ending Date – Enter the ending date up to which the transactions are to be picked.
Consider Sale Return – Specify ‘Y’ in this data field to include sales return transactions also in the report.
Club Retail Sale – Specify ‘Y’ in this data field to club all the retails sales. On specifying ‘Y’ in this data field, in Party column, a Retail Sales value will be displayed and in front of this row all the tax amount collected on the Retail Invoices will be displayed.
Show Address of Parties / Accounts – Specify ‘Y’ in this data field to view address of the party in the report.
Show Parties with Turnover more than – Specify a value in this data field, parties having turnover more than which, will be displayed in the report. For example, if you specify Rs. 1,00,000 in this data field then all the parties with whom sale transactions of more than Rs. 1,00,000 is made will be displayed in the report.
Enter required data in the data fields of Report Options window and click the Ok button. On clicking the Ok button, a Party-Wise Sale VAT Summary report appears. Given here is a screenshot of Party-Wise Sale VAT Summary report.
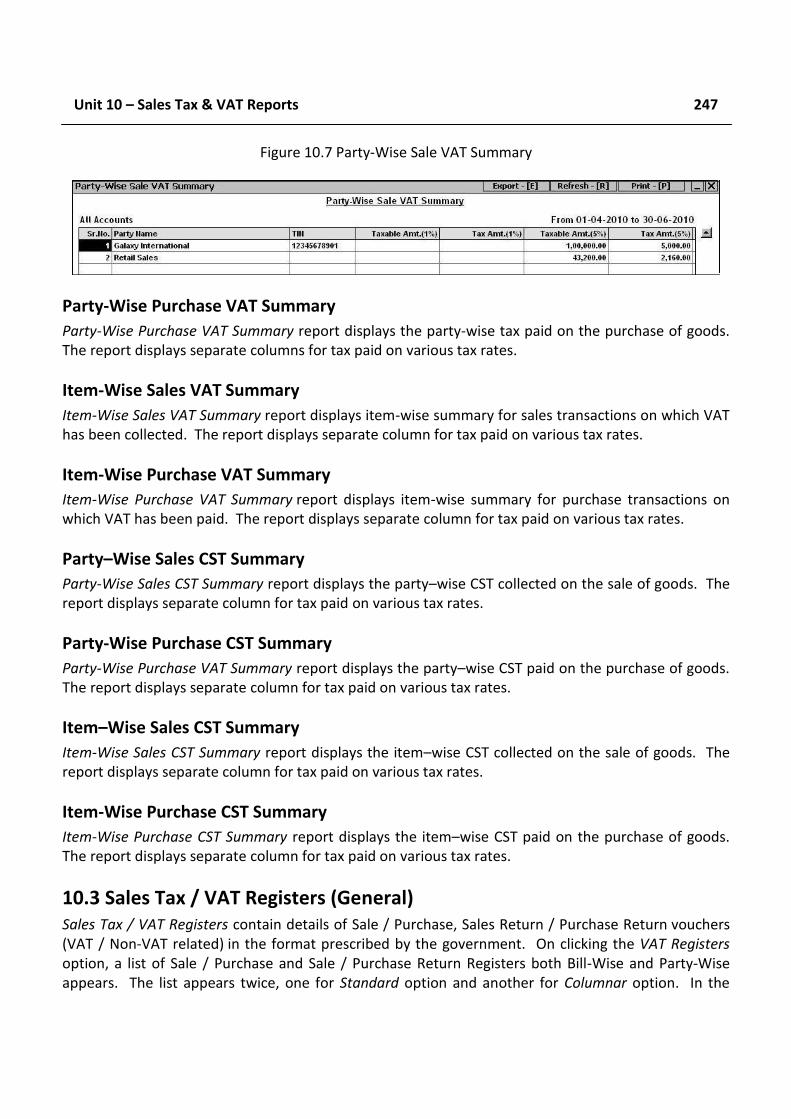
Unit 10 – Sales Tax & VAT Reports 247
Figure 10.7 Party-Wise Sale VAT Summary
Party-Wise Purchase VAT Summary
Party-Wise Purchase VAT Summary report displays the party-wise tax paid on the purchase of goods. The report displays separate columns for tax paid on various tax rates.
Item-Wise Sales VAT Summary
Item-Wise Sales VAT Summary report displays item-wise summary for sales transactions on which VAT has been collected. The report displays separate column for tax paid on various tax rates.
Item-Wise Purchase VAT Summary
Item-Wise Purchase VAT Summary report displays item-wise summary for purchase transactions on which VAT has been paid. The report displays separate column for tax paid on various tax rates.
Party–Wise Sales CST Summary
Party-Wise Sales CST Summary report displays the party–wise CST collected on the sale of goods. The report displays separate column for tax paid on various tax rates.
Party-Wise Purchase CST Summary
Party-Wise Purchase VAT Summary report displays the party–wise CST paid on the purchase of goods. The report displays separate column for tax paid on various tax rates.
Item–Wise Sales CST Summary
Item-Wise Sales CST Summary report displays the item–wise CST collected on the sale of goods. The report displays separate column for tax paid on various tax rates.
Item-Wise Purchase CST Summary
Item-Wise Purchase CST Summary report displays the item–wise CST paid on the purchase of goods. The report displays separate column for tax paid on various tax rates.
10.3 Sales Tax / VAT Registers (General) Sales Tax / VAT Registers contain details of Sale / Purchase, Sales Return / Purchase Return vouchers (VAT / Non-VAT related) in the format prescribed by the government. On clicking the VAT Registers option, a list of Sale / Purchase and Sale / Purchase Return Registers both Bill-Wise and Party-Wise appears. The list appears twice, one for Standard option and another for Columnar option. In the
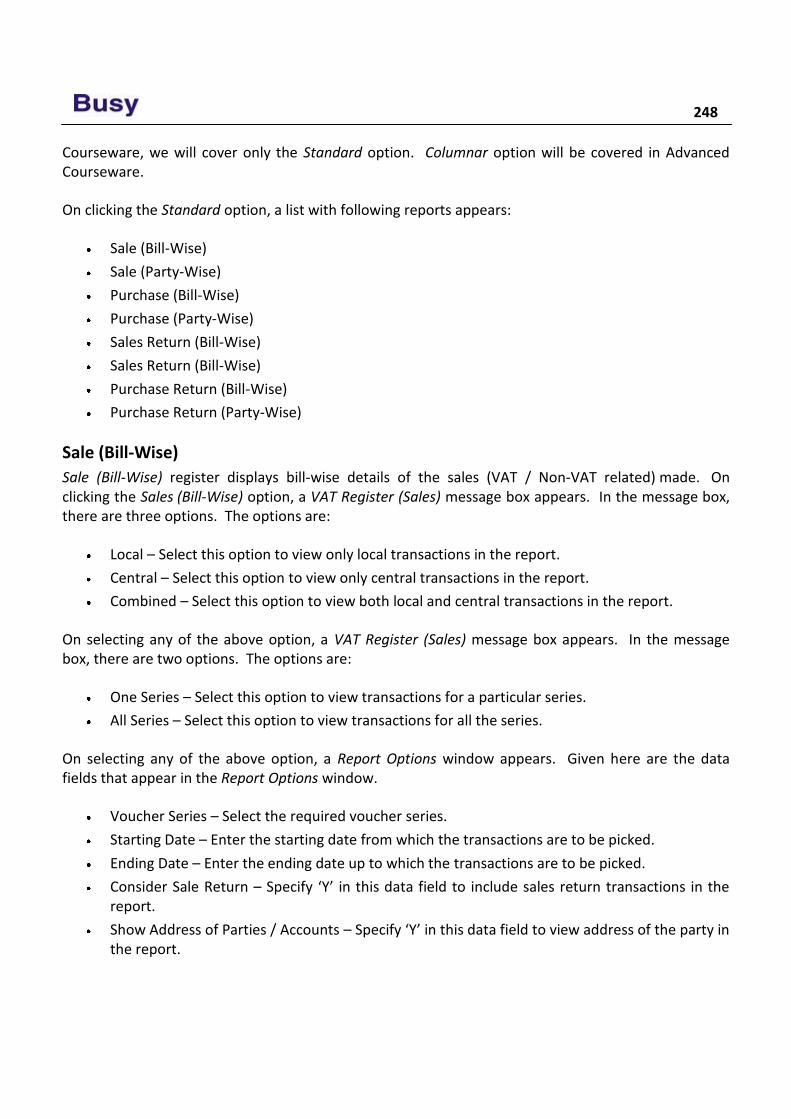
248
Courseware, we will cover only the Standard option. Columnar option will be covered in Advanced Courseware.
On clicking the Standard option, a list with following reports appears:
Sale (Bill-Wise)
Sale (Party-Wise)
Purchase (Bill-Wise)
Purchase (Party-Wise)
Sales Return (Bill-Wise)
Sales Return (Bill-Wise)
Purchase Return (Bill-Wise)
Purchase Return (Party-Wise)
Sale (Bill-Wise)
Sale (Bill-Wise) register displays bill-wise details of the sales (VAT / Non-VAT related) made. On clicking the Sales (Bill-Wise) option, a VAT Register (Sales) message box appears. In the message box, there are three options. The options are:
Local – Select this option to view only local transactions in the report.
Central – Select this option to view only central transactions in the report.
Combined – Select this option to view both local and central transactions in the report.
On selecting any of the above option, a VAT Register (Sales) message box appears. In the message box, there are two options. The options are:
One Series – Select this option to view transactions for a particular series.
All Series – Select this option to view transactions for all the series.
On selecting any of the above option, a Report Options window appears. Given here are the data fields that appear in the Report Options window.
Voucher Series – Select the required voucher series.
Starting Date – Enter the starting date from which the transactions are to be picked.
Ending Date – Enter the ending date up to which the transactions are to be picked.
Consider Sale Return – Specify ‘Y’ in this data field to include sales return transactions in the report.
Show Address of Parties / Accounts – Specify ‘Y’ in this data field to view address of the party in the report.
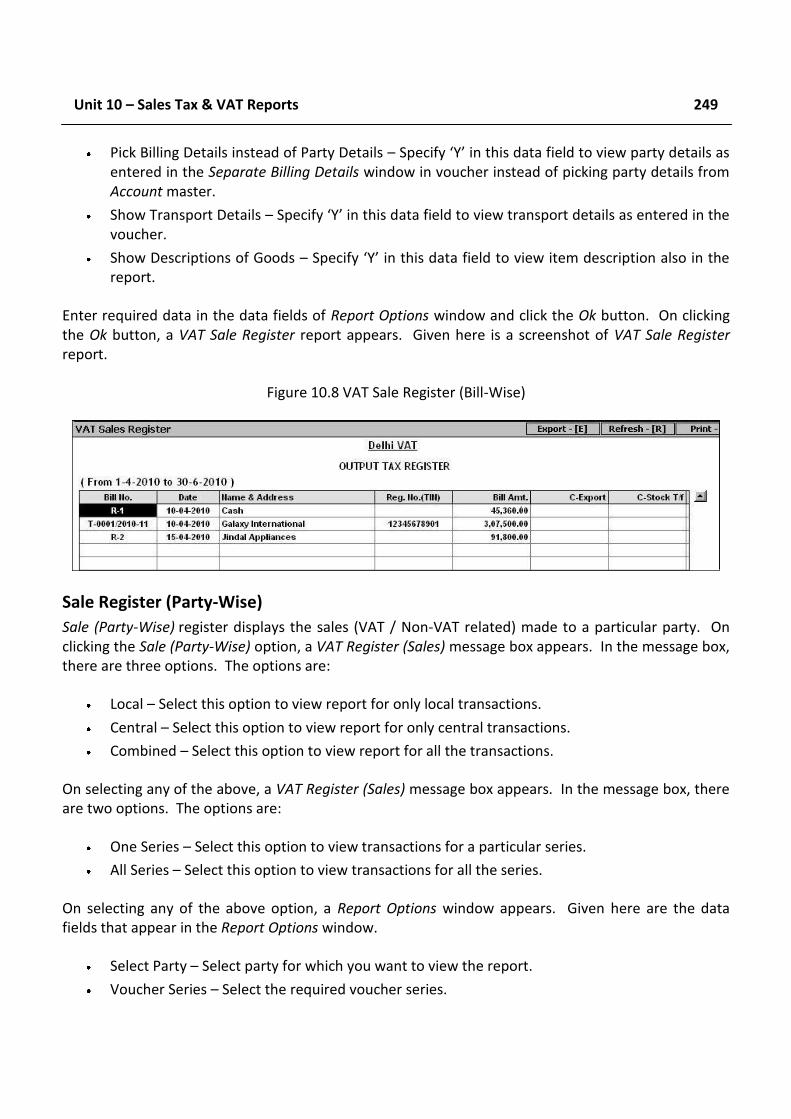
Unit 10 – Sales Tax & VAT Reports 249
Pick Billing Details instead of Party Details – Specify ‘Y’ in this data field to view party details as entered in the Separate Billing Details window in voucher instead of picking party details from Account master.
Show Transport Details – Specify ‘Y’ in this data field to view transport details as entered in the voucher.
Show Descriptions of Goods – Specify ‘Y’ in this data field to view item description also in the report.
Enter required data in the data fields of Report Options window and click the Ok button. On clicking the Ok button, a VAT Sale Register report appears. Given here is a screenshot of VAT Sale Register report.
Figure 10.8 VAT Sale Register (Bill-Wise)
Sale Register (Party-Wise)
Sale (Party-Wise) register displays the sales (VAT / Non-VAT related) made to a particular party. On clicking the Sale (Party-Wise) option, a VAT Register (Sales) message box appears. In the message box, there are three options. The options are:
Local – Select this option to view report for only local transactions.
Central – Select this option to view report for only central transactions.
Combined – Select this option to view report for all the transactions.
On selecting any of the above, a VAT Register (Sales) message box appears. In the message box, there are two options. The options are:
One Series – Select this option to view transactions for a particular series.
All Series – Select this option to view transactions for all the series.
On selecting any of the above option, a Report Options window appears. Given here are the data fields that appear in the Report Options window.
Select Party – Select party for which you want to view the report.
Voucher Series – Select the required voucher series.

250
Starting Date – Enter the starting date from which the transactions are to be picked.
Ending Date – Enter the ending date up to which the transactions are to be picked.
Include Sales Return – Specify ‘Y’ in this data field to include sale return transactions also in the report.
Show Address of Parties / Accounts – Specify ‘Y’ in this data field to view address of the party in the report.
Pick Billing Details instead of Party Details – Specify ‘Y’ in this data field to pick party details as entered in the Separate Billing Details window in the voucher instead of picking party details from the Account master.
Enter required data in the data fields of Report Options window and click the Ok button. On clicking the Ok button, VAT Sale Register report appears. Given here is a screenshot of VAT Sale Register report.
Figure 10.9 VAT Sale Register (Party-Wise)
10.4 Sales Tax / VAT Reports (State Specific) Depending on the state for which you have created the company, the VAT reports as applicable for that state appear under the Sales Tax / VAT Reports menu. Currently BUSY provides VAT reports for 35 states & union territories. For each of the 35 states & union territories, there are different VAT reports. Hence, it is practically very difficult to discuss each VAT report in the Courseware. For detailed help on state specific VAT report, you can refer to the User’s Manual of BUSY. You can invoke the User’s Manual by clicking the Users Manual option under Help menu of BUSY.
10.5 VAT Adjustment Details VAT Adjustment Details report displays the details of Input / Output Tax adjustment or any payment / refund of VAT made. It displays all the details related to VAT payment and refunds such as Challan Number, Challan Date, Bank Name / Code and so on. On clicking the VAT Adjustment Details report, a VAT Adjustments window appears. In the window, there are four options. The options are:
Input Tax – Select this option to view details of Input Tax adjustment.
Output Tax – Select this option to view details of Output Tax adjustment.
For detailed help on other VAT Registers, please refer to Sale Register explained above.
Unit 10 – Sales Tax & VAT Reports 251
Payment – Select this option to view details of VAT payment made.
Refund – Select this option to view details of VAT refund.
On selecting any of the above option, a Report Options window appears. Given here are the data fields that appear in the Report Options window.
Starting Date – Enter the starting date from which the Input Tax / Output Tax / Payment / Refund details are to be considered.
Ending Date – Enter the ending date up to which the Input Tax / Output Tax / Payment / Refund details are to be considered.
Enter required data in the data fields of Report Options window and click the Ok button. On clicking the Ok button, Input Tax Adjustment / Output Tax Adjustment / VAT Payment / VAT Refund report appears.
10.6 Reconcile Accounts & Sales / Purchase Tax With Reconcile Accounts & Sales / Purchase Tax reports, you can view the vouchers due to which difference in the VAT Summary and Balance Sheet appears. For example, you have entered a Sales voucher in which an item of Rs. 100 is taxable @ 4%. Further freight and forwarding (in which Adjust in Sales Account data field is enabled) charges of Rs. 20 are levied on the sale. In such a case, sales amount is Rs. 120 but the taxable amount is Rs. 100. Now this report will list all such vouchers due to which the difference has appeared in the Balance Sheet and VAT Summary.
In the Sales Tax / VAT menu, two different reports for Reconcile Accounts & Sales Tax and Reconcile Accounts & Purchase Tax appear. The only difference between the two reports is that former report displays the vouchers in which taxable amount and sale amount is different and the later report displays the vouchers in which taxable amount and purchase amount is different.
As both the reports are totally similar, we will discuss only the Reconcile Accounts & Sales Tax report.
On clicking the Reconcile Accounts & Sales Tax option, a Reconcile Accounts & Sales Tax message box appears. In the message box, there are three options. The options are:
Local – Select this option to view report for local transactions only.
Central – Select this option to view report for central transactions only.
Both – Select this option to view report for all the transactions.
On selecting any of the above option, a Report Options window appears. Given here are the data fields that appear in the Report Options window.
Starting Date – Enter the starting date from which the vouchers are to be picked.
Ending Date – Enter the ending date up to which the vouchers are to be picked.

252
Enter required data in the data fields of Report Options window and click the Ok button. On clicking the Ok button, Reconcile Accounts & Sales Tax report appears. Given here is a screenshot of Reconcile Accounts & Sales Tax report.
Figure 10.10 Reconcile Accounts & Sales Tax
Review Sales Tax Forms reports display the forms receivable / issuable from / to various parties and
the forms received / issued from / to various parties.
VAT Computation calculates the Net VAT Payable / Refundable for a specified period and displays all the computations used to derive at the final figure.
Sale VAT Summary report contains details of all the Sales and Sales Return transactions on which sales tax has been charged.
Purchase VAT Summary report contains details of all the Purchase and Purchase Return transactions on which sales tax has been paid.
Annual VAT Summary report displays the annual taxable and tax amount bifurcated either monthly or quarterly.
Item Tax Rate-Wise Summary report displays the tax wise details of items. The report generate summary of Opening Stock, Purchase, Sales and Closing Stock of items clubbed on the basis of rate of tax.
Sale (Bill-Wise) register displays the bill-wise details of the sales (VAT / Non-VAT related) made.
Sale (Party-Wise) register displays the sales (VAT / Non-VAT related) made to a particular party.
Sales Tax / VAT reports are state specific reports. Depending on the state for which you have created the company, the VAT reports as applicable for that state appear under the menu.
VAT Adjustment Details report displays the details of Input / Output Tax adjustment or any payment / refund of VAT made.
With Reconcile Accounts & Sales / Purchase Tax report, you can view the vouchers due to which difference in the VAT Summary and Balance Sheet appears.
Unit 10 – Sales Tax & VAT Reports 253
Exercise 1 . VAT Summary is used for:
a) Net Input VAT Only c) Net Payment of VAT b) Net Output VAT Only d) All of the above
2 . Annual Tax Summary report can be viewed:
a) Monthly c) Quarterly b) Both Monthly / Quarterly d) All of the above
3 . Form amount can be:
a) Item Basic Amount c) Bill Amount b) Taxable Amount d) All of the above
4 . Reconcile Accounts & Sales Tax report displays vouchers due to which different VAT amount occurred in:
a) Balance Sheet & VAT Summary c) Balance Sheet & VAT Adjustment b) Balance Sheet & VAT Computation d) Balance Sheet & Sales Register
5 . Which report displays a single form receivable from all the parties?
6 . Which report displays bifurcated sales amount for all Sale Types?
7 . Which report displays bifurcated purchase amount for all Tax Percentage?
8 . Which report displays total VAT collected from a Group of Parties?
9 . Which report displays VAT paid on all items?

Module 5
Managing Data
Unit 11 – Managing Backup
Unit 12 – Utilities
Unit 13 – Housekeeping
Unit 14 – Year-end Process

What Sculpture is to a
block of Marble,
Education is to the Human Soul.
Joseph Addison
Unit 11 Managing Backup
While using accounting software, security of data is as important as the accuracy of data. It is necessary to ensure that the data remains secure to ensure smooth working of organization. There can be circumstances in which data may get corrupted. In such a case, if there is a backup of the data then you can restore data from backup and continue with your work without any hindrance. It is recommended that you take regular backup of the data to avoid loss of data due to unexpected problems like data corruption, virus attack, abnormal shutdown of the PC, hard disk crash and so on.
Topics covered under this unit:
Backup Configuration
Taking backup
Restore Data
11.1 Backup Configuration Backup Configuration feature provides the facility to specify in advance, the path where the backup is to be taken on different days of the week. To specify backup configuration, click Administration Configuration Backup Configuration option. On clicking the Backup Configuration option, a Backup Configuration window appears. Given here is a screenshot of Backup Configuration window.
Image on next Page
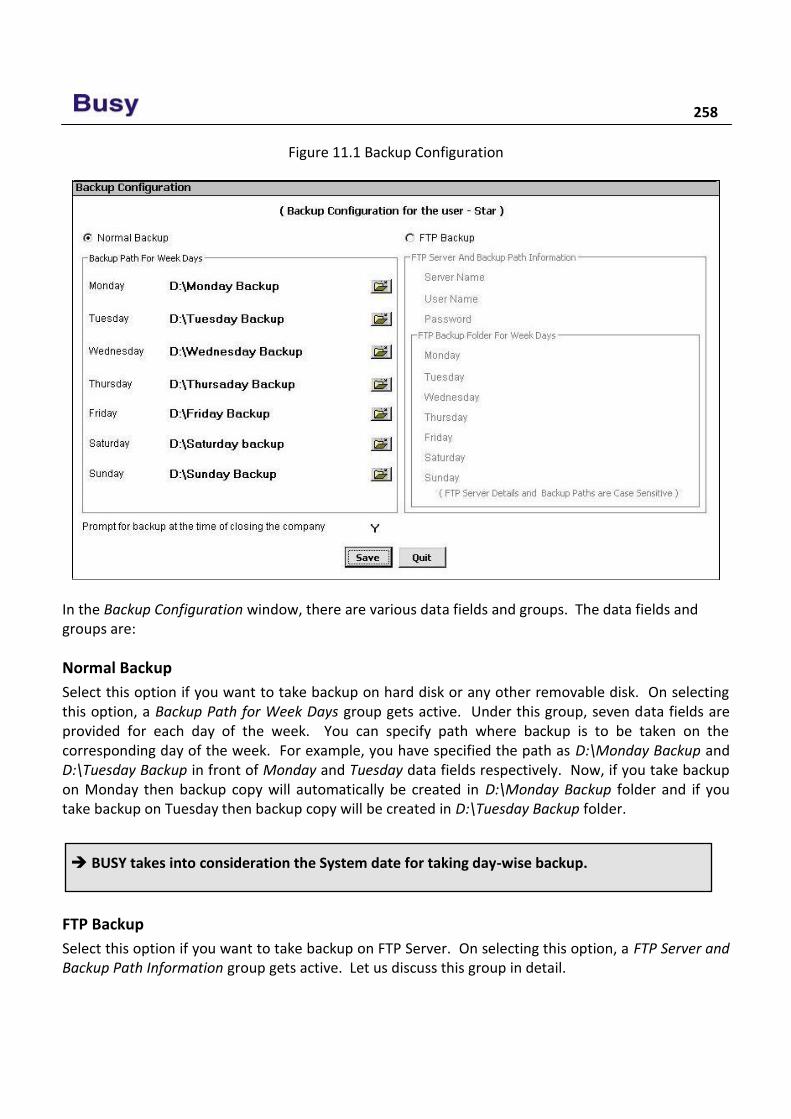
258
Figure 11.1 Backup Configuration
In the Backup Configuration window, there are various data fields and groups. The data fields and groups are:
Normal Backup
Select this option if you want to take backup on hard disk or any other removable disk. On selecting this option, a Backup Path for Week Days group gets active. Under this group, seven data fields are provided for each day of the week. You can specify path where backup is to be taken on the corresponding day of the week. For example, you have specified the path as D:\Monday Backup and D:\Tuesday Backup in front of Monday and Tuesday data fields respectively. Now, if you take backup on Monday then backup copy will automatically be created in D:\Monday Backup folder and if you take backup on Tuesday then backup copy will be created in D:\Tuesday Backup folder.
FTP Backup
Select this option if you want to take backup on FTP Server. On selecting this option, a FTP Server and Backup Path Information group gets active. Let us discuss this group in detail.
BUSY takes into consideration the System date for taking day-wise backup.
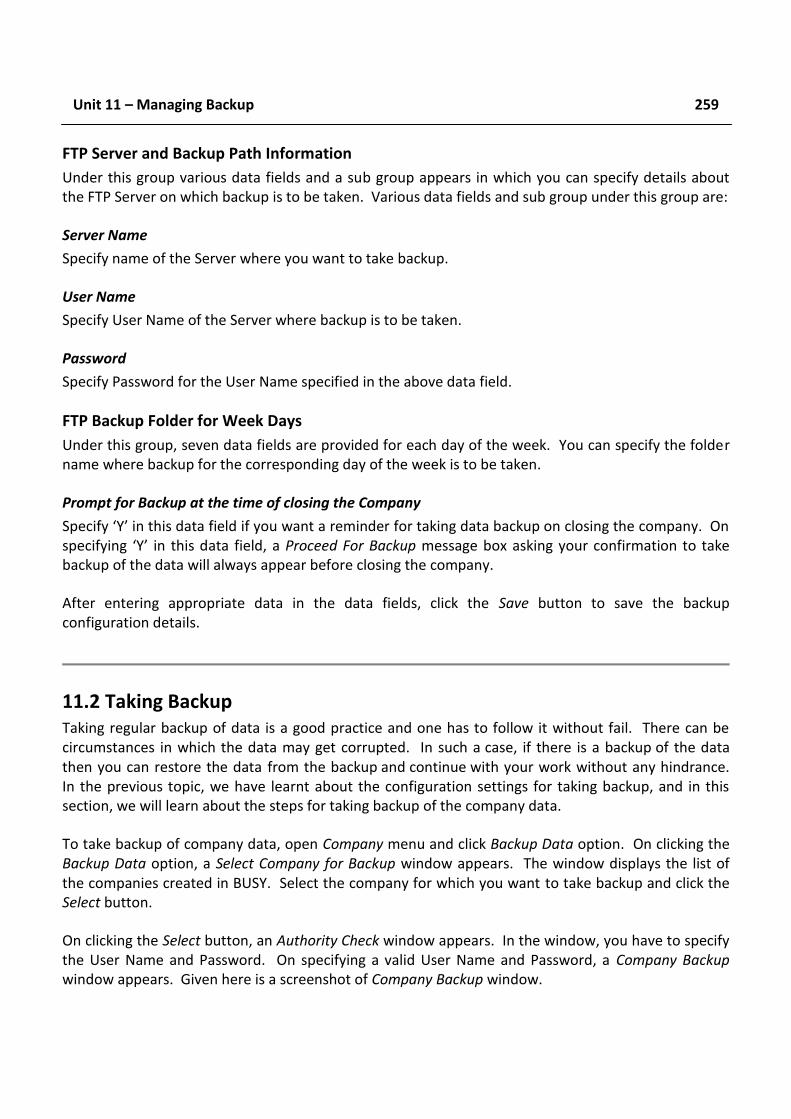
Unit 11 – Managing Backup 259
FTP Server and Backup Path Information
Under this group various data fields and a sub group appears in which you can specify details about the FTP Server on which backup is to be taken. Various data fields and sub group under this group are:
Server Name
Specify name of the Server where you want to take backup.
User Name
Specify User Name of the Server where backup is to be taken.
Password
Specify Password for the User Name specified in the above data field.
FTP Backup Folder for Week Days
Under this group, seven data fields are provided for each day of the week. You can specify the folder name where backup for the corresponding day of the week is to be taken.
Prompt for Backup at the time of closing the Company
Specify ‘Y’ in this data field if you want a reminder for taking data backup on closing the company. On specifying ‘Y’ in this data field, a Proceed For Backup message box asking your confirmation to take backup of the data will always appear before closing the company.
After entering appropriate data in the data fields, click the Save button to save the backup configuration details.
11.2 Taking Backup Taking regular backup of data is a good practice and one has to follow it without fail. There can be circumstances in which the data may get corrupted. In such a case, if there is a backup of the data then you can restore the data from the backup and continue with your work without any hindrance. In the previous topic, we have learnt about the configuration settings for taking backup, and in this section, we will learn about the steps for taking backup of the company data.
To take backup of company data, open Company menu and click Backup Data option. On clicking the Backup Data option, a Select Company for Backup window appears. The window displays the list of the companies created in BUSY. Select the company for which you want to take backup and click the Select button.
On clicking the Select button, an Authority Check window appears. In the window, you have to specify the User Name and Password. On specifying a valid User Name and Password, a Company Backup window appears. Given here is a screenshot of Company Backup window.
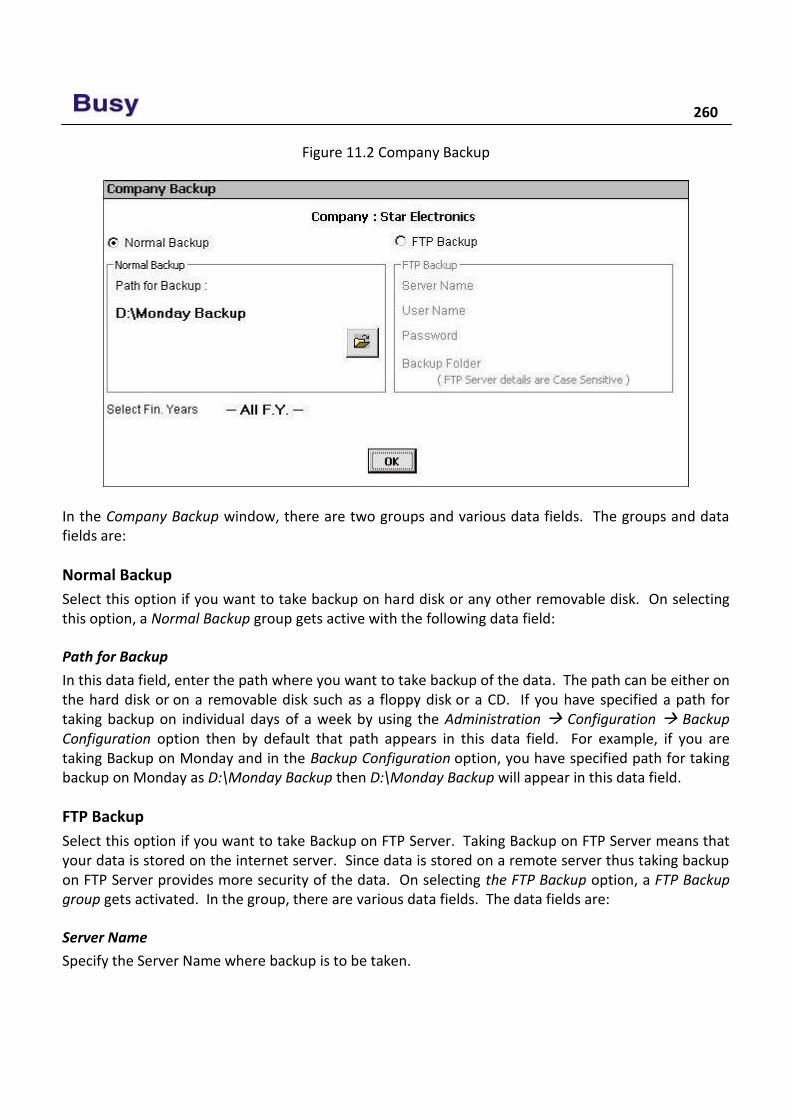
260
Figure 11.2 Company Backup
In the Company Backup window, there are two groups and various data fields. The groups and data fields are:
Normal Backup
Select this option if you want to take backup on hard disk or any other removable disk. On selecting this option, a Normal Backup group gets active with the following data field:
Path for Backup
In this data field, enter the path where you want to take backup of the data. The path can be either on the hard disk or on a removable disk such as a floppy disk or a CD. If you have specified a path for taking backup on individual days of a week by using the Administration Configuration Backup Configuration option then by default that path appears in this data field. For example, if you are taking Backup on Monday and in the Backup Configuration option, you have specified path for taking backup on Monday as D:\Monday Backup then D:\Monday Backup will appear in this data field.
FTP Backup
Select this option if you want to take Backup on FTP Server. Taking Backup on FTP Server means that your data is stored on the internet server. Since data is stored on a remote server thus taking backup on FTP Server provides more security of the data. On selecting the FTP Backup option, a FTP Backup group gets activated. In the group, there are various data fields. The data fields are:
Server Name
Specify the Server Name where backup is to be taken.
Unit 11 – Managing Backup 261
User Name
Specify the User Name for the Server where backup is to be taken.
Password
Specify Password for the User Name specified in the above data field.
Backup Folder
Specify the backup folder name in which the backup of the data is to be taken. This folder is created on the internet server. Creating separate folders is beneficial if you want to take backup of different companies in different folders or if you want to take backup for individual days in separate folders. If you have specified folders for taking backup on individual days of week in the Administration Configuration Backup Configuration option then by default that folder appears in this data field. For example, if you are taking Backup on Monday and in the Backup Configuration option, you have specified folder for taking backup on Monday as Monday-Backup then Monday-Backup will appear in this data field.
Select Fin. Year
In this data field, you can specify whether you want to take backup for all the Financial Years or a particular Financial Year. The data field displays list of all the financial years of the company. You can either select a single financial year for which you want to take backup or choose All F.Y. option to take backup of all the financial years of the company.
After entering appropriate data in the data fields, click the Ok button to start the process of taking backup. On clicking the Ok button, a Start Backup message box appears informing you that the backup process is about to start.
Click the Ok button in the Start Backup message box. On clicking the Ok button, backup of the data will be taken at the specified path. After successful completion of backup, a Backup Successful message box will appear displaying that backup is taken successfully. Click the Yes button in the Backup Successful message box to create more backup copies otherwise click the No button if you do not want to make any other backup copy.
11.3 Restore Data Restore Data option is used to restore data from the backup copy of data. In the previous topic, we have learnt the steps to take backup of data. In this topic, we will discuss the steps to restore data from the backup. Generally, the need for restoring data arises when your company’s data is corrupted due to any reason such as hard disk crash, virus or so on.
All the information provided for FTP Server is case sensitive.
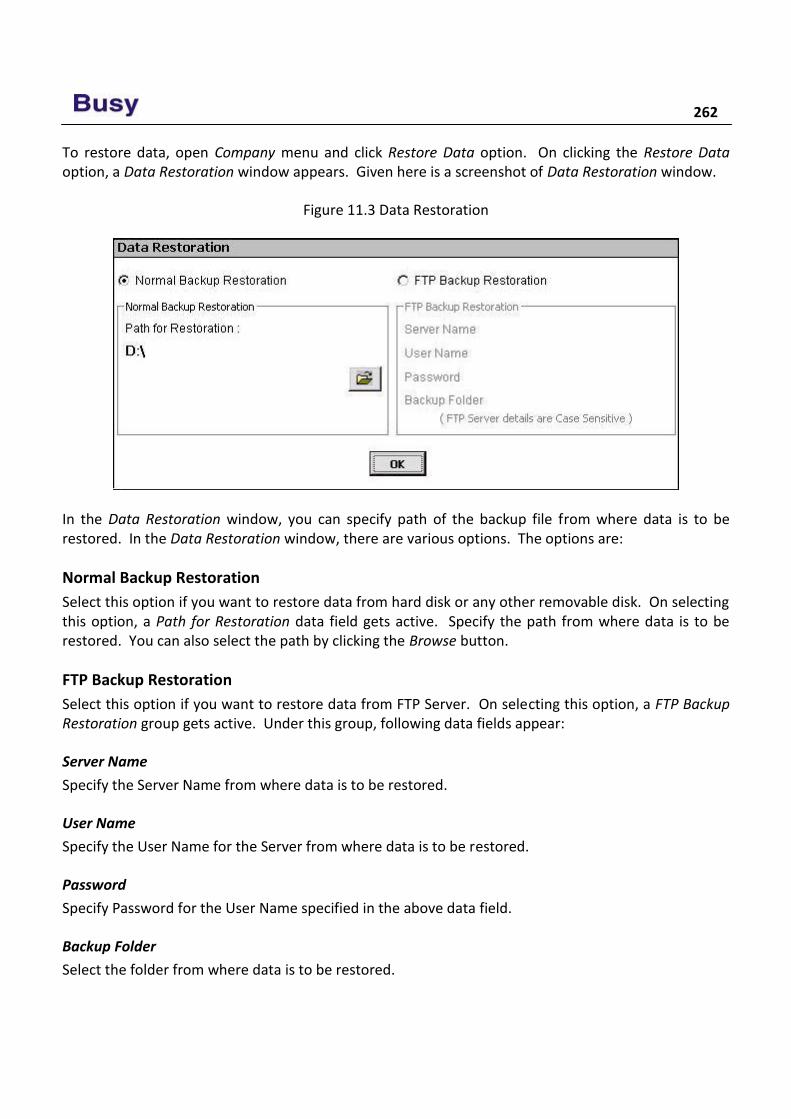
262
To restore data, open Company menu and click Restore Data option. On clicking the Restore Data option, a Data Restoration window appears. Given here is a screenshot of Data Restoration window.
Figure 11.3 Data Restoration
In the Data Restoration window, you can specify path of the backup file from where data is to be restored. In the Data Restoration window, there are various options. The options are:
Normal Backup Restoration
Select this option if you want to restore data from hard disk or any other removable disk. On selecting this option, a Path for Restoration data field gets active. Specify the path from where data is to be restored. You can also select the path by clicking the Browse button.
FTP Backup Restoration
Select this option if you want to restore data from FTP Server. On selecting this option, a FTP Backup Restoration group gets active. Under this group, following data fields appear:
Server Name
Specify the Server Name from where data is to be restored.
User Name
Specify the User Name for the Server from where data is to be restored.
Password
Specify Password for the User Name specified in the above data field.
Backup Folder
Select the folder from where data is to be restored.
Unit 11 – Managing Backup 263
After entering appropriate data in the data fields, click the Ok button to restore data from the backup folder.
On clicking the Ok button, a Data Restoration message box appears, asking your confirmation to restore the data. Click the Yes button in the message box to restore data.
On successful restoration of data, a Data Restoration Successful message box appears. Click the Ok button to close the message box.
Review With Backup Configuration option, you can specify in advance the path where the backup for
different days of the week is to be taken.
You can take backup of company data either on hard disk or any other removable disk or on FTP Server.
Backup of company data can be taken by using the Backup Data option provided under Company menu.
While restoring data, if the company with the same name exists then you can choose to either overwrite the data or create a company with same name but the current date appended with it.
Exercise 1 . Information provided for FTP server is:
a) Case sensitive c) Not case sensitive b) Always in Capital Letters d) Always in small letters
If you are restoring the full data of a company and a company with the same name exists in BUSY then BUSY will open a Company Exist message box. It will ask you whether it should overwrite the existing data for the company. If you click the Yes button, BUSY will overwrite the existing data with the backup copy. If you click the No button, BUSY will create another company with the same name. To differentiate the two companies BUSY will append the current date with the newly created company.
Similarly, if you are restoring the data of a single financial year of a company and a company with the same financial year exists in BUSY then BUSY will open a F.Y. Exist message box. It will ask you whether it should overwrite the existing data for the company. If you click the Yes button, BUSY will overwrite the existing data with the backup copy. If you click the No button, BUSY will create another company with the same financial year. To differentiate between the two companies BUSY will append the current date with the newly created company.
264
2 . We can take backup on: a) Pen Drive c) Zip Drive b) Hard Disk d) All of the above
3 . Backup files are restored at:
a) Data Directory c) Restoration Path b) Any Folder d) None of the above
4 . Take the back up of Star Electronics Company in the D:\BusyBackup2011 folder for financial year 2011-12 only.
5 . Restore backup of financial year for 2011-12 of Star Electronics Company at the path specified
in the data directory.
6 . Using Backup Configuration option, specify the backup folder for each day of the week as D:\Monday Backup to D:\Sunday Backup. Now take backup of Star Electronics Company to one of these folders.


We are like Tea Bags -
We don’t know our Strength
Until We are in Hot Water.
Sister Busche
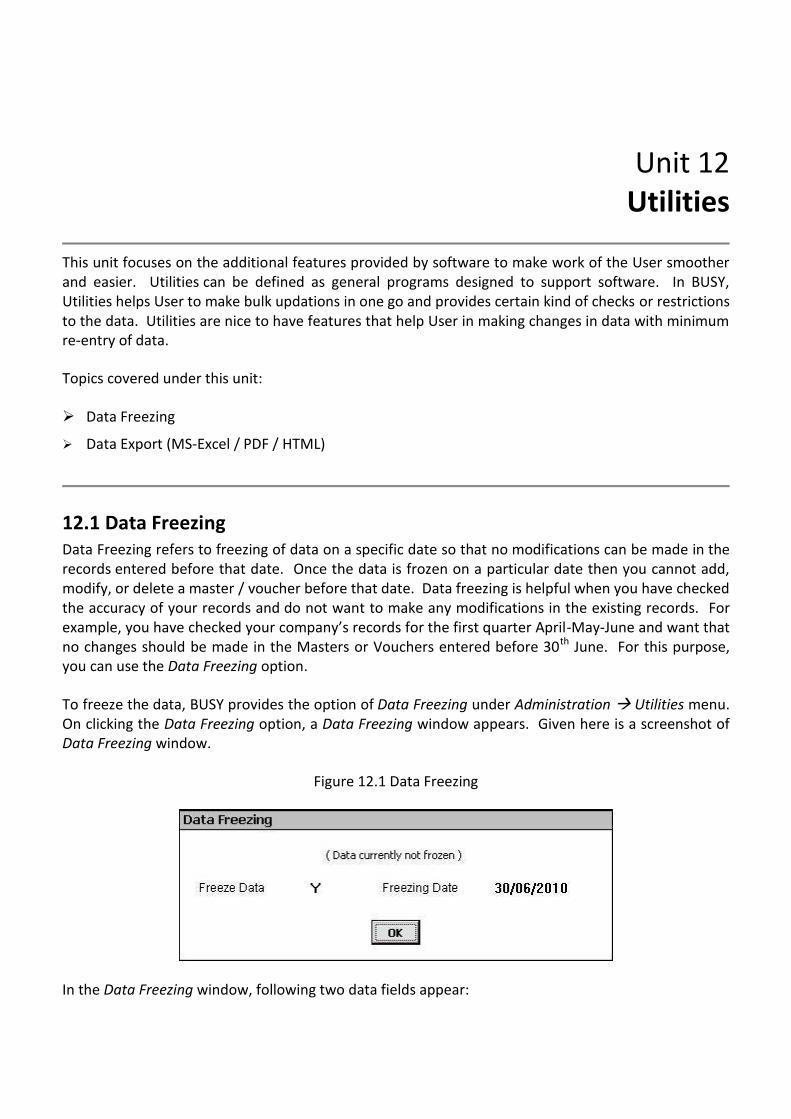
Unit 12 Utilities
This unit focuses on the additional features provided by software to make work of the User smoother and easier. Utilities can be defined as general programs designed to support software. In BUSY, Utilities helps User to make bulk updations in one go and provides certain kind of checks or restrictions to the data. Utilities are nice to have features that help User in making changes in data with minimum re-entry of data.
Topics covered under this unit:
Data Freezing
Data Export (MS-Excel / PDF / HTML)
12.1 Data Freezing Data Freezing refers to freezing of data on a specific date so that no modifications can be made in the records entered before that date. Once the data is frozen on a particular date then you cannot add, modify, or delete a master / voucher before that date. Data freezing is helpful when you have checked the accuracy of your records and do not want to make any modifications in the existing records. For example, you have checked your company’s records for the first quarter April-May-June and want that no changes should be made in the Masters or Vouchers entered before 30th June. For this purpose, you can use the Data Freezing option.
To freeze the data, BUSY provides the option of Data Freezing under Administration Utilities menu. On clicking the Data Freezing option, a Data Freezing window appears. Given here is a screenshot of Data Freezing window.
Figure 12.1 Data Freezing
In the Data Freezing window, following two data fields appear:
268
Freeze Data
Specify ‘Y’ in this data field if you want to freeze the data.
Freezing Date
Specify the date up to which you want to freeze the data.
After entering appropriate data in both the data fields, click the Ok button to freeze / unfreeze the data.
12.2 Data Export (MS-Excel / PDF / HTML) Data Export feature provides User the facility to export reports in xls, pdf, html or txt format. You can export reports in these formats and e-mail it to your clients in the required format. You can export report by using the Export button provided in the Report window itself while viewing report through Display menu. Given here is a screenshot of a Report window, displaying Export button.
Image on next Page
If data is already frozen then you can unfreeze the data by entering 'N' in the Freeze Data data field. In the Data Freezing window, a note always appears to show whether the data is currently frozen or not.
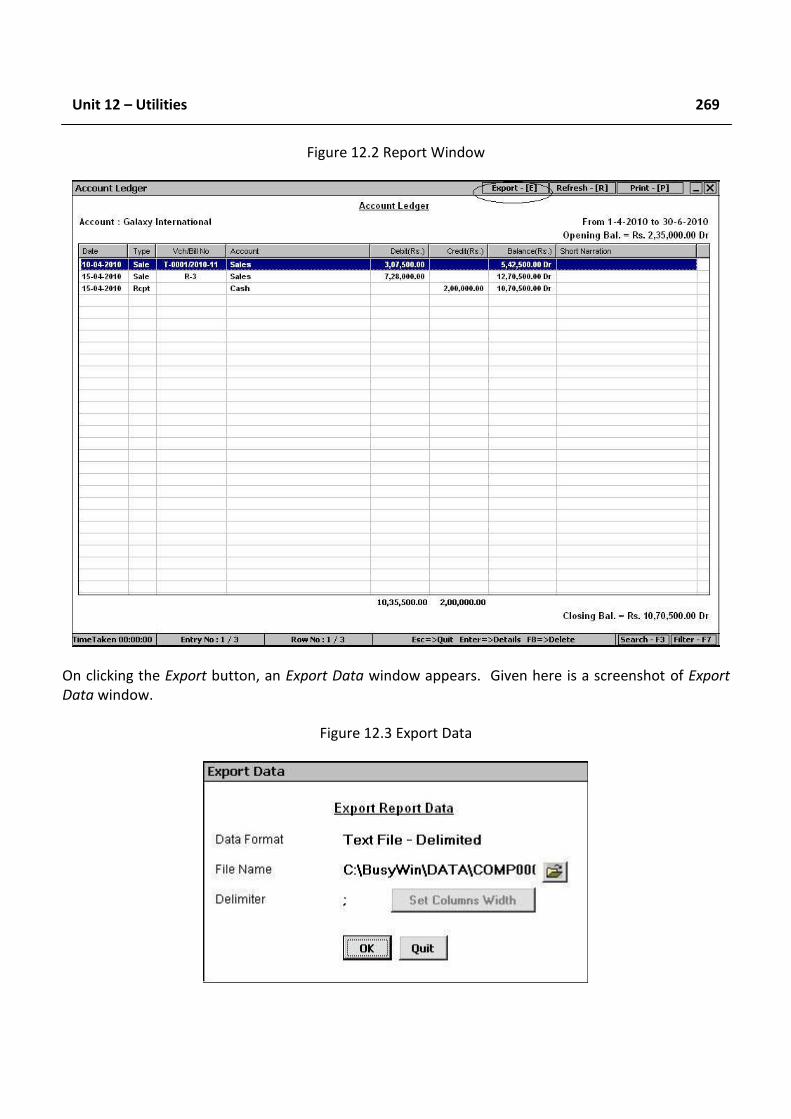
Unit 12 – Utilities 269
Figure 12.2 Report Window
On clicking the Export button, an Export Data window appears. Given here is a screenshot of Export Data window.
Figure 12.3 Export Data
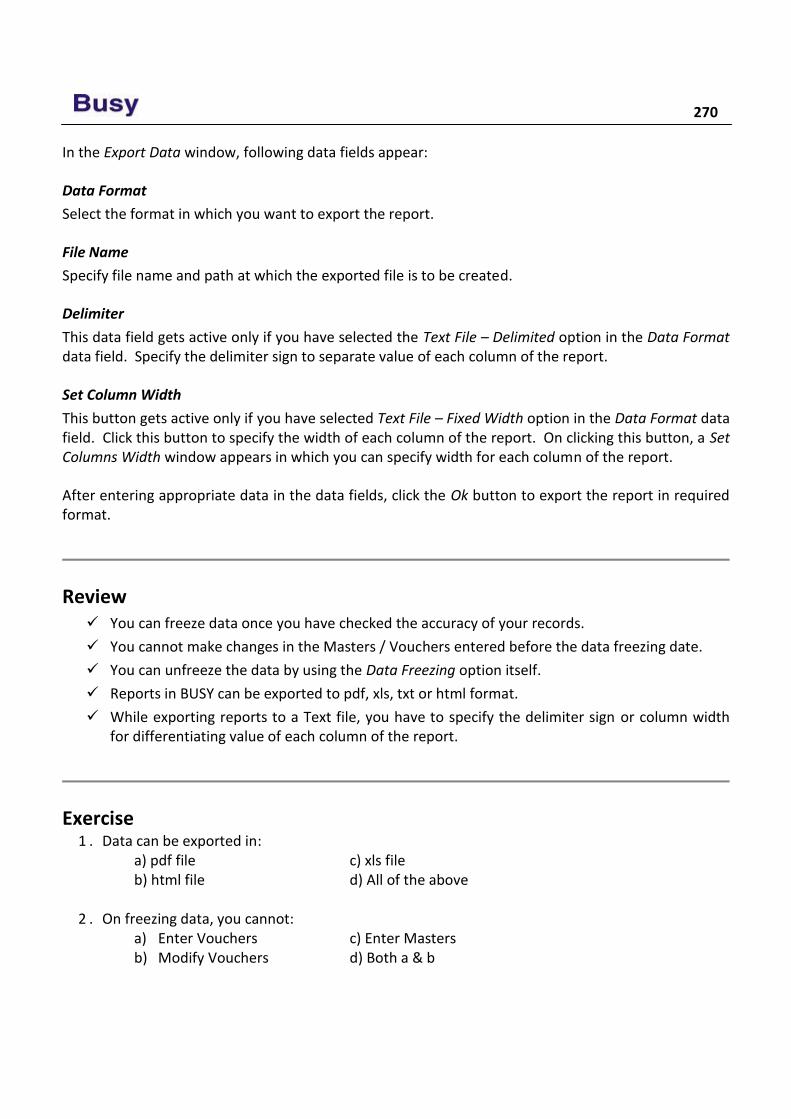
270
In the Export Data window, following data fields appear:
Data Format
Select the format in which you want to export the report.
File Name
Specify file name and path at which the exported file is to be created.
Delimiter
This data field gets active only if you have selected the Text File – Delimited option in the Data Format data field. Specify the delimiter sign to separate value of each column of the report.
Set Column Width
This button gets active only if you have selected Text File – Fixed Width option in the Data Format data field. Click this button to specify the width of each column of the report. On clicking this button, a Set Columns Width window appears in which you can specify width for each column of the report.
After entering appropriate data in the data fields, click the Ok button to export the report in required format.
Review You can freeze data once you have checked the accuracy of your records.
You cannot make changes in the Masters / Vouchers entered before the data freezing date.
You can unfreeze the data by using the Data Freezing option itself.
Reports in BUSY can be exported to pdf, xls, txt or html format.
While exporting reports to a Text file, you have to specify the delimiter sign or column width for differentiating value of each column of the report.
Exercise 1 . Data can be exported in:
a) pdf file c) xls file b) html file d) All of the above
2 . On freezing data, you cannot:
a) Enter Vouchers c) Enter Masters b) Modify Vouchers d) Both a & b
Unit 12 – Utilities 271
3 . Data Freezing option is provided under: a) Utilities Menu c) Housekeeping Menu b) Configuration Menu d) Company Menu
4 . You can freeze data for:
a) All Financial Years c) Previous Financial Year b) Current Financial Year d) All of the above
5 . You can un-freeze data by specifying:
a) ‘N’ in Data Freezing field c) Date beyond current financial year b) Blank Date d) Both a & b
6 . You can export data of following :
a) Account Ledger c) Stock Ledger b) Trial Balance d) All of the above
7 . You can separate report columns in a text file by specifying:
a) Delimiter c) Row Width b) Column Width d) Both a & b
8 . How can you unfreeze the data?
9 . What is the benefit of exporting data?
1 0 . Freeze data for Star Electronics Company up to 30th April 2010.
1 1 . Export the Trial Balance report in a text file and fix the column width as following:
Account – 50 Debit – 35 Credit - 35

We are what we Repeatedly do.
Excellence then is not an Act,
but a Habit.
Aristotle
Unit 13 Housekeeping
The main objective of this unit is to let User know various measures to correct the data in case data gets corrupted due to any reason. Users are always advised to take regular backup of data to ensure that minimum work gets hampered in unlikely event of data corruption. However, on the other side, good software should always provide preventive measure to save data from being getting corrupted and the means to recover data if data gets corrupted due to any reason.
Topics covered under this unit:
Rebuild Databases
Rewrite Books
13.1 Rebuild Databases Sometimes data get corrupted due to various reasons such as virus attack, hard disk crash and so on. In such a case, you can rebuild the databases to repair the corrupted data. Rebuild Databases option helps to repair the corrupted data by means of re-indexing. Re-Indexing refers to rewriting the index for the database. An index in the database is like the index of a book that allows you to access different topics easily and quickly. In addition, the Rebuild Databases option frees up the unused space in the database and makes the database compact.
To rebuild database, either open Company menu and click Rebuild Databases option or click Housekeeping Rebuild Databases option. On clicking the Rebuild Databases option, a Select Company for Rebuilding Databases window appears displaying list of all the companies created in BUSY. Select the company for which you want to rebuild the databases and click the Select button.
On clicking the Select button, a Please Take Backup Before Rebuilding Databases message box appears advising you to take backup of the data before rebuilding the database. Select the appropriate option and click the Ok button.
On clicking the Ok button, a Rebuild Databases message box appears confirming the rebuild action. Click the Ok button to start the rebuilding process.
It is recommended to take backup of the company data before rebuilding the databases.
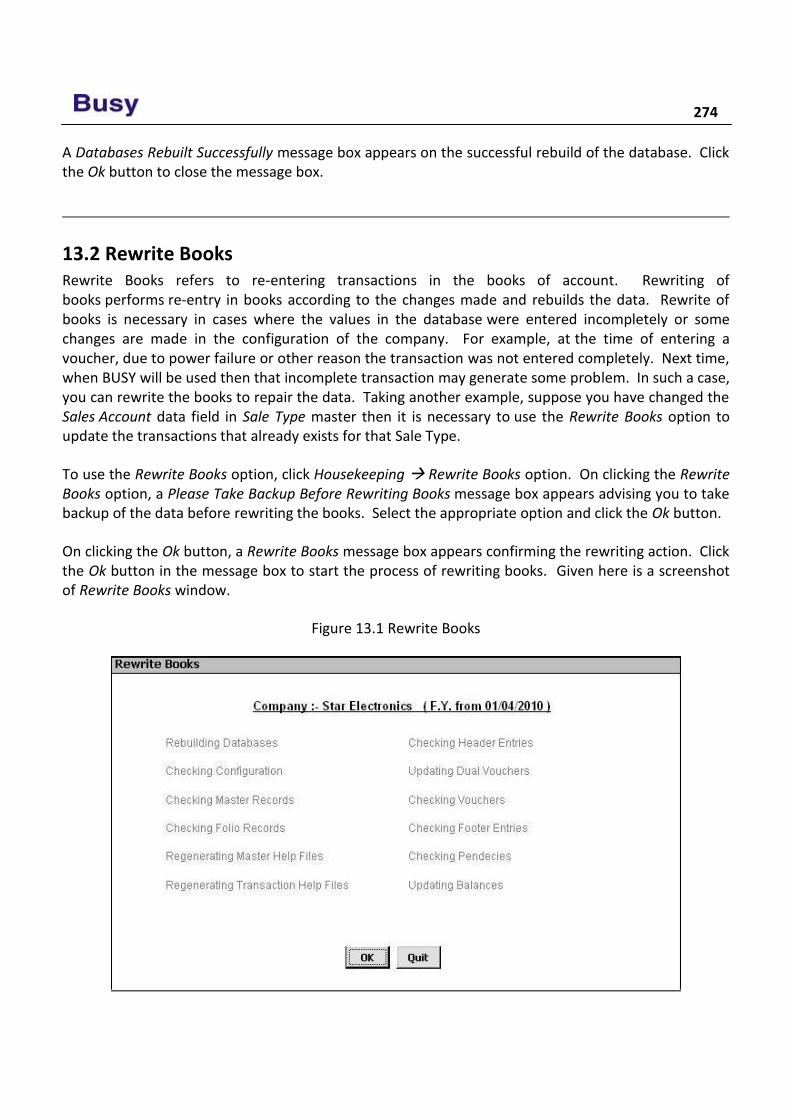
274
A Databases Rebuilt Successfully message box appears on the successful rebuild of the database. Click the Ok button to close the message box.
13.2 Rewrite Books Rewrite Books refers to re-entering transactions in the books of account. Rewriting of books performs re-entry in books according to the changes made and rebuilds the data. Rewrite of books is necessary in cases where the values in the database were entered incompletely or some changes are made in the configuration of the company. For example, at the time of entering a voucher, due to power failure or other reason the transaction was not entered completely. Next time, when BUSY will be used then that incomplete transaction may generate some problem. In such a case, you can rewrite the books to repair the data. Taking another example, suppose you have changed the Sales Account data field in Sale Type master then it is necessary to use the Rewrite Books option to update the transactions that already exists for that Sale Type.
To use the Rewrite Books option, click Housekeeping Rewrite Books option. On clicking the Rewrite Books option, a Please Take Backup Before Rewriting Books message box appears advising you to take backup of the data before rewriting the books. Select the appropriate option and click the Ok button.
On clicking the Ok button, a Rewrite Books message box appears confirming the rewriting action. Click the Ok button in the message box to start the process of rewriting books. Given here is a screenshot of Rewrite Books window.
Figure 13.1 Rewrite Books
Unit 13 - Housekeeping 275
On successful rewriting of books, a Books Rewrite Successful message box appears displaying that the process of rewriting books is completed successfully.
Review Rebuild Databases option helps to repair the corrupted data by means of re-indexing. Re-
indexing refers to rewriting the index for the database.
Rebuild Databases option is provided under Company menu and Housekeeping menu.
Rewrite Books refers to re-entering transactions in the books of account. Rewriting of books performs re-entry in books according to the changes made and rebuilds the data.
Exercise 1 . Rebuild Database option:
a) Repairs the corrupted data c) Does re-indexing of data b) Recreates the database d) Both a & b
2 . Before Rewriting books you are advised to: a) Take Backup of data c) Close the company b) Freeze the data d) None of the above
3 . Rewrite Books helps in:
a) Posting Vouchers c) Taking Backup b) Repairing Data d) Creating Masters
4 . Star Electronics Company has decided to not to include value of Installation Charges Bill Sundry in the cost of goods. Now make the necessary changes in Installation Charges Bill Sundry and run the Rewrite Books command.

Take your Heart to Work.
Integrate what you Believe
into every single area of Life.
Meryl Streep
Unit 14 Year-End Process
This unit will focus on all the issues that arise at the time of ending financial year or carrying forward entries to a new financial year. Generally, in India, an accounting period from 1st April to 31st March is followed. Hence, on 31st of March, closing of the accounts is done and the balances are carried forward to next financial year. There are various entries, which are entered at the end of the financial year only such as depreciation charged on fixed assets, interest paid and so on. Posting of these entries and all other entries, which need to be posted at the end of a financial year, will be covered under this unit.
Topics covered under this unit:
Year-End Entries
Changing Financial Year
14.1 Year-End Entries At the end of a financial year, a company needs to post various entries. These entries are yearly entries which are entered only once in a year and that too at the end of the financial year. In this topic, we will cover all such entries that are entered at the end of the financial year. For example, depreciation on fixed assets is charged at the end of the financial year. Similarly, entry for interest paid on loan is posted at the end of the financial year. In this section, we will try to cover all such entries that are posted at the end of the financial year.
Let us discuss posting of year-end entries one by one starting with the entry of depreciation charged on fixed assets.
Entry 1: Depreciation charged on fixed assets.
Star Electronics Company has charged depreciation of Rs. 30,000 on the Maruti Van that it used to deliver goods to the dealers. To post this entry, company will enter a Journal voucher and debit / credit the following accounts.
Debit: Depreciation A/c 30,000 Credit: Van A/c 30,000
Given here is a screenshot displaying Journal voucher entered for the depreciation charged on fixed asset.
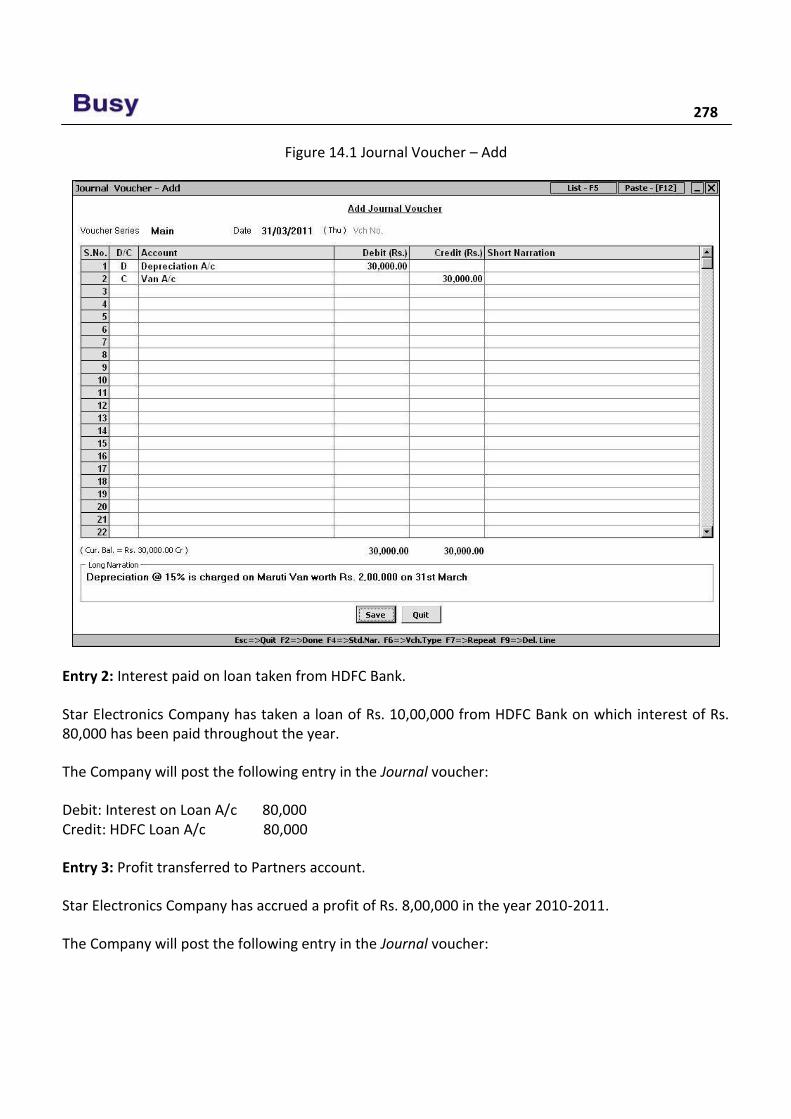
278
Figure 14.1 Journal Voucher – Add
Entry 2: Interest paid on loan taken from HDFC Bank.
Star Electronics Company has taken a loan of Rs. 10,00,000 from HDFC Bank on which interest of Rs. 80,000 has been paid throughout the year.
The Company will post the following entry in the Journal voucher:
Debit: Interest on Loan A/c 80,000 Credit: HDFC Loan A/c 80,000
Entry 3: Profit transferred to Partners account.
Star Electronics Company has accrued a profit of Rs. 8,00,000 in the year 2010-2011.
The Company will post the following entry in the Journal voucher:

Unit 14 – Year-end Process 279
Debit: Profit & Loss A/c 8,00,000 Credit: Capital A/c - Rajesh 4,00,000 Capital A/c - Ankit 2,00,000 Capital A/c - Amit 2,00,000
In the above entry, profit is divided according to capital invested by the partners in the firm.
In case of Proprietorship firm, the profit is transferred to Proprietor’s A/c.
Debit: Profit & Loss A/c Credit: Proprietor’s A/c
In case of a company, profit is transferred to Reserves & Surplus account.
Debit: Profit & Loss A/c Credit: Reserves & Surplus A/c
Entry 4: VAT Payment for the last quarter of the Year.
Apart from the entries explained above, one more entry that needs to be explained is of VAT payment of the last quarter of the year. Payment of VAT to the government for the last quarter of the year i.e. January–February-March is made in the month of April. It means that although the VAT is of the previous financial year but it is deposited in the current financial year. This entry needs to be reflected in the reports of the previous financial year as payment of VAT is for previous year only. In this section we will discuss the posting of such entry in BUSY.
Star Electronics Company has to Pay Rs. 20,000 as VAT for the quarter January-February-March of 2010-11 financial year. The company will post the following entry in the Payment voucher on 31st of March 2011:
Debit: VAT A/c 20,000 Credit: VAT Payable A/c 20,000
On saving the Payment voucher, a VAT Adjustment Details window appears (as VAT account is debited) in which details about the VAT payment such as Challan Number, Cheque Number are to be entered. Since the VAT amount is not yet deposited to the government, the company does not have these details on 31st of March. Hence, the company will leave this window blank on 31st March 2011.
When the company will deposit the VAT to the government i.e. at any time in the current financial year, then it has to do the following two steps:
1. Enter a Payment voucher with following entry:
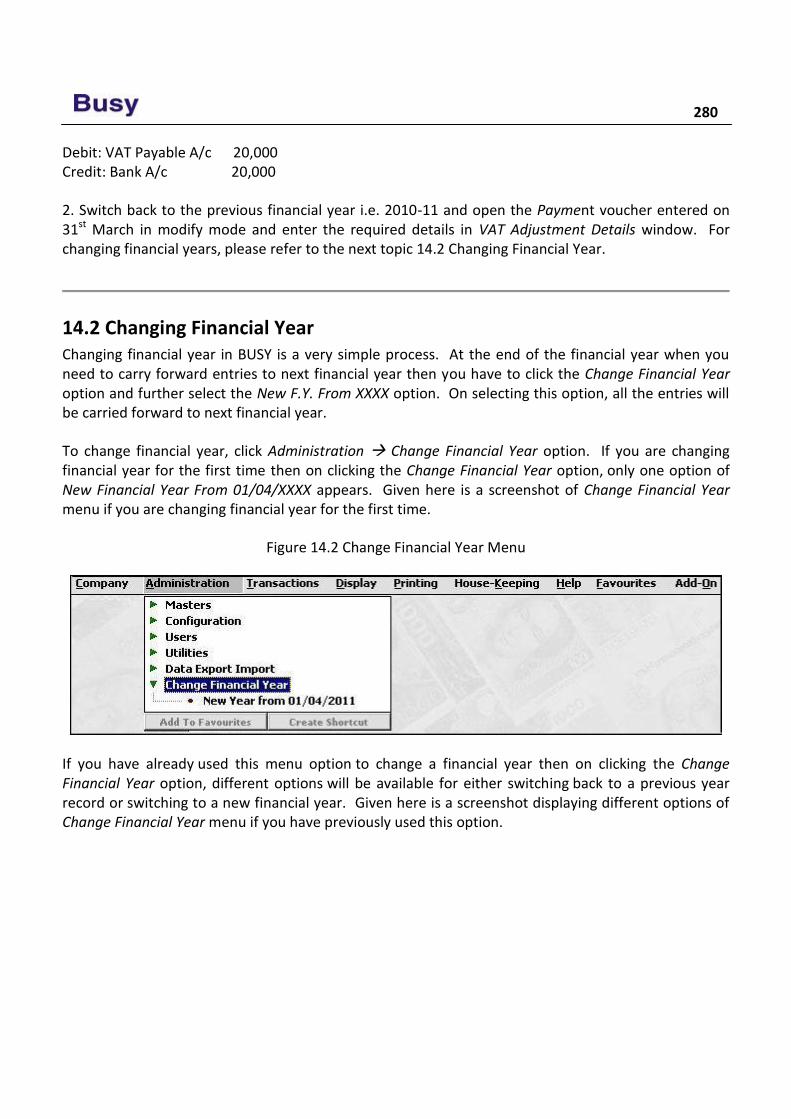
280
Debit: VAT Payable A/c 20,000 Credit: Bank A/c 20,000
2. Switch back to the previous financial year i.e. 2010-11 and open the Payment voucher entered on 31st March in modify mode and enter the required details in VAT Adjustment Details window. For changing financial years, please refer to the next topic 14.2 Changing Financial Year.
14.2 Changing Financial Year Changing financial year in BUSY is a very simple process. At the end of the financial year when you need to carry forward entries to next financial year then you have to click the Change Financial Year option and further select the New F.Y. From XXXX option. On selecting this option, all the entries will be carried forward to next financial year.
To change financial year, click Administration Change Financial Year option. If you are changing financial year for the first time then on clicking the Change Financial Year option, only one option of New Financial Year From 01/04/XXXX appears. Given here is a screenshot of Change Financial Year menu if you are changing financial year for the first time.
Figure 14.2 Change Financial Year Menu
If you have already used this menu option to change a financial year then on clicking the Change Financial Year option, different options will be available for either switching back to a previous year record or switching to a new financial year. Given here is a screenshot displaying different options of Change Financial Year menu if you have previously used this option.
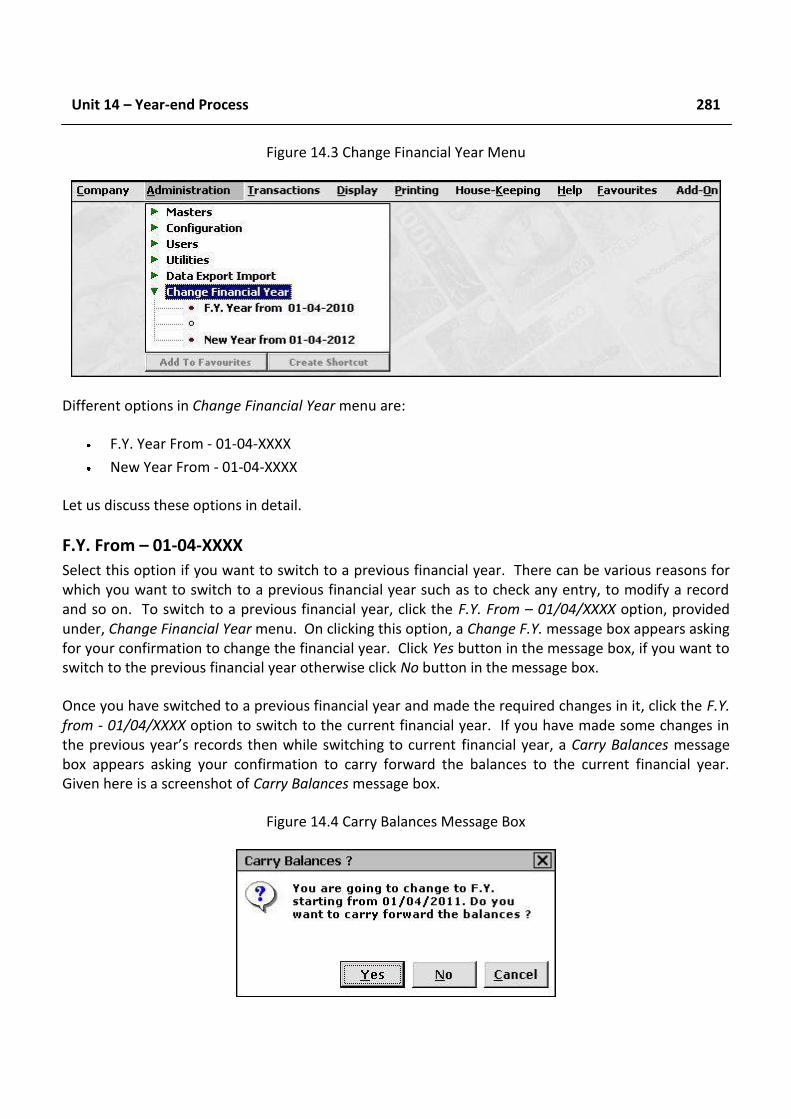
Unit 14 – Year-end Process 281
Figure 14.3 Change Financial Year Menu
Different options in Change Financial Year menu are:
F.Y. Year From - 01-04-XXXX
New Year From - 01-04-XXXX
Let us discuss these options in detail.
F.Y. From – 01-04-XXXX
Select this option if you want to switch to a previous financial year. There can be various reasons for which you want to switch to a previous financial year such as to check any entry, to modify a record and so on. To switch to a previous financial year, click the F.Y. From – 01/04/XXXX option, provided under, Change Financial Year menu. On clicking this option, a Change F.Y. message box appears asking for your confirmation to change the financial year. Click Yes button in the message box, if you want to switch to the previous financial year otherwise click No button in the message box.
Once you have switched to a previous financial year and made the required changes in it, click the F.Y. from - 01/04/XXXX option to switch to the current financial year. If you have made some changes in the previous year’s records then while switching to current financial year, a Carry Balances message box appears asking your confirmation to carry forward the balances to the current financial year. Given here is a screenshot of Carry Balances message box.
Figure 14.4 Carry Balances Message Box
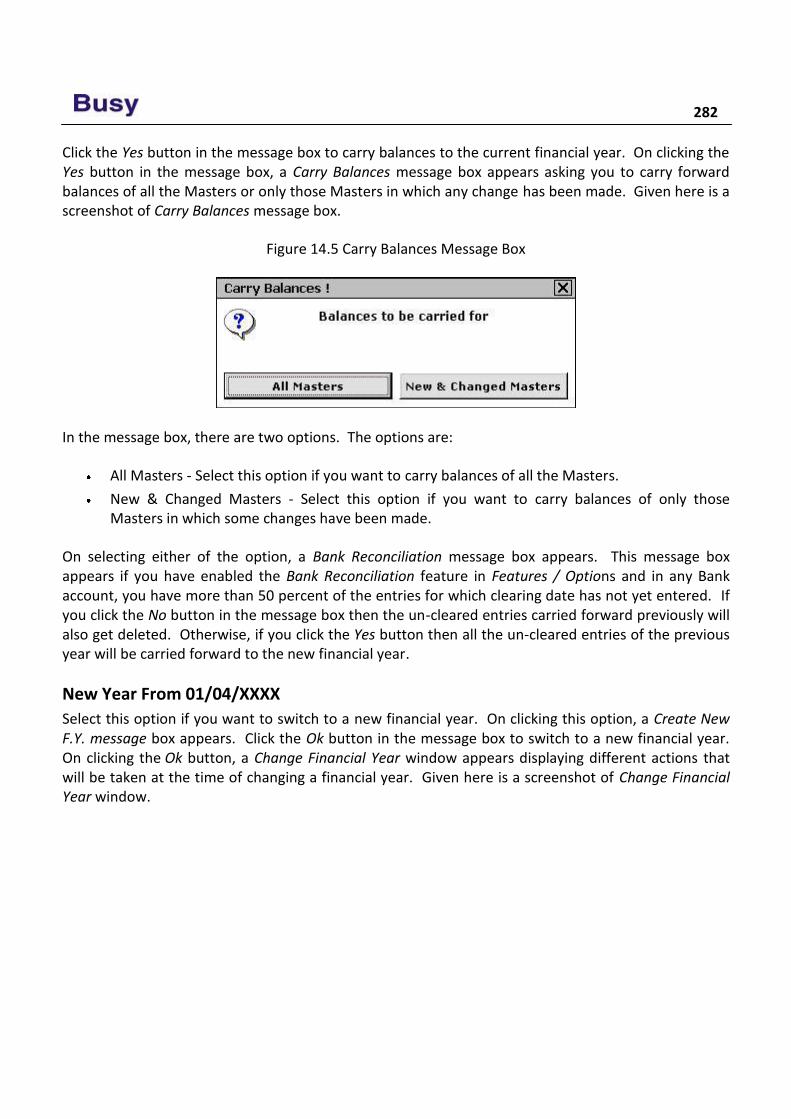
282
Click the Yes button in the message box to carry balances to the current financial year. On clicking the Yes button in the message box, a Carry Balances message box appears asking you to carry forward balances of all the Masters or only those Masters in which any change has been made. Given here is a screenshot of Carry Balances message box.
Figure 14.5 Carry Balances Message Box
In the message box, there are two options. The options are:
All Masters - Select this option if you want to carry balances of all the Masters.
New & Changed Masters - Select this option if you want to carry balances of only those Masters in which some changes have been made.
On selecting either of the option, a Bank Reconciliation message box appears. This message box appears if you have enabled the Bank Reconciliation feature in Features / Options and in any Bank account, you have more than 50 percent of the entries for which clearing date has not yet entered. If you click the No button in the message box then the un-cleared entries carried forward previously will also get deleted. Otherwise, if you click the Yes button then all the un-cleared entries of the previous year will be carried forward to the new financial year.
New Year From 01/04/XXXX
Select this option if you want to switch to a new financial year. On clicking this option, a Create New F.Y. message box appears. Click the Ok button in the message box to switch to a new financial year. On clicking the Ok button, a Change Financial Year window appears displaying different actions that will be taken at the time of changing a financial year. Given here is a screenshot of Change Financial Year window.
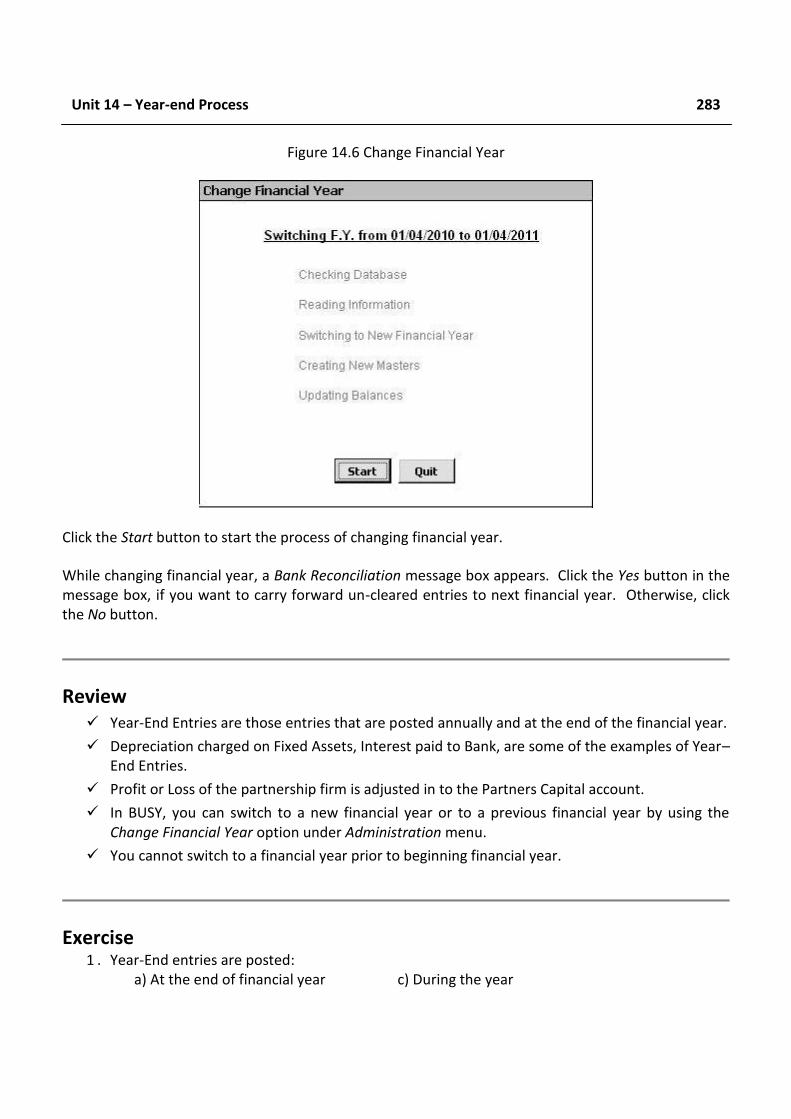
Unit 14 – Year-end Process 283
Figure 14.6 Change Financial Year
Click the Start button to start the process of changing financial year.
While changing financial year, a Bank Reconciliation message box appears. Click the Yes button in the message box, if you want to carry forward un-cleared entries to next financial year. Otherwise, click the No button.
Review Year-End Entries are those entries that are posted annually and at the end of the financial year.
Depreciation charged on Fixed Assets, Interest paid to Bank, are some of the examples of Year– End Entries.
Profit or Loss of the partnership firm is adjusted in to the Partners Capital account.
In BUSY, you can switch to a new financial year or to a previous financial year by using the Change Financial Year option under Administration menu.
You cannot switch to a financial year prior to beginning financial year.
Exercise 1 . Year-End entries are posted:
a) At the end of financial year c) During the year

284
b) At the beginning of financial year d) All of the above
2 . Which of the following is not an year-end entry? a) Depreciation charged on Machinery c) Profit Transferred to Capital Account b) Interest on Loan d) Sales on 31st March
3 . In a Company with beginning financial year as 2010-11, you cannot create a financial year for:
a) 2009-10 c) 2012-13 b) 2011-12 d) 2010-11
4 . Which option appear under Carry Balances message box while switching to a new financial
year: a) All Masters c) Deleted Masters b) New & Changed Master d) Both a & b
5 . Post following entries for Star Electronics Company:
a) Depreciation @ 15% charged on Car worth Rs. 3,00,000. b) Interest of Rs. 30,000 paid during the year to HDFC bank for the loan taken from them.
6 . Change the financial year of Star Electronic Company from 2010-11 to 2011-12.
7 . Switch back to financial year 2010-11 of Star Electronics Company and modify the Journal
voucher in which you have charged depreciation @ 15% on Car. Change the depreciation percentage from 15% to 20 %. Now switch back to the current financial year.

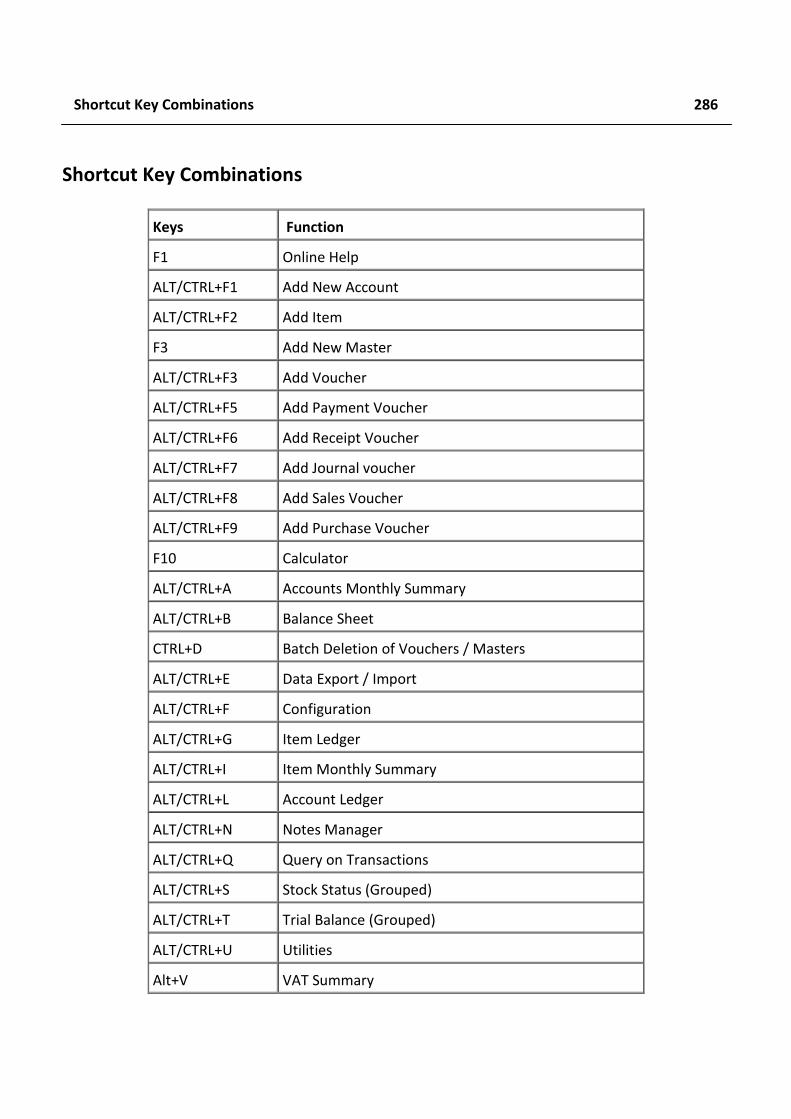
Shortcut Key Combinations 286
Shortcut Key Combinations
Keys Function
F1 Online Help
ALT/CTRL+F1 Add New Account
ALT/CTRL+F2 Add Item
F3 Add New Master
ALT/CTRL+F3 Add Voucher
ALT/CTRL+F5 Add Payment Voucher
ALT/CTRL+F6 Add Receipt Voucher
ALT/CTRL+F7 Add Journal voucher
ALT/CTRL+F8 Add Sales Voucher
ALT/CTRL+F9 Add Purchase Voucher
F10 Calculator
ALT/CTRL+A Accounts Monthly Summary
ALT/CTRL+B Balance Sheet
CTRL+D Batch Deletion of Vouchers / Masters
ALT/CTRL+E Data Export / Import
ALT/CTRL+F Configuration
ALT/CTRL+G Item Ledger
ALT/CTRL+I Item Monthly Summary
ALT/CTRL+L Account Ledger
ALT/CTRL+N Notes Manager
ALT/CTRL+Q Query on Transactions
ALT/CTRL+S Stock Status (Grouped)
ALT/CTRL+T Trial Balance (Grouped)
ALT/CTRL+U Utilities
Alt+V VAT Summary
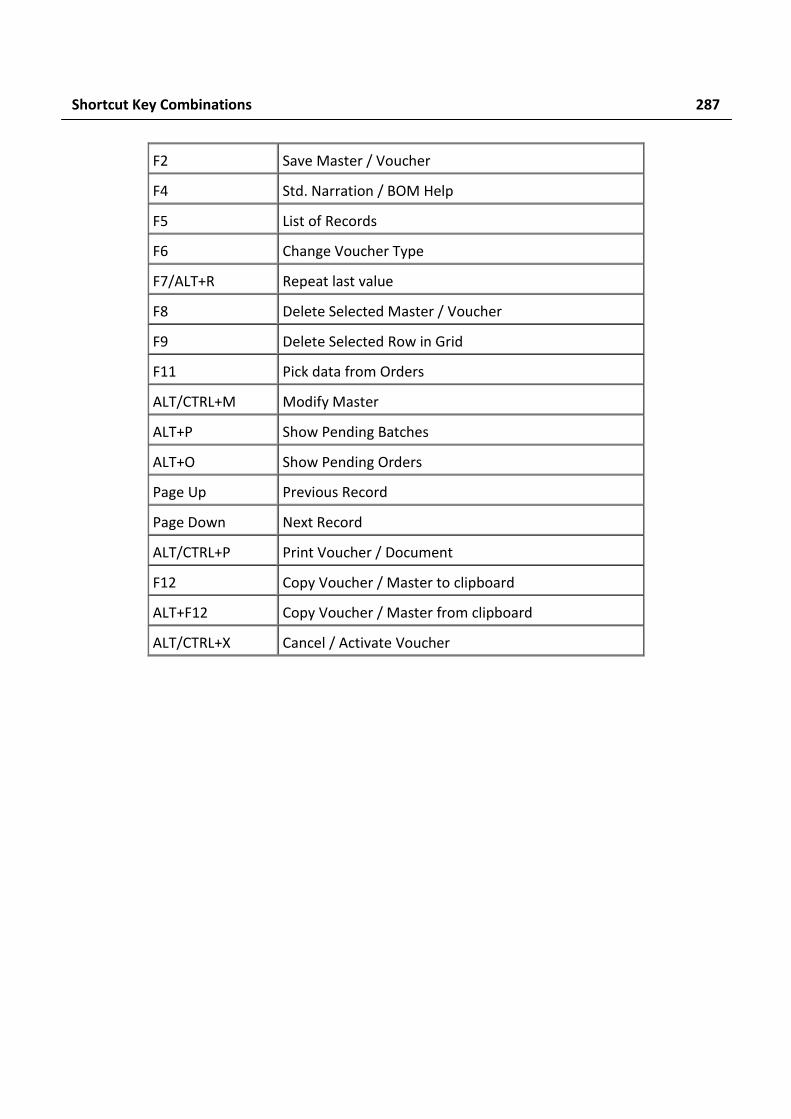
Shortcut Key Combinations 287
F2 Save Master / Voucher
F4 Std. Narration / BOM Help
F5 List of Records
F6 Change Voucher Type
F7/ALT+R Repeat last value
F8 Delete Selected Master / Voucher
F9 Delete Selected Row in Grid
F11 Pick data from Orders
ALT/CTRL+M Modify Master
ALT+P Show Pending Batches
ALT+O Show Pending Orders
Page Up Previous Record
Page Down Next Record
ALT/CTRL+P Print Voucher / Document
F12 Copy Voucher / Master to clipboard
ALT+F12 Copy Voucher / Master from clipboard
ALT/CTRL+X Cancel / Activate Voucher
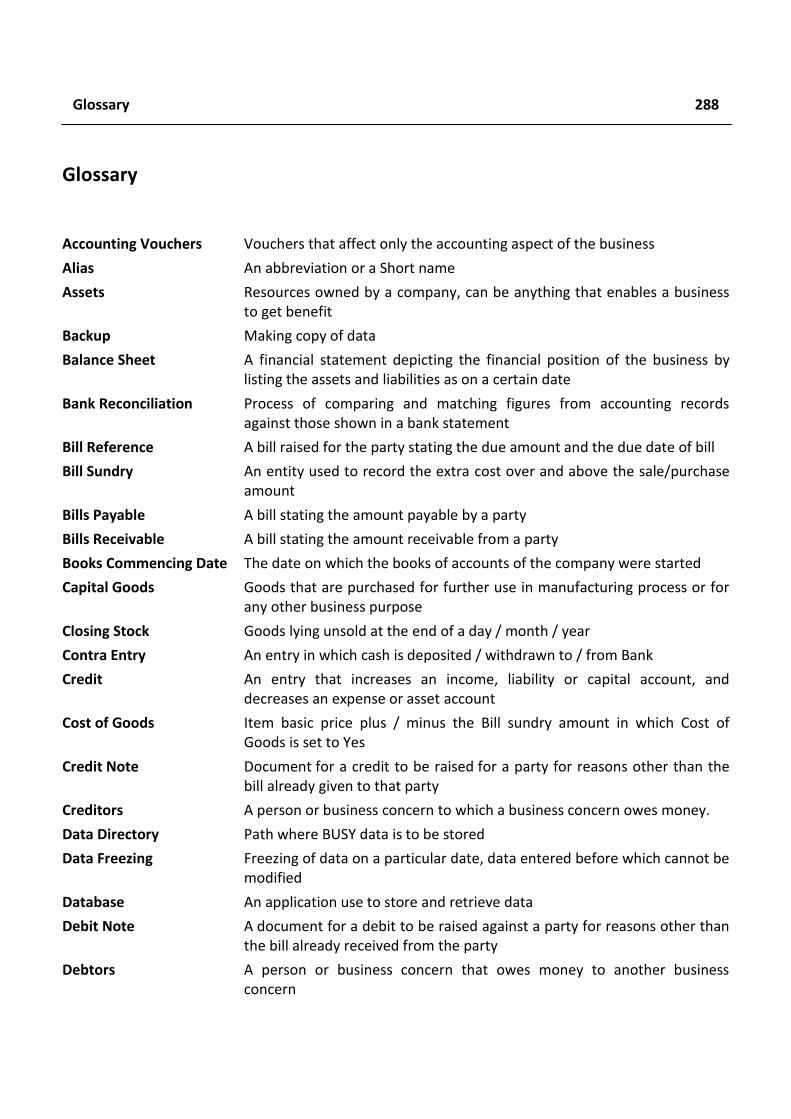
Glossary 288
Glossary
Accounting Vouchers Vouchers that affect only the accounting aspect of the business
Alias An abbreviation or a Short name
Assets Resources owned by a company, can be anything that enables a business to get benefit
Backup Making copy of data
Balance Sheet A financial statement depicting the financial position of the business by listing the assets and liabilities as on a certain date
Bank Reconciliation Process of comparing and matching figures from accounting records against those shown in a bank statement
Bill Reference A bill raised for the party stating the due amount and the due date of bill
Bill Sundry An entity used to record the extra cost over and above the sale/purchase amount
Bills Payable A bill stating the amount payable by a party
Bills Receivable A bill stating the amount receivable from a party
Books Commencing Date The date on which the books of accounts of the company were started
Capital Goods Goods that are purchased for further use in manufacturing process or for any other business purpose
Closing Stock Goods lying unsold at the end of a day / month / year
Contra Entry An entry in which cash is deposited / withdrawn to / from Bank
Credit An entry that increases an income, liability or capital account, and decreases an expense or asset account
Cost of Goods Item basic price plus / minus the Bill sundry amount in which Cost of Goods is set to Yes
Credit Note Document for a credit to be raised for a party for reasons other than the bill already given to that party
Creditors A person or business concern to which a business concern owes money.
Data Directory Path where BUSY data is to be stored
Data Freezing Freezing of data on a particular date, data entered before which cannot be modified
Database An application use to store and retrieve data
Debit Note A document for a debit to be raised against a party for reasons other than the bill already received from the party
Debtors A person or business concern that owes money to another business concern
Glossary 289
Delimiter A symbol used as a separator between two components
Dongle A security device attached to the USB port to check the authenticity of the software
Dual Vouchers Vouchers that affect both accounting and inventory aspect of business
Exempted Items Items, which are totally exempted from tax
Expense Amount spent in order to produce and sell the goods and services, which produce the revenue
Financial Year An accounting period, generally from 1st April to 31st March
FTP File Transfer Protocol is a standard network protocol used to copy a file from one host to other over a network such as Internet
Income Money received by a person or organization because of effort or works done by the person
Input Tax Tax paid on purchases of goods not meant for consumption
Input Tax Credit Amount of input tax for which you are allowed to claim a credit
Inventory Vouchers Vouchers that affect only the inventory aspect of business
Invoice Popularly known as a bill, is a claim raised by the seller of the goods on the buyer of the goods in respect of the goods sold
Item Basic Price Price of the item without charging any tax
Ledger A report displaying all the transactions for an account within a specified date range
Liabilities Something that a business owes to a third party in the form of an obligation to pay
Master Master signifies information that is generally created once but further used in various activities and transactions
Material Centre A place where goods are kept, such as Godown, Showroom
Multi Tax Invoice A single Invoice in which different tax rates are used
Narration A one or two line explanation giving precise information about the voucher entry
Net Tax Payable / Receivable
Difference between Output Tax and Tax Credits allowed to claim in a given tax period
Nett Bill Amount Refers to final bill amount
On Account Entries Entries for which no bill reference has been created
Opening Stock Goods lying unsold at the beginning of the day / month / year
Optional Fields User defined fields created to store additional information about Masters / Vouchers
290
Output Tax The tax charged on sales that are subject to tax
Parent Group Group to which a Master belongs
Predefined Masters Accounts, which are necessary for maintaining books of accounts. Without these accounts, you cannot maintain accounting aspect of business
Prefix Any string added in front of a word
Pricing Mode Mode or method by which Item price will be calculated in vouchers
Primary Group A group which is at the top most level of hierarchy and which does not falls under any other group
Print Name Refers to the name that will appear on documents given to parties such as sales invoice, receipt, debit note and so on
Purchase Return Refers to the goods returned by your company to the party from whom the goods were purchased
Purchase Type Refers to the classification of purchase i.e. central / local, rate of tax and so on
Restore To copy data from the backup copy already created
Retail Invoice Invoice on which Input Tax Credit cannot be claimed
Revenue Income generated during a given period
Sale Return Refers to the goods returned to your company by the party to whom the goods were sold
Sale Type Refers to the classification of sales i.e. central / local, rate of tax and so on
ST Form Sales Tax declaration forms used by registered dealers
Stock Refers to goods lying unsold on a particular date
Stock Transfer Transfer of goods from one place to another generally from one Material Centre to another for reason other than sale / purchase
Stock Updation Date Date on which the goods have been moved out or moved in. Basically, the date on which the goods have been delivered or received
Stock Valuation Method Method by which value of closing stock is calculated
SuperUser SuperUser is the top most user in the hierarchy of the users in BUSY. A SuperUser is like the owner of a business who has all the rights and access privileges in the business. He can create and defines the rights and access of other users
Tax Free Items Items, which are exempted from tax but under certain conditions or in some states
Tax Inclusive Items Items in which tax is included in their price
Tax Invoice An Invoice or bill on which Input Tax Credit can be claimed
Tax Paid Items Items on which tax is already paid or is paid at the first stage of
Glossary 291
manufacturing
Taxable Items Items on which tax is to be charged
Taxable Amount Amount on which tax will be calculated
TIN Tax Payer Identification Number. TIN is the registration number allotted to a dealer registered under the Value Added Tax (VAT) Act
Transactions Day to day activities of a business such as sale, purchase, payment and receipts
Trial Balance A statement prepared to check accuracy of the accounting records. It shows the debit and credit balances of the accounts in two different columns
Unit Conversion Number of Sub Units per Main Unit, such as I Dozen = 12 pieces, I Kg = 1000 gms
VAT Value Added Tax is an indirect tax charged on both the purchase and sale transactions in the chain of production and distribution of goods and provision for a set-off for the tax paid at earlier stages in the chain
Warning Alarms Refer to the alarms or warnings to be raised when the User is making any wrong data entry or under any other situation, which can have a negative impact