approve payable time
TRANSCRIPT
California State University, Sacramento
Human Resources, Payroll Services
How to Enter and Approve Hourly
Time
Using Time and Labor Rapid Entry
Approve Payable Time Launch Pad
(HR 9.0)
Table of Contents How to Enter Time .......................................................................................................................................................... 3
Enter Time via Rapid Entry ............................................................................................................................................3
Navigation.................................................................................................................................................................... .3
Report Rapid Time .......................................................................................................................................................4
Summary ...........................................................................................................................................................................7
How to Approve Payable Time .....................................................................................................................................8
Approve Payable Time..............................................................................................................................................9
Navigation & Search ....................................................................................................................................................10
Review & Approve Time ..............................................................................................................................................11
Use Time & Labor Launch Pad to View Time..............................................................................................................12
Navigation & Search ....................................................................................................................................................13
Time and Labor Launch Pad Page Steps....................................................................................................................14
Summary........................................................................................................................................................................17
Glossary of Terms ...................................................................................................................................................18
Enter Time via Rapid Entry
The Rapid Entry page allows you to quickly enter time for multiple employees. Validation occurs only after the data
has been saved and submitted, making the entry process fast.
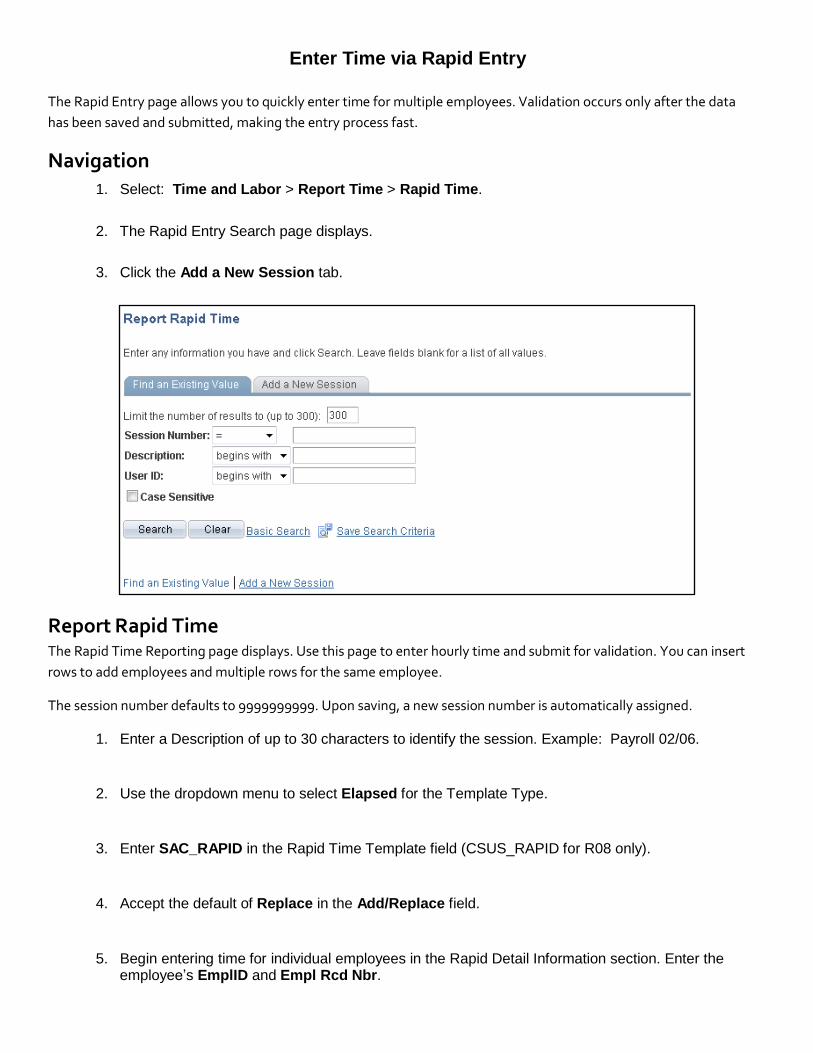
Navigation
1. Select: Time and Labor > Report Time > Rapid Time.
2. The Rapid Entry Search page displays.
3. Click the Add a New Session tab.
Report Rapid Time The Rapid Time Reporting page displays. Use this page to enter hourly time and submit for validation. You can insert
rows to add employees and multiple rows for the same employee.
The session number defaults to 9999999999. Upon saving, a new session number is automatically assigned.
1. Enter a Description of up to 30 characters to identify the session. Example: Payroll 02/06.
2. Use the dropdown menu to select Elapsed for the Template Type.
3. Enter SAC_RAPID in the Rapid Time Template field (CSUS_RAPID for R08 only).
4. Accept the default of Replace in the Add/Replace field.
5. Begin entering time for individual employees in the Rapid Detail Information section. Enter the employee’s EmplID and Empl Rcd Nbr.
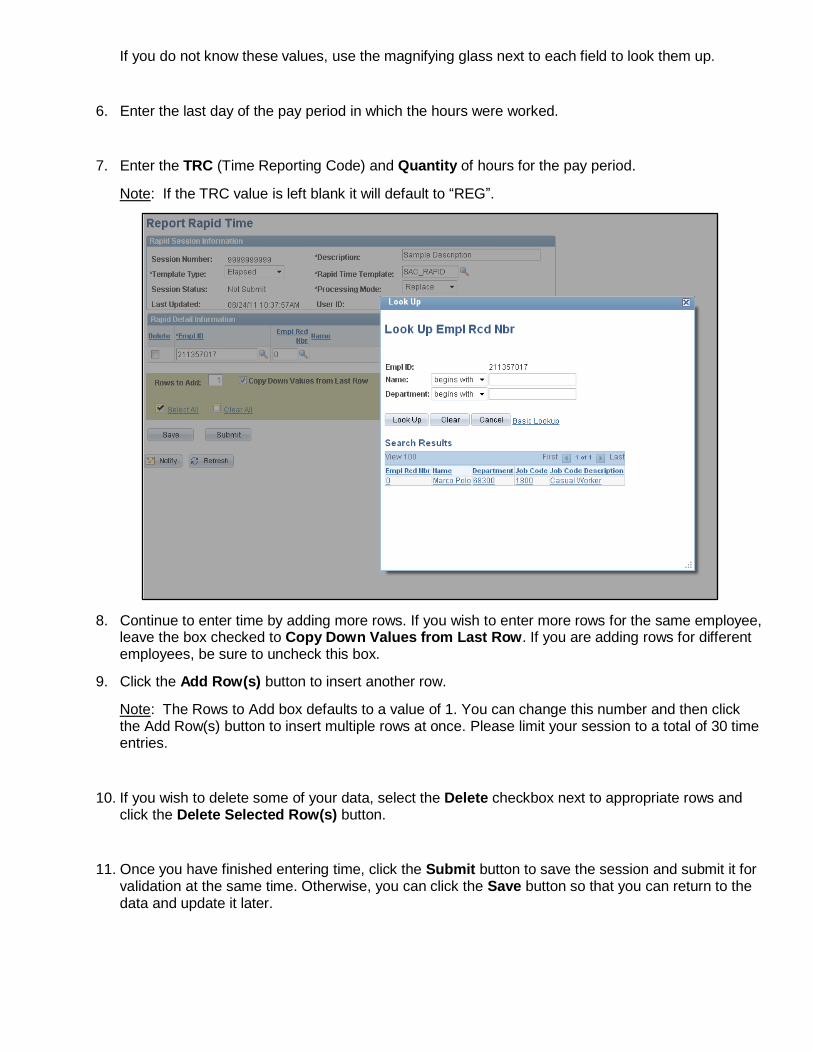
If you do not know these values, use the magnifying glass next to each field to look them up. 6. Enter the last day of the pay period in which the hours were worked.
7. Enter the TRC (Time Reporting Code) and Quantity of hours for the pay period.
Note: If the TRC value is left blank it will default to “REG”.
8. Continue to enter time by adding more rows. If you wish to enter more rows for the same employee, leave the box checked to Copy Down Values from Last Row. If you are adding rows for different employees, be sure to uncheck this box.
9. Click the Add Row(s) button to insert another row.
Note: The Rows to Add box defaults to a value of 1. You can change this number and then click the Add Row(s) button to insert multiple rows at once. Please limit your session to a total of 30 time entries.
10. If you wish to delete some of your data, select the Delete checkbox next to appropriate rows and
click the Delete Selected Row(s) button. 11. Once you have finished entering time, click the Submit button to save the session and submit it for
validation at the same time. Otherwise, you can click the Save button so that you can return to the data and update it later.
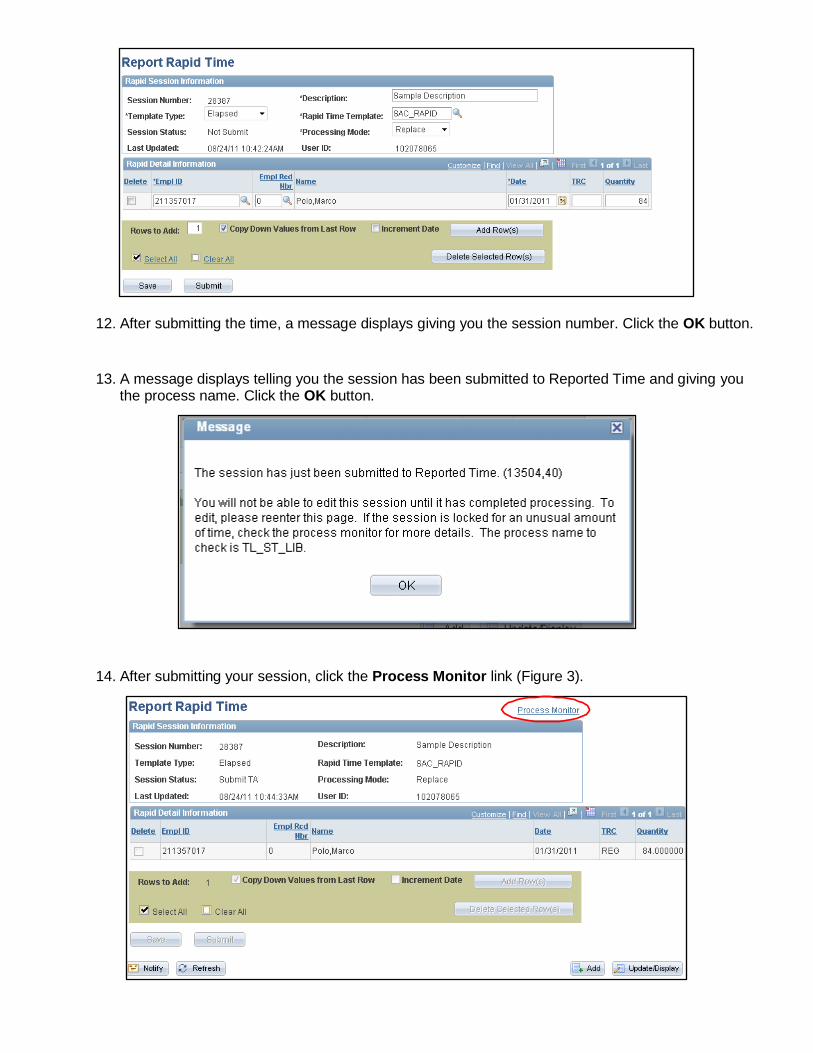
12. After submitting the time, a message displays giving you the session number. Click the OK button. 13. A message displays telling you the session has been submitted to Reported Time and giving you
the process name. Click the OK button. 14. After submitting your session, click the Process Monitor link (Figure 3).
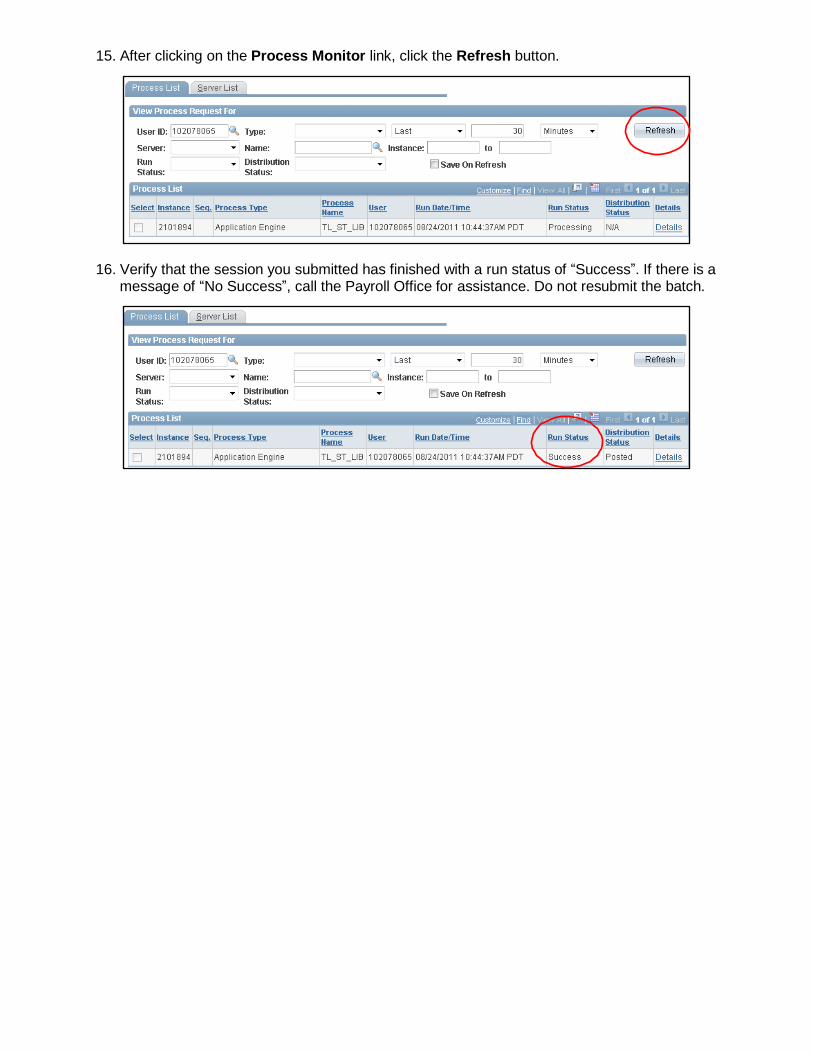
15. After clicking on the Process Monitor link, click the Refresh button.
16. Verify that the session you submitted has finished with a run status of “Success”. If there is a
message of “No Success”, call the Payroll Office for assistance. Do not resubmit the batch.
Summary This document has outlined the process for using Rapid entry in HR 9.0. This process includes:
Rapid Entry – Navigation
Report Rapid Time Page Steps
Once time has been submitted and a Run Status of “Successful” has been returned, time will then need to be “approved” by the Timekeeper or the Master Timekeeper.
How to Approve Payable Time And use Launch Pad HR 9.
Once time has been reported for employees, the Approve Payable Time process should be completed. If you are unable to locate time for approval, you may need to use the Time and Labor Launch Pad to find the source of the problem. This document will demonstrate how to:
Approve Payable Time
o Search for Payable Time
o Approve Payable Time
View Time using Launch Pad
o Navigate to Time & Labor Launch Pad
o Search for Employees
o View Time Details

Approve Payable Time The first step in approving payable time by group or individual is navigating to the Approve Payable Time
page and searching for payable time.
Navigation & Search
1. Select: Time and Labor > Approve Time > Payable Time.
2. Use the Approve Payable Time page to search for employees who have time needing approval
(Figure 1). Enter your search criteria in the Employee Selection Criteria area.
Note: Use the Department field to search by DeptID or the EmplID field to search by individual.
3. Enter the Start Date and End Date for the time period you wish to search.
Note: We recommend choosing a single Start/End Date that corresponds to the end of the pay
period in which the time was keyed. These dates are listed on the Payroll Calendar at
http://www.csus.edu/hr/payroll/.
4. Once the selection criteria and time range have been entered, click the Get Employees button to retrieve payable time needing approval.
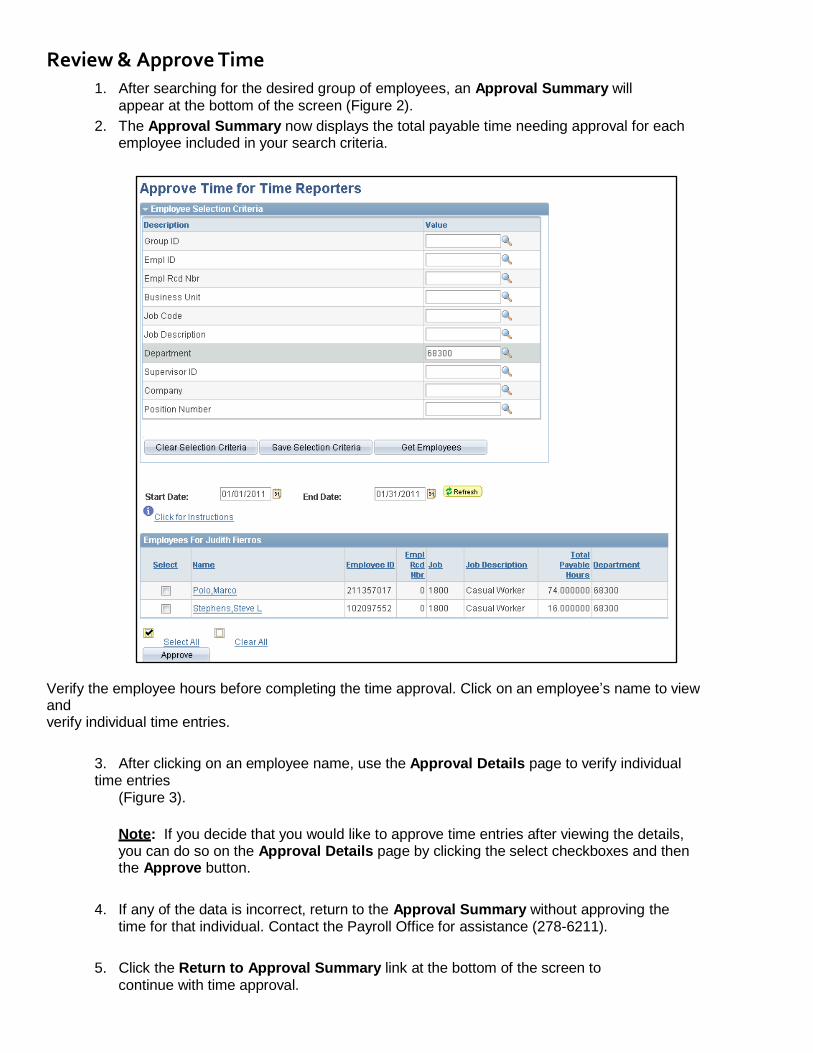
Review & Approve Time
1. After searching for the desired group of employees, an Approval Summary will
appear at the bottom of the screen (Figure 2).
2. The Approval Summary now displays the total payable time needing approval for each employee included in your search criteria.
Verify the employee hours before completing the time approval. Click on an employee’s name to view and verify individual time entries.
3. After clicking on an employee name, use the Approval Details page to verify individual time entries
(Figure 3).
Note: If you decide that you would like to approve time entries after viewing the details, you can do so on the Approval Details page by clicking the select checkboxes and then the Approve button.
4. If any of the data is incorrect, return to the Approval Summary without approving the time for that individual. Contact the Payroll Office for assistance (278-6211).
5. Click the Return to Approval Summary link at the bottom of the screen to
continue with time approval.
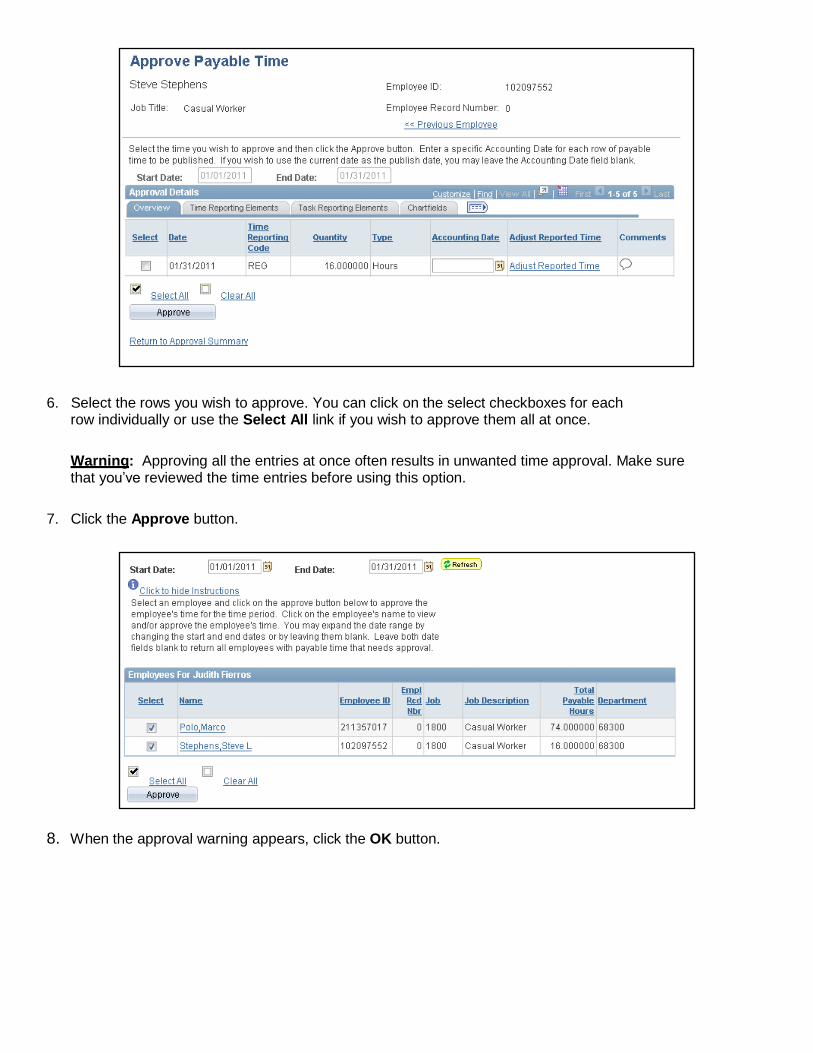
6. Select the rows you wish to approve. You can click on the select checkboxes for each
row individually or use the Select All link if you wish to approve them all at once.
Warning: Approving all the entries at once often results in unwanted time approval. Make sure that you’ve reviewed the time entries before using this option.
7. Click the Approve button.
8. When the approval warning appears, click the OK button.
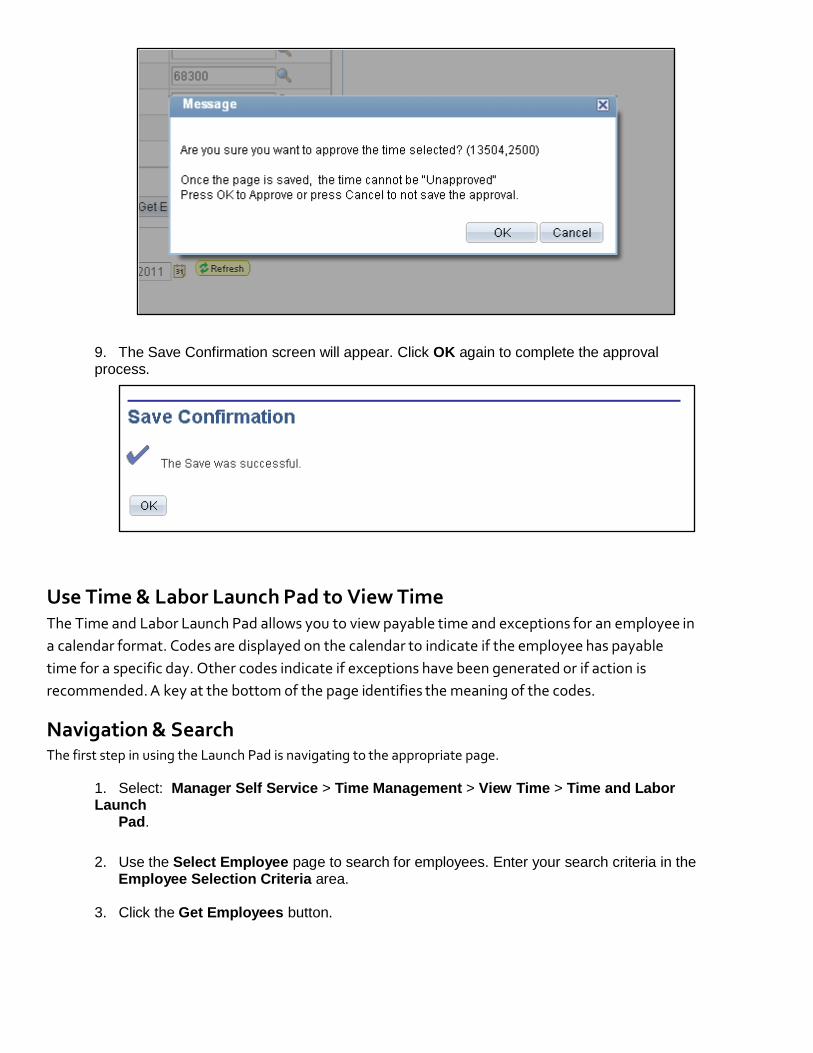
9. The Save Confirmation screen will appear. Click OK again to complete the approval process.
Use Time & Labor Launch Pad to View Time The Time and Labor Launch Pad allows you to view payable time and exceptions for an employee in
a calendar format. Codes are displayed on the calendar to indicate if the employee has payable
time for a specific day. Other codes indicate if exceptions have been generated or if action is
recommended. A key at the bottom of the page identifies the meaning of the codes.
Navigation & Search The first step in using the Launch Pad is navigating to the appropriate page.
1. Select: Manager Self Service > Time Management > View Time > Time and Labor Launch
Pad.
2. Use the Select Employee page to search for employees. Enter your search criteria in the
Employee Selection Criteria area.
3. Click the Get Employees button.
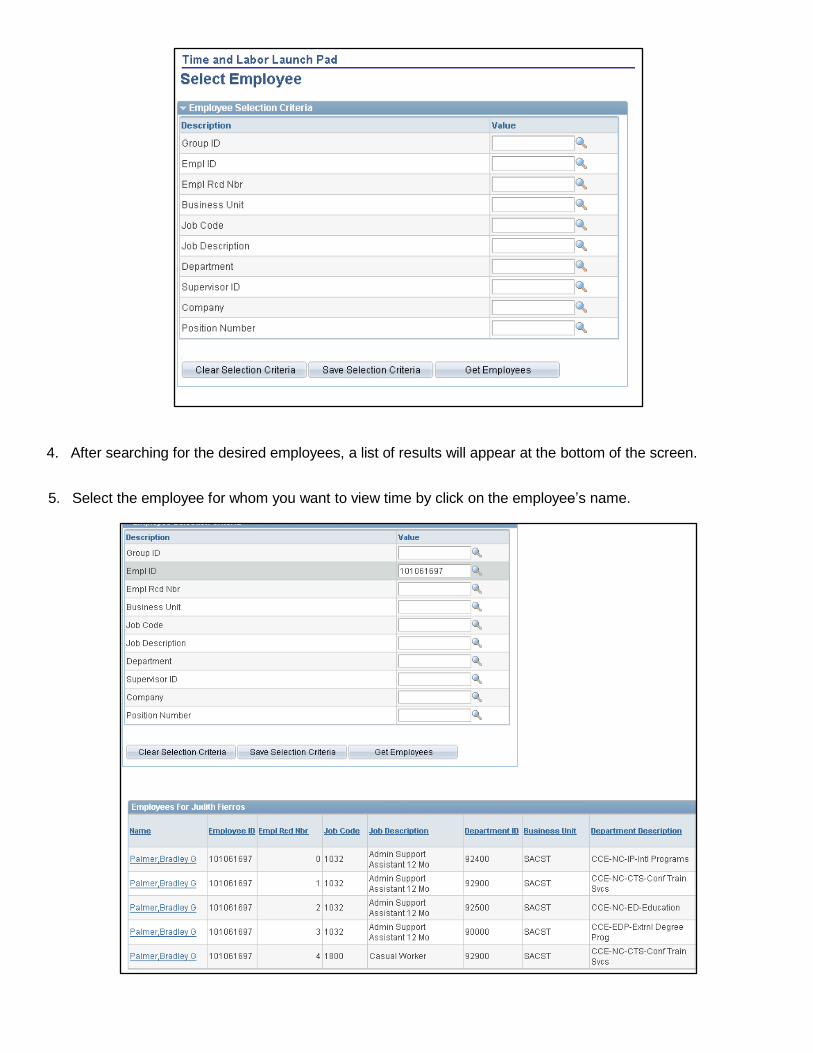
4. After searching for the desired employees, a list of results will appear at the bottom of the screen.
5. Select the employee for whom you want to view time by click on the employee’s name.
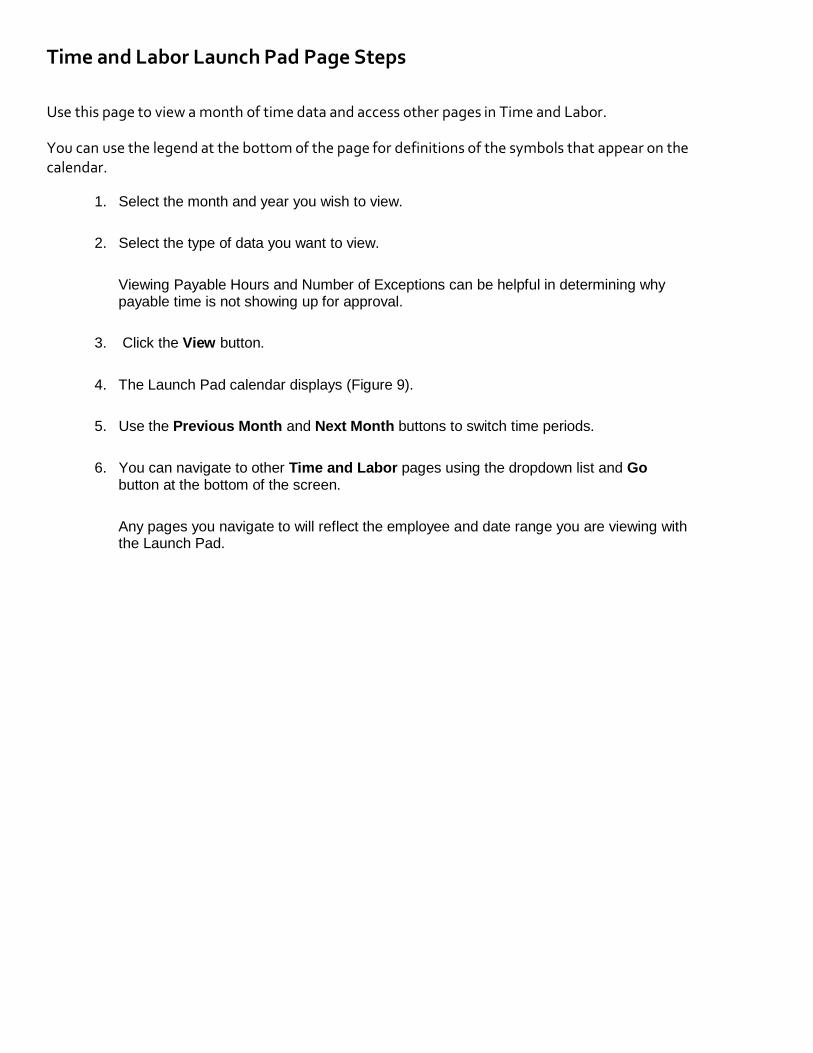
Time and Labor Launch Pad Page Steps
Use this page to view a month of time data and access other pages in Time and Labor.
You can use the legend at the bottom of the page for definitions of the symbols that appear on the calendar.
1. Select the month and year you wish to view.
2. Select the type of data you want to view.
Viewing Payable Hours and Number of Exceptions can be helpful in determining why payable time is not showing up for approval.
3. Click the View button.
4. The Launch Pad calendar displays (Figure 9).
5. Use the Previous Month and Next Month buttons to switch time periods.
6. You can navigate to other Time and Labor pages using the dropdown list and Go button at the bottom of the screen.
Any pages you navigate to will reflect the employee and date range you are viewing with the Launch Pad.
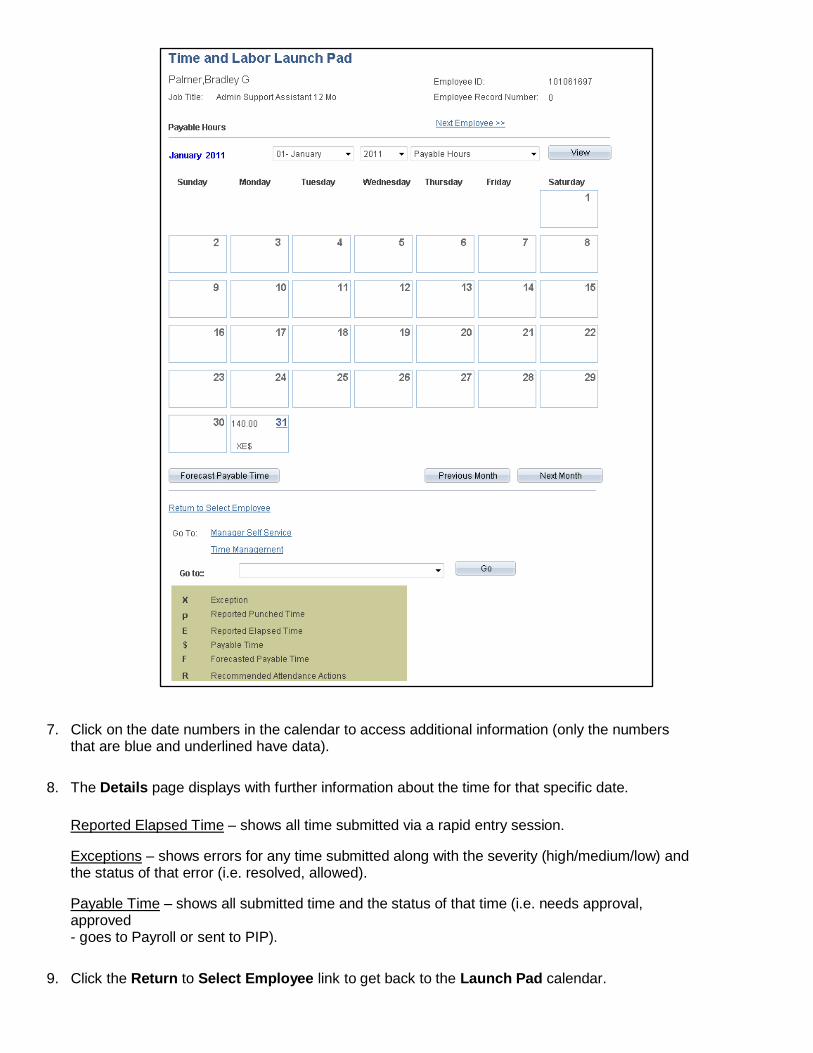
7. Click on the date numbers in the calendar to access additional information (only the numbers
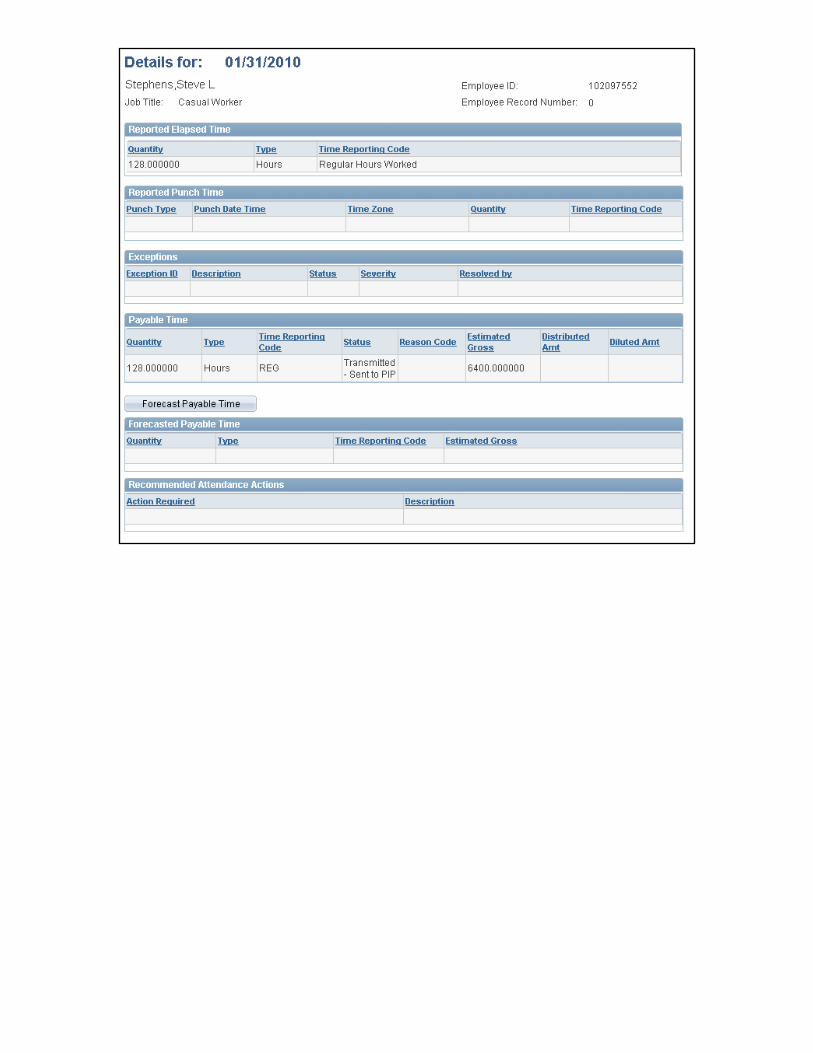
that are blue and underlined have data). 8. The Details page displays with further information about the time for that specific date.
Reported Elapsed Time – shows all time submitted via a rapid entry session.
Exceptions – shows errors for any time submitted along with the severity (high/medium/low) and the status of that error (i.e. resolved, allowed).
Payable Time – shows all submitted time and the status of that time (i.e. needs approval, approved - goes to Payroll or sent to PIP).
9. Click the Return to Select Employee link to get back to the Launch Pad calendar.
This document has introduced you to the processes for Approving Payable Time and viewing time using Time and Labor Launch Pad. These processes include:
Approving Payable Time
o Searching for Payable Time
o Approving Payable Time
View Time using Launch Pad
o Navigate to Time & Labor Launch Pad
o Search for Employees
o View Time Details
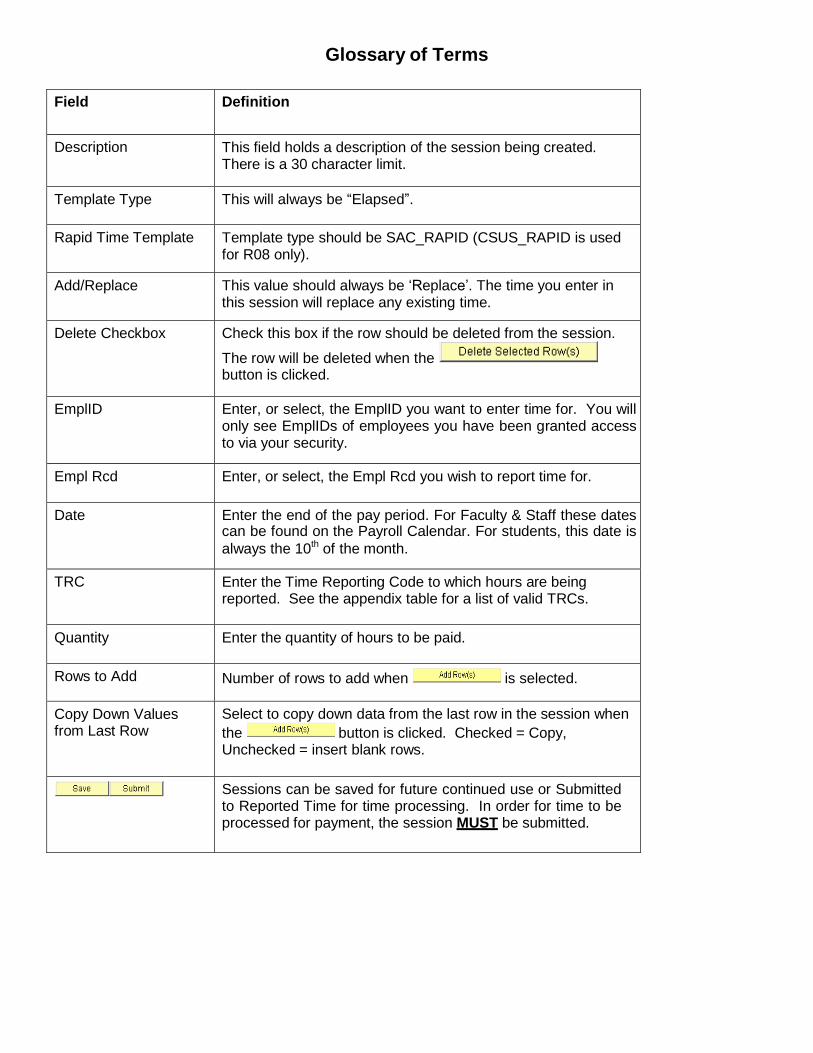
Glossary of Terms
Field Definition
Description This field holds a description of the session being created. There is a 30 character limit.
Template Type This will always be “Elapsed”.
Rapid Time Template Template type should be SAC_RAPID (CSUS_RAPID is used for R08 only).
Add/Replace This value should always be ‘Replace’. The time you enter in this session will replace any existing time.
Delete Checkbox Check this box if the row should be deleted from the session.
The row will be deleted when the button is clicked.
EmplID Enter, or select, the EmplID you want to enter time for. You will only see EmplIDs of employees you have been granted access to via your security.
Empl Rcd Enter, or select, the Empl Rcd you wish to report time for.
Date Enter the end of the pay period. For Faculty & Staff these dates can be found on the Payroll Calendar. For students, this date is
always the 10th of the month.
TRC Enter the Time Reporting Code to which hours are being reported. See the appendix table for a list of valid TRCs.
Quantity Enter the quantity of hours to be paid.
Rows to Add Number of rows to add when is selected.
Copy Down Values from Last Row
Select to copy down data from the last row in the session when
the button is clicked. Checked = Copy, Unchecked = insert blank rows.
Sessions can be saved for future continued use or Submitted to Reported Time for time processing. In order for time to be processed for payment, the session MUST be submitted.
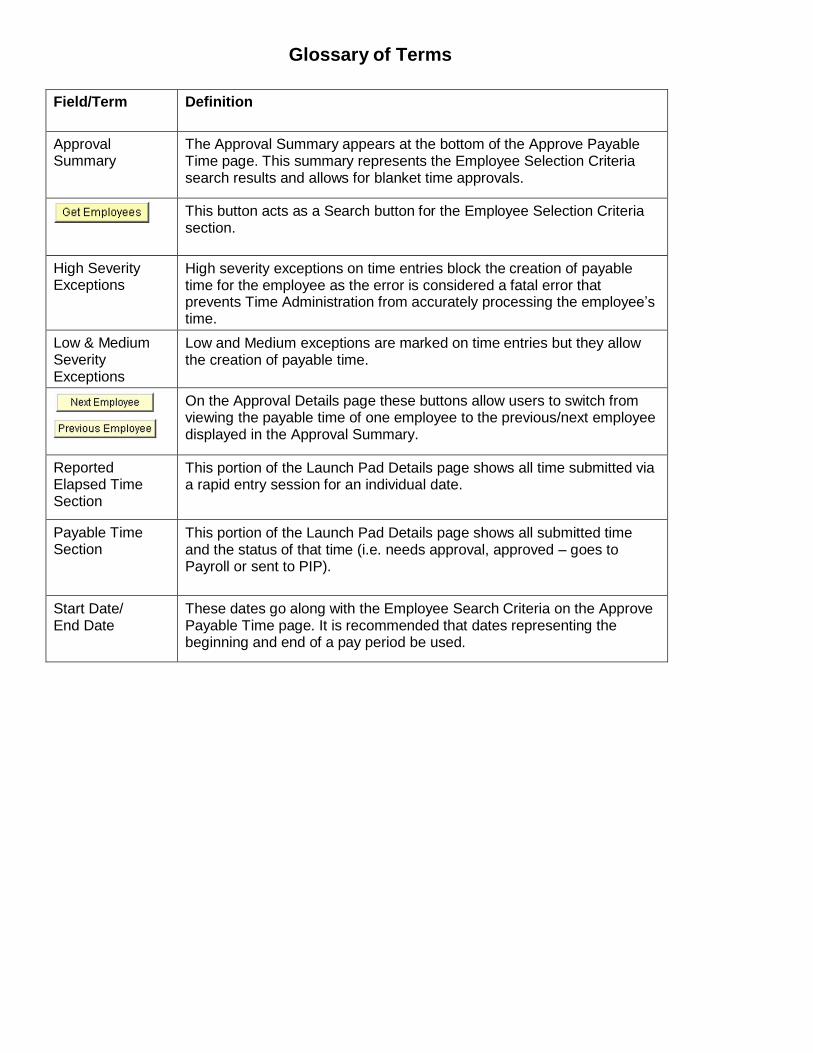
Glossary of Terms
Field/Term Definition
Approval Summary
The Approval Summary appears at the bottom of the Approve Payable Time page. This summary represents the Employee Selection Criteria search results and allows for blanket time approvals.
This button acts as a Search button for the Employee Selection Criteria section.
High Severity Exceptions
High severity exceptions on time entries block the creation of payable time for the employee as the error is considered a fatal error that prevents Time Administration from accurately processing the employee’s time.
Low & Medium Severity Exceptions
Low and Medium exceptions are marked on time entries but they allow the creation of payable time.
On the Approval Details page these buttons allow users to switch from viewing the payable time of one employee to the previous/next employee displayed in the Approval Summary.
Reported Elapsed Time Section
This portion of the Launch Pad Details page shows all time submitted via a rapid entry session for an individual date.
Payable Time Section
This portion of the Launch Pad Details page shows all submitted time and the status of that time (i.e. needs approval, approved – goes to Payroll or sent to PIP).
Start Date/ End Date
These dates go along with the Employee Search Criteria on the Approve Payable Time page. It is recommended that dates representing the beginning and end of a pay period be used.