approvals and workflow setup handbook - jaggaer · approvals and workflow setup ... including...
TRANSCRIPT
SelectSite / HigherMarkets Approvals and Workflow Setup Handbook
SciQuest, Inc. www.SciQuest.com
SELECTS ITE / H IGHERMARKETS
A P P R O V A L S A N D W O R K F L O W S E T U P H A N D B O O K
M A R C H 2 0 1 3
P R O D U C T V E R S I O N : S E L E C T S I T E 1 3 . 1
H A N D B O O K V E R S I O N : A W 1 3 . 1 . 0 1
P R E P A R E D B Y
C O N T A C T U S :
S C I Q U E S T , I N C . 6 5 0 1 W E S T O N P A R K W A Y , S U I T E 2 0 0 C A R Y , N C 2 7 5 1 3 T O L L - F R E E : ( 8 7 7 ) 7 1 0 - 0 4 1 3 P H O N E : ( 9 1 9 ) 6 5 9 - 2 1 0 0 F A X : ( 9 1 9 ) 6 5 9 - 2 1 9 9
S C I Q U E S T S U P P O R T : S U P P O R T @ S C I Q U E S T . C O M O R ( 9 1 9 ) 6 5 9 - 4 2 0 0
O R ( 8 0 0 ) 2 3 3 - 1 1 2 1
SciQuest Confidential.
Copyright © 2013, SciQuest, Inc.

SciQuest, Inc. i www.SciQuest.com
TABLE OF CONTENTS
W E L C O M E . . . . . . . . . . . . . . . . . . . . . . . . . . . . . . . . . . . . . . . . . . . . . . . . . . . . . . . . . . . . . . . . . . . . . 1
Objectives ................................................................................................................................ 1
Key Points ................................................................................................................................ 1
Understanding the Format ......................................................................................................... 1
What you will learn… ................................................................................................................. 2
T H E B A S I C S . . . . . . . . . . . . . . . . . . . . . . . . . . . . . . . . . . . . . . . . . . . . . . . . . . . . . . . . . . . . . . . . . . 3
Lesson 1: Workflow And Approval Basics ..................................................................... 3
Key Concepts ..................................................................................................................... 3
Workflow .................................................................................................................................. 3
Behind the Scenes: SciQuest Setup ............................................................................................ 4
Sample Workflow Process .......................................................................................................... 5
Workflow Triggers and Workflow Steps ...................................................................................... 6
Key Terms related to Workflow .................................................................................................. 7
Permissions related to workflow and approvals ........................................................................... 9
Super User ............................................................................................................................. 15
Implicit Approval ..................................................................................................................... 15
Administrative Option: Prevent Same User from Entering/Approving a PR ................................... 17
Administrative Option: Enabling Email Reminders ...................................................................... 17
Administrative Option: Limiting what items can be added to the cart when using a specific
form ....................................................................................................................................... 17
Lesson 2: Types of Workflow Approval ........................................................................ 18
Workflow Approval Types ........................................................................................................ 18
Financial Approval ................................................................................................................... 18
Dynamic Custom Field Approval ............................................................................................... 18
Dynamic Form Approval ........................................................................................................... 20
Dynamic Departmental Approval .............................................................................................. 20
Dynamic Approval by Contract Type ......................................................................................... 21
Static Workflow Steps .............................................................................................................. 21
Advanced Dynamic Workflow ................................................................................................... 22
Exercises ......................................................................................................................... 23
Setting up Financial Approvals ................................................................................................. 23
Creating Rules for Dynamic Approvals ...................................................................................... 24
SciQuest, Inc. ii www.SciQuest.com
Assigning Approvers to Custom Field Values ............................................................................. 25
Importing and Exporting Custom Field Values and Approvers ..................................................... 25
Assigning Approvers to Form Types .......................................................................................... 27
Assigning Approvers to Departments ........................................................................................ 28
Assigning Approvers to Shared Workflow Folders ...................................................................... 28
Lesson 3: Performing Approval Tasks ......................................................................... 31
Key Concepts ................................................................................................................... 31
Approver ................................................................................................................................ 31
Approval Basics ....................................................................................................................... 31
The My Approvals Screen ........................................................................................................ 32
Returning Requisitions from a Third-Party System ..................................................................... 33
Automatic Approval of an Approver’s Order .............................................................................. 34
Approval Notifications via Email................................................................................................ 34
Email Approvals: How it Works ................................................................................................ 38
Information Included in Emails with Order Data ........................................................................ 39
Email Approvals: Setup and Configuration ................................................................................ 40
Exercises ......................................................................................................................... 41
Accessing Approval Documents ................................................................................................ 41
Moving Documents (PR/PO/Invoice) to Your Approvals Folder ................................................... 43
Reviewing a Workflow Document ............................................................................................. 44
Approving a Workflow Document ............................................................................................. 44
Rejecting a Workflow Document .............................................................................................. 45
Approving and Rejecting a PR or PO from an Email ................................................................... 46
Forwarding a Workflow Document............................................................................................ 46
Assigning a Substitute Approver ............................................................................................... 47
Removing a Substitute Approver .............................................................................................. 48
Expediting an Order ................................................................................................................ 48
Adding a Comment to a PR, PO, or Invoice ............................................................................... 49
Returning a Requisition to the Requisitioner .............................................................................. 50
View Approvers for Workflow Documents ................................................................................. 51
Viewing a List of Email Notifications ......................................................................................... 52
Lesson 4: Review Approvals ......................................................................................... 53
Key Concepts ................................................................................................................... 53
Document Search .................................................................................................................... 53
Workflow Approver Outbox ...................................................................................................... 53

SciQuest, Inc. iii www.SciQuest.com
Exercises ......................................................................................................................... 54
Using the Order Outbox ........................................................................................................... 54
SciQuest, Inc. 1 www.SciQuest.com
WELCOME
OB J ECT I VES
The purpose of this handbook is to provide a comprehensive look at workflow setup and usage in the SelectSite/ HigherMarkets application. We hope it will help you:
• Understand how the approval and workflow process is represented in SelectSite
• Understand the different types of workflow available and how they are used
• Perform tasks associated with order approval – approving, rejecting, forwarding, etc.
K E Y POINT S
• This handbook is designed to be used by Approvers and System Administrators. It is important to note that much of the how, when, and why the system is used is determined by your organization’s business practices. We suggest that you supplement this document with your organization’s business practices, goals, and policies.
• The term SelectSite is used to describe the application in this handbook. For Higher Education customers, this term represents your HigherMarkets application. HigherMarkets and SelectSite can be used interchangeably from a product feature perspective.
UNDERSTAND ING THE FORMAT
A Lesson is created for each of the main aspects of workflow and approvals in SelectSite. Within each lesson, there are three sections:
1. An overview of the goals and functions in the lesson.
2. Background and conceptual information about the lesson. The concepts will help you better understand why and when you perform tasks in the system and how they relate to other parts of the system.
3. Step-by-step exercises detailing specific tasks in the system. Each exercise provides background information about the task, details about the typical user, step-by-step instructions, and in many cases, a results screen to compare your work.
SciQuest, Inc. 2 www.SciQuest.com
WHAT YOU WI L L L EARN…
The document is organized according to the topics related to Workflow and Approvals:
• Workflow and Approval Basics – provides an overview of the workflow and approval process in SelectSite.
• Types of Workflow Approval- provides an in-depth look at the different types of workflow available with SelectSite, along with the setup tasks for your system administrator(s).
• Performing Approval Tasks – instructions for each of the tasks related to reviewing purchase requisitions and orders including approving, rejecting, forwarding, expediting, and more.
• Using History to Review Approvals- using PO, PR, and Sales Order History to track orders sent out by individuals in your department or in your organization.
SciQuest, Inc. 3 www.SciQuest.com
THE BASICS
Lesson 1: WORKFLOW AND APPROV AL
BASICS
The approval process is a key component of both an organization’s overall purchasing program and any E-procurement application used to manage and assist this program. SelectSite provides a flexible and easy-to-use automated approval process that is referred to in the system as workflow.
Workflow is very unique in its rules, structure, and purpose for each organization. This lesson is designed to give an overview of its capabilities in SelectSite. A few key points:
• Workflow is only available with the Requisition Manager, Order Manager, Supplies Manager, and Settlement Manager Modules. For more information on how workflow is used when working with supplies management or invoices, please refer to the Supplies Manager and Settlement Manager Handbooks.
• SciQuest Client Services or Support team is responsible for setting up the workflow rules based on the business practices outlined by each organization.
• SelectSite Administrators can manage many parts of the workflow process, including determining dynamic workflow values and approvers and assigning approvers to specific workflow steps.
• Users with permissions to review purchase requisitions and/or purchase orders are referred to as Approvers. Most organizations have a large number of approvers – typically one or more by department or division.
• To learn about Cart Assignment, please refer to the Requisitioner Handbook.
Key Concepts
WORKF LOW
The workflow process begins when a cart is submitted in SelectSite and continues through when the purchase order is sent out to the supplier. The two major phases of workflow are Purchase Requisition workflow and Purchase Order workflow. The design of an organization’s workflow varies from simple to complex depending on the business needs and purchasing practices.
The goal of workflow is to make sure that all orders sent out are valid. For example, workflow may involve financial approvals. In other cases, it may verify that the certain types of items (such as radioactive or other hazardous items) are not ordered through the system. Certain organizations require the purchasing department to approve all orders sent out, while other organizations may have departmental-approval only or special handling based on line item or header amounts.
Other key points about workflow:
• Workflow is a generic term. Depending on how an organization is using SelectSite and what modules are implemented, NONE, ALL, or SOME of an organization’s workflow may be accomplished through SelectSite. For example, no workflow is captured for Spend Director-only clients.
• Workflow steps are either manual or automatic. Examples of automatic step include a workflow where the user’s budget is checked in an external system or a workflow where the requisition is routed to the appropriate person based on the price of the total order. An example of a manual step includes a workflow where a department head or someone in the purchasing department must approve the order before it is sent out to the supplier.
• In SelectSite, approvals are handled at the requisition level. For example, at Company ABC, all items over $500 require approval from a VP. A user creates a requisition with two items – one for $700 and one for $19. The entire requisition will route to the VP for approval.
• Line items are rejected and approved independently.
SciQuest, Inc. 4 www.SciQuest.com
• Workflow is available to manage purchase order revisions (change orders) or supplier resends.
• The steps in PR and PO workflow are typically quite different and serve a different purpose. For example, the steps in PR approval may involve departmental approval and special approvals such as Grants approvals, EH&S approvals, etc… The PO approval steps may all be automated where the PO is created by the system and sent out to the supplier – OR – a step can be added for final Purchasing approval for orders above a certain amount.
• PR workflow must complete before a PO is created.
• Just because a PO is created, this does NOT indicate the order has been sent out or the approval process is complete.
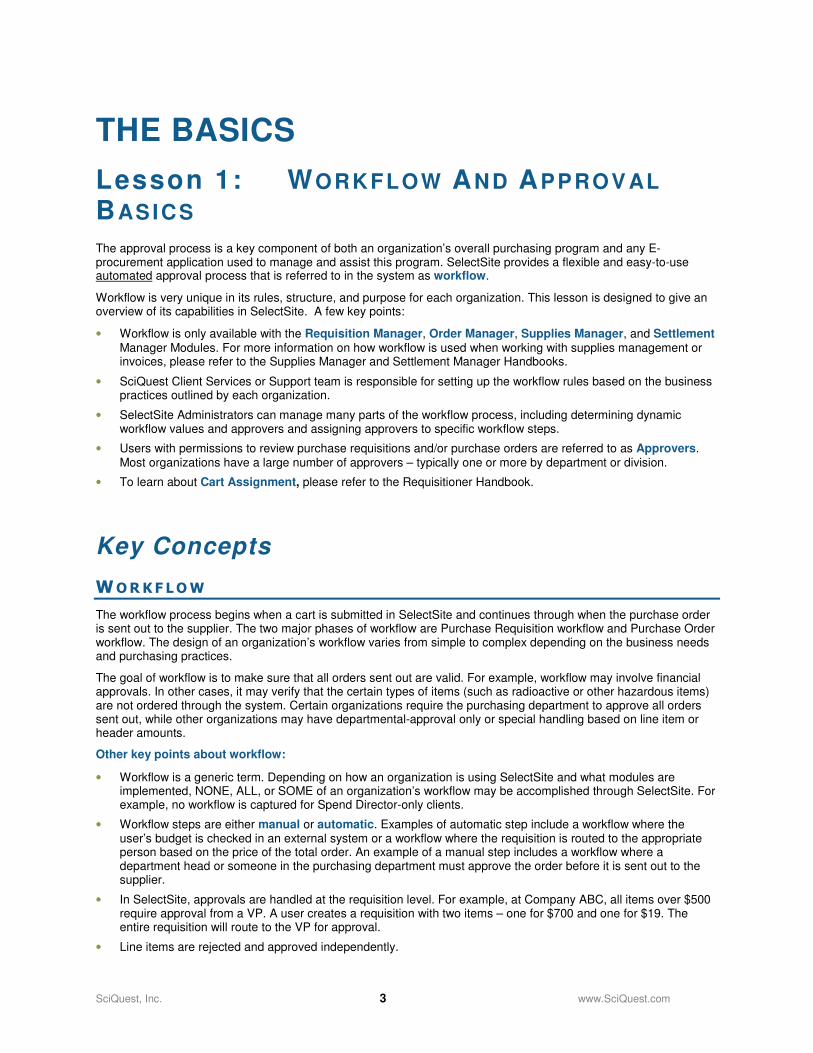
Sample View of Workflow
The graphic below shows an example of the steps in purchase requisition workflow for an order. The steps in workflow vary based on the item(s) ordered, order amount, and organization needs. Prior to the document becoming a PO, it was a Purchase Requisition and went through a similar experience.
In the example below, the requisition is still pending (i.e. – not completed). The current/active step is indicated. Additionally, you can click the view approvers link to see who is responsible for approving the order, and send them an email if desired.
B EH IND TH E SC ENES : SC IQUES T S E TUP
The steps in a workflow process can vary based not only on organization, but user, custom field values, dollar amounts, and more.
Workflow setup is rule-based, and SciQuest Professional Services works with customers to design these rules during the implementation process. Post implementation changes that cannot be accomplished through the SelectSite interface are performed by the SciQuest Support Team.
SciQuest, Inc. 5 www.SciQuest.com
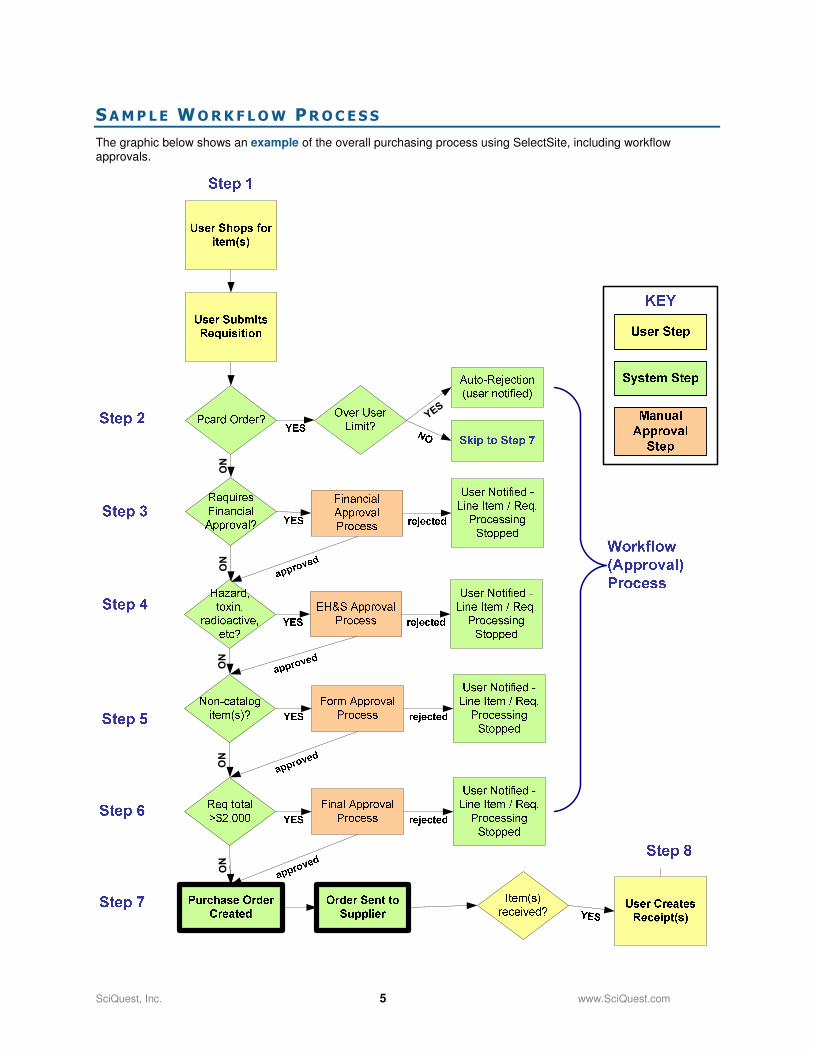
SAMP LE WORKF LOW PROCESS
The graphic below shows an example of the overall purchasing process using SelectSite, including workflow approvals.
NO
NO
NO
YES
NO
NO
SciQuest, Inc. 6 www.SciQuest.com
WORKF LOW TR IGGERS AND WORKF LOW ST EPS
Rules are events or “things” that trigger a step in the workflow process. For example:
• A specific commodity used in a line item can trigger an approval
• A total requisition amount can trigger an approval step
• Ordering from a specific supplier can trigger an approval step
• A value for a custom field can trigger an approval step
• Using a specific form can trigger an approval step
• A user’s spending limits can cause a requisition to auto-reject
• Whether or not a contract is used in the requisition
• Ordering a potentially hazardous may trigger a notification to the your organization’s EH&S department
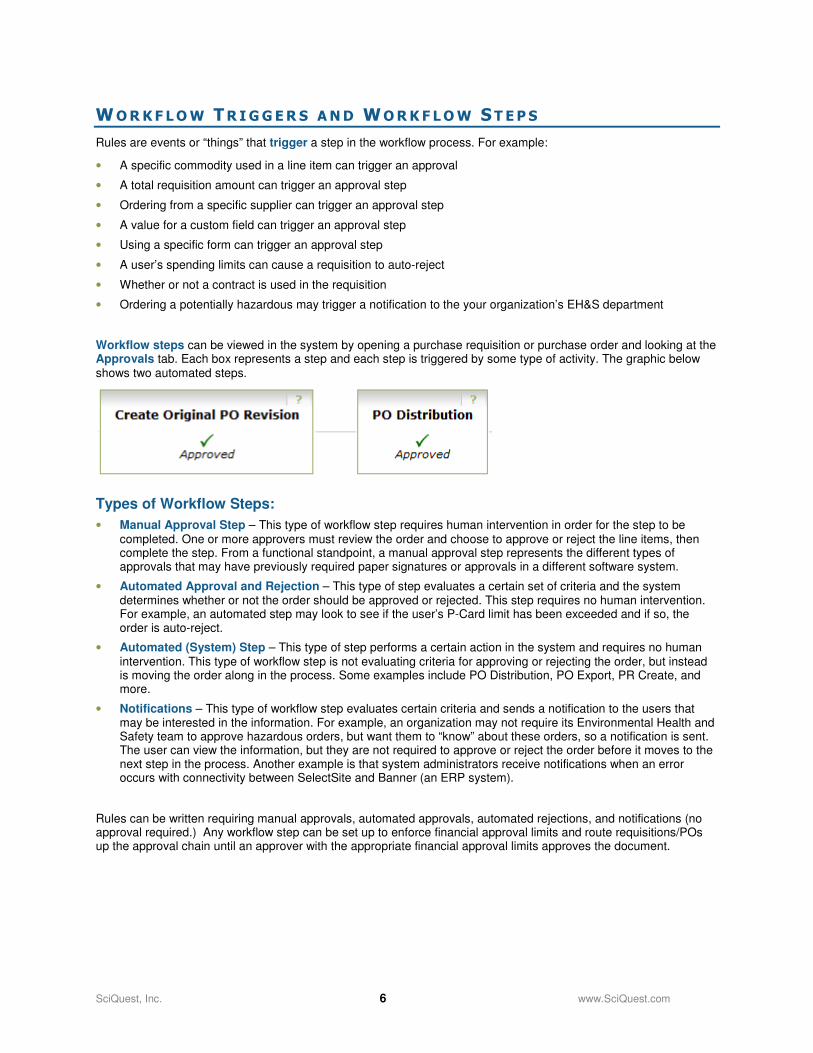
Workflow steps can be viewed in the system by opening a purchase requisition or purchase order and looking at the Approvals tab. Each box represents a step and each step is triggered by some type of activity. The graphic below shows two automated steps.
Types of Workflow Steps:
• Manual Approval Step – This type of workflow step requires human intervention in order for the step to be completed. One or more approvers must review the order and choose to approve or reject the line items, then complete the step. From a functional standpoint, a manual approval step represents the different types of approvals that may have previously required paper signatures or approvals in a different software system.
• Automated Approval and Rejection – This type of step evaluates a certain set of criteria and the system determines whether or not the order should be approved or rejected. This step requires no human intervention. For example, an automated step may look to see if the user’s P-Card limit has been exceeded and if so, the order is auto-reject.
• Automated (System) Step – This type of step performs a certain action in the system and requires no human intervention. This type of workflow step is not evaluating criteria for approving or rejecting the order, but instead is moving the order along in the process. Some examples include PO Distribution, PO Export, PR Create, and more.
• Notifications – This type of workflow step evaluates certain criteria and sends a notification to the users that may be interested in the information. For example, an organization may not require its Environmental Health and Safety team to approve hazardous orders, but want them to “know” about these orders, so a notification is sent. The user can view the information, but they are not required to approve or reject the order before it moves to the next step in the process. Another example is that system administrators receive notifications when an error occurs with connectivity between SelectSite and Banner (an ERP system).
Rules can be written requiring manual approvals, automated approvals, automated rejections, and notifications (no approval required.) Any workflow step can be set up to enforce financial approval limits and route requisitions/POs up the approval chain until an approver with the appropriate financial approval limits approves the document.
SciQuest, Inc. 7 www.SciQuest.com
EVA LUAT ING DOCUMENT B EHAV IOR IN WORKF LOW
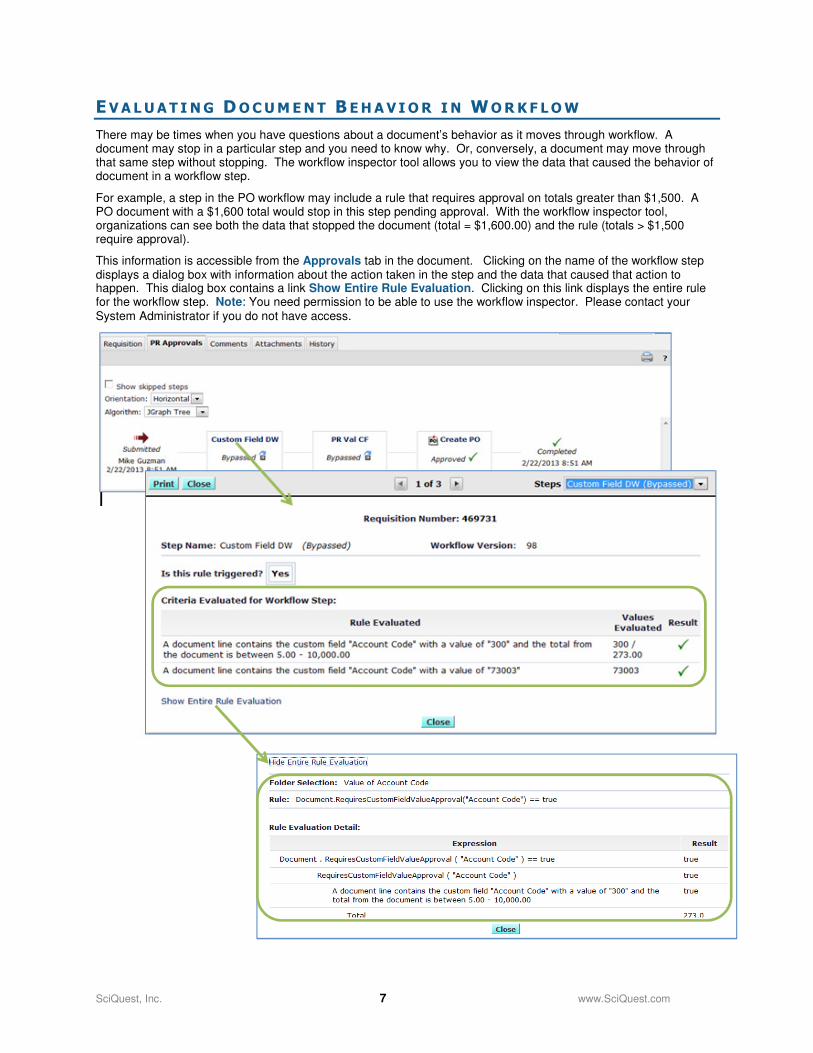
There may be times when you have questions about a document’s behavior as it moves through workflow. A document may stop in a particular step and you need to know why. Or, conversely, a document may move through that same step without stopping. The workflow inspector tool allows you to view the data that caused the behavior of document in a workflow step.
For example, a step in the PO workflow may include a rule that requires approval on totals greater than $1,500. A PO document with a $1,600 total would stop in this step pending approval. With the workflow inspector tool, organizations can see both the data that stopped the document (total = $1,600.00) and the rule (totals > $1,500 require approval).
This information is accessible from the Approvals tab in the document. Clicking on the name of the workflow step displays a dialog box with information about the action taken in the step and the data that caused that action to happen. This dialog box contains a link Show Entire Rule Evaluation. Clicking on this link displays the entire rule for the workflow step. Note: You need permission to be able to use the workflow inspector. Please contact your System Administrator if you do not have access.
SciQuest, Inc. 8 www.SciQuest.com
Workflow Inspector Tool in the Workflow Setup Tab
In addition to being available in the documents, the workflow inspector tool is also available in workflow setup. There, you can view the rules behind the workflow steps, eliminating the need to maintain separate documentation. The workflow process tab contains the workflow steps. You can simply click on the workflow step name to view the rules associated with that step.
K E Y T ERMS R E LAT ED TO WORKF LOW
Below are some definitions related to workflow setup and design.
• Workflow Documents – This term is used to describe purchase requisitions and/or purchase orders in the approval process.
• Workflow Folders – Workflow folders represent a step in the workflow process and may be referred to as workflow queues. When a requisition or workflow arrives at a step, the individual(s) assigned to the workflow folder are notified. Workflow folders are shared, meaning that more than one user can be assigned as an approver in a step. Shared workflow folders are each labeled on the approvals screen in the case that a user is assigned to more than one folder.
• My Approvals – There are two workflow folders that are user-specific: My PR Approvals and My PO Approvals. The contents of these folders vary with each user and indicate that the requisitions and/or orders in this queue require the specific user’s attention. A user must move a workflow document from a shared folder to their folder before it can be approved or rejected. Workflow documents can also arrive in the “My Approvals” folder automatically from dynamic workflow triggers or financial approvals.
• Static Workflow Rules – These are rules that do not change. For example, “If my requisition limits are exceeded, send the requisition to my supervisor.” SciQuest manages this type of workflow rule. However, the organization manages limits and assigned approvers through the interface.
• Dynamic Workflow Rules – These are rules that are triggered based on the assignment of an approver(s) to a custom field value, form type, or department value. For custom field values with one or more approvers assigned, workflow is triggered if a PR/PO contains this value. For example, “Cost Center” has a value of “100-10,” and an approver is assigned to this value. If a user assigns this value to a line item in their requisition, the dynamic rule is triggered, and the PR is routed to the appropriate dynamic workflow folder. Organization administrators with appropriate privileges manage dynamic workflow, e.g., which custom field values trigger workflow and which approvers are assigned to each custom field value.
• PR/PO Requisition Limits – Financial limits can be assigned by role or by individual for both requisitions and purchase orders (line item or total document). If a requisition limit is exceeded, workflow can be triggered. After the initially set up by SciQuest the financial limits and financial approver assignments are managed by administrators or end users.
• LPO Limits – These are additional line item or requisition/PO total limits that can be set by role or user to trigger additional financial approvals. A typical use for LPO limits is to route capital equipment purchases, e.g., line items > $100,000 to a specific shared folder for review by the appropriate Buyer. SciQuest sets up this type of workflow. After the initially set up by SciQuest the financial limits and financial approver assignments are managed by administrators or end users.
• Approval Limits – Approval limits can be set at both the line item and document total levels for requisitions and POs. These limits indicate the authority level approvers have for approving requisitions and POs. If the limits are exceeded, the requisition or order is automatically routed up the approval chain until an approver with the appropriate authority approves the requisition/PO. SciQuest sets up this type of workflow. After the initially set up by SciQuest the financial limits and financial approver assignments are managed by administrators or end users.
SciQuest, Inc. 9 www.SciQuest.com
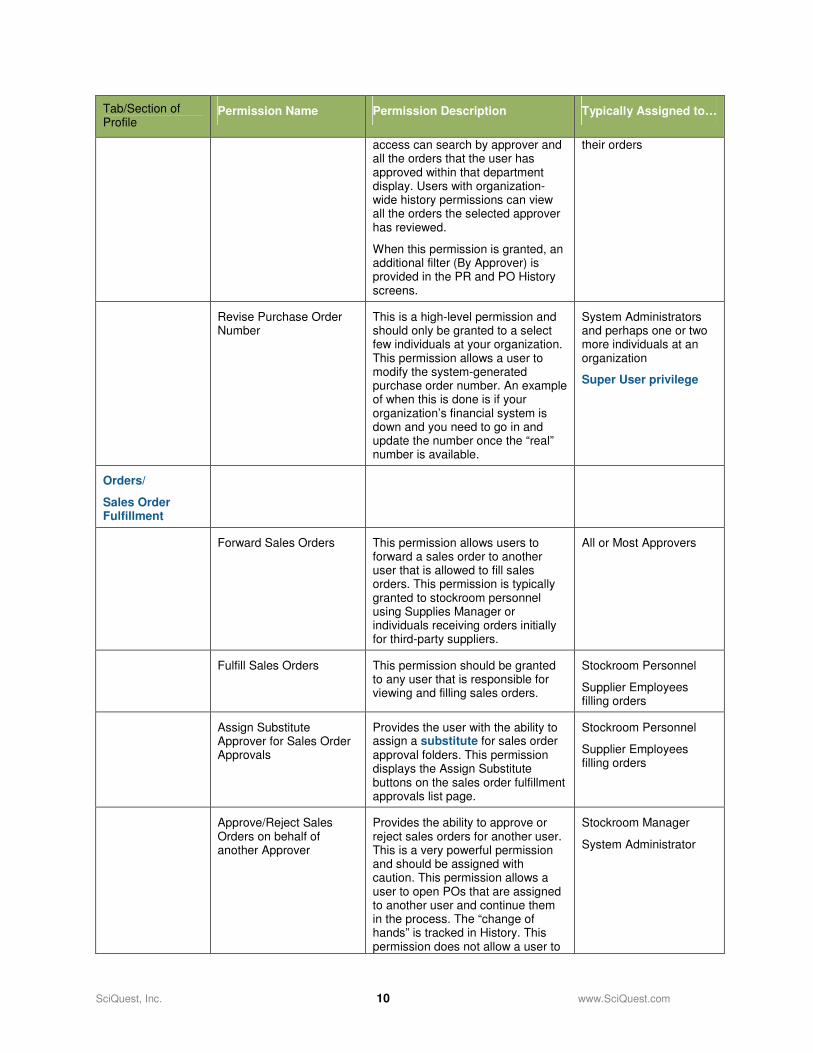
P ERMISS IONS R E LAT ED TO WORKF LOW AND AP PROVALS
Listed below are the permissions in SelectSite related to the approval and workflow process for Purchase Requisition, Purchase orders, and Sales Orders. These permissions allow approvers to perform a variety of functions ranging from reviewing (approving/rejecting) orders to expediting approvals and restarting workflow.
Tab/Section of Profile
Permission Name Permission Description Typically Assigned to…
Shopping/Cart
Cart/Requisition
Edit PO Number Provides the user with the ability to change/add the PO number to a requisition. This may be used to add a specific PO number to a requisition before it is distributed to the supplier.
Very few individuals at an organization – typically one or two system administrators.
Manually Override Pricing This permission allows users to manually change pricing for hosted catalog items. Changes can be made in draft shopping carts as well as pending PRs and POs. The user must also have the Edit Pending PR/POs permissions to change pricing for pending documents.
System Administrators Purchasing Buyers
Orders
My Orders/
Organization Orders
View Organization Orders Provides the ability for a user to view all of the organization's orders through the order history link.
System Administrators Purchasing Buyers
High-Level positions at an organization (VPs, Chairs, etc)
Edit Organization Orders Provides the ability for a user to edit and update any organization orders.
System Administrators Purchasing Buyers
Export Search Results This permission provides the ability to export information from the following sections: PR, PO, Receipts, Invoices, and Fulfillment POs. Once the export request is made, the user will have access to the Search Exports screen (located on the History tab) to view their own exports.
All Approvers – system administrators, departmental approvers, purchasing approvers, etc. Why? You can only export what information you have access to.
Search History by Approver
This permission allows end users to search for their orders by specific approvers – in other words by the people that approved/rejected their orders. Users with department
All approvers AND all end users. This is not required, but is recommended because the user can only see
SciQuest, Inc. 10 www.SciQuest.com
Tab/Section of Profile
Permission Name Permission Description Typically Assigned to…
access can search by approver and all the orders that the user has approved within that department display. Users with organization-wide history permissions can view all the orders the selected approver has reviewed.
When this permission is granted, an additional filter (By Approver) is provided in the PR and PO History screens.
their orders
Revise Purchase Order Number
This is a high-level permission and should only be granted to a select few individuals at your organization. This permission allows a user to modify the system-generated purchase order number. An example of when this is done is if your organization’s financial system is down and you need to go in and update the number once the “real” number is available.
System Administrators and perhaps one or two more individuals at an organization
Super User privilege
Orders/
Sales Order Fulfillment
Forward Sales Orders This permission allows users to forward a sales order to another user that is allowed to fill sales orders. This permission is typically granted to stockroom personnel using Supplies Manager or individuals receiving orders initially for third-party suppliers.
All or Most Approvers
Fulfill Sales Orders This permission should be granted to any user that is responsible for viewing and filling sales orders.
Stockroom Personnel
Supplier Employees filling orders
Assign Substitute Approver for Sales Order Approvals
Provides the user with the ability to assign a substitute for sales order approval folders. This permission displays the Assign Substitute buttons on the sales order fulfillment approvals list page.
Stockroom Personnel
Supplier Employees filling orders
Approve/Reject Sales Orders on behalf of another Approver
Provides the ability to approve or reject sales orders for another user. This is a very powerful permission and should be assigned with caution. This permission allows a user to open POs that are assigned to another user and continue them in the process. The “change of hands” is tracked in History. This permission does not allow a user to
Stockroom Manager
System Administrator
SciQuest, Inc. 11 www.SciQuest.com
Tab/Section of Profile
Permission Name Permission Description Typically Assigned to…
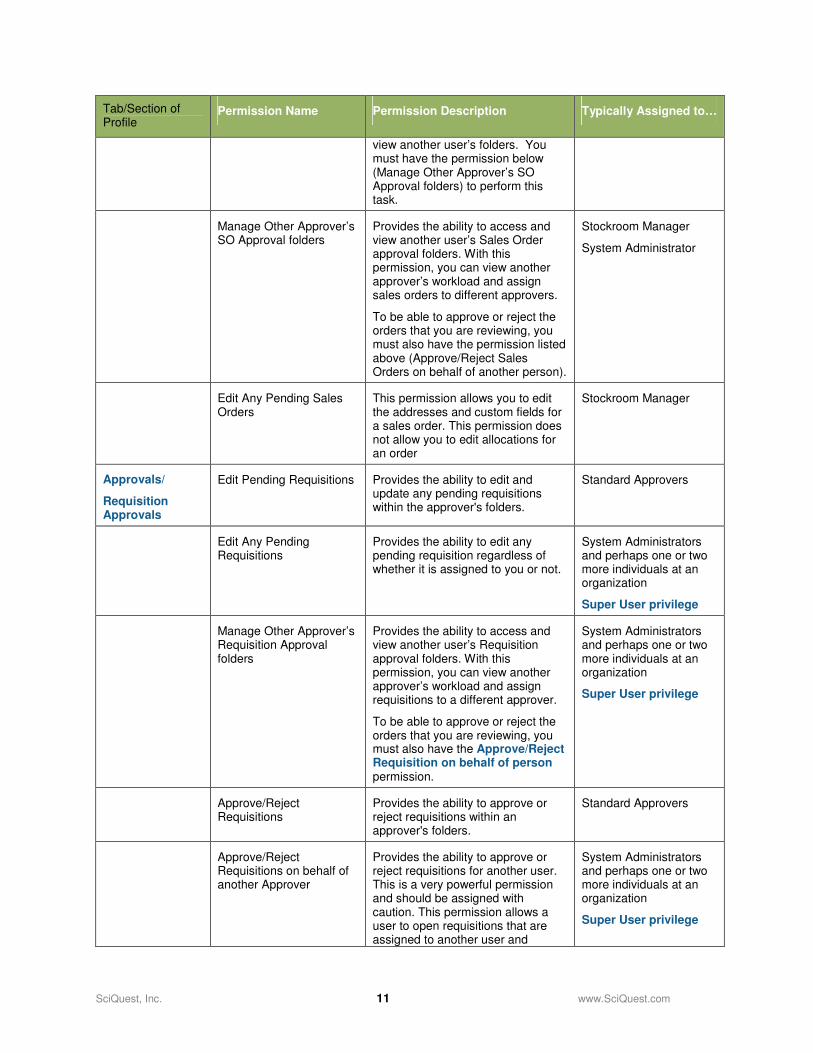
view another user’s folders. You must have the permission below (Manage Other Approver’s SO Approval folders) to perform this task.
Manage Other Approver’s SO Approval folders
Provides the ability to access and view another user’s Sales Order approval folders. With this permission, you can view another approver’s workload and assign sales orders to different approvers.
To be able to approve or reject the orders that you are reviewing, you must also have the permission listed above (Approve/Reject Sales Orders on behalf of another person).
Stockroom Manager
System Administrator
Edit Any Pending Sales Orders
This permission allows you to edit the addresses and custom fields for a sales order. This permission does not allow you to edit allocations for an order
Stockroom Manager
Approvals/
Requisition Approvals
Edit Pending Requisitions Provides the ability to edit and update any pending requisitions within the approver's folders.
Standard Approvers
Edit Any Pending Requisitions
Provides the ability to edit any pending requisition regardless of whether it is assigned to you or not.
System Administrators and perhaps one or two more individuals at an organization
Super User privilege
Manage Other Approver’s Requisition Approval folders
Provides the ability to access and view another user’s Requisition approval folders. With this permission, you can view another approver’s workload and assign requisitions to a different approver.
To be able to approve or reject the orders that you are reviewing, you must also have the Approve/Reject Requisition on behalf of person permission.
System Administrators and perhaps one or two more individuals at an organization
Super User privilege
Approve/Reject Requisitions
Provides the ability to approve or reject requisitions within an approver's folders.
Standard Approvers
Approve/Reject Requisitions on behalf of another Approver
Provides the ability to approve or reject requisitions for another user. This is a very powerful permission and should be assigned with caution. This permission allows a user to open requisitions that are assigned to another user and
System Administrators and perhaps one or two more individuals at an organization
Super User privilege
SciQuest, Inc. 12 www.SciQuest.com
Tab/Section of Profile
Permission Name Permission Description Typically Assigned to…
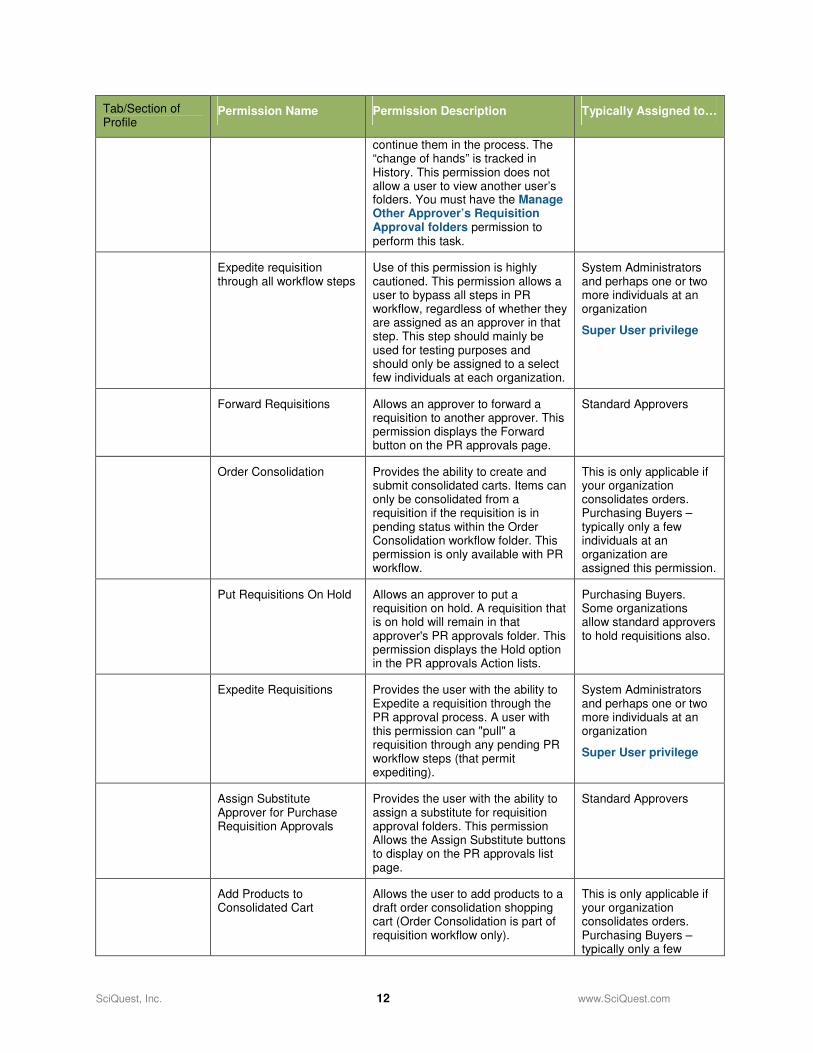
continue them in the process. The “change of hands” is tracked in History. This permission does not allow a user to view another user’s folders. You must have the Manage Other Approver’s Requisition Approval folders permission to perform this task.
Expedite requisition through all workflow steps
Use of this permission is highly cautioned. This permission allows a user to bypass all steps in PR workflow, regardless of whether they are assigned as an approver in that step. This step should mainly be used for testing purposes and should only be assigned to a select few individuals at each organization.
System Administrators and perhaps one or two more individuals at an organization
Super User privilege
Forward Requisitions Allows an approver to forward a requisition to another approver. This permission displays the Forward button on the PR approvals page.
Standard Approvers
Order Consolidation Provides the ability to create and submit consolidated carts. Items can only be consolidated from a requisition if the requisition is in pending status within the Order Consolidation workflow folder. This permission is only available with PR workflow.
This is only applicable if your organization consolidates orders. Purchasing Buyers – typically only a few individuals at an organization are assigned this permission.
Put Requisitions On Hold Allows an approver to put a requisition on hold. A requisition that is on hold will remain in that approver's PR approvals folder. This permission displays the Hold option in the PR approvals Action lists.
Purchasing Buyers. Some organizations allow standard approvers to hold requisitions also.
Expedite Requisitions Provides the user with the ability to Expedite a requisition through the PR approval process. A user with this permission can "pull" a requisition through any pending PR workflow steps (that permit expediting).
System Administrators and perhaps one or two more individuals at an organization
Super User privilege
Assign Substitute Approver for Purchase Requisition Approvals
Provides the user with the ability to assign a substitute for requisition approval folders. This permission Allows the Assign Substitute buttons to display on the PR approvals list page.
Standard Approvers
Add Products to Consolidated Cart
Allows the user to add products to a draft order consolidation shopping cart (Order Consolidation is part of requisition workflow only).
This is only applicable if your organization consolidates orders. Purchasing Buyers – typically only a few
SciQuest, Inc. 13 www.SciQuest.com
Tab/Section of Profile
Permission Name Permission Description Typically Assigned to…
individuals at an organization are assigned this permission.
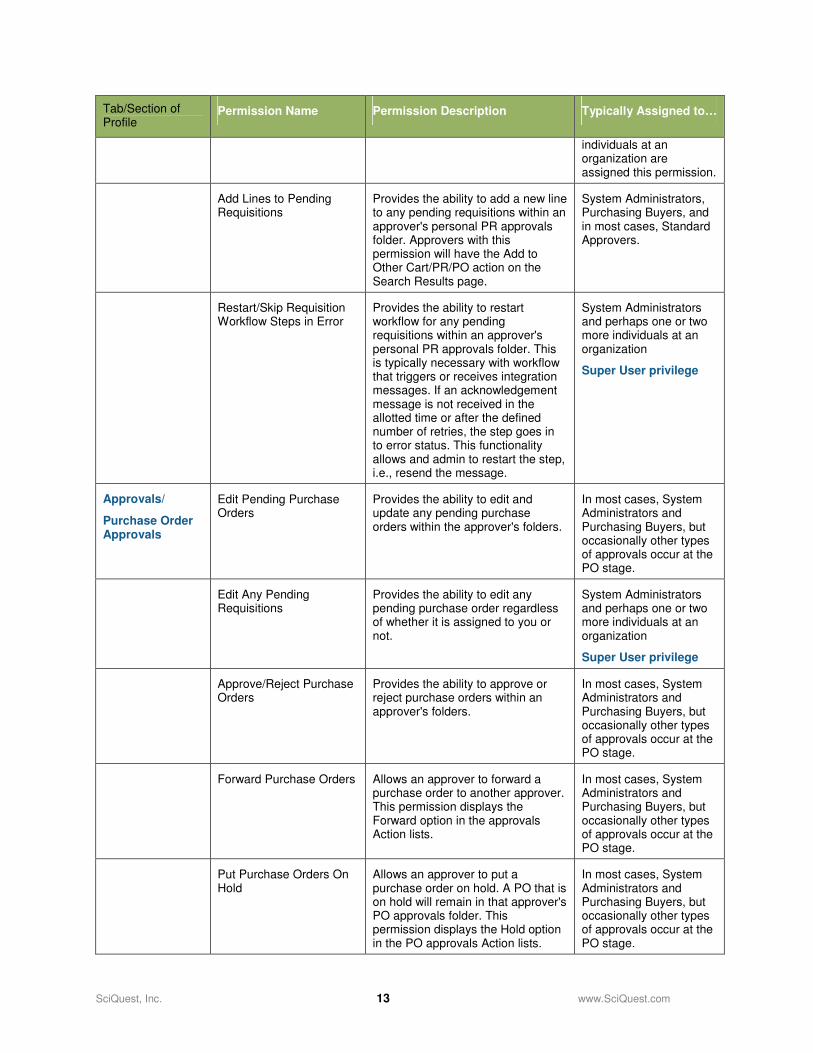
Add Lines to Pending Requisitions
Provides the ability to add a new line to any pending requisitions within an approver's personal PR approvals folder. Approvers with this permission will have the Add to Other Cart/PR/PO action on the Search Results page.
System Administrators, Purchasing Buyers, and in most cases, Standard Approvers.
Restart/Skip Requisition Workflow Steps in Error
Provides the ability to restart workflow for any pending requisitions within an approver's personal PR approvals folder. This is typically necessary with workflow that triggers or receives integration messages. If an acknowledgement message is not received in the allotted time or after the defined number of retries, the step goes in to error status. This functionality allows and admin to restart the step, i.e., resend the message.
System Administrators and perhaps one or two more individuals at an organization
Super User privilege
Approvals/
Purchase Order Approvals
Edit Pending Purchase Orders
Provides the ability to edit and update any pending purchase orders within the approver's folders.
In most cases, System Administrators and Purchasing Buyers, but occasionally other types of approvals occur at the PO stage.
Edit Any Pending Requisitions
Provides the ability to edit any pending purchase order regardless of whether it is assigned to you or not.
System Administrators and perhaps one or two more individuals at an organization
Super User privilege
Approve/Reject Purchase Orders
Provides the ability to approve or reject purchase orders within an approver's folders.
In most cases, System Administrators and Purchasing Buyers, but occasionally other types of approvals occur at the PO stage.
Forward Purchase Orders Allows an approver to forward a purchase order to another approver. This permission displays the Forward option in the approvals Action lists.
In most cases, System Administrators and Purchasing Buyers, but occasionally other types of approvals occur at the PO stage.
Put Purchase Orders On Hold
Allows an approver to put a purchase order on hold. A PO that is on hold will remain in that approver's PO approvals folder. This permission displays the Hold option in the PO approvals Action lists.
In most cases, System Administrators and Purchasing Buyers, but occasionally other types of approvals occur at the PO stage.
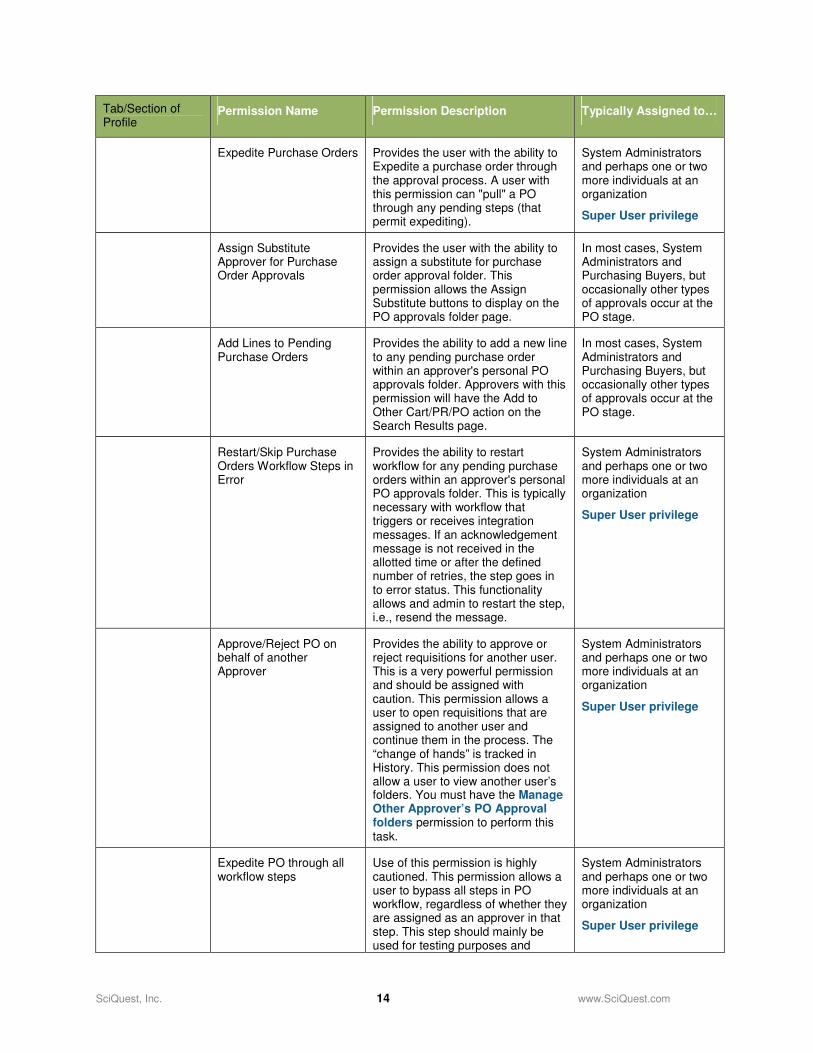
SciQuest, Inc. 14 www.SciQuest.com
Tab/Section of Profile
Permission Name Permission Description Typically Assigned to…
Expedite Purchase Orders Provides the user with the ability to Expedite a purchase order through the approval process. A user with this permission can "pull" a PO through any pending steps (that permit expediting).
System Administrators and perhaps one or two more individuals at an organization
Super User privilege
Assign Substitute Approver for Purchase Order Approvals
Provides the user with the ability to assign a substitute for purchase order approval folder. This permission allows the Assign Substitute buttons to display on the PO approvals folder page.
In most cases, System Administrators and Purchasing Buyers, but occasionally other types of approvals occur at the PO stage.
Add Lines to Pending Purchase Orders
Provides the ability to add a new line to any pending purchase order within an approver's personal PO approvals folder. Approvers with this permission will have the Add to Other Cart/PR/PO action on the Search Results page.
In most cases, System Administrators and Purchasing Buyers, but occasionally other types of approvals occur at the PO stage.
Restart/Skip Purchase Orders Workflow Steps in Error
Provides the ability to restart workflow for any pending purchase orders within an approver's personal PO approvals folder. This is typically necessary with workflow that triggers or receives integration messages. If an acknowledgement message is not received in the allotted time or after the defined number of retries, the step goes in to error status. This functionality allows and admin to restart the step, i.e., resend the message.
System Administrators and perhaps one or two more individuals at an organization
Super User privilege
Approve/Reject PO on behalf of another Approver
Provides the ability to approve or reject requisitions for another user. This is a very powerful permission and should be assigned with caution. This permission allows a user to open requisitions that are assigned to another user and continue them in the process. The “change of hands” is tracked in History. This permission does not allow a user to view another user’s folders. You must have the Manage Other Approver’s PO Approval folders permission to perform this task.
System Administrators and perhaps one or two more individuals at an organization
Super User privilege
Expedite PO through all workflow steps
Use of this permission is highly cautioned. This permission allows a user to bypass all steps in PO workflow, regardless of whether they are assigned as an approver in that step. This step should mainly be used for testing purposes and
System Administrators and perhaps one or two more individuals at an organization
Super User privilege

SciQuest, Inc. 15 www.SciQuest.com
Tab/Section of Profile
Permission Name Permission Description Typically Assigned to…
should only be assigned to a select few individuals at each organization.
Manage Other Approver’s PO Approval folders
Provides the ability to access and view another user’s PO approval folders. With this permission, you can view another approver’s workload and assign a purchase order to a different approver.
To be able to approve or reject the orders that you are reviewing, you must also have the Approve/Reject PO on behalf of another person permission.
System Administrators and perhaps one or two more individuals at an organization
Super User privilege
SUPER U SER
The concept of a “Super User” is used to describe a user that has full access over all orders generated on a site, including approvals, expediting steps, organization-wide viewing privileges, and more. Typically, an organization will assign one or two individuals with the permissions and tasks that are related to being a “Super User.” Super users are typically involved in testing new functionality; therefore they need a way to quickly pass through workflow steps. Additionally, the super user can push an order “out the door” when approvers are holding an order or there are time constraints around sending the order.
Other functions that a “Super User” can perform typically include:
• Expediting a PR or PO through any steps
• Restarting an order (for example after Banner communication is fixed)
• Approving orders for other approvers
• Viewing the workload (folders) for other users
• Viewing Organization-wide history
There are a number of high-level permissions that are assigned to a “Super User.” Refer to the previous concept (page 9) to learn about each of these permissions.
IMPL I C I T APPROVA L
Organizations often employ workflow rules to route documents to folders for approval based on spend amounts. In many cases, the organization will also take advantage of automatic approvals to allow the system to automatically approve a user’s own requisitions or purchase orders for a given rule/folder if the user is an approver for that rule. Implicit approval takes this functionality one step past the “super user” functionality described above. An organization can now allow documents to be automatically approved when the user has a higher spend approval authority than the specific folder’s limits, while not requiring that user to perform the typical administrative functions associated with the rule/folder. Implicit approvals can be configured for requisition and purchase order dynamic and advanced dynamic rules where Enable Automatic Approvals is enabled.
Configuration for Implicit Approvals This feature is disabled by default, and can be set up through both Dynamic Approval and Advanced Dynamic workflow. Details below:

SciQuest, Inc. 16 www.SciQuest.com
Dynamic Approval Setup: (organization setting, and rule setting)
• The organization’s system administrator must enable Allow implicit approvals for dynamic workflow on the general tab of workflow setup. Enabling this field allows dynamic implicit approvals for custom fields, contract type, form type, commodity code and departments where Enable Automatic Approvals is checked.
• Enable Automatic Approvals must be checked for a rule to allow implicit approval. Users with permission to manage any of the dynamic approval types may configure implicit approvals for the corresponding rules/shared folders. If Enable Automatic Approvals is not checked for a rule, implicit approvals are not allowed for that dollar range.
• When the organization setting is enabled and the rule has Enable Automatic Approvals checked, documents that route to the rule that are from an approver who is assigned to a higher rule range will be implicitly approved.
•
•
Advanced Dynamic Workflow Approval Setup:
• To apply Implicit Approvals to Advanced Dynamic Workflow rules, the implicit approver must be added directly to the rule.
• Advanced Dynamic rules now have two approver types for requisitions and purchase orders:
� Approvers continue to be direct rule approvers with access to the approval folder, email notifications, etc.
� Implicit Approvers are strictly for implicitly approving documents for a given user in a workflow step. They will have no access to the folder for approval of orders for other users and they will not receive email notifications for the folder/documents.
� User should be added as an Approver if they will actively manage and approve all documents for that rule. User should be added as an Implicit Approver where it is assumed the user has a higher approval authority, and orders in a lower dollar range rule should be implicitly approved if submitted by that user only.
• Enable Automatic Approvals must be checked on the rule for Implicit Approvals to apply. If Enable Automatic Approvals is not checked, implicit approval will not occur, even if there are Implicit Approvers associated with the rule.
• A new filter has been added to the Rules Management filter to allow searching for implicit approvers. Additionally, the “specify approver” option searches for any rule where the user is an approver or implicit approver.
• Users with permission to manage Advanced Dynamic Workflow can configure implicit approvers for advanced dynamic workflow.
• Implicit Approvers may be added via ADW Rules Import (.txt or .xml format).
SciQuest, Inc. 17 www.SciQuest.com
ADMIN I S TRAT I VE OPT ION : PREVENT SAME US ER F ROM
ENTER ING/APPROV ING A PR
SelectSite provides a feature that prevents purchase requisitions from having the same requisitioner as approver. From a functional perspective, this setting provides a security setting that does not allow a user to approve his or her orders. This option is set at the organization-wide level and can be updated by a system administrator. By default, this setting is turned off. In some cases, an organization may choose to keep this setting turned off in the test environment (to make testing easier), but will enable it in the Production environment.
If this setting is enabled, an approver will see his/her requisitions in the folder (typically a shared folder, but it could also be in the My Approvals folder) as read only. The assign and approve links are not available. In this state, the approver can only perform the operations of a standard requisitioner such as withdrawing, adding a note, copying to a cart, etc. All other PR/PO's (from other users) will appear in the normal fashion.
To activate this setting, go to the workflow setup ���� general ���� Do not allow users to approve their own requisitions/POs. Enable this option then click Save.
ADMIN I S TRAT I VE OPT ION : ENABL ING EMAI L R EMINDERS
An option is available for SelectSite Administrators that allows users with pending approvals for any document type to receive email reminders. Administrators can configure the initial interval for the reminder, an optional follow-up interval for subsequent reminders, and a reminder threshold based on the age of the approval. An email will be sent to any user with a pending approval that is older than the specified interval, reminding them to approve the document (PR, PO, Invoice) if possible.
By default, this option is disabled (OFF). There are three new settings under workflow setup>general navigation for specifying the number of days after which the initial reminder should be sent, the number of days after the initial reminder each follow-up should be sent, and the maximum age threshold for sending reminders. The reminders are based on the creation date of the document in the current approvals folder:
• If the ‘Send initial follow-up reminder for pending approvals’ setting is left blank, no email reminders for pending approvals will be sent.
• If the ‘Send additional follow-up reminders for pending approvals’ setting is left blank, but the setting for initial reminders has a value, only the initial reminder will be sent.
• Documents older than the ‘Threshold for pending approvals that generate reminders’ setting will not generate reminders.
• These settings are applied are the organization level, and cannot be changed for a specific user.
• An email reminder is sent per approval folder, and lists all documents within that folder older than the specified interval that the receiving user can approve.
• The reminders are generated a few times per day automatically, so the reminder may not be sent at the exact time of day the approval was created.
ADMIN I S TRAT I VE OPT ION : L IM I T ING WHAT I T EMS C AN B E
ADDED TO THE CART WHEN US ING A S P EC I F I C FORM
When working in the system, sometimes an organization may want to limit the “type” of shopping in a single cart. For example, an organization may not want Check Requests or Supplier requests to be added alongside hosted catalog items. This option can be assigned to form types by using a field called “Do Not Mix” which is found on the form type screen (Forms Administration � Form Type). For more information, refer to the Advanced Administrator Handbook.
SciQuest, Inc. 18 www.SciQuest.com
Lesson 2: TYPES OF WORKFLOW APPROV AL
The purpose of this lesson is to look at types of workflow approval steps that you may encounter and how they are set up in the system.
WORKF LOW APPROVAL TYP ES
There are a number of different types of workflow steps that can be used in your organization’s workflow process. The types of approvals discussed in this lesson all require approval by one or more persons to complete the step. The following workflow approval types can be used in conjunction with one another to “build” your organization’s workflow setup.
• Financial Approvals – approvals based on dollar amounts and individual user limits
• Dynamic Custom Field Approvals – approvals based on the values entered for one more custom fields.
• Dynamic Form Approvals – approvals based on form types being used by the requisitioner
• Dynamic Departmental Approvals – approvals based on the requisitioner’s department.
• Static Workflow Steps – approvals based on unique “hard-coded” criteria that are set up by SciQuest to initiate the approval
F I NANC I A L APPROVA L
Financial approvals allow organizations to trigger approvals based on a user’s financial limits. If this type of workflow approval is used by an organization, it is typically the first manual approval step in the workflow process. This means that outside of auto-rejections and other system validations, a user’s financial approver is the first person to review and approve or reject the line items in the requisition.
How Financial Approval Works
Financial Approval is required when a user submits a requisition that is above their allowed limit, in which case, approval is required by a specified approver. For example, David Jones is assigned the Requester role with a requisition limit of $400. He submits a requisition for $45 which does not require Financial Approval. He submits a second requisition for $600, and Financial Approval is required.
Setup for Financial Approvals:
The financial approval step must be set up by SciQuest. There are two other tasks related to using financial approvals:
1. Assigning purchasing and approval limits to users. These limits determine when a user requires financial approval. These limits include such things as line-level limit, total requisition limit, P-Cart limit, and more. Typically, the Purchasing and Approval limits are set up at the role level. For more information on setting this up, refer to the Administrator’s Handbook. The Purchasing/Approval Limits sub-tab in a user’s profile identifies what amounts trigger activity such as approval.
2. Assigning Financial Approvers for each user. Some organizations assign approvers to each of its users and others allow their users to determine who can approve their orders. Each user can have one or more financial approver assigned. The Financial Approvers sub-tab in a user’s profile is used to set up and view who can approve the user’s orders.
DYNAMIC CUS TOM F I E LD APPROVA L
A common way in which custom fields are used in SelectSite is to serve as a workflow trigger. For example, an organization may use the account code custom field to determine who should review an order. This is referred to as dynamic workflow because the approver changes depending on the particular account code (custom field value) selected by the user for a requisition or line item.
Approvers can be assigned to one or more custom field values, and each value can have one or more approvers. If one or more approvers are assigned to a custom field value and that value is used in a requisition, then it will trigger an approval step. If an approver is not assigned to the custom field value selected, there will not be an approval step,
SciQuest, Inc. 19 www.SciQuest.com
which is intentional in most cases. For example, your organization may only require approvals on a few types of accounts, such as grants.
Custom field values and the corresponding approvers, which represent dynamic workflow, are managed by a system administrator. The actual step in workflow (i.e. –point in the process) that looks for the approver for the custom field, must be set up by SciQuest.
Setup for Dynamic Custom Field Approvals:
Dynamic Custom Field approvals must initially be enabled by SciQuest and the step or steps created in workflow. In most cases, there are individual steps created for each custom field requiring dynamic approval – mainly because there is typically a specific point or “time” in the workflow where each step should occur.
After the initial setup by SciQuest, the management and control of Dynamic Custom Field approvals can be handled fully by the System Administrator. There are a few setup tasks related to Dynamic Custom Field approval for the system administrator:
1. Create a Custom Field (NOT COMMON): Most custom fields used in dynamic approvals will be created by SciQuest during your implementation, but in some cases, if the workflow is set up to allow for additional approvals to be added as needed, a custom field can be created by a system administrator and used in workflow without intervention from SciQuest. More typically, a client will request a dynamic approval step be added to the workflow using a previously created custom field or a new one is created by SciQuest for the sole purpose of implementing the step. To learn more about creating custom fields, refer to the Administrator Handbook.
2. Adding Custom Field Values: Approvals are determined by the custom field values created in the system and the approvers assigned to each of the values. The initial list of custom field values is typically added to the system during implementation, but oftentimes new values are added –either manually by the system administrator, via a synch for Banner customers, or custom field imports. To learn more about adding custom field values, refer to the Administrator Handbook.
3. Assigning one or more Approvers for each custom field value requiring approval. If your organization determines that it would like an approval whenever a specific custom field value is used, one or more approvers must be assigned to the custom field value. If an approver is NOT assigned, the system assumes that approval is not required and the dynamic approval step will be skipped. This is intentional because the use of some values may not require approvals, while others may. As a system administrator, you can make this determination and make changes whenever needed.
SETTING UP A CATCH-ALL APPROVAL FOLDER:
� If your organization requires that approvals ALWAYS occur for a custom field – no matter the value, then a catch-all approval folder should be considered. By setting up this folder, there is no risk that orders can skip the approval step – even with a new or accidentally unassigned custom field value. This folder must be set up by SciQuest GPS or Customer Support.
SciQuest, Inc. 20 www.SciQuest.com
DYNAMIC FORM APPROVAL
Dynamic Form Approval allows you to automatically trigger an approval step based on the type of form that is used when requesting an item, service, or action. The forms found on each organization’s site, their intended usage, and purpose varies greatly per organization.
Examples of how Dynamic Form Approvals are Used
• A user is ordering items for an approved grant. He enters his line items into the Grants Request form and submits his cart. After standard approvals, his order is then routed to the Grants Department to ensure he is using his funding correctly. This approval step is accomplished by assigning one or more individual to the Grants Request form for approvals.
• A user submits a request to cancel two line items for an order previously distributed to the supplier. The user enters the requested changes into the Change Request Form and the order is automatically routed to the Purchasing Department for handling.
Setup for Dynamic Form Approvals:
Dynamic Form approvals must initially be enabled by SciQuest and the step created in workflow. After this initial setup, the management and control of Dynamic Form Approval can be handled fully by the System Administrator.
1. Create a Form Type and one or more associated Forms. Approvers are assigned to form types. Form types are associated with each new form that is created in the system. There may be a 1:1 relationship for some form types/form. For example, a Grants form type is created and a Grants Request Form is created. In other cases, there may be a 1: many relationship for form type/forms. For example, a Services form type is created and the following forms are created: Professional Services Form, Food Services Form, and Lawn Maintenance Form. In this case, whenever any of the three forms is used by a requisitioner, it would be routed to the same approver or set of approvers. For more information on creating form types and forms, refer to the Administrator Handbook.
2. Assigning one or more Approvers for each form type. If your organization determines that it would like an approval whenever a specific form type is used, one or more approvers must be assigned to the form type. If an approver is NOT assigned, the system assumes that approval is not required and the dynamic form approval step will be skipped. This is intentional because the use of some forms will not require special approvals, while others may. As a system administrator, you can make this determination and make changes whenever policy requires.
DYNAMIC D EPARTMENTA L APPROVA L
Dynamic Departmental Approval allows you to automatically trigger an approval step based on the requisitioner’s department. One more approvers can be set up per departmental. Additionally, you can set up rules so that approvals only occur with certain dollar amounts.
Examples of how Dynamic Departmental Approvals is Used
• Each user in the organization is assigned to a department (i.e. – this is a required field in the profile). Each time a user submits an order, the order must be approved by the Department Administrator. This individual - perhaps a department head or administrative assistant – will approve orders from all members of this department. The approval is set up so that ALL purchases from members of the department go through this step.
• Dynamic Departmental Approvals are set up, but is only implemented for certain departments – and only set up for specific spending thresholds. Therefore, someone in the Athletics department may not have any approvers assigned and no approval is required. Orders from the Chemistry department require approval over $50.
Setup for Dynamic Departmental Approvals:
Dynamic Departmental approvals must initially be enabled by SciQuest and the step created in workflow. After this initial setup, the management and control of Dynamic Departmental Approvals can be handled fully by the System Administrator. There are a few setup tasks related to Dynamic Departmental approval for the system administrator:
1. Make sure that users are assigned a Department. Each user should be assigned to a specific department via their profile.
SciQuest, Inc. 21 www.SciQuest.com
2. Assigning one or more Approvers for each Department requiring approvals. If your organization determines that it would like an approval whenever a requisition is placed from a specific department, one or more approvers must be assigned to the department. If an approver is NOT assigned, the system assumes that approval is not required and the dynamic departmental approval step will be skipped. This is intentional because some departments may not require approvals. As a system administrator, you can make this determination and make changes whenever policy requires.
DYNAMIC APPROVA L BY CONTRACT TYP E
Dynamic Approval by Contract Type allows you to automatically trigger an approval step based on the contract type associated with a line item in the purchase order. This type of approval is only applicable to those organizations using Contract Manager AND using the Contract Type field to classify contracts. For example, all orders from Service contracts may be routed to one individual, whereas all orders using the Catering contract may be routed to a different individual. One more approvers can be set up per contract type. Additionally, you can set up rules so that approvals only occur with certain dollar amounts.
For more information on contract types, including how they are set up and how to assign approvers to a contract type, refer to the Contract Management Handbook.
S T AT I C WORKF LOW ST EPS
In some cases, static or “hard-coded” workflow steps are created to accommodate unique requirements where the other approval types cannot be used. Whenever possible, a dynamic workflow step is used so that changes in organization requirements can be managed through the application by a system administrator.
When static workflow steps are created, one or more shared workflow folders are created in the system. Approvers are then assigned to those shared workflow folders.
Examples of static workflow steps include:
• Purchasing Approval – The final PR workflow step that is initiated if the order is above $5,000.
• IT Approval – A PR workflow step that is initiated if specific (defined) commodity codes are used, if specific (suppliers) are used, or if an IT checkbox is enabled.
• Order Consolidation – A PR workflow step used to consolidate all orders before being sent to suppliers.
Setup for Static Workflow Approvals:
The majority of setup for static workflow approvals is determined during the implementation process. The details – including the specific triggers to initiate the step – must be specified. Additionally, the name of the shared workflow folder must be specified and set up by SciQuest.
The single setup task for system administrator is assigning one or more users to the shared workflow folder. Unlike dynamic approvals, if no one is assigned to the step, the requisitioner or purchase order will still stop. It cannot move past the step until an approver is added and the requisition or order reviewed.
SciQuest, Inc. 22 www.SciQuest.com
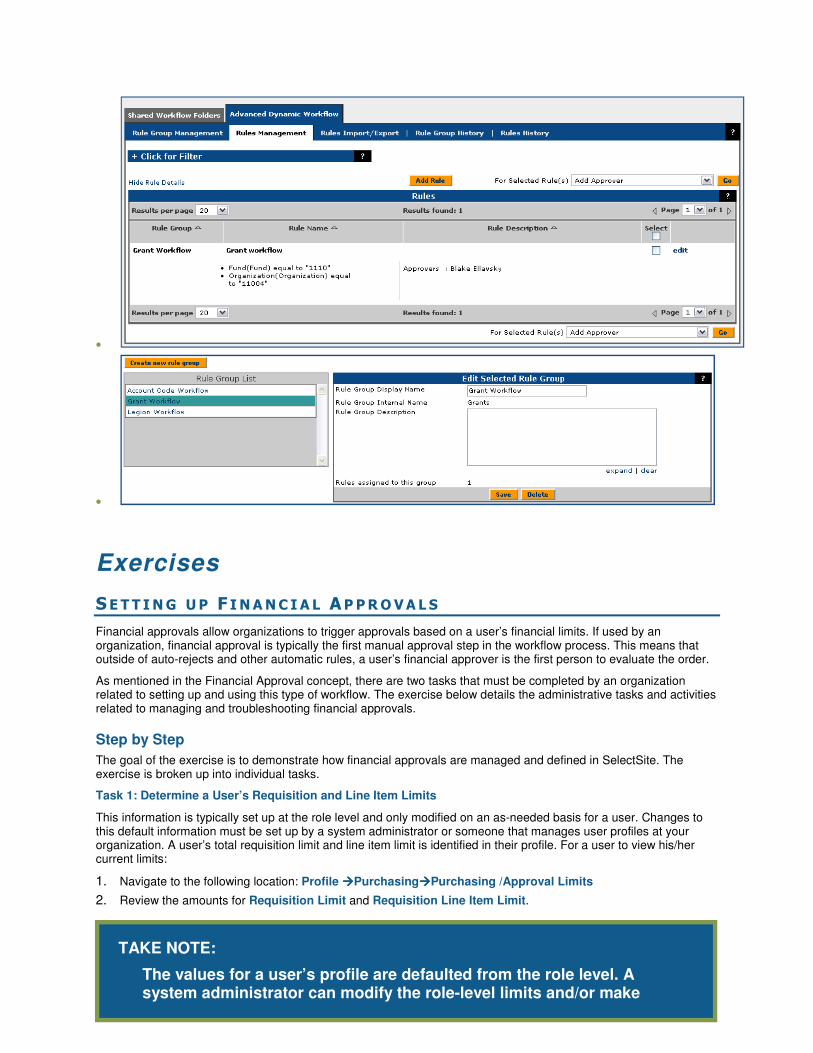
ADVANC ED DYNAMIC WORKFLOW
Advanced Dynamic Workflow is advanced functionality in SelectSite that allows administrators to manage highly complex workflow rules through the application or through the import process. Details of Advanced Dynamic Workflow:
• Administrative screens are available to manage dynamic workflow for PR, PO, and Fulfillment documents.
• Workflow rule elements and data combinations can now be managed by the system administrator. For example, you can set a rule up to say that if the custom field value is X and the dollar amount is X and the user’s requisition limit is under 5,000, then “trigger” the step. Below is a list of the data elements that can be considered in advanced dynamic workflow:
� Document Level:
o Business Unit
o Department
o Document Dates
o Custom Field (single value or range)
o Spend Total Against Custom Fields (single field or set of fields)
� Line Level:
o Line Total Amount
o Line Unit Price
o Custom Field Values (single, range or set)
o Commodity Code Values (single, range or set)
o Form Type
o Product Type
o Supplier Class
o Supplier Number
o Supplier Name
o Fulfillment Center
o Contract Type
o Product Flag
o CAS Number
o UNSPSC Code
• Workflow rule examples:
� The ability to create and manage a rule based on a combination of custom field values (e.g. Account Code = 1234 and Project Code = ABCD).
� Rule elements can be combined - Amount charged against Account Code 1234 > $5000.00 and the Department = Athletics
• The following permission provides access to this functionality via the Workflow Setup navigation path: Advanced Dynamic Workflow.
An example of advanced dynamic workflow is shown below.
SciQuest, Inc. 23 www.SciQuest.com
•
•
Exercises
S E T T ING UP F I NANC IA L APPROVA LS
Financial approvals allow organizations to trigger approvals based on a user’s financial limits. If used by an organization, financial approval is typically the first manual approval step in the workflow process. This means that outside of auto-rejects and other automatic rules, a user’s financial approver is the first person to evaluate the order.
As mentioned in the Financial Approval concept, there are two tasks that must be completed by an organization related to setting up and using this type of workflow. The exercise below details the administrative tasks and activities related to managing and troubleshooting financial approvals.
Step by Step
The goal of the exercise is to demonstrate how financial approvals are managed and defined in SelectSite. The exercise is broken up into individual tasks.
Task 1: Determine a User’s Requisition and Line Item Limits
This information is typically set up at the role level and only modified on an as-needed basis for a user. Changes to this default information must be set up by a system administrator or someone that manages user profiles at your organization. A user’s total requisition limit and line item limit is identified in their profile. For a user to view his/her current limits:
1. Navigate to the following location: Profile ����Purchasing����Purchasing /Approval Limits
2. Review the amounts for Requisition Limit and Requisition Line Item Limit.
TAKE NOTE:
The values for a user’s profile are defaulted from the role level. A system administrator can modify the role-level limits and/or make updates for a specific user.
SciQuest, Inc. 24 www.SciQuest.com
Task 2: Assign a Default Financial Approver
This is a task that can be performed by a user or administrator. For each user, at least one financial approver must be assigned to their profile. If an approver is not assigned and the user submits a requisition requiring approval, the user will receive an error message. To set up one or more financial approvers:
1. Navigate to Profile ����Purchasing����Financial Approvers. Any approvers that have been set up previously are listed.
2. Click the Add Approver button. Search for, locate, and select your financial approver. Note: Only those users assigned an approver role can be selected as an approver.
3. Once the approver is selected, the user’s name displays in the Financial Approvers screen. Select the Preferred button to indicate your default approver.
4. Repeat the steps above to add any additional approvers if needed.
Task 3: Updating a Financial Approver for a specific requisition
This is an optional task that is performed by a user when working in his/her cart. By default, once a preferred financial approver is set up in a user’s profile, this approver displays in any cart (requisition) requiring approval. Directly from the cart, the user has the opportunity to review the current approver, change their financial approver, or add a new approver. Details:
1. Open your current cart (items must be added to the cart). To do this, click on the cart icon in the upper-right-hand corner of the screen.
2. Once in the cart, go to Requisition ���� Summary ����General.
3. Click the Edit button. A secondary window displays.
4. From the Financial Approver field, you can select from values in your profile or search for a new approver for the requisition.
CREAT ING RULES FOR DYNAMIC APPROVAL S
Rules are used to determine “when” an order or requisition requires approval. For each entity value, such as a specific custom field value, department, or form type, you can assign one or more approvers. Additionally, you can create rules so that approvers are only required to review orders that meet certain financial criteria. For example, your organization may only require departmental approvals for orders over $500. In this case, the rule would reflect that minimum amount. Additionally, you can create multiple rules so that different individuals are required to approve orders that meet different financial criteria.
The generic steps below apply to dynamic custom fields, forms, and departments.
Step by Step
1. Open the entity that you would like to create a rule for (a custom field value, specific department, etc.). For specific instructions, refer to the appropriate exercise in this lesson.
2. Select the appropriate tab where the workflow step resides: PR, PO, or Fulfillment. For example, if your department workflow occurs in PR workflow, use the PR tab. Options:
• If you have not assigned any users or created any rules previously, you will need to create a rule before assigning approvers. To do this, click the Add Rule button.
• If you would like to assign additional approvers to an existing rule, go to step 9.
TAKE NOTE:
The Some organizations may choose for an administrator to set up all financial approvers. In this case, the same steps above are followed, except user profiles are accessed via the user search in user management.
SciQuest, Inc. 25 www.SciQuest.com
• If you would like to create a different rule with different amounts for approval, click the All Rule button.
5. Choose in what financial circumstances you would like the approval to occur:
a. Select Route All, which is selected by default, if you would like the order approved no matter the amount.
b. Select Route within defined range if you would like one or more approvers to review the order for the defined amount. For example, you may want User A to review the orders between $1 - $500. Enter these numbers (or the appropriate ranges) in the boxes.
3. Click the Save Rule button.
4. Click the … add more approvers link.
6. Search for, locate, and select the approver that you would like to approve an order with the selected value (form, custom field value, etc).
7. The new approver is listed. Click the …add more approvers link to add any additional approvers for the selected rule.
8. Click the Save Rule button.
9. Click the Apply All Changes button at the top of the window.
A SS IGN ING APPROVERS TO CUSTOM F I E LD VALUES
Approval steps can be triggered by custom field values selected in a requisition. This is referred to as dynamic custom field approval.
If your organization determines that it would like an approval whenever a specific custom field value is used, one or more approvers must be assigned to the custom field value. If an approver is NOT assigned, the system assumes that approval is not required and the dynamic approval step will be skipped. This is intentional because the use of some values may not require approvals, while others may. As a system administrator, you can make this determination and make changes whenever needed.
Step by Step
The goal of this exercise is to assign approvers to specific custom field values, enabling SelectSite administrators to manage dynamic workflow. NOTE: This exercise assumes the custom field and custom field values were created previously.
1. Go to the custom field where you would like to assign approvers:
2. Go to the organizational setup navigation path. Select the custom fields sub-tab, then the values sub-tab.
3. From the left side of the screen, select the custom field you will be working with.
4. Select the first value you will be adding approver(s) to.
5. To add one or more approvers to a single value, click Add Rule.
6. Make sure Route All is selected, then click Save Rule.
7. Click. add more approvers. A user search window displays.
8. Search for, locate, and select the approver for this value. The user displays under the value. NOTE: Only those users with approval permissions can be selected.
9. Add any additional approvers for this custom field value, then click Save.
10. Repeat Steps 1 – 6 for any additional values to which you would like to add an approver, then click Apply All Changes.
IMPORTANT
By adding an approver to a custom field value, a workflow step is automatically added for every requisition containing the custom field value and meeting the criteria such as dollar amount (criteria is not required).
SciQuest, Inc. 26 www.SciQuest.com
IMPORT ING AND EXPORT ING CUSTOM F I E LD VA LUE S AND
APPROVERS
SelectSite allows you to export and import custom field values and matching approvers. If there are a small number of values and approvers, you can set this up by hand. If there are a large number of values and approvers, it is recommended to use the import/export process. Typically this process is completed during implementation, but can be reviewed and updated at any time. Details about the import/export process:
• The Export feature allows you to export a complete list of your current custom field values and any approvers that are assigned. This information can be used initially as the list for custom field values and your organization can enter the user ID for the matching approvers where applicable. The Export feature can also be used to review the current approvers. For example, if an individual leaves the organization, you may want to do the export to determine what values they are assigned and reassign them as needed.
• The Import feature allows you to take the updated export file and add the information to your system. This import can be used to add both custom field values AND approvers.
• The data can be imported and exported in two formats: 1) a csv file which can be manipulated in MS Excel or 2) xml.
Step by Step
The goal of this exercise is to export custom field values and approvers and import this data.
1. Go to the organizational setup navigation path. Select the custom fields sub-tab, then the Import/Export sub-tab.
2. Select the appropriate tab:
3. Select the CSV Values Import/Export tab for a simple way to assign approvers to custom values and/or create new custom fields. This tab should be used if there is the “route all” rule is being used. MS Excel can be used to manipulate this data.
4. Select the CSV Workflow Rule Import/Export to assign approvers to custom values for specific rules – such as from $1 - $500. MS Excel can be used to manipulate this data.
5. Select the CF XML Import/Export tab to use XML messaging for the import and export of custom field rules, values, and approvers.
6. The instructions below are specifically for selection 2a. For information on importing custom field values with rules or using xml, refer to the Adobe files available through the site.
7. Export your current data:
8. Select Export from the Action drop-down box
9. Enter the description for the export. For example, “List of Org codes for November 07.”
10. Select the custom field that you would like to export.
11. Select the type of workflow that you are exporting (and will be importing) approvers to.
12. Click Submit. The exported file displays on the right side of the screen.
13. Open your exported file:
14. From the right side of the screen, the file name will be a link after it is processed. You may have to click the Refresh button if you do not see the file name.
15. Click the file name, then save the file to your hard drive.
16. Open the file in MS Excel and update it as needed (adding values and approvers). Keep in mind, the userID must be the actual user ID in SelectSite – not the user’s last name/first name or your system ID.
17. Save the “final” copy of the file as a .txt file.
18. Validate the file before importing:
19. Select Validate from the Action drop-down box
20. Enter the description for the file. For example, “Updated Approvers for Org values –Nov 07.”
21. Browse and select the file name (from Step 2).
22. Select the type of workflow that you are importing approvers to.
23. Click Submit. The file will begin its validation.
SciQuest, Inc. 27 www.SciQuest.com
24. If there are any errors or warnings, they will be listed and you should correct those prior to importing the items.
25. The imported file displays on the right side of the screen.
26. Open your exported file:
27. From the right side of the screen, the file name will be a link after it is processed. You may have to click the Refresh button if you do not see the file name.
28. Click the file name, then save the file to your hard drive.
29. Open the file in MS Excel and update it as needed (adding values and approvers). Keep in mind, the userID must be the actual user ID in SelectSite – not the user’s last name/first name or your system ID. For other tips, such as understanding the column values, refer to the Adobe instructional file on the site.
30. Save the “final” copy of the file as a .txt file.
31. Import the data AFTER validating:
32. Select Import from the Action drop-down box
33. Enter the description for the file. For example, “Updated Approvers for Org values –Nov 07.”
34. Browse and select the file name (from Step 2).
35. Select the type of workflow that you are importing approvers to.
36. Click Submit. The file will be imported and you will be notified of its success or if any issues occur.
37. Click the Apply All Changes button to activate the changes.
A SS IGN ING APPROVERS TO FORM TYPES
Dynamic Form Approval allows you to automatically trigger an approval step based on the type of form that is used when requesting an item, service, or action. The forms found on each organization’s site, their intended usage, and purpose varies greatly per organization.
The purpose of this exercise is to provide instructions on how to add approvers to form types. Keep in mind that in order for dynamic form approvals to work, the step must be initially set up by SciQuest.
If your organization determines that it would like an approval whenever a specific form type is used, one or more approvers must be assigned to the form type. If an approver is NOT assigned, the system assumes that approval is not required and the dynamic form approval step will be skipped. This is intentional because the use of some forms will not require special approvals, while others may. As a system administrator, you can make this determination and make changes whenever policy requires.
Additional forms can be created to track specific types of requests. If your organization chooses to create additional forms and would like the form(s) to trigger an approval process, it is important to set up a NEW form type. For more information, refer to the Forms lesson in the Administrator Handbook.
Step by Step
The goal of this exercise is to set up dynamic workflow based on form type. After creating a form type and associating a new form to the form type, you must assign approvers to the form type to activate the approval process. This exercise assumes that the form type and associated form(s) have been created.
1. Open the form type:
2. Go to the Forms admin tab.
3. Select the Form Type Admin sub-tab.
4. Select the Form Type from the left side of the screen. The right side of the window populates, including the form type assignment setup.
5. Select the type of workflow (Requisition, PO, Fulfillment, or Invoice)
6. To add one or more approvers to a single value, click Add Rule.
7. Make sure Route All is selected, then click Save Rule.
8. Click add more approvers. A user search window displays.
9. Search for, locate, and select the approver for this form type. NOTE: You can only select from those users with approval permissions. The user displays with the form type.
SciQuest, Inc. 28 www.SciQuest.com
10. Add any additional approvers for this form type, then click Save.
A SS IGN ING APPROVERS TO D EPARTMENTS
Dynamic Departmental Approval allows you to automatically trigger an approval step based on the department that a user is assigned to when they are requesting an item, service, or action.
The purpose of this exercise is to provide instructions on how to add approvers to departments. Keep in mind that in order for dynamic departmental approvals to work, the step must be initially set up by SciQuest.
If your organization determines that it would like an approval based on the user’s department, one or more approvers must be assigned to the department. If an approver is NOT assigned, the system assumes that approval is not required and the approval step will be skipped. This is intentional because some departments may not require approval, while others may. As a system administrator, you can make this determination and make changes whenever policy requires.
Step by Step
The goal of this exercise is to set up dynamic workflow based on department. After adding a department, you must assign approvers to the departments to activate the approval process.
1. Open the department:
2. Go to the user mgt tab.
3. Select the hr config sub-tab.
4. To add one or more approvers to a single value, click Add Rule.
5. Make sure Route All is selected, then click Save Rule.
6. Click add more approvers. A user search window displays.
7. Search for, locate, and select the approver for this form type. NOTE: You can only select from those users with approval permissions. The user displays with the form type.
8. Add any additional approvers for this department, then click Save.
A SS IGN ING APPROVERS TO SHARED WORKF LOW FOLDERS
Shared Workflow Folders are folders are created for static workflow rules requiring manual approvals. Examples of this include a EH&S folder, a High Dollar approval folder, and IT Review folder, and more.
Step by Step
The goal is to assign users to shared workflow folders.
1. Go to the workflow setup navigation tab.
2. Select the appropriate sub-tab, which determines the “type” of workflow you are working with: requisition, purchase order, fulfillment, or invoice.
3. Select the shared workflow folders sub-tab.
4. Click the Shared Workflow Folders sub-tab.
5. On the left side of the screen is a list of all workflow folders set up for your organization. These names were determined during your site design and can only be renamed by SciQuest.
6. Click on the appropriate workflow folder under the Folders list. Add the approver or approvers to be assigned to this workflow folder:
7. Click the Add User button on the right side of the screen. The user search pop-up displays.
IMPORTANT
By adding an approver to a form type, a workflow step is automatically added for every requisition using forms assigned to the form type.
SciQuest, Inc. 29 www.SciQuest.com
8. Locate and select the user to add as the approver for the selected workflow folder. Note: Only those users with approval permissions are eligible for selection.
9. Repeat the process for any additional approvers to add to the workflow folder. It is recommended to have more than one person assigned to each workflow folder in case there are unexpected absences, vacations, etc.
10. Repeat Step 6 for the remaining workflow folders. To remove a user from a workflow folder, click the Remove button to the right of the user’s name in the selected folder.
Once an approver is added to a workflow folder, they will begin receiving notification when requisitions or orders move to that step of the process. This assumes the approver has the appropriate email notifications enabled
R EMOVING APPROVERS F ROM SHARED WORKF LOW FOLDERS
You can remove a user as an approver from shared workflow folders. This is done through the user profile.
Step-by-Step
The goal of this exercise is to remove approvers from shared workflow folders.
1. Access the user profile of the user you would like to remove from the shared workflow folder.
2. In the user profile, click on the Folder Summary tab. A list of the shared workflow folders will display. The list can be sorted and filtered.
3. Remove the user from one or more workflow folders:
• To remove the user from a single folder:
a. Locate the folder from which you would like to remove the user.
b. Click the Remove Approver button. The user will be removed from the folder.
• To remove the user from multiple folders.
a. Click the checkbox to the right of each folder from which you would like to remove the approver.
b. From the drop-down box on the top right select Remove Approver from Selected Folders.
c. Click Go. The user will be removed from the folders.

SciQuest, Inc. 31 www.SciQuest.com
Lesson 3: PERFORMING APPROV AL TASKS
This lesson is geared for individuals responsible for approving purchase requisitions and purchase orders. The previous lessons in this handbook are more focused on administrative setup, but the goal of this lesson is to educate departmental approvers, buyers, and all other types of approvers on how to review, approve, and reject line items and orders in SelectSite.
Key Concepts
APPROVER
The term approver is used to describe someone that is responsible for reviewing and evaluating purchase orders and purchase requisitions. The term approver is also used to describe someone who has the ability to view departmental or organization-wide order history. Approvers consist of departmental approvers, buyers, and more.
Assigning a user approver permissions will not automatically allow the user to perform approval-related tasks. Before an approver can perform approval-related tasks, he or she must be assigned to the appropriate shared workflow folder, set up as a financial approver, or set up as a dynamic approver. These tasks are discussed in the previous lesson.
APPROVAL BAS I CS
• In order to approve requisitions, you must have the appropriate approval permissions. Permissions are granted through role assignment and/or individual permissions being granted by a system administrator.
• Approvers can choose whether or not to receive email notification when an order requiring approval lands in their “queue.” This is set up via the user’s profile and is detailed on one of the exercises in this lesson.
• There are two types of approvals: 1) Manual approvals, requiring human intervention, and 2) System approval, which is automatic. This section of the training guide discussed how to approve/reject orders requiring a manual review.
• An entire requisition can be approved or one or more line items in the requisition can be rejected. If part of a requisition is rejected (one or more line items), the remaining line items continue in the process.
• Comments and attachments can be sent “back and forth” between requisitioners and approvers during the approval process.
• Requisitions can be Returned from an external ERP system, including Banner, to the requisitioner for updates and re-processing. Additionally, requisitions can be marked as approved or rejected from the third-party system.
• If a line item or the entire requisition is rejected (by an individual or the system), the rejection notice will show up in PO History. If the user is set up to receive email notifications for rejections, they will receive an email also. This email contains the rejection note entered by the approver.
• Some types of approval are directed at a single individual and no one else can approve the order (unless a substitute is set up or the order forwarded). Examples of this are for financial approvals or “reports to” approvals.
• Other approval queues can be assigned to multiple approvers. As an organization or department, you can determine how the approvals are handled. For example, you may have a primary approver and someone else may be assigned as a back-up approver OR two people can be assigned to the queue and each individual “takes” orders as their schedule allows. Examples of this type of setup include shared workflow folders, form approval, and more.
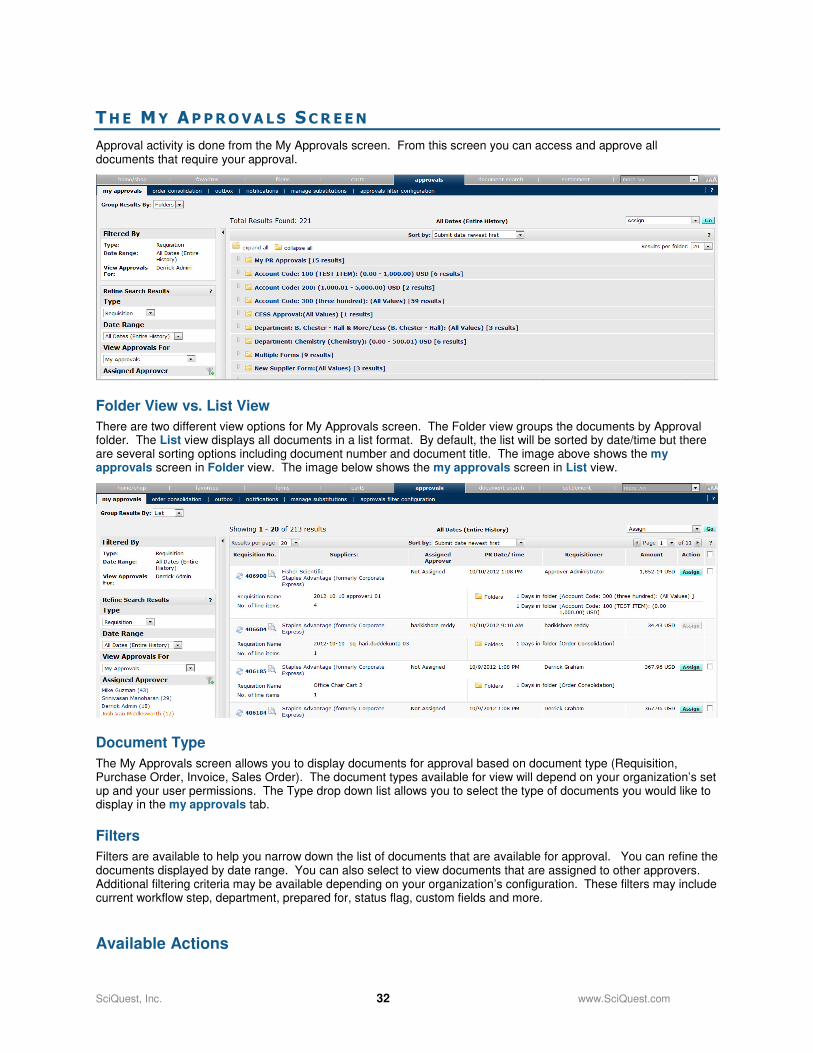
SciQuest, Inc. 32 www.SciQuest.com
THE MY APPROVA LS SCREEN
Approval activity is done from the My Approvals screen. From this screen you can access and approve all documents that require your approval.
Folder View vs. List View
There are two different view options for My Approvals screen. The Folder view groups the documents by Approval folder. The List view displays all documents in a list format. By default, the list will be sorted by date/time but there are several sorting options including document number and document title. The image above shows the my approvals screen in Folder view. The image below shows the my approvals screen in List view.
Document Type
The My Approvals screen allows you to display documents for approval based on document type (Requisition, Purchase Order, Invoice, Sales Order). The document types available for view will depend on your organization’s set up and your user permissions. The Type drop down list allows you to select the type of documents you would like to display in the my approvals tab.
Filters
Filters are available to help you narrow down the list of documents that are available for approval. You can refine the documents displayed by date range. You can also select to view documents that are assigned to other approvers. Additional filtering criteria may be available depending on your organization’s configuration. These filters may include current workflow step, department, prepared for, status flag, custom fields and more.
Available Actions
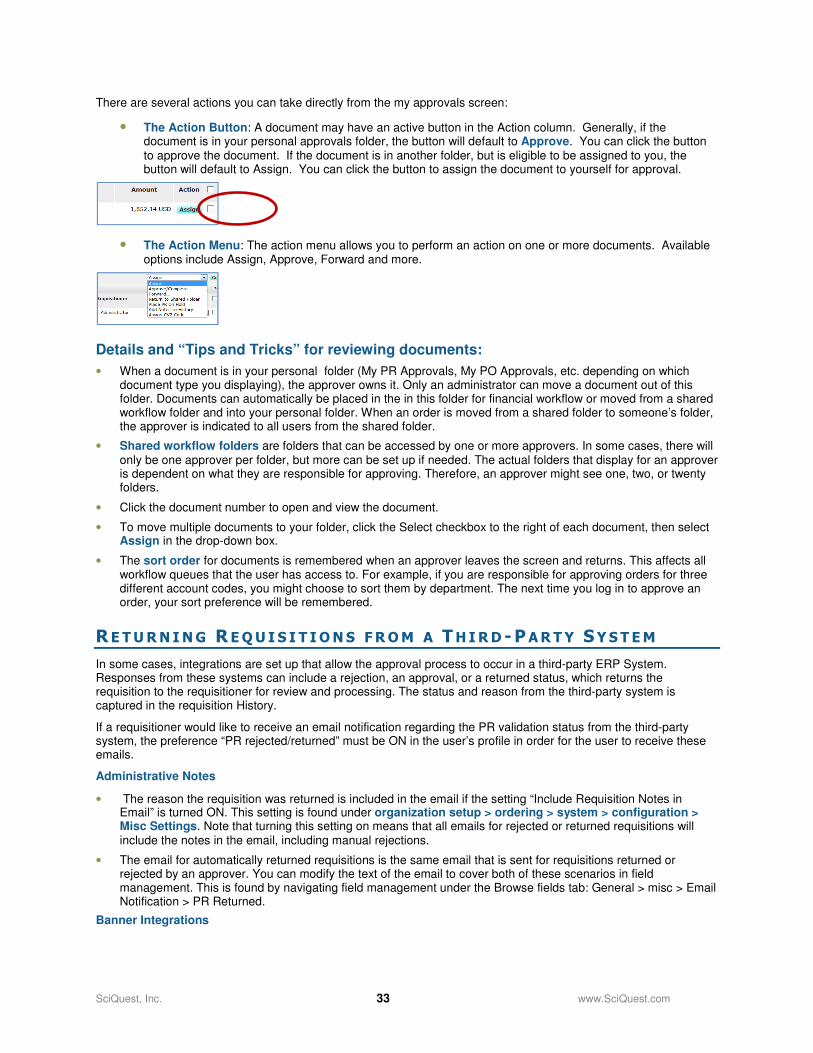
SciQuest, Inc. 33 www.SciQuest.com
There are several actions you can take directly from the my approvals screen:
• The Action Button: A document may have an active button in the Action column. Generally, if the document is in your personal approvals folder, the button will default to Approve. You can click the button to approve the document. If the document is in another folder, but is eligible to be assigned to you, the button will default to Assign. You can click the button to assign the document to yourself for approval.
• The Action Menu: The action menu allows you to perform an action on one or more documents. Available options include Assign, Approve, Forward and more.
Details and “Tips and Tricks” for reviewing documents:
• When a document is in your personal folder (My PR Approvals, My PO Approvals, etc. depending on which document type you displaying), the approver owns it. Only an administrator can move a document out of this folder. Documents can automatically be placed in the in this folder for financial workflow or moved from a shared workflow folder and into your personal folder. When an order is moved from a shared folder to someone’s folder, the approver is indicated to all users from the shared folder.
• Shared workflow folders are folders that can be accessed by one or more approvers. In some cases, there will only be one approver per folder, but more can be set up if needed. The actual folders that display for an approver is dependent on what they are responsible for approving. Therefore, an approver might see one, two, or twenty folders.
• Click the document number to open and view the document.
• To move multiple documents to your folder, click the Select checkbox to the right of each document, then select Assign in the drop-down box.
• The sort order for documents is remembered when an approver leaves the screen and returns. This affects all workflow queues that the user has access to. For example, if you are responsible for approving orders for three different account codes, you might choose to sort them by department. The next time you log in to approve an order, your sort preference will be remembered.
R E TURN ING R EQU I S I T IONS FROM A THIRD -PARTY SYST EM
In some cases, integrations are set up that allow the approval process to occur in a third-party ERP System. Responses from these systems can include a rejection, an approval, or a returned status, which returns the requisition to the requisitioner for review and processing. The status and reason from the third-party system is captured in the requisition History.
If a requisitioner would like to receive an email notification regarding the PR validation status from the third-party system, the preference “PR rejected/returned” must be ON in the user’s profile in order for the user to receive these emails.
Administrative Notes
• The reason the requisition was returned is included in the email if the setting “Include Requisition Notes in Email” is turned ON. This setting is found under organization setup > ordering > system > configuration > Misc Settings. Note that turning this setting on means that all emails for rejected or returned requisitions will include the notes in the email, including manual rejections.
• The email for automatically returned requisitions is the same email that is sent for requisitions returned or rejected by an approver. You can modify the text of the email to cover both of these scenarios in field management. This is found by navigating field management under the Browse fields tab: General > misc > Email Notification > PR Returned.
Banner Integrations
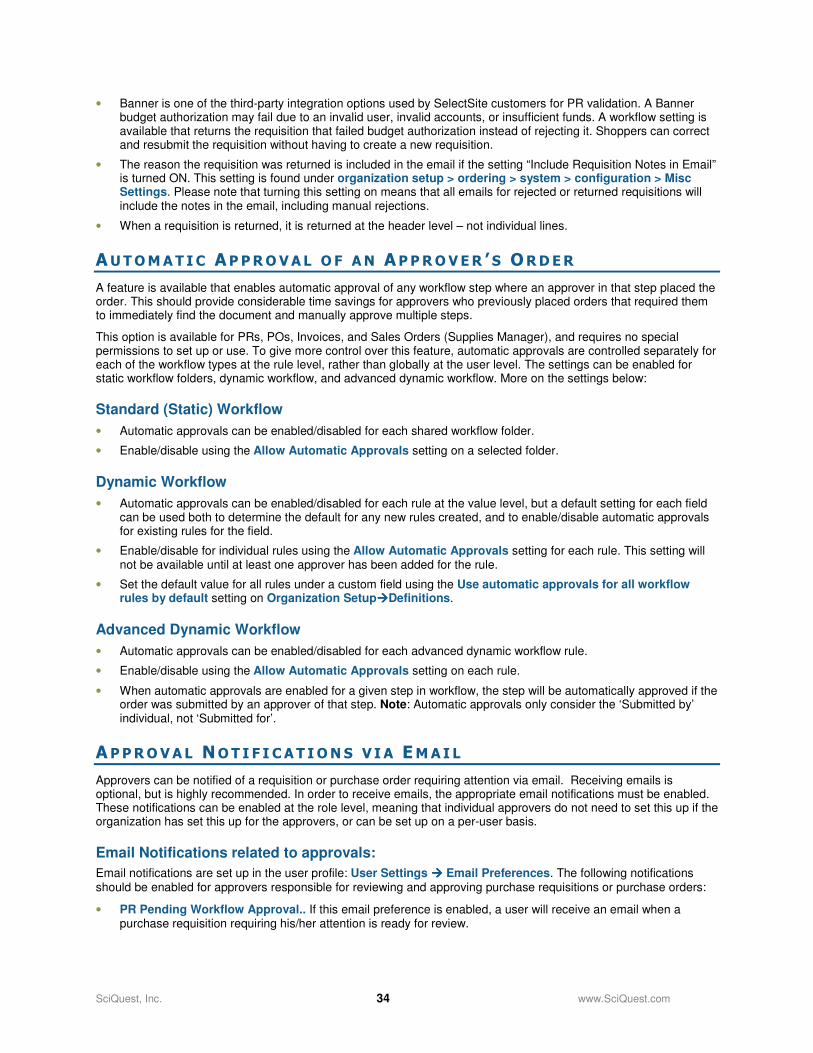
SciQuest, Inc. 34 www.SciQuest.com
• Banner is one of the third-party integration options used by SelectSite customers for PR validation. A Banner budget authorization may fail due to an invalid user, invalid accounts, or insufficient funds. A workflow setting is available that returns the requisition that failed budget authorization instead of rejecting it. Shoppers can correct and resubmit the requisition without having to create a new requisition.
• The reason the requisition was returned is included in the email if the setting “Include Requisition Notes in Email” is turned ON. This setting is found under organization setup > ordering > system > configuration > Misc Settings. Please note that turning this setting on means that all emails for rejected or returned requisitions will include the notes in the email, including manual rejections.
• When a requisition is returned, it is returned at the header level – not individual lines.
AUTOMAT I C APPROVAL O F AN APPROVER ’S ORDER
A feature is available that enables automatic approval of any workflow step where an approver in that step placed the order. This should provide considerable time savings for approvers who previously placed orders that required them to immediately find the document and manually approve multiple steps.
This option is available for PRs, POs, Invoices, and Sales Orders (Supplies Manager), and requires no special permissions to set up or use. To give more control over this feature, automatic approvals are controlled separately for each of the workflow types at the rule level, rather than globally at the user level. The settings can be enabled for static workflow folders, dynamic workflow, and advanced dynamic workflow. More on the settings below:
Standard (Static) Workflow
• Automatic approvals can be enabled/disabled for each shared workflow folder.
• Enable/disable using the Allow Automatic Approvals setting on a selected folder.
Dynamic Workflow
• Automatic approvals can be enabled/disabled for each rule at the value level, but a default setting for each field can be used both to determine the default for any new rules created, and to enable/disable automatic approvals for existing rules for the field.
• Enable/disable for individual rules using the Allow Automatic Approvals setting for each rule. This setting will not be available until at least one approver has been added for the rule.
• Set the default value for all rules under a custom field using the Use automatic approvals for all workflow rules by default setting on Organization Setup����Definitions.
Advanced Dynamic Workflow
• Automatic approvals can be enabled/disabled for each advanced dynamic workflow rule.
• Enable/disable using the Allow Automatic Approvals setting on each rule.
• When automatic approvals are enabled for a given step in workflow, the step will be automatically approved if the order was submitted by an approver of that step. Note: Automatic approvals only consider the ‘Submitted by’ individual, not ‘Submitted for’.
APPROVAL NOT I F I CAT IONS V I A EMAI L
Approvers can be notified of a requisition or purchase order requiring attention via email. Receiving emails is optional, but is highly recommended. In order to receive emails, the appropriate email notifications must be enabled. These notifications can be enabled at the role level, meaning that individual approvers do not need to set this up if the organization has set this up for the approvers, or can be set up on a per-user basis.
Email Notifications related to approvals:
Email notifications are set up in the user profile: User Settings ���� Email Preferences. The following notifications should be enabled for approvers responsible for reviewing and approving purchase requisitions or purchase orders:
• PR Pending Workflow Approval.. If this email preference is enabled, a user will receive an email when a purchase requisition requiring his/her attention is ready for review.
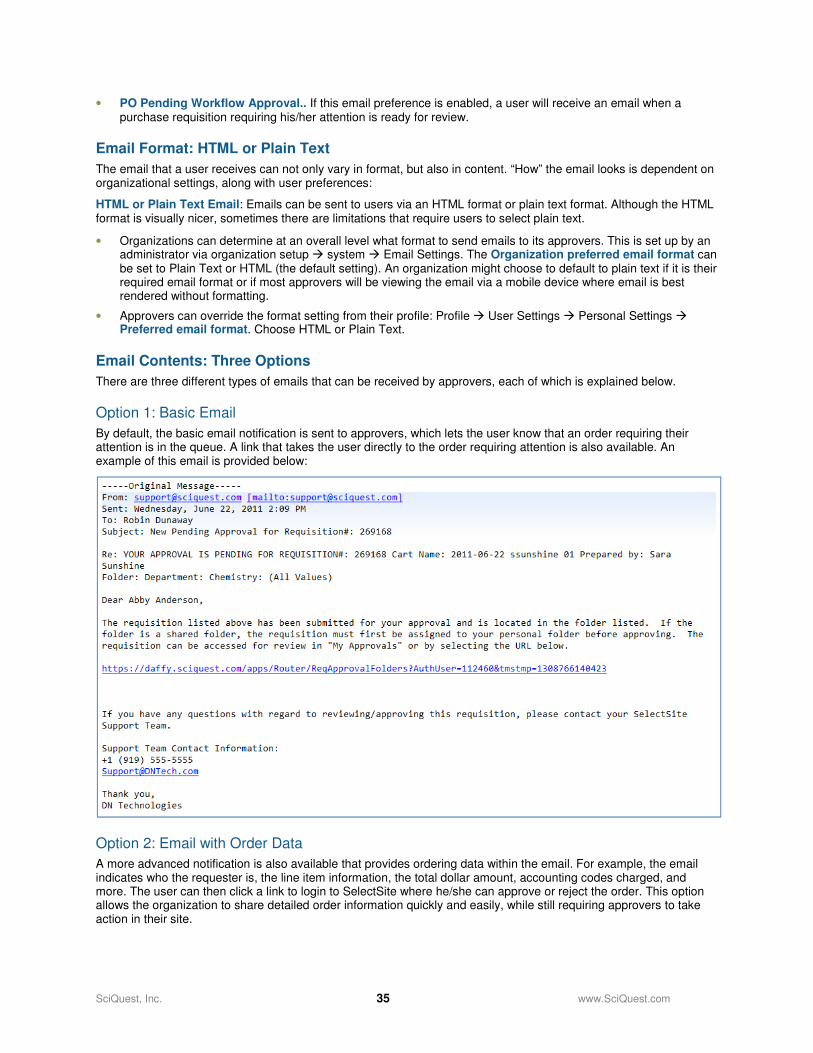
SciQuest, Inc. 35 www.SciQuest.com
• PO Pending Workflow Approval.. If this email preference is enabled, a user will receive an email when a purchase requisition requiring his/her attention is ready for review.
Email Format: HTML or Plain Text
The email that a user receives can not only vary in format, but also in content. “How” the email looks is dependent on organizational settings, along with user preferences:
HTML or Plain Text Email: Emails can be sent to users via an HTML format or plain text format. Although the HTML format is visually nicer, sometimes there are limitations that require users to select plain text.
• Organizations can determine at an overall level what format to send emails to its approvers. This is set up by an administrator via organization setup � system � Email Settings. The Organization preferred email format can be set to Plain Text or HTML (the default setting). An organization might choose to default to plain text if it is their required email format or if most approvers will be viewing the email via a mobile device where email is best rendered without formatting.
• Approvers can override the format setting from their profile: Profile � User Settings � Personal Settings � Preferred email format. Choose HTML or Plain Text.
Email Contents: Three Options
There are three different types of emails that can be received by approvers, each of which is explained below.
Option 1: Basic Email
By default, the basic email notification is sent to approvers, which lets the user know that an order requiring their attention is in the queue. A link that takes the user directly to the order requiring attention is also available. An example of this email is provided below:
Option 2: Email with Order Data
A more advanced notification is also available that provides ordering data within the email. For example, the email indicates who the requester is, the line item information, the total dollar amount, accounting codes charged, and more. The user can then click a link to login to SelectSite where he/she can approve or reject the order. This option allows the organization to share detailed order information quickly and easily, while still requiring approvers to take action in their site.
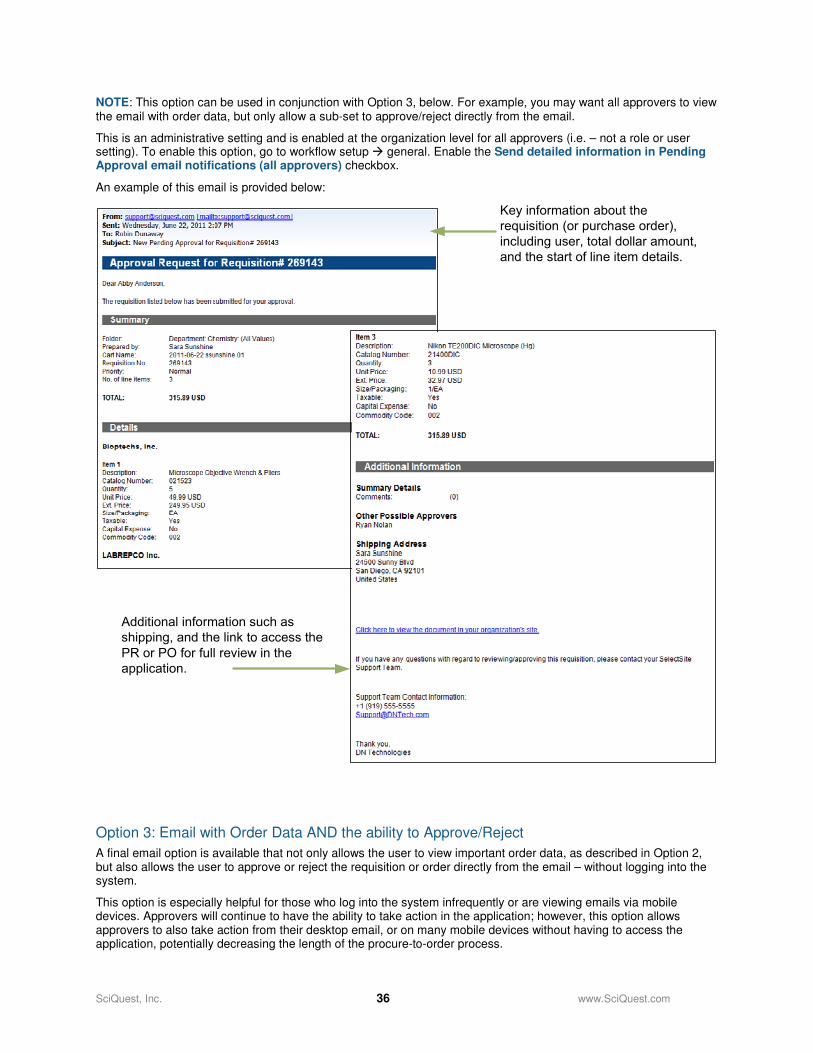
SciQuest, Inc. 36 www.SciQuest.com
NOTE: This option can be used in conjunction with Option 3, below. For example, you may want all approvers to view the email with order data, but only allow a sub-set to approve/reject directly from the email.
This is an administrative setting and is enabled at the organization level for all approvers (i.e. – not a role or user setting). To enable this option, go to workflow setup � general. Enable the Send detailed information in Pending Approval email notifications (all approvers) checkbox.
An example of this email is provided below:
Key information about the
requisition (or purchase order),
including user, total dollar amount,
and the start of line item details.
Additional information such as
shipping, and the link to access the
PR or PO for full review in the
application.
Option 3: Email with Order Data AND the ability to Approve/Reject
A final email option is available that not only allows the user to view important order data, as described in Option 2, but also allows the user to approve or reject the requisition or order directly from the email – without logging into the system.
This option is especially helpful for those who log into the system infrequently or are viewing emails via mobile devices. Approvers will continue to have the ability to take action in the application; however, this option allows approvers to also take action from their desktop email, or on many mobile devices without having to access the application, potentially decreasing the length of the procure-to-order process.
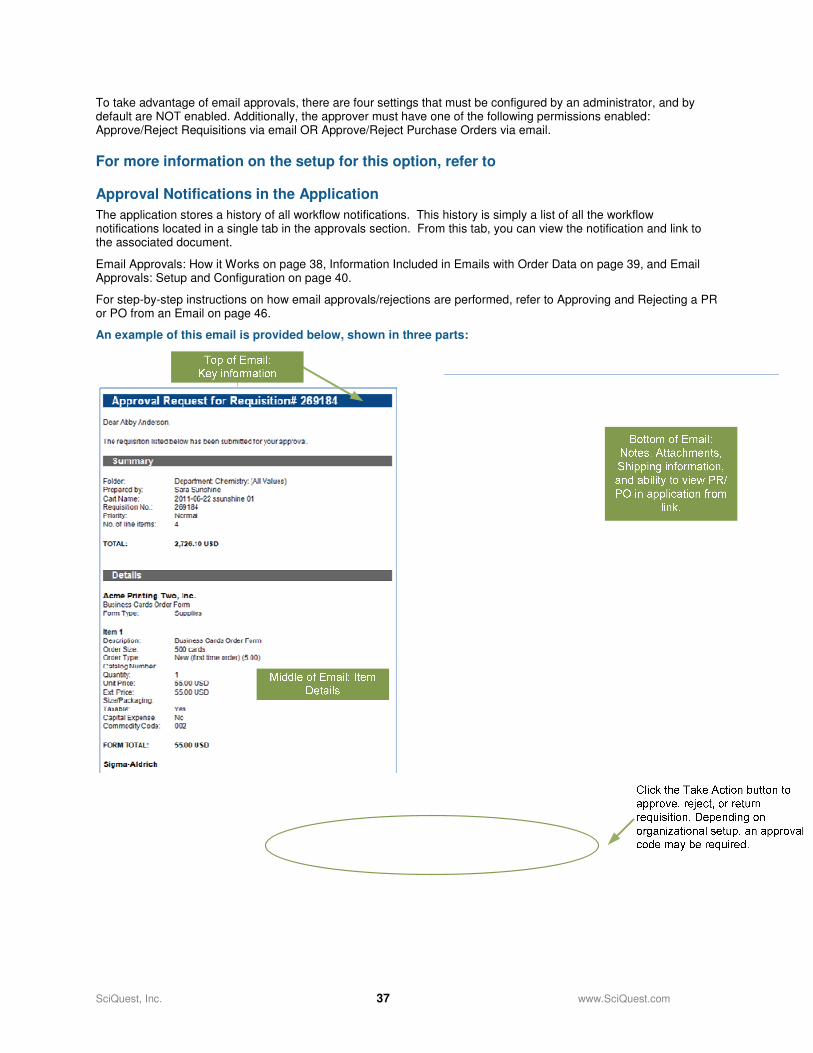
SciQuest, Inc. 37 www.SciQuest.com
To take advantage of email approvals, there are four settings that must be configured by an administrator, and by default are NOT enabled. Additionally, the approver must have one of the following permissions enabled: Approve/Reject Requisitions via email OR Approve/Reject Purchase Orders via email.
For more information on the setup for this option, refer to
Approval Notifications in the Application
The application stores a history of all workflow notifications. This history is simply a list of all the workflow notifications located in a single tab in the approvals section. From this tab, you can view the notification and link to the associated document.
Email Approvals: How it Works on page 38, Information Included in Emails with Order Data on page 39, and Email Approvals: Setup and Configuration on page 40.
For step-by-step instructions on how email approvals/rejections are performed, refer to Approving and Rejecting a PR or PO from an Email on page 46.
An example of this email is provided below, shown in three parts:
SciQuest, Inc. 38 www.SciQuest.com
Option for organizations using an external login method and email approvals:
For those organizations using email approval and an external login method, an option is available that assists with the login process. Approvers will be directed to a specific screen (from an email notification) after they are authenticated by the external system. For example, if an approver receives an email about a pending order to approve (and they are not currently logged in the system), clicking the link in the email will redirect them to their login page. If they successfully login within two minutes, they will be directed to the specific document referenced in the email notification.
To enable this feature, a setting must be turned OFF: Organization Setup -> System -> Email Settings ���� Exclude URL links in Document-based Emails
Approval Notifications in the Application
The application stores a history of all workflow notifications. This history is simply a list of all the workflow notifications located in a single tab in the approvals section. From this tab, you can view the notification and link to the associated document.
EMAI L APPROVAL S : HOW I T WORKS
Organizations with requisition or purchase order workflow can offer their approvers the ability to take action on documents quickly whether they are in the office or on the go. Email approvals allow an approver to receive an email with important information regarding the order to approve or reject, along with the ability to approve or reject the PR or PO without logging into SelectSite. With the option and permissions enabled, approvers will receive an enhanced approval email containing pertinent order information and a quick action webpage link where action may be taken.
How does it work?
When email approval is enabled, organizations will, by default, require approvers to enter an email approval code to take action from the webpage link, therefore ensuring the authorized approver is the person taking action on the requisition or purchase order. Approvers maintain an email approval code in their profile. When the approver accesses the approval webpage, they enter the email approval code and are authenticated as the authorized approver.
Additional Details:
• Only approvers given permission to approve/reject requisitions or PO’s via email will receive the enhanced email. The default email received by those who do not have this permission is the existing basic email notification. If the organization wants all other approvers that to receive the enhanced email without approval links, this may be configured. See section below for Enhanced Approval Email Notification.
• Users will not be able to approve from email where the organization has required email approval codes, but the approver has not yet configured an approval code in their profile. In this case, the approver will receive the enhanced email with order information; however, the email will not contain a link to the approval webpage. Instead, a warning message will display directing them to their site to take action on the document as well as to configure their email approval code to take action from future emails.
Taking action:
• After reviewing the order details in the email, the approver will select the link to access the secure approval webpage.
• The webpage that launches will render in the approver’s site colors, and will display limited document information to confirm the approver has landed on the appropriate approval page.
• The approver will have the same actions that are available to them in the site, for taking action on entire documents. Possible actions include:
• Requisition: approve, reject, assign to myself, and return to requisitioner (if available to the organization).
• Purchase order: approve, reject, assign to myself.
SciQuest, Inc. 39 www.SciQuest.com
• The approver will select the desired action and enter a comment if they choose. Approvers must enter their email approval code to submit the action for organizations where it is required.
• Once the action is complete, the approver receives a confirmation webpage. The action is logged in history as having been taken via email. Comments are also logged to Comments and history.
• If action has already been taken by another approver in a shared folder, the approver will receive a message that action has already been taken on the document.
INFORMAT ION INC LUDED IN EMA I LS WI TH ORDER DATA
If an organization chooses not to use the basic email notifications sent to approvers for pending purchase requisitions or purchase orders, a more detailed email will be sent, providing item and order data. The purpose of this concept is to provide a detailed list of information that will be provided in these email notifications:
Information included with PR Approval Notification emails:
• Summary information including Cart Name, Requisition #, Prepared by user, Prepared for user (if different than prepared by user), Workflow Folder , Priority, No. of line items, and Total amount/currency of the requisition.
• Line level information including Supplier Name, Item number (number of the line on the requisition, Item 1, Item 2, etc.), indication if the item is a non-catalog item, indication if the item is rejected or withdrawn, Product Description, Catalog Number, Quantity, Unit Price, Extended Price, Custom Catalog Attributes (if applicable) - Displays if the attribute is active and has a value, Contract number and name (if applicable), Size/Packaging, Taxable, Capital Expense, Commodity Code, Product flags - listed if true for the item, Custom field values – line values or if line is different from header value, Internal Notes - if populated, Internal Attachments - if present, and External Attachments - if present.
• NOTE: If the requisition contains more than ten lines, a message displays indicating user must login to see the details. If the item was rejected or withdrawn in a previous approval step, only the Product Description and Catalog number displays for that line.
• Form data including the name and type of form that was used to populate the line item(s).
• Account Codes information including the field, value, and description. For example: Project: 123, Services.
• Additional information such as the comments, the list of other approvers, names for internal attachments and supplier attachments, shipping address.
• A hyperlink to take action on the requisition. NOTE: This link does not display if the approver does not have an approval code set up or if it is the user’s own order. This link also does not display for those organizations that do not allow direct approvals from email.
Information included with PO Approval Notification emails:
• Summary information including Purchase Order #, Owner Name, Workflow Folder , Priority, Contract, No. of line items, and Total amount/currency of the requisition.
• Line level information including Supplier Name, Item number (number of the line on the requisition, Item 1, Item 2, etc.), indication if the item is a non-catalog item, indication if the item is rejected or withdrawn, Product Description, Catalog Number, Quantity, Unit Price, Extended Price, Custom Catalog Attributes (if applicable) - Displays if the attribute is active and has a value, Contract number and name (if applicable), Size/Packaging, Taxable, Capital Expense, Commodity Code, Product flags - listed if true for the item, Custom field values – line values or if line is different from header value, Internal Notes - if populated, Internal Attachments - if present, and External Attachments - if present.
• NOTE: If the PO contains more than ten lines, a message displays indicating user must login to see the details. If the item was rejected or withdrawn in a previous approval step, only the Product Description and Catalog number displays for that line.
• Form data including the name and type of form that was used to populate the line item(s).
• Account Codes information including the field, value, and description. For example: Project: 123, Services.
• Additional information such as the comments, the list of other approvers, names for internal attachments and supplier attachments, shipping address.
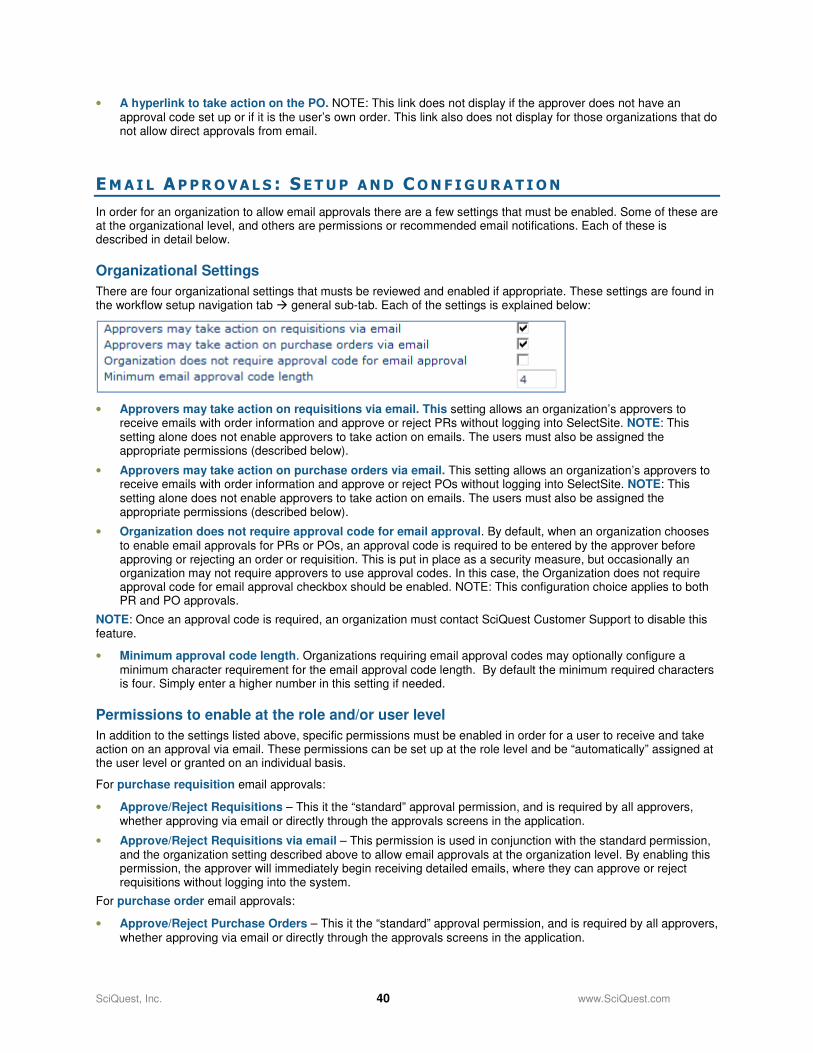
SciQuest, Inc. 40 www.SciQuest.com
• A hyperlink to take action on the PO. NOTE: This link does not display if the approver does not have an approval code set up or if it is the user’s own order. This link also does not display for those organizations that do not allow direct approvals from email.
EMAI L APPROVAL S : S ETUP AND CONF IGURAT ION
In order for an organization to allow email approvals there are a few settings that must be enabled. Some of these are at the organizational level, and others are permissions or recommended email notifications. Each of these is described in detail below.
Organizational Settings
There are four organizational settings that musts be reviewed and enabled if appropriate. These settings are found in the workflow setup navigation tab � general sub-tab. Each of the settings is explained below:
• Approvers may take action on requisitions via email. This setting allows an organization’s approvers to receive emails with order information and approve or reject PRs without logging into SelectSite. NOTE: This setting alone does not enable approvers to take action on emails. The users must also be assigned the appropriate permissions (described below).
• Approvers may take action on purchase orders via email. This setting allows an organization’s approvers to receive emails with order information and approve or reject POs without logging into SelectSite. NOTE: This setting alone does not enable approvers to take action on emails. The users must also be assigned the appropriate permissions (described below).
• Organization does not require approval code for email approval. By default, when an organization chooses to enable email approvals for PRs or POs, an approval code is required to be entered by the approver before approving or rejecting an order or requisition. This is put in place as a security measure, but occasionally an organization may not require approvers to use approval codes. In this case, the Organization does not require approval code for email approval checkbox should be enabled. NOTE: This configuration choice applies to both PR and PO approvals.
NOTE: Once an approval code is required, an organization must contact SciQuest Customer Support to disable this feature.
• Minimum approval code length. Organizations requiring email approval codes may optionally configure a minimum character requirement for the email approval code length. By default the minimum required characters is four. Simply enter a higher number in this setting if needed.
Permissions to enable at the role and/or user level
In addition to the settings listed above, specific permissions must be enabled in order for a user to receive and take action on an approval via email. These permissions can be set up at the role level and be “automatically” assigned at the user level or granted on an individual basis.
For purchase requisition email approvals:
• Approve/Reject Requisitions – This it the “standard” approval permission, and is required by all approvers, whether approving via email or directly through the approvals screens in the application.
• Approve/Reject Requisitions via email – This permission is used in conjunction with the standard permission, and the organization setting described above to allow email approvals at the organization level. By enabling this permission, the approver will immediately begin receiving detailed emails, where they can approve or reject requisitions without logging into the system.
For purchase order email approvals:
• Approve/Reject Purchase Orders – This it the “standard” approval permission, and is required by all approvers, whether approving via email or directly through the approvals screens in the application.
SciQuest, Inc. 41 www.SciQuest.com
• Approve/Reject Purchase Orders via email – This permission is used in conjunction with the standard permission, and the organization setting described above to allow email approvals at the organization level. By enabling this permission, the approver will immediately begin receiving detailed emails, where they can approve or reject orders without logging into the system.
Recommended Email Notifications
Email notifications are set up in the user profile: User Settings ���� Email Preferences. The following notifications should be enabled for approvers responsible for reviewing and approving purchase requisitions or purchase orders:
• PR Pending Workflow Approval. If this email preference is enabled, a user will receive an email when a purchase requisition requiring his/her attention is ready for review.
• PO Pending Workflow Approval. If this email preference is enabled, a user will receive an email when a purchase requisition requiring his/her attention is ready for review.
NOTE: This email will look differently and will function differently if your organization is NOT using email approvals. For more information on the different types of email notifications available, refer to Approval Notifications via Email on page 34.
Email Format: HTML or Plain Text
Emails can be sent to users via an HTML format or plain text format. Although the HTML format is visually nicer, sometimes there are limitations that require users to select plain text.
• Organizations can determine at an overall level what format to send emails to its approvers. This is set up by an administrator via organization setup � system � Email Settings. The Organization preferred email format can be set to Plain Text or HTML (the default setting). An organization might choose to default to plain text if it is their required email format or if most approvers will be viewing the email via a mobile device where email is best rendered without formatting.
• Approvers can override the format setting from their profile: Profile � User Settings � Personal Settings � Preferred email format. Choose HTML or Plain Text.
Setting up Approval Codes
In order to take action on a requisition or purchase order, most organizations require the approver enter an approval code to validate the user. This is a security measure, and can easily be entered via a mobile device or from the pop-up that displays from an email.
Approver Task:
Users must set up their approval code before the detailed emails will be sent. This code can be entered via the user profile: User Settings ���� User Identification ���� Email Approval Code. The user’s code must meet the organization’s minimum character requirement and may be any combination of letters, numbers and characters.
Administrator Task:
Email approval codes are easily set up and maintained by individual approvers. However, should the organization choose to configure each approver’s profile, this may be done via the text, tab-delimited user import. For more information on this task, refer to the Administrator Handbook: Day to Day Tasks.
System Administrators will be able to proactively determine which approvers have entered their email approval code. The field is available in the advanced CSV user export, and the value will be true where users have email approval codes and false where the value is blank.
Exercises
ACCE SS ING APPROVAL DOCUMENTS
All approval documents are accessed from the my approvals tab in the Approvals section of the application. You will have several display and filtering options to help you locate and manage the documents for approval.

SciQuest, Inc. 42 www.SciQuest.com
Step by Step
The goal of this exercise is to access documents for approval.
1. Access the Approvals tab. By default, the my approvals sub-tab will display. If you have access to requisition documents they should display by default. If you have access to only one type of document (PO, Invoice or Sales Order) those documents will display in the my approvals tab.
2. Refine and filter the displayed documents. There are several filtering options to narrow down the documents that are being displayed. As you select filter options, the documents displayed will be refined and the Filtered By area will be updated. Note: The filter options are configurable by your System Administrator. Please see the Administrator Handbook: Advanced Topics for information about configuring the filter options.
a. Locate the Refine Search Results area of the my approvals screen.
b. If applicable change the document type that is being displayed, click the Type dropdown and select the new type. The displayed approval documents will be changed to the selected document type. Note: The available document types will depend on your organization’s setup and your individual permissions.
c. If applicable select a date range for the documents. Click the Date Range dropdown box and select the appropriate date option. The approval documents will be filtered to contain only documents that were created in that date range.
d. If applicable, select documents that belong to another approver. Click the View Approvals For dropdown box and select the approver. The approval documents will be filtered to contain documents that are owned by the selected approver.
e. Select any additional filter criteria. The remaining available filter criteria will vary largely on document type, your organization’s overall setup and your personal permissions. To select a specific filtering criteria, click on the item in the filter section. In the example below, you would click on Chemistry to see only the documents for the Chemistry Department.
As you select filters they will be added to the i area. To remove a filter, un-select the checkbox.
3. Change the document view and display order. When you initially access the my approvals tab, it will default to the folder view. This can be changed to list view. The application will remember the last way you viewed the documents and default to that view each time you access the my approvals tab. By default, documents in list view will display in ascending order based on Submit Date. Use the following steps to change the documents view and display order:
a. To change the document view, click the Group Results by dropdown. Select the appropriate view.
b. When documents are grouped by folder, the folders will appear in alphabetical order with your approvals folder always appearing at the top of the folder list (the exception to this would be if none of the displayed
SciQuest, Inc. 43 www.SciQuest.com
documents exist in your approvals folder). To view all documents in a folder, click the folder icon or name to expand the list.
c. When documents are in the list view, by default the list will display in order of Submit Date with the newest first. Change the sort order by clicking on the Sort by dropdown above the list. Select the appropriate sort criteria and the list will be sorted.
d. Change the number of documents or folders displayed on the screen by clicking the Results per page dropdown and selecting the number of documents to display.
MOVING DOCUMENTS (PR/PO/INVO ICE ) T O YOUR APPROVA LS
FOLDER
Some requisitions, orders, and invoices requiring review automatically go to your approvals folder. If an approval step CAN be shared by more than one person, the document must be assigned to the approver before it is reviewed, updated, etc. By placing the pending document (PR, PO, or Invoice) in your approval folder, it signifies that the approver is responsible for the current step of workflow for the item(s). If multiple approvers are assigned access to a folder, then, by moving an item into the My Approvals folder, the approver is indicating their intent to review (approve or reject) the order.
Note: Requisitions that require financial approval by a specific approver will be placed automatically in the My Approvals folder.
Step by Step
The goal of the exercise is to select and reserve a requisition, purchase order, or invoice for approval review. This exercise will move a document to a user’s My Approvals folder.
1. Access the my approvals screen.
2. Locate unassigned documents in one of the following ways:
• In the filter criteria, locate the State filter groups then select the Not Assigned filter. The documents displayed will be refined to include only unassigned documents.
• You can also identify unassigned documents in the document list by the Assign button located in the action column.
3. Move the document(s) to your approval folder.
To move a single document to your approval folder:
a. To move a s document to your approval folder:
b. Click the Assign button. You will be asked to confirm that you would like to move the document.
c. If the document is currently in multiple folders, you will be asked if you would like to apply the move to all folders or just to the one from which you accessed the document. Click the appropriate action.
d. The document will be moved to your folder.
To move multiple documents to your approval folder:
a. Enable the Select checkbox for the individual items that you would like to assign to your approvals folder After you have selected which documents to assign, select the Assign option from the drop-down box (as shown below).
SciQuest, Inc. 44 www.SciQuest.com
b. If the document is currently in multiple folders, you will be asked if you would like to apply the move to all folders or just to the one from which you accessed the document. Click the appropriate action.
c. All selected documents will be moved to your folder.
4. After you have moved the item(s) to your approvals folder, the next step is to review the document for processing. Refer to the next exercise for further information on approving a requisition or order.
R E V I EWING A WORKF LOW DOCUMENT
An approver can review all the details of a requisition, purchase order, revised purchase order or invoice as part of the approval process. The approver can review this information by following the steps described in this exercise.
NOTE: This exercise assumes the approver is working in SelectSite to perform this task. For details on reviewing a PR or PO from an email notification, refer to Approving and Rejecting a PR or PO from an Email on page 46.
Step by Step
The goal of the exercise is to demonstrate reviewing workflow documents orders in SelectSite.
1. Go to the Approval tab.
2. Go to the my approvals sub tab, select the document type and configure any other filtering criteria to locate documents for review.
3. In most cases, you will approve documents after assigning them to yourself. If the document needing approval is not found in that folder, refer to the previous exercise to move it to this part of the screen.
4. Select the document number to access details of the document. Once you open the document, notice how it looks very similar to a cart that is submitted. The primary difference is that in some cases the data allowed to edit is limited, and the PR/PO workflow has been updated with any previous steps. The next step is to review and edit the document as needed. Sections that can be updated are identified by an Edit button. Click the Edit button to make any updates being sure to save your changes. NOTE: Supplier information cannot be modified on a PO.
APPROV ING A WORKF LOW DOCUMENT
The approver can quickly complete the approval process once the review of the document is complete. This exercise explains how to approve PR, PO, revised PO, and Invoice documents in workflow.
NOTE: This exercise assumes the approver is working in SelectSite to perform this task. For details on approving a PR or PO from an email notification, refer to Approving and Rejecting a PR or PO from an Email on page 46.
SciQuest, Inc. 45 www.SciQuest.com
Step by Step
The goal of the exercise is to demonstrate approving purchase requisitions and purchase orders in SelectSite. The assumption in this exercise is that the document (requisition or order) has been accessed and reviewed or is ready for approval.
QUICK APPROVALS: If you do not need to open a requisition or order before it is approved:
1. In the My Approvals folder locate the document you would like to approve.
2. Click the Approve button If one or more orders are in a shared folder, click on the Select checkboxes for the appropriate documents, then select Approve/Complete from the Action drop-down list box.
STANDARD APPROVALS: With standard approvals, the approver opens the order and reviews the information and makes any changes if needed, then approves the order.
1. Open the document (requisition or order).
2. Review the information and make updates if needed.
3. Click the Go button at the top of the screen. Make sure the Approve/Complete option is selected. To approve the document and move to the next in your approvals folder, select Approve/Complete & Show Next from the dropdown.
R E J EC T ING A WORKF LOW DOCUMENT
To reject a requisition or order, Approvers have the ability to reject all lines of a requisition in one single action rather than line by line. SelectSite also allows you to delete select line items from a requisition or order. This exercise explains how an approver can reject documents and lines from PR and PO documents. This exercise assumes the approver is working in SelectSite to perform this task. For details on rejecting a PR or PO from an email notification, refer to Approving and Rejecting a PR or PO from an Email on page 46.
NOTE: If the approver enters a rejection note, this information will be sent with the rejection email to the requisitioner.
NOTE: Use caution is you are reviewing a purchase order that has been created and revised (change order). Understand that by rejecting a PO revision, the original PO is also rejected.
Step by Step
The goal of the exercise is to demonstrate rejecting the entire PR document.
1. Open the requisition or order (refer to previous exercises). Note: The approver is required to open an order before it can be rejected.
2. Go to the Available Actions drop down at the top of the requisition then select Reject Requisition and click the Go button to reject the entire requisition.
3. Enter a rejection reason in the comment pop-up box.
4. Select the Reject Requisition button to save the comment and reject the requisition. The rejection is not finalized until the workflow step is complete.
SciQuest, Inc. 46 www.SciQuest.com
Rejecting Lines on a Requisition
Step by Step
The goal of the exercise is to demonstrate rejecting lines on a requisition.
1. Open the requisition or order (refer to previous exercises). Note: The approver is required to open an order before it can be rejected.
2. Select one or more line items to reject by clicking the checkbox to the right of the price. Alternately, click the checkbox in the column header row for EACH supplier to select all of the lines for a supplier.
3. Enter the reason in the comment pop-up box.
4. Select the Reject Line Item button to save the comment and reject the line item(s). The rejection is not finalized until the workflow step is complete.
APPROV ING AND R E J EC T ING A PR OR PO F ROM AN EMAI L
Some organizations allow its users to receive email notifications where an order can be processed directly from the email. For more information, refer to Approval Notifications via Email on page 34,
Approval Notifications in the Application
The application stores a history of all workflow notifications. This history is simply a list of all the workflow notifications located in a single tab in the approvals section. From this tab, you can view the notification and link to the associated document.
Email Approvals: How it Works on page 38, Information Included in Emails with Order Data on page 39, or Email Approvals: Setup and Configuration on page 40.
Step by Step
The goal of the exercise is review and take action directly from an email received for a PR or PO requiring attention. This exercise assumes that the organization and user have been properly set up/configured to receive this type of notification.
1. Open the email and review the details regarding the PR or PO..
2. Click the Take Action link to perform any of the following tasks:
3. For a requisition: approve, reject, assign to myself, and return to requisitioner (if available to your organization).
4. For a purchase order: approve, reject, or assign to myself.
5. From the wnidow that displays, enter a comment (optionally).
6. Enter the email approval code if this is required.
7. Click Submit. A confirmation page displays. The action that was performed in logged into the history for the PR or PO, as well as comments.
8. NOTE: If action has already been taken by another approver in a shared folder, the approver will receive a message that action has already been taken on the document
FORWARD ING A WORKF LOW DOCUMENT
Occasionally, an approver may decide that a different individual is a more appropriate approver for a particular request. Forward is a function provided in the workflow process where a document can be sent to a different approver for review. This exercise describes how an approver can forward a PR or PO document in workflow to another approver. NOTE: The substitute function is recommended if you will be on vacation or do not want to handle orders for a specified time period normally assigned to you.
Step by Step
The goal of the exercise is to demonstrate forwarding a PR and PO to another SelectSite user.
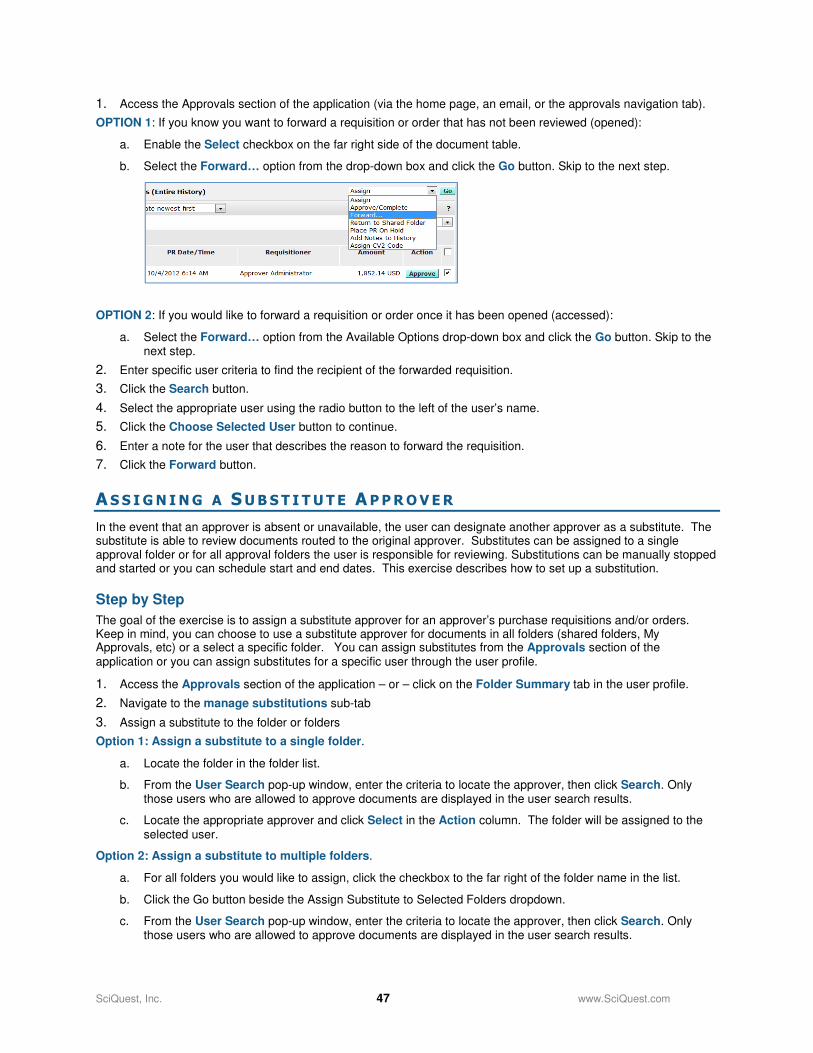
SciQuest, Inc. 47 www.SciQuest.com
1. Access the Approvals section of the application (via the home page, an email, or the approvals navigation tab).
OPTION 1: If you know you want to forward a requisition or order that has not been reviewed (opened):
a. Enable the Select checkbox on the far right side of the document table.
b. Select the Forward… option from the drop-down box and click the Go button. Skip to the next step.
OPTION 2: If you would like to forward a requisition or order once it has been opened (accessed):
a. Select the Forward… option from the Available Options drop-down box and click the Go button. Skip to the next step.
2. Enter specific user criteria to find the recipient of the forwarded requisition.
3. Click the Search button.
4. Select the appropriate user using the radio button to the left of the user’s name.
5. Click the Choose Selected User button to continue.
6. Enter a note for the user that describes the reason to forward the requisition.
7. Click the Forward button.
A SS IGN ING A SUBST I TUTE APPROVER
In the event that an approver is absent or unavailable, the user can designate another approver as a substitute. The substitute is able to review documents routed to the original approver. Substitutes can be assigned to a single approval folder or for all approval folders the user is responsible for reviewing. Substitutions can be manually stopped and started or you can schedule start and end dates. This exercise describes how to set up a substitution.
Step by Step
The goal of the exercise is to assign a substitute approver for an approver’s purchase requisitions and/or orders. Keep in mind, you can choose to use a substitute approver for documents in all folders (shared folders, My Approvals, etc) or a select a specific folder. You can assign substitutes from the Approvals section of the application or you can assign substitutes for a specific user through the user profile.
1. Access the Approvals section of the application – or – click on the Folder Summary tab in the user profile.
2. Navigate to the manage substitutions sub-tab
3. Assign a substitute to the folder or folders
Option 1: Assign a substitute to a single folder.
a. Locate the folder in the folder list.
b. From the User Search pop-up window, enter the criteria to locate the approver, then click Search. Only those users who are allowed to approve documents are displayed in the user search results.
c. Locate the appropriate approver and click Select in the Action column. The folder will be assigned to the selected user.
Option 2: Assign a substitute to multiple folders.
a. For all folders you would like to assign, click the checkbox to the far right of the folder name in the list.
b. Click the Go button beside the Assign Substitute to Selected Folders dropdown.
c. From the User Search pop-up window, enter the criteria to locate the approver, then click Search. Only those users who are allowed to approve documents are displayed in the user search results.
SciQuest, Inc. 48 www.SciQuest.com
d. Locate the appropriate approver and click Select in the Action column. All selected folders will be assigned to the selected user.
Option 3: Assign a substitute approver to all folders.
a. Click the Assign substitutes to All Requisition Folders.
b. From the User Search pop-up window, enter the criteria to locate the approver, then click Search. Only those users who are allowed to approve documents are displayed in the user search results.
c. Locate the appropriate approver and click Select in the Action column. All folders will be assigned to the selected user.
R EMOVING A SUBST I TUTE APPROVER
You can end or remove a substitute approver from one or multiple folders.
Step by Step
The goal of the exercise is to remove a substitute approver for an approver’s purchase requisitions and/or orders. You can remove substitutes from the Approvals section of the application or you can remove substitutes for a specific user through the user profile.
1. Access the Approvals section of the application – or – click on the Folder Summary tab in the user profile.
2. Navigate to the manage substitutions sub-tab
3. Remove substitutes from the folder or folders.
Option 1: Remove a substitute from a single folder
a. Locate the appropriate folder.
b. Click the Remove button. The substitute will be removed.
Option 2: Remove from multiple selected folders.
a. Select the checkbox to the right of each folder you would like to remove.
b. From the dropdown menu select Remove Substitute from Selected Folders.
c. Click Go. The substitutes will be removed.
Option 3: Remove substitutes from all folders.
a. Select the End Substitute for All Requisition folders button above the folder list.
b. The substitutes will be removed.
EXP ED I T ING AN ORDER
Expediting allows an approver to skip one or more steps in the purchase requisition or purchase order workflow. Expediting is typically done for testing purposes or occasionally to purposefully skip steps. Use caution when expediting orders. Whenever an order is expedited, the process is tracked in order history.
There are four permissions associated with expediting, each explained below.
• Expedite requisitions – This permission allows an approver to skip steps up to the last step they are allowed to approve in PR workflow, but not beyond.
• Expedite requisition through all workflow steps – This permission allows an approver to skip any and all steps, including system steps such as creating the purchase order.
• Expedite purchase orders - This permission allows an approver to skip steps up to the last step they are allowed to approve in PO workflow, but not beyond.
• Expedite purchase orders through all workflow steps - This permission allows an approver to skip any and all steps, including system steps such as distributing a purchase order.
SciQuest, Inc. 49 www.SciQuest.com
Step by Step
The goal of the exercise is to describe how an order can be expedited.
1. Access the purchase requisition or order via Document Search.
2. Open the order and go to the Approvals tab.
3. Click the Expedite button on the appropriate step. Keep in mind, the PREVIOUS step/steps will be expedited, but not the one selected.
4. From the pop-up window, document the reason for expediting the order. This note displays in the History for the PR/PO, then click Expedite.
To move to the next step, select Approve/Complete from the drop-down in the upper right-hand corner, then click Go. The order is expedited.
ADD ING A COMMENT TO A PR, PO , OR INVO IC E
Comments can be added to purchase requisitions, purchase orders, and invoices that have been saved/created in the system. Comments provide a way for approvers to communicate any questions they have to the requisitioner, allows requisitioners to add additional documentation needed, and more.
• NEW: The sender address for the email is based on the organization setting. Organizations should update this address in Organization Set up � System � email � Comment added to PR/PO/Invoice.
Step by Step
The goal of the exercise is to add a comment to a workflow document.
1. Open the workflow document. Users can add comments to documents that they created (as the requisitioner), that they have permission to view (based on departmental or org-wide viewing privileges), or orders that require the user’s approval.
2. Add a comment in one of the following ways:
• Click the Comments sub-tab, as shown below. Click the Add Comment button.
• From the Available Actions dropdown menu, select Add Comment and click Go.
3. The Add Comment overlay window displays. From this window, you can determine who will be notified via email of the comment, enter a note, and attach one or more supporting documents:
4. Enable the checkboxes for the users that you would like notified of the comment via email. For example, if you are an approver, you would probably like to notify the requisitioner of the question at hand. If you are a requisitioner responding to a question, you may want to email the approver and your boss. Click the add email recipient... link to find other SelectSite users to email.
5. Enter the note / comment in the text box. Max characters is 1000.
6. If you would like to attach a file or a link for a URL, choose the file type, enter the file name (for reference purposes later), and click Browse to select the file.
7. Click the Add Comment button to save the comment. The appropriate parties will be emailed.
8. Once the comment has been added, the number of comments for the PR will display in parenthesis on the comments tab. See example below.
9. An attachments tab is now available on the PR. If an attachment was added via a comment, the attachment will reference the comment and will also display the number of comments on the tab.
10. After the comment is submitted, a history can be found in the Comments and History sub-tab. Users can reply directly to a comment by clicking the reply to button, as shown below.
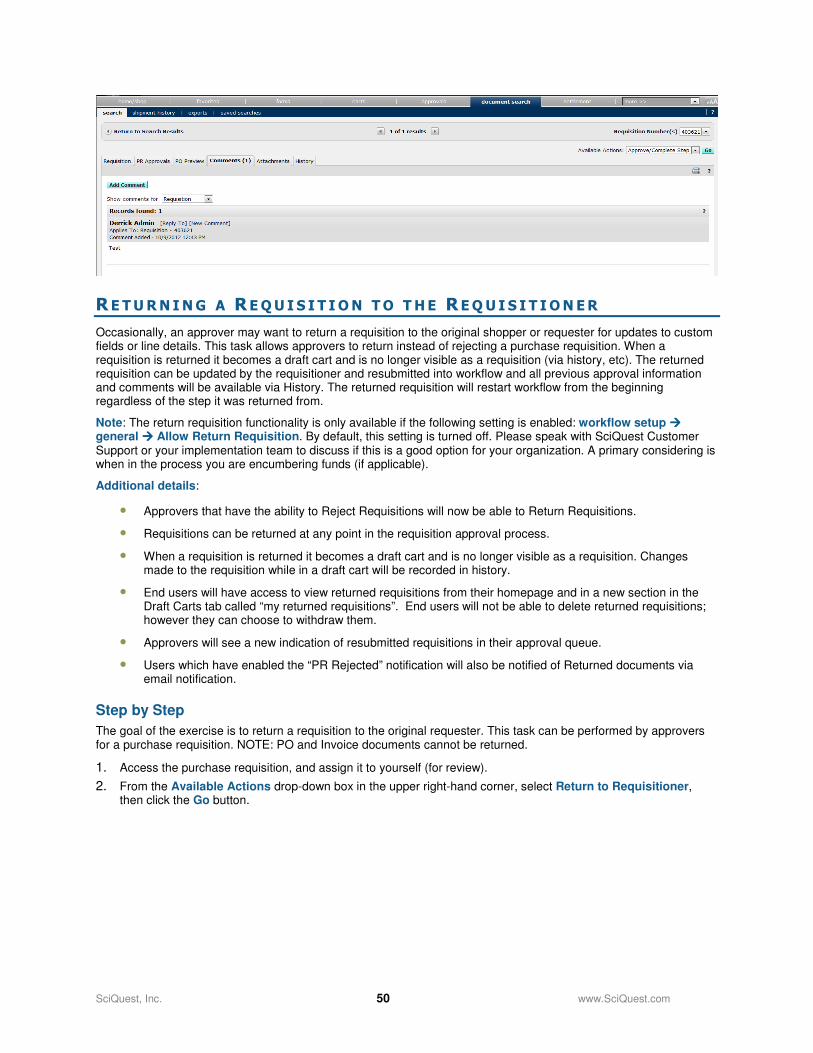
SciQuest, Inc. 50 www.SciQuest.com
R E TURN ING A REQU I S I T ION TO THE REQU I S I T IONER
Occasionally, an approver may want to return a requisition to the original shopper or requester for updates to custom fields or line details. This task allows approvers to return instead of rejecting a purchase requisition. When a requisition is returned it becomes a draft cart and is no longer visible as a requisition (via history, etc). The returned requisition can be updated by the requisitioner and resubmitted into workflow and all previous approval information and comments will be available via History. The returned requisition will restart workflow from the beginning regardless of the step it was returned from.
Note: The return requisition functionality is only available if the following setting is enabled: workflow setup ���� general ���� Allow Return Requisition. By default, this setting is turned off. Please speak with SciQuest Customer Support or your implementation team to discuss if this is a good option for your organization. A primary considering is when in the process you are encumbering funds (if applicable).
Additional details:
• Approvers that have the ability to Reject Requisitions will now be able to Return Requisitions.
• Requisitions can be returned at any point in the requisition approval process.
• When a requisition is returned it becomes a draft cart and is no longer visible as a requisition. Changes made to the requisition while in a draft cart will be recorded in history.
• End users will have access to view returned requisitions from their homepage and in a new section in the Draft Carts tab called “my returned requisitions”. End users will not be able to delete returned requisitions; however they can choose to withdraw them.
• Approvers will see a new indication of resubmitted requisitions in their approval queue.
• Users which have enabled the “PR Rejected” notification will also be notified of Returned documents via email notification.
Step by Step
The goal of the exercise is to return a requisition to the original requester. This task can be performed by approvers for a purchase requisition. NOTE: PO and Invoice documents cannot be returned.
1. Access the purchase requisition, and assign it to yourself (for review).
2. From the Available Actions drop-down box in the upper right-hand corner, select Return to Requisitioner, then click the Go button.
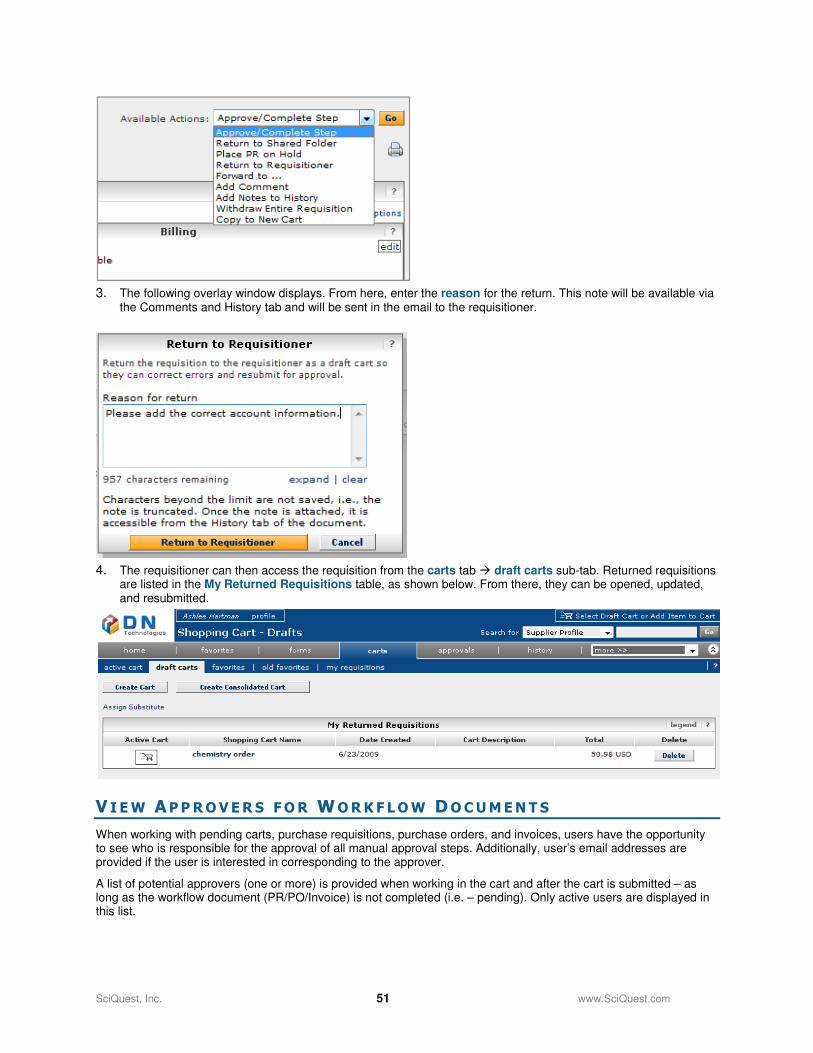
SciQuest, Inc. 51 www.SciQuest.com
3. The following overlay window displays. From here, enter the reason for the return. This note will be available via the Comments and History tab and will be sent in the email to the requisitioner.
4. The requisitioner can then access the requisition from the carts tab � draft carts sub-tab. Returned requisitions are listed in the My Returned Requisitions table, as shown below. From there, they can be opened, updated, and resubmitted.
V I EW APPROVERS FOR WORKF LOW DOCUMENTS
When working with pending carts, purchase requisitions, purchase orders, and invoices, users have the opportunity to see who is responsible for the approval of all manual approval steps. Additionally, user’s email addresses are provided if the user is interested in corresponding to the approver.
A list of potential approvers (one or more) is provided when working in the cart and after the cart is submitted – as long as the workflow document (PR/PO/Invoice) is not completed (i.e. – pending). Only active users are displayed in this list.
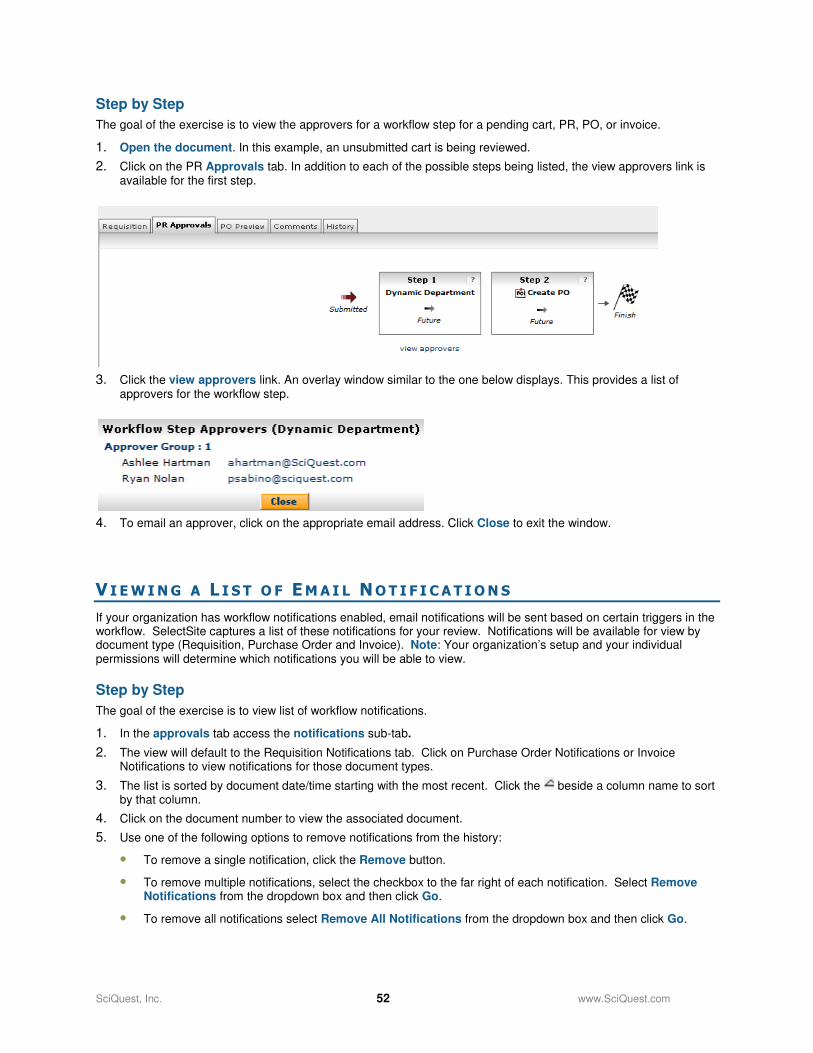
SciQuest, Inc. 52 www.SciQuest.com
Step by Step
The goal of the exercise is to view the approvers for a workflow step for a pending cart, PR, PO, or invoice.
1. Open the document. In this example, an unsubmitted cart is being reviewed.
2. Click on the PR Approvals tab. In addition to each of the possible steps being listed, the view approvers link is available for the first step.
3. Click the view approvers link. An overlay window similar to the one below displays. This provides a list of approvers for the workflow step.
4. To email an approver, click on the appropriate email address. Click Close to exit the window.
V I EWING A L I S T O F EMAI L NOT I F I CAT IONS
If your organization has workflow notifications enabled, email notifications will be sent based on certain triggers in the workflow. SelectSite captures a list of these notifications for your review. Notifications will be available for view by document type (Requisition, Purchase Order and Invoice). Note: Your organization’s setup and your individual permissions will determine which notifications you will be able to view.
Step by Step
The goal of the exercise is to view list of workflow notifications.
1. In the approvals tab access the notifications sub-tab.
2. The view will default to the Requisition Notifications tab. Click on Purchase Order Notifications or Invoice Notifications to view notifications for those document types.
3. The list is sorted by document date/time starting with the most recent. Click the beside a column name to sort by that column.
4. Click on the document number to view the associated document.
5. Use one of the following options to remove notifications from the history:
• To remove a single notification, click the Remove button.
• To remove multiple notifications, select the checkbox to the far right of each notification. Select Remove Notifications from the dropdown box and then click Go.
• To remove all notifications select Remove All Notifications from the dropdown box and then click Go.
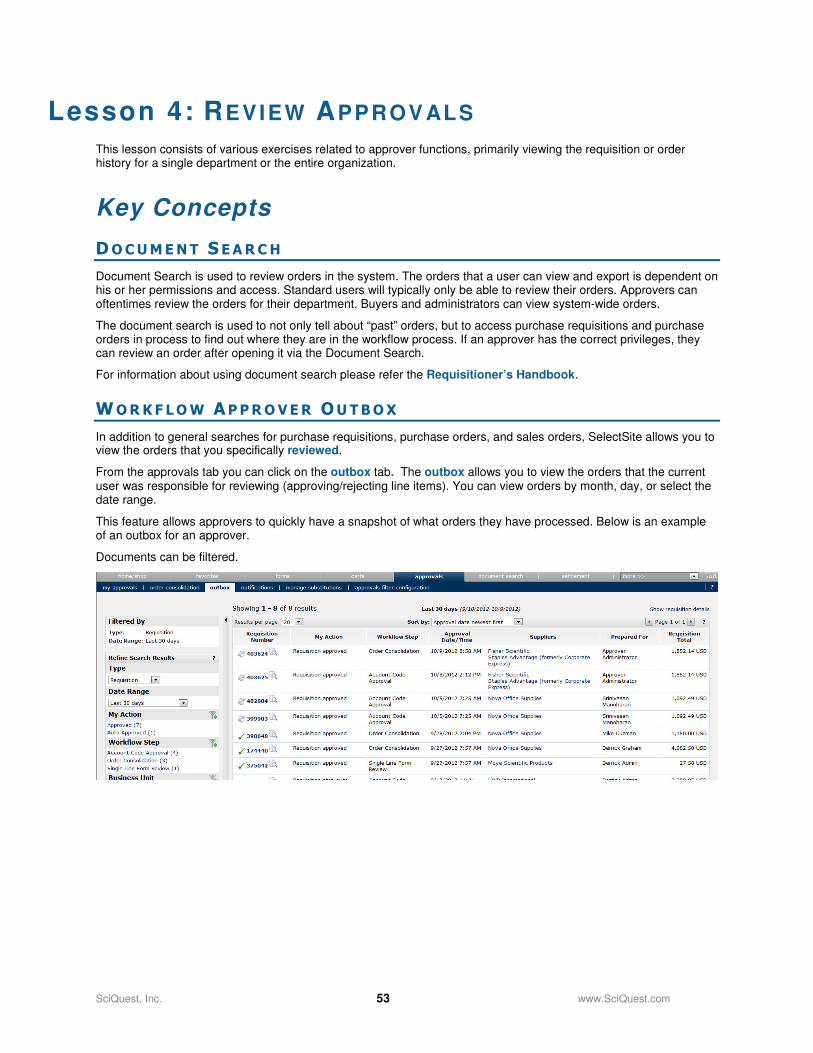
SciQuest, Inc. 53 www.SciQuest.com
Lesson 4: REVIEW APPROV ALS
This lesson consists of various exercises related to approver functions, primarily viewing the requisition or order history for a single department or the entire organization.
Key Concepts
DOCUMENT S EARCH
Document Search is used to review orders in the system. The orders that a user can view and export is dependent on his or her permissions and access. Standard users will typically only be able to review their orders. Approvers can oftentimes review the orders for their department. Buyers and administrators can view system-wide orders.
The document search is used to not only tell about “past” orders, but to access purchase requisitions and purchase orders in process to find out where they are in the workflow process. If an approver has the correct privileges, they can review an order after opening it via the Document Search.
For information about using document search please refer the Requisitioner’s Handbook.
WORKF LOW APPROVER OUTBOX
In addition to general searches for purchase requisitions, purchase orders, and sales orders, SelectSite allows you to view the orders that you specifically reviewed.
From the approvals tab you can click on the outbox tab. The outbox allows you to view the orders that the current user was responsible for reviewing (approving/rejecting line items). You can view orders by month, day, or select the date range.
This feature allows approvers to quickly have a snapshot of what orders they have processed. Below is an example of an outbox for an approver.
Documents can be filtered.
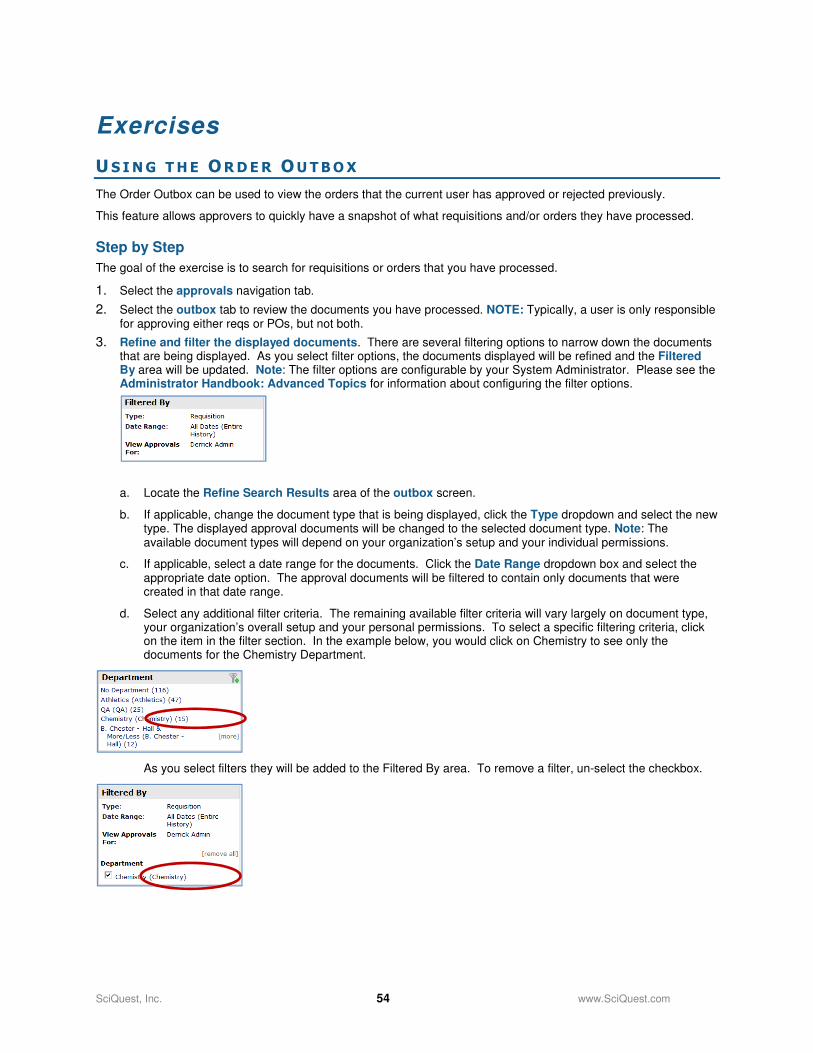
SciQuest, Inc. 54 www.SciQuest.com
Exercises
U S ING THE ORDER OUTBOX
The Order Outbox can be used to view the orders that the current user has approved or rejected previously.
This feature allows approvers to quickly have a snapshot of what requisitions and/or orders they have processed.
Step by Step
The goal of the exercise is to search for requisitions or orders that you have processed.
1. Select the approvals navigation tab.
2. Select the outbox tab to review the documents you have processed. NOTE: Typically, a user is only responsible for approving either reqs or POs, but not both.
3. Refine and filter the displayed documents. There are several filtering options to narrow down the documents that are being displayed. As you select filter options, the documents displayed will be refined and the Filtered By area will be updated. Note: The filter options are configurable by your System Administrator. Please see the Administrator Handbook: Advanced Topics for information about configuring the filter options.
a. Locate the Refine Search Results area of the outbox screen.
b. If applicable, change the document type that is being displayed, click the Type dropdown and select the new type. The displayed approval documents will be changed to the selected document type. Note: The available document types will depend on your organization’s setup and your individual permissions.
c. If applicable, select a date range for the documents. Click the Date Range dropdown box and select the appropriate date option. The approval documents will be filtered to contain only documents that were created in that date range.
d. Select any additional filter criteria. The remaining available filter criteria will vary largely on document type, your organization’s overall setup and your personal permissions. To select a specific filtering criteria, click on the item in the filter section. In the example below, you would click on Chemistry to see only the documents for the Chemistry Department.
As you select filters they will be added to the Filtered By area. To remove a filter, un-select the checkbox.
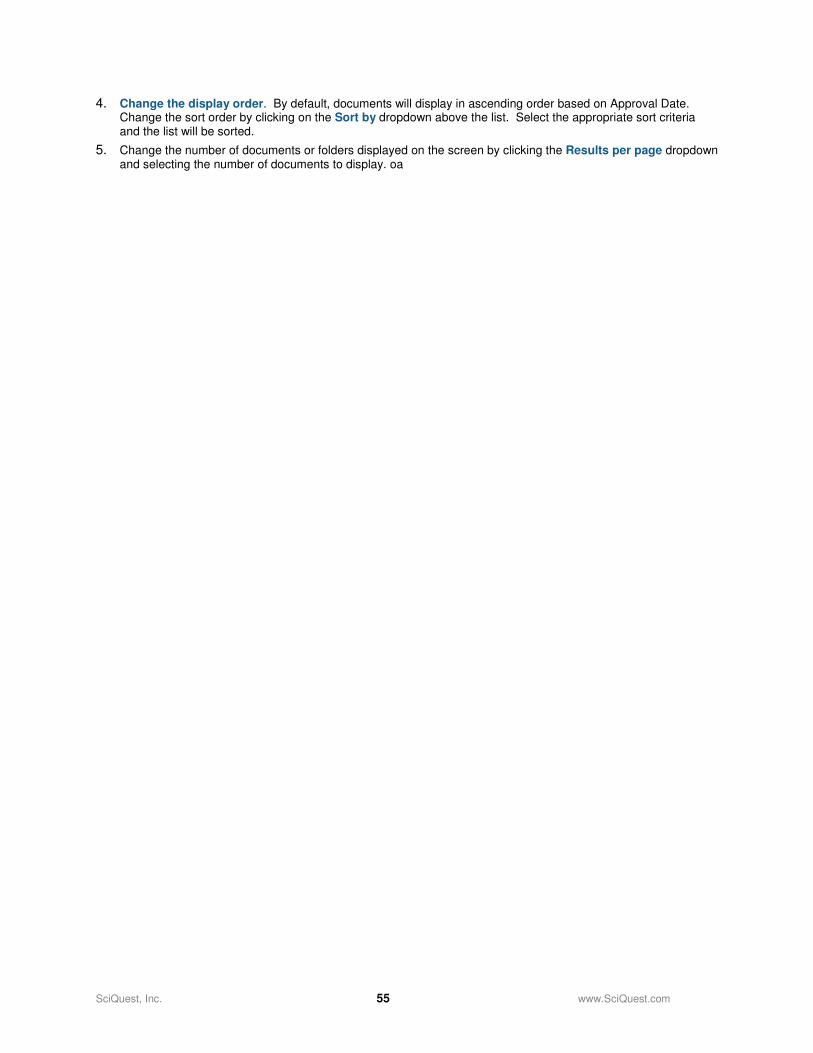
SciQuest, Inc. 55 www.SciQuest.com
4. Change the display order. By default, documents will display in ascending order based on Approval Date. Change the sort order by clicking on the Sort by dropdown above the list. Select the appropriate sort criteria and the list will be sorted.
5. Change the number of documents or folders displayed on the screen by clicking the Results per page dropdown and selecting the number of documents to display. oa