apex ap-pro regal user manual - massage-chair … regal... · apex ap-pro regal user manual please...
TRANSCRIPT

APEX AP-Pro Regal
User Manual
Please read SAFETY INSTRUCTIONS carefully before using the chair.
准备工作
按摩操作
15
23
24
1
5
6
13
19
21
22
7
8
护理
其他
9
安装
AP-Pro RegalWith 3D technology
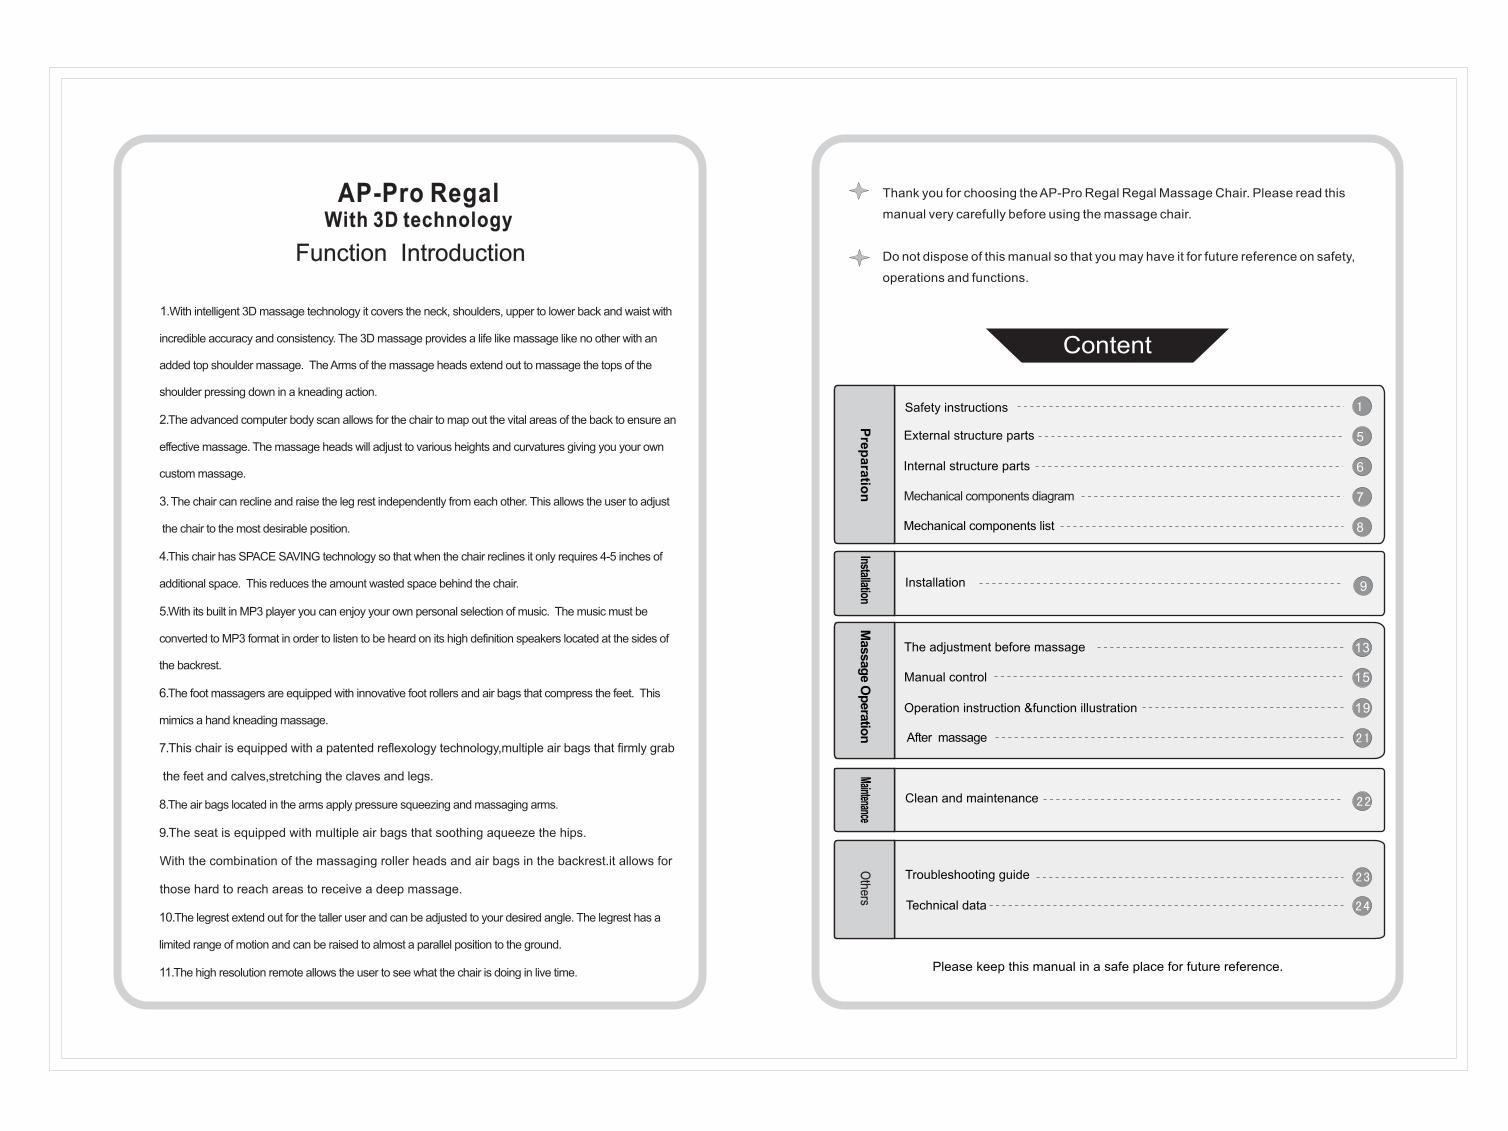
1.With intelligent 3D massage technology it covers the neck, shoulders, upper to lower back and waist with
incredible accuracy and consistency. The 3D massage provides a life like massage like no other with an
added top shoulder massage. The Arms of the massage heads extend out to massage the tops of the
shoulder pressing down in a kneading action.
2.The advanced computer body scan allows for the chair to map out the vital areas of the back to ensure an
effective massage. The massage heads will adjust to various heights and curvatures giving you your own
custom massage.
3. The chair can recline and raise the leg rest independently from each other. This allows the user to adjust
the chair to the most desirable position.
4.This chair has SPACE SAVING technology so that when the chair reclines it only requires 4-5 inches of
additional space. This reduces the amount wasted space behind the chair.
5.With its built in MP3 player you can enjoy your own personal selection of music. The music must be
converted to MP3 format in order to listen to be heard on its high definition speakers located at the sides of
the backrest.
6.The foot massagers are equipped with innovative foot rollers and air bags that compress the feet. This
mimics a hand kneading massage.
7.This chair is equipped with a patented reflexology technology,multiple air bags that firmly grab
the feet and calves,stretching the claves and legs.
8.The air bags located in the arms apply pressure squeezing and massaging arms.
9.The seat is equipped with multiple air bags that soothing aqueeze the hips.
With the combination of the massaging roller heads and air bags in the backrest.it allows for
those hard to reach areas to receive a deep massage.
10.The legrest extend out for the taller user and can be adjusted to your desired angle. The legrest has a
limited range of motion and can be raised to almost a parallel position to the ground.
11.The high resolution remote allows the user to see what the chair is doing in live time.
Function Introduction
Thank you for choosing the AP-Pro Regal Regal Massage Chair. Please read this
manual very carefully before using the massage chair.
Do not dispose of this manual so that you may have it for future reference on safety,
operations and functions.
Please keep this manual in a safe place for future reference.
Content
External structure parts
Internal structure parts
The adjustment before massage
Operation instruction &function illustration
Manual control
Clean and maintenance
Pre
para
tion
Safety instructions
Massag
e O
pera
tion
Troubleshooting guide
After massage
Mechanical components diagram
Mechanical components list
MaintenanceO
thers
Technical data
Installation
Installation

1 2
Warning
Please read this manual carefully to make sure the installation and operation of the massage chair is correct.
“Safety Instructions” is provided in both Warning and Caution for important safety information.
Both Warning and Caution are important safety caution, please pay more attention.
This sign indicates forbidden behavior.
This sign indicates must follow instruction to operate.
This sign indicates self disassembly is forbidden.
This sign indicates correct operation of cable.
This symbol indicates to proceed with extreme caution. May lead to serious
electrical injury or death.
Caution
▲
Symbol meaning
The following should be kept for any further references.
Anyone with a medical condition or has surgery or any medical device implants
can NOT use this chair unless recommended by your physician. People with
pacemakers should NOT use this product because it has magnetic fields from
the electric current.
Children, youth should NOT use this chair.
Do NOT use this chair to sleep in.
If you have been drinking do NOT use this chair.
During the use of this chair if you feel discomfort, immediately stop using the
chair and contact your doctor.
Make sure there are NO children or pets within a 3 foot radius of the chair when
in use. When the legrest and backrest are in motion it may cause serious injury.
Be sure not to allow the massage heads to massage above the neck. If you have
any ailments do NOT use this chair without the approval of a doctor.
Ensure the chair is being plugged in to the proper power supply. We HIGHLY
recommend that you plug the chair into a surge protector. Make sure all plugs
are firmly inserted.
When plugging or unplugging the chair, the power switch in the back of the chair
should be in the OFF position.
Do NOT fold or crease the seat cushions or any of the pads for storage.
Do not have the chair run for long period of time. It is recommended that the
chair be turned off after 1 hour and allow for 30 min. to cool down.
If you see any visible damage to the power plug refrain from using the chair and
contact the manufacturer.
Do not twist, lay on top any objects on the cord.
Do NOT fold or crease the seat cushions or any of the pads for storage.
Do not have the chair run for long period of time. It is recommended that the chair be turned off
after 1 hour and allow for 30 min. to cool down.
If you see any visible damage to the power plug refrain from using the chair and contact the
manufacturer.
Do not twist, lay on top any objects on the cord.
Safety instructions Safety instructions
Pre
para
tion
Pre
para
tion
Warning
This symbol indicates to be very careful with this area of the massage chair or
damage to the product may occur.
3 4
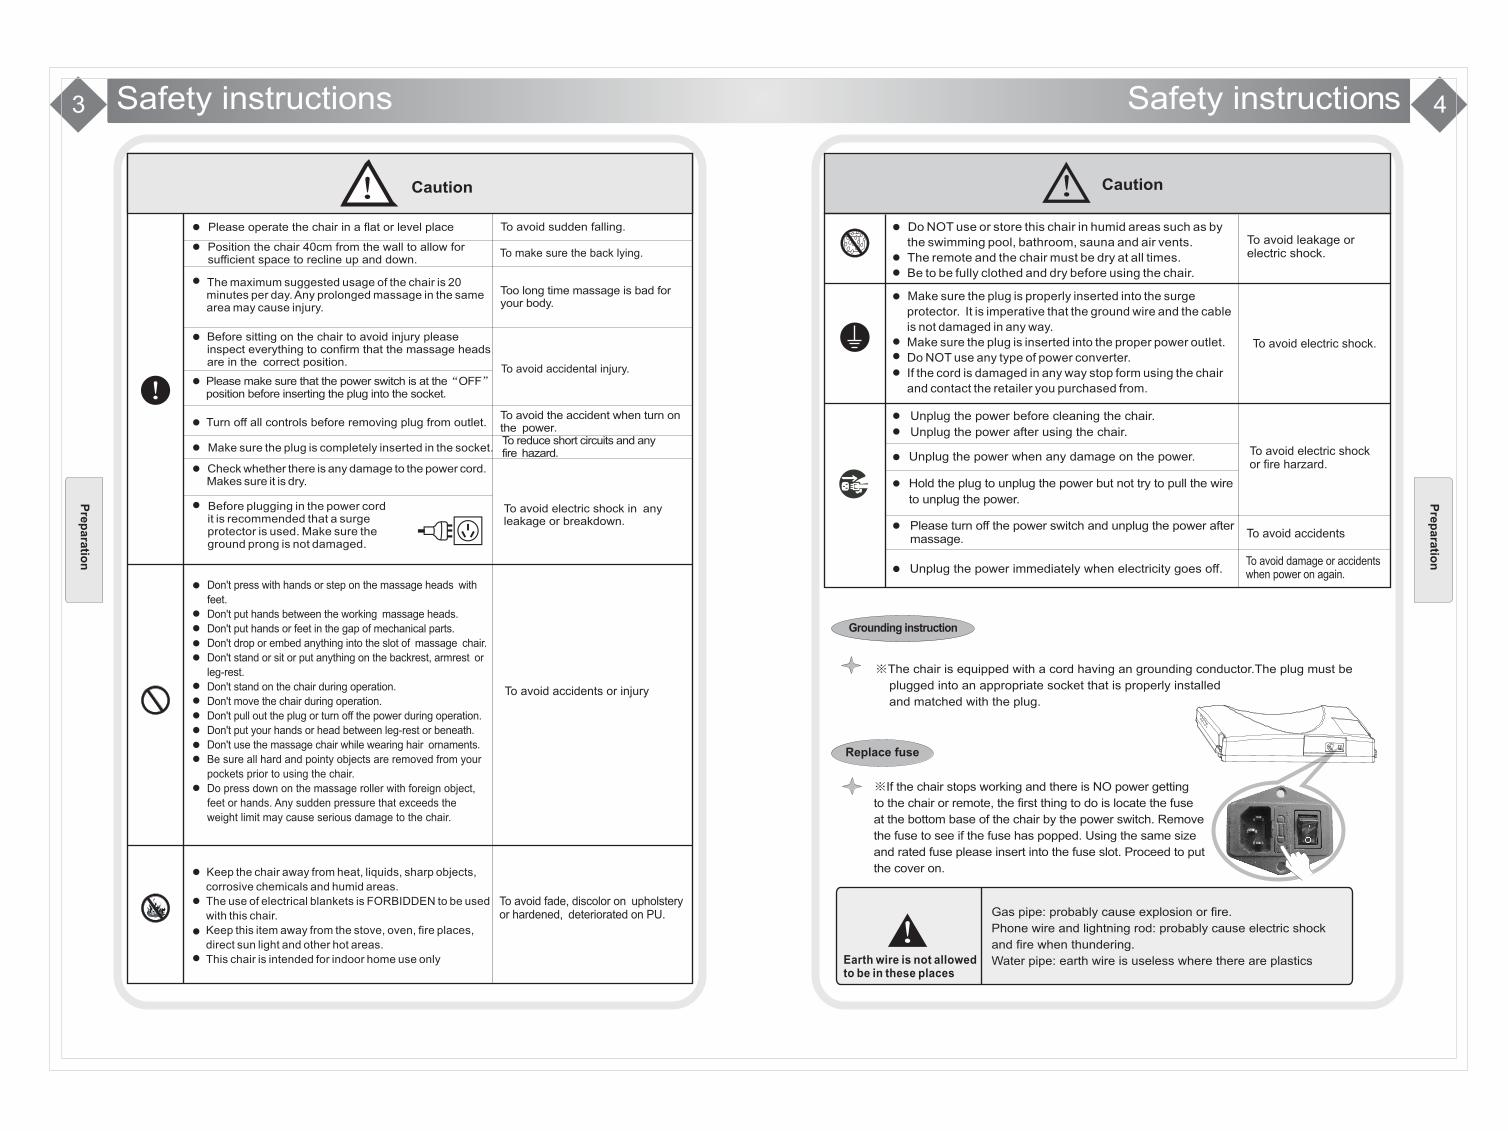
Position the chair 40cm from the wall to allow for sufficient space to recline up and down.
Please operate the chair in a flat or level place
Before plugging in the power cordit is recommended that a surge protector is used. Make sure the ground prong is not damaged.
Don't press with hands or step on the massage heads with
feet.
Don't put hands between the working massage heads.
Don't put hands or feet in the gap of mechanical parts.
Don't drop or embed anything into the slot of massage chair.
Don't stand or sit or put anything on the backrest, armrest or
leg-rest.
Don't stand on the chair during operation.
Don't move the chair during operation.
Don't pull out the plug or turn off the power during operation.
Don't put your hands or head between leg-rest or beneath.
Don't use the massage chair while wearing hair ornaments.
Be sure all hard and pointy objects are removed from your
pockets prior to using the chair.
Do press down on the massage roller with foreign object,
feet or hands. Any sudden pressure that exceeds the
weight limit may cause serious damage to the chair.
Caution
Do NOT use or store this chair in humid areas such as by
the swimming pool, bathroom, sauna and air vents.
The remote and the chair must be dry at all times.
Be to be fully clothed and dry before using the chair.
Unplug the power when any damage on the power.
Caution
To avoid sudden falling.
The maximum suggested usage of the chair is 20 minutes per day. Any prolonged massage in the same area may cause injury.
Before sitting on the chair to avoid injury please inspect everything to confirm that the massage heads are in the correct position.
Too long time massage is bad for your body.
To avoid electric shock in any leakage or breakdown.
To avoid fade, discolor on upholstery or hardened, deteriorated on PU.
Unplug the power before cleaning the chair.
Unplug the power after using the chair.
Keep the chair away from heat, liquids, sharp objects,
corrosive chemicals and humid areas.
The use of electrical blankets is FORBIDDEN to be used
with this chair.
Keep this item away from the stove, oven, fire places,
direct sun light and other hot areas.
This chair is intended for indoor home use only
Make sure the plug is completely inserted in the socket.To reduce short circuits and any fire hazard.
To avoid the accident when turn on the power. Turn off all controls before removing plug from outlet.
Check whether there is any damage to the power cord. Makes sure it is dry.
Please turn off the power switch and unplug the power after massage.
Please make sure that the power switch is at the“OFF” position before inserting the plug into the socket.
Unplug the power immediately when electricity goes off.
Make sure the plug is properly inserted into the surge
protector. It is imperative that the ground wire and the cable
is not damaged in any way.
Make sure the plug is inserted into the proper power outlet.
Do NOT use any type of power converter.
If the cord is damaged in any way stop form using the chair
and contact the retailer you purchased from.
Hold the plug to unplug the power but not try to pull the wire
to unplug the power.
Safety instructions Safety instructions
Pre
para
tion
Pre
para
tion
To make sure the back lying.
To avoid accidental injury.
To avoid accidents or injury
To avoid leakage or electric shock.
To avoid electric shock.
To avoid electric shock or fire harzard.
To avoid accidents
To avoid damage or accidents when power on again.
▲Gas pipe: probably cause explosion or fire.
Phone wire and lightning rod: probably cause electric shock
and fire when thundering.
Water pipe: earth wire is useless where there are plasticsEarth wire is not allowed to be in these places
Grounding instruction
Replace fuse
※The chair is equipped with a cord having an grounding conductor.The plug must be
plugged into an appropriate socket that is properly installed
and matched with the plug.
※If the chair stops working and there is NO power getting
to the chair or remote, the first thing to do is locate the fuse
at the bottom base of the chair by the power switch. Remove
the fuse to see if the fuse has popped. Using the same size
and rated fuse please insert into the fuse slot. Proceed to put
the cover on.
5 6
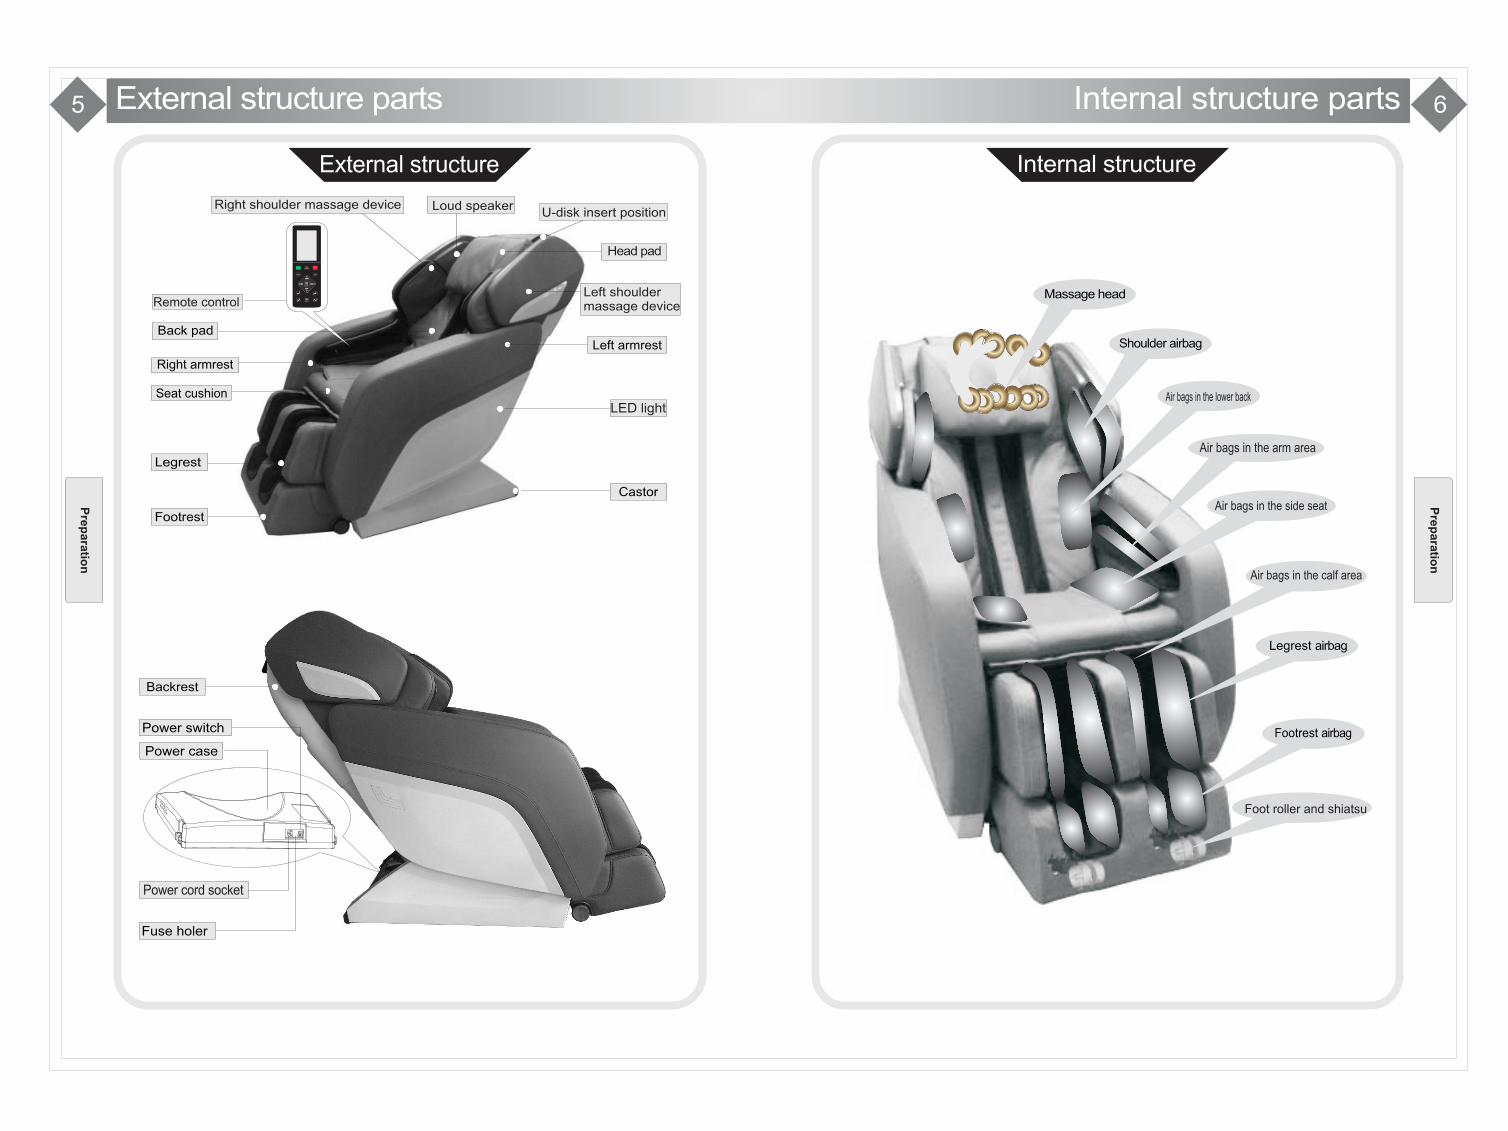
Left shoulder massage device
Loud speaker Right shoulder massage deviceU-disk insert position
LED light
Power switch
Power case
Fuse holer
Power cord socket
Backrest
Pre
para
tion
Remote control
Right armrest
Seat cushion
Legrest
Footrest
Back padLeft armrest
Castor
Head pad
Internal structure parts
Internal structureExternal structure
External structure partsP
rep
ara
tion
Legrest airbag
Shoulder airbag
Massage head
Footrest airbag
Air bags in the lower back
Air bags in the side seat
Air bags in the calf area
Foot roller and shiatsu
Air bags in the arm area
Zero
OK
Vol-
Vol+
On/Off Quick relaxation
Emergency off
Menu Auto
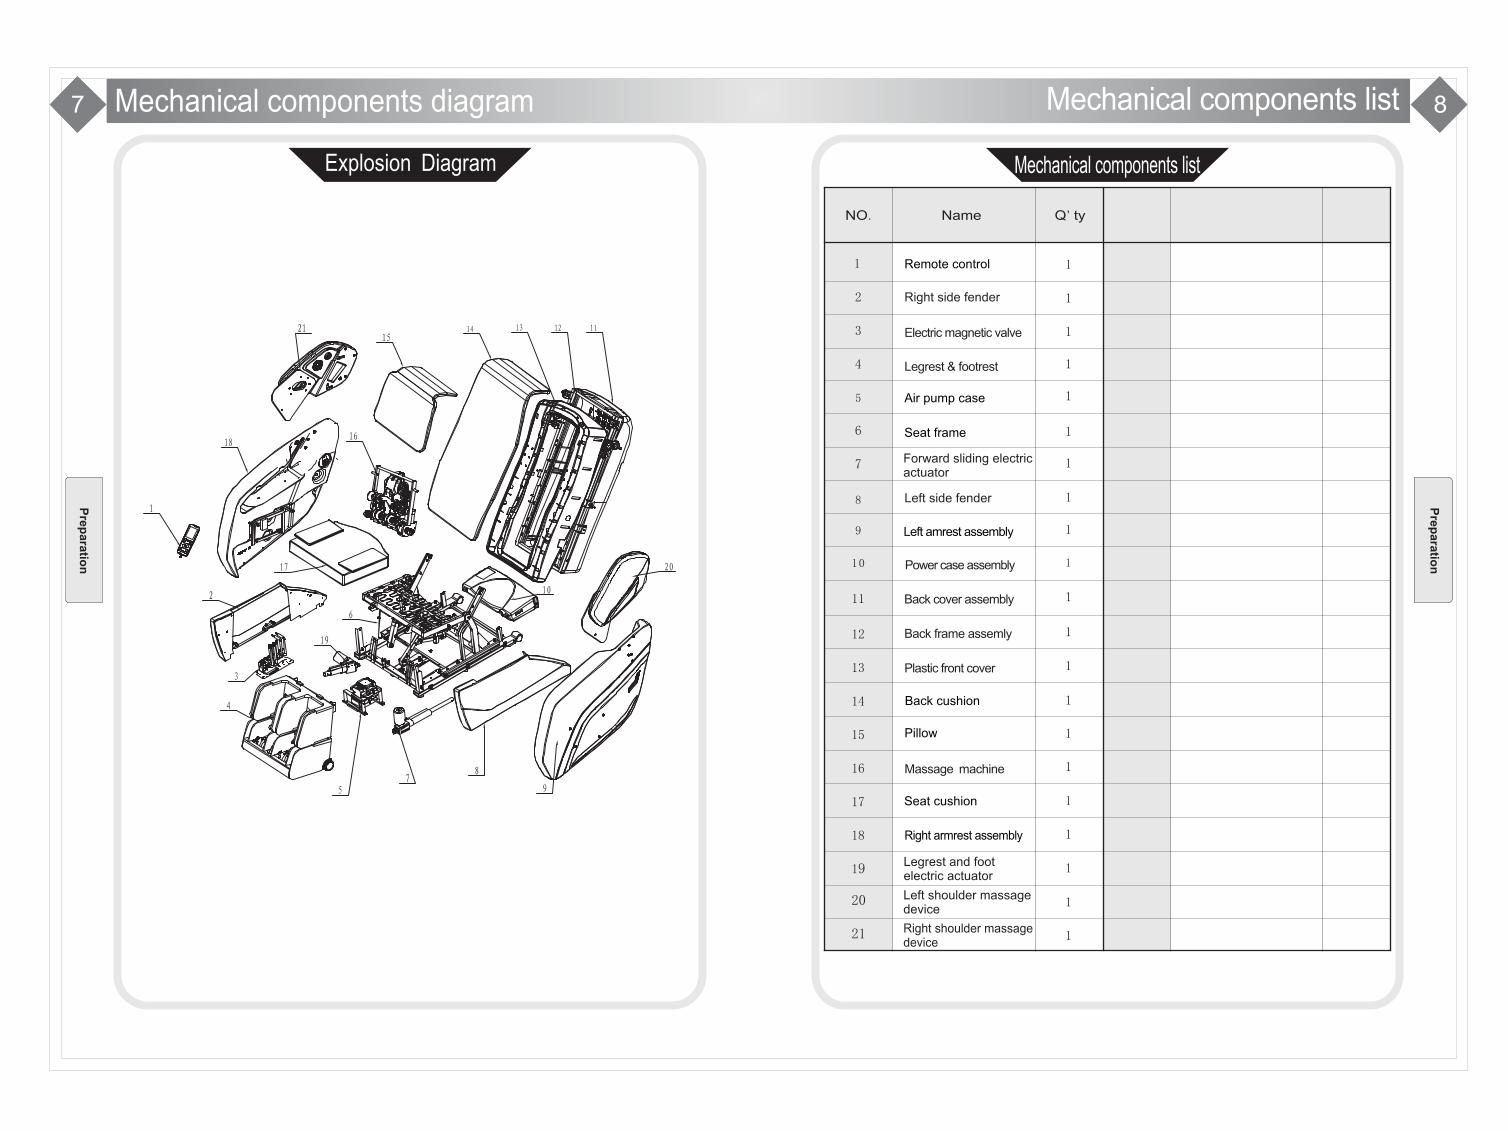
Mechanical components diagram
8
1
1
1
1
1
1
1
11
12
13
14
15
16
17
18
1
2
3
4
7
6
NO. Q'tyName
1
1
1
1
1
5
9
10
1
1
1
1
13 14
按摩
操作
按摩
操作
7 8
1
1Left side fender
Back frame assemly
Plastic front cover
Back cushion
Pillow
Massage machine
Seat cushion
Remote control
Right side fender
Electric magnetic valve
Legrest & footrest
Seat frame
Air pump case
Left amrest assembly
Back cover assembly
Power case assembly
Right armrest assembly
19
20
21
1
1
1
Forward sliding electric actuator
Legrest and foot electric actuator
Left shoulder massage device
Right shoulder massage device
Mechanical components list
Explosion Diagram Mechanical components list
Pre
para
tion
Pre
para
tion
9 10
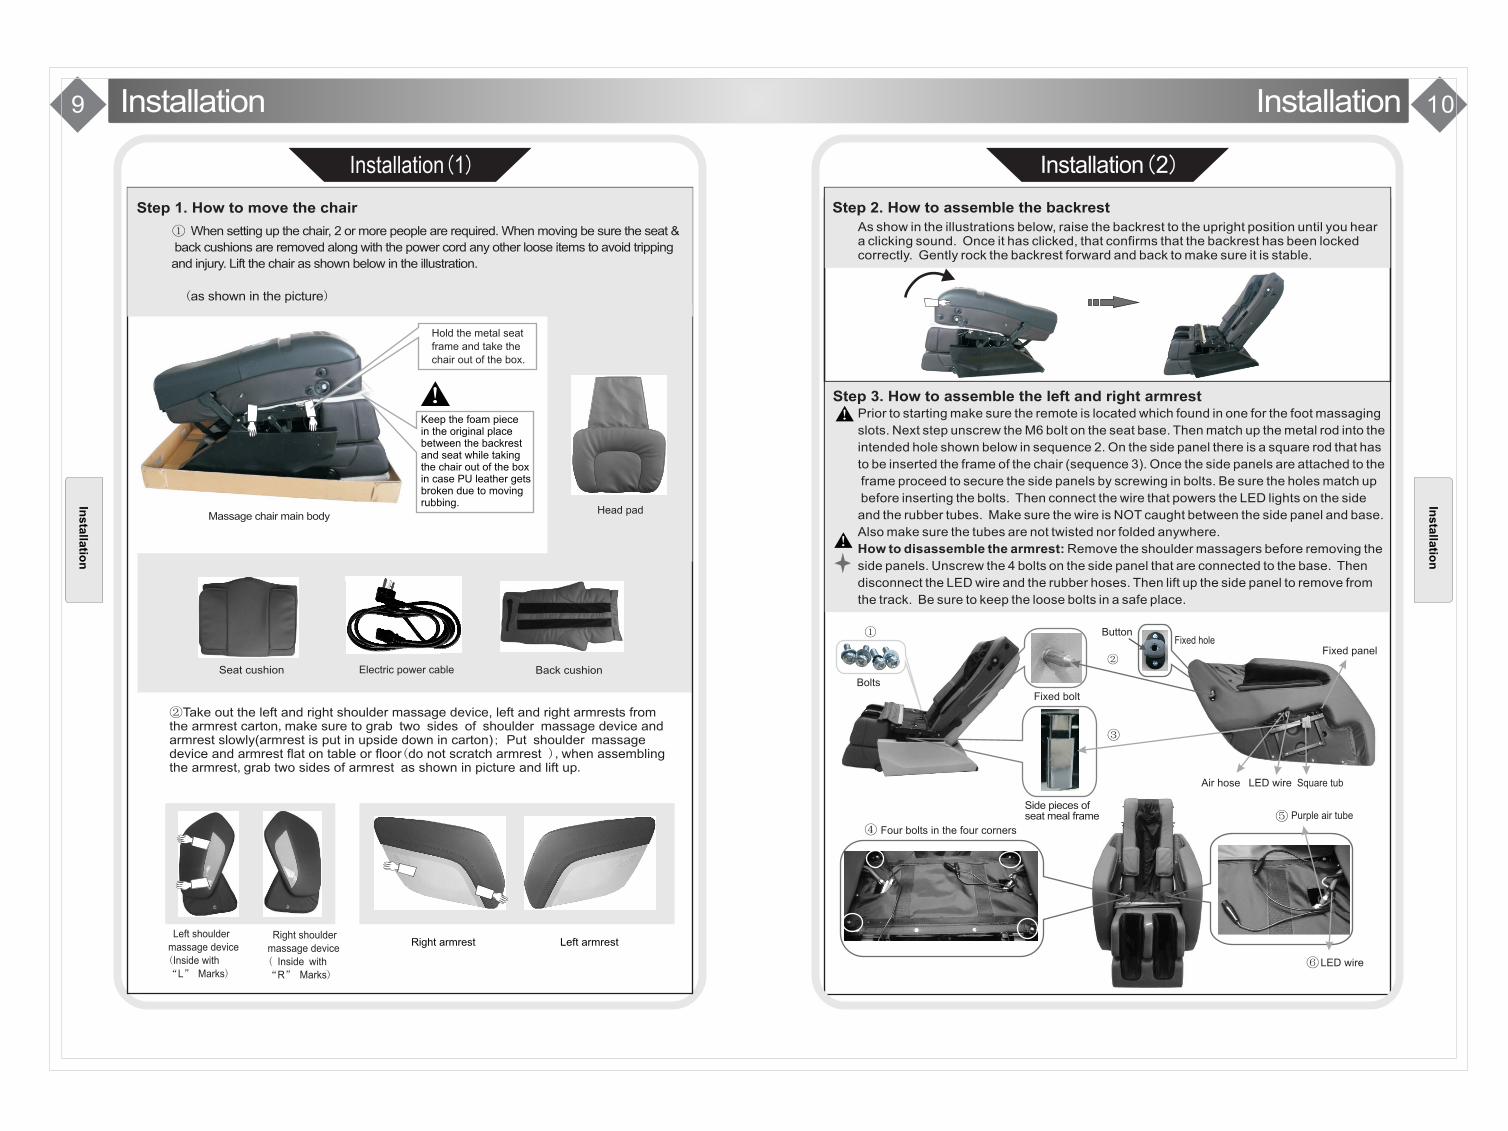
Prior to starting make sure the remote is located which found in one for the foot massaging
slots. Next step unscrew the M6 bolt on the seat base. Then match up the metal rod into the
intended hole shown below in sequence 2. On the side panel there is a square rod that has
to be inserted the frame of the chair (sequence 3). Once the side panels are attached to the
frame proceed to secure the side panels by screwing in bolts. Be sure the holes match up
before inserting the bolts. Then connect the wire that powers the LED lights on the side
and the rubber tubes. Make sure the wire is NOT caught between the side panel and base.
Also make sure the tubes are not twisted nor folded anywhere.
How to disassemble the armrest: Remove the shoulder massagers before removing the
side panels. Unscrew the 4 bolts on the side panel that are connected to the base. Then
disconnect the LED wire and the rubber hoses. Then lift up the side panel to remove from
the track. Be sure to keep the loose bolts in a safe place.
②Take out the left and right shoulder massage device, left and right armrests from the armrest carton,make sure to grab two sides of shoulder massage device and armrest slowly(armrest is put in upside down in carton); Put shoulder massage device and armrest flat on table or floor(do not scratch armrest ),when assembling the armrest,grab two sides of armrest as shown in picture and lift up.
▲
▲
▲
Left shoulder
massage device
(Inside with “L” Marks)
①
③
②
④⑤
⑥
Right shoulder
massage device
( Inside with “R” Marks)
Insta
llatio
n
Installation( )1 Installation( )2
Seat cushion
Step 3. How to assemble the left and right armrest
Step 2. How to assemble the backrest
As show in the illustrations below, raise the backrest to the upright position until you hear a clicking sound. Once it has clicked, that confirms that the backrest has been locked correctly. Gently rock the backrest forward and back to make sure it is stable.
Electric power cable
Step 1. How to move the chair
① When setting up the chair, 2 or more people are required. When moving be sure the seat &
back cushions are removed along with the power cord any other loose items to avoid tripping
and injury. Lift the chair as shown below in the illustration.
(as shown in the picture)
Massage chair main body
Keep the foam piece in the original place between the backrestand seat while taking the chair out of the box in case PU leather gets broken due to moving rubbing.
Hold the metal seat frame and take the chair out of the box.
Bolts
Four bolts in the four corners
Side pieces of seat meal frame
Installation
Right armrest Left armrest
Head pad
Back cushion
Square tubAir hose LED wire
Fixed bolt
Fixed holeButton
Fixed panel
LED wire
Purple air tube
InstallationIn
sta
llatio
n
11 12
a1
2
3
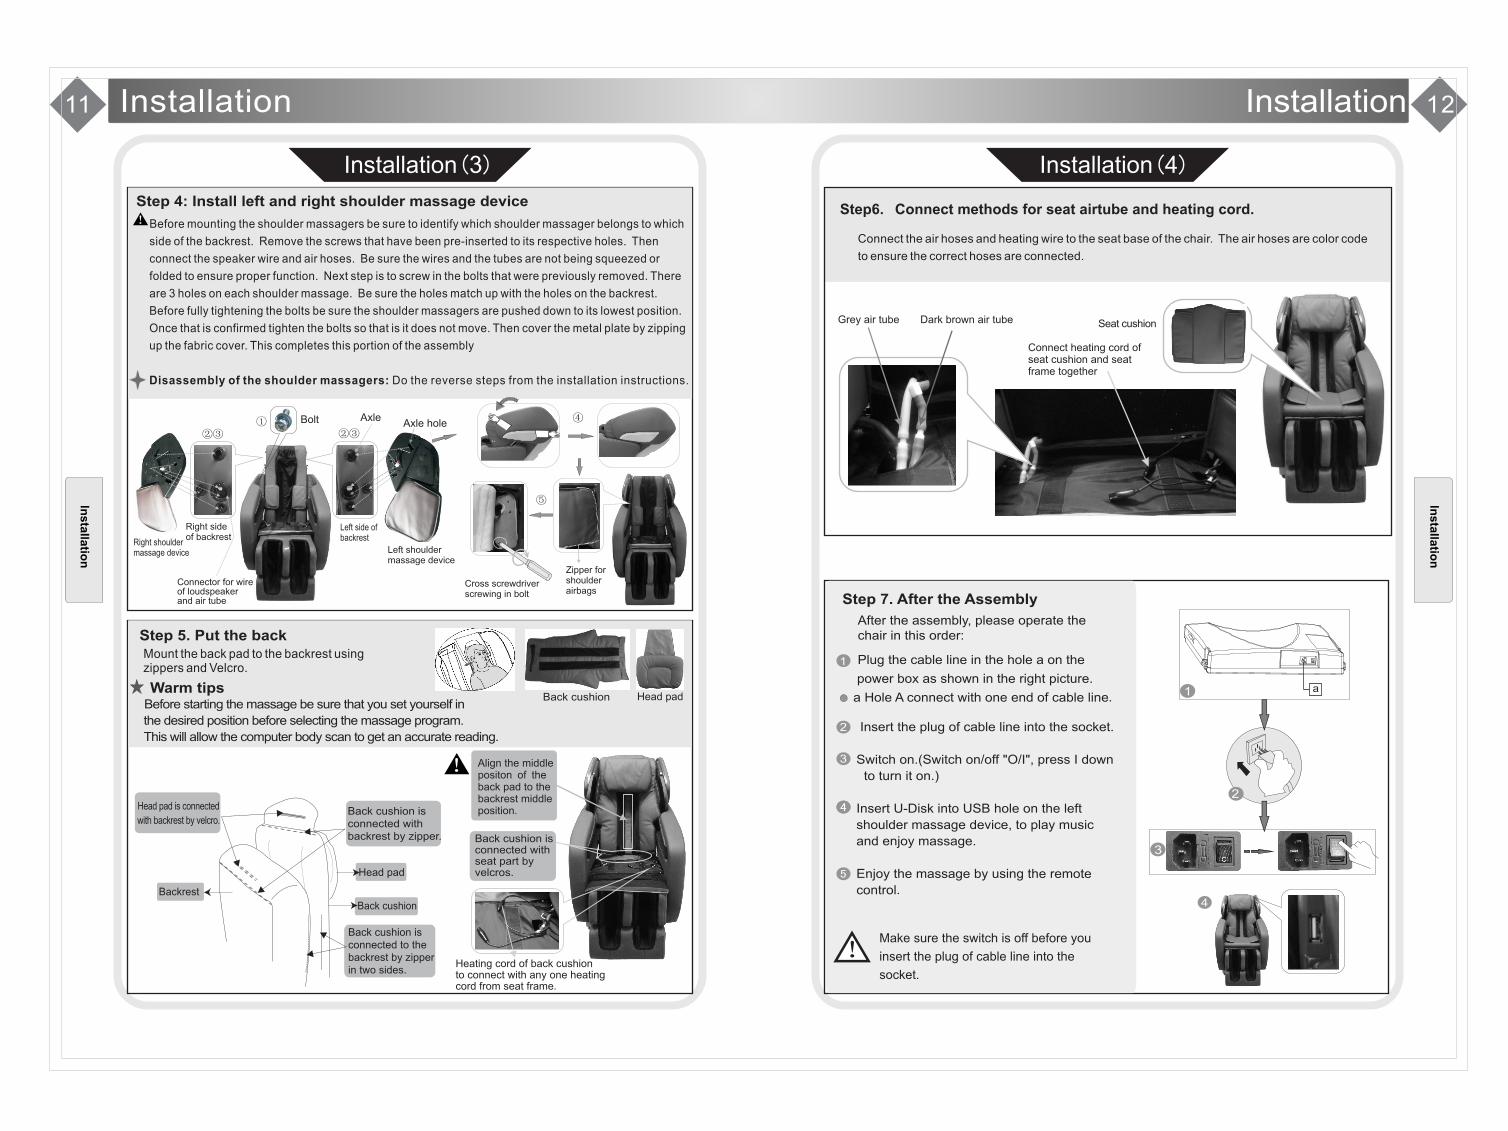
Step6. Connect methods for seat airtube and heating cord.
Connect the air hoses and heating wire to the seat base of the chair. The air hoses are color code
to ensure the correct hoses are connected.
▲
Step 4: Install left and right shoulder massage device
Right shoulder massage device Left shoulder
massage deviceZipper for shoulder airbags
▲
④
⑤
Cross screwdriver screwing in bolt
Connector for wire of loudspeaker and air tube
4
Heating cord of back cushion to connect with any one heating cord from seat frame.
①②③ ②③
AxleAxle hole Bolt
Installation( )3
Step 7. After the Assembly
After the assembly, please operate the chair in this order:
Plug the cable line in the hole a on the
power box as shown in the right picture.
a Hole A connect with one end of cable line.
Insert the plug of cable line into the socket.
Switch on.(Switch on/off "O/I", press I down
to turn it on.)
Enjoy the massage by using the remote
control.
Insert U-Disk into USB hole on the left
shoulder massage device, to play music
and enjoy massage.
1
2
3
4
Make sure the switch is off before you
insert the plug of cable line into the
socket.
Step 5. Put the back
Warm tips
Back cushion is connected with backrest by zipper.
Head pad is connected
with backrest by velcro.
Backrest
Back cushion is connected to the backrest by zipper in two sides.
Before starting the massage be sure that you set yourself in
the desired position before selecting the massage program.
This will allow the computer body scan to get an accurate reading.
Back cushion is connected with seat part by velcros.
Installation
Insta
llatio
n
Installation
Installation( )4
Insta
llatio
n
Mount the back pad to the backrest using zippers and Velcro.
Head padBack cushion
Head pad
Back cushion
Align the middle positon of the back pad to the backrest middle position. 4
5
Seat cushionDark brown air tubeGrey air tube
Right side of backrest
Left side of backrest
Before mounting the shoulder massagers be sure to identify which shoulder massager belongs to which
side of the backrest. Remove the screws that have been pre-inserted to its respective holes. Then
connect the speaker wire and air hoses. Be sure the wires and the tubes are not being squeezed or
folded to ensure proper function. Next step is to screw in the bolts that were previously removed. There
are 3 holes on each shoulder massage. Be sure the holes match up with the holes on the backrest.
Before fully tightening the bolts be sure the shoulder massagers are pushed down to its lowest position.
Once that is confirmed tighten the bolts so that is it does not move. Then cover the metal plate by zipping
up the fabric cover. This completes this portion of the assembly
Disassembly of the shoulder massagers: Do the reverse steps from the installation instructions.
Connect heating cord of seat cushion and seat frame together
1
▲
13 14
Kind suggestion
The adjustment before massage
Caution
Environment Check environment
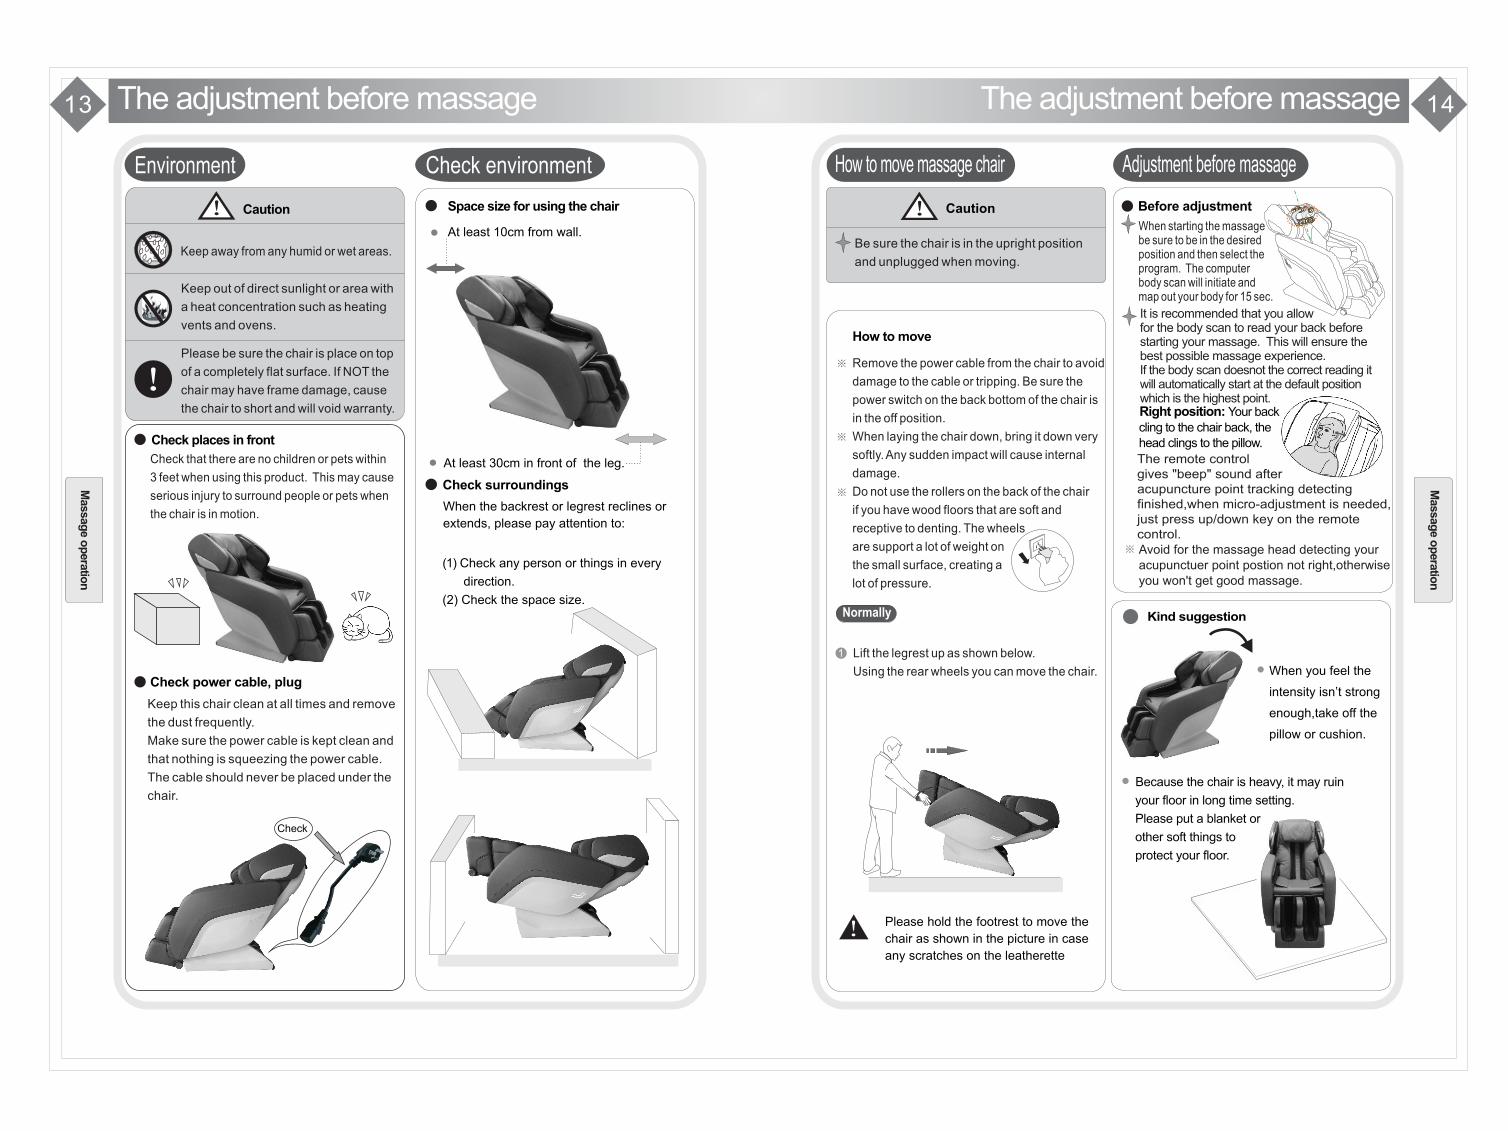
Keep away from any humid or wet areas.
Keep out of direct sunlight or area with
a heat concentration such as heating
vents and ovens.
Please be sure the chair is place on top
of a completely flat surface. If NOT the
chair may have frame damage, cause
the chair to short and will void warranty.
Check places in front
Check that there are no children or pets within
3 feet when using this product. This may cause
serious injury to surround people or pets when
the chair is in motion.
Check power cable, plug
Space size for using the chair
At least 10cm from wall.
Keep this chair clean at all times and remove
the dust frequently.
Make sure the power cable is kept clean and
that nothing is squeezing the power cable.
The cable should never be placed under the
chair.
Check
At least 30cm in front of the leg.
Check surroundings
When the backrest or legrest reclines or
extends, please pay attention to:
(1) Check any person or things in every
direction.
(2) Check the space size.
The adjustment before massage
How to move massage chair Adjustment before massage
Caution
Be sure the chair is in the upright position
and unplugged when moving.
Massag
e o
pera
tion
How to move
Remove the power cable from the chair to avoid
damage to the cable or tripping. Be sure the
power switch on the back bottom of the chair is
in the off position.
When laying the chair down, bring it down very
softly. Any sudden impact will cause internal
damage.
Do not use the rollers on the back of the chair
if you have wood floors that are soft and
receptive to denting. The wheels
are support a lot of weight on
the small surface, creating a
lot of pressure.
Normally
Lift the legrest up as shown below.
Using the rear wheels you can move the chair.
Please hold the footrest to move the
chair as shown in the picture in case
any scratches on the leatherette
Before adjustment
When starting the massage be sure to be in the desired position and then select the program. The computer body scan will initiate and map out your body for 15 sec.
It is recommended that you allow for the body scan to read your back before starting your massage. This will ensure the best possible massage experience.If the body scan doesnot the correct reading itwill automatically start at the default position which is the highest point. Right position: Your back cling to the chair back, thehead clings to the pillow.
Avoid for the massage head detecting your acupunctuer point postion not right,otherwise you won't get good massage.
When you feel the
intensity isn’t strong
enough,take off the
pillow or cushion.
Because the chair is heavy, it may ruin
your floor in long time setting.
Please put a blanket or
other soft things to
protect your floor.
The remote control gives "beep" sound after acupuncture point tracking detecting finished,when micro-adjustment is needed,just press up/down key on the remote control.
Massag
e o
pera
tion
15 16
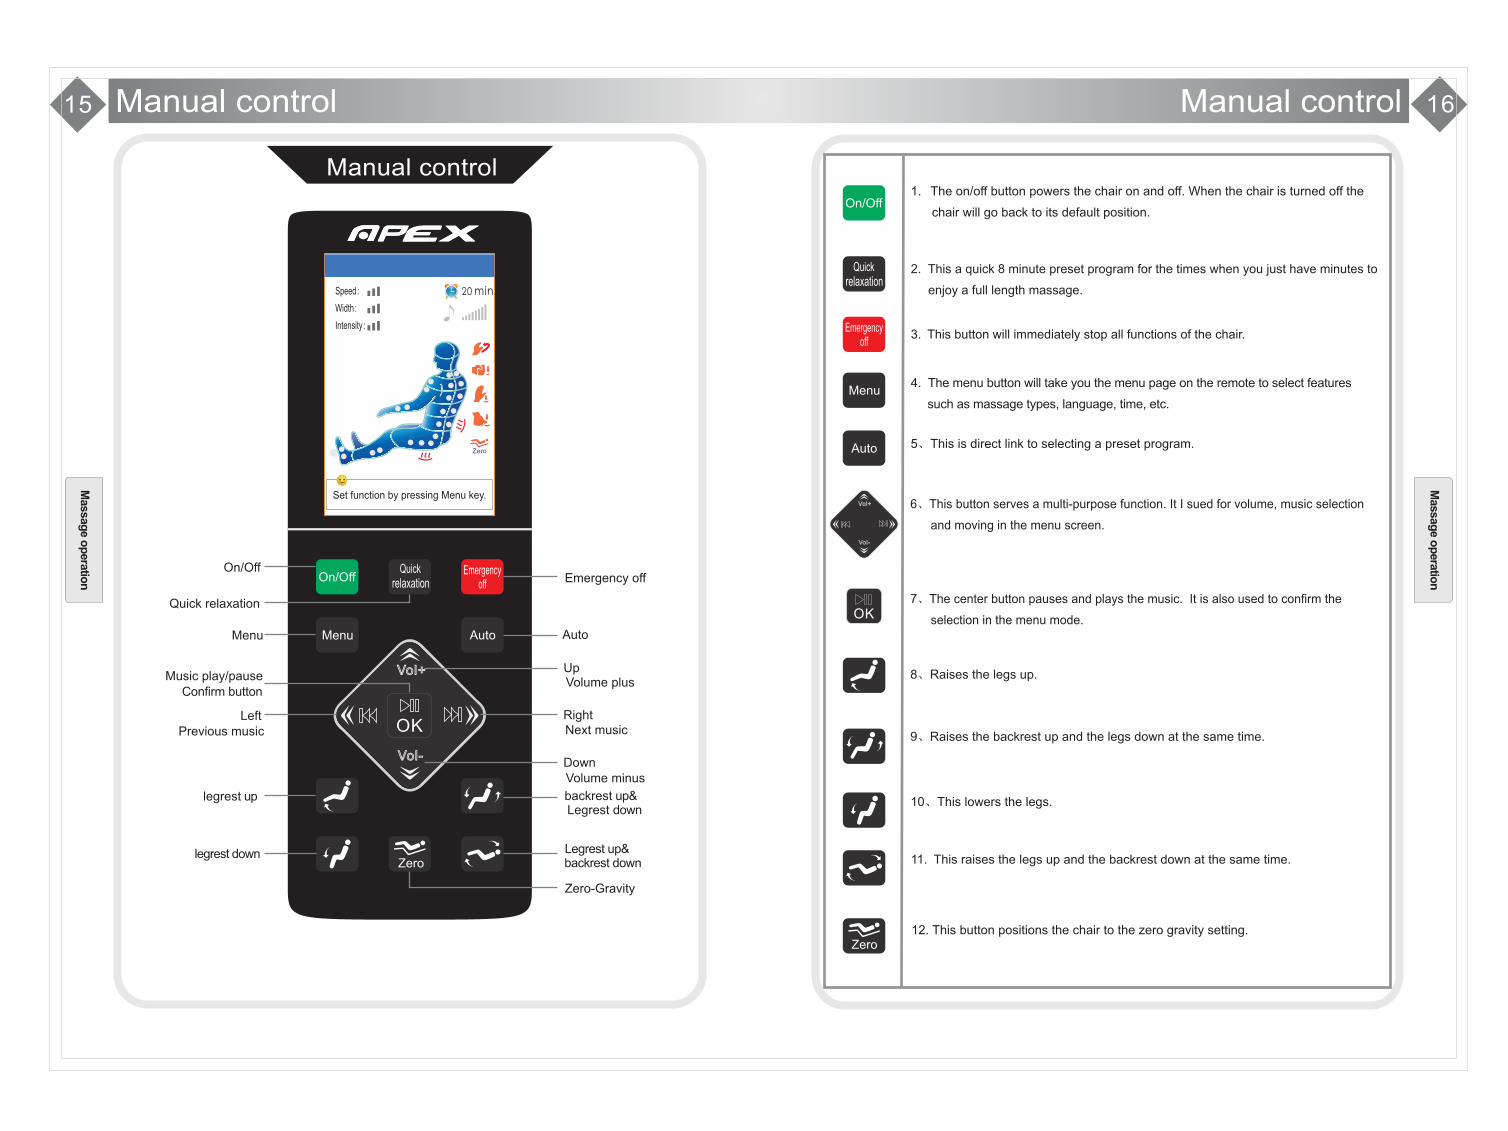
8、Raises the legs up.
9、Raises the backrest up and the legs down at the same time.
5、This is direct link to selecting a preset program.
10、This lowers the legs.
Zero
OK
Volume plus
Volume minus
Next musicPrevious music
Music play/pause
6、This button serves a multi-purpose function. It I sued for volume, music selection
and moving in the menu screen.
7、The center button pauses and plays the music. It is also used to confirm the
selection in the menu mode.OK
Set function by pressing Menu key.
Speed:
Width:
Intensity:
20 min
Zero
Vol-
Vol+
Vol-
Vol+
Manual control
Manual control
1. The on/off button powers the chair on and off. When the chair is turned off the
chair will go back to its default position.
2. This a quick 8 minute preset program for the times when you just have minutes to
enjoy a full length massage.
4. The menu button will take you the menu page on the remote to select features
such as massage types, language, time, etc.
11. This raises the legs up and the backrest down at the same time.
12. This button positions the chair to the zero gravity setting.
3. This button will immediately stop all functions of the chair.
Emergency off
Up
Down
Right
Legrest up& backrest down
On/Off
Auto
Left
Confirm button
legrest down
Zero-Gravity
Menu
Quick relaxation
Manual control
Massag
e o
pera
tion
Massag
e o
pera
tion
legrest up backrest Legrest down
up&
On/Off Quick relaxation
Emergency off
Menu Auto
On/Off
Quick relaxation
Emergency off
Menu
Auto
Zero

17 18
20 min
Zero
Press“on/off”button when power is on,a buzzer beeps once short and brittle. LCD screen display boot screen,after 2-3 seconds it displays the main interface and enter standby mode.Main interface show massage position,method,time,music,heating current massage status etc., all information will be updated timely when the chair start working.
Zero
Manual massage: press“menu”key,select manual massage by the navigation key,press the“OK”button,there are five options:mode,position,width adjustment,speed adjustment,3D function adjustment. Choose the corresponding function, then press the“OK”button to enter next menu,select the required massage method,position,width and speed,3D function adjustment.
Waist and bottom heating: In menu mode, choose waist and bottom heating by navigation key, to start or stop it.
Auto massage: After press“menu”button the cursor stop on auto massage program menu item by default, press the“OK”button,there are five optional auto massage methods, also contain five special auto massage modes.
Zero
Auto-Recovery
Music Heating
3D+
3D-
简体中文
English
한국어
Set function by pressing Menu key.
Speed:
Width:
Intensity:
Massag
e o
pera
tion
Menu interface
Recovery
Pain relief
Stretch
Music sync
3D demo
Special
Select by the navigation keys
Auto
Manual
Air
Roller
Heating
Timing
Language
Stop
Menu
Kneading
Knocking
Pressing
Zero gravity
Massage
time left
Tapping
Massa
ge fu
nctio
n
Massage speed (slow, mid, fast)
Massage width (narrow, mid, wide)
intensity ( weak, mid, strong)Air
Massage position
When massage chair in manual fixed point work modes, users can use up/down button to adjust massage position,information for“massage position adjusting…”will be show at the bottom of the display screen.
Mode
Position
Width
Speed
3D
Knead&Tap
Fixed point
Narrow
Middle
Wide
Low
Middle
High
Press the "menu" button in the main interface,it will switch to the menu interface, user can set all massage function. Press the "menu" button in the menu interface will exit and return to the main menu interface.
Select by the navigation keys
Knead
Knock
Shiatsu
TapOverall
Shoulder back
Waist back
Auto
Manual
Air
Roller
Heating
Timing
Language
Stop
Speed:
Width:
Intensity:
20 min
Manual control
LCD display graphic description
Main interface
Timing: press "menu" key, through the navigation key to select menu item timing ,can choose massage time:30 minutes,20 minutes, 10minutes,the default time is 20 minutes,the chair will turn off automat ically after time is up.
Language: press“menu”key,select language throughthe navigation key, then select the needed language.
Stop: press menu”key,select stop through the navigation key, it will stop massage, and back to main interface.
“
Air : After press MENU button,choose“air pressure”through navigation key,Press“OK”button ,there are two kinds of air pressure related function: Position and Intensity;Choose the corresponding function, then press“OK”to enter next menu and choose required function.
Roller:pressselect foot roller massage by the navigation key,press the "OK" button, Press “OK” button, choose rolling massage mode.
"menu"button,
Massag
e o
pera
tion
Manual control
LCD display graphic description
Position
Intensity
Select by the navigation keys
Quick
Soft
Stop
Select by the navigation keys
10 min
20 min
30 min
Select by the navigation keys
Select by the navigation keys
Select by the navigation keys
Overall
Upper
Middle
Lower
Low
Middle
High
After Power is on, the first time to use auto program, massage chair will start acupun- cture point position detecting, and “acup- uncture point tracking …” will be shown on screen display. After acupuncture point tracking detecting is finished,buzzer will tick 5 times (once every second), meanwhile, the massage machine is located in shoulders position, if user think the position is not proper, press Up and Down to adjust, when adjusting, “acupuncture point adjusting…” is showing on screen display. Default working time is 20 minutes. ( Massage chair will turn off and return after the massage is over)
Acupuncture point tracking …
White-collar
Shopaholic
Back Yoga
Athlete mode
Care of aged
Menu
Menu
Menu
Menu
Menu
Menu
Auto
Manual
Air
Roller
Heating
Timing
Language
Stop
Auto
Manual
Air
Roller
Heating
Timing
Language
Stop
Auto
Manual
Air
Roller
Heating
Timing
Language
Stop
Auto
Manual
Air
Roller
Heating
Timing
Language
Stop
Auto
Manual
Air
Roller
Heating
Timing
Language
Stop
Start
Stop
19 20
Arm massage
Shoulder massage
Zero
1
2
3 2
a
1
3
4
开/关
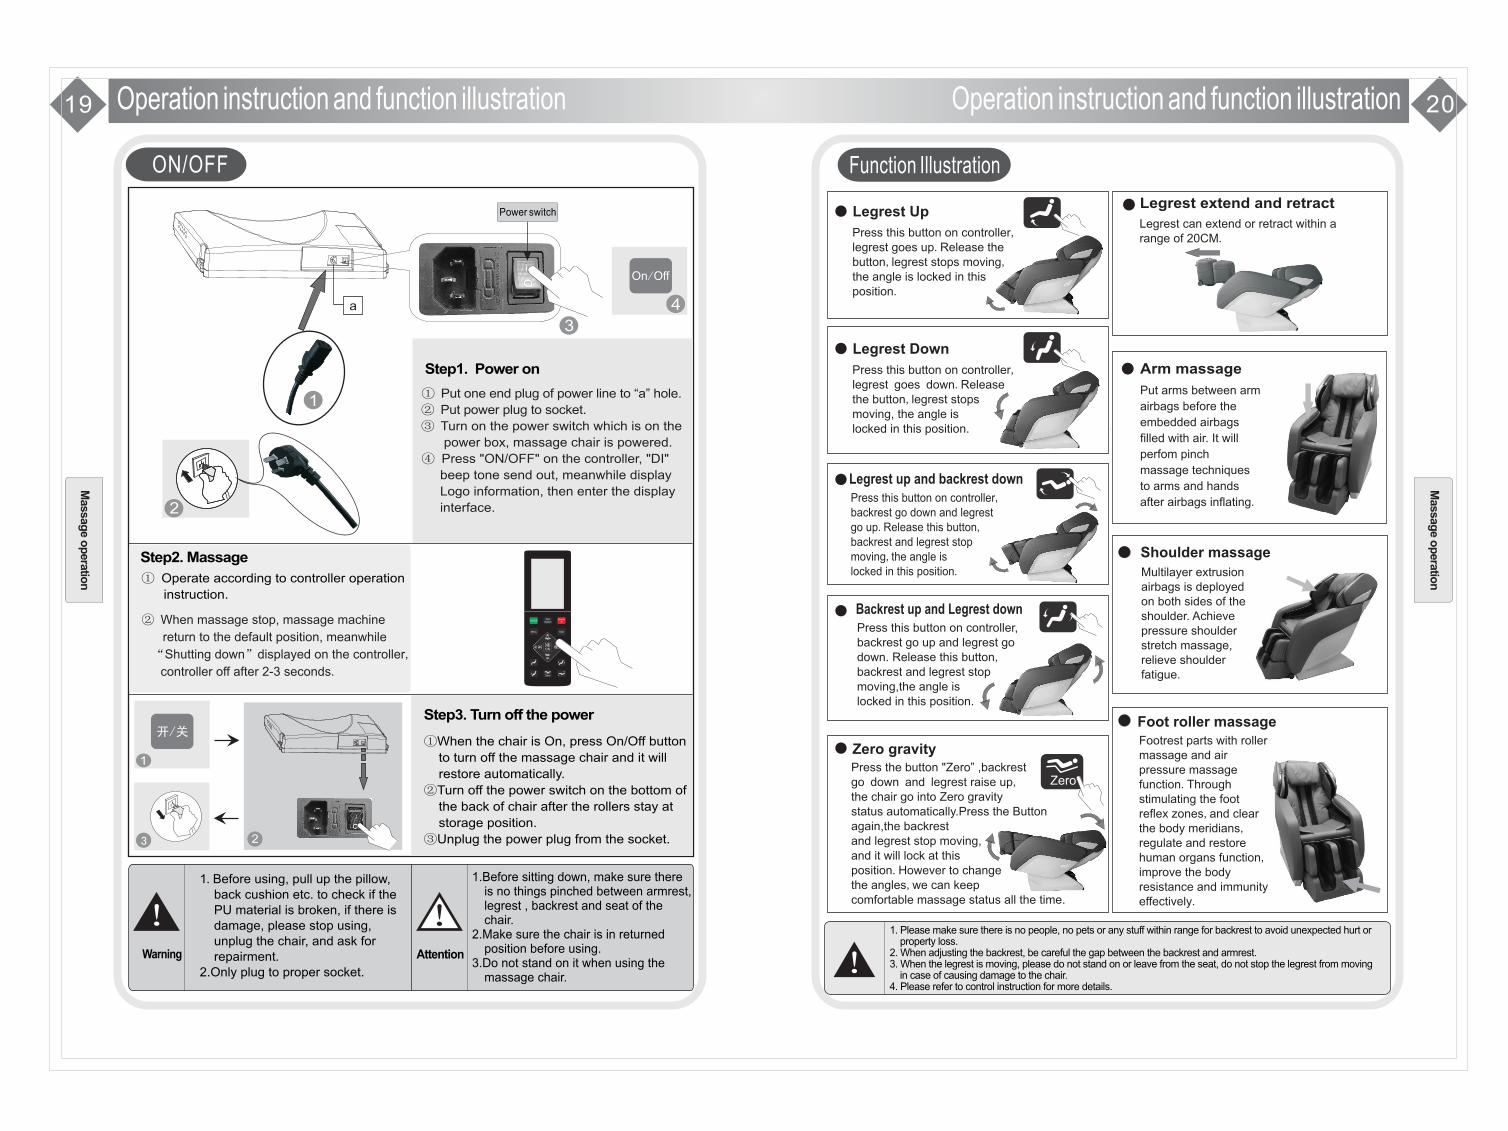
Legrest Up
Legrest Down
Legrest extend and retract
Press this button on controller,backrest go down and legrest go up.Release this button,backrest and legrest stop moving,the angle is locked in this position.
Legrest up and backrest down
Backrest up and Legrest down
Zero gravity
Massag
e o
pera
tion
1. Please make sure there is no people, no pets or any stuff within range for backrest to avoid unexpected hurt or property loss.2. When adjusting the backrest, be careful the gap between the backrest and armrest.3. When the legrest is moving, please do not stand on or leave from the seat, do not stop the legrest from moving in case of causing damage to the chair.4. Please refer to control instruction for more details.
Operation instruction and function illustration
Function Illustration
Operation instruction and function illustration
Massag
e o
pera
tion
ON/OFF
② When massage stop, massage machine
return to the default position, meanwhile
“Shutting down”displayed on the controller,
controller off after 2-3 seconds.
Step1. Power on
On/Off
Power switch
① Put one end plug of power line to “a” hole.
② Put power plug to socket.
③ Turn on the power switch which is on the
power box, massage chair is powered.
④ Press "ON/OFF" on the controller, "DI"
beep tone send out, meanwhile display
Logo information, then enter the display
interface.
Step2. Massage
① Operate according to controller operation
instruction.
Step3. Turn off the power
①
②
③
When the chair is On, press On/Off button
to turn off the massage chair and it will
restore automatically.
Turn off the power switch on the bottom of
the back of chair after the rollers stay at
storage position.
Unplug the power plug from the socket.
1. Before using, pull up the pillow, back cushion etc. to check if the PU material is broken, if there is damage, please stop using, unplug the chair, and ask for repairment.2.Only plug to proper socket.
Warning Attention
1.Before sitting down, make sure there is no things pinched between armrest, legrest , backrest and seat of the chair.
2.Make sure the chair is in returned position before using.
3.Do not stand on it when using the massage chair.
Legrest can extend or retract within a range of 20CM.
Multilayer extrusion airbags is deployed on both sides of the shoulder. Achieve pressure shoulder stretch massage, relieve shoulder fatigue.
Footrest parts with roller massage and air pressure massage function.Through stimulating the foot reflex zones,and clear the body meridians,regulate and restore human organs function,improve the body resistance and immunity effectively.
Put arms between arm
airbags before the
embedded airbags
filled with air. It will
perfom pinch
massage techniques
to arms and hands
after airbags inflating.
Press this button on controller, backrest go up and legrest go down. Release this button,backrest and legrest stop moving,the angle is locked in this position.
Press the button "Zero” ,backrest go down and legrest raise up,the chair go into Zero gravity status automatically.Press the Button again,the backrest and legrest stop moving,and it will lock at this position.However to change the angles,we can keep comfortable massage status all the time.
Foot roller massage
Zero
OK
Vol-
Vol+
On/Off Quick relaxation
Emergency off
Menu Auto
Press this button on controller, legrest goes up.Release the button,legrest stops moving,the angle is locked in this position.
Press this button on controller, legrest goes down.Release the button,legrest stops moving, the angle is locked in this position.
21 22
●1
●2
●1
●2
●3
●4
●1
●2
●3
●1
●2
5
51
2
3
4
6
7
After massage
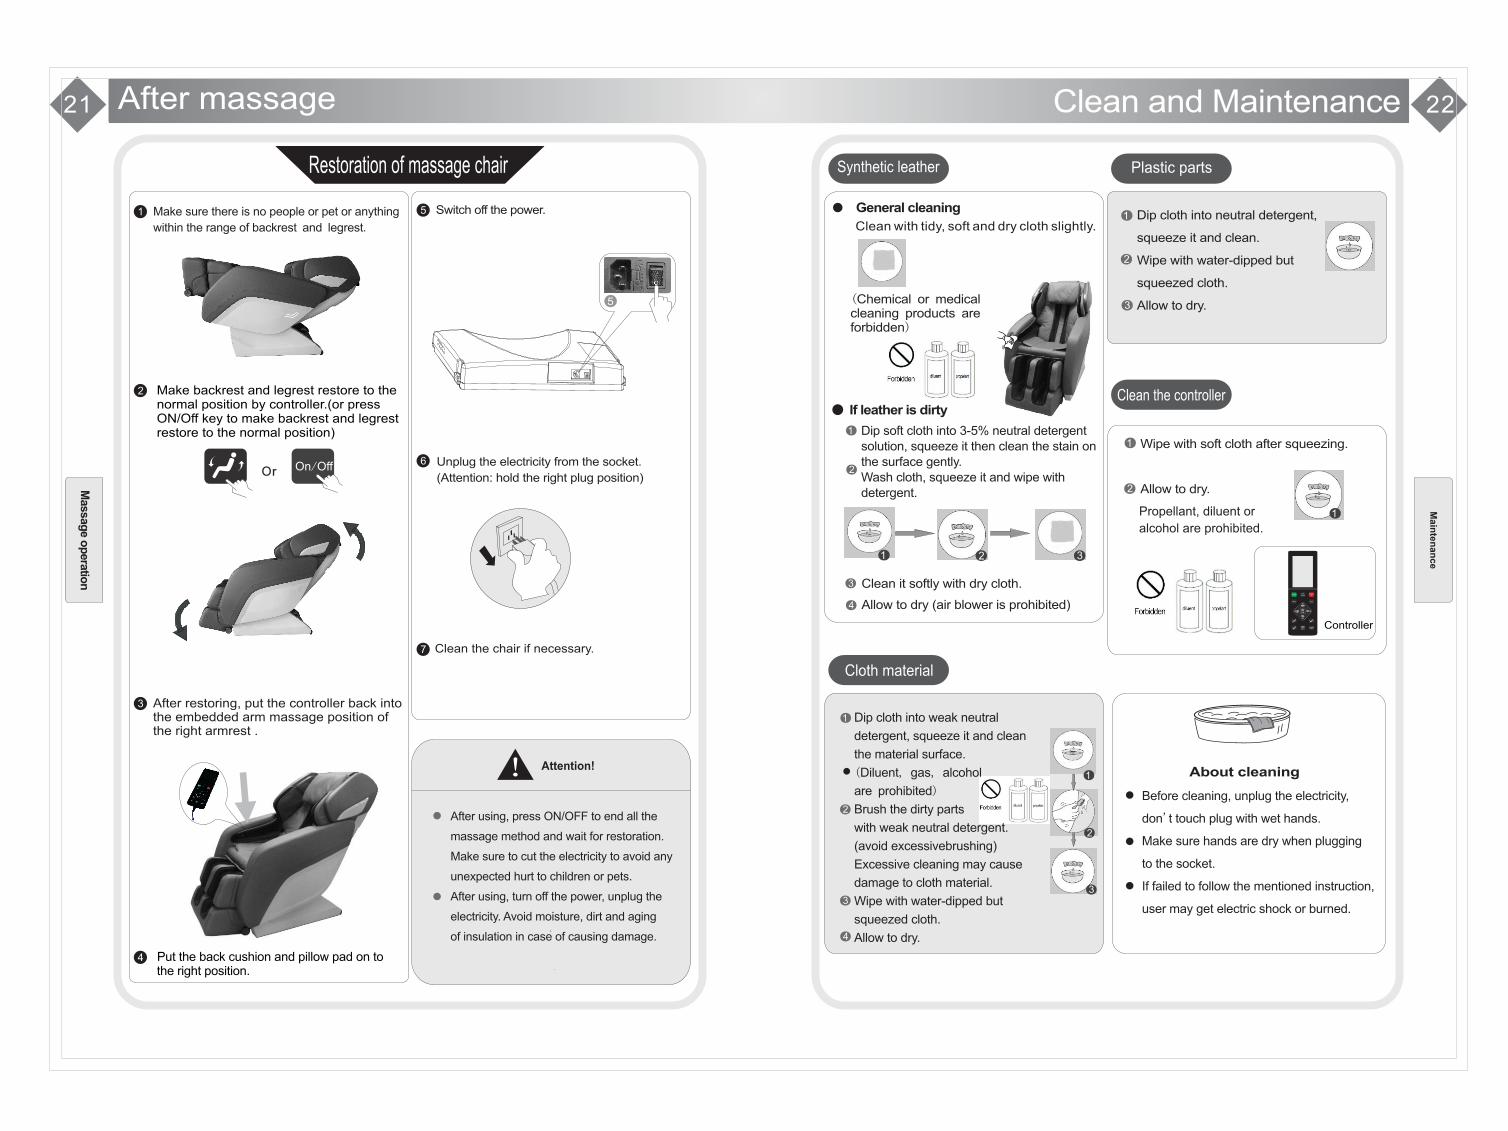
After restoring, put the controller back into the embedded arm massage position of the right armrest .
Or
Make sure there is no people or pet or anything
within the range of backrest and legrest.
Make backrest and legrest restore to the normal position by controller.(or press ON/Off key to make backrest and legrest restore to the normal position)
Put the back cushion and pillow pad on to the right position.
Switch off the power.
Unplug the electricity from the socket.
(Attention: hold the right plug position)
Clean the chair if necessary.
Attention!
After using, press ON/OFF to end all the
massage method and wait for restoration.
Make sure to cut the electricity to avoid any
unexpected hurt to children or pets.
After using, turn off the power, unplug the
electricity. Avoid moisture, dirt and aging
of insulation in case of causing damage.
Restoration of massage chair
On/Off
●3
●4
Synthetic leather
Clean and MaintenanceM
ain
ten
an
ce
Clean with tidy, soft and dry cloth slightly.
Dip soft cloth into 3-5% neutral detergent solution, squeeze it then clean the stain on the surface gently.Wash cloth, squeeze it and wipe with detergent.
General cleaning
If leather is dirty
Wipe with soft cloth after squeezing.
Allow to dry.
About cleaning
Clean the controller
Cloth material
Before cleaning, unplug the electricity,
don't touch plug with wet hands.
Make sure hands are dry when plugging
to the socket.
If failed to follow the mentioned instruction,
user may get electric shock or burned.
Propellant, diluent or
alcohol are prohibited.
Controller
Clean it softly with dry cloth.
Allow to dry (air blower is prohibited)
●1
(Chemical or medical cleaning products are forbidden)
Massag
e o
pera
tion
●3
●4●1 ●2 ●3
●
●2
●1
3
Dip cloth into weak neutral
detergent, squeeze it and clean
the material surface.
(Diluent, gas, alcohol
are prohibited)
Brush the dirty parts
with weak neutral detergent.
(avoid excessivebrushing)
Excessive cleaning may cause
damage to cloth material.
Wipe with water-dipped but
squeezed cloth.
Allow to dry.
Plastic parts
Dip cloth into neutral detergent,
squeeze it and clean.
Wipe with water-dipped but
squeezed cloth.
Allow to dry.
Zero
OK
Vol-
Vol+
On/Off Quick relaxation
Emergency off
Menu Auto
23 24
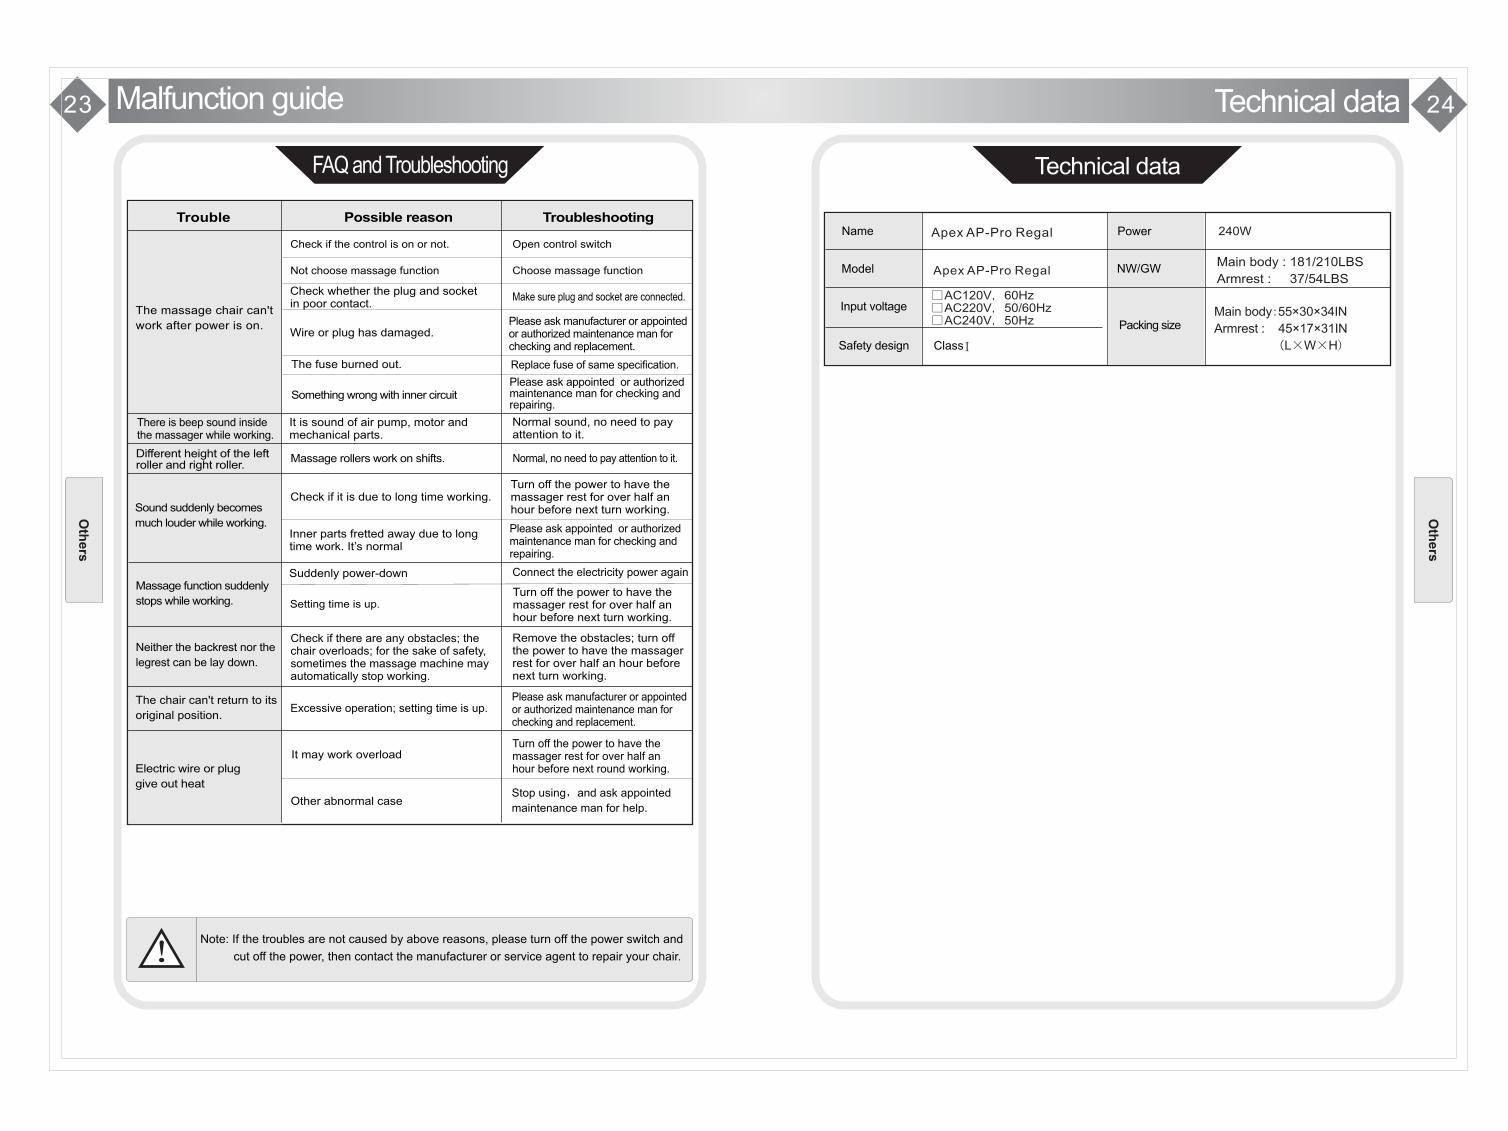
Apex AP-Pro Regal
Ⅰ
240W
Main body : 181/210LBS
Armrest : 37/54LBS
Apex AP-Pro Regal
Main body:55×30×34IN
Armrest : 45×17×31IN
(L×W×H)
□AC120V,60Hz□AC220V,50/60Hz□AC240V,50Hz
Technical data
Technical data
Name
Model
Input voltage
Safety design Class
NW/GW
Packing size
Oth
ers
Oth
ers
Malfunction guide
FAQ and Troubleshooting
Note: If the troubles are not caused by above reasons, please turn off the power switch and
cut off the power, then contact the manufacturer or service agent to repair your chair.
Trouble Possible reason Troubleshooting
The massage chair can't
work after power is on.
Massage function suddenly
stops while working.
Check if the control is on or not.
Setting time is up.
Open control switch
Not choose massage function Choose massage function
Normal sound, no need to pay attention to it.
Normal, no need to pay attention to it.
Turn off the power to have the massager rest for over half an hour before next turn working.
Connect the electricity power again
Check whether the plug and socketin poor contact.
It is sound of air pump, motor and mechanical parts.
Inner parts fretted away due to long time work. It’s normal
Sound suddenly becomes
much louder while working.
Remove the obstacles; turn off the power to have the massager rest for over half an hour before next turn working.
Check if there are any obstacles; the chair overloads; for the sake of safety, sometimes the massage machine may automatically stop working.
Neither the backrest nor the
legrest can be lay down.
Please ask manufacturer or appointed or authorized maintenance man for checking and replacement.
Excessive operation; setting time is up.The chair can't return to its
original position.
Massage rollers work on shifts.Different height of the left roller and right roller.
Make sure plug and socket are connected.
There is beep sound inside the massager while working.
Check if it is due to long time working.
Please ask appointed or authorized maintenance man for checking and repairing.
Electric wire or plug
give out heat
Turn off the power to have the massager rest for over half an hour before next round working.
Wire or plug has damaged.Please ask manufacturer or appointed or authorized maintenance man for checking and replacement.
The fuse burned out. Replace fuse of same specification.
Something wrong with inner circuitPlease ask appointed or authorized maintenance man for checking and repairing.
Suddenly power-down
Turn off the power to have the massager rest for over half an hour before next turn working.
Stop using,and ask appointed
maintenance man for help.
It may work overload
Other abnormal case
Power