antares browser & addon (1.5.1) - unity3d · antares browser & addon is c# class package...
TRANSCRIPT
Antares Browser & Addon (1.5.1)(Open Source Project)
http://antarespb.sourceforge.net/
1. Description 2. Installation 3. Features
DESCRIPTION
Antares Browser & Addon is C# class package extending the functionality and capabilities of Unity Editor, also adding certain auxiliary methods, in order to improve your project management and its code.
Antares Browser & Addon is an Open Source project and you may use it cost free in any number of projects.
INSTALLATION
You can find the latest version of Antares Browser here : http://antarespb.sourceforge.net/
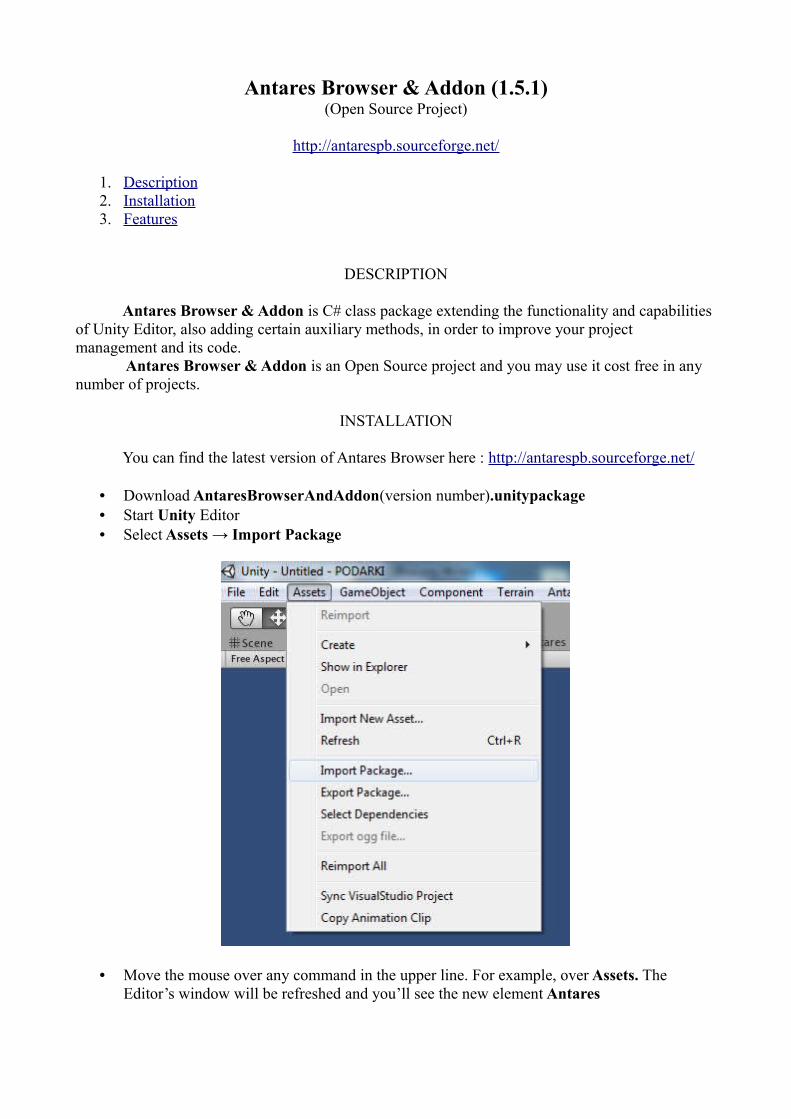
• Download AntaresBrowserAndAddon(version number).unitypackage• Start Unity Editor • Select Assets → Import Package
• Move the mouse over any command in the upper line. For example, over Assets. The Editor’s window will be refreshed and you’ll see the new element Antares

• Congratulations! Antares Browser and Addon has been installed succesfully into your project.
FEATURES
Browser:1. Scripts Browser 2. Models Browser 3. Textures Browser
Addon:4. Component Antares Addon 5. Settings of AntaresAddon 6. Level Design Tools
7. Bezier Curves 1. Creation of Curves in Editor 2. Curve editing in Unity Editor 3. Creation of wires 4. Spirals
1. Settings for Spirals 5. Dynamic creation and editing of Curves 6. Curve API 7. Known bugs.
8. Curve Based Road Generator (Curved Road)1. Generating a road 2. Shaders
9. 1. Multitags system 1. Multitags API
10. 1. Module for saving objects’ description
11. ANTARES : BASKET 1. Export in Asset Bundle format
12. ANTARES : DUBLICATOR
13. Joints Vizualization
14. Tools : Biped
15. Tools : Game Object. 1. INTERPOLATOR
16. Tools : Camera
17. AI
1. Zone Range 2. Zone Range API
18. ANTARES.dll ( shareware) : 1. ANTARES.dll : Manager 2. ANTARES.dll : AGUI 3. ANTARES.dll : BinarySave 4. ANTARES.dll : Antares.Async
19. ADDITIONAL FEATURES 1. Align View to GameObject 2. Copy Animation Clip 3. Hide/Unhide in Hierarchy View
20. Authors 21. Donation
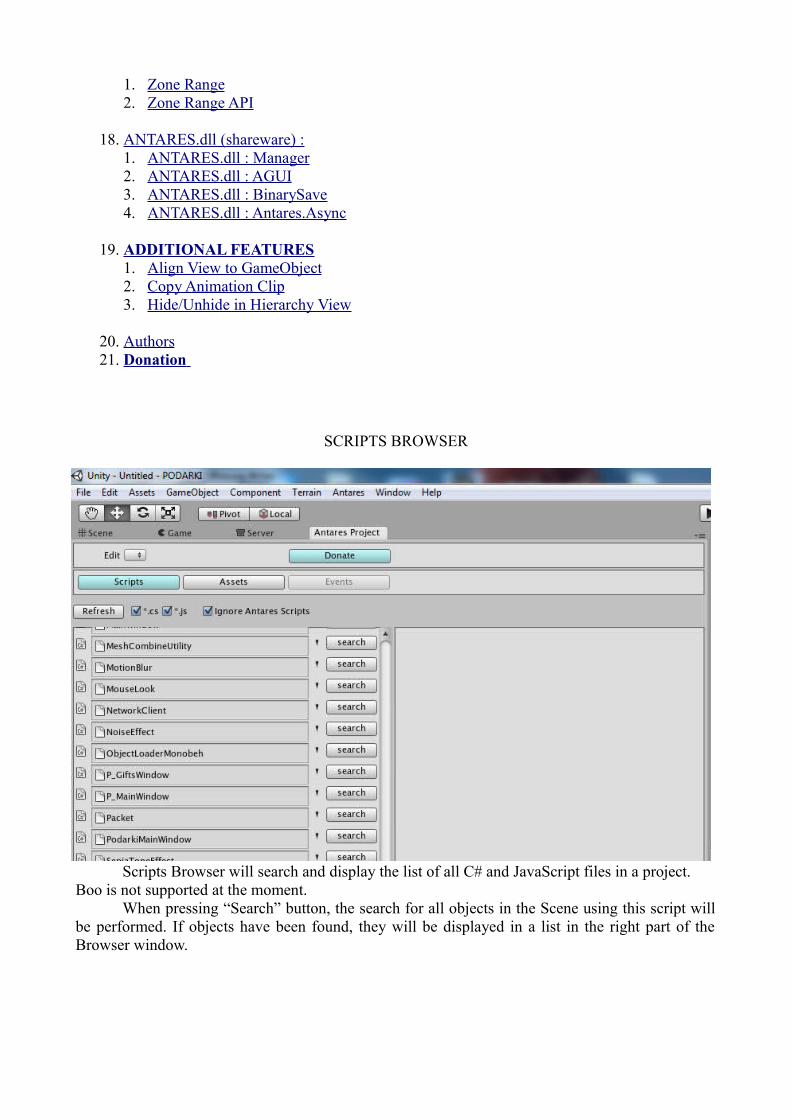
SCRIPTS BROWSER
Scripts Browser will search and display the list of all C# and JavaScript files in a project. Boo is not supported at the moment.
When pressing “Search” button, the search for all objects in the Scene using this script will be performed. If objects have been found, they will be displayed in a list in the right part of the Browser window.
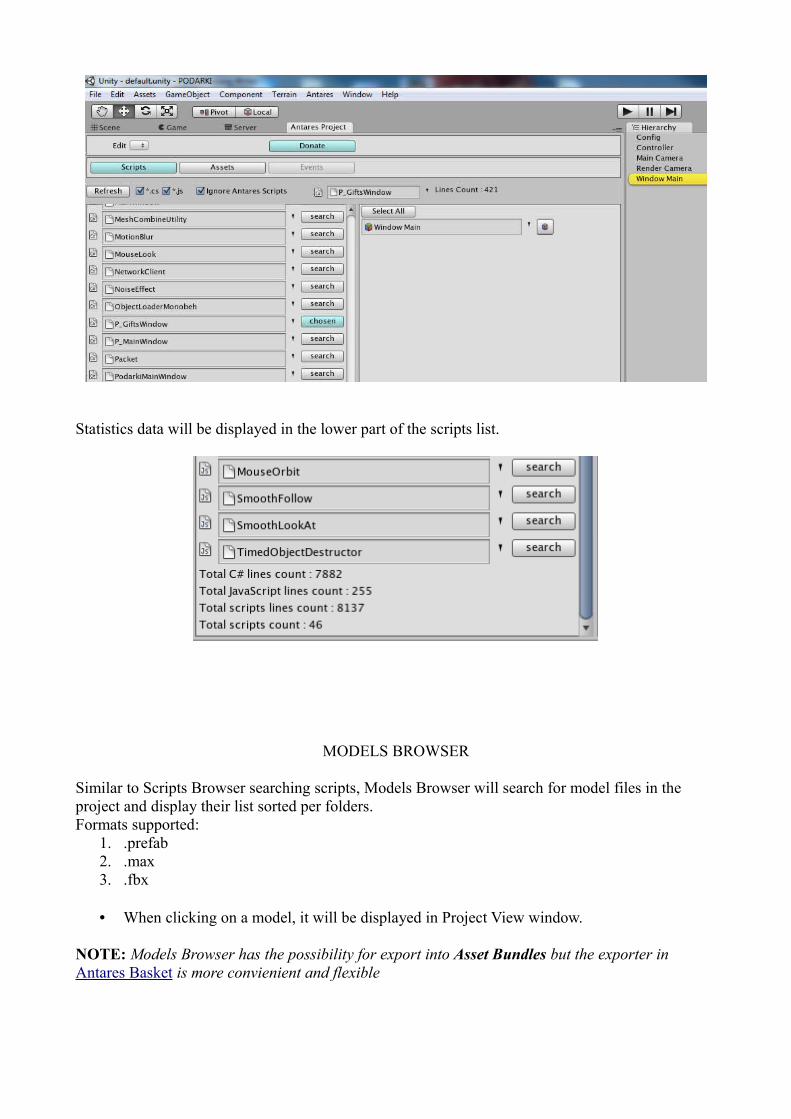
Statistics data will be displayed in the lower part of the scripts list.
MODELS BROWSER
Similar to Scripts Browser searching scripts, Models Browser will search for model files in the project and display their list sorted per folders. Formats supported:
1. .prefab2. .max3. .fbx
• When clicking on a model, it will be displayed in Project View window.
NOTE: Models Browser has the possibility for export into Asset Bundles but the exporter in Antares Basket is more convienient and flexible

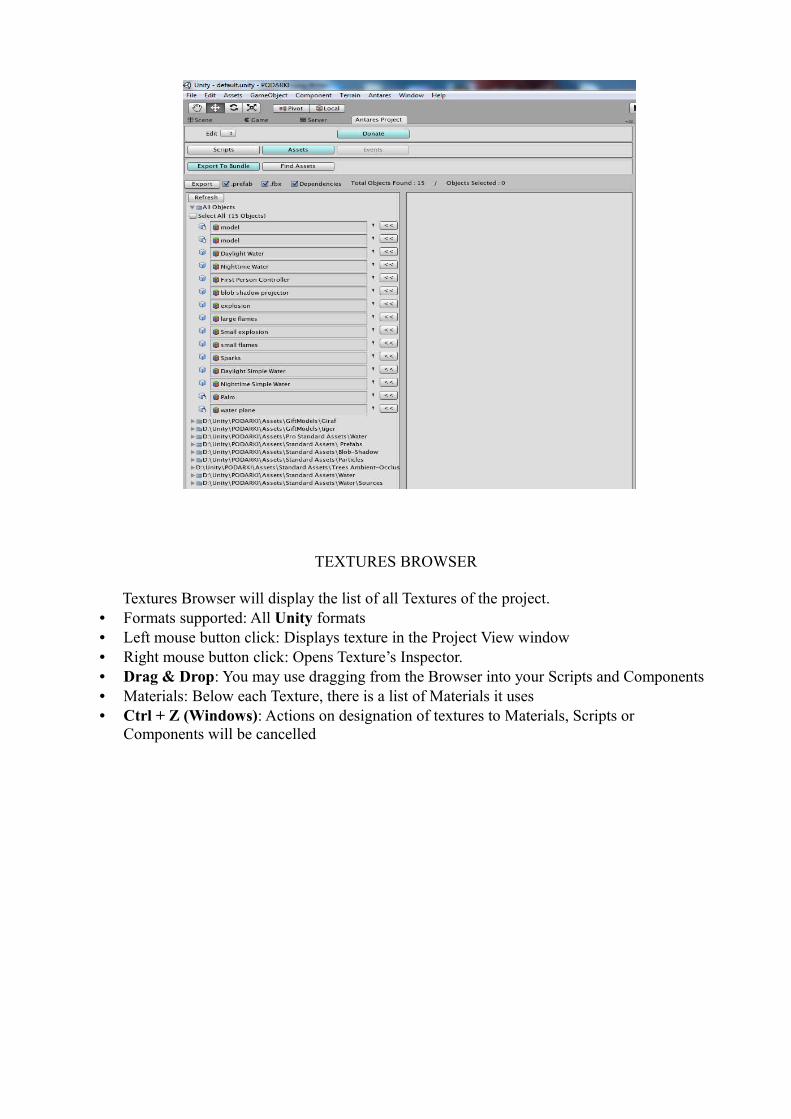
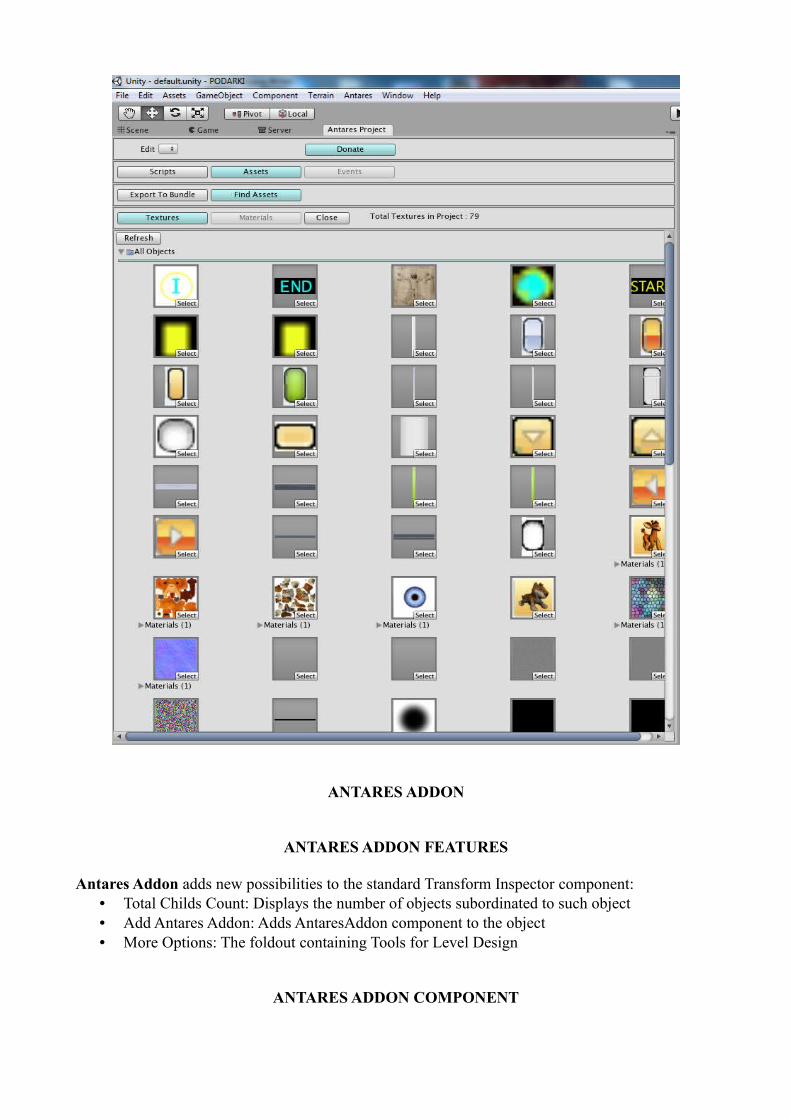
TEXTURES BROWSER
Textures Browser will display the list of all Textures of the project. • Formats supported: All Unity formats• Left mouse button click: Displays texture in the Project View window• Right mouse button click: Opens Texture’s Inspector.• Drag & Drop: You may use dragging from the Browser into your Scripts and Components • Materials: Below each Texture, there is a list of Materials it uses• Ctrl + Z (Windows): Actions on designation of textures to Materials, Scripts or
Components will be cancelled
ANTARES ADDON
ANTARES ADDON FEATURES
Antares Addon adds new possibilities to the standard Transform Inspector component:• Total Childs Count: Displays the number of objects subordinated to such object • Add Antares Addon: Adds AntaresAddon component to the object• More Options: The foldout containing Tools for Level Design
ANTARES ADDON COMPONENT

• When pressing Add Antares Addon button, AntaresAddon component will be added to the object automatically
• If it is the first object in your project, the AntaresController object necessary for saving certain parameters of your objects and Antares Addon settings will be created automatically in the Hierarchy window. The Object will be created only once. Do not remove it.
SETTINGS OF ANTARES ADDON COMPONENT
At the first adding of the AntaresAddon component to any object, GameObject will be created automatically in the Scene, with AntaresAddonController component attached to it.
This script adjusts running of all AntaresAddon components in the Scene. It contains two adjustable parameters:
• Free Memory On Play (by default: On): When starting the Scene in Play mode, it cleans variables of all Antares Addon components without influencing the program run. Added for storage efficiency
• Description max lines count (by default: 1024): Maximum number of symbols in the field Object Description of AntaresAddon components
The AntaresController Object contains a child named MultiTagsCollector.Such object is necessary for data storage on multitags of the Scene objects.
NOTE: Do not remove or change AntaresController and any object subordinated to it.
LEVEL DESIGN TOOLS
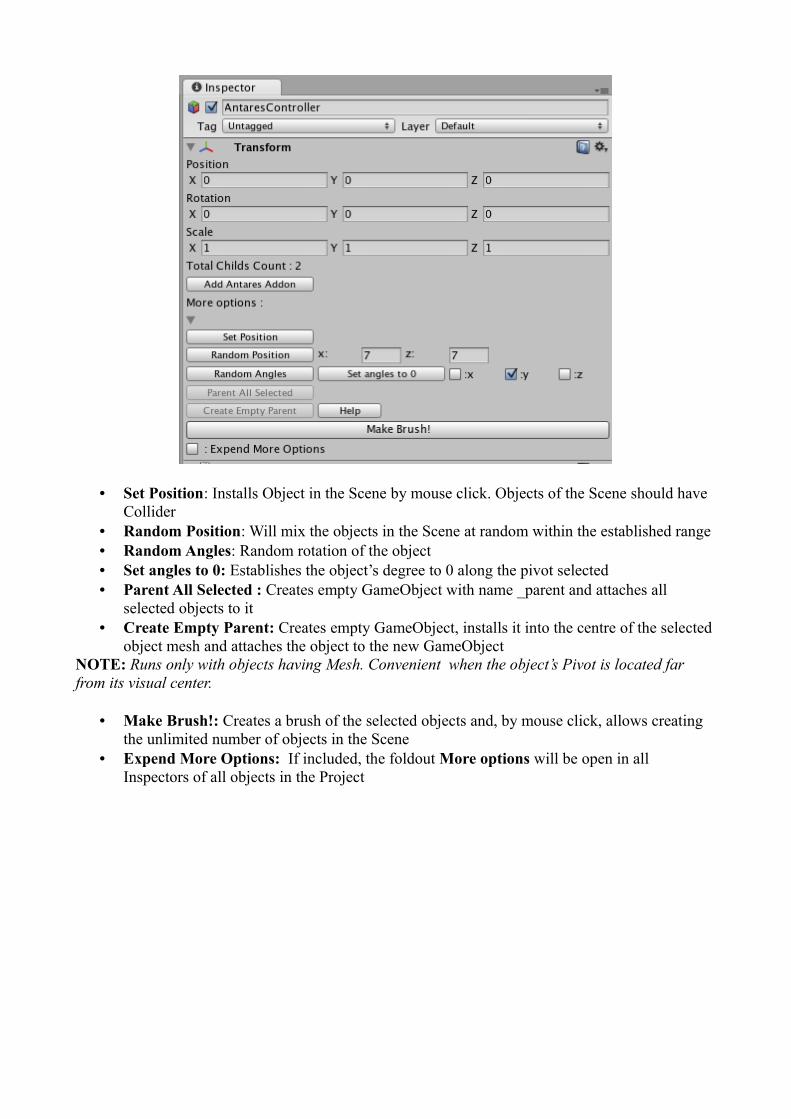
• Set Position: Installs Object in the Scene by mouse click. Objects of the Scene should have Collider
• Random Position: Will mix the objects in the Scene at random within the established range • Random Angles: Random rotation of the object• Set angles to 0: Establishes the object’s degree to 0 along the pivot selected• Parent All Selected : Creates empty GameObject with name _parent and attaches all
selected objects to it • Create Empty Parent: Creates empty GameObject, installs it into the centre of the selected
object mesh and attaches the object to the new GameObjectNOTE: Runs only with objects having Mesh. Convenient when the object’s Pivot is located far from its visual center.
• Make Brush!: Creates a brush of the selected objects and, by mouse click, allows creating the unlimited number of objects in the Scene
• Expend More Options: If included, the foldout More options will be open in all Inspectors of all objects in the Project
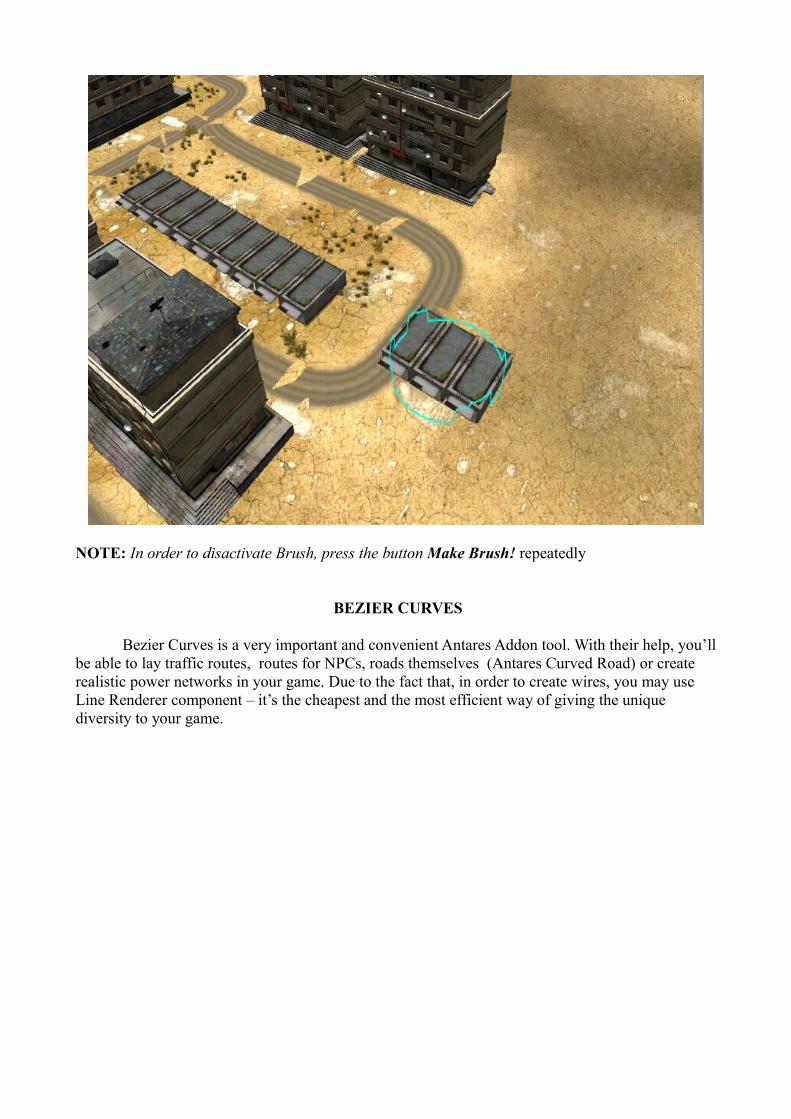
NOTE: In order to disactivate Brush, press the button Make Brush! repeatedly
BEZIER CURVES
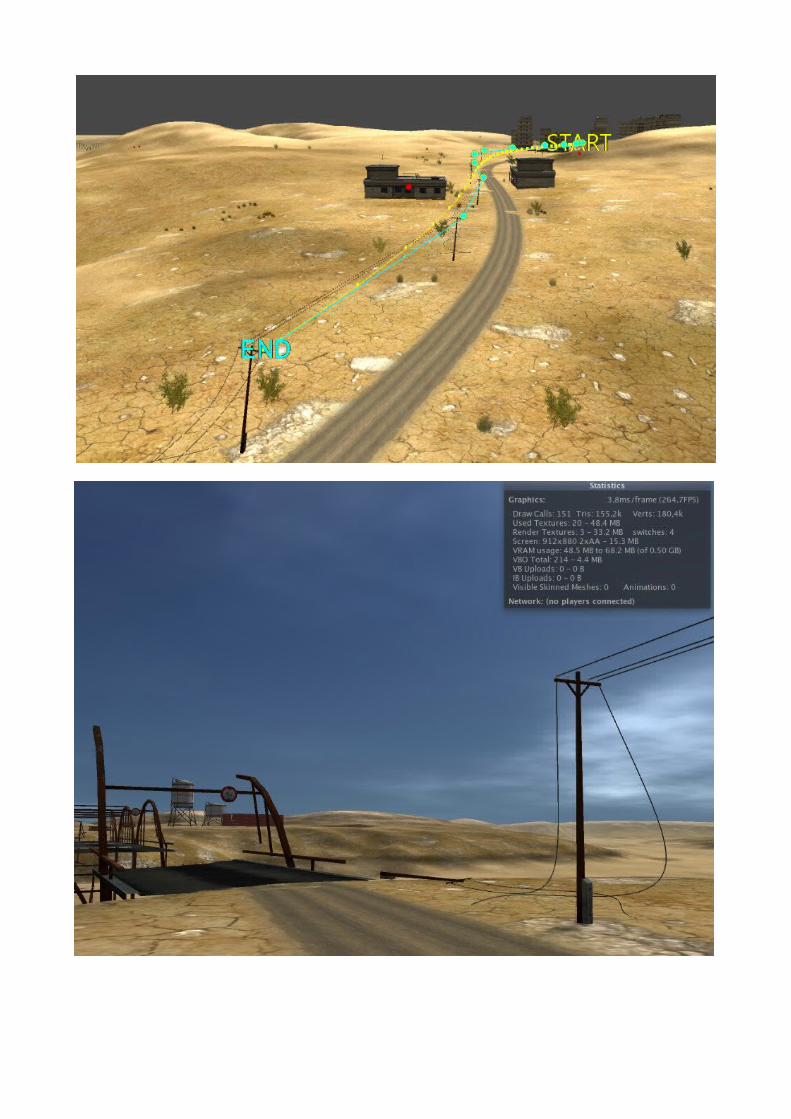
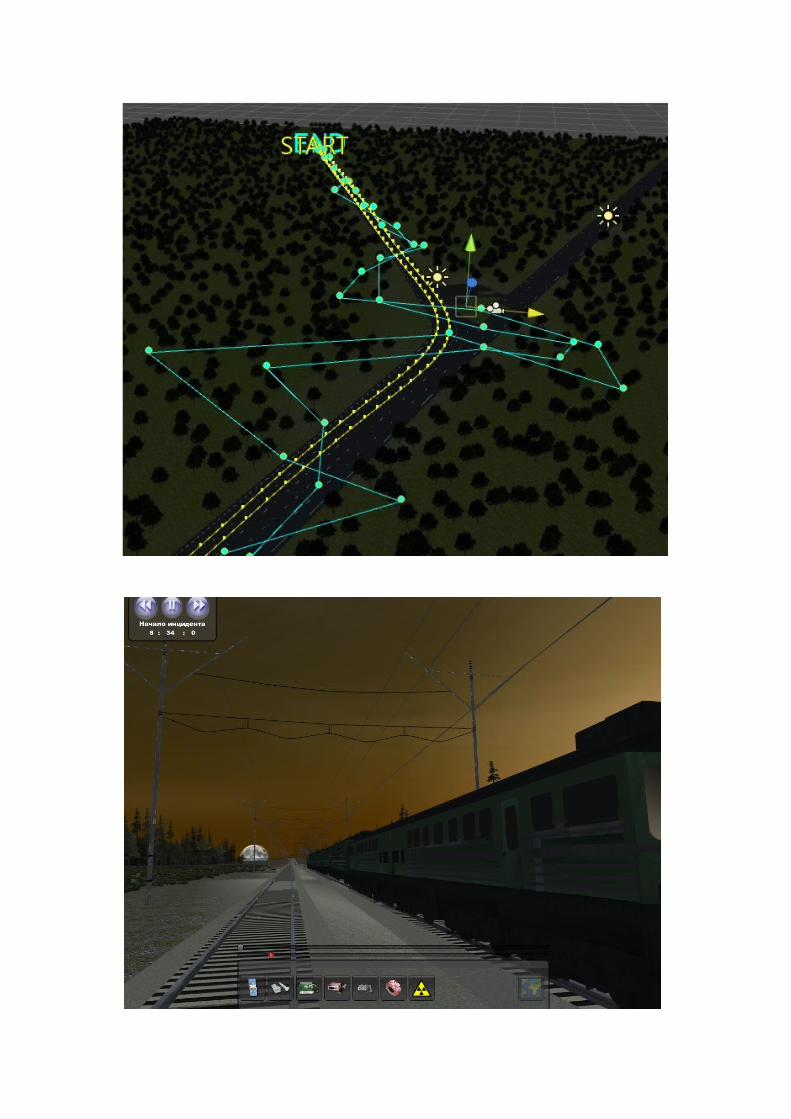
Bezier Curves is a very important and convenient Antares Addon tool. With their help, you’ll be able to lay traffic routes, routes for NPCs, roads themselves (Antares Curved Road) or create realistic power networks in your game. Due to the fact that, in order to create wires, you may use Line Renderer component – it’s the cheapest and the most efficient way of giving the unique diversity to your game.
So, let us learn how to create Curves in Editor.
CREATION OF CURVES IN UNITY EDITOR
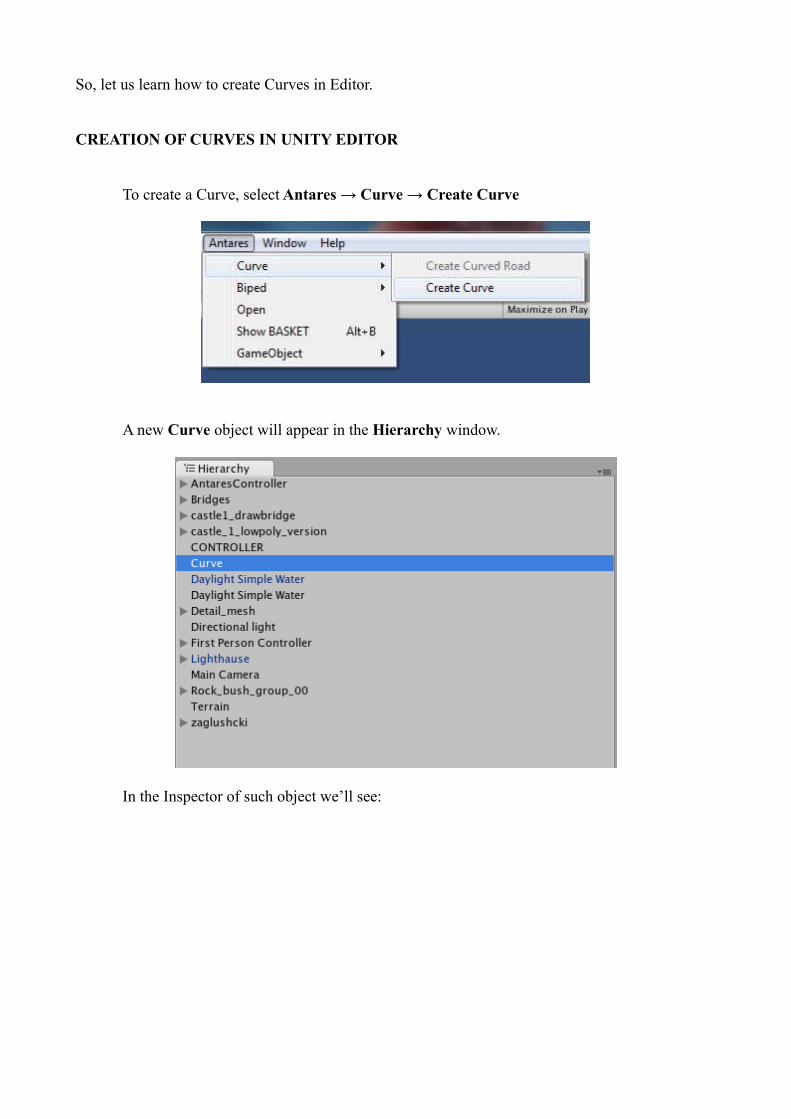
To create a Curve, select Antares → Curve → Create Curve
A new Curve object will appear in the Hierarchy window.
In the Inspector of such object we’ll see:
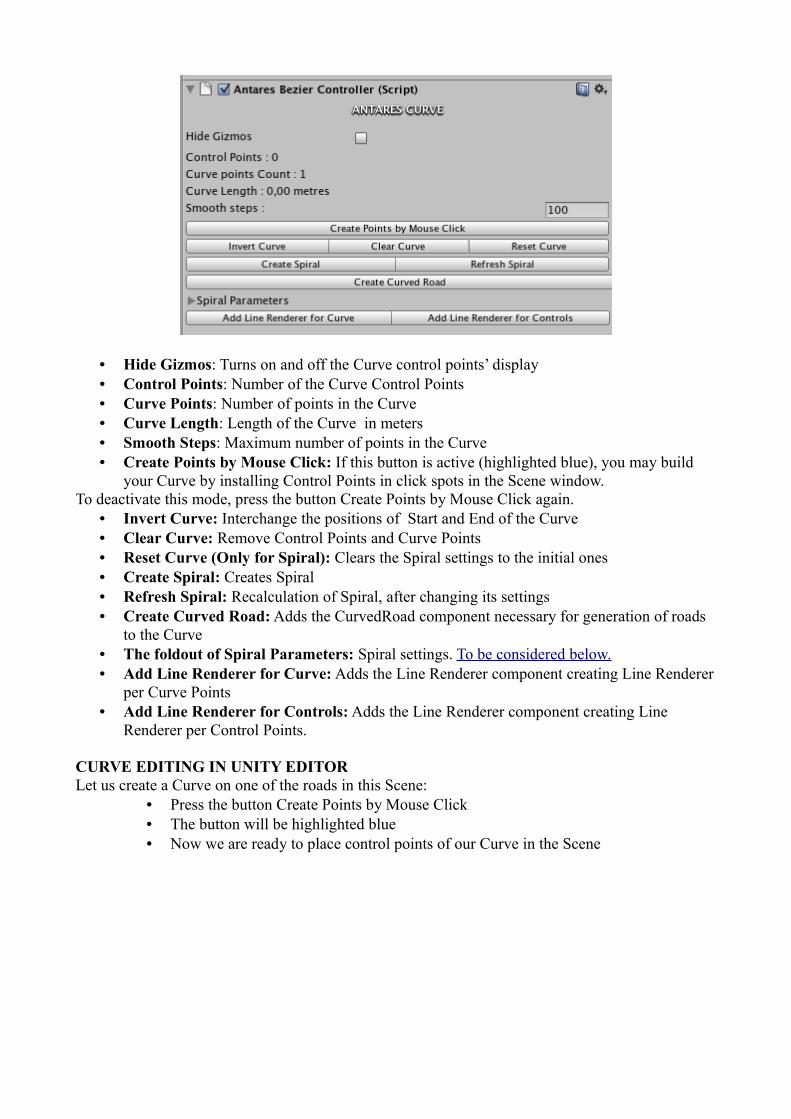
• Hide Gizmos: Turns on and off the Curve control points’ display • Control Points: Number of the Curve Control Points• Curve Points: Number of points in the Curve• Curve Length: Length of the Curve in meters• Smooth Steps: Maximum number of points in the Curve• Create Points by Mouse Click: If this button is active (highlighted blue), you may build
your Curve by installing Control Points in click spots in the Scene window. To deactivate this mode, press the button Create Points by Mouse Click again.
• Invert Curve: Interchange the positions of Start and End of the Curve • Clear Curve: Remove Control Points and Curve Points• Reset Curve (Only for Spiral): Clears the Spiral settings to the initial ones• Create Spiral: Creates Spiral • Refresh Spiral: Recalculation of Spiral, after changing its settings • Create Curved Road: Adds the CurvedRoad component necessary for generation of roads
to the Curve • The foldout of Spiral Parameters: Spiral settings. To be considered below.• Add Line Renderer for Curve: Adds the Line Renderer component creating Line Renderer
per Curve Points• Add Line Renderer for Controls: Adds the Line Renderer component creating Line
Renderer per Control Points.
CURVE EDITING IN UNITY EDITORLet us create a Curve on one of the roads in this Scene:
• Press the button Create Points by Mouse Click• The button will be highlighted blue• Now we are ready to place control points of our Curve in the Scene
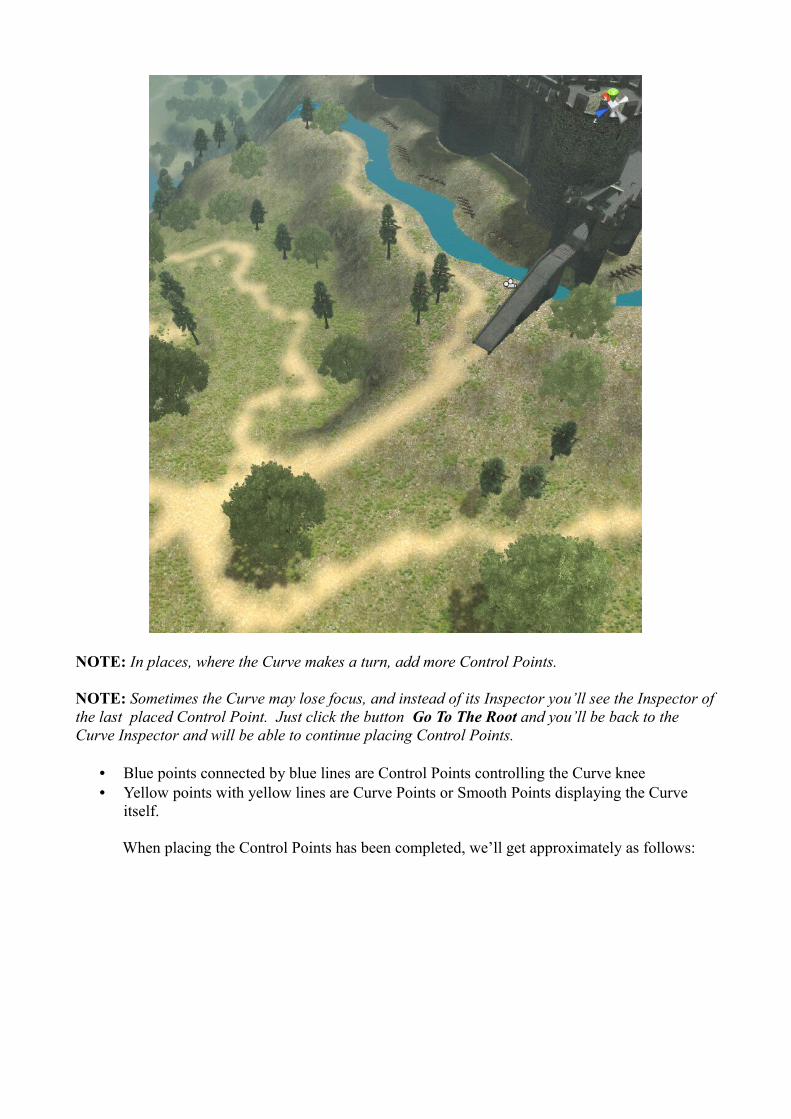
NOTE: In places, where the Curve makes a turn, add more Control Points.
NOTE: Sometimes the Curve may lose focus, and instead of its Inspector you’ll see the Inspector of the last placed Control Point. Just click the button Go To The Root and you’ll be back to the Curve Inspector and will be able to continue placing Control Points.
• Blue points connected by blue lines are Control Points controlling the Curve knee• Yellow points with yellow lines are Curve Points or Smooth Points displaying the Curve
itself.
When placing the Control Points has been completed, we’ll get approximately as follows:

To edit the Curve, we select the required control point and move it as a regular GameObject in the Scene window.

Congratulations! Our Curve has been built! Now we can create a road out of it.
CREATING WIRES
Now let us consider a simple and fast way of creating electrical wires. Let us supppose that we have several supports and we want to connect them by wires.
• Add the MeshCollider component to the supports (we’ll need objects we would be able to click the mouse on).
• Create the Curve Antares → Curve → Create Curve. • Place poles (supports) in the Scene
◦ Add one pole into the Scene ◦ In the Inspector, press the button More options → Expend More Options
NOTE: It is required for the foldout to be open continuously on all objects.
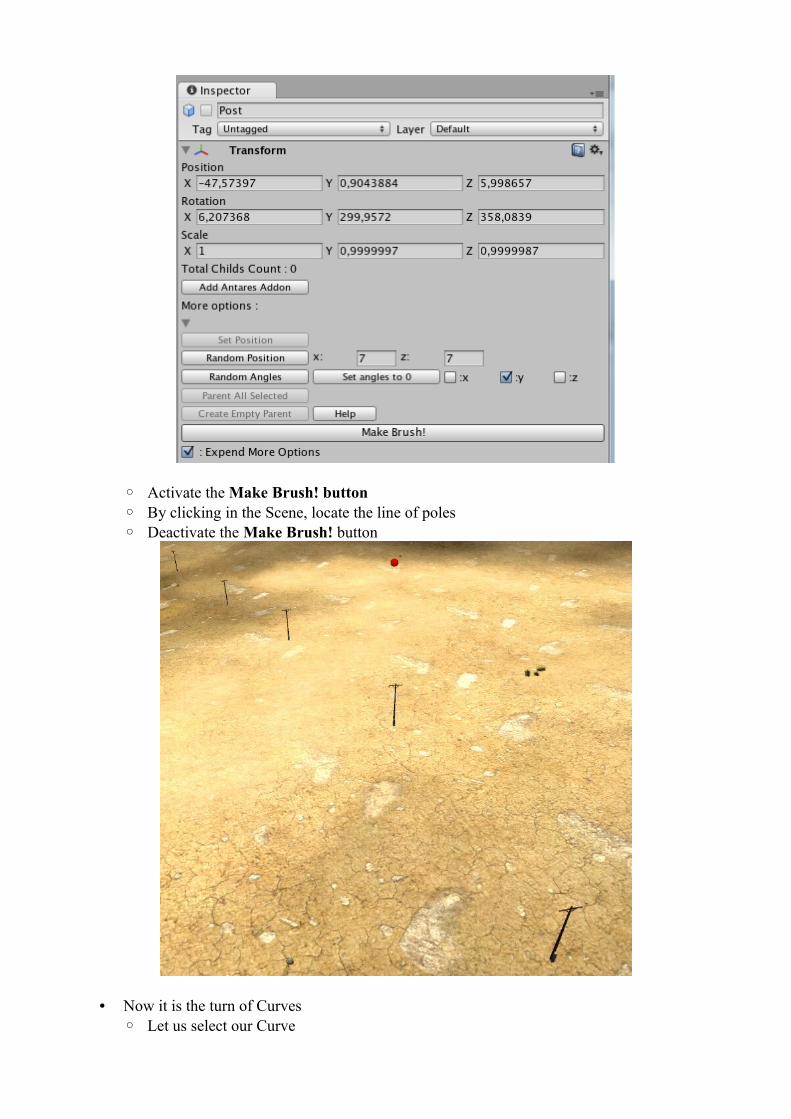
◦ Activate the Make Brush! button◦ By clicking in the Scene, locate the line of poles ◦ Deactivate the Make Brush! button
• Now it is the turn of Curves ◦ Let us select our Curve
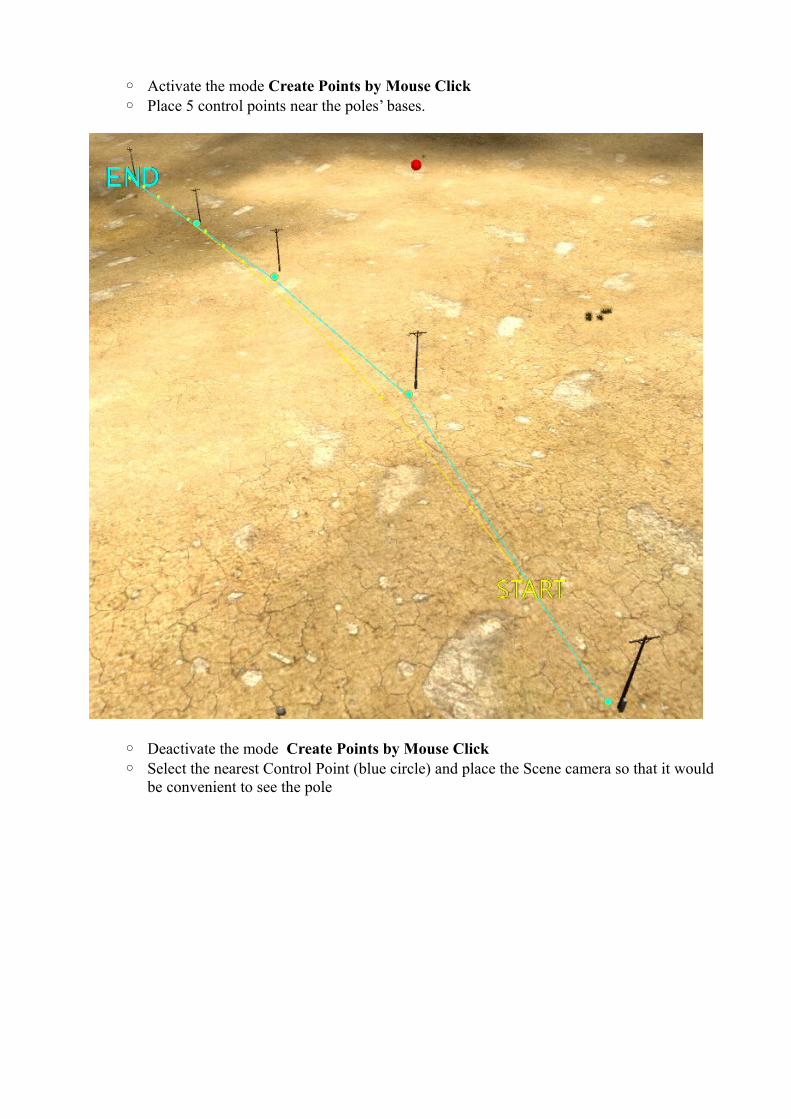
◦ Activate the mode Create Points by Mouse Click◦ Place 5 control points near the poles’ bases.
◦ Deactivate the mode Create Points by Mouse Click◦ Select the nearest Control Point (blue circle) and place the Scene camera so that it would
be convenient to see the pole
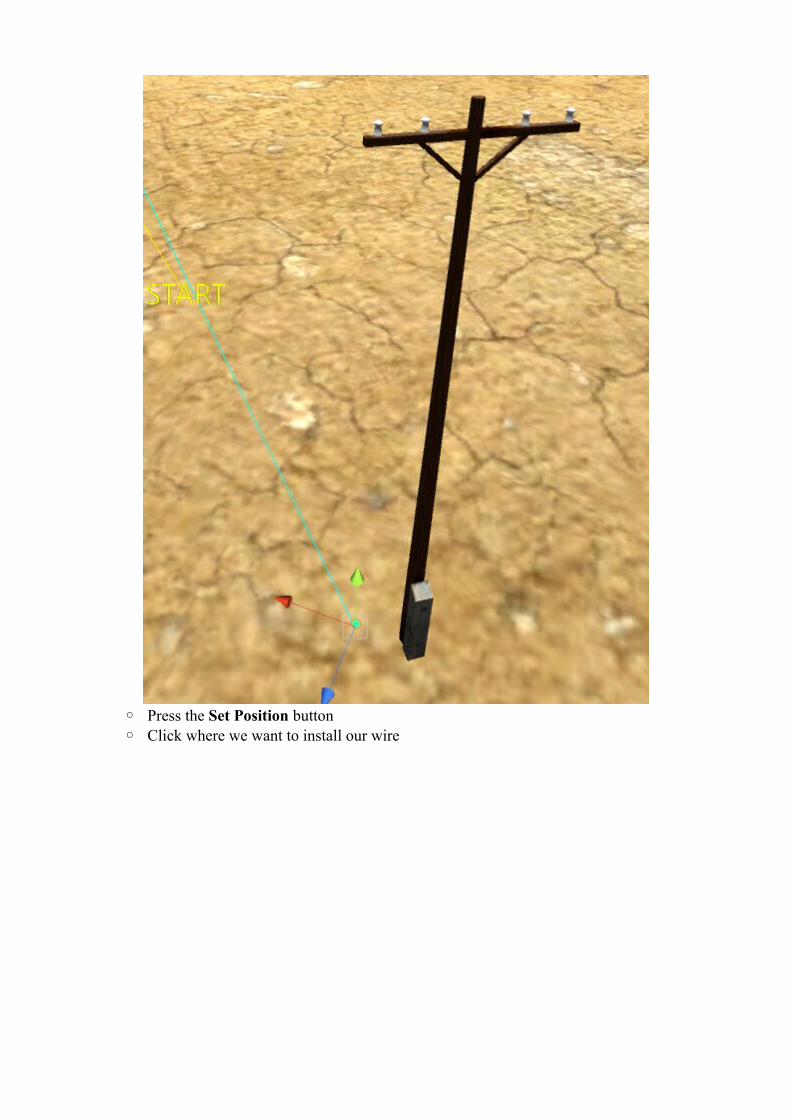
◦ Press the Set Position button◦ Click where we want to install our wire
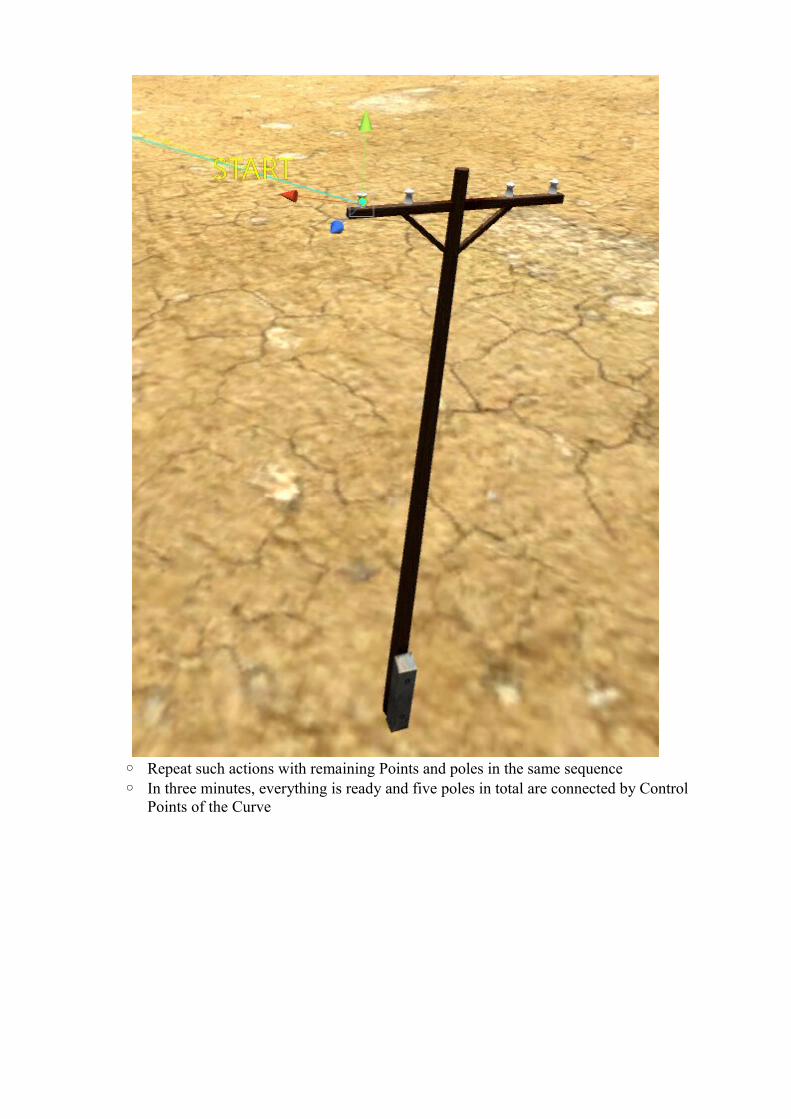
◦ Repeat such actions with remaining Points and poles in the same sequence ◦ In three minutes, everything is ready and five poles in total are connected by Control
Points of the Curve
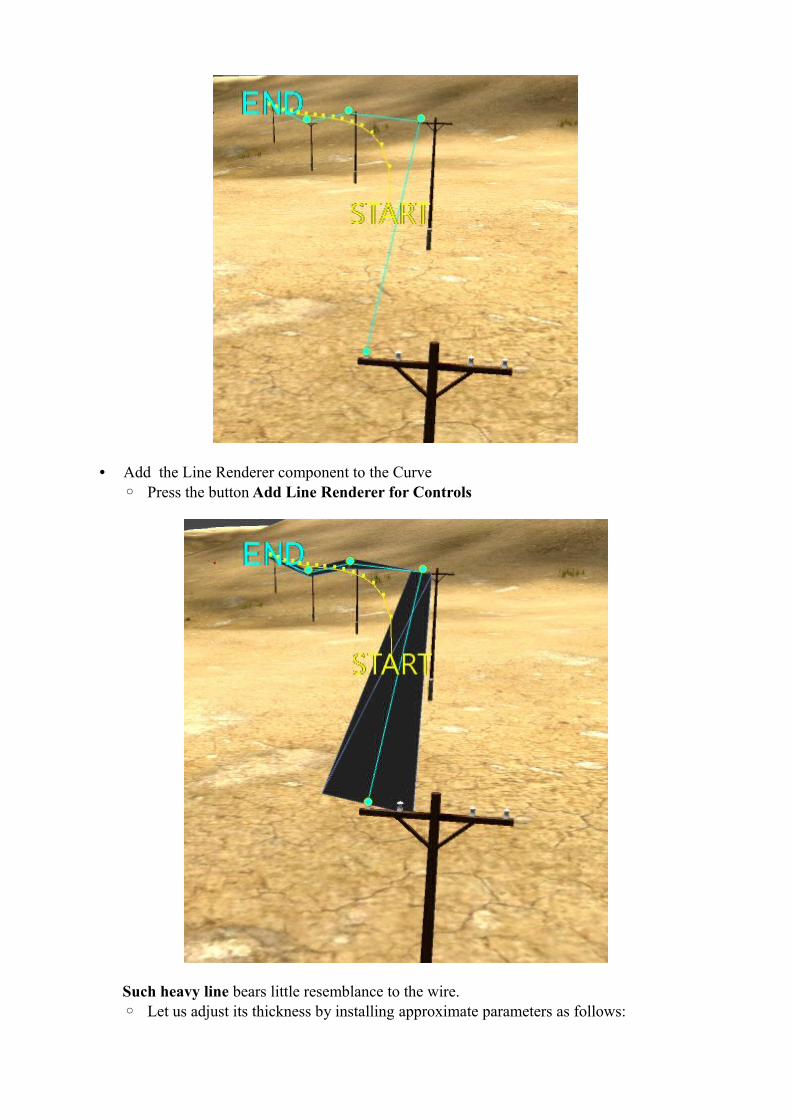
• Add the Line Renderer component to the Curve◦ Press the button Add Line Renderer for Controls
Such heavy line bears little resemblance to the wire. ◦ Let us adjust its thickness by installing approximate parameters as follows:

Congratulations! The first wire is complete!
Further, just make duplicates of the Curve (Ctrl + D (Windows)) and locate them into proper places.
The creation of the electric power line has been completed.
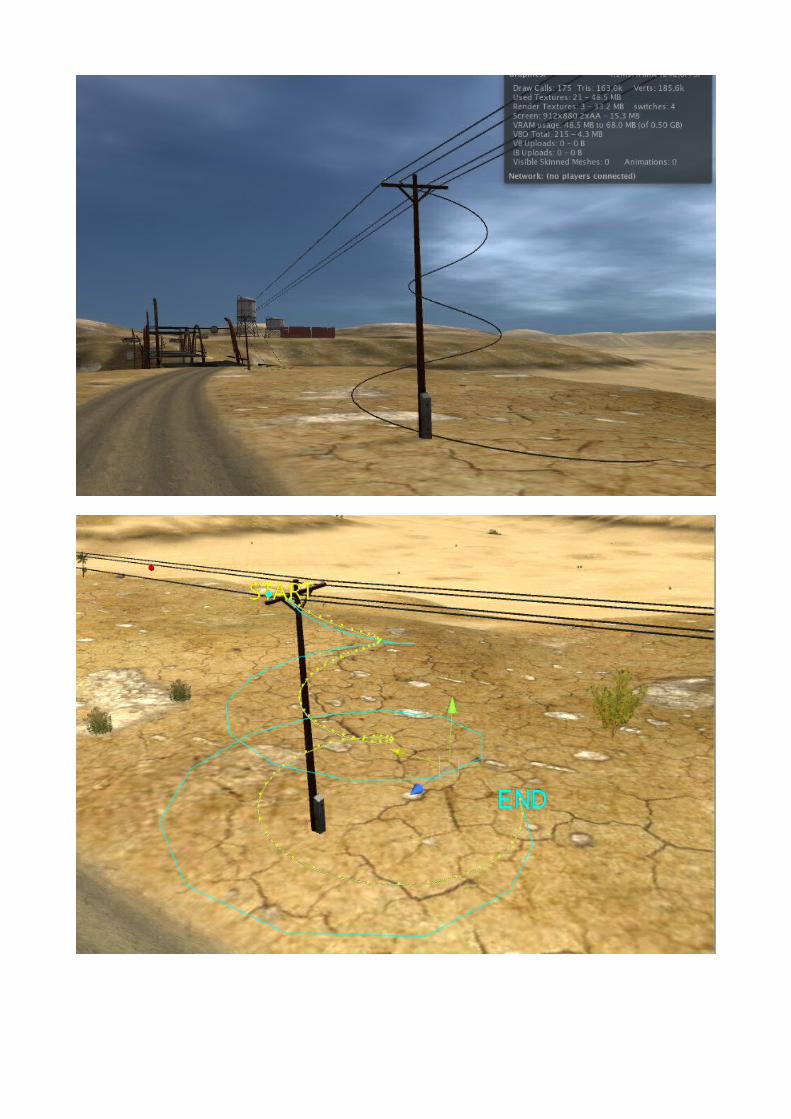
SPIRALS
A Spiral can be created as easy as the Curve, even easier. • Let us add the Curve to the Scene: Antares → Curve → Create Curve• In the Inspector, select the Set Position button and install the Curve into the place, where we
would like to see it. • Press the button Create Curve in Inspector
The spiral has been built.When adding th Line Renderer component (Add Line Renderer for Controls) to it, we
may receive this wonderful broken wire.
SPIRAL SETTINGS
• Spiral Height: The height of a Spiral• Bottom Radius: The radius of the lower turn of the Spiral• Up Radius: The radius of the upper turn of the Spiral• Rounds: Number of the Spiral turns• Control Points Count: Number of Control Points of the Spiral Curve • Clockwise Direction: If on, the Spiral will curl clockwise.
NOTE: When changing settings, it is necessary to press the Refresh Spiral button.
DYNAMIC CREATION AND EDITING CURVES
Curves can be created or changed directly in the runtime mode. The interface class Curve (Curve.cs) is intended for such purpose.
CURVE API
Download the demo here.View ONLINE
In order to create the Curve in the runtime mode, use the following code : GameObject myCurve = new GameObject("My Dinamic Curve", typeof(AntaresBezierController));
CONSTRUCTOR AND DESTRUCTOR
public Curve(GameObject curveObject) : Constructor. As an argument, accepts GameObject, containing the Curve. For example: myCurve or the object created earlier in Unity Editor.
public void Dispose() : Destructor. Call for it, if you want to destroy the interface object Curve (the Curve will not be destroyed automatically).
VARIABLES: public float curveLength : Length of the Curve in meters. public Vector3[] curvePoints : Array of vectors of Curve Points (Smooth Points).
CONTROL POINTS
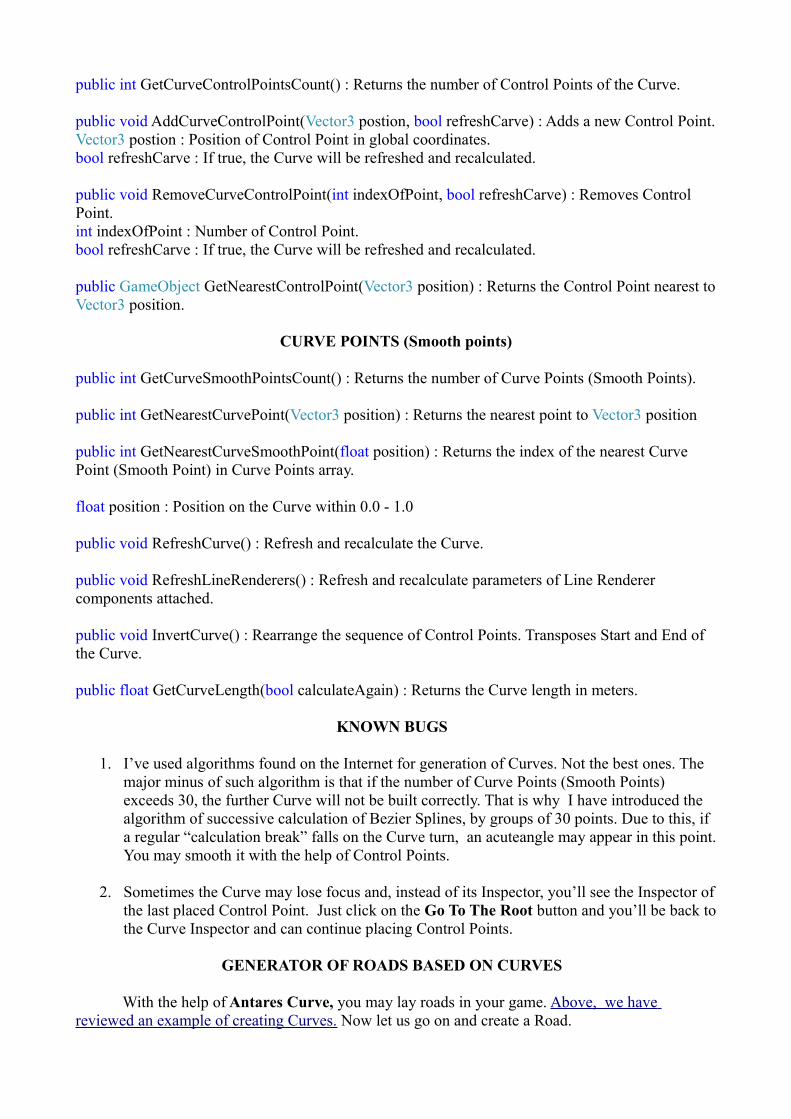
public int GetCurveControlPointsCount() : Returns the number of Control Points of the Curve.
public void AddCurveControlPoint(Vector3 postion, bool refreshCarve) : Adds a new Control Point.Vector3 postion : Position of Control Point in global coordinates.bool refreshCarve : If true, the Curve will be refreshed and recalculated.
public void RemoveCurveControlPoint(int indexOfPoint, bool refreshCarve) : Removes Control Point. int indexOfPoint : Number of Control Point.bool refreshCarve : If true, the Curve will be refreshed and recalculated.
public GameObject GetNearestControlPoint(Vector3 position) : Returns the Control Point nearest to Vector3 position.
CURVE POINTS (Smooth points)
public int GetCurveSmoothPointsCount() : Returns the number of Curve Points (Smooth Points).
public int GetNearestCurvePoint(Vector3 position) : Returns the nearest point to Vector3 position
public int GetNearestCurveSmoothPoint(float position) : Returns the index of the nearest Curve Point (Smooth Point) in Curve Points array.
float position : Position on the Curve within 0.0 - 1.0
public void RefreshCurve() : Refresh and recalculate the Curve.
public void RefreshLineRenderers() : Refresh and recalculate parameters of Line Renderer components attached.
public void InvertCurve() : Rearrange the sequence of Control Points. Transposes Start and End of the Curve.
public float GetCurveLength(bool calculateAgain) : Returns the Curve length in meters.
KNOWN BUGS
1. I’ve used algorithms found on the Internet for generation of Curves. Not the best ones. The major minus of such algorithm is that if the number of Curve Points (Smooth Points) exceeds 30, the further Curve will not be built correctly. That is why I have introduced the algorithm of successive calculation of Bezier Splines, by groups of 30 points. Due to this, if a regular “calculation break” falls on the Curve turn, an acuteangle may appear in this point. You may smooth it with the help of Control Points.
2. Sometimes the Curve may lose focus and, instead of its Inspector, you’ll see the Inspector of the last placed Control Point. Just click on the Go To The Root button and you’ll be back to the Curve Inspector and can continue placing Control Points.
GENERATOR OF ROADS BASED ON CURVES
With the help of Antares Curve, you may lay roads in your game. Above, we have reviewed an example of creating Curves. Now let us go on and create a Road.
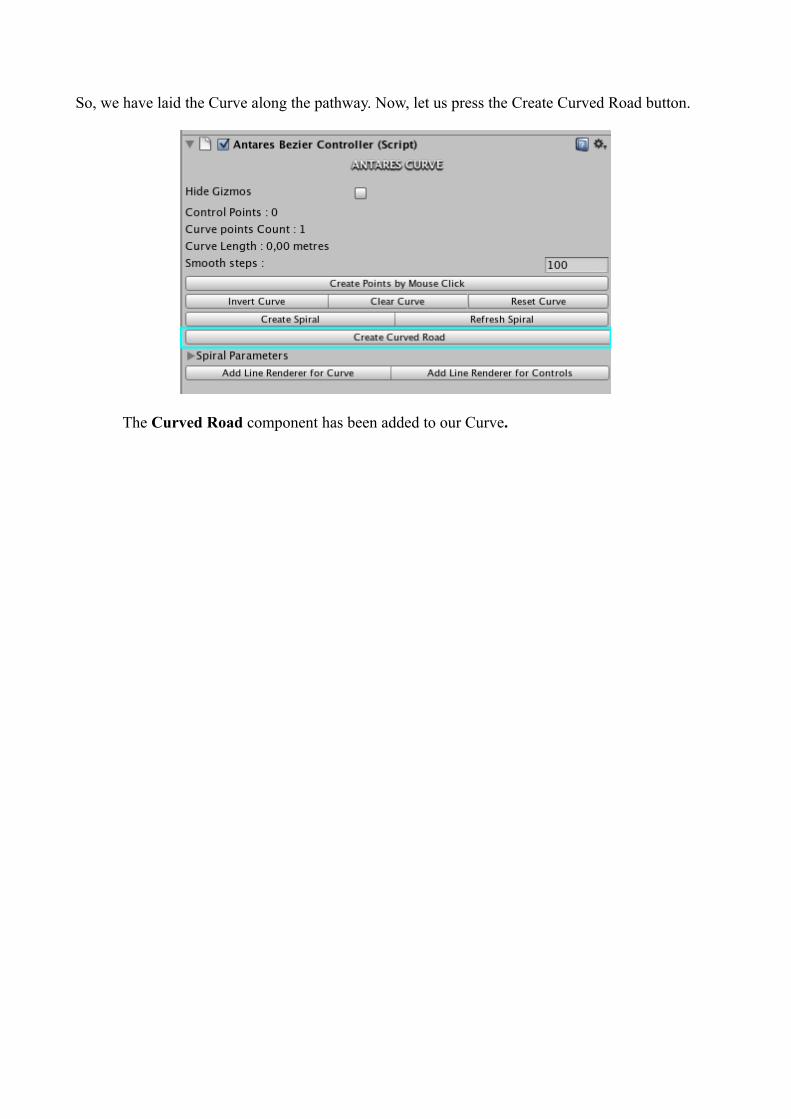
So, we have laid the Curve along the pathway. Now, let us press the Create Curved Road button.
The Curved Road component has been added to our Curve.
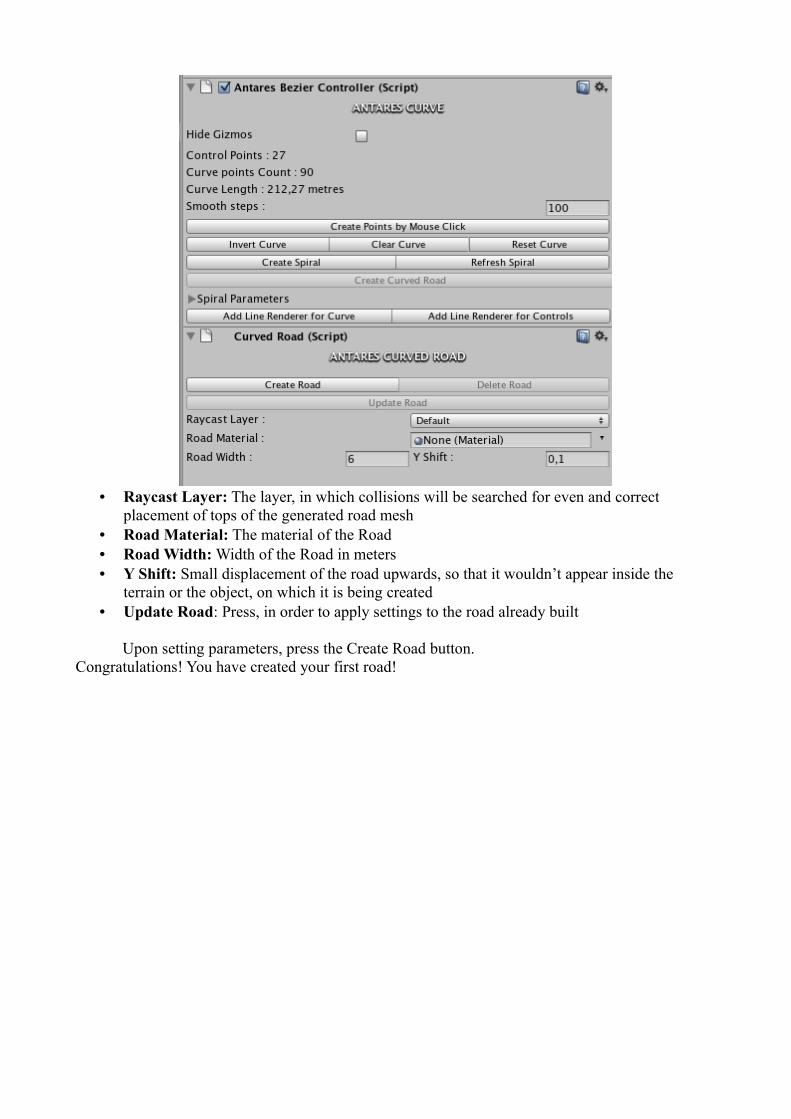
• Raycast Layer: The layer, in which collisions will be searched for even and correct placement of tops of the generated road mesh
• Road Material: The material of the Road• Road Width: Width of the Road in meters• Y Shift: Small displacement of the road upwards, so that it wouldn’t appear inside the
terrain or the object, on which it is being created • Update Road: Press, in order to apply settings to the road already built
Upon setting parameters, press the Create Road button.Congratulations! You have created your first road!
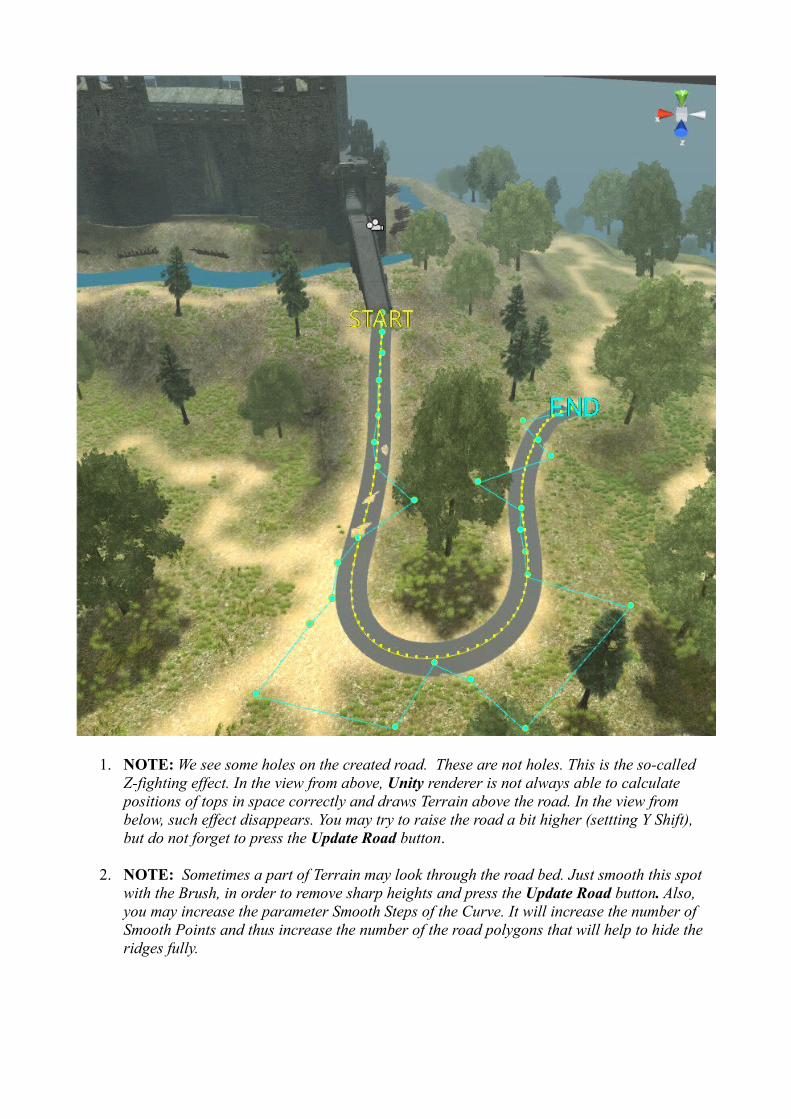
1. NOTE: We see some holes on the created road. These are not holes. This is the so-called Z-fighting effect. In the view from above, Unity renderer is not always able to calculate positions of tops in space correctly and draws Terrain above the road. In the view from below, such effect disappears. You may try to raise the road a bit higher (settting Y Shift), but do not forget to press the Update Road button.
2. NOTE: Sometimes a part of Terrain may look through the road bed. Just smooth this spot with the Brush, in order to remove sharp heights and press the Update Road button. Also, you may increase the parameter Smooth Steps of the Curve. It will increase the number of Smooth Points and thus increase the number of the road polygons that will help to hide the ridges fully.
GENERATOR OF ROADS: SHADERS
The road, which we have just created, looks like an asphalt highway. But a pathway would match better. What shall we do? Let us use shaders, of course.
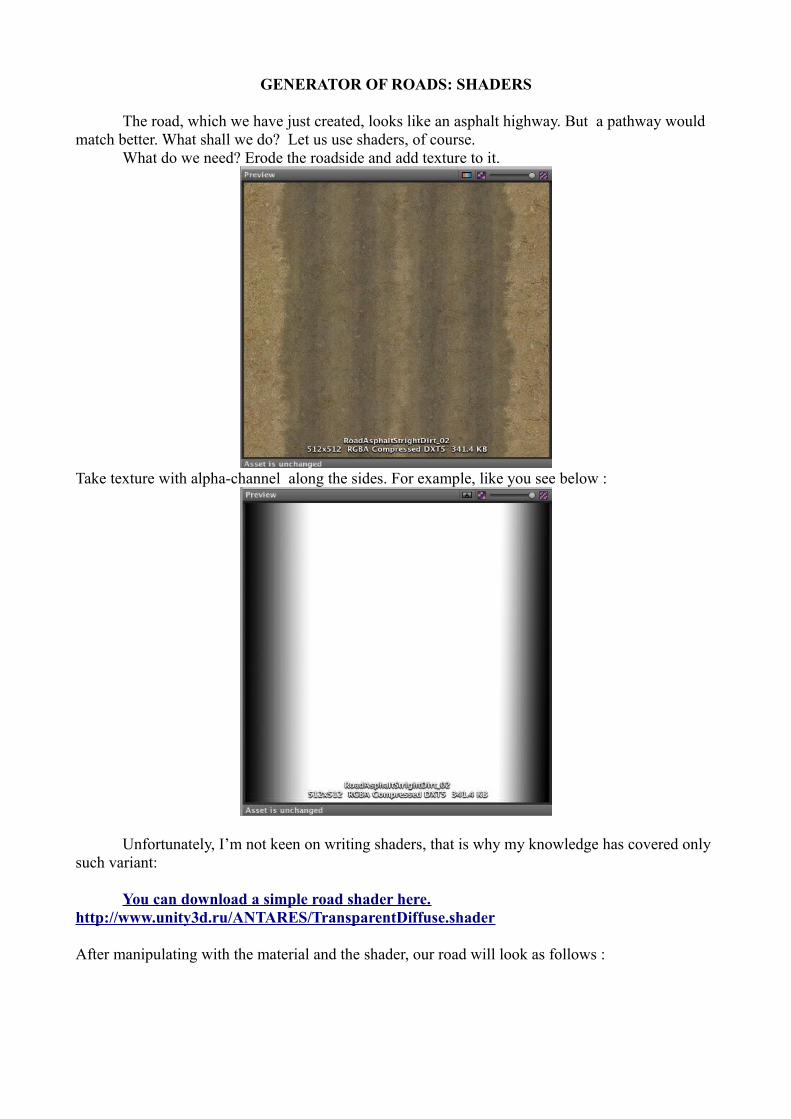
What do we need? Erode the roadside and add texture to it.
Take texture with alpha-channel along the sides. For example, like you see below :
Unfortunately, I’m not keen on writing shaders, that is why my knowledge has covered only such variant:
You can download a simple road shader here.http://www.unity3d.ru/ANTARES/TransparentDiffuse.shader
After manipulating with the material and the shader, our road will look as follows :
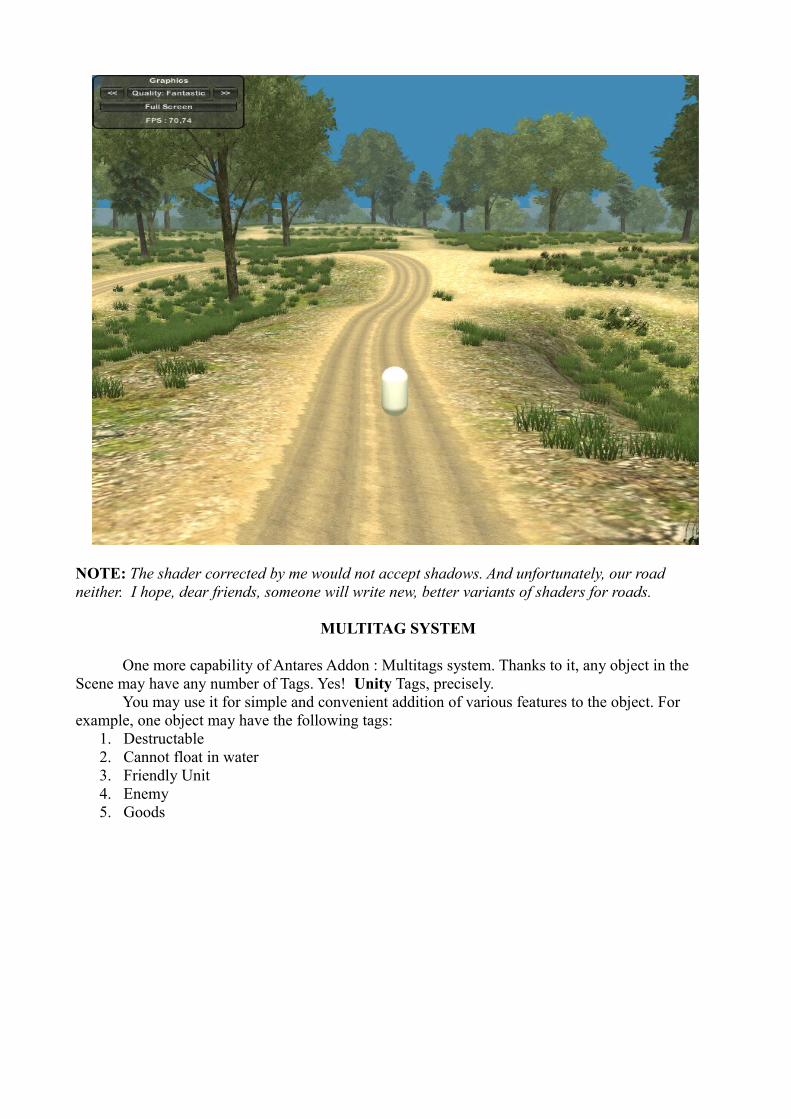
NOTE: The shader corrected by me would not accept shadows. And unfortunately, our road neither. I hope, dear friends, someone will write new, better variants of shaders for roads.
MULTITAG SYSTEM
One more capability of Antares Addon : Multitags system. Thanks to it, any object in the Scene may have any number of Tags. Yes! Unity Tags, precisely.
You may use it for simple and convenient addition of various features to the object. For example, one object may have the following tags:
1. Destructable 2. Cannot float in water 3. Friendly Unit4. Enemy5. Goods
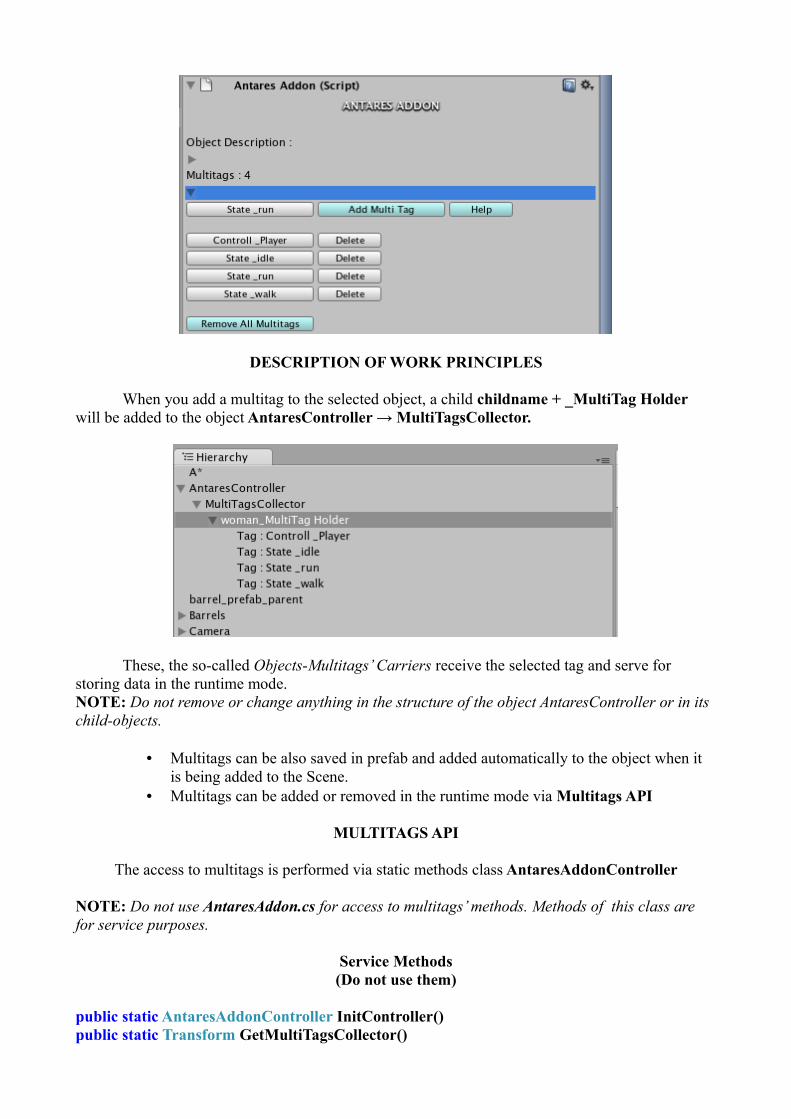
DESCRIPTION OF WORK PRINCIPLES
When you add a multitag to the selected object, a child childname + _MultiTag Holder will be added to the object AntaresController → MultiTagsCollector.
These, the so-called Objects-Multitags’ Carriers receive the selected tag and serve for storing data in the runtime mode. NOTE: Do not remove or change anything in the structure of the object AntaresController or in its child-objects.
• Multitags can be also saved in prefab and added automatically to the object when it is being added to the Scene.
• Multitags can be added or removed in the runtime mode via Multitags API
MULTITAGS API
The access to multitags is performed via static methods class AntaresAddonController
NOTE: Do not use AntaresAddon.cs for access to multitags’ methods. Methods of this class are for service purposes.
Service Methods(Do not use them)
public static AntaresAddonController InitController()public static Transform GetMultiTagsCollector()
public static bool FreeMemoryOnPlay()public static int GetDescCount()
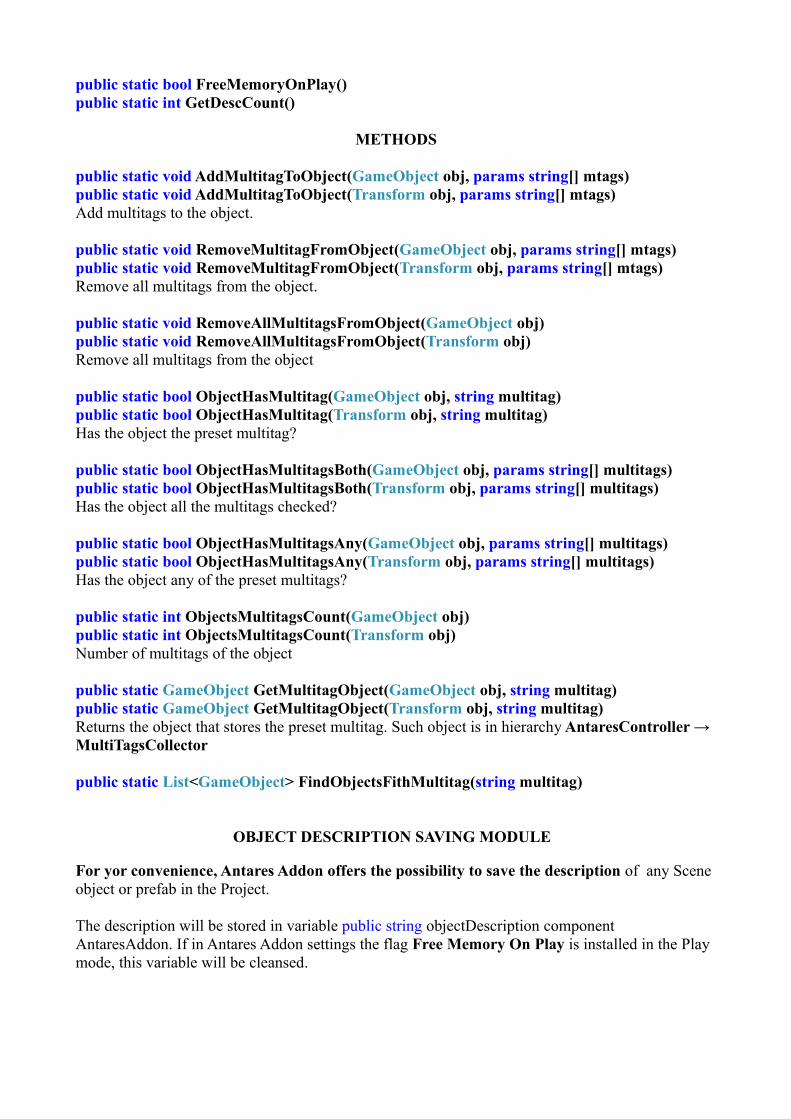
METHODS
public static void AddMultitagToObject(GameObject obj, params string[] mtags)public static void AddMultitagToObject(Transform obj, params string[] mtags)Add multitags to the object.
public static void RemoveMultitagFromObject(GameObject obj, params string[] mtags)public static void RemoveMultitagFromObject(Transform obj, params string[] mtags)Remove all multitags from the object.
public static void RemoveAllMultitagsFromObject(GameObject obj)public static void RemoveAllMultitagsFromObject(Transform obj)Remove all multitags from the object
public static bool ObjectHasMultitag(GameObject obj, string multitag)public static bool ObjectHasMultitag(Transform obj, string multitag)Has the object the preset multitag?
public static bool ObjectHasMultitagsBoth(GameObject obj, params string[] multitags)public static bool ObjectHasMultitagsBoth(Transform obj, params string[] multitags)Has the object all the multitags checked?
public static bool ObjectHasMultitagsAny(GameObject obj, params string[] multitags)public static bool ObjectHasMultitagsAny(Transform obj, params string[] multitags)Has the object any of the preset multitags?
public static int ObjectsMultitagsCount(GameObject obj)public static int ObjectsMultitagsCount(Transform obj)Number of multitags of the object
public static GameObject GetMultitagObject(GameObject obj, string multitag)public static GameObject GetMultitagObject(Transform obj, string multitag)Returns the object that stores the preset multitag. Such object is in hierarchy AntaresController → MultiTagsCollector
public static List<GameObject> FindObjectsFithMultitag(string multitag)
OBJECT DESCRIPTION SAVING MODULE
For yor convenience, Antares Addon offers the possibility to save the description of any Scene object or prefab in the Project. The description will be stored in variable public string objectDescription componentAntaresAddon. If in Antares Addon settings the flag Free Memory On Play is installed in the Play mode, this variable will be cleansed.

ANTARES BASKET
Antares Basket (Alt + B (Windows) or Antares → Show BASKET), probably, is the most convenient tool for level design in Major Projects among all contained in Antares Addon.The basket represents the window accepting Drag & Drop practically of any assets of the project.It has been created, in order you have the possibility to drop objects required at the moment and use them for fast and convenient change in the Scene or settings of the object components.
Also, Antares Basket is able to export any asset types into AssetBundle by two clicks!
1. Example: You are designing the game level. Your Project is large and hundreds or even thousands of objects are in the Project View. Sometimes, it’s a serious test to search for the required assets. Let us assume that at the moment you need only 5 or 15 prefabs, in order to locate a small village in the game level. You are to drop the required assets into the Antares Basket window, find the place for your village to be located and just drag the object to the Scene directly from the window.
NOTE: Buttons Set Position и Make Brush will be of great help here!2. Example: You want to change colour on 10 materials. Unity colorpicker is good but the Antares Basket → Color tab is even better! Here you can create your own colour palette and use as necessary.
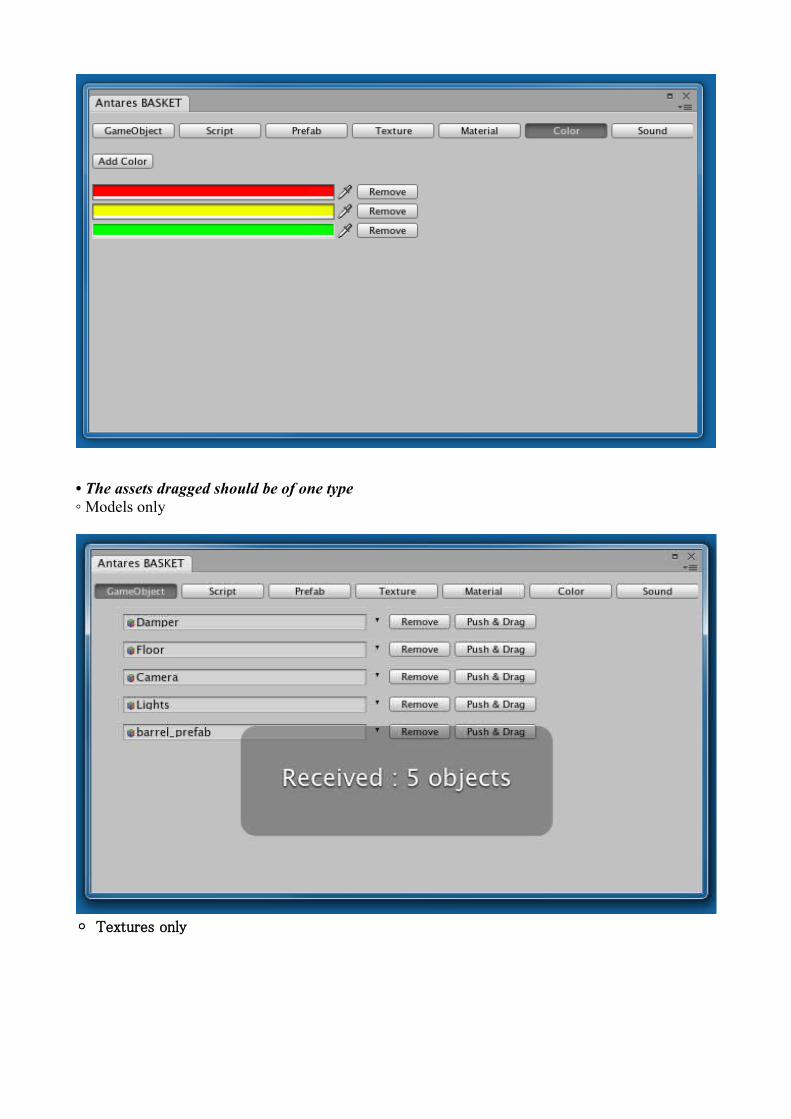
• The assets dragged should be of one type ◦ Models only
◦ Textures only
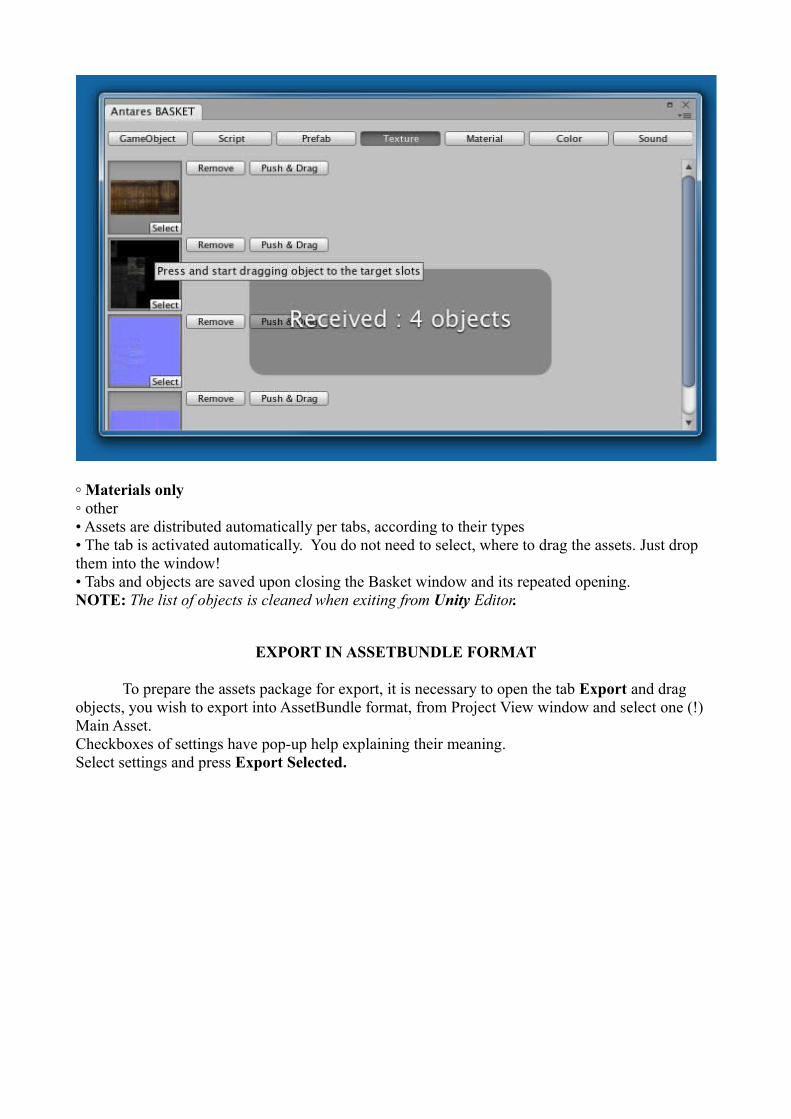
◦ Materials only◦ other• Assets are distributed automatically per tabs, according to their types • The tab is activated automatically. You do not need to select, where to drag the assets. Just drop them into the window! • Tabs and objects are saved upon closing the Basket window and its repeated opening. NOTE: The list of objects is cleaned when exiting from Unity Editor.
EXPORT IN ASSETBUNDLE FORMAT
To prepare the assets package for export, it is necessary to open the tab Export and drag objects, you wish to export into AssetBundle format, from Project View window and select one (!) Main Asset.Checkboxes of settings have pop-up help explaining their meaning.Select settings and press Export Selected.
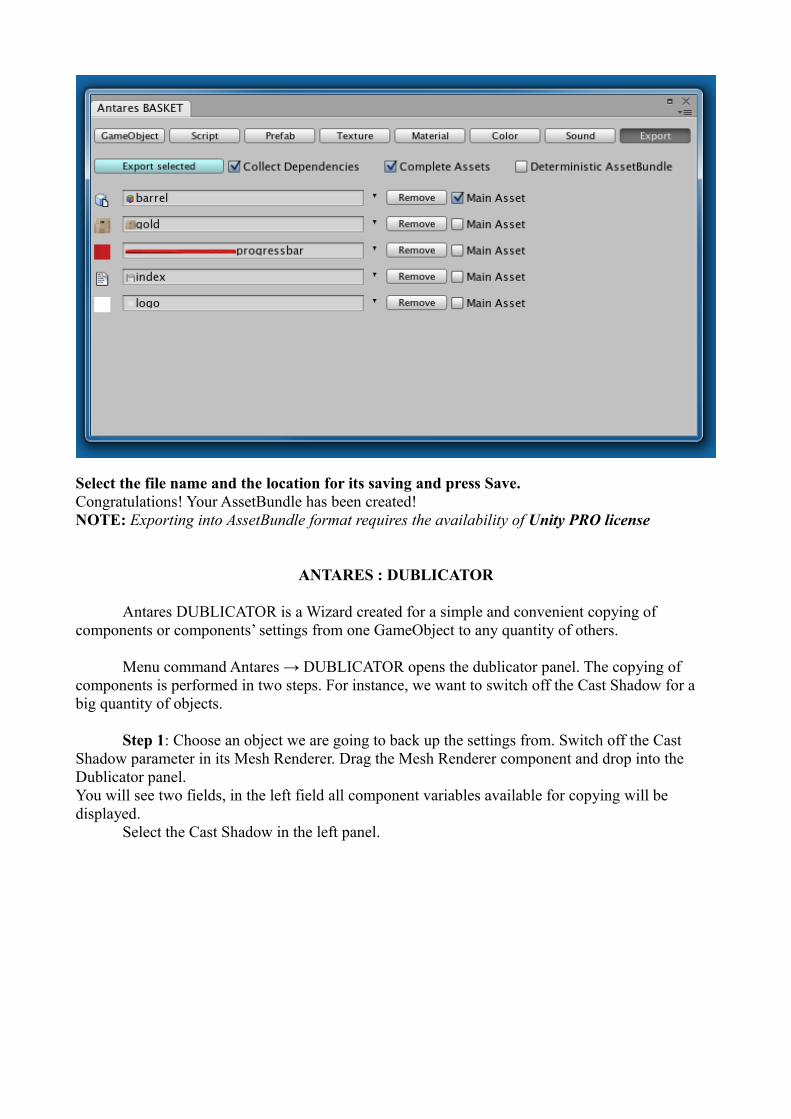
Select the file name and the location for its saving and press Save.Congratulations! Your AssetBundle has been created!NOTE: Exporting into AssetBundle format requires the availability of Unity PRO license
ANTARES : DUBLICATOR
Antares DUBLICATOR is a Wizard created for a simple and convenient copying of components or components’ settings from one GameObject to any quantity of others.
Menu command Antares → DUBLICATOR opens the dublicator panel. The copying of components is performed in two steps. For instance, we want to switch off the Cast Shadow for a big quantity of objects.
Step 1: Choose an object we are going to back up the settings from. Switch off the Cast Shadow parameter in its Mesh Renderer. Drag the Mesh Renderer component and drop into the Dublicator panel.You will see two fields, in the left field all component variables available for copying will be displayed.
Select the Cast Shadow in the left panel.
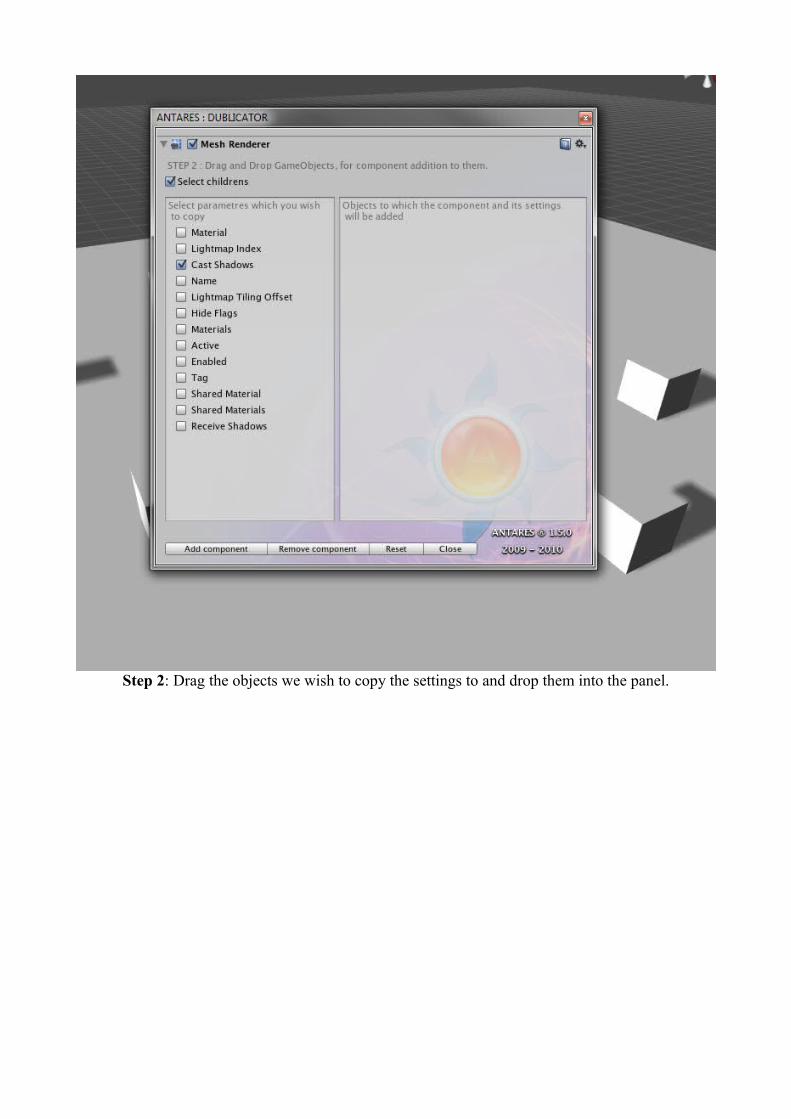
Step 2: Drag the objects we wish to copy the settings to and drop them into the panel.
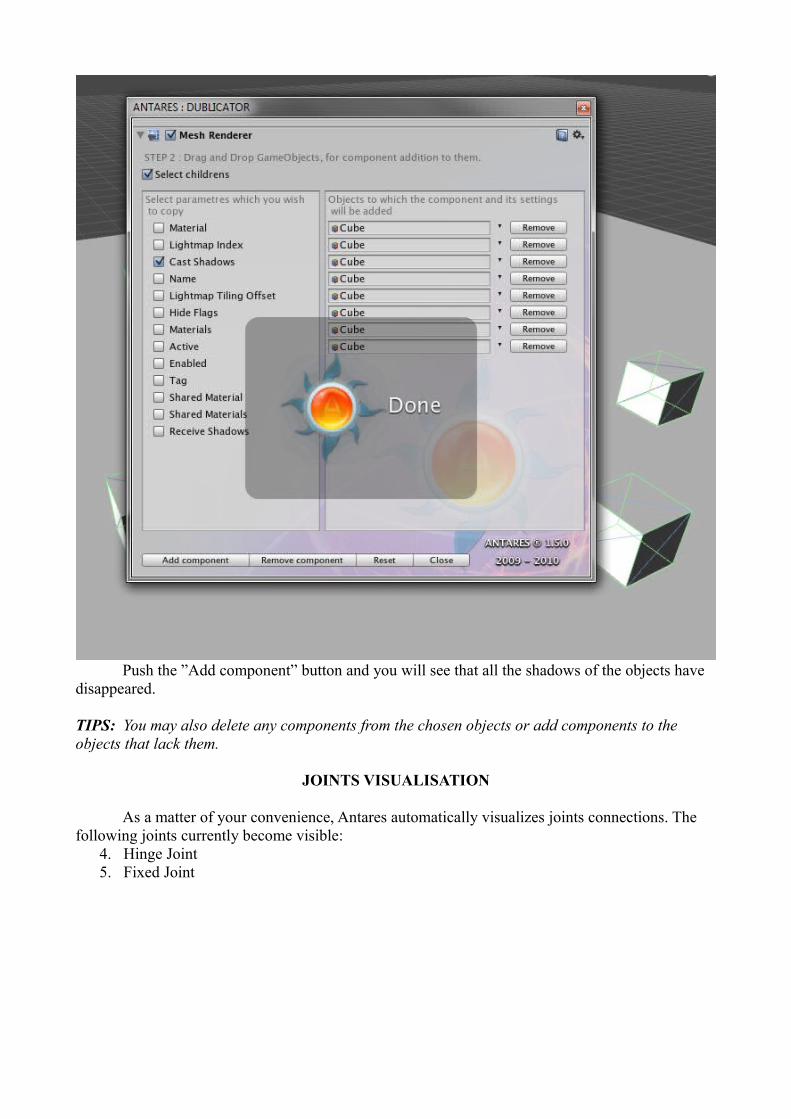
Push the ”Add component” button and you will see that all the shadows of the objects have disappeared.
TIPS: You may also delete any components from the chosen objects or add components to the objects that lack them.
JOINTS VISUALISATION
As a matter of your convenience, Antares automatically visualizes joints connections. The following joints currently become visible:
4. Hinge Joint5. Fixed Joint
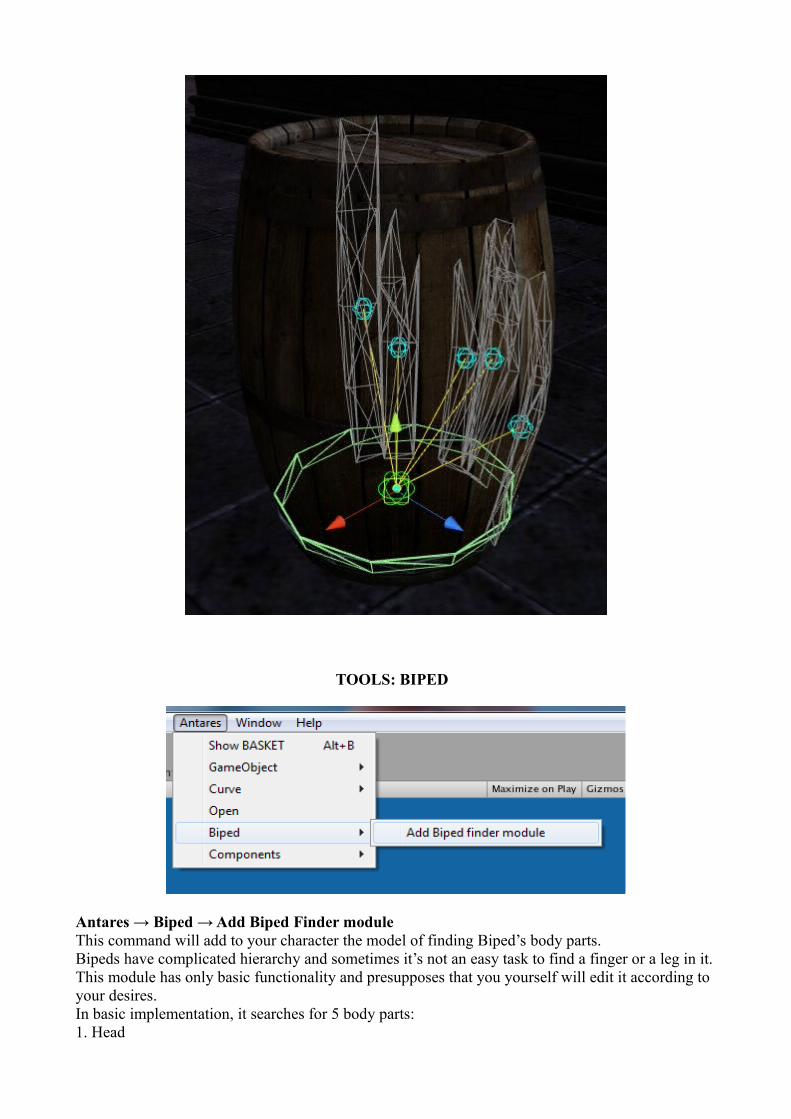
TOOLS: BIPED
Antares → Biped → Add Biped Finder moduleThis command will add to your character the model of finding Biped’s body parts.Bipeds have complicated hierarchy and sometimes it’s not an easy task to find a finger or a leg in it. This module has only basic functionality and presupposes that you yourself will edit it according to your desires. In basic implementation, it searches for 5 body parts:1. Head
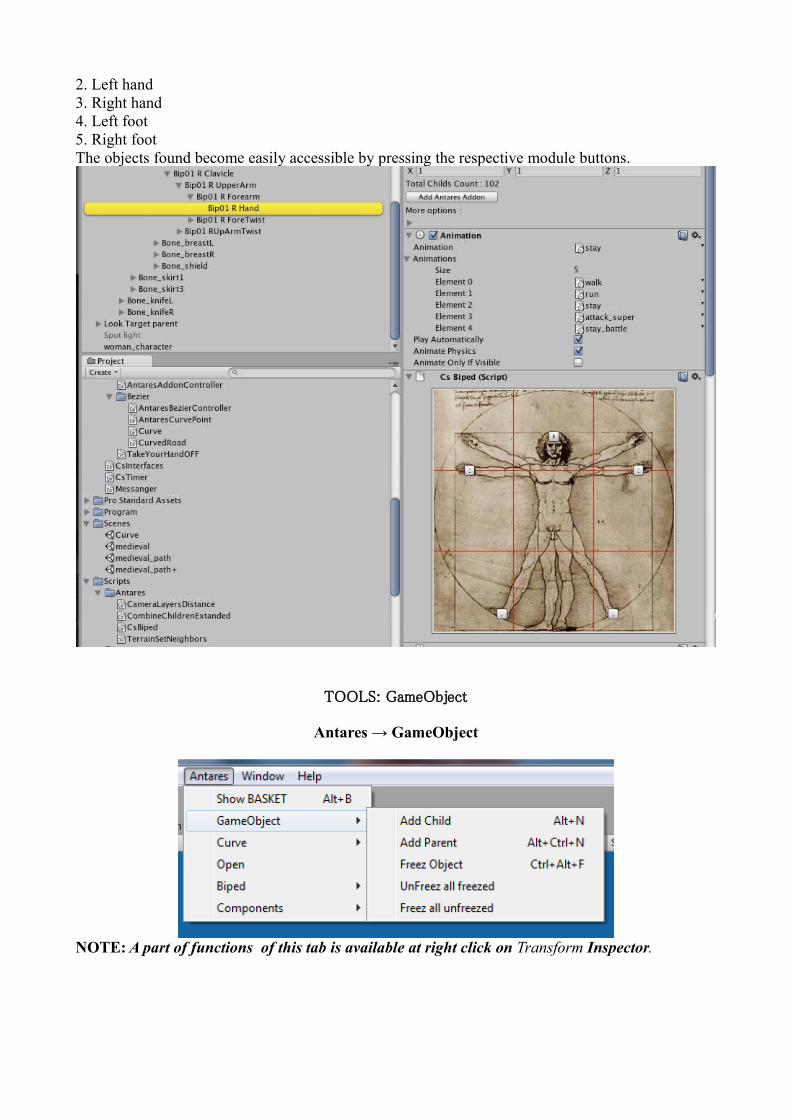
2. Left hand3. Right hand4. Left foot5. Right footThe objects found become easily accessible by pressing the respective module buttons.
TOOLS: GameObject
Antares → GameObject
NOTE: A part of functions of this tab is available at right click on Transform Inspector.
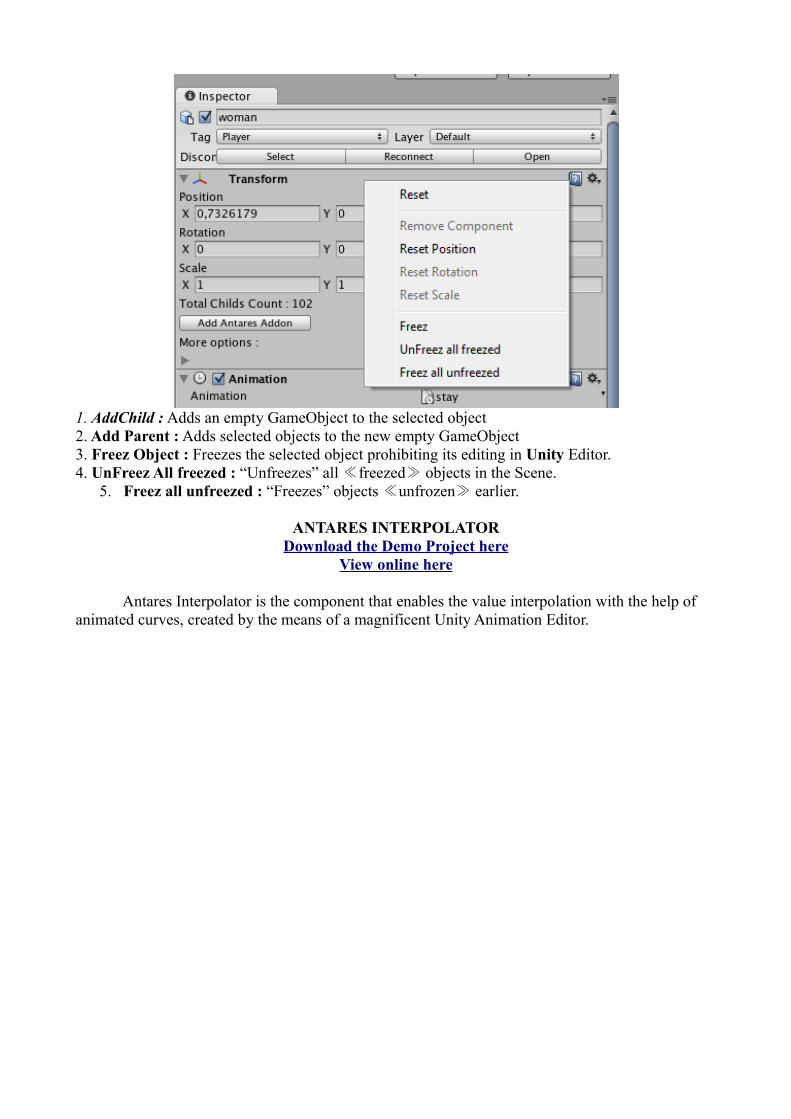
1. AddChild : Adds an empty GameObject to the selected object2. Add Parent : Adds selected objects to the new empty GameObject3. Freez Object : Freezes the selected object prohibiting its editing in Unity Editor.4. UnFreez All freezed : “Unfreezes” all ≪freezed ≫ objects in the Scene.
5. Freez all unfreezed : “Freezes” objects ≪unfrozen ≫ earlier.
ANTARES INTERPOLATORDownload the Demo Project here
View online here
Antares Interpolator is the component that enables the value interpolation with the help of animated curves, created by the means of a magnificent Unity Animation Editor.
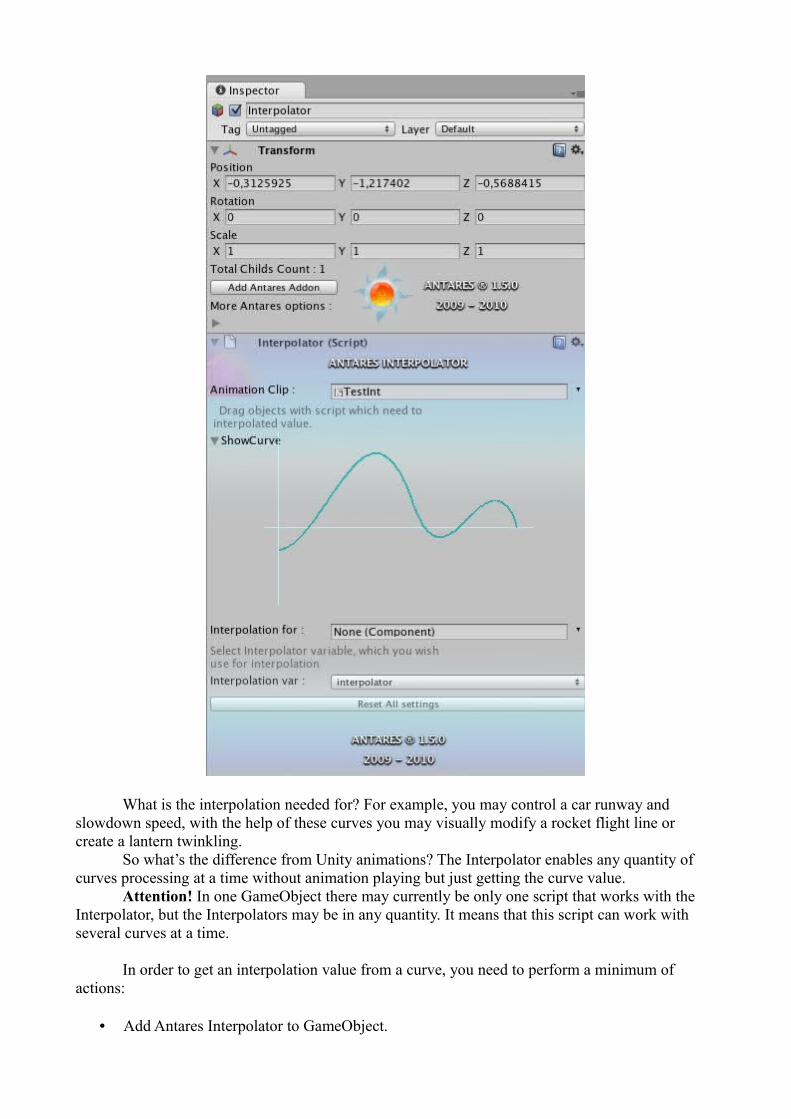
What is the interpolation needed for? For example, you may control a car runway and slowdown speed, with the help of these curves you may visually modify a rocket flight line or create a lantern twinkling.
So what’s the difference from Unity animations? The Interpolator enables any quantity of curves processing at a time without animation playing but just getting the curve value.
Attention! In one GameObject there may currently be only one script that works with the Interpolator, but the Interpolators may be in any quantity. It means that this script can work with several curves at a time.
In order to get an interpolation value from a curve, you need to perform a minimum of actions:
• Add Antares Interpolator to GameObject.
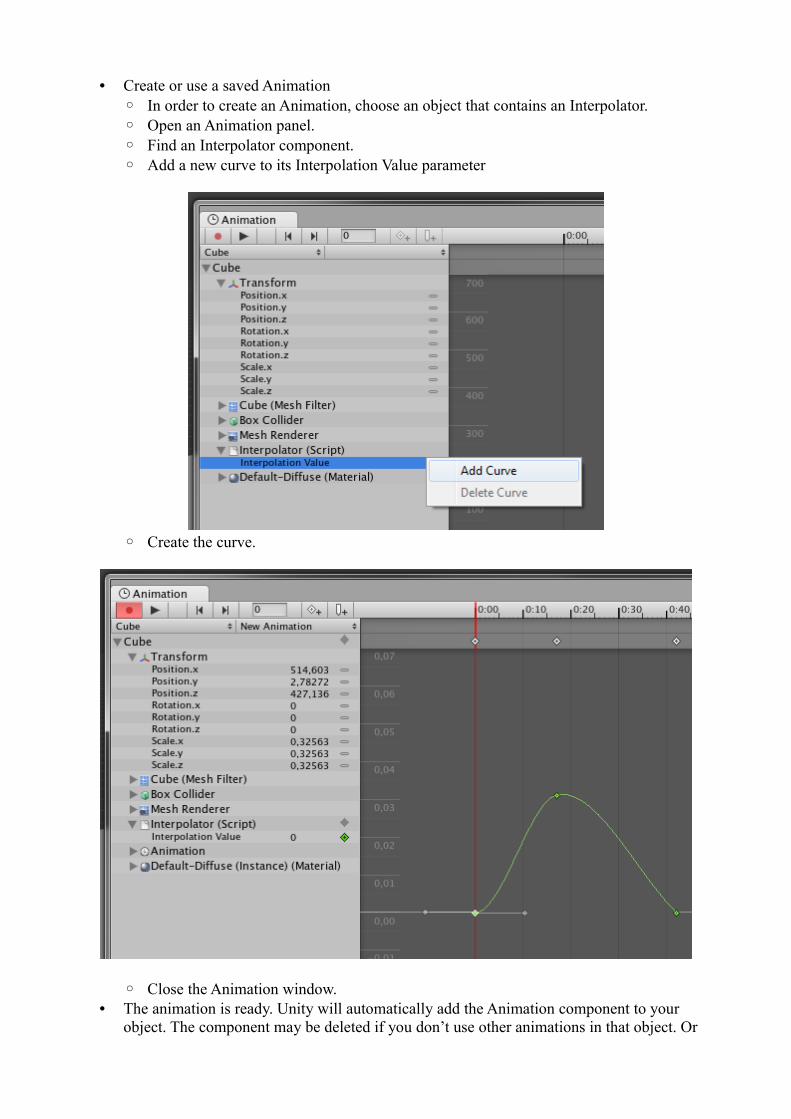
• Create or use a saved Animation◦ In order to create an Animation, choose an object that contains an Interpolator.◦ Open an Animation panel.◦ Find an Interpolator component.◦ Add a new curve to its Interpolation Value parameter
◦ Create the curve.
◦ Close the Animation window. • The animation is ready. Unity will automatically add the Animation component to your
object. The component may be deleted if you don’t use other animations in that object. Or
you may remove the newly created animation from the list.For the Interpolator to work you need only the animation file - the Animation component is not needed and may be deleted.
◦ TIPS : The created animation may be used in any other project. But if you use it in a project different from the one it was created in, you may have some difficulties with the former animation processing.
• We need to declare a variable of a type Interpolator in the script that will be receiving and using the interpolation values:
public Interpolator interpolator, interpolatorAgain; • Now we will just drag the GameObject that contains the script which will be using the
interpolated data and drop it into the Interpolation For field• Below the Interpolation Var. Field will activate. As you see, above we have declared two
variables of type Interpolator : interpolator and interpolatorAgain. In the Interpolation Var dropdown list you may choose the variable you want. It is made to enable one script to work with any desirable quantity of interpolated curves at a time.
• The last thing left is Interpolator fetching and value getting.
The Interpolator component initializes variables of type Interpolator itself, that’s why you don’t have to initialize them in Start or Awake. All you need is fetch the interpolator method. They are called in the manner of the Unity Animation methods:
public void Reset()public float Evaluate(float time)
public float EvaluateAutomatically()
public void Reset() : Resets the parameters to the initial value. If you fetch Reset from the shortcut menu of the Unity Editor, it will clear all the script variables. If you do it from a script in a runtime, it will reset all the parameters to the original state.
public float Evaluate(float time) : Returns the interpolation value. The input parameter is the “time” of a curve, which depends on the animation curve length per second.
For instance, if the length of your curve is 5 sec, in order to get the curve interpolation value in the middle, you need to fetch float middle = Evaluate(0.25f);
public float EvaluateAutomatically() : automatically reproduces the curve and brings back its value in every shot. If the end of the curve is reached, reproduction continues from the beginning.
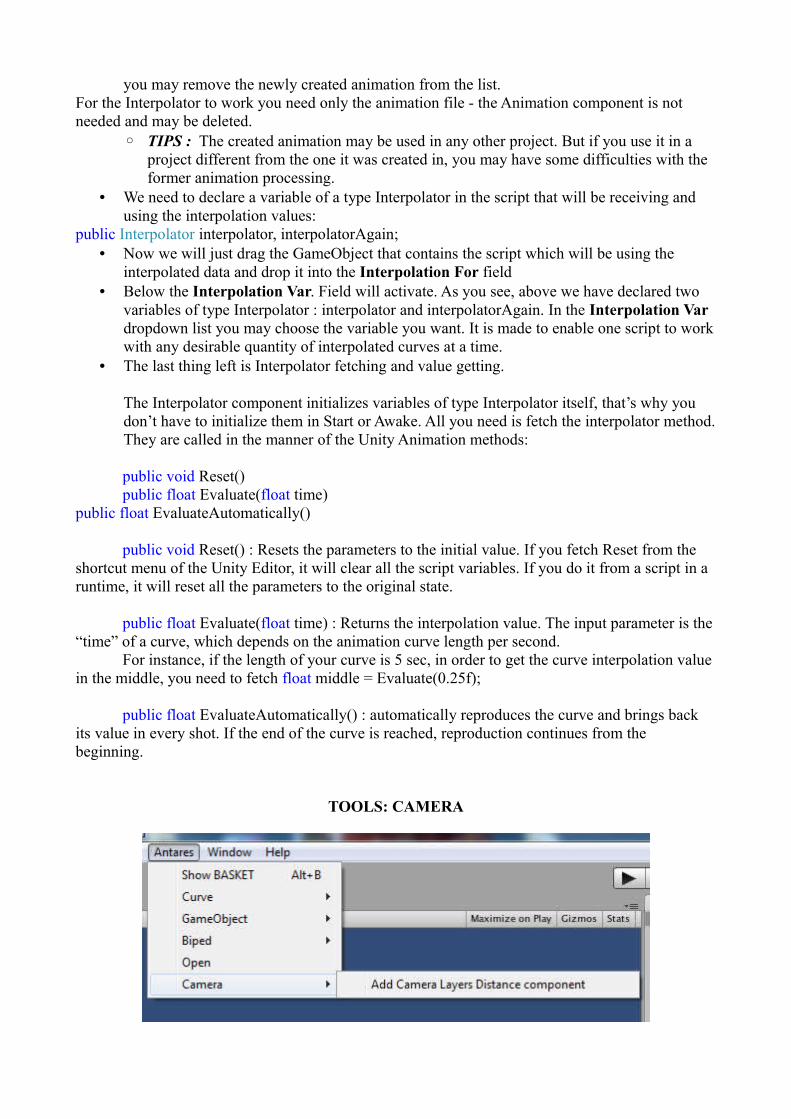
TOOLS: CAMERA
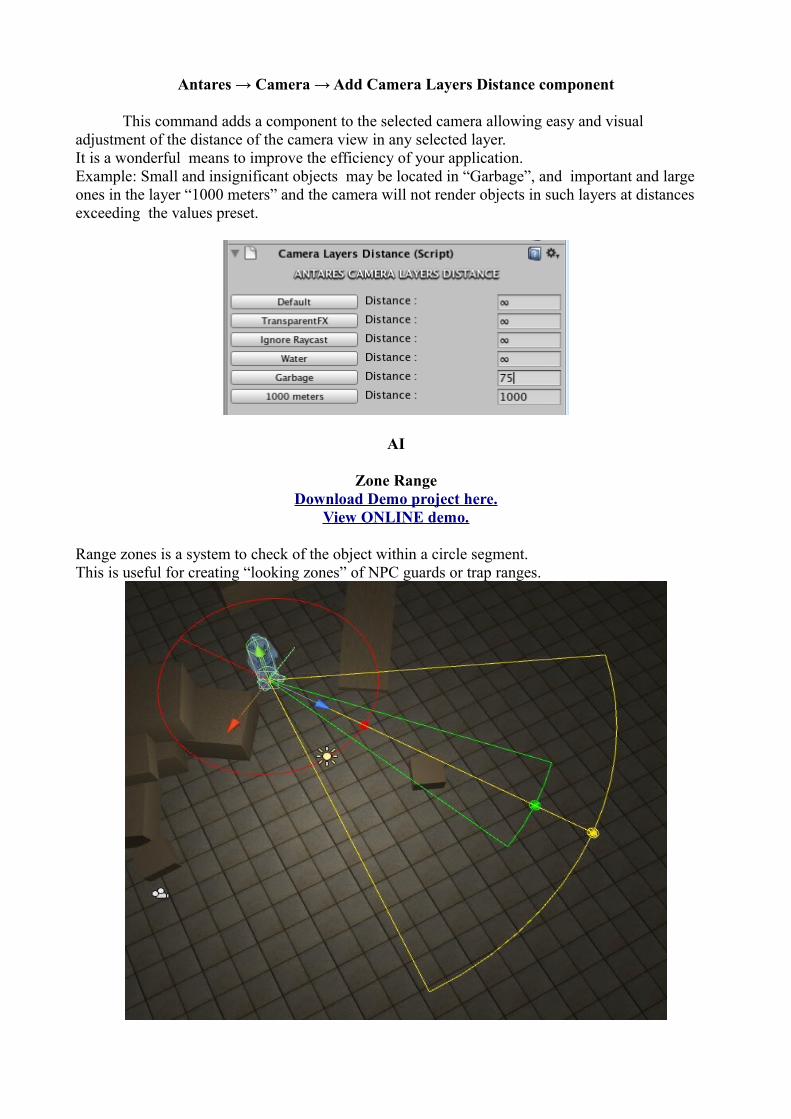
Antares → Camera → Add Camera Layers Distance component
This command adds a component to the selected camera allowing easy and visual adjustment of the distance of the camera view in any selected layer.It is a wonderful means to improve the efficiency of your application.Example: Small and insignificant objects may be located in “Garbage”, and important and large ones in the layer “1000 meters” and the camera will not render objects in such layers at distances exceeding the values preset.
AI
Zone RangeDownload Demo project here.
View ONLINE demo.
Range zones is a system to check of the object within a circle segment.This is useful for creating “looking zones” of NPC guards or trap ranges.
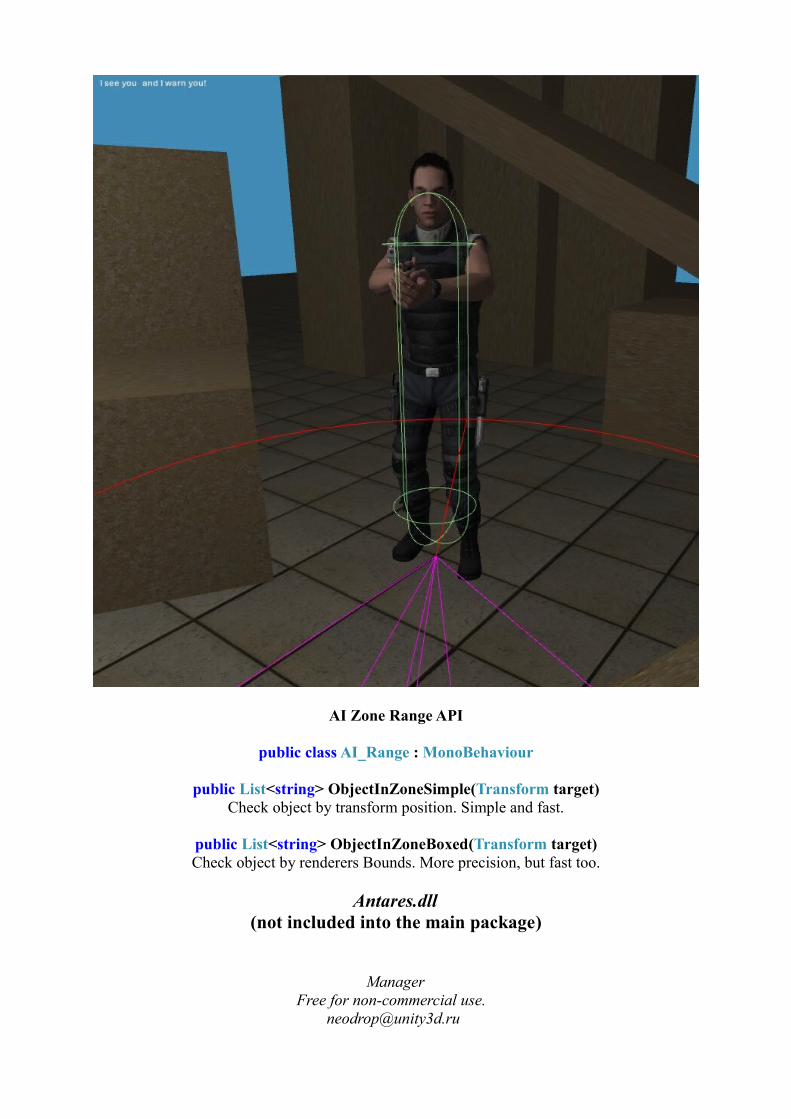
AI Zone Range API
public class AI_Range : MonoBehaviour
public List<string> ObjectInZoneSimple(Transform target)Check object by transform position. Simple and fast.
public List<string> ObjectInZoneBoxed(Transform target)Check object by renderers Bounds. More precision, but fast too.
Antares.dll(not included into the main package)
ManagerFree for non-commercial use.
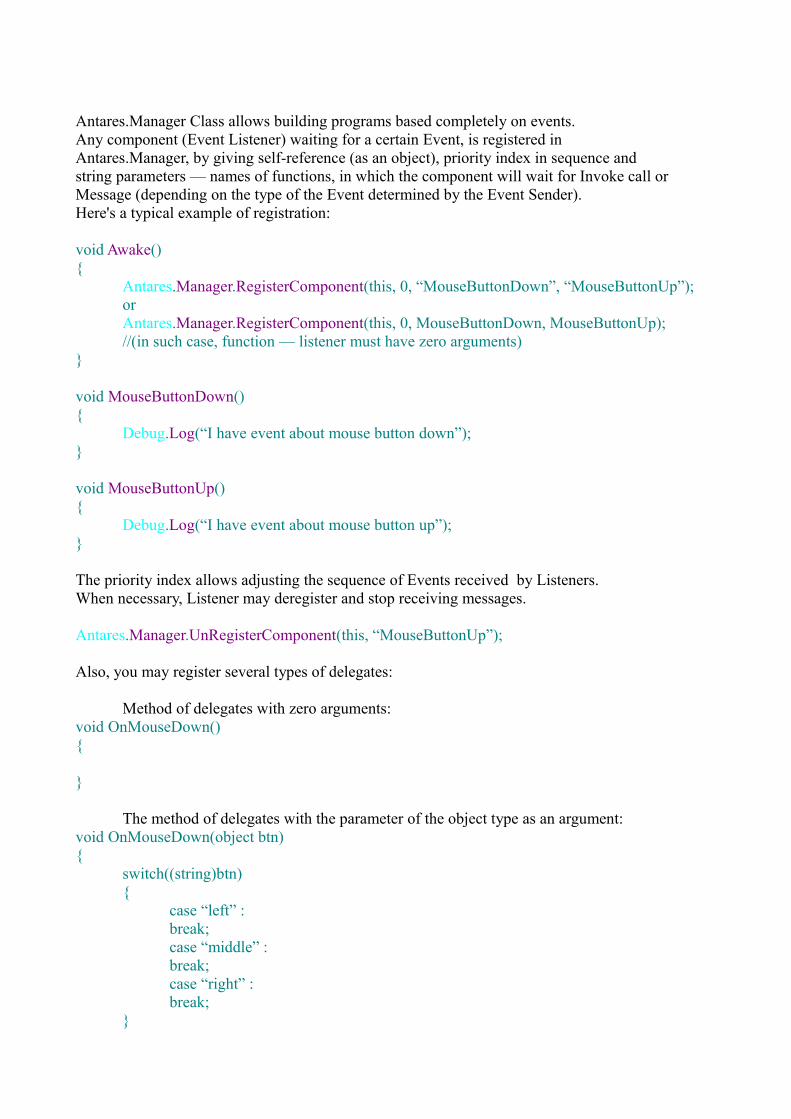
Antares.Manager Class allows building programs based completely on events. Any component (Event Listener) waiting for a certain Event, is registered inAntares.Manager, by giving self-reference (as an object), priority index in sequence andstring parameters — names of functions, in which the component will wait for Invoke call or Message (depending on the type of the Event determined by the Event Sender). Here's a typical example of registration:
void Awake(){
Antares.Manager.RegisterComponent(this, 0, “MouseButtonDown”, “MouseButtonUp”);or Antares.Manager.RegisterComponent(this, 0, MouseButtonDown, MouseButtonUp);//(in such case, function — listener must have zero arguments)
}
void MouseButtonDown(){
Debug.Log(“I have event about mouse button down”);}
void MouseButtonUp(){
Debug.Log(“I have event about mouse button up”);}
The priority index allows adjusting the sequence of Events received by Listeners. When necessary, Listener may deregister and stop receiving messages.
Antares.Manager.UnRegisterComponent(this, “MouseButtonUp”);
Also, you may register several types of delegates:
Method of delegates with zero arguments: void OnMouseDown(){
}
The method of delegates with the parameter of the object type as an argument: void OnMouseDown(object btn){
switch((string)btn){
case “left” :break;case “middle” :break;case “right” :break;
}
}
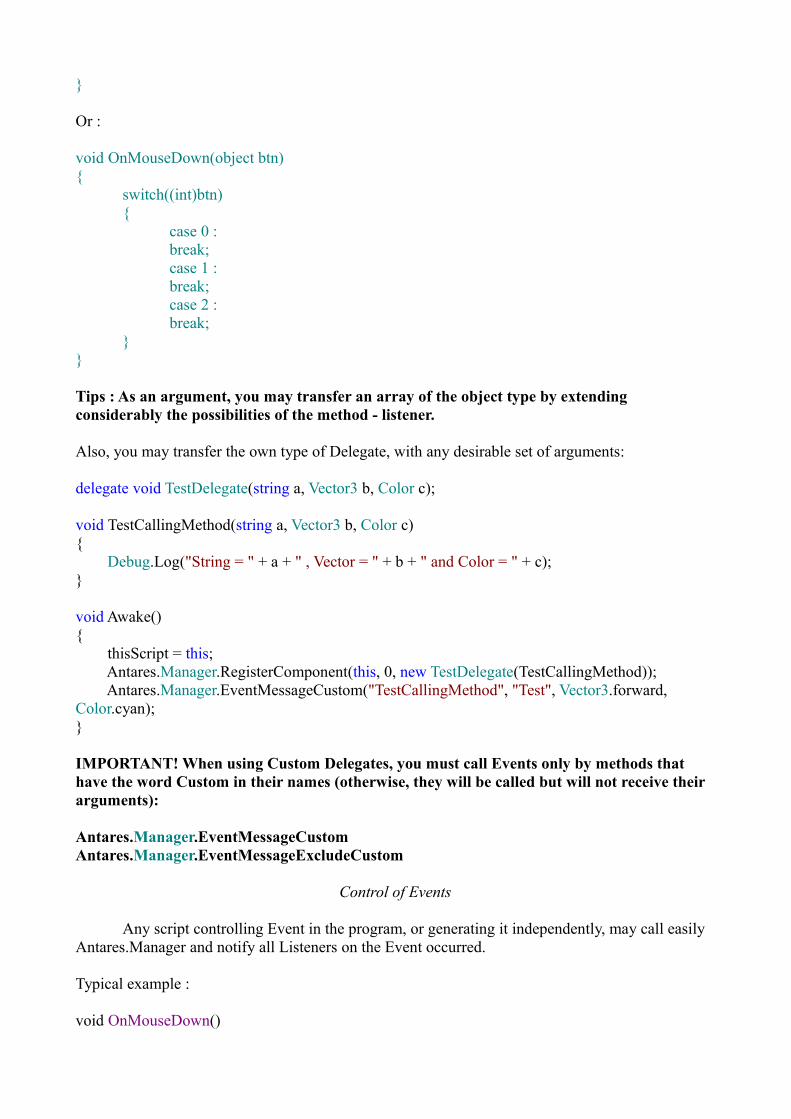
Or :
void OnMouseDown(object btn){
switch((int)btn){
case 0 :break;case 1 :break;case 2 :break;
}}
Tips : As an argument, you may transfer an array of the object type by extending considerably the possibilities of the method - listener. Also, you may transfer the own type of Delegate, with any desirable set of arguments:
delegate void TestDelegate(string a, Vector3 b, Color c);
void TestCallingMethod(string a, Vector3 b, Color c){ Debug.Log("String = " + a + " , Vector = " + b + " and Color = " + c);}
void Awake(){ thisScript = this; Antares.Manager.RegisterComponent(this, 0, new TestDelegate(TestCallingMethod)); Antares.Manager.EventMessageCustom("TestCallingMethod", "Test", Vector3.forward, Color.cyan);}
IMPORTANT! When using Custom Delegates, you must call Events only by methods that have the word Custom in their names (otherwise, they will be called but will not receive their arguments):
Antares.Manager.EventMessageCustomAntares.Manager.EventMessageExcludeCustom
Control of Events
Any script controlling Event in the program, or generating it independently, may call easilyAntares.Manager and notify all Listeners on the Event occurred.
Typical example :
void OnMouseDown()
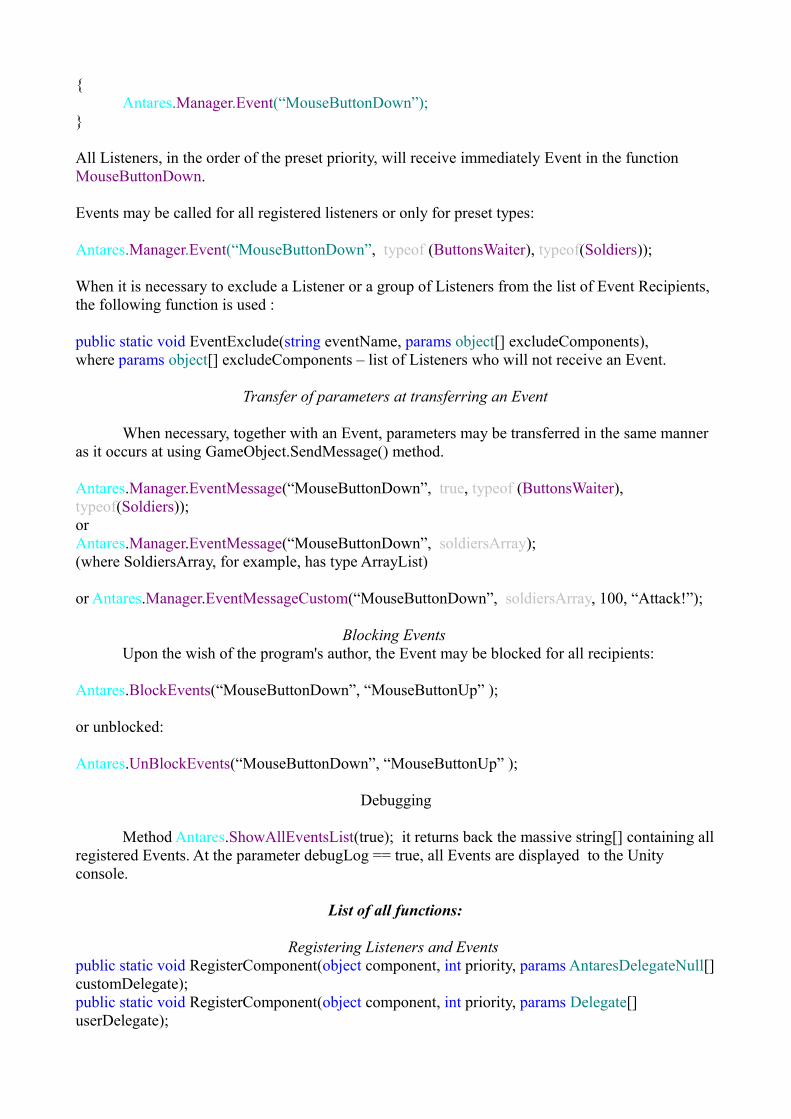
{Antares.Manager.Event(“MouseButtonDown”);
}
All Listeners, in the order of the preset priority, will receive immediately Event in the function MouseButtonDown.
Events may be called for all registered listeners or only for preset types:
Antares.Manager.Event(“MouseButtonDown”, typeof (ButtonsWaiter), typeof(Soldiers));
When it is necessary to exclude a Listener or a group of Listeners from the list of Event Recipients, the following function is used :
public static void EventExclude(string eventName, params object[] excludeComponents),where params object[] excludeComponents – list of Listeners who will not receive an Event.
Transfer of parameters at transferring an Event
When necessary, together with an Event, parameters may be transferred in the same manner as it occurs at using GameObject.SendMessage() method.
Antares.Manager.EventMessage(“MouseButtonDown”, true, typeof (ButtonsWaiter), typeof(Soldiers));or Antares.Manager.EventMessage(“MouseButtonDown”, soldiersArray); (where SoldiersArray, for example, has type ArrayList)
or Antares.Manager.EventMessageCustom(“MouseButtonDown”, soldiersArray, 100, “Attack!”);
Blocking Events Upon the wish of the program's author, the Event may be blocked for all recipients:
Antares.BlockEvents(“MouseButtonDown”, “MouseButtonUp” );
or unblocked:
Antares.UnBlockEvents(“MouseButtonDown”, “MouseButtonUp” );
Debugging
Method Antares.ShowAllEventsList(true); it returns back the massive string[] containing all registered Events. At the parameter debugLog == true, all Events are displayed to the Unity console.
List of all functions:
Registering Listeners and Events public static void RegisterComponent(object component, int priority, params AntaresDelegateNull[] customDelegate);public static void RegisterComponent(object component, int priority, params Delegate[] userDelegate);
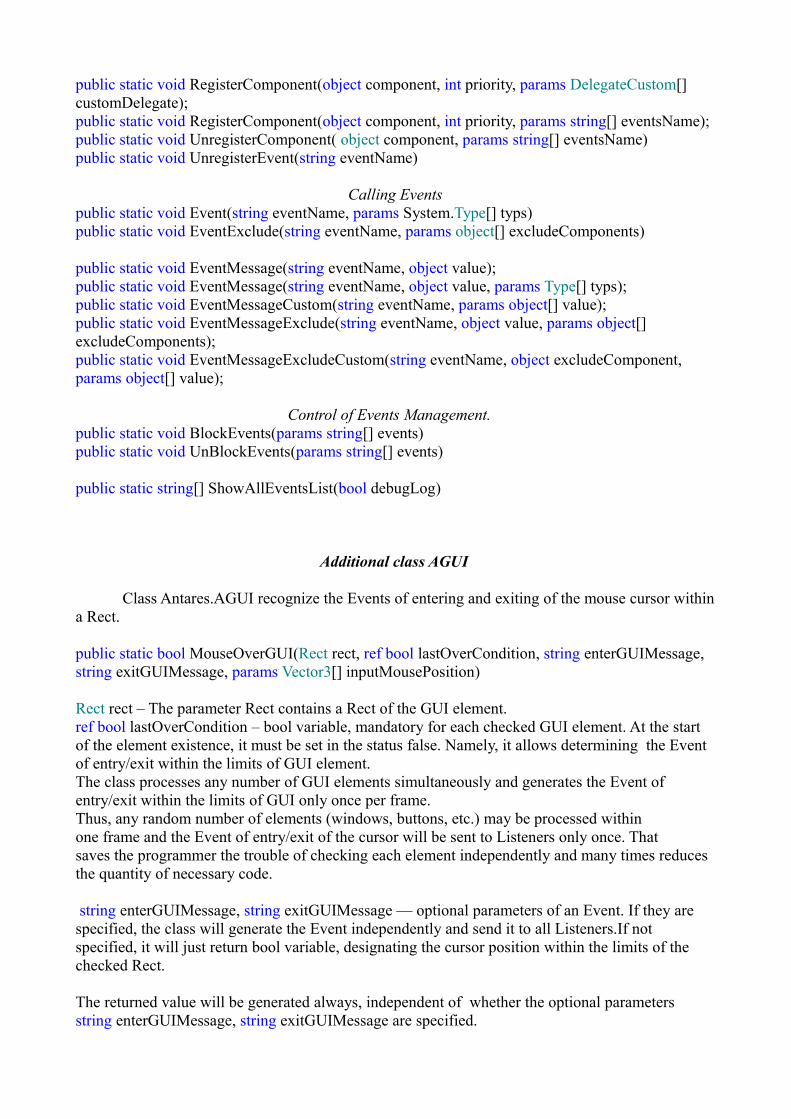
public static void RegisterComponent(object component, int priority, params DelegateCustom[] customDelegate);public static void RegisterComponent(object component, int priority, params string[] eventsName);public static void UnregisterComponent( object component, params string[] eventsName)public static void UnregisterEvent(string eventName)
Calling Eventspublic static void Event(string eventName, params System.Type[] typs)public static void EventExclude(string eventName, params object[] excludeComponents)
public static void EventMessage(string eventName, object value);public static void EventMessage(string eventName, object value, params Type[] typs);public static void EventMessageCustom(string eventName, params object[] value);public static void EventMessageExclude(string eventName, object value, params object[] excludeComponents);public static void EventMessageExcludeCustom(string eventName, object excludeComponent, params object[] value);
Control of Events Management. public static void BlockEvents(params string[] events)public static void UnBlockEvents(params string[] events)
public static string[] ShowAllEventsList(bool debugLog)
Additional class AGUI
Class Antares.AGUI recognize the Events of entering and exiting of the mouse cursor within a Rect.
public static bool MouseOverGUI(Rect rect, ref bool lastOverCondition, string enterGUIMessage, string exitGUIMessage, params Vector3[] inputMousePosition)
Rect rect – The parameter Rect contains a Rect of the GUI element.ref bool lastOverCondition – bool variable, mandatory for each checked GUI element. At the start of the element existence, it must be set in the status false. Namely, it allows determining the Event of entry/exit within the limits of GUI element. The class processes any number of GUI elements simultaneously and generates the Event of entry/exit within the limits of GUI only once per frame. Thus, any random number of elements (windows, buttons, etc.) may be processed within one frame and the Event of entry/exit of the cursor will be sent to Listeners only once. That saves the programmer the trouble of checking each element independently and many times reduces the quantity of necessary code.
string enterGUIMessage, string exitGUIMessage — optional parameters of an Event. If they are specified, the class will generate the Event independently and send it to all Listeners.If not specified, it will just return bool variable, designating the cursor position within the limits of the checked Rect.
The returned value will be generated always, independent of whether the optional parameters string enterGUIMessage, string exitGUIMessage are specified.
params Vector3[] inputMousePosition – optional parameter of the mouse position. May be not transferred. In such case, the class will obtain the mouse position independently.
public static int GetUIDforWindow() - generates unique int number for GUI windows.
List of functions:
public static bool MouseOverGUI(Rect rect, ref bool lastOverCondition, string enterGUIMessage, string exitGUIMessage, params Vector3[] inputMousePosition)public static bool MouseOverGUI(Rect rect, Vector3 mousePosition)public static bool MouseOverGUI(Rect rect)public static int GetUIDforWindow()
Additional class : BinarySave
Class of binary serialization / deserialization of data. It operates both on Windows and on MacOS X
Binary data serialization uses smaller file size than XML serialization and does it much faster. But it has a number of peculiarities.
Binary serialization in Unity is a bit simpler and simultaneously a bit more complicated than XML serialization. The problem is that the majority of structures and classes of Unity have no Serializable flag and in order to save, for example, Vector3, it is necessary to save not the object itself (Vector3) but its variables X, Y, Z.
And here we have the main surprise: due to peculiarities of MONO, after each compilation of the project or any of its scripts, all classes of the Project get new identifiers (not GUID) and binary files, recorded by your program during earlier startups, become unreadable for the program. The solution is simple but for those who do not know C# well, it is rather unexpected. It is necessary to pack the class of data to be saved into .NET DLL After that you may change anything you want both in the program itself and in this DLL, and you will have no problems with data deserialization.
By using this class and the selected traffic, I easily save and upload data on 5000 cars, without any loss in the application productivity. So :
Mandatory function of indication of the folder with which class BinarySave will operate:
public static void SetCurrentFolder(string folder)
The path is specified in relation to the file executed. When working in Unity Editor, this is Assets folder.
That is, if you call SetCurrentFolder(“MyData”) method, when working in Editor, all other methods will look for MyData folder in Assets folder.The operation of this function is backed up completely by the method public static void CreateFolder(string folder)
public static void CreateFolder(string folder)
It creates the folder according to the path specified, in relation to the executed program file.
public static void CreateFolderWithFullPath(string fullPath)
It creates the folder according to the absolute path.
public static void DeleteFolderWithFullPath(string fullPath, bool includeSubfolders)
It deletes the folder according to the absolute path. The variant for the relative patrh is not realized.
public static string GetCurrentFolder()
Returns the current “currentFolder”
public static void Save(object obj, string fileName, string fileExtansion)
Serializes and saves your data in currentFolder. Example:Antares.BinarySave.Save(obj, “Data”, “.sav”);
public static object Load(string fileName, string fileExtansion)
It deserializes the file saved. Example: MySaveClass[] saver = (saver[])Antares.BinarySave.Load(obj, “Data”, “.sav”);
ANTARES ASYNC API(video demo here)
Antares.Async classes are created for the loading simplification of AssetBundles and WWW objects. Their main aim is to watch out and prevent the reloading attempt of existing AssetBundles, to simplify the repeated requests to the objects and provide statistical data of the loaded AssetBundles as well as memory management methods.
ANTARES.ASINC.LOADEDOBJECT :
It is a class that contains the loaded AssetBundle and implements management and access methods to the loaded assets and their content.
Variables :
public bool done : Mark that AssetBundle has been loaded.public System.Type objectType : Object type, loaded from AssetBundlepublic float loadedTime : Loading beginning timepublic float loadingTime : The time spent on loadingpublic List<Loader.AsyncLoaderDelegate> waiter : The list of delegate methods, recorded for these object loading ending expectance.public string path : Loading pathpublic float wwwProgress : Loading progressionpublic WWW www : WWW class object that performs the loading.
Methods :(Only assumed methods are enumerated.)public void UnloadAsset(bool unloadAll) : Unloads AssetBundle from the memory.public string GetObjectName() : Returns the loaded object namepublic Object Instantiate() : Instantiates the object. If you want to use the built-in control of objects copies (GetListOfIstancies()) use this instantiation method instead of UnityEngine.Instantiate()public List<Object> GetListOfIstancies() : Returns the list of all the AssetBundle object copies if it was instantiated with the help of LoadedObject.Instantiate();public Object GetAsset() : Returns AssetBundle.
ANTARES.ASINC.LODER :
public static void LoadObject<T>(string path, string objectName, AsyncLoaderDelegate loadCallback, AsyncProgressDelegate loadProgressCallback, int priority)
<T> : the object type, loaded from AssetBundle. It may be any asset like: 4. Texture5. Material6. GUISkin7. GameObject8. miscellaneous
string path : The path to the loading AssetBundle.string objectName : The object name, loaded from AssetBundle.AsyncLoaderDelegate loadCallback : the delegate method to which a call-out will be performed along with the loading ending.AsyncProgressDelegate loadProgressCallback : the delegate method to which a call-out will be performed in every shot. It serves for the loading progression getting. It may be equal with null.
If AssetBundle has already been loaded, Antares.dll will perform a call-out to loadCallback and will pass the loaded object.
Typical usage :
void Awake(){ Antares.Async.Loader.LoadObject<GameObject>("http://www.unity3d.ru/composition/Giraf_bundle.unity3d","model",OnLoad, OnProgress, 0);}
void OnLoad(Antares.Async.LoadedObject obj)
{obj.Instantiate();
}
private float loadingProgress;void OnProgress(float progress){ loadingProgress = progress;}
ATTENTION! In case of AssetBundle loading failure or AssetBundle specified object loading failure, a call-out to the loadCallback delegate method will nevertheless be performed. I recommend checking if the passed instance of LoadedObject.www.AssetBundle is null before instantiation.
public static void LoadWWW(string path, AsyncLoaderDelegate loadCallback, AsyncProgressDelegate loadProgressCallback)
A similar method that allows the WWW objects loading in the same way as AssetBundlesAfter the loading ending, Antares.dll will perform the loadCallback delegate method call-out and will pass a LoadedObject to it, where you may take the www object from and use it at your own discretion.
public static void UnloadAll() : Unloads all the loaded AssetBundles from the memory.
Created by Andrey Paramonov (aka Neodrop).19.01.2010, Saint-Petersburg, Russia
ADDITIONAL FEATURES
Align View to GameObject : Works like F button and move camera to selected oblect in Scene View. Just select the object and press mouse Wheel.
Copy Animation Clip : If you select Animation file in Project View, by right mouse click, you can choose “Antares/Copy Animation Clip” for convenient copying Animation Clip with possibility freely to edit the copied clip.
Hide/Unhide in Hierarchy View : You can hide any objects in Hierarchy View by special button in “More Antares options” foldout menu and unhide all objects back by Antares/Hide or Freez menu command.
AUTHORS1. Yevgeny Pleshkov (aka Ferz) ( www.unity3d.ru, [email protected] ) :
1. Random Position2. Random Angles3. Set angles to 04. MakeBrush (75%)

2. Andrey Pakhomov (aka PAX) (www.unity3d.ru, [email protected]) :1. Antares DUBLICATOR (reflection code).
3. Alexandr Khomiak. (aka Norgen) (www.unity3d.ru, [email protected]) :1. Art.
4. Slav Pankratov (aka Gnoblin) (www.unity3d.ru, [email protected]) :1. Translation.
5. http://www.reignofsteel.net :1. Add Child2. Add Parent
6. Andrey Paramonov (aka Neodrop) ( www.unity3d.ru, [email protected] )∞ Etceteras.
DONATION
You can help as to grow Antares Project here.