animation & interactivity on the web - creative...
TRANSCRIPT
MAX2014 Lab - Animation & Interactivity on the web
< Animation & Interactivity on the Web />
MAX LAB with Michael Chaize
Twitter: @mchaize
We will learn how to create interactive animations on websites. We’ll cover
several techniques and learn how to use Edge Animate.
Here is the agenda of this lab:
- CSS Transitions in Dreamweaver CC
- CSS animations and keyframes in Dreamweaver CC
- HTML5 interactive sequences with Edge Animate CC
- How to prepare visual assets in Photoshop and Illustrator
- The basics of animations
- The concept of symbol
- Interactive animations with JavaScript
- Web fonts and animations
- Rich media in HTML5
- Publish and embed your animations on your website
This document describes each step of the lab. Be also aware that Michael has
recorded all the lessons and that the videos are freely available on Youtube.
Have fun.
1
MAX2014 Lab - Animation & Interactivity on the web
Lesson 1 - CSS transitions in Dreamweaver CC
CSS transitions are effects created by the browser between two CSS values. It’s a
nice way to add animations on a page, catch the eye of your visitor. Dreamweaver
CC lets you create basic CSS transitions thanks to a new panel that we’ll discover
together in this first lesson.
1. Open L01-css-transition folder.
2. Open the file “Transition101.html” in Dreanweaver CC
3. We want to add a smooth transition on the picture when the mouse is over
it. The blue square will fade-in and fade-out when the mouse leaves the
block. It means that we want the DIV with the “overlay” CSS class to
fade-in and fade-out.
4. Open the Window > CSS Transitions panel
5. Hit the + icon to create a new transition
6. The Target rule is the .overlay class.
7. We start the transition (transition on) when the mouse is over (hover)
8. We’ll use the same transition for all properties
9. Let’s create a 2 second transition, with some easing (ease-in-out).
10. We can apply a transition on several properties, but we’ll just choose one
for the moment: the opacity. The end value will be 1 (the overlay DIV will
be fully visible, 1 equals to 100%).
11. Click on Create Transition.
12. Now if we check the live view, we don’t see any change. It’s because by
default, the overlay DIV is not hidden.
13. Select the overlay div in the code, and hit CMD+D. Select the overlay class.
It will open the code for the CSS class. Dreamweaver has added some
code at the end of the class:
webkittransition: all 2s easeinout; otransition: all 2s easeinout;
2

MAX2014 Lab - Animation & Interactivity on the web
transition: all 2s easeinout; This is how we define a CSS transition. The “all” means that all CSS
properties will be impacted by a transition. 14. At the end of the CSS file, notice that DW has also added a new class
definition with a hover state:
.overlay:hover webkitopacity: 1; opacity: 1;
It means that when the mouse is over, the opacity of the overlay elements
are set to 1. 15. In the .overlay class, add a line with opacity:0; and test the result.
16. You see a nice fade-in and fade-out effect. Remember that the transitions
will be applied to ALL properties. So let’s add one. In the .overlay class,
add width:80% 17. In the .overlay:hover class, add: width:100%;
18. You get a nice “curtain” effect. Now let’s work on a more advanced
transition.
19. Remove the width:80% and width:100%, we don’t need it for the rest.
3
MAX2014 Lab - Animation & Interactivity on the web
Lesson 2 - CSS transitions on several DIV in Dreamweaver CC
Let’s work on a more advanced sample to master the CSS class definitions. Now we
want the “title” of the picture to be animated with a smooth ‘top > center’ move.
We’ll see that CSS selectors are very important in this case.
1. Let’s start from our current page. When we rollover the image, the blue
Overlay appears with a title. The title is actually a link <a> with a CSS “title”
class.
2. Copy paste the CSS transition definition in the .title CSS class:
webkittransition: all 0.5s easeinout; otransition: all 0.5s easeinout; transition: all 0.5s easeinout;
3. Create a new CSS class when the mouse is over the title, we want to
vertically center the title.
.title:hover top:50%;
4. Now test your code. To have the two transitions at the same time, we
have to rollover both the title and the overlay DIV, which is not good. To
trigger both transitions, we need to use CSS selectors and trigger the
transitions on the parent DIV elements. Let’s update the code.
5. This is the structure of our DIV elements:
<div class="blocky"> <img src="PIC01.jpg" class="imgMike"/> <div class="overlay"><a href="https://www.behance.net" class="title">BUBBLES</a></div> </div> So the DIV with the class “blocky” is the parent of DIV-overlay and our title links.
6. In the CSS file, replace the .overlay:hover definition by:
.blocky:hover div.overlay
4
MAX2014 Lab - Animation & Interactivity on the web
7. Now blocky will trigger the mouse event. Let’s do the same for the link and
replace .title:hover by:
.blocky:hover a.title
8. Test your code. It works. You trigger a smooth and synced transition on
two elements. Now let’s style our title before moving on to the next
technique. We’ll add an SVG image behind our title. The arabesque.svg is
already in your directory. To add this image in the background, add some
CSS properties in the .title class:
background:url(arabesque.svg); backgroundrepeat: norepeat; backgroundposition:center; backgroundsize:auto; lineheight:70px; paddingtop:10px;
and just add one margin in the hover class for our title:
.blocky:hover a.title top:50%; margintop: 35px;
9. Nice ! The beauty of CSS definitions and transitions is that we apply it to
elements in general. In the HTML code, copy the entire “DIV Blocky” block
and duplicate it to get three instances.
10. Replace PIC01.jpg by PIC02.jpg, and the third one by PIC03.jpg. Update the
titles, and that’s it. Your portfolio is ready.
These are CSS transitions. Is it powerful? Yes. Does it perform? Yes. Is it easy? No.
Let’s play with CSS keyframes and meet with the limitations of CSS transitions.
5
MAX2014 Lab - Animation & Interactivity on the web
Lesson 3 - CSS animations with keyframes
CSS transitions are limited because we always go from one value to another one.
What if I want to go from 10px to 20px for 2 seconds, and then from 20px to 40px for
5 seconds. CSS keyframes animations is the way to go. We’ll just build a small
sample to get introduced to this technique. We’ll animate a balloon. Let’s start.
1. Open Montgolfiere.html in Dreamweaver CC
2. We have two main DIV elements, the sky (background) and the balloon.
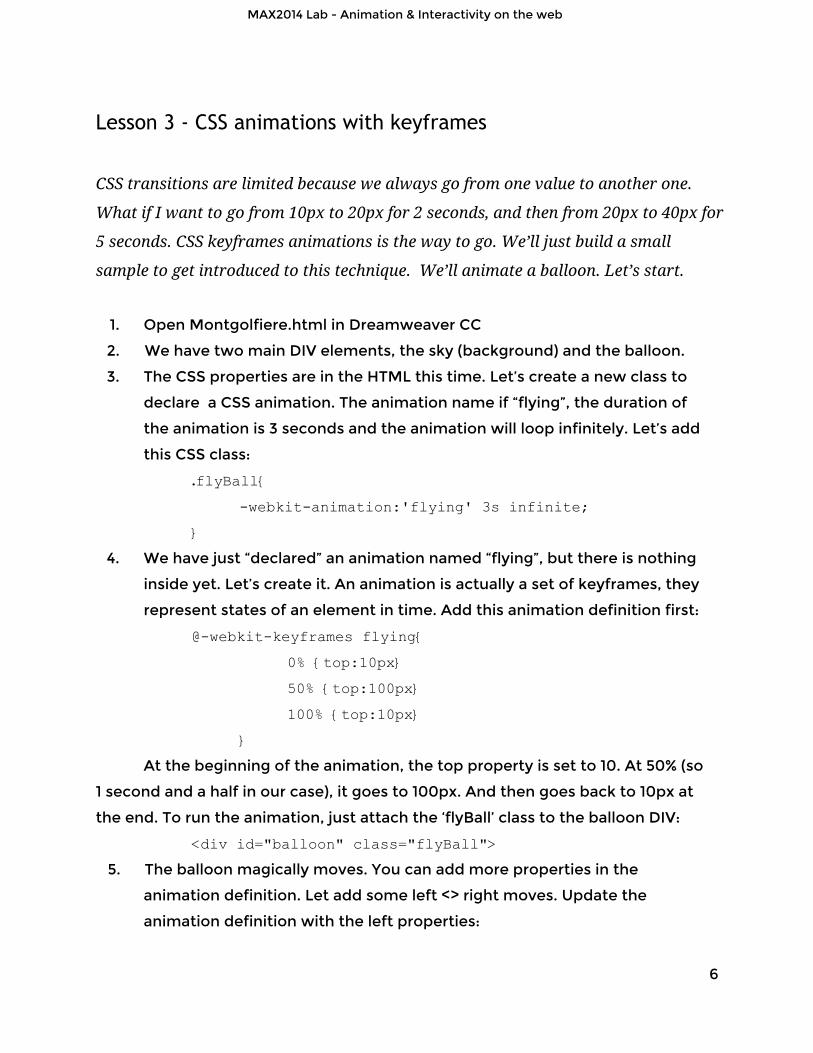
3. The CSS properties are in the HTML this time. Let’s create a new class to
declare a CSS animation. The animation name if “flying”, the duration of
the animation is 3 seconds and the animation will loop infinitely. Let’s add
this CSS class:
.flyBall webkitanimation:'flying' 3s infinite;
4. We have just “declared” an animation named “flying”, but there is nothing
inside yet. Let’s create it. An animation is actually a set of keyframes, they
represent states of an element in time. Add this animation definition first:
@webkitkeyframes flying 0% top:10px 50% top:100px 100% top:10px
At the beginning of the animation, the top property is set to 10. At 50% (so
1 second and a half in our case), it goes to 100px. And then goes back to 10px at
the end. To run the animation, just attach the ‘flyBall’ class to the balloon DIV:
<div id="balloon" class="flyBall"> 5. The balloon magically moves. You can add more properties in the
animation definition. Let add some left <> right moves. Update the
animation definition with the left properties:
6
MAX2014 Lab - Animation & Interactivity on the web
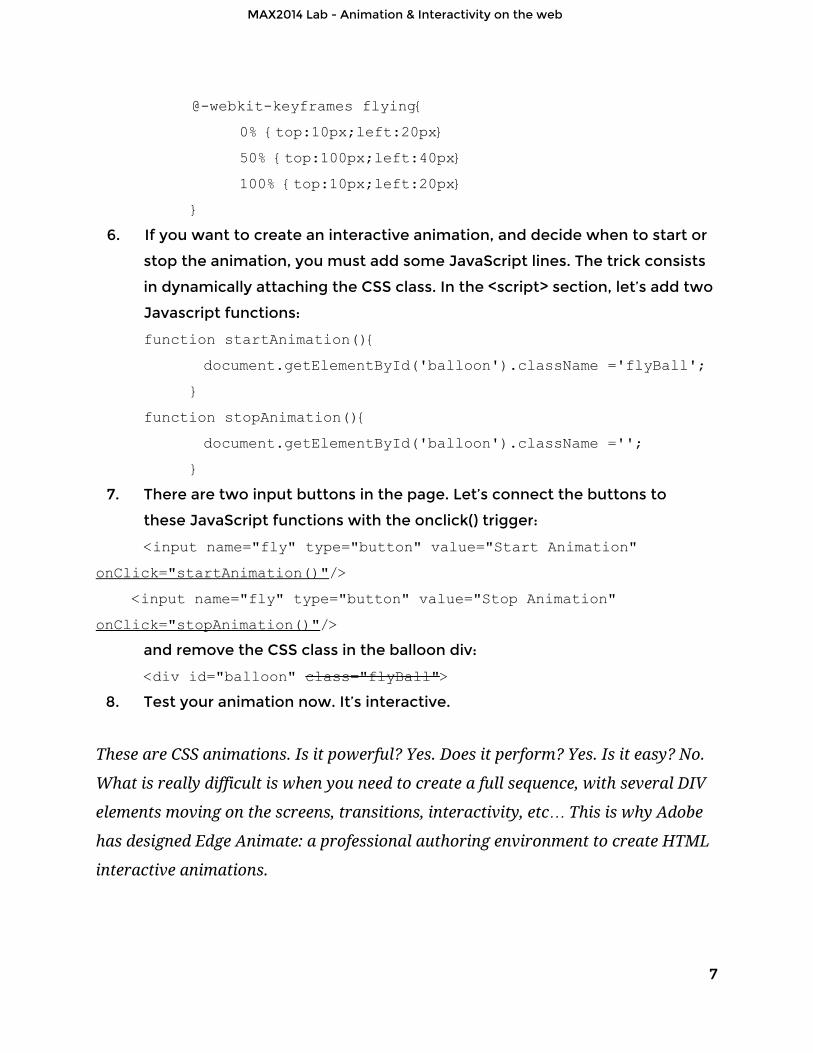
@webkitkeyframes flying 0% top:10px;left:20px 50% top:100px;left:40px 100% top:10px;left:20px
6. If you want to create an interactive animation, and decide when to start or
stop the animation, you must add some JavaScript lines. The trick consists
in dynamically attaching the CSS class. In the <script> section, let’s add two
Javascript functions:
function startAnimation() document.getElementById('balloon').className ='flyBall';
function stopAnimation() document.getElementById('balloon').className ='';
7. There are two input buttons in the page. Let’s connect the buttons to
these JavaScript functions with the onclick() trigger:
<input name="fly" type="button" value="Start Animation" onClick="startAnimation()"/> <input name="fly" type="button" value="Stop Animation" onClick="stopAnimation()"/>
and remove the CSS class in the balloon div:
<div id="balloon" class="flyBall"> 8. Test your animation now. It’s interactive.
These are CSS animations. Is it powerful? Yes. Does it perform? Yes. Is it easy? No.
What is really difficult is when you need to create a full sequence, with several DIV
elements moving on the screens, transitions, interactivity, etc… This is why Adobe
has designed Edge Animate: a professional authoring environment to create HTML
interactive animations.
7

MAX2014 Lab - Animation & Interactivity on the web
Lesson 4 - Edge Animate basics
With Edge Animate, we’ll animate images, shapes and text without coding and with
real-time feedback. It’s a professional environment for motion designers.
EXERCICE 1 - The balloon and the pin
We’ll try to re-create the animation we have just designed with CSS animations.
1. Open Edge Animate and create a new project.
2. Notice on the left the dimensions of the sage, the background color…
3. On the right, you have the elements (the final HTML structure of your
page), and the library of assets.
4. At the bottom a timeline, and in the center, the stage.
5. Let’s add a beautiful gradient sky in the background.
6. Drag and drop the balloon.png file from the previous lesson on the stage.
center the balloon thanks to the visual guides.
7. With the Text tool, let’s add a welcome message.
8. If you want the Welcome message to go behind the balloon, you can
right-click > Arrange > Send to back, OR, change the layer order in the
Elements panel.
8
MAX2014 Lab - Animation & Interactivity on the web
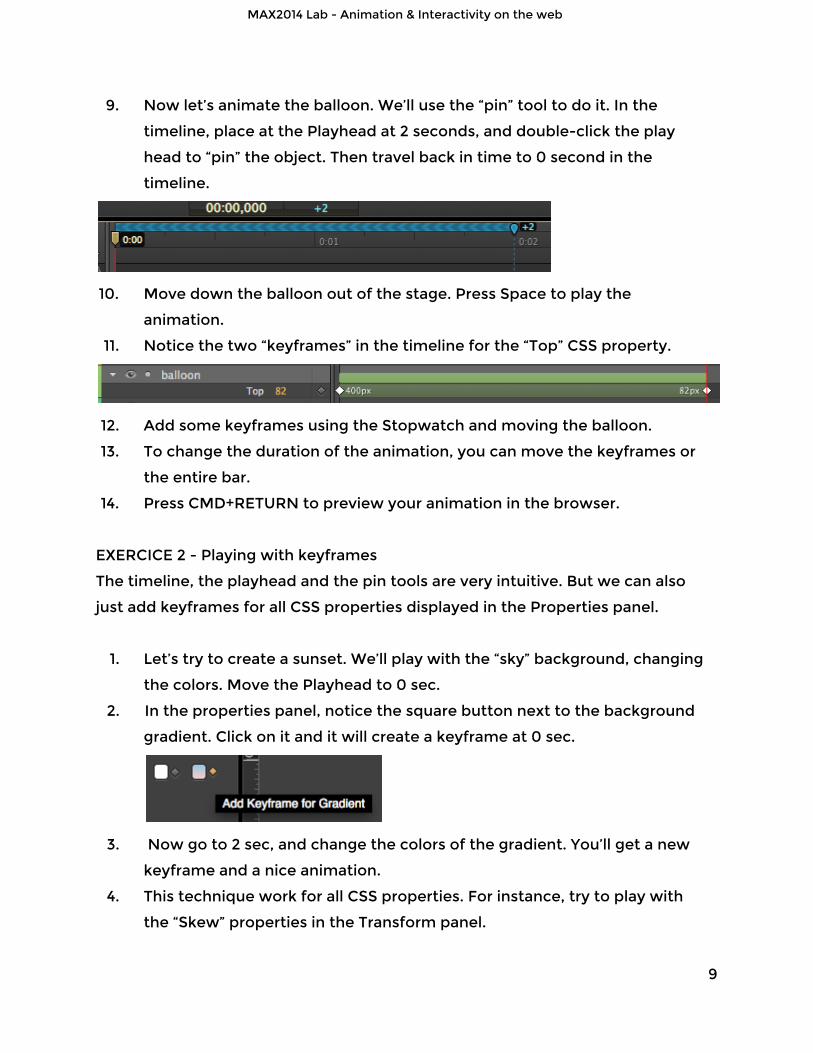
9. Now let’s animate the balloon. We’ll use the “pin” tool to do it. In the
timeline, place at the Playhead at 2 seconds, and double-click the play
head to “pin” the object. Then travel back in time to 0 second in the
timeline.
10. Move down the balloon out of the stage. Press Space to play the
animation.
11. Notice the two “keyframes” in the timeline for the “Top” CSS property.
12. Add some keyframes using the Stopwatch and moving the balloon.
13. To change the duration of the animation, you can move the keyframes or
the entire bar.
14. Press CMD+RETURN to preview your animation in the browser.
EXERCICE 2 - Playing with keyframes
The timeline, the playhead and the pin tools are very intuitive. But we can also
just add keyframes for all CSS properties displayed in the Properties panel.
1. Let’s try to create a sunset. We’ll play with the “sky” background, changing
the colors. Move the Playhead to 0 sec.
2. In the properties panel, notice the square button next to the background
gradient. Click on it and it will create a keyframe at 0 sec.
3. Now go to 2 sec, and change the colors of the gradient. You’ll get a new
keyframe and a nice animation.
4. This technique work for all CSS properties. For instance, try to play with
the “Skew” properties in the Transform panel.
9
MAX2014 Lab - Animation & Interactivity on the web
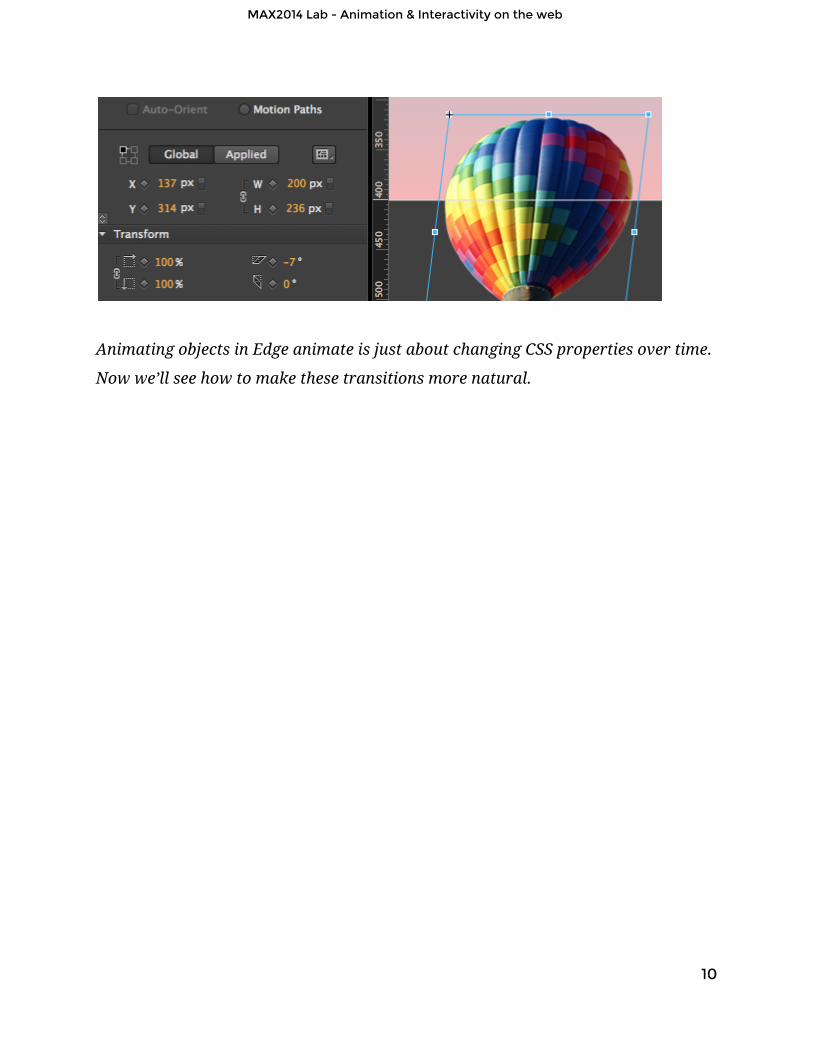
Animating objects in Edge animate is just about changing CSS properties over time.
Now we’ll see how to make these transitions more natural.
10

MAX2014 Lab - Animation & Interactivity on the web
Lesson 5 - Edge Animate and natural moves
We’ll see how to ease your transitions and how your objects can follow a path.
EASING IS KEY
1. First, let’s hide our ballon. In the timeline, you have layers and you can click
on the eye to hide an element. You can also use the “Elements” panel… and
notice that we are just building HTML DIV elements.
2. We’ll focus on the “Welcome” text layer. Let’s create a top > center move.
At 0 sec, move it to the top, out of the stage. At 2 sec, move it to the
center.
3. We have a “linear” transition. The speed of the object is the same from 0
to 2 seconds, which doesn’t look natural. That’s why we’ll add some easing
functions.
4. In the timeline, select the “bar” of your transition, right-click and select
“Easing”.
5. Test your animation with several Ease Out functions (we are interested in
how the text will reach the center, not in the beginning of the animation).
MOVE ALONG A CURVE
11
MAX2014 Lab - Animation & Interactivity on the web
1. The path of our balloon doesn’t look natural. Let’s create a new one with a
different technique. On the right, you should see your “Library” panel. It
lists all the assets of your animation. Select the balloon.png image and
drag it to the stage to create a new layer/element.
2. This time we want the balloon to float from left to right. Select it and
move it to the left of the stage. By default, you’ll create a “X,Y Motion”
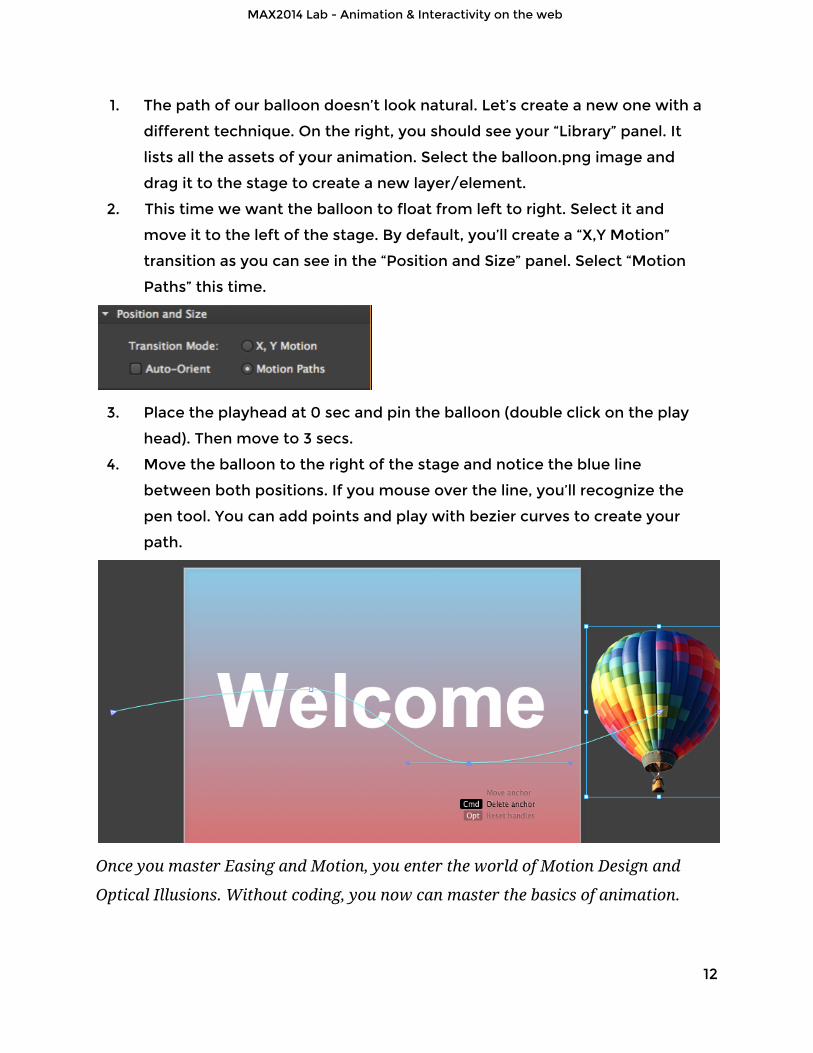
transition as you can see in the “Position and Size” panel. Select “Motion
Paths” this time.
3. Place the playhead at 0 sec and pin the balloon (double click on the play
head). Then move to 3 secs.
4. Move the balloon to the right of the stage and notice the blue line
between both positions. If you mouse over the line, you’ll recognize the
pen tool. You can add points and play with bezier curves to create your
path.
Once you master Easing and Motion, you enter the world of Motion Design and
Optical Illusions. Without coding, you now can master the basics of animation.
12
MAX2014 Lab - Animation & Interactivity on the web
Lesson 6 - Edge Animate, shapes and web fonts
You can draw basic shapes in Edge Animate and add text elements.
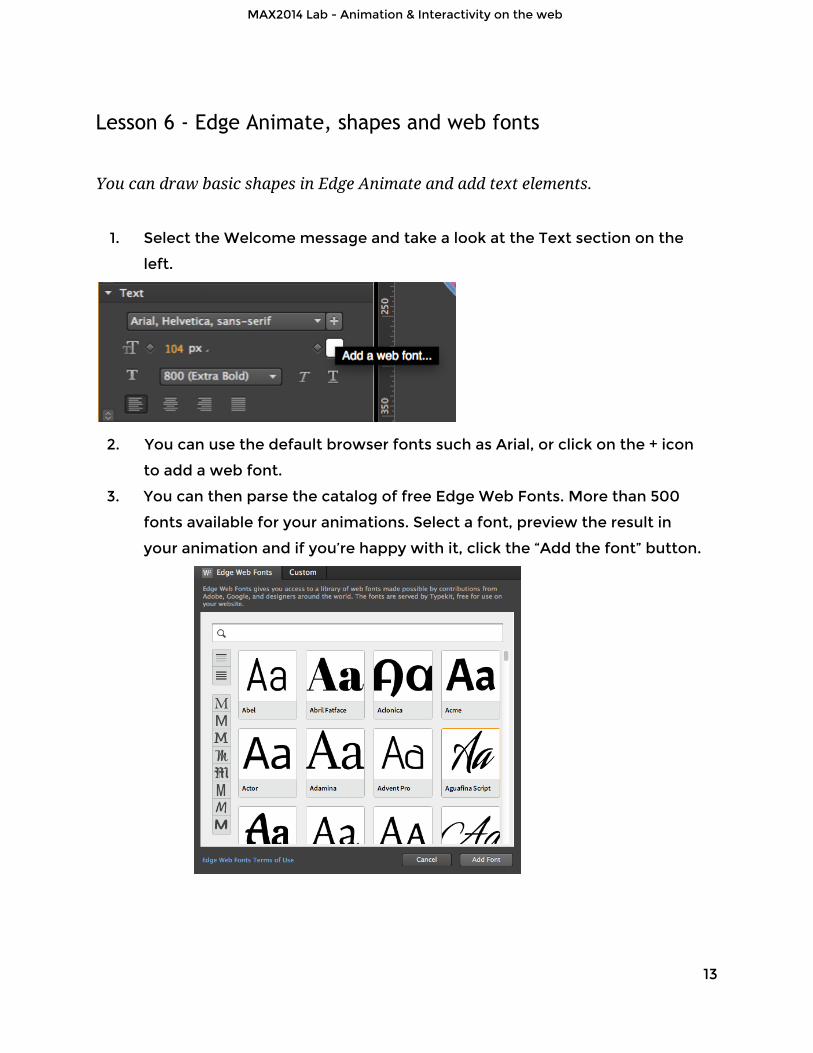
1. Select the Welcome message and take a look at the Text section on the
left.
2. You can use the default browser fonts such as Arial, or click on the + icon
to add a web font.
3. You can then parse the catalog of free Edge Web Fonts. More than 500
fonts available for your animations. Select a font, preview the result in
your animation and if you’re happy with it, click the “Add the font” button.
13
MAX2014 Lab - Animation & Interactivity on the web
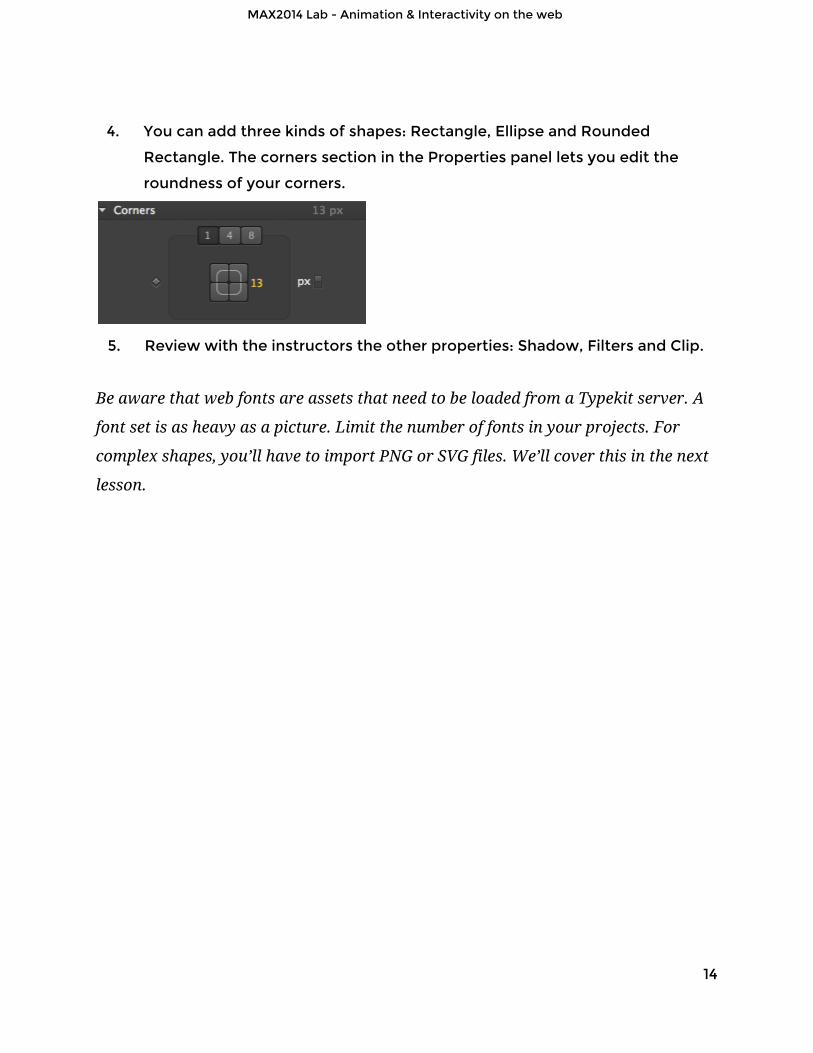
4. You can add three kinds of shapes: Rectangle, Ellipse and Rounded
Rectangle. The corners section in the Properties panel lets you edit the
roundness of your corners.
5. Review with the instructors the other properties: Shadow, Filters and Clip.
Be aware that web fonts are assets that need to be loaded from a Typekit server. A
font set is as heavy as a picture. Limit the number of fonts in your projects. For
complex shapes, you’ll have to import PNG or SVG files. We’ll cover this in the next
lesson.
14
MAX2014 Lab - Animation & Interactivity on the web
Lesson 7 - Prepare assets in Photoshop CC and Illustrator CC
Edge Animate accepts PNG, JPEG and SVG files as we are building an HTML
animation. Do you know how to use Adobe Generator in Photoshop ? And to export
SVG files from Illustrator ?
1. Open AdobeMAX-Banner.psd in Photoshop.
2. Two groups of layers: Screen2 and Screen1. The goal is to export our JPEG
and PNG files for Edge Animate. Usually, we would use “File > Save for the
web…” but it would take hours. Let’s try Adobe Generator.
3. In the File menu, activate Generator: Generate > Image assets.
4. It will create a “AdobeMAX-banner-assets” folder on your disk.
5. Now every time you’ll rename a layer adding “.png” or “.jpg” at the end, it
will generate the asset automatically.
6. You can rename a layer “geek.png” and you’ll get a transparent PNG.
7. Rename a layer “backgroundMAX.jpg” and you’ll get a JPEG.
8. To optimize it, rename it “backgroundMAX.jpg80%” to set the
compression.
9. You can also rename a group of layers ‘backButton.png’
10. If you update your design in Photoshop, it will also update your assets in
the folder.
To create SVG files, you can use Illustrator CC. Let’s see how to export SVG files.
1. Open LOGO-MAX-parts.ai in Illustrator CC
2. This is the new Adobe MAX logo. To create an SVG and import it in
Illustrator… well… it’s just a copy paste. Copy the logo, and paste it in
Edge Animate. It will create a SVG file.
3. If you want to create several SVG files from one single Illustrator CC file,
you can either create one artboard per shape (then File > Save as > SVG
artboards), or use an add-on.
15
MAX2014 Lab - Animation & Interactivity on the web
4. You can install the “Illustrator Layer Exporter” by David Deraedt available
on the Add-ons section of the Creative Cloud website. With the Layer
exporter, you can export each layer as SVG, PNG or JPEG files.
Now let’s go back to Edge Animate to create our professional animated banner.
16
MAX2014 Lab - Animation & Interactivity on the web
Lesson 8 - Symbols, loops and playhead
The last concept we need to learn is “Symbol”. A symbol is a standalone animation
that resides inside your main animation. This way, you can create an animation
that will loop or that you can control from your main animation.
1. Open BannerSTART.an with Edge Animate
2. It’s a 750x400 empty animation. The assets are already imported in the
library.
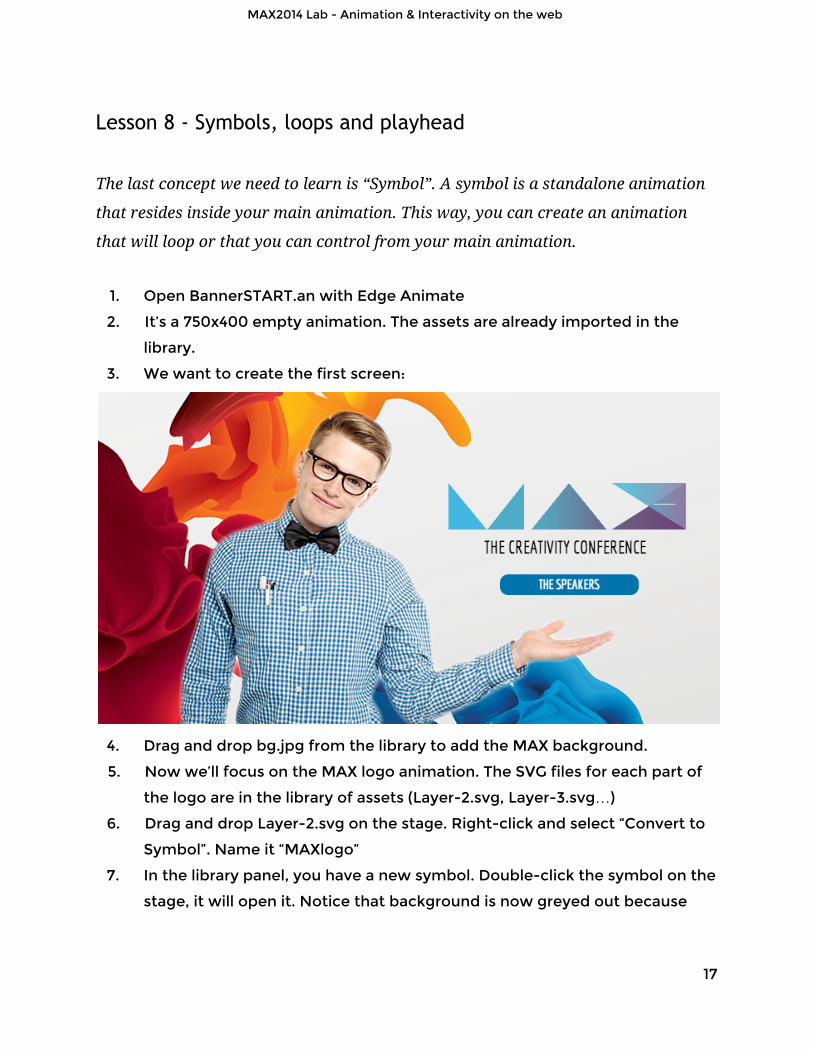
3. We want to create the first screen:
4. Drag and drop bg.jpg from the library to add the MAX background.
5. Now we’ll focus on the MAX logo animation. The SVG files for each part of
the logo are in the library of assets (Layer-2.svg, Layer-3.svg…)
6. Drag and drop Layer-2.svg on the stage. Right-click and select “Convert to
Symbol”. Name it “MAXlogo”
7. In the library panel, you have a new symbol. Double-click the symbol on the
stage, it will open it. Notice that background is now greyed out because
17
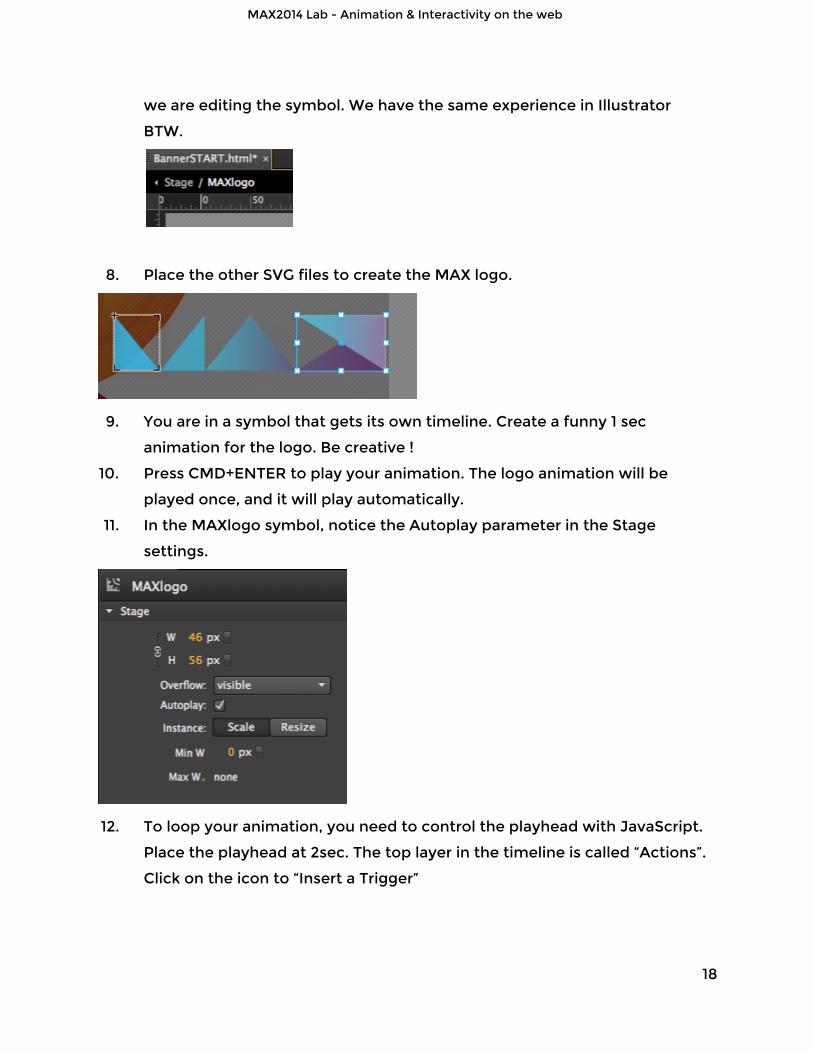
MAX2014 Lab - Animation & Interactivity on the web
we are editing the symbol. We have the same experience in Illustrator
BTW.
8. Place the other SVG files to create the MAX logo.
9. You are in a symbol that gets its own timeline. Create a funny 1 sec
animation for the logo. Be creative !
10. Press CMD+ENTER to play your animation. The logo animation will be
played once, and it will play automatically.
11. In the MAXlogo symbol, notice the Autoplay parameter in the Stage
settings.
12. To loop your animation, you need to control the playhead with JavaScript.
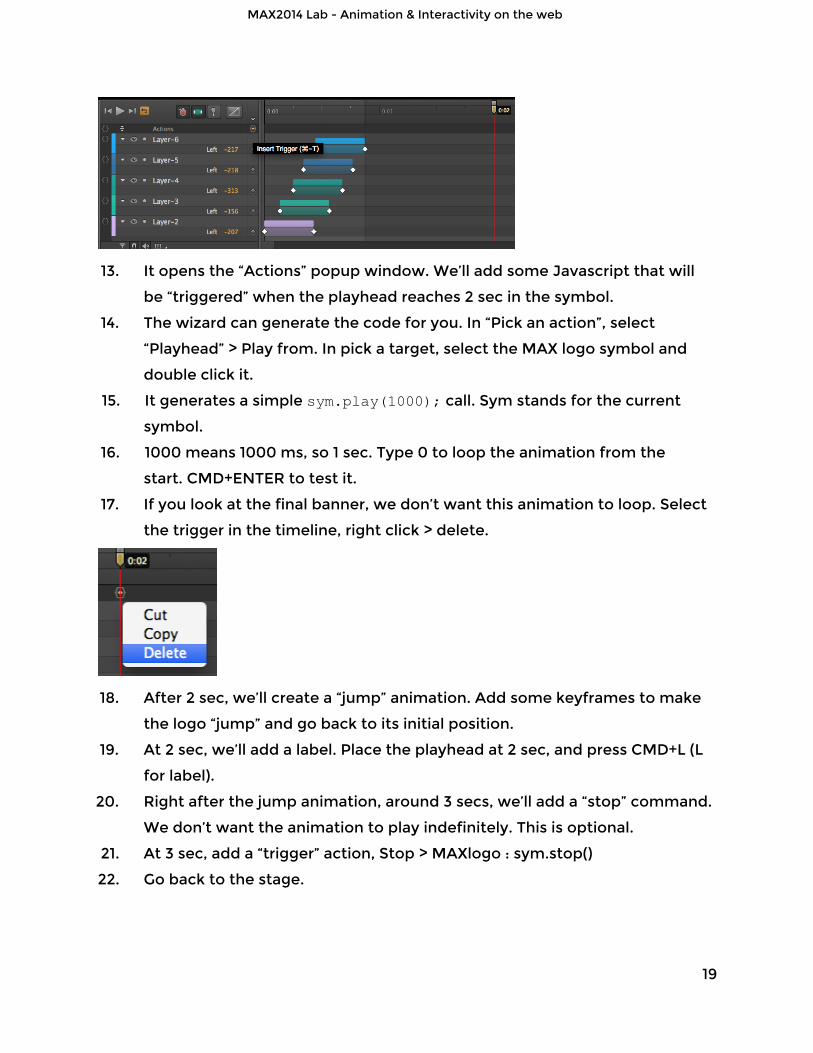
Place the playhead at 2sec. The top layer in the timeline is called “Actions”.
Click on the icon to “Insert a Trigger”
18
MAX2014 Lab - Animation & Interactivity on the web
13. It opens the “Actions” popup window. We’ll add some Javascript that will
be “triggered” when the playhead reaches 2 sec in the symbol.
14. The wizard can generate the code for you. In “Pick an action”, select
“Playhead” > Play from. In pick a target, select the MAX logo symbol and
double click it.
15. It generates a simple sym.play(1000); call. Sym stands for the current
symbol.
16. 1000 means 1000 ms, so 1 sec. Type 0 to loop the animation from the
start. CMD+ENTER to test it.
17. If you look at the final banner, we don’t want this animation to loop. Select
the trigger in the timeline, right click > delete.
18. After 2 sec, we’ll create a “jump” animation. Add some keyframes to make
the logo “jump” and go back to its initial position.
19. At 2 sec, we’ll add a label. Place the playhead at 2 sec, and press CMD+L (L
for label).
20. Right after the jump animation, around 3 secs, we’ll add a “stop” command.
We don’t want the animation to play indefinitely. This is optional.
21. At 3 sec, add a “trigger” action, Stop > MAXlogo : sym.stop()
22. Go back to the stage.
19

MAX2014 Lab - Animation & Interactivity on the web
20
MAX2014 Lab - Animation & Interactivity on the web
Lesson 9 - Control symbols
We have a MAXlogo symbol with two “moves”. The initial animation, and the
“jump” animation. Let’s achieve Screen 1.
8. Add the geek.png.
9. Using the Text tool, add the message “THE CREATIVITY CONFERENCE”.
Choose a nice web font and place the text under the MAX logo.
10. Add a rounded rectangle, and “THE SPEAKERS” label over it.
11. Select the rounded rectangle and convert it into a symbol (right click >
Convert to Symbol…
12. Name is “SpeakerButton” and open it.
13. Create a 1 sec animation to modify the color of the button. We’ll create a
smooth animation. Play with the Filters > Hue-Rotate property to make it
happen.
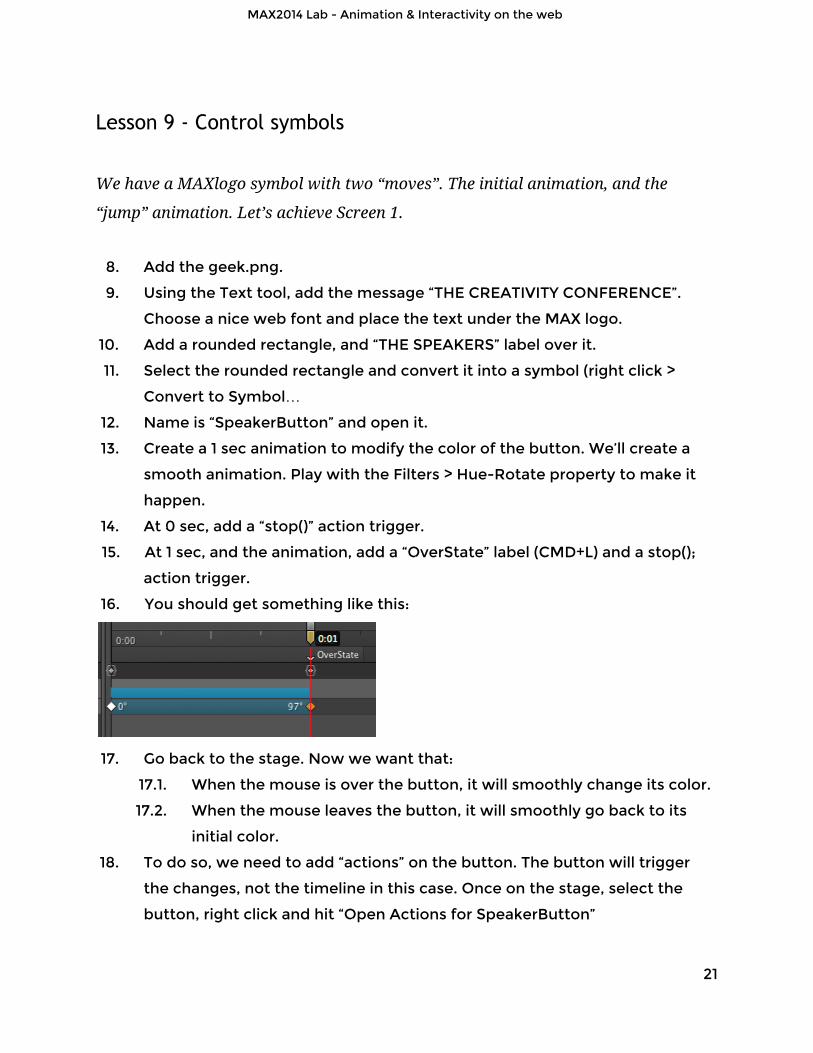
14. At 0 sec, add a “stop()” action trigger.
15. At 1 sec, and the animation, add a “OverState” label (CMD+L) and a stop();
action trigger.
16. You should get something like this:
17. Go back to the stage. Now we want that:
17.1. When the mouse is over the button, it will smoothly change its color.
17.2. When the mouse leaves the button, it will smoothly go back to its
initial color.
18. To do so, we need to add “actions” on the button. The button will trigger
the changes, not the timeline in this case. Once on the stage, select the
button, right click and hit “Open Actions for SpeakerButton”
21
MAX2014 Lab - Animation & Interactivity on the web
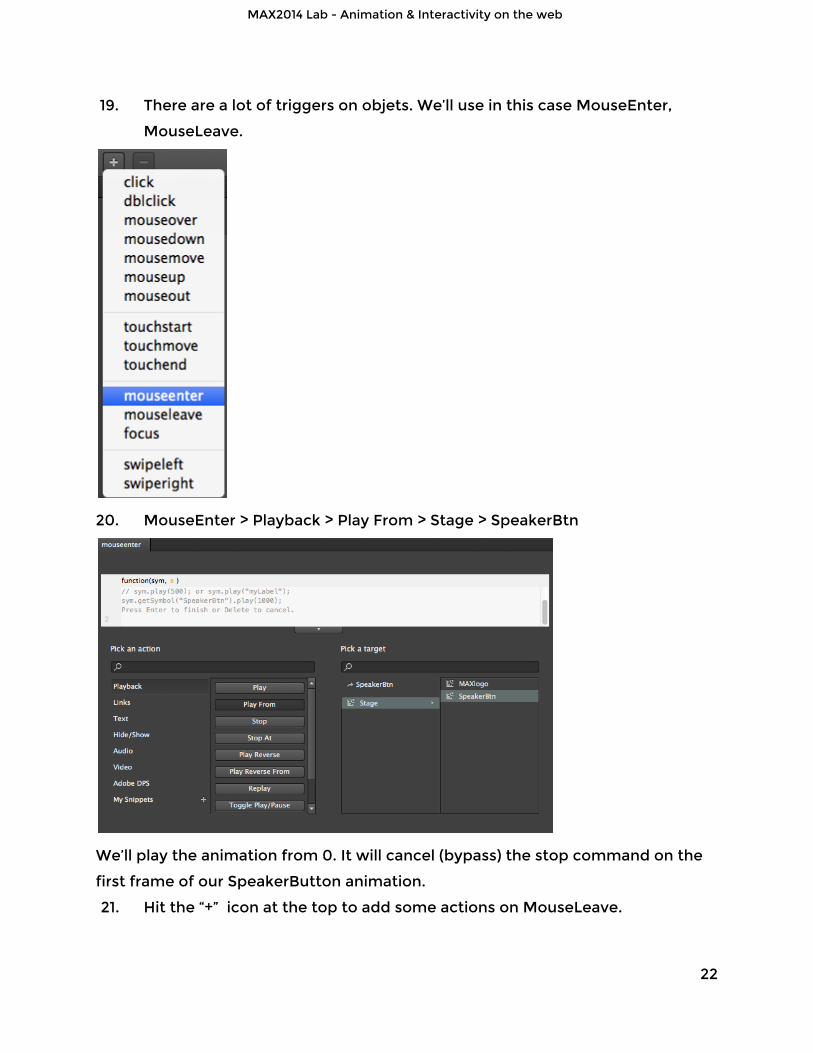
19. There are a lot of triggers on objets. We’ll use in this case MouseEnter,
MouseLeave.
20. MouseEnter > Playback > Play From > Stage > SpeakerBtn
We’ll play the animation from 0. It will cancel (bypass) the stop command on the
first frame of our SpeakerButton animation.
21. Hit the “+” icon at the top to add some actions on MouseLeave.
22
MAX2014 Lab - Animation & Interactivity on the web
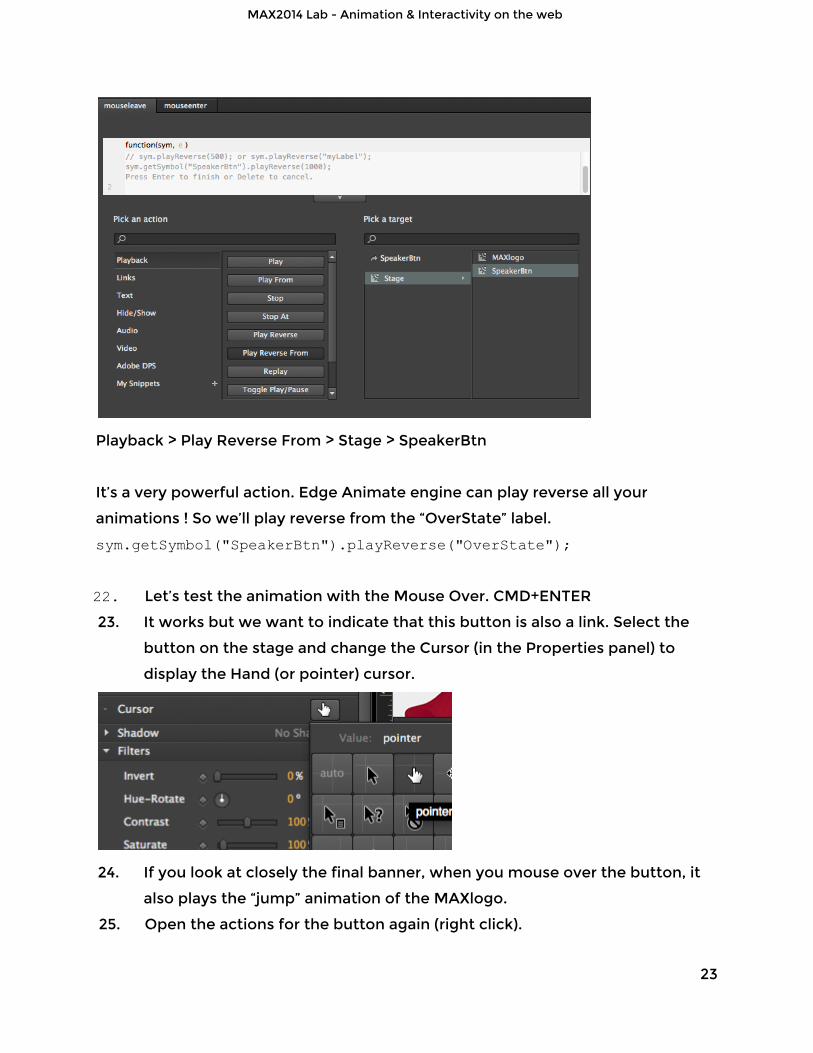
Playback > Play Reverse From > Stage > SpeakerBtn
It’s a very powerful action. Edge Animate engine can play reverse all your
animations ! So we’ll play reverse from the “OverState” label.
sym.getSymbol("SpeakerBtn").playReverse("OverState"); 22. Let’s test the animation with the Mouse Over. CMD+ENTER
23. It works but we want to indicate that this button is also a link. Select the
button on the stage and change the Cursor (in the Properties panel) to
display the Hand (or pointer) cursor.
24. If you look at closely the final banner, when you mouse over the button, it
also plays the “jump” animation of the MAXlogo.
25. Open the actions for the button again (right click).
23
MAX2014 Lab - Animation & Interactivity on the web
26. On MouseEnter (look at the tabs at the top), we will
Playback > Play from > Stage > Maxlogo
sym.getSymbol("MAXlogo").play("jump"); That’s it. With one trigger, you can launch several actions, control the main
playhead (sym.play()); or use sym.getSymbol() to control another symbol !!!
That’s easy and powerful. Now you should be able to create the entire animation
with these techniques.
24
MAX2014 Lab - Animation & Interactivity on the web
Lesson 10 - Rich Media
You can now add video and audio media to your animations. Let’s add some on our
banner. First, we’ll add a sound effect to our MAX logo.
1. Open the MAXlogo symbol
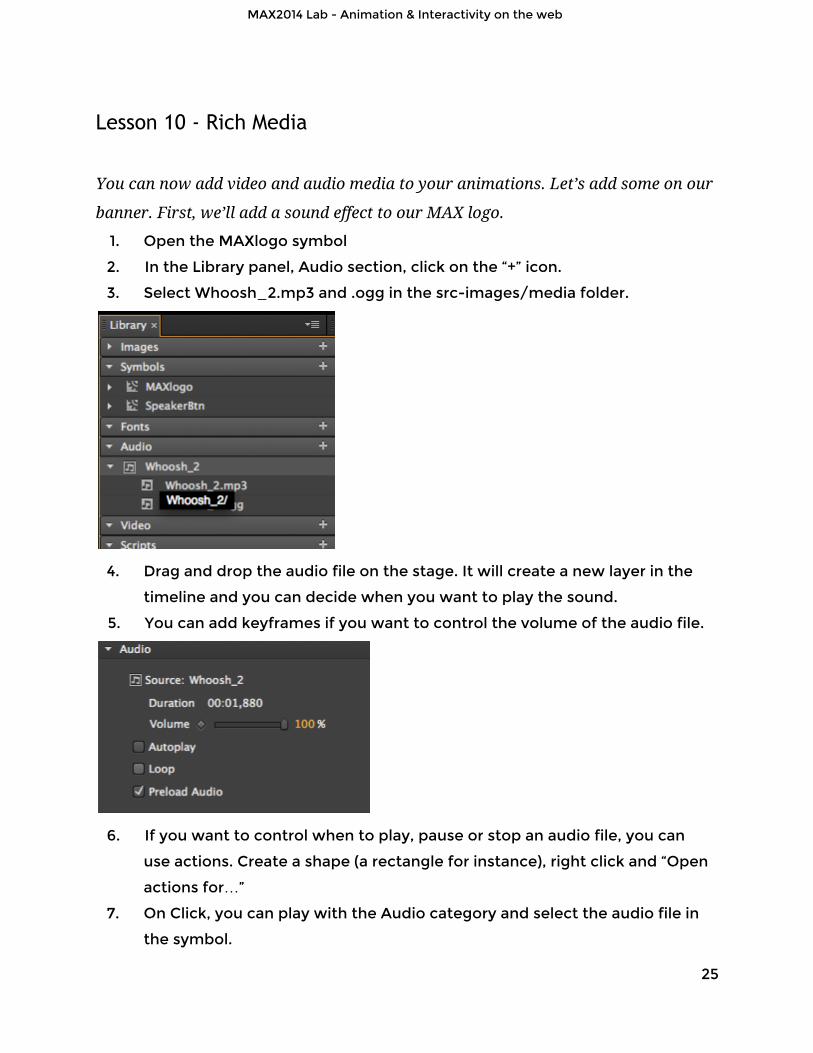
2. In the Library panel, Audio section, click on the “+” icon.
3. Select Whoosh_2.mp3 and .ogg in the src-images/media folder.
4. Drag and drop the audio file on the stage. It will create a new layer in the
timeline and you can decide when you want to play the sound.
5. You can add keyframes if you want to control the volume of the audio file.
6. If you want to control when to play, pause or stop an audio file, you can
use actions. Create a shape (a rectangle for instance), right click and “Open
actions for…”
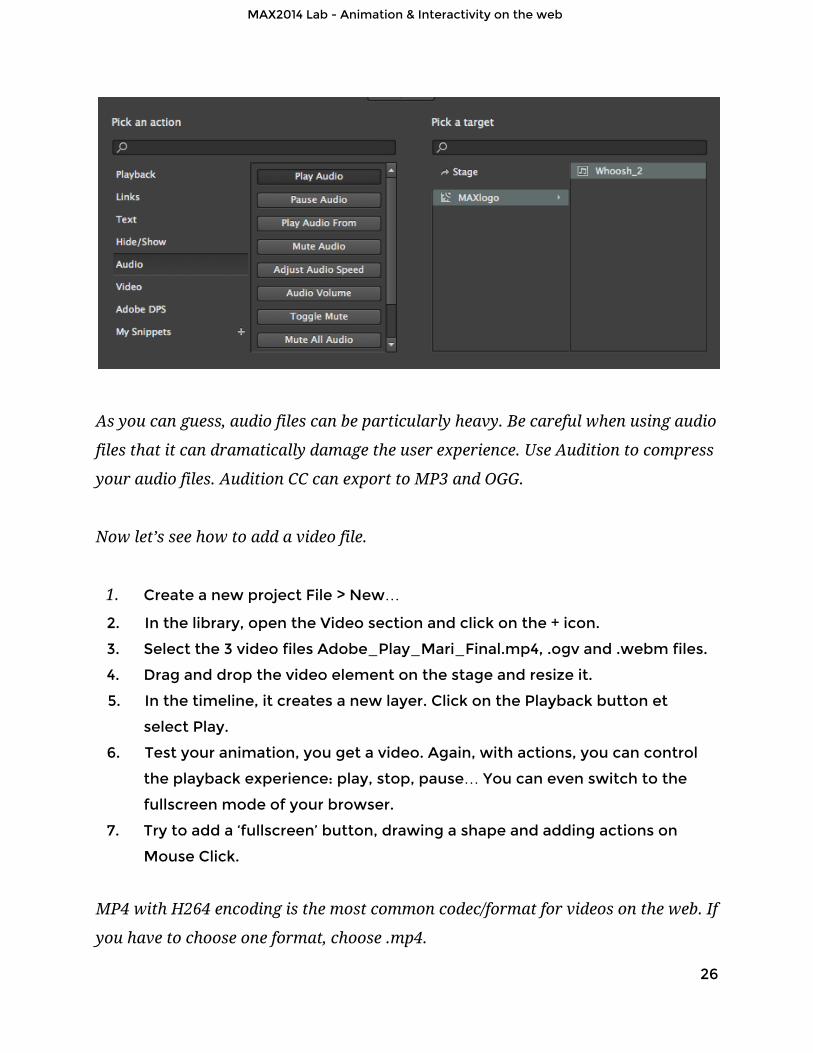
7. On Click, you can play with the Audio category and select the audio file in
the symbol.
25
MAX2014 Lab - Animation & Interactivity on the web
As you can guess, audio files can be particularly heavy. Be careful when using audio
files that it can dramatically damage the user experience. Use Audition to compress
your audio files. Audition CC can export to MP3 and OGG.
Now let’s see how to add a video file.
1. Create a new project File > New…
2. In the library, open the Video section and click on the + icon.
3. Select the 3 video files Adobe_Play_Mari_Final.mp4, .ogv and .webm files.
4. Drag and drop the video element on the stage and resize it.
5. In the timeline, it creates a new layer. Click on the Playback button et
select Play.
6. Test your animation, you get a video. Again, with actions, you can control
the playback experience: play, stop, pause… You can even switch to the
fullscreen mode of your browser.
7. Try to add a ‘fullscreen’ button, drawing a shape and adding actions on
Mouse Click.
MP4 with H264 encoding is the most common codec/format for videos on the web. If
you have to choose one format, choose .mp4.
26
MAX2014 Lab - Animation & Interactivity on the web
Lesson 11 - Publish and embed your animation on your website
Once your animation is ready, you may want to publish it on your website. Let’s
publish our animation and see how to add it to a web page with Dreamweaver.
1. In Edge Animate, open your banner project.
2. If your visitor has an old browser, he won’t be able to play your animation.
The “fallback” will be an image. To generate this image, place the playhead
at the most representative frame of your animation.
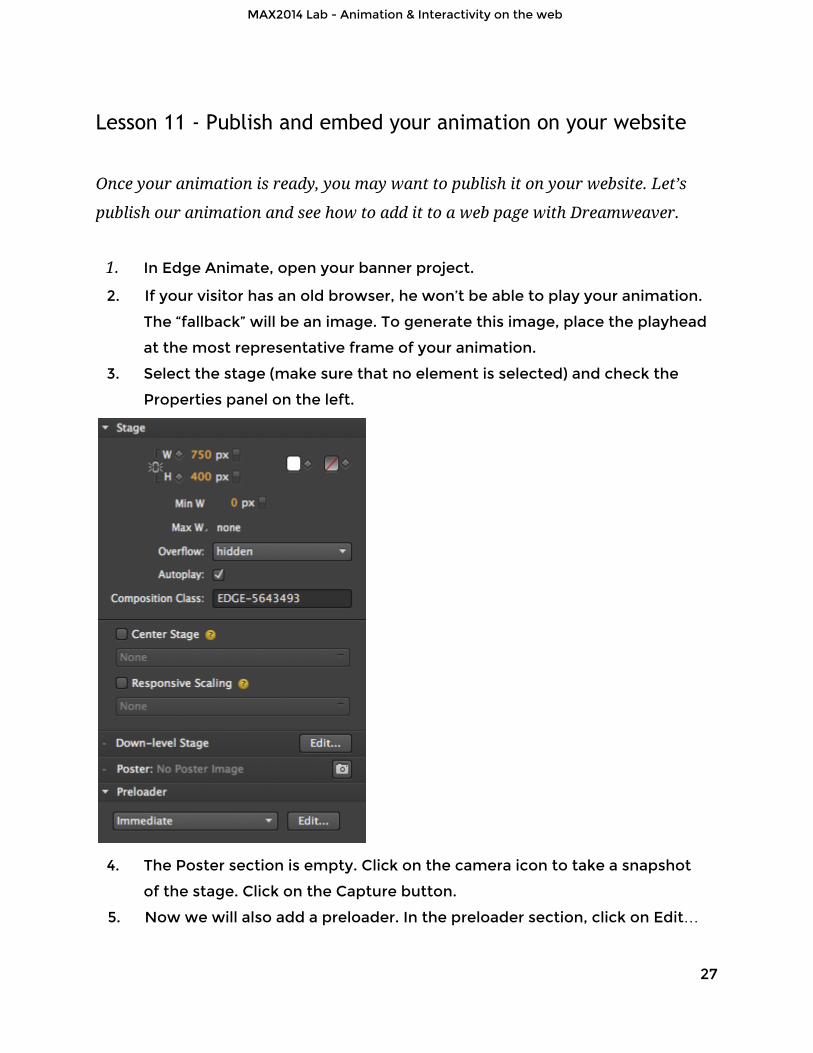
3. Select the stage (make sure that no element is selected) and check the
Properties panel on the left.
4. The Poster section is empty. Click on the camera icon to take a snapshot
of the stage. Click on the Capture button.
5. Now we will also add a preloader. In the preloader section, click on Edit…
27
MAX2014 Lab - Animation & Interactivity on the web
6. It creates a Preloader symbol. On the left, Click “Insert Preloader Clip
Art…” and select the user experience you prefer.
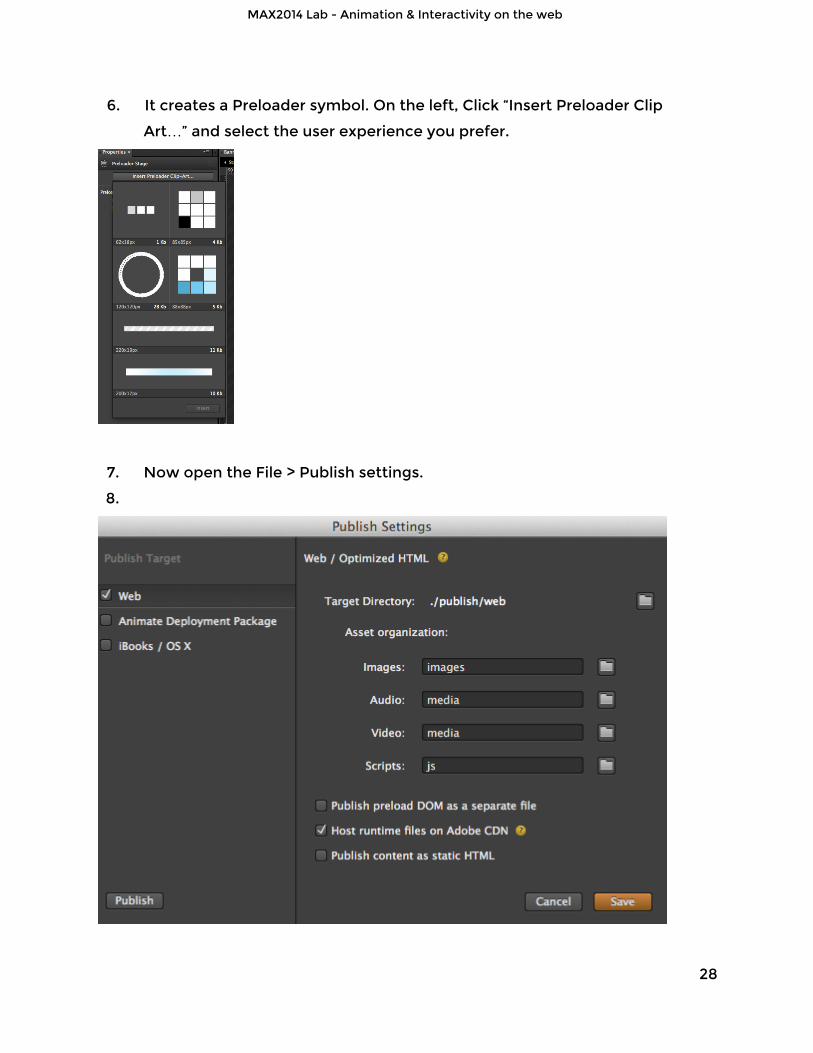
7. Now open the File > Publish settings.
8.
28

MAX2014 Lab - Animation & Interactivity on the web
9. The default settings are okay. Click on Publish. It will create a “publish”
folder on your disk.
An Edge Animation is just: an HTML file, a JavaScript file and two folders of
assets.
10. Copy the two files “Container.html” and “stylesPages.css” in the publish >
web folder of your project. You should get this on your disk:
11. Launch Dreamweaver and open “Container.html” and “BannerSTART.html”
12. In Container.html, we want to add the animation in between the header
and the text. Inside the DIV with the “animation” class attached.
13. Look at the code of BannerSTART.html. There are two elements that we
need to include in Container.html. The first one is the Edge Animate
runtime. In the <head> section, it’s between the Adobe Edge runtime
commented lines. Copy this block and paste it in the <HEAD> section of
Container.html.
14. The runtime is there, now we need the DIV. In BannerSTART.html, copy the
<div> with the id=”Stage” and a unique ID for the class (EDGE-...
something).
15. Paste it in Container.html, inside the “animation” DIV.
16. That’s it. Your animation can now run on your website.
29
MAX2014 Lab - Animation & Interactivity on the web
30