and mark hazel japanese - flamesofwar.com · rectangular standard (the navy has it closer to the...
TRANSCRIPT
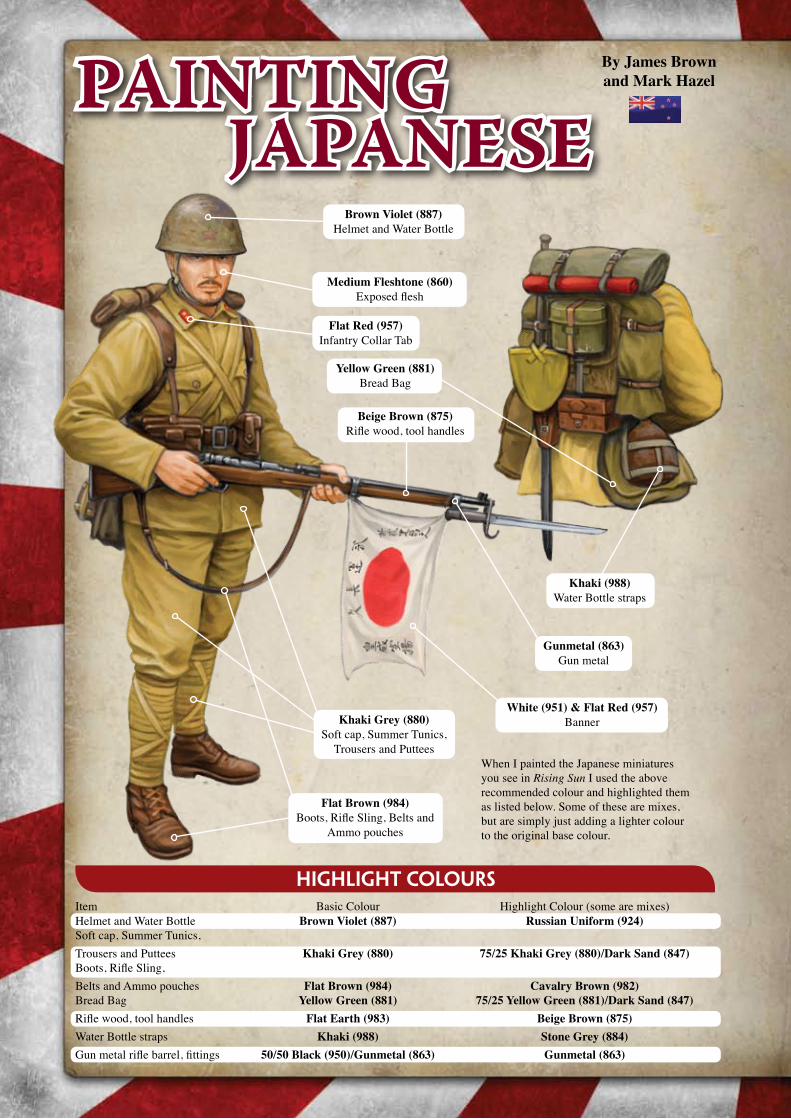
Flat Brown (984)Boots, Rifle Sling, Belts and
Ammo pouches
Beige Brown (875)Rifle wood, tool handles
Yellow Green (881)Bread Bag
Medium Fleshtone (860)Exposed flesh
Brown Violet (887)Helmet and Water Bottle
Khaki Grey (880)Soft cap, Summer Tunics,
Trousers and Puttees
Khaki (988)Water Bottle straps
White (951) & Flat Red (957)Banner
Gunmetal (863)Gun metal
Item Basic Colour Highlight Colour (some are mixes) Helmet and Water Bottle Brown Violet (887) Russian Uniform (924)Soft cap, Summer Tunics, Trousers and Puttees Khaki Grey (880) 75/25 Khaki Grey (880)/Dark Sand (847)Boots, Rifle Sling, Belts and Ammo pouches Flat Brown (984) Cavalry Brown (982)Bread Bag Yellow Green (881) 75/25 Yellow Green (881)/Dark Sand (847)Rifle wood, tool handles Flat Earth (983) Beige Brown (875)Water Bottle straps Khaki (988) Stone Grey (884)Gun metal rifle barrel, fittings 50/50 Black (950)/Gunmetal (863) Gunmetal (863)
When I painted the Japanese miniatures you see in Rising Sun I used the above recommended colour and highlighted them as listed below. Some of these are mixes, but are simply just adding a lighter colour to the original base colour.
HigHligHt colours
PAINTING JAPANESE
By James Brown and Mark Hazel
Flat Red (957)Infantry Collar Tab
Japanese tunics officially had coloured collar tabs to distinguish each branch of service (shown below), but they were usually removed when on campaign, leaving the collars blank. This leave you with the option to add them or not.
Infantry (Red): Flat Red (957)
Cavalry (Green): Medium Olive (850)
Artillery (Yellow):Deep Yellow (915)
Engineers (Crimson): Flat Red (957) + ¼ Dark Blue (930)
Armoured troops (Red): Flat Red (957)
MAnCHUKoU UnIFoRMDuring the 1930s the Manchukou Army adopted a uniform similar to that of the Imperial Japanese Army. The uniforms were cut from the same Khaki cloth as the Japanese uniform. Equipment and weapons were much the same. Head gear was also similar with a Japanese style forage cap and the Japanese model 1930 helmet. Manchukou troops also were issued with peaked caps and fur hats for winter. The Manchukou Army cavalry at Nomonhan wore green collar tabs.
The Japanese carried both simple banners featuring the red sun and their rising sun regimental standard into battle. Both present a great opportunity to really make you Japanese stand out on the battlefield.
A depicted in our painting guide figure on the previous page the banners were simple white fields with a large red sun in the centre. Often they were accom-panied by Japanese characters running down the left and right of the red sun disc.
The banners are usually attached to the soldier’s rifle.
Both the Banners and Standards are made of wavy material, so like uniforms, they benefit from some shading and highlighting.
Painting the basic white of the banner.
1. I started with a base coat of Sky Grey (989).
Notes on the Japanese Regimental Standard
A Imperial Japanese Army regimental standard has the sun disc positioned in the centre of the rectangular standard (the Navy has it closer to the pole). It has 16 red rays, with 5 each spreading to the top and bottom of the standard and three each to the left and right.
otHer uniform details
Painting Banners and standards
Painting the red sun.Next I painted the red sun disc. With the banners with was simply a red circle I painted freehand. However, you may like to cut out a small circle in some masking tape and place this in position before painting the red. This has the advantage of keeping the circles consistent across all your banners. This works for the large circle on the Regimental Standard as well.
2. I then highlighted with a 50/50 mix of Sky Grey (989) and White (951)(or a light grey colour like Flat Aluminium (993)). You only need to leave the base coat show in the deepest recesses.
3. Finally I highlighted the flag with White (951) on the raised curves of the highest points.
4. Paint a red circle with Cavalry Brown (982).
5. Highlight the waves and folds in the circle with Flat Red (957). If you have access to some brighter colours like Red (947) or Scarlet (817) another highlight with one of these will really make the disc stand out.
6. Finally for the Regimental Standard we need to add the sun’s rays. The best method is to mark the positions where the rays go to around the edge of the standard. Once again, you could paint these free hand or use masking tape to mark the edges before painting the red as above.
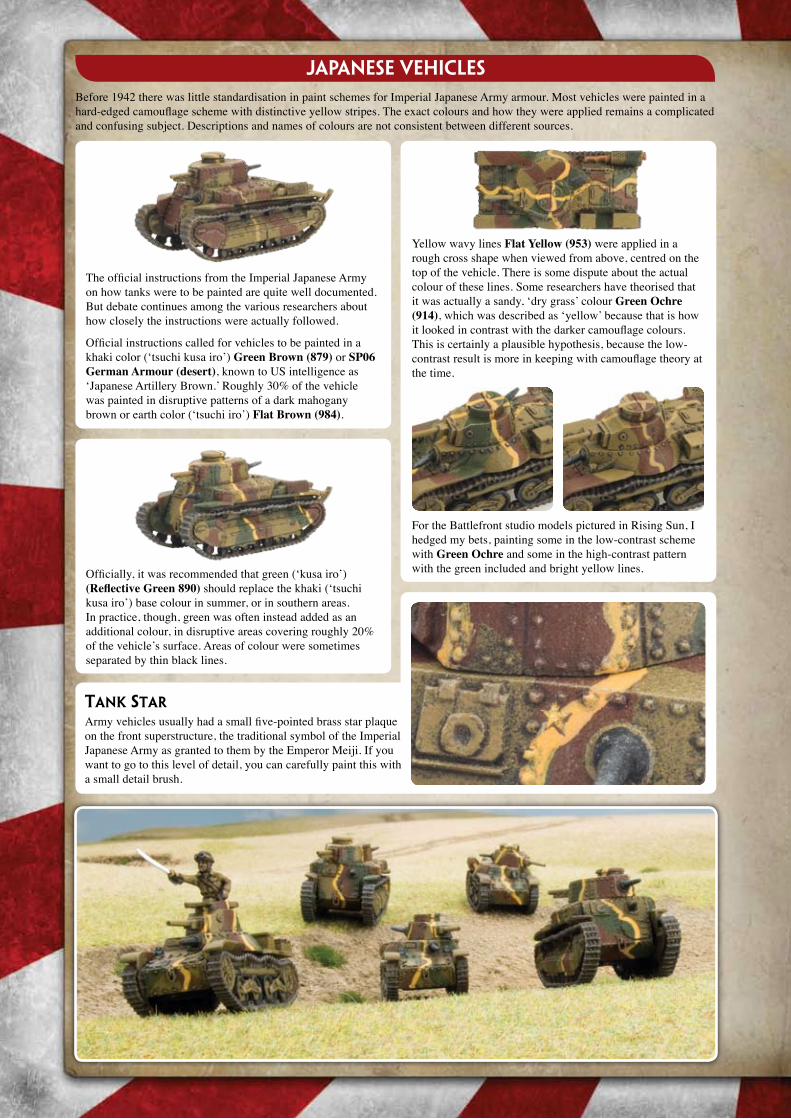
JaPanese VeHiclesBefore 1942 there was little standardisation in paint schemes for Imperial Japanese Army armour. Most vehicles were painted in a hard-edged camouflage scheme with distinctive yellow stripes. The exact colours and how they were applied remains a complicated and confusing subject. Descriptions and names of colours are not consistent between different sources.
The official instructions from the Imperial Japanese Army on how tanks were to be painted are quite well documented. But debate continues among the various researchers about how closely the instructions were actually followed.
Official instructions called for vehicles to be painted in a khaki color (‘tsuchi kusa iro’) Green Brown (879)orSP06 German Armour (desert), known to US intelligence as ‘Japanese Artillery Brown.’ Roughly 30% of the vehicle was painted in disruptive patterns of a dark mahogany brown or earth color (‘tsuchi iro’) Flat Brown (984).
Officially, it was recommended that green (‘kusa iro’) (Reflective Green 890) should replace the khaki (‘tsuchi kusa iro’) base colour in summer, or in southern areas. In practice, though, green was often instead added as an additional colour, in disruptive areas covering roughly 20% of the vehicle’s surface. Areas of colour were sometimes separated by thin black lines.
Yellow wavy lines Flat Yellow (953) were applied in a rough cross shape when viewed from above, centred on the top of the vehicle. There is some dispute about the actual colour of these lines. Some researchers have theorised that it was actually a sandy, ‘dry grass’ colour Green ochre (914), which was described as ‘yellow’ because that is how it looked in contrast with the darker camouflage colours. This is certainly a plausible hypothesis, because the low-contrast result is more in keeping with camouflage theory at the time.
Tank STarArmy vehicles usually had a small five-pointed brass star plaque on the front superstructure, the traditional symbol of the Imperial Japanese Army as granted to them by the Emperor Meiji. If you want to go to this level of detail, you can carefully paint this with a small detail brush.
For the Battlefront studio models pictured in Rising Sun, I hedged my bets, painting some in the low-contrast scheme with Green ochre and some in the high-contrast pattern with the green included and bright yellow lines.
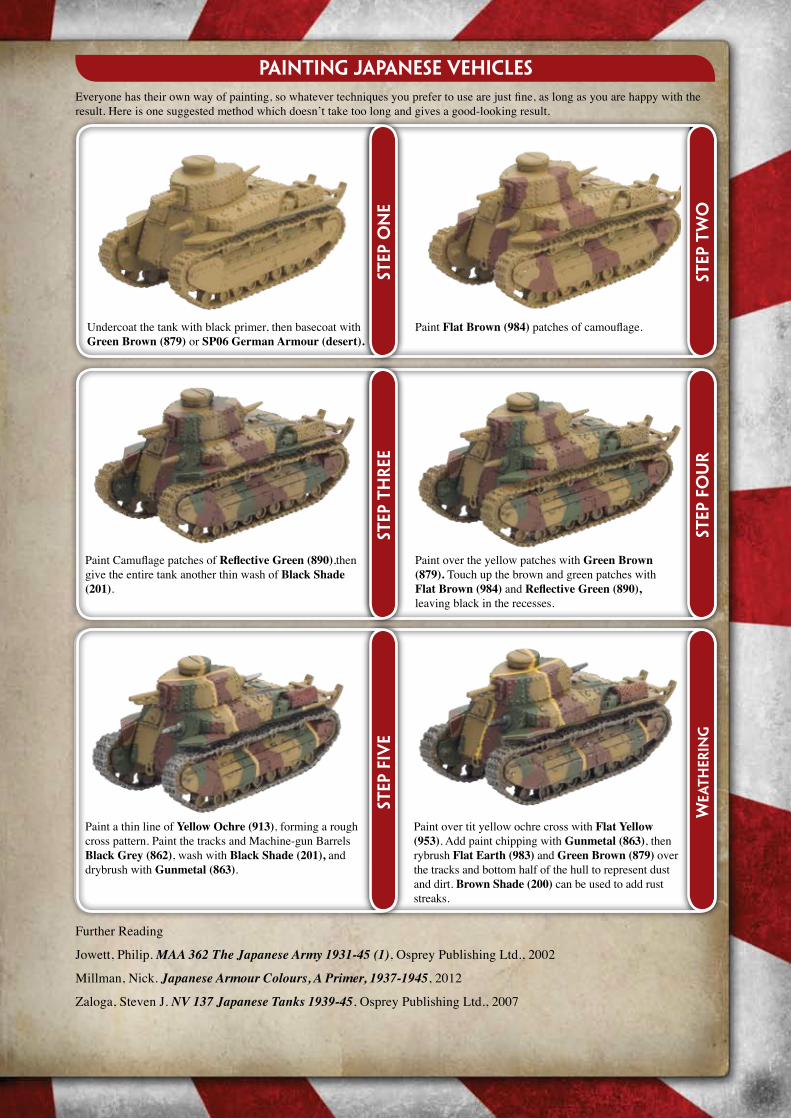
Painting JaPanese VeHicles
STEP
TW
O
STEP
ON
E
STEP
FO
UR
STEP
TH
REE
WEa
THER
iNg
STEP
FiV
E
Undercoat the tank with black primer, then basecoat with Green Brown (879)orSP06 German Armour (desert).
Paint Flat Brown (984) patches of camouflage.
Paint Camuflage patches of Reflective Green (890),then give the entire tank another thin wash of Black Shade (201).
Paint over the yellow patches with Green Brown (879). Touch up the brown and green patches with Flat Brown (984) and Reflective Green (890), leaving black in the recesses.
Paint a thin line of Yellow ochre (913), forming a rough cross pattern. Paint the tracks and Machine-gun Barrels Black Grey (862), wash with Black Shade (201), and drybrush with Gunmetal (863).
Paint over tit yellow ochre cross with Flat Yellow (953). Add paint chipping with Gunmetal (863), then rybrush Flat Earth (983) and Green Brown (879) over the tracks and bottom half of the hull to represent dust and dirt. Brown Shade (200) can be used to add rust streaks.
Everyone has their own way of painting, so whatever techniques you prefer to use are just fine, as long as you are happy with the result. Here is one suggested method which doesn’t take too long and gives a good-looking result.
Further Reading
Jowett, Philip. MAA 362 The Japanese Army 1931-45 (1), Osprey Publishing Ltd., 2002
Millman, Nick. Japanese Armour Colours, A Primer, 1937-1945, 2012
Zaloga, Steven J. NV 137 Japanese Tanks 1939-45, Osprey Publishing Ltd., 2007