alcohol and tobacco tax and trade bureau - ttb · alcohol and tobacco tax and trade bureau v1: hi...
TRANSCRIPT
Slide 1
Industry Circular 2019-2Temporary Voluntary Disclosure
Program
Permits Online Demo:Change in Proprietorship
Alcohol and Tobacco Tax and Trade Bureau
V1: Hi everyone, and thank you for joining our Permits Online presentation for submitting your temporary voluntary disclosure program, or TVDP, applications, per Industry Circular 2019‐2.

Slide 2
Objective
For wholesalers and importers that have undergone an unreported change in proprietorship, demonstrate how to file in Permits Online under the Temporary Voluntary Disclosure Program (TVDP), as outlined in Industry Circular 2019-2.
9/10/192
V2: In this presentation, we’re going to show you how to submit the documentation needed under the temporary voluntary disclosure program for a change in proprietorship.

Slide 3
Objective
Follow the Industry Circular 2019-2 Temporary Voluntary Disclosure Program (TVDP) requirements to:• Create a new application for a Change in
Proprietorship through Permits Online
9/10/193
V2: Today we’re going to show you how to file an application for a new permit for a Change in Proprietorship following the TVDP requirements as outlined in Industry Circular 2019‐2.

Slide 4
Need to Register?
9/10/194
V1: If you are new to Permits Online and need help registering for an account, please click the “viewing our tutorial” link on the Permits Online login page, and visit Part Two of the tutorial. V2: The rest of this presentation will help you navigate the screens you’ll see when you’re logged into Permits Online.
Slide 5
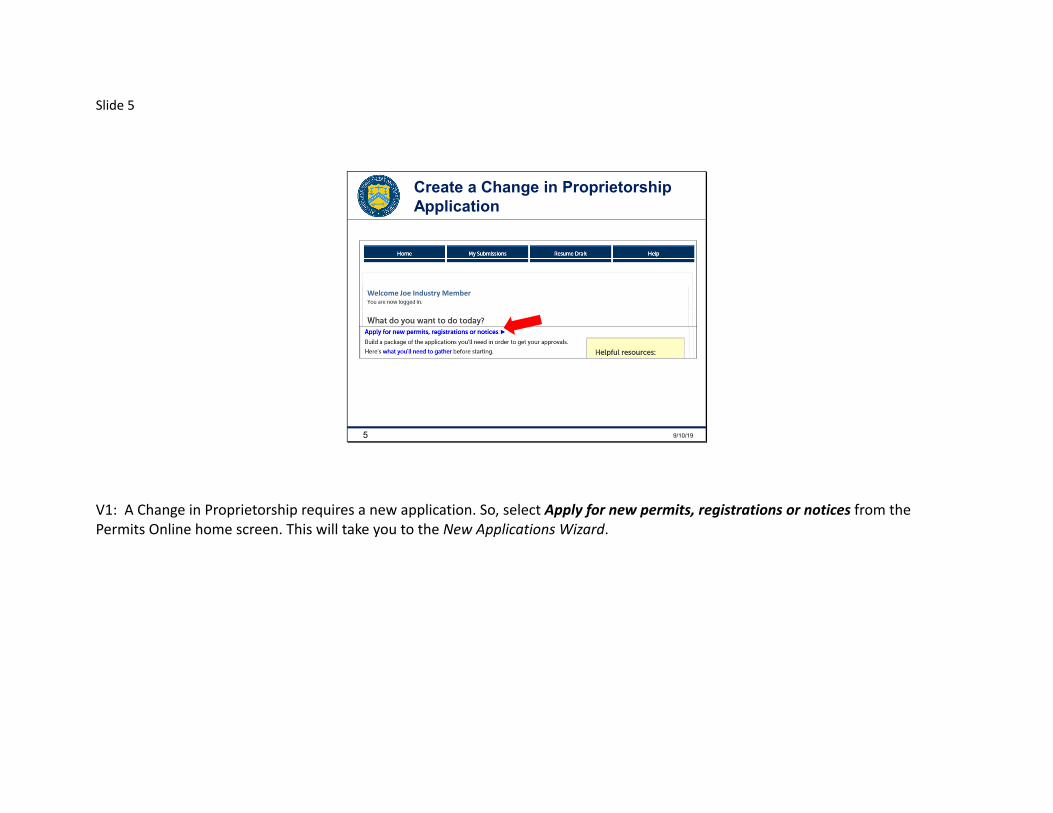
Create a Change in Proprietorship Application
Welcome Joe Industry Member
9/10/195
V1: A Change in Proprietorship requires a new application. So, select Apply for new permits, registrations or notices from the Permits Online home screen. This will take you to the New Applications Wizard.

Slide 6
Rules and Responsibilities
9/10/196
V2: Read the Rules and Responsibilities text box, and then select and accept them by marking the indicated box, and then click Continue.

Slide 7
Verify Contact Information
Joe Industry [email protected]‐222‐3344
000 X Street, Suite 0Anywhere, XX 12345
9/10/197
V1: Next, double check your contact information, indicated by our arrow. If you notice that it’s incorrect, click the blue your information link we circled to edit the information. Note that if you do have to change your contact information, you’ll have to exit the New Applications Wizard to do so, and will need to begin the wizard again after you make the necessary edits. If you can verify your contact information is correct, scroll down to the next section.

Slide 8
Wizard Questions–Premises Address
9/10/198
V2: Here you will enter the address of the physical location where the operations will take place. After entering your premises address, scroll down to the next section.

Slide 9
Wizard Questions–Commodity Selections
9/10/199
V1: Mark the first box, Wholesaler/Importer. Scroll down to the next section, Application Types, and mark one or both of the Application Types you need to submit.

Slide 10
Wizard Questions–Business Entity
9/10/1910
V1: Enter the information about your business in the boxes here.

Slide 11
Identifying Personnel Questionnaires
• If all of your PQs will be submitted separately from the application or are already on file with TTB, select the first option, “All PQs will be submitted separately or are already on file with TTB”. Some applicants prefer to complete their own personnel questionnaires for privacy concerns.
• If some of the PQs will be submitted separately from the application or are already on file with TTB, select the second option, “SOME PQs will be submitted separately…”
• If you’re going to submit all the PQs inside of this application, select the third option, “NO PQs will be submitted separately…”
9/10/1911
V2: On this screen you will decide how to submit your personnel questionnaires, that we’ll call “PQs.” Look at the first drop‐down box we’ve circled, and follow these directions to highlight your selection: • If all of your PQs will be submitted separately from the application or are already on file with TTB, select the first option, “All PQs
will be submitted separately or are already on file with TTB”. Some applicants prefer to complete their own personnel questionnaires for privacy concerns.
• If some of the PQs will be submitted separately from the application or are already on file with TTB, select the second option, “SOME PQs will be submitted separately…”
• If you’re going to submit all the PQs inside of this application, select the third option, “NO PQs will be submitted separately…”

Slide 12
Identifying Personnel Questionnaires
For more information, please see our guidance about Personnel Questionnaires:
TTB G 2018‐3
9/10/1912
V1: Then, in the area we’ve indicated with an arrow, make sure you list the correct number of PQs for the question, “How many blank PQ applications should we add…” – it’s important to do this because the wizard will create PQ applications in your package based on the number you provide here. If you list too many or not enough, you’ll need to start the amendment wizard all over again to get the correct amount. PQs already on file with TTB and PQs that you plan to submit separately do not count toward this number. V2: If you need additional information about Personnel Questionnaires, please search for “TTB G 2018‐3” on TTB.gov.

Slide 13
Check Your Answers
9/10/1913
V1: After you complete all the questions and you’re at the bottom of the page, you’ll get a reminder to check your questions and verify that you’ve reviewed them and they’re accurate. Once you check the Confirm box, you’ll notice a red prompt asking if you’re sure. Make sure you ARE sure because you can’t change your answers after leaving this screen. This is your last opportunity to make sure you answered all the questions in the wizard correctly. Once you click Continue, the package will be built based on your answers.

Slide 14
Review
9/10/1914
V2: This page allows you to review everything again. It shows you all the questions you were asked, along with the answers you provided. You can’t make any corrections at this point. So if your package is incorrect, you’ll need to exit by clicking the circled blue start over link and begin the New Applications Wizard again. If everything is correct, click Continue. Unfortunately, users have reported issues with the Save and resume later function, and we do not recommend using it at this time.

Slide 15
Start Your Application Package
9/10/1915
V1: Okay, now the Application Package the wizard created based on your answers is ready. Click on the Start link to begin each application in your package. For the purpose of this presentation, we will begin with the Application for Original Entity.

Slide 16
Verify Contact Information
Joe Industry [email protected]‐222‐3344
000 X Street, Suite 0Anywhere, XX 12345
9/10/1916
V1: Next, double check your contact information here. If you notice that it’s incorrect, click the blue your information link we circled to edit the information. Note that if you need to change your contact information, you’ll have to exit the system to do so, and then log in again after you make the necessary edits. Once you verify your contact information, click Continue.

Slide 17
Business Entity
9/10/1917
V1: Here you’re going to verify your Entity Information and then click Continue.

Slide 18
Officer/Ownership Information
9/10/1918
V2: When you get to this section of the Application in Permits Online, you’ll see three separate tables. One for Officer/Ownership Information, one for Signing Authority, and another one for Power of Attorney. This screenshot only shows you the Officer/Ownership Information table as an example, but each table works the same way to add, remove, or delete any of the information, and they are all located on the same page. V1: Here you must select Add a Row to identify the ownership of your business.

Slide 19
Officer/Ownership Info (cont.)
9/10/1919
V1: Then you’ll get a pop up screen like this. As you begin answering these questions, you’ll notice some will disappear and some additional questions will appear based on the answers you provide. Be sure to answer all required fields identified with a red asterisk, like the one circled here. When you’ve answered all required questions, click the OK button to return to the Owner/Officer Table.

Slide 20
Officer/Ownership (cont.)
9/10/1920
V2: Now you’ll see the information you entered in the prior screen here in the Officer/Ownership Information Table. If you need to add additional information, click the Add a Row button as many times as you need to correctly identify the ownership of your business. Once this table is complete, scroll down to the next table.

Slide 21
Signing Authority
9/10/1921
V1: The Signing Authority Table allows you to add the individual or individuals that have the ability to sign and act on behalf of the business. Select Add a Row to begin adding this information.

Slide 22
Signing Authority (cont.)
9/10/1922
V2: You’ll see a pop up screen like this, similar to the Officer/Ownership Table. Start answering these questions and again notice that some questions will appear or disappear based on your answers. Later in the application process, you’ll have to upload the document that is assigning the signing authority to each of the individuals listed in this table. So, be sure to answer all required fields identified with a red asterisk, indicated here with a small red circle. Note that you’ll be required to list at least one individual in this table and at least one of the individuals listed must be designated as a key contact for TTB, shown here with a big green circle. When you have answered all required questions, click the OK button to return to the Signing Authority Table.

Slide 23
Signing Authority (cont.)
9/10/1923
V1: Here, you’ll see the information you entered in the prior screen for the Signing Authority Table. If you need to add additional information, click the Add a Row button as many times as you need to correctly identify all individuals having signing authority for your business. Once this table is complete, scroll down to the next table.

Slide 24
Power Of Attorney Information
9/10/1924
V2: The Power of Attorney Table allows you to identify all others you wish to have authority to sign and act on behalf of the business. You’re not required to complete this table. If you choose not to assign anyone with Power of Attorney, scroll down to the next table. If you would like to assign Power of Attorney, select Add a Row to begin adding this information.

Slide 25
Power Of Attorney Information (cont.)
9/10/1925
V1: If you clicked the Add a Row button, a pop‐up screen will show you this series of fields to fill in. Be sure to answer all required fields identified with a red asterisk. Later in the application process you’ll have to upload the document that is assigning the authority to each of the individuals listed in this table. When you have answered all required questions, click the OK button to return to the Power of Attorney Table to review the information you have added, if any.

Slide 26
Trade Names
9/10/1926
V2: Now scroll down to the Trade Name Table. This table allows you to enter each trade name you wish to use. You may skip this section if it doesn’t apply to your business. If you would like to add any trade names, select Add a Row to begin adding this information.

Slide 27
Trade Names (cont.)
9/10/1927
V1: If you clicked on Add a Row, a pop‐up screen like this will come up. Be sure to answer all required fields identified with a red asterisk. When you have answered all required questions, click the OK button to return to the Trade Name Table to review the information you’ve added here.

Slide 28
Trade Names (cont.)
9/10/1928
V2: If you added any trade name information in the prior screen, you’ll see that information here. Click on Add a Row as many times as you need to enter all trade names listed on your permit. Once this table is complete, click Continue.
Slide 29
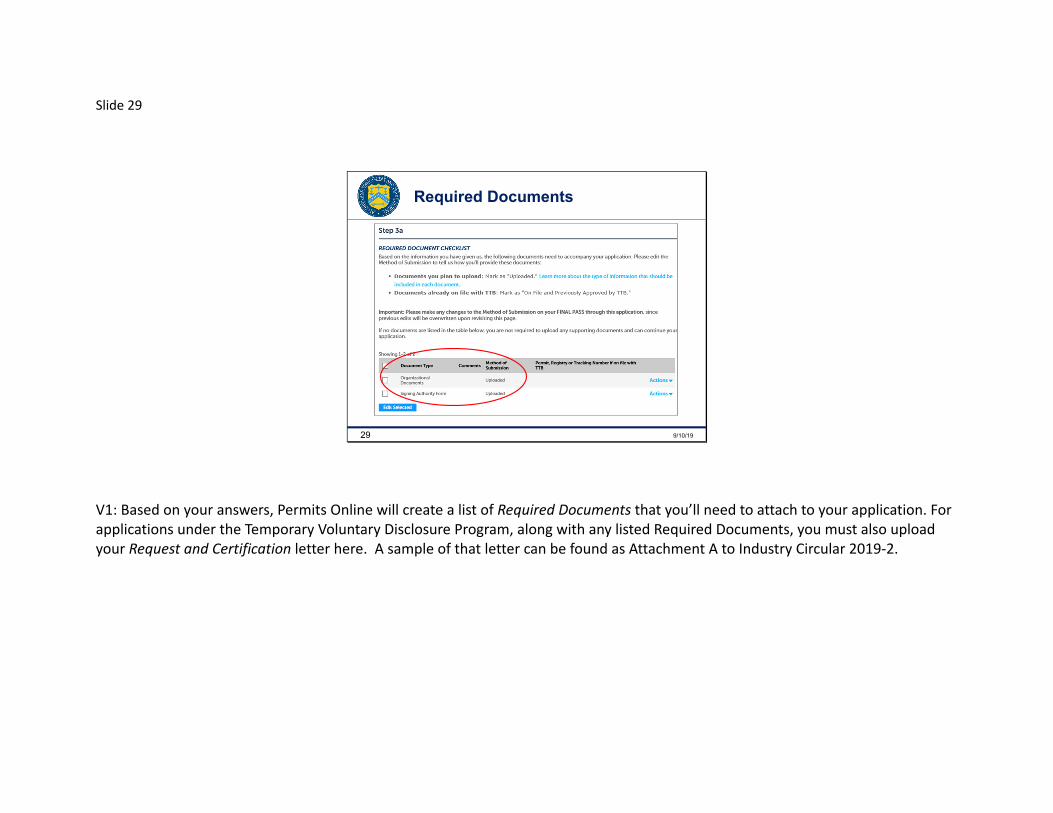
Required Documents
9/10/1929
V1: Based on your answers, Permits Online will create a list of Required Documents that you’ll need to attach to your application. For applications under the Temporary Voluntary Disclosure Program, along with any listed Required Documents, you must also upload your Request and Certification letter here. A sample of that letter can be found as Attachment A to Industry Circular 2019‐2.

Slide 30
Uploading Documents
9/10/1930
V2: Click the Add button to browse your computer files to find and attach the required documents.

Slide 31
Uploading Documents (cont.)
9/10/1931
V1: In addition to any listed required documents, don’t forget to upload the Request and Certification letter. First, in the Type dropdown, select Voluntary Disclosure Request for the Request and Certification letter. Next, once it’s uploaded, click Save Attachments, and then click Continue.

Slide 32
Verify Uploads
9/10/1932
V1: Review the attachment list and verify that your documents were successfully uploaded, including the Request and Certification letter. After you verify that you uploaded the documents, click Continue.

Slide 33
Declare and Acknowledge
9/10/1933
V2: After you read the Declaration, acknowledge it by checking the Declare and Acknowledge box. The Declaration Date will populate automatically, then click Continue.

Slide 34
Editing Your Answers
9/10/1934
V2: All of your answers will show up on this page. If you notice that you missed something, you can select the start over link we’ve circled to add what’s missing. If everything is there, click Continue.

Slide 35
Start Application Package
9/10/1935
V1: Then you’ll come back to your Application Package. Begin the next application on your list here by selecting the appropriate Start link. For the purpose of this presentation, we’ll demonstrate the submission of an application as an Alcohol Wholesaler, so we’ll select the “Application for Alcohol Wholesaler and/or Exporter.”

Slide 36
Adding Mailing Address
9/10/1936
Joe Industry [email protected]‐222‐3344
000 X Street, Suite 0Anywhere, XX 12345
V2: The first three sections you’ll see will be completed for you based on the information you entered in the New Application Wizard.

Slide 37
Adding Mailing Address (cont.)
9/10/1937
Joe Industry [email protected]‐222‐3344
000 X Street, Suite 0Anywhere, XX 12345
V1: Here, provide your mailing address by clicking the Auto Fill button, which will pull the information from your User Profile that you filled out when you created your account in Permits Online. If the mailing address needs to be different than the address entered in your User Profile, click the New button to enter the new mailing address. When finished, click Continue.

Slide 38
Operation Description
9/10/1938
V2: If you need a Doing Business As / Operating Name on your Permit, enter it here. Then, under the Reason for the Application, mark the Change of proprietorship ‐ ownership box.

Slide 39
Application Reason
9/10/1939
V1: Notice the additional questions that appear after you mark the Change of proprietorship – ownership box. Answer all the required questions, these appear with red asterisks.

Slide 40
Owner Background
9/10/1940
V2: Select the type(s) of alcohol beverages you intend to purchase for resale at wholesale and then answer the two Owner Background Information questions and, if applicable, the Export Bond Information question.

Slide 41
Export Bond Information
9/10/1941
V1: If you answered “yes” to the Export Bond Information question, you’ll have to Add a Row in the Export Bond Information Table. If you answered “no,” scroll down to the next table.

Slide 42
Request for Variance
9/10/1942
V2: If you need to add a variance request to your application, which isn’t that common, you do that in the Request for Variance Table. Click Add a Row to enter the necessary information. If you don’t need to add a variance, click Continue.

Slide 43
Required Document Checklist
9/10/1943
V1: Based on the answers you’ve provided, Permits Online will provide a list of documents that you must upload with your application. If all of the required documents are already on file with TTB, you may not be required to upload anything here, which is the case with this demonstration showing No records found.

Slide 44
Upload Required Documents
9/10/1944
V2: If you have any documents to upload, the same steps we previously described apply here as well. V1: In this demonstration, there are no files that must be uploaded at this stage. We already uploaded the Request and Certification letter to the Original Entity application. Therefore, we can click Continue.

Slide 45
Declare and Acknowledge
9/10/1945
V2: After you read the declaration, acknowledge it by checking the Declare and Acknowledge box. The Declaration Date will populate automatically, then click Continue.

Slide 46
Editing Your Answers
9/10/1946
V1: Next, you’ll review your answers. If everything is correct, click Continue. If you notice that you missed something, you can select the start over link we’ve circled to add what’s missing.

Slide 47
Submit Application Package
9/10/1947
V2: Then, you’ll be directed back to your Application package. Complete any remaining applications by clicking on the appropriate Start link.

Slide 48
Submit Application Package (cont.)
9/10/1948
V1: Once all of the applications have been completed, click the Submit Application Package button. You’ll know the applications are all complete when you see a Ready to submit status next to each application.

Slide 49
Confirmation
9/10/1949
V2: Your submission confirmation window will pop up and your email confirmation will include the Tracking Numbers assigned to your applications.

Slide 50
Questions
Contact TTB at:
• 1-877-882-3277
OR
9/10/1950
V1: If you have any questions, please contact us by phone or email and we’ll be happy to help you! Good luck and thanks for joining us!