alber battery xplorer enterprise - vertiv...1.3. battery xplorer enterprise system diagram .....1-1...
TRANSCRIPT

Alber Battery Xplorer Enterprise
System Installation Guide
Vertiv Corporation
1050 Dearborn Drive
Columbus, OH 43085
Tel: (954) 377-7101
www.vertivco.com
590-2168-501A/SL-29237/4200-105

590-2618-501A/SL-29237/4200-105 i
The information contained in this document is subject to change without notice and may not be suitable for all applications. While every precaution has been taken to ensure the accuracy and completeness of this document, Vertiv assumes no responsibility and disclaims all liability for damages resulting from use of this information or for any errors or omissions. Refer to other local practices or building codes as applicable for the correct methods, tools, and materials to be used in performing procedures not specifically described in this document. The products covered by this instruction manual are manufactured and/or sold by Vertiv. This document is the property of Vertiv and contains confidential and proprietary information owned by Vertiv. Any copying, use or disclosure of it without the written permission of Vertiv is strictly prohibited. Notice to Users
Vertiv Corporation reserves the right to make changes to this document without notice to any user or reseller of this product. Vertiv Corporation also reserves the right to substitute or terminate distribution of this document, with no obligation to notify any person or party of such substitutions or terminations.

590-2618-501A/SL-29237/4200-105 ii
Vertiv Customer Service Vertiv Customer Service is available Monday to Friday, 8:00AM to 4:30PM Eastern Time.
Telephone: (954) 377-7101
Email: [email protected]
Website: www.vertivco.com
Corporate Office Address:
Vertiv Corporation
1050 Dearborn Drive
Columbus, OH 43085 USA

590-2618-501A/SL-29237/4200-105 iii

590-2618-501A/SL-29237/4200-105 iv
Table of Contents
1. About Installing Battery Xplorer Enterprise ....................................................................................... 1-1
1.1. Overview .................................................................................................................................... 1-1
1.2. Getting started with the installation .......................................................................................... 1-1
1.3. Battery Xplorer Enterprise System Diagram .............................................................................. 1-1
1.4. Battery Xplorer Enterprise Client Supported Platforms ............................................................ 1-3
1.5. Battery Xplorer Enterprise Hardware and Software System Requirements ............................. 1-3
2. Installing Internet Information Services (IIS and ASP.net) ................................................................. 2-1
2.1. Installing Internet Information Services on Windows XP .......................................................... 2-1
2.2. Installing Internet Information Services for Windows 7 and Windows 8 .................................. 2-5
2.3. Configuring Internet Information Services for Windows 2012 Server ...................................... 2-9
3. Installing the Vertiv Battery Xplorer Enterprise System .................................................................... 3-1
4. Installing Battery Xplorer Enterprise through Custom Setup (Optional) ........................................... 4-1
4.1. Battery Xplorer Enterprise Web Application ............................................................................. 4-2
4.2. Web Application Manager (WAM)............................................................................................. 4-4
4.3. SQL Server Database Engine (SQL) ............................................................................................. 4-5
4.4. Database Import Manager (DIM) ............................................................................................... 4-6
4.5. Configuration Manager (CM) ..................................................................................................... 4-7
4.6. Monitor Engine (MSM) .............................................................................................................. 4-8
4.7. Documentation .......................................................................................................................... 4-9
5. Setting Up the Battery Xplorer Enterprise System for the First Time ................................................ 5-1
5.1. Features Activation Manager ................................................................................................... 5-14
6. Upgrading Battery Xplorer Enterprise ............................................................................................... 6-1
7. Battery Xplorer Enterprise System Migration .................................................................................... 7-1
8. Enabling Auto-Login (Optional) .......................................................................................................... 8-1
8.1. Setting up a Browser for Auto-Login .......................................................................................... 8-1
8.2. Setting up Active Directory for Auto-Login within IIS ................................................................ 8-1

590-2618-501A/SL-29237/4200-105 v
List of Figures
Figure 1 – Battery Xplorer Enterprise System Hosted Environment Customer Owned ............. 1-2 Figure 2 – Installing Internet Information Services on Windows XP ......................................... 2-1 Figure 3 – Installing and Configuring Internet Information Services on Windows XP .............. 2-2
Figure 4 – Installing and Configuring Internet Information Services on Windows XP .............. 2-3 Figure 5 – Installing and Configuring Internet Information Services on Windows XP .............. 2-4 Figure 6 – Installing and Configuring Internet Information Services on Windows XP Complete 2-
4 Figure 7 – Using the Run window to Access Internet Information Services Window ................ 2-5
Figure 8 – Accessing Programs and Features for Configuring Internet Information Services .... 2-6 Figure 9 – Selecting IIS for Windows 7 or 8 ............................................................................... 2-7
Figure 10 – Information Window for Changes to Features ......................................................... 2-8
Figure 11 – Beginning to Add Roles and Features on a Windows 2012 Server ......................... 2-9
Figure 12 – Install Type for Adding Roles and Features on a Windows 2012 Server .............. 2-10 Figure 13 – Select Server from the Server Pool on a Windows 2012 Server ............................ 2-11 Figure 14 – Select Server Roles on a Windows 2012 Server .................................................... 2-12
Figure 15 – Select Handler Mappings in IIS Manager on a Windows 2012 Server .................. 2-13 Figure 16 – Select ASP and ASP.NET for Configuring IIS on a Windows 2012 Server ......... 2-14
Figure 17 – Preparing to Install Battery Xplorer ......................................................................... 3-1 Figure 18 – Install Battery Xplorer Welcome .............................................................................. 3-2 Figure 19 – Battery Xplorer Installation Setup Type ................................................................... 3-3 Figure 20 – Ready to Install Battery Xplorer ............................................................................... 3-4 Figure 21 – Battery Xplorer Error message if Internet Information Services is not installed ..... 3-5
Figure 22 – Battery Xplorer Installation In Progress ................................................................... 3-6 Figure 23 – Installing Microsoft SQL Server for Battery Xplorer Enterprise ............................. 3-6
Figure 24 – Installing Microsoft SQL Server for Battery Xplorer Enterprise Continued ........... 3-7 Figure 25 – Installing Microsoft SQL Server for Battery Xplorer Enterprise Continued ........... 3-7 Figure 26 – Installing Microsoft SQL Server Setup Support Files .............................................. 3-8
Figure 27 – Battery Xplorer Installation Completed ................................................................... 3-9 Figure 28 – Battery Xplorer Enterprise Custom Setup Type ....................................................... 4-1
Figure 29 – Battery Xplorer Enterprise Custom Setup Type ....................................................... 4-2 Figure 30 – Battery Xplorer Enterprise Web Application Custom Setup Installation ................ 4-3 Figure 31 – Battery Xplorer Custom Setup Installation for Web Application Manager ............. 4-4
Figure 32 – Battery Xplorer Custom Setup Installation for SQL Server Database Engine ......... 4-5 Figure 33 – Battery Xplorer Custom Setup Installation for Database Import Manager .............. 4-6 Figure 34 – Battery Xplorer Custom Setup Installation for Configuration Manager .................. 4-7
Figure 35 – Battery Xplorer Custom Setup Installation for Monitor Service Manager .............. 4-8
Figure 36 – Battery Xplorer Custom Setup Installation for Documentation ............................... 4-9 Figure 37 – Battery Xplorer Installation Progress Window ...................................................... 4-10 Figure 38 – Battery Xplorer Installation Complete Window ..................................................... 4-11 Figure 39 – Battery Xplorer Web Application Manger Window ................................................ 5-1 Figure 40 – Battery Xplorer Connect to SQL Server Window .................................................... 5-2 Figure 41 – Create New Battery Xplorer Enterprise Database Window ..................................... 5-2 Figure 42 – Battery Xplorer Enterprise Database Created Window ............................................ 5-3

590-2618-501A/SL-29237/4200-105 vi
Figure 43 – Inialization Complete ............................................................................................... 5-3
Figure 44 – Create New Battery Xplorer Enterprise Database Window ..................................... 5-3
Figure 45 – Battery Xplorer Enterprise Database Import Manager Window .............................. 5-4 Figure 46 – Connecting to Datasource System Type ................................................................... 5-4 Figure 47 – Database Import Manager Connection Data Found ................................................. 5-5 Figure 48 – Database Import Manager Connection Data Found ................................................. 5-6 Figure 49 – Battery Xplorer Enterprise Configuration Manager Window .................................. 5-7
Figure 50 – Battery Xplorer Enterprise Email Test Form ........................................................... 5-7 Figure 51 – Message Sent Successfully Window ........................................................................ 5-8 Figure 52 – Battery Xplorer Enterprise Database Connection Window ...................................... 5-8 Figure 53 – Battery Xplorer Enterprise Monitor Service Manager Window .............................. 5-9 Figure 54 – Monitor Service Manager Configuration Complete Window .................................. 5-9
Figure 55 – Battery Xplorer Enterprise System Initialization Window .................................... 5-10
Figure 56 – Battery Xplorer Enterprise System Initialization Window with Notification Message
.................................................................................................................................................... 5-11
Figure 57 – Battery Xplorer Enterprise Login Window ............................................................ 5-12
Figure 58 – Battery Xplorer Enterprise Main Window ............................................................. 5-13 Figure 59 – Battery Xplorer Enterprise InstallShield Wizard ..................................................... 6-1 Figure 60 – Battery Xplorer Enterprise InstallShield Wizard Preparation .................................. 6-2
Figure 61 – Battery Xplorer Enterprise InstallShield Wizard ..................................................... 6-2 Figure 62 – Battery Xplorer Enterprise Upgrade in Progress ...................................................... 6-3
Figure 63 – Battery Xplorer Enterprise Installation in Progress .................................................. 6-3 Figure 64 – Battery Xplorer Enterprise Upgrade Complete ........................................................ 6-3 Figure 65 – Restart your Battery Xplorer Enterprise ................................................................... 6-4
Figure 66 – Web Application Manager ....................................................................................... 6-4 Figure 67 – Web Application Manager ....................................................................................... 6-4
Figure 68 – Inialization Complete ............................................................................................... 6-4 Figure 69 – Web Application Manger Complete ......................................................................... 6-5
Figure 70 – Microsoft SQL Server Management Studio ............................................................. 7-1 Figure 71 – Backup BEEnterprise Database using Microsoft SQL Server Management Studio 7-2
Figure 72 – Battery Xplorer Enterprise Watchdog Service Properties ........................................ 7-3 Figure 73 – Web Application Manager ....................................................................................... 7-3 Figure 74 – User Mapping BEEnterprise User ............................................................................ 7-4
Figure 75 – Deleting Vertiv Registry ........................................................................................... 7-5 Figure 76 – Starting the Monitor Service Manager ..................................................................... 7-6 Figure 77 – Battery Explorer Enterprise Features Activation Manager ...................................... 7-7
Figure 78 – IIS Manager Set up ................................................................................................... 8-2 Figure 79 – System Manager ....................................................................................................... 8-3
Figure 80 – User Manager ........................................................................................................... 8-4
About Installing Battery Xplorer Enterprise
590-2168-501A/SL-29237/4200-105 1-1
1. About Installing Battery Xplorer Enterprise
1.1. Overview
This section outlines how to successfully install and configure the Battery Xplorer Enterprise system.
These instructions describe two setup types for installing Battery Xplorer Enterprise software
components. These components can be installed on a single computer using the Complete installation
setup type or installed separately on multiple computers using the Custom installation setup type.
Some of the reasons to install the Battery Xplorer Enterprise components separately are:
• Performance – the amount of time for refreshes will be faster.
• Stability – if one of the servers goes down then the other server will continue without interruption to the battery monitor application. Clustering can be beneficial for backup purposes in case one server goes down.
• Expandability – more data can be accessed and saved by having additional servers.
• Security – by using multiple machines, data can be housed on a separate machine for a more secured environment.
Note: For small stationary battery systems, installing using the complete install on one machine is recommended for ease of installation.
1.2. Getting started with the installation
To get started with the installation, review the following areas in this guide:
• Review the Battery Xplorer diagram section for high-level details on how the installation will be set up.
• When doing a complete install, refer to sections 1, 2, and 3. Note: All Battery Xplorer components are automatically installed when doing a Complete install setup type on one computer.
• When doing a custom install, refer to all sections including steps in section 4 in this document. Use the Custom install setup type for installing specific software components on specific computers.
Note: All components will automatically be installed on one computer when using the Complete Installation setup type. If the Custom setup is used the components can be installed on multiple computers.
1.3. Battery Xplorer Enterprise System Diagram
This diagram shows the Battery Xplorer Enterprise infrastructure system with a customer owned local
network configuration hosted locally. This system environment is:
• Customer owned and maintained
• Has limited security concerns

About Installing Battery Xplorer Enterprise
590-2168-501A/SL-29237/4200-105 1-2
• Will be in a stable environment for dependable service
• Expandable for growth of system
Figure 1 – Battery Xplorer Enterprise System Hosted Environment Customer Owned

About Installing Battery Xplorer Enterprise
590-2168-501A/SL-29237/4200-105 1-3
1.4. Battery Xplorer Enterprise Client Supported Platforms
The Battery Xplorer Enterprise monitoring application supports the following client platforms:
• Windows
• Mac
• Linux
• Tablets that support Android, iOS, and Windows tablet operating systems
The Battery Xplorer Enterprise monitoring application supports any of the following Web Browsers:
• Microsoft Internet Explorer version 8.0 or above
• Google Chrome version 20 or above (preferred)
• Safari version 5.1. or above
• Firefox version 13 or above
1.5. Battery Xplorer Enterprise Hardware and Software System Requirements
The Battery Xplorer Enterprise monitoring application requires certain hardware to be setup before the
software is installed. The following list provides a general guidance on Battery Xplorer Enterprise System
hardware requirements:
• Processor – Pentium 4 or better
• RAM – 2 GB
• Software disk space – approximately 500 MB or more
• Database disk space – 5 GB or more
• Network topology – Ethernet 100 mbps or better
The Battery Xplorer Enterprise monitoring application requires certain software components to be
available before the software is installed. The following list provides the supported software
components required before Battery Xplorer Enterprise System software is installed:
• Microsoft Windows XP Professional, SP 2 or above
• Adobe Reader version 9.0 or above
• Internet Information Services (IIS) Manager version 4.0 or above. Refer to section 2 for Installing
and Configuring Internet Information Services (IIS).
• Microsoft ASP.NET and Microsoft ASP.NET AJAX
The following is a list of other required software components that are automatically installed during the
installation of Battery Xplorer Enterprise software:
• VC 2005 Runtime
• Microsoft .NET Framework version 4.0
• Microsoft SQL Server Express 2008

Installing Internet Information Services (IIS and ASP.net)
590-2168-501A/SL-29237/4200-105 2-1
2. Installing Internet Information Services (IIS and ASP.net)
Note: You must install Internet Information Services (IIS and ASP.net) before continuing with the Battery
Xplorer Software Installation.
The following procedures explain how to install IIS and ASP.net on the Web server to communicate with
the Battery Xplorer Enterprise system. IIS and ASP.net can be installed on the following platforms:
• Windows XP Professional- refer to sections 2.1
• Windows 7 Professional, Enterprise, or Ultimate and Windows 8 - refer to sections 2.2
• Windows 2012 - refer to sections 2.3
2.1. Installing Internet Information Services on Windows XP
Follow these steps to install IIS and ASP.net.
1. From the Start menu, select Control Panel, double-click Add or Remove Programs.
2. Click Add/Remove Windows Components. The Windows Components Wizard window appears.
3. Click the check box for Internet Information Services (IIS) and click Next.
Figure 2 – Installing Internet Information Services on Windows XP
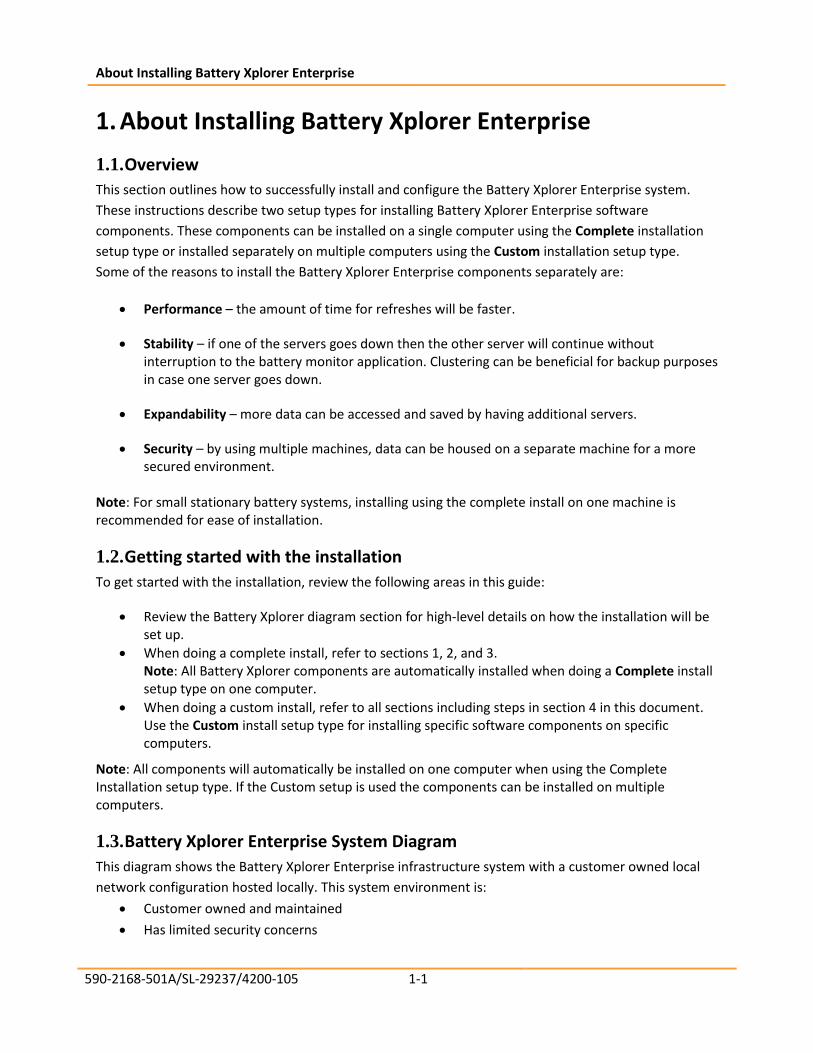
4. The Configuring Components window appears.
Installing Internet Information Services (IIS and ASP.net)
590-2168-501A/SL-29237/4200-105 2-2
Figure 3 – Installing and Configuring Internet Information Services on Windows XP
5. If prompted, insert your Windows XP disk or browse to C:\i386 and click OK.

Installing Internet Information Services (IIS and ASP.net)
590-2168-501A/SL-29237/4200-105 2-3
Figure 4 – Installing and Configuring Internet Information Services on Windows XP
6. The Configuring Components window appears showing the progress of the IIS install. The IIS files
will be installed on your machine.
Installing Internet Information Services (IIS and ASP.net)
590-2168-501A/SL-29237/4200-105 2-4
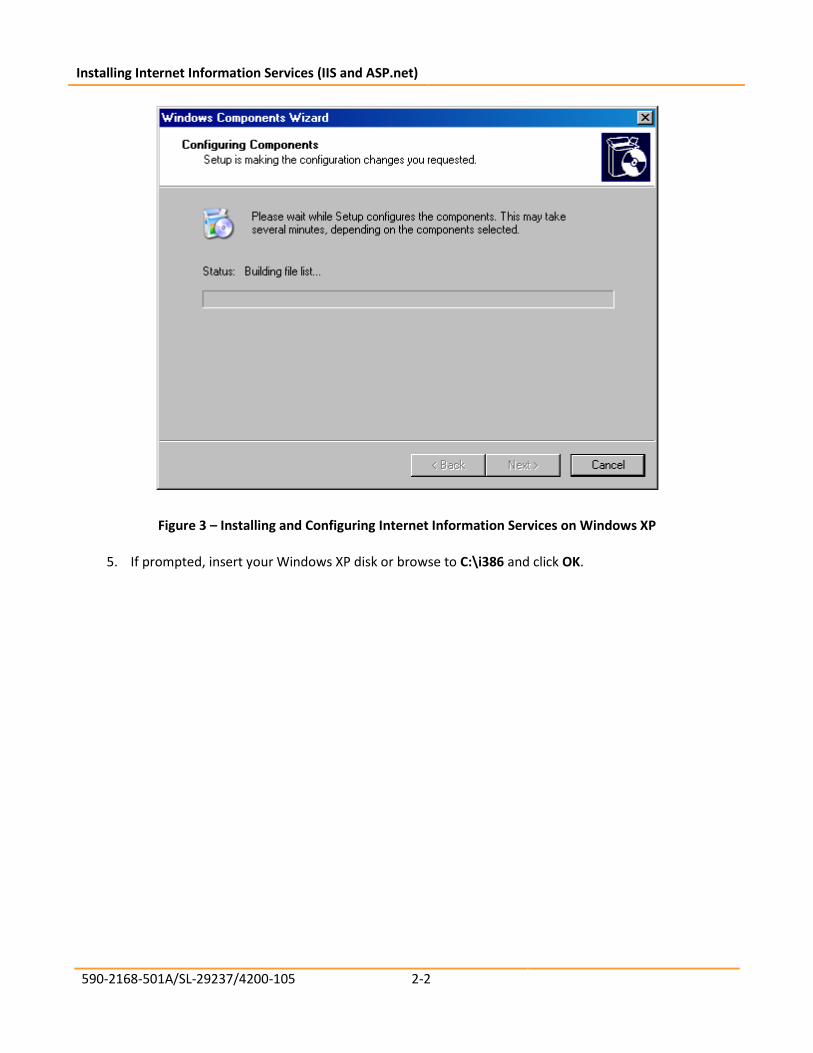
Figure 5 – Installing and Configuring Internet Information Services on Windows XP
7. Click Finish. The IIS and ASP.net software is installed. Reboot if prompted. The Battery Xplorer Enterprise Web feature is now ready to be installed.
Figure 6 – Installing and Configuring Internet Information Services on Windows XP Complete
Installing Internet Information Services (IIS and ASP.net)
590-2168-501A/SL-29237/4200-105 2-5
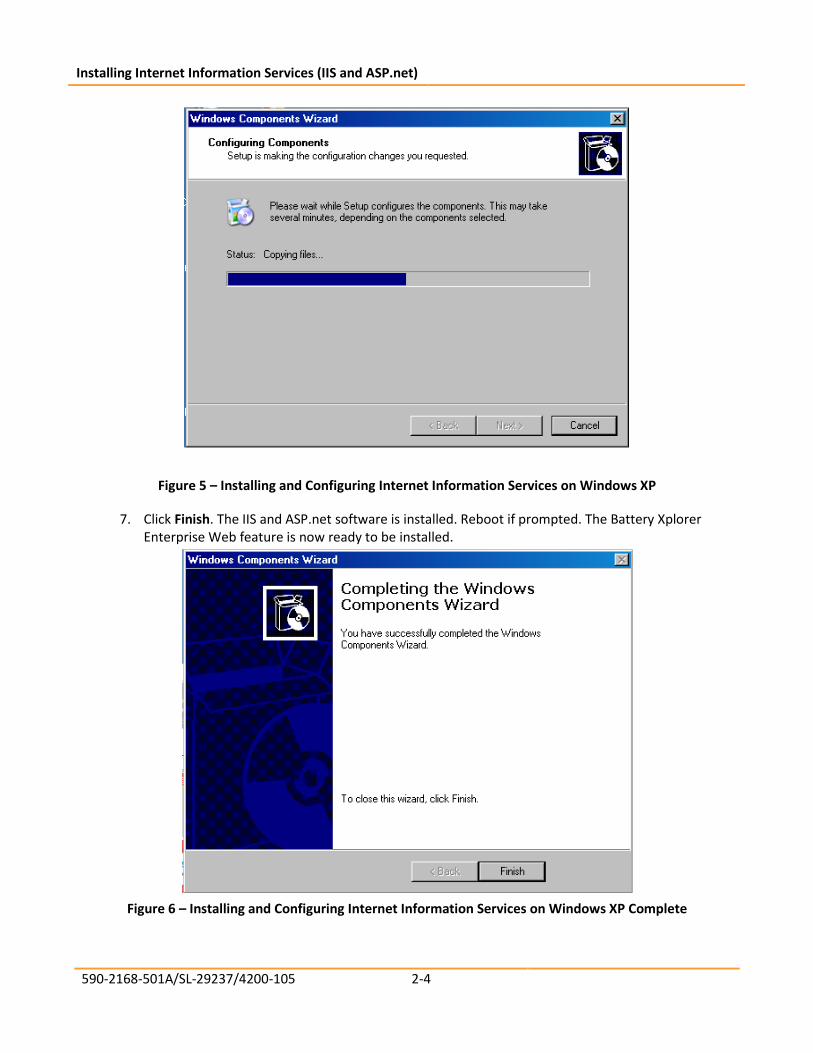
2.2. Installing Internet Information Services for Windows 7 and Windows 8
1. Press the Windows key + R, to open the Run window, then type appwiz.cpl and press Enter or
click OK.
Figure 7 – Using the Run window to Access Internet Information Services Window
2. On the left hand pane, click on Turn Windows features on or off.

Installing Internet Information Services (IIS and ASP.net)
590-2168-501A/SL-29237/4200-105 2-6
Figure 8 – Accessing Programs and Features for Configuring Internet Information Services
3. Check the box for Internet Information Services and expand the tree to World Wide Web
Services then Application Development Features and select ASP, ASP .NET 3.5, ASP .NET 4.5
and then under Security select Windows Authentication check boxes. Click OK to apply the
changes, a message stating that the changes are being made appears, restart if prompted.

Installing Internet Information Services (IIS and ASP.net)
590-2168-501A/SL-29237/4200-105 2-7
Figure 9 – Selecting IIS for Windows 7 or 8

Installing Internet Information Services (IIS and ASP.net)
590-2168-501A/SL-29237/4200-105 2-8
Figure 10 – Information Window for Changes to Features
The Battery Xplorer Enterprise Web feature is now ready to be installed.

Installing Internet Information Services (IIS and ASP.net)
590-2168-501A/SL-29237/4200-105 2-9
2.3. Configuring Internet Information Services for Windows 2012 Server
To install and configure Internet Information Services on the Web Server with Windows 2012 Server,
follow these steps.
1. From the Start menu, select Control Panel, Programs, Programs and features, then Turn
Windows features on or off. The Before You Begin Add Roles and Features Wizard window
appears.
Figure 11 – Beginning to Add Roles and Features on a Windows 2012 Server
2. Read the information in the previous window and click Next, the Select Installation Type
window appears.

Installing Internet Information Services (IIS and ASP.net)
590-2168-501A/SL-29237/4200-105 2-10
Figure 12 – Install Type for Adding Roles and Features on a Windows 2012 Server
3. Select the installation type for installing roles and features on a running physical computer or
virtual machine, or you may install on a offline virtual hard disk (VHD). Click the dialog button for
Role-based or feature-based installation. This option will configure a single server by adding
roles, role services and features.
Note: Do not select Remote Desktop Services Installation at this time.
4. Click Next, the Select Destination Server window appears.
Installing Internet Information Services (IIS and ASP.net)
590-2168-501A/SL-29237/4200-105 2-11
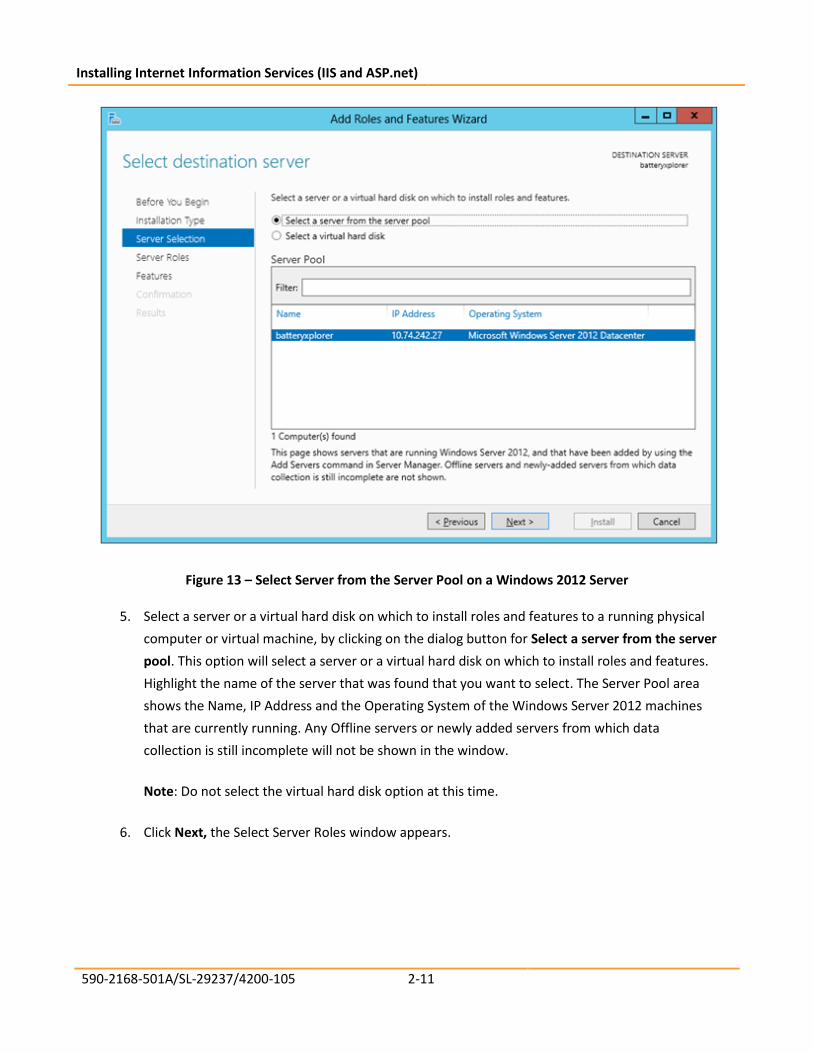
Figure 13 – Select Server from the Server Pool on a Windows 2012 Server
5. Select a server or a virtual hard disk on which to install roles and features to a running physical
computer or virtual machine, by clicking on the dialog button for Select a server from the server
pool. This option will select a server or a virtual hard disk on which to install roles and features.
Highlight the name of the server that was found that you want to select. The Server Pool area
shows the Name, IP Address and the Operating System of the Windows Server 2012 machines
that are currently running. Any Offline servers or newly added servers from which data
collection is still incomplete will not be shown in the window.
Note: Do not select the virtual hard disk option at this time.
6. Click Next, the Select Server Roles window appears.
Installing Internet Information Services (IIS and ASP.net)
590-2168-501A/SL-29237/4200-105 2-12
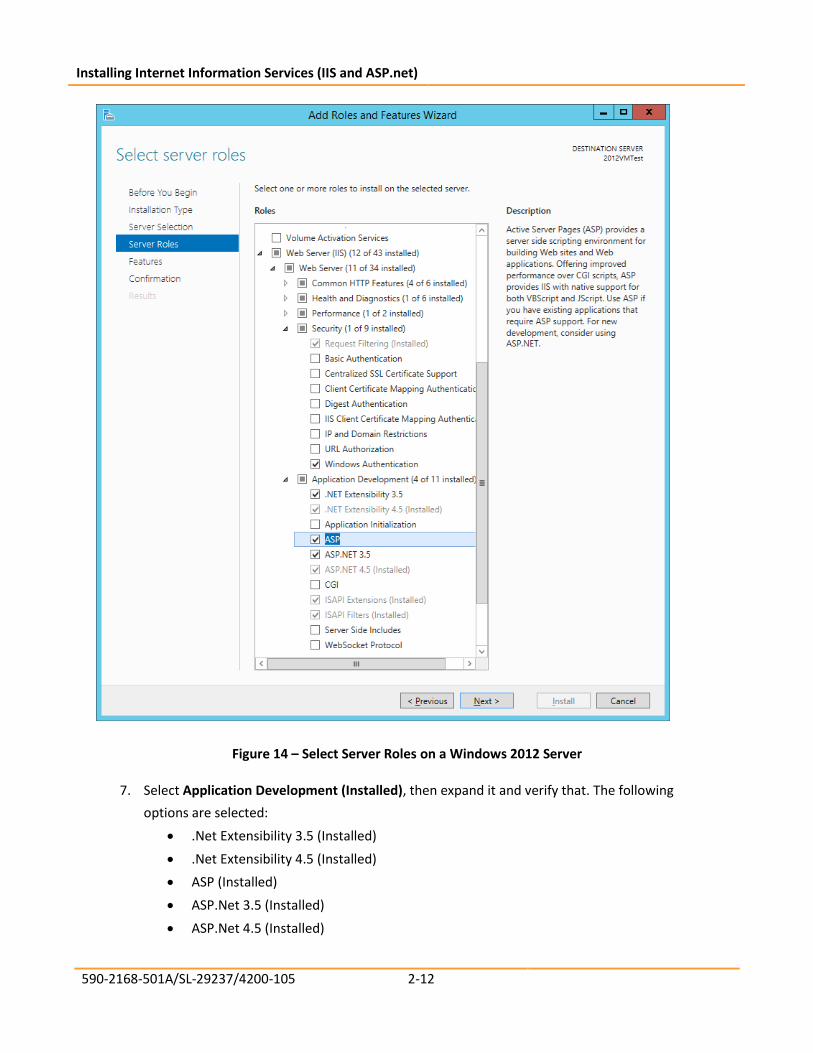
Figure 14 – Select Server Roles on a Windows 2012 Server
7. Select Application Development (Installed), then expand it and verify that. The following
options are selected:
• .Net Extensibility 3.5 (Installed)
• .Net Extensibility 4.5 (Installed)
• ASP (Installed)
• ASP.Net 3.5 (Installed)
• ASP.Net 4.5 (Installed)
Installing Internet Information Services (IIS and ASP.net)
590-2168-501A/SL-29237/4200-105 2-13
• ISAPI Extensions (installed)
8. Under Security, expand and select the Windows Authentication option.
9. This window provides infrastructure for developing and hosting Web applications. These
features are used for creating Web content or extend the functionality of IIS . These options
provide a way to perform dynamic operations that result in the creation of HTML output, which
IIS then sends to fulfill client requests.
10. Click Next to continue and follow the prompts to complete the install of the roles and features
for Windows 2012 Server.
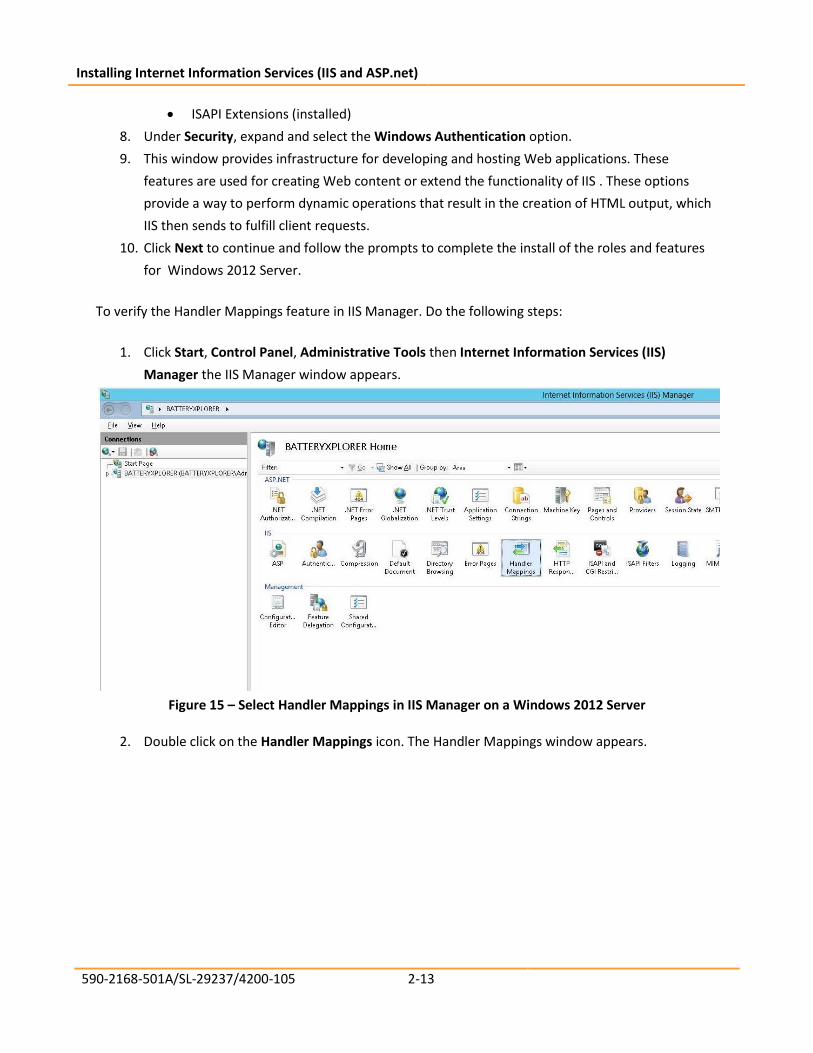
To verify the Handler Mappings feature in IIS Manager. Do the following steps:
1. Click Start, Control Panel, Administrative Tools then Internet Information Services (IIS)
Manager the IIS Manager window appears.
Figure 15 – Select Handler Mappings in IIS Manager on a Windows 2012 Server
2. Double click on the Handler Mappings icon. The Handler Mappings window appears.
Installing Internet Information Services (IIS and ASP.net)
590-2168-501A/SL-29237/4200-105 2-14
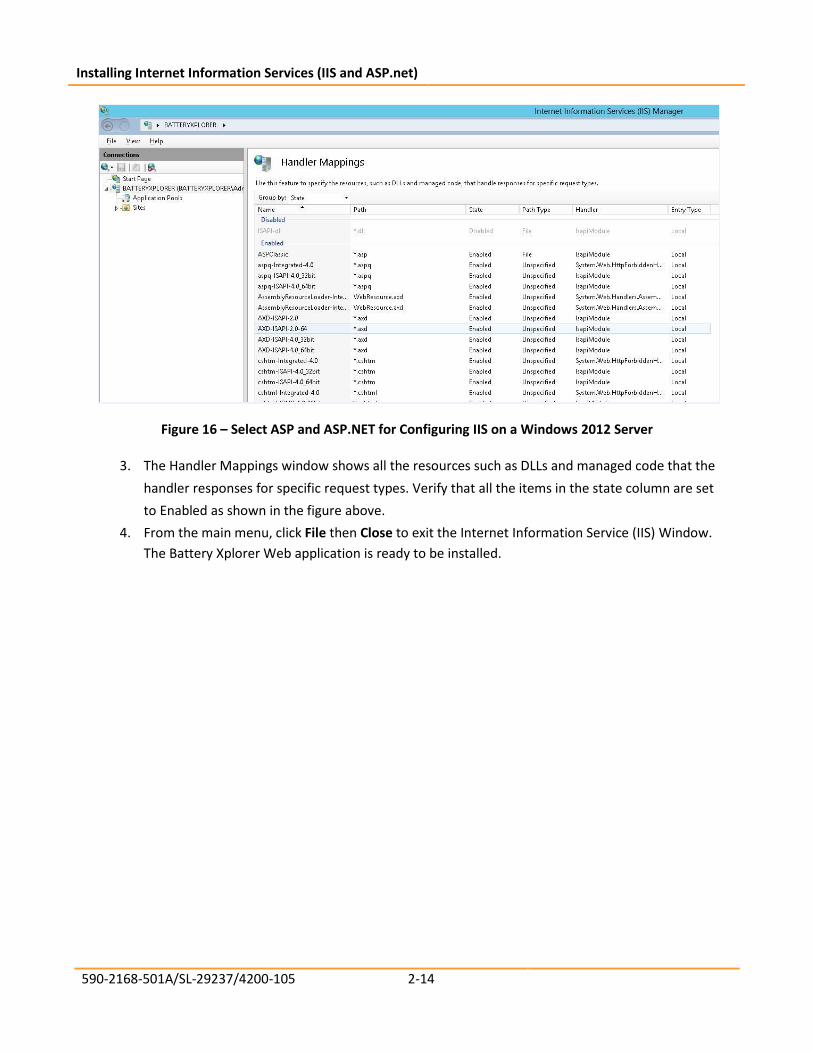
Figure 16 – Select ASP and ASP.NET for Configuring IIS on a Windows 2012 Server
3. The Handler Mappings window shows all the resources such as DLLs and managed code that the
handler responses for specific request types. Verify that all the items in the state column are set
to Enabled as shown in the figure above.
4. From the main menu, click File then Close to exit the Internet Information Service (IIS) Window.
The Battery Xplorer Web application is ready to be installed.

Installing the Vertiv Battery Xplorer Enterprise System
590-2168-501A/SL-29237/4200-105 3-1
3. Installing the Vertiv Battery Xplorer Enterprise System
To install the Vertiv Battery Xplorer Enterprise system, follow these steps:
1. Insert the Vertiv Battery Xplorer Enterprise CD and browse the CD for the setup.exe file. The
software will start the installation preparation.
Figure 17 – Preparing to Install Battery Xplorer
The Welcome to the InstallShield Wizard for Vertiv Battery Xplorer Enterprise window appears.
2. Follow the prompts in the Vertiv Battery Xplorer InstallShield wizard by clicking Next.

Installing the Vertiv Battery Xplorer Enterprise System
590-2168-501A/SL-29237/4200-105 3-2
Figure 18 – Install Battery Xplorer Welcome
The Setup Type window appears.
• If Complete is clicked, all program features are installed at once.
• If Custom is clicked, refer to the next section on Installing Battery Xplorer Enterprise through
Custom Setup (Optional).
3. Click Next.

Installing the Vertiv Battery Xplorer Enterprise System
590-2168-501A/SL-29237/4200-105 3-3
Figure 19 – Battery Xplorer Installation Setup Type
Note: If Microsoft SQL Server Express 2008 is not installed, the Battery Xplorer Enterprise software
installation will automatically install the Microsoft SQL Server Express 2008. The installation can take
up to 20 minutes to install SQL software.
4. The Vertiv Battery Xplorer InstallShield wizard is ready to install by clicking Install.

Installing the Vertiv Battery Xplorer Enterprise System
590-2168-501A/SL-29237/4200-105 3-4
Figure 20 – Ready to Install Battery Xplorer
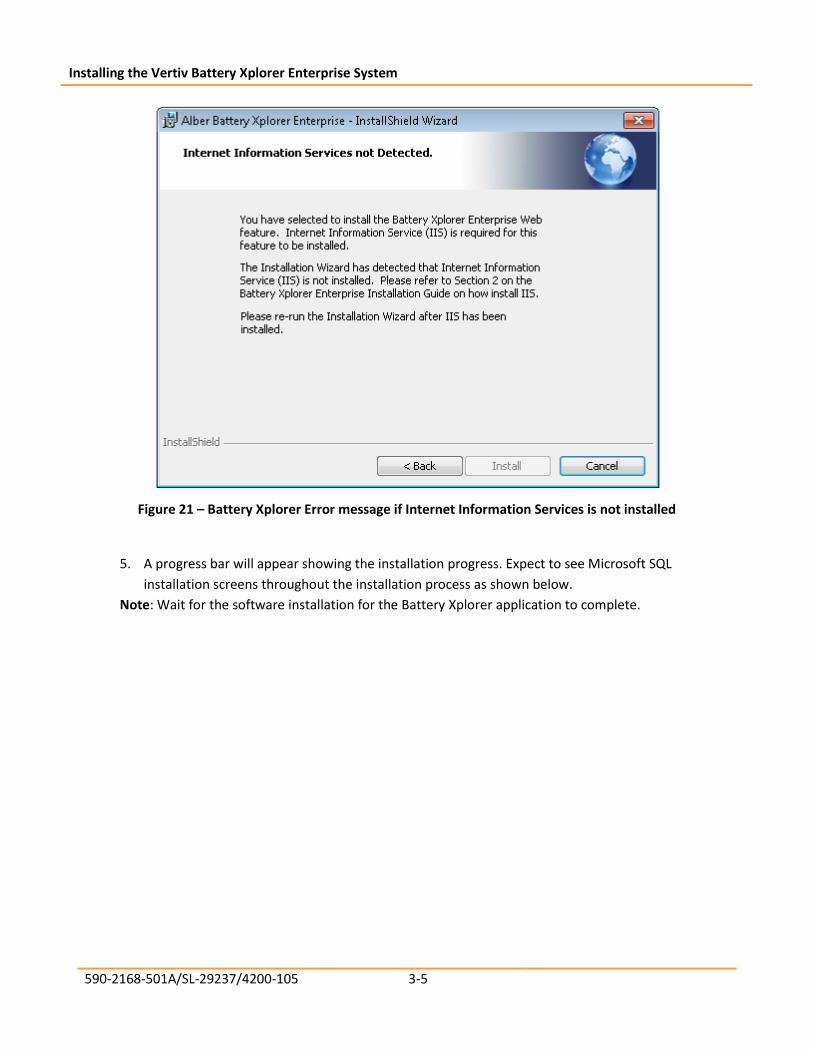
Note: If Internet Information Services (IIS) is not installed, the following window appears. Press
Cancel to abort the installation wizard, then refer to section 2 on how to install IIS. Re-run the
installation wizard after IIS has been installed.
Installing the Vertiv Battery Xplorer Enterprise System
590-2168-501A/SL-29237/4200-105 3-5
Figure 21 – Battery Xplorer Error message if Internet Information Services is not installed
5. A progress bar will appear showing the installation progress. Expect to see Microsoft SQL
installation screens throughout the installation process as shown below.
Note: Wait for the software installation for the Battery Xplorer application to complete.

Installing the Vertiv Battery Xplorer Enterprise System
590-2168-501A/SL-29237/4200-105 3-6
Figure 22 – Battery Xplorer Installation In Progress
Figure 23 – Installing Microsoft SQL Server for Battery Xplorer Enterprise

Installing the Vertiv Battery Xplorer Enterprise System
590-2168-501A/SL-29237/4200-105 3-7
Figure 24 – Installing Microsoft SQL Server for Battery Xplorer Enterprise Continued
Figure 25 – Installing Microsoft SQL Server for Battery Xplorer Enterprise Continued

Installing the Vertiv Battery Xplorer Enterprise System
590-2168-501A/SL-29237/4200-105 3-8
Figure 26 – Installing Microsoft SQL Server Setup Support Files
Installing the Vertiv Battery Xplorer Enterprise System
590-2168-501A/SL-29237/4200-105 3-9
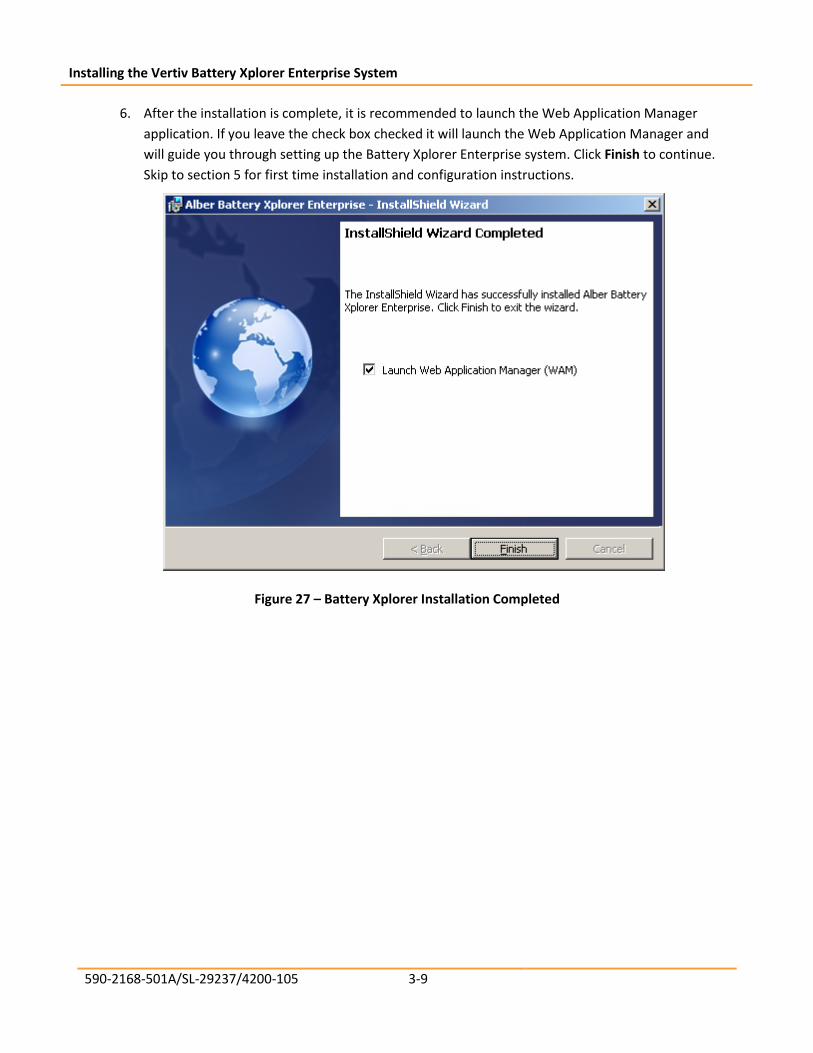
6. After the installation is complete, it is recommended to launch the Web Application Manager
application. If you leave the check box checked it will launch the Web Application Manager and
will guide you through setting up the Battery Xplorer Enterprise system. Click Finish to continue.
Skip to section 5 for first time installation and configuration instructions.
Figure 27 – Battery Xplorer Installation Completed
Installing Battery Xplorer Enterprise through
Custom Setup (Optional)
590-2168-501A/SL-29237/4200-105 4-1
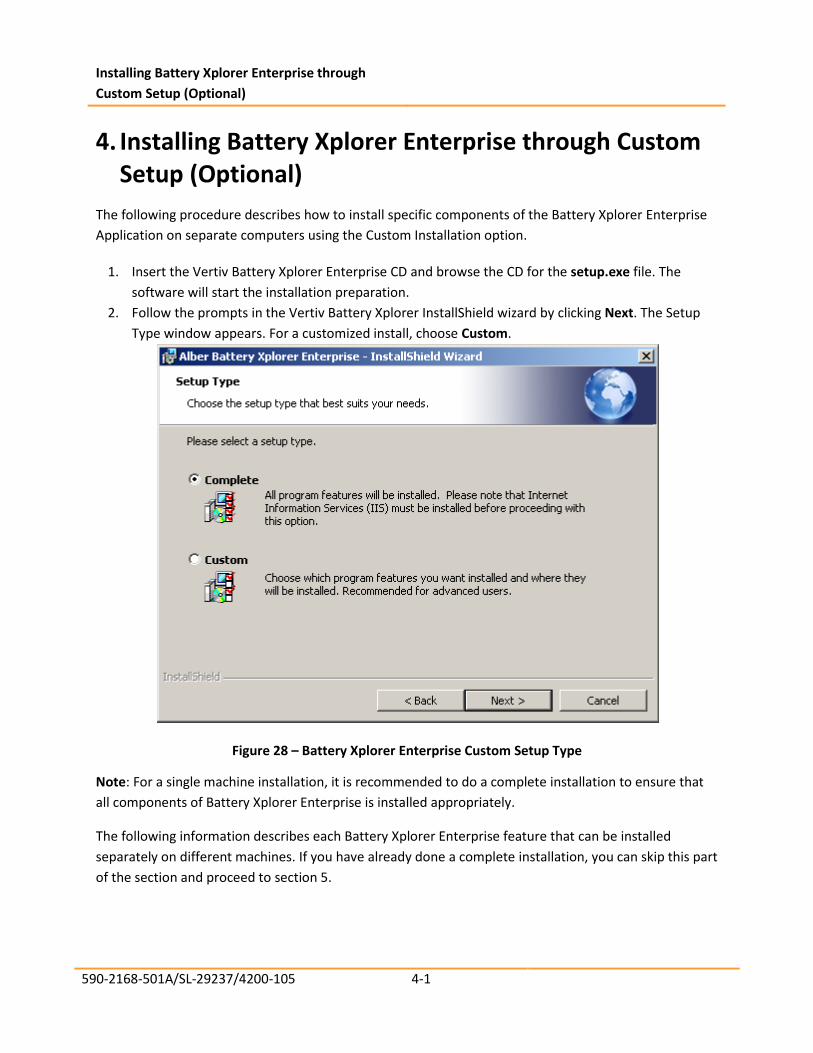
4. Installing Battery Xplorer Enterprise through Custom Setup (Optional)
The following procedure describes how to install specific components of the Battery Xplorer Enterprise
Application on separate computers using the Custom Installation option.
1. Insert the Vertiv Battery Xplorer Enterprise CD and browse the CD for the setup.exe file. The
software will start the installation preparation.
2. Follow the prompts in the Vertiv Battery Xplorer InstallShield wizard by clicking Next. The Setup
Type window appears. For a customized install, choose Custom.
Figure 28 – Battery Xplorer Enterprise Custom Setup Type
Note: For a single machine installation, it is recommended to do a complete installation to ensure that
all components of Battery Xplorer Enterprise is installed appropriately.
The following information describes each Battery Xplorer Enterprise feature that can be installed
separately on different machines. If you have already done a complete installation, you can skip this part
of the section and proceed to section 5.
Installing Battery Xplorer Enterprise through
Custom Setup (Optional)
590-2168-501A/SL-29237/4200-105 4-2
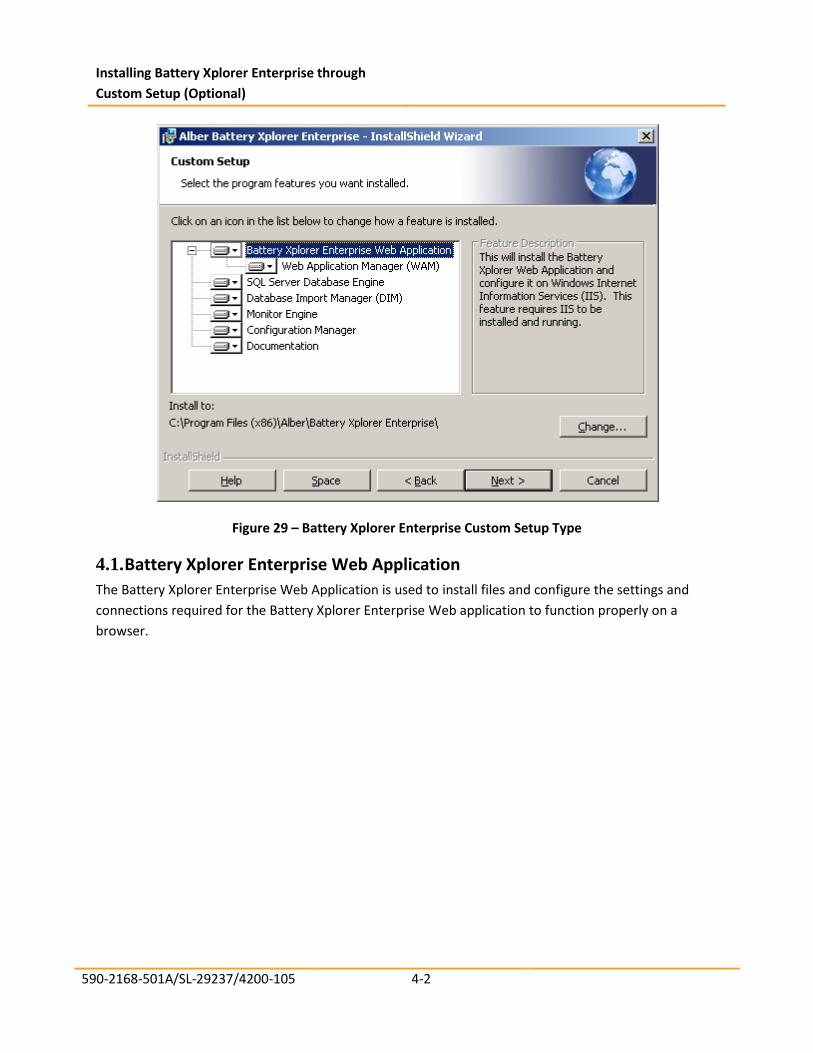
Figure 29 – Battery Xplorer Enterprise Custom Setup Type
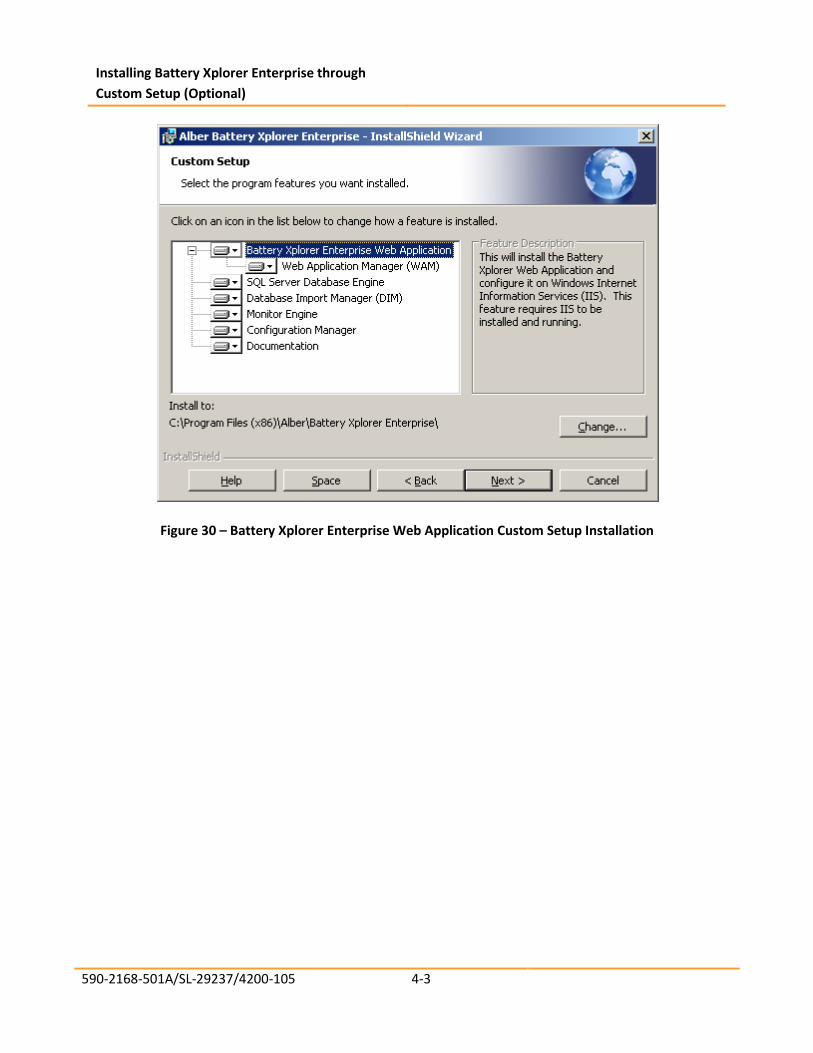
4.1. Battery Xplorer Enterprise Web Application
The Battery Xplorer Enterprise Web Application is used to install files and configure the settings and
connections required for the Battery Xplorer Enterprise Web application to function properly on a
browser.
Installing Battery Xplorer Enterprise through
Custom Setup (Optional)
590-2168-501A/SL-29237/4200-105 4-3
Figure 30 – Battery Xplorer Enterprise Web Application Custom Setup Installation

Installing Battery Xplorer Enterprise through
Custom Setup (Optional)
590-2168-501A/SL-29237/4200-105 4-4
4.2. Web Application Manager (WAM)
The Web Application Manager is used to configure the database and the battery Explorer Enterprise
Web settings and connections required for the Battery Xplorer Enterprise application to function
properly.
Figure 31 – Battery Xplorer Custom Setup Installation for Web Application Manager
For details on how to setup Battery Explorer Enterprise system for the first time, refer to section 5.
“Setting Up the Battery Xplorer Enterprise System for the First time”. This section explains how to
configure the settings and connections for the Web Application Manager.

Installing Battery Xplorer Enterprise through
Custom Setup (Optional)
590-2168-501A/SL-29237/4200-105 4-5
4.3. SQL Server Database Engine (SQL)
The SQL Server Database Engine is used to install the SQL database engine is required for the Battery
Xplorer Enterprise application to function properly. The primary use for the SQL Server database engine
is for storing, processing and securing data. It also provides controlled access and fast transaction
processing to meet the requirement needs of your data in the Battery Xplorer Enterprise application.
Figure 32 – Battery Xplorer Custom Setup Installation for SQL Server Database Engine
Note: If Microsoft SQL Server Express 2008 R2 is not installed, the Battery Xplorer Enterprise software
installation will automatically install the Microsoft SQL Server Express 2008 R2. The installation can
take up to 20 minutes to install SQL software.

Installing Battery Xplorer Enterprise through
Custom Setup (Optional)
590-2168-501A/SL-29237/4200-105 4-6
4.4. Database Import Manager (DIM)
The Vertiv Battery Xplorer Enterprise Database Import Manager (DIM) is a comprehensive feature allowing import of system configuration and historical data from existing BMDM MS Access and SQL databases and from next generation products (i.e. UXCM) to the Battery Xplorer Enterprise database. System configuration data includes information such as customer data, location data, battery, string, and cell setup data. Historical data contains information such as battery, string and cell data captured over time either periodically or by user request that can be used for trending and multiple data set comparisons. The DIM provides an intuitive interface, with instructions, that guide a user through the process of importing data from a source database (a user selected database such as an existing BMDM SQL or MS Access database) to the destination database (a user selected Battery Xplorer database). The process of importing is done in four steps:
• Source Data Connection – allows selection of the source database or device for import.
• Destination Data Connection – allows selection of the Battery Xplorer database to store the imported data.
• Configuration Data Import – collects the configuration data from the source and presents the information on the left pane (Source Database) of the application. User can later select the information that is desired for import into the destination database (Battery Xplorer). The Source Database pane is highlighted in different colors to indicate whether data already exists in the database (green) or is new data (red).
• Historical Data Import – transfers all data from the source database to the destination database. If the historical data from the source already exists in the destination database it is skipped (not transferred/not duplicated) in the destination database.
Figure 33 – Battery Xplorer Custom Setup Installation for Database Import Manager

Installing Battery Xplorer Enterprise through
Custom Setup (Optional)
590-2168-501A/SL-29237/4200-105 4-7
For details on how to setup Battery Explorer Enterprise system for the first time, refer to section 5.
“Setting Up the Battery Xplorer Enterprise System for the First time”. This section explains how to
import configuration and historical data for the Database Import Manager.
4.5. Configuration Manager (CM)
The Configuration Manager is a feature that is used to install the configuration manager for
configuration of multiple Battery Explorer Enterprise e-mail settings such as SMTP, email testing and
other configuration settings.
Figure 34 – Battery Xplorer Custom Setup Installation for Configuration Manager
For details on how to setup Battery Explorer Enterprise system for the first time, refer to section 5.
“Setting up the Battery Xplorer Enterprise System for the First time”. This section explains how to install
and configure SMTP settings using the Configuration Manager.

Installing Battery Xplorer Enterprise through
Custom Setup (Optional)
590-2168-501A/SL-29237/4200-105 4-8
4.6. Monitor Engine (MSM)
The Monitor Engine is a feature that is used to install the HAL Drivers, Process Manager, Watchdog, and
the Monitor Service Manager application for the Battery Explorer Enterprise.
Figure 35 – Battery Xplorer Custom Setup Installation for Monitor Service Manager
The following processes are installed on the Monitor Engine machine:
• HAL Driver • Process Manger • Watchdog • Monitor Service Manager
For details on how to setup Battery Explorer Enterprise system for the first time, refer to section 5.
“Setting Up the Battery Xplorer Enterprise System for the First time”. This section explains how to
configure the settings for the Monitor Service Manager.

Installing Battery Xplorer Enterprise through
Custom Setup (Optional)
590-2168-501A/SL-29237/4200-105 4-9
4.7. Documentation
The documentation feature will install all the documentation PDF files for installing and configuring the
Battery Explorer Enterprise Web application.
Figure 36 – Battery Xplorer Custom Setup Installation for Documentation
After making your installation selections, click Next to install the program features.
Wait for the software installation for the Battery Xplorer application to complete.

Installing Battery Xplorer Enterprise through
Custom Setup (Optional)
590-2168-501A/SL-29237/4200-105 4-10
Figure 37 – Battery Xplorer Installation Progress Window
Click Finish. The Custom Installation is complete.

Installing Battery Xplorer Enterprise through
Custom Setup (Optional)
590-2168-501A/SL-29237/4200-105 4-11
Figure 38 – Battery Xplorer Installation Complete Window
It is recommended to launch the Web Application Manager now. If you leave the check box checked it
will automatically launch the Web Application Manager and will guide you through setting up the
Battery Xplorer Enterprise system.

Setting Up the Battery Xplorer Enterprise System
for the First Time
590-2168-501A/SL-29237/4200-105 5-1
5. Setting Up the Battery Xplorer Enterprise System for the First Time
To set up the Battery Xplorer Enterprise system for the first time, launch the Web Application Manager
and follow these steps:
Note: After the install, the Web Application Manager (WAM) will be launched automatically if the
checkbox was checked on the Battery Xplorer Wizard complete window. If the checkbox was not
checked, follow the steps below.
1. Click Start, All Programs, Alber, Battery Explorer Enterprise then Web Application Manager. The Web Application Manager window appears.
2. To configure the Web application, press Start.
Figure 39 – Battery Xplorer Web Application Manger Window
3. The Connect to SQL Server window appears. On a complete install, the default database is already pre-populated in the connection field (LOCALHOST\BEENT_SQL). Click Connect to connect to the default database. For custom installations, browse to the database you wish to connect, enter the SQL server IP address or server name in the connection field.

Setting Up the Battery Xplorer Enterprise System
for the First Time
590-2168-501A/SL-29237/4200-105 5-2
Figure 40 – Battery Xplorer Connect to SQL Server Window
4. A Window appears indicating the database does not exist yet and prompts you to create a new database. Click yes to create a new database.
Figure 41 – Create New Battery Xplorer Enterprise Database Window

Setting Up the Battery Xplorer Enterprise System
for the First Time
590-2168-501A/SL-29237/4200-105 5-3
5. A window appears indicating the database creation was successful. Click OK to acknowledge the creation of the Battery Xplorer database.
Figure 42 – Battery Xplorer Enterprise Database Created Window
6. On the Inialization Complete window, click OK.
Figure 43 – Inialization Complete
7. A window appears indicating the Web application initialized. Click Exit, the system will launch the DIM next.
Figure 44 – Create New Battery Xplorer Enterprise Database Window
8. On the Database Import Manager window, click Connect to Data Source to choose your desired data source for import.

Setting Up the Battery Xplorer Enterprise System
for the First Time
590-2168-501A/SL-29237/4200-105 5-4
Figure 45 – Battery Xplorer Enterprise Database Import Manager Window
Note: Refer to the Vertiv Battery Xplorer Enterprise Database Import Manager Getting Started
Guide for details on how to utilize the Database Import Manager.
9. Choose your data source and click Next. Follow the steps in the Database Import Getting Started Guide to connect to the selected device.
Figure 46 – Connecting to Datasource System Type
Setting Up the Battery Xplorer Enterprise System
for the First Time
590-2168-501A/SL-29237/4200-105 5-5
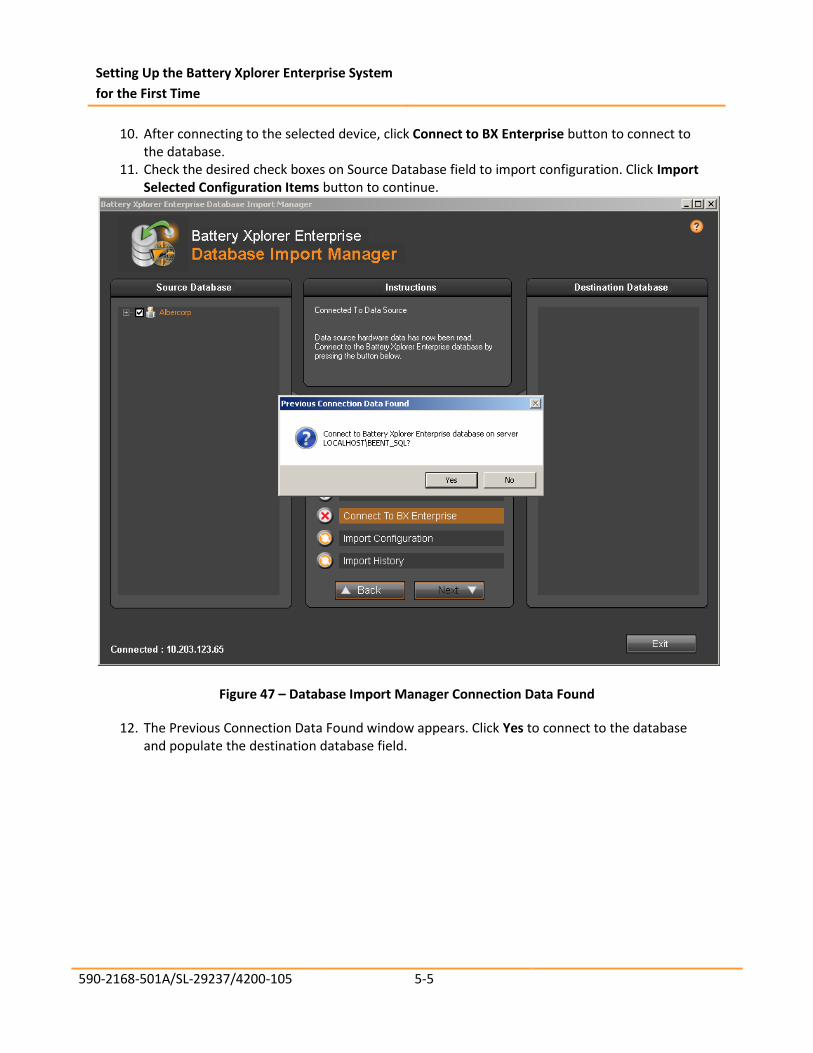
10. After connecting to the selected device, click Connect to BX Enterprise button to connect to the database.
11. Check the desired check boxes on Source Database field to import configuration. Click Import Selected Configuration Items button to continue.
Figure 47 – Database Import Manager Connection Data Found
12. The Previous Connection Data Found window appears. Click Yes to connect to the database and populate the destination database field.
Setting Up the Battery Xplorer Enterprise System
for the First Time
590-2168-501A/SL-29237/4200-105 5-6
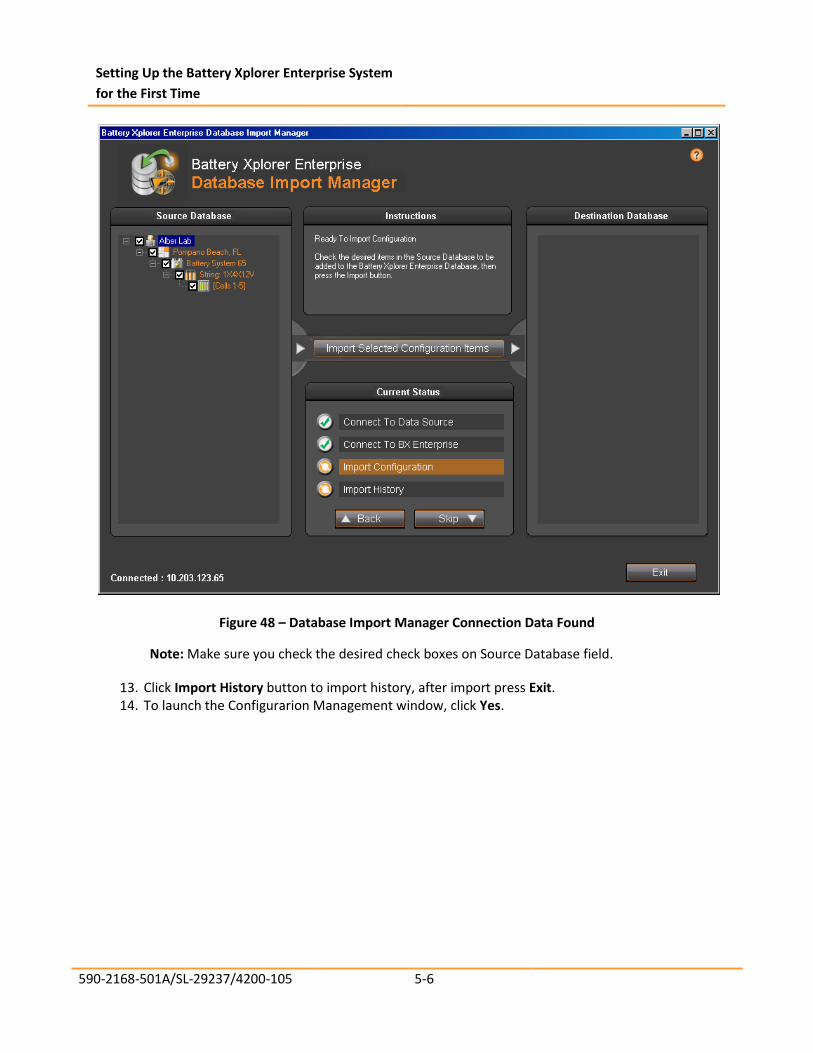
Figure 48 – Database Import Manager Connection Data Found
Note: Make sure you check the desired check boxes on Source Database field.
13. Click Import History button to import history, after import press Exit. 14. To launch the Configurarion Management window, click Yes.

Setting Up the Battery Xplorer Enterprise System
for the First Time
590-2168-501A/SL-29237/4200-105 5-7
15. After configuring and exiting the Database Import Manager a BXE Configurarion Management window appears prompting to enter your SMTP Server information (Port, Username and Password are optional). Click Save and then click Test Settings to test your email settings.
Note: Check the Use SSL Security checkbox if the SMTP server requires SSL encryption.
Figure 49 – Battery Xplorer Enterprise Configuration Manager Window
16. Type in the Email address that you want to send the test message to.
Figure 50 – Battery Xplorer Enterprise Email Test Form
17. Click Send Test Email. A message appears confirming that the email was sent successfully. Click Close. Check your email to verify the message was received. Click OK then click Exit.
Setting Up the Battery Xplorer Enterprise System
for the First Time
590-2168-501A/SL-29237/4200-105 5-8
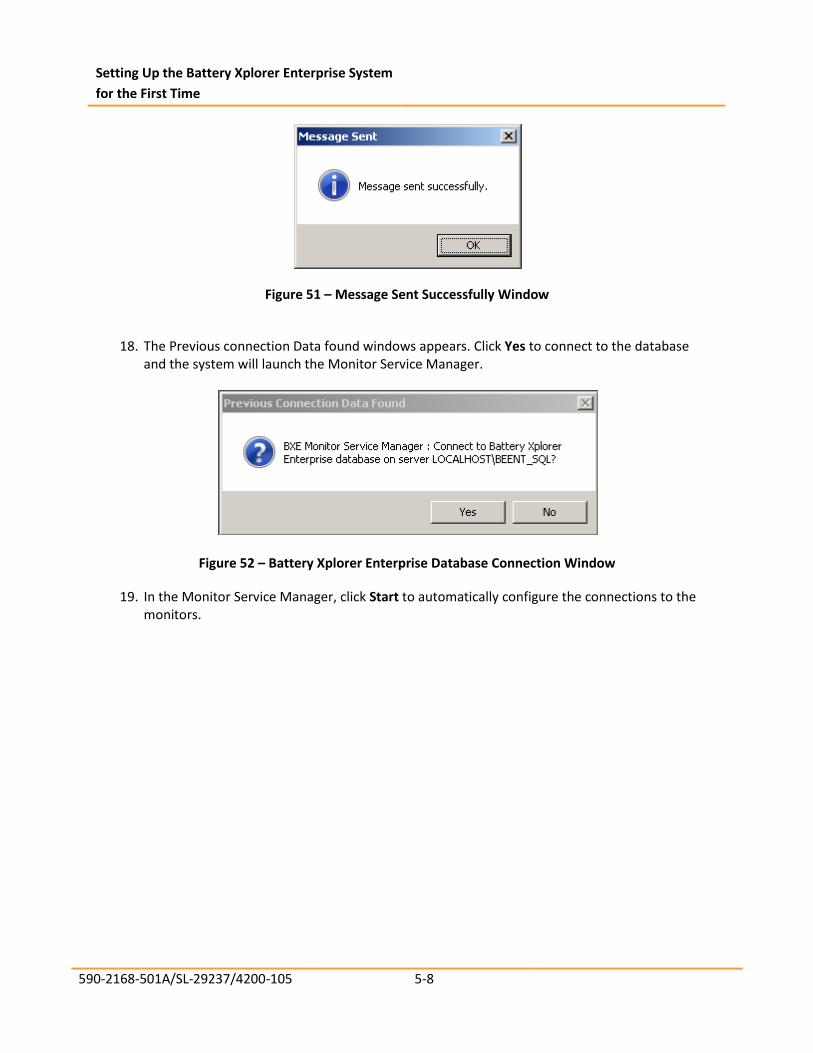
Figure 51 – Message Sent Successfully Window
18. The Previous connection Data found windows appears. Click Yes to connect to the database
and the system will launch the Monitor Service Manager.
Figure 52 – Battery Xplorer Enterprise Database Connection Window
19. In the Monitor Service Manager, click Start to automatically configure the connections to the monitors.
Setting Up the Battery Xplorer Enterprise System
for the First Time
590-2168-501A/SL-29237/4200-105 5-9
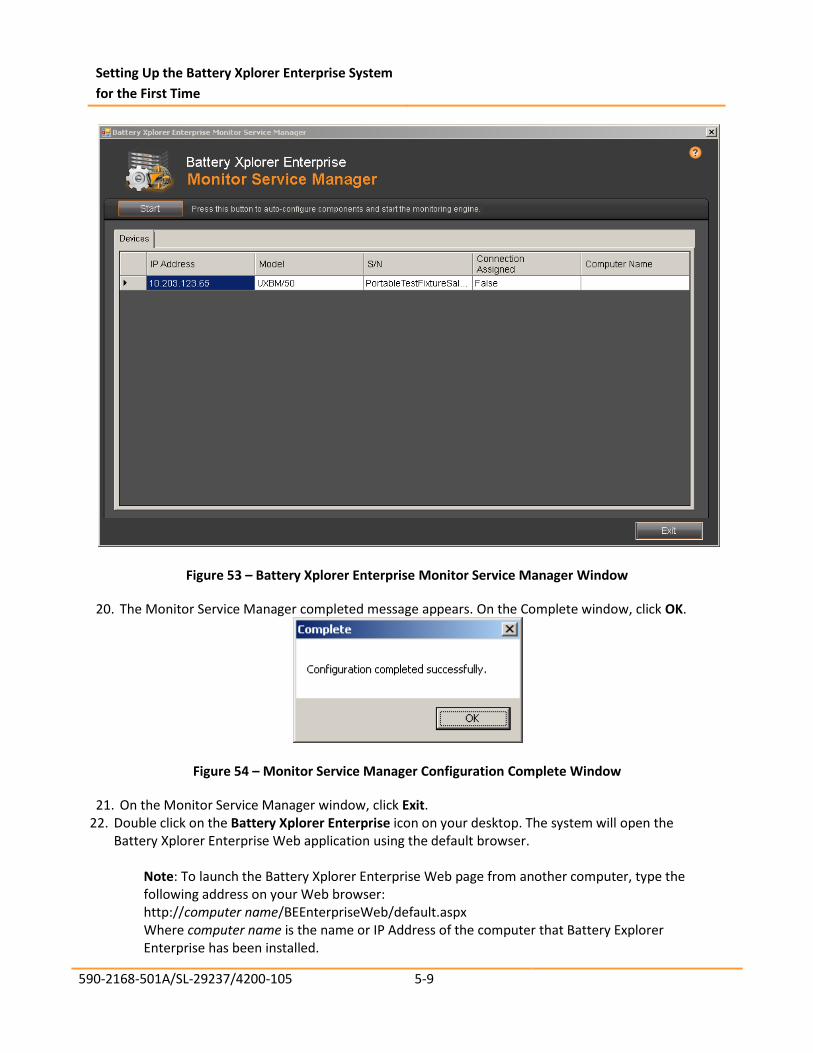
Figure 53 – Battery Xplorer Enterprise Monitor Service Manager Window
20. The Monitor Service Manager completed message appears. On the Complete window, click OK.
Figure 54 – Monitor Service Manager Configuration Complete Window
21. On the Monitor Service Manager window, click Exit. 22. Double click on the Battery Xplorer Enterprise icon on your desktop. The system will open the
Battery Xplorer Enterprise Web application using the default browser. Note: To launch the Battery Xplorer Enterprise Web page from another computer, type the following address on your Web browser: http://computer name/BEEnterpriseWeb/default.aspx Where computer name is the name or IP Address of the computer that Battery Explorer Enterprise has been installed.

Setting Up the Battery Xplorer Enterprise System
for the First Time
590-2168-501A/SL-29237/4200-105 5-10
If you desire to have a custom name for example, Battery Xplorer.com to access your Battery Xplorer
Enterprise Web page, Contact your Systems Administrator for the necessary DNS changes.
23. The System Initialization page appears. An administrator must fill out the page. Enter the following information:
• User Name (Note: Cannot be changed on the Administrator account)
• Password
• Confirm Password
• First Name
• Last Name
24. Click Submit after entering the Administrator account information.
Figure 55 – Battery Xplorer Enterprise System Initialization Window
25. A login page appears for you to enter your username and password.

Setting Up the Battery Xplorer Enterprise System
for the First Time
590-2168-501A/SL-29237/4200-105 5-11
26. A confirmation notification message will be sent to the email provided for your Administrative Account confirming that the Battery Xplorer has been setup successfully. Click Continue.
Figure 56 – Battery Xplorer Enterprise System Initialization Window with Notification Message
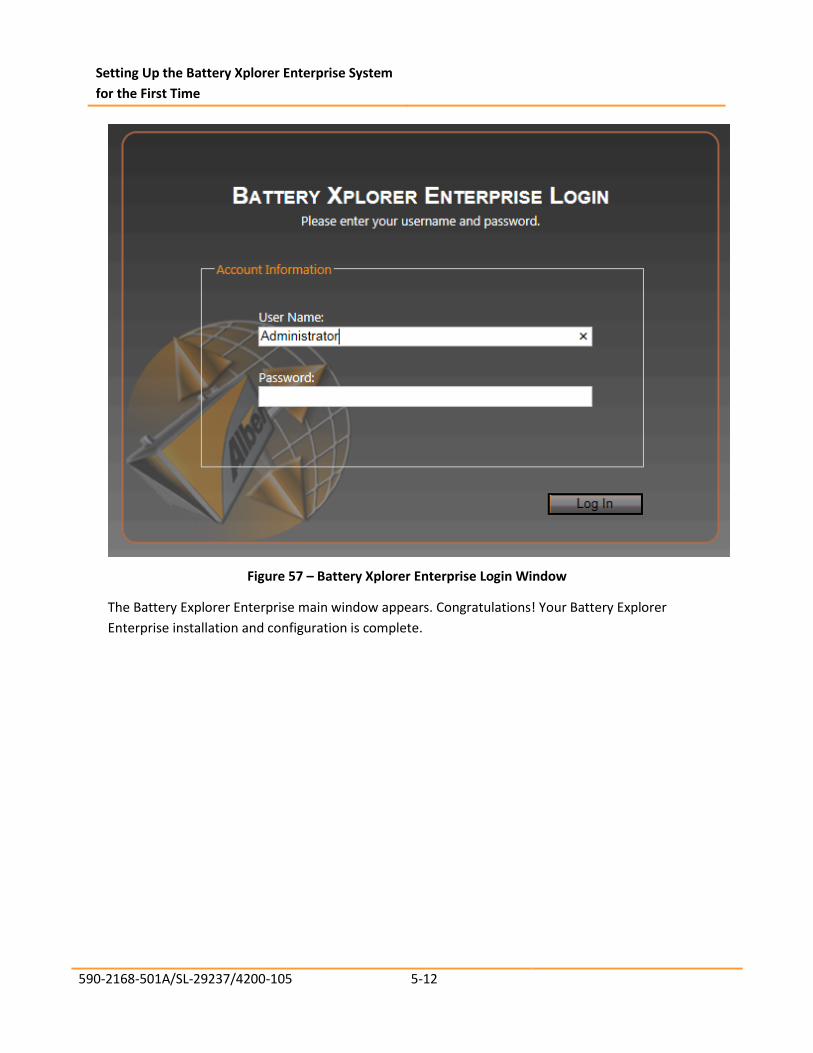
27. Enter your newly created “Administrator” Username and password and click Log In.
Setting Up the Battery Xplorer Enterprise System
for the First Time
590-2168-501A/SL-29237/4200-105 5-12
Figure 57 – Battery Xplorer Enterprise Login Window
The Battery Explorer Enterprise main window appears. Congratulations! Your Battery Explorer
Enterprise installation and configuration is complete.
Setting Up the Battery Xplorer Enterprise System
for the First Time
590-2168-501A/SL-29237/4200-105 5-13
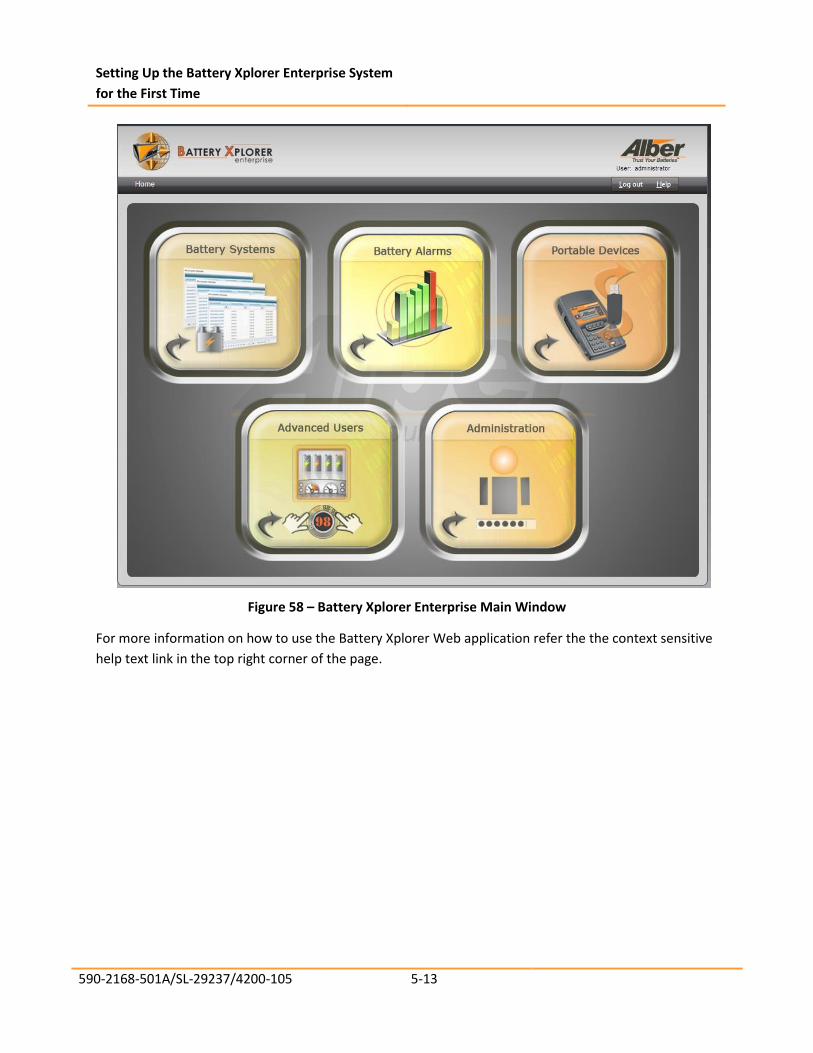
Figure 58 – Battery Xplorer Enterprise Main Window
For more information on how to use the Battery Xplorer Web application refer the the context sensitive
help text link in the top right corner of the page.

Setting Up the Battery Xplorer Enterprise System
for the First Time
590-2168-501A/SL-29237/4200-105 5-14
5.1. Features Activation Manager
The Battery Xplorer Enterprise monitoring system features require activation keys that allow certain features to be activated within the software application. In order to receive activation keys to turn on your Battery Xplorer Enterprise features, you must register by contacting Vertiv Customer Service. Locate your Purchase Order number and Installation Key in the Features Activation Manager page and contact Vertiv Customer Service (954) 623-6660 or email [email protected]. The following Battery Xplorer Enterprise features are available for activation: • 30 Day Demo • 1 to 10 Strings • 1 to 25 Strings • 1 to 100 Strings • 100 Strings and Higher • Advanced Reporting • Portable Device Support
To activate Battery Xplorer Enterprise features: 1. On the Battery Xplorer home page, click the Administration Icon. The Administration Access page
appears. 2. Scroll down to the bottom of the list and click Features Activation Manager, the Features
Activation Manager page appears. 3. Contact Vertiv Customer Service (954) 623-6660 or email to [email protected] and provide
your Purchase Order number and Installation key (shown in the window). 4. Type your 16 digit Activation Key number and click Apply Activation Key. A message appears
informing you the activation was successful. 5. Verify that your purchased feature has a status of Active.
Note: If the activation of any of your purchased features are not successfully active, contact Vertiv Customer Service.

Upgrading Battery Xplorer Enterprise
590-2168-501A/SL-29237/4200-105 6-1
6. Upgrading Battery Xplorer Enterprise
To download the latest Battery Explorer Enterprise software, follow these steps:
1. On your browser go to http://www.vertivco.com/all-alber-product/software/software-
downloads/
2. Click on Select Battery Explorer Enterprise software upgrade. Download the setup.exe file to
your hard drive.
3. Double click the setup.exe file. The Vertiv Battery Xplorer Enteprise – InstallShield Wizard
window appears.
4. Click Yes. The Vertiv Battery Xplorer Enterprise – InstallShield Wizard prepares to install the
software.
Figure 59 – Battery Xplorer Enterprise InstallShield Wizard

Upgrading Battery Xplorer Enterprise
590-2168-501A/SL-29237/4200-105 6-2
Figure 60 – Battery Xplorer Enterprise InstallShield Wizard Preparation
5. Click Next.
Figure 61 – Battery Xplorer Enterprise InstallShield Wizard
The Vertiv Battery Xplorer Enteprise – InstallShield Wizard installs the software.

Upgrading Battery Xplorer Enterprise
590-2168-501A/SL-29237/4200-105 6-3
Figure 62 – Battery Xplorer Enterprise Upgrade in Progress
6. An Information window displays that a reboot will be required at the end of the upgrade. Click
OK to proceed or Cancel to stop the upgrade and close any windows that you have open.
Figure 63 – Battery Xplorer Enterprise Installation in Progress
7. When the Battery Explorer Enterprise Upgrade is complete, click Finish.
Figure 64 – Battery Xplorer Enterprise Upgrade Complete
The Vertiv Battery Xplorer Enterprise – software upgrade is complete.
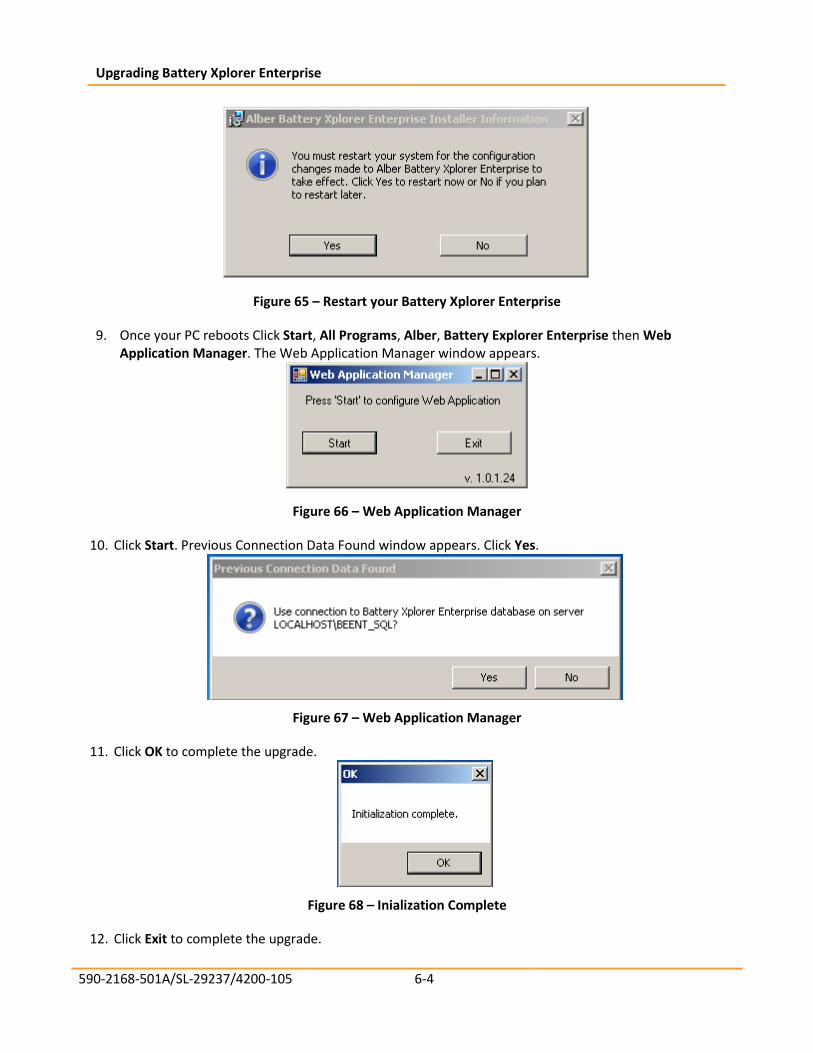
8. It is required to restart your system for the configuration changes to be made to the Battery
Explorer Enterprise Upgrade to take effect and complete, click Yes.
Upgrading Battery Xplorer Enterprise
590-2168-501A/SL-29237/4200-105 6-4
Figure 65 – Restart your Battery Xplorer Enterprise
9. Once your PC reboots Click Start, All Programs, Alber, Battery Explorer Enterprise then Web Application Manager. The Web Application Manager window appears.
Figure 66 – Web Application Manager
10. Click Start. Previous Connection Data Found window appears. Click Yes.
Figure 67 – Web Application Manager
11. Click OK to complete the upgrade.
Figure 68 – Inialization Complete
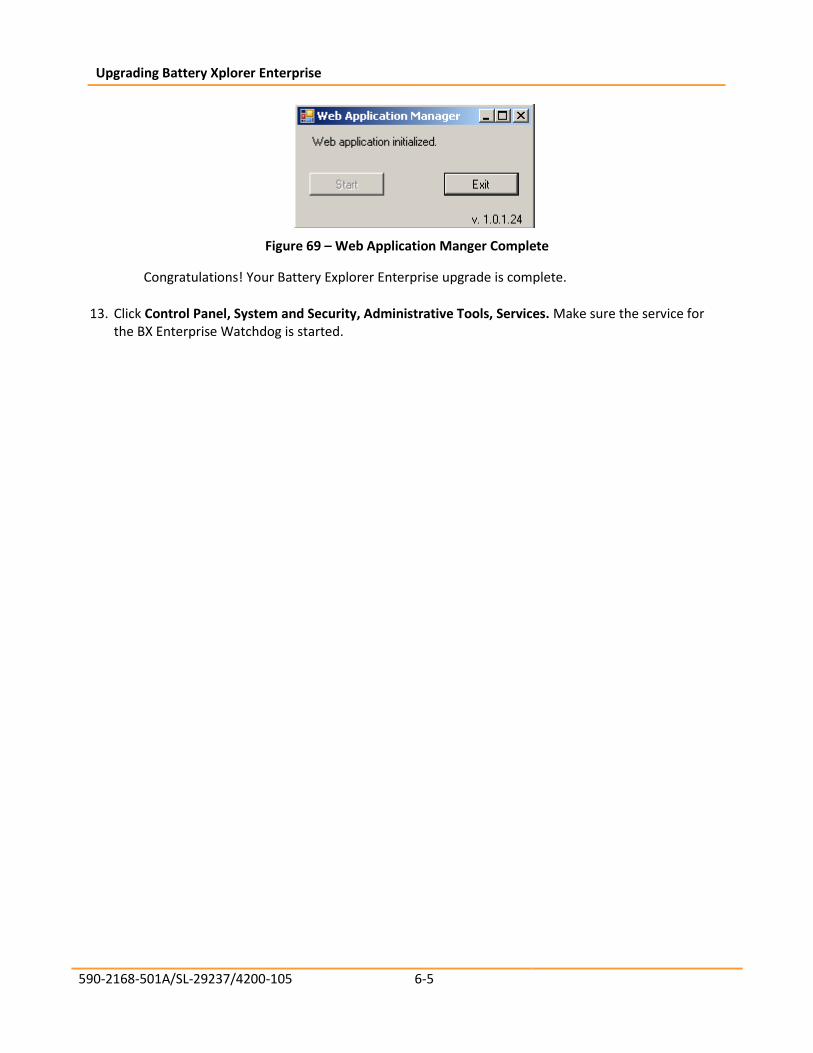
12. Click Exit to complete the upgrade.
Upgrading Battery Xplorer Enterprise
590-2168-501A/SL-29237/4200-105 6-5
Figure 69 – Web Application Manger Complete
Congratulations! Your Battery Explorer Enterprise upgrade is complete.
13. Click Control Panel, System and Security, Administrative Tools, Services. Make sure the service for the BX Enterprise Watchdog is started.
Battery Xplorer Enterprise System Migration
590-2168-501A/SL-29237/4200-105 7-1
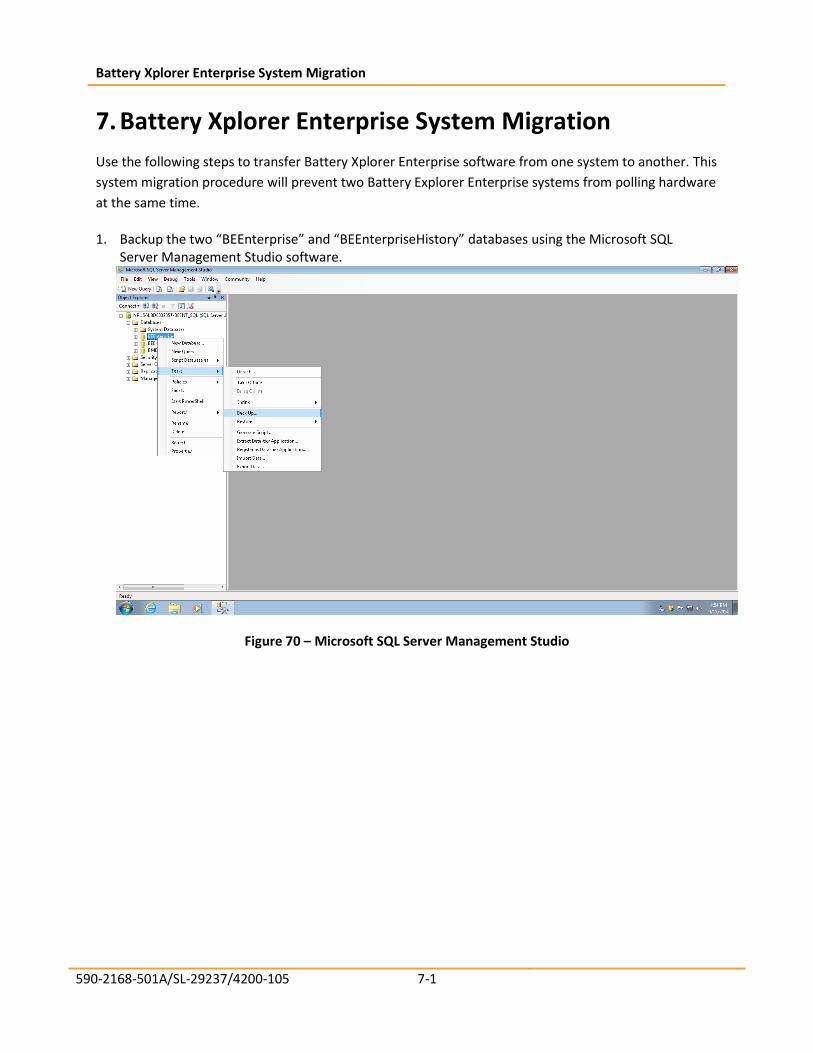
7. Battery Xplorer Enterprise System Migration
Use the following steps to transfer Battery Xplorer Enterprise software from one system to another. This
system migration procedure will prevent two Battery Explorer Enterprise systems from polling hardware
at the same time.
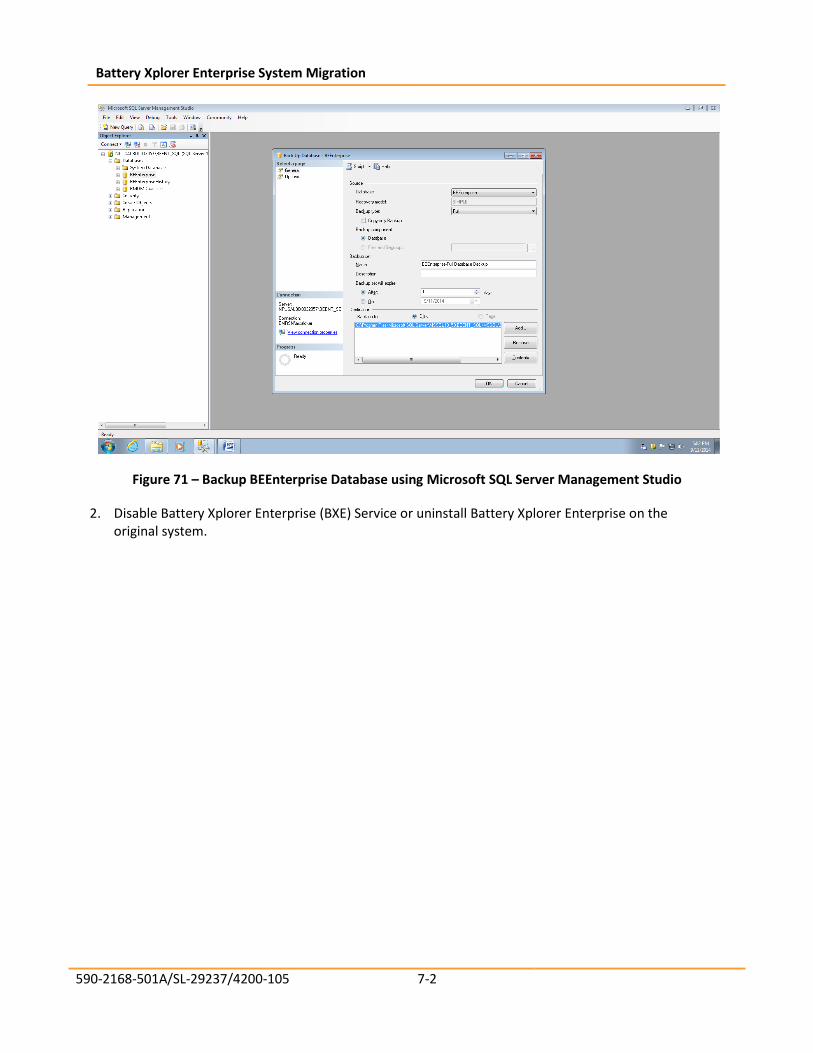
1. Backup the two “BEEnterprise” and “BEEnterpriseHistory” databases using the Microsoft SQL Server Management Studio software.
Figure 70 – Microsoft SQL Server Management Studio
Battery Xplorer Enterprise System Migration
590-2168-501A/SL-29237/4200-105 7-2
Figure 71 – Backup BEEnterprise Database using Microsoft SQL Server Management Studio
2. Disable Battery Xplorer Enterprise (BXE) Service or uninstall Battery Xplorer Enterprise on the original system.

Battery Xplorer Enterprise System Migration
590-2168-501A/SL-29237/4200-105 7-3
Figure 72 – Battery Xplorer Enterprise Watchdog Service Properties
3. Install the Battery Xplorer Enterprise software on the new system. 4. Run the Web Application Manager on the new system.
Figure 73 – Web Application Manager
5. Delete Battery Xplorer Enterprise Databases (BEEnterprise and BEEnterpriseHistory) using the Microsoft SQL Server Management Studio created by the Web Application Manager on the new system.
6. Restore original Databases (BEEnterprise and BEEnterpriseHistory) using the Microsoft SQL Server Management Studio to the new system.
Battery Xplorer Enterprise System Migration
590-2168-501A/SL-29237/4200-105 7-4
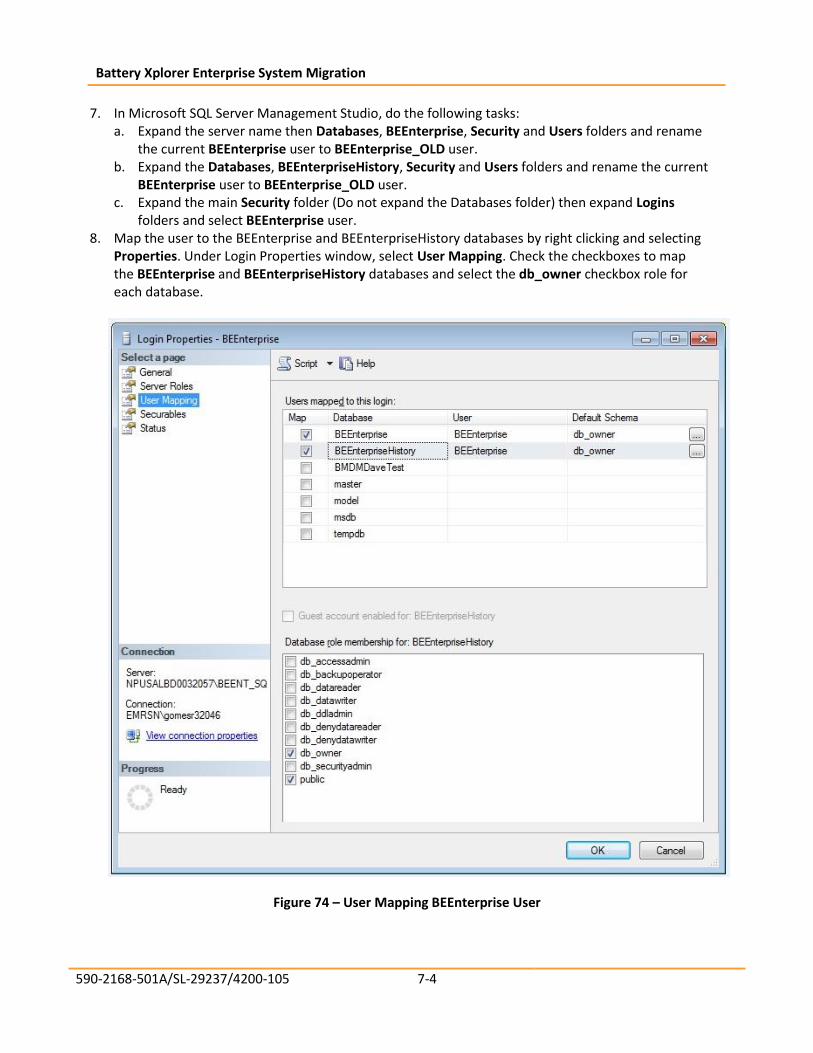
7. In Microsoft SQL Server Management Studio, do the following tasks: a. Expand the server name then Databases, BEEnterprise, Security and Users folders and rename
the current BEEnterprise user to BEEnterprise_OLD user. b. Expand the Databases, BEEnterpriseHistory, Security and Users folders and rename the current
BEEnterprise user to BEEnterprise_OLD user. c. Expand the main Security folder (Do not expand the Databases folder) then expand Logins
folders and select BEEnterprise user. 8. Map the user to the BEEnterprise and BEEnterpriseHistory databases by right clicking and selecting
Properties. Under Login Properties window, select User Mapping. Check the checkboxes to map the BEEnterprise and BEEnterpriseHistory databases and select the db_owner checkbox role for each database.
Figure 74 – User Mapping BEEnterprise User

Battery Xplorer Enterprise System Migration
590-2168-501A/SL-29237/4200-105 7-5
9. Delete the Alber (HKEY_CURRENT_CONFIG\Software\Alber) registry entry created by Web Application Manager using regedit (Click Start and type regedit.)
Figure 75 – Deleting Alber Registry
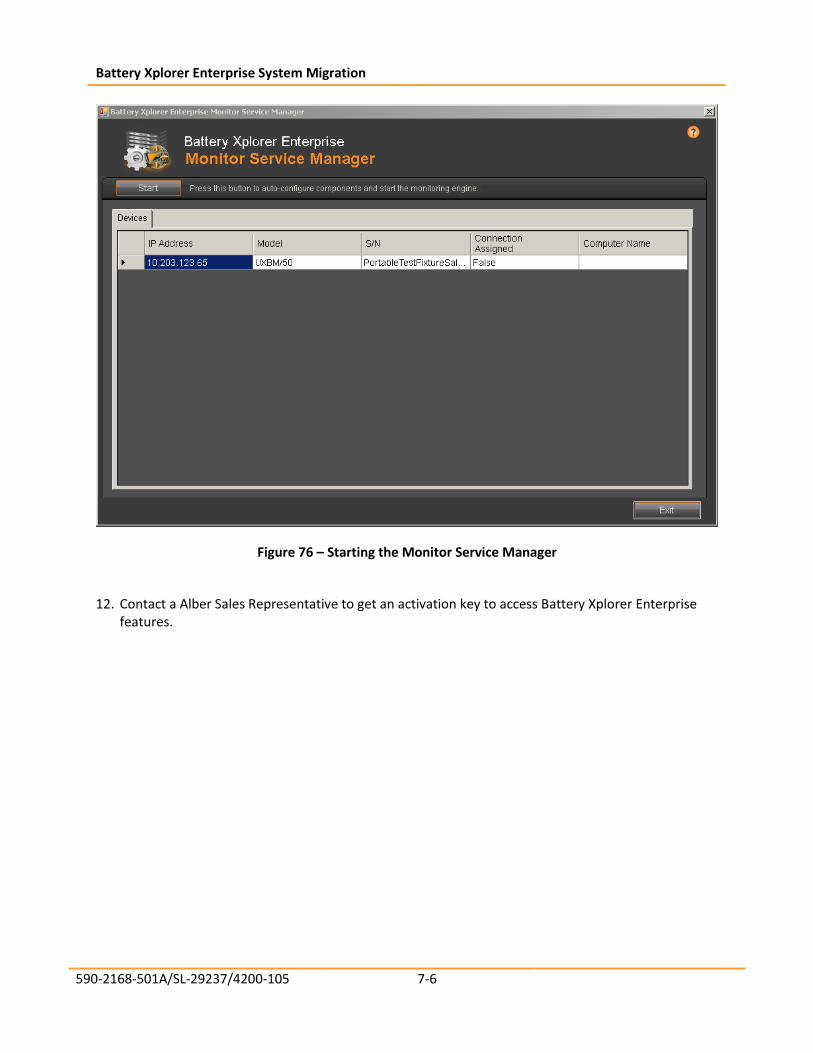
10. Re-run the Web Application Manager on the new system. 11. Run Monitor Service Manager Program and then click the Clear MSM Config option, located on the
Tools menu. Press the Start button to assign and start the BX Enterprise Watchdog service.
Battery Xplorer Enterprise System Migration
590-2168-501A/SL-29237/4200-105 7-6
Figure 76 – Starting the Monitor Service Manager
12. Contact a Alber Sales Representative to get an activation key to access Battery Xplorer Enterprise
features.

Battery Xplorer Enterprise System Migration
590-2168-501A/SL-29237/4200-105 7-7
Figure 77 – Battery Explorer Enterprise Features Activation Manager

Enabling Auto-Login (Optional)
590-2168-501A/SL-29237/4200-105 8-1
8. Enabling Auto-Login (Optional)
Login permissions can be optionally set up to automatically log you into the Battery Xplorer Enterprise
system without entering a username and password. Either browser auto-login or active directory auto-
login methods can be used to enable the auto-login feature in Battery Xplorer Enterprise.
8.1. Setting up a Browser for Auto-Login
Your browser can save your username and password for future logins, so you do not have to retype it
each time you login to the system.
To set up the browser auto-login feature:
1. Double click the Battery Xplorer Enterprise Web icon or click Start, All Programs, Alber, Alber
Battery Xplorer Enterprise, then Battery Xplorer Enterprise Web to open the login page. Login
to the Battery Xplorer Enterprise application by entering your username and password and click
Log In.
2. The first time you login to the Battery Xplorer Enterprise web site, your browser prompts you to
save your username and password. Click Yes to save your username and password, the login
fields are prepopulated the next time you login to the Battery Xplorer Enterprise Login page.
Note: You also have the option to use Active Directory to set up your auto-login. See the next section on
how to set up auto-login with Active Directory within Internet Information Services Manager (IIS).
8.2. Setting up Active Directory for Auto-Login within IIS
If you are logged into your PC as an Active Directory user and the same Active Directory user (or group)
account has been added to the Battery Xplorer Enterprise User Management page, you may be
automatically logged into the Battery Xplorer Enterprise web site.
To set up the Active Directory auto-login feature within IIS:
1. Click the Start button, select All Programs, Accessories, then Run. Type INETMGR and click OK.
2. On the left side of the pane, click the plus sign or arrow next to your machine name to expand
the sites below.
3. Click the plus sign or arrow next to “Sites”.
4. Click the plus sign or arrow next to “Default Web Site”.
5. Click on BEEnterpiseWeb.
6. Under the IIS area in the center of the pane, double-click Authentication.
7. Select Forms Authentication and right-click and select Disabled.
8. Select Windows Authentication and right-click and select Enabled.

Enabling Auto-Login (Optional)
590-2168-501A/SL-29237/4200-105 8-2
Figure 78 – IIS Manager Set up
9. Click the X in the top right corner to close the IIS window.
Setting up Active Directory for auto-login within Battery Xplorer Enterprise
To set up the Active Directory auto-login feature within Battery Xplorer Enterprise:
1. Double click the Battery Xplorer Enterprise Web icon or click Start, All Programs, Alber, Alber
Battery Xplorer Enterprise, Battery Xplorer Enterprise Web to open the login page. Login to the
Battery Xplorer Enterprise application by entering your username and password and click Log In.
2. On the main Battery Xplorer page, click Administration.
3. On the Administration Access page, click System Manager.
4. In the System Configuration area enter your Active Directory Server name.
5. Click the checkbox to select and enable Active Directory Auto Login.
Note: You must have IIS Windows Authentication enabled and Forms Authentication disabled.

Enabling Auto-Login (Optional)
590-2168-501A/SL-29237/4200-105 8-3
Figure 79 – System Manager
6. Click Save then Exit.
7. On the main Battery Xplorer page, click Administration Access then User Manager. The User
Management page appears.
Enabling Auto-Login (Optional)
590-2168-501A/SL-29237/4200-105 8-4
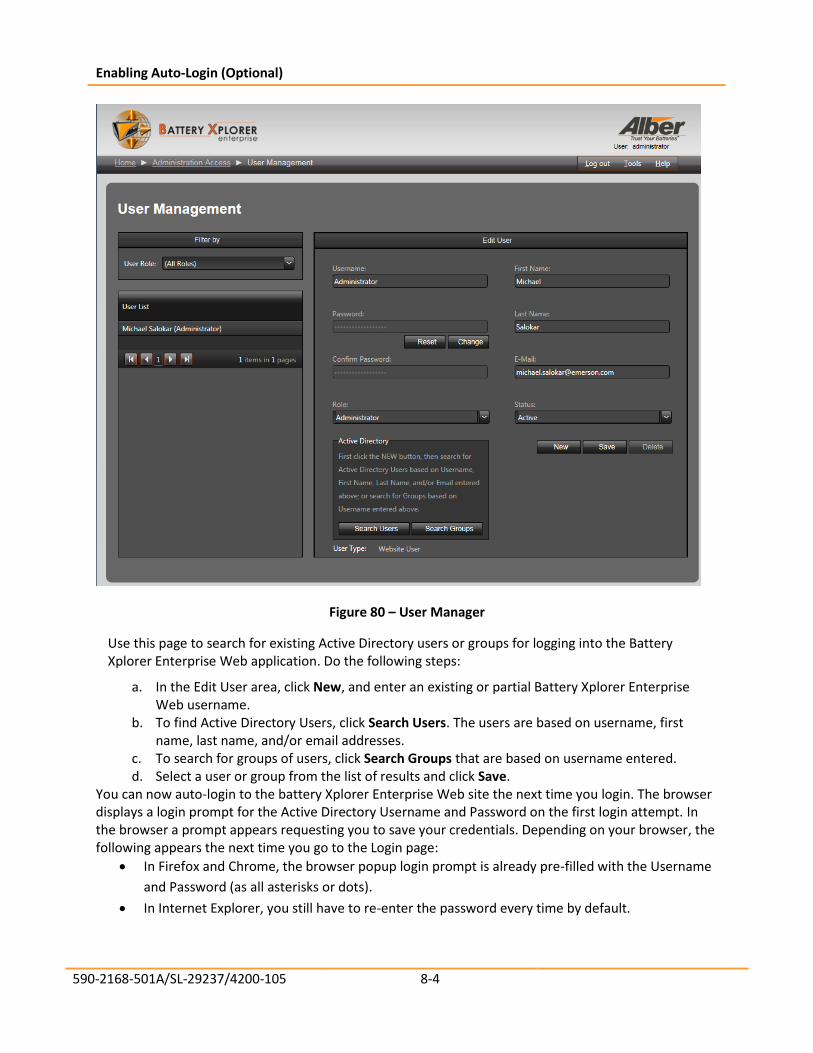
Figure 80 – User Manager
Use this page to search for existing Active Directory users or groups for logging into the Battery Xplorer Enterprise Web application. Do the following steps:
a. In the Edit User area, click New, and enter an existing or partial Battery Xplorer Enterprise Web username.
b. To find Active Directory Users, click Search Users. The users are based on username, first name, last name, and/or email addresses.
c. To search for groups of users, click Search Groups that are based on username entered. d. Select a user or group from the list of results and click Save.
You can now auto-login to the battery Xplorer Enterprise Web site the next time you login. The browser displays a login prompt for the Active Directory Username and Password on the first login attempt. In the browser a prompt appears requesting you to save your credentials. Depending on your browser, the following appears the next time you go to the Login page:
• In Firefox and Chrome, the browser popup login prompt is already pre-filled with the Username
and Password (as all asterisks or dots).
• In Internet Explorer, you still have to re-enter the password every time by default.

Enabling Auto-Login (Optional)
590-2168-501A/SL-29237/4200-105 8-5
Once you get through to the web site, if Auto Login checkbox is checked on the System Management
page, you will bypass the Login page. Otherwise, you can fill out the Login prompt as usual.