agronomy guide for field crops publication 811 · 15.ninsectsnandnpestsnofnfieldncrops...
TRANSCRIPT

15. Insects and Pests of Field Crops
OMAFRA Publication 812, Field Crop Protection Guide, a companion to Publication 811, is the source for information on integrated pest management (IPM) options and insect, pest and disease control products. Visit the OMAFRA website at ontario.ca/crops.
Several natural enemies help to manage field crop pests. Refer to Chapter 14, Integrated Pest Management and Protecting Natural Enemies and Pollinators, for more information on key natural enemies and how to encourage their presence and provide protection in field crop production.
Soil Insects and Pests of Field CropsSeveral insects and pests feed underground and are strongly associated with soil types, crop rotations and weed or nutrient management strategies. As long as a susceptible host crop is planted into these conditions, when the feeding stage of the pest is present, injury is experienced. The following soil pests are known to cause injury to field crops. Under each pest, the primary host crops are listed, along with a description of the pest, their life cycle and the damage they cause. Specific scouting techniques, thresholds and management strategies are listed separately under each crop section within this chapter.
GRUBS (European chafer, June beetle or Japanese beetle)
Crops at Risk: corn, soybeans, forages, winter cerealsVarious types of grubs can attack field crops. European chafer and June beetle are the most common problem grubs in Ontario field crops, although Japanese beetle grubs can also cause damage. Proper identification of the species of grub present in each field is important, as their life cycles are different, which influences the management strategies implemented.
Description: Grubs are white and C-shaped larvae, with an orange-brown head and dark posterior (Photo 15–1 and Photo 15–2). When walking, they drag their posterior along the ground. Correctly identifying the species of grub requires using a hand lens focused on the anal bristles known as “rasters” that are positioned on the underside, at the last abdominal segment of the larva (posterior). Each species has a particular raster pattern. Identifying the species will determine when feeding activity is expected, how long they will remain in the soil and when control measures can be implemented.
Photo 15–1. Overview of a grub. Source: A. Schaafsma, University of Guelph,
Ridgetown Campus.
Photo 15–2. Grub feeding on corn seedling. Source: J. Smith, University of Guelph,
Ridgetown Campus.
301
More information on the description, life cycle and damage can be found under each grub species.
Damage: Grubs feed on the fibrous roots 3–5 cm (1–2 in.) from the soil surface. Roots are pruned, causing plants to become stunted and eventually wilt (Photo 15–2). Intense root feeding results in poor emergence and plant death. Crop damage is dependent on the timing of planting and crop emergence in relation to larval feeding activity. If the crop is planted after the grub species has completed its larval stages (feeding stage of the insect), crop damage can be avoided. Additional damage can occur from predators such as skunks and raccoons that dig up and feed on the grubs, although the damage seldom causes economic yield loss.
Conditions That Increase Risk: Fields with sandy or silty knolls and in areas close to treelines are prone to more egg laying. Fields following soybeans, alfalfa, sod, pasture cereals and potatoes are at higher risk. Susceptible crops grown adjacent to pasture, sod farms,
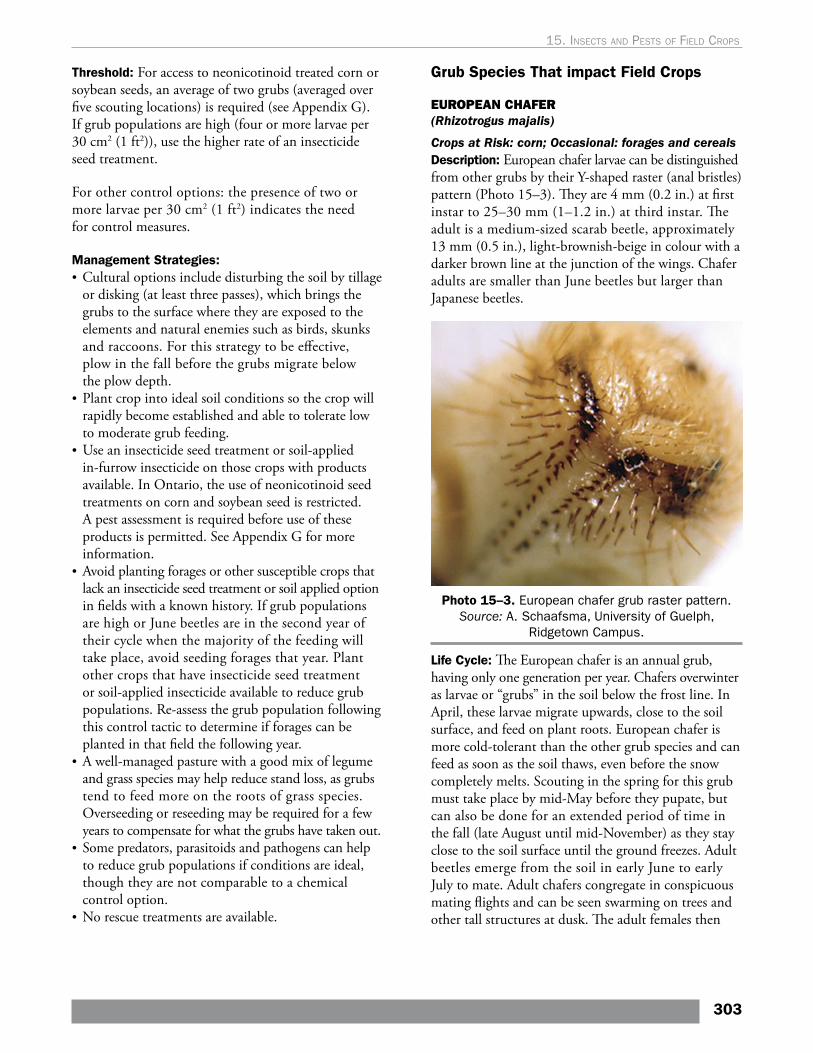
parkland and golf courses are particularly prone to grub infestations. Figure 15–1, Life cycles and feeding periods for common grubs, describes the life cycles and feeding periods for common grubs.
Scouting Technique: Fall is the best time to scout for grubs, though spring scouting before or after planting is also possible. Soil temperatures and grub life cycle determines when each grub species is feeding at the soil surface. See life cycle sections under each grub species to properly target scouting. Scout for grubs on the sandier knolls of fields, areas near treelines and in areas where past or current injury was/is evident.
For access to neonicotinoid treated corn or soybean seeds for protection against grubs, a pest assessment must be completed according to specific criteria outlined in the Class 12 regulation requirement, outlined in Appendix G.
General scouting, not related to Class 12 pesticide requirements: Using a shovel, dig up approximately 30 cm2 (1 ft2) of soil, roughly 7.5–10 cm (3–4 in.) deep, in at least five areas of the field. Sift through the soil by hand, breaking up any clumps, and count how many grubs are found in each sample. If the crop has already emerged, find areas of the field where there are gaps in the stand or wilting seedlings. Go to the next nearest surviving plant and dig up those roots to find any actively feeding grubs.
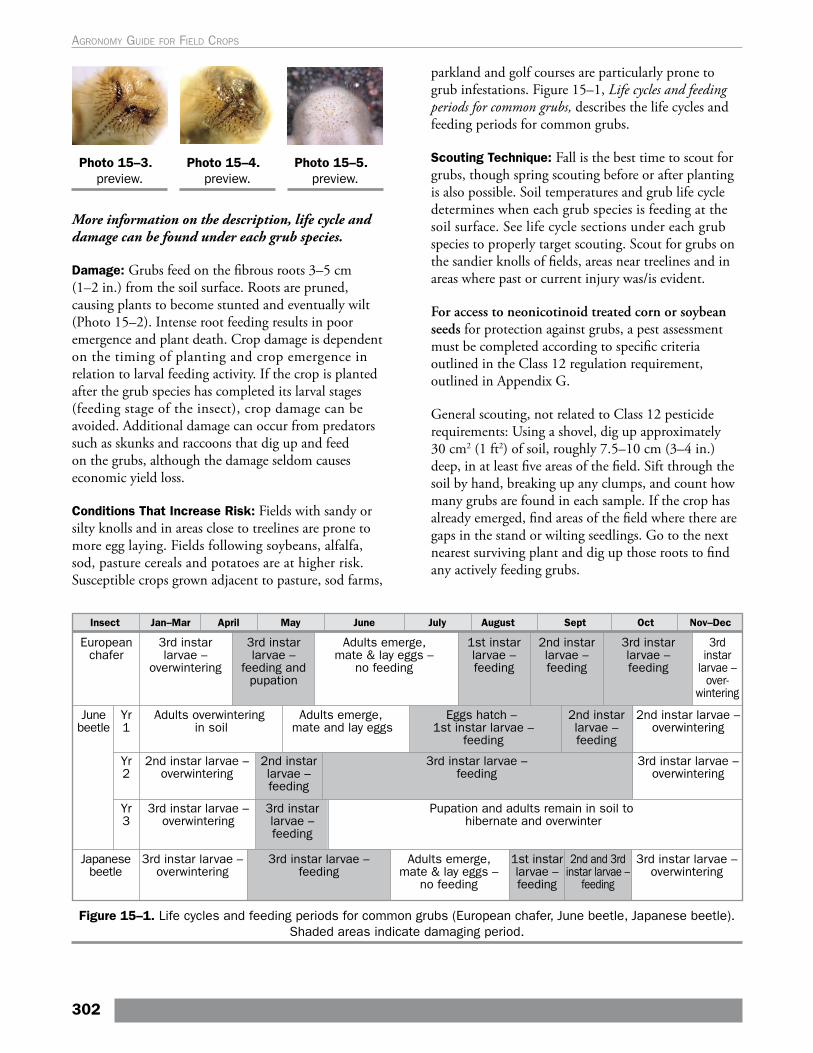
Photo 15–3. preview.
Photo 15–4. preview.
Photo 15–5. preview.
Figure 15–1. Life cycles and feeding periods for common grubs (European chafer, June beetle, Japanese beetle). Shaded areas indicate damaging period.
302
Agronomy guide for field Crops
Threshold: For access to neonicotinoid treated corn or soybean seeds, an average of two grubs (averaged over five scouting locations) is required (see Appendix G). If grub populations are high (four or more larvae per 30 cm2 (1 ft2)), use the higher rate of an insecticide seed treatment.
For other control options: the presence of two or more larvae per 30 cm2 (1 ft2) indicates the need for control measures.
Management Strategies:• Cultural options include disturbing the soil by tillage
or disking (at least three passes), which brings the grubs to the surface where they are exposed to the elements and natural enemies such as birds, skunks and raccoons. For this strategy to be effective, plow in the fall before the grubs migrate below the plow depth.
• Plant crop into ideal soil conditions so the crop will rapidly become established and able to tolerate low to moderate grub feeding.
• Use an insecticide seed treatment or soil-applied in-furrow insecticide on those crops with products available. In Ontario, the use of neonicotinoid seed treatments on corn and soybean seed is restricted. A pest assessment is required before use of these products is permitted. See Appendix G for more information.
• Avoid planting forages or other susceptible crops that lack an insecticide seed treatment or soil applied option in fields with a known history. If grub populations are high or June beetles are in the second year of their cycle when the majority of the feeding will take place, avoid seeding forages that year. Plant other crops that have insecticide seed treatment or soil-applied insecticide available to reduce grub populations. Re-assess the grub population following this control tactic to determine if forages can be planted in that field the following year.
• A well-managed pasture with a good mix of legume and grass species may help reduce stand loss, as grubs tend to feed more on the roots of grass species. Overseeding or reseeding may be required for a few years to compensate for what the grubs have taken out.
• Some predators, parasitoids and pathogens can help to reduce grub populations if conditions are ideal, though they are not comparable to a chemical control option.
• No rescue treatments are available.
Grub Species That impact Field Crops
EUROPEAN CHAFER (Rhizotrogus majalis)
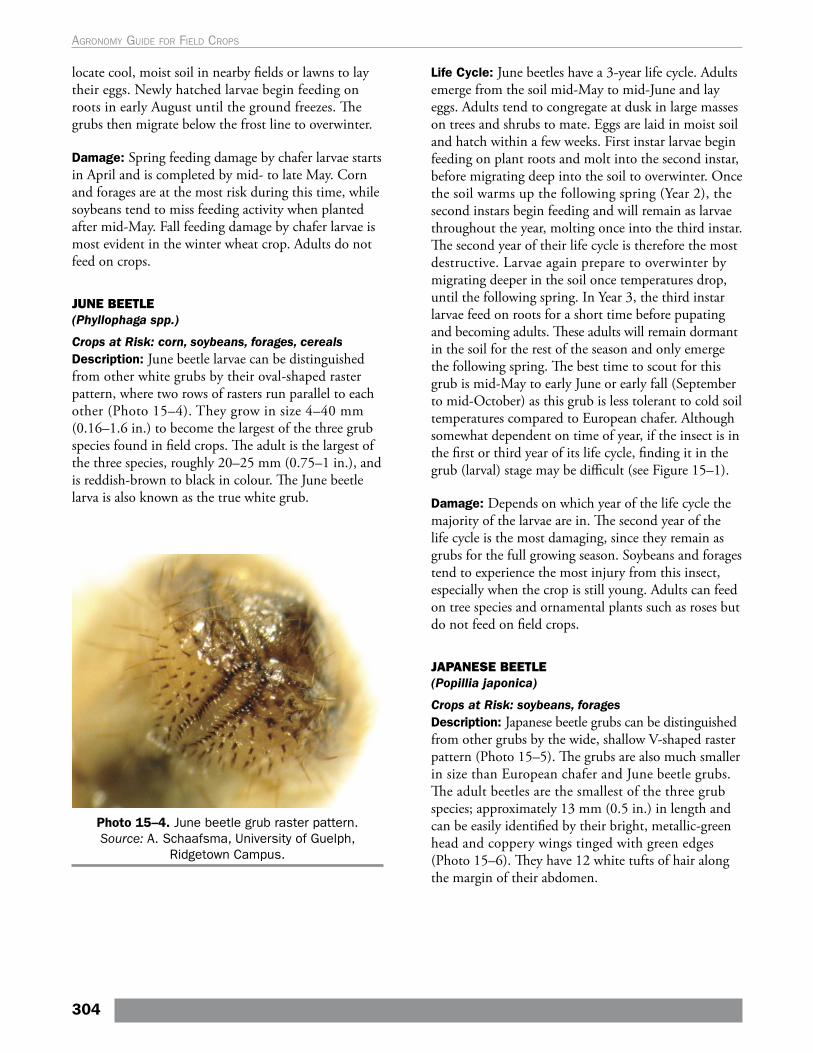
Crops at Risk: corn; Occasional: forages and cereals Description: European chafer larvae can be distinguished from other grubs by their Y-shaped raster (anal bristles) pattern (Photo 15–3). They are 4 mm (0.2 in.) at first instar to 25–30 mm (1–1.2 in.) at third instar. The adult is a medium-sized scarab beetle, approximately 13 mm (0.5 in.), light-brownish-beige in colour with a darker brown line at the junction of the wings. Chafer adults are smaller than June beetles but larger than Japanese beetles.
Photo 15–3. European chafer grub raster pattern. Source: A. Schaafsma, University of Guelph,
Ridgetown Campus.
Life Cycle: The European chafer is an annual grub, having only one generation per year. Chafers overwinter as larvae or “grubs” in the soil below the frost line. In April, these larvae migrate upwards, close to the soil surface, and feed on plant roots. European chafer is more cold-tolerant than the other grub species and can feed as soon as the soil thaws, even before the snow completely melts. Scouting in the spring for this grub must take place by mid-May before they pupate, but can also be done for an extended period of time in the fall (late August until mid-November) as they stay close to the soil surface until the ground freezes. Adult beetles emerge from the soil in early June to early July to mate. Adult chafers congregate in conspicuous mating flights and can be seen swarming on trees and other tall structures at dusk. The adult females then
303
15. Insects and pests oF FIeld crops
locate cool, moist soil in nearby fields or lawns to lay their eggs. Newly hatched larvae begin feeding on roots in early August until the ground freezes. The grubs then migrate below the frost line to overwinter.
Damage: Spring feeding damage by chafer larvae starts in April and is completed by mid- to late May. Corn and forages are at the most risk during this time, while soybeans tend to miss feeding activity when planted after mid-May. Fall feeding damage by chafer larvae is most evident in the winter wheat crop. Adults do not feed on crops.
JUNE BEETLE (Phyllophaga spp.)
Crops at Risk: corn, soybeans, forages, cerealsDescription: June beetle larvae can be distinguished from other white grubs by their oval-shaped raster pattern, where two rows of rasters run parallel to each other (Photo 15–4). They grow in size 4–40 mm (0.16–1.6 in.) to become the largest of the three grub species found in field crops. The adult is the largest of the three species, roughly 20–25 mm (0.75–1 in.), and is reddish-brown to black in colour. The June beetle larva is also known as the true white grub.
Photo 15–4. June beetle grub raster pattern. Source: A. Schaafsma, University of Guelph,
Ridgetown Campus.
Life Cycle: June beetles have a 3-year life cycle. Adults emerge from the soil mid-May to mid-June and lay eggs. Adults tend to congregate at dusk in large masses on trees and shrubs to mate. Eggs are laid in moist soil and hatch within a few weeks. First instar larvae begin feeding on plant roots and molt into the second instar, before migrating deep into the soil to overwinter. Once the soil warms up the following spring (Year 2), the second instars begin feeding and will remain as larvae throughout the year, molting once into the third instar. The second year of their life cycle is therefore the most destructive. Larvae again prepare to overwinter by migrating deeper in the soil once temperatures drop, until the following spring. In Year 3, the third instar larvae feed on roots for a short time before pupating and becoming adults. These adults will remain dormant in the soil for the rest of the season and only emerge the following spring. The best time to scout for this grub is mid-May to early June or early fall (September to mid-October) as this grub is less tolerant to cold soil temperatures compared to European chafer. Although somewhat dependent on time of year, if the insect is in the first or third year of its life cycle, finding it in the grub (larval) stage may be difficult (see Figure 15–1).
Damage: Depends on which year of the life cycle the majority of the larvae are in. The second year of the life cycle is the most damaging, since they remain as grubs for the full growing season. Soybeans and forages tend to experience the most injury from this insect, especially when the crop is still young. Adults can feed on tree species and ornamental plants such as roses but do not feed on field crops.
JAPANESE BEETLE(Popillia japonica)
Crops at Risk: soybeans, foragesDescription: Japanese beetle grubs can be distinguished from other grubs by the wide, shallow V-shaped raster pattern (Photo 15–5). The grubs are also much smaller in size than European chafer and June beetle grubs. The adult beetles are the smallest of the three grub species; approximately 13 mm (0.5 in.) in length and can be easily identified by their bright, metallic-green head and coppery wings tinged with green edges (Photo 15–6). They have 12 white tufts of hair along the margin of their abdomen.
304
Agronomy guide for field Crops
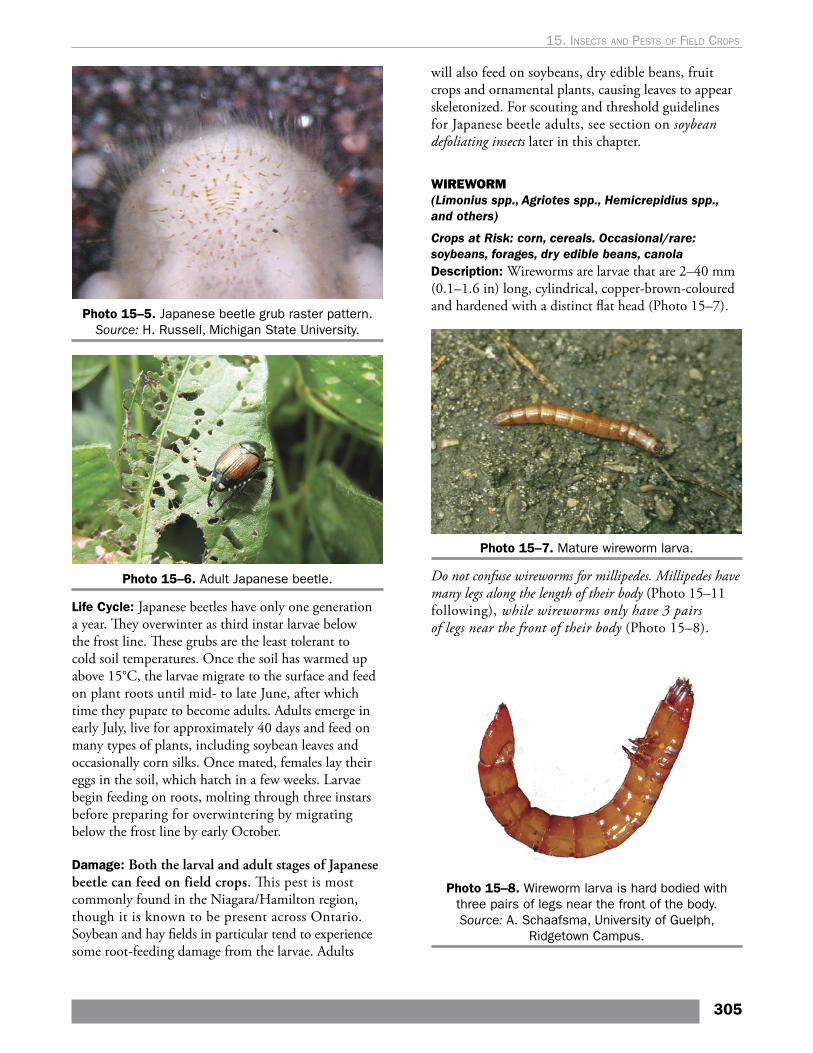
Photo 15–5. Japanese beetle grub raster pattern. Source: H. Russell, Michigan State University.
Photo 15–6. Adult Japanese beetle.
Life Cycle: Japanese beetles have only one generation a year. They overwinter as third instar larvae below the frost line. These grubs are the least tolerant to cold soil temperatures. Once the soil has warmed up above 15°C, the larvae migrate to the surface and feed on plant roots until mid- to late June, after which time they pupate to become adults. Adults emerge in early July, live for approximately 40 days and feed on many types of plants, including soybean leaves and occasionally corn silks. Once mated, females lay their eggs in the soil, which hatch in a few weeks. Larvae begin feeding on roots, molting through three instars before preparing for overwintering by migrating below the frost line by early October.
Damage: Both the larval and adult stages of Japanese beetle can feed on field crops. This pest is most commonly found in the Niagara/Hamilton region, though it is known to be present across Ontario. Soybean and hay fields in particular tend to experience some root-feeding damage from the larvae. Adults
will also feed on soybeans, dry edible beans, fruit crops and ornamental plants, causing leaves to appear skeletonized. For scouting and threshold guidelines for Japanese beetle adults, see section on soybean defoliating insects later in this chapter.
WIREWORM (Limonius spp., Agriotes spp., Hemicrepidius spp., and others)
Crops at Risk: corn, cereals. Occasional/rare: soybeans, forages, dry edible beans, canola Description: Wireworms are larvae that are 2–40 mm (0.1–1.6 in) long, cylindrical, copper-brown-coloured and hardened with a distinct flat head (Photo 15–7).
Photo 15–7. Mature wireworm larva.
Do not confuse wireworms for millipedes. Millipedes have many legs along the length of their body (Photo 15–11 following), while wireworms only have 3 pairs of legs near the front of their body (Photo 15–8).
Photo 15–8. Wireworm larva is hard bodied with three pairs of legs near the front of the body. Source: A. Schaafsma, University of Guelph,
Ridgetown Campus.
305
15. Insects and pests oF FIeld crops

Adult wireworms are elongated dark-bodied (brown, charcoal or black) beetles that are 8–20 mm (0.3–0.8 in.) and have the ability to flip themselves upright when placed on their backs (Photo 15–9). As they flip, there is an audible click, giving them their name “click beetles.”
Photo 15–9. Adult wireworm is also known as a click beetle.
Life Cycle: Wireworms, depending on the species, take up to 6 years to develop from egg to adult, spending most of their life as larvae. They overwinter as larvae in the soil below the frost line. When soil temperatures warm to 10°C in the spring, the larvae move to the surface to feed. Due to their long life cycle, the larvae can damage several successive crops, feeding on the roots of weeds, grasses and crop plants. Once soil temperatures reach approximately 26°C, and soil moisture decreases, the larvae migrate downward and may be difficult to find in the summer. Once soil temperatures cool again in the fall, larvae may migrate back to the soil surface to feed on roots until moving downward again to overwinter. The larvae that have reached the end of their cycle will pupate and become adults in the summer, which then lay their eggs at the base of grassy weeds.
Damage: Wireworms are most active during the months of April to June, and occur most often in fields that have little disturbance. The larvae attack roots, seeds and germinating seedlings of many crops, such as corn, soybeans, spring cereals, dry edible beans and potatoes. Non-uniform growth or gaps in the stand may be due to wireworm feeding on germinating seeds (Photo 15–10). Injured seedlings appear stunted and wilted, with leaves sometimes becoming purple or blue at the tips. Wireworms are rarely a problem in fall-planted cereals, however, they can be serious in spring-planted grains.
Photo 15–10. Wireworm damage to corn seedlings results in non-uniform growth and gaps in the stand.
Source: A. Schaafsma, University of Guelph, Ridgetown Campus.
Conditions That Increase Risk: Sandy and silty soils with high frequency of grassy crop rotation (cereals, mixed forages, and especially following sod), canola or vegetable crops including carrots, potatoes and sweet potatoes). Fields with grassy weeds or following summer fallow are also at risk. More crop injury occurs in cool, wet springs when crop emergence is slowed.
Scouting Technique: The best time to scout is in the fall or spring when soil temperatures are just above 10°C, but below 26°C. Baits are most effective at approximately 10°C, since the bait ferments and releases CO2 to attract wireworms. Warmer soil temperatures will cause the wireworms to be more attracted to other vegetation in the soil. For access to neonicotinoid treated corn or soybean seeds for protection against wireworms, a pest assessment must be completed according to specific criteria outlined in the Class 12 regulation requirements, outlined in Appendix G.
General scouting, not related to Class 12 pesticide requirements: Establish two bait stations per high-risk area of the field. High-risk areas include sandy or silty knolls, areas with grassy weed patches or problem areas of the field where gaps in the stand have been noticed. Dig a hole at each station, approximately 15 cm (6 in.) wide and deep. Take 1 cup of all-purpose flour, or 1 cup of equal parts of untreated corn, wheat and bean seeds soaked overnight and drop it into the hole. Bury the bait, breaking up any soil clumps, and mound the soil over the bait to prevent standing water. If soil temperatures are still cool, place a black plastic bag over the bait station and cover the edges with
306
Agronomy guide for field Crops

soil or rocks. Place a flag at the bait station to make it easier to find again. Return to the bait traps 7 days later to dig up the baits and determine the presence of wireworms. Note: millipedes may also be found in the baits. See Millipedes, to ensure proper identification is made.
Threshold: For neonicotinoid treated corn or soybean seeds, an average of one wireworm, averaged over five scouting locations is required (see Appendix G). For other crops or other chemical control options: One wireworm per bait trap indicates the need for an insecticide seed treatment or soil-applied insecticide.
Management Strategies for All Crops: • Use insecticide seed treatments or in-furrow soil
insecticides in fields that have reached threshold, have a history of wireworm incidence or are following grassy sods. For access to neonicotinoid treated corn or soybean seed, a pest assessment report must be completed an submitted at the time of seed order (see Appendix G).
• Avoid planting a cereal or corn crop following sod or pasture. Non-host crops include alfalfa, pulse crops, and buckwheat.
• Control grassy weeds in previous year’s crop when a susceptible crop is to follow.
• Increase the seeding rate by up to 10% to compensate for the potential yield loss.
• Plant in warm, moist conditions, which help the crop to emerge and establish quickly.
• Predators and pathogens play a minor role in controlling wireworm populations.
• No rescue treatments are currently available.
MILLIPEDES(various species)
Crops at Risk: corn, soybeansDescription: Millipedes are not insects but arthropods. They are hard-shelled, cylindrical and approximately 2.5–5 cm (1–2 in.) long (Photo 15–11). They get their name (milli: thousands, pedes: legs) from having many legs — two short pairs of legs per body segment in the adult stage. Adult millipedes are dark reddish-brown to grey-black in colour and have hardened bodies, while the immature millipedes look similar to adults but are white, have fewer legs and do not have hardened bodies (Photo 15–12). As they mature, they develop more legs and turn darker in colour. Another distinguishing characteristic is that they coil up tight when disturbed.
Photo 15–11. Mature millipede.
Photo 15–12. Immature millipede have fewer legs and do not have hardened bodies.
Source: A. Schaafsma, University of Guelph, Ridgetown Campus.
Do not confuse millipedes with wireworms; wireworms are coppery-brown in colour and only have three pairs of legs (Photo 15–8).
Life Cycle: Both adult and immature millipedes overwinter in the soil under debris, rocks, etc. They can live for several years in the soil, taking up to 5 years to mature to the adult stage. They have become more prevalent with the adoption of reduced or no-till systems due to the increase in surface residues. Females lay their eggs in the soil near crop debris. Newly hatched millipedes begin with only 3–4 pairs of legs, adding more body segments and pairs of legs as they moult and grow to adult size.
307
15. Insects and pests oF FIeld crops
Damage: Millipedes are typically beneficial. They help decompose organic matter and feed on other insects. However, when planting early in cool, wet springs, conditions are ideal for millipedes to feed on the swollen seeds and young seedling roots, particularly corn and soybeans.
Conditions That Increase Risk: No-till fields with residue and high organic matter are at greater risk, though damage has also been experienced in conventional fields. Deep planting can also promote injury. Droughty conditions will lessen their impact.
Scouting Technique: Inspect roots, germinating seed and soil around areas with gaps in the plant stand. Millipedes could be present on the roots or within the seed. If early-season injury is noticeable, but no pest is present, setting up wireworm bait stations will also be effective at capturing millipedes to determine their presence.
Threshold: No threshold is available at this time.
Management Strategies for Corn and Soybeans: • Insecticide seed treatments are not effective at
controlling millipedes. • No rescue treatments are currently available.• Plant in ideal conditions to improve seed
germination in these fields, particularly when cool, wet springs are forecasted.
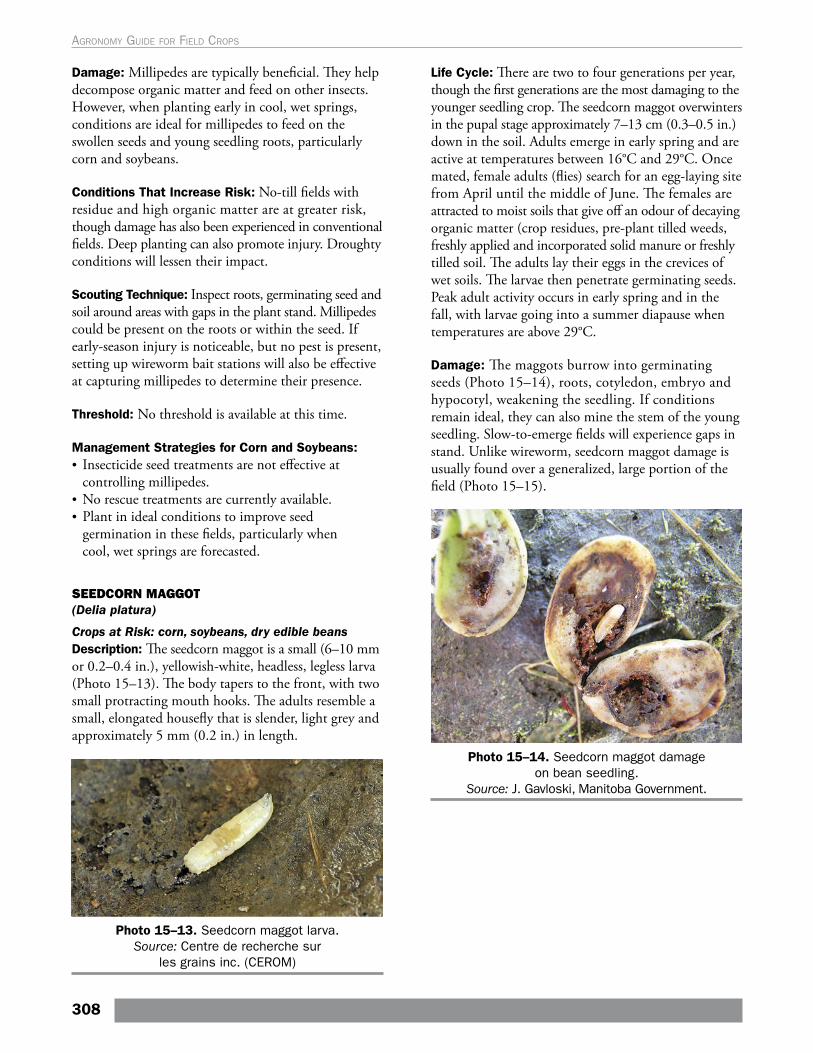
SEEDCORN MAGGOT (Delia platura)
Crops at Risk: corn, soybeans, dry edible beansDescription: The seedcorn maggot is a small (6–10 mm or 0.2–0.4 in.), yellowish-white, headless, legless larva (Photo 15–13). The body tapers to the front, with two small protracting mouth hooks. The adults resemble a small, elongated housefly that is slender, light grey and approximately 5 mm (0.2 in.) in length.
Photo 15–13. Seedcorn maggot larva. Source: Centre de recherche sur
les grains inc. (CEROM)
Life Cycle: There are two to four generations per year, though the first generations are the most damaging to the younger seedling crop. The seedcorn maggot overwinters in the pupal stage approximately 7–13 cm (0.3–0.5 in.) down in the soil. Adults emerge in early spring and are active at temperatures between 16°C and 29°C. Once mated, female adults (flies) search for an egg-laying site from April until the middle of June. The females are attracted to moist soils that give off an odour of decaying organic matter (crop residues, pre-plant tilled weeds, freshly applied and incorporated solid manure or freshly tilled soil. The adults lay their eggs in the crevices of wet soils. The larvae then penetrate germinating seeds. Peak adult activity occurs in early spring and in the fall, with larvae going into a summer diapause when temperatures are above 29°C.
Damage: The maggots burrow into germinating seeds (Photo 15–14), roots, cotyledon, embryo and hypocotyl, weakening the seedling. If conditions remain ideal, they can also mine the stem of the young seedling. Slow-to-emerge fields will experience gaps in stand. Unlike wireworm, seedcorn maggot damage is usually found over a generalized, large portion of the field (Photo 15–15).
Photo 15–14. Seedcorn maggot damage on bean seedling.
Source: J. Gavloski, Manitoba Government.
308
Agronomy guide for field Crops
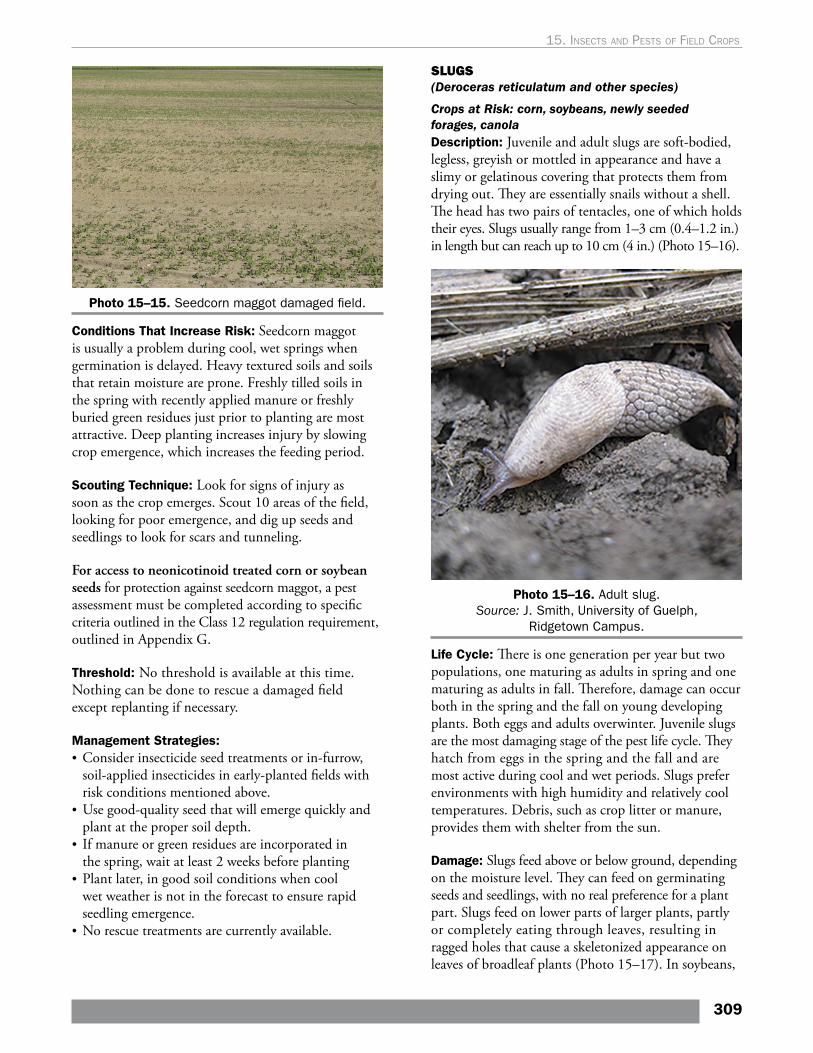
Photo 15–15. Seedcorn maggot damaged field.
Conditions That Increase Risk: Seedcorn maggot is usually a problem during cool, wet springs when germination is delayed. Heavy textured soils and soils that retain moisture are prone. Freshly tilled soils in the spring with recently applied manure or freshly buried green residues just prior to planting are most attractive. Deep planting increases injury by slowing crop emergence, which increases the feeding period.
Scouting Technique: Look for signs of injury as soon as the crop emerges. Scout 10 areas of the field, looking for poor emergence, and dig up seeds and seedlings to look for scars and tunneling.
For access to neonicotinoid treated corn or soybean seeds for protection against seedcorn maggot, a pest assessment must be completed according to specific criteria outlined in the Class 12 regulation requirement, outlined in Appendix G.
Threshold: No threshold is available at this time. Nothing can be done to rescue a damaged field except replanting if necessary.
Management Strategies: • Consider insecticide seed treatments or in-furrow,
soil-applied insecticides in early-planted fields with risk conditions mentioned above.
• Use good-quality seed that will emerge quickly and plant at the proper soil depth.
• If manure or green residues are incorporated in the spring, wait at least 2 weeks before planting
• Plant later, in good soil conditions when cool wet weather is not in the forecast to ensure rapid seedling emergence.
• No rescue treatments are currently available.
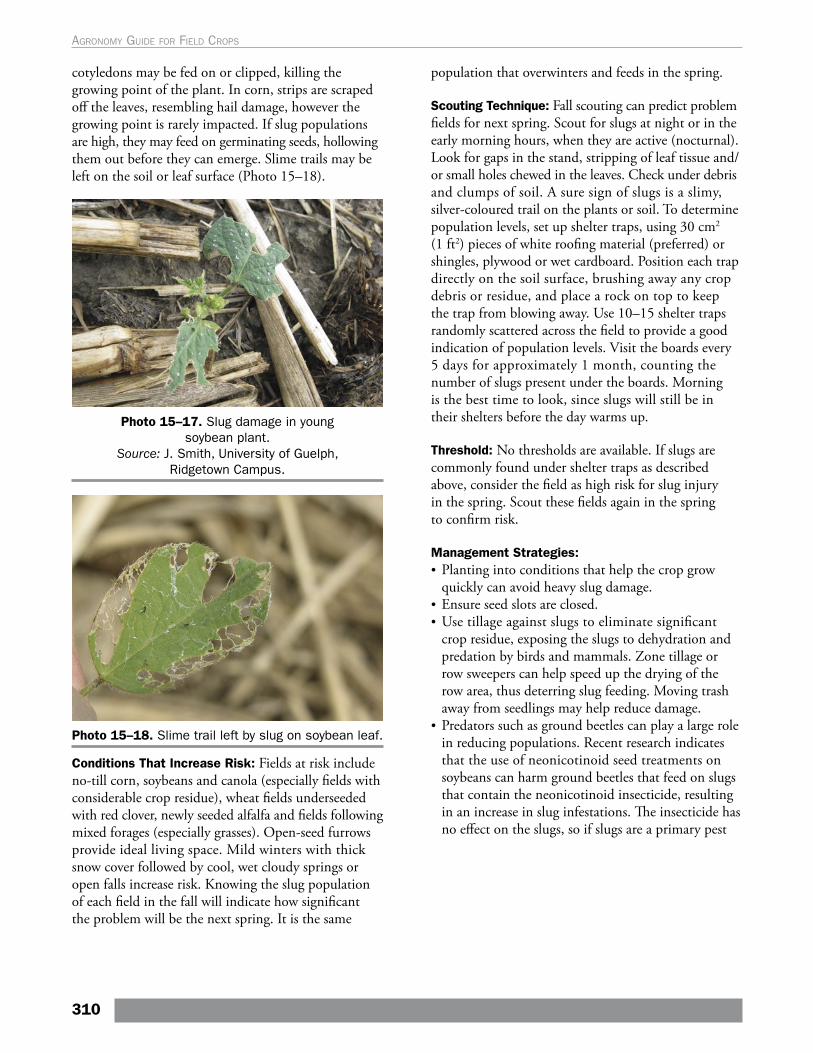
SLUGS (Deroceras reticulatum and other species)
Crops at Risk: corn, soybeans, newly seeded forages, canolaDescription: Juvenile and adult slugs are soft-bodied, legless, greyish or mottled in appearance and have a slimy or gelatinous covering that protects them from drying out. They are essentially snails without a shell. The head has two pairs of tentacles, one of which holds their eyes. Slugs usually range from 1–3 cm (0.4–1.2 in.) in length but can reach up to 10 cm (4 in.) (Photo 15–16).
Photo 15–16. Adult slug. Source: J. Smith, University of Guelph,
Ridgetown Campus.
Life Cycle: There is one generation per year but two populations, one maturing as adults in spring and one maturing as adults in fall. Therefore, damage can occur both in the spring and the fall on young developing plants. Both eggs and adults overwinter. Juvenile slugs are the most damaging stage of the pest life cycle. They hatch from eggs in the spring and the fall and are most active during cool and wet periods. Slugs prefer environments with high humidity and relatively cool temperatures. Debris, such as crop litter or manure, provides them with shelter from the sun.
Damage: Slugs feed above or below ground, depending on the moisture level. They can feed on germinating seeds and seedlings, with no real preference for a plant part. Slugs feed on lower parts of larger plants, partly or completely eating through leaves, resulting in ragged holes that cause a skeletonized appearance on leaves of broadleaf plants (Photo 15–17). In soybeans,
309
15. Insects and pests oF FIeld crops
cotyledons may be fed on or clipped, killing the growing point of the plant. In corn, strips are scraped off the leaves, resembling hail damage, however the growing point is rarely impacted. If slug populations are high, they may feed on germinating seeds, hollowing them out before they can emerge. Slime trails may be left on the soil or leaf surface (Photo 15–18).
Photo 15–17. Slug damage in young soybean plant.
Source: J. Smith, University of Guelph, Ridgetown Campus.
Photo 15–18. Slime trail left by slug on soybean leaf.
Conditions That Increase Risk: Fields at risk include no-till corn, soybeans and canola (especially fields with considerable crop residue), wheat fields underseeded with red clover, newly seeded alfalfa and fields following mixed forages (especially grasses). Open-seed furrows provide ideal living space. Mild winters with thick snow cover followed by cool, wet cloudy springs or open falls increase risk. Knowing the slug population of each field in the fall will indicate how significant the problem will be the next spring. It is the same
population that overwinters and feeds in the spring.
Scouting Technique: Fall scouting can predict problem fields for next spring. Scout for slugs at night or in the early morning hours, when they are active (nocturnal). Look for gaps in the stand, stripping of leaf tissue and/or small holes chewed in the leaves. Check under debris and clumps of soil. A sure sign of slugs is a slimy, silver-coloured trail on the plants or soil. To determine population levels, set up shelter traps, using 30 cm2 (1 ft2) pieces of white roofing material (preferred) or shingles, plywood or wet cardboard. Position each trap directly on the soil surface, brushing away any crop debris or residue, and place a rock on top to keep the trap from blowing away. Use 10–15 shelter traps randomly scattered across the field to provide a good indication of population levels. Visit the boards every 5 days for approximately 1 month, counting the number of slugs present under the boards. Morning is the best time to look, since slugs will still be in their shelters before the day warms up.
Threshold: No thresholds are available. If slugs are commonly found under shelter traps as described above, consider the field as high risk for slug injury in the spring. Scout these fields again in the spring to confirm risk.
Management Strategies: • Planting into conditions that help the crop grow
quickly can avoid heavy slug damage. • Ensure seed slots are closed.• Use tillage against slugs to eliminate significant
crop residue, exposing the slugs to dehydration and predation by birds and mammals. Zone tillage or row sweepers can help speed up the drying of the row area, thus deterring slug feeding. Moving trash away from seedlings may help reduce damage.
• Predators such as ground beetles can play a large role in reducing populations. Recent research indicates that the use of neonicotinoid seed treatments on soybeans can harm ground beetles that feed on slugs that contain the neonicotinoid insecticide, resulting in an increase in slug infestations. The insecticide has no effect on the slugs, so if slugs are a primary pest
310
Agronomy guide for field Crops

of concern, use fungicide-only treated seed to help promote ground beetle populations.
• There are presently no economically feasible chemical methods available for slug control in field crops. Insecticides (seed treatment, foliar or soil-applied) do not control slugs. Slug baits, made of iron phosphate pellets, are available for field crops but are not cost effective and are only recommended for use in small
problem areas of the field. Apply baits shortly after May 24 to achieve the highest potential for success.
• Experiments with 28% nitrogen/water mixtures or foliar potash applications have proven to be inconsistent and are not encouraged.
Corn Insects and PestsTable 15–1, Corn insect and pest symptoms in the field, shows symptoms of corn insects and pests.
Table 15–1. Corn insect and pest symptoms in the field
LEGEND: Y = symptom – = not a symptom
Symptom
Insects and Pests
Gru
bs (
page
301)
Wirew
orm
s (p
age
305)
Mill
iped
es (
page
30
7)
See
dcor
n m
aggo
t (p
age
308)
Slu
gs (
page
309)
Bla
ck c
utw
orm
(pa
ge 3
12)
Cor
n fle
a be
etle
(pa
ge 3
14)
True
arm
ywor
m (
page
315
)
Sti
nk b
ug (
page
316, 3
34)
Euro
pean
cor
n bo
rer
(pag
e 3
17)
Cor
n ro
otw
orm
larv
ae (
page
319)
Cor
n ro
otw
orm
adu
lts
(pag
e 320
)
Wes
tern
bea
n cu
twor
m (
page
322)
Cor
n ea
rwor
m (
page
32
4)
Fall
arm
ywor
m (
page
32
5)
Cor
n le
af a
phid
(pa
ge 3
21)
Seed and seedling damage
Seed is fed upon or hollowed out – Y Y Y Y – – – – – – – – – – –
Gaps or thinning of stand Y Y Y Y Y Y – – – – – – – – – –
Plant is stunted or wilting Y Y Y – – Y – – – – – – – – – –
Roots are clipped or missing Y Y Y – – – – – – – Y – – – – –
Plants are cut off at or below soil level – – – – – Y – – – – – – – – – –
Tunnelling along stem of seedling – – – Y – – – – – – – – – – – –
Plant is deformed or tillering – – – – – – – – Y – – – – – – –
Leaf tissue feeding
Pinholes or irregular holes in leaves – – – – – Y – Y – Y – – – – – –
Window-paned strips parallel with leaf vein – – – – – – Y – – – – Y – – – –
Leaves shredded similar to hail damage – – – – Y – – – – – – – – – – –
Entire leaf eaten except for midrib – – – – – – – Y – – – – – – – –
Stalk damage
Tunnelling within the stalk – – – – – – – – – Y – – – – – –
Goosenecking/plants lodging – – – – – – – – – – Y – – – – –
Ear damage
Surface feeding on kernel and/or tunnelling – – – – – – – – – Y – – Y – Y –
Kernels poorly developed or pierced – – – – – – – – Y – – – – Y – –
Large chunks of kernel missing – – – – – – – – – – – – Y Y Y –
Silks are clipped – – – – – – – – – – – Y Y Y – –
Ear drop – – – – – – – – – Y – – – – – –
Tassel damage
Tassels fed on – – – – – – – – – – – Y Y – – –
Tassels broken – – – – – – – – – Y – – – – – –
Tassels sticky or discoloured – – – – – – – – – – – – – – – Y
311
15. Insects and pests oF FIeld crops
Below Ground Corn PestsA number of pests feed on corn seeds and seedlings. Refer to the section Soil Insects and Pests of Field Crops, at the start of this chapter, for further information.
Insecticide seed treatments are commonly used on corn seed for crop protection against below ground insect pests. The planting of these treatments using vacuum planters pose a risk to pollinators. Refer to Chapter 14, Integrated Pest Management and Protecting Natural Enemies and Pollinators, for more information on best management practices and measures to help reduce the risk to pollinators.
GRUBS — SEE PAGE 301
WIREWORMS — SEE PAGE 305
MILLIPEDES — SEE PAGE 307
SEEDCORN MAGGOT — SEE PAGE 308
Above Ground Corn PestsCorn is foraged by bees. Take precautions to protect pollinators during any foliar insecticide applications. See Protecting Pollinators and Beneficials in Chapter 14 for more information.
SLUGS — SEE PAGE 309
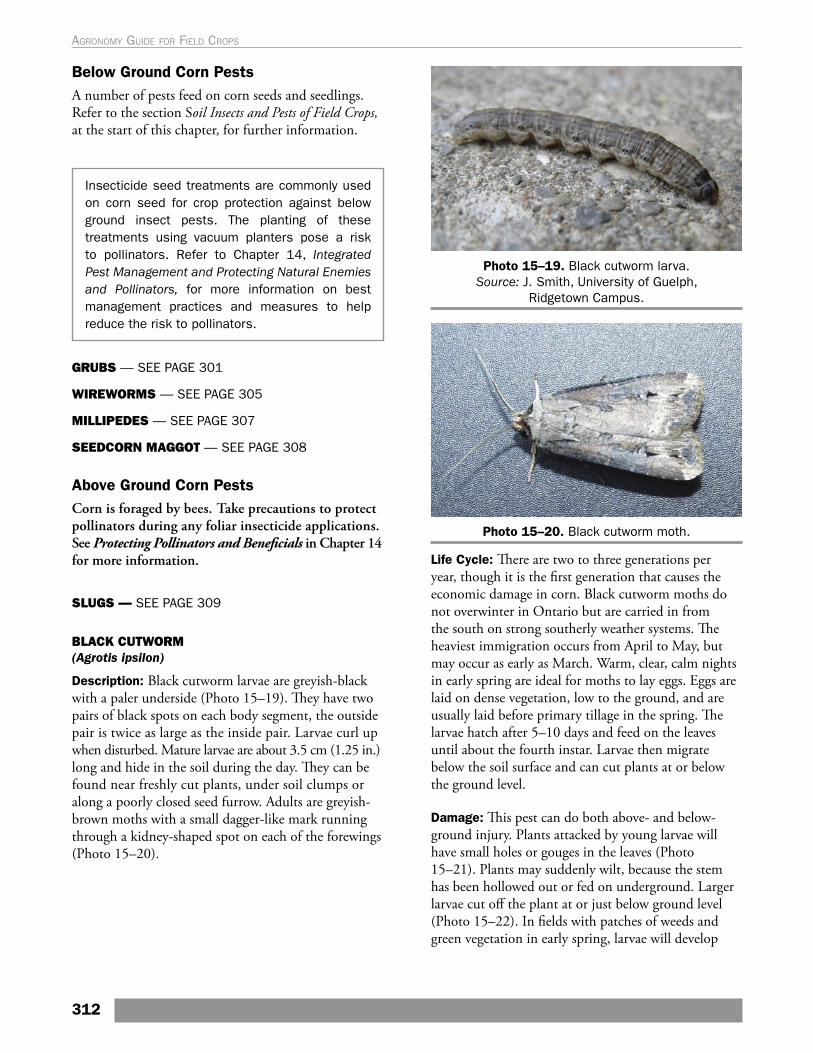
BLACK CUTWORM(Agrotis ipsilon)
Description: Black cutworm larvae are greyish-black with a paler underside (Photo 15–19). They have two pairs of black spots on each body segment, the outside pair is twice as large as the inside pair. Larvae curl up when disturbed. Mature larvae are about 3.5 cm (1.25 in.) long and hide in the soil during the day. They can be found near freshly cut plants, under soil clumps or along a poorly closed seed furrow. Adults are greyish-brown moths with a small dagger-like mark running through a kidney-shaped spot on each of the forewings (Photo 15–20).
Photo 15–19. Black cutworm larva. Source: J. Smith, University of Guelph,
Ridgetown Campus.
Photo 15–20. Black cutworm moth.
Life Cycle: There are two to three generations per year, though it is the first generation that causes the economic damage in corn. Black cutworm moths do not overwinter in Ontario but are carried in from the south on strong southerly weather systems. The heaviest immigration occurs from April to May, but may occur as early as March. Warm, clear, calm nights in early spring are ideal for moths to lay eggs. Eggs are laid on dense vegetation, low to the ground, and are usually laid before primary tillage in the spring. The larvae hatch after 5–10 days and feed on the leaves until about the fourth instar. Larvae then migrate below the soil surface and can cut plants at or below the ground level.
Damage: This pest can do both above- and below- ground injury. Plants attacked by young larvae will have small holes or gouges in the leaves (Photo 15–21). Plants may suddenly wilt, because the stem has been hollowed out or fed on underground. Larger larvae cut off the plant at or just below ground level (Photo 15–22). In fields with patches of weeds and green vegetation in early spring, larvae will develop
312
Agronomy guide for field Crops
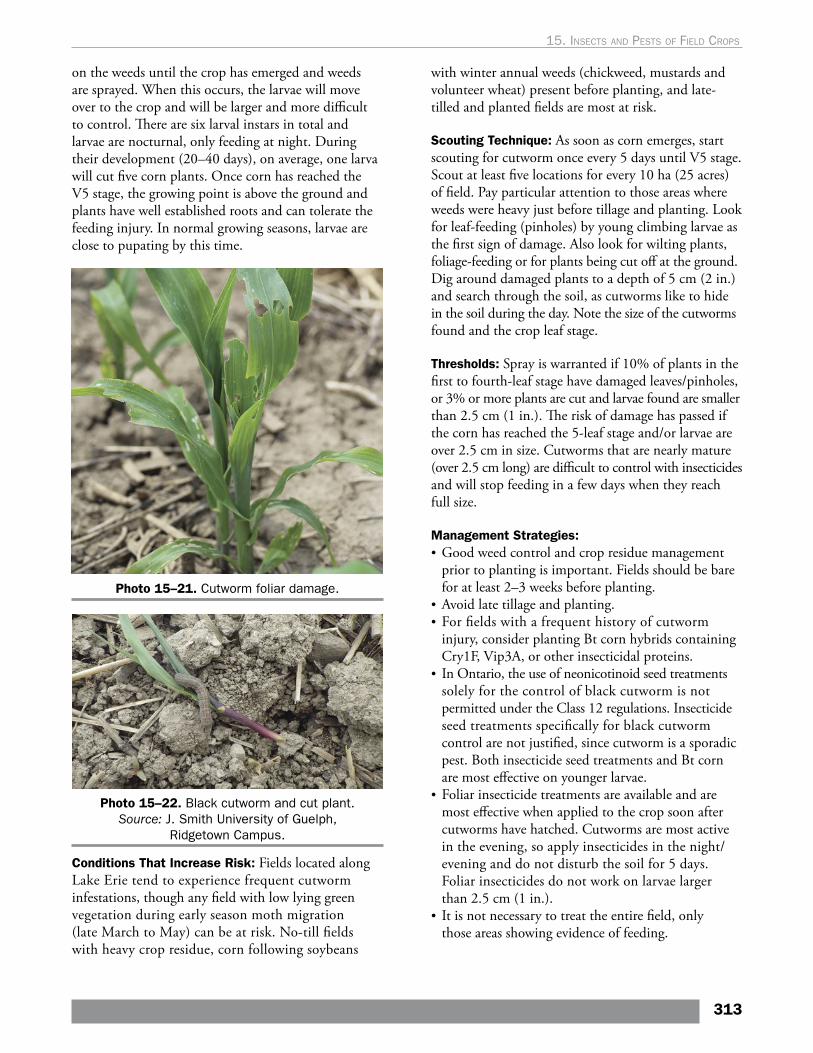
on the weeds until the crop has emerged and weeds are sprayed. When this occurs, the larvae will move over to the crop and will be larger and more difficult to control. There are six larval instars in total and larvae are nocturnal, only feeding at night. During their development (20–40 days), on average, one larva will cut five corn plants. Once corn has reached the V5 stage, the growing point is above the ground and plants have well established roots and can tolerate the feeding injury. In normal growing seasons, larvae are close to pupating by this time.
Photo 15–21. Cutworm foliar damage.
Photo 15–22. Black cutworm and cut plant. Source: J. Smith University of Guelph,
Ridgetown Campus.
Conditions That Increase Risk: Fields located along Lake Erie tend to experience frequent cutworm infestations, though any field with low lying green vegetation during early season moth migration (late March to May) can be at risk. No-till fields with heavy crop residue, corn following soybeans
with winter annual weeds (chickweed, mustards and volunteer wheat) present before planting, and late-tilled and planted fields are most at risk.
Scouting Technique: As soon as corn emerges, start scouting for cutworm once every 5 days until V5 stage. Scout at least five locations for every 10 ha (25 acres) of field. Pay particular attention to those areas where weeds were heavy just before tillage and planting. Look for leaf-feeding (pinholes) by young climbing larvae as the first sign of damage. Also look for wilting plants, foliage-feeding or for plants being cut off at the ground. Dig around damaged plants to a depth of 5 cm (2 in.) and search through the soil, as cutworms like to hide in the soil during the day. Note the size of the cutworms found and the crop leaf stage.
Thresholds: Spray is warranted if 10% of plants in the first to fourth-leaf stage have damaged leaves/pinholes, or 3% or more plants are cut and larvae found are smaller than 2.5 cm (1 in.). The risk of damage has passed if the corn has reached the 5-leaf stage and/or larvae are over 2.5 cm in size. Cutworms that are nearly mature (over 2.5 cm long) are difficult to control with insecticides and will stop feeding in a few days when they reach full size.
Management Strategies: • Good weed control and crop residue management
prior to planting is important. Fields should be bare for at least 2–3 weeks before planting.
• Avoid late tillage and planting.• For fields with a frequent history of cutworm
injury, consider planting Bt corn hybrids containing Cry1F, Vip3A, or other insecticidal proteins.
• In Ontario, the use of neonicotinoid seed treatments solely for the control of black cutworm is not permitted under the Class 12 regulations. Insecticide seed treatments specifically for black cutworm control are not justified, since cutworm is a sporadic pest. Both insecticide seed treatments and Bt corn are most effective on younger larvae.
• Foliar insecticide treatments are available and are most effective when applied to the crop soon after cutworms have hatched. Cutworms are most active in the evening, so apply insecticides in the night/evening and do not disturb the soil for 5 days. Foliar insecticides do not work on larvae larger than 2.5 cm (1 in.).
• It is not necessary to treat the entire field, only those areas showing evidence of feeding.
313
15. Insects and pests oF FIeld crops
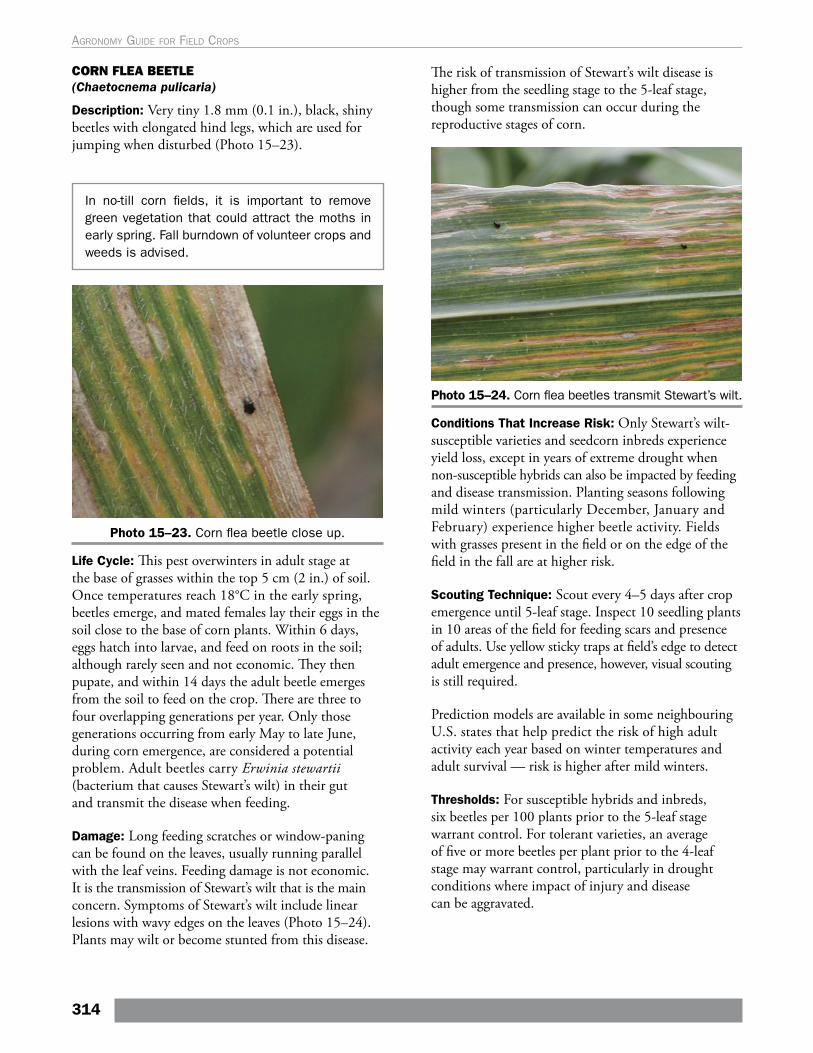
CORN FLEA BEETLE (Chaetocnema pulicaria)
Description: Very tiny 1.8 mm (0.1 in.), black, shiny beetles with elongated hind legs, which are used for jumping when disturbed (Photo 15–23).
In no-till corn fields, it is important to remove green vegetation that could attract the moths in early spring. Fall burndown of volunteer crops and weeds is advised.
Photo 15–23. Corn flea beetle close up.
Life Cycle: This pest overwinters in adult stage at the base of grasses within the top 5 cm (2 in.) of soil. Once temperatures reach 18°C in the early spring, beetles emerge, and mated females lay their eggs in the soil close to the base of corn plants. Within 6 days, eggs hatch into larvae, and feed on roots in the soil; although rarely seen and not economic. They then pupate, and within 14 days the adult beetle emerges from the soil to feed on the crop. There are three to four overlapping generations per year. Only those generations occurring from early May to late June, during corn emergence, are considered a potential problem. Adult beetles carry Erwinia stewartii (bacterium that causes Stewart’s wilt) in their gut and transmit the disease when feeding.
Damage: Long feeding scratches or window-paning can be found on the leaves, usually running parallel with the leaf veins. Feeding damage is not economic. It is the transmission of Stewart’s wilt that is the main concern. Symptoms of Stewart’s wilt include linear lesions with wavy edges on the leaves (Photo 15–24). Plants may wilt or become stunted from this disease.
The risk of transmission of Stewart’s wilt disease is higher from the seedling stage to the 5-leaf stage, though some transmission can occur during the reproductive stages of corn.
Photo 15–24. Corn flea beetles transmit Stewart’s wilt.
Conditions That Increase Risk: Only Stewart’s wilt-susceptible varieties and seedcorn inbreds experience yield loss, except in years of extreme drought when non-susceptible hybrids can also be impacted by feeding and disease transmission. Planting seasons following mild winters (particularly December, January and February) experience higher beetle activity. Fields with grasses present in the field or on the edge of the field in the fall are at higher risk.
Scouting Technique: Scout every 4–5 days after crop emergence until 5-leaf stage. Inspect 10 seedling plants in 10 areas of the field for feeding scars and presence of adults. Use yellow sticky traps at field’s edge to detect adult emergence and presence, however, visual scouting is still required.
Prediction models are available in some neighbouring U.S. states that help predict the risk of high adult activity each year based on winter temperatures and adult survival — risk is higher after mild winters.
Thresholds: For susceptible hybrids and inbreds, six beetles per 100 plants prior to the 5-leaf stage warrant control. For tolerant varieties, an average of five or more beetles per plant prior to the 4-leaf stage may warrant control, particularly in drought conditions where impact of injury and disease can be aggravated.
314
Agronomy guide for field Crops

Management Strategies: • Plant tolerant hybrids, especially following
a mild winter.• Avoid early planting dates for susceptible
hybrids, particularly following a mild winter.• Be diligent about weed management, especially
grasses in the beginning of the season because they attract flea beetles.
• In Ontario, the use of neonicotinoid seed treatments on grain or silage corn solely for the control of corn flea beetle is not permitted under the Class 12 regulations. Use insecticide seed treatment for seed corn inbreds planted in fields with a history of flea beetle infestations.
• Foliar insecticides are effective. Additional foliar sprays may be necessary for seed corn and susceptible varieties if populations are very high. It is not economical to spray corn with insecticides to protect against the transmission of Stewart’s wilt, except for highly susceptible inbreds and hybrids.
TRUE ARMYWORM(Mythimna unipuncta)
Description: Full grown, true armyworm are 4 cm (1.5 in.) long. The dull-green to brown larvae can easily be confused with other caterpillars, including variegated cutworm and fall armyworm. Variegated cutworm have distinctive yellow dots along the top of the first few abdominal segments of the larvae. Both true and fall armyworm have white-bordered stripes running laterally along the body, but only true armyworm have dark diagonal bands at the top of each abdominal proleg (Photo 15–25). The head is yellow-brown with a network of dark-brown lines creating a mottled pattern. The adult sand-coloured moth has distinctive white spots on the centre of each forewing.
Life Cycle: There are two generations per year, but the first generation tends to do the most damage to corn in Ontario. True armyworms overwinter as far north as Pennsylvania. Moths emerge in early spring and migrate into Ontario via weather fronts. Adults prefer to lay their eggs in grassy vegetation, including grassy weeds, cereals, grassy forages and rye cover crop. Larvae hatch from the eggs and feed at night or on overcast days, for approximately a month. Ontario has experienced injury in corn from second-generation larvae in late June in rare, extreme outbreak years. Outbreak years tend to coincide with cool wet springs that are detrimental to the parasites which typically control armyworm.
Photo 15–25. True armyworm larva.
Damage: True armyworm larvae feed at night. Most feeding damage is done on corn in June to early July, but can start in late May. In conventional-till corn fields, damage usually occurs first in the border rows, whereas infestations may develop throughout no-till corn following small grains, sod, mixed forages or fields that had pre-plant grassy weeds. True armyworm also frequently invades corn fields from neighbouring cereal fields. Larvae strip the leaf margins, moving up the plant to feed on the panicles and flowers leaving only the midrib (Photo 15–26). As long as the growing point of the plant is not damaged, the corn plant will be able to recover from moderate feeding.
Photo 15–26. Armyworm leaf feeding in corn.
Conditions That Increase Risk: Reduced till fields planted after sod, mixed forages or with pre-plant grassy weeds, and fields neighbouring cereals.
315
15. Insects and pests oF FIeld crops
Scouting Technique: The best time to scout for true armyworm is shortly after dusk when larvae are actively feeding. Examine 20 plants in five areas in the field (100 plants total). During the day, you may find the larvae in the whorl, leaf axil, amongst the crop debris on the soil surface or under soil clods. Brown frass, often mistaken for eggs, may also be present in the whorl or on the soil near the plant. When scouting, check the backs of armyworms for eggs. These small, oval, yellowish white eggs are usually located just behind the head of the larva (Photo 15–73). These are eggs of a parasitic fly. The eggs will hatch, and the maggots mine inside the armyworm larva and kill it. Record the size and number of larvae. Scout along the field boundaries bordering cereal, sod/turf and corn crops since larvae will “march” in from neighbouring fields and may be controlled prior to entering the corn field.
Threshold: Foliar insecticide may be warranted in seedling corn if there are two or more unparasitized larvae per seedling, or if 10% or more of the plants have feeding and larvae are smaller than 2.5 cm (1 in.). For corn past the 6-leaf stage, if 50% of the plants have leaf-feeding damage and are infested with larvae smaller than 2.5 cm (1 in.), insecticide treatment may be warranted. As long as the growing point of the plant is not damaged, the corn plant is usually able to recover from moderate feeding.
Management Strategies: • If the larvae are over 2.5 cm (1 in.) long, there is
no benefit in applying insecticide, since most of the feeding damage has already occurred and the insecticide is not effective on larger larvae.
• Treatment may be confined to infested areas. If armyworm are migrating from adjacent cereal or corn fields, spraying an insecticide along the field border may be sufficient.
• Parasites and other beneficial organisms usually keep armyworms from reaching damaging levels, though cool, wet springs are not favourable for these parasites. Avoid treating with insecticides when large numbers of parasitized larvae are present.
• Eliminate grassy weeds which are attractive to armyworm moths for egg-laying. However, late-season grass control may not be a good option, since this will cause the feeding larvae to migrate from the dead grassy weeds to the crop itself.
STINK BUGS
BROWN STINK BUG(Euschistus servus)
GREEN STINK BUG(Chinavia hilaris)
BROWN MARMORATED STINK BUG(Halyomorpha halys)
Description and Life Cycle: See page 334
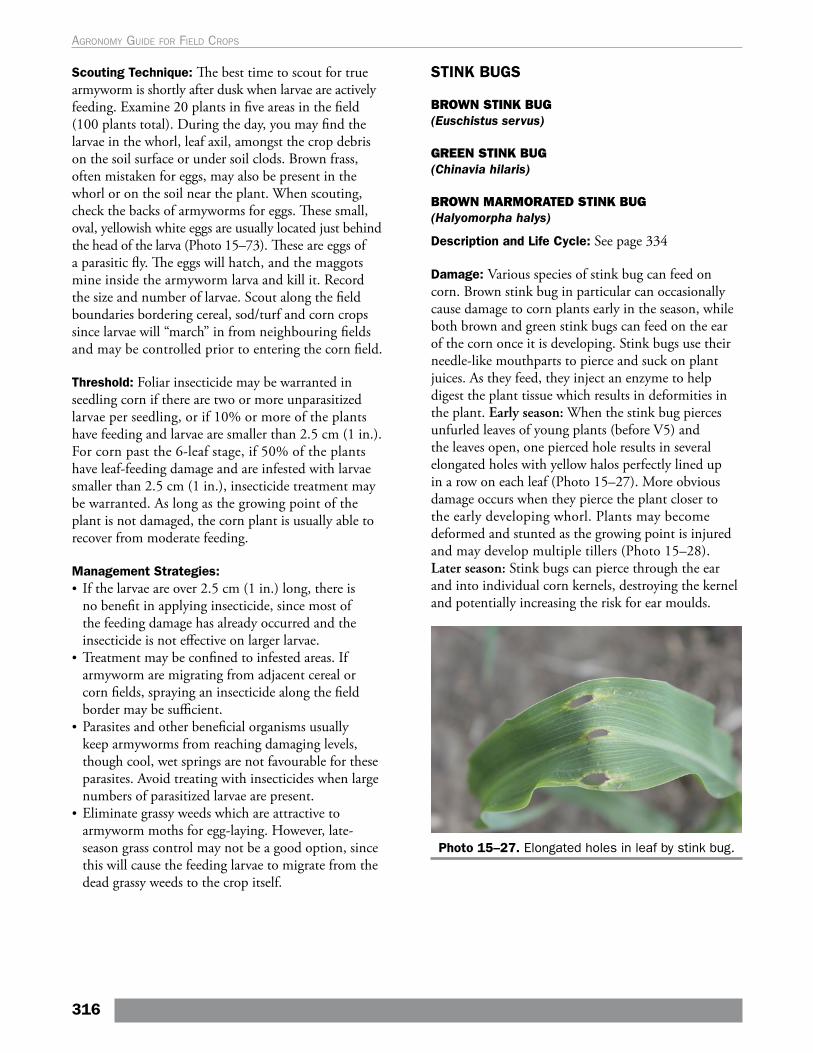
Damage: Various species of stink bug can feed on corn. Brown stink bug in particular can occasionally cause damage to corn plants early in the season, while both brown and green stink bugs can feed on the ear of the corn once it is developing. Stink bugs use their needle-like mouthparts to pierce and suck on plant juices. As they feed, they inject an enzyme to help digest the plant tissue which results in deformities in the plant. Early season: When the stink bug pierces unfurled leaves of young plants (before V5) and the leaves open, one pierced hole results in several elongated holes with yellow halos perfectly lined up in a row on each leaf (Photo 15–27). More obvious damage occurs when they pierce the plant closer to the early developing whorl. Plants may become deformed and stunted as the growing point is injured and may develop multiple tillers (Photo 15–28). Later season: Stink bugs can pierce through the ear and into individual corn kernels, destroying the kernel and potentially increasing the risk for ear moulds.
Photo 15–27. Elongated holes in leaf by stink bug.
316
Agronomy guide for field Crops
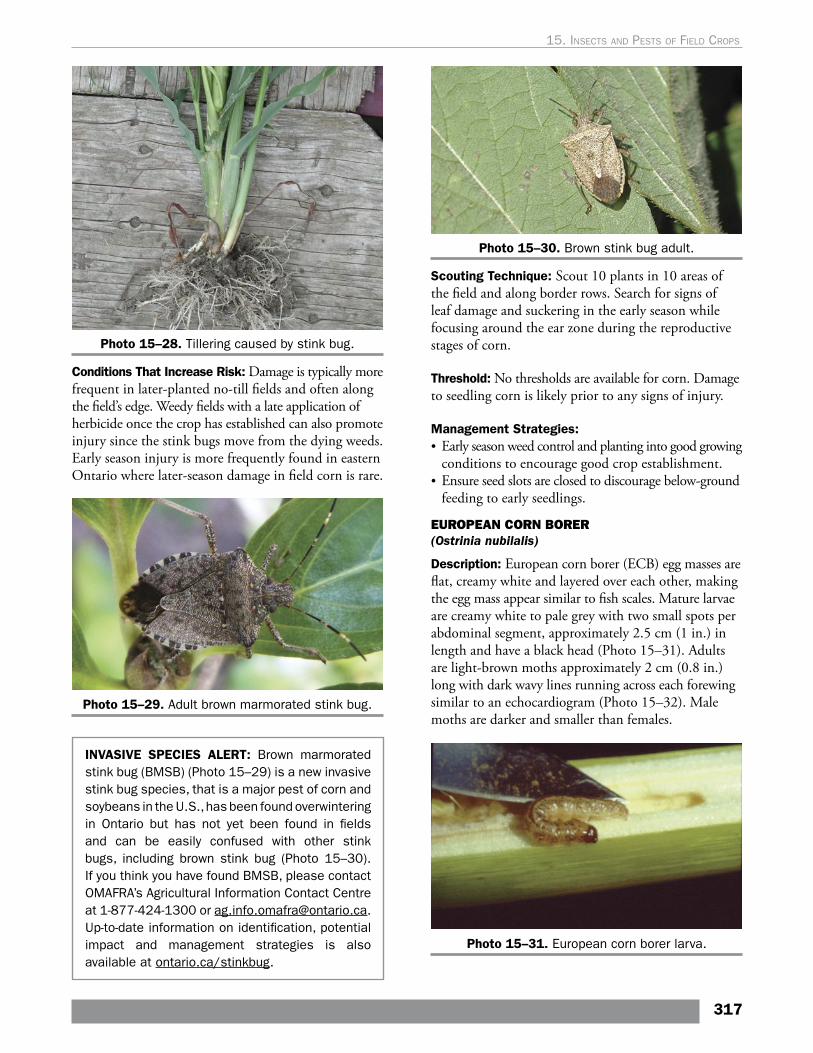
Photo 15–28. Tillering caused by stink bug.
Conditions That Increase Risk: Damage is typically more frequent in later-planted no-till fields and often along the field’s edge. Weedy fields with a late application of herbicide once the crop has established can also promote injury since the stink bugs move from the dying weeds. Early season injury is more frequently found in eastern Ontario where later-season damage in field corn is rare.
Photo 15–29. Adult brown marmorated stink bug.
INVASIVE SPECIES ALERT: Brown marmorated stink bug (BMSB) (Photo 15–29) is a new invasive stink bug species, that is a major pest of corn and soybeans in the U.S., has been found overwintering in Ontario but has not yet been found in fields and can be easily confused with other stink bugs, including brown stink bug (Photo 15–30). If you think you have found BMSB, please contact OMAFRA’s Agricultural Information Contact Centre at 1-877-424-1300 or [email protected]. Up-to-date information on identification, potential impact and management strategies is also available at ontario.ca/stinkbug.
Photo 15–30. Brown stink bug adult.
Scouting Technique: Scout 10 plants in 10 areas of the field and along border rows. Search for signs of leaf damage and suckering in the early season while focusing around the ear zone during the reproductive stages of corn.
Threshold: No thresholds are available for corn. Damage to seedling corn is likely prior to any signs of injury.
Management Strategies: • Early season weed control and planting into good growing
conditions to encourage good crop establishment.• Ensure seed slots are closed to discourage below-ground
feeding to early seedlings.
EUROPEAN CORN BORER (Ostrinia nubilalis)
Description: European corn borer (ECB) egg masses are flat, creamy white and layered over each other, making the egg mass appear similar to fish scales. Mature larvae are creamy white to pale grey with two small spots per abdominal segment, approximately 2.5 cm (1 in.) in length and have a black head (Photo 15–31). Adults are light-brown moths approximately 2 cm (0.8 in.) long with dark wavy lines running across each forewing similar to an echocardiogram (Photo 15–32). Male moths are darker and smaller than females.
Photo 15–31. European corn borer larva.
317
15. Insects and pests oF FIeld crops

Photo 15–32. European corn borer moth.
Life Cycle: There are two distinct strains in Ontario. South of a line from Sarnia to Simcoe, a bivoltine strain can undergo multiple generations (typically two), depending on the length of the season. North of this line, a univoltine strain has only one generation per year. There is a band of overlap for these two strains, about 50–80 km wide along this line. The insect overwinters as larvae in corn stalks and other residue left on the surface from the previous growing season. As day-length increases and average day temperatures exceed 10°C, the larvae pupate. Pupae are found within larval feeding tunnels and require 2 weeks to develop before adults emerge. While emergence begins around the third week of May in the southernmost regions of the province, moths do not usually appear until mid-June in eastern Ontario. Once moths emerge, they fly to nearby “action sites” or vegetative habitats, such as fencerows, ditches and hedgerows along fields. Once mated, females leave the action sites to lay eggs on the host crop. Eggs are generally laid on the underside of leaves, close to the midrib. Where univoltine ECB are present, larvae develop through the season until autumn, when as fifth instars they prepare for overwintering. Where bivoltine ECB are present, first-generation larvae will pupate in mid-summer, emerge as adults and complete a second generation before entering diapause in the fall.
Damage: Early-season larvae feed on leaves, creating small pinholes and eventually migrate into the whorl of the plant and attack the enclosed tassel. Later-season larvae feed briefly on the leaves, bore into the midrib of the leaf and then migrate into the stalk of the plant and husk of the ear. Larvae may also feed directly on the developing kernels. Stalk lodging and ear droppage may occur as a result of significant infestations. This pest can carry both stalk rots and ear rots into the plant.
Conditions That Increase Risk: With the widespread use of ECB Bt corn hybrids, ECB populations have been reduced to very low levels in corn and are more likely to be found in other host crops. Only those fields not planted with a Bt hybrid are at risk. No-till fields with high residue are at risk, along with frequent corn crops in the rotation. Regions with a high percentage of corn (50% or greater in region) and regions where univoltine and bivoltine strains overlap are also at risk.
Scouting Technique: Early-season moths are attracted to taller, early-planted corn fields while second-generation corn borer female moths are attracted to late-planted fields that are silking/tasselling later than normal. Examine a minimum of five sets of 20 plants (100 plants per field).
First-generation scouting — Look for leaf-feeding damage. Pull out and unroll the whorl of the damaged plants, looking for small larvae. Split the stalk of the plants from top to bottom to locate older larvae. Record the percentage of damaged plants, and number and size of larvae found.
Second-generation scouting — Look for egg masses on the underside of leaves close to the midrib of the plant. Concentrate scouting efforts to the three leaves above and below the ear of the plant. Record the percentage of plants with egg masses. Repeat scouting every 5–7 days until peak moth flights have subsided (approximately 1 month).
Economic Thresholds for Non-Bt Corn Hybrids: See Appendix H, European Corn Borer Economic Threshold Calculations, to calculate ECB economic thresholds for field corn. For seed corn, see the publication Seed Corn Best Management Practices for Ontario, available at www.scgo.ca/seed-corn-ontario-research/
Management Strategies for Non-Bt Corn Hybrids: • Insecticides have generally not provided economic
control of ECB in field corn. • When ECB Bt corn hybrids cannot be used, select
non-Bt corn hybrids with resistance or tolerance to ECB feeding that have good agronomics and stalk strength.
• Shredding debris after harvest is an effective way to destroy borers overwintering in stalks and stubble. Leave as little stalk as possible.
• Immature stages of ECB are attacked by natural enemies. Predators such as lady beetles and minute pirate bugs feed on the eggs and young larvae. Parasitic wasps and predaceous mites can also help control this pest.
318
Agronomy guide for field Crops
Management Strategies for ECB Bt Corn Hybrids:• If ECB Bt corn is planned, the Canadian Food
Inspection Agency requires producers to follow insect resistance management (IRM) strategies. This requirement is endorsed by the Canadian Corn Pest Coalition.
• The amount of refuge that is needed and where it must be planted depends on the type of Bt hybrid that has been purchased. Go to the Refuge Selector at www.refugeselector.ca/ to find out how much refuge must be planted for the chosen Bt corn products, and what refuge hybrids are available for a specific area.
• Do not mix Bt and non-Bt corn seed on farm, at or before planting.
• Conventional or single trait herbicide-tolerant corn hybrids can be used as refuge if they are of similar maturity and agronomics as the Bt corn hybrid — within 100–150 crop heat units (CHU). They must also be planted at the same time as the Bt corn so that both are equally attractive to the female moths for egg laying.
• The refuge may be treated for corn rootworm (CRW) larval control with soil-applied or seed insecticides if economic thresholds prescribe it.
• If thresholds indicate that control is warranted, the non-Bt refuge may be treated with a foliar insecticide (except those that contain Bt) for control of other caterpillar pests (e.g., Western bean cutworm). If the refuge is treated, the Bt corn must also be treated.
Both the Canadian Corn Pest Coalition website, www.cornpest.com, and the Refuge Selector, www.refugeselector.ca, provide specific information on insect biology, currently registered Bt products in Canada and refuge requirements.
Producers planting stacked Bt corn hybrids containing both ECB and corn rootworm (CRW) Bt must follow the CRW refuge requirements outlined for corn rootworm.
CORN ROOTWORM (Diabrotica virgifera and Diabrotica barberi)
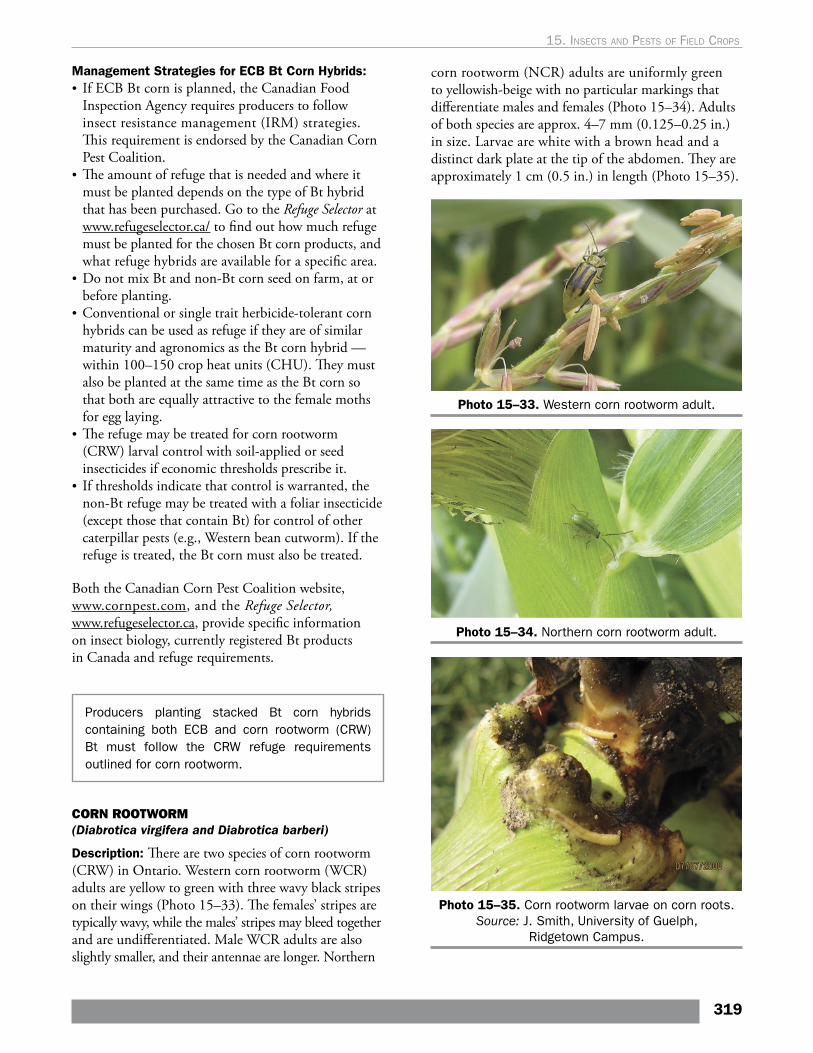
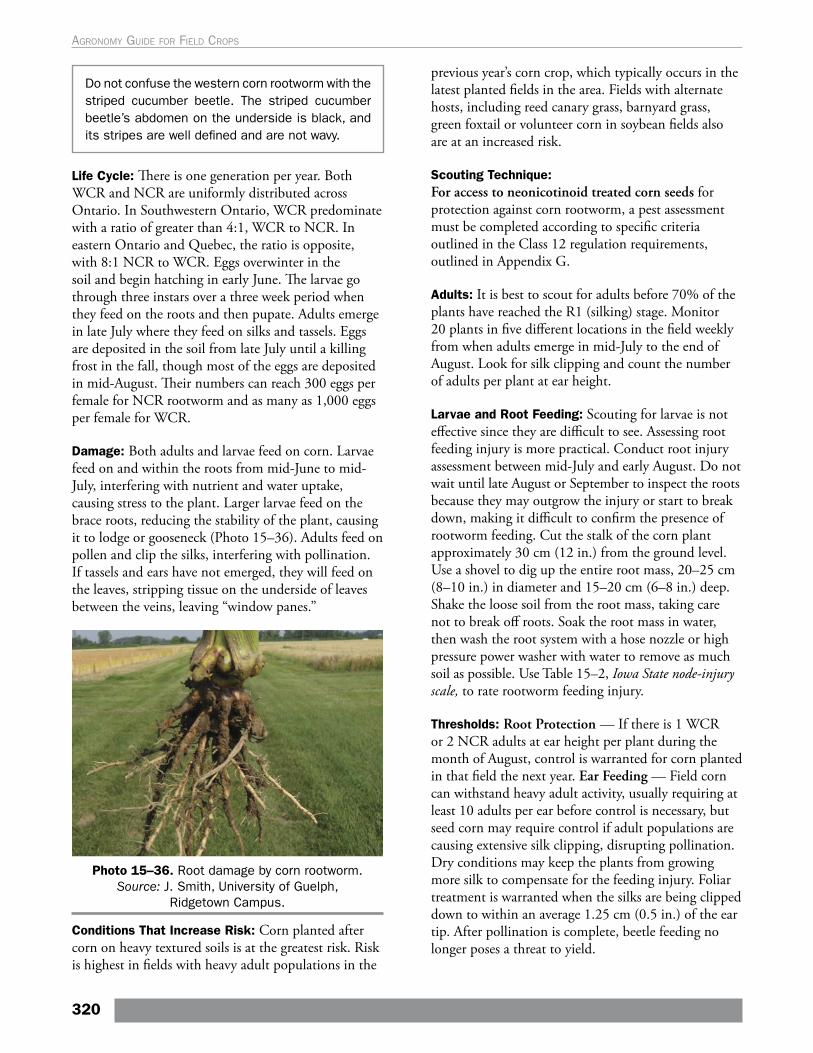
Description: There are two species of corn rootworm (CRW) in Ontario. Western corn rootworm (WCR) adults are yellow to green with three wavy black stripes on their wings (Photo 15–33). The females’ stripes are typically wavy, while the males’ stripes may bleed together and are undifferentiated. Male WCR adults are also slightly smaller, and their antennae are longer. Northern
corn rootworm (NCR) adults are uniformly green to yellowish-beige with no particular markings that differentiate males and females (Photo 15–34). Adults of both species are approx. 4–7 mm (0.125–0.25 in.) in size. Larvae are white with a brown head and a distinct dark plate at the tip of the abdomen. They are approximately 1 cm (0.5 in.) in length (Photo 15–35).
Photo 15–33. Western corn rootworm adult.
Photo 15–34. Northern corn rootworm adult.
Photo 15–35. Corn rootworm larvae on corn roots. Source: J. Smith, University of Guelph,
Ridgetown Campus.
319
15. Insects and pests oF FIeld crops
Do not confuse the western corn rootworm with the striped cucumber beetle. The striped cucumber beetle’s abdomen on the underside is black, and its stripes are well defined and are not wavy.
Life Cycle: There is one generation per year. Both WCR and NCR are uniformly distributed across Ontario. In Southwestern Ontario, WCR predominate with a ratio of greater than 4:1, WCR to NCR. In eastern Ontario and Quebec, the ratio is opposite, with 8:1 NCR to WCR. Eggs overwinter in the soil and begin hatching in early June. The larvae go through three instars over a three week period when they feed on the roots and then pupate. Adults emerge in late July where they feed on silks and tassels. Eggs are deposited in the soil from late July until a killing frost in the fall, though most of the eggs are deposited in mid-August. Their numbers can reach 300 eggs per female for NCR rootworm and as many as 1,000 eggs per female for WCR.
Damage: Both adults and larvae feed on corn. Larvae feed on and within the roots from mid-June to mid-July, interfering with nutrient and water uptake, causing stress to the plant. Larger larvae feed on the brace roots, reducing the stability of the plant, causing it to lodge or gooseneck (Photo 15–36). Adults feed on pollen and clip the silks, interfering with pollination. If tassels and ears have not emerged, they will feed on the leaves, stripping tissue on the underside of leaves between the veins, leaving “window panes.”
Photo 15–36. Root damage by corn rootworm. Source: J. Smith, University of Guelph,
Ridgetown Campus.
Conditions That Increase Risk: Corn planted after corn on heavy textured soils is at the greatest risk. Risk is highest in fields with heavy adult populations in the
previous year’s corn crop, which typically occurs in the latest planted fields in the area. Fields with alternate hosts, including reed canary grass, barnyard grass, green foxtail or volunteer corn in soybean fields also are at an increased risk.
Scouting Technique: For access to neonicotinoid treated corn seeds for protection against corn rootworm, a pest assessment must be completed according to specific criteria outlined in the Class 12 regulation requirements, outlined in Appendix G.
Adults: It is best to scout for adults before 70% of the plants have reached the R1 (silking) stage. Monitor 20 plants in five different locations in the field weekly from when adults emerge in mid-July to the end of August. Look for silk clipping and count the number of adults per plant at ear height.
Larvae and Root Feeding: Scouting for larvae is not effective since they are difficult to see. Assessing root feeding injury is more practical. Conduct root injury assessment between mid-July and early August. Do not wait until late August or September to inspect the roots because they may outgrow the injury or start to break down, making it difficult to confirm the presence of rootworm feeding. Cut the stalk of the corn plant approximately 30 cm (12 in.) from the ground level. Use a shovel to dig up the entire root mass, 20–25 cm (8–10 in.) in diameter and 15–20 cm (6–8 in.) deep. Shake the loose soil from the root mass, taking care not to break off roots. Soak the root mass in water, then wash the root system with a hose nozzle or high pressure power washer with water to remove as much soil as possible. Use Table 15–2, Iowa State node-injury scale, to rate rootworm feeding injury.
Thresholds: Root Protection — If there is 1 WCR or 2 NCR adults at ear height per plant during the month of August, control is warranted for corn planted in that field the next year. Ear Feeding — Field corn can withstand heavy adult activity, usually requiring at least 10 adults per ear before control is necessary, but seed corn may require control if adult populations are causing extensive silk clipping, disrupting pollination. Dry conditions may keep the plants from growing more silk to compensate for the feeding injury. Foliar treatment is warranted when the silks are being clipped down to within an average 1.25 cm (0.5 in.) of the ear tip. After pollination is complete, beetle feeding no longer poses a threat to yield.
320
Agronomy guide for field Crops
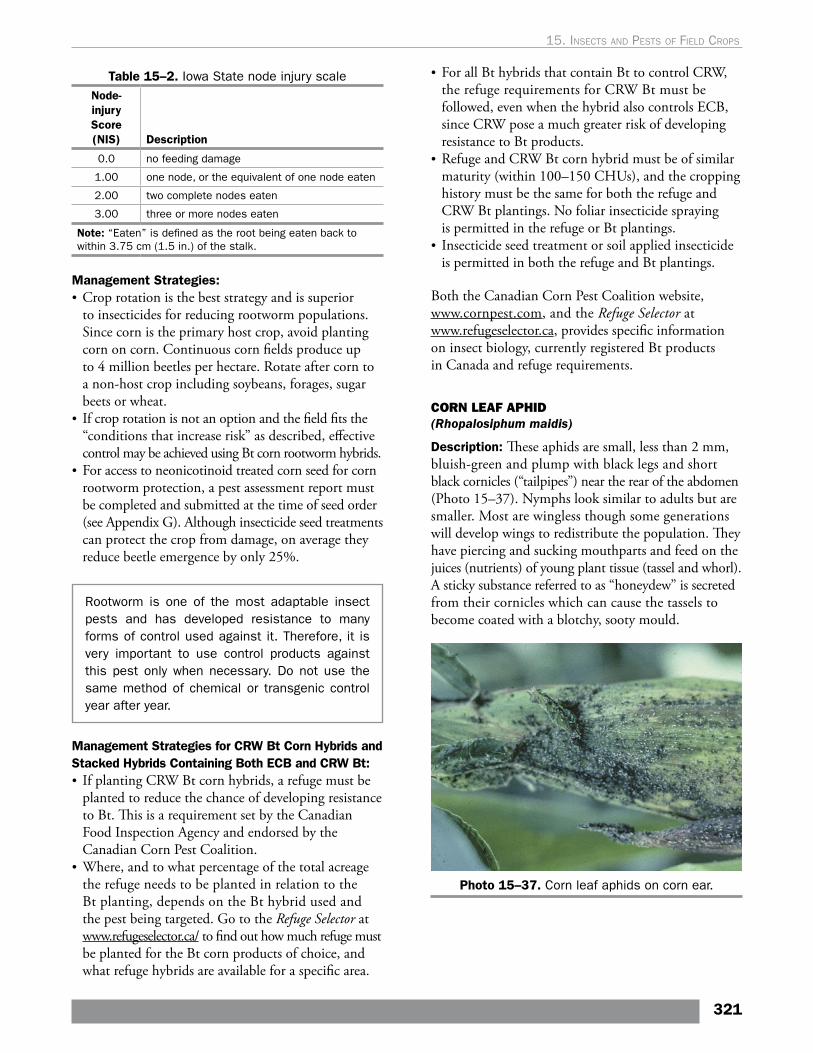
Table 15–2. Iowa State node injury scaleNode-injury Score (NIS) Description
0.0 no feeding damage
1.00 one node, or the equivalent of one node eaten
2.00 two complete nodes eaten
3.00 three or more nodes eaten
Note: “Eaten” is defined as the root being eaten back to within 3.75 cm (1.5 in.) of the stalk.
Management Strategies: • Crop rotation is the best strategy and is superior
to insecticides for reducing rootworm populations. Since corn is the primary host crop, avoid planting corn on corn. Continuous corn fields produce up to 4 million beetles per hectare. Rotate after corn to a non-host crop including soybeans, forages, sugar beets or wheat.
• If crop rotation is not an option and the field fits the “conditions that increase risk” as described, effective control may be achieved using Bt corn rootworm hybrids.
• For access to neonicotinoid treated corn seed for corn rootworm protection, a pest assessment report must be completed and submitted at the time of seed order (see Appendix G). Although insecticide seed treatments can protect the crop from damage, on average they reduce beetle emergence by only 25%.
Rootworm is one of the most adaptable insect pests and has developed resistance to many forms of control used against it. Therefore, it is very important to use control products against this pest only when necessary. Do not use the same method of chemical or transgenic control year after year.
Management Strategies for CRW Bt Corn Hybrids and Stacked Hybrids Containing Both ECB and CRW Bt:• If planting CRW Bt corn hybrids, a refuge must be
planted to reduce the chance of developing resistance to Bt. This is a requirement set by the Canadian Food Inspection Agency and endorsed by the Canadian Corn Pest Coalition.
• Where, and to what percentage of the total acreage the refuge needs to be planted in relation to the Bt planting, depends on the Bt hybrid used and the pest being targeted. Go to the Refuge Selector at www.refugeselector.ca/ to find out how much refuge must be planted for the Bt corn products of choice, and what refuge hybrids are available for a specific area.
• For all Bt hybrids that contain Bt to control CRW, the refuge requirements for CRW Bt must be followed, even when the hybrid also controls ECB, since CRW pose a much greater risk of developing resistance to Bt products.
• Refuge and CRW Bt corn hybrid must be of similar maturity (within 100–150 CHUs), and the cropping history must be the same for both the refuge and CRW Bt plantings. No foliar insecticide spraying is permitted in the refuge or Bt plantings.
• Insecticide seed treatment or soil applied insecticide is permitted in both the refuge and Bt plantings.
Both the Canadian Corn Pest Coalition website, www.cornpest.com, and the Refuge Selector at www.refugeselector.ca, provides specific information on insect biology, currently registered Bt products in Canada and refuge requirements.
CORN LEAF APHID (Rhopalosiphum maidis)
Description: These aphids are small, less than 2 mm, bluish-green and plump with black legs and short black cornicles (“tailpipes”) near the rear of the abdomen (Photo 15–37). Nymphs look similar to adults but are smaller. Most are wingless though some generations will develop wings to redistribute the population. They have piercing and sucking mouthparts and feed on the juices (nutrients) of young plant tissue (tassel and whorl). A sticky substance referred to as “honeydew” is secreted from their cornicles which can cause the tassels to become coated with a blotchy, sooty mould.
Photo 15–37. Corn leaf aphids on corn ear.
321
15. Insects and pests oF FIeld crops

Life Cycle: There are several generations per year. This pest does not overwinter in Ontario but arrives each year on air currents from the south typically in the month of July and August. Initial spring migrants feed on cereals, until corn becomes attractive. Migrating populations are comprised of winged females only. Once they settle, these females reproduce without mating and give birth to live wingless nymphs. Both winged and wingless generations of adults develop, depending on the nutrient quality of the plant. Winged aphids then fly to nearby corn fields and enter the whorl.
Damage: Corn leaf aphids rarely reach threshold in Ontario. The degree of feeding injury depends on the size of the population and weather conditions. Nymphs and adults feed initially on the whorls of the plant, sucking nutrients from the plant which usually goes unnoticed until symptoms appear and damage is severe. In droughty conditions, symptoms include yellowing, wilting and curling of the leaves. As populations increase and dry conditions continue, leaf surfaces and tassels may become black and sooty as mould begins to grow on the honeydew. Tassels may become gummy, causing poor pollination. They are also vectors of maize dwarf mosaic virus and barley yellow dwarf virus.
Conditions That Increase Risk: Dry weather conditions that increase moisture stress will exacerbate the feeding injury.
Scouting Technique: Examine five sets of 20 plants per field.
Thresholds: If 50% of all plants have 400 aphids per plant during the late-whorl-to-early tassel stage, and plants are under moisture stress, control is required. Control is not warranted once the corn is past the early tassel stages.
Management Strategies: • Chemical control is warranted only if the natural
enemies and parasites of the corn leaf aphids are not present, the plants are under moisture stress and aphid densities are above threshold. There are several natural enemies that exist and are quite effective at controlling corn leaf aphids. These include lady beetle adults and larvae, lacewing adults and larvae, and a few parasitic wasps.
• Chemical control will kill natural enemies and may lead to a resurgence of the aphid population.
EAR FEEDING INSECTS
EUROPEAN CORN BORER (Ostrinia nubilalis) — SEE PAGE 317
CORN ROOTWORM (Diabrotica virgifera and Diabrotica barberi) — SEE PAGE 319
STINK BUGS (Euschistus servus, Chinavia hilaris and Halyomorpha halys)— SEE PAGE 316
WESTERN BEAN CUTWORM(Striacosta albicosta)
Description: Western bean cutworm (WBC) larvae are tan to pink in colour. When they first emerge from their eggs, they resemble European corn borer with dark heads and beige bodies. Third instar larvae begin to appear like true armyworm, with district stripes along their bodies, but lack bands on their prolegs (Photo 15–38). Unlike armyworm, WBC has a larger spacing between their true front legs and prolegs, which cause the third and fourth instars to creep along like inchworms. Once they reach the fifth and sixth instars, there are no longer any distinct features on the body. They lack any strips except for two broad dark brown bands on their pronotum (Photo 15–39). Adult moths are easy to identify from other corn pests. Each wing of the moth has a white band running along the edge or margin of the wing and has a spot or “moon” and comma-like mark approximately two-thirds of the way down the wing (Photo 15–40). Eggs are laid in masses of 5–200 eggs. WBC eggs are the size of a pinhead, pearly white when first laid, and are shaped like tiny cantaloupe (Photo 15–41). As the eggs mature, they turn tan and then purple in colour. Eggs hatch in about 5–7 days.
Photo 15–38. Young western bean cutworm.
322
Agronomy guide for field Crops
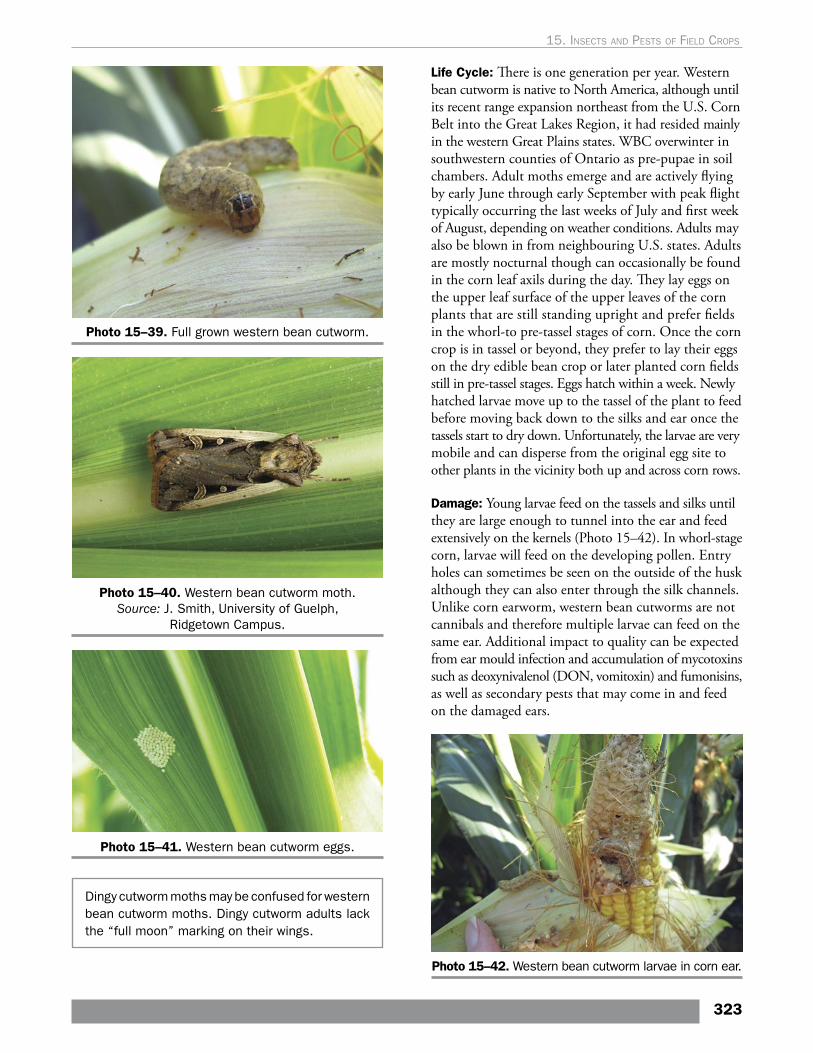
Photo 15–39. Full grown western bean cutworm.
Photo 15–40. Western bean cutworm moth. Source: J. Smith, University of Guelph,
Ridgetown Campus.
Photo 15–41. Western bean cutworm eggs.
Dingy cutworm moths may be confused for western bean cutworm moths. Dingy cutworm adults lack the “full moon” marking on their wings.
Life Cycle: There is one generation per year. Western bean cutworm is native to North America, although until its recent range expansion northeast from the U.S. Corn Belt into the Great Lakes Region, it had resided mainly in the western Great Plains states. WBC overwinter in southwestern counties of Ontario as pre-pupae in soil chambers. Adult moths emerge and are actively flying by early June through early September with peak flight typically occurring the last weeks of July and first week of August, depending on weather conditions. Adults may also be blown in from neighbouring U.S. states. Adults are mostly nocturnal though can occasionally be found in the corn leaf axils during the day. They lay eggs on the upper leaf surface of the upper leaves of the corn plants that are still standing upright and prefer fields in the whorl-to pre-tassel stages of corn. Once the corn crop is in tassel or beyond, they prefer to lay their eggs on the dry edible bean crop or later planted corn fields still in pre-tassel stages. Eggs hatch within a week. Newly hatched larvae move up to the tassel of the plant to feed before moving back down to the silks and ear once the tassels start to dry down. Unfortunately, the larvae are very mobile and can disperse from the original egg site to other plants in the vicinity both up and across corn rows.
Damage: Young larvae feed on the tassels and silks until they are large enough to tunnel into the ear and feed extensively on the kernels (Photo 15–42). In whorl-stage corn, larvae will feed on the developing pollen. Entry holes can sometimes be seen on the outside of the husk although they can also enter through the silk channels. Unlike corn earworm, western bean cutworms are not cannibals and therefore multiple larvae can feed on the same ear. Additional impact to quality can be expected from ear mould infection and accumulation of mycotoxins such as deoxynivalenol (DON, vomitoxin) and fumonisins, as well as secondary pests that may come in and feed on the damaged ears.
Photo 15–42. Western bean cutworm larvae in corn ear.
323
15. Insects and pests oF FIeld crops

Conditions That Increase Risk: Fields with sandy soils located between Thamesville and Strathroy, (particularly around Bothwell area) and Tillsonburg to Simcoe, experience economic injury every year though late-planted fields in other regions have experienced damage on occasion. High-risk fields are those on sandy soils that are in pre-tassel stages during peak moth flight (typically the last few weeks of July and the first week of August).
Scouting Technique: Scout 20 plants in five areas of the field. Focus efforts on the top 3–4 upper leaves of the plant. Look for egg masses and young larvae. Use pheromone traps to monitor for moth flight, which will indicate when eggs are being laid in the field and when to initiate scouting efforts. Contact a provincial entomologist for pheromone trap configurations, supply sources and monitoring protocols.
Threshold: Spray is warranted if 5% of the plants have eggs or small larvae. If the eggs have hatched, spray at 95% tassel emergence or if tassels are already emerged, when most of the eggs are expected to hatch.
Management Strategies: • Plant fields that have a history of WBC injury with
Bt corn hybrids containing Vip3A protein, which to date (2016) provides nearly 100% control. Cry1F Bt hybrids have been less effective over the last few years, raising concerns about resistance development or decreased tolerance of WBC to Cry1F.
• If Vip3A hybrids are not available or preferred, then expect to scout and apply a foliar insecticide if thresholds are reached.
• Select hybrids rated to have low incidence of DON (vomitoxin).
• Foliar insecticide timing is critical. Once the larvae enter the corn ear, insecticides are no longer effective. Select insecticides that have some residual or control both eggs and larvae.
• Timing of application must coincide with egg hatch and when young larvae are feeding.
• Deep tillage can help disturb and kill larvae overwintering in soil chambers though unlikely to significantly reduce populations.
• Heavy rain can reduce young larvae survival. • Several natural enemies feed on egg masses and young
larvae, including lady beetles, spiders and others.
CORN EARWORM (Helicoverpa zea)
Description: Corn earworm (CEW) larvae vary greatly in colour from light green to yellow. The full-grown larvae are 4 cm (1.5 in.) long with prominent stripes and dark tubercles (warts) with hairs sticking out of them running the length of their bodies (Photo 15–43). Adult moths are buff or tan coloured. The forewing has a central brown dot visible from the underside of the wing, and the hind wings are pale in colour, with a darker brown border (Photo 15–44). Egg masses are difficult to see, as they are the same colour and width of a strand of corn silk.
Photo 15–43. Corn earworm larvae on corn silks.
Photo 15–44. Corn earworm moths.
The size and presence of the stripes differentiate corn earworm from European corn borer, while its tan head colour differentiates it from fall armyworm. There are no strips on the pronotum, which distinguishes them from western bean cutworm.
Life Cycle: Corn earworm, also known as cotton bollworm, a pest on cotton, does not overwinter in Ontario but migrates as adult moths from the southern U.S. via storm fronts. Usually they arrive in Ontario in August, but they may come as early as late June. The moths lay their eggs individually on fresh silks. The eggs hatch, and the larvae feed on the silks and kernels at the ear tip. Generally only one larva per ear will be
324
Agronomy guide for field Crops

found as they are cannibalistic and will feed on any other CEW or smaller WBC larvae present. Larvae will pupate in the soil but die soon after frost.
Damage: Corn earworm damage is rarely economical in field corn in Ontario. Larvae may feed on leaves and tassels but mainly are found feeding on silks and developing kernels. Larvae damage tassels, causing poor pollination, and consume silks, affecting ear development.
Unlike European corn borer, western bean cutworm and fall armyworm, corn earworm does not leave entry holes in the ear husk as it enters directly via the silk channels. Feeding is typically concentrated at the top third of the ear.
Conditions That Increase Risk: Fields at risk are those planted late, that are in early silking stages with fresh silks present during peak moth flight time.
Scouting Technique: Locate five sets of 10 plants per field and open the ear to inspect for feeding damage or larval presence, including the presence of ear moulds carried in by the pest. Determine the percentage of ears infested. Corn earworms are cannibalistic and, therefore, there is usually no more than one larva per ear of corn. Eggs are the same size and colour of a strand of corn silk and therefore it is not practical to scout for them.
Thresholds: This pest is usually only an economic pest in sweet corn but can affect late-planted seed corn fields that are silking at the time of egg-laying.
Management Strategies: • Earlier-planted corn may have a chance to escape
the peak infestations of corn earworm if they silk early enough.
• Insecticides have generally not provided economic control of corn earworm in field corn. There may be some value in treating seed corn to maintain kernel quality.
• Several natural enemies exist in the field, including trichogramma wasps, lady beetles, lacewings and parasitic flies, that help to keep pest populations in check.
• Some transgenic Bt hybrids provide suppression of corn earworm but should not be used for the sole purpose of controlling a sporadic pest such as corn earworm.
FALL ARMYWORM (Spodoptera frugiperda)
Description: Full-grown fall armyworms are 4 cm (1.5 in.) long, varying in colour from light tan or green to near-black (Photo 15–45). Three white, thin stripes run down the back. One thicker, yellow band with red spots runs along the side, just above the legs of the larvae. Adults are dark grey moths with a mottled pattern on their wings and a prominent white spot on the very tip.
Photo 15–45. Mature fall armyworm larva on corn ear.
The fall armyworm larvae can be distinguished from the true armyworm by a white, inverted “Y” on the front of the head. The fall armyworm head is dark brown to black. Though the larvae have similar stripes to the true armyworm, fall armyworm larvae also have elevated dark tubercles (warts) with hair sticking out of each one. Four of these spots form a square on the top of the last abdominal segment of the larvae. Unlike true armyworm, fall armyworm do not have black bands on their prolegs (chubby back legs).
Life Cycle: Fall armyworm adult moths migrate from the southern U.S. and show up later in the season (late July to the end of August), when the corn is fully grown. Adults lay their eggs on host plants and eggs hatch within a week. Larvae go through six instars before dropping to the ground to pupate. This insect cannot overwinter in areas where the ground freezes.
Damage: Fall armyworm rarely causes economic injury in field corn. The larvae feed on the whorl leaves and ears predominately from late July to September. Fall armyworm feeding occurs in the daytime, unlike true armyworm feeding, which occurs at night. Initial leaf
325
15. Insects and pests oF FIeld crops

feeding appears as tiny holes similar to ECB feeding but as the larvae grow, holes become very large, with ragged edges similar to grasshopper feeding. Severe feeding on younger plants may be confused for hail damage. Moist, reddish-brown frass can be found nearby.
Conditions That Increase Risk: Very late-planted fields that are in the early silking stages during peak moth flight (late July/early August).
Scouting Technique: Examine 20 plants from five locations in the field to determine the level of infestation. Record the size and number of larvae. When scouting, check the backs of armyworms for parasite eggs. These small, oval, yellowish eggs are usually located just behind the head of the larva. These are eggs of a parasitic fly whose maggots will kill the armyworm larvae.
Threshold: If 50% of the plants are infested with unparasitized larvae smaller than 2.5 cm (1 in.), insecticide treatment may be warranted. However, damage is usually not economical unless infestations are high, and feeding is concentrated on the undeveloped tassels.
Management Strategies in Corn: • Bt corn hybrids containing Cry1F protein provide
some protection against fall armyworm. • Parasites and other beneficial organisms usually keep
armyworms from reaching damaging levels. Avoid treating with insecticides when large numbers of parasitized larvae are present.
• Late-planted corn is most susceptible to leaf and whorl feeding. Grassy areas in and along the field borders are attractive to the egg-laying moths. Therefore, controlling grasses and weeds from the corn field is encouraged.
Soybean Insects and PestsTable 15–3, Soybean insect and pest symptoms in the field, shows insects and pests that could be causing the symptoms in the field.
Table 15–3. Soybean insect and pest symptoms in the field
LEGEND: Y = symptom – = not a symptom
Symptom
Insects and Pests
Gru
bs (
page
301
)
See
dcor
n m
aggo
t (p
age
30
8)
Mill
iped
es o
r w
irew
orm
s (p
age
305,
307
)
Slu
gs (
page
309
)
Bea
n le
af b
eetl
e (p
age
329)
Soy
bean
aph
id (
page
327)
Japa
nese
bee
tle
adul
ts (
page
304)
Red
-hea
ded
flea
beet
les
(pag
e 33
2)
Cor
n ro
otw
orm
adu
lts
(pag
e 3
20)
Two-
spot
ted
spid
er m
ite
(pag
e 331)
Sti
nk b
ug (
page
334
)
Seed and seedling damage
Gaps in stand, wilting plants Y Y Y Y Y – – – – – –
Tunneling on seed, cotyledon or hypocotyl – Y – Y Y – – – – – –
Plants clipped off at soil level – – – Y Y – – – – – –
Foliar injury Round holes in leaves – – – – Y – – – Y – –
Leaves skeletonized – – – Y – – Y Y – – –
Feeding similar to hail damage – – – Y – – – – – – –
Leaves turn yellow or appear sand-blasted with webbing on the underside
– – – – – – – – – Y –
Leaves are puckering and appear mottled – – – – – Y – – – – –
Pod feeding Pods have feeding scars/holes on the surface or are clipped off
– – – – Y – – – – – –
Pods are pierced or kinked with seeds inside having blemishes or “picks”
– – – – – – – – – – Y
326
Agronomy guide for field Crops

BELOW GROUND SOYBEAN PESTSThere are a number of pests that feed on soybean seeds and seedlings. Refer to the section Soil Insects and Pests of Field Crops at the start of this chapter for further information.
Insecticide seed treatments are commonly used on soybean seed for crop protection against below-ground insect pests. The planting of these treatments on corn and soybeans using vacuum planters pose a risk to pollinators. Refer to Chapter 14, Integrated Pest Management and Protecting Natural Enemies and Pollinators, for more information on best management practices and measures to take to reduce the risk to pollinators.
GRUBS — SEE PAGE 301
WIREWORMS — SEE PAGE 305
MILLIPEDES — SEE PAGE 307
SEEDCORN MAGGOT — SEE PAGE 308
ABOVE GROUND SOYBEAN PESTSSoybeans are foraged by bees. Take precautions to protect pollinators during any foliar insecticide applications. See Protecting Pollinators and Beneficials, in Chapter 14 for more information.
SLUGS — SEE PAGE 309
SOYBEAN APHID(Aphis glycines)
Description: The soybean aphid is a small (pinhead-size), pale yellow aphid with black cornicles (“tailpipes”) and a pale yellow tail (Photo 15–46). Adults may be winged or wingless. Nymphs are smaller than the adults and are wingless. Eggs on buckthorn are small, football-shaped and yellow when first laid but turn a dark brown similar to the colour of the buckthorn branch. Eggs are usually laid along the seams of the buckthorn bud.
Life Cycle: The soybean aphid, a pest originally from Asia, was first discovered in North America in 2000 and in Ontario in 2001. This insect requires two hosts to complete its life cycle. The soybean aphid survives as eggs on the twigs of buckthorn species. In the spring, nymphs hatch from these eggs, and the aphids undergo two generations as wingless females on buckthorn. The third generation develops as winged adults that migrate
to early planted soybean plants. The aphids then continue to produce wingless generations until the soybean plants become crowded with aphids and the plant quality is reduced. Once crowded, winged adults are produced in the next generation to disperse to less-crowded soybean plants, either in the same field or to more ideal fields nearby. There can be as many as 18 generations of aphids per year on soybeans. Like most aphids, the soybean aphids are all female, born pregnant and give birth to live nymphs. Males are only born in the fall so that the females and males can mate to produce the egg on buckthorn. Eastern Ontario tends to experience a higher frequency of early season infestations of soybean aphids (before or at R1 stage) coming directly from their overwintering buckthorn locations, while the rest of southern Ontario experiences infestations later in the season (R3 stage and beyond) once aphids migrate from the U.S., as buckthorn is not as prevalent in the southern counties of Ontario.
Photo 15–46. Wingless adult soybean aphid. Source: A. Schaafsma, University of Guelph, Ridgetown Campus.
Damage: Aphids have piercing-sucking mouthparts that suck juices and nutrients from the plant. Lower populations of aphids can live and feed on soybeans without causing yield loss. Once populations reach threshold levels, especially in dry years when the plants are stressed, aphids can cause the plants to abort flowers, become stunted, reducing pod and seed production and quality. Yield loss by soybean aphid is greatest when soybeans are in the early R stages (R1–R2), when flowers can abort and impact pod establishment. Peak infestations during the pod fill stage (R3) and beyond can result in smaller seed size and a reduction in seed quality. Aphids also excrete a sticky substance called honeydew, which can act as a substrate for grey sooty mould development. This insect may also be a vector for soybean mosaic virus, see Soybean Mosaic Virus in Chapter 16.
327
15. Insects and pests oF FIeld crops
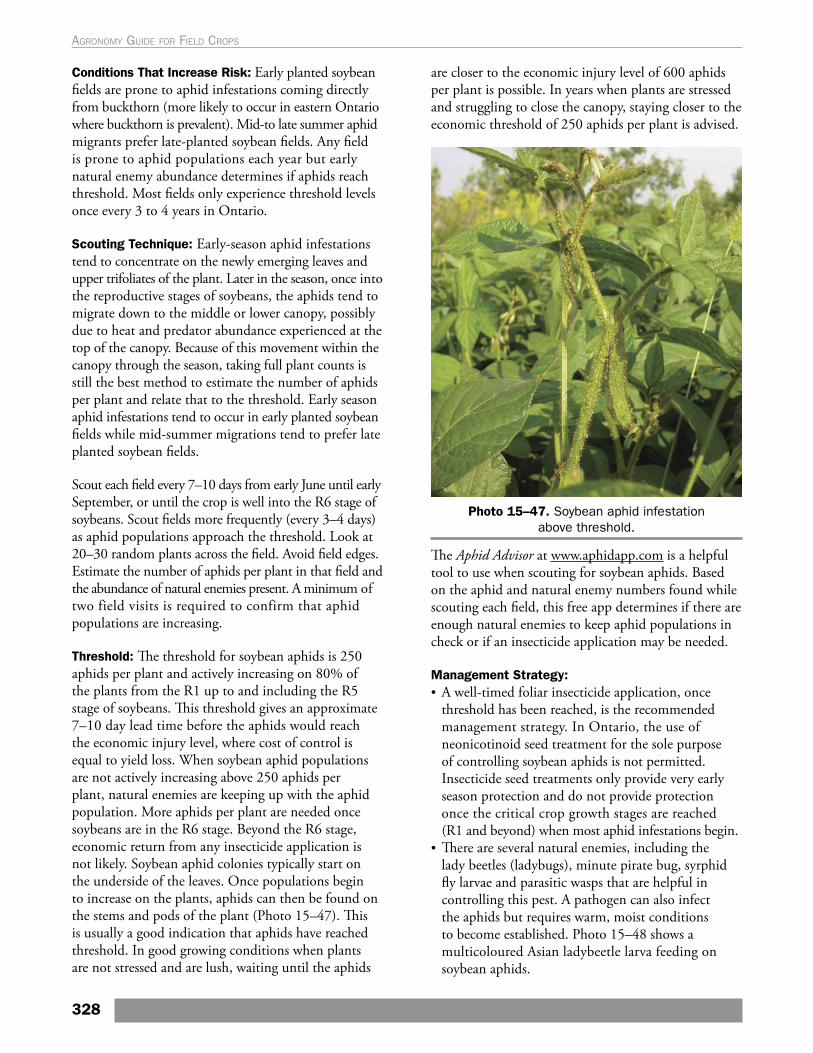
Conditions That Increase Risk: Early planted soybean fields are prone to aphid infestations coming directly from buckthorn (more likely to occur in eastern Ontario where buckthorn is prevalent). Mid-to late summer aphid migrants prefer late-planted soybean fields. Any field is prone to aphid populations each year but early natural enemy abundance determines if aphids reach threshold. Most fields only experience threshold levels once every 3 to 4 years in Ontario.
Scouting Technique: Early-season aphid infestations tend to concentrate on the newly emerging leaves and upper trifoliates of the plant. Later in the season, once into the reproductive stages of soybeans, the aphids tend to migrate down to the middle or lower canopy, possibly due to heat and predator abundance experienced at the top of the canopy. Because of this movement within the canopy through the season, taking full plant counts is still the best method to estimate the number of aphids per plant and relate that to the threshold. Early season aphid infestations tend to occur in early planted soybean fields while mid-summer migrations tend to prefer late planted soybean fields.
Scout each field every 7–10 days from early June until early September, or until the crop is well into the R6 stage of soybeans. Scout fields more frequently (every 3–4 days) as aphid populations approach the threshold. Look at 20–30 random plants across the field. Avoid field edges. Estimate the number of aphids per plant in that field and the abundance of natural enemies present. A minimum of two field visits is required to confirm that aphid populations are increasing.
Threshold: The threshold for soybean aphids is 250 aphids per plant and actively increasing on 80% of the plants from the R1 up to and including the R5 stage of soybeans. This threshold gives an approximate 7–10 day lead time before the aphids would reach the economic injury level, where cost of control is equal to yield loss. When soybean aphid populations are not actively increasing above 250 aphids per plant, natural enemies are keeping up with the aphid population. More aphids per plant are needed once soybeans are in the R6 stage. Beyond the R6 stage, economic return from any insecticide application is not likely. Soybean aphid colonies typically start on the underside of the leaves. Once populations begin to increase on the plants, aphids can then be found on the stems and pods of the plant (Photo 15–47). This is usually a good indication that aphids have reached threshold. In good growing conditions when plants are not stressed and are lush, waiting until the aphids
are closer to the economic injury level of 600 aphids per plant is possible. In years when plants are stressed and struggling to close the canopy, staying closer to the economic threshold of 250 aphids per plant is advised.
Photo 15–47. Soybean aphid infestation above threshold.
The Aphid Advisor at www.aphidapp.com is a helpful tool to use when scouting for soybean aphids. Based on the aphid and natural enemy numbers found while scouting each field, this free app determines if there are enough natural enemies to keep aphid populations in check or if an insecticide application may be needed.
Management Strategy:• A well-timed foliar insecticide application, once
threshold has been reached, is the recommended management strategy. In Ontario, the use of neonicotinoid seed treatment for the sole purpose of controlling soybean aphids is not permitted. Insecticide seed treatments only provide very early season protection and do not provide protection once the critical crop growth stages are reached (R1 and beyond) when most aphid infestations begin.
• There are several natural enemies, including the lady beetles (ladybugs), minute pirate bug, syrphid fly larvae and parasitic wasps that are helpful in controlling this pest. A pathogen can also infect the aphids but requires warm, moist conditions to become established. Photo 15–48 shows a multicoloured Asian ladybeetle larva feeding on soybean aphids.
328
Agronomy guide for field Crops
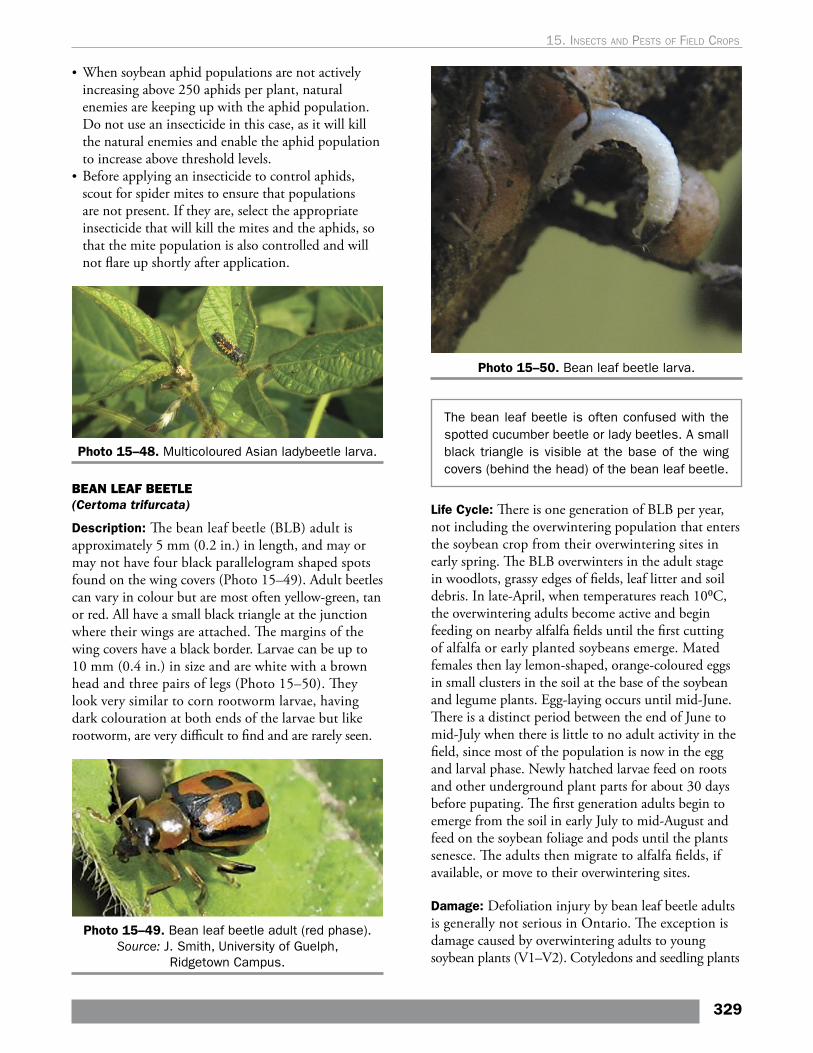
• When soybean aphid populations are not actively increasing above 250 aphids per plant, natural enemies are keeping up with the aphid population. Do not use an insecticide in this case, as it will kill the natural enemies and enable the aphid population to increase above threshold levels.
• Before applying an insecticide to control aphids, scout for spider mites to ensure that populations are not present. If they are, select the appropriate insecticide that will kill the mites and the aphids, so that the mite population is also controlled and will not flare up shortly after application.
Photo 15–48. Multicoloured Asian ladybeetle larva.
BEAN LEAF BEETLE (Certoma trifurcata)
Description: The bean leaf beetle (BLB) adult is approximately 5 mm (0.2 in.) in length, and may or may not have four black parallelogram shaped spots found on the wing covers (Photo 15–49). Adult beetles can vary in colour but are most often yellow-green, tan or red. All have a small black triangle at the junction where their wings are attached. The margins of the wing covers have a black border. Larvae can be up to 10 mm (0.4 in.) in size and are white with a brown head and three pairs of legs (Photo 15–50). They look very similar to corn rootworm larvae, having dark colouration at both ends of the larvae but like rootworm, are very difficult to find and are rarely seen.
Photo 15–49. Bean leaf beetle adult (red phase). Source: J. Smith, University of Guelph,
Ridgetown Campus.
Photo 15–50. Bean leaf beetle larva.
The bean leaf beetle is often confused with the spotted cucumber beetle or lady beetles. A small black triangle is visible at the base of the wing covers (behind the head) of the bean leaf beetle.
Life Cycle: There is one generation of BLB per year, not including the overwintering population that enters the soybean crop from their overwintering sites in early spring. The BLB overwinters in the adult stage in woodlots, grassy edges of fields, leaf litter and soil debris. In late-April, when temperatures reach 10⁰C, the overwintering adults become active and begin feeding on nearby alfalfa fields until the first cutting of alfalfa or early planted soybeans emerge. Mated females then lay lemon-shaped, orange-coloured eggs in small clusters in the soil at the base of the soybean and legume plants. Egg-laying occurs until mid-June. There is a distinct period between the end of June to mid-July when there is little to no adult activity in the field, since most of the population is now in the egg and larval phase. Newly hatched larvae feed on roots and other underground plant parts for about 30 days before pupating. The first generation adults begin to emerge from the soil in early July to mid-August and feed on the soybean foliage and pods until the plants senesce. The adults then migrate to alfalfa fields, if available, or move to their overwintering sites.
Damage: Defoliation injury by bean leaf beetle adults is generally not serious in Ontario. The exception is damage caused by overwintering adults to young soybean plants (V1–V2). Cotyledons and seedling plants
329
15. Insects and pests oF FIeld crops

can be clipped off by heavier populations. Once leaves emerge, beetles make small circular holes between the major leaflet veins (Photo 15–51). Larvae feed on soybean roots and nodules but are not of economic concern. Late-season pod feeding is of concern. BLB feed on the surface of the pod, leaving only a thin film of tissue to protect the seeds within the pod (Photo 15–52). These pod lesions increase the pod’s susceptibility to secondary pod diseases such as Alternaria. Pods may also be clipped off the plant, but this is not the primary cause of yield loss. The most important concern is that BLB is a vector of bean pod mottle virus. The virus causes the plant and seed to become wrinkled and mottled, reducing the quality of the seed.
Photo 15–51. Leaf feeding damage by bean leaf beetle.
Source: J. Smith, University of Guelph, Ridgetown Campus.
Photo 15–52. Bean leaf beetle pod damage.
Conditions That Increase Risk: Early planted soybean fields experience overwintering adult populations, particularly in the most southern counties of Ontario. Later planted fields are prone to infestations by the first generation adults and may experience pod-feeding injury. Soybean fields neighbouring alfalfa and other legume crops may also be at risk. Mild winters may also increase risk.
Scouting Techniques:Soybean Seedling Stage: Select at least five sampling sites from across the entire field at random. At each sampling site, slowly walk down 4.5–6 m (15–20 ft) of row and carefully count all beetles. Beetles may quickly drop off the plants and hide in soil cracks. Try to approach unnoticed and keep from casting a shadow on the plant while scouting. Calculate the average number of beetles per metre (foot) of row.
Beyond Soybean Seedling Stage to R4: In 10 areas of the field, determine the percent defoliation as described under Assessing Defoliation in Soybeans and the images in Figure 15–2.
Soybean R5–R6 Stage: Assess 20 plants in five areas of the field. Avoid the field edge. Determine the percent defoliation and the number of pods damaged or clipped off and make note of the presence of adults.
Threshold:Soybean Seedling Stage (VE–V2): Thresholds for bean leaf beetle are 52 adult beetles per metre of row (16 adult beetles per foot of row) in early seedling stages. If plants are being clipped off, control is warranted.
Soybean V3–R4 Stage: If the defoliation exceeds the thresholds stated in Table 15–4, Standard damage thresholds for soybean insect defoliation, a rescue treatment may be warranted.
Soybean R5–R6 Stage of IP, Food Grade and Seed Fields: If 10% of the pods on the plants have feeding injury AND the beetles are still active in the field, a spray is warranted. Consider days to harvest intervals before making a spray decision. If damage is only concentrated on the leaves, follow the defoliation thresholds as stated in Table 15–4.
Management Strategies: • In fields with a history of injury, delay planting to the
end of May/beginning of June after the emergence of the overwintering beetles. Later planted fields however may be susceptible to late season pod feeding from first generation adults.
• Avoid being the first field to emerge in the area if there is a history of seedling injury.
• For access to neonicotinoid treated soybean seed for bean leaf beetle protection, a pest assessment report must be completed and submitted at the time of seed order. See Appendix G for more details. Use
330
Agronomy guide for field Crops
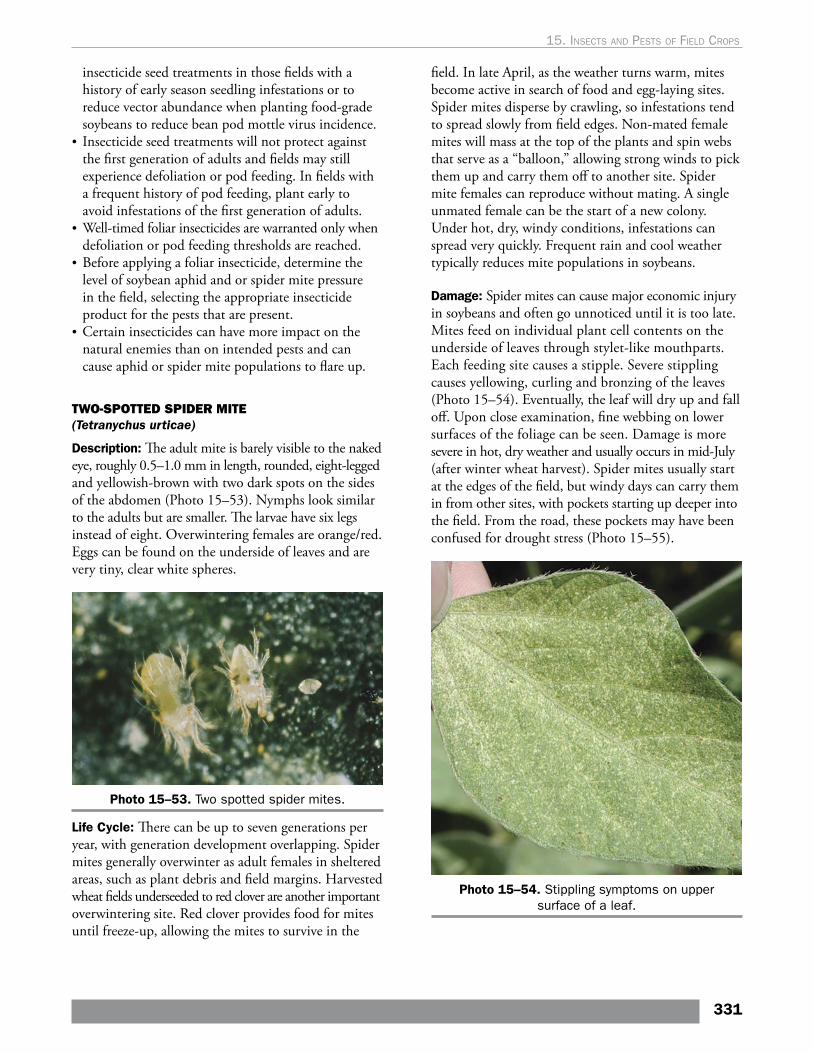
insecticide seed treatments in those fields with a history of early season seedling infestations or to reduce vector abundance when planting food-grade soybeans to reduce bean pod mottle virus incidence.
• Insecticide seed treatments will not protect against the first generation of adults and fields may still experience defoliation or pod feeding. In fields with a frequent history of pod feeding, plant early to avoid infestations of the first generation of adults.
• Well-timed foliar insecticides are warranted only when defoliation or pod feeding thresholds are reached.
• Before applying a foliar insecticide, determine the level of soybean aphid and or spider mite pressure in the field, selecting the appropriate insecticide product for the pests that are present.
• Certain insecticides can have more impact on the natural enemies than on intended pests and can cause aphid or spider mite populations to flare up.
TWO-SPOTTED SPIDER MITE (Tetranychus urticae)
Description: The adult mite is barely visible to the naked eye, roughly 0.5–1.0 mm in length, rounded, eight-legged and yellowish-brown with two dark spots on the sides of the abdomen (Photo 15–53). Nymphs look similar to the adults but are smaller. The larvae have six legs instead of eight. Overwintering females are orange/red. Eggs can be found on the underside of leaves and are very tiny, clear white spheres.
Photo 15–53. Two spotted spider mites.
Life Cycle: There can be up to seven generations per year, with generation development overlapping. Spider mites generally overwinter as adult females in sheltered areas, such as plant debris and field margins. Harvested wheat fields underseeded to red clover are another important overwintering site. Red clover provides food for mites until freeze-up, allowing the mites to survive in the
field. In late April, as the weather turns warm, mites become active in search of food and egg-laying sites. Spider mites disperse by crawling, so infestations tend to spread slowly from field edges. Non-mated female mites will mass at the top of the plants and spin webs that serve as a “balloon,” allowing strong winds to pick them up and carry them off to another site. Spider mite females can reproduce without mating. A single unmated female can be the start of a new colony. Under hot, dry, windy conditions, infestations can spread very quickly. Frequent rain and cool weather typically reduces mite populations in soybeans.
Damage: Spider mites can cause major economic injury in soybeans and often go unnoticed until it is too late. Mites feed on individual plant cell contents on the underside of leaves through stylet-like mouthparts. Each feeding site causes a stipple. Severe stippling causes yellowing, curling and bronzing of the leaves (Photo 15–54). Eventually, the leaf will dry up and fall off. Upon close examination, fine webbing on lower surfaces of the foliage can be seen. Damage is more severe in hot, dry weather and usually occurs in mid-July (after winter wheat harvest). Spider mites usually start at the edges of the field, but windy days can carry them in from other sites, with pockets starting up deeper into the field. From the road, these pockets may have been confused for drought stress (Photo 15–55).
Photo 15–54. Stippling symptoms on upper surface of a leaf.
331
15. Insects and pests oF FIeld crops
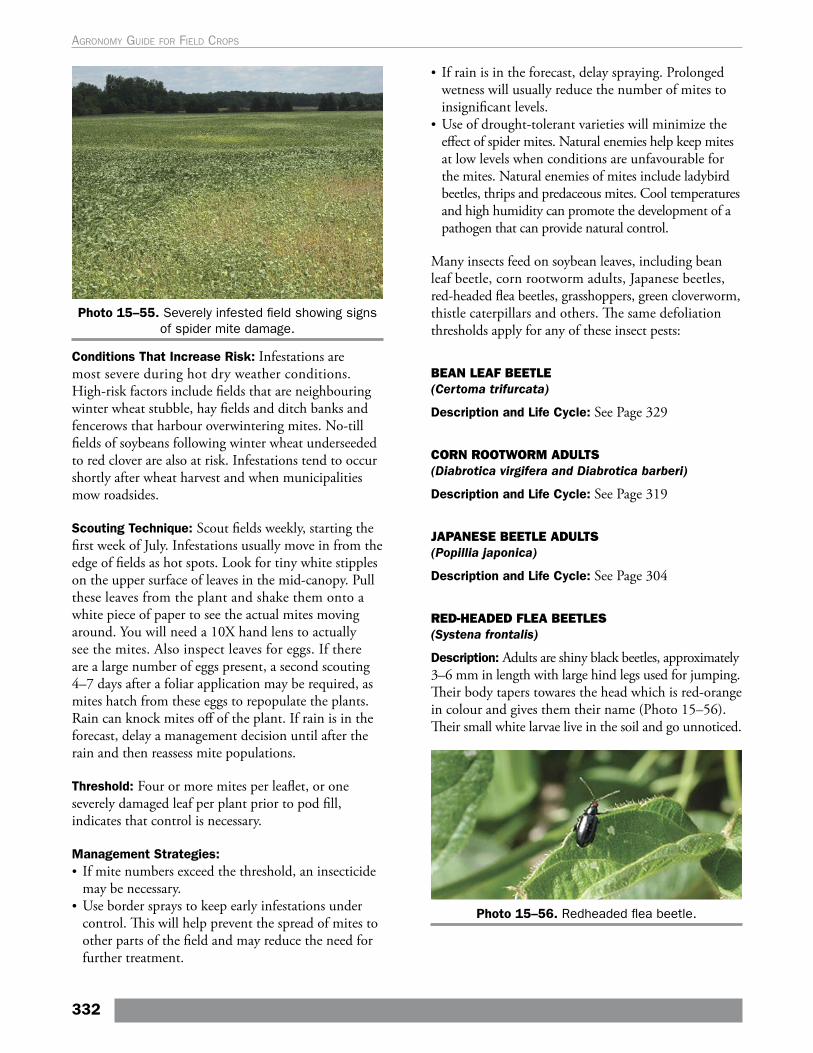
Photo 15–55. Severely infested field showing signs of spider mite damage.
Conditions That Increase Risk: Infestations are most severe during hot dry weather conditions. High-risk factors include fields that are neighbouring winter wheat stubble, hay fields and ditch banks and fencerows that harbour overwintering mites. No-till fields of soybeans following winter wheat underseeded to red clover are also at risk. Infestations tend to occur shortly after wheat harvest and when municipalities mow roadsides.
Scouting Technique: Scout fields weekly, starting the first week of July. Infestations usually move in from the edge of fields as hot spots. Look for tiny white stipples on the upper surface of leaves in the mid-canopy. Pull these leaves from the plant and shake them onto a white piece of paper to see the actual mites moving around. You will need a 10X hand lens to actually see the mites. Also inspect leaves for eggs. If there are a large number of eggs present, a second scouting 4–7 days after a foliar application may be required, as mites hatch from these eggs to repopulate the plants. Rain can knock mites off of the plant. If rain is in the forecast, delay a management decision until after the rain and then reassess mite populations.
Threshold: Four or more mites per leaflet, or one severely damaged leaf per plant prior to pod fill, indicates that control is necessary.
Management Strategies: • If mite numbers exceed the threshold, an insecticide
may be necessary. • Use border sprays to keep early infestations under
control. This will help prevent the spread of mites to other parts of the field and may reduce the need for further treatment.
• If rain is in the forecast, delay spraying. Prolonged wetness will usually reduce the number of mites to insignificant levels.
• Use of drought-tolerant varieties will minimize the effect of spider mites. Natural enemies help keep mites at low levels when conditions are unfavourable for the mites. Natural enemies of mites include ladybird beetles, thrips and predaceous mites. Cool temperatures and high humidity can promote the development of a pathogen that can provide natural control.
Many insects feed on soybean leaves, including bean leaf beetle, corn rootworm adults, Japanese beetles, red-headed flea beetles, grasshoppers, green cloverworm, thistle caterpillars and others. The same defoliation thresholds apply for any of these insect pests:
BEAN LEAF BEETLE(Certoma trifurcata)
Description and Life Cycle: See Page 329
CORN ROOTWORM ADULTS(Diabrotica virgifera and Diabrotica barberi)
Description and Life Cycle: See Page 319
JAPANESE BEETLE ADULTS(Popillia japonica)
Description and Life Cycle: See Page 304
RED-HEADED FLEA BEETLES(Systena frontalis)
Description: Adults are shiny black beetles, approximately 3–6 mm in length with large hind legs used for jumping. Their body tapers towares the head which is red-orange in colour and gives them their name (Photo 15–56). Their small white larvae live in the soil and go unnoticed.
Photo 15–56. Redheaded flea beetle.
332
Agronomy guide for field Crops

Life Cycle: Little information is available on the life cycle of red-headed flea beetles, but most sources indicate that they overwinter as eggs in the soil. Larvae hatch in early spring and feed on root hairs. Adults emerge from the soil and are present in many different crops from late June until early September.
Assessing Defoliation in SoybeansNo matter which insect is present, the assessment is based on the amount of defoliation taking place, rather than the number of insects present. It is important to ensure that the insect that did the feeding damage is still present and actively feeding before making a management decision. Soybeans are able to compensate for large amounts of foliage loss due to insect feeding, and often little effect on yield is observed. Soybean plants not only continue to put out new leaves at the top to compensate for the feeding, but leaves positioned below the feeding injury sites actually grow larger, increasing their surface area, since they are getting more sunlight through the canopy. However, the most critical stage for soybeans is bloom (R1) to pod-fill (R4), when seed development is highly dependent on photosynthesis. Large amounts of defoliation occurring throughout the plant during these stages, will affect yield, particularly in dry years.
To estimate damage thresholds for leaf-feeding insects on soybeans, determine the percentage of defoliation occurring in each soybean field. In 10 areas of the field, pick trifoliate leaves from five plants in the middle of the plant’s canopy. Discard the least and most damaged leaflets from each trifoliate collected, leaving only one leaflet for each trifoliate collected. Also take note of the crop stage of the plant.
Compare the remaining leaflets with the images in Figure 15–2, Defoliation chart for soybean leaf-feeding insects, which shows the percent defoliation and determine the average percentage of defoliation by crop stage. Defoliation is often overestimated. Most of the defoliating insects feed on the tops of the plants and field edges first so that, upon first inspection of the field, it appears that there is a lot of defoliation. Make sure to inspect trifoliates from the middle of the plant canopy to get a good assessment of defoliation.
Figure 15–2. Defoliation chart for soybean leaf-feeding insects.
After determining the level of defoliation in each field, see Table 15–4, Standard damage thresholds for soybean insect defoliation, to determine whether control is necessary, depending on the stage of the crop.
Table 15–4. Standard damage thresholds for soybean insect defoliation
Soybean Development Defoliation
Pre-bloom (i.e., vegetative stages) 30%
Bloom (R1) to pod-fill (R4) 15%
Pod-fill to maturity (R5–R6) 25% (unless pod feeding
observed; then see Pod-Feeding Insects section)
333
15. Insects and pests oF FIeld crops
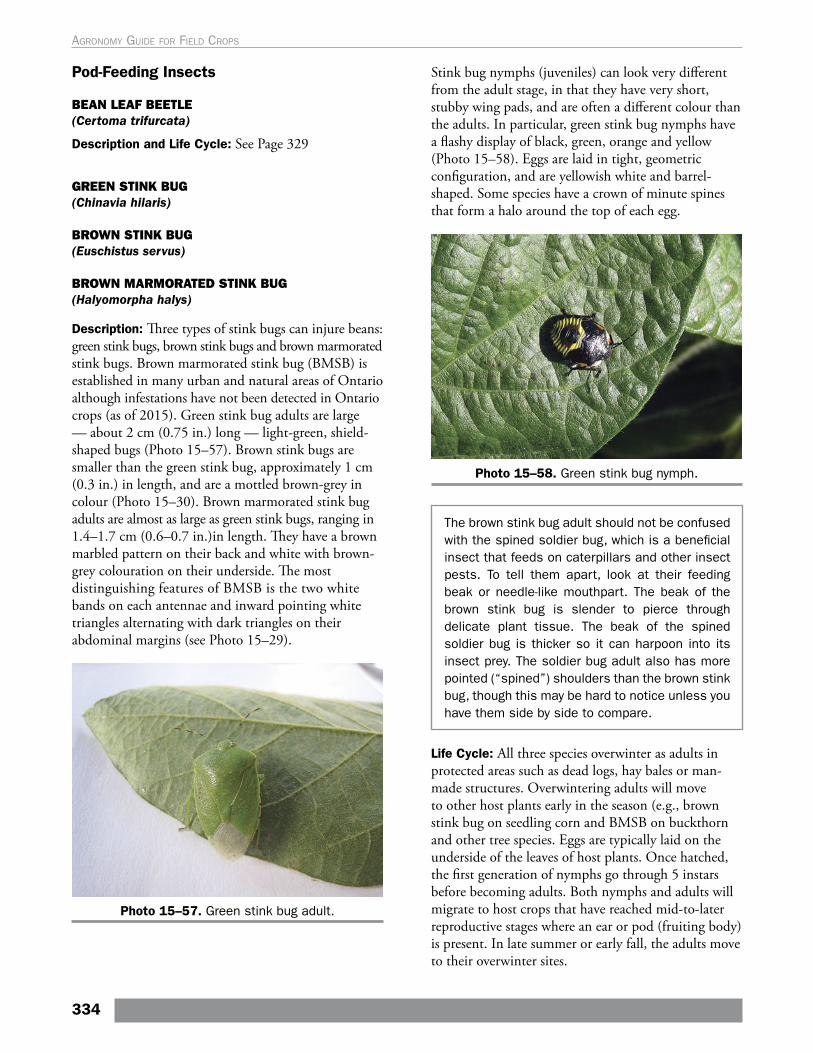
Pod-Feeding Insects
BEAN LEAF BEETLE(Certoma trifurcata)
Description and Life Cycle: See Page 329
GREEN STINK BUG(Chinavia hilaris)
BROWN STINK BUG(Euschistus servus)
BROWN MARMORATED STINK BUG(Halyomorpha halys)
Description: Three types of stink bugs can injure beans: green stink bugs, brown stink bugs and brown marmorated stink bugs. Brown marmorated stink bug (BMSB) is established in many urban and natural areas of Ontario although infestations have not been detected in Ontario crops (as of 2015). Green stink bug adults are large — about 2 cm (0.75 in.) long — light-green, shield-shaped bugs (Photo 15–57). Brown stink bugs are smaller than the green stink bug, approximately 1 cm (0.3 in.) in length, and are a mottled brown-grey in colour (Photo 15–30). Brown marmorated stink bug adults are almost as large as green stink bugs, ranging in 1.4–1.7 cm (0.6–0.7 in.)in length. They have a brown marbled pattern on their back and white with brown-grey colouration on their underside. The most distinguishing features of BMSB is the two white bands on each antennae and inward pointing white triangles alternating with dark triangles on their abdominal margins (see Photo 15–29).
Photo 15–57. Green stink bug adult.
Stink bug nymphs (juveniles) can look very different from the adult stage, in that they have very short, stubby wing pads, and are often a different colour than the adults. In particular, green stink bug nymphs have a flashy display of black, green, orange and yellow (Photo 15–58). Eggs are laid in tight, geometric configuration, and are yellowish white and barrel-shaped. Some species have a crown of minute spines that form a halo around the top of each egg.
Photo 15–58. Green stink bug nymph.
The brown stink bug adult should not be confused with the spined soldier bug, which is a beneficial insect that feeds on caterpillars and other insect pests. To tell them apart, look at their feeding beak or needle-like mouthpart. The beak of the brown stink bug is slender to pierce through delicate plant tissue. The beak of the spined soldier bug is thicker so it can harpoon into its insect prey. The soldier bug adult also has more pointed (“spined”) shoulders than the brown stink bug, though this may be hard to notice unless you have them side by side to compare.
Life Cycle: All three species overwinter as adults in protected areas such as dead logs, hay bales or man-made structures. Overwintering adults will move to other host plants early in the season (e.g., brown stink bug on seedling corn and BMSB on buckthorn and other tree species. Eggs are typically laid on the underside of the leaves of host plants. Once hatched, the first generation of nymphs go through 5 instars before becoming adults. Both nymphs and adults will migrate to host crops that have reached mid-to-later reproductive stages where an ear or pod (fruiting body) is present. In late summer or early fall, the adults move to their overwinter sites.
334
Agronomy guide for field Crops
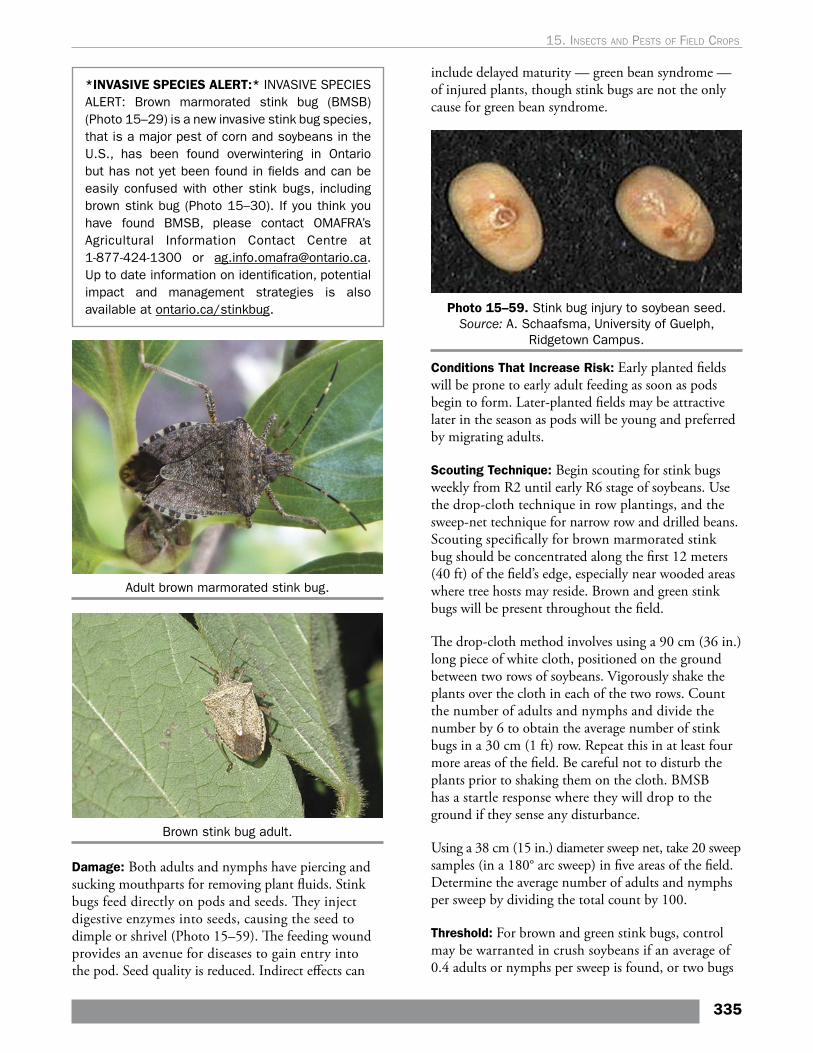
*INVASIVE SPECIES ALERT:* INVASIVE SPECIES ALERT: Brown marmorated stink bug (BMSB) (Photo 15–29) is a new invasive stink bug species, that is a major pest of corn and soybeans in the U.S., has been found overwintering in Ontario but has not yet been found in fields and can be easily confused with other stink bugs, including brown stink bug (Photo 15–30). If you think you have found BMSB, please contact OMAFRA’s Agricultural Information Contact Centre at 1-877-424-1300 or [email protected]. Up to date information on identification, potential impact and management strategies is also available at ontario.ca/stinkbug.
Adult brown marmorated stink bug.
Brown stink bug adult.
Damage: Both adults and nymphs have piercing and sucking mouthparts for removing plant fluids. Stink bugs feed directly on pods and seeds. They inject digestive enzymes into seeds, causing the seed to dimple or shrivel (Photo 15–59). The feeding wound provides an avenue for diseases to gain entry into the pod. Seed quality is reduced. Indirect effects can
include delayed maturity — green bean syndrome — of injured plants, though stink bugs are not the only cause for green bean syndrome.
Photo 15–59. Stink bug injury to soybean seed. Source: A. Schaafsma, University of Guelph,
Ridgetown Campus.
Conditions That Increase Risk: Early planted fields will be prone to early adult feeding as soon as pods begin to form. Later-planted fields may be attractive later in the season as pods will be young and preferred by migrating adults.
Scouting Technique: Begin scouting for stink bugs weekly from R2 until early R6 stage of soybeans. Use the drop-cloth technique in row plantings, and the sweep-net technique for narrow row and drilled beans. Scouting specifically for brown marmorated stink bug should be concentrated along the first 12 meters (40 ft) of the field’s edge, especially near wooded areas where tree hosts may reside. Brown and green stink bugs will be present throughout the field.
The drop-cloth method involves using a 90 cm (36 in.) long piece of white cloth, positioned on the ground between two rows of soybeans. Vigorously shake the plants over the cloth in each of the two rows. Count the number of adults and nymphs and divide the number by 6 to obtain the average number of stink bugs in a 30 cm (1 ft) row. Repeat this in at least four more areas of the field. Be careful not to disturb the plants prior to shaking them on the cloth. BMSB has a startle response where they will drop to the ground if they sense any disturbance.
Using a 38 cm (15 in.) diameter sweep net, take 20 sweep samples (in a 180° arc sweep) in five areas of the field. Determine the average number of adults and nymphs per sweep by dividing the total count by 100.
Threshold: For brown and green stink bugs, control may be warranted in crush soybeans if an average of 0.4 adults or nymphs per sweep is found, or two bugs
335
15. Insects and pests oF FIeld crops
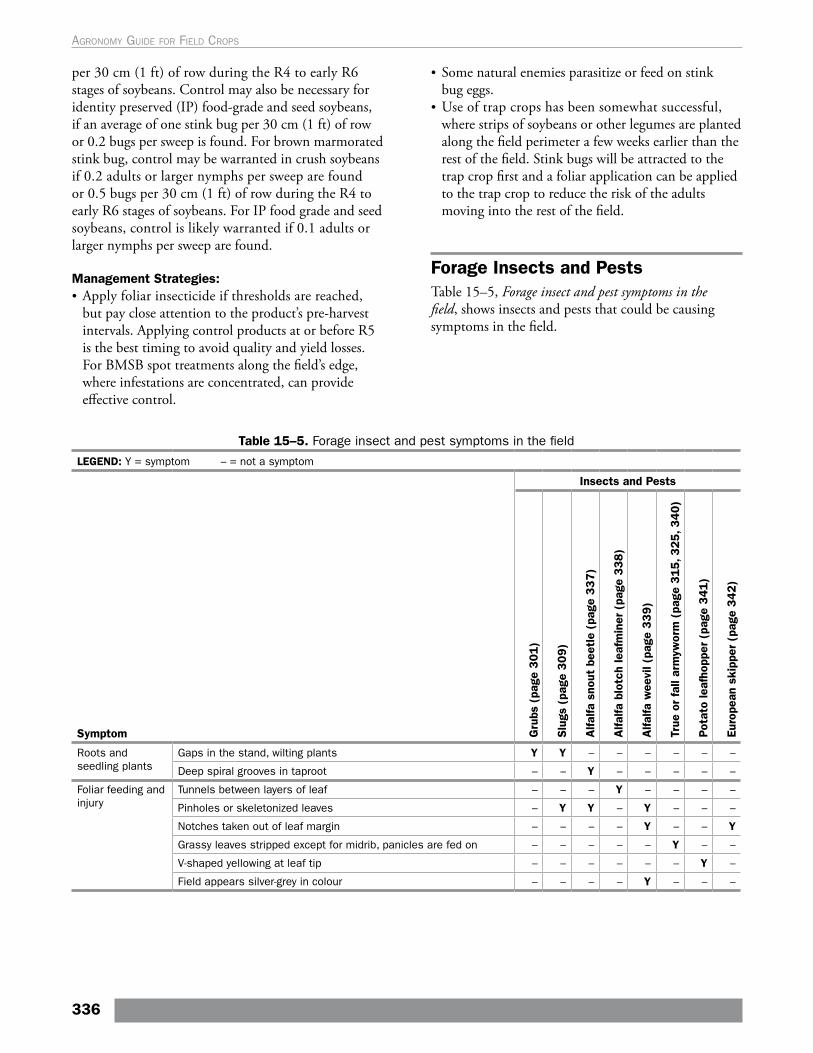
per 30 cm (1 ft) of row during the R4 to early R6 stages of soybeans. Control may also be necessary for identity preserved (IP) food-grade and seed soybeans, if an average of one stink bug per 30 cm (1 ft) of row or 0.2 bugs per sweep is found. For brown marmorated stink bug, control may be warranted in crush soybeans if 0.2 adults or larger nymphs per sweep are found or 0.5 bugs per 30 cm (1 ft) of row during the R4 to early R6 stages of soybeans. For IP food grade and seed soybeans, control is likely warranted if 0.1 adults or larger nymphs per sweep are found.
Management Strategies: • Apply foliar insecticide if thresholds are reached,
but pay close attention to the product’s pre-harvest intervals. Applying control products at or before R5 is the best timing to avoid quality and yield losses. For BMSB spot treatments along the field’s edge, where infestations are concentrated, can provide effective control.
• Some natural enemies parasitize or feed on stink bug eggs.
• Use of trap crops has been somewhat successful, where strips of soybeans or other legumes are planted along the field perimeter a few weeks earlier than the rest of the field. Stink bugs will be attracted to the trap crop first and a foliar application can be applied to the trap crop to reduce the risk of the adults moving into the rest of the field.
Forage Insects and PestsTable 15–5, Forage insect and pest symptoms in the field, shows insects and pests that could be causing symptoms in the field.
Table 15–5. Forage insect and pest symptoms in the field
LEGEND: Y = symptom – = not a symptom
Symptom
Insects and Pests
Gru
bs (
page
301)
Slu
gs (
page
309)
Alfa
lfa s
nout
bee
tle
(pag
e 337)
Alfa
lfa b
lotc
h le
afm
iner
(pa
ge 3
38)
Alfa
lfa w
eevi
l (pa
ge 3
39
)
True
or
fall
arm
ywor
m (
page
315, 3
25, 3
40)
Pot
ato
leaf
hopp
er (
page
341
)
Euro
pean
ski
pper
(pa
ge 3
42
)
Roots and seedling plants
Gaps in the stand, wilting plants Y Y – – – – – –
Deep spiral grooves in taproot – – Y – – – – –
Foliar feeding and injury
Tunnels between layers of leaf – – – Y – – – –
Pinholes or skeletonized leaves – Y Y – Y – – –
Notches taken out of leaf margin – – – – Y – – Y
Grassy leaves stripped except for midrib, panicles are fed on – – – – – Y – –
V-shaped yellowing at leaf tip – – – – – – Y –
Field appears silver-grey in colour – – – – Y – – –
336
Agronomy guide for field Crops
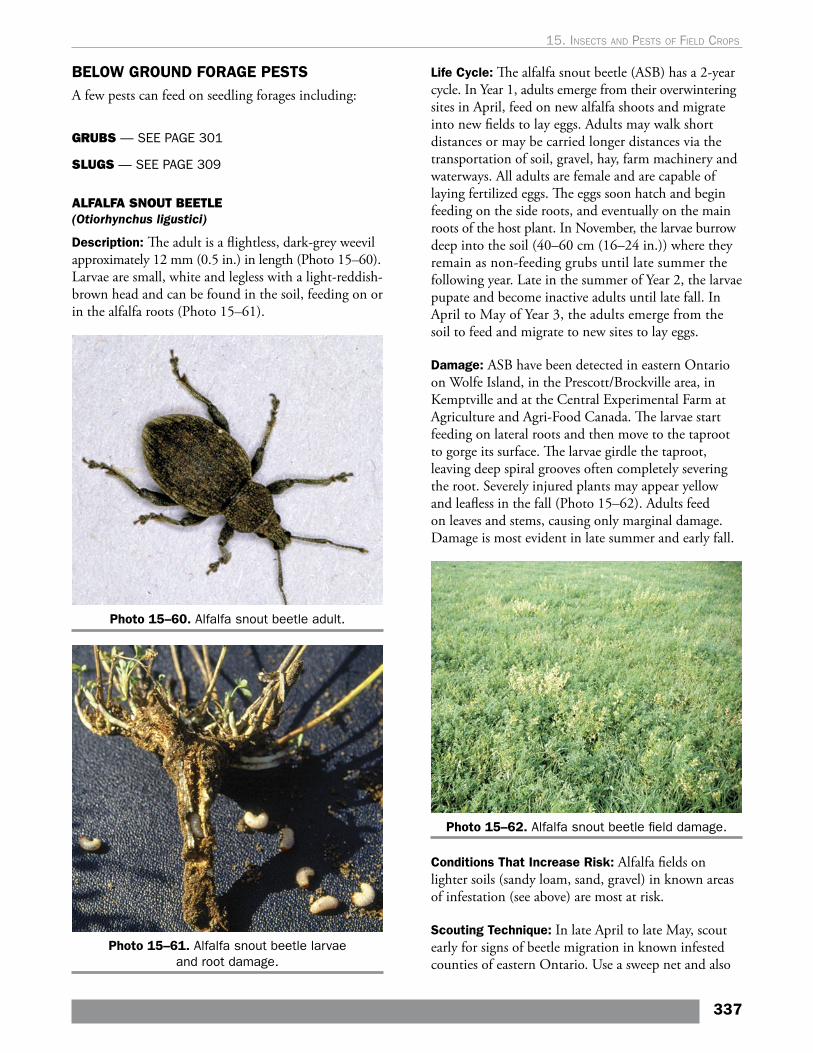
BELOW GROUND FORAGE PESTSA few pests can feed on seedling forages including:
GRUBS — SEE PAGE 301
SLUGS — SEE PAGE 309
ALFALFA SNOUT BEETLE(Otiorhynchus ligustici)
Description: The adult is a flightless, dark-grey weevil approximately 12 mm (0.5 in.) in length (Photo 15–60). Larvae are small, white and legless with a light-reddish-brown head and can be found in the soil, feeding on or in the alfalfa roots (Photo 15–61).
Photo 15–60. Alfalfa snout beetle adult.
Photo 15–61. Alfalfa snout beetle larvae and root damage.
Life Cycle: The alfalfa snout beetle (ASB) has a 2-year cycle. In Year 1, adults emerge from their overwintering sites in April, feed on new alfalfa shoots and migrate into new fields to lay eggs. Adults may walk short distances or may be carried longer distances via the transportation of soil, gravel, hay, farm machinery and waterways. All adults are female and are capable of laying fertilized eggs. The eggs soon hatch and begin feeding on the side roots, and eventually on the main roots of the host plant. In November, the larvae burrow deep into the soil (40–60 cm (16–24 in.)) where they remain as non-feeding grubs until late summer the following year. Late in the summer of Year 2, the larvae pupate and become inactive adults until late fall. In April to May of Year 3, the adults emerge from the soil to feed and migrate to new sites to lay eggs.
Damage: ASB have been detected in eastern Ontario on Wolfe Island, in the Prescott/Brockville area, in Kemptville and at the Central Experimental Farm at Agriculture and Agri-Food Canada. The larvae start feeding on lateral roots and then move to the taproot to gorge its surface. The larvae girdle the taproot, leaving deep spiral grooves often completely severing the root. Severely injured plants may appear yellow and leafless in the fall (Photo 15–62). Adults feed on leaves and stems, causing only marginal damage. Damage is most evident in late summer and early fall.
Photo 15–62. Alfalfa snout beetle field damage.
Conditions That Increase Risk: Alfalfa fields on lighter soils (sandy loam, sand, gravel) in known areas of infestation (see above) are most at risk.
Scouting Technique: In late April to late May, scout early for signs of beetle migration in known infested counties of eastern Ontario. Use a sweep net and also
337
15. Insects and pests oF FIeld crops

make visual assessments. Inspect field edges and sides of roads, and check hay equipment carefully before moving into uninfested fields. Later in the season (September to mid-October), use a shovel and dig up wilted alfalfa plants and surrounding soil, checking for signs of root damage and the presence of larvae. Alfalfa snout beetle has a wide range of hosts. Although it finds alfalfa to be the most attractive crop, larvae of the insect may attack all species of clover, grape and strawberry. They sometimes even feed on weeds, especially ones with fleshy roots such as wild carrot and dandelion.
Thresholds: None available.
Management Strategies:• No chemical control is available. • Thoroughly clean machinery of any soil and plant debris
before moving it out of an infested field. Try to complete all field work in the uninfested fields first before moving to the infested fields, to help reduce the risk of introducing the pest into new fields.
• Alfalfa snout beetle will not survive long without a host crop to feed on. Follow a tight alfalfa rotation of 2–3 years (seedling year + 1 or 2 production years) with two or more years of non-host crops, which include corn, soybeans or small grain cereals.
• If adults are present during harvest, they may end up in the bales and survive for some time. Store first-cut hay from infested fields for at least 2 months before it is shipped.
• If this pest is suspected, consult the provincial field crop entomologist, or forage specialist.
• Parasitic nematodes have been found to be effective at collapsing populations in research trials in New York.
ABOVE GROUND FORAGE PESTSForages are foraged by bees. Take precautions to protect pollinators during any foliar insecticide applications. See Chapter 14, Integrated Pest Management and Protecting Natural Enemies and Pollinators for more information.
ALFALFA SNOUT BEETLE(Otiorhynchus ligustici)
— SEE PAGE 337
ALFALFA BLOTCH LEAFMINER(Agromyza frontella)
Description: The adult is a very small 4 mm (0.2 in.), black, hump-backed fly. The larvae are small, pale yellow maggots found within tunnels in the leaf tissue.
Life Cycle: In late May, the adult fly emerges from pupa overwintering on the soil surface. The female adult lays her eggs inside the leaves of new alfalfa plants. The larvae develop inside small tunnels in the leaves. Larvae drop to the ground when mature and pupate. A second generation of adults appears in approximately 1 week (mid-July) and a third generation appears in mid-August.
Damage: This pest of alfalfa is now a more serious problem in northern Ontario. Small pinhole punctures are left in the leaves when the adult feeds and lays its eggs. The developing maggots feed inside the leaflet, creating tunnels or mines between the top and bottom layers of the leaf. These tunnels usually begin at the base of the leaflet and widen towards the leaf apex, creating a “blotchy” appearance (Photo 15–63). Feeding damage primarily decreases forage quality and seldom causes yield loss except in extreme dry conditions.
Photo 15–63. Alfalfa blotch leaf miner.
Conditions That Increase Risk: Areas of increased foliar insecticide use, which can negatively impact populations of the parasitoid that helps control the pest.
Scouting Technique: Scout fields weekly to monitor for pinhole feeding.
Thresholds: Control is only necessary if more than 40% of leaflets show adult pinhole feeding.
338
Agronomy guide for field Crops
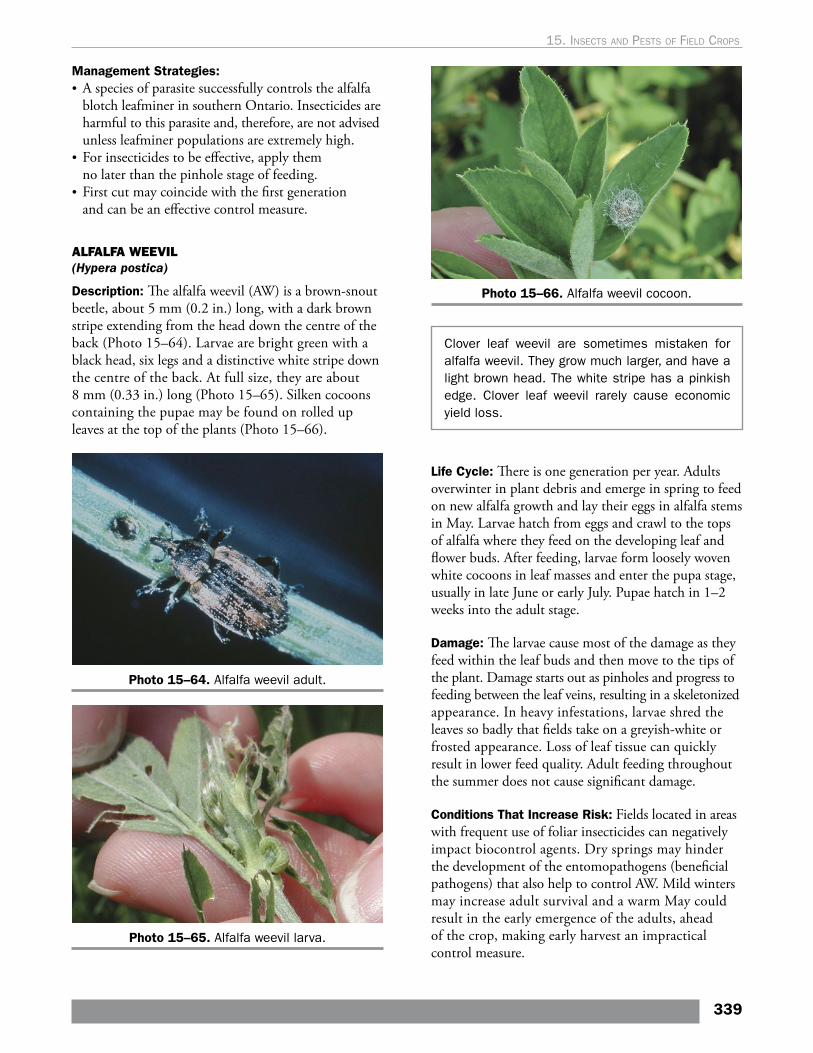
Management Strategies:• A species of parasite successfully controls the alfalfa
blotch leafminer in southern Ontario. Insecticides are harmful to this parasite and, therefore, are not advised unless leafminer populations are extremely high.
• For insecticides to be effective, apply them no later than the pinhole stage of feeding.
• First cut may coincide with the first generation and can be an effective control measure.
ALFALFA WEEVIL(Hypera postica)
Description: The alfalfa weevil (AW) is a brown-snout beetle, about 5 mm (0.2 in.) long, with a dark brown stripe extending from the head down the centre of the back (Photo 15–64). Larvae are bright green with a black head, six legs and a distinctive white stripe down the centre of the back. At full size, they are about 8 mm (0.33 in.) long (Photo 15–65). Silken cocoons containing the pupae may be found on rolled up leaves at the top of the plants (Photo 15–66).
Photo 15–64. Alfalfa weevil adult.
Photo 15–65. Alfalfa weevil larva.
Photo 15–66. Alfalfa weevil cocoon.
Clover leaf weevil are sometimes mistaken for alfalfa weevil. They grow much larger, and have a light brown head. The white stripe has a pinkish edge. Clover leaf weevil rarely cause economic yield loss.
Life Cycle: There is one generation per year. Adults overwinter in plant debris and emerge in spring to feed on new alfalfa growth and lay their eggs in alfalfa stems in May. Larvae hatch from eggs and crawl to the tops of alfalfa where they feed on the developing leaf and flower buds. After feeding, larvae form loosely woven white cocoons in leaf masses and enter the pupa stage, usually in late June or early July. Pupae hatch in 1–2 weeks into the adult stage.
Damage: The larvae cause most of the damage as they feed within the leaf buds and then move to the tips of the plant. Damage starts out as pinholes and progress to feeding between the leaf veins, resulting in a skeletonized appearance. In heavy infestations, larvae shred the leaves so badly that fields take on a greyish-white or frosted appearance. Loss of leaf tissue can quickly result in lower feed quality. Adult feeding throughout the summer does not cause significant damage.
Conditions That Increase Risk: Fields located in areas with frequent use of foliar insecticides can negatively impact biocontrol agents. Dry springs may hinder the development of the entomopathogens (beneficial pathogens) that also help to control AW. Mild winters may increase adult survival and a warm May could result in the early emergence of the adults, ahead of the crop, making early harvest an impractical control measure.
339
15. Insects and pests oF FIeld crops
Scouting Technique: Examine each field twice a week from mid-May to June. Check several areas throughout the field. Look for damage to show up first on shallow soils or on southerly slopes, particularly during warm, dry springs. Experience in Ontario has shown that the peak of larval attack usually coincides with the bud stage of the first crop. To count larvae, collect 30 stems in an M-shaped pattern. Place them inside a white pail and beat them against the side to knock off the third-to-fourth-stage instar larvae. First and second instars are smaller — 3 mm or less — pale yellow-to-light green, with the white stripe not yet distinguishable. They may be in the upper leaves, but do not include these younger larvae in the count. Check to see whether the weevil larvae look active and healthy. Larvae infected by the fungus pathogen are slow-moving, yellow or tan.
Threshold:• Leaf-tip damage and weevil counts are used in
assessing threshold levels and appropriate action of either harvesting or insecticide application. If there is 40% leaf-tip feeding, with two or three active weevils per stem, and there is more than 7–10 days to preferred harvest date, consider applying an insecticide. (“Leaf-tip feeding” refers to the percent of plant tips showing obvious signs of damage, which is not to be confused with the percent defoliation.)
• Less than one active larva per stem does not require action, but continue to monitor.
• Two larvae per stem requires action if the alfalfa is less than 40 cm (16 in.) high.
• If there are more than three active larvae per stem, immediate action is required.
Occasionally, if weevil populations are high on an early first cut, surviving larvae will feed on the regrowth. Such feeding can eliminate alfalfa regrowth, which may lead to a loss of the stand. With a severe infestation, be sure to monitor stubble regrowth. The characteristic symptom is the alfalfa plant not “greening up,” due to weevils feeding on the developing crown buds. The presence of two or more active larvae per crown, or 4–8 larvae per 30 cm2 (1 ft2) indicates a need to spray the stubble with insecticide.
Management Strategies:• Insecticides are recommended only when cutting is
impractical, such as when the alfalfa is in the pre-bud stage. Cutting before the bud stage may result in reduced alfalfa vigour and excessive forage quality for most livestock. It can result in reduced yields due to extensive weevil damage to second cut regrowth.
• The key to weevil control is proper timing of harvest or insecticide application based on field inspection. When threatening infestations occur, cut fields immediately to eliminate feeding damage. Most of the larvae will be removed from the field, while any remaining larvae usually dry out, starve and are exposed to natural enemies.
• Use of foliar insecticides will also kill beneficial insects, the natural enemies of alfalfa weevil. This increases the potential for future outbreaks of this pest.
• Occasionally, warm May weather will result in an early hatch of weevil. Feeding damage will show before the bud stage when it would be practical to harvest the alfalfa. In those situations, an insecticide may be warranted.
TRUE ARMYWORM (Mythimna unipuncta) and
FALL ARMYWORM (Spodoptera frugiperda)
Description and Life Cycle: For true armyworm see page 315 and for fall armyworm see page 325.
Damage: There is more of a concern for mixed forages in outbreak years when armyworm has also been a problem in cereal and corn. Armyworm larvae feed at night and do not feed on pure stands of alfalfa but will feed on alfalfa/grass mixtures. Larvae strip the grass leaf margins, moving up the plant to feed on the panicles leaving only the midrib. Infestations tend to be caused by second generation true armyworm once cereals and other preferred hosts are more advanced, although first generation true armyworm can be a concern if neighbouring fields of cereal and corn crops are infested in June. Fall armyworm is a concern in late summer.
Conditions That Increase Risk: Mixed forage crops that are adjacent to cereals and corn fields in outbreak years.
Scouting Technique: The best time to scout for armyworm is at or shortly after dusk. Examine 10 areas of the field, assessing the number of larvae per 30 cm2 (1 ft2). Scout along the field boundaries bordering cereal and corn crops as larvae will “march” in from neighbouring fields and may be controlled prior to larvae entering the forage crop. During the day, the larvae may be found amongst the crop debris on the soil surface or under soil clods. Brown frass, often mistaken for eggs, may also be detected on the soil
340
Agronomy guide for field Crops
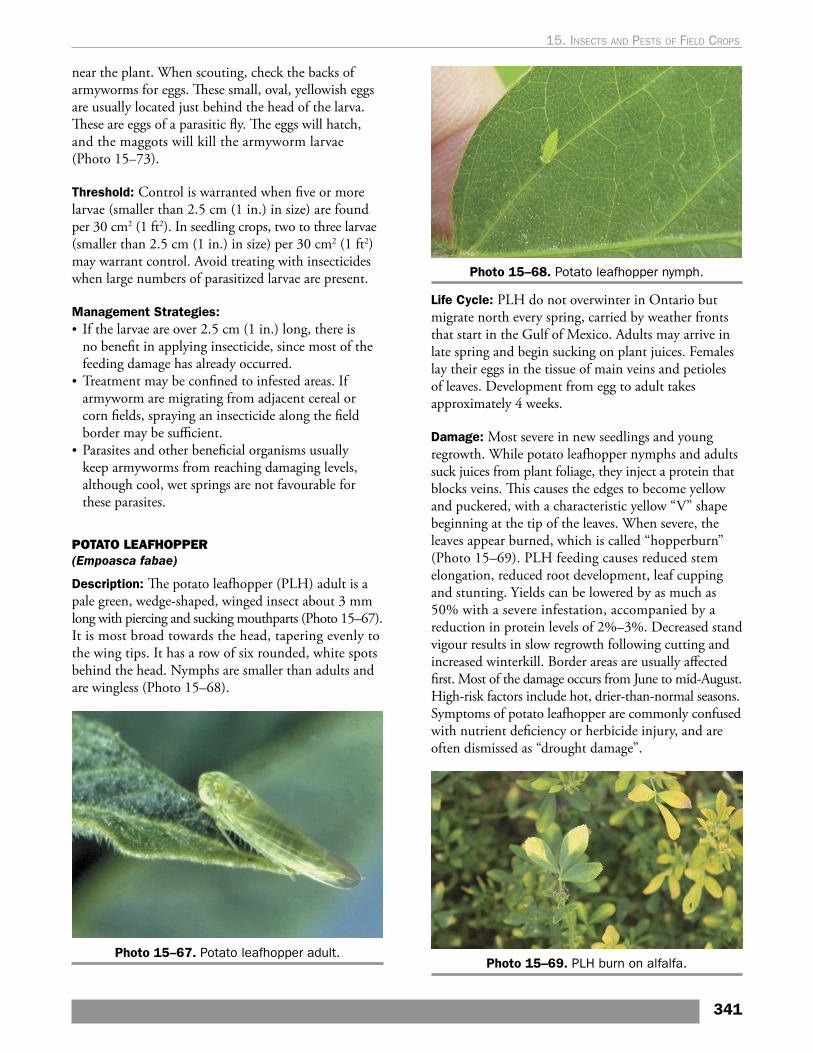
near the plant. When scouting, check the backs of armyworms for eggs. These small, oval, yellowish eggs are usually located just behind the head of the larva. These are eggs of a parasitic fly. The eggs will hatch, and the maggots will kill the armyworm larvae (Photo 15–73).
Threshold: Control is warranted when five or more larvae (smaller than 2.5 cm (1 in.) in size) are found per 30 cm2 (1 ft2). In seedling crops, two to three larvae (smaller than 2.5 cm (1 in.) in size) per 30 cm2 (1 ft2) may warrant control. Avoid treating with insecticides when large numbers of parasitized larvae are present.
Management Strategies: • If the larvae are over 2.5 cm (1 in.) long, there is
no benefit in applying insecticide, since most of the feeding damage has already occurred.
• Treatment may be confined to infested areas. If armyworm are migrating from adjacent cereal or corn fields, spraying an insecticide along the field border may be sufficient.
• Parasites and other beneficial organisms usually keep armyworms from reaching damaging levels, although cool, wet springs are not favourable for these parasites.
POTATO LEAFHOPPER(Empoasca fabae)
Description: The potato leafhopper (PLH) adult is a pale green, wedge-shaped, winged insect about 3 mm long with piercing and sucking mouthparts (Photo 15–67). It is most broad towards the head, tapering evenly to the wing tips. It has a row of six rounded, white spots behind the head. Nymphs are smaller than adults and are wingless (Photo 15–68).
Photo 15–67. Potato leafhopper adult.
Photo 15–68. Potato leafhopper nymph.
Life Cycle: PLH do not overwinter in Ontario but migrate north every spring, carried by weather fronts that start in the Gulf of Mexico. Adults may arrive in late spring and begin sucking on plant juices. Females lay their eggs in the tissue of main veins and petioles of leaves. Development from egg to adult takes approximately 4 weeks.
Damage: Most severe in new seedlings and young regrowth. While potato leafhopper nymphs and adults suck juices from plant foliage, they inject a protein that blocks veins. This causes the edges to become yellow and puckered, with a characteristic yellow “V” shape beginning at the tip of the leaves. When severe, the leaves appear burned, which is called “hopperburn” (Photo 15–69). PLH feeding causes reduced stem elongation, reduced root development, leaf cupping and stunting. Yields can be lowered by as much as 50% with a severe infestation, accompanied by a reduction in protein levels of 2%–3%. Decreased stand vigour results in slow regrowth following cutting and increased winterkill. Border areas are usually affected first. Most of the damage occurs from June to mid-August. High-risk factors include hot, drier-than-normal seasons. Symptoms of potato leafhopper are commonly confused with nutrient deficiency or herbicide injury, and are often dismissed as “drought damage”.
Photo 15–69. PLH burn on alfalfa.
341
15. Insects and pests oF FIeld crops

Conditions That Increase Risk: Hot dry conditions can promote outbreak years. Fields along Lake Erie tend to experience more frequent infestations.
Scouting Technique: Economic losses occur before plant symptoms develop, so it is important to identify the presence of large leafhopper populations before the damage occurs, especially in new seedings. Scout frequently as PLHs can arrive on storm fronts and land in fields at threshold levels overnight. See Using Sweep Nets, in Chapter 10, Field Scouting, for a discussion on how to scout using a sweep net. Scouting with a sweep net will help determine whether early harvest or spraying is needed. Scout at intervals of 5–7 days, beginning after first cut. Take 20 sweeps from five areas of the field beginning in late June. Avoid field edges. Determine the average number of PLHs per sweep. Take 20 alfalfa stems at random and record the average plant height. Table 15–6, Thresholds for potato leafhopper on alfalfa, will help determine when thresholds have been reached.
Table 15–6. Thresholds for potato leafhopper on alfalfa
Stem Height1 Potato Leafhoppers per Sweep2
9 cm (3.5 in.) 0.2 adults
15 cm (6 in.) 0.5 adults
25 cm (10 in.) 1.0 adults or nymph
36 cm (14 in.) 2.0 adults or nymph1 The taller the alfalfa, the more leafhoppers can be
tolerated before control is necessary.2 1 sweep = 180° arc.
Management Strategies:• Resistant varieties that use glandular hairs as the
resistance factor are available. These glandular hairs, both on the leaves and stems, act as mechanical barriers to PLH feeding. Use the thresholds in Table 15–6 for new seedings of PLH-resistant varieties since the glandular hairs are not fully expressed in the first year.
• When considering whether or not to use a PLH-resistant variety, consider level of PLH infestation expected in a typical year (higher in Lake Erie counties), cost of scouting, insecticide and spray application, any additional cost of PLH-resistant varieties and other variety performance traits (e.g., yield and disease resistance).
• Cutting alfalfa early will potentially reduce egg, nymph and adult populations. A naturally occurring fungal pathogen helps reduce the populations of the PLH under cool, moist conditions.
• Before applying an insecticide, ensure that thresholds have been reached and cutting is not possible. Spraying insecticides on alfalfa will also kill the natural enemies of alfalfa weevil.
EUROPEAN SKIPPER (Thymelicus lineola)
Description: European skipper is a sporadic pest of timothy, both in hay and seed production. Larvae can usually be found within rolled leaves where they feed. Younger larvae have black heads that eventually turn brown. Mature larvae are light green, approximately 19 mm (0.75 in.) in length and have brown heads with two light bands. The adult is a pumpkin-orange butterfly with a 2.5 cm (1 in.) wing-spread that skips about hay fields in midsummer.
Life Cycle: There is one generation per year. Eggs overwinter on the stems of crop debris and weeds and hatch in the spring. Young larvae roll themselves up in the leaves and seal the leaves closed with silk webbing. Larvae feed on timothy and other grasses until late-June. The larvae then attach themselves to grass stems or the underside of weed leaves and develop into chrysalids (the pupa stage of the butterfly). In approximately 2 weeks, the adult skipper emerges.
Damage: Larval feeding causes leaf margins to become irregularly notched and when abundant can cause defoliation which is often confused with armyworm injury. When the population is very high, the larvae will also feed on the heads of plants, leaving only the stems remaining in a field. Adult skippers feed on the nectar of flowers and weeds and do not cause any damage to plants.
Scouting Technique: Begin scouting for larvae by late-April. Remove five random, 30 cm2 (1 ft2) samples of forage down to ground level and place them along with the old crop residue into a bag. Tie the bag and leave overnight at room temperature. The caterpillars will crawl out of the residue and can be easily counted.
Threshold: Control may be warranted when 6–8 larvae in a 30 cm2 (1 ft2) area are found in the early, brown-headed stage.
Management Strategies: • See OMAFRA Publication 812, Field Crop Protection
Guide, for insecticide recommendations. • Products containing Bacillus thuringiensis (Bt)
are available for organic production.
342
Agronomy guide for field Crops
Cereal Insects and PestsTable 15–7, Cereal insect and pest symptoms in the field, shows insects and pests that may be causing symptoms in the field.
Table 15–7. Cereal insect and pest symptoms in the field
LEGEND: Y = symptom – = not a symptom
Symptom
Insects and Pests
Gru
bs (
page
30
1)
Wirew
orm
s (p
age
305
)
Slu
gs (
page
30
9)
Cer
eal a
phid
s (p
age
34
4)
Hes
sian
fly
(pag
e 3
45)
Cer
eal l
eaf
beet
le (
page
34
5)
True
arm
ywor
m (
page
315
, 34
6)
Euro
pean
cor
n bo
rer
(pag
e 3
17
)
Gra
ss s
awfly
(pa
ge 3
47)
Whe
at s
tem
saw
fly
Whe
at s
tem
mag
got
Roots and seedling plants
Gaps in stand Y Y Y – – – – – – – –
Seed is hollowed out – – Y – – – – – – – –
Roots on seedlings clipped Y Y – – – – – – – – –
• Plants stunted, turning bluish-green• Tillering may occur• Flax seed-like pupae may be found inside stems near base• Typically found in early fall planted fields
– – – – Y – – – – – –
Foliar feeding injury
• Scratches on leaves running parallel with leaf veins• Field scouting may stain clothing
– – – – – Y – – – – –
Leaves are tattered, looking like hail damage – – Y – – – – – – – –
Ragged holes in leaves or completely defoliated with only stem remaining
– – – – – – Y – Y – –
• Aphids typically present at leaf collar• Plants take on a bronzy colour• Flagleaves may corkscrew, constricting cereal head
development• Typically found in early fall planted cereals
– – – Y – – – – – – –
Stem and head injury
• Stem breaks easily at the nodes• Internodes may be shortened
– – – – Y – – – – – –
• Plant breaks and lodges near the base of plant• Tunnelling throughout the plant, including the nodes• Heads are not bleached• Larvae may be present close to base of plant
– – – – – – – – – Y –
• Head bleached • Caterpillar found within stem• Primarily in Eastern Ontario
– – – – – – – Y – – –
Stems cut into approximately 13 cm (5 in.) sections and left lying on the ground
– – – – – – – – Y – –
• Stem easily pulled from plant• Head bleached while rest of plant is still green• Poor grain fill• Maggot (no legs) found within stem, near top of plant
– – – – – – – – – – Y
Cereal head clipped off – – – – – – Y – Y – –
343
15. Insects and pests oF FIeld crops

BELOW GROUND CEREAL PESTS
GRUBS – SEE PAGE 301
WIREWORMS – SEE PAGE 305
SLUGS – SEE PAGE 309
ABOVE GROUND CEREAL PESTS
Cereal Aphid Complex:
BIRD CHERRY-OAT APHID (Rhopalosiphum padi)
ENGLISH GRAIN APHID (Sitobion avenae)
CORN LEAF APHID (Rhopalosiphum maidis)
Description: Three main species of aphids can infest cereals in Ontario. The bird cherry-oat aphid is the most common. These aphids are small, 2 mm or less. Adults are olive-green with patches of red-orange near the rear of the abdomen, between a pair of tubes called cornicles (Photo 15–70). The cornicles and legs are pale green; the antennae are long and black. Younger aphids are light green. Winged adults are darker than the wingless forms.
Photo 15–70. Bird cherry-oat aphids.
The English grain aphid is typically the largest of the three species and is a pale green or apricot colour. It has an elongated body with long legs that may appear green to black and has long black antennae and cornicles.
The corn leaf aphid is also olive green, but the legs, cornicles and antennae are black and the shape of the body is more rectangular, while the bird cherry-oat aphid is bulb-shaped. Winged adults are darker than the wingless forms.
Russian wheat aphid is a serious pest of cereals but has not been found in Ontario.
Life Cycle: Cereal aphids have overwintered in Ontario on winter wheat, particularly in mild winters with prolonged snow cover, although a large number of the aphids also migrate from other regions via storm fronts. Once they find a host crop, they will colonize young plants, producing several generations of wingless forms until winged forms are necessary for redistribution. All aphids are female, giving birth to live nymphs and there are multiple generations per year.
Damage: Seldom a direct problem in Ontario, aphids cluster on the upper sides of leaves near the base of young plants. Eventually, aphids will climb to the top and can be found in the leaf whorls. All species of aphids have piercing and sucking mouthparts that suck the juices (nutrients) from young plant tissues. Aphids secrete a sticky substance referred to as “honeydew,” which can cause sooty mould. High populations can result in fields appearing to have large bronze patches and can cause the flag leaf to curl up in a tight corkscrew constricting the awns, resulting in a buggy whipping of the wheat head. Leaf curl caused by the bird cherry-oat aphid resembles a corkscrew, Cereal aphids are vectors of barley yellow dwarf virus (BYDV), see Barley Yellow Dwarf Virus in Chapter 16 .
Conditions That Increase Risk: Mild winters may increase the incidence of aphids. Fields planted in late summer or early fall (August/September) are at highest risk of fall aphid infestations. Volunteer cereals allow aphids to survive until the host crop is planted and can increase the risk of virus being vectored into the crop.
Scouting Technique: Fall scouting for cereal aphids is important, as early-season infection with BYDV is most harmful to cereals. In spring, scout the field weekly prior to heading. Examine 20 stems in five areas across the field. Shake the plants over a piece of paper and count the number of aphids present or look for colonies specifically at the leaf collar. Also make note of any predators present and whether the aphids are parasitized or infected with a fungus.
Thresholds: Control may be warranted if prior to the heading stage there are 12–15 cereal aphids per stem or up to 50 aphids per head once headed.
Management Strategies:• Apply insecticide when the threshold has been reached.
To prevent barley yellow dwarf virus in winter cereals, avoid planting any earlier than 10 days prior to optimum planting date as shown in Chapter 4, Cereals, Figure 4–4, Optimum date to seed winter wheat across Ontario.
344
Agronomy guide for field Crops
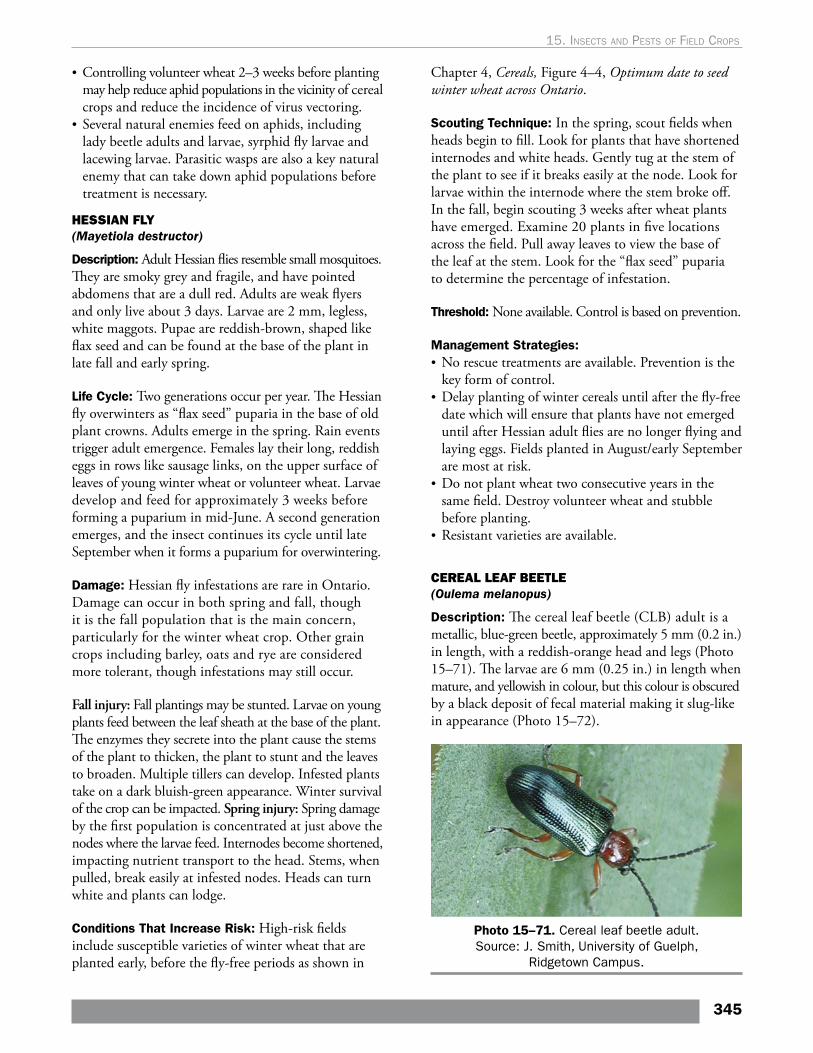
• Controlling volunteer wheat 2–3 weeks before planting may help reduce aphid populations in the vicinity of cereal crops and reduce the incidence of virus vectoring.
• Several natural enemies feed on aphids, including lady beetle adults and larvae, syrphid fly larvae and lacewing larvae. Parasitic wasps are also a key natural enemy that can take down aphid populations before treatment is necessary.
HESSIAN FLY (Mayetiola destructor)
Description: Adult Hessian flies resemble small mosquitoes. They are smoky grey and fragile, and have pointed abdomens that are a dull red. Adults are weak flyers and only live about 3 days. Larvae are 2 mm, legless, white maggots. Pupae are reddish-brown, shaped like flax seed and can be found at the base of the plant in late fall and early spring.
Life Cycle: Two generations occur per year. The Hessian fly overwinters as “flax seed” puparia in the base of old plant crowns. Adults emerge in the spring. Rain events trigger adult emergence. Females lay their long, reddish eggs in rows like sausage links, on the upper surface of leaves of young winter wheat or volunteer wheat. Larvae develop and feed for approximately 3 weeks before forming a puparium in mid-June. A second generation emerges, and the insect continues its cycle until late September when it forms a puparium for overwintering.
Damage: Hessian fly infestations are rare in Ontario. Damage can occur in both spring and fall, though it is the fall population that is the main concern, particularly for the winter wheat crop. Other grain crops including barley, oats and rye are considered more tolerant, though infestations may still occur.
Fall injury: Fall plantings may be stunted. Larvae on young plants feed between the leaf sheath at the base of the plant. The enzymes they secrete into the plant cause the stems of the plant to thicken, the plant to stunt and the leaves to broaden. Multiple tillers can develop. Infested plants take on a dark bluish-green appearance. Winter survival of the crop can be impacted. Spring injury: Spring damage by the first population is concentrated at just above the nodes where the larvae feed. Internodes become shortened, impacting nutrient transport to the head. Stems, when pulled, break easily at infested nodes. Heads can turn white and plants can lodge.
Conditions That Increase Risk: High-risk fields include susceptible varieties of winter wheat that are planted early, before the fly-free periods as shown in
Chapter 4, Cereals, Figure 4–4, Optimum date to seed winter wheat across Ontario.
Scouting Technique: In the spring, scout fields when heads begin to fill. Look for plants that have shortened internodes and white heads. Gently tug at the stem of the plant to see if it breaks easily at the node. Look for larvae within the internode where the stem broke off. In the fall, begin scouting 3 weeks after wheat plants have emerged. Examine 20 plants in five locations across the field. Pull away leaves to view the base of the leaf at the stem. Look for the “flax seed” puparia to determine the percentage of infestation.
Threshold: None available. Control is based on prevention.
Management Strategies:• No rescue treatments are available. Prevention is the
key form of control. • Delay planting of winter cereals until after the fly-free
date which will ensure that plants have not emerged until after Hessian adult flies are no longer flying and laying eggs. Fields planted in August/early September are most at risk.
• Do not plant wheat two consecutive years in the same field. Destroy volunteer wheat and stubble before planting.
• Resistant varieties are available.
CEREAL LEAF BEETLE (Oulema melanopus)
Description: The cereal leaf beetle (CLB) adult is a metallic, blue-green beetle, approximately 5 mm (0.2 in.) in length, with a reddish-orange head and legs (Photo 15–71). The larvae are 6 mm (0.25 in.) in length when mature, and yellowish in colour, but this colour is obscured by a black deposit of fecal material making it slug-like in appearance (Photo 15–72).
Photo 15–71. Cereal leaf beetle adult. Source: J. Smith, University of Guelph,
Ridgetown Campus.
345
15. Insects and pests oF FIeld crops
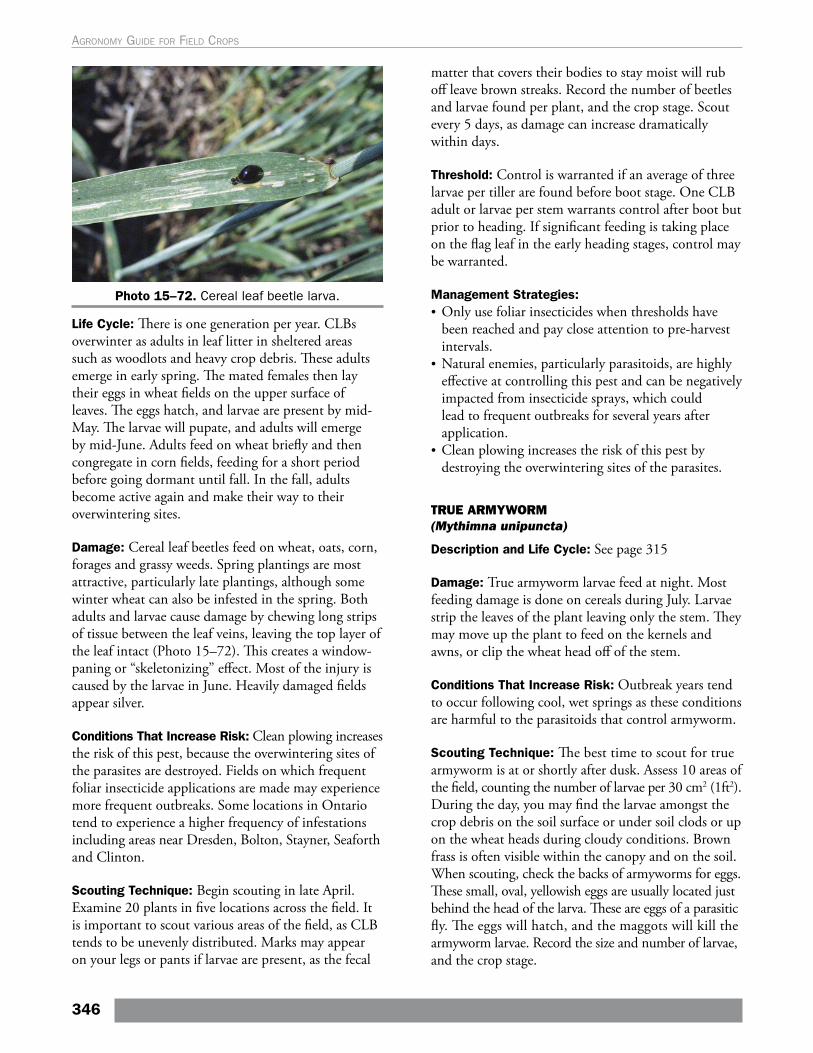
Photo 15–72. Cereal leaf beetle larva.
Life Cycle: There is one generation per year. CLBs overwinter as adults in leaf litter in sheltered areas such as woodlots and heavy crop debris. These adults emerge in early spring. The mated females then lay their eggs in wheat fields on the upper surface of leaves. The eggs hatch, and larvae are present by mid-May. The larvae will pupate, and adults will emerge by mid-June. Adults feed on wheat briefly and then congregate in corn fields, feeding for a short period before going dormant until fall. In the fall, adults become active again and make their way to their overwintering sites.
Damage: Cereal leaf beetles feed on wheat, oats, corn, forages and grassy weeds. Spring plantings are most attractive, particularly late plantings, although some winter wheat can also be infested in the spring. Both adults and larvae cause damage by chewing long strips of tissue between the leaf veins, leaving the top layer of the leaf intact (Photo 15–72). This creates a window-paning or “skeletonizing” effect. Most of the injury is caused by the larvae in June. Heavily damaged fields appear silver.
Conditions That Increase Risk: Clean plowing increases the risk of this pest, because the overwintering sites of the parasites are destroyed. Fields on which frequent foliar insecticide applications are made may experience more frequent outbreaks. Some locations in Ontario tend to experience a higher frequency of infestations including areas near Dresden, Bolton, Stayner, Seaforth and Clinton.
Scouting Technique: Begin scouting in late April. Examine 20 plants in five locations across the field. It is important to scout various areas of the field, as CLB tends to be unevenly distributed. Marks may appear on your legs or pants if larvae are present, as the fecal
matter that covers their bodies to stay moist will rub off leave brown streaks. Record the number of beetles and larvae found per plant, and the crop stage. Scout every 5 days, as damage can increase dramatically within days.
Threshold: Control is warranted if an average of three larvae per tiller are found before boot stage. One CLB adult or larvae per stem warrants control after boot but prior to heading. If significant feeding is taking place on the flag leaf in the early heading stages, control may be warranted.
Management Strategies:• Only use foliar insecticides when thresholds have
been reached and pay close attention to pre-harvest intervals.
• Natural enemies, particularly parasitoids, are highly effective at controlling this pest and can be negatively impacted from insecticide sprays, which could lead to frequent outbreaks for several years after application.
• Clean plowing increases the risk of this pest by destroying the overwintering sites of the parasites.
TRUE ARMYWORM (Mythimna unipuncta)
Description and Life Cycle: See page 315
Damage: True armyworm larvae feed at night. Most feeding damage is done on cereals during July. Larvae strip the leaves of the plant leaving only the stem. They may move up the plant to feed on the kernels and awns, or clip the wheat head off of the stem.
Conditions That Increase Risk: Outbreak years tend to occur following cool, wet springs as these conditions are harmful to the parasitoids that control armyworm.
Scouting Technique: The best time to scout for true armyworm is at or shortly after dusk. Assess 10 areas of the field, counting the number of larvae per 30 cm2 (1ft2). During the day, you may find the larvae amongst the crop debris on the soil surface or under soil clods or up on the wheat heads during cloudy conditions. Brown frass is often visible within the canopy and on the soil. When scouting, check the backs of armyworms for eggs. These small, oval, yellowish eggs are usually located just behind the head of the larva. These are eggs of a parasitic fly. The eggs will hatch, and the maggots will kill the armyworm larvae. Record the size and number of larvae, and the crop stage.
346
Agronomy guide for field Crops
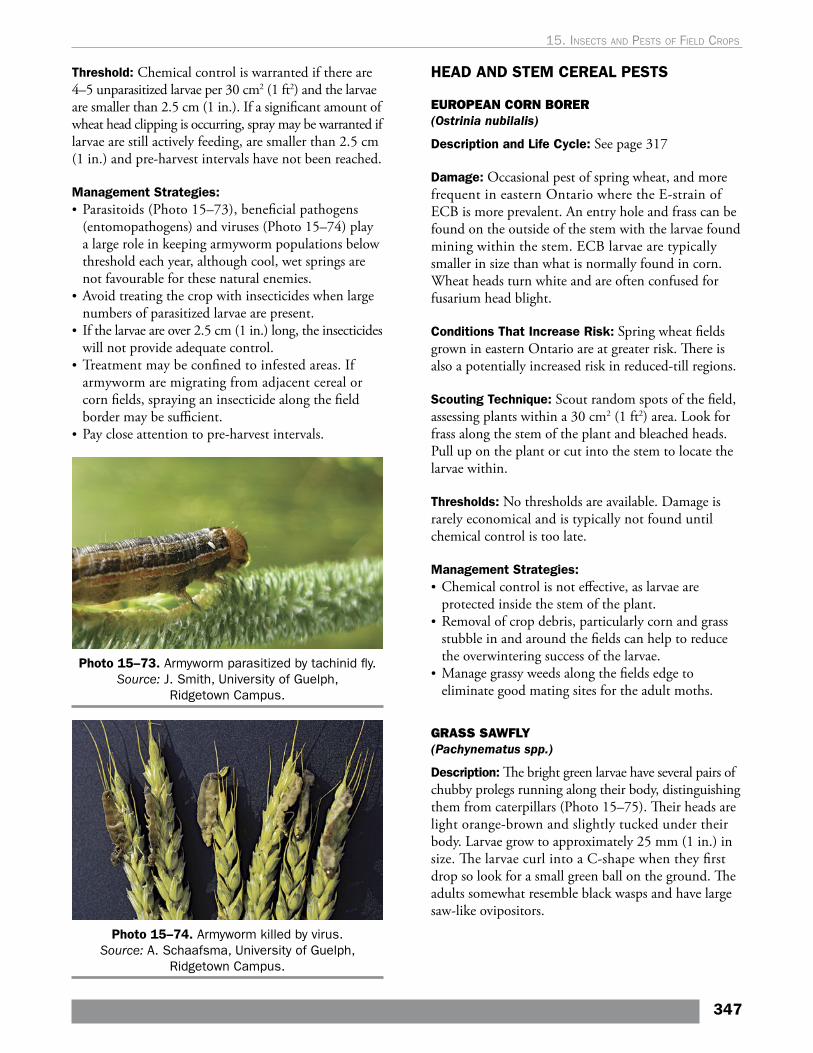
Threshold: Chemical control is warranted if there are 4–5 unparasitized larvae per 30 cm2 (1 ft2) and the larvae are smaller than 2.5 cm (1 in.). If a significant amount of wheat head clipping is occurring, spray may be warranted if larvae are still actively feeding, are smaller than 2.5 cm (1 in.) and pre-harvest intervals have not been reached.
Management Strategies: • Parasitoids (Photo 15–73), beneficial pathogens
(entomopathogens) and viruses (Photo 15–74) play a large role in keeping armyworm populations below threshold each year, although cool, wet springs are not favourable for these natural enemies.
• Avoid treating the crop with insecticides when large numbers of parasitized larvae are present.
• If the larvae are over 2.5 cm (1 in.) long, the insecticides will not provide adequate control.
• Treatment may be confined to infested areas. If armyworm are migrating from adjacent cereal or corn fields, spraying an insecticide along the field border may be sufficient.
• Pay close attention to pre-harvest intervals.
Photo 15–73. Armyworm parasitized by tachinid fly. Source: J. Smith, University of Guelph,
Ridgetown Campus.
Photo 15–74. Armyworm killed by virus. Source: A. Schaafsma, University of Guelph,
Ridgetown Campus.
HEAD AND STEM CEREAL PESTS
EUROPEAN CORN BORER (Ostrinia nubilalis)
Description and Life Cycle: See page 317
Damage: Occasional pest of spring wheat, and more frequent in eastern Ontario where the E-strain of ECB is more prevalent. An entry hole and frass can be found on the outside of the stem with the larvae found mining within the stem. ECB larvae are typically smaller in size than what is normally found in corn. Wheat heads turn white and are often confused for fusarium head blight.
Conditions That Increase Risk: Spring wheat fields grown in eastern Ontario are at greater risk. There is also a potentially increased risk in reduced-till regions.
Scouting Technique: Scout random spots of the field, assessing plants within a 30 cm2 (1 ft2) area. Look for frass along the stem of the plant and bleached heads. Pull up on the plant or cut into the stem to locate the larvae within.
Thresholds: No thresholds are available. Damage is rarely economical and is typically not found until chemical control is too late.
Management Strategies:• Chemical control is not effective, as larvae are
protected inside the stem of the plant.• Removal of crop debris, particularly corn and grass
stubble in and around the fields can help to reduce the overwintering success of the larvae.
• Manage grassy weeds along the fields edge to eliminate good mating sites for the adult moths.
GRASS SAWFLY(Pachynematus spp.)
Description: The bright green larvae have several pairs of chubby prolegs running along their body, distinguishing them from caterpillars (Photo 15–75). Their heads are light orange-brown and slightly tucked under their body. Larvae grow to approximately 25 mm (1 in.) in size. The larvae curl into a C-shape when they first drop so look for a small green ball on the ground. The adults somewhat resemble black wasps and have large saw-like ovipositors.
347
15. Insects and pests oF FIeld crops

Photo 15–75. Grass sawfly larva.
Life Cycle: There is one generation per year. Adult sawflies emerge from the soil and lay eggs on grassy plants in late April or early May. Eggs hatch and larvae feed for approximately 4 weeks. There are six instars. Larvae then drop to the ground and spend the rest of the summer in the soil, eventually pupating in the fall.
Damage: Infestations are rare but occur at the same time as armyworm feeding, although sawflies are potentially more damaging. Infestations are usually spotty and more concentrated near the field’s edge. Larvae feed during the day but are difficult to see
since they are the same colour as the plant. Some foliar feeding may take place but the majority of the injury comes from clipping. The larvae have a peculiar behaviour of clipping the plant stems into equal 10–13 cm (4–5 in.) sections, leaving them piled up on the ground (Photo 15–76). Armyworm does not do this type of damage. Sawfly larvae can also go straight to the head of the plant and clip it off at the base, similar to armyworms. One larva can clip 10–12 heads.
Photo 15–76. Wheat stems clipped by grass sawfly. Source: L. Freitag, Cargill.
Table 15–8. Dry edible bean insect and pest symptoms in the field
LEGEND: Y = symptom – = not a symptom
Symptom
Insects and Pests
Gru
bs (
page
301)
Wirew
orm
s (p
age
30
5)
See
dcor
n m
aggo
t (p
age
308
)
Slu
gs (
page
309)
Pot
ato
leaf
hopp
er (
page
341
, 349)
Bea
n le
af b
eetl
e (p
age
329, 3
51)
Mex
ican
bea
n be
etle
(pa
ge 3
50)
Wes
tern
bea
n cu
twor
m (
page
322
, 351
)
Euro
pean
cor
n bo
rer
(pag
e 31
7)
Tarn
ishe
d pl
ant
bug
(pag
e 353
)
Seed and seedling damage
Holes in the seed – – Y Y – – – – – –
Gaps in the stand Y Y Y – – Y – – – –
Tunneling into cotyledon or hypocotyl – – Y – – – – – – –
Roots clipped Y Y – – – – – – – –
Foliar feeding
Ragged holes in the leaves, looks like hail damage – – – Y – – – – – –
Leaves are skeletonized – – – Y – – Y – – –
Round holes in the leaves – – – – – Y – – – –
Leaf tip or margins yellow, leaves puckered and appear scorched – – – – Y – – – – –
Pod feeding Holes on surface of pod – – – – – Y – – – –
Entry hole into pod, larva inside, seed fed on – – – – – – – – Y –
Entry hole into pod, no larva found, seed fed on – – – – – – – Y – –
Hard dark spots on pod, seed has picks or dimples – – – – – – – – – Y
348
Agronomy guide for field Crops
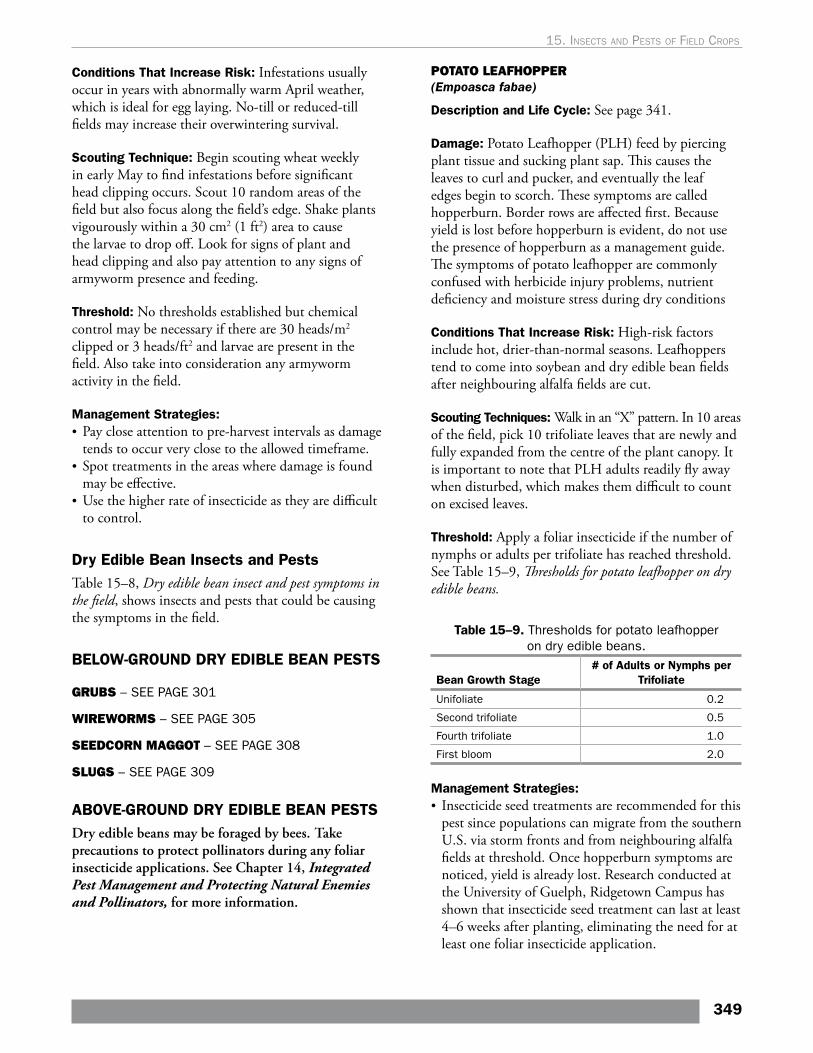
Conditions That Increase Risk: Infestations usually occur in years with abnormally warm April weather, which is ideal for egg laying. No-till or reduced-till fields may increase their overwintering survival.
Scouting Technique: Begin scouting wheat weekly in early May to find infestations before significant head clipping occurs. Scout 10 random areas of the field but also focus along the field’s edge. Shake plants vigourously within a 30 cm2 (1 ft2) area to cause the larvae to drop off. Look for signs of plant and head clipping and also pay attention to any signs of armyworm presence and feeding.
Threshold: No thresholds established but chemical control may be necessary if there are 30 heads/m2 clipped or 3 heads/ft2 and larvae are present in the field. Also take into consideration any armyworm activity in the field.
Management Strategies:• Pay close attention to pre-harvest intervals as damage
tends to occur very close to the allowed timeframe.• Spot treatments in the areas where damage is found
may be effective.• Use the higher rate of insecticide as they are difficult
to control.
Dry Edible Bean Insects and PestsTable 15–8, Dry edible bean insect and pest symptoms in the field, shows insects and pests that could be causing the symptoms in the field.
BELOW-GROUND DRY EDIBLE BEAN PESTS
GRUBS – SEE PAGE 301
WIREWORMS – SEE PAGE 305
SEEDCORN MAGGOT – SEE PAGE 308
SLUGS – SEE PAGE 309
ABOVE-GROUND DRY EDIBLE BEAN PESTSDry edible beans may be foraged by bees. Take precautions to protect pollinators during any foliar insecticide applications. See Chapter 14, Integrated Pest Management and Protecting Natural Enemies and Pollinators, for more information.
POTATO LEAFHOPPER(Empoasca fabae)
Description and Life Cycle: See page 341.
Damage: Potato Leafhopper (PLH) feed by piercing plant tissue and sucking plant sap. This causes the leaves to curl and pucker, and eventually the leaf edges begin to scorch. These symptoms are called hopperburn. Border rows are affected first. Because yield is lost before hopperburn is evident, do not use the presence of hopperburn as a management guide. The symptoms of potato leafhopper are commonly confused with herbicide injury problems, nutrient deficiency and moisture stress during dry conditions
Conditions That Increase Risk: High-risk factors include hot, drier-than-normal seasons. Leafhoppers tend to come into soybean and dry edible bean fields after neighbouring alfalfa fields are cut.
Scouting Techniques: Walk in an “X” pattern. In 10 areas of the field, pick 10 trifoliate leaves that are newly and fully expanded from the centre of the plant canopy. It is important to note that PLH adults readily fly away when disturbed, which makes them difficult to count on excised leaves.
Threshold: Apply a foliar insecticide if the number of nymphs or adults per trifoliate has reached threshold. See Table 15–9, Thresholds for potato leafhopper on dry edible beans.
Table 15–9. Thresholds for potato leafhopper on dry edible beans.
Bean Growth Stage# of Adults or Nymphs per
Trifoliate
Unifoliate 0.2
Second trifoliate 0.5
Fourth trifoliate 1.0
First bloom 2.0
Management Strategies:• Insecticide seed treatments are recommended for this
pest since populations can migrate from the southern U.S. via storm fronts and from neighbouring alfalfa fields at threshold. Once hopperburn symptoms are noticed, yield is already lost. Research conducted at the University of Guelph, Ridgetown Campus has shown that insecticide seed treatment can last at least 4–6 weeks after planting, eliminating the need for at least one foliar insecticide application.
349
15. Insects and pests oF FIeld crops

• Consider using insecticide seed treatment on fields with a history of leafhopper infestations, to reduce the number of foliar applications required.
• Use foliar insecticides only if thresholds have been reached.
• A naturally occurring fungal pathogen helps reduce the populations of the PLH under warm, moist conditions. Predators and parasites appear to play a minor role in controlling the pest.
• If spraying during bloom, spray in the evening when bees are less active, and contact local beekeepers so they can protect their hives. Rotate insecticide chemical families to reduce the risk of resistance.
COMMON DEFOLIATING INSECTS OF DRY EDIBLE BEANS:
BEAN LEAF BEETLE(Certoma trifurcata)
Description and Life Cycle: See page 329.
JAPANESE BEETLE(Popillia japonica)
Description and Life Cycle: See page 304.
MEXICAN BEAN BEETLE(Epilachna varivestis)
Description: Mexican bean beetle infestations are rare in Ontario. Mexican bean beetle is the only member of the lady beetle family in Ontario that feeds on plants. All the other lady beetles are beneficial predacious insects. The adult beetles are oval in shape, approximately 6 mm (0.25 in.) in length with 16 small black spots on their coppery-red backs, resembling a lady beetle (Photo 15–77). The heads of the Mexican bean beetle, however, are the same coppery-red colour as their backs.
Photo 15–77. Mexican bean beetle and injury.
Assessing Defoliation in Dry Edible BeansResearch conducted at the University of Guelph, Ridgetown Campus, shown in Figure 15–3, Yield loss vs. defoliation of navy beans, indicates that prior to flowering, dry edible beans are able to tolerate up to 50% leaf loss with minimal loss in final yield. Complete defoliation prior to flowering delayed maturity by 30 days but lower levels of defoliation did not delay maturity. At later stages, the impact of defoliation is greater. Full impact depends on the growing conditions and the ability of the plant to recover. Losing more than one-third of the leaves during flowering or pod fill can greatly reduce yield.
Figure 15–3. Yield loss vs. defoliation of navy beans. Source: Schaafsma and Ablett, 1994
A few insects feed on the leaves of dry edible beans. Bean leaf beetle and the occasional pests like Mexican bean beetle, grasshoppers and slugs can cause defoliation, though rarely do they reach threshold levels that require management in dry edible beans. No matter which pest is doing the feeding, the decision to spray comes down to how much defoliation is occurring prior to pod-fill, and is not based on the number of insects per plant, though the insect still needs to be present and actively feeding for the application to be cost effective. Once the beans are in the pod-fill stages, it is more important to assess pod-feeding injury instead of focusing solely on defoliation.
Scouting Technique: From Vegetative to Pod-fill Stages: In 10 areas of the field, pick trifoliate leaves that are fully expanded in the middle of the plant canopy from five plants. Discard the least- and most-damaged
350
Agronomy guide for field Crops
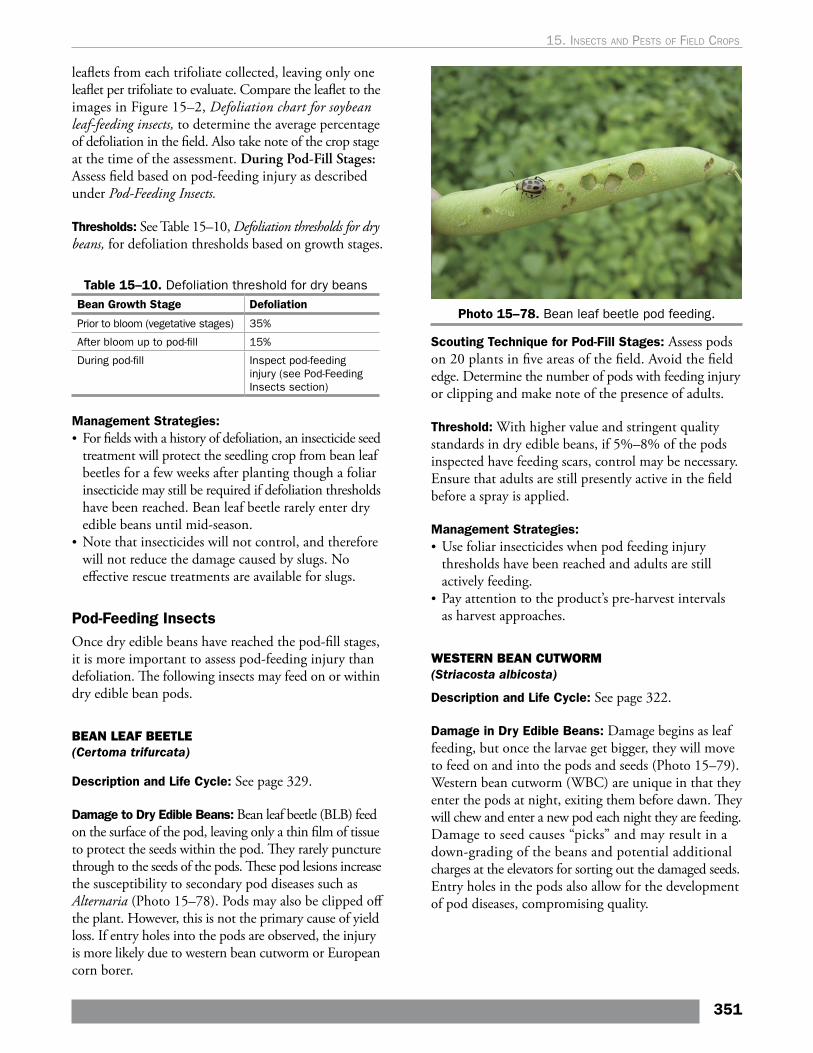
leaflets from each trifoliate collected, leaving only one leaflet per trifoliate to evaluate. Compare the leaflet to the images in Figure 15–2, Defoliation chart for soybean leaf-feeding insects, to determine the average percentage of defoliation in the field. Also take note of the crop stage at the time of the assessment. During Pod-Fill Stages: Assess field based on pod-feeding injury as described under Pod-Feeding Insects.
Thresholds: See Table 15–10, Defoliation thresholds for dry beans, for defoliation thresholds based on growth stages.
Table 15–10. Defoliation threshold for dry beansBean Growth Stage Defoliation
Prior to bloom (vegetative stages) 35%
After bloom up to pod-fill 15%
During pod-fill Inspect pod-feeding injury (see Pod-Feeding Insects section)
Management Strategies: • For fields with a history of defoliation, an insecticide seed
treatment will protect the seedling crop from bean leaf beetles for a few weeks after planting though a foliar insecticide may still be required if defoliation thresholds have been reached. Bean leaf beetle rarely enter dry edible beans until mid-season.
• Note that insecticides will not control, and therefore will not reduce the damage caused by slugs. No effective rescue treatments are available for slugs.
Pod-Feeding Insects Once dry edible beans have reached the pod-fill stages, it is more important to assess pod-feeding injury than defoliation. The following insects may feed on or within dry edible bean pods.
BEAN LEAF BEETLE(Certoma trifurcata)
Description and Life Cycle: See page 329.
Damage to Dry Edible Beans: Bean leaf beetle (BLB) feed on the surface of the pod, leaving only a thin film of tissue to protect the seeds within the pod. They rarely puncture through to the seeds of the pods. These pod lesions increase the susceptibility to secondary pod diseases such as Alternaria (Photo 15–78). Pods may also be clipped off the plant. However, this is not the primary cause of yield loss. If entry holes into the pods are observed, the injury is more likely due to western bean cutworm or European corn borer.
Photo 15–78. Bean leaf beetle pod feeding.
Scouting Technique for Pod-Fill Stages: Assess pods on 20 plants in five areas of the field. Avoid the field edge. Determine the number of pods with feeding injury or clipping and make note of the presence of adults.
Threshold: With higher value and stringent quality standards in dry edible beans, if 5%–8% of the pods inspected have feeding scars, control may be necessary. Ensure that adults are still presently active in the field before a spray is applied.
Management Strategies:• Use foliar insecticides when pod feeding injury
thresholds have been reached and adults are still actively feeding.
• Pay attention to the product’s pre-harvest intervals as harvest approaches.
WESTERN BEAN CUTWORM(Striacosta albicosta)
Description and Life Cycle: See page 322.
Damage in Dry Edible Beans: Damage begins as leaf feeding, but once the larvae get bigger, they will move to feed on and into the pods and seeds (Photo 15–79). Western bean cutworm (WBC) are unique in that they enter the pods at night, exiting them before dawn. They will chew and enter a new pod each night they are feeding. Damage to seed causes “picks” and may result in a down-grading of the beans and potential additional charges at the elevators for sorting out the damaged seeds. Entry holes in the pods also allow for the development of pod diseases, compromising quality.
351
15. Insects and pests oF FIeld crops

Photo 15–79. Western bean cutworm edible bean damage.
Source: J. Smith, University of Guelph, Ridgetown Campus.
Conditions That Increase Risk: Dry edible bean fields planted on sandy soils and in areas of known hot spots (Thamesville to Strathroy and Tillsonburg/Simcoe). Fields bordering corn, that have reached threshold are at risk, especially once corn is beyond the pre-tassel stages.
Scouting Technique: WBC rarely feed on the leaves but instead puncture the bean pod and enter it to feed on the developing seeds inside. Each night the larvae enter and exit a new pod. Larvae hide in the soil and are rarely present on the plants or within the pod during the day. If larvae are found in the pod, it is more likely to be European corn borer. An increasing number of dry edible bean fields in Ontario have been found with WBC injury within the field before harvest or as picks on the seed after harvest. Due to the difficulty in finding the presence of WBC within dry edible bean fields, the focus on scouting is first based on monitoring adults through pheromone traps to indicate if and when scouting is necessary. Contact the provincial entomologist for pheromone trap configurations, supply sources and monitoring protocols. Monitoring with traps consists of placing two WBC pheromone traps per bean field on opposite sides of the field, along the field’s edge close to low lying vegetation like grassy weeds. Place traps no later than the last week of June and monitor them through the growing season. Check traps regularly at least weekly to ensure all moths are counted. It is best to use the traps as guides, focusing scouting efforts in the field approximately 10–20 days after peak moth flight when pod feeding is likely to occur. Scouting for egg masses in adjacent cornfields, which are easier to find than in dry edible beans, can also help determine local WBC populations.
Threshold: due to the difficulty in finding eggs and larvae when scouting for WBC in dry edible beans, no thresholds have been established at this time. If WBC has reached a threshold in the neighbouring corn field, then adjacent dry edible bean fields are likely at risk, especially if the corn fields have passed the pre-tassel stage. If entry holes are observed in the pods prior to R6 stage, an insecticide application is necessary.
Management Strategies: • Since WBC exit and enter new pods each night, foliar
insecticides do have a chance at controlling the larvae, unlike European corn borer, which stays within the pod and is protected from insecticide applications. Spot treatments may be effective if injury is concentrated to one area of the field.
• Select insecticides that have some residual, and pay attention to pre-harvest intervals.
• Several natural enemies feed on egg masses and young larvae, including lady beetles, spiders and others.
EUROPEAN CORN BORER (Ostrinia nubilalis)
Description and Life Cycle: See page 317
Damage: European corn borer larvae can occasionally be found feeding inside dry edible bean pods, though the incidence is rare. Larvae create entry holes in the pod and feed on the developing seed. Unlike WBC, they remain inside the pod and can be found feeding inside during the day (Photo 15–80). Entry holes promote the development of pod diseases.
Photo 15–80. European corn borer pod feeding.
352
Agronomy guide for field Crops
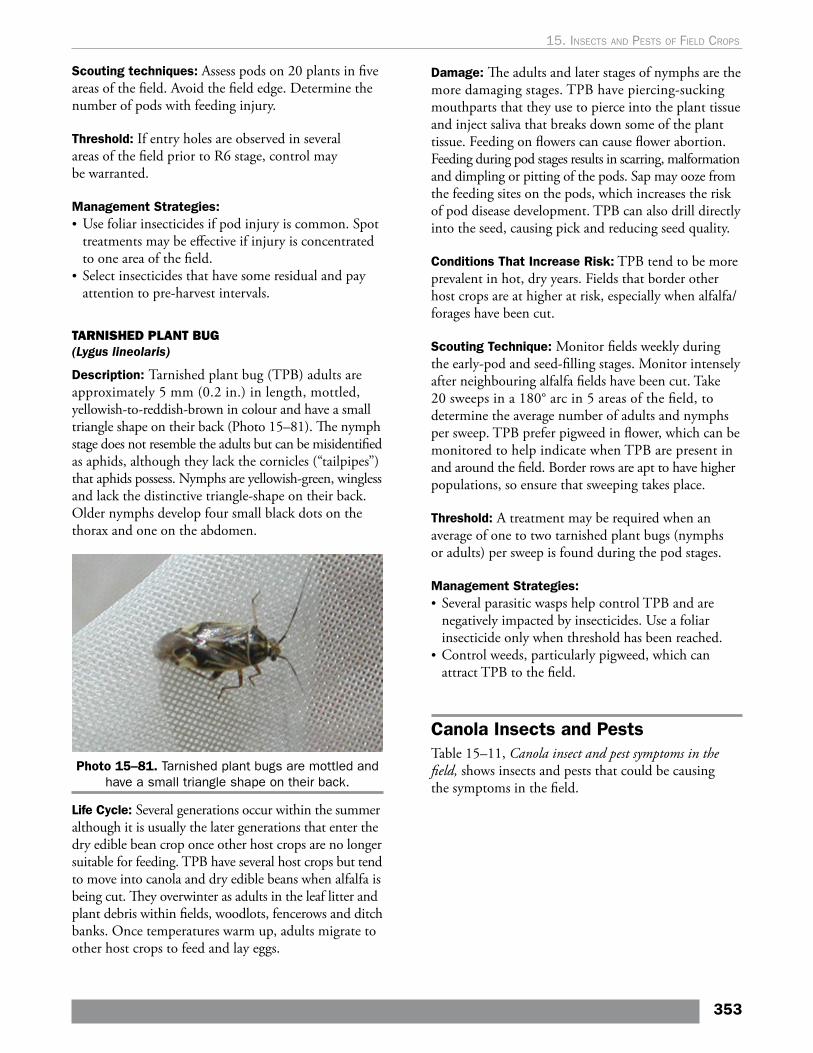
Scouting techniques: Assess pods on 20 plants in five areas of the field. Avoid the field edge. Determine the number of pods with feeding injury.
Threshold: If entry holes are observed in several areas of the field prior to R6 stage, control may be warranted.
Management Strategies: • Use foliar insecticides if pod injury is common. Spot
treatments may be effective if injury is concentrated to one area of the field.
• Select insecticides that have some residual and pay attention to pre-harvest intervals.
TARNISHED PLANT BUG(Lygus lineolaris)
Description: Tarnished plant bug (TPB) adults are approximately 5 mm (0.2 in.) in length, mottled, yellowish-to-reddish-brown in colour and have a small triangle shape on their back (Photo 15–81). The nymph stage does not resemble the adults but can be misidentified as aphids, although they lack the cornicles (“tailpipes”) that aphids possess. Nymphs are yellowish-green, wingless and lack the distinctive triangle-shape on their back. Older nymphs develop four small black dots on the thorax and one on the abdomen.
Photo 15–81. Tarnished plant bugs are mottled and have a small triangle shape on their back.
Life Cycle: Several generations occur within the summer although it is usually the later generations that enter the dry edible bean crop once other host crops are no longer suitable for feeding. TPB have several host crops but tend to move into canola and dry edible beans when alfalfa is being cut. They overwinter as adults in the leaf litter and plant debris within fields, woodlots, fencerows and ditch banks. Once temperatures warm up, adults migrate to other host crops to feed and lay eggs.
Damage: The adults and later stages of nymphs are the more damaging stages. TPB have piercing-sucking mouthparts that they use to pierce into the plant tissue and inject saliva that breaks down some of the plant tissue. Feeding on flowers can cause flower abortion. Feeding during pod stages results in scarring, malformation and dimpling or pitting of the pods. Sap may ooze from the feeding sites on the pods, which increases the risk of pod disease development. TPB can also drill directly into the seed, causing pick and reducing seed quality.
Conditions That Increase Risk: TPB tend to be more prevalent in hot, dry years. Fields that border other host crops are at higher at risk, especially when alfalfa/forages have been cut.
Scouting Technique: Monitor fields weekly during the early-pod and seed-filling stages. Monitor intensely after neighbouring alfalfa fields have been cut. Take 20 sweeps in a 180° arc in 5 areas of the field, to determine the average number of adults and nymphs per sweep. TPB prefer pigweed in flower, which can be monitored to help indicate when TPB are present in and around the field. Border rows are apt to have higher populations, so ensure that sweeping takes place.
Threshold: A treatment may be required when an average of one to two tarnished plant bugs (nymphs or adults) per sweep is found during the pod stages.
Management Strategies: • Several parasitic wasps help control TPB and are
negatively impacted by insecticides. Use a foliar insecticide only when threshold has been reached.
• Control weeds, particularly pigweed, which can attract TPB to the field.
Canola Insects and PestsTable 15–11, Canola insect and pest symptoms in the field, shows insects and pests that could be causing the symptoms in the field.
353
15. Insects and pests oF FIeld crops
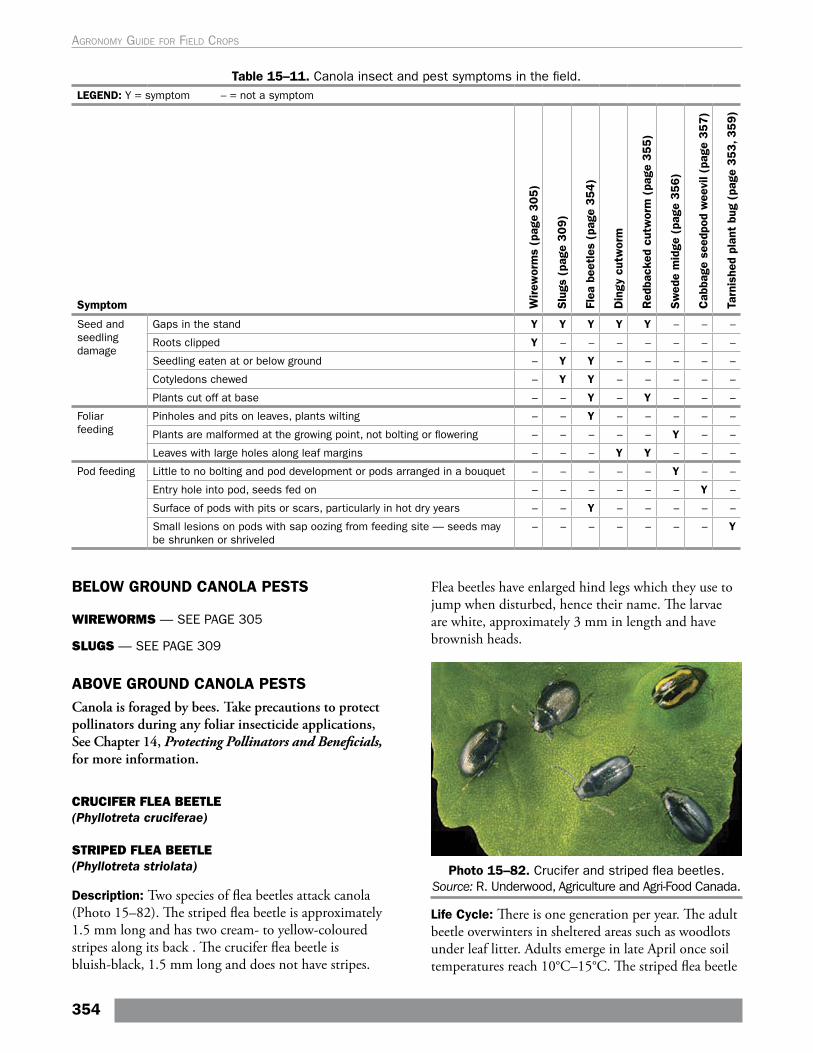
Table 15–11. Canola insect and pest symptoms in the field.LEGEND: Y = symptom – = not a symptom
Symptom Wir
ewor
ms
(pag
e 3
05
)
Slu
gs (
page
30
9)
Flea
bee
tles
(pa
ge 3
54
)
Din
gy c
utw
orm
Red
back
ed c
utw
orm
(pa
ge 3
55
)
Sw
ede
mid
ge (
page
35
6)
Cab
bage
see
dpod
wee
vil (
page
35
7)
Tarn
ishe
d pl
ant
bug
(pag
e 3
53, 3
59)
Seed and seedling damage
Gaps in the stand Y Y Y Y Y – – –
Roots clipped Y – – – – – – –
Seedling eaten at or below ground – Y Y – – – – –
Cotyledons chewed – Y Y – – – – –
Plants cut off at base – – Y – Y – – –
Foliar feeding
Pinholes and pits on leaves, plants wilting – – Y – – – – –
Plants are malformed at the growing point, not bolting or flowering – – – – – Y – –
Leaves with large holes along leaf margins – – – Y Y – – –
Pod feeding Little to no bolting and pod development or pods arranged in a bouquet – – – – – Y – –
Entry hole into pod, seeds fed on – – – – – – Y –
Surface of pods with pits or scars, particularly in hot dry years – – Y – – – – –
Small lesions on pods with sap oozing from feeding site — seeds may be shrunken or shriveled
– – – – – – – Y
BELOW GROUND CANOLA PESTS
WIREWORMS — SEE PAGE 305
SLUGS — SEE PAGE 309
ABOVE GROUND CANOLA PESTSCanola is foraged by bees. Take precautions to protect pollinators during any foliar insecticide applications, See Chapter 14, Protecting Pollinators and Beneficials, for more information.
CRUCIFER FLEA BEETLE(Phyllotreta cruciferae)
STRIPED FLEA BEETLE(Phyllotreta striolata)
Description: Two species of flea beetles attack canola (Photo 15–82). The striped flea beetle is approximately 1.5 mm long and has two cream- to yellow-coloured stripes along its back . The crucifer flea beetle is bluish-black, 1.5 mm long and does not have stripes.
Flea beetles have enlarged hind legs which they use to jump when disturbed, hence their name. The larvae are white, approximately 3 mm in length and have brownish heads.
Photo 15–82. Crucifer and striped flea beetles. Source: R. Underwood, Agriculture and Agri-Food Canada.
Life Cycle: There is one generation per year. The adult beetle overwinters in sheltered areas such as woodlots under leaf litter. Adults emerge in late April once soil temperatures reach 10°C–15°C. The striped flea beetle
354
Agronomy guide for field Crops
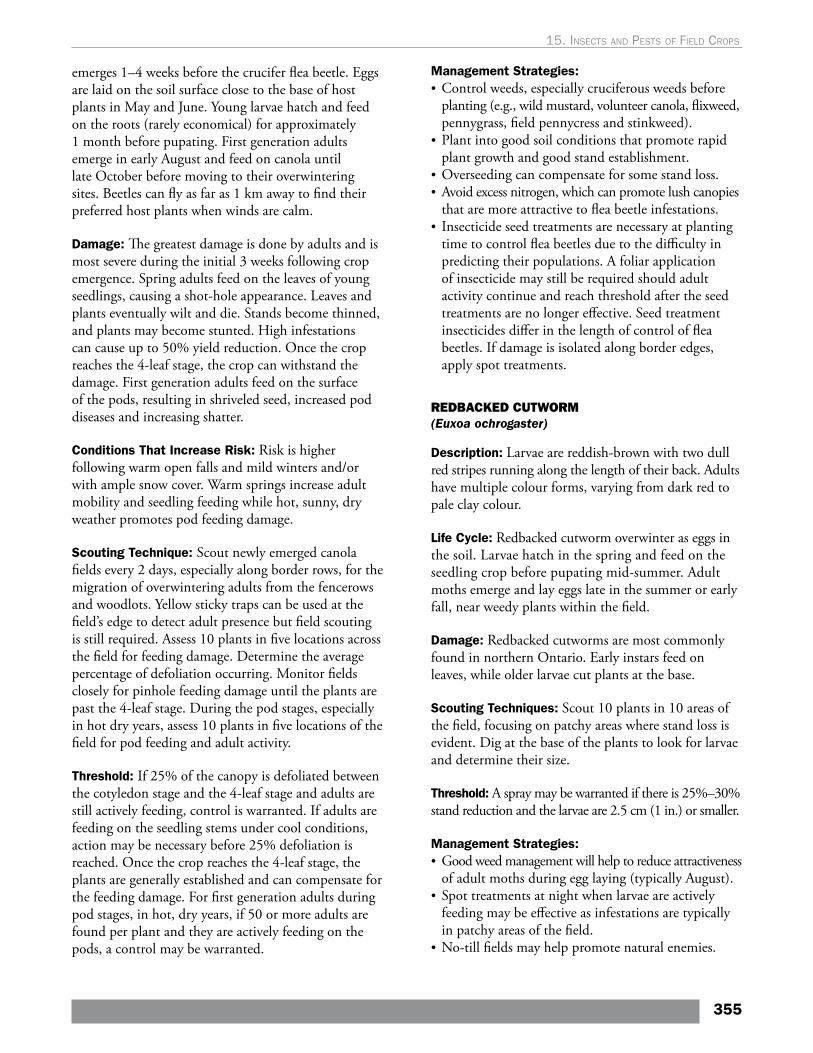
emerges 1–4 weeks before the crucifer flea beetle. Eggs are laid on the soil surface close to the base of host plants in May and June. Young larvae hatch and feed on the roots (rarely economical) for approximately 1 month before pupating. First generation adults emerge in early August and feed on canola until late October before moving to their overwintering sites. Beetles can fly as far as 1 km away to find their preferred host plants when winds are calm.
Damage: The greatest damage is done by adults and is most severe during the initial 3 weeks following crop emergence. Spring adults feed on the leaves of young seedlings, causing a shot-hole appearance. Leaves and plants eventually wilt and die. Stands become thinned, and plants may become stunted. High infestations can cause up to 50% yield reduction. Once the crop reaches the 4-leaf stage, the crop can withstand the damage. First generation adults feed on the surface of the pods, resulting in shriveled seed, increased pod diseases and increasing shatter.
Conditions That Increase Risk: Risk is higher following warm open falls and mild winters and/or with ample snow cover. Warm springs increase adult mobility and seedling feeding while hot, sunny, dry weather promotes pod feeding damage.
Scouting Technique: Scout newly emerged canola fields every 2 days, especially along border rows, for the migration of overwintering adults from the fencerows and woodlots. Yellow sticky traps can be used at the field’s edge to detect adult presence but field scouting is still required. Assess 10 plants in five locations across the field for feeding damage. Determine the average percentage of defoliation occurring. Monitor fields closely for pinhole feeding damage until the plants are past the 4-leaf stage. During the pod stages, especially in hot dry years, assess 10 plants in five locations of the field for pod feeding and adult activity.
Threshold: If 25% of the canopy is defoliated between the cotyledon stage and the 4-leaf stage and adults are still actively feeding, control is warranted. If adults are feeding on the seedling stems under cool conditions, action may be necessary before 25% defoliation is reached. Once the crop reaches the 4-leaf stage, the plants are generally established and can compensate for the feeding damage. For first generation adults during pod stages, in hot, dry years, if 50 or more adults are found per plant and they are actively feeding on the pods, a control may be warranted.
Management Strategies: • Control weeds, especially cruciferous weeds before
planting (e.g., wild mustard, volunteer canola, flixweed, pennygrass, field pennycress and stinkweed).
• Plant into good soil conditions that promote rapid plant growth and good stand establishment.
• Overseeding can compensate for some stand loss.• Avoid excess nitrogen, which can promote lush canopies
that are more attractive to flea beetle infestations.• Insecticide seed treatments are necessary at planting
time to control flea beetles due to the difficulty in predicting their populations. A foliar application of insecticide may still be required should adult activity continue and reach threshold after the seed treatments are no longer effective. Seed treatment insecticides differ in the length of control of flea beetles. If damage is isolated along border edges, apply spot treatments.
REDBACKED CUTWORM(Euxoa ochrogaster)
Description: Larvae are reddish-brown with two dull red stripes running along the length of their back. Adults have multiple colour forms, varying from dark red to pale clay colour.
Life Cycle: Redbacked cutworm overwinter as eggs in the soil. Larvae hatch in the spring and feed on the seedling crop before pupating mid-summer. Adult moths emerge and lay eggs late in the summer or early fall, near weedy plants within the field.
Damage: Redbacked cutworms are most commonly found in northern Ontario. Early instars feed on leaves, while older larvae cut plants at the base.
Scouting Techniques: Scout 10 plants in 10 areas of the field, focusing on patchy areas where stand loss is evident. Dig at the base of the plants to look for larvae and determine their size.
Threshold: A spray may be warranted if there is 25%–30% stand reduction and the larvae are 2.5 cm (1 in.) or smaller.
Management Strategies: • Good weed management will help to reduce attractiveness
of adult moths during egg laying (typically August).• Spot treatments at night when larvae are actively
feeding may be effective as infestations are typically in patchy areas of the field.
• No-till fields may help promote natural enemies.
355
15. Insects and pests oF FIeld crops

SWEDE MIDGE
(Contarinia nasturtii)Description: The adult swede midge is a very tiny light brown fly roughly 1.5–2 mm. It is difficult to properly identify from other closely related midges. Larvae are small (0.3–3 mm when mature), off-white-to-yellow maggots that congregate at the growing point within the plant (Photo 15–83).
Photo 15–83. Swede midge larvae in canola.
Life Cycle: There are four to five overlapping generations per year in Ontario starting in mid-May until October. Each generation can take 24–31 days to complete, depending on temperature. Swede midge overwinters as a larva in a cocoon in the soil, pupating in the spring before emerging as an adult. First adult emergence is in mid-to-late May, although not all swede midge emerge at the same time. There are two main emergence phenotypes that have their first peaks about 10–14 days apart in late May to early June. Rainfall totaling 6 mm (0.2 in.) or more over a 7 day period triggers emergence. Adults live for only 1–3 days and although considered to be relatively weak flyers, they are capable of moving several hundred meters and can be carried considerably further by wind. Females are ready to mate on the same day they emerge, laying their eggs in clusters of 20–50 eggs on the youngest, most actively growing portions of the host plant. Larvae hatch from the eggs and feed in clusters on the growing point of the plant. Larvae may feed for 1–3 weeks, depending on temperature. Once mature, the larvae drop to the top few centimetres of soil to pupate for 2 weeks until emerging as an adult. Some larvae of every summer generation will enter diapause with increasing numbers as day length shortens in late summer. Some midges (2%–10%) remain in diapause for 2 years, possibly more.
Damage: Enzymes in the saliva of the larvae break down plant tissue, resulting in swollen and distorted leaves, shoots and flower buds (Photo 15–84). On young plants, the main growing point of the plant may die, preventing bolting and producing blind heads. Secondary racemes may develop from he destroyed primary shoots which prolongs days to maturity. It may take five or more days for damage symptoms to become apparent and damage will remain until harvest. On injured plants, pull open growing points that show symptoms and look for small maggots feeding within. This will confirm that injury was caused by swede midge and was not due to herbicide application or mechanical injury. However, as damage is persistent, larvae may have already left the plant for pupation. Damage before bolting may lead to stunting of the plant and bunching of pods at the top of the stem, like a bouquet or a witches broom. If the canola plant is beyond the bolting stage (GS 30–39 or 2.1–2.10) before the midge infests the plant, the impact is usually not as extreme, but any developing bud tissue in the leaf axils will be susceptible to infestation. Winter canola may experience some swede midge damage in the fall, but tends to avoid much of the injury in the spring and summer because plants are at an advanced growth stage when exposed to swede midge.
Photo 15–84. Stunting from swede midge injury in canola.
Conditions That Increase Risk: Fields grown in known areas of infestation, within close proximity to last year’s canola crop. Late-planted fields are most at risk as they will be in the younger vulnerable stages of the crop when adult activity is peaking.
Scouting Technique: This pest requires intensive monitoring and management to protect the crop from injury. Swede midge scouting focuses on monitoring for the adults using pheromone traps. Larvae are difficult to see or may have exited the plant before the damage is observed.
356
Agronomy guide for field Crops
Begin trapping in early May, as soon as seedlings have emerged in order to determine when first adult emergence or arrival has occurred and when thresholds are reached. Start monitoring traps when plants have one true leaf and continue until the crop is in full bloom. As swede midge numbers can increase to threshold levels quickly, it is important to check traps regularly (every 2 days) to determine the number of adults captured per trap per day.
Swede midge traps can be purchased from Solida: www.solida.ca. For each field monitored for an 8 week period, the following supplies are required:
• 4 white Jackson traps per field• 66 liners (4 liners changed twice per week for
8 weeks with 2 extra)• 8 pheromone lures (one per trap, changed after
4 weeks of use)
Other supplies needed include 4 stakes per field (preferably rotation pasture stakes) and some binder clips. Place each stake at least 60 m (200 ft.) apart from each other along the field perimeter. Expand each trap into a triangle. Slide the sticky liner face-up into the floor of the trap. Fix the lure onto the metal clip provided by the trap supply company and hang the clip so that the lure is positioned along the inside ceiling of the trap. Use the larger metal hanger also provided to hang the trap so that the bottom is no higher than 25 cm (10 in.) from the ground. Use a binder clip to secure the trap on the stake in case of wind. Change the inner sticky liners of the trap each time they are checked (every 2–3 days). Lures also need to be replaced every 4 weeks.
Threshold: Once seedlings have one true leaf, begin counting the number of midges captured in each trap and add them together. When a total of 20 adults have been captured from the start of trapping, the first insecticide application is required. Subsequent insecticide treatments may be necessary if an average of five adults per trap per day are caught and the canola is still in pre-flowering stages. To determine this, count the total number of midges captured and divide by the number of traps and the number of days since the last count. Make the insecticide application as soon as possible once the threshold has been reached. Do not use damage symptoms to time spray applications.
Management Strategies: • Crop rotation is very important. In fields with known
infestations, rotating out of canola and other crucifer crops for at least 4 years is the best strategy.
• Avoid planting canola closer the 2 km from the nearest canola field or from the previous year’s field.
• Control all cruciferous weeds and cover crops in and along field perimeters that can act as alternative hosts, including mustard (e.g., wild, white, black, brown, garlic, hedge), hoary alyssum, stinkweed, penny-cress, wild radish, tillage radish, shepherd’s purse, yellow rocket, pepper-grass and volunteer canola.
• Plant spring canola as early as possible to avoid the crop being in the most vulnerable stage in early June. If fields cannot be planted early, consider planting a different crop that is not a host to this pest. The crop is most vulnerable during the vegetative (rosette) stage to the green bud stage (GS 11–51 or 2.0–3.3) when tiny flower buds are developing in the centre of the plant and during secondary bud development (GS 58).
• Clean all farming equipment that is used in infested fields. Leave infested fields until last to reduce the risk of spreading the insect to non-infested fields. Since swede midge overwinter and pupate in the top 1–2 cm (0.4–0.8 in.) of soil, cocoons can easily be picked up on wheels and moved to other locations.
• Tillage completed shortly after harvest may help reduce overwintering populations.
• Spray immediately when thresholds are reached• Use high water volumes (>200 litres per ha or >18
gallons per acre) and smaller droplet size to ensure good coverage and penetration of crevices where swede midge larvae are feeding.
• Currently registered products do not provide 100% control.
• Multiple treatments will likely be necessary. Leave a minimum interval of 7 days between treatments.
• Rotate product chemistries to avoid resistance.• For further information on rates and label
precautions, refer to OMAFRA Publication 812, Field Crop Protection Guide.
POD-FEEDING INSECT
CABBAGE SEEDPOD WEEVIL (Ceutorhynchus obstrictus)
Description: The adult cabbage seedpod weevil (CSW) is ash-grey to black in colour and approximately 4 mm (0.2 in.) in length. Like all weevils, it has a snout that resembles an elephant’s trunk (Photo 15–85). The larva are white, C-shaped and legless and can only be found within the pod.
357
15. Insects and pests oF FIeld crops
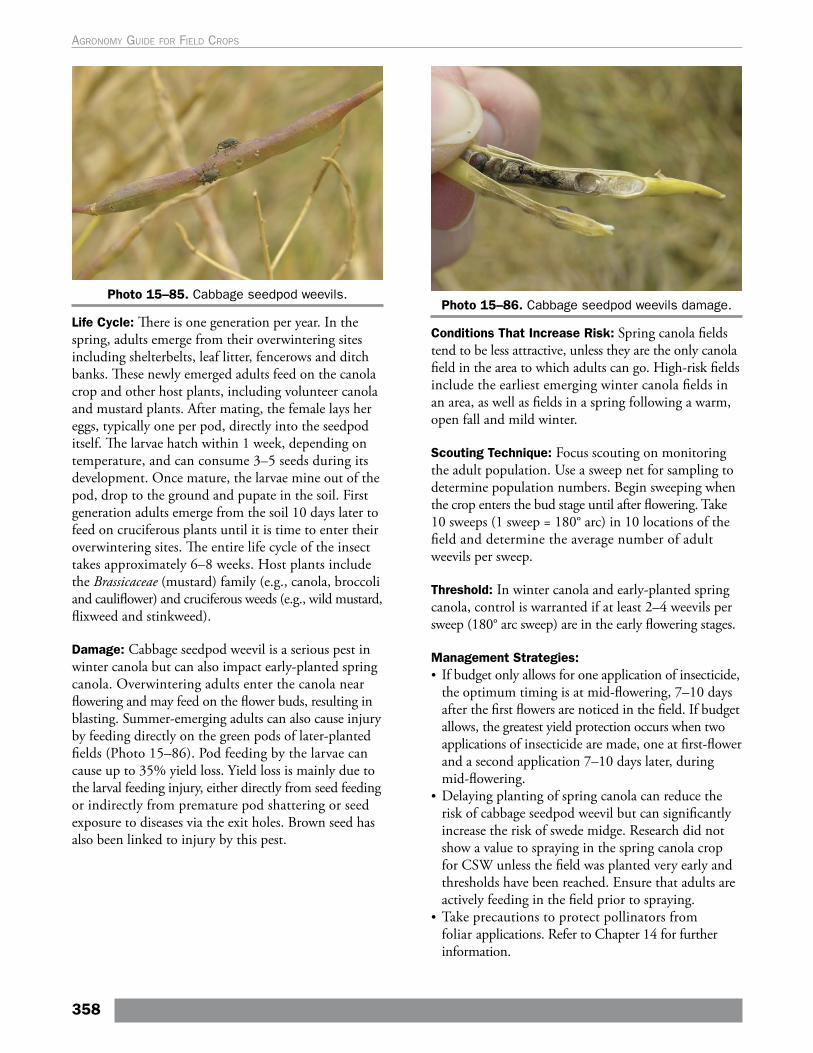
Photo 15–85. Cabbage seedpod weevils.
Life Cycle: There is one generation per year. In the spring, adults emerge from their overwintering sites including shelterbelts, leaf litter, fencerows and ditch banks. These newly emerged adults feed on the canola crop and other host plants, including volunteer canola and mustard plants. After mating, the female lays her eggs, typically one per pod, directly into the seedpod itself. The larvae hatch within 1 week, depending on temperature, and can consume 3–5 seeds during its development. Once mature, the larvae mine out of the pod, drop to the ground and pupate in the soil. First generation adults emerge from the soil 10 days later to feed on cruciferous plants until it is time to enter their overwintering sites. The entire life cycle of the insect takes approximately 6–8 weeks. Host plants include the Brassicaceae (mustard) family (e.g., canola, broccoli and cauliflower) and cruciferous weeds (e.g., wild mustard, flixweed and stinkweed).
Damage: Cabbage seedpod weevil is a serious pest in winter canola but can also impact early-planted spring canola. Overwintering adults enter the canola near flowering and may feed on the flower buds, resulting in blasting. Summer-emerging adults can also cause injury by feeding directly on the green pods of later-planted fields (Photo 15–86). Pod feeding by the larvae can cause up to 35% yield loss. Yield loss is mainly due to the larval feeding injury, either directly from seed feeding or indirectly from premature pod shattering or seed exposure to diseases via the exit holes. Brown seed has also been linked to injury by this pest.
Photo 15–86. Cabbage seedpod weevils damage.
Conditions That Increase Risk: Spring canola fields tend to be less attractive, unless they are the only canola field in the area to which adults can go. High-risk fields include the earliest emerging winter canola fields in an area, as well as fields in a spring following a warm, open fall and mild winter.
Scouting Technique: Focus scouting on monitoring the adult population. Use a sweep net for sampling to determine population numbers. Begin sweeping when the crop enters the bud stage until after flowering. Take 10 sweeps (1 sweep = 180° arc) in 10 locations of the field and determine the average number of adult weevils per sweep.
Threshold: In winter canola and early-planted spring canola, control is warranted if at least 2–4 weevils per sweep (180° arc sweep) are in the early flowering stages.
Management Strategies: • If budget only allows for one application of insecticide,
the optimum timing is at mid-flowering, 7–10 days after the first flowers are noticed in the field. If budget allows, the greatest yield protection occurs when two applications of insecticide are made, one at first-flower and a second application 7–10 days later, during mid-flowering.
• Delaying planting of spring canola can reduce the risk of cabbage seedpod weevil but can significantly increase the risk of swede midge. Research did not show a value to spraying in the spring canola crop for CSW unless the field was planted very early and thresholds have been reached. Ensure that adults are actively feeding in the field prior to spraying.
• Take precautions to protect pollinators from foliar applications. Refer to Chapter 14 for further information.
358
Agronomy guide for field Crops
• A parasitic wasp has been found to help control this pest, though insecticide applications will be detrimental to this wasp.
• Control cruciferous weeds (e.g., mustard, stinkweed) and volunteer canola plants that can act as hosts.
Tarnished Plant Bug(Lygus lineolaris)
Description and Life Cycle: See page 353.
Damage: The adults and later stages of nymphs are the more damaging stages. Tarnished Plant Bugs (TPB) have piercing-sucking mouthparts that they use to pierce into the plant tissue and inject saliva that breaks down some of the plant tissue. Feeding on flowers can cause flower abortion. Feeding during pod stages results in scarring, malformation and dimpling or pitting of the pods. Sap may ooze from the feeding sites on the pods, which increases the risk of pod disease development. TPB can also drill directly into the seed, causing pick and reducing seed quality.
Scouting Technique: Monitor fields weekly during the early-pod and seed-filling stages. Monitor intensely after neighbouring alfalfa fields have been cut. Take 20 sweeps (1 sweep = 180° arc) in five areas of the field to determine the average number of adults and nymphs per sweep. TPB prefer pigweed in flower, which can be monitored to help indicate when TPB are present in and around the field. Border rows are apt to have higher populations, so focus sweeping efforts there first.
Threshold: No thresholds have been validated for Ontario, though other jurisdictions suggest spraying canola when two tarnished plant bugs per sweep can be found after petal fall, but prior to pod maturity.
Management Strategies: • Several parasitic wasps help control TPB. Use a foliar
insecticide only when threshold has been reached, because insecticides are extremely detrimental to these parasitoids.
• Take precautions to protect pollinators from foliar applications. Refer to Chapter 14 for further information.
• Control weeds, particularly pigweed, which can attract TPB to the field.
359
15. Insects and pests oF FIeld crops