agilent microarray hybridization chamber user guide€¦ · agilent microarray hybridization...
TRANSCRIPT

Agilent microarray hybridization chamberuser guide
For use in hybridizing Agilent 60-mer oligo
microarrays with Agilent G2534A microarray
hybridization chambers
Version 2.0
August 2006
Agilent microarray hybridizations enabled by SureHyb technology
Research use only

Notices
© Agilent Technologies, Inc. 2006
Manual Part NumberG2534-90001
EditionFirst edition, version 2.0, August 2006
Printed in USA
Agilent Technologies, Inc.Bioresearch Solutions Unit5301 Stevens Creek Blvd.Santa Clara, CA 95052 USA
Technical SupportTechnical product support may be obtained by contacting your localAgilent Support Services representative. Access to Agilent’s mostup-to-date user guides and protocols as well as list of worldwidesales and support center telephone numbers can be obtained at thefollowing Web site:
www.agilent.com/chem/dnasupport
Notice to PurchaserThis product is intended for use in research only. Agilent productsmay not be resold, modified for resale, or used to manufacturecommercial products without written approval of AgilentTechnologies, Inc.
No part of this manual may be reproduced in any form or by anymeans (including electronic storage and retrival or translation into aforeign language) without prior agreement and written consent fromAgilent Technologies, Inc. as governed by United States andinternational copyright laws.
Warranty:Each Product purchased will include a global warranty. A globalwarranty includes the warranty for the country of purchase. If theProduct is moved to another country, Customer will receive thedestination country’s standard warranty, provided that: 1) theProduct has a return to Agilent warranty, or 2) if the Product has anon-site warranty, Agilent has a Product specific support presence inthat country.
Product warranty information is available with Products, onquotations, or upon request. The warranty period begins onDelivery, or the date of installation if installed by Agilent. IfCustomer schedules or delays installation by Agilent more than 30days after Delivery, the warranty period begins on the 31st day afterDelivery. Customer may receive a different warranty when theProduct is purchased as part of a system.
Agilent warrants that Software will not fail to execute itsprogramming instructions due to defects in materials andworkmanship when properly installed and used on the hardwaredesignated by Agilent. Agilent further warrants that Agilent ownedstandard Software will substantially conform to Specifications.Agilent does not warrant that Software will operate in hardware andsoftware combinations selected by Customer, or meet requirementsspecified by Customer.
Agilent does not warrant that the operation of Products will beuninterrupted or error free.
If Agilent receives notice of defects or non-conformance as definedin Sections 7(c) and 7(d) during the warranty period, Agilent will, atits option, repair or replace the affected Product(s). Customer willpay expenses for return of such Product(s). Agilent will payexpenses for shipment of repaired or replacement Product(s). IfAgilent is unable, within a reasonable time, to repair or replace theaffected Product(s), Customer will be entitled to a refund of thepurchase price upon prompt return of the Product(s) to Agilent.
Agilent warrants that Agilent Support will be provided in aprofessional and workmanlike manner. Agilent will replace, at nocharge, parts which are defective and returned to Agilent within 90days of delivery.
The above warranties do not apply to defects resulting fromimproper or inadequate maintenance, repair or calibration byCustomer; Customer or third party supplied hardware or software,interfacing or supplies; unauthorized modification; improper use oroperation outside of the Specifications for the Product; abuse,negligence, accident, loss or damage in transit; or improper sitepreparation.
THE ABOVE WARRANTIES ARE EXCLUSIVE AND NO OTHERWARRANTY, WHETHER WRITTEN OR ORAL, IS EXPRESSED ORIMPLIED. AGILENT SPECIFICALLY DISCLAIMS THE IMPLIEDWARRANTIES OF MERCHANTABILITY AND FITNESS FOR APARTICULAR PURPOSE.
A CAUTION notice denotes a hazard. It calls attention to something that, if not correctly per-formed, could result in damage to the product or loss of important data. Do not proceed beyond aCAUTION notice until you meet the conditions it describes.
2 Agilent microarray hybridization chamber user guide
CAUTION

Agilent microarray hybridization chamber user guide 3
Table of Contents
Introduction 4
Required Equipment 5Agilent microarray chamber kit (G2534A) contents 5Disposable gasket slides for Agilent microarray hybridization chambers 6Partial listing from the Agilent 60-mer oligo microarray processing protocol 7
Other Required Reagents—Not Included in the Kit 8Recommended hybridization kit 8Safety Notes 9Specified Use 10Notes and Recommendations on Handling Agilent Oligo Microarrays 10General Procedural Notes 10
Before You Begin 11
Intended use of this guide 11 Recommendations 11
Handing recommendations 11Storage recommendations 11Labeling recommendations 12Assembly recommendations 12Wet the gasket slide seal after assembling the chamber 13Inspect for proper bubble formation 14Cleaning chamber assemblies 14
Microarray Hybridization Chamber Instructions 15
Preheat the hybridization oven to 65 °C 15Prepare materials prior to loading samples 15Remove gasket slide from its packaging 16Insert hybridization gasket slide into chamber base 16Pipette the sample 17Add the oligo microarray slide 18Assemble the chamber 18Wet the gasket 19Inspect for good bubble formation 20Continue the process of loading samples and assembling chambers 20Place assembled chambers into hybridization oven 20Disassemble the hybridization chamber 20Remove the oligo microarray slide 21Repeat disassembly procedure 22Follow slide washing, drying and storage procedures 23Dispose of gasket slides in a safe manner 23
4 Agilent microarray hybridization chamber user guide
Introduction
Agilent is enabling researchers to successfully run microarray experiments in their own labs, withenhanced ease-of-use and quality. The Agilent microarray hybridization chamber (G2534A)represents a second generation product advancement in engineering based on Agilent’s SureHybtechnology–comprising an integrated set of hybridization reagents and other products.
Built to enable “hybridizations anywhere,” these new chambers are fabricated from stainlesssteel for precision fit and finish and long-term durability in most lab environments. To ensurequality hybridizations from run to run, disposable glass gasket slides are used. The siliconegaskets are fabricated in an industrial-scale setting and meet Agilent’s stringent qualitystandards. The gasket slides come in a variety of formats to accommodate most of Agilent’smicroarray layouts. Because these are disposable, they are not meant for reuse–sparingresearchers from potential erroneous results.
When combined with Agilent’s 60-mer oligo microarray processing protocol and In situHybridization kit series of reagents, researchers will benefit from a fully integrated and testedsystem that will improve productivity while reducing microarray experiment variability.
Agilent cannot guarantee microarray performance using non-Agilent protocols in microarraylabeling and hybridization and it does not provide support to any non-Agilent protocols.
This user guide may be updated periodically, so we encourage you to register online forproduct support updates at: www.agilent.com/chem/dnasupport
Updated protocols for all of Agilent’s gene expression products are available at:www.agilent.com/chem/dnasupport
NOTE

Agilent microarray hybridization chamber user guide 5
Required Equipment
Store protected in a storage box or drawer.DO NOT stack or drop chamber components as this can cause
irreparable harm to the precision stainless steel hybridization surfaces.
Agilent microarray chamber kit (G2534A) contents
Component
Microarray hybridization chamber assemblies G2534-60001
(Chamber base, cover, clamp assembly)
Plastic tweezers 8710-0777
Microarray hybridization chamber user guide G2534-90001
BRIDGE
THUMBSCREW
CLAMP ASSEMBLY
CHAMBER BASE
CHAMBER COVER
TWEEZERS
}

6 Agilent microarray hybridization chamber user guide
Component Part Number
Microarray hybridization chamber, stainless steel G2534A
Gasket slide, 1 microarray/slide format (5 slides/box) G2534-60003
Gasket slide, 2 microarrays/slide format (5 slides/box) G2534-60002
Gasket slide, 4 microarrays/slide format (5 slides/box) G2534-60011
Required Equipment Disposable gasket slides for Agilent microarray hybridization chambers
Component Part Number
Practice slide kit (5 slides/kit) G2534-60515
Practice slides We strongly recommend that all new users of Agilent’s microarray hybridization chamberspractice assembling and disassembling these chambers prior to use. Practice slides areavailable for purchase and provide an excellent means to assess proficiency with handlingthese microarray hybridization components. Each practice slide surface mimics the surface onan oligo microarray–so wetting and bubble formation will be identical. Use of practice slideswill provide users with added confidence that they have mastered the assembly, pipetting anddisassembly steps.

Agilent microarray hybridization chamber user guide 7
Required Equipment Partial listing from the Agilent 60-mer oligo microarray processing protocol
(consult the most up-to-date protocol on our Web site for a complete listing)
• Powder-free gloves
• Micropipettors to pipette a range of 0.1 µL to 1 mL volumes
• Sterile, nuclease-free aerosol barrier pipette tips
• Ice bucket
• Timer
• Three (3) slide staining dishes (Thermo Shandon catalog number 121 or equivalent)
• Slide rack
• Magnetic stir plate (2)
• Magnetic stir bars (2); one large
• 1 L beaker
• Agilent-recommended hybridization oven (e.g., Agilent product number G2545A)
• Oven hybridization rotator for Agilent microarray hybridization chambers (Agilent productnumber G2530-60029)

8 Agilent microarray hybridization chamber user guide
Other Required Reagents—Not Included in the Kit Recommended hybridization kitAgilent Gene Expression Hybridization Kit (p/n 5188-5242) or Agilent Oligo aCGHHybridization Kit (p/n 5188-5220) - provides the necessary hybridization reagent, and controltargets needed to hybridize cRNA or cDNA targets to an Agilent oligo microarray.
Reagents in this kit are sufficient to perform the following number of hybridizations, based on theAgilent microarray format provided:
• Agilent 4 microarrays/slide format–enough reagent to hybridize 10 slides (40 microarrays total)
• Agilent 2 microarrays/slide format–enough reagent to hybridize 10 slides (20 microarrays total)
• Agilent single microarray/slide format–enough reagent to hybridize 10 slides (10 microarrays total)
Large-volume kit availability: For users who desire a larger volume kit and respectivehybridization components, Agilent offers the Large Volume In situ Hybridization kit-plus, (productnumber 5185-5977). Please consult the Agilent Web site for more details on ordering this largervolume kit or any of its components separately, www.agilent.com/chem/contactus.
Other required reagents• Nuclease-free water (Invitrogen catalog number 10977-015)
• Agilent-specified wash solutions listed in the Agilent 60-mer oligo microarray processingprotocol
• Deionized water, nuclease-free water (e.g., Milli-Q)
Note that Milli-Q water is not guaranteed to be nuclease-free. Improperly maintained Milli-Qsystems may harbor nucleases. Milli-Q water systems that are improperly maintained ormonitored may introduce nucleases. Please verify the integrity of your own Milli-Q water beforeuse.
Gene Expression Hybridization Kitcomponents
25x fragmentation buffer (100 µL)
2x hybridization buffer (2.5 mL)
2x GEx hybridization buffer HI-RPM (2.5 mL)
10x blocking agent (lyophilized)
Oligo aCGH Hybridization Kitcomponents
2x oligo aCGH Hybridization solution (7 mL)
10x oligo aCGH blocking agent (lyophilized)
NOTE

Agilent microarray hybridization chamber user guide 9
Safety Notes
• Observe standard laboratory safety procedures when working in the laboratory.
• The edges of the slides may be sharp. Please handle carefully.
• Pipette tips may be sharp. Please handle carefully and dispose of appropriately.
• Wear appropriate protective equipment when working in a laboratory.
• The recommended Agilent hybridization buffer contains lithium chloride (LiCl) and lithiumlauryl sulfate (LLS).
• LiCl is toxic.
• Its target organ is the central nervous system.
• It is a potential teratogen and may cause harm to breast-fed babies.
• It may also impose a risk of impaired fertility.
• LiCl is harmful by inhalation, by contact with the skin, and if swallowed. Wear suitableprotective equipment.
• LLS is harmful by inhalation and is irritating to the eyes, the respiratory system, and theskin. Again, please wear suitable protective equipment.
• The recommended buffer in the Agilent In situ Hybridization kit-plus contains Triton X-102:
• This compound is harmful if swallowed and may be harmful if inhaled or absorbedthrough the skin.
• There is a risk of serious damage to your eyes in the event of contact. If eithercompound contacts your eyes, rinse with copious amounts of water for at least 15minutes. Seek medical advice.
For the Material Safety Data Sheets (MSDSs) for these compounds, please visitwww.agilent.com/chem/msds.

10 Agilent microarray hybridization chamber user guide
Specified Use
• Agilent designed these microarray chambers and accessories to be used with its 60-mer oligomicroarrays.
• Use with non-Agilent microarray formats is up to the sole discretion of the researcher.Agilent cannot support use of these chambers with other microarrays and is not responsiblefor results generated using non-Agilent microarrays or reagents.
• Gasket slide specifications:
Gasket dimensions for the 1 pack (one gasket/slide format), 2 pack (two gaskets/slide for-mat), and the 4 pack (four gaskets/slide format) as well as the required printed microarraydimensions on a 1” x 3” (25 mm x 75 mm) glass slide are available in a special Agilent appli-cation note (publication number 5988-9939EN). To obtain this guide, please visit the AgilentWeb site and register to access this publication number. www.agilent.com/chem/dnasupport
Required microarray glass dimensions (1 mm thick, 25.4 mm wide x 76.2 mm long)
Fill volumes:
4 microarrays/slide format = 100 µL/maximum/microarray
2 microarrays/slide format = 245 µL/maximum/microarray
1 microarray/slide format = 490 µL/maximum/microarray
Notes and Recommendations on Handling Agilent Oligo Microarrays
• Each slide contains one, two, or fourmicroarrays. They are printed on the sidecontaining the barcode labeled"AGILENT." We call this side the activeside. The numeric barcode alone is on theinactive side of the slides.
• Please consult the section “GeneratingImages of the Hybridized Microarrays” inthe Agilent 60-mer oligo microarrayprocessing protocol for the microarray lay-out, file formats on the microarray kit CD,as well as microarray layout, featuredimensions and spacing information foruse with non-Agilent scanners.
General Procedural Notes
• Follow Biosafety Level 1 (BL1) safety rules.
• To prevent contamination of reagents by ribonucleases, always wear powder-free laboratorygloves and use dedicated solutions and pipettors with nuclease-free aerosol-resistant tips.
• Maintain a clean work area.
• When preparing hybridization or wash reagents and handling them, NEVER use an apparatusthat has been used to handle RNAse solutions.
• Remember to set your hybridization oven to 65°C before you need to put your assembledmicroarray hybridization chambers into it.
• Microarray handling precaution: When handling slides by their edges, always wear gloves, asthe edges may be sharp. Never touch the surfaces of the slides.
InactiveSide
Active Side
Double-barcoded slide example
ActiveMicroarray
Surface
ActiveMicroarray
Surface
Agilent
Inactive Glass Surface
16000442000243
NOTE

Agilent microarray hybridization chamber user guide 11
Before You Begin
Intended use of this guideThis user guide is a supplement to theAgilent 60-mer oligo microarray processingprotocol (available online at:www.agilent.com/chem/dnasupport) and isintended to demonstrate the assembly anddisassembly procedures of the Agilentmicroarray chambers (G2534A).
Recommendations
1. Handling recommendations:
Treat these hybridization chambersand accessories with care. The stain-less steel surfaces, if not stored orhandled properly, may be prone todamage that could adversely affectthe performance of the microarraychamber sealing capability.
The GASKET SLIDE should remain inits packaging prior to placement intothe Microarray CHAMBER BASE. Careshould be taken to handle the GASKET SLIDE by its edges only.
2. Storage recommendations:
Microarray chamber assemblies
We strongly recommend that thechambers be stored in a protectedenvironment, free from any potentialdamaging forces that include “stack-ing, dropping, or nuclease contamina-tion.” When storing, dry each partand then assemble the chambers andline up neatly in a drawer or store inprotective plastic containers.
Microarray gasket slides
These gasket slides come packaged in a protective sleeve and assembledin a shipping box. We recommendstoring these gasket slides in theirnative shipping boxes or, alternatively,storing them in a protected containerto avoid breakage and potential contamination by nucleases.

12 Agilent microarray hybridization chamber user guide
3. Labeling recommendations:
Microarray chamber assemblies
To better track samples during processing, we suggest that you pre-label your Chamber Bases. Oneway to do this is to scribe the numbers onto the outer, top edges ofthe pieces. Alternatively, you canmark them with a BLACK waterproof marking pen.
4. Assembly recommendations:
Removing gasket slide from protective sleeve
Take care not to slice or cut open the GASKET SLIDE protective packaging. With tweezers, carefullylift up the corner of the clear plasticcovering and slowly pull back the protective sheath. With clean powder-free gloved fingers, remove the GASKET SLIDE from its package beingsure to handle only the edges of theslide. Immediately place in the CHAMBER BASE to avoid any potential contamination.
Gasket slide placement
Always place the GASKET SLIDE intothe CHAMBER BASE with the“Agilent” label facing up and alignedin the rectangular end section of thebase.
Oligo microarray slide placement
Always place the oligo microarrayslide into the CHAMBER BASE withthe NUMERIC BARCODE FACING UPand aligned in the rectangular endsection of the base.
Gasket slide alignment in chamberbase
In addition to the rectangular align-ment area, there are 4 guideposts inthe CHAMBER BASE. These facilitatealignment of both the GASKET SLIDEand oligo microarray slide into theCHAMBER BASE.
NOTE
Rectangular Section

Agilent microarray hybridization chamber user guide 13
When placing either of these slidesinto the base, inspect to make surethat the slide does not rest on theedge of the CHAMBER BASE.
To familiarize new users with theseplacement techniques, we recommendthat they practice placing two ordinary1” x 3” (25 mm x 75 mm) glass slidesinto the CHAMBER BASE prior to running an experiment.
Dispensing Hybridization Solution
To avoid spillage/leakage of thehybridization solution, dispense thehybridization solution to the center ofthe gasket well without touching thegasket with the pipette tip.
Cover placement
To ensure a proper seal, the CHAMBER COVER must be placed correctly on the CHAMBER BASE containing the slides. See the figuresat right that detail the correct andincorrect placement and orientation ofthe CHAMBER COVER component.
5. Wet the gasket slide seal afterassembling the chamber:
Rotate assembled chamber clockwise
Wetting the GASKET SLIDE seal will help ensure that the mixing bubble willrotate freely during the hybridizationstep. Once the entire chamber hasbeen assembled, rotate it vertically 2 to 3 times to help wet the gasket lining(s). While you are rotating it,observe the bubble formation asdescribed in the next step.
NO!YES!
NO!
YES!
NO!
NO!
YES!

14 Agilent microarray hybridization chamber user guide
6. Inspect for proper bubble formation:
Good bubble
Hybridization is best facilitated by asingle, large mixing bubble (top 2 figures to the right ) which freelymoves around the chamber whenrotated. After assembly, verify thatthere are NO STRAY/STATIONARYBUBBLES that stay in one place whenrotating the assembly clockwise inyour hands. These can be removed by gently tapping each corner of thechamber assembly on a firm surfaceas you rotate it.
7. Cleaning chamber assemblies:
Avoid stacking, piling, throwing orother mishandling of the assemblies
As described in the StorageRecommendations, these chambersare precision engineered and prone todamage by mishandling resulting fromthrowing chamber pieces into a sinkor stacking them haphazardly in awash basin. Take care to line up eachchamber piece side by side in a washbasin for cleaning and rinsing to avoidpotential damage to the stainlesssteel surfaces.
RNAse cleaning solutions or likecleaners should be thoroughly rinsedoff each part as any remaining solu-tion can potentially damage the stainless steel surface. Rinse withcopious amounts of water. Dry eachpart completely and then assembleand store appropriately.
YES!
NO!
Multiple bubbles areacceptable so longas they move whenyou rotate thechamber.
DO NOT Load intothe hybridizationoven/rotator rackuntil these stray or stationary bubbles movefreely!

Agilent microarray hybridization chamber user guide 15
1. Preheat the hybridization oven to 65 °C
Adhere to the hybridization temperature and time settings specified in the Agilent65-mer oligo microarray processing protocol. Agilent cannot support its microarrays where these hybridization conditions are not followed.
2. Prepare materials prior to loading samples
a. Ensure that the work area is clean and free from potential contaminants.
b. Gather the necessary quantity of labeled chamber assemblies and packaged gasket slides to process samples. Disassemble chambers, if needed, and line up bases, corresponding covers and clamp components.
c. Prepare pipettes and tips for sample addition steps.
d. For the wash steps: Organize wash staining dishes, wash accessories and any needed wash solutions.
CAUTION
Microarray Hybridization Chamber Instructions

16 Agilent microarray hybridization chamber user guide
3. Remove gasket slide from its packaging
With tweezers, carefully lift up the corner of the clear plastic covering and slowly pullback the protective sheath. With clean, powder-free gloved fingers, remove the GASKET SLIDE from its package–being sure to handle the slide only from its edges. Immediately place in the CHAMBER BASE to avoid any potential contamination from surrounding surface materials.
4. Insert hybridization gasket slide into chamber base
a. Prior to adding the GASKET SLIDE to the CHAMBER BASE, ensure that you are holding the slide with the label reading “Agilent” facing up–denoting the “gasket-side” of the slide.
b. Locate the 4 guideposts and rectangular barcode guide in the CHAMBER BASE. Position the GASKET SLIDE between the 4 guideposts (see illustration) with the “Agilent Label” resting over the base’s “rectangular barcode shaped” guide area. Gently place the GASKET SLIDE into the CHAMBER BASE.
Microarray Hybridization Chamber Instructions

Agilent microarray hybridization chamber user guide 17
c. Check for any potential misalignment where the GASKET SLIDE may not be resting flush against the CHAMBER BASE. Re-adjust to a flush position against the CHAMBER BASE if necessary.
5. Pipette the sample
a. Select the correct volume of hybridization mixture to pipette onto the GASKET SLIDE surface. Refer to the Agilent 60-mer oligo microarray processing protocol (available online at: www.agilent.com/chem/dnasupport) for target and hybridization solution preparation steps.
4 microarrays per slide = 100 uL maximum/microarray
2 microarrays per slide = 245 µL maximum/microarray
1 microarray per slide = 490 µL maximum/microarray
b. Aspirate the required amount of sample and apply to the microarray surface in the following manner:
Starting close to one end of the inner gasketed well area, slowly dispense your sample while moving your pipette to the opposite end of the well without touching the slide–we call this “drag and dispense” pipetting method. This facilitates even distribution of sample across the surface and avoids any potential of mis-pipetting the sample over the gasket edge.
NOTE
Microarray Hybridization Chamber Instructions
NO!
CAUTIONThe images above are for demonstration purposes only. The backing slide is alwaysplaced in the chamber base before dispensing the hybridization solution.

18 Agilent microarray hybridization chamber user guide
6. Add the oligo microarray slide
With gloved fingers, retrieve a 60-mer oligo microarray from its slide holder. Grab the slide between your thumb and index finger, NUMERIC BARCODE SIDE FACING UP, and carefully lower it on top of the GASKET SLIDE.
Barcode ends of both slides must line up at rectangular end of the CHAMBER BASE.
Use the 4 CHAMBER BASE guideposts and rectangular end of the base to position the oligo microarray slide as you lower it to within 3 mm (1/8”) above the GASKET SLIDE. Once positioned, gently rest it on the lower GASKET SLIDE.
Be sure not to drop the array slide onto the gasket slide as this will increase the chances of sample mixing between gasket wells. Ensure that the oligo microarray is not ajar. Quickly reposition the slide if needed. Once correctly placed–do not attempt to move the chamber and sandwiched slides as this could cause leakage of the hybridization solution.
7. Assemble the chamber
a. CHAMBER COVER placement:
Place the CHAMBER COVER, correct side facing up, onto the CHAMBER BASE containing both “sandwiched” slides.
NOTE
NOTE
Microarray Hybridization Chamber Instructions

Agilent microarray hybridization chamber user guide 19
b. Attach CLAMP ASSEMBLY:
From the rounded corner of the CHAMBER BASE, slip the CLAMP ASSEMBLY onto the CHAMBER BASE and COVER until it stops firmly in place–resting at the center of the two pieces.
c. Tighten the completed CHAMBER ASSEMBLY:
Before you start to tighten the THUMBSCREW, be sure to leave the CHAMBER ASSEMBLY flat on the lab bench. This will help avoid spillage of the hybridization solution.
Next, firmly tighten the THUMBSCREW fully handtight.
The slides will not be harmed by hand-tightening. DO NOT use tools to tighten the THUMBSCREW. The use of pliers or other tools can damage the parts and will void the warranty.
8. Wet the gasket
Rotate the final assembled chamber in a VERTICAL ORIENTATION, 2 to 3 times to wet the gaskets. This helps ensure that the hybridization solution will coat the entire surface of the microarray during the incubation process.
Microarray Hybridization Chamber Instructions
NOTE

20 Agilent microarray hybridization chamber user guide
9. Inspect for good bubble formation
Once you’ve completed the “wetting” procedure (step 8), hold the chamber vertically and inspect for stray or small bubbles that don’t move as you rotate the chamber. You should have a “large mixing bubble” that should dislodge these small stray or stationary bubbles.
If the small stray or stationary bubbles persist, gently tap the assembled chamber on a firm surface, rotating the chamber on its sides as you tap. This is the preferred means to dislodge these types of bubbles. Inspect again and repeat if necessary until the small stray or stationary bubbles dissipate.
10. Continue the process of loading samples and assembling chambers
Repeat steps 2 through 9 until you’ve loaded all of your samples and assembled your chambers.
11. Place assembled chambers into the hybridization oven
Load each assembled chamber into the oven rotator rack. Once loaded, close the door and adjust the rotator speed to match what is specified in the Agilent 60-meroligo microarray processing protocol.
12. Disassemble the hybridization chamber
a. Prepare the wash staining dishes as described in the Agilent 60-meroligo microarray processing protocol. Fill with Wash Solutions. Have the slide racks, stir bars and magnetic stirrer ready to go. Locate a pair of blunt end tweezers and place them next to the FIRST wash staining dish for quick disassembly of slides.
b. Remove 1 microarray hybridization CHAMBER ASSEMBLY from the oven at a time. This prevents any unnecessary cooling of the chambers during the disassemblyprocess.
NOTE
NOTE
Microarray Hybridization Chamber Instructions

Agilent microarray hybridization chamber user guide 21
c. Place the hybridization CHAMBER ASSEMBLY on a flat surface and loosen the THUMBSCREW, turning COUNTERCLOCKWISE .
d. Slide off the CLAMP ASSEMBLY and remove the CHAMBER COVER
e. With gloved fingers, remove the “sandwiched slides” from the CHAMBER BASE by grabbing the slides from their ends. Keep the oligo microarray slide NUMERIC BARCODE FACING UP as you quickly transfer the sandwiched slides to the FIRSTwash staining dish (step 13).
13. Remove the oligo microarray slide
a. Without letting go of the “sandwiched slides,” submerge the slides into the FIRSTwash staining dish containing Wash Solution 1.
NOTE
Microarray Hybridization Chamber Instructions

22 Agilent microarray hybridization chamber user guide
b. With the “sandwiched slides” completely submerged in the wash solution, pry the two slides apart from the barcode end only.
Do this by slipping one of the blunt ends of the tweezers between the slides and thenGENTLY turn the tweezers upward or downward to separate the slides.
Let the GASKET SLIDE drop to the bottom of the wash staining dish.
c. Remove the oligo microarray slide quickly and place into the slide rack contained in the SECOND wash staining dish–containing Wash Solution 1. Minimize exposure of the slide to air.
14. Repeat disassembly procedure
Remove the next CHAMBER ASSEMBLY from the oven and load the slides into the rack following steps 12b to 13c. Place up to 8 slides in each rack.
NOTE
NOTE
Microarray Hybridization Chamber Instructions
NOTE
Agilent microarray hybridization chamber user guide 23
15. Follow slide washing, drying and storage procedures Agilent provides detailed washing and drying procedures for its 60-mer oligo microarrays. It is important that you follow the appropriate protocol chosen for your particular experimental design.
Agilent 60-mer oligo microarray processing protocols are available on the Agilent Web site at: www.agilent.com/chem/dnasupport
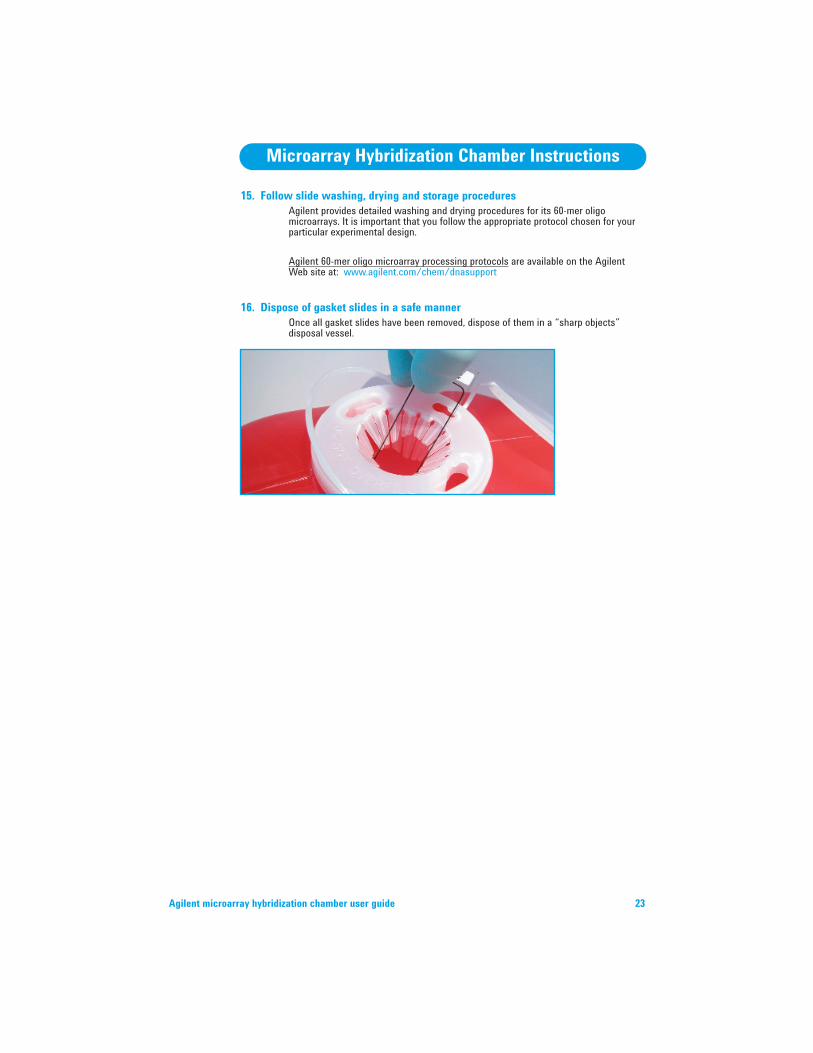
16. Dispose of gasket slides in a safe manner Once all gasket slides have been removed, dispose of them in a “sharp objects” disposal vessel.
Microarray Hybridization Chamber Instructions

Agilent Technologies, Inc.Bioresearch Solutions Unit5301 Stevens Creek Blvd.Santa Clara, CA 95052 USAE-mail: [email protected]
Global Web site: www.agilent.com/chem/dna
Information, descriptions and specifications aresubject to change without notice. Please registeronline with Agilent to receive new product updates at:www.agilent.com/chem/dnasupport
Part Number: G2534-90001, August 2006, Version 2.0
G2534-90001