affiliate utilities - [email protected] 4 affiliate measurement the affiliate...
TRANSCRIPT
Affiliate Utilities
Affiliate Measurement ................................................................................................... 4
Setup ................................................................................................................................................... 4
Manual Setup .................................................................................................................................. 4
Automatic Setup .............................................................................................................................. 5
Running the Utility................................................................................................................................ 5
Affiliate Measurement File.................................................................................................................... 5
Week Values ................................................................................................................................... 6
Affiliate Measurement Report ............................................................................................................... 7
Calculations ..................................................................................................................................... 7
Exclusions from Report Calculations ................................................................................................ 7
Selectivity ........................................................................................................................................ 8
Affiliate Report Queue .................................................................................................. 9
Setup ................................................................................................................................................... 9
CSI Server Method .......................................................................................................................... 9
Windows Task Scheduler Method .................................................................................................. 10
Report Queue Shortcut Method...................................................................................................... 10
User Setup ........................................................................................................................................ 11
Sending Reports to the Report Queue ............................................................................................... 11
Viewing the Report Queue Status Screen .......................................................................................... 12
Alerts ............................................................................................................................ 13
AST Check Utility ........................................................................................................ 14
Calculate Average Weeks Delinquent in Posting Utility .......................................... 15
Check Email Format .................................................................................................... 16
Clean Up Station Info .................................................................................................. 17
Compliance Tracer ...................................................................................................... 18
CPTT Agree between Affiliate and Web .................................................................... 19
CPTT Check ................................................................................................................. 20
CPTT Rectify ................................................................................................................ 21
Record Types .................................................................................................................................... 21
Utility Setup ....................................................................................................................................... 21
Running the Utility.............................................................................................................................. 21
Utility Output ...................................................................................................................................... 22
Sample Output File ........................................................................................................................ 22
Output Field Definitions .................................................................................................................. 22
Troubleshooting ................................................................................................................................. 23
CSI Marketron Helper .................................................................................................. 24
Installation and Setup ........................................................................................................................ 24
INI File ........................................................................................................................................... 24
Running the Application ..................................................................................................................... 25
Main Screen .................................................................................................................................. 25
Download Screen .......................................................................................................................... 25
Downloading Files.......................................................................................................................... 26
Import File ......................................................................................................................................... 26
Duplicate Blackout Fix ................................................................................................ 27
Duplicate CPTT Fix...................................................................................................... 28
Messages Viewer......................................................................................................... 29
Affiliate Log Files ............................................................................................................................... 29
Printing the Log File ........................................................................................................................... 30
Emailing the Log File ......................................................................................................................... 30
Email Screen ................................................................................................................................. 31
Re-Import Affiliate Spots ............................................................................................ 32
Overview ........................................................................................................................................... 32
Running the Utility.............................................................................................................................. 32
Agreement Code............................................................................................................................ 33
Vehicle/Stations ............................................................................................................................. 33
Station/Vehicles ............................................................................................................................. 34
SQL Call ........................................................................................................................................ 35
TTP 7906....................................................................................................................................... 35
Set Compliance ........................................................................................................... 37
Running the Utility.............................................................................................................................. 37
Set CPTT Complete ..................................................................................................... 38
Setup ................................................................................................................................................. 38
Running the Application ..................................................................................................................... 38
Results .............................................................................................................................................. 39
File .................................................................................................................................................... 39
Set MGs ........................................................................................................................ 40
Overview ........................................................................................................................................... 40
Running the Utility.............................................................................................................................. 40
Agreement Code............................................................................................................................ 41
Vehicle/Stations ............................................................................................................................. 41
Station/Vehicles ............................................................................................................................. 42
Date Range ................................................................................................................................... 43
Set Program Times...................................................................................................... 44
Spot Count Tie-Out ..................................................................................................... 45
Specification Screen .......................................................................................................................... 45
Tie-out Results Screen ...................................................................................................................... 46
Unpost and/or Delete Spot ......................................................................................... 50
When to Run the Web Export Utility ................................................................................................... 50
Selecting Which Utility to Run ............................................................................................................ 50
How to Run the Utility ........................................................................................................................ 51
Selectivity ...................................................................................................................................... 51
User Status Screen ..................................................................................................... 53
Accessing the User Status Screen ..................................................................................................... 53
Activity Log ........................................................................................................................................ 54
User Status Buttons ........................................................................................................................... 54
Initiating System Shutdown ................................................................................................................ 54
Information Fields .......................................................................................................................... 55
Procedures to Sign On....................................................................................................................... 56
Vendor Setup ............................................................................................................... 57

View Blocks ................................................................................................................. 59
Sample Block..................................................................................................................................... 59
Block Utilities ..................................................................................................................................... 59
Unblocking/Unlocking a User ............................................................................................................. 59
Refresh.............................................................................................................................................. 59
View SQL ...................................................................................................................... 60
Affiliate Measurement The Affiliate Measurement utility is a standalone background program that runs at a designated
time at least once a week. The utility amasses compliance information that is stored in the
Affiliate Measurement file. The file contains 52 weeks of information for every Vehicle/Station
Agreement in the system.
The utility can be used to determine:
• The rate of delinquency for the entire database as of the generation date
• How the current delinquency rate compares to past delinquency rates
• Whether affiliates are improving or declining in submitting their posts
• Seasonal fluctuations or trends in delinquency
• Predictable delinquency factors, meaning, are there certain vehicle characteristics that resulting higher delinquency rates? i.e. vehicle formats, group owners, geographic location, size of market, agreements sold by certain Affiliate A/Es, etc.
• Whether these factors are improving or worsening
• The effectiveness of network Affiliate Compliance personnel in their stations non-delinquent
• Those personnel that have had the greatest improvement in their stations’ becoming non-delinquent
• Measuring the success of various methods to control delinquency
Setup
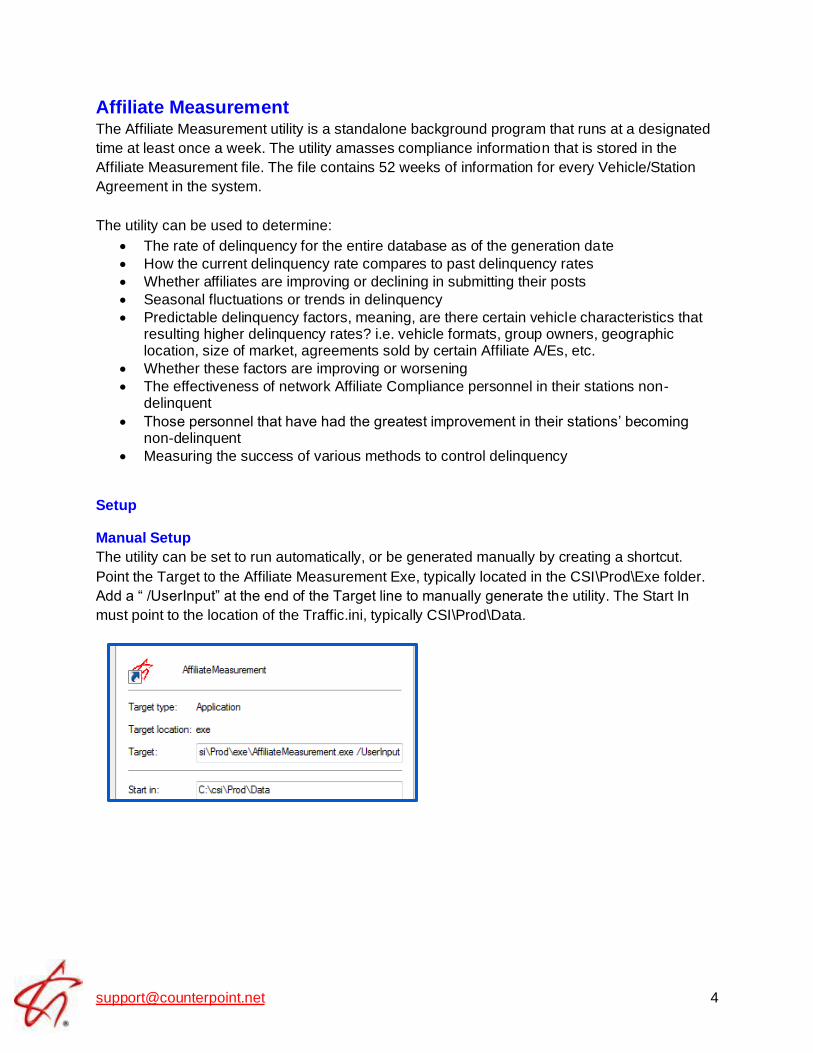
Manual Setup
The utility can be set to run automatically, or be generated manually by creating a shortcut.
Point the Target to the Affiliate Measurement Exe, typically located in the CSI\Prod\Exe folder.
Add a “ /UserInput” at the end of the Target line to manually generate the utility. The Start In
must point to the location of the Traffic.ini, typically CSI\Prod\Data.
Automatic Setup
You can set the utility to run automatically through Windows Task scheduler or using CSI
Server.
Open the CSI_Server.ini in any text editor and add AffiliateMeasurement to the list of section
names.
Example:
SectionNames = GetPaid, Backup, AffiliateMeasurement
Add the AffiliateMeasurement section to CSI_Server.ini file:
[AffiliateMeasurement]
Enabled = 1
WeekDays = 1111111
StartTime = 2:00am
Interval = 86400
Exe = D:\csi\prod\exe\affiliatemeasurement.exe
StartInFolder = d:\csi\prod\data
CommandLine =
KeepProgramRunning = 0
Edit the Exe and StartInFolder paths as needed (the StartInFolder must point to the location of
the Traffic.ini and Affiliat.ini files.)
Running the Utility
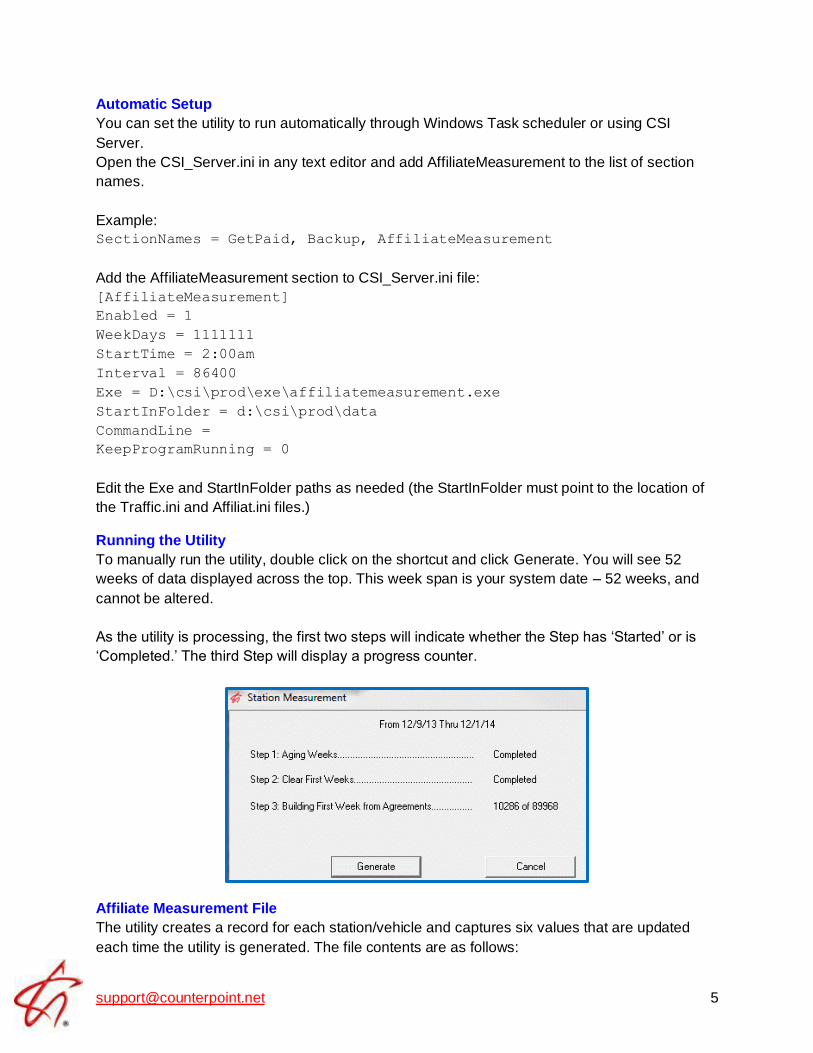
To manually run the utility, double click on the shortcut and click Generate. You will see 52
weeks of data displayed across the top. This week span is your system date – 52 weeks, and
cannot be altered.
As the utility is processing, the first two steps will indicate whether the Step has ‘Started’ or is
‘Completed.’ The third Step will display a progress counter.
Affiliate Measurement File
The utility creates a record for each station/vehicle and captures six values that are updated
each time the utility is generated. The file contents are as follows:

Week One Start Date
Network Name
Vehicle
Station
Affiliate Sales Rep
Affiliate Service Rep
Delinquency Index (52 weeks) where Week 1 = last week, (going backwards for 52 weeks)
Each week contains the following values:
1. # weeks aired in last 52 weeks 2. # weeks missing in last 52 weeks 3. # spots posted in last 52 weeks
4. # Station Non-Compliant Spots 5. # Network Non-Compliant Spots 6. # Station Responsiveness
Week Values
The six values are updated by a set of calculations each time the utility is generated.
1. # Weeks Aired in the Last 52 Weeks
To arrive at this number, the utility tallies the number of weeks within the last 52 week period
that the station carried the vehicle.
When a new agreement is created, 1 is the first week of the agreement. The number increases
each week until it hits 52. It will remain 52 until the agreement is canceled, and then it drops by
one number each week until it hits 0.
2. # Weeks missing in the Last 52 Weeks
To arrive at this figure, the utility looks at the number of weeks in the last 52 week period that
are missing affidavits from the stations. A partially posted week is considered missing. Outstanding weeks are included in this count until they exceed of 52 weeks in the past.
The utility also subtracts the total of missing weeks from the number found in value 1, to find the number of weeks that received affidavits in the last 52 week period.
3. # Spots Posted in the Last 52 Weeks
This value is the total number of spots that have been returned/posted to the network.
4. # Station Noncompliant Spots
To determine the number of spots that are not station compliant, the utility adds all of the
missed spots that were not madegood to the number of spots that were aired differently than
how they were pledged to air. Conversely, subtracting this sum from the total found in value 3
will provide the number of station compliant spots.
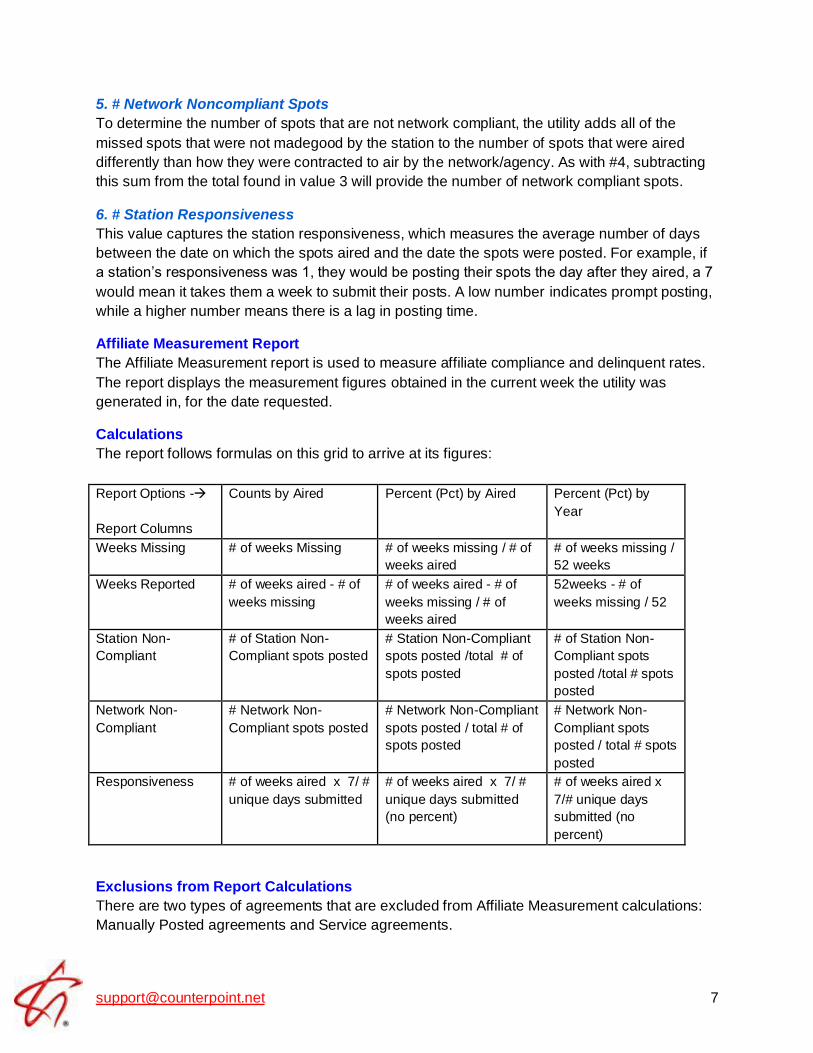
5. # Network Noncompliant Spots
To determine the number of spots that are not network compliant, the utility adds all of the
missed spots that were not madegood by the station to the number of spots that were aired
differently than how they were contracted to air by the network/agency. As with #4, subtracting
this sum from the total found in value 3 will provide the number of network compliant spots.
6. # Station Responsiveness
This value captures the station responsiveness, which measures the average number of days
between the date on which the spots aired and the date the spots were posted. For example, if
a station’s responsiveness was 1, they would be posting their spots the day after they aired, a 7
would mean it takes them a week to submit their posts. A low number indicates prompt posting,
while a higher number means there is a lag in posting time.
Affiliate Measurement Report
The Affiliate Measurement report is used to measure affiliate compliance and delinquent rates.
The report displays the measurement figures obtained in the current week the utility was
generated in, for the date requested.
Calculations
The report follows formulas on this grid to arrive at its figures:
Report Options -→
Report Columns
Counts by Aired Percent (Pct) by Aired Percent (Pct) by
Year
Weeks Missing # of weeks Missing # of weeks missing / # of
weeks aired
# of weeks missing /
52 weeks
Weeks Reported # of weeks aired - # of
weeks missing
# of weeks aired - # of
weeks missing / # of
weeks aired
52weeks - # of
weeks missing / 52
Station Non-
Compliant
# of Station Non-
Compliant spots posted
# Station Non-Compliant
spots posted /total # of
spots posted
# of Station Non-
Compliant spots
posted /total # spots
posted
Network Non-
Compliant
# Network Non-
Compliant spots posted
# Network Non-Compliant
spots posted / total # of
spots posted
# Network Non-
Compliant spots
posted / total # spots
posted
Responsiveness # of weeks aired x 7/ #
unique days submitted
# of weeks aired x 7/ #
unique days submitted
(no percent)
# of weeks aired x
7/# unique days
submitted (no
percent)
Exclusions from Report Calculations
There are two types of agreements that are excluded from Affiliate Measurement calculations:
Manually Posted agreements and Service agreements.
• Affidavit Control Manual: Agreements set to be manually posted in the Agreement -> Delivery screen will not be included since the network posts the affidavits.
• Service Agreements: Agreements that have the “Service Agreement” setting set to Yes will be bypassed.
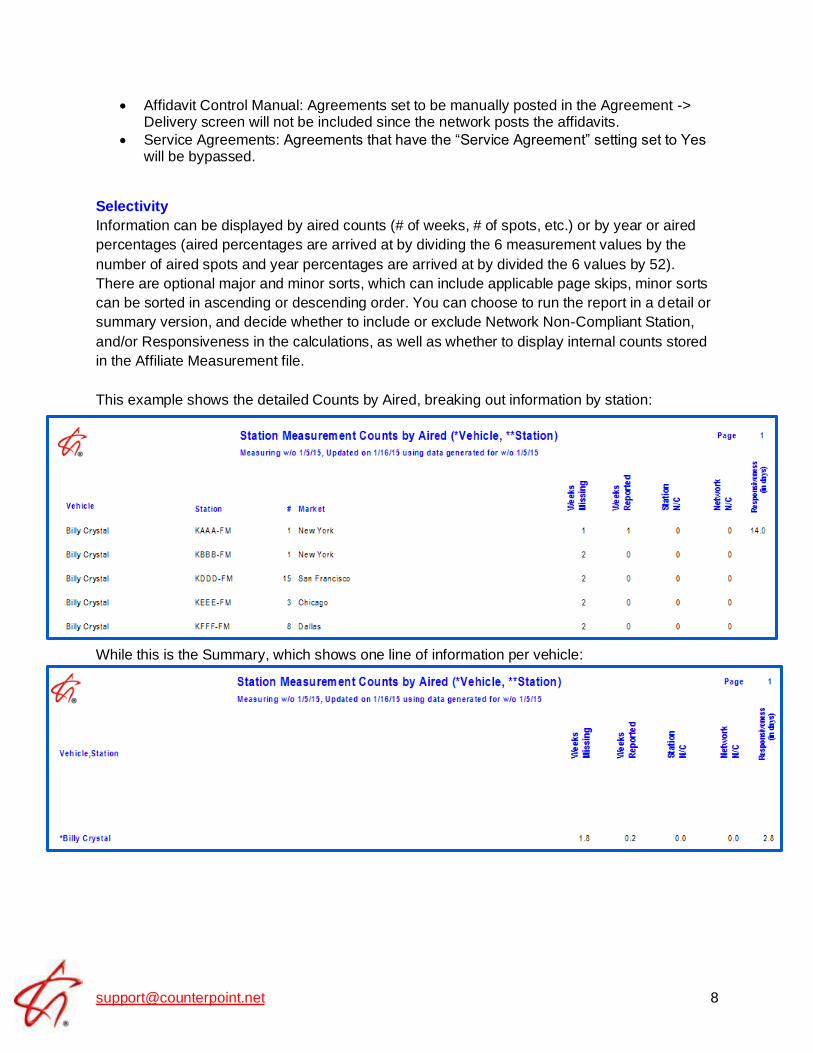
Selectivity
Information can be displayed by aired counts (# of weeks, # of spots, etc.) or by year or aired
percentages (aired percentages are arrived at by dividing the 6 measurement values by the
number of aired spots and year percentages are arrived at by divided the 6 values by 52).
There are optional major and minor sorts, which can include applicable page skips, minor sorts
can be sorted in ascending or descending order. You can choose to run the report in a detail or
summary version, and decide whether to include or exclude Network Non-Compliant Station,
and/or Responsiveness in the calculations, as well as whether to display internal counts stored
in the Affiliate Measurement file.
This example shows the detailed Counts by Aired, breaking out information by station:
While this is the Summary, which shows one line of information per vehicle:
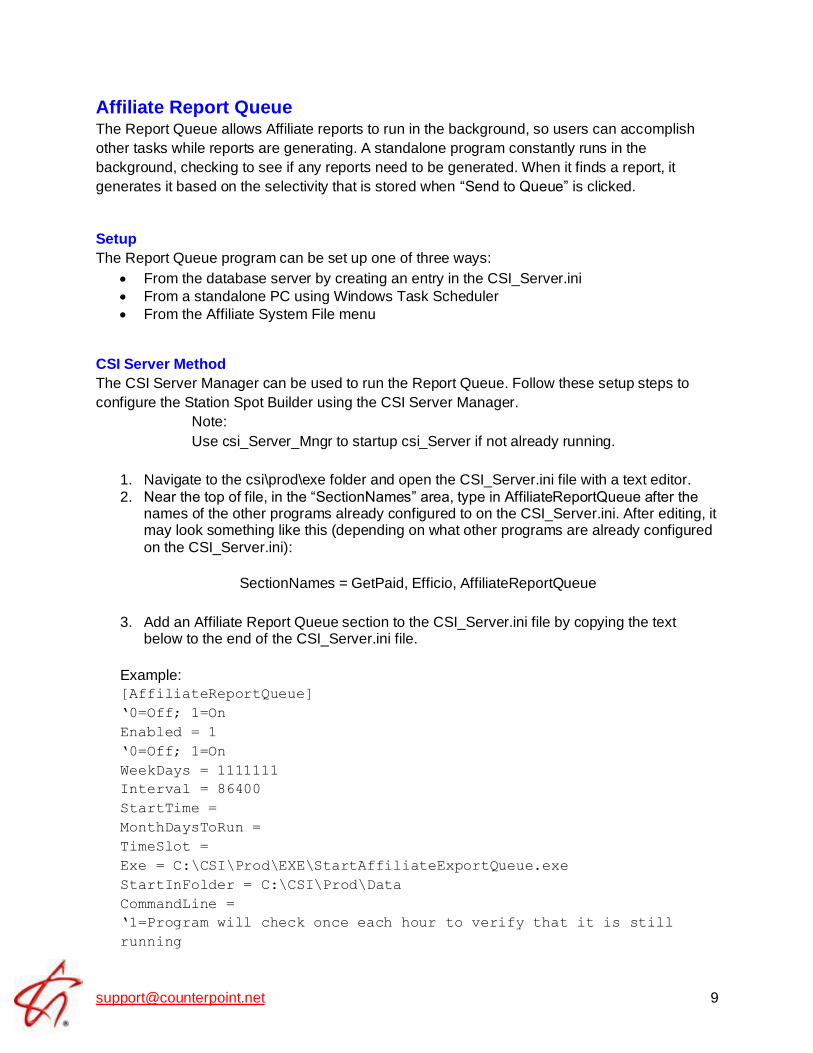
Affiliate Report Queue The Report Queue allows Affiliate reports to run in the background, so users can accomplish
other tasks while reports are generating. A standalone program constantly runs in the
background, checking to see if any reports need to be generated. When it finds a report, it
generates it based on the selectivity that is stored when “Send to Queue” is clicked.
Setup
The Report Queue program can be set up one of three ways:
• From the database server by creating an entry in the CSI_Server.ini
• From a standalone PC using Windows Task Scheduler
• From the Affiliate System File menu
CSI Server Method
The CSI Server Manager can be used to run the Report Queue. Follow these setup steps to
configure the Station Spot Builder using the CSI Server Manager.
Note:
Use csi_Server_Mngr to startup csi_Server if not already running.
1. Navigate to the csi\prod\exe folder and open the CSI_Server.ini file with a text editor.
2. Near the top of file, in the “SectionNames” area, type in AffiliateReportQueue after the names of the other programs already configured to on the CSI_Server.ini. After editing, it may look something like this (depending on what other programs are already configured
on the CSI_Server.ini):
SectionNames = GetPaid, Efficio, AffiliateReportQueue
3. Add an Affiliate Report Queue section to the CSI_Server.ini file by copying the text below to the end of the CSI_Server.ini file.
Example:
[AffiliateReportQueue]
‘0=Off; 1=On
Enabled = 1
‘0=Off; 1=On
WeekDays = 1111111
Interval = 86400
StartTime =
MonthDaysToRun =
TimeSlot =
Exe = C:\CSI\Prod\EXE\StartAffiliateExportQueue.exe
StartInFolder = C:\CSI\Prod\Data
CommandLine =
‘1=Program will check once each hour to verify that it is still
running
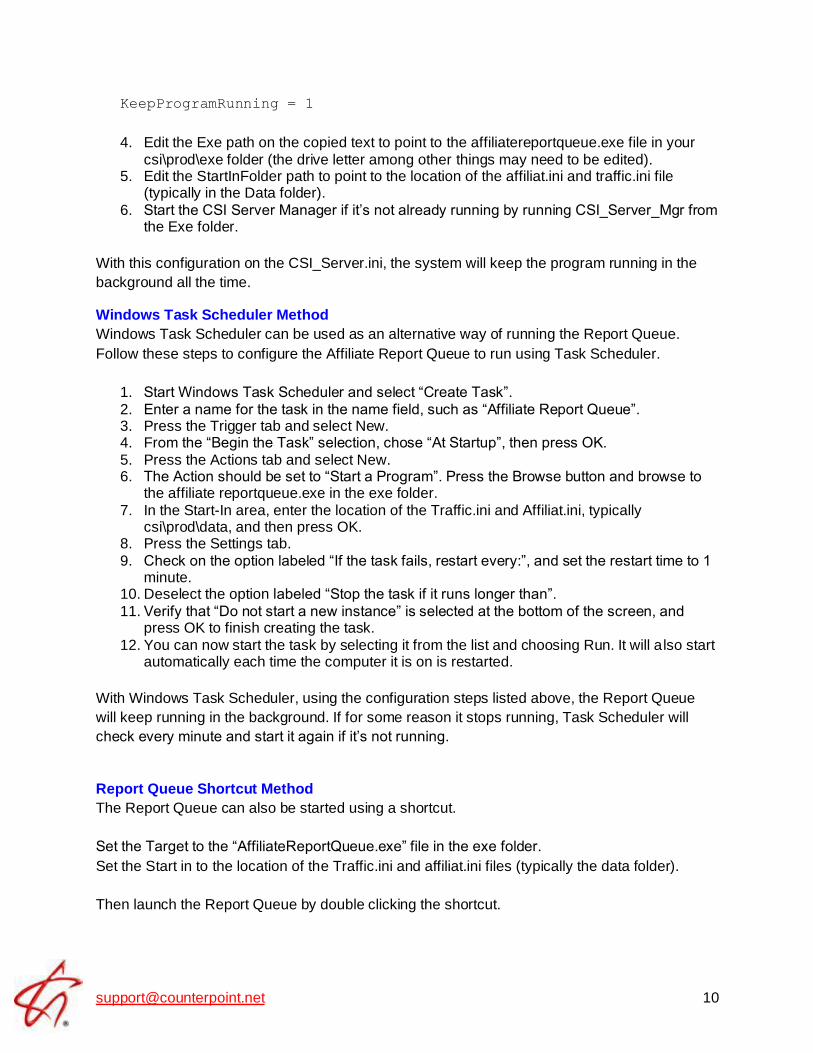
KeepProgramRunning = 1
4. Edit the Exe path on the copied text to point to the affiliatereportqueue.exe file in your
csi\prod\exe folder (the drive letter among other things may need to be edited). 5. Edit the StartInFolder path to point to the location of the affiliat.ini and traffic.ini file
(typically in the Data folder).
6. Start the CSI Server Manager if it’s not already running by running CSI_Server_Mgr from the Exe folder.
With this configuration on the CSI_Server.ini, the system will keep the program running in the
background all the time.
Windows Task Scheduler Method
Windows Task Scheduler can be used as an alternative way of running the Report Queue.
Follow these steps to configure the Affiliate Report Queue to run using Task Scheduler.
1. Start Windows Task Scheduler and select “Create Task”.
2. Enter a name for the task in the name field, such as “Affiliate Report Queue”. 3. Press the Trigger tab and select New. 4. From the “Begin the Task” selection, chose “At Startup”, then press OK.
5. Press the Actions tab and select New. 6. The Action should be set to “Start a Program”. Press the Browse button and browse to
the affiliate reportqueue.exe in the exe folder.
7. In the Start-In area, enter the location of the Traffic.ini and Affiliat.ini, typically csi\prod\data, and then press OK.
8. Press the Settings tab.
9. Check on the option labeled “If the task fails, restart every:”, and set the restart time to 1 minute.
10. Deselect the option labeled “Stop the task if it runs longer than”.
11. Verify that “Do not start a new instance” is selected at the bottom of the screen, and press OK to finish creating the task.
12. You can now start the task by selecting it from the list and choosing Run. It will also start automatically each time the computer it is on is restarted.
With Windows Task Scheduler, using the configuration steps listed above, the Report Queue
will keep running in the background. If for some reason it stops running, Task Scheduler will
check every minute and start it again if it’s not running.
Report Queue Shortcut Method
The Report Queue can also be started using a shortcut.
Set the Target to the “AffiliateReportQueue.exe” file in the exe folder.
Set the Start in to the location of the Traffic.ini and affiliat.ini files (typically the data folder).
Then launch the Report Queue by double clicking the shortcut.
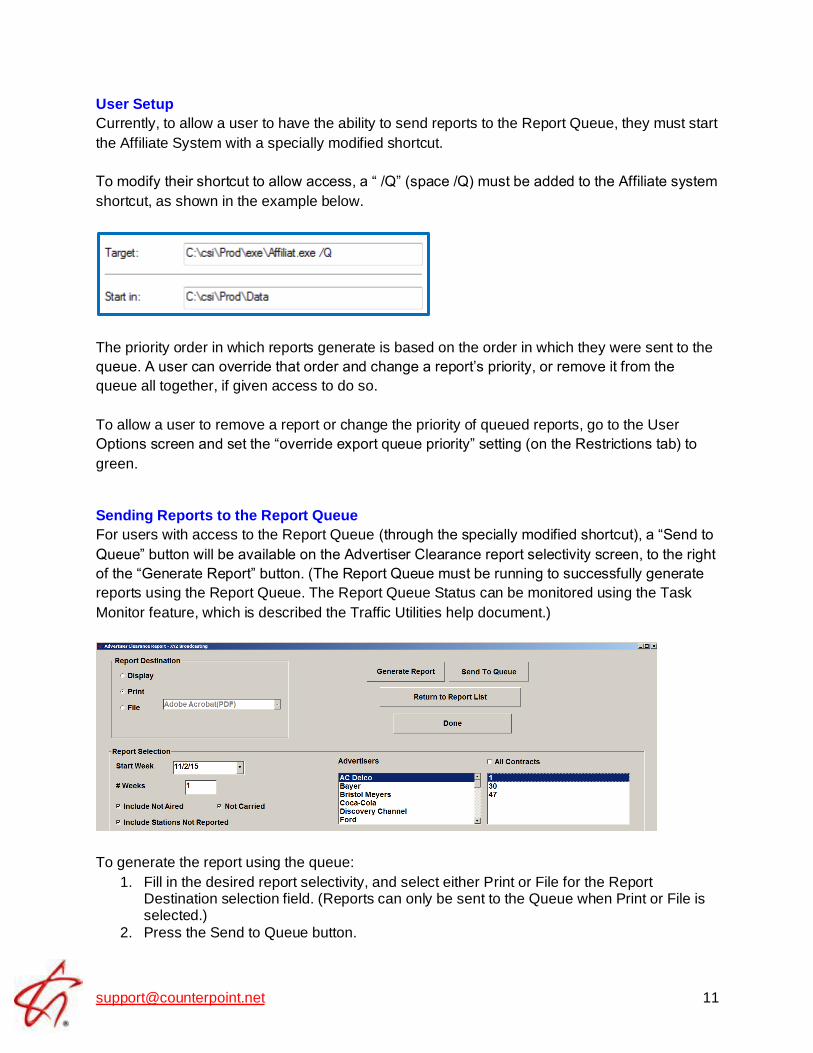
User Setup
Currently, to allow a user to have the ability to send reports to the Report Queue, they must start
the Affiliate System with a specially modified shortcut.
To modify their shortcut to allow access, a “ /Q” (space /Q) must be added to the Affiliate system
shortcut, as shown in the example below.
The priority order in which reports generate is based on the order in which they were sent to the
queue. A user can override that order and change a report’s priority, or remove it from the
queue all together, if given access to do so.
To allow a user to remove a report or change the priority of queued reports, go to the User
Options screen and set the “override export queue priority” setting (on the Restrictions tab) to
green.
Sending Reports to the Report Queue
For users with access to the Report Queue (through the specially modified shortcut), a “Send to
Queue” button will be available on the Advertiser Clearance report selectivity screen, to the right
of the “Generate Report” button. (The Report Queue must be running to successfully generate
reports using the Report Queue. The Report Queue Status can be monitored using the Task
Monitor feature, which is described the Traffic Utilities help document.)
To generate the report using the queue:
1. Fill in the desired report selectivity, and select either Print or File for the Report Destination selection field. (Reports can only be sent to the Queue when Print or File is selected.)
2. Press the Send to Queue button.
3. A popup screen will appear that allows the user to enter a descriptive title for the report in the Description field. Enter a description for the report, then press the Add to Queue
button. This will add the report to the report queue, where it will be generated when it reaches the top of the queue. The finished report will be either be printed or placed in the export folder, depending on whether the report destination was set to Print or File.
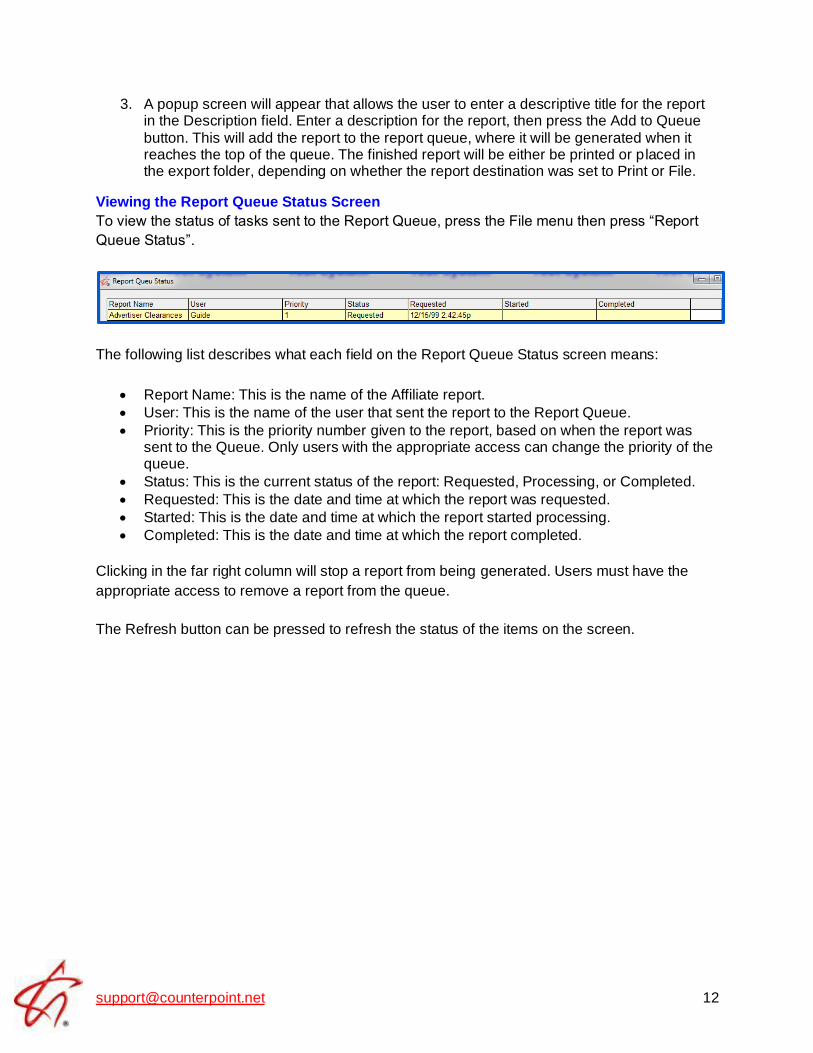
Viewing the Report Queue Status Screen
To view the status of tasks sent to the Report Queue, press the File menu then press “Report
Queue Status”.
The following list describes what each field on the Report Queue Status screen means:
• Report Name: This is the name of the Affiliate report.
• User: This is the name of the user that sent the report to the Report Queue.
• Priority: This is the priority number given to the report, based on when the report was sent to the Queue. Only users with the appropriate access can change the priority of the queue.
• Status: This is the current status of the report: Requested, Processing, or Completed.
• Requested: This is the date and time at which the report was requested.
• Started: This is the date and time at which the report started processing.
• Completed: This is the date and time at which the report completed.
Clicking in the far right column will stop a report from being generated. Users must have the
appropriate access to remove a report from the queue.
The Refresh button can be pressed to refresh the status of the items on the screen.
Alerts Alerts are used to notify affiliate users that certain actions have happened, which means the
affiliate users must take certain actions in response to the alert. For example, when the final log
is generated, the “Export Spots” alert is shown to notify users that the web export must be run.
Affiliate alerts can be viewed by pressing the red Alert button that appears in the Title Bar. This
button only appears when there is at least one alert that can be viewed.
There are five types of affiliate alerts: Export Spots, Export ISCI, Agreement Alerts, and Web
Vendors. This section explains what each alert is for and how it is cleared.
• Export Spots: The Export Spots alert appears when a final or reprint log has been generated. The following exports clear the Export Spots alert: CSI Electronic Affidavit, IDC, iPump, Marketron, Wegener-Compel, X-Digital.
• Export ISCI: This alert appears when a final or reprint log has been generated, and is cleared by running the ISCI export (from the Affiliate -> File -> Export menu).
• Agreement Alerts: When Programming has been changed on the Traffic system, an Agreement alert will be shown to notify affiliate users that agreements require updating
for the vehicle that was altered. This alert can only be cleared manually. To clear this alert, select the alert on the Alerts menu and press the Clear button. Press Yes on the confirmation button to clear the alert.
• Web Vendors: If an issue occurred during the export/import from the web to Wide Orbit or vice versa, a web vendor alert will be displayed. (The Web Vendor Manager must be enabled for monitoring using the Task Monitor system for this type of alert to appear.)
• Info Alerts: There are two types of alerts shown in the Info Alerts section, with the different alert types being indicated in the Source field. An alert with the source of “Pool”
appears when the process that assigns copy to affiliate spots is unable to find blackout pool copy that can be assigned to a spot, with the result that the generic copy will be used instead. (Version 7.1 and above only, and only when the blackout pool feature is
used.) For more information on the blackout pool feature, see the Copy Screen help document. A source of “Compel” indicates an error such as a crash was encountered when running the Wegener Compel import
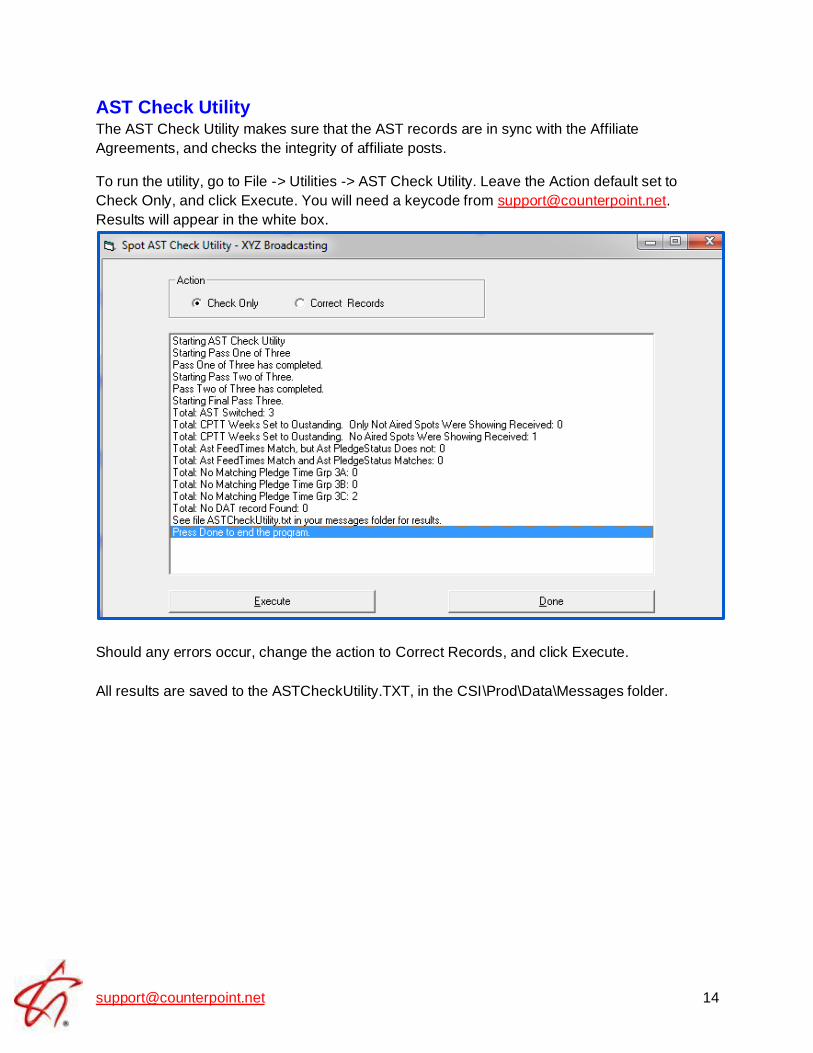
AST Check Utility The AST Check Utility makes sure that the AST records are in sync with the Affiliate
Agreements, and checks the integrity of affiliate posts.
To run the utility, go to File -> Utilities -> AST Check Utility. Leave the Action default set to
Check Only, and click Execute. You will need a keycode from [email protected].
Results will appear in the white box.
Should any errors occur, change the action to Correct Records, and click Execute.
All results are saved to the ASTCheckUtility.TXT, in the CSI\Prod\Data\Messages folder.

Calculate Average Weeks Delinquent in Posting Utility The “Calculate Average Weeks Delinquent in Posting” utility is used to see the average number
of affidavit weeks that are unposted or partially posted per agreement, and is accessed from the
Affiliate System -> File -> Utilities menu. When first started, the utility displays a date, which is
the Sunday prior to the current week (for example, if today is Wednesday 2/13/19, it will default
to Sunday 2/10/19). This date is labeled “Calculating average # weeks delinquent in posting
through”, and is the cutoff date used by the utility. After pressing the Calculate button to run the
utility, the following additional information will be shown:
Total # weeks unposted/partially posted: the utility will gather all the affidavit weeks (CPTT
records) that are unposted or partially posted and it will display a total count of all the records.
For example, if there’s a total of 3,000 unposted or partially posted affidavit weeks, it will show
3,000 for this number.
Average # weeks delinquent in posting: this is the "Total # weeks unposted/partially posted"
divided by "total agreements" (the total number of agreements that have at least one week that
is unposted or partially posted. In other words, if an agreement had two unposted or partially
posted weeks, it counts as one agreement. If an agreement has zero unposted or partially
posted weeks, it counts as zero.) This number is the number of affidavit weeks (CPTT records)
that are unposted or partially posted on average per agreement. This is used to get a sense of
how many unposted/partially posted CPTT records on average each agreement has, and if this
number is tracked by running the utility periodically, over time, this number may change.
Increased reliance on auto-web posting should reduce the average number of unposted and
partially posted affidavit weeks.
Check Email Format The Check Email Format utility examines all of the email addresses entered in the system, and
verifies that they are all formatted correctly. It does not check that they are currently being used,
but rather that they meet the correct format.
To run the utility, go to File -> Utilities -> Check Email Format and click Check.
Results will appear in the white box. The results simply show addresses with errors, it does not
fix them.
Any errors are stored in the “Email-Improperly formatted emails” log that can be viewed from the
Accessories -> Messages Viewer.
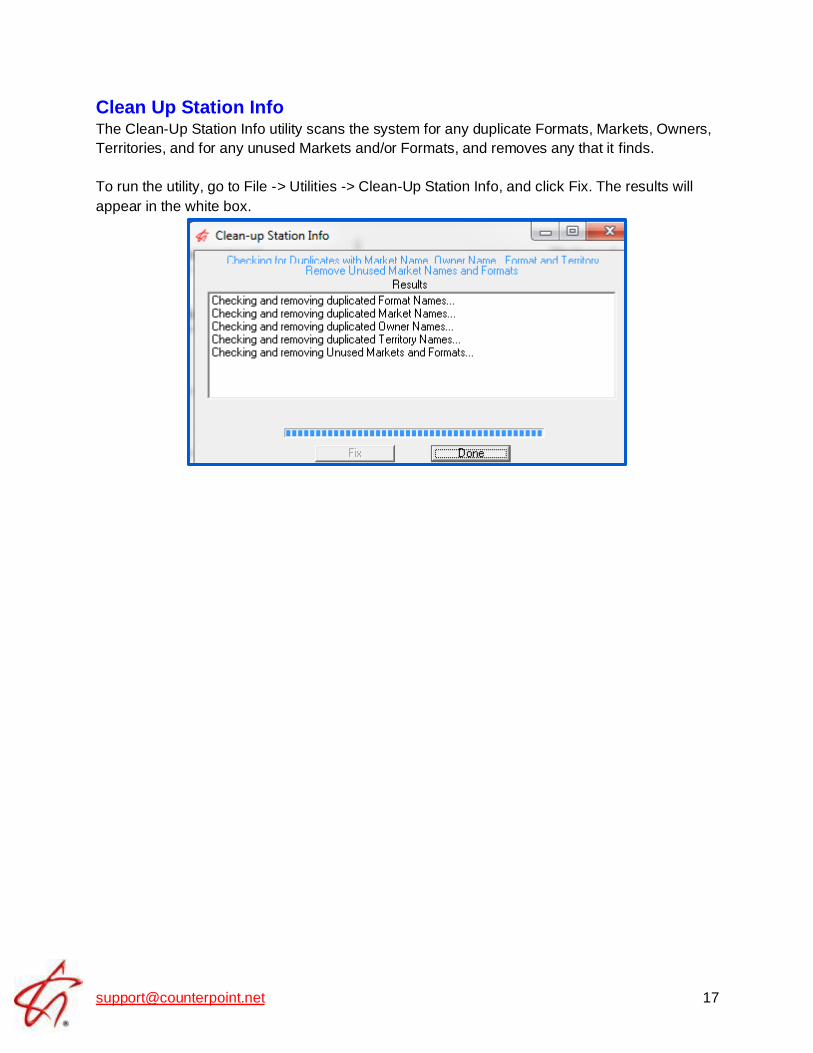
Clean Up Station Info The Clean-Up Station Info utility scans the system for any duplicate Formats, Markets, Owners,
Territories, and for any unused Markets and/or Formats, and removes any that it finds.
To run the utility, go to File -> Utilities -> Clean-Up Station Info, and click Fix. The results will
appear in the white box.
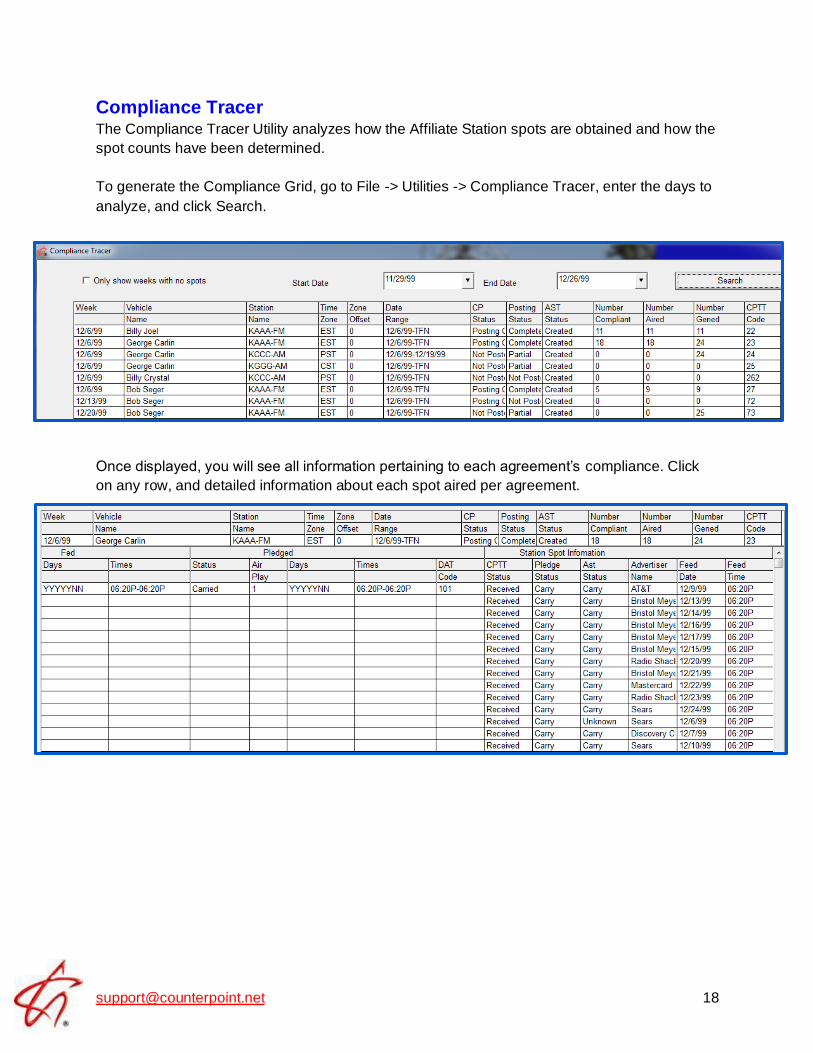
Compliance Tracer The Compliance Tracer Utility analyzes how the Affiliate Station spots are obtained and how the
spot counts have been determined.
To generate the Compliance Grid, go to File -> Utilities -> Compliance Tracer, enter the days to
analyze, and click Search.
Once displayed, you will see all information pertaining to each agreement’s compliance. Click
on any row, and detailed information about each spot aired per agreement.
CPTT Agree between Affiliate and Web This feature is not yet implemented.
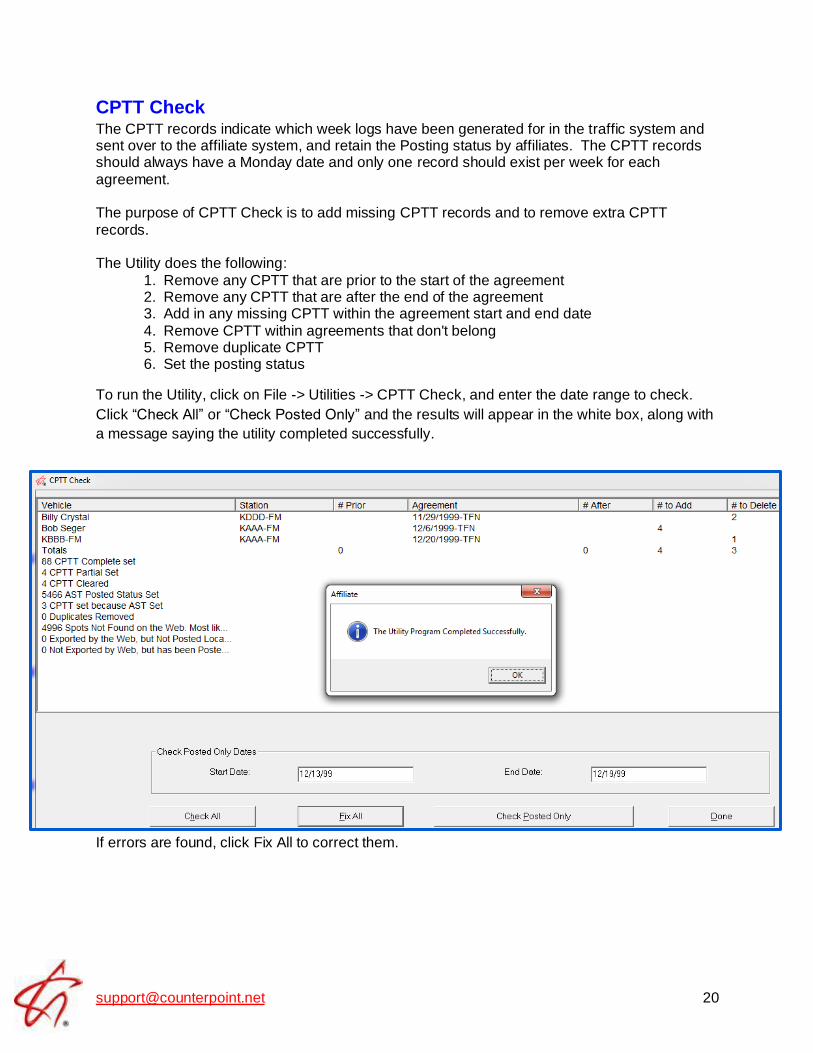
CPTT Check The CPTT records indicate which week logs have been generated for in the traffic system and sent over to the affiliate system, and retain the Posting status by affiliates. The CPTT records should always have a Monday date and only one record should exist per week for each
agreement. The purpose of CPTT Check is to add missing CPTT records and to remove extra CPTT
records. The Utility does the following:
1. Remove any CPTT that are prior to the start of the agreement 2. Remove any CPTT that are after the end of the agreement 3. Add in any missing CPTT within the agreement start and end date
4. Remove CPTT within agreements that don't belong 5. Remove duplicate CPTT 6. Set the posting status
To run the Utility, click on File -> Utilities -> CPTT Check, and enter the date range to check.
Click “Check All” or “Check Posted Only” and the results will appear in the white box, along with
a message saying the utility completed successfully.
If errors are found, click Fix All to correct them.
CPTT Rectify CPTT Rectify creates missing CPTT Records as well as missing Affiliate spots (AST Records).
Record Types
There are two types of records this utility will create: CPTT and AST.
• CPTT Records (CPTT) o These records indicate whether a week has or has not been posted
o They are created when Logs are generated (Final and/or Reprint) ▪ They are also created when an agreement is created for any weeks that
are between the start date of the agreement and the last log date for the
vehicle that the agreement is being created for
• Affiliate Spots (AST) o These records are the spots that get sent to a station from the Affiliate Log based
on the Agreement Pledge information
o AST records are created when: ▪ A user exports to the web using the CSI Electronic Affidavit system, or
runs another affiliate export such as Marketron, Wegener, X-Digital, etc.
▪ A user views a vehicle/station/week in Post CP ▪ A user runs a report that shows affiliate spots, if they haven’t been
created yet by any of the other actions
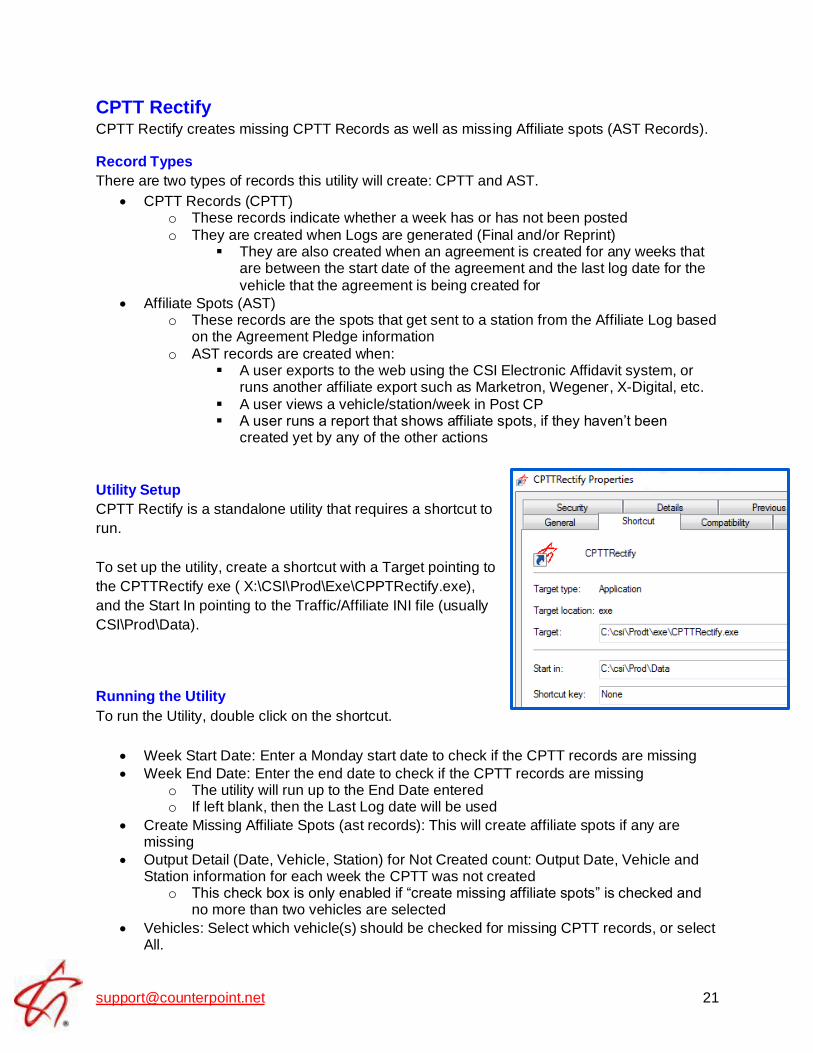
Utility Setup
CPTT Rectify is a standalone utility that requires a shortcut to
run.
To set up the utility, create a shortcut with a Target pointing to
the CPTTRectify exe ( X:\CSI\Prod\Exe\CPPTRectify.exe),
and the Start In pointing to the Traffic/Affiliate INI file (usually
CSI\Prod\Data).
Running the Utility
To run the Utility, double click on the shortcut.
• Week Start Date: Enter a Monday start date to check if the CPTT records are missing
• Week End Date: Enter the end date to check if the CPTT records are missing o The utility will run up to the End Date entered o If left blank, then the Last Log date will be used
• Create Missing Affiliate Spots (ast records): This will create affiliate spots if any are missing
• Output Detail (Date, Vehicle, Station) for Not Created count: Output Date, Vehicle and Station information for each week the CPTT was not created
o This check box is only enabled if “create missing affiliate spots” is checked and no more than two vehicles are selected
• Vehicles: Select which vehicle(s) should be checked for missing CPTT records, or select All.
• Click Rectify to start the process
• After the Utility is completed, all results will be displayed
Utility Output
The utility creates a file called “CPTTRectify_mmddyy.csv”, which is stored in the
CSI\Prod\Data\Messages folder.
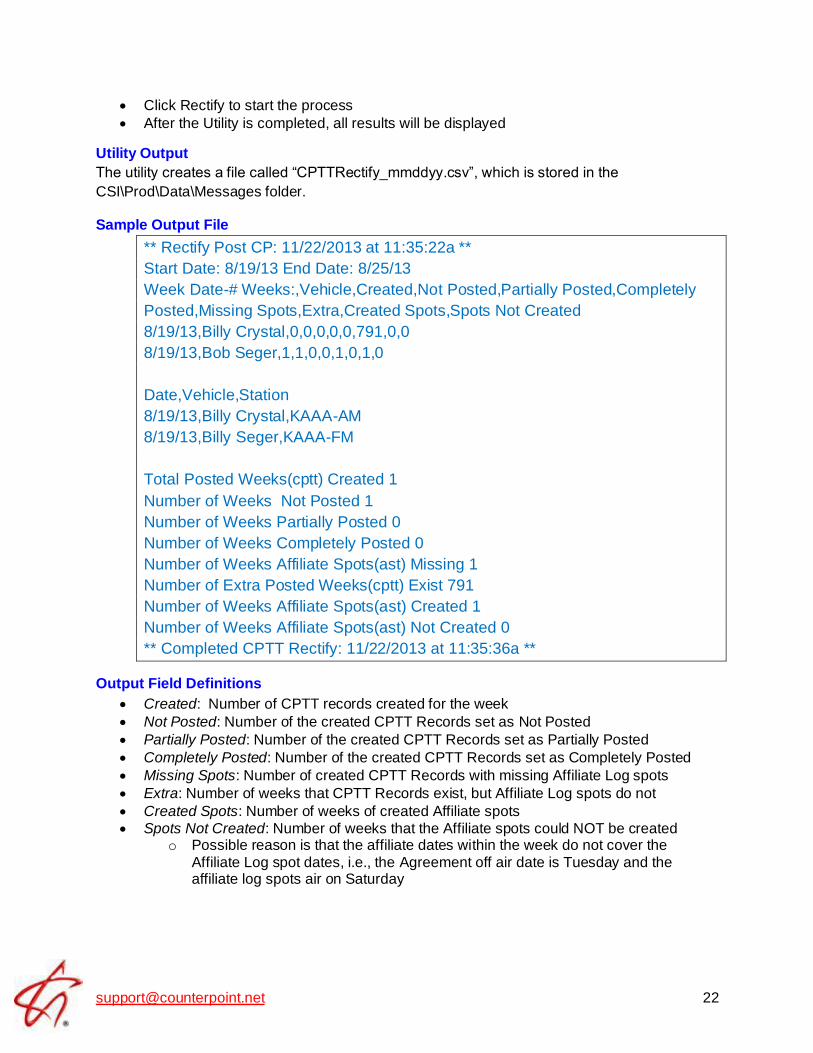
Sample Output File
** Rectify Post CP: 11/22/2013 at 11:35:22a **
Start Date: 8/19/13 End Date: 8/25/13
Week Date-# Weeks:,Vehicle,Created,Not Posted,Partially Posted,Completely
Posted,Missing Spots,Extra,Created Spots,Spots Not Created
8/19/13,Billy Crystal,0,0,0,0,0,791,0,0
8/19/13,Bob Seger,1,1,0,0,1,0,1,0
Date,Vehicle,Station
8/19/13,Billy Crystal,KAAA-AM
8/19/13,Billy Seger,KAAA-FM
Total Posted Weeks(cptt) Created 1
Number of Weeks Not Posted 1
Number of Weeks Partially Posted 0
Number of Weeks Completely Posted 0
Number of Weeks Affiliate Spots(ast) Missing 1
Number of Extra Posted Weeks(cptt) Exist 791
Number of Weeks Affiliate Spots(ast) Created 1
Number of Weeks Affiliate Spots(ast) Not Created 0
** Completed CPTT Rectify: 11/22/2013 at 11:35:36a **
Output Field Definitions
• Created: Number of CPTT records created for the week
• Not Posted: Number of the created CPTT Records set as Not Posted
• Partially Posted: Number of the created CPTT Records set as Partially Posted
• Completely Posted: Number of the created CPTT Records set as Completely Posted
• Missing Spots: Number of created CPTT Records with missing Affiliate Log spots
• Extra: Number of weeks that CPTT Records exist, but Affiliate Log spots do not
• Created Spots: Number of weeks of created Affiliate spots
• Spots Not Created: Number of weeks that the Affiliate spots could NOT be created o Possible reason is that the affiliate dates within the week do not cover the
Affiliate Log spot dates, i.e., the Agreement off air date is Tuesday and the affiliate log spots air on Saturday
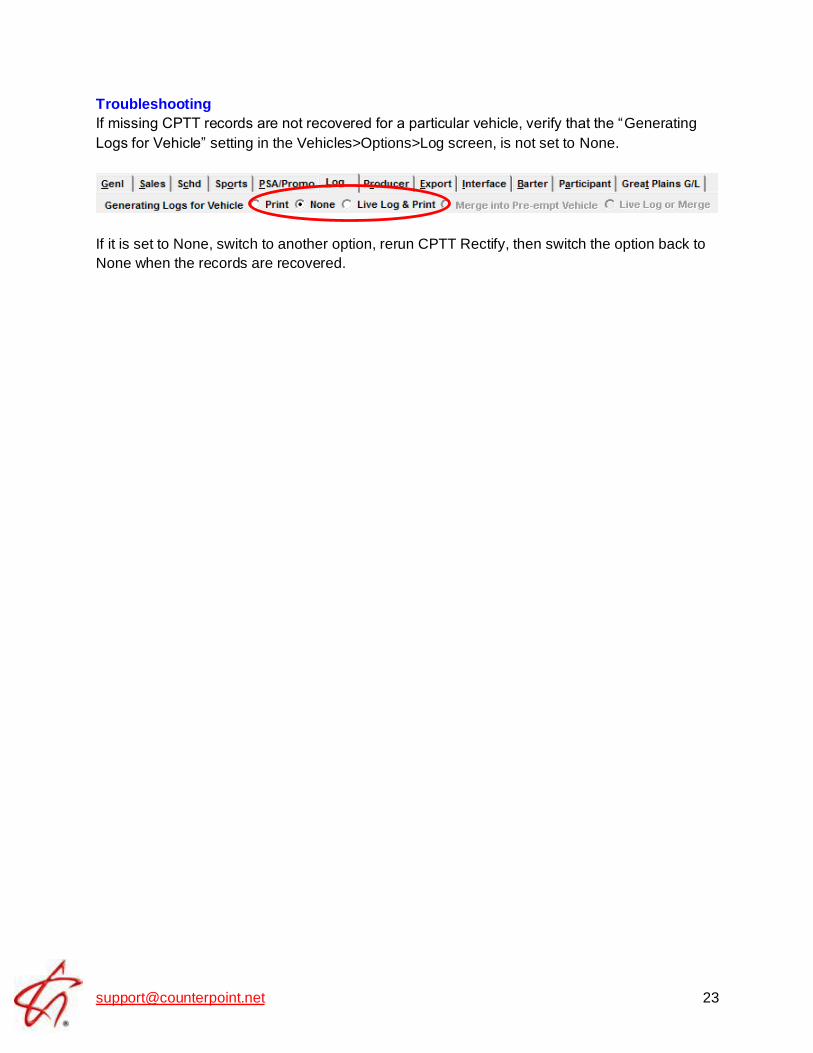
Troubleshooting
If missing CPTT records are not recovered for a particular vehicle, verify that the “Generating
Logs for Vehicle” setting in the Vehicles>Options>Log screen, is not set to None.
If it is set to None, switch to another option, rerun CPTT Rectify, then switch the option back to
None when the records are recovered.
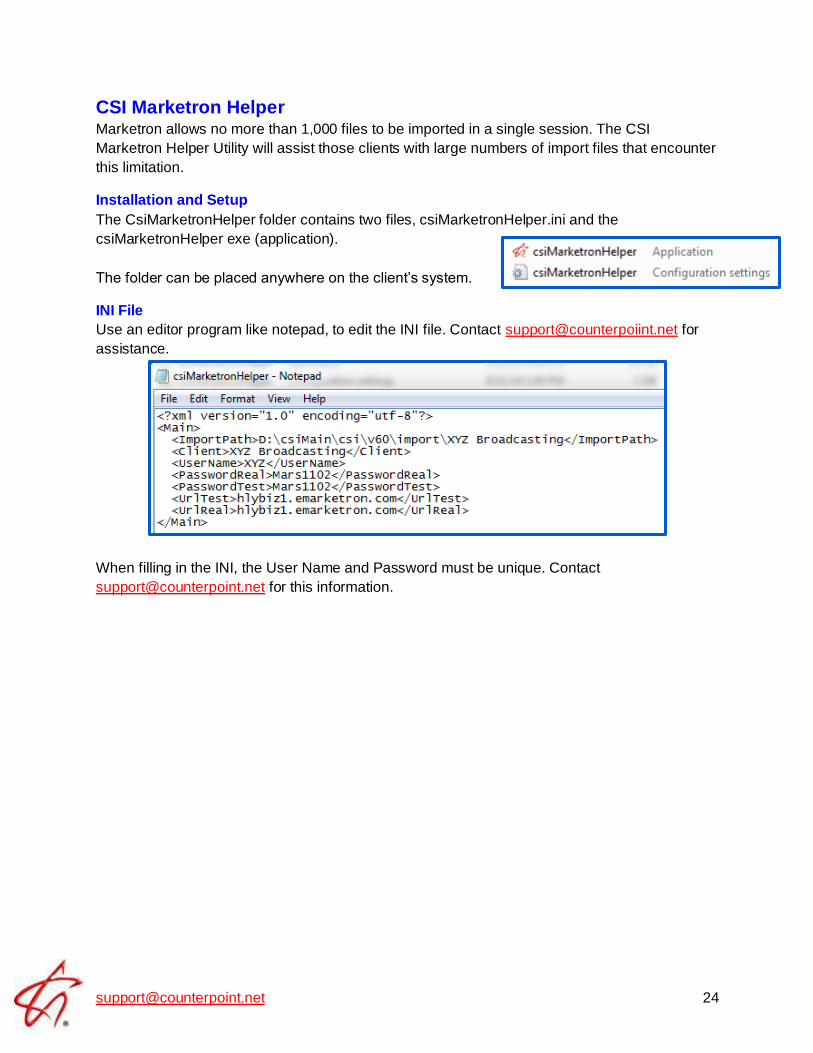
CSI Marketron Helper Marketron allows no more than 1,000 files to be imported in a single session. The CSI
Marketron Helper Utility will assist those clients with large numbers of import files that encounter
this limitation.
Installation and Setup
The CsiMarketronHelper folder contains two files, csiMarketronHelper.ini and the
csiMarketronHelper exe (application).
The folder can be placed anywhere on the client’s system.
INI File
Use an editor program like notepad, to edit the INI file. Contact [email protected] for
assistance.
When filling in the INI, the User Name and Password must be unique. Contact
[email protected] for this information.

Running the Application To run the utility, double click on csiMarketronHelper within the folder, to bring up the
application.
Main Screen
From the Main screen, you can click “Get # of Files” to see the total amount of files. Clicking this
does not import any files, it simply gives you a total number of files waiting to be imported.
Download Screen The Download screen is where the actual
download will occur.
Upon the first download, you will need to
browse to the folder in which the files will be
downloaded and saved. This path can be
anywhere on the client’s system, but generally
is the folder used to import Marketron files, i.e.
CSI\Prod\Import\XYZBroadcasting.
Once defined, the utility will remember the path and make it the default.
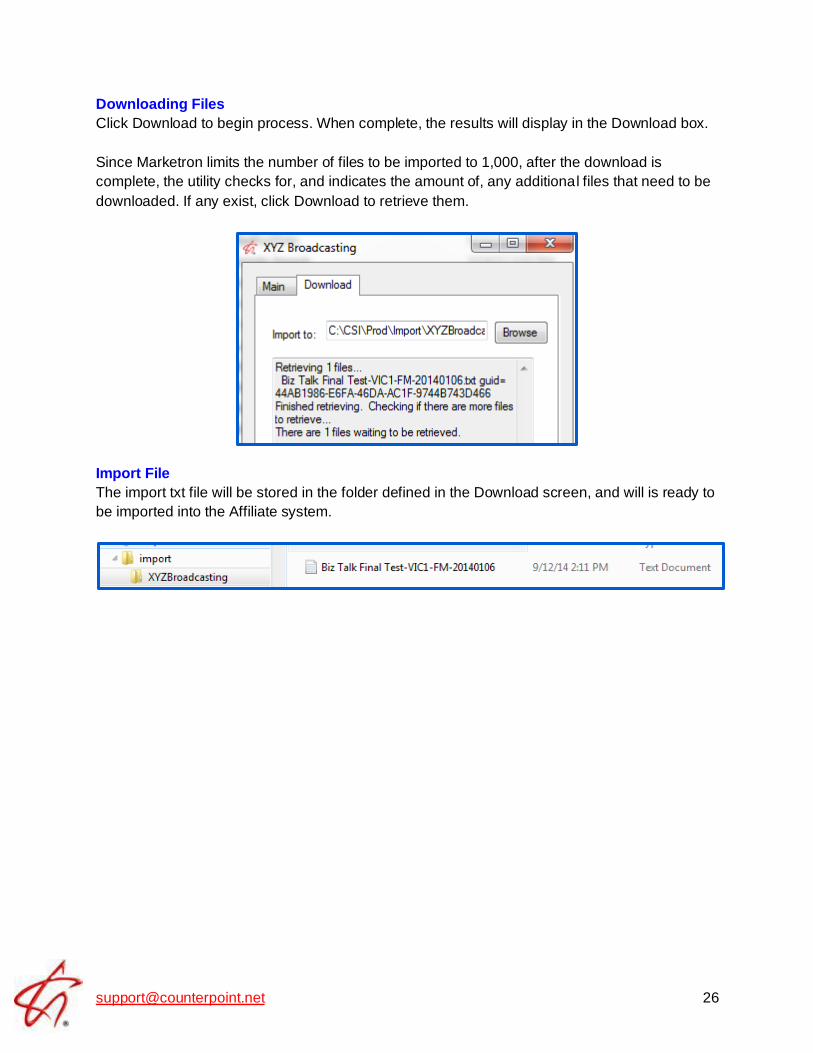
Downloading Files
Click Download to begin process. When complete, the results will display in the Download box.
Since Marketron limits the number of files to be imported to 1,000, after the download is
complete, the utility checks for, and indicates the amount of, any additional files that need to be
downloaded. If any exist, click Download to retrieve them.
Import File
The import txt file will be stored in the folder defined in the Download screen, and will is ready to
be imported into the Affiliate system.
Duplicate Blackout Fix This utility is used to fix duplicate blackout spots that were created when they should not have
been created, as a result of a software error. When run, the utility will remove duplicate
blackouts from the selected vehicle or vehicles from the selected start date. The results are
logged on a text file named CheckBkout.txt, which is created in the Export folder.
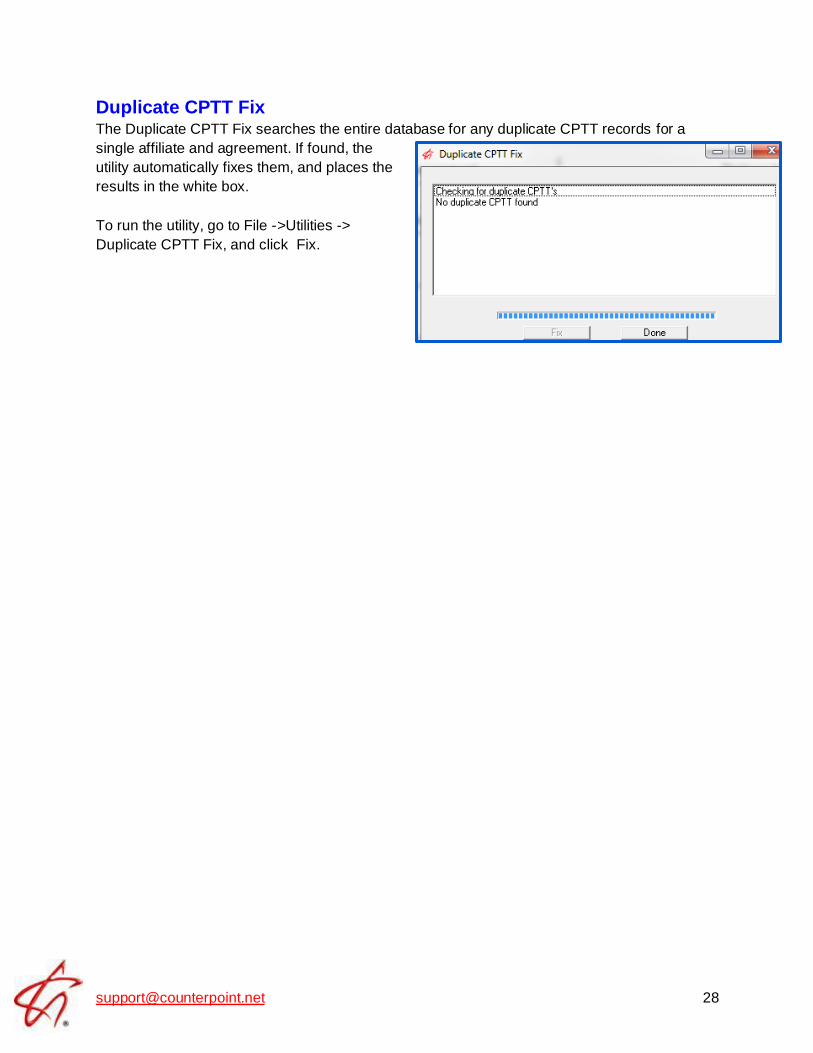
Duplicate CPTT Fix The Duplicate CPTT Fix searches the entire database for any duplicate CPTT records for a
single affiliate and agreement. If found, the
utility automatically fixes them, and places the
results in the white box.
To run the utility, go to File ->Utilities ->
Duplicate CPTT Fix, and click Fix.
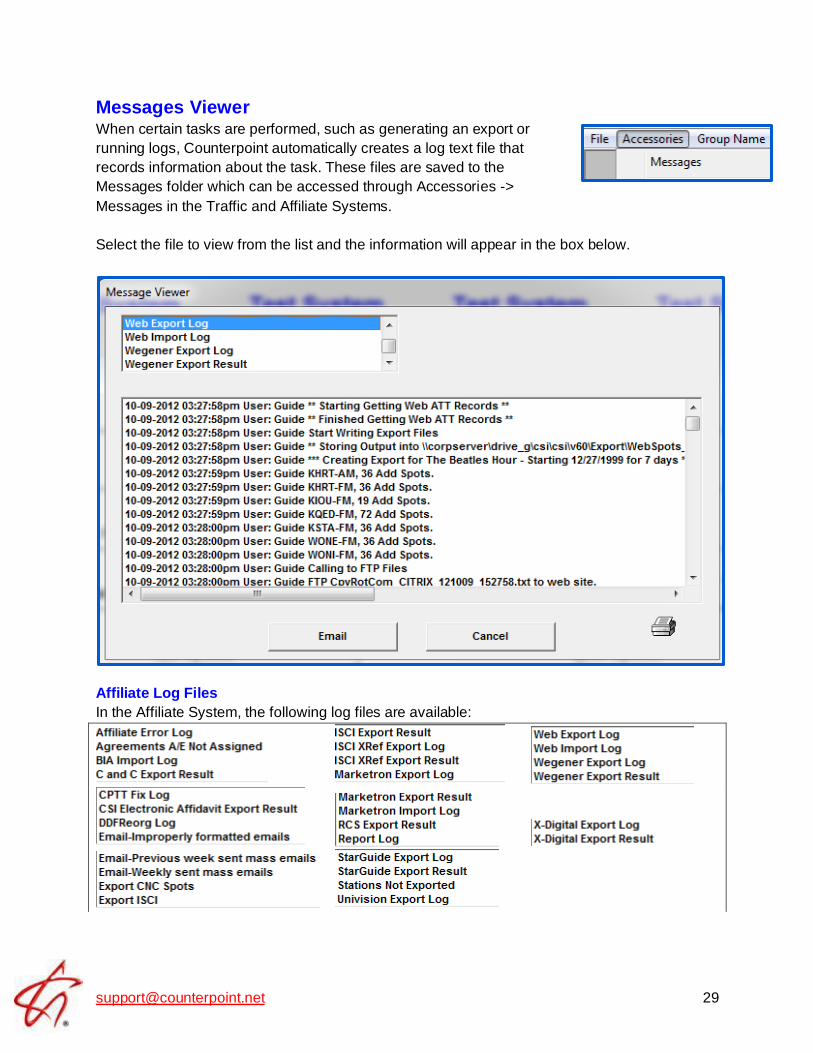
Messages Viewer When certain tasks are performed, such as generating an export or
running logs, Counterpoint automatically creates a log text file that
records information about the task. These files are saved to the
Messages folder which can be accessed through Accessories ->
Messages in the Traffic and Affiliate Systems.
Select the file to view from the list and the information will appear in the box below.
Affiliate Log Files
In the Affiliate System, the following log files are available:
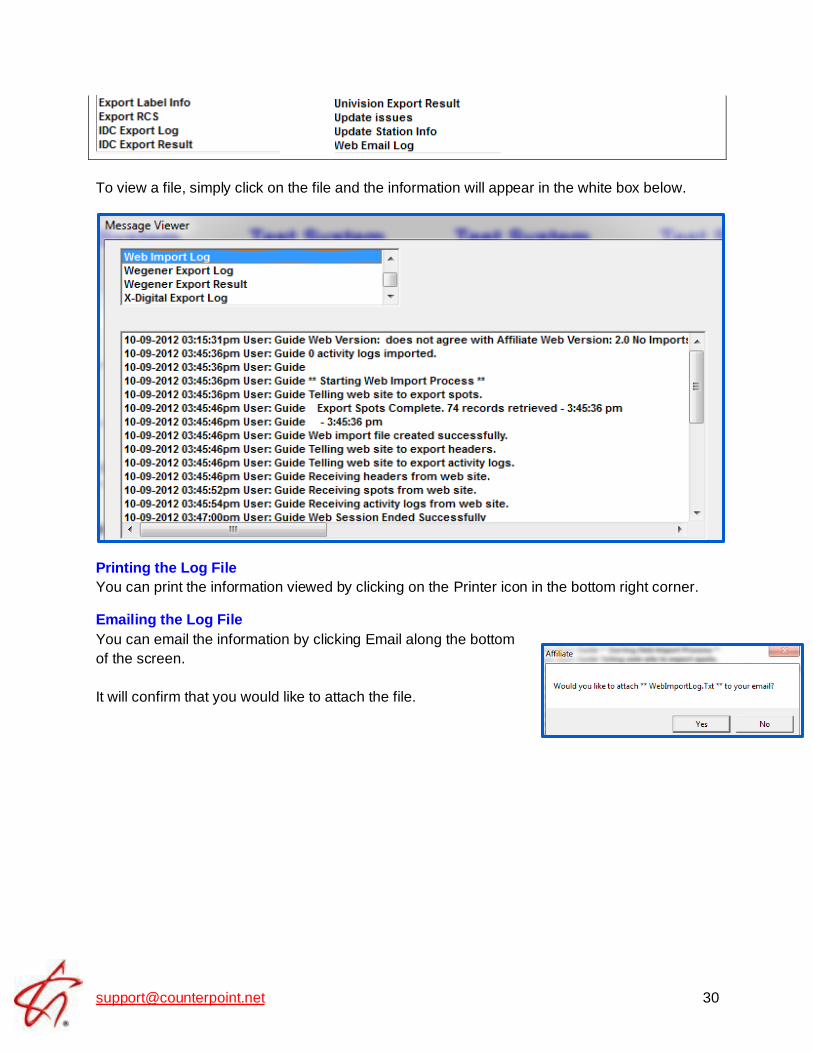
To view a file, simply click on the file and the information will appear in the white box below.
Printing the Log File
You can print the information viewed by clicking on the Printer icon in the bottom right corner.
Emailing the Log File
You can email the information by clicking Email along the bottom
of the screen.
It will confirm that you would like to attach the file.
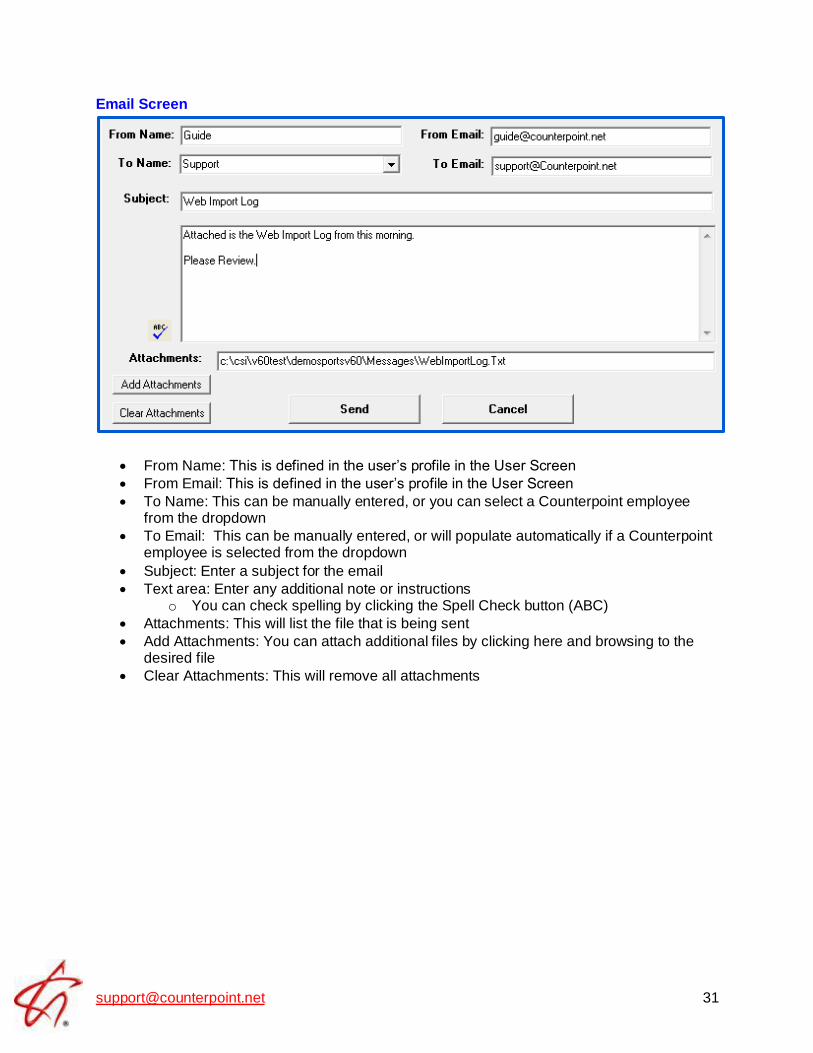
Email Screen
• From Name: This is defined in the user’s profile in the User Screen
• From Email: This is defined in the user’s profile in the User Screen
• To Name: This can be manually entered, or you can select a Counterpoint employee from the dropdown
• To Email: This can be manually entered, or will populate automatically if a Counterpoint employee is selected from the dropdown
• Subject: Enter a subject for the email
• Text area: Enter any additional note or instructions o You can check spelling by clicking the Spell Check button (ABC)
• Attachments: This will list the file that is being sent
• Add Attachments: You can attach additional files by clicking here and browsing to the desired file
• Clear Attachments: This will remove all attachments
Re-Import Affiliate Spots
Overview
The Re-Import Affiliate Spots utility is used to re-import posting information directly from the CSI
Electronic Affidavit system and from Marketron Direct Connect. This utility can only be run to re-
import spot information that has previously been imported; it will not import data that has not yet
been imported. The purpose of re-importing a previously imported week would be to correct an
error with the posting information that occurred after importing the spots from either the CSI
Electronic Affidavit website or Marketron Direct Connect so that the airing information reverts
back to what was originally posted by the affiliate.
Running the Utility
To launch the utility, go to File -> Utilities, and select “Re-Import Affiliate Spots”. Note: This utility
is only available in version 7.0 and higher.
When starting the utility, the user will be prompted to enter a password to continue. The
password must be obtained from Counterpoint support.
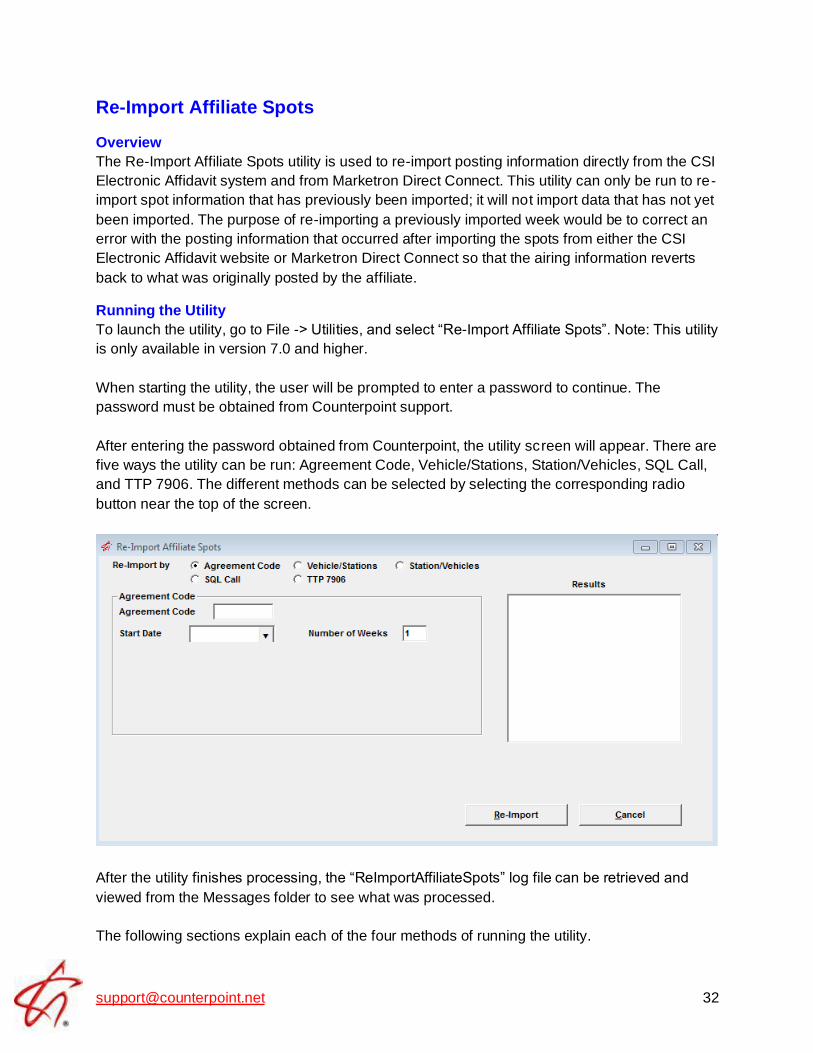
After entering the password obtained from Counterpoint, the utility screen will appear. There are
five ways the utility can be run: Agreement Code, Vehicle/Stations, Station/Vehicles, SQL Call,
and TTP 7906. The different methods can be selected by selecting the corresponding radio
button near the top of the screen.
After the utility finishes processing, the “ReImportAffiliateSpots” log file can be retrieved and
viewed from the Messages folder to see what was processed.
The following sections explain each of the four methods of running the utility.
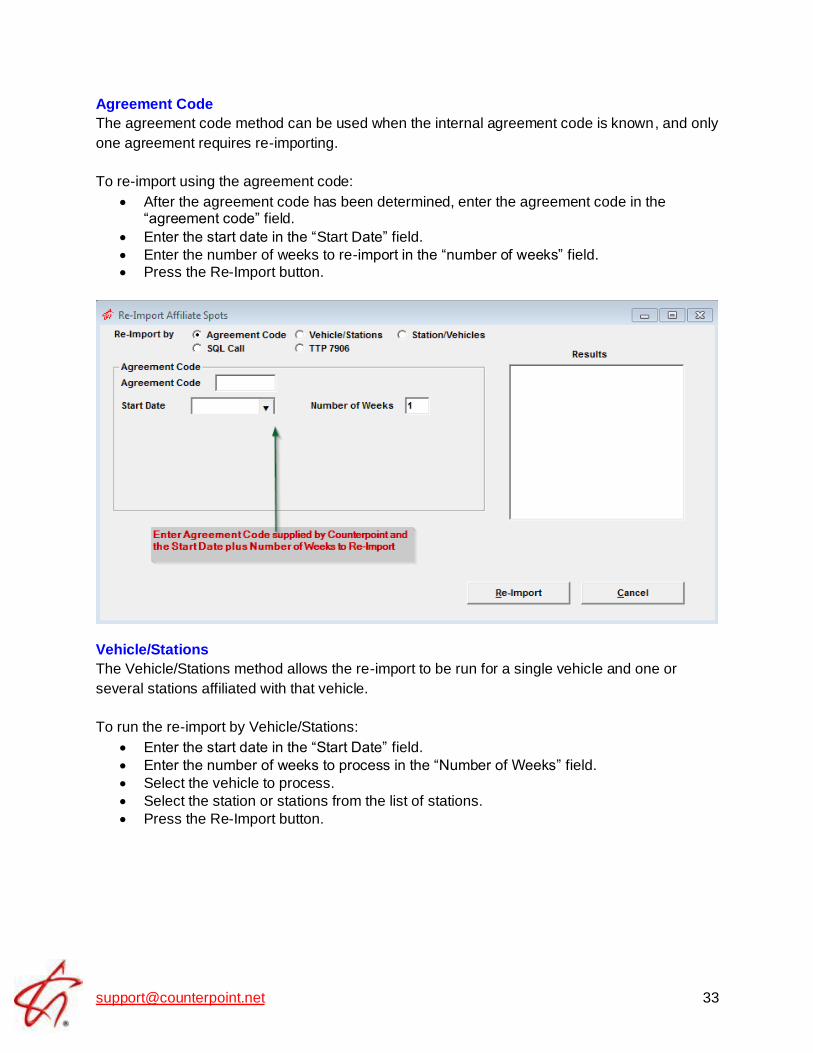
Agreement Code
The agreement code method can be used when the internal agreement code is known, and only
one agreement requires re-importing.
To re-import using the agreement code:
• After the agreement code has been determined, enter the agreement code in the “agreement code” field.
• Enter the start date in the “Start Date” field.
• Enter the number of weeks to re-import in the “number of weeks” field.
• Press the Re-Import button.
Vehicle/Stations
The Vehicle/Stations method allows the re-import to be run for a single vehicle and one or
several stations affiliated with that vehicle.
To run the re-import by Vehicle/Stations:
• Enter the start date in the “Start Date” field.
• Enter the number of weeks to process in the “Number of Weeks” field.
• Select the vehicle to process.
• Select the station or stations from the list of stations.
• Press the Re-Import button.
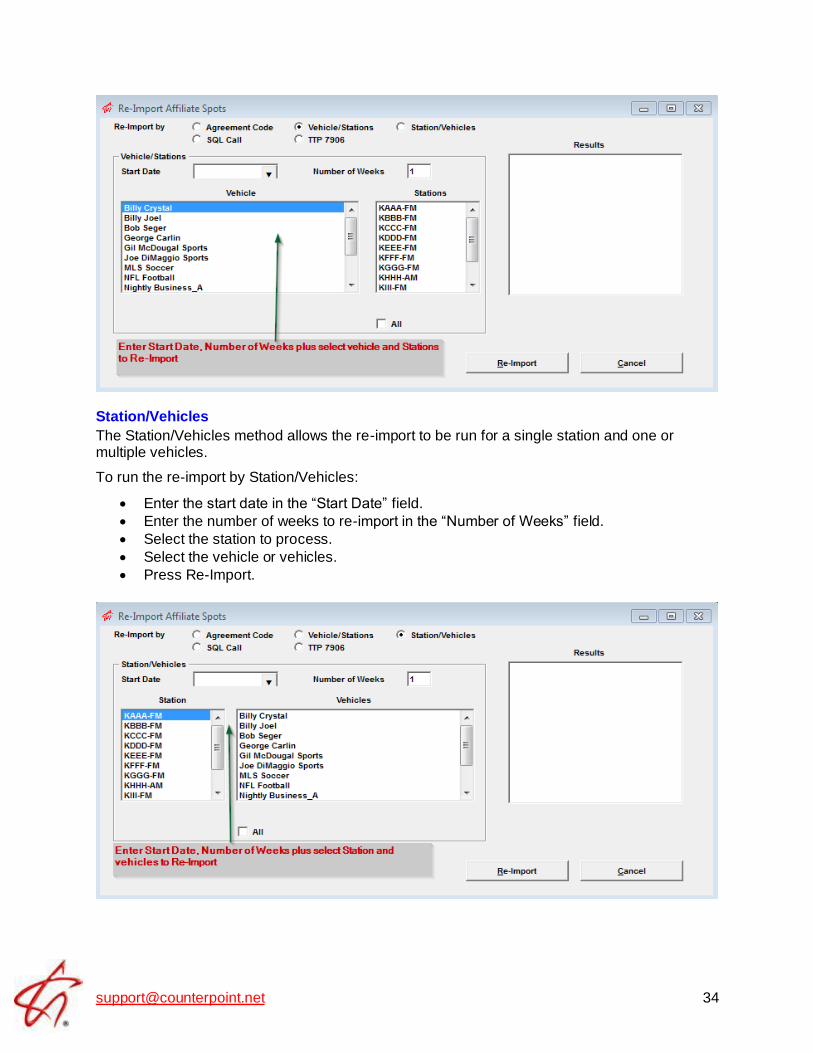
Station/Vehicles
The Station/Vehicles method allows the re-import to be run for a single station and one or multiple vehicles.
To run the re-import by Station/Vehicles:
• Enter the start date in the “Start Date” field.
• Enter the number of weeks to re-import in the “Number of Weeks” field.
• Select the station to process.
• Select the vehicle or vehicles.
• Press Re-Import.
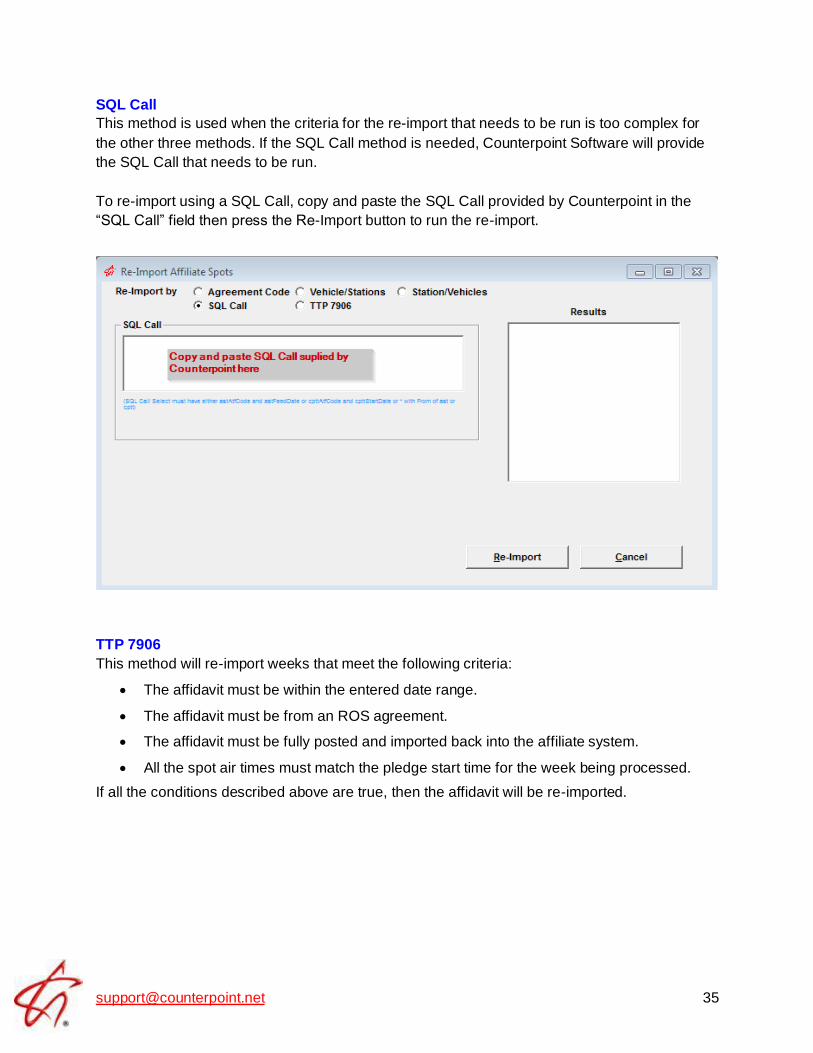
SQL Call
This method is used when the criteria for the re-import that needs to be run is too complex for
the other three methods. If the SQL Call method is needed, Counterpoint Software will provide
the SQL Call that needs to be run.
To re-import using a SQL Call, copy and paste the SQL Call provided by Counterpoint in the
“SQL Call” field then press the Re-Import button to run the re-import.
TTP 7906
This method will re-import weeks that meet the following criteria:
• The affidavit must be within the entered date range.
• The affidavit must be from an ROS agreement.
• The affidavit must be fully posted and imported back into the affiliate system.
• All the spot air times must match the pledge start time for the week being processed.
If all the conditions described above are true, then the affidavit will be re-imported.
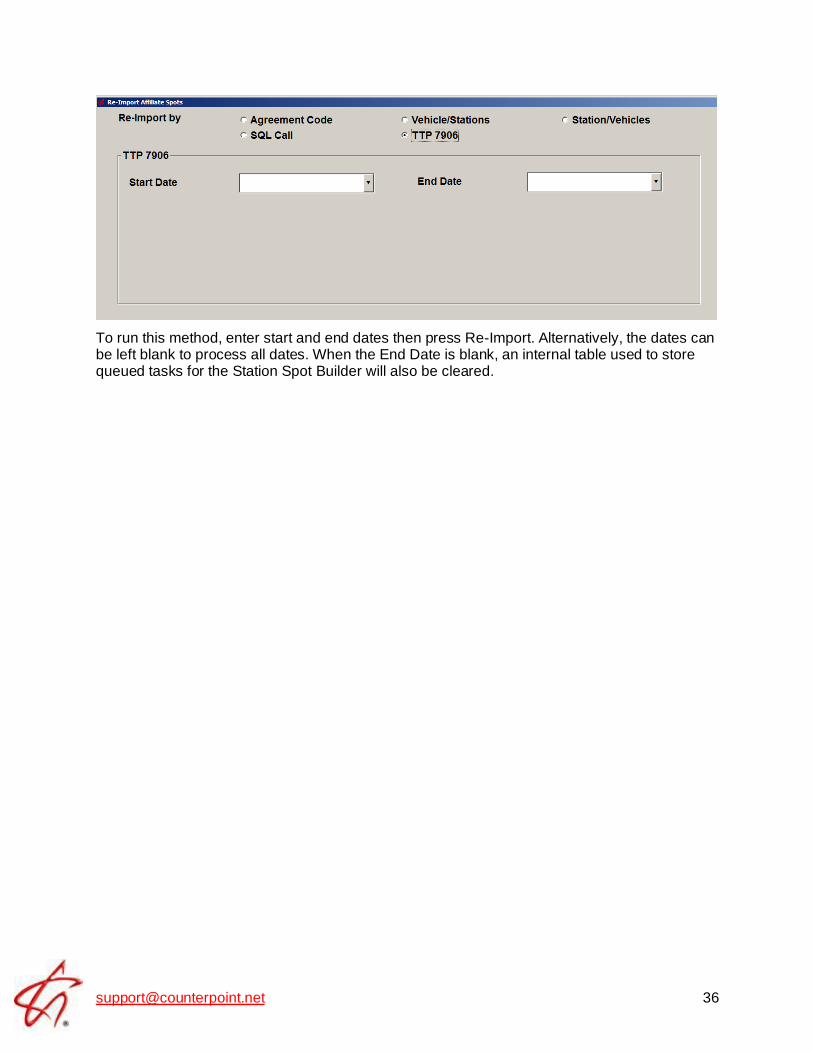
To run this method, enter start and end dates then press Re-Import. Alternatively, the dates can be left blank to process all dates. When the End Date is blank, an internal table used to store queued tasks for the Station Spot Builder will also be cleared.
Set Compliance Available in V7.0 and higher only. This utility can be run to set the compliance flags for affiliate
spots that were created prior to converting to Version 7.0. Spots created in Version 7.0 and
above will automatically have their compliance flags set when posted spots are imported, or
when affiliate’s affidavits are viewed in Affiliate Management.
For more information on the rules the system uses to determine network and station
compliance, please see the “Network and Station Compliance” help document.
Running the Utility
To check and set the compliance for previously generated spots, enter a date range and select
the vehicles, and then click Process. (Note: the date range must begin with a Monday start
date.)
You can run the utility for a date range as large as the amount of data you wish to convert, i.e. a
year’s worth of spots, or if you have a large amount of data, you can use the date range to run
the utility on a group of spots, for example, two months overnight.
When finished, Process will change to Done, and a record of the process, will be stored in the
Data -> Messages folder. The Set Compliance log will list everything that was converted, along with the processing time.
Set CPTT Complete CPTT Complete is a standalone application that verifies the posting status of each
affiliate/agreement. When it is generated, all posting is checked, and the posting status is
assigned one of the following statuses: Completely Posted, Partially Posted, or Not Posted.
If a CPTT record is set to “Did Not Air,” but there are spots associated that did air the CPTT
record will be marked as “Partially Posted” or “Completely Posted,” depending on whether its
spots are partially or completely posted.
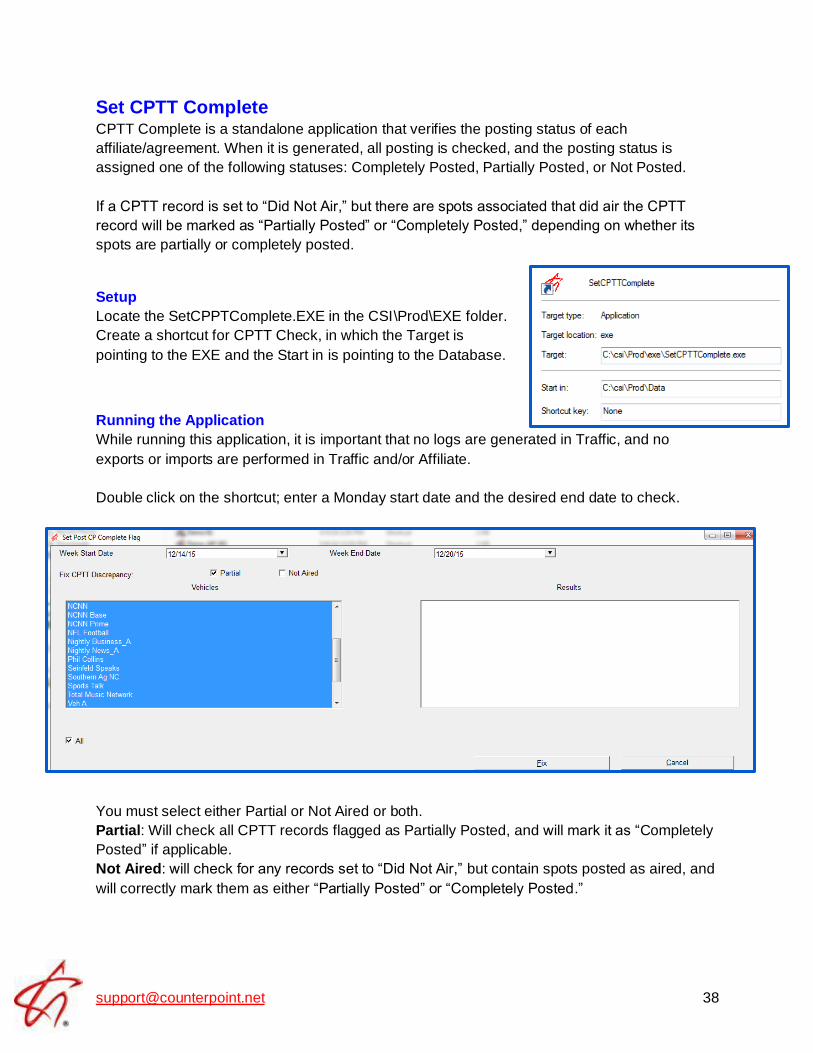
Setup
Locate the SetCPPTComplete.EXE in the CSI\Prod\EXE folder.
Create a shortcut for CPTT Check, in which the Target is
pointing to the EXE and the Start in is pointing to the Database.
Running the Application
While running this application, it is important that no logs are generated in Traffic, and no
exports or imports are performed in Traffic and/or Affiliate.
Double click on the shortcut; enter a Monday start date and the desired end date to check.
You must select either Partial or Not Aired or both.
Partial: Will check all CPTT records flagged as Partially Posted, and will mark it as “Completely
Posted” if applicable.
Not Aired: will check for any records set to “Did Not Air,” but contain spots posted as aired, and
will correctly mark them as either “Partially Posted” or “Completely Posted.”

Results
When completed, everything updated will show in the Results box.
The following items are checked, potentially set to complete, and displayed in the Results box:
• Records Checked: The total number of records checked by the utility
• Records Changed: The total number of CPTT weeks that the utility set to complete that were marked as partially posted
• Partially Posted Records: The number of CPTT weeks that were checked that were valid partially posted weeks
o No changes are done to these
• Changed from Partial to Complete: The number of weeks from the “Records Changed” total that had spots set to a “not posted” status that were actually posted on the web
o The utility will mark these spots as posted in the Affiliate System
File
A file containing the results is stored in the CSI\Prod|Data|Messages folder. The file header lists:
“Station, Vehicle, ATTCode, Week Date, Type”.
The filename will reflect either Partial or Not Aired, depending on which option was selected
(this only applies if only one option was generated).
Set MGs
Overview
Available on version 7.0 and above, the Set MGs (set makegoods) utility is used to set a
“makegood” flag on affiliate spots that were marked by a station website user as airing outside
of the pledge week and were imported in the past (prior to this feature being implemented). It
also creates a missed spot for the original fed spot so that each makegood has a missed spot
that it ties back to.
The makegood flags will be set automatically when importing the spots when the software for
this feature is installed, so the utility is designed to set the makegood flags for spots that were
imported in the past if needed.
Makegood spots and the corresponding missed spots can be viewed on the Affiliate Affidavits
screen and the Affiliate Management screen. The example below is from the Affiliate Affidavits
screen and shows what is displayed after running the utility to set the makegood flag for a
makegood spot.
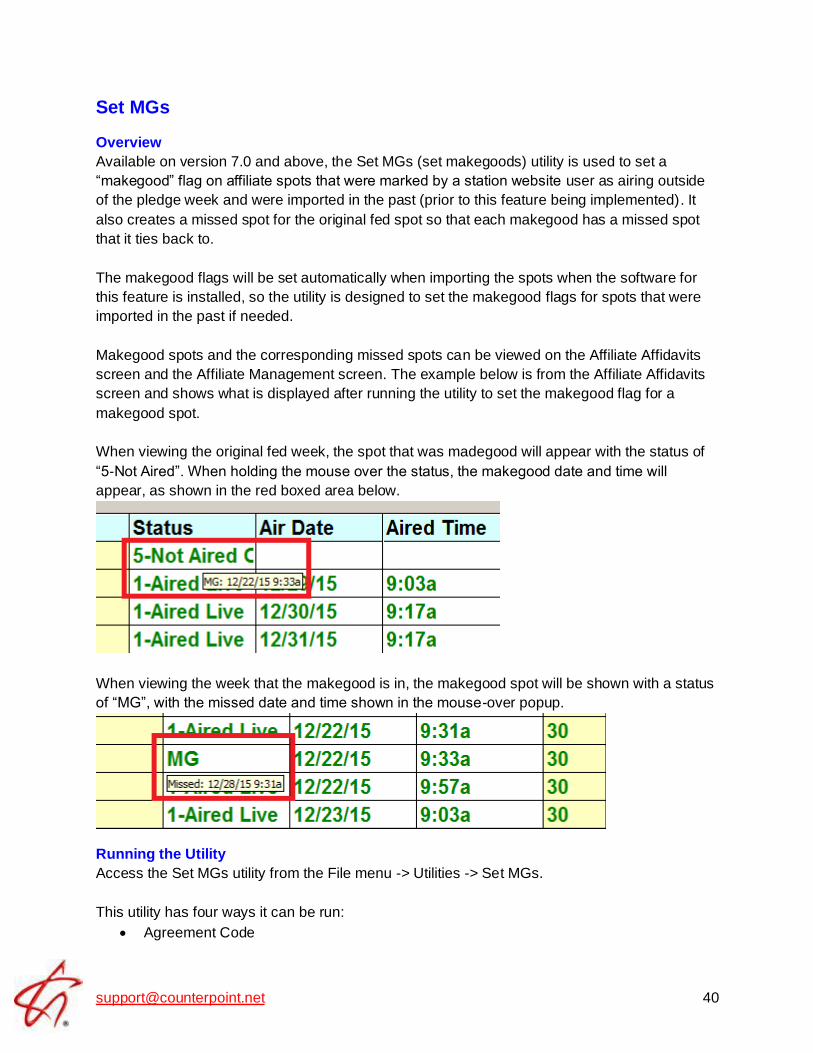
When viewing the original fed week, the spot that was madegood will appear with the status of
“5-Not Aired”. When holding the mouse over the status, the makegood date and time will
appear, as shown in the red boxed area below.
When viewing the week that the makegood is in, the makegood spot will be shown with a status
of “MG”, with the missed date and time shown in the mouse-over popup.
Running the Utility
Access the Set MGs utility from the File menu -> Utilities -> Set MGs.
This utility has four ways it can be run:
• Agreement Code
• Vehicle/Station
• Station/Vehicles
• Date Range
The different methods can be selected by selecting the corresponding radio button near the top
of the screen.
The utility logs what was processed in the log file “SetMGAffiliateSpots.txt”, which can be
retrieved from the Data\Messages folder.
The following sections describe the different ways the utility can be run.
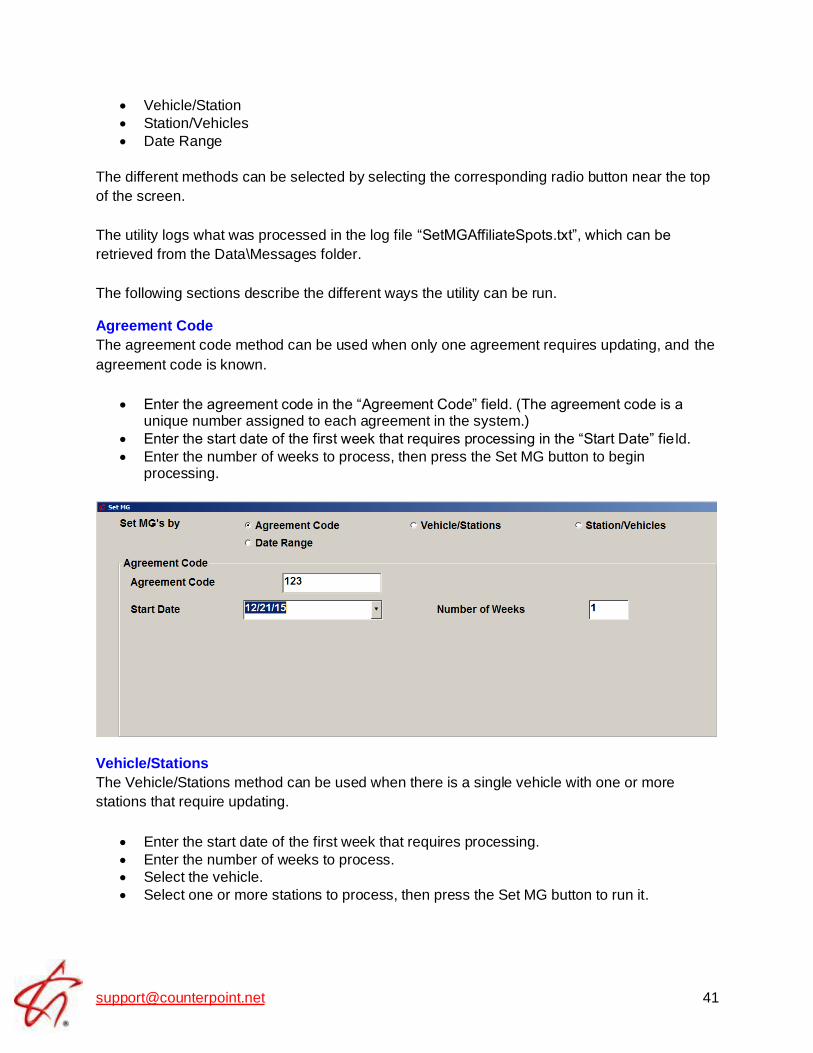
Agreement Code
The agreement code method can be used when only one agreement requires updating, and the
agreement code is known.
• Enter the agreement code in the “Agreement Code” field. (The agreement code is a unique number assigned to each agreement in the system.)
• Enter the start date of the first week that requires processing in the “Start Date” fie ld.
• Enter the number of weeks to process, then press the Set MG button to begin processing.
Vehicle/Stations
The Vehicle/Stations method can be used when there is a single vehicle with one or more
stations that require updating.
• Enter the start date of the first week that requires processing.
• Enter the number of weeks to process.
• Select the vehicle.
• Select one or more stations to process, then press the Set MG button to run it.
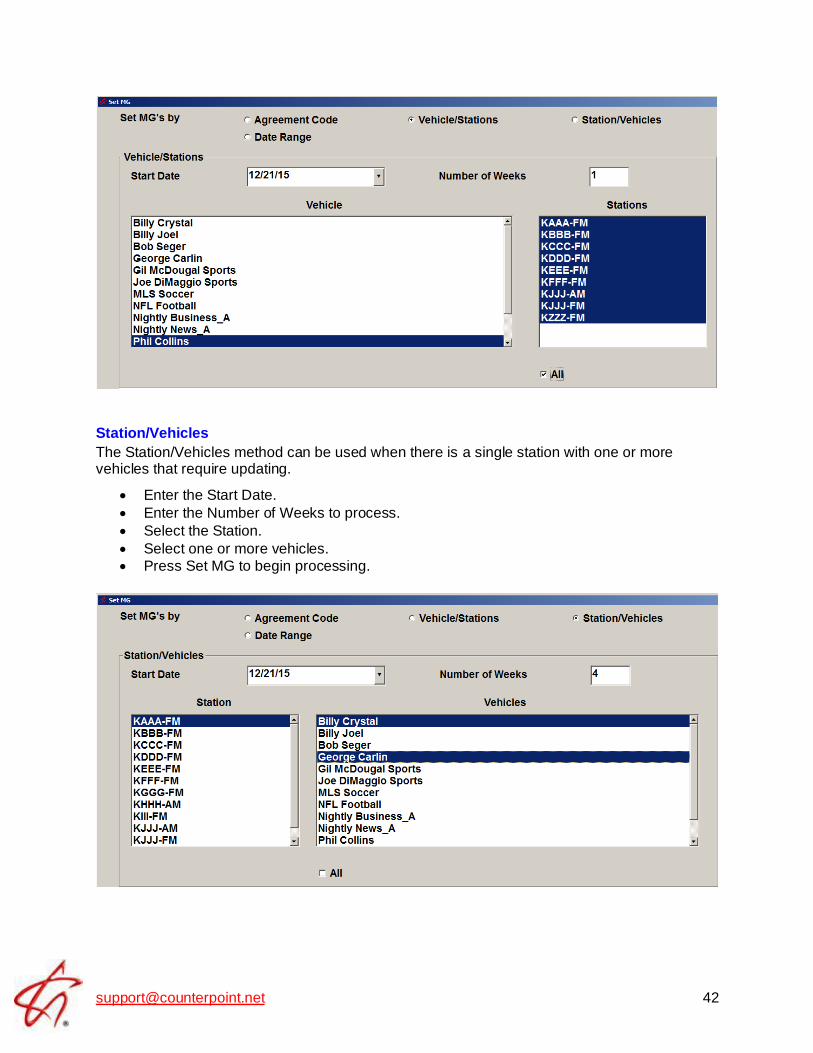
Station/Vehicles
The Station/Vehicles method can be used when there is a single station with one or more vehicles that require updating.
• Enter the Start Date.
• Enter the Number of Weeks to process.
• Select the Station.
• Select one or more vehicles.
• Press Set MG to begin processing.
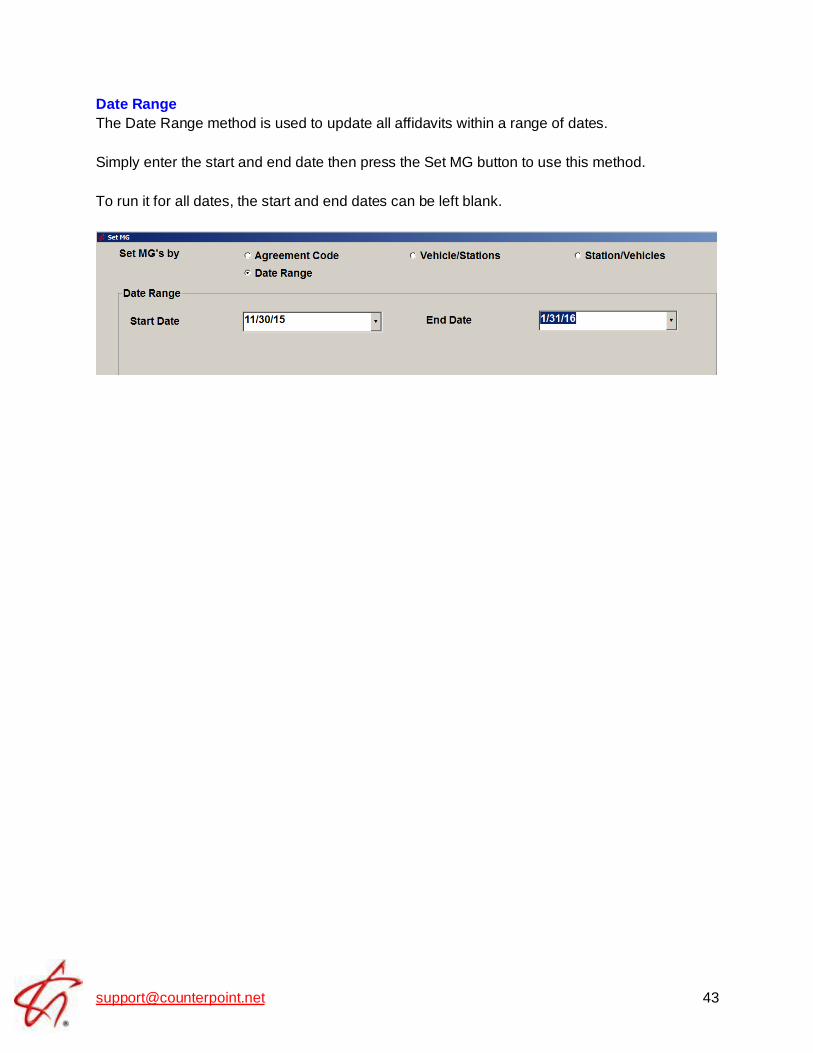
Date Range
The Date Range method is used to update all affidavits within a range of dates.
Simply enter the start and end date then press the Set MG button to use this method.
To run it for all dates, the start and end dates can be left blank.
Set Program Times Available in Version 7.0 and higher only.
The Set Program Times Utility sets the program time range (start/end times) for each affiliate
agreement. These times are then used to help in determining the Station Compliance for each affiliate.
The utility analyzes the start and end times defined in Programming, to create the widest time range possible.
Example: Program Times defined as 6a-10a Mo-Fr and 1p-5p Sa and 2p-6p Su. The program time range will be 6a-6p.
To generate the utility, select the desired vehicles and click Process. A log of the changes will be stored in the Data -> Messages folder. The SetPrgTimes.txt log will list everything that was converted, along with the processing time.
Spot Count Tie-Out The Spot Count Tie-Out utility is used to examine the current spot counts for a single week for
troubleshooting purposes. Spot counts by network, feed, pledge, affiliate spot, web makegoods,
vendor exports and imports, and network and station compliance counts, are all shown and can
be analyzed.
Access the Spot Count Tie-Out utility from the Affiliate system -> File -> Utilities -> Spot Count
Tie-Out menu option. A keycode is needed to access the utility.
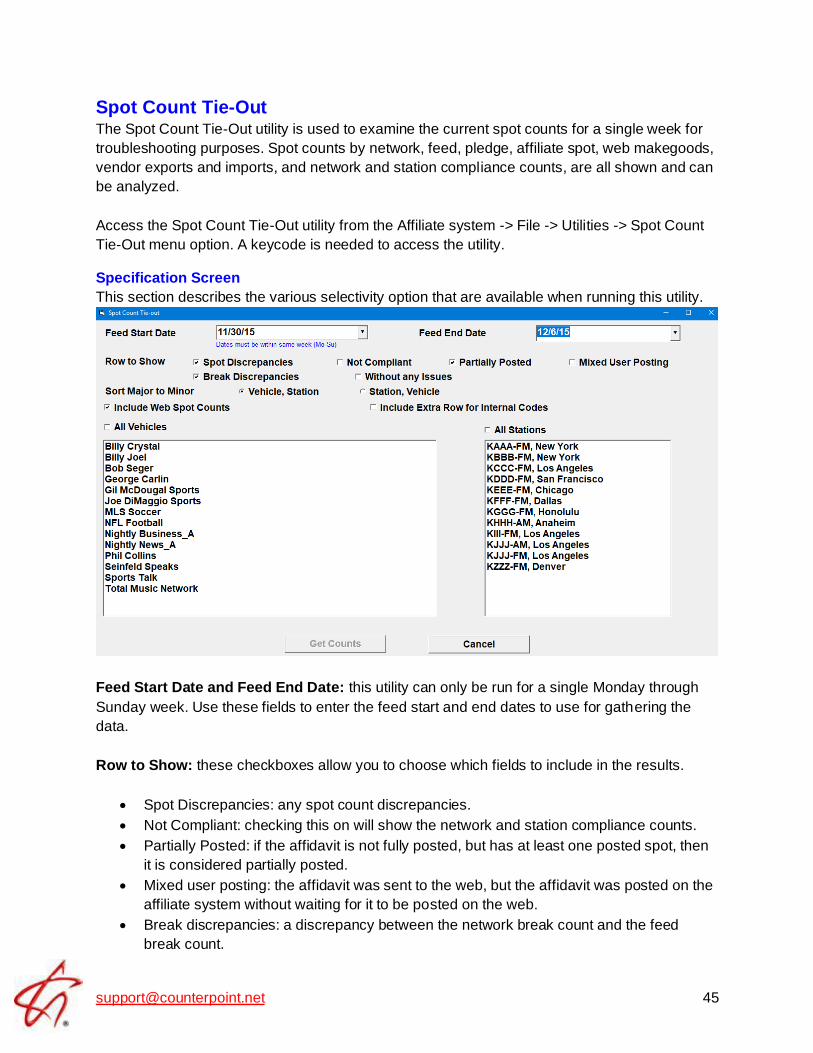
Specification Screen
This section describes the various selectivity option that are available when running this utility.
Feed Start Date and Feed End Date: this utility can only be run for a single Monday through
Sunday week. Use these fields to enter the feed start and end dates to use for gathering the
data.
Row to Show: these checkboxes allow you to choose which fields to include in the results.
• Spot Discrepancies: any spot count discrepancies.
• Not Compliant: checking this on will show the network and station compliance counts.
• Partially Posted: if the affidavit is not fully posted, but has at least one posted spot, then
it is considered partially posted.
• Mixed user posting: the affidavit was sent to the web, but the affidavit was posted on the
affiliate system without waiting for it to be posted on the web.
• Break discrepancies: a discrepancy between the network break count and the feed
break count.
• Without any issues: checking this on will include rows that have no issues. Uncheck it to
exclude rows without issues.
Sort Major to Minor: the results can be sorted by vehicle and station or by station and vehicle.
Include web spot counts: when checked on, the web spot counts (“Spot (ast) Count”) will be
included in the results.
Include extra row for internal codes: when checked on, an extra row is shown in the results
for the agreement code, vehicle code, station code, and time zone.
Vehicles and Stations: select the vehicles and stations to have the utility check.
Get Counts: press the Get Counts button to run the utility.
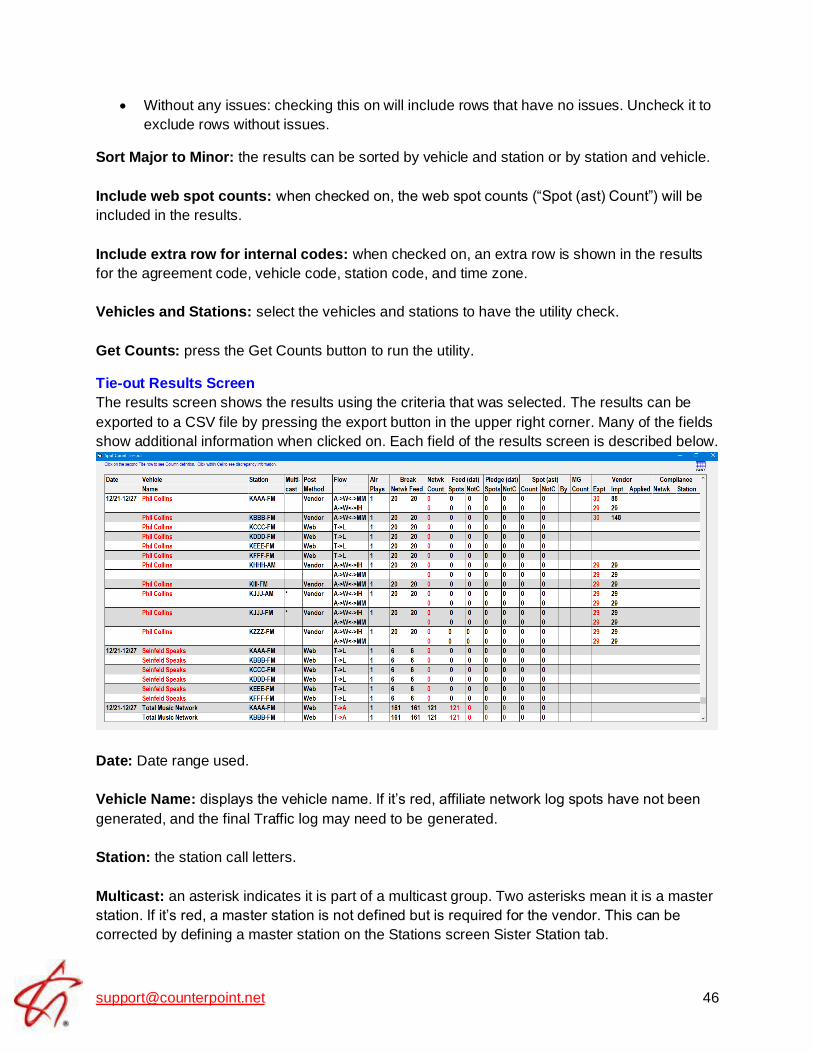
Tie-out Results Screen
The results screen shows the results using the criteria that was selected. The results can be
exported to a CSV file by pressing the export button in the upper right corner. Many of the fields
show additional information when clicked on. Each field of the results screen is described below.
Date: Date range used.
Vehicle Name: displays the vehicle name. If it’s red, affiliate network log spots have not been
generated, and the final Traffic log may need to be generated.
Station: the station call letters.
Multicast: an asterisk indicates it is part of a multicast group. Two asterisks mean it is a master
station. If it’s red, a master station is not defined but is required for the vendor. This can be
corrected by defining a master station on the Stations screen Sister Station tab.
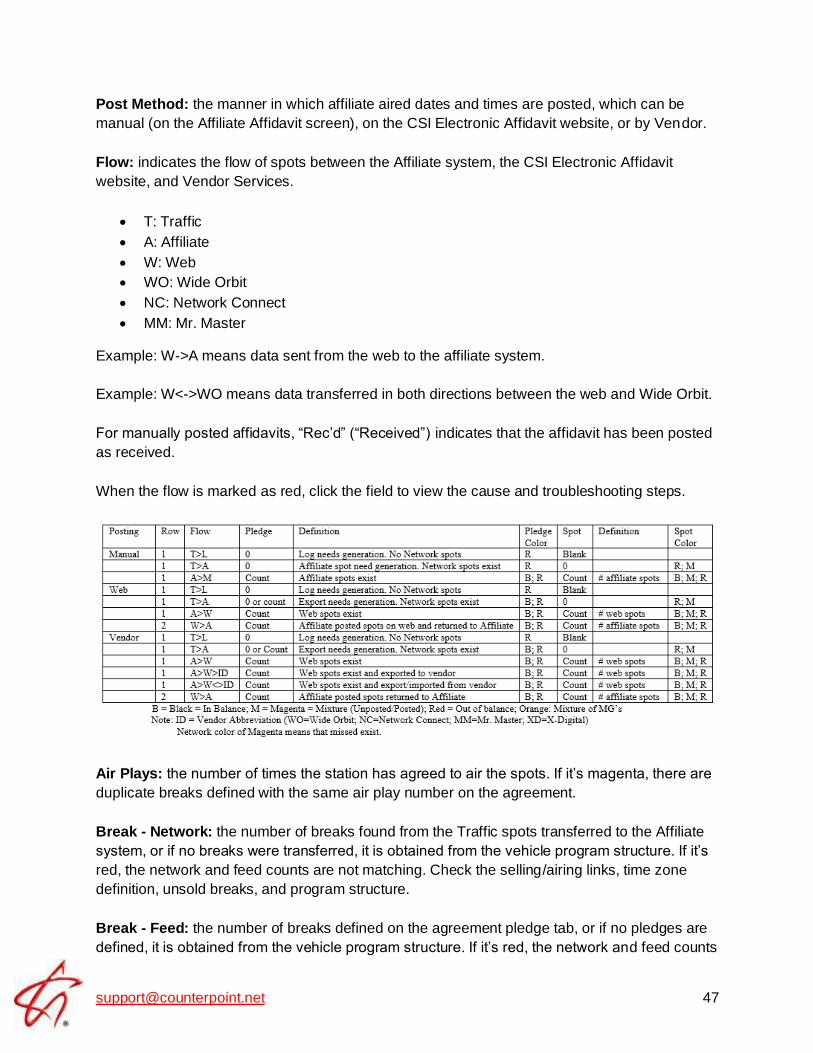
Post Method: the manner in which affiliate aired dates and times are posted, which can be
manual (on the Affiliate Affidavit screen), on the CSI Electronic Affidavit website, or by Vendor.
Flow: indicates the flow of spots between the Affiliate system, the CSI Electronic Affidavit
website, and Vendor Services.
• T: Traffic
• A: Affiliate
• W: Web
• WO: Wide Orbit
• NC: Network Connect
• MM: Mr. Master
Example: W->A means data sent from the web to the affiliate system.
Example: W<->WO means data transferred in both directions between the web and Wide Orbit.
For manually posted affidavits, “Rec’d” (“Received”) indicates that the affidavit has been posted
as received.
When the flow is marked as red, click the field to view the cause and troubleshooting steps.
Air Plays: the number of times the station has agreed to air the spots. If it’s magenta, there are
duplicate breaks defined with the same air play number on the agreement.
Break - Network: the number of breaks found from the Traffic spots transferred to the Affiliate
system, or if no breaks were transferred, it is obtained from the vehicle program structure. If it’s
red, the network and feed counts are not matching. Check the selling/airing links, time zone
definition, unsold breaks, and program structure.
Break - Feed: the number of breaks defined on the agreement pledge tab, or if no pledges are
defined, it is obtained from the vehicle program structure. If it’s red, the network and feed counts

don’t match. Check the selling/airing links, the time zone definition, unsold breaks, and program
structure.
Network Count: the count of traffic log spots transferred to the affiliate system. If it’s red, the
affiliate network spots have not been generated. Fix by generating the Traffic log.
Feed (dat) - Spots: the number of feed spots are determined by applying the agreement pledge
rules (excluding not carried pledges) to the network spots. If it’s red, the feed and pledge counts
don’t match. Fix by generating the Traffic log. If log generation failed to solve the problem,
check selling to airing links, time zone definition, unsold breaks, and program structure.
Feed (dat) - NotCarried: the number of not carried feed spots, determined by applying the
agreement pledge rules for not carried pledges to the network spots. If it’s red, the feed and
pledge counts don’t match. Fix by generating the Traffic log. If log generation failed to solve the
problem, check selling to airing links, time zone definition, unsold breaks, and program
structure.
Pledge (dat) - Spots: the number of affiliate spots generated by applying the agreement pledge
rules (excluding not carried pledges). If it’s red, the feed and pledge spot counts are not
matching, or the pledge and spot counts are not matching. Fix by generating the Traffic log. If
log generation failed to solve the problem, check selling to airing links, time zone definition,
unsold breaks, and program structure.
Pledge (dat) - NotCarried: the number of affiliate spots that are not carried as per the
agreement pledge rules. If it’s red, the feed and pledge spot counts are not matching. Fix by
generating the Traffic log. If log generation failed to solve the problem, check selling to airing
links, time zone definition, unsold breaks, and program structure.
Spots (ast) - Count: the number of affiliate or web system spots (aired and missed). Whether it
is the affiliate or web spots is determined by looking at the last destination – excluding the
vendor – in the Flow section. For example, if the Flow shows W->A, then the Spot (ast) Count is
the Affiliate system spot count (because the “A” for affiliate is the last destination). If it’s red, the
pledge and spot counts are not matching. Fix by generating the traffic log and/or exporting to
the web. If log generation failed to fix the problem, check the selling/airing links, time zone
definition, unsold breaks, and program structure.
Spots (ast) - NotCarried: the number of not carried affiliate system spots. If it’s red, the pledge
and spot counts are not matching. Fix by generating the traffic log and/or exporting to the web. If
log generation failed to fix the problem, check the selling/airing links, time zone definition,
unsold breaks, and program structure.
Spots (ast) - By: the source of the system that posted the affiliate spot dates and times. A =
Affiliate system; W = Web system; V = Vendor. If it’s red, spots are manually posted within the
Affiliate system but posting is not completed on the web (mixed user posting). Fix by completing
the posting process on the web.
MG Count: the number of affiliate spots defined as makegoods within the specified date range.
Vendor - Export: the number of web spots sent to the vendor. If it’s red, not all web spots have
been exported to the vendor. Fix by re-exporting affiliate spots to the web.
Vendor - Import: the number of vendor spots returned to the web.
Vendor - Applied: the number of returned vendor spots that were in sync with the web spots.
Compliance - Network: the number of affiliate spots that are marked as Network Compliant.
It’s red if not all spots are Network Compliant.
Compliance - Station: the number of affiliate spots that are marked as Station Compliant. It’s
red if not all spots are Station Compliant.
Unpost and/or Delete Spot The Affiliate System has built in Utilities that affect spots on the Electronic Affidavit Web
System.
When to Run the Web Export Utility
These utilities are very powerful, cannot be reversed once performed, and should only be
generated under the guidance of Counterpoint Service. For questions as to whether to run these
utilities, please contact [email protected]. Some common reasons why you would run
these utilities include:
• When a station needs to repost previously posted spots on the Electronic Affidavit Web Site, due to an error on their part
• If you are trying to end an agreement and receive a Message indicating that spots have been posted to the agreement after your desired end date
• If you need to re-export a revised log, and a station has already partially posted that week’s affidavit
Selecting Which Utility to Run
Each utility affects different areas of both the Affiliate and Electronic Affidavit systems. Below is
a complete description of what each utility does and what needs to be done to recreate the
spots. You can also hover over each utility and a brief help description will appear.
Select what Utility you wish to run:
• Clear Posted Spots: used to clear an erroneous posting done by an affiliate, this option
resets the posting flags for CSI Electronic Affidavit web spots, so that the affiliate can
repost the affidavit on the web. It also removes the posted status flags from the affiliate
system spots and resets the Post CP/Affiliate Affidavit record to outstanding. Once the
posted spots have been cleared, the affiliate can repost the affidavit, then it can be
reimported.
• Delete Posted Spots: used to resolve a problem with the affiliate spots, this option
removes affiliate system spots, CSI Electronic Affidavit web spots, and resets the Post
CP/Affiliate Affidavit status to outstanding. After deleting the spots, if a change is
required on the Traffic system to resolve a problem, after making the change, reprint the
log and re-export to the web. If no Traffic change is required, re-export to the web so the
affiliate can post the affidavit.
• Delete All Spots for All Weeks: will remove all spot information (posted and unposted)
from the Electronic Affidavit System, and the actual spots from Post C.P./Affiliate
Affidavits, as if the spots were never generated in the Affiliate system. This will remove
all spots as it does not have date selectivity. You will need a password from
[email protected] to perform this action, and must regenerate logs in the Traffic
system and re-export logs to the Electronic Affidavit system to recreate spots.
• Delete Network Web Spots: will remove all spots from the Electronic Affidavit System
within a requested date span, but will not remove spots from Post C.P./Affiliate
Affidavits. You will need a password from [email protected] to perform this
action, and must re-export logs to the Electronic Affidavit system to recreate spots for
your affiliates.
Important note about Web Vendors and the Delete Spot utility: If web vendor services are
used to automatically post spots, do not delete web spots for affidavits that use web vendors
after the spots have aired in an attempt to correct the data that was previously exported.
Instead, if changes need to be made to previously exported data that is now partially or fully in
the past, make the changes on the Traffic system, then re-export the new data to the web. As
an example, if the week in question is Monday 3/9, it is okay to delete spots up through today’s
date of 3/8. But if today’s date is 3/9 (or 3/10 or any date after), do not use the Delete utility but
instead make Traffic changes and re-export.
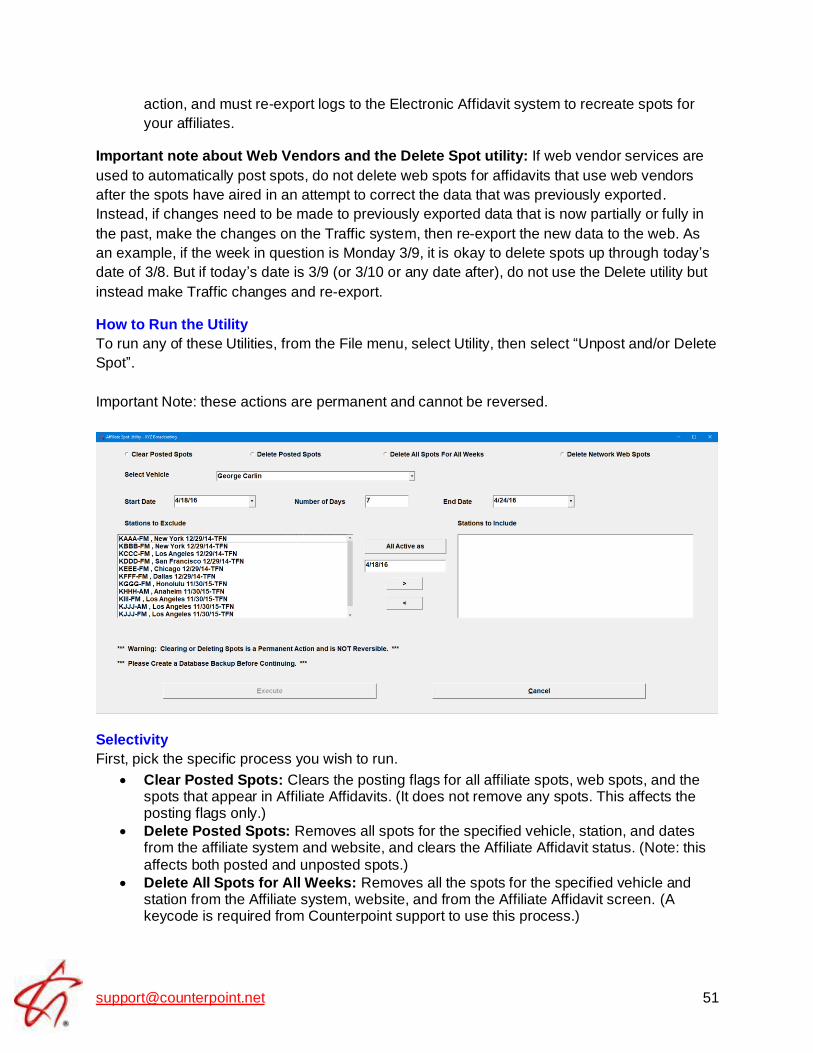
How to Run the Utility
To run any of these Utilities, from the File menu, select Utility, then select “Unpost and/or Delete
Spot”.
Important Note: these actions are permanent and cannot be reversed.
Selectivity
First, pick the specific process you wish to run.
• Clear Posted Spots: Clears the posting flags for all affiliate spots, web spots, and the spots that appear in Affiliate Affidavits. (It does not remove any spots. This affects the posting flags only.)
• Delete Posted Spots: Removes all spots for the specified vehicle, station, and dates from the affiliate system and website, and clears the Affiliate Affidavit status. (Note: this
affects both posted and unposted spots.)
• Delete All Spots for All Weeks: Removes all the spots for the specified vehicle and station from the Affiliate system, website, and from the Affiliate Affidavit screen. (A keycode is required from Counterpoint support to use this process.)

• Delete Network Web Spots: Removes web spots for the selected vehicle, station, and dates. (A keycode is required from Counterpoint support to use this process.)
Then select the remaining information as needed:
• Select Vehicle: Select the vehicle you wish to process from this dropdown.
• Start Date/Number of Days/End Date: Enter the start date and end date, and the number of days it will run for will be automatically calculated. If a start date and number of days is entered, then the end date will be automatically calculated. Note: these date fields only appear for the Clear Posted Spots, Delete Posted Spots, and Delete Network
Web Spots processes. The “Delete All Spots for All Weeks” process has no date selectivity.
• Stations: A list of stations that are affiliated with the vehicle will appear in the left side
“Stations to Exclude” box. Select the stations for which you wish to process by either
holding the CTRL (Control) key while mouse clicking the individual stations, or by
selecting the first station, scrolling down, holding the Shift key down, and clicking on the
last station to select a block of stations. Once the stations are selected, click the Right
arrow, and they will move into the “Stations to Include” box on the right side of the
screen.
When all the required options are selected, click the Execute button and the utility will start
to run. When you click Execute, each utility will ask a unique question that is used to confirm
that you are running the correct utility for what you intend to do. Simply press OK on this
warning message to run the utility.
o Clear Posted Spots Warning: “This option will reset spots as if they were sent to
Network Web but not Posted (removing all Posted status flags from Affiliate
Spots, Network Web Spots and Post CP status). Do you wish to continue?”
o Delete Posted Spots Warning: “This option will remove spots as if they were
never generated on the Affiliate system (removing Affiliate Spots, Network Web
Spots, and resetting Post CP status). Do you wish to continue?”
o Delete All Spots for All Weeks Warning: “This option will Remove all spots as if
Traffic Logs were never generated (removing Affiliate Spots, Network Web
Spots, and Post CP). Do you wish to continue?”
o Delete Network Web Spots Warning: “This option will remove Network Web
spots as if they were never Exported (removing Network Web Spots). Do you
wish to continue?”
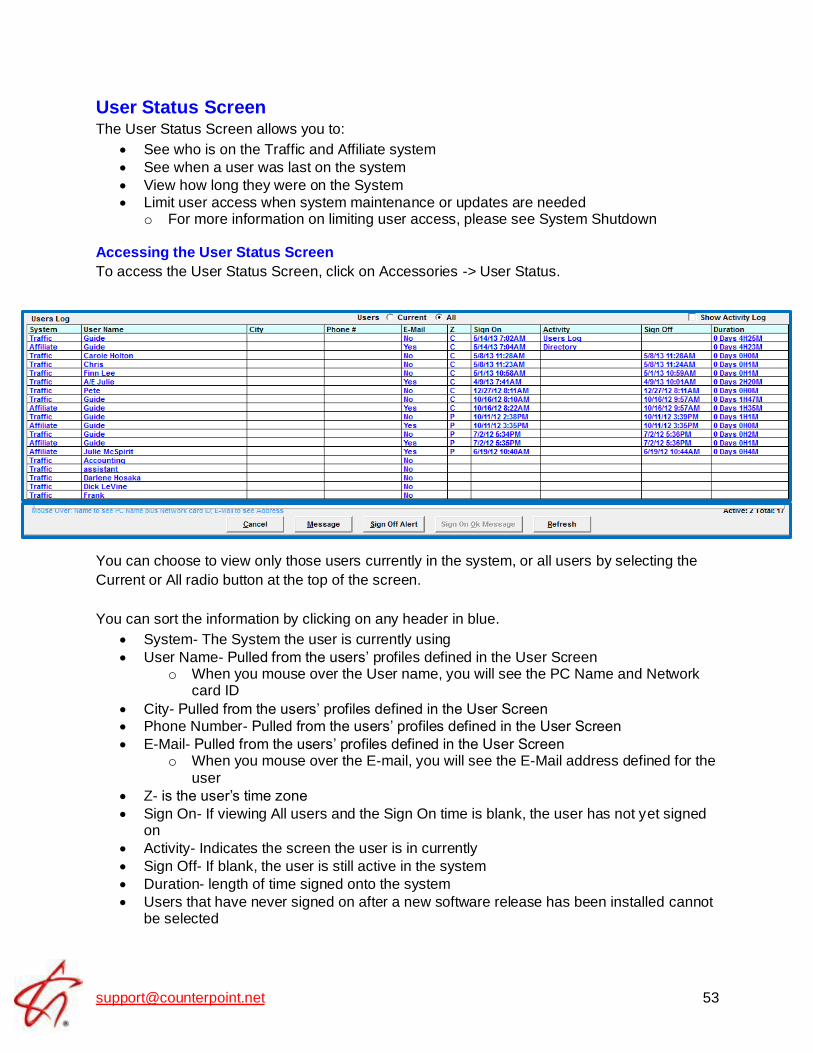
User Status Screen The User Status Screen allows you to:
• See who is on the Traffic and Affiliate system
• See when a user was last on the system
• View how long they were on the System
• Limit user access when system maintenance or updates are needed o For more information on limiting user access, please see System Shutdown
Accessing the User Status Screen
To access the User Status Screen, click on Accessories -> User Status.
You can choose to view only those users currently in the system, or all users by selecting the
Current or All radio button at the top of the screen.
You can sort the information by clicking on any header in blue.
• System- The System the user is currently using
• User Name- Pulled from the users’ profiles defined in the User Screen o When you mouse over the User name, you will see the PC Name and Network
card ID
• City- Pulled from the users’ profiles defined in the User Screen
• Phone Number- Pulled from the users’ profiles defined in the User Screen
• E-Mail- Pulled from the users’ profiles defined in the User Screen o When you mouse over the E-mail, you will see the E-Mail address defined for the
user
• Z- is the user’s time zone
• Sign On- If viewing All users and the Sign On time is blank, the user has not yet signed on
• Activity- Indicates the screen the user is in currently
• Sign Off- If blank, the user is still active in the system
• Duration- length of time signed onto the system
• Users that have never signed on after a new software release has been installed cannot be selected
You can see the total number of Active Users, along with the total number of Users if you
selected All, in the bottom right corner of the screen.
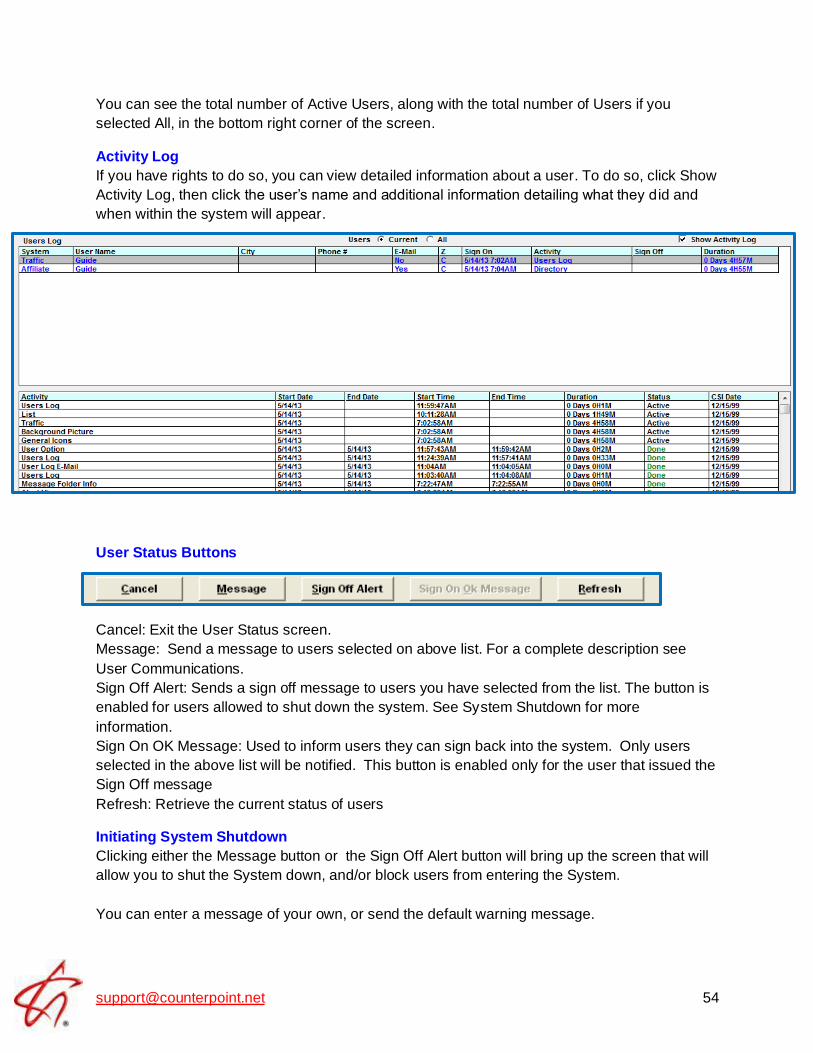
Activity Log
If you have rights to do so, you can view detailed information about a user. To do so, click Show
Activity Log, then click the user’s name and additional information detailing what they d id and
when within the system will appear.
User Status Buttons
Cancel: Exit the User Status screen.
Message: Send a message to users selected on above list. For a complete description see
User Communications.
Sign Off Alert: Sends a sign off message to users you have selected from the list. The button is
enabled for users allowed to shut down the system. See System Shutdown for more
information.
Sign On OK Message: Used to inform users they can sign back into the system. Only users
selected in the above list will be notified. This button is enabled only for the user that issued the
Sign Off message
Refresh: Retrieve the current status of users
Initiating System Shutdown
Clicking either the Message button or the Sign Off Alert button will bring up the screen that will
allow you to shut the System down, and/or block users from entering the System.
You can enter a message of your own, or send the default warning message.
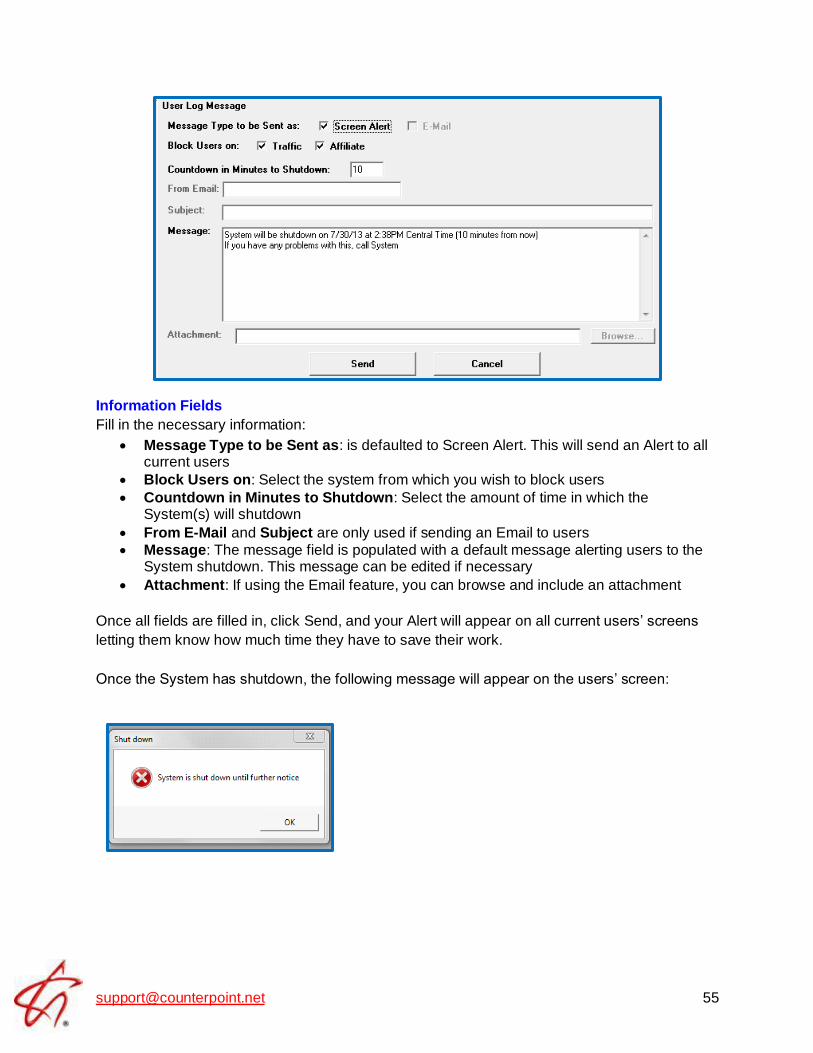
Information Fields
Fill in the necessary information:
• Message Type to be Sent as: is defaulted to Screen Alert. This will send an Alert to all current users
• Block Users on: Select the system from which you wish to block users
• Countdown in Minutes to Shutdown: Select the amount of time in which the System(s) will shutdown
• From E-Mail and Subject are only used if sending an Email to users
• Message: The message field is populated with a default message alerting users to the System shutdown. This message can be edited if necessary
• Attachment: If using the Email feature, you can browse and include an attachment
Once all fields are filled in, click Send, and your Alert will appear on all current users’ screens
letting them know how much time they have to save their work.
Once the System has shutdown, the following message will appear on the users’ screen:
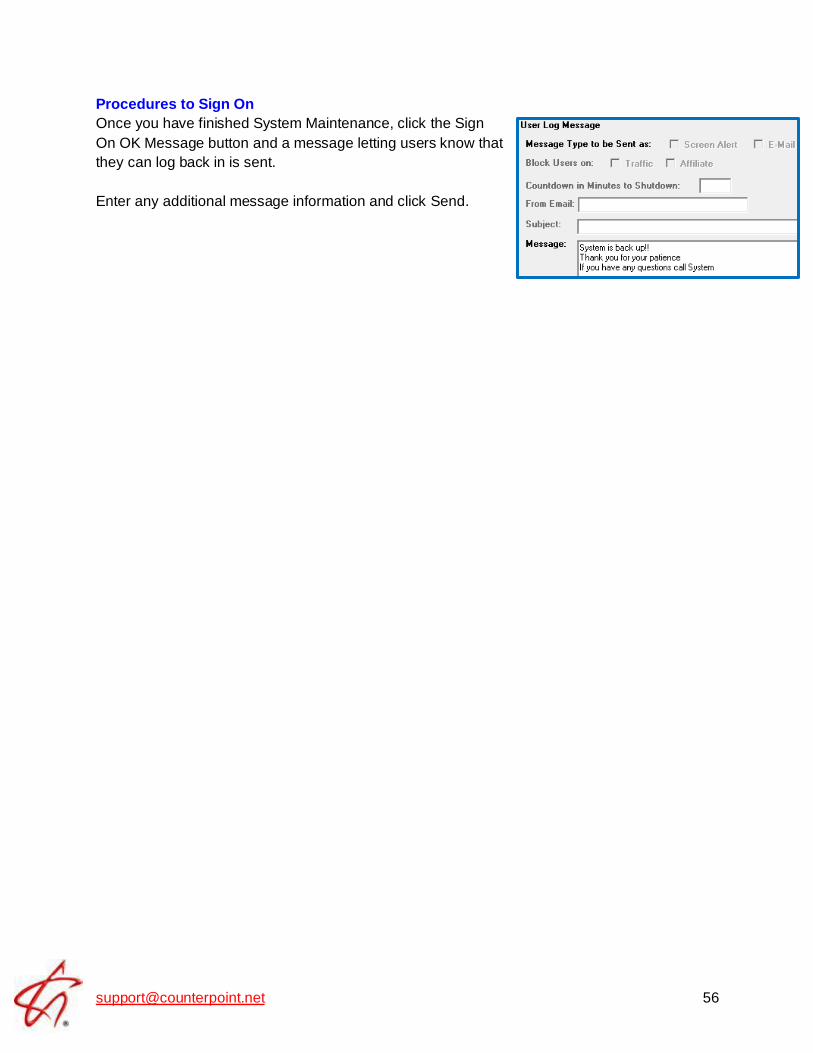
Procedures to Sign On
Once you have finished System Maintenance, click the Sign
On OK Message button and a message letting users know that
they can log back in is sent.
Enter any additional message information and click Send.
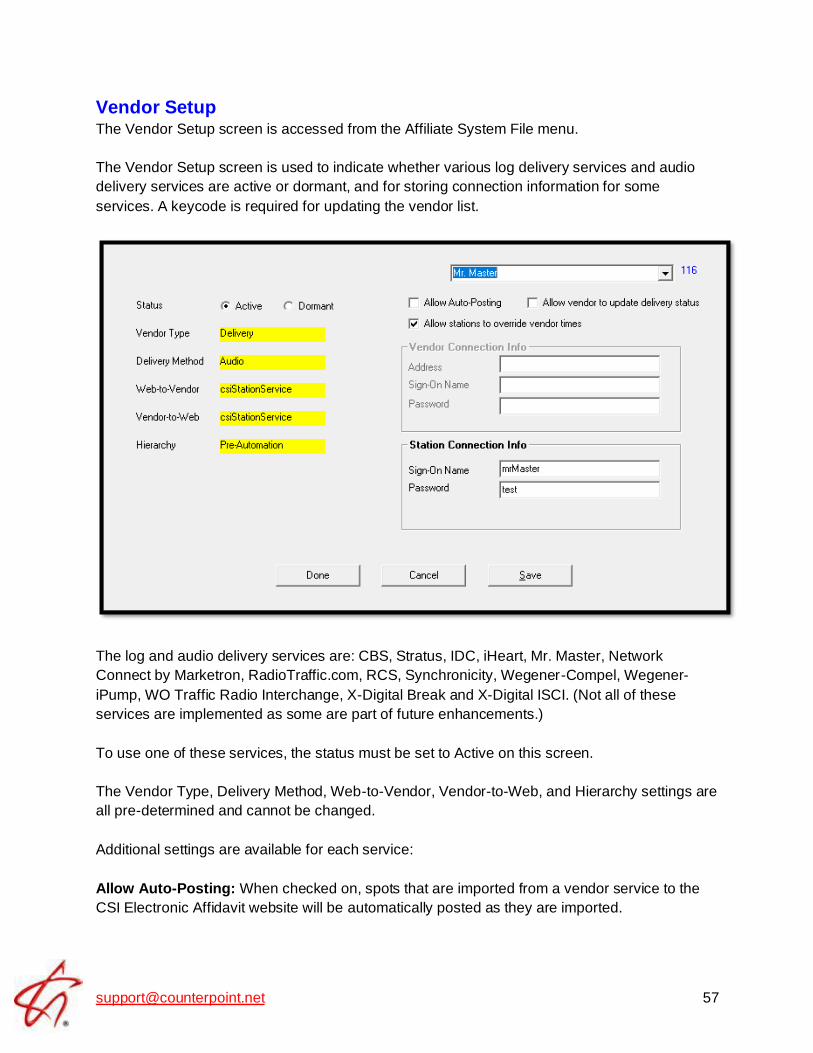
Vendor Setup The Vendor Setup screen is accessed from the Affiliate System File menu.
The Vendor Setup screen is used to indicate whether various log delivery services and audio
delivery services are active or dormant, and for storing connection information for some
services. A keycode is required for updating the vendor list.
The log and audio delivery services are: CBS, Stratus, IDC, iHeart, Mr. Master, Network
Connect by Marketron, RadioTraffic.com, RCS, Synchronicity, Wegener-Compel, Wegener-
iPump, WO Traffic Radio Interchange, X-Digital Break and X-Digital ISCI. (Not all of these
services are implemented as some are part of future enhancements.)
To use one of these services, the status must be set to Active on this screen.
The Vendor Type, Delivery Method, Web-to-Vendor, Vendor-to-Web, and Hierarchy settings are
all pre-determined and cannot be changed.
Additional settings are available for each service:
Allow Auto-Posting: When checked on, spots that are imported from a vendor service to the
CSI Electronic Affidavit website will be automatically posted as they are imported.
Allow vendor to update delivery status: This setting is only available with the Mr. Master
service and it allows web version 2 stations to be posted by Mr. Master.
Allow stations to override vendor times: If this is checked on, station users can override the
air times of spots imported from this vendor service. If not checked on, then stations users
cannot override those imported air times.
Vendor and Station Connection Info: If the service is a csiStationService, then the Station
Connection Info must be defined. If the service is a csiVendorService, then the Vendor
Connection Info must be defined. Wide Orbit requires both the Vendor and Station Connection
Info to be defined.
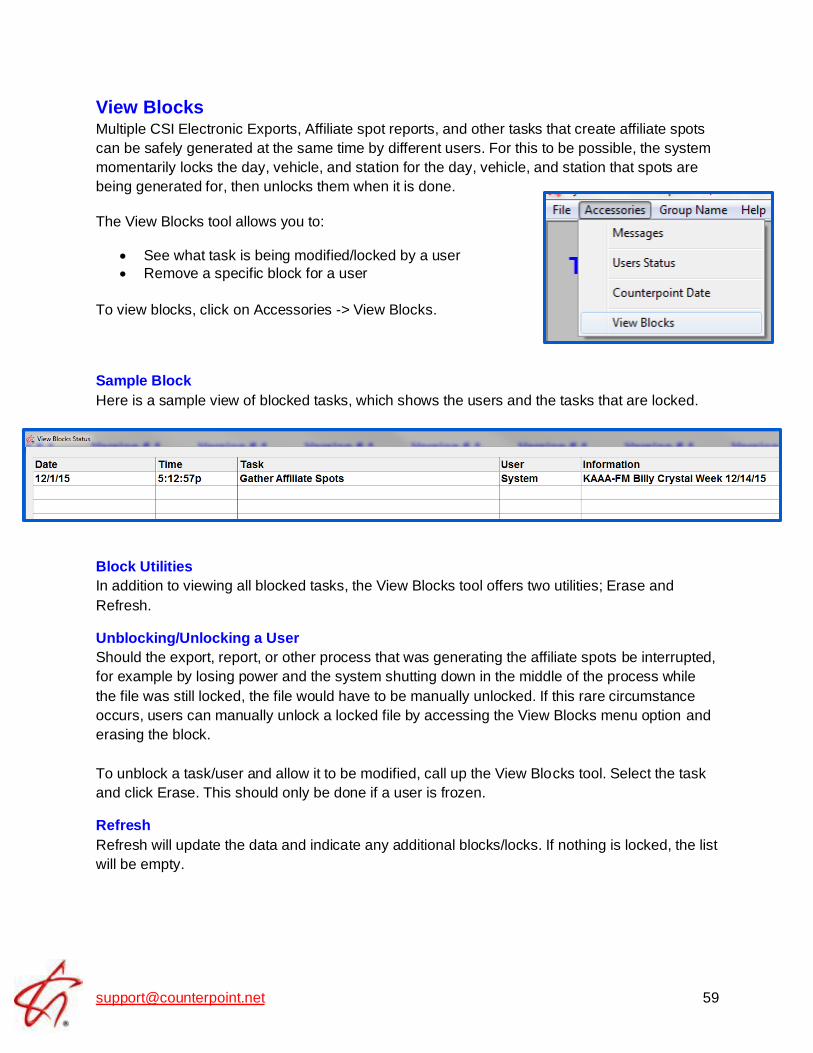
View Blocks Multiple CSI Electronic Exports, Affiliate spot reports, and other tasks that create affiliate spots
can be safely generated at the same time by different users. For this to be possible, the system
momentarily locks the day, vehicle, and station for the day, vehicle, and station that spots are
being generated for, then unlocks them when it is done.
The View Blocks tool allows you to:
• See what task is being modified/locked by a user
• Remove a specific block for a user
To view blocks, click on Accessories -> View Blocks.
Sample Block
Here is a sample view of blocked tasks, which shows the users and the tasks that are locked.
Block Utilities
In addition to viewing all blocked tasks, the View Blocks tool offers two utilities; Erase and
Refresh.
Unblocking/Unlocking a User
Should the export, report, or other process that was generating the affiliate spots be interrupted,
for example by losing power and the system shutting down in the middle of the process while
the file was still locked, the file would have to be manually unlocked. If this rare circumstance
occurs, users can manually unlock a locked file by accessing the View Blocks menu option and
erasing the block.
To unblock a task/user and allow it to be modified, call up the View Blocks tool. Select the task
and click Erase. This should only be done if a user is frozen.
Refresh
Refresh will update the data and indicate any additional blocks/locks. If nothing is locked, the list
will be empty.

View SQL The View SQL program is a standalone utility that allows users to execute SQL statements on
the Pervasive database to review or correct records. It can be accessed from the Traffic or
Affiliate system via the Utilities menu. For more information on the View SQL utility, please see
the Traffic Utilities document.