adobe&connect&getting&started&guide - emory...
TRANSCRIPT
Adobe Connect Getting Started Guide
Adobe Connect Getting Started Guide Page 1 of 19
TABLE OF CONTENTS Overview, Cost & Technical Requirements 2 How to Create an Adobe Connect Meeting Room 5 Uploading and Sharing Content in an Adobe Connect Meeting Room 13 Monitoring Adobe Connect Meeting Rooms 16 Accessing Adobe Connect from Mobile Devices 18 FAQs 20
Adobe Connect Getting Started Guide
Adobe Connect Getting Started Guide Page 2 of 19
OVERVIEW Adobe Connect is Emory University’s web conferencing tool that gives faculty and staff the ability to host online meetings, webinars, and publish on-‐demand rich media content. Adobe Connect is a solution that is comprised of the following modules:
● Adobe Connect Web Meetings -‐ This module allows you to conduct live, real-‐time, online meetings. ● Adobe Connect Events\Webinars -‐ This module allows you to create registration pages for online events,
meetings, virtual classrooms or other types of content. ● Adobe Connect Pro Authoring – This module allows you to publish .ppts, .swfs, .flvs, .zip, .imgs, .mp3s, .mp4s,
.htmls, and .pdfs to Connect so your end users can access this content via the web. This module is typically used to produce on-‐demand content.
Adobe Connect includes many other features. Please see the link below for a list of other useful features: http://www.adobe.com/products/acrobatconnectpro/features/
GENERAL COST The cost will depend upon which module you need and how many users will be associated with that module. Emory currently uses the Named Organizer/Meeting Host Model, which allows each Meeting Host to conduct meetings with up to 100 participants. The EDU price is $126 per Meeting host.
REQUIREMENTS The requirements for Adobe Connect at Emory University or Emory Healthcare are: Netid -‐ Emory University\Healthcare faculty and staff require an active netid to log into Adobe Connect. Sponsored accounts are not supported. Adobe Flash Player -‐ For participants. Flash Player 11.2 is the minimum requirement. Adobe Flash Player is standard in most browsers. You can find out which version of Flash Player you have at the Adobe Flash website; http://www.adobe.com/products/flash/about/
Adobe Connect Pro Add-‐In -‐ For meeting host only. The Adobe Connect Add-‐In allows you to host meetings, along with screen sharing, and uploading files meetings. To install the add-‐in, follow the appropriate link.
· Windows: http://www.adobe.com/support/connect/updaters.html · ·
Mac: Linux:
http://www.adobe.com/support/connect/updaters.html http://www.adobe.com/support/connect/updaters.html
Adobe Connect Getting Started Guide
Adobe Connect Getting Started Guide Page 3 of 19
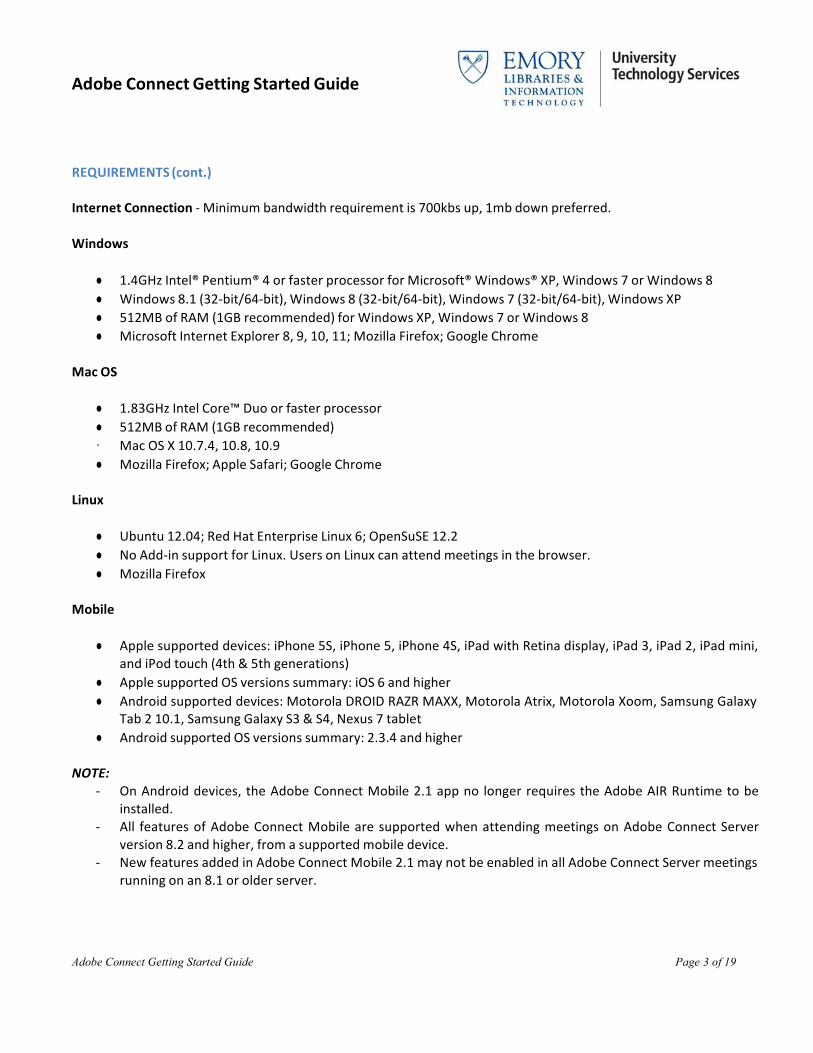
REQUIREMENTS (cont.) Internet Connection -‐ Minimum bandwidth requirement is 700kbs up, 1mb down preferred. Windows
● 1.4GHz Intel® Pentium® 4 or faster processor for Microsoft® Windows® XP, Windows 7 or Windows 8 ● Windows 8.1 (32-‐bit/64-‐bit), Windows 8 (32-‐bit/64-‐bit), Windows 7 (32-‐bit/64-‐bit), Windows XP ● 512MB of RAM (1GB recommended) for Windows XP, Windows 7 or Windows 8 ● Microsoft Internet Explorer 8, 9, 10, 11; Mozilla Firefox; Google Chrome
Mac OS
● 1.83GHz Intel Core™ Duo or faster processor ● 512MB of RAM (1GB recommended) · Mac OS X 10.7.4, 10.8, 10.9 ● Mozilla Firefox; Apple Safari; Google Chrome
Linux
● Ubuntu 12.04; Red Hat Enterprise Linux 6; OpenSuSE 12.2 ● No Add-‐in support for Linux. Users on Linux can attend meetings in the browser. ● Mozilla Firefox
Mobile
● Apple supported devices: iPhone 5S, iPhone 5, iPhone 4S, iPad with Retina display, iPad 3, iPad 2, iPad mini, and iPod touch (4th & 5th generations)
● Apple supported OS versions summary: iOS 6 and higher ● Android supported devices: Motorola DROID RAZR MAXX, Motorola Atrix, Motorola Xoom, Samsung Galaxy
Tab 2 10.1, Samsung Galaxy S3 & S4, Nexus 7 tablet ● Android supported OS versions summary: 2.3.4 and higher
NOTE:
-‐ On Android devices, the Adobe Connect Mobile 2.1 app no longer requires the Adobe AIR Runtime to be installed.
-‐ All features of Adobe Connect Mobile are supported when attending meetings on Adobe Connect Server version 8.2 and higher, from a supported mobile device.
-‐ New features added in Adobe Connect Mobile 2.1 may not be enabled in all Adobe Connect Server meetings running on an 8.1 or older server.
Adobe Connect Getting Started Guide
Adobe Connect Getting Started Guide Page 4 of 19
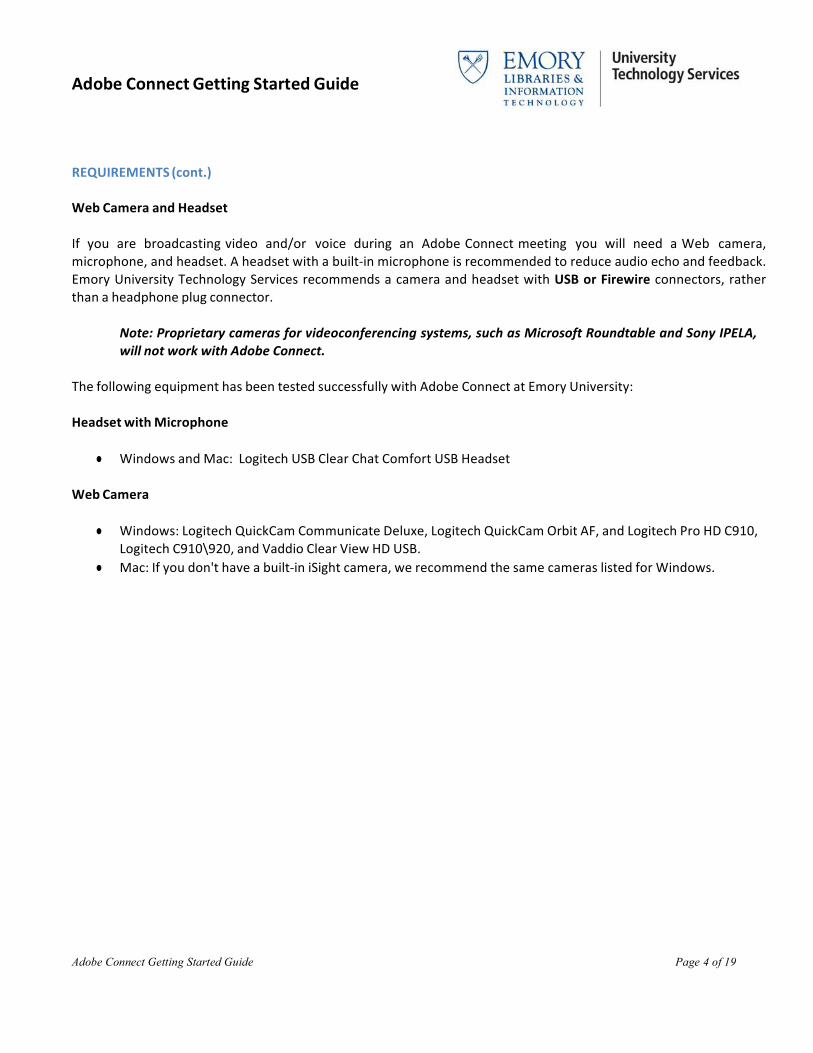
REQUIREMENTS (cont.) Web Camera and Headset If you are broadcasting video and/or voice during an Adobe Connect meeting you will need a Web camera, microphone, and headset. A headset with a built-‐in microphone is recommended to reduce audio echo and feedback. Emory University Technology Services recommends a camera and headset with USB or Firewire connectors, rather than a headphone plug connector.
Note: Proprietary cameras for videoconferencing systems, such as Microsoft Roundtable and Sony IPELA, will not work with Adobe Connect.
The following equipment has been tested successfully with Adobe Connect at Emory University: Headset with Microphone
● Windows and Mac: Logitech USB Clear Chat Comfort USB Headset Web Camera
● Windows: Logitech QuickCam Communicate Deluxe, Logitech QuickCam Orbit AF, and Logitech Pro HD C910, Logitech C910\920, and Vaddio Clear View HD USB.
● Mac: If you don't have a built-‐in iSight camera, we recommend the same cameras listed for Windows.
Adobe Connect Getting Started Guide
Adobe Connect Getting Started Guide Page 5 of 19
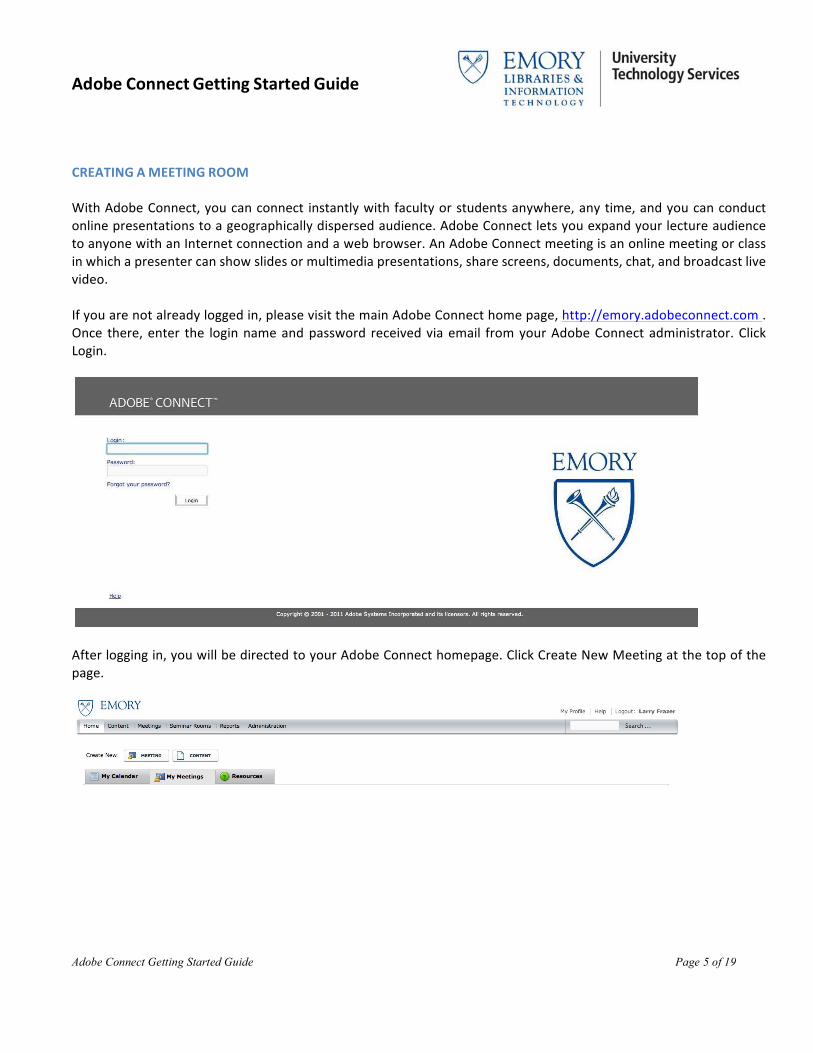
CREATING A MEETING ROOM With Adobe Connect, you can connect instantly with faculty or students anywhere, any time, and you can conduct online presentations to a geographically dispersed audience. Adobe Connect lets you expand your lecture audience to anyone with an Internet connection and a web browser. An Adobe Connect meeting is an online meeting or class in which a presenter can show slides or multimedia presentations, share screens, documents, chat, and broadcast live video. If you are not already logged in, please visit the main Adobe Connect home page, http://emory.adobeconnect.com . Once there, enter the login name and password received via email from your Adobe Connect administrator. Click Login.
After logging in, you will be directed to your Adobe Connect homepage. Click Create New Meeting at the top of the page.
Adobe Connect Getting Started Guide
Adobe Connect Getting Started Guide Page 6 of 19
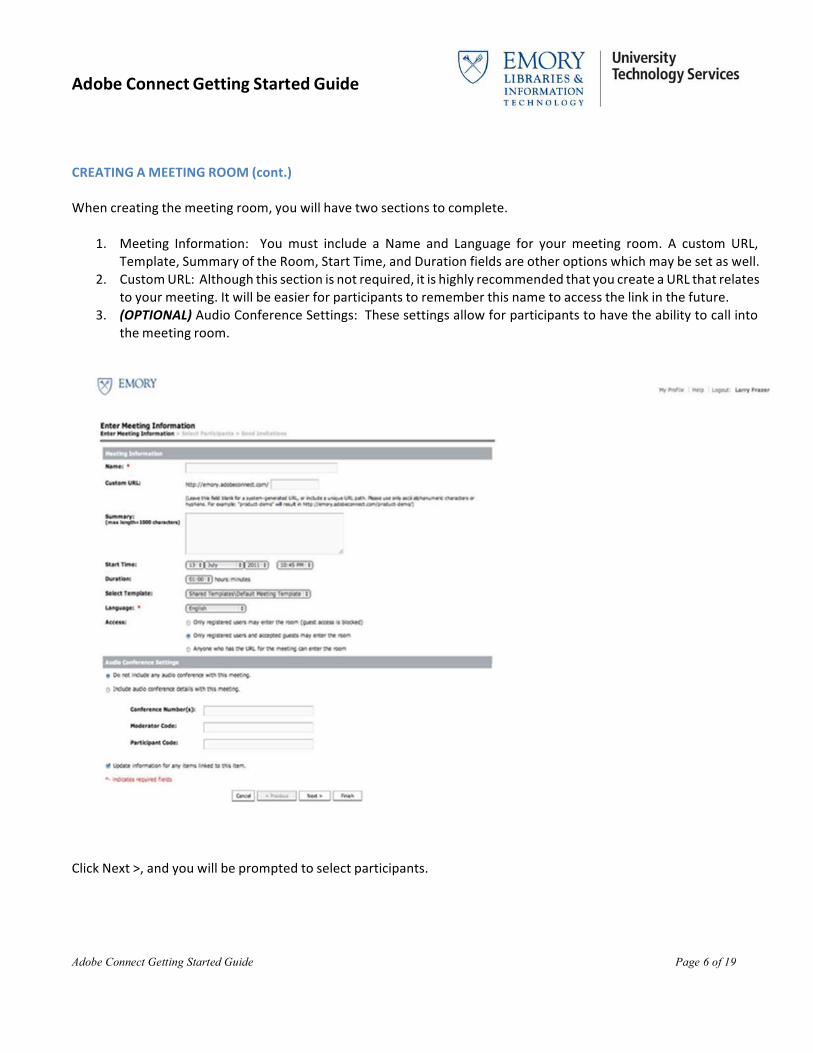
CREATING A MEETING ROOM (cont.) When creating the meeting room, you will have two sections to complete.
1. Meeting Information: You must include a Name and Language for your meeting room. A custom URL, Template, Summary of the Room, Start Time, and Duration fields are other options which may be set as well.
2. Custom URL: Although this section is not required, it is highly recommended that you create a URL that relates to your meeting. It will be easier for participants to remember this name to access the link in the future.
3. (OPTIONAL) Audio Conference Settings: These settings allow for participants to have the ability to call into the meeting room.
Click Next >, and you will be prompted to select participants.
Adobe Connect Getting Started Guide
Adobe Connect Getting Started Guide Page 7 of 19
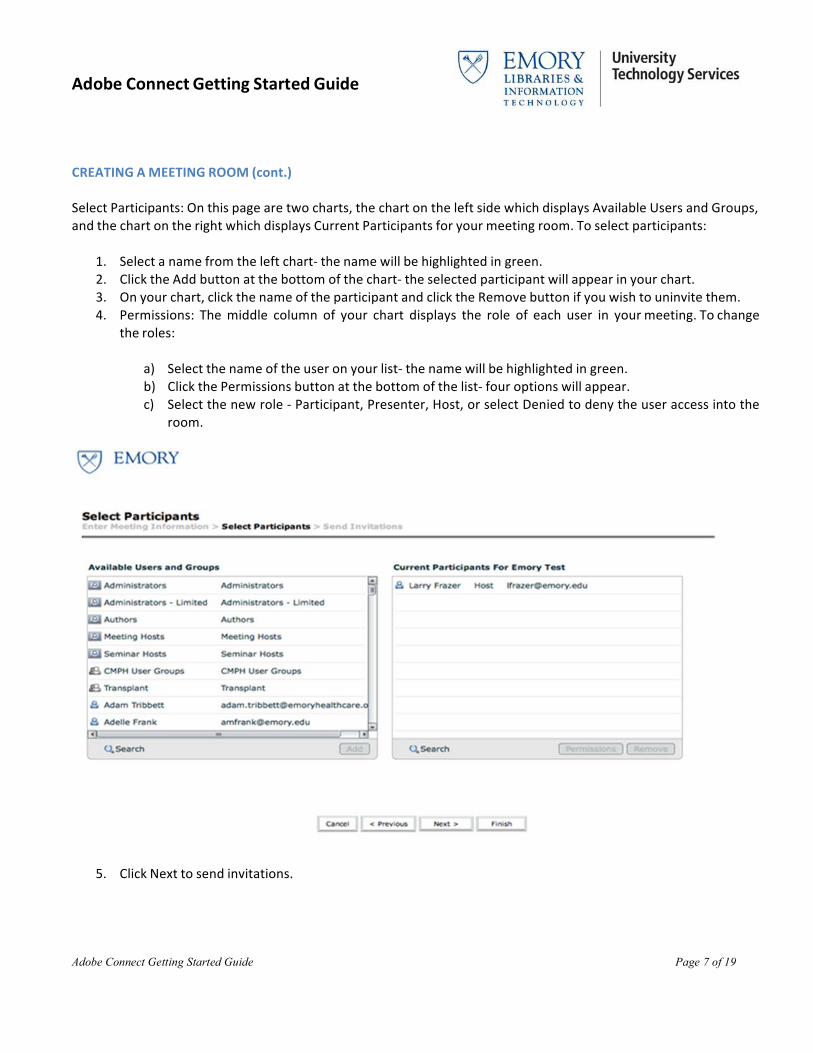
CREATING A MEETING ROOM (cont.) Select Participants: On this page are two charts, the chart on the left side which displays Available Users and Groups, and the chart on the right which displays Current Participants for your meeting room. To select participants:
1. Select a name from the left chart-‐ the name will be highlighted in green. 2. Click the Add button at the bottom of the chart-‐ the selected participant will appear in your chart. 3. On your chart, click the name of the participant and click the Remove button if you wish to uninvite them. 4. Permissions: The middle column of your chart displays the role of each user in your meeting. To change
the roles:
a) Select the name of the user on your list-‐ the name will be highlighted in green. b) Click the Permissions button at the bottom of the list-‐ four options will appear. c) Select the new role -‐ Participant, Presenter, Host, or select Denied to deny the user access into the
room.
5. Click Next to send invitations.
Adobe Connect Getting Started Guide
Adobe Connect Getting Started Guide Page 8 of 19
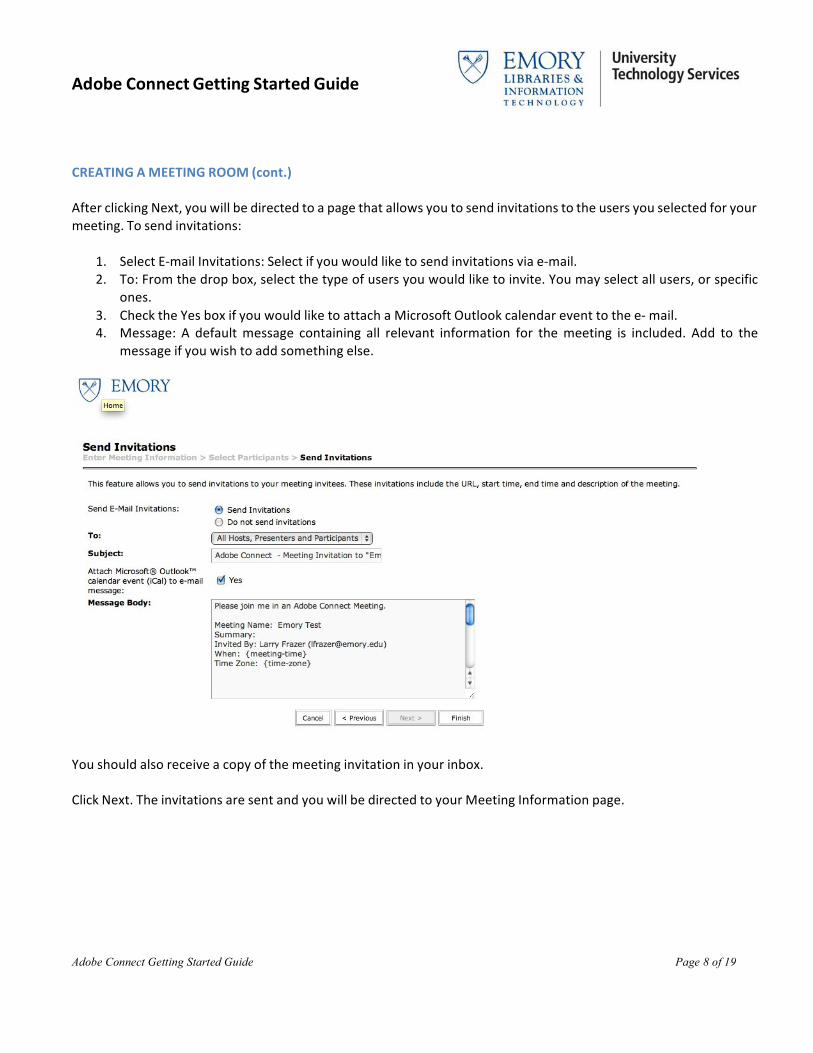
CREATING A MEETING ROOM (cont.) After clicking Next, you will be directed to a page that allows you to send invitations to the users you selected for your meeting. To send invitations:
1. Select E-‐mail Invitations: Select if you would like to send invitations via e-‐mail. 2. To: From the drop box, select the type of users you would like to invite. You may select all users, or specific
ones. 3. Check the Yes box if you would like to attach a Microsoft Outlook calendar event to the e-‐ mail. 4. Message: A default message containing all relevant information for the meeting is included. Add to the
message if you wish to add something else.
You should also receive a copy of the meeting invitation in your inbox. Click Next. The invitations are sent and you will be directed to your Meeting Information page.
Adobe Connect Getting Started Guide
Adobe Connect Getting Started Guide Page 9 of 19
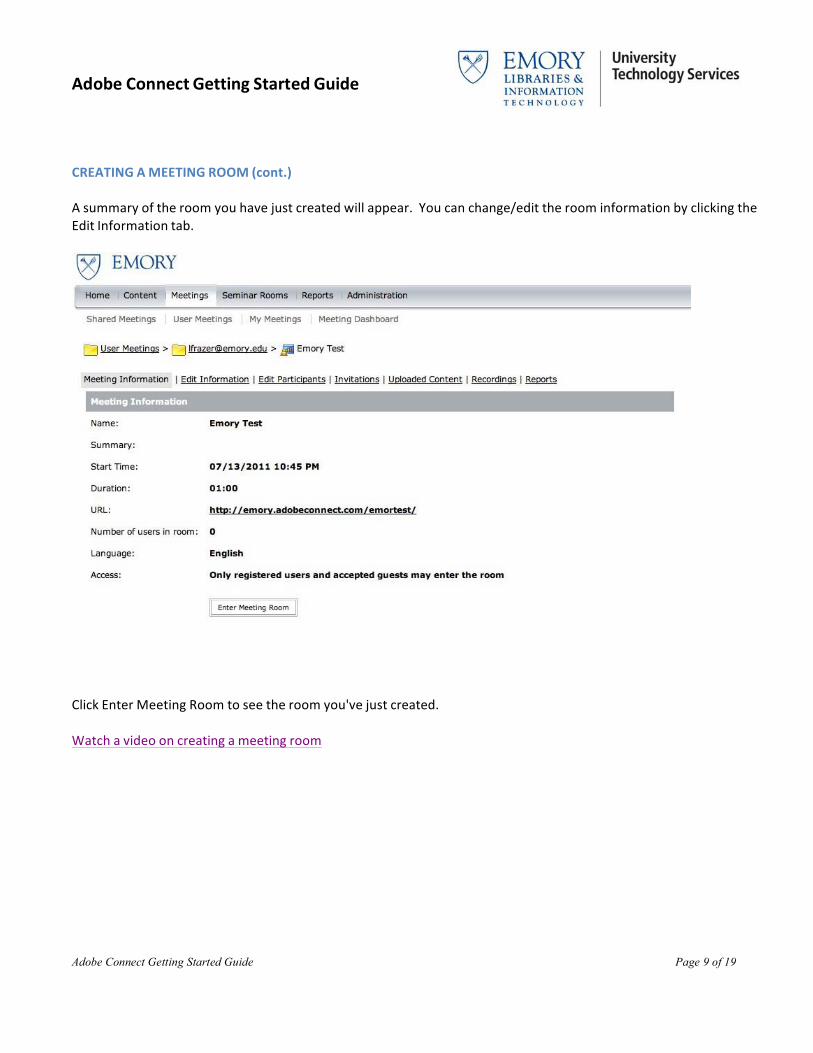
CREATING A MEETING ROOM (cont.) A summary of the room you have just created will appear. You can change/edit the room information by clicking the Edit Information tab.
Click Enter Meeting Room to see the room you've just created.
Watch a video on creating a meeting room
Adobe Connect Getting Started Guide
Adobe Connect Getting Started Guide Page 10 of 19
SCHEDULING AN ADOBE CONNECT MEETING ROOM USING THE ADOBE CONNECT ADD-‐IN FOR MICROSOFT OUTLOOK (OPTIONAL) Before you begin, please contact your local IT Support for assistance with installing the Adobe Connect Add-‐in for Microsoft Outlook using the instructions below:
1. From the Connect Users website, click the Connect Add-‐In for Microsoft Outlook link to download the installation file to your desired location. http://www.connectusers.com/downloads . Your local IT Support may also contact UTS Client Services for the pre-‐configured installer or Microsoft SCCM task.
2. Close Microsoft Outlook. If it is open when you start the installer, you will be asked to close it before you proceed with the installation.
3. Double-‐click the installation file. 4. Follow the instructions in the Setup wizard. During installation, the wizard may ask you to install some .NET
Framework applications if they are not already on your system. The Adobe Connect Add-‐in for Microsoft Outlook gives you the ability to quickly add your Adobe Connect meeting information to your Microsoft Outlook meeting requests. Using Outlook’s scheduling functionality, you can easily review attendees’ schedules and plan times for your meeting. When you schedule an Adobe Connect meeting, you create an Outlook appointment request that includes your invitees. Outlook then adds this appointment to the calendar of all attendees and provides reminders to all attendees who accepted the request. The first time you start Outlook after installing the Adobe Connect Add-‐in for Microsoft Outlook, the add-‐in checks the Outlook and Acrobat preferences for an existing Adobe Connect server URL, login and password. If it cannot find this information, it prompts you to configure it.
1. Start Microsoft Outlook. The Adobe Connect Add-‐in for Microsoft Office splash screen appears, asking you to configure it. Click OK.
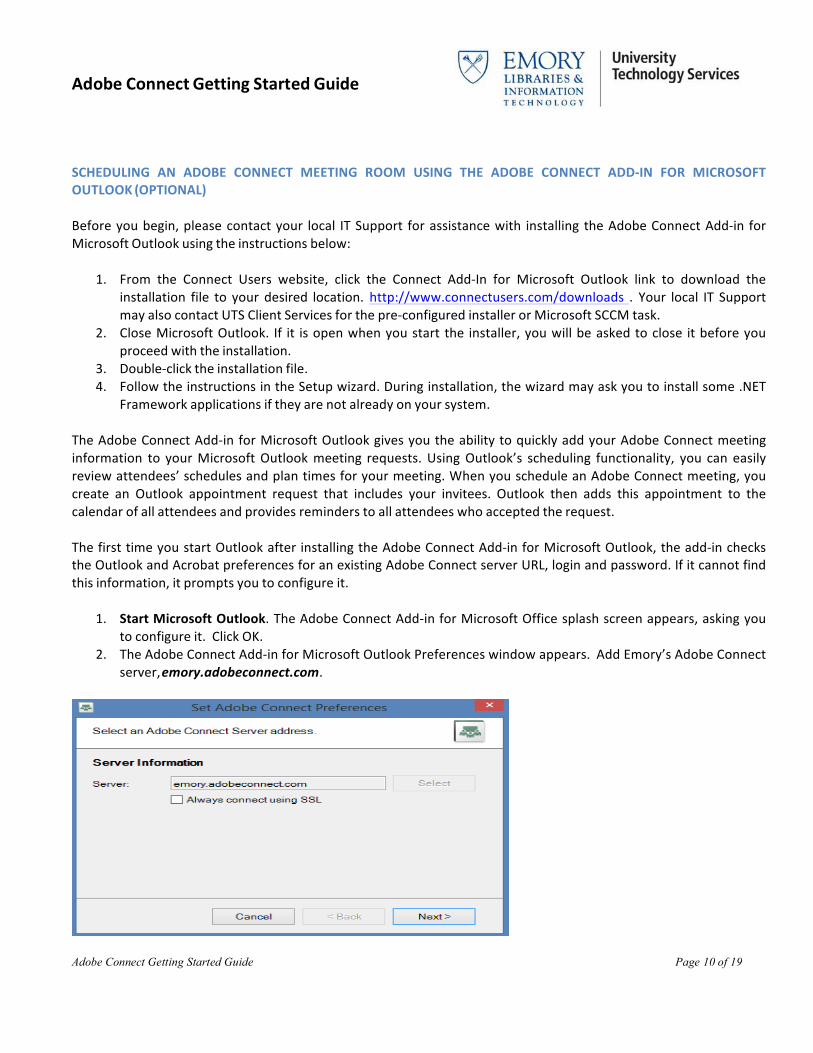
2. The Adobe Connect Add-‐in for Microsoft Outlook Preferences window appears. Add Emory’s Adobe Connect server, emory.adobeconnect.com.
Adobe Connect Getting Started Guide
Adobe Connect Getting Started Guide Page 11 of 19
SCHEDULING AN ADOBE CONNECT MEETING ROOM USING THE ADOBE CONNECT ADD-‐IN FOR MICROSOFT OUTLOOK (OPTIONAL) (cont.)
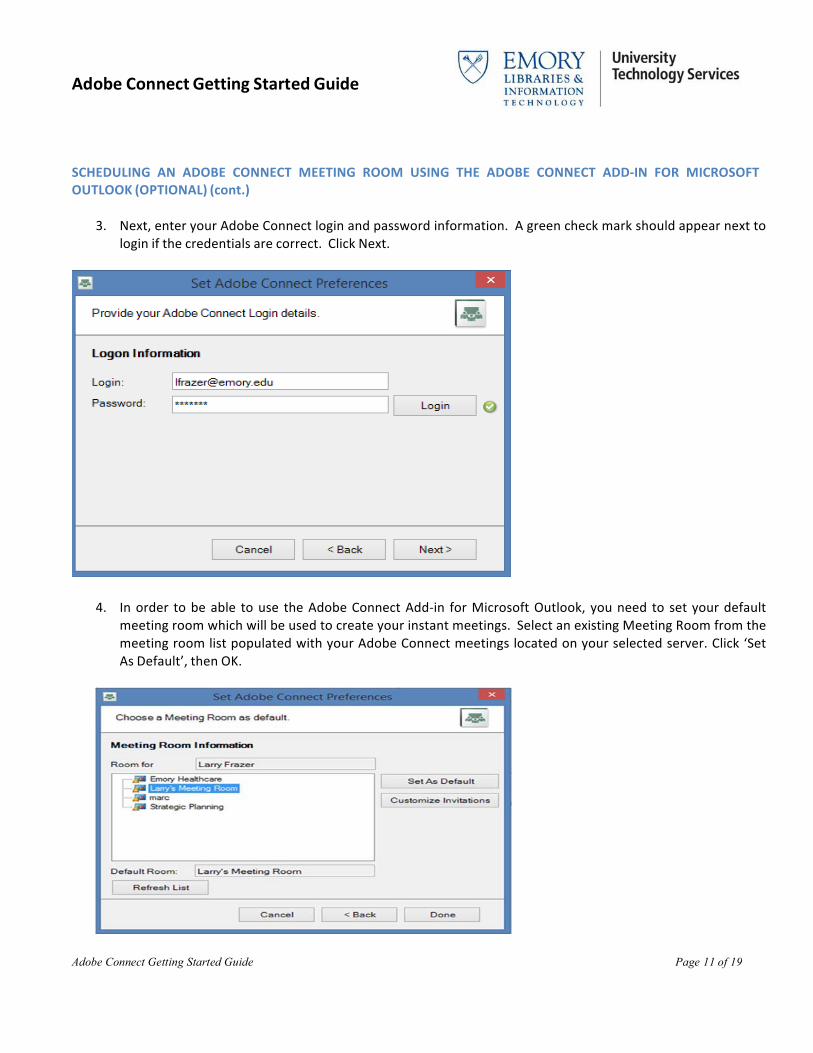
3. Next, enter your Adobe Connect login and password information. A green check mark should appear next to login if the credentials are correct. Click Next.
4. In order to be able to use the Adobe Connect Add-‐in for Microsoft Outlook, you need to set your default meeting room which will be used to create your instant meetings. Select an existing Meeting Room from the meeting room list populated with your Adobe Connect meetings located on your selected server. Click ‘Set As Default’, then OK.
Adobe Connect Getting Started Guide
Adobe Connect Getting Started Guide Page 12 of 19
SCHEDULING AN ADOBE CONNECT MEETING ROOM USING THE ADOBE CONNECT ADD-‐IN FOR MICROSOFT OUTLOOK (OPTIONAL) (cont.) You are now ready to schedule your Adobe Connect Meeting within Outlook.
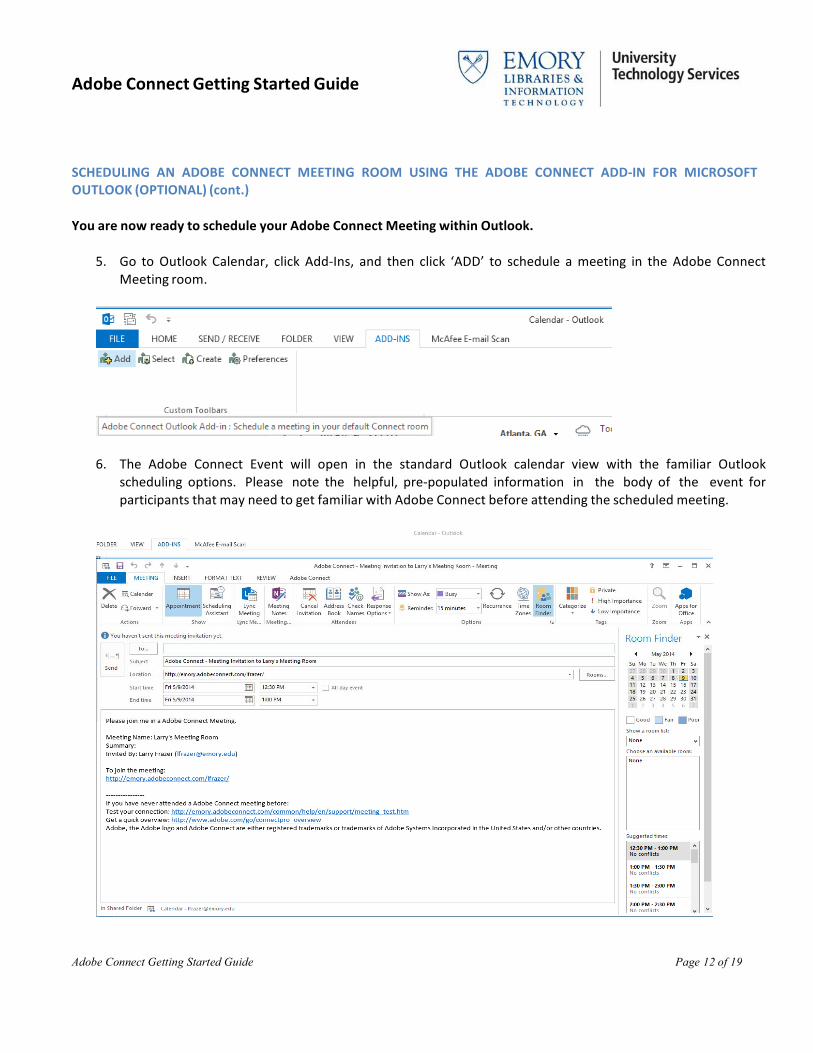
5. Go to Outlook Calendar, click Add-‐Ins, and then click ‘ADD’ to schedule a meeting in the Adobe Connect Meeting room.
6. The Adobe Connect Event will open in the standard Outlook calendar view with the familiar Outlook scheduling options. Please note the helpful, pre-‐populated information in the body of the event for participants that may need to get familiar with Adobe Connect before attending the scheduled meeting.
Adobe Connect Getting Started Guide
Adobe Connect Getting Started Guide Page 13 of 19
SHARING A POWERPOINT PRESENTATION Different meeting types require different considerations, and as the complexity of the meeting types increase, so does the Host's skill requirements. This section outlines the considerations for the most common meeting type, sharing a PowerPoint presentation. If you are planning to hold an Adobe Connect meeting, please remember to let your Attendees know that there are things they need to do on their end to help ensure a pleasant experience for everyone. Attendees who have never used Adobe Connect or who are using Adobe Connect on a new computer or from a new location should test their connection well in advance of the scheduled meeting to be sure they are able to enter the meeting room. Attendees also need to know how to test their speakers using the Audio Setup Wizard and how to set their connection speed using the information they receive from the Connection Test. We recommend adding a statement to your invitation message like the one below: "If you plan to join this Emory meeting through Adobe Connect, please read through the Getting Started information at http://www.connectusers.com/learning_center/getting_started/ and test your connection in advance with our generic test meeting room at http://kb2.adobe.com/cps/351/d83c3511.html .
A PowerPoint presentation can be shared in Adobe Connect. You can load PPT, SWF, JPEG, MP3, or FLV files from your computer into a Share pod. The files are uploaded to the server. PPT files are converted to Flash files that are then viewed in Adobe Connect.
1. The best way to share your PowerPoint file in Adobe Connect is to upload it to Adobe Connect to see what works and what doesn’t. There may be some image and font compatibility problems you may need to resolve. If you have recorded sound in PowerPoint (rather than in Adobe Presenter) you won’t be able to hear it when sharing the .ppt file in Adobe Connect. For recording sound to a PowerPoint presentation use Adobe Presenter.
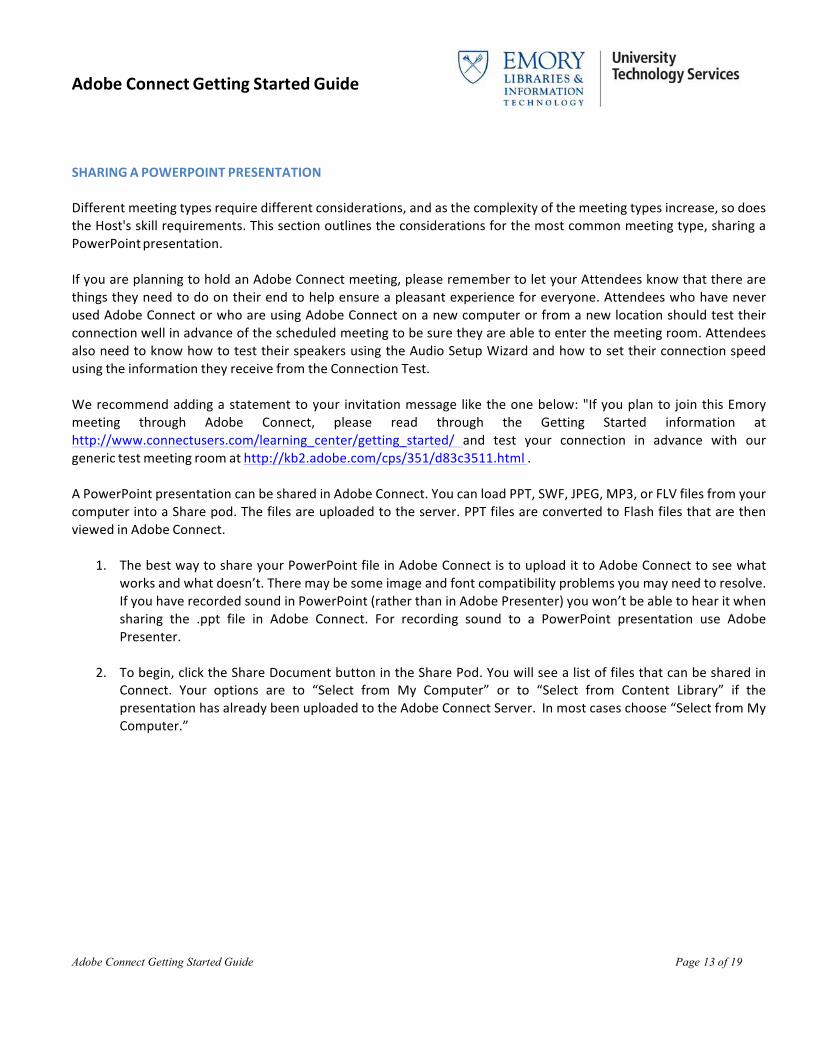
2. To begin, click the Share Document button in the Share Pod. You will see a list of files that can be shared in
Connect. Your options are to “Select from My Computer” or to “Select from Content Library” if the presentation has already been uploaded to the Adobe Connect Server. In most cases choose “Select from My Computer.”
Adobe Connect Getting Started Guide
Adobe Connect Getting Started Guide Page 14 of 19
SHARING A POWERPOINT PRESENTATION (cont.)
This will allow you to navigate your computer for the desired file. Find a PowerPoint document to upload.
3. Afterwards, you will note that Adobe Connect needs to convert the file to a Flash format. At the same time you share the presentation in the Share Pod it will be uploaded to the Adobe Connect server to your shared document content library for the next time you need to use it.
Note: Documents shared in the Share pod can be viewed but not downloaded by attendees. In order to enable attendees to download documents, a host or presenter must upload the documents to the File Share pod.
4. After the presentation loads you can use the navigation arrows in the lower left hand corner of the Share Pod. To execute an animation or a slide change simply click the right arrow or Next button. If you are more comfortable using the keyboard to navigate you can use the arrow keys.
Adobe Connect Getting Started Guide
Adobe Connect Getting Started Guide Page 15 of 19
SHARING A POWERPOINT PRESENTATION (cont.)
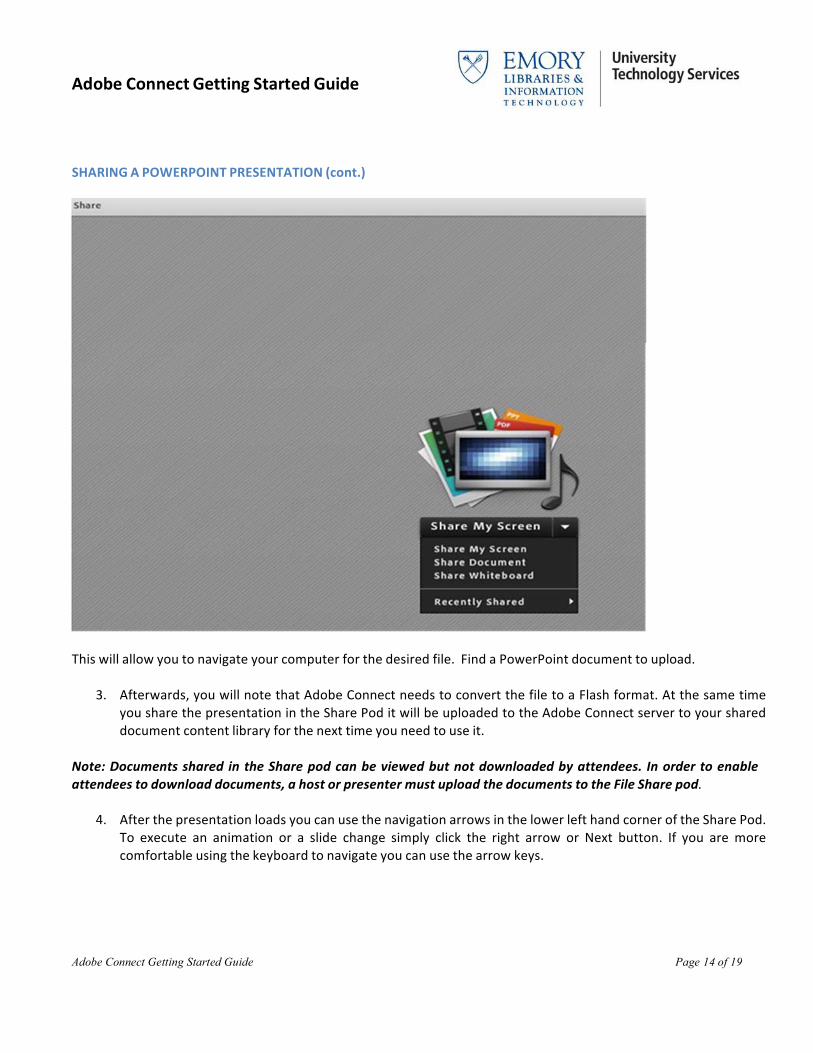
5. You can also share the content in Full Screen mode. Doing this will occupy the entire real estate of every meeting attendee’s screen with the slide content.
6. Another way to navigate through a presentation is to use the Sidebar. To begin click the Show Side Bar button
which gives you access to the presentation outline, slide notes and more.
Watch a video on sharing a PowerPoint presentation Watch a video on sharing screens and applications
Adobe Connect Getting Started Guide
Adobe Connect Getting Started Guide Page 16 of 19
MONITORING ADOBE CONNECT MEETING ROOMS
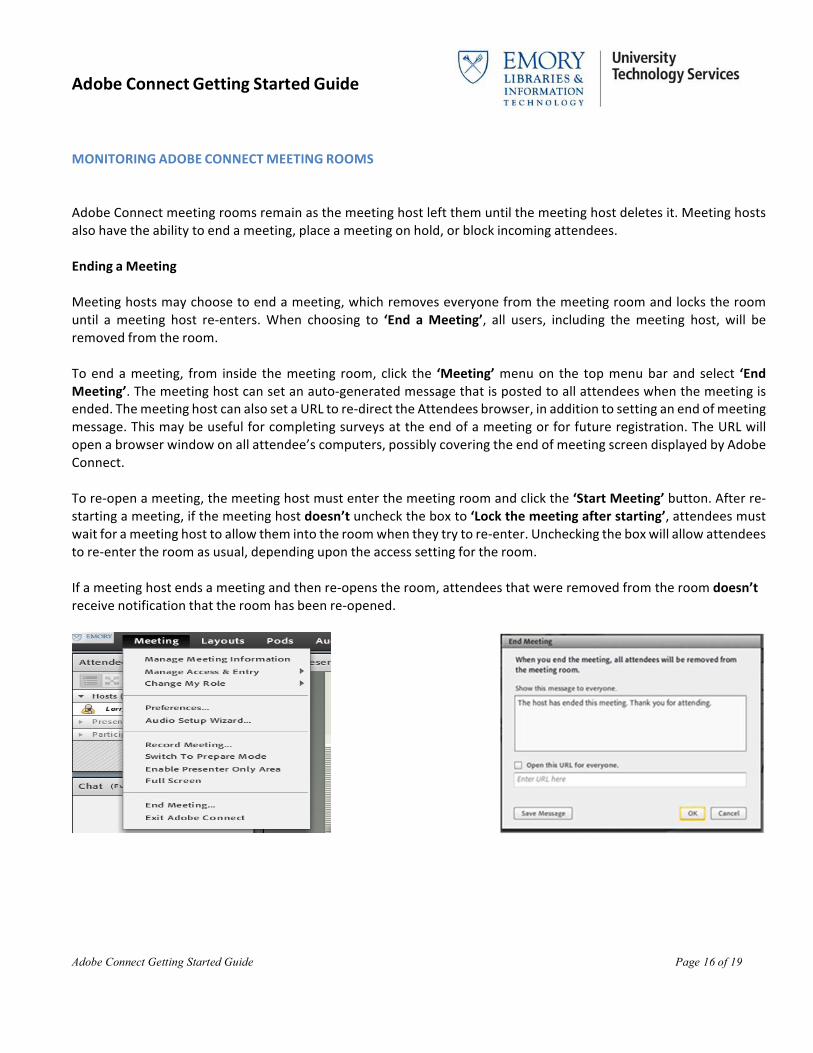
Adobe Connect meeting rooms remain as the meeting host left them until the meeting host deletes it. Meeting hosts also have the ability to end a meeting, place a meeting on hold, or block incoming attendees. Ending a Meeting Meeting hosts may choose to end a meeting, which removes everyone from the meeting room and locks the room until a meeting host re-‐enters. When choosing to ‘End a Meeting’, all users, including the meeting host, will be removed from the room. To end a meeting, from inside the meeting room, click the ‘Meeting’ menu on the top menu bar and select ‘End Meeting’. The meeting host can set an auto-‐generated message that is posted to all attendees when the meeting is ended. The meeting host can also set a URL to re-‐direct the Attendees browser, in addition to setting an end of meeting message. This may be useful for completing surveys at the end of a meeting or for future registration. The URL will open a browser window on all attendee’s computers, possibly covering the end of meeting screen displayed by Adobe Connect. To re-‐open a meeting, the meeting host must enter the meeting room and click the ‘Start Meeting’ button. After re-‐ starting a meeting, if the meeting host doesn’t uncheck the box to ‘Lock the meeting after starting’, attendees must wait for a meeting host to allow them into the room when they try to re-‐enter. Unchecking the box will allow attendees to re-‐enter the room as usual, depending upon the access setting for the room. If a meeting host ends a meeting and then re-‐opens the room, attendees that were removed from the room doesn’t receive notification that the room has been re-‐opened.
Adobe Connect Getting Started Guide
Adobe Connect Getting Started Guide Page 17 of 19
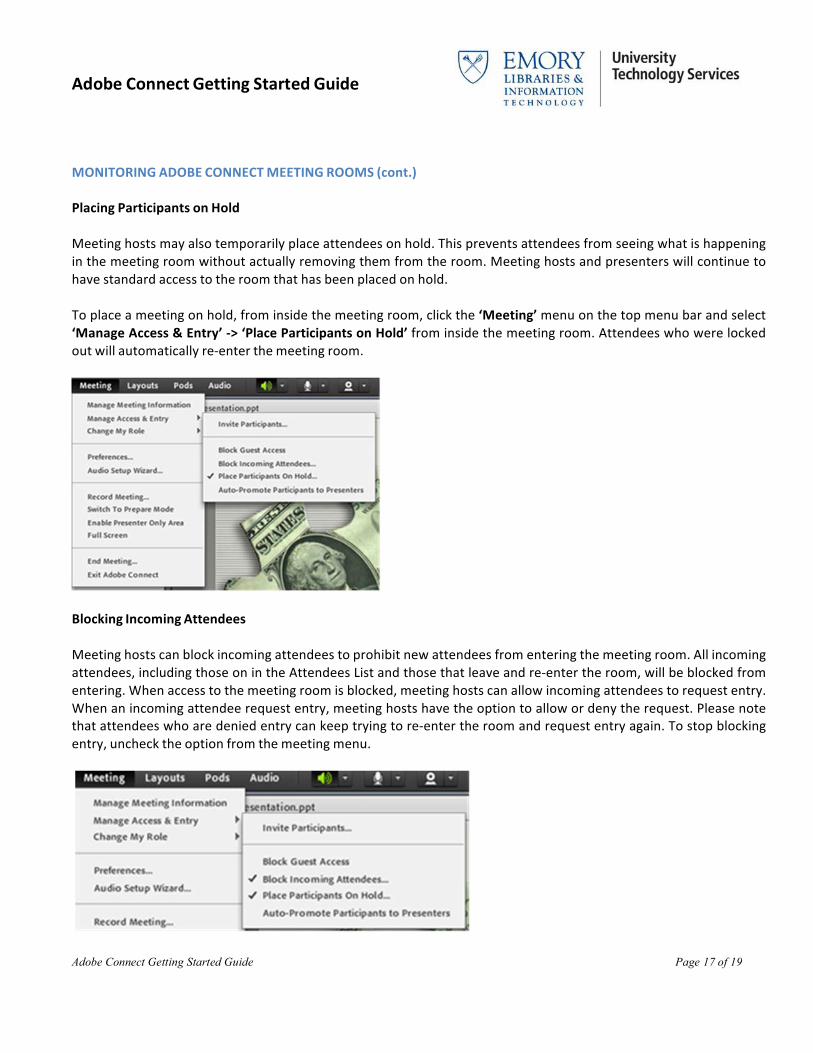
MONITORING ADOBE CONNECT MEETING ROOMS (cont.) Placing Participants on Hold Meeting hosts may also temporarily place attendees on hold. This prevents attendees from seeing what is happening in the meeting room without actually removing them from the room. Meeting hosts and presenters will continue to have standard access to the room that has been placed on hold. To place a meeting on hold, from inside the meeting room, click the ‘Meeting’ menu on the top menu bar and select ‘Manage Access & Entry’ -‐> ‘Place Participants on Hold’ from inside the meeting room. Attendees who were locked out will automatically re-‐enter the meeting room.
Blocking Incoming Attendees Meeting hosts can block incoming attendees to prohibit new attendees from entering the meeting room. All incoming attendees, including those on in the Attendees List and those that leave and re-‐enter the room, will be blocked from entering. When access to the meeting room is blocked, meeting hosts can allow incoming attendees to request entry. When an incoming attendee request entry, meeting hosts have the option to allow or deny the request. Please note that attendees who are denied entry can keep trying to re-‐enter the room and request entry again. To stop blocking entry, uncheck the option from the meeting menu.
Adobe Connect Getting Started Guide
Adobe Connect Getting Started Guide Page 18 of 19
ACCESSING ADOBE CONNECT FROM MOBILE DEVICES Adobe Connect Mobile provides the ability to host, share, and collaborate on an iOS and Android mobile device. Key features of Adobe Connect Mobile are:
● Confidently share presentations, documents and multimedia content from your library in the cloud, as well as photos in your photo library, and ensure that all fonts, animations and images appear as expected.
● Annotate and whiteboard using your fingertip on top of your content Here is how you get started with Adobe Connect Mobile.
1. Download the Adobe Connect Mobile App for the following devices from here:
● iPhone or iPad ● Android based phone or tablet ● Blackberry Playbook
2. The instructions below are for iPhones and iPads. Once the app has been installed, you will notice the
following Adobe Connect Icon on your iPhone or iPad.
3. There are two ways to connect to an Adobe Connect meeting from a mobile device.
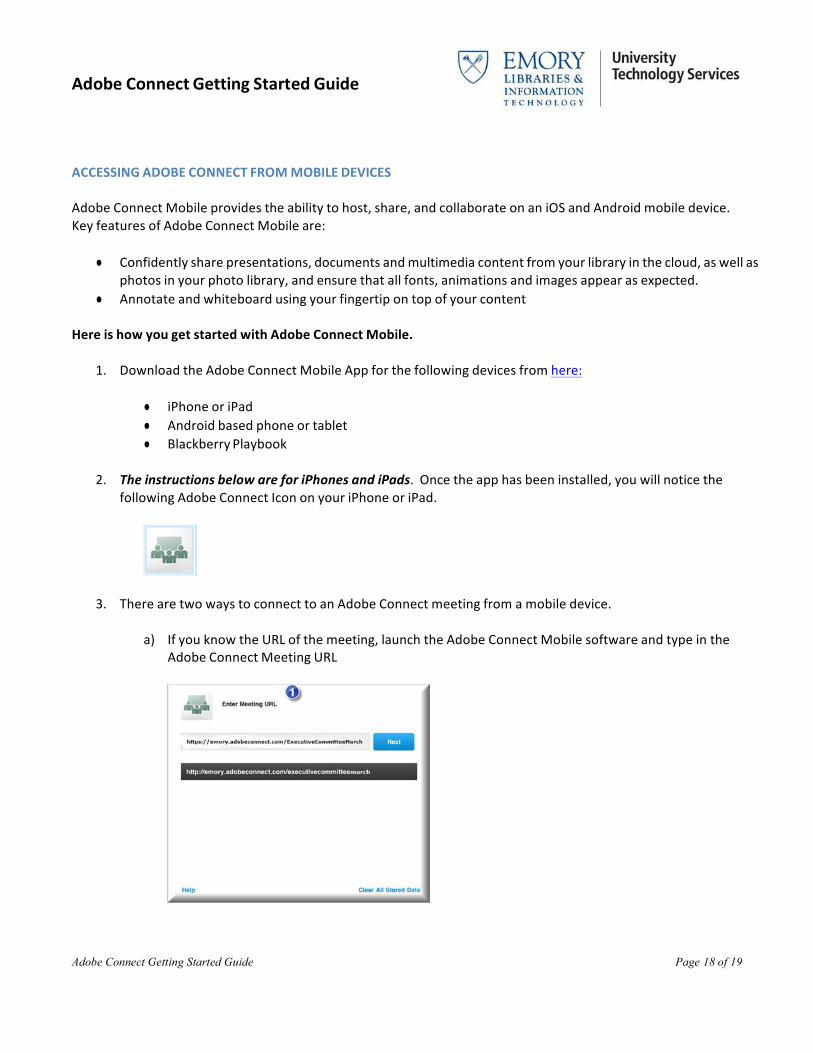
a) If you know the URL of the meeting, launch the Adobe Connect Mobile software and type in the Adobe Connect Meeting URL
Adobe Connect Getting Started Guide
Adobe Connect Getting Started Guide Page 19 of 19
ACCESSING ADOBE CONNECT FROM MOBILE DEVICES (cont.)
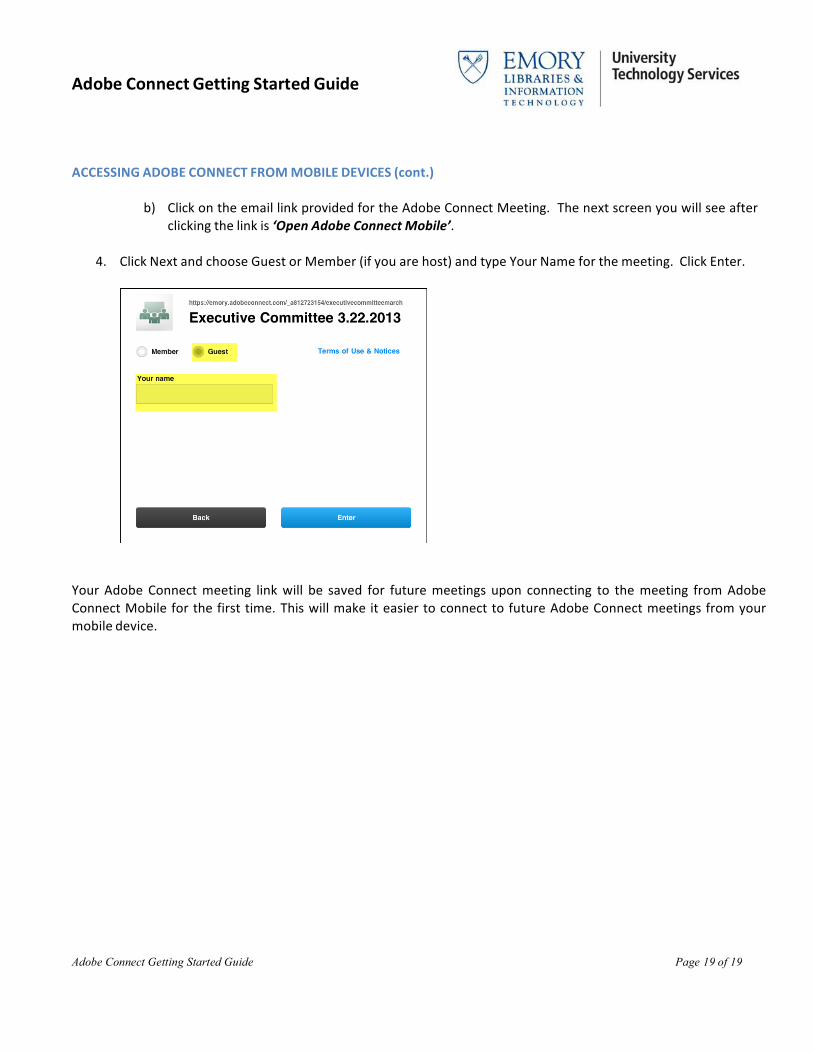
b) Click on the email link provided for the Adobe Connect Meeting. The next screen you will see after clicking the link is ‘Open Adobe Connect Mobile’.
4. Click Next and choose Guest or Member (if you are host) and type Your Name for the meeting. Click Enter.
Your Adobe Connect meeting link will be saved for future meetings upon connecting to the meeting from Adobe Connect Mobile for the first time. This will make it easier to connect to future Adobe Connect meetings from your mobile device.
Adobe Connect Getting Started Guide
Adobe Connect Getting Started Guide Page 20 of 19
FAQ
1. Does Adobe Connect work with VDT?
Yes, Adobe Connect will work with VDT as a participant. To ensure that users can share all desired screens, not just the screen from the Citrix silo where Internet Explorer is installed, users need to host outside VDT. To ease support and make it less confusing, our recommendation is to participate in or host any video conferencing event outside the VDT.
2. How much does Adobe Connect cost?
Adobe Connect is $126 per year for each meeting host.
3. I don’t have admin rights, can I still use Adobe Connect?
Yes, Adobe Connect does not require admin rights during installation if Flash is installed.
4. We will have multiple users and want to administer Adobe Connect using a single account. Do you see an issue with this?
Yes, each license is handled separately and cannot be shared with multiple users.
5. What is the difference between ‘Shared Meeting’ and ‘My Meeting’?
If a meeting is in the ‘Shared Meeting’ space, ANY meeting host can access your meeting. If the meeting appears in the ‘My Meeting’ space, only the meeting host you configured can access the meeting room.
6. How do I request an Adobe Connect account?
We have 2 options for requesting an Adobe Connect account (the current annual license fee is $126 per host):
A. Please enter a service request at https://emory.service-‐now.com (Configuration Item is Adobe Connect).
B. Call the University (404-‐727-‐7777) or Healthcare (404-‐778-‐4357) Service Desk.