adobe connect hosting tutorial - university of wyoming€¦ · adobe connect hosting tutorial vers....
TRANSCRIPT
Adobe Connect Hosting Tutorial
Vers. 1.0 270907 Page 1
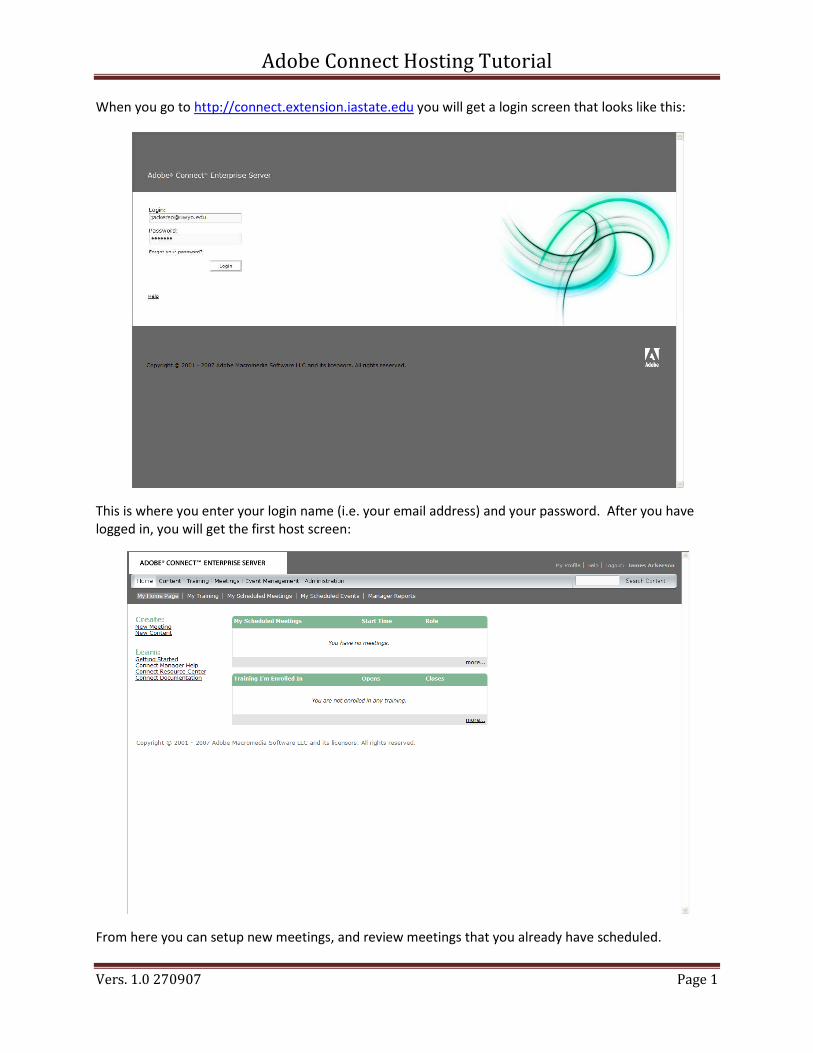
When you go to http://connect.extension.iastate.edu you will get a login screen that looks like this:
This is where you enter your login name (i.e. your email address) and your password. After you have
logged in, you will get the first host screen:
From here you can setup new meetings, and review meetings that you already have scheduled.
Adobe Connect Hosting Tutorial
Vers. 1.0 270907 Page 2
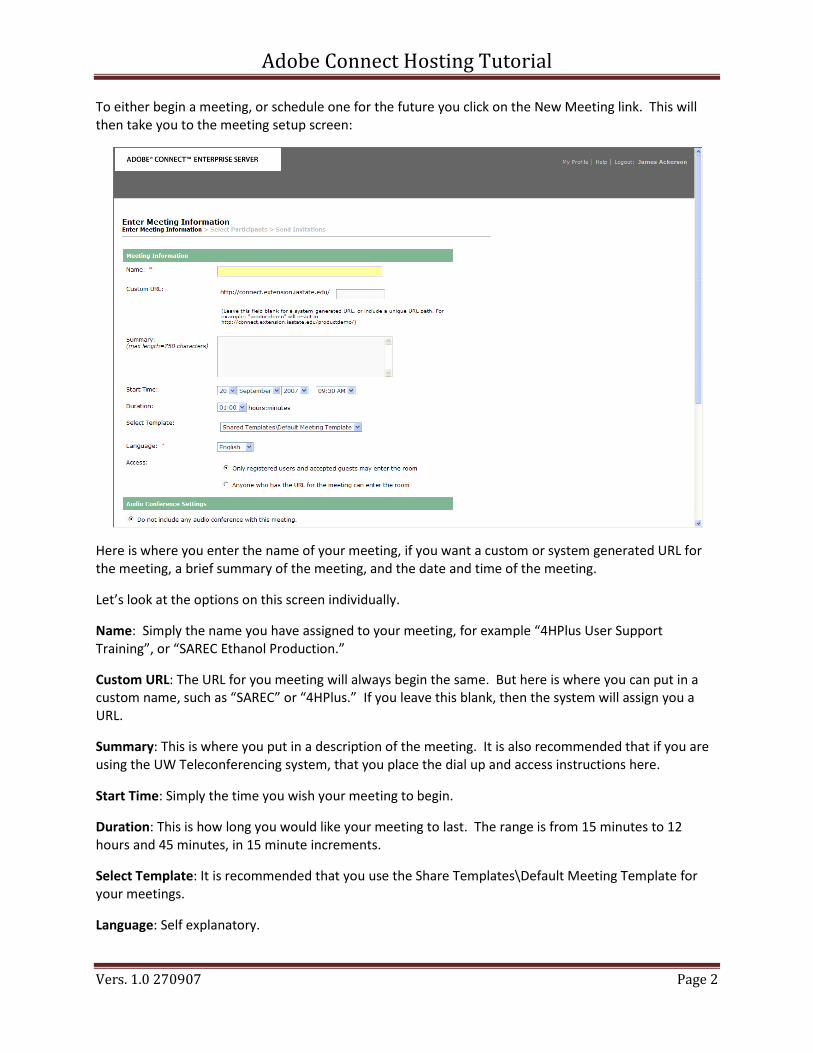
To either begin a meeting, or schedule one for the future you click on the New Meeting link. This will
then take you to the meeting setup screen:
Here is where you enter the name of your meeting, if you want a custom or system generated URL for
the meeting, a brief summary of the meeting, and the date and time of the meeting.
Let’s look at the options on this screen individually.
Name: Simply the name you have assigned to your meeting, for example “4HPlus User Support
Training”, or “SAREC Ethanol Production.”
Custom URL: The URL for you meeting will always begin the same. But here is where you can put in a
custom name, such as “SAREC” or “4HPlus.” If you leave this blank, then the system will assign you a
URL.
Summary: This is where you put in a description of the meeting. It is also recommended that if you are
using the UW Teleconferencing system, that you place the dial up and access instructions here.
Start Time: Simply the time you wish your meeting to begin.
Duration: This is how long you would like your meeting to last. The range is from 15 minutes to 12
hours and 45 minutes, in 15 minute increments.
Select Template: It is recommended that you use the Share Templates\Default Meeting Template for
your meetings.
Language: Self explanatory.
Adobe Connect Hosting Tutorial
Vers. 1.0 270907 Page 3
Access: This determines who can join the meeting. It is imperative that you choose “Anyone who has
the URL for the meeting can enter the room” option. Otherwise you the system will not generate an
email, and as host will have to approve everyone who tries to join the meeting.
Next on the screen as you scroll down, you will see the Audio Conference Settings options. Leave this
set to “Do not include any audio conference with this meeting.” The reason for this is that you will
either be using UW Teleconferencing or the VoIP (Voice over Internet) option for your meetings.
If you are going to use UW Teleconferencing, you will need to schedule that through C&T Support staff,
with as much lead time as possible. You will then be given the dial in number, and the PIN number for
the teleconference.
To use the VoIP option, every participant in the meeting will need to have either a headset with a
microphone, or a standalone microphone and speakers for the individual computers. Unless you are
sure of your participants level of expertise, it is recommended that you use the teleconferencing lines
from UW.
After you press the next button at the bottom of the screen, you will be taken to the “Select
Participants” screen. Simply hit next and move on to the next screen.
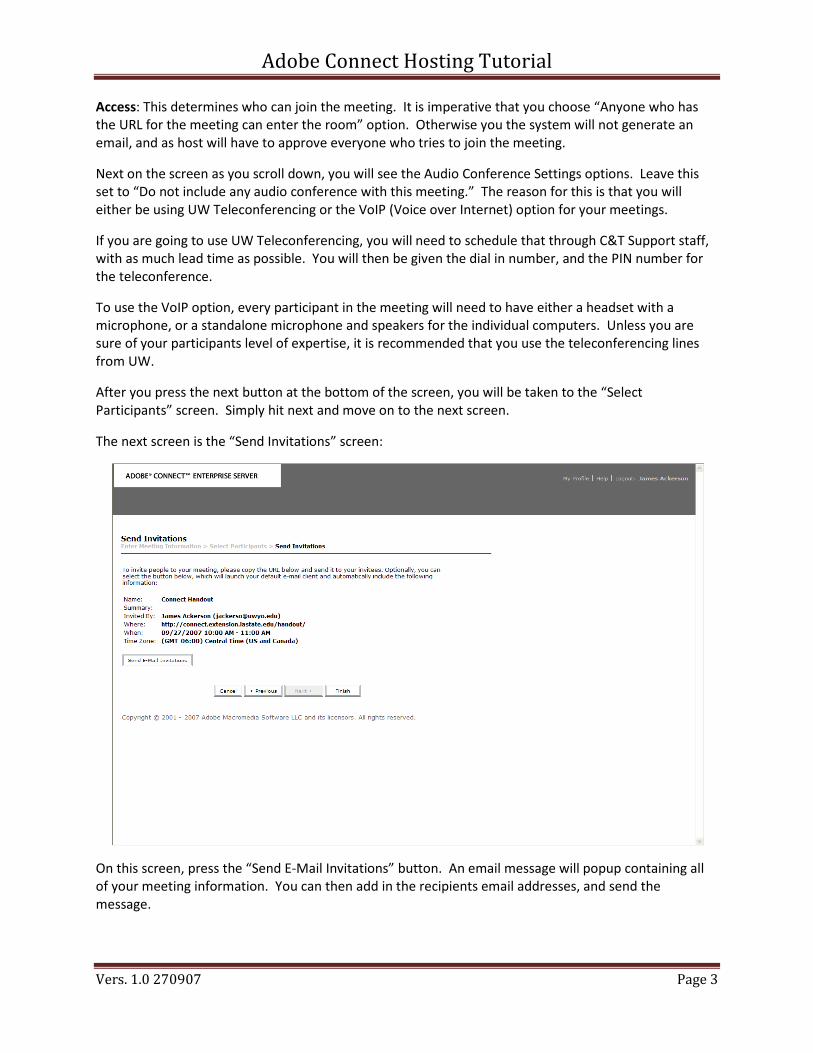
The next screen is the “Send Invitations” screen:
On this screen, press the “Send E-Mail Invitations” button. An email message will popup containing all
of your meeting information. You can then add in the recipients email addresses, and send the
message.
Adobe Connect Hosting Tutorial
Vers. 1.0 270907 Page 4
After sending the e-mail invitations, press the “Finish” button. You will be taken to a Meeting
Information screen that will have the summary of your meeting, including the description. At this point
you are done, and can exit Adobe Connect by closing your web browser.
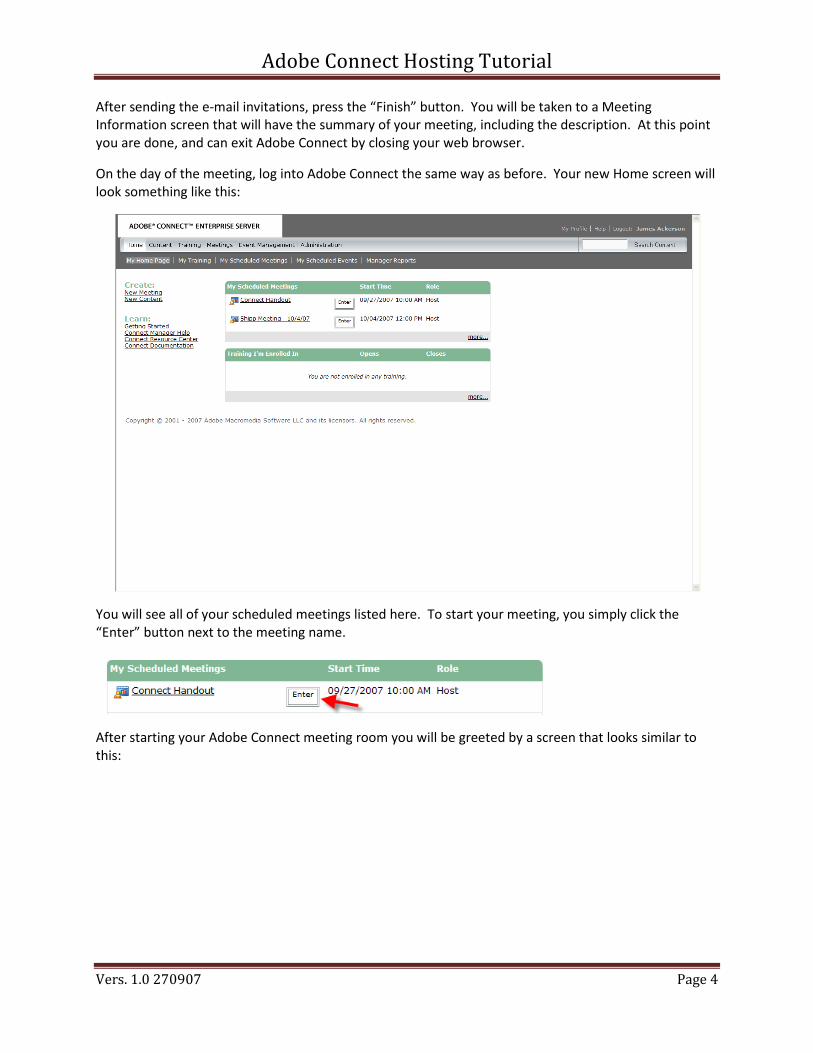
On the day of the meeting, log into Adobe Connect the same way as before. Your new Home screen will
look something like this:
You will see all of your scheduled meetings listed here. To start your meeting, you simply click the
“Enter” button next to the meeting name.
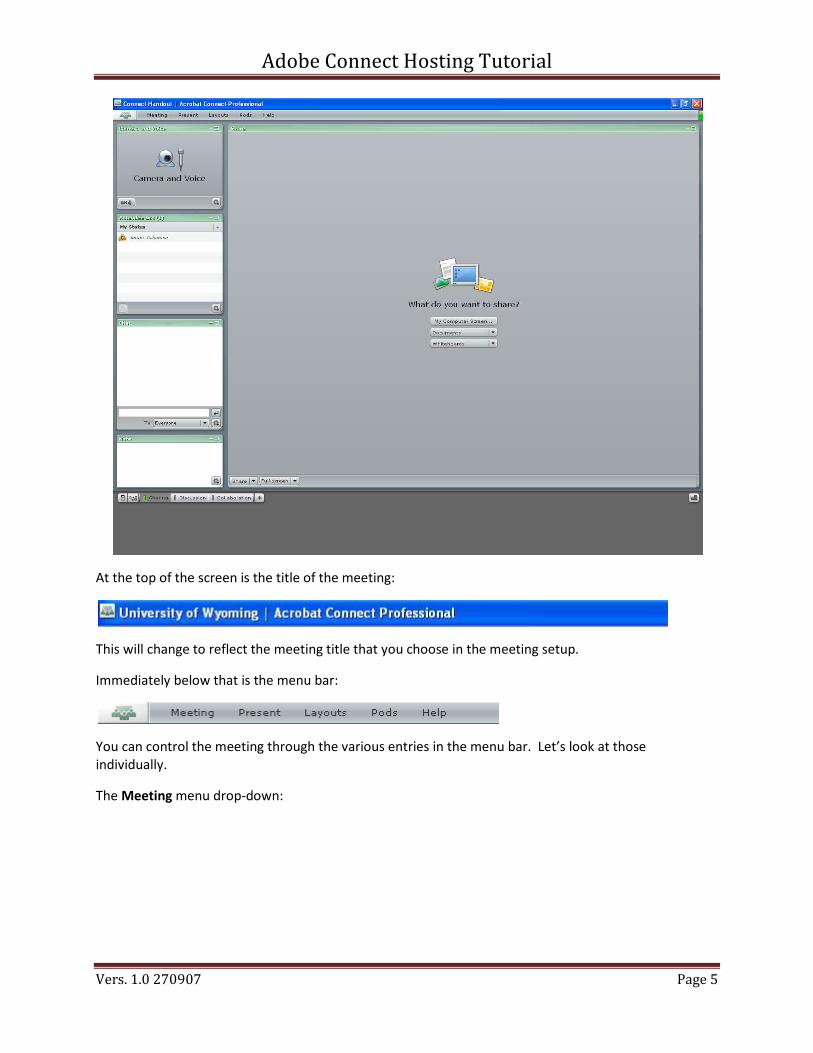
After starting your Adobe Connect meeting room you will be greeted by a screen that looks similar to
this:
Adobe Connect Hosting Tutorial
Vers. 1.0 270907 Page 5
At the top of the screen is the title of the meeting:
This will change to reflect the meeting title that you choose in the meeting setup.
Immediately below that is the menu bar:
You can control the meeting through the various entries in the menu bar. Let’s look at those
individually.
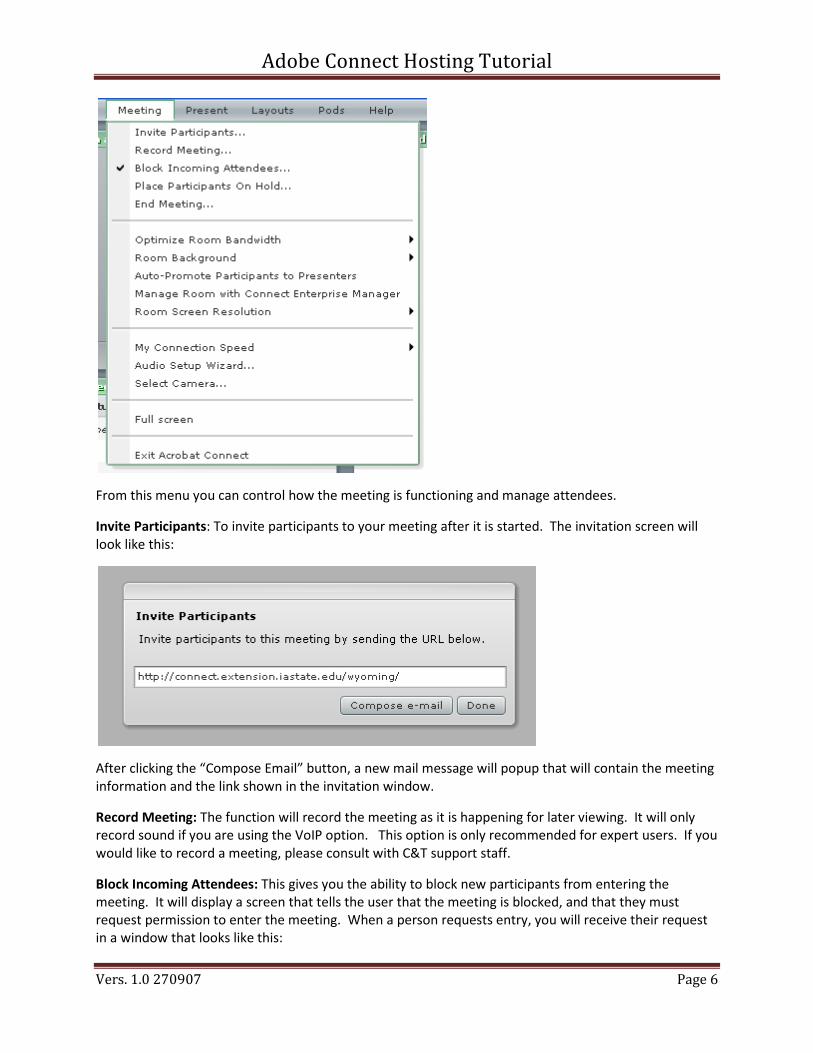
The Meeting menu drop-down:
Adobe Connect Hosting Tutorial
Vers. 1.0 270907 Page 6
From this menu you can control how the meeting is functioning and manage attendees.
Invite Participants: To invite participants to your meeting after it is started. The invitation screen will
look like this:
After clicking the “Compose Email” button, a new mail message will popup that will contain the meeting
information and the link shown in the invitation window.
Record Meeting: The function will record the meeting as it is happening for later viewing. It will only
record sound if you are using the VoIP option. This option is only recommended for expert users. If you
would like to record a meeting, please consult with C&T support staff.
Block Incoming Attendees: This gives you the ability to block new participants from entering the
meeting. It will display a screen that tells the user that the meeting is blocked, and that they must
request permission to enter the meeting. When a person requests entry, you will receive their request
in a window that looks like this:
Adobe Connect Hosting Tutorial
Vers. 1.0 270907 Page 7
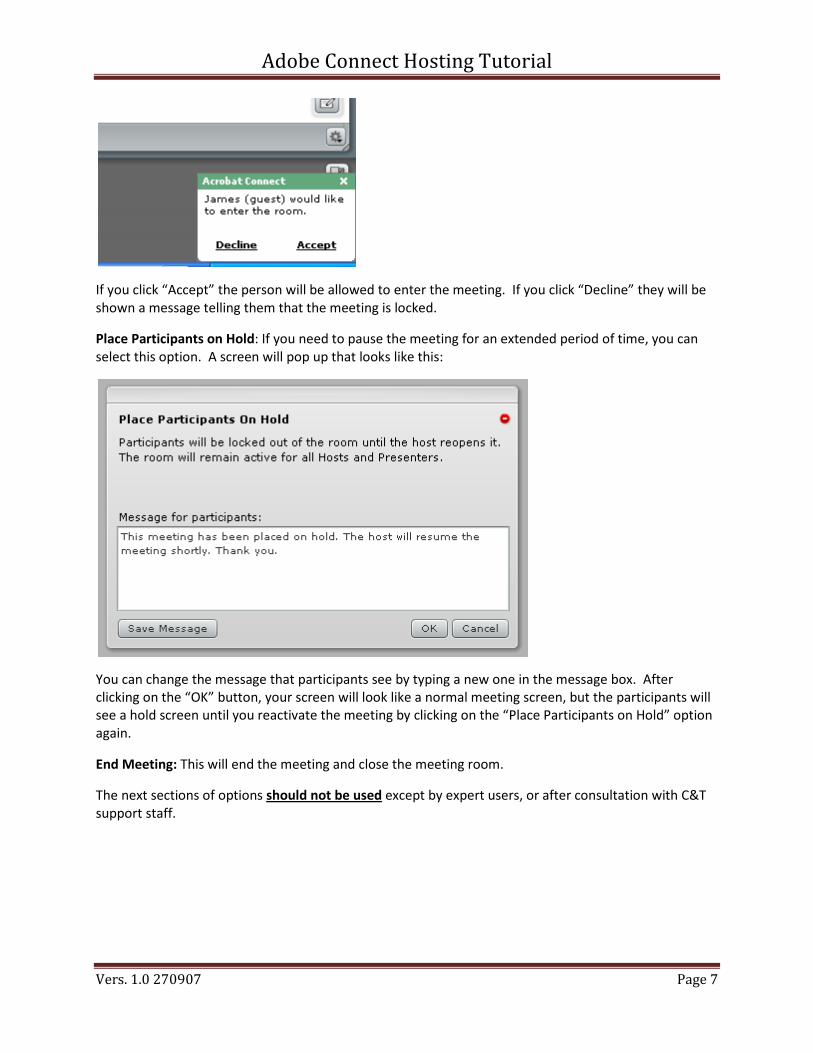
If you click “Accept” the person will be allowed to enter the meeting. If you click “Decline” they will be
shown a message telling them that the meeting is locked.
Place Participants on Hold: If you need to pause the meeting for an extended period of time, you can
select this option. A screen will pop up that looks like this:
You can change the message that participants see by typing a new one in the message box. After
clicking on the “OK” button, your screen will look like a normal meeting screen, but the participants will
see a hold screen until you reactivate the meeting by clicking on the “Place Participants on Hold” option
again.
End Meeting: This will end the meeting and close the meeting room.
The next sections of options should not be used except by expert users, or after consultation with C&T
support staff.
Adobe Connect Hosting Tutorial
Vers. 1.0 270907 Page 8
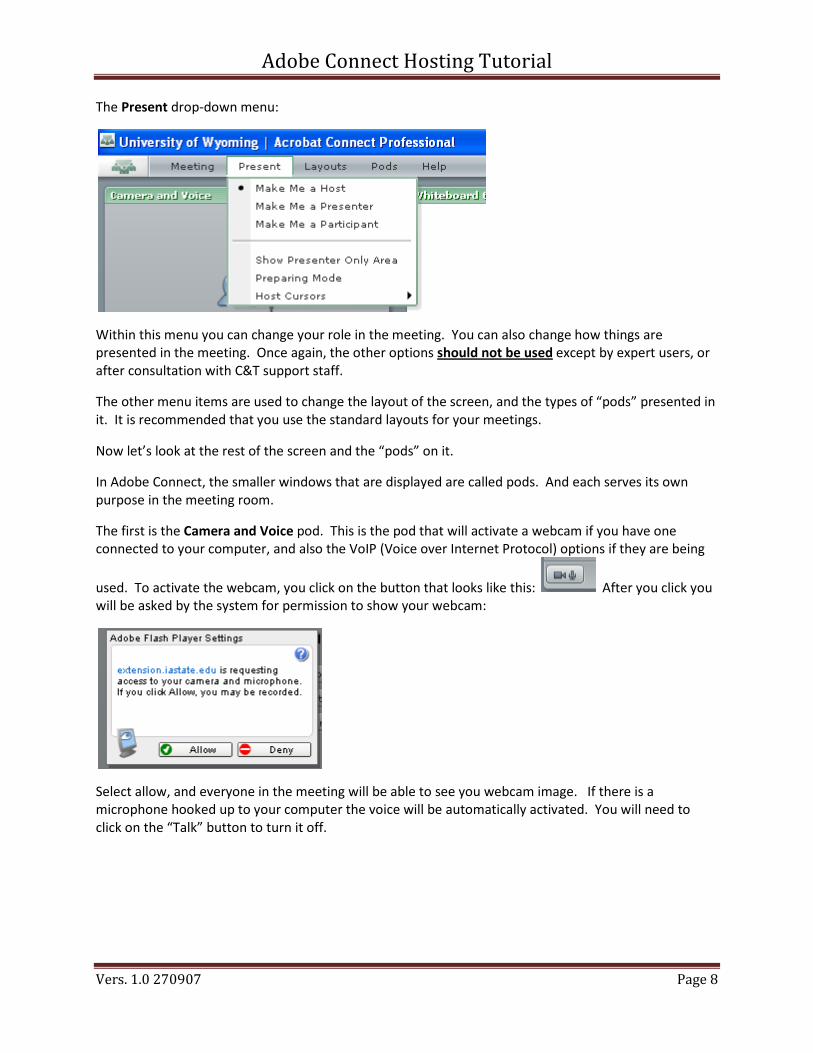
The Present drop-down menu:
Within this menu you can change your role in the meeting. You can also change how things are
presented in the meeting. Once again, the other options should not be used except by expert users, or
after consultation with C&T support staff.
The other menu items are used to change the layout of the screen, and the types of “pods” presented in
it. It is recommended that you use the standard layouts for your meetings.
Now let’s look at the rest of the screen and the “pods” on it.
In Adobe Connect, the smaller windows that are displayed are called pods. And each serves its own
purpose in the meeting room.
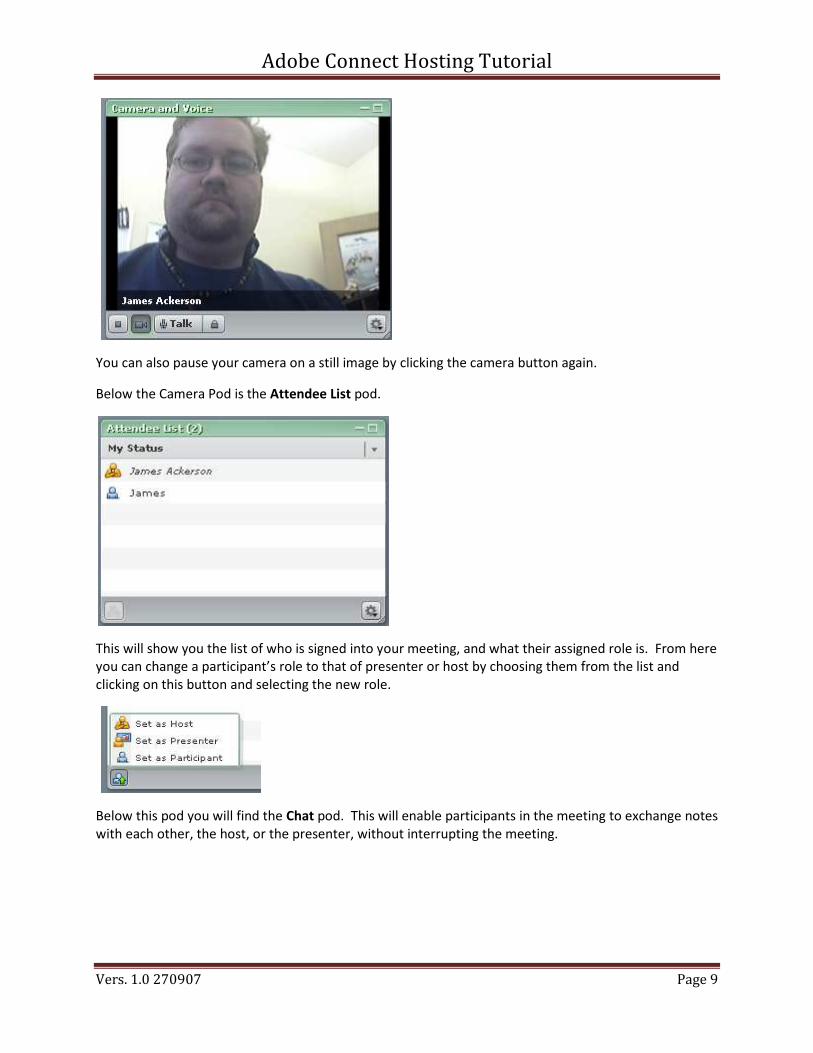
The first is the Camera and Voice pod. This is the pod that will activate a webcam if you have one
connected to your computer, and also the VoIP (Voice over Internet Protocol) options if they are being
used. To activate the webcam, you click on the button that looks like this: After you click you
will be asked by the system for permission to show your webcam:
Select allow, and everyone in the meeting will be able to see you webcam image. If there is a
microphone hooked up to your computer the voice will be automatically activated. You will need to
click on the “Talk” button to turn it off.
Adobe Connect Hosting Tutorial
Vers. 1.0 270907 Page 9
You can also pause your camera on a still image by clicking the camera button again.
Below the Camera Pod is the Attendee List pod.
This will show you the list of who is signed into your meeting, and what their assigned role is. From here
you can change a participant’s role to that of presenter or host by choosing them from the list and
clicking on this button and selecting the new role.
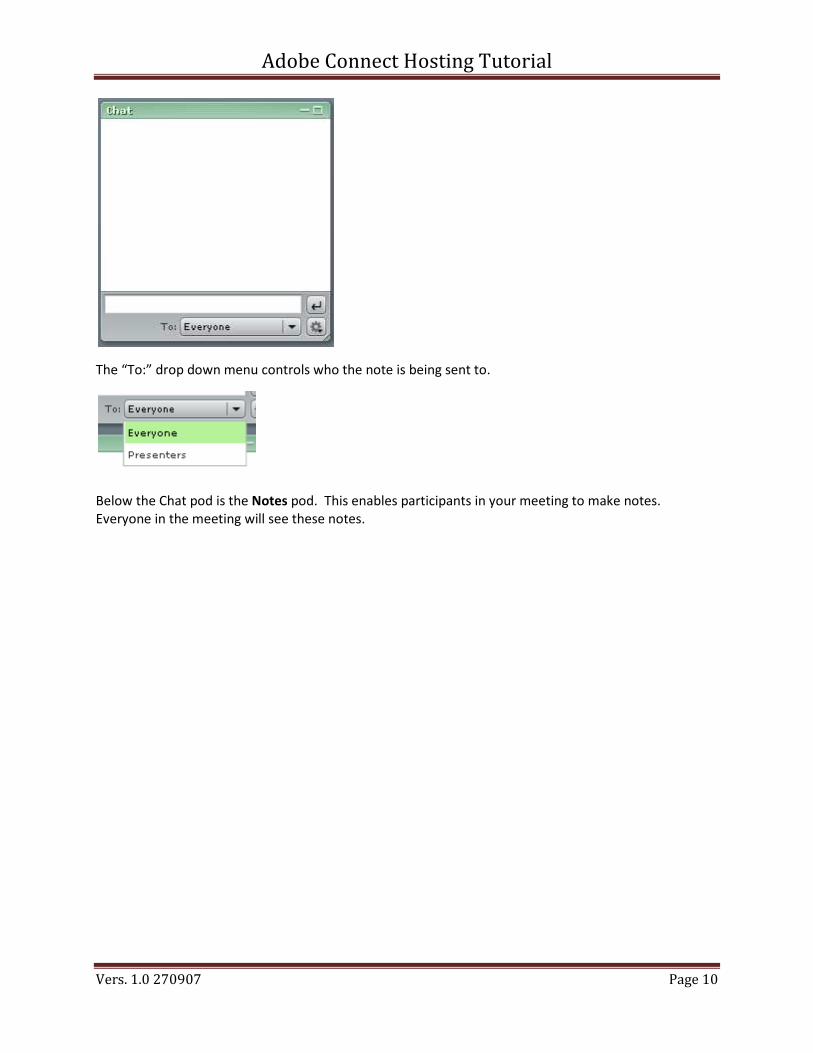
Below this pod you will find the Chat pod. This will enable participants in the meeting to exchange notes
with each other, the host, or the presenter, without interrupting the meeting.
Adobe Connect Hosting Tutorial
Vers. 1.0 270907 Page 10
The “To:” drop down menu controls who the note is being sent to.
Below the Chat pod is the Notes pod. This enables participants in your meeting to make notes.
Everyone in the meeting will see these notes.
Adobe Connect Hosting Tutorial
Vers. 1.0 270907 Page 11
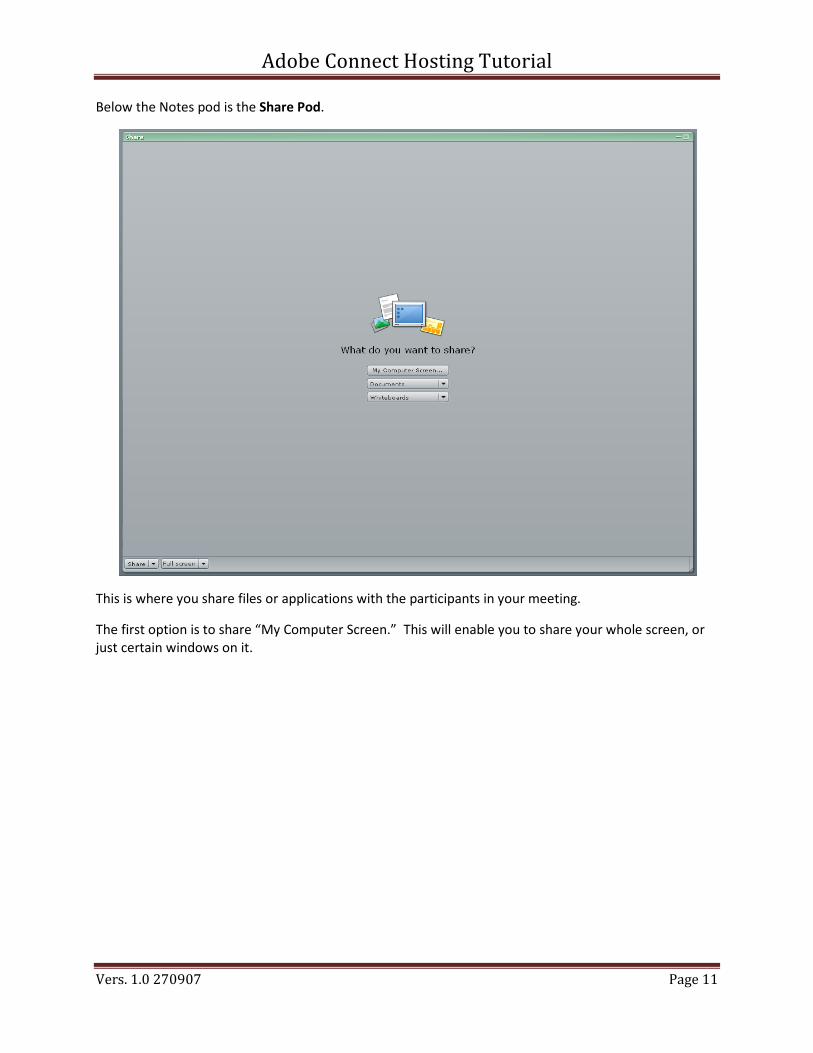
Below the Notes pod is the Share Pod.
This is where you share files or applications with the participants in your meeting.
The first option is to share “My Computer Screen.” This will enable you to share your whole screen, or
just certain windows on it.
Adobe Connect Hosting Tutorial
Vers. 1.0 270907 Page 12
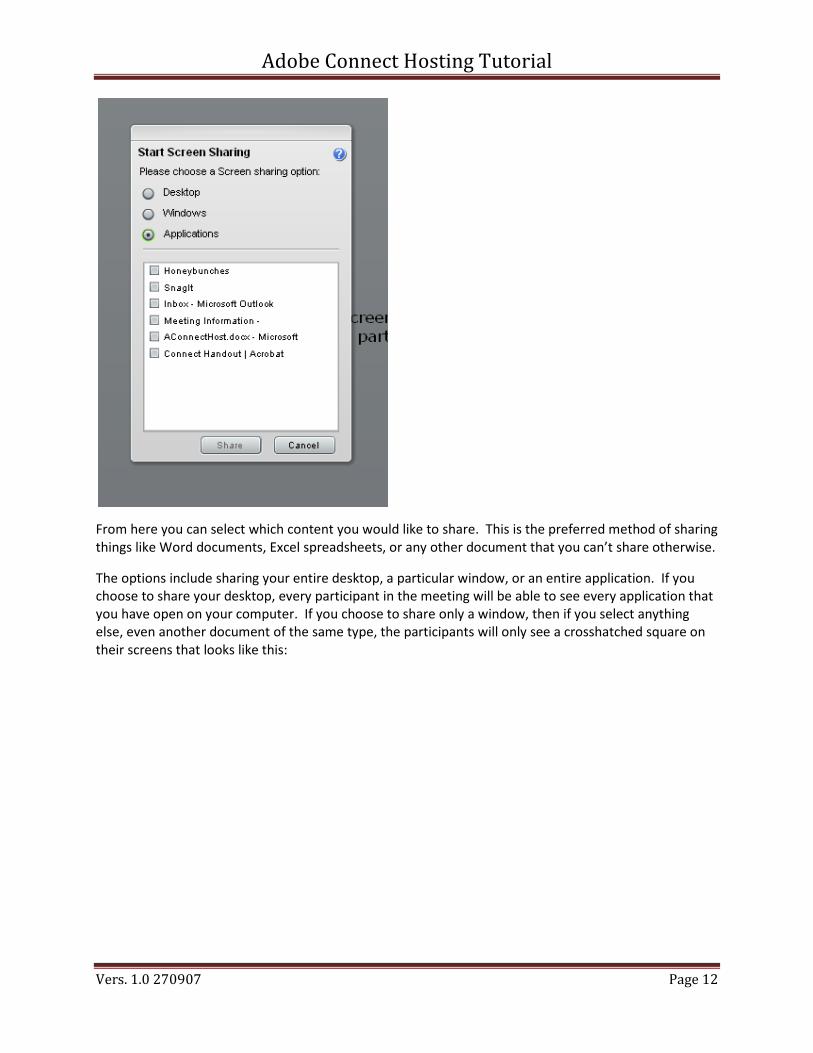
From here you can select which content you would like to share. This is the preferred method of sharing
things like Word documents, Excel spreadsheets, or any other document that you can’t share otherwise.
The options include sharing your entire desktop, a particular window, or an entire application. If you
choose to share your desktop, every participant in the meeting will be able to see every application that
you have open on your computer. If you choose to share only a window, then if you select anything
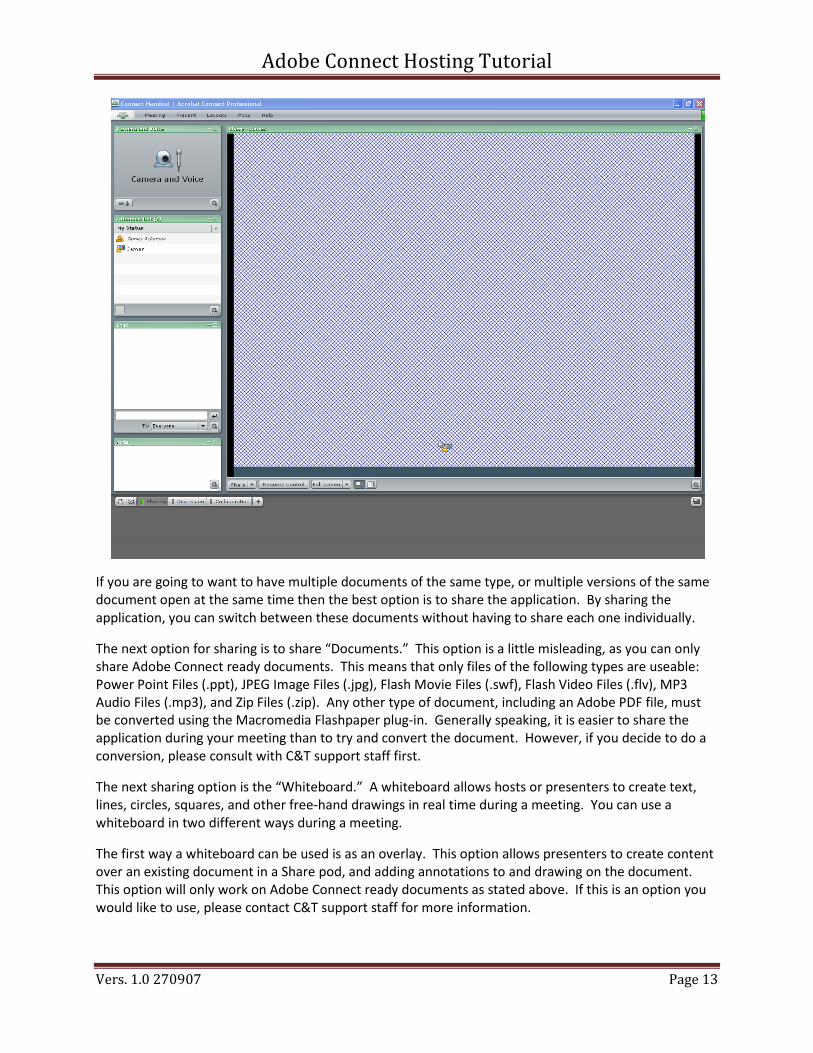
else, even another document of the same type, the participants will only see a crosshatched square on
their screens that looks like this:
Adobe Connect Hosting Tutorial
Vers. 1.0 270907 Page 13
If you are going to want to have multiple documents of the same type, or multiple versions of the same
document open at the same time then the best option is to share the application. By sharing the
application, you can switch between these documents without having to share each one individually.
The next option for sharing is to share “Documents.” This option is a little misleading, as you can only
share Adobe Connect ready documents. This means that only files of the following types are useable:
Power Point Files (.ppt), JPEG Image Files (.jpg), Flash Movie Files (.swf), Flash Video Files (.flv), MP3
Audio Files (.mp3), and Zip Files (.zip). Any other type of document, including an Adobe PDF file, must
be converted using the Macromedia Flashpaper plug-in. Generally speaking, it is easier to share the
application during your meeting than to try and convert the document. However, if you decide to do a
conversion, please consult with C&T support staff first.
The next sharing option is the “Whiteboard.” A whiteboard allows hosts or presenters to create text,
lines, circles, squares, and other free-hand drawings in real time during a meeting. You can use a
whiteboard in two different ways during a meeting.
The first way a whiteboard can be used is as an overlay. This option allows presenters to create content
over an existing document in a Share pod, and adding annotations to and drawing on the document.
This option will only work on Adobe Connect ready documents as stated above. If this is an option you
would like to use, please contact C&T support staff for more information.
Adobe Connect Hosting Tutorial
Vers. 1.0 270907 Page 14
The second way is as a standalone whiteboard that allows presenters to create content on the white
background. This option is very similar to a black board, or dry-erase board in a conventional meeting or
class room. If you or your presenters are interested in using a whiteboard during your presentation, it is
recommended that you setup a dummy meeting and practice using the tools repeatedly, until you are
familiar with how each one works.
You are now ready to host your Adobe Connect meeting. When your meeting is done, simply select the
“End Meeting” option from the Meeting drop down menu.
As always if you have any questions feel free to contact C&T Support staff.
Adobe Connect Hosting Tutorial
Vers. 1.0 270907 Page 15
Quick Tips Sheet:
To host an Adobe Connect meeting:
1: Log into Adobe Connect at the following URL: http://connect.extension.iastate.edu/ .
2: Select New Meeting under Create.
3: Enter meeting information – remember to select “Anyone who has the URL for the Meeting” under
access for the system to generate the notification e-mail.
4: Select the “Next” button twice to get to the “Send Invitations” screen.
5: Select the “Send E-Mail Invitations” button, and enter in your participants email addresses in the e-
mail message that pops up.
6: Select the “Finish” button after the email is sent.
7: On the day of the meeting, log into Adobe Connect at the following URL:
http://connect.extension.iastate.edu/ , and select the “Enter” button that is next to the name of your
meeting.
8: After the meeting, select the “End Meeting” option from the Meeting drop down menu.