adobe captivate 9 - application gateway · pdf fileuniversity information technology services...
TRANSCRIPT

Adobe Captivate 9 Quizzes
Learning Technologies, Training, & Audiovisual Outreach
University Information Technology Services

Copyright © 2016 KSU Division of University Information Technology Services
This document may be downloaded, printed, or copied for educational use without further permission of the
University Information Technology Services Division (UITS), provided the content is not modified and this
statement is not removed. Any use not stated above requires the written consent of the UITS Division. The
distribution of a copy of this document via the Internet or other electronic medium without the written
permission of the KSU - UITS Division is expressly prohibited.
Published by Kennesaw State University – UITS 2016
The publisher makes no warranties as to the accuracy of the material contained in this document and
therefore is not responsible for any damages or liabilities incurred from UITS use.

University Information Technology Services
Adobe Captivate 9
Quizzes
Table of Contents
Introduction ............................................................................................................................................................ 4
Learning Objectives ................................................................................................................................................. 4
Create Assessment Quizzes in Captivate ................................................................................................................ 5
Adding Question Slides ....................................................................................................................................... 5
Question Types ............................................................................................................................................... 7
Editing Existing Question Slides .......................................................................................................................... 7
Editing Question and Answer Wording .......................................................................................................... 7
Accessing Quiz Properties ............................................................................................................................... 7
Developing a Question Pool .................................................................................................................................. 11
Adding a Random Question Slide ..................................................................................................................... 13
Accessing Quiz Preferences .................................................................................................................................. 14
Quiz Preferences – Settings .............................................................................................................................. 15
Quiz Preferences – Pass or Fail ......................................................................................................................... 16
Quiz Preferences – Default Labels .................................................................................................................... 17
Editing Feedback and Buttons on Existing Question Slides .......................................................................... 18
Using Master Slides With Your Question Slides ................................................................................................... 19
Previewing the Quiz .......................................................................................................................................... 21
Publishing Your Quiz ............................................................................................................................................. 22
Saving as HTML5/SWF: ..................................................................................................................................... 22
Saving as an Executable: ................................................................................................................................... 23
Additional Help ..................................................................................................................................................... 23

Revised 4/21/2016 Page 4 of 23
Introduction
In addition to being a powerful video-capture program, Adobe Captivate can also be used to create
assessments to test the knowledge of your viewers. By using the question features in Adobe Captivate, you
will be able to add questions, configure quiz settings, score quiz results.
Captivate allows you to create assessments or quizzes for assessing participants understanding of subject
material. Captivate lets you add a variety of questions, such as multiple choice, fill-in-the-blank, and true/false,
which participants can answer in their web browsers.
You can also create question pools containing a combination of different types of questions. Adobe Captivate
can randomly pick questions from these pools and build a quiz at run-time for your participants. This way, you
can make the questions unpredictable for your participants.
Note: The material in this booklet is presented to inform faculty/staff about Captivate as a tool for assessing
the understanding of subject material. There are known issues with adding SCORM to D2L Brightspace
courses, so it is not recommended Captivate Quizzes be used to record assessments to the gradebook.
Learning Objectives
After completing the instructions in this booklet, you will be able to:
Add question slides to an existing Adobe Captivate project
Edit question slides and adjust quiz properties
Develop a question pool and add random question slides to your project
Edit the master slides for your project
Preview your quiz
Publish your quiz as an HTML5, Shockwave Flash, or Executable file

Page 5 of 23
Create Assessment Quizzes in Captivate
This document will assume you have a pre-existing Adobe Captivate project created. For additional
help in creating content in Adobe Captivate, please refer to the Adobe Captivate 9: Creating an Adobe
Captivate Project booklet on the UITS Documentation Center at https://uits.kennesaw.edu/cdoc.
Adding Question Slides
You can add a variety of different question types (e.g. multiple choice, true/false, short answer, etc.) to
your existing Adobe Captivate project. To add a question slide:
1. In your Adobe Captivate project, select the slide that will come before your desired question
slide.
Figure 1 - Select Location to Insert Question Slide
2. In the Ribbon, click Slides.
Figure 2 - Click Slides

Page 6 of 23
3. From the drop-down, click Question Slide.
Figure 3 - Insert Question Slide
4. The Insert Questions window will appear and a list of question types will be displayed:
a. Question type: Lists the type of question. Click the checkbox to include it in your project
(see Figure 4).
b. Number of questions: Enter the number of question slides for that question you wish to
be inserted (see Figure 4).
c. Evaluation type: Select from the following (see Figure 4):
i. Graded: Users are graded on if the question is answered correctly or not.
ii. Survey: Ungraded questions. Useful when you want to gather information from
users.
iii. Pretest: Gauge’s knowledge and will allow users to advance if their score is high
enough.
5. Click OK to confirm selection and add your question slides (see Figure 4).
Figure 4 - Insert Questions Window
6. Your question slides will be added to your Adobe Captivate project.

Page 7 of 23
Question Types
There are nine types of questions that can be added to your Adobe Captivate projects:
Multiple Choice: Participants select the correct answer from a list of choices.
True/False: Participants must decide if a statement is true or false.
Fill-In-The-Blank: Participants complete a sentence with the correct word.
Short Answer: Participants type the correct answer. This question can allow for longer
responses from participants.
Matching: Participants are presented a list of words and must associate their meaning with a
list of answers.
Hot Spot: Participants are presented with a picture and must select the correct spot on the
picture based off the question asked.
Sequence: Participants are presented with a sequence and must rearrange the answers so they
are in the correct order.
Rating Scale (Likert): Participants are asked to rate/respond to a question by giving the
appropriate level of feedback. This question is locked to the survey evaluation type only.
Random Question: Selects a random question from an existing question pool. See the section
on Developing a Question Pool for more information.
Editing Existing Question Slides
Once your question slide has been added to your Adobe Captivate project, you can begin editing the
question slides.
Editing Question and Answer Wording
1. To edit the text for your questions and question answers, double-click on the text.
2. You can now edit the text. Once finished, click on an empty space outside the Captivate slide to
confirm your edits.
Accessing Quiz Properties
By accessing the Quiz Properties, you can edit the set-up of your question slide. The following will
explain how to access the Quiz Properties for a multiple choice question:
1. Under the Filmstrip, select the question slide you wish to edit.
2. In the Ribbon, click the Properties icon.
Figure 5 - Access Properties

Page 8 of 23
3. The Properties menu will open to the right of the canvas. Click the Quiz tab.
Figure 6 - Click the Quiz Tab
Note: If you are already on the slide you wish to edit, but do not see the Quiz tab, click on a blank
area of the slide to show the Quiz tab.
4. The Quiz Properties will open with the following options:
a. Evaluation Type: Make a selection between Graded,
Survey, and Pretest (see Figure 7).
b. Number of Answers: Adjust the number of answer
choices possible (see Figure 7).
c. Answer Settings: Shuffle answers, allow for multiple
answer selections, give a partial score, as well as assign
point/penalty value and set the numbering style
(see Figure 7).
d. Captions: A caption will appear if the set conditions are
met (e.g. a notification will display that the answer is
correct if Correct is checked) (see Figure 7).
e. Buttons: Provides additional navigational buttons to
participant (see Figure 7).
f. Actions: Settings that decide what will happen upon
success/failure to answer the question correctly
(see Figure 7).
g. Reporting: Uncheck this box to exclude the selected
question slide from the quiz (see Figure 7).
Note: The quiz properties defaults are showing in Figure 7.
Figure 7 - Quiz Properties

Page 9 of 23
5. Next to Answers, click the number and enter the desired amount of answers for your question.
Figure 8 - Adjust Number of Answers
6. Click the checkbox next to Shuffle Answers (see Figure 9).
7. Next to Numbering, click the drop-down and select 1), 2), 3),… (see Figure 9).
Figure 9 - Set Shuffle and Numbering

Page 10 of 23
8. Under Actions, click the checkboxes for Infinite Attempts, and Retry Message.
Figure 10 - Set Actions to Happen on Success/Failure
9. Under Reporting, de-select the checkbox next to Report Answers if you wish the results of the
question to be excluded from the quiz (this is helpful if you just want to test the participant’s
knowledge without counting the question towards their overall score).
Figure 11 - Report Answers
10. To edit the feedback textboxes (e.g. correct answer, incorrect answer, etc), double-click the
textbox you wish to edit, then type in your new wording.
Note: Feedback textboxes may stack on top of each other. In order to edit them, you may have to
reposition the text boxes.
11. To indicate to Adobe Captivate which answer is correct, just click the button next to the correct
answer(s).
Figure 12 - Selecting the Correct Answer

Page 11 of 23
Developing a Question Pool
A Question Pool is a collection of questions that, when used with the random question type, will
present one (or many) questions from the pool to the participant at random. This allows participants to
experience different questions every time the quiz is taken.
The easiest way to add questions to your question bank is to add your question slides to your Adobe
Captivate project first. After adding your questions and setting them up, you can move them over into
your Question Pool:
1. In the menu bar, click Quiz.
2. From the drop-down menu, click Question Pool Manager.
Note: You can also access the Question Pool Manager using the keyboard shortcut Ctrl + Alt + Q.
3. The Question Pool Manager window will appear with an existing default question pool.
a. To rename the title of the question pool, double-click the title of the pool to rename
(see Figure 13).
b. To add/remove more question pools, click the + or – buttons next to # Pools in Project
(see Figure 13).
c. Click Close once finished setting up your question pools (see Figure 13).
Figure 13 - Question Pool Manager
4. The Question Pool Manager window will close and your changes will be saved.
5. To display the Question Pool window, click Window in the menu bar.
6. From the drop-down menu, click Question Pool.

Page 12 of 23
7. Below your slide view, next to the Timeline, a new tab for the Question Pool will appear.
Figure 14 - Question Pool Added to Timeline
8. To add existing questions to the Question Pool, right-click on the question slide you wish to
add.
9. A context sensitive menu will appear. Select Move Question To, then click the Question Pool
you wish to add the slide to.
Figure 15 - Move Question To Question Pool
Page 13 of 23
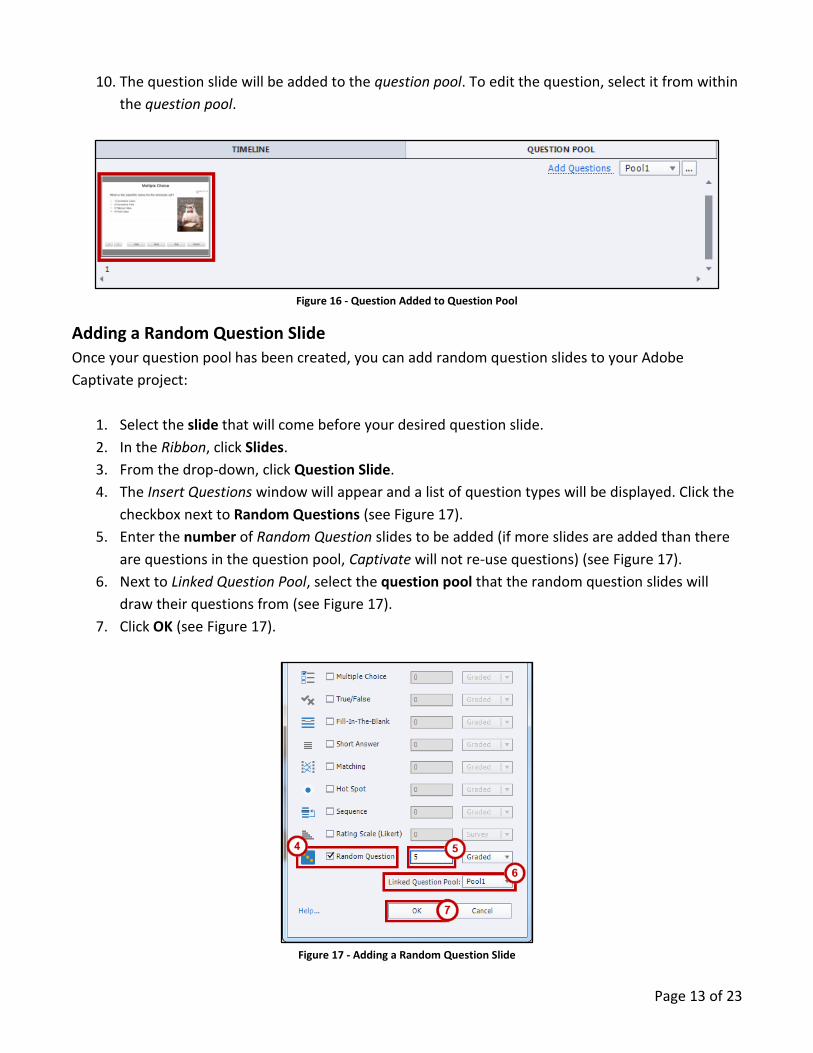
10. The question slide will be added to the question pool. To edit the question, select it from within
the question pool.
Figure 16 - Question Added to Question Pool
Adding a Random Question Slide
Once your question pool has been created, you can add random question slides to your Adobe
Captivate project:
1. Select the slide that will come before your desired question slide.
2. In the Ribbon, click Slides.
3. From the drop-down, click Question Slide.
4. The Insert Questions window will appear and a list of question types will be displayed. Click the
checkbox next to Random Questions (see Figure 17).
5. Enter the number of Random Question slides to be added (if more slides are added than there
are questions in the question pool, Captivate will not re-use questions) (see Figure 17).
6. Next to Linked Question Pool, select the question pool that the random question slides will
draw their questions from (see Figure 17).
7. Click OK (see Figure 17).
Figure 17 - Adding a Random Question Slide

Page 14 of 23
8. The Random Question slides will be added to your Adobe Captivate project.
Accessing Quiz Preferences
You can further customize your quiz settings by accessing the quiz preferences. Here you’ll find settings
for your quiz, change pass/fail criteria, and edit the default labels for your question feedback. Some
settings will not carry over to existing question slides, so it is recommended to adjust settings before
creating your quiz. To access Quiz Preferences:
1. In the Ribbon, click Quiz.
2. From the drop-down, click Quiz Preferences…
3. The Preferences window will open with the following options:
a. Reporting: Settings for handling reporting in your project with LMS’s (note: Due to issues
with adding SCORM to D2L Brightspace courses, reporting will not be covered in this
document) (see Figure 18).
b. Settings: Alter settings to make quiz required, shuffle answers, show score to participants,
and more (see Figure 18).
c. Pass or Fail: Set the percentage of correct questions, or number of points needed to pass
the quiz, and what actions to take if the participant passes/fails (see Figure 18).
d. Default Labels: Change the default response messages (changing these options will not
apply to any existing question slides) (see Figure 18).
Figure 18 - Quiz Preferences

Page 15 of 23
Quiz Preferences – Settings
The Quiz Settings contains the following setting options for adjusting your quiz:
a. Name: Name the quiz. Useful if you have more than one quiz in your project (see Figure 19).
b. Required: Make the quiz required or optional with the following options (see Figure 19):
Optional: The participant has the option to skip the quiz.
Required: The participant must take the quiz to continue.
Pass Required: The participant must pass this quiz to continue.
Answer All: The participant must answer every question to continue.
c. Settings: Various options for quiz slides (see Figure 19):
Shuffle Answers: Have questions automatically shuffle answers.
Clear/Back/Skip: Adds the following buttons to quiz slides.
Review Mode Navigation Buttons: Adds << and >> buttons to cycle through quiz so
participants can review their
answers after completion.
Submit All: Gives participant an
option to submit all responses to
questions and complete the quiz.
Show Progress: Show
participants which question
number they are currently on.
Allow Backward Movement:
Allow participants to visit slides
that were attempted previously.
Show Score at End of the Quiz:
Let participants view their score
at the end of the quiz. Click Quiz
Result Messages… to customize
the messages.
Allow User to Review the Quiz:
Let participants review a quiz
after their attempt and score has
been displayed. Click Question
Review Messages… to customize
the messages.
Hide Playbar in Quiz: Hides the
playback bar while the participant
is taking/reviewing the quiz.
Figure 19 - Quiz Preferences - Settings

Page 16 of 23
Quiz Preferences – Pass or Fail
The Quiz Pass or Fail settings contain the following options for handling the success/failure of
completing a quiz:
a. Pass/Fail Options: Set whether participants need to have a percentage or more of total
points to pass, or a set number or more of points to pass (see Figure 20).
b. Pass/Fail Grade Actions: Set what actions the quiz will carry out if the participant passes the
quiz, or fails. Can also set the number of times a user can attempt the quiz (see Figure 20).
Figure 20 - Quiz Preferences - Pass or Fail

Page 17 of 23
Quiz Preferences – Default Labels
The Quiz Default Label settings will list all the default message feedback and buttons displayed to
participants, and can be altered as needed. Any changes made to your default labels will only apply to
new question slides added after the labels have been changed:
a. Default Messages: Display the default message feedback when conditions are met
(e.g. correct message is displayed when a question is answered correctly) (see Figure 21).
b. Default Buttons: Lists all the default button labels displayed on any buttons added to the
quiz (see Figure 21).
c. Styles Preview: This window shows a preview of the message/button currently being edited
(see Figure 21).
Figure 21 - Quiz Preferences - Default Labels

Page 18 of 23
Editing Feedback and Buttons on Existing Question Slides
If you have existing question slides in your Adobe Captivate project, then altering the default labels will
not apply the changes to these slides. You will need to go through each existing question slide to
change the labels:
1. Select the question slide you wish to edit.
2. Double-click the feedback label you wish to edit.
3. Type in your preferred wording for the selected label.
Figure 22 - Editing Feedback Messages
To edit the caption on a button:
1. Select the button you wish to edit.
2. In the Properties side-panel under the Caption field, type in the new name for the button.
Figure 23 - Edit Button Caption

Page 19 of 23
Using Master Slides With Your Question Slides
Master Slides can be used to help provide a uniform appearance to your slides throughout your
project. You won’t be able to edit existing text on the slide, but you can alter the placement of objects,
or add new ones (e.g. a background picture). To edit your Master Slides:
1. In the Properties side-bar, click Master slide view.
Figure 24 - Master Slide View
2. The Filmstrip to the left will change to the Master Slide View. Scroll down to access the master
slides for questions (e.g. MCQ, T/F, FIB, Sequence, Matching, Hotspot, Likert, Result).
Figure 25 - List of Master Slides

Page 20 of 23
3. Click on a master slide to edit. The master slide will display on your Canvas.
Figure 26 - Editing a Master Slide
4. Make any edits/adjustments to the objects on your master slide. When finished, click Filmstrip
view under Preferences to return to the filmstrip view of your project.
Figure 27 - Return to Filmstrip View
5. The changes to the master slide will be applied to all slides of that type.
Page 21 of 23
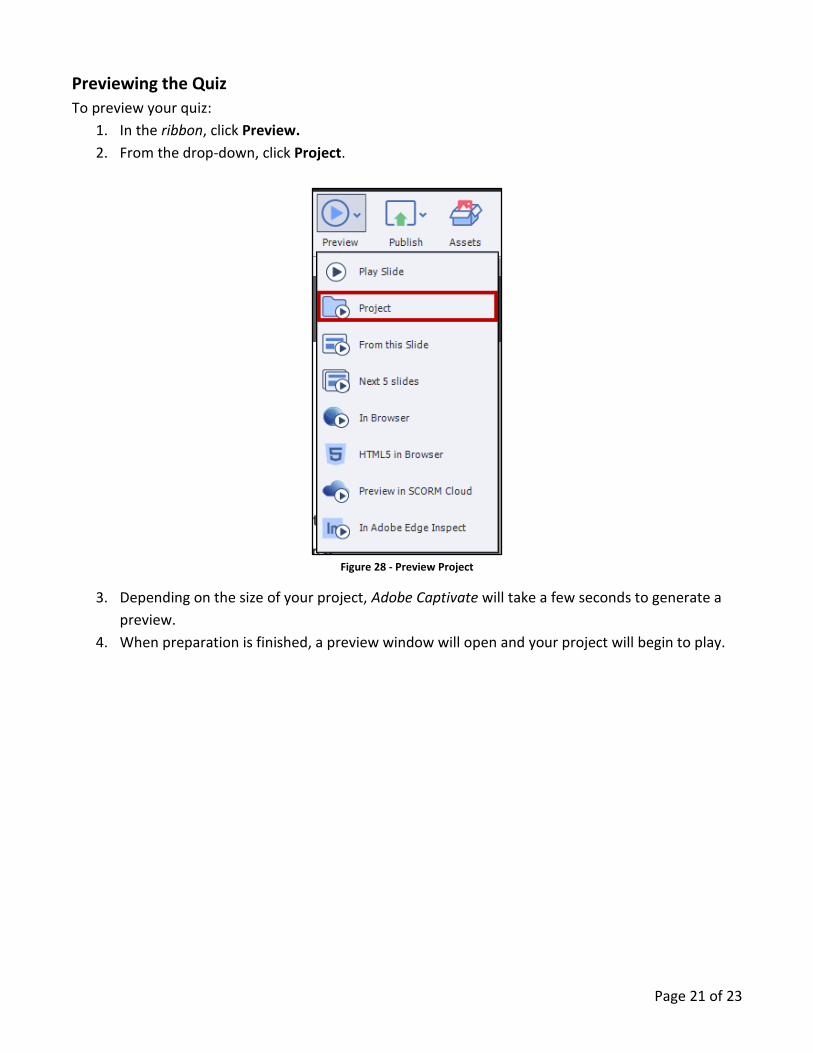
Previewing the Quiz
To preview your quiz:
1. In the ribbon, click Preview.
2. From the drop-down, click Project.
Figure 28 - Preview Project
3. Depending on the size of your project, Adobe Captivate will take a few seconds to generate a
preview.
4. When preparation is finished, a preview window will open and your project will begin to play.

Page 22 of 23
Publishing Your Quiz
In order to retain the interactive elements of your quiz, you will need to publish the quiz as a
Shockwave Flash, HTML5, or executable file:
1. In the menu bar, click on File.
2. Click on publish. The Publish To My Computer window will open.
Saving as HTML5/SWF:
a. In the Publish as: field, select HTML5/SWF (see Figure 29).
b. Enter a name for your project in the Project Title field (see Figure 29).
c. In the Location field, select a location on your computer to save the file (see Figure 29).
d. Next to Output Format, select SWF, HTML5, or Both (see Figure 29).
e. Click Publish (see Figure 29).
Figure 29 - Publishing Project as HTML5/SWF
Adobe Captivate will begin to publish your project as the selected file type. This process may take
several seconds/minutes due to the size of your project. Once complete, a notification window will
appear.

Page 23 of 23
Saving as an Executable:
a. In the Publish as: field, select Executable (see Figure 30).
b. Next to Publish Type, select Windows Executable or MAC Executable (see Figure 30).
Note: Windows Executables and Mac Executables are only compatible with their respective
platforms.
c. Enter a name for your project in the Project Title field (see Figure 30Figure 29).
d. In the Location field, select a location on your computer to save the file (see Figure 30).
e. Click Publish (see Figure 30).
Figure 30 - Publish Project as an Executable
Adobe Captivate will begin to publish your project as the selected file type. This process may take
several seconds/minutes due to the size of your project. Once complete, a notification window will
appear.
Additional Help
For additional support, please contact the KSU Service Desk:
KSU Service Desk for Faculty & Staff
Phone: 470-578-6999
Email: [email protected]
Website: http://uits.kennesaw.edu