openoffice.org administration guide · openoffice.org administration guide describes how to...
TRANSCRIPT
OpenOffice.org 3.2Administration Guide

CopyrightThis document is published under the PDL. See: http://www.openoffice.org/licenses/PDL.html

Contents
Copyright....................................................................................................................................................................................2
Preface......................................................................................................5
1 Deploy OpenOffice.org using package managers ...........................................7Solaris Sparc/x86.......................................................................................................................................................................7
Linux...........................................................................................................................................................................................8
Microsoft Windows.................................................................................................................................................................10
Mac OS X.................................................................................................................................................................................12
2 OpenOffice.org Basic Macros and Libraries .................................................13About OpenOffice.org Basic Libraries and Modules.........................................................................................................13
About OpenOffice.org Basic Configuration Files...............................................................................................................14
Distributing OpenOffice.org Basic Libraries.......................................................................................................................14
3 OpenOffice.org Extension Manager ............................................................19Single user install ....................................................................................................................................................................19
Shared user install ...................................................................................................................................................................19
Using the unopkg Command to Manage Extensions.........................................................................................................20
4 Adding Template Files to an OpenOffice.org Installation ..............................23To Add a Template For All Users of a OpenOffice.org Network Installation...............................................................23
To Add a Template to a Workstation Installation of OpenOffice.org.............................................................................23
To Add a Template Directory to an OpenOffice.org Installation....................................................................................23
5 Adding AutoText Files to an OpenOffice.org Network Installation .................25To Add AutoText Files For All Users of an OpenOffice.org Network Installation......................................................25
To Add AutoText Files to a Workstation Installation of OpenOffice.org......................................................................25
To Add an AutoText Directory to an OpenOffice.org Installation..................................................................................25
6 Deactivating the OpenOffice.org Registration Wizard ..................................27To Deactivate the Registration Wizard ................................................................................................................................27
7 Accessing Email Clients .............................................................................29Configuring OpenOffice.org to Use an Email Client on Solaris and Linux....................................................................29
3
Configuring OpenOffice.org to Use an Email Client on Windows..................................................................................29
8 Customizing the User Interface ..................................................................31Creating a Customized XML Configuration File.................................................................................................................31
Applying a Customized User Interface to Different OpenOffice.org Installations........................................................33
9 Restricting Functionality in OpenOffice.org .................................................35Creating a Command Configuration File ............................................................................................................................35
10 Accessing OpenOffice.org User Profiles on an LDAP Server ..........................37Configuring OpenOffice.org to Retrieve User Profiles From an LDAP Repository.....................................................37
Mapping LDAP User Profiles................................................................................................................................................39
Preface
OpenOffice.org Administration Guide describes how to administer an OpenOffice.org network installation. This guide is intended for system administrators who are responsible for the installation and setup of OpenOffice.org on a server.
Note – Throughout this document, the OpenOffice.org installation directory is represented in syntax as installation-dir.
5

1 C H A P T E R 1
1 Deploy OpenOffice.org using package managers
You can use some of the most popular package managers and software installation tools to install OpenOffice.org for each platform (Solaris PKG, Linux RPM and DEB, Mac OS X DMG, and Windows MSI). This includes the command line interface to deploy OpenOffice.org through the network.
Solaris Sparc/x86
Installation
The Solaris Package Manager is a powerful tool you can use to deploy software packages both locally and throughout a network.
Note – These instructions assume you have downloaded and extracted the OpenOffice.org installation files.
1 Become root if necessary
su -
2 Change directory to:
<OpenOffice.org_unzip-dir>/packages
3 For a silent installation of OpenOffice.org, you must create an admin file. This hides any recurring queries during the installation.
echo action=nocheck > /tmp/adminecho conflict=quit >> /tmp/adminecho idepend=nocheck >> /tmp/admin
4 Install the OpenOffice.org packages :
pkgadd -n -a /tmp/admin -d . *
You can safely delete the OpenOffice.org installation packages after the install is complete.
Uninstall
Do not delete the OpenOffice.org files from the file system. You must use either the OpenOffice.org Java setup or the pkgrm tool to uninstall OpenOffice.org.
7
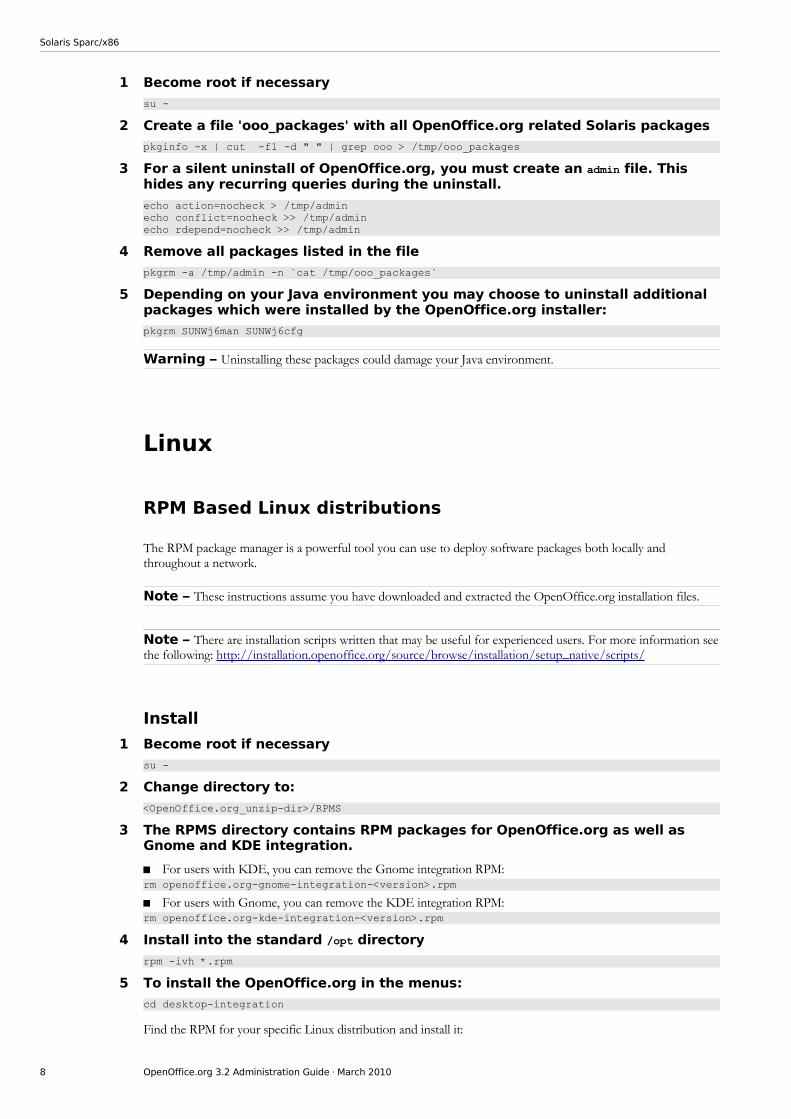
Solaris Sparc/x86
1 Become root if necessary
su -
2 Create a file 'ooo_packages' with all OpenOffice.org related Solaris packages
pkginfo -x | cut -f1 -d " " | grep ooo > /tmp/ooo_packages
3 For a silent uninstall of OpenOffice.org, you must create an admin file. This hides any recurring queries during the uninstall.
echo action=nocheck > /tmp/adminecho conflict=nocheck >> /tmp/adminecho rdepend=nocheck >> /tmp/admin
4 Remove all packages listed in the file
pkgrm -a /tmp/admin -n `cat /tmp/ooo_packages`
5 Depending on your Java environment you may choose to uninstall additional packages which were installed by the OpenOffice.org installer:
pkgrm SUNWj6man SUNWj6cfg
Warning – Uninstalling these packages could damage your Java environment.
Linux
RPM Based Linux distributions
The RPM package manager is a powerful tool you can use to deploy software packages both locally and throughout a network.
Note – These instructions assume you have downloaded and extracted the OpenOffice.org installation files.
Note – There are installation scripts written that may be useful for experienced users. For more information see the following: http://installation.openoffice.org/source/browse/installation/setup_native/scripts/
Install
1 Become root if necessary
su -
2 Change directory to:
<OpenOffice.org_unzip-dir>/RPMS
3 The RPMS directory contains RPM packages for OpenOffice.org as well as Gnome and KDE integration.
For users with KDE, you can remove the Gnome integration RPM: rm openoffice.org-gnome-integration-<version>.rpm
For users with Gnome, you can remove the KDE integration RPM: rm openoffice.org-kde-integration-<version>.rpm
4 Install into the standard /opt directory
rpm -ivh *.rpm
5 To install the OpenOffice.org in the menus:
cd desktop-integration
Find the RPM for your specific Linux distribution and install it:
8 OpenOffice.org 3.2 Administration Guide · March 2010
Linux
rpm -ivh openoffice.org-<distribution>-menus_<version>.rpm
Note – If you prefer to install OpenOffice.org in a different location, use the -prefix option.rpm -ivh –prefix <install-dir> *.rpm
You can safely delete the OpenOffice.org installation packages after the install is complete.
Uninstall
Do not delete the OpenOffice.org files from the file system. You must use either the OpenOffice.org Java setup or the RPM package manager to uninstall OpenOffice.org.
1 Become root if necessary
su -
2 Create a file 'ooo_packages' with all OpenOffice.org related RPM packages
rpm -qa | grep openoffice > ooo_packages
3 Check the content of this file carefully. All packages in this list will be removed. This list does not include the JRE package that was installed if you used the OpenOffice.org installstion set that includes JRE.
4 To remove all OpenOffice.org related packages:
rpm -e 'cat ooo_packages'
DEB Based Linux Distributions
The APT or DPKG package manager is a powerful tool you can use to install, update and remove DEB packages, and is provided as part of some Linux distributions such as Debian and Ubuntu.
Note – If you have the RPM package and do not want to download the DEB package, you can convert the RPM files to DEB files using the following command: sudo alien -d --scripts *.rpm
Note – There are installation scripts written that may be useful for experienced users. For more information see the following: http://installation.openoffice.org/source/browse/installation/setup_native/scripts/
Install
1 Become root if necessary
su -
2 Change directory to:
<OpenOffice.org_unzip-dir>/DEBS
3 The DEBS directory contains DEB packages for OpenOffice.org as well as Gnome and KDE integration.
For users with KDE, you can remove the Gnome integration DEB: rm openoffice.org-gnome-integration-<version>.deb
For users with Gnome, you can remove the KDE integration DEB: rm openoffice.org-kde-integration-<version>.deb
4 Install into the standard /opt directory
dpkg -i *.deb
5 To install the OpenOffice.org in the menus:
cd desktop-integration
Chapter 1 · Deploy OpenOffice.org using package managers 9
Linux
dpkg -i openoffice.org-debian-menus_<version>.deb
Note – If you prefer to install OpenOffice.org in a different location, use the --instdir=<directory> option. dpkg -i --installdir=<install-dir> *.deb
You can safely delete the OpenOffice.org installation packages after the install is complete.
Uninstall
Do not delete the OpenOffice.org files from the file system. You must use either the OpenOffice.org Java setup or the DEB package manager to uninstall OpenOffice.org.
1 Become root if necessary
su -
2 To remove all OpenOffice.org related packages:
apt-get remove openoffice.org*
Microsoft Windows
The OpenOffice.org setup for Microsoft Windows uses MSI packages. MSI is the standard tool for installing software packages under Microsoft Windows.
Note – The Advertise option (/J{m|u}) of the Microsoft Software Installer is not supported by the OpenOffice.org installation package.
Extract the OpenOffice.org installation files
All files of the OpenOffice.org installation set are packed into a single file in the download version of the OpenOffice.org installation set. This file must be unpacked before the MSI package is accessible.
To expand the download installation set :
1 Double click on the the file from the download install set or start the file from the command line.
2 The OpenOffice.org Installation Preparation Wizard appears.
3 Click Next.
4 Select the Destination Folder for the unpacked files.
5 Once all files are unpacked, the regular OpenOffice.org Installation Wizard dialog appears. Do not follow the installation dialog. Leave the dialog open and copy the expanded files from the installation set into a different directory.
6 Click Cancel in the OpenOffice.org Installation Wizard, click Yes to confirm the cancellation, and click Finish to close the Installation Wizard.
Unattended (silent) installation
The parameter /qn is used to suppress the User Interface and all message boxes during the installation.
10 OpenOffice.org 3.2 Administration Guide · March 2010
Microsoft Windows
msiexec /qn /i openofficeorg<version>.msi
Copy the OpenOffice.org installation set to a network share
This installation type does not install OpenOffice.org on single machine, instead it copies the installation files, ready for a future OpenOffice.org installation, into a directory. The user could later start the OpenOffice.org setup from this directory for a local installation.
1 Start the network Installation Wizard
msiexec /a openofficeorg<version>.msi
2 Click Next
3 Specify the network share where the installation files will be copied.
4 Click Install.
5 Click Finish when the installer is finished copying the files to the network share.
Users can install OpenOffice.org from this shared network location by browsing to the shared directory and double clicking on openofficeorg<version>.msi.
Note – If you choose to include specific configuration files for a specific environment, you can copy them from a template directory you created into the users' application data directory using the command xcopy /v /y /e /z template-dir "%APPDATA%\OpenOffice.org\3\"
If you want to install addons, then you can use the command:
echo yes | "c:\program files\openoffice.org 3\program\unopkg.com" add <specificaddon>.oxt
Uninstall
Uninstalling MSI packages from the command line is not easy. Using the original name of the MSI package does not work. The Windows Installer expects the ProductCode of the application. The product code for an English OpenOffice.org installation set is different to the product code for a German or Italian installation set. OpenOffice.org saves this ProductCode into the setup.ini that is located in the program directory of OpenOffice.org. The parameter for the uninstall is /x and the /qn parameter for a silent uninstall.
1 Open a file manager and browse to <openoffice.org-install-dir>/program.
2 Open setup.ini and locate the ProductCode.
3 Uninstall OpenOffice.org with:
msiexec /qn /x {4BC1CB2B-FDCE-4DB4-A557-BA8127569B0D}
Note – The ProductCode {4BC1CB2B-FDCE-4DB4-A557-BA8127569B0D} is an example. You must find the correct product code for your specific OpenOffice.org installation.
Repairing an OpenOffice.org installation
Existing OpenOffice.org installations can also be repaired using msiexec.
msiexec /f [p|o|e|d|c|a|u|m|s|v] /x {ProductCode}
A description of all repair options is available online in the Microsoft Developer Network:
Chapter 1 · Deploy OpenOffice.org using package managers 11
Microsoft Windows
http://msdn.microsoft.com/library/default.asp?url=/library/en-us/msi/setup/command_line_options.asp
Mac OS X
OpenOffice.org for Mac OS X uses the Mac OS X DMG disk image format.
Install
To install OpenOffice.org locally or over a network:
1 Locate the disk image file and open it.
2 Drag and drop the icon from within the disk image to a location on the local drive or a location on the network.
3 Enter the administrator password when you are prompted for it.
Command line install
You can install OpenOffice.org from the command line on Mac OS X.
In a terminal window, type:
hdiutil attach <disk image name>cp -a "/Volumes/OpenOffice.org <version>/OpenOffice.org.app" <path>hdiutil detach "/Volumes/OpenOffice.org <version>"
Uninstall
To uninstall OpenOffice.org, drag the icon for the OpenOffice.org application to the Trash.
Remove the user profile for OpenOffice.org
To remove the user profile for OpenOffice.org:
1 Go to the user's home directory.
2 Select Library > Application Support.
3 Move the OpenOffice.org directory to the Trash.
12 OpenOffice.org 3.2 Administration Guide · March 2010
2 C H A P T E R 2
2 OpenOffice.org Basic Macros and Libraries
OpenOffice.org Basic is a programming language you can use to automate tasks in OpenOffice.org. OpenOffice.org Basic macros are stored in modules that in turn are stored in libraries. Libraries also act as containers for dialog boxes you create in OpenOffice.org Basic. You can store Basic libraries in any directory that a user can access.
Note – Use OpenOffice.org extensions for packaging and deploying Basic Libraries. The OpenOffice.org Developer's Guide describes these Extensions in detail.
About OpenOffice.org Basic Libraries and Modules
The default OpenOffice.org Basic libraries are located in the install-dir/share/basic directory. A library contains the following files:
script.xlb
An XML file that contains the names of the modules in the library.
dialog.xlb
An XML file that contains the names of dialog boxes in the library.
*.xba
An XML file that stores the OpenOffice.org Basic source code for a single OpenOffice.org Basic module. The file name corresponds to the module name.
*.xdl
An XML file that stores the dialog elements of an OpenOffice.org Basic dialog box. The file name corresponds to the dialog name.
*.pba
An OpenOffice.org Basic module which is protected with a password, that is, the source code is encrypted. The file name corresponds to the module name.
13
About OpenOffice.org Basic Configuration Files
About OpenOffice.org Basic Configuration Files
The script.xlc and dialog.xlc configuration files list the location of OpenOffice.org Basic libraries and dialog boxes. These files are located in the install-dir/user/basic/ directory which also contains the default Standard OpenOffice.org Basic library as well as the user-defined libraries.
Warning – You cannot change the location of the script.xlc and dialog.xlc configuration files.
The XML-based script.xlc file includes a list of all Basic libraries that are available to OpenOffice.org. The following tags are used:
library:name
Specifies the name of the OpenOffice.org Basic library.
xlink:href
Specifies the URL of the script.xlb file for the library. The URL must begin with the file:/// notation.
Note – You do not need to specify a value for the xlink:href tag if the library is in the <OpenOffice.org installation directory>/user/basic directory.
xlink:type
This tag, required by the xlink:href tag, must be set to simple.
library:link
Specifies that the entry is a link to a library that is not in the default library location. The default location for OpenOffice.org Basic libraries is install-dir/user/basic. If you only use the default location for the libraries, set the value of this tag to false. For all other libraries, set the value of this tag to true.
library:readonly
Specifies whether a library is read-only. Set the value of this tag to true for read-only access.
The following XML code is for a script.xlc configuration file for OpenOffice.org Basic libraries. The only difference between this file and a dialog.xlc file is that the xlink:href tag points to the script.xlb file of a library instead of the dialog.xlb file.
<?xml version="1.0" encoding="UTF-8"?><!DOCTYPE library:libraries PUBLIC "-//OpenOffice.org//DTD OfficeDocument 1.0//EN" "libraries.dtd">
<library:libraries xmlns:library="http://openoffice.org/2000/library" xmlns:xlink="http://www.w3.org/1999/xlink">
<library:library library:name="Standard" xlink:href="file:///.../user/basic/Standard/script.xlb/" xlink:type="simple" library:link="false"/>
<library:library library:name="FormWizard" xlink:href="file:///.../share/basic/FormWizard/script.xlb/" xlink:type="simple" library:link="true" library:readonly="false"/></library:libraries>
Distributing OpenOffice.org Basic Libraries
You can make custom OpenOffice.org Basic libraries available to either existing OpenOffice.org installations or new installations only.
14 OpenOffice.org 3.2 Administration Guide · March 2010
Distributing OpenOffice.org Basic Libraries
Note – The script.xlc and dialog.xlc configuration files are located in the following directories: Solaris and Linux platforms: install-dir/usr/basic/Windows: C:\Documents and Settings\user-id\Application Data\install-dir\user\basic\
To Make a Custom OpenOffice.org Basic Library Available to All Users on a Network
Use OpenOffice.org to create a custom library as well as the macros in the library.
1 As root, copy the custom library from the user installation where you created the library to the OpenOffice.org server installation.cp -r install-dir/user/basic/custom library install-dir/share/basic/
Note – On Windows, the location of the custom library you created is C:\Documents and Settings\user-id\Application Data\installation-dir\user\basic\custom library
2 In the script.xlc configuration file for the user installation, add a link to the script.xlb configuration file for the library.
Use the following syntax for the link:
<library:library library:name="Library Name" xlink:href="$(USER)/basic/Library Name/script.xlb/" xlink:type="simple" library:link="true" library:readonly="false"/>
3 In the dialog.xlc configuration file for the user installation, add a link to the script.xlb configuration file for the library.
Use the following syntax for the link:
<library:library library:name="Library Name" xlink:href="$(USER)/basic/Library Name/dialog.xlb/" xlink:type="simple" library:link="false"/>
4 Restart OpenOffice.org on the workstations.
To Make a Custom OpenOffice.org Basic Library Available to a Single User
1 Copy the custom library from the user installation where you created the library to the user installation where you want to deploy the library.
On the Solaris and Linux platforms, become root, and copy the library. cp -r ''install-dir''/user/basic/custom library ''install-dir''/user/basic/
On Windows, become a user with administrator privileges, and copy the library.
The file name path for the library is C:\Documents and Settings\user-id\Application Data\install-dir\user\basic\custom library
2 In the script.xlc configuration file for the user installation, add a link to the script.xlb configuration file for the library. Use the following syntax for the link:
<library:library library:name="Library Name" xlink:href="$(USER)/basic/Library Name/script.xlb/" xlink:type="simple" library:link="true" library:readonly="false"/>
3 In the dialog.xlc configuration file for the user installation, add a link to the script.xlb configuration file for the library. Use the following syntax for the link:
<library:library library:name="Library Name" xlink:href="$(USER)/basic/Library Name/dialog.xlb/" xlink:type="simple" library:link="false"/>
4 Restart OpenOffice.org.
Chapter 2 · OpenOffice.org Basic Macros and Libraries 15
Distributing OpenOffice.org Basic Libraries
To Install a Custom OpenOffice.org Basic Library With a Macro
You can create a macros that installs a OpenOffice.org Basic library from an OpenOffice.org document.
1 In Writer, create a custom OpenOffice.org Basic library in a new document.
2 Save the document.
3 Create an installation macro.
a. Choose Tools → Macros → Organize Macros → OpenOffice.org Basic. The OpenOffice.org Basic Macros dialog box appears.
b. In the Macro from list, select your Writer document.
c. In the Macro name box, type a name from the installation macro.
d. Click the New button. The BASIC IDE window appears.
e. Type the following code:
Sub AddBasicLibrary Dim SourceLibraryName As String, DestLibraryName As String Dim oSrcLib As Object, oDestLib As Object, iCounter As Integer Dim oLib As Object, oGlobalLib As Object ' set these 2 variables to your lib name SrcLibraryName = "TextLib" ' The name of the library that contains the modules DestLibraryName = "NewLib" ' This library will be created and is the ' destination for the modules from the source document. oLib = BasicLibraries ' For Basic libaries oGlobalLib = GlobalScope.BasicLibraries For iLib = 1 To 2 If oGlobalLib.hasByName( DestLibraryName ) = False Then oGlobalLib.createLibrary( DestLibraryName ) End If If oLib.hasByName( SrcLibraryName ) Then oLib.loadLibrary( SrcLibraryName ) oSrcLib = oLib.getByName( SrcLibraryName ) sSrcModules = oSrcLib.getElementNames() iCounter = lBound( sSrcModules() ) while( iCounter <= uBound( sSrcModules() ) ) oDestLib = oGlobalLib.getByName(DestLibraryName) If oDestLib.hasByName( sSrcModules(iCounter) ) = False Then oDestLib.insertByName( sSrcModules(iCounter),_ oSrcLib.getByName( sSrcModules(iCounter) ) ) End If iCounter = iCounter + 1 wend End If oLib = DialogLibraries ' The same for the Dialog libraries oGlobalLib = GlobalScope.DialogLibraries Next iLib End Sub
f. Replace the SrcLibraryName and DestLibraryName variables with the name of your library.
g. Close the BASIC IDE window.
4 Add a push button to the document.
a. On the Form Controls toolbar, click the Push Button icon.
b. In your document, drag to draw the button.
5 Assign the installation macro to a button event.
16 OpenOffice.org 3.2 Administration Guide · March 2010
Distributing OpenOffice.org Basic Libraries
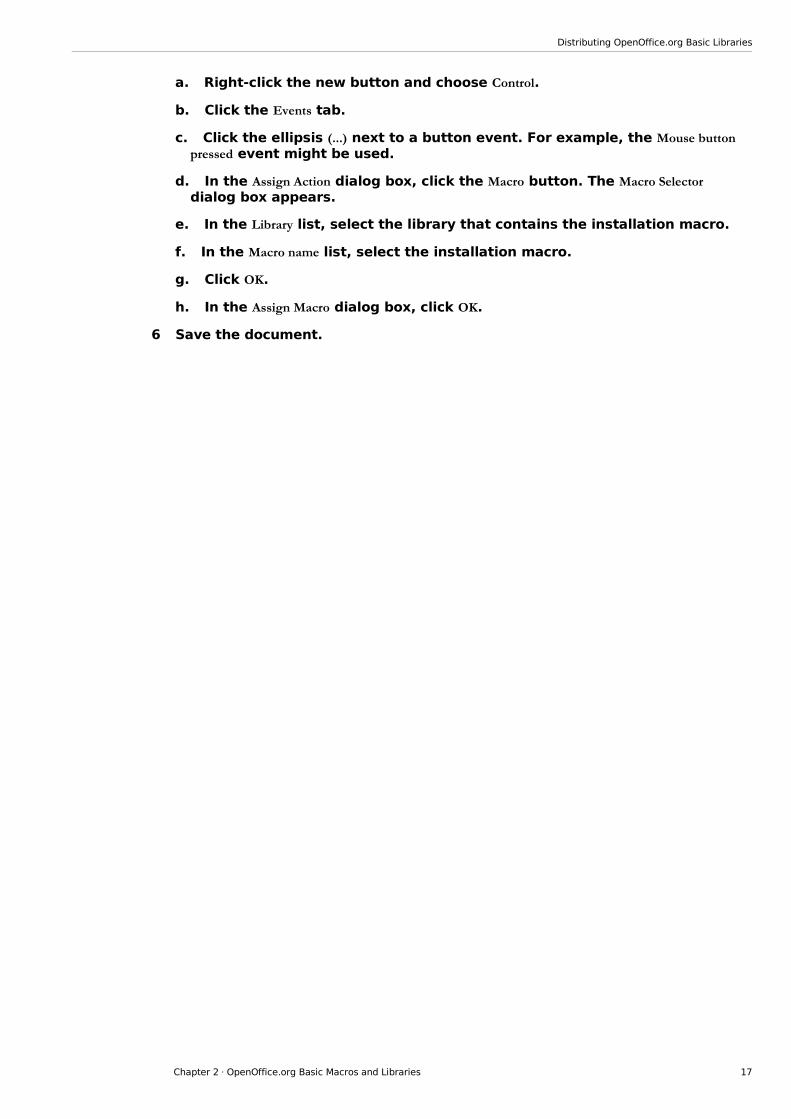
a. Right-click the new button and choose Control.
b. Click the Events tab.
c. Click the ellipsis (...) next to a button event. For example, the Mouse button pressed event might be used.
d. In the Assign Action dialog box, click the Macro button. The Macro Selector dialog box appears.
e. In the Library list, select the library that contains the installation macro.
f. In the Macro name list, select the installation macro.
g. Click OK.
h. In the Assign Macro dialog box, click OK.
6 Save the document.
Chapter 2 · OpenOffice.org Basic Macros and Libraries 17
3 C H A P T E R 3
3 OpenOffice.org Extension Manager
You can use the OpenOffice.org Extension Manager to add, remove, disable, enable, or export OpenOffice.org extensions. For example, you can use the Extension Manager to add or remove the following types of extensions:
Configuration Data Configuration Libraries Extensions Universal Network Objects (UNO) components
These components represent compiled software packages. UNO is the interface-based component model for OpenOffice.org. For more information on this model, go to the UNO Development Kit project web site.
Note – You cannot manage XSLT filters, language modules, or palettes with the Extension Manager.
You can manage extensions from a dialog box or from the command-line.
Extensions can be installed so they are available to either the current user (single user installation), or to all users (shared user installation).
Single user install
To install an extension for the current user, open the Extension Manager dialog box from the Tools menu in any OpenOffice.org program and install the extension. The extension will be installed and be immediately available to the current user. The extension will not be available to other users on this computer.
Shared user install
To install an extension for all users (shared user installation), you must install the extension as root or Administrator. You can do this from the command line (recommended), or from the OpenOffice.org Extension manager.
Using the Extension manager
To install an extension for all users on a single machine, you can use the OpenOffice.org Extension manager. You must be running OpenOffice.org as root or Administrator.
19
Shared user install
Open the Extension Manager dialog box from the Tools menu in any OpenOffice.org program and install the extension. You will be asked "For whom do you want to install the extension?". Select For all users and complete the install. The extension will be installed and be immediately available to all users.
Using the command line
To install an extension for all users, you can use the unopkg add --shared command-line application. You must have root or Administrator privileges.
To Add an Extension for All Users
1 Become root.
In UNIX, Linux and OSX, open a terminal window, type su and enter your root user password. In Windows XP, open a command prompt. In Windows Vista and Windows 7, right-click the icon for the Command Prompt and select Run as
Administrator.
2 Change to the install-dir/program directory.
3 Type unopkg add --shared package-name.
To Remove an Extension for All Users
1 Become root.
In UNIX, Linux,and OSX, open a terminal window, and type su. In Windows XP, open a command prompt. In Windows Vista and Windows 7, right-click on the icon for the Command Prompt and select Run as
Administrator.
2 Change to the install-dir/program directory.
3 Type unopkg remove package-name.
Using the unopkg Command to Manage Extensions
You can manage packages from the command line. The syntax for the unopkg command is:
unopkg add {-v, -f, --log-file, --shared}
extension-path | remove {-v, -f, --log-file, --shared}
extension-name | list {-v, -f, --log-file, --shared}
extension-name | reinstall {-v, -f, --log-file, --shared} |
gui | -V | -h
add
Adds extensions to an OpenOffice.org installation.
remove
Removes extensions from an OpenOffice.org installation.
list
Displays information about the deployed extensions.
reinstall
Reinstalls the deployed extensions.
20 OpenOffice.org 3.2 Administration Guide · March 2010
Using the unopkg Command to Manage Extensions
gui
Opens the Extension Manager dialog box.
–V, – –version
Displays the version information for the unopkg command.
–h, – –help
Displays the help for the unopkg command.
-v, --verbose
Runs the command in verbose mode.
-f, --force
Overwrites existing extensions that have the same names.
--log-file filename
Creates a log file. The default file name path for the log file is cache-dir/log.txt
--shared
Expert feature: operate on shared installation deployment context; run only when no concurrent processes are running
Chapter 3 · OpenOffice.org Extension Manager 21
4 C H A P T E R 4
4 Adding Template Files to an OpenOffice.org Installation
You can make custom document templates available to all users or to individual users of an OpenOffice.org network installation. You can also make specific directories for document templates available to these users.
Warning – Do not give users write permission for template files.
To Add a Template For All Users of a OpenOffice.org Network Installation
1 Become root.
2 Copy the template to the network-install-dir/share/template/ directory.
To Add a Template to a Workstation Installation of OpenOffice.org
1 Become root.
2 Copy the template to the ooo-user-dir/user/template/ directory on the workstation.
To Add a Template Directory to an OpenOffice.org Installation
1 In any OpenOffice.org program, choose Tools > Options > OpenOffice.org > Paths.
2 In the list of default paths, select Templates, and then click Edit.
3 In the Edit Paths dialog box, click the Add button.
23
To Add a Template Directory to an OpenOffice.org Installation
4 Locate the template directory you want to add and click Select.
5 In the Edit Paths dialog box, click the OK button.
6 In the Options - OpenOffice.org - Paths dialog box, click OK.
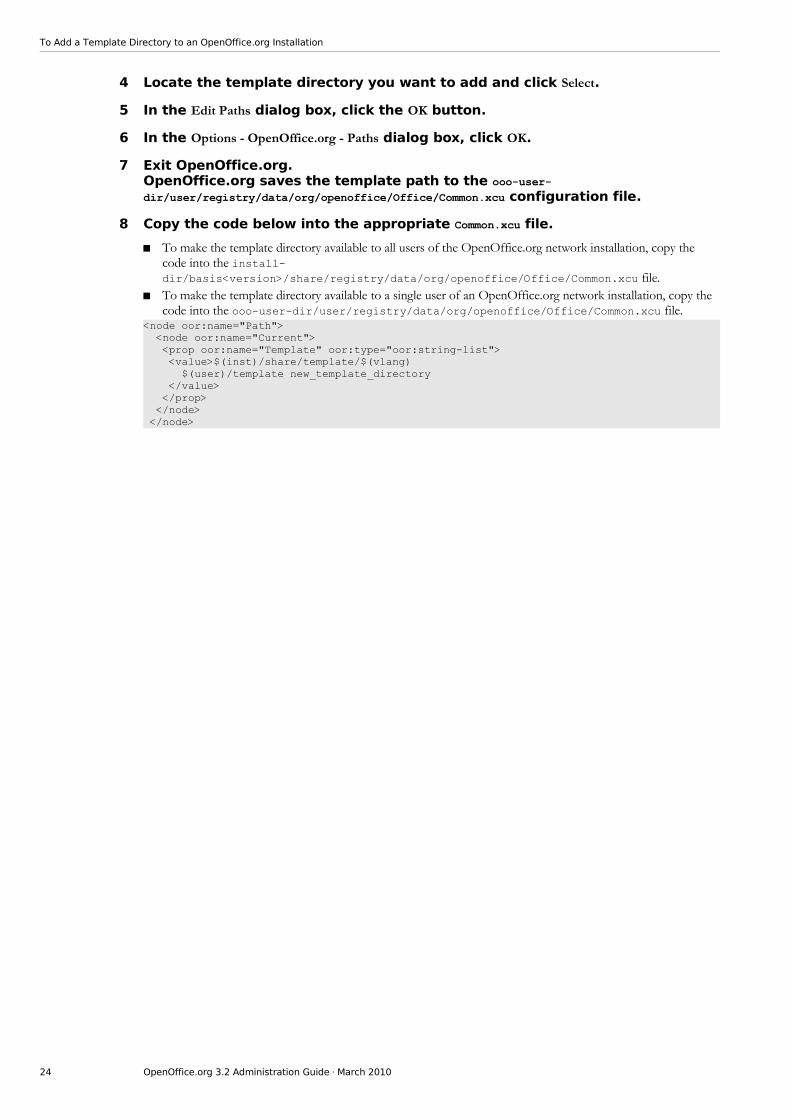
7 Exit OpenOffice.org.OpenOffice.org saves the template path to the ooo-user-dir/user/registry/data/org/openoffice/Office/Common.xcu configuration file.
8 Copy the code below into the appropriate Common.xcu file.
To make the template directory available to all users of the OpenOffice.org network installation, copy the code into the install-dir/basis<version>/share/registry/data/org/openoffice/Office/Common.xcu file.
To make the template directory available to a single user of an OpenOffice.org network installation, copy the code into the ooo-user-dir/user/registry/data/org/openoffice/Office/Common.xcu file.
<node oor:name="Path"> <node oor:name="Current"> <prop oor:name="Template" oor:type="oor:string-list"> <value>$(inst)/share/template/$(vlang) $(user)/template new_template_directory </value> </prop> </node> </node>
24 OpenOffice.org 3.2 Administration Guide · March 2010
5 C H A P T E R 5
5 Adding AutoText Files to an OpenOffice.org Network Installation
OpenOffice.org saves AutoText entries to categories in files with a *.bau extension. You can make custom AutoText files available to all users or to individual users of a network installation of OpenOffice.org.
Note – For information on how to create AutoText entries, search for the keyword "AutoText" in the online help for OpenOffice.org Writer
To Add AutoText Files For All Users of an OpenOffice.org Network Installation
1 Become root.
2 Copy the AutoText *.bau files to the network-install-dir/share/autotext/ directory.
To Add AutoText Files to a Workstation Installation of OpenOffice.org
1 Become root.
2 Copy the AutoText *.bau files to the install-dir/user/autotext/ directory on the workstation.
To Add an AutoText Directory to an OpenOffice.org Installation
1 In any OpenOffice.org program, choose Tools → Options → OpenOffice.org → Paths.
2 In the list of default paths, select AutoText, and then click Edit.
3 In the Edit Paths dialog box, click Add.
25
To Add an AutoText Directory to an OpenOffice.org Installation
4 Locate the directory that contains the AutoText *.bau files that you want to add and click the Select button.
5 In the Edit Paths dialog box, click OK.
6 In the Options - OpenOffice.org - Paths dialog box, click OK.
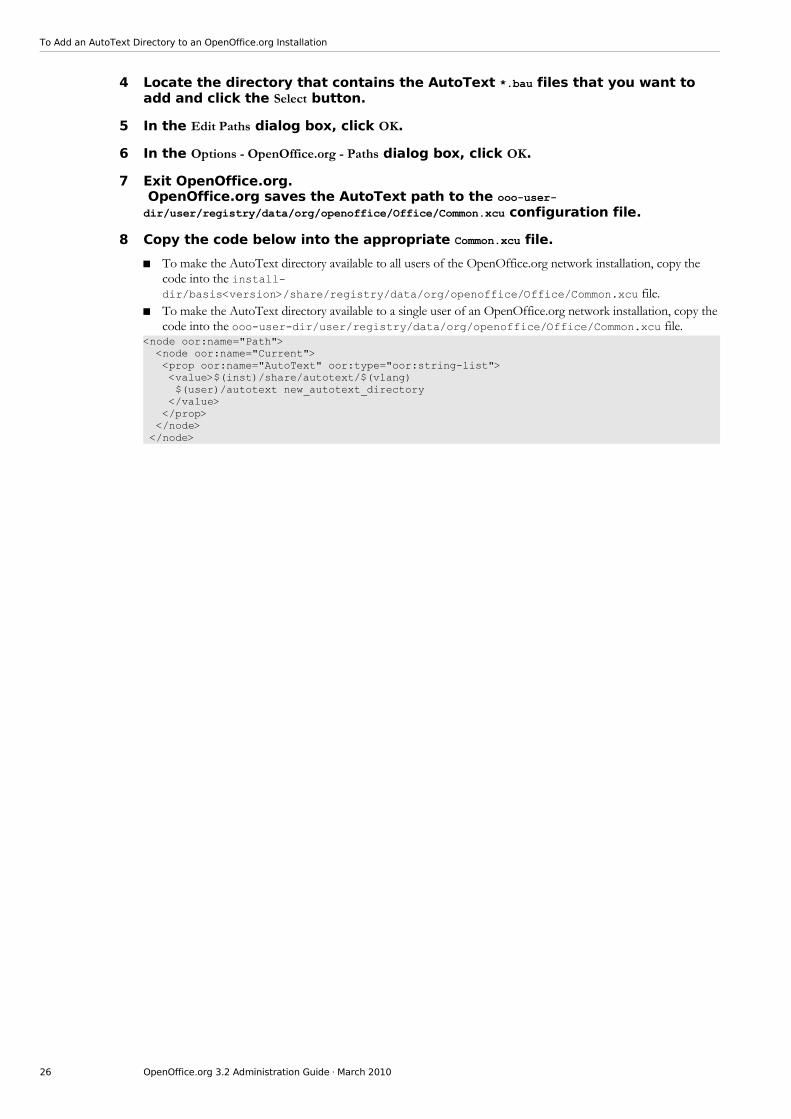
7 Exit OpenOffice.org. OpenOffice.org saves the AutoText path to the ooo-user-dir/user/registry/data/org/openoffice/Office/Common.xcu configuration file.
8 Copy the code below into the appropriate Common.xcu file.
To make the AutoText directory available to all users of the OpenOffice.org network installation, copy the code into the install-dir/basis<version>/share/registry/data/org/openoffice/Office/Common.xcu file.
To make the AutoText directory available to a single user of an OpenOffice.org network installation, copy the code into the ooo-user-dir/user/registry/data/org/openoffice/Office/Common.xcu file.
<node oor:name="Path"> <node oor:name="Current"> <prop oor:name="AutoText" oor:type="oor:string-list"> <value>$(inst)/share/autotext/$(vlang) $(user)/autotext new_autotext_directory </value> </prop> </node> </node>
26 OpenOffice.org 3.2 Administration Guide · March 2010
6 C H A P T E R 6
6 Deactivating the OpenOffice.org Registration Wizard
The first time you start OpenOffice.org, a wizard opens to guide you through the registration process. You can also start this process if you choose the Help → Registration menu item in any OpenOffice.org program. You can deactivate the registration wizard as well as the Registration menu command.
To Deactivate the Registration Wizard
To use an extension to deactivate the Registration Wizard at the first startup of OpenOffice.org:
1 Download the DisableFirstStartWzd.oxt extension:
For OpenOffice.org 2.x: DisableFirstStartWzd.oxt For OpenOffice.org 3.0.x: DisableFirstStartWzd_ooo3.oxt For OpenOffice.org 3.1: DisableFirstStartWzd_ooo31.oxt For OpenOffice.org 3.1.1: DisableFirstStartWzd_ooo311.oxt For OpenOffice.org 3.2: DisableFirstStartWzd_ooo32.oxt
2 Install OpenOffice.org.
3 At the command line, type:
unopkg add --shared DisableFirstStartWzd.oxt
Note – The text in Step 3 demonstrates how to install the extension for OpenOffice.org 2.x. If you are installing the extension for one of the other versions of OpenOffice.org, make sure you are typing the correct OXT filename.
This command installs the extension and makes it available to all users of this specific OpenOffice.org installation. You must install the extension on each OpenOffice.org installation where you want to disable the Registration Wizard.
Note – MS Windows only: The First Start wizard creates a shortcut link for the OpenOffice.org Quickstarter in the Windows startup folder. If you deactivate the First Start wizard, this shortcut will not be placed in the startup folder.
27
7 C H A P T E R 7
7 Accessing Email Clients
In OpenOffice.org, you can send the current document as an email attachment.
On the Solaris and Linux platforms, the email client must support the attachment of a document to an email message through a command at the command line. In Windows, the email client must support the Messaging Application Program Interface (MAPI).
OpenOffice.org works with most common email clients, including but not limited to:
Mozilla Thunderbird Evolution/Groupwise Sylpheed/Claws-mail Apple Mail
Configuring OpenOffice.org to Use an Email Client on Solaris and Linux
You need to specify the email client you want to use.
To Specify the Email Client for the Solaris and Linux Platforms
1 In OpenOffice.org Writer, choose Tools → Options → Internet → E-mail
2 Click the ellipsis (...) button next to the E-mail program box.
3 Locate the email client you want to use and click the Open button.
Configuring OpenOffice.org to Use an Email Client on Windows
You do not need to configure OpenOffice.org to use an email client in Windows. OpenOffice.org automatically uses the default email client, if the client uses the Messaging Application Program Interface (MAPI). See this Mozilla article for information about how to change the default email client per user under Windows.
29
Configuring OpenOffice.org to Use an Email Client on Windows
Note – OpenOffice.org uses the senddoc.exe program in the program directory of the OpenOffice.org installation to access the MAPI email client.
30 OpenOffice.org 3.2 Administration Guide · March 2010
8 C H A P T E R 8
8 Customizing the User Interface
Creating a Customized XML Configuration File
OpenOffice.org stores most of the User Interface (UI) configuration settings in Extensible Markup Language (XML) format. The UI components are defined in the XML-based User Interface Language (XUL) and stored in XML files.
OpenOffice.org provides a Customize dialog box where you can make changes to most of the UI components. For example, you could use this dialog box to add a custom menu to Writer.
You can also edit an XML UI configuration file to make your changes. The XML elements and attributes for the OpenOffice.org UI components are described in the following sections.
Using the Customize Dialog Box
You can use the Customize dialog box to create or make changes to the following UI components:
Menus Shortcut keys Toolbars Events
The changes are saved to an XML configuration file. After you make your changes in the Customize dialog box, you can use the XML configuration file that you created to apply the changes to other OpenOffice.org installations.
Note – For more information on the location of the individual XML configuration files, see Using a Text Editor
To Customize Menus, Keyboard Shortcuts, Toolbars, and Events
1 Open the OpenOffice.org program where you want to customize a UI element.
2 Choose Tools → Customize
The Customize dialog box appears.
31

Creating a Customized XML Configuration File
3 Click the UI element tab you want to customize.
Make your changes and click OK.The changes are saved to one or more XML configuration files in the OpenOffice.org user directory. The file names and location for these files is ooo-user-dir/config/soffice.cfg/modules/module-identifier/element-type/element-name.xml
Using a Text Editor for UI Customization
You can also use a text editor to customize a UI element in an XML configuration file. For example, to remove an item from the Tools menu in Writer, open the menubar.xml file for Writer, and delete the XML element for the menu item. You can also use XML configuration files to limit the functionality of OpenOffice.org. See Restricting functionality for more information.
The UI configuration settings for each of the following components in an OpenOffice.org module are stored in separate XML configuration files:
Menu bars Shortcut keys Toolbars Events Status bars Images
These UI elements are located in install-dir/basics<version>/share/config/soffice.cfg/modules/module-identifier/element-type/element-name.xml
For example, the XML configuration file for the OpenOffice.org 3.2 Writer menu bar is install-dir/basics3.2/share/config/soffice.cfg/modules/swriter/menubar/menubar.xml
The following table lists the short module identifiers for each OpenOffice.org module:
32 OpenOffice.org 3.2 Administration Guide · March 2010
Customize Dialog box
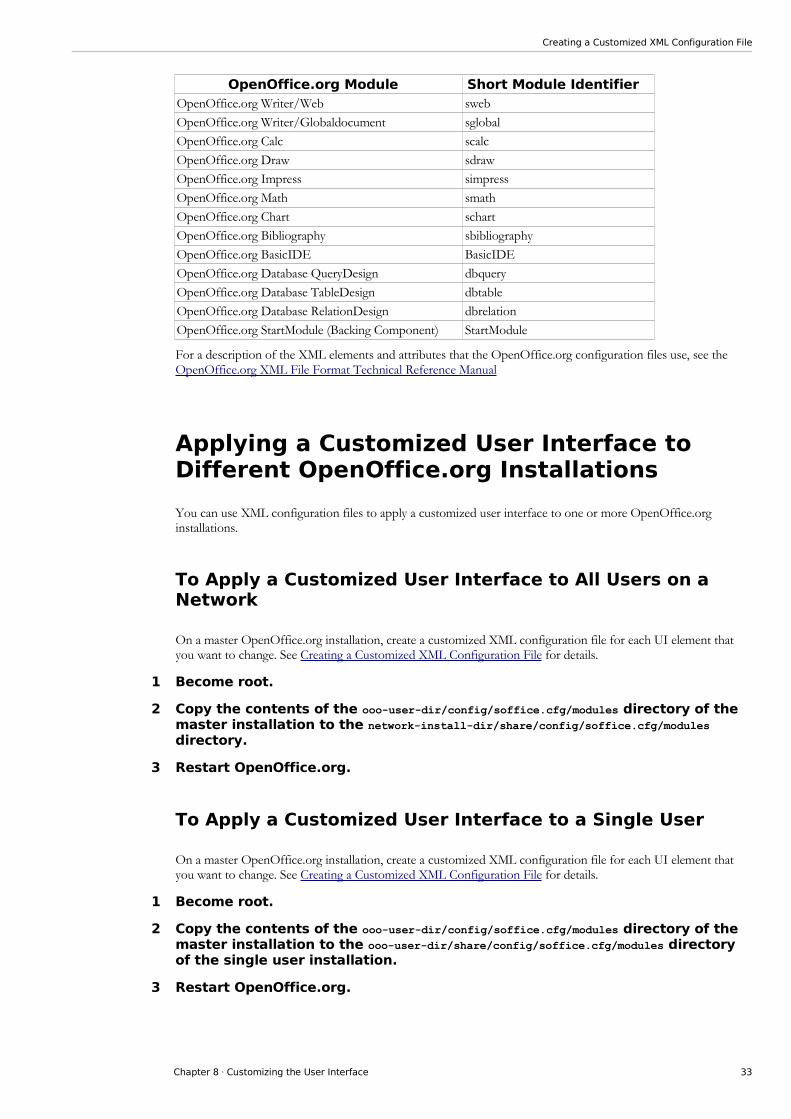
Creating a Customized XML Configuration File
OpenOffice.org Module Short Module Identifier OpenOffice.org Writer/Web sweb
OpenOffice.org Writer/Globaldocument sglobal
OpenOffice.org Calc scalc
OpenOffice.org Draw sdraw
OpenOffice.org Impress simpress
OpenOffice.org Math smath
OpenOffice.org Chart schart
OpenOffice.org Bibliography sbibliography
OpenOffice.org BasicIDE BasicIDE
OpenOffice.org Database QueryDesign dbquery
OpenOffice.org Database TableDesign dbtable
OpenOffice.org Database RelationDesign dbrelation
OpenOffice.org StartModule (Backing Component) StartModule
For a description of the XML elements and attributes that the OpenOffice.org configuration files use, see the OpenOffice.org XML File Format Technical Reference Manual
Applying a Customized User Interface to Different OpenOffice.org Installations
You can use XML configuration files to apply a customized user interface to one or more OpenOffice.org installations.
To Apply a Customized User Interface to All Users on a Network
On a master OpenOffice.org installation, create a customized XML configuration file for each UI element that you want to change. See Creating a Customized XML Configuration File for details.
1 Become root.
2 Copy the contents of the ooo-user-dir/config/soffice.cfg/modules directory of the master installation to the network-install-dir/share/config/soffice.cfg/modules directory.
3 Restart OpenOffice.org.
To Apply a Customized User Interface to a Single User
On a master OpenOffice.org installation, create a customized XML configuration file for each UI element that you want to change. See Creating a Customized XML Configuration File for details.
1 Become root.
2 Copy the contents of the ooo-user-dir/config/soffice.cfg/modules directory of the master installation to the ooo-user-dir/share/config/soffice.cfg/modules directory of the single user installation.
3 Restart OpenOffice.org.
Chapter 8 · Customizing the User Interface 33
9 C H A P T E R 9
9 Restricting Functionality in OpenOffice.org
You can restrict the functionality of OpenOffice.org program modules for individual users, groups, or across a network. You can apply different restrictions to different users. You can also create a command configuration file in XML format to restrict the availability of menu commands in an OpenOffice.org program.
Creating a Command Configuration File
The creation of a command configuration file is a three-step process:
Determine the command names of the features you want to restrict. Create an XML configuration file. Copy the configuration file to the appropriate location in the OpenOffice.org installation directory.
To Create a Command Configuration File
1 Determine the UNO Command Names for the feature that you want to restrict.
2 In a text editor, create an XML configuration file.
a. Use the following file structure.
<?xml version="1.0" encoding="UTF-8" ?> <oor:node oor:name="Commands" oor:package="org.openoffice.Office" xmlns:oor="http://openoffice.org/2001/registry" xmlns:xs="http://www.w3.org/2001/XMLSchema" xmlns:xsi="http://www.w3.org/2001/XMLSchema-instance"> <node oor:name="Execute"> <node oor:name="Disabled"> <node oor:name="CommandName" oor:op="replace"> <prop oor:name="Command"> <value>CommandName</value> </prop> </node> </node> </node> </oor:node>
The Commands.xcu file uses the following schema:
<?xml version='1.0' encoding='UTF-8'?> <oor:component-schema oor:name="Commands" oor:package="org.openoffice.Office" xml:lang="en-US" xmlns:oor="http://openoffice.org/2001/registry" xmlns:xs="http://www.w3.org/2001/XMLSchema" xmlns:xsi="http://www.w3.org/2001/XMLSchema-instance">
35
Creating a Command Configuration File
<templates> <group oor:name="CommandType"> <prop oor:name="Command" oor:type="xs:string"/> </group> </templates> <component> <group oor:name="Execute"> <set oor:name="Disabled" oor:node-type="CommandType"/> </group> </component> </oor:component-schema>
b. Create a separate node for each feature you want to restrict.
c. In each node, replace the term CommandName with the command name of the feature.
3 Save the file with the name Commands.xcu.
The following example Commands.xcu file disables the ability to customize menus in OpenOffice.org.
<?xml version="1.0" encoding="UTF-8" ?> <oor:node oor:name="Commands" oor:package="org.openoffice.Office" xmlns:oor="http://openoffice.org/2001/registry" xmlns:xs="http://www.w3.org/2001/XMLSchema" xmlns:xsi="http://www.w3.org/2001/XMLSchema-instance"> <node oor:name="Execute"> <node oor:name="Disabled"> <node oor:name="ConfigureDialog" oor:op="replace"> <prop oor:name="Command"> <value>ConfigureDialog</value> </prop> </node> <node oor:name="ConfigureToolboxVisible" oor:op="replace">; <prop oor:name="Command"> <value>LoadToolBox</value> </prop> </node> </node> </node> </oor:node>
To apply this restriction to all users, copy the file to the network-install-dir/share/registry/data/org/openoffice/Office directory.
For a list of command names and their descriptions, see Index of UNO Command Names for OpenOffice.org.
To Apply a Command Configuration File
You can apply a command configuration file to OpenOffice.org on the Solaris, Linux, and Windows platforms.
1 Exit all OpenOffice.org applications.
On Windows, ensure that you exit the OpenOffice.org Quickstarter in the system tray.
2 Copy the Commands.xcu file to the appropriate directory.
To apply the configuration to all users on the network, copy the Commands.xcu file to the following directory:network-install-dir/share/registry/data/org/openoffice/Office
To apply the configuration to a specific user on the network, copy the Commands.xcu file to the following directory:workstat-dir/user/registry/data/org/openoffice/Office
The configuration is applied when you restart OpenOffice.org
36 OpenOffice.org 3.2 Administration Guide · March 2010

10 C H A P T E R 1 0
10 Accessing OpenOffice.org User Profiles on an LDAP Server
OpenOffice.org can use an LDAP User Profile Back End to access user profiles, such as first name, last name, and address, on an LDAP server. As a result, you do not need to manually enter user profiles when you install OpenOffice.org on a network.
To retrieve user profiles for OpenOffice.org from an LDAP repository, you need to provide the LDAP User Profile Back End with the following information:
Location of the LDAP repository Mapping file that identifies the attributes in the LDAP repository that are required to generate an
OpenOffice.org user profile
Configuring OpenOffice.org to Retrieve User Profiles From an LDAP Repository
You specify the settings for the LDAP User Profile Back End in LDAP.xcu, an XML file. OpenOffice.org loads these settings during startup. The structure of the LDAP.xcu file is defined by the configuration schema for the org.openoffice.LDAP component. The schema is located in install-dir/share/registry/schema/org/openoffice/LDAP.xcs.
To Configure OpenOffice.org to Access User Profiles From an LDAP Repository
1 In a text editor, create an XML configuration file with the name LDAP.xcu
Note – A sample LDAP.xcu file is provided at install-dir/share/registry/data/org/openoffice/LDAP.xcu.sample
The structure of the LDAP.xcu.sample file is:
<oor:component-data oor:name="LDAP" oor:package="org.openoffice" xmlns:oor="http://openoffice.org/2001/registry" xmlns:xs="http://www.w3.org/2001/XMLSchema" xmlns:xsi="http://www.w3.org/2001/XMLSchema-instance"> <node oor:name="UserDirectory"> <node oor:name="ServerDefinition"> <prop oor:name="Server" oor:type="xs:string"> <value>ldapserver.mycorp.com</value> </prop>
37
Configuring OpenOffice.org to Retrieve User Profiles From an LDAP Repository
<prop oor:name="BaseDN" oor:type="xs:string"> <value>dc=mycorp,dc=com</value> </prop> <prop oor:name="Port" oor:type="xs:int"> <value>389</value> </prop> </node> <!-- The following settings should be omitted if anonymous access is possible --> <prop oor:name="SearchUser" oor:type="xs:string"> <value>MyUserLogin</value> </prop> <prop oor:name="SearchPassword" oor:type="xs:string"> <value>MyPassword</value> </prop> <!-- End of strings that should be omitted if anonymous access is possible --> <prop oor:name="UserObjectClass" oor:type="xs:string"> <value>inetorgperson</value> </prop> <prop oor:name="UserUniqueAttribute" oor:type="xs:string"> <value>uid</value> </prop> <prop oor:name="Mapping" oor:type="xs:string"> <value>oo-ldap</value> </prop> </node> </oor:component-data>
Server
Host name of the LDAP Server.
BaseDN
Root entry of the enterprise directory.
Port
Port number of the LDAP Server. The default port number is 389.
SearchUser
Distinguished Name (DN) of an existing user with read-only access to the LDAP repository.
Note – This setting is only required if anonymous access is not supported by the LDAP server.
SearchPassword
Password of SearchUser.
Note – This setting is only required if anonymous access is not supported by the LDAP server.
UserObjectClass
Object class that identifies user entities.For example, the user entity for an OpenDS Server might be inetOrgPerson. To find the DN of a user, you need to use this entity in conjunction with the UserUniqueAttribute attribute.
UserUniqueAttribute
Attribute that identifies user entities.For example, the UserUniqueAttribute for an LDAP repository that is on an OpenDS server might be uid. To find the DN of a user, you need to use this attribute in conjunction with the UserObjectClass. The server compares the value of this attribute to the login user name for the operating system.
Mapping
String that indicates a named mapping file, that is, $(Mapping)-attr.map. For example, if the LDAP repository is an OpenDS server, then the mapping entry is oo-ldap. This entry tells the LDAP User Profile Back End to use oo-ldap-attr.map as the mapping file. Alternatively, if the LDAP repository is an Active Directory, then the Mapping entry is oo-ad-ldap. This entry tells the LDAP User Profile Back End to use oo-ad-ldap-attr.map as the mapping file.
2 Replace the value placeholders in the LDAP.xcu file with the mandatory settings for your LDAP server.
38 OpenOffice.org 3.2 Administration Guide · March 2010
Configuring OpenOffice.org to Retrieve User Profiles From an LDAP Repository
3 Copy the LDAP.xcu file to install-dir/share/registry/data/org/openoffice/.
Mapping LDAP User Profiles
By default, an OpenOffice.org installation includes two meta-configuration mapping files that map OpenOffice.org user profile attributes to LDAP attributes. The LDAP User Profile Back End uses the install-dir/share/registry/ldap/oo-ldap-attr.map mapping file for a Sun Java System Directory Server and the install-dir/share/registry/ldap/oo-ad-ldap-attr.map mapping file for a Windows Active Directory Server. The Mapping entry in the LDAP.xcu file indicates which mapping file to use. For example, oo-ldap indicates the oo-ldap-attr.map file.
Note – If you want to change the location of the mapping files, then edit the CFG_LdapMappingUrl entry in the install-dir/program/configmgrrc file to point to the new location of the file. In Windows, this entry is in the install-dir/program/configmgr.ini file.
You can also create a custom user profile mapping file for an alternative LDAP server.
To Create a Custom User Profile Mapping File
1 Create a text file with the name oo-ldap-server-type-attr.map.
Tip - Edit a copy of an existing mapping file, for example, install-dir/share/registry/ldap/oo-ldap-attr.map.
2 Type the mapping information.
Each line in the file must have the following format: user-profile-attribut=LDAP-attribute1,LDAP-attribute2,...,LDAP-attribute-n. You can only map user profile attributes that are present in the OpenOffice.org configuration schema. The file name path for this schema is install-dir/share/registry/schema/org/openoffice/UserProfile.xcs. You can edit the list of corresponding LDAP attributes to show which attributes in the user entries hold the personal data. The LDAP server sequentially queries each LDAP attribute in the list.
3 Copy the mapping file to the install-dir/share/registry/ldap/ directory.
Note – You need administrator rights to copy the mapping file to this directory on a network installation.
4 In the install-dir/share/registry/data/org/openoffice/LDAP.xcu file, change the value of the Mapping property to the string that appears before the -attr.map in the name of the mapping file. For example, the value of the Mapping property for the file.
Chapter 10 · Accessing OpenOffice.org User Profiles on an LDAP Server 39