add neighbors cm_v5
DESCRIPTION
thyhhhhhhhhTRANSCRIPT

How to add 3G neighbors relations using CM and plan editor.
TELCEL 3GEnrique Pico
2 © Nokia Siemens Networks Plan Editor/ Enrique Pico/ 07-22-08For internal use
The purpose of this presentation is to show the process of adding neighbor relations 3G to 3G and 3G to 2G using the tools form the OSS CM manager and Plan Editor.
Objective:
3 © Nokia Siemens Networks Plan Editor/ Enrique Pico/ 07-22-08For internal use
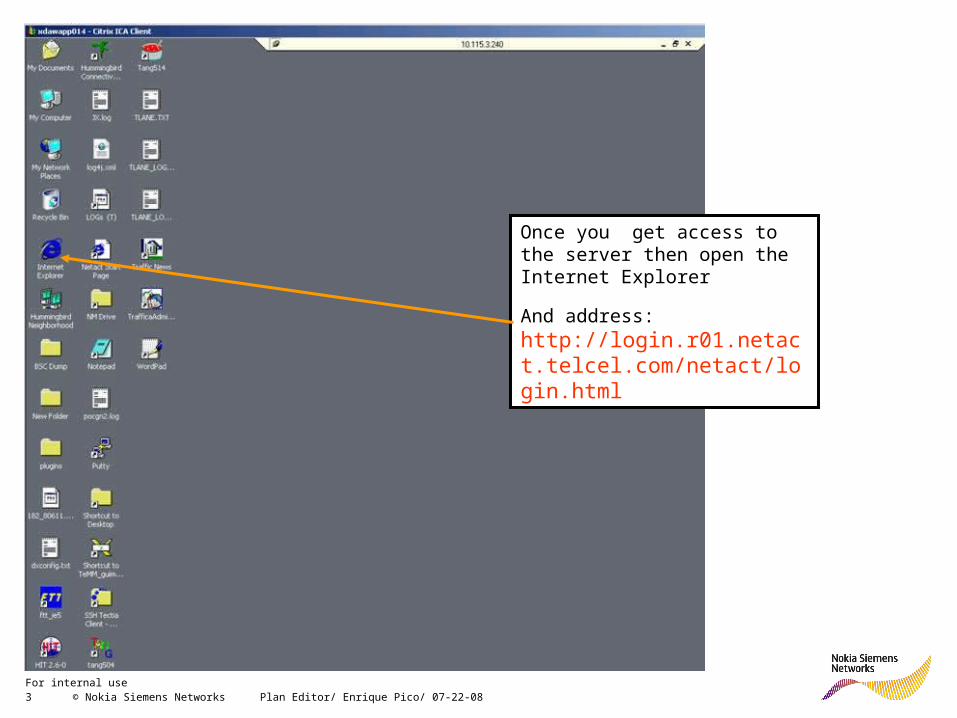
Once you get access to the server then open the Internet Explorer
And address: http://login.r01.netact.telcel.com/netact/login.html
4 © Nokia Siemens Networks Plan Editor/ Enrique Pico/ 07-22-08For internal use
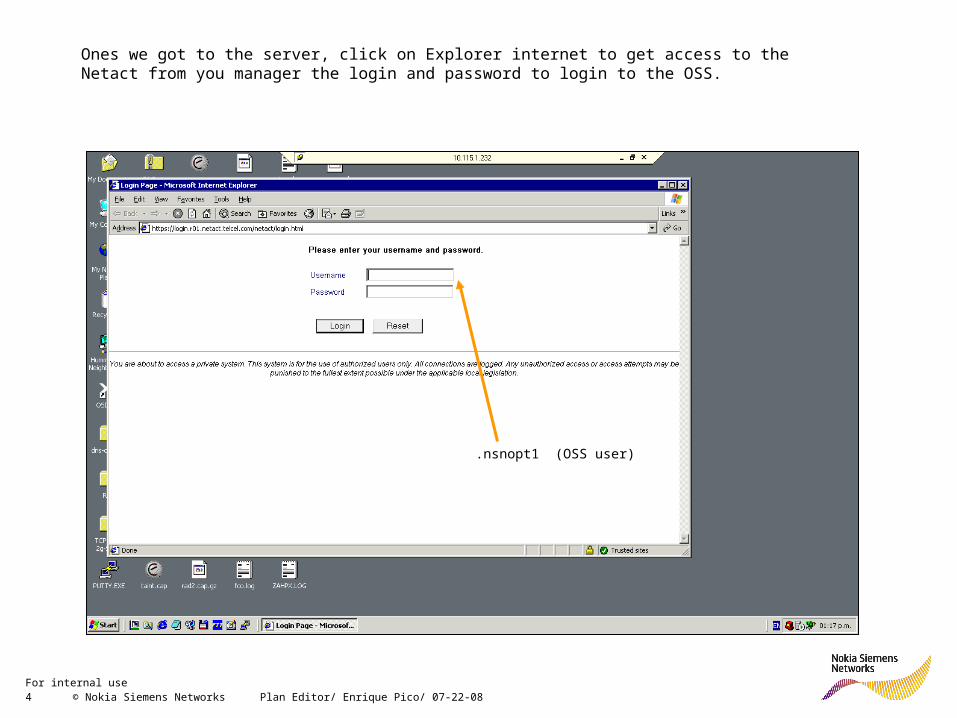
Ones we got to the server, click on Explorer internet to get access to the Netact from you manager the login and password to login to the OSS.
.nsnopt1 (OSS user)
5 © Nokia Siemens Networks Plan Editor/ Enrique Pico/ 07-22-08For internal use
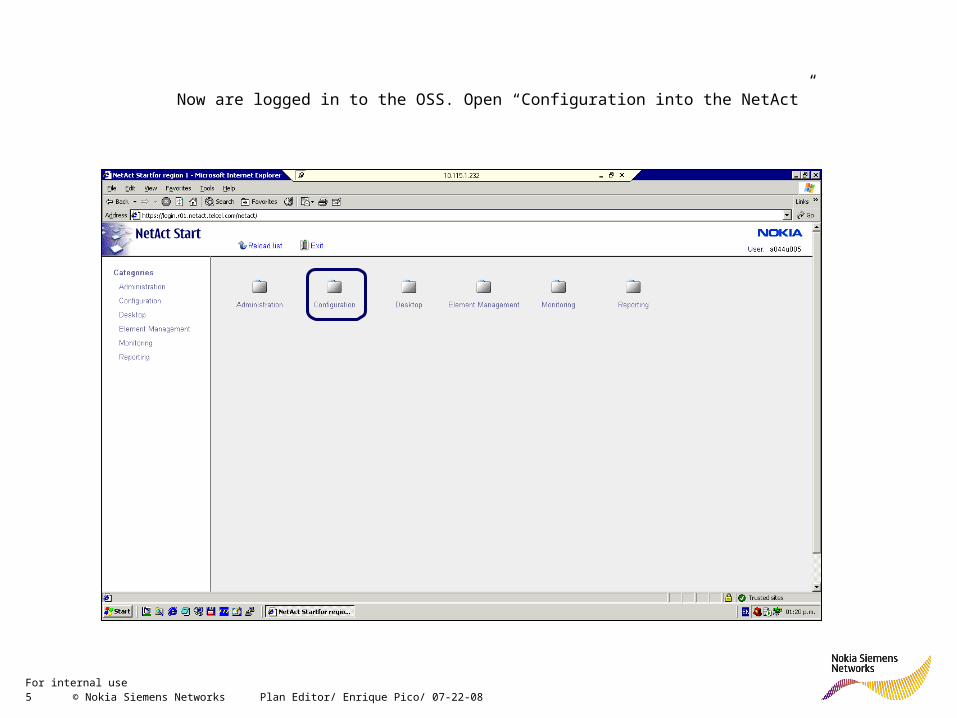
Now are logged in to the OSS. Open “Configuration into the NetAct”
6 © Nokia Siemens Networks Plan Editor/ Enrique Pico/ 07-22-08For internal use
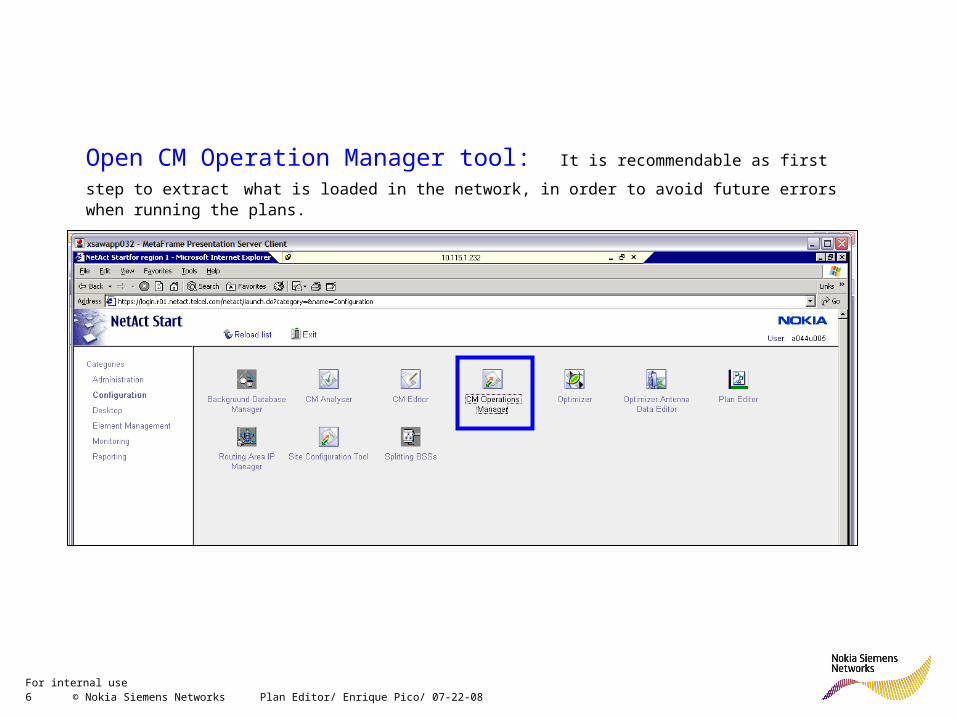
Open CM Operation Manager tool: It is recommendable as first step to extract what is loaded in the network, in order to avoid future errors when running the plans.
7 © Nokia Siemens Networks Plan Editor/ Enrique Pico/ 07-22-08For internal use
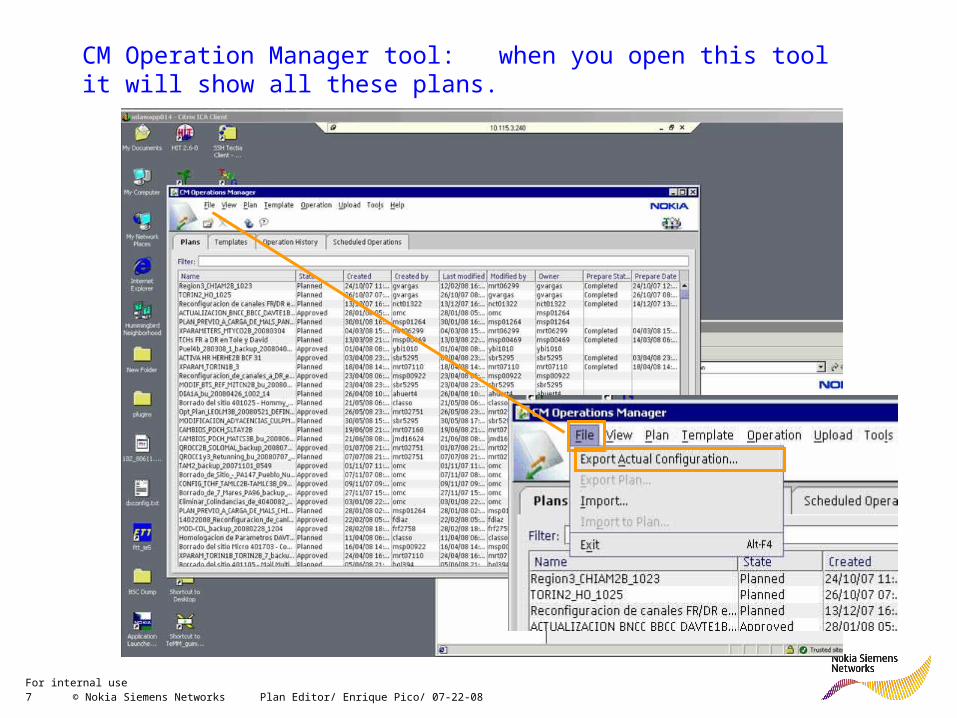
CM Operation Manager tool: when you open this tool it will show all these plans.
8 © Nokia Siemens Networks Plan Editor/ Enrique Pico/ 07-22-08For internal use
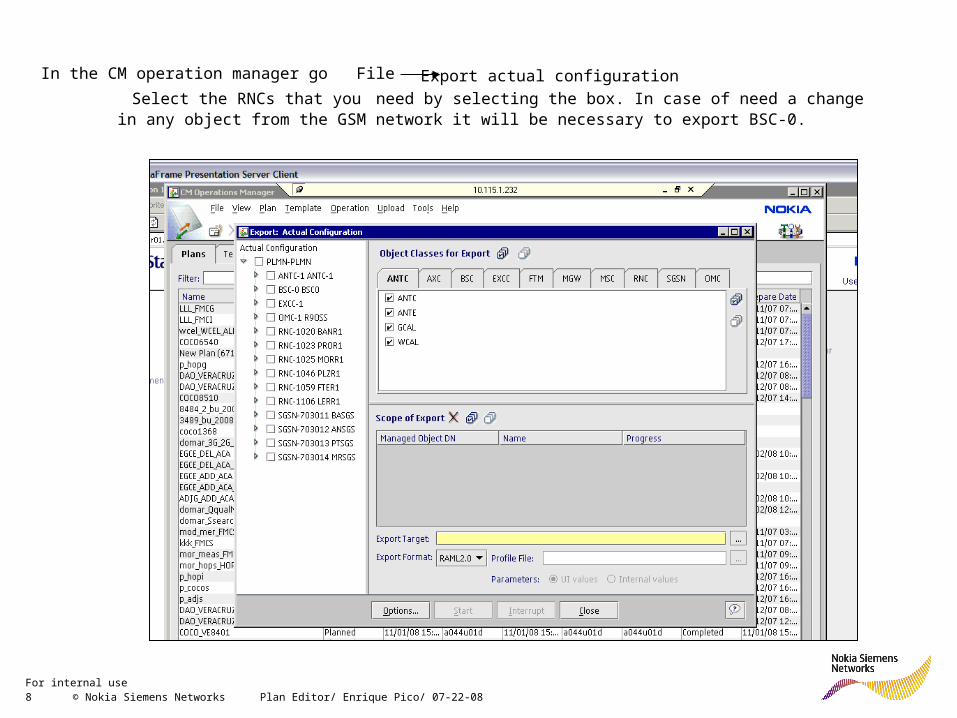
In the CM operation manager go File Export actual configuration
Select the RNCs that you need by selecting the box. In case of need a change in any object from the GSM network it will be necessary to export BSC-0.
9 © Nokia Siemens Networks Plan Editor/ Enrique Pico/ 07-22-08For internal use
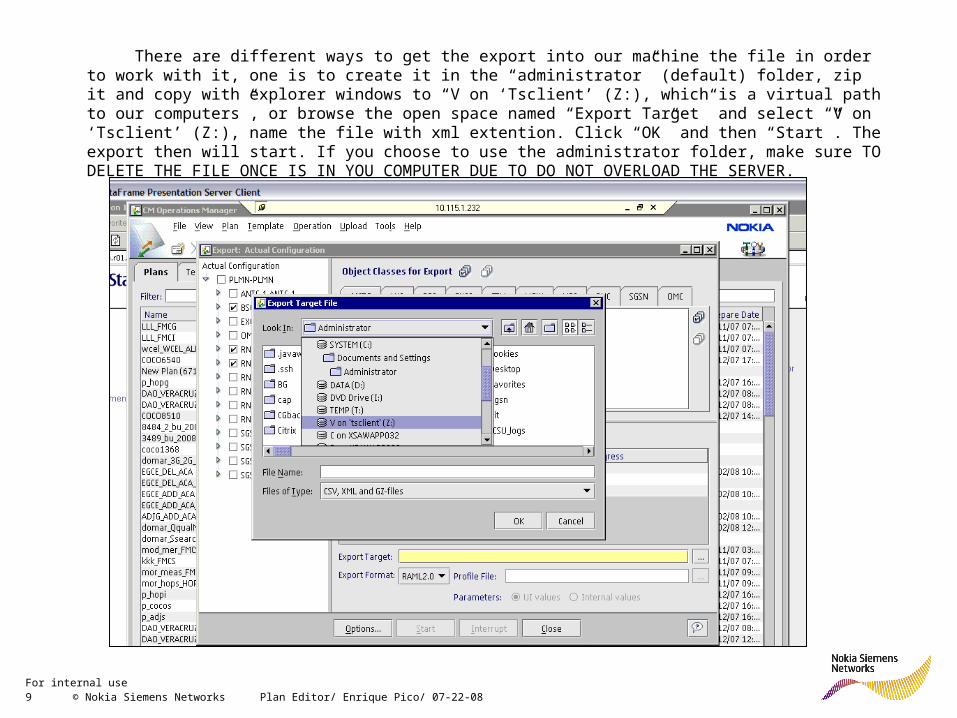
There are different ways to get the export into our machine the file in order to work with it, one is to create it in the “administrator” (default) folder, zip it and copy with explorer windows to “V on ‘Tsclient’ (Z:), which is a virtual path to our computers”, or browse the open space named “Export Target” and select “V on ‘Tsclient’ (Z:), name the file with xml extention. Click “OK” and then “Start”. The export then will start. If you choose to use the administrator folder, make sure TO DELETE THE FILE ONCE IS IN YOU COMPUTER DUE TO DO NOT OVERLOAD THE SERVER.
10 © Nokia Siemens Networks Plan Editor/ Enrique Pico/ 07-22-08For internal use
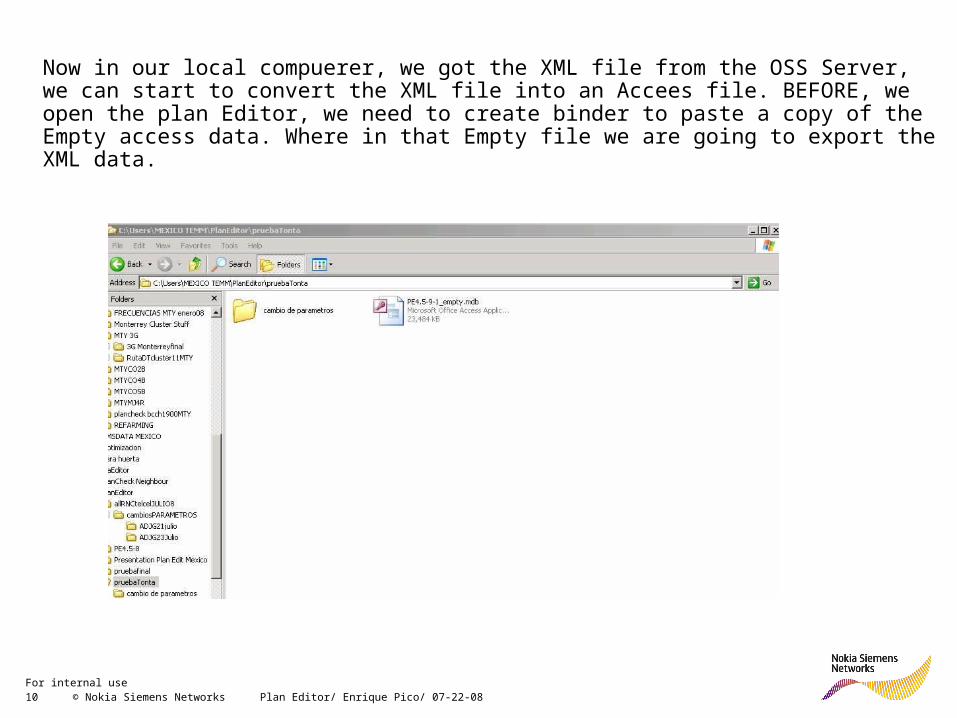
Now in our local compuerer, we got the XML file from the OSS Server, we can start to convert the XML file into an Accees file. BEFORE, we open the plan Editor, we need to create binder to paste a copy of the Empty access data. Where in that Empty file we are going to export the XML data.
11 © Nokia Siemens Networks Plan Editor/ Enrique Pico/ 07-22-08For internal use
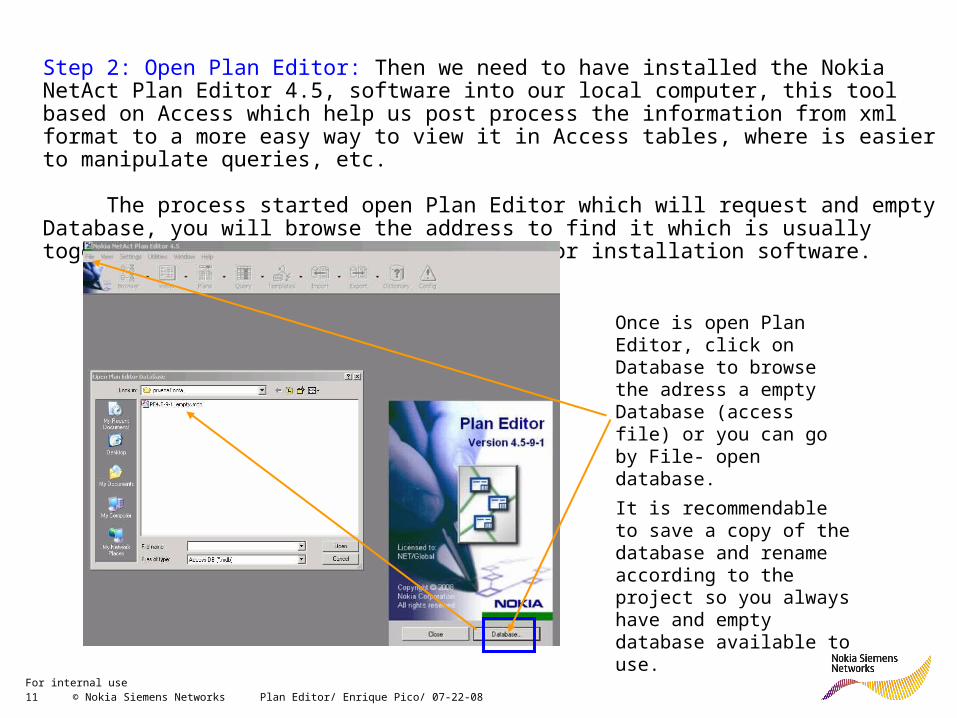
Step 2: Open Plan Editor: Then we need to have installed the Nokia NetAct Plan Editor 4.5, software into our local computer, this tool based on Access which help us post process the information from xml format to a more easy way to view it in Access tables, where is easier to manipulate queries, etc.
The process started open Plan Editor which will request and empty Database, you will browse the address to find it which is usually together with the Nokia NetAct Plan editor installation software.
Once is open Plan Editor, click on Database to browse the adress a empty Database (access file) or you can go by File- open database.
It is recommendable to save a copy of the database and rename according to the project so you always have and empty database available to use.
12 © Nokia Siemens Networks Plan Editor/ Enrique Pico/ 07-22-08For internal use
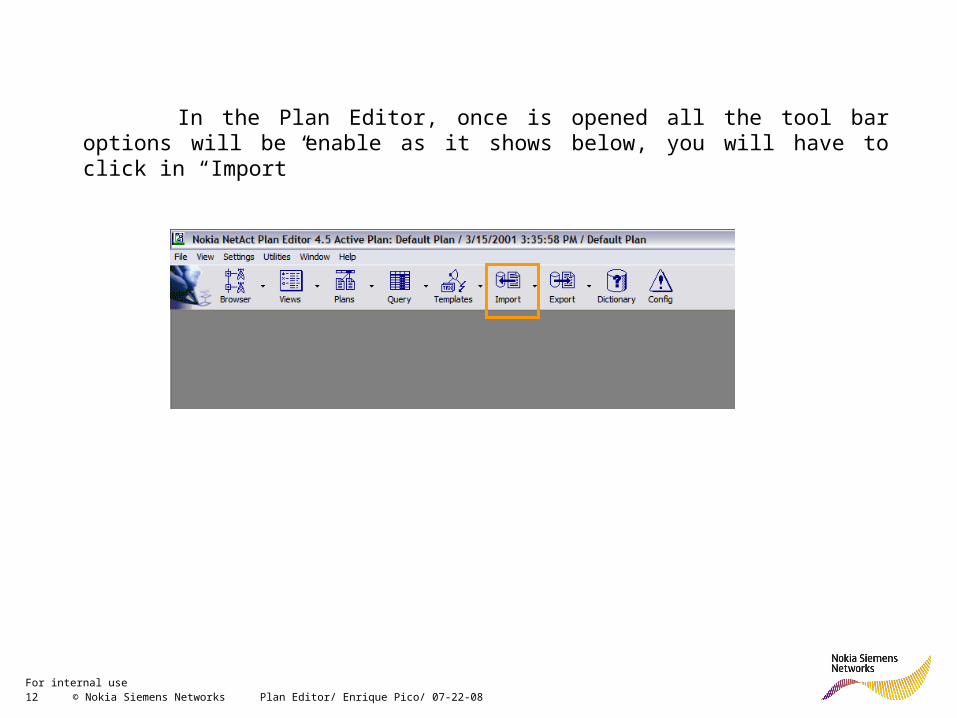
In the Plan Editor, once is opened all the tool bar options will be enable as it shows below, you will have to click in “Import”
13 © Nokia Siemens Networks Plan Editor/ Enrique Pico/ 07-22-08For internal use
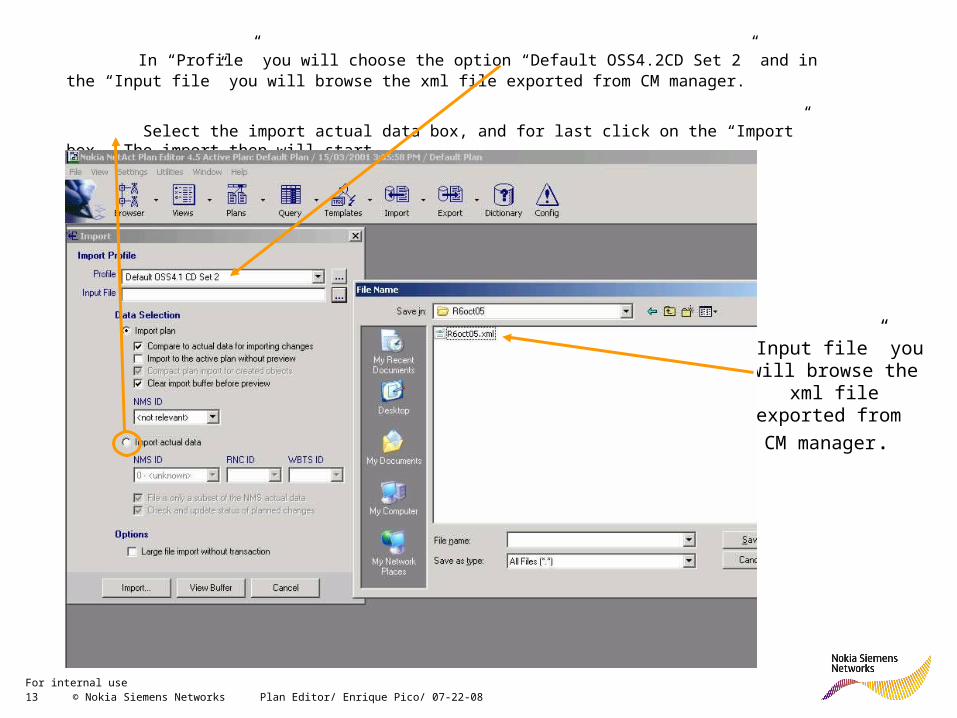
In “Profile” you will choose the option “Default OSS4.2CD Set 2” and in the “Input file” you will browse the xml file exported from CM manager.
Select the import actual data box, and for last click on the “Import” box…. The import then will start.
“Input file” you will browse the xml file exported from CM
manager.
14 © Nokia Siemens Networks Plan Editor/ Enrique Pico/ 07-22-08For internal use
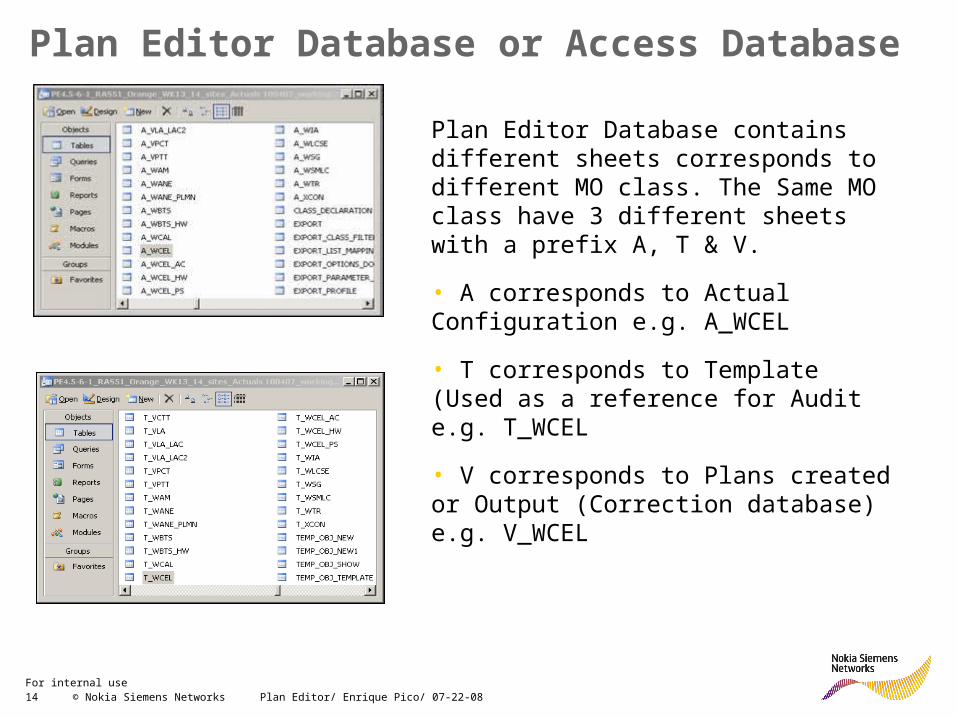
Plan Editor Database or Access Database
Plan Editor Database contains different sheets corresponds to different MO class. The Same MO class have 3 different sheets with a prefix A, T & V.
• A corresponds to Actual Configuration e.g. A_WCEL
• T corresponds to Template (Used as a reference for Audit e.g. T_WCEL
• V corresponds to Plans created or Output (Correction database) e.g. V_WCEL
15 © Nokia Siemens Networks Plan Editor/ Enrique Pico/ 07-22-08For internal use
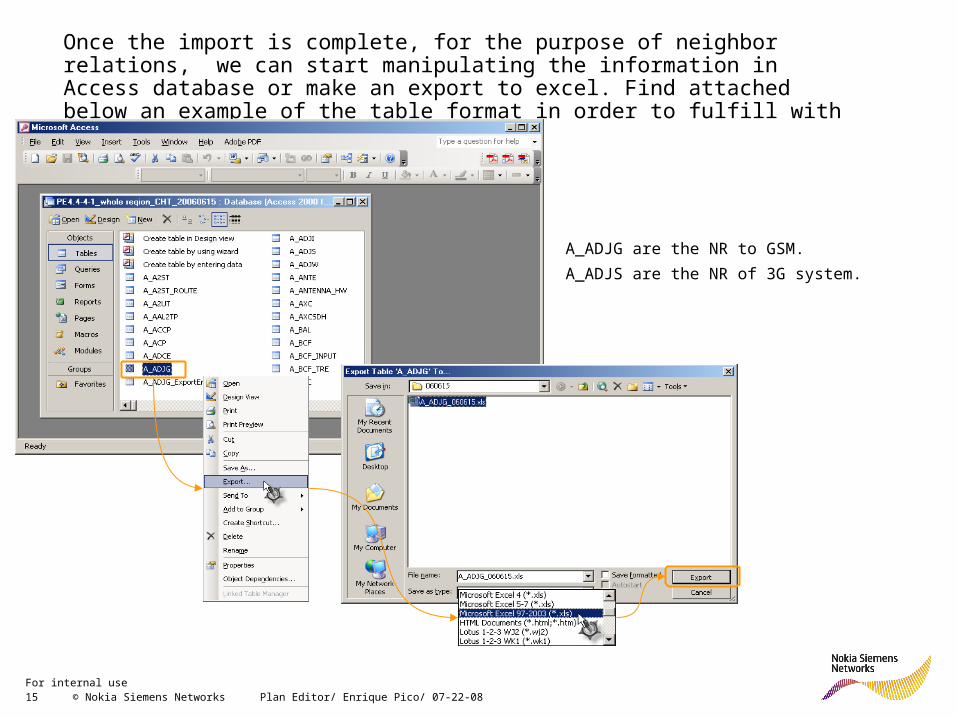
Once the import is complete, for the purpose of neighbor relations, we can start manipulating the information in Access database or make an export to excel. Find attached below an example of the table format in order to fulfill with the changes needed:
A_ADJG are the NR to GSM.
A_ADJS are the NR of 3G system.

16 © Nokia Siemens Networks Plan Editor/ Enrique Pico/ 07-22-08For internal use
OPEN THE EXCEL FILE:
NOTE: Its is recommended to delete the last 3 columns of the exported document from Access to avoid any problem while creating the xml file.
It is very important to notice that the column “ADJGId” is an index of the number of neighbors defined for the source cell, so we have to be very careful when we choose this index for the new neighbor relations to add in order this index to be consecutive with the last neighbor relation defined, otherwise the export not be possible. ( the ADJGid only reach till 31, from 0 to 31).
Once the changes are done the document has to be saved in CSV format in order to be exported to Plan Editor.
Microsoft Excel Worksheet
ADJS
17 © Nokia Siemens Networks Plan Editor/ Enrique Pico/ 07-22-08For internal use
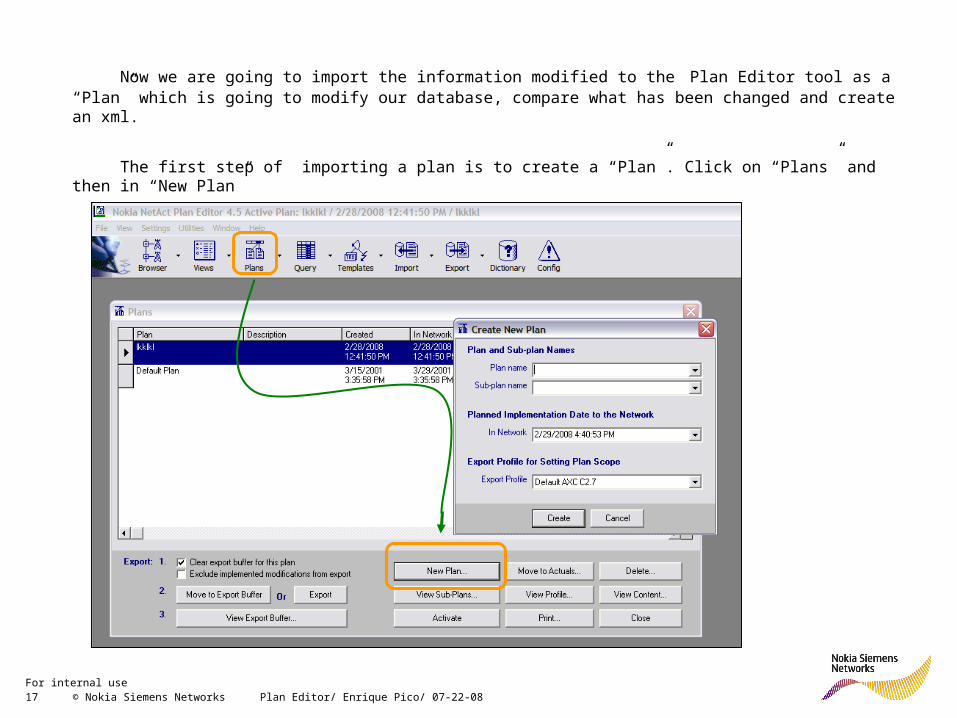
Now we are going to import the information modified to the Plan Editor tool as a “Plan” which is going to modify our database, compare what has been changed and create an xml.
The first step of importing a plan is to create a “Plan”. Click on “Plans” and then in “New Plan”
18 © Nokia Siemens Networks Plan Editor/ Enrique Pico/ 07-22-08For internal use
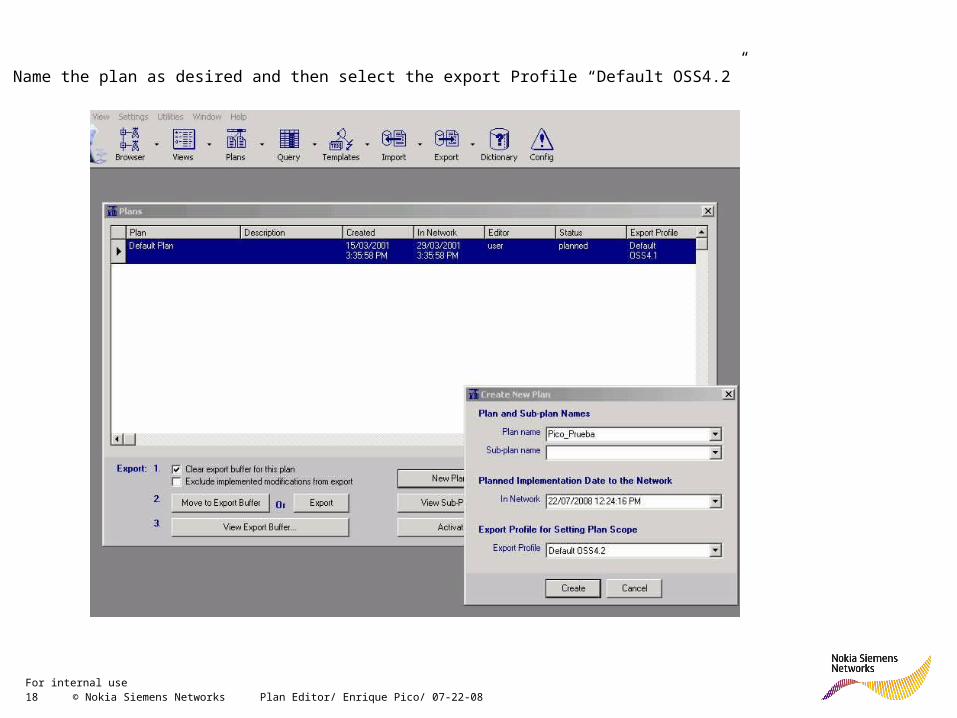
Name the plan as desired and then select the export Profile “Default OSS4.2”
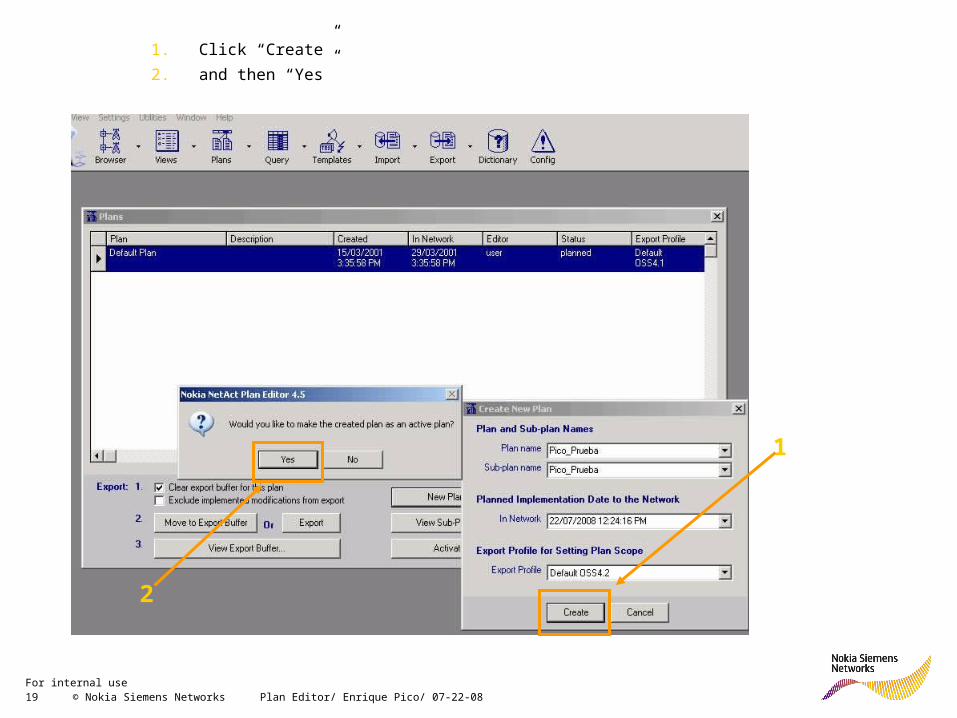
19 © Nokia Siemens Networks Plan Editor/ Enrique Pico/ 07-22-08For internal use
1. Click “Create”
2. and then “Yes”
1
2
20 © Nokia Siemens Networks Plan Editor/ Enrique Pico/ 07-22-08For internal use
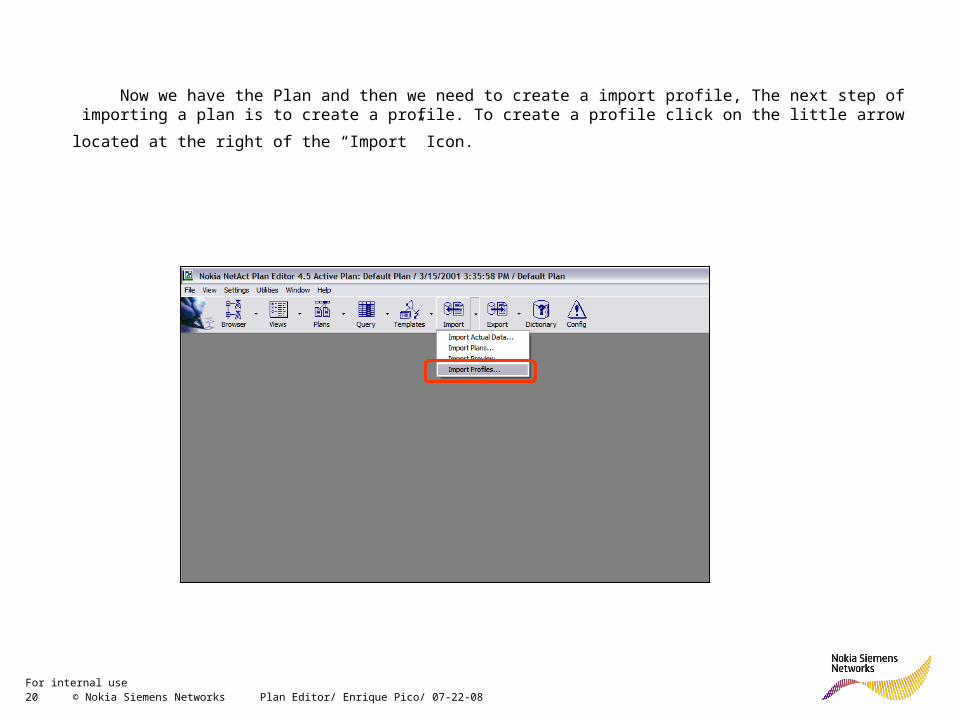
Now we have the Plan and then we need to create a import profile, The next step of importing a plan is to create a
profile. To create a profile click on the little arrow located at the right of the “Import” Icon.
21 © Nokia Siemens Networks Plan Editor/ Enrique Pico/ 07-22-08For internal use
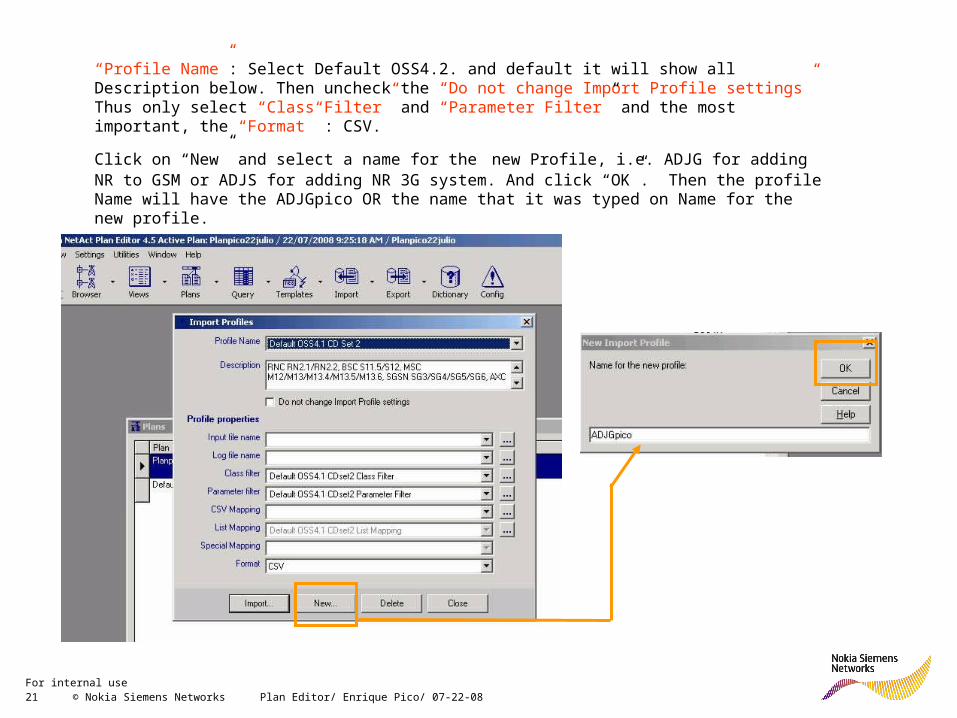
“Profile Name”: Select Default OSS4.2. and default it will show all Description below. Then uncheck the “Do not change Import Profile settings” Thus only select “Class Filter” and “Parameter Filter” and the most important, the “Format” : CSV.
Click on “New” and select a name for the new Profile, i.e. ADJG for adding NR to GSM or ADJS for adding NR 3G system. And click “OK”. Then the profile Name will have the ADJGpico OR the name that it was typed on Name for the new profile.
22 © Nokia Siemens Networks Plan Editor/ Enrique Pico/ 07-22-08For internal use
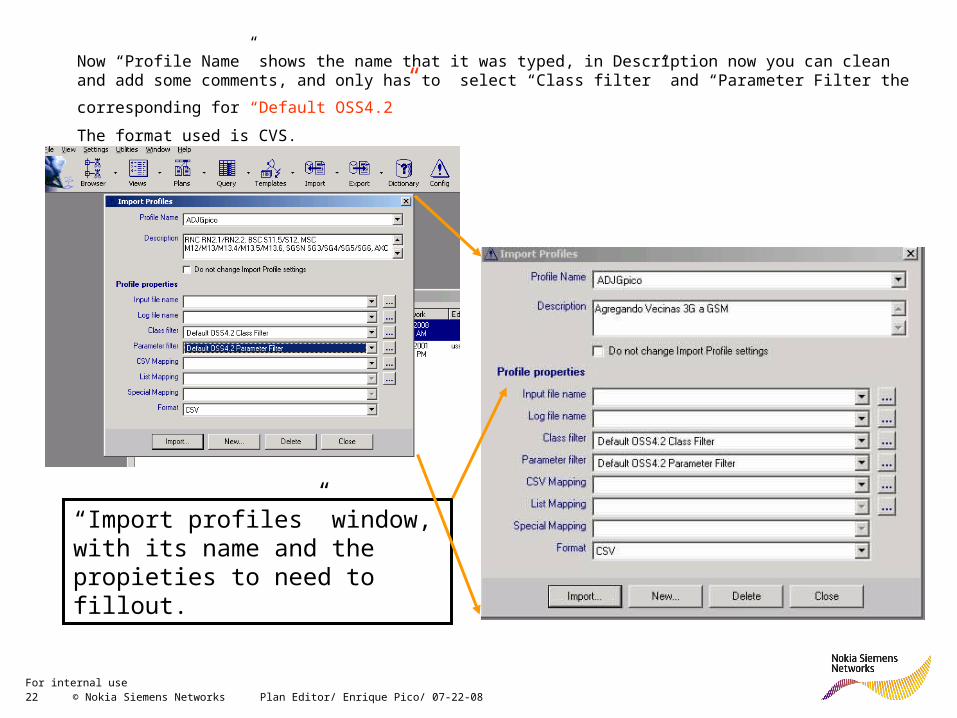
Now “Profile Name” shows the name that it was typed, in Description now you can clean and add some comments, and
only has to select “Class filter” and “Parameter Filter the corresponding for “Default OSS4.2”The format used is CVS.
“Import profiles” window, with its name and the propieties to need to fillout.

23 © Nokia Siemens Networks Plan Editor/ Enrique Pico/ 07-22-08For internal use
1. On CVS Table Mapping” click on browse icon … and it will show the CSV Table Mapping, in that table select the Dafault CSV Table mapping as “Name” 2. Click on New, and will shows the Add New CSV Mapping.
1
2
24 © Nokia Siemens Networks Plan Editor/ Enrique Pico/ 07-22-08For internal use
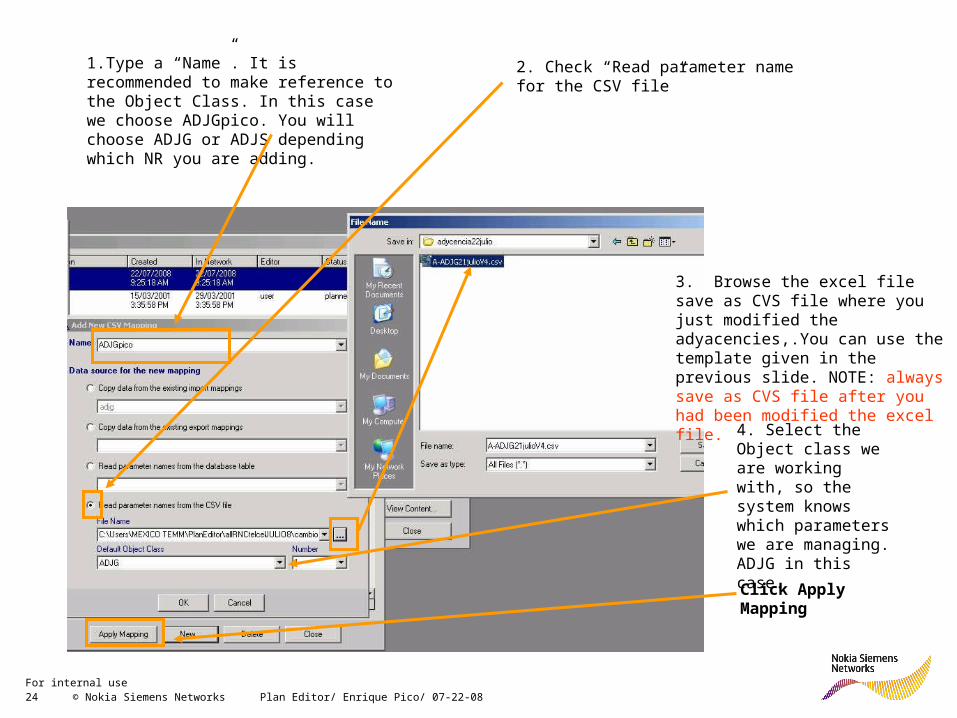
1.Type a “Name”. It is recommended to make reference to the Object Class. In this case we choose ADJGpico. You will choose ADJG or ADJS depending which NR you are adding.
2. Check “Read parameter name for the CSV file”
4. Select the Object class we are working with, so the system knows which parameters we are managing. ADJG in this case.
3. Browse the excel file save as CVS file where you just modified the adyacencies,.You can use the template given in the previous slide. NOTE: always save as CVS file after you had been modified the excel file.
Click Apply Mapping
25 © Nokia Siemens Networks Plan Editor/ Enrique Pico/ 07-22-08For internal use
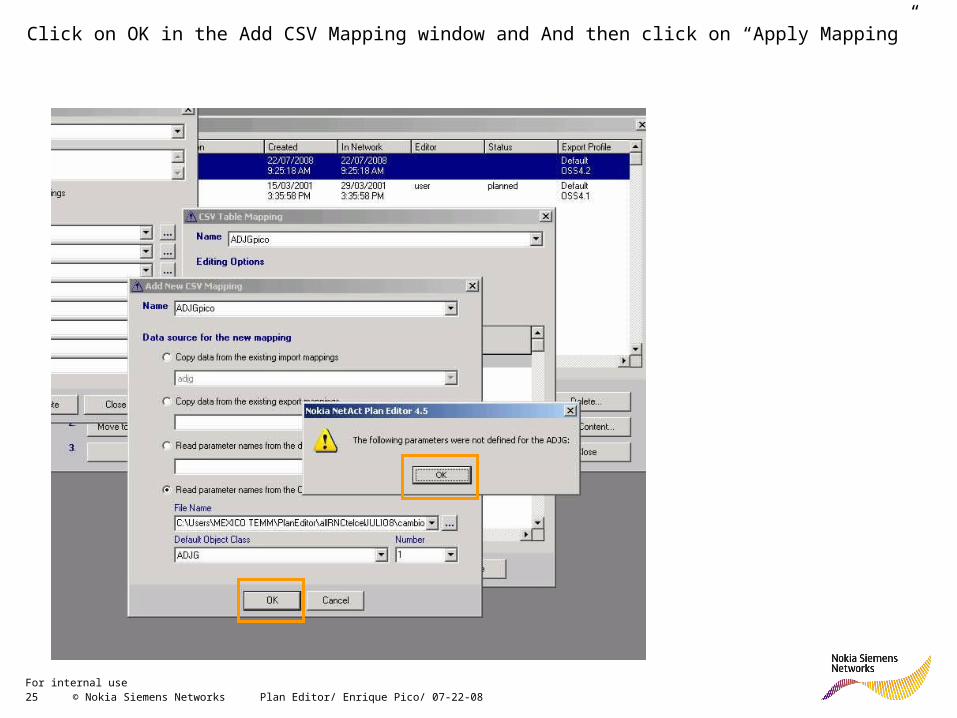
Click on OK in the Add CSV Mapping window and And then click on “Apply Mapping”
26 © Nokia Siemens Networks Plan Editor/ Enrique Pico/ 07-22-08For internal use
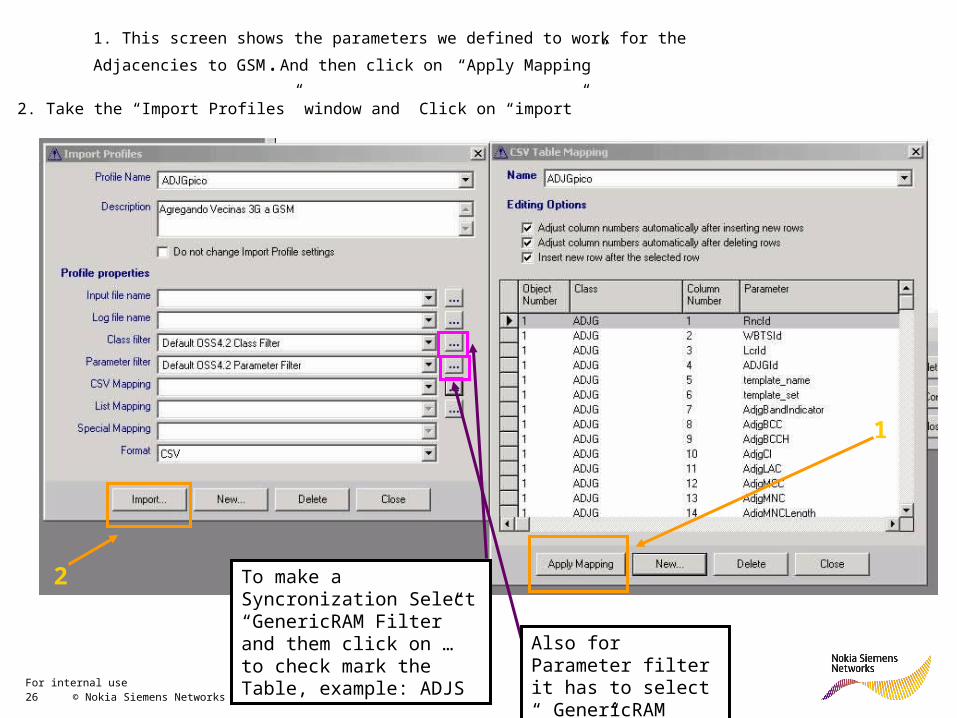
2. Take the “Import Profiles” window and Click on “import”
1. This screen shows the parameters we defined to work for the Adjacencies to GSM.And then
click on “Apply Mapping”
2
1
To make a Syncronization Select “GenericRAM Filter” and them click on … to check mark the Table, example: ADJS
Also for Parameter filter it has to select “ GenericRAM filter”.
27 © Nokia Siemens Networks Plan Editor/ Enrique Pico/ 07-22-08For internal use
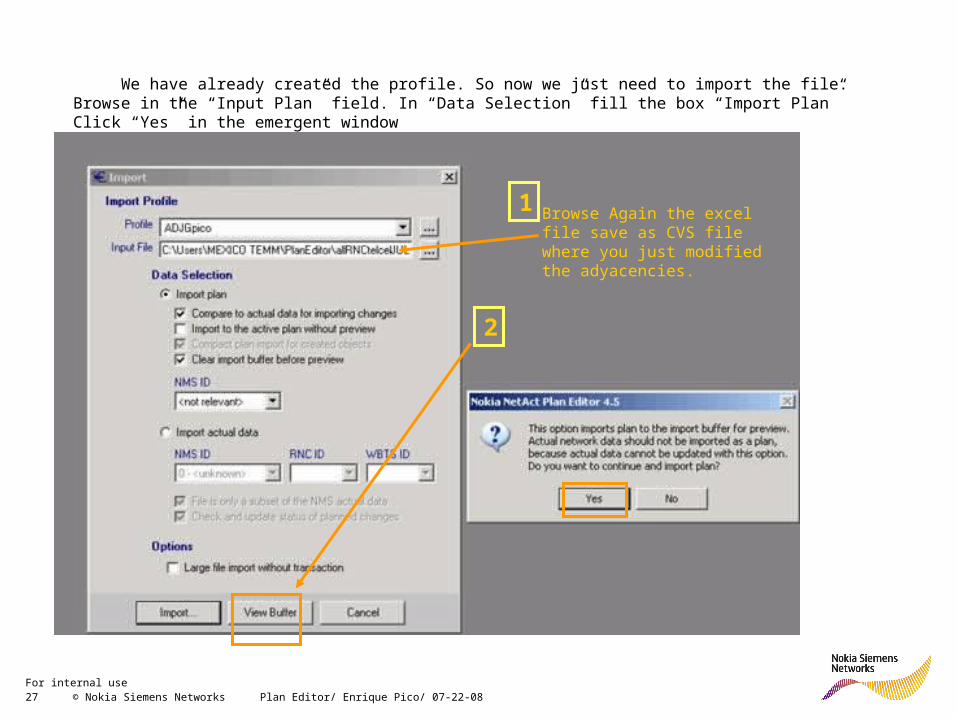
We have already created the profile. So now we just need to import the file. Browse in the “Input Plan” field. In “Data Selection” fill the box “Import Plan” Click “Yes” in the emergent window
1
2
Browse Again the excel file save as CVS file where you just modified the adyacencies.
28 © Nokia Siemens Networks Plan Editor/ Enrique Pico/ 07-22-08For internal use
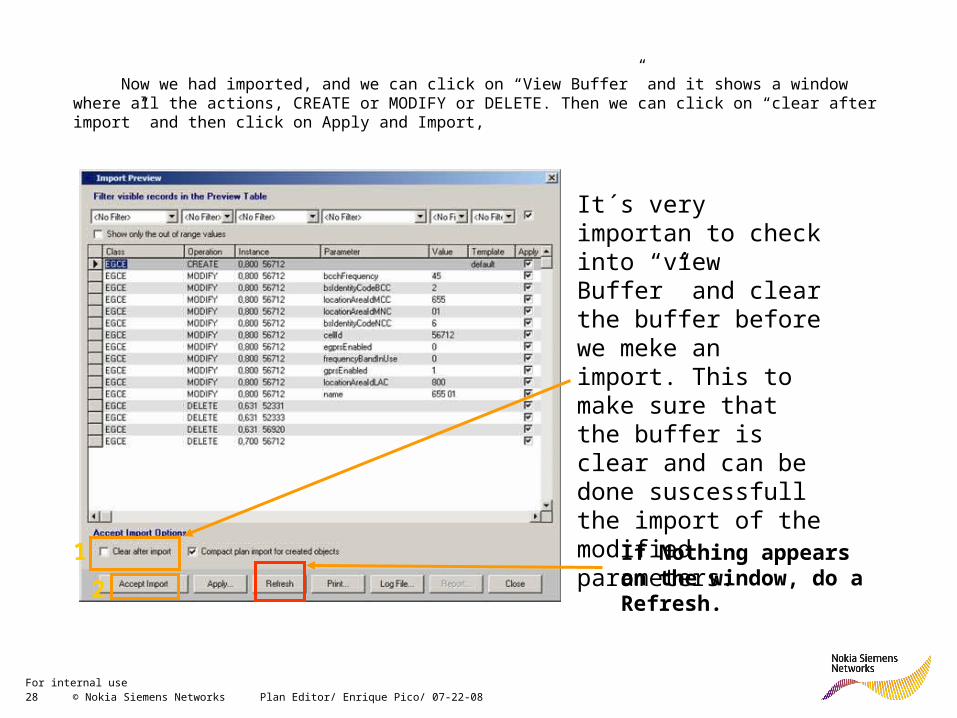
Now we had imported, and we can click on “View Buffer” and it shows a window where all the actions, CREATE or MODIFY or DELETE. Then we can click on “clear after import” and then click on Apply and Import,
It´s very importan to check into “view Buffer” and clear the buffer before we meke an import. This to make sure that the buffer is clear and can be done suscessfull the import of the modified parameters.
1
2
If Nothing appears on the window, do a Refresh.
29 © Nokia Siemens Networks Plan Editor/ Enrique Pico/ 07-22-08For internal use
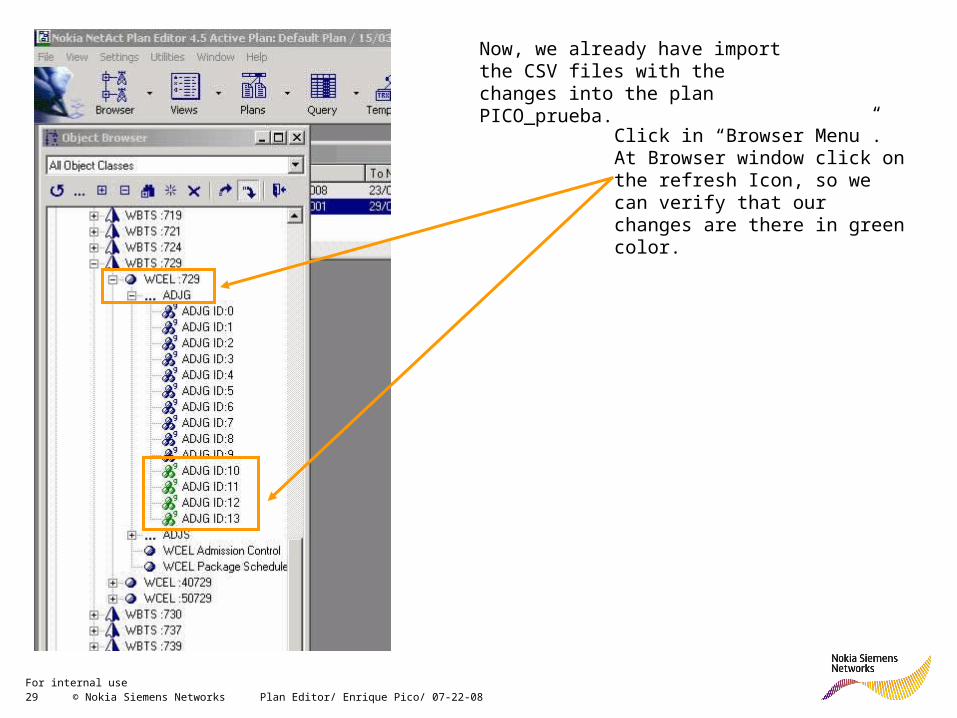
Click in “Browser Menu”. At Browser window click on the refresh Icon, so we can verify that our changes are there in green color.
Now, we already have import the CSV files with the changes into the plan PICO_prueba.
30 © Nokia Siemens Networks Plan Editor/ Enrique Pico/ 07-22-08For internal use
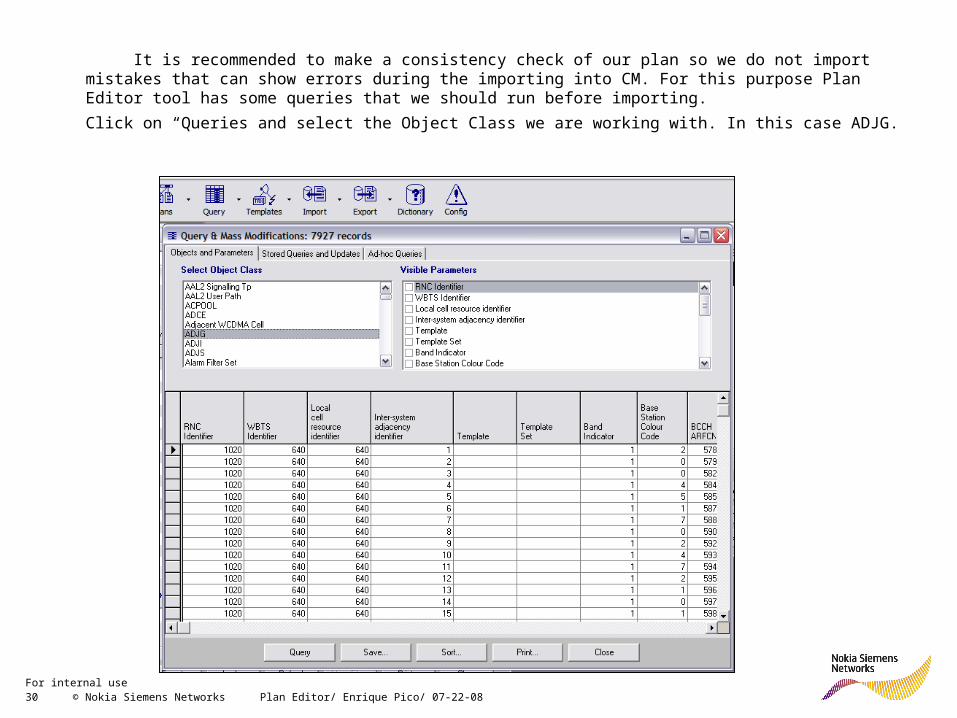
It is recommended to make a consistency check of our plan so we do not import mistakes that can show errors during the importing into CM. For this purpose Plan Editor tool has some queries that we should run before importing.
Click on “Queries and select the Object Class we are working with. In this case ADJG.
31 © Nokia Siemens Networks Plan Editor/ Enrique Pico/ 07-22-08For internal use
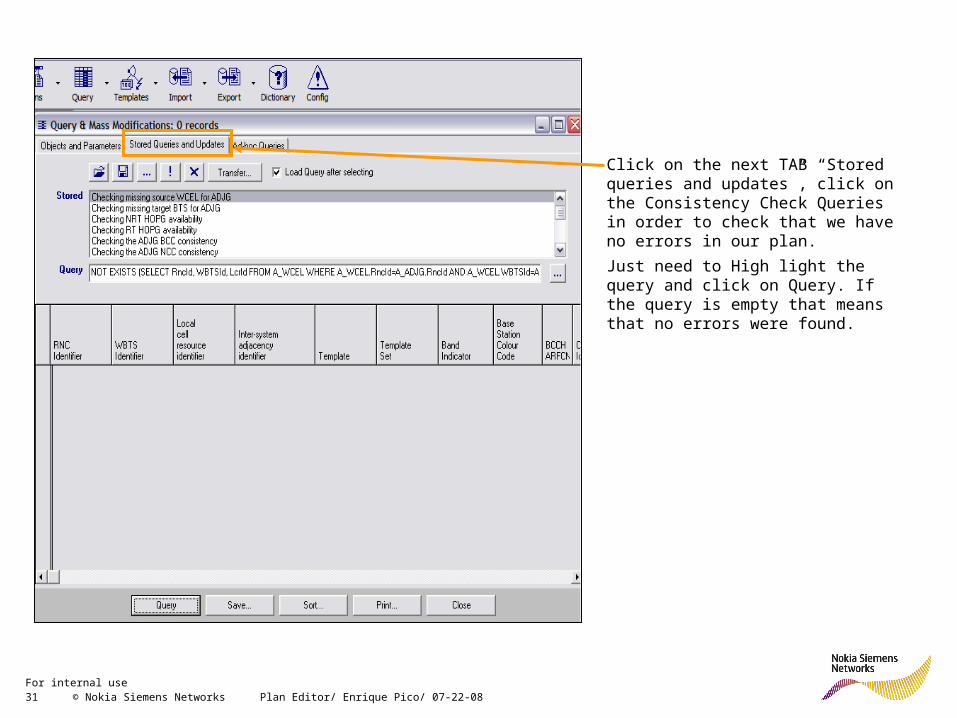
Click on the next TAB “Stored queries and updates”, click on the Consistency Check Queries in order to check that we have no errors in our plan.
Just need to High light the query and click on Query. If the query is empty that means that no errors were found.
32 © Nokia Siemens Networks Plan Editor/ Enrique Pico/ 07-22-08For internal use
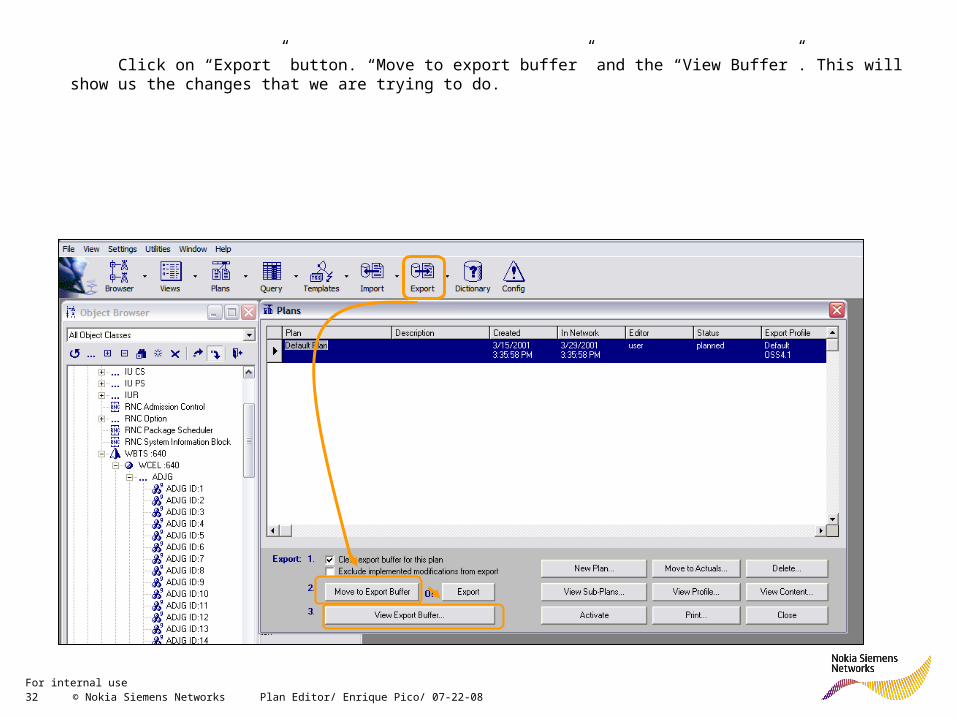
Click on “Export” button. “Move to export buffer” and the “View Buffer”. This will show us the changes that we are trying to do.
33 © Nokia Siemens Networks Plan Editor/ Enrique Pico/ 07-22-08For internal use
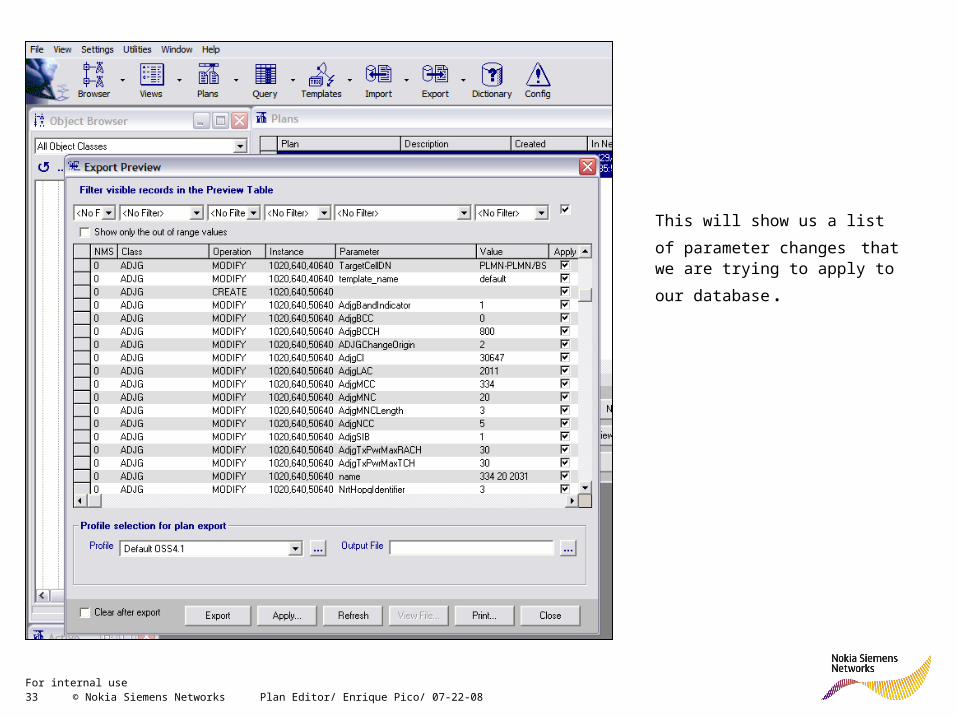
This will show us a list of parameter
changes that we are trying to apply
to our database.
34 © Nokia Siemens Networks Plan Editor/ Enrique Pico/ 07-22-08For internal use
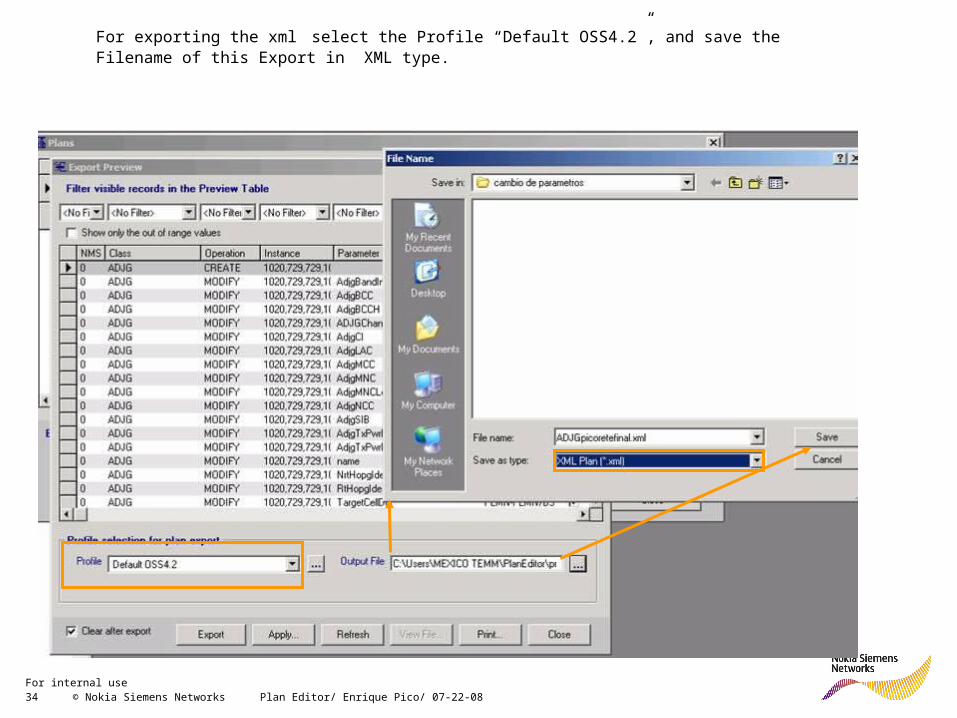
For exporting the xml select the Profile “Default OSS4.2”, and save the Filename of this Export in XML type.
35 © Nokia Siemens Networks Plan Editor/ Enrique Pico/ 07-22-08For internal use
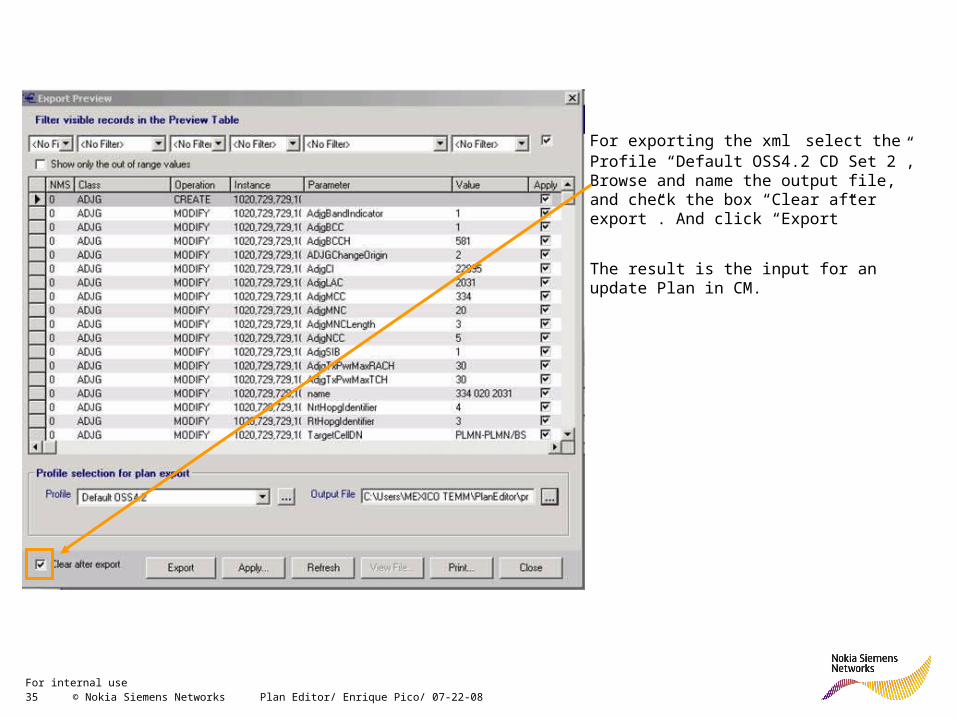
For exporting the xml select the Profile “Default OSS4.2 CD Set 2”, Browse and name the output file, and check the box “Clear after export”. And click “Export”
The result is the input for an update Plan in CM.

36 © Nokia Siemens Networks Plan Editor/ Enrique Pico/ 07-22-08For internal use
To connect to the OSS you should use the RASTool connecting to https://netras.europe.nokia.com. Once in the OSS you should go to Configuration CM Operation manager File and Import
37 © Nokia Siemens Networks Plan Editor/ Enrique Pico/ 07-22-08For internal use
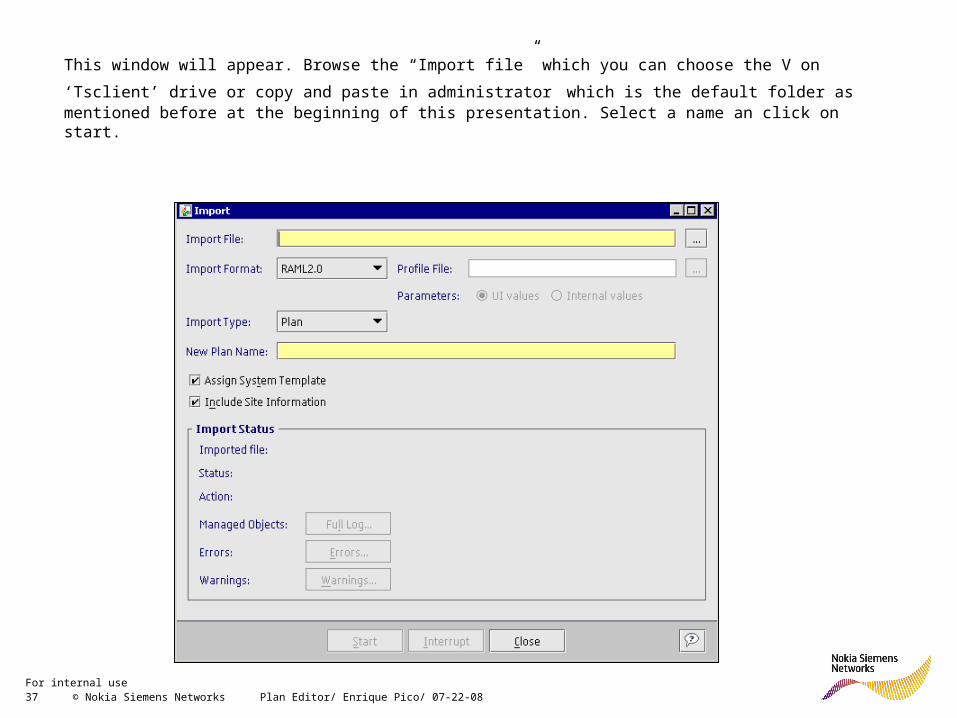
This window will appear. Browse the “Import file” which you can choose the V on ‘Tsclient’ drive or copy and paste
in administrator which is the default folder as mentioned before at the beginning of this presentation. Select a name an click on start.
38 © Nokia Siemens Networks Plan Editor/ Enrique Pico/ 07-22-08For internal use
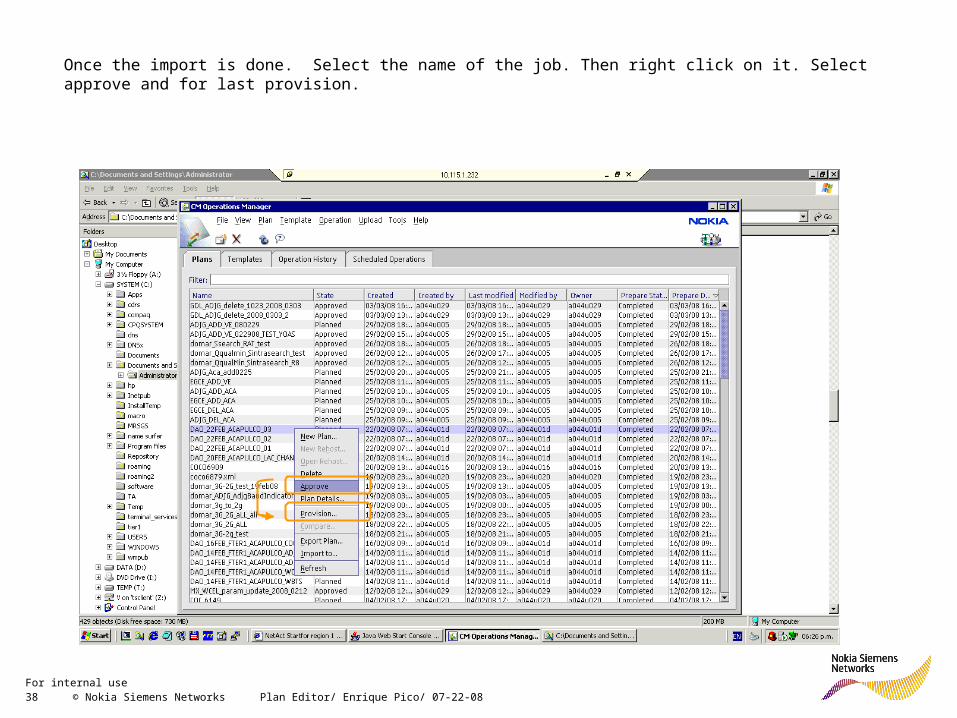
Once the import is done. Select the name of the job. Then right click on it. Select approve and for last provision.
39 © Nokia Siemens Networks Plan Editor/ Enrique Pico/ 07-22-08For internal use
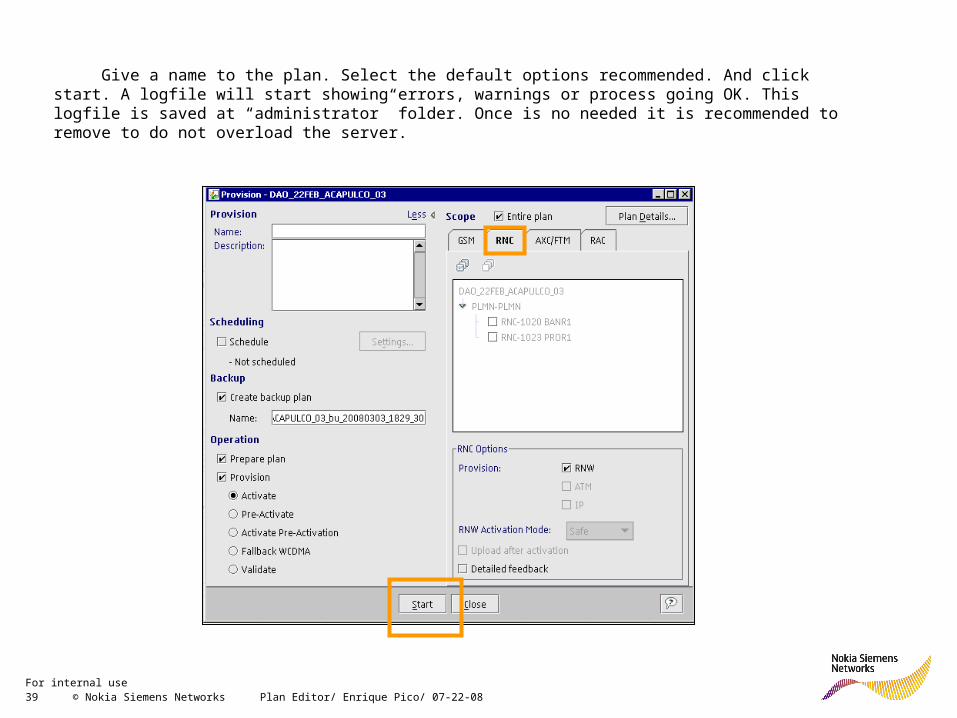
Give a name to the plan. Select the default options recommended. And click start. A logfile will start showing errors, warnings or process going OK. This logfile is saved at “administrator” folder. Once is no needed it is recommended to remove to do not overload the server.
40 © Nokia Siemens Networks Plan Editor/ Enrique Pico/ 07-22-08For internal use
Now we have added the Neighbor relation from 3G to GSM, now is needed to make another import from the system and update our database in Plan Editor so we work always with updated and reliable information from the system.