adafruit speaker bonnet for raspberry pi - adafruit industries · adafruit speaker bonnet for...
TRANSCRIPT
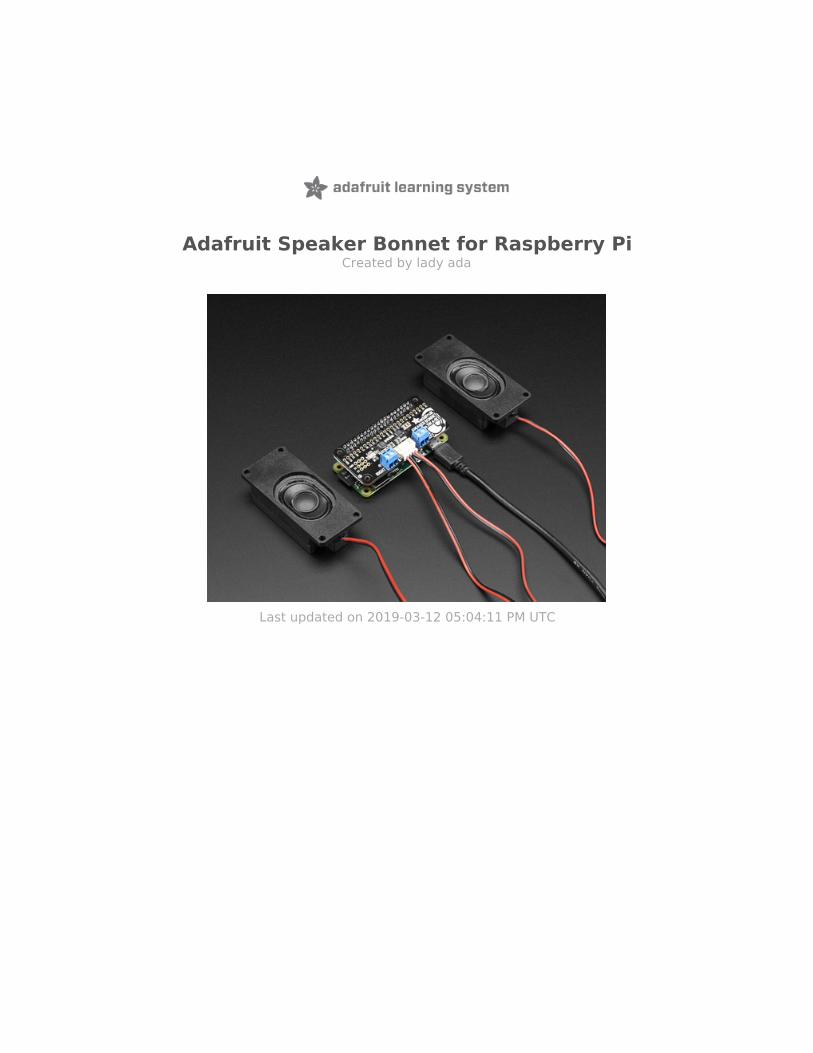
Adafruit Speaker Bonnet for Raspberry PiCreated by lady ada
Last updated on 2019-03-12 05:04:11 PM UTC

Overview
Hey Mr. DJ! Turn up that Raspberry Pi mix to the max with this cute 3W Stereo Amplifier Bonnet for Raspberry Pi. (It'snot big enough to be an official HAT, so we called it a bonnet, you see?) It's the exact same size as a Raspberry Pi Zerobut works with any and all Raspberry Pi computers with a 2x20 connector - A+, B+, Zero, Pi 2, Pi 3, etc. We've tested itout with Raspbian (the offical operating system) and Retropie.
This Bonnet uses I2S a digital sound standard, so you get really crisp audio. The digital data goes right into the
© Adafruit Industries https://learn.adafruit.com/adafruit-speaker-bonnet-for-raspberry-pi Page 3 of 39

amplifier so there's no static like you hear from the headphone jack. And it's super easy to get started. Just plug in any4 to 8 ohm speakers, up to 3 Watts, run our installer script on any Raspberry Pi, reboot and you're ready to jam!
Each order comes as a fully assembled PCB with a 2x20 header and 2x terminal blocks. Some light soldering isrequired to attach the header onto PCB so you can plug it into your Raspberry Pi. Once that's done either plug one ofour enclosed speaker sets (http://adafru.it/1669) right into the JST jack in the middle or you can solder the terminalblocks in and then connect any speaker you like.
Don't forget to make sure you have a good strong 5V power supply - especially if you're using the 3W 4 ohm speakers!Our 2.4A power plug is recommended (http://adafru.it/1995)
© Adafruit Industries https://learn.adafruit.com/adafruit-speaker-bonnet-for-raspberry-pi Page 4 of 39

Assembly
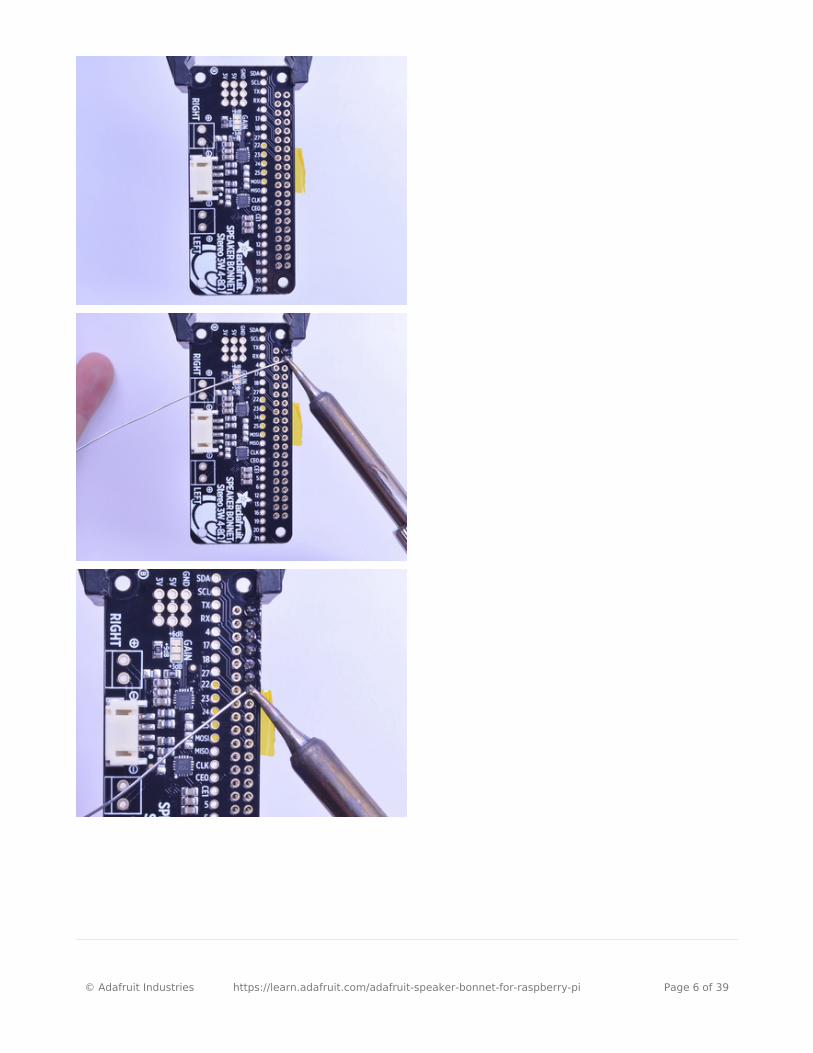
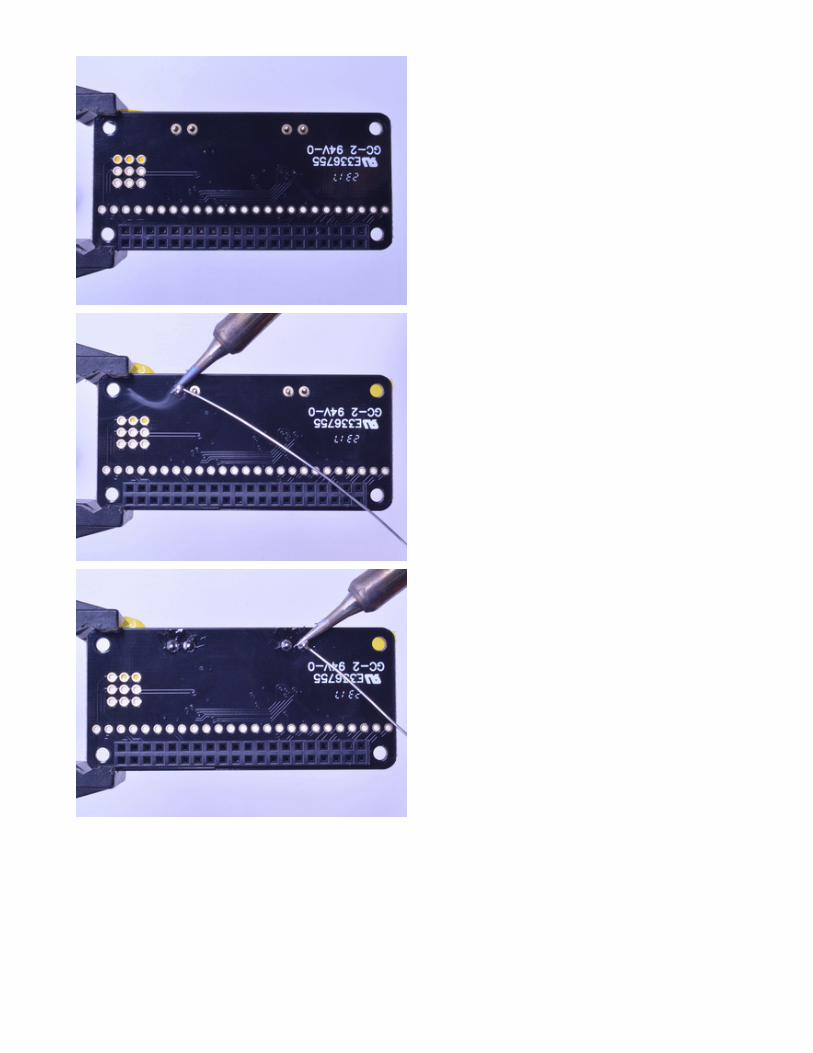
Place the 2x20 female header in so the connector is on
the bottom. To make it easier to keep it in place, you
can use some tape. Tacky clay also works, whatever
you've got handy!
And Solder!
Be sure to solder all pins for reliable electrical contact.
(For tips on soldering, be sure to check out our Guide to
Excellent Soldering (https://adafru.it/aTk)).
Start by soldering the first row of header
© Adafruit Industries https://learn.adafruit.com/adafruit-speaker-bonnet-for-raspberry-pi Page 5 of 39
© Adafruit Industries https://learn.adafruit.com/adafruit-speaker-bonnet-for-raspberry-pi Page 6 of 39
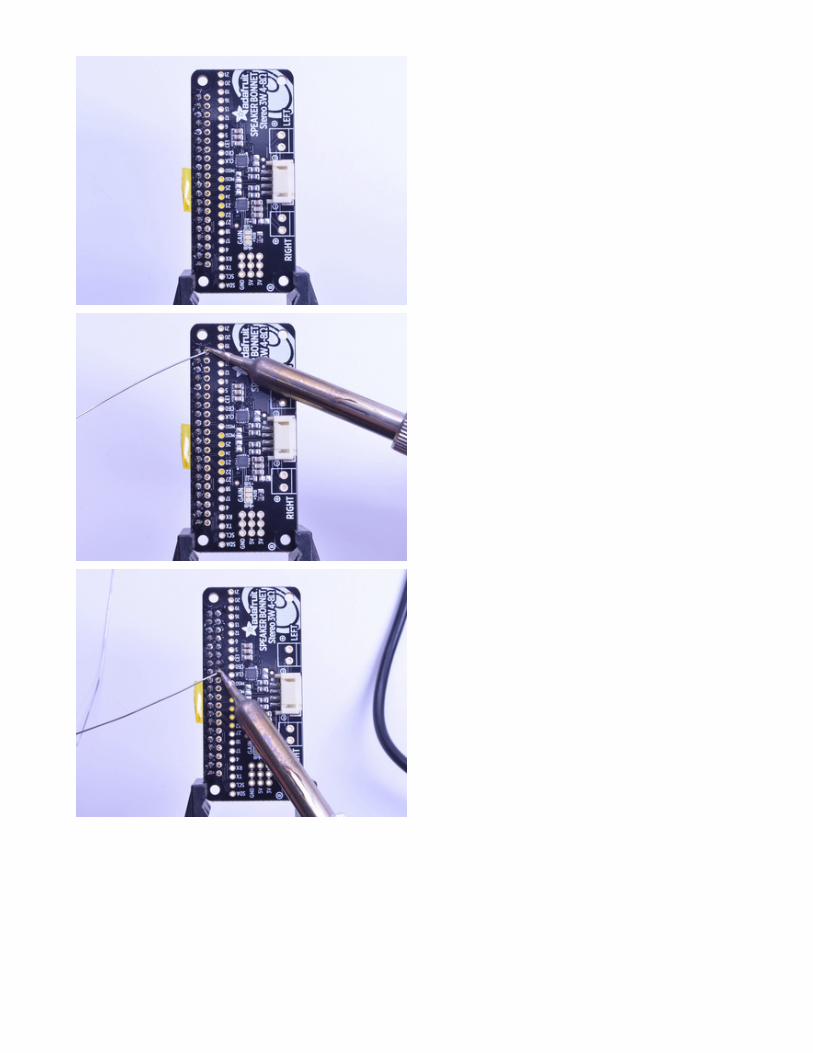
Now flip around and solder the other row completely
© Adafruit Industries https://learn.adafruit.com/adafruit-speaker-bonnet-for-raspberry-pi Page 7 of 39
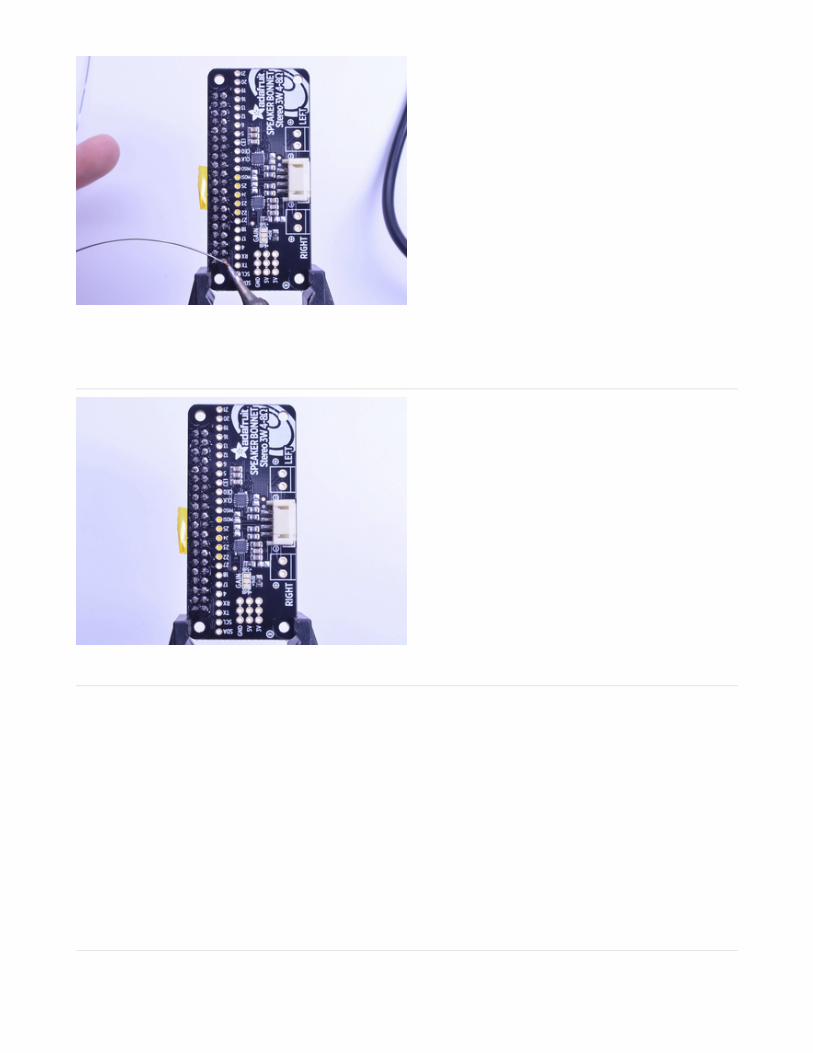
You're done with the header strips.
Check your solder joints visually and continue onto the
next steps
Next we will solder in the 2 3.5mm terminal blocks used
to connect speakers to the Speaker Bonnet.
Make sure the open parts of the terminals face
outwards so you can easily connect wires.
To make it easier to keep these in place, you can use
some tape to hold down the two header pieces. Tacky
clay also works, whatever you've got handy!
© Adafruit Industries https://learn.adafruit.com/adafruit-speaker-bonnet-for-raspberry-pi Page 8 of 39
Solder in each block, make sure you get to each of the
4 pins
© Adafruit Industries https://learn.adafruit.com/adafruit-speaker-bonnet-for-raspberry-pi Page 9 of 39

Now that you're done with the terminal blocks, check
your work make sure that each solder joint is done and
looks shiny
OK you're done!
© Adafruit Industries https://learn.adafruit.com/adafruit-speaker-bonnet-for-raspberry-pi Page 10 of 39

Pinouts
Power Supply
The two amplifier chips use the 3V + 5V + GND power pin at the 'top' of the 2x20 header. If using 3W speakers, youcan draw a significant amount of current, over 1.5 Amps! Make sure you power your Pi with a good wall adapter likeour 2.4A microUSB power plug.
Alternatively, if you really need a lot of power, use a 5V 4A power adapter and then a DC to micro USB adapter
5V 2.5A Switching Power Supply with 20AWG MicroUSBCable
$7.50IN STOCK
ADD TO CART
5V 4A (4000mA) switching power supply - UL Listed
$14.95IN STOCK
ADD TO CART
© Adafruit Industries https://learn.adafruit.com/adafruit-speaker-bonnet-for-raspberry-pi Page 11 of 39

I2S Audio Data Pins
The Bonnet uses 3 data pins and they cannot be changed! Pins #18, #19 and #21 are used. All other pins are available
Speaker Outputs
This is the fun part, you get stereo output - one left and one right channel. Each one is Bridge-Tied-Load so do notconnect both outputs together to get more volume!
MicroUSB Plug to 5.5/2.1mm DC Barrel Jack Adapter
$1.95IN STOCK
ADD TO CART
© Adafruit Industries https://learn.adafruit.com/adafruit-speaker-bonnet-for-raspberry-pi Page 12 of 39

You can use the JST 4-pin plug in the center if you're going to just plug in one of our enclosed speaker kits:
OR
You can use the terminal block spots on the left & right to connect regular speaker cones. You'll need to solder wireson and such but this way you can use whatever speaker you like! We suggest 8 ohm 1W or 4 ohm 3W. For louderaudio, but more power usage, use the 4 ohm speakers. For quieter audio, but less power usage, use the 8 ohmspeakers
You can also use other 'audio' devices like sonic transducers! These are devices you can put down onto a surface likea table, to make it into a speaker.
Stereo Enclosed Speaker Set - 3W 4 Ohm
$7.50IN STOCK
ADD TO CART
Speaker - 3" Diameter - 4 Ohm 3 Watt
$1.95IN STOCK
ADD TO CART
Speaker - 3" Diameter - 8 Ohm 1 Watt
$1.95IN STOCK
ADD TO CART
© Adafruit Industries https://learn.adafruit.com/adafruit-speaker-bonnet-for-raspberry-pi Page 13 of 39

Medium Surface Transducer with Wires - 4 Ohm 3 Watt
$14.95IN STOCK
ADD TO CART
© Adafruit Industries https://learn.adafruit.com/adafruit-speaker-bonnet-for-raspberry-pi Page 14 of 39

Raspberry Pi Setup
Fast Install
Luckily its quite easy to install support for I2S DACs on Raspbian.
These instructions are totally cribbed from the PhatDAC instructions at the lovely folks atPimoroni! (https://adafru.it/nFy)
Run the following from your Raspberry Pi with Internet connectivity:
curl -sS https://raw.githubusercontent.com/adafruit/Raspberry-Pi-Installer-Scripts/master/i2samp.sh | bash
We've added an extra helper systemd script that will play quiet audio when the I2S peripheral isn't in use. Thisremoves popping when playback starts or stops. It uses a tiny amount of CPU time (on a Pi Zero, 5%, on a Pi 2 or 3 itsnegligible). You don't need this on RetroPie because it never releases the I2S device, but it's great for Raspbian.
At this time, Raspbery Pi linux kernel does not support mono audio out of the I2S interface, you can only playstereo, so any mono audio files may need conversion to stereo!�
2017-11-2 Raspbian PIXEL ('full') has broken something in volume control. I2S works, but there's no softwarevolume setup, if you need this, try Raspbian Lite - will try to fix as soon as we figure out why :)�
© Adafruit Industries https://learn.adafruit.com/adafruit-speaker-bonnet-for-raspberry-pi Page 15 of 39

You will need to reboot once installed.
After rebooting, log back in and re-run the script again...It will ask you if you want to test the speaker. Say yes andlisten for audio to come out of your speakers...
If it sounds really distorted, it could be the volume is too high. However, in order to have volume control appear inRaspbian desktop or Retropie you must reboot a second time after doing the speaker test, with sudo reboot
Once rebooted, try running alsamixer and use arrow keys to lower the volume, 50% is a good place to start.
If you're still having audio problems, try re-running the script and saying N (disable) the /dev/zero playback service .
You must reboot to enable the speaker hardware!�
You must reboot *twice* to enable alsamixer volume (really!)�
© Adafruit Industries https://learn.adafruit.com/adafruit-speaker-bonnet-for-raspberry-pi Page 16 of 39

You can then go to the next page on testing and optimizing your setup. Skip the rest of this page on DetailedInstallation if the script worked for you!
Detailed Install
If, for some reason, you can't just run the script and you want to go through the install by hand - here's all the steps!
Update /etc/modprobe.d (if it exists)
Log into your Pi and get into a serial console (either via a console cable, the TV console, RXVT, or what have you)
Edit the raspi blacklist with
sudo nano /etc/modprobe.d/raspi-blacklist.conf
If the file is empty, just skip this step
However, if you see the following lines:
blacklist i2c-bcm2708blacklist snd-soc-pcm512x blacklist snd-soc-wm8804
Update the lines by putting a # before each line
© Adafruit Industries https://learn.adafruit.com/adafruit-speaker-bonnet-for-raspberry-pi Page 17 of 39

Save by typing Control-X Y <return>
Disable headphone audio (if it's set)
Edit the raspi modules list with
sudo nano /etc/modules
If the file is empty, just skip this step
However, if you see the following line:
snd_bcm2835
Put a # in front of it
© Adafruit Industries https://learn.adafruit.com/adafruit-speaker-bonnet-for-raspberry-pi Page 18 of 39

and save with Control-X Y <return>
Create asound.conf file
Edit the raspi modules list with
sudo nano /etc/asound.conf
This file ought to be blank!
Copy and paste the following text into the file
© Adafruit Industries https://learn.adafruit.com/adafruit-speaker-bonnet-for-raspberry-pi Page 19 of 39
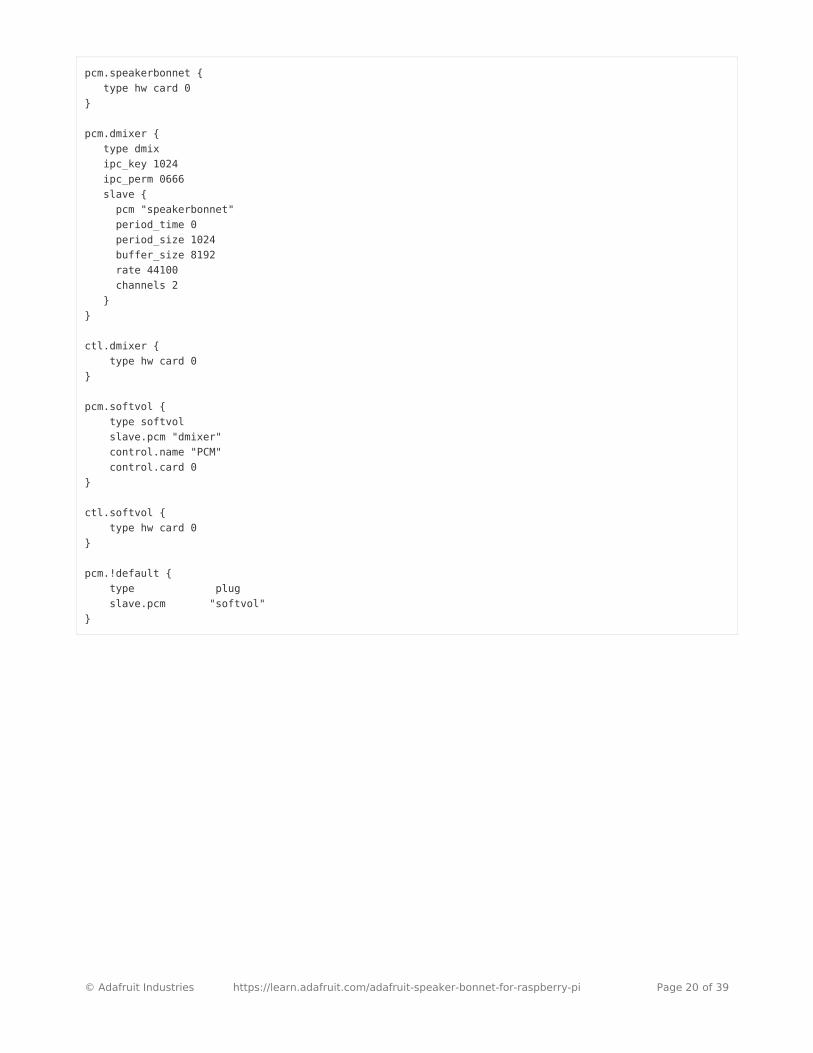
pcm.speakerbonnet { type hw card 0}
pcm.dmixer { type dmix ipc_key 1024 ipc_perm 0666 slave { pcm "speakerbonnet" period_time 0 period_size 1024 buffer_size 8192 rate 44100 channels 2 }}
ctl.dmixer { type hw card 0}
pcm.softvol { type softvol slave.pcm "dmixer" control.name "PCM" control.card 0}
ctl.softvol { type hw card 0}
pcm.!default { type plug slave.pcm "softvol"}
© Adafruit Industries https://learn.adafruit.com/adafruit-speaker-bonnet-for-raspberry-pi Page 20 of 39

Save the file as usual
Add Device Tree Overlay
Edit your Pi configuration file with
sudo nano /boot/config.txt
And scroll down to the bottom. If you see a line that says: dtparam=audio=on
Disable it by putting a # in front.
Then add:dtoverlay=hifiberry-dacdtoverlay=i2s-mmap
© Adafruit Industries https://learn.adafruit.com/adafruit-speaker-bonnet-for-raspberry-pi Page 21 of 39

on the next line. Save the file.
Reboot your Pi with sudo reboot
© Adafruit Industries https://learn.adafruit.com/adafruit-speaker-bonnet-for-raspberry-pi Page 22 of 39

Raspberry Pi Test
Speaker Tests!
OK you can use whatever software you like to play audio but if you'd like to test the speaker output, here's some quickcommands that will let you verify your amp and speaker are working as they should!
Simple white noise speaker test
Run speaker-test -c2 to generate white noise out of the speaker, alternating left and right.
If you have a mono output amplifier, the I2S amp merges left and right channels, so you'll hear continuous white noise
Simple WAV speaker test
Once you've got something coming out, try to play an audio file with speaker-test (for WAV files, not MP3)
speaker-test -c2 --test=wav -w /usr/share/sounds/alsa/Front_Center.wav
You'll hear audio coming from left and right alternating speakers
Simple MP3 speaker test
If you want to play a stream of music, you can try
sudo apt-get install -y mpg123mpg123 http://ice1.somafm.com/u80s-128-mp3
If you want to play MP3's on command, check out this tutorial which covers how to set that up (https://adafru.it/aTD)
At this time, Jessie Raspbery Pi kernel does not support mono audio out of the I2S interface, you can only play stereo,so any mono audio files may need conversion to stereo!
Volume adjustment
Many programs like PyGame and Sonic Pi have volume control within the application. For other programs you can setthe volume using the command line tool called alsamixer. Just type alsamixer in and then use the up/down arrows toset the volume. Press Escape once its set
omxplayer does not seem use the I2S interface for audio - only HDMI - so you won't be able to use it�
© Adafruit Industries https://learn.adafruit.com/adafruit-speaker-bonnet-for-raspberry-pi Page 23 of 39

In Raspbian PIXEL you can set the volume using the menu item control. If it has an X through it, try restarting the Pi(you have to restart twice after install to get PIXEL to recognize the volume control
© Adafruit Industries https://learn.adafruit.com/adafruit-speaker-bonnet-for-raspberry-pi Page 24 of 39

Pi I2S Tweaks
Reducing popping
For people who followed our original installation instructions with the simple alsa config, they may find that the I2Saudio pops when playing new audio.
The workaround is to use a software mixer to output a fixed sample rate to the I2S device so the bit clock does notchange. I use ALSA so I configured dmixer and I no longer have any pops or clicks. Note that the RaspPi I2S driverdoes not support dmixer by default and you must follow these instructions provided (https://adafru.it/sHF) to add it.Continue on for step-by-step on how to enable it!
Step 1
Start by modify /boot/config.txt to add dtoverlay=i2s-mmap
Run sudo nano /boot/config.txt and add the text to the bottom like so:
Save and exit.
Then change /etc/asound.conf to:
This page is deprecated, our installer already performs these steps for you, but we'll keep them here forarchival use!�
© Adafruit Industries https://learn.adafruit.com/adafruit-speaker-bonnet-for-raspberry-pi Page 25 of 39

By running sudo nano /etc/asound.conf
This creates a PCM device called speakerbonnet which is connected to the hardware I2S device. Then we make anew 'dmix' device ( type dmix ) called pcm.dmixer . We give it a unique Inter Process Communication key ( ipc_key1024 ) and permissions that are world-read-writeable (ipc_perm 0666 ) The mixer will control the hardware pcm
device speakerbonnet (pcm "speakerbonnet") and has a buffer set up so its nice and fast. The communication buffer isset up so there's no delays ( period_time 0 , period_size 1024 and buffer_size 8192 work well). The default mixed
rate is 44.1khz stereo ( rate 44100 channels 2 )
Finally we set up a control interface but it ended up working best to just put in the hardware device here - ctl.dmixer {type hw card 0 }
pcm.speakerbonnet { type hw card 0 }
pcm.!default { type plug slave.pcm "dmixer" }
pcm.dmixer { type dmix ipc_key 1024 ipc_perm 0666 slave { pcm "speakerbonnet" period_time 0 period_size 1024 buffer_size 8192 rate 44100 channels 2 } }
ctl.dmixer { type hw card 0 }
© Adafruit Industries https://learn.adafruit.com/adafruit-speaker-bonnet-for-raspberry-pi Page 26 of 39

Save and exit. Then reboot the Pi to enable the mixer. Also, while it will greatly reduce popping, you still may get oneonce in a while - especially when first playing audio!
Add software volume control
The basic I2S chipset used here does not have software control built in. So we have to 'trick' the Pi into creating asoftware volume control. Luckily, its not hard once you know how to do it (https://adafru.it/ydQ).
Create a new audio config file in ~/.asoundrc with nano ~/.asoundrc and inside put the following text:
© Adafruit Industries https://learn.adafruit.com/adafruit-speaker-bonnet-for-raspberry-pi Page 27 of 39
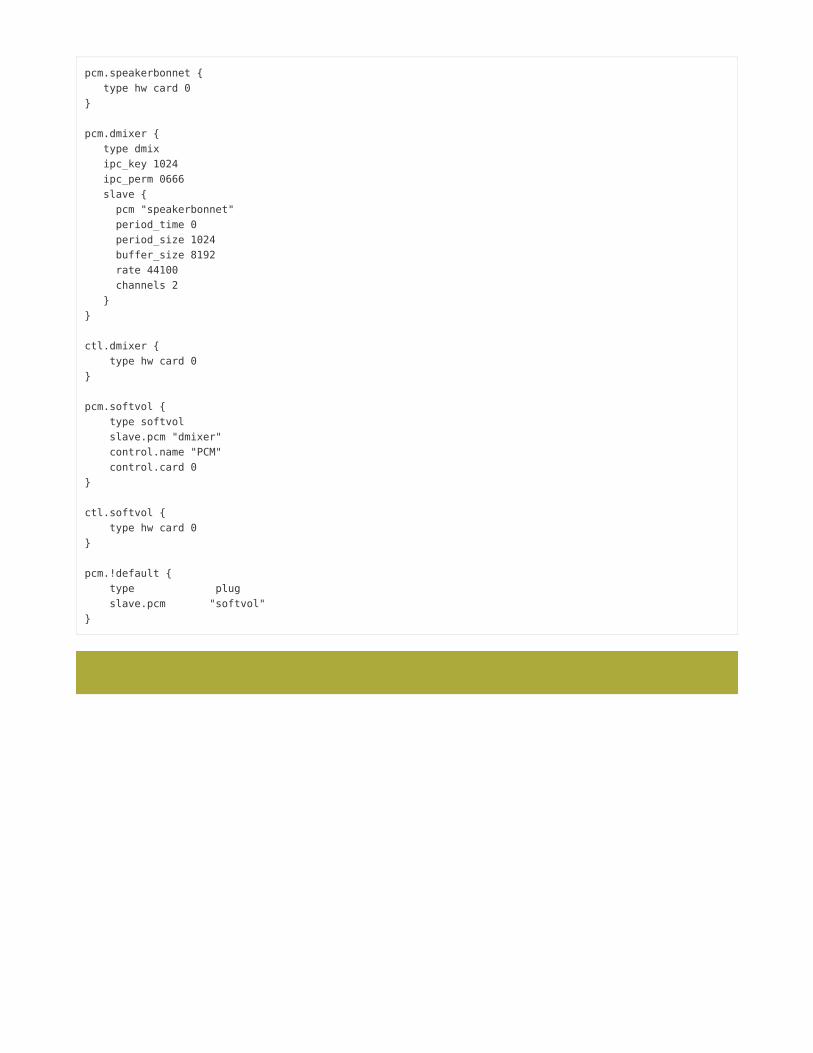
pcm.speakerbonnet { type hw card 0}
pcm.dmixer { type dmix ipc_key 1024 ipc_perm 0666 slave { pcm "speakerbonnet" period_time 0 period_size 1024 buffer_size 8192 rate 44100 channels 2 }}
ctl.dmixer { type hw card 0}
pcm.softvol { type softvol slave.pcm "dmixer" control.name "PCM" control.card 0}
ctl.softvol { type hw card 0}
pcm.!default { type plug slave.pcm "softvol"}
This assumes you set up the dmixer for no-popping above!�
© Adafruit Industries https://learn.adafruit.com/adafruit-speaker-bonnet-for-raspberry-pi Page 28 of 39

Save and exit
Now, here's the trick, you have to reboot, then play some audio through alsa, then reboot to get the alsamixer to syncup right:
speaker-test -c2 --test=wav -w /usr/share/sounds/alsa/Front_Center.wav
Then you can type alsamixer to control the volume with the 'classic' alsa mixing interface
Just press the up and down arrows to set the volume, and ESC to quit
© Adafruit Industries https://learn.adafruit.com/adafruit-speaker-bonnet-for-raspberry-pi Page 29 of 39

�
I2S Audio FAQ
Hey in Raspbian Pixel desktop, the speaker icon is X'd out!�
© Adafruit Industries https://learn.adafruit.com/adafruit-speaker-bonnet-for-raspberry-pi Page 30 of 39

� Even with dmixer enabled, I get a staticy-pop when the Pi first boots or when it first starts playingaudio�
© Adafruit Industries https://learn.adafruit.com/adafruit-speaker-bonnet-for-raspberry-pi Page 31 of 39

� The audio on my DAC sounds really bad/distorted�
© Adafruit Industries https://learn.adafruit.com/adafruit-speaker-bonnet-for-raspberry-pi Page 32 of 39

� Does this work with my favorite software?�
© Adafruit Industries https://learn.adafruit.com/adafruit-speaker-bonnet-for-raspberry-pi Page 33 of 39

© Adafruit Industries https://learn.adafruit.com/adafruit-speaker-bonnet-for-raspberry-pi Page 34 of 39

Play Audio with PyGame
You can use mpg123 for basic testing but it's a little clumsy for use where you want to dynamically change the volumeor have an interactive program. For more powerful audio playback we suggest using PyGame to playback a variety ofaudio formats (MP3 included!)
Install PyGame
Start by installing pygame support, you'll need to open up a console on your Pi with network access and run:
Next, download this pygame example zip to your Pi
https://adafru.it/wbp
https://adafru.it/wbp
On the command line, run
wget https://cdn-learn.adafruit.com/assets/assets/000/041/506/original/pygame_example.zip (https://adafru.it/wbq)
unzip pygame_example.zip (https://adafru.it/wbq)
Run Demo
Inside the zip is an example called pygameMP3.py
This example will playback all MP3's within the script's folder. To demonstrate that you can also adjust the volumewithin pygame, the second argument is the volume for playback. Specify a volume to playback with a command lineargument between 0.0 and 1.0
For example here is how to play at 75% volume:
Here's the code if you have your own mp3s!
sudo apt-get install python-pygame
python pygameMP3.py 0.75
''' pg_midi_sound101.pyplay midi music files (also mp3 files) using pygametested with Python273/331 and pygame192 by vegaseat'''#code modified by James DeVito from here: https://www.daniweb.com/programming/software-development/code/454835/let-pygame-play-your-midi-or-mp3-files
#!/usr/bin/python
import sysimport pygame as pgimport osimport time
© Adafruit Industries https://learn.adafruit.com/adafruit-speaker-bonnet-for-raspberry-pi Page 35 of 39
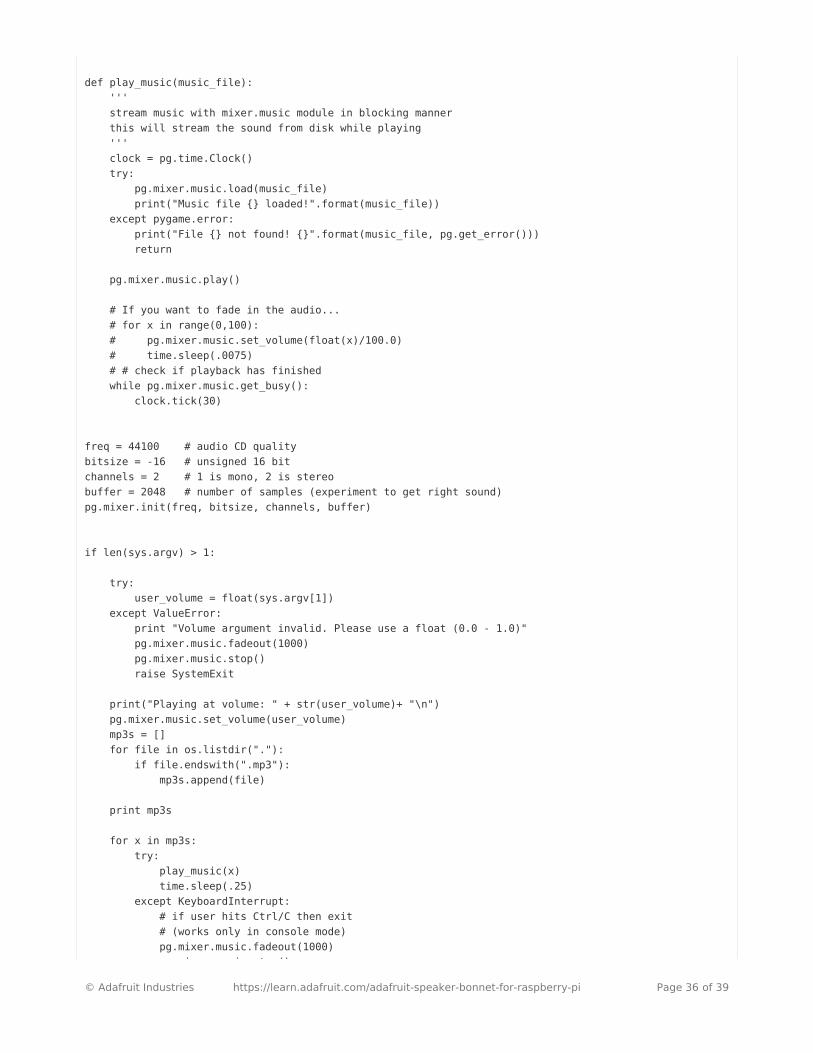
def play_music(music_file): ''' stream music with mixer.music module in blocking manner this will stream the sound from disk while playing ''' clock = pg.time.Clock() try: pg.mixer.music.load(music_file) print("Music file {} loaded!".format(music_file)) except pygame.error: print("File {} not found! {}".format(music_file, pg.get_error())) return
pg.mixer.music.play() # If you want to fade in the audio... # for x in range(0,100): # pg.mixer.music.set_volume(float(x)/100.0) # time.sleep(.0075) # # check if playback has finished while pg.mixer.music.get_busy(): clock.tick(30)
freq = 44100 # audio CD qualitybitsize = -16 # unsigned 16 bitchannels = 2 # 1 is mono, 2 is stereobuffer = 2048 # number of samples (experiment to get right sound)pg.mixer.init(freq, bitsize, channels, buffer)
if len(sys.argv) > 1:
try: user_volume = float(sys.argv[1]) except ValueError: print "Volume argument invalid. Please use a float (0.0 - 1.0)" pg.mixer.music.fadeout(1000) pg.mixer.music.stop() raise SystemExit
print("Playing at volume: " + str(user_volume)+ "\n") pg.mixer.music.set_volume(user_volume) mp3s = [] for file in os.listdir("."): if file.endswith(".mp3"): mp3s.append(file)
print mp3s
for x in mp3s: try: play_music(x) time.sleep(.25) except KeyboardInterrupt: # if user hits Ctrl/C then exit # (works only in console mode) pg.mixer.music.fadeout(1000) pg.mixer.music.stop()
© Adafruit Industries https://learn.adafruit.com/adafruit-speaker-bonnet-for-raspberry-pi Page 36 of 39

pg.mixer.music.stop() raise SystemExitelse: print("Please specify volume as a float! (0.0 - 1.0)")
© Adafruit Industries https://learn.adafruit.com/adafruit-speaker-bonnet-for-raspberry-pi Page 37 of 39

Downloads
Datasheets & Files
MAX98357 Datasheet (https://adafru.it/nFz)EagleCAD PCB files (https://adafru.it/t1d)Fritzing object in Adafruit Fritzing library (https://adafru.it/c7M)
Schematic
Fabrication Print
Dims in mm
© Adafruit Industries https://learn.adafruit.com/adafruit-speaker-bonnet-for-raspberry-pi Page 38 of 39

© Adafruit Industries Last Updated: 2019-03-12 05:04:11 PM UTC Page 39 of 39