aaa and port authentication - allied telesis · aaa and port authentication. ... tri-authentication...
TRANSCRIPT
Technical GuideTechnical GuideTechnical GuideTechnical GuideTechnical Guide
Feature Overview and Configuration Guide
AAA and Port Authentication
IntroductionThis guide describes the AlliedWare Plus implementation of Authentication, Accounting
and Authorization. Port Authentication commands enable you to specify three different
types of device authentication: 802.1X-authentication, Web-authentication, and MAC-
authentication.
802.1X is an IEEE standard providing a mechanism for authenticating devices attached to
a LAN port or wireless device. Web-authentication is applicable to devices that have a
human user who opens the web browser and types in a user name and password when
requested. MAC-authentication is used to authenticate devices that have neither a human
user nor implement 802.1X supplicant when making a network connection request.
ContentsIntroduction.........................................................................................................................1
Products and software version that apply to this guide...............................................3
Authentication, Authorization and Accounting (AAA)..........................................................3
Introduction ..................................................................................................................3
Available Functions and Server Types..........................................................................3
Server Groups ..............................................................................................................4
Method Lists.................................................................................................................5
Processing Authentication Requests ...........................................................................9
Configuring AAA Login Authentication .......................................................................11
Sample Authentication Configurations.......................................................................12
x alliedtelesis.comC613-22088-00 REV A
802.1x Authentication ...................................................................................................... 18
Introduction................................................................................................................ 18
Basic Steps in 802.1x Configuration ......................................................................... 21
802.1x VLAN Assignment .......................................................................................... 24
Verify the operation of 802.1x.................................................................................... 30
Web Authentication .......................................................................................................... 31
Introduction................................................................................................................ 31
What is Web-authentication?.................................................................................... 31
Configuring Web-authentication................................................................................ 33
Starting a Web-authentication Session ..................................................................... 35
Understanding the Web-authentication Features...................................................... 36
Customising the Login Page...................................................................................... 40
Setting the Intercept Port Number............................................................................. 49
Secure Authentication ............................................................................................... 49
Ping-poll Monitoring of Supplicant Presence ............................................................ 51
Checking the Auth-web-server Status ...................................................................... 52
Checking the IP Addresses of the Supplicants ......................................................... 53
Idle Time-out.............................................................................................................. 53
Monitoring the Operation of Web-authentication ...................................................... 55
Configuration Example: Guest VLAN and URL Redirection ...................................... 56
What does the user experience? ............................................................................... 58
MAC-Authentication......................................................................................................... 59
Why is MAC-Authentication Required? ..................................................................... 59
How Does MAC-Authentication Work? ..................................................................... 59
Configuring MAC-Authentication............................................................................... 60
Tri-Authentication ............................................................................................................. 61
Tri-Authentication Configuration................................................................................ 61
Two-step Authentication .................................................................................................. 63
Ensuring Authentication Methods Require Different Usernames and Passwords ........... 64
Roaming Authentication................................................................................................... 65
Roaming Authentication Overview ............................................................................ 66
Roaming Authentication Feature Interactions ........................................................... 67
Unauthenticated Supplicant Traffic .................................................................................. 68
Deciding When a Supplicant Fails Authentication..................................................... 70
Failed Authentication VLAN....................................................................................... 71
Limitations on Allowed Feature Combinations .......................................................... 72
Port Authentication Profiles.............................................................................................. 73
What are port authentication profiles ........................................................................ 73
Using port authentication profiles.............................................................................. 73
Page 2 |
Products and software version that apply to this guide
This guide applies to all AlliedWare Plus™ products, running version 5.4.6 or later.
Feature support may change in later software versions. For the latest information, see the
following documents:
The product’s Datasheet
The product’s Command Reference
These documents are available from the above links on our website at alliedtelesis.com.
Authentication, Authorization and Accounting(AAA)
Introduction
AAA is the collective title for the three related functions of Authentication, Authorization
and Accounting. These functions can be applied in a variety of methods with a variety of
servers. The purpose of the AAA commands is to map instances of the AAA functions to
sets of servers.
The Authentication function can be performed in multiple contexts, such as authentication
of users logging in at a console, or 802.1X-Authentication of devices connecting to
Ethernet ports.
For each of these contexts, you may want to use different sets of servers for examining
the proffered authentication credentials and deciding if they are valid. AAA Authentication
commands enable you to specify which servers will be used for different types of
authentication.
Available Functions and Server Types
The three types of servers that can be used for Authentication, Authorization and
Accounting are:
Local user database
RADIUS servers
TACACS+ servers
Products and software version that apply to this guide | Page 3

Authentication decides whether the client is allowed access and is performed in the
following contexts:
Login authentication of user shell sessions on the console port, and via Telnet/SSH
Enable password authentication for user shell sessions on the console port, and via
Telnet/SSH (TACACS+ or local user database only)
802.1X-authentication of devices connecting to switch ports
MAC-authentication of devices connecting to switch ports
Web-based authentication of devices connecting to switch ports
Authorization decides what level of access a client is allowed, i.e. what services are they
allowed to use. In AlliedWare Plus, authorization is performed as part of the login
authentication process and there are no separate authorization commands available.
Authorization is performed in the following context:
Login authentication of user shell sessions on the console port, and via Telnet/SSH
Accounting keeps a record of the client’s session and collects statistics on their data
usages, it is performed in the following contexts:
Console, Telnet, and SSH login sessions
Commands executed within user shell sessions (TACACS+ only)
802.1X-authenticated connections
MAC-authenticated connections
Web-authenticated connections
Different servers might be used for different activities. A network might use RADIUS for
802.1x authentication, but TACACS+ for authenticating users logging into the
management interfaces of the device itself.
Server Groups
The two protocols most commonly used for Authentication, Authorization, and
Accounting are RADIUS and TACACS+. When using these protocols, the device will
exchange data with a RADIUS or TACACS+ server.
For authentication, the device will send user credentials to a RADIUS or TACACS+
server, and listen for the server’s response to those credentials.
For accounting, the device sends accounting messages to the server, and the server
uses those to accumulate usage records of network services.
For redundancy purposes, a network will often contain more than one RADIUS or
TACACS+ server.
Page 4 | Server Groups
To enable a set of servers to be conveniently referenced from AAA commands, the
concept of a server group has been introduced to the device command line.
Configuring server groups
A server group is defined by the command aaa group server. This command puts you
into server group configuration mode. Once in that mode you can add servers to the
group by using the command server ip-address.
Any number of servers can be added to a group. Typically, you will add servers which
have already been configured by the command radius-server host. If you add a server
that has not yet been configured by the command radius-server host, you will receive a
warning that the server has not yet been configured, but the command will still be
accepted.
There is one server group, named radius, that is always present on the device. This group
cannot be removed and contains all servers that have been configured using the
command radius-server host. As soon as a server is configured by the command
radius-server host, it is automatically a member of the server group radius and cannot
be removed from it.
Note: While it is possible to create named server groups for RADIUS servers, there is noequivalent feature for TACACS+ servers. For TACACS+, the only server group is thedefault group, that contains all the TACACS+ servers configured on the device.
The show radius server group command displays information about the RADIUS server
groups configured on a device.
Method Lists
A method list defines the set of server types that you want to be used for authenticating or
accounting a user or device. It also specifies the order in which you want the server types
to be used.
You may want to:
Check the usernames submitted for logging in at the console are in the local user
database. You can create a method list that specifies local.
Or, check the TACACS+ servers first, and resort to the local user database if none of
the TACACS+ servers respond. You can create a method list that specifies group
TACACS+ first, followed by local.
Or, check the RADIUS servers first, and resort to the local user database if none of the
RADIUS servers respond. You can create a method list that specifies group RADIUS
first, followed by local.
A method list defines the servers where authentication requests are sent. The first server
listed is contacted; if that server fails to respond then the next authentication server type
Method Lists | Page 5
in the method list is selected. This process continues until there is a successful response
or until all server types fail to respond.
In the case of a user logging into the device, the device sends an authentication request
to the first authentication server in the method list:
If the first server in the list is reachable and it contains a username and password
matching the authentication request, the user is authenticated and the login succeeds.
If the authentication server denies the authentication request because of an incorrect
username or password, the user login fails.
If the first server in the method list is unreachable, the device sends the request to the
next server in the list, and so on.
For example, if the method list specifies group tacacs+ local, and a user attempts to log
in with a password that does not match a user entry in the first TACACS+ server, this
TACACS+ server denies the authentication request, then the device does not try any other
TACACS+ servers nor the local user database; the user login fails.
If the first server type in the method list is a server group containing multiple servers, then
all servers in the group are tried before moving on to the next server type in the method
list.
The details of how requests are retried progressively through a group of servers are
described in "Checking multiple authentication servers" on page 10.
Configuring method lists
Within AlliedWare Plus, it is possible to create method lists for two types of activities:
authentication
accounting
The method lists for these two activities can be created for four different contexts:
1. 802.1x
2. MAC-based authentication
3. Web-based authentication
4. Device management session login
In addition to the default method list it is possible to create any number of other, named,
method lists for all four contexts.
For 802.1x, MAC-auth and web-auth, the method available for authentication is RADIUS
and it is necessary to define which RADIUS server group is being used.
Page 6 | Method Lists
Default method lists
For every authentication or accounting type, it is always possible to define a method list
called default.
As soon as the default method list is defined for a given authentication or accounting type,
it is automatically applied as the method list to be used for any instance of that type of
authentication or accounting, except for instances to which another named method list
has already been specifically applied.
Authentication method lists
The commands to create an authentication method list for 802.1x, MAC-auth, and web-
auth are:
awplus(config)# aaa authentication dot1x {default|<list-name>} group {<group-name>|radius}
awplus(config)# aaa authentication auth-mac {default|<list-name>} group {<group-name>|radius}
awplus(config)# aaa authentication auth-web {default|<list-name>} group {<group-name>|radius}
Points to note:
For any one of these authentication types, the authentication will not operate until the
either the default or a named method authentication method list has been defined.
The commands above effectively enable those three authentication types.
If the server group radius is chosen, then all the RADIUS servers configured on the
device will be available to the authentication method.
For authentication of the login to management sessions on the device, the local method
is available, as well as RADIUS and TACACS+.
So, the syntax of the command for creating a login method list is:
awplus(config)# aaa authentication login {default|<list-name>} {[local][group {radius|tacacs+|<group-name>}]}
Accounting method lists
The command for creating an accounting method list for 802.1x, auth-MAC, or auth-web
is:
awplus(config)# aaa accounting <context> {default|<list-name>} {start-stop|stop-only|none} {group {radius|<group-name>}}
where <context> is one of dot1x, auth-mac, or auth-web.
Management login session method lists are configured with the following command:
awplus(config)# aaa accounting login {default|<list-name>}{start-stop|stop-only|none} {group {radius|<group-name>}}
Method Lists | Page 7
The method list definition also defines whether the device will send accounting start and/
or stop messages or neither. There is a separate command aaa accounting update that
controls whether or not RADIUS accounting update messages will be sent. This is a global
command, so it controls the action of all accounting sessions, regardless of which
method list they are controlled by.
Applying named method lists for port authentication
You apply a named method lists to an interface from that interface’s configuration mode.
The command to enter the configuration mode for an interface is:
awplus# configure terminal
awplus(config)# interface <interface-name>
Once in the interface configuration mode apply an authentication method list to the
interface with the command:
awplus(config-if)# <context> authentication {default|<list-name>}
or apply an accounting method list to the interface with the command:
awplus(config-if)# <context> accounting {default|<list-name>}
where <context> is one of dot1x, auth-mac, or auth-web.
The show aaa server group command lists the AAA servers and any method lists
associated with them.
Applying login method lists
The types of management session to which method lists can be applied are:
Console sessions on the device’s RS-232 port
Remote CLI sessions via Telnet
Remote CLI sessions via SSH
The method lists are applied to these session types by configuring the login method on
the virtual interfaces via which these sessions access the device.
The virtual interfaces are configured via the line command. The command to enter
configuration mode for the console virtual interface is:
awplus# configure terminal
awplus(config)# line console 0
The command to enter configuration mode for the Telnet/SSH virtual interface is:
awplus(config)# line vty 0 4
Note: Telnet and SSH both use the same set of vty lines.
Page 8 | Method Lists
Within the interface configuration mode for these virtual interfaces, the command to apply
an authentication method list is:
awplus(config-line)# login authentication <method list name>
To configure Telnet/SSH to use a RADIUS group ‘trust’, then check the local database,
configure as
awplus(config)# aaa authentication login remote-login group trust local
awplus(config)# line vty 0 4
awplus(config-line)# login authentication remote-login
Processing Authentication Requests
Checking multiple authentication servers
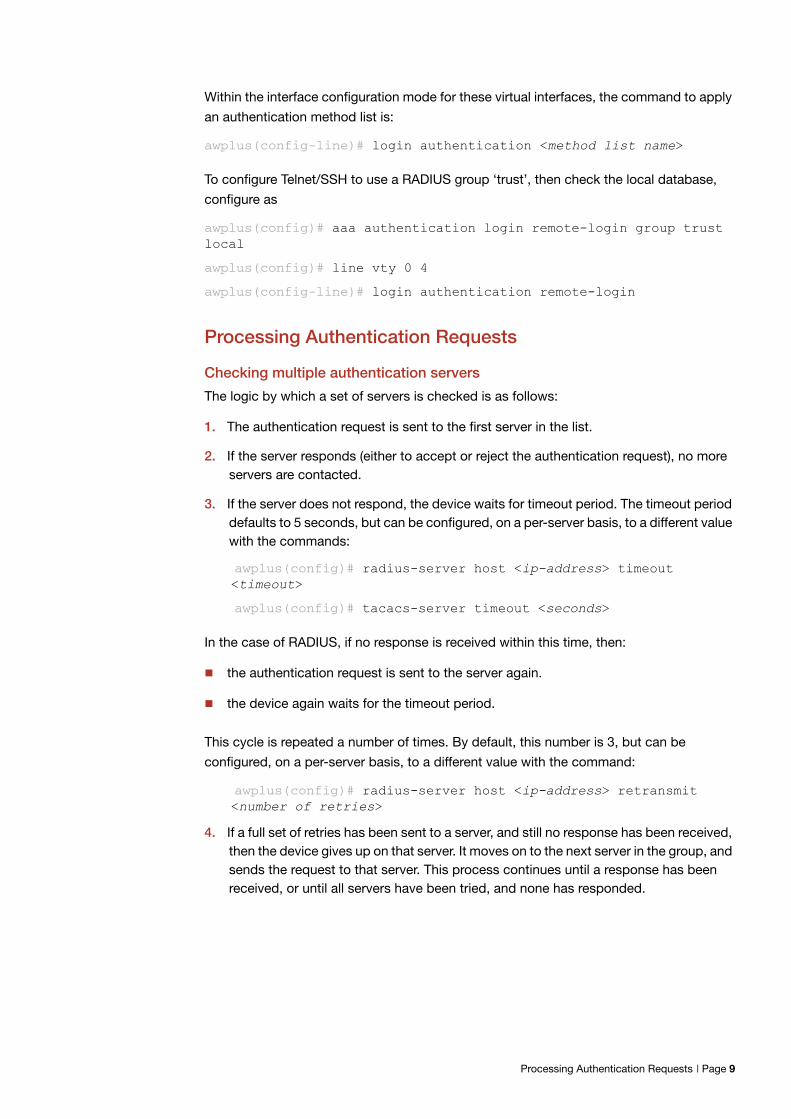
The logic by which a set of servers is checked is as follows:
1. The authentication request is sent to the first server in the list.
2. If the server responds (either to accept or reject the authentication request), no moreservers are contacted.
3. If the server does not respond, the device waits for timeout period. The timeout perioddefaults to 5 seconds, but can be configured, on a per-server basis, to a different valuewith the commands:
awplus(config)# radius-server host <ip-address> timeout <timeout>
awplus(config)# tacacs-server timeout <seconds>
In the case of RADIUS, if no response is received within this time, then:
the authentication request is sent to the server again.
the device again waits for the timeout period.
This cycle is repeated a number of times. By default, this number is 3, but can be
configured, on a per-server basis, to a different value with the command:
awplus(config)# radius-server host <ip-address> retransmit <number of retries>
4. If a full set of retries has been sent to a server, and still no response has been received,then the device gives up on that server. It moves on to the next server in the group, andsends the request to that server. This process continues until a response has beenreceived, or until all servers have been tried, and none has responded.
Processing Authentication Requests | Page 9
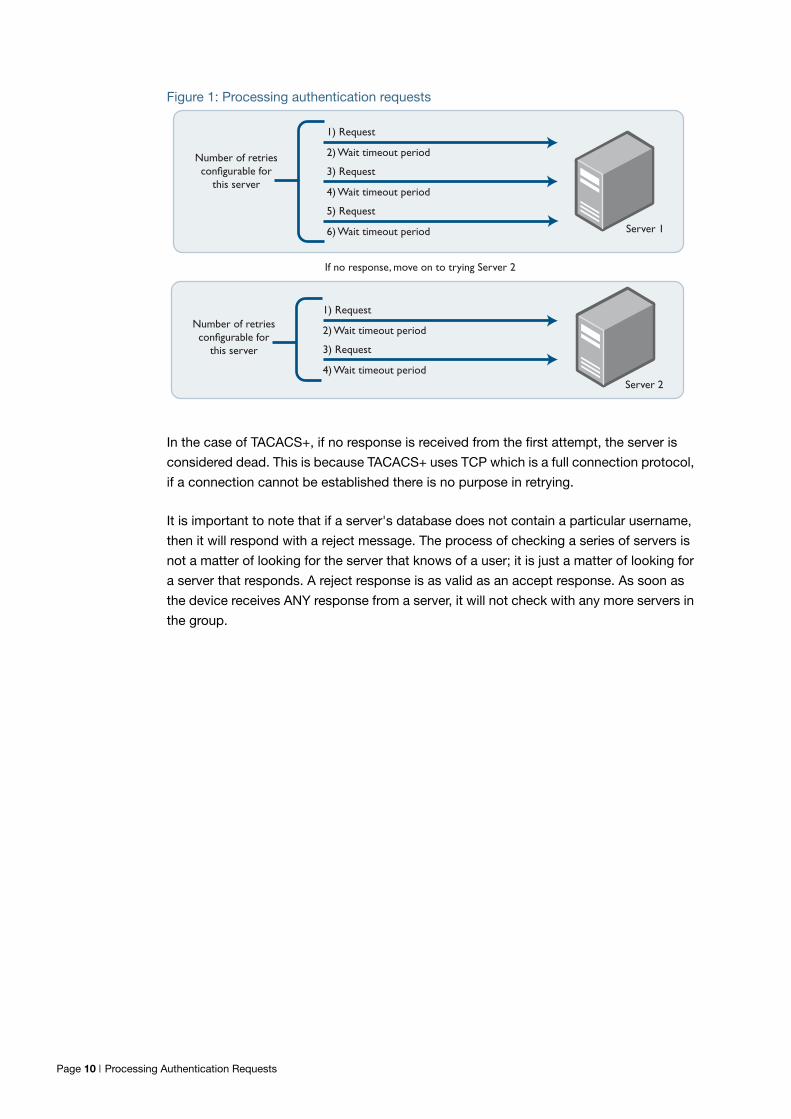
Figure 1: Processing authentication requests
In the case of TACACS+, if no response is received from the first attempt, the server is
considered dead. This is because TACACS+ uses TCP which is a full connection protocol,
if a connection cannot be established there is no purpose in retrying.
It is important to note that if a server's database does not contain a particular username,
then it will respond with a reject message. The process of checking a series of servers is
not a matter of looking for the server that knows of a user; it is just a matter of looking for
a server that responds. A reject response is as valid as an accept response. As soon as
the device receives ANY response from a server, it will not check with any more servers in
the group.
Server 1
Number of retries
configurable for
this server
1) Request
2) Wait timeout period
3) Request
4) Wait timeout period
5) Request
6) Wait timeout period
1) Request
2) Wait timeout period
3) Request
4) Wait timeout period
Number of retries
configurable for
this server
Server 2
If no response, move on to trying Server 2
Page 10 | Processing Authentication Requests
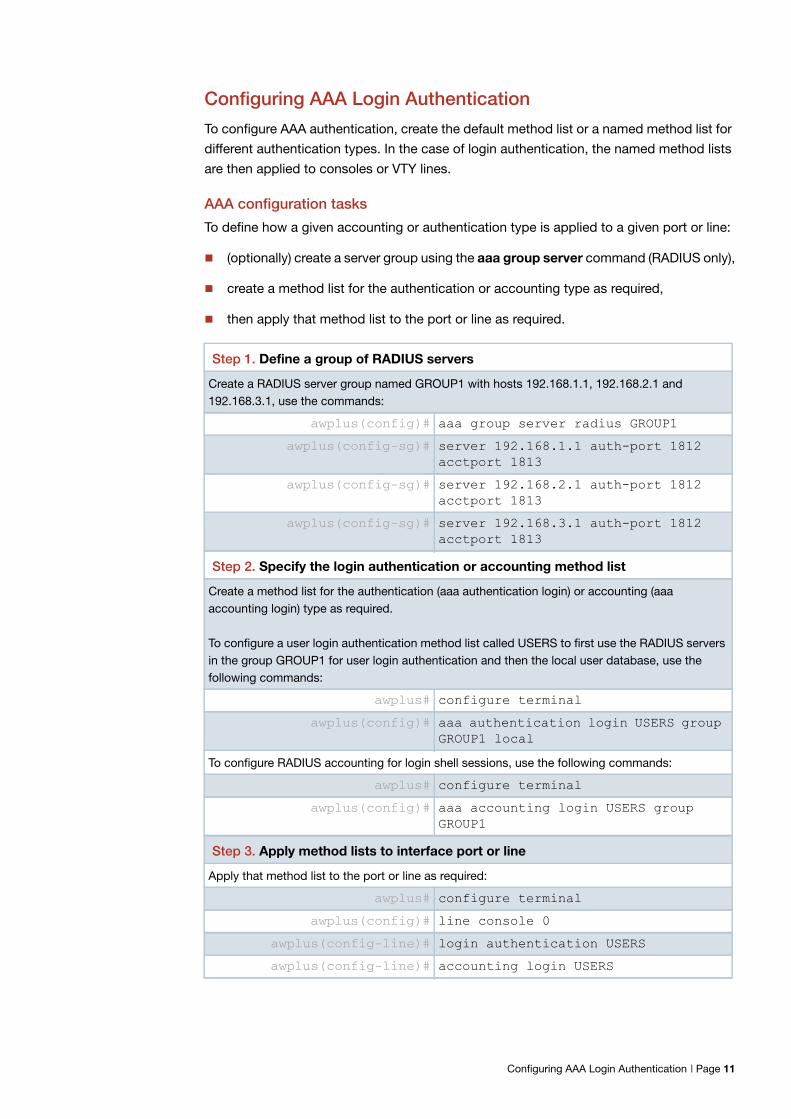
Configuring AAA Login Authentication
To configure AAA authentication, create the default method list or a named method list for
different authentication types. In the case of login authentication, the named method lists
are then applied to consoles or VTY lines.
AAA configuration tasks
To define how a given accounting or authentication type is applied to a given port or line:
(optionally) create a server group using the aaa group server command (RADIUS only),
create a method list for the authentication or accounting type as required,
then apply that method list to the port or line as required.
Step 1. Define a group of RADIUS servers
Create a RADIUS server group named GROUP1 with hosts 192.168.1.1, 192.168.2.1 and192.168.3.1, use the commands:
awplus(config)# aaa group server radius GROUP1
awplus(config-sg)# server 192.168.1.1 auth-port 1812 acctport 1813
awplus(config-sg)# server 192.168.2.1 auth-port 1812 acctport 1813
awplus(config-sg)# server 192.168.3.1 auth-port 1812 acctport 1813
Step 2. Specify the login authentication or accounting method list
Create a method list for the authentication (aaa authentication login) or accounting (aaaaccounting login) type as required.
To configure a user login authentication method list called USERS to first use the RADIUS serversin the group GROUP1 for user login authentication and then the local user database, use thefollowing commands:
awplus# configure terminal
awplus(config)# aaa authentication login USERS group GROUP1 local
To configure RADIUS accounting for login shell sessions, use the following commands:
awplus# configure terminal
awplus(config)# aaa accounting login USERS group GROUP1
Step 3. Apply method lists to interface port or line
Apply that method list to the port or line as required:
awplus# configure terminal
awplus(config)# line console 0
awplus(config-line)# login authentication USERS
awplus(config-line)# accounting login USERS
Configuring AAA Login Authentication | Page 11
Sample Authentication Configurations
Sample 802.1X-authentication configuration
The configuration below shows an example configuration for dot1x authentication, using
the local RADIUS server.
The 802.1X-authentication feature needs the aaa authentication dot1x command
configured globally and the dot1x port-control command configured on an interface. See
the CLI reference for command information to edit this configuration.
The local RADIUS Server has been configured to respond to authentication requests
generated by 802.1X-authentication in this sample configuration. See the radius-server
local and server enable commands in the CLI reference for command information.
This sample configuration enables 802.1X-authentication on interface VLAN1 which has
IP address 192.168.1.120. Change the VLAN ID and IP address as required for your
configuration.
!radius-server host 127.0.0.1 key awplus-local-radius-server!aaa authentication dot1x default group radius!radius-server localserver enablenas 127.0.0.1 key awplus-local-radius-serveruser guest password guest!!no spanning-tree rstp enable!interface port1.0.1dot1x port-control auto!interface vlan1ip address 192.168.1.120/24!
Page 12 | Sample Authentication Configurations
Sample MAC-authentication configuration
The configuration below shows an example configuration for MAC authentication, using
the local RADIUS server.
The MAC-authentication feature needs the aaa authentication auth-mac command
configured globally and the auth-mac enable command configured on an interface.
The local RADIUS server has been configured to use MAC-authentication in this sample
configuration. For information on the commands used in this configuration, see the CLI
reference.
This configuration enables MAC-authentication on VLAN1 which has IP address
192.168.1.120. Change the interface VLAN ID, MAC, and IP addresses as needed in your
configuration.
!radius-server host 127.0.0.1 key awplus-local-radius-server!aaa authentication auth-mac default group radius!radius-server localserver enablenas 127.0.0.1 key awplus-local-radius-serveruser 00-d0-59-ab-70-37 password 00-d0-59-ab-70-37!no spanning-tree rstp enable!interface port1.0.1auth-mac enable!interface vlan1ip address 192.168.1.120/24!
Sample Authentication Configurations | Page 13
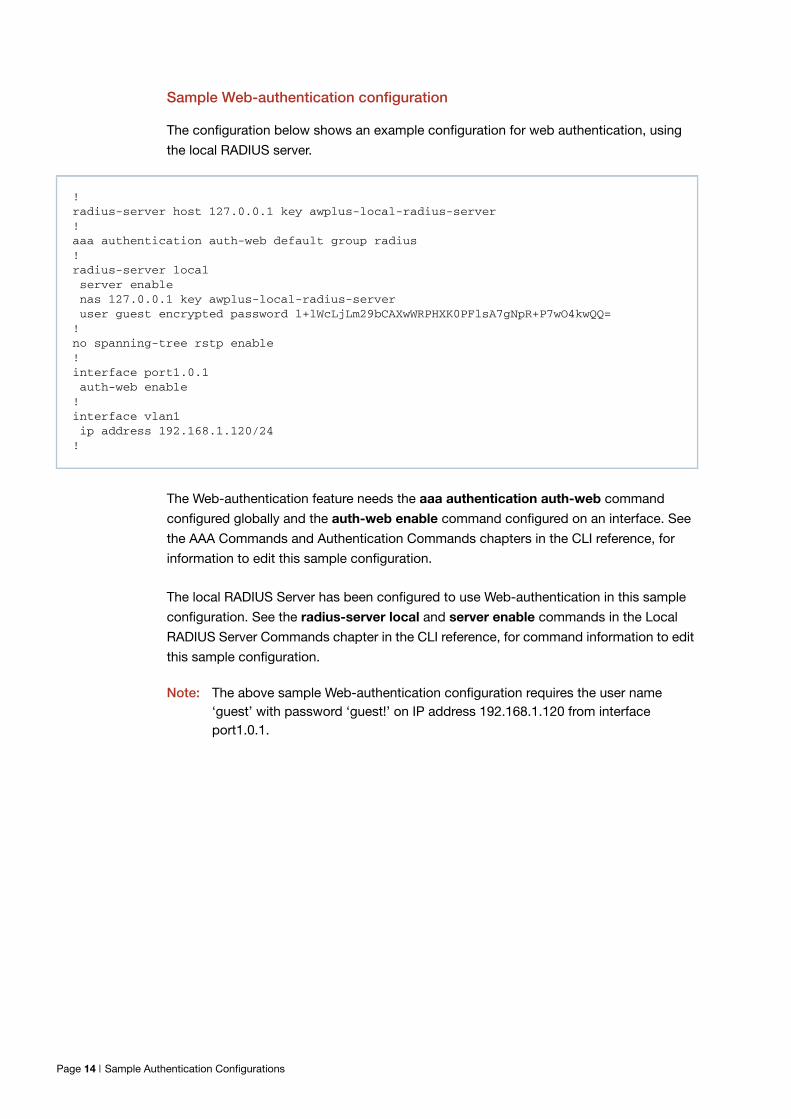
Sample Web-authentication configuration
The configuration below shows an example configuration for web authentication, using
the local RADIUS server.
The Web-authentication feature needs the aaa authentication auth-web command
configured globally and the auth-web enable command configured on an interface. See
the AAA Commands and Authentication Commands chapters in the CLI reference, for
information to edit this sample configuration.
The local RADIUS Server has been configured to use Web-authentication in this sample
configuration. See the radius-server local and server enable commands in the Local
RADIUS Server Commands chapter in the CLI reference, for command information to edit
this sample configuration.
Note: The above sample Web-authentication configuration requires the user name‘guest’ with password ‘guest!’ on IP address 192.168.1.120 from interfaceport1.0.1.
!radius-server host 127.0.0.1 key awplus-local-radius-server!aaa authentication auth-web default group radius!radius-server localserver enablenas 127.0.0.1 key awplus-local-radius-serveruser guest encrypted password l+lWcLjLm29bCAXwWRPHXK0PFlsA7gNpR+P7wO4kwQQ=
!no spanning-tree rstp enable!interface port1.0.1auth-web enable
!interface vlan1ip address 192.168.1.120/24
!
Page 14 | Sample Authentication Configurations
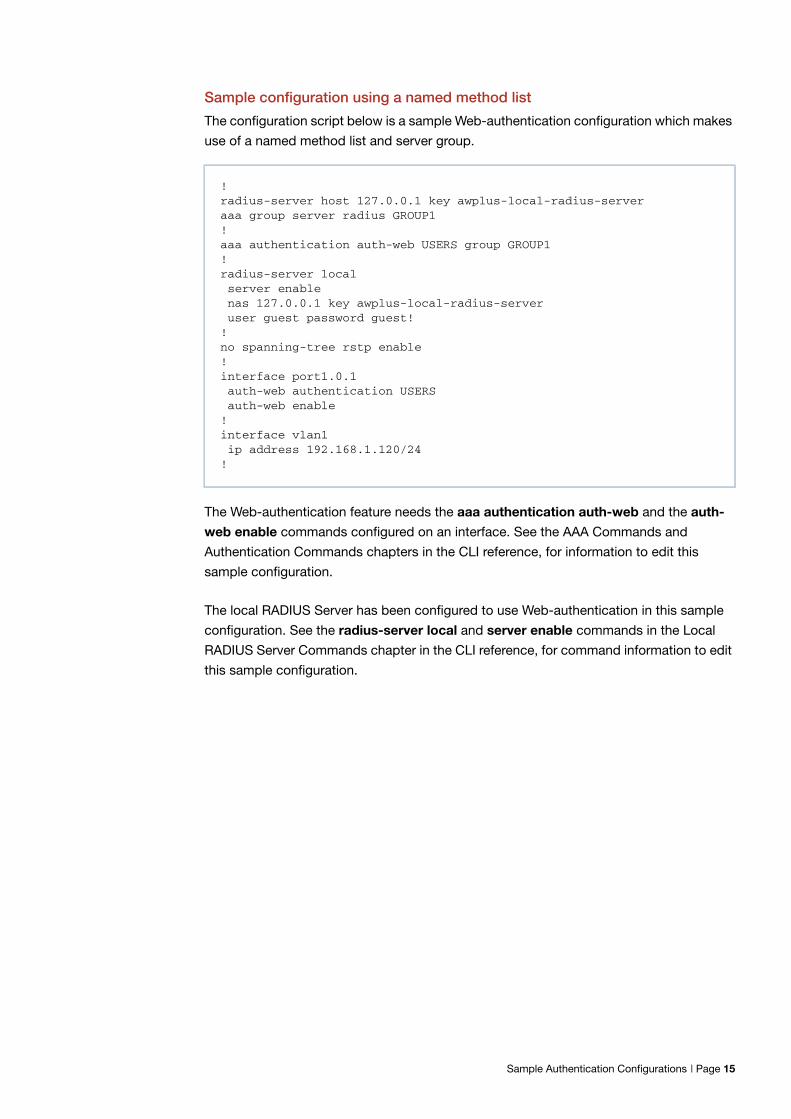
Sample configuration using a named method list
The configuration script below is a sample Web-authentication configuration which makes
use of a named method list and server group.
The Web-authentication feature needs the aaa authentication auth-web and the auth-
web enable commands configured on an interface. See the AAA Commands and
Authentication Commands chapters in the CLI reference, for information to edit this
sample configuration.
The local RADIUS Server has been configured to use Web-authentication in this sample
configuration. See the radius-server local and server enable commands in the Local
RADIUS Server Commands chapter in the CLI reference, for command information to edit
this sample configuration.
!radius-server host 127.0.0.1 key awplus-local-radius-serveraaa group server radius GROUP1!aaa authentication auth-web USERS group GROUP1!radius-server localserver enablenas 127.0.0.1 key awplus-local-radius-serveruser guest password guest!!no spanning-tree rstp enable!interface port1.0.1auth-web authentication USERSauth-web enable!interface vlan1ip address 192.168.1.120/24!
Sample Authentication Configurations | Page 15
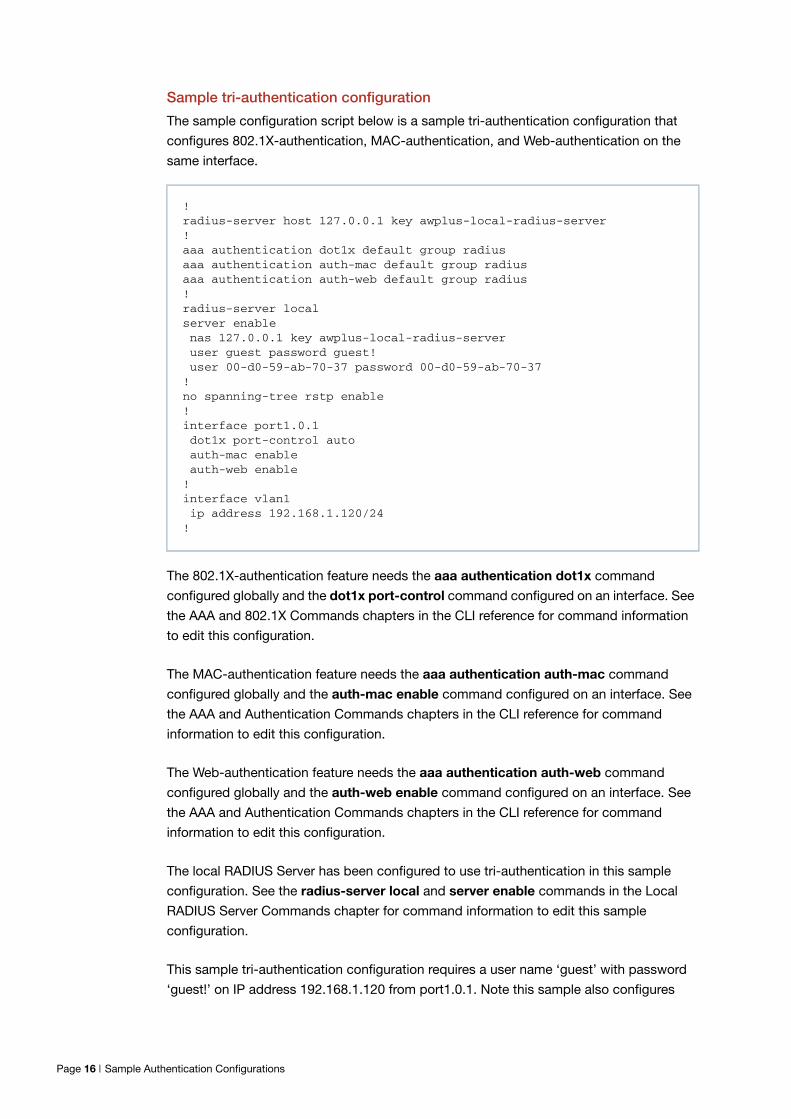
Sample tri-authentication configuration
The sample configuration script below is a sample tri-authentication configuration that
configures 802.1X-authentication, MAC-authentication, and Web-authentication on the
same interface.
The 802.1X-authentication feature needs the aaa authentication dot1x command
configured globally and the dot1x port-control command configured on an interface. See
the AAA and 802.1X Commands chapters in the CLI reference for command information
to edit this configuration.
The MAC-authentication feature needs the aaa authentication auth-mac command
configured globally and the auth-mac enable command configured on an interface. See
the AAA and Authentication Commands chapters in the CLI reference for command
information to edit this configuration.
The Web-authentication feature needs the aaa authentication auth-web command
configured globally and the auth-web enable command configured on an interface. See
the AAA and Authentication Commands chapters in the CLI reference for command
information to edit this configuration.
The local RADIUS Server has been configured to use tri-authentication in this sample
configuration. See the radius-server local and server enable commands in the Local
RADIUS Server Commands chapter for command information to edit this sample
configuration.
This sample tri-authentication configuration requires a user name ‘guest’ with password
‘guest!’ on IP address 192.168.1.120 from port1.0.1. Note this sample also configures
!radius-server host 127.0.0.1 key awplus-local-radius-server!aaa authentication dot1x default group radiusaaa authentication auth-mac default group radiusaaa authentication auth-web default group radius!radius-server localserver enablenas 127.0.0.1 key awplus-local-radius-serveruser guest password guest!user 00-d0-59-ab-70-37 password 00-d0-59-ab-70-37!no spanning-tree rstp enable!interface port1.0.1dot1x port-control autoauth-mac enableauth-web enable!interface vlan1ip address 192.168.1.120/24!
Page 16 | Sample Authentication Configurations

802.1X- and MAC-authentication on VLAN1 which has IP address 192.168.1.120. Change
the interface VLAN ID, MAC and IP address as needed for your configuration.
Note that when tri-authentication is applied to the same interface, then the order of
execution is MAC-authentication first, then 802.1X- or Web-authentication, if MAC-
authentication fails.
Sample Authentication Configurations | Page 17
802.1x Authentication
Introduction
802.1x is an IEEE standard providing a mechanism for authenticating devices attached to
a LAN port or wireless device. Devices wishing to access services behind a port must
authenticate themselves before any Ethernet packets are allowed to pass through. The
protocol is referred to as 802.1x because it was initially defined in the IEEE standard
802.1x, published in 2001 and revised in 2004 and again as the current 802.1x 2010
standard.
Networks have two important requirements:
Security: Authentication and Authorization
Flexibility: The ability for users to roam
Networks need a device authentication method that is highly secure, but not tied to a
port’s physical location. Network resources presented to a given user need to be
determined from their authentication credentials.
802.1x user authentication satisfies these requirements. It is relatively uncomplicated and
has little impact on network performance. It is a protocol that is medium-independent —
being equally as effective on wireless connections (802.11i) and wired connections.
802.1x user authentication is rapidly becoming an expected component on networks.
802.1x System Components
There are three main components to a system using 802.1x port authentication control:
Authenticator: the device that wishes to enforce authentication before allowing
access to services that are accessible behind it. An example of this is a switch that has
802.1x port authentication control enabled.
Supplicant: the client that wishes to access services offered by the authenticator’s
system. An example of this is a Windows XP Professional PC with an 802.1x client.
Authentication server: the device that uses the authentication credentials supplied by
the supplicant, to determine if the authenticator should grant access to its services. The
AlliedWare Plus implementation of 802.1x supports the use of a RADIUS.
authentication server using Extensible Authentication Protocol (EAP) in conjunction
with RADIUS.
Page 18 | Introduction
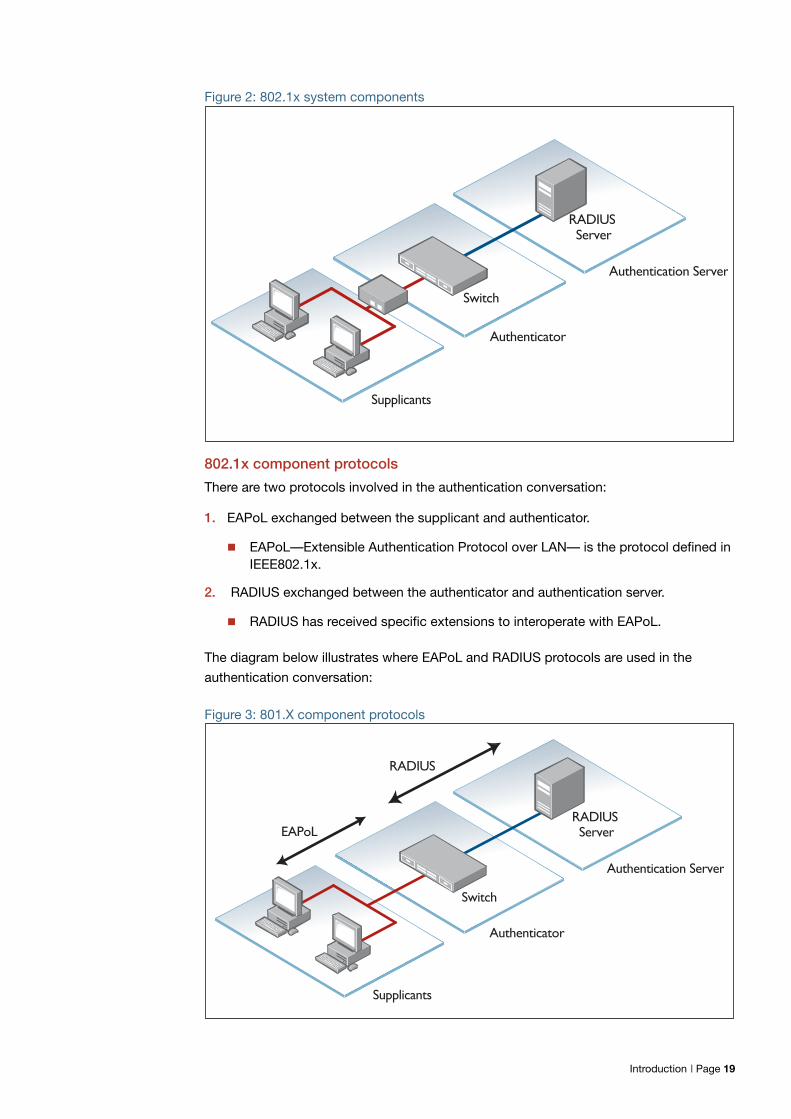
Figure 2: 802.1x system components
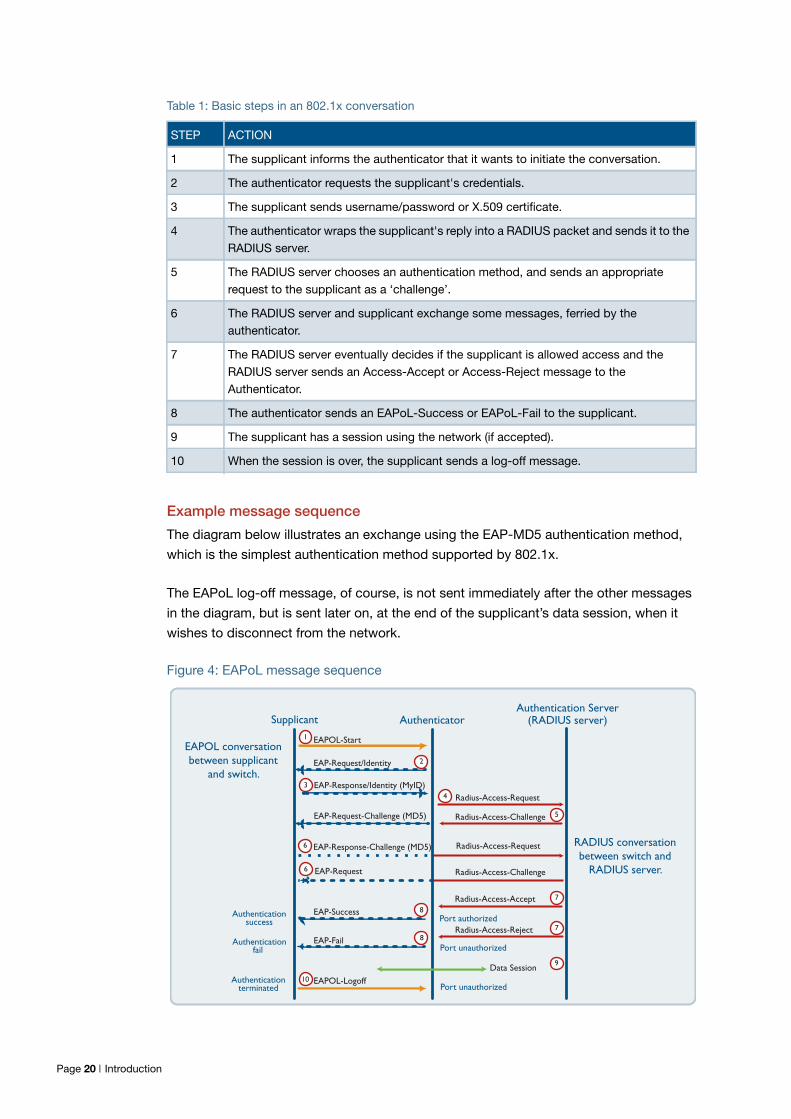
802.1x component protocols
There are two protocols involved in the authentication conversation:
1. EAPoL exchanged between the supplicant and authenticator.
EAPoL—Extensible Authentication Protocol over LAN— is the protocol defined inIEEE802.1x.
2. RADIUS exchanged between the authenticator and authentication server.
RADIUS has received specific extensions to interoperate with EAPoL.
The diagram below illustrates where EAPoL and RADIUS protocols are used in the
authentication conversation:
Figure 3: 801.X component protocols
Switch
RADIUSServer
Supplicants
Authenticator
Authentication Server
Switch
RADIUSServer
Supplicants
Authenticator
Authentication Server
RADIUS
EAPoL
Introduction | Page 19
Example message sequence
The diagram below illustrates an exchange using the EAP-MD5 authentication method,
which is the simplest authentication method supported by 802.1x.
The EAPoL log-off message, of course, is not sent immediately after the other messages
in the diagram, but is sent later on, at the end of the supplicant’s data session, when it
wishes to disconnect from the network.
Figure 4: EAPoL message sequence
Table 1: Basic steps in an 802.1x conversation
STEP ACTION
1 The supplicant informs the authenticator that it wants to initiate the conversation.
2 The authenticator requests the supplicant's credentials.
3 The supplicant sends username/password or X.509 certificate.
4 The authenticator wraps the supplicant's reply into a RADIUS packet and sends it to theRADIUS server.
5 The RADIUS server chooses an authentication method, and sends an appropriaterequest to the supplicant as a ‘challenge’.
6 The RADIUS server and supplicant exchange some messages, ferried by theauthenticator.
7 The RADIUS server eventually decides if the supplicant is allowed access and theRADIUS server sends an Access-Accept or Access-Reject message to theAuthenticator.
8 The authenticator sends an EAPoL-Success or EAPoL-Fail to the supplicant.
9 The supplicant has a session using the network (if accepted).
10 When the session is over, the supplicant sends a log-off message.
EAP-Request6 Radius-Access-Challenge
EAPOL-Start
EAP-Response/Identity (MyID)
EAP-Request/Identity
EAP-Request-Challenge (MD5)
EAP-Response-Challenge (MD5)
EAP-Success
EAP-Fail
EAPOL-Logoff
Radius-Access-Request
Radius-Access-Challenge
Radius-Access-Accept
Radius-Access-Reject
Authenticationfail
Authentication success
Authentication terminated
Port unauthorized
Port authorized
Port unauthorized
Authentication Server(RADIUS server)AuthenticatorSupplicant
EAPOL conversation
between supplicant
and switch.
RADIUS conversation
between switch and
RADIUS server.
1
5
4
7
2
10
3
8
6
8
7
Radius-Access-Request
Data Session9
Page 20 | Introduction
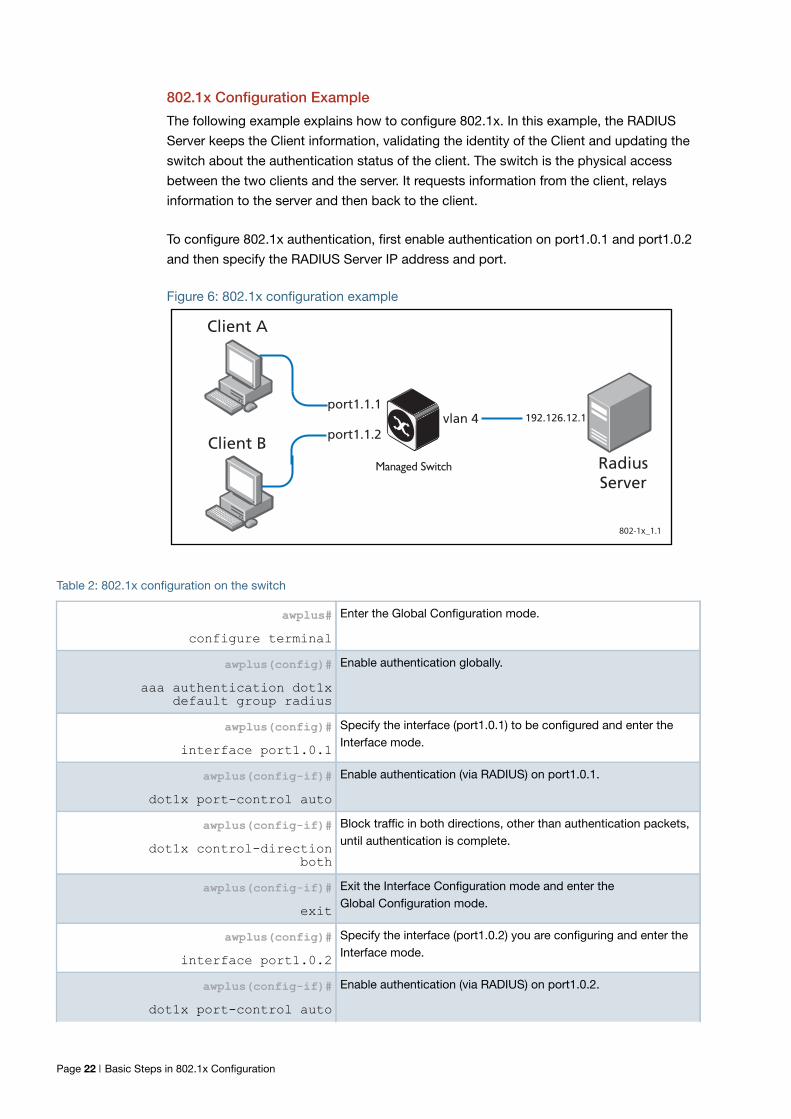
Basic Steps in 802.1x Configuration
To configure the switch operating as authenticator, follow the instructions below:
Figure 5: Configuring 802.1x basic steps
Step 1: Configure a RADIUS server for the switch to send requests to
awplus(config)# radius-server host 192.168.1.250 key <secret-key>
Step 2: Instruct 802.1x to use the configured RADIUS server
awplus(config)# aaa authentication dot1x default group radius
Step 3: Configure port1.0.5 for 802.1x authentication
awplus(config)# interface port1.0.5
awplus(config-if)# dot1x port-control auto
awplus(config-if)# spanning-tree portfast
Switch
RADIUSServer
Supplicant
Authenticator
Authentication Server
192.168.1.250
192.168.1.45
port1.0.5
Basic Steps in 802.1x Configuration | Page 21
802.1x Configuration Example
The following example explains how to configure 802.1x. In this example, the RADIUS
Server keeps the Client information, validating the identity of the Client and updating the
switch about the authentication status of the client. The switch is the physical access
between the two clients and the server. It requests information from the client, relays
information to the server and then back to the client.
To configure 802.1x authentication, first enable authentication on port1.0.1 and port1.0.2
and then specify the RADIUS Server IP address and port.
Figure 6: 802.1x configuration example
802-1x_1.1
Client B
Client A
192.126.12.1port1.1.1
RadiusServer
port1.1.2vlan 4
Table 2: 802.1x configuration on the switch
awplus#configure terminal
Enter the Global Configuration mode.
awplus(config)#aaa authentication dot1x
default group radius
Enable authentication globally.
awplus(config)#interface port1.0.1
Specify the interface (port1.0.1) to be configured and enter theInterface mode.
awplus(config-if)#dot1x port-control auto
Enable authentication (via RADIUS) on port1.0.1.
awplus(config-if)#dot1x control-direction
both
Block traffic in both directions, other than authentication packets,until authentication is complete.
awplus(config-if)#exit
Exit the Interface Configuration mode and enter theGlobal Configuration mode.
awplus(config)#interface port1.0.2
Specify the interface (port1.0.2) you are configuring and enter theInterface mode.
awplus(config-if)#dot1x port-control auto
Enable authentication (via RADIUS) on port1.0.2.
Page 22 | Basic Steps in 802.1x Configuration

Multi-supplicant modes
AlliedWare Plus can be configured to accept one or more supplicants downstream of a
port. Three authentication host-modes are available:
single-supplicant: the default state, only one supplicant allowed per port.
multi-host: once the first host on a port is authenticated, all other downstream hosts
are allowed without being authenticated (piggy-back mode).
multi-supplicant: multiple separate supplicants are individually authenticated on one
port.
The command (entered in interface configuration mode for a physical port interface) is :
awplus(config-if)# auth host-mode {single-supplicant|multihost| multi-supplicant}
This command controls how the switch deals with the situation where multiple
authentication supplicants are downstream of a single port. This is possible if an EAP
session passes through a Layer 2 switch which has been connected to the port, and the
supplicants are attached to that Layer 2 switch.
Single supplicant
The first option that the command can set is single-host. With this option, only one
supplicant may be authenticated on the port. Once that host has been authenticated, no
other supplicants may be authenticated until the first supplicant’s session has closed.
This means, of course, that none of the other hosts downstream of the port will be able to
send or receive traffic on that port.
This option is recommended when you know that there should only be one host
connected to a port. By limiting the port to a single authenticated host, you guard against
the consequences of someone accidentally or maliciously connecting a downstream
switch to the port.
awplus(config-if)#exit
Exit the Interface Configuration mode and enter theGlobal Configuration mode.
awplus(config)#radius-server host
192.126.12.1 auth-port 1812
Specify the RADIUS Server address (192.126.12.1) andauthentication port.
awplus(config)#radius-server key secret
Specify the shared key “secret” between the RADIUS server and theclient.
awplus(config)#interface vlan4
Specify the vlan (vlan4) to be configured and enter the Interfacemode.
awplus(config-if)#ip address 192.126.12.2/24
Set the IP address on vlan4.
Table 2: 802.1x configuration on the switch (continued)
Basic Steps in 802.1x Configuration | Page 23
Multi-host
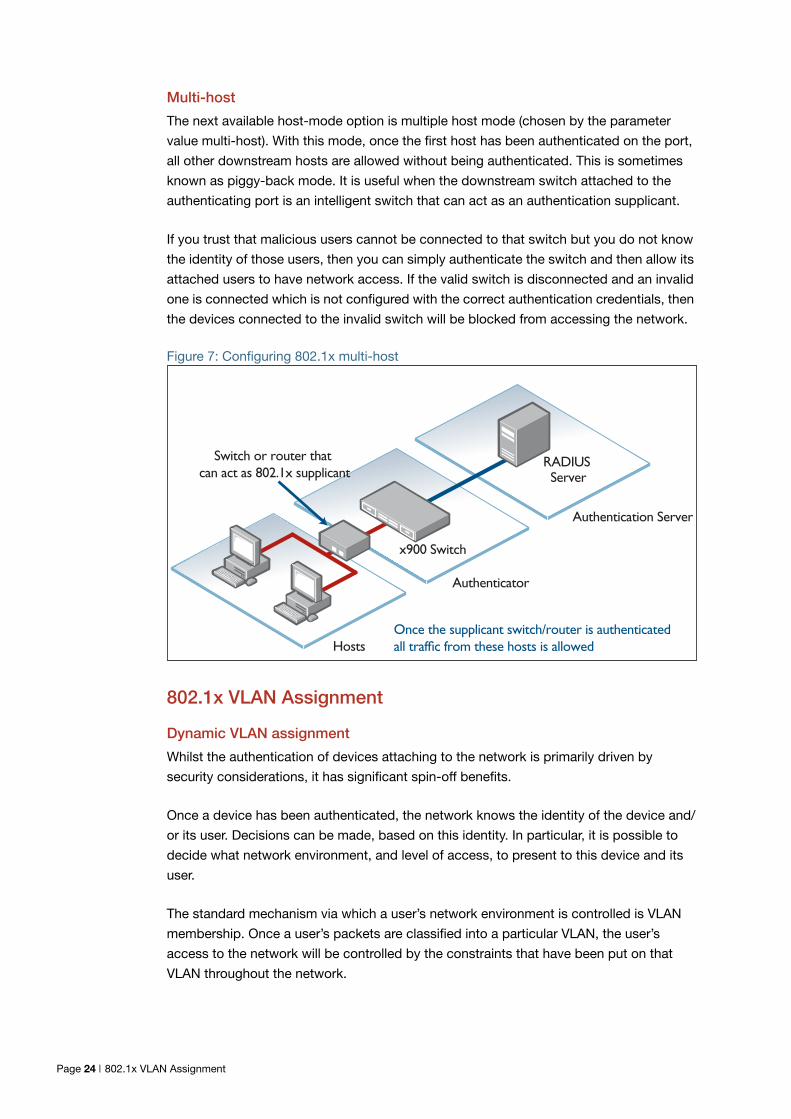
The next available host-mode option is multiple host mode (chosen by the parameter
value multi-host). With this mode, once the first host has been authenticated on the port,
all other downstream hosts are allowed without being authenticated. This is sometimes
known as piggy-back mode. It is useful when the downstream switch attached to the
authenticating port is an intelligent switch that can act as an authentication supplicant.
If you trust that malicious users cannot be connected to that switch but you do not know
the identity of those users, then you can simply authenticate the switch and then allow its
attached users to have network access. If the valid switch is disconnected and an invalid
one is connected which is not configured with the correct authentication credentials, then
the devices connected to the invalid switch will be blocked from accessing the network.
Figure 7: Configuring 802.1x multi-host
802.1x VLAN Assignment
Dynamic VLAN assignment
Whilst the authentication of devices attaching to the network is primarily driven by
security considerations, it has significant spin-off benefits.
Once a device has been authenticated, the network knows the identity of the device and/
or its user. Decisions can be made, based on this identity. In particular, it is possible to
decide what network environment, and level of access, to present to this device and its
user.
The standard mechanism via which a user’s network environment is controlled is VLAN
membership. Once a user’s packets are classified into a particular VLAN, the user’s
access to the network will be controlled by the constraints that have been put on that
VLAN throughout the network.
x900 Switch
RADIUSServer
Hosts
Authenticator
Authentication Server
Once the supplicant switch/router is authenticated
all traffic from these hosts is allowed
Switch or router that
can act as 802.1x supplicant
Page 24 | 802.1x VLAN Assignment
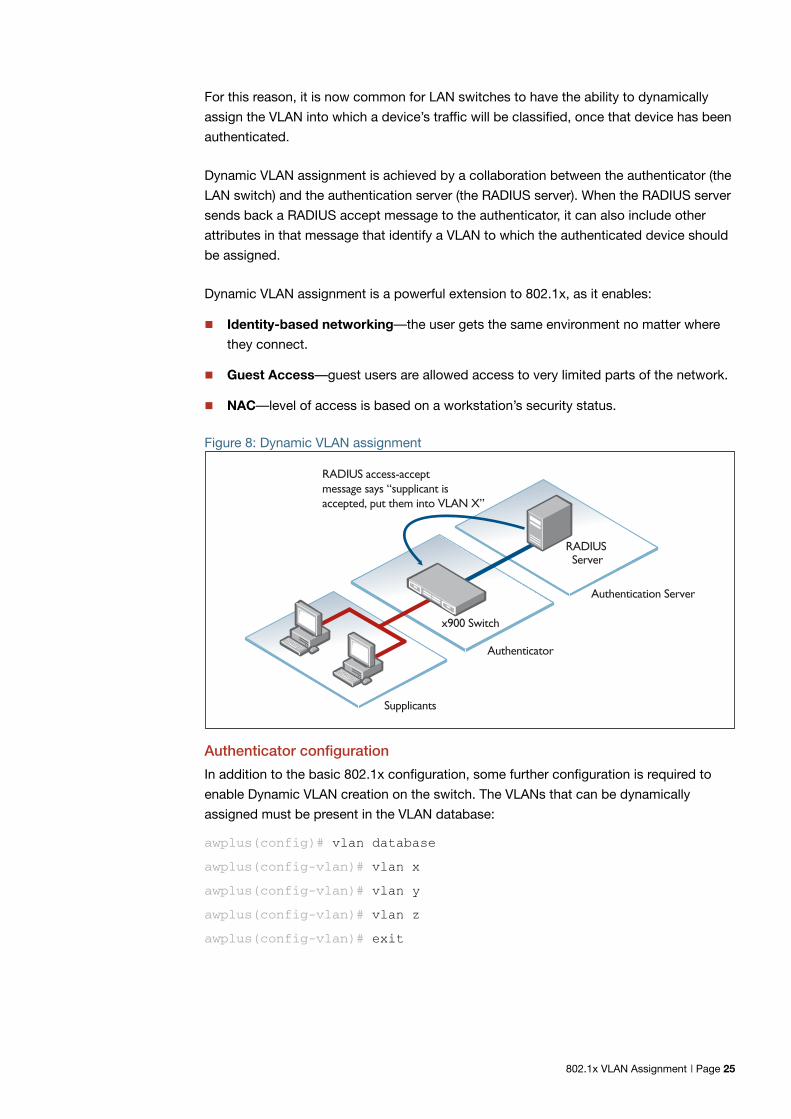
For this reason, it is now common for LAN switches to have the ability to dynamically
assign the VLAN into which a device’s traffic will be classified, once that device has been
authenticated.
Dynamic VLAN assignment is achieved by a collaboration between the authenticator (the
LAN switch) and the authentication server (the RADIUS server). When the RADIUS server
sends back a RADIUS accept message to the authenticator, it can also include other
attributes in that message that identify a VLAN to which the authenticated device should
be assigned.
Dynamic VLAN assignment is a powerful extension to 802.1x, as it enables:
Identity-based networking—the user gets the same environment no matter where
they connect.
Guest Access—guest users are allowed access to very limited parts of the network.
NAC—level of access is based on a workstation’s security status.
Figure 8: Dynamic VLAN assignment
Authenticator configuration
In addition to the basic 802.1x configuration, some further configuration is required to
enable Dynamic VLAN creation on the switch. The VLANs that can be dynamically
assigned must be present in the VLAN database:
awplus(config)# vlan database
awplus(config-vlan)# vlan x
awplus(config-vlan)# vlan y
awplus(config-vlan)# vlan z
awplus(config-vlan)# exit
x900 Switch
RADIUSServer
Supplicants
Authenticator
Authentication Server
RADIUS access-accept
message says “supplicant is
accepted, put them into VLAN X”
802.1x VLAN Assignment | Page 25
Ports that accept VLAN membership dynamically have to be enabled for dynamic VLAN
creation:
awplus(config)# interface port1.0.5
awplus(config-if)# auth dynamic-vlan-creation
Dynamic VLAN assignment with multiple supplicants
In multi-supplicant mode, what happens if two supplicants downstream of the same port
are assigned to different VLANs? The auth dynamic-vlan-creation command has two
parameters that govern the operation in this situation: rule and type.
The ruleparameter
The first parameter is the rule parameter.
For SBx8100, SBx908 and x900 Series switches, it is not possible to assign different
VLANs to untagged traffic from different supplicants. On the SBx8100, SBx908 and x900,
dynamic VLAN assignment effectively says ‘the one untagged VLAN to be used on the
authenticating port is VLAN x’. So, if the first supplicant is authenticated and assigned
VLAN 45, then the authenticating port will classify all untagged traffic arriving on the port
into VLAN 45. But if a second supplicant downstream of the same port then
authenticates, and the RADIUS server assigns VLAN 56 to that supplicant, the switch then
faces a dilemma. It is already using VLAN 45 as the untagged VLAN on that port; it cannot
use VLAN 56 as well.
There are two ways that the switch can resolve this situation. It can:
1. Allow the second supplicant to access the network, but assign its data to VLAN 45.
2. Block the second supplicant from having network access.
The rule parameter configures which of these choices the switch will opt for. If rule is set
to permit, then option (1) above is chosen. If rule is set to deny, then option (2) above is
chosen.
The typeparameter
The second parameter is the type parameter.
The type parameter applies to the x210, x230, x310, x510, x600, x610 and x930 Series
switches. This is because these switches support MAC-based VLANs, whereas the
x8100, x900 Series and SBx908 do not.
The effect of the type parameter is to make use of MAC-based VLAN support to provide a
better solution to the case where different supplicants downstream of a single port are
dynamically allocated to different VLANs.
If type is set to the value single, then the MAC-based VLAN capability is not used, and
the port’s behavior in the different-dynamic-VLANs situation will be controlled by the rule
parameter.
However, if type is set to multi, the switch brings the MAC-based VLAN capability into
play. This capability enables it to support multiple different untagged VLANs on the same
Page 26 | 802.1x VLAN Assignment
port. This is achieved by associating VLAN membership with the source MAC address of
the incoming packets.
So, when different supplicants downstream of a single port are dynamically assigned
different VLANs, the switch simply builds a table that maps supplicants’ MAC addresses
to their dynamically assigned VLANs.
The combination of these parameters results in three options for handling the case where
different VLANs are assigned to supplicants on the same ports.
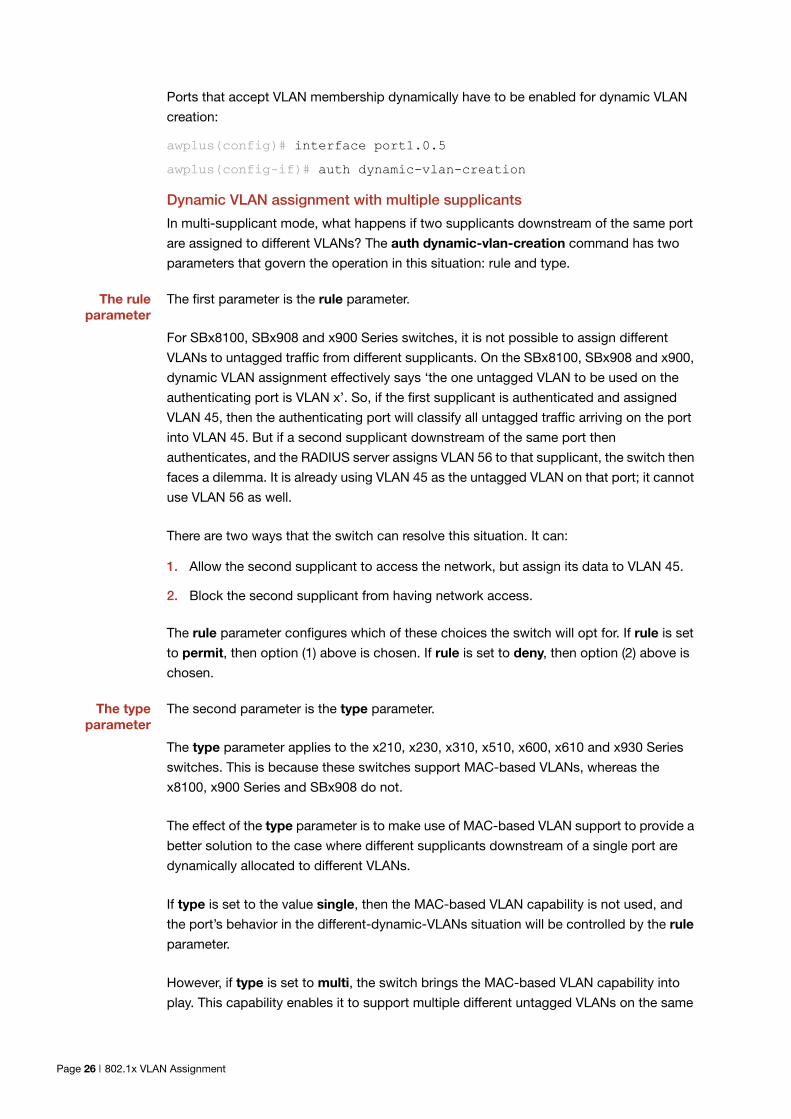
Option 1 Deny access to supplicant assigned a different VLAN.
If the first supplicant authenticated on the port is assigned VLAN X, then any supplicants
subsequently assigned a different VLAN are denied access. This is the default state when
dynamic VLAN creation is enabled.
This is configured with:
awplus(config-if)# auth dynamic-vlan-creation rule deny
Figure 9: Deny access to supplicant assigned to a different VLAN
Option 2 Force all supplicants into the same VLAN
If the first supplicant authenticated on the port is assigned VLAN X, then any supplicants
subsequently assigned a different VLAN are allowed access, but forced into VLAN X
This is configured with:
awplus(config-if)# auth dynamic-vlan-creation rule permit
2. Supplicant accepted and assigned to VLAN11. Authenticator allows access.
1. Supplicant accepted and assigned VLAN 10
802.1x VLAN Assignment | Page 27
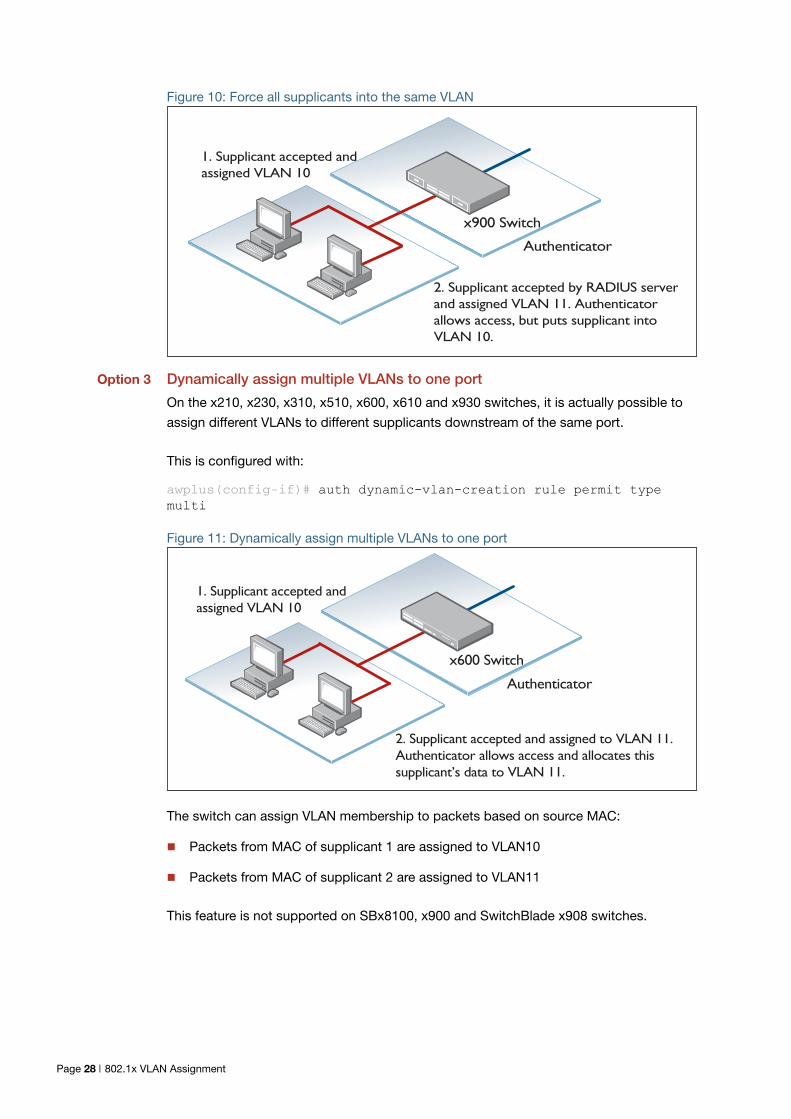
Figure 10: Force all supplicants into the same VLAN
Option 3 Dynamically assign multiple VLANs to one port
On the x210, x230, x310, x510, x600, x610 and x930 switches, it is actually possible to
assign different VLANs to different supplicants downstream of the same port.
This is configured with:
awplus(config-if)# auth dynamic-vlan-creation rule permit type multi
Figure 11: Dynamically assign multiple VLANs to one port
The switch can assign VLAN membership to packets based on source MAC:
Packets from MAC of supplicant 1 are assigned to VLAN10
Packets from MAC of supplicant 2 are assigned to VLAN11
This feature is not supported on SBx8100, x900 and SwitchBlade x908 switches.
x900 Switch
2. Supplicant accepted by RADIUS server
and assigned VLAN 11. Authenticator
allows access, but puts supplicant into
VLAN 10.
Authenticator
1. Supplicant accepted and
assigned VLAN 10
x600 Switch
2. Supplicant accepted and assigned to VLAN 11. Authenticator allows access and allocates this supplicant’s data to VLAN 11.
Authenticator
1. Supplicant accepted andassigned VLAN 10
Page 28 | 802.1x VLAN Assignment
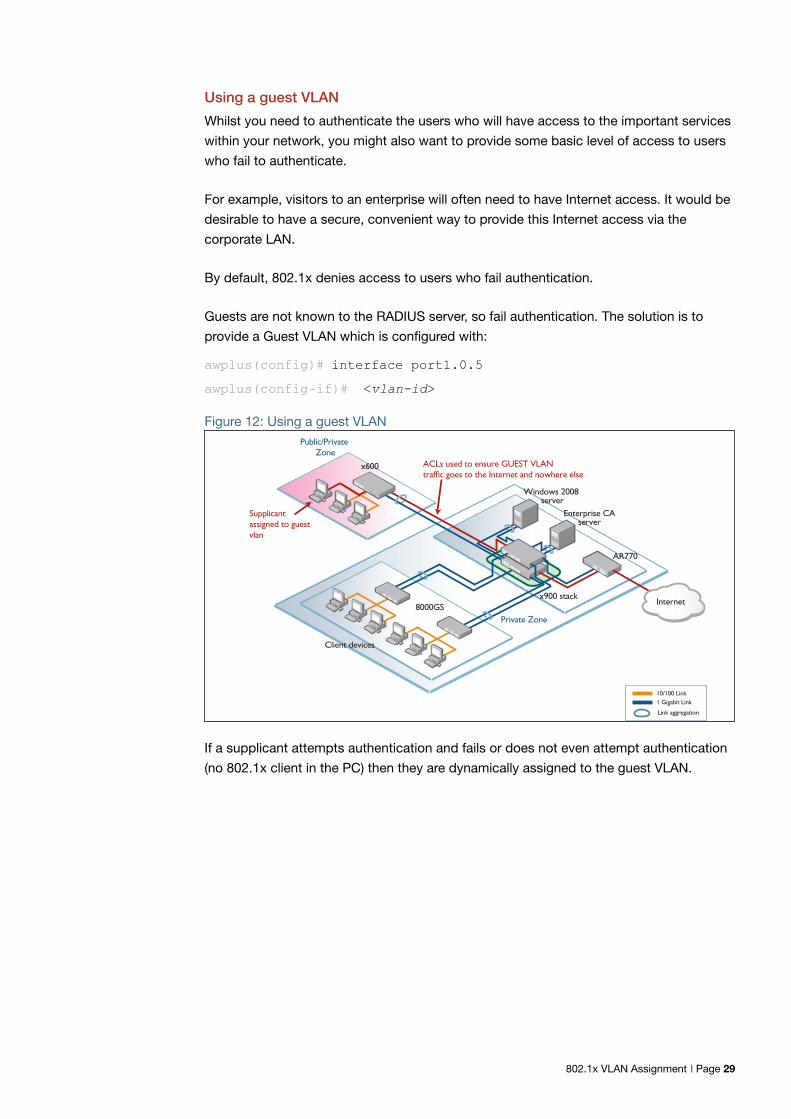
Using a guest VLAN
Whilst you need to authenticate the users who will have access to the important services
within your network, you might also want to provide some basic level of access to users
who fail to authenticate.
For example, visitors to an enterprise will often need to have Internet access. It would be
desirable to have a secure, convenient way to provide this Internet access via the
corporate LAN.
By default, 802.1x denies access to users who fail authentication.
Guests are not known to the RADIUS server, so fail authentication. The solution is to
provide a Guest VLAN which is configured with:
awplus(config)# interface port1.0.5
awplus(config-if)# <vlan-id>
Figure 12: Using a guest VLAN
If a supplicant attempts authentication and fails or does not even attempt authentication
(no 802.1x client in the PC) then they are dynamically assigned to the guest VLAN.
10/100 Link
1 Gigabit Link
Link aggregation
x900 stack
x600
Supplicant
assigned to guest
vlan
Windows 2008 server
AR770
8000GSInternet
Private Zone
Enterprise CAserver
Client devices
Public/Private
Zone
ACLs used to ensure GUEST VLAN
traffic goes to the Internet and nowhere else
802.1x VLAN Assignment | Page 29

Verify the operation of 802.1x
When a supplicant has been authenticated on a port the details of the authentication can
be seen with:
When a supplicant has been authenticated, and assigned to a VLAN, the port they
authenticated on will then be seen to be a member of that VLAN.
Names of commands used
dot1x port-control radius-server host radius-server key show dot1x show dot1x interface
show dot1x supplicant int port1.0.5Interface port1.0.5
authenticationMethod: dot1xtotalSupplicantNum: 1
authorizedSupplicantNum: 1macBasedAuthenticationSupplicantNum: 0dot1xAuthenticationSupplicantNum: 1WebBasedAuthenticationSupplicantNum:otherAuthenticationSupplicantNum: 0
Supplicant name: Engineer01
Supplicant address:0002.b363.319f authenticationMethod: 802.1x
portStatus: Authorized - currentId: 9abort:F fail:F start:F timeout:F success:TPAE: state: Authenticated - portMode: AutoPAE: reAuthCount: 0 - rxRespId: 0PAE: quietPeriod: 60 - maxReauthReq: 2BE: state: Idle - reqCount: 0 - idFromServer: 8CD: adminControlledDirections: both - operControlledDirections:
bothCD: bridgeDetected: falseKR: rxKey: falseKT: keyAvailable: false - keyTxEnabled: falsedynamicVlanId: 20assignment enabled
show vlan 20
VLAN ID Name Type State Member ports(u)-Untagged, (t)-Tagged======= ================ ======= ======= ======================20 Engineering STATIC ACTIVE port1.0.5(u)
show vlan 30
VLAN ID Name Type State Member ports(u)-Untagged, (t)-Tagged======= ================ ======= ======= ======================30 Marketing STATIC ACTIVE port1.0.5(u)
<--- Authenticated by 802.1x
<--- Supplicant name<---MAC of authenticated device
<--- VLAN assigned, if dynamic VLA
Page 30 | Verify the operation of 802.1x
Web Authentication
Introduction
Web-authentication, also known as Captive Portal, is a simple way to provide secure
guest- user access to a network. It is used in a wide range of environments including Wi Fi
hot spots, hotels, universities, and business centers.
In basic terms, if the switch detects an unauthorized user Web browsing, then irrespective
of the IP configuration on their PC, they are re-directed to a web-authentication login
page. At this point, the user is required to enter a username and password before they can
begin to Web browse.
The main benefits of this solution come from not requiring additional customer
knowledge, software or special configuration.
Users are able to quickly and easily gain access to the network regardless of the type of
device or operating system used.
What is Web-authentication?
Web-authentication is a convenient alternative to 802.1x authentication, it’s commonly
used to authenticate users in educational institutions, where regular users’ workstations
are not managed by the network administrator. Web-authentication enables the switch to
detect an unauthenticated workstation web browsing into the network, then redirect the
user’s web browser to its own authentication web page.
Web-authentication works like this:
The authenticating switch hijacks the user's web browsing session, and sends them
the auth-web login page.
The user enters their username and password into the web page, which the switch then
sends to a RADIUS server for checking.
If the RADIUS server accepts the user’s credentials, the switch then allows their traffic
into the network.
The web-authenticating switch interacts with a RADIUS server in the same way as an
802.1x Authenticator. So the two methods can easily be used together in the same
network, using the same RADIUS server.
Introduction | Page 31
Web-authentication basics
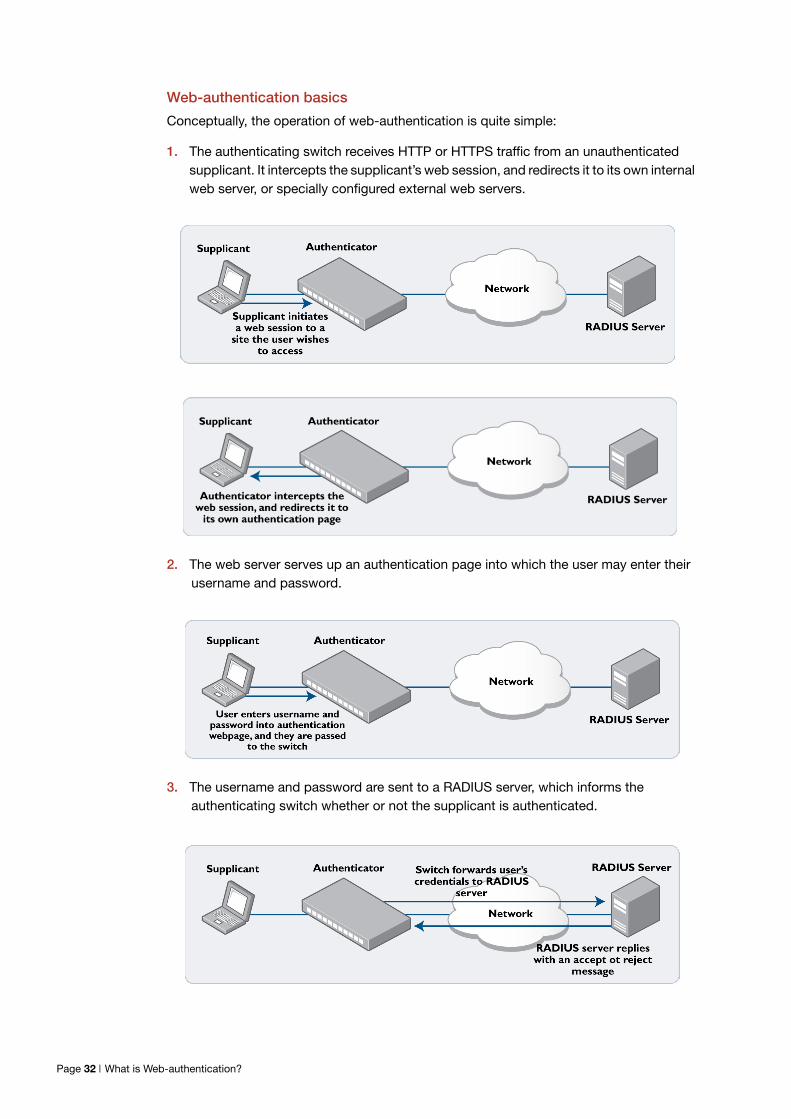
Conceptually, the operation of web-authentication is quite simple:
1. The authenticating switch receives HTTP or HTTPS traffic from an unauthenticatedsupplicant. It intercepts the supplicant’s web session, and redirects it to its own internalweb server, or specially configured external web servers.
2. The web server serves up an authentication page into which the user may enter theirusername and password.
3. The username and password are sent to a RADIUS server, which informs theauthenticating switch whether or not the supplicant is authenticated.
Page 32 | What is Web-authentication?
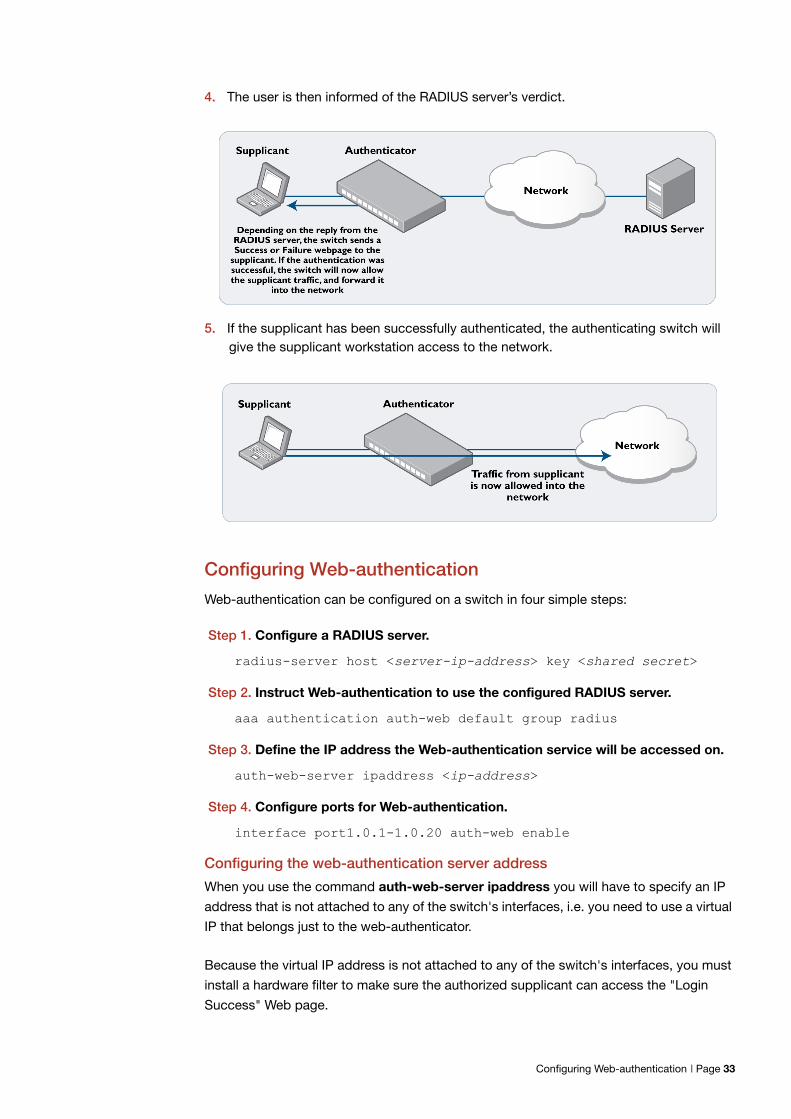
4. The user is then informed of the RADIUS server’s verdict.
5. If the supplicant has been successfully authenticated, the authenticating switch willgive the supplicant workstation access to the network.
Configuring Web-authentication
Web-authentication can be configured on a switch in four simple steps:
Step 1. Configure a RADIUS server.
radius-server host <server-ip-address> key <shared secret>
Step 2. Instruct Web-authentication to use the configured RADIUS server.
aaa authentication auth-web default group radius
Step 3. Define the IP address the Web-authentication service will be accessed on.
auth-web-server ipaddress <ip-address>
Step 4. Configure ports for Web-authentication.
interface port1.0.1-1.0.20 auth-web enable
Configuring the web-authentication server address
When you use the command auth-web-server ipaddress you will have to specify an IP
address that is not attached to any of the switch's interfaces, i.e. you need to use a virtual
IP that belongs just to the web-authenticator.
Because the virtual IP address is not attached to any of the switch's interfaces, you must
install a hardware filter to make sure the authorized supplicant can access the "Login
Success" Web page.
Configuring Web-authentication | Page 33
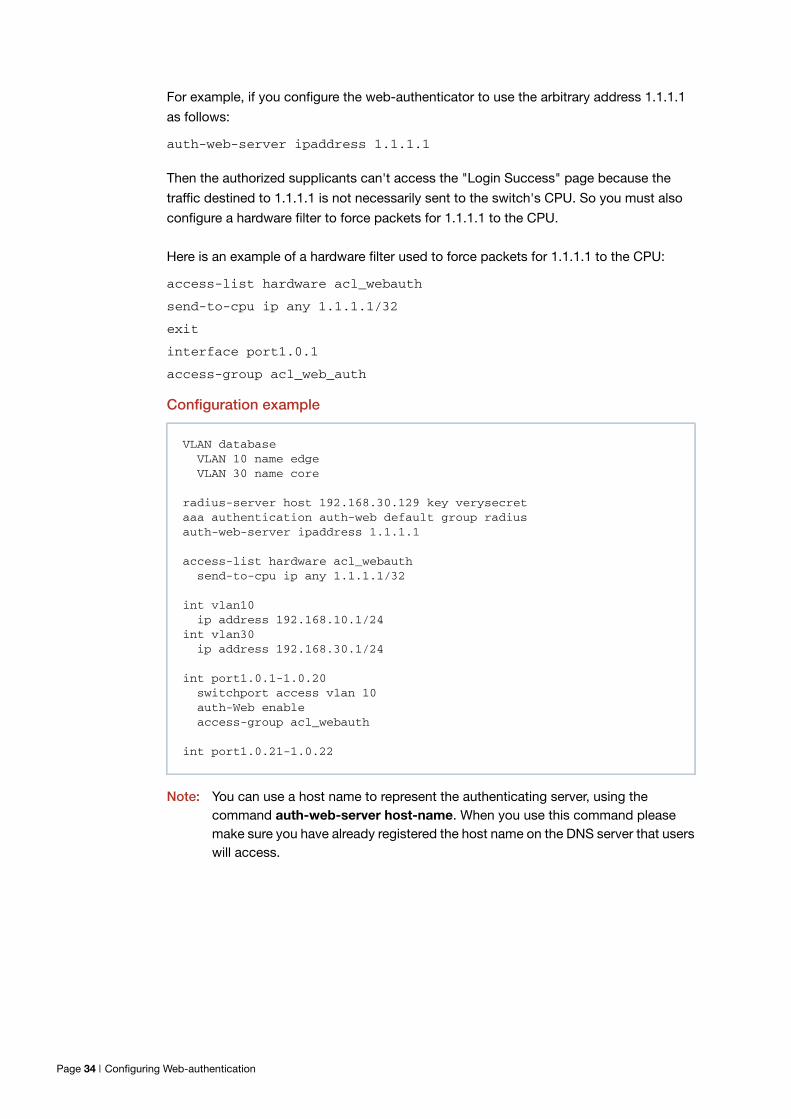
For example, if you configure the web-authenticator to use the arbitrary address 1.1.1.1
as follows:
auth-web-server ipaddress 1.1.1.1
Then the authorized supplicants can't access the "Login Success" page because the
traffic destined to 1.1.1.1 is not necessarily sent to the switch's CPU. So you must also
configure a hardware filter to force packets for 1.1.1.1 to the CPU.
Here is an example of a hardware filter used to force packets for 1.1.1.1 to the CPU:
access-list hardware acl_webauth
send-to-cpu ip any 1.1.1.1/32
exit
interface port1.0.1
access-group acl_web_auth
Configuration example
Note: You can use a host name to represent the authenticating server, using thecommand auth-web-server host-name. When you use this command pleasemake sure you have already registered the host name on the DNS server that userswill access.
VLAN databaseVLAN 10 name edgeVLAN 30 name core
radius-server host 192.168.30.129 key verysecretaaa authentication auth-web default group radiusauth-web-server ipaddress 1.1.1.1
access-list hardware acl_webauthsend-to-cpu ip any 1.1.1.1/32
int vlan10ip address 192.168.10.1/24
int vlan30ip address 192.168.30.1/24
int port1.0.1-1.0.20switchport access vlan 10auth-Web enableaccess-group acl_webauth
int port1.0.21-1.0.22
Page 34 | Configuring Web-authentication
Starting a Web-authentication Session
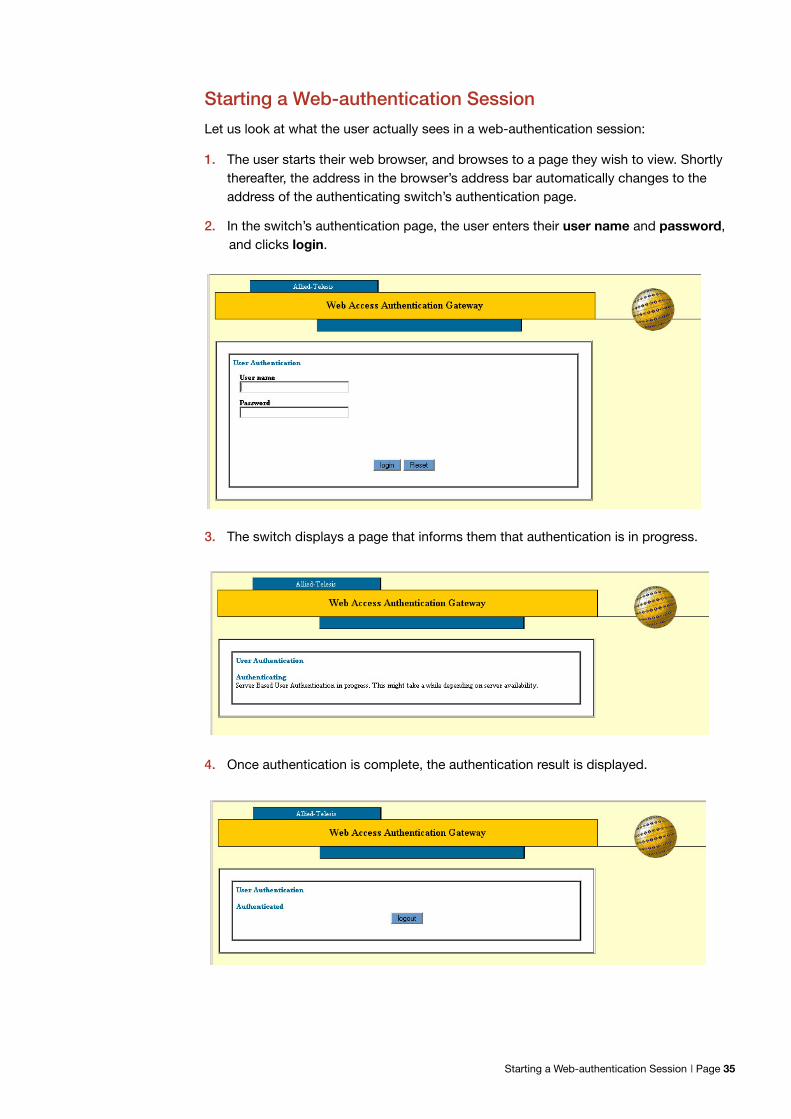
Let us look at what the user actually sees in a web-authentication session:
1. The user starts their web browser, and browses to a page they wish to view. Shortlythereafter, the address in the browser’s address bar automatically changes to theaddress of the authenticating switch’s authentication page.
2. In the switch’s authentication page, the user enters their user name and password,and clicks login.
3. The switch displays a page that informs them that authentication is in progress.
4. Once authentication is complete, the authentication result is displayed.
Starting a Web-authentication Session | Page 35
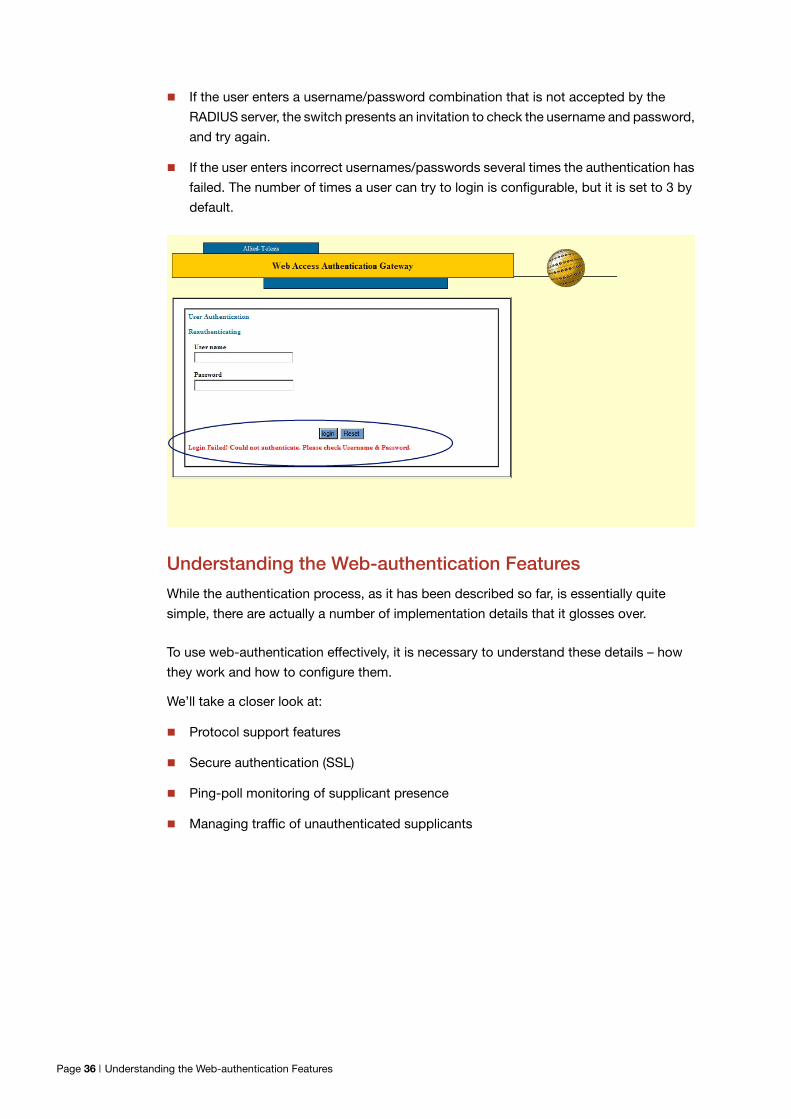
If the user enters a username/password combination that is not accepted by the
RADIUS server, the switch presents an invitation to check the username and password,
and try again.
If the user enters incorrect usernames/passwords several times the authentication has
failed. The number of times a user can try to login is configurable, but it is set to 3 by
default.
Understanding the Web-authentication Features
While the authentication process, as it has been described so far, is essentially quite
simple, there are actually a number of implementation details that it glosses over.
To use web-authentication effectively, it is necessary to understand these details – how
they work and how to configure them.
We’ll take a closer look at:
Protocol support features
Secure authentication (SSL)
Ping-poll monitoring of supplicant presence
Managing traffic of unauthenticated supplicants
Page 36 | Understanding the Web-authentication Features
Support for protocols underlying web-authentication
Web-authentication does not use a dedicated protocol like 802.1x, with a standards-
defined set of messages for authentication conversation. When it comes to web-
authentication, the switch is overlaying the authentication process on top of another
process that was not designed for authentication.
The web browser communication process that the authentication overlays, is itself reliant
on IP addressing, ARP, and DNS. The authentication needs to occur in a seamless manner
for all users, irrespective of their IP and DNS setting, and before they have full access to
the network.
To make this possible, the switch needs to provide facilities that enable the user’s PC to
access the authentication web page.
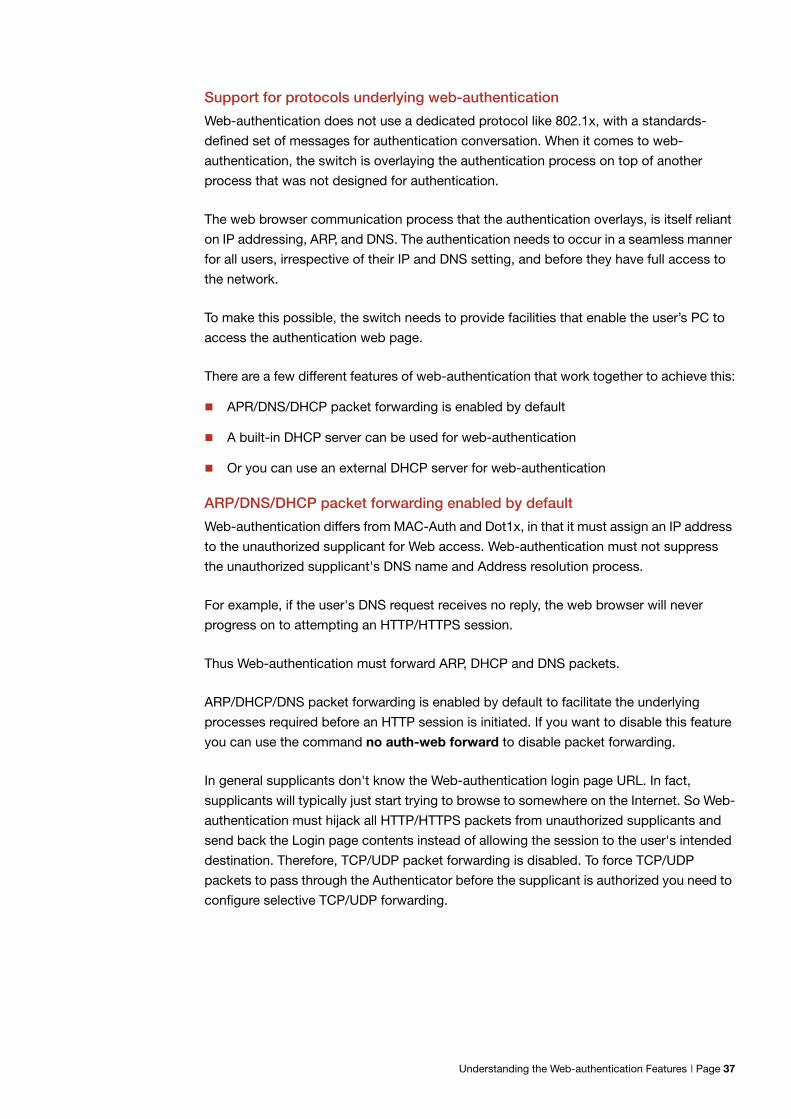
There are a few different features of web-authentication that work together to achieve this:
APR/DNS/DHCP packet forwarding is enabled by default
A built-in DHCP server can be used for web-authentication
Or you can use an external DHCP server for web-authentication
ARP/DNS/DHCP packet forwarding enabled by default
Web-authentication differs from MAC-Auth and Dot1x, in that it must assign an IP address
to the unauthorized supplicant for Web access. Web-authentication must not suppress
the unauthorized supplicant's DNS name and Address resolution process.
For example, if the user's DNS request receives no reply, the web browser will never
progress on to attempting an HTTP/HTTPS session.
Thus Web-authentication must forward ARP, DHCP and DNS packets.
ARP/DHCP/DNS packet forwarding is enabled by default to facilitate the underlying
processes required before an HTTP session is initiated. If you want to disable this feature
you can use the command no auth-web forward to disable packet forwarding.
In general supplicants don't know the Web-authentication login page URL. In fact,
supplicants will typically just start trying to browse to somewhere on the Internet. So Web-
authentication must hijack all HTTP/HTTPS packets from unauthorized supplicants and
send back the Login page contents instead of allowing the session to the user's intended
destination. Therefore, TCP/UDP packet forwarding is disabled. To force TCP/UDP
packets to pass through the Authenticator before the supplicant is authorized you need to
configure selective TCP/UDP forwarding.
Understanding the Web-authentication Features | Page 37
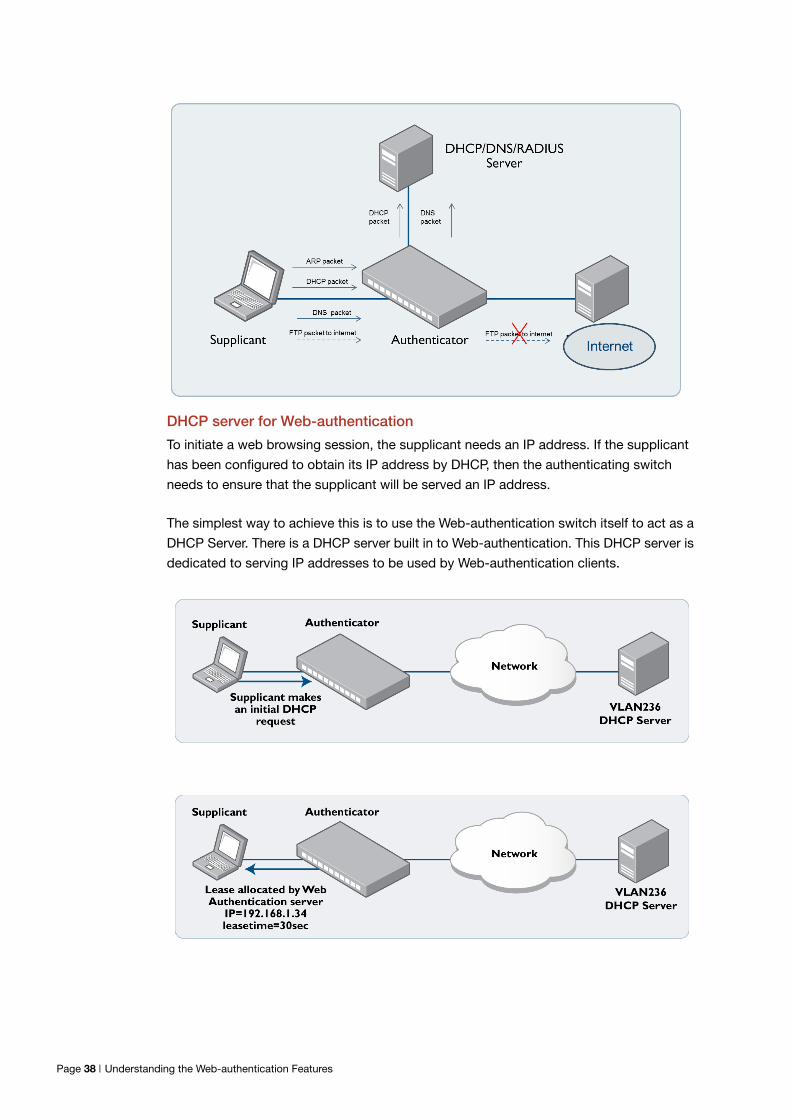
DHCP server for Web-authentication
To initiate a web browsing session, the supplicant needs an IP address. If the supplicant
has been configured to obtain its IP address by DHCP, then the authenticating switch
needs to ensure that the supplicant will be served an IP address.
The simplest way to achieve this is to use the Web-authentication switch itself to act as a
DHCP Server. There is a DHCP server built in to Web-authentication. This DHCP server is
dedicated to serving IP addresses to be used by Web-authentication clients.
Page 38 | Understanding the Web-authentication Features
This DHCP service is configured by the command:
auth-web-server dhcp ip address <ip-address/prefix-length>
The IP address specified in this command is the IP address of the Web-authentication
service. If the Web-authentication service’s IP address has not already been configured by
the command auth-web-server ip address <ip-address>, then this command
configures the service’s address.
If the Web-authentication service’s IP address has already been configured by the
command auth-web-server ip address <ip-address>, then the IP address in the auth-
web-server dhcp command must be the same as that already configured. By default, this
DHCP server serves leases of 30 seconds duration. The lease duration can be changed
by the command auth-web-server dhcp lease <20-60>. The short lease is deliberate. It
facilitates the transition to a new VLAN/subnet after authentication. The supplicant is
unaware that the switch transitions it to another VLAN, with another DHCP server, after
authentication succeeds.
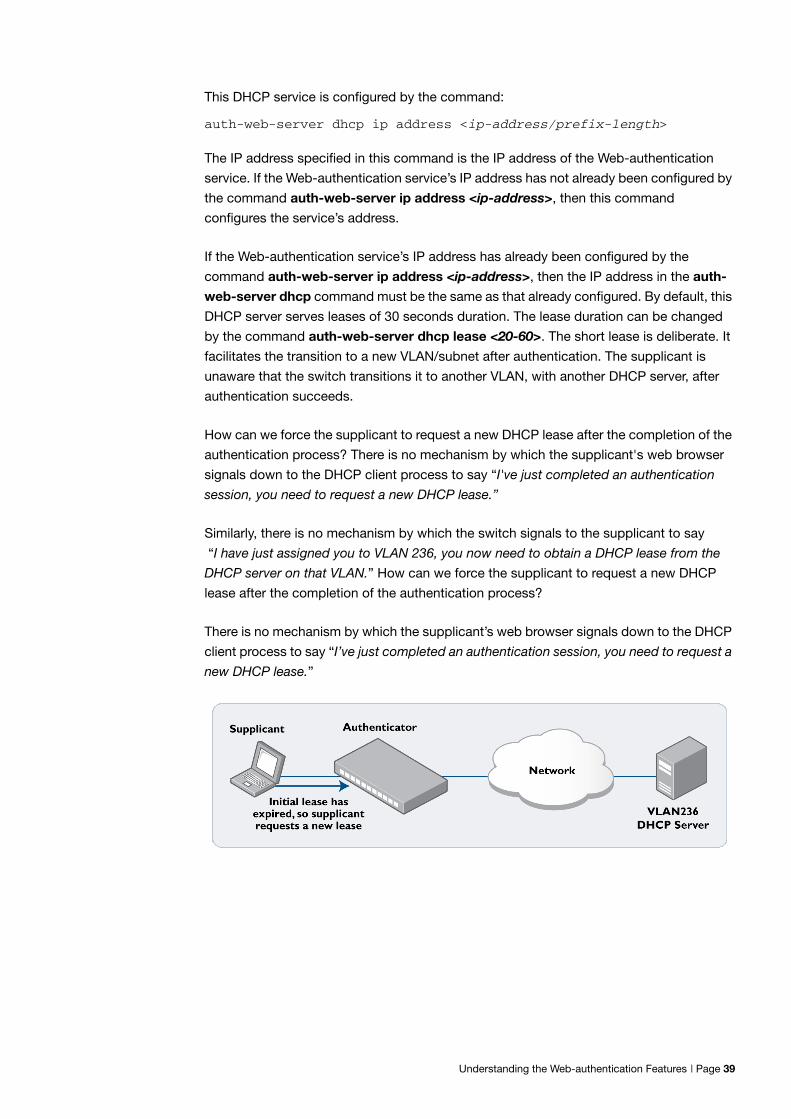
How can we force the supplicant to request a new DHCP lease after the completion of the
authentication process? There is no mechanism by which the supplicant's web browser
signals down to the DHCP client process to say “I've just completed an authentication
session, you need to request a new DHCP lease.”
Similarly, there is no mechanism by which the switch signals to the supplicant to say
“I have just assigned you to VLAN 236, you now need to obtain a DHCP lease from the
DHCP server on that VLAN.” How can we force the supplicant to request a new DHCP
lease after the completion of the authentication process?
There is no mechanism by which the supplicant’s web browser signals down to the DHCP
client process to say “I’ve just completed an authentication session, you need to request a
new DHCP lease.”
Understanding the Web-authentication Features | Page 39
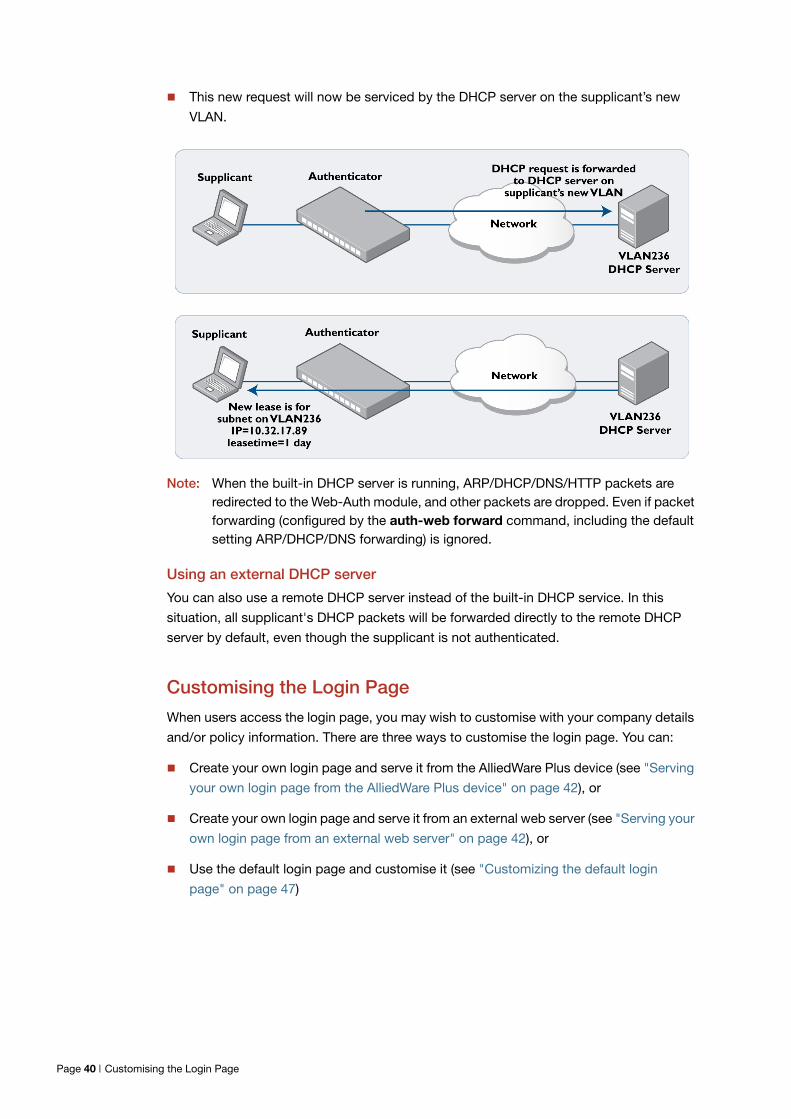
This new request will now be serviced by the DHCP server on the supplicant’s new
VLAN.
Note: When the built-in DHCP server is running, ARP/DHCP/DNS/HTTP packets areredirected to the Web-Auth module, and other packets are dropped. Even if packetforwarding (configured by the auth-web forward command, including the defaultsetting ARP/DHCP/DNS forwarding) is ignored.
Using an external DHCP server
You can also use a remote DHCP server instead of the built-in DHCP service. In this
situation, all supplicant's DHCP packets will be forwarded directly to the remote DHCP
server by default, even though the supplicant is not authenticated.
Customising the Login Page
When users access the login page, you may wish to customise with your company details
and/or policy information. There are three ways to customise the login page. You can:
Create your own login page and serve it from the AlliedWare Plus device (see "Serving
your own login page from the AlliedWare Plus device" on page 42), or
Create your own login page and serve it from an external web server (see "Serving your
own login page from an external web server" on page 42), or
Use the default login page and customise it (see "Customizing the default login
page" on page 47)
Page 40 | Customising the Login Page

Serving your own login page from the AlliedWare Plus device
With Version 5.4.6-1.1 and later, you can create your own web authentication login page.
To create your own login page, follow these steps:
Step 1. Create the page
Write the page in HTML. Note that it must include the following login form code:
If you do not include the above login form, the page will display in the client browser but
will not perform web authentication.
Step 2. Save the page onto the switch
Name the file login_page.html and save it in the folder /flash/web-auth/
Serving your own login page from an external web server
Web-authentication supports a method for obtaining a custom login page from an
external web server. You can customize this login page fully to give it any appearance you
like. See "Customizing the default login page" on page 47 for details.
When Web-authentication is set up to obtain the login page from an external web server,
the sequence of events is as follows:
<form action="/index.cgi" autocomplete="off" target="_self" name="AUTH" method="POST">
<div>User name</div><div><input size="30" type="text" maxlength="64" name="USERNAME"></div><div>Password</div><div><input size="30" type="password" maxlength="64" name="PASSWORD"></div>
<div><input type="submit" name="ACTION" value="login"><input type="reset" name="RESET" value="Reset"></div>
</form>
Customising the Login Page | Page 41
After the supplicant gets an IP address from the DHCP server:
1. The supplicant will start to browse, and the Authenticator will intercept the supplicantHTTP packets.
2. The Authenticator sends an HTTP response packet to the supplicant, and in this packetthe Authenticator uses the “refresh” attribute to tell the supplicant to obtain the loginpage from the external web server.
3. The supplicant sends an HTTP request to external web server requesting the pagelogin.html.
4. The external web server returns the login page. The external server must hold the filethat is specified in the command auth-web-server login-url.
5. The supplicant then returns to communicating with the Authenticator. When the userenters their username and password, the supplicant sends these to the Authenticator.
6. The Authenticator will pass the user name and password to the RADIUS server forauthentication.
7. The RADIUS server sends back the result to the Authenticator.
8. The Authenticator sends the result page to the supplicant. This is not a custom page,but is the standard page built into Web-authentication.
The role of the external web server is to provide a customized login-page only. Web-
authentication is still performed by the AlliedWare Plus built-in server.
Page 42 | Customising the Login Page
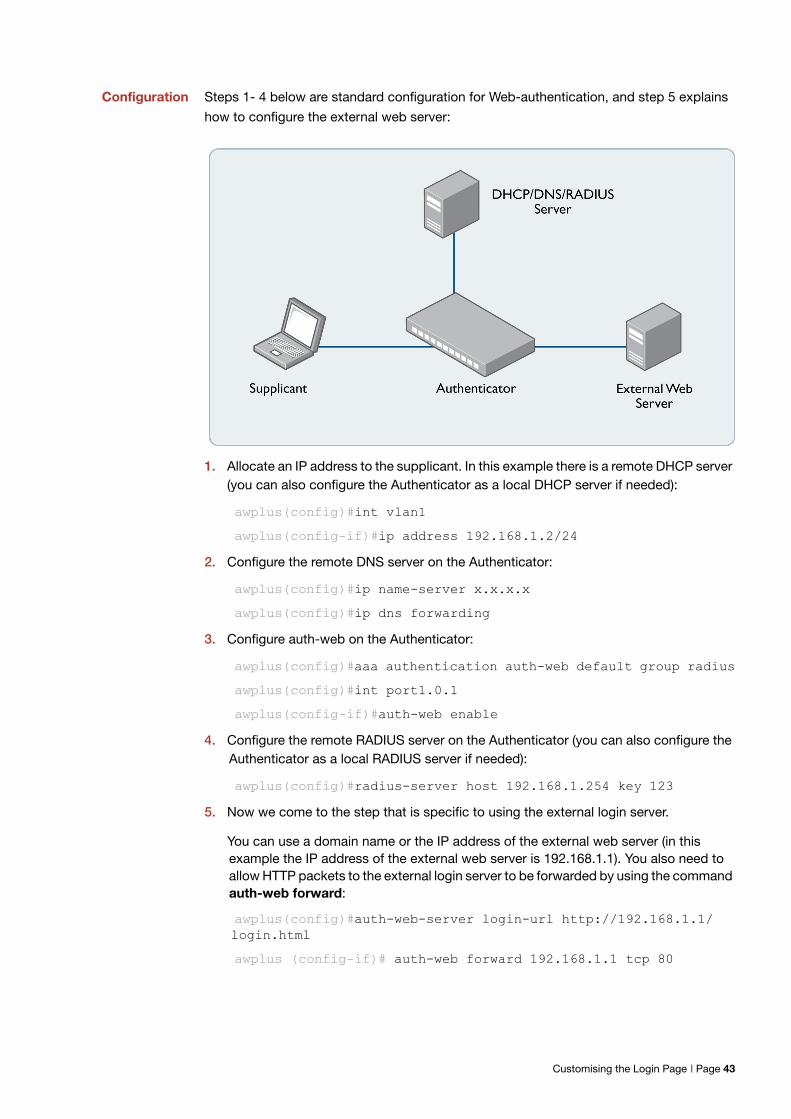
Configuration Steps 1- 4 below are standard configuration for Web-authentication, and step 5 explains
how to configure the external web server:
1. Allocate an IP address to the supplicant. In this example there is a remote DHCP server(you can also configure the Authenticator as a local DHCP server if needed):
awplus(config)#int vlan1
awplus(config-if)#ip address 192.168.1.2/24
2. Configure the remote DNS server on the Authenticator:
awplus(config)#ip name-server x.x.x.x
awplus(config)#ip dns forwarding
3. Configure auth-web on the Authenticator:
awplus(config)#aaa authentication auth-web default group radius
awplus(config)#int port1.0.1
awplus(config-if)#auth-web enable
4. Configure the remote RADIUS server on the Authenticator (you can also configure theAuthenticator as a local RADIUS server if needed):
awplus(config)#radius-server host 192.168.1.254 key 123
5. Now we come to the step that is specific to using the external login server.
You can use a domain name or the IP address of the external web server (in thisexample the IP address of the external web server is 192.168.1.1). You also need toallow HTTP packets to the external login server to be forwarded by using the commandauth-web forward:
awplus(config)#auth-web-server login-url http://192.168.1.1/login.html
awplus (config-if)# auth-web forward 192.168.1.1 tcp 80
Customising the Login Page | Page 43
If the external web server is using another TCP port, then change 80 to the corresponding
port number.
Note: The routing in this network must be set up such that packets can be routed directlybetween the supplicant and the external web server.
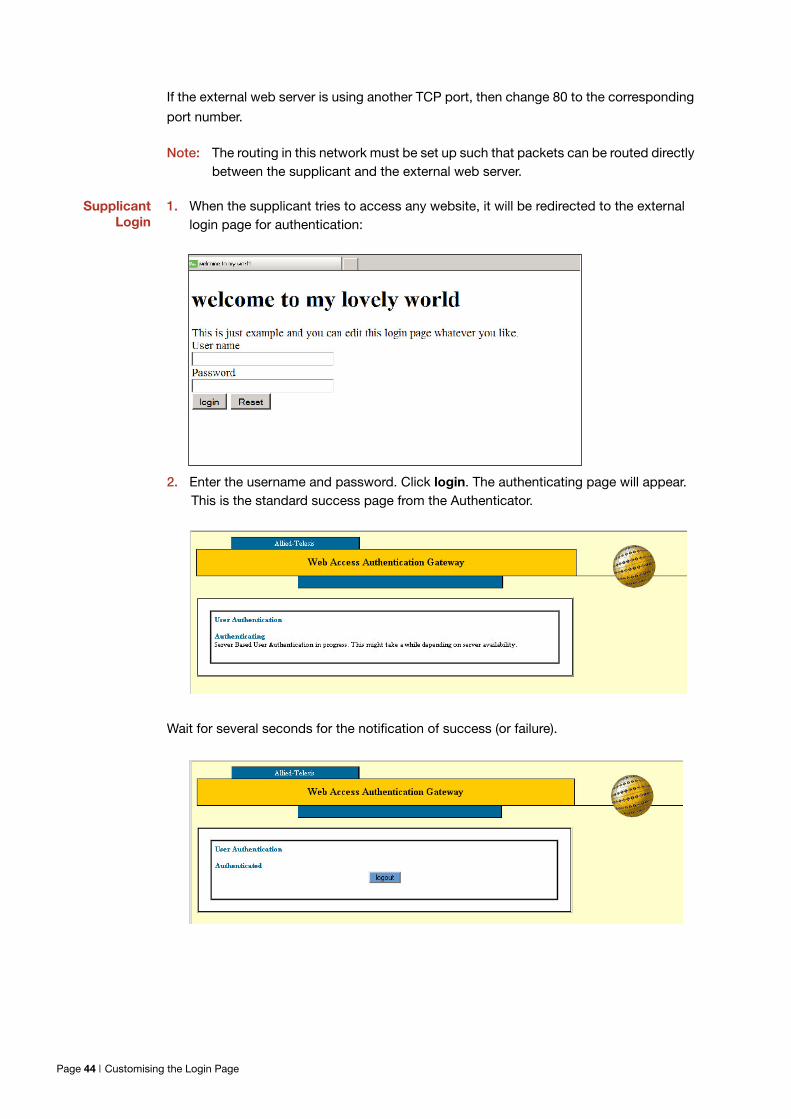
SupplicantLogin
1. When the supplicant tries to access any website, it will be redirected to the externallogin page for authentication:
2. Enter the username and password. Click login. The authenticating page will appear.This is the standard success page from the Authenticator.
Wait for several seconds for the notification of success (or failure).
Page 44 | Customising the Login Page
External loginpage support
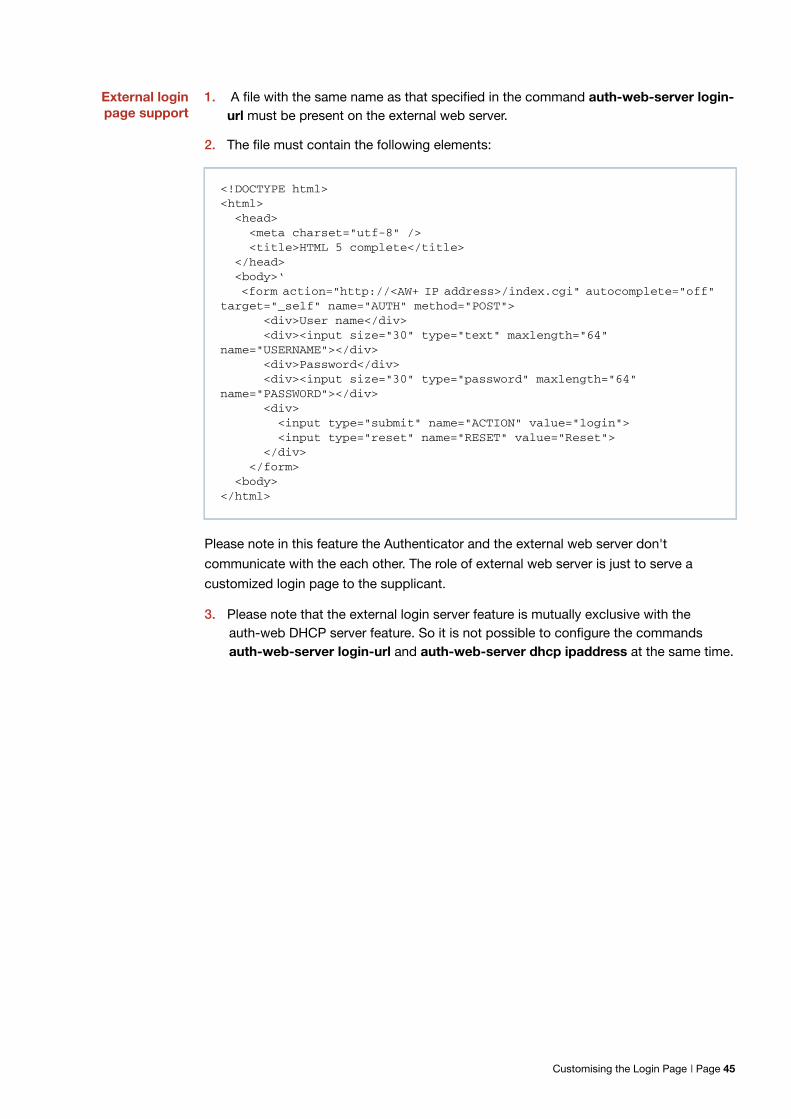
1. A file with the same name as that specified in the command auth-web-server login-url must be present on the external web server.
2. The file must contain the following elements:
Please note in this feature the Authenticator and the external web server don't
communicate with the each other. The role of external web server is just to serve a
customized login page to the supplicant.
3. Please note that the external login server feature is mutually exclusive with theauth-web DHCP server feature. So it is not possible to configure the commandsauth-web-server login-url and auth-web-server dhcp ipaddress at the same time.
<!DOCTYPE html><html>
<head><meta charset="utf-8" /><title>HTML 5 complete</title>
</head><body>‘<form action="http://<AW+ IP address>/index.cgi" autocomplete="off"
target="_self" name="AUTH" method="POST"><div>User name</div><div><input size="30" type="text" maxlength="64"
name="USERNAME"></div><div>Password</div><div><input size="30" type="password" maxlength="64"
name="PASSWORD"></div><div>
<input type="submit" name="ACTION" value="login"><input type="reset" name="RESET" value="Reset">
</div></form>
<body></html>
Customising the Login Page | Page 45
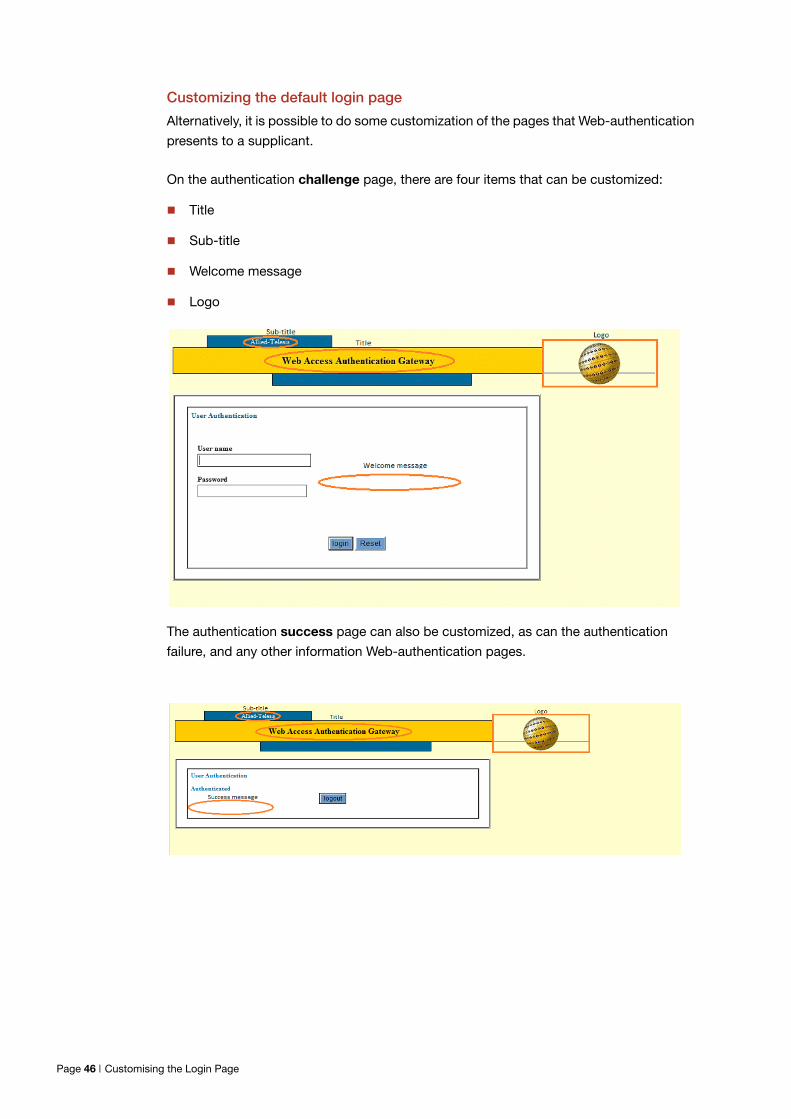
Customizing the default login page
Alternatively, it is possible to do some customization of the pages that Web-authentication
presents to a supplicant.
On the authentication challenge page, there are four items that can be customized:
Title
Sub-title
Welcome message
Logo
The authentication success page can also be customized, as can the authentication
failure, and any other information Web-authentication pages.
Page 46 | Customising the Login Page
Customisingthe web-
authenticationpage
To configure customized web-authentication pages, use the following steps:
1. Use the following commands to customise the strings that are present on the pagesby default:
auth-web-server page sub-title {hidden|text <sub-title>}
auth-web-server page title {hidden|text <title>}
The hidden option on these commands will, of course, simply remove the stringfrom the page altogether.
The no form of these commands simply takes the string back to its default state.
2. Use these commands to add the strings that are not present by default:
auth-web-server page success-message text <success-message>
auth-web-server page welcome-message text <welcome-message>
The no form of these commands simply removes those strings.
3. To customise the logo, load your new logo to the location: flash:/logo.gif
e.g. copy tftp://<tftp server address>/my_logo.gif flash:/logo.gif
By default, the logo displayed on the web-authentication pages is:
The content of flash:/logo.gif if the file exists
If a flash:/logo.gif does not exist, then the default Allied Telesis globe is used
The following command provides other options:
auth-web-server page logo {auto|default|hidden}
If default is specified, then the logo displayed on the web-authentication pages isthe default Allied Telesis globe regardless of whether or not flash:/logo.gif exists.
if hidden is specified, then no logo is displayed.
the auto option is the default behaviour described above.
Logo file properties
Format: GIF
Dimensions: The ideal dimensions for the logo file are 185x90 pixels.
Customising the Login Page | Page 47
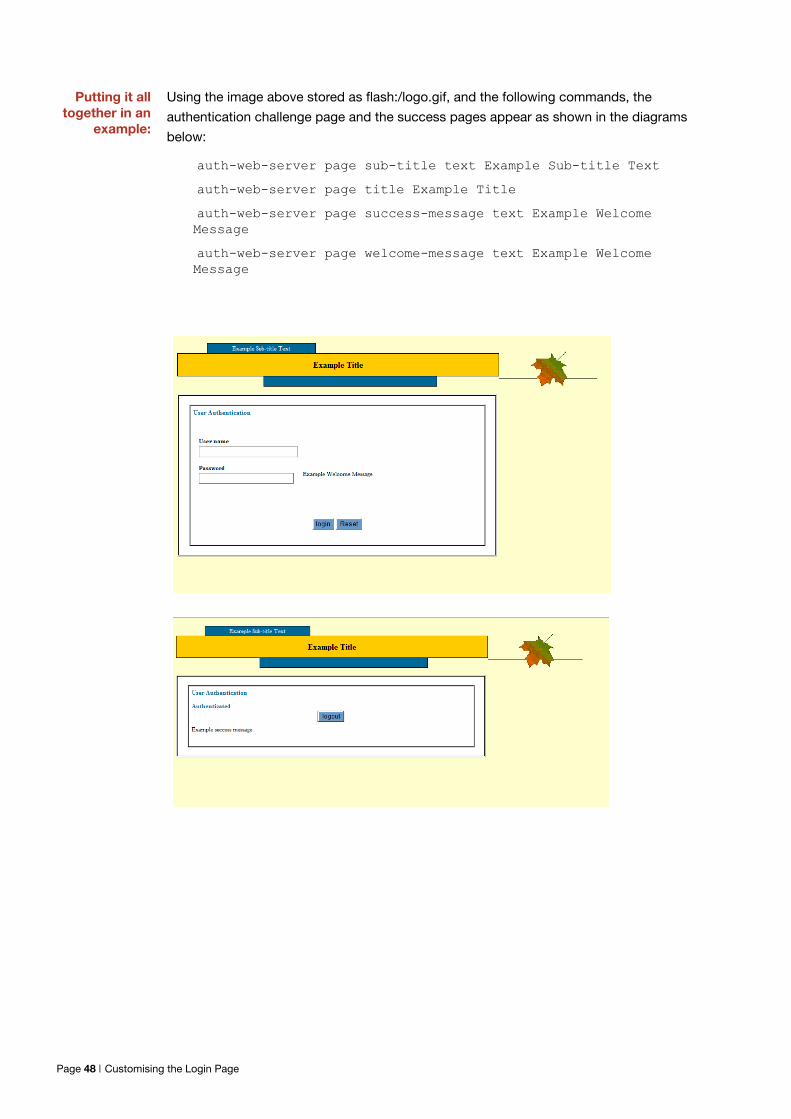
Putting it alltogether in an
example:
Using the image above stored as flash:/logo.gif, and the following commands, the
authentication challenge page and the success pages appear as shown in the diagrams
below:
auth-web-server page sub-title text Example Sub-title Text
auth-web-server page title Example Title
auth-web-server page success-message text Example Welcome Message
auth-web-server page welcome-message text Example Welcome Message
Page 48 | Customising the Login Page
Setting the Intercept Port Number
By default web-authentication recognizes packets going to TCP port 80 as HTTP packets,
and those going to TCP port 443 as HTTPS packets. Web-authentication redirects HTTP
and HTTPS packets received from unauthorized supplicants irrespective of their
destination, to its own web-authentication server.
If you have Web servers or HTTP proxy servers in your network that are listening on ports
other than 80 and 443, then you must register these port numbers as port numbers to
intercept. You can configure web-authentication to treat particular port numbers as
denoting HTTP traffic by using the auth-web-server intercept-port command, and other
port numbers as denoting HTTPS traffic by using the auth-web-server ssl intercept-port
command.
For example, If you have an HTTP proxy server listening on TCP port 8080, you must
configure the following command:
awplus(config)# auth-web-server intercept-port 8080
Similarly, if you have an HTTPS server listening on TCP port 900, you must configure the
following command:
awplus(config)# auth-web-server ssl intercept-port 900
If you have proxy server setting in your Intranet, please note that HTTP packets going to
the proxy server will be redirected, but Web-authentication doesn't support the redirecting
of HTTPS packets going to a proxy server.
Secure Authentication
The Web-authentication service can be configured to use a secure HTTPS connection.
This ensures that the username and password are sent from the supplicant to the switch
in encrypted form, and cannot be snooped by anyone eavesdropping on the session.
By default auth-web uses a non-secure HTTP connection to communicate login account
information.
You can configure it to use a secure HTTPS instead of HTTP with the command:
awplus(config)# auth-web-server ssl
You can also use both HTTP and HTTPS using the command:
awplus(config)# auth-web-server ssl hybrid
When both protocols are used, HTTP packets are redirected to the HTTP server and
HTTPS packets are redirected to the HTTPS server respectively.
Setting the Intercept Port Number | Page 49
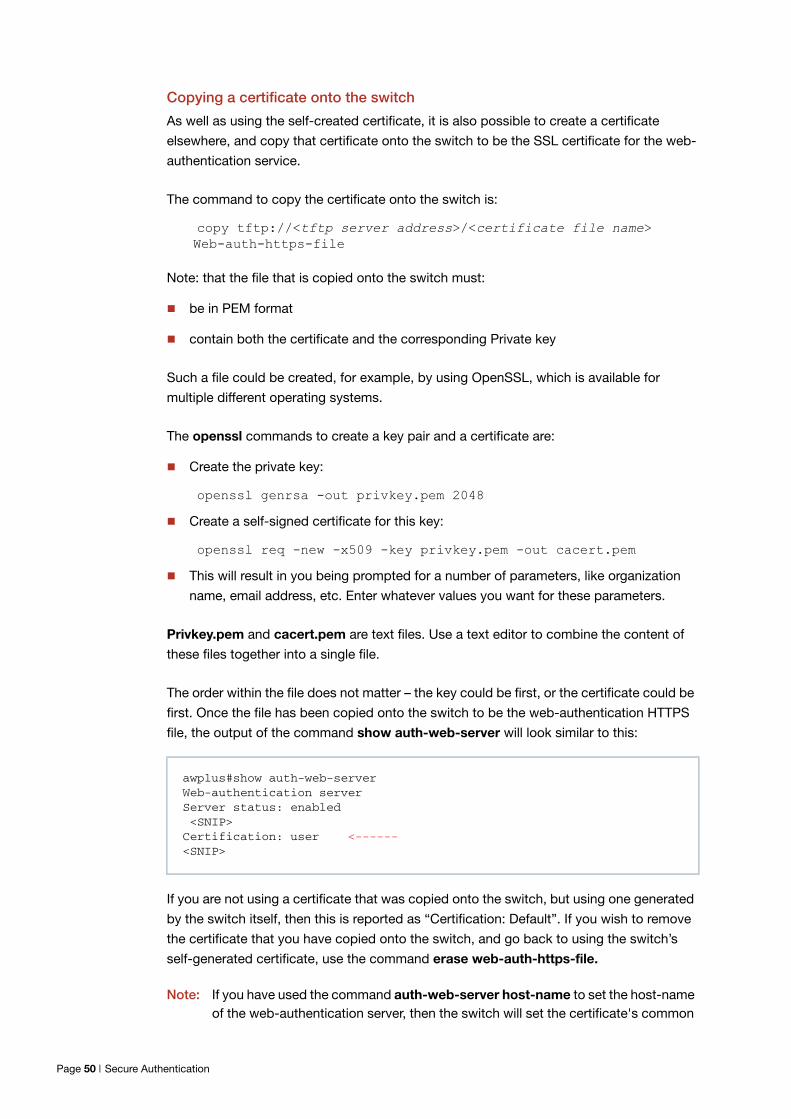
Copying a certificate onto the switch
As well as using the self-created certificate, it is also possible to create a certificate
elsewhere, and copy that certificate onto the switch to be the SSL certificate for the web-
authentication service.
The command to copy the certificate onto the switch is:
copy tftp://<tftp server address>/<certificate file name> Web-auth-https-file
Note: that the file that is copied onto the switch must:
be in PEM format
contain both the certificate and the corresponding Private key
Such a file could be created, for example, by using OpenSSL, which is available for
multiple different operating systems.
The openssl commands to create a key pair and a certificate are:
Create the private key:
openssl genrsa -out privkey.pem 2048
Create a self-signed certificate for this key:
openssl req -new -x509 -key privkey.pem -out cacert.pem
This will result in you being prompted for a number of parameters, like organization
name, email address, etc. Enter whatever values you want for these parameters.
Privkey.pem and cacert.pem are text files. Use a text editor to combine the content of
these files together into a single file.
The order within the file does not matter – the key could be first, or the certificate could be
first. Once the file has been copied onto the switch to be the web-authentication HTTPS
file, the output of the command show auth-web-server will look similar to this:
If you are not using a certificate that was copied onto the switch, but using one generated
by the switch itself, then this is reported as “Certification: Default”. If you wish to remove
the certificate that you have copied onto the switch, and go back to using the switch’s
self-generated certificate, use the command erase web-auth-https-file.
Note: If you have used the command auth-web-server host-name to set the host-nameof the web-authentication server, then the switch will set the certificate's common
awplus#show auth-web-serverWeb-authentication serverServer status: enabled<SNIP>Certification: user <------<SNIP>
Page 50 | Secure Authentication
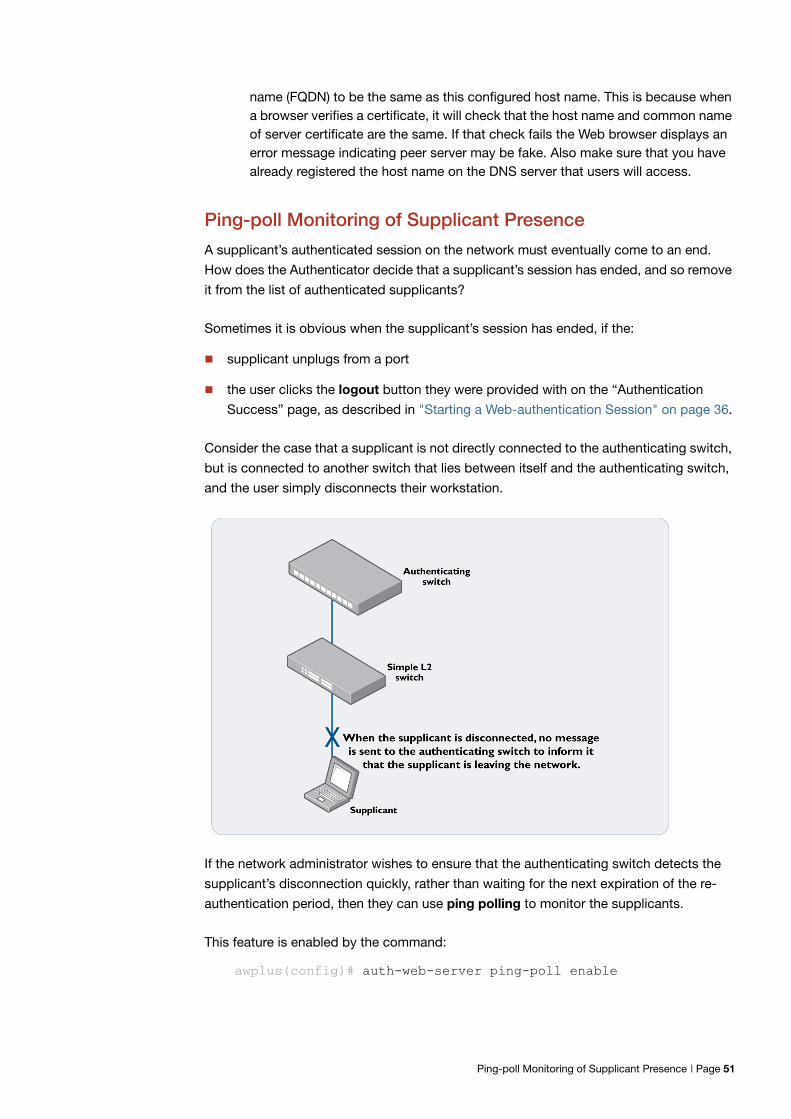
name (FQDN) to be the same as this configured host name. This is because whena browser verifies a certificate, it will check that the host name and common nameof server certificate are the same. If that check fails the Web browser displays anerror message indicating peer server may be fake. Also make sure that you havealready registered the host name on the DNS server that users will access.
Ping-poll Monitoring of Supplicant Presence
A supplicant’s authenticated session on the network must eventually come to an end.
How does the Authenticator decide that a supplicant’s session has ended, and so remove
it from the list of authenticated supplicants?
Sometimes it is obvious when the supplicant’s session has ended, if the:
supplicant unplugs from a port
the user clicks the logout button they were provided with on the “Authentication
Success” page, as described in "Starting a Web-authentication Session" on page 36.
Consider the case that a supplicant is not directly connected to the authenticating switch,
but is connected to another switch that lies between itself and the authenticating switch,
and the user simply disconnects their workstation.
If the network administrator wishes to ensure that the authenticating switch detects the
supplicant’s disconnection quickly, rather than waiting for the next expiration of the re-
authentication period, then they can use ping polling to monitor the supplicants.
This feature is enabled by the command:
awplus(config)# auth-web-server ping-poll enable
Ping-poll Monitoring of Supplicant Presence | Page 51
Once ping polling has been enabled, the web-authentication service will automatically
ping-poll every web-authentication supplicant once they have been authenticated.
By default the ping-poll has a:
polling interval of 30 seconds
timeout of 1 second (i.e. the switch waits 1 second for the ping response before
deciding the ping has failed)
failcount of 5 (i.e. if a given supplicant fails to respond to five pings in a row, its
authenticated session is terminated)
These default values can be altered by using the commands:
auth-web-server ping-poll interval <1-65535>
auth-web-server ping-poll timeout <1-30>
auth-web-server ping-poll failcount <1-100>
The currently configured values of these parameters can be seen by using the command:
show auth-web-server
Checking the Auth-web-server Status
To assign a hostname to the web authentication server, use the command:
awplus(config)# auth-web-server host-name
When you use this command to serve a host-name to represent the web-authentication
server, the supplicant must be able to resolve that host-name to access the web-
authentication server. This means the host-name assigned to the web-authentication
server must be registered to a DNS server. For example, if you enter the command auth-
web-server host-name abcauthenticating, you also must register a record for
abcauthenticating to the DNS server. The Authenticator device acts as the default
gateway and will register the gateway information when the supplicant is authorized.
Any HTTP Get Request received on an unauthorized interface is redirected to the web
authentication server automatically by default. So the command auth-web-server http-
redirect is hidden.
awplus#show auth-web-serverWeb-authentication server
PingInterval: 30Timeout: 1FailCount: 5ReauthTimerRefresh: disabled
Page 52 | Checking the Auth-web-server Status
Checking the IP Addresses of the Supplicants
To verify the IP addresses of the supplicants that the switch is ping-polling, use the
command show auth supplicant brief.
Idle Time-out
On the NGFW products (AR3050, AR4050), web-authentication supports an Idle-Time
feature. If the Authenticator has not seen data from a client for a configurable time period,
then the client is automatically set to unauthorized.
The command to enable the web-authentication idle timeout process on eth1:
awplus#configure terminal
awplus(config)#interface eth1
awplus(config-if)#auth-web enable
awplus(config-if)#auth-web idle-timeout enable
To set 30 minutes to the idle-timeout, use this command:
awplus#configure terminal
awplus(config)#interface eth1
awplus(config-if)#auth-web idle-timeout timeout 1800
[no] auth-web timeout idle-timeout <300-86400> (interface mode)
Note that the minimum timeout period is 300 seconds.
awplus#show auth supplicant briefInterface port1.0.19
authenticationMethod: web
...
Interface VID Mode MAC Address Status IP Address Username=========== ==== ==== ============== ============= ============= ========port1.0.19 150 W 001c.7e95.d6bb Authenticated 192.168.150.9 test
Checking the IP Addresses of the Supplicants | Page 53
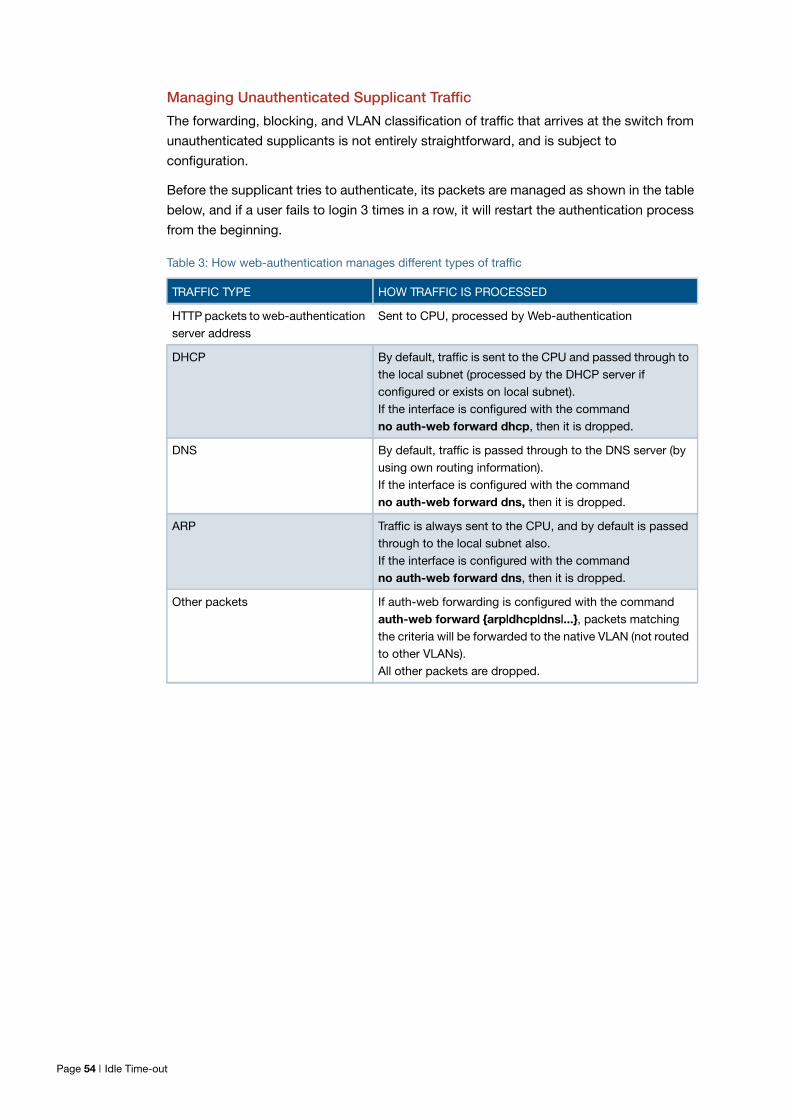
Managing Unauthenticated Supplicant Traffic
The forwarding, blocking, and VLAN classification of traffic that arrives at the switch from
unauthenticated supplicants is not entirely straightforward, and is subject to
configuration.
Before the supplicant tries to authenticate, its packets are managed as shown in the table
below, and if a user fails to login 3 times in a row, it will restart the authentication process
from the beginning.
Table 3: How web-authentication manages different types of traffic
TRAFFIC TYPE HOW TRAFFIC IS PROCESSED
HTTP packets to web-authenticationserver address
Sent to CPU, processed by Web-authentication
DHCP By default, traffic is sent to the CPU and passed through tothe local subnet (processed by the DHCP server ifconfigured or exists on local subnet).If the interface is configured with the commandno auth-web forward dhcp, then it is dropped.
DNS By default, traffic is passed through to the DNS server (byusing own routing information).If the interface is configured with the commandno auth-web forward dns, then it is dropped.
ARP Traffic is always sent to the CPU, and by default is passedthrough to the local subnet also.If the interface is configured with the commandno auth-web forward dns, then it is dropped.
Other packets If auth-web forwarding is configured with the commandauth-web forward {arp|dhcp|dns|...}, packets matchingthe criteria will be forwarded to the native VLAN (not routedto other VLANs).All other packets are dropped.
Page 54 | Idle Time-out

Monitoring the Operation of Web-authentication
There is no specific debugging available for web-authentication. The conversation
between web-authentication and a RADIUS server can be output by the command:
debug RADIUS all
An audit trail of web-authentication events is kept in the system log. Successful and
unsuccessful login attempts, and log offs all generate entries in the system log.
A list of all currently authenticated web-authentication supplicants can be seen from the
commands:
awplus(config)# show auth supplicant
awplus(config)# show auth supplicant brief
2010 Jun4 18:50:54 daemon.notice awplus radiusd[1712]: Login OK:[andrewr] (from client 127.0.0.1 port 5019 cli 00-1c-7e-95-d6-bb)
2010 Jun4 18:50:56 user.notice awplus 802.1X[1044]: port1.0.19: Web-authentication successful for andrewr, IP 10.32.4.78, Mac001c.7e95.d6bb
2010 Jun 4 18:52:31 daemon.notice awplus radiusd[1712]: Loginincorrect: [tester] (from client 127.0.0.1 port 5019 cli 00-1c-7e-95-d6-bb)
2010 Jun4 18:52:33 user.notice awplus 802.1X[1044]: port1.0.19: Web-authentication failed for tester, IP 192.168.101.6, Mac 001c.7e95.d6bb
2010 Jun 15 18:35:00 user.notice awplus 802.1X[1046]: port1.0.19:Supplicant and rewr unauthorized, Mac 001c.7e95.d6bb
Monitoring the Operation of Web-authentication | Page 55
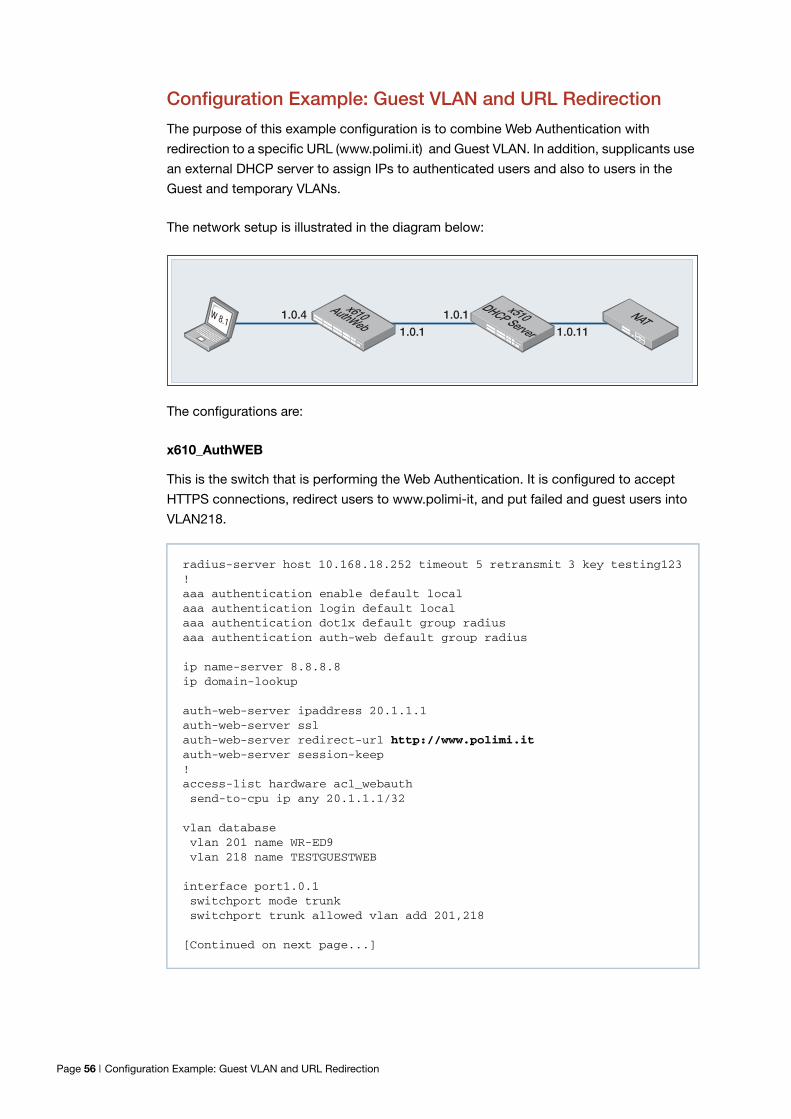
Configuration Example: Guest VLAN and URL Redirection
The purpose of this example configuration is to combine Web Authentication with
redirection to a specific URL (www.polimi.it) and Guest VLAN. In addition, supplicants use
an external DHCP server to assign IPs to authenticated users and also to users in the
Guest and temporary VLANs.
The network setup is illustrated in the diagram below:
The configurations are:
x610_AuthWEB
This is the switch that is performing the Web Authentication. It is configured to accept
HTTPS connections, redirect users to www.polimi-it, and put failed and guest users into
VLAN218.
radius-server host 10.168.18.252 timeout 5 retransmit 3 key testing123!aaa authentication enable default localaaa authentication login default localaaa authentication dot1x default group radiusaaa authentication auth-web default group radius
ip name-server 8.8.8.8ip domain-lookup
auth-web-server ipaddress 20.1.1.1auth-web-server sslauth-web-server redirect-url http://www.polimi.itauth-web-server session-keep!access-list hardware acl_webauthsend-to-cpu ip any 20.1.1.1/32
vlan databasevlan 201 name WR-ED9vlan 218 name TESTGUESTWEB
interface port1.0.1switchport mode trunkswitchport trunk allowed vlan add 201,218
[Continued on next page...]
1.0.4x510
DHCP Server
AuthWebNATW 8.1
1.0.1
1.0.1
1.0.11
x610
Page 56 | Configuration Example: Guest VLAN and URL Redirection
x510_DHVCP_serv:
This is the switch that is operating as the DHCP server.
interface port1.0.2switchport access vlan 218
interface port1.0.4switchport access vlan 201access-group acl_webauthauth-web enabledot1x port-control autodot1x timeout tx-period 5218auth auth-fail vlan 218spanning-tree portfast
interface vlan201ip address 10.169.0.201/24
interface vlan218ip address 10.168.18.218/24ip route 0.0.0.0/0 10.168.18.253ip dns forwarding
ip dhcp pool dhcp_guest218network 10.168.18.0 255.255.255.0range 10.168.18.200 10.168.18.235dns-server 8.8.8.8default-router 10.168.18.254lease 0 0 0 20
ip dhcp pool dhcp_201network 10.169.0.0 255.255.255.0range 10.169.0.200 10.169.0.240dns-server 8.8.8.8default-router 10.169.0.254lease 0 0 60
interface port1.0.1switchport mode trunkswitchport trunk allowed vlan add 201,218switchport trunk native vlan none
interface port1.0.11switchport mode trunkswitchport trunk allowed vlan add 201,218switchport trunk native vlan none
interface vlan201ip address 10.169.0.253/24
interface vlan218ip address 10.168.18.253/24ip route 0.0.0.0/0 10.169.0.251
Configuration Example: Guest VLAN and URL Redirection | Page 57
What does the user experience?
When a supplicant connects to port1.0.4, they are initially put into the guest VLAN
(VLAN218), and allocated an IP address in the 10.18.168.0/24 subnet.
If they then try to browse to a website, they are presented with the WebAuth login page.
If they log in successfully they are:
put into VLAN201, and given an IP address in the 10.169.0.0/24 subnet.
shown the Authenticated page
automatically directed to the website www.polimi.it
The terminal monitor on the authorizing switch reports:
DHCP debugging on the x510 shows the change of IP from guest-vlan218 to vlan201.
15:15:14 x610_AuthWEB 802.1X[1431]: Web Authentication successful [email protected](10.168.18.200) on port1.0.415:15:14 x610_AuthWEB NSM[1403]: Interface port1.0.4: authorised (0 --> 1)15:15:14 x610_AuthWEB NSM[1403]: Notify PM that interface port1.0.4becomes authorised by 802.1x
15:18:54 DHCP_serv dhcpd[31660]: DHCPREQUEST for 10.168.18.200 from00:21:70:d7:38:56 (LAB_D630) via vlan21815:18:54 DHCP_serv dhcpd[31660]: DHCPACK on 10.168.18.200 to00:21:70:d7:38:56 (LAB_D630) via vlan21815:18:44 DHCP_serv dhcpd[31660]: DHCPREQUEST for 10.168.18.200 from00:21:70:d7:38:56 (LAB_D630) via vlan21815:18:44 DHCP_serv dhcpd[31660]: DHCPACK on 10.168.18.200 to00:21:70:d7:38:56 (LAB_D630) via vlan21815:19:04 DHCP_serv dhcpd[31660]: DHCPNAK on 10.168.18.200 to00:21:70:d7:38:56 via vlan201
15:19:04 DHCP_serv dhcpd[31660]: DHCPDISCOVER from 00:21:70:d7:38:56via vlan20115:19:05 DHCP_serv dhcpd[31660]: DHCPOFFER on 10.169.0.200 to00:21:70:d7:38:56 (LAB_D630) via vlan20115:19:05 DHCP_serv dhcpd[31660]: DHCPREQUEST for 10.169.0.200(10.169.0.253) from 00:21:70:d7:38:56 (LAB_D630) via vlan20115:19:05 DHCP_serv dhcpd[31660]: DHCPACK on 10.169.0.200 to00:21:70:d7:38:56 (LAB_D630) via vlan201
Page 58 | What does the user experience?
MAC-Authentication
Why is MAC-Authentication Required?
The authentication mechanisms provided by 802.1X and Web authentication are powerful
and effective. But, they are not universally applicable. Web authentication is only
applicable to devices that have a human user who opens the web browser and types in a
username and password when requested. 802.1X authentication is only possible from
devices whose software implements an 802.1X supplicant.
There are plenty of network-connected devices, like printers, scanners, fire-alarm
monitors and so on, that have neither a human user nor implement an 802.1X supplicant.
In a network that ensures all access is authenticated, there needs to be a mechanism for
authenticating these devices.
Fortunately, all Ethernet transceivers have a unique identifier—their MAC address. Hence,
even without user input of a username and password, any Ethernet device will
automatically identify itself simply by virtue of the source MAC address in the packets it
sends. The method that has been developed for authenticating these devices uses the
MAC address as the identifier, and so is called MAC-based authentication.
How Does MAC-Authentication Work?
In essence, MAC-authentication works little differently from 802.1X or Web-based
authentication.
Here are the main steps:
1. The supplicant is connected to the switch.
2. The switch (acting as the authenticator) receives an ID from the supplicant.
3. The switch passes the supplicant's ID to a RADIUS server in an Access-Requestpacket
4. The RADIUS server returns an Access-Accept or an Access-Deny. The Access-Acceptcan be accompanied with other attributes, for dynamic VLAN assignment.
The unique aspects of MAC-authentication are in steps 2 and 3.
MAC-authentication does not involve a process whereby the switch sends an ID request
to the supplicant. The switch receives the ID from the supplicant by simply looking at the
source MAC in the packets being sent from the supplicant.
The MAC address of the supplicant is a single identifier. But a RADIUS access-request
requires both a username and a password. The workaround employed by MAC-
authentication is simply to use the MAC address as both username and password.
Why is MAC-Authentication Required? | Page 59
The switch extracts the source MAC address from the supplicant's packets and puts it
into a string of the form xx-xx-xx-xx-xx-xx, using lower-case letters for any hex digits in
the range a-f. This string is then used as both the username and the password in the
RADIUS access-request packet. The supplicant MAC address is also sent in the attribute
31 “calling-station-id” as usual.
Configuring MAC-Authentication
Under AlliedWare Plus, there are two steps to setting up MAC-authentication.
1. Define the authentication method list that is used for MAC-authentication.
There is only one method list that can be created for MAC-authentication—the default
method list. Moreover, the only authentication server type that can be used is RADIUS.
The command for defining the method list is:
awplus(config)# aaa authentication auth-mac default group radius
2. Enable MAC-authentication on the ports that are to perform this authentication:
The command for defining the method list is:
awplus(config)# interface port1.0.2
awplus(config)# auth-mac enable
awplus(config)# spanning-tree edgeport
On the RADIUS server, it is necessary to create user entries where both the username and
password are the MAC address of the supplicant, in the form xx-xx-xx-xx-xx-xx. For
example on the AlliedWare Plus local RADIUS server, the configuration is:
awplus(config)# radius-server local
awplus(config-radsrv)# user xx-xx-xx-xx-xx-xx passwordxx-xx-xx-xx-xx-xx
The supplicant, requires no configuration, as the whole purpose of MAC-authentication is
to authenticate devices that cannot be configured for authentication.
It is also possible to configure the authentication protocol that the switch uses in its
interaction with the RADIUS server. There are two choices of protocol: EAP-MD5 and PAP.
The default method is PAP, and can be changed by using the command:
awplus(config-if)# auth-mac method [eap-md5|pap]
Page 60 | Configuring MAC-Authentication
Tri-AuthenticationThe switch supports three types of authentication for devices that connect to switch
ports.
802.1X-authentication of devices connecting to switch ports
MAC-authentication of devices connecting to switch ports
Web-authentication of devices connecting to switch ports
All three types can be configured to run simultaneously on a switch port. The
simultaneous configuration and authentication of all three types on a port is called tri-
authentication.
Tri-Authentication Configuration
Follow the below three steps to configure tri-authentication across a range of switch
ports:
Step 1: Define the RADIUS Server:
Define the RADIUS Server where the switch will send authentication requests by using the
commands:
awplus# configure terminal
awplus(config)# radius-server host <ip-address> key <key-string>
These commands adds the RADIUS Server address and set parameters to the RADIUS
server. The key parameter specifies the secret key for the server.
Step 2: Define the default authentication server lists
Define the default authentication server lists for 802.1X authentication, Web-
authentication, and MAC-authentication:
awplus# configure terminal
awplus(config)# aaa authentication dot1x default group radius
awplus(config)# aaa authentication auth-web default group radius
awplus(config)# aaa authentication auth-mac default group radius
The RADIUS Server, where the switch sends authentication requests, can be theswitch’s own Local RADIUS Server. For information on how to configure LocalRADIUS Server see the Local RADIUS Server Feature Overview and ConfigurationGuide.
Tri-Authentication Configuration | Page 61

Step 3: Enable 802.1X-authentication, Web-authentication, and MAC-authentication:
Follow the instructions below to enable 802.1X-authentication, Web-authentication, and
MAC-authentication on switch ports to attach supplicant devices. This authenticates the
supplicant if any of the three methods that the supplicant tries work, depending on the
auth-fail VLAN settings. After enabling the authentication, refer to earlier chapters to
configure VLAN, IP address and other authentication configurations for the authentication
type you want
awplus# configure terminal
awplus(config)# interface <interface-range>
awplus(config-if)# switchport mode access
awplus(config-if)# switchport access vlan 1
awplus(config-if)# auth-web enable
awplus(config-if)# auth-mac enable
awplus(config-if)# dot1x port-control auto
awplus(config-if)# auth dynamic-vlan-creation
Page 62 | Tri-Authentication Configuration
Two-step AuthenticationThe single step authentication methods (either user or device authentication) have a
potential security risk:
an unauthorized user can access the network with an authorized device, or
an authorized user can access the network with an unauthorized device
Two-step authentication solves this problem by authenticating both the user and the
device. The supplicant will only become authenticated if both these steps are successful.
If the first authentication step fails, then the second step is not started.
The following authentication sequences are supported for two-step authentication:
MAC Authentication followed by 802.1X Authentication
MAC Authentication followed by Web Authentication
802.1X Authentication followed by Web Authentication.
To configure two-step authentication:
1. Configure the first authentication method.
2. Configure the second authentication method.
3. Specify the command auth two-step enable.
4. Make sure that both authentication steps require different authentication credentials.
For more information and examples, see the “Two-step authentication” section in the
Alliedware Plus Technical Tips and Tricks.
Tri-Authentication Configuration | Page 63
Ensuring Authentication Methods RequireDifferent Usernames and PasswordsIf you configure a user or device to use multiple authentication methods, you need to set
up your system to avoid a potential vulnerability.
The vulnerability occurs because there is no way for a RADIUS server to determine what
authentication method you are using. Authentication simply queries a RADIUS server to
see whether a username/password pair is valid.
This means that if you use the same RADIUS server for multiple authentication methods, a
user can enter the same username/password pair for each of these authentication
methods. If that username/password pair is valid for one of the methods, it will work for all
of them.
This vulnerability is particularly significant for MAC authentication, because the default
username and password is the MAC address of the supplicant device, which is easy to
discover.
For example, if you set up two-step authentication of MAC authentication and 802.1X
authentication, and both use the same RADIUS server, then an attacker does not need to
know the 801.1x username and password. Instead, they can pass the 802.1X
authentication step by entering the device’s MAC address into the 802.1X username and
password fields.
To avoid this vulnerability:
Use different RADIUS servers for each authentication method, and/or
Change the default password for MAC authentication, by using the auth-mac
password command.
Page 64 | Tri-Authentication Configuration
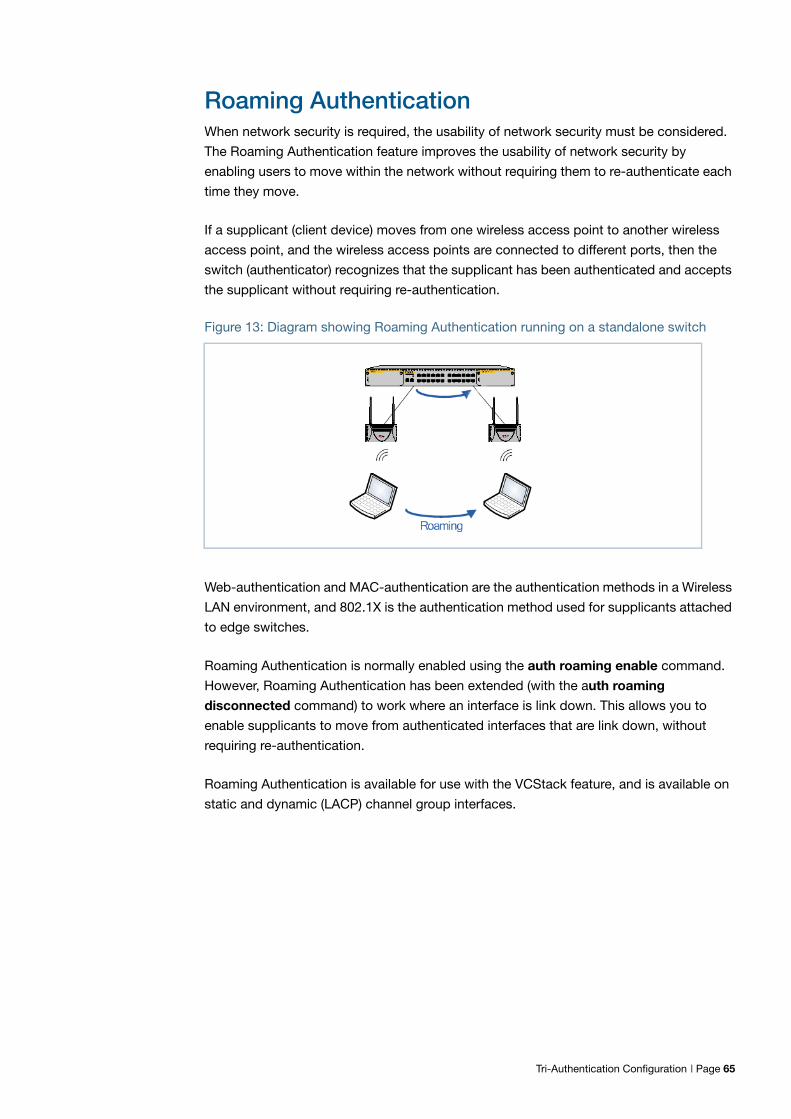
Roaming AuthenticationWhen network security is required, the usability of network security must be considered.
The Roaming Authentication feature improves the usability of network security by
enabling users to move within the network without requiring them to re-authenticate each
time they move.
If a supplicant (client device) moves from one wireless access point to another wireless
access point, and the wireless access points are connected to different ports, then the
switch (authenticator) recognizes that the supplicant has been authenticated and accepts
the supplicant without requiring re-authentication.
Figure 13: Diagram showing Roaming Authentication running on a standalone switch
Web-authentication and MAC-authentication are the authentication methods in a Wireless
LAN environment, and 802.1X is the authentication method used for supplicants attached
to edge switches.
Roaming Authentication is normally enabled using the auth roaming enable command.
However, Roaming Authentication has been extended (with the auth roaming
disconnected command) to work where an interface is link down. This allows you to
enable supplicants to move from authenticated interfaces that are link down, without
requiring re-authentication.
Roaming Authentication is available for use with the VCStack feature, and is available on
static and dynamic (LACP) channel group interfaces.
Tri-Authentication Configuration | Page 65
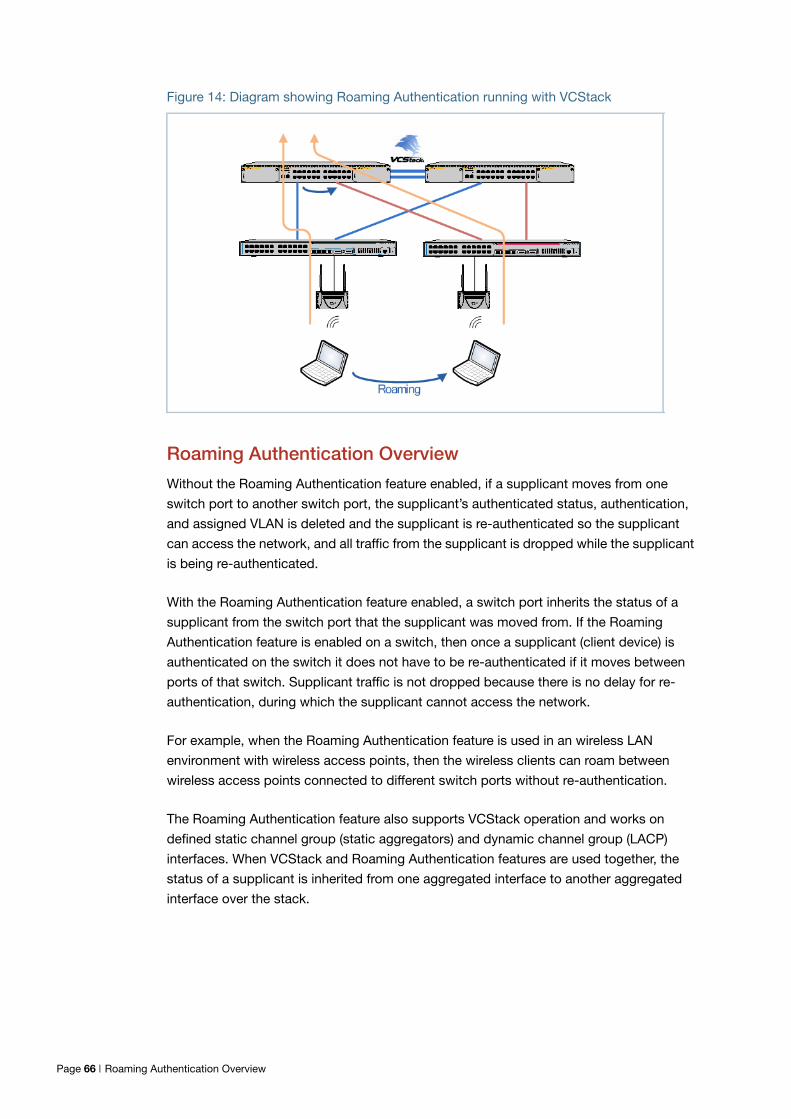
Figure 14: Diagram showing Roaming Authentication running with VCStack
Roaming Authentication Overview
Without the Roaming Authentication feature enabled, if a supplicant moves from one
switch port to another switch port, the supplicant’s authenticated status, authentication,
and assigned VLAN is deleted and the supplicant is re-authenticated so the supplicant
can access the network, and all traffic from the supplicant is dropped while the supplicant
is being re-authenticated.
With the Roaming Authentication feature enabled, a switch port inherits the status of a
supplicant from the switch port that the supplicant was moved from. If the Roaming
Authentication feature is enabled on a switch, then once a supplicant (client device) is
authenticated on the switch it does not have to be re-authenticated if it moves between
ports of that switch. Supplicant traffic is not dropped because there is no delay for re-
authentication, during which the supplicant cannot access the network.
For example, when the Roaming Authentication feature is used in an wireless LAN
environment with wireless access points, then the wireless clients can roam between
wireless access points connected to different switch ports without re-authentication.
The Roaming Authentication feature also supports VCStack operation and works on
defined static channel group (static aggregators) and dynamic channel group (LACP)
interfaces. When VCStack and Roaming Authentication features are used together, the
status of a supplicant is inherited from one aggregated interface to another aggregated
interface over the stack.
Page 66 | Roaming Authentication Overview
Roaming Authentication Feature Interactions
When the Roaming Authentication feature is disabled, a supplicant must be re-
authenticated on the destination interface when it roams. When the Roaming
Authentication is enabled, the following supplicant authentication status and information
is inherited from the source interface:
Authentication status
Authentication method
Supplicant MAC address
Supplicant IP address (if an authenticated interface is configured for Web
authentication)
Supplicant name
Authorized dynamic VLAN ID
Authorized RADIUS server
Reauthentication timer (if configured using the auth timeout reauth-period command)
Roaming Authentication is only supported between interfaces with the same
authentication configuration. If source and destination interfaces have different
authentication configuration then the supplicant will be re-authenticated at the destination
interface.
When the host mode is set with the auth host-mode, a supplicant is not authenticated on
a destination interface, and the authentication status is deleted on the source interface.
When a supplicant moves from an interface with authentication configured to an interface
without authentication configured, the supplicant’s authentication status is deleted.
A supplicant is re-authenticated when it moves to a destination interface that is
configured on a different VLAN than the VLAN that is configured for the source interface.
See the following Roaming Authentication feature interactions:
Multiple Dynamic VLANs are supported when configured with the auth dynamic-vlan-
creation using the multi parameter. Multiple Dynamic VLANs are disabled by default.
Supplicants are re-authenticated on the destination interface if the VLAN ID changes
when Single Dynamic VLANs are configured with the auth dynamic-vlan-creation the
using the single parameter. Single Dynamic VLANs are disabled by default.
The Roaming Authentication feature is supported on Guest VLANs configured by the .
The Roaming Authentication feature will not function with Dynamic VLANs.
The Roaming Authentication feature will not function with Guest VLANs.
Roaming Authentication Feature Interactions | Page 67
When the Roaming Authentication feature is configured for use on a stack with the
VCStack feature, note that supplicants are initialized and re-authenticated if a VCStack
failover occurs.
Unauthenticated Supplicant TrafficWhen any authentication is configured on a switch port, the question arises as to what the
switch does with packets that arrive into the switch port from unauthenticated
supplicants.
Unauthenticated supplicants fall into three categories listed below:
Newly attached supplicants, which are still in the process of their first authentication
attempt
Supplicants that have made an authentication attempt, but have failed authentication
Supplicants that have been attached, but have not made an authentication attempt.
For example, on a port that has only 802.1X authentication enabled, any supplicant that
has no 802.1X client software will not be able to attempt 802.1X authentication.
In switches that are running the AlliedWarePlus Operating System, packets from all these
three categories of unauthenticated supplicants are treated equally; no distinction is made
between these three categories. The treatment of the traffic from unauthenticated
supplicants does, however, depend on two factors:
Whether a Guest VLAN has been configured on the switch port to which the supplicant
is attached
Whether Web authentication has been configured on the switch port to which the
supplicant is attached
Page 68 | Roaming Authentication Feature Interactions
The rules governing the treatment of packets from unauthenticated supplicants are laid
out in the table below:Table 4: Treatment of packets from unauthenticated supplicants
SWITCH PORTCONFIGURATION
NO GUEST VLAN CONFIGURED NO GUEST VLANCONFIGURED, AUTH-FAIL VLANCONFIGURED
GUEST VLAN CONFIGURED
Web-authenticationconfigured
Packets from unauthenticatedsupplicants are associated withthe Native VLAN of the port.Packets from unauthenticatedsupplicants are processedaccording these rules:■ Packets destined to the
WebAuth server IP address/TCP port are forwarded to theserver (which may well be theswitch itself).
■ DHCP packets are sent to theCPU, to be processed by alocal DHCP server, or relayedto another DHCP server,depending on theconfiguration of the switch.
■ DNS packets are forwarded tothe CPU, and then sent on toa DNS server, if the switch isconfigured with a DNS serveraddress.
■ ARP packets are forwarded tothe CPU, and an ARP entry forthe supplicant is learnt.
■ If web-auth forwarding isenabled for particular types ofpackets, then those packetswill be forwarded within theNative VLAN
■ All other packets are dropped.
Packets fromunauthenticatedsupplicants areassociated with theNative VLAN of the port. Ifnewly connectedsupplicants attempt802.1X portauthentication or Web-authentication and fail,then they are moved tothe auth-fail VLAN.
Packets from unauthenticatedsupplicants are associated with theGuest VLAN of the port. Packetsfrom unauthenticated supplicantsare processed according to theserules:■ Packets destined to the
WebAuth server IP address/TCPport are forwarded to the server(which may well be the switchitself).
■ DHCP packets are sent to theCPU, to be processed by a localDHCP server, or relayed toanother DHCP server,depending on the configurationof the switch.
■ DNS packets are forwarded tothe CPU, and then sent on to aDNS server, if the switch isconfigured with a DNS serveraddress.
■ ARP packets are forwarded tothe CPU, and an ARP entry forthe supplicant is learnt.
■ Drop all other packets destinedto the IP address of the GuestVLAN.
■ Layer 2 forward packetsdestined to other addresseswithin the Guest VLAN.
■ All other packets are dropped.
No Web-authenticationconfigured
All non-eap packets fromunauthenticated supplicants aredropped.
All non-eap packets fromunauthenticatedsupplicants are dropped.
Packets from unauthenticatedsupplicants are associated with theGuest VLAN of the port. Thepackets are processed according tothese rules:■ Drop packets destined to the IP
address of the Guest VLAN.■ Layer 2 forward packets
destined to other addresseswithin the Guest VLAN.
■ Drop all other packets.
Roaming Authentication Feature Interactions | Page 69
Deciding When a Supplicant Fails Authentication
Although the treatment of packets from unauthenticated supplicants does not differentiate
between the three categories of supplicant, it is still useful to know for sure when the
switch decides that a supplicant has failed authentication.
The rules for deciding that a supplicant has failed authentication are listed below for each
type of authentication available:
Deciding when a supplicant fails 802.1X authentication
If the supplicant responds to EAP authentication requests, and the supplicant’s
authentication information is sent to the RADIUS server, and the RADIUS server replies
with an Authentication-Reject, then the supplicant is immediately deemed to have failed
authentication.
If the supplicant does not respond to EAP authentication requests, then the switch will
resend the authentication requests up to a maximum number of attempts set by the
command dot1x max-reauth-req (the default is 2). The interval between the attempts is
set by the command dot1x timeout tx-period (the default is 30 seconds). If the
supplicant still has not responded after this, it is deemed to have not attempted
authentication.
Deciding when a supplicant fails Web authentication
As soon as the supplicant attempts any web-browsing, the switch will intercept the web
session, and present the supplicant with an authentication request page. If the user enters
a username and password, and clicks the login button, then the switch will send the
username and password to the RADIUS server. If the RADIUS server replies with an
Authentication-Reject, then the supplicant is immediately deemed to have failed
authentication.
Until the supplicant has attempted any web-browsing, or has received the authentication
request page, but not yet clicked the login button, the supplicant is deemed to be not yet
authenticated (as against not able to authenticate).
Deciding when a supplicant fails MAC authentication
As soon as the supplicant sends any packet, the source MAC address from the packet
will be sent to the RADIUS server for authentication. If the RADIUS server replies with an
Authentication-Reject, then the supplicant is immediately deemed to have failed
authentication.
With MAC auth there really is no concept of not-yet-attempted authentication, because
authentication is attempted as soon as a supplicant sends a packet.
Page 70 | Deciding When a Supplicant Fails Authentication
Failed Authentication VLAN
The auth-fail VLAN feature allows the network administrator to separate the supplicants
who attempted authentication, but failed, from the supplicants who did not attempt
authentication.
This feature enables the network administrator to enact a security policy in which the
supplicants who fail authentication are given extremely limited access, or are given
access to remedial applications.
If the Guest VLAN and auth-fail VLAN are both configured on a switch, then a newly
connected supplicant initially belongs to the Guest VLAN. If newly connected supplicants
attempt 802.1X port authentication or Web-authentication and fail, then they are moved
from the Guest VLAN to the auth-fail VLAN.
The criteria for how many failed authentication attempts are allowed before the supplicant
is moved to the auth-fail VLAN differs, depending on the authentication method used.
If Web-authentication is used, then the supplicant is moved to the auth-fail VLAN after the
first failed attempt. If 802.1X port authentication is used, then the supplicant is moved to
the auth-fail VLAN after the number of failed attempts is equal to the value configured by
the dot1x max-auth-fail command (by default, three failed 802.1X authentication attempts
are allowed).
The MAC-authentication feature does not support the max-auth-fail option. If auth-fail
VLAN feature is used in conjunction with MAC-authentication only one attempt is allowed
for a MAC-authentication supplicant. If the attempt fails, then the supplicant will be
treated as “Authenticated” and the interface will be added to the configured auth-fail
VLAN.
Failed Authentication VLAN | Page 71
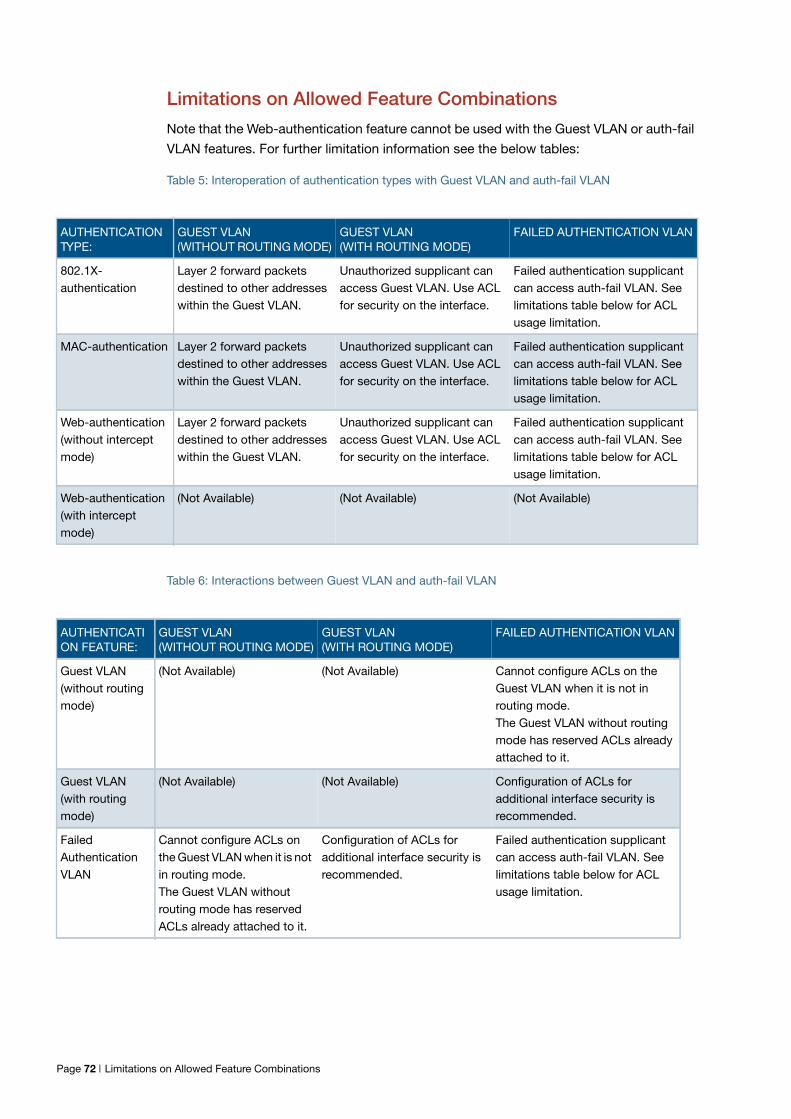
Limitations on Allowed Feature Combinations
Note that the Web-authentication feature cannot be used with the Guest VLAN or auth-fail
VLAN features. For further limitation information see the below tables:
Table 5: Interoperation of authentication types with Guest VLAN and auth-fail VLAN
Table 6: Interactions between Guest VLAN and auth-fail VLAN
AUTHENTICATIONTYPE:
GUEST VLAN(WITHOUT ROUTING MODE)
GUEST VLAN(WITH ROUTING MODE)
FAILED AUTHENTICATION VLAN
802.1X-authentication
Layer 2 forward packetsdestined to other addresseswithin the Guest VLAN.
Unauthorized supplicant canaccess Guest VLAN. Use ACLfor security on the interface.
Failed authentication supplicantcan access auth-fail VLAN. Seelimitations table below for ACLusage limitation.
MAC-authentication Layer 2 forward packetsdestined to other addresseswithin the Guest VLAN.
Unauthorized supplicant canaccess Guest VLAN. Use ACLfor security on the interface.
Failed authentication supplicantcan access auth-fail VLAN. Seelimitations table below for ACLusage limitation.
Web-authentication(without interceptmode)
Layer 2 forward packetsdestined to other addresseswithin the Guest VLAN.
Unauthorized supplicant canaccess Guest VLAN. Use ACLfor security on the interface.
Failed authentication supplicantcan access auth-fail VLAN. Seelimitations table below for ACLusage limitation.
Web-authentication(with interceptmode)
(Not Available) (Not Available) (Not Available)
AUTHENTICATION FEATURE:
GUEST VLAN(WITHOUT ROUTING MODE)
GUEST VLAN(WITH ROUTING MODE)
FAILED AUTHENTICATION VLAN
Guest VLAN(without routingmode)
(Not Available) (Not Available) Cannot configure ACLs on theGuest VLAN when it is not inrouting mode.The Guest VLAN without routingmode has reserved ACLs alreadyattached to it.
Guest VLAN(with routingmode)
(Not Available) (Not Available) Configuration of ACLs foradditional interface security isrecommended.
FailedAuthenticationVLAN
Cannot configure ACLs onthe Guest VLAN when it is notin routing mode.The Guest VLAN withoutrouting mode has reservedACLs already attached to it.
Configuration of ACLs foradditional interface security isrecommended.
Failed authentication supplicantcan access auth-fail VLAN. Seelimitations table below for ACLusage limitation.
Page 72 | Limitations on Allowed Feature Combinations

Port Authentication Profiles
What are port authentication profiles
You can manage authentication configurations with port authentication profiles.
Authentication profiles are named objects that aggregate authentication configuration
commands and are easy to attach to, and detach from, an interface.
Instead of applying authentication commands directly to an interface they are applied to a
profile. This profile, which can be thought of as a template, is then attached to an
interface. A single profile can be attached to multiple interfaces, alternatively multiple
profiles can be created for one or more interfaces and attached as needed.
Using port authentication profiles
A port authentication profile is defined by using the auth profile <profile-name>
command. This command puts you into authentication profile mode. If <profile-name>
does not exist it will be created; if it does exist then any configuration changes you make
will be applied to the existing profile.
From the port authentication profile mode authentication configuration commands can be
entered exactly as they would be entered in interface mode.
The following commands configure an authentication profile called ‘student’. If ‘student’ does notalready exist it will be created.
awplus# config terminal
awplus(config)# auth profile student
awplus(config-auth)#
Add authentication configuration setting to the ‘student’ profile. This profile can then be attachedto an interface.
awplus(config-auth)# auth-mac enable
awplus(config-auth)# auth-web enable
awplus(config-auth)# auth host-mode multi-supplicant
awplus(config-auth)# auth auth-fail vlan 40
awplus(config-auth)# auth dynamic-vlan-creation
awplus(config-auth)# auth-web max-auth-fail 2
awplus(config-auth)# exit
awplus(config)#
What are port authentication profiles | Page 73
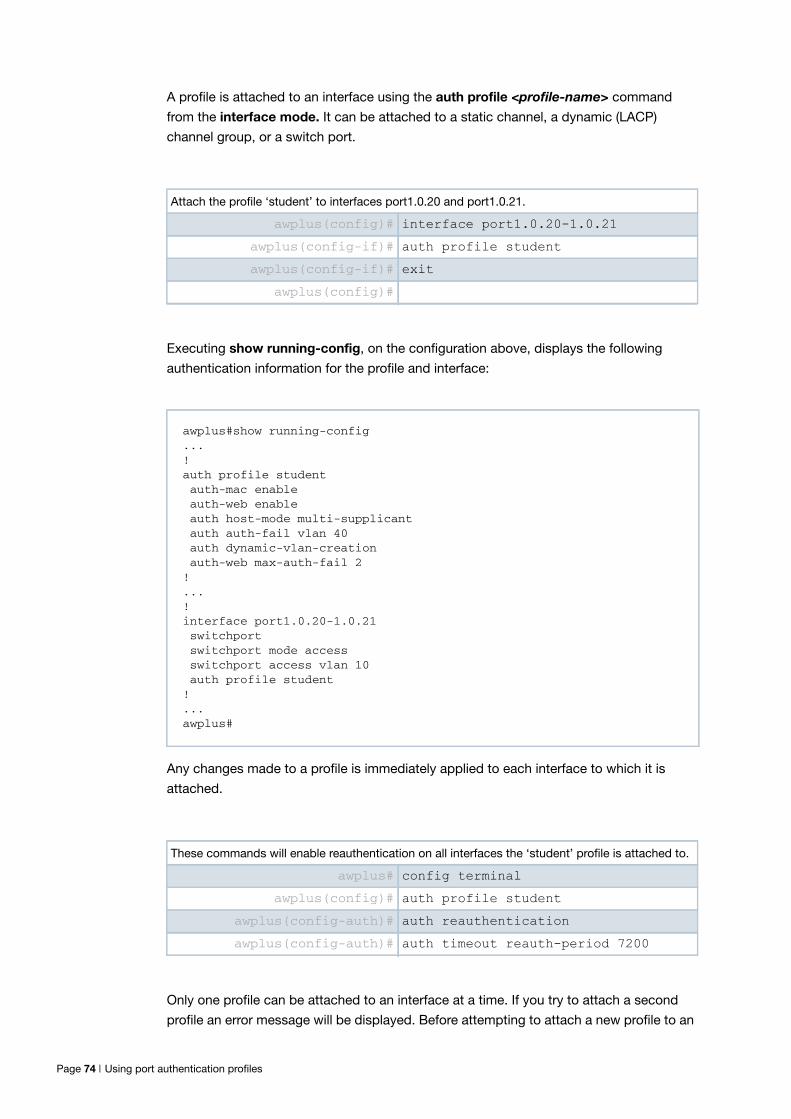
A profile is attached to an interface using the auth profile <profile-name> command
from the interface mode. It can be attached to a static channel, a dynamic (LACP)
channel group, or a switch port.
Executing show running-config, on the configuration above, displays the following
authentication information for the profile and interface:
Any changes made to a profile is immediately applied to each interface to which it is
attached.
Only one profile can be attached to an interface at a time. If you try to attach a second
profile an error message will be displayed. Before attempting to attach a new profile to an
Attach the profile ‘student’ to interfaces port1.0.20 and port1.0.21.
awplus(config)# interface port1.0.20-1.0.21
awplus(config-if)# auth profile student
awplus(config-if)# exit
awplus(config)#
awplus#show running-config...!auth profile studentauth-mac enableauth-web enableauth host-mode multi-supplicantauth auth-fail vlan 40auth dynamic-vlan-creationauth-web max-auth-fail 2!...!interface port1.0.20-1.0.21switchportswitchport mode accessswitchport access vlan 10auth profile student!...awplus#
These commands will enable reauthentication on all interfaces the ‘student’ profile is attached to.
awplus# config terminal
awplus(config)# auth profile student
awplus(config-auth)# auth reauthentication
awplus(config-auth)# auth timeout reauth-period 7200
Page 74 | Using port authentication profiles
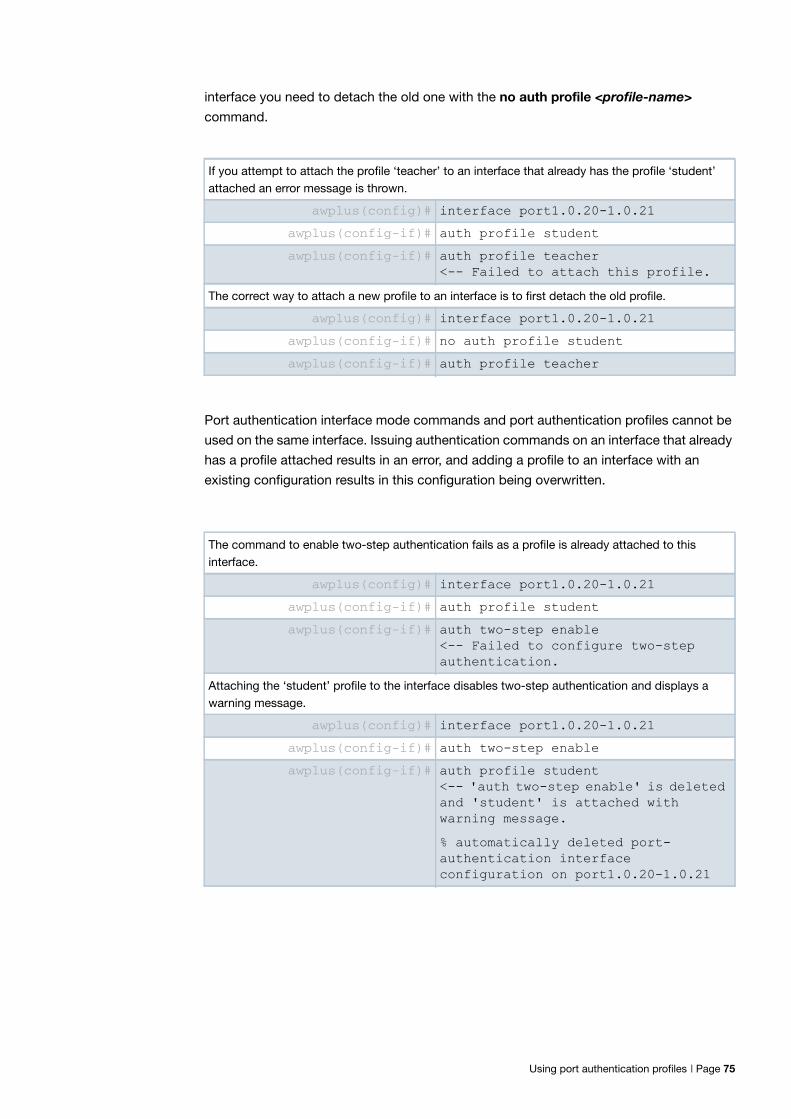
interface you need to detach the old one with the no auth profile <profile-name>
command.
Port authentication interface mode commands and port authentication profiles cannot be
used on the same interface. Issuing authentication commands on an interface that already
has a profile attached results in an error, and adding a profile to an interface with an
existing configuration results in this configuration being overwritten.
If you attempt to attach the profile ‘teacher’ to an interface that already has the profile ‘student’attached an error message is thrown.
awplus(config)# interface port1.0.20-1.0.21
awplus(config-if)# auth profile student
awplus(config-if)# auth profile teacher <-- Failed to attach this profile.
The correct way to attach a new profile to an interface is to first detach the old profile.
awplus(config)# interface port1.0.20-1.0.21
awplus(config-if)# no auth profile student
awplus(config-if)# auth profile teacher
The command to enable two-step authentication fails as a profile is already attached to thisinterface.
awplus(config)# interface port1.0.20-1.0.21
awplus(config-if)# auth profile student
awplus(config-if)# auth two-step enable <-- Failed to configure two-step authentication.
Attaching the ‘student’ profile to the interface disables two-step authentication and displays awarning message.
awplus(config)# interface port1.0.20-1.0.21
awplus(config-if)# auth two-step enable
awplus(config-if)# auth profile student <-- 'auth two-step enable' is deleted and 'student' is attached with warning message.
% automatically deleted port-authentication interface configuration on port1.0.20-1.0.21
Using port authentication profiles | Page 75
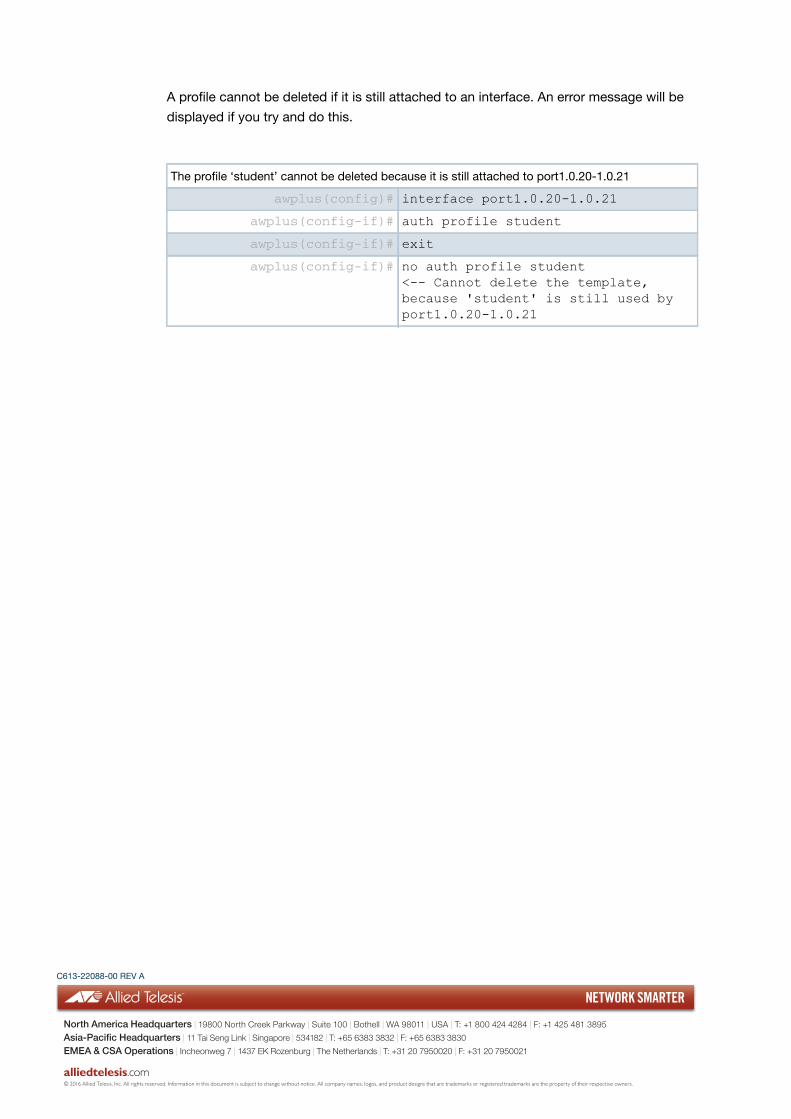
A profile cannot be deleted if it is still attached to an interface. An error message will be
displayed if you try and do this.
The profile ‘student’ cannot be deleted because it is still attached to port1.0.20-1.0.21
awplus(config)# interface port1.0.20-1.0.21
awplus(config-if)# auth profile student
awplus(config-if)# exit
awplus(config-if)# no auth profile student <-- Cannot delete the template, because 'student' is still used by port1.0.20-1.0.21
C613-22088-00 REV A
NETWORK SMARTER
alliedtelesis.com
North America Headquarters | 19800 North Creek Parkway | Suite 100 | Bothell | WA 98011 | USA | T: +1 800 424 4284 | F: +1 425 481 3895
Asia-Pacific Headquarters | 11 Tai Seng Link | Singapore | 534182 | T: +65 6383 3832 | F: +65 6383 3830
EMEA & CSA Operations | Incheonweg 7 | 1437 EK Rozenburg | The Netherlands | T: +31 20 7950020 | F: +31 20 7950021
© 2016 Allied Telesis, Inc. All rights reserved. Information in this document is subject to change without notice. All company names, logos, and product designs that are trademarks or registered trademarks are the property of their respective owners.